Manuale Software Pegasus 2.4.X. R.3-EN G - DATE: 28-01-2009 INSTRUCTIONS MANUAL

Manuale Software Pegasus 2.4.X. R.3-ENG - DATE: 28-01-2009 INSTRUCTIONS MANUAL.
Dec 25, 2015
Welcome message from author
This document is posted to help you gain knowledge. Please leave a comment to let me know what you think about it! Share it to your friends and learn new things together.
Transcript

Manuale Software Pegasus 2.4.X. R.3-ENG - DATE: 28-01-2009
INSTRUCTIONS MANUAL

2
1. PURPOSE AND CONTENTS 2. MINIMUM COMPUTER REQUIREMENTS FOR SOFTWARE INSTALLATION 3. SOFTWARE INSTALLATION4. SOFTWARE UPDATE
5. USE OF THE PEGASUS PROGRAM 5.1 BEFORE STARTING THE PROGRAM 5.2 PEGASUS MAIN WINDOW 5.2.1 MAIN MENU 5.2.1.1 SETTING PARAMETERS, COMPONENTS, FUNCTIONS. 5.2.1.2 AUTOMATIC CALIBRATION 5.2.1.3 CALIBRATION CORRECTION 5.2.2 DATA BASE INSTALLATION 5.3 EMERGENCY START 5.4 LPG SWITCHOVER LED VARIATION 6. GLOSSARY OF TERMS AND ACRONYMS USED IN THE PÈGASUS SOFTWARE MANUAL 7. TROUBLESHOOTING THE PÈGASUS SOFTWARE
TABLE OF CONTENTS

3
This manual providesthe installer with information on how to use the Pègasus software. It is necessary for the correct installation and operation of the Polàris LPG system.The software allows DISPLAYING on a video screen all the main operating and adjusting parameters, as well as executing the standard CALIBRATION of the system in automatic and, if necessary, its "manual correction.”It also enables creating a database which contains the identification data of the vehicles on which the systems were installed, the systems themselves and the installer's customers. The database allows the installer to effectively control and manage the installations carried out.
1. PURPOSE AND CONTENTS
2. MINIMUM COMPUTER REQUIREMENTS FOR SOFTWARE INSTALLATION
Microprocessor: Pentium II 350 MHzRAM: 128 MBFree hard disk space: 30 MBVideo card: 256-colour VGA 800x600Operating system: Microsoft Windows 98 SE and better
The software must be installed on your PC before use (preferable a Notebook).Use the CD supplied by Stargas for the installation.The installation program is designed to run automatically, as described below.

4
Insert the CD;• wait a few seconds for the installation program to run automatically and for the installation screen to appear as shown in Figure 3.1 below:
click “OK” , the next screen will appear, Figure 3.2
3. SOFTWARE INSTALLATION
Figure 3.1

5
If no destination folder is selected by the user, the Pègasus software will be installed by default in the "Programs" folder.• the following screen will appear (Figure 3.3)
Figure 3 . 2
Figure 3 . 3
• click "continue" and follow the instructions until the software has been installed.
• click the button

6
•Restart the computer.•Open the software for the first time. To open the software, click "start" on the application bar located at the bottom
of the desktop and from the start menu select Programs / Pegasus / Pegasus, click again on the Pègasus icon as shown in Figure 3.4
the “PEGASUS” window will appear (figure 3.5)
Figure 3 . 4
7
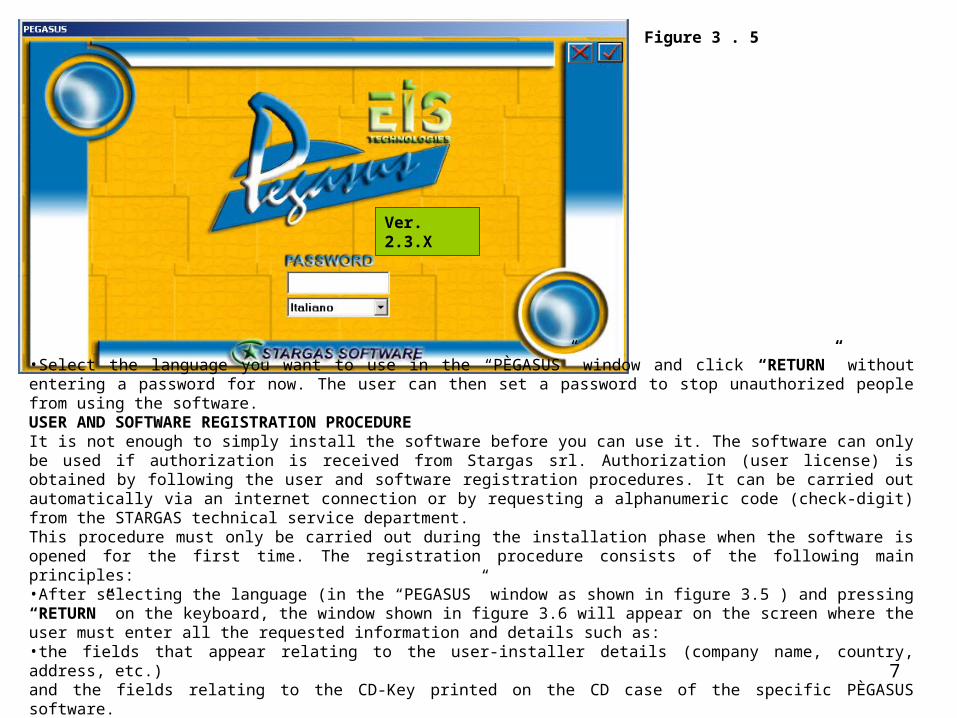
•Select the language you want to use in the “PÈGASUS” window and click “RETURN” without entering a password for now. The user can then set a password to stop unauthorized people from using the software.USER AND SOFTWARE REGISTRATION PROCEDUREIt is not enough to simply install the software before you can use it. The software can only be used if authorization is received from Stargas srl. Authorization (user license) is obtained by following the user and software registration procedures. It can be carried out automatically via an internet connection or by requesting a alphanumeric code (check-digit) from the STARGAS technical service department.This procedure must only be carried out during the installation phase when the software is opened for the first time. The registration procedure consists of the following main principles:•After selecting the language (in the “PEGASUS” window as shown in figure 3.5 ) and pressing “RETURN” on the keyboard, the window shown in figure 3.6 will appear on the screen where the user must enter all the requested information and details such as:•the fields that appear relating to the user-installer details (company name, country, address, etc.)and the fields relating to the CD-Key printed on the CD case of the specific PÈGASUS software.
Ver. 2.3.X
Figure 3 . 5

8
•To proceed the user must click ”Confirm” which will open other fields (“User-Key”, “Authorize”, “WEB registration” and “Check-Digit”) in the same window, as shown in figure 3.7
•To proceed, select the field “Authorize”, to consent to the processing of personal data. Then click “Confirm” and “Start (Avvia)” as shown in figure 3.7 •N.B. If authorization is not given for the processing of personal data, the registration procedure cannot continue.
Figure 3 . 6 Figure 3 . 7

9
If registering the software automatically via internet, you must:• connect the computer to internet;• click start (Avvia) in the field “ Web Registration” (see figure 3.8);• The software will automatically complete the registration procedure. • If the registration is successful, the following message will appear: “REGISTRATION COMPLETED”. • If this message does not appear, then the registration was not successful. In this case, refer to the chapter
“TROUBLESHOOTING THE PÈGASUS SOFTWARE”.If registering the software manually:• provide (by phone/fax/email) all the data, exactly as they are entered in the "registration form” (figure 3. 8), to the
STARGAS technical department. STARGAS will communicate you a check-digit to enter into the appropriate boxes of the registration window (see figure 3.8)
• click“ confirm”.• If the registration is successful, the message “REGISTRATION COMPLETED” appears. If this message does not
appear, then the registration was not successful. Therefore, refer to the paragraph “TROUBLESHOOTING THE PÈGASUS SOFTWARE”.
Figure 3 . 8
The registration procedure can be completed automatically (via an internet connection) or manually (requesting the check digit from the STARGAS technical department).
N.B.: The CD containing the software can only be used for one installation.
The CHECK DIGIT only allows the software to be used on the "workstation" or PC on which it was installed the first
time.

10
Stargas S.r.l. periodically updates the “Pegasus“ software to allow it to interface with later versions of the Elios control unit. Therefore, the installer must "update" the Pegasus software on a periodical basis. When updating the software do not remove (uninstall) the old "version" of the software already installed on the PC.
A CD-ROM (labeled “Stargas On-Line”) supplied by Stargas Srl is available to update the software.
The installation procedure involves:
• inserting the CD ROM labeled “Stargas On-Line” into the CD unit;• wait for the update procedure to automatically start. If it does not start automatically, refer to the chapter "TROUBLESHOOTING THE PÈGASUS SOFTWARE”;
In addition to the CD, the software update is also available via internet. In order to execute the update via internet:
• make sure you have an internet connection and go to the website: http://www.eistechnologies.it/polaris
• Follow the instructions shown in figures 4.1 to 4.8.
4. SOFTWARE UPDATE

11
enter the internet address www.eistechnologies.it/polaris/
Figura 4.1

12
Click on Download
Figure 4.2
Figure 4.3
If you click on Save (Salva) then the installation file will be saved on your computer, as shown in figures 4.4 to 4.8.If you click on Execute (Esegui) then the software Pegasus will be directly installed on the computer, as shown starting from figure 4.7

13
Specify the directory where you want to save the file (in this example on the DESKTOP) and then click SAVE.
The file will be saved on the Computer
Figure 4.5
Figure 4.4

14
When the download is finished, on the DESKTOP click on the icon “PegasusSetup.exe”. The installation software Pegasus x.y. will start automatically.
Figure 4.6
15
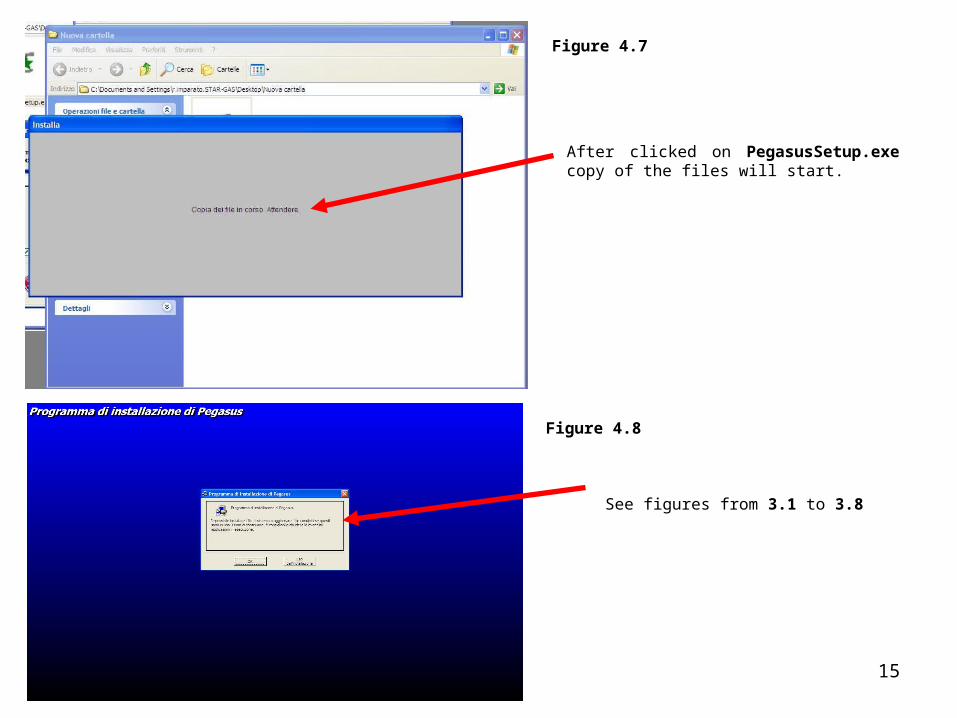
After clicked on PegasusSetup.exe copy of the files will start.
See figures from 3.1 to 3.8
Figure 4.7
Figure 4.8
16
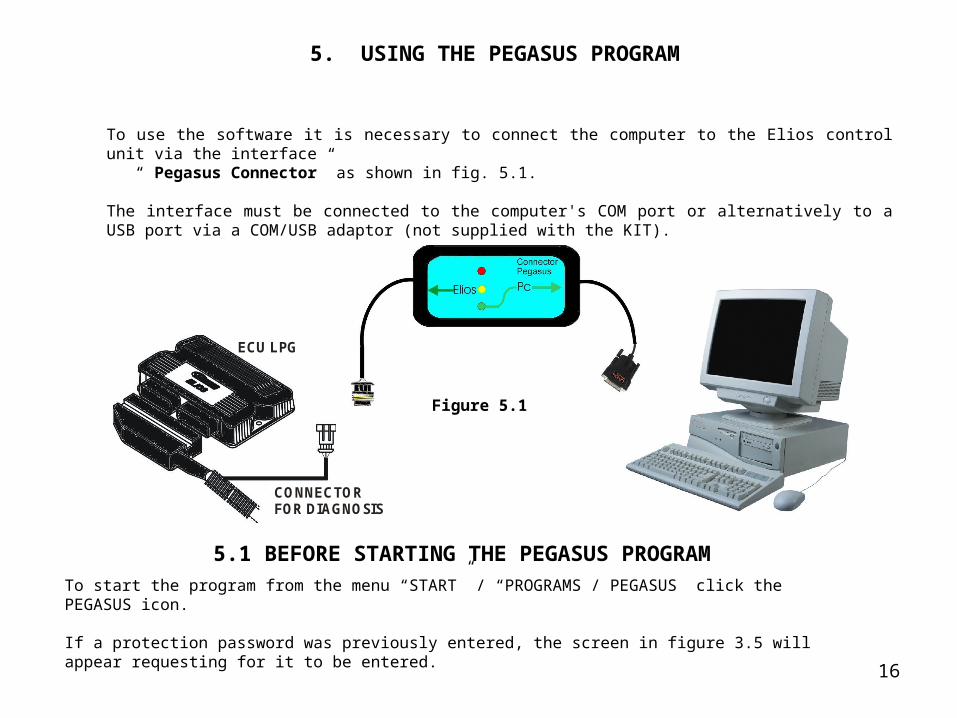
To use the software it is necessary to connect the computer to the Elios control unit via the interface “ Pegasus Connector” as shown in fig. 5.1.
The interface must be connected to the computer's COM port or alternatively to a USB port via a COM/USB adaptor (not supplied with the KIT).
5. USING THE PEGASUS PROGRAM
Figure 5.1
To start the program from the menu “START” / “PROGRAMS / PEGASUS click the PEGASUS icon.
If a protection password was previously entered, the screen in figure 3.5 will appear requesting for it to be entered.
5.1 BEFORE STARTING THE PEGASUS PROGRAM
ECU LPG
CONNECTOR FOR DIAGNOSIS

17
Go on Start, Programs, Pegasus. Open the program. A window like the one in the figure will appear.
Click on Info.
In this window some information like version of the software, CD KEY and USER KEY are displayed.
Note: in case you need to install your software Pegasus on a second computer, it is necessary to contact Stargas
Srl, in order to require the necessary authorization.
CD KEY

18
If the system comes with an Elios control unit ver. 4.5 or later, the screens shown in figures 5.2 and 5.3 will appear on the first connection. The type of injector installed can be selected in these screens.
Figure 5.2 Figure 5.3
Click with the mouse on the injector selected (fig. 5.3). The next screen will appear (fig. 5.4) requesting confirmation of the injector selected.

19
After confirming, click “YES”, and the next screen will appear (figure 5.5) showing the injector selected and confirmed.
Then click “Exit” to open the “PEGASUS-HOME” window shown in Figure 5.6 Once the injector has been selected, the data identifying the type of injector installed will appear in the "injector details" field each time the “PEGASUS.-HOME” window is opened. If you need to change the type of injector, click the "injectors" button in the PEGASUS-HOME window
Figure 5.4 Figure 5.5

20
The “PEGASUS-HOME” main window is always the first window appearing each time the program is opened.
Figure 5.6
5.2 PEGASUS MAIN WINDOW

21
Displays the Main Menu (par. 5.2.1)
The database button gives access to an archive where you can register all the cars converted to LPG. (par. 5.2.2)
Allows displaying the Copyright information and the software version installed
Allows the user to exit from the program.
The injector button opens the window for selecting the injector installed. (from fig. 5.3 to 5.5)
Allows the user to change the language.
DESCRIPTION OF THE “PEGASUS-HOME” MAIN WINDOW.
The “Control Unit Details" displays information on the control unit such as: type, serial number, manufacturing date, version and the PC port on which the interface is connected.
The "Calibration Data" field displays information on the calibrations executed on the system, in particular, the date of the first calibration (upon installation), the date of the last calibration executed and the total number of calibrations executed on the system starting from the first.
The "Injector Details" field displays the type of injector selected.
22
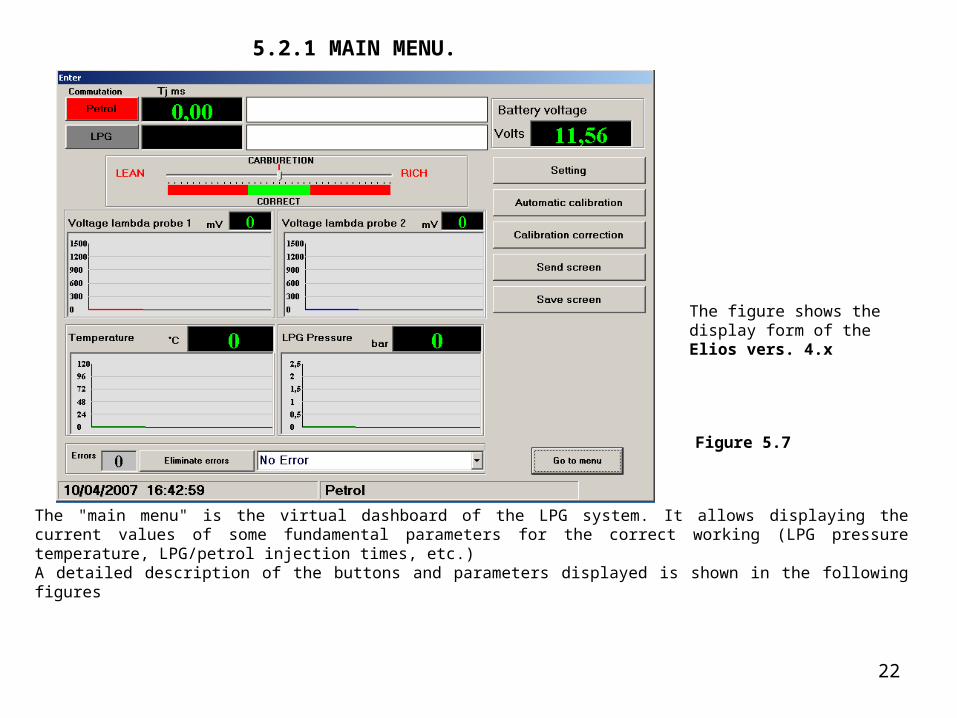
The figure shows the display form of the Elios vers. 4.x
The "main menu" is the virtual dashboard of the LPG system. It allows displaying the current values of some fundamental parameters for the correct working (LPG pressure temperature, LPG/petrol injection times, etc.)A detailed description of the buttons and parameters displayed is shown in the following figures
5.2.1 MAIN MENU.
Figure 5.7

23
…displays the current values of the car's injection time in Petrol or LPG mode, both numerically and graphically.The switchover can also be executed from the actual program by pressing the "Petrol" and "LPG" buttons.
…displays the carburetion status in "LPG" mode. The cursor moves to the red zones if the LPG injection time is higher or lower than the Petrol injection time, and in the green zone if it is the same.
The “Battery Voltage” field displays the voltage value of the car's battery in Volts.
The “LPG pressure" field displays the pressure value (in bar) of the LPG at the vaporizer outlet.
The “LPG Temperature" field displays the temperature value of the LPG in the vaporizer expressed in Celsius degrees (°C).

24
…displays, in form of oscillogram, working of the lambda signal 1 in mV. (WHITE wire of the wiring).
The lambda probe 1 is located before the car's catalytic converter
.
This field shows the current date and time, as well as the current operating condition of the engine's fuel supply. More specifically, if the engine is fuelled permanently by LPG, if permanently by petrol, if temporarily by petrol but waiting to switchover to LPG, or if it is fuelled by LPG but the system is in the calibration status.
MANAGEMENT ERRORS: indicates the errors detected by the control unit. These can be displayed by clicking on the black arrow (right side of the bar) and can be cancelled by clicking “ELIMINATE ERRORS"
…displays, in form of oscillogram, working of the lambda signal 2 in mV. (WHITE/BLACK wire of the wiring).
The lambda probe 2 is located after the car's catalytic converter.

25
The "Setting" button opens the window from which it is possible to set the values of some operating parameters (FIG. 5.8).
This button opens the “Automatic Calibration” window.
This button opens the “Calibration correction” window.
Press this button to automatically send the form with the values displayed to the Stargas technical department’s email address.
Press this button to save on your computer the entire form with the instantaneous values that are displayed.

26
5.2.1.1 SETTING OF PARAMETERS, COMPONENTS, FUNCTIONS
For the correct functioning of the system, the installer must manually specify and set some information which characterize the specific installation.
Figure 5.8

27
• Minimum switchover temperature: The car switches to LPG after reaching the preset temperature value, which can be set via the cursor shown in the figure. It is recommended to keep the switchover temperature at 35 °C.
• Minimum deactivation temperature: This is the temperature (detected by the reducer) below which the car automatically switches over to petrol.
• Minimum switchover time: This is the minimum waiting time for the switchover. The value is expressed in seconds.
Level sensor: This option allows to set any type of level sensor.
The figure shows the display form of the Elios vers. 4.x program

28
If during the PETROL/LPG switchover phase the engine stops or shows feeding “holes”, you can try, among other things, to eliminate these problems by changing the "LPG switchover" function from "Automatic" to "Deceleration." The value to set (from 3 ms to 16 ms) must be determined in an experimental way.
LPG SWITCHOVER
29
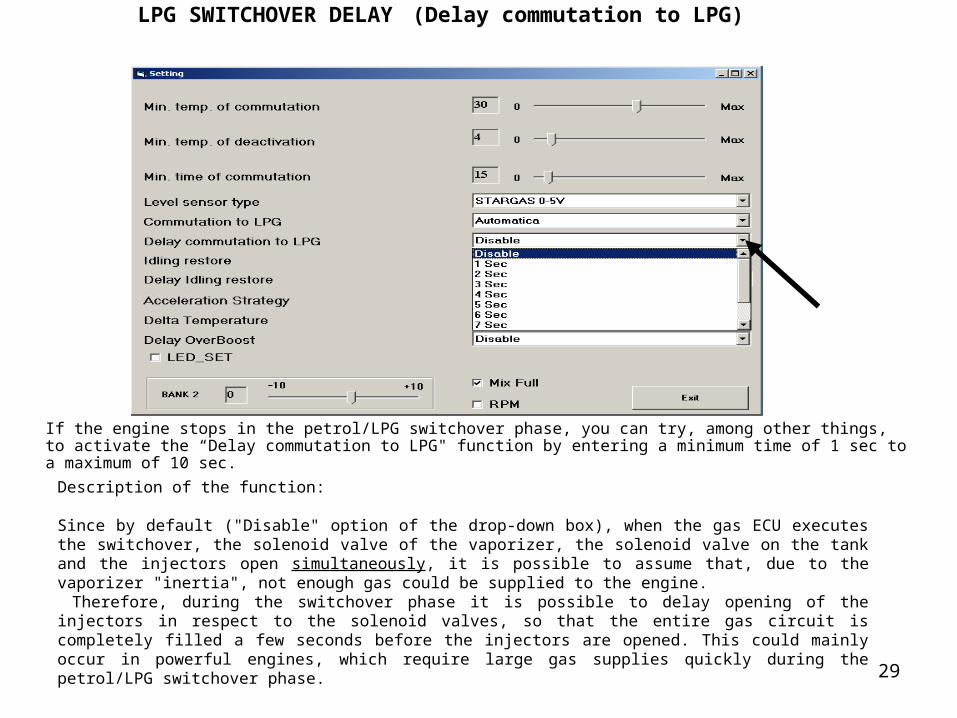
LPG SWITCHOVER DELAY (Delay commutation to LPG)
If the engine stops in the petrol/LPG switchover phase, you can try, among other things, to activate the “Delay commutation to LPG" function by entering a minimum time of 1 sec to a maximum of 10 sec.
Description of the function:
Since by default ("Disable" option of the drop-down box), when the gas ECU executes the switchover, the solenoid valve of the vaporizer, the solenoid valve on the tank and the injectors open simultaneously, it is possible to assume that, due to the vaporizer "inertia", not enough gas could be supplied to the engine. Therefore, during the switchover phase it is possible to delay opening of the injectors in respect to the solenoid valves, so that the entire gas circuit is completely filled a few seconds before the injectors are opened. This could mainly occur in powerful engines, which require large gas supplies quickly during the petrol/LPG switchover phase.

30
IDLING RESTORE
NOTE: • The “LED_SET” box must be DISABLED at the end of the setting operations.
• The “Idling Restore” function must not be used if the petrol pump is disabled while the engine is fed by LPG.
FLASHING OF THE RED PETROL LED
Description of the function: This operation allows, below the RPM value selected, a LPG/petrol "hybrid" feeding (in case “Mix full box” is not active) or exclusively a petrol feeding (in case “Mix full box” is active, which is the default condition).Over the RPM value selected the system will work exclusively on LPG.To display the correct working of this function (hybrid or petrol), it is necessary to make active the box “LED_SET”. In this case, while hybrid fuel (or just petrol) is being supplied, the RED LED of the status quadrant of the switch blinks.
If the engine stops while it is running at idling, you can try among other things, to enable the “Idling restore" function.The value to be set (from a minimum of 600 RPM to a maximum of 3500 RPM) must be determined in an experimental way

31
IDLING RESTORE DELAY
If the function “Idling Restore" has been activated, it is possible to use, in combination with it, also the function "Delay Idling Restore“, by selecting a value from 10 sec. to 60 sec.When during the "hybrid" (or exclusively petrol) working, managed by the function “Idling Restore”, the time set here has lapsed, this function restores the LPG mode, even if the engine is still working at a RPM value which is below the one set in the function “Idling Restore”.

32
ACCELERATION STRATEGY
This function normally must be disabled. It could be used specially on vehicles with automatic gear, when in particular power charges (namely, in particular levels of injection times) the gear is not able to pass to the next ratio. It can be set for values of injection times included between 10 and 34 ms .
If this function is active, during the working in gas mode, the system, when the injection time reaches the set values, will switch to gasoline for the time (seconds) set in “T.Max” square, time that can be adjusted by the relevant cursor.
To display the correct working of this function, it is necessary to make active the box “LED_SET”. In this case, when the system is working in petrol mode, instead of LPG, the RED LED of the switch blinks.
NOTE: The “LED_SET” box must be DISABLED at the end of the setting operations.
The “Acceleration Strategy” function must not be used if the petrol pump is disabled while the engine is fed by LPG.
33
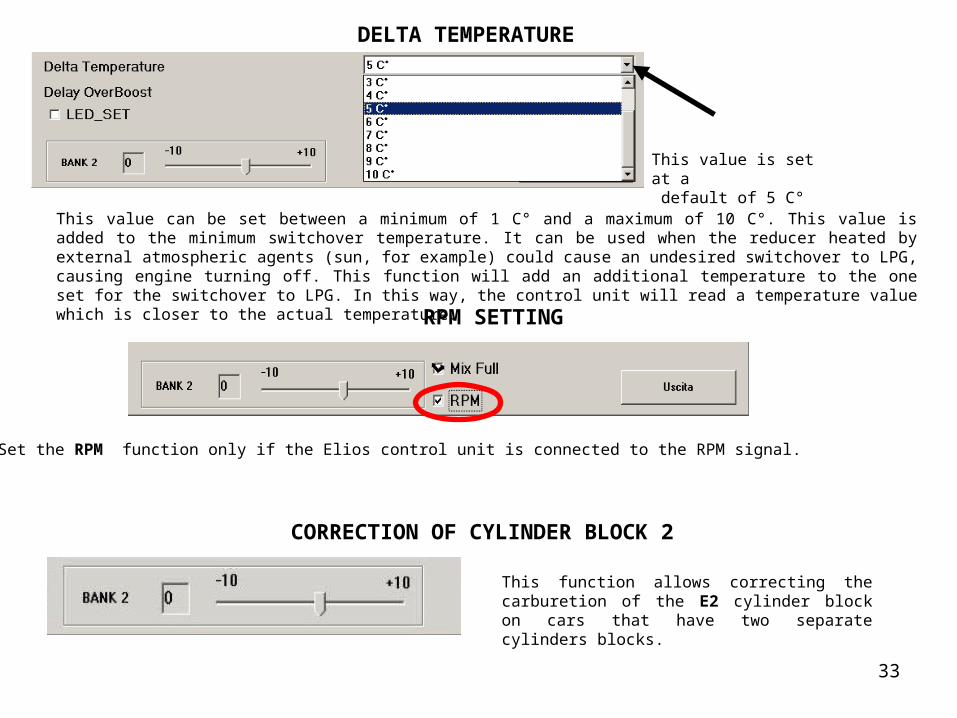
This value can be set between a minimum of 1 C° and a maximum of 10 C°. This value is added to the minimum switchover temperature. It can be used when the reducer heated by external atmospheric agents (sun, for example) could cause an undesired switchover to LPG, causing engine turning off. This function will add an additional temperature to the one set for the switchover to LPG. In this way, the control unit will read a temperature value which is closer to the actual temperature.
DELTA TEMPERATURE
This value is set at a default of 5 C°
Set the RPM function only if the Elios control unit is connected to the RPM signal.
CORRECTION OF CYLINDER BLOCK 2
This function allows correcting the carburetion of the E2 cylinder block on cars that have two separate cylinders blocks.
RPM SETTING
34
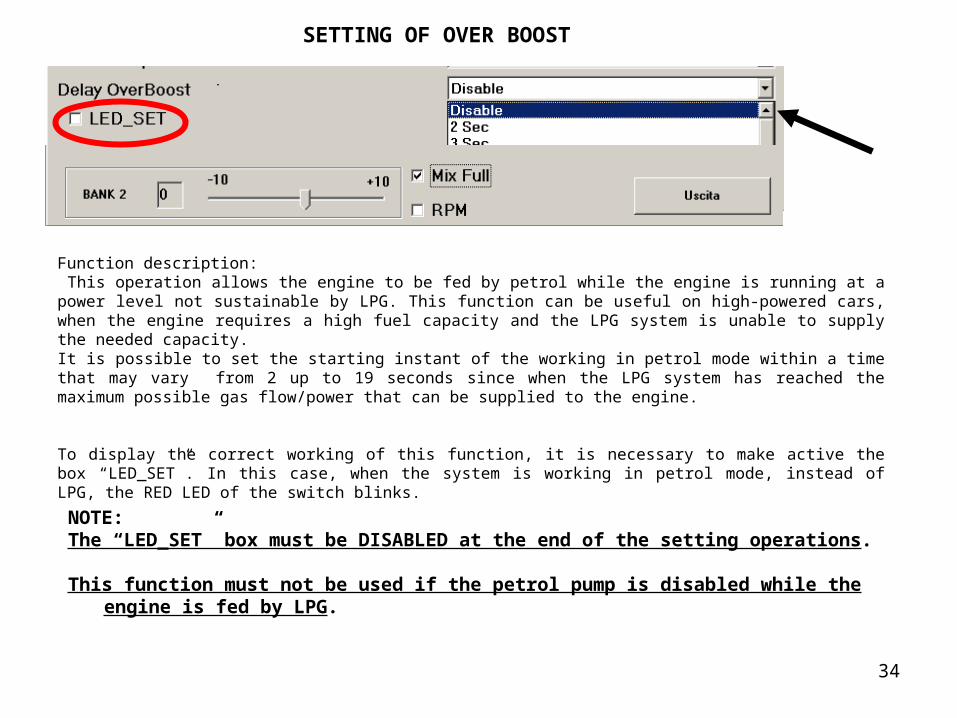
SETTING OF OVER BOOST
Function description: This operation allows the engine to be fed by petrol while the engine is running at a power level not sustainable by LPG. This function can be useful on high-powered cars, when the engine requires a high fuel capacity and the LPG system is unable to supply the needed capacity.It is possible to set the starting instant of the working in petrol mode within a time that may vary from 2 up to 19 seconds since when the LPG system has reached the maximum possible gas flow/power that can be supplied to the engine.
To display the correct working of this function, it is necessary to make active the box “LED_SET”. In this case, when the system is working in petrol mode, instead of LPG, the RED LED of the switch blinks.
NOTE: The “LED_SET” box must be DISABLED at the end of the setting operations.
This function must not be used if the petrol pump is disabled while the engine is fed by LPG.

35
5.2.1.2 AUTOMATIC CALIBRATION
CALIBRATION PHASES:
Before calibrating the car, make sure that all the parameters fall within the normal operating values, e.g. temperature, pressure, etc.
1. Switch the car over to LPG a couple of times.2. Adjust the pressure on the reducer while the engine is running on LPG.3. Switch the car to PETROL and wait for the temperature to reach 70°C.4. The calibration can be executed at idling or at 3000 RPM. Once fixed the RPM level (idling or 3000 RPM), execute
the calibration by pressing "START“. 5. During the calibration, the "Calibration progress bar" will move forwards. Press “Go to menu” when it reaches 100%.

36
5.2.1.3 CALIBRATION CORRECTION
In this panel the operator can modify the injection times, by moving the "FUEL TRIM” cursors. As you see, 16 “steps” are represented, each of them corresponding to a particular engine rating.The Step with the blue box indicates the current working rating of the engine. Move the cursor towards right (e.g. +10 (e.g. +10 Rich)Rich) to make the mixture richer, vice versa, move the cursor towards left (e.g. –10 Leane.g. –10 Lean ) to make the mixture leaner.
This panel gives the possibility to correct the mixture (making it leaner or richer) in correspondence of specific ranges of temperature of the vaporizer.
Press (F1) or (F2) to switch the fuel supply from petrol to LPG or vice versa.
Press this key to delete all the corrections done in this window.
Press this key to save the map.
The figure shows the window displayed for the version Elios 4.x

37
DATA MAP ARCHIVE
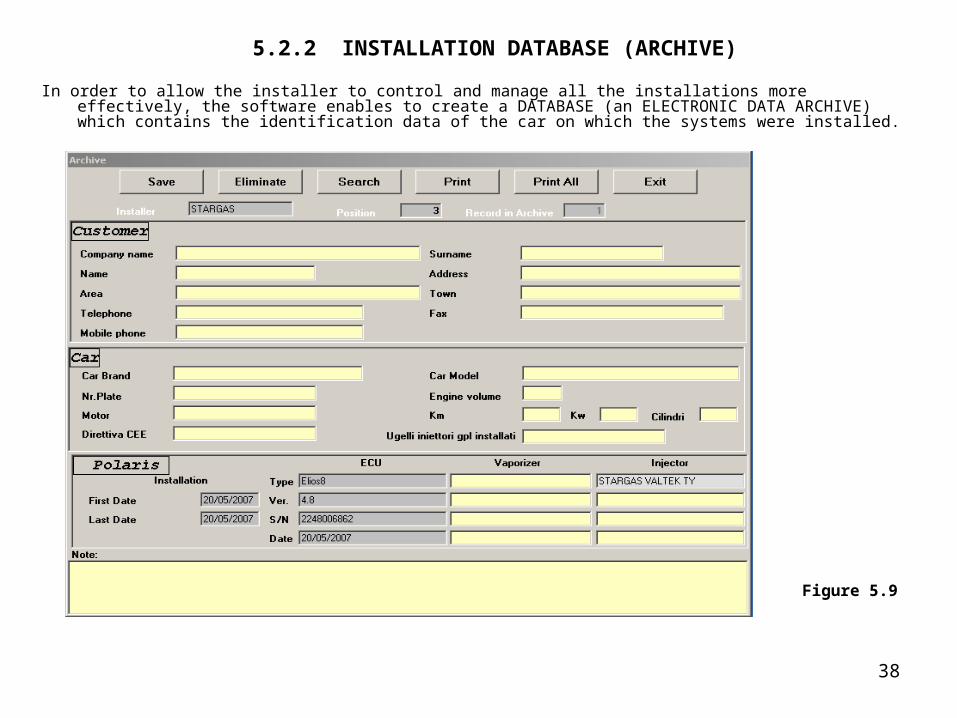
To allow the installer to control and manage the installations more effectively, the software allows to create a DATABASE which contains the identification data of the cars on which the systems were installed, of the components installed and of the installer's customers. The data relevant to each specific installation must be entered by the installer at the end of each installation in the fields ("Vehicle", "Customer", “Polaris”, “Notes”) of the "Archive" window, as shown in the figure.
Two other buttons are also present:“SAVE”: allows saving a file with the image of the settings made on the computer.
“SEND”: allows sending a file with the image of the settings directly to the Stargas technical service via internet.
38
In order to allow the installer to control and manage all the installations more effectively, the software enables to create a DATABASE (an ELECTRONIC DATA ARCHIVE) which contains the identification data of the car on which the systems were installed.
5.2.2 INSTALLATION DATABASE (ARCHIVE)
Figure 5.9

39
5.3 EMERGENCY START
Blue LED
Switch key
Each time the panel is started, the LEDS of all the quadrants of the switchover panel start flashing simultaneously. While the LEDs are flashing, keep the switchover key pressed to activate the emergency start procedure; the BLUE LED of the status quadrant will start flashing quickly; then the engine can be started in this moment, directly to LPG.
If the engine is not started within five seconds, the switchover returns to the initial state of "switchover pending".
If the operation is not successful, repeat the entire procedure from the beginning.
5.4 VARIATION OF THE LUMINOSITY OF THE LPG SWITCHOVER LED
At each start up of the panel, the LEDS of all the quadrants of the switchover panel will start flashing simultaneously.
After a few seconds, all the LEDS of the switch will remain bright in fix way for a few seconds. At this point, press the switch key to vary the intensity of the brightness. You can choose among seven different intensity values. On releasing the key, the control unit records the set intensity and returns to the normal state of "switchover pending".
If the operation is not successful, repeat the procedure from the beginning.
Switch key

40
CD KEYalphanumeric code (20 characters) which limits unauthorized installations, without which the software installed on the computer cannot work. The CD KEY is provided by the manufacturer along with the CD containing the Pegasus software (it is normally printed on the cover of the CD case).
CHECK-DIGIT alphanumeric code (20 characters) associated to the user license of the software which limits the number of authorized installations. An user license is necessary for each computer which uses the software. A check-digit provided by the manufacturer is associated to this license.
SEARCH KEY alphanumeric code which unequivocally and quickly identifies data in a group of other similar data
DATABASE The term Database indicates a series of data concerning the same topic, or more topics associated to each other, structured in such a way to allow the data to be used by various applications and, normally, can evolve over time.
FILE A file is a series of coded information organized like a sequence (of bytes), stored like a single element on a mass memory inside the File System existing on that particular mass memory.
Form In computer terms, a form is a term used to indicate the interface of an application that uses the metaphor of the "form to fill out" for entering the data. In many cases, the term refers to a form contained in a web page: for example, a form is made up of the text boxes and drop-down menus contained in a registration page.
PASSWORD A password is a type of authentication that uses secret data to control access to a resource. The password should remain secret to people who are not authorized to access the resource in question.
GLOSSARY OF TERMS AND ACRONYMS OF THE PÈGASUS SOFTWARE MANUAL

41
PERIPHERAL A peripheral is, in computer terms, a hardware device connected to a computer, sometimes controlled by its own microprocessor, whose functions are controlled by the operating system via the relative drivers. The main peripherals necessary for optimising the computer include mass memories (hard disk), paper input and output (scanner and printer) and hardware to communicate with other computers (network boards and modems). Similarly, the keyboard, mouse and monitor are all primary components of the interface with the user.
COM port In computer terms, a port is usually a connection through which data is sent and received.
RECORD In computer terms, a record is an object of a structured database that contains a series of fields and elements, which each have their own name and type.
SERVER A server is a computer dedicated to performing a specific service, such as the management of a local or geographic network, the management of the print peripherals (print-server), the exchange and sharing of data between computers (file server, database server), the sending or forwarding of email (mail server) or to contain the files in a web site (web server).
Software The term software (used in the computer field) indicates a program or a series of programs capable of functioning on a processor.
MIXING RATIO The mixing ratio is defined as the ratio between the air quantity and the fuel quantity present in the air-fuel mixture.
UP-DATE An update (often called an upgrade, or in the case of programs update or patch) refers to the process of replacing a component of a computer system with a more recent component. The replacement has the aim of resolving defects of the previous component, improving the performances or adding new functions.
USER-KEY alphanumeric code (16 characters) which unequivocally associates an authorised installation of the Pegasus software with the user/installer's details which are requested during the "user and software registration”.
6. GLOSSARY OF TERMS AND ACRONYMS OF THE PÈGASUS SOFTWARE MANUAL
42
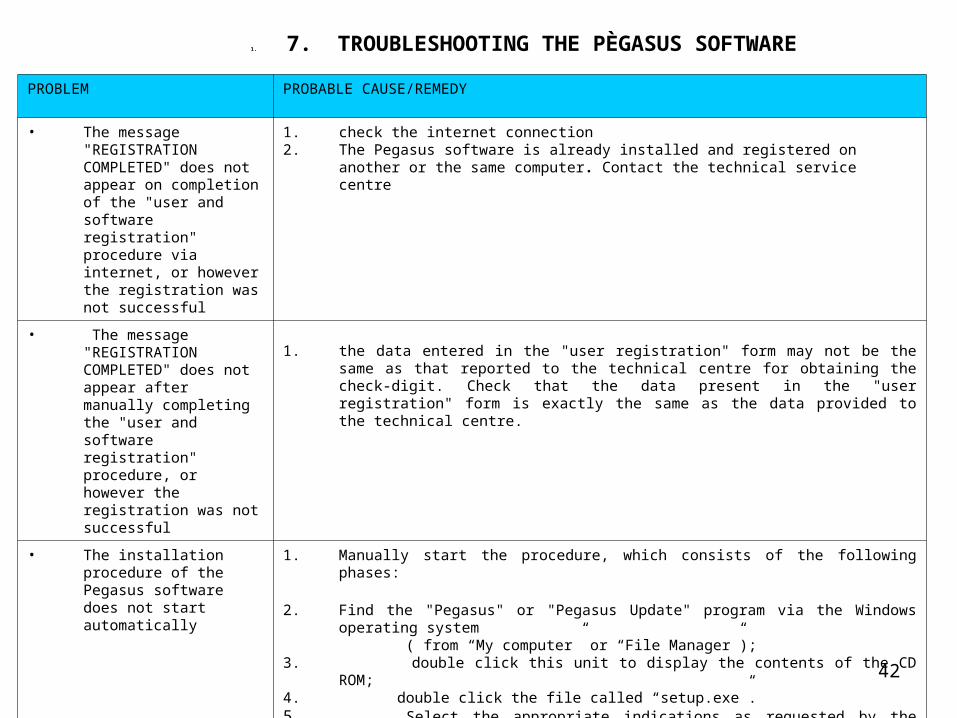
PROBLEM PROBABLE CAUSE/REMEDY
• The message "REGISTRATION COMPLETED" does not appear on completion of the "user and software registration" procedure via internet, or however the registration was not successful
1. check the internet connection2. The Pegasus software is already installed and registered on another or the same
computer. Contact the technical service centre
• The message "REGISTRATION COMPLETED" does not appear after manually completing the "user and software registration" procedure, or however the registration was not successful
1. the data entered in the "user registration" form may not be the same as that reported to the technical centre for obtaining the check-digit. Check that the data present in the "user registration" form is exactly the same as the data provided to the technical centre.
• The installation procedure of the Pegasus software does not start automatically
1. Manually start the procedure, which consists of the following phases:
2. Find the "Pegasus" or "Pegasus Update" program via the Windows operating system ( from “My computer” or “File Manager”);3. double click this unit to display the contents of the CD ROM;4. double click the file called “setup.exe”.5. Select the appropriate indications as requested by the installation procedure, follow the
steps until the installation has been completed (see the chapter on “SOFTWARE INSTALLATION”)
1. 7. TROUBLESHOOTING THE PÈGASUS SOFTWARE

43
The automatic calibration procedure cannot be executed
make sure all the preliminary operations have been executed on the start-up of the calibration.if the program was preset to automatically exclude the functioning of the petrol pump while the engine was running on LPG, to protect the pump itself, exclude this automatic device for the entire duration of the automatic calibrating operation.
The injectors cannot be set via the software
the version of the gas ECU is older than 4.5, the software has not been updated
On first start-up, when the panel is inserted, the red LED on the status quadrant starts flashing
set the type of injector via the software
The compressed file "Pegasus.zip" downloaded from internet to update the software does not open.
most likely, WINZIP has not been installed on the computer, which is necessary for opening compressed files. In this case, download it from the internet site reported below: www.winzip.com. After which, extract the files from the “Pegasus.zip” update file. Then open the files and the folders that were compressed and double click the file SETUP.EXE.
After having inserted the update CD ROM of the Pegasus software, the installation procedure does not start automatically.
via the operating system (from "My Computer" or "File Manager") find the file “setup.exe” present on the CD ROM and click the relative icon twice rapidly.
”.
1. 7. TROUBLESHOOTING THE PÈGASUS SOFTWARE
Related Documents