Quick Start Owner’s Manual (ENGLISH) Manual de inicio rápido para el usuario (ESPAÑOL) Schnellbedienungsanleitung (DEUTSCH) Manuel d’utilisation du propriétaire (FRANÇAIS) Manuale rapido di utilizzazione (ITALIANO) CONTENIDO DE LA CAJA • MÁQUINA DE RITMOS SR-16 • SUMINSTRO DE ALIMENTACIÓN • MANUALES CONTENU DE LA BOÎTE • BOÎTE À RYTHME SR-16 • ADAPTATEUR CA : • GUIDES D'UTILISATION INHALT DER VERPACKUNG • SR-16 SCHLAGZEUGMASCHINE • NETZADAPTER • ANLEITUNG BOX CONTENTS • SR-16 DRUM MACHINE • POWER ADAPTER • MANUALS CONTENUTO DELLA CONFEZIONE • DRUM MACHINE SR-16 • ADATTATORE ALIMENTAZIONE • MANUALI

Welcome message from author
This document is posted to help you gain knowledge. Please leave a comment to let me know what you think about it! Share it to your friends and learn new things together.
Transcript
Quick Start Owner’s Manual (ENGLISH)
Manual de inicio rápido para el usuario (ESPAÑOL)
Schnellbedienungsanleitung (DEUTSCH)
Manuel d’utilisation du propriétaire (FRANÇAIS)
Manuale rapido di utilizzazione (ITALIANO)
CONTENIDO DE LA CAJA
• MÁQUINA DE RITMOS SR-16
• SUMINSTRO DE ALIMENTACIÓN
• MANUALES
CONTENU DE LA BOÎTE
• BOÎTE À RYTHME SR-16
• ADAPTATEUR CA :
• GUIDES D'UTILISATION
INHALT DER VERPACKUNG
• SR-16 SCHLAGZEUGMASCHINE
• NETZADAPTER
• ANLEITUNG
BOX CONTENTS
• SR-16 DRUM MACHINE
• POWER ADAPTER
• MANUALS
CONTENUTO DELLA CONFEZIONE
• DRUM MACHINE SR-16
• ADATTATORE ALIMENTAZIONE
• MANUALI

2

SR-16 Quick Setup (English)
As you hook up the SR-16, the volume control onyour power amp and the SR-16 should be all theway down, and power to both units should be off.
VOLUME
3 Plug the AC adapter cordinto the 9V AC jack andthe adapter into a wallsocket. 2 If you have a couple of
footswitches, plugthem into theStart/Stop andCount/A/B/Fill jacks.
1 Plug 1/4" monocords from themain outputs to anamplifier, mixer, orstereo system.
4 Turn on theunit.
5 Tap the pads to hear drumsounds.
6 Adjust the volume.
3

5 Speed up the tempo by pressing theTEMPO/UP arrow button.Slow down the tempo by pressing theTEMPO/DOWN arrow button.
4 Press PLAY to start apattern, STOP to stop it.
3 Press the UP/DOWNarrow buttons to select a Pattern. Youcan also enter a patternnumber (00-49) with theNumber buttons. Use a“leading zero” (e.g. 01,02, 03) for the first ninepatterns.
2 If the display's upper right window showsUSER, press the PRESET/USER button to select Preset Patterns.
1 If the display's upper right window shows Song,Press the PATTERN/SONG button once to select Pattern mode.
Playing Patterns
VOLUME
PATTERN
A
PRESS PLAY
TEMPO
PERFORM
ROCKIN 1
4

3 You can call up adifferent Patternnumber if desired.Press the UP/DOWNarrow buttons to select a Pattern orenter a Pattern number(00-49) with thenumber buttons.
2 If an A Pattern is playing, pressthe B button (or press A if a BPattern is playing).The alternate Pattern will beginplaying as soon as the currently-selected Pattern reaches its end.
1 Begin by selecting a Pattern and pressingPLAY.
Each Pattern number, Preset and User, includes A and B "sub-Patterns." The Preset A and Bvariations complement each other. For example, in a Rock Pattern, A could play the verse, and Bthe chorus. In fact, you may construct many songs just by switching back and forth between theA and B variations.
Playing Sequences of Patterns
VOLUME
PATTERN
A
PRESS PLAY
TEMPO
PERFORM
ROCKIN 1
5

4 Fills do not always have to be transitionalPatterns. Suppose an A Pattern is playing. Ifyou press the FILL button, a fill will start—butthis time, keep the FILL button held downuntil after the fill has finished playing.This cancels the transition to the alternatepattern (in this example, the A pattern wouldcontinue playing).
3 Press the FILL button again. A different fill willtransition from the B patternback into the A pattern.2 Press and release the FILL button
while the main A Pattern is playing.You'll hear a drum fill that leadsright into the associated B pattern.
1 Begin by selecting anA Pattern thenpressing PLAY.
Each A and B variation also includes associated Fill Patterns, which can play transitions betweenthe A and B variations. You can push a button to have a Fill take over from its associated mainPattern and transition to the alternate Pattern.
Playing Fills
VOLUME
PATTERN
A
PRESS PLAY
TEMPO
PERFORM
ROCKIN 1
6
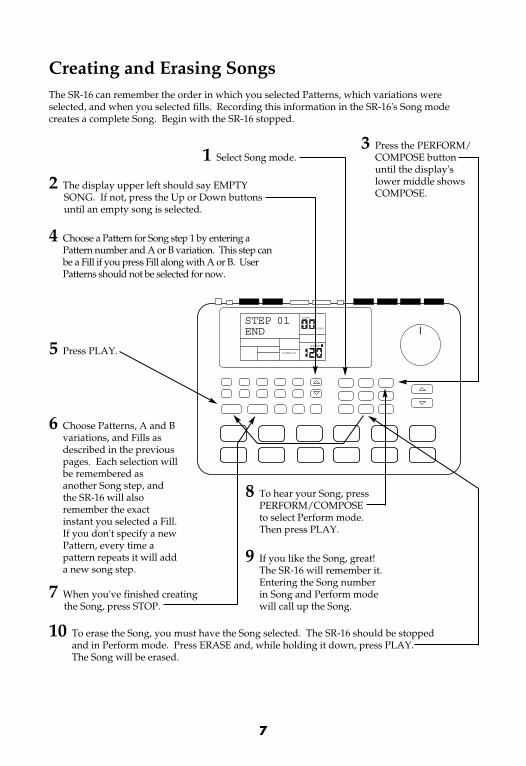
9 If you like the Song, great!The SR-16 will remember it.Entering the Song numberin Song and Perform modewill call up the Song.
8 To hear your Song, pressPERFORM/COMPOSE to select Perform mode.Then press PLAY.
10 To erase the Song, you must have the Song selected. The SR-16 should be stoppedand in Perform mode. Press ERASE and, while holding it down, press PLAY.The Song will be erased.
7 When you've finished creatingthe Song, press STOP.
6 Choose Patterns, A and Bvariations, and Fills asdescribed in the previouspages. Each selection willbe remembered asanother Song step, andthe SR-16 will alsoremember the exactinstant you selected a Fill.If you don't specify a newPattern, every time apattern repeats it will adda new song step.
5 Press PLAY.
4 Choose a Pattern for Song step 1 by entering aPattern number and A or B variation. This step canbe a Fill if you press Fill along with A or B. UserPatterns should not be selected for now.
3 Press the PERFORM/COMPOSE buttonuntil the display'slower middle showsCOMPOSE.
2 The display upper left should say EMPTYSONG. If not, press the Up or Down buttonsuntil an empty song is selected.
1 Select Song mode.
The SR-16 can remember the order in which you selected Patterns, which variations wereselected, and when you selected fills. Recording this information in the SR-16's Song modecreates a complete Song. Begin with the SR-16 stopped.
Creating and Erasing Songs
VOLUME
PRESS PLAY
TEMPO
STEP 01END
SONG
USER
COMPOSE
7
Footswitch Control
Now that we have the basics down, let's investigate some live performance options usingfootswitch control. This is particularly useful if you're playing along with Patterns and Songs onthe pads and can't use your hands to punch buttons.
There are two jacks for footswitches (Start/Stop and Count/A/B/Fill). Always plug thesefootswitches in before turning on power. Either normally open or normally closed types (the twomost common footswitch types) can be used; the SR-16 determines which kind is in use duringpower-up.
Here's how to use the footswitches.
Set TempoThe SR-16 must be stopped. Before playing a Song or Pattern, tap the Count/A/B/Fill jackfootswitch several times at the desired tempo. The SR-16 will average the time between taps andderive a tempo, the display will update the tempo with each tap. Tapping the STOP buttonaccomplishes the same result as tapping the Count/A/B/Fill footswitch.
Start a Song or PatternWhen the SR-16 is stopped, pressing the Start/Stop footswitch is equivalent to pressing PLAY.When the SR-16 is running, pressing the Start/Stop footswitch is equivalent to pressing STOP.
Initiate a Fill When Playing PatternsIn Perform mode, the Count/A/B/Fill footswitch duplicates the FILL button function whenplaying Patterns.
Cancel a Transition From A to B, or B to A, PatternsWhen you initiate a Fill, an A Pattern will transition to a B pattern (or vice-versa) when the Fillhas finished playing. However, you can cancel this transition if desired. We've alreadyexplained how to do this with the front panel FILL button. However, you can also use theCount/A/B/Fill footswitch. If you press the footswitch before the fill has finished playing andhold it down until after the fill has played (i.e, past the downbeat of the next Pattern), the SR-16will return to the original MainA or B Pattern.
Extend a Song Step When Playing Back a SongIn Song Perform mode (i.e, during song playback), pressing and holding the Count/A/B/Fillfootswitch until past the end of a Song Step will cause that step to repeat. This is great if thesoloist wants to take a few more bars.
8

7 If you make a mistake, holddown the ERASE button, then hold down the drum pad ofthe sound you want to erase.
6 Play the pads.The SR-16 will shift your playing to thenearest rhythmic value shown in thelower-left corner of the quantizewindow.
5 Press PLAY to startrecording.You will probably heara metronome click.When a Pattern reachesits end, it will loop backto the beginning so youcan do overdubs.
4 Press the Up/Downarrow buttonsuntil you find an EMPTYPATTern, as shown onthe display.
3 Push the PERFORM/COMPOSE button until the display's lowermiddle shows COMPOSE.
1 If the display's upper right window shows SONG,press the PATTERN/SONG buttononce to select Pattern mode.
2 If the display's upper right window does notshow USER, press the PRESET/USER buttonto select User Patterns.
Recording Your Own Patterns
VOLUME
PATTERN
A
PRESS PLAY
TEMPO
EMPTY PATT
COMPOSE
USER
9
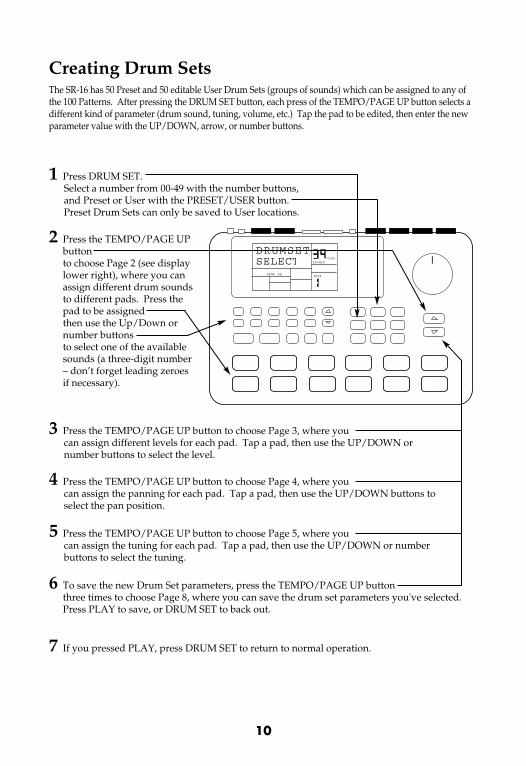
7 If you pressed PLAY, press DRUM SET to return to normal operation.
6 To save the new Drum Set parameters, press the TEMPO/PAGE UP buttonthree times to choose Page 8, where you can save the drum set parameters you've selected.Press PLAY to save, or DRUM SET to back out.
3 Press the TEMPO/PAGE UP button to choose Page 3, where you can assign different levels for each pad. Tap a pad, then use the UP/DOWN ornumber buttons to select the level.
4 Press the TEMPO/PAGE UP button to choose Page 4, where you can assign the panning for each pad. Tap a pad, then use the UP/DOWN buttons toselect the pan position.
5 Press the TEMPO/PAGE UP button to choose Page 5, where you can assign the tuning for each pad. Tap a pad, then use the UP/DOWN or numberbuttons to select the tuning.
2 Press the TEMPO/PAGE UPbuttonto choose Page 2 (see displaylower right), where you canassign different drum soundsto different pads. Press thepad to be assignedthen use the Up/Down ornumber buttonsto select one of the availablesounds (a three-digit number– don’t forget leading zeroesif necessary).
1 Press DRUM SET. Select a number from 00-49 with the number buttons,and Preset or User with the PRESET/USER button.Preset Drum Sets can only be saved to User locations.
The SR-16 has 50 Preset and 50 editable User Drum Sets (groups of sounds) which can be assigned to any ofthe 100 Patterns. After pressing the DRUM SET button, each press of the TEMPO/PAGE UP button selects adifferent kind of parameter (drum sound, tuning, volume, etc.) Tap the pad to be edited, then enter the newparameter value with the UP/DOWN, arrow, or number buttons.
Creating Drum Sets
VOLUME
PAGE
DRUMSETSELECT
DRUM SET
DRUM
USER
SET
10
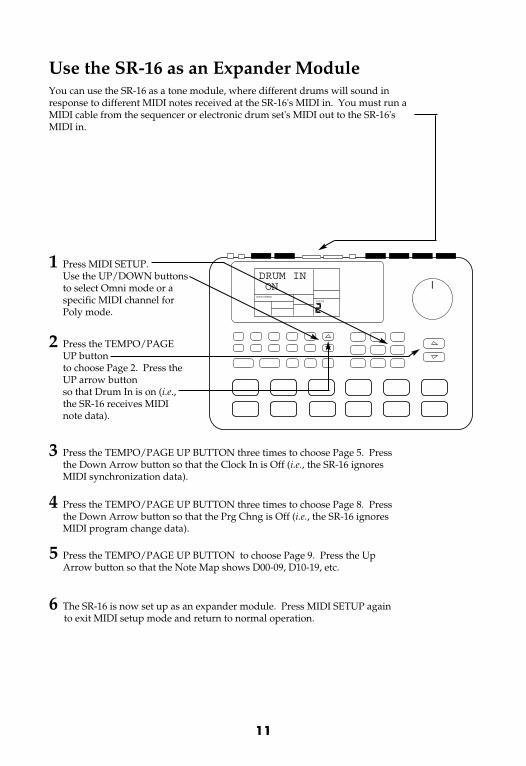
6 The SR-16 is now set up as an expander module. Press MIDI SETUP againto exit MIDI setup mode and return to normal operation.
3 Press the TEMPO/PAGE UP BUTTON three times to choose Page 5. Pressthe Down Arrow button so that the Clock In is Off (i.e., the SR-16 ignoresMIDI synchronization data).
4 Press the TEMPO/PAGE UP BUTTON three times to choose Page 8. Pressthe Down Arrow button so that the Prg Chng is Off (i.e., the SR-16 ignoresMIDI program change data).
5 Press the TEMPO/PAGE UP BUTTON to choose Page 9. Press the UpArrow button so that the Note Map shows D00-09, D10-19, etc.
2 Press the TEMPO/PAGEUP buttonto choose Page 2. Press theUP arrow buttonso that Drum In is on (i.e.,the SR-16 receives MIDInote data).
1 Press MIDI SETUP.Use the UP/DOWN buttonsto select Omni mode or aspecific MIDI channel forPoly mode.
You can use the SR-16 as a tone module, where different drums will sound inresponse to different MIDI notes received at the SR-16's MIDI in. You must run aMIDI cable from the sequencer or electronic drum set's MIDI out to the SR-16'sMIDI in.
Use the SR-16 as an Expander Module
VOLUME
DRUM IN
PAGE
ONSETUPMIDI
11

12

Instalación rápida del SR-16(Español)
Cuando se conecta el SR-16, el control de volumende su amplificador de potencia y el SR-16 debenestar totalmente al mínimo y la alimentación deambas unidades debe estar apagada.
VOLUME
3 Enchufe el cable deladaptador de CA alconector de CA de 9 V y eladaptador altomacorriente.
2 Si tiene un par deinterruptores de pedal,enchúfelos a losconectores deStart/Stop(Inicio/Parada) y deCount/A/B/Fill.
1 Enchufe cablesmono de 1/4pulgadas desde lassalidas principalesa un amplificador,mezclador osistema estéreo.
4 Encienda launidad.
5 Golpee los padsligeramentepara escucharlos sonidos dela batería.
6 Ajuste elvolumen.
13

5 Aumente la velocidad del tempopresionando el botón de flecha arriba deTEMPO. Disminuya la velocidad del tempopresionando el botón de flecha abajo deTEMPO.
4 Presione PLAY parainiciar un patrón, STOPpara pararlo.
3 Presione los botones deflechas arriba y abajopara seleccionar unpatrón. También puedeintroducir un número depatrón (00-49) con losbotones numéricos. Useun "cero no significativo"(por ejemplo, 01, 02, 03)para los primeros nuevepatrones.
2 Si la ventana superior derecha de la pantallamuestra USER, presione el botónPRESET/USER para seleccionar el los patronespredeterminados.
1 Si la ventana superior derecha de la pantallamuestra "Song", presione el botónPATTERN/SONG una vez para seleccionar elmodo de patrón.
Patrones para tocar
VOLUME
PATTERN
A
PRESS PLAY
TEMPO
PERFORM
ROCKIN 1
14
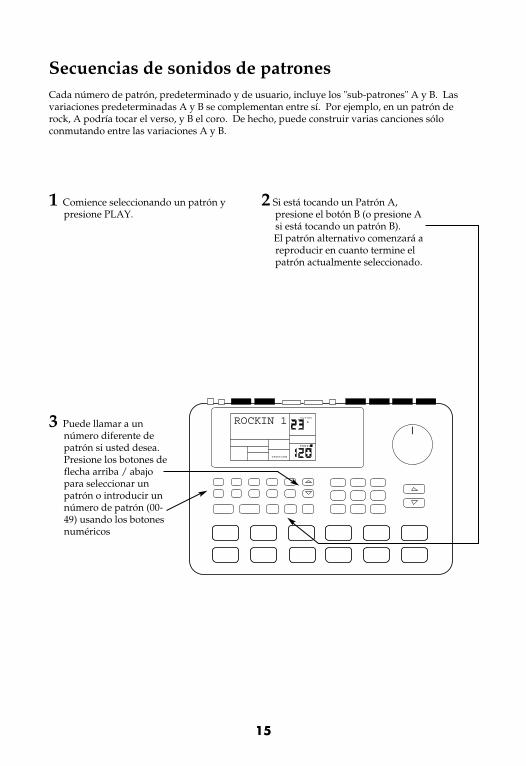
3 Puede llamar a unnúmero diferente depatrón si usted desea.Presione los botones deflecha arriba / abajopara seleccionar unpatrón o introducir unnúmero de patrón (00-49) usando los botonesnuméricos
2 Si está tocando un Patrón A,presione el botón B (o presione Asi está tocando un patrón B).El patrón alternativo comenzará areproducir en cuanto termine elpatrón actualmente seleccionado.
1 Comience seleccionando un patrón ypresione PLAY.
Cada número de patrón, predeterminado y de usuario, incluye los "sub-patrones" A y B. Lasvariaciones predeterminadas A y B se complementan entre sí. Por ejemplo, en un patrón derock, A podría tocar el verso, y B el coro. De hecho, puede construir varias canciones sóloconmutando entre las variaciones A y B.
Secuencias de sonidos de patrones
VOLUME
PATTERN
A
PRESS PLAY
TEMPO
PERFORM
ROCKIN 1
15
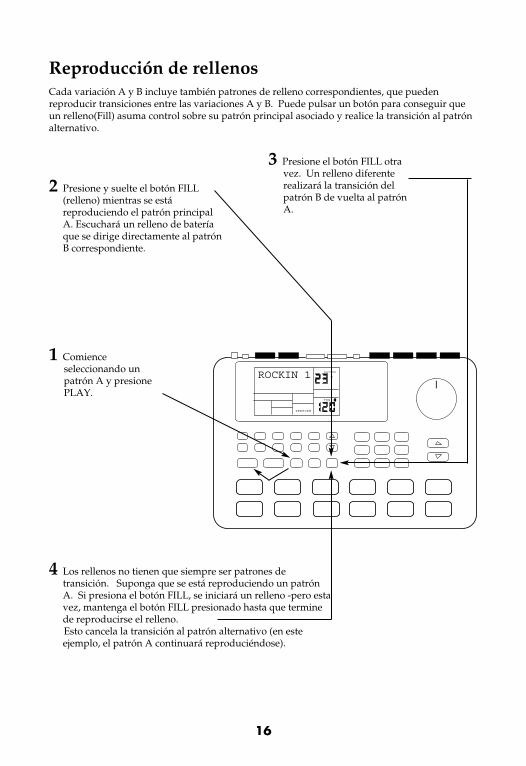
4 Los rellenos no tienen que siempre ser patrones detransición. Suponga que se está reproduciendo un patrónA. Si presiona el botón FILL, se iniciará un relleno -pero estavez, mantenga el botón FILL presionado hasta que terminede reproducirse el relleno.Esto cancela la transición al patrón alternativo (en esteejemplo, el patrón A continuará reproduciéndose).
3 Presione el botón FILL otravez. Un relleno diferenterealizará la transición delpatrón B de vuelta al patrónA.
2 Presione y suelte el botón FILL(relleno) mientras se estáreproduciendo el patrón principalA. Escuchará un relleno de bateríaque se dirige directamente al patrónB correspondiente.
1 Comienceseleccionando unpatrón A y presionePLAY.
Cada variación A y B incluye también patrones de relleno correspondientes, que puedenreproducir transiciones entre las variaciones A y B. Puede pulsar un botón para conseguir queun relleno(Fill) asuma control sobre su patrón principal asociado y realice la transición al patrónalternativo.
Reproducción de rellenos
VOLUME
PATTERN
A
PRESS PLAY
TEMPO
PERFORM
ROCKIN 1
16
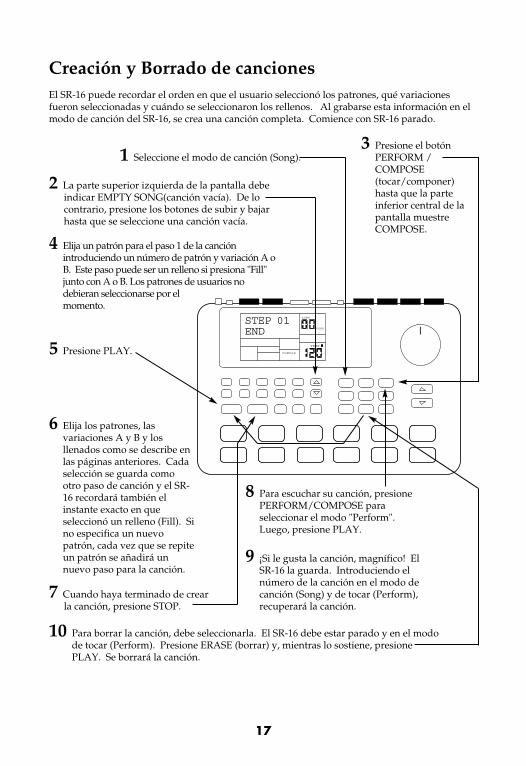
9 ¡Si le gusta la canción, magnífico! ElSR-16 la guarda. Introduciendo elnúmero de la canción en el modo decanción (Song) y de tocar (Perform),recuperará la canción.
8 Para escuchar su canción, presionePERFORM/COMPOSE paraseleccionar el modo "Perform".Luego, presione PLAY.
10 Para borrar la canción, debe seleccionarla. El SR-16 debe estar parado y en el modode tocar (Perform). Presione ERASE (borrar) y, mientras lo sostiene, presionePLAY. Se borrará la canción.
7 Cuando haya terminado de crearla canción, presione STOP.
6 Elija los patrones, lasvariaciones A y B y losllenados como se describe enlas páginas anteriores. Cadaselección se guarda comootro paso de canción y el SR-16 recordará también elinstante exacto en queseleccionó un relleno (Fill). Sino especifica un nuevopatrón, cada vez que se repiteun patrón se añadirá unnuevo paso para la canción.
5 Presione PLAY.
4 Elija un patrón para el paso 1 de la canciónintroduciendo un número de patrón y variación A oB. Este paso puede ser un relleno si presiona "Fill"junto con A o B. Los patrones de usuarios nodebieran seleccionarse por elmomento.
3 Presione el botónPERFORM /COMPOSE(tocar/componer)hasta que la parteinferior central de lapantalla muestreCOMPOSE.
2 La parte superior izquierda de la pantalla debeindicar EMPTY SONG(canción vacía). De locontrario, presione los botones de subir y bajarhasta que se seleccione una canción vacía.
1 Seleccione el modo de canción (Song).
El SR-16 puede recordar el orden en que el usuario seleccionó los patrones, qué variacionesfueron seleccionadas y cuándo se seleccionaron los rellenos. Al grabarse esta información en elmodo de canción del SR-16, se crea una canción completa. Comience con SR-16 parado.
Creación y Borrado de canciones
VOLUME
PRESS PLAY
TEMPO
STEP 01END
SONG
USER
COMPOSE
17

Control de interruptor de pedalAhora que conocemos los puntos básicos, veamos algunas opciones de espectáculo en vivousando el control del interruptor de pedal. Esto es especialmente útil si está tocando conpatrones y canciones en los pads y no puede usar las manos para presionar los botones.
Hay dos conectores para los interruptores de pedal (Start/Stop y Count/A/B/Fill). Siempreenchufe estos interruptores de pedal antes de conectar la alimentación. Puede usar los tiposnormalmente abiertos o cerrados (los dos tipos más comunes de interruptores de pedal); el SR-16determina qué tipo se está usando al momento de conectarse la alimentación.
Los interruptores de pie se usan de la siguiente manera.
Ajuste del TempoSe debe parar el SR-16. Antes de tocar una canción o patrón, dele un golpecito al interruptor depie de Count/A/B/Fill varias veces al tempo deseado. El SR-16 calculará el promedio de tiempoentre los golpecitos y creará un tempo, la pantalla actualizará el tempo con cada golpecito.Dándole golpecitos al botón STOP, logrará el mismo resultado que dándolos al interruptor depedal de Count/A/B/Fill.
Inicie una canción o patrónCuando el SR-16 se ha detenido, presionar el interruptor de pedal de Start/Stop es equivalente apresionar PLAY. Cuando el SR-16 está funcionando, presionar el interruptor de pedal de Start/Stop esequivalente a presionar STOP.
Iniciación de un relleno cuando se reproducen patronesEn modo Perform, el interruptor Count/A/B/Fill duplica la función de relleno del botón FILL alreproducir patrones.
Cancelación de una transición de patrones de A hasta B, o de B hasta ACuando inicia un relleno, un patrón A cambiará a un patrón B (o viceversa) cuando el rellenohaya terminado de reproducirse. Sin embargo, puede cancelar esta transición si lo desea. Yahemos explicado cómo hacer esto con el botón FILL del panel frontal. Sin embargo, puedetambién usar el interruptor de pedal Count/A/B/Fill. Si presiona el interruptor de pedal antesde que haya terminado de reproducirse el relleno y lo mantiene presionado hasta que termine (esdecir, pasado el downbeat del patrón siguiente), el SR-16 volverá al patrón principal A o alpatrón B.
Extensión de un paso de canción durante la reproducción de una canciónEn modo Song Perform (es decir, durante la reproducción de una canción), presionar y mantenerpresionado el interruptor de pedal Count/A/B/Fill hasta que termine un paso de canción, haceque ese paso se repita. Esto es bueno si el solista quiere tomar unas pocas barras más.
18

7 Si comete un error, mantengapresionado el botón ERASE(borrar) y luego presione el padde la batería del sonido quequiere borrar.
6 Cómo tocar los pads. Mientras toca su música, el SR-16moverá sus ritmos al valor rítmico máscercano que se muestra en la esquinainferior izquierda de la ventana decuantificación.
5 Presione PLAY paracomenzar a grabar. Es posible que oiga un clicde metrónomo. Cuandotermina un patrón,volverá al comienzo paraque pueda sobregrabar(overdub).
4 Presione los botones desubir / bajar hasta que encuentre unpatrón vacío (EMPTYPATTERN), como semuestra en la pantalla.
3 Presione el botón PERFORM/ COMPOSE(tocar/componer) hasta quela parte inferior central de lapantalla muestre COMPOSE.
1 Si la ventana superior derecha de la pantallamuestra SONG, presione el botónPATTERN/SONG una vez para seleccionar el modo de patrón.
2 Si la ventana superior derecha de la pantalla nomuestra USER, presione el botón PRESET/USERpara seleccionar los patrones de usuario.
Grabación de sus propios patrones
VOLUME
PATTERN
A
PRESS PLAY
TEMPO
EMPTY PATT
COMPOSE
USER
19

7 Si presionó PLAY, presione DRUM SET para volver a la operación normal.
6 Para guardar los parámetros del nuevo juego de batería, presione el botón TEMPO/PAGE UP tres veces para seleccionar la página 8, donde puede guardar los parámetros del juego de batería que ha seleccionado. Presione PLAY para guardarlo o DRUM SET para volver.
3 Presione el botón TEMPO/PAGE UP para elegir la página 3, donde puede asignar diferentes niveles para cada pad. dele un golpecito a un pad yuse los botones de subir / bajar o numéricos para seleccionar el nivel.
4 Presione el botón TEMPO/PAGE UP para elegir la página 4, donde puede asignar la función panning para cada pad. dele un golpecito a un pad yuse los botones de subir / bajar para seleccionar la posición de panning.
5 Presione el botón TEMPO/PAGE UP para elegir la página 5, donde puede asignar la afinación para cada pad. dele un golpecito a un pad, y use losbotones de subir / bajar o numéricos para seleccionar la afinación.
2 Presione el botónTEMPO/PAGE UP paraseleccionar la página 2 (vea laparte inferior derecha de lapantalla), donde puede asignardiferentes sonidos de batería adiferentes pads. Presione elpad que va asignar y use losbotones de subir / bajar onuméricos para seleccionar unode los sonidos disponibles (unnúmero de tres dígitos - no se leolvide usar los ceros nosignificativos si es necesario).
1 Presione DRUM SET. Seleccione un número de 00-49 usando los botones numéricos, yPreset (preajuste) o User (usuario) con el botón PRESET/USER.Los juegos de batería preajustados pueden guardarse solamenteen lugares de usuario.
El SR-16 cuenta con 50 juegos de batería (grupos de sonidos) del usuario preajustados y 50 editables quepueden asignarse a cualquiera de los 100 patrones. Después de presionar el botón DRUM SET, cada vez quepresiona el botón TEMPO/PAGE UP selecciona un diferente tipo de parámetro (sonido de batería, afinación,volumen, etc.). Presione el pad a editar e introduzca el nuevo valor del parámetro usando la flecha de subir /bajar o con los botones numéricos.
Creación de juegos de baterías
VOLUME
PAGE
DRUMSETSELECT
DRUM SET
DRUM
USER
SET
20
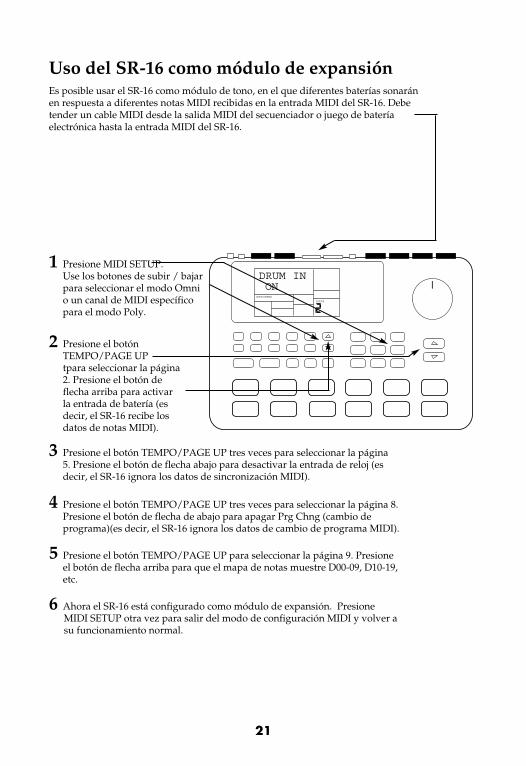
6 Ahora el SR-16 está configurado como módulo de expansión. PresioneMIDI SETUP otra vez para salir del modo de configuración MIDI y volver asu funcionamiento normal.
3 Presione el botón TEMPO/PAGE UP tres veces para seleccionar la página5. Presione el botón de flecha abajo para desactivar la entrada de reloj (esdecir, el SR-16 ignora los datos de sincronización MIDI).
4 Presione el botón TEMPO/PAGE UP tres veces para seleccionar la página 8.Presione el botón de flecha de abajo para apagar Prg Chng (cambio deprograma)(es decir, el SR-16 ignora los datos de cambio de programa MIDI).
5 Presione el botón TEMPO/PAGE UP para seleccionar la página 9. Presioneel botón de flecha arriba para que el mapa de notas muestre D00-09, D10-19,etc.
2 Presione el botónTEMPO/PAGE UPtpara seleccionar la página2. Presione el botón deflecha arriba para activarla entrada de batería (esdecir, el SR-16 recibe losdatos de notas MIDI).
1 Presione MIDI SETUP. Use los botones de subir / bajarpara seleccionar el modo Omnio un canal de MIDI específicopara el modo Poly.
Es posible usar el SR-16 como módulo de tono, en el que diferentes baterías sonaránen respuesta a diferentes notas MIDI recibidas en la entrada MIDI del SR-16. Debetender un cable MIDI desde la salida MIDI del secuenciador o juego de bateríaelectrónica hasta la entrada MIDI del SR-16.
Uso del SR-16 como módulo de expansión
VOLUME
DRUM IN
PAGE
ONSETUPMIDI
21

22

SR-16 Kurzbedienungsanleitung (Deutsch)
Während Sie Ihre SR-16 anschließen, sollte dieLautstärke Ihres Verstärkers und der SR-16 ganznach unten gestellt und beide Geräteausgeschaltet sein.
VOLUME
3 Schließen Sie das KabeldesWechselstromadapters indie 9VWechselstrombuchse undden Adapter an eineSteckdose an.
2 Falls Fußschaltervorhanden sind,schließen Sie diese andie Start/Stop- und dieCount/A/B/Fill-Buchsen an.
1 Schließen Sie die6,3 mm Monokabelan dieHauptausgängeund den Verstärker,das Mischpult oderdie Stereoanlage an.
4 Schalten Siedas Gerät ein.
5 Tippen Sie mitdem Finger aufdieTrommelfelle,um dieTrommeltönezu hören.
6 Stellen SiedieLautstärkeein.
23

5 Erhöhen Sie das Tempo, indem Sie dieTEMPO/UP-Pfeiltaste drücken. Das Tempo wird mit der TEMPO/DOWN-Pfeiltaste verringert.
4 Drücken Sie PLAY umdas Muster abzuspielenund STOP um denAbspielvorgang zubeenden.
3 Drücken Sie die UP-/DOWN-Tasten (mit Pfeilgekennzeichnet), um einMuster auszuwählen. Siekönnen aber auch dieMusternummer (00-49)mit den Zahlentasteneingeben. Für die erstenneun Muster muss aufder ersten Stelle eine"null" eingegeben (z.B.01, 02, 03) werden.
2 Falls die Anzeige oben rechts USER anzeigt,drücken Sie die PRESET/USER-Taste um auf Preset Patterns (vom Werkprogrammierte Muster) umzuschalten.
1 Falls in der Anzeige oben rechts Song angezeigtwird, drücken Sie die PATTERN/SONG-Tasteeinmal, um in den Pattern-Modus zu gelangen.
Abspielen von Mustern
VOLUME
PATTERN
A
PRESS PLAY
TEMPO
PERFORM
ROCKIN 1
24
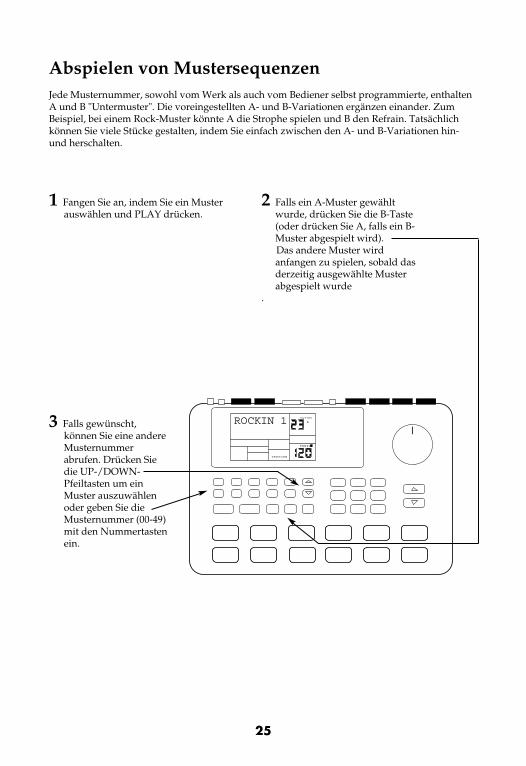
3 Falls gewünscht,können Sie eine andereMusternummerabrufen. Drücken Siedie UP-/DOWN-Pfeiltasten um einMuster auszuwählenoder geben Sie dieMusternummer (00-49)mit den Nummertastenein.
2 Falls ein A-Muster gewähltwurde, drücken Sie die B-Taste(oder drücken Sie A, falls ein B-Muster abgespielt wird).Das andere Muster wirdanfangen zu spielen, sobald dasderzeitig ausgewählte Musterabgespielt wurde
.
1 Fangen Sie an, indem Sie ein Musterauswählen und PLAY drücken.
Jede Musternummer, sowohl vom Werk als auch vom Bediener selbst programmierte, enthaltenA und B "Untermuster". Die voreingestellten A- und B-Variationen ergänzen einander. ZumBeispiel, bei einem Rock-Muster könnte A die Strophe spielen und B den Refrain. Tatsächlichkönnen Sie viele Stücke gestalten, indem Sie einfach zwischen den A- und B-Variationen hin-und herschalten.
Abspielen von Mustersequenzen
VOLUME
PATTERN
A
PRESS PLAY
TEMPO
PERFORM
ROCKIN 1
25

4 Fills müssen nicht immer als Übergangsmusterfungieren. Nehmen wir an, es wird gerade ein A-Musterabgespielt. Falls Sie nun die FILL-Taste drücken, wird einFill abgespielt - aber dieses Mal halten Sie die FILL-Tastegedrückt, bis das Fill abgespielt ist.Dies führt zu einem Abbruch des Übergangs zumanderen Muster (in diesem Beispiel würde das A-Musterweiterspielen).
3 Drücken Sie die FILL-Tasteerneut. Ein anderes Fill fülltnun die Überleitung vom B-Muster zurück zum A-Muster aus.
2 Drücken Sie die FILL-Taste undlassen Sie diese los, während dasHauptmuster A abgespielt wird. Siehören nun ein Trommel-Fill,welches direkt in das zugehörige B-Muster überleitet.
1 Fangen Sie an, indemSie ein A-Musterauswählen und dannPLAY drücken.
Jede A- und B-Variation enthält außerdem zugehörige Füll-Muster, welche als Übergangzwischen den A- und B-Variationen gespielt werden können. Sie können eine Taste drücken,sodass ein Fill von seinem zugehörigen Muster übernommen werden kann und einen Übergangzu einem anderen Muster bildet.
Abspielen von Fills
VOLUME
PATTERN
A
PRESS PLAY
TEMPO
PERFORM
ROCKIN 1
26
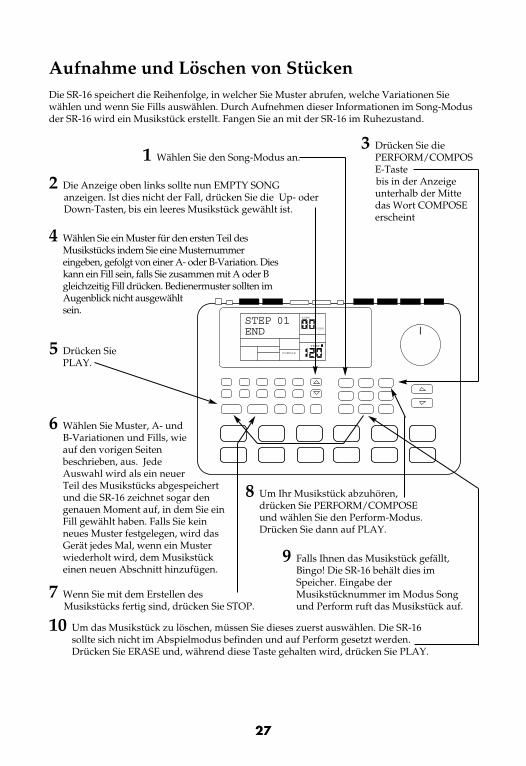
9 Falls Ihnen das Musikstück gefällt,Bingo! Die SR-16 behält dies imSpeicher. Eingabe derMusikstücknummer im Modus Songund Perform ruft das Musikstück auf.
8 Um Ihr Musikstück abzuhören,drücken Sie PERFORM/COMPOSEund wählen Sie den Perform-Modus.Drücken Sie dann auf PLAY.
10 Um das Musikstück zu löschen, müssen Sie dieses zuerst auswählen. Die SR-16sollte sich nicht im Abspielmodus befinden und auf Perform gesetzt werden.Drücken Sie ERASE und, während diese Taste gehalten wird, drücken Sie PLAY.
7 Wenn Sie mit dem Erstellen des Musikstücks fertig sind, drücken Sie STOP.
6 Wählen Sie Muster, A- undB-Variationen und Fills, wieauf den vorigen Seitenbeschrieben, aus. JedeAuswahl wird als ein neuerTeil des Musikstücks abgespeichertund die SR-16 zeichnet sogar dengenauen Moment auf, in dem Sie einFill gewählt haben. Falls Sie keinneues Muster festgelegen, wird dasGerät jedes Mal, wenn ein Musterwiederholt wird, dem Musikstückeinen neuen Abschnitt hinzufügen.
5 Drücken SiePLAY.
3 Drücken Sie diePERFORM/COMPOSE-Taste bis in der Anzeigeunterhalb der Mittedas Wort COMPOSEerscheint
4 Wählen Sie ein Muster für den ersten Teil desMusikstücks indem Sie eine Musternummereingeben, gefolgt von einer A- oder B-Variation. Dieskann ein Fill sein, falls Sie zusammen mit A oder Bgleichzeitig Fill drücken. Bedienermuster sollten imAugenblick nicht ausgewähltsein.
2 Die Anzeige oben links sollte nun EMPTY SONGanzeigen. Ist dies nicht der Fall, drücken Sie die Up- oderDown-Tasten, bis ein leeres Musikstück gewählt ist.
1 Wählen Sie den Song-Modus an.
Die SR-16 speichert die Reihenfolge, in welcher Sie Muster abrufen, welche Variationen Siewählen und wenn Sie Fills auswählen. Durch Aufnehmen dieser Informationen im Song-Modusder SR-16 wird ein Musikstück erstellt. Fangen Sie an mit der SR-16 im Ruhezustand.
Aufnahme und Löschen von Stücken
VOLUME
PRESS PLAY
TEMPO
STEP 01END
SONG
USER
COMPOSE
27

Steuerung über den FußschalterDa wir nun die Grundlagen kennen, können wir uns einigen der Live-Auftrittsoptionen unterVerwendung des Fußschalters zuwenden. Dies ist vor allem dann von Nutzen, wenn Sie Musterund Musikstücke über die Trommelfelle begleiten und daher Ihre Hände nicht zur Bedienungder Tasten frei sind.
Für Fußschalter sind zwei Anschlussbuchsen vorhanden (Start/Stop und Count/A/B/Fill).Schließen Sie die Fußschalter immer vor Einschalten des Geräts an. Verwendet werden könnennormalerweise offene oder geschlossene Typen (die zwei meist verwendeten Arten vonFußschaltern); die SR-16 findet beim Einschalten heraus, welche Art angeschlossen ist.
So werden die Fußschalter verwendet.
Tempo einstellenDie SR-16 muss gestoppt werden. Vor Abspielen eines Musikstücks oder eines Musters, tippenSie den an der Buchse Count/A/B/Fill angeschlossenen Fußschalter einige Male imgewünschten Tempo an. Die SR-16 errechnet einen Durchschnittswert zwischen den Schlägenund bildet daraus ein Tempo, die Anzeige zeigt das letzte Tempo nach jedem Schlag an. EinAntippen der STOP-Taste hat den gleichen Effekt wie Antippen des Count/A/B/Fill-Fußschalters.
Musikstück oder Muster AbspielenIst die SR-16 im Ruhebetrieb, ist eine Betätigung des Start/Stop-Fußschalters gleichbedeutendmit dem Drücken der PLAY-Taste. Befindet sich die SR-16 im Abspielbetrieb, ist ein Drücken desFußschalters gleichbedeutend mit Betätigung der STOP-Taste.
Aktivierung eines Fills während ein Muster abgespielt wirdIm Perform-Modus fungiert der Count/A/B/Fill-Fußschalter genau gleich wie die FILL-Taste,wenn Muster abgespielt werden.
Aufhebung eines Übergangs von A nach B oder B nach A, MusterWenn Sie ein Fill aktivieren, wird ein A-Muster in ein B-Muster übergehen (oder umgekehrt),wenn das Abspielen des Fills beendet ist. Sie können aber diesen Übergang, falls gewünschtaufheben. Wir haben bereits erklärt, wie dies mit der FILL-Taste an der Vorderseite des Gerätserfolgt. Sie können dazu aber auch den Count/A/B/Fill-Fußschalter verwenden. Wenn Sie denFußschalter drücken und diesen gedrückt halten, bevor das Fill beendet ist, bis nach Ende desFills (z.B. nach dem Downbeat des nächsten Musters), kehrt die SR-16 zum ursprünglichenHauptmuster A oder B zurück.
Verlängerung des Abschnitts eines Musikstücks bei AbspielenIm Modus Song Perform (z.B. während der Wiedergabe eines Musikstücks), führt Drücken undFesthalten des Count/A/B/Fill-Fußschalters bis nach Ende des Musikstücks zur Wiederholungdieses Abschnitts. Dies ist vor allem dann von Nutzen, wenn der Solospieler noch ein paarAkkorde lang weitermachen möchte.
28
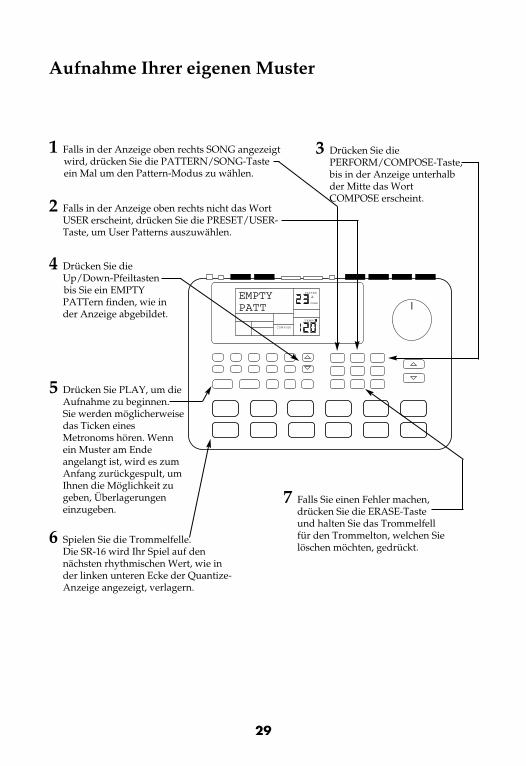
3 Drücken Sie diePERFORM/COMPOSE-Taste, bis in der Anzeige unterhalbder Mitte das WortCOMPOSE erscheint.
7 Falls Sie einen Fehler machen,drücken Sie die ERASE-Tasteund halten Sie das Trommelfellfür den Trommelton, welchen Sielöschen möchten, gedrückt.
6 Spielen Sie die Trommelfelle.Die SR-16 wird Ihr Spiel auf dennächsten rhythmischen Wert, wie inder linken unteren Ecke der Quantize-Anzeige angezeigt, verlagern.
5 Drücken Sie PLAY, um dieAufnahme zu beginnen.Sie werden möglicherweisedas Ticken einesMetronoms hören. Wennein Muster am Endeangelangt ist, wird es zumAnfang zurückgespult, umIhnen die Möglichkeit zugeben, Überlagerungeneinzugeben.
4 Drücken Sie dieUp/Down-Pfeiltasten bis Sie ein EMPTYPATTern finden, wie inder Anzeige abgebildet.
1 Falls in der Anzeige oben rechts SONG angezeigtwird, drücken Sie die PATTERN/SONG-Taste ein Mal um den Pattern-Modus zu wählen.
2 Falls in der Anzeige oben rechts nicht das WortUSER erscheint, drücken Sie die PRESET/USER-Taste, um User Patterns auszuwählen.
Aufnahme Ihrer eigenen Muster
VOLUME
PATTERN
A
PRESS PLAY
TEMPO
EMPTY PATT
COMPOSE
USER
29

7 Falls Sie PLAY gedrückt haben, drücken Sie DRUM SET, um in den Normalbetrieb zurückzukehren.
6 Um die Parameter für das neue Schlagzeug abzuspeichern, drücken Sie die TEMPO/PAGEUP-Taste drei Mal, um auf Seite 8 zu gelangen, wo Sie die von Ihnen gewähltenSchlagzeugparameter abspeichern können. Drücken Sie PLAY, um abzuspeichern oder DRUMSET, um diesen Vorgang abzubrechen
3 Drücken Sie die TEMPO/PAGE UP-Taste, um Seite 3 anzuwählen, auf welcher Sie fürjedes Trommelfell verschiedene Pegel eingeben können. Drücken Sie ein Trommelfellund geben Sie dann den Pegel mit den UP/DOWN- oder Nummertasten ein.
4 Drücken Sie die TEMPO/PAGE UP-Taste, um Seite 4 anzuwählen, auf welcher Sie diePanoramaausrichtung für jedes Trommelfell eingeben können. Tippen Sie ein Trommelfellan und stellen Sie dann die Panoramaausrichtung mit den UP/DOWN-Tasten ein.
5 Drücken Sie die TEMPO/PAGE UP-Taste, um Seite 5 anzuwählen, auf welcher Sie dasTuning für jedes Trommelfell einstellen können. Tippen Sie ein Trommelfell an undwählen Sie dann das richtige Tuning mit den UP/DOWN- oder den Nummertasten.
2 Drücken Sie dieTEMPO/PAGE UP-Taste,um Seite 2 (siehe Anzeige untenrechts) anzuwählen, auf welcherSie verschiedene Trommeltöneverschiedenen Trommelfellenzuordnen können. Drücken Siedas Trommelfell, zu welchemdie Zuordnung erfolgen sollund wählen Sie dann dievorhandenen Töne mit denUp/Down- oder Nummertasten(eine dreistellige Zahl -vergessen Sie nicht, fallsnotwendig, mit der Eingabe vonNullen zu beginnen).
1 Drücken Sie DRUM SET. Wählen Sie eine Nummer von 00 bis 49 mit den Nummertasten undPreset oder User mit der PRESET/USER-Taste. VoreingestellteSchlagzeuge können nur auf Benutzerplätze abgespeichert werden.
Die SR-16 besitzt 50 vom Werk programmierte und 50 vom Benutzer programmierbare Komplettschlagzeuge(Gruppen von Tönen), welche jedem der 100 Muster zugeordnet werden können. Nach Drücken der DRUMSET-Taste wählt jedes Betätigen der TEMPO/PAGE UP-Taste einen anderen Parameter (Trommelton,Einstellung, Lautstärke usw.). Tippen Sie das Trommelfell, welches Sie editieren möchten, an und geben Siedann den neuen Parameterwert mit den Tasten UP/DOWN, Pfeil oder Nummern ein.
Erstellung von Komplettschlagzeugen
VOLUME
PAGE
DRUMSETSELECT
DRUM SET
DRUM
USER
SET
30
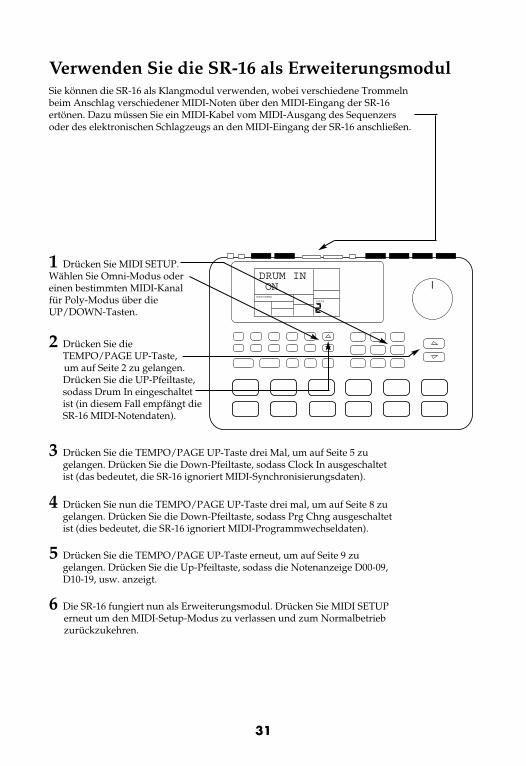
6 Die SR-16 fungiert nun als Erweiterungsmodul. Drücken Sie MIDI SETUPerneut um den MIDI-Setup-Modus zu verlassen und zum Normalbetriebzurückzukehren.
3 Drücken Sie die TEMPO/PAGE UP-Taste drei Mal, um auf Seite 5 zugelangen. Drücken Sie die Down-Pfeiltaste, sodass Clock In ausgeschaltetist (das bedeutet, die SR-16 ignoriert MIDI-Synchronisierungsdaten).
4 Drücken Sie nun die TEMPO/PAGE UP-Taste drei mal, um auf Seite 8 zugelangen. Drücken Sie die Down-Pfeiltaste, sodass Prg Chng ausgeschaltetist (dies bedeutet, die SR-16 ignoriert MIDI-Programmwechseldaten).
5 Drücken Sie die TEMPO/PAGE UP-Taste erneut, um auf Seite 9 zugelangen. Drücken Sie die Up-Pfeiltaste, sodass die Notenanzeige D00-09,D10-19, usw. anzeigt.
2 Drücken Sie dieTEMPO/PAGE UP-Taste, um auf Seite 2 zu gelangen.Drücken Sie die UP-Pfeiltaste,sodass Drum In eingeschaltetist (in diesem Fall empfängt dieSR-16 MIDI-Notendaten).
1 Drücken Sie MIDI SETUP.Wählen Sie Omni-Modus odereinen bestimmten MIDI-Kanalfür Poly-Modus über dieUP/DOWN-Tasten.
Sie können die SR-16 als Klangmodul verwenden, wobei verschiedene Trommelnbeim Anschlag verschiedener MIDI-Noten über den MIDI-Eingang der SR-16ertönen. Dazu müssen Sie ein MIDI-Kabel vom MIDI-Ausgang des Sequenzersoder des elektronischen Schlagzeugs an den MIDI-Eingang der SR-16 anschließen.
Verwenden Sie die SR-16 als Erweiterungsmodul
VOLUME
DRUM IN
PAGE
ONSETUPMIDI
31

32
Guide d'installation rapide du SR-16 (Français)
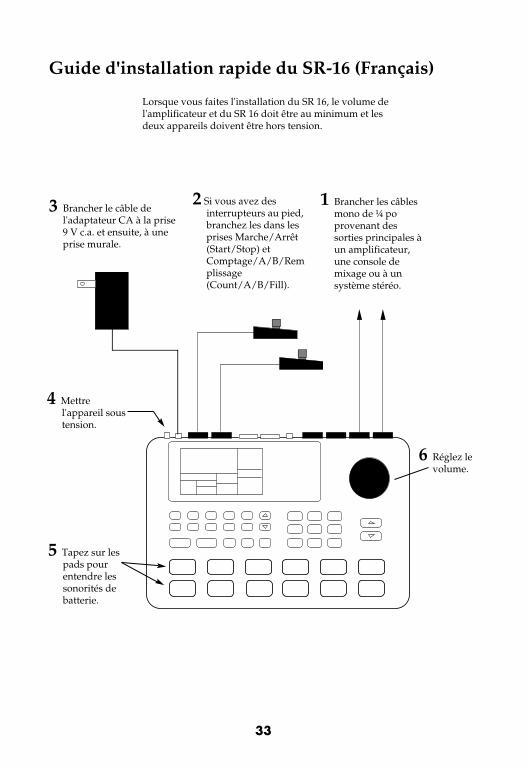
Lorsque vous faites l'installation du SR 16, le volume del'amplificateur et du SR 16 doit être au minimum et lesdeux appareils doivent être hors tension.
VOLUME
3 Brancher le câble del'adaptateur CA à la prise9 V c.a. et ensuite, à uneprise murale.
2 Si vous avez desinterrupteurs au pied,branchez les dans lesprises Marche/Arrêt(Start/Stop) etComptage/A/B/Remplissage(Count/A/B/Fill).
4 Mettrel'appareil soustension.
5 Tapez sur lespads pourentendre lessonorités debatterie.
6 Réglez levolume.
33
1 Brancher les câblesmono de ¼ poprovenant dessorties principales àun amplificateur,une console demixage ou à unsystème stéréo.
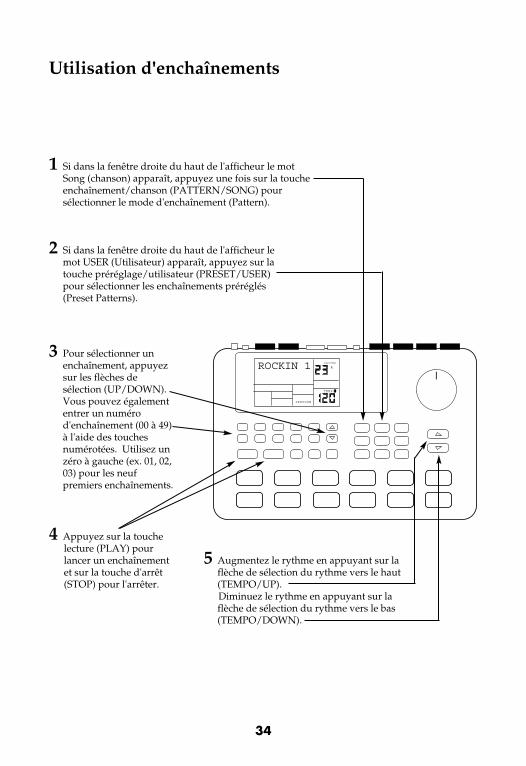
5 Augmentez le rythme en appuyant sur laflèche de sélection du rythme vers le haut(TEMPO/UP). Diminuez le rythme en appuyant sur laflèche de sélection du rythme vers le bas(TEMPO/DOWN).
4 Appuyez sur la touchelecture (PLAY) pourlancer un enchaînementet sur la touche d'arrêt(STOP) pour l'arrêter.
3 Pour sélectionner unenchaînement, appuyezsur les flèches desélection (UP/DOWN).Vous pouvez égalemententrer un numérod'enchaînement (00 à 49)à l'aide des touchesnumérotées. Utilisez unzéro à gauche (ex. 01, 02,03) pour les neufpremiers enchaînements.
2 Si dans la fenêtre droite du haut de l'afficheur lemot USER (Utilisateur) apparaît, appuyez sur latouche préréglage/utilisateur (PRESET/USER)pour sélectionner les enchaînements préréglés(Preset Patterns).
1 Si dans la fenêtre droite du haut de l'afficheur le motSong (chanson) apparaît, appuyez une fois sur la toucheenchaînement/chanson (PATTERN/SONG) poursélectionner le mode d'enchaînement (Pattern).
Utilisation d'enchaînements
VOLUME
PATTERN
A
PRESS PLAY
TEMPO
PERFORM
ROCKIN 1
34

3 Vous pouvez égalementfaire appel à unnumérod'enchaînementdifférent si vous ledésirez. Appuyez surles flèches de sélection(UP/DOWN) pour sélectionner unenchaînement ouentrez un numérod'enchaînement (00 à49) à l'aide des touchesnumérotées.
2 Si un enchaînement A joue,appuyez sur la touche B (ou A sic'est un enchaînement B qui joue).L'enchaînement d'alternancecommence à jouer aussitôt quel'enchaînement en cours setermine.
1 Commencez par sélectionner unenchaînement et appuyez ensuite sur latouche de lecture (PLAY).
Chaque numéro d'enchaînement, préréglages et utilisateurs, incluant les " sous enchaînements "A et B. Les variations des préréglages A et B se complète. Par exemple, dans un enchaînementrock, A peut jouer le couplet et B le refrain. En fait, vous pouvez construire plusieurs chansonsen passant tout simplement d'une variation à l'autre (A et B).
Utilisation de séquences d'enchaînements
VOLUME
PATTERN
A
PRESS PLAY
TEMPO
PERFORM
ROCKIN 1
35

4 Les sons de remplissage peuvent égalementservir de sons de fond. Supposons qu'unenchaînement A joue. Si vous appuyez sur latouche de remplissage (FILL), un remplissages'effectue; maintenez la touche enfoncéejusqu'à ce que le remplissage soit terminé.De cette façon la transition à un autreenchaînement est annulée (par exemple,l'enchaînement A continuerait de jouer).
3 Appuyer à nouveau sur latouche de remplissage(FILL). Un son de remplissagedifférent effectuera latransition de l'enchaînementB pour revenir àl'enchaînement A.
2 Appuyez et relâchez la touche deremplissage (FILL) lorsquel'enchaînement A joue. Vousentendrez un son de remplissage debatterie qui effectuera la transition àl'enchaînement B qui lui est associé.
1 Commencez parsélectionner unenchaînement A et enappuyant ensuite surla touche de lecture(PLAY).
Les variations A et B sont dotées d'enchaînements de remplissage qui peuvent faire la transitionentre les variations. À l'aide d'une touche, vous pouvez utiliser un son de remplissage, associéprincipalement à une autre variation pour faire une transition à un autre enchaînement.
Utilisation de sons de remplissage
VOLUME
PATTERN
A
PRESS PLAY
TEMPO
PERFORM
ROCKIN 1
36
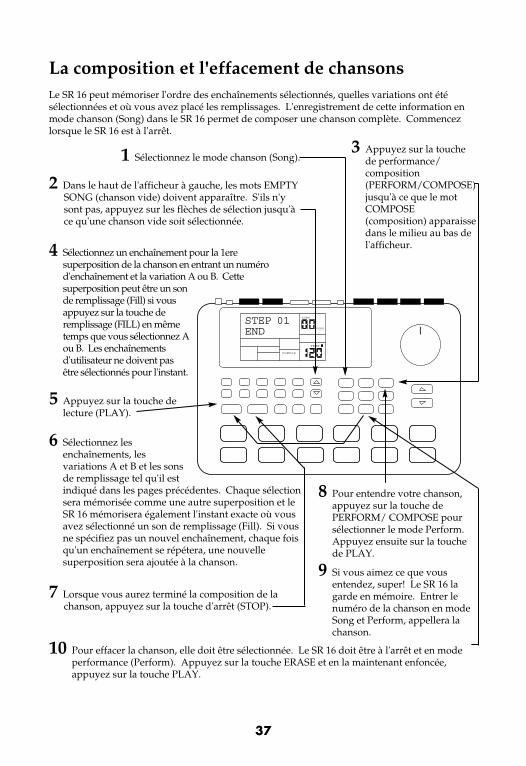
7 Lorsque vous aurez terminé la composition de lachanson, appuyez sur la touche d'arrêt (STOP).
6 Sélectionnez lesenchaînements, lesvariations A et B et les sonsde remplissage tel qu'il estindiqué dans les pages précédentes. Chaque sélectionsera mémorisée comme une autre superposition et leSR 16 mémorisera également l'instant exacte où vousavez sélectionné un son de remplissage (Fill). Si vousne spécifiez pas un nouvel enchaînement, chaque foisqu'un enchaînement se répétera, une nouvellesuperposition sera ajoutée à la chanson.
5 Appuyez sur la touche delecture (PLAY).
4 Sélectionnez un enchaînement pour la 1eresuperposition de la chanson en entrant un numérod'enchaînement et la variation A ou B. Cettesuperposition peut être un sonde remplissage (Fill) si vousappuyez sur la touche deremplissage (FILL) en mêmetemps que vous sélectionnez Aou B. Les enchaînementsd'utilisateur ne doivent pasêtre sélectionnés pour l'instant.
3 Appuyez sur la touchede performance/composition(PERFORM/COMPOSE)jusqu'à ce que le motCOMPOSE(composition) apparaissedans le milieu au bas del'afficheur.
2 Dans le haut de l'afficheur à gauche, les mots EMPTYSONG (chanson vide) doivent apparaître. S'ils n'ysont pas, appuyez sur les flèches de sélection jusqu'àce qu'une chanson vide soit sélectionnée.
1 Sélectionnez le mode chanson (Song).
Le SR 16 peut mémoriser l'ordre des enchaînements sélectionnés, quelles variations ont étésélectionnées et où vous avez placé les remplissages. L'enregistrement de cette information enmode chanson (Song) dans le SR 16 permet de composer une chanson complète. Commencezlorsque le SR 16 est à l'arrêt.
La composition et l'effacement de chansons
VOLUME
PRESS PLAY
TEMPO
STEP 01END
SONG
USER
COMPOSE
37
9 Si vous aimez ce que vousentendez, super! Le SR 16 lagarde en mémoire. Entrer lenuméro de la chanson en modeSong et Perform, appellera lachanson.
8 Pour entendre votre chanson,appuyez sur la touche dePERFORM/ COMPOSE poursélectionner le mode Perform.Appuyez ensuite sur la touchede PLAY.
10 Pour effacer la chanson, elle doit être sélectionnée. Le SR 16 doit être à l'arrêt et en modeperformance (Perform). Appuyez sur la touche ERASE et en la maintenant enfoncée,appuyez sur la touche PLAY.
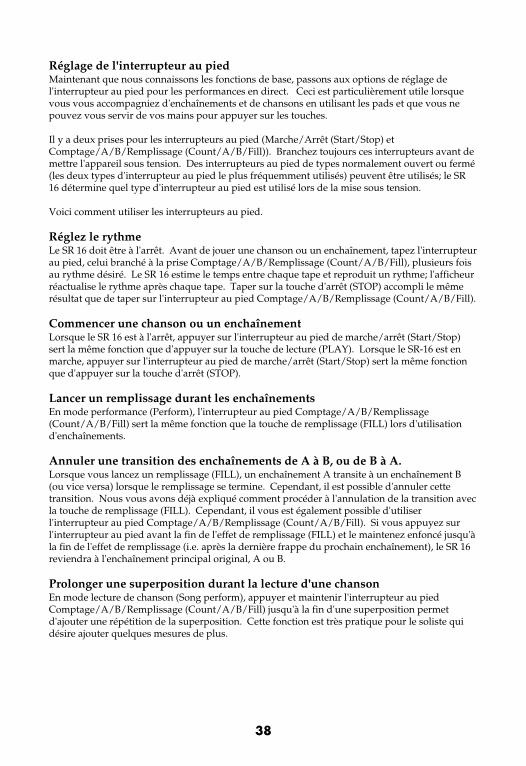
Réglage de l'interrupteur au piedMaintenant que nous connaissons les fonctions de base, passons aux options de réglage del'interrupteur au pied pour les performances en direct. Ceci est particulièrement utile lorsquevous vous accompagniez d'enchaînements et de chansons en utilisant les pads et que vous nepouvez vous servir de vos mains pour appuyer sur les touches.
Il y a deux prises pour les interrupteurs au pied (Marche/Arrêt (Start/Stop) etComptage/A/B/Remplissage (Count/A/B/Fill)). Branchez toujours ces interrupteurs avant demettre l'appareil sous tension. Des interrupteurs au pied de types normalement ouvert ou fermé(les deux types d'interrupteur au pied le plus fréquemment utilisés) peuvent être utilisés; le SR16 détermine quel type d'interrupteur au pied est utilisé lors de la mise sous tension.
Voici comment utiliser les interrupteurs au pied.
Réglez le rythmeLe SR 16 doit être à l'arrêt. Avant de jouer une chanson ou un enchaînement, tapez l'interrupteurau pied, celui branché à la prise Comptage/A/B/Remplissage (Count/A/B/Fill), plusieurs foisau rythme désiré. Le SR 16 estime le temps entre chaque tape et reproduit un rythme; l'afficheurréactualise le rythme après chaque tape. Taper sur la touche d'arrêt (STOP) accompli le mêmerésultat que de taper sur l'interrupteur au pied Comptage/A/B/Remplissage (Count/A/B/Fill).
Commencer une chanson ou un enchaînementLorsque le SR 16 est à l'arrêt, appuyer sur l'interrupteur au pied de marche/arrêt (Start/Stop)sert la même fonction que d'appuyer sur la touche de lecture (PLAY). Lorsque le SR-16 est enmarche, appuyer sur l'interrupteur au pied de marche/arrêt (Start/Stop) sert la même fonctionque d'appuyer sur la touche d'arrêt (STOP).
Lancer un remplissage durant les enchaînementsEn mode performance (Perform), l'interrupteur au pied Comptage/A/B/Remplissage(Count/A/B/Fill) sert la même fonction que la touche de remplissage (FILL) lors d'utilisationd'enchaînements.
Annuler une transition des enchaînements de A à B, ou de B à A.Lorsque vous lancez un remplissage (FILL), un enchaînement A transite à un enchaînement B(ou vice versa) lorsque le remplissage se termine. Cependant, il est possible d'annuler cettetransition. Nous vous avons déjà expliqué comment procéder à l'annulation de la transition avecla touche de remplissage (FILL). Cependant, il vous est également possible d'utiliserl'interrupteur au pied Comptage/A/B/Remplissage (Count/A/B/Fill). Si vous appuyez surl'interrupteur au pied avant la fin de l'effet de remplissage (FILL) et le maintenez enfoncé jusqu'àla fin de l'effet de remplissage (i.e. après la dernière frappe du prochain enchaînement), le SR 16reviendra à l'enchaînement principal original, A ou B.
Prolonger une superposition durant la lecture d'une chansonEn mode lecture de chanson (Song perform), appuyer et maintenir l'interrupteur au piedComptage/A/B/Remplissage (Count/A/B/Fill) jusqu'à la fin d'une superposition permetd'ajouter une répétition de la superposition. Cette fonction est très pratique pour le soliste quidésire ajouter quelques mesures de plus.
38
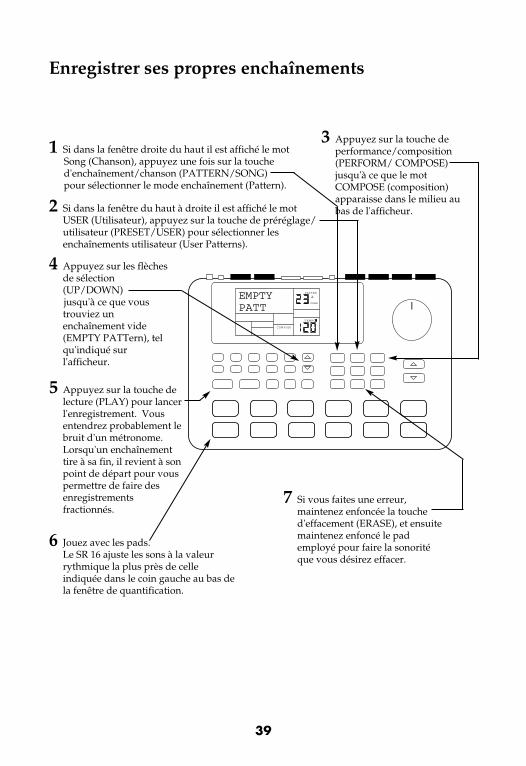
7 Si vous faites une erreur,maintenez enfoncée la touched'effacement (ERASE), et ensuitemaintenez enfoncé le pademployé pour faire la sonoritéque vous désirez effacer.
6 Jouez avec les pads. Le SR 16 ajuste les sons à la valeurrythmique la plus près de celleindiquée dans le coin gauche au bas dela fenêtre de quantification.
5 Appuyez sur la touche delecture (PLAY) pour lancerl'enregistrement. Vousentendrez probablement lebruit d'un métronome.Lorsqu'un enchaînementtire à sa fin, il revient à sonpoint de départ pour vouspermettre de faire desenregistrementsfractionnés.
4 Appuyez sur les flèchesde sélection(UP/DOWN) jusqu'à ce que voustrouviez unenchaînement vide(EMPTY PATTern), telqu'indiqué surl'afficheur.
3 Appuyez sur la touche deperformance/composition(PERFORM/ COMPOSE)jusqu'à ce que le motCOMPOSE (composition)apparaisse dans le milieu aubas de l'afficheur.
1 Si dans la fenêtre droite du haut il est affiché le motSong (Chanson), appuyez une fois sur la touched'enchaînement/chanson (PATTERN/SONG)pour sélectionner le mode enchaînement (Pattern).
2 Si dans la fenêtre du haut à droite il est affiché le motUSER (Utilisateur), appuyez sur la touche de préréglage/utilisateur (PRESET/USER) pour sélectionner lesenchaînements utilisateur (User Patterns).
Enregistrer ses propres enchaînements
VOLUME
PATTERN
A
PRESS PLAY
TEMPO
EMPTY PATT
COMPOSE
USER
39
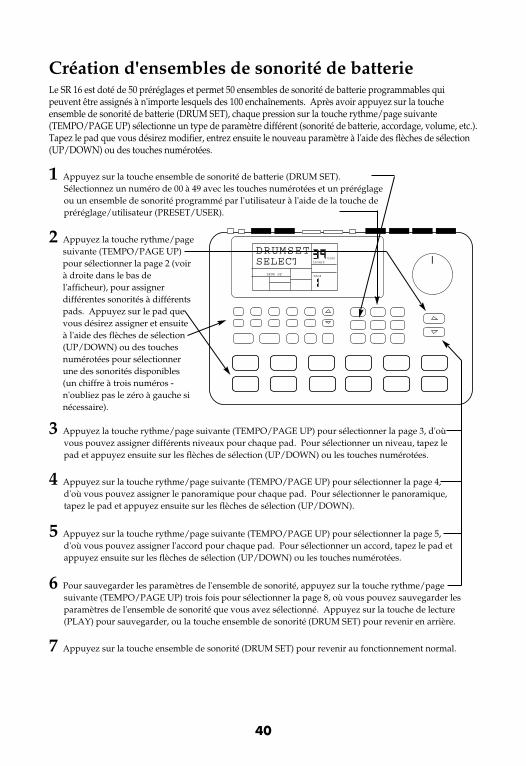
3 Appuyez la touche rythme/page suivante (TEMPO/PAGE UP) pour sélectionner la page 3, d'oùvous pouvez assigner différents niveaux pour chaque pad. Pour sélectionner un niveau, tapez lepad et appuyez ensuite sur les flèches de sélection (UP/DOWN) ou les touches numérotées.
7 Appuyez sur la touche ensemble de sonorité (DRUM SET) pour revenir au fonctionnement normal.
6 Pour sauvegarder les paramètres de l'ensemble de sonorité, appuyez sur la touche rythme/pagesuivante (TEMPO/PAGE UP) trois fois pour sélectionner la page 8, où vous pouvez sauvegarder lesparamètres de l'ensemble de sonorité que vous avez sélectionné. Appuyez sur la touche de lecture(PLAY) pour sauvegarder, ou la touche ensemble de sonorité (DRUM SET) pour revenir en arrière.
4 Appuyez sur la touche rythme/page suivante (TEMPO/PAGE UP) pour sélectionner la page 4,d'où vous pouvez assigner le panoramique pour chaque pad. Pour sélectionner le panoramique,tapez le pad et appuyez ensuite sur les flèches de sélection (UP/DOWN).
5 Appuyez sur la touche rythme/page suivante (TEMPO/PAGE UP) pour sélectionner la page 5,d'où vous pouvez assigner l'accord pour chaque pad. Pour sélectionner un accord, tapez le pad etappuyez ensuite sur les flèches de sélection (UP/DOWN) ou les touches numérotées.
2 Appuyez la touche rythme/pagesuivante (TEMPO/PAGE UP)pour sélectionner la page 2 (voirà droite dans le bas del'afficheur), pour assignerdifférentes sonorités à différentspads. Appuyez sur le pad quevous désirez assigner et ensuiteà l'aide des flèches de sélection(UP/DOWN) ou des touchesnumérotées pour sélectionnerune des sonorités disponibles(un chiffre à trois numéros -n'oubliez pas le zéro à gauche sinécessaire).
1 Appuyez sur la touche ensemble de sonorité de batterie (DRUM SET).Sélectionnez un numéro de 00 à 49 avec les touches numérotées et un préréglageou un ensemble de sonorité programmé par l'utilisateur à l'aide de la touche depréréglage/utilisateur (PRESET/USER).
Le SR 16 est doté de 50 préréglages et permet 50 ensembles de sonorité de batterie programmables quipeuvent être assignés à n'importe lesquels des 100 enchaînements. Après avoir appuyez sur la toucheensemble de sonorité de batterie (DRUM SET), chaque pression sur la touche rythme/page suivante(TEMPO/PAGE UP) sélectionne un type de paramètre différent (sonorité de batterie, accordage, volume, etc.).Tapez le pad que vous désirez modifier, entrez ensuite le nouveau paramètre à l'aide des flèches de sélection(UP/DOWN) ou des touches numérotées.
Création d'ensembles de sonorité de batterie
VOLUME
PAGE
DRUMSETSELECT
DRUM SET
DRUM
USER
SET
40

6 Le SR 16 est maintenant configuré pour fonctionner comme module expandeur. Appuyez ànouveau sur la touche de configuration MIDI (MIDI SETUP) afin de sortir du mode MIDI etretourner au mode de fonctionnement normal.
3 Appuyez sur la touche rythme/page suivante (TEMPO/PAGE UP) trois fois poursélectionner la page 5. Appuyez sur la flèche vers le bas pour que l'entrée Clock In soitdésactivée (i.e. le SR-16 ignore les données de synchronisation MIDI).
4 Appuyez sur la touche rythme/page suivante (TEMPO/PAGE UP) trois fois poursélectionner la page 8. Appuyez sur la flèche vers le bas pour que la fonction de (Prg Chng)soit désactivée (i.e. le SR-16 ignore les données changement de programme MIDI).
5 Appuyez sur la touche rythme/page suivante (TEMPO/PAGE UP) pour sélectionner lapage 9. Appuyez sur la flèche vers le haut pour que la fonction Note Map indique D00 09,D10-19, etc.
2 Appuyez sur la toucherythme/page suivante(TEMPO/PAGE UP) poursélectionner la page 2.Appuyez sur la flèche versle haut pour que l'entréeDrum In soit activée (i.e. leSR 16 reçoit des donnéesen notes MIDI).
1 Appuyez sur la touche deconfiguration MIDI (MIDISETUP). Utilisez les flèchesde sélection (UP/DOWN)pour sélectionner le modeOmni ou un canal MIDIspécifique pour le modePoly.
Il est possible d'utiliser le SR 16 comme module de tonalité, où des sonorités debatteries différentes retentiront en réponse à différentes notes MIDI reçues parl'entremise de l'entrée MIDI. Vous devez brancher un câble MIDI à la sortie MIDIdu séquenceur ou de la batterie électronique que vous brancherez ensuite à l'entréeMIDI du SR 16.
Utilisation du SR 16 comme module expandeur
VOLUME
DRUM IN
PAGE
ONSETUPMIDI
41

42

Manuale di impostazione rapida SR-16 (Italiano)
Al momento di collegare l'SR-16, i comandivolume a livello dell'amp di alimentazione edell'SR-16 devono essere azzerati, el'alimentazione di entrambi gli apparecchi deveessere spenta.
VOLUME
3 Inserire il cavodell'adattatore CA nel jackCA da 9V, e l'adattatore inuna presa di rete a muro. 2 Inserire eventuali tasti
pedale in vostropossesso nei jackStart/Stop eCount/A/B/Fill.
1 Inserire i cavi monoda 1/4" dalle usciteprincipali ad unamplificatore,mixer, o complessostereo.
4 Accenderel'apparecchio.
5 Battere i padper udire ilsuono dellabatteria.
6 Regolare ilvolume.
43
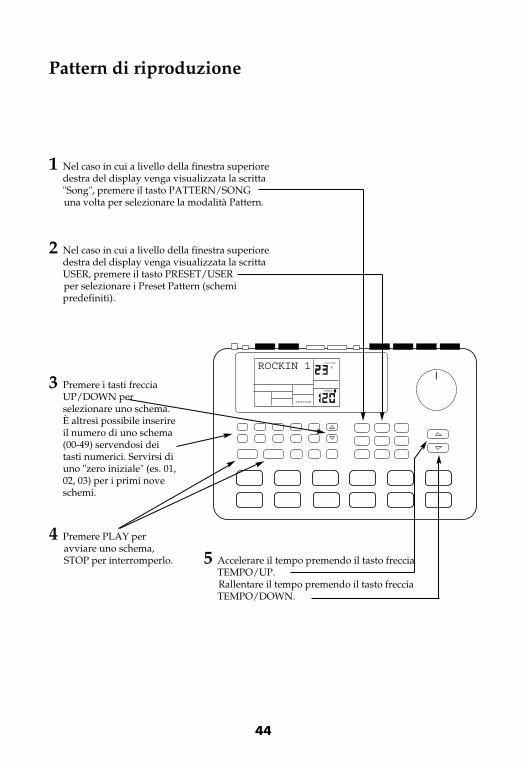
5 Accelerare il tempo premendo il tasto frecciaTEMPO/UP. Rallentare il tempo premendo il tasto frecciaTEMPO/DOWN.
4 Premere PLAY peravviare uno schema,STOP per interromperlo.
3 Premere i tasti frecciaUP/DOWN perselezionare uno schema.È altresì possibile inserireil numero di uno schema(00-49) servendosi deitasti numerici. Servirsi diuno "zero iniziale" (es. 01,02, 03) per i primi noveschemi.
2 Nel caso in cui a livello della finestra superioredestra del display venga visualizzata la scrittaUSER, premere il tasto PRESET/USER per selezionare i Preset Pattern (schemipredefiniti).
1 Nel caso in cui a livello della finestra superioredestra del display venga visualizzata la scritta"Song", premere il tasto PATTERN/SONG una volta per selezionare la modalità Pattern.
Pattern di riproduzione
VOLUME
PATTERN
A
PRESS PLAY
TEMPO
PERFORM
ROCKIN 1
44

3 Se desiderato, èpossibile richiamare undiverso numero dischema. Premere i tastifreccia UP/DOWN per selezionare unoschema, oppureinserire il numero delloschema desiderato (00-49) servendosi dei tastinumerici.
2 Nel caso di uno schema A in viadi riproduzione, premere il tastoB (o premere A nel caso in cui sistia suonando B). Lo schema alternato inizierà asuonare appena lo schemaattualmente in corso giunga atermine.
1 Iniziare selezionando uno schema(Pattern) e premendo PLAY.
Ciascun numero di schema, Preset e User, include i "sotto-schemi" A e B. Le variazionipredefinite A e B sono complementari. Ad esempio, in uno schema Rock, A può suonare il verso,e B il chorus. Infatti, è possibile creare numerose canzoni unicamente passando avanti e indietrotra le varianti A e B.
Suonando Sequenze di Schemi
VOLUME
PATTERN
A
PRESS PLAY
TEMPO
PERFORM
ROCKIN 1
45
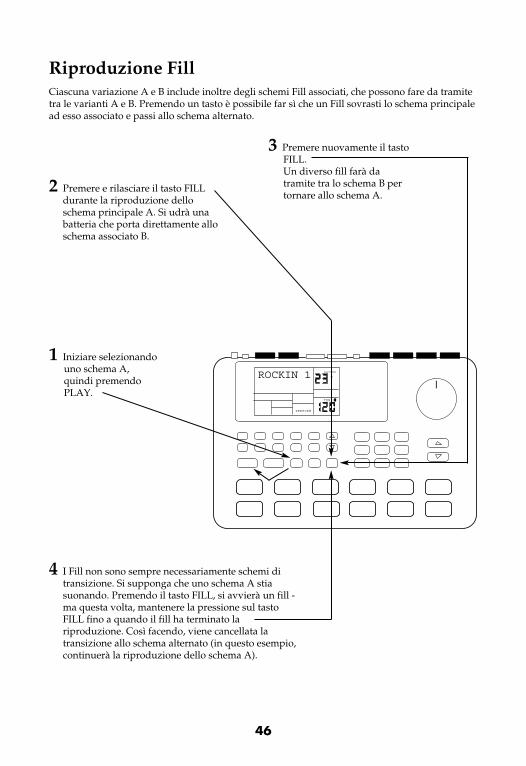
4 I Fill non sono sempre necessariamente schemi ditransizione. Si supponga che uno schema A stiasuonando. Premendo il tasto FILL, si avvierà un fill -ma questa volta, mantenere la pressione sul tastoFILL fino a quando il fill ha terminato lariproduzione. Così facendo, viene cancellata latransizione allo schema alternato (in questo esempio,continuerà la riproduzione dello schema A).
3 Premere nuovamente il tastoFILL. Un diverso fill farà datramite tra lo schema B pertornare allo schema A.
2 Premere e rilasciare il tasto FILLdurante la riproduzione delloschema principale A. Si udrà unabatteria che porta direttamente alloschema associato B.
1 Iniziare selezionandouno schema A,quindi premendoPLAY.
Ciascuna variazione A e B include inoltre degli schemi Fill associati, che possono fare da tramitetra le varianti A e B. Premendo un tasto è possibile far sì che un Fill sovrasti lo schema principalead esso associato e passi allo schema alternato.
Riproduzione Fill
VOLUME
PATTERN
A
PRESS PLAY
TEMPO
PERFORM
ROCKIN 1
46
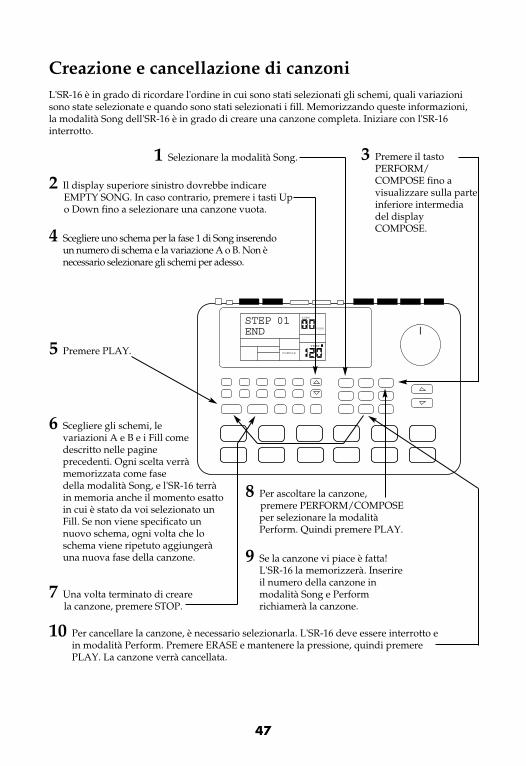
9 Se la canzone vi piace è fatta!L'SR-16 la memorizzerà. Inserireil numero della canzone inmodalità Song e Performrichiamerà la canzone.
8 Per ascoltare la canzone, premere PERFORM/COMPOSEper selezionare la modalitàPerform. Quindi premere PLAY.
10 Per cancellare la canzone, è necessario selezionarla. L'SR-16 deve essere interrotto ein modalità Perform. Premere ERASE e mantenere la pressione, quindi premerePLAY. La canzone verrà cancellata.
7 Una volta terminato di crearela canzone, premere STOP.
6 Scegliere gli schemi, levariazioni A e B e i Fill comedescritto nelle pagineprecedenti. Ogni scelta verràmemorizzata come fasedella modalità Song, e l'SR-16 terràin memoria anche il momento esattoin cui è stato da voi selezionato unFill. Se non viene specificato unnuovo schema, ogni volta che loschema viene ripetuto aggiungeràuna nuova fase della canzone.
5 Premere PLAY.
4 Scegliere uno schema per la fase 1 di Song inserendoun numero di schema e la variazione A o B. Non ènecessario selezionare gli schemi per adesso.
3 Premere il tastoPERFORM/COMPOSE fino avisualizzare sulla parteinferiore intermediadel displayCOMPOSE.
2 Il display superiore sinistro dovrebbe indicareEMPTY SONG. In caso contrario, premere i tasti Upo Down fino a selezionare una canzone vuota.
1 Selezionare la modalità Song.
L'SR-16 è in grado di ricordare l'ordine in cui sono stati selezionati gli schemi, quali variazionisono state selezionate e quando sono stati selezionati i fill. Memorizzando queste informazioni,la modalità Song dell'SR-16 è in grado di creare una canzone completa. Iniziare con l'SR-16interrotto.
Creazione e cancellazione di canzoni
VOLUME
PRESS PLAY
TEMPO
STEP 01END
SONG
USER
COMPOSE
47
Comando interruttore a pedale
Dopo aver posto le basi, analizziamo alcune opzioni di prestazioni dal vivo servendosidell'interruttore a pedale. Ciò è particolarmente utile se state suonando con Patterns e Songs suipad e non siete in grado di premere i tasti.
Ci sono due jack per gli interruttori a pedale (Start/Stop e Count/A/B/Fill). Inserire sempre gliinterruttori a pedale prima di accendere l'alimentazione. È possibile servirsi di interruttori di tiponormalmente aperto o normalmente chiuso (I due tipi di interruttori a pedale più comuni); l'SR-16 determina quale di essi è in uso durante l'accensione.
Ecco come utilizzare i tasti a pedale:
Impostazione del TempoL'SR-16 deve essere interrotto. Prima di suonare una canzone o uno schema, batti l'interruttore apedale a livello del jack Count/A/B/Fill diverse volte e al tempo desiderato. L'SR-16 calcoleràuna media del tempo intercorso tra i battiti e originerà un tempo; il display aggiornerà il tempocon ciascun battito. Battendo il tasto STOP si otterrà lo stesso risultato che battendo il tasto apedale Count/A/B/Fill.
Avvia una canzone o uno schemaQuando l'SR-16 è interrotto, premere il tasto a pedale Start/Stop equivale a premere PLAY.Quando l'SR-16 è in funzione, premere l'interruttore a pedale Start/Stop equivale a premereSTOP.
Inizia un Fill durante la riproduzione di schemiIn modalità Perform, l'interruttore a pedale Count/A/B/Fill assume la funzione del tasto FILLdurante la riproduzione di schemi.
Cancella una transizione dagli schemi da A a B o da B ad AQuando viene iniziato un fill, uno schema A farà da tramite nel passaggio ad uno schema B (oviceversa) quando la riproduzione del fill giunge a termine. Tuttavia, è possibile cancellarequesta transizione, se desiderato. Abbiamo già spiegato come procedere servendosi del tastoFILL sul pannello anteriore. È altresì possibile servirsi dell'interruttore a pedale Count/A/B/Fill.Premendo l'interruttore a pedale prima del termine della riproduzione del fill, e mantenendo lapressione fino a che il fill ha finito di suonare (cioè oltre l'introduzione dello schema successivo),l'SR-16 tornerà all'originale schema principale A o B.
Estendere un Song Step al momento di riprodurre una canzone In modalità Song Perform (cioè, durante la riproduzione della canzone), la pressionedell'interruttore a pedale Count/A/B/Fill mantenuta fino a passare la fine di un Song Step faràsì che esso venga ripetuto. Questo è fantastico quando un solista desidera eseguire ulterioribattute.
48

7 In caso di errore, mantenere lapressione sul tasto ERASE,quindi mantenere la pressione sulpad del suono che desideratecancellare.
6 Suonare i pad.L'SR-16 farà passare quanto suonato alpiù vicino valore ritmico illustratonell'angolo inferiore sinistro dellafinestra di quantizzazione.
5 Premere PLAY peravviare la registrazione.Sentirete probabilmente ilticchettio di unmetronomo. Quando unoschema giunge a termine,tornerà all'inizio in mododa permettere ildoppiaggio.
4 Premere i tasti frecciaUp/Down fino a trovare un EMPTYPATTERN, comeillustrato a display.
3 Premere il tasto PERFORM/COMPOSE fino a quando il displayintermedio inferiorevisualizza COMPOSE.
1 Se la finestra superiore destra del displayvisualizza SONG, premere il tasto PATTERN/SONG una volta perselezionare la modalità Pattern.
2 Se la finestra superiore destra del display nonvisualizza USER, premere il tastoPRESET/USER per selezionare User Patterns.
Registrazione dei vostri schemi personalizzati
VOLUME
PATTERN
A
PRESS PLAY
TEMPO
EMPTY PATT
COMPOSE
USER
49

7 Se avete premuto PLAY, premere DRUM SET per tornare al normale funzionamento.
6 Per salvare I nuovi parametri del Drum Set premere tre volte il tasto TEMPO/PAGE UP per scegliere pagina 8, dove è possibile salvare i parametri del drum set che avete selezionato. Premere PLAY per salvare, o DRUM SET per tornare indietro.
3 Premere il tasto TEMPO/PAGE UP per scegliere pagina 3, dove è possibile assegnare diversi livelli a ciascun pad. Battere un pad, quindi servirsi deltasto UP/DOWN o dei tasti numerici per selezionare il livello.
4 Premere il tasto TEMPO/PAGE UP per scegliere la pagina 4, dove è possibile assegnare il panning a ciascun pad. Battere un pad, quindi servirsi dei tastiUP/DOWN per selezionare la posizione del pan.
5 Premere il tasto TEMPO/PAGE UP per scegliere la pagina 5, dove è possibile scegliere il tuning per ciascun pad. Battere un pad, quindi servirsi del tastoUP/DOWN o dei tasti numerici per selezionare il tuning.
2 Premere il tastoTEMPO/PAGE UPper scegliere pagina 2 (vedidisplay inferiore destro),dove è possibile assegnarediversi suoni di percussioni adiversi pad. Premere il padda assegnare e servirsi deitasti Up/Down o numericiper selezionare uno dei suonidisponibili (un numero a trecifre - non dimenticare diapporre uno zero, senecessario).
1 Premere DRUM SET. Selezionare un numero da 00-49 con i tasti numerici, e Preset oUser con il tasto PRESET/USER. Le impostazioni Preset Drumpossono essere salvate unicamente in posizioni User.
L'SR-16 è dotato di 50 set di User Drum Predefiniti e di 50 set modificabili (gruppi di suoni) che possonoessere assegnati a uno qualsiasi dei 100 schemi. Dopo aver premuto il tasto DRUM SET, ogni pressione deltasto TEMPO/PAGE UP seleziona un diverso tipo di parametro (suono di batteria, regolazione, volume, ecc.)Battere il pad da modificare, quindi inserire il nuovo valore del parametro con i tasti UP/DOWN, freccia onumerici.
Creare set di percussioni
VOLUME
PAGE
DRUMSETSELECT
DRUM SET
DRUM
USER
SET
50
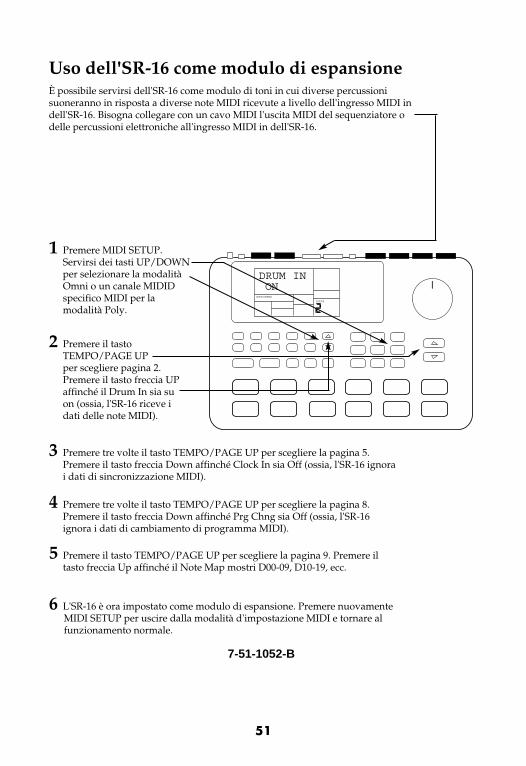
6 L'SR-16 è ora impostato come modulo di espansione. Premere nuovamenteMIDI SETUP per uscire dalla modalità d'impostazione MIDI e tornare alfunzionamento normale.
3 Premere tre volte il tasto TEMPO/PAGE UP per scegliere la pagina 5.Premere il tasto freccia Down affinché Clock In sia Off (ossia, l'SR-16 ignorai dati di sincronizzazione MIDI).
4 Premere tre volte il tasto TEMPO/PAGE UP per scegliere la pagina 8.Premere il tasto freccia Down affinché Prg Chng sia Off (ossia, l'SR-16ignora i dati di cambiamento di programma MIDI).
5 Premere il tasto TEMPO/PAGE UP per scegliere la pagina 9. Premere iltasto freccia Up affinché il Note Map mostri D00-09, D10-19, ecc.
2 Premere il tastoTEMPO/PAGE UP per scegliere pagina 2.Premere il tasto freccia UPaffinché il Drum In sia suon (ossia, l'SR-16 riceve idati delle note MIDI).
1 Premere MIDI SETUP.Servirsi dei tasti UP/DOWNper selezionare la modalitàOmni o un canale MIDIDspecifico MIDI per lamodalità Poly.
È possibile servirsi dell'SR-16 come modulo di toni in cui diverse percussionisuoneranno in risposta a diverse note MIDI ricevute a livello dell'ingresso MIDI indell'SR-16. Bisogna collegare con un cavo MIDI l'uscita MIDI del sequenziatore odelle percussioni elettroniche all'ingresso MIDI in dell'SR-16.
Uso dell'SR-16 come modulo di espansione
VOLUME
DRUM IN
PAGE
ONSETUPMIDI
51
7-51-1052-B
Related Documents