World Health Organization Geneva M A N U A L O F B A S I C TECHNIQUES FOR A HEALTH LABORATORY 2 n d e d i t i o n

Welcome message from author
This document is posted to help you gain knowledge. Please leave a comment to let me know what you think about it! Share it to your friends and learn new things together.
Transcript

World Health OrganizationGeneva
This manual provides a practical guide to the safe and accurate perfor-mance of basic laboratory techniques. Intended for use by laboratorytechnicians working in peripheral-level laboratories in developing coun-tries, the book emphasizes simple, economical procedures that canyield accurate results where resources, including equipment, are scarceand the climate is hot and humid.
The book is divided into three parts. The first describes the setting-upof a peripheral health laboratory and general laboratory procedures,including use of a microscope and laboratory balances, centrifugation,measurement and dispensing of liquids, and cleaning, disinfection andsterilization of laboratory equipment. Methods of disposal of labora-tory waste, dispatch of specimens to reference laboratories and labora-tory safety are also discussed. The second part describes techniques forthe examination of different specimens for helminths, protozoa, bacte-ria and fungi. Techniques for the preparation, fixation and staining ofsmears are also discussed. The third and final part describes theexamination of urine, cerebrospinal fluid and blood, including tech-niques based on immunological and serological principles. For eachtechnique, a list of materials and reagents is given, followed by adetailed description of the method and the results of microscopicexamination.
Numerous illustrations are used throughout the book to clarify thedifferent steps involved. A summary of the reagents required for thevarious techniques and their preparation is provided in the annex.
M A N U A LO F B A S I CT E C H N I Q U E S
FOR A HEALTHLABORATORY
2 n d e d i t i o nM
AN
UA
L OF B
ASIC
TEC
HN
IQU
ES FOR
A H
EALT
H LA
BO
RA
TO
RY
– 2nd
editio
n
WHO9 789241 545303
ISBN 92-4-154530-5

The World Health Organization was established in 1948 as a specialized agency of the United Nations servingas the directing and coordinating authority for international health matters and public health. One of WHO’sconstitutional functions is to provide objective and reliable information and advice in the field of humanhealth, a responsibility that it fulfils in part through its extensive programme of publications.
The Organization seeks through its publications to support national health strategies and address the mostpressing public health concerns of populations around the world. To respond to the needs of Member Statesat all levels of development, WHO publishes practical manuals, handbooks and training material for specificcategories of health workers; internationally applicable guidelines and standards; reviews and analyses ofhealth policies, programmes and research; and state-of-the-art consensus reports that offer technical adviceand recommendations for decision-makers. These books are closely tied to the Organization’s priorityactivities, encompassing disease prevention and control, the development of equitable health systemsbased on primary health care, and health promotion for individuals and communities. Progress towardsbetter health for all also demands the global dissemination and exchange of information that draws on theknowledge and experience of all WHO’s Member countries and the collaboration of world leaders in publichealth and the biomedical sciences.
To ensure the widest possible availability of authoritative information and guidance on health matters, WHOsecures the broad international distribution of its publications and encourages their translation andadaptation. By helping to promote and protect health and prevent and control disease throughout theworld, WHO’s books contribute to achieving the Organization’s principal objective – the attainment by allpeople of the highest possible level of health.
Selected WHO publications of related interest
Basic laboratory methods in medical parasitology.1991 (122 pages)
Basic laboratory methods in clinical bacteriology.1991 (128 pages)
Laboratory diagnosis of sexually transmitted diseases.Van Dyck E, Meheus AZ, Piot P.
1999 (146 pages)
Maintenance and repair of laboratory,diagnostic imaging, and hospital equipment.
1994 (164 pages)
Safe management of wastes from health-care activities.Prüss A, Giroult E, Rushbrook P, eds.
1999 (244 pages)
Safety in health-care laboratories.(document WHO/LAB/97.1)
1997 (157 pages)
Laboratory biosafety manual, 2nd ed.1993 (133 pages)
Basics of quality assurance for intermediateand peripheral laboratories, 2nd ed.
El-Nageh MM et al.WHO Regional Publications, Eastern Mediterranean Series, No. 2
2002 (256 pages)
Further information on these and other WHO publications can be obtained fromMarketing and Dissemination, World Health Organization,
1211 Geneva 27, Switzerland.

Contents i
Manual ofbasic techniques for a healthlaboratorySecond edition
World Health OrganizationGeneva2003

ii Manual of basic techniques for a health laboratory
© World Health Organization 2003
All rights reserved. Publications of the World Health Organization can be obtained from Marketingand Dissemination, World Health Organization, 20 Avenue Appia, 1211 Geneva 27, Switzerland (tel.:+41 22 791 2476; fax: +41 22 791 4857; e-mail: [email protected]). Requests for permission to repro-duce or translate WHO publications – whether for sale or for noncommercial distribution – should beaddressed to Publications, at the above address (fax: +41 22 791 4806; e-mail: [email protected]).
The designations employed and the presentation of the material in this publication do not imply theexpression of any opinion whatsoever on the part of the World Health Organization concerning thelegal status of any country, territory, city or area or of its authorities, or concerning the delimitation ofits frontiers or boundaries. Dotted lines on maps represent approximate border lines for which theremay not yet be full agreement.
The mention of specific companies or of certain manufacturers’ products does not imply that they areendorsed or recommended by the World Health Organization in preference to others of a similar na-ture that are not mentioned. Errors and omissions excepted, the names of proprietary products aredistinguished by initial capital letters.
The World Health Organization does not warrant that the information contained in this publication iscomplete and correct and shall not be liable for any damages incurred as a result of its use.
WHO Library Cataloguing-in-Publication Data
Manual of basic techniques for a health laboratory. — 2nd ed.
1.Clinical laboratory techniques — handbooks 2.Technology, Medical — handbooks 3.Manuals
ISBN 92 4 154530 5 (NLM classification: QY 25)
Design by minimum graphicsTypeset in Hong Kong
Printed in Malta99/12670 — SNPBest-set/Interprint — 15000

Contents iii
Contents
Preface x
1. Introduction 1
1.1 Aim of the manual 1
1.2 Reagents and equipment 1
1.2.1 Reagents 1
1.2.2 Equipment 1
1.3 The responsibility of laboratory workers 2
1.4 Units of measurement 2
1.4.1 Quantities and units in the clinical laboratory 2
1.4.2 SI units and names for quantities 2
PART I 9
2. Setting up a peripheral health laboratory 11
2.1 Plan of a peripheral medical laboratory 11
2.1.1 A one-room laboratory 11
2.1.2 A two-room laboratory 12
2.2 Electricity 12
2.2.1 Sources of electricity 13
2.2.2 Setting up simple electrical equipment 15
2.2.3 What to do in case of failure of electrical equipment 17
2.3 Plumbing: simple procedures 20
2.3.1 Tools and materials 20
2.3.2 Taps 20
2.3.3 Sink traps 22
2.4 Water for laboratory use 23
2.4.1 Clean water 24
2.4.2 Distilled water 24
2.4.3 Demineralized water 27
2.4.4 Buffered water 29
2.5 Equipment 32
2.5.1 Essential laboratory instruments 32
2.5.2 Additional items 33
2.5.3 Equipment and supplies 33
2.5.4 Making glass equipment 33
2.5.5 Specimen containers 42
2.5.6 Storage, stocktaking and ordering supplies 45
2.6 Registration of specimens and preparation of monthly reports 46
2.6.1 Registration of specimens 46
iii

iv Manual of basic techniques for a health laboratory
2.6.2 Preparation of monthly reports 47
3. General laboratory procedures 53
3.1 Use of a microscope 53
3.1.1 Components of a microscope 53
3.1.2 Setting up the microscope 58
3.1.3 Focusing the objective 61
3.1.4 Use of an ocular micrometer 63
3.1.5 Dark-field microscopy 64
3.1.6 Routine maintenance 64
3.2 Weighing: use of laboratory balances 66
3.2.1 Sensitivity of a balance 67
3.2.2 Open two-pan balance 67
3.2.3 Analytical balance 68
3.2.4 Dispensary balance 69
3.3 Centrifugation 69
3.3.1 Principle 69
3.3.2 Types of centrifuge 70
3.3.3 Instructions for use 71
3.4 Measurement and dispensing of liquids 73
3.4.1 Pipettes 73
3.4.2 Volumetric flasks 75
3.4.3 Burettes 77
3.4.4 Graduated conical glasses 77
3.5 Cleaning, disinfection and sterilization 77
3.5.1 Cleaning glassware and reusable syringes and needles 77
3.5.2 Cleaning non-disposable specimen containers 81
3.5.3 Cleaning and maintenance of other laboratory equipment 83
3.5.4 Disinfectants 83
3.5.5 Sterilization 85
3.6 Disposal of laboratory waste 90
3.6.1 Disposal of specimens and contaminated material 90
3.6.2 Incineration of disposable materials 90
3.6.3 Burial of disposable materials 91
3.7 Dispatch of specimens to a reference laboratory 91
3.7.1 Packing specimens for dispatch 91
3.7.2 Fixation and dispatch of biopsy specimens forhistopathological examination 95
3.8 Safety in the laboratory 96
3.8.1 Precautions to prevent accidents 97
3.8.2 First aid in laboratory accidents 98
3.9 Quality assurance in the laboratory 101
3.9.1 Specimen collection 102
PART II 103
4. Parasitology 105
4.1 Introduction 105
4.2 Examination of stool specimens for parasites 107

Contents v
4.2.1 Collection of specimens 107
4.2.2 Visual examination 107
4.2.3 Microscopic examination 107
4.2.4 Dispatch of stools for detection of parasites 109
4.3 Intestinal protozoa 111
4.3.1 Identification of motile forms (trophozoites) 111
4.3.2 Identification of cysts 118
4.4 Intestinal helminths 125
4.4.1 Identification of eggs 126
4.4.2 Identification of adult helminths 146
4.5 Techniques for concentrating parasites 152
4.5.1 Flotation technique using sodium chloride solution (Willis) 152
4.5.2 Formaldehyde–ether sedimentation technique (Allen & Ridley) 153
4.5.3 Formaldehyde–detergent sedimentation technique 154
4.5.4 Sedimentation technique for larvae of Strongyloidesstercoralis (Harada–Mori) 156
4.6 Chemical test for occult blood in stools 157
4.6.1 Principle 157
4.6.2 Materials and reagents 157
4.6.3 Method 158
4.6.4 Results 159
4.7 Parasites of the blood and skin 159
4.7.1 Filariae 159
4.7.2 Plasmodium spp. 172
4.7.3 Trypanosoma spp. 182
4.7.4 Leishmania spp. 194
5. Bacteriology 197
5.1 Introduction 197
5.2 Preparation and fixation of smears 197
5.2.1 Principle 197
5.2.2 Materials and reagents 197
5.2.3 Preparation of smears 198
5.2.4 Fixation of smears 199
5.3 Staining techniques 199
5.3.1 Gram staining 199
5.3.2 Staining with Albert stain (for the detection ofCorynebacterium diphtheriae) 201
5.3.3 Staining with Ziehl–Neelsen stain (for the detection ofacid-fast bacilli) 202
5.3.4 Staining with Wayson stain (for the detection of Yersiniapestis) 203
5.3.5 Staining with Loeffler methylene blue (for the detection ofBacillus anthracis) 204
5.4 Examination of sputum specimens and throat swabs 204
5.4.1 Materials and reagents 205
5.4.2 Method 205
5.4.3 Microscopic examination 206
5.4.4 Dispatch of specimens for culture 206

vi Manual of basic techniques for a health laboratory
5.5 Examination of urogenital specimens for gonorrhoea 207
5.5.1 Materials and reagents 207
5.5.2 Method 207
5.5.3 Microscopic examination 208
5.5.4 Dispatch of specimens for culture 209
5.6 Examination of genital specimens for syphilis 209
5.6.1 Materials and reagents 210
5.6.2 Method 210
5.6.3 Microscopic examination 211
5.7 Examination of semen specimens 211
5.7.1 Materials and reagents 211
5.7.2 Method 212
5.7.3 Macroscopic examination 212
5.7.4 Microscopic examination 212
5.8 Examination of vaginal discharge 215
5.8.1 Materials and reagents 215
5.8.2 Method 215
5.8.3 Microscopic examination 215
5.9 Examination of watery stool specimens 216
5.9.1 Materials and reagents 216
5.9.2 Method 216
5.9.3 Microscopic examination 216
5.9.4 Dispatch of specimens for culture 216
5.10 Examination of aspirates, exudates and effusions 218
5.10.1 Materials and reagents 218
5.10.2 Method 218
5.10.3 Microscopic examination 219
5.11 Examination of pus for Bacillus anthracis 219
5.11.1 Materials and reagents 219
5.11.2 Method 220
5.11.3 Microscopic examination 220
5.12 Examination of skin smears and nasal scrapings forMycobacterium leprae 220
5.12.1 Materials and reagents 220
5.12.2 Method 221
5.12.3 Microscopic examination 223
6. Mycology 225
6.1 Examination of skin and hair for fungi 225
6.1.1 Materials and reagents 225
6.1.2 Method 225
6.2 Examination of pus for mycetoma 226
6.2.1 Materials and reagents 227
6.2.2 Method 227
6.3 Examination of skin for pityriasis versicolor 227
6.3.1 Materials and reagents 227
6.3.2 Method 228

Contents vii
PART III 231
7. Examination of urine 233
7.1 Collection of urine specimens 233
7.1.1 Types of urine specimen 233
7.1.2 Preservation of urine specimens 234
7.2 Examination of urine specimens 234
7.2.1 Appearance 234
7.2.2 Testing for the presence of blood 234
7.2.3 Measuring the pH 235
7.2.4 Detection of glucose 236
7.2.5 Detection and estimation of protein 236
7.2.6 Detection of ketone bodies 239
7.2.7 Detection of abnormal elements 240
7.2.8 Detection of Schistosoma haematobium infection 249
7.2.9 Detection of bacteria 251
8. Examination of cerebrospinal fluid (CSF) 255
8.1 Common reasons for investigation of CSF 255
8.2 Collection of CSF specimens 255
8.3 Examination of CSF specimens 255
8.3.1 Precautions 255
8.3.2 Direct examination 256
8.3.3 Microscopic examination 257
8.3.4 Determination of glucose concentration 261
8.3.5 Determination of protein concentration 262
8.3.6 Summary 263
8.4 Dispatch of CSF specimens for culture 263
8.4.1 Materials and reagents 263
8.4.2 Method using Stuart transport medium (for the isolation ofNeisseria meningitidis) 264
9. Haematology 265
9.1 Types of blood cell 265
9.1.1 Erythrocytes 265
9.1.2 Leukocytes 265
9.1.3 Thrombocytes 266
9.2 Collection of blood specimens 267
9.2.1 Principle 267
9.2.2 Materials and reagents 267
9.2.3 Method 267
9.3 Estimation of the haemoglobin concentration 271
9.3.1 Haemiglobincyanide photometric method 271
9.3.2 Alkaline haematin D method 276
9.4 Estimation of the erythrocyte volume fraction 279
9.4.1 Micro-scale method 280
9.4.2 Macro-scale method 286
9.5 Estimation of the erythrocyte number concentration 287

viii Manual of basic techniques for a health laboratory
9.6 Estimation of the leukocyte number concentration 288
9.6.1 Principle 288
9.6.2 Materials and reagents 288
9.6.3 Method 289
9.6.4 Results 291
9.7 Measurement of the erythrocyte sedimentation rate 292
9.7.1 Principle 292
9.7.2 Materials and reagents 292
9.7.3 Method 292
9.7.4 Results 293
9.8 Measurement of the bleeding time: Duke method 295
9.8.1 Principle 295
9.8.2 Materials and reagents 295
9.8.3 Method 295
9.8.4 Results 296
9.9 Observation of clot retraction and measurement of lysis time 297
9.9.1 Principle 297
9.9.2 Materials 297
9.9.3 Method 297
9.9.4 Results 298
9.10 Preparation and staining of thin blood films 299
9.10.1 Principle 299
9.10.2 Materials and reagents 299
9.10.3 Method 300
9.10.4 Microscopic examination 305
9.11 Test for sickle-cell anaemia 314
9.11.1 Principle 314
9.11.2 Materials and reagents 314
9.11.3 Method 315
9.11.4 Microscopic examination 315
9.12 Determination of the reticulocyte number concentration/fraction 316
9.12.1 Principle 316
9.12.2 Materials and reagents 316
9.12.3 Method 317
9.12.4 Microscopic examination 318
9.13 Determination of the leukocyte type number fraction 319
9.13.1 Principle 319
9.13.2 Materials 319
9.13.3 Microscopic examination 320
9.14 Determination of the thrombocyte number concentration 321
9.14.1 Materials 321
9.14.2 Microscopic examination 321
10. Blood chemistry 322
10.1 Estimation of glucose concentration in blood: o-toluidinemethod 322
10.1.1 Principle 322
10.1.2 Materials and reagents 322

Contents ix
10.1.3 Method 322
10.1.4 Results 324
10.2 Estimation of urea concentration in blood: diacetyl monoxime/thiosemicarbazide method 325
10.2.1 Principle 325
10.2.2 Materials and reagents 325
10.2.3 Method 326
10.2.4 Results 327
11. Immunological and serological techniques 328
11.1 Introduction to immunology 328
11.1.1 Antibodies 328
11.1.2 Antigens 329
11.1.3 Antigen–antibody interactions 330
11.2 Principle of immunochemical techniques 330
11.2.1 Primary binding tests 330
11.2.2 Secondary binding tests 332
11.3 Determination of rheumatoid factors by the latex-agglutinationtechnique 336
11.3.1 Materials and reagents 336
11.3.2 Method 336
11.4 Tests for the determination of anti-streptolysin O antibodies 336
11.4.1 Anti-streptolysin O test (ASOT) 336
11.4.2 Latex agglutination 338
11.5 Determination of b-human chorionic gonadotropin (b-hCG) in urineby the agglutination inhibition technique 339
11.5.1 Materials and reagents 339
11.5.2 Method 339
11.6 Quantitative determination of IgA, IgG and IgM by radialimmunodiffusion 339
11.6.1 Materials and reagents 339
11.6.2 Method 340
11.7 Tests for the determination of HIV antibodies 341
11.7.1 ELISA 341
11.7.2 Dipstick test 342
11.8 Tests for hepatitis virus infection 342
11.8.1 ELISA for hepatitis B surface antigen 343
11.8.2 Dipstick test for hepatitis B surface antigen 344
11.9 Dipstick test for falciparum malaria 344
11.9.1 Materials and reagents 344
11.9.2 Method 345
11.10 Tests for syphilis infection 346
11.10.1 RPR test 347
11.10.2 TPHA test 348
Annex: Reagents and their preparation 350
Index 369

x Manual of basic techniques for a health laboratory
Preface
This book is a revised edition of the Manual of basic techniques for a health laboratory(WHO, 1980), major revisions having been carried out by Dr K. Engbaek, Dr C.C.Heuck and Mr A.H. Moody. The revision was necessary because of new proce-dures and technology that have been developed since the previous edition and thathave proved to be useful to small laboratories in developing countries. The proce-dures have been included in the relevant sections of the manual, and some obsoleteprocedures have been replaced by more up-to-date techniques.
The original objective of the manual remains unchanged. It is intended mainly forthe use of laboratory personnel in developing countries during their training andthereafter in their work. In the selection of techniques, particular attention hasbeen paid to the low cost, reliability and simplicity of the methods and to the avail-ability of resources in small laboratories.
WHO expresses its thanks to all those who have assisted in the revision of thismanual.
x

1. Introduction 1
1
1. Introduction
1.1 Aim of the manualThis manual is intended for use mainly in medical laboratories in developing coun-tries. It is designed particularly for use in peripheral laboratories in such countries(i.e. in small or medium-sized laboratories attached to regional hospitals) and indispensaries and rural health centres where the laboratory technician often has towork alone. The language used has been kept as simple as possible althoughcommon technical terms are employed when necessary.
The manual describes examination procedures that can be carried out with a mi-croscope or other simple apparatus. Such procedures include the following:
— the examination of stools for helminth eggs;
— the examination of blood for malaria parasites;
— the examination of sputum for tubercle bacilli;
— the examination of urine for bile pigments;
— the examination of blood for determination of the white cell (leukocyte) typenumber fraction (differential leukocyte count)
— the examination of blood for determination of the glucose concentration.
The intention is to provide an account of basic laboratory techniques that areuseful to peripheral laboratories and can be carried out with a limited range ofbasic equipment.
Some laboratories may not be able to perform all the procedures described. Forexample, a laboratory in a rural health centre may not be able to carry out certainblood chemistry or serological tests.
1.2 Reagents and equipment1.2.1 ReagentsEach reagent has been given a number. The reagents required and their numbersare indicated in the description of each technique. An alphabetical list of all thereagents used, with the numbers assigned to them, their composition, methods ofpreparation and storage requirements appears in the Annex at the end of the manual.For example, one of the reagents needed for Gram staining is crystal violet, modifiedHucker (reagent no. 18). The composition of crystal violet and the method of pre-paring it are given in the alphabetical list of reagents (see Annex).
1.2.2 EquipmentThe items required for each technique are listed at the beginning of the corre-sponding section. A list of the apparatus needed to equip a laboratory capable ofcarrying out all the examinations described in this manual can be found in section2.5.
When certain articles are not available, the technician should find an appropriatesubstitute; for example, empty bottles that formerly contained antibiotics for injec-tion (“penicillin bottles”) and other drug containers can be kept; racks for test-
2 Manual of basic techniques for a health laboratory
tubes and slides can be made locally; and empty tins can be used to make water-baths.
1.3 The responsibility of laboratory workersLaboratory workers carry out laboratory examinations to provide information forclinical staff in order to benefit patients. They therefore play an important role inhelping patients to get better. At the same time, in the course of their work, theygain a lot of information about patients and their illnesses. Laboratory workers, likeclinical staff, must regard this information as strictly confidential; only the clinicalstaff who request the examinations should receive the reports on them. When pa-tients enquire about test results they should be told to ask the clinical staff.
In most countries there are high moral and professional standards of behaviour forclinical staff and qualified laboratory personnel. Every laboratory worker handlingclinical materials must maintain these standards.
1.4 Units of measurementIn the laboratory you will work extensively with both quantities and units of meas-urement, and it is important to understand the difference between them.
Any measurable physical property is called a quantity. Note that the word “quan-tity” has two meanings; the scientific meaning just defined and the everyday mean-ing “amount of”. In scientific usage height, length, speed, temperature and electriccurrent are quantities, whereas the standards in which they are measured are units.
1.4.1 Quantities and units in the clinical laboratoryAlmost all your work in the laboratory will involve making measurements of quan-tities and using units for reporting the results of those measurements. Since thehealth — and even the life — of a patient may depend on the care with which youmake a measurement and the way in which you report the results, you should thor-oughly understand:
— the quantities you measure;
— the names that are given to those quantities;
— the units that are used to measure the quantities.
1.4.2 SI units and names for quantitiesA simple standardized set of units of measurement has been the goal of scientistsfor almost two centuries. The metric system was introduced in 1901. Since thenthis system has been gradually expanded, and in 1960 it was given the name “Systèmeinternational d’Unités” (International System of Units) and the international ab-breviation “SI”. Units of measurement that form part of this system are called “SIunits”. These units have been used to an increasing extent in the sciences, espe-cially chemistry and physics, since 1901 (long before they were called SI units), butmost of them were introduced into medicine only after 1960.
To accompany the introduction of SI units, medical scientists prepared a system-atic list of names for quantities. Some of these names are the same as the traditionalones; in other cases, however, the traditional names were inaccurate, misleading orambiguous, and new names were introduced to replace them.
This manual uses SI units and the currently accepted names for quantities. How-ever, since traditional units and names for quantities are still used in some laborato-ries, these are also included and the relationship between the two is explained.

1. Introduction 3
The following section gives a brief description of the SI units and of the quantitynames that are used in this manual.
SI units used in this manual
All SI units are based on seven SI base units. Only four of them are used in thismanual; they are listed in Table 1.1.
Table 1.1 SI base units used in this manual
Quantity Unit name Symbol
Length metre m
Mass kilogram kg
Time second s
Amount of substance mole mol
Table 1.2 SI derived units used in thismanual
Quantity Unit name Symbol
Area square metre m2
Volume cubic metre m3
Speed metre per second m/s or ms-1
The first three of these units will be familiar to you, although the quantity names“mass” and “amount of substance” and the unit name “mole” may needexplanation.
Mass is the correct term for what is commonly called “weight”. (There is a techni-cal meaning of the term “weight”: it is a measure of the force with which the earth’sgravity attracts a given mass. Mass, on the other hand, is independent of the earth’sgravitational attraction. The two terms are mixed up in everyday usage; further-more, we speak of measuring a mass as “weighing”.) “Amount of substance” andits unit, mole, are important terms in medicine and they will affect your work in thelaboratory more than any other quantities or SI units. When two or more chemicalsubstances react together, they do not do so in relation to their mass. For example:
sodium hydrochloric Æ sodium carbonbicarbonate
+ acid chloride
+ dioxide
+ water
In this reaction 1kg (1 kilogram) of sodium bicarbonate does not react with 1kg ofhydrochloric acid; in fact, 1mol (1 mole) of sodium bicarbonate reacts with 1molof hydrochloric acid. Whenever chemical substances interact, they do so in relationto their relative molecular mass (the new name for what used to be called “molecu-lar weight”). Use of the mole, which is based on the relative molecular mass, there-fore gives a measure of equivalent amounts of two or more different substances(use of mass units does not).
Most of the SI units are called SI derived units. These are obtained by combiningthe SI base units (by multiplication or division) as appropriate. Some common SIderived units are shown in Table 1.2.
The unit of area is metre ¥ metre = metre squared or square metre; the unit ofvolume is metre ¥ metre ¥ metre = metre cubed or cubic metre; and the unit ofspeed is metre divided by second = metre per second. All the SI derived units areobtained in this simple way. In some cases, however, it is necessary to multiply and

4 Manual of basic techniques for a health laboratory
divide several times, and the resulting expression becomes very cumbersome; forexample, the unit of pressure is kilogram divided by (metre ¥ second ¥ second). Toavoid this difficulty such units are given special names. For example, the unit ofpressure is called the pascal.
If the SI base units and derived units were the only ones available, measurementswould be difficult because these units are too large or too small for many purposes.For example, the metre is far too large to be convenient for measurement of thediameter of a red blood cell (erythrocyte). To overcome this difficulty, the SI incor-porates a series of prefixes, called SI prefixes, which when added to the name of aunit multiply or divide that unit by a certain factor, giving decimal multiples orsubmultiples of the unit. The SI prefixes used in this manual are listed in Table 1.3.
Table 1.3 SI prefixes
Factor Prefix Symbol
Multiply by 1 000 000 or 1 million (¥ 106) mega M
Multiply by 1000 (¥ 103) kilo k
Divide by 100 (¥ 0.01 or 10-2) centi c
Divide by 1000 (¥ 0.001 or 10-3) milli m
Divide by 1 000 000 (¥ 0.000 001 or 10-6) micro mDivide by 1000 million (¥ 0.000 000 001 or 10-9) nano n
For example, 1 kilometre (1km) = 1000 metres (1000m); 1 centimetre (1cm) =0.01 metre (0.01m or 10-2 m); 1 millimetre (1mm) = 0.001 metre (0.001m or10-3 m); and 1 micrometre (1mm) = 0.000001 metre (0.000001m or 10-6 m). Theseprefixes have the same meaning when they are applied to any other unit.
Quantity names used in this manual
Certain names for quantities were introduced to accompany the change to SI units.Most of these names are used to describe concentration and related quantities.
Units for measurement of concentration
The difficulty with concentration is that it can be expressed in different ways. Tra-ditionally all of these were called simply “concentration”, which was misleading.Now each different way of expressing concentration has its own special name. Be-fore these names can be described, it is necessary to explain the unit of volumecalled the “litre” (l). You are probably familiar with this unit of volume, and mayhave been surprised that it has not already been mentioned. This is because thelitre is not an SI unit.
The SI derived unit of volume is the cubic metre, but this is far too large to beconvenient for measurements of body fluids. A submultiple of the cubic metre istherefore used; the cubic decimetre. The prefix “deci” was not listed above becauseit is not used in this manual, but it means division by 10 (or multiplication by 0.1 or10-1). A decimetre is therefore 0.1m, and a cubic decimetre is 0.1 ¥ 0.1 ¥ 0.1m3 =0.001m3 (or 10-3 m3; that is, one-thousandth of a cubic metre). The name “litre”,although not part of the SI, has been approved for use as a special name for thecubic decimetre. The litre and its submultiples, such as the millilitre (ml), are usedmainly for measuring relatively small volumes of liquids and sometimes gases; vol-umes of solids and large volumes of liquids and gases are usually measured interms of the cubic metre or one of its multiples or submultiples. The litre is the unitused in the clinical laboratory for reporting all concentrations and related quanti-ties. However, you may encounter (for example, on graduated glassware) volumes

1. Introduction 5
marked in terms of submultiples of the cubic metre. The equivalent submultiples ofthe cubic metre and of the litre are listed in Table 1.4.
Having explained the litre, we can now return to the names for different ways ofexpressing concentration. First, suppose that we have a solution of salt. The massof dissolved salt divided by the volume of solution is called the mass concentration. Amore general definition of mass concentration is “the mass of a given component(e.g. a dissolved substance) divided by the volume of solution”. The unit in whichit is measured is gram (or milligram, microgram, etc.) per litre. In the SI massconcentration is rarely used; it is used only for substances such as proteins whoserelative molecular mass is uncertain.
Now suppose that we have another solution of salt, only this time the amount ofdissolved salt is expressed in terms of the “amount of substance”. The amount ofsubstance of salt (that is, the number of moles of salt) contained in the solutiondivided by the volume of the solution is called the amount of substance concentra-tion, or, for short, the substance concentration. The unit in which substance concen-tration is measured is mole (or millimole, micromole, etc.) per litre. When SI unitsare used all concentrations are expressed in terms of substance concentration wher-ever possible.
This use of substance concentration instead of mass concentration is the most im-portant difference between the use of SI units and the use of traditional units.
In the traditional system mass concentration was used almost exclusively.However, mass concentration was not, in the traditional system, alwaysexpressed in terms of “per litre”. Sometimes “per litre” was used, sometimes“per 100ml” (0.1 litre), and sometimes “per millilitre”. Different countries(and even different laboratories in the same country) followed different prac-tices, making for considerable confusion.
For particles or entities that are not dissolved, a different quantity must be used.For example, the blood contains many different kinds of cell. These cells are sus-pended in the blood, and we must have a way of expressing the number of cells ineach litre of blood. In this case the quantity name is the number concentration, whichis defined as “the number of specified particles or entities in a mixture divided bythe volume of the mixture”. The unit in which number concentration is measuredis number per litre.
In the traditional system number concentration was called a “count” and itwas expressed in the unit “number per cubic millimetre”.
Sometimes the quantity that is of concern is not the actual number of cells per litre(number concentration) but the proportion of cells of a given type — that is, thefraction of the total number that is accounted for by cells of that type. This quantityis called the number fraction, and it is expressed as a fraction of 1.0 (unity). At firstsight this may seem a little confusing, but it is really very simple. Unity or 1.0represents the whole, 0.5 represents one-half, 0.2 one-fifth, 0.25 one-quarter, 0.1one-tenth, and so on. For example, five kinds of leukocyte occur in the blood. The
Table 1.4 SI derived units of volume
Unit name Symbol Equivalent in Unit name Symbol Equivalent in Equivalent incubic metres (m3) litres (l) millilitres (ml)
Cubic decimetre dm3 0.001 litre l 1 1000
— 100 cm3 0.0001 decilitrea dl 0.1 100
— 10 cm3 0.000 01 centilitrea cl 0.01 10
Cubic centimetre cm3 0.000 001 millilitre ml 0.001 1
Cubic millimetre mm3 0.000 000 001 microlitre ml 0.000 001 0.001
a Seldom used in the laboratory.

6 Manual of basic techniques for a health laboratory
Table 1.5 Metric and traditional quantity names and units
Quantity name SI unit Traditional quantity Traditional unit Conversion factors and examplesa
name
Erythrocyte number no. ¥ 1012/l erythrocyte count million/mm3 No conversion factor:concentration 4.5 million/mm3 = 4.5 ¥ 1012/l(see section 9.5) 5.0 ¥ 1012/l = 5.0 million/mm3
Erythrocyte volume fraction 1 packed cell volume % Packed cell volume 38% ¥ 0.01 =(see section 9.4) (haematocrit) erythrocyte volume fraction 0.38
Erythrocyte volume fraction 0.4¥ 100 = packed cell volume 40%
Leukocyte number no. ¥ 109/l leukocyte count no./mm3 8000/mm3 ¥ 0.001 = 8.0 ¥ 109/lconcentration (blood) (blood) 7.5 ¥ 109/l ¥ 1000 = 7500/mm3
(see section 9.6)
Leukocyte number no. ¥ 106/l leukocyte count (CSF) no./mm3 No conversion factor:concentration (CSF) 27/mm3 = 27 ¥ 106/l(see section 8.3.3) 25 ¥ 106/l = 25/mm3
Leukocyte type number 1 differential leukocyte % Lymphocytes 33% ¥ 0.01 =fraction (blood and CSF) count (e.g. lymphocyte number fraction 0.33(e.g. lymphocyte number lymphocytes) Lymphocyte number fractionfraction; see sections 9.13 0.33 ¥ 100 = lymphocytes 33%and 8.3.3)
Reticulocyte number no. ¥ 109/l reticulocyte count no./mm3 86 000/mm3 ¥ 0.001 = 86.0 ¥ 109/lconcentration 91.5 ¥ 109/l ¥ 1000 = 91 500/mm3
(see section 9.12)
Reticulocyte number no. ¥ 10-3 reticulocyte count % 0.5% ¥ 10 = 5 ¥ 10-3
fractionb (see section 9.12) 12 ¥ 10-3 ¥ 0.1 = 1.2%
‰ 5‰ = 5 ¥ 10-3
12 ¥ 10-3 = 12‰
number fraction of each type might be 0.45, 0.35, 0.10, 0.08 and 0.02. (If you addthese fractions, you will find that the total is 1.0 — the whole.)
In the traditional system this quantity had no name and results were re-ported as percentages instead of fractions. For example, a number fractionof 0.5 was reported as 50%, and a number fraction of 0.08 was reported as8%. From this you will see that percentage divided by 100 gives the numberfraction.
Another quantity that is expressed as a fraction of 1.0 is the volume fraction. This isdefined as the volume of a specified component of a mixture divided by the totalvolume of the mixture. For example, if the total volume occupied by all theerythrocytes in 1 litre (1000ml) of blood is 450ml, the erythrocyte volume fractionis 450/1000 = 0.45. The erythrocyte volume fraction is important for the diagnosisof many diseases and you will often measure it in the laboratory.
In the traditional system volume fraction had no special name: instead, eachdifferent volume fraction had a different name. Erythrocyte volume frac-tion, for example, was called “packed cell volume” (which was misleadingbecause it did not specify what kind of cell was measured and because it wasreported as a percentage, not as a volume).
From the above explanation you will see that number fraction is “number pernumber” and volume fraction is “volume per volume” — that is, they are bothratios.
Table 1.5 lists metric and traditional quantity names and units, with conversionfactors.

1. Introduction 7
Table 1.5 (cont.)
Quantity name SI unit Traditional quantity Traditional unit Conversion factors and examplesa
name
Thrombocyte number no. ¥ 109/l platelet count no./mm3 220 000/mm3 ¥ 0.001 = 220 ¥ 109/lconcentration (see 250 ¥ 109/l ¥ 1000 = 250 000/mm3
section 9.14)
Glucose, substance mmol/l glucose, mass mg/100 ml 81 mg/100 ml ¥ 0.0555 = 4.5 mmol/lconcentration concentrationc (blood 4.2 mmol/l ¥ 18.02 = 75.7 mg/(blood and CSF) and CSF) 100 ml(see sections 10.1 and 8.3.4)
Haemoglobin (Fe), mmol/l haemoglobin, mass g/100 ml Hb 13.7 g/100 ml ¥ 0.621 = Hb(Fe)substance concentration concentrationc 8.5 mmol/l(see section 9.3) Hb(Fe) 9 mmol/l ¥ 1.61 = Hb 14.5
g/100 ml
Haemoglobin, mass g/l haemoglobin, mass g/100 ml 14.8 g/100 ml ¥ 10 = 148 g/lconcentration concentrationc 139 g/l ¥ 0.1 = 13.9 g/100 ml(see section 9.3)
Mean erythrocyte mmol/l mean corpuscular %e 35% ¥ 0.621 = 21.7 mmol/lhaemoglobin (Fe) substance haemoglobin 22 mmol/l ¥ 1.611 = 35.4%concentration concentration (i.e. mass(see section 9.4) concentration)d
Mean erythrocyte g/l mean corpuscular %e 35% ¥ 10 = 350 g/lhaemoglobin mass haemoglobin 298 g/l ¥ 0.1 = 29.8%concentration (see section concentration (i.e. mass9.4) concentration)
Protein, mass concentration g/l protein, mass mg/100 ml 25 mg/100 ml ¥ 0.01 = 0.25 g/l(CSF) (see section 8.3.5) concentrationc 0.31 g/l ¥ 100 = 31 mg/100 ml
g/l No change
Urea, substance mmol/l urea, mass mg/100 ml 15 mg/100 ml ¥ 0.167 = 2.5 mmol/lconcentration (blood) concentrationc 2.9 mmol/l ¥ 6.01 = 17.4 mg/100 ml(see section 10.2) urea nitrogen,e mass mg/100 ml urea nitrogen 7 mg/100 ml
concentration ¥ 0.357 = urea 2.5 mmol/l
CSF: cerebrospinal fluid.a The examples show first the conversion of actual numerical values in traditional units into values in SI units, and then the conversion from SIinto traditional units. The conversion factor is underlined.
b In this case, the number fraction is reported not as a fraction of 1, but as a fraction of 1000, in order to avoid inconveniently small numericalvalues.
c Mass concentration is what was measured, but the term “mass concentration” was not usually used.d Mean corpuscular haemoglobin concentration was sometimes expressed as a decimal fraction rather than a percentage, e.g. 0.35 instead of35%. In this case, each of the conversion factors listed must be multiplied or divided by 100, as in the following examples:
0.35 ¥ 62.1 = 21.7 mmol/l22 mmol/l ¥ 0.01611 = 0.3540.35 ¥ 1000 = 350 g/l298 g/l ¥ 0.001 = 0.298
e In the traditional system urea was sometimes reported in terms of urea and sometimes in terms of urea nitrogen (i.e. the nitrogen content ofthe urea).

8 Manual of basic techniques for a health laboratory

2. Setting up a peripheral health laboratory 9
Part I

10 Manual of basic techniques for a health laboratory

2. Setting up a peripheral health laboratory 11
2. Setting up a peripheralhealth laboratory
2.1 Plan of a peripheral medical laboratory2.1.1 A one-room laboratoryFigure 2.1 sets out the possible arrangement of a peripheral medical laboratoryattached to a health centre. It shows a laboratory suitable for carrying out some orall of the techniques described in the manual. The plan is limited to one room,since often this is all the space that is available for the laboratory. The room shouldmeasure at least 5m ¥ 6m.
Figure 2.2 indicates another possible arrangement of a peripheral laboratory. It canobviously be modified to suit different circumstances.
11
Fig. 2.1 Plan for a one-room laboratory

12 Manual of basic techniques for a health laboratory
2.1.2 A two-room laboratoryIf two rooms are available, it is recommended that the second be used for washingand sterilization. Dirty and/or contaminated material should be removed from thelaboratory working area as quickly as possible, both for the safety of the workersand to avoid errors and cross-contamination.
2.2 ElectricityA reliable energy supply should be available to ensure continuity of the work in alaboratory. The energy can be provided from the following sources:
Fig. 2.2 Alternative plan for a one-room laboratory1: outpatient’s table; 2: hand-operated centrifuge; 3: microscopes; 4: haematology area; 5: colorimeter; 6: water-bath; 7: electric centrifuge; 8: syphilis serology and biochemistry area; 9: reagent refrigerator; 10: reagent shelf;11: glassware shelf; 12: balance; 13: staining box; 14: area for examination of sputum specimens; 15: Bunsenburner; 16: sinks; 17: waste sink; 18: bed for patients; 19: record-keeping area; 20: area for examination of stoolspecimens; 21: area for examination of urine specimens; 22: area for reception of specimens; 23: gas bottle.

2. Setting up a peripheral health laboratory 13
— mains electricity supply
— generators
— solar energy supply system.
Remote laboratories often have problems in ensuring a continuous supply of elec-trical power and may need to generate electricity by using a local generator or asolar energy supply system.
2.2.1 Sources of electricityGenerators
Electrical energy can be provided by a fuel generator. It is possible to use the com-bustion engine of a motor car or a purpose-built generator. A purpose-built genera-tor produces an alternating current of 110 volts (V) or 220V and can usually generatemore energy than a car engine. A car engine provides a direct current of 12V or24V, which can be fed into rechargeable batteries (see below).
The type of current available will limit the selection of laboratory equipment; forexample, an instrument that requires direct current can be supplied with energy from:
— batteries
— a direct current network with a transformer
— an alternating current network with a converter.
The installation of a direct current network is simple and it is safe to operate.However, for instruments that require a low-voltage (6V, 12V or 24V) direct cur-rent, the high voltage produced from the direct current network must be convertedby means of a transformer. Alternatively, for instruments that require alternatingcurrent (110V, 220V or 240V), the direct current must be converted into alternat-ing current by means of an inverter. Inverters are heavy and expensive and significantenergy losses occur in the conversion process. It is therefore preferable to use eitherdirect current or alternating current appliances, depending on your supply, andavoid the need for conversion.
If no generator is available or if a mains power supply is accessible, but the electri-cal current fluctuates or is prone to frequent breakdowns, a solar energy supplymay be preferable (see below).
Solar energy supply systems (photovoltaic systems)
A laboratory with a few instruments with low energy requirements can work with asmall energy supply. For laboratories located in remote areas, a solar energy supplysystem may be more suitable than a generator since there are no problems of fuelsupplies and it can be easily maintained.
A solar energy supply system has three components:
— solar panel(s)
— an electronic charge regulator
— batteries.
Solar panels
Two different types of solar panel are commercially available:
— panels with cells of crystalline silicon
— panels with cells of amorphous silicon.
Amorphous silicon panels are less expensive, but produce solar energy less efficientlythan crystalline silicon panels.

14 Manual of basic techniques for a health laboratory
Solar panels must be installed so that they are exposed to direct light, since shadereduces the efficiency of energy production. They should be inclined at an angle of15°. The underside of the panel must be freely ventilated. The minimum distanceof the underside of the panel from the surface of the supporting construction mustbe more than 5cm to avoid heating of the panel, which would reduce the efficiencyof energy production.
Electronic charge regulators
A charge regulator controls the charging and discharging of the batteries automati-cally. When the battery voltage falls below a threshold value during discharge, thelaboratory instrument will be disconnected from the battery. On the other hand, ifthe voltage increases above a threshold value (e.g. when the battery is recharged),the solar panel will be disconnected from the battery. A good charge regulatoradapts the maximal voltage of the battery to the change in the temperature of theambient environment. This prevents the loss of water in the battery by evaporation.It is important to keep a spare charge regulator in stock in case of breakdown. Thecharge regulator chosen should be stable under tropical conditions. It is advisableto choose a charge regulator with an integrated digital display that allows the bat-tery charge to be monitored easily.
Batteries
Lead batteriesSolar energy systems require rechargeable batteries, which may be either lead ornickel–cadmium (Ni–Cd) batteries. Lead batteries are preferred and many typesare available commercially (see Table 2.1). High-efficiency batteries have practicaladvantages, although they are more expensive than normal batteries.
When purchasing batteries choose 12V batteries with the highest capacity (1000ampere-hours (Ah)).
Several types of maintenance-free lead batteries are commercially available, butthey are expensive and less efficient than those that require maintenance. The de-velopment of this type of battery is still in progress; it has not been thoroughlytested in tropical climates. Therefore, the maintenance-free batteries are not rec-ommended.
Transport of lead batteriesLead batteries should be emptied before being transported. It is important to re-member that if lead batteries are to be transported by air they must be empty ofelectrolyte solution, which should be replaced on arrival at the destination.
Table 2.1 Specifications for batteries used for solar power supply
Specification Type of battery
Nickel–cadmium Lead–calcium Lead–calcium Lead–calciumantimony (2%) antimony (6%)
Type of electrolyte liquid liquid liquid liquid
Maximum discharge 100% 80% 80% 50%
Discharge during normal operation 20% 20% 20% 20%
Voltage/cell 1.2V 2 V 2 V 2 V
Self-discharge rate high low medium low
Topping up required minimal infrequent frequent infrequent
Capital costs high mid-range mid-range low
Suitability for photovoltaic use highly highly recommended notrecommended recommended recommended

2. Setting up a peripheral health laboratory 15
Maintenance of lead batteriesThe daily discharge of lead batteries should not exceed 20% of the batteries’ ca-pacity, otherwise the lifetime of the batteries (normally about 1100 recharge cy-cles), will be shortened. If the batteries are repeatedly discharged to 40% of theircapacity, they will last for only about 600 cycles. (There are some special leadbatteries available that can be discharged by 40%, but will last for about 3000recharge cycles.) For maintenance the level of fluid must be checked regularly andwhen necessary refilled with the distilled water that is used for car batteries.
High-efficiency batteries cannot be replaced by normal car batteries in case of abreakdown. When only car batteries are available to replace a defective high-efficiencybattery, all the batteries in the energy storage system must be replaced with car batteries.
Nickel–cadmium (Ni–Cd) batteriesNi–Cd batteries can be recharged by a solar panel. Some Ni–Cd batteries are thesame size, but have different capacities. The AA-size Ni–Cd battery is available witha capacity from 0.5Ah up to 0.7Ah. Choose the batteries with the highest capacity.The small Ni–Cd batteries, type AAA to D, for use in laboratory instruments shouldbe recharged in advance to enable continuous operation in a laboratory. The lifespanof Ni–Cd batteries may be 1000 recharging cycles, depending on their quality.
Maintenance of Ni–Cd batteriesNi–Cd batteries appear to work unreliably in tropical countries. This apparentunreliability is caused by an increased rate of discharge rather than inefficient re-charging of the battery at high ambient temperatures (see below). Such problemsmay be partially overcome as follows:
● Ni–Cd batteries should be recharged at a low ambient temperature (e.g. in arefrigerator or in a specially constructed recharging box) shortly prior to beingused. (For example, only 62% of the energy can be made available from a Ni–Cdbattery that was charged at 40 °C.)
● Recharged Ni–Cd batteries should be stored under cool, dry conditions to mini-mize their rate of self-discharge. (For example, a Ni–Cd battery stored for 2weeks at 40 °C will have a residual capacity of only 32%.) High humidity willalso accelerate the self-discharge of the battery.
2.2.2 Setting up simple electrical equipmentIf the laboratory has an electricity supply the following equipment can be used:
— an electric lamp for the microscope (stable illumination makes adjustmenteasier);
— an electric centrifuge (much faster than the manually operated type);
— a microhaematocrit centrifuge (for detection of anaemia);
— a spectrophotometer or colorimeter (allows accurate estimation of haemo-globin);
— a water-bath, refrigerator etc.
You may have to make simple connections or repairs to this equipment in the labo-ratory. The explanations given below are intended to help the laboratory technicianto do this and are limited to the steps to follow in each case. Inexperienced personsshould start by carrying out the procedures in the presence of an instructor.

16 Manual of basic techniques for a health laboratory
ON
OFF
The electricity meter (Fig. 2.3)
An electricity meter measures and records the amount ofelectricity used. It indicates:
— the voltage, measured in volts (220V, 110V, etc.);
— the strength of the current, measured in amperes (A);
— the frequency of the alternating current, e.g. 50 hertz(Hz) (cycles per second).
Some types of meter have switches or buttons:
— a flip-switch that can be flipped one way to cut off theelectricity supply to the whole building (the mainsfuse) and the other way to restore it;
— a button marked “OFF” that can be pushed to cut offthe electricity supply;
— a button marked “ON” that can be pushed to restorethe electricity supply.
The flip-switch or “OFF” button also acts as a circuit-breaker, automatically cutting off the current when the cir-cuit is overloaded. When this happens, first find and correctthe fault that caused the cut-off, then press the “ON” but-ton or flip the switch to restore the current.
Setting up new electrical equipment
Voltage
Check that the voltage marked on the instrument is the same as that of your elec-tricity supply. The instrument has a label on it stating the voltage with which itmust be used. The voltage of your electricity supply is marked on your electricitymeter.
Dual-voltage equipment
Dual-voltage instruments can be used with two different voltage supplies.
There is a device on the instrument that enables you to select the appropriatevoltage, i.e. the voltage marked on your electricity meter. Depending on the instru-ment, this device may be:
— a lever or switch that can be moved to the 110V position or the 220V posi-tion (Fig. 2.4(a));
— an unwired plug that can be transferred from the 110V position to the 220Vposition (Fig. 2.4(b));
— a screw that can be turned to the 110V position or the 220V position (Fig.2.4(c)).
Fig. 2.3 An electricity meter
Fig. 2.4 Dual-voltage instruments
(c)
(b)(a)
2. Setting up a peripheral health laboratory 17
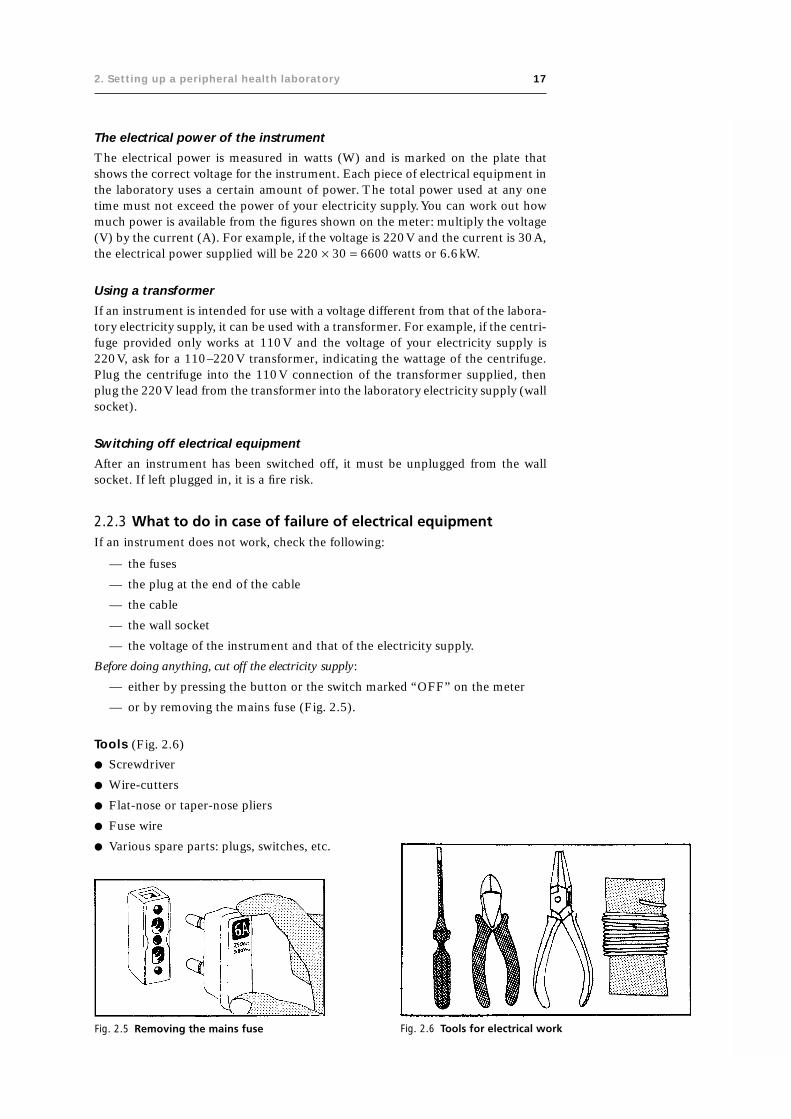
The electrical power of the instrument
The electrical power is measured in watts (W) and is marked on the plate thatshows the correct voltage for the instrument. Each piece of electrical equipment inthe laboratory uses a certain amount of power. The total power used at any onetime must not exceed the power of your electricity supply. You can work out howmuch power is available from the figures shown on the meter: multiply the voltage(V) by the current (A). For example, if the voltage is 220V and the current is 30A,the electrical power supplied will be 220 ¥ 30 = 6600 watts or 6.6kW.
Using a transformer
If an instrument is intended for use with a voltage different from that of the labora-tory electricity supply, it can be used with a transformer. For example, if the centri-fuge provided only works at 110V and the voltage of your electricity supply is220V, ask for a 110–220V transformer, indicating the wattage of the centrifuge.Plug the centrifuge into the 110V connection of the transformer supplied, thenplug the 220V lead from the transformer into the laboratory electricity supply (wallsocket).
Switching off electrical equipment
After an instrument has been switched off, it must be unplugged from the wallsocket. If left plugged in, it is a fire risk.
2.2.3 What to do in case of failure of electrical equipmentIf an instrument does not work, check the following:
— the fuses
— the plug at the end of the cable
— the cable
— the wall socket
— the voltage of the instrument and that of the electricity supply.
Before doing anything, cut off the electricity supply:
— either by pressing the button or the switch marked “OFF” on the meter
— or by removing the mains fuse (Fig. 2.5).
Tools (Fig. 2.6)
● Screwdriver
● Wire-cutters
● Flat-nose or taper-nose pliers
● Fuse wire
● Various spare parts: plugs, switches, etc.
Fig. 2.5 Removing the mains fuse Fig. 2.6 Tools for electrical work

18 Manual of basic techniques for a health laboratory
Changing the fuse
Remove the cover from the fuse box.
If it is a screw-type fuse, the fuse wire is stretched between two screws.If the wire is broken or melted, the current no longer passes: the fusehas blown. Loosen the two screws (Fig. 2.7). Remove the old fusewire. Replace it with new fuse wire of the same gauge (thickness), orwith thinner wire if the same size is not available. Fix the wire in an“S” shape, with a loop at either end. The wire must pass beneaththe small washers under the screws.
If it is a two-pin fuse, fix the fuse wire to the base of the pins, andthen tighten the pins with pliers (Fig. 2.8).
Once the fuse has been repaired, check the whole circuit beforeswitching on the electricity supply.
Checking the plug
If a fault is suspected in a plug, it must be repaired or replaced.There are many different types of plug; some have a screw on theoutside that can be unscrewed so that the cover can be removed.
Two-pin plug (Fig. 2.9)
Inside the plug, the two wires of the cable are fixed to the terminalscrews (T) of the contact pins (P). Check that the terminal screwsare tightened. Sometimes this is all that is needed to repair the plug.
Fitting a new plugTo fit a new plug, remove the insulating material along a length of1.0–1.5cm from the end of each of the two wires making up thecable. This can be done by scraping with a knife but take care not todamage the wire inside. Twist the exposed ends of both wires toallow them to fit neatly into the terminal once the screw has beenloosened (Fig. 2.10).
Insert one exposed end into each of the terminals of the plug. Tightenthe terminal screws and replace the terminals (Fig. 2.11). The screwsshould hold the wires firmly; check by pulling the wires gently.
Fig. 2.10 Twist the exposed ends of bothwires
Fig. 2.11 After inserting the wires into theplug terminals, tighten theterminal screws
Fig. 2.7 Removing fuse wire from a blownfuse
Fig. 2.8 Changing a two-pin fuse
Fig. 2.9 A two-pin plug
Three-pin plug (Fig. 2.12)
Two of the pins are connected to the electricity supply; one is “live” and one is“neutral”. The third (usually the middle) pin is connected to the “ground” or “earth”.It is most important to connect each of the three wires in the cable to the correctpin, and the plug usually contains instructions that should be strictly followed. Ifthere is the slightest doubt, consult an electrician.

2. Setting up a peripheral health laboratory 19
Fig. 2.13 A switch
Extension lead
An extension lead is a cable with a male plug (M) on oneend and a female plug (F) on the other (Fig. 2.14). The fe-male plug is fixed to the cable by two terminals inside theplug, just as in the normal male plug.
Checking the wall socket
To check a wall socket, plug in a lamp that you know to beworking. Some sockets are fitted with a small replaceable fuse.If this is not the case, it is usually wise to call in an electricianto repair a wall socket.
Precautions
● Never take electrical equipment apart without first disconnecting the electricitysupply.
● Never touch electrical equipment with wet hands (water is a good conductor ofelectricity).
Fig. 2.12 A three-pin plug
Fig. 2.14 An extension lead
The ground or earth wire is covered in green or green and yellow insulating material.It provides an escape for the electric current in case of poor insulation, thus avoid-ing passage of the current through the human body.
Checking the cable or switch
Check to see whether the cable is burned or broken. If so, it should be replaced.
There are many different types of switch. They have to be unscrewed and opened ifyou want to check that they are working properly. Make sure that the two incomingwires and the two outgoing wires are firmly fixed in their respective terminals(Fig. 2.13).

20 Manual of basic techniques for a health laboratory
Fig. 2.15 Tools and materials for plumbing repairs
Fig. 2.16 Components of a tapB: body; H: head; J: joint; W: washer.
Fig. 2.17 Removing the head of a tap
● Never plug a new piece of equipment into the electricity supply without firstchecking the plate to see whether the voltage marked is the same as that of thelaboratory supply (110V, 220V, etc.).
● Never remove a plug from a socket by pulling the cable.
● Never replace fuse wire with wire that is thicker.
2.3 Plumbing: simple proceduresA fault in the plumbing of the laboratory (a dripping tap, a blocked sink, etc.) canhamper laboratory work considerably. Some simple remedies are described below,in case a plumber is not readily available.
2.3.1 Tools and materials (Fig. 2.15)
● Adjustable wrench
● Pipe wrench
● Set of screwdrivers
● Bottle brush
● Rubber washers for taps
● Rubber stoppers such as those used in penicillinbottles
● Plunger for clearing blocked pipes
● Tow and jointing compound for sealing joints, ifavailable.
Important: Before starting any plumbing operation, cut offthe water at the mains.
2.3.2 TapsA tap is made up of two parts (Fig. 2.16):
— the body (B), through which the water flows
— the head (H), which controls the flow of water by means of a rubberwasher (W).
Between the head and the body, there is a joint (J) of rubber or tow.

2. Setting up a peripheral health laboratory 21
What to do if water flows when the tap isturned off
If water continues to flow when the tap is turned off, thewasher needs to be replaced.
1. Unscrew the head of the tap using an adjustable wrench(turn in an anticlockwise direction) (Fig. 2.17).
2. Remove the worn washer from the base of the head (B).If the washer is embedded (Fig. 2.18(a)), pull it out. If itis screwed on (Fig. 2.18(b)), unscrew it.
3. Replace it with a new washer of the same type.
4. If the tap continues to leak after the washer has been re-placed, the seating (S) that receives the washer (Fig.2.19(a)) is probably faulty. In this case place a rubberstopper in the hole (Fig. 2.19(b)).
This will act as a temporary seal until a plumber can becalled in.
Fig. 2.19 Repairing the seating for the washerS: seating.
Fig. 2.18 Removing the washerB: base of the head of the tap.
Fig. 2.20 Removing the towfrom around thescrew thread
(a) (b)
What to do if water leaks out of the head ofthe tap
If water leaks out of the head of the tap, the joint needs to be replaced.
1. Unscrew the head of the tap using an adjustable wrench.
2. Replace the joint with a new one of the same type.
If the joint is made of tow:
1. Remove the old joint, scraping the screw thread with a pointed knife (Fig. 2.20).
2. Wind new tow around the screw thread, starting at the top and winding in aclockwise direction (Fig. 2.21).
3. Smear jointing compound over the tow (Fig. 2.22).
4. Replace the head of the tap on the body and screw down as far as it will go.
Replacing the whole tap
Unscrew the faulty tap, using a pipe wrench (turn in an anticlockwise direction).
Take the new tap; the body ends in a large screw (S) (Fig. 2.23(a)). Wind towaround the thread and smear with jointing compound as described above.

22 Manual of basic techniques for a health laboratory
Screw the new tap into the water pipe in the wall in place of the old one(Fig. 2.23(b)). Tighten with the wrench.
2.3.3 Sink trapsComponents of a sink trap (Fig. 2.24)
The sink trap consists of:
— the body, fixed to the sink outflow by a joint (J1);
— the swan neck of the U-shaped trap, fixed to the body by a joint(J2).
The whole trap is attached to the waste pipe by a joint (J3).
The wastewater flows into the trap, which is permanently filled with water(the seal). This prevents foul air from the waste pipes and sewers fromcoming up into the sink. Sink traps may become blocked so that wastewaterfrom the sink or basin cannot drain away.
Fig. 2.21 Winding new tow around the screw Fig. 2.22 Applying jointing compound to the tow
Fig. 2.23 Replacing a tapS: screw.
Fig. 2.24 Components of a sink trapJ1, J2, J3: joints.

2. Setting up a peripheral health laboratory 23
Fig. 2.26 Unblocking a sink by emptying the sink trap Fig. 2.27 Replacing the seal at the bottom of a sink
Unblocking with a plunger
Place the plunger over the waste pipe. Let a little waterflow around it to help it stick. Press down on the woodenhandle to flatten the plunger (Fig. 2.25).
Pull it up and then push it down hard again. Repeat thisprocedure several times, as fast as you can. The suctioncaused may break up whatever is blocking the sink.
Unblocking with chemicals
Use a commercial product intended for the purpose. Al-ternatively, use 250g of sodium hydroxide pellets. Put thepellets in the bottom of the sink or basin, over the wastepipe. Pour 2 litres of boiling water on to the pellets (avoid splashing). Leave for 5minutes, then rinse the sink thoroughly with cold water from the tap.
Warning: Sodium hydroxide solution is highly corrosive and should be used withextreme care. If it is splashed on the skin or in the eyes, wash the affected areasimmediately with large quantities of water.
Unblocking by emptying the sink trap
Place a bucket beneath the trap. Unscrew joint J2 using an adjustable spanner (Fig.2.26).
Clean the trap with a bottle brush or piece of wire. Clear away all waste material. Ifthere is a white deposit (limescale) in the trap, take it apart completely. Heat thecomponents in diluted acetic acid (20ml of acid per litre of water).
Reassemble the sink trap.
What to do if the sink trap is leaking
If foul smells come up through the waste pipe of the sink, the permanent reservoirof water (the seal) at the bottom of the trap must have leaked because of a fault injoint J2. Screw the joint down tightly, or replace it with a new one (Fig. 2.27).
Important: Never pour strong acids down a sink, since they can cause corrosion.
2.4 Water for laboratory useThe medical laboratory needs an adequate water supply for its work. It requires:
— clean water
— distilled water
— demineralized water (if possible)
— buffered water (if possible).
Fig. 2.25 Unblocking a sink with a plunger

24 Manual of basic techniques for a health laboratory
2.4.1 Clean waterTo check whether the water supply is clean, fill a bottle with water and let it standfor 3 hours. Examine the bottom of the bottle. If there is a deposit, the water needsto be filtered.
Fig. 2.28 Filtering water using a porous unglazedporcelain or sintered glass filter
Fig. 2.29 Filtering water using a sand filterG: gravel; S: sand.
Filtering
Using a porous unglazed porcelain or sintered glass filter
This type of filter can be attached to a tap. Alternatively, it canbe kept immersed in a container of the water to be filtered (Fig.2.28).
Important: Filters of this type must be dismantled once a monthand washed in boiling filtered water.
Using a sand filter
A sand filter can be made in the laboratory. You will need thefollowing (see Fig. 2.29):
— a filter reservoir (a large container such as a metal drum, abig earthenware pot or a perforated bucket)
— sand (S)
— gravel (G).
Note: Water that has been filtered through a sand filter is almostfree of particles, but it may contain water-soluble chemical com-pounds and bacteria.
Storage of water
If water is scarce or comes from a tank or well, always keep alarge supply in reserve, preferably in glass or plastic containers.
Decant water that has been stored before filtering it.
Water supply
If there is no running water in the laboratory, set up a distributoras follows (see Fig. 2.30):
1. Place the container of water on a high shelf.
2. Attach a length of rubber tubing to the container so that thewater can flow down.
3. Clamp the rubber tubing with a Mohr clip or a small screwclamp.
2.4.2 Distilled waterDistilled water is free from nonvolatile compounds (e.g. miner-als) but it may contain volatile organic compounds.
Preparation
Distilled water is prepared using a still, in which ordinary wateris heated to boiling point, and the steam produced is cooled as itpasses through a cooling tube where it condenses to form dis-tilled water.
Fig. 2.30 A water distributor

2. Setting up a peripheral health laboratory 25
Fig. 2.31 Components of a copper or stainless steel alembicB: Bunsen burner; C: cooling column; R: reservoir; T: cold-water tube.
Glass stills (Fig. 2.32)
Glass stills are more fragile, but almost always produce purer water than metalstills. The distillation method is the same. Make sure that the running water circu-lates freely round the condenser (C). The water can be heated in the flask by theelectric element (E).
The following types of still are available:
— copper or stainless steel stills (alembics)
— glass stills
— solar stills.
They are heated by gas, kerosene, electricity or solar energy, depending on the typeof still.
Copper or stainless steel alembics (Fig. 2.31)
1. Fill the reservoir (R) with the water to be distilled.
2. Connect the cold-water tube (T) to a tap.
3. Heat the reservoir with a Bunsen burner (B) or kerosene heater.
The still can produce 1 or 2 litres of distilled water per hour, depending on theefficiency of the heating system.

26 Manual of basic techniques for a health laboratory
Fig. 2.32 Components of a glass stillC: condenser; D: distillate; E: electric element.
Fig. 2.33 Components of a solar still
Solar stills (Fig. 2.33)
For laboratories in remote areas and with limited resources, a simple solar-powered water still can be easily constructed using a clean plastic container withtwo compartments (one large and one small) and a large surface area, over which isplaced a glass cover in a sloping position.
The water is poured into the large compartment from which it is evaporated by thesun. It condenses on the glass cover and drops into the small compartment. Thesmall compartment has an outlet at the bottom through which the distilled watercan pass into a glass bottle placed underneath the container.

2. Setting up a peripheral health laboratory 27
In tropical climates 2–7 litres of distilled water can be produced daily from a solarstill with a surface area of 1m2.
Important:
● Collect the distilled water in a glass or plastic container.
● Do not distil the last quarter of the water heated; it contains residues.
Quality control
The pH of distilled water is normally between 5.0 and 5.5 (i.e. it is acid).
Use a 1.7% solution of silver nitrate (AgNO3) (reagent no. 49) to check for theabsence of chloride compounds (e.g. calcium chloride).
Put in a beaker:
— 10ml of distilled water;
— 2 drops of nitric acid;
— 1ml of silver nitrate solution.
The water should remain perfectly clear.
If a slight whitish turbidity appears, the distillation process should be repeated.
Uses
Distilled water is used for the preparation of reagents and as a final rinse for someglassware before drying.
Important:
● Do not use commercial distilled water (the type sold for filling car batteries) forthe preparation of laboratory reagents.
● Freshly prepared distilled water is preferable; if this is not available, use distilledwater stored in glass or plastic containers, which should be washed periodically.
● Always use distilled water prepared the same week.
2.4.3 Demineralized waterPrinciple
Demineralized water is free from ions but not necessarily free from organic com-pounds.
Preparation
Demineralized water is prepared by passing ordinary water through a column ofion-exchange resin. The apparatus consists of a long cartridge filled with ion-exchange resin granules. The water filters through the column of granules, whichretain all the mineral ions (i.e. all the dissolved mineral salts). Some demineralizershave two cartridges through which the water passes successively (Fig. 2.34).
1. Check that the cartridge is completely filled with ion-exchange resin granules.
2. Connect the inlet tube of the apparatus to the water supply (a tap or a small tankplaced above the apparatus). In some models the water flows in at the top of thecolumn, in others it flows in at the bottom.
3. Let the water flow in slowly.
4. Collect the demineralized water in a closed container.

28 Manual of basic techniques for a health laboratory
Quality control
Apparatus with a control dial
The dial registers the resistivity of the water resulting from the presence of ions.The more complete the demineralization, the higher the electrical resistivity of thewater.
1. Check that the control system is fitted with a battery in good working order.
2. To check that the battery is charged, press the button marked “zero test”; theneedle on the dial should swing to zero (Fig. 2.35(a)).
3. Let water flow into the cartridge.
4. When demineralized water begins to flow out at the other end, press the buttonmarked “water test”. The needle should register a resistivity of over 2 megaohms/cm (2MW/cm) (Fig. 2.35(b)).
5. If the needle stops at a point below 2MW/cm or stays at zero, the cartridge ofion-exchange resin granules has been used for too long and must be replaced orreactivated.
The apparatus may indicate the resistivity (MW/cm) or the reciprocal value, theconductivity (cm/MW or Siemens, S).
Apparatus without a control dial
Using an indicator paper, determine:
— the pH of the water supply flowing into the apparatus, and
— the pH of the demineralized water that flows out at the other end.
If the pH remains the same (usually below 6.5), the resin is no longer active.Demineralized water should have a pH between 6.6 and 7.0.
An additional check can be made using a 1.7% solution of silver nitrate (reagentno. 49). Pass a weak solution of sodium chloride (cooking salt) through theresin, then carry out the test described in section 2.4.2 for the quality controlof distilled water. If a slight whitish cloudiness appears, the resin must bereplaced.
Fig. 2.34 A demineralizer

2. Setting up a peripheral health laboratory 29
Change of colour in resin
If the resin changes colour (e.g. it turns black), consult the instructions for usesupplied by the manufacturer.
It may need to be reactivated or replaced, as described below.
Replacement or reactivation of ion-exchange resin
This can be done in one of the following ways, depending on the model:
● The cartridge is replaced by another filled with ion-exchange resin granules.
● The column of the apparatus is refilled with ion-exchange resin or a mixture oftwo resins.
● The exhausted ion-exchange resin is reactivated by passing a solution of ammo-nia through the apparatus. Follow the instructions supplied by the manufac-turer.
Uses
Demineralized water can be used for:
— rinsing glassware before drying;
— preparing almost all the reagents used in medical laboratories, including stains.
2.4.4 Buffered waterDistilled water is usually acid and demineralized water becomes acid on exposureto the air. For a number of laboratory procedures (preparation of stains, etc.) the
Fig. 2.35 Measuring the resistivity of demineralized waterWHO 01.203
04
21
0.5 0.3 0.1
0
04
21
0.5 0.3 0.1
M /cm
M /cm
(b)
(a)

30 Manual of basic techniques for a health laboratory
pH of the water has to be around 7.0 (neutral water) and has to be kept neutral.This is achieved, if possible, by dissolving buffer salts in the water (buffered water).
Materials and reagents
● Measuring cylinders, 10ml and 1000ml
● Volumetric flask, 1000ml
● Universal indicator paper (for measuring pH from 1 to 10)
● Indicator paper of limited pH range: for the 5.0–7.0 range and for the 6.0–8.0range
● Distilled (or demineralized) water
● Acetic acid, 5% solution (reagent no. 1), diluted 1:10 with distilled water
● Disodium hydrogen phosphate (Na2HPO4·2H2O), hydrated
● Phenol red, 1% solution (reagent no. 42)
● Potassium dihydrogen phosphate (KH2PO4), anhydrous
● Sodium carbonate, 0.2% solution (reagent no. 51).
Method
1. Weigh out accurately 3.76g of disodium hydrogen phosphate.
2. Transfer the chemical to a 1000-ml volumetric flask through a funnel (Fig.2.36).
3. Rinse out the weighing container into the volumetric flask several times withwater. Rinse the funnel into the flask.
4. Weigh out accurately 2.1g of potassium dihydrogen phosphate and proceed asin steps 2 and 3.
5. Add a little more water and mix the solution until the chemicals are dissolved.
6. Fill the flask to the 1000-ml mark with water.
7. Replace the flask stopper and mix the solution well.
8. Store the solution in a white glass reagent bottle and keep in a refrigerator.
Fig. 2.36 Transferring disodium hydrogen phosphate into a volumetric flask

2. Setting up a peripheral health laboratory 31
9. Dip a strip of the universal indicator paper into the buffersolution and compare the colour obtained with that shownon the standard chart (Fig. 2.37). Read off the pH unitgiven for the colour that matches the test paper mostclosely.
10. According to the result obtained, select a strip of indica-tor paper for the corresponding limited range. For exam-ple, if the pH is 6, use indicator paper for the range5.0–7.0. If the pH is 7.5, use indicator paper for the range6.0–8.0.
11. Repeat the test, using the paper for the corresponding lim-ited range. Read off the pH of the buffer solution on thestandard chart.
12. If the pH is between 7.0 and 7.2, the buffered water is satisfactory. If it is below7.0, the water is acidic. If the water is acidic, make a fresh solution, using dis-tilled water that has been boiled for 10 minutes in an uncovered round flask(this gets rid of the carbon dioxide).
13. If the water is still acidic after boiling:— add five drops of phenol red solution for every litre of water;— neutralize by adding sodium carbonate solution, one drop at a time, until
the water turns pink (Fig. 2.38).
14. If the water is alkaline (pH above 7.2):— add five drops of phenol red solution for every litre of water;— neutralize by adding acetic acid solution, one drop at a time, until the water
turns orange (Fig. 2.39).
Fig. 2.38 Correcting the pH of acidic bufferedwater
Fig. 2.39 Correcting the pH of alkalinebuffered water
If neither disodium hydrogen phosphate nor potassium dihydrogen phosphate isavailable, neutralize distilled or demineralized water directly, as shown in steps12–14 above.
Note: The pH can also be corrected by adding small quantities of the buffer salts:
● Disodium hydrogen phosphate can be used to increase the pH if the water isacidic (pH below 7.0).
● Potassium dihydrogen phosphate can be added to reduce the pH if the water isalkaline (pH above 7.2).
Fig. 2.37 Checking the pH using universal indicatorpaper

32 Manual of basic techniques for a health laboratory
2.5 EquipmentThe following is a list of the apparatus needed to equip a laboratory capable ofcarrying out all the examinations described in this manual. Such a laboratory wouldusually be located in a small rural hospital (district level) which might have be-tween 60 and 100 beds.
2.5.1 Essential laboratory instrumentsMicroscopes1
The laboratory should be equipped with two microscopes.
● One microscope is for use in haematology. It should have an inclined binoculartube, a mechanical stage, three objectives (¥ 10, ¥ 40, ¥ 100), two eyepieces (¥ 5,¥ 10), a condenser and an electric lamp that can be connected to the mainselectricity supply or a battery.
● The second microscope is for use in other laboratory procedures (parasitology,urine analysis, bacteriology, etc.) and should have an inclined binocular tubeand accessories as listed above.
At the health centre level one binocular microscope is sufficient.
Centrifuges2
It is useful to have two centrifuges:
— an electric centrifuge with a microhaematocrit head attachment and a reader;
— a hand-operated or an electric centrifuge with four buckets.
Balance3
An analytical balance with a set of weights is necessary if reagents are to be pre-pared in the laboratory.
If the laboratory is required to prepare a wide range of reagents, a two-pan balancewith a corresponding set of weights (see section 3.2.2) is useful.
Refrigerator
Reagents (such as those required for pregnancy tests, etc.) and materials (such ascertain transport media, specimens, etc.) should be kept in the refrigerator.
Water-bath
A water-bath equipped with a thermostat for temperature control is required whensamples or materials must be kept at a certain temperature and when measure-ments must be made at a given temperature.
Differential counter
Although a hand tally counter can be used, a differential counter saves time.
Photometer or colorimeter
It is necessary to have a photometer or colorimeter for blood chemistry tests andfor accurate determination of haemoglobin levels. Battery-powered models are com-mercially available.
1 For further information, see section 3.1.2 For further information, see section 3.3.3 For further information, see section 3.2.3.

2. Setting up a peripheral health laboratory 33
2.5.2 Additional itemsAutoclave
If the laboratory is in a hospital, the hospital sterilization service can be used. If thelaboratory is in a health centre one of the following is needed (see section 3.5.5):
— a small autoclave (electric or heated by an oil stove or with butane gas)
— a pressure cooker.
Hot-air oven
If the laboratory is fairly large, a small hot-air oven is useful for drying glasswareand for sterilization in conjunction with the autoclave (see section 3.5.5).
Deionizer or water still
A deionizer is an apparatus for demineralizing water by means of cartridges filledwith ion-exchange resin (see section 2.4.3).
If a deionizer is not available, a water still can be used (see page 25).
2.5.3 Equipment and suppliesA list of equipment and supplies for a peripheral-level health laboratory is given inTable 2.2. The quantities proposed are sufficient to enable a laboratory with one ortwo technicians to perform 20–50 examinations per day for a period of 6 months.Glassware and small items of equipment for laboratory use are shown in Fig. 2.40.
2.5.4 Making glass equipmentGlass is produced by the fusion at a very high temperature of sand and potassium(or sodium). This forms a silicate (ordinary soda-lime glass). Sometimes boric acidis added to the ingredients to produce borosilicate glass, which is less brittle andmore resistant to heat than ordinary glass. Certain pieces of equipment can bemade in the medical laboratory by heating ordinary glass.
Materials
● Hollow glass tubing with an external diameter of 4–8mm and 0.9–1.0mm thick
● Glass rods with a diameter of 4–8mm
● File, glass cutter or diamond pencil
● Cloth
● Bunsen burner (or a small gas or petrol blowlamp).
Making a Pasteur pipette
1. Take a piece of glass tubing 4–6mm in diameter. Using the file, mark off therequired lengths of tubing:
— 14–15cm for small pipettes;
— 18–25cm for large pipettes.
Etch the mark right round the tube, forming a circle (Fig. 2.41).

34 Manual of basic techniques for a health laboratory
Fig. 2.40 Glassware and equipment for laboratory use
(a)

2. Setting up a peripheral health laboratory 35
(b)

36 Manual of basic techniques for a health laboratory
Table 2.2 Equipment and supplies for a peripheral-level healthlaboratory
Item Quantity required
Equipment for collection of specimens
Essential equipment
Syringes, graduated, disposable, 20ml as needed
Syringes, graduated, disposable, 10ml as needed
Syringes, graduated, disposable, 5ml as needed
Needles, disposable, 18-gauge (1.2mm) ¥ 40mm as needed
Needles, disposable, 19-gauge (1.0–1.1mm) ¥ 40mm as needed
Needles, disposable, 20-gauge (0.9mm) ¥ 40mm as needed
Needles, disposable, 22-gauge (0.7mm) ¥ 40mm as needed
Needles, disposable, 23-gauge (0.6mm) ¥ 32mm as needed
Needles, disposable, 23-gauge (0.6mm) ¥ 90mm as needed
Rubber tubing for tourniquet, 2–5mm bore 2 pieces
Lancets for taking capillary blood as needed
Cotton wool, white, absorbent 2 ¥ 500g
Cotton wool, non-absorbent 2 ¥ 500g
Bottles, previously containing antibiotics, reagents, etc. for as many asinjection (5, 10, 20ml) possible
Additional equipment
Scalpel with disposable blades for taking slit skin smear 1specimens (for leprosy)
Curved clamp forceps without teeth for taking slit skin smear 1specimens (for leprosy)
Boxes, plastic or cardboard, disposable, for stool collection 50
Applicators, wooden (12cm ¥ 1mm) (can be made locally) 50
Bottles, 2.5ml and 5ml, preferably plastic 50
Bottles, white glass, wide-mouthed, 50ml, with metal screw cap 25and rubber washer, for collection of sputum specimens
Bottles, white glass, 25ml, with metal screw cap and rubber 25washer, for various specimens
Bottles, wide-mouthed, all sizes, for collection of urine 20–40specimens
Forceps, punch, for taking skin biopsies (for onchocerciasis) 1
Tongue depressors, wooden 50
Glassware
Essential items
Glass rods, solid, 6mm diameter 3
Beakers, plastic, flat, 50ml 4
Beakers, plastic, flat, 100ml 4
Beakers, plastic, flat, 250ml 4
Staining troughs, rectangular, for 20 slides 4
Funnel, glass, 60mm diameter 1
Funnels, glass, 90mm diameter 2
Funnel, plastic, 200mm diameter 1
Measuring cylinders, graduated, glass, 25ml 3
Measuring cylinders, graduated, glass, 50ml 3
Measuring cylinders, graduated, glass, 100ml 3
Measuring cylinders, graduated, glass, 250ml 2
Measuring cylinder, graduated, glass, 500ml 1
Measuring cylinder, graduated, glass, 1000ml 1
Flasks, Erlenmeyer, heat-resistant, wide-mouthed, 250ml 3

2. Setting up a peripheral health laboratory 37
Table 2.2 (cont.)
Item Quantity required
Flasks, Erlenmeyer, heat-resistant, wide-mouthed, 500ml 3
Flasks, Erlenmeyer, heat-resistant, wide-mouthed, 1000ml 3
Drop bottles, plastic or glass, 100ml 12
Drop bottles, brown glass, 100ml 3
Reagent bottles, plastic or glass, 100ml 20
Reagent bottles, plastic or glass, 500ml 10
Reagent bottles, plastic or glass, 1000ml 10
Flasks, volumetric, glass, with stoppers, 100ml 4
Flasks, volumetric, glass, with stoppers, 250ml 2
Flasks, volumetric, glass, with stoppers, 500ml 2
Flask, volumetric, glass, with stoppers, 1000ml 1
Microscope slides, 25mm ¥ 75mm 2 ¥ 1000
Coverslips, 20mm ¥ 20mm 20 ¥ 100
Wash bottles, plastic, 500ml 2
Wash bottles, plastic, 1000ml 2
Watch glasses, 50mm diameter 2
Pipettes, graduated from the top (and not to the tip), 1ml 12(0.01-ml subdivisions)
Pipettes, graduated from the top (and not to the tip), 2ml 10(0.01-ml subdivisions)
Pipettes, graduated from the top (and not to the tip), 5ml 10(0.1-ml subdivisions)
Pipettes, graduated from the top (and not to the tip), 10ml 6(0.1-ml subdivisions)
Pipettes, Pasteur 2 ¥ 144
Test-tubes, heat-resistant, 150mm ¥ 16mm 50
Test-tubes, heat-resistant, 85mm ¥ 15mm (Kahn tubes) 100
Test-tubes, heat-resistant, 50mm ¥ 6mm (cross-matching tubes) 20
Centrifuge tubes, conical, 15ml 40
Centrifuge tubes, conical, graduated, 15ml (0.1-ml subdivisions) 50
Glass tubing, 1.0–1.5mm thick, 7–8mm diameter 1 kg
Additional items
Petri dishes, glass, 112mm diameter 4
Petri dishes, glass, 156mm diameter 4
Evaporating dishes, 75mm diameter (75ml) 2
Dessicator 1
Equipment for haematology tests
Pipettes, Sahli, 0.02ml, with rubber tubing 30
Pipettes, blood, 0.05ml 20
Counting chambers, improved Neubauer (bright line if possible) 3
Counting chamber, Fuchs–Rosenthal 1
Coverslips, optically plane, for counting chambers 12
Tally counter 1
Tubes, Westergren, for determination of erythrocyte 30sedimentation rate
Stands for Westergren tubes 2
Microhaematocrit centrifuge 1
Microhaematocrit capillary tubes, heparinized 1000
Wax, for sealing microhaematocrit tubes 1 roll
Equipment for bacteriological and biochemical tests
Nichrome wire, 1mm diameter 1 m

38 Manual of basic techniques for a health laboratory
Table 2.2 (cont.)
Item Quantity required
Loop holders 4
Wooden block for loop holders 1
Protein standard tubes 1 set
Test-tube racks, large, for 12 tubes 4
Test-tube racks, small, for 12 tubes 4
Wooden test-tube holders 2
Forceps, stainless steel, for slides 2
Bunsen burner for use with butane gas 1
Butane gas cylinder as needed
Tripod with asbestos gauze 1
Spatulas, various sizes, for weighing reagents 3
Laboratory records and reports
Record books, hardbacked, large 6
Glass-marking pencils, wax, red 12
Glass-marking pencils, wax, blue 12
Glass marker, diamond point 1
Pencils, lead 12
Pens, ballpoint, red ink (for recording positive specimens) 2
Pens, ballpoint, black or blue ink 3
Cellophane tape 3 rolls
Adhesive tape, white 3 rolls
Labels for specimen bottles 1000
Laboratory request forms (preferably standardized centrally) as needed
Miscellaneous equipment
Microscopes 2
Colorimeter 1
Water bath 1
Refrigerator 1
Hot-air oven 1
Centrifuge 1
Balance 2
Deionizer or water still 1
Timer, 0–60min, with alarm 1
Spirit lamp 1
Hammer 1
Pliers 1 pair
Pliers, electrician’s 1 pair
Screwdriver, small 1
Screwdriver, medium 1
Screwdriver, large 1
Round metal file, 5mm 1
Small ampoule files 12
Saucepan, flat-bottomed with lid, 30cm diameter 1
Hot plate 1
Pestle (10cm diameter) and mortar 1
Bowls, plastic, 50cm ¥ 30cm 3
Bucket, plastic, 12 litres 1
Rubber safety bulb 4
Micropipette, 20 ml 1

2. Setting up a peripheral health laboratory 39
Table 2.2 (cont.)
Item Quantity required
Micropipette, 50 ml 1
Micropipette, 100 ml 1
Micropipette, 200 ml 1
Micropipette, 500 ml 1
Micropipette tips, plastic, disposable, 20ml as needed
Micropipette tips, plastic, disposable, 50ml as needed
Micropipette tips, plastic, disposable, 100ml as needed
Micropipette tips, plastic, disposable, 200ml as needed
Micropipette tips, plastic, disposable, 500ml as needed
Scissors, medium 1
Scissors, large 1
Vacuum pump, metal 1
Thermometer, 0–100 °C 1
Stoppers, rubber 1 set
Stoppers, cork 1 set
Corkscrew 1
Test-tube and bottle cleaning brushes (various sizes) 6
Filter-paper, 15cm diameter (Whatman’s No. 1 or equivalent) 4 boxes
pH paper, narrow range (6.8–7.2) 6 books
pH paper, wide range (0–12) 6 books
Lens paper 2 packets
Fine paintbrush, soft camel-hair brush or blower (for cleaning lenses) 1
Small rubber bulb (for cleaning lenses) 1
Toilet tissue 10 rolls
Towels and clean rags as needed
Immersion oil 6 bottles(10ml each)
Fig. 2.41 Marking off the required length of glass tubing using a file
Fig. 2.42 Breaking the glass tubing byhand
Fig. 2.43 Rounding off the ends of theglass tubing by flaming
2. Wrap the part to be broken in a cloth. Hold the tube with both hands, onethumb on either side of the etched mark (Fig. 2.42). Snap by pressing with yourthumbs.
3. Round off the end of each piece of tubing as shown in Fig. 2.43:
— heat the end, holding the tube almost vertical just above the blue flame ofthe burner;

40 Manual of basic techniques for a health laboratory
Fig. 2.44 Heating the glass tubing before pulling thepipette
Fig. 2.45 Pulling the pipette Fig. 2.46 Rounding off the ends of the pipetteby flaming
6. Remove the tubing from the flame, still rotating it continuously, and pull the twoends apart slowly, keeping your hands perfectly level (Fig. 2.45). Pull the glass tothe length required (10–20cm).
7. Leave to cool. Cut off the drawn portion at the exact length required. Round offthe sharp edges by holding them for a few seconds in the flame (Fig. 2.46).
Alternatively, separate and seal the two pipettes by heating the pulled-out por-tion in the flame.
Making a stirring rod
1. Use a glass rod about 5mm in diameter. Cut the rod into lengths of 15, 20 or25cm according to requirements, using a file (see Fig. 2.41).
2. Round off the ends by rotating them over the blue flame of the burner, untilabout 1cm of the rod is bright red (Fig. 2.47).
3. Flatten the heated end against the (dry) tiled working surface with a 500-g or1-kg weight (Fig. 2.48).
4. Heat the other end and press it gently down on the tiled surface (Fig. 2.49).
Glass rods can be used to decant liquids or to pour them slowly (see Fig. 3.52).
Fig. 2.47 Rounding off theends of the glassrod by flaming
— keep turning slowly;
— stop when the glass becomes red hot.
4. Stand the tubes in a beaker or a can, heated ends up,and leave to cool.
Wash all the pieces of tubing prepared (following theinstructions given in section 3.5.1). Rinse and dry.
5. Pulling the pipette is carried out as follows:
— heat the middle of the length of tubing over theblue flame (Fig. 2.44);
— keep rotating the tubing until the glass becomesred.
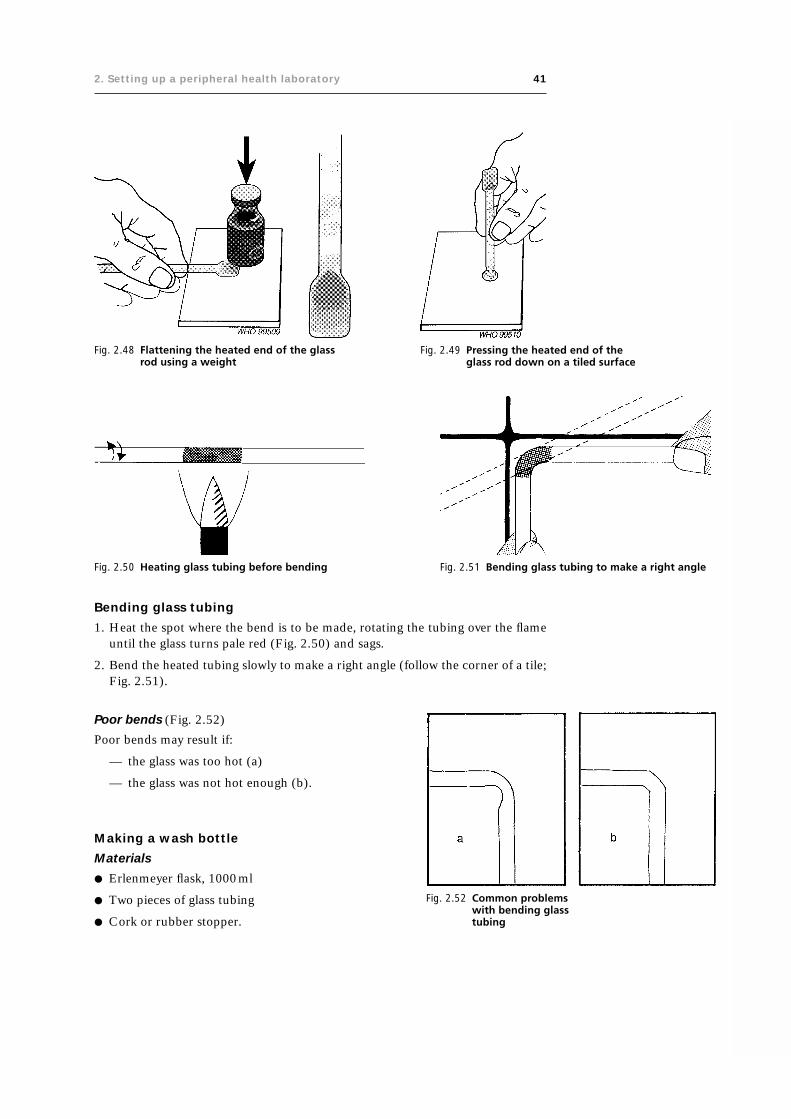
2. Setting up a peripheral health laboratory 41
Fig. 2.48 Flattening the heated end of the glassrod using a weight
Fig. 2.49 Pressing the heated end of theglass rod down on a tiled surface
Fig. 2.50 Heating glass tubing before bending Fig. 2.51 Bending glass tubing to make a right angle
Bending glass tubing
1. Heat the spot where the bend is to be made, rotating the tubing over the flameuntil the glass turns pale red (Fig. 2.50) and sags.
2. Bend the heated tubing slowly to make a right angle (follow the corner of a tile;Fig. 2.51).
Fig. 2.52 Common problemswith bending glasstubing
Poor bends (Fig. 2.52)
Poor bends may result if:
— the glass was too hot (a)
— the glass was not hot enough (b).
Making a wash bottle
Materials
● Erlenmeyer flask, 1000ml
● Two pieces of glass tubing
● Cork or rubber stopper.

42 Manual of basic techniques for a health laboratory
Fig. 2.53 Components of a wash bottle
1 Ethylene diamine tetraacetic acid; also known as edetic acid.
Fig. 2.54 Containers for stool specimens
Method
Pierce the stopper with a cork borer. Moisten the ends of the tubing witha few drops of water (for cork) or glycerol (for rubber) before insertingthem in the holes (Fig. 2.53). Protect your hands with a cloth.
2.5.5 Specimen containersDifferent types of containers are used for the collection of specimenssuch as stools, blood, urine and sputum in the laboratory.
Containers for stool specimens
The following types of container are suitable for the collection of stoolspecimens (Fig. 2.54):
— waxed cardboard box
— empty tin with a lid
— light plastic box
— glass jar specially designed for stool collection, with a spoon at-tached to the stopper.
Bottles and test-tubes for collecting blood specimens
Without anticoagulant
The best type of test-tube to use for blood specimens is one that can becentrifuged: this avoids excessive handling of the specimen.
● Use clean dry test-tubes of 5–20 ml capacity, depending onrequirements.
With anticoagulant for haematological tests
EDTA1 dipotassium saltPut 0.5ml of EDTA dipotassium salt, 10% solution (reagent no. 22)into each of a series of 5-ml bottles (Fig. 2.55) (or use 0.2ml in 2-mlbottles). Place the open bottles in an incubator at 37°C or leave them todry at room temperature, if no incubator is available.
Use these bottles for:
— blood cell counts
— haemoglobin estimation.
Heparinized tubesHeparin is an expensive anticoagulant that is not very stable in hot climates.Heparinized tubes are usually obtained commercially or prepared by central labo-ratories and are already marked to show the level to which the blood should beadded.
Trisodium citrateTrisodium citrate, 3.2% solution (reagent no. 60) is used for the determination ofthe erythrocyte sedimentation rate.
Use 1ml of trisodium citrate solution per 4ml of blood (or 0.4ml per 1.6ml ofblood).

2. Setting up a peripheral health laboratory 43
Fig. 2.55 Dispensing EDTA solution into bottles for collection of blood specimens
Important: Never carry out a blood cell count on citrated blood.
With anticoagulant for biochemical tests
Sodium fluoride (NaF) is the anticoagulant normally used for biochemical tests.Use 10mg of sodium fluoride powder per 10ml of blood, or 2mg per 2ml of blood.Use for:
— blood glucose estimation
— blood urea estimation (certain techniques).
Warning: Sodium fluoride is a poison.
Precautions to be taken when using anticoagulants
● Mix as soon as the blood is collected by inverting the bottle several times gentlyand evenly. Do not shake.
● Use clean bottles. Dry before adding anticoagulant.
Warning: Traces of detergent will dissolve the erythrocytes. Ensure that the bot-tles are rinsed thoroughly before drying.
● Store bottles containing anticoagulants in a dry place. EDTA dipotassium saltsolution and sodium fluoride are stable at room temperature but trisodium citratesolution and heparin must be kept in the refrigerator.
● Use the correct proportions. Use bottles and tubes with a graduation mark, orstick on a label so that its upper edge corresponds to the required amount ofblood (2ml, 5ml, etc.).

44 Manual of basic techniques for a health laboratory
Bottles and tubes for collecting other specimens
● Urine — use clean, dry, wide-mouthed Erlenmeyer flasks of 250-ml capacity orclean wide-mouthed bottles.
● Cerebrospinal fluid (CSF) — use test-tubes measuring 150mm ¥ 16mm. Seesection 8.2.
Boxes and jars for collecting sputum specimens
Glass screw-top jars or disposable plastic jars with lids can be used for collectingsputum specimens, or small cartons can be made in the laboratory using cardboardand a stapler. These cartons can be used once only for sputum collected in thelaboratory.
1. Cut out pieces of thin cardboard 18cm square and fold them as shown in Fig.2.56:
— first from corner to corner— then into nine equal squares.
2. Fold the diagonal creases in each corner square inwards (Fig. 2.57).
3. Fold two of the corners back against one side, and the other two against theother side (Fig. 2.58).
4. Staple the two folded corners on each side of the box (Fig. 2.59), which is nowready to receive the specimen.
5. Burn these cartons and plastic jars after use, as described in section 3.6.2.
Fig. 2.56 Folding cardboard to make cartonsfor sputum collection
Fig. 2.57 Folding the corners inwards
Fig. 2.58 Folding two of the corners back againstone side of the carton
Fig. 2.59 Securing the folded corners

2. Setting up a peripheral health laboratory 45
2.5.6 Storage, stocktaking and ordering suppliesStorage
Glassware
Keep glassware on the shelves of a cupboard away from dust. Erlenmeyer flasksshould be plugged with non-absorbent cotton wool or covered with brown paper(or preferably with thin sheets of paraffin wax or clinging plastic, if available) andarranged by type and size. Graduated pipettes should be kept in drawers dividedinto sections.
Chemicals and reagents
Arrange chemicals and reagents in strict alphabetical order. Acids and inflammableand dangerous chemicals (indicated by appropriately coloured labels) should bestored separately in a special section. Unopened stocks can be kept in crates filledwith sawdust.
Poisons (also indicated by appropriately coloured labels) should be stored sepa-rately in a locked cupboard.
Instruments
Some instruments, e.g. spectrophotometers, should be kept in an air-conditionedroom if the climate is hot and humid. For storage of microscopes see section 3.1.6.
Stocktaking
Stock cards
A stock card should be prepared for every chemical, stain, piece of glassware, etc.A sample stock card is shown in Table 2.3.
When you order an item, indicate:
— in the column headed “Ordered from”: where you sent the order
— in the column headed “Ordered”: the date and the quantity ordered.
When you receive an item, indicate:
— in the column headed “Received”: the date of receipt and the quantity re-ceived
— in the column headed “In stock”: the total in stock in the laboratory after theitem has been received.
When an item has been used up (or broken), indicate:
— in the column headed “Issued”: the date of issue and the amount issued
— in the column headed “In stock”: the total left in stock after the item hasbeen issued.
Table 2.3 A sample stock card
Item: Giemsa stain (250-ml bottle) Item no.: 29
Ordered from Ordered Received Issued In stock
Date Quantity Date Quantity Date Quantity
2 bottles
Company A 1.8.01 2 bottles 20.8.01 2 bottles 4 bottles
10.10.01 1 bottle 3 bottles
3.12.01 1 bottle 2 bottles
Company A 15.11.01 2 bottles 10.12.01 2 bottles 4 bottles

46 Manual of basic techniques for a health laboratory
Classify the stock cards in strictly alphabetical order and keep them in a box orfiling drawer. Each item can be given a number, which is then entered on the stockcard after the heading “Item no.”.
Inventory
Make an inventory of all laboratory supplies every 6 months. Count the quantity ofeach item in stock and check that the figure corresponds to the one shown in the“In stock” column of the stock card.
Ordering supplies
A well-organized laboratory should submit an order to the central supply storesevery 3 months. To draw up the order, check the stock cards one by one.
It makes it easier to estimate the quantities required if a table summarizing thestock used each month (see Table 2.4) is added to the bottom of each stock card.
In the case of chemicals, stains and reagents, order the quantity used in a 3-monthperiod, taking into account any recent increase or decrease in the amount used. Forexample:
● Eight bottles of Giemsa stain have been used in a year.
● This gives an average of two bottles used every 3 months.
● Order two bottles every 3 months (or four bottles every 6 months if orders aresubmitted twice a year).
Expiry dates
Reagents (e.g. blood group antisera, antigens, etc.) have to be used before a certaindate. This expiry date should be marked on the container by the supplier. Make anote of the expiry date on the stock card in the column headed “In stock”.
2.6 Registration of specimens and preparation of monthlyreports
2.6.1 Registration of specimensAll specimens must be registered and given numbers when they arrive at the labo-ratory and the results of all investigations must be recorded. This will:
— prevent the specimens from getting mixed up;
— make it possible to look up a result;
— make the results available for the promotion of public health.
Table 2.4 Estimating the quantity of supplies required
Year Quantity used per month
Jan. Feb. March April May June July Aug. Sept. Oct. Nov. Dec.
2000
2001
2002

2. Setting up a peripheral health laboratory 47
The laboratory should have:
— examination request forms that accompany the specimens;
— a register for recording details concerning the specimens and the resultsobtained;
— monthly report forms.
Numbering the specimens (Fig. 2.60)
Give each specimen a number as soon as it is received.Write this number immediately:
— on the request form
— on the specimen container (use a grease pencil)
— on every test-tube used for the specimen
— on every microscope slide used for the specimen.
This will prevent any mistakes.
Laboratory registers
Each numbered specimen should be recorded in a register for that type of speci-men. The following registers are suggested:
— haematology
— blood chemistry
— urine analysis
— CSF examination
— pregnancy tests
— bacteriology
— parasitology
— mycology
— serology (if the samples are few, incorporate in the bacteriology register;otherwise keep a separate register)
— histopathology
— water analysis.
Tables 2.5–2.11 show examples of some of these registers, which should be modifiedaccording to your requirements.
It is both helpful and time-saving to have rubber stamps for the most common testsand results. For example:
● For parasitology: no. of ova or parasites seen.
● For bacteriology: no. of leukocytes
no. of erythrocytes
no. of epithelial cells
no. and type of organisms.
2.6.2 Preparation of monthly reportsAt the end of every month the laboratory should submit a report to the director oflaboratory services at the central level or, if there is none, to the department ofpublic health at both the provincial and the central level. The report is valuable fortwo main reasons.
Fig. 2.60 Numbering the specimens

48 Manual of basic techniques for a health laboratory
Firstly, it helps to keep a check on the laboratory’s activities and is useful for ensur-ing adequate staffing, for the ordering of supplies by the central stores, and for thepreparation of the budget for laboratory services at the national level. Reports basedon the number of tests done are the most suitable.
Secondly, a monthly report is an aid in public health surveillance of the areacovered by the laboratory since it reports the number of positive results obtainedfor various communicable diseases. An example of a monthly report is given inTable 2.12.

2. Setting up a peripheral health laboratory 49
Tab
le 2
.5H
ae
ma
tolo
gy
re
gis
tera
Dat
eSp
ecim
enPa
tien
tSe
nt
Hb
Eryt
hro
cyte
sR
etic
ulo
cyte
MEH
Cd
Leu
kocy
tes
Mal
aria
Oth
erR
esu
lts
no
.b
yco
nce
ntr
atio
nb
Vo
lum
eES
RN
o.
Mo
rph
olo
gy
no
. fra
ctio
nc
(g/l
)N
o.
Typ
e n
o. f
ract
ion
test
sse
nt
(g/l
)fr
acti
on
(mm
/h)
con
cen
trat
ion
con
cen
trat
ion
NL
ME
O
(dat
e)
2.1.
011
Mr
RD
r M
117
—23
—A
NS
++12
4 ¥
10-3
—4.
2 ¥
109
0.48
0.35
0.13
0.04
—M
any
P.—
2.1.
01PO
IK +
falc
ipar
um
PMN
++
tro
ph
ozo
ites
2.1.
012
Mrs
LD
r H
580.
2152
—A
NS
++0.
071
¥ 10
-327
65.
7 ¥
109
0.32
0.56
0.04
0.08
—M
od
erat
e—
2.1.
01PO
IK +
+n
o. o
f P.
HC
++
falc
ipar
um
PMN
+tr
op
ho
zoit
es
Hb
: hae
mo
glo
bin
; ESR
: ery
thro
cyte
sed
imen
tati
on
rat
e; A
NS:
an
iso
cyto
sis;
PO
IK: p
oik
ilocy
tosi
s; P
MN
: po
lym
orp
ho
nu
clea
r er
yth
rocy
tes;
HC
: hyp
och
rom
ic e
ryth
rocy
tes;
MEH
C: m
ean
ery
thro
cyte
hae
mo
glo
bin
mas
s co
nce
ntr
atio
n; N
: neu
tro
ph
ils; L
: lym
ph
ocy
tes;
M: m
on
ocy
tes;
E: e
osi
no
ph
ils; O
: oth
er.
aFo
r ex
pla
nat
ion
of
the
colu
mn
hea
din
gs,
see
th
e re
leva
nt
sect
ion
s o
f th
e te
xt.
bH
aem
og
lob
in m
ay a
lso
be
rep
ort
ed i
n t
erm
s o
f th
e su
bst
ance
co
nce
ntr
atio
n;
the
colu
mn
hea
din
g w
ou
ld t
hen
be
“Hb
(Fe
), s
ub
stan
ce c
on
cen
trat
ion
(m
mo
l/l)”
. In
th
at c
ase,
th
e va
lues
qu
ote
d i
n t
he
two
exam
ple
s w
ou
ld b
e 7.
3 an
d 3
.6m
mo
l/l, r
esp
ecti
vely
.cTh
e re
ticu
locy
te c
on
cen
trat
ion
may
als
o b
e re
po
rted
in t
erm
s o
f th
e n
um
ber
co
nce
ntr
atio
n, i
.e. t
he
nu
mb
er p
er li
tre.
In t
hat
cas
e th
e co
lum
n h
ead
ing
wo
uld
rea
d “
reti
culo
cyte
no
. co
nce
ntr
atio
n”
and
th
eva
lues
wo
uld
dep
end
on
th
e er
yth
rocy
te n
um
ber
co
nce
ntr
atio
n (
no
t re
po
rted
in t
he
exam
ple
s g
iven
).d
MEH
C m
ay a
lso
be
rep
ort
ed in
ter
ms
of
the
sub
stan
ce c
on
cen
trat
ion
; th
e co
lum
n h
ead
ing
wo
uld
th
en b
e “m
ean
ery
thro
cyte
hae
mo
glo
bin
(Fe)
co
nce
ntr
atio
n (M
EH(F
e)C
(mm
ol/l
)”. I
n t
hat
cas
e th
e ex
amp
leq
uo
ted
(n
o. 2
) w
ou
ld h
ave
a va
lue
of
17.1
.
Tab
le 2
.6B
loo
d c
he
mis
try
re
gis
ter
Dat
eSp
ecim
enPa
tien
tSe
nt
by
Ure
a, s
ub
stan
ceG
luco
se c
on
cen
trat
ion
Oth
er t
ests
Res
ult
s se
nt
no
.co
nce
ntr
atio
n (
mm
ol/
l)(m
mo
l/l)
(sp
ecif
y)(d
ate)
2.1.
011
Mrs
WW
ard
112
.8—
—2.
1.01
2.1.
012
Mr
GD
r W
—5.
3—
2.1.
01
Tab
le 2
.7U
rin
e a
na
lysi
s r e
gis
ter
Dat
eSp
ecim
enPa
tien
tSe
nt
pH
Dir
ect
mic
rosc
op
icTe
st f
or
Test
fo
rTe
st f
or
Test
fo
rTe
st f
or
Ch
emic
alO
ther
tes
tsR
esu
lts
no
.b
yex
amin
atio
ng
luco
sep
rote
inb
ileu
rob
ilin
og
enke
ton
este
st f
or
(sp
ecif
y)se
nt
pig
men
tsb
loo
d(d
ate)
2.1.
011
Mr
CD
r R
7.0
Leu
kocy
tes
(20–
30N
egat
ive
Neg
ativ
eN
DN
DN
DN
DN
D2.
1.01
per
hig
h-p
ow
er fi
eld
),fe
w h
yalin
e cy
sts
2.1.
012
Mrs
ED
r A
6.8
Leu
kocy
tes
(5–1
0 p
er++
+N
egat
ive
ND
ND
+N
DPr
egn
ancy
2.1.
01h
igh
-po
wer
fiel
d),
few
test
: po
siti
veep
ith
elia
l cel
ls
ND
: tes
t n
ot
do
ne;
—: n
egat
ive;
+: w
eakl
y p
osi
tive
; ++:
mo
der
atel
y p
osi
tive
; +++
: str
on
gly
po
siti
ve.

50 Manual of basic techniques for a health laboratory
Tab
le 2
.8C
SF
ex
am
ina
tio
n (
in u
rin
e a
na
lysi
s r e
gis
ter
or
sep
ara
te)
Dat
eSp
ecim
enPa
tien
tSe
nt
Mac
rosc
op
icD
irec
t m
icro
sco
pic
Leu
kocy
te n
o.
Glu
cose
Tota
l pro
tein
Pan
dy
test
Oth
er t
ests
(sp
ecif
y)R
esu
lts
no
.b
yap
pea
ran
ceex
amin
atio
nco
nce
ntr
atio
nco
nce
ntr
atio
nco
nce
ntr
atio
nfo
rse
nt
(mm
ol/
l)(g
/l)
glo
bu
lin(d
ate)
2.1.
011
Ms
WD
r G
Clo
ud
yG
ram
-sta
inin
g30
1.5
0.45
+Le
uko
cyte
typ
e n
o. f
ract
ion
:2.
1.01
sho
ws
man
yn
eutr
op
hils
0.9
4,le
uko
cyte
s an
d a
lym
ph
ocy
tes
0.06
few
Gra
m-n
egat
ive
intr
acel
lula
rd
iplo
cocc
i
17.1
.01
2M
r L
Dr
CC
lear
ND
43.
30.
25N
egat
ive
ND
17.1
.01
Tab
le 2
.9B
act
eri
olo
gy
re
gis
ter
Dat
eSp
ecim
enPa
tien
tSe
nt
by
Spec
imen
Exam
inat
ion
req
ues
ted
Res
ult
sR
esu
lts
sen
tn
o.
(dat
e)
2.1.
011
Mr
JD
r R
Spu
tum
Mic
rosc
op
ic e
xam
inat
ion
of
No
aci
d-f
ast
bac
illi s
een
2.1.
01sm
ear
for
tub
ercu
losi
s
2.1.
012
Mrs
AM
edic
alPu
s fr
om
Mic
rosc
op
ic e
xam
inat
ion
of
Man
y le
uko
cyte
s, f
ew e
ryth
rocy
tes,
few
2.1.
01w
ard
2w
ou
nd
Gra
m-s
tain
ed s
mea
rep
ith
elia
l cel
ls, m
od
erat
e n
o. o
f G
ram
-n
egat
ive
rod
s
3.1.
013
Mr
LD
r M
Ure
thra
l pu
sM
icro
sco
pic
exa
min
atio
n o
fM
od
erat
e n
o. o
f in
trac
ellu
lar
Gra
m-
3.1.
01G
ram
-sta
ined
sm
ear
neg
ativ
e d
iplo
cocc
i see
n, i
ncl
ud
ing
go
no
cocc
al c
occ
i
3.1.
014
Mrs
RM
edic
alC
SFM
icro
sco
pic
exa
min
atio
n o
fO
ccas
ion
al le
uko
cyte
s an
d e
pit
hel
ial
3.1.
01w
ard
1G
ram
-sta
ined
sm
ear
cells
, no
ery
thro
cyte
s o
r o
rgan
ism
sse
en

2. Setting up a peripheral health laboratory 51
Table 2.10 Parasitology register
Date Specimen Patient Sent by Specimen Examination Results Results sentno. provided requested (date)
2.1.01 1 Mr F Dr A Stool Intestinal Direct microscopy: moderate no. 2.1.01parasites of Ascaris lumbricoides ova seen
2.1.01 2 Ms M Dr C Stool Intestinal Direct microscopy: no ova or 2.1.01parasites parasites seen
Concentration technique: no ovaor parasites seen
2.1.01 3 Mrs L Medical Skin Onchocerciasis No parasites seen 3.1.01ward 1 snips
3.1.01 4 Mr S Dr R Stool Parasites Occult blood: positive 3.1.01
Direct microscopy: manytrophozoites of Entamoebahistolytica and a few hookwormova seen
Table 2.11 Serology register
Date Specimen no. Patient Sent by Specimen Examination requested Results Results sent(date)
3.1.01 1 Mrs P Prenatal clinic Blood ELISA for determination Non-reactive 3.1.01of antibodies to HIV
3.1.01 2 Mrs T Dr M Blood ELISA for determination Reactive, 1 :8 3.1.01of antibodies to HIV
ELISA: enzyme-linked immunosorbent assay; HIV: human immunodeficiency virus.

52 Manual of basic techniques for a health laboratory
Table 2.12 Sample monthly report for a health laboratory
Name of laboratory:
Report for the month ending:
LABORATORY RECORD
Number of examinations carried out
Haematology (general) 1235
Blood chemistry 27
Urine analyses:
— direct examination 287
— chemistry 43
Pregnancy tests 17
CSF examinations:
— direct examination 3
— chemistry 3
Parasitology:
— examination of stools 162
— examination of blood 802
— other examinations (e.g. examination of lymph glands for trypanosomes) 2
Bacteriology:
— Gram stains 63
— acid-fast stains 41
— Wayson stains 11
Mycology 3
Serology:
— qualitative 114
— quantitative 16
Number of specimens sent to specialized laboratories
Water for bacteriological analysis 8
Specimens for bacteriological culture 32
Sera for serology 0
Tissue biopsies 2
Other specimens 0
COMMUNICABLE DISEASES RECORDa
Number of cases reported
Gonorrhoea 11
Leprosy 0
Plague 0
Tuberculosis 7
Amoebiasis 14
Ascariasis 22
Filariasis 1
Hookworm 80
Malaria 253
Onchocerciasis 0
Schistosomiasis 2
a The list of notifiable diseases varies from country to country. It is established by the central publichealth authority on the basis of:
— international regulations on reporting communicable diseases— diseases prevalent in the area.

3. General laboratory procedures 53
53
3. General laboratoryprocedures
3.1 Use of a microscopeThe microscope is an essential instrument for the diagnosis of disease. It is a preci-sion instrument and requires careful maintenance to prevent damage to the me-chanical and ocular parts and also to stop fungi from obscuring the lenses.
3.1.1 Components of a microscopeThe various components of the microscope can be classified into four systems:
— the support system
— the magnification system
— the illumination system
— the adjustment system.
Support system (Fig. 3.1)
This consists of:
— the foot (1)
— the limb (2)
— the revolving nosepiece (objective changer) (3)
— the stage (4)
— the mechanical stage (5), which gives a slow con-trolled movement to the object slide.
Magnification system (Fig. 3.2)
This consists of a system of lenses. The lenses of themicroscope are mounted in two groups, one at each endof the long tube — the body tube.
● The first group of lenses is at the bottom of the tube,just above the preparation under examination (theobject), and is called the objective.
● The second group of lenses is at the top of the tubeand is called the eyepiece.
Objectives
MagnificationThe magnifying power of each objective is shown by afigure engraved on the sleeve of the lens (Fig. 3.3):
— the ¥ 10 objective magnifies 10 times;
— the ¥ 40 objective magnifies 40 times;
— the ¥ 100 objective magnifies 100 times.
Fig. 3.1 Components of the support system of amicroscope1: foot; 2: limb; 3: revolving nosepiece; 4: stage;5: mechanical stage.

54 Manual of basic techniques for a health laboratory
Fig. 3.2 Components of the magnification system of a microscope
Fig. 3.3 Objective lenses
Fig. 3.4 Numerical aperture
(The ¥ 100 objective is usually marked with a red ring to show that it must be usedwith immersion oil.)
Some microscopes are fitted with a ¥ 3 or ¥ 5 objective instead of a ¥ 10 objective.
Numerical apertureThe numerical aperture is also engraved on the sleeve, next to the magnification(Fig. 3.4), for example:
ubeT
Objective
Eyepiece
who 01243

3. General laboratory procedures 55
— 0.30 on the ¥ 10 objective
— 0.65 on the ¥ 40 objective
— 1.30 on the ¥ 100 objective.
The greater the numerical aperture, the greater the resolving power (see below).Moreover, the greater the numerical aperture, the smaller the front lens mountedat the base of the objective. The front lens of the ¥ 100 objective is the size of apinhead, so handle it with care.
Other figures that may be marked on the sleeveThe sleeve may also display:
— the recommended length in millimetres of the tube (between the objectiveand the eyepiece) — usually 160mm;
— the recommended thickness in millimetres of the coverslip used to cover theobject slide — e.g. 0.16mm.
The screw threads of all objectives are standard, so the objectives in the revolvingnosepiece are interchangeable.
Working distanceThe working distance of an objective is the distance between the front lens of theobjective and the object slide when the image is in focus. The greater the magnify-ing power of the objective, the smaller the working distance (Fig. 3.5):
— ¥ 10 objective: the working distance is 5–6mm
— ¥ 40 objective: the working distance is 0.5–1.5mm
— ¥ 100 objective: the working distance is 0.15–0.20mm.
Fig. 3.5 Working distance of an objective
Resolving powerThe resolving power of an objective is its ability to reveal closely adjacent details asseparate and distinct. The greater the resolving power of the objective, the clearerthe image.
The maximum resolving power of a good medical laboratory microscope is about0.25mm (the resolving power of the normal human eye is about 0.25mm).
Immersion oil increases the resolving power by conserving many light rays thatwould be lost by refraction if a dry objective were used.

56 Manual of basic techniques for a health laboratory
Eyepiece
MagnificationThe magnifying power of the eyepiece is marked on it (Fig. 3.6):
— a ¥ 5 eyepiece magnifies the image produced by the objective five times;
— a ¥ 10 eyepiece magnifies the image 10 times.
If the object is magnified 40 times by the ¥ 40 objective, then by five times by the¥ 5 eyepiece, the total magnification is: 5 ¥ 40 = 200. To calculate the totalmagnification of the object observed, multiply the magnifying power of the objec-tive by that of the eyepiece. Microscopes used in medical laboratories have a mag-nifying power of between ¥ 50 and ¥ 1000.
Certain eyepieces have a calibrated graticule. These eyepieces are used to measurethe size of an object under the microscope (e.g. protozoan cysts).
Binocular microscopesBinocular microscopes (two eyepieces but using only one objective at a time) aregenerally recommended. They are less tiring for the eyes than monocular micro-scopes when long examinations have to be made. Electric illumination is, however,essential for using the ¥ 100 objective.
Illumination system
Light source
An electric light source is preferable, since it is easy to adjust. It is provided eitherby a lamp built into the microscope beneath the stage, or by an external lampplaced in front of the microscope.
Mirror
The mirror reflects rays from the light source onto the object. One side has a planesurface, the other a concave surface (Fig. 3.7). The concave side forms a low-powercondenser and is not intended to be used if the microscope already has a con-denser.
Fig. 3.6 An eyepiece
Fig. 3.7 A microscope mirror
Fig. 3.8 A condenser
Condenser
The condenser (Fig. 3.8) brings the rays of light to a common focus on the objectto be examined. It is situated between the mirror and the stage.
The condenser can be raised (maximum illumination) and lowered (minimum illu-mination). It must be centred and adjusted correctly.
Diaphragm
The diaphragm (Fig. 3.9), which is inside the condenser, is used to reduce orincrease the angle and therefore also the amount of light that passes into thecondenser.
The wider the diaphragm the greater the numerical aperture and the smaller thedetail seen. But the contrast is correspondingly diminished.

3. General laboratory procedures 57
Fig. 3.9 A diaphragm
Filters
In some microscopes coloured filters (particularly blue filters) are fitted below thecondenser. These can be left in place or removed according to the type of prepara-tion being examined.
Adjustment system (Figs. 3.10 and 3.11)
This consists of:
— a coarse adjustment screw
— a fine adjustment screw
— a condenser adjustment screw
— condenser centring screws
— an iris diaphragm lever
— mechanical stage controls.
Coarse adjustment screw
This is the largest screw. It is used first to achieve an approximate focus.
Fine adjustment screw
This moves the objective more slowly. It is used to bring the object into perfectfocus.
Fig. 3.10 Microscope adjustment system1: coarse adjustment screw;2: fine adjustment screw;3: condenser adjustment screw;4: condenser centring screws;5: iris diaphragm lever.
Fig. 3.11 Mechanical stage controls

58 Manual of basic techniques for a health laboratory
Condenser adjustment screw
This is used to raise the condenser for greater illumination or to lower it to reducethe illumination.
Condenser centring screws
There may be three screws placed around the condenser: one in front, one on theleft and one on the right. They are used to centre the condenser exactly in relationto the objective.
Iris diaphragm lever
This is a small lever fixed to the condenser. It can be moved to close or open thediaphragm, thus reducing or increasing both the angle and the intensity of thelight.
Mechanical stage controls
These are used to move the object slide on the stage: one screw moves it backwardsand forwards and the other screw moves it to the left or right (see Fig. 3.11).
3.1.2 Setting up the microscopeWhen a new microscope is received in the laboratory, it is important to know howto set it up correctly.
Positioning the microscope
Place it on a firm level bench (check with a spirit level) of adequate size but not toohigh. The microscope must be placed in the shade away from the window. Place asquare felt pad under the microscope. If no felt is available, use a piece of heavycloth.
Setting up a lamp for the microscope
If the microscope has a mirror, you can make a lamp to provide illumination. Aporcelain holder for a light bulb is fixed on a wooden base and the whole is encasedin a wooden or tin box with an opening for the light (Fig. 3.12). Cut slits in the topof the box to enable the bulb to cool.
Alternatively, a flap can be fitted above the opening to serve as a shutter (Fig. 3.13).Use a 100W opaque electric bulb of the “daylight” type (blue–white).
Fitting the accessories
Screw the objectives into the revolving nosepiece, following this order in a clock-wise direction:
— ¥ 3, ¥ 5 or ¥ 10 objective;
— ¥ 40 objective;
— ¥ 100 oil-immersion objective.
The screw threads are standard. After you have screwed in the objectives:
● Put the eyepiece(s) in place.
● Fix the condenser under the stage.
● Fix the mirror on the foot.

3. General laboratory procedures 59
Fig. 3.13 Alternative light source for the microscope
Fig. 3.14 Positioning the light source
Fig. 3.12 Setting up a lamp for the microscope
Positioning the lamp
If electric illumination is to be used, place the lamp 20cm in front of the micro-scope facing the mirror. Adjust the position of the lamp so that it shines on thecentre of the mirror (Fig. 3.14).
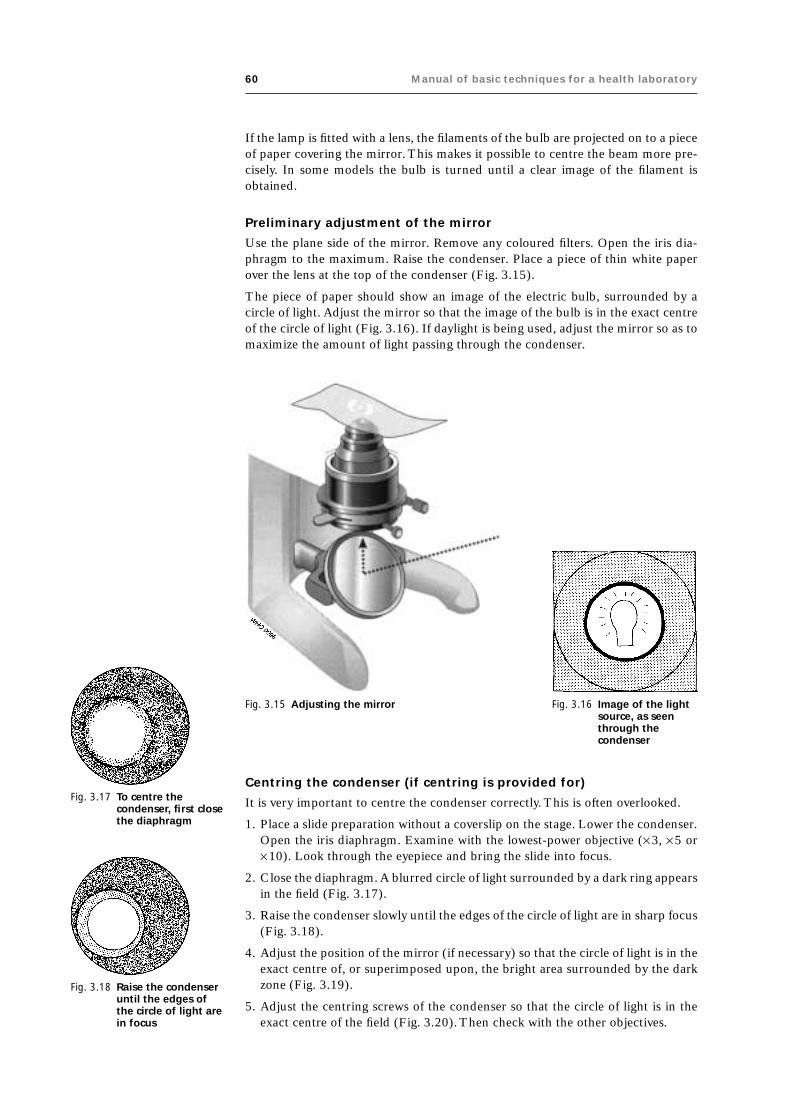
60 Manual of basic techniques for a health laboratory
If the lamp is fitted with a lens, the filaments of the bulb are projected on to a pieceof paper covering the mirror. This makes it possible to centre the beam more pre-cisely. In some models the bulb is turned until a clear image of the filament isobtained.
Preliminary adjustment of the mirror
Use the plane side of the mirror. Remove any coloured filters. Open the iris dia-phragm to the maximum. Raise the condenser. Place a piece of thin white paperover the lens at the top of the condenser (Fig. 3.15).
The piece of paper should show an image of the electric bulb, surrounded by acircle of light. Adjust the mirror so that the image of the bulb is in the exact centreof the circle of light (Fig. 3.16). If daylight is being used, adjust the mirror so as tomaximize the amount of light passing through the condenser.
Fig. 3.15 Adjusting the mirror Fig. 3.16 Image of the lightsource, as seenthrough thecondenser
Centring the condenser (if centring is provided for)
It is very important to centre the condenser correctly. This is often overlooked.
1. Place a slide preparation without a coverslip on the stage. Lower the condenser.Open the iris diaphragm. Examine with the lowest-power objective (¥ 3, ¥ 5 or¥ 10). Look through the eyepiece and bring the slide into focus.
2. Close the diaphragm. A blurred circle of light surrounded by a dark ring appearsin the field (Fig. 3.17).
3. Raise the condenser slowly until the edges of the circle of light are in sharp focus(Fig. 3.18).
4. Adjust the position of the mirror (if necessary) so that the circle of light is in theexact centre of, or superimposed upon, the bright area surrounded by the darkzone (Fig. 3.19).
5. Adjust the centring screws of the condenser so that the circle of light is in theexact centre of the field (Fig. 3.20). Then check with the other objectives.
Fig. 3.17 To centre thecondenser, first closethe diaphragm
Fig. 3.18 Raise the condenseruntil the edges ofthe circle of light arein focus

3. General laboratory procedures 61
Adjusting the diaphragm
Open the diaphragm completely. Remove the eyepiece and look down the tube: theupper lens of the objective will be seen to be filled with a circle of light. Close thediaphragm slowly until the circle of light takes up only two-thirds of the surface(Fig. 3.21). Do this for each objective as it is used.
Adjusting the eyepieces
Selecting the eyepiece
The ¥ 5 and ¥ 10 eyepieces give good results in the medical laboratory. The high-power eyepiece increases magnification but there may be no great increase in de-tail. The eyepiece to use is a matter of individual choice.
Binocular adjustment
When a binocular microscope is used, the interpupillary distance (the distance be-tween the pupils of the eyes) can be adjusted to suit the operator.
Focusing the eyepieces
One of the eyepiece holders (usually the left) has a focusing collar (Fig. 3.22). If thecollar is on the left eyepiece holder, close your left eye and, using the ¥ 40 objective,bring the image into focus for your right eye with the right eyepiece.
Then close your right eye and look through the left eyepiece. If the image is infocus, no adjustment is needed. If the image is not clear, turn the focusing collaruntil it is in focus. The microscope is now adjusted to suit your own binocularvision.
3.1.3 Focusing the objectiveLow-power objective (¥¥¥¥¥10)
Rack the condenser down to the bottom. Lower the objective until it is just abovethe slide preparation. Raise the objective, using the coarse adjustment screw, untila clear image is seen in the eyepiece.
Fig. 3.20 Use the centringscrews of thecondenser to centrethe light source
Fig. 3.21 Adjusting the diaphragm Fig. 3.22 Focusing the eyepieces
Fig. 3.19 Adjust the position ofthe mirror to centre thelight source

62 Manual of basic techniques for a health laboratory
Fig. 3.23 Establishing theposition of imagesseen under themicroscope
Occasionally a clear image cannot be obtained although the objective has beenlowered as far as possible. This is because the fine adjustment screw has been turnedright to the end. Turn it back as far as it will go in the other direction and then focusby raising the objective. Rack the condenser up slightly if there is insufficient illu-mination.
High-power objective (¥¥¥¥¥40)
Rack the condenser half-way down. Lower the objective until it is just above theslide preparation (the working distance is very short — about 0.5mm). Using thecoarse adjustment screw, raise the objective very slowly until a blurred image ap-pears in the field. Bring into focus using the fine adjustment screw. Raise the con-denser to obtain sufficient illumination. If the microscope has no condenser, usethe concave side of the mirror.
Oil-immersion objective (¥¥¥¥¥100)
Perfectly dry, stained preparations must be used. Place a tiny drop of immersion oilon the part to be examined (use synthetic oils, which do not dry, in preference tocedarwood oil, which dries quickly). Rack the condenser up as far as it will go, andopen the iris diaphragm fully. Lower the ¥ 100 objective until it is in contact withthe oil. Bring it as close as possible to the slide, but avoid pressing on the prepara-tion (modern objectives are fitted with a damper). Look through the eyepiece andturn the fine adjustment screw very slowly upwards until the image is in focus. Ifthe illumination is inadequate, use the concave side of the mirror as recommendedfor the ¥ 40 objective.
Important: In most modern microscopes, it is not the objective holder but the stagewhich is moved up and down by the coarse and fine adjustment screws to bring theimage into focus.
Depth of the microscope field
The image is seen in depth when a low-power objective is used. When the high-power objectives (¥ 40, ¥ 100) are used, the depth of focus is small and the fineadjustment screw must be used to examine every detail from the top to the bottomlevels of focus of the object observed (e.g. the different nuclei in a spherical amoebacyst).
Images seen under the microscope
Remember that the circle of light seen in the eyepiece is called “the microscopicfield”.
How to establish the position of images seen
Images observed in the microscopic field can be placed in relation to the hands ofa clock. For example, a schistosome egg is placed at “2 o’clock” in Fig. 3.23.
Inversion of images
The image seen is inverted by the lenses:
● Objects seen at the bottom of the microscopic field are actually at the top.
● Objects seen on the left side of the microscopic field are actually on the right.
Moving the object
If you move the slide in one direction, the object examined moves in the oppositedirection (Fig. 3.24).

3. General laboratory procedures 63
Changing the objective
Modern microscopes are made so that the object remainsmore or less in focus when you change from a low-powerobjective to a more powerful one. If this is not the case foryour microscope, raise the nosepiece before changing to themore powerful objective and refocus. Before changing objec-tives, make sure that the object examined is in the middle ofthe field, so that it is not lost after changing the objective.
3.1.4 Use of an ocular micrometerThe size of microorganisms or substructures of organismscan be measured by microscopy using an ocular with a cali-brated micrometer disc. The micrometer disc has a scale thatis usually divided into 0.1-mm and 0.01-mm subdivisions(Fig. 3.25). Fig. 3.24 Moving the object
Fig. 3.25 An ocular micrometer disc
Fig. 3.26 Calibration of an ocularmicrometer with a stagemicrometer
A stage micrometer is used to calibrate the ocular micrometer.
Materials
● Binocular microscope
● Ocular with a ¥ 10 magnification
● Ocular micrometer disc
● Stage micrometer
● Lens paper
● Immersion oil.
Method
1. Unscrew the eye lens of the ocular.
2. Place the micrometer with the engraved scale face-down in the ocular. Use lenspaper to handle the disc.
3. Replace the lens carefully.
4. Place the ocular with the micrometer in the ocular tube of the microscope.
5. Put the calibrated stage micrometer on the stage of the microscope and focuson the scale. You should be able to clearly distinguish the 0.1-mm and 0.01-mm subdivisions.
6. Adjust the stage micrometer so that the 0-mm line coincides with the0-mm line of the ocular micrometer.
7. Look for another set of lines where the scale of the stage micrometer coincideswith that of the ocular micrometer. This set of lines should be as far away fromthe 0-mm line as possible (Fig. 3.26). The distance between the two coincidingsets of lines varies, depending on the magnification of the objective of themicroscope.
8. Count the number of 0.1-mm subdivisions of the stage micrometer scale be-tween the 0-line and the second set of coinciding lines.
9. Count the number of subdivisions of the ocular micrometer scalebetween the 0-line and the second set of coinciding lines.
10. Calculate the proportion of a millimetre that is measured by a singleocular unit using the following formula:
stage reading mm m
ocular reading mmocular units m
( ) ¥¥
= ( )1000
1
mm

64 Manual of basic techniques for a health laboratory
Example
For a microscope with a high-power objective (¥ 40), the calculation is as follows:
0 1 100050 1
2. mm m
units mmm
¥¥
=m m
Important: Corresponding objectives should not be exchanged for a calibrated ob-jective, but must be separately calibrated. The ocular containing the micrometerdisc should be stored until required. Each microscope that is to be used for meas-uring the size of organisms must be individually calibrated.
3.1.5 Dark-field microscopyTo obtain a dark field a special condenser with a blacked-out centre is used. If thisis not available it is possible to obtain a dark field under the ¥ 10 and ¥ 40 objectivesby inserting a disc or stop in the filter holder below the condenser.
The stops must be made of a material through which light cannot pass and must bethe correct size for the objective in use. If the stop is too small, too much light willpass into the objective and a dark field will not be obtained.
If the stop is too large, insufficient light will be available to illuminate the specimen.
3.1.6 Routine maintenanceMicroscopes must be installed in a clean environment, away from chemicals.
Workplaces should be well ventilated or permanently air-conditioned (intermittentuse of air conditioners produces condensed water). The microscope needs dailyattention to keep it in good working order and thus to ensure reliable laboratoryresults. Optical instruments should not be kept for long periods in closed compart-ments since these conditions also favour fungal growth which can corrode opticalsurfaces. Special care is required in hot and humid climates.
Cleaning the microscope
Microscopes are used to investigate biological tissues and fluids and must thereforebe decontaminated at regular intervals.
Materials
● Clean pieces of old cloth and a fine linen handkerchief
● Special lens tissue paper or, if unavailable, white absorbent paper or medical-grade cotton wool
● A piece of chamois leather, if possible (otherwise a non-fluffy rag)
● A small bottle of cleaning solution (see below)
● A plastic cover
● A small rubber bulb and, if possible, a soft camel-hair brush (or a fine paint-brush or blower for cleaning lenses)
● A desiccator 15–20cm in diameter containing not less than 250g of dry bluesilica gel (which indicates humidity by turning pink).
Method
Cleaning the optical surfacesThe optical surfaces (condenser, objectives, eyepieces) must be kept free of dustwith a fine paintbrush, a soft camel-hair brush (Fig. 3.27) or a blower. If dust isfound inside the eyepiece, unscrew the upper lens and clean the inside.

3. General laboratory procedures 65
Maintaining the microscope
When you carry out repair and maintenance procedures, take care not to confusethe condenser centring screws with the condenser clamp screws. To maintain themicroscope proceed as follows:
● Check the mechanical stage.
● Check the focusing mechanism.
● Remove any fungal growth.
● Check the diaphragm.
● Clean all mechanical parts.
● Lubricate the microscope according to the manufacturer’s instructions.
● Check the spring load on the specimen clamp. Too high a tension may result inbreakage of slides and damage to the clamp.
● Check the optical alignment. A dim appearance of the specimen is often due tomisalignment of the optical parts rather than to insufficient light.
Precautions
● Never dip the objectives in xylene or ethanol, as this may cause the lenses tobecome detached.
● Never use ordinary paper to clean the lenses.
● Never touch the lenses with your fingers.
● Never clean the support or the stage with xylene or acetone.
● Never clean the inside lenses of the eyepieces and objectives with cloth or paper(this might remove the anti-reflective coating); use a soft camel-hair brush, afine paintbrush or a blower instead.
● Never leave the microscope without the eyepieces unless the openings are plugged.
● Never keep the microscope in a closed wooden box in hot humid countries.
● Never press the objective on to the slide, since both the slide and the objectivemay break. Take care when focusing the microscope.
Fig. 3.27 Cleaning the objective lenses using asoft camel-hair brush
Oil residues on the lenses should be removed with special lenstissue paper, absorbent paper or medical-grade cotton wool. Theoptical surfaces may be finally cleaned with a special solution,consisting of the following:
— 80% petroleum ether (boiling point 60–80°C)
— 20% 2-propanol.
Note: Do not use 95% ethanol, xylene or toluene for cleaningthe lenses, since these substances dissolve the cement. They can,however, be used for cleaning mirrors.
Cleaning the instrumentHeavy contamination can be removed with mild soapy solutions.Grease and oil can be removed with the special cleaning solu-tion described above. The instrument should then be cleanedwith a 50 :50 mixture of distilled water and 95% ethanol. Thismixture is not suitable for cleaning the optical surfaces.
The mechanical parts (coarse adjustment screw, fine adjustmentscrew, condenser focusing and mechanical stage) should beperiodically cleaned and lubricated with machine oil to makethem run freely.

66 Manual of basic techniques for a health laboratory
● Keep the mechanical stage clean.
● Do not dismantle the optical components, as this may cause misalignment. Theoptical surfaces should be cleaned with lens cleaning tissue or soft tissuepaper.
● Never put the microscope away with immersion oil on the objective. Removeany oil daily. Mild soap solution is suitable for most cleaning.
● Use organic solvents only in accordance with the manufacturer’s recom-mendations.
● Never carry the microscope by the limb with one hand; use both hands, oneunder the foot, the other holding the limb.
● When changing a bulb, avoid touching the glass with your fingers, as finger-prints reduce the intensity of illumination.
● To maximize the lifespan of bulbs, adjust the voltage with a dimmer switch togive the lowest required light intensity.
● If the mains voltage fluctuates excessively, use a voltage stabilizer.
Additional precautions to be taken in hot climates
Dry climates
In hot, dry climates the main problem is dust. Fine particles work their way into thethreads of the screws and under the lenses. This can be avoided as follows:
● Always keep the microscope under an airtight plastic cover when not in use.
● At the end of the day’s work, clean the microscope thoroughly by blowing airover it with a rubber bulb.
● Finish cleaning the lenses with a soft camel-hair brush, a fine paintbrush or ablower. If dust particles remain on the surface of the objective, clean it withspecial lens tissue paper.
Humid climates
In hot, humid climates and during the wet season in hot, dry climates, fungi maygrow on the microscope, particularly on the surface of the lenses, in the grooves ofthe screws and under the paint, and the instrument will soon be useless. This canbe prevented as described below.
Always keep the microscope under an airtight plastic cover when not in use, to-gether with a dish filled with blue silica to dry the air under the cover. (The silicawill turn red when it has lost its capacity to absorb moisture from the air. It can besimply regenerated by heating in a hot-air oven or over a fire.) The microscopemust be cleaned daily to get rid of dust.
These procedures must be carried out regularly, and are essential in conjunctionwith repair and maintenance procedures.
3.2 Weighing: use of laboratory balancesBalances may be either electrically or manually operated. All types should be posi-tioned on a firm level bench away from vibrations, draughts and direct sunlight.
The balance is used to weigh chemicals for production of reagents, and cleanlinessis essential if accurate results are to be obtained:
● Remove dust by blowing or using a soft brush.
● Remove stains or chemicals using a soft brush.
● Use a plastic weigh boat or filter-paper to weigh chemicals on the balance; neverplace chemicals directly on to the pan.

3. General laboratory procedures 67
Fig. 3.28 An open two-pan balance Fig. 3.29 Set of weights (in grams) for usewith an open two-pan balance
Important: If water has been used to clean the balance, make sure that it is thor-oughly dry before weighing. Always set the balance to zero before weighing. Checkthe accuracy of the balance regularly according to the manufacturer’s recommen-dations. Handle loose weights with forceps.
3.2.1 Sensitivity of a balanceThe sensitivity corresponds to the smallest mass that makes the pointer move overone division on the scale. For example, if the sensitivity of a balance is 1mg, thismeans that a mass of at least 1mg is needed to move the pointer.
For routine laboratory purposes, the sensitivity of a balance can be considered tobe the smallest mass that it will measure accurately.
3.2.2 Open two-pan balance (Fig. 3.28)
The two-pan balance has two pans supported by shafts. It may be designed for usewith separate weights, as illustrated in Fig. 3.29, or may incorporate a graduatedarm with a sliding weight. It is used to weigh large amounts (up to several kilo-grams) when a high degree of accuracy is not required, e.g. 22.5g, 38g, 8.5g,380g.
Sensitivity: 0.5g.
If the pans are made of easily scratched or corroded material, protect them withcircles cut out of strong plastic or old X-ray films; the two circles should be of equalweight.
Instructions for use
1. Place the bottle containing the substance to be weighed to the left of thebalance.
2. Place on the left-hand pan the receptacle (folded paper or dish) in which thesubstance will be weighed.
3. Place on the right-hand pan the weights equivalent to the weight of the recep-tacle plus the amount of the substance to be weighed.
4. To measure out the substance to be weighed, hold the bottle tilted in your lefthand (label upwards) and tap the neck of the bottle gently with your right hand,so that the powder or crystals to be weighed fall little by little into the receptacle(Fig. 3.30). (Use a clean spatula to dispense small amounts of substances forweighing.)
When the substance has been weighed, move the bottle to the right-hand side ofthe balance (Fig. 3.31).

68 Manual of basic techniques for a health laboratory
Fig. 3.31 Keep weighed and unweighed substancesapart to avoid confusion
Fig. 3.30 Measuring out the substance to beweighed
Thus place:
— the weighed substances on the right
— the unweighed substances on the left.
This avoids confusion.
Read the label three times:
— before taking the bottle off the shelf;
— while weighing the substances (label facing upwards);
— after weighing, when you move the bottle to the right of the balance.
3.2.3 Analytical balanceThis balance has two pans suspended from a cross-beam inside a glass case.
Use the balance:
— to weigh small quantities (up to 20 or 200g, depending on the model);
— when great accuracy is required: e.g. 3.85g, 0.220g, 6.740g.
Sensitivity: 0.1–0.5mg, depending on the model.
Components (Fig. 3.32)
● Cross-beam (CB). This is the structure from which the pans are suspended.
● Knife edges (KE1, KE2, KE3). These support the beam at the fulcrum duringthe weighing and give sensitivity to the balance. Those on the beam support thesuspended pans.
● Stirrups (S1, S2).
● Pointer (Pt).
● Pans (P).
● Beam release screw (or pan lock control) (B). Locks the pan so that the suddenaddition of weights or chemicals will not damage the delicate knife edges.
● Adjusting screws (AS1, AS2). Used only for initial adjustment of the unloadedbalance to a reading of zero.
Figure 3.33 shows a set of weights for use with an analytical balance.
Instructions for use
● Always ensure that the cross-beam is at rest (beam release screw tightened) be-fore placing the weights and the substance to be weighed on the pans.

3. General laboratory procedures 69
● Check that the pans are balanced (after closing the glass case) by unscrewing thebeam release screw.
● Always place the substance to be weighed on a piece of paper folded in four, orin a watch glass or porcelain dish.
● Use the adjusting screws (AS1 and AS2) to obtain a perfect balance when com-pensating for the weight of the receptacle in which the substance will be weighed.
● Always use forceps to pick up the weights.
● Always put the cross-beam back at rest before removing the weights andthe substance that has been weighed from the pans.
3.2.4 Dispensary balance (Fig. 3.34)
This balance also has two suspended pans, but it has no glass case and nosupports.
Sensitivity: 5–10mg.
The dispensary balance is more accurate than the open two-pan balance,but weighs only up to 50g.
After using the dispensary balance, put it away in a closed cupboard.
3.3 Centrifugation3.3.1 PrincipleA body is rotated in a circular movement at speed. This creates a force thatdrives the body away from the centre of the circular movement (Fig. 3.35).To calculate the relative centrifugal force (rcf) for an individual centrifuge,measure the radius (r) of the rotor arm (in cm) and the number of revolu-tions per minute (rpm) and use the formula below:
rcf = 1.118 ¥ 10-6 ¥ r ¥ (rpm)2
For example, if the radius is 25cm and the rpm is 1300rev/min, the rcf isabout 50g.
Fig. 3.32 Components of an analytical balanceAS1, AS2: adjusting screws; B: beamrelease screw; CB: cross-beam;KE1, KE2, KE3: knife edges; P: pans;Pt: pointer; S1, S2: stirrups.
Fig. 3.33 Set of weights for use with ananalytical balanceSingle pieces: 1g, 2g, 5g, 10g, 20g,50g, 100g, 200g and 500g.Single fractional pieces: 2mg, 5mg,10mg, 20 mg, 50mg, 100mg, 200mgand 500mg.
Fig. 3.34 A dispensary balance
Fig. 3.35 Principle of centrifugation

70 Manual of basic techniques for a health laboratory
Fig. 3.36 Components of acentrifugeA: central shaft or spindle;E: centrifuge head;T: centrifuge tubes.
Fig. 3.37 A hand-operatedcentrifuge
Components of a centrifuge (Fig. 3.36)
A centrifuge consists of:
— a central shaft or spindle (A) that rotates at high speed;
— a head (E), fixed to the shaft, with buckets for holding the centrifuge tubes;
— tubes (T) containing the liquid to be centrifuged.
When the spindle rotates the tubes are subjected to centrifugal force. They swingout to the horizontal and the particles in suspension in the liquids in the tubes arethrown to the bottom of the tubes. The particles are compacted at the bottom ofthe centrifuge tubes. These particles form the centrifuge deposit which can be sepa-rated from the supernatant fluid and examined. The deposit may contain, for ex-ample:
— blood cells;
— parasite eggs (in diluted stools);
— cells from the urinary tract (in urine).
3.3.2 Types of centrifugeHand-operated centrifuge (Fig. 3.37)
This is operated manually by turning a handle. It takes two or four tubes.
The hand-operated centrifuge can be used:
— to examine urinary deposits;
— to concentrate certain parasites in stools.
The speed is insufficient for satisfactory separation of erythrocytes from plasma inblood.
Important:
● Clamp the centrifuge firmly on a stable support (edge of a table).
● Balance the two diametrically opposite tubes perfectly as described in the in-structions for use, section 3.3.3.
● Keep your distance while operating the centrifuge.
● To stop the centrifuge, do not slow down the turning of the handle. Pull thehandle out of the machine with a sharp movement.
● Remove the tubes slowly and carefully (so as not to disturb the deposit).
● Lubricate the spindle of the centrifuge regularly.
Warning: The hand-operated centrifuge can cause serious injury, so follow the in-structions above carefully.
Electric centrifuges
Electric centrifuges are more accurate than hand-operated centrifuges and shouldbe used whenever possible. Electric centrifuges are used with two types of head —the “swing-out” head and the “angle” head.
“Swing-out” head (Fig. 3.38)
The head is designed to swing the tubes out to a horizontal position during centri-fuging. This is the type most frequently needed.
“Angle” head (Fig. 3.39)
The “angle” head holds the tubes at an angle of about 45° during centrifuging. It isuseful for certain techniques, e.g. agglutination tests in blood-grouping by the test-tube method.

3. General laboratory procedures 71
Buckets (tube holders)
There are several types of bucket for use with electric centrifuges (Fig. 3.40). Thechoice depends on the model of centrifuge:
— buckets designed to hold one round-bottomed or conical tube only;
— buckets that hold two round-bottomed or conical tubes;
— buckets that hold nine small (precipitin) tubes, etc.
Some models are also fitted with:
— a timer that stops the centrifuge automatically when the time is up (e.g. after5 or 10 minutes);
— a cooling chamber that prevents heating of the specimen during centrifug-ing;
— a revolution counter, i.e. a dial with a needle that indicates the speed of themachine during centrifuging (this is useful for some methods of concentra-tion of parasites).
Battery-operated centrifuges
Small battery-operated centrifuges are sometimes used to measure the packed cellvolume in haematology.
3.3.3 Instructions for useYou should always follow the manufacturer’s instructions when using the centri-fuge.
Fig. 3.39 A centrifuge with an angle head Fig. 3.40 Types of bucket for a centrifuge
Fig. 3.38 A centrifuge with a swing-out head

72 Manual of basic techniques for a health laboratory
To balance: either add more of the liquid to be centrifuged to the lighter tube (Fig.3.42); or add water to the bucket containing the lighter tube (using a wash bottle;Fig. 3.43).
If only one tube of liquid is to be centrifuged, balance it with an identical tube filledwith water.
Preventing breakage of tubes
Always pad the bottom of the buckets with the rubber cushions provided with themachine. This protects the bottom of the centrifuge tubes.
Using a wash bottle, add a little water between each tube and its bucket.
Safety precautions
● Check that the tubes are the correct size for the centrifuge. Tubes that are toolong or too small may break.
● Fill the tubes to no more than three-quarters full to prevent spillage in the bowl.
● Always balance the centrifuge buckets before starting the centrifuge. Failure todo this can cause excessive wear or the centrifuge may move.
● Ensure that the lid is closed before starting the centrifuge.
● When starting the centrifuge, gradually increase the speed, turning the knobslowly, until the desired speed is reached.
● Stop the centrifuge gradually (some models have a brake that can be applied).Never try to slow the centrifuge down with your hand.
● Never open the centrifuge until it has come to a complete stop.
● Remove the tubes slowly and carefully.
Installing the centrifuge
The centrifuge must be placed on rubber pads or a mat on a flatlevel surface.
Balancing the tubes
If the tubes are numbered, place them as shown in Fig. 3.41:
— tube 1 opposite tube 2;
— tube 3 opposite tube 4.
Balance the tubes that are opposite each other by weighing themin their buckets on the open two-pan balance.
Fig. 3.42 Balancing centrifuge tubes by addingliquid to the lighter tube
Fig. 3.43 Balancing centrifuge tubes by adding water tothe bucket containing the lighter tube
Fig. 3.41 Balancing centrifuge tubes

3. General laboratory procedures 73
Cleaning and maintenance
For details of cleaning and maintenance of centrifuges, see section 3.5.3.
3.4 Measurement and dispensing of liquidsMany of the liquids handled in the laboratory are either infectious, corrosive orpoisonous. It is important for the prevention of accidents that the correct pro-cedures for the measurement and dispensing of these liquids are clearly under-stood and are followed conscientiously.
Many of the new procedures for analysis require very small volumes of fluid andvarious pipetting and dispensing devices are available to enable small volumes tobe measured with great precision.
Large volumes can be measured using a measuring cylinder or a volumetric flask.
A measuring cylinder measures various volumes of fluid but is not very accurate. Avolumetric flask measures a single volume of fluid, e.g. 1 litre, accurately.
Small volumes of fluid (0.1–10ml) can be dispensed rapidly and accurately usingone of the following methods:
● A fixed or variable volume dispenser attached to a reservoir made of glass orpolypropylene. Various volumes from 0.1 to 1.0ml and from 2.0 to 10.0ml canbe dispensed.
● A calibrated pipette with a rubber safety bulb.
3.4.1 PipettesTypes of pipette
Graduated pipettes
Graduated pipettes have the following information marked at the top (Fig. 3.44):
— the total volume that can be measured;
— the volume between two consecutive graduation marks.
There are two types of graduated pipette (Fig. 3.45):
● A pipette with graduations to the tip (A). The total volume that can be measuredis contained between the 0 mark and the tip.
● A pipette with graduations not extending to the tip (B). The total volume is con-tained between the 0 mark and the last mark before the tip (this type is re-commended for quantitative chemical tests).
Various volumes can be measured using graduated pipettes. For example:
— a 10-ml pipette can be used to measure 8.5ml;
— a 5-ml pipette can be used to measure 3.2ml;
— a 1-ml pipette can be used to measure 0.6ml.
Volumetric pipettes
Volumetric pipettes are intended to measure a precise volume with a high degreeof accuracy.
There are two types of volumetric pipette (Fig. 3.46):
● A pipette with a single graduation mark (A), which is intended to be filled to themark. After discharge of the contents, the pipette is allowed to drain for 15–45 seconds, according to its size (marked on the bulb) and the last drop isexpressed against the side of the recipient container. It should not be expelled.
Fig. 3.44 A graduatedpipette
Fig. 3.45 Types of graduatedpipetteA: pipette withgraduations to the tip;B: pipette withgraduations notextending to the tip.

74 Manual of basic techniques for a health laboratory
● A pipette with two graduation marks (B) may be more accuratein skilled hands. It is less reliable when used by aninexperienced person because it is easy to overrun the lowergraduation mark when discharging the contents.
Hold the pipette vertically to check that the liquid reaches thedesired graduation mark (G in Fig. 3.47). This mark should belevel with the bottom of the meniscus formed by the liquid. Thetip of the pipette should be held against the side of the recepta-cle while the fluid is discharged.
Plastic bulb pipettes
Plastic bulb pipettes are cheap and very useful for transferringvolumes of liquid such as serum or disinfectant. They are availablewith different tips and can be obtained with calibrations markedon the stem.
They can be reused after disinfection and washing but cannotbe autoclaved.
Micropipettes
Micropipettes with disposable tips are frequently used to measuresmall volumes. They are available in a variety of volumes, rangingfrom 5 ml to 1000ml. Used tips are disposed of directly intodisinfectant using an ejector mechanism. The micropipettes havetwo positions of the plunger operated by thumb (Fig. 3.48).Thefirst position is used to pick up the sample and the second toexpel the sample from the tip into a tube or well.
Fig. 3.46 Types of volumetric pipetteA: pipette with a single graduationmark; B: pipette with two graduationmarks.
Fig. 3.48 A micropipette witha disposable tipT: disposable tip.
Fig. 3.47 How to hold a pipetteG: graduation mark;S: safety bulb.

3. General laboratory procedures 75
Fig. 3.49 Using a dropping pipette Fig. 3.50 Calibrating a dropping pipetteS: safety bulb.
Micropipettes must be calibrated and maintained according to the instructions ofthe manufacturer.
Calibrated dropping pipettes
Ordinary calibrated dropping pipettes often deliver 20 drops per ml of distilledwater, thus 1 drop = 0.05ml. Hold the dropping pipette absolutely vertical to expelthe drops (Fig. 3.49).
Calibration of dropping pipettes (Fig. 3.50)Using a volumetric pipette (see page 74), measure 1ml of water into a small tube.Draw the water into the dropping pipette to be calibrated. Count the number ofdrops delivered from the millilitre of water. Repeat the procedure three times tocheck the accuracy.
Precautions
Pipetting by mouth is dangerous and should not be done. It can cause thefollowing:
— infection
— burns
— poisoning
— cuts.
Always use a rubber safety bulb (see Fig. 3.50) with the pipette instead.
3.4.2 Volumetric flasksVolumetric flasks are graduated to measure a certain volume when filled to thegraduation mark.

76 Manual of basic techniques for a health laboratory
They have various capacities:
— 2000ml
— 1000ml
— 500ml
— 250ml
— 200ml
— 100ml
— 50ml
— 25ml.
Volumetric flasks are more accurate than measuring cylinders. They should be usedfor the preparation of reagents.
Fig. 3.51 Preparing sodium chloride solutionin a volumetric flask
Fig. 3.52 Alternative method for preparingreagents using a volumetric flask
For example: 1 litre of sodium chloride, 0.85% solution (reagent no. 53), is pre-pared by washing 8.5g of sodium chloride, dissolved in 100ml of distilled water ina beaker, into a 1000-ml flask through a funnel and diluting to the 1000-ml mark(Fig. 3.51). The solution should be shaken before use.
Alternatively, the substance(s) can be dissolved in a small container and the solu-tion poured into the flask along a glass rod (Fig. 3.52). Fill to the graduation mark.(This method is recommended for the preparation of titrated chemical reagents.)
Temperature of the liquid
The temperature at which liquids should be measured is etched on the flask (afterthe capacity figure; Fig. 3.53).
Liquids expand with heat and contract with cold. Never measure hot liquids, orcold liquids just taken from the refrigerator.
Stoppers
Volumetric flasks should have plastic stoppers; if these are not available use groundglass ones. Be careful not to lose them.
Cost
Volumetric flasks are very expensive, so use them with great care.
Fig. 3.53 Mark the temper-ature at which thereagent should bemeasured on theflask

3. General laboratory procedures 77
3.4.3 BurettesThese are graduated glass tubes with a glass stopcock at the lower end. Burettes arefilled from the top with the liquid to be measured (Fig. 3.54). They are of 10ml,20ml, 25ml and 50ml capacity.
Maintenance of burettes
The stopcock and tap should be kept well greased. To grease a clean stopcockproperly, apply the tiniest smear of petroleum or silicone jelly with a finger tipdown the two sides of the stopcock away from the capillary bore. Then insert thestopcock in the burette and rotate it until a smooth covering of the whole stopcockis obtained. Keep the top plugged or covered (Fig. 3.55).
Fig. 3.54 Filling a burette
Fig. 3.56 A graduated conicaltesting glass
3.4.4 Graduated conical glasses (Fig. 3.56)
These are not accurate. Avoid using them for laboratory tests.
3.5 Cleaning, disinfection and sterilization3.5.1 Cleaning glassware and reusable syringes and needlesInstructions for cleaning:
— glass containers (Erlenmeyer flasks, beakers, test-tubes)
— pipettes
— microscope slides
— coverslips
— reusable syringes and needles.
Glass containers
New glassware
Glassware that has never been used may be slightly alkaline.
In order to neutralize it:
● Prepare a bowl containing 3 litres of water and 60ml of concentrated hydrochlo-ric acid (i.e. a 2% solution of acid).
● Leave the new glassware completely immersed in this solution for 24 hours.
● Rinse twice with ordinary water and once with demineralized water.
● Dry.
Fig. 3.55 Keep the top of the buretteplugged or covered

78 Manual of basic techniques for a health laboratory
Dirty glassware
Preliminary rinsingRinse twice in cold or lukewarm water (never rinse bloodstained tubes in hotwater).
If the glassware has been used for fluids containing protein, it should be rinsedimmediately and then washed (never allow it to dry before rinsing).
Soaking in detergent solutionPrepare a bowl of water mixed with washing powder or liquid detergent. Put therinsed glassware in the bowl and brush the inside of the containers with a test-tubebrush (Fig. 3.57). Leave to soak for 2–3 hours.
RinsingRemove the articles one by one. Rinse each one thoroughly under the tap, thensoak them all in a bowl of ordinary water for 30 minutes.
Rinse each article in a stream of clean water. (Do not forget that traces of detergentleft on glassware can lead to false laboratory results.)
DrainingPlace containers (beakers, flasks, measuring cylinders) on the pegs of a drainingrack. Place test-tubes upside-down in a wire basket.
DryingPlace the glassware in wire baskets and dry in a hot-air oven at 60 °C. Alternatively,place the baskets in a sunny spot in the laboratory and cover them with a fine cloth.
PluggingThe clean dry glassware should be put away in a cupboard to protect it from dust.It is recommended that glass containers be plugged with non-absorbent cottonwool or their mouths covered with small caps made from newspaper (Fig. 3.58) or,preferably, thin sheets of paraffin wax or clinging plastic, if available.
Pipettes
Immediate rinsing
Once a pipette has been used, rinse it immediately in a stream of cold water toremove blood, urine, serum, reagents, etc.
Fig. 3.57 Cleaning dirty glassware Fig. 3.58 Plug or cover glassware toprotect it from dust

3. General laboratory procedures 79
Soaking in water
After rinsing, place the pipettes in a large, plastic measuring cylinder (or bowl) fullof water. If the pipettes have been used to measure infected material, leave them ina cylinder full of disinfectant solution (e.g. a quaternary ammonium compound or1% bleach solution; see pages 84 and 85) for 4 hours.
Soaking in detergent and rinsing
Follow the instructions given above for soaking and rinsing of laboratoryglassware.
Blocked pipettes
1. Put blocked pipettes in a cylinder filled with dichromate cleaning solution (rea-gent no. 20). Slide them carefully into the solution and leave for 24 hours.
2. The next day, pour the dichromate solution into another cylinder (it can be usedfour times).
3. Hold the cylinder containing the pipettes under the tap and rinse thoroughly.
4. Remove the pipettes one at a time. Check that the obstruction has been washedaway. Rinse again.
5. Leave to soak in ordinary water for 30 minutes, then change the water and soakfor a further 30 minutes.
Warning: Dichromate cleaning solution is highly corrosive and should be used withextreme care. If it is accidentally splashed on the skin or clothing or into the eye(s),wash at once with large quantities of water.
Drying
Dry heat-resistant glass pipettes in a hot-air oven at 60 °C and ordinary pipettes inan incubator at 37 °C. Alternatively, leave pipettes to air-dry.
Fig. 3.59 Using a vacuum pumpto rinse a pipette
Using the vacuum pump
This is a small instrument made of metal, plastic or glass that is attached to thewater tap.
1. Turn the water on hard to drive a strong jet through the pump. This causes airto be sucked into the side arm of the pump and the rubber tubing attached toit.
2. Fit this rubber tubing over the tip of the pipette.
3. Dip the other end of the pipette into the rinsing liquid (water or detergentsolution), which is sucked through the pipette and discharged by the pumpinto the sink (Fig. 3.59).
Microscope slides
New slides
Soaking in detergent solutionPrepare a bowl of water mixed with washing powder or liquid detergent. Use theamounts recommended by the manufacturer. Place the slides in the bowl one byone and leave to soak overnight.
Rinsing in waterRinse each slide with tap water and then soak in clean water for 15 minutes.

80 Manual of basic techniques for a health laboratory
Wiping and dryingWipe the slides, one at a time, with a soft, non-fluffy cloth. Place them on a sheet offilter paper, one by one. Leave to dry. Examine each slide. Discard any slides thatare stained, scratched or yellow or that have dull patches on them, or try to cleanthem again.
Wrapping upDivide the slides into piles of 10 or 20 and wrap each pile in a small sheet of paper.
NumberingIn some laboratories the slides are numbered in advance in series of five packetswith a diamond pencil. (For example, for packets containing 20 slides each, theslides are numbered 1–20, 21–40, 41–60, 61–80 and 81–100, respectively.)
Dirty slides
Slides covered with immersion oilTake the oily slides one by one and rub them with newspaper to remove as much ofthe oil as possible.
Slides with coverslipsUsing the tip of a needle or forceps, detach the coverslips and drop them into abeaker of water (Fig. 3.60) (for cleaning of coverslips, see overleaf).
Soaking in detergent solutionPrepare a bowl of cold or lukewarm water mixed with detergent. Use the amountrecommended by the manufacturer to produce a strong detergent solution.
Leave the slides to soak for 24 hours.
Note: Detergents containing enzymes are excellent for removing blood films.
When slides have been used for infected specimens (e.g. urine, stools), they shouldbe placed in disinfectant solution before cleaning.
CleaningAfter the slides have soaked for 24 hours, prepare another bowl containing a weakdetergent solution (15ml of household detergent per litre of water).
Remove the slides one by one from the strong detergent solution.
Rub each one with cotton wool dipped in the strong detergent solution, then dropinto the bowl of weak detergent solution and leave to soak for 1 or 2 hours.
Rinsing
Preferred methodRemove the slides one by one from the weak detergent solution using forceps. Ifyou must use your fingers, pick the slides up by their edges. Rinse each slide sepa-rately under the tap, then soak for 30 minutes in a bowl of water.
Quick methodEmpty the bowl of weak detergent solution and fill with clean water. Change thewater three times, shaking the bowl vigorously each time.
Wiping, drying and wrapping upFollow the instructions given above for new slides.
Fig. 3.60 Removingcoverslips from aslide for cleaning
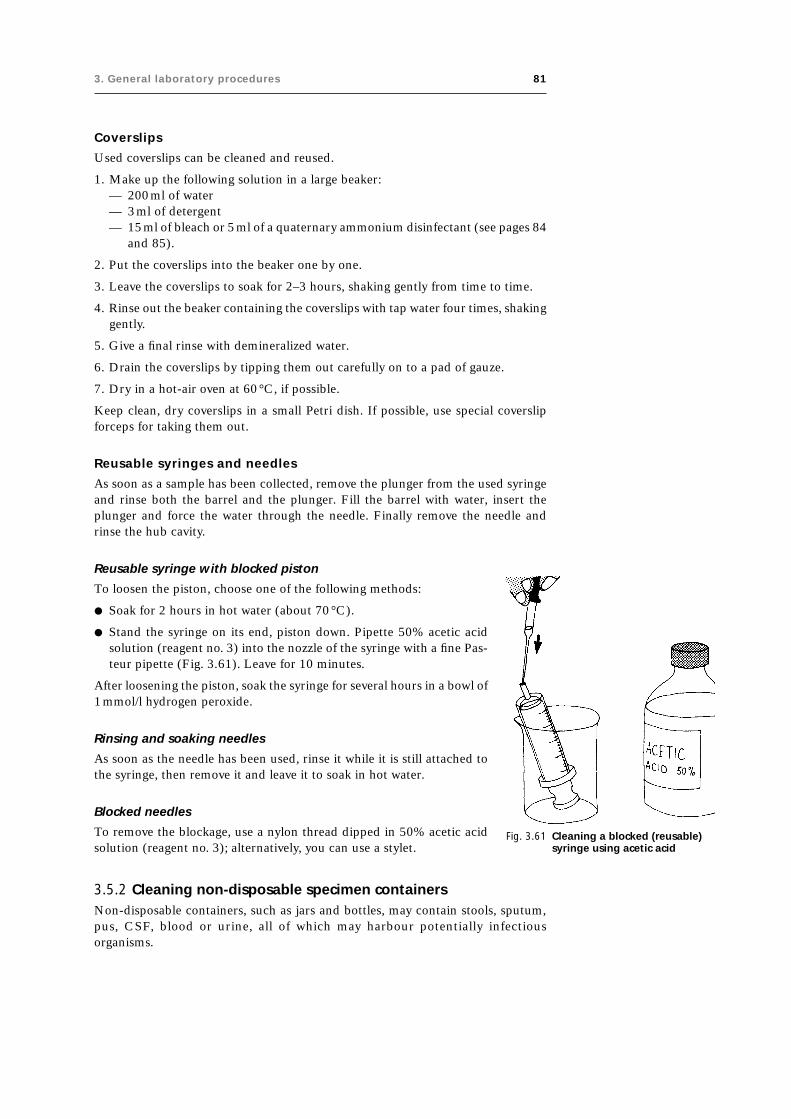
3. General laboratory procedures 81
Coverslips
Used coverslips can be cleaned and reused.
1. Make up the following solution in a large beaker:— 200ml of water— 3ml of detergent— 15ml of bleach or 5ml of a quaternary ammonium disinfectant (see pages 84
and 85).
2. Put the coverslips into the beaker one by one.
3. Leave the coverslips to soak for 2–3 hours, shaking gently from time to time.
4. Rinse out the beaker containing the coverslips with tap water four times, shakinggently.
5. Give a final rinse with demineralized water.
6. Drain the coverslips by tipping them out carefully on to a pad of gauze.
7. Dry in a hot-air oven at 60°C, if possible.
Keep clean, dry coverslips in a small Petri dish. If possible, use special coverslipforceps for taking them out.
Reusable syringes and needles
As soon as a sample has been collected, remove the plunger from the used syringeand rinse both the barrel and the plunger. Fill the barrel with water, insert theplunger and force the water through the needle. Finally remove the needle andrinse the hub cavity.
Fig. 3.61 Cleaning a blocked (reusable)syringe using acetic acid
Reusable syringe with blocked piston
To loosen the piston, choose one of the following methods:
● Soak for 2 hours in hot water (about 70 °C).
● Stand the syringe on its end, piston down. Pipette 50% acetic acidsolution (reagent no. 3) into the nozzle of the syringe with a fine Pas-teur pipette (Fig. 3.61). Leave for 10 minutes.
After loosening the piston, soak the syringe for several hours in a bowl of1mmol/l hydrogen peroxide.
Rinsing and soaking needles
As soon as the needle has been used, rinse it while it is still attached tothe syringe, then remove it and leave it to soak in hot water.
Blocked needles
To remove the blockage, use a nylon thread dipped in 50% acetic acidsolution (reagent no. 3); alternatively, you can use a stylet.
3.5.2 Cleaning non-disposable specimen containersNon-disposable containers, such as jars and bottles, may contain stools, sputum,pus, CSF, blood or urine, all of which may harbour potentially infectiousorganisms.

82 Manual of basic techniques for a health laboratory
Containers for stool specimens
If the lavatory is not connected to a septic tank, fill the jars containing stools with a5% solution of cresol (see page 83) or a similar disinfectant. Leave for 6 hours.Empty into the lavatory.
If the lavatory is connected to a septic tank, cresol or other disinfectants should notbe added to the stools before disposal. Clean the jars with detergent and water, asdescribed on page 80.
Sputum pots and tubes containing pus or CSF specimens
There are several possible methods.
Using an autoclave1
This is the best method.
1. Place the containers in the autoclave and sterilize for 30 minutes at 120 °C.
2. After the containers have cooled, empty the contents into the sink or lavatory.
3. Clean with detergent and water, as described on page 80.
1 For further information, see section 3.5.5.
Fig. 3.62 Cleaning sputum pots byboiling in detergent
Boiling in detergent
Keep a large pan especially for this purpose.
Boil sputum pots for 30 minutes in water containing washing powder (60g perlitre of water) (Fig. 3.62).
Using formaldehyde solution or cresol
Pour into each sputum pot either:
— 10ml of undiluted formaldehyde, 10% solution (reagent no. 28), or
— 5ml of 5% cresol (see page 83).
Leave for 12 hours.
Urine bottles
Empty the bottles into the lavatory.
Fill them with either:
— a 10% solution of household bleach (see page 84), or
— a 5% solution of cresol (see page 83).
Leave for 4 hours.
Test-tubes containing blood specimens
Test-tubes of fresh blood collected on the same day should be:
— rinsed in cold water
— left to soak in a detergent solution (see page 80).
Test-tubes of “old” blood kept for several days at room temperature may contain largenumbers of microorganisms. They should be:
— filled with a 10% solution of household bleach (see page 84)
— left for 12 hours and then
— rinsed and cleaned.

3. General laboratory procedures 83
3.5.3 Cleaning and maintenance of other laboratory equipmentCentrifuges1
Clean the bowl of the centrifuge daily or after any spillage occurs. Use 70% ethanolfor metal bowls and 1% bleach (see page 84) for plastic ones. (Do not use bleachfor metal bowls as it may cause corrosion.)
Rinse the centrifuge buckets after use and remove any traces of blood, etc.
Check the wiring for fraying and loose connections at regular intervals. If the cen-trifuge is sparking or running irregularly, the carbon brushes may need replacing.
Lubrication of the centrifuge should be carried out by a specialist, according to themanufacturer’s instructions.
Water-baths
If possible fill the water-bath with distilled water or rainwater to prevent depositsforming inside. A crystal of thymol will help to prevent algal growth.
Change the water and clean the inside of the water-bath at least once a month orwhenever it looks dirty. Use a thermometer to check the water temperature eachtime the water is changed as scale on the heating element may cause the thermostatto malfunction.
Incubators
Incubators are used for bacterial culture by laboratories working in microbiology.The incubator must maintain a constant average temperature of 35 °C (range 33–37 °C). The actual temperature must correspond to the thermostat setting whenthe instrument is used.
In carbon dioxide incubators used for microbial culture, the concentration ofcarbon dioxide should be maintained at 5–10% and the humidity at 50–100%.
The temperature in the incubators should be recorded daily. Like all laboratoryinstruments, incubators must be cleaned at regular intervals (at least every fort-night) and also after spillage of any material, whether infectious or non-infectious.
Westergren tubes
Rinse in water, then leave to soak in clean water for 12 hours. Dry completely (inan incubator at 37 °C, if possible). Do not use washing powder, acids or ethanol.
3.5.4 DisinfectantsThere are many disinfectants that have various different chemical actions on infec-tive agents. Table 3.1 lists the disinfectants that are most commonly used in healthlaboratories.
Cresols
Cresols may be solid or liquid; they are less water-soluble than phenol, but a 5%aqueous solution can be kept as a stock solution. Cresols emulsify well in soapsolutions.
Lysol
Lysol is an emulsion of 50% cresol in an aqueous solution of soap. Cresol can bereplaced by phenol, but since phenol is a less powerful disinfectant the time of
1 For further information, see section 3.3.3.

84 Manual of basic techniques for a health laboratory
exposure of material to phenol solution must be longer than for cresol. Phenol andcresol solutions cause irritation of the skin and eyes.
Sodium and calcium hypochlorite
Sodium and calcium hypochlorite solutions (household bleaches) are very strongdisinfectants. They are used in a number of laboratory, household and industrialapplications. Hypochlorites are rapidly inactivated by particles of dust and organicmaterials and must be freshly prepared from stock solutions every day. Hypochloritescause irritation of the skin, eyes and lungs.
Strong, undiluted solutions should contain 10% available chlorine.
For preparing working dilutions, the following dilutions are recommended:
● For jars and containers in which used pipettes, slides or other glassware arediscarded and for swabbing bench surfaces: 10ml of concentrated hypochloritesolution in 990ml of water (0.1% available chlorine). Place the used glasswareinto the jars of hypochlorite solution and leave for at least 12 hours. Do notoverfill the containers. Change the containers daily.
Table 3.1 Commonly used disinfectants
Intended object of Disinfectant Recommended Minimum Stock preparation ofdisinfection dilution for duration of disinfectant
disinfection (v/v) treatment
Blood Cresol, 5% solution 2 : 1 6 h crystals or liquid
Calcium hypochlorite solution (1% 2 : 1 6 h powderavailable chlorine)
Stool Cresol, 5% solution 2 : 1 6 h crystals or liquid
Calcium or sodium hypochlorite solution 3 : 1 6 h powder(1% available chlorine)
Calcium hydroxide, 20% solution 2 : 1 6 h powder
Chloramine (4% available chlorine) undiluted 6 h powder
Urine Cresol, 5% solution 1 : 1 4 h crystals or liquid
Sputum Cresol, 5% solution 1 : 1 4 h crystals or liquid
Skin Cresol, 50% solution undiluted 2min 50% cresol in soap solution
Ethanol, 80% solution undiluted 2min 95% solution
Iodine, 1% solution undiluted 2min 5% solution
Polyvidone iodine, 1% solution undiluted 2min pure
Isopropanol, 70% solution undiluted 2min pure
n-Propanol, 60% solution undiluted 2min pure
Chloramine (1% available chlorine) undiluted 2min powder
Quaternary ammonium compounds undiluted 2min solution
Drinking- Chloramine, 0.25% solution undiluted 16 min powderwater
Work benches Cresol, 50% solution undiluted 4 h 50% cresol in soap solution
Cresol, 5% solution undiluted 4 h crystals or liquid
Chloramine (5% available chlorine) undiluted 4 h powder
Sodium hypochlorite (1% available undiluted 4 h powderchlorine)
Laboratory Sodium hypochlorite (0.1% available undiluted 4 h 5%, 10%, 15% solutioninstrumentsa chlorine)
Glassware Sodium hypochlorite (1% available undiluted 12h 5%, 10%, 15% solutionchlorine)
a Chemical disinfection for skin-cutting and invasive instruments should be employed only as the last resort, if neither sterilization nor high-level disinfection by boiling is possible, and then only if the appropriate concentration of the chemical is available and if the instrumentshave been thoroughly cleaned to remove gross contamination before soaking in the chemical disinfectant.

3. General laboratory procedures 85
● For decontamination of blood spills and other specimens with a high proteincontent: 40ml of concentrated hypochlorite solution in 360ml of water (1%available chlorine).
Strong hypochlorite solutions are corrosive and can cause burns. Handle solutionsof bleach carefully: wear rubber gloves to protect the hands, and eye shields toprevent splashing in the eyes.
Calcium hypochlorite is available in its solid form as powder or granules. It decom-poses at a slower rate than sodium hypochlorite. A solution of 1% available chlor-ine is obtained by dissolving 14g of calcium hypochlorite in 1 litre of water.
Chloramine
Chloramine (tosylchloramide sodium) is a crystalline powder which, like thehypochlorites, releases chlorine as the active disinfectant agent, although at a slowerrate. It is also used for water disinfection: chlorinated water has a concentration of0.05% chloramine. Note that chlorinated water can interfere with laboratory tests.Distilled water must therefore be used.
Calcium hydroxide
Calcium hydroxide solution is prepared from quicklime (calcium oxide) powder orgranules dissolved in water (1 part :3 parts w/v). Calcium hydroxide solution is notsuitable for disinfecting stools from patients with tuberculosis.
Quaternary ammonium compounds
Quaternary ammonium compounds (QUATS) are effective against vegetative bac-teria and some fungi. They are not effective against spores, viruses and mycobacte-ria; they are not toxic and are harmless to the skin.
Alcohols
Alcohols (e.g. ethanol, isopropanol, n-propanol) are fast-acting, but relatively ex-pensive disinfectants that are usually used for skin disinfection. They kill bacteriaand some viruses, but not fungi.
Iodine
Iodine is an excellent, fast-acting disinfectant with a wide range of action. It killsbacteria, many spores, viruses and fungi. At low temperatures iodine is more activethan other disinfectants. Some people are hypersensitive to iodine and suffer a rashon areas of skin that have been exposed to iodine solution. Their sensitivity ismuch less when iodophores (polymer solutions that bind iodine) such as polyvidoneiodine are used.
3.5.5 SterilizationSterilization is defined as the destruction of all microorganisms in or about anobject. In the medical laboratory sterilization is achieved either by moist heat(autoclaving, boiling) or by dry heat (hot-air oven, flaming). Materials are steri-lized for three main purposes in the medical laboratory:
— in preparation for taking specimens (needles, syringes, tubes, etc. must besterile);
— to disinfect contaminated materials;
— to prepare the equipment used for bacteriological cultures (Petri dishes,Pasteur pipettes, tubes, etc.).

86 Manual of basic techniques for a health laboratory
Sterilization by steam
Using an autoclave
Clinical samples and other contaminated waste materials are placed in a specialautoclave bag or into a metal or plastic bucket for autoclaving. Use the autoclavesterilizing indicators to control the sterilizing cycle.
PrincipleWater is heated in a closed container. This produces saturated steam under pres-sure, with a temperature of over 100 °C. Most types of microorganism, includingall bacteria (but not all viruses) are killed when apparatus is heated for 20 minutesat 120 °C in this steam under pressure.
Components of an autoclave (Fig. 3.63)
1. BoilerA large deep cylinder in which the items to be sterilized are placed.
2. BasketA big wire basket that holds the materials to be sterilized.
Fig. 3.63 Components of an autoclave1: boiler; 2: basket; 3: basketsupport; 4: drainage tap; 5: lid;6: lid clamps; 7: air outlet valve;8: safety valve; 9: temperaturegauge or pressure gauge.
3. Basket supportA support in the bottom of the autoclave that holds the basket abovethe water level.
4. Drainage tapA tap fitted at the base of the boiler to drain off excess water.
5. LidThe lid covers and seals the boiler and is fitted with a rubber washer.
6. Lid clampsThese clamps, together with the rubber washer, seal the lid and pre-vent steam from escaping.
7. Air outlet valveA valve at the top of the boiler or on the lid that is used to let air outwhen the water is first heated.
8. Safety valveA valve at the top of the boiler or on the lid that lets steam escape ifthe pressure becomes too high and so prevents an explosion.
9. Temperature gauge or pressure gaugeAll gauges indicate the temperature in degrees Celsius (°C); somealso have a second set of figures indicating the pressure.
Heating systemThe heating system may be built into the autoclave in the form of:
— electric elements
— gas burners
— a paraffin oil stove.
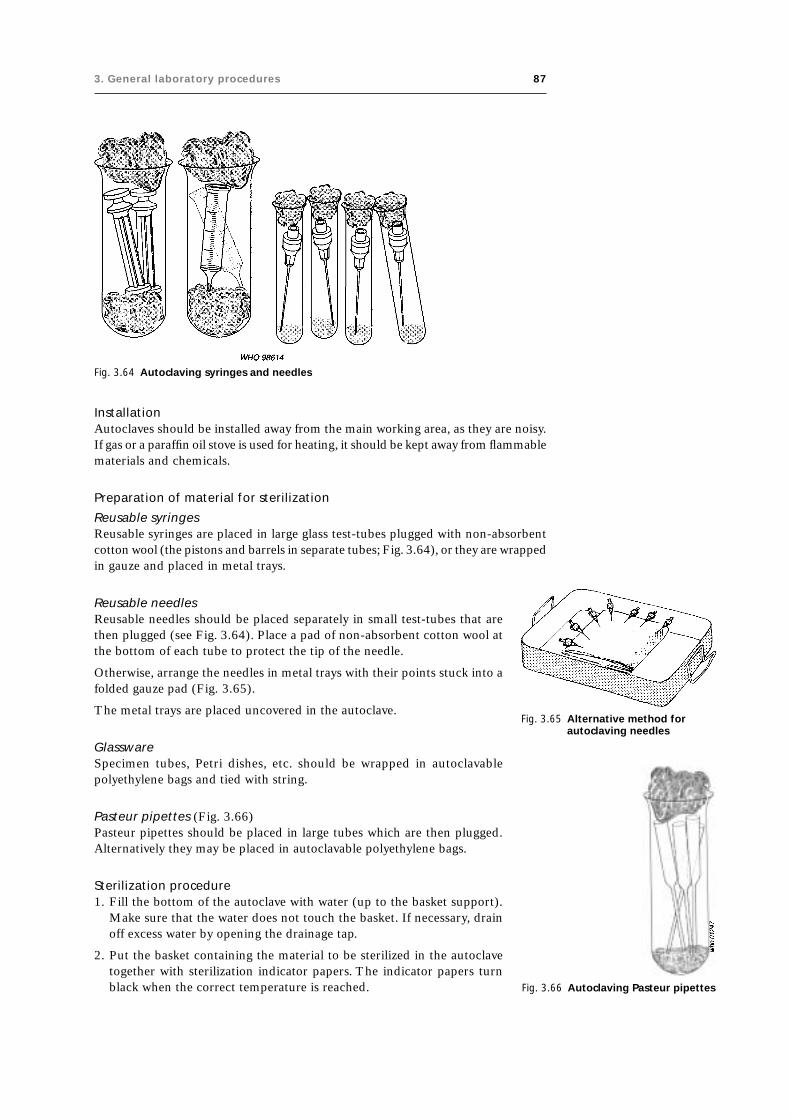
3. General laboratory procedures 87
Fig. 3.64 Autoclaving syringes and needles
Fig. 3.65 Alternative method forautoclaving needles
InstallationAutoclaves should be installed away from the main working area, as they are noisy.If gas or a paraffin oil stove is used for heating, it should be kept away from flammablematerials and chemicals.
Preparation of material for sterilization
Reusable syringesReusable syringes are placed in large glass test-tubes plugged with non-absorbentcotton wool (the pistons and barrels in separate tubes; Fig. 3.64), or they are wrappedin gauze and placed in metal trays.
Fig. 3.66 Autoclaving Pasteur pipettes
Reusable needlesReusable needles should be placed separately in small test-tubes that arethen plugged (see Fig. 3.64). Place a pad of non-absorbent cotton wool atthe bottom of each tube to protect the tip of the needle.
Otherwise, arrange the needles in metal trays with their points stuck into afolded gauze pad (Fig. 3.65).
The metal trays are placed uncovered in the autoclave.
GlasswareSpecimen tubes, Petri dishes, etc. should be wrapped in autoclavablepolyethylene bags and tied with string.
Pasteur pipettes (Fig. 3.66)Pasteur pipettes should be placed in large tubes which are then plugged.Alternatively they may be placed in autoclavable polyethylene bags.
Sterilization procedure1. Fill the bottom of the autoclave with water (up to the basket support).
Make sure that the water does not touch the basket. If necessary, drainoff excess water by opening the drainage tap.
2. Put the basket containing the material to be sterilized in the autoclavetogether with sterilization indicator papers. The indicator papers turnblack when the correct temperature is reached.

88 Manual of basic techniques for a health laboratory
3. Close the lid, making sure that the rubber washer is in its groove. Screw downthe lid clamps evenly and firmly, but not too tightly.
4. Open the air outlet valve.
5. Begin heating the autoclave.
6. Watch the air outlet valve until a jet of steam appears. Wait 3 or 4 minutes untilthe jet of steam is uniform and continuous. This shows that all the air has beendriven out of the autoclave.
7. Close the air outlet valve. Tighten the lid clamps and reduce the heat slightly.
8. Watch the temperature gauge. When the desired temperature is reached (i.e.120 °C) the heat must be regulated to maintain it. Reduce the heat until theneedle on the dial remains at the temperature selected. Start timing at this point.
Sterilization times● Materials for collecting specimens (reusable syringes and needles, tubes): 20
minutes at 120 °C.
● Containers of infected material (sputum pots, tubes of pus): 30 minutes at 120 °C.
● Bacteriological culture media: follow the instructions of the bacteriologist or thechief laboratory technician.
Turning off the heat1. Turn off the heat as soon as the required time is up.
2. When the temperature falls below 100 °C, open the air outlet valve to equalizethe pressures inside and outside the autoclave.
3. When the hissing sound stops, unscrew the lid clamps. Take off the lid. Leave theautoclave to cool, then carefully remove the basket of sterile equipment. If dropsof water have formed, dry the sterile equipment in an incubator at 37°C, ifpossible.
CleaningWipe the inside of the autoclave daily or whenever spillages occur.
Precautions● Never touch the drainage tap, outlet valve or safety valve of the autoclave while
heating it under pressure.
● Never heat the autoclave too quickly to bring up the pressure once the outletvalve is closed.
● Never leave the autoclave unattended while the pressure is rising.
● Never open the lid before the pressure has dropped to normal, as you may bescalded with steam.
● During sterilization make sure the lid is secured and no steam escapes as if itdoes, neither the pressure nor the temperature will be correct.
● Never leave the autoclave to cool for too long, because if it is left for severalhours without the outflow valve being opened, a vacuum forms.
Using a pressure cooker
Pressure cookers are large saucepans designed to cook food very quickly, usingsteam under pressure. They are used in some small laboratories to sterilize equip-ment used for specimen collection.

3. General laboratory procedures 89
Pressure cooker with revolving valve1. Fill the bottom of the pressure cooker with water. Place the material or object to
be sterilized in the basket (which is held above the water level by a support). Thewrapped articles should be placed upright (never lay them flat; Fig. 3.67).
2. Fit on the lid. Screw it down with its knob. Place the revolving valve (V1) on itsshaft in the lid (Fig. 3.68).
3. Start heating the pressure cooker on the stove. The valve soon begins to turn,letting a jet of steam escape.
4. Wait until the jet of steam is continuous, then lower the heat so that thevalve keeps turning slowly. Leave the pressure cooker on moderate heat for 20minutes.
5. Turn off the heat. Leave the pressure cooker to cool (or cool it in cold water).
6. Pull off the revolving valve so that air can enter. Remove the lid. Take out thesterilized material or object and leave the pressure cooker to dry.
Warning: Never touch the safety valve (V2 in Fig. 3.68), which is fixed to the lid.
Pressure cooker with fixed valve1. Put the water and material or object to be sterilized in the pressure cooker as
described above.
2. Open the valve in the lid. Start heating the pressure cooker.
3. As soon as a continuous jet of steam escapes from the valve, close the valve.
4. Wait until the valve begins to whistle. When it does, reduce the heat. Leave thepressure cooker on moderate heat for 20 minutes.
5. Turn off the heat. Leave the pressure cooker to cool (or cool it in cold water).
6. Open the valve so that air can enter. Remove the lid. Take out the sterilizedmaterial or object and leave the pressure cooker to dry.
Warning: Never touch the safety valve.
Sterilization by boiling
This method should be used only where there is no alternative. Use a special boil-ing pan or, if not available, a saucepan. Fill the pan with water (preferablydemineralized) and heat over the stove. Glassware (reusable syringes) should beput in while the water is still cold. Metal articles (reusable needles, forceps) shouldbe put in when the water is boiling. Leave the articles to boil for 30 minutes.
Sterilization by dry heat
Using a hot-air oven
This method should be used only for glass or metal articles (reusable syringes andneedles, pipettes, etc.) when an autoclave is not available. It must not be used forculture media used in microbiology, which should be autoclaved (see page 86).
1. Prepare the object to be sterilized in the same way as for the autoclave method.Cotton-wool plugs should not be too thick, otherwise the hot air cannot pen-etrate. Raise the lids of the metal boxes slightly and arrange them so that theyface the back of the oven.
2. Set the thermostat to 175 °C and switch on the oven. If there is a fan, check thatit is working.
3. Watch the thermometer. When the temperature reaches 175 °C, continue heat-ing at this temperature for a further 60 minutes. If the object to be sterilized isheavy or bulky or if it includes powders, oils or petroleum jelly, heat at 175 °C for2 hours.
Fig. 3.67 Sterilizingequipment using apressure cooker
Fig. 3.68 Components of apressure cooker

90 Manual of basic techniques for a health laboratory
4. Switch off the heat. Wait until the temperature falls to 40 °C. Open the ovendoor. Close the lids of the metal boxes. Remove the sterile object.
By flaming
This method should be used only for metal articles such as for-ceps and scalpels. It is not suitable for general use.
1. Place the articles in a metal tray.
2. Add about 10 drops of ethanol and ignite.
3. During flaming tilt the tray first one way, then the other (Fig.3.69).
To sterilize bacteriological loops, heat them in the flame of a gasburner or spirit lamp until they are red hot.
3.6 Disposal of laboratory waste3.6.1 Disposal of specimens and contaminated materialAny clinical material brought into the laboratory and any apparatus used to handlethis material must be considered as infectious. To avoid laboratory accidents, makesure that priority is given to correct handling and disposal of specimens and con-taminated material (see section 3.8).
3.6.2 Incineration of disposable materialsMaking an incinerator (Fig. 3.70)
An old metal drum is suitable for this purpose.
1. Fix a strong metal grating (G) firmly about one-third of the way up the drum.
2. Cut a wide opening or vent (V) below the level of the grating.
3. Find a removable lid (L) for the drum.
Using an incinerator
● At the end of each morning’s and each afternoon’s work, place all used stool andsputum boxes on the grating of the incinerator (Fig. 3.71).
Fig. 3.70 Components of an incineratorG: metal grating; L: lid; V: vent.
Fig. 3.71 Using an incinerator
Fig. 3.69 Sterilization by flaming

3. General laboratory procedures 91
Fig. 3.72 Disposal of materials byburying
● Always keep the metal drum tightly closed (both lid and vent), exceptduring incineration.
● Incinerate once a week, or more often if necessary. Fill the bottom of thedrum with paper, sticks, wood shavings, etc.
● Remove the lid. Light the fire and keep it burning until all the infectedmaterial has been reduced to ashes.
● The ash produced is not dangerous and can be thrown on the refuseheap.
3.6.3 Burial of disposable materialsDig a pit 4–5 metres deep and 1–2 metres wide at a location where neithergroundwater nor surface water can enter and where leaching of waste liq-uids into the groundwater cannot occur (Fig. 3.72). A pit must never beconstructed near a water source.
Make a lid that fits tightly over the pit. It is advisable to strengthen theupper rim of the pit by lining it with bricks or stones.
● The pit must be protected from animals, birds and humans.
● Throw stool or sputum boxes and other infected material into the pittwice a day. Replace the lid immediately.
● Once a week, cover the refuse with a layer (about 10cm thick) of driedleaves.
● If possible, instead of using dry leaves add a layer of quicklime (calciumoxide) once a week.
3.7 Dispatch of specimens to a reference laboratoryThe peripheral laboratory sends specimens to reference laboratories ormore specialized laboratories for examinations that cannot be carried outlocally. For example, serological examinations for treponemal infection ortyphoid; culture of stools for detection of cholera vibrio; and histologicalexamination of biopsy material.
Table 3.2 shows, for each type of specimen and each examination:
— which container and preservative (where necessary) to use;
— how much of the specimen to send;
— how long the specimen will keep.
3.7.1 Packing specimens for dispatchAlways observe the regulations in force in your country.
Double pack specimens. Place the specimen in the bottle or tube and seal her-metically (fixing the stopper with sticking-plaster; see Fig. 3.73).
Check that the bottle is labelled with the patient’s name and the date of collectionof the specimen. Then place the sealed bottle in an aluminium tube with a screwcap. Wedge it in the tube with absorbent cotton wool.
Wrap the request form around the metal tube (Fig. 3.74).
It should show:
— the patient’s name (written in capital letters) and date of birth;
— the nature of the specimen;
— the date of collection of the specimen;

92 Manual of basic techniques for a health laboratoryTable 3.2 Dispatch of specimens to a reference laboratory
Type of Type of laboratory Container and preservative Amount of Preservationspecimen examination specimen to time
send
Sputum Culture of tubercle bacilli (see 45-ml bottle containing 25ml of — 10 dayssection 5.4) cetylpyridinium bromide, 0.6% solution
Culture of other organisms No preservative — 2 hours
Throat swabs Culture of diphtheria bacilli Tube containing coagulated serum — 24 hours(see section 5.4)
Cotton-wool swab — 4 hours
CSF (see Culture of meningococcus Special bottle containing Stuart — 24–48 hourssection 8) transport medium, modified (reagent
no. 56) (see section 8.4.2)
Sterile airtight bottle sent in a vacuum 2 ml 12 hoursflask filled with water at 37 °C
Culture of other organisms Sterile bottle 2 ml 2 hours
Chemical tests (for glucose, Sterile bottle 2–4ml 2 hoursprotein, chloride, etc.; seesections 8.3.4 and 8.3.5)
Urethral pus Culture of gonococcus (see Special bottle of Stuart transport Swab of pus 24 hourssection 5.5) medium, modified (reagent no. 56)
Pus from other Bacteriological culture (see Sterile tube 1 ml 2 hourssources section 5)
Blood (see Erythrocyte and leukocyte cell EDTA dipotassium salt, 10% solution 5 ml 12 hourssections 9–11) counts (see sections 9.5 and 9.6) (reagent no. 22)
Serological tests for syphilis Sterile tube without anticoagulant; send 10ml 3 days(see section 11.10) serum or dried drops of blood as
appropriate
Serological tests for HIV and Send successive specimens of serum: 5 ml 24 hourshepatitis B virus (see sections ● taken at the onset of the disease11.7 and 11.8) ● taken after 2–4 weeks (to detect
● increase in antibodies)
Tests for glucose (see section 5mg of sodium fluoride 5 ml 2 hours10.1)
Other biochemical tests: Bottle without anticoagulant (send 10ml 48 hours● bilirubin serum)● cholesterol● serum iron● serum lipids● proteins● liver function● uraemia
Enzyme estimations: Bottle without anticoagulant 5 ml 2 hours● amylase phosphatase● transaminases
Culture Special sterile flask containing 50ml of 5 ml 24 hoursbroth raised to 37 °C as quickly aspossible after adding the specimen
Stools Culture of all organisms, Cary–Blair transport medium (reagent — 4 weeksincluding Vibrio cholerae (see no. 17)section 5.9)
Culture of all organisms, Buffered glycerol saline (reagent no. 14) — 2 weeksexcept Vibrio cholerae
Examination for parasite ova, 30-ml bottles containing 15ml of about 5ml Keepslarvae and cysts (see section formaldehyde, 10% solution (reagent almost4.2.4) no. 28) indefinitely
Examination for vegetative 10-ml tube containing thiomersal– — Keepsforms of amoebae (see section iodine–formaldehyde (TIF) fixative almost4.2.4) fixative (reagent no. 58) or polyvinyl indefinitely
alcohol (reagent no. 44)
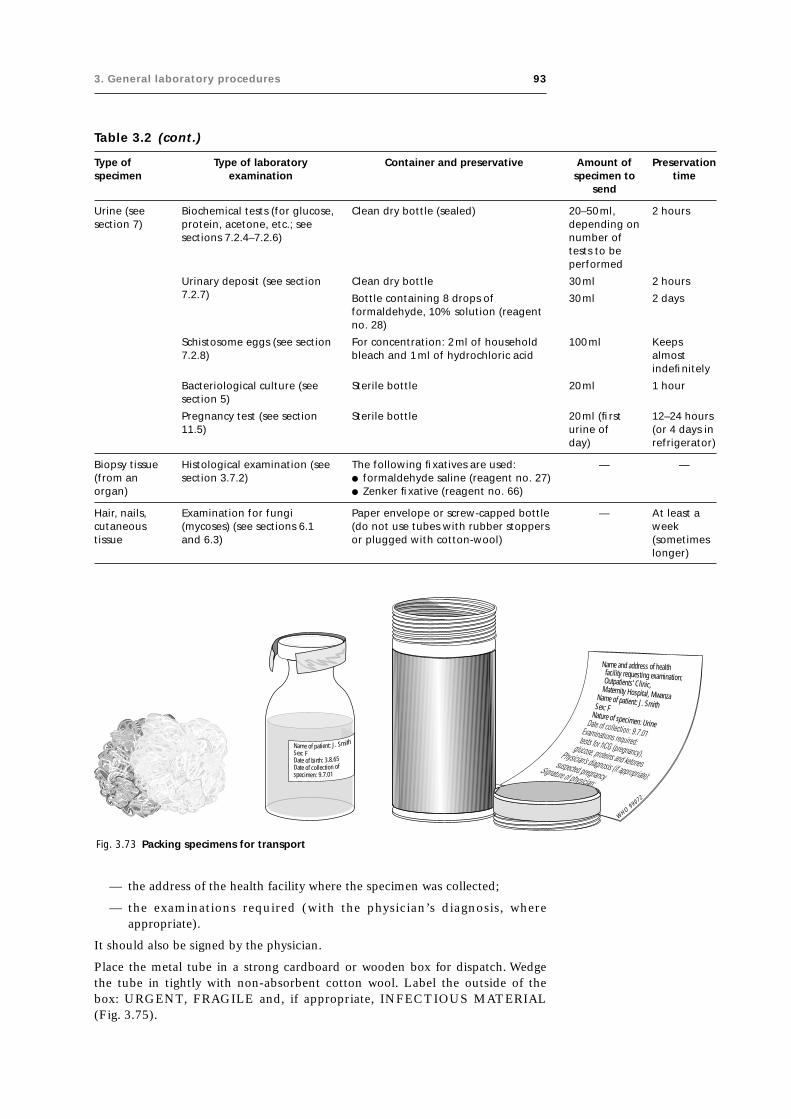
3. General laboratory procedures 93
Table 3.2 (cont.)
Type of Type of laboratory Container and preservative Amount of Preservationspecimen examination specimen to time
send
Urine (see Biochemical tests (for glucose, Clean dry bottle (sealed) 20–50ml, 2 hourssection 7) protein, acetone, etc.; see depending on
sections 7.2.4–7.2.6) number oftests to beperformed
Urinary deposit (see section Clean dry bottle 30ml 2 hours7.2.7) Bottle containing 8 drops of 30ml 2 days
formaldehyde, 10% solution (reagentno. 28)
Schistosome eggs (see section For concentration: 2ml of household 100 ml Keeps7.2.8) bleach and 1ml of hydrochloric acid almost
indefinitely
Bacteriological culture (see Sterile bottle 20ml 1 hoursection 5)
Pregnancy test (see section Sterile bottle 20ml (first 12–24 hours11.5) urine of (or 4 days in
day) refrigerator)
Biopsy tissue Histological examination (see The following fixatives are used: — —(from an section 3.7.2) ● formaldehyde saline (reagent no. 27)organ) ● Zenker fixative (reagent no. 66)
Hair, nails, Examination for fungi Paper envelope or screw-capped bottle — At least acutaneous (mycoses) (see sections 6.1 (do not use tubes with rubber stoppers weektissue and 6.3) or plugged with cotton-wool) (sometimes
longer)
Fig. 3.73 Packing specimens for transport
— the address of the health facility where the specimen was collected;
— the examinations required (with the physician’s diagnosis, whereappropriate).
It should also be signed by the physician.
Place the metal tube in a strong cardboard or wooden box for dispatch. Wedgethe tube in tightly with non-absorbent cotton wool. Label the outside of thebox: URGENT, FRAGILE and, if appropriate, INFECTIOUS MATERIAL(Fig. 3.75).
WHO 99072
Name and address of healthfacility requesting examination:Outpatients’ Clinic,Maternity Hospital, MwanzaName of patient: J. SmithSex: F
Nature of specimen: Urine
Name of patient: J. Smith
Sex: FDate of birth: 3.8.65Date of collection ofspecimen: 9.7.01

94 Manual of basic techniques for a health laboratory
Fig. 3.74 Wrap the request form around the metal tube containing the specimen
Fig. 3.75 Label the box containing the specimen
Sex:FNatureofspecimen:Urine
Dateofcollection:9.7.01
Examinationsrequired:
WHO 99073
Sex: F
Natur
e ofspe
cimen:
Urine
Date of
collec
tion:
9.7.01
Examina
tions
requir
ed:
WHO 99074
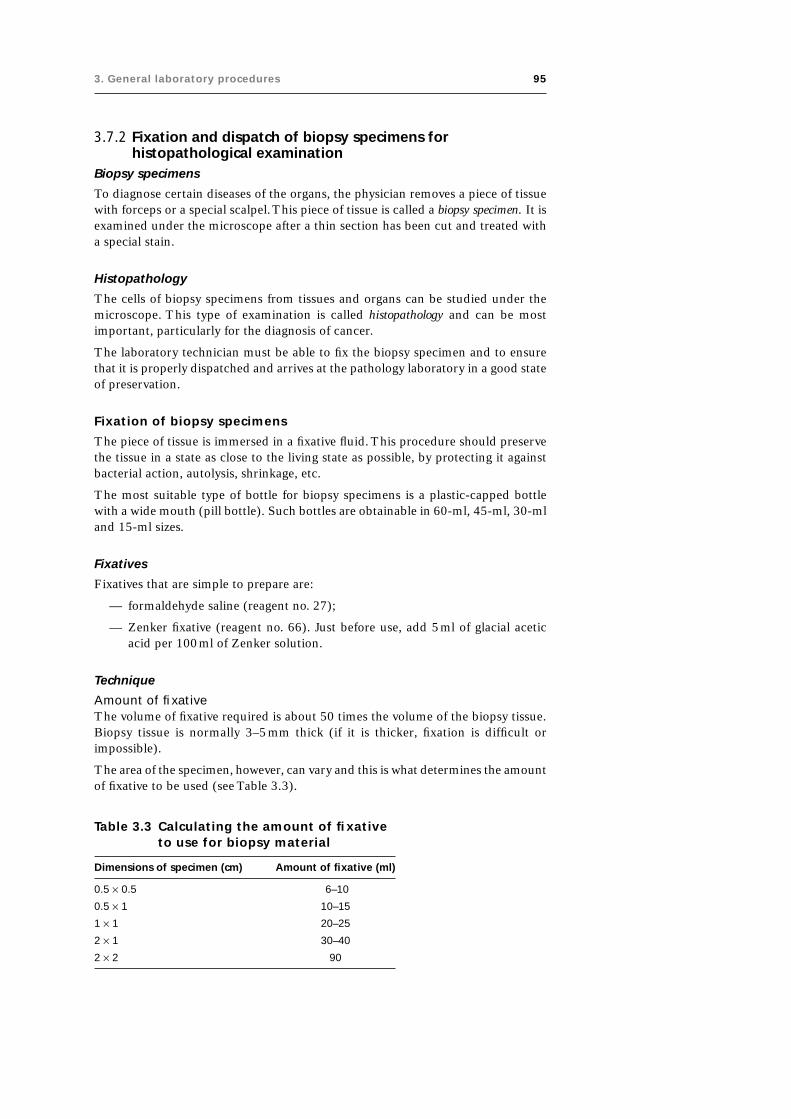
3. General laboratory procedures 95
3.7.2 Fixation and dispatch of biopsy specimens forhistopathological examination
Biopsy specimens
To diagnose certain diseases of the organs, the physician removes a piece of tissuewith forceps or a special scalpel. This piece of tissue is called a biopsy specimen. It isexamined under the microscope after a thin section has been cut and treated witha special stain.
Histopathology
The cells of biopsy specimens from tissues and organs can be studied under themicroscope. This type of examination is called histopathology and can be mostimportant, particularly for the diagnosis of cancer.
The laboratory technician must be able to fix the biopsy specimen and to ensurethat it is properly dispatched and arrives at the pathology laboratory in a good stateof preservation.
Fixation of biopsy specimens
The piece of tissue is immersed in a fixative fluid. This procedure should preservethe tissue in a state as close to the living state as possible, by protecting it againstbacterial action, autolysis, shrinkage, etc.
The most suitable type of bottle for biopsy specimens is a plastic-capped bottlewith a wide mouth (pill bottle). Such bottles are obtainable in 60-ml, 45-ml, 30-mland 15-ml sizes.
Fixatives
Fixatives that are simple to prepare are:
— formaldehyde saline (reagent no. 27);
— Zenker fixative (reagent no. 66). Just before use, add 5ml of glacial aceticacid per 100ml of Zenker solution.
Technique
Amount of fixativeThe volume of fixative required is about 50 times the volume of the biopsy tissue.Biopsy tissue is normally 3–5mm thick (if it is thicker, fixation is difficult orimpossible).
The area of the specimen, however, can vary and this is what determines the amountof fixative to be used (see Table 3.3).
Table 3.3 Calculating the amount of fixativeto use for biopsy material
Dimensions of specimen (cm) Amount of fixative (ml)
0.5 ¥ 0.5 6–10
0.5 ¥ 1 10–15
1 ¥ 1 20–25
2 ¥ 1 30–40
2 ¥ 2 90

96 Manual of basic techniques for a health laboratory
PreparationIt is essential to act quickly on receipt of a biopsy specimen. Never leave it untillater. First pour the fixative into the bottle. Then pick up the biopsy specimen on apiece of stiff paper (do not use forceps, which may damage the tissue).
Drop the specimen into the bottle.
LabellingCut out a small rectangle (about 3cm ¥ 1cm) of stiff paper. Using a lead pencil,write on it the name of the patient, the nature of the specimen and the date ofcollection. Place the slip of paper in the bottle with the fixative.
Fixation timeThis will vary according to the fixative used. With the two fixatives mentioned above,the specimen can be left in the liquid for at least a week before it is cut and stained.Fixed material should be dispatched to the pathology laboratory without delay, buta long transit period will not result in the deterioration of specimens.
Dispatch of biopsy specimens
Secure the cap or stopper of the bottle with adhesive plaster. Place the bottle in analuminium tube with a screw cap, together with the request form (see section 3.7.1).Then place the tube and the request form in a small wooden or cardboard box anddispatch immediately.
3.8 Safety in the laboratory● Each laboratory should have a written manual of safe laboratory practices which
should be followed at all times.
● The laboratory should have a first-aid box (see section 3.8.2) and at least onestaff member trained in first aid.
● The laboratory should be a work area only; visitors should be restricted.
● No food or drink should be consumed in the laboratory.
● Wear protective clothing and remove it before leaving the laboratory.
● Always consider any laboratory specimen as potentially infectious and handle itcarefully; wear protective gloves.
● Place all specimens safely on a bench or in a rack to prevent spillage or breakage.
● Take great care when collecting and processing blood samples as they may har-bour infective agents (e.g. hepatitis B virus, parasites, etc.).
● Do not contaminate yourself or the work areas with any specimen.
● Do not pipette blood or other body fluids or any reagents by mouth.
● Cover all cuts with an impervious dressing (plaster).
● Dispose of used needles and lancets safely in a “sharps” container. (Sharps con-tainers can be made from plastic bottles with a screw top in which a hole ismade.) Once filled, containers should be autoclaved or soaked in disinfectantbefore burning or burying in a deep pit (see sections 3.6.2 and 3.6.3).
● Cover any spilled material or broken culture tubes with a cloth soaked in disin-fectant (see section 3.5.4) and leave for 30min. Then use a stiff brush or sheet ofcardboard to sweep it into a disposable specimen container.
● At the end of the day swab the benches with a cloth soaked in disinfectant (seesection 3.5.4).

3. General laboratory procedures 97
● Wash your hands well after handling infective material and before leaving thelaboratory.
Specimens may be disposed of:
— in cardboard cartons or plastic pots that can be destroyed (stools, sputum);
— in glass jars and bottles that can be cleaned, sterilized and used again (seesections 3.5.1, 3.5.2 and 3.5.5).
Disposable containers must not be reused.
3.8.1 Precautions to prevent accidentsHandling acids and alkalis
Diluting concentrated sulfuric acid with water
Always add the concentrated sulfuric acid to the water drop by drop, stirring themixture after each drop. Do this in a sink whenever possible. Never pour the waterinto the sulfuric acid because of the danger of splashing due to the explosive evapo-ration of water while mixing.
Bottles of acids and alkalis
Keep bottles of acids and alkalis on the lower shelves of the cupboards. When youtake a bottle out make sure your hand is dry and hold the bottle firmly upright. Donot keep acids and alkalis in bottles with ground glass stoppers (they may get stuck).
Pipetting
Use small measuring cylinders for measuring acids and alkalis. If more accuratemeasurement is required, use a pipette with a rubber safety bulb attached. Pipetteslowly, watching the level of the liquid.
Heating glassware and liquids
Test-tubes
Never heat the bottom of a test-tube; the liquid inside might sputter. Heat themiddle of the tube, shaking gently. The mouth of the tube should be facing awayfrom you and any other person, towards an empty work space or a sink.
Heat-resistant glass
Only heat-resistant glassware and porcelain receptacles can be heated over aBunsen flame. Ordinary glass will break.
Flammable liquids
Only small quantities of flammable liquids such as ether, ethanol, acetone, benzeneand toluene should be kept in the laboratory.
Warning: Ether will ignite at a distance of several metres from a flame. Never placea bottle of ether on a workbench where there is an open flame.
Propane and butane gas burners
When lighting a gas burner, always light the match and hold it to the burner beforeturning on the gas tap. Turn off the main valves of all bottles of butane gas everyevening. Replace the rubber connecting pipes once a year.

98 Manual of basic techniques for a health laboratory
3.8.2 First aid in laboratory accidentsAccidents in the medical laboratory may have various causes:
● Acids or alkalis: splashes on the skin or in the eyes, swallowing.
● Toxic substances.
● Heat: naked flames, hot liquids, flammable liquids, explosions.
● Injuries involving infectious material, electric shocks, etc.
First-aid equipment
● First-aid box (see below)
● Sodium carbonate, 5% solution (reagent no. 52)
● Sodium bicarbonate, 2% solution (reagent no. 50) (in an eyedrop bottle)
● Boric acid, saturated solution (reagent no. 12) (in an eyedrop bottle)
● Acetic acid, 5% solution (reagent no. 1)
● Cotton wool and gauze
● Mercurochrome and tincture of iodine.
The above items should be readily available in the laboratory. They must not bekept in a locked cupboard. The solutions should be kept in plastic bottles.
First-aid box
The first-aid box should contain the following:
● An instruction sheet giving general guidance
● Individually wrapped sterile adhesive dressings in a variety of sizes
● Sterile eye-pads with bandages for attachment
● Triangular bandages
● Sterile dressings for serious wounds
● A selection of sterile unmedicated dressings for minor wounds
● Safety-pins
● A bottle containing eye drops
● A first-aid manual.
The contents of the first-aid box should be replenished immediately after use andinspected regularly to ensure that they remain in satisfactory condition.
Corrosive injuries from acids
Acids such as nitric acid, sulfuric acid, chromic acid, hydrochloric acid, acetic acidand trichloroacetic acid can cause corrosive injuries. It is therefore essential to takeimmediate action in the event of an accident.
In all cases: Wash the affected area immediately with large quantities of water.
Acid splashes on the skin
● Wash the affected area thoroughly and repeatedly with large quantities of water.
● Bathe the affected skin with cotton wool soaked in a 5% solution of sodiumcarbonate.

3. General laboratory procedures 99
Acid splashes in the eye
● Wash the eye immediately with large quantities of water sprayed from apolyethylene bottle (or rubber bulb) for 15min (Fig. 3.76); squirt the water intothe corner of the eye near the nose. Alternatively, wash the eye with runningwater from a tap (Fig. 3.77). Ask the patient to close the eye that is not affected.
● After washing, put 4 drops of a 2% solution of sodium bicarbonate into the eye.
● Send for a physician. Continue to apply bicarbonate solution to the eye until thephysician arrives.
Fig. 3.76 Rinsing the eye using apolyethylene bottle
Fig. 3.77 Rinsing the eye under the tap
Swallowing acids
If acid is accidentally swallowed:
● Send for a physician.
● Make the patient drink some milk immediately (alternatively, two egg whitesmixed with 500ml of water may be given). If neither of these is available, thepatient should drink ordinary water.
● Make the patient gargle with the milk.
● Give the patient three or four glasses of ordinary water.
● If the lips and tongue are burned by the acid:— rinse thoroughly with water, then— bathe with a 2% solution of sodium bicarbonate.
Note: Always pipette acids using a rubber safety bulb, never by mouth.
Corrosive injuries from alkalis
Alkalis such as sodium hydroxide, potassium hydroxide and ammonium hydroxidecan also cause corrosive injuries. Such injuries may be more serious than thosecaused by acids.
In all cases: Wash the affected area immediately with large quantities of water.

100 Manual of basic techniques for a health laboratory
Alkali splashes on the skin
● Wash the affected area thoroughly and repeatedly with water.
● Bathe the affected skin with cotton wool soaked in a 5% solution of acetic acid(or undiluted vinegar or lemon juice).
Alkali splashes in the eye
● Wash the eye immediately with large quantities of water sprayed from apolyethylene bottle (or rubber bulb); squirt the water into the corner of the eyenear the nose (see Fig. 3.76). Alternatively, wash the eye with running waterfrom a tap (see Fig. 3.77).
● After washing the eye with water, bathe it with a saturated solution of boric acid.
● Send for a physician. Continue to apply boric acid solution to the eye until thephysician arrives.
Swallowing alkalis
If alkali is accidentally swallowed:
● Send for a physician.
● Immediately make the patient drink a 5% solution of acetic acid (or lemon juiceor vinegar diluted 1 part vinegar to 3 parts water).
● Make the patient gargle with the same acid solution.
● Give the patient three or four glasses of ordinary water.
● If the lips and tongue are burned by the alkali:— rinse throughly with water, then— bathe with a 5% solution of acetic acid.
Poisoning
This can be caused by:
— inhaling toxic vapours or gases (e.g. chloroform)
— accidental swallowing of a poisonous solution.
In all cases:
● Send for a physician or qualified nurse, specifying the toxic substance involved.
● Place the victim in the open air while waiting for the physician or nurse.
Burns caused by heat
These fall into two categories:
● Severe burns (e.g. burns caused when burning ether or boiling water is spilledover the victim).
● Minor burns (e.g. burns caused by hot glassware or a Bunsen flame).
Severe burns
● If the victim is on fire (e.g. splashed with burning ether or other flammablesolvents), roll him or her in a blanket to extinguish the flames.
● Inform the physician on duty at the casualty department immediately, specifyingthat a patient with severe burns will have to be moved.
● Lay the victim on the ground. Do not remove any clothing. Cover the patient ifhe or she is cold.
● Do not apply any treatment to the burns: this must be left to the physician.

3. General laboratory procedures 101
Minor burns
● Plunge the affected part into cold water or a mixture of ice and water to soothethe pain.
● Apply mercurochrome or tincture of iodine to the burn.
● Apply a dry gauze dressing loosely.
● If the burn becomes infected or does not heal, refer the patient to a physician.
Note: Never tear off blisters that form over burns!
Injuries caused by broken glass
Clean glass
● Disinfect the skin in the normal way (using, for example, mercurochrome ortincture of iodine).
● If the cut is minor, cover it with a sterile adhesive dressing (ready-made type).
● If the cut bleeds profusely, stop the bleeding by pressing down on it with a sterilecompress. Refer the patient to the casualty department.
● If the cut bleeds heavily with the blood spurting out at intervals, try to stop thebleeding by pressing down on it with a sterile compress and send for a physicianor qualified nurse.
● Continue to press on the covered wound while waiting for the physician or nurse.(He or she will decide whether a tourniquet should be applied.)
Glass containing infected material
Glassware containing stools, pus, bacterial cultures, etc.:
● Check whether the cut is bleeding; if not, squeeze hard to make it bleed forseveral minutes.
● Bathe the whole area (the edges of the cut and inside the cut) with tincture ofiodine or a surgical antiseptic (see Table 3.1, page 84).
● Wash the whole area thoroughly with soapy water.
● Bathe the area again with tincture of iodine.
● Refer the victim to the physician if the material involved is known to be infective(e.g. bacterial cultures, pus).
Electric shocks
Alternating electric current (120V or 220V) is usually used in the laboratory. Elec-tric shocks may occur when faulty equipment is being handled, particularly withwet hands. The symptoms are fainting, asphyxia and cardiac arrest.
● Before doing anything else, cut off the electricity at the main fuse.
● Send for a physician.
● In case of a cardiac arrest, massage the heart externally if necessary and begingiving artificial respiration.
3.9 Quality assurance in the laboratoryQuality assurance in the laboratory includes all aspects of the analytical work, fromcorrect identification and preparation of the patient to ensuring that the laboratoryresult goes back to the doctor.
The prime objective of quality assurance is to ensure that the laboratory providesresults that are correct and relevant to the clinical situation of the patient.

102 Manual of basic techniques for a health laboratory
The stages at which quality assurance should be applied include:
— preparing the patient
— collecting the specimen
— handling and dispatch of the specimen (see sections 2.6.1 and 3.7)
— control of methods and reagents (see individual methods)
— calibration of equipment (see section 2.5)
— reporting results (see section 2.6.2).
3.9.1 Specimen collectionThe appropriate collection of specimens is of utmost importance if the laboratoryresults are to be relevant to the clinical situation of a patient. When material iscollected for the purpose of monitoring and control of treatment of patients, thefollowing factors should be considered:
— the physiological state of the patient (e.g. the reference ranges of certainindicators vary with age and sex);
— the appropriate preparation of patients for specimen collection (e.g. bloodfor the measurement of glucose and lipids should be taken in the morningfrom a patient who has fasted for 12 hours, because their concentrations areelevated after a meal);
— the appropriate tools for specimen collection (e.g. blood for cell countingshould be collected in tubes containing EDTA dipotassium salt to avoidplasma coagulation and platelet aggregation);
— the appropriate site for specimen collection (e.g. the concentration of glu-cose is different in arterial and venous blood).
Specific aspects of specimen collection, including those for the detection of infec-tive organisms (bacteria and parasites), are outlined in the relevant sections of thismanual.
To ensure that the most useful specimen is obtained, it should always be collectedat the appropriate time. Random collection should be limited to emergency situa-tions. For example, sputum specimens for the detection of tubercle bacilli shouldbe collected in the early morning, while urine for the diagnosis of schistosomiasisand other conditions should be collected as a “terminal” urine specimen (see sec-tion 7.2.8).

4. Parasitology 103
Part II

104 Manual of basic techniques for a health laboratory

4. Parasitology 105
4.Parasitology
4.1 IntroductionA parasite is an organism that lives in or on another living organism of a differentspecies. The organism from which the parasite takes its food is called the host. Aparasite such as a tick that lives on its host is called an ectoparasite. A parasite thatlives in its host, such as a hookworm or an amoeba, is called an endoparasite.
Many diseases are caused by infection with parasites. They are an important causeof diarrhoea (see Table 4.1), which is a major health problem in developingcountries.
If acute diarrhoea is caused by parasitic infection, this can be determined byexamination of a stool specimen.
105
Table 4.1 Common causes of diarrhoeal disease
Type of cause Specific cause
Infectious
Protozoa Amoebae
Giardia spp.
Balantidium coli
Isospora belli
Cryptosporidium spp.
Plasmodium spp.
Bacteria Salmonella spp.
Shigella spp.
Escherichia coli
Vibrio cholerae
Staphylococcus spp.
Campylobacter spp.
Viruses Rotaviruses
Helminths Fasciolopsis spp.
Strongyloides stercoralis
Trichuris trichiura
Hymenolepis nana
Heterophyes heterophyes
Non-infectious
Malabsorption syndromes Tropical sprue
Crohn disease
Whipple disease
Intoxications Food poisoning
Chemicals
Drugs
Inborn errors of metabolism Carbohydrate intolerance
Gluten enteropathy
Metabolic disorders Adrenal disease

106 Manual of basic techniques for a health laboratory
It is useful for laboratory technicians to understand the ways in which people canbecome infected by intestinal parasites (see Table 4.2). They can then give adviceon hygiene to members of the community and avoid infection themselves, particu-larly in the laboratory.
Table 4.2 Routes of transmission of intestinal parasites
Scientific name Common name How infection is contracted
Helminths
Ancylostoma duodenale Hookworm Walking barefoot on ground contaminated by stools; playing oncontaminated ground (children)
Ascaris lumbricoides Roundworm, ascaris Eating unwashed raw vegetables and salads; playing on groundcontaminated by stools (children)
Clonorchis sinensis Chinese liver fluke Eating undercooked infected meat
Dicrocoelium dendriticum, Lancet fluke Swallowing infected ants (in unwashed salad or while playing inD. hospes grass (children))
Diphyllobothrium latum Fish tapeworm Eating raw or undercooked freshwater fish
Dipylidium caninum Dog tapeworm Swallowing dog fleas (children)
Enterobius vermicularis Pinworm, threadworm Walking barefoot on ground contaminated by stools;autoinfection; contact with infected persons with dirty hands;failure to observe safety regulations relating to cleanliness inthe laboratory
Fasciola gigantica Giant liver fluke Eating unwashed salads
Fasciola hepatica Liver fluke Eating unwashed salads
Fasciolopsis buski Giant intestinal fluke Eating unwashed salads
Heterophyes heterophyes Dwarf fluke Eating undercooked infected meat
Hymenolepis diminuta Rat tapeworm Swallowing rat fleas
Hymenolepis nana Dwarf tapeworm Eating contaminated vegetables; autoinfection
Metagonimus yokogawai Japanese fluke Eating undercooked infected meat
Necator americanus Hookworm Walking barefoot on ground contaminated by stools; playing oncontaminated ground (children)
Paragonimus westermani Oriental lung fluke Eating undercooked infected freshwater crabs
Schistosoma haematobium Schistosome (vesical) Bathing in streams or ponds contaminated by infected stools orurine
Schistosoma intercalatum Schistosome (rectal) Bathing in streams or ponds contaminated by infected stools orurine
Schistosoma japonicum Schistosome (Asiatic Bathing in streams or ponds contaminated by infected stools oror Oriental) urine
Schistosoma mansoni Schistosome (intestinal) Bathing in streams or ponds contaminated by infected stools orurine
Taenia saginata Beef tapeworm Eating undercooked infected meat
Taenia solium: Pork tapeworm— adults Eating undercooked infected meat— larval form (cysticercus) Eating unwashed raw vegetables; autoinfection
Trichostrongylus spp. — Eating unwashed salads (Asia)
Trichuris trichiura Whipworm Eating unwashed raw vegetables and salads
Protozoa
Balantidium coli — Eating unwashed vegetables; contact with infected pigs (onfarms)
Entamoeba histolytica — Drinking contaminated water; eating unwashed raw vegetablesand salads; contact with infected persons with dirty hands;failure to observe safety regulations relating to cleanliness inthe laboratory
Giardia intestinalis — Drinking contaminated water; eating unwashed raw vegetablesand salads; contact with infected persons with dirty hands;failure to observe safety regulations relating to cleanliness inthe laboratory

4. Parasitology 107
4.2 Examination of stool specimens for parasites4.2.1 Collection of specimensCollect approximately 100g of faeces in a clean, dry container without preserva-tives. A screw-top container is most suitable (see section 2.5.5). Make sure that anyadult worms or segments passed are included.
For collection of stool specimens for bacteriological examination (e.g. for cultureof cholera and other bacteria that cause dysentery), see section 5.9.4.
Precautions
● Never leave stool specimens exposed to the air in containers without lids.
● Never accept stool specimens mixed with urine (e.g. in a bedpan).
● Never examine stool specimens without first putting on gloves.
● Always examine stool specimens within 1–4 hours after collection. If severalspecimens are received at the same time, examine the liquid stools and thosecontaining mucus or blood first, as they may contain motile amoebae (which diequickly).
4.2.2 Visual examinationFaecal samples are best described by their colour, consistency and presence orabsence of macroscopic blood or exudate.
Colour
The colour can be described as:
— black (occult blood)
— brown, pale yellow (fat)
— white (obstructive jaundice).
Consistency (Fig. 4.1)
The consistency can be described as:
— formed (normal shape)
— soft formed
— unformed or liquid (watery).
The presence of external blood or mucus, usually seen as streaks of red or white,should be noted. Blood may be present in certain medical conditions (e.g. ulcera-tive colitis, schistosomiasis).
4.2.3 Microscopic examinationDirect microscopic examination of faeces in saline or iodine suspension is usefulfor the following reasons:
— to detect motile trophozoites;
— to detect ova and cysts present in moderate numbers;
— to detect erythrocytes, cellular debris or excess fat.
Select unformed or liquid faeces when using direct microscopy for detection oftrophozoites. Formed stools rarely contain motile trophozoites. Also perform adirect examination of any external blood or mucus.
Fig. 4.1 Assessing theconsistency of faecalspecimens

108 Manual of basic techniques for a health laboratory
Materials and reagents (Fig. 4.2)
● Microscope
● Microscope slides
● Coverslips
● Wooden applicators or wire loops (0.45mm, nickel–chromium alloy wire)
● Grease pencils
● Sodium chloride, 0.85% solution (reagent no. 53)
● Lugol iodine, 0.5% solution (reagent no. 37)
● Acetic acid, 50% solution (reagent no. 3), diluted 1:1 with distilled water
● Methylene blue solution (reagent no. 39)
● Eosin, 2% solution in saline (reagent no. 24).
Fig. 4.2 Materials and reagents for directmicroscopic examination of faeces forparasites
Fig. 4.3 Adding a drop of saline and adrop of iodine suspension to theslide
Method
1. Prepare a 1:1 mixture of Lugol iodine solution and acetic acid solution (dilutedas above). Dilute the mixture with four volumes of distilled water and stir.
2. Take a dry microscope slide and label it with the name or number of thepatient.
3. Put:— one drop of sodium chloride solution warmed to 37 °C in the middle of
the left half of the slide; and— one drop of the iodine–acetic acid solution in the middle of the right half
of the slide (Fig. 4.3).
4. Using an applicator or wire loop, take a small portion (about 2–3 mmdiameter) of the stool.(a) If the stools are formed, take the portion from the centre of the sample
(Fig. 4.4) and from the surface to look for parasite eggs.(b) If the stools contain mucus or are liquid, take the portion from the mucus
on the surface or from the surface of the liquid to look for amoebae.
5. Mix the sample with the drop of sodium chloride solution on the slide.
6. Using the applicator or wire loop, take a second portion of stool from the speci-men as described above and mix it with the drop of iodine–acetic acid solution.Discard the applicator (or flame the wire loop) after use.
7. Place a coverslip over each drop (apply the coverslips as shown in Fig. 4.5 toavoid the formation of air bubbles).
8. Examine the preparations under the microscope. For the saline preparationuse the ¥ 10 and ¥ 40 objectives and a ¥ 5 eyepiece. As the eggs and cysts are

4. Parasitology 109
Fig. 4.4 Sampling a faecalspecimen forparasite eggs
colourless, reduce the amount of light using the condenser aperture or lowerthe condenser to increase the contrast.
Examine the first preparation with the ¥ 10 objective, starting at the top left-hand corner as indicated in Fig. 4.6. Focus on the edge of one coverslip usingthe ¥ 10 objective and examine the whole area under each coverslip for thepresence of ova and larvae of Strongyloides stercoralis. Then switch to the ¥ 40objective and again examine the whole area of the coverslip over the saline formotile trophozoites and the area of the coverslip over the iodine for cysts.
9. Lugol iodine–acetic acid solution causes the trophozoite forms to become non-motile. The nucleus is clearly stained but it may be difficult to distinguish be-tween trophozoite and cystic forms.
10. Using a fine Pasteur pipette, allow a drop of methylene blue solution to rununder the coverslip over the saline preparation (Fig. 4.7). This will stain thenuclei of any cells present and distinguish the lobed nuclei of polymorphs fromthe large single nuclei of mucosal cells.
11. If a drop of eosin solution is added, the whole field becomes stained except forthe protozoa (particularly amoebae), which remain colourless and are thus eas-ily recognized.
4.2.4 Dispatch of stools for detection of parasitesStools may be sent to a specialized laboratory for the identification of rare parasitesthat are difficult to recognize. In such cases a preservative should be added to thespecimens before they are dispatched for examination. The following preservativesare used:
— formaldehyde, 10% solution (reagent no. 28), for wet mounting;
— Lugol iodine, 0.5% solution (reagent no. 37);
— polyvinyl alcohol (PVA) fixative (reagent no. 44);
— thiomersal–iodine–formaldehyde (TIF) fixative (reagent no. 58), for wetmounting.
Fig. 4.6 Examining the area under thecoverslip for parasites
Fig. 4.5 Technique for applying a coverslip toavoid the formation of air bubbles
Fig. 4.7 Staining the saline preparation with methylene blue

110 Manual of basic techniques for a health laboratory
Fig. 4.8 Preserving a faecalspecimen informaldehyde solution
Fig. 4.9 Crushing the faecalspecimen with aglass rod
1 Also known as thimerosal and mercurothiolate.
Using 10% formaldehyde solution
1. Prepare a mixture containing about one part of stool to three parts of formalde-hyde solution (Fig. 4.8).
2. Crush the stool thoroughly with a glass rod (Fig. 4.9).
Formaldehyde solution preserves eggs and cysts of parasites indefinitely if the speci-men container is tightly closed. It does not preserve vegetative forms of protozoa,which are destroyed after a few days.
Using polyvinyl alcohol fixative
In a bottle
1. Pour about 30ml of PVA fixative into a 40-ml bottle.
2. Add enough fresh stools to fill the last quarter of the bottle.
3. Mix thoroughly with a glass rod.
PVA fixative preserves all forms of parasites indefinitely.
On a slide
1. To examine for amoebae and flagellates, place a small portion of the stool onone end of the slide.
2. Add three drops of PVA fixative to the stool.
3. Using a glass rod, carefully spread the specimen over about half of the slide (Fig.4.10). Leave to dry for 12 hours (preferably at 37 °C).
Specimens preserved in this way can be kept for about 3 months. They can bestained on arrival at the specialized laboratory.
Using thiomersal1–iodine–formaldehyde fixative
1. Just before dispatch, mix 4.7ml of TIF fixative and 0.3ml of Lugol iodine solutionin a tube or a small bottle.
2. Add approximately 2ml (2cm3) of stool and crush well with a glass rod.
The above-mentioned mixture preserves all forms of parasites indefinitely, includ-ing vegetative forms of amoebae (those of flagellates deteriorate slightly).
Fig. 4.10 Spreading a faecal specimen ona slide

4. Parasitology 111
Table 4.3 Pathogenicity of intestinal protozoa
Species Pathogenicity
Amoebae
Entamoeba histolytica Only amoeba that is commonly pathogenic tohumans. May cause dysentery or abscesses
Entamoeba coli Non-pathogenic, but very common
Entamoeba hartmanni, Endolimax Non-pathogenic. Differentiation is difficult but notnanus, Iodamoeba butschlii, really necessary; it is enough to be able toDientamoeba fragilis distinguish these species from Entamoeba
histolytica
Flagellates
Giardia intestinalis Pathogenic
Trichomonas hominis Non-pathogenic
Chilomastix mesnili Non-pathogenic
Ciliates
Balantidium coli Pathogenic
4.3 Intestinal protozoaProtozoa are microorganisms consisting of a single cell. Intestinal protozoa may befound in stools in their motile form (trophozoites) or as cysts. Some intestinal pro-tozoa are pathogenic (see Table 4.3); others are harmless. All these protozoa arefound throughout the world.
4.3.1 Identification of motile forms (trophozoites)The trophozoites of protozoa are motile (Fig. 4.11):
— either because of slow movements of the cell (amoebae);
— or because they have rapidly moving flagella (long whip-like threads) or cilia(numerous short hairs).
Trophozoites are chiefly found in:
— watery stools
— stools containing mucus
— soft formed stools.
The following features are useful for the identification ofmotile forms of intestinal protozoa (Fig. 4.12):
— size
— cytoplasm
— pseudopodia
— nuclei
— ectoplasm
— endoplasm
— vacuoles
— inclusion bodies containing erythrocytes, bacteria,yeast cells, debris, etc.
— nuclear membrane (chromatin)
— nuclear karyosome
— flagella
— undulating membrane.
Fig. 4.11 Motile forms of protozoaA: amoeba; F: flagellate; C: ciliate.

112 Manual of basic techniques for a health laboratory
Pseudopodium
Cytoplasm
Nucleus
Ectoplasm
Endoplasm
Vacuole
Inclusion bodies:(a) containing erythrocytes
(b) containing bacteria, yeast cells and/or cell debris
Nuclear membrane (chromatin)
Nuclearkaryosome
Flagellum
Undulating membrane
Fig. 4.12 Features for the identification of motile forms of protozoa
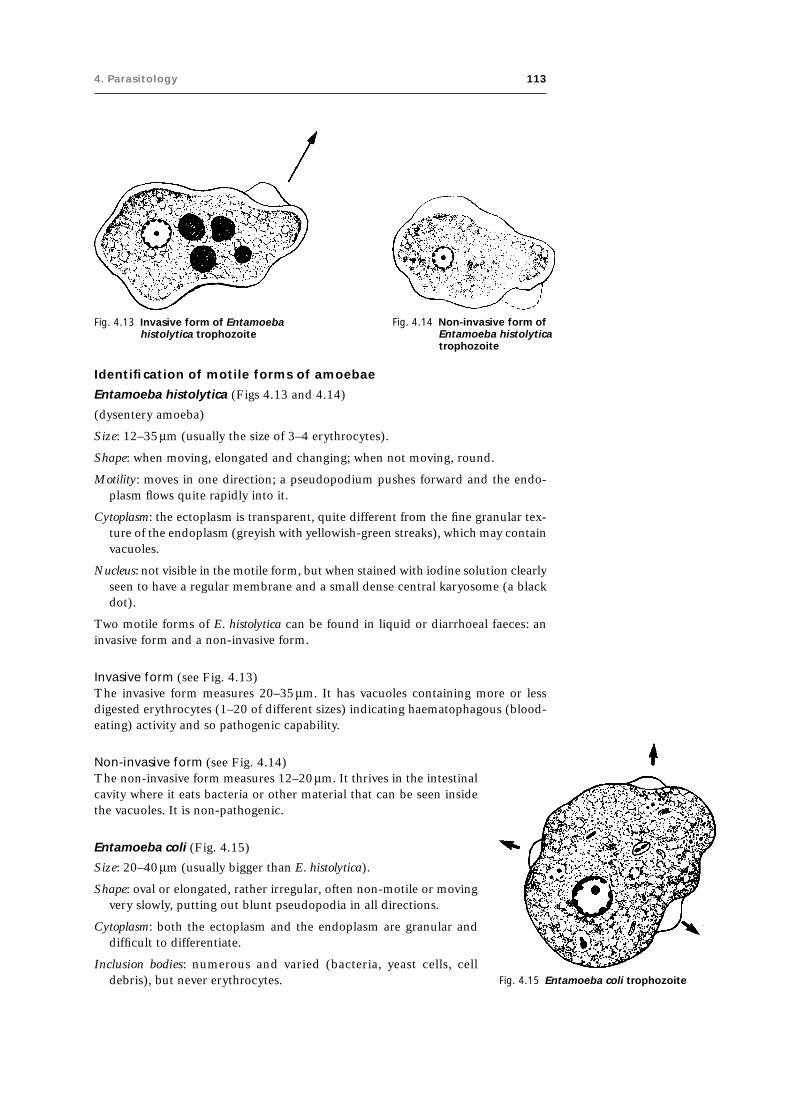
4. Parasitology 113
Fig. 4.13 Invasive form of Entamoebahistolytica trophozoite
Fig. 4.14 Non-invasive form ofEntamoeba histolyticatrophozoite
Identification of motile forms of amoebae
Entamoeba histolytica (Figs 4.13 and 4.14)
(dysentery amoeba)
Size: 12–35mm (usually the size of 3–4 erythrocytes).
Shape: when moving, elongated and changing; when not moving, round.
Motility: moves in one direction; a pseudopodium pushes forward and the endo-plasm flows quite rapidly into it.
Cytoplasm: the ectoplasm is transparent, quite different from the fine granular tex-ture of the endoplasm (greyish with yellowish-green streaks), which may containvacuoles.
Nucleus: not visible in the motile form, but when stained with iodine solution clearlyseen to have a regular membrane and a small dense central karyosome (a blackdot).
Two motile forms of E. histolytica can be found in liquid or diarrhoeal faeces: aninvasive form and a non-invasive form.
Invasive form (see Fig. 4.13)The invasive form measures 20–35mm. It has vacuoles containing more or lessdigested erythrocytes (1–20 of different sizes) indicating haematophagous (blood-eating) activity and so pathogenic capability.
Non-invasive form (see Fig. 4.14)The non-invasive form measures 12–20mm. It thrives in the intestinalcavity where it eats bacteria or other material that can be seen insidethe vacuoles. It is non-pathogenic.
Entamoeba coli (Fig. 4.15)
Size: 20–40mm (usually bigger than E. histolytica).
Shape: oval or elongated, rather irregular, often non-motile or movingvery slowly, putting out blunt pseudopodia in all directions.
Cytoplasm: both the ectoplasm and the endoplasm are granular anddifficult to differentiate.
Inclusion bodies: numerous and varied (bacteria, yeast cells, celldebris), but never erythrocytes. Fig. 4.15 Entamoeba coli trophozoite

114 Manual of basic techniques for a health laboratory
Table 4.4 Features for the differential diagnosis of Entamoeba histolytica and E. coli
Feature E. histolytica E. coli
Motion In a definite direction Haphazard
Motility Fairly motile Non-motile or barely motile
Ectoplasm Transparent, quite different from Little or no differentiation fromendoplasm endoplasm
Inclusion bodies Erythrocytes if haematophagous Bacteria, yeast cells and varied debris,no erythrocytes
Nucleus (fresh state) Invisible Visible (nuclear membrane is like abead necklace)
Nuclear membrane (after staining Regular membrane Irregular membranewith iodine solution)
Karyosome Small, dense, central Large, eccentric
Nucleus: visible in the fresh state, without staining. The membrane is irregular andgranular (like a bead necklace), the karyosome large and eccentric.
Table 4.4 summarizes the features used for the differential diagnosis of Entamoebahistolytica and E. coli. If a trophozoite moves quickly in one direction and projectspseudopodia rapidly, it is probably Entamoeba histolytica. Other species of amoebado not usually move like this. If the trophozoite moves as described and if erythrocytesare present in the cytoplasm, it can be assumed that it is E. histolytica. If necessary,buffered methylene blue can be used to stain the nucleus for confirmation.
Entamoeba hartmanni (Fig. 4.16)
Size: always less than 10mm (about the size of an erythrocyte).
All characteristics similar to those of E. histolytica but never contains erythrocytes.There may be distinct vacuoles.
Endolimax nanus (Fig. 4.17)
Size: 6–10mm.
Motility: many small rounded pseudopodia moving slowly in all directions.
Cytoplasm: very granular with small vacuoles.
Inclusion bodies: various (mainly bacteria).
Nucleus: karyosome similar to an ink-spot, visible after staining with iodine solution.
Iodamoeba butschlii (Fig. 4.18)
Size: 10–15mm.
Shape: compact, leaf-like.
Motility: very slow; clear, rounded or finger-shaped pseudopodia.
Inclusion bodies: bacteria, large vacuoles.
Nucleus: a large oval karyosome next to a group of granules, visible after stainingwith iodine solution.
I. butschlii amoebae are rarely seen in stools.
Dientamoeba fragilis (Fig. 4.19)
Size: 6–15mm.
Shape: round.
Fig. 4.16 Entamoebahartmannitrophozoite
Fig. 4.17 Endolimax nanustrophozoite
Fig. 4.18 Iodamoebabutschliitrophozoite
Fig. 4.19 Dientamoebafragilis trophozoite

4. Parasitology 115
Motility: either non-motile (most often) or very motile (in very fresh fluid stools),with pseudopodia similar to the blades of an electric fan; quickly becomes non-motile under the coverslip.
Cytoplasm: clear ectoplasm.
Inclusion bodies: bacteria.
Nucleus: one or two nuclei, visible after staining with iodine solution; karyosomessplit into 4–6 granules (membrane hardly visible).
Identification of motile forms of flagellates
All of these parasites, with the exception of Trichomonas hominis, can appear in anactive flagellate vegetative form or as inactive cysts.
Giardia intestinalis (Fig. 4.20)
Size: 10–18mm (size of two erythrocytes).
Fig. 4.20 Giardia intestinalis trophozoite
Shape: rather elongated
front view: similar to a pear
side view: spoon-shaped.
Motility: either moves forward in small rapid jerks in adefinite direction, sometimes turning in a loop (fluidstools), or is hardly motile.
Nuclei: two large oval nuclei, faintly visible.
Important:
● The characteristic movement is seen only in freshliquid stools.
● Flakes of mucus in fluid stools often contain clus-ters of large numbers of G. intestinalis.
● The vegetative and cystic forms of G. intestinalis areoften found together in soft stools.
Trichomonas hominis (Fig. 4.21)
Size: 10–15mm (slightly smaller than G. intestinalis).
Shape: oval with two pointed poles.
Motility: whirls and turns in all directions, seeming tovibrate.
Undulating membrane: present on one side only;extremely motile (a rapid wavy movement).
Nucleus: one nucleus, difficult to see.
Flagella: usually four.
T. hominis is the most resistant flagellate. It remains motile even in old stools.
Chilomastix mesnili (Fig. 4.22)
Size: 10–15mm.
Shape: triangular and tapered at one end, appears twisted.
Motility: moves in one definite direction, in a spiral.

116 Manual of basic techniques for a health laboratory
Cytoplasm: greyish-green with:
— towards the tapered end: a distinct spiral marking, around which the flagellateturns (figure-of-eight)
— near the rounded end: a mouth-like cleft (faintly visible cytostome).
Nucleus: one nucleus, easily visible in unstained preparations.
Identification of motile forms of ciliates
Balantidium coli (rare) (Fig. 4.23)
Size: about 50mm.
Shape: oval, with one pole more rounded than the other.
Cilia: covered with many small cilia, which move with rapid strokes.
Motility: moves very rapidly in stools, crossing the field in a definite direction andsometimes turning in circles.
Cytoplasm: transparent.
Nuclei: a large kidney-shaped nucleus next to a small round nucleus.
“Mouth”: the cytostome; a sort of mouth that contracts and expands, drawing incell debris.
Important: If stools are left exposed to the air, without a lid, organisms of the infusoriatype may fall on to them from the atmosphere. These may be confused withBalantidium coli.
Fig. 4.21 Trichomonas hominis trophozoites Fig. 4.22 Chilomastix mesnili trophozoites

4. Parasitology 117
Rapid Field stain for faecal trophozoites
Materials and reagents
● Microscope● Microscope slides● Slide rack● Field stain (reagent no. 25):
— Field stain A (undiluted)— Field stain B (diluted one part of stain in four parts of distilled water)
● Sodium chloride, 0.85% solution (reagent no. 53)
● Methanol.
Method
1. Prepare a thin faecal smear in sodium chloride solution on a clean slide.
2. Once the smear is dry, fix it by covering the slide with methanol for 3minutes.
3. Tip off the methanol.
4. Pipette 1ml of diluted Field stain B onto the slide, followed by 1ml ofundiluted Field stain A.
5. Mix well by tilting the slide and allow to stain for 1 minute.
6. Wash the slide in water and allow it to air-dry.
7. Examine the slide using the ¥100 oil-immersion objective. Scan the smear,particularly around the edges.
The cytoplasm and flagella of trophozoites of Giardia intestinalis stain blueand their nuclei stain red. Cysts of G. intestinalis also stain blue and theirnuclei stain red.
Note:
● Leave freshly prepared stains for 3 days before use.
● Use rainwater to prepare the stains if the local well-water supply is too salty.
● Cover the jars containing the staining solutions to prevent evaporation andabsorption of dust.
● Avoid carrying over one staining solution to another.
Eosin stain for faecal trophozoites and cysts
Materials and reagents
● Microscope
● Microscope slides
● Slide rack
● Coverslips
● Eosin, 1% solution (reagent no. 23).
Method
1. Emulsify a small portion of stool in 1% eosin solution on a clean slide. Spreadover an area of approximately 2cm ¥ 1cm.
2. Put a coverslip on the slide and place it on the microscope stage.
3. Use the ¥10 objective to examine the smear systematically for unstainedtrophozoites and cysts. Examine in more detail with the ¥40 objective.
Fig. 4.23 Balantidium coli trophozoite

118 Manual of basic techniques for a health laboratory
The eosin stain provides a pink background against which unstained trophozoitesand cysts are clearly visible.
Note: If 1% eosin solution is not available, use a drop of Field stain B (see above).
4.3.2 Identification of cystsCysts are the resistant forms of certain intestinal amoebae, flagellates and ciliates.They are small, round and non-motile and may have one or several nuclei.
Measurement of cysts is useful for the correct identification of species.
Importance of cysts
The clinical importance of cysts varies from country to country. The cyst is theinfective form of the organism. Healthy persons may be asymptomatic carriers ofcysts and are, therefore, a public health hazard.
The most important problem in the laboratory is the precise identification of cystsof Entamoeba histolytica, Giardia intestinalis and Balantidium coli. Some of the featuresused in the identification of these cysts and those of other intestinal protozoa areillustrated in Fig. 4.24.
Identification of cysts of amoebae
Entamoeba histolytica (Fig. 4.25)
Size: 12–15mm (1–2 erythrocytes).
Shape: round.
Nuclei: 1–4 nuclei:
membrane — thin, regular, circular
karyosome — small, compact, central (like a black dot).
Cytoplasm: yellowish-grey after staining with iodine solution, granular; “dirty”appearance.
Chromatoid bodies: oblong, rounded at ends (sausage-shaped); not found in all cysts.
Vacuole: sometimes a large glycogen vacuole (stained reddish-brown by iodine so-lution) in young cysts with one or two nuclei.
E. histolytica may cause dysentery. Identification of cysts of other amoebae that donot cause disease may be difficult. The main thing is to differentiate between themand the cysts of E. histolytica.
Entamoeba coli (Fig. 4.26)
Size: 12–20mm (1–2 erythrocytes; slightly larger than the cyst of E. histolytica).
Shape: round or slightly oval, sometimes irregular.
Nuclei: 1–8 nuclei:
membrane — irregular, thick in parts, not a perfect circle
karyosome — large, diffuse, often eccentric.
Cytoplasm: pale yellow after staining with iodine solution, bright (as compared withE. histolytica).
Chromatoid bodies: sharp or jagged ends (dagger-shaped or needle-shaped); not foundin all cysts.
Vacuole: sometimes a very large vacuole (stained reddish-brown by iodine solution)compressing two nuclei, one at either pole.

4. Parasitology 119
Fig. 4.24 Features for the identification of cysts of intestinal protozoa
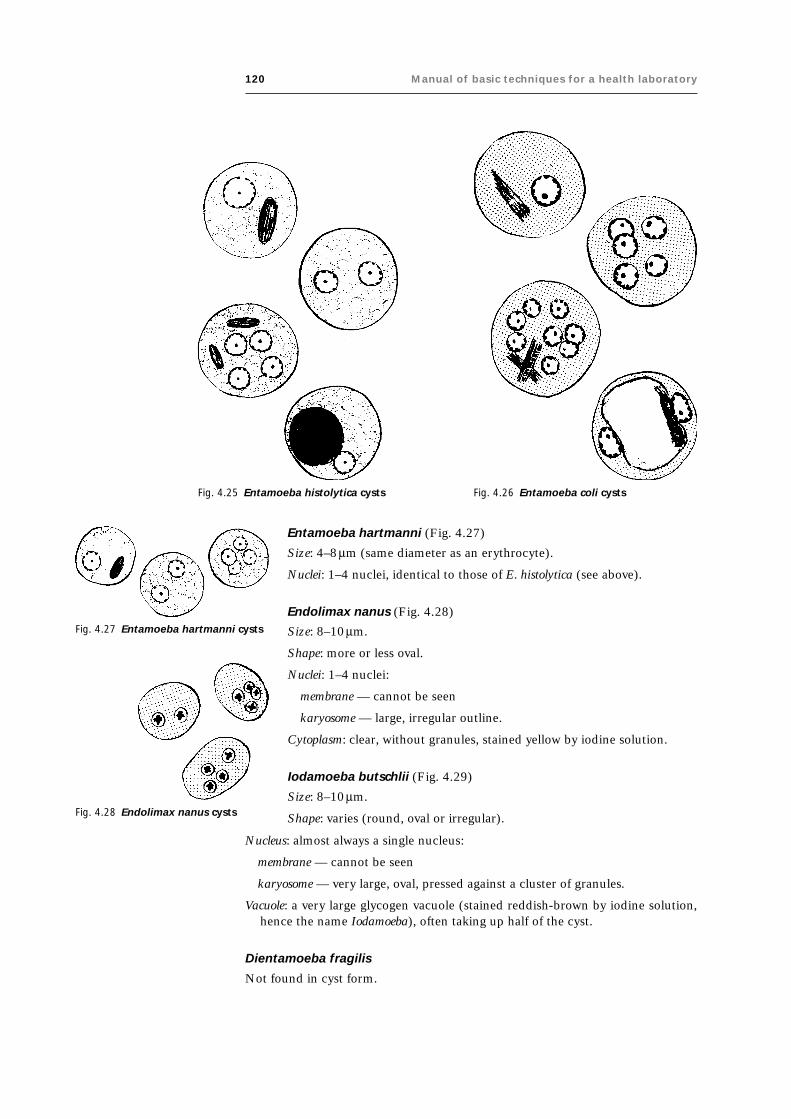
120 Manual of basic techniques for a health laboratory
Entamoeba hartmanni (Fig. 4.27)
Size: 4–8mm (same diameter as an erythrocyte).
Nuclei: 1–4 nuclei, identical to those of E. histolytica (see above).
Endolimax nanus (Fig. 4.28)
Fig. 4.25 Entamoeba histolytica cysts Fig. 4.26 Entamoeba coli cysts
Fig. 4.27 Entamoeba hartmanni cysts
Fig. 4.28 Endolimax nanus cysts
Size: 8–10mm.
Shape: more or less oval.
Nuclei: 1–4 nuclei:
membrane — cannot be seen
karyosome — large, irregular outline.
Cytoplasm: clear, without granules, stained yellow by iodine solution.
Iodamoeba butschlii (Fig. 4.29)
Size: 8–10mm.
Shape: varies (round, oval or irregular).
Nucleus: almost always a single nucleus:
membrane — cannot be seen
karyosome — very large, oval, pressed against a cluster of granules.
Vacuole: a very large glycogen vacuole (stained reddish-brown by iodine solution,hence the name Iodamoeba), often taking up half of the cyst.
Dientamoeba fragilis
Not found in cyst form.

4. Parasitology 121
Identification of cysts of flagellates
Giardia intestinalis (Fig. 4.30)
Size: 8–12mm.
Shape: oval, one pole more rounded than the other.
Shell: often appears to be thick with a double wall; the second wall is themembrane of the cytoplasm.
Nuclei: 2–4 oval nuclei (not clearly seen):
membrane — very fine
karyosome — small, central, faintly coloured.
Cytoplasm: clear, shiny when unstained; pale yellowish-green or bluishafter staining with iodine solution.
Fibril: shiny, hair-like line, folded in two or S-shaped, placed lengthwisein the centre of the cyst (adjust the microscope).
Chilomastix mesnili (Fig. 4.31)
Size: 6–8mm.
Shape: round, one pole tapered (similar to a pear).
Nucleus: a single, large nucleus:
membrane — clearly seen, thick in parts
karyosome — small and central.
Fibril: twisted, like a curled hair.
Identification of cysts of ciliates
Balantidium coli (Fig. 4.32)
Size: 50–70mm (the size of an Ascaris lumbricoides egg).
Shape: round.
Shell: thin, double wall.
Nuclei: a large kidney-shaped nucleus next to a small round nucleus.
Cytoplasm: granular, greenish, filled with inclusion bodies.
Often the trophozoite form (see page 119) can be seen faintly inside.
Fig. 4.29 Iodamoeba butschlii cysts
Fig. 4.30 Giardia intestinaliscysts
Fig. 4.31 Chilomastix mesnilicysts
Fig. 4.32 Balantidium coli cyst

122 Manual of basic techniques for a health laboratory
Coccidia (Fig. 4.33)
Coccidia are protozoa that may be parasites of humans (without causing any sig-nificant pathogenic effects) or may be found in transit in the stools of people whohave consumed infected food (fish, rabbit, etc.). They appear in the stools in a formresembling cysts (and are called oocysts or sporocysts).
Size: 15–20mm, depending on the species.
Shape: an elongated oval, sometimes tapered at one pole.
Colour: colourless and transparent (or occasionally pale yellow).
Shell: a quite distinct, slightly shiny double line; sometimes an operculum is presentat one pole.
There are three types of coccidia (see Fig. 4.33):
(a) containing four sporozoites (small banana-shaped rods), each with a small roundnucleus; sometimes a few large granules are clustered at one pole;
(b) containing one large round granular cell;
(c) containing shiny granules completely filling the interior.
Microscopic examination of cysts
Preparation in saline wet mount
Cysts can be seen as transparent shiny globules standing out clearly against a greybackground. They have well-defined shells.
Using the ¥ 40 objective, look for shiny round objects with a diameter roughly equalto 1–3 erythrocytes.
Chromatoid bodiesLook also for chromatoid bodies (rod-shaped structures). Chromatoid bodies aremore distinct in saline mounts than in iodine mounts. These bodies are character-istic in appearance and occur in cysts of Entamoeba histolytica and E. coli. The rod-shaped chromatoid bodies of E. histolytica have blunt rounded ends; those of E. colihave pointed ends. These chromatoid bodies are seen less frequently in cysts ofE. coli than in those of E. histolytica.
NucleiNuclei are not easily visible in saline mounts but are clearly seen in iodine mounts.The appearance of the nucleus is important in differentiating between species ofamoeba. Therefore, if cysts (or cyst-like bodies) are seen in the saline mount, exam-ine an iodine mount.
Fig. 4.33 Types of coccidiaa: Containing four sporozoites and occasionally a few large granules clusteredat one pole; b: containing one large round granular cell; c: containing refractivegranules completely filling the interior.

4. Parasitology 123
MeasurementAccurate measurement of cysts is essential for their correct identification. Measureany cysts you find; if possible use a calibrated graticule in the eyepiece (see section3.1.1, page 56).
Preparation in iodine wet mount
Iodine mounts are used to detect cysts of amoebae and flagellates. Cysts can bedetected with the ¥10 objective. Use the ¥40 objective to see the characteristics ofthe cysts and measure them to ensure correct identification.
Iodine stains the cytoplasm of the cysts yellow or light brown; nuclei are staineddark brown. When cysts of Entamoeba spp. are stained with iodine, the arrangementof the peripheral chromatin and the position of the karyosome can be seen. (If theperipheral chromatin is absent, the cyst is not a species of Entamoeba.) Theseperipheral chromatoid bodies stain light yellow and may not be very clear. Some-times, young cysts contain glycogen; this stains dark brown with iodine. Stainingflagellate cysts with iodine enables the fibrils (filaments) to be seen.
Cysts of several different species may be found in the same stool specimen.
ConcentrationIf necessary, use the formaldehyde–ether sedimentation technique (see section 4.5.2)to examine a larger number of cysts for more certain identification.
Eosin stain for faecal trophozoites and cysts
See section 4.3.1, page 117.
Modified Ziehl–Neelsen technique for staining oocysts of Cryptosporidiumspp.
Infections with Cryptosporidium spp. cause fever, abdominal cramps, diarrhoea andweight loss with an associated eosinophilia. In severe cases, a malabsorption syn-drome may develop.
Cryptosporidiosis causes self-limiting diarrhoea in children. It is a recognized causeof chronic diarrhoea in adults with lowered immunity, e.g. patients with acquiredimmunodeficiency syndrome (AIDS). Cryptosporidiosis should be suspected inpatients with chronic diarrhoea and weight loss, for which no other cause can befound.
Materials and reagents● Microscope
● Microscope slides
● Slide rack
● Petri disk
● Cotton wool
● Sodium chloride, 0.85% solution (reagent no. 53)
● Formaldehyde, 37% solution (formalin)
● Carbol fuchsin for Ziehl–Neelsen stain (reagent no. 16)
● Acid–ethanol for Ziehl–Neelsen stain (reagent no. 5)
● Malachite green, 1% solution (see reagent no. 31)
● Methanol.
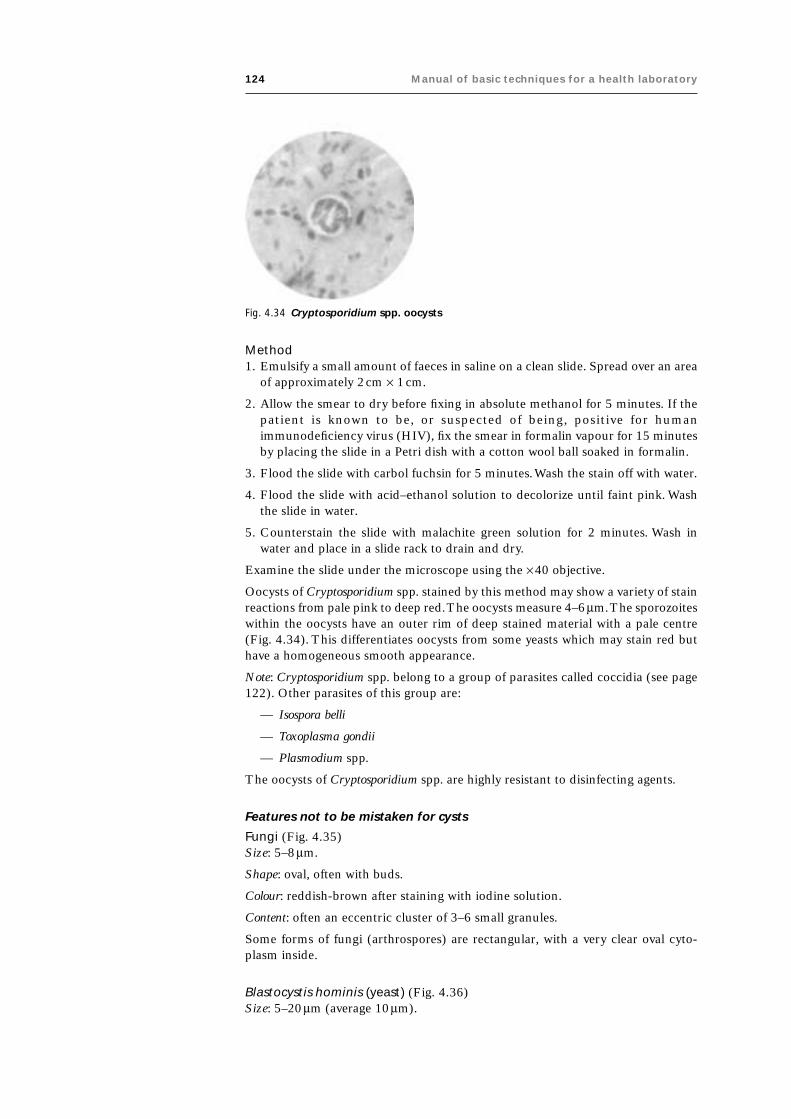
124 Manual of basic techniques for a health laboratory
Fig. 4.34 Cryptosporidium spp. oocysts
Method1. Emulsify a small amount of faeces in saline on a clean slide. Spread over an area
of approximately 2cm ¥ 1cm.
2. Allow the smear to dry before fixing in absolute methanol for 5 minutes. If thepatient is known to be, or suspected of being, positive for humanimmunodeficiency virus (HIV), fix the smear in formalin vapour for 15 minutesby placing the slide in a Petri dish with a cotton wool ball soaked in formalin.
3. Flood the slide with carbol fuchsin for 5 minutes. Wash the stain off with water.
4. Flood the slide with acid–ethanol solution to decolorize until faint pink. Washthe slide in water.
5. Counterstain the slide with malachite green solution for 2 minutes. Wash inwater and place in a slide rack to drain and dry.
Examine the slide under the microscope using the ¥40 objective.
Oocysts of Cryptosporidium spp. stained by this method may show a variety of stainreactions from pale pink to deep red. The oocysts measure 4–6mm. The sporozoiteswithin the oocysts have an outer rim of deep stained material with a pale centre(Fig. 4.34). This differentiates oocysts from some yeasts which may stain red buthave a homogeneous smooth appearance.
Note: Cryptosporidium spp. belong to a group of parasites called coccidia (see page122). Other parasites of this group are:
— Isospora belli
— Toxoplasma gondii
— Plasmodium spp.
The oocysts of Cryptosporidium spp. are highly resistant to disinfecting agents.
Features not to be mistaken for cysts
Fungi (Fig. 4.35)Size: 5–8mm.
Shape: oval, often with buds.
Colour: reddish-brown after staining with iodine solution.
Content: often an eccentric cluster of 3–6 small granules.
Some forms of fungi (arthrospores) are rectangular, with a very clear oval cyto-plasm inside.
Blastocystis hominis (yeast) (Fig. 4.36)Size: 5–20mm (average 10mm).

4. Parasitology 125
Shape: round or oval, sometimes with angular irregular edges.
Colour: very shiny when unstained; the vacuole is not stainedby iodine solution, but the periphery is pale yellow.
Content: one large vacuole taking up almost the whole cell;the compressed cytoplasm forms a granular ring round it.
Some physicians request that the presence of B. hominis bereported, particularly in children’s stools.
Leukocytes (white blood cells) (Fig. 4.37)Size: 10–20mm.
Shape: round or slightly elongated, with an irregular outline.
Nucleus: indistinct, sometimes with a star-shaped “falsekaryosome”.
Content: shiny cytoplasm, clear and granular with tiny vacuoles.
Pus (Fig. 4.38)Pus appears to the naked eye as opaque, greyish streaks (nottransparent like mucus). Under the microscope it appears asa mass of degenerated leukocytes.
The presence of pus should be reported as it is a sign ofinfection.
Fig. 4.35 Fungi
Fig. 4.36 Blastocystis hominis
4.4 Intestinal helminthsHelminth infections cause a variety of clinical symptoms including abdominalcramps, fever, weight loss, vomiting, appendicitis, blood loss, anaemia and eosino-philia. There are three groups of medically important helminths:
— nematodes (roundworms)
— cestodes (tapeworms)
— trematodes (flukes).
Helminth infections are usually diagnosed by detecting eggs and larvae. Less fre-quently, infections are diagnosed by detecting adult worms (e.g. Ascaris lumbricoidesand Enterobius vermicularis) or proglottids (segments) of adult worms (e.g. Taeniasaginata and T. solium). However, for most helminth infections, eggs are used foridentification.
Fig. 4.37 Leukocytes Fig. 4.38 Pus

126 Manual of basic techniques for a health laboratory
4.4.1 Identification of eggsThe characteristics used to identify eggs of helminth species are as follows:
Size
The length and width are measured and are generally within a specific range.
Shape
Each species has its own particular shape.
Stage of development when passed
The eggs of some species consist of a single cell, some eggs have several cells, andsome eggs are usually embryonated, i.e. they contain a larva.
Occasionally, if stool specimens are 1–2 days old, eggs may develop to moreadvanced stages. Ascaris lumbricoides (roundworm) eggs usually have only one cellwhen passed in the faeces; however, the single cell may divide and, in specimensover 12 hours old, eggs with two or four cells may be seen.
Ancylostoma duodenale or Necator americanus (hookworm) eggs present in speci-mens that are several hours old may contain 16, 32 or more cells. After 12–24hours, the eggs may be embryonated and later still the larvae may hatch.
When observing the stage of development of helminth eggs, be sure that the stoolspecimen is freshly passed. If it is several hours or a day old, expect to see changesin the stage of development of some species. Ideally only fresh samples should beaccepted for diagnosis.
Thickness of the egg shell
The eggs of some species such as Ascaris lumbricoides have thick shells, whereasothers such as Ancylostoma duodenale or Necator americanus have thin shells.
Colour
The eggs of some species such as Ancylostoma duodenale, Necator americanus andEnterobius vermicularis are colourless, whereas others such as Ascaris lumbricoidesand Trichuris trichiura are yellow or brown.
Other characteristics
The presence of characteristics such as opercula (lids), spines, plugs, hooklets ormammilated outer coats can also be aids to identification.
If an egg or an object that looks like an egg is found, the above-mentioned charac-teristics should be carefully observed in order to make a specific identification.Occasionally, atypical or distorted eggs are seen. In such cases, it is necessary tolook for more typical forms in order to make a reliable diagnosis. Remember thatmore than one species of helminth may be present in a patient.
Measurement of eggs
● 1 micrometre (1mm) = 0.001mm.
The size in mm given in this manual is that of the long side of the egg.
The size can be estimated by comparison with that of an erythrocyte, whichmeasures 7.5–8mm.

4. Parasitology 127
● The size can be assessed in relation to the microscope field:
— if a ¥10 objective is used, the egg takes up about one-tenth of the field— if a ¥40 objective is used, the egg takes up about one-third of the field.
● The egg can be measured by inserting a micrometer scale slide in the eyepieceof the microscope. One division of the scale using the ¥10 objective and the ¥10eyepiece = 1mm.
● Another method of measuring is to compare the egg with one of another speciescommon in the locality whose size under the microscope is known (e.g. Ascarislumbricoides).
How to recognize eggs
The method recommended is:
● Establish the probable identity of the egg from its general appearance.
● Make a systematic study of all the characteristics of the egg to confirm itsidentity. In order to gain experience (if possible, under the guidance of aninstructor):— study the different eggs found in your locality;— identify, one by one, all the characteristics of each egg as described in this
manual.
Table 4.5 lists the helminth species whose eggs are found in stools.
The terms used for the identification of helminth eggs and a key to their identifica-tion are given in Figs. 4.39 and 4.40, respectively. Fig. 4.41 shows the relative sizesof helminth eggs.
Ancylostoma duodenale
Size: 50–80mm.
Shape: oval with rounded slightly flattened poles (one pole often more flattenedthan the other).
Shell: very thin; appears as a black line.
Content: varies according to the degree of maturity.
Colour: pale grey; dark brown after staining with iodine solution.
Type A (in fresh stools) (Fig. 4.42)
Four, eight or 16 grey granular cells, clear but not shiny (blastomeres).
Type B (in stools a few hours old) (Fig. 4.43)
A uniform mass of many small grey granular cells.
Type C (in stools 12–48 hours old) (Fig. 4.44)
The whole of the egg is filled by a small larva (the future worm), wrapped arounditself. The egg is “embryonate”.
Ascaris lumbricoides
There are four types of Ascaris egg:
● A: fertilized egg with double shell.
● B: unfertilized egg with double shell.

128 Manual of basic techniques for a health laboratory
Table 4.5 Helminth species whose eggs are found in stools
Scientific name Geographical distribution
Ancylostoma duodenale Worldwide
Ascaris lumbricoides Worldwide
Clonorchis sinensis South-east Asia
Dicrocoelium dendriticum, Dicrocoelium hospes Worldwide
Diphyllobothrium latum Worldwide
Dipylidium caninum Worldwide
Enterobius vermicularis Worldwide
Fasciola gigantica Worldwide
Fasciola hepatica Worldwide
Fasciolopsis buski Eastern and southern Asia
Heterophyes heterophyes South-east Asia, eastern Mediterranean
Hymenolepis diminuta Worldwide
Hymenolepis nana Worldwide
Metagonimus yokogawai Eastern and southern Asia, central and eastern Europe
Necator americanus Worldwide
Opisthorchis felineus Eastern and southern Asia, central and eastern Europe
Paragonimus westermania Central Africa, South America, eastern and southern Asia
Schistosoma haematobiumb Africa, eastern Mediterranean
Schistosoma intercalatum Africa
Schistosoma japonicum Eastern and southern Asia
Schistosoma mansoni Africa (south of the Sahara), Central and South America,the Caribbean
Schistosoma mekongi South-east Asia
Strongyloides stercoralis c Worldwide
Taenia saginata Worldwide
Taenia solium Worldwide
Trichostrongylus (various species) Asia
Trichuris trichiura Worldwide
a Found mainly in sputum.b Found mainly in urine.c Found mainly as larvae in stools.
● C: semi-decorticated fertilized egg (less frequent).
● D: semi-decorticated unfertilized egg (very rare).
Type A. Fertilized egg with double shell (Fig. 4.45)
Size: 45–70mm.
Shape: oval or sometimes round.
Shell: the two shells are distinct:
— the external shell is rough, brown and covered with small lumps(mamillated)
— the internal shell is smooth, thick and colourless.
Content: a single round granular central mass.
Colour: external shell — brown; content — colourless or pale yellow.

4. Parasitology 129
Fig. 4.39 Terms used for the identification of helminth eggs

130 Manual of basic techniques for a health laboratory
Fig. 4.40 Key to the identification of helminth eggs
Eggs
Encapsulated?Notencapsulated
Encapsulated (30–40 µm x 25–50 µm)
With orwithoutplugs?
Without plugs
With or withoutoperculum?
Withoutoperculum
With or withoutspine?
With operculum
Length of egg?
Length<35 µm
With or withoutshouldering?
Withoutshouldering
Elongated(25–35 µm x8–12 µm)
Opisthorchis felineus(posterior end withpointed terminal knob)
Thin shell(25–30 µm x15–20 µm)
Metagonimusyokogawai
Withshouldering
Marked shouldering(25–45 µm x 10–22 µm)
Clonorchis sinensis(posterior end broadand round)
Less distinct shouldering,broad operculum(25–30 µm x 15–17 µm)
Length35–120 µm
Ovoid, thick shell, goldenyellow, not embryonated(55–80 µm x 40–50 µm)
Diphyllobothrium latum
Ovoid, thick shell, goldenbrown, not embryonated
Flattenedoperculum?
Yes Paragonimus westermani(65–120 µm x 40–50 µm)
No Echinostoma sp.(80–120 µm x 55–90 µm)
Length >120 µmOvoid, thick shell,yellowish brown
Fasciola hepatica(130–145 µm x 70–90 µm)
Fasciolopsis buski(125–140 µm x 70–90 µm)
With plugs Clearly protruding plugs(50–65 µm x 20–30 µm)
Trichuris trichiura
No clearly protrudingplugs, lemon-shaped(35–45 µm x 20–30 µm)
Slightly narrowingin middle?
No Capillaria hepatica
Yes Capillaria philippinensis
Dipylidium caninum
Heterophyes heterophyes(small knob at posterior end)

4. Parasitology 131

132 Manual of basic techniques for a health laboratory
Fig.
4.4
1R
elat
ive
size
s o
f h
elm
inth
eg
gsa
a Sch
isto
som
a in
terc
alat
um
an
d S
. mek
on
gi h
ave
bee
n o
mit
ted
.

4. Parasitology 133
Type B. Unfertilized egg with double shell (Fig. 4.46)
Size: 45–90mm (larger than type A).
Shape: more elongated than type A (elliptical or irregular).
Shell: the two shells are indistinct:
— the external shell is brown and puffy, with rather jagged lumps
— the internal shell is thin (one or two lines may be visible).
Content: the egg is full of large, round, very shiny granules.
Type C. Semi-decorticated fertilized egg (Fig. 4.47)
Similar to type A but without the external shell.
Shell: single, smooth, thick and colourless (or very pale yellow).
Content: a single round, colourless, granular central mass.
Type D. Semi-decorticated unfertilized egg (Fig. 4.48)
Shell: single, smooth, thin and colourless (double line).
Content: large, roundish, colourless, shiny granules.
Caution: Do not confuse type D with Ancylostoma duodenale, Fasciola spp. orFasciolopsis buski eggs.
Fig. 4.42 Ancylostoma duodenale eggsin fresh stools
Fig. 4.43 Ancylostoma duodenaleegg in stools a few hoursold
Fig. 4.44 Ancylostoma duodenaleegg in stools 12–48 hoursold
Fig. 4.45 Fertilized Ascarislumbricoides eggwith double shell
Fig. 4.46 Unfertilized Ascarislumbricoides eggwith double shell
Fig. 4.47 Semi-decorticatedfertilized Ascarislumbricoides egg
Fig. 4.48 Semi-decorticatedunfertilized Ascarislumbricoides egg

134 Manual of basic techniques for a health laboratory
Clonorchis sinensis (Fig. 4.49)
Size: 25–45mm.
Shape: distinctive.
Shell: fine and smooth but quite thick (double line).
Operculum: easily visible at the narrow end of the egg, fitting into a thickened rim ofthe shell.
Boss: a small knob at the wide end of the egg.
Content: a well-organized ciliated embryo.
Colour: shell — yellowish-brown, content — pale yellow.
Dicrocoelium spp.
Size: 35–50mm.
Shape: oval, rather asymmetrical.
Shell: thick, smooth and yellow, orange or light brown.
Operculum: easily visible.
Type A. Eggs in passage1 (form most often found; Fig. 4.50)
Shell: yellow, orange or light brown.
Content: an indistinct dark yellow oval mass, often with 1–4 shiny globules.
Fig. 4.49 Clonorchis sinensiseggsB: boss.
Fig. 4.50 Dicrocoelium sp. egg inpassageO: operculum.
Fig. 4.51 Dicrocoelium sp. egg frominfected patient
Type B. Eggs from infected patient (very rare; Fig. 4.51)
Shell: uniform dark brown.
Content: a ciliated embryo.
Diphyllobothrium latum (Fig. 4.52)
Size: 55–80mm.
Shape: oval.
Shell: smooth and thick.
Operculum: scarcely visible when not raised.
Boss: very small, at the opposite end to the operculum.
Content: a mass of small cells around a large central cell.
Colour: pale yellow.
Fig. 4.52 Diphyllobothriumlatum eggB: boss;O: operculum.
1 Observed when the patient has eaten sheep or beef liver infected by the flukes. The eggs of theflukes are not digested and although they appear in the stools, the patient is not infected. Repeatthe examination 8 days later. Tell the patient not to eat liver or liver products in the meantime.

4. Parasitology 135
Fig. 4.53 Dipylidiumcaninum eggs
Fig. 4.54 Enterobiusvermicularis eggs
Fig. 4.55 Preparation of slide for collectionof pinworm eggs
1 Based on Melvin D, Brooke M. Laboratory procedures for the diagnosis of intestinal parasites. At-lanta, GA, United States Department of Health, Education and Welfare, Centers for DiseaseControl, 1969:138.
Fig. 4.56 Positioning the spoon handle underneaththe slide
Dipylidium caninum (Fig. 4.53)
Dipylidium caninum eggs are found in clusters of 6–20enclosed in a fine membrane.
Size: 30–40mm (the cluster is 150–300mm).
Shape: round.
Shell: thick and slightly granulated, without striations.
Content: a single uniform granular mass with three pairs ofshiny hooklets arranged in the shape of a fan.
Colour: yellow or pale grey.
Enterobius vermicularis (Fig. 4.54)
Size: 50–60mm.
Shape: oval but clearly asymmetrical (flattened on one side,rounded on the other).
Shell: smooth and thin, but a double line is visible.
Content: either (a) a small, granular mass in the shape of anirregular oval, or (b) the embryo of the worm, a smallcurled-up larva.
Colour: colourless.
E. vermicularis eggs are usually more easily found in the foldsof skin around the anus than in the faeces (see below).
Technique for the collection and examination of eggs
PrincipleThe eggs of Enterobius vermicularis (pinworm) are usuallycollected (particularly in children) from the folds of skinaround the anus. They rarely appear in the stools.
Materials and reagents● Microscope
● Microscope slides
● Test-tubes
● Pasteur pipette
● Adhesive cellophane tape
● Spoon 10cm long or, better, a wooden tongue depressor
● Cotton wool
● Sodium chloride, 0.85% solution (reagent no. 53).
Method1
1. Place a strip of cellophane tape, sticky side down, on aslide, as shown in Fig. 4.55.
2. Place the spoon handle against the underside of the slide(Fig. 4.56).

136 Manual of basic techniques for a health laboratory
Fig. 4.58 Technique for collecting pinworm eggs from an infant
3. Gently pull the tape away from the slide and loop it over the end of the spoonhandle, as shown in Fig. 4.57.
4. Hold the completed tape swab in your right hand, pressing the slide firmly againstthe spoon.
5. Separate the patient’s buttocks with your left hand. Press the end of the spooncovered with tape against the skin round the anus in several places (Fig. 4.58).
6. Take the slide and fold the tape back on to it, sticky side down (Fig. 4.59).
7. Make sure that the tape is firmly stuck flat to the slide by pressing it with a pieceof cotton wool (Fig. 4.60).
8. Examine under the microscope with the condenser aperture reduced, using the¥ 10 objective. Look for eggs of E. vermicularis (see Fig. 4.54).
Fig. 4.57 Looping the tape over the end of the spoon handle

4. Parasitology 137
Alternative method1. If no cellophane tape is available, use a cotton wool swab to wipe around (but
not inside) the anus (Fig. 4.61).
2. Dip the swab into a test-tube containing about 0.5ml (10 drops) of sodiumchloride solution. Rinse the swab well in the solution (Fig. 4.62).
3. Draw up the liquid with a Pasteur pipette. Transfer it to a slide (Fig. 4.63), coverwith a coverslip and examine under the microscope as described in step 8 above.
Fig. 4.59 Transferring the sample to theslide
Fig. 4.60 Making sure that the tape is firmly stuck tothe slide
Fig. 4.61 Alternative technique for collecting pinworm eggs from an infant
Fig. 4.62 Transferring thesample to a test-tube

138 Manual of basic techniques for a health laboratory
Fasciola hepatica (Fig. 4.64)
Size: 130–145mm.
Shape: oval with rounded poles.
Shell: smooth and fine with a double line.
Content: a mass of large indistinct cells with clear, granular nuclei (adjust the focus).
Colour: ranges from yellow to dark brown.
Other features: finely marked operculum at one pole; the cell wall may be visiblyretracted. Thickening of a small part of the cell wall at the other pole.
Only small numbers of eggs are found in the stools (a search can be made byduodenal aspiration in doubtful cases).
Fasciolopsis buski (Fig. 4.65)
Very similar to the eggs of Fasciola hepatica (see Fig. 4.64), but usually present ingreater numbers in the stools.
Size: 125–140mm.
Shape: oval.
Shell: thinner than F. hepatica, single line, with a marked thickening of the wall atthe opposite pole to the operculum.
Operculum: slightly smaller than F. hepatica.
Content: cells may be shiny with one clear cell in the centre of the egg.
Heterophyes heterophyes (Fig. 4.66)
Similar to the eggs of Clonorchis sinensis (see Fig. 4.49).
Size: 25–30mm.
Shape: more oval than C. sinensis; the operculum does not overlap.
Shell: slightly thicker than that of C. sinensis.
Boss: tiny and wart-shaped, at the wider end of the egg; not always visible.
Fig. 4.63 Transferring the sample toa slide
Fig. 4.64 Fasciola hepatica eggT: thickening; O: operculum.
Fig. 4.65 Fasciolopsis buskieggT: thickening;O: operculum.

4. Parasitology 139
Content: a mass of cells, sometimes with large shiny granules (unfertilized) or aciliated embryo.
Colour: yellow to dark brown.
Hymenolepis diminuta (Fig. 4.67)
Rare species (found in children’s stools).
Size: 70–90mm (much larger than H. nana).
Shape: round.
Shell: external shell thin with transverse lines; internal shell very thick withoutfilaments.
Content: a rounded embryo containing six hooklets arranged in fan shape.
Colour: transparent or pale yellow.
Hymenolepis nana (Fig. 4.68)
Size: 40–60mm.
Shape: oval, almost round.
Shell: double; external membrane thin and internal membrane often thicker at thepoles, with filaments coming away from both poles (reduce the intensity of themicroscope light source to see them), mixed with granules occupying the spacebetween the two membranes.
Content: rounded mass (embryo) with six shiny hooklets arranged in fan shape andoften some well-defined granules in the centre.
Colour: very pale grey.
Important: Record whether there are many or few eggs present.
Metagonimus yokogawai (Fig. 4.69)
Similar to the eggs of Clonorchis sinensis and Heterophyes heterophyes (see Figs. 4.49and 4.66).
Size: 25–30mm.
Shape: oval, with no marked shouldering.
Shell: thicker than C. sinensis and H. heterophyes.
Operculum: more rounded than in H. heterophyes; overlapping less than in C. sinensis.
Boss: tiny or invisible, at the narrower end of the egg.
Content: a ciliated embryo.
Fig. 4.66 Heterophyes heterophyeseggs
Fig. 4.67 Hymenolepis diminuta egg
Fig. 4.68 Hymenolepis nanaegg
Fig. 4.69 Metagonimusyokogawai egg

140 Manual of basic techniques for a health laboratory
Necator americanus (Fig. 4.70)
Almost identical to the eggs of Ancylostoma duodenale (see Fig. 4.42).
Size: 60–80mm (slightly longer than A. duodenale).
Shape: oval with rounded flattened poles (more flattened than in A. duodenale).
Content: always contains at least eight cells (never four like A. duodenale in freshstools).
Opisthorchis felineus (Fig. 4.71)
Similar to the eggs of Clonorchis sinensis (see Fig. 4.49).
Size: 25–35mm (identical to C. sinensis).
Shape: slightly narrower at the base and with less shouldering than C. sinensis; someeggs are asymmetrical.
Operculum: less overlap than C. sinensis.
Boss: rarely visible.
Content: a ciliated embryo.
It is very difficult to differentiate between the eggs of O. felineus, C. sinensis, Hetero-phyes heterophyes and Metagonimus yokogawai:
● O. felineus: narrow, often asymmetrical, boss rarely visible.
● C. sinensis: squat shape, operculum with distinct overlap.
● H. heterophyes: squat shape, darker colour.
● M. yokogawai: thicker shell.
Paragonimus westermani (Fig. 4.72)
Eggs mainly found in sputum (if swallowed they pass into the stools).
Size: 65–120mm (smaller than the eggs of Fasciolopsis buski ).
Shape: oval, often slightly flattened on one side.
Operculum: quite distinct, with an obvious rim.
Shell: distinct thickening at the opposite end to the operculum.
Content: clear central space surrounded by squarish cells.
Colour: golden brown.
Schistosoma bovis (Fig. 4.73)
Eggs found in the stools of patients who have eaten infected beef.
Size: about 200mm.
Shape: spindle-shaped, with narrowed extremities extending beyond the embryo.
Spine: long terminal spine.
Content: small round embryo lying in the centre of the egg but not filling it.
S. bovis does not cause disease in humans.
Schistosoma haematobium (Fig. 4.74)
Eggs found in urine (for detection, see section 7.2.8) and occasionally in stools.
Size: 110–150mm.
Shape: oval, with one well-rounded pole.
Spine: terminal and situated at the other pole.
Fig. 4.70 Necator americanusegg
Fig. 4.71 Opisthorchisfelineus eggs
Fig. 4.72 Paragonimuswestermani egg
Fig. 4.73 Schistosoma bovisegg

4. Parasitology 141
Shell: smooth, very thin.
Content: a well-formed broad ciliated embryo surrounded by a membrane (internalshell).
Colour: grey or pale yellow.
Schistosoma intercalatum (Fig. 4.75)
Similar in appearance to S. haematobium (see Fig. 4.74), but found in stools.
Size: 140–180mm (slightly larger than S. haematobium).
Shape: spindle-shaped; less broad than S. haematobium (sides particularly flattenedtowards the rounded pole).
Spine: terminal spine; longer and more tapered than S. haematobium.
Content: a ciliated embryo surrounded by a membrane with two depressions orindentations, one on each side near the middle.
Schistosoma japonicum (Fig. 4.76)
Size: 70–100mm.
Shape: oval, almost round.
Spine: difficult to see, lateral and very small; may be hidden by small granules oftenfound on the surface of the egg.
Content: a broad ciliated embryo.
Colour: transparent or pale yellow.
Schistosoma mansoni (Fig. 4.77)
Size: 110–180mm.
Shape: oval, with one well-rounded pole and one conical pole.
Spine: lateral, near the rounded pole; large and triangular (if hidden underneath,adjust the focus of the microscope).
Shell: smooth, very thin.
Content: a broad ciliated embryo, surrounded by a membrane (internal shell) as inall Schistosoma spp.
Colour: pale yellow.
Cellophane faecal thick-smear technique for diagnosis of Schistosomamansoni infection (Kato–Katz technique)
The Kato–Katz technique has proved to be an efficient means of diagnosingS. mansoni and certain other intestinal helminth infections. The slides can be pre-pared in the field, stored in microscope-slide boxes, and shipped great distances,for examination at a central laboratory if required. The technique is not suitable fordiagnosing strongyloidiasis or infections with Enterobius vermicularis or protozoa.
Materials and reagents● Flat-sided applicator stick, wooden
● Screen, stainless steel, nylon or plastic, 60–105 mesh
● Template, stainless steel, plastic or cardboard
● Microscope
● Microscope slides
● Cellophane, 40–50mm thick, in strips 25mm ¥ 30mm or 25mm ¥ 35mm
Fig. 4.74 Schistosomahaematobium eggS: spine.
Fig. 4.75 Schistosomaintercalatum eggD: depression;S: spine.
Fig. 4.76 Schistosomajaponicum eggG: granules;S: spine.
Fig. 4.77 Schistosomamansoni eggS: spine.

142 Manual of basic techniques for a health laboratory
Fig. 4.78 Using an applicator stick, scrape across the upper surface of the screen to sievethe faecal sample
● Flat-bottomed jar
● Forceps
● Toilet paper or absorbent tissue
● Scrap paper (e.g. newspaper)
● Glycerol–malachite green solution (reagent no. 31) or methylene blue solution(reagent no. 39).
MethodImportant: Care must be taken to avoid contamination during collection of stoolspecimens. Always wear gloves.
1. Soak the cellophane strips in the glycerol–malachite green (or methylene blue)solution for at least 24 hours before use.
2. Transfer a small amount (approximately 0.5g) of faeces on to a piece of scrappaper (newspaper is ideal).
3. Press the screen on top of the faecal sample.
4. Using the applicator stick, scrape across the upper surface of the screen to sievethe faecal sample (Fig. 4.78).
5. Place the template on a clean microscope slide. Transfer the sieved faecal materialinto the hole of the template and level with the applicator stick (Fig. 4.79).
6. Remove the template carefully so that all the faecal material is left on the slideand none is left sticking to the template.
7. Cover the faecal sample on the slide with a glycerol-soaked cellophane strip(Fig. 4.80).
8. If any glycerol is present on the upper surface of the cellophane, wipe it off witha small piece of absorbent tissue.
9. Invert the microscope slide and press the faecal sample against the cellophaneon a smooth surface (a piece of tile or flat stone is ideal) to spread the sampleevenly.

4. Parasitology 143
10. Do not lift the slide straight up or it may separate fromthe cellophane. Gently slide the microscope slidesideways while holding the cellophane.
Preparation of the slide is now complete. Wipe off any excessglycerol with a piece of absorbent tissue to ensure that thecellophane stays fixed. With practice you can obtain perfectpreparations.
Strongyloides stercoralis (Fig. 4.81)
S. stercoralis eggs are rarely seen in formed stools becausethey hatch before evacuation to produce larvae. They may,however, be found in liquid stools (and occasionally in theformed stools of carriers of certain strains).
S. stercoralis eggs are very similar to those of Ancylostomaduodenale (see Fig. 4.42).
Fig. 4.79 Filling the template with the sieved faecal sample
Fig. 4.80 Covering the faecal sample with a glycerol-soaked cellophane strip
Fig. 4.81 Strongyloidesstercoralis eggs
1 The correct name for these “eggs” is “embryophores”, embryonated eggs that have lost theirouter sac.
Size: 50–80mm (slightly smaller than A. duodenale).
Shape: oval with slightly flattened poles.
Shell: very thin; appears as a black line.
Content: a thick larva curved around itself one or more times and sometimes motile.
Colour: pale grey; dark brown after staining with iodine solution.
Taenia saginata and T. solium (Fig. 4.82(a))
The “eggs”1 of these two tapeworms are practically identical. They may be found instools and eggs of T. saginata can also be collected from the skin around the anus(see page 136).
Size: 30–80mm.
Shape: round.
Shell: very thick, smooth, with transverse lines (reduce the illumination).
Content: a round granular mass enclosed by a fine membrane, with three pairs ofshiny lancet-shaped hooklets (adjust the focus).

144 Manual of basic techniques for a health laboratory
Colour: shell — dark yellowish-brown, content — light yellowish-grey.
Other features: sometimes the egg is enclosed in a floating transparent sac (Fig.4.82(b)).
Trichostrongylus spp. (Fig. 4.83)
Quite similar to eggs of Ancylostoma duodenale (see Fig. 4.42).
Size: 75–115mm (slightly larger than A. duodenale).
Shape: oval, asymmetrical, with one rounded pole and one narrower pole.
Shell: very thin and smooth (similar to A. duodenale).
Content: a mass of at least 20 small round granular cells (in fresh stools). The eggquickly develops into an embryo.
Colour: yellowish-brown.
Trichuris trichiura (Fig. 4.84)
Size: 50–65mm.
Shape: barrel-shaped.
Shell: fairly thick and smooth, with two layers.
Content: a uniform granular mass (sometimes divided in old stools).
Colour: shell — orange; content — yellow.
Other features: a rounded, transparent plug at each pole.
Important: Specify whether there are many or few eggs present.
Features not to be mistaken for eggs
Starch granules from plants (Fig. 4.85)
Size: 50–100mm.
Shape: round or oval and elongated.
Shell: thick in places, very irregular, with cracks.
Content: masses of starch packed closely.
Colour: whitish or greyish-yellow; violet after staining with iodine solution.
Fig. 4.82 Taenia spp. eggsa: Normal egg;b: egg enclosedin a floatingtransparent sac.
Fig. 4.83 Trichostrongylussp. eggs
Fig. 4.84 Trichuris trichiuraeggs
Fig. 4.85 Starch granulesfrom plants

4. Parasitology 145
These granules are the residue of starchy foods such as potatoes, beans,yams and cassava.
Digested meat fibres (Fig. 4.86)
Size: 100–200mm.
Shape: oval or rectangular with rounded corners.
Content: transparent with no granulations or lines (or residual lines wheremeat is not properly digested).
Colour: yellow.
Soaps (Fig. 4.87)
Size: 20–100mm.
Shape: round, oval or irregular (like a section of a tree trunk).
Content: lines radiating from the centre and visible near the rim; nothingin the centre.
Colour: brownish-yellow or colourless.
Air bubbles and oil droplets (Figs. 4.88 and 4.89)
Size: variable (can be any size).
Shape: perfectly round.
False shell: a circular ring, very shiny (several layers in the case of oil).
Content: none.
Fig. 4.86 Digested meat fibres
Fig. 4.87 Soap
Fig. 4.88 Air bubbles Fig. 4.89 Oil droplets
Plant hairs (Fig. 4.90)
Size: very variable (50–300mm).
Shape: rather rigid, often curved; wide and clean-cut at one end, tapered at theother.
Content: a narrow empty central canal between two transparent shiny layers.
Colour: pale yellow.

146 Manual of basic techniques for a health laboratory
Pollen grains and fungus spores (Fig. 4.91)
Size: very variable, depending on the geographical area and the local diet.
Shape: distinctive geometrical shapes.
Other features: distinctive saw-like or rounded projections, etc.
4.4.2 Identification of adult helminthsAdult helminths brought to the laboratory for identification may have been foundin stools, in clothing or bed linen, or during a surgical operation.
What to examine:
— their length
— their shape
— whether they are flat or segmented
— whether they are cylindrical (round)
— their internal structure.
Common helminths
Ascaris lumbricoides (roundworm) (Fig. 4.92)
Length: male — about 15cm, with a curved tail; female — 20–25cm, with a straighttail.
Colour: pinkish.
Fig. 4.90 Plant hairs
Enterobius vermicularis (pinworm or threadworm) (Fig. 4.93)
Length: male — 0.5cm; female — 1cm, with a very pointed tail (males are lesscommon).
Colour: white.
Pinworms or threadworms are found in large numbers, especially in children’sstools, and are motile. They may also be found in the folds of skin around the anus,where they can be collected with a strip of adhesive cellophane (see section 4.4.1,page 135).
Taenia saginata (beef tapeworm) and T. solium (pork tapeworm)
Length: total worm, 3–10m, but single mature segments (1–3cm long) or frag-ments of the chain (variable in length) are usually presented for examination.
Fig. 4.91 Pollen grains and fungus spores

4. Parasitology 147
Fig. 4.92 Adult Ascaris lumbricoides (roundworm) Fig. 4.93 Adult Enterobius vermicularis (pinworm orthreadworm)
Colour: ivory white (T. saginata) or pale blue (T. solium).
Important: If there is a delay in examination, separate pieces may dry out and rollup, making them look like roundworms. Moisten them with water to restore theirshape.
Examination
Materials and reagents● Microscope or magnifying glass
● Microscope slides
● Petri dish
● Forceps.
Method● Examine a chain of segments to observe the arrangement
of the lateral pores (Fig. 4.94).
● Examine a single segment gently flattened between twoslides (Fig. 4.95).
Hold the slide against the light to observe and count the uterinebranches with the naked eye.
To examine the head (scolex):
1. Place the whole worm in a Petri dish (or on a plate) filledwith water.
2. Using forceps, transfer the worm little by little into anotherdish (Fig. 4.96); untangle it, starting with the thicker end.
3. If at the end of a very narrow section (the neck) you find aswelling the size of a small pinhead, examine it under themicroscope with the ¥ 10 objective or with a magnifyingglass. (The head is rarely found.) Fig. 4.94 Segments of adult Taenia spp.

148 Manual of basic techniques for a health laboratory
Figure 4.97 shows how to differentiate between T. saginata and T. solium and twoless common tapeworms, Hymenolepis nana and Dipylidium caninum.
Other helminths found in stools
The helminths described below are rarely found in the stools. They are, however,occasionally found in a patient’s organs during a surgical operation. Flukes areseen in the liver and intestines and hydatid cysts are observed in the liver and lungs.
Ancylostoma duodenale and Necator americanus (hookworm) (Fig. 4.98)
A roundworm (resembles a piece of thread) similar to E. vermicularis (see Fig. 4.93).
Length: 1.0–1.5cm.
Colour: white, or red if it contains blood.
Examine the head (scolex) under the microscope with the ¥ 10 objective.
Fig. 4.95 Flattening a segment between two slides
Fig. 4.96 Using forceps to transfer a tapeworm
4. Parasitology 149
Fig. 4.97 Features for the identification of tapeworms

150 Manual of basic techniques for a health laboratory
Flukes (Fig. 4.100)
A flatworm with two suckers; it looks like a leaf.
Large flukeLength: 2–3cm.
Width: fairly broad.
Colour: reddish-brown or dull white.
Small flukeLength: 0.5–1.0cm.
Width: narrow.
Colour: transparent, greyish-red.
Schistosoma spp. (blood flukes) (Fig. 4.101)
A small thin flatworm.
Fig. 4.98 Adult Ancylostoma duodenale and Necator americanus (hookworm)
Fig. 4.99 Adult Trichuris trichiura (whipworm)
Trichuris trichiura (whipworm) (Fig. 4.99)
A small thin worm that lives in the wall of the caecum or occasionally the rectum.
Length: 3–5cm.
Colour: white.
Fig. 4.100 Flukes

4. Parasitology 151
Length: 0.5–1.5cm.
Colour: white.
The flat male is rolled around the thread-like female, which is slightly longer. Eachschistosome has two suckers near the head.
Echinococcus granulosus (hydatid cyst)
Echinococcus granulosus worms are found in dogs. The worms are 3–6mm long.Humans and livestock may become infected by accidental ingestion of the eggs,which then develop into hydatid cysts in the liver or lungs (Fig. 4.102).
Size: about 150mm.
Shape: round, irregular or oval, with one pole slightly flattened.
Content: fine granules and a distinct ring of 10–30 hooklets.
Colour: colourless and transparent.
Hydatid disease occurs preferentially in areas where sheep are bred, such as Eastand North Africa, South America, the Arabian peninsula, Australia and NewZealand.
Fig. 4.101 Schistosomes
Fig. 4.102 Hydatid cysts

152 Manual of basic techniques for a health laboratory
Diphyllobothrium latum (fish tapeworm)
Diphyllobothrium latum is found mainly in cold climates. Infection occurs througheating raw or inadequately cooked fish and can result in intestinal obstruction,anaemia, pain and weight loss.
Length: up to 20m.
4.5 Techniques for concentrating parasitesConcentration techniques are used when the number of helminthic ova or larvae,or protozoal cysts or trophozoites, is small. Four different concentration techniquesare described in this book:
— the flotation technique using sodium chloride solution (Willis)
— the formaldehyde–ether sedimentation technique (Allen & Ridley)
— the formaldehyde–detergent sedimentation technique
— the sedimentation technique for larvae of Strongyloides stercoralis (Harada–Mori).
Important: Always make a direct microscopic examination of stools before prepar-ing a concentration. (Motile forms of protozoa are not found in concentratedpreparations.)
4.5.1 Flotation technique using sodium chloride solution (Willis)This method is recommended for the detection of eggs of Ancylostoma duodenaleand Necator americanus (best method), Ascaris lumbricoides, Hymenolepis nana, Taeniaspp. and Trichuris trichiura.
It is not suitable for the detection of eggs of flukes and Schistosomaspp., larvae of Strongyloides stercoralis, or protozoal cysts ortrophozoites.
Principle
The stool sample is mixed with a saturated solution of sodiumchloride (increasing the specific gravity). The eggs are lighter inweight and float to the surface where they can be collected (Fig.4.103).Fig. 4.103 Principle of the flotation technique
Materials and reagents
● Microscope
● Microscope slides
● Coverslips
● Wide-mouth bottle, 10ml
● Wooden applicators
● Gauze
● Petri dishes
● 95% Ethanol
● Ether
● Willis solution (reagent no. 64)
● Petroleum jelly
● Wax.

4. Parasitology 153
Concentration of parasites
1. Place approximately 0.5g of stool in a wide-mouth bottle. Fill the bottle to the2.5-ml mark with Willis solution.
2. Using an applicator, crush the portion of stool and mix it well with the solution.Then fill the bottle to the top with Willis solution; the suspension should becompletely uniform.
3. Place a coverslip carefully over the mouth of the bottle.
4. Check that the coverslip is in contact with the liquid, with no air bubbles. Leavefor 10 minutes.
5. Remove the coverslip with care; a drop of liquid should remain on it. Place thecoverslip on a slide and examine under the microscope (using the ¥10 objective)at once because the preparation dries very quickly. Otherwise seal the coverslipwith petroleum jelly and wax.
Use the fine adjustment of the microscope to examine every object in the field(eggs tend to stick to the coverslip and are not immediately distinct).
4.5.2 Formaldehyde–ether sedimentation technique(Allen & Ridley)
Principle
The stool specimen is treated with formaldehyde, which preserves any parasitespresent. Lumpy residues are removed by filtration. Fatty elements of the faecalsuspension are separated by extraction with ether (or ethyl acetate), followed bycentrifugation, which sediments any parasites present.
Materials and reagents
● Microscope
● Microscope slides
● Coverslips
● Centrifuge
● Test-tubes
● Test-tube rack
● Centrifuge tubes
● Wooden applicators
● Brass wire filter, 40 mesh (425mm), 7.2cm diameter (nylon coffee strainersprovide an inexpensive alternative)
● Small porcelain or stainless steel dish or beaker
● Pasteur pipette
Method
Preparation of grease-free coverslips
1. Mix in a cylinder: 10ml of 95% ethanol and 10ml of ether.
2. Pour into a Petri dish and in it place 30 coverslips, one by one;shake and leave for 10 minutes.
3. Take the coverslips out one by one and dry them with gauze.
4. Keep them in a dry Petri dish.
The above steps are summarized in Fig. 4.104.Fig. 4.104 Preparation of grease-free coverslips

154 Manual of basic techniques for a health laboratory
● Formalin, 10% solution (100ml of formaldehyde, 37% solution in 900ml ofdistilled water)
● Ether (or ethyl acetate).
Method
1. Using a wooden applicator, remove a small amount (approximately 0.5g) offaeces from both the surface and the inside of the stool specimen.
2. Place the sample in a centrifuge tube containing 7ml of 10% formalin.
3. Emulsify the faeces in the formalin and filter into the dish.
4. Wash the filter (with soapy water) and discard the lumpy residue.
5. Transfer the filtrate to a large test-tube. Add 3ml of ether (or ethyl acetate).
6. Stopper the tube and mix well.
7. Transfer the resulting suspension back to the centrifuge tube and centri-fuge at 2000g for 1 minute.
8. Loosen the fatty plug with an applicator and pour the supernatant awayby quickly inverting the tube (Fig. 4.105).
9. Allow the fluid remaining on the sides of the tube to drain on to thedeposit and then mix well. Using the pipette, transfer a drop on to theslide and cover with a coverslip.
10. Use the ¥ 10 and ¥ 40 objectives to examine the whole of the coverslipfor ova and cysts.
It is now common practice to perform all the above steps in a biologicalsafety cabinet. If the extraction system of the cabinet is not fireproof, thesteps involving ether should be done outside the cabinet. Ethyl acetate providesa less flammable alternative to ether.
4.5.3 Formaldehyde–detergent sedimentation techniquePrinciple
The formaldehyde–detergent sedimentation technique is an inexpensive, safe andsimple quantitative sedimentation method in which a measured amount of faecesis mixed in formaldehyde–detergent solution of low specific gravity. The suspen-sion is sieved and is then left undisturbed to allow the ova to sediment under theirown weight. The detergent “clears” the faecal debris in a short time. Followingsedimentation and clearing, the small amount of fine sediment which forms isexamined under the microscope for ova and the eggs are counted to give aquantitative result.
Materials and reagents
● Microscope
● Microscope slides
● Commercial test kit, consisting of a conical-based container, a plastic strainer, aPasteur pipette, a beaker and a commercial detergent, diluted 1:50 with distilled water
● Formalin, 2% solution (prepared by diluting formaldehyde, 37% solution 1:50with distilled water).
Method
Details of the method as supplied with the kit are as follows:
1. Fill the conical-based container to the 10-ml mark with 2% detergent in 2%formalin.
Fig. 4.105 After centrifuging thesuspension, loosen thefatty plug and discardthe supernatant

4. Parasitology 155
Fig. 4.106 Straining the suspension Fig. 4.107 Removing the supernatant
2. Using the spoon attached to the lid of the container, transfer approximately350mg of faeces to the container and mix well in the formaldehyde–detergentsolution.
3. Using the plastic strainer, strain the suspension into the beaker supplied withthe kit (Fig. 4.106). Rinse the container and then add the filtrate.
4. Stand the container upright in the rack provided and leave for 1 hour (do notcentrifuge). Under field conditions, the emulsified faeces can be transportedback to the laboratory for examination. The schistosome eggs are fixed and willnot become distorted.
5. Carefully remove and discard the supernatant fluid, taking care not to disturbthe sediment which has formed in the base of the container (Fig. 4.107).
6. Add 10ml of the formaldehyde–detergent solution; mix and allow to sedimentfor a further 1 hour. Further clearing of the faecal debris will take place.
7. Remove and discard the supernatant fluid, leaving approximately 0.5ml of finesediment.
8. Using the Pasteur pipette, transfer the entire sediment to a slide and cover witha 22mm ¥ 40mm coverslip (supplied with the kit) (Fig. 4.108).
9. Examine the entire preparation under the microscope, using the ¥ 10 objectivewith the condenser iris closed sufficiently to give good contrast.
Count all the ova present and multiply the number by 3 to give the approximatenumber per gram of faeces.
Note: If the supernatant fluid is not removed after 1 hour, but instead a further10ml of reagent is added and the suspension is remixed and allowed to sedimentovernight, ova, cysts and larvae of other parasites will be sedimented. The tech-nique is of particular value in laboratories without the facilities to perform the

156 Manual of basic techniques for a health laboratory
formaldehyde–ether sedimentation technique. The formalin preserves the parasiteswithout distorting their morphology.
4.5.4 Sedimentation technique for larvae of Strongyloidesstercoralis (Harada–Mori)
Principle
A strip of filter-paper is partially submerged in a test-tube containing water. Anylarvae of Strongyloides stercoralis present in the specimen migrate against the cur-rent of water that rises by capillary action and accumulate at the bottom of thetube.
Materials and reagents
● Microscope
● Cellophane tape
● Test-tubes
● Test-tube rack
● Strips of filter-paper (30mm ¥ 150mm)
● Spatula
● Lugol iodine, 0.5% solution (reagent no. 37).
Method
1. Use the spatula to spread a small quantity of the faecal specimen along a strip offilter-paper (previously folded lengthwise to keep it straight), but leave the last 4or 5cm clean to be put into water.
2. Put the strip of filter-paper, clean end first, into a test-tube containing filtered orboiled water 2.5–3.0cm deep; fold the strip at the top so that the bottom doesnot touch the bottom of the tube.
3. Record the serial number or name of the patient indelibly on the tube.
4. Plug the tube with cotton wool or, preferably, seal with cellophane tape and keepfor 7–8 days at room temperature.
5. Look for the larvae at the bottom of the tube. Stain with iodine solution for 1minute and then examine under the microscope, using the ¥ 10 objective.
The larvae usually seen in fresh stool specimens are the rhabditiform (first-stage)larvae of S. stercoralis. However, if the stool was passed more than 12 hours earlier,the larvae may have hatched into filariform (infective-stage) larvae. These must be
Fig. 4.108 Transferring the sediment to a slide
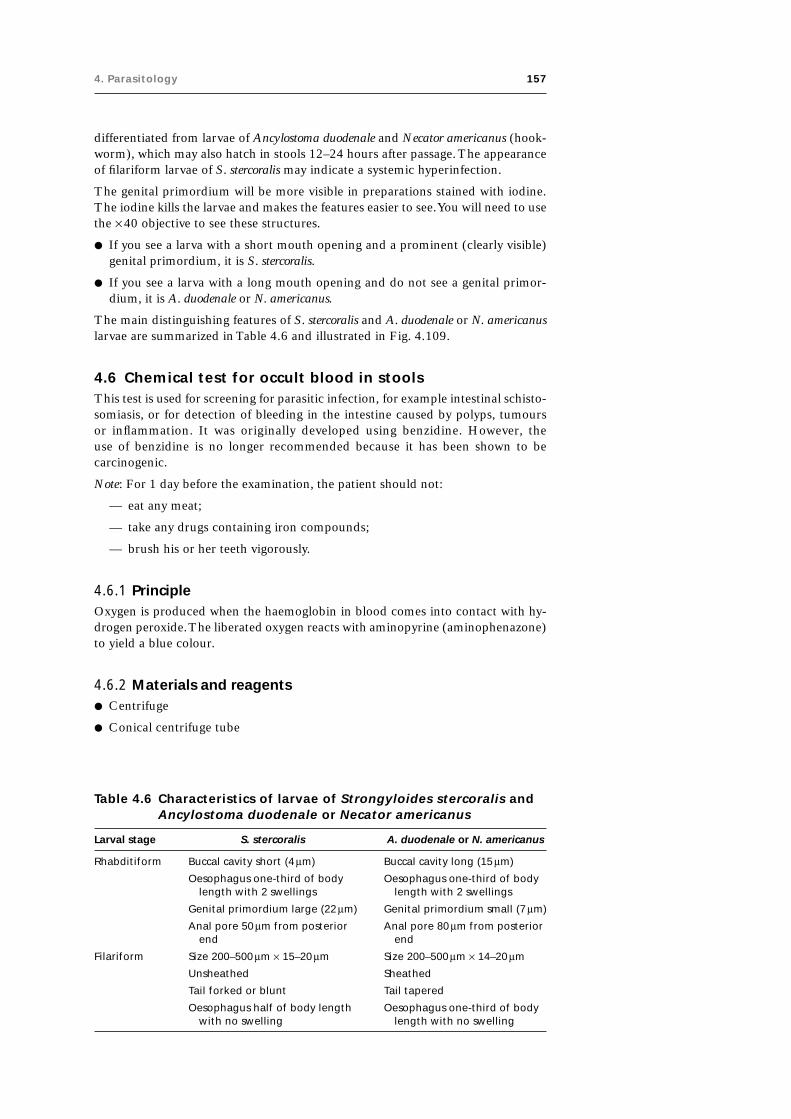
4. Parasitology 157
differentiated from larvae of Ancylostoma duodenale and Necator americanus (hook-worm), which may also hatch in stools 12–24 hours after passage. The appearanceof filariform larvae of S. stercoralis may indicate a systemic hyperinfection.
The genital primordium will be more visible in preparations stained with iodine.The iodine kills the larvae and makes the features easier to see. You will need to usethe ¥ 40 objective to see these structures.
● If you see a larva with a short mouth opening and a prominent (clearly visible)genital primordium, it is S. stercoralis.
● If you see a larva with a long mouth opening and do not see a genital primor-dium, it is A. duodenale or N. americanus.
The main distinguishing features of S. stercoralis and A. duodenale or N. americanuslarvae are summarized in Table 4.6 and illustrated in Fig. 4.109.
4.6 Chemical test for occult blood in stoolsThis test is used for screening for parasitic infection, for example intestinal schisto-somiasis, or for detection of bleeding in the intestine caused by polyps, tumoursor inflammation. It was originally developed using benzidine. However, theuse of benzidine is no longer recommended because it has been shown to becarcinogenic.
Note: For 1 day before the examination, the patient should not:
— eat any meat;
— take any drugs containing iron compounds;
— brush his or her teeth vigorously.
4.6.1 PrincipleOxygen is produced when the haemoglobin in blood comes into contact with hy-drogen peroxide. The liberated oxygen reacts with aminopyrine (aminophenazone)to yield a blue colour.
4.6.2 Materials and reagents● Centrifuge
● Conical centrifuge tube
Table 4.6 Characteristics of larvae of Strongyloides stercoralis andAncylostoma duodenale or Necator americanus
Larval stage S. stercoralis A. duodenale or N. americanus
Rhabditiform Buccal cavity short (4 mm) Buccal cavity long (15 mm)
Oesophagus one-third of body Oesophagus one-third of bodylength with 2 swellings length with 2 swellings
Genital primordium large (22 mm) Genital primordium small (7 mm)
Anal pore 50 mm from posterior Anal pore 80 mm from posteriorend end
Filariform Size 200–500 mm ¥ 15–20 mm Size 200–500 mm ¥ 14–20 mm
Unsheathed Sheathed
Tail forked or blunt Tail tapered
Oesophagus half of body length Oesophagus one-third of bodywith no swelling length with no swelling
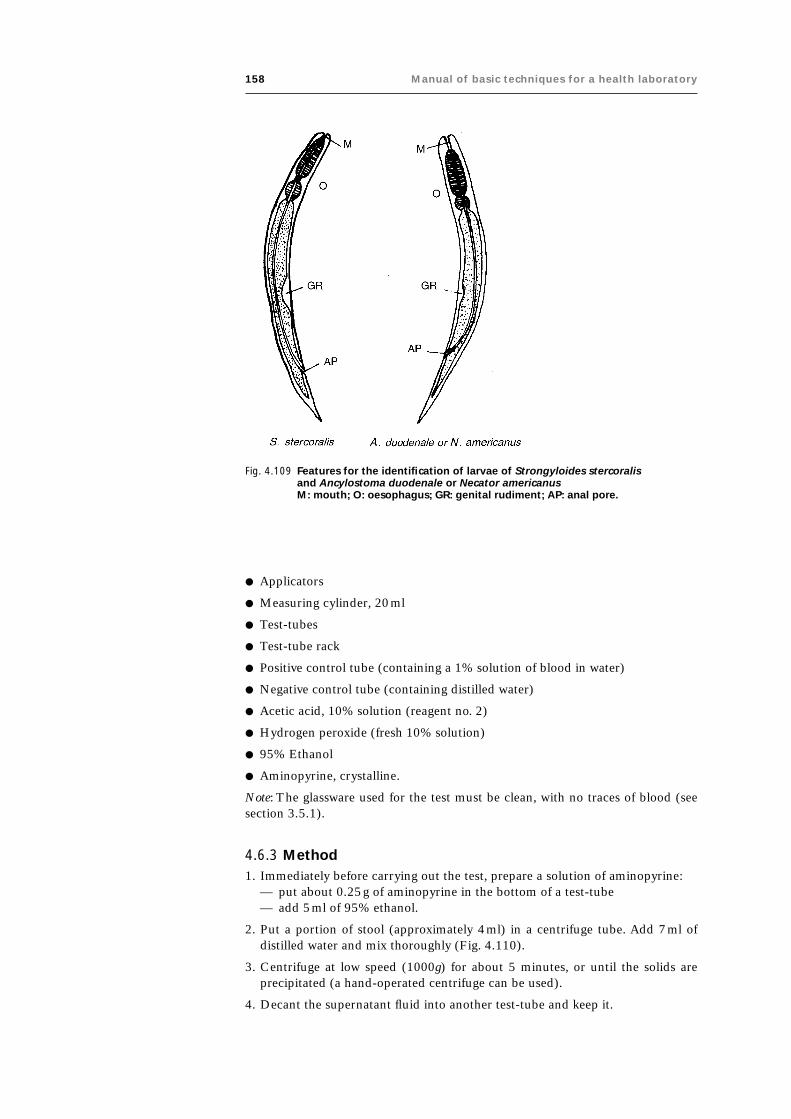
158 Manual of basic techniques for a health laboratory
● Applicators
● Measuring cylinder, 20ml
● Test-tubes
● Test-tube rack
● Positive control tube (containing a 1% solution of blood in water)
● Negative control tube (containing distilled water)
● Acetic acid, 10% solution (reagent no. 2)
● Hydrogen peroxide (fresh 10% solution)
● 95% Ethanol
● Aminopyrine, crystalline.
Note: The glassware used for the test must be clean, with no traces of blood (seesection 3.5.1).
4.6.3 Method1. Immediately before carrying out the test, prepare a solution of aminopyrine:
— put about 0.25g of aminopyrine in the bottom of a test-tube— add 5ml of 95% ethanol.
2. Put a portion of stool (approximately 4ml) in a centrifuge tube. Add 7ml ofdistilled water and mix thoroughly (Fig. 4.110).
3. Centrifuge at low speed (1000g) for about 5 minutes, or until the solids areprecipitated (a hand-operated centrifuge can be used).
4. Decant the supernatant fluid into another test-tube and keep it.
Fig. 4.109 Features for the identification of larvae of Strongyloides stercoralisand Ancylostoma duodenale or Necator americanusM: mouth; O: oesophagus; GR: genital rudiment; AP: anal pore.

4. Parasitology 159
5. Add to the test-tube containing the supernatant fluid, without mixing:— 10 drops of 10% acetic acid solution— 5ml of the aminopyrine solution.
To prevent mixing, hold the tip of the pipette containing the aminopyrine solu-tion against the inside wall of the test-tube and allow the liquid to run down thewall.
6. Add 10 drops of the 10% hydrogen peroxide solution. Do not mix. Let it standfor 1 minute.
The results must be read within 5 minutes of adding the hydrogen peroxidesolution.
4.6.4 ResultsIf the reaction is positive a red colour appears between the two lay-ers of liquid (Fig. 4.111). Report the results as follows:
— pale red = positive reaction (+)
— red = strong positive reaction (++)
— dark red = very strong positive reaction (+++)
— no change in colour = negative reaction (-).
4.7 Parasites of the blood and skinParasites that spend all or part of their life cycle in blood or tissueare known as haemoparasites. They include:
— species belonging to the genera Brugia, Dirofilaria, Loa,Mansonella, Meningonema, Onchocerca and Wuchereria — re-sponsible for filariasis;
— Trypanosoma spp. — responsible for trypanosomiasis;
— Plasmodium spp. — responsible for malaria.
Infection by these parasites and Borrelia spp. can be diagnosed byexamination of stained blood specimens under the microscope.
4.7.1 FilariaeThere are many species of filariae, but most are parasites of animalsand rarely affect humans. Only eight filarial species have adapted tohumans, and are transmissible between them. Of these, the mostimportant is subperiodic Brugia malayi.
Fig. 4.110 Mixing the stool specimen withdistilled water
Fig. 4.111 Chemical test for occult blood instoolsa: Positive reaction; b: negativereaction.
The filarial worms inhabit the lymphatic system. The larvae of the adult worms —the microfilariae — invade the blood, and they can be identified in a blood film.The microfilariae of Onchocerca volvulus are normally confined to the skin (seebelow), but sometimes migrate to the eyes (which may result in blindness); theymay also be found in the blood. The main clinical symptoms of lymphatic filariasisare lymphadenopathy and lymphangitis. Attacks of lymphadenopathy lasting sev-eral days occur at regular intervals, with headache, nausea, swelling of one leg,hydrocoele and sterile abscesses. In advanced cases, elephantiasis of the lower ex-tremities may occur due to obstruction of the lymphatic circulation. Elephantiasisof the scrotum, such as is seen in bancroftian filariasis (caused by Wuchereriabancrofti), is rare in brugian filariasis (caused by Brugia malayi). Infections amongpopulations in regions where bancroftian and brugian filariasis are endemic mayremain asymptomatic.
160 Manual of basic techniques for a health laboratory
Microfilariae of the following species are found in human blood: Brugia malayi,Brugia timori, Loa loa, Mansonella perstans,1 Mansonella ozzardi and Wuchereriabancrofti. Table 4.7 shows the geographical distribution of these species.
Infections with Loa loa among populations of areas where it is endemic are oftenasymptomatic. Non-residents visiting these areas are susceptible to symptomaticinfection. The initial infection is characterized by a transient, localized, subcutaneousswelling, known as a “Calabar swelling”. Adult worms may migrate across theconjunctiva of the eyes, causing inflammation, but the infection does not causeblindness. Chronic infection may lead to complications such as renal disease,encephalopathy and cardiomyopathy.
Infections with Mansonella perstans generally seem to be asymptomatic, but havebeen associated with pruritus, abdominal pain, urticaria and Calabar-like swellings(see above). Infections with Mansonella ozzardi are also generally asymptomatic,but have been associated with lymphadenopathy, pruritus, fever, and pains in theknees and ankles.
Microfilariae are transmitted by mosquitoes, flies and midges, which feed on theblood of infected humans. The microfilariae develop into infective larvae whichinvade the mouth parts of the insect.
Examination of skin for microfilariae of Onchocerca volvulus
A very small piece of the patient’s skin is collected. To see the highly motilemicrofilariae, it is examined as a wet preparation between a slide and coverslipunder the microscope.
Materials and reagents
● Microscope
● Microscope slides
● Coverslips
● Pasteur pipette
● Needle (for intramuscular or subcutaneous injection), 22-gauge
● Scalpel or razor blade
● Sodium chloride, 0.85% solution (reagent no. 53)
● 70% Ethanol.
Table 4.7 Geographical distribution of filarial worms
Species Geographical distribution
Brugia malayi Asia
Brugia timori Parts of Indonesia
Loa loa Central and West Africa
Mansonella ozzardi Central and South America, Caribbean
Mansonella perstans Central and West Africa, Central and South America
Onchocerca volvulus Tropical Africa, Central and South America, parts of Arabia
Wuchereria bancrofti Endemic in many tropical countries
1 Previously known as Dipetalonema perstans.

4. Parasitology 161
Method
Collection of specimensLook for nodules (see Fig. 4.112):
— on the chest (over the ribs) (1);
— on the hips (2);
— on the legs (tibia) (3);
— on the back (shoulder-blades) (4).
The nodules are round and hard, 1–5cm in diameter; when pushed with thefingertips they slide about under the skin. Take the specimen from the skin in thecentre of the nodule.
If the patient does not have nodules, take the skin specimen from the top ofthe buttocks (the upper outer part where intramuscular injections are given — 1 inFig. 4.113). If the examination gives a negative result, take specimens from:
— the calf (upper outer part — 2 in Fig. 4.113);
— the back (centre of the shoulder-blade — 3 in Fig. 4.113).
Fig. 4.112 Sites for collection of slitskin specimens frompatients with nodules1: chest (over the ribs);2: hips; 3: legs (tibia);4: back (shoulder blades).
Fig. 4.113 Sites for collection of slit skin specimensfrom patients without nodules1: top of the buttocks; 2: calves (upperouter part); 3: back (shoulder blades).
It is recommended that six specimens (two from the buttocks, two from the calvesand two from the shoulder-blades) be examined before reporting a negative result.
1. Flame the scalpel (or razor blade) and the needle with ethanol.
2. Place one drop of sodium chloride solution on a slide.
3. Disinfect the chosen area with a gauze pad dipped in ethanol.
4. Using your left hand, pierce the skin with the point of the needle to a depth of2–3mm.
5. Pull the skin away from the flesh with the point of the needle (Fig. 4.114).
6. Place the cutting edge of the scalpel or razor blade on the stretched skinabove the point of the needle (using your right hand; see Fig. 4.115).
7. Cut with a quick stroke the piece of skin pulled up by the point of theneedle, as close to the needle as possible (Fig. 4.116). Fig. 4.114 Lifting the skin with a needle

162 Manual of basic techniques for a health laboratory
The specimen should be about this size: ● (2–3mm in diameter).
It should remain attached to the tip of the needle. The specimen shouldnot be bloodstained; the biopsy must be bloodless.
8. Place the fragment of skin in the drop of sodium chloride solutionon the slide (using the scalpel or razor blade if necessary). Do notflatten the piece of skin; if only one microfilaria is present, it mightbe damaged.
9. Cover with a coverslip. If any part of the specimen is not in contactwith the liquid, add more solution, injecting it under the coverslipwith a Pasteur pipette, until the whole area underneath the cover-slip is wet.
10. Wait 2–3 minutes. Meanwhile, clean the spot from which the speci-men was taken with ethanol. Apply an adhesive dressing.
Collection of specimens in the fieldIf no microscope is available, or during mass epidemiological surveys:
1. Place the piece of skin in a small bottle containing 2ml of sodiumchloride solution.
2. Wait 15 minutes for the microfilariae to leave the skin.
3. Fix the specimen by adding 2ml of 10% formaldehyde solution(reagent no. 28). Mix and replace the cap on the bottle.
4. When you return to the laboratory, shake the bottle well.
Centrifuge the liquid (after removing the piece of skin) at mediumspeed (2000g) for 5 minutes.
5. Transfer the deposit from the centrifuge tube to a slide and cover itwith a coverslip.
Microscopic examination
Examine the wet preparation under the microscope using the ¥ 10 ob-jective. Microfilariae are highly motile. If any are present, they will beseen moving towards the sodium chloride solution (Fig. 4.117).Microfilariae of Onchocerca volvulus have the following features:
Length: 200–315mm.
Width: 5–9mm (the same as an erythrocyte).
Curvature of the body: angular.
Front end: slightly broader than an erythrocyte.
Tail: curved and tapered.
Fig. 4.115 Place the blade above thepoint of the needle
Fig. 4.116 Collecting a slit skin specimen
If no microfilariae emerge, wait for 10 minutes and look at the centre of the piece ofskin; you may see one or two microfilariae moving. If you are in any doubt, take afresh blood specimen from the patient’s finger and prepare a smear on a slide.Cover it with a coverslip and examine it under the microscope. If you see anymicrofilariae, prepare a stained skin smear (see below) and a stained thick bloodfilm (see page 170) to identify the species.
If microfilariae are present, they will be clearly visible. Staining is not necessary, asthe microfilariae can be identified by their characteristic angular curves.
Fig. 4.117 Onchocerca volvulusmicrofilariae in wetpreparation

4. Parasitology 163
Procedure for obtaining a stained specimenExamine the deposit using the ¥10 objective. A smear is made on a slide by crush-ing the skin specimen. It is fixed using methanol and stained with Giemsa stain (seepage 170).
Stained microfilariae of Onchocerca volvulus show the following features (Fig. 4.118):
— they have no sheath;
— the front end is broad;
— the body shows rigid curves;
— the tail tapers gradually and ends in a sharp curve;
— the nuclei are large and oval and stain blue-black; they are well separated anddo not extend to the tip of the tail.
Other microfilariae found in skin biopsiesMansonella streptocerca causes an itchy dermatitis of the infected area. Its microfilariaeare found in the skin and differ from Onchocerca volvulus in the following ways(Fig. 4.119):
— they are slightly shorter (180–240mm);
— they are less broad (5–6mm — half the width of an erythrocyte);
— the front end is not broad;
— the tail ends in a rounded crook;
— the nuclei are smaller and reach the tip of the tail.
Recommended procedures for the detection and identification ofmicrofilariae in blood
The microfilariae of some species (e.g. Loa loa) and the most common strain ofBrugia malayi appear in the blood with a marked nocturnal or diurnal periodicity(Table 4.8). Other species and strains of B. malayi do not show the same degree ofperiodicity; they are nocturnally subperiodic or diurnally subperiodic (e.g. Wuchereriabancrofti ). Other species show no periodicity (e.g. Mansonella ozzardi).
The times for collection of blood specimens should be selected in accordance withthe patient’s clinical symptoms and travel history. Table 4.9 shows the recommendedtimes for collecting blood specimens for testing for periodic and subperiodic spe-cies of microfilariae.
Fig. 4.118 Onchocerca volvulus microfilariain Giemsa-stained smear
Fig. 4.119 Mansonella streptocercamicrofilaria in wet preparation

164 Manual of basic techniques for a health laboratory
Note: Although microfilariae are not directly infectious to humans, all pathologicalspecimens should be treated as potentially hazardous.
An absolute minimum of one “day blood” specimen (taken around 13:00) and one“night blood” specimen (taken around 24:00) should be examined. This is usuallysufficient to detect mixed infections and infections with subperiodic strains.
A blood sample for microfilariae is best examined immediately. If a “night blood”sample will not be examined until the following morning, leave it at roomtemperature.
For each specimen, collect 5–10ml of blood into a 2% solution of trisodium citratein saline (reagent no. 59) or heparin anticoagulant. Direct finger-prick samplesmay give adequate results in areas where filariasis is endemic.
Microscopic examination of capillary blood
Materials and reagents● Microscope
● Microscope slides
● Coverslips
● Blood lancets
● Cotton wool swabs
● Sodium chloride, 0.85% solution (reagent no. 53)
● 70% Ethanol.
Method1. Sterilize the third finger with ethanol. Dry well. Prick with the lancet.
2. Collect the first drop of blood that appears (it contains most microfilariae) directlyon to the middle of the slide (Fig. 4.120).
3. Add an equal-sized drop of sodium chloride solution to the slide.
4. Mix the blood and sodium chloride solution using the corner of a slide. Coverthe preparation with a coverslip.
5. Examine the smear systematically under the microscope using the ¥ 10 objectivewith the condenser aperture reduced. The first sign of the presence of microfilariaeis rapid movement among the erythrocytes.
6. To identify the species of microfilariae, prepare two smears on another slideusing two more drops of blood and stain them as described on page 170.
Fig. 4.120 Collecting a capillary blood sample

4. Parasitology 165
Tab
le 4
.8C
ha
ract
eri
stic
s o
f co
mm
on
hu
ma
n fi
lari
al
pa
rasi
tes
Ch
arac
teri
stic
B. m
alay
iB
. tim
ori
L. lo
aM
. ozz
ard
iM
. per
stan
sM
. str
epto
cerc
aO
. vo
lvu
lus
W. b
ancr
oft
i
Geo
gra
ph
ical
Sou
th-e
ast
Asi
a,Le
sser
Su
nd
aC
entr
al a
nd
Cen
tral
an
dC
entr
al a
nd
Cen
tral
an
dA
fric
a, C
entr
alTr
op
ical
an
dd
istr
ibu
tio
nIn
dia
nis
lan
ds,
Tim
or
Wes
t A
fric
aSo
uth
Am
eric
a,W
est
Afr
ica,
Wes
t A
fric
aan
d S
ou
th A
mer
ica
sub
tro
pic
alsu
bco
nti
nen
tC
arib
bea
nSo
uth
Am
eric
aco
un
trie
s
Vec
tors
Mo
squ
ito
esM
osq
uit
oes
Tab
anid
flie
sB
itin
g m
idg
esB
itin
g m
idg
esB
itin
g m
idg
esB
lack
flie
sM
osq
uit
oes
(An
op
hel
es a
nd
(An
op
hel
es s
pp
.)(C
hry
sop
s sp
p.)
(Cu
lico
ides
sp
p.)
(Cu
lico
ides
(Cu
lico
ides
sp
p.)
(Sim
uliu
m s
pp
.)(C
ule
x, A
edes
,M
anso
nia
sp
p.)
and
bla
ckfl
ies
spp
.)A
no
ph
eles
an
d(S
imu
lium
sp
p.)
Man
son
ia s
pp
.)
Hab
itat
Ad
ult
sLy
mp
hat
icLy
mp
hat
icSu
bcu
tan
eou
sSu
bcu
tan
eou
sM
esen
tery
Der
mis
Sub
cuta
neo
us
Lym
ph
atic
syst
emsy
stem
tiss
ues
, orb
itti
ssu
esti
ssu
essy
stem
Mic
rofi
lari
aeB
loo
dB
loo
dB
loo
dB
loo
dB
loo
dSk
inSk
inB
loo
d
Peri
od
icit
y o
fN
oct
urn
ala
No
ctu
rnal
Diu
rnal
Ap
erio
dic
Ap
erio
dic
NA
NA
No
ctu
rnal
b
mic
rofi
lari
ae
Mo
rph
olo
gy
of
mic
r ofi
lari
ae
Shea
thPr
esen
tPr
esen
tPr
esen
tA
bse
nt
Ab
sen
tA
bse
nt
Ab
sen
tPr
esen
t
Len
gth
(mm
)17
5–23
0 in
265–
325
in23
0–25
0 in
160–
205
in19
0–20
0 in
180–
240
in s
kin
300–
315
in s
kin
240–
300
insm
ears
;sm
ears
;sm
ears
;sm
ears
;sm
ears
;sn
ips
snip
ssm
ears
;24
0–30
0 in
2%
330–
385
in 2
%27
0–30
0 in
2%
205–
250
in 2
%18
0–22
5 in
2%
275–
320
in 2
%fo
rmal
info
rmal
info
rmal
info
rmal
info
rmal
info
rmal
in
Wid
th (
mm)
5.0–
6.0
4.4–
6.8
5.0–
7.0
3.0–
5.0
4.0–
5.0
5.0–
6.0
5.0–
9.0
7.5–
10.0
Tail
Tap
ered
;Ta
per
ed;
Tap
ered
; nu
clei
Lon
g, s
len
der
,B
lun
tly
Blu
ntl
y ro
un
ded
,Ty
pic
ally
flex
ed;
Tap
ered
;su
bte
rmin
al a
nd
sub
term
inal
an
dir
reg
ula
rly
po
inte
d;
rou
nd
ed; n
ucl
eib
ent
into
a h
oo
k;ta
per
ed t
o p
oin
t;an
ucl
eate
term
inal
nu
clei
term
inal
nu
clei
spac
edan
ucl
eate
to e
nd
nu
clei
to
en
dan
ucl
eate
wid
ely
sep
arat
edw
idel
y se
par
ated
Key
fea
ture
sLo
ng
hea
d s
pac
e;Lo
ng
hea
d s
pac
e;Sh
eath
Smal
l siz
e; lo
ng
Smal
l siz
e;Sl
end
er s
hap
e;Fl
exed
tai
l;Sh
ort
hea
d s
pac
e;sh
eath
sta
ins
pin
ksh
eath
un
stai
ned
un
stai
ned
insl
end
er t
ail;
blu
nt
tail
fille
dh
oo
ked
tai
l fille
do
ccu
r in
ski
n a
nd
shea
th u
nst
ain
edin
Gie
msa
; ter
min
alin
Gie
msa
;G
iem
sa; s
ing
leap
erio
dic
wit
h n
ucl
ei;
wit
h n
ucl
ei;
occ
asio
nal
ly in
in G
iem
sa; b
od
yan
d s
ub
term
inal
term
inal
an
dro
w o
f n
ucl
ei t
oap
erio
dic
occ
ur
in s
kin
uri
ne
or
blo
od
in s
mo
oth
nu
clei
sub
term
inal
nu
clei
end
of
tail
afte
r tr
eatm
ent
curv
es; d
isp
erse
dn
ucl
ei
aN
oct
urn
ally
su
bp
erio
dic
in In
do
nes
ia, M
alay
sia,
par
ts o
f th
e Ph
ilip
pin
es a
nd
Th
aila
nd
.bD
iurn
ally
su
bp
erio
dic
in N
ew C
aled
on
ia a
nd
Po
lyn
esia
; no
ctu
rnal
ly s
ub
per
iod
ic in
ru
ral a
reas
of
Thai
lan
d.

166 Manual of basic techniques for a health laboratory
Table 4.9 Recommended times for collectionof blood specimens for testing formicrofilariae
Speciesa Recommended collection time
Periodic (nocturnal) 23:00–01:00 (peak 24:00)
Periodic (diurnal) 12:00–14:00 (peak 13:00)
Subperiodic (nocturnal) 20:00–22:00 (peak 21:00)
Subperiodic (diurnal) 15:00–17:00 (peak 16:00)
Aperiodic any time (day or night)
a See Table 4.8.
Fig. 4.121 A pathogenic microfilariaLength: 250–300mm;thickness: 6–8 mmmmmm (diameterof an erythrocyte).e.g. Wuchereria bancrofti,Loa loa, Brugia malayi.
Fig. 4.122 A microfilaria of doubtfulpathogenicityLength: about 150mm;thickness: about 4 mmmmmm (halfthe diameter of anerythrocyte).e.g. Mansonella ozzardi,M. perstans.
Staining is generally required to identify microfilariae in blood smears. It is possi-ble, however, to gain some indication of the species seen and its pathogenicity froma fresh smear (Figs. 4.121 and 4.122).
Microscopic examination of venous blood concentrated by centrifugation
Materials and reagents● Microscope
● Microscope slides
● Syringes (5ml or 10ml)
● Needles for venepuncture
● Centrifuge or microhaematocrit centrifuge
● Conical centrifuge tubes or microhaematocrit capillary tubes
● Plastic modelling clay
● Adhesive tape
● Anticoagulant: trisodium citrate, 2% solution in saline (reagent no. 59)
● Formalin, 2% solution (prepared by diluting 37% formaldehyde solution 1:50with distilled water) or saponin, 1% solution (reagent no. 48)
● Ether
● 70% Ethanol.

4. Parasitology 167
Method1. Collect 4ml of venous blood. Expel into a bottle containing 1ml of trisodium
citrate solution. Mix.
2. Measure into a conical centrifuge tube 10ml of 2% formaldehyde solution. Add1ml of citrated blood. Mix. Wait 5 minutes for the erythrocytes to lyse.
3. Centrifuge for 5 minutes at 10000g. Pour off the supernatant fluid. Tap the tubeto mix the deposit.
4. Place one drop of the deposit on a slide. Spread the drop to form a thin smearand leave to air-dry.
5. Fix the smear using a 1:1 mixture of ethanol and ether. Leave to dry for 2 minutes,then stain immediately as described on page 170 to identify the species ofmicrofilaria.
Alternative method using a microhaematocrit centrifuge1. Collect 4ml of venous blood. Expel into a bottle containing 1ml of trisodium
citrate solution. Mix.
2. Three-quarters fill a microhaematocrit capillary tube with the citrated blood.Seal one end of the tube with plastic modelling clay or by heating.
3. Centrifuge in a microhaematocrit centrifuge at 10000g for 2 minutes.
4. Lay the capillary tube on a slide and secure the two ends with adhesive tape.
5. Examine the dividing line between the blood cells and the plasma under themicroscope (Fig. 4.123), using the ¥ 10 objective with the condenser aperturereduced.
Motile microfilariae will be seen at the bottom of the column of plasma, just abovethe layer of leukocytes and erythrocytes (Fig. 4.124).
The tube can be snapped at the bottom of the column of plasma (see Fig. 4.124).Use the first drop from each piece of the broken tube to prepare a thick film. Stainthe film as described on page 170 to identify the species.
Capillary blood can also be examined by this method. Collect two drops of capil-lary blood from the finger on to a slide and mix with one drop of 2% trisodiumcitrate solution.
Fig. 4.123 Examining the microhaematocritcapillary tube under themicroscope
Fig. 4.124 Motile microfilariaeE: erythrocytes; L: leukocytes;P: plasma.

168 Manual of basic techniques for a health laboratory
Alternative method using saponin lysing solution1. Add 10ml of citrated blood (see above) to 10ml of saponin lysing solution.
2. Mix the blood gently and leave for 15 minutes to allow the erythrocytes to lyse.
3. Centrifuge at 2000g for 15 minutes.
4. Remove the supernatant with a pipette and discard it into a dish containingdisinfectant.
5. Transfer the deposit to a slide and cover with a coverslip.
6. Examine the entire deposit for motile microfilariae using the ¥ 10 objective.(Microfilariae will still be motile in a “night blood” sample examined thefollowing morning.)
7. Count the number of microfilariae in the preparation and divide by 10 to givethe number of microfilariae per ml of blood.
Considerable experience is required to identify unstained microfilariae. It isrecommended that identification be performed on stained preparations (see page170).
Microscopic examination of venous blood concentrated by filtration
Materials and reagents● Microscope
● Microscope slides
● Coverslips
● Syringe, 15ml
● Swinnex-type filter holder
● Polycarbonate membrane filter (25mm diameter, 5mm pore size)1
● Filter-paper pad (25mm diameter)
● Shallow dish, 15ml, with lid
● Blunt forceps
● Sodium chloride, 0.85% solution (reagent no. 53)
● Absolute methanol
● Distilled water.
Method1. Draw up 10ml of distilled water into a syringe.
2. Draw 1ml of fresh blood or citrated blood into the syringe (Fig. 4.125). Rotategently to mix the contents. Wait for 2–3 minutes, for the erythrocytes to lyse.
3. Moisten the filter-paper pad with a few drops of distilled water and cover withthe membrane filter. Place the filter on the filter holder.
4. Connect the syringe to the filter holder. Gently push the blood through thefilter into a dish containing disinfectant solution (Fig. 4.126).
5. Remove the syringe from the filter holder (taking care to avoid disturbing thefilter) and draw up 10ml of distilled water.
6. Reconnect the syringe to the filter holder and gently push the water throughthe filter into the dish containing disinfectant solution, to remove the debrisfrom the filter (Fig. 4.127).
1 In areas endemic for Mansonella perstans, a membrane filter with a pore size of 3mm should beused.

4. Parasitology 169
7. Remove the syringe from the filter holder and draw upapproximately 5ml of air.
8. Reconnect the syringe to the filter holder and push the airthrough the filter over the dish containing disinfectant,to remove excess water from the filter. Discard the disin-fectant solution into a sink.
9. Remove the syringe from the filter holder. Dismantlethe filter holder and remove the membrane filter usingforceps.
10. Place the membrane filter, top side facing up, on a slide.Add a drop of sodium chloride solution and cover with acoverslip.
11. Examine the entire membrane for motile microfilariae,using the ¥ 10 objective. (Microfilariae will still be motilein a “night blood” specimen examined the followingmorning.
12. Count the number of microfilariae in the preparation anddivide by 10 to give the approximate number ofmicrofilariae per ml of blood.
Considerable experience is required to identify unstainedmicrofilariae. It is recommended that identification be per-formed on stained preparations (see below). To prepare astained preparation, follow the method described above, withthe following modifications:
Fig. 4.125 Drawing up citrated blood into a syringe
Fig. 4.126 Filtering the blood sample Fig. 4.127 Rinsing the filter
170 Manual of basic techniques for a health laboratory
8. Reconnect the syringe to the filter holder and push the air through the filterover the dish containing disinfectant, to remove excess water from the filter.
9. Remove the syringe from the filter holder and draw up approximately 7ml ofair and 3ml of methanol.
10. Reconnect the syringe to the filter holder and push the methanol and air throughthe filter over the dish containing disinfectant, to fix the microfilariae and re-move excess methanol from the filter, respectively.
11. Remove the syringe from the filter holder. Dismantle the filter holder and re-move the membrane filter using forceps.
12. Place the membrane filter, top side facing up, on a slide. Allow to air-dry.
13. Stain with Giemsa stain as for thick films (see page 175) and examine theentire filter membrane using the ¥ 10 objective.
Technique for staining microfilariae
Materials and reagents● Microscope
● Microscope slides
● Giemsa stain (reagent no. 29)
● Delafield’s haematoxylin stain (reagent no. 19)
● Methanol
● Buffered water (reagent no. 15).
Method1. Prepare a thick blood smear of the deposit as described on page 174. Allow the
smear to air-dry.
2. Fix in methanol for 1 minute.
3. Stain with Giemsa stain (diluted 1 in 20 with buffered water, pH 6.8) for 30minutes.
4. Examine the preparation under the microscope using the ¥ 10 objective. If it isdifficult to distinguish the nuclei of the microfilariae, return the slide to theGiemsa stain solution for another 5–10 seconds.
5. Stain with Delafield’s haematoxylin stain (diluted 1 in 10 with buffered water,pH 6.8) for 5 minutes. Wash in buffered water, pH 6.8. (This second stain isrequired because Giemsa stain alone does not stain the sheath of Loa loa verywell.)
6. Examine the preparation under the microscope. Use the ¥ 10 objective first tolocate the microfilariae; then identify the filarial species using the ¥ 40 and ¥ 100objectives.
ResultsUnder the light microscope microfilariae appear (after appropriate staining) as primi-tive organisms, serpentine in shape, often enclosed in a sheath and filled with thenuclei of many cells (Fig. 4.128).
Not all species have a sheath. In those that do, the sheath may extend a short orlong distance beyond either extremity. In some species, depending on the stainused, the sheath displays a unique staining quality which aids in species identification.
The nuclei of the cells which fill the body are usually darkly stained and may becrowded together or dispersed (see Fig. 4.128). The anterior extremity is charac-

4. Parasitology 171
teristically devoid of nuclei and is called the cephalic or head space; it may be shortor long.
As you look from the anterior to the posterior end of the body you will see addi-tional spaces and cells that serve as anatomical landmarks. These include the nervering, excretory pore, excretory cell and anal pore. In some species an amorphousmass called the inner body and four small cells (known as rectal cells) can be seen.Some of these structures and their positions are useful in identifying the species.Other useful features include the shape of the tail and the presence or absence ofnuclei within it.
Table 4.8 summarizes the features of common human filarial parasites that areused in their identification.
Note:
● Sometimes the microfilariae of the periodic strain of Brugia malayi lose theirsheath.
● Identification of species can be difficult and mistakes are frequently made. Theguidelines for the identification of microfilariae given above and those that ap-pear in most textbooks make identification seem deceptively simple. Sometimesit is difficult to see the sheath. At other times, the nuclei do not appear in theircharacteristic position at the tip of the tail. It is good practice to examine severalmicrofilariae carefully, before deciding on their species. If a systematic study ismade of all the characteristics mentioned above, it should be possible to identifywith certainty the species observed. The identification must not be based on asingle characteristic, but on all the features taken together.
Fig. 4.128 Microfilariae found in humansR1, R2, R3, R4: rectal cells.
Nuclei not extendingto tip of tail,
cephalic spaceas long as broad
Onchocercavolvulus
Mansonellastreptocerca
Mansonellaozzardi
Mansonellaperstans
Wuchereriabancrofti
Loa loaBrugiamalayi
Nuclei not extendingto tip of tail,thick filaria
Nuclei extendingto tip of tail,
small, thin filaria,hooked tail
Nuclei not extendingto tip of tail,
small, thin filaria
With sheath Without sheath Without sheath
In skin
Nuclei extendingto tip of tail
Tail swollen with2 distinct nuclei,
cephalic space twiceas long as broad
In blood
Tail uniform,cephalic space
as long as broad
Nuclei extendingto tip of tail,
tail blunt
Sheath
With a sheath
Anal poreCephalic space R1 cell
R4 cell R3 cell R2 cell
Nerve ring Excretory pore Excretory cell
Without a sheath
Microfilariae
who
905
89

172 Manual of basic techniques for a health laboratory
Geographical origin of the patient. Always bear in mind where the patient isfrom or which countries the patient has visited recently.
If the patient is from:
— Cameroon, eastern Nigeria or the Democratic Republic of the Congo riverbasin, the parasite is probably Loa loa;
— Ghana, India, Senegal or the West Indies, the parasite is probably Wuchereriabancrofti;
— Thailand, the parasite is probably Brugia malayi;
— Guyana, the parasite is probably Mansonella ozzardi.
Examination of thin films. Identification of microfilariae in stained thin filmsis not recommended; the microfilariae are shrunken, distorted and difficult torecognize.
4.7.2 Plasmodium spp.Malaria, which is caused by infection with protozoa of the genus Plasmodium, is themost important parasitic disease in tropical countries. It is transmitted to humansthrough the inoculation of Plasmodium sporozoites by female Anopheles mosquitoesor by blood transfusion. The sporozoites travel through the blood to the liver, wherethey transform into large tissue schizonts containing considerable numbers ofmerozoites (tissue schizogony). These begin to rupture after 5–20 days, accordingto the species, and the released merozoites invade circulating erythrocytes. Thereplication cycle is repeated at regular intervals.
Clinical symptoms
The first clinical symptoms of infection are low-grade fever, headaches, muscleaches and malaise. These symptoms are often misinterpreted as being the result ofa viral influenza infection. The influenza-like symptoms are followed by recurrent,periodic attacks of high fever and shivering. If high temperatures are accompaniedby mental disturbances marked by hallucinations and cerebral excitation, this mayindicate cerebral malaria, which is often fatal.
In areas in which malaria is endemic and where the population has developed par-tial immunity to the disease, the clinical symptoms may be more moderate.
Plasmodium species infective to humans
There are four different species of Plasmodium infective to humans. These areP. falciparum, P. malariae, P. ovale and P. vivax.
Fig. 4.129 Possible cause of misidentification ofWuchereria bancrofti: broken orfolded tail
Possible causes of misidentification
Broken or folded tail. If the tail of Wuchereria bancrofti is brokenor folded over (Fig. 4.129), it appears to have nuclei extending tothe tip like Loa loa.
Torn or colourless sheath. The sheath is sometimes torn or al-most colourless. In Loa loa, for example, the sheath appears as acolourless space between the tail and the blood cells.
Unusually large or small microfilariae. Some Mansonellaperstans are very long (e.g. 200mm), and some Wuchereria bancroftiand Loa loa are small (e.g. 250mm).
Badly made smears (or films). If it is damaged when the smear(or film) is being made, Wuchereria bancrofti may appear twistedand Loa loa may show a few curves.

4. Parasitology 173
Table 4.10 Geographical distribution of Plasmodium spp. infectiveto humans
Country or area P. falciparum P. malariae P. ovale P. vivax
Central Africa Predominant Rare Rare Rare
East Africa Predominant Rare Rare Common
North Africa Very rare Very rare Absent Predominant
West Africa Predominant Rare Rare Very rare
Central America Common Rare Absent Predominant
South America Common Common Absent Predominant
Central and south-west Asia Common Common Absent Predominant
South-east Europe Very rare Very rare Absent Predominant
Indian subcontinent Common Rare Very rare Predominant
Indochina Predominant Rare Rare Common
Indonesia Predominant Very rare Very rare Common
Madagascar, Indian Ocean Predominant Rare Rare Common
Pacific Islands Predominant Very rare Rare Common
The geographical distribution of these species is summarized in Table 4.10.
Identification of Plasmodium spp. in blood films
Malaria parasites are usually detected in blood films stained with Field or Giemsastains. They may also be detected using an immunological procedure known as adipstick test (see section 11.9).
It is important for the prognosis and treatment of the disease that the species in-volved are identified in the laboratory. If you cannot identify the species, alwaysreport the presence of any malaria parasites you see. Do not mistake thrombocytessuperimposed upon erythrocytes for malaria parasites.
Preparation of a thick and a thin blood film on the same slide
For routine malaria microscopy, a thin and a thick film are made on the same slide.The thick film is used for the detection of parasites, while the thin film is used inidentifying the species of parasite.
Materials and reagents● Microscope
● Clean glass microscope slides (see section 3.5.1)
● Sterile blood lancets
● Cotton wool
● Grease pencil
● Methanol
● 70% Ethanol.
MethodBlood to be examined for malaria parasites is usually collected at a health centre.The most suitable time for collection is at the height of an episode of fever, whenthe parasites are most numerous in the blood. Blood specimens should always becollected before antimalarial drugs are given.

174 Manual of basic techniques for a health laboratory
Fig. 4.130 Cleaning the finger beforecollecting a capillary bloodsample
Fig. 4.131 Using a lancet to puncture the ball ofthe finger
1. With the patient’s left hand palm upwards, select the third or fourth finger. (Thebig toe can be used with infants. The thumb should never be used for adults orchildren.) Use cotton wool lightly soaked in ethanol to clean the finger — usingfirm strokes to remove dirt and grease from the ball of the finger (Fig. 4.130).Dry the finger with a clean piece of cotton wool (or lint).
2. With a sterile lancet, puncture the ball of the finger (Fig. 4.131), using a quickrolling action. By applying gentle pressure to the finger, express the first drop ofblood and wipe it away with dry cotton wool. Make sure that no strands ofcotton wool remain on the finger.
3. Working quickly and handling clean slides only by the edges, collect the blood asfollows:• Apply gentle pressure to the finger and collect a single small drop of blood,
about this size ●, on to the middle of the slide. This is for the thin film.• Apply further pressure to express more blood and collect two or three larger
drops, about this size ● , on to the slide about 1cm from the drop intended forthe thin film (see Fig. 4.132).
Wipe the remaining blood away with cotton wool.
4. Thin film. Using another clean slide as a “spreader”, and with the slide with theblood drops resting on a flat, firm surface, touch the small drop with the spreaderand allow the blood to run along its edge. Firmly push the spreader along theslide, away from the largest drops, keeping the spreader at an angle of 45° (Fig.4.133). Make sure that the spreader is in even contact with the surface of theslide all the time the blood is being spread.
5. Thick film. Always handle slides by the edges, or by a corner, to make the thickfilm as follows:
Using the corner of the spreader, quickly join the larger drops of blood andspread them to make an even, thick film (Fig. 4.134).
6. Allow the thick film to dry in a flat, level position protected from flies, dust andextreme heat. Label the dry film with a grease pencil by writing across the thickerportion of the thin film the patient’s name or number and date (as shown in Fig.4.135).

4. Parasitology 175
Staining blood films with Giemsa stain
PrincipleDuring staining of the blood film, the haemoglobin in the erythrocytes dissolves(dehaemoglobinization) and is removed by the water in the staining solution. Allthat remain are the parasites and the leukocytes, which can be seen under themicroscope.
Materials and reagents● Microscope
● Measuring cylinders, 10, 50 and 100ml
● Beakers, 50 and 250ml
● Staining troughs
● Glass rods
● Wash bottle
● Slide forceps
● Slide racks
Fig. 4.132 Collecting the blood sample Fig. 4.133 Preparing a thin blood film
Fig. 4.134 Preparing a thick blood film Fig. 4.135 Labelling the slide

176 Manual of basic techniques for a health laboratory
● Timer
● Giemsa stain (reagent no. 29)
● Methanol in a drop bottle
● Buffered water, pH 7.2 (reagent no. 15) or distilled water.
Routine method for staining thick and thin blood filmsIdeally, for optimum staining, thick and thin films should be made on separateslides. This is often not possible and thick and thin films are generally made on thesame slide. When this is done, good-quality staining of the thick film is of primaryimportance. Best results are obtained if the blood films have dried overnight.
This method is suitable for staining 20 or more slides.
1. Fix the thin film by adding three drops of methanol, or by dipping it into acontainer of methanol for a few seconds. With prolonged fixation it may be difficultto detect Schüffner’s dots and Maurer’s clefts. To permit dehaemoglobinization,the thick film should not be fixed; therefore avoid exposure of the thick film tomethanol or methanol vapour.
Fig. 4.136 Placing the slides in a stainingtrough
Fig. 4.137 Pouring clean water into thestaining trough to remove thedeposit
Fig. 4.138 Pouring off the remainingstain
In some laboratories with limited supplies the diluted Giemsa stain is reused; insuch cases it must be used on the same day.
7. Using forceps, remove the slides one by one. Place them in a slide rack to drainand dry, film side downwards, making sure that the film does not touch the sliderack.
Rapid method for staining thick and thin blood filmsThis method is suitable for rapid staining of thick films when urgent results arerequired. It uses much more stain than the regular method.
2. Using forceps, place the slides back to back in a staining trough (Fig.4.136).
3. Prepare a 3% Giemsa solution in buffered or distilled water, pH 7.2,in sufficient quantity to fill the number of staining troughs being used.Mix the stain well.
4. Pour the stain gently into the staining trough, until all the slides aretotally covered. Stain for 30–45 minutes out of sunlight.
5. Pour clean water gently into the trough to remove the deposit on thesurface of the staining solution (Fig. 4.137).
6. Gently pour off the remaining stain (Fig. 4.138), and rinse again inclean water for a few seconds. Pour the water off.

4. Parasitology 177
1. Allow the thick film to dry thoroughly; if results are required urgently, dryingmay be hastened by fanning, or briefly exposing the slide to gentle heat such asthat from a microscope lamp. Care should be taken to avoid overheating, other-wise the thick film will be heat-fixed.
2. Fix the thin film by adding three drops of methanol, or by dipping it into acontainer of methanol for a few seconds. To permit dehaemoglobinization, thethick film should not be fixed; therefore avoid exposure of the thick film to metha-nol or methanol vapour.
3. Prepare a 10% Giemsa solution in buffered or distilled water, pH 7.2; if a smallquantity is being used, three drops of stain per ml of buffered water will give thecorrect concentration of Giemsa solution. One slide requires about 3ml of made-up stain. Mix the stain well with a glass rod.
4. Gently pour the stain on to the slides or use a pipette. Stain for 5–10 minutes.
5. Gently flush the stain off the slides by adding drops of clean water. Do not tip offthe stain and then wash, as this will leave a deposit of scum over the smears.
6. Place the slides in the slide rack to drain and dry, film side downwards, makingsure that the film does not touch the slide rack.
Staining blood films with Field stain
Staining with Field stain allows rapid detection of malaria parasites (but it does notalways stain Schüffner’s dots).
Materials and reagents● Microscope
● Glass jars
● Slide racks
● Methanol
● Field stain (reagent no. 25)
● Buffered water, pH 7.2 (reagent no. 15).
Method for staining thick films1. Dip the unfixed film into a jar containing Field stain A solution for 3 seconds.
2. Wash gently by dipping (once) into a jar of clean water for 5 seconds.
3. Dip the slide into a jar containing Field stain B solution for 3 seconds.
4. Wash the slide gently as in step 2.
5. Place the slide upright in a slide rack to air-dry.
Method for staining thin films1. Fix the film in methanol for 1 minute.
2. Wash off the methanol with buffered water.
3. Using a pipette, cover the film with diluted Field stain B (one volume of stainplus four volumes of buffered water).
4. Immediately add an equal volume of Field stain A solution and mix well bytilting the slide.
5. Allow to stain for 1 minute.
6. Wash off the stain with clean water.
7. Place the slide upright in a slide rack to air-dry.

178 Manual of basic techniques for a health laboratory
Microscopic examination
Examine the slide under the microscope using the ¥ 100 objective. Malaria para-sites found in the blood are at different stages of development (Fig. 4.139). Somemalaria parasites have granules of pigments in their cytoplasm (Fig. 4.140).
Thin blood filmsIn thin blood films, the infected erythrocytes may remain unchanged or have adifferent colour or shape, or may contain pink (“Schüffner’s”) or red (“James”)
Fig. 4.139 Stages of development of malaria parasites
Fig. 4.140 Malaria parasites containing pigment

4. Parasitology 179
dots (see Table 4.11). Thin films can be used to identify the species of malariaparasite (see Table 4.12).
Note: In patients who have been suffering from malaria for a long time, monocytesmay be seen in the thin blood film; the cytoplasm often contains brown or greenish-black bodies (siderophils). In patients who have recently received an injection of anantimalarial drug, the parasites stain poorly and appear distorted and indistinct.
Thick blood filmsIn thick blood films, the background should be clean and free from debris, as theinfected erythrocytes are lysed. The malaria parasites should have deep red chromatinand blue or pale purplish-blue cytoplasm. In thick films stained with Giemsa, thenuclei of leukocytes should be stained dark purple. Schüffner’s dots may be seenaround the malaria parasites.
Thick blood films are used for estimating the parasite density, as described below.
Parasite densityThe parasite density is the number of parasites counted in each microscope field. Itusually varies according to the species.
Two methods can be used to count malaria parasites in thick blood films: determi-nation of the number of parasites per microlitre (ml) of blood, and the plus system.
Table 4.11 Comparison of infected erythrocytes in thin blood films
P. falciparum P. malariae P. vivax P. ovale
Size of youngtrophozoite incomparisonwith diameterof an erythrocyte(at the samestage ofdevelopment) One-fifth to one- One-quarter to two- One-quarter to two- One-quarter to two-
third of diameter thirds of diameter thirds of diameter thirds of diameter
Appearance ofinfectederythrocyte
Remains Remains unchanged or Enlarged and often Enlarged, oval, withunchanged becomes smaller and pale-staining torn jagged edges
sometimes moredeeply coloured
Dots in theinfectederythrocyte
Often nonea None Small pink dots Large red dots (James(Schüffner’s dots) dots) always present
Stages found Trophozoites and/or All stages found in the All stages found in the All stages found in the(see Fig. 4.139) gametocytes; many same film same film same film
trophozoites can befound in one cell
a In some erythrocytes infected with adult trophozoites of P. falciparum, a few large pink granules (“Maurer’s clefts”) can be found.

180 Manual of basic techniques for a health laboratory
1. Determination of the number of parasites/ml of blood is accomplished by count-ing the number of parasites in relation to a standard number of leukocytes/ml(8000). Initially, the blood film is examined for the presence of parasite speciesand their stages of development. Using two hand tally counters, one for count-ing leukocytes and the other for parasites, follow one of these two procedures:
Table 4.12 Identification of Plasmodium spp. infective to humans in blood films
P. falciparum P. malariae
(Stage frequently found) (Stage frequently found)
Cytoplasm: small, fine, pale blue ring Cytoplasm: thick, dense, blue ring
Chromatin: one or two small red dots with some granules of black pigment
Chromatin: one large red dot
(Stage frequently found) (Stage frequently found)
Cytoplasm: rather thin, blue ring, or Cytoplasm: either (a) round, compact,shaped like a comma or an dark blue, with many black particlesexclamation mark of pigment, or (b) in band form (in
Chromatin: one or two medium- thin films only)
sized red dots Chromatin: a round dot or red band
(Very rare) (Fairly frequently found)
Hardly ever found in blood films Merozoites: 8–10 large red granules(except in very serious cases) surrounded by pale cytoplasm and
Merozoites: 18–32 arranged irregularly (young form) or
Pigment: dark brownish-blackin a rosette
Pigment: always seen
(Fairly frequently found) (Fairly frequently found)Shape: similar to a banana or sickle Shape: large, oval or rounded
Colour: pale blue (male) or dense blue Colour: pale blue (male) or dense(female) blue (female)
Nucleus: reddish-pink Nucleus: one round spot of red
Pigment: a few blue–black granules in chromatin against one edge
the centre of the cytoplasm or Pigment: large black granules in thescattered through it cytoplasm
Normal in size Normal in size and shape
May show crenation cells containing No red dots usually seenmature trophozoites; often contain afew red dots, irregular in size andshape
Often very high density Low density
You
ng
tro
ph
ozo
ite
Mat
ure
tro
ph
ozo
ite
Sch
izo
nt
Gam
eto
cyte
Eryt
hro
cyte
sPa
rasi
ted
ensi
tyb
a The identity of P. ovale must be confirmed by examination of a thin blood film.b The parasite density in any area depends mainly on whether the malaria is seasonal or endemic. Adults living in endemic areas often developimmunity to the disease and have a low parasite density.

4. Parasitology 181
Table 4.12 (cont.)
P. vivax P. ovalea
(Stage frequently found) Cytoplasm: regular, dense
Cytoplasm: blue, irregular, quite blue ring
thick ring Chromatin: one medium-
Chromatin: one large red dot sized red dot
(Not frequently found) Cytoplasm: round, compact,
Cytoplasm: large, blue, irregular very blue with a few
(sometimes divided into 2–4); particles of brown pigment
small particles of brownish- Chromatin: one large redorange pigment dot
Chromatin: 1 red dot
(Quite frequently found) Merozoites: 8–14 large red
Merozoites: 12–18 large granules in a rosette,
compact red granules round a central mass of
surrounded by pale blue particles of brown pigment
cytoplasm
(Frequently found) Shape: large, oval or round,
Female: oval or rounded, dense dense blue
blue Nucleus: one round red spotA dense red triangular nucleus, Pigment: a few brownoften at one end; many particles in the cytoplasmparticles of orange pigment in Differentiated from:the cytoplasm — P. vivax by its brownMale: rounded, pale blue pigmentA round central pale red — P. malariae by thenucleus; some particles of presence of Schüffner’sorange pigment in the dotscytoplasm
Enlarged, often pale-staining See Table 4.11 May appear oval withSchüffner’s dots, especially around jagged endsmature trophozoites Easily seen large red James
dots
Medium density Medium density
You
ng
tro
ph
ozo
ite
Mat
ure
tro
ph
ozo
ite
Sch
izo
nt
Gam
eto
cyte
Eryt
hro
cyte
sPa
rasi
ted
ensi
tyb
(i) if, after counting 200 leukocytes, 10 or more parasites are found, record theresults on the record form in terms of the number of parasites/200 leukocytes;
(ii) if, after counting 200 leukocytes, the number of parasites is 9 or fewer,continue counting until you reach 500 leukocytes and then record thenumber of parasites/500 leukocytes.

182 Manual of basic techniques for a health laboratory
After procedure (i) or (ii), use a simple mathematical formula, multiplying thenumber of parasites by 8000 and then dividing this figure by the number ofleukocytes (200 or 500). The result is the number of parasites/ml of blood. It isnormal practice to count all the species present and to count and record sepa-rately the gametocytes of P. falciparum and the asexual parasites. This is particu-larly important when monitoring the response to antimalarial drugs that areactive against the schizont stage, which would not be expected to have anyeffects on gametocytes.
number of parasites counted number of leukocytes
number of parasites l of blood= m
Example:
If 200 leukocytes are counted:
50 2000parasites 8000 200 leukocytes parasites of blood¥( ) = ml
If 500 leukocytes are counted:
5 80 parasites 8000 500 leukocytes parasites of blood¥( ) = ml
2. A simpler method of counting parasites in thick blood films is to use the plussystem. This system is less satisfactory, however, and should be used only whenit is not possible to carry out the more acceptable count of parasites/ml of blood.In this system, a code of between one and four plus signs is used:
+ = 1–10 parasites per 100 thick film fields++ = 11–100 parasites per 100 thick film fields+++ = 1–10 parasites per single thick film field++++ = more than 10 parasites per single thick film field.
Remember: For proper identification and reliable parasite counting, use clean slidesand well-made and well-stained thick films.
Note: Patients with very high parasite densities (over 10 parasites per thick filmfield) require urgent treatment. Therefore, if you find a high parasite density, statethe result clearly in your report and send it immediately to the patient’s physician.
Reporting resultsIf the result of the examination of the stained blood films is positive, specify:
— the species of parasite found;
— the stage of development of the parasite;
— the parasite density.
Blood films containing P. ovale and P. vivax may contain few parasites and thereforetake more time to examine under the microscope. However, it is necessary to dif-ferentiate the two species, since they may reappear in the blood without reinfec-tion. Patients infected with P. ovale or P. vivax require additional treatment to eradicatethe liver stages of these parasites.
A patient can harbour more than one species of malaria parasite at the same time(e.g. P. falciparum and P. malariae or P. falciparum and P. vivax).
If the result is negative, report as “no parasites found”.
4.7.3 Trypanosoma spp.Trypanosomiasis is caused by infection with parasitic protozoa of the genusTrypanosoma. It occurs in southern and western Africa, where it is known assleeping sickness or African trypanosomiasis, and in Central and South America,where it is called Chagas disease.

4. Parasitology 183
African trypanosomiasis
African trypanosomiasis occurs in three phases:
— the acute phase
— the parasitaemic phase
— the neurological phase.
Two or 3 days after the bite of an infected tsetse fly, a chancre appears at the inocu-lation site; it disappears within 2–3 weeks. From the site of the chancre, thetrypanosomes invade the bloodstream, giving rise to occasional episodes of inter-mittent fever. The most common symptoms of the first or acute phase are head-ache, sleeplessness, pain in the joints and posterior lymph nodes of the neck, swellingof the eyelids and joints, weight loss and generalized intense itching, especially inthe region of the breast bone. Invasion of the central nervous system causes irrita-bility, paraesthesia, sleeplessness and eventually severe headaches and blurred vi-sion, as well as epileptic attacks, psychotic phenomena, drowsiness, mental lethargyand coma.
Trypanosomiasis caused by Trypanosoma brucei gambiense generally has a slow andchronic course. Between the first and second phases, weeks or months can pass,and months or years may elapse between the second and third phases. Trypano-somiasis caused by T.b. rhodesiense follows a more acute course and the phases areless marked. It may cause death within a few months. Heart complications aremore frequent in trypanosomiasis caused by T.b. rhodesiense, and some patients diebefore reaching the neurological phase.
Sources of infection and modes of transmissionAfrican trypanosomiasis is transmitted by tsetse flies (Glossina spp.) and humansare the main reservoir of infection. Pigs, dogs and possibly other animal species canalso harbour the parasite, but their role in spreading the disease is secondary.
Transmission occurs when tsetse flies ingest the blood of infected humans oranimals.
Examination of lymph node aspirates for Trypanosoma brucei gambienseand T.b. rhodesiense
In patients with African trypanosomiasis trypanosomes are found in the lymphglands in the early stage, i.e. 2–3 weeks after infection. They disappear from theglands within 2–6 months. At a later stage the parasites may infect the central nervoussystem.
The standard method of diagnosis of African trypanosomiasis in the early stage isto search for trypanosomes in aspirates from enlarged cervical lymph nodes.
PrincipleA drop of fluid from the lymph node is collected with a needle and examined im-mediately as a wet preparation. The trypanosomes, which are motile flagellate pro-tozoa, are easily seen under the microscope.
Materials and reagents● Microscope
● Microscope slides
● Coverslips
● Needle (for subcutaneous injection), 25-gauge
● Syringe, 5 or 10ml (both syringe and needle must be perfectly dry)
● Tincture of iodine

184 Manual of basic techniques for a health laboratory
Fig. 4.141 Finding a lymph gland infected with trypanosomes
● 70% Ethanol
● Sodium chloride, 0.85% solution (reagent no. 53).
MethodFinding a lymph glandLymph nodes are found among the cervical glands of the neck. Feel both the rightand the left sides of the neck, from the base of the neck up to the ears.
Affected glands are swollen and form a round lump 2–4cm in diameter (Fig. 4.141).They are elastic and slide under the skin, offering little resistance to pressure. Theydo not become hard (except in chronic cases).
Collection of samples1. Ask the patient to sit down. Disinfect the chosen site on the neck with ethanol.
2. With the left hand, take the gland between the thumb and the index finger andmake it stand out (Fig. 4.142). Hold your hand steady.
3. Holding the needle between your thumb and forefinger, introduce it at rightangles into the centre of the gland (Fig. 4.143). First pierce the skin, then pen-etrate the centre of the gland. Avoid the jugular vein and the arteries.
4. With the left hand, gently knead the gland.
With the right hand revolve the needle in both directions (Fig. 4.144).
5. The glandular fluid will ooze into the needle. The operation should take about 1minute.
Fig. 4.142 Making the lymph gland standout
Fig. 4.143 Introducing a needle into the lymphgland

4. Parasitology 185
6. Attach the needle to the syringe, with the piston pulled back (Fig. 4.145). Pushthe piston gently halfway down the barrel to discharge a drop of the glandularfluid in the needle on to a slide.
Fig. 4.144 Twist the needle in both directions Fig. 4.145 Collecting a sample of fluid from thelymph node
Microscopic examinationExamine the slide first using the ¥ 10 objective, then change to the¥ 40 objective to examine the parasites in greater detail. Close thecondenser iris diaphragm sufficiently to give a sharp image.
Wait until the convection currents stop. It is impossible to see themovement of trypanosomes among moving cells.
Begin by examining the periphery of the preparation, near the edgesof the coverslip, as shown in Fig. 4.146, as the trypanosomes tendto make their way to the edges. Then examine the rest of the prepa-ration.
The preparation will contain erythrocytes and leukocytes.Trypanosomes are about 20mm long and are often hidden by cel-lular elements which are disturbed by the flagella of thetrypanosomes as they move (Fig. 4.147).
Examination of blood films for Trypanosoma bruceigambiense and T.b. rhodesiense
PrincipleTrypanosomes belonging to the species Trypanosoma brucei are de-tected in the blood:
— in wet preparations
— in thick films after staining
— following concentration by repeated centrifuging
— in serological tests.
Important: In African trypanosomiasis trypanosomes appear in the blood at inter-vals for a period of a few days, mainly during the first 3 months of the disease andespecially during bouts of fever.
Microscopic examination of capillary bloodMaterials and reagents● Microscope
● Microscope slides
Fig. 4.146 Examining a lymph node sampleunder the microscope
Fig. 4.147 Appearance of trypanosomes ina lymph node preparation

186 Manual of basic techniques for a health laboratory
Fig. 4.148 Collecting a capillary blood sample on each of twoslides
Fig. 4.149 Collecting a capillary bloodsample on filter-paper
● Coverslips
● Blood lancets
● Filter-paper
● Sodium chloride, 0.85% solution (reagent no. 53)
● Giemsa stain (reagent no. 29) or Field stain (reagent no. 25)
● Buffered water, pH 7.2 (reagent no. 15)
● 70% Ethanol.
Method1. Sterilize the pad of the third finger then prick with the blood lancet. Wipe away
the first drop of blood with filter-paper. Collect two drops of blood (Fig. 4.148):— one drop on one slide— one drop on a second slide.
2. Collect two drops of blood on a piece of filter-paper (Fig. 4.149). Leave to dry.
3. On the first slide, place one drop of sodium chloride solution beside the drop ofblood.
Mix, using the corner of a slide (Fig. 4.150). Cover with a coverslip.
4. On the other slide, spread the blood to make a thick film (see page 174).
Stain with Giemsa stain (see page 175) or Field stain (see page 177).
Note: Blood films must be stained and examined immediately after collection ofblood samples, since trypanosomes lyse and disappear within a few hours.
Microscopic examinationWet preparation. Examine the first slide (with the wet preparation) under themicroscope, using the ¥ 40 objective and reducing the condenser aperture.
Examine the edges of the smear first. Look for movement among the erythrocytes;trypanosomes will displace them with their flagellum as they move forward.
Make sure that the organisms are trypanosomes:
Length: 15–25mm (2–3 erythrocytes).
Width: 3mm (half an erythrocyte).
Shape: like an elongated fish.
Motility: trypanosomes move rapidly, advancing and contracting like a snake, andhave an undulating membrane extending from a motile flagellum at the anteriorend (Fig. 4.151).

4. Parasitology 187
Fig. 4.150 Using a slide, mix the blood sample withsaline solution
Fig. 4.151 Appearance of trypanosomes ina wet preparation
Fig. 4.152 Appearance of trypanosomesin a stained thick blood filmF: flagellum; K: kinetoplast;M: undulating membrane.
Do not confuse trypanosomes with microfilariae, which aremuch bigger (100–300mm or 10–40 erythrocytes).
Thick films. Thick films must always be examined, even if theexamination of the wet preparation seems positive, to make surethat the motile organisms seen are trypanosomes.
Trypanosomes of T.b. gambiense and T.b. rhodesiense are identicalin appearance in stained preparations (Fig. 4.152):
Length: 15–25mm.
Cytoplasm: pale blue.
Nucleus: large central nucleus, stained reddish-purple.
Granules: one compact red body at the posterior end: the kine-toplast.
Undulating membrane: reddish-pink, starting at the kinetoplast.
Flagellum: pink, extending 5mm beyond the undulating mem-brane.
If both slides are negative, repeat the tests for up to 7 days.
Send the dried drops of blood on the strip of filter-paper to an immunologicalreference laboratory for testing for immunoglobulin M (IgM) and specific antibod-ies.
Microscopic examination of venous blood concentrated by centrifugationMaterials and reagents● Microscope
● Microscope slides
● Coverslips
● Centrifuge or microhaematocrit centrifuge
● Conical centrifuge tubes with a mark at 10ml or microhaematocrit capillarytubes
● Pasteur pipette
● Trisodium citrate, 3.2% solution (reagent no. 60).

188 Manual of basic techniques for a health laboratory
Method1. Pour 1ml of trisodium citrate solution into a conical centrifuge tube.
2. Collect 9ml of venous blood and add it to the trisodium citrate (i.e. fill the tubeup to the 10-ml mark).
3. Mix and immediately centrifuge at 3000g for 3 minutes.
4. Draw off all the supernatant plasma and the layer of leukocytes above the de-posit of erythrocytes.
Expel this supernatant liquid into another tube (tube 2). Centrifuge at 3000g for5 minutes.
5. Draw off all the supernatant fluid (but keep the deposit from tube 2).
Expel the supernatant fluid into a third tube (tube 3). Centrifuge at 3000g for10 minutes.
6. Examine the deposits of tubes 2 and 3 between a slide and a coverslip under themicroscope.
The trypanosomes will appear in the deposit from tube 3 (and occasionally inthat from tube 2).
Alternative methodIf a microhaematocrit centrifuge is available, venous (or capillary) blood with anti-coagulant can be collected into a microhaematocrit capillary tube. The method ofcollection and examination is as for microfilariae (see page 164). Motiletrypanosomes, if present, can be found in the plasma just above the layer ofleukocytes. First use the ¥ 10 objective with reduced condenser aperture to detectany movement, then use the ¥ 40 objective to see the trypanosomes more clearly.
Card agglutination trypanosomiasis test (CATT) for Africantrypanosomiasis
The card agglutination trypanosomiasis test (CATT) is a serological test that isused for the diagnosis of African trypanosomiasis.
Materials and reagents● Jar
● Tissue paper or cloth
● Glass stirring rods
● Dispensing vial droppers
● Rubber bulb for microhaematocrit tubes
● Syringes, 2.5ml, with needles
● Blood lancets
● Heparinized microhaematocrit tubes
● Test cards
● Microhaematocrit tube holders with cover
● Manual or electric (12/220V) rotator with cover
● Lyophilized antigen
● Lyophilized positive control serum
● Lyophilized negative control serum
● Buffer to reconstitute reagents.

4. Parasitology 189
The above materials and reagents are available commercially as a test kit. The quan-tities supplied are sufficient to carry out 250 tests. Before carrying out the test,prepare your materials and reconstitute the amount of reagents required for theday’s work. Read and follow carefully the instructions provided in the kit.
MethodCollection of samples1. Using a blood lancet, make a small puncture wound in the first, second or third
finger of the patient. Collect the blood into a heparinized microhaematocrit tube(Fig. 4.153) until it is three-quarters full.
2. Immediately rotate the tube gently so that the blood runs from one end of thetube to the other (Fig. 4.154). Repeat the movement twice. This ensures that theblood and the heparin are mixed together, and prevents the sample from clot-ting in the tube.
3. Place the microhaematocrit tube in the special holder (sup-plied with the kit; Fig. 4.155). Keep the holder covered asmuch as possible to avoid dust and to prevent the bloodsample from drying in the tube.
Microhaematocrit tube holders have 10 numbered slits.Make sure that you place the first tube in the first slit, etc.
Once the holder is full, pass it to the person performing thetest.
Performing the test1. Prepare two test cards. Place one drop of the reconstituted
antigen in wells 1 and 2 of the first card and in all the wellsof the second card. Hold the vial vertically to have constantcalibrated drops (Fig. 4.156).
Fig. 4.153 Collecting a blood sample using amicrohaematocrit tube
Fig. 4.154 Rotating the tube to mix the sample
Fig. 4.155 A microhaematocrit tube holder
2. Using the first card, check the quality of the reagent. Place one drop of thereconstituted positive control in well 1 and one drop of the reconstituted nega-tive control in well 2 (Fig. 4.157).
Note: It is only necessary to do this once at the beginning of each day in a fieldsurvey.

190 Manual of basic techniques for a health laboratory
3. Using the second card, test the collected blood. Place one drop of blood fromthe first microhaematocrit tube in well 1, from the second tube in well 2, etc.(Fig. 4.158). Discard the microhaematocrit tube in a jar containing water withdetergent.
4. Using a stirring rod, mix the reagents in each well of the first card and the rea-gents and blood samples in each well of the second card. Spread the mixture sothat it covers the well (Fig. 4.159). Use a separate stirring rod for each well orclean the rod with a piece of tissue paper or a cloth between each well to avoidcontamination of the samples.
5. Place both cards on the rotator, cover and set the timer to 5 minutes. If it is amanual rotator, check the time with your watch. The rotation speed should beslow, approximately 100g. If the rotation speed is too fast, clumps will settle atthe edge of the wells; if it is too slow, the reaction will be weak.
6. After 5 minutes, examine the plates and record the reactions in each well. Donot allow the samples to dry out. If any samples have dried out, the test shouldbe repeated.
Fig. 4.156 Applying antigen to the test card
Fig. 4.157 Preparation of controls for the CATT

4. Parasitology 191
Fig. 4.158 Applying test samples to the test card
Fig. 4.159 Mixing the samples in each well of the test card
Fig. 4.160 Strong positive reaction inthe CATT
Results
Strongly positive reactions (Fig. 4.160)Small or large clumps of particles are visible over the whole well or form a circlearound the edge of the well.
Weak positive reactions (Fig. 4.161)Very small clumps of particles are spread throughout the well or form a circle aroundthe edge of the well. Repeat the test using serum or plasma.
Fig. 4.161 Weak positive reaction inthe CATT

192 Manual of basic techniques for a health laboratory
Fig. 4.162 Negative reaction in theCATT
who 1156
Fig. 4.163 Nonspecific reaction in theCATT
Negative reactions (Fig. 4.162)No agglutination is visible. The reaction remains uniform or occasionally slightlydenser in the centre.
Nonspecific reactions (Fig. 4.163)A dried-up ring is observed around the edge of the well or small dots or fine threadsare seen.
This type of reaction is usually negative. If you are in any doubt about it, repeat thetest using serum or plasma.
Note: Discard any unused reconstituted reagents at the end of the day, unless theyhave been refrigerated. They will not keep and may give false results if used thenext day.
Other diagnostic tests for African trypanosomiasis
In addition to the tests described above, African trypanosomiasis is also diagnosedin the laboratory by:
— examining lymph node aspirates for trypanosomes (see page 183);
— testing dried blood collected on filter-paper for IgM and specific antibodies(see page 187);
— inoculation of rats or mice with heparinized blood samples (only in special-ized laboratories);
— examining CSF specimens for trypanosomes (see section 8.3.3, page 259).
Chagas disease
Chagas disease primarily affects children and is characterized by intermittent orcontinual high fever. About 50% of children manifest unilateral swelling of theeyelids (Romaña’s sign). On other areas of the face or body, cutaneous lesions(chagomas) that resemble furuncles occur near the inoculation site. There may begeneralized oedema of the entire body. Enlargement of the liver is common in chil-dren but not often seen in adults. The fever can be accompanied by myocarditisand meningitis. The infection of the digestive tract causes vomiting and diarrhoea.Primary infections can often pass unnoticed, but severe infections may be fatal.
After the acute phase, a period of latent infection follows (indeterminate phase);this phase is characterized by a low level of parasitaemia and absence of clinicalsymptoms. It can either persist indefinitely or may lead to the chronic form of thedisease. The indeterminate phase is characterized by the presence of specific anti-bodies which can be detected by serological tests, but not by clinical symptoms.
Patients suffering from the chronic form of the disease exhibit signs of cardiacinsufficiency. Abnormalities in the electrocardiogram are often apparent although

4. Parasitology 193
clinical symptoms are absent. Patients with the chronic form of the diseasemay deny having ever experienced the acute form, possibly because it passedasymptomatically or because it occurred in childhood and has been forgotten.
Sources of infection and modes of transmissionIn Chagas disease the parasite (Trypanosoma cruzi) is transmitted by bugs of thegenus Triatoma that become infected by ingesting the blood of infected humans oranimals. The parasite multiplies in the intestine of the triatomine bug. Humans areinfected when the wound at the site of a triatomine bite is contaminated with theinfected faeces of the bug.
There is a serious risk that Chagas disease may be transmitted via blood transfu-sion if proper precautions are not taken.
Diagnostic tests for Chagas disease
Trypanosoma rangeli infects humans in almost the same areas as T. cruzi. AlthoughT. rangeli is not pathogenic, it must be identified and distinguished from T. cruzi forthe diagnosis of Chagas disease.
Important: Motile trypanosomes are found in the blood during the acute phase ofthe disease, and rarely thereafter. During the chronic stage the diagnosis is basedessentially on immunological methods.
The trypanosomes that cause Chagas disease are difficult to find in the blood. Thesame techniques are used as for African trypanosomiasis:
— examination of a wet preparation (see page 186; rarely positive during thechronic stage of the disease);
— examination of thick films (see page 187) repeated several days in succession;
— examination of blood films prepared from centrifuged blood samples (seepages 187–188);
— examination of dried blood samples for IgM and specific antibodies (see page187).
Identification of Trypanosoma cruzi in thick blood films (Fig. 4.164)
Length: about 15mm in broad forms and 20mm in slender forms.
Shape: broad forms are C-shaped; slender forms are generally S-shaped.
Cytoplasm: pale blue.
Fig. 4.164 Appearance of Trypanosoma cruzi in thick blood films

194 Manual of basic techniques for a health laboratory
Nucleus: large, central and red.
Kinetoplast: large and round granule, dark red or purple, near the posteriorextremity.
Undulating membrane: narrow, reddish-pink.
Flagellum: pink, extending beyond the undulating membrane.
Identification of Trypanosoma rangeli in thick blood films (Fig. 4.165)
Length: 25–35mm.
Shape: only slender forms, with tapering extremities.
Nucleus: red, near the central part of the cell body.
Kinetoplast: small, like a dark red dot, far away from the posterior extremity.
Undulating membrane: visible, narrow.
Flagellum: extending beyond the undulating membrane.
4.7.4 Leishmania spp.Leishmaniasis is a group of diseases caused by infection with parasitic protozoa ofthe genus Leishmania. It can affect the skin (cutaneous leishmaniasis), mucousmembranes (mucocutaneous leishmaniasis) and the reticuloendothelial system (vis-ceral leishmaniasis or kala-azar).
The incubation period is generally from 2 to 6 months, but can vary from 10 daysto several years. In some patients a primary lesion forms several months before theother symptoms appear. Amastigotes of the Leishmania spp. multiply slowly inmacrophages near the site of inoculation. Some infected macrophages enter thebloodstream and reach the viscera, where the amastigotes multiply rapidly.
Clinically, the early phases of visceral leishmaniasis are characterized by chronicirregular fever, cough, diarrhoea and bleeding of the mucous membranes and sec-ondary infections. Later, progressive enlargement of the spleen, liver and, occa-sionally, the lymph nodes, weight loss and — in some patients — patchyhypopigmentation of the skin occur.
Cutaneous leishmaniasis is characterized by skin ulcers, which may be single ormultiple. In certain forms of cutaneous leishmaniasis plaques, papules or nodulesmay appear in different parts of the body.
The clinical symptoms of leishmaniasis may be similar to those found inschistosomiasis, chronic malaria and chronic leukaemia.
Sources of infection and modes of transmission
The epidemiology of the disease has unique features in each region and varies fromone geographical area to another.
● In the Americas, infection is spread to humans by the bite of the phlebotominefly Lutzomyia longipalpis. The vector feeds on dogs, wild animals and, less fre-quently, humans; it can be found both outside in the countryside and insidedwellings. The disease occurs mainly in rural areas.
● In India, humans are the main reservoir.
● In the Mediterranean basin and the Gulf area, dogs are the main reservoir, andthe vectors are various species of the genus Phlebotomus.
● In Sudan, wild rodents and carnivores have been found to be reservoirs.
Transmission can take place inside dwellings, which constitute microfoci ofinfection.
Fig. 4.165 Appearance ofTrypanosomarangeli in thickblood films
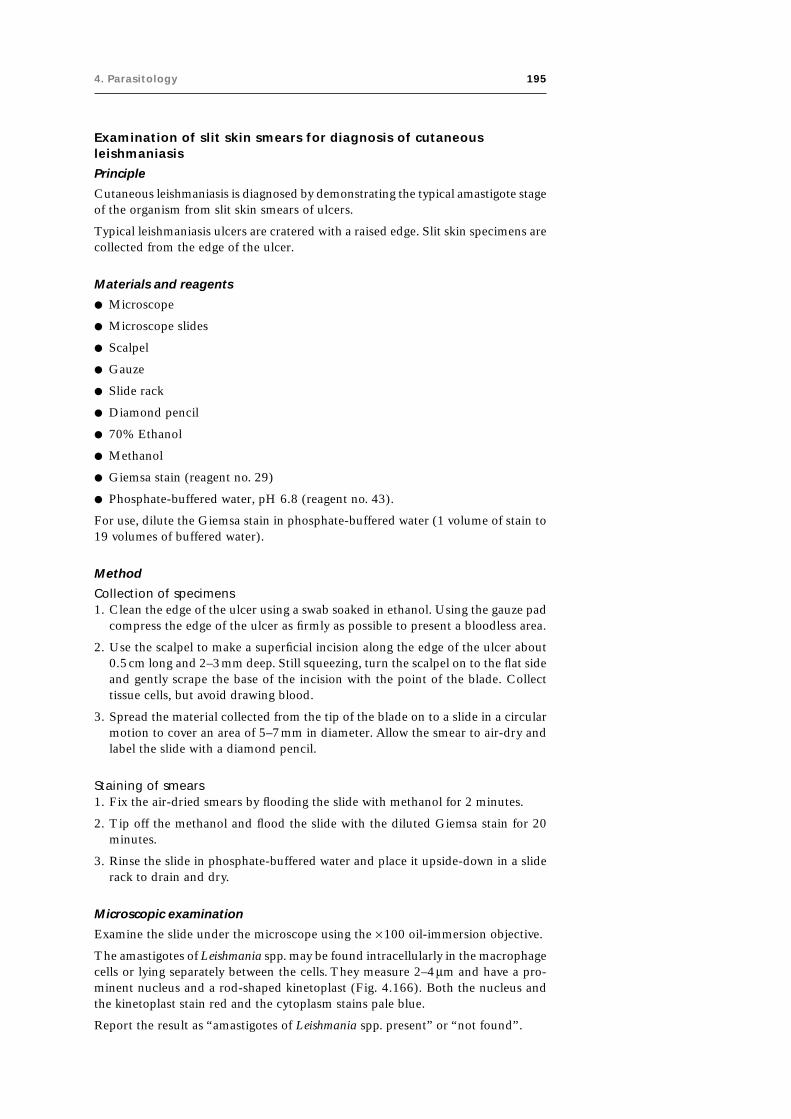
4. Parasitology 195
Examination of slit skin smears for diagnosis of cutaneousleishmaniasis
Principle
Cutaneous leishmaniasis is diagnosed by demonstrating the typical amastigote stageof the organism from slit skin smears of ulcers.
Typical leishmaniasis ulcers are cratered with a raised edge. Slit skin specimens arecollected from the edge of the ulcer.
Materials and reagents
● Microscope
● Microscope slides
● Scalpel
● Gauze
● Slide rack
● Diamond pencil
● 70% Ethanol
● Methanol
● Giemsa stain (reagent no. 29)
● Phosphate-buffered water, pH 6.8 (reagent no. 43).
For use, dilute the Giemsa stain in phosphate-buffered water (1 volume of stain to19 volumes of buffered water).
Method
Collection of specimens1. Clean the edge of the ulcer using a swab soaked in ethanol. Using the gauze pad
compress the edge of the ulcer as firmly as possible to present a bloodless area.
2. Use the scalpel to make a superficial incision along the edge of the ulcer about0.5cm long and 2–3mm deep. Still squeezing, turn the scalpel on to the flat sideand gently scrape the base of the incision with the point of the blade. Collecttissue cells, but avoid drawing blood.
3. Spread the material collected from the tip of the blade on to a slide in a circularmotion to cover an area of 5–7mm in diameter. Allow the smear to air-dry andlabel the slide with a diamond pencil.
Staining of smears1. Fix the air-dried smears by flooding the slide with methanol for 2 minutes.
2. Tip off the methanol and flood the slide with the diluted Giemsa stain for 20minutes.
3. Rinse the slide in phosphate-buffered water and place it upside-down in a sliderack to drain and dry.
Microscopic examination
Examine the slide under the microscope using the ¥ 100 oil-immersion objective.
The amastigotes of Leishmania spp. may be found intracellularly in the macrophagecells or lying separately between the cells. They measure 2–4mm and have a pro-minent nucleus and a rod-shaped kinetoplast (Fig. 4.166). Both the nucleus andthe kinetoplast stain red and the cytoplasm stains pale blue.
Report the result as “amastigotes of Leishmania spp. present” or “not found”.

196 Manual of basic techniques for a health laboratory
Formol gel test for visceral leishmaniasis
This test is a non-specific indicator for the increased serum levels of gamma globu-lin that are seen in most patients with visceral leishmaniasis.
Materials and reagents
● Test-tubes
● Test-tube rack
● Centrifuge
● Centrifuge tubes
● Formalin (37% formaldehyde).
Method
1. Collect 2–5ml of blood into a centrifuge tube and allow it to clot.
2. Separate the serum by centrifuging the tube for 3 minutes at 5000g or by leavingthe tube overnight in a refrigerator or on the bench.
3. Pipette 1ml of clear serum into a test-tube.
4. Add two or three drops of formalin to the serum. Allow the tube to stand for 30minutes.
Results
A positive result is shown by gelling of the serum — it becomes solid and turnswhite, usually after about 5 minutes.
A negative result is recorded when there is no gelling or whitening of the serum.
Note: Increased gamma globulin concentrations in serum are also seen followinghepatitis B infection (see section 11.8) and in certain malignant diseases, such asmultiple myeloma and Waldenström macroglobulinaemia.
Fig. 4.166 Leishmania spp.amastigotes

5. Bacteriology 197
197
5. Bacteriology
5.1 IntroductionDirect microscopic examination of smears is generally not sufficient to identify abacterial species; precise identification can only be obtained by culture. The collec-tion and dispatch of specimens to referral laboratories is, therefore, of utmost im-portance. Nevertheless, direct microscopic examination of stained smears is anefficient way of studying the presence of bacteria in biological fluids that are nor-mally sterile and in specimens from other sources. It may provide information ofgreat value for the diagnosis, immediate treatment and control of the disease. Forexample:
● Specimens from male patients with urethritis at an early stage can be used todiagnose gonococcal infection with reasonable certainty (in females it is muchmore difficult).
● Microscopic examination of sputum smears is a practical and effective tech-nique for the detection of infectious cases of tuberculosis.
● Microscopic examination of CSF is used in identifying the bacteria or fungi thatcause meningitis (see section 8.3.3).
The diagnosis of some diseases is also possible through serology; an example issyphilis (see section 11.10). Serological techniques are also important for epide-miological surveillance and early detection of diseases caused by bacteria that aredifficult to culture (e.g. Mycobacterium tuberculosis).
5.2 Preparation and fixation of smears5.2.1 PrincipleThe sample to be examined (pus, sputum, urine centrifugate, CSF, etc.) is pre-pared as follows:
● The specimen is spread in a thin layer on a glass slide.
● It is allowed to dry completely.
● It is fixed with 70% methanol or by heating before being stained.
5.2.2 Materials and reagents● Inoculating loop: this is a metal wire (usually made of nickel–chromium alloy)
fixed on to a handle and bent into a loop at the other end. Make the loop withforceps, taking care that it is centred (Fig. 5.1). The actual diameter of the loopshould be 2mm.
● Microscope
● Microscope slides
● Coverslips
● Bunsen burner or spirit lamp
● 70% Methanol.

198 Manual of basic techniques for a health laboratory
5.2.3 Preparation of smears1. Flame the loop until it is red-hot: hold the loop just above the blue part of the
flame, as close to the vertical as possible (Fig. 5.2). Allow it to cool (count to20).
2. Take a portion of the specimen to be examined by placing the loop flat on thesurface of the liquid (Fig. 5.3).
3. Number a slide, then press the loop flat on to the centre of the slide (Fig. 5.4).
4. Still holding it flat against the slide, move the loop in an oval spiral, outwardsfrom the centre (Fig. 5.5).
Leave a space between the specimen and each of the four sides of the slide. Letthe slide dry completely in the air.
5. Repeat step 1.
Unmarked smears are sometimes received in the laboratory from outside sources.
To find out on which side of an unmarked slide the smear has been made, turn theslide so that it reflects the light from the window:
● The side without the smear will shine.
● The side with the smear will not reflect the light.
Fig. 5.1 Making an inoculating loop
Fig. 5.2 Flaming an inoculating loop Fig. 5.3 Collecting a sample using an inoculatingloop
Fig. 5.4 Transferring a sample to a slide Fig. 5.5 Preparing a smear

5. Bacteriology 199
5.2.4 Fixation of smearsWhen the smear has dried completely, fix it by covering theslide with a few drops of 70% methanol for 2 minutes or byquickly passing the back of the slide through the flame threetimes (Fig. 5.6).
The fixed smear can be stained as described in section 5.3.
It is sometimes useful to draw a circle around the smearwith a grease pencil, so that it can be seen more easily.
5.3 Staining techniques5.3.1 Gram stainingGram stain will enable the smear to be examined by microscopy for the presence ofbacteria, pus cells, Vincent’s bacilli and Candida albicans. Commensal bacteria, whichare always present, are not important. They do not need to be considered for fur-ther examination or reported.
Principle
● Crystal violet stains all bacteria deep violet (Fig. 5.7).
● Iodine solution fixes the violet colour more or less strongly in the bacteria(Fig. 5.8).
● 95% Ethanol:— decolorizes certain bacteria when the crystal violet is not strongly fixed by
iodine solution (Fig. 5.9 (a));— does not decolorize other bacteria when the crystal violet is strongly fixed by
iodine solution (Fig. 5.9 (b)).
● Carbol fuchsin, neutral red or safranine solution (pink):— re-stains (pink) the bacteria discoloured by ethanol (Fig. 5.10 (a))— has no effect on the other bacteria, which remain dark violet (Fig. 5.10 (b)).
Fig. 5.7 Gram staining reaction:staining with crystal violeta: Gram-negative bacteria;b: Gram-positive bacteria.
Fig. 5.8 Gram staining reaction:fixation using iodinea: Gram-negative bacteria;b: Gram-positive bacteria.
Fig. 5.6 Fixing a smear over a flame
Fig. 5.9 Gram staining reaction:decolorization with ethanola: Gram-negative bacteria;b: Gram-positive bacteria.
Fig. 5.10 Gram staining reaction: re-staining with carbolfuchsin, neutral red orsafranine solutiona: Gram-negative bacteria;b: Gram-positive bacteria.
(a)
(a)
(a)
(a) (b)(b)
(b)
(b)

200 Manual of basic techniques for a health laboratory
Materials and reagents
● Microscope
● Slide rack
● Crystal violet, modified Hucker (reagent no. 18)
● Lugol iodine, 0.1% solution (reagent no. 36)
● Acetone–ethanol decolorizer (reagent no. 4)
● Carbol fuchsin solution for Ziehl–Neelsen stain (reagent no. 16) (diluted 10-fold with 95% ethanol), neutral red, 0.1% solution (reagent no. 40) or safraninesolution (reagent no. 47).
Method
1. Fix the smear as described in section 5.2.4.
2. Cover the smear with crystal violet stain for 60 seconds.
3. Wash off the stain with clean water. Drain the slide and cover the smear withiodine for 60 seconds.
4. Wash off the iodine with clean water. Decolorize rapidly with acetone–ethanol.Only 2–3 seconds are needed.
5. Cover the smear with carbol fuchsin for 2 minutes.
6. Wash off the stain with clean water and place the slide upright in a slide rack todrain and air-dry.
Microscopic examination
First examine the slide using the ¥ 40 objective to see how the smear is distributedand then use the ¥ 100 oil-immersion objective.
Gram-positive organisms
Gram-positive organisms appear dark purple (Fig. 5.11) (e.g. staphylococci, strep-tococci, micrococci, pneumococci, enterococci, diphtheria bacilli, anthrax bacilli).
Fig. 5.12 Gram-negative organismsFig. 5.11 Gram-positive organisms
Gram-negative organisms
Gram-negative organisms appear red (Fig. 5.12) (e.g. gonococci, meningo-cocci, coliform bacilli, shigellae, salmonellae, cholera vibrios).
Identification of specific organisms
Candida albicans appears as large (2–4mm in diameter) oval or round Gram-positive spores (Fig 5.13(a)) with mycelium-like filaments of varying lengthwith rounded ends (Fig. 5.13(b)).
“Actinomycetes” are seen as large granules, sometimes visible to the naked eye(white to yellow colour). The centre is Gram-negative, the periphery Gram-positive (Fig. 5.14). They are found in pus from skin, sputum, etc.Fig. 5.13 Candida albicans

5. Bacteriology 201
Vincent’s bacilli are seen as Gram-negative spirochaetes and fusiform rods(Fig. 5.15).
No other bacteria should be reported as there are many commensal bacteria whichmay be confused with pathogens.
Sources of error
A false Gram-positive reaction may occur because:
● The smear was fixed before it was dry.
● The smear was too thick.
● There was sediment in the bottle of crystal violet (filter before using).
● The iodine solution was not thoroughly washed off the slide.
● The acetone–ethanol was not left on the slide long enough.
● The carbol fuchsin (or safranine or neutral red) solution was too strong or lefton the slide too long.
A false Gram-negative reaction may occur because:
● The iodine solution was not left on the slide long enough.
● The acetone–ethanol was left on too long or not washed off properly.
5.3.2 Staining with Albert stain (for the detection ofCorynebacterium diphtheriae)
If diphtheria is suspected a sputum smear should be stained withAlbert stain. This stain is used to show the dark-staining volutingranules that appear in Corynebacterium diphtheriae bacilli (seeFig. 5.16).
Materials and reagents
● Microscope
● Slide rack
● Albert stain (reagent no. 7).
Method
1. Fix the smear as described in section 5.2.4.
2. Cover the smear with Albert stain for 3–5 minutes.
3. Wash off the stain with clean water and place the slide uprightin a slide rack to drain and air-dry.
Fig. 5.14 “Actinomycetes” Fig. 5.15 Vincent’s bacilli
Fig. 5.16 Corynebacterium diphtheriaeC. diphtheriae rods may be arranged inrows (a) or in V-formation (b) or joinedat angles, giving the appearance ofChinese characters (c).

202 Manual of basic techniques for a health laboratory
Microscopic examination
First examine the slide using the ¥ 40 objective to see how the smear is distributedand then use the ¥ 100 oil-immersion objective.
Corynebacterium diphtheriae appears as green rods (Fig. 5.16) containing green–black volutin granules. The rods may be arranged in rows (a) or in V-formation (b),or joined at angles, giving the appearance of Chinese characters (c). The presenceof slender rods containing volutin granules is sufficient evidence for starting treat-ment for diphtheria.
If diphtheria is suspected, a specimen should be sent to the bacteriology laboratoryfor culture (see section 5.4.4).
5.3.3 Staining with Ziehl–Neelsen stain (for the detection ofacid-fast bacilli)
Ziehl–Neelsen stain is used to identify mycobacteria and oocysts of Cryptosporidiumspp. (see section 4.3.2, page 123).
Principle
When mycobacteria and oocysts of Cryptosporidium spp. are stained with a hotstrong solution of carbol fuchsin, they resist decolorization with a solution of acidor acid–ethanol and stain red. Tissues and other organisms are decolorized by theacid–ethanol solution and are demonstrated by a counterstain such as methyleneblue, which stains them blue.
Mycobacterium leprae and oocysts of Cryptosporidium spp. only resist decolorizationwith weak solutions of acid or acid–ethanol. They are demonstrated using the modi-fied Ziehl–Neelsen technique (Table 5.1).
Mycobacterium spp. and oocysts of Cryptosporidium spp. are referred to as “acid-fast” due to their resistance to decolorization with acid solution. They do not stainwell with Gram stain or simple stains such as methylene blue.
Materials and reagents
● Microscope
● Spirit lamp or Bunsen burner
● Slide rack
● Forceps
● Carbol fuchsin solution for Ziehl–Neelsen stain (reagent no. 16) (filtered beforeuse)
Table 5.1 Organisms stained by Ziehl–Neelsen stain
Sample Organism
Sputum M. tuberculosis
M. bovis
Skin M. leprae
M. ulcerans
Urine M. tuberculosis
M. bovis
Stool Cryptosporidium spp.
Gastric lavage M. tuberculosis
M. bovis

5. Bacteriology 203
Table 5.2 Reporting the number of acid-fast bacilli present
Number of acid-fast bacilli present per Resultmicroscope field
< 0.1 (< 10 per 100 fields) Specify number present per 100 fields
0.1–1 (10–100 per 100 fields) +1–10 ++> 10 +++
● Acid–ethanol for Ziehl–Neelsen stain (reagent no. 5)
● Malachite green, 1% solution (see reagent no. 31), diluted 1:1 with distilledwater, or methylene blue solution (reagent no. 39).
Method
1. Fix the smear as described in section 5.2.4.
2. Cover the smear with filtered carbol fuchsin stain. Using forceps, gently heat theslide over a spirit lamp or Bunsen burner until the stain starts to evaporate (atabout 60 °C — do not overheat).
3. Leave the stain on the slide for 5 minutes.
4. Wash off the stain with clean water and cover the smear with acid–ethanol for5 minutes or until the smear is pale pink.
5. Wash the slide well in clean water and cover the smear with malachite green ormethylene blue for 1–2 minutes.
6. Wash off the stain with clean water and place the slide upright in a slide rack todrain and air-dry. Do not blot the smear.
Microscopic examination
Examine the slide under the microscope; first use the ¥ 40 objective to see how thesmear is distributed. Then systematically examine the slide with the ¥ 100 oil-immersion objective to look for acid-fast bacilli (red bacilli). Examine the slidefrom end to end in steps until the whole smear is covered. Count the number ofacid-fast bacilli present per microscope field (or per 100 microscope fields, if veryfew acid-fast bacilli are present).
Before moving to another slide, wipe the objective clean with lens tissue to preventtransfer of acid-fast bacilli to another slide.
If red bacilli can be seen, report as “acid-fast bacilli present”. Report the numbersof acid-fast bacilli present as described in Table 5.2.
If no acid-fast bacilli are seen, report as “no acid-fast bacilli found”.
5.3.4 Staining with Wayson stain (for the detection ofYersinia pestis)
Wayson stain is used to identify Yersinia pestis in bubo aspirates (see section 5.10).
Materials and reagents
● Microscope
● Slide rack
● 70% Methanol
● Wayson stain (reagent no. 63).

204 Manual of basic techniques for a health laboratory
Method
1. Fix the smear with methanol for 2 minutes.
2. Cover the smear with Wayson stain for 15 seconds.
3. Wash the slide in clean water and place it upright in a slide rack to drain and air-dry.
Microscopic examination
First examine the slide using the ¥ 40 objective to check the distribution of thematerial and then use the ¥ 100 oil-immersion objective.
Yersinia pestis appears as bipolar organisms which stain blue with pink ends.
5.3.5 Staining with Loeffler methylene blue (for the detection ofBacillus anthracis)
Loeffler methylene blue is used to stain Bacillus anthracis, which causes anthrax(see section 5.11).
Note: Anthrax is a highly contagious disease. Gloves and protective clothing shouldtherefore be worn when specimens suspected of being infected with anthrax arehandled. The staining procedure should be carried out in a safety cabinet.
Fig. 5.17 Bacillus anthracis
Materials and reagents
● Microscope
● Slide rack
● Potassium permanganate, 4% solution (reagent no. 46)
● Loeffler methylene blue (reagent no. 35).
Method
1. Cover the slide with potassium permanganate for 10 minutes.
2. Wash the slide in clean water and cover the smear with Loeffler meth-ylene blue for 1 minute.
3. Wash off the stain with clean water and place the slide upright in aslide rack to drain and air-dry.
Microscopic examination
First examine the slide using the ¥ 40 objective and then use the ¥ 100oil-immersion objective.
Bacillus anthracis appears as large blue rods surrounded by a mauve capsule; thebacilli appear in chains (Fig. 5.17).
5.4 Examination of sputum specimens and throat swabsThe presence of pathogenic organisms is revealed by microscopic examination ofsputum specimens and throat swabs. The organisms include:
● Bacteria: Gram-positive and Gram-negative acid-fast bacilli.
● Fungi or yeasts: filaments of mycelium with or without pores. They may be patho-genic or saprophytes that have multiplied in the sample after collection (correctidentification by a specialized laboratory necessary).
● Actinomycetes: granules, see page 200.

5. Bacteriology 205
● Parasites: eggs of pulmonary flukes and, very rarely, eggs of schistosomes andadult worms of Mammomonogamus laryngeus.
Culture is often necessary for the identification of the infective agents.
5.4.1 Materials and reagents● Microscope
● Microscope slides
● Wide-necked, leakproof containers for sputum specimens, such as jars or stiffpaper boxes (see section 2.5.5)
● Sterile cotton wool swabs
● Tongue depressor or spatula
● Test-tubes
● Sodium chloride crystals
● N-cetylpyridinium chloride
● Distilled water.
If possible, sterile cotton wool swabs should be prepared at a central-level labora-tory; otherwise, the following technique may be used.
1. Prepare some thin sticks of wood (or aluminium wire), 18cm long and 2mm indiameter. Prepare strips of cotton wool, 6cm long by 3cm wide and as thin aspossible.
2. Roll the cotton wool round one end of the stick (or wire).
3. Mould the swab into a conical shape.
4. Place in a glass test-tube. Plug with non-absorbent cotton wool. Sterilize (seesection 3.5.5).
5.4.2 MethodCollection of specimens
Sputum specimens
Sputum specimens should be collected early in the morning.
1. Ask the patient to take a deep breath and then cough deeply, spittingwhat he or she brings up into the container (Fig. 5.18).
Secure the top and label the container with the name and number ofthe patient.
Check that a sufficient amount of sputum has been produced.
2. If the specimen is to be dispatched to a laboratory for culture of Myco-bacterium tuberculosis (see section 5.4.4), ask the patient to expectoratedirectly into a wide-mouthed, screw-topped jar containing 25ml ofthe following solution:
N-cetylpyridinium chloride 5 gSodium chloride 10gDistilled water to 1000ml.
Screw on the top and label the jar with the patient’s name and the date of collec-tion of the specimen (see section 3.7.1).
Important: Liquid frothy saliva and secretions from the nose and pharynx arenot suitable for bacteriological examination. Ask the patient to produce anotherspecimen.
Fig. 5.18 Collecting a sputum sample

206 Manual of basic techniques for a health laboratory
Throat specimens
1. Using a tongue depressor or a spatula to press the tongue down (Fig. 5.19),examine the back of the throat.
2. Look carefully for signs of inflammation and any exudate, pus, membraneousdeposits or ulcers.
3. Use a sterile cotton wool swab to swab the infected area. Take care not to con-taminate the swab with saliva. Return the swab to the sterile test-tube.
Preparation of slides
Prepare two smears from each of the specimens (see section 5.2.3). Stain one smearwith Albert stain (see section 5.3.2) and the other with Ziehl–Neelsen stain (seesection 5.3.3).
5.4.3 Microscopic examinationExamine the sputum with the naked eye and then by microscopy.
The sputum of a person suffering from a bacterial infection usually contains:
— thick mucus with air bubbles
— threads of fibrin
— patches of pus
— occasional brownish streaks of blood.
After visual inspection report the appearance of the sputum as:
— purulent: greenish, containing pus;
— mucopurulent: greenish, containing both pus and mucus;
— mucoid: containing mostly mucus;
— mucosalivary: containing mucus with a small amount of saliva.
If there is blood present, this must also be reported.
A sputum sample composed mostly of saliva will not be useful either for culture orfor direct examination.
Examine the smear stained with Albert stain as described in section 5.3.2. If greenrods containing green-black volutin granules (see Fig. 5.16) are seen, report as“Corynebacterium diphtheriae present”.
Examine the smear stained with Ziehl–Neelsen stain as described in section 5.3.3.If red bacilli can be seen, report as “acid-fast bacilli present”. Report the numbersof acid-fast bacilli present as described in Table 5.2. If no acid-fast bacilli are seen,report as “no acid-fast bacilli found”.
5.4.4 Dispatch of specimens for culture1
Sputum specimens
Sputum specimens are sent to a bacteriology laboratory for culture of Myco-bacterium tuberculosis, antimicrobial susceptibility testing and inoculation intoguinea-pigs.
The specimen should be collected in a transport medium as described in section5.4.2 and dispatched immediately to the laboratory.
Maximum preservation time: 10 days.
Fig. 5.19 Examining the backof the throat
1 See also section 3.7.1.

5. Bacteriology 207
Throat specimens
For routine investigation
As soon as the specimen has been collected, replace the swab in the sterile test-tube(see section 5.4.2) and send it immediately to the bacteriology laboratory.
For confirmation of Corynebacterium diphtheriae infection
If diphtheria is suspected, the specimen should be sent in a sterile tube containingcoagulated serum (which must be stored in a refrigerator).
Rub the swab over the slanted surface of the serum, starting from the bottom andnot applying pressure (Fig. 5.20). Send the same day.
Maximum preservation time: 24 hours.
For detection of meningococci
This is seldom necessary, except for epidemiological surveys aimed at identifyingcarriers of meningococci. If possible, use a transport medium such as Stuart trans-port medium, modified (reagent no. 56).
Rub the swab over the surface of the medium from one side of the bottle to theother, starting from the bottom (Fig. 5.21). Send the same day.
Maximum preservation time: 3 days.
Fig. 5.20 Dispatching throatspecimens in coagulatedserum
Fig. 5.21 Dispatching throatspecimens in Stuarttransport medium
5.5 Examination of urogenital specimens for gonorrhoea5.5.1 Materials and reagents● Microscope
● Microscope slides
● Bottle, 100ml
● Pasteur pipette
● Cotton wool
● Amies transport medium (reagent no. 9).
5.5.2 MethodCollection of specimens
From male patients
1. If possible collect the specimen first thing in the morning before the patientpasses urine.
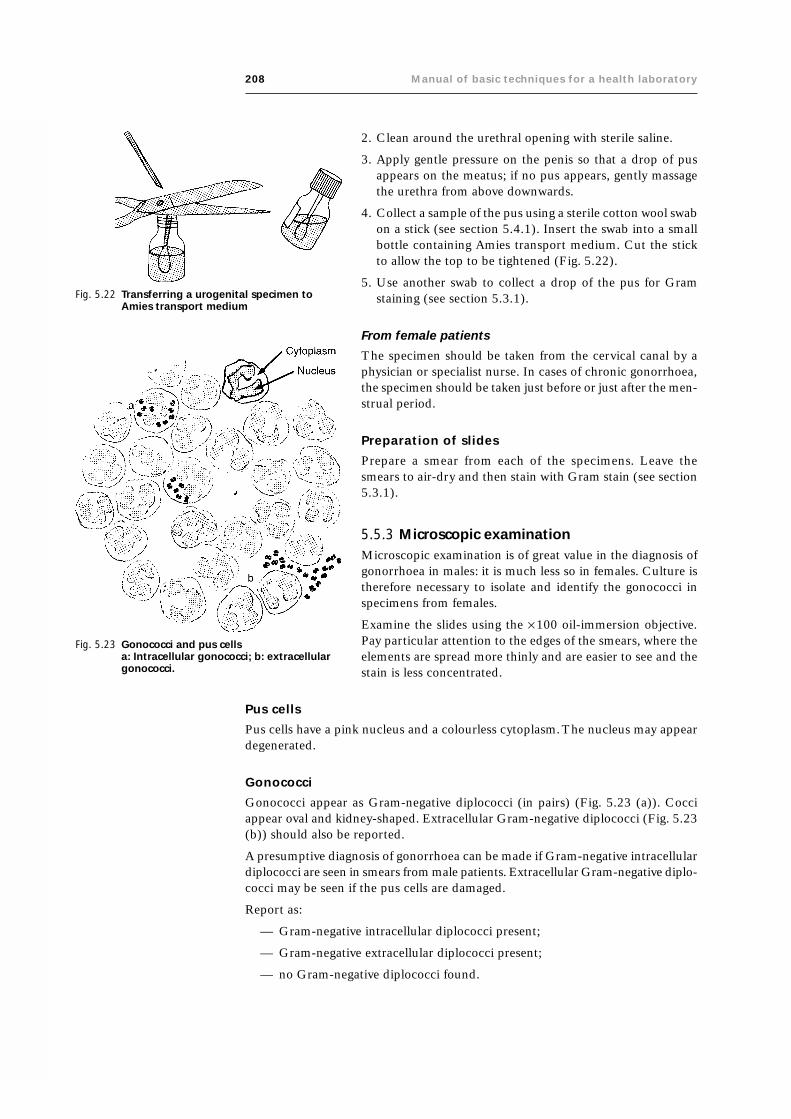
208 Manual of basic techniques for a health laboratory
2. Clean around the urethral opening with sterile saline.
3. Apply gentle pressure on the penis so that a drop of pusappears on the meatus; if no pus appears, gently massagethe urethra from above downwards.
4. Collect a sample of the pus using a sterile cotton wool swabon a stick (see section 5.4.1). Insert the swab into a smallbottle containing Amies transport medium. Cut the stickto allow the top to be tightened (Fig. 5.22).
5. Use another swab to collect a drop of the pus for Gramstaining (see section 5.3.1).
From female patients
The specimen should be taken from the cervical canal by aphysician or specialist nurse. In cases of chronic gonorrhoea,the specimen should be taken just before or just after the men-strual period.
Preparation of slides
Prepare a smear from each of the specimens. Leave thesmears to air-dry and then stain with Gram stain (see section5.3.1).
5.5.3 Microscopic examinationMicroscopic examination is of great value in the diagnosis ofgonorrhoea in males: it is much less so in females. Culture istherefore necessary to isolate and identify the gonococci inspecimens from females.
Examine the slides using the ¥ 100 oil-immersion objective.Pay particular attention to the edges of the smears, where theelements are spread more thinly and are easier to see and thestain is less concentrated.
Fig. 5.23 Gonococci and pus cellsa: Intracellular gonococci; b: extracellulargonococci.
Fig. 5.22 Transferring a urogenital specimen toAmies transport medium
Pus cells
Pus cells have a pink nucleus and a colourless cytoplasm. The nucleus may appeardegenerated.
Gonococci
Gonococci appear as Gram-negative diplococci (in pairs) (Fig. 5.23 (a)). Cocciappear oval and kidney-shaped. Extracellular Gram-negative diplococci (Fig. 5.23(b)) should also be reported.
A presumptive diagnosis of gonorrhoea can be made if Gram-negative intracellulardiplococci are seen in smears from male patients. Extracellular Gram-negative diplo-cocci may be seen if the pus cells are damaged.
Report as:
— Gram-negative intracellular diplococci present;
— Gram-negative extracellular diplococci present;
— no Gram-negative diplococci found.

5. Bacteriology 209
Other bacteria that cause infections in male patients
Numbers of the following may occasionally be seen in smears of urethral pus:
— Gram-positive cocci (e.g. staphylococci);
— Gram-positive bacilli (e.g. diphtheria bacilli);
— Gram-negative bacilli (e.g. coliform bacilli).
These organisms are described in section 5.3.1.
Other bacteria that cause infections in female patients
All kinds of organisms are found in the smears, particularly:
— Gram-positive bacilli;
— Gram-negative cocci (saprophytes).
5.5.4 Dispatch of specimens for culture1
Using Stuart transport medium
Sending the specimen in Stuart transport medium, modified (reagent no. 56) is thebest method, if the medium can be obtained from a specialized laboratory. It isusually supplied in 30-ml flat bottles that contain 8ml of solid medium (along oneside of the bottle) and are filled with a mixture of air (90%) and carbon dioxide(10%). Round bottles may also be used. The bottle should remain open for as shorta time as possible to prevent the escape of gas.
Method
1. Place the bottle of medium upright. Collect the pus specimen on a swab asdescribed in section 5.5.2. Unscrew the bottle cap.
2. Holding the bottle as upright as possible (to prevent the gas escaping), rub theswab of pus over the whole surface of the solid medium, from one side of thebottle to the other, starting from the bottom (see Fig. 5.22).
3. Replace the cap on the bottle at once. Dispatch the bottle (at ambient tempera-ture) immediately.
Maximum preservation time: 3 days, but the shorter the delay the better.
This transport medium is also suitable for meningococci.
Using a Pasteur pipette
Method
1. Collect the pus specimen on a sterile cotton wool swab as described in section5.5.2.
2. Draw the pus specimen into a sterile Pasteur pipette plugged with cotton wool.
3. Place the pipette in a sterile test-tube, padded and plugged with cotton wool, asshown in Fig. 5.24.
Maximum preservation time: 6 hours (at ambient temperature).
5.6 Examination of genital specimens for syphilisSyphilis is a sexually transmitted disease caused by Treponema pallidum and occursin three clinical stages.
1 See also section 3.7.1.
Fig. 5.24 Dispatchingurogenitalspecimens in aPasteur pipette

210 Manual of basic techniques for a health laboratory
The primary stage is characterized by a painless genital ulcer (syphilitic chancre),sometimes with enlargement of the lymph nodes in certain regions of the body. Thechancre heals spontaneously, even when untreated.
In some patients the disease progresses to the secondary stage.
The secondary stage results in:
— skin rash
— mouth ulcers
— genital warts
— generalized enlargement of lymph nodes.
The tertiary stage is very rare and is characterized by central nervous system in-volvement and cardiac disease.
Secondary or tertiary syphilis may be transmitted to a fetus in utero (congenitalsyphilis).
Yaws
Yaws is caused by a non-venereal treponeme (Treponema pertenue) and occurs inhumid tropical climates. It is characterized by granular papillomas on the skin.
T. pallidum and T. pertenue are delicate, tightly-coiled spirochaetes measuring 6–12mm ¥ 0.2mm. They are indistinguishable under the microscope.
It is necessary to inspect samples suspected of being infected with spirochaetes bydark-field microscopy as they do not stain easily for viewing by transmitted light.
5.6.1 Materials and reagents● Microscope with dark-field attachment
● Microscope slides
● Coverslips
● Gloves
● Gauze
● Sterile lancet or scalpel
● Sodium chloride, 0.85% solution (reagent no. 53).
5.6.2 MethodCollection of specimens
Important:
● Wear protective gloves for this procedure.
● The chancre area should be clear of any ointment before attempting to collectthe specimens.
Fig. 5.25 Collecting a chancrespecimen
1. Collect the chancre specimen with gauze moistened with sodium chlo-ride solution.
2. If there is no obvious serous fluid, gently scrape the edge of the ulcerwith a sterile lancet or the flat edge of a scalpel blade (Fig. 5.25). Do notdraw blood.
3. Compress the ulcer gently with a gauze pad.
4. Using a coverslip, collect a drop of the serous exudate and invert it im-mediately onto a slide.

5. Bacteriology 211
5.6.3 Microscopic examinationExamine the slide using the dark-field microscope.
With experience of dark-field microscopy, the treponemes may be seen and can bedistinguished from saprophytic treponemes by their size, characteristic movementand typical number of coils (Fig. 5.26).
Fig. 5.26 Treponemes
5.7 Examination of semen specimensSemen is investigated in patients to exclude infertility. This is done by assessing thefunctional characteristics of spermatozoa in the seminal fluid.
5.7.1 Materials and reagents● Microscope
● Microscope slides
● Coverslips
● Blood (Sahli) pipette
● Graduated cylinder, 10ml
● pH indicator paper
● Improved Neubauer counting chamber
● Sodium bicarbonate
● Phenol or formalin (37% formaldehyde)
● Distilled water
● Petroleum jelly.
Before collecting the semen specimen, prepare the semen diluting fluid asfollows:
— sodium bicarbonate 5 g
— phenol or formalin 1 ml
— distilled water to 100 ml.

212 Manual of basic techniques for a health laboratory
5.7.2 MethodCollection of specimens
The semen is collected by the patient in a clean, dry bottle and is brought to thelaboratory as soon as possible after collection, preferably within 30 minutes. Itcannot be examined immediately as semen is a highly viscous fluid and must“liquefy”. It does this within 15–30 minutes and should be examined as soon aspossible after liquefaction has taken place.
Preparation of slides
After liquefaction has taken place, make a thin smear of semen on a slide (similar toa blood smear), let it dry in the air and then heat it very gently to fix. Remove themucus (which will interfere with staining) by washing the slide with semen dilutingfluid (see above). Then wash the slide gently with buffered distilled water.
Stain the sperm with Leishman stain or Giemsa stain (see section 9.10.3, page303–304).
5.7.3 Macroscopic examinationVolume
Measure the volume in a small graduated cylinder — the amount varies from onlya few drops up to 10ml. The normal volume is 4–5ml. Less than 1.5ml is consid-ered abnormal.
Viscosity
Freshly ejaculated semen should be completely liquefied within 30 minutes.Absence of liquefaction may interfere with sperm motility and fertilization.
Colour
Semen is normally an opaque grey colour. After an extended period of abstinencefrom sexual activity it may appear slightly yellow.
pH
The pH is usually noted though it is of little significance. Semen is always alkaline,with an average pH of about 7.6 (range 7.2–8.9).
5.7.4 Microscopic examinationNormal spermatozoa are 50–70mm in length, with a large oval head, a small neckand a long slender tail; the tail takes up about 90% of the total length (Fig. 5.27).The head is 3–6mm ¥ 2–3mm.
Fig. 5.27 Normal spermatozoaSource: Image House Medical, Sperm MORPHsystem. Used with permission.

5. Bacteriology 213
The abnormalities of morphology to be looked for include:
— abnormally shaped heads (Fig. 5.28);
— abnormally sized heads (giant or minute) (Fig. 5.29);
— double heads (Fig. 5.30);
Fig. 5.28 Spermatozoan with anabnormally shapedheadSource: Image HouseMedical, Sperm MORPHsystem. Used withpermission.
Fig. 5.29 Spermatozoan with an abnormallysmall headSource: Image House Medical, SpermMORPH system. Used with permission.
Fig. 5.30 Spermatozoan with a double headSource: Image House Medical, Sperm MORPH system. Used with permission.

214 Manual of basic techniques for a health laboratory
— coiled tails (Fig. 5.31);
— absent, bifurcated or swollen necks (middle section) (Fig. 5.32);
— double, rudimentary or absent tails (Fig. 5.33).
In a normal smear there should not be more than 20% abnormal forms.
During the examination of semen note the presence of any other cells such as:
— erythrocytes;
— polymorphonuclear leukocytes;
— epithelial cells;
— immature cells from the testis, etc.
Various crystals may also be seen; their presence should also be noted.
Motility
To check the motility, place a drop of semen on a slide, cover the drop with acoverslip and rim the edge with petroleum jelly to prevent evaporation. Examineunder the ¥ 40 objective of the microscope.
Estimate roughly the proportion of motile to non-motile sperm forms in severaldifferent microscope fields. Normally about 80% of the spermatozoa are activelymotile and about 20% are sluggish or not moving at all. Observe the slide after 3and 6 hours, and if convenient, also after 12 and 24 hours. For up to 3 hours thereshould be little or no reduction in motility, but after this there is an increasing lossof motility which at room temperature is often complete by 12 hours.
Decreased sperm motility may be a factor in infertility.
Sperm count
1. After liquefaction has taken place, gently shake the specimen to mix.
2. Using a Sahli pipette, draw semen to the 0.5-ml mark; then draw in the semendiluting fluid to the 11-ml mark and place the pipette on a rotator to mix thecontents.
Fig. 5.31 Spermatozoan with acoiled tailSource: Image HouseMedical, SpermMORPH system. Usedwith permission.
Fig. 5.32 Spermatozoan with swollen neckSource: Image House Medical, SpermMORPH system. Used withpermission.
Fig. 5.33 Spermatozoan withdouble orrudimentary tailsSource: ImageHouse Medical,Sperm MORPHsystem. Used withpermission.

5. Bacteriology 215
3. Load an improved Neubauer counting chamber (see Fig. 9.40), allow the spermto settle and then count in the four corner squares, as for a leukocyte count (seesection 9.6.3). The formula for calculation is similar to that used for leukocytes,except that the sperm count is per ml instead of per mm3, so an additional mul-tiplication factor of 1000 is needed.
Number of sperm ml = ¥ ¥ ¥n 10 20 1000
4
where n = number of sperm counted.
The normal sperm count is between 60 million and 150 million per ml (100–500 million/ml according to some sources). Patients with sperm counts below60 million per ml definitely have low counts, though they may still be fertile.
5.8 Examination of vaginal dischargeVaginal discharge is examined by microscopy to exclude infections with gonococci,Candida albicans and Trichomonas vaginalis, which cause bacterial vaginosis, vulvo-vaginal candidiasis and trichomoniasis, respectively.
5.8.1 Materials and reagents● Microscope
● Microscope slides
● Coverslips
● Sodium chloride, 0.85% solution (reagent no. 53).
5.8.2 MethodCollection of specimens
The specimen should be collected by a physician or specialist nurse.
Preparation of slides
1. Make a smear of the discharge on a slide and allow it to air-dry. Stain the smearwith Gram stain (see section 5.3.1) and examine for Candida albicans.
2. Transfer a small sample of discharge to a second slide, add a drop of salinesolution and cover with a coverslip. Look for gonococci and Trichomonas vaginalistrophozoites in this preparation.
5.8.3 Microscopic examinationExamine the Gram-stained slide using the ¥ 40 objective and the ¥ 100 oil-immersion objective. Candida albicans appears as large Gram-positive yeasts, oftenwith budding or short lengths of mycelium (see Fig. 5.13).
Examine the saline preparation as soon as possible using the ¥ 10 and the ¥ 40objectives. Use a microscope with the iris diaphragm closed to give good contrast.Do not allow the specimen to dry out. Gonococci are Gram-negative and appear assmall dots (see Fig. 5.12). Trichomonas vaginalis trophozoites appear as highlymotile flagellates measuring 8–20mm, with an undulating membrane and a promi-nent nucleus.

216 Manual of basic techniques for a health laboratory
5.9 Examination of watery stool specimensDark-field microscopy is used to identify Vibrio cholerae and Campylobacter spp. inwatery stool specimens.
5.9.1 Materials and reagents● Microscope with dark-field attachment
● Microscope slides
● Coverslips
● Inoculating loop
● Sodium chloride, 0.85% solution (reagent no. 53).
5.9.2 Method1. Suspend 0.2g of stool in 5ml of sodium chloride solution. Allow the large parti-
cles to sediment.
2. Using an inoculating loop (sterilized by flaming), prepare a very thin smear on aslide. Carefully remove any large particles.
3. Cover with a coverslip. Place the slide on the microscope stage.
4. Open the iris diaphragm fully and place the dark-field attachment in position.
5.9.3 Microscopic examinationUse the ¥ 10 objective for focusing. The background appears black, and all objectssuspended in the saline solution appear bright.
Use the ¥ 40 objective to search for bacteria with characteristic shapes and motility(see below).
Vibrio cholerae appears as motile rods, which may be short, curved, straight or invo-luted (Fig. 5.34).
Campylobacter spp. are Gram-negative spiral rods that rotate rapidly on a centralaxis.
5.9.4 Dispatch of specimens for culture1
It is often necessary to send stool specimens to a bacteriology laboratory forculture:
— for the detection of cholera vibrios
— for the detection of other bacteria that cause dysentery (species of Salmo-nella, Shigella, etc.).
Using Cary–Blair transport medium
Cary–Blair transport medium (reagent no. 17) will preserve many kinds of entericbacteria (cholera vibrios, other vibrios, salmonella, shigella, etc.) for up to 4 weeks.The uninoculated medium may be stored in a sealed bottle at room temperaturefor 8–12 weeks.
1. Dip a sterile cotton wool swab in the stool specimen (Fig. 5.35).
2. For infants or other patients who cannot produce a stool specimen, take a rectalswab. Moisten the swab with sodium chloride solution and introduce the swabinto the rectum. Turn the swab several times with a circular movement (Fig.5.36).
1 See also section 3.7.1.

5. Bacteriology 217
3. Place the swab in a bottle containing Cary–Blair medium (three-quarters full)and send it to the bacteriology laboratory. If you cannot send the swab immedi-ately, store it at room temperature.
Important:
● Never store the swab in the incubator.
● Never store the swab in the refrigerator.
Using buffered glycerol saline
When specimens are to be sent for culture of enteric organisms other than choleravibrios and Cary–Blair transport medium is not available, buffered glycerol saline(reagent no. 14) may be used.
Note: If the buffered glycerol saline has changed colour from pink to yellow, discardit and prepare a fresh solution.
Fig. 5.35 Collecting a waterystool specimen
Fig. 5.36 Collecting a stool specimen from an infant
Fig. 5.34 Vibrio cholerae

218 Manual of basic techniques for a health laboratory
1. A bijou bottle with a capacity of 7.5ml is recommended. Fill it to within 2cm ofthe top with buffered glycerol saline.
2. Place the stool swab or rectal swab in the bottle and send it directly to the bac-teriology laboratory.
5.10 Examination of aspirates, exudates and effusionsAspirates, exudates and effusions are collected by inserting a sterile needle into theappropriate cavity. This can only be done by an experienced physician as there is arisk of introducing infection. The cavities from which effusions can be collectedinclude the following:
— pleural (chest)
— peritoneal (abdominal)
— pericardial
— synovial joint
— bursa.
Bubo aspirates are examined for Yersinia pestis, which causes bubonic plague. Theorganism is carried from the sites of inoculation to the lymph glands in the axillae,groin and neck, where it causes localized swellings or buboes.
5.10.1 Materials and reagents● Microscope
● Microscope slides
● Centrifuge
● Centrifuge tubes
● Specimen containers (see section 3.7)
● Inoculating loop
● 70% Methanol
● Reagents for:— Giemsa stain (see section 9.10.3)— Gram stain (see section 5.3.1)— Wayson stain (see section 5.3.4)— Ziehl–Neelsen stain (see section 5.3.3).
5.10.2 MethodCollection of specimens
Aspirated cavity fluid
Aspirated cavity fluid is collected into clean, dry, sterile containers.
Report the appearance of the fluid. Cavity fluid is normally straw-coloured (yel-low), but can appear turbid or bloodstained.
Preparation of slides
Aspirated cavity fluid
1. Using an aseptic (sterile) technique, transfer 10ml of the fluid to a centrifugetube and centrifuge at moderate speed (2000g) for several minutes.

5. Bacteriology 219
2. Remove the supernatant, resuspend the deposit and use an inoculating loop(sterilized by flaming) to prepare three smears. Spread the fluid thinly over eachslide (see section 5.2.3).
3. Allow the smears to air-dry and fix with methanol.
4. Stain the slides with:— Gram stain (see section 5.3.1)— Ziehl–Neelsen stain (see section 5.3.3)— Giemsa stain (see section 9.10.3).
Bubo aspirates
1. Prepare a smear from the aspirated fluid as described in section 5.2.3.
2. Fix the smear in methanol for 2 minutes and stain with Wayson stain (see section5.3.4).
5.10.3 Microscopic examinationAspirated cavity fluid
Examine each slide using the ¥ 40 objective and the ¥ 100 oil-immersionobjective.
Look for any bacteria present on the slide stained with Gram stain.
Look for acid-fast bacilli (mycobacteria) on the slide stained with Ziehl–Neelsenstain.
When examining the slide stained with Giemsa stain, identify the predominanttype of blood cell present — leukocytes, lymphocytes or mesothelial cells (from thelining of the cavity) and any atypical cells which may suggest cancer cells.
If there are more than a few cells present or if the fluid is bloodstained, send theslide to a bacteriology laboratory for culture.
Bubo aspirates
First examine the slide using the ¥ 40 objective to check the distribution of thematerial and then use the ¥ 100 oil-immersion objective to look for Yersinia pestis.
Yersinia pestis is seen as bipolar organisms which stain blue with pink ends.
5.11 Examination of pus for Bacillus anthracisBacillus anthracis is a pathogen of several types of animal. It is responsible for cuta-neous anthrax where it shows in its early form as a blister on the skin often called amalignant pustule.
5.11.1 Materials and reagents● Protective clothing
● Gloves
● Microscope
● Microscope slides
● Inoculating loop or sterile cotton wool swabs (see section 5.4.1)
● Loeffler methylene blue (reagent no. 35)
● Potassium permanganate, 4% solution (reagent no. 46).

220 Manual of basic techniques for a health laboratory
5.11.2 MethodCollection of specimens
Warning: Anthrax is highly contagious. Gloves and protective clothing musttherefore be worn when specimens are collected.
Using an inoculating loop or a cotton wool swab, collect a few drops of pus orfluid from malignant pustules. Leave the smear to air-dry in a safety cabinet.
Preparation of slides
1. Prepare a smear from the pus or fluid as described in section 5.2.3.
2. Fix the smear with potassium permanganate for 10 minutes, then stain withLoeffler methylene blue (see section 5.3.5).
5.11.3 Microscopic examinationFirst examine the smear using the ¥ 40 objective to check the distribution ofthe material and then use the ¥ 100 oil-immersion objective to look for Bacillusanthracis.
Bacillus anthracis is seen as large blue rods surrounded by a mauve capsule; thebacilli are arranged in chains (see Fig. 5.17).
5.12 Examination of skin smears and nasal scrapings forMycobacterium leprae
Leprosy or Hansen disease is an infection of the peripheral nerve tissues by thebacterium Mycobacterium leprae. The bacilli can be present in large numbers inlepromatous lesions (multibacillary leprosy) and are usually sparse or absent intuberculoid lesions (paucibacillary leprosy).
Diagnosis is made by examination of slit skin smears taken from various siteson the body, or from nasal scrapings taken from the septum of the nose. Afterfixation, smears are stained by the modified Ziehl–Neelsen method.
Slit skin smears are usually collected from six sites, which are chosen fromareas where nerves run near to the skin surface. These sites should include anynodules or patches on the face or the body.
5.12.1 Materials and reagents● Microscope
● Microscope slides
● Scalpel
● Forceps with rounded ends and no teeth, or curved clamp forceps with noteeth, or tissue forceps
● Diamond pencil
● Gauze
● Small plastic sheets or gloves
● Sterile cotton wool swabs (see section 5.4.1)
● Spirit lamp or Bunsen burner
● Reagents for Ziehl–Neelsen stain (see section 5.3.3)
● 95% Ethanol
● Sodium chloride, 0.85% solution (reagent no. 53).

5. Bacteriology 221
5.12.2 MethodCollection of specimens
Specimens from the ear and skin lesions
1. Examine the ear and skin in good light, look for any lesions orsmall swellings with a shiny surface (Fig. 5.37).
From each ear select the most congested lesion or nodule. If nolesion is visible, use the edges of the ear lobe.
From the skin lesion choose one area just inside the edge of apatch of depigmented area.
2. Disinfect the area using a gauze swab moistened with ethanol.Flame the forceps and scalpel.
3. Squeeze the ear lobe or skin area hard using forceps (Fig. 5.38),
Fig. 5.37 Leprosy lesions on the ear
Fig. 5.38 Squeezing the ear lobe to stop theblood flow
Fig. 5.39 Collecting a specimen from an earlesion
if available, or else use the forefinger and thumb to stop the flow of blood.
4. Use the scalpel to make a superficial incision about 0.5cm long and 2–3mmdeep lengthwise in the middle of the lesion.
Still squeezing with the forceps, turn the scalpel on to the flat side and gentlyscrape the base of the incision with the point of the blade (Fig. 5.39). Collect theserous tissue fluid and a small amount of cellular material, but avoid drawingblood.
Specimens from the body and face
1. Examine the body and face for:
— lesions similar to those found on the ear, but often larger (Fig. 5.40);
— papules, flat patches (maculae) or plaques (Fig. 5.41); these are pale or thick-ened, infiltrated areas of skin which are similar in appearance to orange peel.
Choose the most acutely infiltrated lesion and select a site for collection of thespecimen. This should be just inside the edge of the patch, where the skin

222 Manual of basic techniques for a health laboratory
appears to be altering most rapidly. (This is important, to ensure thatbacilli are detected.)
A sample can also be taken from an area of skin showing the first signs ofleprous infiltration.
2. Disinfect the area using a gauze swab soaked in ethanol. Flame the clampforceps and scalpel.
3. Squeeze the site hard using the forceps and make an incision about 0.5cmlong and 2–3mm deep with the tip of the scalpel (Fig. 5.42).
4. Still squeezing with the forceps, scrape the bottom and edges of the inci-sion with the tip of the scalpel. Collect a small amount of pulp and serousmaterial. Disinfect the incision with ethanol and apply a dressing if thereis bleeding.
Specimens from the nose
Specimens are best prepared from an early morning “nose blow”. The pa-tient blows his or her nose thoroughly into a small clean dry sheet of cello-phane or plastic.
Fig. 5.40 Leprosy lesions on the arm
Fig. 5.41 Leprosy lesions on theface
Fig. 5.42 Collecting a specimen from a skin lesion
Preparation of slides
Specimens from the ear and skin lesions
1. Spread the serous material from the tip of the blade on to the slide in a circularmotion until it covers an area of 5–7mm in diameter (Fig. 5.43). Label the slidewith a diamond pencil. Between two and four smears from the same patientmay be prepared on a single slide.
2. Leave the slide to dry in a dust-free place and then fix the smears by passing theback of the slide through the flame of a spirit lamp or Bunsen burner severaltimes.
3. Stain the smears using the modified Ziehl–Neelsen technique (see section 5.3.3).
Specimens from the body and face
1. Using the scalpel, spread the specimen in a circular motion over an area 5–7mm in diameter on a glass slide labelled with a diamond pencil. Betweenthree and six specimens from the same patient can be placed on the same slide.
2. Dry and fix the smears as for specimens from the ear or skin lesions (see above).
3. Stain the smears using the modified Ziehl–Neelsen technique (see section 5.3.3).

5. Bacteriology 223
Specimens from the nose
1. Using a small cotton wool swab slightly moistened in sodiumchloride solution, transfer some of the nasal mucus from the plas-tic sheet to a labelled slide.
Fig. 5.43 Transferring the specimen to a slide
Fig. 5.44 Mycobacterium lepraeM. leprae rods arranged: (a) in groupsof 2–5 lying in parallel; (b) in largergroups or clusters; and (c) in largenumbers in circular masses (globi).
2. Spread the material evenly on the slide and leave to dry.
3. When completely dry, fix the slide by passing the back of the slide quickly throughthe flame of a spirit lamp or Bunsen burner several times.
4. Stain the slide by the modified Ziehl–Neelsen technique (see section 5.3.3).
5.12.3 Microscopic examinationExamine the slide using the ¥ 100 oil-immersion objective.
Mycobacterium leprae are acid-fast bacilli. After staining by the modified Ziehl–Neelsen technique, they appear red on a blue background.
Size: 1–8mm.
Shape: Largish rods, straight or slightly curved with rounded ends; they may oftenappear granular with the rod being broken into several parts.
Arrangement: The rods are arranged either in groups of 2–5 lying in parallel (Fig.5.44 (a) or in larger groups or clusters (Fig. 5.44 (b)); occasionally large num-bers in circular masses called “globi” can be seen (Fig. 5.44 (c)).
Note: Nasal smears sometimes contain non-pathogenic acid-fast bacilli that are notM. leprae.
Recording the results
Record the results as follows:
— acid-fast bacilli present, or
— no acid-fast bacilli seen.
The results of the examination can be graded as shown in Table 5.3.
Bacteriological index
The bacteriological index (BI) is a guide to the bacterial load and is calculatedby adding all the positive findings from all the body sites where a sample hasbeen taken and dividing the total number of positive specimens by the number ofsites. For example:

224 Manual of basic techniques for a health laboratory
— right ear 3 +
— left ear 2 +
— left arm 2 +
— back 1 +
The total number of positive specimens is 8 + and the BI is 8/4 = 2.
Morphological index
The morphological index provides an indicator of the viability of the bacilli. It isdetermined as follows:
Examine 100 bacilli on the prepared slide using the ¥100 objective. Count thenumbers of bacilli that are uniformly stained red, with no break in the rod. Theseare considered as viable bacilli and if, for example, the number of viable bacilli is 8,the morphological index is 8%.
The morphological index is used for the initial diagnosis and follow-up of patientswith multibacillary leprosy.
Culture
There is no method available for the in vitro culture of Mycobacterium leprae.However, the organism can be cultured in vivo in the foot pads of mice or in thearmadillo.
Table 5.3 Reporting the results of theexamination for Mycobacteriumleprae
Number of bacilli per microscope field Result
None (< 1 per 100 fields) 0
0.01–0.1 (1–10 per 100 fields) 1 +0.1–1 (1–10 per 10 fields) 2 +1–10 3 +10–100 4 +100–1000 5 +> 1000 6 +

225
6. Mycology1
6.1 Examination of skin and hair for fungiRingworm or tinea is a fungal infection of the skin. It can be found on the surfaceof the body, the scalp and the nails and between the toes. Cross-infection betweenhumans frequently occurs and infection can also be acquired from infected ani-mals or soil.
The circular lesions on the skin consist of a mass of branching hyphae; infected hairand nails may also contain spores of fungi.
6.1.1 Materials and reagents● Microscope
● Microscope slides (or dark paper)
● Coverslips
● Scalpel
● Tweezers
● Petri dish
● Bunsen burner or spirit lamp
● Cotton wool swab
● Cotton wool
● 70% Ethanol
● Lactophenol cotton blue mounting solution (reagent no. 33)
● Potassium hydroxide, 20% solution (reagent no. 45).
6.1.2 Method2
Collection of specimens
1. Clean the infected area with a cotton wool swab soaked in ethanol.
2. Use a sterile scalpel to gently scrape the edge of a lesion and collect some skinscales on to a glass slide or on to a piece of dark paper on which the scales can bemore easily seen. Also collect a few broken or damaged hairs from the infectedareas of the scalp using broad tweezers and place them on the slide.
3. Place a drop of lactophenol cotton blue mounting solution and a drop of 20%potassium hydroxide on to the scales and hair (Fig. 6.1). Cover with a coverslip.The strong alkali will dissolve the keratin in the tissue, enabling hyphae andspores to be seen.
Note: Potassium hydroxide is a corrosive fluid and should not be allowed totouch the skin.
1 A description of the method used for the identification of Candida albicans in vaginal dischargeis provided in section 5.8.
2 Tinea infection can also be identified by examining the patient in a dark room illuminated withultraviolet light. The hairs infected with tinea will appear fluorescent.

226 Manual of basic techniques for a health laboratory
4. Place the slide in a covered Petri dish with some damp cotton wool to preventthe specimen drying out. Leave the specimen to clear for 5–30 minutes, depend-ing on the thickness. Alternatively, clear the specimen by holding the slide abovea Bunsen burner or spirit lamp flame for 1 minute (Fig. 6.2).
Microscopic examination
Examine the cleared specimen using the ¥10 and ¥40 objectives. Adjust the irisdiaphragm of the condenser to give good contrast.
Branching hyphae and chains of angular rounded arthrospores may be seen. Fun-gal hyphae can be differentiated from other tissue structures by their branchingand cross walls or septa. They stain blue with lactophenol cotton blue.
Spores (large round granules with transparent membranes) may be seen aroundthe outside of the hairs (Fig. 6.3). These spores are known as ectothrix.
Spores found inside the hairs are called endothrix (Fig. 6.4).
Report as “fungal hyphae or spores present” or “not found”.
6.2 Examination of pus for mycetomaMycetoma is a chronic granulomatous disease of the subcutaneous and deep tis-sue. The most commonly infected site is the foot, where it is called “Madura foot”.Other possible sites of infection include the hands, the head and the chest wall.
Mycetoma produce small granules which are discharged through sinuses to thesurface. These granules are used in the diagnosis of the disease.
Fig. 6.1 Preparation of slides formicroscopic examination ofskin and hair for fungi
Fig. 6.2 Clearing the specimen abovea flame
Fig. 6.3 Ectothrixa: Immature spores;b: mature spores.
Fig. 6.4 Endothrixa: Immature spores;b: mature spores.

6. Mycology 227
6.2.1 Materials and reagents● Microscope
● Microscope slides
● Coverslips
● Sterile needles
● Distilled water
● 70% Methanol
● Sodium chloride, 0.85% solution (reagent no. 53)
● Potassium hydroxide, 20% solution (reagent no. 45)
● Reagents for Gram staining (see section 5.3.1).
6.2.2 MethodCollection of specimens
1. Use a sterile needle to lift the surface crust over a sinus.
2. Carefully remove some of the discharging pus on to a slide.
3. Add a drop of saline or water, spread the pus gently and look for granules. Gran-ules vary in colour, size, shape and degree of hardness.
4. Crush a few granules in some distilled water and place on two slides.
5. Allow one slide to air-dry, fix with methanol for 2–3 minutes and stain withGram stain (see section 5.3.1).
6. Place a few drops of 20% potassium hydroxide on to the second slide and coverwith a coverslip. Leave the specimen to clear for 10 minutes.
Microscopic examination
Examine the cleared specimen using the ¥10 and ¥40 objectives. Adjust the irisdiaphragm of the condenser to give good contrast.
Look for branching and twisted hyphae or fragmented threads. Gram-stained gran-ules may show thin or fragmented Gram-positive threads.
Report as:
● “pus from sinus containing granules [specify colour and size] present”;
● “Gram staining shows Gram-positive thin hyphae” or “Gram staining does notshow Gram-positive thin hyphae”.
6.3 Examination of skin for pityriasis versicolorPityriasis versicolor is a common skin disease in hot climates; it is caused by thefungus Pityrosporum furfur. The face and body are covered with patches, whichappear:
— pale and discoloured in dark-skinned patients;
— yellowish-brown in white-skinned patients.
6.3.1 Materials and reagents● Microscope
● Microscope slides
● Adhesive cellophane tape
● Tongue depressor or glass rod

228 Manual of basic techniques for a health laboratory
● Forceps
● Gauze pads
● Eosin, 1% solution (reagent no. 23), if possible (otherwise, examine withoutstaining).
6.3.2 MethodCollection of specimens
1. Choose a rapidly developing patch of infected skin. Moisten it with a gauzepad dipped in the eosin solution (Fig. 6.5). Leave to dry for 1 minute. (Donot take the specimen if talcum powder has been used on the skin. Wash it offfirst.)
2. Cut a strip of adhesive tape about 5cm long. Place it over the patch so that itoverlaps one edge (Fig. 6.6).
3. Stick the tape on the skin and press firmly from one end to the other, passing atongue depressor or glass rod over it several times (Fig. 6.7).
Pull the adhesive tape away with forceps. Place it immediately on a microscopeslide, sticky side down (Fig. 6.8).
Fig. 6.6 Applying adhesive tape to a skin patch
Fig. 6.7 Collecting a skin specimen
Fig. 6.5 Staining pityriasis versicolor-infected skin patcheswith eosin

6. Mycology 229
Fig. 6.9 Pityrosporum furfur (¥¥¥¥¥40)
Microscopic examination
Examine the whole slide under the microscope using the¥40 objective until a cluster of large granules (the spores)is seen (Fig. 6.9). The spores appear white on a pink back-ground if the skin was treated with eosin, and are alsovisible in unstained preparations.
Change to the ¥ 100 oil-immersion objective to examinethe details (Fig. 6.10).
Spores
Size: 3–8mm diameter.
Shape: round or slightly rectangular, thick-walled, arrangedin a bunch or cluster. Budding is sometimes visible.
Mycelium filaments
Size: 20–40mm long and 5mm wide.
Shape: finger-shaped, bent and twisted rods, with branches.
Fig. 6.8 Transferring a skin specimen to a slide
Fig. 6.10 Pityrosporum furfur (¥¥¥¥¥100)


7. Examination of urine 231
Part III

232 Manual of basic techniques for a health laboratory

7. Examination of urine 233
7. Examination of urine
Examination of urine is a fundamental investigation in patients in whom kidneydisorders or infections of the urinary tract are suspected. There are also many pa-tients who exhibit no clinical symptoms, but in whom previously unrecognizedurinary tract infections can be diagnosed by urine examination.
7.1 Collection of urine specimensContainers for the collection of urine should be wide-mouthed, clean and dry. Ifthe urine specimen has to be transported for any length of time it should contain anappropriate preservative to prevent bacterial overgrowth or hatching of viable ova.
7.1.1 Types of urine specimenEarly morning urine specimen
Early morning urine provides the most concentrated sample.
Random urine specimen
A random urine sample, taken at any time of the day, will enable the laboratory toscreen for substances which are indicators of kidney infection.
24-Hour urine specimen
The 24-hour urine specimen is collected in a clear 2-litre bottle with a stopper. Onthe first morning the patient gets up and urinates; this urine is not collected. All theurine passed during the rest of the day and night is collected in the bottle. The nextmorning the patient gets up and collects the first urine of the morning in the bottle.The bottle should then be taken immediately to the laboratory.
Measure the volume of urine with a measuring cylinder and record it.
Midstream urine specimen
While passing urine, the patient places an open container in the stream of urineand collects about 20ml of urine. The container should be covered immediately.
Terminal urine specimen
The patient urinates the last portion of urine into an open container.
Urine specimens collected using a catheter
Collection of urine using a catheter must be carried out by a qualified physician ornurse. The procedure is used for certain bacteriological tests, mainly in women.Usually, however, a specimen collected in the normal way following thorough cleans-ing is acceptable for this purpose.
233

234 Manual of basic techniques for a health laboratory
Urine specimens from infants
Urine can be collected into a plastic bag with an adhesive mouth. The bag is fixedaround the genitalia and left in place for 1–3 hours, depending on the examinationrequested. Colostomy bags can be used.
7.1.2 Preservation of urine specimens● Urine passed at a clinic and examined immediately does not require
preservation.
● If urine has been collected to check for the presence of Schistosoma haematobiumova but it may not be examined for several hours, it should be acidified with afew drops of 10% acetic acid (reagent no. 2).
7.2 Examination of urine specimens7.2.1 Appearance● Urine is normally clear straw-yellow in colour. More concentrated urine may
appear dark yellow.
● The presence of blood cells or excess salts may make the urine appear cloudy.
● Pigments from bile substances may make the urine appear deep yellow or brown.
● Urine can occasionally appear colourless.
Report the appearance as:
— clear or cloudy;
— colourless, pale yellow, deep yellow or brown.
7.2.2 Testing for the presence of bloodElevated erythrocyte counts and haemoglobin levels may occur in urine:
— after heavy physical exercise;
— in vaginal tract infections;
— in parasitic infections (e.g. schistosomiasis);
— in acute glomerulonephritis;
— in acute cystitis or urethritis;
— in patients suffering from certain tumours.
Blood cells are easily seen by microscopic examination after centrifugation (seesection 7.2.7).
Lysed erythrocytes can be detected using a urine dipstick which has a segment fordetection of blood. Urine dipsticks are available for detection of a single substance(e.g. blood, glucose or protein) or for detection of several substances (e.g. nitriteand leukocyte esterase).
Method
The dipsticks are placed into the urine and immediately removed. They are thencompared with a comparison chart after an appropriate time that is also specifiedon the chart.
The colour changes observed on the dipstick will give a semi-quantitative estima-tion of the amount of substance present. This can be reported as negative, +, ++,+++, ++++ or as an approximate value of the concentration of the substance testedfor.
Dipsticks must be stored according to the manufacturer’s instructions.

7. Examination of urine 235
Fig. 7.1 Materials for measuring the pH of urine
Fig. 7.2 Applying the urine specimen to universalindicator paper
Fig. 7.3 Checking the pH using universal indicatorpaper
Fig. 7.4 Checking the pH using indicator paper oflimited pH range
7.2.3 Measuring the pHNormal freshly passed urine is slightly acid, with a pH ofaround 6.0.
In certain diseases the pH of the urine may increase ordecrease.
Principle
● Coloured indicator paper is dipped in the urine (or placedin a watch glass and a few drops of urine are added to it).
● The colour changes according to the pH.
● The paper is then compared with a standard control chartgiving the corresponding pH value.
Materials (Fig. 7.1)
● Watch glasses
● Dropper
● Forceps
● Universal indicator paper (for measuring pH from 1 to10)
● Indicator paper of limited pH range: for the 5.0–7.0 rangeand for the 6.0–8.0 range.
The urine specimen must be tested within 1 hour ofcollection.
Method
1. Place a strip of universal indicator paper in a watch glass.
Let a few drops of fresh urine fall from the dropper on tothe paper (Fig. 7.2).
Alternatively, dip the test paper directly into the urine inthe receptacle.
2. Pick the strip of paper up with forceps.
Compare the colour obtained with those shown on thestandard chart (Fig. 7.3). Read off the pH unit given forthe colour that matches the test paper most closely.
3. According to the result obtained, select a strip of indicatorpaper for the corresponding limited range. For example,if the pH is 6, use indicator paper for the range 5.0–7.0.If the pH is 7 or more, use indicator paper for the range6.0–8.0.
4. Repeat the test in another watch glass, using the paperfor the corresponding limited range. Read off the pH ofthe urine on the standard chart (Fig. 7.4), e.g. pH = 6.2or pH = 7.5.
The pH of urine is normally about 6.0 (range 5.0–7.0). AcidpH values (4.5–5.5) are observed in some forms of diabe-tes, muscular fatigue and acidosis. Alkaline pH values (7.8–8.0) are common in patients with infections of the urinarytract and in people on a vegetarian diet.

236 Manual of basic techniques for a health laboratory
pH and crystalline deposits
Determination of the pH of urine is useful for the identification of crystallinedeposits (see section 7.2.7, pages 245–248).
Some crystals are deposited only in acid urine, others only in alkaline urine.
For example:
— acid urine: oxalates, uric acid;
— alkaline urine: phosphates, carbonates, urates.
Except in very rare diseases, crystalline deposits in urine have no diagnosticsignificance.
7.2.4 Detection of glucosePrinciple
Glucose is the most commonly found sugar substance in urine, particularly in dia-betic patients and patients suffering from chronic renal failure. Glucose is a reduc-ing substance. It reduces the blue copper sulfate in Benedict solution to red copperoxide, which is insoluble.
Lactose is also a reducing sugar and is occasionally seen in the urine of pregnantwomen.
Materials and reagents
● Test-tubes
● Wooden test-tube holder
● Test-tube rack
● Beaker or can
● Bunsen burner or spirit lamp
● Dropper pipette
● Graduated pipette, 5ml
● Benedict solution (reagent no. 10).
Fig. 7.5 Benedict method fordetection of reducingsubstances in urine
Method
1. Pipette 5ml of Benedict solution into a test-tube.
2. Add eight drops of urine and mix well.
3. Boil over a Bunsen burner or spirit lamp for 2 minutes (Fig. 7.5), or placethe test-tube in a beaker or can of boiling water for 5 minutes.
4. Place the test-tube in the test-tube rack and allow to cool to room tem-perature.
Examine the colour change of the solution and any precipitate. Report theresult as shown in Table 7.1.
Glucose in urine can also be detected using a urine dipstick (see section7.2.2).
7.2.5 Detection and estimation of proteinElevated protein levels are observed in the urine of patients with:
— urinary schistosomiasis
— chronic renal disease

7. Examination of urine 237
— pyelonephritis
— diabetes mellitus
— systemic disorders (lupus erythematosus)
— multiple myeloma.
However, orthostatic proteinuria, a form of functional proteinuria usually seen inyoung men, which occurs on standing up and disappears on lying down, has nopathological significance.
Principle1
When trichloroacetic acid is added to urine containing protein, a precipitate isformed, which is measured by turbidimetry. This reaction occurs with almost allproteins, including albumin and globulins.
Materials and reagents
● Spectrophotometer
● Test-tubes
● Test-tube rack
● Centrifuge
● Mechanical rotator
● Bovine or human serum albumin
● Trichloroacetic acid, 5% solution (see reagent no. 62), diluted 1:4 with distilledwater
● Sodium chloride, 0.85% solution (reagent no. 53)
● Positive and negative controls
● Albumin working standard, 0.005% solution (prepared from albumin stockstandard, 5.0% solution, diluted 1:100 with sodium chloride, 0.85% solution(reagent no. 53)).
The albumin working standard can be divided into aliquots and stored at -20°Cfor up to 6 months.
If albumin stock standard is not available, commercial serum-based standardscontaining both albumin and globulin can be used to prepare a working standardsolution of the appropriate concentration. As with the albumin standard, the workingstandard can also be divided into aliquots and stored at –20°C for up to 6 months.
1 Further details of the method described here are given in the following references: ShahangianS, Brown PI, Ash KO. Turbidimetric measurement of total urinary proteins: a revised method.American journal of clinical pathology, 1984, 81:651–654; Tietz NW, ed. Textbook of clinical chemistry,2nd ed. Philadelphia, WB Saunders, 1994.
Table 7.1 Reporting the results of theBenedict method for detection ofreducing substances in urine
Colour Result
Blue Negative
Green Borderline
Green with yellow precipitate +Yellow/dark green ++Brown +++Orange to brick red ++++

238 Manual of basic techniques for a health laboratory
Method
Collection of specimens
Random, timed or 24-hour urine specimens should be used (see section 7.1.1). Nopreservatives should be added to the specimens. Specimens that are collected over24 hours should be stored at 4–8°C during the period of collection, to preventbacterial growth.
Collected specimens should be kept at 4°C until analysis. If analysis is likely to bedelayed for more than 24 hours, however, the specimens should be stored at-20°C.
Technique
1. Add 1.6ml of the urine specimen to each of two test-tubes (test and test blank).Repeat the process with the working standard and the control.
2. Add 0.4ml of trichloroacetic acid solution to all of the test-tubes and mix well.Leave to stand at room temperature for 10 minutes.
3. Centrifuge the test blanks at 2000g for 10 minutes.
4. Using the spectrophotometer, measure and record the optical density of thetests and blanks at 620nm. The spectrophotometer should be set to zero withdistilled water before any measurements are taken. It should also be calibrated,as described below. The analytical range of measurement using this method is100–1000mg/l.
Calculation
Calculate the concentration of protein in the urine specimen using the followingformula:
OD OD C
OD ODT TB
R RB
- ¥-
where:
C = concentration of the calibration solution
ODR = optical density of the working standard
ODRT = optical density of the working standard test blank
ODT = optical density of the test specimen
ODTB = optical density of the test specimen blank.
Note:
● If a serum-based control is used for calibration purposes, an independent materialmust be used for the purpose of quality control.
● Because the amount of protein excreted in the urine may vary greatly, any positiveresults should always be confirmed by repeating the test on one or more separatesamples.
● If this method is used to screen for microproteinuria (which may be correlatedwith microalbuminuria in the absence of tubular damage, urinary infections andtreatment with certain drugs) in high-risk populations such as patients withdiabetes, the following modifications should be applied to steps 2 and 4:
2. Leave all the tubes to stand at room temperature for 35 minutes after mixing.
4. Using the spectrophotometer, measure and record the optical density of thetests and blanks at 405nm.

7. Examination of urine 239
The analytical range of this modified method is 25–700mg/l.
Protein in urine can also be detected using a protein dipstick (see section 7.2.2).
7.2.6 Detection of ketone bodiesNormal urine does not contain ketone bodies. Acetone and other ketone bodiesmay appear in urine:
— in severe or untreated diabetes;
— in certain other conditions (dehydration, vomiting, malnutrition, prolongedstarvation and following strenuous exercise).
Principle
When sodium nitroprusside (sodium nitrosyl pentacyanoferrate (III)) is added tourine containing ketone bodies, a purple colour is produced.
Materials and reagents
● Test-tubes
● Test-tube rack
● Measuring cylinder, 10ml
● Dropping pipette
● Sodium nitroprusside crystals
● Acetic acid
● Ammonia.
Method
1. Just before carrying out the test, place a sufficient number of sodium nitroprus-side crystals into a test-tube to cover the bottom (Fig. 7.6).
2. Add 5ml of distilled water. Shake well until the crystals are almost dissolved.(Not all the crystals are expected to dissolve as the solution is saturated.)
3. Measure 10ml of urine into another test-tube.
4. Add four drops of acetic acid to the urine, followed by 10 drops of freshly pre-pared sodium nitroprusside solution. Mix well.
5. Holding the tip of the pipette against the side of the tube, let 20 drops (1ml) ofammonia solution flow on to the surface of the liquid (Fig. 7.7). Wait for 5 min-utes before reading — a positive result may be obvious before this time.
Fig. 7.6 Preparation of sodium nitroprusside solution Fig. 7.7 Adding ammonia solution to thesurface of the sodium nitroprussidesolution

240 Manual of basic techniques for a health laboratory
If the result is positive (Fig. 7.8), a purple ring appears on top of the urine. If theresult is negative, no colour change occurs.
Report the result as shown in Table 7.2.
Ketone bodies in urine can also be detected using a urine dipstick (see section7.2.2).
7.2.7 Detection of abnormal elementsPrinciple
Urine contains cells and crystals in suspension that can be collected by centrifu-gation or by allowing the urine to stand and the suspended particles to form asediment. The resulting urinary deposit can be examined under the microscope.
In certain diseases of the urinary tract, the urinary deposits are considerably al-tered. The following abnormal elements may be found:
— leukocytes
— abnormal numbers of erythrocytes
— abnormal crystals (very rarely)
— parasitic trophozoites (e.g. Trichomonas vaginalis) or ova (e.g. Schistosomahaematobium,1 Enterobius vermicularis)
— bacteria
— fungi
— abnormal casts.
Materials and reagents
● Microscope
● Microscope slides
● Centrifuge
● Conical centrifuge tube, 15ml
● Pasteur pipette
● Coverslips
● Formaldehyde
● Distilled water.
1 See also section 7.2.8.
Fig. 7.8 Test for ketonesubstances in urinea: Positive reaction;b: negative reaction.
Table 7.2 Reporting the results of the testfor detection of ketone bodies inurine
Colour change Result
None Negative
Pink ring +Red ring ++Purple ring +++

7. Examination of urine 241
Method
Collection of specimens
Urine to be examined under the microscope must be freshly passed into a clean dryvessel. A midstream urine specimen (see section 7.1.1) is the most useful. Urinestored in a refrigerator may contain an excess of precipitated salts and will not besuitable for microscopy.
The specimen can be preserved for microscopic examination of the deposit byadding 8–10 drops of formaldehyde, 10% solution (reagent no. 28) per 300ml ofurine. Urine preserved in this way is not suitable for other tests.
Preparation of the deposit
1. Mix the urine specimen gently and pour approximately 11ml into a centrifugetube.
2. Centrifuge the specimen at medium speed (2000g) for 5 minutes.
3. Pour off the supernatant by quickly inverting the tube without shaking. (Thesupernatant may be used for biochemical testing.)
4. Resuspend the deposit in distilled water and mix by shaking the tube.
5. Transfer one drop of the deposit on to a slide using a Pasteur pipette and coverwith a coverslip.
6. Label the slide with the patient’s name or identification number.
Microscopic examination
Using the ¥ 10 objective and with the condenser lowered, scan the coverslip all overto look for ova of Schistosoma haematobium when indicated.
Using the ¥ 40 objective and with the condenser lowered or aperture reduced, scanthe coverslip area again and report any findings as a quantitative value for eachhigh-power field.
The following may be found in urine:
— erythrocytes
— leukocytes
— epithelial cells
— casts
— fungi
— crystals
— parasite eggs and larvae
— Trichomonas vaginalis
— spermatozoa.
Erythrocytes (Fig. 7.9)
Erythrocytes in urine may be:
(a) intact: small yellowish discs, darker at the edges (8mm);
(b) crenated: spiky edges, reduced diameter (5–6mm);
(c) swollen: thin circles, increased diameter (9–10mm).
Fig. 7.9 Erythrocytesa: Intact cells; b: crenated cells; c: swollencells.
The shape of the cells often changes during storage of urineand does not have any diagnostic importance.
There are normally very few erythrocytes in urine.
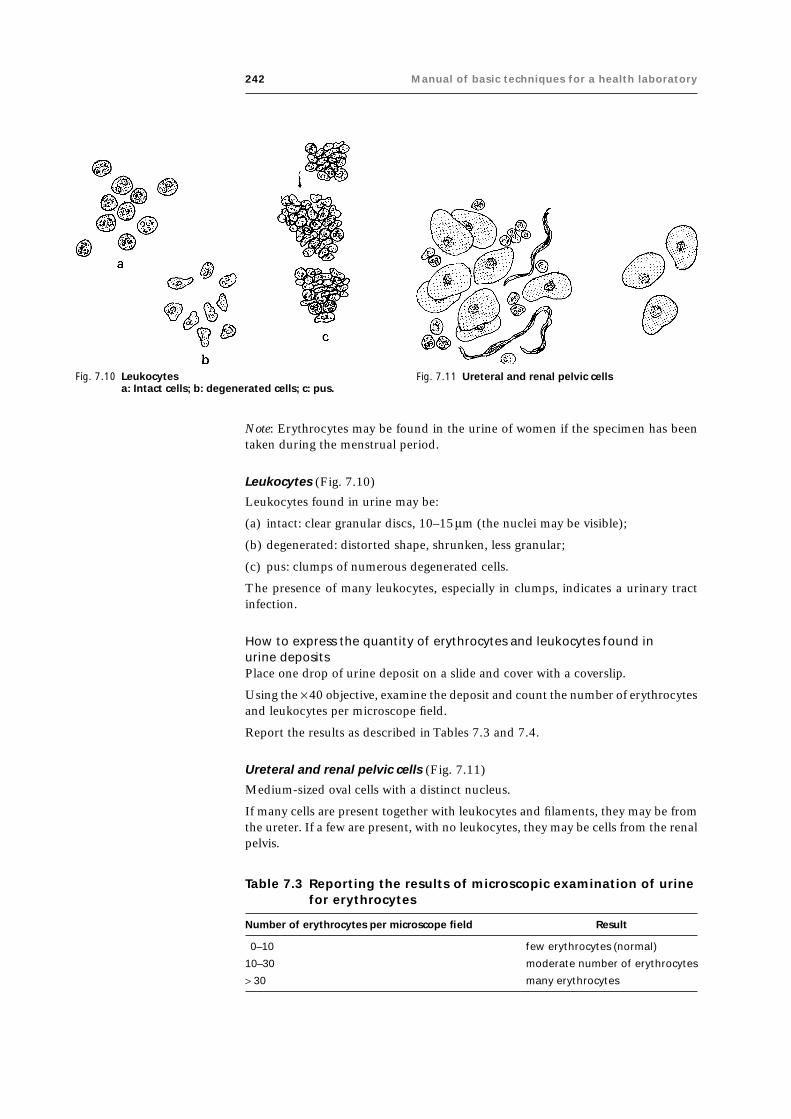
242 Manual of basic techniques for a health laboratory
Note: Erythrocytes may be found in the urine of women if the specimen has beentaken during the menstrual period.
Leukocytes (Fig. 7.10)
Leukocytes found in urine may be:
(a) intact: clear granular discs, 10–15mm (the nuclei may be visible);
(b) degenerated: distorted shape, shrunken, less granular;
(c) pus: clumps of numerous degenerated cells.
The presence of many leukocytes, especially in clumps, indicates a urinary tractinfection.
How to express the quantity of erythrocytes and leukocytes found inurine depositsPlace one drop of urine deposit on a slide and cover with a coverslip.
Using the ¥ 40 objective, examine the deposit and count the number of erythrocytesand leukocytes per microscope field.
Report the results as described in Tables 7.3 and 7.4.
Ureteral and renal pelvic cells (Fig. 7.11)
Medium-sized oval cells with a distinct nucleus.
If many cells are present together with leukocytes and filaments, they may be fromthe ureter. If a few are present, with no leukocytes, they may be cells from the renalpelvis.
Table 7.3 Reporting the results of microscopic examination of urinefor erythrocytes
Number of erythrocytes per microscope field Result
0–10 few erythrocytes (normal)
10–30 moderate number of erythrocytes
> 30 many erythrocytes
Fig. 7.11 Ureteral and renal pelvic cellsFig. 7.10 Leukocytesa: Intact cells; b: degenerated cells; c: pus.

7. Examination of urine 243
Renal cells (Fig. 7.12)
Renal cells are smaller than renal pelvic cells (the size of 1–2 leukocytes) and arevery granular. The nucleus is shiny and clearly visible.
Renal cells are almost always present with protein in the urine.
Casts
Casts are cylindrical in shape and long, crossing almost the whole field when exam-ined under the ¥ 40 objective.
Hyaline casts are transparent and slightly shiny; the ends are rounded or tapered(Fig. 7.13). They may be found in healthy persons after strenuous muscular effortand have no diagnostic significance.
Table 7.4 Reporting the results of microscopic examination of urinefor leukocytes
Number of leukocytes per microscope field Result
0–10 few leukocytes (normal)
10–20 moderate number of leukocytes
20–30 many leukocytes
20–30 (degenerated) in clumps many leukocytes seen in clumps
> 30 (degenerated) in clumps full field
Fig. 7.12 Renal cells Fig. 7.13 Hyaline casts
Fig. 7.14 Granular casts
Granular casts are rather short casts filled with large granules, paleyellow in colour, with rounded ends (Fig. 7.14). The granules comefrom degenerated epithelial cells from the tubules of the kidneyand have no diagnostic significance.
Fine granular casts (Fig. 7.15) have smaller granules that do not fillthe cast (a). Do not confuse with hyaline casts, partly covered byamorphous phosphate crystals (b).
Blood casts are filled with more or less degenerated erythrocytes,brownish in colour (Fig. 7.16). They are found in acute kidneydisease.
Pus casts (Fig. 7.17) are completely filled with leukocytes (a). Do not confuse withhyaline casts, which may contain a few leukocytes (b). Pus casts are found in patientssuffering from kidney infection.
Epithelial casts are filled with pale yellow epithelial cells (Fig. 7.18). (To make thecells more distinct, add a drop of 10% acetic acid (reagent no. 2) to the deposit.)Epithelial casts have no diagnostic significance.
Fatty casts are very shiny yellowish casts; the edges are indented and distinct andthe ends are rounded (Fig. 7.19). They are soluble in ether but not in acetic acid.Fatty casts are found in patients with severe kidney disease.

244 Manual of basic techniques for a health laboratory
Fig. 7.15 Fine granular castsa: True fine granular casts; b: hyaline castspartly covered by amorphous phosphatecrystals.
Fig. 7.16 Blood casts
Fig. 7.17 Pus castsa: True pus casts; b: hyaline casts.
Fig. 7.18 Epithelial casts
Fig. 7.19 Fatty casts Fig. 7.20 False castsa: Phosphate crystals; b: translucentmucus.
False casts (Fig. 7.20). Do not mistake for casts:
— clumps of phosphate crystals, short and clear-cut (a);
— aggregations of translucent mucus, the ends tapering into threads (b).
Miscellaneous foreign substances
If dirty receptacles or slides are used or if the urine specimen is left exposed to theair, the following may be found (see Fig. 7.21):
— oil droplets (shiny) (a);
— starch granules (which will be stained blue–black with Lugol iodine, 0.5%solution (reagent no. 37)) (b);
— grains of pollen from flowers (c);
— hairs (d);

7. Examination of urine 245
— cotton fibres (e);
— air bubbles (f ).
Crystals (Fig. 7.22)
Crystals have regular geometric shapes (a), unlike amorphous debris, which is madeup of clumps of small granules with no definite shape (b). Except in very rarediseases, crystals in urine have no diagnostic significance.
Normal crystalline deposits
Calcium oxalate (acid urine) (Fig. 7.23)Size: 10–20mm (a) or about 50mm (b).
Shape: envelope-shaped (a) or peanut-shaped (b).
Colour: colourless, very shiny.
Uric acid (acid urine) (Fig. 7.24)Size: 30–150mm.
Shape: varies (square, diamond-shaped, cubical or rose-shaped).
Colour: yellow or brownish-red.
Triple phosphates (neutral or alkaline urine) (Fig. 7.25)Size: 30–150mm.
Shape: rectangular (a) or like a fern leaf or star (b).
Colour: colourless, shiny.
Fig. 7.21 Miscellaneous foreign substancesa: Oil droplets; b: starch granules; c: pollengrains; d: hairs; e: cotton fibres; f: airbubbles.
Fig. 7.22 Crystalsa: Crystals; b: amorphous debris.
Fig. 7.23 Calcium oxalate crystalsa: Envelope-shaped crystals; b: peanut-shaped crystals.
Fig. 7.24 Uric acid crystals

246 Manual of basic techniques for a health laboratory
Fig. 7.25 Triple phosphate crystalsa: Rectangular-shaped crystals; b: fernleaf-shaped crystals.
Fig. 7.26 Urate crystalsa: Cactus-shaped crystals; b: needle-shaped crystals.
Fig. 7.27 Calcium phosphatecrystals
Fig. 7.28 Calcium carbonate crystals
Urates (alkaline urine) (Fig. 7.26)Size: about 20mm.
Shape: like a cactus (a) or a bundle of needles (b).
Colour: yellow, shiny.
Urates are often found together with phosphates.
Calcium phosphate (neutral or alkaline urine) (Fig. 7.27)Size: 30–40mm.
Shape: like a star.
Colour: colourless.
Calcium carbonate (neutral or alkaline urine) (Fig. 7.28)Size: very small.
Shape: similar to millet or corn grains, grouped in pairs.
Colour: colourless.
If acetic acid, 10% solution (reagent no. 2) is added, the crystals dissolve, giving offbubbles of gas.
Calcium sulfate (acid urine) (Fig. 7.29)Size: 50–100mm.
Shape: long prisms or flat blades, separate or in bundles.
Calcium sulfate crystals can be distinguished from calcium phosphate crystals bymeasuring the pH of the urine.
Amorphous debris
Amorphous phosphates (alkaline urine) (Fig. 7.30)Amorphous phosphates appear as small, whitish granules, often scattered.

7. Examination of urine 247
Fig. 7.29 Calcium sulfate crystals Fig. 7.30 Amorphous phosphates
Fig. 7.31 Amorphous urates Fig. 7.32 Cystine crystals
They are soluble in acetic acid, 10% solution (reagent no. 2) (one drop per drop ofdeposit).
Amorphous urates (acid urine) (Fig. 7.31)Amorphous urates appear as very small, yellowish granules, which are grouped incompact clusters.
They are not soluble in acetic acid, 10% solution (reagent no. 2), but dissolve if theurine is gently heated.
(Urine kept in the refrigerator often shows a heavy precipitate of urates.)
Other crystalline depositsThe following are rarely found in the urine. When present, however, they are foundin large quantities in patients with certain diseases.
Cystine (acid urine) (Fig. 7.32)Size: 30–60mm.
Shape: hexagonal plates.
Colour: colourless, very shiny.
Cystine crystals are found only in fresh urine as they are soluble in ammonia.
They are found in patients with cystinuria, a very rare hereditary disease.
Cholesterol (acid urine) (Fig. 7.33)Size: 50–100 mm.
Shape: squarish plates, with notches on one side.
Colour: colourless, shiny.
Cholesterol crystals are found in the urine of patients with nephrotic syndrome.

248 Manual of basic techniques for a health laboratory
Bilirubin (very rare) (Fig. 7.34)Size: about 5mm.
Shape: square or like beads or needles.
Colour: brown.
(The chemical test for bile pigments is positive.)
Acetyl sulfonamides (neutral or acid urine)Shape: varied, but often similar to sheaves of needles.
Acetyl sulfonamide crystals are found in the urine following treatment withsulfonamide drugs. The presence of these crystals should be reported as they cancause kidney damage.
Fungi (Fig. 7.35)
Size: 5–12mm.
Shape: round or oval bodies of various sizes found together. Do not confuse witherythrocytes. Budding may be seen. Fungi are not soluble in acetic acid.
Fungi are occasionally present in urine containing glucose. Check that the urinespecimen is fresh.
Parasite eggs and larvae
The following may be found:
— eggs of Schistosoma haematobium: found together with erythrocytes (Fig. 7.36);
— microfilariae of Wuchereria bancrofti (see Fig. 4.121): the urine appears whiteand cloudy.
Fig. 7.33 Cholesterol crystals Fig. 7.34 Bilirubin crystals
Fig. 7.35 Fungi Fig. 7.36 Schistosoma haematobium

7. Examination of urine 249
7.2.8 Detection of Schistosoma haematobium infectionIn countries where schistosomiasis is endemic, urine specimens are examined foreggs of Schistosoma haematobium. Trophozoites of Trichomonas vaginalis may also beseen. Microfilariae of Wuchereria bancrofti and Onchocerca volvulus may also be foundin the centrifuged sediment of urine from patients in countries where filariasis isendemic.
The first indirect evidence of Schistosoma haematobium infection is haematuria and/or proteinuria, which is detectable using a urine dipstick (see section 7.2.2). Grosshaematuria indicates heavy infection.
The two methods used for detection of ova of Schistosoma haematobium are sedi-mentation and filtration. The sedimentation method is less sensitive but is cheaperand simpler to perform. The filtration technique is used when quantitative infor-mation is required for epidemiological surveillance purposes.
Materials and reagents
● Microscope
● Microscope slides
● Coverslips
● Centrifuge (sedimentation method)
● Conical centrifuge tubes, 15ml (sedimentation method)
● Filter holder, 13 or 25mm diameter (filtration method)
● Membrane filter, 12–20mm pore size (nylon or polycarbonate) or Whatman No.541 (or equivalent) filter-paper (filtration method)
● Conical flask for urine collection
● Pasteur pipettes (sedimentation method)
● Plastic syringe, 10ml (filtration method)
● Lugol iodine, 0.5% solution (reagent no. 37) (filtration method)
● Formaldehyde, 37% solution.
Method
Collection of urine specimens
The number of ova in the urine varies throughout the day; it is highest in urineobtained between 10:00 and 14:00. The specimen should therefore be collectedbetween these times and should consist of a single terminal urine specimen (seesection 7.1.1) of at least 10ml. Alternatively, a 24-hour collection of terminal urinecan be made (see section 7.1.1).
The whole specimen must be examined, as it may contain only a few ova. Ask thepatient to collect the urine in a clean flask or bottle. Examine the specimen at once.
If the urine cannot be examined for an hour or longer, add 1ml of undiluted for-malin (37% formaldehyde solution) to each 100ml of urine. This will preserve anyeggs that might be present.
Note: If formalin is not available, 2ml of ordinary household bleach can be addedto each 100ml of urine.
Warning: Formalin and bleach are corrosive and must not be swallowed.

250 Manual of basic techniques for a health laboratory
Sedimentation method
1. Shake the urine specimen well and pour into the conical flask.
2. Allow the urine to sediment for 1 hour. Remove thesupernatant and transfer the sediment into a centrifuge tube.Centrifuge at 2000g for 2 minutes.
3. Examine the deposit under the microscope for the presenceof ova.
Do not increase the centrifugation time and do not exceed 2000gas this may disrupt the ova and release miracidia.
Important:
— process the specimen as soon as possible;
— shake the container before pouring the urine specimen intothe conical flask;
— label slides and tubes carefully.
Filtration method
1. Place a filter in the filter holder.
2. Agitate the urine sample gently and draw 10ml into the syringe(Fig. 7.37). Attach the syringe to the filter holder.
3. Expel the urine from the syringe through the filter over a bucketor sink (Fig. 7.38).
4. Disconnect the syringe from the filter holder. Draw air intothe syringe (Fig. 7.39), reattach the syringe to the filter holderand expel the air through the filter (Fig. 7.40).
Fig. 7.37 Drawing urine into the syringe
Fig. 7.38 Expelling the urine throughthe filter
Fig. 7.39 Drawing air into the syringe
5. Disconnect the syringe from the filter holder. Using forceps, carefully removethe membrane filter or filter-paper and place it on a microscope slide. The nylonmembrane and filter-paper should be placed face-up, while the polycarbonatemembrane should be placed face-down.
6. Add one drop of Lugol iodine solution to improve the visibility of the eggs.
7. Examine the entire filter under the microscope at ¥ 10 or ¥ 40. Record the resultsas the number of eggs per 10ml of urine.

7. Examination of urine 251
Reuse of filtersIf you have used a plastic filter, remove it immediately after use and soak it over-night in a 1% hypochlorite solution (domestic bleach). After soaking the filter,wash it thoroughly with detergent solution, then rinse it several times with cleanwater. Check the filter under the microscope to ensure that it is free of parasitesbefore reusing it.
Microscopic examination
The eggs of Schistosoma haematobium are large, about 120–150mm long, and have aterminal spine at one end (Fig. 7.41 (a)). An embryo (the miracidium) can be seeninside the egg.
Sometimes it is necessary to determine whether the eggs are viable. This can bedone if the specimen is fresh and no preservatives have been added.
Look carefully at the eggs to see if the embryos are moving. This is the best indica-tion of viability. If no movement is seen, look for the “flame cells” (Fig. 7.41 (b)).There are four flame cells, one at each corner of the embryo. Use a ¥100 objectivewith slightly reduced illumination to look for the rapid movement of cilia (shorthairs) in the flame cells.
Reporting the results
When the syringe filtration technique is used, the results may be reported accord-ing to egg count categories:
● Light infection: 1–49 eggs per 10ml of urine.
● Heavy infection: > 50 eggs per 10ml of urine.
A third category, such as >500 eggs per 10ml of urine, or >1000 eggs per 10ml ofurine, may be appropriate in areas where the intensity of infection frequently reachesthis level (i.e. in more than 10% of cases).
7.2.9 Detection of bacteriaIn healthy persons the urine contains practically no organisms. Bacteria may befound in patients who have an infection of some part of the urinary tract (e.g.urethritis, cystitis or nephritis), or where bacteria from an infection elsewhere inthe body are excreted in the urine.
The urine is centrifuged at high speed and the resulting deposit is examined underthe microscope (as described in section 7.2.7). This is the most important part ofthe analysis. However, the deposit may also be used to make smears that are stainedby Gram and Ziehl–Neelsen stains and examined under the microscope.
Culture is always essential for precise determination of the identity of the organ-isms found and the quantity present.
Materials and reagents
● Microscope
● Microscope slides
● Sterile 250-ml Erlenmeyer flask with stopper
● Centrifuge
● Sterile conical centrifuge tubes with stoppers
● Inoculating loop
● Bunsen burner or spirit lamp
● 70% Ethanol
Fig. 7.40 Expelling air fromthe syringe
Fig. 7.41 Schistosomahaematobiuma: Miracidium;b: flame cells.

252 Manual of basic techniques for a health laboratory
● Reagents needed for Gram staining (see section 5.3.1) and Ziehl–Neelsen stain-ing (see section 5.3.3).
Method
Collection of specimens
The genitals should be cleansed beforehand, using soap and water. Collect a mid-stream specimen (see section 7.1.1) in the sterile flask. Examine as quickly as pos-sible. (Another way is to collect the urine in a conical tube rinsed only in boilingwater and to examine it immediately.)
Preparation of slides
1. Pour 10ml of fresh urine into a sterile centrifuge tube. Seal the tube with eithera screw-cap or a plug of sterile cotton wool fixed with gauze and string.
2. Centrifuge the specimen at 1500g for 10 minutes. If tuberculosis is suspected,centrifuge a further 10-ml specimen at 5000g for 20 minutes.
3. Pour off the supernatant from the two tubes (Fig. 7.42). Using an inoculatingloop (sterilized by flaming) (Fig. 7.43), mix the deposit with distilled water untilit forms a homogeneous suspension.
Fig. 7.42 Pouring off thesupernatant fluid
Fig. 7.43 Mixing the urinary deposit
4. Using an inoculating loop (sterilized by flaming), prepare asmear from each of the two suspensions (Fig. 7.44). Leavethe slides to air-dry.
5. Fix the slides by flooding with ethanol and flaming or byheating.
6. Stain the first slide with Gram stain (see section 5.3.1) andthe second with Ziehl–Neelsen stain (see section 5.3.3).
Microscopic examination
Examine the slides under the microscope using the ¥ 100objective.
Fig. 7.44 Preparation of smears from the urinarydeposit
Examine the slide stained with Gram stain for the following (see section 5.3.1):
● pus (many leukocytes stained red by Gram stain)
● Gram-negative bacilli (Fig. 7.45(a))
● Gram-positive cocci (Fig. 7.45(b))
● Gram-positive diphtheroid bacilli (Fig. 7.45(c))
● Gram-positive fungi (Fig. 7.45(d)).
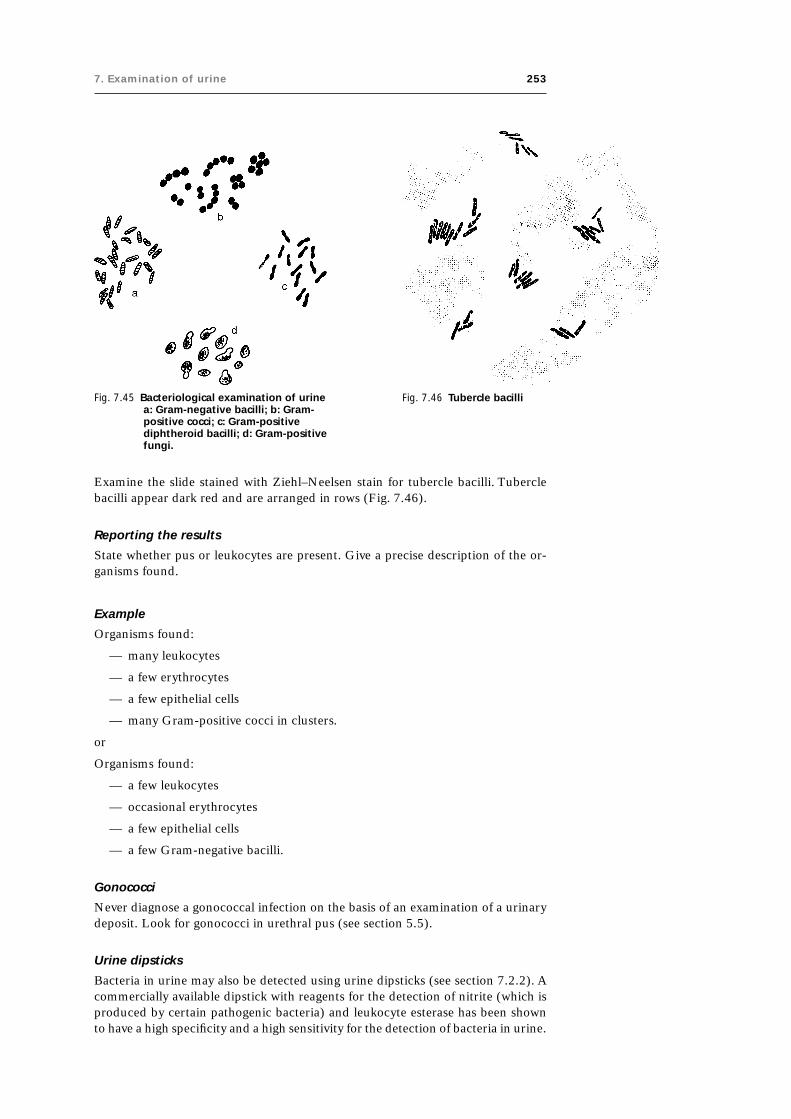
7. Examination of urine 253
Examine the slide stained with Ziehl–Neelsen stain for tubercle bacilli. Tuberclebacilli appear dark red and are arranged in rows (Fig. 7.46).
Reporting the results
State whether pus or leukocytes are present. Give a precise description of the or-ganisms found.
Example
Organisms found:
— many leukocytes
— a few erythrocytes
— a few epithelial cells
— many Gram-positive cocci in clusters.
or
Organisms found:
— a few leukocytes
— occasional erythrocytes
— a few epithelial cells
— a few Gram-negative bacilli.
Gonococci
Never diagnose a gonococcal infection on the basis of an examination of a urinarydeposit. Look for gonococci in urethral pus (see section 5.5).
Urine dipsticks
Bacteria in urine may also be detected using urine dipsticks (see section 7.2.2). Acommercially available dipstick with reagents for the detection of nitrite (which isproduced by certain pathogenic bacteria) and leukocyte esterase has been shownto have a high specificity and a high sensitivity for the detection of bacteria in urine.
Fig. 7.45 Bacteriological examination of urinea: Gram-negative bacilli; b: Gram-positive cocci; c: Gram-positivediphtheroid bacilli; d: Gram-positivefungi.
Fig. 7.46 Tubercle bacilli

254 Manual of basic techniques for a health laboratory
Urine cultures
Urine cultures are indicated when very high levels of bacteria are detected bymicroscopy or using urine dipsticks. In such cases, a urine specimen should bedispatched to the bacteriology laboratory without delay for a semi-quantitativeculture of the pathogenic organisms and for determination of their sensitivity toantimicrobials.

8. Examination of cerebrospinal fluid (CSF) 255
8.Examination ofcerebrospinal fluid (CSF)
Cerebrospinal fluid (CSF) is contained in the cavity that surrounds the brain in theskull and the spinal cord in the spinal column (Fig. 8.1). It supplies nutrients to thetissues of the central nervous system and helps to protect the brain and spinal cordfrom injury.
The volume of the CSF in adults is 100–150ml. The volume is less in children andvaries according to the body length.
8.1 Common reasons for investigation of CSFThe most common reasons for investigating CSF are to exclude:
— meningitis
— bleeding into the central nervous system
— certain cancers.
Meningitis is an inflammation of the meninges, the membranes lining the skulland covering the brain and spinal column. It is often caused by infection (seeTable 8.1).
Leukaemia, tumours with manifestations in the brain and lead poisoning have alsobeen shown to cause meningitis.
Note: Immediate laboratory investigation of the CSF may be life-saving if meningi-tis is suspected.
8.2 Collection of CSF specimensCSF specimens should be collected only by a physician or a specially trained nurse.
Fig. 8.1 Location of CSF
255
Fig. 8.2 Collecting a CSF specimen
1. The sterile lumbar puncture needle is inserted between thefourth and fifth lumbar vertebrae to a depth of 4–5cm. Thestylet is withdrawn and the fluid flows freely through theneedle (Fig. 8.2).
2. Between 6 and 7ml of CSF are collected in each of twotubes, numbered 1 and 2.
Tube 1 is used for visual inspection, microscopic and chemicalanalysis.
Tube 2 is used for bacterial culture.
8.3 Examination of CSF specimens8.3.1 Precautions● Do not delay in testing the CSF. Cells and trypanosomes are
rapidly lysed in CSF samples. Glucose is also rapidlydestroyed, unless preserved with fluoride oxalate (reagentno. 26; see section 10.1).

256 Manual of basic techniques for a health laboratory
Table 8.1 Common causes of meningitis
Type of infection Specific organism
Bacterial Neisseria meningitidis
Streptococcus spp., especiallyS. pneumoniae
Staphylococcus spp.
Haemophilus influenzae
Escherichia coli
Listeria monocytogenes
Leptospira spp.
Mycobacterium tuberculosis
Treponema pallidum
Pseudomonas spp.
Protozoal Plasmodium spp.
Viral Coxsackieviruses
Arboviruses
Echoviruses
Polioviruses
Mumps virus
Arenaviruses
Human herpesviruses
Hepatitis viruses
Fungal Candida albicans
Cryptococcus neoformans
● Work carefully and economically. Often only a small quantity of CSF is availablefor examination. The specimen is difficult to collect so do not waste any of it.
● The CSF may contain virulent organisms. Use pipettes plugged with non-absorbentcotton wool, or use a rubber safety bulb to draw up the fluid in the pipette. Neverpipette CSF by mouth.
Fig. 8.3 Examining the appearance of CSFa: Clear (normal) CSF; b: cloudy CSF;c: bloodstained CSF.
8.3.2 Direct examinationDescribe the appearance of the CSF specimen in the laboratory report.
Clear CSF
Normal CSF is clear and colourless (Fig. 8.3 (a)).
Cloudy CSF
If pus is present, the CSF may appear slightly cloudy or greyish-white(Fig. 8.3 (b)).
Bloodstained CSF
If blood is present, the CSF may appear cloudy and pink or reddish(Fig. 8.3 (c)). Blood is usually present in the CSF for one of tworeasons:
— because of injury to blood vessels in the course of the lumbar puncture (inthis case there is more blood in tube 1 than in tube 2);
— because of a subarachnoid haemorrhage (in this case both tubes are the samecolour).

8. Examination of cerebrospinal fluid (CSF) 257
Fig. 8.4 CSF from a patientwith a blood vesselinjury
Fig. 8.5 CSF from a patientwith a subarachnoidhaemorrhage
Fig. 8.6 CSF from a patientwith xanthochromia
If only one tube of CSF is available, wait for the erythrocytes to settle (or centrifugeat 2000g for 5 minutes) and examine the supernatant fluid.
If the supernatant fluid is clear (Fig. 8.4), the blood is there because of accidentalinjury to a blood vessel.
If the supernatant fluid is bloodstained (Fig. 8.5), the blood is there because of asubarachnoid haemorrhage.
Xanthochromia
Yellow discoloration of the CSF (xanthochromia; Fig. 8.6) may be caused by:
— an old haemorrhage
— severe jaundice
— constriction of the spine.
Clot formation
Examine the tubes of CSF 10 minutes after collection to see whether clots haveformed. Normal CSF has no clots, but clots may be found in the following diseasesor conditions:
— tuberculous meningitis: single or numerous small fine clots that can easily beoverlooked;
— purulent meningitis: a large clot;
— constriction of the spine: the CSF clots completely.
If clots are present, they should be described in the laboratory report.
8.3.3 Microscopic examinationMicroscopic examination of CSF includes:
— examination of a wet preparation for blood cells;
— examination of a wet preparation for trypanosomes in areas where Africantrypanosomiasis occurs;
— examination of a Gram-stained smear for organisms that cause meningitis,such as Neisseria meningitidis, Streptococcus pneumoniae and Haemophilusinfluenzae (see Table 8.1);
— examination of a Ziehl–Neelsen-stained smear if tuberculous meningitis issuspected;
— examination for fungi such as Cryptococcus neoformans and Candida albicans,if suspected.
The above examinations are made using the deposit from centrifuged CSF.
Blood cells in the CSF
The CSF may contain blood cells in varying quantities in certain diseases. TheCSF is examined:
— to detect erythrocytes;
— to determine the total number of leukocytes (leukocyte number con-centration);
— to determine the types of leukocyte present (differential leukocyte count).

258 Manual of basic techniques for a health laboratory
● Pasteur pipette with rubber teat
● Coverslips (supplied with the counting chamber)
● Bottle, 2–5 ml
● Türk solution (reagent no. 61).
Method1. Cover the counting chamber with the coverslip supplied (Fig. 8.8).
2. Gently mix the CSF and fill the chamber with the fluid (Fig. 8.9):— undiluted, if the CSF appears clear;— diluted, if the CSF appears cloudy.
Make a 1 in 20 dilution using 0.05 ml of the CSF and 0.95 ml of Türk solution.Pipette into a small bottle and mix.
3. Leave the counting chamber on the bench for 5 minutes to allow the cells tosettle. Place the chamber on the microscope stage.
4. Count the cells in 1 mm3 of CSF, using the ¥10 objective. When reporting in SIunits, report as “number ¥ 106/l”; the value does not change.
Example: 150 cells per mm3 are reported as “150 ¥ 106/l”.
Fig. 8.7 Materials for determining the leukocytenumber concentration
Important: The investigation of erythrocytes must be carriedout as soon as possible after collection of the specimen, sincethey are rapidly lysed.
Determination of the leukocyte number concentration
Materials and reagents (Fig. 8.7)● Microscope
● Fuchs–Rosenthal counting chamber (if not available, animproved Neubauer counting chamber may be used)
Fig. 8.8 Covering the countingchamber with a coverslip
Fig. 8.9 Filling the counting chamber with CSF
Important: If undiluted CSF is used, examine the cells using the ¥40 objective tomake sure that the cells are leukocytes. If erythrocytes are present, make the countusing the ¥40 objective.
Use of the Fuchs–Rosenthal counting chamberThe Fuchs–Rosenthal ruled counting chamber has an area of 9mm2 (modifiedchamber) or 16mm2. The depth of the chamber is 0.2mm.
Count the cells in 5mm2 using squares 1, 4, 7, 13 and 16 (Fig. 8.10).
If undiluted CSF is used, no calculation is necessary; the number of cells countedgives the number per mm3 of CSF.
If a 1 in 20 dilution of CSF is used, the number of cells counted is multiplied by 20to give the number of cells per mm3 of CSF.

8. Examination of cerebrospinal fluid (CSF) 259
● Tuberculous and viral meningitis: mostly lymphocytes
● African trypanosomiasis: mostly lymphocytes, but Mott cells may be seen, aswell as trypanosomes.
Determination of the leukocyte type number fraction(differential leukocyte count)
Materials and reagents● Microscope
● Microscope slides
● Centrifuge
● Centrifuge tubes
● Pipettes
● Romanowsky stain (see section 9.10.1)
● Methanol.
MethodIf the CSF does not contain many cells (less than 200 ¥ 106/l):
1. Centrifuge the CSF at 3000g for 10 minutes. Pour off the supernatant fluid intoanother tube (to be used for other tests).
2. Mix the deposit by tapping the end of the tube. Spread on a clean slide and leaveto dry.
3. Fix with methanol and stain with a Romanowsky stain as described in section9.10.3. Examine the cells under the microscope using the ¥40 objective.
If there are many cells in the CSF:
1. Pipette one drop of uncentrifuged, mixed CSF on to a slide.
2. Make a thin smear and leave to dry.
3. Fix with methanol and stain with a Romanowsky stain as described in section9.10.3.
Wet preparation for trypanosomes
Method
Place one drop of CSF deposit on a slide and cover with a coverslip. Examine thepreparation under the microscope using the ¥40 objective.
Fig. 8.10 Using the Fuchs–Rosenthal countingchamber
Use of the improved Neubauer counting chamberIf you are using an improved Neubauer chamber, count the cellswithin the entire ruled area, which is 9mm3.
If undiluted CSF is used, multiply the number of cells counted by10 and divide by nine to give the number of cells per mm3 of CSF.
If a 1 in 20 dilution of CSF is used, multiply the number of cellscounted by 20 and divide by nine to give the number of cells permm3 of CSF.
ResultsNormal CSF contains less than 5 ¥ 106 leukocytes per litre (lessthan 5 per mm3). An increased number of leukocytes can be foundin:
● Bacterial meningitis (meningococcal, Haemophilus influenzae,pneumococcal): mostly neutrophils

260 Manual of basic techniques for a health laboratory
Report any organisms seen in the Gram-stained smear by their:
● Gram reaction: positive or negative
● morphology: cocci, diplococci, bacilli, etc.
● numbers found.
A definite species identification cannot be made from a Gram-stained smear only.Culture of the organisms is necessary.
The organisms that commonly cause meningitis are described on the followingpages.
Neisseria meningitidis (meningococci) (Fig. 8.12)● Gram-negative
● Diplococci, lying side by side
● Intracellular, inside the neutrophils.
Note: Diplococci may occasionally be seen outside the cells and are usually few innumber.
Streptococcus pneumoniae (pneumococci) (Fig. 8.13)● Gram-positive
● Diplococci, lying end to end
Fig. 8.11 Trypanosomes in a wetpreparation stained withRomanowsky stainL: lymphocytes; M: Mottcells; T: trypanosomes.
The finding of motile trypanosomes in the CSF means that the later stage oftrypanosomiasis has been reached, in which the central nervous system isinfected (see section 4.7.3). The protein concentration of the CSF is raisedand the Pandy test is positive (see section 8.3.5). The fluid also contains anincreased number of white blood cells.
In a wet preparation stained with Romanowsky stain, the leukocytes can beidentified as lymphocytes (L), and Mott cells (M) can often be seen (Fig.8.11). These are large cells containing vacuoles and large amounts of immu-noglobulin M (IgM) that stain dark with the eosin part of Romanowskystains (see section 9.10.4).
Gram-stained smear for meningitis
Method
Make a smear of the CSF deposit and allow it to dry in the air. Stain thesmear with Gram stain as described in section 5.3.1.
Fig. 8.12 Neisseria meningitidis Fig. 8.13 Streptococcuspneumoniae

8. Examination of cerebrospinal fluid (CSF) 261
● Surrounded by a capsule, which is not visible with Gram stain
● Not intracellular
● Usually many in number.
Haemophilus influenzae (especially in young children) (Fig. 8.14)● Gram-negative
● Small bacilli (coccobacilli)
● Not intracellular
● Often numerous.
In all the above-mentioned forms of meningitis the leukocytes present areneutrophils.
Gram-positive bacilliVery rarely found. May belong to the Listeria group. Culture is essential.
Ziehl–Neelsen-stained smear for tuberculous meningitis
Method
If tuberculous meningitis is suspected, the CSF should be left to stand. If a clotforms, it should be removed, spread on a slide and stained with Ziehl–Neelsenstain, as described in section 5.3.3.
If organisms are seen (Fig. 8.15), report the smear as “acid-fast bacilli present”.
Fungi in the CSF
Very rarely, fungi (Cryptococcus neoformans and Candida albicans) may be observedin a smear stained with Gram stain.
Cryptococcus neoformans may be found in cloudy CSF with lymphocytes.
Method
Mix on a microscope slide:
— one drop of CSF deposit
— one drop of Indian ink.
Examine the mixture between a slide and a coverslip.
Cryptococcus neoformans appears as follows (Fig. 8.16):
— round budding spores containing greyish granulations;
— each group of 1–3 spores is surrounded by a colourless capsule.
Candida albicans may be found in an unstained wet preparation of CSF deposit. Itappears as follows (Fig. 8.17):
— oval budding spores
— short mycelium filaments.
8.3.4 Determination of glucose concentrationGlucose concentrations in the CSF are normally about 60% of those in blood, i.e.2.5–4.2mmol/l (45–75mg/100ml).
In patients with meningitis (especially purulent and tuberculous meningitis), theconcentration of glucose in the CSF is greatly reduced.
Fig. 8.14 Haemophilusinfluenzae
Fig. 8.15 Acid-fast bacilli
Fig. 8.16 Cryptococcusneoformans
Fig. 8.17 Candida albicans

262 Manual of basic techniques for a health laboratory
Method
For determination of glucose concentrations in the CSF, all methods that are usedfor determination of blood glucose concentrations can be applied. When theorthotoluidine method (see section 10.1) is used, four times more CSF is neededthan in the test on blood.
Important: As the glucose in the CSF is rapidly destroyed once the fluid is collected,it is important to carry out the estimation of glucose concentration as soon as possible.If there is likely to be a delay, the CSF should be preserved in fluoride oxalate(reagent no. 26).
8.3.5 Determination of protein concentrationPrinciple
The total protein concentration in the CSF is measured by diluting the CSF insulfosalicylic acid and comparing the cloudiness produced against a set of proteinstandards.
A raised globulin level in the CSF is shown by adding the CSF to a phenol solutionin the Pandy test (see below).
Fig. 8.18 Materials and reagents fordetermining the proteinconcentration of CSF
Fig. 8.19 Comparing a test sample againstthe protein standards
Materials and reagents (Fig. 8.18)
● CSF: centrifuge the CSF at 2000g for 5 minutes and use thesupernatant fluid
● Graduated pipettes
● Dropping pipettes
● Test-tubes
● Test-tube rack
● Black cardboard
● Sulfosalicylic acid, 3% solution (reagent no. 57)
● Pandy reagent (reagent no. 41)
● Protein standards (see section 7.2.5).
Method for determination of total protein
1. Pipette 3ml of sulfosalicylic acid into a test-tube that matches thestandard tubes.
2. Add 1ml of clear CSF supernatant fluid and mix. Leave the tubefor 5 minutes.
3. Compare the cloudiness of the test sample against the proteinstandards (Fig. 8.19). Record the concentration of protein in theCSF in g/l.
The normal concentration of protein in the CSF is 100–450mg/l. The proteinconcentration is increased in:
— meningitis, subarachnoid haemorrhage or constriction of the spine;
— African trypanosomiasis.
Method for determination of globulin (Pandy test)
1. Measure 1ml of Pandy reagent into a small test-tube.
2. Place the tube in front of a piece of black cardboard.

8. Examination of cerebrospinal fluid (CSF) 263
Table 8.2 Typical findings on examination of CSF
Disease or condition Appearance Blood cell Protein concentration Glucose Other findingsconcentration concentration
Purulent meningitis Cloudy, yellowish >3000 cells/ml, Highly elevated, Greatly reduced Bacteriamainly granulocytes 1–10 g/l
Tuberculous Clear or almost 30–300 cells/ml, Elevated Greatly reduced Bacteria, clottedmeningitis clear mainly lymphocytes proteins
Viral meningitis Clear 10–300 cells/ml, Normal or slightly Normal —mainly lymphocytes elevated
Malaria Slightly cloudy Elevated, mainly Elevated Reduced —granulocytes
African Clear or slightly >5 cells/ml, mainly Elevated Reduced Trypanosomes,trypanosomiasis cloudy lymphocytes Mott cells
Subarachnoid Red Not interpretable Not interpretable Not Afterhaemorrhage interpretable centrifugation,
red
Compression of the Clear, yellowish Normal or slightly Highly elevated Normal —spine elevated
Fig. 8.20 Adding CSF to Pandy reagent Fig. 8.21 Pandy test for globulina: Positive result; b: negative result
3. Using a dropping pipette, slowly add three drops of CSF (Fig. 8.20).
Examine the solution after the addition of each drop.
4. Read the results immediately.
If globulin is present, a white cloud forms as the drops of CSF mix with the reagent(Fig. 8.21 (a)).
If globulin is absent, no white cloud forms as the drops of CSF mix with the rea-gent, or there is a slight cloudiness that redissolves (Fig. 8.21 (b)).
Report the test as “Pandy test positive” or “Pandy test negative”.
8.3.6 SummaryTable 8.2 summarizes the typical findings on examination of CSF.
8.4 Dispatch of CSF specimens for cultureBefore dispatch keep the CSF in the incubator at 37 °C. Do not put it in therefrigerator.
8.4.1 Materials and reagents● Flat bottles containing an appropriate transport medium, such as Stuart trans-
port medium, modified (reagent no. 56).
(a) (b)

264 Manual of basic techniques for a health laboratory
8.4.2 Method using Stuart transport medium (for the isolation ofNeisseria meningitidis)
This is the best method. The medium is supplied in 30-ml bottles that contain 8mlof solid medium (along one side of the flat bottle). The bottles are filled with amixture of air (90%) and carbon dioxide (10%).
Follow the instructions given for gonococci in section 5.5.4.
If possible, sow centrifuged CSF deposit on the medium (Fig. 8.22); otherwise useuncentrifuged CSF.
Preservation time: up to 4 days at room temperature.Fig. 8.22 Dispatching CSF
specimens forculture using Stuarttransport medium

9. Haematology 265
265
9. Haematology
Haematology is the study of the cells that are found in blood and the factors thataffect their functioning.
Volume of blood in the human body
An adult weighing 60kg has about 4.5 litres of blood. There is therefore no dangerinvolved in taking 0.5 litre of blood as a donation for transfusion, and no risk intaking two 10-ml tubes or more for analysis. Make this clear to anxious patientswhen you take their blood.
9.1 Types of blood cellThree main classes of blood cell can be distinguished under the microscope: redcells (erythrocytes), white cells (leukocytes) and platelets (thrombocytes).
Fig. 9.1 Erythrocytes
Fig. 9.2 Leukocytes
9.1.1 Erythrocytes (Fig. 9.1)
Appearance: round or slightly oval cells filled with haemoglobin. After stainingwith a Romanowsky stain (see section 9.10.4), they appear pink with apale central area. From the side erythrocytes look like biconcave discs;they do not contain nuclei.
Size: 7–8mm.
Number concentration: normally around 4–5 ¥ 1012 per litre (4–5 ¥ 106 permm3) of blood.
Erythrocytes carry haemoglobin which combines with and carries oxygen fromthe lungs to the tissues. They also carry carbon dioxide from the tissues to thelungs, thus removing the principal end-product to which most organic sub-stances are metabolized in the body.
9.1.2 Leukocytes (Fig. 9.2)
Appearance: round cells containing a nucleus and granules in the cytoplasm.
Size: 9–20mm.
Number concentration: normally about 8 ¥ 109 per litre (8000 per mm3) ofblood.
The presence of a nucleus enables leukocytes to be readily distinguished fromerythrocytes under the microscope. There are five types of leukocyte(neutrophils, eosinophils, basophils, lymphocytes and monocytes) which dif-fer in size, shape of the nucleus, colour of the granules in the cytoplasm andother factors. They can be identified by microscopy after staining with a Ro-manowsky stain (see section 9.10.4).
Leukocytes play an important role in the defence or immune system.

266 Manual of basic techniques for a health laboratory
9.1.3 Thrombocytes (Fig. 9.3)
Thrombocytes or platelets are fragments of megakaryocytes that are found in theperipheral blood, where they are involved in clot formation.
Size: 2–5mm.
Cytoplasm: very little visible, contains granules.
In healthy adults, the blood contains about 150–300 ¥ 109 thrombocytes per litre(150000–300000 per mm3).
Clotting of blood1
When blood is collected in a glass tube it solidifies within 5–10 minutes forming aclot; it has coagulated.
Clotted blood separates into two components (Fig. 9.4):
— the serum, a yellow liquid;
— the clot, a solid red mass.
If an anticoagulant is added to the blood as soon as it is collected, clotting is pre-vented and the blood remains fluid. Examples of anticoagulants include: fluorideoxalate (reagent no. 26), trisodium citrate, 3.2% solution (reagent no. 60) and EDTAdipotassium salt, 10% solution (reagent no. 22).
Blood treated with an anticoagulant separates into two liquid components (Fig.9.5):
— the plasma, a yellow liquid;
— the blood cells, which sediment over time or following centrifugation to forma thin layer of leukocytes over a deposit of erythrocytes.
Difference between plasma and serum
● Plasma contains a soluble protein called fibrinogen in addition to a large numberof other proteins.
● Serum does not contain fibrinogen, but all the other proteins are present. Thefibrinogen is changed into insoluble fibrin, which together with the erythrocytesforms the clot.
Fig. 9.3 Thrombocytes
Fig. 9.4 Clotted blood Fig. 9.5 Blood treated with ananticoagulant
1 See section 9.9.

9. Haematology 267
9.2 Collection of blood specimens9.2.1 PrincipleVenous blood is collected from a vein in the arm with a needle and syringe, asdescribed below.
Capillary blood may be collected from the finger, the ear or the heel (in infants), asdescribed in section 9.4.1.
9.2.2 Materials and reagents● For disinfecting the skin:
— cotton wool— 70% ethanol or tincture of iodine
● For the venepuncture (Fig. 9.6):— gloves— a tourniquet of soft rubber tubing, 2–3mm bore— needles, 30–40mm, 20 gauge, 19 gauge, 18 gauge, medium bevel
● For collection of blood:
— syringes, 2ml, 5ml, 10ml, 20ml (check that the end of each syringe fits intothe needle)
— bottles or test-tubes (Fig. 9.7), either empty or containing an anticoagulant(see section 9.1.3) and bearing a mark corresponding to the required amountof blood (e.g. at the 5-ml level).
Fig. 9.6 Materials forvenepuncture
Fig. 9.7 Bottles and test-tubes for collection of blood specimens
If blood samples are to be taken from children under 5 years, 23 gauge or 25 gaugeneedles will also be required.
Keep a stock of sterile needles in a small glass tube: the point should rest on apad of non-absorbent cotton wool and the tube should be plugged with the samematerial.
9.2.3 MethodPreparation
1. Read the patient’s request form carefully:(a) Decide how much blood is needed.(b) Prepare the correct bottle or tube to be used for each test.
2. If blood is to be used for different laboratory investigations, plan the sequence inwhich blood samples must be taken. (For example, the first 1ml of blood mustbe discarded when blood is taken for coagulation assays.)
3. Before taking the blood, wash your hands with soap and water.
Ask the patient to sit alongside the table used for taking blood.
Lay the patient’s arm on the table, palm upwards, and support it by placing asmall cushion under the elbow (Fig. 9.8).

268 Manual of basic techniques for a health laboratory
If the patient is in bed, lay his or her arm in an outstretched position (Fig. 9.9).
The correct site to take the blood is the vein in the bend of the elbow, at the pointwhere the vein is thickest and most easily visible (Fig. 9.10). If possible, choose oneof the branches forming a Y just above their junction (1). If necessary, points 2, 3and 4 can be used as alternatives.
Procedure
1. Fix the needle on to the syringe, touching only the top of the needle. Test theneedle and syringe to make sure that the needle is not blocked and the syringeis airtight.
Place the end of the needle in the sterile tube until ready for use.
2. Apply the tourniquet. With the right hand, wrap the tourniquet firmly roundthe arm and hold the ends.
3. With the left hand, pull one of the ends across (Fig. 9.11).
4. Loop the end under the main part of the tourniquet (Fig. 9.12). The tourni-quet should be just tight enough to slow down the blood flow in and distendthe veins, but it must not be so tight that the blood flow in the arteries isreduced.
5. Ask the patient to open and close his or her hand several times to swell theveins.
Fig. 9.8 Taking blood from a patient in thelaboratory
Fig. 9.9 Taking blood from a patient in bed
Fig. 9.10 Sites for takingvenous blood1: Preferred site;2, 3, 4: alterna-tive sites.
Fig. 9.11 Applying a tourniquet Fig. 9.12 Tying a tourniquet
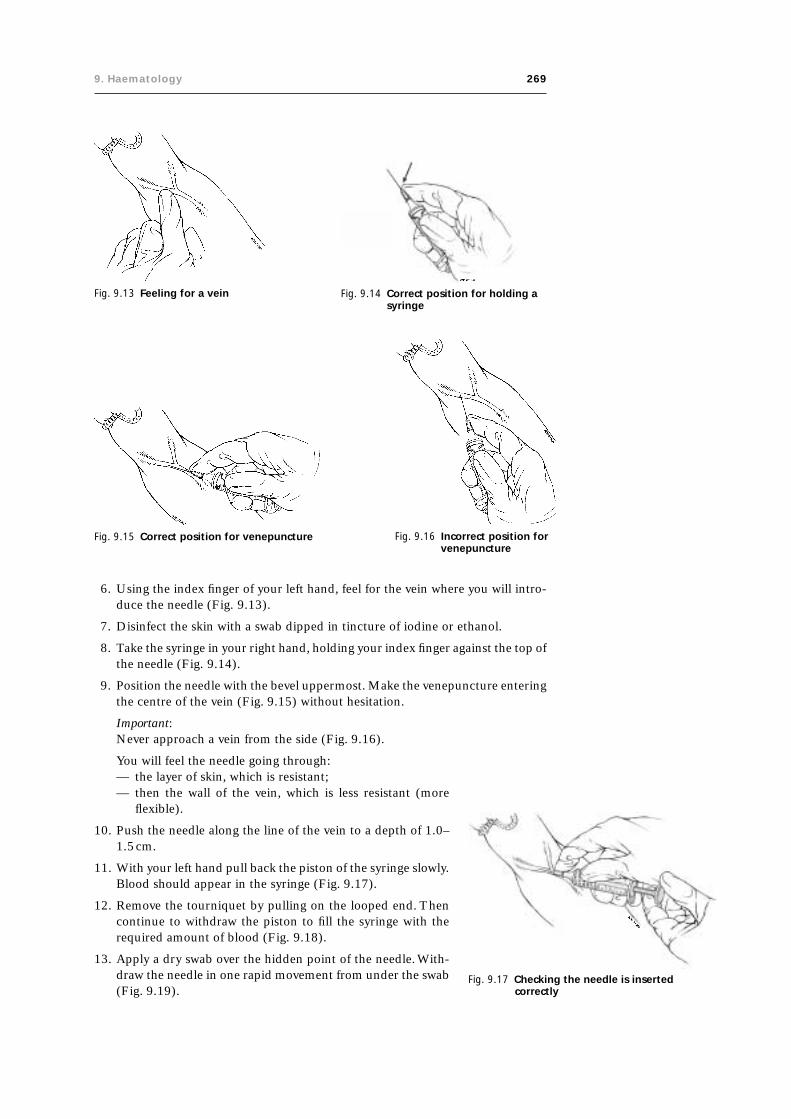
9. Haematology 269
6. Using the index finger of your left hand, feel for the vein where you will intro-duce the needle (Fig. 9.13).
7. Disinfect the skin with a swab dipped in tincture of iodine or ethanol.
8. Take the syringe in your right hand, holding your index finger against the top ofthe needle (Fig. 9.14).
9. Position the needle with the bevel uppermost. Make the venepuncture enteringthe centre of the vein (Fig. 9.15) without hesitation.
Important:Never approach a vein from the side (Fig. 9.16).
You will feel the needle going through:— the layer of skin, which is resistant;
Fig. 9.13 Feeling for a vein Fig. 9.14 Correct position for holding asyringe
Fig. 9.15 Correct position for venepuncture Fig. 9.16 Incorrect position forvenepuncture
— then the wall of the vein, which is less resistant (moreflexible).
10. Push the needle along the line of the vein to a depth of 1.0–1.5cm.
11. With your left hand pull back the piston of the syringe slowly.Blood should appear in the syringe (Fig. 9.17).
12. Remove the tourniquet by pulling on the looped end. Thencontinue to withdraw the piston to fill the syringe with therequired amount of blood (Fig. 9.18).
13. Apply a dry swab over the hidden point of the needle. With-draw the needle in one rapid movement from under the swab(Fig. 9.19).
Fig. 9.17 Checking the needle is insertedcorrectly

270 Manual of basic techniques for a health laboratory
Fig. 9.18 Filling the syringe with blood Fig. 9.19 Withdrawing the needle
Fig. 9.20 Correct (a) and incorrect (b) positions for stopping blood flow
14. Ask the patient to press firmly on the cotton wool swab for 3 minutes, keepingthe arm outstretched (Fig. 9.20(a)). Bending the arm back over the swab (Fig.9.20(b)) is not recommended (because of the risk of a haematoma).
15. Remove the needle from the syringe.
Fill the specimen tubes or bottles with the blood up to the mark (Fig. 9.21).
Immediately invert the tubes or bottles that contain anticoagulant several times.
16. Label the tubes or bottles clearly with:— the patient’s name— the date— the patient’s outpatient or hospital number if this is available.
Rinse the needle and syringe at once with cold water, then rinse in disinfectant (seesection 3.5.4).
Place the rinsed needles and syringes in small glass tubes plugged with non-absorbent cotton wool and sterilize in the autoclave or the dry-heat sterilizer (seesection 3.5.5). Never use a needle or syringe on another person before it has beenresterilized. Disposable needles must only be used once, as they cannot beresterilized.

9. Haematology 271
9.3 Estimation of the haemoglobin concentrationHaemoglobin is the red pigment contained in erythrocytes. It consists of proteinchains and iron-containing molecules.
Units of measurement
The SI unit for expressing haemoglobin concentrations is millimole per litre (mmol/l). When this unit is used, it is necessary to specify the chemical structure to which
Fig. 9.21 Transferring the blood to a specimentube
1 Some spectrophotometers run either on mains electricity or on current from a motor car bat-tery. One model is supplied by UNICEF: reference no. 09.309.98 (110V battery) or 09.310.00(220V battery); it can be ordered from the following address: UNICEF, UNICEF Plads, Freeport,DK 2100 Copenhagen, Denmark.
it applies. In practice, this means that the term “haemoglobin(Fe)”should be used instead of the simple term “haemoglobin”. How-ever, as an interim measure, before making the change to millimoleper litre, some laboratories are using the unit “gram per litre” (g/l).When this unit is used, the simple term “haemoglobin” suffices, andit is not necessary to say “haemoglobin(Fe)”. Values in grams perlitre may be converted into values in millimoles per litre by multi-plying by 0.062.
Example:
haemoglobin 150g/l ¥ 0.062 = haemoglobin(Fe) 9.3mmol/l
In this manual calculations and values are usually expressed in bothforms. It should be noted that if the unit “gram per litre” is used, thevalues are 10 times greater than values in the traditional unit “gramper 100ml”. For example, 150g/l = 15.0g/100ml.
9.3.1 Haemiglobincyanide photometric methodPrinciple
The blood is diluted in Drabkin diluting fluid, which haemolyses the red cells andconverts the haemoglobin into haemiglobincyanide (cyanmethaemoglobin). Thesolution obtained is examined in a spectrophotometer (or colorimeter). Its absorb-ance is proportionate to the amount of haemoglobin in the blood.
The haemiglobincyanide photometric method gives the most accurate haemoglobinestimations. It should be used wherever possible.
Materials and reagents
● Spectrophotometer1 (or colorimeter)
● Spectrophotometer (or colorimeter) cuvettes
● Test-tubes
● Test-tube rack
● Blood (Sahli) pipettes, 0.2ml
● Drabkin diluting fluid (reagent no. 21)
● Reference solution, which may be:— the fresh haemiglobincyanide reference solution used to calibrate the
instrument,— a reference solution previously calibrated against the haemiglobincyanide
reference solution, or— a blood sample of known haemoglobin concentration.
A calibration curve must be prepared before the spectrophotometer (or colorim-eter) can be used for haemoglobin estimation. From such a curve a graph can beprepared and a table made for the haemoglobin values.

272 Manual of basic techniques for a health laboratory
Fig. 9.22 Preparing serial dilutions ofhaemiglobincyanidereference solution
Table 9.1 Preparing serial dilutions of reference solution
Tube number Volume of reference Volume of Drabkin diluting Dilutionsolution (ml) fluid (ml)
1 4.0 0.0 undiluted
2 2.0 2.0 1 : 2
3 1.3 2.7 1 : 3
4 1.0 3.0 1 : 4
haemoglobin value of reference solution in grams per litre = concen-tration in mg/100ml ¥ 2.5
Example:
concentration of reference solution = 60mg/100ml
haemoglobin value = 60 ¥ 2.5 = 150g/l
2. Prepare a series of dilutions of the reference solution in four test-tubes(labelled 1–4) (Fig. 9.22). Pipette into each tube the amounts shown inTable 9.1.
3. Mix the contents of the tubes and allow to stand for 5 minutes (Fig.9.23).
4. Read the dilutions in the spectrophotometer (or colorimeter):(a) Set the wavelength to 540 nanometres (nm) or place a green filter in
the spectrophotometer (or colorimeter).(b) Fill a matched cuvette with Drabkin diluting fluid and place in the
spectrophotometer (or colorimeter).
Important:
At the beginning of each day:
● Clean the matched spectrophotometer (or colorimeter) cuvettes.
● Fill one of the cleaned tubes with fresh Drabkin diluting fluid, which is used tozero the spectrophotometer (or colorimeter).
● Read a reference solution (see above).
Calibration of the spectrophotometer (or colorimeter) usinghaemiglobincyanide reference solution (or a reference solution previouslycalibrated against haemiglobincyanide reference solution)
1. Calculate the haemoglobin value of the reference solution in grams per litre byusing the following formula:
concentration in mg ml a
cb100 10
1000251
¥ ¥
where:a = the factor for converting 100ml to 1 litre;b = the dilution factor when 0.02ml of blood is diluted with 5ml of Drabkin
diluting fluid;c = the factor for converting milligrams to grams.
Since 10 ¥ 251/1000 is very nearly 2.5, the above formula can be simplified asfollows:1
1 If a dilution of 1 in 200 is used (i.e. 0.02ml of blood and 4ml of Drabkin diluting fluid),multiply by 2.0 instead of 2.5.

9. Haematology 273
(c) Zero the spectrophotometer.(d) Read the contents of tubes 1 to 4, using a cuvette.
Make sure the needle returns to zero between each reading with Drabkin dilut-ing fluid.
5. Prepare a graph, plotting the readings of the diluted reference solutions againsttheir respective haemoglobin concentrations (Table 9.2 and Fig. 9.24).
6. From the graph make a table of haemoglobin values from 20 to 180g/l.
Calibration of the spectrophotometer (or colorimeter) using a bloodsample of known haemoglobin concentration
1. Obtain a sample of blood of known haemoglobin concentration (e.g. 168g/l).
2. Switch on the spectrophotometer (or colorimeter) and set to wavelength 540nm.
3. Pipette 8ml of Drabkin diluting fluid into a test-tube. Add 0.04ml of well-mixedblood. Be sure to wipe the outside of the pipette beforehand to avoid addingexcess blood. Mix the haemiglobincyanide solution by inverting several times.Leave to stand for 10 minutes.
4. Zero the spectrophotometer using Drabkin diluting fluid.
5. Read and record the absorbance of the haemiglobincyanide solution preparedabove.
6. Prepare a series of dilutions of the haemiglobincyanide solution in four test-tubes (labelled 1–4) as shown in Table 9.3.
7. Read and record the absorbances of the diluted solutions.
Fig. 9.23 After mixing the dilutions of referencesolution, leave them to stand for 5minutes
Fig. 9.24 Standard curve for determiningthe haemoglobin concentrationof blood specimens
Table 9.2 Sample spectrophotometer readings for different dilu-tions of reference solution
Dilution Haemoglobin concentration (g/l) Absorbance at 540nm
undiluted 150 35.0
1 : 2 150/2 = 75 17.5
1 : 3 150/3 = 50 11.5
1 : 4 150/4 = 37.5 8.5

274 Manual of basic techniques for a health laboratory
8. Plot a graph of absorbance against haemoglobin concentration, using ordinarygraph paper. Draw a straight line starting at the origin passing as close to eachpoint as possible. Extend the line so that you can read absorbances for haemo-globin values greater than 168g/l.
A reference table of values is prepared using the graphs obtained from either of theabove methods:
● Draw up a table of absorbance readings starting from 0.00, 0.01, 0.02 and end-ing at 1.50.
● Determine the haemoglobin concentrations for each of the absorbances fromthe graph.
Precautions
● Potassium cyanide is very poisonous. It must be kept in a locked cupboard at alltimes when not in use. Wash your hands immediately after handling it.
● Store Drabkin diluting fluid in a brown reagent bottle because it decomposes onexposure to light. If a brown reagent bottle is not available, use a clear glassbottle carefully wrapped in silver foil.
● Drabkin diluting fluid should be clear and pale yellow. If it becomes turbid, orloses its colour, it should be discarded. The clarity of the diluting fluid can bechecked by measuring its absorbance in a spectrophotometer at 540nm againstwater as a blank. The absorbance must read zero.
● Once the haemiglobincyanide solution has been prepared, the haemoglobinestimation must be carried out within 6 hours.
● Drabkin diluting fluid remains stable for several months when stored at cooltemperatures. If the room temperature exceeds 30 °C, store it in a refrigeratorat 4–6 °C. Do not freeze, as this may cause decomposition of the compound.Always allow the diluting fluid to warm to room temperature before use.
Method
1. Pipette 5ml of Drabkin diluting fluid into a tube. Draw venous or capillary bloodto the 0.02-ml mark of a blood (Sahli) pipette. Do not allow air bubbles to enter.With venous blood ensure that it is well mixed by inverting the bottle containingit and the anticoagulant repeatedly for about 1 minute immediately beforepipetting it.
2. Wipe the outside of the pipette. Check that the blood is still on the 0.02-ml mark(Fig. 9.25). Squeeze the bulb of the pipette to expel the blood into the Drabkindiluting fluid and rinse the pipette by drawing up and expelling the fluid in thetube three times.
3. Mix the contents of the tube and leave for 5 minutes (see Fig. 9.23).
Table 9.3 Preparing serial dilutions of haemiglobincyanide solution
Tube Volume of haemiglobincyanide Volume of Drabkin Concentration ofnumber solution (ml) diluting fluid (ml) haemoglobina (g/l)
1 4.0 1.0 13.4
2 3.0 2.0 10.1
3 2.0 3.0 6.7
4 1.0 4.0 3.4
a In this example, it is assumed that the haemoglobin concentration of the haemiglobincyanide solutionis 168 g/l.

9. Haematology 275
4. Zero the colorimeter using Drabkin diluting fluid. Read the absorbance of thepatient’s diluted blood in the spectrophotometer test-tube or cuvette.
If cloudiness appears in the diluted blood, this may be attributable to abnormalplasma proteins or to a high concentration of white cells. Centrifuge the dilutedblood at 2000g for 5 minutes before taking a reading.
Using the table prepared from the calibration curve, record the concentration ofhaemoglobin in g/l.
Reference range
Table 9.4 shows the reference ranges for different age groups.
Fig. 9.25 Checking that the blood is still on the mark
Table 9.4 Normal haemoglobin concentrations, by age group
Age group Haemoglobin (Fe) Haemoglobin concentration (g/l)concentration (mmol/l)
Newborn infants 8.4–12.1 136–196
Infants (1 year) 7.0–8.1 113–130
Children (10–12 years) 7.4–9.2 115–148
Women 7.4–9.9 120–160
Men 8.1–11.2 130–180

276 Manual of basic techniques for a health laboratory
9.3.2 Alkaline haematin D methodPrinciple
When a blood sample is added to an alkaline solution containing a non-ionic deter-gent, the haemoglobin is converted to alkaline haematin D-575, which is a stablecoloured compound. The absorbance of the alkaline haematin D-575 is measuredusing a haemoglobinometer or colorimeter. The spectrophotometer and haemo-globinometer directly determine the haemoglobin (Hb) concentration of the bloodsample, whereas with a colorimeter, the haemoglobin concentration of the bloodsample is obtained from the absorbance using a prepared calibration curve or tableof values.
The alkaline haematin D (AHD) method offers several advantages over the hae-moglobin cyanide method:
● It is as accurate, but less expensive.
● The calibration procedure uses chlorhaemin, a stable crystalline compound thatis commercially available.
● The AHD reagent does not include potassium cyanide, which is highly toxic, incontrast to Drabkin diluting fluid for the haemoglobin cyanide method.
● The AHD reagent can be prepared using chemicals that are generally availablelocally.
Materials and reagents
● Spectrophotometer, haemoglobinometer or colorimeter
● Test-tubes
● Test-tube racks
● Corks or rubber stoppers
● Cuvettes
● Grease pencil
● Cotton wool or gauze
● AHD standard (supplied by the central laboratory)
● AHD reagent (reagent no. 8).
Calibration of the spectrophotometer or haemoglobinometer
1. Note the concentration of the AHD standard indicated on the label, e.g. 160g/lat a 1:150 dilution.
2. Pipette 20ml of AHD standard into a clean test-tube containing 3ml of AHDreagent.
3. Stopper the test-tube using a clean cork or rubber stopper and mix by inversion.Leave the tube to stand for 2–3 minutes.
4. Fill a clean cuvette with the undiluted AHD reagent. Dry the outside of thecuvette with cotton wool or gauze and place it in the cuvette chamber. Adjust thespectrophotometer or haemoglobinometer to read zero (blank).
5. Replace the undiluted AHD reagent in the cuvette with the diluted AHD stand-ard solution; repeat the measurement procedure and adjust the spectrophotom-eter or haemoglobinometer to read the correct haemoglobin concentrationindicated on the label, e.g. 160g/l.

9. Haematology 277
Calibration of the colorimeter
1. Switch on the colorimeter and set the wavelength to 540nm. Allow the color-imeter to warm up for the time recommended by the manufacturer.
2. Arrange six test-tubes in a test-tube rack. Label the test-tubes 1, 2, 3, 4, B andN.
3. Pipette 5ml of AHD reagent into the test-tube marked B.
4. Pipette 3ml of AHD reagent and 20ml of AHD standard into the test-tubemarked N.
5. Dilute the reference solution in test-tube N as described in Table 9.5.
6. Pipette the indicated volumes of AHD reagent and reference solution into test-tubes 1–4. Stopper each tube and mix by inversion.
7. Calculate the haemoglobin concentrations in the test-tubes as follows:
haemoglobin concentration = concentration of reference solution¥ dilution factor
For example:
tube N: 160gHb/l
tube 1: 160gHb/l ¥ 4/5 = 128gHb/l
tube 2: 160gHb/l ¥ 3/5 = 96gHb/l
tube 3: 160gHb/l ¥ 2/5 = 64gHb/l
tube 4: 160gHb/l ¥ 1/5 = 32gHb/l
tube B: 0gHb/l
8. Pour the AHD reagent from test-tube B into a clean cuvette. Dry the outside ofthe cuvette with cotton wool or gauze. Place the cuvette into the cuvette cham-ber, close the cuvette chamber and adjust the colorimeter to read zero absorb-ance (blank).
9. Replace the AHD reagent in the cuvette with the reference solution from testtube 4. Record the absorbance. Pour the solution back into test-tube 4.
10. Repeat the procedure using test-tubes 3, 2, 1 and N, respectively in sequence.
11. Plot a graph of the absorbance values against the haemoglobin concentration(g/l) for the standard and test samples (N and tubes 1–4, respectively) (Fig.9.26). Starting from the origin, draw a straight line joining through as many ofthe points as possible.
Note: Always prepare a new calibration curve whenever you use a different colorim-eter, type of cuvette, or method for haemoglobin measurement.
Method
Method using a spectrophotometer or haemoglobinometer
1. Switch on the spectrophotometer or haemoglobinometer. Allow it to warm upfor the time recommended by the manufacturer (usually 10 minutes).
Table 9.5 Preparation of serial dilutionsof AHD reference solution forcalibration of a colorimeter
Test-tube 1 2 3 4
AHD reagent (ml) 1 2 3 4
AHD reference solution (ml) 4 3 2 1
Total volume (ml) 5 5 5 5

278 Manual of basic techniques for a health laboratory
2. Arrange the test-tubes in a test-tube rack: one for each sample to be tested, onefor the blank and two for the control samples.
3. Using a grease pencil, label the test-tubes with the appropriate laboratory num-bers of the samples to be measured, B for the blank, and C1 and C2 for thecontrol samples.
4. Pipette 3ml of AHD reagent into each test-tube.
5. Pipette 20ml of blood collected in EDTA from a patient into the AHD reagentof the appropriate tube. Flush the pipette carefully five times with the AHDreagent.
6. Pipette 20ml of AHD standard into test-tubes C1 and C2.
7. Plug all the test-tubes with a clean cork or rubber stopper and mix by inversion.Leave the tubes to stand for 2–3 minutes.
8. Pour the AHD solution from test-tube B into a clean cuvette. Dry the outside ofthe cuvette with cotton wool or gauze. Make sure that there are no air bubbles inthe solution. Place the cuvette in the cuvette chamber and adjust the spectro-photometer or haemoglobinometer to read zero.
9. Repeat the procedure with the solution in test-tubes C1 and C2, respectively. Ifthe readings of the two controls differ by less than 2.5%, measure the haemo-globin concentration of all the test samples. Record all the results.
Method using a colorimeter
The AHD method is also applicable using a colorimeter. The measurement proce-dure is the same as that described for a spectrophotometer or haemoglobinometer.However, the absorbance in a colorimeter does not increase linearly with haemo-globin at elevated concentrations. Therefore, a calibration curve must be used torelate the absorbance readings to the haemoglobin concentration, as described above.
Results
Report the results in g/l. Example: “haemoglobin = 89g/l”.
Fig. 9.26 Calibration carve for determining haemoglobin concentration

9. Haematology 279
Errors in haemoglobin estimation
Errors in sampling:
— inadequate flow of blood from the finger prick;
— excessive squeezing of the finger after pricking;
— prolonged use of a tourniquet when collecting venous blood, which leads toconcentration of blood cells;
— insufficient mixing of venous blood, which has sedimented after collection;
— small clots in venous blood due to inadequate mixing with EDTA after col-lection;
— adding too little or excess blood to Drabkin diluting fluid;
— air bubbles trapped in pipettes.
Faulty or dirty equipment, such as:
— broken or chipped pipettes;
— dirty pipettes;
— dirty cuvettes;
— dirty filters;
— a defective spectrophotometer, haemoglobinometer or colorimeter.
Faulty technique:
— using a dilution factor different from the one for which the spectrophotom-eter, haemoglobinometer or colorimeter was calibrated;
— inadequate mixing of reagent;
— placing the cuvette in the chamber with the frosted sides facing the lightpath;
— air bubbles in the cuvette;
— using a standard filter from another spectrophotometer or haemoglobinom-eter for adjustment;
— using the wrong filter for the colorimeter.
Note:
If the spectrophotometer, haemoglobinometer or colorimeter requires frequentrecalibration, e.g. every 2–3 days, change the bulb and repeat the procedure forinternal quality control. If the problem of frequent recalibration persists, send themachine to a servicing agent.
9.4 Estimation of the erythrocyte volume fractionThe total volume of erythrocytes in a given volume of blood divided by the volumeof blood is called the erythrocyte volume fraction. For example, if the volume oferythrocytes in 1 litre (1000ml) of blood is 450ml, the erythrocyte volume fractionis 450ml/1000ml = 0.45 (since the fraction is millilitres divided by millilitres, theunit “ml” cancels out, and the result is a simple decimal fraction with no unit). Theremainder of the blood is made up almost entirely of plasma, together with a smallvolume of leukocytes. If the latter are ignored, the plasma volume fraction in theabove example would be 550ml/1000ml = 0.55 (note that 0.45 + 0.55 = 1.0; i.e.erythrocyte volume fraction plus plasma volume fraction = 1). The erythrocytevolume fraction is therefore a measure of the proportion of erythrocytes to plasma.It is of diagnostic value in patients suffering from anaemia, dehydration, shock orburns.
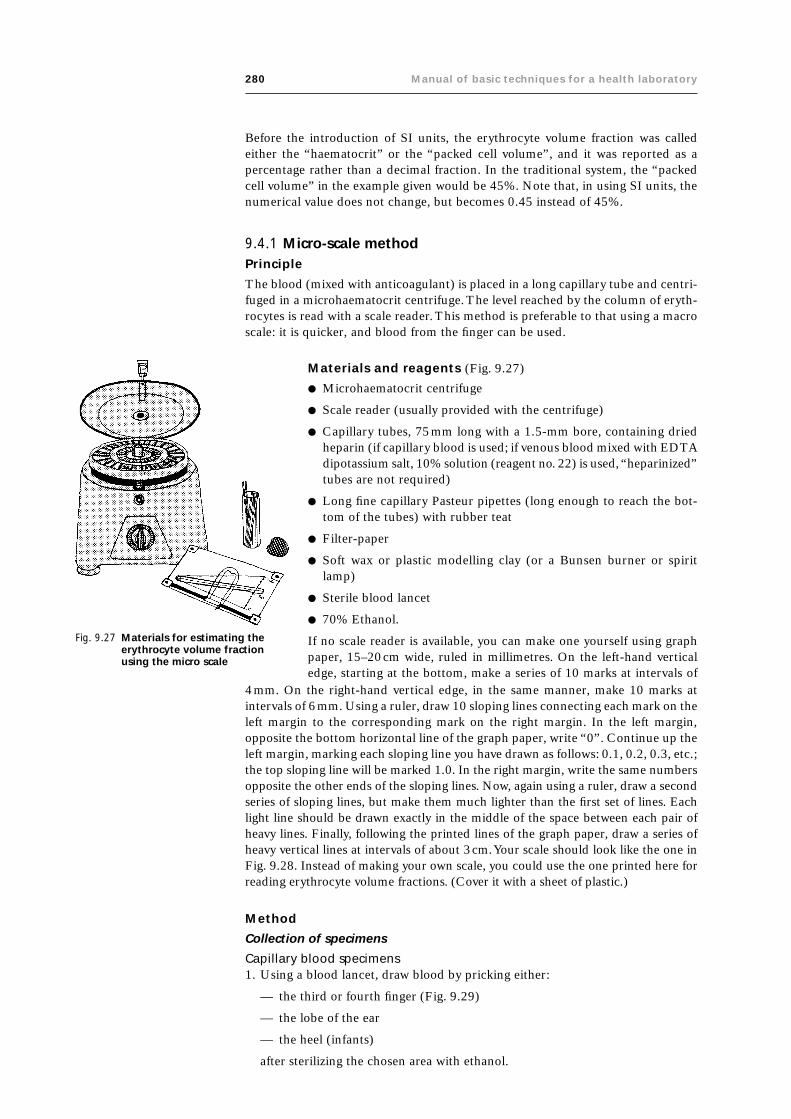
280 Manual of basic techniques for a health laboratory
Before the introduction of SI units, the erythrocyte volume fraction was calledeither the “haematocrit” or the “packed cell volume”, and it was reported as apercentage rather than a decimal fraction. In the traditional system, the “packedcell volume” in the example given would be 45%. Note that, in using SI units, thenumerical value does not change, but becomes 0.45 instead of 45%.
9.4.1 Micro-scale methodPrinciple
The blood (mixed with anticoagulant) is placed in a long capillary tube and centri-fuged in a microhaematocrit centrifuge. The level reached by the column of eryth-rocytes is read with a scale reader. This method is preferable to that using a macroscale: it is quicker, and blood from the finger can be used.
Materials and reagents (Fig. 9.27)
● Microhaematocrit centrifuge
● Scale reader (usually provided with the centrifuge)
● Capillary tubes, 75mm long with a 1.5-mm bore, containing driedheparin (if capillary blood is used; if venous blood mixed with EDTAdipotassium salt, 10% solution (reagent no. 22) is used, “heparinized”tubes are not required)
● Long fine capillary Pasteur pipettes (long enough to reach the bot-tom of the tubes) with rubber teat
● Filter-paper
● Soft wax or plastic modelling clay (or a Bunsen burner or spiritlamp)
● Sterile blood lancet
● 70% Ethanol.
If no scale reader is available, you can make one yourself using graphpaper, 15–20cm wide, ruled in millimetres. On the left-hand verticaledge, starting at the bottom, make a series of 10 marks at intervals of
4mm. On the right-hand vertical edge, in the same manner, make 10 marks atintervals of 6mm. Using a ruler, draw 10 sloping lines connecting each mark on theleft margin to the corresponding mark on the right margin. In the left margin,opposite the bottom horizontal line of the graph paper, write “0”. Continue up theleft margin, marking each sloping line you have drawn as follows: 0.1, 0.2, 0.3, etc.;the top sloping line will be marked 1.0. In the right margin, write the same numbersopposite the other ends of the sloping lines. Now, again using a ruler, draw a secondseries of sloping lines, but make them much lighter than the first set of lines. Eachlight line should be drawn exactly in the middle of the space between each pair ofheavy lines. Finally, following the printed lines of the graph paper, draw a series ofheavy vertical lines at intervals of about 3cm. Your scale should look like the one inFig. 9.28. Instead of making your own scale, you could use the one printed here forreading erythrocyte volume fractions. (Cover it with a sheet of plastic.)
Method
Collection of specimens
Capillary blood specimens1. Using a blood lancet, draw blood by pricking either:
— the third or fourth finger (Fig. 9.29)
— the lobe of the ear
— the heel (infants)
after sterilizing the chosen area with ethanol.
Fig. 9.27 Materials for estimating theerythrocyte volume fractionusing the micro scale

9. Haematology 281
The blood should flow freely or with very little pressure tothe area. Wipe away the first drop with filter-paper.
2. Apply the tip (circled with red) of a capillary tube containingdried heparin to the drop of blood (Fig. 9.30). The bloodflows into the tube by capillarity. Fill about three-quarters ofthe tube.
3. Plug the other end of the tube (i.e. the end that has not comeinto contact with the blood) with soft wax or plastic model-ling clay (Fig. 9.31). Check that it is completely plugged to adepth of about 2mm.
Fig. 9.28 Micro scale for estimating the erythrocyte volume fraction
Fig. 9.29 Taking a capillary blood sample
Fig. 9.30 Technique for drawing blood into acapillary tube
Alternatively, seal the end of the tube by heating it carefully over a Bunsen burneror spirit lamp (Fig. 9.32).
Leave it to cool in a horizontal position.
It is useful to have ready a numbered stand containing plastic modelling clay, sothat each patient’s tube can be stuck upright next to the corresponding number.
Venous blood specimens1. Collect a venous blood specimen as described in section 9.2 and add it to a
test-tube containing EDTA dipotassium salt solution.

282 Manual of basic techniques for a health laboratory
Fig. 9.31 Sealing the capillary tube with wax
Fig. 9.32 Sealing the capillary tube by flaming
2. Using a capillary pipette, fill about three-quarters of a capillary tube with blood.
3. Seal the tube as described in step 3 above.
Measurement technique
1. Place the capillary tubes in the numbered slots in the centrifuge head, makingsure that the number on the slot corresponds to the specimen number. Thesealed end of the tube should point outwards, away from the centre (Fig. 9.33).
2. Centrifuge at 3000g (for the period of time recommended by the manufacturerof the centrifuge — usually 10 minutes).
After centrifugation, the tubes will show three layers (Fig. 9.34):— at the top, a column of plasma;— in the middle, a very thin layer of leukocytes;— at the bottom, a column of erythrocytes.
The erythrocyte volume fraction reading is made exactly at the top of the col-umn of erythrocytes.
3. Hold the tube against the scale so that the bottom of the column of erythrocytes(not the bottom of the tube) is aligned with the horizontal zero line (see Fig.9.35).
4. Move the tube across the scale until the line marked 1.0 passes through the topof the plasma column. Check to make sure that the bottom of the column of
Fig. 9.33 Placing the capillary tubes in a centrifuge

9. Haematology 283
erythrocytes is still on the zero line; also check (by means of the heavy verticallines) that the tube is vertical.
5. The line that passes through the top of the column of erythrocytes gives theerythrocyte volume fraction (0.4 in Fig. 9.35). The light intermediate lines rep-resent intervals of 0.05; if the top of the column of erythrocytes is not on a line,but between a heavy line and a light line, its position can be estimated to thenearest 0.01.
Note: If your laboratory has not yet changed to SI units and is still using the tradi-tional system, the same chart can be used. Simply read the numbers as percentagesinstead of fractions. For example, instead of “erythrocyte volume fraction, 0.4”report the result as “packed cell volume, 40%”.
Fig. 9.34 Centrifuged capillary blood sampleE: erythrocytes; L: leukocytes; P: plasma.
Fig. 9.35 Measuring the erythrocyte volume fraction using the micro scale
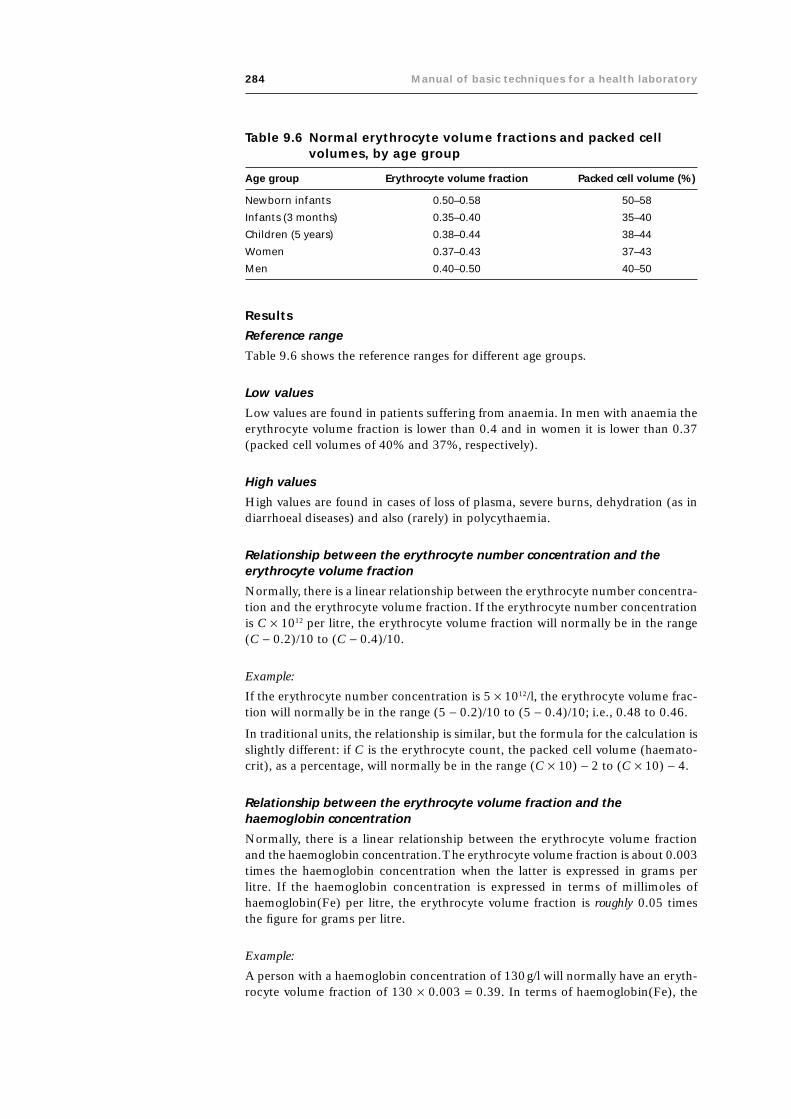
284 Manual of basic techniques for a health laboratory
Results
Reference range
Table 9.6 shows the reference ranges for different age groups.
Low values
Low values are found in patients suffering from anaemia. In men with anaemia theerythrocyte volume fraction is lower than 0.4 and in women it is lower than 0.37(packed cell volumes of 40% and 37%, respectively).
High values
High values are found in cases of loss of plasma, severe burns, dehydration (as indiarrhoeal diseases) and also (rarely) in polycythaemia.
Relationship between the erythrocyte number concentration and theerythrocyte volume fraction
Normally, there is a linear relationship between the erythrocyte number concentra-tion and the erythrocyte volume fraction. If the erythrocyte number concentrationis C ¥ 1012 per litre, the erythrocyte volume fraction will normally be in the range(C - 0.2)/10 to (C - 0.4)/10.
Example:
If the erythrocyte number concentration is 5 ¥ 1012/l, the erythrocyte volume frac-tion will normally be in the range (5 - 0.2)/10 to (5 - 0.4)/10; i.e., 0.48 to 0.46.
In traditional units, the relationship is similar, but the formula for the calculation isslightly different: if C is the erythrocyte count, the packed cell volume (haemato-crit), as a percentage, will normally be in the range (C ¥ 10) - 2 to (C ¥ 10) - 4.
Relationship between the erythrocyte volume fraction and thehaemoglobin concentration
Normally, there is a linear relationship between the erythrocyte volume fractionand the haemoglobin concentration. The erythrocyte volume fraction is about 0.003times the haemoglobin concentration when the latter is expressed in grams perlitre. If the haemoglobin concentration is expressed in terms of millimoles ofhaemoglobin(Fe) per litre, the erythrocyte volume fraction is roughly 0.05 timesthe figure for grams per litre.
Example:
A person with a haemoglobin concentration of 130g/l will normally have an eryth-rocyte volume fraction of 130 ¥ 0.003 = 0.39. In terms of haemoglobin(Fe), the
Table 9.6 Normal erythrocyte volume fractions and packed cellvolumes, by age group
Age group Erythrocyte volume fraction Packed cell volume (%)
Newborn infants 0.50–0.58 50–58
Infants (3 months) 0.35–0.40 35–40
Children (5 years) 0.38–0.44 38–44
Women 0.37–0.43 37–43
Men 0.40–0.50 40–50

9. Haematology 285
concentration is about 8.0mmol/l, and the erythrocyte volume fraction will be about8.0 ¥ 0.05 = 0.4.
Additional information provided by the erythrocyte volume fraction test
Examine the layer of leukocytes just above the column of erythrocytes (see Fig.9.34). It is normally very thin; if it seems thick, determine the leukocyte numberconcentration (see section 9.6). The layer will seem abnormally thick if the leukocytenumber concentration is greater than 20 ¥ 109/l. In cases of leukaemia, when theleukocyte number concentration may be 100–200 ¥ 109/l, the layer may be severalmillimetres thick.
Mean erythrocyte haemoglobin concentrationThe mean erythrocyte haemoglobin concentration is a measure of the average hae-moglobin content of the erythrocytes. It is expressed either in grams of haemo-globin per litre or in millimoles of haemoglobin(Fe) per litre1 and is calculated bydividing the haemoglobin concentration of the blood by the erythrocyte volumefraction.
Example:
● If the haemoglobin concentration is expressed in grams of haemoglobin perlitre:
haemoglobin concentration = 150g/l
erythrocyte volume fraction = 0.43
mean erythrocyte haemoglobin concentration = 150/0.43 = 349g/l (or 34.9%).
● If the haemoglobin concentration is expressed in millimoles of haemoglobin(Fe)per litre:
haemoglobin(Fe) = 9.3mmol/l
erythrocyte volume fraction = 0.43
mean erythrocyte haemoglobin concentration = 9.3/0.43 = 21.6mmol/l.
Note: to convert values in g/l to values in mmol/l, multiply by 0.06206. Thus, usingthe above example, 349g/l ¥ 0.06206 = 21.6mmol/l.
Reference valuesNormally the mean erythrocyte haemoglobin concentration lies between the fol-lowing limits:
— lower limit: haemoglobin 322g/l or haemoglobin(Fe) 20mmol/l;
— upper limit: haemoglobin 371g/l or haemoglobin(Fe) 23mmol/l.
When the value falls within this range, the erythrocytes are said to be “normochro-mic” (i.e. of normal colour).
Values below the lower limit of the reference range indicate that the erythrocytesare “hypochromic” (i.e. less coloured than normal). Low values are found in pa-tients with hypochromic anaemia.
If the value is higher than the upper limit of the reference range, the mean erythro-cyte haemoglobin concentration should be determined again. Haemoglobin formsabout 95% of the erythrocyte mass. Therefore, erythrocytes are never “hyperchro-mic” (i.e. more coloured than normal), but they may increase in volume and thusbe capable of containing more haemoglobin than normal; in this case the mean
1 See note about expression of haemoglobin concentration on page 284.

286 Manual of basic techniques for a health laboratory
erythrocyte haemoglobin concentration may be as high as 380g/l (haemoglobin(Fe)23.6mmol/l), but it never exceeds these values.
The mean erythrocyte haemoglobin concentration is usually called the “mean cor-puscular haemoglobin concentration” (MCHC). It can also be expressed as apercentage. This is calculated by dividing the haemoglobin concentration of theblood in grams per 100ml by the packed cell volume as a percentage and multiply-ing by 100.
Example:
haemoglobin concentration = 15.0g/100ml
packed cell volume = 43%
MCHC = (15.0/43) ¥ 100 = 35%.
In this system, the reference range is 32–37%. The MCHC never exceeds 38%. Ifsuch a result is obtained, the test should be repeated.
9.4.2 Macro-scale methodPrinciple
The blood (mixed with anticoagulant) is placed in a graduated tube and centri-fuged to pack the erythrocytes. The level of the column of erythrocytes is then readdirectly in the graduated tube (Fig. 9.36).
Materials and reagents (Fig. 9.37)
● Centrifuge
● Special graduated tubes (Wintrobe tubes), 9.5cm long with a 0.6-cm bore, cali-brated from 0 to 100
● Long fine capillary Pasteur pipette (long enough to reach the bottom of thetube) with rubber teat
● Anticoagulant — EDTA dipotassium salt, 10% solution (reagent no. 22) orWintrobe solution (reagent no. 65).
Method
Collection of specimens
1. Collect a venous blood specimen as described in section 9.2 and add it to agraduated tube containing anticoagulant (see above).
2. Using the capillary pipette, fill the graduated tube with blood up to the 100mark, making sure that no air bubbles form (Fig. 9.38).
Fig. 9.36 Principle of themacro scale forestimating theerythrocytevolume fraction
Fig. 9.38 Using a capillarypipette to fill agraduated tubewith blood
Fig. 9.37 Materials for estimating theerythrocyte volume fraction usingthe macro scale

9. Haematology 287
Measurement technique
1. Place the graduated tubes in the centrifuge and centrifuge for30 minutes at 2300g. If the rotor arm of the centrifuge (mea-sured from the axis of rotation to the base of the bucket hold-ing the tube) is 15cm long, 3600rpm will be needed to attainthis force; with a 20-cm arm 3100rpm will be needed.
Important: a force of less than about 2300g will give a falseresult.
2. Read the level at which the erythrocytes meet the layer ofleukocytes (Fig. 9.39). Make sure that the correct set of gradu-ations is being used, upwards towards the 100 mark. The figureobtained is a percentage (the “packed cell volume”); divide by100 to obtain the erythrocyte volume fraction.
Results
See page 282.
9.5 Estimation of the erythrocyte number concentrationThe number of erythrocytes contained in 1 litre of blood is called the erythrocytenumber concentration. (In traditional units, it is expressed as the number of eryth-rocytes per cubic millimetre and is called the erythrocyte or red cell “count”.)Accurate methods for counting erythrocytes require an electronic counter system.Unfortunately, such instruments are often not available in peripheral laboratories.A simple but far less accurate method uses a counting chamber in which erythro-cytes are counted under the microscope. However, this method is of such low pre-cision that it should not be used. It is recommended instead that the erythrocytevolume fraction (see section 9.4) or the haemoglobin concentration (see section9.3) is measured and the erythrocyte number concentration calculated.
Reference range
Table 9.7 shows the reference ranges for different age groups.
High values
Patients who are dehydrated or have polycythaemia will have high erythrocytenumber concentrations.
Low values
Patients with anaemia caused by insufficient production, loss or haemolysis of eryth-rocytes will have low erythrocyte number concentrations.
Note: Anaemia is a clinical syndrome that has many different underlying causes.The clinical picture is determined by the extent and duration of anaemia. The
Table 9.7 Normal erythrocyte number concentrations, by age group
Age group Erythrocyte number concentration
SI units (per litre) Traditional units (per mm3)
Newborn infants 5.0–7.0 ¥ 1012 5.0–7.0 ¥ 106
Infants (1–6 months) 3.8–5.9 ¥ 1012 3.8–5.9 ¥ 106
Children (4 years) 3.8–5.4 ¥ 1012 3.8–5.4 ¥ 106
Women 4.0–5.4 ¥ 1012 4.0–5.4 ¥ 106
Men 4.5–6.2 ¥ 1012 4.5–6.2 ¥ 106
Fig. 9.39 Measuring the packed cell volume

288 Manual of basic techniques for a health laboratory
symptoms range from pallor and mild fatigue to headache, dizziness and irritabilityto uncontrolled behaviour and even shock and cardiac insufficiency.
Anaemia may result from:
— blood loss
— decreased production of erythrocytes
— increased destruction of erythrocytes.
The most common cause of anaemia worldwide is iron deficiency. Other commoncauses such as infection, malaria, malnutrition and vitamin deficiencies usuallycontribute to anaemia in association with iron deficiency. Other causes of anaemiaare:
— trauma
— parasitic infections
— diseases of the endocrine system
— chronic diseases
— inborn errors of metabolism
— intoxication.
9.6 Estimation of the leukocyte number concentrationThe number of leukocytes contained in 1 litre of blood is called the leukocytenumber concentration or leukocyte count.
In certain diseases the number of leukocytes in the blood is altered. For example,in infectious mononucleosis and bacterial infections there is a marked increase,whereas in typhoid fever there is a marked decrease.
9.6.1 PrincipleThe blood is diluted in a leukocyte diluting fluid which haemolyses the erythro-cytes, but leaves the leukocytes intact.
The leukocytes are then counted in a counting chamber under the microscope, andthe number of cells per litre of blood is calculated.
9.6.2 Materials and reagents● Microscope
● Ruled counting chamber — preferably the improved Neubauer chamber (Fig.9.40; the Bürker chamber is rarely used)
● Blood (Sahli) pipette, graduated to the 50-ml (0.05-ml) mark
Fig. 9.40 Neubauer counting chamber

9. Haematology 289
● Graduated pipette, 1ml
● Pasteur pipette or capillary tube
● Hand tally counter or bead counter
● Diluting fluid (prepared by adding 2ml of glacial acetic acid to 1ml of gentianviolet, 1% aqueous solution, and making up the volume to 100ml with distilledwater).
The dimensions of the Neubauer ruled chamber are as follows:
— area = 9mm2;— depth = 0.1mm.
9.6.3 Method1. Pipette 0.95ml of diluting fluid into a small bottle using the 1-ml graduated
pipette.
2. Draw venous or capillary blood to the 0.05-ml mark of the blood (Sahli) pipette.Do not allow air bubbles to enter. With venous blood ensure that it is well mixedby inverting the bottle containing it and the anticoagulant repeatedly for about 1minute immediately before pipetting it.
3. Wipe the outside of the pipette with absorbent paper, check that the blood is stillon the 0.05-ml mark (Fig. 9.41), and expel it into the bottle of diluting fluid.Rinse the pipette by drawing in and discharging fluid from the bottle three times.The dilution of the blood is 1 in 20. Label the bottle with the patient’s nameand/or number.
4. Attach the coverslip (supplied with the chamber) to the counting chamber, press-ing it carefully into place.
When the coverslip is properly attached, coloured bands called Newton’s ringsappear between the two glass surfaces.
5. Mix the diluted blood well. Use a Pasteur pipette or a capillary tube to fill thecounting chamber (Fig. 9.42). Take care not to overfill beyond the ruled area.
Fig. 9.41 Checking that the blood is still on the mark

290 Manual of basic techniques for a health laboratory
Important: If the liquid overflows into the channel between the two chambers,you must start again: remove and clean the coverslip; clean the counting cham-ber; and refill with another drop.
6. Leave the counting chamber on the bench for 3 minutes to allow the cells tosettle.
7. Place the chamber on the stage of the microscope. Use the ¥ 10 objective andthe ¥ 10 eyepiece. Reduce the amount of light entering the condenser by adjust-ing the iris diaphragm. Focus the rulings of the chamber and the leukocytes. Donot mistake pieces of dust for leukocytes.
8. Count the leukocytes in an area of 4mm3 of the chamber, using the corner squaresnumbered 1, 3, 7 and 9 as shown in Fig. 9.43. Include in the count the leukocytesseen on the lines of two sides of each square counted, as shown in Fig. 9.44. Thissquare represents one of the four counted.
9. Calculate the number of leukocytes in 1 litre of blood by multiplying the numberof leukocytes counted in the four squares by 0.05. Report the result as “numberby 109/l)”.
Example:
number of leukocytes counted = 188
number of leukocytes per litre = (188 ¥ 0.05) ¥ 109
Result reported: 9.4 ¥ 109/l
Explanation of calculation
Each of the four squares in which leukocytes are counted has an area of 1mm2; thetotal area is therefore 4mm2. The chamber depth is 0.1mm, therefore the volumein which leukocytes are counted is 4 ¥ 0.1 = 0.4mm3. Thus division by four andmultiplication by 10 will give the number of leukocytes in 1mm3 of diluted blood.Since the dilution is 1 in 20, multiplication by 20 will give the number of leukocytesin 1mm3 of undiluted blood. Finally, there are 1 million (106) cubic millimetres in
Fig. 9.42 Filling the counting chamber Fig. 9.43 Using the improved Neubauer ruledchamber
Fig. 9.44 Countingleukocytesusing theimprovedNeubauerruled chamber

9. Haematology 291
1 litre, so multiplication by 106 will give the number of leukocytes per litre of undi-luted blood. This can be summarized as follows:
number of leukocytes per litreleukocytes counted
leukocytes counted
leukocytes counted
= ¥ ¥ ¥
= ¥ ¥= ¥ ¥
10 204
10
50 10
0 05 10
6
6
9.
Example:
A total of 188 leukocytes are counted in the four squares. The number of leukocytesper cubic millimetre of undiluted blood is therefore:
188 10 204
188 50 9400¥ ¥ = ¥ =( )
and the number per litre is:
9400 ¥ 106 = 9.4 ¥ 109
9.6.4 ResultsReference range
The reference ranges for different age groups are given in Table 9.8.
High values
An increase in the total number of circulating leukocytes is called leukocytosis.This can occur with certain bacterial infections. In leukaemia, leukocyte numberconcentrations of 50 ¥ 109/l to 400 ¥ 109/l, or even higher values, can be found. Inthis case it is necessary, when determining the number concentration, to use agreater dilution of blood — for example 0.05ml of blood and 1.95ml of dilutingfluid, which gives a dilution of 1 in 40. If this dilution is used, the number of cellscounted is multiplied by 0.1 instead of by 0.05 in order to give the number ¥ 109
per litre. (If traditional units are being used, multiply by 100 instead of 50 to givethe number per cubic millimetre.)
Low values
A decrease in the total number of circulating leukocytes is called leukopenia. Thiscan occur with certain infections including typhoid fever and malaria. Leukopeniais also seen following treatment with certain drugs. When the leukocyte numberconcentration is very low, it is necessary to dilute the blood less — for example0.05ml of blood and 0.45ml of diluting fluid, which gives a dilution of 1 in 10. Ifthis dilution is used, the number of cells counted is multiplied by 0.25 instead of by0.05 to give the number ¥ 109 per litre.
Table 9.8 Normal leukocyte number concentrations, by age group
Age group Leukocyte number concentration (per litre)a
Newborn infants 10–20 ¥ 109
Infants (3–9 months) 4–15 ¥ 109
Children (3 years) 4–11 ¥ 109
Children (10 years) 4–10 ¥ 109
Adults 4–10 ¥ 109
a The reference range may be different in certain indigenous populations.

292 Manual of basic techniques for a health laboratory
Correction for nucleated erythrocytes
Nucleated erythrocytes or normoblasts (see Fig. 9.90) are early stages of erythro-cytes. They are not normally present in the blood, but they may be present in theblood in certain diseases such as sickle cell anaemia or other haemolytic anaemias.Normoblasts are not haemolysed in the diluting fluid and are therefore countedwith the leukocytes. When normoblasts are present in large numbers and theleukocytes are counted using a fully or semi-automated cell counter, the leukocytenumber concentration must be corrected as follows.
Examine a thin Romanowsky-stained blood film (see section 9.10) and count thenumber of normoblasts seen for every 100 leukocytes.
Calculation:
The number concentration of normoblasts (per litre) is:
number of normoblasts countednumber of normoblasts counted
leukocyte number concentration100 +
¥
Example:
If 50 normoblasts are counted and the leukocyte number concentration is 16 ¥ 109/l,the number concentration of normoblasts is:
50100 50
16 5 3 109
+¥ = ¥. l
and the corrected leukocyte number concentration is:
(16 - 5.3) ¥ 109/l = 10.7 ¥ 109/l.
9.7 Measurement of the erythrocyte sedimentation rate9.7.1 PrincipleBlood collected into an anticoagulant is placed in a long graduated tube held in avertical position. The erythrocytes settle to the bottom, leaving a layer of plasmaabove.
The height of the column of plasma after 1 hour indicates the sedimentation rate ofthe erythrocytes (erythrocyte sedimentation rate (ESR)).
9.7.2 Materials and reagents (Fig. 9.45)
● Westergren ESR tube: internal diameter 2.5mm; graduated from 0 to 200mm(often marked 1 to 20: 1 corresponds to 10mm, 2 to 20mm, etc.)
● Westergren stand
● Test-tubes
● Graduated syringe, 5ml
● Graduated pipette, 5ml
● Timer
● Anticoagulant: trisodium citrate, 3.2% solution (reagent no. 60) (keep in refrig-erator) or EDTA dipotassium salt, 10% solution (reagent no. 22).
9.7.3 Method1. Pipette 0.4ml of trisodium citrate solution into a test-tube or bottle.
2. Collect a venous blood specimen (see section 9.2). Apply the tourniquet as looselyas possible; puncture the vein at once and release the tourniquet.
Collect 2ml of blood into a syringe.

9. Haematology 293
3. Remove the needle from the syringe and add 1.6ml of blood to the test-tubecontaining anticoagulant (marked to contain a total of 2.0ml) (Fig. 9.46). Shakegently. Measurement of the ESR should begin within 2 hours of collection of theblood.
4. Draw the citrated blood into the Westergren tube (using a rubber safety bulb) upto the 0-mm mark (Fig. 9.47).
5. Place the tube in the Westergren stand, making sure that the tube is completelyupright (Fig. 9.48).
Check that there are no air bubbles in the tube.
Check that the stand is level.
6. Leave on a bench away from vibration (e.g. not on the same bench as a centri-fuge), free from draughts, not close to a central heating radiator and not in directsunlight.
7. Wait 1 hour (set the timer to ring), then note the height of the column of plasmain mm graduations starting from the 0-mm mark at the top of the tube (Fig.9.49).
9.7.4 ResultsThe result is expressed in millimetres per hour (mm/h).
Reference range
Table 9.9 shows the reference ranges for adults.
Note: If a patient is dehydrated measurement of the ESR has little value.
High values
Any disease that produces plasma protein changes will increase the ESR. Theseinclude acute and chronic infections, myocardial infarctions and rheumatoid ar-thritis.
The ESR is also increased in patients suffering from anaemia (see page 285).
Fig. 9.45 Materials for measuring theerythrocyte sedimentation rate
Fig. 9.46 Adding a blood sample to thetrisodium citrate solution
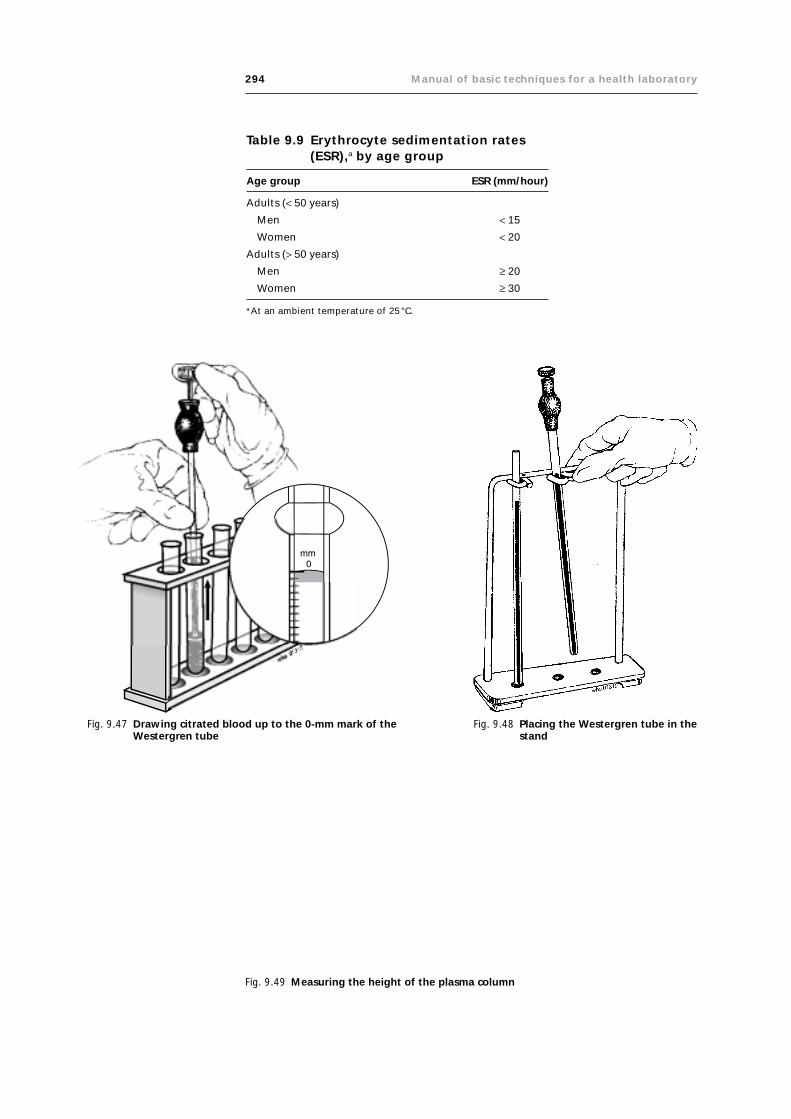
294 Manual of basic techniques for a health laboratory
Fig. 9.47 Drawing citrated blood up to the 0-mm mark of theWestergren tube
Fig. 9.48 Placing the Westergren tube in thestand
Table 9.9 Erythrocyte sedimentation rates(ESR),a by age group
Age group ESR (mm/hour)
Adults (< 50 years)
Men < 15
Women < 20
Adults (> 50 years)
Men ≥ 20
Women ≥ 30
a At an ambient temperature of 25 °C.
Fig. 9.49 Measuring the height of the plasma column

9. Haematology 295
Very high ESR values occur in tuberculosis, trypanosomiasis and malignant dis-eases. The ESR is also raised in pregnancy.
9.8 Measurement of the bleeding time: Duke method9.8.1 PrincipleA small cut is made with a lancet in the lobe of the ear. Blood flows from thepuncture and the time it takes for the bleeding to stop is measured.
The test is performed:
— for the diagnosis of certain haemorrhagic disorders;
— before surgical operations;
— before puncture of the liver or spleen.
9.8.2 Materials and reagents● Sterile blood lancets
● Microscope slides
● Filter-paper (or blotting paper)
● Stopwatch, if available, otherwise a watch with a second hand
● Ether.
9.8.3 Method1. Gently clean the lobe of the ear with cotton wool and ether (Fig. 9.50). Do not
rub. Allow to dry.
2. Puncture the ear lobe (Fig. 9.51). The blood should flow freely, without anyneed to squeeze the ear lobe. Start the stopwatch.
3. After 30 seconds collect the first drop of blood on a corner of the filter-paper (orblotting paper) (Fig. 9.52). Do not touch the skin with the paper.
4. Wait 30 seconds more. Collect the second drop of blood in the same way, a littlefurther along the strip of paper (Fig. 9.53).
Fig. 9.50 Cleaning the ear lobe withether
Fig. 9.51 Puncturing the ear lobe

296 Manual of basic techniques for a health laboratory
Fig. 9.52 After 30 seconds,collect the first dropof blood
Fig. 9.53 After 1 minute, collect thesecond drop of blood
Fig. 9.54 Continue to collect one moredrop of blood every 30 seconds
Fig. 9.55 Calculating the bleedingtime
5. Continue to collect one more drop of blood every 30 seconds. The drops be-come progressively smaller (Fig. 9.54).
6. When no more blood appears, stop the stopwatch (or note the time on the watch).
Another method is to count the number of drops on the filter-paper (or blottingpaper) and multiply by 30 seconds (Fig. 9.55).
For example: there are seven drops. The bleeding time is 7 ¥ 30 seconds =3.5 minutes.
9.8.4 ResultsReport the bleeding time to the nearest half minute.
Mention also the reference range for the method used. Example: bleeding time3.5 minutes (normal range, Duke method: 1–5 minutes).
If the bleeding time is prolonged, examine a Romanowsky-stained thin blood film(see section 9.10) to see whether the number of thrombocytes appears to be lessthan normal (venous blood must be used).

9. Haematology 297
9.9 Observation of clot retraction and measurement oflysis time
9.9.1 PrincipleThe tubes with clotted blood are used:
— for observation of the retraction of the clot
— for measurement of the time it takes for the clot to dissolve (lysis).
These tests are carried out for the diagnosis of certain haemorrhagic disorders.
9.9.2 Materials● Glass test-tubes, 75mm ¥ 10mm, marked to hold 1ml
● Timer
● Metal test-tube rack
● Water-bath
● Materials to carry out venepuncture (see section 9.2.2).
9.9.3 MethodCollection of specimens
Collect a venous blood specimen from patients as described in section 9.2. Do notadd anticoagulant to the tubes in which you collect the blood.
Observation of clot retraction
1. Place the tube in the water-bath at 23°C (or leave it to stand at roomtemperature).
2. Examine the clot after 1, 2, 3 and 4 hours. The clot normally remains solidduring the first 4 hours, although it begins to retract, usually in the first hour.After 4 hours the clot will have completely retracted, the red cell mass separatingfrom the yellow serum (Fig. 9.56).
Measurement of lysis time
1. Place the tube containing the blood in the water-bath at 37°C (or leave it tostand at room temperature).
2. Examine the clot after 12, 24, 48 and 72 hours until lysis occurs; that is, until theclot dissolves completely and all the erythrocytes sink to the bottom of the tube(Fig. 9.57).
Fig. 9.56 After 4 hours, examine the clot

298 Manual of basic techniques for a health laboratory
9.9.4 ResultsNormal clot retraction
The red clot is well separated and, at the surface, is attached to the sides of the tube(Fig. 9.58). There may be a small deposit of erythrocytes in the bottom of the tube;it should not be more than 5mm thick.
Abnormal clot retraction
Blood deficient in fibrinogen
If blood is deficient in fibrinogen there is a small red clot at the bottom of the tube,not necessarily attached to the sides of the tube. It is surrounded by sedimentederythrocytes and covered by supernatant (Fig. 9.59).
Blood deficient in thrombocytes
If blood is deficient in thrombocytes there is a red clot that remains almost com-pletely attached to the sides of the tube and that will have retracted very little, if atall (Fig. 9.60). Hardly any serum will have exuded.
(Examine a Romanowsky-stained thin blood film, using venous blood, see section9.10.)
Abnormal plasma proteins
Abnormal plasma proteins cause coagulation of plasma. This appears as a yellowclot — clotted plasma. Beneath it is a poorly retracted red clot (Fig. 9.61).
Haemophilia
If there is no clot at all or a yellow clot that forms very slowly over the deposit oferythrocytes (Fig. 9.62), the cause is a serious clotting factor deficiency such asthat which occurs in haemophilia.
Haemophilia is a hereditary haemorrhagic disease affecting males.
Report the clot retraction as:
— “normal”
— “abnormal”, with a description of the clot.
Lysis time
A clot normally takes at least 48 hours to dissolve. However, the lysis time may bereduced in certain conditions. For example, in patients with acute fibrinolytic dis-ease the clot may dissolve within 1–4 hours.
Report the lysis time of the clot in hours.
Fig. 9.57 Lysis
Fig. 9.58 Normal clotretraction
Fig. 9.59 Blood deficient infibrinogen
Fig. 9.60 Blood deficientin thrombocytes
Fig. 9.61 Blood containingabnormal plasmaproteins
Fig. 9.62 Haemophilia

9. Haematology 299
9.10 Preparation and staining of thin blood films9.10.1 PrincipleA thin blood film is prepared by spreading a small drop of blood evenly on a slideso that there is only one layer of cells.
Thin blood films are stained with Romanowsky stains, which contain essentialazure B and eosin dyes.
The Romanowsky stains most widely used include:
● Leishman stain, which is used alone.
● May–Grünwald stain, which is used with Giemsa stain.
● Giemsa stain, which can be used alone or together with May–Grünwald or Jennerstain.
● Field stains A and B, which are prepared in water unlike the above-mentionedstains, which are made up in methanol. Field stains are used for both thin andthick blood films.
The Romanowsky stains prepared in methanol can be used to fix thin films beforebeing diluted on the slides to stain the films. Better results are obtained by fixingfirst with methanol, then staining with pre-prepared diluted stains, as describedbelow.
After staining, blood films are used for:
— determining leukocyte type number fractions (see section 9.13)
— detecting abnormal erythrocytes (see section 9.10.4)
— identifying certain parasites (see section 4.7)
— estimating the number of thrombocytes (see section 9.14).
9.10.2 Materials and reagents● Microscope
● Microscope slides (should be well washed and, if necessary, cleaned with etha-nol or ether using a piece of soft cloth (Fig. 9.63))
● Spirit lamp or Bunsen burner
● Glass spreader (see below)
● Blood lancet
● Two glass rods, either over a sink or over a staining tank
● Measuring cylinder, 50 ml or 100 ml
● Beakers or bottles containing clean tap water
● Wash bottle containing buffered water (reagent no. 15)
● Interval timer
● Rack for drying slides
● Field stain (reagent no. 25)
● Giemsa stain (reagent no. 29)
● Leishman stain (reagent no. 34)
● May–Grünwald stain (reagent no. 38)
● EDTA dipotassium salt, 10% solution (reagent no. 22)
● Methanol
● 70% Ethanol or ether.
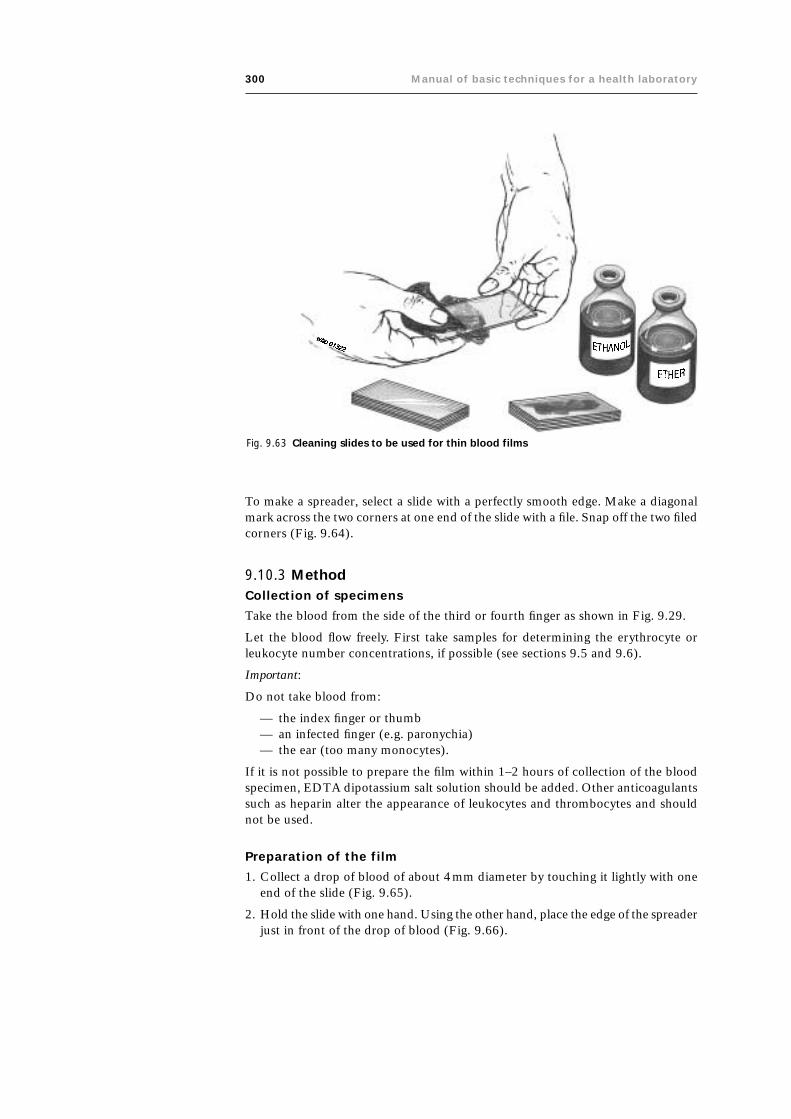
300 Manual of basic techniques for a health laboratory
To make a spreader, select a slide with a perfectly smooth edge. Make a diagonalmark across the two corners at one end of the slide with a file. Snap off the two filedcorners (Fig. 9.64).
9.10.3 MethodCollection of specimens
Take the blood from the side of the third or fourth finger as shown in Fig. 9.29.
Let the blood flow freely. First take samples for determining the erythrocyte orleukocyte number concentrations, if possible (see sections 9.5 and 9.6).
Important:
Do not take blood from:
— the index finger or thumb— an infected finger (e.g. paronychia)— the ear (too many monocytes).
If it is not possible to prepare the film within 1–2 hours of collection of the bloodspecimen, EDTA dipotassium salt solution should be added. Other anticoagulantssuch as heparin alter the appearance of leukocytes and thrombocytes and shouldnot be used.
Preparation of the film
1. Collect a drop of blood of about 4mm diameter by touching it lightly with oneend of the slide (Fig. 9.65).
2. Hold the slide with one hand. Using the other hand, place the edge of the spreaderjust in front of the drop of blood (Fig. 9.66).
Fig. 9.63 Cleaning slides to be used for thin blood films

9. Haematology 301
Fig. 9.64 Making a glass spreader
Fig. 9.66 Position the spreader in front of the drop of blood
Fig. 9.65 Collecting a drop of blood on a slide
3. Draw the spreader back until it touches the drop of blood (Fig. 9.67).
4. Let the blood run along the edge of the spreader (Fig. 9.68).
5. Push the spreader to the end of the slide with a smooth movement (Fig 9.69) (allthe blood should be used up before you reach the end). Blood from patients withanaemia should be spread more rapidly.

302 Manual of basic techniques for a health laboratory
Fig. 9.67 Draw the spreader back until it touches the drop of blood
Fig. 9.68 Allow the blood to run along the edge of the spreader
Fig. 9.69 Push the spreader to the end of the slide witha smooth movement
Fig. 9.70 Correctly (a) and incorrectlyprepared (b) blood films
6. Check that the film is satisfactory as shown in Fig. 9.70 (a).● There should be no lines extending across or down through the film.● The film must be smooth at the end, not ragged and lined as shown in
Fig. 9.70 (b).● The film must not be too long.● The film must not be too thick.● The film must not contain holes because a greasy slide has been used.
A well-spread film is of great importance. A badly spread film will give the wrongleukocyte type number fractions and make it impossible to report erythrocytemorphology.

9. Haematology 303
Drying the film
Adequate drying is essential to preserve the quality of the film, especially inhumid climates. The film can be left to air-dry in dry climates.
In the wet season (in the tropics)Dry the film by waving it rapidly about 5cm away from the flame of a spiritlamp or Bunsen burner: hold the slide to the side and slightly above (butnever directly over) the flame (Fig. 9.71). If necessary, protect the blood filmfrom flies.
Mark the dry film with the patient’s name or number. Write with a leadpencil on the thick part of the film not used for examination. Fig. 9.71 Drying the blood film over
a spirit lamp
Fixation of the filmIf the film is intended for determining leukocyte type number fractions, it shouldbe fixed with methanol before staining with May–Grünwald stain (see below).
If the film is intended for detection of parasites, it should be fixed with methanolbefore staining with Giemsa or Field stain (see below).
Precautions
Care is required to avoid the formation of deposits of stain, which appear on thefilm as masses of little black spots. A number of precautions are also required toavoid staining the films too blue, too pink or too dark; these are briefly describedbelow.
● Use perfectly clean glassware. Wash it every day. Do not use acid. Remove staindeposits with methanol.
● Use neutral water (buffered if possible, except for Field stain). The preparationtechnique is described in section 2.4.4. Acid water produces a film that is toored; alkaline water one that is too blue. Neutral water must be freshly preparedas it becomes acid when exposed to air.
Staining of the film
Method for Leishman stain
1. Fix the thin blood film with methanol for 2–3 minutes.
2. Prepare a 1 in 3 dilution of Leishman stain using one volume of stain and twovolumes of buffered water. Mix.
Example: Use 10ml of stain and 20ml of buffered water.
Prepare sufficient stain for 1 day’s use only, as the diluted stain does not keepwell.
3. Cover the slide with the diluted stain for 7–10 minutes.
Important: The staining time may need to be adjusted, especially when a newbatch of stain is received or the stain has been stored for a long time.
4. Wash the stain off in a stream of buffered water. Do not tip the stain off as thiswill leave a deposit of stain on the film.
5. Leave clean water on the slide for 2–3 minutes to differentiate the film. (Thetime taken for differentiation will depend on the stain and the pH of the waterused.)
The pH of the water is of vital importance in differentiating the different types ofleukocyte with Leishman stain. It should be between 6.8 and 7.2, and preferablybetween 7.0 and 7.2.
6. Tip the water off and place the slide in a draining rack to dry.

304 Manual of basic techniques for a health laboratory
Method for May–Grünwald and Giemsa stains
1. Fix the thin film with methanol for 2–3 minutes.
2. Prepare the stains as follows:● Dilute May–Grünwald stain 1 in 2 using equal volumes of stain and buffered
water. Mix.
Example: use 10ml of stain and 10ml of buffered water.
● Dilute Giemsa stain 1 in 10 using one volume of stain and nine volumes ofbuffered water. Mix gently.
Example: use 2ml of stain and 18ml of buffered water.
Note: Prepare only enough stain for 1 day’s use, as the diluted stains do not keepwell. Prepare the Giemsa mixture slowly and carefully. Shaking causes the stainto precipitate.
3. Cover the slide with diluted May–Grünwald stain for 5 minutes.
4. Tip the stain off and replace with diluted Giemsa stain for 10 minutes.
Important: The staining time may need to be adjusted, especially when a newbatch of stain is received or the stain has been stored for a long time.
5. Wash the stain off in a stream of buffered water. Do not tip the stain off as thiswill leave a deposit of stain on the film.
6. Leave clean water on the slide for 2–3 minutes to differentiate the film. The timefor differentiation will depend on the stain and the pH of the water used. The pHshould be between pH 6.8 and 7.0.
7. Tip the water off and place the slide in a draining rack to dry.
Method (rapid) for Field stain
1. Fix the thin film with methanol for 2–3 minutes.
2. Dip the slide into Field stain B (Fig. 9.72) and count up to five. Drain and washthe slide in the first container of tap water (Fig. 9.73).
3. Drain and dip the slide into Field stain A and count up to 10. Drain and washthe slide well in the second container of tap water.
Fig. 9.72 Staining the blood film withField stain
Fig. 9.73 Rinsing the slide in water

9. Haematology 305
4. Examine the colour of the film. It should appear mauve, neither too blue nor toopink.
If the film is not satisfactory, return the slide either to the Field stain A or to theField stain B for a few more seconds, as needed.
If the film is satisfactory, stand the slide in a draining rack to dry.
How to remedy poor results
Deposits of May–Grünwald stain or neutral waterDeposits caused by May–Grünwald stain or neutral water can be seen with thenaked eye in the liquid on the slide. Drain off the stain. Rinse the slide twice inmethanol. Dry and re-stain using fresh or filtered May–Grünwald stain.
Deposits of Giemsa stainThese deposits are seen with the naked eye or under the microscope. Rinse withmethanol, but wash off immediately with neutral water. Dry the slide and repeatthe staining procedure from the beginning.
Too much blue in the film (basophilic staining)Prepare a solution of 1% boric acid in 95% ethanol. Rinse the slide twice in thispreparation. Wash at once in neutral water. Dry and examine under the microscopewithout further treatment. Basophilic staining can usually be prevented by usingbuffered water at a more acid pH and, if necessary, altering the differentiation time.
Poor staining may also be caused by impurities in the dyes — the use of the stand-ardized stain is recommended.
9.10.4 Microscopic examinationUsing the ¥ 40 objective, examine the slides. The cells should appear as describedin Table 9.10.
Erythrocytes
In certain diseases, especially anaemia, the erythrocytes may have an abnormalshape, size or colour. To check for abnormal erythrocytes, look at the cells justbefore the thin end of the film; this is where they are spread out, just touching oneanother, but not overlapping (Fig. 9.74). Do not look at either the thick end, wherethe cells are too closely packed (Fig. 9.75), or the thin end, where there are notenough cells (Fig. 9.76).
The various types of abnormal erythrocytes are described below.
Table 9.10 Appearance of blood cells in thin films stained withLeishman stain
Cell type Appearance
Neutrophils Cytoplasm stains faint pink and contains small mauve granules
Eosinophils Cytoplasm stains faint pink and contains large red granules
Basophils Cytoplasm contains numerous dark mauve-blue granules
Monocytes Cytoplasm stains grey-blue
Lymphocytes
large Cytoplasm stains clear blue
small Cytoplasm stains dark blue
Erythrocytes Stain pink-red
Thrombocytes Stain mauve-pink

306 Manual of basic techniques for a health laboratory
Fig. 9.75 Examining blood films for abnormal erythrocytes: cells too closely packed
Fig. 9.74 Examining blood films for abnormal erythrocytes: where to look
Fig. 9.76 Examining blood films for abnormal erythrocytes: not enough cells
Normal erythrocytes (Fig. 9.77)
Size: 6–8mm.
Shape: round, discoid, occasionally slightly irregular.
Cytoplasm: periphery deep pink, centre pale pink or colourless.
Target cells (Fig. 9.78)
Size: 6–8mm.
Shape: round or slightly irregular.
Cytoplasm: centre and periphery stain well, but between them there is a colourlessring.
Seen in thalassaemias, vitamin B6 deficiency, haemoglobinopathy, liver diseases,sickle-cell anaemia and iron-deficiency anaemia.

9. Haematology 307
Fig. 9.77 Normal erythrocytes Fig. 9.78 Target cells
Fig. 9.80 MicrocytesFig. 9.79 Sickle cells
Sickle cells (Fig. 9.79)
Shape: elongated and narrow, often with one or both ends curved and pointed.
Seen in sickle-cell anaemia and sickle-cell thalassaemia, along with nucleated eryth-rocytes, target cells and often macrocytes.
Microscopic examination of sickle cells in wet preparations is described in section9.11.4.
Microcytes (Fig. 9.80)
Size: small (about 5mm).
Seen often in iron-deficiency anaemia, sideroblastic anaemia and thalassaemias.Must be distinguished from spherocytes (see below).
Macrocytes (Fig. 9.81)
Size: large (9–10mm).
Seen in macrocytic anaemias caused by folic acid deficiency, vitamin B12 deficiencyand iron-deficiency anaemia, and in certain liver diseases. Must be distinguishedfrom reticulocytes (see below).

308 Manual of basic techniques for a health laboratory
Schistocytes (Fig. 9.82)
Size: normal or slightly smaller than normal erythrocytes.
Fragmented cells.
Seen in haemolytic anaemias, sickle-cell disease and thalassaemias.
Spherocytes (Fig. 9.83)
Size: small (6mm).
Shape: perfectly round.
Cytoplasm: more darkly stained than normal erythrocytes.
Seen in haemolytic anaemias and hereditary spherocytosis.
Elliptocytes (Fig. 9.84)
Size: normal (8mm).
Shape: oval.
Cytoplasm: stained darker at the periphery (especially at the poles).
Fig. 9.81 Macrocytes Fig. 9.82 Schistocytes
Fig. 9.83 Spherocytes Fig. 9.84 Elliptocytes

9. Haematology 309
Seen very occasionally. Found in hereditary elliptocytosis, iron-deficiency anae-mia, pernicious anaemia, sickle-cell disease, thalassaemias and myelofibrosis.
Anisocytosis (Fig. 9.85)
A condition in which erythrocytes of different sizes are present in the blood, e.g.erythrocytes measuring 9mm are mixed with erythrocytes measuring 6mm.
Seen in many types of anaemia.
Poikilocytes (Fig. 9.86)
Erythrocytes of different shapes in the blood, e.g. a mixture of round, oval, triangu-lar, pear-shaped and indented cells.
Seen in many types of severe anaemia and myelofibrosis.
Erythrocytes containing Howell–Jolly bodies (Fig. 9.87)
Erythrocytes containing one or more large purple granules (nuclearremnants).
Do not confuse with thrombocytes lying on the cells.
Seen in haemolytic anaemias and megaloblastic anaemia, and follow-ing splenectomy.
Erythrocytes containing Cabot ring bodies (Fig. 9.88)
Erythrocytes containing thin ring-shaped or figure-of-eight structuresthat stain red with Wright stain.
Seen in severe anaemias.
Do not confuse with malaria parasites.
Erythrocytes containing basophilic stippling (Fig. 9.89)
Erythrocytes containing multiple blue–black dots in the cytoplasm.
Do not confuse with stain deposits.
Seen in vitamin deficiency, thalassaemias and lead poisoning.
Fig. 9.85 Anisocytosis Fig. 9.86 Poikilocytes
Fig. 9.87 Erythrocytes containing Howell–Jolly bodies

310 Manual of basic techniques for a health laboratory
Nucleated erythrocytes (normoblasts) (Fig. 9.90)
Size: 8–10mm.
Shape: round or irregular.
Nucleus: round, often eccentric, with deep purple, dense chromatin.
Cytoplasm: pink or greyish-blue.
Seen in accelerated erythropoiesis in severe anaemias, for examplesickle-cell anaemia, in severe bacterial infections, and in leukaemiasand cancers.
Reticulocytes (Fig. 9.91)Erythrocytes containing granules (nuclear remants) that stain darkblue with vital stains such as brilliant cresyl blue and Evan’s blue.Reticulocytes usually disappear within 4 hours after the release of theerythrocytes into the blood.
Leukocytes
In contrast to erythrocytes, leukocytes contain a nucleus that mayvary in size and shape. As already mentioned, there are five maintypes of leukocyte — neutrophils, eosinophils, basophils, lymphocytesand monocytes.
The proportion of each type of leukocyte, known as the leukocytetype number fraction, is of diagnostic importance.
Polymorphonuclear cells (neutrophils, eosinophils andbasophils)
Polymorphonuclear cells have:
— a nucleus with several lobes;
— granules in the cytoplasm (hence their usual name,granulocytes).
Polymorphonuclear neutrophils (Fig. 9.92)Size: 12–15mm.
Shape: rounded, well defined.
Fig. 9.88 Erythrocytes containing Cabot ringbodies
Fig. 9.89 Erythrocytes containing basophilicstippling
Fig. 9.90 Normoblasts
Fig. 9.91 Reticulocytes

9. Haematology 311
Nucleus: several (2–5) lobes, linked by strands of chromatin. The chromatin ap-pears as a uniform deep purple mass.
Cytoplasm: abundant, pinkish, containing numerous very small, mauve granules.The granules appear brown-violet after staining.
Polymorphonuclear eosinophils (Fig. 9.93)Size: 12–15mm.
Nucleus: usually two lobes.
Cytoplasm: very little visible, containing numerous large, round, densely packed,orange-red granules.
Sometimes the cell appears damaged, with scattered granules.
Fig. 9.92 Polymorphonuclear neutrophils Fig. 9.93 Polymorphonuclear eosinophils
Fig. 9.94 Polymorphonuclear basophils
Polymorphonuclear basophils (Fig. 9.94)These are the rarest type of granulocyte.
Size: 11–13mm.
Shape: round.
Nucleus: difficult to see because it is covered by the granules.
Cytoplasm: very little visible, containing numerous very large, round,deep purple granules, less densely packed than those of theeosinophils. Small colourless vacuoles are sometimes present.
Lymphocytes and monocytes
Lymphocytes and monocytes have a compact nucleus and may ormay not have granules in the cytoplasm.
Small lymphocytes (Fig. 9.95)Size: 7–10mm.
Shape: round.
Nucleus: large (occupying most of the cell), with densely packed dark purplechromatin.
Cytoplasm: very little visible, blue with no granules.

312 Manual of basic techniques for a health laboratory
Fig. 9.95 Small lymphocytes Fig. 9.96 Large lymphocytes
Large lymphocytes (Fig. 9.96)Size: 10–15mm.
Shape: round or irregular.
Nucleus: oval or round, may lie to one side of the cell.
Cytoplasm: abundant, pale blue, containing several large, dark red gran-ules.
Monocytes (Fig. 9.97)Size: 15–25mm (largest of the leukocytes).
Shape: irregular.
Nucleus: variable, often kidney-shaped with pale mauve chromatinarranged in strands.
Cytoplasm: pale blue, containing fine, dust-like, usually reddish gran-ules. Vacuoles are usually present.
In patients suffering from malaria the cytoplasm often containsbrownish-black masses. These masses are malaria pigment.
Rare or abnormal cells
Plasma cells (Fig. 9.98)Plasma cells produce antibodies. They may be seen in blood filmsprepared from patients with measles, tuberculosis, other viral or bac-terial infections or multiple myeloma.
Size: 12–15mm.
Shape: round or oval.
Nucleus: round, eccentric, with densely packed chromatin, often in awheel-like arrangement.
Cytoplasm: dark blue with a pale-staining area round the nucleus.Numerous very small vacuoles are present, which are not easilyseen.
Fig. 9.97 Monocytes
Fig. 9.98 Plasma cells

9. Haematology 313
Fig. 9.99 Immature polymorphonuclearneutrophils
Immature granulocytesImmature polymorphonuclear granulocytes of the bone marrow passinto the bloodstream in severe bacterial infections. They can be dis-tinguished by the following features:
Size: 12–18mm.
Nucleus: without lobes, with chromatin varying in colour from darkred to purple.
Cytoplasm: pale blue or pink with many large mauve or dark red gran-ules. Toxic granulation may be seen, in which the granules are verylarge and darkly stained.
If immature polymorphonuclear neutrophils (“band form” or “stabcells”) (Fig. 9.99) are seen, report their number fraction as for othertypes of leukocyte.
There are also immature cells without granules and with nucleoli(lymphoblasts) (see Fig. 9.102).
Hypersegmented polymorphonuclear neutrophils (Fig. 9.100)Hypersegmented polymorphonuclear neutrophils look like normalneutrophils, except that their nuclei have 5–10 lobes and are oftenlarger in size.
Such neutrophils can be seen in patients with macrocytic anaemia,caused by folic acid or vitamin B12 deficiency.
Atypical lymphocytes (Fig. 9.101)Atypical lymphocytes can be seen in viral infections, especially infec-tious mononucleosis (glandular fever), whooping cough and measles.They are also found in tuberculosis, severe malaria and the acquiredimmunodeficiency syndrome (AIDS).
Size: very variable, 12–18mm.
Shape: usually irregular.
Nucleus: round or irregular, often lying to one side of the cell; nucleolimay be seen.
Cytoplasm: usually darker blue than that of large lymphocytes; formsa dark edge to the cell. Does not contain granules.
Lymphoblasts (Fig. 9.102)The earliest (most immature) of all the types of leukocyte.Lymphoblasts can be seen in the blood films of patients with leukae-mia.
Size: large, 15–25mm.
Nucleus: large, round, pale mauve, containing 1–5 nucleoli.
Cytoplasm: dark blue, with a clear unstained area round the nucleus.Does not contain granules.
Fig. 9.100 Hypersegmentedpolymorphonuclear neutrophils
Fig. 9.101 Atypical lymphocyte

314 Manual of basic techniques for a health laboratory
Megakaryocytes (Fig. 9.103)The parent cells of thrombocytes (see section 9.1.3) found in the bone marrow.
Size: very large, 60–100mm.
Nucleus: very irregular, greatly lobulated but dense.
Cytoplasm: contains numerous fine granules, mostly dark red, and thrombocytes.The cell wall is not clearly defined.
(Very rarely found in the blood.)
9.11 Test for sickle-cell anaemiaHaemoglobin S is an inherited abnormal haemoglobin. If inherited from both par-ents it causes sickle-cell anaemia, a serious disease. If inherited from only one par-ent it causes sickle-cell trait, which does not usually cause disease. Haemoglobin Soccurs mainly in tropical Africa but also in the Eastern Mediterranean region andamong Americans of African origin. The sickle-cell slide test does not distinguishbetween sickle-cell anaemia and sickle-cell trait.
9.11.1 PrincipleOne drop of blood is mixed with one drop of sodium metabisulfite reagent on aslide. If the erythrocytes contain haemoglobin S, they will become sickle-shaped orhalf-moon-shaped (see Fig. 9.79).
The reagent removes oxygen from the cells, allowing sickling to take place.
9.11.2 Materials and reagents● Microscope
● Microscope slides
● Coverslips
● Filter-paper
● Pasteur pipette (or dropping pipette)
● Two small wooden sticks
● Containers to prevent drying of the preparation, such as Petri dishes
● Fresh sodium metabisulfite, 2% solution (reagent no. 55).
Fig. 9.102 Lymphoblast Fig. 9.103 Megakaryocyte

9. Haematology 315
9.11.3 Method1. Place a small drop of capillary blood (about 4mm diam-
eter) in the centre of a slide (see Fig. 9.65).
2. Add an equal-sized drop of sodium metabisulfitesolution.
3. Mix carefully with the corner of a slide (Fig. 9.104). Coverwith a coverslip, making sure that no air bubbles form.
4. Place the slide in a Petri dish that has wet filter-paper inthe bottom. Support the slide on two sticks (Fig. 9.105).Wait 30 minutes before examining the slide.
Note: When using a reducing reagent such as sodiummetabisulfite it is not necessary to seal the preparation.
9.11.4 Microscopic examinationExamine the slide under the microscope using the ¥ 40objective.
Negative result
The erythrocytes remain round (Fig. 9.106).
If the test is negative, re-examine the slide after a further 30minutes, then after 2 hours and after 24 hours.
Positive result
The erythrocytes become sickle-shaped or banana-shaped(Fig. 9.107 (a)), often with spikes (Fig. 9.107 (b)).
It is important to examine several parts of the preparation,as sickling can occur more quickly in one part than in an-other.
Do not mistake normal erythrocytes lying on their side orcrenated cells for sickle cells.
Fig. 9.104 Mixing the blood and sodium metabisulfite solution
Fig. 9.105 Incubating the slide in a Petri dish
Fig. 9.106 Test for sickle-cell anaemia: negativeresult
Fig. 9.107 Test for sickle-cell anaemia: positiveresulta: Sickle-shaped erythrocytes; b: sickle-shaped erythrocytes with spikes.

316 Manual of basic techniques for a health laboratory
Note:
False-negative results may occur if:
— outdated reagents are used;
— concentrations of haemoglobin S are low;
— patients have moderate or severe anaemia.
If the test is positive a thin blood film should be examined. Patients with sickle-cellanaemia have sickle cells, nucleated erythrocytes, target cells, marked poikilocyto-sis and often macrocytosis. Patients with sickle-cell trait are not usually anaemicand have a normal erythrocyte morphology. Whenever possible, electrophoresis ofthe haemoglobin should be carried out to confirm a diagnosis of sickle-cell disease.This can be done in a reference laboratory.
Other methods
● The test can be carried out on venous blood provided it is freshly collected(within 1–2 hours of the test) or collected into an anticoagulant (EDTA dipotas-sium salt, 10% solution (reagent no. 22)).
● The test can also be carried out using a test-tube rather than a Petri dish. Com-mercial reagents are available for this method.
9.12 Determination of the reticulocyte numberconcentration/fraction
Reticulocytes are immature erythrocytes that pass into the bloodstream from thebone marrow. The number of reticulocytes in the blood indicates the degree ofactivity of the bone marrow in the production of erythrocytes, and when the mar-row is very active (as in anaemia) their number increases. Reticulocytes containfine, deep-violet granules arranged in a network (reticulum). They do not contain anucleus.
9.12.1 PrincipleThe fine granules in reticulocytes can be stained with brilliant cresyl blue. A bloodfilm is stained with this dye and a certain number of erythrocytes observed underthe microscope. From this observation, either:
— the number of reticulocytes per litre of blood, or
— the proportion of erythrocytes that are reticulocytes is calculated.
9.12.2 Materials and reagents● Microscope
● Microscope slides (grease-free)
● Glass spreader
● Test-tubes
● Test-tube rack
● Funnel
● Filter-paper
● Two Pasteur pipettes with teats
● Hand tally counter, if available
● Saturated solution of brilliant cresyl blue (reagent no. 13).

9. Haematology 317
9.12.3 Method1. Filter a little of the cresyl blue solution into a test-tube. In the bottom of another
tube place two drops of filtered cresyl blue solution (Fig. 9.108).
2. Collect a few drops of blood from the patient’s finger with a Pasteur pipette (Fig.9.109), or use venous blood collected in EDTA dipotassium salt solution andmix well.
3. Add two drops of blood to the tube containing cresyl blue solution.
4. Mix by gently shaking the tube. Plug the tube with non-absorbent cotton wool.Leave for 15 minutes.
5. Take the tube and shake it gently. Remove one drop of the mixture. Place it ona slide ready for spreading.
6. Make a thin smear of the mixture with the spreader (see section 9.10.3).Leave the smear to air-dry.
9.12.4 Microscopic examinationExamine the smear using the ¥ 100 oil-immersion objective (Fig. 9.110). Look atthe end of the smear, where the erythrocytes should be well separated from eachother. Erythrocytes stain pale blue.
Examine at least 100 erythrocytes. Keep a careful count of the total numberof erythrocytes examined and the number of these that are reticulocytes.(Counting is easier if the size of the microscope field is reduced. This can bedone by placing in the eyepiece a small circular piece of stiff black paper in whicha hole of about 5mm in diameter has been punched.)
Some haematologists prefer reticulocytes to be reported in terms of the numberconcentration (number of reticulocytes per litre of blood), while others preferthem to be reported in terms of the number fraction (the proportion oferythrocytes that are reticulocytes). Depending on the practice in yourlaboratory or the specification of the requesting physician, make the appropri-ate calculation.1
Fig. 9.108 Preparing the cresylblue solution
Fig. 9.109 Collecting a capillary blood sample
1 Traditionally, reticulocytes have been reported in the form of percentages (i.e. the proportion,expressed as a percentage, of the erythrocytes that are reticulocytes). If 500 erythrocytes areobserved on the blood film and n of them are reticulocytes, the percentage of erythrocytes iscalculated by multiplying n by 0.2.Example:Of 500 erythrocytes examined, 25 are reticulocytes. The percentage of reticulocytes is then25 ¥ 0.2 = 5%. The normal range for newborn infants is 2.0–6.0%, and that for adults and chil-dren is 0.2–2.0%.

318 Manual of basic techniques for a health laboratory
Calculation
To calculate the reticulocyte number concentration, you mustknow the total erythrocyte number concentration. If C is thetotal erythrocyte number concentration (omitting the “¥ 1012/l”)and n is the number of reticulocytes seen on observing 500erythrocytes, the reticulocyte number concentration is C ¥ 2n ¥109/l.
Example:
total erythrocyte number concentration = 4.5 ¥ 1012/l
number of reticulocytes seen in counting 500 erythrocytes = 6
reticulocyte number concentration = 4.5 ¥ (2 ¥ 6) ¥ 109/l= 4.5 ¥ 12 ¥ 109/l= 54 ¥ 109/l(report this result).
To calculate the reticulocyte number fraction you do not need toknow the erythrocyte number concentration. If n is the number ofreticulocytes seen in examining 500 erythrocytes, the reticulocytenumber fraction is 2n ¥ 10-3.
Example:
number of reticulocytes seen in counting 500 erythrocytes = 6
reticulocyte number fraction = (2 ¥ 6) ¥ 10-3 = 12 ¥ 10-3
Table 9.11 Reticulocyte number concentrations and reticulocytenumber fractions, by age group
Age group Reticulocyte number concentrationa Reticulocyte number fraction
Infants (newborn) 100–300 ¥ 109/l 20–60 ¥ 10-3
Children 8–110 ¥ 109/l 2–20 ¥ 10-3
Adults 8–110 ¥ 109/l 2–20 ¥ 10-3
a Approximate values. The concentration depends on the erythrocyte number concentration (see Table9.7).
a
b
cFig. 9.110 Examining the smear under the
microscopea: Typical reticulocytes, containingfine, deep violet granules;b: reticulocytes containing filaments;c: mature reticulocytes (containingonly a few granules).
Note: If more than 500 erythrocytes are examined on the blood film, the calculationwill have to be adjusted accordingly.
Reference range
Table 9.11 shows the reference ranges for different age groups.
Other structures that can be seen in blood films stained withbrilliant cresyl blue
The blood film stained with brilliant cresyl blue that is used for determining thereticulocyte number concentration and reticulocyte number fraction may also showthe following structures.
Haemoglobin H bodies
Haemoglobin H bodies appear as pale blue dots, variable in size. Unlike the reticu-lum of the reticulocytes, they occur in most of the erythrocytes. They are found ina-thalassaemia or haemoglobin H disease.

9. Haematology 319
Heinz bodies
Heinz bodies appear as blue granules, variable in size, lying to one side of theerythrocyte near the cell membrane. They occur in glucose-6-phosphatase dehy-drogenase deficiency following treatment with certain drugs.
9.13 Determination of the leukocyte type number fraction9.13.1 PrincipleA total of 100 leukocytes are counted and the number of each type seen is re-corded. The proportion of each type of leukocyte is reported as a decimal fraction.1
Example: neutrophils 0.56, lymphocytes 0.25, eosinophils 0.12, monocytes 0.06and basophils 0.01.
The total of all the fractions should be 1. If the total leukocyte count is known,express the result in terms of the number concentration (i.e. number of cells perlitre) rather than as a decimal fraction.
9.13.2 Materials● Microscope
● Immersion oil
● Well-spread thin blood films stained with a Romanowsky stain (see section 9.10.3)
● Paper
● Pencil.
9.13.3 Microscopic examinationUsing the ¥ 100 oil-immersion objective, check that the leukocytes are evenlydistributed.
In a badly spread film, the neutrophils may have collected at the end of the film.
To record the different types of leukocytes as they are counted, proceed as follows:
Draw up a table with:
— five vertical columns (N, E, B, L and M), and
— 10 horizontal lines (see Fig. 9.111).
When 10 strokes have been made in the first line, go on to the next. Thus, when the10th line has been completed, you know that you have counted 100 leukocytes.Then add up the total for each vertical column.
These totals give the percentage of each type of leukocyte. The totals are turnedinto decimal fractions by placing a decimal point two digits to the left (in somecases this may necessitate the insertion of a zero). Thus 59 becomes 0.59, 8 be-comes 0.08, 1 becomes 0.01, 28 becomes 0.28, etc., as in the last line of the illus-tration. These decimals are the number fractions of each type of leukocyte and arethe results that are reported when SI units are used.
Reference range
Table 9.12 shows the reference ranges for different age groups.
1 In the traditional system, the leukocyte type number fractions are called the “differential leukocyte(or white cell) count”, and the proportion of each type is reported as a percentage (e.g. neutrophils56%, lymphocytes 25%, eosinophils 12%, monocytes 6% and basophils 1% in the examplegiven above).

320 Manual of basic techniques for a health laboratory
There are two main patterns of distribution of different types ofleukocyte:
● One pattern shows a majority of lymphocytes (this type is seen in infantsand children under 10 years).
● The other pattern shows a majority of neutrophils (seen in newborninfants, children over 10 years and adults).
Each type of leukocyte may be reported in terms of its numberconcentration (i.e. number of cells per litre) instead of as a number frac-tion. The number concentration is calculated by multiplying the numberfraction of a particular type of leukocyte by the total leukocyte numberconcentration.
Example:
leukocyte number concentration = 5 ¥ 109/lneutrophil number fraction = 0.42neutrophil number concentration = 0.42 ¥ 5 ¥ 109 = 2.1 ¥ 108/l.
Abnormal findings
● Neutrophilia is an increased proportion of neutrophils (above 0.65). Itis particularly common in infections.
● Eosinophilia is an increased proportion of eosinophils (above 0.05).It almost always suggests a parasitic infection localized in the tissues(e.g. schistosomiasis, filariasis, hookworm, ascariasis). It can also becaused by allergies.
Table 9.12 Normal leukocyte type number fractions, by age group
Age group Cell typea
Neutrophils Eosinophils Basophils Lymphocytes Monocytes
Newborn infants 0.55–0.65 0.02–0.04 0.00–0.01 0.30–0.35 0.03–0.06
Infants (up to 0.40–0.48 0.02–0.05 0.00–0.01 0.40–0.48 0.05–0.101 year, excludingnewborns)
Infants (1–4 years) 0.36–0.48 0.02–0.05 0.00–0.01 0.44–0.54 0.03–0.06
Children (10 years) 0.45–0.55 0.02–0.05 0.00–0.01 0.38–0.45 0.03–0.06
Adults 0.55–0.65 0.02–0.04 0.00–0.01 0.25–0.35 0.03–0.06
a To obtain values in traditional units (i.e. as percentages), multiply each value by 100. The differentialleukocyte count is calculated by multiplying the percentage of a particular type of leukocyte (e.g.neutrophils) by the total leukocyte count and dividing by 100.Example:
total leukocyte count = 5000/mm3
percentage of neutrophils = 42%“absolute” neutrophil count = (42 ¥ 5000)/100 = 2100/mm3.
Fig. 9.111 Table for recording thedifferent types ofleukocytesN: neutrophils; E: eosino-phils; B: basophils; L: lympho-cytes; M: monocytes.
● Lymphocytosis is an increased proportion of lymphocytes (above 0.35 in adultsand above 0.45 in children). It is found in certain virus infections (e.g. measles),certain chronic infections (e.g. malaria, tuberculosis) and some toxic conditions.
● Monocytosis is an increased proportion of monocytes (above 0.06). It occurs incertain bacterial infections (e.g. typhoid fever, infectious mononucleosis) andcertain parasitic infections (e.g. malaria, kala-azar (visceral leishmaniasis)).
● Neutropenia is a decreased number of neutrophils. It may occur in certain infec-tions (e.g. sepsis) and some other diseases.
● Lymphopenia is a decreased number of lymphocytes and may occur in AIDS.

9. Haematology 321
9.14 Determination of the thrombocyte numberconcentration
9.14.1 Materials● Microscope
● Immersion oil
● Well-spread blood film stained with a Romanowsky stain (see section 9.10.3).
9.14.2 Microscopic examinationUsing the ¥ 100 oil-immersion objective, count the number of thrombocytes in 20fields and make a rough estimate of the number of erythrocytes per field.
Calculate the ratio of thrombocytes to erythrocytes. If the erythrocyte number con-centration (see section 9.5) is known, the thrombocyte count can be estimated. Ifnot, a rough estimate of the thrombocyte count, either “normal”, “high” or “low”,can be based on a ratio of approximately one thrombocyte per 500–1000 erythro-cytes being normal.
Reference range
Table 9.13 shows the reference ranges for different age groups.
Table 9.13 Normal thrombocyte counts, byage group
Age group Thrombocyte count (per mm3)
Infants (< 1 year) 3.5–6.6 ¥ 105
Children (1–15 years) 2.5–5.1 ¥ 105
Adults 1.7–4.0 ¥ 105

322
10.Blood chemistry
10.1 Estimation of glucose concentration in blood:o-toluidine method1
Estimates of the glucose (sugar) concentration in blood are required to help in thediagnosis of diabetes mellitus or any other condition in which there is abnormalcarbohydrate metabolism in the body. In patients with diabetes glucose is usuallyfound in the urine (see section 7.2.4).
10.1.1 PrincipleThe proteins are first precipitated by trichloroacetic acid. The glucose in the filtratereacts with the o-toluidine reagent to give a green colour, which is measured usinga photoelectric colorimeter.
10.1.2 Materials and reagents● Colorimeter
● Conical centrifuge tubes and large test-tubes (to hold 20ml)
● Test-tube racks
● Blood (Sahli) pipettes, 0.2ml
● Pipettes, 0.5ml, 5.0ml
● Water-bath at 100°C
● Glucose reagents (reagent no. 30)— trichloroacetic acid, 3% solution— o-toluidine reagent— benzoic acid, 0.1% solution— glucose stock reference solution (100mmol/l)— glucose working reference solutions (2.5, 5.0, 10, 20 and 25mmol/l)
● Whole blood (capillary or venous), plasma or serum, taken from a fastingpatient2
● Control serum.
A control serum should be used with each batch of tests. If the result of the testwith the control serum is correct, it can be assumed that the patient’s results willalso be correct.
10.1.3 Method1. Pipette 1.8ml of trichloroacetic acid solution into each of three centrifuge tubes.
Note: Trichloroacetic acid is corrosive. Use it with care.
1 This method is also used for estimating the glucose concentration in CSF (see section 8.3.4).2 If venous blood is used, it is advisable to use fluoride oxalate (reagent no. 26) as the anticoagu-
lant. This will prevent the glucose from being destroyed in the blood.

10. Blood chemistry 323
2. With a 0.2-ml blood pipette, deliver 0.2ml of the blood1 specimen to the bottomof the first centrifuge tube (B in Fig. 10.1) — i.e. under the trichloroacetic acidsolution (A in Fig. 10.1). The trichloroacetic acid solution will become cloudywhere it makes contact with the blood specimen.
3. Raise the pipette and draw clear trichloroacetic acid solution into it in order towash out all traces of the blood specimen (Fig. 10.2).
4. Expel the trichloroacetic acid solution from the pipette into the centrifuge tube(Fig. 10.3).
5. Mix well (the entire solution will become cloudy) and allow to stand for 5minutes.
6. Using a clean 0.2ml blood pipette, deliver 0.2ml of distilled water and 0.2mlof glucose working reference solution to the second and third centrifuge tubes,respectively, as described in step 2. These tubes will be used to prepare thereagent blank and the glucose working reference standard, respectively.
7. Centrifuge the three tubes at 3000g for 5 minutes. The precipitated proteins inthe tube containing the blood specimen will sediment and a clear supernatantfluid will be obtained.
8. Take three (or more if needed) large test-tubes and label as shown in Fig.10.4:— blank tube (B)— reference tube (R)— patient tube (P).
Note: If more than one estimation is being carried out, label each of the Ptubes with the name or number of the patient.
9. Pipette into each tube as follows:● Blank:
— 0.5ml of fluid from the second centrifuge tube— 3.5ml of o-toluidine reagent.
● Reference:— 0.5ml of from the third centrifuge tube— 3.5ml of o-toluidine reagent.
● Patient:— 0.5ml of supernatant fluid from the first centrifuge tube— 3.5ml of o-toluidine reagent.
Note: The o-toluidine reagent is corrosive.
1 When this test is performed using CSF, the volume required in this step is greater (0.8ml).
Fig. 10.3 Expellingtrichloroacetic acidsolution into acentrifuge tube
Fig. 10.2 Rinsing the bloodpipette withtrichloroacetic acidsolution
Fig. 10.1 Delivering bloodunder trichloroaceticacid solution using ablood pipetteA: trichloroacetic acidsolution; B: blood.
Fig. 10.4 Labelling test-tubes forthe testB: blank tube;R: reference tube;P: patient tube.

324 Manual of basic techniques for a health laboratory
10. Mix the contents of each tube. Place all the tubes in the water-bath at 100 °Cfor exactly 12 minutes (Fig. 10.5).
11. Remove the tubes and allow them to cool in a beaker of cold water for5 minutes.
12. Measure the colour produced in a colorimeter at a wavelength of 630nm.(a) Place the orange-red filter in the colorimeter.(b) Fill the colorimeter tube or cuvette with the solution contained in the tube
marked B (blank) and place in the colorimeter.(c) Adjust the reading of the colorimeter to zero with the cuvette containing
solution B in place.(d) Pour solution B out of the cuvette, rinse the cuvette with a small amount of
solution R (reference), pour this out, and fill the cuvette with solution R;place the cuvette in the colorimeter and read the absorbance, AR.
(e) Pour solution R out of the cuvette, rinse the cuvette with a small amount ofsolution P (patient), pour this out, and fill the cuvette with solution P;place the cuvette in the colorimeter and read the absorbance, AP.
Calibration of the colorimeter
Before taking measurements, prepare a calibration graph using the different con-centrations of the glucose working reference solution treated as described in steps6–9. The graph should be linear up to the highest concentration and should passthrough the origin. Prepare a new graph whenever the o-toluidine reagent is re-newed, to confirm the linearity.
10.1.4 ResultsCalculation
Calculate the concentration of glucose in the blood specimen using the followingformula:1
concentration of glucose in blood mmol l( ) = ( ) ¥A A CP R
where:
AP = absorbance reading of the patient’s specimenAR = absorbance reading of the glucose working reference solutionC = concentration of the glucose working reference solution.
Note: If a control serum has been included, make the calculation for that serum inexactly the same way, substituting Ac (absorbance of the control solution) for Ap inthe formula.
Reference range
The reference ranges of glucose concentrations in the blood of fasting patients areshown in Table 10.1.
High and low values
If unusually high or low values are observed, the test should be repeated in order toconfirm the results, as described below.
Fig. 10.5 Heating the test-tubes in a water-bath
1 The calculation given is for SI units. The formula for calculating blood glucose concentrationsin traditional units is as follows:
concentration of glucose mg 100ml glucose( ) = ( ) ¥concentration of mmol l 1 0 0555.

10. Blood chemistry 325
Glucose concentrations higher than 16.5mmol/l
Dilute solutions B (blank) and P (patient) with an equal volume of glacial aceticacid. Using diluted solution B in the cuvette, set the colorimeter reading to zero.Then read the absorbance AP with diluted solution P in the cuvette. Recalculate theglucose concentration, using the new value of AP and the value of AR that wasobtained previously. Multiply the result by two (because solution P has beendiluted 1 in 2) to obtain the true glucose concentration.
Glucose concentrations lower than 2.3mmol/l
Repeat the entire test. In step 1, use 1.6ml of trichloroacetic acid solution (insteadof 1.8ml), and in step 2 use 0.4ml of blood, serum or plasma (instead of 0.1ml).Perform the test and calculate the result exactly as before. Divide the result by fourto obtain the true glucose concentration.
10.2 Estimation of urea concentration in blood: diacetylmonoxime/thiosemicarbazide method
Urea is a waste product formed in the liver following the breakdown of protein. Itpasses into the blood, is filtered out by the kidneys and excreted in the urine.
If the kidneys do not remove urea, the concentration in the blood is increased. Thiscan happen if the kidney tubules become damaged or if the volume of blood flow-ing through the kidneys is reduced.
10.2.1 PrincipleThe proteins are first precipitated by trichloroacetic acid. The urea in the filtratereacts with diacetyl monoxime in the presence of acid, oxidizing reagent andthiosemicarbazide to give a red solution. The colour is measured using a photoelec-tric colorimeter.
10.2.2 Materials and reagents● Colorimeter
● Conical tubes and test-tubes (to hold 20ml)
● Pipettes, 50ml, 0.1ml, 0.5ml, 5ml
● Measuring cylinder, 50ml
● Water-bath at 100 °C
● Urea reagents (reagent no. 62):— trichloroacetic acid, 5% solution— diacetyl monoxime stock solution— colour reagent— urea stock reference solution (125mmol/l)— urea working reference solution (10mmol/l)
● Acid reagent (reagent no. 6)
Table 10.1 Blood glucose concentrations in fasting patients
Fluid Glucose concentration
SI units (mmol/l) Traditional units (mg/100ml)
Venous blood 3.3–5.5 60–100
Capillary blood 3.9–5.5 70–100
Serum 3.9–6.4 70–115
Plasma 3.9–6.4 70–115

326 Manual of basic techniques for a health laboratory
● Blank reagent (reagent no. 11)
● Patient’s blood (treated with EDTA dipotassium salt, 10% solution (reagent no.22)), serum or plasma
● Control serum.
A control serum (of known concentration) should be used with each batch oftests. If the result of the test with the control serum is correct, it can be assumedthat the patient’s results will also be correct.
10.2.3 Method1. Prepare the colour reagent immediately before use, using a 1:1 mixture of the
diacetyl monoxime stock solution and acid reagent. Prepare at least 15ml ofcolour reagent for each test.
Mix the colour reagent in a large test-tube or small flask.
2. Pipette into a conical centrifuge tube 50ml of whole blood (treated with EDTAdipotassium salt solution), serum or plasma.
3. Add 1ml of trichloroacetic acid solution and mix.
Centrifuge at high speed (3000g) for 5 minutes to sediment the precipitatedproteins and obtain a clear supernatant fluid.
4. Take three (or more if needed) large test-tubes and label as shown in Fig. 10.4:— blank tube (B)— reference tube (R)— patient tube (P).
Note: If more than one estimation is being carried out, label each of the P tubeswith the name or number of the patient.
5. Pipette into each tube as follows:● Blank:
— 0.1 ml of blank reagent— 3.0 ml of freshly prepared colour reagent.
● Reference:— 0.1 ml of working reference solution— 3.0 ml of freshly prepared colour reagent.
● Patient:— 0.1 ml of supernatant fluid— 3.0 ml of freshly prepared colour reagent.
6. Mix the contents of each tube. Place all the tubes in the water-bath at 100°C for15 minutes (see Fig. 10.5) to allow the red colour to develop.
7. Remove the tubes and place them in a beaker of cold water until they havecooled to room temperature.
8. Measure the colour produced in a colorimeter at a wavelength of 520nm.(a) Place the green filter in the colorimeter.(b) Fill the colorimeter test-tube or cuvette with the solution contained in the
tube marked B (blank) and place in the colorimeter.(c) Adjust the reading of the colorimeter to zero with the cuvette containing
solution B in place.(d) Pour solution B out of the cuvette, rinse the cuvette with a small amount of
working reference solution R (reference), pour this out, and fill the cuvettewith solution R; place the cuvette in the colorimeter and read the absorb-ance, AR.
(e) Pour solution R out of the cuvette, rinse the cuvette with a small amount ofsolution P (patient), pour this out, and fill the cuvette with solution P; placethe cuvette in the colorimeter and read the absorbance, AP.

10. Blood chemistry 327
10.2.4 ResultsCalculation
Calculate the concentration of urea in the blood as follows:1
urea concentration mmol l( ) = ( ) ¥A A Cp R
where:
AP = absorbance reading of patient’s specimenAR = absorbance reading of urea working reference standardC = concentration of working reference standard (10mmol/l).
Reference range
The reference range of urea concentrations in blood is approximately 3–7mmol/l(18–42mg/100ml).
High values
If a value greater than 25mmol/l (150mg/100ml) is obtained, repeat the entiretest, using 0.1ml of whole blood (treated with EDTA dipotassium salt solution),serum or plasma in step 2. Perform the test and calculate the results exactly asbefore, but divide the result by two to obtain the true urea concentration.
1 The calculation given is for SI units. The formula for calculating blood urea concentrations intraditional units is as follows:
urea concentration mg 100ml( ) = ( ) ¥urea concentration mmol l 1 0 167.

328
11. Immunological andserological techniques
Many of the diagnostic techniques applied in immunology are based on the factthat antigens and antibodies interact. Most infectious diseases are diagnosed byisolating and identifying the infectious microorganism in a specimen from the pa-tient. In some cases microorganisms are difficult to culture and isolate or may re-quire special and often expensive techniques that are not available for routinediagnosis. In other immunological disorders there is no microorganism per se toidentify or isolate. There are also some “naturally” occurring immune diseases,often classified as autoimmune diseases, which are not caused by a microorganismbut can be detected by some of the diagnostic techniques applied in immunology.Several of these techniques detect specific metabolic products or specific antibod-ies and antigens. In those disease states where a microorganism is involved, theseimmunology tests do not detect the microorganism directly, but provide evidenceof its presence.
A number of diagnostic techniques based on biological reactions using antigen–antibody interactions are described. It is beyond the scope of this manual to go intodetail about the immune system. The aim here is to introduce some terminologyand general concepts of the immune system, which will help in understanding someof the immunological techniques described. Note that various approaches are avail-able for different diagnostic purposes; the choice should be based upon the ques-tion asked and the availability of facilities. The diagnostic techniques describedhere are those most frequently used as an aid in the diagnosis of certain diseasesthat cause an immunological reaction.
11.1 Introduction to immunologyThe role of the immune system is defence. The immune system has both non-specific and specific mechanisms to recognize and respond accordingly to foreignand potentially pathogenic microorganisms. The non-specific defences are physicalor mechanical barriers, for example, the skin and mucous membranes. These barri-ers are there to prevent entry of pathogens into the body. These barriers usuallywork very well, but some pathogens do manage to enter the body where they areimmediately destroyed by phagocytic cells such as macrophages.
When pathogenic microorganisms enter the body the specific defence mechanismsare activated. The specific mechanisms are divided into the humoral (antibody-mediated) and the cell-mediated systems. The humoral system is associated withcells known as B-lymphocytes, which are the precursors of plasma cells. Plasmacells produce and secrete protein substances known as antibodies or imm-unoglobulins. The cell-mediated system is associated with T-lymphocytes whichcan process and destroy foreign bodies.
11.1.1 AntibodiesAntibodies are found in serum, milk, saliva, tears, urine and other body fluids. Inneonates, antibody production is virtually absent and protection is provided bymaternal antibodies mainly through breast milk and those that cross the placenta.A growing infant is constantly exposed to various environmental antigens which

11. Immunological and serological techniques 329
promote production of antibodies. In humans there are five major classes ofantibodies or immunoglobulins: IgG, IgM, IgA, IgE and IgD.
These proteins differ in their electrophoretic mobility, relative molecular mass,antigenic structure, sedimentation coefficient, shape and other properties. Allthe immunoglobulins have a structure composed of four polypeptide chainswith two long or heavy (H) chains and two short or light (L) chains (Fig.11.1).
Within these H and L chains there are regions known as constant regions,where amino acid sequences are very similar, and variable regions (usually atthe ends of the chains), where amino acid sequences are highly variable. Thevariable regions give the different antibodies their specificity.
11.1.2 AntigensAntigens are molecules (usually proteins) that can elicit an immune response.Antigens have sites on them known as antigenic determinants which can be recog-nized by antibodies. Antigens may have several determinants of differentconfiguration or several of the same configuration such that antibodies of the samekind or of several different kinds can bind to these sites.
Several properties can influence the immunogenicity of an antigen; these are brieflydiscussed below.
Recognition of the antigen as a foreign substance
The most important property of an antigen is that which allows the body to recog-nize the substance as foreign. An individual’s immune system is normally capableof distinguishing substances belonging to the body from those that do not (selffrom non-self ). Certain conditions incapacitate the self-tolerance mechanism andthe system starts to react against itself.
Relative molecular mass
The relative molecular mass or size of an antigen also affects its immunogenicity.As a general rule, large molecules make good antigens (i.e. they are effective ingenerating an immune response), provided they are foreign to the body. Smallmolecules are usually poor antigens.
Complexity
The more complex the molecule, the better the immune response to the antigen.Complex proteins make “better” antigens than repeating polymers of lipids, carbo-hydrates and nucleic acids.
Stability
It is essential for the antigen to be stable for it to be recognized by the immunesystem.
Degradability
The substance must be degradable. In order to initiate an immune response theimmune system must be able to process the substance.
Route of antigen administration and dosage
Antigens must be administered correctly. Some substances elicit an immune re-sponse if administered subcutaneously, but not if administered intravenously. The
H chain
L chain
Fig. 11.1 Structure ofimmunoglobulins
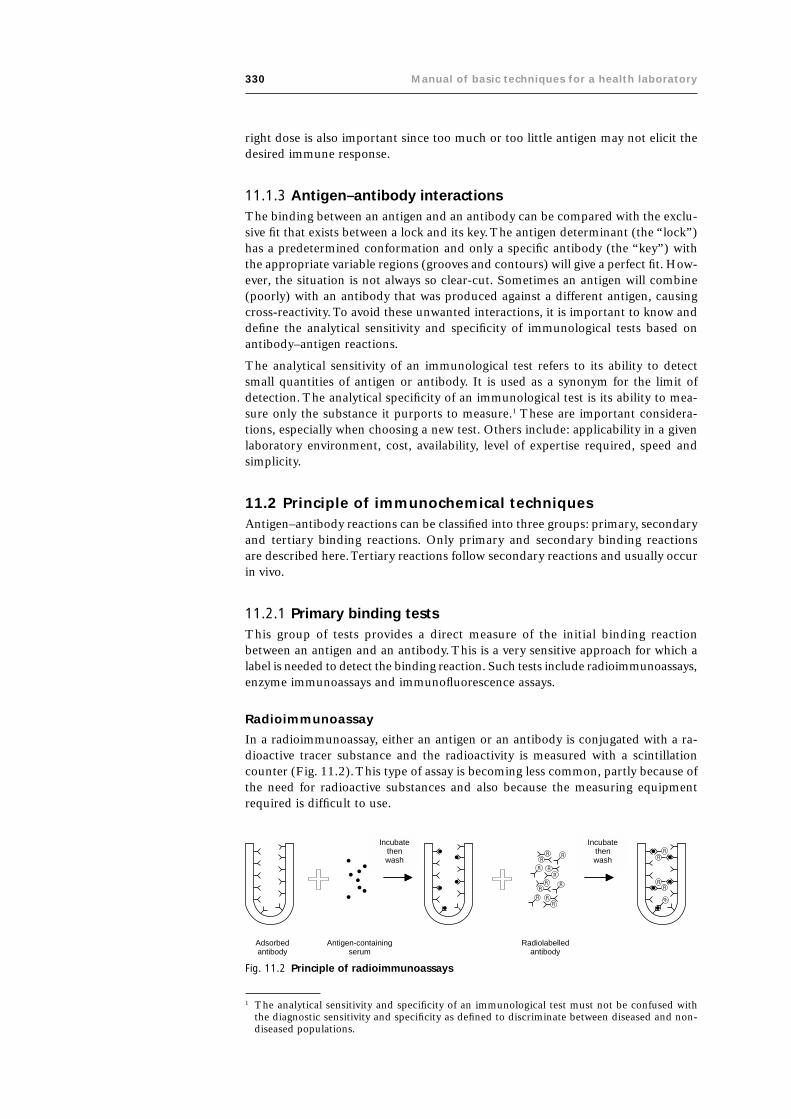
330 Manual of basic techniques for a health laboratory
right dose is also important since too much or too little antigen may not elicit thedesired immune response.
11.1.3 Antigen–antibody interactionsThe binding between an antigen and an antibody can be compared with the exclu-sive fit that exists between a lock and its key. The antigen determinant (the “lock”)has a predetermined conformation and only a specific antibody (the “key”) withthe appropriate variable regions (grooves and contours) will give a perfect fit. How-ever, the situation is not always so clear-cut. Sometimes an antigen will combine(poorly) with an antibody that was produced against a different antigen, causingcross-reactivity. To avoid these unwanted interactions, it is important to know anddefine the analytical sensitivity and specificity of immunological tests based onantibody–antigen reactions.
The analytical sensitivity of an immunological test refers to its ability to detectsmall quantities of antigen or antibody. It is used as a synonym for the limit ofdetection. The analytical specificity of an immunological test is its ability to mea-sure only the substance it purports to measure.1 These are important considera-tions, especially when choosing a new test. Others include: applicability in a givenlaboratory environment, cost, availability, level of expertise required, speed andsimplicity.
11.2 Principle of immunochemical techniquesAntigen–antibody reactions can be classified into three groups: primary, secondaryand tertiary binding reactions. Only primary and secondary binding reactionsare described here. Tertiary reactions follow secondary reactions and usually occurin vivo.
11.2.1 Primary binding testsThis group of tests provides a direct measure of the initial binding reactionbetween an antigen and an antibody. This is a very sensitive approach for which alabel is needed to detect the binding reaction. Such tests include radioimmunoassays,enzyme immunoassays and immunofluorescence assays.
Radioimmunoassay
In a radioimmunoassay, either an antigen or an antibody is conjugated with a ra-dioactive tracer substance and the radioactivity is measured with a scintillationcounter (Fig. 11.2). This type of assay is becoming less common, partly because ofthe need for radioactive substances and also because the measuring equipmentrequired is difficult to use.
Fig. 11.2 Principle of radioimmunoassays
Adsorbedantibody
Antigen-containingserum
Incubatethenwash
Radiolabelledantibody
Incubatethenwash R
R
R
R
R
RR
RR
R
R
RR
R
R
R
R
1 The analytical sensitivity and specificity of an immunological test must not be confused withthe diagnostic sensitivity and specificity as defined to discriminate between diseased and non-diseased populations.

11. Immunological and serological techniques 331
Enzyme immunoassay
In an enzyme immunoassay, an antigen or antibody is conjugated with a labelledenzyme and a colour change is produced by the enzyme reacting with its substrate.This change can be detected visually or with a spectrophotometer. The bindingevent can be either competitive or non-competitive. Competitive binding dependson competition between a labelled (known amount) and an unlabelled (unknownamount) antigen for the same antibody (when measuring antigen) or between alabelled (known amount) and an unlabelled (unknown amount) antibody for thesame antigen (when measuring antibody) (Fig. 11.3). The amount of binding ofthe labelled antigen (or antibody) is related to the amount of unlabelled antigen (orantibody) present.
In non-competitive binding (sandwich technique), the antigen or antibodyis adsorbed (or immobilized) to a solid phase, which may be an insoluble particle(bead) or the sides of a test-tube or the bottom of a microtitre plate. The test sam-ple containing the corresponding antibody or antigen is then added. A labelledantibody or antigen (conjugate) is added last to form the top layer of the sandwich(Fig. 11.4). When testing for an antibody, the conjugate would contain anti-immu-noglobulin and when testing for an antigen, the conjugate would containan antibody specific for that antigen. The amount of binding of the conjugate isdirectly related to the amount of antigen or antibody in the test sample and onlythe bound portion is measured in this assay.
An example of this technique is the enzyme-linked immunosorbent assay (ELISA).The enzymes used in ELISAs include horseradish peroxidase, alkaline phosphatase,lysozyme and b-galactosidase.
The enzyme immunoassays are replacing many radioimmunoassays because of theiradvantages over the latter, which include longer reagent shelf-life, cheaper and sim-pler equipment, no restrictive regulations for reagent disposal, and saferreagents.
Fig. 11.3 Principle of competitive enzyme immunoassays
Solid-phaseadsorbedantigen
Antibody-containingserum
Enzyme-labelledanti-immunoglobulin
Colour
+ Enzymesubstrate
Incubatethen wash
Incubatethen wash E
E
E
E
E
E
Solid-phaseadsorbedantigen
Antibody-containingserum
Enzyme-labelledanti-immunoglobulin
Colour
+ Enzymesubstrate
Incubatethenwash
Incubatethenwash
E
E
E
E
E
E
E
Fig. 11.4 Principle of non-competitive enzyme immunoassays

332 Manual of basic techniques for a health laboratory
Immunofluorescence
Fluorescent dyes such as fluorescein isothiocyanate and tetra-methylrhodamineisothiocyanate can be coupled to antibodies without destroying their specificity.Fluorescence occurs when molecules that have been excited to a higher energystate return to their normal energy state. The excess energy is released in the formof light. A fluorescent microscope, which is a modified light microscope, is used tovisualize the light emitted.
Two types of immunofluorescence technique can be used.
Direct immunofluorescence
Direct immunofluorescence is used when testing for an antigen. In this technique afluorescent dye is linked to the isolated portion of an antiserum containing anti-bodies directed against a specific component of cells or tissue. The antiserum isapplied directly to the tissue specimen. The antigen and antibody react, then thetissue specimen is washed.
The tissue specimen is examined under the microscope and fluorescence is seenwhere the antibody is attached to the antigen (Fig. 11.5).
Indirect immunofluorescence
Indirect immunofluorescence is used to determine whether antibodies are presentin a patient’s serum. The serum is applied directly to an appropriate tissue speci-men containing an antigen directed against the specific antibody under investiga-tion. The antigen and antibody react, then the tissue specimen is washed. Ananti-immunoglobulin with a fluorescent label is added and the tissue specimen isthen incubated before being washed again.
The labelled anti-immunoglobulin will attach to any antibody already bound to theantigen in the tissue specimen and shows up under the microscope as areas offluorescence (Fig. 11.6). The indirect method is more sensitive than the directmethod because it is amplified in the sense that each unlabelled antibody can bebound by two labelled antibodies.
11.2.2 Secondary binding testsThe secondary binding tests enable visible manifestations following the primaryreaction to be observed. In these tests one can actually see the effects of the bindingevent without the aid of an additional label. These tests include agglutination,precipitation, complement-dependent reactions and neutralization methods. Theagglutination and precipitation methods are routinely employed for diagnostic pur-poses. These methods are briefly described below.
Fig. 11.5 Principle of direct immunofluorescence
F
F
F
FF F
Fluorescence-labelledantibodies
Incubatethenwash
FluorescenceAntigen(cell or tissue specimen)
F
F
F
F

11. Immunological and serological techniques 333
Agglutination
Agglutination involves the reaction of an antibody with a particulate (insoluble)antigen leading to visible clumping of these particles (Fig. 11.7). The interaction ofsurface antigens and antibodies directed against them leads to cross-linking ofadjacent particles, e.g. bacteria, to form a lattice of agglutinated cells.
Active agglutination (direct)
Active agglutination involves antigenic determinants that are an intrinsic constitu-ent of the particle, e.g. haemagglutination reactions used for blood grouping.
Passive agglutination (indirect)
Passive agglutination involves antigenic determinants that are not an intrinsic con-stituent of the particle. A soluble antigen is combined with insoluble particles suchas erythrocytes. The erythrocytes are usually treated with tannic acid, which alterstheir surface properties so that the antigen can bind firmly. Other insoluble parti-cles include bacteria, charcoal, bentonite (clay) and polyvinyl latex where the anti-gen is simply adsorbed.
Semi-quantitative titrations can be carried out to determine the amount of anti-body present in a sample. A constant volume of suspended particles (antigen) isadded to a constant volume of serially diluted antiserum. The presence of antibodyin the serum causes agglutination of the particles (Fig. 11.8) and the reaction isusually scored on a scale of 0 to 4 +. The antibody content is expressed as a titre —
Fig. 11.6 Principle of indirect immunofluorescence
F
F
F
FF
F
F
F
F
F
Antibody Fluorescence-labelledanti-immunoglobulin
Incubatethen wash
Incubatethenwash
Fluorescence
Antigen(cell or tissue specimen)
Fig. 11.7 Principle of agglutination
Antigen(insoluble)
Antibody-containingserum
Incubatethenwash
Precipitation

334 Manual of basic techniques for a health laboratory
the reciprocal of the final dilution of antiserum capable of producing visibleagglutination.
Agglutination inhibition
Agglutination inhibition is used for determining the presence of antigen. This assayis based on competition between particulate and soluble antigen for antibody-bindingsites. The antibody and the test sample are allowed to react together. If solubleantigen is present in the sample, the antibody reacts with it and is not free to reactfurther after the subsequent addition of indicator particles or cells. Thus, the ab-sence of agglutination with a specimen under investigation indicates a positive testresult. An example of this kind of assay is the detection of human chorionic gona-dotropin (hCG) used in the test for confirmation of pregnancy and also in otherpathological conditions where hCG levels are important (Fig. 11.9).
Precipitation
Unlike agglutination reactions in which the antigen is particulate (insoluble), inprecipitation reactions the interaction is between a soluble antibody and a solubleantigen. If a soluble antibody is incubated with a soluble antigen, antibody andantigen complexes cross-link and form a precipitate. Precipitation methods can bequantitative or qualitative and the interactions are dependent on ionic strength, pHand concentration.
Incubatethenwash
Antigencarrier
particles
Antigen (soluble) Absorbedantigen
AgglutinationAntibody-containingserum
Incubatethenwash
Fig. 11.8 Principle of passive agglutination
hCG antibody Adsorbed hCGantigen
hCG antigen(urine specimen from
pregnant woman)
No precipitation = positive result
(a)
(b)
hCG antibody Adsorbed hCGantigen
Precipitation = negative result
Fig. 11.9 Principle of the agglutination inhibition test for hCG

11. Immunological and serological techniques 335
elometry, turbidimetry, radial immunodiffusion (Mancini technique), double dif-fusion (Ouchterlony) and some immunoelectrophoresis techniques.
Nephelometry and turbidimetry
Nephelometry and turbidimetry involve the measurement of the light scatteringand light absorption properties, respectively, of antigen–antibody complexes. Thesetechniques are used to measure concentrations of proteins and drugs in serum orCSF. The assays are rapid and sensitive. A constant, excessive amount of antibodyis incubated with an antigen in a cuvette.
In nephelometry light is passed through the cuvette and the scatter produced bythe antigen–antibody complexes that have been formed is measured.
The antigen concentration is determined from a standard curve made by mea-suring the light scatter produced by a series of antigen solutions of known con-centrations. In some assays, polymers are added to accelerate the formation ofantigen–antibody complexes.
In turbidimetry light is passed through the cuvette andthe absorption produced by the antigen–antibody com-plexes that have been formed is measured. A conven-tional photometer can be used for this purpose.
Radial immunodiffusion (Mancini technique)
Radial immunodiffusion is based on the principle that aquantitative relationship exists between the amount ofantigen placed in a well cut in an agarose gel containingantibody and the diameter of the resulting ring of pre-cipitate. The antigen concentration is proportional tothe square of the diameter of the ring of precipitate. Theconcentration of unknown samples is calculated with theaid of a standard curve which is prepared by plottingthe diameter2 of the resulting ring of precipitate producedby a series of antigen solutions of known concentration(Fig. 11.11). This technique can be used for the quanti-tative measurement of complement factors andimmunoglobulins.
Excessantibody
Excessantigen
Equivalence
Concentration of antigen
Mas
s of
pre
cipi
tate
d an
tibod
y
Fig. 11.10 A quantitative precipitin curve
A quantitative precipitin curve can be drawn in which theproportion of antigen and antibody determines the extent ofcross-linking and precipitation. The curve shows the follow-ing features (Fig. 11.10):
● The equivalence zone in which the proportions of anti-gen and antibody are equivalent.
● The excess antibody zone in which all available antigenicdeterminants are bound by individual antibody molecules,leaving some antibody molecules unbound.
● The excess antigen zone in which all the antigen bindingsites of an antibody are bound by individual antigen mol-ecules, leaving some molecules of antigen unbound.
Several other immunological techniques employ the precipi-tation reaction in one form or another. These include neph-
Fig. 11.11 Principle of radial immunodiffusion
Standard 1 Standard 2
Antigen (or antibody) concentration
Dia
met
er2
of r
ing
of p
reci
pita
te
Standard 3 Unknown

336 Manual of basic techniques for a health laboratory
11.3 Determination of rheumatoid factors by thelatex-agglutination technique
11.3.1 Materials and reagents● Test plates (preferably with a dark background)
● Stirring rods, wooden orange sticks or rotator
● Test-tubes, 5ml
● Test-tube rack
● Micropipettes
● Latex rheumatoid factor (RF) reagent (aqueous suspension of latex particlescoated with human IgG)
● Negative and positive control sera
● Sodium chloride, 0.85% solution (reagent no. 53).
The above-mentioned materials and reagents are usually supplied as part of a com-mercial test kit.
11.3.2 Method1. Bring the test and control sera and latex RF reagent to room temperature.
2. Dilute the test and control sera 1 :5 with sodium chloride solution.
3. Apply one drop of each dilution to the test plates.
4. Shake the vial of latex RF reagent and add one drop to each of the samples onthe test plates.
5. Mix well with stirring rods or orange sticks (one for each sample) and rotate theplates gently (about 10 times), or place on a rotator.
6. After 2 minutes, examine the plates and compare the reactions of the test serawith those of the control sera (Fig. 11.12).
7. If any sera are positive, repeat steps 3–6, using a twofold dilution.
The highest dilution of serum that causes agglutination is the titre.
11.4 Tests for the determination of anti-streptolysin Oantibodies
11.4.1 Anti-streptolysin O test (ASOT)Streptolysin O is a toxin produced by haemolytic streptococci. The anti-streptolysinO test (ASOT) is the most commonly used laboratory test for following a strepto-coccal infection and its sequelae (rheumatic fever and acute post-streptococcalglomerulonephritis). Other approaches are now available, but the “standard” ASOTis based on the fact that streptolysin O will lyse human or sheep erythrocytes unlessneutralized by anti-streptolysin O antibodies present in the patient’s serum.
Fig. 11.12 Latex agglutination testa: Positive result; b: negative result.

11. Immunological and serological techniques 337
One streptolysin O unit is the minimum amount of streptolysin O that will lyse0.5ml of a freshly prepared 5% suspension of sheep erythrocytes when incubatedfor 1 hour at 37 °C. One Todd unit is defined as the amount of anti-streptolysin Oantibody that will neutralize 0.5 streptolysin O units.
Principle
The test is performed by incubating a constant amount of standardized streptolysinO with serial dilutions of heat-inactivated patient’s serum (containing anti-streptolysin O antibodies) at 37 °C for 15 minutes. A freshly prepared suspensionof 5% sheep erythrocytes is then added to all the tubes and incubation is continuedfor a further 45 minutes. After centrifugation at 500g, the highest dilution of pa-tient’s serum that still has a clear supernatant (no haemolysis) is the end-point andits Todd unit value (reciprocal of the dilution) is reported. This technique is rathertime-consuming and simpler and more rapid methods using latex agglutination arenow available (see section 11.4.2).
Materials and reagents
● Volumetric flask, 1000ml
● Test-tubes, 75mm ¥ 12mm
● Test-tube racks
● Serological pipettes
● Water-bath
● Centrifuge
● Phosphate-buffered water, pH 6.8 (reagent no. 43)
● Sodium chloride, 0.85% solution (reagent no. 53)
● 5% Suspension of washed sheep erythrocytes in sodium chloride, 0.85% solu-tion (reagent no. 53)
● Reduced streptolysin O (instructions for the preparation of reduced streptolysinO from the unreduced form are usually provided by the manufacturer).
Method
1. Make three dilutions of the patient’s serum (inactivated by heating at 56 °C for30 minutes) as follows:
0.5ml of serum + 4.5ml of phosphate buffer = 1 :100.5ml of 1 :10 serum + 4.5ml of phosphate buffer = 1 :1001ml of 1 :100 serum + 4ml of phosphate buffer = 1 :500
2. From these master dilutions, make an extended series of dilutions as shown inTable 11.1. For screening purposes, use only the first seven tubes and the con-trol tubes (13 and 14).
3. Add 0.5ml (equivalent to 1 International Unit (IU)) of reduced streptolysin Oto all the tubes except tube 13. Mix and incubate in a water-bath at 37°C for 15minutes.
4. Add 0.5ml of the 5% suspension of sheep erythrocytes to each tube. Mix andincubate in a water-bath at 37 °C for 45 minutes, mixing again after the first 15minutes of incubation.
5. Centrifuge the tubes gently at 500g for 3 minutes and observe for haemolysis.
The end-point is the last tube (i.e. the highest dilution) showing no haemolysis.Control tube 13 should show no haemolysis. If there is haemolysis in this tubethe test should be repeated. Control tube 14 should show complete haemolysis.
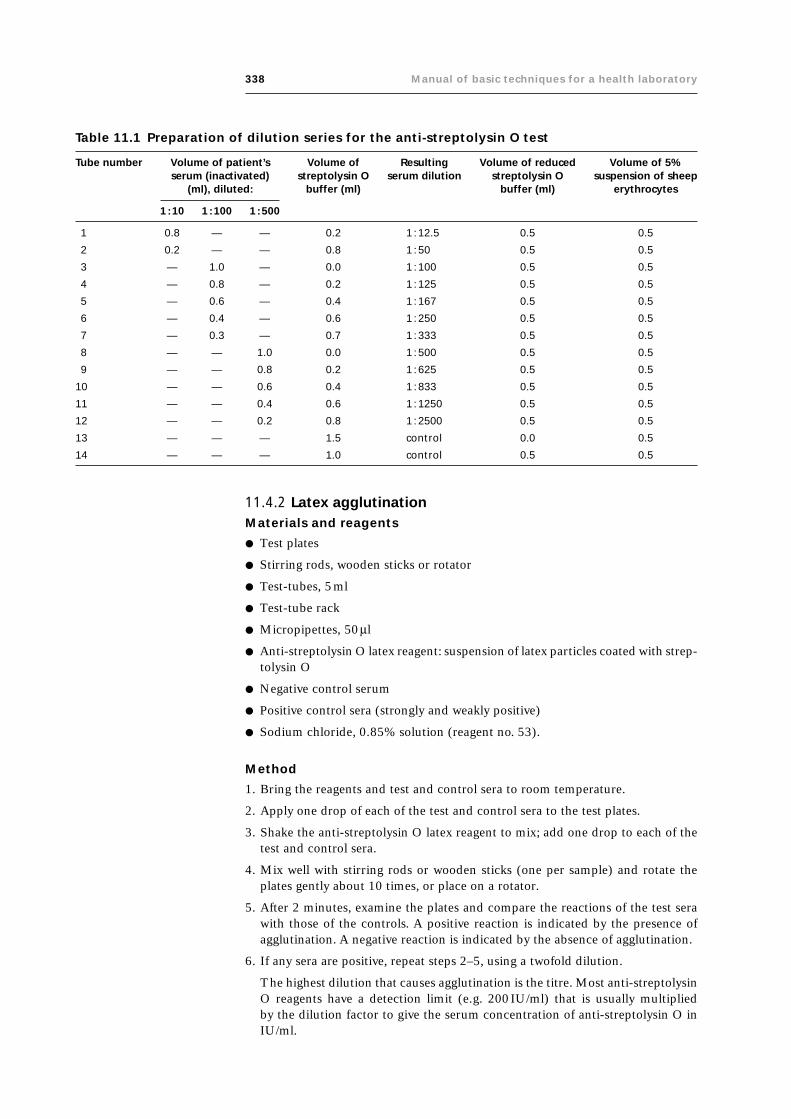
338 Manual of basic techniques for a health laboratory
11.4.2 Latex agglutinationMaterials and reagents
● Test plates
● Stirring rods, wooden sticks or rotator
● Test-tubes, 5ml
● Test-tube rack
● Micropipettes, 50ml
● Anti-streptolysin O latex reagent: suspension of latex particles coated with strep-tolysin O
● Negative control serum
● Positive control sera (strongly and weakly positive)
● Sodium chloride, 0.85% solution (reagent no. 53).
Method
1. Bring the reagents and test and control sera to room temperature.
2. Apply one drop of each of the test and control sera to the test plates.
3. Shake the anti-streptolysin O latex reagent to mix; add one drop to each of thetest and control sera.
4. Mix well with stirring rods or wooden sticks (one per sample) and rotate theplates gently about 10 times, or place on a rotator.
5. After 2 minutes, examine the plates and compare the reactions of the test serawith those of the controls. A positive reaction is indicated by the presence ofagglutination. A negative reaction is indicated by the absence of agglutination.
6. If any sera are positive, repeat steps 2–5, using a twofold dilution.
The highest dilution that causes agglutination is the titre. Most anti-streptolysinO reagents have a detection limit (e.g. 200IU/ml) that is usually multipliedby the dilution factor to give the serum concentration of anti-streptolysin O inIU/ml.
Table 11.1 Preparation of dilution series for the anti-streptolysin O test
Tube number Volume of patient’s Volume of Resulting Volume of reduced Volume of 5%serum (inactivated) streptolysin O serum dilution streptolysin O suspension of sheep
(ml), diluted: buffer (ml) buffer (ml) erythrocytes
1 :10 1 : 100 1 : 500
1 0.8 — — 0.2 1 : 12.5 0.5 0.5
2 0.2 — — 0.8 1 : 50 0.5 0.5
3 — 1.0 — 0.0 1 : 100 0.5 0.5
4 — 0.8 — 0.2 1 : 125 0.5 0.5
5 — 0.6 — 0.4 1 : 167 0.5 0.5
6 — 0.4 — 0.6 1 : 250 0.5 0.5
7 — 0.3 — 0.7 1 : 333 0.5 0.5
8 — — 1.0 0.0 1 : 500 0.5 0.5
9 — — 0.8 0.2 1 : 625 0.5 0.5
10 — — 0.6 0.4 1 : 833 0.5 0.5
11 — — 0.4 0.6 1 : 1250 0.5 0.5
12 — — 0.2 0.8 1 : 2500 0.5 0.5
13 — — — 1.5 control 0.0 0.5
14 — — — 1.0 control 0.5 0.5

11. Immunological and serological techniques 339
11.5 Determination of bbbbb-human chorionic gonadotropin(bbbbb-hCG) in urine by the agglutination inhibitiontechnique
11.5.1 Materials and reagents● Test plates
● Stirring rods, wooden sticks or rotator
● Test-tubes, 75mm ¥ 12mm
● Test-tube rack
● Anti-b-human chorionic gonadotropin (anti-b-hCG) antibody
● Latex hCG reagent (suspension of latex particles coated with hCG)
● Negative control
● Positive controls (strongly and weakly positive).
The above-mentioned reagents are usually supplied as part of a commercial testkit.
11.5.2 Method1. Bring the urine samples and reagents to room temperature.
2. Add one drop of each of the urine samples and each of the controls to the testplates.
3. Add one drop of anti-b-hCG antibody to each of the samples and each of thecontrols. Mix carefully.
4. Mix the latex hCG reagent suspension well; apply one drop to the testsamples and rotate the plates or mix with stirring rods or wooden sticks (one persample).
5. After 3 minutes examine the plates and compare the reactions of the test sam-ples with those of the controls.
A positive reaction (pregnant or b-hCG present) is indicated by the absence ofagglutination. A negative reaction (non-pregnant or b-hCG absent) is indicatedby the presence of agglutination.
Semi-quantitative analysis
Semi-quantitative analysis may be desirable in some cases where the production ofb-hCG may have a pathological cause. This may occur in both pregnant and non-pregnant patients.
Make a twofold dilution of the positive urine samples and examine as described insteps 2–5 above. The highest dilution that does not cause agglutination is the titre.
The results for this semi-quantitative analysis are reported in IU/ml which can beobtained by multiplying the dilution factor of the highest dilution that does notcause agglutination by the sensitivity or limit of detection of the method, as statedby the manufacturer.
11.6 Quantitative determination of IgA, IgG and IgM byradial immunodiffusion
11.6.1 Materials and reagents● Siliconized glass plates 8cm ¥ 12cm, or Petri dishes (glass or plastic)
● Boxes with tightly fitting lids
● Hole-punch with inner diameter of 2mm

340 Manual of basic techniques for a health laboratory
● Pipettes, 5ml
● Water-bath
● Thermometer
● Test-tubes
● Test-tube racks
● Agar, 3% solution in distilled water
● Sodium chloride, 0.15mol/l with 0.1% sodium azide
● Agarose or agar
● Anti-human IgA antiserum
● Anti-human IgG antiserum
● Anti-human IgM antiserum
● Human standard serum containing:— IgA 2.0mg/ml (123IU/ml)— IgG 9.5mg/ml (110IU/ml)— IgM 0.96mg/ml (111IU/ml).
The above-mentioned reagents are usually supplied as part of a commercial testkit.
11.6.2 Method1. Coat as many glass plates (or Petri dishes) as necessary (allowing one per pa-
tient) with agar, 3% solution.
2. Calculate the exact volume of 1% agarose gel that needs to be prepared tocover all the plates with gel to a thickness of 1.5mm.The formula for calculat-ing this is as follows:
pd 2
40 15¥ .
where d is the diameter of the plate (in cm).
3. Prepare 40ml of 1% agarose in 0.15mol/l sodium chloride with 0.1% sodiumazide. Dissolve the agarose by placing it in the water-bath at 100 °C. When thesuspension is clear, allow it to cool to 56 °C.
4. Warm the antisera to 56 °C in the water-bath.
5. Add 0.1ml of anti-human IgA antiserum to each 10ml of the agarose solution.Mix thoroughly.
6. Pour on to each glass plate (or Petri dish) the exact volume of the agarose–antiserum mixture needed to make a gel with a thickness of 1.5mm and allowit to solidify at room temperature.
7. Prepare two more agarose gels in the same way: the first with 0.2ml of anti-human IgG antiserum per 10ml of agarose solution and the second with 0.13mlof anti-human IgM antiserum per 10ml of agarose solution.
8. Punch holes of 2-mm diameter in the gels.
9. Prepare twofold dilutions of the standard serum in 0.15mol/l sodium chloride,as follows, for the determination of:● IgA: 1 :8, 1 :16, 1 :32, 1 :64 and 1 :128.● IgG: 1 :20, 1 :40, 1 :80, 1 :160 and 1 :320.● IgM: undiluted, 1 :2, 1 :4, 1 :8 and 1 :16.
10. Prepare 1 :2, 1 :16 and 1 :40 dilutions of the patients’ sera in 0.15mol/l sodiumchloride for the determination of IgM, IgA and IgG, respectively.

11. Immunological and serological techniques 341
11. Pipette 5ml of each of the dilutions of the standard serum and the patients’ serainto different holes of the appropriate agarose gels (see steps 6 and 7).
12. Place the plates in tightly closed boxes in a humid atmosphere and incubatethem for 3 days at room temperature.
13. Measure the diameter of the rings of precipitate (in millimetres) using a ruler.
14. Make plots of the titrations of the standard serum. On the x-axis plot the squareof diameter of the rings of precipitate, and on the y-axis plot the concentrationsof the standard serum (see Fig. 11.11).
15. Use these curves to read the concentration of IgA, IgG and IgM in the patients’sera.
11.7 Tests for the determination of HIV antibodies11.7.1 ELISAMaterials and reagents
● Micropipettes
● Incubator or water-bath at 37°C
● Washer or vacuum pump
● Spectrophotometer (reader)
● Distilled or deionized water
● ELISA test kit (commercially available)
● Solid-phase support system, reagents and controls.
Method
Each kit comes with its own instructions which should be followed carefully. How-ever, the general steps are as outlined below.
1. Add the test (serum) sample and controls to the antigen-precoated solid-phasesupport system and incubate at the specified temperature for the appropriatetime.
2. Carefully aspirate the sample from the solid-phase system and wash to removeexcess sample and other proteins. The washing should not remove the HIV anti-bodies that have attached to the solid phase during incubation.
3. Add the indicated amount of conjugate (enzyme-linked anti-human (usually goat)IgG) and incubate according to the manufacturer’s instructions.
4. Carefully aspirate the liquid again to remove any unbound conjugate and washthe solid-phase system.
5. Add the appropriate quantity of substrate and incubate according to the manu-facturer’s instructions. This is the colour development stage and should be pro-tected from light.
6. At the end of the incubation period, add the stopping solution. The stoppingsolution inhibits any further reaction between the enzyme and the substrate.
7. Read the results in a spectrophotometer at the recommended wavelength.
8. Calculate the cut-off values for each test run according to the manufacturer’sinstructions.
9. If borderline results are obtained, repeat the test in case there have been techni-cal errors. If borderline results are still obtained, examine the sample using awestern blot. Alternatively, repeat the test using a different ELISA and/or a rapidtest system (see section 11.7.2).

342 Manual of basic techniques for a health laboratory
11.7.2 Dipstick testPrinciple
Dipstick tests were developed for the rapid detection of antigens and anti-bodies in human serum. These tests are generally employed in situations wherequick decisions may need to be taken and often require no equipment otherthan that provided in the kits.
In the dipstick test for HIV antibody, which is commercially available, a poly-styrene strip is coated with HIV antigen and allowed to react with serum. AnyHIV antibody present will then bind to the HIV antigen. After subsequentincubation with a substrate solution, a coloured spot that indicates the pres-ence of HIV antibody will develop (Fig. 11.13).
Materials and reagents
● Timer
● Absorbent towels or filter-paper
● Commercially available test kit containing dipsticks, reagents and positiveand negative controls
● Weak-positive in-house control serum.
Method
Follow the instructions provided in the kit.
A positive result is indicated by any colour development on the antibody-coated spot. A spot should be visible on the positive control and no colourshould be seen on the negative control. Weak-positive in-house controls shouldbe included to help in reading results. The test run is invalid if the resultsobtained using the controls are not as described above.
11.8 Tests for hepatitis virus infectionRoutine tests for hepatitis include the use of markers for hepatitis A, B and Cviruses. Hepatitis A is most common in children, especially in nurseries; how-ever, it is not routinely tested for, except in cases of epidemics.
Hepatitis B and C viruses are transmitted through blood products, body fluids,contaminated needles and other contaminated materials.
Hepatitis B virus has several markers which include:
— surface antigen (HBsAg)
— antibody to surface antigen (anti-HBs)
— envelope antigen (HBeAg)
— antibody to envelope antigen (anti-HBe)
— antibody to core antigen (anti-HBc).
The concentrations of these markers vary during the course of an infection.The antigen markers appear first or earlier on after exposure to the virus.
Dipsticck
Incubate
Wash
Incubate
Wash
Incubate
Wash, dry andevaluate visually
Sppot = positive reactionNo sspot = negative reaction
Substrate
Enzyme-conjugatedantiserum
Testsample
Fig. 11.13 Dipstick assay for HIVantibody
A test run is invalid if the positive control values are less than the calculated cut-off values. In such cases, the test run must be repeated.
Note: Criteria for testing samples using a western blot vary from laboratory to labo-ratory. Some laboratories test all samples that give a positive reaction in the ELISA.In some cases a specific request may be made for a western blot even if the ELISAwas non-reactive.

11. Immunological and serological techniques 343
Seroconversion (antibody production) often occurs several weeks or months afterexposure.
Hepatitis testing is routinely done by solid-phase ELISA and radioimmunoassaymethods. Commercial kits for detection of hepatitis markers are available and specificcriteria and instructions are provided with each kit. The general principles of theELISA technique for one of the markers for hepatitis B virus are outlined below.
11.8.1 ELISA for hepatitis B surface antigenMaterials and reagents
● Micropipettes
● Incubator or water-bath
● Washer or vacuum pump
● Spectrophotometer (reader)
● Commercially available test kit containing solid-phase support system, reagentsand controls
● Distilled or deionized water.
Method
1. Add the test (serum) samples and controls to the anti-HBs precoated solid-phase support system and incubate according to the manufacturer’s instructions.
2. Using a vacuum pump or automated washer, carefully aspirate the liquid fromthe solid phase and wash the system.
3. Add the specified amount of conjugate (enzyme-linked anti-HBs) and incubateaccording to the manufacturer’s instructions.
4. Aspirate the liquid and wash to remove any unbound conjugate.
5. Add the specified amount of substrate (usually o-phenylenediamine) and incu-bate in the dark. (This is the colour development stage and should be protectedfrom light.)
6. Add the stopping solution as specified. The stopping solution (usually an acid)inhibits any further reaction between the enzyme and the substrate.
7. Read the results in a spectrophotometer at the specified wavelength.
8. Calculate the cut-off value for the test run as instructed by the manufacturer.
The test run is invalid if the positive control values are less than the cut-off value.In such cases the assay must be repeated.
Precautions
The ELISA method is fairly easy to perform, but pay attention to the following:
● Make sure that the reagents and samples are brought to room temperature.
● Make appropriate dilutions of reagents or specimens if required.
● Make sure that the pre-coated antigen or antibody (solid phase) is not disturbedduring the addition of the sample or of beads.
● Prepare only enough chromogen solution for a single test run. Store the solutionin a closed container, in the dark. If colour develops prior to application, a newsolution should be prepared.
● Avoid cross-contamination of samples.
● Adhere strictly to the incubation times, temperatures and other conditionsspecified in the manufacturer’s instructions.

344 Manual of basic techniques for a health laboratory
11.8.2 Dipstick test for hepatitis B surface antigen
Principle
The dipstick test for the detection of hepatitis B surface antigen (HBsAg)takes advantage of the formation of a visible spot by precipitatingimmunocomplexes.
Conjugates of monoclonal antibodies against HBsAg coupled to colloidalgold particles are adsorbed to one area of a nitrocellulose strip (zone A inFig. 11.14).
Polyclonal antibodies against HBsAg are chemically fixed to another areaof the strip (zone B in Fig. 11.14). A drop of human serum is applied tozone A (Fig. 11.15). The HBsAg antigen in the serum binds to the anti-body conjugate and the gold–HBsAg immunocomplex migrates along thestrip until it reaches the fixed polyclonal antibodies in zone B. The polyclonalantibodies precipitate the gold–HBsAg immunocomplex, and form a vis-ible red band in zone B (Fig. 11.16). No red band is formed if the serumdoes not contain HBsAg.
Materials and reagents
● Commercially available test kit containing dipsticks, reagents andcontrols.
Method
1. Label the test strip with the patient’s name and/or number.
2. Add a drop of serum to zone A as recommended by the manufacturer.
3. Allow the serum fluid to migrate to zone B on the test strip.
4. Inspect zone B after 10–20 minutes for the appearance of a spot indicat-ing a positive reaction.
11.9 Dipstick test for falciparum malariaDipstick tests are also available for the detection of the malarial parasitePlasmodium falciparum. The test described here is based on the detectionby monoclonal antibodies of the species-specific histidine-rich protein II(HRP-II) which is expressed by the asexual blood stages and possibly earlygametocyte stages of the parasite.
11.9.1 Materials and reagents● Capillary tubes and rubber bulbs
● Test-tubes
● Test-tube rack
● Reaction stand
● Commercially available test kit containing dipsticks, test cards, reagentsand controls.
Fig. 11.14 Dipstick for the detectionof HBsAg
Nam
e
Zone B
Zone A
Nam
e
Zone B
Zone A
Fig. 11.16 Dipstick test for HBsAg:positive reaction
me
Nam
e
Zone B
Zone A
Fig. 11.15 Applying a test sample tothe dipstick
● In addition to the controls in the kit, it is generally recommended to include anin-house control of known optical density for quality control purposes.
The dipstick is pretreated with a mouse monoclonal antibody against HRP-II whichis applied in a line across the stick about 1cm from its base. A second dotted line ofHRP-II antigen is incorporated into the dipstick about 2–3mm above the line ofmonoclonal antibody as a positive reagent control.

11. Immunological and serological techniques 345
11.9.2 Method1. Collect a finger-prick sample of blood from the patient.
2. Place one drop of blood into a test-tube containing three drops of lysing reagent(Fig. 11.17).
3. Place one drop of the lysed blood sample into one of the wells of the test card inthe reaction stand (Fig. 11.18).
4. Place the dipstick in the lysed blood until all the blood has been absorbed (Fig.11.19).
5. Apply one drop of detection reagent to the base of the dipstick (Fig. 11.20).This reagent consists of a suspension of micelles (phospholipid vesicles) con-taining sulfo-rhodamine B as a marker coupled to rabbit antibody raised againstHRP-II.
6. When the reagent has been absorbed, apply two drops of washing reagent toclear the lysed blood (Fig. 11.21).
If the result is positive a thin red line will be left across the dipstick with a brokenline (the reagent control) above it.
Fig. 11.19 Placing the dipstick in thelysed blood
Fig. 11.18 Applying the blood sample to thetest card
Fig. 11.17 Adding a blood sample tolysing reagent
Fig. 11.20 Applying detection reagent to thedipstick

346 Manual of basic techniques for a health laboratory
Fig. 11.21 Clearing the lysed blood withwashing reagent
If the result is negative only the broken line is seen.
The whole test takes less than 10 minutes.
Current studies indicate that the test has a sensitivity and a specificityof 86–95% when compared with standard light microscopy carriedout by experienced technicians. A similar test for P. vivax is underdevelopment.
11.10 Tests for syphilis infectionSyphilis is caused by Treponema pallidum. There are four stages ofsyphilis infection: primary, secondary, latent and tertiary, and aspecial condition of maternal–fetal transmission termed congenitalsyphilis. Immune responses to syphilis can be grouped into twocategories: non-specific (or reaginic) and specific.
The non-specific reagin is of the IgM class and reacts with analcoholic extract of beef heart known as cardiolipin (a phospholipid).
Since the reaginic antibody lacks specificity, it shows up in many other conditionsand disease states unrelated to treponemal infection. In these cases false-positivereactions can occur. Specific antibodies to treponemes (both to T. pallidum and tononpathogenic treponemes) of the normal bacterial flora of the oral or genital tractcan also develop. These antibodies are of the IgG class and remain detectablethroughout the life of the patient despite treatment. Routine tests for syphilis includethe rapid plasma reagin (RPR) test, the fluorescent treponemal antibody-absorbed(FTA-Abs) test and the T. pallidum haemagglutination (TPHA) test.
Principle
RPR test
The RPR test has replaced the Venereal Disease Research Laboratory (VDRL)test, as a rapid screening test for the following reasons:
● There is no need for daily preparation of reagents.
● No microscope is required.
● Heat inactivation of serum is not required.
The RPR test uses the VDRL antigen modified with choline chloride to inactivatecomplement, and charcoal particles to allow the results of the reaction to be readwithout a microscope. The RPR test can also be applied as a semi-quantitative test.
FTA-Abs test
The FTA-Abs test is used in the confirmation of syphilis. In the first step of thetest, serum is diluted in a concentrated culture filtrate of Reiter treponemes toabsorb any antibodies to nonpathogenic treponemes. The serum is then layeredover a glass slide on which killed T. pallidum organisms (Nichols strain) have beenaffixed. The slide is incubated, washed and overlaid with a fluorescent-labelled anti-human immunoglobulin antibody. If the test result is positive the treponemes willfluoresce.
This indirect immunofluorescence technique is highly sensitive in all stages of syphi-lis, especially in the very early and very late stages. Once positive this test remainspositive for the life of the patient. It is not used as a screening test for syphilisbecause it does not detect reinfection and it is time-consuming and costly (a fluor-escence microscope with a dark-field condenser is required).
The results of a test for syphilis must be interpreted according to the type(s) of testemployed and the stage of the disease the patient has reached. Remember that a

11. Immunological and serological techniques 347
positive result from a screening test for syphilis may be due to other heterophileantibodies, faulty technique or to the presence of other treponemal antibodies. Anegative result may mean one of the following:
● The infection is too recent to have produced detectable levels of antibodies.
● The test is temporarily non-reactive because of treatment the patient isreceiving.
● The test has been rendered temporarily non-reactive because the patient hasconsumed alcohol prior to testing.
● The disease is latent or inactive.
● The patient has not produced protective antibodies because of immunologicaltolerance.
● The technique is faulty.
Weakly positive results may be due to:
— very early infection;
— lessening of the activity of the disease after treatment;
— nonspecific immunological reactions;
— incorrect technique.
The greatest value of the non-treponemal tests is in screening following therapyand in the detection of reinfection.
TPHA test
The TPHA test is also used in the confirmation of syphilis. In the first step of thetest, diluted serum is mixed with absorbing diluent containing non-pathogenic Reitertreponemes. The serum is then transferred to a microtitre plate and erythrocytessensitized with killed T. pallidum organisms (Nichols strain) are added. If the testresult is positive the erythrocytes will form a smooth mat of agglutinated cells.
11.10.1 RPR testMaterials and reagents1
● Test plates
● Disposable Pasteur pipettes
● Serological pipette
● Test-tubes, 75mm ¥ 12mm
● Test-tube rack
● Rotator
● RPR antigen
● Negative, weak-positive and strongly positive controls
● Sodium chloride, 0.85% solution (reagent no. 53).
The above reagents are usually supplied as part of a test kit.
Method
1. Bring the test and control sera and RPR antigen to room temperature.
2. Dispense one drop of each of the test and control sera on to the test plates andspread carefully in the individual wells.
1 Note: The reagents for the RPR test should be stored at 2–6 °C in the refrigerator.

348 Manual of basic techniques for a health laboratory
3. Add one drop of RPR antigen to each well of the test plates.
4. Place the test plates on the rotator and rotate for 8 minutes at 100rpm. (Therecommended speed is between 95 and 105rpm and this should be checkeddaily as part of quality control.)
If a mechanical rotator is not available, tilt the plates back and forth and rotatethe plates carefully for 8 minutes at 80–85rpm.
5. Examine the test plates for flocculation (Fig. 11.22) and compare the reactionsof the test sera with those of the controls.
6. Prepare a twofold dilution of any positive sera and examine the dilutionsas described in steps 2–5. The highest dilution of serum to give flocculation isthe titre.
11.10.2 TPHA testMaterials and reagents
● Test-tubes
● Test-tube rack
● Commercially available TPHA test kit containing microtitre plates, micropipettes(with disposable tips), absorbing diluent, erythrocytes sensitized with T. pallidum,unsensitized erythrocytes, positive and negative control sera
● Distilled water.
The reagents and controls should be reconstituted before use according to themanufacturer’s instructions.
Method
1. Dilute the test and control sera 1:20 with absorbing diluent.
2. Using a micropipette, dispense 25ml of the negative control serum into wells 1and 2 of the first horizontal row of the microtitre plate (A in Fig. 11.23).
3. Dispense 25ml of the positive control serum into wells 1 and 2 of the secondhorizontal row of the microtitre plate (B in Fig. 11.23).
4. Dispense 25ml of the first test serum into wells 1 and 2 of the third horizontalrow of the microtitre plate (C in Fig. 11.23). Repeat the procedure with theremaining test sera. If necessary, use the adjacent wells (e.g. 3 and 4 in Fig.11.23).
5. Add 75ml of the control erythrocytes to the wells in the first vertical row (1) andevery other row (3, 5, 7, 9 and 11), as appropriate.
Fig. 11.22 RPR test

11. Immunological and serological techniques 349
6. Add 75ml of the sensitized erythrocytes to the wells in the second vertical row(2) and every other row (4, 6, 8, 10 and 12), as appropriate.
7. Rotate the plates carefully, cover and leave to stand at room temperature for thetime recommended by the manufacturer. The plates should be protected fromvibration, radiant heat and direct sunlight.
8. Place the plates carefully on a white background or a sintered glass plate illumi-nated from below or a viewing device that allows the sedimentation pattern to beseen from below through a mirror.
If the result is positive a smooth mat of agglutinated cells will be seen. The cellsmay be surrounded by a red circle, or may even cover the entire base of the well. Ifthe result is negative a compact red button of non-agglutinated cells will be seen,with or without a very small hole in its centre.
If the result is doubtful (borderline) a button of non-agglutinated cells with a smallhole in its centre will be seen.
Note: The results should be interpreted according to the criteria provided by themanufacturer.
Fig. 11.23 Test plate for the TPHA test

350 Manual of basic techniques for a health laboratory
350
ANNEX Reagents and theirpreparation
OrderReagents are listed in alphabetical order. For example:
acetic acid is under Abrilliant cresyl blue is under Bcarbol fuchsin is under Chydrochloric acid is under Hsodium carbonate is under S
Each reagent has a number which appears after the name (the numbers are given inthe techniques).
q.s. = the quantity required to make up a certain volume
For example: sodium chloride 8.5gdistilled water q.s. 1000ml
This means:
Place 8.5g of sodium chloride in a volumetric flask. Add enough water (q.s.) toobtain a total volume of 1000ml.
Chemical formulaeIn most cases the chemical formulae of the compounds used are given immediatelyafter the English names:
— sodium chloride (NaCl)
— potassium hydroxide (KOH)
— sulfuric acid (H2SO4)
etc.
This can be useful when checking the label on the bottle.
Acetic acid, 50g/l (5%) solution (No. 1)Glacial acetic acid (CH3COOH) 20mlDistilled water q.s. 200ml
Label the bottle “ACETIC ACID 5% SOLUTION” and write the date.
Warning: Glacial acetic acid is highly corrosive.
Acetic acid, 100g/l (10%) solution (No. 2)Glacial acetic acid (CH3COOH) 20mlDistilled water q.s. 200ml
Label the bottle “ACETIC ACID 10% SOLUTION” and write the date.
Warning: Glacial acetic acid is highly corrosive.

Annex. Reagents and their preparation 351
Acetic acid, 500g/l (50%) solution (No. 3)Glacial acetic acid (CH3COOH) 100mlDistilled water q.s. 200ml
Label the bottle “ACETIC ACID 50% SOLUTION” and write the date.
Warning: Glacial acetic acid is highly corrosive.
Acetone–ethanol decolorizer for Gram stain (No. 4)Acetone 200mlAbsolute ethanol 475mlDistilled water 25ml
Mix the acetone, ethanol and distilled water and transfer to a clean glass-stopperedbottle. Label the bottle “ACETONE–ETHANOL DECOLORIZER” and writethe date.
Acid–ethanol for Ziehl–Neelsen stain (No. 5)Hydrochloric acid (HCl), concentrated 3mlEthanol (CH3CH2OH), 95% 97ml
Label the bottle “ACID–ETHANOL FOR ZIEHL–NEELSEN STAIN” and writethe date.
Warning: Hydrochloric acid is highly corrosive.
Acid reagent (No. 6)Concentrated sulfuric acid (H2SO4) 44mlOrthophosphoric acid (H3PO4), 85% 66mlCadmium sulfate 1.6gThiosemicarbazide 50mgDistilled water q.s. 500ml
Half fill a 500-ml flask with distilled water, add the sulfuric acid very slowly, stir-ring constantly, and follow with the orthophosphoric acid. Continue mixing thesolution and add the thiosemicarbazide and then the cadmium sulfate. Make upthe volume to 500ml with distilled water. Transfer the reagent to a brown bottle.Label the bottle “ACID REAGENT” and write the date. Store at 2–8°C.
The reagent will keep for at least 6 months at 2–8 °C.
Warning: Sulfuric acid is highly corrosive.
Albert stain (No. 7)Toluidine blue 0.15gMalachite green 0.20gGlacial acetic acid (CH3COOH) 1mlEthanol (CH3CH2OH), 96% 2mlDistilled water q.s. 100ml
Dissolve the glacial acetic acid in 30ml of distilled water in a clean 100-ml bottle.Add the toluidine blue and malachite green and mix well. Add the ethanol andmake up the volume to 100ml with distilled water. Mix well. Label the bottle“ALBERT STAIN” and write the date. Store at room temperature.
Warning: Glacial acetic acid is highly corrosive.

352 Manual of basic techniques for a health laboratory
Alkaline haematin D reagent (No. 8)Sodium hydroxide (NaOH) 4 gTriton X-100 (or equivalent) 25gDistilled water 1000ml
Dissolve the sodium hydroxide in the distilled water in a clean conical flask. Stirusing a glass rod until the crystals have completely dissolved. Add the Triton X-100(or equivalent) and mix well. Filter the solution into a clean glass-stoppered rea-gent bottle, using Whatman No. 1 (or equivalent) filter-paper. Label the bottle“ALKALINE HAEMATIN D REAGENT” and write the date. Store at room tem-perature (20–25°C).
Check the quality of the solution (see below).
Alkaline haematin D (AHD) reagent will keep for several months at 20–25°C. If aprecipitate forms during storage, the reagent should be filtered before use.
Note: Use filtered rainwater if distilled water is not available.
Quality control of alkaline haematin D reagentAn alkaline haematin D standard solution (AHD standard) supplied by the centrallaboratory is used to test the quality of new batches of AHD reagent in peripheral-level laboratories.
1. Fill a clean cuvette with distilled water. Place the cuvette in the cuvette chamberand adjust the haemoglobinometer or colorimeter to read zero at 540 nmwavelength.
2. Replace the distilled water with AHD reagent. The haemoglobinometer or colo-rimeter should read zero.
3. Pipette 20ml of AHD standard into a test-tube containing 3ml of the freshlyprepared AHD reagent (1:150 dilution).
4. Measure the haemoglobin concentration of the AHD standard (see section 9.3.2).
5. Repeat the procedure using the previous batch of AHD reagent. Compare theresults.
6. If the haemoglobin values differ by more than 5g/l, discard the freshly preparedAHD reagent and prepare a new batch, paying attention to accurate measure-ment of the constituents and the cleanliness of the glassware.
The AHD standard stock solution will keep for 8 months at 4–8°C.
Amies transport medium (No. 9)Charcoal, pharmaceutical grade 10.0gSodium chloride (NaCl) 3.0gDisodium hydrogen phosphate (Na2HPO4·2H2O) 1.15gPotassium dihydrogen phosphate (KH2PO4) 0.20gSodium thioglycollate 0.10gCalcium chloride (CaCl2), anhydrous 0.10gMagnesium chloride (MgCl2) 0.10gAgar 4.00gDistilled water 1000ml
Suspend the mixture of salts in the distilled water. Add the agar and heat until theagar has completely dissolved. Add the charcoal. Dispense into small tubes or bot-tles while stirring to keep the charcoal evenly suspended.

Annex. Reagents and their preparation 353
Sterilize by autoclaving at 120°C for 15min. Cool immediately in cold water tokeep the charcoal evenly suspended. Label the tubes or bottles “AMIES TRANS-PORT MEDIUM” and write the date.
Amies transport medium is also available commercially.
Benedict solution (No. 10)Copper sulfate (CuSO4·5H2O) 17.3gTrisodium citrate (Na3C6H5O7·2H2O) 173gSodium carbonate (Na2CO3), anhydrous 100gDistilled water q.s. 1000ml
Dissolve the copper sulfate crystals by heating in 100ml of distilled water.
Dissolve the trisodium citrate and the sodium carbonate in about 800 ml ofdistilled water. Add the copper sulfate solution slowly to the sodium carbonate/trisodium citrate solution, stirring constantly. Make up the volume to 1000ml withdistilled water. Transfer the solution to a glass-stoppered bottle. Label the bottle“BENEDICT SOLUTION” and write the date.
Blank reagent (No. 11)Trichloroacetic acid (CCl3COOH), 50g/l (5%) solution
(5g in 100ml of distilled water; see No. 62) 50mlDistilled water q.s. 100ml
Mix. Transfer the solution to a glass-stoppered bottle. Label the bottle “BLANKREAGENT” and write the date. Store at room temperature (20–25°C).
The reagent will keep for several months at 20–25°C.
Warning: Trichloroacetic acid is highly corrosive.
Boric acid, saturated solution (No. 12)Boric acid 4.8gDistilled water q.s. 1000ml
Store in a glass-stoppered bottle. Label the bottle “BORIC ACID SATURATEDSOLUTION” and write the date.
Brilliant cresyl blue (No. 13)Brilliant cresyl blue 1.0gTrisodium citrate (Na3C6H5O7·2H2O) 0.4gSodium chloride (NaCl), 8.5g/l (0.85%) solution
(No. 53) 100ml
Dissolve the dye and the trisodium citrate together in the sodium chloride solution.Filter the solution obtained into a staining bottle. Label the bottle “BRILLIANTCRESYL BLUE” and write the date.
Buffered glycerol saline (No. 14)Sodium chloride (NaCl) 4.2gDipotassium hydrogen phosphate (K2HPO4),
anhydrous 3.1gPotassium dihydrogen phosphate (KH2PO4),
anhydrous 1.0gPhenol red 0.003g

354 Manual of basic techniques for a health laboratory
Distilled water 700mlGlycerol (C3H8O3) 300ml
Final pH = 7.2
Dispense the solution into bijou bottles so that there is only a 2-cm gap betweenthe top of the medium and the top of the bottles. Label the bottles “BUFFEREDGLYCEROL SALINE” and write the date.
Buffered water, pH 7.2 (No. 15)Buffer solution for May–Grünwald, Giemsa and Leishman stains.
Disodium hydrogen phosphate (Na2HPO4·2H2O) 3.8gPotassium dihydrogen phosphate (KH2PO4),
anhydrous 2.1gDistilled water q.s. 1000ml
Dissolve the salts in the distilled water, stirring well. Check the pH using narrow-range pH papers; it should be 7.0–7.2.
Transfer the solution to a glass-stoppered bottle. Label the bottle “BUFFEREDWATER” and write the date.
Carbol fuchsin solution for Ziehl–Neelsen stain (No. 16)Solution A (saturated solution of basic fuchsin):
Basic fuchsin 3 gEthanol (CH3CH2OH), 95% 100ml
Solution B (phenol aqueous solution, 50g/l (5%)):
Phenol (C6H5OH) 10gDistilled water q.s. 200ml
Mix 10ml of solution A with 90ml of solution B. Transfer the resulting mixture toa glass-stoppered bottle. Label the bottle “CARBOL FUCHSIN SOLUTION”and write the date.
Warning: Phenol is highly corrosive and poisonous.
Cary–Blair transport medium (No. 17)Sodium thioglycolate 1.5gDisodium hydrogen phosphate (Na2HPO4),
anhydrous 1.1gSodium chloride (NaCl) 5.0gAgar 5.0gDistilled water 991.0ml
Add the salts, agar and distilled water to a clean 1000-ml beaker and mix. Heatwhile mixing until the solution becomes clear. Cool to 50 °C, add 9 ml of freshlyprepared aqueous calcium chloride (CaCl2), 10 g/l (1%) solution, and adjust thepH to about 8.4.
Dispense the solution in 7-ml volumes into previously rinsed and sterilized 9-mlscrew-capped vials. Autoclave the vials containing the media for 15 minutes, cool,and tighten the caps.
Label the vials “CARY–BLAIR TRANSPORT MEDIUM” and write the date.

Annex. Reagents and their preparation 355
Crystal violet, modified Hucker (No. 18)Solution A
Crystal violet 2.0gEthanol (CH3CH2OH), 95% 20ml
Solution B
Ammonium oxylate ((NH4)2CO4·H2O) 0.8gDistilled water 80ml
Mix solutions A and B. Store for 24 hours before use. Filter into a staining bottle.Filter the stain solution into a staining bottle. Label the bottle “CRYSTAL VIO-LET, MODIFIED HUCKER” and write the date.
Delafield’s haematoxylin stain (No. 19)Haematoxylin 4.0gAmmonium alum 8.0gPotassium permanganate 0.2gAbsolute ethanol 125mlDistilled water 410ml
Warm the ethanol by placing the beaker in a bowl of hot water. Add the haematoxy-lin and stir until it has dissolved. Allow the solution to cool, then filter.
Add the ammonium alum to 400ml of distilled water (warmed to 40°C) and stiruntil it has dissolved. Add the solution to the filtered haematoxylin solution andmix well.
Dissolve the potassium permanganate in 10ml of distilled water and add this solu-tion to the stain solution. Mix well. Transfer the stain solution to a staining bottle.Label the bottle “DELAFIELD’S HAEMATOXYLIN STAIN” and write the date.Store at room temperature (20–25°C).
The stain will keep for several months at 20–25°C.
Dichromate cleaning solution (No. 20)For cleaning glassware.
Potassium dichromate (K2Cr2O7) 100gConcentrated sulfuric acid (H2SO4) 100mlDistilled water 1000ml
Dissolve the dichromate in the distilled water. Add the acid gradually, stirring con-stantly. The acid must always be added to the water, not the water to the acid.Transfer the solution to a glass-stoppered bottle. Label the bottle “DICHROMATECLEANING SOLUTION” and write the date.
Warning: Since potassium dichromate and sulfuric acid are both corrosive and themixture even more so, use the solution as seldom as possible.
Drabkin diluting fluid (No. 21)Drabkin diluting fluid can be prepared from commercially available reagent tab-lets. The instructions for its preparation are supplied by the manufacturer.
For laboratories equipped with an accurate balance, Drabkin diluting fluid can beprepared as follows:
Potassium ferricyanide (K3Fe(CN)6) 0.40gPotassium cyanide (KCN) 0.10gPotassium dihydrogen phosphate (KH2PO4) 0.28gSterox SE (or equivalent) 1mlDistilled water q.s. 2000ml

356 Manual of basic techniques for a health laboratory
Dissolve the first three chemicals in the distilled water and mix. Add the detergentand mix gently. The reagent should be clear and pale yellow in colour. When mea-sured against water as blank in a spectrophotometer at a wavelength of 540nm, theabsorbance should be zero. Transfer the diluting fluid to a brown bottle. Label thebottle “DRABKIN DILUTING FLUID” and write the date. If the reagent ap-pears cloudy, discard.
Warning: Potassium cyanide is a highly poisonous chemical and should be usedonly by experienced chemists. When not in use it should be kept in a locked cup-board. After using the chemical, wash your hands thoroughly.
EDTA dipotassium salt, 100g/l (10%) solution (No. 22)Dipotassium ethylenediaminetetraacetate
(potassium edetate) 20gDistilled water q.s. 200ml
For use, pipette 0.04ml of this solution into small containers marked to hold 2.5mlof blood. Allow the anticoagulant to dry by leaving the containers overnight on awarm bench or in an incubator at 37 °C.
Eosin, 10g/l (1%) solution (No. 23)Eosin 1 gDistilled water q.s. 100ml
Label the bottle “EOSIN 1% SOLUTION” and write the date.
Eosin, 20g/l (2%) solution in saline (No. 24)Eosin 2 gSodium chloride (NaCl), 8.5g/l (0.85%)
solution (No. 53) q.s. 100ml
Label the bottle “EOSIN 2% SOLUTION IN SALINE” and write the date.
Field stain (No. 25)Field stain APreparation from prepared powders
Field stain A powder 5 gDistilled water, heated to 80 °C q.s. 600ml
Mix until dissolved. Filter when cool into a 1000-ml bottle. Label the bottle “FIELDSTAIN A” and write the date.
Preparation from original stains and chemicals
Methylene blue (medicinal) 1.6gAzur 1 1.0gDisodium hydrogen phosphate (Na2HPO4),
anhydrous 10.0gPotassium dihydrogen phosphate (KH2PO4),
anhydrous 12.5gDistilled water q.s. 1000ml
Dissolve the two salts in the distilled water. Pour about half of the solution into a1000-ml bottle containing a few glass beads. Add the stain powders and mix well.Add the remainder of the solution. Mix well and filter into a clean 1000-ml bottle.Label the bottle “FIELD STAIN A” and write the date.

Annex. Reagents and their preparation 357
Field stain B
Preparation from prepared powders
Field stain B powder 4.8gDistilled water, heated to 80 °C q.s. 600ml
Mix until dissolved. Filter when cool into a 1000-ml bottle. Label the bottle “FIELDSTAIN B” and write the date.
Preparation from original stain and chemicals
Eosin (yellow water-soluble) 2.0gDisodium hydrogen phosphate (Na2HPO4),
anhydrous 10.0gPotassium dihydrogen phosphate (KH2PO4),
anhydrous 12.5gDistilled water q.s. 1000ml
Dissolve the two salts in the distilled water. Pour into a 1000-ml bottle. Add theeosin. Mix until dissolved. Filter into a clean 1000-ml bottle. Label the bottle“FIELD STAIN B” and write the date.
Undiluted, Field stains can be used for as long as they give good results. Afterdilution, they should be filtered every 2–3 days.
Fluoride oxalate anticoagulant (No. 26)Sodium fluoride (NaF) 1.2gPotassium oxalate (KCOOH) 6.0gDistilled water q.s. 100ml
For use, pipette 0.1ml of the anticoagulant into small containers, marked to hold2ml of blood (or CSF).
Warning: Both sodium fluoride and potassium oxalate are poisonous.
Formaldehyde saline (No. 27)Neutral commercial formaldehyde (CH2O) solution,
at least 37% (formalin) 10mlSodium chloride (NaCl), 8.5g/l (0.85%) solution (No. 53) 90ml
Commercial formaldehyde solution is neutralized by adding a few drops of sodiumcarbonate, 50g/l (5%) solution (No. 52). Test with pH indicator paper.
Label the bottle “FORMALDEHYDE SALINE” and write the date.
Warning: Formaldehyde is corrosive and poisonous.
Formaldehyde, 10% solution (No. 28)Commercial formaldehyde (CH2O) solution, at least 37%
(formalin) 100mlDistilled water 300ml
Transfer the solution to a glass-stoppered bottle. Label the bottle “FORMALDE-HYDE 10% SOLUTION” and write the date.
Warning: Formaldehyde is corrosive and poisonous.
Giemsa stain (No. 29)Powdered Giemsa stain 0.75gMethanol (CH3OH) 65mlGlycerol (C3H8O3) 35ml

358 Manual of basic techniques for a health laboratory
Put the ingredients in a bottle containing glass beads and shake. Shake the bottlethree times a day for 4 consecutive days. Filter into a staining bottle. Label thebottle “GIEMSA STAIN” and write the date.
Glucose reagents (No. 30)Trichloroacetic acid, 30g/l (3%) solutionTrichloroacetic acid (CCl3COOH) 15gDistilled water q.s. 500ml
Weigh the acid out quickly, since it is highly deliquescent. Transfer to a beaker. Adddistilled water to dissolve the chemical. Transfer to a 500-ml flask and make up thevolume to 500ml with distilled water. Label the flask “TRICHLOROACETICACID 3% SOLUTION” and write the date. Keep in the refrigerator.
Warning: Trichloroacetic acid is highly corrosive.
o-Toluidine reagentThiourea 0.75gGlacial acetic acid (CH3COOH) 470mlo-Toluidine 30ml
Dissolve the thiourea in the glacial acetic acid. (If it is difficult to dissolve, stand theflask in a bowl of hot water.) Add the o-toluidine and mix well. Transfer the reagentto a brown bottle. Label the bottle “O-TOLUIDINE REAGENT” and write thedate. Keep at room temperature. Allow to stand for at least 24 hours before use.
Warning: Glacial acetic acid is highly corrosive.
Benzoic acid, 1g/l (0.1%) solutionBenzoic acid 1 gDistilled water q.s. 1000ml
Measure 1000ml of distilled water and heat to just below boiling. Add the benzoicacid and mix well until it is dissolved. Allow to cool. Transfer the solution to a1000-ml glass-stoppered bottle. Label the bottle “BENZOIC ACID 0.1% SOLU-TION” and write the date.
Glucose stock reference solution (100mmol/l)Glucose, pure, anhydrous 9 gBenzoic acid, 1g/l (0.1%) solution q.s. 500ml
Label the flask “GLUCOSE STOCK REFERENCE SOLUTION 100 MMOL/L” and write the date.
Freeze in quantities of about 100ml. Use a new bottle of frozen stock referencesolution each time the working reference is prepared.
Glucose working reference solutions (2.5, 5, 10, 20 and25mmol/l)Allow the glucose stock reference solution to reach room temperature. Carefullypipette 2.5, 5, 10, 20 and 25ml of the stock reference solution into each of five100-ml volumetric flasks. Make up to the mark with the benzoic acid solution andmix well. Label the flasks as above and write the date. Store in a refrigerator. Renewmonthly.

Annex. Reagents and their preparation 359
Glycerol–malachite green solution (No. 31)1. Prepare a stock solution of malachite green, 1% solution:
Malachite green 1 gDistilled water 100ml
Using a pestle and mortar, grind the malachite green crystals to a powder. Dissolve1g of the freshly prepared powder in 100ml of distilled water and pour the solutioninto a dark bottle. Label the bottle “MALACHITE GREEN 1% SOLUTION”and write the date. Close the bottle tightly and keep it in the dark.
2. Prepare a working solution of glycerol–malachite green:
Glycerol 100mlMalachite green, 1% stock solution 1mlDistilled water 100ml
Add the glycerol, malachite green stock solution and distilled water to a 250-mlglass-stoppered bottle. Label the bottle “GLYCEROL–MALACHITE GREENSOLUTION” and write the date. Mix gently before use.
Hydrochloric acid, 0.01mol/l solution (No. 32)Hydrochloric acid (HCl), concentrated 8.6mlDistilled water q.s. 1000ml
Measure out 500ml of distilled water into a 1000-ml glass-stoppered bottle. Addthe acid, drop by drop. Make up to 1000ml with the rest of the distilled water.Label the bottle “HYDROCHLORIC ACID 0.01 MOL/L SOLUTION” and writethe date. Renew monthly.
Warning: Hydrochloric acid is highly corrosive.
Isotonic salineSee Sodium chloride.
Lactophenol cotton blue mounting solution (No. 33)Cotton blue (aniline blue) 50mgPhenol (C6H5OH) crystals 20mgLactic acid (CH3CH(OH)COOH) 20mlGlycerol (C3H8O3) 40mlDistilled water 20ml
Add the phenol, lactic acid and glycerol to the distilled water, mix and dissolve byheating gently. Add the cotton blue and mix. Transfer the solution to a glass-stoppered bottle. Label the bottle “LACTOPHENOL COTTON BLUEMOUNTING SOLUTION” and write the date.
Warning: Phenol is highly corrosive and poisonous.
Leishman stain (No. 34)Leishman powder 1.5gMethanol (CH3OH) q.s. 1000ml
Rinse out a clean staining bottle with methanol. Add a few clean dry glass beads.Add the staining powder and methanol and mix well. Label the bottle “LEISHMANSTAIN” and write the date.
The stain is ready for use the following day. It is important to prevent moisturefrom entering the stain during its preparation and storage.

360 Manual of basic techniques for a health laboratory
Loeffler methylene blue (No. 35)Methylene blue 0.5gAbsolute ethanol (CH3CH2OH) 30mlPotassium hydroxide (KOH), 200g/l (20%) solution
(No. 45) 0.1mlDistilled water q.s. 100ml
Dissolve the methylene blue in 30ml of distilled water and transfer the solution toa clean brown bottle. Add the potassium hydroxide, ethanol and the remainder ofthe distilled water and mix well. Label the bottle “LOEFFLER METHYLENEBLUE” and write the date. Store in a dark place at room temperatures (20–25°C).
Lugol iodine, 1g/l (0.1%) solution (No. 36)Iodine 1 gPotassium iodide (KI) 2 gDistilled water 300ml
Grind the dry iodine and potassium iodide in a mortar. Add distilled water, a fewmillilitres at a time, and grind thoroughly after each addition until the iodine andiodide dissolve. Rinse the solution into an amber glass bottle with the remainder ofthe distilled water.
Alternatively, measure 300ml of distilled water in a cylinder. First dissolve thepotassium iodide in about 30ml of the distilled water. Add the iodine and mix untildissolved. Add the remainder of the distilled water and mix well. Store in a brownbottle.
Label the bottle “LUGOL IODINE 0.1% SOLUTION” and write the date.
Lugol iodine, 5g/l (0.5%) solution (No. 37)Iodine 5 gPotassium iodide (KI) 10gDistilled water q.s. 300ml
Grind the dry iodine and potassium iodide in a mortar. Add distilled water, a fewmillilitres at a time, and grind thoroughly after each addition until the iodine andiodide dissolve. Rinse the solution into an amber glass bottle with the remainder ofthe distilled water.
Alternatively, measure 300ml of distilled water in a cylinder. First dissolve thepotassium iodide in about 30ml of the distilled water. Add the iodine and mix untildissolved. Add the remainder of the distilled water and mix well. Store in a brownbottle.
Label the bottle “LUGOL IODINE 0.5% SOLUTION” and write the date.
May–Grünwald stain (No. 38)May–Grünwald powder 5 gMethanol q.s. 1000ml
Rinse out a clean 1000-ml bottle with methanol. Add a few clean dry glass beads.Add the staining powder and methanol. Mix well to dissolve the stain. Label thebottle “MAY-GRÜNWALD STAIN” and write the date.
The stain is improved by keeping for 1–2 weeks, mixing at intervals. It is importantto prevent moisture from entering the stain during its preparation and storage.

Annex. Reagents and their preparation 361
Methylene blue solution (No. 39)Methylene blue 0.3gDistilled water 100ml
Dissolve the methylene blue in the distilled water. Filter the solution into a cleanbrown bottle. Label the bottle “METHYLENE BLUE SOLUTION” and writethe date.
Neutral red, 1g/l (0.1%) solution (No. 40)Neutral red 1 gDistilled water q.s. 1000ml
Dissolve the neutral red in about 300ml of distilled water in a clean 1000-mlbottle. Make up the volume to 1000ml with distilled water and mix well. Labelthe bottle “NEUTRAL RED 0.1% SOLUTION” and write the date. Store at roomtemperature.
Pandy reagent (No. 41)Phenol (C6H5OH) 30gDistilled water 500ml
Put the phenol in a 1000-ml bottle. Add the distilled water and shake vigorously.Label the bottle “PANDY REAGENT” and write the date. Leave to stand for 1day. Check whether any phenol remains undissolved. If so, filter. (If all the phenolhas dissolved, add a further 10g and wait another day before filtering.) (Pandyreagent is a saturated solution of phenol.)
Warning: Phenol is highly corrosive and poisonous.
Phenol red, 10g/l (1%) solution (No. 42)Phenol red crystals 0.1gDistilled water 10mlWeigh out the phenol red crystals in a 20-ml beaker. Add the distilled water and stiruntil the crystals have dissolved. Transfer the solution to a plastic dropper bottle.Label the bottle “PHENOL RED 1% SOLUTION” and write the date. Store atroom temperature (20–25°C).
Phosphate-buffered water, 0.01mol/l, pH 6.8 (No. 43)1. Prepare a stock solution of anhydrous sodium dihydrogen phosphate in a 1000-
ml volumetric flask:
Sodium dihydrogen phosphate, anhydrous (NaH2PO4) 13.6gDistilled water q.s. 1000ml
Sterilize the stock solution by filtering it through a 0.2-mm pore size filter. Ifanhydrous sodium dihydrogen phosphate is not available, the solution can beprepared by dissolving 17.2 g of sodium dihydrogen phosphate dihydrate(NaH2PO4·2H2O) in 1000ml of distilled water. Label the volumetric flask “AN-HYDROUS SODIUM DIHYDROGEN PHOSPHATE” and write the date.Keep the stock solution in a refrigerator.
2. Prepare a stock solution of disodium hydrogen phosphate in a 1000-ml volu-metric flask:
Disodium hydrogen phosphate, dihydrate(Na2HPO4·2H2O) 17.8g
Distilled water q.s. 1000ml

362 Manual of basic techniques for a health laboratory
Sterilize the stock solution by filtering it through a 0.2-mm pore size filter. Ifdisodium hydrogen phosphate dihydrate is not available, the solution can beprepared by dissolving 26.8g of disodium hydrogen phosphate, heptahydrate(Na2HPO4·7H2O) or 35.8g of disodium hydrogen phosphate, dodecahydrate(Na2HPO4·12H2O). Label the volumetric flask “DISODIUM HYDROGENPHOSPHATE STOCK SOLUTION” and write the date. Keep the stock solu-tion in a refrigerator.
3. Mix the two stock solutions in the amounts shown in the table below to obtain100ml of buffered water. The pH should be as indicated in the table. If the pH istoo low, adjust it with sodium hydroxide (NaOH), 0.01mol/l solution (No. 54);if it is too high, adjust it with hydrochloric acid (HCl), 0.01mol/l solution (No.32).
pH of working solution Volume of stock solution (ml)
NaH2PO4 Na2HPO4·2H2O
6.4 83.2 16.8
6.5 75.0 25.0
6.8 50.8 49.2
6.9 43.9 56.1
7.0 39.0 61.0
7.2 28.0 72.0
7.4 19.9 81.0
7.6 13.0 87.0
7.8 8.5 91.5
8.0 5.3 94.7
Polyvinyl alcohol (PVA) fixative (No. 44)Note: This should be prepared at an intermediate level laboratory, because of thedangerous reagents involved.
Modified Schaudinn fixativeMercuric chloride crystals (HgCl2) 1.5gEthanol, 95% 31.0mlGlacial acetic acid 5.0ml
Dissolve the mercuric chloride in the ethanol in a stoppered flask (50 or 125ml) byswirling at intervals. Add the acetic acid, stopper, and mix by swirling. Label theflask “MODIFIED SCHAUDINN FIXATIVE” and write the date.
Warning: Mercuric acid is highly poisonous. Glacial acetic acid is highly corrosive.
PVA mixtureGlycerol 1.5mlPVA powder (low viscosity) 5.0gDistilled water 52.5ml
In a small beaker, add the glycerol to the PVA powder and mix thoroughly with aglass rod until all particles appear coated with the glycerol. Scrape the mixture intoa 125-ml flask. Add the distilled water, stopper, and leave at room temperature(20–25°C) for 3 hours or overnight. Label the flask “PVA MIXTURE” and writethe date. Swirl the mixture occasionally to mix.

Annex. Reagents and their preparation 363
PVA powder and PVA fixative solutions are available from several commercialsources. There are many grades of PVA powder on the market, but the grades withhigh hydrolysis and low or medium viscosity are most satisfactory for preparingPVA fixative.
PVA fixative working solution1. Heat a water-bath (or large beaker of water) to 70–75°C. Adjust the heat to
maintain this temperature range.
2. Place the loosely stoppered flask containing the PVA mixture in the water-bathfor about 10 minutes, swirling frequently.
3. When the PVA powder appears to be mostly dissolved, pour in the modifiedSchaudinn fixative solution, restopper and swirl to mix.
4. Continue to swirl the mixture in the water-bath for 2–3 minutes to dissolve theremainder of the PVA, to allow bubbles to escape, and to clear the solution.
5. Remove the flask from the water-bath and allow it to cool. Store the PVA fixativein a screw-cap or glass-stoppered bottle. Label the bottle “PVA FIXATIVE” andwrite the date. The fixative will keep for 6–12 months.
Potassium hydroxide, 200 g/l (20%) solution (No. 45)Potassium hydroxide (KOH) pellets 20gDistilled water q.s. 100ml
Label the volumetric flask “POTASSIUM HYDROXIDE 20% SOLUTION” andwrite the date.
Warning: Potassium hydroxide is corrosive.
Potassium permanganate, 40g/l (4%) solution (No. 46)Potassium permanganate (KMnO4) 40gDistilled water q.s. 1000ml
Dissolve the potassium permanganate in 300ml of distilled water in a 1000-mlvolumetric flask. Make up the volume to 1000ml with distilled water. Label thevolumetric flask “POTASSIUM PERMANGANATE 4% SOLUTION” and writethe date.
Safranine solution (No. 47)1. Prepare a stock solution:
Safranine O 2.5gEthanol (CH3CH2OH), 95% q.s. 100ml
Mix until all the safranine has dissolved. Transfer the solution to a glass-stopperedbottle. Label the bottle “SAFRANINE STOCK SOLUTION” and write the date.
2. Prepare a working solution in a glass-stoppered bottle:
Stock solution 10mlDistilled water 90ml
Label the bottle “SAFRANINE WORKING SOLUTION” and write the date.Store in the dark.
Saponin, 10g/l (1%) solution (No. 48)Saponin 1 gSodium chloride (NaCl), 8.5g/l (8.5%) solution (No. 53) 100ml

364 Manual of basic techniques for a health laboratory
Add the sodium chloride solution to a glass bottle. Add the saponin, mix, and heatuntil it has completely dissolved.
Label the bottle “1% SAPONIN IN SALINE” and write the date.
Silver nitrate, 17g/l (1.7%) solution (No. 49)Silver nitrate (AgNO3) 5.1gDistilled water q.s. 300ml
Mix until all the silver nitrate has dissolved. Label the bottle “SILVER NITRATE1.7% SOLUTION” and write the date.
Warning: Silver nitrate is caustic.
Sodium bicarbonate, 20g/l (2%) solution (No. 50)Sodium bicarbonate (NaHCO3) 2 gDistilled water q.s. 100ml
Label the volumetric flask “SODIUM BICARBONATE 2% SOLUTION” andwrite the date.
Sodium carbonate, 2gl/l (0.2%) solution (No. 51)Sodium carbonate (Na2CO3), anhydrous 2 g
(or an equivalent quantity of one of the hydrates)Distilled water q.s. 100ml
Label the volumetric flask “SODIUM CARBONATE 0.2% SOLUTION” andwrite the date.
Sodium carbonate, 50g/l (5%) solution (No. 52)Sodium carbonate (Na2CO3), anhydrous 5 g
(or an equivalent quantity of one of the hydrates)Distilled water q.s. 100ml
Label the volumetric flask “SODIUM CARBONATE 5% SOLUTION” and writethe date.
Sodium chloride, 8.5g/l (0.85%) solution (isotonic saline)(No. 53)Sodium chloride (NaCl) 8.5gDistilled water q.s. 1000ml
Label the volumetric flask “SODIUM CHLORIDE 0.85% SOLUTION” and writethe date.
Sodium citrateSee Trisodium citrate.
Sodium hydrogen carbonateSee Sodium bicarbonate.
Sodium hydroxide, 0.01mol/l solution (No. 54)Sodium hydroxide (NaOH) pellets 3 gDistilled water q.s. 100ml

Annex. Reagents and their preparation 365
Label the volumetric flask “SODIUM HYDROXIDE 0.01 MOL/L SOLUTION”and write the date.
Warning: Sodium hydroxide is corrosive.
Sodium metabisulfite, 20g/l (2%) solution (No. 55)Sodium metabisulfite (Na2S2O5) 0.5gDistilled water q.s. 25ml
Make up freshly for use.
Label the volumetric flask “SODIUM METABISULFITE 2% SOLUTION” andwrite the date.
Stuart transport medium, modified (No. 56)Agar 4.00gDistilled water 1000ml
Heat until dissolved and add while hot:
Sodium chloride (NaCl) 3.00gPotassium chloride (KCl) 0.20gDisodium hydrogen phosphate (Na2HPO4),
anhydrous 1.15gSodium dihydrogen phosphate (NaH2PO4),
anhydrous 0.20gSodium thioglycolate 1.00gCalcium chloride (CaCl2), 10g/l (1%) aqueous
solution (freshly prepared) 10mlMagnesium chloride (MgCl2), 10g/l (1%)
aqueous solution 10ml
Final pH: 7.3
1. Stir until dissolved and add 10g of neutral charcoal powder.
2. Dispense 5–6ml of medium per 13mm ¥ 10mm screw-capped tube (avoidcrushing).
3. Autoclave at 121 °C for 20 minutes. Invert the tubes before the medium solidifiesin order to distribute the charcoal uniformly. Label the tubes “STUARTTRANSPORT MEDIUM, MODIFIED” and write the date. Store in the refrig-erator.
Sulfosalicylic acid, 30g/l (3%) solution (No. 57)Sulfosalicylic acid 3 gDistilled water q.s. 100ml
Label the volumetric flask “SULFOSALICYLIC ACID 3% SOLUTION” and writethe date.
TIF (thiomersal–iodine–formaldehyde) fixative (No. 58)1. Prepare a stock solution:
Tincture of thiomersal, 1 :1000 200mlFormaldehyde, 10% solution (No. 28) 25mlGlycerol 5mlDistilled water q.s. 250ml

366 Manual of basic techniques for a health laboratory
Transfer the stock solution to a brown bottle. Label the bottle “THIOMERSAL–FORMALDEHYDE STOCK SOLUTION” and write the date. The stock solu-tion will keep for up to 3 months.
Warning: Formaldehyde is corrosive and poisonous.
2. On the day of use, mix:
Stock thiomersal solution 9.4mlLugol iodine, 50g/l (5%) solution (No. 37) 0.6ml
Trisodium citrate, 20g/l (2%) solution in saline (No. 59)Trisodium citrate, dihydrate (Na3C6H5O7·2H2O) 2 gSodium chloride, 8.5g/l (0.85%) solution (No. 53) q.s. 100ml
Keep in the refrigerator.
Label the volumetric flask “TRISODIUM CITRATE 2% SOLUTION INSALINE” and write the date.
Trisodium citrate, 32g/l (3.2%) solution (No. 60)This is used as an anticoagulant.
Trisodium citrate, anhydrous (Na3C6H5O7) 3.2g(or an equivalent quantity of either the dihydrateor the pentahydrate)
Distilled water q.s. 100ml
Keep in the refrigerator. Use 1ml of the solution per 4ml of blood.
Label the volumetric flask “TRISODIUM CITRATE 3.2% SOLUTION” and writethe date.
Türk solution (No. 61)Glacial acetic acid (CH3COOH) 4mlMethylene blue solution (No. 39) 10 dropsDistilled water q.s. 200ml
Dissolve the glacial acetic acid in 100ml of the distilled water. Add the methyleneblue solution and mix. Transfer the mixture to a 200-ml volumetric flask and makeup the volume to 200ml with distilled water. Label the volumetric flask “TURKSOLUTION” and write the date.
Warning: Glacial acetic acid is highly corrosive.
Urea reagents (No. 62)Trichloroacetic acid, 50g/l (5%) solutionTrichloroacetic acid (CCl3COOH) 10gDistilled water q.s. 200ml
Weigh the acid out quickly; it is highly deliquescent. Transfer to a beaker. Add100ml of distilled water and mix to dissolve the chemical. Transfer the solution toa 200-ml volumetric flask and make up the volume to 200ml with distilled water.Label the volumetric flask “TRICHLOROACETIC ACID 5% SOLUTION” andwrite the date.
Warning: Trichloroacetic acid is highly corrosive.

Annex. Reagents and their preparation 367
Diacetyl monoxime stock solutionDiacetyl monoxime (also called 2,3-butanedione
monoxime) 2 gDistilled water q.s. 500ml
Label the volumetric flask “DIACETYL MONOXIME STOCK SOLUTION”and write the date. The solution will keep for at least 6 months at 2–8 °C.
Colour reagentAcid reagent (No. 6) 50mlDiacetyl monoxime reagent 50ml
Mix the acid reagent and stock solution in a 100-ml stoppered flask. Label the flask“COLOUR REAGENT”. The quantities shown above are sufficient for 33 meas-urements. The reagent must be prepared daily.
Urea stock reference solution, 125mmol/lUrea 750mgBenzoic acid, 1g/l (0.1%) solution (see No. 30) q.s. 100ml
Dissolve the urea in about 20ml of the benzoic acid solution in a 100-ml volumet-ric flask. Make up the volume to 100ml with benzoic acid solution. Label the flask“UREA STOCK REFERENCE SOLUTION 125 MMOL/L” and write the date.Store in a refrigerator. The solution will keep for several months at 2–8 °C.
Urea working reference solution, 10mmol/lUrea stock reference solution 8mlBenzoic acid (C7H6O2), 1g/l (0.1%) solution
(see No. 30) q.s. 100ml
Mix the solutions well in a 100-ml volumetric flask. Label the volumetric flask“UREA WORKING REFERENCE SOLUTION 10 MMOL/L” and write the date.
Wayson stain (No. 63)Solution A1:
Basic fuchsin 2 gAbsolute methanol (CH3OH) 100ml
Solution A2:
Methylene blue 7 gAbsolute methanol (CH3OH) 100ml
Combine the two solutions to give solution A.
Solution B (phenol, 50g/l (5%) solution):
Phenol (C6H5OH) 100gDistilled water 2000ml
Add solution A to solution B. The staining properties of Wayson stain improve withage. Make the stain in large quantities and dispense it in small amounts in to darkbottles for future use. Label the bottles “WAYSON STAIN” and write the date.
Warning: Phenol is corrosive.

368 Manual of basic techniques for a health laboratory
Willis solution (No. 64)This is a saturated solution of sodium chloride.
Sodium chloride (NaCl) 125gDistilled water 500ml
Dissolve the sodium chloride by heating the mixture to boiling point. Leave to cooland stand. Check that some of the salt remains undissolved. If it has all dissolvedadd a further 50g. Filter into a corked bottle. Label the bottle “WILLIS SOLU-TION” and write the date.
Wintrobe solution (No. 65)Ammonium oxalate (NH4)2C2O4·H2O) 1.2gPotassium oxalate (K2C2O4·H2O) 0.8gDistilled water q.s. 100ml
Dissolve the two salts in 50ml of distilled water in a 100-ml volumetric flask.Make up the volume to 100ml with distilled water. Label the volumetric flask“WINTROBE SOLUTION” and write the date.
Put 0.5ml of this mixture in each 5-ml bottle used for the collection of blood.Leave the open bottles to dry at room temperature or, preferably, place them in anincubator at 37 °C.
Zenker fixative (No. 66)Potassium dichromate (K2Cr2O7) 2.5gMercuric chloride (HgCl2) 5.0gSodium sulfate (Na2SO4) 1.0gDistilled water q.s. 100ml
Just before use, add 5ml of glacial acetic acid to the solution.
Dissolve the three salts in 50ml of distilled water in a 100-ml volumetric flask.Make up the volume to 100ml with distilled water. Label the volumetric flask“ZENKER FIXATIVE” and write the date.
Warning: Glacial acetic acid is highly corrosive and mercuric chloride is highlypoisonous. This fixative should be made up by fully qualified and experiencedtechnicians only.

Index
369
Note: Page numbers in bold refer to main entries; italicized page numbers refer toillustrations.
Acidscorrosive injuries from 98–99handling precautions 97
Acquired immunodeficiency syndrome(AIDS) (see also Humanimmunodeficiency virus) 313,320
“Actinomycetes”, identification 200,201, 204
African trypanosomiasis 182–192,184–187, 259–260, 260, 263
Agglutination techniques 333–334,333–334, 336, 336, 339
CATT 188–192, 189–192AHD, see Alkaline haematin DAIDS, see Acquired immunodeficiency
syndromeAlbert stain 201, 201–202, 351Albumin, urine 237Alcohols, disinfection 85Alembics, distilled water 25, 25Alkaline haematin D (AHD) 276–279,
352Alkalis
corrosive injuries from 99–100handling precautions 97
Allen & Ridley sedimentationtechnique 153–154, 154
Amies transport medium 352–353Amoebae 105
cysts 118–120, 119–121, 123motile forms 111–114, 113–115pathogenicity 111
Anaemias 284, 287–288, 292, 293, 313abnormal erythrocytes 305–310,
306–310sickle-cell 306, 307, 307, 308–310,
314–316, 315Analytical balances 32, 68–69, 69Ancylostoma duodenale (hookworm) 106
adults 148, 150eggs 126, 127, 128, 133, 152larvae 157, 158
Anisocytosis 309, 309Anthrax (Bacillus anthracis) 204, 204,
219Antibodies 328–329, 329
antigen interactions 330immunochemical techniques 330–335tests 331–336, 336–349, 344–346,
348–349Anticoagulants 42–43, 266, 357
Antigens 329–330antibody interactions 330immunochemical techniques 330–335tests 331–336, 336–349, 344–346,
348–349Anti-streptolysin O test (ASOT)
336–338Applicators, wooden 36Ascaris lumbricoides (roundworm) 106
adults 146, 147eggs 126, 127–128, 133, 133, 152
ASOT, see Anti-streptolysin O testAspiration
body cavity fluids 218–220buboes 218, 219lymph nodes 183–185, 184–185
Assays, immunology 330–331, 330–331,343–344
Autoclaves 33, 86–87, 86–88
Bacillus anthracis 204, 204, 219Bacteria 197–224
anthrax 220body cavity fluids 218–220diarrhoeal diseases 105leprosy 220–224, 221–223smears 199–201sputum/throat specimens 204–207,
205–207staining techniques 199–201,
199–204, 204stool specimens 216–218, 217urine specimens 240, 249–254,
250–253urogenital specimens 209–211,
210–211, 215–216Bacteriological index (BI) 223–224Bacteriological tests (see also Bacteria)
equipment 37–38laboratory registers 47, 50
Balances, laboratory 32, 66–69, 67–69Balantidium coli 105, 116, 117, 121, 121Base units, SI 3Basophilic staining 305Basophilic stippling, erythrocytes 309,
310Basophils, polymorphonuclear 310,
311, 311Batteries, electrical supply 14–15Battery-operated centrifuges 71Benedict solution 236, 236–237, 353Benzoic acid 358

370 Index
BI, see Bacteriological indexBilirubin crystals, urine 248, 248Binding tests, immunology 330–335,
330–335Biopsy specimens 93, 95–96, 160–163,
161–163Blank reagent 353Blastocystis hominis (yeast) 124–125, 127Bleaches, household 84–85Bleeding time, measurement 295–296,
295–296Blood
cells 265–266, 265–266clotting 266, 266, 297–298, 297–298CSF specimens 256–259, 256–259disinfection 84–85stool specimens 157–159, 158urine specimens 234, 241–242,
241–243, 244Blood flukes (Schistosoma spp.) 106,
150–151, 151Blood specimens
chemistry registers 47, 49collection 102, 267–270, 267–270,
280–282, 281, 286dispatch 92equipment 42–43, 43glucose concentrations 322–325,
323–324parasites 159–160, 166–196
microfilariae 159, 163–172, 166,167, 169, 171, 173
Plasmodium spp. 172–182, 178protozoa 172–194, 178, 185, 187,
193–194Trypanosoma spp. 159, 182–194,
185–187test-tube cleaning 82thick blood films 173–182, 175, 187,
187, 193–194, 193–194thin blood films 175, 299–314,
300–304, 306–314urea concentrations 7, 325–327
Boric acid 353Bottles 36–37Brilliant cresyl blue 316–317, 318–319,
353Broken glass injuries 101Brugia spp. 159–160, 165, 166, 171,
173Bubonic plague (Yersinia pestis)
203–204, 218, 219Buffered glycerol saline 217–218, 353–
354Buffered water 29–31, 31, 354, 361–362Bunsen burners 35Burettes 77, 77Burns, laboratory accidents 100–101Butane gas burners 97
Cables, electrical 19Cabot ring bodies 309, 310
Calcium crystals, urine 245, 245, 246,246, 247
Calcium hydroxide 85Calcium hypochlorite 84–85Calculations (see also Measurement)
blood glucose concentration 7,324–325
blood urea concentration 327erythrocyte number concentration 6,
287–288erythrocyte sedimentation rate
292–295, 293–294erythrocyte volume fraction 6,
279–287, 280–283, 286–287haemoglobin concentration 7,
271–279, 272–273leukocyte number concentration 6,
258–259, 258–259, 288–290,288–292
leukocyte type number fraction 6,319–321, 320
malaria parasites 180–182reticulocyte number concentration/
fraction 6, 317–318thrombocyte number concentration
7, 321urine protein 238–239
Calibrated dropping pipettes 75, 75Calibration
colorimeters 277, 278, 279, 324spectrophotometers 272–274,
272–273, 276, 279Campylobacter spp. 216Candida albicans
CSF 257, 261, 261identification 200, 200vaginal discharge 215
Capillary bloodbleeding time 295–296, 295–296collection 164, 164, 166, 280–281,
281glucose concentration 325
Carbol fuchsin solution 354Card agglutination trypanosomiasis test
(CATT) 188–192, 189–192Cary–Blair transport medium 216–217,
354Casts, urine 240, 243–244, 243–244Catheters 233CATT, see Card agglutination
trypanosomiasis testCavity body fluids, specimens 218–219Cellophane faecal thick smear
technique 141–143, 142–143Cells
blood 125, 125, 265–266, 265–266plasma 312, 312polymorphonuclear 310–311, 311,
313, 313target 306, 307urine specimens 241–243, 241–243
Centrifugation 69, 166–168

Index 371
Centrifuges 32, 69–72, 69–73balancing 72, 72cleaning and maintenance 83tubes 34, 37
Cerebrospinal fluid (CSF) 255–264,255–264
blood in 256–259, 256–259glucose concentration 7, 261–262laboratory registers 47, 50leukocyte number concentration/
fraction 6, 258–259meningitis 260–261, 260–261protein concentration 262, 262specimen containers 44, 82specimen dispatch 92trypanosomes 259–260, 260
Chagas disease 192–194, 193–194Chancre, syphilitic 210, 210Chemical formulae, reagents 350Chemicals, storage 45Children (see also Infants; Neonates)
Chagas disease 192–194, 193–194erythrocyte number concentration
287erythrocyte volume fraction 284Haemophilus influenzae 261, 261leukocyte number concentration
291leukocyte type number fraction 320normal haemoglobin 275normal thrombocytes 321reticulocyte number concentration
318venous blood collection 267
Chilomastix mesnili 115–116, 117, 121,121
Chinese liver fluke (Clonorchissinensis) 106, 130, 134, 134
Chloramine 85Cholesterol crystals, urine 247, 248Chromatoid bodies 122Ciliates
cysts 121, 121motile forms 111, 116, 117pathogenicity 111
Cleaning 77–85, 78–82centrifuges 83glassware 77–81, 78–81incubators 83laboratory balances 66–67microscopes 65, 64–65reusable syringes/needles 81specimen containers 81–82, 82
Clonorchis sinensis (Chinese liverfluke) 106, 130, 134, 134
Clottingblood 266, 266, 297–298, 297–298CSF 257
Coccidia 122, 122, 124Colorimeters 32, 271–274
AHD method 276–277calibration 277–278, 278, 279, 324
Colour reagent 367Communicable diseases, reporting 52Concentration techniques,
parasites 152–156, 152–157Concentrations
blood glucose 322–325, 323–324blood urea 325–327CSF glucose 26l–262erythrocyte number 6, 263, 284,
287–288haemoglobin 7, 271–279, 284–285leukocyte number 6, 265, 288–290,
288–292measurement 4–6reticulocyte number 6, 316–319thrombocyte number 7, 266, 321
Condensers, microscopes 56, 56, 58,60–61, 60
Confidentiality 2Containers
cleaning 81–82, 82“sharps” 96specimens 42–44, 42–44
Corrosive injuries, acids/alkalis 98–100Corynebacterium diphtheriae (see also
Diphtheria)specimen dispatch 207, 207staining techniques 201, 201–202
Counters, differential 32Counting chambers 37
Fuchs–Rosenthal 258–259, 258–259Neubauer 259, 288, 288–291, 290
Counts (see also Numberconcentrations; Numberfractions)
parasite eggs 251sperm 214–215
Coverslips, slides 80, 80, 81Cresols 83Cresyl blue, see Brilliant cresyl blueCryptococcus neoformans, CSF 257, 261,
261Cryptosporidium spp. 123–124, 124,
202–203Crystals, urine 236, 240, 245–248,
245–248Crystal violet, modified Hucker 355CSF, see Cerebrospinal fluidCultures
dispatch 206–207, 207, 263–264, 264Mycobacterium leprae 223urine 254watery stools 216
Cutaneous leishmaniasis 195–196Cuts, laboratory accidents 101Cystine crystals, urine 247, 247Cysts
hyatid 151, 151protozoa 118–125, 119–122, 124–
125stool examination 108, 109yeast 124–125, 125

372 Index
Dark-field microscopy 64, 211, 211,216
Decontaminationblood spills 84laboratory accidents 101microscopes 65
Definitionsmass 3mole 3quantity 2weight 3
Deionizers 33Delafield’s haematoxylin stain 355Demineralized water 27–29, 28–29, 33Derived units, SI 3–5Dessicators 34, 37Diabetes 236, 239, 322Diacetyl monoxime
blood urea concentration 325–327stock solution 367
Diaphragms, microscopes 56, 57, 58,61, 61
Diarrhoeal diseases (see also Intestinalparasites)
common causes 105–106dysentery amoebae 113, 113–114
Dichromate cleaning solution 355Dicrocoelium spp. (lancet fluke) 106,
131, 134, 134Dientamoeba fragilis 114, 114–115, 120Differential counters 32Differential diagnoses
Entamoeba histolytica/Escherichiacoli 114
larvae 157, 158parasites and other matter 144–146,
144–146tapeworms 148, 149
Differential leukocyte counts, seeLeukocyte type number fraction
Digested meat fibres, identification 145,145
DilutionsAHD reference solution 277Drabkin fluid 271–275, 355–356haemiglobincyanide reference
solution 272–273, 272–275Diphtheria (see also Corynebacterium
diphtheriae) 201, 201–202, 252,253
Diphyllobothrium latum (fish tapeworm)106, 152
adults 152eggs 130, 136, 136
Dipstick testsfalciparum malaria 344–346, 345–346hepatitis B 344, 344HIV 342, 342urine 234, 253–254
Dipylidium caninum (tapeworm) 106adults 148, 149eggs 130, 135, 135
Direct examinationCSF 256–257, 256–257semen 212stools 107, 107urine 234
Dirofilaria spp. 159Disinfectants (see also Cleaning;
Sterilization) 85–90Disodium hydrogen phosphate
361–362Dispatch
specimens 91–96, 93–94CSF 263–264, 264sputum 205, 206stool 109–110, 216–218throat 207, 207urogenital 209, 209
Dispensary balances 69, 69Dispensing, liquids 73–77, 73–77Disposable materials 90–91, 90–91Disposal
laboratory waste 90–91specimens 97
Distilled water 24–27, 25–26Distributors, water 24, 24Drabkin diluting fluid 271–275,
355–356Drainage, plumbing 22–23, 22–23Drinking-water, disinfection 84Drop bottles 35, 37Dropping pipettes, calibrated 75,
75Dry heat, sterilization 90, 89–90Dual-voltage electrical equipment 16,
16Duke method, bleeding time 295–296,
295–296Dysentery amoebae (Entamoeba
histolytica) 113, 113–114
Ear lesions, leprosy 221, 221–223Echinococcus granulosus (hydatid
cyst) 151, 151Ectothrix 226, 226EDTA dipotassium salt 356Effusions, examination 218–219Eggs
helminths 126–144, 129–144,152–153
sputum/throat specimens 206–207urine specimens 248, 249–251
Electric centrifuges 70–72, 70–72Electricity 12–20
equipment 15–17equipment failure 17–20meters 16shocks from 101supply sources 12–15
Electronic charge regulators 14ELISA, see Enzyme-linked
immunosorbent assayElliptocytes 308, 308–309

Index 373
Endolimax nanus 114, 114, 120, 120Endothrix 226, 226Entamoeba
coli 113, 113–114, 118, 120hartmanni 114, 114, 120, 120histolytica 106, 113, 113–114, 118,
120Enterobius vermicularis (pinworm) 106
adults 146, 147eggs 126, 128, 135–137, 135–137
Enzyme immunoassay 331, 331Enzyme-linked immunosorbent assay
(ELISA) 331, 341–342, 343–344Eosinophils, polymorphonuclear 310,
311, 311Eosin solution 117–118, 356Epithelial casts, urine 243, 244Equipment 1–2
centrifuges 70–73, 70–73cleaning 77–90, 78–82electrical 15–20, 16–19first-aid 98laboratory 32–46, 34–35, 39–44water demineralizers 27–29, 28–29
Erlenmeyer flasks 34, 36–37, 45Erythrocytes 265, 265, 306, 307
abnormal 306–310, 306–310Cabot ring bodies 309, 310CSF 257–258haemoglobin relationship 284–285immature (reticulocytes) 316–319,
318malaria infected 179measurement 6–7nucleated 292, 310, 310number concentration 6, 265, 284,
287–288sedimentation rate (ESR) 292–295,
293–294sickle-cell anaemia 314–316, 315thin blood films 305–310, 306–310urine 240, 241, 241–242volume fraction 6, 279–287, 280–283,
286–287ESR, see Erythrocytes, sedimentation
rateEstimation, see CalculationEvaporating dishes 34, 37Expiry dates, reagents 46Extension leads, electrical 19, 19Exudates, examination 218–220Eyepieces, microscopes 56, 61, 61Eyes
acid/alkali splashes in 99, 99, 100filarial infection 160
Facial lesions, leprosy 221–223, 222Faeces, see StoolsFailure, electrical equipment 17–20False casts, urine 244, 244False positives/negatives, smear
staining 201
Fasciola spp. 106, 128, 138, 138Fasciolopsis buski 106, 128, 138, 138Fatty casts, urine 243, 244Female patients, urogenital
specimens 208, 209, 215Fibrinogen, deficiency 298Field stains 356–357
faecal trophozoites 117malaria parasites 177–178thin blood films 299, 304, 304–305
Filariae 159–172, 162–163blood infection 163–172, 166–167,
171–172geographical distribution 160, 165,
172skin infection 160–163, 161–163
Filariasis, see FilariaeFilms (see also Slide preparation)
thick blood 173–182, 175, 187, 187,193–194, 193–194
thin blood 173–179, 175–176,178–181, 299–314, 300–304,306–314
Filter funnels 34Filters
microscopes 57water 24, 24
Filtration, parasite detection 168–170,169, 250–251, 250–251
Fire risk, electricity 17First aid 98–101, 99Fish tapeworm (Diphyllobothrium
latum) 106, 152eggs 128, 134, 134
Fixationbiopsy specimens 95–96smears 197, 199, 199
Fixatives 95, 362–363, 368Flagellates
cysts 121, 121, 123motile forms 111, 115–116, 115–116pathogenicity 111
Flaming, sterilization 90, 90Flammable liquids, precautions 97Flasks 34, 36–37Flatworms, see FlukesFlotation techniques, parasite
detection 152–153, 152–153Flukes (see also Schistosoma spp.)
liver, transmission routes 106stools 150–151, 150–151
Fluorescent treponemal antibody-absorbed (FTA-Abs) test,syphilis 346–347
Fluoride oxalate anticoagulant 357Forceps 35, 36, 38Foreign substances, urine
specimens 244–245, 245Formaldehyde 357
stool preservation 109, 110, 110Formaldehyde–detergent sedimentation
technique 154–156, 155–156

374 Index
Formaldehyde–ether sedimentationtechnique 153–154, 154
Formol gel test, leishmaniasis 196Formulae, reagents 350FTA-Abs, see Fluorescent treponemal
antibody-absorbed testFuchs–Rosenthal counting
chamber 258, 258–259Fungi 204, 224–228, 226, 228–229
CSF 257, 261, 261identification 124–125, 125, 146, 146urine 240, 248, 248, 252, 253
Fuses, electrical 18, 18
Gas burners, precautions 97Generators, electrical supply 13Genital specimens, see Urogenital
specimensGeographical distribution
filarial parasites 160, 165, 172malaria parasites 173
Giardia intestinalis 115, 115, 121, 121Giemsa stain 175–177, 299–300, 304,
305, 357–358Glassware 34–35, 36–37
autoclaving 87, 87cleaning 77–81, 78–81disinfection 84heating precautions 97injuries from 101making in the laboratory 33, 39–42,
39–42stills 25, 26storage 45tubing 37, 39–42, 39–42
Globulins, CSF (Pandy test) 262–263,263
Glucoseblood concentrations 322–325,
323–324CSF specimens 261–262substance concentration 7urine specimens 236, 236
Glucose reagents 358Glycerol–malachite green solution 359Gonococcal infection 197, 215
urogenital specimens 207–208, 208,253
Gonorrhoea, see Gonococcal infectionGraduated conical glasses 77Graduated pipettes 73, 73Gram staining 199–201, 199–201
acetone–ethanol decolorizer 351CSF specimens 260–261, 260–261urine specimens 252–253, 253
Granular casts, urine 243, 243–244Granulocytes, immature 313, 313
Habitat, common filarial parasites 165Haematology (see also
Haemoglobin) 265–321blood cell types 265–266, 265–266
Haematology (continued)blood clotting 297–298, 297–298erythrocytes 279–288, 280–283,
286–287ESR 292–295, 293–294leukocytes 319–321, 320microscopes 32registers 47, 49reticulocytes 316–318, 317specimen collection 267–270,
267–270test equipment 37, 42–43thin blood films 299–314, 300–304,
306–314thrombocytes 321
Haemoglobinerythrocyte relationship 284–285estimation 7, 271–279, 272–273, 275,
278, 284–285H bodies 319
Haemoglobinometers, seeSpectrophotometers
Haemophilia 298, 298Haemophilus influenzae 257, 259, 261,
261Hair
fungal infections 225–226, 227specimen dispatch 93
Hand-operated centrifuges 70, 70Hansen disease, see LeprosyHarada–Mori sedimentation
technique 156–157b-hCG, see b-Human chorionic
gonadotropinHeads, centrifuge 70, 71Heinz bodies 319Helminths
intestinal 105, 125–152, 129–151,156–159
adults 146–152, 147–151eggs 125, 126–144, 129–144larvae 156–159, 158transmission routes 106
Heparinized tubes 42Hepatitis, tests 342–344, 344Heterophyes heterophyes 106, 128,
138–139, 139HIV, see Human immunodeficiency
virusHookworm (Ancylostoma duodenale/
Necator americanus) 106adults 148, 150eggs 126, 127, 128, 133, 152, 152larvae 157, 158
Hot-air ovens 33, 89–90Household bleaches 84–85Howell–Jolly bodies, erythrocytes 309,
309b-Human chorionic gonadotropin
(b-hCG) 339Human immunodeficiency virus
(HIV) 341–342, 342

Index 375
Hyaline casts, urine 243, 243Hydatid cysts (Echinococcus
granulosus) 151, 151Hydrochloric acid 359Hygiene, intestinal parasites 106Hymenolepis spp. (tapeworm)
adults 148, 149eggs 128, 139, 139, 152
Hypersegmented polymorphonuclearneutrophils 313, 313
Hypochlorite solutions 84–85
IdentificationBacillus anthracis 204, 204Balantidium coli 116, 117, 121, 121Blastocystis hominis (yeast) 124–125,
125blood parasites
microfilariae 163–172, 166, 167,169, 171–172
Plasmodium spp. 173–182, 174–176,179–181
Trypanosoma spp. 187, 185–194,193–194
Corynebacterium diphtheriae 201, 202filariae 159–172, 162–163, 166–167,
171–172fungi 124–125, 125, 146helminths
adults 146–152, 147–151eggs 126–144, 129–144larvae 156–158, 158tapeworms 149
intestinal protozoa 111–117, 111–125,119–122, 124
amoebae 113–114, 113–115, 118,120, 120
ciliates 116, 121, 121coccidia 122, 122flagellates 115–116, 115–116, 121,
121Leishmania spp. 195–196, 196leukocytes 125, 125pollen grains 146, 146pus 125, 125starch granules 144, 144–145Yersinia pestis 204
Immunofluorescence 332–333, 332Immunoglobulins, see AntibodiesImmunology 328–349, 329–336
antibodies 328–329, 329antigens 329–330immune system 328, 329immunochemical techniques 330–335tests 336–349
Incineration, laboratory waste 90, 90–91Incubators, cleaning and
maintenance 83Infants (see also Children; Neonates)
capillary blood collection 280erythrocyte number concentration
287
Infants (continued)erythrocyte volume fraction 284leukocyte number concentration 291leukocyte type number fraction 320normal haemoglobin 275normal thrombocyte counts 321pinworm egg collection 135–137,
135–137reticulocyte number concentration
318stool specimens 217urine collection 234
Infection sourcesAfrican trypanosomiasis 183blood/skin parasites 160Chagas disease 193intestinal parasites 106leishmaniasis 194
Infectious mononucleosis 313Injuries, laboratory accidents 98–101,
99Inoculating loops 197–198, 198Instruments 32
disinfection 84storage 45
Intestinal parasites 105–159concentration techniques 152–156,
152–157helminths 125–152, 129–151
adults 146–152, 147–151eggs 125, 126–144, 129–144larvae 156–158, 158
protozoa 111–117, 111–124, 119–122,124–125
amoebae 113–114, 113–115,118–120, 120
ciliates 116, 121, 121coccidia 122, 122cysts 118–124, 119–122, 124–125flagellates 115–116, 115–116, 121,
121sedimentation techniques 153–157,
154–156stool specimens 107–110, 107–111,
159–161transmission routes 106
Inventories, supplies 46Iodamoeba butschlii 114, 114, 120, 121Iodine 85, 123Iron deficiency 288Isospora belli 124Isotonic saline, see Sodium chloride
Kahn tubes 34Kato–Katz technique, Schistosoma
mansoni infection 141–143,142–143
Ketone bodies, urine specimens239–240, 239–240
Labellingbiopsy specimens 96

376 Index
Labelling (continued)specific reagents 350–368specimens for transport 94
Laboratory workers, responsibilities 2Lactophenol cotton blue mounting
solution 359Lamps, microscopes 58–60, 59Lancet flukes (Dicrocoelium spp.) 106,
128, 134, 134Lancets 36Larvae (see also Microfilariae) 156–157,
158stool specimens 109urine specimens 248
Latex agglutination techniques 336,336, 338
Lead batteries 14–15Lead poisoning 255, 309Leishman stain 299, 303, 305, 354, 359Leishmaniasis (Leishmania spp.)
194–196, 196Lenses, microscopes 53–54, 54Leprosy (Mycobacterium leprae)
220–224, 221–223Leukaemia 285, 291, 313Leukocytes 125, 125, 265, 265, 310–314,
311–314CSF specimens 255–257, 255–257malaria 180–182number concentration 6, 265, 288–
290, 288–292type number fraction 6, 259, 319–320,
320urine specimens 240, 242, 242–243
Leukocytosis 291Leukopenia 291Liquids
heating precautions 97measurement/dispensing 73–77,
73–77Litre, measurement 4–5Liver diseases 306, 307Liver flukes, see FlukesLoa spp. 159–160, 163, 165, 172Loeffler methylene blue 204, 360Lugol iodine 360Lutzomyia longipalpis 194Lymphatic system, filarial worms 159Lymph nodes, aspiration 183–185,
184–185Lymphoblasts 313, 314Lymphocytes 311–313, 311–313Lymphocytosis 320Lymphopenia 320Lysis time, blood specimens 297–298,
297–298Lysol 84–85
Macrocytes 307, 308Macroscopic examination, see Direct
examinationMadura foot, see Mycetoma
Magnification, microscopes 53–56,54–56
Maintenance (see also Repairs)batteries 15burettes 77centrifuges 83incubators 83lead batteries 15microscopes 64–66, 65water-baths 83
Malaria (see also Plasmodium spp.) 159,172–182, 178, 291, 309
blood cells 312, 313, 320dipstick test 344–346, 345–346
Male patients, urogenitalspecimens 197, 207–208,209–210
Mammomonogamus laryngeus 205Mancini technique, see Radial
immunodiffusionMansonella spp. 159–160, 163, 163, 165,
172Markers, hepatitis B virus 342–343Mass, definition 3, 5May–Grünwald stain 299, 304, 305,
354, 360Mean erythrocyte haemoglobin
concentration 285–286Measles 312, 313, 320Measurement (see also Calculations;
Number concentrations; Numberfractions) 2–7
balances 32, 66–69, 67–69bleeding time 295–296, 295–296blood clotting 297–298, 297–298ESR 292–295, 293–294helminth eggs 126–127liquids 73–77, 73–77lysis time 297–298, 297–298metric system 2–7ocular micrometers 63, 63–64pH, urine 235, 235–236protozoa cysts 123quantities 2–3traditional system 5–7
Megakaryocytes 266, 314, 314Meker burners 35Meningitis 255, 259
common causes 256CSF examination 197, 260–261,
260–261, 263tuberculous 257, 259, 261, 263
Meningonema spp. 159Mercurothiolate, see ThiomersalMetagonimus yokogawai 106, 128, 139,
139Meters, electricity 16, 16Methylene blue solution 361Metric system 2–7Microcytes 307, 307Microfilariae 159–172, 163, 166,
171–172, 249

Index 377
Microhaematocrit equipment 37Micrometers, ocular 63, 63–64Micropipettes 38–39, 74, 74–75Microscopes 32, 38, 53–57, 53–66,
59–63, 65adjustment system 57, 57–58cleaning 64–65, 65focusing 61, 62–63illumination system 56–57, 56–57, 59,
59maintenance 64–66, 65mirrors 56, 56, 60, 60precautions 65–66setting up 58–61, 59–61slides 37, 79–80, 80
Microscopic examinationacid-fast bacilli 203Bacillus anthracis 204, 204, 220body cavity fluid 219–220Corynebacterium diphtheriae 202CSF 257–261, 258–261fungi 226, 226, 227, 229, 229gonorrhoea 208, 209–210Gram-stained organisms 200–201,
200–201, 253Leishmania spp. 195–196, 196leukocyte type number fraction
319–320malaria parasites 178, 178–182microfilariae in blood 164, 166–167,
166–172, 169, 171–172microfilariae, Onchocerca volvulus
162–163, 162–163mycetoma pus specimens 227Mycobacterium leprae 223, 223–224pityriasis versicolor 229, 229protozoa cysts 124, 124–125reticulocyte numbers 317, 317–318semen specimens 212–214, 212–215sickle-cell anaemia 315, 315–316sputum/throat specimens 206stool specimens 107–109, 108–109syphilis treponemes 211, 211thin blood films 305–314, 306–314thrombocyte number concentration
321Trypanosoma spp. 185–187, 185–188urine 241–248, 241–248, 250–253,
251–254vaginal discharge specimens 215watery stools 216, 217Yersinia pestis 204
Moledefinition 3substance concentration 5
Molecular weight 3Monocytes 311–312, 312Morphological index, Mycobacterium
leprae 224Mortars/pestles 35Motile forms (see also Trophozoites)
protozoa 111–117, 111–118
Motility, spermatozoa 214Mott cells 259, 260Mycetoma, pus examination 226–227Mycobacterium
leprae 202, 220–224, 221–223tuberculosis 197, 206
Mycology (see also Fungi) 225–229, 226,228–229
Myelofibrosis 309Myeloma 237, 312
Nail specimens, dispatch 93Nasal specimens, leprosy 220, 222,
223–224, 223Necator americanus (hookworm)
adults 148, 150eggs 126, 128, 140, 140, 152larvae 157, 158
Needlesdisposable 36reusable 81, 81, 87, 87
Neisseria meningitidis 260, 260, 264Neonates (see also Children; Infants)
erythrocyte number concentration287
erythrocyte volume fraction 284immune system 328leukocyte number concentration 291leukocyte type number fraction 320normal haemoglobin 275
Nephelometry, immunology 335Nephrotic syndrome 247Neubauer counting chambers 259, 288,
288–291, 290Neutral red 361Neutropenia 320Neutrophilia 320Neutrophils, polymorphonuclear
310–311, 311, 313, 313New glassware, cleaning 77Nickel–cadmium (Ni–Cd) batteries
15Normoblasts, see Nucleated erythrocytesNucleated erythrocytes 292, 310, 310Number concentrations 5–7
erythrocytes 265, 284, 287–288leukocytes 265, 285, 288–290,
288–292leukocytes in CSF 258–259, 258–259reticulocytes 316–319thrombocytes 266, 321
Number fractions 5–6leukocyte type 6, 259, 319, 319–321reticulocyte 6, 316–319, 317
Occult blood, stools 157–159, 159Ocular micrometers 63, 63–64Oil droplets, identification 145, 145Onchocerca volvulus 160–163, 161–163,
165, 249Oocysts, Cryptosporidium spp. 123–124,
124

378 Index
Open two-pan balances 67–68, 67–68Opisthorchis felineus, eggs 128, 140,
140Ordering, supplies 46Orthostatic proteinuria 237Ovens, hot-air 33, 89–90
Packed cell volume, see Erythrocytevolume fraction
Packing, specimens for dispatch 91–94,93–94
Pandy reagent 361Pandy test, CSF globulin 262–263, 263Panels, solar 13–14Paragonimus westermani 106, 128, 140,
140Parasites (see also Intestinal
parasites) 105–196, 320blood 159–160, 163–194, 178,
186–187, 189–194, 196malaria 172–182, 178microfilariae 159–172, 163, 166,
171–172protozoa 172–196, 178, 185, 187,
193–194trypanosomiasis 182–194, 184–187,
189–192concentration techniques 152–156,
152–156laboratory registers 47, 49–51leishmaniasis 194–196skin 159–163, 161–163, 195–196, 196sputum/throat 205transmission routes 106urine 240, 248, 248–251, 251
Pasteur pipetteshow to make 33, 39–40, 39–40sterilization 87, 87urogenital specimens 209, 209
Pathogenicity, intestinal protozoa 111Pelvic cells, urine 242, 242Pestles/mortars 35Petri dishes 34, 37Phenol red 361pH measurement, urine 235, 235–236Phosphate-buffered water 361–362Photometers 32Photometric methods, haemoglobin
estimation 271–279, 272–273Pinworm (Enterobius vermicularis)
adults 146, 147eggs 126, 128, 135–138, 135–137
Pipettes 37–39, 73–75, 73–75cleaning 78–79, 79Pasteur 33, 39–40, 39–40precautions 97
Pityriasis versicolor (Pityrosporumfurfur) 227–229, 228–229
Plans, laboratories 11–12, 11–12Plant parts, identification 145–146, 146Plasma
abnormal proteins 298
Plasma (continued)cells 312, 312, 328erythrocyte volume fraction 279–
280glucose concentration 325serum comparison 266
Plasmodium spp. (see also Malaria) 124,159, 173–182, 175–176, 178
dipstick test 344–346, 345–346Platelets, see ThrombocytesPlugs, electrical 18–19, 18–19Plumbing 20–23, 20–23Poikilocytes 309, 309Poisoning
laboratory accidents 100lead 255, 309
Pollen grains, identification 146, 146Polycythaemia 287Polymorphonuclear cells 310–311, 311,
313, 313Polyvinyl alcohol (PVA) 110, 362–363Potassium cyanide 274Potassium hydroxide 363Potassium permanganate 363Power, electrical 17Precautions (see also Safety)
accident prevention 97anthrax specimens 204, 220anticoagulants 43autoclaving 88centrifuges 72CSF specimens 255–256electricity 19–20ELISA for hepatitis B 343–344hypochlorite solutions 85microscope care 65–66pipette use 75potassium cyanide 274, 356potassium hydroxide 225stool specimens 107, 116thin blood films 303
Precipitation, immunology 334–335,335
Precipitin tubes 34Prefixes, SI 4Preparation (see also Slide preparation)
reagents 350–368smears 197–199, 198–199thin blood films 299–314, 300–304,
306–314Preservation
stool specimens 109–110, 110urine specimens 234
Pressure cookers, equipmentsterilization 88–89, 89
Preventionaccidents 97laboratory infections 96–97
Propane gas burners 97Protein
CSF specimens 262–263, 262–263urine specimens 236–239

Index 379
Protozoablood 173–194, 178, 185, 187,
193–194intestinal 105–106, 111–117,
111–124, 119–122, 124transmission routes 106
Public health, laboratory reports 47–48,52
Pus casts, urine 243, 244Pus specimens
Bacillus anthracis 219–220containers 83CSF 256, 256dispatch 92gonorrhoea 210, 210identification 125, 125mycetoma 227–228
PVA, see Polyvinyl alcoholPyelonephritis 237
Quality assurance 101–102Quality control
AHD reagent 352demineralized water 28–29distilled water 27
Quantities, measurement 2–7Quaternary ammonium compounds
(QUATS) 85QUATS, see Quaternary ammonium
compounds
Radial immunodiffusion 335, 335,339–341
Radioimmunoassay 330, 330Rapid Field stain, trophozoites 117Rapid plasma reagin (RPR) test,
syphilis 346, 347–348, 348Reagents 1, 350–368
acetic acid 350–351acetone–ethanol decolorizer 351acid–ethanol for Ziehl–Neelsen
stain 351acid reagent 351Albert stain 201, 351alkaline haematin D reagent 276,
352Amies transport medium 352–353Benedict solution 353benzoic acid 358blank reagent 353boric acid 353brilliant cresyl blue 353buffered glycerol saline 353–354buffered water, pH 7.2 29–31, 354Carbol fuchsin solution 354Cary–Blair transport medium 354chemical formulae 350colour reagent 367crystal violet, modified Hucker 355Delafield’s haematoxylin stain 355diacetyl monoxime stock solution 367dichromate cleaning solution 355
Reagents (continued)disodium hydrogen phosphate stock
solution 361–362Drabkin diluting fluid 355–356EDTA dipotassium salt 356eosin 356expiry dates 46Field stains 117, 356–357fixatives 95, 362–363, 365–366, 368fluoride oxalate anticoagulant 357formaldehyde 357Giemsa stain 357–358glucose reagents 358glycerol–malachite green solution 359hydrochloric acid 359lactophenol cotton blue mounting
solution 359Leishman stain 359Loeffler methylene blue 204, 360Lugol iodine 360May–Grünwald stain 360methylene blue solution 361modified Schaudinn fixative 362neutral red 361Pandy reagent 361phenol red 361phosphate-buffered water 361–362polyvinyl alcohol (PVA) fixative
362–363potassium hydroxide 363potassium permanganate 363safranine solution 363saponin 363–364silver nitrate 364sodium bicarbonate 364sodium carbonate 364sodium chloride 364sodium hydroxide 364–365sodium metabisulfite 365streptolysin O 336–338Stuart transport medium, modified
365sulfosalicylic acid 365thiomersal–iodine–formaldehyde
(TIF) 365–366o-toluidine 322–325, 323–324, 358trisodium citrate 366Türk solution 366urea reagents 325, 366–367Wayson stain 203, 367Willis solution 152, 368Wintrobe solution 368Zenker fixative 368Ziehl–Neelsen stain 202–203, 219,
221, 351, 354Records, laboratory 38, 47–52, 223–224Red blood cells, see ErythrocytesReference laboratories, specimen
dispatch 91–96, 93–94Reference ranges
blood glucose concentrations324–325
380 Index
Reference ranges (continued)blood urea concentrations 327erythrocytes 284, 287ESR 293–294leukocytes 291, 320normal haemoglobin 275reticulocytes 318thrombocytes 321
Reference solutions, haemoglobin272–273, 272–273
Refrigerators 32Registers (see also Records)
specimens 47–51Renal cells, urine 242–243, 242–243Renal disease 236Repairs (see also Maintenance)
electrical equipment 17–19, 17–20microscopes 65plumbing 20–23, 20–23
Reports, laboratory 38, 47–48, 52, 251,253
Resolving power, microscopes 55Responsibilities, laboratory workers 2Results, reporting 47–48, 52, 251, 253Reticulocytes 6, 310, 310, 316–319, 317Reusable needles 81, 87, 87Reusable syringes 81, 81, 87, 87Rheumatoid factors, determination 336,
336Ringworm 225–226, 226Romanowsky stains 265, 299Roundworm (Ascaris lumbricoides) 106
adults 146, 147eggs 126, 127–128, 133, 133, 152
RPR, see Rapid plasma reagin
Safety (see also Precautions)electricity 19–20in the laboratory 97pressure cookers 89
Safety bulbs, rubber 35Safranine solution 363Sand filters 24, 24Sanitation, plumbing 20–23, 20–23Saponin 363–364Scale readers, erythrocyte volume
fraction 280–281Scalpels 36Schaudinn fixative, modified 362Schistocytes 308, 308Schistosoma
eggs 128, 140–141, 140–143haematobium 248, 248, 249–251,
250–251mansoni 141–143, 142–143spp. (blood flukes) 108, 150–151, 151
Schistosomiasis (see alsoSchistosoma) 320
urine detection 234, 240, 248, 248,249–251, 250–251
Sedimentation rate, erythrocytes(ESR) 292–295, 293–294
Sedimentation techniques 153–157,154–156, 250
Semen specimens 211–215, 212–214Serological tests
African trypanosomiasis 188–192,189–192
registers 47, 51Serum
glucose concentration 325plasma comparison 266
Sharps containers 96Shocks, electric 101SI units (International System of
Units) 2–7, 271Sickle-cell anaemia 292, 307, 307–308,
310test 314–316, 315
Silver nitrate 364Sink traps, plumbing 22–23, 22–23Sizes, helminth eggs 132Skin
acid/alkali splashes on 98, 100disinfection 84
Skin specimens (see also Slit skinspecimens)
dispatch 93fungal infections 225–229, 226,
228–229Mycobacterium leprae 220–224,
221–223parasites 159–163, 161–163, 195–196,
196Sleeping sickness, see African
trypanosomiasisSlide preparation (see also Thick blood
films; Thin blood films) 198–201,198–204, 204
anthrax diagnosis 220body cavity fluids 218–219erythrocytes 305–310, 306–310fungal infections 225–226, 226,
228–229, 229gonorrhoea diagnosis 208leprosy diagnosis 222–224, 223malaria diagnosis 173–179, 175–176semen specimens 212sputum/throat specimens 206syphilis diagnosis 210urine specimens 252, 252vaginal discharge specimens 215
Slidescleaning 79–80, 80supplies 37
Slit skin specimenscutaneous leishmaniasis 195–196,
196leprosy 221–222, 222Onchocerca 161–162, 161–162
SmearsCSF 259, 260–261, 260–261faecal 141–143, 142–143Mycobacterium leprae 220–225, 223
Index 381
Smears (continued)preparation/fixation 197–199,
198–199staining techniques 199–201,
199–204, 204Soaps, identification 145, 145Sodium bicarbonate 364Sodium carbonate 364Sodium chloride 364
flotation technique 152–153, 152–153Sodium citrate, see Trisodium citrateSodium dihydrogen phosphate,
anhydrous 361–362Sodium hydrogen carbonate, see Sodium
bicarbonateSodium hydroxide 364–365Sodium hypochlorite 84–85Sodium metabisulfite 365Solar energy, electrical supply 13–15Solar stills 26, 26–27Specimen collection
appropriate 102blood 267–270, 267–270, 280–282,
281, 286malaria parasites 174–175, 174microfilariae 164, 164, 166thin blood films 300, 301trypanosomes 186, 186, 189, 189
body cavity fluids 218CSF 255, 255fungal infection 225, 227–228, 228leprosy 221–222, 221–223lymph node aspirates
184–185, 184–185pinworm eggs 135–137, 135–137pus 220, 227semen 212skin 161–163, 161–163, 195, 196sputum 205, 205–206stools 107, 216–217, 217syphilis chancre 210, 210throat swabs 206, 206urine 231–232, 238, 241, 249, 252urogenital samples 207–208, 215
Specimen containers 34, 42–44, 42–44cleaning 81–82, 82
Specimensdispatch 91–96, 93–94disposal 97registration 46–51
Spectrophotometers (see alsoColorimeters) 271–279
calibration 272–274, 273, 276–277Sperm counts (see also Semen
specimens) 214–215Spherocytes 308, 308Spherocytosis, hereditary 308Spinal compression 257, 262, 263Spirit lamps 35Sputum, disinfection 84Sputum specimens 204–206, 205
containers 44, 44, 82, 82
Sputum specimens (continued)Corynebacterium diphtheriae 201,
201–202dispatch 92
Staining techniques 109blood films 175–176, 175–178,
303–305, 304faecal cysts 123–124, 124faecal trophozoites 117–118Leishmania spp. 195microfilariae 170–171, 171–172Onchocerca volvulus 163, 163Plasmodium spp. 175, 177smears 199–201, 199–204, 204
Staining troughs 34Stains (see also Staining techniques;
Ziehl–Neelsen stain)Albert 201, 201–202, 351brilliant cresyl blue 316–317, 317,
318–319, 353Delafield’s haematoxylin 355eosin 117–118, 356Field 117, 356–357Giemsa 299–300, 304, 305, 357–358Gram 199–201Leishman 359May–Grünwald 299, 304, 305, 354,
360Romanowsky 265, 299Wayson 367
Standard curve, haemoglobinconcentration 273
Starch granules, identification 144,144–145
Sterilization (see also Cleaning;Disinfection) 85–90, 86–87,89–90
autoclaving 86–87, 86–88boiling 89dry heat 89–90, 91using a pressure cooker 89–90, 90
Stillsdemineralized water 33distilled water 24–27, 25–26
Stirring rods, how to make 40–41, 40Stocktaking, supplies 45–46Stools, disinfection 85Stool specimens
containers 42, 42, 82dispatch 92occult blood 157–159, 159parasitology 107–110, 107–110watery 216–218, 217
Stoppers, volumetric flasks 76Storage
supplies 45water 24
Streptococcus pneumoniae 257, 260,260–261
Streptolysin O 336–338Strongyloides stercoralis
eggs 109, 128, 143, 143

382 Index
Strongyloides stercoralis (continued)larvae 156–157, 158
Stuart transport medium 207, 209, 264,264, 365
Subarachnoid haemorrhage 256–257,257, 262, 263
Sulfosalicylic acid 365Sulfuric acid, handling 97Supplies
electricity 12–20laboratory 33, 34–35, 36–39ordering procedures 46stocktaking 45–46
Supplies (continued)storage 45water 24–31
Switches, electrical 19, 19Symptoms
African trypanosomiasis 183Chagas disease 192–193leishmaniasis 194malaria 172
Syphilis (Treponema pallidum) 197,209–211, 211
tests 346–349, 348–349Syringes 36, 81, 81, 87, 87Système internationale, see Units, SI
Taenia spp. (tapeworm) 106adults 146–148, 147–149eggs 128, 143–144, 144, 152identification 149
Tally counters 37Tapeworm, fish (Diphyllobothrium
latum) 106, 128, 134, 134, 152Tapeworm (Taenia spp.)
adults 146–148, 147, 149eggs 128, 143–144, 144, 152identification 149
Taps, water supply 20–22, 20–22Target cells, erythrocytes 306, 307Techniques (see also Tests)
agglutination 188–192, 189–192,333–334, 333–336, 336,338–339
anthrax detection 204, 204, 219–220biopsy fixation 95–96blood sample staining 175–176,
175–177cellophane faecal thick smear
141–143, 142–143CSF examinations 256–264, 256–264fungi detection 225–229, 226,
228–229, 261, 261gonorrhoea diagnosis 207–209, 208leishmaniasis diagnosis 196, 195–196leprosy diagnosis 221–223, 221–224microfilariae detection 164, 164–172,
166–167, 169, 171–172oocyst detection 123–124, 124parasite concentration 152–156,
152–157
Techniques (continued)pinworm eggs examination 135–138,
135–137Plasmodium spp. detection 173–182,
178Schistosoma mansoni detection
141–143, 142–143sedimentation 153–157, 154–156semen examination 212, 212–214smear staining 199–201, 199–204, 204sputum/throat swab examination
205–206, 205–206stools examination 107–109, 108–109syphilis diagnosis 210–211, 211,
346–349tapeworm detection 147–149,
147–148thin blood films 300–304, 300–314,
306–314trophozoites staining 117–118Trypanosoma spp. detection 183–194,
184–187, 189–194urine protein estimation 238–239Willis solution flotation 152–153,
153–154Tests (see also Techniques)
African trypanosomiasis 188–192,189–192
anthrax 204, 204, 220antibody determination 339–341ASOT 336–338Chagas disease 193–194, 193–194ELISA 341–342, 343–344falciparum malaria 344–346,
345–346hepatitis 342–344, 344HIV 341–342, 342immunology 330–335, 330–335latex agglutination 336, 336, 338leishmaniasis formol gel 196Onchocerca volvulus 160–163, 161–163rheumatoid factors determination
336, 336sickle-cell anaemia 314–316, 315stools occult blood 157–159, 158syphilis infection 346–349, 348–349
Test-tubes 34, 37cleaning 82heating precautions 97holders 35
Thalassaemias 306–309Thermometers 35Thick blood films
Chagas disease 193–194, 193–194Plasmodium spp. 173–182, 175Trypanosoma spp. 187, 187
Thimerosal, see ThiomersalThin blood films 299–314, 300–304,
306–314Plasmodium spp. 173–182, 175preparation 300–303, 300–303staining 303–305, 304

Index 383
Thiomersal–iodine–formaldehyde(TIF) 109, 110, 365–366
Thiosemicarbazide, blood ureaconcentrations 325–327
Threadworm, see PinwormThroat specimens 92, 206–209,
208–209Thrombocytes 266, 266
deficiency 298number concentration 7, 321
TIF, see Thiomersal–iodine–formaldehyde
Timers 35Tinea infection 225–226, 226o-Toluidine reagent 322–325, 323–324,
358Tongue depressors 36Tools
electrical repairs 17, 17laboratory 38plumbing 20, 20
Tourniquets, blood collection 268, 268Toxoplasma gondii 124Traditional system, measurement 5–7Transformers, electrical 17Transmission
African trypanosomiasis 183blood/skin parasites 160Chagas disease 193intestinal parasites 106leishmaniasis 194
Transportbiological specimens 91–96, 93–94lead batteries 14specimens, see Dispatch
Transport media 263–264Amies 352–353buffered glycerol saline 218Cary–Blair 216–217, 354Stuart 207, 209, 264, 264, 365
Treponemapallidum 209–210, 346–349pertenue 210–211
Trichloroacetic acid 322–323, 353, 358,366
Trichomonashominis 115, 116vaginalis 215, 249
Trichostrongylus spp. 106, 128, 144,144
Trichuris trichiura (whipworm) 106adults 150, 150eggs 126, 128, 144, 144, 152
Triple phosphate crystals, urine 245,246
Trisodium citrate 366Trophozoites 111–117, 111–118
amoebae 113–114, 113–115ciliates 116, 117flagellates 115–116, 115–116staining methods 117–118urine specimens 240, 249
Trypanosoma spp. 159, 182–194, 185,187, 193
CSF 259–260, 260Trypanosomiasis (see also Trypanosoma
spp.) 161, 295African 183–192, 184–187Chagas disease 192–194, 193
Tubercle bacilli 253, 253Tuberculosis 197, 295Tuberculous meningitis 257, 259
CSF examination 263Ziehl–Neelsen staining 261
Tubes (see also Test-tubes)centrifuge 72, 72glass 33, 34, 37, 39–40, 39–42Westergren 37
Turbidimetry, immunology 335Türk solution 366Type number fraction, leukocyte 6, 259,
319, 319–320Typhoid fever 291, 320
Units, SI 2–7Urates, urine 246, 246, 247, 247Urea 7, 325–327Urea reagents 325, 366–367Uric acid crystals, urine 245, 245Urine
disinfection 84neutral 245–246, 248
Urine specimens 231–254, 235–236,239–248, 250–253
abnormalities detection 241–248,241–248
analysis register 47, 49bacteriological examination 251–254,
252–253blood 234, 241–242, 241–242casts 243–244, 243–244cells 241–243, 241–243containers 44, 82crystals 236, 245–248, 245–248dispatch 93foreign substances 244–245, 245glucose detection 236, 236b-hCG determination 339ketone bodies 239–240, 239–240pH measurement 235, 235–236preservation 234protein detection 236–239Schistosoma haematobium 248, 248,
249–251, 250–251Urogenital specimens
gonorrhoea 207–208, 208syphilis 209–210, 210vaginal discharge 215–216
Vacuum pumps 79, 79Vaginal discharge specimens
215–216Vectors (see also Transmission)
common filarial parasites 165

384 Index
Venous bloodcollection 267–270, 267–270, 281,
286examination 166–170glucose concentration 325
Vibrio cholerae 216, 217Vincent’s bacilli 199, 201, 201Virus infections 312, 313, 321
diarrhoeal disease 105hepatitis 342–344, 344
Visceral leishmaniasis 196Voltage, electrical supply 16Volume fraction, erythrocyte 6,
279–287, 280–283, 286Volume, SI derived units of 4–5Volumetric flasks 34, 75–76, 76Volumetric pipettes 73–74, 74
Wall sockets, electrical 19Wash bottles 35, 37, 42, 41–42Waste disposal 90–91, 90–91Watch glasses 34, 37Water
laboratory supplies 23–31, 354,361–362
plumbing 20–23waste 22–23
Water-baths 32, 83Watery stool specimens 216–218, 217Wayson stain 203–204, 367
Weighing, laboratory balances 66–69,67–69
Weight, definition 3Westergren tubes 37, 83Whipworm (Trichuris trichiura) 106
adults 150, 150eggs 126, 128, 144, 144, 152
White blood cells, see LeukocytesWillis solution 152–153, 152–153, 368Wintrobe solution 368Work benches, disinfection 85Worms, see Filariae, HelminthsWuchereria
bancrofti 248, 249spp. 159–160, 163, 165, 172
Xanthochromia, CSF 257, 257
Yaws (Treponema pertenue) 210–211, 211Yeasts 124–125, 125, 204Yersinia pestis (bubonic plague) 218
staining techniques 203–204, 218,219
Zenker fixative 368Ziehl–Neelsen stain 123–124, 202–203
acid–ethanol 351carbol fuchsin solution 354smears 221, 222–223tuberculous meningitis 261

The World Health Organization was established in 1948 as a specialized agency of the United Nations servingas the directing and coordinating authority for international health matters and public health. One of WHO’sconstitutional functions is to provide objective and reliable information and advice in the field of humanhealth, a responsibility that it fulfils in part through its extensive programme of publications.
The Organization seeks through its publications to support national health strategies and address the mostpressing public health concerns of populations around the world. To respond to the needs of Member Statesat all levels of development, WHO publishes practical manuals, handbooks and training material for specificcategories of health workers; internationally applicable guidelines and standards; reviews and analyses ofhealth policies, programmes and research; and state-of-the-art consensus reports that offer technical adviceand recommendations for decision-makers. These books are closely tied to the Organization’s priorityactivities, encompassing disease prevention and control, the development of equitable health systemsbased on primary health care, and health promotion for individuals and communities. Progress towardsbetter health for all also demands the global dissemination and exchange of information that draws on theknowledge and experience of all WHO’s Member countries and the collaboration of world leaders in publichealth and the biomedical sciences.
To ensure the widest possible availability of authoritative information and guidance on health matters, WHOsecures the broad international distribution of its publications and encourages their translation andadaptation. By helping to promote and protect health and prevent and control disease throughout theworld, WHO’s books contribute to achieving the Organization’s principal objective – the attainment by allpeople of the highest possible level of health.
Selected WHO publications of related interest
Basic laboratory methods in medical parasitology.1991 (122 pages)
Basic laboratory methods in clinical bacteriology.1991 (128 pages)
Laboratory diagnosis of sexually transmitted diseases.Van Dyck E, Meheus AZ, Piot P.
1999 (146 pages)
Maintenance and repair of laboratory,diagnostic imaging, and hospital equipment.
1994 (164 pages)
Safe management of wastes from health-care activities.Prüss A, Giroult E, Rushbrook P, eds.
1999 (244 pages)
Safety in health-care laboratories.(document WHO/LAB/97.1)
1997 (157 pages)
Laboratory biosafety manual, 2nd ed.1993 (133 pages)
Basics of quality assurance for intermediateand peripheral laboratories, 2nd ed.
El-Nageh MM et al.WHO Regional Publications, Eastern Mediterranean Series, No. 2
2002 (256 pages)
Further information on these and other WHO publications can be obtained fromMarketing and Dissemination, World Health Organization,
1211 Geneva 27, Switzerland.

World Health OrganizationGeneva
This manual provides a practical guide to the safe and accurate perfor-mance of basic laboratory techniques. Intended for use by laboratorytechnicians working in peripheral-level laboratories in developing coun-tries, the book emphasizes simple, economical procedures that canyield accurate results where resources, including equipment, are scarceand the climate is hot and humid.
The book is divided into three parts. The first describes the setting-upof a peripheral health laboratory and general laboratory procedures,including use of a microscope and laboratory balances, centrifugation,measurement and dispensing of liquids, and cleaning, disinfection andsterilization of laboratory equipment. Methods of disposal of labora-tory waste, dispatch of specimens to reference laboratories and labora-tory safety are also discussed. The second part describes techniques forthe examination of different specimens for helminths, protozoa, bacte-ria and fungi. Techniques for the preparation, fixation and staining ofsmears are also discussed. The third and final part describes theexamination of urine, cerebrospinal fluid and blood, including tech-niques based on immunological and serological principles. For eachtechnique, a list of materials and reagents is given, followed by adetailed description of the method and the results of microscopicexamination.
Numerous illustrations are used throughout the book to clarify thedifferent steps involved. A summary of the reagents required for thevarious techniques and their preparation is provided in the annex.
M A N U A LO F B A S I CT E C H N I Q U E S
FOR A HEALTHLABORATORY
2 n d e d i t i o n
MA
NU
AL O
F BA
SIC T
ECH
NIQ
UES FO
R A
HEA
LTH
LAB
OR
ATO
RY
– 2nd
editio
n
WHO9 789241 545303
ISBN 92-4-154530-5
Related Documents


