3-1 Manual 2 Home and Field Center Procedures ARIC Visit 5 and NCS Study Protocol Version 1.0 – March 7, 2013 Study website - http://www.cscc.unc.edu/aric/

Welcome message from author
This document is posted to help you gain knowledge. Please leave a comment to let me know what you think about it! Share it to your friends and learn new things together.
Transcript
3-1
Manual 2
Home and Field Center Procedures
ARIC Visit 5 and NCS Study Protocol
Version 1.0 – March 7, 2013
Study website - http://www.cscc.unc.edu/aric/
2
ARIC Visit 5 and NCS Study Protocol
Manual of Operations 2 - Home and Field Center Procedures
Table of Contents (pages are numbered within sections)
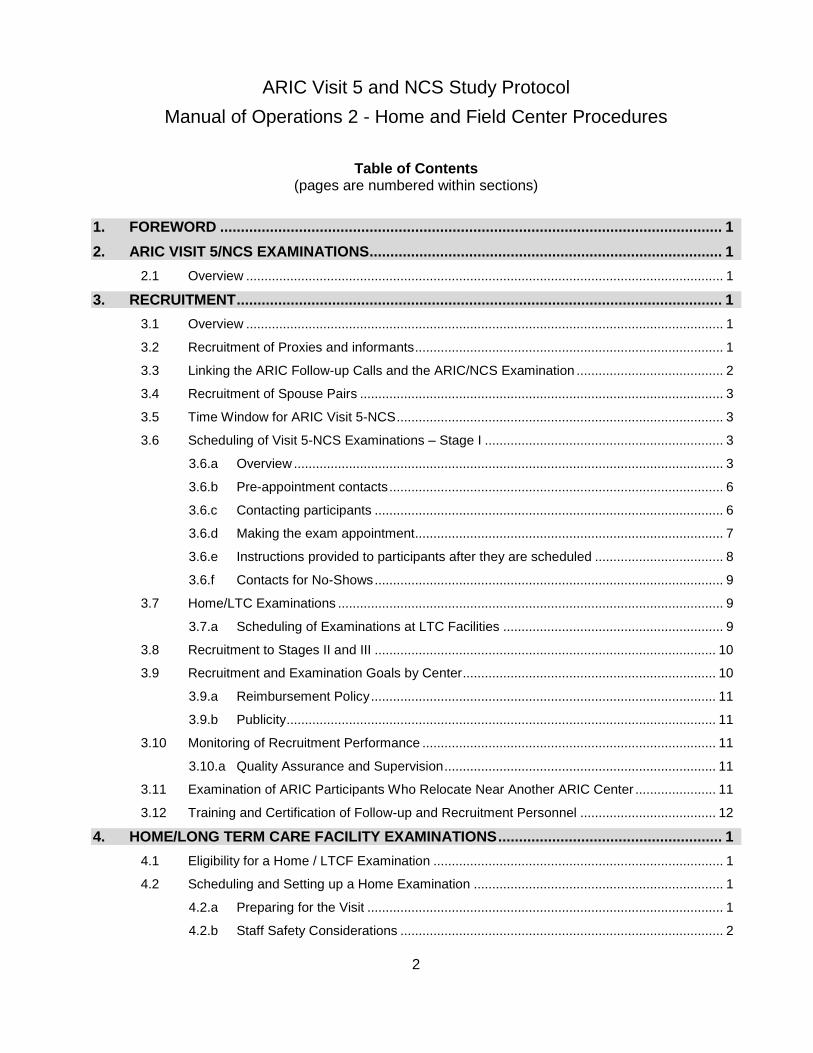
1. FOREWORD ......................................................................................................................... 1
2. ARIC VISIT 5/NCS EXAMINATIONS ..................................................................................... 1
2.1 Overview .................................................................................................................................. 1
3. RECRUITMENT ..................................................................................................................... 1
3.1 Overview .................................................................................................................................. 1
3.2 Recruitment of Proxies and informants .................................................................................... 1
3.3 Linking the ARIC Follow-up Calls and the ARIC/NCS Examination ........................................ 2
3.4 Recruitment of Spouse Pairs ................................................................................................... 3
3.5 Time Window for ARIC Visit 5-NCS ......................................................................................... 3
3.6 Scheduling of Visit 5-NCS Examinations – Stage I ................................................................. 3
3.6.a Overview ..................................................................................................................... 3
3.6.b Pre-appointment contacts ........................................................................................... 6
3.6.c Contacting participants ............................................................................................... 6
3.6.d Making the exam appointment.................................................................................... 7
3.6.e Instructions provided to participants after they are scheduled ................................... 8
3.6.f Contacts for No-Shows ............................................................................................... 9
3.7 Home/LTC Examinations ......................................................................................................... 9
3.7.a Scheduling of Examinations at LTC Facilities ............................................................ 9
3.8 Recruitment to Stages II and III ............................................................................................. 10
3.9 Recruitment and Examination Goals by Center ..................................................................... 10
3.9.a Reimbursement Policy .............................................................................................. 11
3.9.b Publicity ..................................................................................................................... 11
3.10 Monitoring of Recruitment Performance ................................................................................ 11
3.10.a Quality Assurance and Supervision .......................................................................... 11
3.11 Examination of ARIC Participants Who Relocate Near Another ARIC Center ...................... 11
3.12 Training and Certification of Follow-up and Recruitment Personnel ..................................... 12
4. HOME/LONG TERM CARE FACILITY EXAMINATIONS ...................................................... 1
4.1 Eligibility for a Home / LTCF Examination ............................................................................... 1
4.2 Scheduling and Setting up a Home Examination .................................................................... 1
4.2.a Preparing for the Visit ................................................................................................. 1
4.2.b Staff Safety Considerations ........................................................................................ 2
3
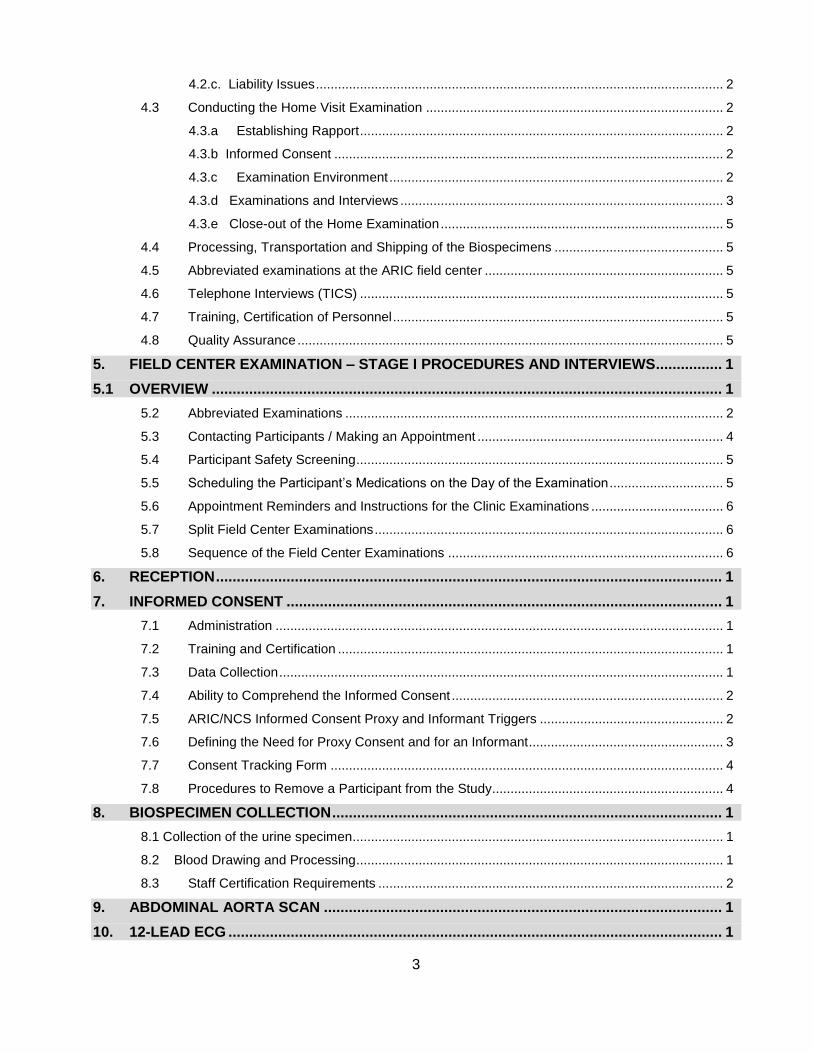
4.2.c. Liability Issues ............................................................................................................... 2
4.3 Conducting the Home Visit Examination ................................................................................. 2
4.3.a Establishing Rapport ................................................................................................... 2
4.3.b Informed Consent .......................................................................................................... 2
4.3.c Examination Environment ........................................................................................... 2
4.3.d Examinations and Interviews ........................................................................................ 3
4.3.e Close-out of the Home Examination ............................................................................. 5
4.4 Processing, Transportation and Shipping of the Biospecimens .............................................. 5
4.5 Abbreviated examinations at the ARIC field center ................................................................. 5
4.6 Telephone Interviews (TICS) ................................................................................................... 5
4.7 Training, Certification of Personnel .......................................................................................... 5
4.8 Quality Assurance .................................................................................................................... 5
5. FIELD CENTER EXAMINATION – STAGE I PROCEDURES AND INTERVIEWS ................ 1
5.1 OVERVIEW ........................................................................................................................... 1
5.2 Abbreviated Examinations ....................................................................................................... 2
5.3 Contacting Participants / Making an Appointment ................................................................... 4
5.4 Participant Safety Screening .................................................................................................... 5
5.5 Scheduling the Participant’s Medications on the Day of the Examination ............................... 5
5.6 Appointment Reminders and Instructions for the Clinic Examinations .................................... 6
5.7 Split Field Center Examinations ............................................................................................... 6
5.8 Sequence of the Field Center Examinations ........................................................................... 6
6. RECEPTION .......................................................................................................................... 1
7. INFORMED CONSENT ......................................................................................................... 1
7.1 Administration .......................................................................................................................... 1
7.2 Training and Certification ......................................................................................................... 1
7.3 Data Collection ......................................................................................................................... 1
7.4 Ability to Comprehend the Informed Consent .......................................................................... 2
7.5 ARIC/NCS Informed Consent Proxy and Informant Triggers .................................................. 2
7.6 Defining the Need for Proxy Consent and for an Informant ..................................................... 3
7.7 Consent Tracking Form ........................................................................................................... 4
7.8 Procedures to Remove a Participant from the Study............................................................... 4
8. BIOSPECIMEN COLLECTION .............................................................................................. 1
8.1 Collection of the urine specimen ..................................................................................................... 1
8.2 Blood Drawing and Processing .................................................................................................... 1
8.3 Staff Certification Requirements .............................................................................................. 2
9. ABDOMINAL AORTA SCAN ................................................................................................ 1
10. 12-LEAD ECG ....................................................................................................................... 1

4
10.1. Local ECG Reading ................................................................................................................. 1
10.2 Minor Abnormalities ................................................................................................................. 2
10.3 Training and Quality Assurance ............................................................................................... 2
11. ANTHROPOMETRY .............................................................................................................. 1
11.1 Equipment and Supplies .......................................................................................................... 1
11.2 Staff .......................................................................................................................................... 1
11.3 Anthropometry Form ................................................................................................................ 1
11.4 Examination Procedures .......................................................................................................... 1
11.4.a Standing Height .......................................................................................................... 1
11.4.b Weight and Body Composition ................................................................................... 3
11.4.c Abdominal (Waist) Circumference .............................................................................. 8
11.4.d Hip Circumference ...................................................................................................... 8
11.5 Quality Assurance/Quality Control ........................................................................................... 9
11.5.a Calibration Procedures and Equipment Check ........................................................... 9
11.5.b Training, Certification and Quality Control .................................................................. 9
12. COGNITIVE FUNCTION ........................................................................................................ 1
12.1 Rationale .................................................................................................................................... 1
12.2 Administration - Overview .......................................................................................................... 1
12.3 Mini-Mental State Examination (MMSE) ..................................................................................... 2
12.3.a Rationale ................................................................................................................... 2
12.3.b Administration ............................................................................................................ 2
12.4 Wide Range Achievement Test (WRAT-3) .............................................................................. 2
12.4.a Rationale ................................................................................................................... 2
12.4.b Administration ............................................................................................................. 2
12.5. Delayed Word Recall Test (DWRT) ......................................................................................... 2
12.5.a Rationale .................................................................................................................... 2
12.5.b Administration ........................................................................................................... 3
12.6 Digit Symbol Substitution test (DSST) .................................................................................... 3
12.6.a Rationale ..................................................................................................................... 3
12.6.b Administration ............................................................................................................ 3
12.7. Incidental Learning .................................................................................................................. 3
12.7.a Rationale ..................................................................................................................... 3
12.7.b Administration ........................................................................................................... 3
12.8. Word Fluency (FAS) ............................................................................................................... 3
12.8.a Rationale ................................................................................................................... 3
12.8.b Administration ........................................................................................................... 3
12.9. Animal Naming ......................................................................................................................... 4

5
12.9.a Rationale .................................................................................................................... 4
12.9.b Administration ........................................................................................................... 4
12.10. Logical Memory I and II .......................................................................................................... 4
12.10.a Rationale .................................................................................................................. 4
12.10.b Administration .......................................................................................................... 4
12.11. Digit Span Backwards ............................................................................................................ 4
12.11.a Rationale .................................................................................................................. 4
12.11.b Administration .......................................................................................................... 4
12.12.a Rationale .................................................................................................................. 5
12.12.b Administration .......................................................................................................... 5
12.13. Finger Tapping ....................................................................................................................... 5
12.13.a Rationale ................................................................................................................... 5
12.13.b Administration .......................................................................................................... 5
12.14. Boston Naming Test (BNT) ................................................................................................... 5
12.14.a Rationale .................................................................................................................. 5
12.14.b Administration .......................................................................................................... 5
12.15. Clock Perception Test ............................................................................................................ 5
12.15.a Rationale .................................................................................................................. 5
12.15.b Administration .......................................................................................................... 6
12.16. Smell Test ............................................................................................................................... 6
12.16.a Rationale .................................................................................................................. 6
12.16.b Administration ......................................................................................................... 6
12.17. Center for Epidemiologic Studies Depression Scale (CESD) Short Form & Hopelessness . 6
12.18. Refusals and Discontinued Tests ............................................................................................ 8
12.19. Training and Certification ..................................................................................................... 8
12.20. Quality Assurance ................................................................................................................ 8
13. SITTING BLOOD PRESSURE .............................................................................................. 1
13.1. Introduction, Equipment and Supplies ..................................................................................... 1
13.1.1. The Sitting Blood Pressure (SBP) form ...................................................................... 2
13.2. Blood Pressure Measurement Procedures .............................................................................. 2
13.2.a Selection of the Arm ................................................................................................... 2
13.2.b Cuff Size Selection and Application ............................................................................ 3
13.2.c Measurement of Arm Circumference .......................................................................... 3
13.2.d Choosing the Correct Cuff Size .................................................................................. 3
13.2.e Positioning the ARIC Participant and Placing the Cuff ............................................... 3
13.2.f Locating the Pulse Points ............................................................................................ 4
13.2.g Wrapping the Blood Pressure Cuff around the Arm ................................................... 4
13.3 Procedure for the OMRON HEM-907XL ..................................................................................... 5
6
13.3.a Setting up the OMRON ............................................................................................... 5
13.3.b Measuring the Blood Pressure ................................................................................... 8
13.4 Recording the OMRON Results ............................................................................................. 10
13.5 Reporting the Blood Pressure Values .................................................................................... 10
13.6 Equipment Maintenance ........................................................................................................ 11
13.7 Inspection and Validation of the OMRON Sphygmomanometer ........................................... 11
13.7.a Daily Check points .................................................................................................... 11
13.7.b Quarterly Validation of the OMRON Sphygmomanometer ........................................ 11
13.8 Glossary and References ...................................................................................................... 13
14. ECHOCARDIOGRAPHY ....................................................................................................... 1
15. PHYSICAL FUNCTION ......................................................................................................... 1
15.1 Short Physical Performance Battery (SPPB) ........................................................................... 1
15.1.a SPPB Administration Overview .................................................................................. 1
15.1.b Equipment: SPPB ....................................................................................................... 2
15.1.c Safety Issues and Exclusions for the SPPB ............................................................... 2
15.2 Administration of the SPPB Single Chair Stand ...................................................................... 3
15.2.a Scoring the SPPB Single Chair Stand ........................................................................ 3
15.3 Administration of the SPPB Repeated Chair Stands ............................................................... 4
15.3.a Scoring the SPPB Repeated Chair Stands ................................................................ 4
15.4 Administration of the SPPB Standing Balance ........................................................................ 4
15.4.a Administration of the Semi-Tandem Stand ................................................................. 5
15.4.a.1 Scoring the SPPB Semi-Tandem Balance .............................................................. 6
15.4.b Side-by-Side Stand ..................................................................................................... 6
15.4.b.1 Scoring the Side-by-Side Stand ................................................................................ 6
15.4.c Administration of the Tandem Stand ........................................................................... 6
15.4.c.1 Scoring of the Tandem Stand ................................................................................... 7
15.5 Administration of the SPPB 4 Meter Usual and Rapid Pace Walk .......................................... 7
15.5.a Walking course ........................................................................................................... 7
15.5.b Usual pace walk .......................................................................................................... 7
15.5.c Rapid pace walk.......................................................................................................... 8
15.7 Training and Certification ......................................................................................................... 8
15.8 Quality Control ......................................................................................................................... 9
15.10 Grip strength .......................................................................................................................... 10
15.10.a Exclusions ............................................................................................................... 10
15.10.b Equipment ................................................................................................................ 10
15.10.c Equipment Calibration .............................................................................................. 10
15.10.d Administration of the Grip Strength ........................................................................ 10
7
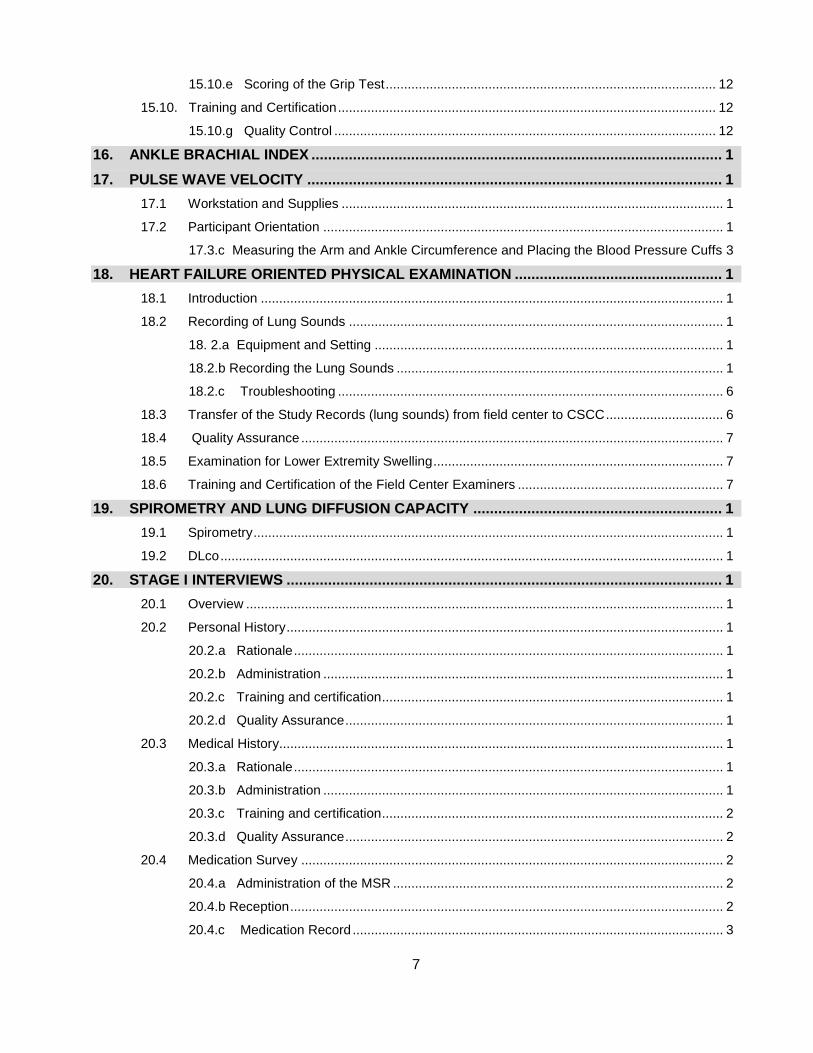
15.10.e Scoring of the Grip Test .......................................................................................... 12
15.10. Training and Certification ....................................................................................................... 12
15.10.g Quality Control ........................................................................................................ 12
16. ANKLE BRACHIAL INDEX ................................................................................................... 1
17. PULSE WAVE VELOCITY .................................................................................................... 1
17.1 Workstation and Supplies ........................................................................................................ 1
17.2 Participant Orientation ............................................................................................................. 1
17.3.c Measuring the Arm and Ankle Circumference and Placing the Blood Pressure Cuffs 3
18. HEART FAILURE ORIENTED PHYSICAL EXAMINATION .................................................. 1
18.1 Introduction .............................................................................................................................. 1
18.2 Recording of Lung Sounds ...................................................................................................... 1
18. 2.a Equipment and Setting ............................................................................................... 1
18.2.b Recording the Lung Sounds ......................................................................................... 1
18.2.c Troubleshooting ......................................................................................................... 6
18.3 Transfer of the Study Records (lung sounds) from field center to CSCC ................................ 6
18.4 Quality Assurance ................................................................................................................... 7
18.5 Examination for Lower Extremity Swelling ............................................................................... 7
18.6 Training and Certification of the Field Center Examiners ........................................................ 7
19. SPIROMETRY AND LUNG DIFFUSION CAPACITY ............................................................ 1
19.1 Spirometry ................................................................................................................................ 1
19.2 DLco ......................................................................................................................................... 1
20. STAGE I INTERVIEWS ......................................................................................................... 1
20.1 Overview .................................................................................................................................. 1
20.2 Personal History ....................................................................................................................... 1
20.2.a Rationale ..................................................................................................................... 1
20.2.b Administration ............................................................................................................. 1
20.2.c Training and certification ............................................................................................. 1
20.2.d Quality Assurance ....................................................................................................... 1
20.3 Medical History......................................................................................................................... 1
20.3.a Rationale ..................................................................................................................... 1
20.3.b Administration ............................................................................................................. 1
20.3.c Training and certification ............................................................................................. 2
20.3.d Quality Assurance ....................................................................................................... 2
20.4 Medication Survey ................................................................................................................... 2
20.4.a Administration of the MSR .......................................................................................... 2
20.4.b Reception ...................................................................................................................... 2
20.4.c Medication Record ..................................................................................................... 3
8
20.4.d Medication Use Interview ........................................................................................... 3
20.4.e Medication Adherence Interview................................................................................ 3
20.4.f Training ....................................................................................................................... 3
20.4.g Certification .................................................................................................................. 4
20.4.h Quality Assurance ....................................................................................................... 4
20.4.i Data Collection............................................................................................................ 4
20.5 Subjective Memory .................................................................................................................. 4
20.5.a Rationale ..................................................................................................................... 4
20.5.b Administration ............................................................................................................. 4
20.5.c Training and Certification ............................................................................................ 4
20.5.d Quality Assurance ....................................................................................................... 5
20.6 Physical Activity ....................................................................................................................... 5
20.6.a Rationale ..................................................................................................................... 5
20.6.b Administration ............................................................................................................. 5
20.6.c Coding and Scoring of Physical Activity ..................................................................... 5
20.6.d Training ....................................................................................................................... 5
20.6.e Certification ................................................................................................................. 5
20.6.f Quality Control ............................................................................................................ 5
20.6.g Data Collection............................................................................................................ 6
20.7 SF-12TM
General Health ........................................................................................................... 6
20.7.a Rationale ..................................................................................................................... 6
20.7.b Equipment and Setting ............................................................................................... 6
20.7.c Training and Certification ............................................................................................ 6
20.7.d Quality Assurance ....................................................................................................... 6
20.8 Access to Care and Satisfaction with Care .............................................................................. 7
20.8.a Rationale ..................................................................................................................... 7
20.8.b Administration ............................................................................................................. 7
20.8.c Training and Certification: ........................................................................................... 7
20.8.d Quality Assurance: ...................................................................................................... 7
20.9 Center for Epidemiologic Studies Depression Scale (CESD) Short Form & Hopelessness ... 7
20.9.a Rationale ..................................................................................................................... 7
20.9.b Administration ............................................................................................................. 8
20.9.c Scoring ........................................................................................................................ 8
20.9.d Training and Certification ............................................................................................ 8
20.9.f Quality Assurance ....................................................................................................... 8
20.9.e Alert Guidelines and Instructions for Notification of Participants and Physicians Regarding Depression Scores ................................................................................................. 8
20.10 Dietary and Vitamin Intake ....................................................................................................... 9
9
20.11 Respiratory Symptoms ......................................................................................................... 9
21. ARIC/NCS STAGE II FIELD CENTER INTERVIEWS AND PROCEDURES ......................... 1
21.1 Neurological Family History ..................................................................................................... 1
21.1.a Rationale ....................................................................................................................... 1
21.1.b Administration ............................................................................................................... 1
21.1.c Training and Certification ........................................................................................................................ 2
21.1.d Quality Assurance ................................................................................................................................... 2
21.2 Neurological Medical History ............................................................................................... 2
21.2.a Rationale 2
21.2.b Administration 2
21.2.c Training and Certification ........................................................................................................................ 2
212.d Quality Assurance .................................................................................................................................... 2
22. ARIC/NCS STAGE III – CEREBRAL IMAGING .................................................................... 1
23. DATA INVENTORY AND REPORT PREPARATION ............................................................ 1
24. EXIT INTERVIEW .................................................................................................................. 1
25. PARTICIPANT SAFETY ........................................................................................................ 1
25.1 Measures to Protect the Participant ......................................................................................... 1
25.2 Procedures for Handling Emergencies .................................................................................... 2
25.3 Procedures to Document Adverse Events and Emergencies .................................................. 3
25.4 Conditions Ascertained at the Time of Scheduling Field Center Visit ..................................... 5
25.6 Stopping Rules for Clinic Examinations and/or Procedures .................................................... 6
25.7 Mental Health Emergency Procedures .................................................................................... 8
25.7.a. Suicidal Ideation.................................................................................................................................... 8
25.7.b. Participant Appears Intoxicated ............................................................................................................ 9
26. REPORT OF STUDY RESULTS, MEDICAL REFERRALS AND NOTIFICATIONS .............. 1
26.1 Procedures for Medical Referrals and Notification of Results ................................................................ 1
26.3 Medically Relevant Information ................................................................................................ 1
27. STUDY RESULTS REPORTING SCHEDULE ....................................................................... 1
27.1 Contents of Reports and Referral / Reference Values for Study Results ................................ 2
27.1.a Seated Blood Pressure ........................................................................................................................... 2
27.1.b Ankle-Brachial Ratio ............................................................................................................................... 4
27.1.c Twelve-Lead Electrocardiogram ............................................................................................................. 4
27.1.d Respiratory Function Testing and DLCO ................................................................................................ 4
27.1.e Blood Chemistry Measurements ............................................................................................................. 6
27.2 Conveying the Results to the Study Participant ....................................................................... 6
27.2.a Support to Field Center Staff in Reporting Results to Participants ....................................................... 6
27.3 Quality Assurance .................................................................................................................... 8
10
Appendices
Appendices are identified by section number in Manual 2, and are found in the secure section of
the ARIC study Website (http://www.cscc.unc.edu/aric/), under Exam 5 Manuals.
Appendix 1.
Appendix 1.A PROTOTYPE RECRUITMENT LETTER
Appendix 1.B VISIT 5 SCHEDULING SCRIPT
Appendix 1.C PROTOTYPE APPOINTMENT LETTER
Appendix 1.D ARIC MEDICATION INSTRUCTIONS (included in the clinic packet)
Appendix 1.E CLINIC APPOINTMENT REMINDER
Appendix 1.F HOME APPOINTMENT REMINDER
Appendix 1.G PROXY/INFORMANT RECRUITMENT
Appendix 1.H SCHEDULING/RECRUITMENT FOR STAGES 2 AND 3
Appendix1.I NAME AND CONTACT INFORMATION FOR SCHEDULING OF ARIC PARTICIPANTS IN ALTERNATE FIELD CENTERS
Appendix 2 ARIC/NCS Home Visit Scheduling Script
Appendix 13 OMRON Calibration Log
Appendix 17
Appendix 17.A. Omron TU-100 Pulse Wave Unit Manual
Appendix 17.B Omron VP-1000 plus Non-invasive Vascular Screening Device Manual
Appendix 17.C ARIC PWV/ABI Data Sheet
Appendix 17 D PWV/ABI Maintenance Sheet
Appendix 18. Results for ARIC Participants and their Physicians
Appendix 26
Appendix 26.A End of Visit Report of Results
Appendix 26.B Summary of Study Results for ARICV Participants and their Physicians
Appendix 26.C Prototype Cover Letters for Reports of Study Results
1-1
1. FOREWORD
This manual of operations, entitled Home and Field Center Procedures is one of a series of protocols and manuals of operation for the Atherosclerosis Risk in Communities (ARIC) Study. The fourth re-examination of the ARIC cohort (ARIC Visit 5) is integrated with the Stage I examination of the ARIC Neurocognitive Study (ARIC-NCS). The integrated ARIC visit 5 – NCS Stage I examinations are referred to here as ARIC/NCS.
The large number of procedures to be detailed for ARIC/NCS requires separate manuals of operation. These have been organized into a set of protocol manuals. Manual 1 provides an overview of the background, aims, organization, and general objectives of the ARIC/NCS. Manual 2 provides an overview of the interviews and clinical measurements conducted as part of the field center and home examinations and includes references to the procedures not covered in this manual, as well as appendices with listings of the data collection forms and the item by item instructions for their administration. The workstations are presented in the order in which they occur (i.e., reception, interviews, procedures, medical data review); the descriptions of the individual interviews and procedures are presented in alphabetical order. Table 1 lists the main components of the field center examination and cross-references each procedure with its respective manual of operation and study forms.
High quality of data and a strict standardization of the interviews and examination procedures across all field sites and throughout the duration of the study are essential for the success of the ARIC/NCS. This makes it important for all ARIC/NCS field center personnel to be fully familiar with this manual of procedures. To meet our scientific goals, all ARIC/NCS field center technicians must be fully trained and certified in the procedures described in this manual, and must remain standardized throughout the data collection phase. A complete knowledge of the procedures described in this manual is required so that patterns in the ARIC/NCS data can reflect differences between study participants and their characteristics, as opposed to differences between study technicians or deviations from study protocol.
To the degree that this is applicable, the description of each interview/exam component in this manual includes a brief rationale for its use, operational procedures, an overview of training requirements and certification criteria, routine quality assurance measures, and data collection procedures.
2-1
2. ARIC Visit 5/NCS EXAMINATIONS
2.1 Overview
The ARIC/NCS examinations are structured as a sequence of three stages, from a comprehensive Stage I examination to a more specialized neuropsychometric evaluation in Stage II, and a cerebral MRI identified as Stage III. All ARIC/NCS participants are invited to a Stage I examination. ARIC/NCS participants with evidence of cognitive impairment as well as a sample of the remaining participants who have had cognitive testing (NCS Stage I) are selected for further cognitive evaluation (NCS Stage II) and cerebral MRI (Stage III). In addition, all participants in the 2004-6 ARIC Brain MRI study participants are selected for stages II and III.
Stage I: All ARIC participants are invited to an examination at the ARIC field center conducted according to standardized procedures, to collect the interviews and measurements described below. The expected duration of this examination is 6-7 hours. Participants who find this examination too demanding may choose an abbreviated version, approximately 3 hours long.
Stage II: A sample of participants examined in Stage I are selected to Stage II as described in the following section, for an examination that includes a detailed neurological exam and retinal photography.
ARIC Visit 5/NCS offers the opportunity to conduct home or long term care (LTC) facility visits to examine ARIC participants who are unable to be seen at an ARIC field center. The contents of the Home/LTC examination and its procedures are also described in the protocol manual.
Stage III: Approximately 70-75% of ARIC participants examined in Stage II are selected to Stage III, which consists of a brain MRI. Sampling to Stage III is mostly based on results from the cognitive assessment from Stages I and II, as well as informant interviews. Also, participants who attended the 2004-2006 ARIC Brain MRI sub-study at the Forsyth and Jackson sites will be invited to participate in Stage III. Participants examined at home or LTCF are not recruited to Stage III.
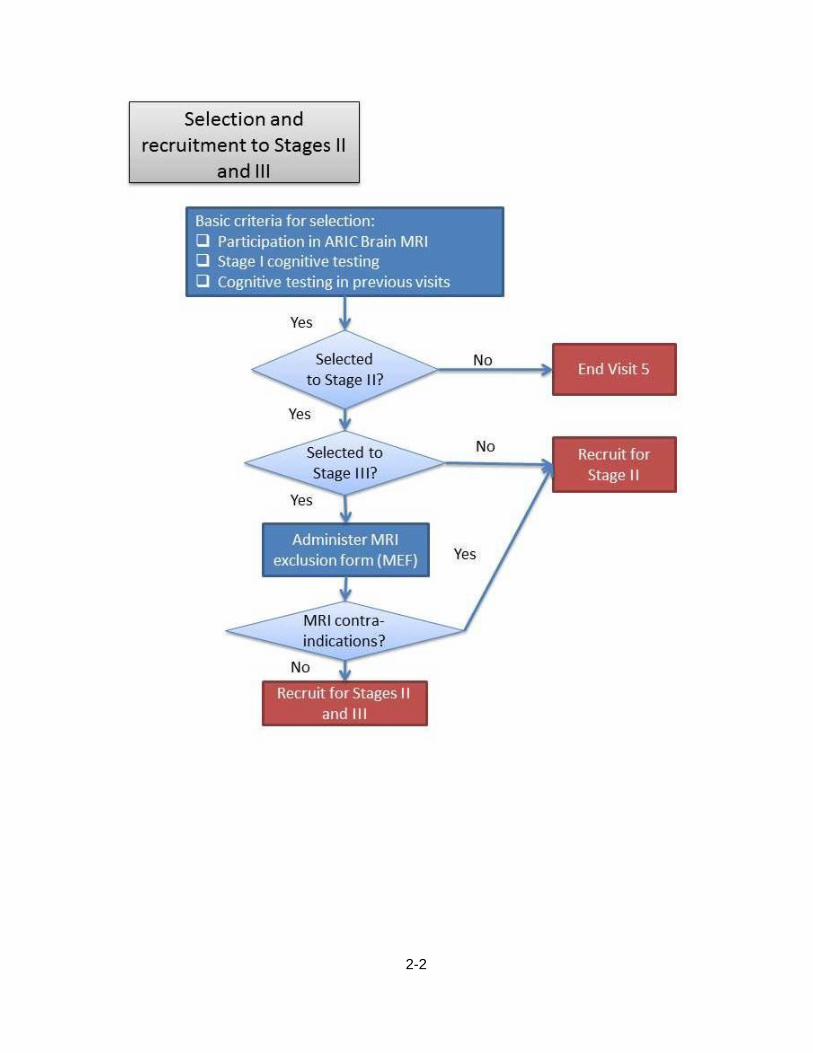
Once Stage I cognitive testing has been completed on the DMS, the selection to stages II and III is processed in the DMS, which provides ARIC staff with the information necessary to proceed as shown in Figure 2.1 (below), namely (a) arrange for an informant CDR interview, (b) consider Visit 5 to be complete once all Stage I elements have been collected, (c) recruit the participant only for Stage II of the ARIC/NCS exam, or (d) recruit the participant for stages II and III.
Figure 2.1 Selection and Recruitment for ARIC/NCS Stages II and III
2-2
3-1
3. RECRUITMENT
3.1 Overview
The purpose of this section is to provide information on the recruitment procedures for ARIC Visit 5 and ARIC NCS. These procedures aim to obtain the highest participation rate among eligible ARIC cohort members.
Recruitment and scheduling of participants will proceed as follows. First, it will be necessary to determine whether the participant will attend the clinic or will require a home or LTCF visit. For those being examined in the clinic, it will be necessary to schedule their Stage I exam. At the time Stage I is completed, Stage II and III is scheduled for those eligible. If the ARIC member requires a home/LTCF exam, scheduling of the visit will be done directly with the cohort member, or with his/her proxy if the former is not capable (e.g. because of cognitive impairment) or no direct contact is possible (e.g. he or she is in a nursing home).
3.2 Recruitment of Proxies and informants
In ARIC Visit/NCS study personnel are likely to interact, and consult with individuals who serve as proxies for an ARIC cohort member or as an informant who contributes information additional to that provided by an ARIC participant. This may happen at several levels, such as during annual follow-up interviews, recruitment, the process of informed consent, or in sharing information on an ARIC participant’s day-to-day activities as part of a Stage II assessment.
This section provides study-wide definitions for these roles when exercised on behalf of ARIC participants, general guidance on the criteria by which the need to engage a proxy or informant, and describes their role in recruitment. An exam proxy is a person who can provide informed consent on behalf of an ARIC participant who is unable to do so for him/herself (for example, if cognitively impaired). The designation of an exam proxy is a process regulated by ethical conduct of research regulations and is addressed in greater detail in the section on informed consent.
Only a limited number of study participants are likely to need an exam proxy. However, as part of the ARIC/NCS exam all participants who have not already done so will identify a proxy respondent for purposes of cohort follow-up. This is a person designated by the participant to provide medical information about the participant to ARIC personnel, and/or to sign a Medical Release Form to obtain hospital or physician records for the ARIC Study. An exam proxy can also be considered the proxy respondent for ARIC’s follow-up.
An informant is a person sufficiently familiar with participant’s daily activities to be able to provide adequate information on the behaviors and functional ability of an ARIC participant selected for a Stage II evaluation. If sufficiently familiar with the participant’s performance in the course of daily activities, an exam proxy may serve as an informant. Thus, for most participants, the exam proxy and the informant are the same person, although this is not required.
A decision to request the presence of a proxy at the time of a Home/LTC visit in order to obtain informed consent is made by the recruitment staff. Cohort members who required a proxy informant during previous AFU calls, as noted in the AFU study records, are likely candidates for needing an exam proxy for ARIC/NCS. If at the time of an ARIC/NCS recruitment call the interviewer may perceive that the study participant is being challenged by the interview, possibly confused, or that she/he may experience difficulties in completing a home visit, a decision is made to request the presence of a proxy at the time of the home examination. When recruiters are uncertain about the need to recruit an exam proxy for an interviewee, the 6-item screener can be administered during the recruitment call and a decision will be made based on its results. In circumstances when recruitment staff is unsure of the need for a proxy the 6-item screener is used, as described in the Follow-up Interview protocol manual. The participant’s performance of the 6-item screener is
3-2
recorded in the data management system (DMS) and the recruitment process proceeds accordingly.
In sum: the study participant is asked to designate a person to be recruited as an exam proxy if there is a record of prior need for a proxy respondent during annual follow-up calls, disorientation in time or impaired memory according to the 6-item screener, (see Table 3.1) or clear evidence in the assessment of the interviewer that it would be difficult or inappropriate for the study participant to sign an informed consent. Even when a participant is considered competent to provide informed consent (that is, does not need an exam proxy), having impaired memory in the 6-item screener (whether she or he is a home/LTCF or clinic exam), will require recruitment of an informant, in order to obtain accurate information in the questionnaires to be administered during the exam.
Table 3.1 Eligibility criteria for receiving 6-item screener and requiring recruitment of proxy or informant
Clinic exam (Stage I) Clinic exam (Stage II) Home/LTCF visit
Administration of 6-item screener
If questions exist on the need to recruit proxy and/or informant
Not applicable All, unless need of proxy or informant is already established
Recruitment of an exam proxy
Demented, disoriented to time,a or staff judgment
Demented, disoriented to time,a or staff judgment
Demented, disoriented to time,a or staff judgment
Recruitment of an informant
Proxy criteria or impaired memoryb
All (at least by phone)
Proxy criteria or impaired memoryb
aDisoriented to time if score <2 on orientation items from 6-item screener. bImpaired memory if score <2 on memory items from 6-item screener
The identification of an exam proxy and informant occurs at the time of the recruitment of the participant. In some cases, the contact person for a cohort member is already designated as a proxy, so that recruitment and scheduling should be discussed directly with him/ her. If recruitment staff considers that a proxy or informant is needed (based on the previously stated criteria) the participant is asked to identify a person who is close to them and who they trust, so that ARIC staff may contact them in order to facilitate the examination visit. A decision is reached between the recruiter and the ARIC participant on who should contact the proxy/informant. If authorized by the study participant, ARIC staff can contact the proxy or informant, prior to which the ARIC informational and recruitment materials are mailed to them. A phone script for the recruitment of proxy or informants is presented in Appendix 1.
3.3 Linking the ARIC Follow-up Calls and the ARIC/NCS Examination
In previous exam visits recruitment of ARIC participants occurred at the time of the annual ARIC follow-up phone call. The two-year examination time line and design features of the ARIC/NCS require some modification to this approach, to accommodate high risk cohort members and to allow for home and LTC visits. Systematic approaches to recruitment were avoided however to reduce possible drift or bias in the data collected. Taking these issues into account, recruitment and scheduling for ARIC/NCS proceeds as follows.
The Coordinating Center randomly divided the cohort into halves, to be targeted for years 1 and 2 of the examination period. To facilitate recruitment, the Coordinating Center provides lists to the
3-3
field centers every three months including individuals selected for recruitment during the next three months, ordered by contact month (the month of the ARIC baseline examination visit) to ARIC Follow-up and Recruitment personnel at each field center. The indicators included on these lists include (1) spousal pair (to allow joint scheduling), (2) LTC residence or known to be cognitively impaired, (3) seasonal change of residence (“snowbird” status), (4) permanent out-of-state residence, and (5) no more contact desired (field centers has the ability to determine whether this is a ‘firm’ or ‘soft’ desire for no further contact by ARIC). This information is used by the field centers to flag participants who may need home visits (e.g. those with known cognitive impairment or at an LTC facility), and to allow for flexibility in scheduling (e.g., snowbirds and out-of-state cohort members).
The Coordinating Center also provides each field center with a complete list of its cohort members, divided in three groups: no contacts, special needs (out-of-state, snowbird, LTC), and regular follow-up status. This provides information to the field centers that may assist in scheduling participants with special needs. The Coordinating Center also provides updated lists by identifying cohort members already examined and final refusals.
Based on the above recruitment lists, field centers have flexibility in scheduling their study participants, with the goal of achieving a high response rate and accommodating their study participant’s needs. Scheduling of Stage I examination visits can occur during the ARIC follow-up call, or in a separate call if circumstances require this. Recruitment to and scheduling of Stages II and III is done by ARIC field center staff, based on information collected in the course of Stage I. ARIC cohort members who participated in the ARIC Brain MRI study can be recruited to Stages II and III at the time of recruitment and scheduling for Stage I, I since they will be automatically selected to the additional stages.
3.4 Recruitment of Spouse Pairs
For efficiency and to make the exam more convenient to participants, field centers try to recruit spousal pairs at the same time, and to schedule their exams on the same day. To avoid temporal clustering of spousal pairs the field centers recruit spousal pair in the year in which the wife was selected. (If the husband was selected for recruitment in year 1 and the wife in year 2, both will be recruited in year 2). The recruitment lists prepared by the Coordinating Center include an indicator to facilitate recruitment of spousal pairs, with the proviso that this information applies to spouse pairs at the ARIC baseline examination so that field centers consult their own records confirm that intact spouse pairs are recruited simultaneously.
3.5 Time Window for ARIC Visit 5-NCS
The field work is scheduled to extend for two years. Scheduling of participants begins approximately 1 month prior the start-up of field work. A general overview of the recruitment procedures for the clinic and home visits is provided in the two figures below.
3.6 Scheduling of Visit 5-NCS Examinations – Stage I
3.6.a Overview
The steps in the scheduling of procedures for Visit 5 are similar to those for scheduling and conducting the ARIC Follow-up Interview, but also include determining whether the participant will require a home/LTCF visit and whether his or her cognitive status requires a proxy for informed consent procedures.

3-4

3-5
While the ARIC Coordinating Center provides a complete list of living cohort members, divided in groups of no contact desired, special needs (out-of-state, snowbird, LTCF), and regular follow-up status, which field centers can use in defining scheduling priorities, field centers may need to update these indicators using their own records. Additionally, the Follow-up tracing lists retrieved by field centers include an indicator for the recruitment year of each participant (year 1 or year 2).
At the discretion of each field center, a letter is mailed to the participant indicating that the usual AFU telephone call will take place, and at that time an appointment for ARIC Visit 5 will be set. A brief description of Visit 5 is provided in the letter, as well as a request to have a calendar available to facilitate scheduling Visit 5. The ARIC recruitment DVD and brochure are included in this mailing to explain the main objectives and procedures of the new exam and extend an invitation for participation. A letter template is provided in Appendix 1.A.
The cohort member is contacted by telephone and the ARIC follow-up call is conducted in the usual manner. At the conclusion of the interview the participant is reminded of the new ARIC visit, asked whether the recruitment materials were reviewed, questions are answered and the cohort member is invited to participate. The location of the ARIC field center is mentioned if possible, an appointment for Visit 5 at the exam site is scheduled.
The participant is asked whether he/she has any special considerations for the examination visit, such as medical treatments, transportation, ambulation, or a preference to be accompanied during the exam visit, so that these can be addressed prior to the visit. At the discretion of the field center, these elements are addressed by the recruiter or referred to a designated field center staff person. Information on participant safety and examination logistics identified at this time is recorded on the Participant Itinerary Checklist or the Participant Safety Screener, according to field center practice. These become part of the recruitment record for the participant and are transferred to the field center staff responsible for arranging the exam visit and for the reminder call.

3-6
A complete ARIC/NCS examination at the ARIC field center is the default, and is strongly preferred over other options. If the cohort member is unable or unwilling to participate in the complete exam, but is able to come to the exam site, the possibility of conducting an abbreviated exam is offered. If this is not possible, the option of a home visit by ARIC staff to conduct an interviews and a brief physical examination is suggested. Cohort members who are unable to leave their home or are residents of a LTC are offered the home visit as the first option. Additional details about recruiting participants for the home visit are provided below.
If the above options have been exhausted, those unwilling or unable to participate at the ARIC center or to have a home exam are asked to answer a few additional questions by phone and the phone cognitive assessment is done using the Telephone Interview for Cognitive Status (TICS) tool. Participants who are unwilling to extend the phone interview at this point are offered the opportunity to complete these additional questions (the TICS) at a later, more convenient time.
After scheduling the appointment a reminder letter is sent indicating the appointment time and including the instructions for the exam visit and the informed consent DVD that provides details about the different components of the exam as well as its risks and benefits. The letter also indicates that a reminder telephone call is made shortly before the examination visit. Contact information for the participant, a proxy, informant or relatives to call the ARIC field center are also provided and the questions prior to the appointment data are encouraged. The procedures are modified for examinations to be performed at the home or in LTC facilities.
3.6.b Pre-appointment contacts
As mentioned above, to enhance response following the scheduling telephone call by an ARIC interviewer, a packet is mailed prior to the scheduled appointment. This pre-appointment packet confirms the examination date and time and reviews the preparation procedures. Reminder calls are made to each participant shortly prior to the examination. At this time, the information concerning the fasting requirements, collection of all medications and supplements for review at the field center, special needs and the use of prescribed medications on the day of the examination are reviewed with the participant. The screening for conditions that exclude a participant from selected examination procedures is also done at this time by completing the Participant Safety Screen form.
3.6.c Contacting participants
The Coordinating Center generates from the ARIC database a list of cohort members to be contacted for Visit 5 and their contact month. The list is similar to that provided for AFU calls, and is generated well in advance of the contact window to allow field centers to trace and schedule hard to find cohort members, snowbirds, and out-of-state residents. See above.
Field centers have the option of mailing a letter and recruitment DVD to all cohort members informing them about the new exam. A prototype letter is provided in Appendix 1.A. Cohort member address files for producing mailing labels are routinely updated and distributed to the field centers by the Coordinating Center. These letters are sent in envelopes stamped “forwarding and address correction requested”, to assist in tracking cohort members who have moved.
Approximately one week after the letter is mailed, a telephone call is placed to the cohort member’s home. Prior to initiating the joint AFU interview – visit 5 scheduling telephone call, the interviewer has assembled (1) the AFU form/questionnaire and other relevant forms in the Data Management System, (2) scheduling script (which includes the 6-item cognitive screener), (3) information on reimbursement amounts and transportation, (4) calendar for scheduling field center appointment and home visits, and (5) the Contact Information Update (CIU) form. The recruitment lists prepared by the Coordinating Center or materials available at the field center identify other ARIC cohort members in the participant’s household. If there is more than one ARIC cohort member in a
3-7
household, the interviewer has the option of completing the AFU and clinic scheduling portions of the interview with each cohort member, or completing the AFU portion with each individual before jointly scheduling their field center appointments (preferred). Prototype scripts are provided in Appendix 1. As explained above, spousal pairs will be recruited in the year in which the wife was selected.
Recruitment calls for the Visit 5 exam are made as part of the ARIC Follow-up call, if possible. Otherwise, the ARIC follow-up and recruitment calls are performed separately. Each field center keeps track of both AFU completion and Visit 5 recruitment status for all selectees, with overview provided by the Coordinating Center in periodic reports to the Steering Committee.
3.6.d Making the exam appointment
After completing the AFU interview for all cohort members in a household, the interviewer describes the exam, including the new components, and schedules the participant’s Visit 5 appointment following the prototype script provided in Appendix 1.B. During the first part of the scheduling script the interviewer explains where the clinic is and a decision on whether a clinic or home visit is made and, in the case of clinic visit, whether this is to be a complete or abbreviated exam. Once this has been decided, the interviewer inquires about several items to assist in scheduling the appointments:
Preferred time and date of examination
Establish how participants prefer to get there
Determine existence of any medical conditions (e.g., diabetes, dietary restrictions) which might affect the physical examination and/or type of snack provided
Need for assistance getting to or moving around the clinic
If home visit is required, information on home safety issues and availability of adequate space, and if at a LTCF who to make arrangements with
How to invite the proxy to be there
The interviewer also mentions that an information packet will be mailed including the specifics of the appointment just made, instructions, and a DVD with detailed information of the exam procedures. Lastly, participants’ questions are answered and staff can mention that a reminder call will be made the day before the examination.
If possible, the interviewer schedules appointments for the examination during the 30 days following the telephone call. Field centers, however, can be flexible in scheduling snowbirds or out-of-state residents, to make exams coincide with travel to the field center area. The appointment is recorded on a reminder sheet which is mailed to the participant. When possible, cohort members are scheduled for appointments at their convenience, including scheduling all eligible members of a single household for examinations on the same day whenever possible.
In the case that a proxy respondent, and not the cohort member, is responsible for scheduling the exam (e.g. if the patient has cognitive impairment or lives in a LTCF), study materials will be mailed to the proxy. If the cohort member is in a LTCF, materials will be mailed to the proxy and LTCF caregivers, but not directly to the cohort member.
After the call, recruiters notify the clinic of participant ID; name, address, and phone number; appointment location (clinic, home, LTCF), time and transportation preference; and any special instructions. Soon after the call, clinic personnel prepare a letter and information packet to be mailed to the participant (see Appendix 1.C. for materials included with this letter). For participants examined in LTCF, in addition to sending study materials to the proxy, a letter notifying the LTCF and asking their permission to conduct the exam will be mailed. Also, if deemed appropriate by the recruitment staff at each field center, a call to the LTCF can be made.
3-8
Finally, a reminder call is made on the evening prior to the appointment using “Appointment Reminder Call Script” (Appendices 3 and 4). If the exam takes place in a LTCF, a reminder call will also be made to the facility, though each participant in a LTCF will be approached in a case by case basis (see below for information on home and LTCF visit scheduling).
The outcome of the recruitment call will be recorded in the Recruitment Tracking and Scheduling (RTS) form.
3.6.e Instructions provided to participants after they are scheduled
The instructions for the visit to the field center or the home visits are specified on an information sheet prepared by each field center, and mailed to the participant, proxy, or LTCF caregiver, as required, soon after the appointment is made. The instructions include (see Appendices 1.C – 1.E) for a letter template including the information below):
Appointment date and time
Preparations:
Instructions on how to complete the 8-hour fast. Note: for home/LTCF visits, fasting is preferred but not absolutely required
Instructions on proper hydration while maintaining the fast. Specifically, water can be taken but in small sips. This is important in order to obtain the best images in the abdominal sonogram.
Instructions concerning restrictions on the use of tobacco and vigorous physical activity the morning of the visit, and for non-use of perfume, body lotion, baby powder, etc.
Instructions on appropriate clothing to wear for the examinations
Items to bring to the field center or have at the home exam:
Eyeglasses for reading
Hearing aids, if needed
Name and address of primary care physician and/or clinic
Name and address of ophthalmologist
Name, address, and phone number of contact persons
Medication Instruction Sheet: Instructions for bringing prescription and over-the-counter medications, including vitamins and mineral supplements, taken within two weeks prior to the examination and a bag for bringing the medications to the field center. As shown in Appendix 1.D, participants are asked to assemble and bring to the ARIC center all prescription, over-the-counter, and research medications, including medications that are solid or non-solid, that may be swallowed, inhaled, applied to the skin or hair, injected, implanted, or placed in the ears, eyes, nose, mouth, or any other part of the body
Overview of Exam at the Clinic or at home/LTCF (as applicable):
A listing of the interviews and procedures for the examination (optional)
A reminder that snacks are provided during the exam (both for clinic and home/LTCF exams)
Clinic hours and phone number for questions or rescheduling appointments
Directions to the clinic (e.g., a map) and to parking facilities (only for clinic exam):
A reminder that free parking or reimbursement is provided
Transportation, if applicable (some centers provide transportation and arrange for participant pick-up)
3-9
Informed consent DVD
3.6.f Contacts for No-Shows
Eligible participants who fail to arrive for a scheduled appointment or who cancel their appointments are contacted by telephone to reschedule the appointment. At that time, the scheduler tries to address any concerns the participant may have, and address barriers to participation.
Each no-show case is individually reviewed by the interviewer and when necessary by the supervisor. Conversion efforts include a combination of telephone contacts, conversion letters, and the possibility of offering an abbreviated exam or a home visit. A cohort member is considered to have refused following three conversion contacts or three broken appointments, or if they otherwise firmly refuse. These individuals are re-contacted to administer the TICS instrument.
3.7 Home/LTC Examinations
A major difference of Visit 5 with previous ARIC exams is the possibility of scheduling home or LTCF visits for those cohort members unable or unwilling to participate in the clinic exam. Overall, each field center should aim to have as many participants in the clinic exam as possible since the amount and quality of information will be higher during the clinic exam, and the associated costs are lower. However, we expect that approximately 16% of the exams will be home/LTCF visits and the field centers should plan accordingly.
Deciding whether a participant will undergo home or clinic exam will be done during the initial recruitment/scheduling call. Criteria that should be taken into account when deciding whether a participant needs a home visit are:
Inability to travel to clinic site due to reduced mobility (because of disability, morbid obesity, or other condition)
Need to stay at home taking care of another person
Preference: if the only way a cohort member is willing to participate in the new exam is with a home visit, the field centers should try to accommodate this preference
If a home visit is scheduled, the interviewer will collect information on exam proxy need and availability, home safety issues and availability of an adequate setting to conduct the exam (see appendices 2 and 4).
3.7.a Scheduling of Examinations at LTC Facilities
In most cases, contact with cohort members who reside in an LTCF will not be possible. If this is the case, recruitment and scheduling of the cohort member follow alternate approaches:
The recruiter will contact the cohort member’s proxy respondent, provide information about the exam, and request authorization for conducting the exam in the LTCF. During this call, the recruiter will obtain contact information for the LTCF and how best to approach the cohort member.
Once information on the facility is obtained, an explanatory letter will be sent to the LTCF giving details about the study, the importance of examining the cohort member, and that the member’s proxy has provided authorization to conduct the exam in the LTCF. This letter will also mention that an ARIC staff member will phone the facility to schedule an appointment.
A few days after the information letter has been sent to the LTCF, recruitment staff will phone the LTCF to request authorization to conduct the exam and, if this is granted, schedule it.
It might be possible to directly contact some cohort members in a LTCF by telephone. In these cases, obtaining authorization from the proxy (step 1 above) will not be necessary. However, once the cohort member agrees to participate, it is recommended to inform and obtain authorization from
3-10
the LTCF to conduct the exam (steps 2 and 3). In this case, scheduling will be done talking directly with the participant and, if necessary, involving the LTCF caregivers in this decision.
3.8 Recruitment to Stages II and III
Based on results from cognitive testing done during the Stage I clinic exam, cognitive testing done in previous ARIC visits, and previous participation in the ARIC Brain MRI study, participants will be sampled and selected to participate in Stage II (Neurological exam and retinal photography). Sampling to Stage III (Brain MRI) will be based on the same information as is used for Stage II.
Recruitment to Stage II will be decided at the end of the Stage I clinic exam. Therefore, recruitment to Stages II and III will be done by clinic staff interacting with the DMS. The overall process has the following steps:
Based on the participant’s cognitive tests, and the participant’s previous participation in the ARIC Brain MRI study, he or she is sampled by the DMS and invited to participate in Stage II. In most cases, participants could be simultaneously invited to and scheduled for Stage II and Stage III. Detailed criteria for recruitment to Stage II are provided in MOP #17, Section 1.
At the end of Stage I, clinic staff will provide an information package to participants selected for Stage II. The purpose of this information is to provide additional details about Stages II and III to the participant’s informant and the need of contacting the informant to obtain additional information.
Scheduling for Stage II (and III, when indicated) is done at the end of the Stage I exam and, if not possible, by phone. Scripts for recruitment to Stage II and III are provided in Appendix 1.H. Field centers will need to keep separate appointment books for Stage II and III.
A reminder call will be made to selected participants the day before their Stage II exam.
If a participant is sampled to Stage III, eligibility for undergoing MRI will be assessed. If eligible, the participant will be scheduled at the end of Stage I or by phone on a later day.
One or two days before the Stage III exam (brain MRI), a reminder call will be made to participants selected and eligible to participate. If Stage II and III occur the same day this last step would not be necessary.
Some field centers may decide to conduct Stage I and II in the same day, and leave Stage III for a different day in eligible participants. This approach can be taken for participants in the ARIC Brain MRI study, who are automatically selected to Stages II and III, or in those who meet Stage II selection criteria after the cognitive testing performed during Stage I.
3.9 Recruitment and Examination Goals by Center
It is estimated that approximately 8220 ARIC participants will be examined in Visit 5, with 1334 being home or LTCF exams. Of the 6886 undergoing Stage I at the clinic, approximately 2637 will undergo Stage II, and 2000 Stage III. These numbers correspond to approximately 334 home visits, 1722 Stage I, 659 Stage II, and 500 Stage III exams per field center, respectively. In order to finish in 24 months, field centers should aim to complete approximately 18-20 Stage I exams, 7-8 Stage II, 5-6 Stage III, and 3-4 home/LTCF visits per week.
Projected visit 5 exam rates depend on each field center’s ability to contact eligible cohort members and schedule appointments. Every effort is made to make the field center or home/LTCF visit as pleasant and burden free as possible. Additionally, the following features are part of the effort to maximize participation: (1) qualified interviewers, (2) pre-appointment contacts, (3) no show procedures, (4) reimbursement of transportation costs, and (5) publicity.
3-11
3.9.1 3.9.a Reimbursement Policy
Each center provides for, or reimburses, local transportation and/or parking. For those who are reimbursed, records are maintained for accounting purposes according to Office of Management and Budget (OMB) regulations and each university’s guidelines.
3.9.2 3.9.b Publicity
To enhance participation, the field centers maintain active contact with the media in their communities. Periodic attempts are made to provide them with updates of the study and to enhance community support.
3.10 Monitoring of Recruitment Performance
Interviewers scheduling examinations report appointment information to their field center on a daily schedule. Sufficient appointments are scheduled each day from Monday through Friday (Saturdays as needed) to meet the requirements of approximately 25-28 Stage I and II clinic exams and 3-4 home/LTCF visits per week.
Each field center maintains the following scheduling documentation:
A listing of cohort members by ID or name, with telephone number and other contact information (Contact Information Update (CIU) Form)
Tracking forms for each cohort member (Recruitment Tracking and Scheduling Form). One form per cohort member to track and document the status of each attempt to recruit them to the visit 5 exam.
Daily appointment log with cohort member’s name, ID number, appointment time, and special considerations such as health restrictions. This schedule is used to structure that day’s appointments and to check in participants as they arrive.
3.10.1 3.10.a Quality Assurance and Supervision
Throughout the process from initial interview to final examination or refusal, close supervision helps maximize the rate of response. Supervisors record reasons for non-response, and examine performance trends by interviewer and by area. When deemed appropriate, supervisors initiate re-contact with refusing cohort members to attempt their conversion. Detailed records of all contacts are maintained.
3.11 Examination of ARIC Participants Who Relocate Near Another ARIC Center
Over time, some ARIC cohort members have moved away from the community in which they were recruited and are closer to another field center. These individuals are offered the opportunity to have the new exam at a different field center if this is convenient for them. In essence, however, they remain members of their original field center cohort. Despite data being collected ‘off-site’ (i.e. at the alternate center), these data are monitored at the original field center, and the original field center is responsible for preparing results reports and letters. The guidelines for implementing these procedures are as follows:
The original field center continues to perform all Annual Follow-up calls and the scheduling of the field center examinations.
When cohort members are interested in completing the new clinic exam at another field center, the original field center contacts the closest ARIC field center (i.e. the alternate field center) and arranges for scheduling the appointment.
The original center sends the ARIC Coordinating Center and the alternate center written notification of the participant ID, as soon as the participant agrees to complete the exam at the new field center.
3-12
Notifying the Coordinating Center is necessary so the alternate field center can access the participant’s information through the Data Management System. Scheduling of the clinic exam or home/LTCH visit will be done by the alternate field center after being notified by the original field center. Whether the alternate field center offers travel reimbursement for participating in the clinic exam or the possibility of home/LTCF exam will be decided by the alternate field center, not the original field center. For example, if the study staff has to travel a long distance to reach the participant, the alternate field center could decide not to offer home visit because of costs or time constraints.
The original field center sends labels and copies of current Annual Follow-up forms and any other pertinent information to the alternate field center. Other pertinent information includes mention of any ‘special needs’, and copies of prior study results reports and letters to participants and physicians. All this is treated as confidential information.
The Medical Data Review which occurs at the end of the clinic visit is performed by the alternate center. This includes any immediate follow-up to findings during the clinic visit. Subsequent notification of any alert values and the preparation of the report of study results and the accompanying letter(s) to the participant’s provider of medical care are the responsibility of the original center.
Any study data or document collected on paper at the alternate field center will be photocopied, and the originals sent to the original field center. This includes informed consent documents in addition to any other paper forms used during the exam. The alternate center should use any local informed consent forms to gain consent from the participant. The alternate center keeps copies of all mailed documents until reception of them at the original field center is verified.
The alternate field center annotates all central agency sample inventory sheets, indicating the special situation. The central agencies (laboratories and reading centers) correspond with the original field center in the event of alert values or other special issues related to relocated participant data. The original center then sends a copy of the alert to the nurse/clinician at the alternate center for their information, since the participant may call either center with questions. In addition, any local alerts reported through the DMS at the original field center should be communicated to the alternate field center. In the cases of both reading center and local alerts, the alternate site should contact the participant.
To facilitate coordination between the field centers, contact information for each center is provided in Appendix 1.I.
3.12 Training and Certification of Follow-up and Recruitment Personnel
Interviewers are trained and certified in general interviewing techniques and the administration of the AFU form. This requires familiarity with the contents and procedures for administering the AFU form, assigning contact and appointment status codes on the AFU Record of Calls, scheduling a field center appointment, and verifying contact information on the Contact Information Update form. Staff is certified centrally. Recertification is required annually with the recommendation of periodic refresher courses and retraining if quality assurance analyses indicate poor performance or inconsistent results. The training and recertification requirements apply to any staff in charge of recruitment, even if they do not conduct AFU calls (in some situations, AFU and recruitment might be independently conducted).
4-1
4. HOME/LONG TERM CARE FACILITY EXAMINATIONS
Home visits provide an opportunity to obtain important data on ARIC participants who are frail, disabled, or cognitively impaired, those who reside in a long term care facility (LTC), or those who provide dependent care for another person and are unable to come to the field center. At the time of recruitment study participants who meet the above criteria are offered an examination at their place of residence, if they are located within a distance considered to be accessible by the respective ARIC/NCS field center. The examination at the participant’s home or LTC is an abbreviated assessment which includes measurement of blood pressure and weight, a review of medications taken, a neurocognitive assessment, a blood draw and a urine specimen collection. The interview and physical examination procedures at the home follow the field center protocol as closely as the physical environment permits. Two staff attend each home visit, one or both of whom are certified in ARIC’s protocol for blood drawing and specimen processing and in neurocognitive testing and examination. The expected duration of the home visit is approximately three hours.
4.1 Eligibility for a Home / LTCF Examination
On a quarterly basis the ARIC Coordinating Center provides field centers with lists of cohort members scheduled for recruitment that include several indicators of the possible need for a home visit. Arranging for an examination at a home, nursing home or LCTF may require consultation with the participant’s next of kin or proxy, a provider of dependent care, or a nursing facility manager. In the interest of greater comfort for the participant and better quality of study data, cohort members who are frail, disabled, or reside in a LTCF and who are mobile are offered the option of an abbreviated examination at the ARIC field center instead of an examination at their place of residence.
4.2 Scheduling and Setting up a Home Examination
4.2.a Preparing for the Visit
In scheduling the visit with the participant ARIC staff considers the participant’s routines, meal times and rest periods, and attempts to schedule the visit after a usual rest period since fatigue can impair a participant's test performance and result in misleading data. In scheduling a home visit the participant is reminded of the approximate time needed to complete the testing, and the requirement for a quiet and private testing area with a table and two chairs. ARIC staff carefully explains the need to avoid distractions during the examination period. This applies to interruptions by family members, children, pets, noise from TV, radio, stereo, or phone calls. If there is a pet in the home, the participant is asked whether the pet can be kept in a separate room during the testing, with the exception of service animals used by the participant. At this time it is also determined whether the participant’s proxy will be available during the home visit and the informed consent process is briefly reviewed with the participant at this time.
The scheduled visit, date, and time are confirmed by letter. The letter includes reference to the physical requirements for home testing, the informed consent video, and the informed consent forms (the latter at the discretion of the field center). ARIC staff telephones the participant on the day before, or the morning of the scheduled visit to confirm the appointment day and time. If needed, the examination time is adjusted. The participant is reminded of the needed table and chairs, and the need for a quiet space during testing.
The home examination materials are assembled on the day before the home visit; the participant ID labels are printed and the biospecimen collection tubes are labeled per the Biospecimen Collection Protocol and placed in the home examination kit. The cognitive testing materials include the bound testing booklet, pencils, stopwatch, smell sticks, finger tapper and cognitive stimulus materials. The only items needed for the examination are the reflex hammer and safety pin (in addition to a chair). The equipment required includes: professional scale (McKesson), home biospecimen collection kit

4-2
and biospecimen collection supplies, small container with ice (for EDTA tubes), the OMRON blood pressure monitor, a laptop with the ARIC/NCS data management system, and a barcode reader. Before departing for the home visit staff verifies that equipment and testing materials are complete, that the directions to the home are clear, and that adequate travel time has been allowed.
4.2.b Staff Safety Considerations
Home visits are made during the daylight hours whenever possible. A map and explicit directions are secured before leaving the field center. Travel and home visits are done in pairs. Staff dress conservatively and wear the Study ID in a prominent place. Staff carries a letter of introduction, as well as a copy of the reminder letter or appointment card that the participant should have received earlier.
In the field, staff must remain aware of the surroundings and use common sense for personal safety. A written record of the participant visit and travel arrangements, as well as the examiners cell phone numbers are left with the home field center. Purses are locked inside the trunk of the car before leaving (rather than doing this at the participant's home). Staff are encouraged to be cautious of pets, either the participant's or others, and to have car keys in hand when leaving the participant’s home (not stand by the car to search for the keys). When directions to the home are obtained, ask whether there are safety concerns or pets (the participant's or others) to be aware of.
4.2.c. Liability Issues
At each field center staff seek counsel on the requirements of the liability insurance policy that covers this work. If paperwork is applicable for purposes of insurance, this is completed before leaving for the home visit.
4.3 Conducting the Home Visit Examination
4.3.a Establishing Rapport
Appointments are met on time. If a situation arises that prevents staff from being on time, the participant and the contact or proxy if applicable, are called and alerted to the possible delay. Appointments are rescheduled as a last resort.
On arrival the examiners introduce themselves and show identification or copy of the appointment letter or card. Appropriate time is spent talking with the participant, family member(s), and/or caregiver to provide a transition from arrival to testing. The content and length of the examination are described, and time is taken to answer any questions that the participant may have.
4.3.b Informed Consent
The informed consent is administered prior to setting up the examination area and proceeding to the examination. This applies to the study participant, the proxy and the informant, if the latter are present per prior arrangement. The informed consent DVD and the informed consent forms are mailed to the study participant – and to the proxy, an informant or relative as applicable – in advance of the home visit. One week is allowed for these materials to be reviewed prior to the home visit. To administer the informed consent ARIC staff follows the procedures for informed consent administration at the field center described in a following section of the protocol manual.
4.3.c Examination Environment
Staff assesses the environment for a suitable testing area and in necessary refer to the request for the use of a table (kitchen, card, desk, etc.), two straight chairs and adequate lighting. Care is taken to have an exam environment is as quiet as possible and that pets have been put in a separate room. All persons in the house are made aware that a quiet area is needed for testing.

4-3
The participant is asked whether he/she would like to use the bathroom before beginning the testing, at which point the urine specimen is collected. A rest period or bathroom break can be offered about midpoint of the testing.
4.3.d Examinations and Interviews
All home/LTC examinations include the ARIC/NCS Stage I components. Because the prevalence of dementia is expected to be higher for those seen at home, the 6-item screener is administered by phone prior to the home exam (see section on Recruitment). The phone screen allows for recruitment of an exam proxy or informant prior to the visit. The components of the home/LTCF examination are listed below, in the recommended sequence of administration.
Table 4.1 Stage I Examination Components of the ARIC/NCS Home/LTC Examination, Listed in their Recommended Sequence
ARIC/NCS Home/LTC Stage I Examination Components Forms MOP Ppt. Time
(min.)
Setting up the exam environment -- 2 5
Informed Consent ICT 2 20
Update of contact/proxy/tracking information CIU 2 6
Blood draw, urine specimen BIO 2 15
Weight, Seated blood pressure ANT/SBP 2 12
Snack -- -- 10
MMSE screening MME 17 6
Neurocognitive Test Battery Block A: Delayed Word Recall, Digit Symbol Substitution, Word Fluency, Animal Naming
Neurocognitive Test Battery Block B: Neurocognitive Test Battery Block B (Wechsler Memory Scale III, Boston Naming, Clock Reading, , Trails A, Digit Span Backwards, Trails B, Word Reading, Finger Tapping, Smell Test
NCS 17 30-40
Depression Scale CES
Personal History PHX 2 10
Medication Inventory MSR 2 12
SF-12 Health Survey SFE 2 5
Access to medical care AQC 2 3
Subjective Memory SMF 17 2
Determination of Stage II eligibility NSS 2/ 17 5/ 15
Exit interview 2 10

4-4
The interviews at the home or LTC facility are conducted using the ARIC-NCS DMS and include the standard versions of the data collection forms for stages I and II. The interviews and examinations are administered per the instructions found in manuals 2 and 17. The data collection forms employed at the home/LTC are those used at the ARIC field center.
If the home/ LTC visit is greatly limited by time restrictions, the Neurocognitive Test Battery Block A is given priority, and should occur immediately after the MMSE (which is the minimum that should be included in the home/LTC evaluation). In these circumstances the following interviews could be skipped: Medical and Personal History, Medication Inventory, SF-12 Health Survey, Subjective Memory, Neurological and Dementia history, Neurological Family history, and Determination of Stage II eligibility/ CDR Subject.
The study procedures are implemented at the home/LTC facility as close to the corresponding, standardized procedures used at ARIC field center as the circumstances in the home environment permit. Similarly, the same quality assurance/quality control protocol applies.
Before completing Stage I the participant’s cognitive status is evaluated by an automated algorithm in the ARIC DMS for possible cognitive impairment based on their cognitive test performance at Stage I, decline in test performance from earlier ARIC exams and, when necessary, evidence of functional decline from the informant CDR. This is also the case for the field center examination but a relaxed criterion is used for selection for Stage II for the home/LTC exam compared to the clinic exam since a higher prevalence of cognitive impairment is anticipated in those examined at home. Participants meeting criteria for possible cognitive impairment proceed to the Stage II elements of the home/LTC examination. In some cases, informants need to be interviewed in order to determine Stage II. These interviews are administered if the informant is present, or promptly scheduled (CDR informant interview telephone call). Detailed information on the selection criteria into Stage II is presented in Manual 17, section on “Stage II and Stage III Selection”, and in Manual 2 as part of Recruitment.
Stage II NCS Home/LTC Examination
Stage II exams are similar to those performed in clinic, except that there is no retinal exam, and no home or LTC examinees are scheduled for Stage III (MRI). The elements of the Stage examination at the home or LTC facility are listed in the following table.
Table 4. 2 Stage II Examination Components of the ARIC/NCS Home/LTC Examination
ARIC/NCS Home/LTC Stage II Examination Components Form MOP Time (min.)
Neurological examination:
Physical and neurological exam
Unified Parkinson’s Rating Scale
Clinical Dementia Rating (CDR subject)
Hachinski Ischemic Scale
PNE
UPR
CDP
HIS
17
25
Neurological and dementia history NHX 17 3
Neurological Family History NFH 17 5
CDR informant and summary/Neuropsychiatric inventory CDI/CDS/NPI 17 15
Exit interview 2 10
4-5
The neurological exam, including the Hachinski and Unified Parkinson’s Disease Ratings are administered following the procedures detailed in Protocol Manual 17 – Neurologic Exam and Interviews.
4.3.e Close-out of the Home Examination
After completion of the interviews and examination the participant and proxy or informant are thanked, and asked whether they have questions. Staff mentions that a summary of the blood test results will be mailed in approximately six weeks to the person designated at the time informed consent was obtained. The provisions for continued follow-up calls with the participant or the follow-up interview informant are reviewed, verifying that the respondent is aware of the twice-yearly schedule of the subsequent ARIC follow-up calls. Indications that a different informant or frequency of follow-up calls is desired are recorded and shared with the AFU personnel at the field center. A few minutes are spent in participant-centered conversation as a transition to the departure.
4.4 Processing, Transportation and Shipping of the Biospecimens
The materials and procedures used for biospecimen collection at a home or LTC facility are specified in MOP 7. This includes procedures to be followed in transporting these specimens to the ARIC field center, and the prompt processing of the specimens once at the field center.
4.5 Abbreviated examinations at the ARIC field center
Cohort members who are eligible for an examination at home or long term care facility but are mobile are offered the option of an abbreviated examination at the ARIC field center instead of an examination at their place of residence. This offers greater comfort to a participant if mobility is not restricted, and a better as well as standardized environment for the examination. The contents of a ‘home examination’ conducted at an ARIC field center do not differ from those conducted at a home, but the field center exam protocol procedures and equipment are used.
4.6 Telephone Interviews (TICS)
ARIC participants whose home or a LTC examination is cancelled or rescheduled for three times are interviewed using the Telephone Interview for Cognitive Status (TICS, as mentioned in the section on Recruitment).
4.7 Training, Certification of Personnel
Collecting measurements and interviews according to a rigorously standardized protocol under the varying conditions of the place of residence of the examinees presents challenges to the ARIC study personnel. Special care and attention to protocol adherence are required to protect the quality of the ARIC data collected under these circumstances. ARIC study personnel who conduct home examinations are trained centrally and are certified prior to being authorized to collect study data. ARIC personnel who conduct home visits are trained in, and certified for the examination procedures and interviews that apply to examinations at the ARIC field centers, and they maintain certification status based on the quality assurance program in place at the field center. Additional training is provided by a supervisor on the implementation of the ARIC procedures in the field, as described above.
4.8 Quality Assurance
ARIC personnel who conduct home visits maintain certification status based on the quality assurance program in place at the field center.
5-1
5. FIELD CENTER EXAMINATION – STAGE I PROCEDURES AND INTERVIEWS
5.1 Overview
The ARIC/NCS examination is a fully standardized sequence of interviews and procedures conducted according to a common protocol. As described above, its components are grouped into a Stage I examination administered to all consenting ARIC participants at the home or the field center environment, and a set of specialized examinations defined as Stage II, to which participants are recruited according to the criteria described in Section 2 of this manual. The components of the Stage I examination at an ARIC field center are listed in Table 5.1, presented in a specified sequence of administration, as follows.
Study participants are asked to fast for at least 8 hours and to abstain from smoking and caffeinated beverages on the morning of their ARIC examination at the field center (or prior to their examination at home). Accordingly, following the participant’s informed consent, a first set of procedures and examinations is conducted in the fasting state because food intake would affect the quality of data acquisition or the exam results. This group of procedures is shown in the shaded portion of Table 5.1, prior to the participant’s breakfast or snack. With the exception of the informed consent, the procedures performed in the fasting state can be administered in any sequence while the participant is fasting. Consumption of caffeinated beverages should also be avoided during this time, until the participant is scheduled to have a snack.
Following the snack, two sets of interviews are administered first, in the order shown in Table 5.1, namely the MMSE and the neurocognitive battery, identified in the table as Interview Block A. The remaining procedures and interviews preceding the exit interview can be administered in the order best suited to an efficient exam flow at each field center.
5-2
Table 5.1 ARIC Field Center Examination Components, in Order of Administration
Stage I Examination Components - Field Center Forms MOPs Ppt.Time (min)
Reception -- 10
Informed Consent (Video seen at home / watched at FC) ICT 2 15 / 35
Update to Contact Information CIU 2 6
Participant safety screen / Itinerary PSA 2 3
Change of Clothes -- -- 10
Collection of Urine Specimen BIO 2 10
Blood Draw, Biospecimen Processing BIO 2 18
Abdominal Aorta Scan AAT/PRO 15 25
Echocardiogram PRO 2 40
Anthropometry ANT/PRO 2 8
Electrocardiogram PRO 5 15
Snack -- -- 15
MMSE MME 2 6
Neurocognitive Test Battery (Delayed Word Recall, Digit Symbol Substitution, Incidental Learning, Word Fluency, Animal Naming, Logical Memory I, Digit Span Backwards, Trails A, Trails B, Finger Tapping, Boston Naming, Clock Reading, Smell Test, Logical Memory II), CES-D
NCS
CES
17, 2
45-75
Interview Block (Personal History, SF-12 Health Survey, Access/Quality of Health Care, Respiratory Symptoms)
SFE, PHX, NFH, AQC,
RSE
2 32
Seated Blood Pressure SBP 2 8
Alcohol use , Smoking ALC 2 4
Subjective Memory SMF 2 2
Physical Activity PAC 2 15
Physical Function and Timed Gait PFX 2 20
Pulse Wave Velocity and Ankle Brachial Index PRO 2 25
Physical Exam/Lung Sounds PEX 2 15
Medication Use Survey MSR 2 12
Spirometry, Lung Diffusion Capacity PRO 4 30
Change of Clothes -- -- 10
Review of Data Completeness, Stage Eligibility, CDR Subject -- 2 20
Eligibility for Stages II, III and CDR Subject, if prompted NSS 2/ 17 10/ 20
MRI exclusions MEF 17 5
Exit interview (end-of-visit report; review of alerts) -- 2 12
5-3
5.2 Abbreviated Exams
Cohort members who are frail or find the ARIC/NCS examination too long or demanding may choose an abbreviated version, approximately 3 hours long. Although such an option is negotiated with the study participant the elements of the abbreviated examination are established by protocol, as set out in Table 5.2. With minor differences the abbreviated field center examination corresponds to the Stage I Home/LTC exam; it is desirable however to obtain an echocardiogram as part of an abbreviated center examination. If a participant appears to be severely demented, the echocardiogram is skipped, and testing proceeds with snack and MMSE/ neurocognitive evaluation, as tolerated.
Table 5.2 Components of the ARIC/NCS Abbreviated Examination, Listed in their Recommended Sequence
Abbreviated Field Center Exam Components § Forms MOP
Ppt. Time (min.)
Reception -- 2 10
Informed Consent ICT 2 20
Update of contact/proxy/tracking information CIU 2 6
Participant safety screen PSA 2 3
Blood draw, urine specimen BIO 2 15
Weight, Seated blood pressure ANT/SBP 2 12
Echocardiogram PRO 15 30
Snack -- -- 10
MMSE screening & abbreviated exam for frail or severely impaired MME 17 6
Neurocognitive Test Battery Block A (Delayed Word Recall, Digit Symbol Substitution, Word Fluency, Animal Naming)
17 15
Neurocognitive Test Battery Block B (Wechsler Memory Scale III, Boston Naming, Clock Reading, , Trails A, Digit Span Backwards, Trails B, Word Reading, Finger Tapping, Smell Test
NCS 17, 2 45-75
Depression Scale CES
Personal history PHX 2 4
Medication inventory MSR 2 12
SF-12 Health Survey SFE 2 5
Access to medical care AQC 2 3
Subjective memory SMF 17 2
Determination of Stage II eligibility and CDR Subject, if prompted NSS 2/ 17 5/ 15
Exit interview 2 10
§ Shaded area: portion of the examination for which fasting and abstinence from caffeinated beverages is required
5.2.a Participants who are infirm or unable to schedule a more extensive examination are offered a Mini Exam – at home or the ARIC field center – that includes the informed consent (self/proxy), participant safety (PSA), height, weight and seated blood pressure (ANT, SBP), blood draw and collection of urine specimen (BIO), medication inventory (MSR), and an abbreviated neurocognitive

5-4
assessment (the MMSE and the DWRT, DSST, FAS sections of the NCS). This is followed by an exit interview. A fasting status is preferred but not required, and the examinee may wear street clothes.
Table 5.2.a Components of the ARIC/NCS Mini Examination (Approved 02.27.13)
Mini Exam Components (Home or Field Center) Forms MOP Ppt. Time
(min.)
Informed Consent ICT 2 20
Update of contact/proxy/tracking information (if needed) CIU 2 6
Participant safety screen PSA 2 3
Blood draw and urine specimen collection BIO 2 15
Height*, Weight, Seated blood pressure ANT/SBP 2 12
Abbreviated Neurocognitive Test (Mini-mental Status, Delayed
Word Recall, Word Fluency, Digit-symbol Substitution)
MME, DWRT,
FAS, DSST#
17, 2 20
Medication inventory MSR 2 15
SF-12 Health Survey SFE 2 5
Exit interview -- 2 15
*: Height is not measured at home visits or in long term care facilities. In the ANT form, collect item 1, either 2 or 4, and 3 (if height is collected) and then set the remainder of the fields to ‘permanently missing’.
#: The MME is completed per protocol. The scores for the DWRT, FAS and DSST are entered in the NCS form and the remaining fields on the NCS are set to ‘permanently missing’. The NSS form is set to ‘permanently missing.’
The ‘Type of exam being scheduled’ on the Recruitment Tracking and Scheduling form (RTS), item #3, is recorded as ‘Clinic Exam – Abbreviated’ when it is conducted in the clinic. If the exam was conducted at home or at a long term care facility, the corresponding response is recorded in the RTS.
5.3 Contacting Participants / Making an Appointment
Following recruitment, ARIC participants are scheduled for a field center examination or a home visit by the field center recruitment team and/or by personnel at the field center who coordinate this process. Field centers exercise local options to schedule individuals successfully recruited for an examination, and each field center is responsible for entering information promptly into the study screening and recruitment forms so that updated lists used to schedule the field center examination visit can be produced locally.
Before scheduling an appointment field center personnel must have appropriate scheduling forms and worksheets as used locally, the available clinic appointment dates/times, and all relevant scripts. Interviewers make the number of call attempts specified for each ARIC field center, tracking them on an exam scheduling worksheet. If informational materials have been mailed to the study participant prior to the call or left by the recruitment team during household screening, the interviewee is first reminded of the letter and brochure and the staff person reviews this information and answers questions about the study and its procedures, as required.
5-5
5.4 Participant Safety Screening
Verification of eligibility for all study procedures and a pre-screening to identify a participant’s special needs and to ensure safety are part of the visit scheduling procedures. For this purpose ARIC personnel use the Participant Safety Screening Form (PSA), supported by the ARIC Data Management System (DMS) on the staff person’s laptop/desktop. Following an explanation of the ARIC study and the procedures involved, the interviewer requests an opportunity to verify the individual’s eligibility for all procedures. The rationale for these questions is provided in the instructions for the PSA form, and are explained to the participant if requested.
Any medication taken routinely by the participant – on any schedule – is recorded as Yes on item 1 of the PSA form. Only medications that are taken occasionally are recorded as No. The purpose of this question is to prompt ARIC staff to review the medications taken on a schedule with the participant at the time the clinic visit (or home visit) is scheduled. As described in the following section, the participant is then asked to take specific medications on their prescribed schedule, or to defer others until after the blood draw during the exam visit. At the time the participant’s visit is scheduled and/or at Reception after signed informed consent, arrangements are made for the participant to have access to medication that needs to be taken in the course of the exam at set times, and with food if required. This is specified on the Participant Exam Checklist.
The conditions reviewed during this interview (and listed on the form) include the participant’s use of a pacemaker, defibrillator or other implanted electronic device, use of an inhaler, and verification of conditions recorded during previous examinations or annual follow-up interviews (diabetes or high blood pressure). Also included in this safety screening are questions about a heart attack, stroke, or surgery during the previous six months, and interventions for an abdominal aorta aneurysm. The responses of the safety screening questions are recorded on the PSA form and the participant is told of any procedures to avoid, and to verify that a sticker be placed on his/her name tag to make the study technicians aware of this during the field center examination.
During this interview staff also inquires about special needs, such as any medical conditions or treatment that would affect fasting times or the appointment time, difficulties in getting on or off an examination table, or impediments in hearing or reading. Arrangements for a safe and comfortable examination visit are made, inclusive of transportation, consulting with the Clinic Manager as appropriate. Participants should be reminded to bring all their medications to the field center, and the schedule of any medications to be taken on the day of the examination is reviewed (next section).
5.5 Scheduling the Participant’s Medications on the Day of the Examination
Participants who have conditions that require the daily use of pharmacologic agents are instructed to do the following on the day of their field center examination:
Antihypertensive medications should be taken according the participant’s usual schedule for these medications. This is recommended to avoid changes in a participant’s usual blood pressure on the day of the examination and in order to avoid abrupt changes in blood pressure and possible hemodynamic events during the visit. Nitrates (anti-anginal medications) also should be taken on the day of the examination according to schedule.
There are no particular safety concerns associated with aspirin, anticoagulants and antiplatelet aggregation agents, although bruising and minimal bleeding may occur at the venipuncture site. Participants using inhalers should be asked not to use their inhaler in the morning of their examination at the ARIC field center unless they experience discomfort. This is because 4-6 hours should elapse since the last use of a bronchodilator and the pulmonary function test.
Individuals who are diabetics and take oral hypoglycemic medications can withhold them until the last blood draw and their snack. Participants who take insulin should be asked to withhold the
5-6
morning dose until the last blood draw and snack. Participants who use insulin should be advised to check their capillary glucose level two hours after the snack.
Medications for cancer, HIV, autoimmune and neurological disorders should be taken as prescribed by the participant’s physician. Some of these medications may need to be taken with food, and at set times. Field centers make it possible for the participant to take these medications accordingly; if this is not practicable the participant is asked to consult with their physician.
The study participant is reminded that the blood tests and other examination procedures require fasting for at least 8 hours prior to drawing blood and that a snack is provided about two hours after the start of the field center examination. Fasting means no consumption of food or drinks (including alcohol), with the exception of water. Participants will be asked to not consume food or drinks after midnight prior to the clinic visit and to refrain from smoking for the same length of time, or for 8 hours prior to the scheduled time of arrival at the field center. The participant is asked whether there are medical reasons for him/her not to be fasting for this length of time and alternate arrangements are made if necessary after consultation with the a supervisor. Study participants are then told what the options for the snack are at the field center and asked whether the participant has any dietary needs that are not met by these choices.
Key scheduling tasks are to explain where the clinic is; identify a clinic time; establish how participant prefers to get there; identify any special medical conditions; provide brief but complete instructions. The interviewer also mentions that a confirmation letter will be mailed with the specifics of the appointment just made, a bag for their medications, and with instructions. Lastly, remaining questions are answered and (optionally) staff can mention that a reminder call will be made.
After a successful scheduling call, study personnel process the participant ID; name, address and phone number; appointment time and transportation preference; and any special instructions. The “final status” screening status is recorded on an exam scheduling worksheet.
5.6 Appointment Reminders and Instructions for the Clinic Examinations
The instructions for the visit to the field center are specified on an information sheet prepared by each field center, and mailed to the participant soon after the appointment is made. This set of instructions is provided in Section 3.6 of this manual. ARIC personnel responsible for scheduling a field center examinations provide participants with another copy of these instructions if seen as useful.
5.7 Split Field Center Examinations
Examinations may be scheduled as split exams if the study participant is unable to take part in a full examination, or split to accommodate circumstances not anticipated at the time the examination was scheduled. Split examinations must be completed no more than 30 days apart.
Under exceptional circumstances field center managers may authorize scheduling split examination beyond 30 days. Weather conditions, the unforeseen absence of key personnel, illnesses, and a participant’s inability to complete an examination within the time period specified by protocol represent such exceptional circumstances. The frequency of split examinations that occur more than 30 days apart must not exceed 5% of a field center’s examinations during one year.
5.8 Sequence of the Field Center Examinations
The sequence of examination procedures (participant flow) includes fixed and flexible components. Briefly, informed consent must be obtained prior to any data collection, followed by the collection of measurements that must be obtained in the fasting state. These are the blood specimen collection,
5-7
the abdominal aorta scan, and the electrocardiogram. Following the snack the MMSE and the CNF are administered to minimize the influence of participant fatigue.
Following this point, each participant’s itinerary is structured with exchangeable blocks of procedures and interviews that optimize participant and staff time. Field centers develop participant flow schedules that best fit their staffing pattern and facilities. Such participant itineraries reflect the number of examinees scheduled for the day, and are adjusted as needed to accommodate cancellations, or delays that occur during the participant’s progression through the sequence of examinations and interviews. At the field center’s discretion, participant itineraries are prepared in advance and printed or displayed on a board for convenient consultation by staff during the examination, also at the discretion of the field center.
The termination of the examination also represents a fixed sequence to assure that a DMS-based data inventory is run to prevent inadvertent omissions in data collection, that the clinically relevant study results available at this point can be reviewed with the participant, and that the instructions for Stage II or Stage III studies are discussed with the participant. Modification of a fixed sequence is a matter of study protocol and requires Steering Committee approval.
The completion of the components of the exam are captured in the ARIC DMS as study forms are entered, or by updating the Procedure Completion form for exam components that are not collected through the DMS. The progression of the examination is also checked off manually on the Participant Itinerary Checklist, which accompanies the participant from station to station. This checklist provides a convenient means for ARIC staff to monitor the progression through the exam and it reminds staff of any safety exclusions that preclude selected examinations for a participant.
Because of the length of the field center examination participant comfort and safety are of concern. Interviewers and technicians should be attentive to signs of fatigue, physical and/or emotional discomfort. When any one of these conditions is observed, participants are offered the opportunity to rest.
7-1
6. RECEPTION
Reception is the first workstation for a participant’s examination visit at an ARIC field center. The participant is welcomed, informed consent is obtained, participant questions are answered, participant tracing information and the information on the participant’s contacts are updated, fasting status is determined and the medication bag is logged and labeled.
Prior to the participant’s visit information on mobility and special needs recorded on the Participant Safety Screening form (PSA) are transferred to Participant Itinerary Checklist (see Appendix under this section heading). The Itinerary Checklist is not a form in the DMS but is used on paper, and accompanies the participant from station to station during the field center exam. At the time of the participant’s arrival at the reception station, staff displays the Contact Information Update form on the Data Management System and confirms the identifying information, address, and contact information with the study participant. The Participant Safety Screening form is filled prior to the exam visit, during the recruitment or the appointment/reminder call, to alert field center personnel of any special needs and any self-reported conditions that represent exclusions from an examination for safety reasons. At the reception station conditions noted on the Participant Safety Screening form are confirmed with the participant; if no safety exclusions are noted it is important to confirm that a Safety Screening form has been completed in the DMS, and that no exclusions are noted. Unless already indicated on the form, the Participant Safety Screening form is administered by qualified staff. This can happen immediately after the Informed Consent has been administered.
All exclusion conditions are recorded on the Itinerary Checklist, which is attached to the participant’s folder labeled with his/her name, to accompany the participant throughout the examination visit. See Section 5.4.
After the medication bag is labeled, its contents are inspected with the participant to determine if it contains any medications that require refrigeration. Medications requiring refrigeration are labeled with the participant's ID number and placed in the refrigerator. The location of the medication is noted on the Participant Itinerary Form.
As soon as the initial steps of welcome and reception mentioned above have been addressed and participants are comfortable, they are given the opportunity to read and review the informed consent as described below. If the study participant has not viewed the informed consent DVD, s/he is given a copy of the informed consent form and asked to watch the DVD. No data collection can take place before informed consent has been obtained.
Once consenting procedures are complete (next section of this manual) participants are then shown where to change into an examination gown/robe. They are reminded to remove pantyhose and constricting garments, to remove all jewelry, to place clothing and valuables in a secured locker, and to keep eye glasses with them. At this point the participant is reminded of the need to collect a urine specimen, by saying something like:
“As we mentioned at the time we scheduled your visit we need to collect a urine sample. You may do that as you change clothes for the exam. If you wish to do it later, please notify us when you need to use the bathroom; we can take your urine specimen at any time.” The procedures for the collection of the urine specimen are described in Section 8 of this manual.
Staff is trained for the reception workstation by the Study Coordinator at each field center. Certification requirements include the training on general interviewing techniques, Informed Consent, the Informed Consent Tracking forms, and the data entry system. Although there is no formal certification process for staff at the reception workstation, personnel working at the reception workstation are observed by the local study coordinator for quality assurance and standardization.
7-1
7. INFORMED CONSENT
Informed consent is the first form administered during the course of the examination. Its core content complies with guidelines from the National Heart, Lung, and Blood Institute and the ARIC Steering Committee. Its content and format also meet the specific requirements of each field center’s Institutional Review Board.
The primary objective of re-administering Informed Consent is to inform the participant of the purpose and procedures of ARIC and the voluntary nature of their participation. Further, this form is intended to protect the rights of the ARIC Study participants, meet local Institutional Review Board requirements, and to identify the participant's instructions for the type of information and biospecimens to be collected, their long term storage and disposition, and sharing. The informed consent makes the study participant aware of the right to withdraw from the study, to not participate in a procedure, or to decline to answer question(s) without penalty. Also at this time the participant is asked for authorization for subsequent contacts by ARIC personnel, to access information in their medical records, and for instructions on distribution of the ARIC study results.
7.1 Administration
The purpose of the ARIC and the measurements to be made are reviewed with the participant. Informational materials about ARIC, its goals, measurements and procedures are mailed to participants prior to their examination visit. After introducing the consent form to the participant in a private area ask whether s/he prefers to read the consent form or to have it read by the staff person. Record this preference on the Itinerary form to make this information easily accessible to interviewers throughout the clinic visit to avoid repeated questions whether the participant is comfortable reading. Before proceeding assess whether the participant uses reading glasses or a hearing aid. Record this information on the Itinerary form and explain to the participant how to have the hearing aid / reading glasses conveniently and safely available throughout the clinic visit.
At field centers’ discretion, a DVD is played at the reception station to explain the purpose of the ARIC exam, its components, the rights the cohort member has a study participant. Questions are encouraged and time is allowed for the person to read and sign the informed consent document.
Staff should be attentive to the possibility that participants may have read the informed consent form prior to their arrival. Questions of clarification should be solicited also under these circumstances and the consent portion of the form must be filled out and signed in the presence of the staff person who serves as witness.
If a participant is visually impaired or otherwise incapable of reading the study description and informed consent page, the narrative portion is read to him/her and then the participant is asked to sign the document. The original Informed Consent document is filed in the participant's study folder. A copy of the informed consent is given to the participant.
7.2 Training and Certification
Study coordinators are responsible for providing local staff training. Certification by the Study Coordinator is required, as listed above. Quality assurance is provided at each field center by means of observation by the local study coordinator.
7.3 Data Collection
The Informed Consent is a paper form. When the participant receives a copy of the informed consent, the field center has the option of providing a copy of the entire form, or merely the signed consent pages. In all cases, the original signature page must be kept at the field center and stored in the participant's study folder. Any restrictions noted on the informed consent form are keyed into the Informed Consent Tracking form (see below).
7-2
7.4 Ability to Comprehend the Informed Consent
Although the capacity to provide informed consent is required for the ARIC examination to be conducted in an ethical manner it can be challenging to identify individuals who may not have the ability to comprehend the informed consent. There are no nationally recognized standards for this assessment and somewhat different findings have emerged when some states (and courts) have taken up this issue. As a result, each field center follows the guidance of its local IRB on whether specific procedures are required for identification of such individuals.
Unless impairment is obvious, recognizing cognitive impairment in a participant is difficult (even for professionals), particularly since social skills can remain intact for participants who otherwise do not perform well on testing. As an added consideration, decision-making capacity is frequently task specific. As a result, depending on the type and extent of impairment cognitively impaired individuals can remain fully capable of making a variety of decisions, including whether or not to participate in a study. Field center personnel need to be attentive to indicators of potential cognitive impairment, such as repetition (i.e., repeating questions/stories over the course of just a few minutes) and empty or poor responses (i.e., the participant who frequently responds with "I don't know"). Individuals who seem to always be looking to their spouse or a companion for answers to historical questions or medical history questions also warrant consideration for a reduced capacity to answer all ARIC questionnaires.
Unless an IRB specifies specific procedures for vulnerable individuals there is need for guidelines common to the ARIC field centers to provide an environment that assists participants in comprehending the informed consent. To ensure that participants understand the informed consent staff can ask the participant to explain back (in their own words) certain portions of the study. This can be introduced by stating that it is very important that the participant understand his/her rights and the process by which the ARIC project protects the confidentiality of the participant’s information. If the responses from the participant suggest that he/she has difficulty comprehending the consent process or the form contents, the staff person brings this to the attention of the supervisor.
7.5 ARIC/NCS Informed Consent Proxy and Informant Triggers
All ARIC study participants signed an informed consent at baseline, updated at each re-examination, or subsequently through specific instructions provided by the participant to ARIC that modify or revoke their informed consent. The mechanism by which ARIC monitors and implements the instructions from study participants for use of their data (or future contacts) is the informed consent tracking (ICT) form. The ARIC/NCS examination provides the opportunity to update the ARIC informed consent to current standards of ethical conduct of research, and to tailor the informed consent materials to the study participant’s ability to provide an informed consent.
Cognitive deficits may affect the ability to provide informed consent and accurately respond to interviews and questionnaires. Given the age of the ARIC cohort and the increasing risk of cognitive impairment formal procedures are implemented to identify participants: (1) considered vulnerable due to diminished capacity, in particular reduced decision-making capacity to provide informed consent, and (2) with cognitive impairment sufficient to call into question their ability to provide accurate self-report. Those deemed to have diminished capacity to provide informed consent require consent from a proxy to participate in the ARIC study. In addition, access to a knowledgeable informant who can assist with interviews and questionnaires is requested for participants falling into the second category, where self-report may be suspect.
The diversity and the breadth of characterization of the ARIC cohort participants in ARIC’s Visit 5 and in the NCS requires that several consent materials be available, as summarized in the following table, and that they be used appropriately.

7-3
ARIC Visit 5 / ARIC/NCS Informed Consent Materials
Informed Consent
Study Compone
nt
Is there a proxy
version?
If consent by proxy, does
participant provide Assent?
Mechanism to Update
Home exam informed consent Stages I-II Yes Asked to co-sign ICT form
Field center exam informed consent
Stages I-II Yes Asked to co-sign ICT form
Informed consent of the Informant
Stage II N.A. Asked to co-sign N.A.
MRI informed consent Stage III Yes Asked to co-sign N.A.
Until a cohort member has participated in the ARIC/NCS examination as a home or clinic visit, his/her informed consent of reference is the latest informed consent provided to ARIC from ARIC exam visits 1-4, the ARIC Brain MRI Study, or the Carotid Artery MRI Study (ARIC CarMRI).
7.6 Defining the Need for Proxy Consent and for an Informant
A proxy is a person authorized to act on behalf of an adult not capable of giving consent. Although some variation exists by state, persons favored to served as a proxy in order of priority are a Legally Authorized Representative, such as a Health Care Agent or Legal Guardian; a spouse; adult child; adult sibling; friend or other relative. An informant is a person sufficiently familiar with the participant’s daily activities to be able to provide information on the participant’s performance. If sufficiently familiar with the participant’s performance in the course of daily activities, a proxy may serve as an informant.
Classifying decision-making capacity is challenging, and may be task specific. Given the minimal risk associated with the ARIC procedures, conservative criteria are suggested as triggers for requiring proxy consent. These include (any of):
A prior diagnosis of dementia
Disorientation to time (e.g., score < 2 on orientation items from 6-item screener)
Staff assessment, at the time of annual follow-up interview or at the time of in-person informed consent. Because no mental status screen will identify all cases of cognitive impairment, the need for a proxy or informant will also be informed by the judgment of our trained interviewers.
Informant Trigger (independent of the need for informed consent by a proxy)
Impaired memory (e.g., score <2 on memory items from 6-item screener)
Because the prevalence of cognition impairments and of dementia is expected to be higher for those seen at home or in nursing homes, the 6-Item Screener will be administered by phone prior to the home/nursing home visit. The phone screen will allow arrangement for a proxy or informant prior to the visit. Note that the informant trigger does not replace the NCS criteria for an informant interview (designed to gather information about participants’ cognitive and functional status).
7-4
7.7 Consent Tracking Form
The Informed Consent Tracking (ICT) form is an internal form to monitor the level of consent given by study participants to participate in the ARIC and records all restrictions specified by the participant (see ICT form). This form tracks each participant's type of consent (full or partial), restrictions on use or storage of DNA, type of restrictions on the participant’s data for different types of research questions, the ability to share de-identified data with investigators not affiliated with ARIC, or restrictions on the release of results to participant's physician and permission to access medical records. The tiered informed consent section of the consent form includes 9 items asking the participants whether they agree/disagree. The participant’s instructions for each of the 9 items are recorded on the ICT. This form must be completed in the DMS within 3 days of the examination, since this form must be in the database for the ARIC coordinating center and central laboratories to perform the assays and specimen storage procedures according to the participant’s instructions as recorded on the informed consent form.
The ICT includes an additional question (item 10 on the ICT), to record whether the participant restricted access to his/her medical records. This is not an item found in the tiered informed consent section that includes the 9 items listed above. Instead, item 10 of the ICT is based on the information included in the body of the informed consent form under the heading How will my medical records help ARIC? (located on page 6 of the ARIC informed consent template; pagination may differ across centers).
ARIC participants have granted ARIC personnel access to their medical records since the inception of ARIC, as stated again in this consent form. If the participant does not consent to give access to his/her medical records, the pertinent sentence or paragraph in the informed consent form signed by the participant is crossed out, and initialed by the participant. Item 10 of the ICT is answered Agree if this section of the informed consent was not amended in the process of obtaining informed consent. If any portion of the section titled ‘How will my medical records help ARIC?’ has been amended or restricted by the participant, Item 10 of the ICT is answered Do Not Agree, and a note log is added to this item to list the restriction in a few words. For example, note log entries could mention ‘No hospital records’, ‘do not contact physician’s office’, ‘do not contact next of kin in case of death’, ‘does not allow use of SSN’.
Consent to Release Protected Health Information. After informed consent has been obtained the ARIC staff who administers the consent provides the participant with the pre-filled, but undated, consent to release Protected Health Information. If the participant agrees to sign such a release form for eventual use by the ARIC staff, this is entered in item 10a of the ICT form.
7.8 Procedures to Follow During the ARIC Exam if a Participant Restricts Consent
If a study participant has restricted his/her informed consent to portions of the examination or has placed limits on the use of the data or blood specimens, field center personnel document the restriction(s) on the consent form signed by the study participant, and record the participant’s instructions in the ICT form, as described in the previous section. Based on the ICT form the ARIC Coordinating Center keeps a record of each study participant’s instructions in a central database, which is shared with the ARIC laboratories and reading centers so that their work can conform to the dispositions of the study participant. At the time of data analysis for publication, restrictions to study records based on the ICT are also communicated to the analysts and users of the ARIC data.
If a study participant has restricted consent for specific questionnaires or measurements, these individual interviews and procedures are not collected at the time of the examination, and the corresponding data collection form(s) are recorded in the DMS as permanently missing. A different procedure is followed for the collection of the biospecimens and their processing. If a participant refuses to donate blood or urine to ARIC, the specimens are not collected (and the reason for the

7-5
missing data is recorded in the DMS). However, no changes are made to the biospecimen collection and processing protocol if a participant has restricted the use of DNA, another specimen or lab test, or to the options to share their genetic material and data. In such a case, all tubes are collected, processed and shipped following the instructions set out in MOP 7. Adjustments to the sample processing, storage and disposition of a participant’s biospecimens are then done at the central laboratory, according to the instructions recorded on the ICT form at the field center.
7.9 Procedures to Remove a Participant from the Study
It is possible to remove a consented study participant for administrative reasons if the field center lead investigator notifies the coordinating center that one or more of the following conditions are true:
The participant’s informed consent was invalid due to cognitive impairment, substance abuse, or equivalent
The informed consent was revoked by the participant, wishing a full withdrawal from the study and no further contact
Threatening / antisocial behavior by the participant towards the staff or other study participants
Administrative exclusion of an eligible participant recruited and/or examined by ARIC must be initiated or approved by the field center PI, and communicated to the coordinating center for adjustments to the field center’s list of eligible enrollees, purging of the Exam 5 biospecimen repositories, adjustments to the collaborative database and analysis files, and to enable recognition of the former study participant by various study management tools.
8-1
8. BIOSPECIMEN COLLECTION
8.1 Collection of the urine specimen
A urine sample is collected from each participant, preferably at the beginning of the clinical exam as the participant changes into scrub suits. After participants complete the Reception work station activities and are taken to change clothes, they are informed about the urine collection. If the participant has not voided by the time of the exit interview, the participant is asked to void at that time.
A specimen cup (labeled with the participant’s ID), cup lid, and a Time Voided label are provided by the staff member working with the participant at that time. The participant is instructed to:
void in the cup, filling it if possible, and place the lid securely on top of the container,
record the time of voiding on the label, and
bring the specimen cup back to the staff member, OR
place the sample container in a refrigerator designated for urine samples, and report to a staff member that the specimen has been collected, depending on locally approved OSHA regulations.
Scripted instructions are provided in Manual 7. Bathrooms are equipped with a wall clock and pencils for participants to use in recording the time of voiding on the label. The staff member verifies the participant has written the "time voided" on the label, and assesses the adequacy of the sample for processing. At least 6 mL of urine is required for processing. If insufficient, the participant is requested to void again in a clean container prior to leaving the field center. A note is made on the participant's Itinerary sheet that a second sample is needed by the staff person who observes the placement of the participant's urine specimen in the refrigerator. The instructions for providing the urine sample are repeated to the participant at that time.
Labeled urine samples should be placed in the designated specimen refrigerator for storage prior to processing and as soon as possible after the specimen has been voided. This can be done either by the participant or a staff member, as determined by local option. Procedures are set up at each field center to verify that urine samples are not inadvertently left out at room temperature since urine may be not be left at room temperature for no more than 4 hours.
8.2 Blood Drawing and Processing
The procedures for the collection, processing and shipment of blood samples and urine samples are described in Manual 7. Laboratory tests are performed on specimen samples that are collected and processed according to a common protocol by the technicians at each of the four ARIC field centers. Specimens are shipped for assay and long term storage at three core laboratories: the ARIC DNA Laboratory at the University of Texas Medical School in Houston, TX, the ARIC Atherosclerosis Laboratory at Baylor College of Medicine in Houston, TX, and the ARIC Clinical Chemistry Laboratory at the University of Minnesota in Minneapolis, MN. A list of the tests performed at these laboratories is located in Appendix 1 of Manual 7.
The most important step in this process (and potentially the most difficult to standardize) is the collection and field center processing of the blood samples. Laboratory tests can be repeated, but if the blood sample itself is not correctly drawn, labeled, and processed, the laboratory results may not be accurate even if the laboratory assays are precise. For the study to succeed, it is important that variation in measurement values reflect true differences between the study participants rather than differences in blood drawing or processing procedures. Thus, it is important that all field center technicians are well-trained, certified, fully compliant with the protocol for drawing and processing the specimens in the field, and also willing to take pride and responsibility in their work.

8-2
The ARIC study collects approximately 80 ml of blood from each participant. A total of 11 tubes of blood are collected
8.3 Staff Certification Requirements
The blood collection and processing is performed by ARIC-certified technicians at each field center. The technicians complete a training course taught by certified laboratory staff. Each technician must complete the training and pass both written and practical exams before becoming ARIC-certified. Re-certification takes place annually and is authorized by the supervisory personnel.
9-1
9. ABDOMINAL AORTA SCAN
ARIC/NCS field center examinations include an assessment of abdominal aortic diameter using b-mode ultrasound. Abdominal aortic aneurysms (AAA) are common in older adults ruptures of AAA are associated with high mortality. The causes of AAA are not well understood and there are no specific treatments to prevent AAA or reduce their progression. The ARIC ultrasound examination of the abdominal aorta will identify cases of undiagnosed AAA. The abdominal aorta scan is done before the participant breaks the fast, preferably proceeding from the abdominal scan to cardiac echogram in the same session. If the examination schedule/number of participant examine on a given day does not permit the combination of fasting abdominal scans and echocardiograms, then efforts are made to obtain all abdominal scans in the fasting state and to perform the participant’s echocardiogram during the non-fasting portion of the examination. The training and certification of the sonographers, the scanning and reading procedures are detailed in Manual 15.
10-1
10. 12-Lead ECG
A 12-lead electrocardiogram (ECG) is acquired following a standardized protocol (Manual 5). The timing of the ECG during the field center exam is important to the quality of the data because an increase in blood sugar has been shown to affect the wave forms on the ECG, and because the use of a bronchodilator importantly affects the heart rate and may induce minor arrhythmias. As a result, the ECG should be obtained in the fasting state, and before spirometry. If a bronchodilator has been administered to a participant as part of lung function testing, at least two hours should be allowed before an ECG is taken.
10.1 Local ECG Reading
The ECG is coded by the Central ECG Reading Center (EPICARE), several weeks after the field center examination. For participant safety purposes a local clinical reading of the ECG at the time the of the field center examination is part of the ARIC/NCS protocol, if triggered by ECG abnormalities defined as “alerts” because of their potential severity. It is acknowledged that the automated report printed by the Marquette system on the ECG tracing is quite sensitive, which typically leads to “over-calling” abnormalities.
Minor, clinically insignificant ECG findings are commonly found in ECGs obtained in the general population; most of these do not need immediate attention. ECGs with major abnormalities on the other hand should be reviewed by clinically qualified personnel at the field center, and evaluated for possible referral. To place ECG abnormalities in context staff should consider whether the participant is experiencing discomfort, acute symptoms or distress. If rhythm abnormalities are present on the ECG, staff should inquire whether the participant is aware of/has been told by a physician that s/he has a heart rhythm condition.
Although guidelines are provided below for ARIC personnel, a physician can override these instructions according to individual circumstances and/or a repeat ECG. In reviewing the ECG tracings ARIC staff does not make diagnoses or convey any information that may alarm the participant. A list of most common ECG abnormalities follows.
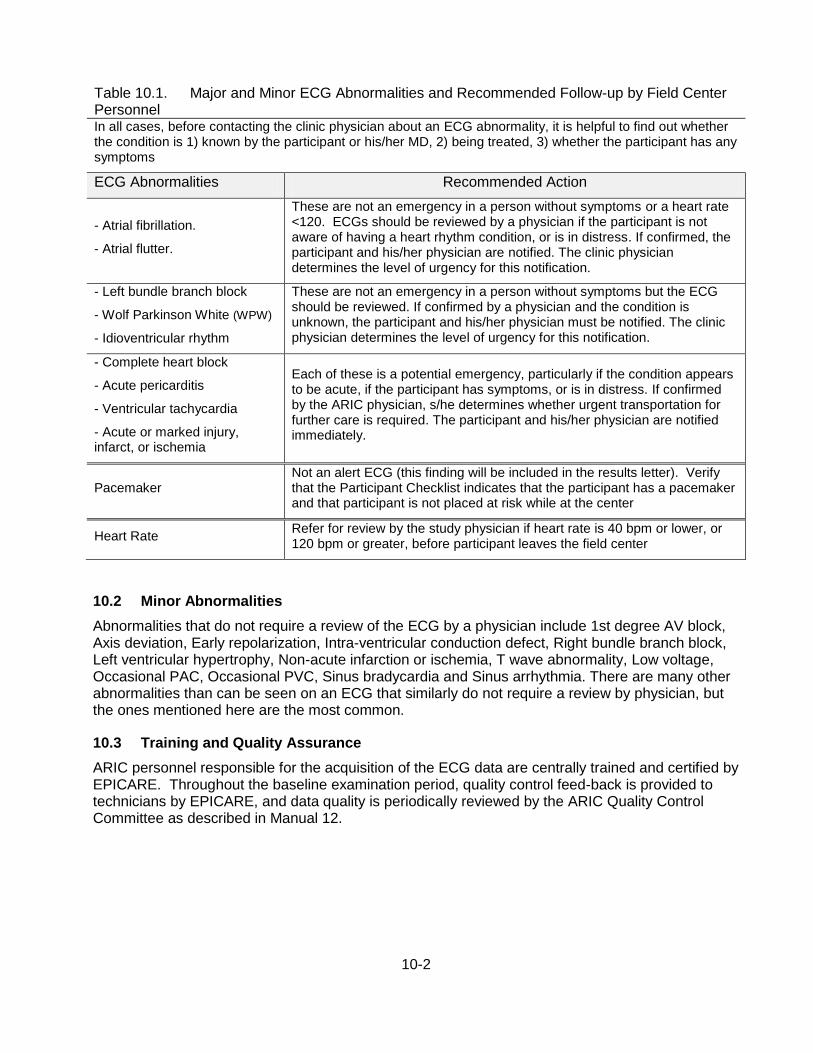
10-2
Table 10.1. Major and Minor ECG Abnormalities and Recommended Follow-up by Field Center Personnel In all cases, before contacting the clinic physician about an ECG abnormality, it is helpful to find out whether the condition is 1) known by the participant or his/her MD, 2) being treated, 3) whether the participant has any symptoms
ECG Abnormalities Recommended Action
- Atrial fibrillation.
- Atrial flutter.
These are not an emergency in a person without symptoms or a heart rate <120. ECGs should be reviewed by a physician if the participant is not aware of having a heart rhythm condition, or is in distress. If confirmed, the participant and his/her physician are notified. The clinic physician determines the level of urgency for this notification.
- Left bundle branch block
- Wolf Parkinson White (WPW)
- Idioventricular rhythm
These are not an emergency in a person without symptoms but the ECG should be reviewed. If confirmed by a physician and the condition is unknown, the participant and his/her physician must be notified. The clinic physician determines the level of urgency for this notification.
- Complete heart block
- Acute pericarditis
- Ventricular tachycardia
- Acute or marked injury, infarct, or ischemia
Each of these is a potential emergency, particularly if the condition appears to be acute, if the participant has symptoms, or is in distress. If confirmed by the ARIC physician, s/he determines whether urgent transportation for further care is required. The participant and his/her physician are notified immediately.
Pacemaker Not an alert ECG (this finding will be included in the results letter). Verify that the Participant Checklist indicates that the participant has a pacemaker and that participant is not placed at risk while at the center
Heart Rate Refer for review by the study physician if heart rate is 40 bpm or lower, or 120 bpm or greater, before participant leaves the field center
10.2 Minor Abnormalities
Abnormalities that do not require a review of the ECG by a physician include 1st degree AV block, Axis deviation, Early repolarization, Intra-ventricular conduction defect, Right bundle branch block, Left ventricular hypertrophy, Non-acute infarction or ischemia, T wave abnormality, Low voltage, Occasional PAC, Occasional PVC, Sinus bradycardia and Sinus arrhythmia. There are many other abnormalities than can be seen on an ECG that similarly do not require a review by physician, but the ones mentioned here are the most common.
10.3 Training and Quality Assurance
ARIC personnel responsible for the acquisition of the ECG data are centrally trained and certified by EPICARE. Throughout the baseline examination period, quality control feed-back is provided to technicians by EPICARE, and data quality is periodically reviewed by the ARIC Quality Control Committee as described in Manual 12.
11-1
11. ANTHROPOMETRY
Anthropometric measures include height, weight, waist and hip circumference and body fat. These measures are used to assess the relationship between overweight and risk of disease.
11.1 Equipment and Supplies
The equipment and supplies necessary for body measurements are as follows:
Tanita Body Composition Analyzer, TBF-300A Wall mounted stadiometer Gulick II 150 and 250 cm anthropometric tape Full length mirror Balance weight scale (available at all times as back up) Calibration weights (10 kg)
11.2 Staff
It is preferable to have an examiner and recorder for each procedure. Technicians are trained to perform both roles. If necessary, a technician may perform the measurements and enter the data into the ANT record in the data management system (DMS).
The examiner is responsible for positioning the participant, taking each measurement, and calling the measurement aloud to the recorder. The recorder keys the information into the DMS and asks the examiner to confirm or re-measure any out-of-range messages identified by the data entry system. Otherwise, the examiner proceeds to the next measurement in the sequence established by the protocol. The participant remains on the instrument (or the measuring tape remains on the participant) until the recorder enters the measurement in the DMS.
11.3 Anthropometry Form
The ANT form records anthopometry measurements in three sections: ability to stand (A), height, weight, bio-impedance output values from the Tanita scale (B) , and waist circumference (C). As the technician progress through the examination procedures, they will record (or directly enter) results into the ANT form.
11.4 Examination Procedures
For all measurements, participants should wear scrub suits or light, non-constricting clothing and slippers or socks, but participants must be barefoot when measuring weight and body composition with the Tanita scale.
11.4.a Standing Height
Standing height is measured with a fixed (wall mounted) stadiometer with a vertical backboard and a moveable headboard. Have the participant move or remove hair ornaments, jewelry, buns, braids, and corn rolls from the top of the head in order to measure stature properly.
Have the participant stand on the floor (see Figure 1) with the heels of both feet together and the toes pointed slightly outward at approximately a 60˚ angle. Make sure the body weight is evenly distributed and both feet are flat on the floor. Check the position of the heels, the buttocks, shoulder blades, and the back of the head for contact with the vertical backboard. Depending on the overall body conformation of the individual, all points may not touch. In such case, make sure the participant’s trunk is vertical above the waist, and the arms and shoulders are relaxed.
Align the head in the Frankfort horizontal plane. The head is in the Frankfort plane when the horizontal line from the ear canal to the lower border of the orbit of the eye is parallel to the floor and perpendicular to the vertical backboard. Many people assume this position naturally, but for
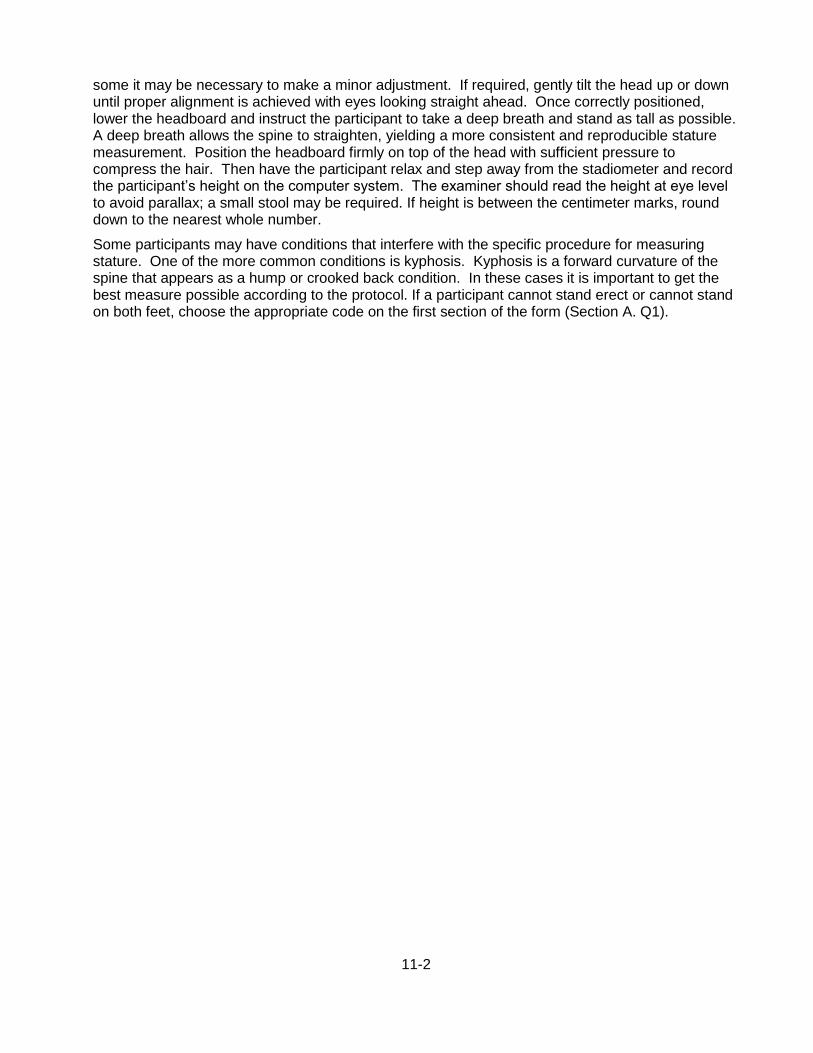
11-2
some it may be necessary to make a minor adjustment. If required, gently tilt the head up or down until proper alignment is achieved with eyes looking straight ahead. Once correctly positioned, lower the headboard and instruct the participant to take a deep breath and stand as tall as possible. A deep breath allows the spine to straighten, yielding a more consistent and reproducible stature measurement. Position the headboard firmly on top of the head with sufficient pressure to compress the hair. Then have the participant relax and step away from the stadiometer and record the participant’s height on the computer system. The examiner should read the height at eye level to avoid parallax; a small stool may be required. If height is between the centimeter marks, round down to the nearest whole number.
Some participants may have conditions that interfere with the specific procedure for measuring stature. One of the more common conditions is kyphosis. Kyphosis is a forward curvature of the spine that appears as a hump or crooked back condition. In these cases it is important to get the best measure possible according to the protocol. If a participant cannot stand erect or cannot stand on both feet, choose the appropriate code on the first section of the form (Section A. Q1).
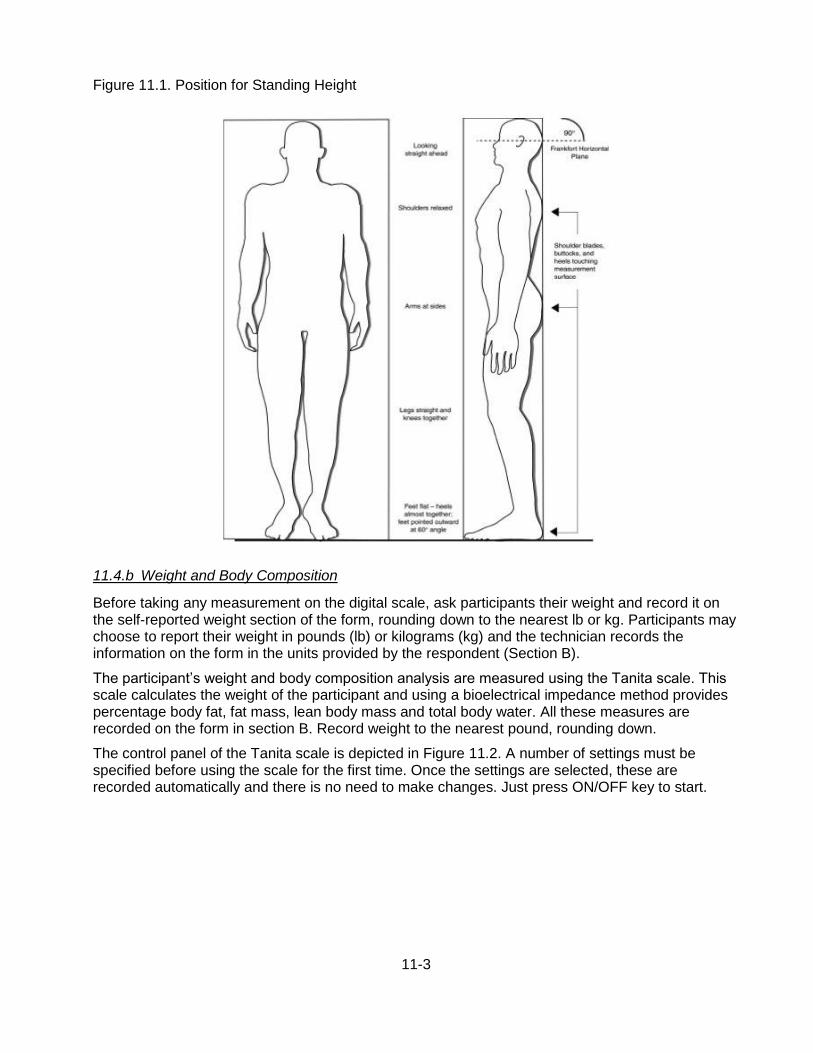
11-3
Figure 11.1. Position for Standing Height
11.4.b Weight and Body Composition
Before taking any measurement on the digital scale, ask participants their weight and record it on the self-reported weight section of the form, rounding down to the nearest lb or kg. Participants may choose to report their weight in pounds (lb) or kilograms (kg) and the technician records the information on the form in the units provided by the respondent (Section B).
The participant’s weight and body composition analysis are measured using the Tanita scale. This scale calculates the weight of the participant and using a bioelectrical impedance method provides percentage body fat, fat mass, lean body mass and total body water. All these measures are recorded on the form in section B. Record weight to the nearest pound, rounding down.
The control panel of the Tanita scale is depicted in Figure 11.2. A number of settings must be specified before using the scale for the first time. Once the settings are selected, these are recorded automatically and there is no need to make changes. Just press ON/OFF key to start.
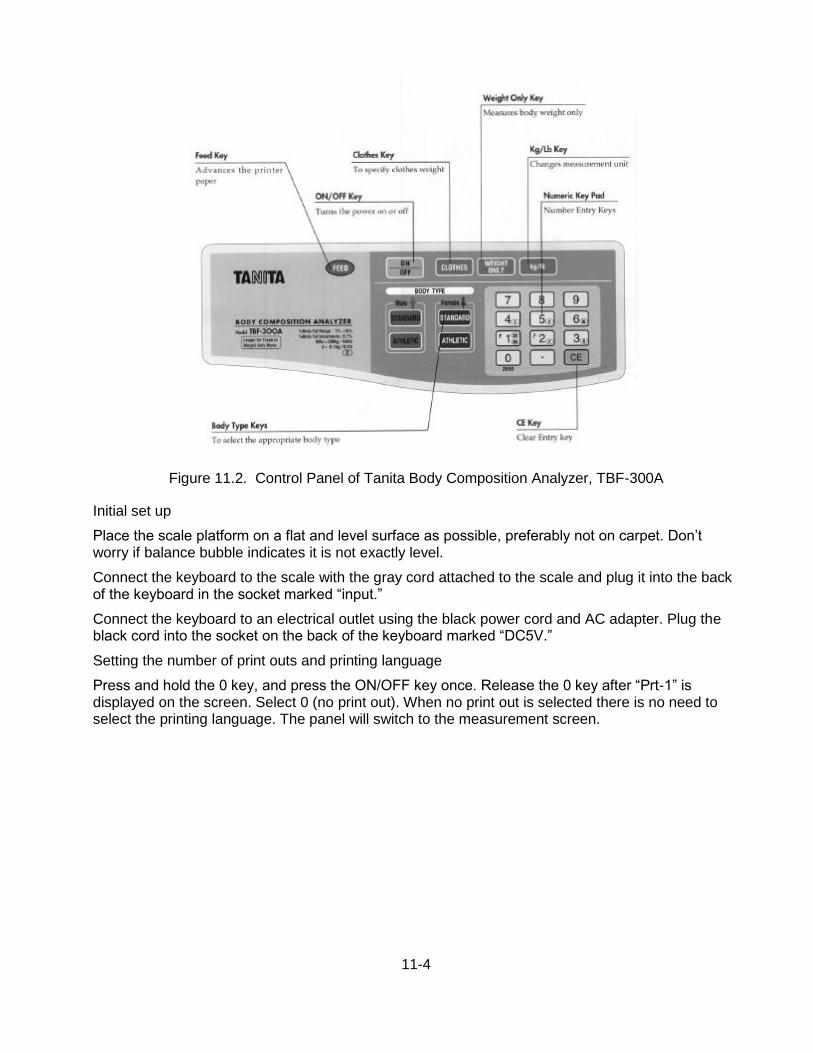
11-4
Figure 11.2. Control Panel of Tanita Body Composition Analyzer, TBF-300A
Initial set up
Place the scale platform on a flat and level surface as possible, preferably not on carpet. Don’t worry if balance bubble indicates it is not exactly level.
Connect the keyboard to the scale with the gray cord attached to the scale and plug it into the back of the keyboard in the socket marked “input.”
Connect the keyboard to an electrical outlet using the black power cord and AC adapter. Plug the black cord into the socket on the back of the keyboard marked “DC5V.”
Setting the number of print outs and printing language
Press and hold the 0 key, and press the ON/OFF key once. Release the 0 key after “Prt-1” is displayed on the screen. Select 0 (no print out). When no print out is selected there is no need to select the printing language. The panel will switch to the measurement screen.
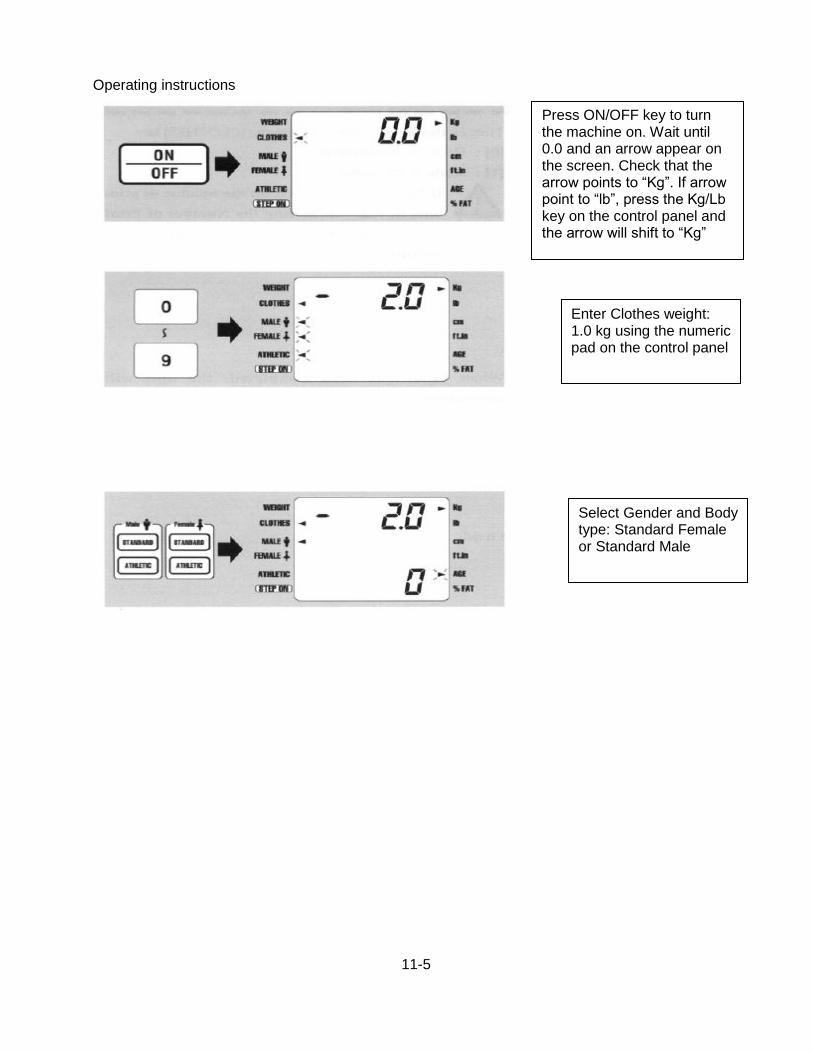
11-5
Operating instructions
Press ON/OFF key to turn the machine on. Wait until 0.0 and an arrow appear on the screen. Check that the arrow points to “Kg”. If arrow point to “lb”, press the Kg/Lb key on the control panel and the arrow will shift to “Kg”
Enter Clothes weight: 1.0 kg using the numeric pad on the control panel
Select Gender and Body type: Standard Female or Standard Male
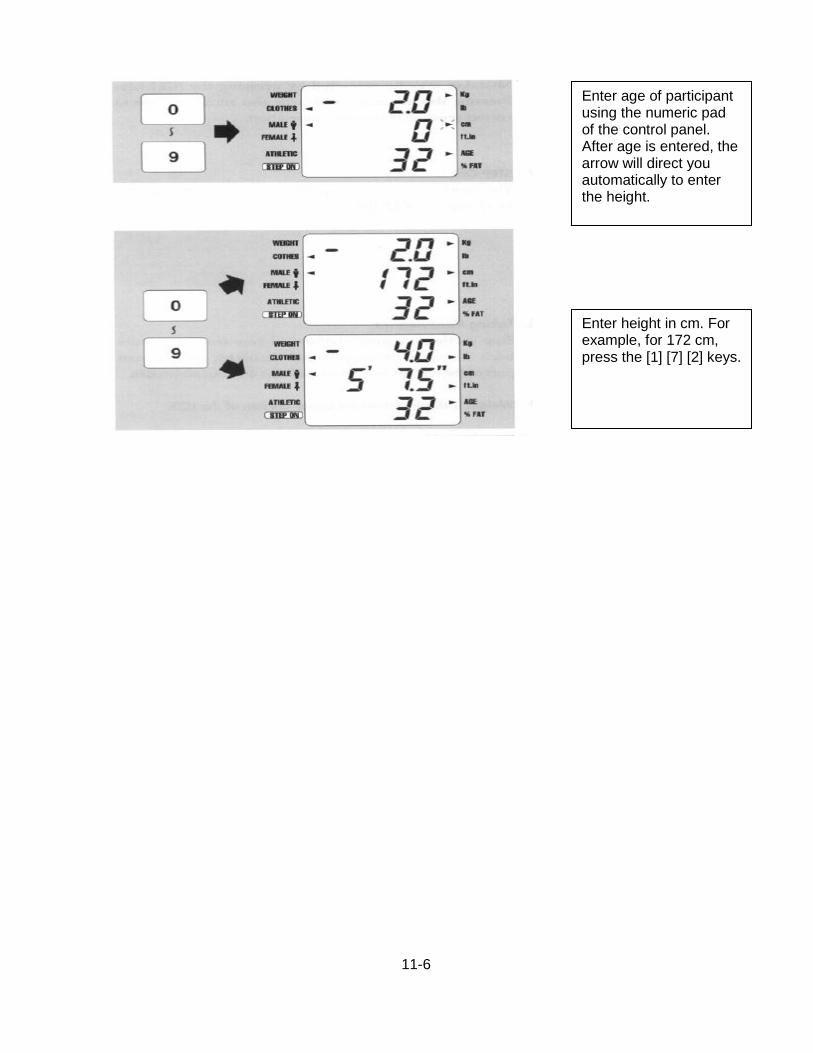
11-6
Enter age of participant using the numeric pad of the control panel. After age is entered, the arrow will direct you automatically to enter the height.
Enter height in cm. For example, for 172 cm, press the [1] [7] [2] keys.
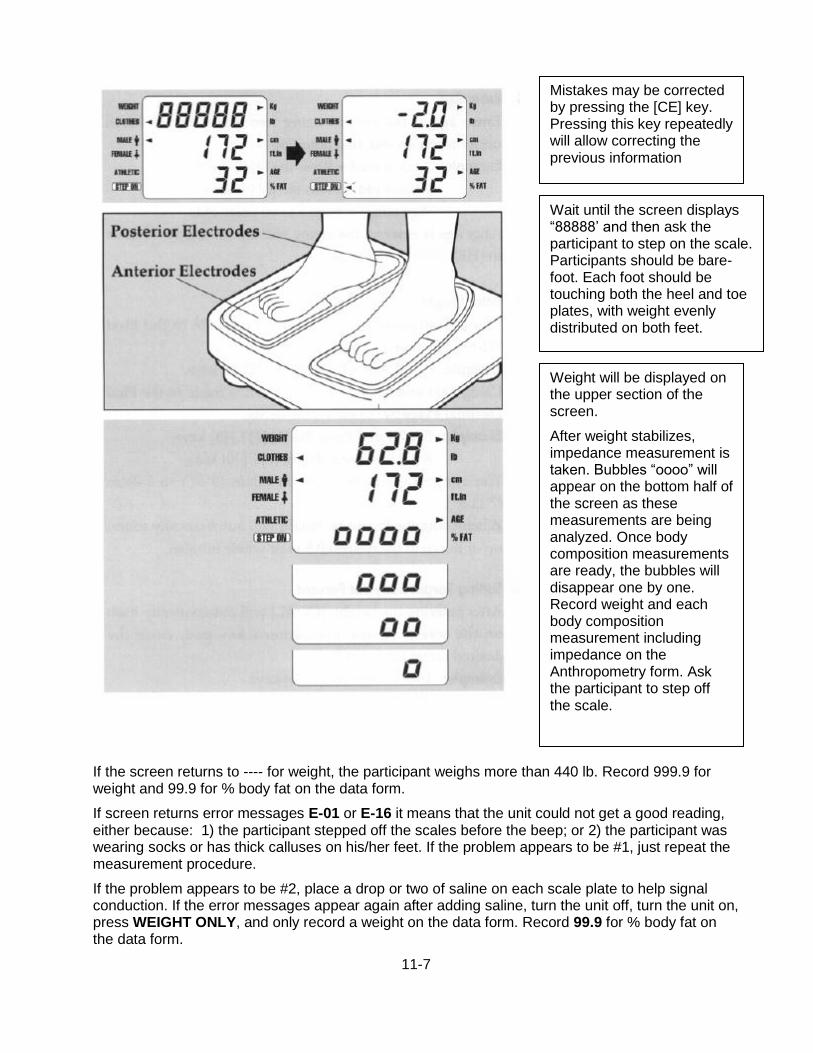
11-7
If the screen returns to ---- for weight, the participant weighs more than 440 lb. Record 999.9 for weight and 99.9 for % body fat on the data form.
If screen returns error messages E-01 or E-16 it means that the unit could not get a good reading, either because: 1) the participant stepped off the scales before the beep; or 2) the participant was wearing socks or has thick calluses on his/her feet. If the problem appears to be #1, just repeat the measurement procedure.
If the problem appears to be #2, place a drop or two of saline on each scale plate to help signal conduction. If the error messages appear again after adding saline, turn the unit off, turn the unit on, press WEIGHT ONLY, and only record a weight on the data form. Record 99.9 for % body fat on the data form.
Mistakes may be corrected by pressing the [CE] key. Pressing this key repeatedly will allow correcting the previous information
Wait until the screen displays “88888’ and then ask the participant to step on the scale. Participants should be bare-foot. Each foot should be touching both the heel and toe plates, with weight evenly distributed on both feet.
Weight will be displayed on the upper section of the screen.
After weight stabilizes, impedance measurement is taken. Bubbles “oooo” will appear on the bottom half of the screen as these measurements are being analyzed. Once body composition measurements are ready, the bubbles will disappear one by one. Record weight and each body composition measurement including impedance on the Anthropometry form. Ask the participant to step off the scale.

11-8
Once measurements are completed, the machine will automatically return to the Gender and Body Type screen in about 10 seconds. Leave keyboard on. Wipe off plates on scale with antiseptic wipes. You can then measure the next participant.
IMPORTANT SAFETY ALERT: PARTICIPANTS WITH A PACEMAKER, A DEFIBBRILLATOR
OR OTHER INTERNAL ELECTRONIC DEVICE, SHOULD BE MEASURED IN ‘WEIGHT ONLY’ MODE, OR ON A REGULAR, CALIBRATED SCALE.
Do not weigh participants who have a cast, if larger than a finger splint, that cannot easily be removed or that the participant is comfortable removing. If a participant has a prosthetic limb, measure weight with limb in the “Weight Only” mode, make a note in the comment section of the form.
In the event of a power outage or if the scale is not functioning properly, use the balance scale as back-up and notify the project coordinator.
11.4.c Abdominal (Waist) Circumference
To define the level at which the abdominal circumference is measured, first locate and mark a bony landmark, the lateral border of the ilium. Have the participant stand and hold their t-shirt above the waist. Lower the pants and underclothing of the participant slightly, and standing behind and to the right of the participant, palpate the hip area to locate the right ilium (see Figure 3). Draw a horizontal line just above the uppermost lateral border of the right ilium and then cross the line to indicate the mid-axillary line of the body. Standing on the participant’s right side, place the measuring tape around the trunk in a horizontal plane at the level marked on the right side of the trunk. Hold the zero end below the measurement value. Use the mirror on the wall to ensure correct horizontal alignment of the measuring tape. This is especially useful when measuring overweight participants or women with hourglass-shaped torsos. The recorder (if available) makes sure that the tape is parallel to the floor and that the tape is snug, without compressing the skin. Measurements are made at the end of a normal expiration and reported to the recorder to the nearest centimeter, rounding down, and entered in section D of the form.
11.4.d Hip Circumference
Instruct the participant to stand erect but relaxed, with weight distributed equally over both feet. The hip girth is measured at the level of maximal protrusion of the gluteal muscles (hips). Verify this position by passing the tape above and below the observed maximum. Keep the anthropometric tape horizontal at this level and record the measurement to the nearest centimeter. The tape should be snug, but not tight enough to compress tissue. The measurement should be made from the participant’s right side. Only one measurement is made.
The greatest source of error for this measurement is due to not having the tape horizontal. Before making the measurement, the observer verifies the position of the tape from both the front and back to assure its correct position and that the tape is horizontal. In the absence of a recorder, the technician uses the wall mirror to confirm that the tape is horizontal. Record the results to the nearest centimeter, rounding down.
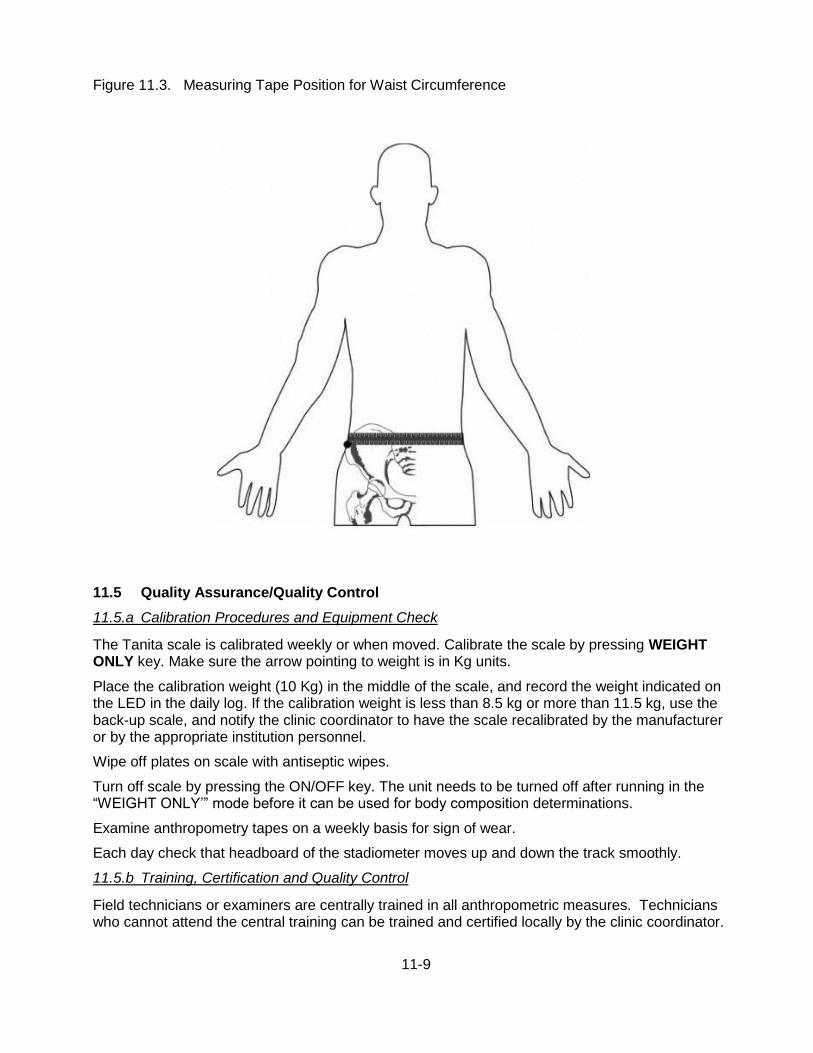
11-9
Figure 11.3. Measuring Tape Position for Waist Circumference
11.5 Quality Assurance/Quality Control
11.5.a Calibration Procedures and Equipment Check
The Tanita scale is calibrated weekly or when moved. Calibrate the scale by pressing WEIGHT ONLY key. Make sure the arrow pointing to weight is in Kg units.
Place the calibration weight (10 Kg) in the middle of the scale, and record the weight indicated on the LED in the daily log. If the calibration weight is less than 8.5 kg or more than 11.5 kg, use the back-up scale, and notify the clinic coordinator to have the scale recalibrated by the manufacturer or by the appropriate institution personnel.
Wipe off plates on scale with antiseptic wipes.
Turn off scale by pressing the ON/OFF key. The unit needs to be turned off after running in the “WEIGHT ONLY’” mode before it can be used for body composition determinations.
Examine anthropometry tapes on a weekly basis for sign of wear.
Each day check that headboard of the stadiometer moves up and down the track smoothly.
11.5.b Training, Certification and Quality Control
Field technicians or examiners are centrally trained in all anthropometric measures. Technicians who cannot attend the central training can be trained and certified locally by the clinic coordinator.

11-10
Each technician performs a minimum of 5 observed procedures to receive certification, with a level of agreement of measurements relative to the supervisor as specified in the QA/QC manual.
Technicians are observed by the clinic coordinator twice monthly for the first month and then quarterly, to ensure standardization. The Supervisor Checklist is used to document these observations and deviations from the protocol are reviewed with the technicians. A minimum of 6 procedures every month is required in order to maintain certification.
12-1
12. COGNITIVE FUNCTION
12.1 Rationale
To identify and characterize dementia and Mild Cognitive Impairment (MCI), an efficient but comprehensive neuropsychological assessment will be administered by trained and certified psychometrists. The battery of cognitive measures are well-validated, standardized instruments that are widely used in clinical and epidemiologic studies of dementia and cognitive function, and include most of the measures recommended in the Uniform Data Set (UDS) implemented in 2005 across all National Institute on Aging-sponsored Alzheimer's Disease Centers.
The neuropsychological battery will assess multiple domains including: memory, language, visuospatial, attention, executive function, premorbid intelligence, olfaction and motor function. Test scores will be compared to age, education, and race-specific normative data to identify those with suspected dementia/MCI. Participants meeting a priori criteria for poor cognitive performance will be invited to Stage II for further evaluation, along with a comparison sample of persons without poor cognitive performance. In order to quantify change in cognitive functioning since the baseline cognitive assessment (1990-92), the 3 cognitive tests (i.e., Delayed Word Recall, Word Fluency, and Digit Symbol Substitution) administered in previous ARIC visits will be repeated. Six tests administered in the ARIC Brain MRI Study are also repeated, allowing quantification of associations between change in specific neurocognitive domains and change in MRI measures since 2004-06 for the subset of the cohort that participated in the ARIC Brain MRI study (i.e., participants in Forsyth County, NC and Jackson, MS).
12.2 Administration - Overview
To avoid the influence of fatigue on the test results, the cognitive battery is administered following the snack. If this is not possible, this battery is administered early in the flow of the examination procedures, but not while the participant is fasting. A trained examiner administers the cognitive function tests in a fixed order, one right after the other, during a single session in a quiet room. The tests are administered following the instructions printed on the Neurocognitive Test Battery Packet and QxQ instructions. Responses are recorded on the paper test packet by the examiner or by the participant and kept in the participant’s folder. Test results are tabulated by the examiner after the participant has completed the tests and left the room. Test results are summarized on the Neurocognitive Summary Score Form and keyed into the Data Management System by the examiner immediately following the testing session so that Stage II selection is determined prior to the end of the Stage I examination.
The order of test administration is as follows: MMSE, WRAT-III, DWRT (exposure), DSST, DWRT (recall), Incidental Learning, FAS, Animal Naming, 5 min. break, Logical Memory I, Digit Span (backwards), Trails A, Trails B, Finger Tapping, Boston Naming Test, Clock Perception, Smell Test, and Logical Memory II.
A brief description, administration, and scoring of each measures are provided below. Administration of the complete battery will require approximately 45 minutes. A list of the test materials and detailed testing procedures are found in the QxQ.
12-2
12.3 Mini-Mental State Examination (MMSE)
12.3.a Rationale
The MMSE was developed as a brief, standardized instrument for screening a limited number of cognitive functions. Since its introduction, the MMSE has been utilized as a screening tool for the detection of cognitive impairment in institutionalized and community-dwelling individuals and as a device for tracking cognitive changes over time.
A number of variations with regard to administration, wording, and content of specific questions on the MMSE exist. The format utilized in this study will include the following modifications:
Consistent with the CERAD battery participants will be requested to spell the word WORLD backwards for the attention and calculation component of the MMSE. As in the procedures utilized by CERAD and the Cardiovascular Health Study, participants will be assisted with spelling WORLD forward if they are unable to do so independently.
As recommended by Tombaugh and McIntyre, participants will be asked to name the county in which they reside, rather than the county in which the examination is taking place. Participants will be examined in different settings (clinic, home, and nursing home) and field centers. Therefore, specific place and floor of the building are modified to: “What is the name of the place where we are right now” and “Are we on the ground floor or a higher floor of this building?”
12.3.b Administration
The MMSE is administered by interview and should be attempted in all participants. A detailed script is provided for each item and task. Each item response is entered into the DMS, which will calculate a total score (range 0-30). In the ARIC Brain MRI study, MMSE scores ranged from 14 - 30 (M = 27). Intersecting pentagons from the MMSE will be used as one of two measures of the visuospatial skill domain and scored as pass/fail.
12.4 Wide Range Achievement Test (WRAT-3)
12.4.a Rationale
The WRAT is a widely used measure of academic achievement and commonly used to provide an estimate of premorbid functioning in adults with neurological conditions. In addition to education level, scores on the WRAT-3 Reading subtest will be taken into account by Dementia/MCI reviewers when interpreting neuropsychological tests results.
12.4.b Administration
Following brief instructions, the participant is handed a test card and asked to read the words on the card aloud. Responses are recorded on the paper form. The test is discontinued following 5 consecutive errors. Scores range from 0 – 70.
12.5 Delayed Word Recall Test (DWRT)
12.5.a Rationale
The DWRT is a measure of verbal memory that requires the participant to recall a list of 10 common nouns following a short delay. The DWRT was previously administered to all ARIC participants at Visits 2 and 4 and to a large subset of the participants at Visit 3 in Forsyth County, NC and Jackson, MS who had cerebral MRI scans. In addition, the DWRT was administered to a large subset of participants in the Carotid and Brain MRI ancillary studies.
12-3
12.5.b Administration
The participant is presented with a stimulus card for each of 10 words. The examiner reads each word aloud, and asks the participant to repeat the word and use it in a sentence. This procedure is repeated, providing two exposures to the words.
Following an approximate 5-minute delay, during which the (non-verbal) DSST is given, the participant is asked to recall as many words as possible.
Scores range from 0 to 10 words recalled. In the ARIC Brain MRI study, the mean delayed recall score was 4.2.
12.6 Digit Symbol Substitution test (DSST)
12.6.a Rationale
The Digit Symbol Substitution Test (DSST) is a measure of psychomotor speed and sustained attention. Like the DWRT, the DSST has been administered in several previous ARIC visits (see DWRT for specific visits). Besides its own value, the DSST also serves as a nonverbal distracter task, interposed between learning and recall for the DWRT above.
12.6.b Administration
The participant is asked to translate numbers (1-9) to symbols using a key provided at the top of the test form. The participant is provided with a pencil (without an eraser). Instructions are provided in a deliberate and slow pace.
One point is given for each correctly drawn symbol completed within the 90-second time limit. Scores range from 0 - 93. In the ARIC Brain MRI study, the mean DSST score was 35.
12.7 Incidental Learning
12.7.a Rationale
The Incidental Learning Test was adapted from the WAIS-R NI and provides a non-verbal measure of recent memory.
12.7.b Administration
Following the DSST, the participant is presented with the Incidental Learning Template. The participant is asked to write down as many of the DSST symbols as he/she can remember, in any order. Next, the participant is asked to write down the number that was paired with each of the symbols from the DSST.
Two scores are yielded: 1) Free Recall: total number of symbols recalled, regardless of pairing and 2) Pairing: number of correct symbols correctly paired with corresponding numbers. Scores for each range from 0-9. In the ARIC Brain MRI study, the means were 6.1 and 3.2, respectively.
12.8 Word Fluency (FAS)
12.8.a Rationale
The Word Fluency Test is a measure of verbal functioning. Like the DWRT, the FAS Test has been administered in several previous ARIC visits (see DWRT for specific visits).
12.8.b Administration
In this task, the participant is ask to produce as many words as possible that begin with the letters F, A, and S within a time limit of 60 seconds for each letter, avoiding proper nouns, variations, plurals, and repetitions.
12-4
The score is the total number of admissible words produced across letters. In the ARIC Brain MRI study, the range was 1 - 77, with a mean of 31 words.
12.9 Animal Naming
12.9.a Rationale
Animal Naming is a measure of category fluency (semantic association). Category fluency, and specifically animal naming, is part of the Boston Diagnostic Aphasia Examination, the Stanford-Binet test, and the CERAD.
12.9.b Administration
The participant is asked name as many different animals as possible within a 60 second time limit.
The score is given as the sum of all admissible names. In the ARIC Brain MRI study, the range was 2 - 33, with a mean of 16.1 names.
12.10 Logical Memory I and II
12.10.a Rationale
This test, part of the Wechsler Memory Scale-Revised version, provides a measure of immediate and delayed verbal recall for the number of ideas presented in two stories which are read to the participant.
12.10.b Administration
Two stories are read to the participant, each at a slow and deliberate pace. After each story is presented, the participant is asked to recall as much of the story as possible. The Logical Memory I score provides a measure of immediate recall and is calculated as the average number of ideas recalled from Story A and B. Each story contains 25 scoring units, the maximum score is 25 (25+25/2).
An approximate 20 minute delay follows, during which the remaining (non-memory) tests are administered. Following the delay period, the participant is again asked to recall the stories. The Logical Memory II score provides a measure of delayed recall and is calculated as the average number of story elements recalled from Story A and B. As each story contains 25 scoring units, the maximum score is 25 (25+25/2).
In the ARIC Brain MRI study, Logical Memory I scores were: range = 0 – 24, M = 10.1 and Logical Memory II were: range = 0 – 24, M = 6.6.
12.11 Digit Span Backwards
12.11.a Rationale
Digit Span Backwards is part of the Wechsler Memory Scale-Revised and provides a measure of attention and working memory.
12.11.b Administration
The participant is read a series of numbers progressively increasing in length from two to eight digits. After the numbers are read, the participant is asked to repeat the numbers in the reverse order. Two trails at each digit length are performed (i.e, 2 trials with 2 digits, 2 trials with 3 digits, etc.). The test is discontinued after two consecutive errors of the same length item.
Scores range from 0 – 12.
12-5
12.12 Trail Making Test (TMT) A & B
12.12.a Rationale
The TMT is a timed task in which participants connect letters and numbers in sequence as quickly as possible. TMT measures attention, sequencing, mental flexibility, and visual search and motor function.
12.12.b Administration
In TMT A, the participant is asked to draw a line and connect a series of numbers (from 1-25) as quickly as possible. In TMT B, the participant is asked to draw a line and connect a series of numbers and letters, alternating between a given number and letter (e.g., 1 to A, A to 2, 2 to B, B to 3, etc) as quickly as possible. Prior to each test part, the participant is given a sample test to demonstrate the task.
The score for TMT A and B is the number of seconds required to complete the task. A maximum of 240 seconds (4 minutes) and 5 errors is allowed. In the ARIC Brain MRI study, TMT A scores were: range = 16 – 240, M = 62.1 and TMT B were: range = 34 - 240, M = 150.5.
12.13 Finger Tapping
12.13.a Rationale
This test assesses motor speed of the index finger of each hand. A specially adapted “tapper” from Reitan Neuropsychology Laboratory will be used.
12.13.b Administration
The participant is asked to place the preferred or dominant hand palm down with fingers extended and the index finger placed on the key. The participant is asked to tap as quickly as he/she can, moving only the index finger. Two, 10-second, trials are performed with each hand.
The total number of taps performed for each trial is recorded. A total score for each hand is calculated. In the ARIC Brain MRI study, the number of taps for the dominant hand was: range = 3 – 69, M = 40.
12.14 Boston Naming Test (BNT)
12.14.a Rationale
The BNT assess visual naming ability using black-and-white drawings of common objects. For this study, the 30-item version used by the National Alzheimer's Coordinating Centers Uniform Data Set will be used.
12.14.b Administration
The participant is presented with a series of line drawings of objects and asked to name each object. The items become progressive more difficult based on their frequency of occurrence in the English language.
A total score is calculated as the number of spontaneously produced correct responses. Scores may range from 0 – 30.
12.15 Clock Perception Test
12.15.a Rationale
The clock perception test provides a measure of visuospatial cognition.
12-6
12.15.b Administration
The participant is presented with a series of 12 clock faces each set to a different time. The participant is asked to tell the time on each clock.
One point is given for each correct response. A total score is calculated as the number of correct responses (range 0 -12). Failure on 3 or more clocks will be considered as failure (at -1.5 SD) on the visuospatial skill domain.
12.16 Smell Test
12.16.a Rationale
Smell lose is prevalent among patients with Alzheimer’s and Parkinson’s disease and may be an early marker of neurodegenerative change. Olfactory function will be assessed using the Brief Smell Identification Test.
12.16.b Administration
The participant is presented with 12 different pens containing odors which they are asked to identify in a multiple choice format.
A total score for number of odors correctly identified is calculated. Scores range from 0 – 12.
12.17 Center for Epidemiologic Studies Depression Scale (CESD) Short Form & Hopelessness
12.17.a Rationale
Depressive symptoms have been linked to a number of important health outcomes including cardiovascular disease risk factors, CHD morbidity and mortality, cognitive functioning, and MCI/dementia. In ARIC V5/NCS, depressive symptoms will be assessed using the Center for Epidemiologic Studies Depression Scale (CES-D) Short Form (Kohout et. al, 1993). The CES-D Short Form is an 11-item questionnaire derived from the original 20-item CES-D (Radloff, 1977). In addition to a reduced administration time and clearer response options (relative to the 20-item version), the Short Form is highly correlated with the original (r > .94), has a high internal consistency, retains the same factor structure as the original, and has a similar positive predictive value as a screening tool for identifying clinical depression. A related construct, hopelessness, has been independently associated with increased risk of incident MI, cancer, and all-cause mortality (Everson et. al, 1996). One item assessing hopelessness will be collected.
12.17.b Administration
It takes approximately 3 minutes to complete this questionnaire. The questionnaire is administered by interview. The participant is provided with a response card listing the 3 response options. As a scale for depression, responses must be provided by the participant, not a proxy. Because of the sensitive nature of some of the questions, interviewers must take care to ask questions and record responses in a sensitive and non-judgmental manner. Most of the questions are self-explanatory; however, if the respondent is unclear, the interviewer will repeat the question and use general phrases, such as: “Answer as best you can, based on how you have felt over the past week.” Interviewers should not lead participants to an answer but remaining neutral.
12-7
12.17.c Scoring
Participants are asked to rate each item on a 3-point scale (scored 0 to 2) on the basis of “how often you have felt this way during the past week.” Response categories are: - Hardly ever or never (scored as 0) - Some of the time (scored as 1) - Much or most of the time of (scored as 3) The DMS will compute a total score, calculated as the sum of the responses to questions 1-11. To control for response bias, questions # 5 and 8 are reverse scored. Scores range from 0 to 22 with higher scores indicating more severe depressive symptoms. If more than three items are missing, a score is not calculated. If one to three items are missing, scores on the completed items are summed; the total is divided by the number of items answered and multiplied by 11. Hopelessness is simply the corresponding score to question #12.
12.17.d Training and Certification
Interviewers are centrally trained. Study coordinators are responsible for training new staff if necessary after central training based on standardized interviewing techniques, QxQ instructions, and role playing example situations.
12.17.e Quality Assurance
Data quality is monitored by the Quality Control Committee, based on analyses prepared by the coordinating center. In cases where score patterns suggest suboptimal data quality, the study coordinator will be notified and technical assistance and remedial action provided. In addition, interviews will be audio-taped and regularly reviewed for adherence to protocol. 12.17.f Alert Guidelines and Notification of Participants and Physicians Regarding Depression Scores The CES-D is not a diagnostic tool but may be used as a screening test to identify individuals at risk for clinical depression. In elderly participants, especially those with multiple comorbidities, some positive responses are expected. A CES-D score ≥ 9 suggests probable Major Depression. Participants with scores in this range will be notified as well as their primary care physician by letter, indicating the presence of significant depressive symptoms on a common screening test and recommending a follow-up clinical assessment to evaluate for clinical depression and possible treatment. The alert letter should be mailed within 2 to 6 weeks of receiving the CES-D results. Instructions if Participants Report Depressive Symptoms Beyond Those Addressed in the Questionnaire (Off-the-Record) or Report Suicidal Thoughts During administration of screening tools such as the CESD, it is not uncommon for participants to reveal additional symptoms of depression. Participants who acknowledge significant depression should be advised to see their physician (psychiatrist or psychologist if they have one) within 48 hours so that an appropriate referral can be made. Participants who acknowledge suicidal thoughts to interviewers should be referred immediately to the emergency room of the nearest hospital. If a participant refuses to go to the emergency room, he/she should be strongly encouraged to seek care as soon as possible. The interviewer should be aware however that no participant can be made to seek care against his/her will.

12-8
12.18 Refusals and Discontinued Tests
There are some occasions when a test will not be performed or will be discontinued. The reasons may include participant refusal, task difficulty, or if the examiner determines that the participant is unable to perform a test due to a physical impairment. These are described in detail in the QxQ.
12.19 Training and Certification
Prior to the examination, examiners will be trained centrally to a common level of proficiency in the administration and scoring of the neurocognitive measures. Following central training, examiners will obtain approval from the field center lead examiner or study coordinator and submit 3 audio-taped neurocognitive assessments along with copies of the associated paper protocols to the Dr. Mosley at the University of Mississippi Medical Center for review. Certification assessments should not be performed on ARIC participants. Examiner certification for the neurocognitive battery exam is achieved by the successful administration and scoring of the 3 certification assessments reviewed and approved by a designated investigator on the Neurocognitive Committee.
The field center lead examiner or study coordinator is responsible for the basic training of all new field center examiners. Following basic training and approval by the field center study coordinator, new examiners will submit 3 audio-taped neurocognitive assessments for review and approval.
Maintaining proficiency in the administration of the neurocognitive measures requires regular exposure to the protocol. In order to maintain certification, examiners will administer the neurocognitive measures at least once per month.
Recertification will be performed annually and requires the successful administration and scoring of one audio-taped neurocognitive examination reviewed and approved by a designated investigator on the Neurocognitive Committee. An actual participant assessment may be submitted for recertification purposes.
12.20 Quality Assurance
Several procedures are in place to monitor data quality. With participant approval, all assessments are routinely audio-taped for quality control. During the first six months of the study, 2 audio-taped exams and associated paper protocols for each examiner will be review by the Neurocognitive Committee to ensure appropriate pacing and technique, adherence to protocol, and accuracy of recorded responses and scoring. Notes about any inconsistencies and deviations from the established protocol will be sent to the field center lead examiner or study coordinator. After the initial 6 month period, one audio-taped exam and associated paper protocol for each examiner will be reviewed for accuracy and adherence to protocol by the Neurocognitive Committee.
General feedback pertaining to all examiners is provided on monthly conference calls involving field center study coordinators. These calls also provide an opportunity to discuss and problem-solve any exam issues that arise.
A designate of the Neurocognitive Committee will also conduct an annual site visit to the field centers to observe examiner performance and ensure an optimal testing environment.
Test score means and standard deviations are regularly tracked and reported for each examiner by the Data Coordinating Center allowing detection of outliers and investigation of possible systematic differences by examiner.
13-1
13. SITTING BLOOD PRESSURE
13.1 Introduction, Equipment and Supplies
Accurate blood pressure measurements are critical for the estimation of the prevalence of high blood pressure and for tracking the incidence of hypertension. For many years the “gold standard” blood pressure measuring device has been the mercury sphygmomanometer. However, because of the increase in awareness of the serious adverse health effects of mercury contamination in the environment, more and more institutions, including the National Institutes of Health, have banned or discouraged the continued use of mercury sphygmomanometers and thermometers. Further, the Environmental Protection Agency (EPA) and the American Hospital Association (AHA) took steps to eliminate mercury-containing waste by 2005. For these reasons, increasing numbers of institutions and clinics have switched to alternate sphygmomanometers such as aneroid or automated devices that do not contain mercury. Furthermore, it is important that ARIC measurements be directly to other national studies such as the NHANES. In line with these developments and for the best repeatability of measurements, a tested, automatic sphygmomanometer (the OMRON HEM-907 XL) is used in ARIC. This model has been validated in other studies, including CARDIA and NHANES, and more recently ARIC.
Field center technicians are responsible for verifying that all equipment and supplies are in the examination room, at all times.
Equipment
OMRON HEM -907XL sphygmomanometer
4 cuffs
Gulick II tape measure
Foot stool
Room Thermometer
Supplies
Wipes
Alcohol
Tissues
Water soluble ink pens
Gauze (4 x 4)
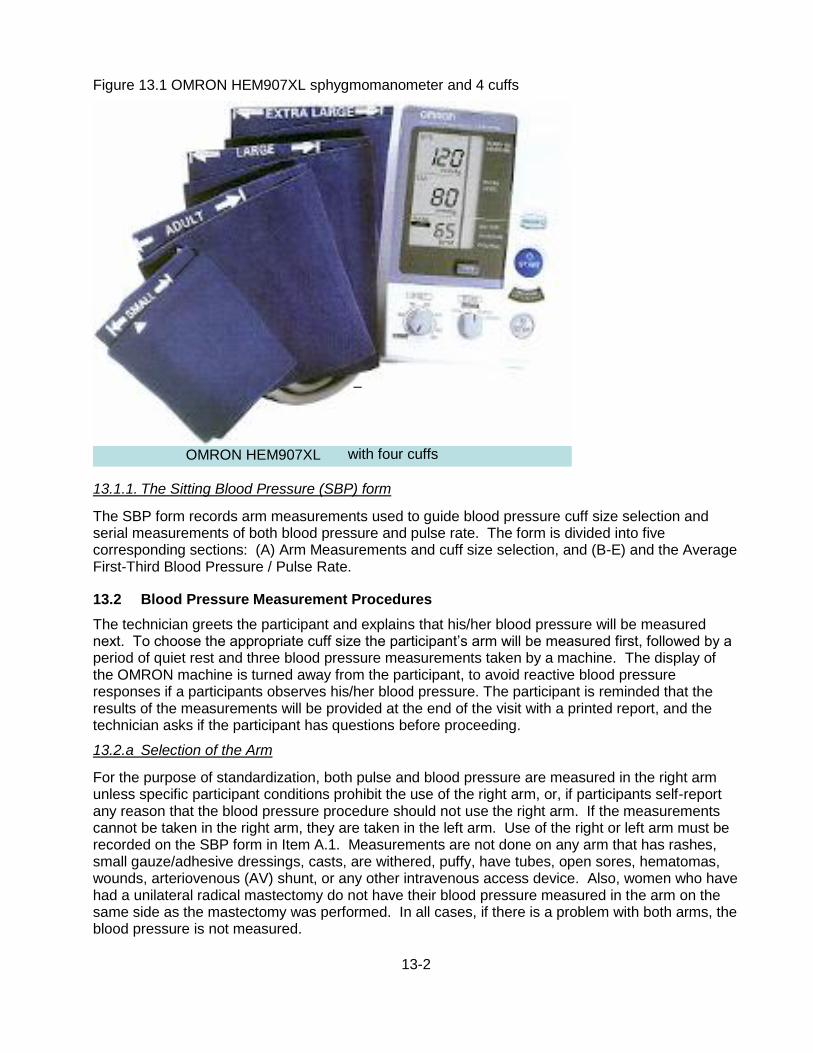
13-2
Figure 13.1 OMRON HEM907XL sphygmomanometer and 4 cuffs
13.1.1. The Sitting Blood Pressure (SBP) form
The SBP form records arm measurements used to guide blood pressure cuff size selection and serial measurements of both blood pressure and pulse rate. The form is divided into five corresponding sections: (A) Arm Measurements and cuff size selection, and (B-E) and the Average First-Third Blood Pressure / Pulse Rate.
13.2 Blood Pressure Measurement Procedures
The technician greets the participant and explains that his/her blood pressure will be measured next. To choose the appropriate cuff size the participant’s arm will be measured first, followed by a period of quiet rest and three blood pressure measurements taken by a machine. The display of the OMRON machine is turned away from the participant, to avoid reactive blood pressure responses if a participants observes his/her blood pressure. The participant is reminded that the results of the measurements will be provided at the end of the visit with a printed report, and the technician asks if the participant has questions before proceeding.
13.2.a Selection of the Arm
For the purpose of standardization, both pulse and blood pressure are measured in the right arm unless specific participant conditions prohibit the use of the right arm, or, if participants self-report any reason that the blood pressure procedure should not use the right arm. If the measurements cannot be taken in the right arm, they are taken in the left arm. Use of the right or left arm must be recorded on the SBP form in Item A.1. Measurements are not done on any arm that has rashes, small gauze/adhesive dressings, casts, are withered, puffy, have tubes, open sores, hematomas, wounds, arteriovenous (AV) shunt, or any other intravenous access device. Also, women who have had a unilateral radical mastectomy do not have their blood pressure measured in the arm on the same side as the mastectomy was performed. In all cases, if there is a problem with both arms, the blood pressure is not measured.
OMRON HEM907XL
–
with four cuffs
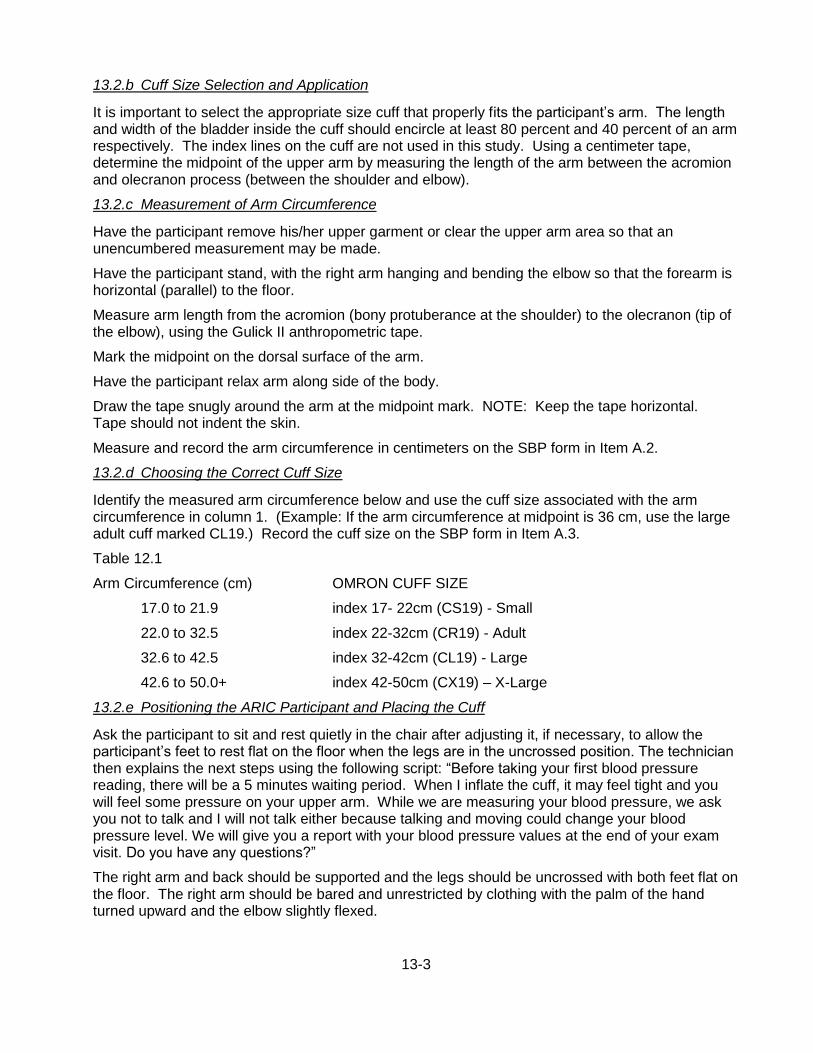
13-3
13.2.b Cuff Size Selection and Application
It is important to select the appropriate size cuff that properly fits the participant’s arm. The length and width of the bladder inside the cuff should encircle at least 80 percent and 40 percent of an arm respectively. The index lines on the cuff are not used in this study. Using a centimeter tape, determine the midpoint of the upper arm by measuring the length of the arm between the acromion and olecranon process (between the shoulder and elbow).
13.2.c Measurement of Arm Circumference
Have the participant remove his/her upper garment or clear the upper arm area so that an unencumbered measurement may be made.
Have the participant stand, with the right arm hanging and bending the elbow so that the forearm is horizontal (parallel) to the floor.
Measure arm length from the acromion (bony protuberance at the shoulder) to the olecranon (tip of the elbow), using the Gulick II anthropometric tape.
Mark the midpoint on the dorsal surface of the arm.
Have the participant relax arm along side of the body.
Draw the tape snugly around the arm at the midpoint mark. NOTE: Keep the tape horizontal. Tape should not indent the skin.
Measure and record the arm circumference in centimeters on the SBP form in Item A.2.
13.2.d Choosing the Correct Cuff Size
Identify the measured arm circumference below and use the cuff size associated with the arm circumference in column 1. (Example: If the arm circumference at midpoint is 36 cm, use the large adult cuff marked CL19.) Record the cuff size on the SBP form in Item A.3.
Table 12.1
Arm Circumference (cm) OMRON CUFF SIZE
17.0 to 21.9 index 17- 22cm (CS19) - Small
22.0 to 32.5 index 22-32cm (CR19) - Adult
32.6 to 42.5 index 32-42cm (CL19) - Large
42.6 to 50.0+ index 42-50cm (CX19) – X-Large
13.2.e Positioning the ARIC Participant and Placing the Cuff
Ask the participant to sit and rest quietly in the chair after adjusting it, if necessary, to allow the participant’s feet to rest flat on the floor when the legs are in the uncrossed position. The technician then explains the next steps using the following script: “Before taking your first blood pressure reading, there will be a 5 minutes waiting period. When I inflate the cuff, it may feel tight and you will feel some pressure on your upper arm. While we are measuring your blood pressure, we ask you not to talk and I will not talk either because talking and moving could change your blood pressure level. We will give you a report with your blood pressure values at the end of your exam visit. Do you have any questions?”
The right arm and back should be supported and the legs should be uncrossed with both feet flat on the floor. The right arm should be bared and unrestricted by clothing with the palm of the hand turned upward and the elbow slightly flexed.
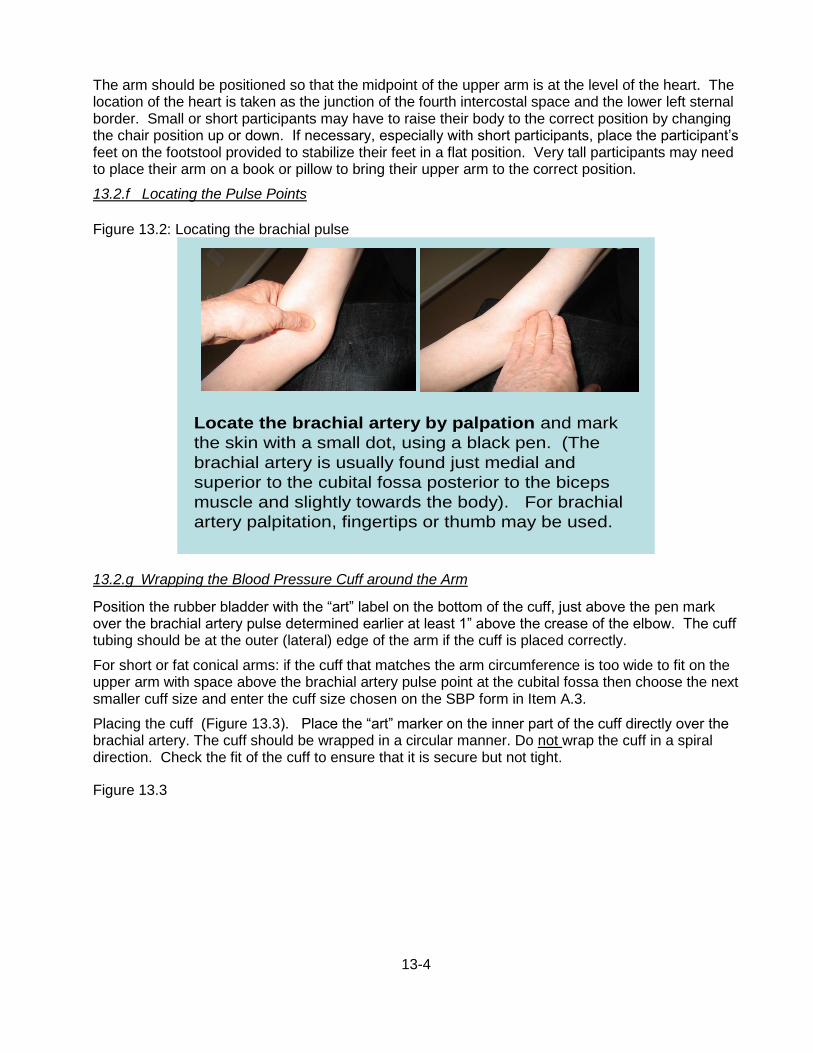
13-4
The arm should be positioned so that the midpoint of the upper arm is at the level of the heart. The location of the heart is taken as the junction of the fourth intercostal space and the lower left sternal border. Small or short participants may have to raise their body to the correct position by changing the chair position up or down. If necessary, especially with short participants, place the participant’s feet on the footstool provided to stabilize their feet in a flat position. Very tall participants may need to place their arm on a book or pillow to bring their upper arm to the correct position.
13.2.f Locating the Pulse Points
Figure 13.2: Locating the brachial pulse
13.2.g Wrapping the Blood Pressure Cuff around the Arm
Position the rubber bladder with the “art” label on the bottom of the cuff, just above the pen mark over the brachial artery pulse determined earlier at least 1” above the crease of the elbow. The cuff tubing should be at the outer (lateral) edge of the arm if the cuff is placed correctly.
For short or fat conical arms: if the cuff that matches the arm circumference is too wide to fit on the upper arm with space above the brachial artery pulse point at the cubital fossa then choose the next smaller cuff size and enter the cuff size chosen on the SBP form in Item A.3.
Placing the cuff (Figure 13.3). Place the “art” marker on the inner part of the cuff directly over the brachial artery. The cuff should be wrapped in a circular manner. Do not wrap the cuff in a spiral direction. Check the fit of the cuff to ensure that it is secure but not tight.
Figure 13.3
Locate the brachial artery by palpation and mark
the skin with a small dot, using a black pen. (The
brachial artery is usually found just medial and
superior to the cubital fossa posterior to the biceps
muscle and slightly towards the body). For brachial
artery palpitation, fingertips or thumb may be used.

13-5
13.3 Procedure for the OMRON HEM-907XL
This protocol is written for use with the OMRON HEM-907XL automated blood pressure monitor. Special attention must be placed on assessment and maintenance of the instrument’s accuracy as per the manual that accompanies the instrument. The design and operation of the OMRON HEM-907XL are based upon the combined principles of compression of the brachial artery under an elastic, inflatable cuff and estimation of the systolic and diastolic blood pressure levels by detection of oscillometric waves.
13.3.a Setting up the OMRON
At a start of each session check that the monitor is attached to the AC adapter to the DC jack and plugged in (Figure 13.4) and AC sign (Figure 13.5) is visible in the lower window.
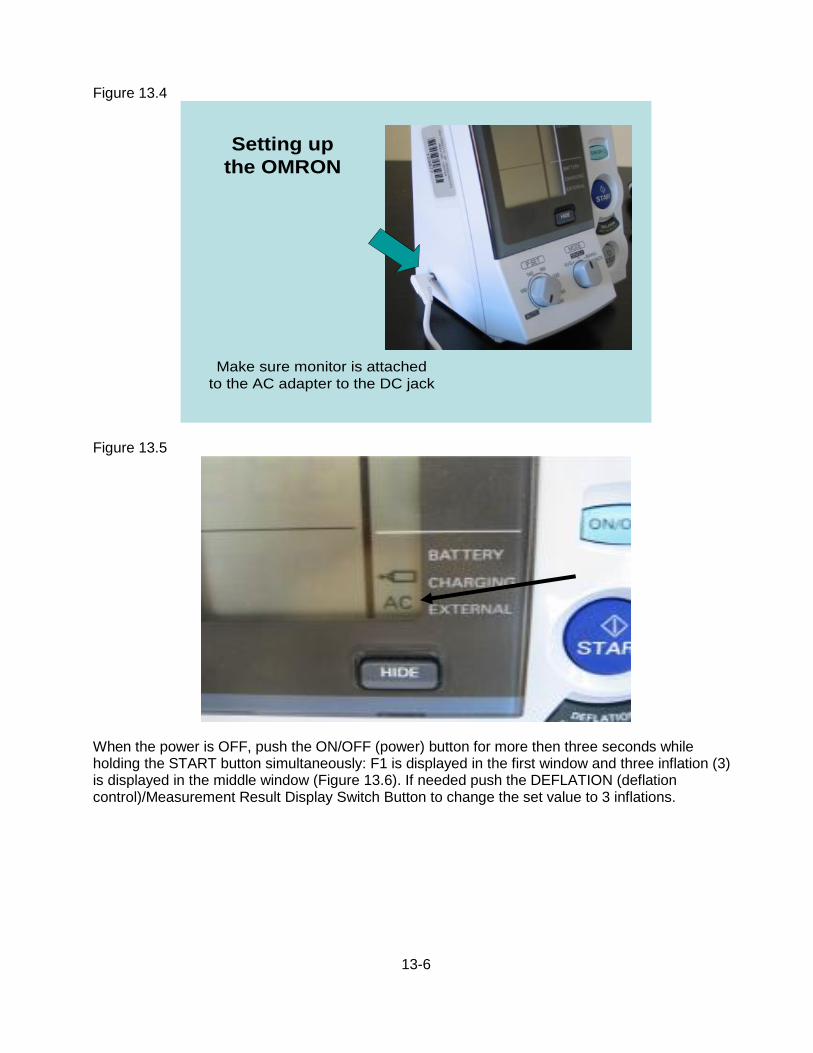
13-6
Figure 13.4
Figure 13.5
When the power is OFF, push the ON/OFF (power) button for more then three seconds while holding the START button simultaneously: F1 is displayed in the first window and three inflation (3) is displayed in the middle window (Figure 13.6). If needed push the DEFLATION (deflation control)/Measurement Result Display Switch Button to change the set value to 3 inflations.
Make sure monitor is attached
to the AC adapter to the DC jack
Setting up
the OMRON
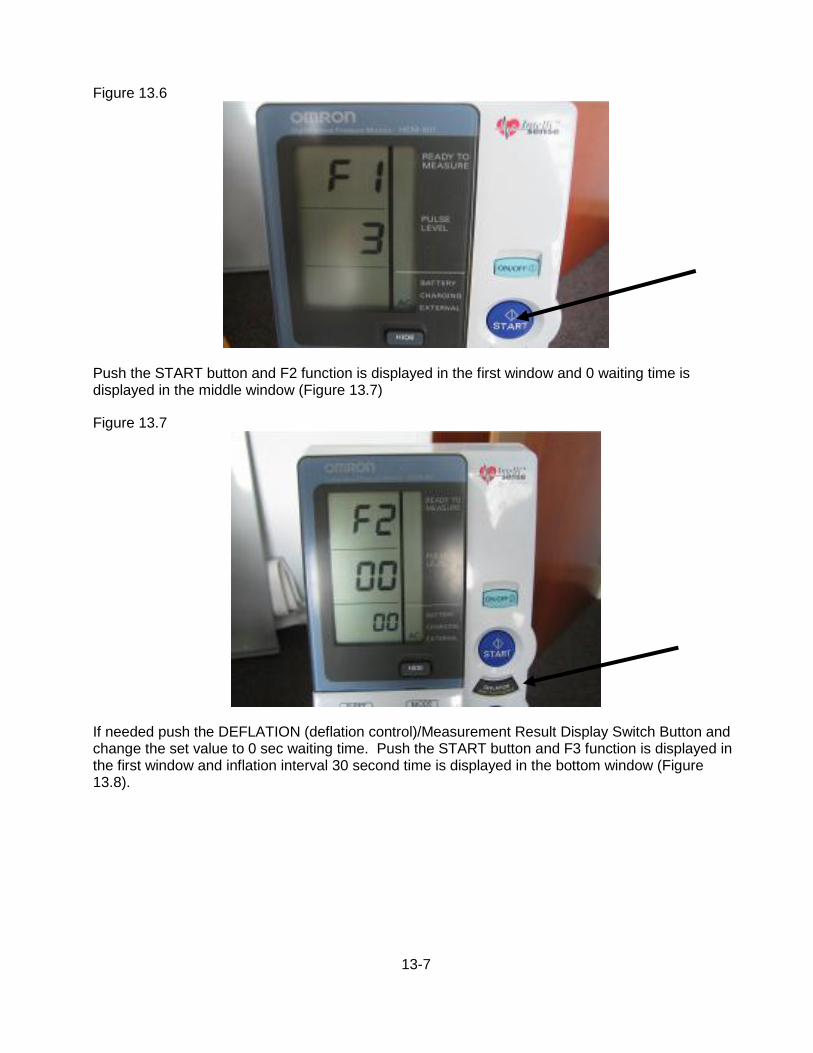
13-7
Figure 13.6
Push the START button and F2 function is displayed in the first window and 0 waiting time is displayed in the middle window (Figure 13.7)
Figure 13.7
If needed push the DEFLATION (deflation control)/Measurement Result Display Switch Button and change the set value to 0 sec waiting time. Push the START button and F3 function is displayed in the first window and inflation interval 30 second time is displayed in the bottom window (Figure 13.8).

13-8
Figure 13.8
If needed push the DEFLATION (deflation control)/Measurement Result Display Switch Button and change the set value to 30 sec measurement interval.
Table 12.2 summarizes the needed settings for the exam
Function # Items to set Set value
F1 Number of inflations 3 times
F2 Waiting time to start the first inflation 0 sec
F3 Inflation interval 30 sec
13.3.b Measuring the Blood Pressure
Once these settings are validated the exam can start. Turn off the OMRON by pushing the ON/OFF button. To measure blood pressure in average mode, push the ON/OFF button to turn on the power. Set the MODE selection to AVG, set the P-SET (inflation level) knob to AUTO (Figure 13.9).
Figure 19.9
AUTO AVG
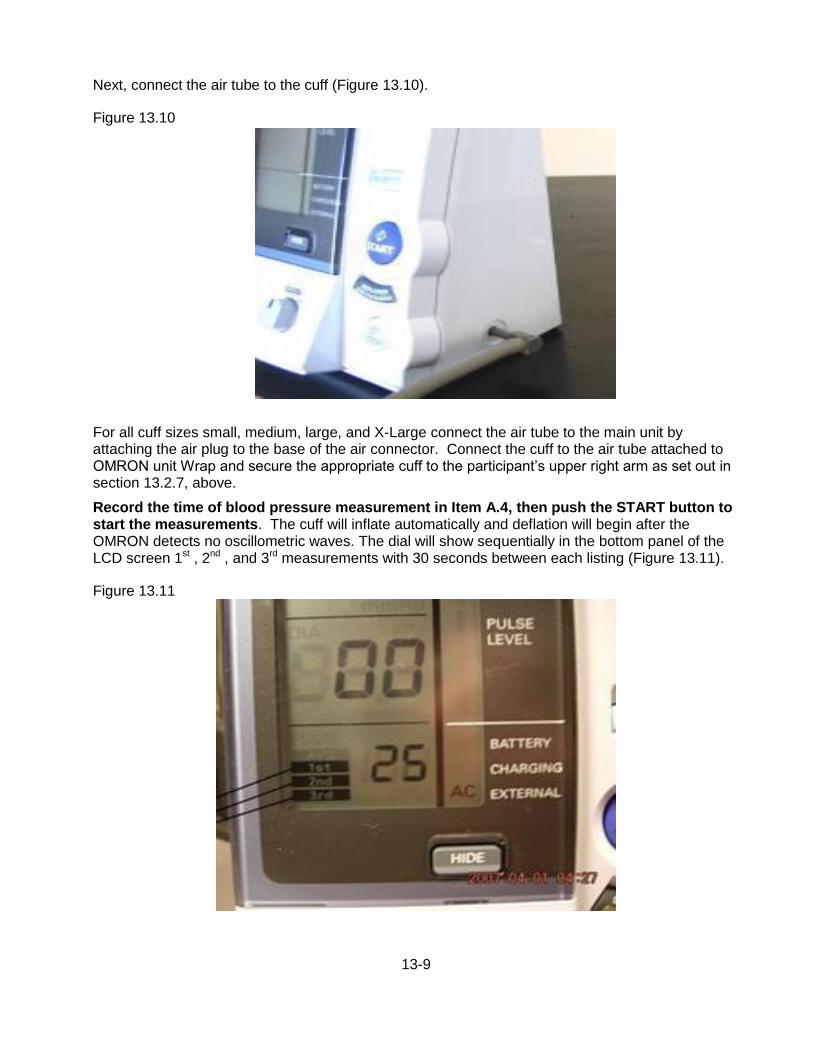
13-9
Next, connect the air tube to the cuff (Figure 13.10).
Figure 13.10
For all cuff sizes small, medium, large, and X-Large connect the air tube to the main unit by attaching the air plug to the base of the air connector. Connect the cuff to the air tube attached to OMRON unit Wrap and secure the appropriate cuff to the participant’s upper right arm as set out in section 13.2.7, above.
Record the time of blood pressure measurement in Item A.4, then push the START button to start the measurements. The cuff will inflate automatically and deflation will begin after the OMRON detects no oscillometric waves. The dial will show sequentially in the bottom panel of the LCD screen 1st , 2nd , and 3rd measurements with 30 seconds between each listing (Figure 13.11).
Figure 13.11
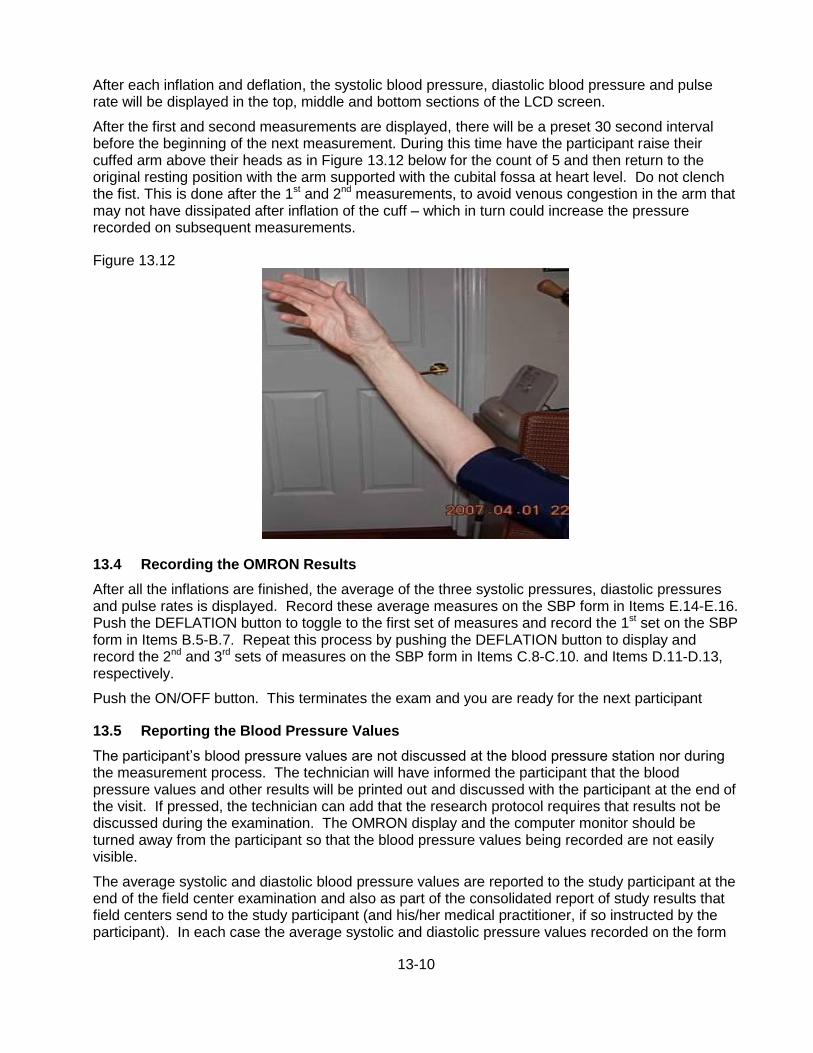
13-10
After each inflation and deflation, the systolic blood pressure, diastolic blood pressure and pulse rate will be displayed in the top, middle and bottom sections of the LCD screen.
After the first and second measurements are displayed, there will be a preset 30 second interval before the beginning of the next measurement. During this time have the participant raise their cuffed arm above their heads as in Figure 13.12 below for the count of 5 and then return to the original resting position with the arm supported with the cubital fossa at heart level. Do not clench the fist. This is done after the 1st and 2nd measurements, to avoid venous congestion in the arm that may not have dissipated after inflation of the cuff – which in turn could increase the pressure recorded on subsequent measurements.
Figure 13.12
13.4 Recording the OMRON Results
After all the inflations are finished, the average of the three systolic pressures, diastolic pressures and pulse rates is displayed. Record these average measures on the SBP form in Items E.14-E.16. Push the DEFLATION button to toggle to the first set of measures and record the 1st set on the SBP form in Items B.5-B.7. Repeat this process by pushing the DEFLATION button to display and record the 2nd and 3rd sets of measures on the SBP form in Items C.8-C.10. and Items D.11-D.13, respectively.
Push the ON/OFF button. This terminates the exam and you are ready for the next participant
13.5 Reporting the Blood Pressure Values
The participant’s blood pressure values are not discussed at the blood pressure station nor during the measurement process. The technician will have informed the participant that the blood pressure values and other results will be printed out and discussed with the participant at the end of the visit. If pressed, the technician can add that the research protocol requires that results not be discussed during the examination. The OMRON display and the computer monitor should be turned away from the participant so that the blood pressure values being recorded are not easily visible.
The average systolic and diastolic blood pressure values are reported to the study participant at the end of the field center examination and also as part of the consolidated report of study results that field centers send to the study participant (and his/her medical practitioner, if so instructed by the participant). In each case the average systolic and diastolic pressure values recorded on the form
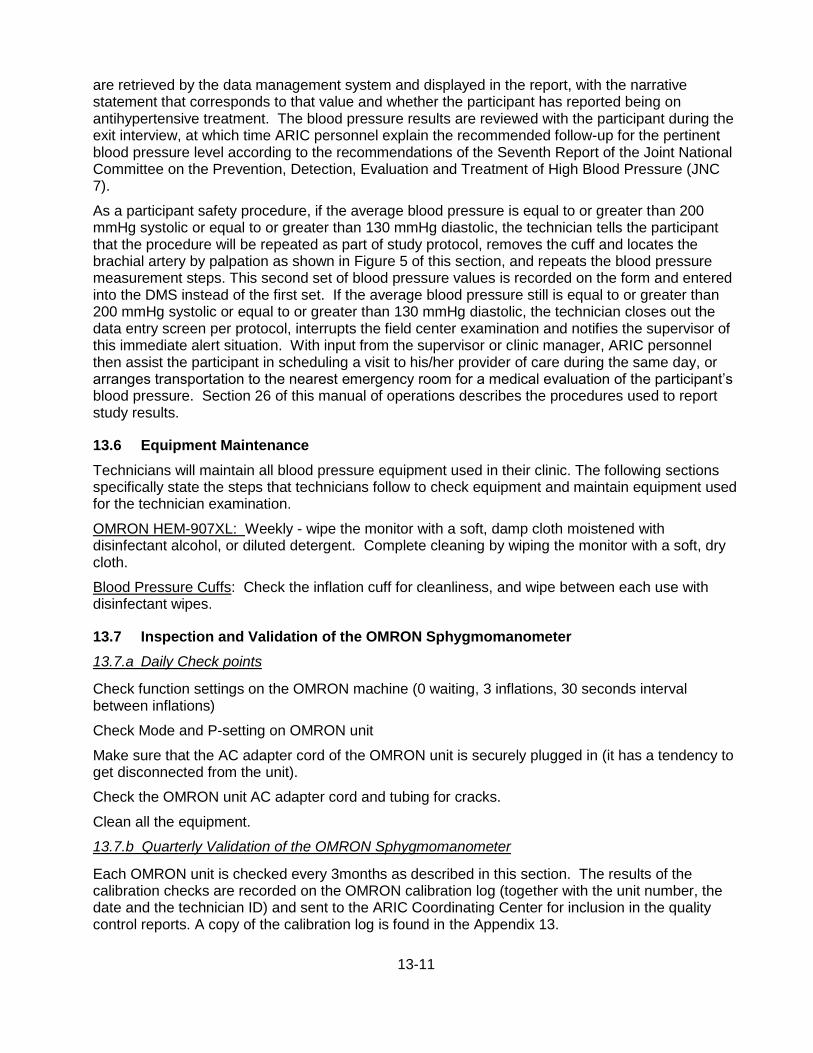
13-11
are retrieved by the data management system and displayed in the report, with the narrative statement that corresponds to that value and whether the participant has reported being on antihypertensive treatment. The blood pressure results are reviewed with the participant during the exit interview, at which time ARIC personnel explain the recommended follow-up for the pertinent blood pressure level according to the recommendations of the Seventh Report of the Joint National Committee on the Prevention, Detection, Evaluation and Treatment of High Blood Pressure (JNC 7).
As a participant safety procedure, if the average blood pressure is equal to or greater than 200 mmHg systolic or equal to or greater than 130 mmHg diastolic, the technician tells the participant that the procedure will be repeated as part of study protocol, removes the cuff and locates the brachial artery by palpation as shown in Figure 5 of this section, and repeats the blood pressure measurement steps. This second set of blood pressure values is recorded on the form and entered into the DMS instead of the first set. If the average blood pressure still is equal to or greater than 200 mmHg systolic or equal to or greater than 130 mmHg diastolic, the technician closes out the data entry screen per protocol, interrupts the field center examination and notifies the supervisor of this immediate alert situation. With input from the supervisor or clinic manager, ARIC personnel then assist the participant in scheduling a visit to his/her provider of care during the same day, or arranges transportation to the nearest emergency room for a medical evaluation of the participant’s blood pressure. Section 26 of this manual of operations describes the procedures used to report study results.
13.6 Equipment Maintenance
Technicians will maintain all blood pressure equipment used in their clinic. The following sections specifically state the steps that technicians follow to check equipment and maintain equipment used for the technician examination.
OMRON HEM-907XL: Weekly - wipe the monitor with a soft, damp cloth moistened with disinfectant alcohol, or diluted detergent. Complete cleaning by wiping the monitor with a soft, dry cloth.
Blood Pressure Cuffs: Check the inflation cuff for cleanliness, and wipe between each use with disinfectant wipes.
13.7 Inspection and Validation of the OMRON Sphygmomanometer
13.7.a Daily Check points
Check function settings on the OMRON machine (0 waiting, 3 inflations, 30 seconds interval between inflations)
Check Mode and P-setting on OMRON unit
Make sure that the AC adapter cord of the OMRON unit is securely plugged in (it has a tendency to get disconnected from the unit).
Check the OMRON unit AC adapter cord and tubing for cracks.
Clean all the equipment.
13.7.b Quarterly Validation of the OMRON Sphygmomanometer
Each OMRON unit is checked every 3months as described in this section. The results of the calibration checks are recorded on the OMRON calibration log (together with the unit number, the date and the technician ID) and sent to the ARIC Coordinating Center for inclusion in the quality control reports. A copy of the calibration log is found in the Appendix 13.

13-12
Equipment Required for Accuracy Check
The calibration equipment is the Pressure-Vacuum Meter (Shown in Figure 13.13). Netech DigiMano Digital Pressure/ Vacuum Meter model 2000 for a range of 0 to 300 mmHg). The following adaptors are used and are kept at the field center: Y tubing – with 2 arms and an inflation bulb attached to the middle arm of the Y tubing; Y- adapter with appropriate male/female connectors; Adaptors for tubing connection; OMRON cuff with short tubing attached. If indicated by the ARIC/NCS Quality Control Committee, once per year each DigiMano device is shipped to the manufacturer for calibration. Completion of this check by Netech is then reported to the Quality Control Committee.
Figure 13.13
OMRON Accuracy Testing protocol
The following sequence of steps detail the OMRON accuracy testing protocol.
1. Inspect the OMRON sphygmomanometer for signs of damage to the case, and wall mount bracket if applicable.
Inspect the tubing for holes or cracks, which would allow air to leak out. Cracking is commonly found around the connection points to the sphygmomanometer, and cuff. If cracking is seen the tubing is replaced from that point by trimming the damaged area with scissors and reconnecting the tubing. In extreme cases, the entire tubing is replaced.
Inspect the cuff(s) for signs of wear and tear to the outer cloth casing and Velcro fabric. Also, inflate the unit (with the cuff connected to the OMRON and wrapped around a rigid cylinder and the OMRON MODE knob set on CHECK) enough to determine if the bladder within the cuff is leak- proof. If leaks or damage are noted to the cuff or bladder, it should be replaced.
Disconnect the cuff from the long adaptor tubing that stays connected to the OMRON sphygmomanometer.

13-13
Connect one upper arm of the Y adaptor to the short tubing from the cuff and attach the other upper arm to the long tubing attached to the OMRON.
Connect the bottom arm of the Y adapter to one arm of the Y tubing..
Connect other end of the Y tubing to the pressure-vacuum meter.
Turn the pressure-vacuum meter on. Use the accompanying AC adapter if necessary.
Following manufacturer's instructions, select "mm Hg" as the type of unit to be tested.
Zero the pressure-vacuum meter per manufacturer's instruction.
Pump up the aneroid unit to 280 mm Hg. Release the pressure slowly and observe the changing OMRON LED mm Hg for a smooth descent along the range to 20 mm Hg
Again, pump the aneroid unit to above 250 mm Hg (but less than 300 mmHg) using the bulb and tighten the valve as tightly as possible
Check to see if the aneroid unit is within + 3 mm Hg of the readout on the pressure-vacuum meter.
Continue to compare the readout of the OMRON unit to the pressure-vacuum meter approximately every 20 mm Hg along the entire range – down to 30mm Hg. Variations greater than + 3 mm Hg requires the OMRON unit be removed from service and repaired or replaced.
15. Record the results of the calibration checks on the OMRON calibration log (together with the unit number, the date and the technician ID) and send the log to the ARIC Coordinating Center. A copy of the calibration log is found in Appendix 13.
13.8 Glossary and References
Systolic blood pressure is defined as the highest arterial blood pressure of a cardiac cycle occurring immediately after contraction of the left ventricle of the heart.
Diastolic blood pressure is the lowest arterial blood pressure of a cardiac cycle occurring during the passive rhythmical expansion or dilation of the cavities of the heart during which they fill with blood.
Auscultatory method detects sounds of pulsatile blood flow in the artery using a stethoscope held over the artery just below an inflated blood pressure cuff. As the blood pressure cuff gradually deflated, pulsatile blood flow is re-established and accompanied by sounds that can be detected by the stethoscope. The pulsatile sound corresponds to a reading of a mercury column (mercury sphygmomanometer) or a dial (aneroid) device connected to the blood pressure cuff.
Oscillometric method uses a transducer to measure the oscillations of pressure in the blood pressure cuff corresponding to the pulsatile blood flow in the artery under the cuff. The oscillometric method is used by all automated blood pressure machine.

14-1
14. ECHOCARDIOGRAPHY
ARIC/NCS field center examinations include an assessment of cardiac structure and function using echocardiography (cardiac ultrasound). Heart failure (HF) is a progressive disorder afflicting 5 million Americans, with 550,000 patients diagnosed annually, and is responsible for 53,000 deaths annually. HF is predominantly a disease of the elderly, with over 80% of HF hospitalizations occurring in persons over 65 years of age. Abnormalities of left ventricular contraction, relaxation, and valvular function contribute to the development of HF. A better understanding of the differences in cardiac structure and function through the spectrum of HF stages (at risk, asymptomatic ventricular remodeling, symptomatic HF) will deepen our understanding of the pathophysiology driving HF progression.
Echocardiograms are performed by trained and certified sonographers during the ARIC/NCS examination and analyzed according to a common protocol at the Echocardiography Reading Center. The scanning and reading procedures, as well as the training and certification of the sonographers and readers are detailed in ARIC Protocol Manual 15.
Because many echocardiography measurements are load dependent, a blood pressure needs to be recorded in close proximity to every cardiac echo exam. There are several ways to accomplish this. The preferred option is to schedule the seated BP measurement (taken according to the ARIC protocol) immediately prior to, or as close as possible to the cardiac echo exam. The blood pressure form (SBP) is completed in the DMS, and the clock time and the average SBP and DBP is recorded on the participant’s itinerary sheet, for use by the echo technician.
If the time elapsed between the seated blood pressure measurement and the echo exam is greater than 30 minutes, the echo technician takes a (single) blood pressure measurement, at the end of the echo examination to allow maximum time in the supine position. For this purpose an Omron BP device is kept in the echo room at all times, pre-set to take a single measurement, and the echo technicians are trained on the use of this Omron device.
15-1
15. PHYSICAL FUNCTION
This abbreviated objective measure of physical function is based on previous epidemiologic studies of aging that incorporated physical function assessments, such as the Established Populations for Epidemiologic Studies of the Elderly (EPESE), Framingham Heart Study, the Cardiovascular Health Study, Women’s Health and Aging Study, Health ABC, and the Baltimore Longitudinal Study of Aging. The battery described below includes the Short Physical Performance Battery which consists of chair stands, a regular paced 4 meter walk, balance tests, and grip strength. Prior to training for the “Physical Function” Exam form, all examiners should review the QxQ and complete the online training module for the National Institute on Aging Short Physical Performance Battery (SPPB) at http://www.grc.nia.nih.gov/branches/ledb/sppb/index.htm. Note that the video does not include training on grip strength. This video should be reviewed prior to initial training session and every 6 months. Details on downloading the video can be found at this website by clicking “Instructions” - pdf. “CD (Download and Execute) – (exe)” contains the video material to be downloaded.
15.1 Short Physical Performance Battery (SPPB)
A direct assessment of physical performance has become standard practice in epidemiologic observational studies of health and disease. The most commonly used assessments, such as the Short Physical Performance Battery (SPPB), were initially designed to differentiate function in older adults. The SPPB is a well-known and validated lower extremity performance measure that predicts adverse outcomes including mortality, falls, nursing home placement, and incident disability in older adults.
15.1.a SPPB Administration Overview
Since motivation and level of understanding can have a significant impact on performance, each component of the exam should be administered strictly according to the protocol and in the following sequence:
• Explain the procedure to the study participant making sure to adhere to the script.
• Demonstrate the procedure, using the script.
• Ask the participant if he/she has any questions.
• Re-explain the procedure briefly using the script.
• Ask the participant to perform the procedure.
• Begin all timed procedures with the words, "Ready? Go!"
Use the script provided to assure that all key points are covered when you describe each test and how to perform it properly. Do not provide additional description or encouragement beyond the key points provided by the standard scripts.
Demonstrate each maneuver correctly. Experience has shown that participants follow more closely what the examiner does rather than what he/she says. If the participant indicates they do not understand the test maneuver, demonstrate it again rather than solely relying on repeating the verbal instructions.
Limit practice trials for each test to those described in the individual measurement procedures.
Allow the participant to rest between tests if out of breath or fatigued during the assessments.
If a test is not attempted because the participant refuses or cannot understand the instructions, record “Participant refused”. If you or the participant considers the test unsafe, record “Not attempted/unable” on the scoring form. If a test is attempted, but cannot be completed or scored, record “Attempted, unable” on the scoring form.

15-2
Walking Course Layout (not to scale)
½ meter
Tape
4meters
½ meter
For the walking and balance tests, the examiner should stand next to and slightly behind the participant and position his/her hands very close to either side of the participant’s trunk at the hip or waist level without touching the participant. The examiner should be ready to place both hands on the participant to stabilize them if necessary. If the participant loses balance, the examiner should grab/catch the participant with both hands at the trunk to stabilize them. If the participant begins to fall, the examiner should reach under the participant’s shoulders from behind and slowly ease them down to the floor, rather than try to catch the participant while standing still. This strategy should protect both the participant and examiner from injury.
If the participant falls and is not injured, the examiner should have the participant get on their knees or on all fours, place a chair next to the participant, and have the participant support themselves on the chair as he/she helps lift the participant under the shoulders. The examiner should not try to lift the participant from the floor by him/herself.
• Footwear: To reduce effects of different footwear on test performance, the participant should wear tennis shoes or comfortable walking shoes with minimal or no heels. The participant may perform the tests in stocking or bare feet if appropriate footwear is not available.
• The chair should be a straight-backed chair without arms, with seat height of 45 cm. It should be placed on a non-skid surface (e.g., low pile carpeting if available) with the back of the chair against a wall for stability. There should be adequate room in front and on the sides of the chair for the examiner and participant to move freely.
• The standing balance test should be performed with the participant standing a little less than an arm’s length from a wall to provide an additional source of support should loss of balance occur.
• Walking course: The short walks should be conducted on a 4-meter path (3-meter path allowed for in-home assessments) laid-out in an uncarpeted, unobstructed, low traffic corridor at least 122 cm (about 4 feet) wide. The start and finish lines will be marked by tape on the floor. Allow an additional ½ meter on each end of the walking course.
• For grip strength, the participant should be seated at a standard height table at about shoulder level or next to a table with an adjustable tray table attached.
15.1.b Equipment: SPPB
• Digital stopwatch (repeated chair stands, standing balance, short walk tests)
• Standard chair: straight back, flat, level, firm seat; seat height 45 cm at front (single and repeated chair stands).
• Colored tape to mark walking course (see drawing included in description of walking tests)
15.1.c Safety Issues and Exclusions for the SPPB
The large majority of participants should be able to attempt each performance test. Walking aids may not be used for the chair stand or standing balance tests but may be used for the timed walks if
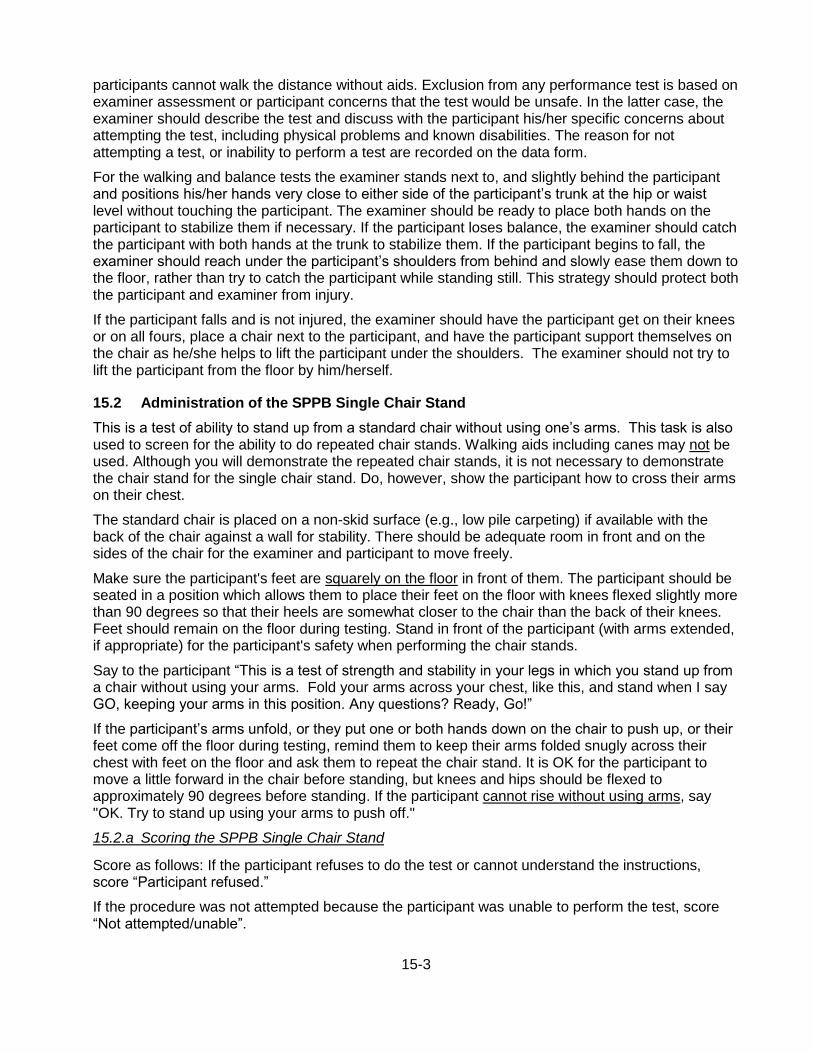
15-3
participants cannot walk the distance without aids. Exclusion from any performance test is based on examiner assessment or participant concerns that the test would be unsafe. In the latter case, the examiner should describe the test and discuss with the participant his/her specific concerns about attempting the test, including physical problems and known disabilities. The reason for not attempting a test, or inability to perform a test are recorded on the data form.
For the walking and balance tests the examiner stands next to, and slightly behind the participant and positions his/her hands very close to either side of the participant’s trunk at the hip or waist level without touching the participant. The examiner should be ready to place both hands on the participant to stabilize them if necessary. If the participant loses balance, the examiner should catch the participant with both hands at the trunk to stabilize them. If the participant begins to fall, the examiner should reach under the participant’s shoulders from behind and slowly ease them down to the floor, rather than try to catch the participant while standing still. This strategy should protect both the participant and examiner from injury.
If the participant falls and is not injured, the examiner should have the participant get on their knees or on all fours, place a chair next to the participant, and have the participant support themselves on the chair as he/she helps to lift the participant under the shoulders. The examiner should not try to lift the participant from the floor by him/herself.
15.2 Administration of the SPPB Single Chair Stand
This is a test of ability to stand up from a standard chair without using one’s arms. This task is also used to screen for the ability to do repeated chair stands. Walking aids including canes may not be used. Although you will demonstrate the repeated chair stands, it is not necessary to demonstrate the chair stand for the single chair stand. Do, however, show the participant how to cross their arms on their chest.
The standard chair is placed on a non-skid surface (e.g., low pile carpeting) if available with the back of the chair against a wall for stability. There should be adequate room in front and on the sides of the chair for the examiner and participant to move freely.
Make sure the participant's feet are squarely on the floor in front of them. The participant should be seated in a position which allows them to place their feet on the floor with knees flexed slightly more than 90 degrees so that their heels are somewhat closer to the chair than the back of their knees. Feet should remain on the floor during testing. Stand in front of the participant (with arms extended, if appropriate) for the participant's safety when performing the chair stands.
Say to the participant “This is a test of strength and stability in your legs in which you stand up from a chair without using your arms. Fold your arms across your chest, like this, and stand when I say GO, keeping your arms in this position. Any questions? Ready, Go!”
If the participant’s arms unfold, or they put one or both hands down on the chair to push up, or their feet come off the floor during testing, remind them to keep their arms folded snugly across their chest with feet on the floor and ask them to repeat the chair stand. It is OK for the participant to move a little forward in the chair before standing, but knees and hips should be flexed to approximately 90 degrees before standing. If the participant cannot rise without using arms, say "OK. Try to stand up using your arms to push off."
15.2.a Scoring the SPPB Single Chair Stand
Score as follows: If the participant refuses to do the test or cannot understand the instructions, score “Participant refused.”
If the procedure was not attempted because the participant was unable to perform the test, score “Not attempted/unable”.
15-4
If the participant attempted but was unable to arise even using their arms, score as “Attempted, unable to stand.”
If the participant uses arms to stand up, score as "Rises using arms."
If they stood up all the way without using arms, score as “Stands without using arms.” Go on to Repeated Chair Stands. Skip repeated chair stand for all other responses.
15.3 Administration of the SPPB Repeated Chair Stands
Next the participant stands from a seated position five times as quickly as possible. Record the time it takes to stand five times. Say to the participant, “This time I want you to stand up five times as quickly as you can, keeping your arms folded across your chest.” With the next instructions, cross your arms over your chest and then rise while emphasizing “full standing position,” and sit while emphasizing “all the way down”: “When you stand up, come to a full standing position each time, and when you sit down, sit all the way down each time. I will demonstrate two chair stands to show you how it is done.” Count as you stand each time. Then begin the test. “When I say GO, stand five times in a row as quickly as you can without stopping. Stand up all the way and sit all the way down each time. Ready, Go!”
Start timing as soon as you say “Go.” Count: "1, 2, 3, 4, 5" as the participant straightens to standing position each time. Stop timing when the participant stands the final time.
If the participant is unable to complete the chair stands correctly (e.g., is not coming to a full stand, lifts feet off the floor), stop the procedure, repeat the demonstration, wait 1 minute, and begin the procedure again. If the participant stops before completing five stands, confirm that they cannot continue by asking: "Can you continue?” If they say yes, continue timing for up to 1 minute. Otherwise, stop the stopwatch and record the number of chair stands that were completed. If 5 stands have not been completed by 1 minute, stop the test and record “Attempted, unable to complete 5 stands” as well as the number completed.
15.3.a Scoring the SPPB Repeated Chair Stands
If the participant refuses to do the test or cannot understand the instructions, score “Participant refused.” If the procedure was not attempted because the participant was unable to perform the test, score “Not attempted/unable.” It is acceptable to question the participant to determine if the participant refused because they thought they would have difficulty, be unable to do, or it would be unsafe due to inability to perform well; these should be coded “Not attempted/unable”.
If participant attempted but was unable to complete five stands without using their arms, score as “Attempted, unable to complete five stands” and record the number completed without using arms.
If five chair stands were completed, record the number of seconds, to a hundredth of a second, required to complete five stands.
15.4 Administration of the SPPB Standing Balance
This is a series of timed, progressively more difficult, static balance tests. The level of difficulty increases as the lateral base of support decreases. The time (up to 10 seconds) that the participant can hold each position (i.e., side-by-side, semi-tandem, tandem) is recorded. Walking aids such as a cane or walker may not be used.
The standing balance test should be performed with the participant standing a little less than an arm’s length from a wall to provide an additional source of support should loss of balance occur.
For each stand, describe the position to the participant and then demonstrate it while facing the participant. After demonstrating, approach the participant from the front and off to the side away
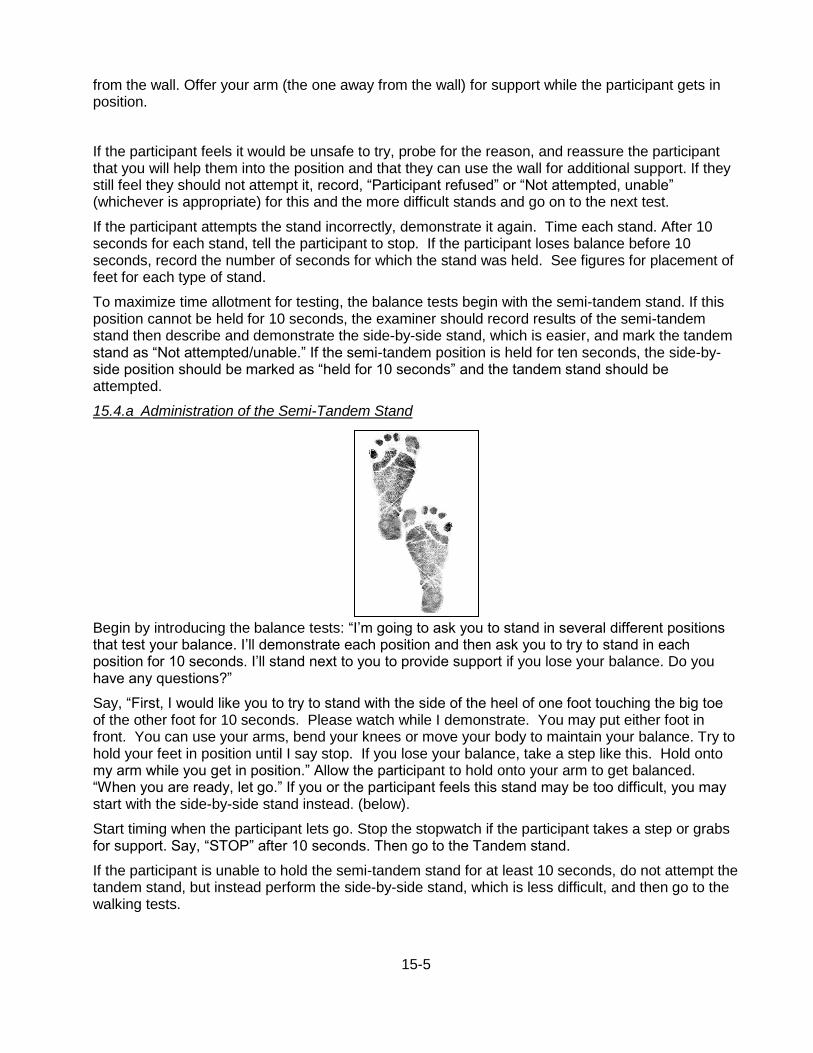
15-5
from the wall. Offer your arm (the one away from the wall) for support while the participant gets in position.
If the participant feels it would be unsafe to try, probe for the reason, and reassure the participant that you will help them into the position and that they can use the wall for additional support. If they still feel they should not attempt it, record, “Participant refused” or “Not attempted, unable” (whichever is appropriate) for this and the more difficult stands and go on to the next test.
If the participant attempts the stand incorrectly, demonstrate it again. Time each stand. After 10 seconds for each stand, tell the participant to stop. If the participant loses balance before 10 seconds, record the number of seconds for which the stand was held. See figures for placement of feet for each type of stand.
To maximize time allotment for testing, the balance tests begin with the semi-tandem stand. If this position cannot be held for 10 seconds, the examiner should record results of the semi-tandem stand then describe and demonstrate the side-by-side stand, which is easier, and mark the tandem stand as “Not attempted/unable.” If the semi-tandem position is held for ten seconds, the side-by-side position should be marked as “held for 10 seconds” and the tandem stand should be attempted.
15.4.a Administration of the Semi-Tandem Stand
Begin by introducing the balance tests: “I’m going to ask you to stand in several different positions that test your balance. I’ll demonstrate each position and then ask you to try to stand in each position for 10 seconds. I’ll stand next to you to provide support if you lose your balance. Do you have any questions?”
Say, “First, I would like you to try to stand with the side of the heel of one foot touching the big toe of the other foot for 10 seconds. Please watch while I demonstrate. You may put either foot in front. You can use your arms, bend your knees or move your body to maintain your balance. Try to hold your feet in position until I say stop. If you lose your balance, take a step like this. Hold onto my arm while you get in position.” Allow the participant to hold onto your arm to get balanced. “When you are ready, let go.” If you or the participant feels this stand may be too difficult, you may start with the side-by-side stand instead. (below).
Start timing when the participant lets go. Stop the stopwatch if the participant takes a step or grabs for support. Say, “STOP” after 10 seconds. Then go to the Tandem stand.
If the participant is unable to hold the semi-tandem stand for at least 10 seconds, do not attempt the tandem stand, but instead perform the side-by-side stand, which is less difficult, and then go to the walking tests.

15-6
15.4.a.1 Scoring the SPPB Semi-Tandem Balance
Based on the results from the semi-tandem stand, if you reason it would be unsafe for the participant to proceed to the more difficult tandem position, record “not attempted/unable” on the form for the tandem stand and continue to the walking tests. If the participant refuses or cannot understand the instructions, score “Participant refused.” If the procedure was not attempted because the participant was unable to perform the test, score “Not attempted/unable.” If the participant attempted the test but could not hold the position for at least 1 second, score as “Unable to attain position or hold for one second.” If the participant held the position for at least 1 second but less than 10 seconds, score as “Holds position >1 but less than 10 seconds” and record the time to 0.01 second. If the participant held the semi-tandem stand for 10 seconds, score as “Holds for 10 seconds” and also score the side-by-side stand as “held for 10 seconds”.
15.4.b Side-by-Side Stand
“Now, I would like you to try to stand with your feet together, side-by-side, for 10 seconds. You can use your arms, bend your knees or move your body to maintain your balance, but try not to move your feet. Try to hold this position until I tell you to stop. Hold on to my arm while you get in position.” Allow the participant to hold onto your arm to get balanced. Say: “When you are ready, let go.”
Start timing when the participant lets go. Stop the stopwatch if they take a step or grab for support. Record to 0.01 second the time the participant could hold this position. Say, “STOP” after 10 seconds.
15.4.b.1 Scoring the Side-by-Side Stand
If the participant refuses or cannot understand the instructions, score “Participant refused.” If the procedure was not attempted because the participant was unable to perform the test, score “Not attempted/unable.” If the participant attempted the test but could not hold the position for at least 1 second, score as “Unable to attain position or hold for one second.” If the participant held the position for at least 1 second but less than 10 seconds, score as “Holds position >1 but less than 10 seconds” and record the time to 0.01 second. If the participant held the position for 10 seconds, score as “Holds for 10 seconds”.
15.4.c Administration of the Tandem Stand
The Tandem Stand is only administered if the participant is able to hold the Semi-Tandem stand for at least 10 seconds. “Now I would like you to try to stand with the heel of one foot in front of and touching the toes of the other foot for 10 seconds. Please watch while I demonstrate. You may put either foot in front. You can use your arms, bend your knees or move your body to maintain your
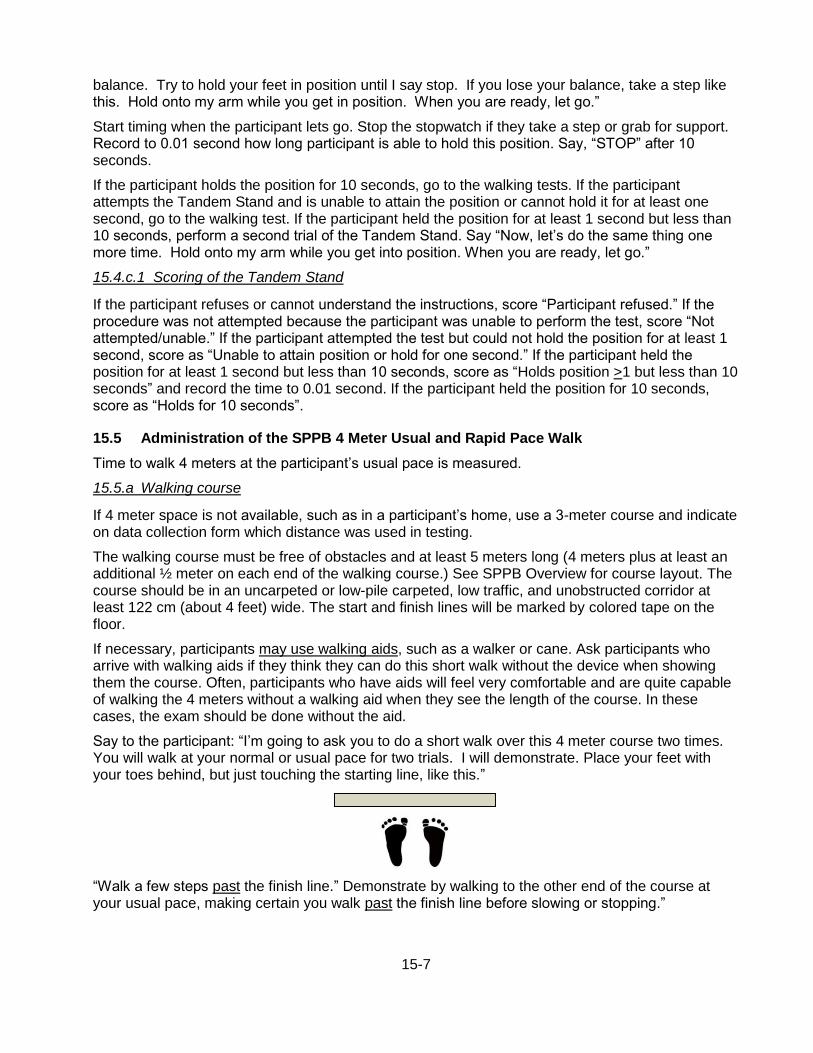
15-7
balance. Try to hold your feet in position until I say stop. If you lose your balance, take a step like this. Hold onto my arm while you get in position. When you are ready, let go.”
Start timing when the participant lets go. Stop the stopwatch if they take a step or grab for support. Record to 0.01 second how long participant is able to hold this position. Say, “STOP” after 10 seconds.
If the participant holds the position for 10 seconds, go to the walking tests. If the participant attempts the Tandem Stand and is unable to attain the position or cannot hold it for at least one second, go to the walking test. If the participant held the position for at least 1 second but less than 10 seconds, perform a second trial of the Tandem Stand. Say “Now, let’s do the same thing one more time. Hold onto my arm while you get into position. When you are ready, let go.”
15.4.c.1 Scoring of the Tandem Stand
If the participant refuses or cannot understand the instructions, score “Participant refused.” If the procedure was not attempted because the participant was unable to perform the test, score “Not attempted/unable.” If the participant attempted the test but could not hold the position for at least 1 second, score as “Unable to attain position or hold for one second.” If the participant held the position for at least 1 second but less than 10 seconds, score as “Holds position >1 but less than 10 seconds” and record the time to 0.01 second. If the participant held the position for 10 seconds, score as “Holds for 10 seconds”.
15.5 Administration of the SPPB 4 Meter Usual and Rapid Pace Walk
Time to walk 4 meters at the participant’s usual pace is measured.
15.5.a Walking course
If 4 meter space is not available, such as in a participant’s home, use a 3-meter course and indicate on data collection form which distance was used in testing.
The walking course must be free of obstacles and at least 5 meters long (4 meters plus at least an additional ½ meter on each end of the walking course.) See SPPB Overview for course layout. The course should be in an uncarpeted or low-pile carpeted, low traffic, and unobstructed corridor at least 122 cm (about 4 feet) wide. The start and finish lines will be marked by colored tape on the floor.
If necessary, participants may use walking aids, such as a walker or cane. Ask participants who arrive with walking aids if they think they can do this short walk without the device when showing them the course. Often, participants who have aids will feel very comfortable and are quite capable of walking the 4 meters without a walking aid when they see the length of the course. In these cases, the exam should be done without the aid.
Say to the participant: “I’m going to ask you to do a short walk over this 4 meter course two times. You will walk at your normal or usual pace for two trials. I will demonstrate. Place your feet with your toes behind, but just touching the starting line, like this.”
“Walk a few steps past the finish line.” Demonstrate by walking to the other end of the course at your usual pace, making certain you walk past the finish line before slowing or stopping.”
[Type a quote from the document or the summary of an interesting point. You can position the text box anywhere in the document. Use the Text Box Tools tab to change the formatting of the pull quote text box.]

15-8
15.5.b Usual pace walk
Make sure the feet are in proper position. “Do you have any questions? When I say “Go”, please walk at your normal pace. Remember to walk a few steps past the finish line.” To start the test, say, “Ready, Go.” Start timing with the participant’s first movement.
Follow along a few paces behind and a little to the side of the participant so you can see when the foot crosses the finish line. Stop timing when the first foot fully crosses an imaginary plane extending vertically up from the ending line/tape. Record the time to the nearest 0.01 second.
Have the participant repeat the usual pace walk: “Let’s try this one more time. Ready? Go.”
15.5.c Rapid pace walk
Demonstrate the test and say the following: “Now, let’s do the fast pace walk. Place your feet with your toes behind, but touching the starting line. Wait until I say “GO.” When I say “Go”, please walk as fast as you can, like this.” Walk to the other end as quickly as you can without running. Walk back to the participant. “Remember to walk a few steps past the finish line. Do you have any questions?”
“Ready? Go.”
Start timing with the participant’s first movement. Follow along a few paces behind and a little to the side of the participant. Stop timing when the first foot crosses an imaginary plane extending vertically up from the ending line/tape.
Have the participant repeat the rapid pace walk: “Let’s try this one more time. Ready? Go.”
15.7 Training and Certification
A training video for the SPPB is available online. Instructions for downloading the video (“Instructions – pdf“) and the demonstration video (“CD (Download and Execute – (.exe)) can be found at http://www.grc.nia.nih.gov/branches/ledb/sppb/index.htm. This video should be reviewed prior to initial training session and every 6 months. Training will include:
• Watch the video for the SPPB
• Read and study the QxQ
• Attend ARIC training session on performance test administration techniques, or be trained at the ARIC field center by an experienced examiner
• Practice on other staff or volunteers
• Discuss problems and questions with local expert or QC officer
Certification will include:
• Complete training requirements
• Recite exclusions
• Conduct exam on two volunteers:
- According to protocol, as demonstrated by completed QC checklist
- Times agree within ± 0.5 second of QC officer or designated personnel for SPPB and fast walk
The following elements must be demonstrated successfully for certification:
Chair stands Back of chair against a wall

15-9
Script correctly and clearly delivered Correctly demonstrates two stands, emphasizing full stand and return to complete sit Says “Ready? Go” for each test Records timed measure within 0.5seconds of QC officer or designated personnel Counts each chair stand and records stand if less than 5 Records and explains unusual values Starts timing with “Go”, stops with final stand or one minute If task was not performed, codes and explains reasons Standing balance Side-by-side stand Script correctly and clearly delivered Correctly demonstrates position Timing started coincident with participant release and stopped when participant takes a step or grabs for support Records timed measure within 0.5seconds of QC officer or designated personnel If task was not performed, codes/records reasons Semi-tandem stand Script correctly and clearly delivered Correctly demonstrates position Timing started coincident with participant release and stopped when participant takes a step or grabs for support Records timed measure within 0.5seconds of QC officer or designated personnel If task was not performed, codes/records reasons Tandem stand Script correctly and clearly delivered Correctly demonstrates position Timing started coincident with participant release and stopped when participant takes a step or grabs for support Records timed measure within 0.5seconds of QC officer or designated personnel If task was not performed, codes/records reasons Repeat (second trial), if necessary Short walk Usual pace Script correctly and clearly delivered Correctly demonstrates Toes touching start line Timing started coincident with participant’s first movement Time stopped when the first foot crosses an imaginary plane extending vertically up from the ending line/tape Repeat (second trial) Records timed measure within 0.5seconds of QC officer or designated personnel If task was not performed, codes/records reasons
15.8 Quality Control
The data collected by each interviewer are periodically reviewed by the Quality Control Committee from quality control analyses performed by the Coordinating Center. Data patterns suggestive of deviations from protocol are brought to the attention of the field center principal investigator, QC
15-10
officer or designated personnel. Observation of the assessments then follows, with discussion of possible remedial actions with staff.
15.10 Grip strength
Grip strength is a commonly used measure of upper body skeletal muscle function, has been widely used as a general indicator of frailty and, in the absence of other measures of strength, is a good marker of global muscle strength. Grip strength is often measured in the dominant hand or in both hands and the best result used in analyses. This assessment is modified slightly to accommodate time restrictions while maximizing physical function measurements; overall, it is focused on measuring maximal strength. Grip strength in the participant’s preferred hand, usually the dominant hand, will be measured using an adjustable, hydraulic grip strength dynamometer. Allowing participants to choose the best side should be comparable to either testing one’s dominant hand, as most will choose the dominant hand, or to choosing the best result of bilateral testing. Allowing participant preference will permit participants to choose non-dominant side if medical or other conditions, e.g. stroke, have impaired the dominant hand and testing that side would not necessarily represent global muscle mass or strength.
15.10.a Exclusions
Grip strength exclusion is limited to those who have had surgery on both hands or both wrists in the previous 3 months. If only one side is affected, test the unaffected side. The test can be performed if the participant has a current flare-up of pain in their wrist or hand, for example arthritis or tendonitis. Be sure to record this information on the data collection form.
15.10.b Equipment
Jamar Hydraulic Hand Dynamometer, which registers maximum kilograms of force during a trial, with adjustable handgrip.
Mouse pad for small rolled towel for wrist support
Table with adjustable height (moveable tray table preferred)
15.10.c Equipment Calibration
Weekly: Check the calibration of the grip strength dynamometer by hanging 5 kg and 20 kg (or 10 and 50 lb) weights across the handle using two Velcro straps, one strap on each side of the dynamometer handle, or one wide strap that covers the whole handle. Lift the weights slowly from the floor while they are strapped to the dynamometer handle and record the maximum kilograms registered. The lifting motion should be very slow and smooth, and the weight should remain evenly distributed between the two sides of the handle. Repeat the procedure three times and record each result.
Average the three calibration trials. The dynamometer should be accurate within ± 2 kgs for the average of the three calibration trials. It may be necessary to send the dynamometer to the manufacturer for repair and recalibration. DO NOT attempt to recalibrate the dynamometer yourself. Calibration problems can be caused by dropping the dynamometer or by leaks in the hydraulic system.
15.10.d Administration of the Grip Strength
The participant should be seated at a standard height table or on a seat with a moveable tray table attached.
"The next test I’ll ask you to do is the grip strength test. This device is used to measure the strength in your hand. Even when you squeeze the grip bars as hard as you can, the bars will not feel like
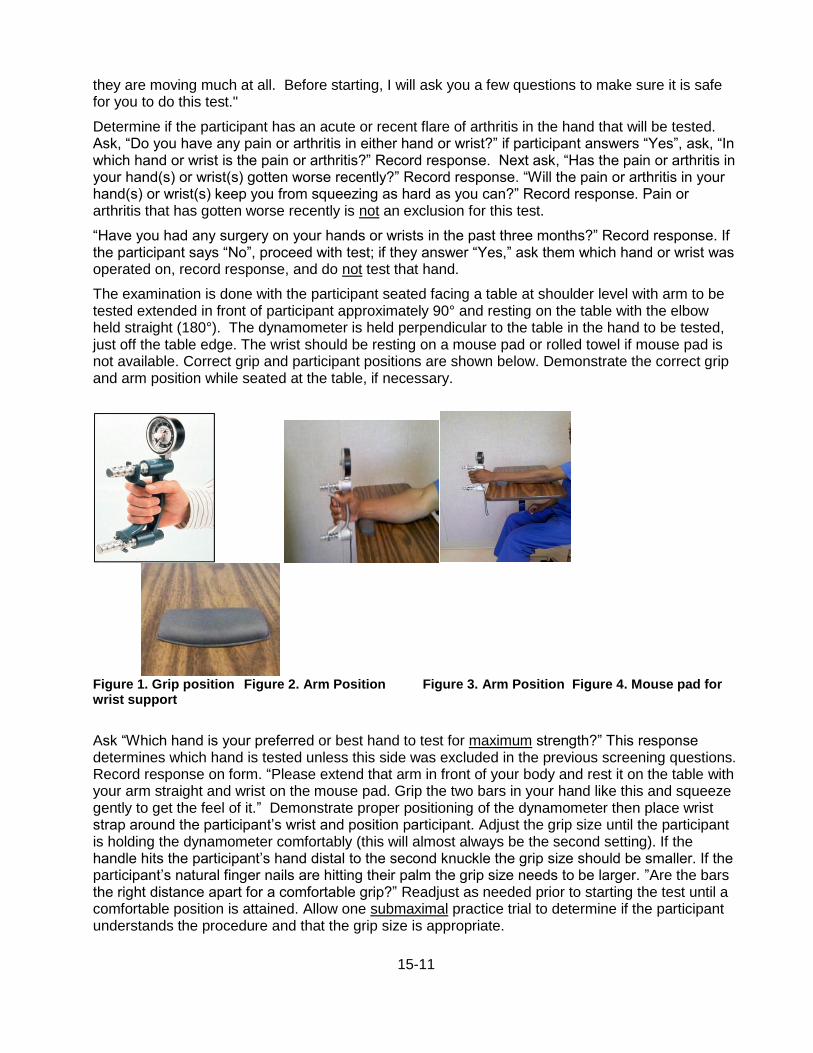
15-11
they are moving much at all. Before starting, I will ask you a few questions to make sure it is safe for you to do this test."
Determine if the participant has an acute or recent flare of arthritis in the hand that will be tested. Ask, “Do you have any pain or arthritis in either hand or wrist?” if participant answers “Yes”, ask, “In which hand or wrist is the pain or arthritis?” Record response. Next ask, “Has the pain or arthritis in your hand(s) or wrist(s) gotten worse recently?” Record response. “Will the pain or arthritis in your hand(s) or wrist(s) keep you from squeezing as hard as you can?” Record response. Pain or arthritis that has gotten worse recently is not an exclusion for this test.
“Have you had any surgery on your hands or wrists in the past three months?” Record response. If the participant says “No”, proceed with test; if they answer “Yes,” ask them which hand or wrist was operated on, record response, and do not test that hand.
The examination is done with the participant seated facing a table at shoulder level with arm to be tested extended in front of participant approximately 90° and resting on the table with the elbow held straight (180°). The dynamometer is held perpendicular to the table in the hand to be tested, just off the table edge. The wrist should be resting on a mouse pad or rolled towel if mouse pad is not available. Correct grip and participant positions are shown below. Demonstrate the correct grip and arm position while seated at the table, if necessary.
Figure 1. Grip position Figure 2. Arm Position Figure 3. Arm Position Figure 4. Mouse pad for wrist support
Ask “Which hand is your preferred or best hand to test for maximum strength?” This response determines which hand is tested unless this side was excluded in the previous screening questions. Record response on form. “Please extend that arm in front of your body and rest it on the table with your arm straight and wrist on the mouse pad. Grip the two bars in your hand like this and squeeze gently to get the feel of it.” Demonstrate proper positioning of the dynamometer then place wrist strap around the participant’s wrist and position participant. Adjust the grip size until the participant is holding the dynamometer comfortably (this will almost always be the second setting). If the handle hits the participant’s hand distal to the second knuckle the grip size should be smaller. If the participant’s natural finger nails are hitting their palm the grip size needs to be larger. ”Are the bars the right distance apart for a comfortable grip?” Readjust as needed prior to starting the test until a comfortable position is attained. Allow one submaximal practice trial to determine if the participant understands the procedure and that the grip size is appropriate.

15-12
When ready for the practice trial, say, “Now try it once just to get the feel of it. For this practice, just squeeze gently. It won't feel like the bars are moving, but your strength will be recorded.” Show dial to participant after squeezing then reset to zero. “You’ll do this two times. When I say “squeeze”, squeeze as hard as you can. Ready? Squeeze! Squeeze! Squeeze! Now, stop.”
Perform two trials with 15 to 20 sec rest in between. After the first trial, reset the dial to zero, and say “Now, one more time. Squeeze as hard as you can. Ready. Squeeze! Squeeze! Squeeze! Now, stop.” Set the dynamometer to zero prior to each attempt. Record the kilograms from the dial to the nearest 2 kilograms onto the form. If the reading is exactly between two readings on the scale, round up to the next higher even number. Reset the dial to “0” after each trial.
15.10.e Scoring of the Grip Test
Score as follows: if the participant refuses or cannot understand the instructions, score “Participant refused.” If the participant was unable to perform the test, score “Unable to do.” If the participant was excluded due to recent surgery, record “Excluded”. If the participant completed only 1 trial, record “Did 1 trial”; if he/she completed both trials, record “Did 2 trials”. Round to nearest 2kg; if exactly between two readings on dynamometer, round up to next higher even number.
Training and Certification
Examiners are centrally trained prior to the start of the study. Study coordinators are responsible for training new staff if necessary after central training based on standardized QxQ instructions.
The examiner requires no special qualifications or experience to perform this assessment. Training will include:
• Read and study the manual
• Attend ARIC training session on performance test administration techniques (or observe administration by experienced examiner)
• Practice on other staff or volunteers
• Discuss problems and questions with local expert or QC officer
• QC officer or designated person may review video of 2 performances if necessary
Certification will include: • Complete training requirements • Recite exclusions • Conduct exam on two volunteers: - According to protocol, as demonstrated by completed QC checklist - Kilograms agree within + 2 kilograms of QC officer for grip strength QC elements required for certification are: Participant is asked about recent surgery on hands Participant is asked about pain and arthritis in hands Recording dial reset to zero after sub maximal practice and each trial Appropriate hand placement and grip adjustment if needed Appropriate position of participant and dynamometer Reviews and correctly completes form
15.10.g Quality Control
The data collected by each examiner are periodically reviewed by the Quality Control Committee from quality control analyses performed by the Coordinating Center. Data patterns suggestive of

15-13
deviations from protocol are brought to the attention of the field center principal investigator and project manager. Observation of the assessments then follows, with discussion of possible remedial actions with staff. Major deviations are brought to the attention of the Executive Committee.
16-1
16. ANKLE BRACHIAL INDEX
The ratio of systolic blood pressure in the ankle divided by the systolic pressure in the arm, or ankle-brachial index (ABI) is a valid and clinically useful sign of peripheral artery disease. Asymptomatic adults with low ABI have been found to have markedly increased coronary heart disease and all-cause as well as cardiovascular disease mortality. The ABI is most often measured by recording in sequence the systolic blood pressure in each arm and ankle with the use of a conventional sphygmomanometer and a hand-help doppler device, a process that is time consuming and open to operator variability. In ARIC the ABI is measured using the Omron VP-1000 plus device as detailed below, to reduce participant burden and inter-observer variation. Intra-individual variability is also reduced by repeating the ABI measurement after five minutes.
The ABI measurement procedures are described in the following section, integrated with the pulse-wave velocity (PWV) measurement procedures which employ the same data acquisition device and setting. ARIC technicians are trained and certified in the use of the Omron VP-1000 plus to collect the ABI and the PWI during the same session. The data transfer and quality assurance procedures also are in common for the ABI and PWV.

17-1
17. PULSE WAVE VELOCITY
An increase in the stiffness of central arteries adversely affects systemic cardiovascular function and is associated with a greater risk of disease. Further, arterial stiffness is the principal cause of increasing systolic and pulse pressure with advancing age. ARIC/NCS technicians record arterial stiffness (and ABI) using the Omron VP-1000 plus system. This device is used since it safe, noninvasive and automated, thus reducing observer-related variability. The device simultaneously measures PWV, the central (carotid) blood pressure, the augmentation index (an index of arterial wave reflection) and the ABI, and thus reduces participant and staff burden. In addition to carotid-femoral PWV, this device derives another measure of arterial stiffness, the brachial-ankle PWV. The latter does not require the placement of transducers and at this time is the only index of arterial stiffness used in routine clinical settings. Once the sensors are in place, measurements can be repeated during the session for better data quality and to reduce measurement variability.
17.1 Workstation and Supplies
The ABI/PWV workstation includes Omron VP-1000 plus device, a PC laptop approved by the ARIC Coordinating Center, a laser printer (Brother HL-2140), a RossCraft segmometer, a Gulick II anthropometric tape, and the following supplies:
a) ECG electrodes & PCG sensor pads (Omron Healthcare #047372; 1 box has 20 sets of electrodes and sensor pad; orders are placed with Omron America at 847-247-5701)
b) Alcohol swab/wipes
c) Letter size paper always loaded in the printer
d) Replacement printer cartridge (Brother TN-360 or TN-330)
Supplies are checked daily, prior to testing.
17.2 Participant Orientation
The study participants wear loose fitting clothing provided by the field center. Prior to measuring the ABI/PWV the ARIC technician confirms that jewelry on the neck, including chains or necklaces, is removed. Socks or stockings are removed/moved below the ankle to keep the participant’s feet and toes warm.
17.3 Testing Procedure
17.3.a Preparation of the Equipment Turn on the power of the main unit; the laptop computer is turned on last. Following a brief interval after the power is turned on, the ID entry screen appears. Enter the ARIC (subject) ID on this screen. Then select [Search/Next], and the Patient Information Screen appears. Data must be entered in the following 3 columns: [Sex] – choose either “Male” or “Female”. [Birth Date] – Enter the birth date in the format “MM/DD/YYYY”. (to protect the confidentiality of the participant, input arbitrary birth date that matches his/her age) [Height] – Enter the height (input range is 120-210 cm). Ensure that the following are displayed in each column. [Lcf] – Enter 50 as an initial value; the correct data will be entered during the carotid sensor set-up; see below. [Weight] – Leave blank. [Waist] – Leave blank. [Disease] – “No”.

17-2
[Order No] – Enter “1” (for the first measurement). [Meas Sensor] – “ECG, PCG, CAP, FAP” [Meas Site] – “Both Bra + Both Ank” If the participant indicates that there is a medical or post-surgical reason for not having the blood pressure measured on any of the 4 limbs, turn off the blood pressure cuff to that particular limb. [Max Pressure] – “R Auto, L Auto” [Sync Meas] – “Off” [Doctor] – Leave blank. [Technician] – select the technician’s 3-digit ID and select [OK]. The technician information must be stored in advance under the Main Menu. To enter the technician’s name, click on “Facil/Dr./Technician/Category” on the Main Menu screen. Click on the “Technician” tab and then “Add” to type the technician’s ID. [Category] – Leave blank. When all the data entry is complete, click “Next”. NOTE: With every measurement, the machine outputs a pdf file AND a cache file for printing purposes. The machine is capable of storing up to 200 tests. When the number of tests (or data) stored in the machine exceeds 200, the machine will begin deleting the oldest data. If you manually delete data, the machine will not delete old pdf files and cache files, as the elimination of these files is done when the number of data exceeds 200. This will create a small storage space as well as database area as you continue to accumulate pdf files and cache files in the machine. Let the machine automatically delete the oldest data; do not make manual deletions.
17.3.b Preparation of the Study Participant
Participants wear loose fitting gowns provided by each field center. Jewelry present on the neck including gold chains and necklaces, is removed prior to testing. Socks or stockings are removed or moved below the ankle if necessary to keep the feet and toes warm. Speaking slowly, the technician tells the participant: “I will now measure the blood pressure in your arms and your ankles, and the elasticity of your arteries. To do this I will put four blood pressure cuffs on you, some of the patches used in physician offices to take an ECG, and also small microphones that will sit on your neck and your leg to record the pulsing of the blood while you are lying on this examination table. To do that I will ask you to open your gown to put a microphone on your chest. I will also feel for your pulse on the neck and the top of your leg.” “Do you have any questions for me? Is there any reason I should not put a blood pressure cuff on one of your arms or ankles? This will take about 10 minutes; will you be comfortable lying on your back for about 10 minutes?” Place the femoral sensor strap on the examination table before the participant lies down. The participant is positioned on the examination table in the supine position. Before a measurement is performed, clean the skin where the carotid and femoral sensors, ECG patches, and a PCG sensor directly contact using alcohol wipes. The following steps are the followed without deviation from these instructions.

17-3
17.3.c Measuring the Arm and Ankle Circumference and Placing the Blood Pressure Cuffs
In order to select the appropriate cuff size, one arm is measured following the procedure used for this purpose in the sitting blood pressure protocol. The arm measurement need not be repeated if already done per protocol for the seated blood pressure measurement. Instead, it can be retrieved from Item A.2 of the SBP form; note, however, that the cuff sizes differ for the two procures. Have the participant clear the upper arm area so that an unencumbered measurement may be made. The measurements are done in sequence and recorded on the ABI/PWV Data Sheet. It is recommended that two trained ARIC technicians be present to set up the procedure, place the cuffs and electrodes. Have the participant place the left arm along the side of the body, bending the elbow 90 degrees. Measure length of the arm, from the acromion (bony protuberance at the shoulder) to the olecranon (tip of the elbow), using the Gulick II anthropometric tape. Mark the midpoint on the dorsal surface of the arm. Have the participant relax the arm along the side of the body. Draw the tape snugly around the arm at the midpoint mark. Note: keep the tape vertical. The tape should not indent the skin. Measure and record the arm circumference on the Data Sheet. Select the arm cuff size according to the specifications shown below: Size S upper arm circumference 16-25 cm Size M upper arm circumference 20-32 cm Size L upper arm circumference 30-38 cm If the participant’s arm circumference exceeds 38 cm, use size L cuffs and note this on the Data Sheet. To place the arm cuffs position the arrows on the arm creases. Wrap the cuffs loosely enough so that one or two fingers can be inserted between the cuff and the arm. Measure 7 cm proximal to the top edge of the inside ankle bone (tibia) and mark the spot. Draw the Gulick II anthropometric tape snugly around the ankle. Measure and record the ankle circumference on the Data Sheet, and select the ankle cuff size according to the specifications below. Size M - ankle circumference 16-33 cm Size L - ankle circumference 30-38 cm In attaching the ankle cuffs, align the tag on the ankle cuff with the top edge of the inside ankle bone (tibia) with the mark at the center of the bone. Wrap the ankle (distal) side of the cuff first than wrap the calf (proximal) side of the cuff. Tighten the cuff so that one or two fingers can be just barely inserted under the cuff.
17.3.d Attaching the ECG Clips
Prepare 3 ECG clip electrodes. While squeezing the side buttons of the ECG clips, attach ECG clip electrodes in the holes. Remove the protective
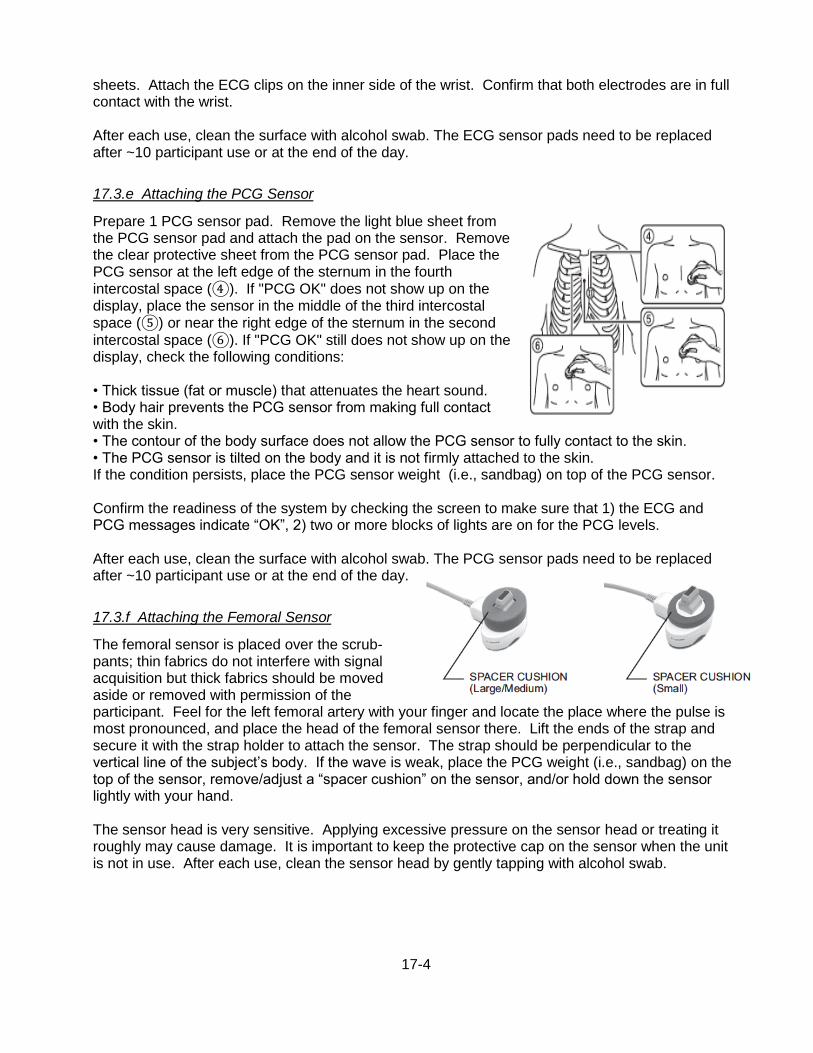
17-4
sheets. Attach the ECG clips on the inner side of the wrist. Confirm that both electrodes are in full contact with the wrist. After each use, clean the surface with alcohol swab. The ECG sensor pads need to be replaced after ~10 participant use or at the end of the day.
17.3.e Attaching the PCG Sensor
Prepare 1 PCG sensor pad. Remove the light blue sheet from the PCG sensor pad and attach the pad on the sensor. Remove the clear protective sheet from the PCG sensor pad. Place the PCG sensor at the left edge of the sternum in the fourth intercostal space (④). If "PCG OK" does not show up on the display, place the sensor in the middle of the third intercostal space (⑤) or near the right edge of the sternum in the second
intercostal space (⑥). If "PCG OK" still does not show up on the display, check the following conditions: • Thick tissue (fat or muscle) that attenuates the heart sound. • Body hair prevents the PCG sensor from making full contact with the skin. • The contour of the body surface does not allow the PCG sensor to fully contact to the skin. • The PCG sensor is tilted on the body and it is not firmly attached to the skin. If the condition persists, place the PCG sensor weight (i.e., sandbag) on top of the PCG sensor. Confirm the readiness of the system by checking the screen to make sure that 1) the ECG and PCG messages indicate “OK”, 2) two or more blocks of lights are on for the PCG levels. After each use, clean the surface with alcohol swab. The PCG sensor pads need to be replaced after ~10 participant use or at the end of the day.
17.3.f Attaching the Femoral Sensor
The femoral sensor is placed over the scrub-pants; thin fabrics do not interfere with signal acquisition but thick fabrics should be moved aside or removed with permission of the participant. Feel for the left femoral artery with your finger and locate the place where the pulse is most pronounced, and place the head of the femoral sensor there. Lift the ends of the strap and secure it with the strap holder to attach the sensor. The strap should be perpendicular to the vertical line of the subject’s body. If the wave is weak, place the PCG weight (i.e., sandbag) on the top of the sensor, remove/adjust a “spacer cushion” on the sensor, and/or hold down the sensor lightly with your hand. The sensor head is very sensitive. Applying excessive pressure on the sensor head or treating it roughly may cause damage. It is important to keep the protective cap on the sensor when the unit is not in use. After each use, clean the sensor head by gently tapping with alcohol swab.
17-5
17.3.g Attaching the Carotid Sensor
The carotid sensor should be attached after all other sensors are in place on the participant. The participant is asked to look straight up at the ceiling. The ARIC technician may raise the participant’s chin slightly. Measure the neck circumference using the Gulick II anthropometric tape and record the measurement on the Data Sheet. An arm with the appropriate neck size must be selected to properly attach the sensor on the neck of the subject. Arm is inserted into the sensor such that the red line is barely visible. Make sure that the pressure adjustment level is at “1”.
Remove the pillow. Insert the sensor arm behind the neck so that the sensor will be securely attached with the arch of the arm supporting the back of the neck. Hold the arm with your right hand to open the arm. While keeping the sensor arm open with your right hand, feel for the left carotid artery with your finger and locate the place where the pulse is most pronounced. Place the head of the carotid sensor there. Check the tonogram on the screen; the tonogram should be mountain-shaped. If the shape of the tonogram is not convex or shaped like a mountain, adjust the position of the sensor. Then confirm that the active channel points to the peak of the mountain and the top of the active bar is green. Lastly, the pressure level line (indicating the degree of contact between the sensor and the skin) should be a relatively smooth line. If the tonogram displays a steep slope, adjust the angle of the carotid sensor by sliding sensor head to either A side or B side. When the message “Move sensor toward A-side” or “Move the sensor toward B-side” is displayed, move the sensor in the indicated direction to adjust the position. If the “Weak signal” message appears, adjust the pressure by changing levels from “1” to “2” and then to “3” if needed. At the discretion of the technician, the spot over the carotid artery may be marked lightly with an erasable felt tipped pen at the time the carotid sensor is removed. If the carotid sensor is pressed unnecessarily strongly against the neck, the error message “Excessive CAP pressure” will appear and an alarm will sound. Note: the sensor head is very sensitive. Applying excessive pressure on the sensor head or treating it roughly may cause damage. It is important to keep the protective cap on the sensor when the unit is not in use. After each use, clean the sensor head by gently tapping with a swab and alcohol.

17-6
17.3.h Arterial Path Length Measurement
Measure (1) the straight distance between the suprasternal notch and the carotid artery recording site (i.e., a spot on the neck that was previously marked) and (2) the straight distance between the carotid artery recording site and femoral artery recording site (i.e., the top of the femoral sensor). In order to minimize effects of body contours (e.g., large stomach or bust) on the path length the straight horizontal distances are measured using a special segmometer specifically designed for PWV studies (Rosscraft Anthropometric Segmometer, Surray, Canada) instead of surface tracing with a tape measure. Subtract the distance (1) from the distance (2) and enter the arterial path length data (i.e., calculated value or subtracted value) in the machine. To do so, click “Back” on the screen to return to the Patient Information screen and enter the length on [Lcf]. Make sure to record all the length information on the Data Sheet. Place the carotid sensor back on the neck where it was previously marked. At this point, make sure that the CAP and FAP messages are both “OK”. Confirm the suitable state in the CAP and FAP diagrams (explained under “Attaching the carotid sensor”). 17.4 Measurement of the PWV and ABI The measurement is made twice per testing session. Mention to the participant that the blood pressure measurement will now begin and press the [START] button. After the blood pressures are measured at the four limbs and the cuff is maintained at a fixed low pressure, the message “Confirm CAP tonogram and press [START] button” is displayed, and the measurement pauses. Confirm the shape of the tonogram again. If the signal is stable, press the [START] button to begin pulse wave measurement. If the [START] button is not pressed within 160 seconds, the system will start to measure the pulse wave automatically. After the measurement ends, promptly remove the carotid sensor as it may be uncomfortable to the subject. Wait 2-5 minutes. During the waiting period, click “Remeasurement” and choose “In Same Condition”. On the measurement screen, click “Back” to go back to the Patient Information Screen and place “2” under the “Order ID” to denote that this is the second measurement under the same exam. Place the carotid sensor back on. After the shape of the tomogram is confirmed, repeat the measurements by pressing the [START] button. After the second measurement, press the [END] button to end the examination, remove the sensors and electrodes, and assist the participant to the seated position. If any of the blood pressure and PWV values are not reported on the printout, repeat the measurement (for a third time) after waiting 2-5 minutes. In this case, “Order ID” will be “3”. Confirm that the participant is comfortable, assist him/her in standing up, and escort the participant to the next station on his/her itinerary. 17.5 Storing the Data on the Laptop Computer After the study participant has been thanked and has been escorted to another station, or at the end of the day, the study results are transferred from the vascular testing device to the Form folder on the laptop computer via special Ethernet “crossover” cable. Note that a “crossover” cable of 6 ft. in length (or longer) is used; a regular ethernet cable does not work. To store the data on the laptop computer go to the “Main Menu” and click on “Print Report/Edit Patient Info”. Select the

17-7
record to transmit and tap “Transmit Data”. All the data transmitted will be stored in the folder called “Form” on the computer’s C-drive. CSV files are recorded in the document called “Append1” and the back-ups are recorded in “Append2”. Individual summary data from each test will be stored as a pdf file. Keep a copy of the printout for back-up purposes. If another participant is to be tested, go to the ID screen and start a new testing session. Otherwise, turn off the machine to end the session. 17.6 Procedure Completion Form In order to register the completion of an ABI/PWV procedure in the DMS, bring up the participant’s Procedure Completion Form (PRO) in the DMS and fill out items 13 and 14 on this form. If no ABI/PWV data were collected on a study participant, this also needs to be recorded on the PRO form. 17.7 Transfer of the Data to the ARIC Coordinating Center On a weekly basis and a fixed day of the week, e.g., every Friday, the study records stored on the laptop are transferred to the ARIC Coordinating Center. As part of this transfer, the records are exported and also saved on the computer. Each field center designates one staff person and one back-up person to transfer the ABI/PWV records to the ARIC CC. To begin the data transfer,
rename the “Append1” file to “ABIPWV_ARIC5_Site letter_MMDDYYYY.CSV”. Use site letter F for
Forsyth County, J for Jackson, M for Minneapolis, and W for Washington County. Append 2 is a back-up file, and is not renamed. Next, the user verifies that that the laptop computer is connected to the internet.
An icon installed on the laptop that supports the VP-1000 system transfers the .CSV and .PDF files to the Coordinating Center. After renaming the Append 1 files, the user will click on the ICON once per week to transfer the files. The program activated by the ICON does the following:
• Verifies that the computer is connected to the internet (if not connected to the internet, a message will display and the program will close);
• Transfers all of the files from the Forms folder to the ARIC Coordinating Center;
• Creates a subdirectory within the ARIC DATA folder labeled with the current date, and moves the transferred files into it.
After this step has been completed one per week, all Append 2 files in the Forms folder are deleted. 17.8 Study results reported to the participant The ABI values for the each extremity are included in the summary report of study results the participants receive approximately 6 weeks after the ARIC exam visit. Pulse wave velocity values are not reported to the participants/their physicians as these are of research value only and there are no clinical standard or threshold values for these measures. The printed waveforms and graphics are used by ARIC only for feed-back to the study technicians and for quality assurance; they are not shared with the study participants or their providers of medical care. 17.9 Training and Certification The ARIC technicians need not be health professionals, but they must be trained and certified by ARIC in the PWV/ABI measurement protocol. Initial Central Training. Technicians from each Field Center are trained centrally by Dr. Hirofumi Tanaka. A combination of didactic presentations and hands-on practical demonstrations and practice of the vascular testing device are conducted. Power point presentations will include anatomy and physiology of arterial circulation, pathophysiology of atherosclerosis and arterial stiffening, technical background of PWV and ABI techniques, key clinical findings using these
17-8
techniques, and basic operation of the equipment. The hands-on practical demonstration will include calibration checks, cleaning, sensor replacements, printing and transferring data reports, and testing of classmates and other clinical staff and investigators. Following training, technicians will be certified after successfully demonstrating calibration checks, sensor placement, care and maintenance of the sensors, and data transfer. Only certified technologists will perform the measurement for ARIC participants. To retain certification, technicians must collect good quality data on at least 10 participants each month during the examination period. Retraining Sessions. Certification of new technicians after the initial central training may be performed by a centrally-trained certified PWV/ABI technician. An internet-based didactic seminar, identical to the presentation given during the initial training, is given by Dr. Tanaka. The hands-on practical training is given by a certified PWV/ABI technologist from the field center. The performance of the new technologist is observed by a certified PWV/ABI technologist for the first 10 tests. The evaluation reports are then be examined by Dr. Tanaka who determines if the technician is certified for testing. It is the responsibility of each field center to report to the ARIC Coordinating Center when the certification procedures are complete. Follow-up and technician support. Problems and difficulties encountered by the technicians will be shared among all the technicians and possible solutions will be given, during phone or web-based conferences conducted every 3-6 months throughout the study period. The performance of the technologists at each site will be evaluated using the variability/reliability data compiled for each technician. After the technicians at each field center have tested at least 30 study participants, a site visit will be conducted by Dr. Tanaka to observe and evaluate the techniques used for the measurements of PWV and ABI, calibration procedures, and adherence to the PWV/ABI protocols using the checklist. Each technician will be evaluated during the direct observation of testing of study participants. Suboptimal quality testing sessions and protocol violations will be reviewed and discussed during the site visits, and these points will be reinforced later in a written report. 17.10 Quality Control To ensure that the accuracy of the PWV/ABI measurements throughout the study duration, the following quality control measures are developed and applied at all field centers. 1) recruitment of the most qualified personnel 2) standardized training and certification 3) retraining and recertification 4) standardized and reliable procedure 5) frequent staff meetings to provide feedback and to trouble shoot 6) equipment maintenance program 17.11 Equipment Maintenance Each field center is responsible for the proper operation and maintenance of its equipment. A detailed record of equipment maintenance is kept at each field center. All staff are instructed to report any real or suspected equipment problems to the PWV/ABI team promptly. The machine is inspected once a month by the technician. These inspections include appearance and condition of all sensors, tubing, and fittings. The equipment unit is cleaned if inspection indicates that it is needed or at least once a month. The unit is cleaned by wiping them with a well-wrung out cloth moistened with a diluted neutral detergent. The tonometry sensors need to be gently wiped by gently tapping with (30-50%) isopropyl alcohol or (70%) ethyl alcohol swab. Apply pressure to the sensor as little as possible.

17-9
A maintenance program is run quarterly (4 times a year) consisting of 1) Air leakage test and 2) Pressure accuracy test. To run the maintenance program, under [Main Menu], choose [Maintenance Menu]. For the Air Leakage test, all the blood pressure cuffs must be wrapped firmly on a 3-inch diameter PVC pipes. Push “Start” to begin the test. The values on the last column (“Diff”) should be 20 mmHg or below after 2 minutes, to pass this test. Air leakage test must be performed on all the blood pressure cuffs used in the ARIC exam. Write down the blood pressure values on the last column (”Diff”) on the maintenance data sheet. The Pressure accuracy test requires connecting the blood pressure tubing to a pressure calibrator (e.g., Netech DigiMano) through a Y-tube as shown below. Testing will be performed at 3 different pressure settings (50 mmHg, 150 mmHg, and 250 mmHg). Change the inflation pressure to one of the pressure settings and click on “Start Inflation” to begin the test. Ensure that the unit on the Netech DigiMano is “mmHg”. Write down all the pressure values displayed on the Omron machine as well as the pressure reading on the Netech DigiMano on the maimntenance data sheet. The pressure values recorded should be within ±3 mmHg of the pressure settings. It is not necessary to perform the Inflation/Deflation Test.
17-10
In general, no maintenance is required on the laptop computer. In case of any system problems, the field center staff contacts the ARIC Coordinating Center.
18-1
18. HEART FAILURE ORIENTED PHYSICAL EXAMINATION
18.1 Introduction
An important objective of ARIC exam 5 is to evaluate the participants for heart failure (HF). HF is common in older people and causes considerable morbidity. Heart failure, when it is not well-controlled, causes accumulation of fluid (edema) in the lower legs and lower lungs. A physical exam can contribute to detect the “fluid overload” of heart failure. Two physical signs of HF are 1) pitting edema of the lower extremities (around the ankles), and 2) fine crackling sounds (rales) in the lower lung fields (at the back) during inhalation. These physical signs of fluid overload correlate well with the shortness of breath (dyspnea) experienced by persons with HF -- which often starts within several minutes of lying down flat (orthopnea due to more fluid accumulating in their lungs, by gravity). A brief physical examination is performed in ARIC/NCS by a technician, trained nurse, nurse practitioner, physician assistant or physician, adhering to the described procedures.
18.2 Recording of Lung Sounds
18. 2.a Equipment and Setting
ARIC uses an electronic stethoscope (Littmann 3200) to transmit lung sounds in real time to a nearby laptop computer using Bluetooth (like wireless headsets for cell phones). Software named StethAssist (http://www.zargis.com/index-2.php) stores the lung sounds on the laptop. The stethoscope uses one AAA battery which lasts for more than 50 hours (when using a new lithium battery). The laptop must have windows (Windows Vista, Windows XP or Windows 7), a USB port and have Zargis StethAssist software previously loaded from the CD which came with the stethoscope. The software may be downloaded to as many computers as needed. The laptop should be secure and have password protection. The stethoscope comes with a wireless dongle (connects to laptop by USB) which must be connected to laptop prior to use of stethoscope. At each field center site, there should be one laptop as the primary one for lung sounds and one back-up laptop should problems arise with the primary computer. The laptop may have other uses than for just lung sounds, however it would need to be available at the bedside for the physical examination.
Figure 1. The Littmann 3200 stethoscope
18.2.1 18.2.b Recording the Lung Sounds
Most older patients like the traditional “high touch” physical exams in comparison to high tech “fancy tests” like echocardiograms. Try to warm your hands before the physical exam by washing them in warm water. Also try to keep the stethoscope head warm (so that the patient is not surprised by cold hands or a cold instrument on their skin.
M button
Button to select diaphragm
on/off
Volume up (+) or down (-)
Picture shows diaphragm in use
Battery indicator
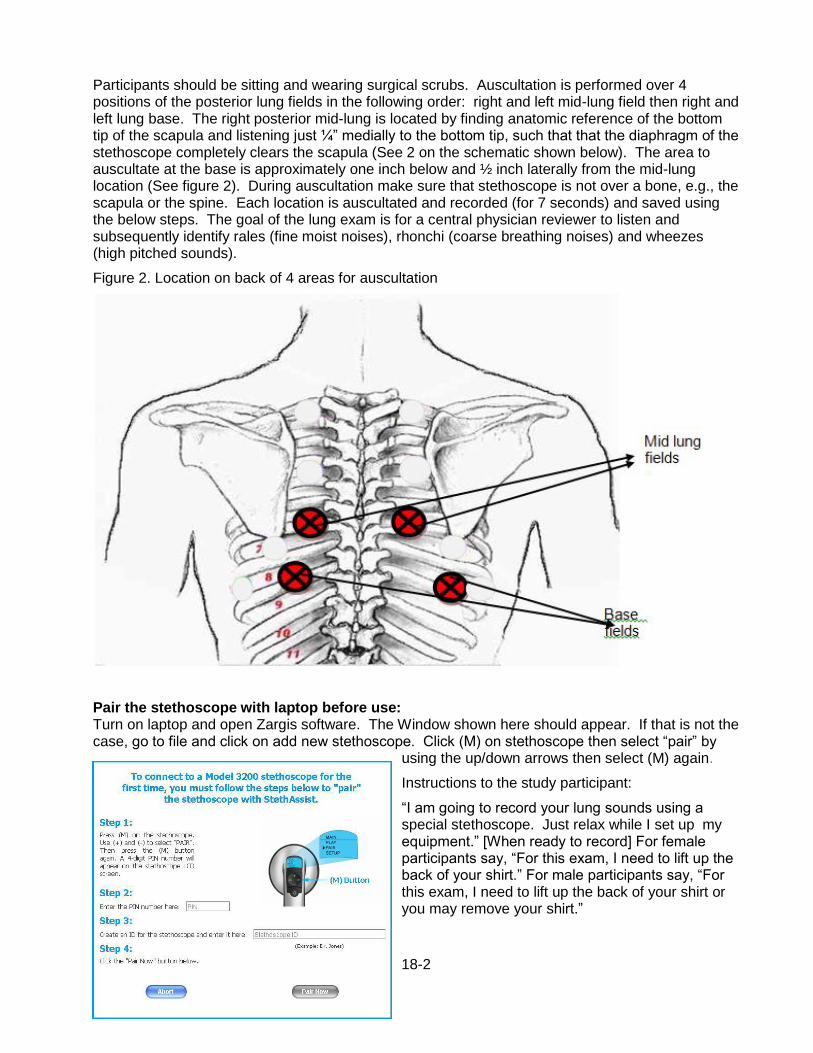
18-2
Participants should be sitting and wearing surgical scrubs. Auscultation is performed over 4 positions of the posterior lung fields in the following order: right and left mid-lung field then right and left lung base. The right posterior mid-lung is located by finding anatomic reference of the bottom tip of the scapula and listening just ¼” medially to the bottom tip, such that that the diaphragm of the stethoscope completely clears the scapula (See 2 on the schematic shown below). The area to auscultate at the base is approximately one inch below and ½ inch laterally from the mid-lung location (See figure 2). During auscultation make sure that stethoscope is not over a bone, e.g., the scapula or the spine. Each location is auscultated and recorded (for 7 seconds) and saved using the below steps. The goal of the lung exam is for a central physician reviewer to listen and subsequently identify rales (fine moist noises), rhonchi (coarse breathing noises) and wheezes (high pitched sounds).
Figure 2. Location on back of 4 areas for auscultation
Pair the stethoscope with laptop before use: Turn on laptop and open Zargis software. The Window shown here should appear. If that is not the case, go to file and click on add new stethoscope. Click (M) on stethoscope then select “pair” by
using the up/down arrows then select (M) again.
Instructions to the study participant:
“I am going to record your lung sounds using a special stethoscope. Just relax while I set up my equipment.” [When ready to record] For female participants say, “For this exam, I need to lift up the back of your shirt.” For male participants say, “For this exam, I need to lift up the back of your shirt or you may remove your shirt.”
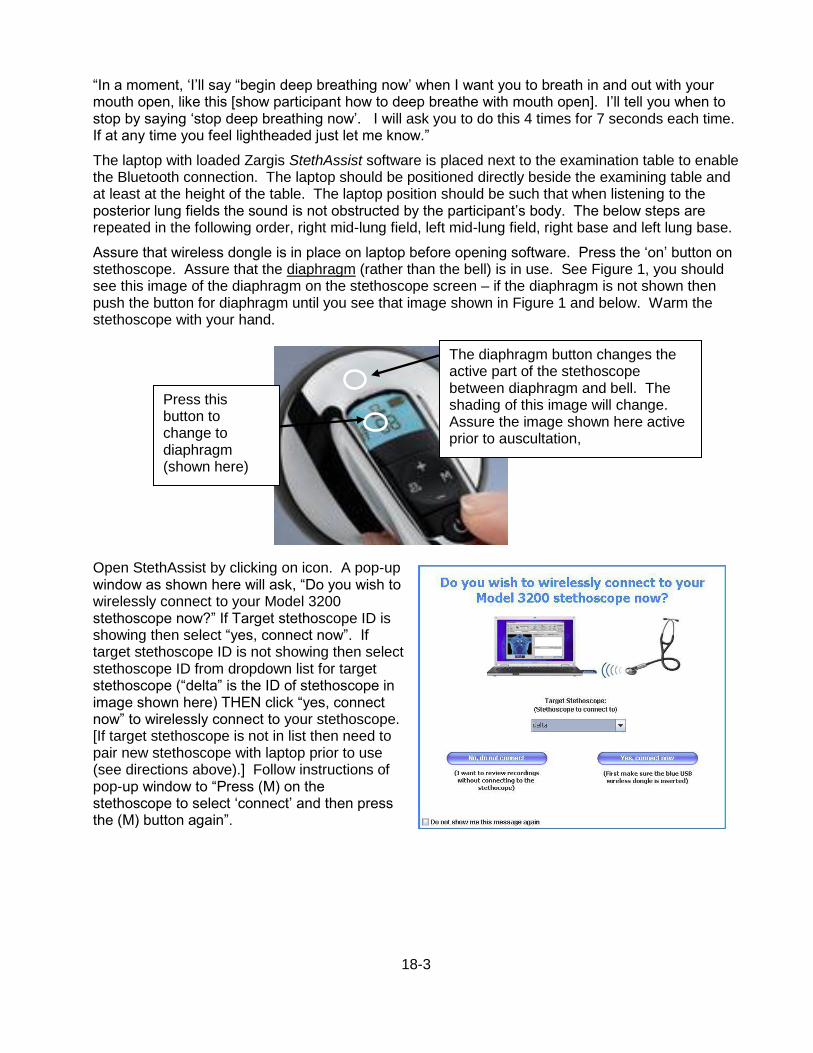
18-3
“In a moment, ‘I’ll say “begin deep breathing now’ when I want you to breath in and out with your mouth open, like this [show participant how to deep breathe with mouth open]. I’ll tell you when to stop by saying ‘stop deep breathing now’. I will ask you to do this 4 times for 7 seconds each time. If at any time you feel lightheaded just let me know.”
The laptop with loaded Zargis StethAssist software is placed next to the examination table to enable the Bluetooth connection. The laptop should be positioned directly beside the examining table and at least at the height of the table. The laptop position should be such that when listening to the posterior lung fields the sound is not obstructed by the participant’s body. The below steps are repeated in the following order, right mid-lung field, left mid-lung field, right base and left lung base.
Assure that wireless dongle is in place on laptop before opening software. Press the ‘on’ button on stethoscope. Assure that the diaphragm (rather than the bell) is in use. See Figure 1, you should see this image of the diaphragm on the stethoscope screen – if the diaphragm is not shown then push the button for diaphragm until you see that image shown in Figure 1 and below. Warm the stethoscope with your hand.
Open StethAssist by clicking on icon. A pop-up window as shown here will ask, “Do you wish to wirelessly connect to your Model 3200 stethoscope now?” If Target stethoscope ID is showing then select “yes, connect now”. If target stethoscope ID is not showing then select stethoscope ID from dropdown list for target stethoscope (“delta” is the ID of stethoscope in image shown here) THEN click “yes, connect now” to wirelessly connect to your stethoscope. [If target stethoscope is not in list then need to pair new stethoscope with laptop prior to use (see directions above).] Follow instructions of pop-up window to “Press (M) on the stethoscope to select ‘connect’ and then press the (M) button again”.
Press this button to change to diaphragm (shown here)
The diaphragm button changes the active part of the stethoscope between diaphragm and bell. The shading of this image will change. Assure the image shown here active prior to auscultation,

18-4
On laptop click on “new encounter” and the Start button to launch the Recording Set-up Window.
In the Recording Set-up Window, enter a participant’s ARIC ID in the Patient ID field and enter the Participant’s acrostic in the last name window. Recording length should be set to 7 seconds and patient posture should be set to sitting. Click “preset sites” then select “pulmonary”. Select your initial recording site, posterior middle (R), from the pre-set sites then click “OK”.
start button
new encounter
Save File
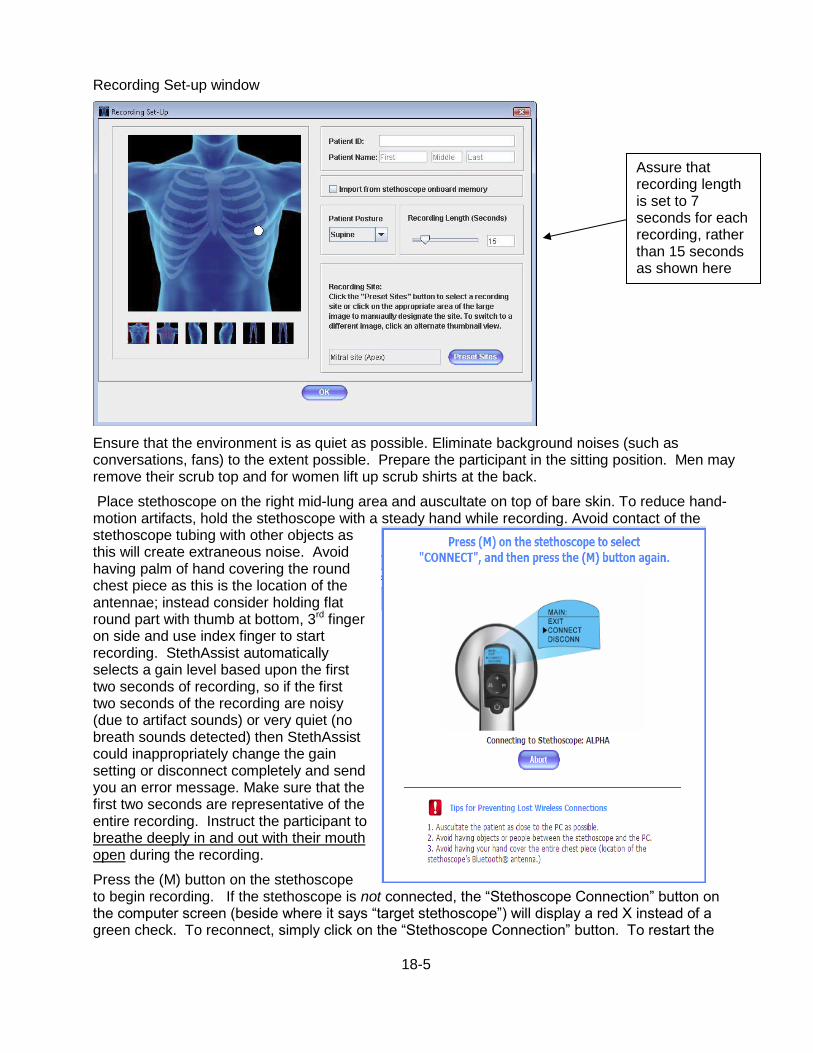
18-5
Recording Set-up window
Ensure that the environment is as quiet as possible. Eliminate background noises (such as conversations, fans) to the extent possible. Prepare the participant in the sitting position. Men may remove their scrub top and for women lift up scrub shirts at the back.
Place stethoscope on the right mid-lung area and auscultate on top of bare skin. To reduce hand-motion artifacts, hold the stethoscope with a steady hand while recording. Avoid contact of the stethoscope tubing with other objects as this will create extraneous noise. Avoid having palm of hand covering the round chest piece as this is the location of the antennae; instead consider holding flat round part with thumb at bottom, 3rd finger on side and use index finger to start recording. StethAssist automatically selects a gain level based upon the first two seconds of recording, so if the first two seconds of the recording are noisy (due to artifact sounds) or very quiet (no breath sounds detected) then StethAssist could inappropriately change the gain setting or disconnect completely and send you an error message. Make sure that the first two seconds are representative of the entire recording. Instruct the participant to breathe deeply in and out with their mouth open during the recording.
Press the (M) button on the stethoscope to begin recording. If the stethoscope is not connected, the “Stethoscope Connection” button on the computer screen (beside where it says “target stethoscope”) will display a red X instead of a green check. To reconnect, simply click on the “Stethoscope Connection” button. To restart the
Assure that recording length is set to 7 seconds for each recording, rather than 15 seconds as shown here
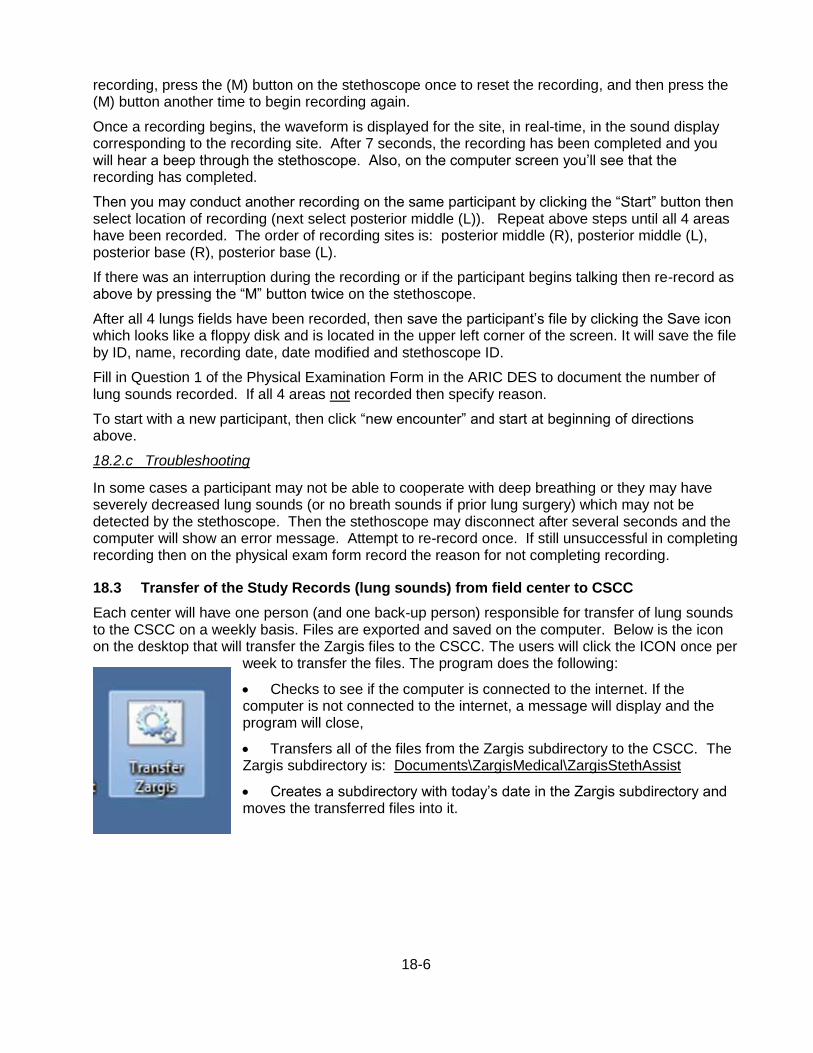
18-6
recording, press the (M) button on the stethoscope once to reset the recording, and then press the (M) button another time to begin recording again.
Once a recording begins, the waveform is displayed for the site, in real-time, in the sound display corresponding to the recording site. After 7 seconds, the recording has been completed and you will hear a beep through the stethoscope. Also, on the computer screen you’ll see that the recording has completed.
Then you may conduct another recording on the same participant by clicking the “Start” button then select location of recording (next select posterior middle (L)). Repeat above steps until all 4 areas have been recorded. The order of recording sites is: posterior middle (R), posterior middle (L), posterior base (R), posterior base (L).
If there was an interruption during the recording or if the participant begins talking then re-record as above by pressing the “M” button twice on the stethoscope.
After all 4 lungs fields have been recorded, then save the participant’s file by clicking the Save icon which looks like a floppy disk and is located in the upper left corner of the screen. It will save the file by ID, name, recording date, date modified and stethoscope ID.
Fill in Question 1 of the Physical Examination Form in the ARIC DES to document the number of lung sounds recorded. If all 4 areas not recorded then specify reason.
To start with a new participant, then click “new encounter” and start at beginning of directions above.
18.2.c Troubleshooting
In some cases a participant may not be able to cooperate with deep breathing or they may have severely decreased lung sounds (or no breath sounds if prior lung surgery) which may not be detected by the stethoscope. Then the stethoscope may disconnect after several seconds and the computer will show an error message. Attempt to re-record once. If still unsuccessful in completing recording then on the physical exam form record the reason for not completing recording.
18.3 Transfer of the Study Records (lung sounds) from field center to CSCC
Each center will have one person (and one back-up person) responsible for transfer of lung sounds to the CSCC on a weekly basis. Files are exported and saved on the computer. Below is the icon on the desktop that will transfer the Zargis files to the CSCC. The users will click the ICON once per
week to transfer the files. The program does the following:
Checks to see if the computer is connected to the internet. If the computer is not connected to the internet, a message will display and the program will close,
Transfers all of the files from the Zargis subdirectory to the CSCC. The Zargis subdirectory is: Documents\ZargisMedical\ZargisStethAssist
Creates a subdirectory with today’s date in the Zargis subdirectory and moves the transferred files into it.

18-7
18.4 Quality Assurance
For each physical examination technician, a quality control report is generated. This report will include frequencies for each of the questions on the “Heart Failure Physical Exam” form. In addition, the report will include frequencies of responses regarding quality of sound from technicians and physician reviewers. The reports will be reviewed by the chief trainer and sent to the technician. If performance problems are noted, then retraining will be considered.
18.5 Examination for Lower Extremity Swelling
To save time this exam for leg edema can be done just before or just after recording the electrocardiogram (ECG), since the participant will be lying flat on an exam table. The examination for lower extremity swelling can be also done before the ABI/PWV examination but not afterwards, since pressure from the ankle cuffs may interfere with the assessment of swelling.
Instructions for the participant: “Next I am going to look for swelling of your legs. I’m going to press lightly on your legs with my thumb to see if you have any swelling. Okay?”
While the participant is lying on his/her back, remove the socks in order to view the ankles and the tops of the feet (where “pedal edema” is located). Avoid pressure to any areas with ulcers or sores (often due to poor circulation). Apply gentle but firm pressure for a second or two with your thumb anteriorly along the mid-tibia (along the bony surface) down to the ankle in each leg, at 5 to 6 locations. With the examiner facing the patient, use your left hand/thumb for the right leg and right hand for the left leg exam. It is acceptable to stabilize the leg by holding the back of the participant’s ankle with your other hand. Look for pitting or indention that remains after pressure has been removed. If the indentation (pit) remains for more than two seconds, it is called “pitting edema.” Pitting above the middle of the lower leg (between the knee and ankle) is considered “marked;” if it only occurs below that point, it is considered “mild.” The exam is repeated on the other leg. Mark the appropriate findings on the physical exam form. If there has been an amputation or a cast or other reason that this examination cannot be performed then indicate “not done” on the form and indicate the reason.
18.6 Training and Certification of the Field Center Examiners
Examiners are trained and certified by the chief trainer. Certification requires familiarity with the protocol and equipment, and successful performance of the two components of the physical examination on five volunteers, inclusive of data entry and transfer, witnessed by the trainer. After initial training and certification, continued education is based on performance indicators monitored by the ARIC Quality Control Committee. Re-training / re-certification may be required at the request of this committee.
19-1
19. SPIROMETRY AND LUNG DIFFUSION CAPACITY
19.1 Spirometry
Spirometry is conducted using the Omni dry-rolling seal volume spirometer, fitted by OMI with a digital volume encoder, temperature sensor, and RS232 serial computer interface. The main spirometry measurements are the forced vital capacity (FVC), the forced expiration volume in one second (FEV1), and the ratio between these two values (FEV1/FVC). Testing, interpretation of the results and reporting will follow the spirometry guidelines of the American Thoracic Society (ATS) and the European Thoracic Society (ERS) (combined ATS + ERS spirometry guideline published in 2005). If pre-bronchodilator spirometry shows mild obstruction or mild restriction, a post-bronchodilator spirometry is conducted. Detailed instructions are found in Manual 4A.
19.2 DLco
The diffusing capacity for carbon monoxide (DLco) is a measure of the ability of gas to transfer from the alveoli across the alveolar epithelium and the capillary endothelium to the red blood cells. DLco depends not only on the area and thickness of the blood-gas barrier but also on the volume of blood in the pulmonary capillaries. The distribution of alveolar volume and ventilation also affects the measurement. DLco is measured by sampling end-expiratory gas for carbon monoxide (CO) after patients inspire a small amount of CO, hold their breath, and exhale.
DLco is decreased in patients with heart failure and contributes to dyspnea and exercise intolerance in these patients; it increases after successful treatment for heart failure (4). DLco has been shown to be an independent predictor of cardiac death in patients with heart failure. Conditions that affect the lung diffusely, such as emphysema and pulmonary fibrosis, decrease both DLco and alveolar ventilation (VA). DLco is also lowered by anemia which is why measurements are corrected for the hematocrit. DLco is not altered by asthma, chronic bronchitis, obesity or deconditioning. The addition of DLco to the spirometry will help to differentiate dyspnea due to the three major causes in this age group chronic obstructive pulmonary disease, asthma and heart failure. Detailed instructions are found in manual 4B.
20-1
20. STAGE I INTERVIEWS
20.1 Overview
As in previous examinations of the ARIC cohort a series of standardized questionnaires are administered by trained and certified interviewers who follow a common protocol throughout the study. Standardization and adherence to protocol are particularly important considering the many of these interviews are intended to capture change over time, by repeating questionnaires used previously by ARIC. The cognitive battery interviews are always administered following the snack as close as possible. The remainder of the Stage I interviews can be administered in convenient blocks throughout the examination or alternating with examinations to facilitate an efficient progression of the examination.
20.2 Personal History
20.2.a Rationale
The Personal History Questionnaire (PHX) helps to characterize the socio-economic characteristics of the study participant at the level of the household and in terms of perceived socio-economic status.
20.2.b Administration
The Personal History is interviewer-administered and can be administered at any time during the visit. Staff must be aware of the potentially sensitive nature of disclosing one’s income and self-rated social status. To avoid disclosing income figures having to verbalize statements that may carry some degree of social stigma, response cards are used. It is important that staff maintain a calm and neutral tone of voice, and present the response cards for questions 1 and 3 to the participant as they clearly enunciate the questions. Detailed instructions for administering each question are provided in the question by question instructions.
20.2.c Training and certification
ARIC staff are trained centrally or locally. Certification is achieved by the demonstration of adequate technique on 5 interviews, reviewed and approved by the study coordinator or interviewer supervisor.
20.2.d Quality Assurance
Two audio-recorded interviews per technician is reviewed by the supervisor. Technique and adherence to protocol are also monitored by Coordinating Center Monitors; data quality is monitored by the Quality Control Committee.
20.3 Medical History
20.3.a Rationale
The Medical History Questionnaire (MHQA) documents a number of chronic diseases or conditions of interest to ARIC. The collection of a medical history on each participant permits the assessment of overall health, and various non-cardiovascular conditions.
20.3.b Administration
The Medical History Questionnaire is an interviewer-administered questionnaire given to each participant (clinic, home, nursing home, or wherever the exam is performed). It can be administered at any time during the visit. Detailed instructions for administering each question are provided in the question by question instructions.
20-2
One of the objectives of this form is to determine in a standardized fashion whether a doctor ever diagnosed the participant as having any of the medical conditions mentioned. Many of the questions in the Medical History Questionnaire are phrased as "has a doctor or health professional ever told you that you had (name of condition)".
20.3.c Training and certification
ARIC staff are trained centrally or locally. Certification is achieved by the demonstration of adequate technique on 5 interviews, reviewed and approved by the study coordinator or interviewer supervisor.
20.3.d Quality Assurance
A non-systematic sample of Medical History forms is reviewed by the supervisor. Technique and adherence to protocol are also monitored by Coordinating Center Monitors; data quality is monitored by the Quality Control Committee.
20.4 Medication Survey
The Medication Survey (MSR) records all prescription and over-the-counter medications, including cold and allergy medications, vitamins, herbals or supplements used by participants in the four weeks preceding their interviews. This information assists in measuring patterns of medication use in the study communities, temporal changes in medical care practice, diagnostic classification of cardiovascular diseases, interpretation of laboratory results, and predictors of study end points.
The MSR and the Question-by-Question instructions for its use are found on the ARIC website. The survey ascertains usage of up to 25 medications. Ascertainment includes scanning of twelve-digit Universal Product Code (UPC) bar code symbols when available. Medical Therapeutic Classification (coding) is automated where possible. Otherwise, manual coding is centralized (performed only in the Coordinating Center).
20.4.a Administration of the MSR
The MSR is divided into four major sections: A) Reception, B) Medication Record, C) Medication Use Interview, and D) Medication Adherence, administered as described below. To reduce the length of the visit it is important that staff complete section B, Medication Record, while the participant is occupied with interviews or procedures, and prior to completing section C and D (Medication Use and Medication Adherence Interviews). A further reason for staff to complete section C early during the visit is to make available the information on coded medications in the Data Management System, where it can be interrogated by the ARIC technician for medications that exclude a participant from using a bronchodilator.
20.4.b Reception
Trained and certified study personnel places identification labels on the participant’s medication bag. Once the medication bag is logged and labeled, the interviewer checks with the participant to determine if it contains any medications that require refrigeration. Medications that require refrigeration are labeled with the participant’s ID and placed in the refrigerator. The interviewer then determines and records whether the participant has brought in all medications taken within the last four weeks. If the participant has not brought in any (all) medications, the interviewer inquires to differentiate between non-compliance with pre-visit instructions or non-use of medications in the prior four weeks. In case of inadvertent omissions, the interviewer makes arrangements for obtaining the information, preferably by having the participant return at a later date to the Field Center with the medications for scanning or transcription. The interviewer records deliberate omissions of medications on the MSR. Staff can administer subsequent parts of the MSR during
20-3
Reception (if the work area affords the opportunity for maintaining confidentiality) or later, in an area designated for conducting interviews.
20.4.c Medication Record
The interviewer first verifies that the name on the medication bag matches the participant’s name. Then the interviewer removes all medication containers from the medication bag and places them on the work area. When there are more than 25 medications for scanning / transcription, staff uses the following algorithm to guide prioritization: [1] prescription medications; then [2] aspirin, aspirin-containing medications and anti-inflammatory drugs (see Question-by-Question instructions, List #1 and List #2); followed by [3] over-the-counter medications; and finally [4] vitamins, herbals, and supplements.
The interviewer scans / transcribes the UPC (part (a) of items 5-29) into the Data Management System. The Data Management System will try to match a Medical Therapeutic Classification (MTC) to the UPC. If MTC-UPC matching is successful, the Data Management System will skip the rest of the fields (parts b-d) for this medication item and move to the next medication. If an UPC is not available or the Data Management System does not successfully match the UPC, the interviewer transcribes the medication National Drug Code (NDC) (part a). If an NDC is not available or the Data Management System does not successfully match the NDC, the interviewer transcribes the medication name (part b), strength (part c) and units (part d).
If this is done in the presence of the study participant the interviewer shows each medication to the participant as it is scanned / transcribed, while keeping the other medications in view. The interviewer verifies scanned / transcribed information against container labels, making corrections when necessary to ensure accuracy. If a bar code label is not on the medication container or a bar code cannot be successfully scanned and a medication name exceeds the number of positions for the medication name (b) in the Data management System, the interviewer right-truncates the name without abbreviating the name in any other fashion. After successfully scanning / transcribing each medication, the interviewer returns corresponding containers to the medication bag to minimize confusion and to assure that all medications are returned to the participant.
Loose pills and medications in containers that are unmarked are examined only in the presence of the participant. With his/her permission and help, the interviewer examines loose pills and unclearly labeled containers, or those which hold more than one medication (e.g., medisets). The interviewer uses pill imprints, the Facts and Comparisons Drug Identifier on the desktop computer, and the Ident-A-Drug Reference on the web to identify these medications.
20.4.d Medication Use Interview
The interviewer ascertains via a series of questions whether any of the participant-reported medications were used to treat pulmonary or cardiovascular diseases and/or their symptoms, whether any aspirin or aspirin-containing medications were used in the last four weeks, and whether any other non-steroidal anti-inflammatory drugs are being used on a regular basis.
20.4.e Medication Adherence Interview
The interviewer ascertains via a series of questions if the participant is non-adherent with medications, the degree of non-adherence, and factors influencing non-adherence (e.g. method of payment).
20.4.f Training
Interviewers are centrally trained and when certified, assume responsibility for providing local staff training in medication scanning / transcription.
20-4
20.4.g Certification
Interviewers are certified to administer the MSR by attending the central training, completing the scanning / transcription exercise designed by the central trainer, and passing with a score of ≥ 80%. New staff, unable to attend central training, are eligible for remote certification when:
The candidate is trained by the lead certified interviewer at the corresponding Field Center.
The candidate has completed five taped interviews demonstrating adequate technique based on review and approval by the lead interviewer.
The Study Coordinator has submitted a request for certification to the Coordinating Center on behalf of the candidate.
The Coordinating Center has sent to the Study Coordinator a mock medication bag with detailed instructions for the candidate’s certification.
The candidate independently completes an MSR and enters it into the Data Management System.
The Study Coordinator returns the medication bag with all of its contents, the instructions, and printouts of the MSR screens to the Coordinating Center for evaluation.
The candidate passes with a score of ≥ 80%.
20.4.h Quality Assurance
With participant’s approval, interviews are audiotaped for quality control. The Coordinating Center also performs site visits to observe technique and adherence to protocol. The Quality Control Committee monitors data quality semi-annually.
20.4.i Data Collection
The MSR is designed to be interviewer-administered and keyed directly into the Data Management System unless a workstation is not available. A paper version of the form is available for back-up and delayed data management. Medication UPC/NDCs (part (a) of items 5-29), medication names (part b), strengths (part c), and units (part d) are listed alphabetically in hard copy. Details of data collection are provided in the Question-by-Question instructions for the MSR.
20.5 Subjective Memory
20.5.a Rationale
This section allows the participant to report any symptoms of memory loss or memory impairment that he or she has noticed. It is administered in Stage I to allow for all participants to complete the questionnaire (the subset of participants who complete the CDR, either as part of Stage II or as part of eligibility for Stage II, will be asked in more detail about subjective memory symptoms).
20.5.b Administration
This form is administered by interview following instructions in the QXQ, either in the clinic or at home. This should not be administered to a proxy.
20.5.c Training and Certification
Interviewers are trained centrally or locally. Study coordinators are responsible for training new staff if necessary after central training based on standardized interviewing techniques and QXQ instructions.

20-5
20.5.d Quality Assurance
Data quality is monitored by the quality control committee, based on analyses prepared by the coordinating center.
20.6 Physical Activity
Information on habitual work and leisure-time related physical activity is collected by means of the questionnaire previously used in ARIC’s Visit 1 and Visit 3. The Physical Activity form and the instructions for its administration are found on the ARIC website. The mode of administration of this form in the Carotid MRI study is supported by pop-up screens on the DES that were not available previously.
20.6.a Rationale
The assessment of physical activity in a cohort such as ARIC required that the instrument capture usual physical activity, be of known validity and reliability, and be as brief as possible. The ARIC Physical Activity Questionnaire is based on a self-administered questionnaire developed for a Dutch population by Baecke et al. (Am J Clin Nutr 1982;36:932-42). The questionnaire was adapted for ARIC and the same modifications and clarifications in the version translated from Dutch that were made in Visit 1 still apply.
20.6.b Administration
The ARIC Physical Activity Questionnaire is interviewer administered. Response cards are used to help the subject formulate a response. The interviewer introduces the questionnaire by reading the introduction given on the form. The interviewer then reads each question slowly, calling attention to the corresponding response screen for each question. The form, question-by-question instructions, and a physical activity coding dictionary are required.
20.6.c Coding and Scoring of Physical Activity
The coding of the physical activities reported by each participant is based on a physical activity dictionary which is appended to the question by question instructions. The physical activities are coded by ARIC staff after the interview is complete (but not in the presence of the participant). Subsequent scoring of physical activity for purposes of analysis is done by the Coordinating Center, based on the algorithm developed by Baecke et al.
20.6.d Training
Interviewers are centrally trained prior to the start of the study. Topics include proper coding of various physical activities, usage of response cards, scoring and knowledge of when and how to probe.
20.6.e Certification
Manual 12 on Quality Control, describes the certification procedures.
20.6.f Quality Control
The data collected by each interviewer are periodically reviewed by the Quality Control Committee from quality control analyses performed by the Coordinating Center. Data patterns suggestive of deviations from protocol are brought to the attention of the field center principal investigator and project manager. Observation of the interviews or review of taped interviews the follows, with discussion of possible remedial actions with staff. Major deviations are brought to the attention of the Executive Committee.
20-6
20.6.g Data Collection
The Physical Activity Questionnaire is administered by direct data entry on the DES, with the help of response cards handed to the interviewee.
20.7 SF-12TM General Health
20.7.a Rationale
The 12-item Short-Form Health Survey, SF-12, is a shortened version of the SF-36 Health Survey (Ware, Kosinsk, and Keller, 1995, 1996) which assesses health-related quality of life. Like the SF-36, it is a generic measure, as opposed to one that targets a specific age, disease, or treatment group.
The SF-36 is the most widely-used health survey throughout the world because it is both brief and comprehensive, readily available, psychometrically-sound, and of proven usefulness in measuring health status and monitoring health outcomes. However, the SF-36 has been judged to be too long for the ARIC examination. The ARIC study will be using a shortened version of the SF-36. The same eight domains of health that can be estimated from the SF-36 can be constructed using the SF-12v2, but estimation of the physical and mental health domains have the greatest accuracy. All of the questions and response categories on the SF-12 Version 2 are identical to those on the SF-36. The questionnaire is available in the standard (4-week) and acute (1-week) recall versions – ARIC will use the standard version. The SF-12v2 was chosen for ARIC because (1) it has been demonstrated to have reproducibility and validity compared with other health-related quality of life (HR-QOL) forms, and (2) U.S. population norms exist.
20.7.b Equipment and Setting
The interview takes place in a quiet and private setting to put the participant at ease and allow the participant to focus on the task. Data are collected electronically using the DMS. A paper version of the form is available for back-up if the DMS is unavailable. The SF-12v2 items are scored so that a higher score indicates a better health state. The algorithms for scoring the summary physical [Physical Component Summary (PCS-12)] and mental [Mental Component Summary (MCS-12)] health scores are documented in Chapter 8 of the manual (How to Score Version 2 of the SF-12TM Health Survey, 2002). In addition to estimates of PCS and MCS, the manual provides scoring algorithms for the eight domains of health profiled by the SF-36.
20.7.c Training and Certification
Interviewers are trained and certified in general interviewing techniques and administration of the form. This requires familiarity with the contents and procedures for administering the SF-12v2 form via the DMS or on paper. Staff can be trained centrally or locally at the field center. Retraining is required if quality assurance analyses indicate poor performance or inconsistent results.
20.7.d Quality Assurance
Monthly data quality reports will be prepared by the Coordinating Center and reviewed by the Quality Control Committee examining the frequency of out-of-range values, missing data, and summary measures (PCS, MCS) by field center and interviewer.

20-7
20.8 Access to Care and Satisfaction with Care
20.8.a Rationale
Poor access to health care may be associated with increased cardiovascular morbidity and mortality. Likewise, patient satisfaction is an important health outcome and an essential component of quality of care that can serve to inform the process of care.
This questionnaire aims to address access to health care and satisfaction with care among ARIC study participants. Equitable access to necessary care is defined as care for which (1) the benefits of care outweigh the risks, (2) the benefits to the patient are likely and substantial, and (3) physicians have judged that not recommending the care would be improper . The questionnaire evaluates overall access to health care of the participants by asking questions concerning their usual source of care, physical accessibility of care, difficulty, if any, in accessing care and, where appropriate, reasons for delay or inability to obtain necessary care. The questionnaire further addresses issues related to satisfaction with care.
20.8.b Administration
The questionnaire takes approximately 4 minutes to complete. The questionnaire consists of the following four components: Administrative Information, Usual Source of Care, Difficulty in Obtaining Care, and Satisfaction with Care. The questions are formulated so that the person interviewed refers to the usual source of care rather than an occasional physician visit. The questionnaire will be administered as part of the ARIC Visit 5 interview using the electronic Data Management System. Detailed instructions for administering each question are provided in the QxQs.
20.8.c Training and Certification:
The ARIC study personnel are trained centrally using standardized interview techniques and certified prior to data collection. Detailed QxQ instructions are provided at the time of training and during the interview.
20.8.d Quality Assurance:
Data quality monitoring within the ARIC study is conducted using statistical procedures in the individual field centers and centrally through the ARIC Study Coordinating Center. Data collection and transfer will be evaluated according to established protocols. Interviews will be audio-taped and randomly chosen for regular review of adherence to protocol.
20.9 Center for Epidemiologic Studies Depression Scale (CESD) Short Form & Hopelessness
20.9.a Rationale
Depressive symptoms have been linked to a number of important health outcomes including cardiovascular disease risk factors, CHD morbidity and mortality, cognitive functioning, and MCI/dementia. In ARIC V5/NCS, depressive symptoms will be assessed using the Center for Epidemiologic Studies Depression Scale (CES-D) Short Form (Kohout et. al, 1993). The CES-D Short Form is an 11-item questionnaire derived from the original 20-item CES-D (Radloff, 1977). In addition to a reduced administration time and clearer response options (relative to the 20-item version), the Short Form is highly correlated with the original (r > .94), has a high internal consistency, retains the same factor structure as the original, and has a similar positive predictive value as a screening tool for identifying clinical depression. A related construct, hopelessness, has been independently associated with increased risk of incident MI, cancer, and all-cause mortality (Everson et. al, 1996). One item assessing hopelessness will be collected.
20-8
20.9.b Administration
It takes approximately 3 minutes to complete this questionnaire. The questionnaire is administered by interview. The participant is provided with a response card listing the 3 response options. As a scale for depression, responses must be provided by the participant, not a proxy. Because of the sensitive nature of some of the questions, interviewers must take care to ask questions and record responses in a sensitive and non-judgmental manner. Most of the questions are self-explanatory; however, if the respondent is unclear, the interviewer will repeat the question and use general phrases, such as: “Answer as best you can, based on how you have felt over the past week.” Interviewers should not lead participants to an answer but remaining neutral.
20.9.c Scoring
Participants are asked to rate each item on a 3-point scale (scored 0 to 2) on the basis of “how often you have felt this way during the past week.” Response categories are:
- Hardly ever or never (less than 1 day in the past week); scored as 0
- Some of the time (1-2 days in the past week); scored as 1
- Much or most of the time of (3-7 days in the past week); scored as 2
The DMS will compute a total score, calculated as the sum of the responses to questions 1-11. To control for response bias, questions # 5 and 8 are reverse scored. Scores range from 0 to 22 with higher scores indicating more severe depressive symptoms. If more than three items are missing, a score is not calculated. If one to three items are missing, scores on the completed items are summed; the total is divided by the number of items answered and multiplied by 11. Hopelessness is simply the corresponding score to question #12.
20.9.d Training and Certification
Interviewers are centrally trained. Study coordinators are responsible for training new staff if necessary after central training based on standardized interviewing techniques, QxQ instructions, and role playing example situations.
20.9.f Quality Assurance
Data quality is monitored by the Quality Control Committee, based on analyses prepared by the coordinating center. In cases where score patterns suggest suboptimal data quality, the study coordinator will be notified and technical assistance and remedial action provided. In addition, interviews will be audio-taped and regularly reviewed for adherence to protocol.
20.9.e Alert Guidelines and Instructions for Notification of Participants and Physicians Regarding
Depression Scores
The CES-D is not a diagnostic tool but may be used as a screening test to identify individuals at risk for clinical depression. In elderly participants, especially those with multiple comorbidities, some positive responses are expected.
A CES-D score ≥ 9 suggests probable Major Depression. Participants with scores in this range will be notified as well as their primary care physician by letter, indicating the presence of significant depressive symptoms on a common screening test and recommending a follow-up clinical assessment to evaluate for clinical depression and possible treatment. A CES-D score ≥ 9 is flagged as an alert condition on the report printed by ARIC staff for review with the participant during the Exit Interview (see Section 24).
20-9
20.10 Dietary and Vitamin Intake
During ARIC exams 1 and 3 dietary intake data were collected using a 66-item modified version of the food frequency questionnaire (FFQ) developed by Walter Willett and colleagues. This questionnaire was administered also to a small sample of cohort members during Visit 2, to assess the repeatability properties of the instrument. During the ARIC Carotid MRI study, a 135-item FFQ, also developed by Willett, was administered to ARIC MRI participants. For ARIC exam 5, an updated FFQ may be administered to elderly participants if funding is obtained through an ancillary study.
20.11 Respiratory Symptoms
< not located >

21-1
21. ARIC/NCS STAGE II FIELD CENTER INTERVIEWS AND PROCEDURES
Participants with evidence of cognitive impairment and a sample of the remaining participants who have had cognitive testing in Stage I are selected for further cognitive evaluation (Stage II) and cerebral MRI (Stage III). In addition, all ARIC Brain MRI study participants examined in 2004-6 are selected. The Stage II components are listed in table 21.1 and are detailed in Manual 17. These are validated, standardized instruments widely used in both clinical and epidemiologic studies of dementia and cognitive function, in addition to non-mydriatic retinal fundus photography. The latter is described in Manual 3A.
21.1 Neurological Family History
21.1.a Rationale
Family history of dementia may be pertinent in evaluating cognitive outcomes in NCS participants. This form also includes questions relating to family history of Parkinson’s disease, which will also be helpful in evaluating associations with disease and with genetic factors. Because some hereditary degenerative disorders are associated with an earlier age of onset than non-hereditary neurodegenerative disorders, the form includes questions about age of onset of dementia or Parkinson’s Disease.
21.1.b Administration
This form is administered by interview following instructions in the QxQ either in the clinic or at home. In the event that the participant requires a proxy, the proxy will be asked these questions in the presence of the participant.
Table 21.1 ARIC/NCS STAGE II FIELD CENTER INTERVIEWS AND PROCEDURES
ARIC/NCS Stage II Examination Components - Field Center Forms MOPs Time (min.)
Reception (separate visit) -- 10
Neurological examination: Physical and neurological exam Unified Parkinson’s Rating Scale Clinical Dementia Rating (CDR subject) Hachinski Ischemic Scale
PNE UPR CDP HIS
17
25
Retinal photography REX 3A 20
Neuropsychiatric Inventory 5
Neurological and dementia history NHX 17
Neurological family history NFH 17
CDR informant and summary CDI/CDS 17 15
MRI consent (can be done as part of Stage I) -- 13 8
Exit interview 2 13
21-2
21.1.c Training and Certification
Interviewers are centrally trained. Study coordinators are responsible for training new staff if necessary after central training based on standardized interviewing techniques and QxQ instructions.
21.1.d Quality Assurance
Data quality is monitored by the Quality Control Committee, based on analyses prepared by the coordinating center. In cases where score patterns suggest suboptimal data quality, the study coordinator will be notified and technical assistance and remedial action provided.
21.2 Neurological Medical History
21.2.a Rationale
The neurological medical history is important in the determination of mitigating factors explaining potential problems in cognitive performance, as well as in the classification process. The form includes questions about vision and hearing, as well as depression, in addition to neurologic history: Alzheimer’s or dementia, Parkinson’s disease, seizures, head trauma, multiple sclerosis, brain tumors. Stroke and TIA are not on this form as they are found on the Visit 5 medical history form. In the etiologic diagnosis classification stage, knowledge about other neurologic diagnoses that might explain an individual’s performance is needed, and these other diagnoses are included in this form.
21.2.b Administration
This form is administered by interview following instructions in the QxQ either in the clinic or at home. In the event that the participant requires a proxy, the proxy will be asked these questions in the presence of the participant.
21.2.c Training and Certification
Interviewers are centrally trained. Study coordinators are responsible for training new staff if necessary after central training based on standardized interviewing techniques and QxQ instructions.
212.d Quality Assurance
Data quality is monitored by the Quality Control Committee, based on analyses prepared by the coordinating center. In cases where score patterns suggest suboptimal data quality, the study coordinator will be notified and technical assistance and remedial action pro

22-1
22. ARIC/NCS STAGE III – CEREBRAL IMAGING
Cerebral magnetic resonance imaging (MRI) constitutes Stage III of the ARIC/NCS examination. It is scheduled on the same day as Stage 2 when possible. Participants with contraindications to MRI are not invited for Stage III. These contraindications are a cardiac pacemaker, defibrillator or valvular prosthesis, history of meningioma, history of arachnoid cyst, history of craniotomy with resection or radiation therapy involving the skull or brain, history of normal pressure hydrocephalus, metal fragments in the eyes, brain, or spinal cord, cochlear implant, spinal cord stimulator, or other internal electrical device, permanent eyeliner, or weight > 350 lbs. The cerebral MRI examination procedures are described in Manual 13.
23-1
23. DATA INVENTORY AND REPORT PREPARATION
The data inventory is done after all interviews and examination procedures have been completed and prior to the Exit Interview. At the field center’s discretion, this can be done while the study participant changes into street clothes. Because participant data are collected by various means during the course of the exam, the objective of this inventory is to verify that all data items have been collected before the participant leaves the study center. In order to perform the data inventory, run the Participant Inventory Report found on the “Reports” page of the study Data Management System (DMS). Enter the ARIC participant ID and the application will list the set of completed forms and procedures, noting which ones are missing. As part of this inventory the “end of visit” report of study results is personalized and printed for review with the participant during the exit interview.
24-1
24. EXIT INTERVIEW
The end of visit debriefing provides an opportunity to ask for feed-back about the visit and to identify aspects that the participant may have perceived as stressful or unpleasant. It also provides an opportunity to re-establish rapport with the study participant and to seek commitment for a long-term association with the ARIC study. The participant is reminded of the six-month follow-up call, and at the field center’s discretion the call can be scheduled at that time.
The summary of results provided at the end of the examination visit is discussed with the participant, and any results identified at this time for confirmation or referral for medical care are discussed. The participant is told that a written summary report, including additional tests, will be mailed to the participant and his/her physician (or alternate) six to eight weeks after the field center exam. It is important to establish who is authorized to receive the report of study results, according to the participant’s instructions. If a proxy provided informed consent on behalf of the study participant, it is the proxy who should receive the participant’s study results. In this process, staff must be sensitive to the participant’s self-esteem; if authorized by the proxy, ARIC staff may provide of the study results to the study participant.
During the administration of the CES-D or during the Exit Interview a participant may reveal indications of depression. Participants who acknowledge significant depression should be advised to see their physician (psychiatrist or psychologist if they have one) within 48 hours so that an appropriate referral can be made. If in doubt whether a referral is needed, ARIC staff conducting the exit interview must consult with their supervisor or the study coordinator. A list of referral services available in the ARIC study community is kept on file.
Participants who acknowledge suicidal thoughts to interviewers should be referred immediately to the emergency room of the nearest hospital. If a participant refuses to go to the emergency room, he/she should be strongly encouraged to seek care as soon as possible since no participant can be made to seek care against his/her will. This requires consultation with the study coordinator and/or the medical professional on call for the ARIC field center. Once the participant has been placed in the care of a health service or qualified professional, and adverse event form is filed.
To meet its obligations to participants, the study notifies participants or their caregivers about a poor performance on their cognitive status assessment (failure on two cognitive domains is notifiable). This information is sensitive, and is presented to the study participant – or the proxy/caregiver if present – during the exit interview to avoid a notification by letter. Notification of cognitive deficits recorded in the medical record could adversely affect a participant's ability to obtain long term care insurance in the future. A letter summarizing this information (see Manual 17) is therefore handed to the participant / caregiver, with a verbal explanation that does not deviate from the contents of the letter. If under exceptional circumstances this letter must be mailed, it is addressed (only) to the study participant or the proxy.
The scheduling for Stages II – III of the NCS exam is reviewed with the participant and the corresponding appointment – it applicable – is made. The DMS does NOT provide the reason for eligibility or ineligibility for Stage II. Instead, it indicates whether a study participant is/is not/ may be eligible for stages II and III. Participants can be expected to ask why they were selected (or why not). Staff should explain that this follows a selection process run in the study’s computer system and that they do not know the specific reason one or another participant is selected. If the participant is not eligible for Stage II s/he is thanked for participating in the ARIC exam visit and asked whether he/she has any remaining questions or any concerns.

25-1
25. PARTICIPANT SAFETY
The safety of the ARIC participants is protected by specific measures taken in the course of the examination; by the mechanisms established for handling potential emergencies; the routine notification of participants regarding the results of the examination, and by procedures used by study personnel to review all potentially medically important results and make the appropriate referrals.
Various conditions are ascertained as part of ARIC protocol that make a person ineligible for an exam procedure. These include: a. Use of a pacemaker or defibrillator for bioimpedence estimation and bronchodilator use; b. Reported heart attack, stroke, or eye surgery or abdominal surgery in the last 6 months for pulmonary function testing; c. Use of specific medications that exclude the use of albuterol. The presence of these conditions can be ascertained at various stages ranging from scheduling the visit to the examination process, by different staff. It is the responsibility of the staff person administering a procedure to verify the presence of a safety exclusion prior to proceeding with the test or measurement. If in doubt, the supervisor is consulted. As a result, updated, revised or contradictory information on self-reported exclusionary conditions can occur; all inconsistent information has to be resolved – and documented in the Participant Safety Screening Form (PSA) – to verify that participant safety precautions have been met.
The master record used in ARIC to document and monitor safety is the Participant Safety Screening Form (PSA). Although some exclusion conditions are also recorded on other study forms as well as on a check list, the Participant Safety Screening Form (PSA) serves as the document of record for safety items in the ARIC database and is the register by which the Study monitors compliance with the safety protocol. Thus, if the study participant or an authorized ARIC clinic staff person updates information provided previously the PSA form must be updated. This is done by (a) changing the pertinent response on the PSA in the DMS, and (b) by adding a note log to that item with a brief explanation for this action and the staff person’s ARIC ID.
25.1 Measures to Protect the Participant
Examination procedures which convey potential, small risk to participants include the venipuncture, spirometry and the administration of albuterol. Precautions are taken to exclude individual who have conditions or characteristics that expose them to greater than minimal risk in the context of these procedures, as detailed below. Methods by which participant risk is minimized (more fully described elsewhere in the ARIC Manuals) include the following. At the time a participant’s examination at the ARIC field center is scheduled conditions and circumstances that can convey risk in the context of examination procedure are ascertained and recorded. Safety exclusions are also ascertained prior to specific exclusions, as detailed below.
The possibility of hypoglycemia with a 8-hour fast is diminished by routine inquiry about reasons which should exempt the participant from fasting during the scheduling of the examination visit. Because many diabetic participants should not fast and take their morning medication, ARIC staff ask during recruitment (and preferably also during the reminder call), whether they can hold their medication, bring it to the clinic, and take it during the snack. Other medical conditions or dietary restrictions which may be incompatible with the snack provided in the clinic are also ascertained. Hematomas or prolonged bleeding resulting from venipuncture are usually avoided if well-trained technicians follow the procedures for blood drawing and take the precautions described in ARIC Manual 7. Occasionally, bleeding persists after Venipuncture, in which case procedures described in Manual 7 are followed. Participants may experience syncope during the venipuncture. Methods for handling major and minor emergencies are described below.
For persons with conditions which require emergency and immediate referrals, such as cardiac events, anginal pain, ECGs or echocardiograms or abdominal aorta scans with acute and potentially severe abnormalities, or blood pressures > 200/130 mm Hg (see below), the ARIC
25-2
clinician is consulted immediately, the clinic exam is terminated as soon as the condition is observed and if indicated, transport to an emergency health care facility is arranged.
25.2 Procedures for Handling Emergencies
While all life threatening emergencies (e.g., suspected acute MI) require immediate evaluation of the participant at an acute care facility, some emergency measures may be required in the clinic before departure. In addition, there are minor emergencies (hypotension, fainting, etc.) which may require treatment on the premises only. Although most emergencies are of the less severe nature, ARIC Field Center clinics are prepared for both types.
Major emergencies
In a serious event the primary concern of the clinic staff is to implement pre-established procedures to get the participant to the nearest medical facility. All ARIC clinics are located within a few city blocks of a large, general, acute-care hospital. Needed life support procedures are continued until emergency care arrives or the participant is transported to a hospital. Each ARIC field center, depending on its location and staffing patterns, has specific emergency procedures, which define:
1. Who is in charge during the emergency.
2. Who is to administer treatments.
3. Who is to be notified.
4. What action clinic staff is to take.
5. Which reports are to be filed.
Each field center clinic is required to have access at all times during which participants are interviewed and examined to either a physician, a physician assistant or a registered nurse. Each field center has, in addition to trained personnel and emergency equipment, the following information posted in conspicuous places (e.g., the reception area): phone number of police and fire stations; ambulance services; and specific phone numbers or codes to alert medical teams, if applicable.
In each participant's record, the name and phone number of his/her physician or usual source of health care and the home and work telephone numbers of one or more contact persons are available . Emergency situations are coordinated by the staff person(s) designated, a priori, or by a physician if present. If not physically present in clinic, the designated physician on duty is within immediate reach by phone or paging system, and within a short distance to the clinic. The physician duty roster is posted in the field center and in the office of the nurse/clinician so that the responsible physician can be contacted. However, under no circumstances must emergency referral and/or care be deferred while staff attempts to locate the medical director or designated ARIC physician.
All emergencies, whether serious or minor, are documented. This requires filling out an institutionally-approved form identifying the type of emergency as well as an ARIC Adverse Event Form (see below). This is done by the person in charge at the time; all reports are co-signed by a clinic physician and filed at each clinic. The adverse event forms are keyed into the ARIC DMS.
Minor emergencies
The most common minor emergency is simple syncope (fainting) and near syncope. These events may occur during venipuncture or spirometry. The management of simple syncope or near syncope follows the procedures detailed in Manual 7.
25-3
Many syncopal episodes can be prevented if clinic staff is alert to early signs. In any situation in which syncope is likely, e.g., after the venipuncture, staff verifies that the participant does not look or feel faint. If the participant looks faint or feels faint in the venipuncture area:
Have the person remain in the chair. If necessary, have him/her lie on the floor with their legs elevated. Use of a transfer belt may be indicated in this situation. Take an ampule of smelling salts, crush it, and wave it under the person's nose for a few seconds. Provide the person with a basin if he/she feels nauseous. Have the person remain seated until the color returns and he/she feels better. Have someone stay with the person to prevent them from falling or injuring themselves if they should faint. Place a cold wet cloth on the back of the person's neck or on their forehead. Once the episode has passed, some fruit juice may be given to the participant in order to counteract any possible hypoglycemia due to their fast. If the person continues to feel sick, take a blood pressure and pulse reading. Contact a medical staff member for further direction. Hypoglycemia (blood glucose < 50 mg/dL with or without symptoms) refers to abnormally low blood glucose level and occurs when there is an imbalance between the dose of hypoglycemic medications (in a treated diabetic) or the blood sugar level (in any person) and the person's food intake and activity level. Symptoms can include anxiety, tremor, palpitations, faintness, hunger cold, clammy skin, rapid heart rate, sweating, numbness around the lips or on the tongue, tiredness, weakness (generalized), motor incoordination, slurred speech, irritability, appearing to be “absent” or not behaving “normal”. Hypoglycemic symptoms can occur with a glucose level within normal range (in those who are chronically hyperglycemic). These individuals need oral glucose replacement as well. If untreated, a further decrease in blood glucose may lead to confusion followed by loss of consciousness. Prolonged hypoglycemia may precipitate angina pectoris or seizures. It is important to remember that symptoms of hypoglycemia are variable and may be partially masked in older participants.
If a person displays any of these symptoms and is able to take food orally, 8oz of orange juice containing additional sugar should be given immediately and the clinic physician notified as soon as possible. If a hypoglycemic event has occurred the participant is evaluated by clinical staff prior to leaving the field center.
Severe hypoglycemic reactions are a medical emergency and the person should be transported immediately to an emergency care facility. Should a participant with hypoglycemia become stuporous or non-responsive, oral replacement with glucose should not be administered in order to avoid aspiration. Instead, oral glucose gel is placed on the inside of the cheeks, and immediate transfer to the ER should proceed.
Emergency Equipment
A basic first aid kit is maintained at each field center. The kit contains a reference guide of its contents, and is checked every year and immediately after each use. At each field center the Study Coordinator identifies a person responsible for its maintenance.
25.3 Procedures to Document Adverse Events and Emergencies
Adverse Event Definition and Reporting in ARIC
An adverse event (AE) is an adverse change in health or "side-effect" that occurs in a person who participates in ARIC, which may or may not be caused by participation in the study. Serious adverse events (SAEs) and adverse events that are not anticipated in the study protocol or referred
25-4
to in the informed consent must be reported to the local Institutional Review Board (IRB) and to the study sponsor (NHLBI).
AEs must be addressed promptly according to institutional safety guidelines and the ARIC study protocol, to resolve any safety concerns or participant discomfort. The supervisor, medical director and/or principal investigator are notified according to the perceived severity of the event and the safety protocol.
AE Classification in ARIC
Serious AE (vs. Minor or not serious)
An adverse event is serious if it results in any of the following outcomes:
Death
A threat to life
Requires (inpatient) hospitalization
Likely causes persistent or significant disability or incapacity
Likely associated with a congenital anomaly or birth defect
Requires treatment to prevent one of the outcomes listed above, other than for pre-existing conditions detected as a result of participation in ARIC, its tests and examination protocol.
Expected (vs. unexpected)
An adverse event is unexpected if the risk information is not mentioned in the consent form, if the AE is not mentioned in the study protocol, or if the AE is not reasonably expected to be related to study procedures. The study procedures in ARIC are deemed to be safe. Serious adverse events (SAEs) are therefore unanticipated and unexpected, whether study related or otherwise.
Study-related, possibly study-related, or not study-related.
Related AE – An adverse event which is related to the use of a device, procedure or an ingested substance in a way that supports a reasonable possibility (such as strong temporal relationship) that the adverse event may have been caused by the device, procedure or intervention used in ARIC.
Possibly Related AE – An adverse event which is possibly study-related is one that may have been caused by a procedure, device, or ingested substance, with insufficient information to determine the likelihood of this possibility.
Unrelated AE – An adverse event that has no apparent relationship to the study.
Reporting of Adverse Events and Information Flow
Once the participant safety and comfort concerns have been addressed all AEs are recorded in the ARIC DMS, and the Institutional Review Board (IRB) is notified according to each IRB’s guidelines. All adverse events (whether serious or not serious) are recorded in the ARIC DMS. The Serious Adverse Event form or the Minor (not serious) Adverse Event form is used for this purpose. Serious adverse events also require that the ARIC field center staff entering the SAE form in the DMS notify the coordinating center by sending an email with the study participant ID to [email protected] This results in a report of the SAE to the NHLBI by the Coordinating Center, within 72 hours. No direct notification of an adverse event to NHLBI is required of the field center unless additional information is needed. Adverse events not considered serious are summarized periodically by the Coordinating Center for the NHLBI, the OSMB, and/or the Steering Committee, as required. Summary tables of

25-5
adverse events are included in the management reports prepared by the Coordinating Center. The reporting schedule of AEs in the ARIC is presented in Table 25.1.
Table 25.1 Adverse Events - Actions by the ARIC Study Agencies and Timing
Type of AE ARIC Field Center Coordinating
Center ARIC Ops
Cmte. Steering
Committee
Serious (SAE)
Address any ppt. safety
issues; inform medical
director and PI
Record SAE in the ARIC DMS and report to Arichelp*
(include ID)
Report AE to IRB
Notify NHLBI
Review event & report to
SC, FC Managers,
Lab, as appropriate
Review study procedures
with experts; propose
revisions if required
Review report of AE and study
procedures; modify
protocol if required
Time / Schedule
Immediate 48 hrs. 72 hrs. 72 hrs. 2 weeks 4 weeks
Not serious (MAE)
Unexpected Related, Possibly Related, or Unrelated
Address any ppt. safety / comfort issues
Record AE in the ARIC DMS
Report AE to IRB
Notify NHLBI, SC, FC Managers & Centers if warranted
Review study procedures with experts; propose revisions if required
Review report of AE and study procedures; modify protocol if required
Time / Schedule
Immediate 72 hrs. 72 hrs. Quarterly 4 weeks As needed
Not serious (MAE)
Expected
(mentioned in the ARIC consent form)
Address any ppt. safety / comfort issues
Record AE in the ARIC DMS
No
Update ARIC management report
N.A.
N.A.
Time / Schedule
Immediate 72 hrs. N.A. Quarterly N.A. N.A.
25.4 Conditions Ascertained at the Time of Scheduling Field Center Visit
Safety-related conditions considered exclusions from examination procedures.
Medications that need to be taken on schedule.
25.5 Exclusions from Study Procedures
Exclusion from Any Study Component
SBP >= 200 or DBP >120 (Stop exam visit, arrange for urgent care; if technician unaware, this alert condition is triggered on entry into DES)
Exclusion from Bioimpedence Estimation
25-6
Cardiac pacemakers (or automatic implanted cardiac defibrillator (AICD), if in doubt)
Exclusions from Spirometry
SBP >= 200 or DBP >120 mmHg. Stop exam visit, arrange for urgent care.
Automatic implanted cardiac defibrillator (AICD).
Has had heart attack, a stroke, eye surgery, or surgery to the chest or abdomen in the last 6 months.
Was told by a doctor that has had bleeding inside an eye or the retina, or a retinal tear or detachment.
Has had any significant problems doing spirometry in the past.
Exclusions from the Bronchodilator Test (Only applicable to participants selected for bronchodilator)
If following spirometry the participant is selected for a bronchodilator test the technician shows the albuterol metered dose inhaler and asks whether participant has had any significant problems taking a puffer. If “YES” the participant is excluded from the bronchodilator test.
Then, determine whether the participant is taking a Class 1 anti-arrhythmic drug, monoamine oxidase inhibitor, or tricylic antidepressant and ask the participant “Are you taking medication for a serious heart rhythm problem?” If the response is “YES” the participant is excluded from the bronchodilator test.
If the participant or the ARIC technician prefer to verify that a medication taken by the participant is not an exclusion from the bronchodilator test, the list of medications shown below is consulted. This list is kept as a laminated chart in the spirometry room at each ARIC field center:
Anti-Arrhythmics That Exclude Participants from Bronchodilator Testing: Amiodarone (Cordarone) Bretylium (Bretylol) Bretylol (Bretylium) Cardioquin (Quinidine, Quinalan, Quinidex, Quinaglute) Cordarone (Amiodarone) Disopyramide (Norpace) Dofetilide Enkaid (Encainide) Ethmozine (Moricizine) Flecanide (Tambocor) Ibutilide Lidocaine (Xylocaine, Xylocard) Mexiletine (Mexitil) Mexitil (Mexilitine) Moricizine (Ethmozine) Norpace (Disopyramide) Procainamide (Pronestyl, Procan SR) Procan SP (Procainamide, Pronestyl) Pronestyl (Procan SP, Procainamide) Propafenone (Rhythmol) Rhythmol (Propafenone) Tambocore (Flecainide) Tocainide (Tonocard) Tonocard (Tocainide) Quinaglute (Cardioquin, Quinidine, Quinora, Quinalan, Quinidex) Quinidine (Quinora, Quinalan, Cardioquin, Quinidex, Quinaglute) Quinalan (Quinora, Cardioquin, Quinidex, Quinaglute, Quinidine) Quinora (Quinidine, Quinalan, Cardioquin, Quinidex, Quinaglute) Xylocaine (Lidocaine, Xylocard)
25-7
Xylocard (Lidocaine, Xylocaine)
MAO Inhibitors that Exclude Participants from Bronchodilator Testing:
Isocarboxazid (Marplan) Phenelzine Sulfate (Nardil) Tranylcypromine Sulfate (Parnate) Phenelzine Sulfate Tranylcypromine Sulfate Tricyclic Antidepressants that Exclude Participants from Bronchodilator Testing: Amitriptyline (Elavil, Vanatrip, Endep) Amoxapine (Asendin) Clomipramine (Anafranil) Desipramine (Norpramin, Pertofrane) Doxepin (Sinequan, Zonalon, Adapin) Imipramine (Tofranil) Maprotiline (Ludiomil) Nortriptyline (Aventyl, Pamelor) Protriptyline (Vivactil, Triptil) Trimipramine (Surmontil).
25.6 Stopping Rules for Clinic Examinations and/or Procedures
Participant Safety/Alert Thresholds.
If a participant feels unwell or if an alert value is met on a study measurement the participant is referred to health care and the remainder of the field center examination may be deferred, according to the action levels identified in previous sections of this manual. If the health care referral is an alert value or if the examination is discontinued field center personnel explain the urgent need to seek medical care and assist the participant in making an appointment if this is helpful. The study participant is also told that ARIC personnel will contact him/her within 48 hours as a courtesy follow up. During this follow-up call field center personnel confirm that the participant has seen a doctor, or has understood the need to seek medical care.
Within one month after the initial visit the participant is contacted to schedule the completion of the examination. A similar process is followed to schedule a continuation visit for field center examinations interrupted because of an elevated blood pressure, a major acute abnormality detected on an electrocardiogram, or similar emergent referrals. On re-contacting the participant ARIC personnel ask whether she/he has seen a doctor for the condition that prompted the referral. If the participant has not seen a physician he/she is again encouraged to do so (but no clinic visit is scheduled). If the participant reports having seen a physician field center personnel ask if the participant feels well enough to schedule the continuation of the ARIC examination visits and proceed according to the response.
Fatigue/Discomfort.
A clinic examination or procedure may be discontinued due to participant fatigue or physical and/or emotional discomfort. When any one of these conditions are observed by a staff member, the participant is offered the opportunity to discontinue the interview or procedure, and is given an opportunity to rest before being taken to the next work station. If in the course of the field center visit, a participant seems to exhibit anxiety when instructed to perform tasks or shows a pattern of repetition or empty responses during interviews and/or seeks assistance from others during interviews, the staff person uses a break between procedures to bring this to the attention of the supervisor. The supervisor can decide whether the participant should be asked to complete the longer interviews that remain on the participant’s schedule. Persons incapable of completing the
25-8
full field center exam are invited to change back into their street clothes and participate in the exit review and reschedule the clinic exam on another day.
25.7 Mental Health Emergency Procedures
In the course of the ARIC field center activities there are a number of circumstances that require training and judgment on the part of staff, consultation regarding clinical decision making, and filing of incident reports. They include medical emergencies, participants who may be suicidal, participants who may be homicidal, participants who appear intoxicated, indications that it may be necessary to file a child abuse report, and circumstances when it may be necessary to file an elder or dependent adult abuse report.
While several of these situations will not be directly assessed in ARIC, procedures are in place at the ARIC field center for the eventuality that any of these issues arise during the course of the study. Each of these instances must be handled with caution and sensitivity, in a way that ensures that the appropriate clinical decisions are made. Information regarding each of these separate circumstances is presented below.
ARIC field centers have personnel trained to respond to physical and medical emergencies, and certified according to their institutional policies. As mentioned above, contact and locator information for medical emergencies and physical threats are displayed throughout the field center. In all emergencies and crises study personnel contact the supervisor, consultant or security personnel according to the circumstances. If the situation is associated with potential harm to a study participant, action is taken and resolved prior to the participant's departure from the premises. An incident report is filed and documented within 24 hours of an incident in order to provide a record of the actions taken by the staff and supervisors. The study principal investigator is informed of the incident and of any action taken by the study personnel.
25.7.a. Suicidal Ideation
In instances in which the participant can be assessed to be in moderate or extreme danger of attempting suicide, the medical personnel identified as responder for emergencies should be notified to obtain guidance prior to the participant’s departure from the building.
Any spontaneous comments or circumstances indicative of suicidal ideation made by the participant (i.e., “life not worth living,” “be better off dead,” etc.) at any point during the study should be explored with the participant. If suicidal ideation (thoughts of suicide or wanting to take one’s life) is present, it is the responsibility of the staff to determine the imminence/ dangerousness of risk.
Assessments of imminence/dangerousness can be completed in a number of ways, depending on the degree to which the participant appears to be forthcoming about her or his suicidality. First, the participant should be asked directly, "Are you feeling suicidal right now?" This should be followed by another direct question: "Have you felt suicidal in the past?" and then, "When was the last time you felt suicidal?"
The following items may also be used as a general framework in which to formulate questions about suicide for the participant you believe to be potentially at risk.
What is her current motivation for suicide? Current level of depression?
Does he/she have any prior suicide attempts?
What has stopped her from committing suicide up to this point?
What is his current affect? (is it blunt or flat?) Current mood?
Does she have a plan? Is it well-formulated? Is it lethal? Does it allow for rescue?

25-9
What environmental support does he have? What's his support network like? What are his perceptions of support from others?
What has he done? What arrangements have been made? Has he already begun to follow some type of plan?
If the suicidal threat is judged to be immediate (the participant cannot categorically state that he/she will not hurt him/herself), the staff must maintain contact with the participant, contact the field center physician for consultation, and ensure that the subject is taken to a psychiatric emergency setting. Contact information for a crisis mental health unit or equivalent emergency facility should be available at the ARIC field center. If this information is conveyed by phone or the participant is unwilling to accept a voluntary evaluation and requires commitment (Baker Act), the police department may be contacted for transport (call 911 or (Security / Police).
A suicidal threat is judged to be significant but not immediate, if it is of concern and questionable risk. In this situation, the staff person must maintain contact with the participant and contact the filed center physician to discuss an assessment and disposition. Recommendations for further action will be made by this individual. In most cases, the participant will be provided with a comprehensive list of community referrals. The following script may be used:
Mr./Ms. ______, I’m concerned to hear that you have been feeling this way. A lot of individuals who have had similar symptoms have found several things helpful – first to talk to their doctor about possible medication to help with your symptoms, and secondly to talk to a mental health service provider to treat these symptoms.
Have you thought about seeking help for this? You should talk to your doctor or contact any of these mental health service providers in your community (hand them community referral list).
Once the participant leaves, write a clear report of what has occurred immediately, co-signed by the field center physician. The report should document:
1) What the participant initially said to warrant further assessment,
2) How the participant was assessed,
3) The conclusions that were drawn,
4) Who was consulted, and
5) What was done to protect the participant's well-being.
25.7.b. Participant Appears Intoxicated
Participants who arrive at the field center potentially intoxicated are asked not to participate in the research procedures at that time. The clinic manager is notified of any suspicion of intoxication. The interviewer or clinician will explain to the participant why he or she will be excluded from the procedures and why s/he should leave the research premises (i.e. that s/he appears to be intoxicated, smells like alcohol, is staggering). To protect the participant from possible injury, interviewers and/or clinicians must make sure that the client does not drive home, either by calling a taxi or calling the police to escort him/her home. Intoxication must be documented as an incident report.
26-1
26. REPORT OF STUDY RESULTS, MEDICAL REFERRALS AND NOTIFICATIONS
ARIC attempts to serve its study participants and the community by returning scientific information that has applicability and translational value. In the same spirit, all study results that have established value for medical diagnosis or treatment are reported to the study participants, in ways that are consistent with current guidelines endorsed by professional societies and governmental agencies. Laboratory tests and examinations performed by ARIC that are of research value only and not directly relevant in the context of current guidelines are not reported, to avoid burden to the study participants and their medical practitioners. As part of the informed consent process, study participants are told that they are taking part in a research study that follows a research protocol. They are informed that procedures are not identical to those performed in a regular clinical examination, and that they will only receive study results that are of known value to medical practitioners.
Information on examination and laboratory test results are shared with ARIC participants during an interview at the end of their field center examination visit, and subsequently as test results are returned by the ARIC central laboratory and reading centers responsible for the central and standardized processing of the data. The reporting schedule incorporated into this process is a function of alert ranges that define emergent, urgent or routine notification. This process is described in the following sections.
26.1 Procedures for Medical Referrals and Notification of Results
Since the participant's safety is of paramount concern, data collected during the examination that could indicate the need for referral for medical care are reviewed with the participant prior to the completion of the examination, during the exit interview unless the alert condition required stopping the examination. The type of study result to be reported to the study participant and the schedule of notification also are reviewed at this time. The secondary purposes of the exit interview are to verify that all components of the field center clinic visit have been completed, to solicit comments and feed-back from the participant, to return the participant’s medications, and answer any remaining questions. A further objective of the exit interview is to determine the participant’s eligibility for Stage II, and to invite the participant to this phase of the ARIC examination.
In its feedback to the participants, the study relies on established guidelines and other evidence-based documentation for community practitioners. Values or measurement results that exceed the thresholds underwritten by treatment guidelines are identified to the participant with a recommendation for review and or confirmation in consultation with their provider of medical care. The study defines these notifications as a referral, although such notifications emphasize to the study participant and his/her provider of care that the results originate from a research protocol and cannot be equated to a clinical evaluation.
26.3 Medically Relevant Information
Medically relevant information is provided to the study participants and their providers of medical care, if so authorized by the study participant. If consent to provide this information to the person's physician was given as part of the informed consent process, copies of the reports of study results are sent to the participant's physician. With the exception of a proxy designated by the study participant no study information is shared with other persons or entities, other than with the written authorization of the participant, or as required by law.
Procedures are in place throughout ARIC to identify clinically relevant values in the study data that are so abnormal as to be considered an "alert value" (for threshold levels, see table 26.1) This applies to measurements performed at the field centers and to study data processed at the Central Laboratory and the central reading centers. Alert values trigger a rapid notification process described below. Study results that exceed the study guidelines but do not meet “alert” threshold

26-2
criteria are identified to the study participant as requiring consultation with their provider of medical care for purposes of confirmation. Lastly, measurements and assay results that are within normal ranges according to the guidelines in use in ARIC are reported in a consolidated summary report to the participant once all information has converged to the collaborative database. This report includes any results previously reported to the study participant on an expedited schedule (such as “alert values”).
Medical information is provided to participants (and physicians) at the following points:
(1) Exit Interview. During the exit interview at the conclusion of the field center examination, a staff member gives the participant a "clinic visit report" and reviews their weight, height, estimated body fat if desired, current blood pressure, and ankle-brachial index. At the discretion of the field center, a copy of the electrocardiogram can be given at this time; otherwise this is sent with the final summary of results approximately 6 weeks after the exam visit. The “clinic visit report” also indicates to participants that they will receive by mail a copy of the interpretation of selected blood tests, the echocardiogram and aortic ultrasound, and feedback on their meaning. If a participant completes stage II they will also get their additional blood tests and retinal photography findings as a part of the summary of study results, and if they complete stage III, a summary statement of MRI findings will be included.
(2) Alert Notifications. Measurement values and incidental findings designated as alert values can be detected at the ARIC field center or in the course of an MRI exam. Definitions of alert conditions are set out in Table 26.1. After the participant’s safety and comfort have been attended to, alert values are promptly recorded in the DMS, on the Alert Tracking Form (ATF). Column A of the ATF registers the occurrence of the alert or data the field center received notification of the alert condition. This activates a flag in the DMS that makes field center (and Coordinating Center) staff aware of an alert value that requires resolution. Column B of the RTF registers the date on which the study participant, his/her provider of medical care, or proxy were notified of this alert value, conveying the need for a follow-up or verification of the alert condition. This rests the flag in the DMS, and the alert condition or value will no longer be listed in the Alert Notification Report (see below). Transferring a study participant to the nearest emergency department or the offices of the participant’s provider of medical care are also recorded in column B of the ATF, as actions that resolve an alert value.
Study data processed by the ARIC central laboratories and the ARIC reading centers are transmitted on an ongoing basis to the Coordinating Center, where they are stored in the ARIC database. From it, field centers can interrogate the data any time via the DMS to generate an Alert Notification Report. Each ARIC field center designates one staff person – as well as a back-up – to generate a daily report of study results to be reported as alert values received at the ARIC Coordinating Center. A comprehensive, daily report of alert values that are pending notification is generated as a matter of routine by each field center; reports of active alert values can also be generated by field center exam date or by ID. In some cases, the central echocardiography or MRI reading centers may call, or notify the corresponding field center directly, for conditions perceived as emergent or potentially severe. These notifications – and their resolution – are referred to each field center’s medical director or designated clinical specialist. Conditions notified directly to the field center are also recorded by the reading center in the ARIC DMS, and will be reflected in the Alert Notification Report generated by staff of the corresponding field center as soon as the data are transferred from the reading center to the Coordinating Center. ARIC field center staff must register the alert condition reported by the reading center in the ATF, as well as the date of its notification/resolution. If the ATF is update before the information is transferred from the reading center to the Coordinating Center, then the emergent condition is no longer flagged as an alert in the Alert Notification Report.

26-3
Notifications of alert values to ARIC study participants or their proxy, and/or the provider of care designated by the participant, are downloaded daily by the ARIC field center, recorded in the ATF, and immediately made available to the person designated by the study participant for receipt of the study results. For this purpose, field center personnel print and send a personalized Participant Alert Letter (see Appendix 26C) and/or a Physician Alert Letter (if permission was obtained to release these data to a physician). Phone calls may be placed to the study participant, a proxy or a provider of medical care if warranted by the severity of the suspected condition notified.
(3) Stage I Summary of Results. Once all results from the Central Laboratory and the central reading centers are received at the Coordinating Center or after 8 weeks since the participant’s examination visit have elapsed, the Summary of Results is assembled at the ARIC Coordinating Center and made available to the respective field center as a report downloaded from a secure area of the ARIC study website. This report lists the individual study results of medical value, a script suitable to the value or finding reported, and an indication whether follow-up with a medical practitioner id recommended for a given result, and the recommended time frame for the follow-up. ARIC field center personnel prepare personalized cover letters to the study participants and their physician (if permission was obtained to release these data). Sample copies of the summary of Stage I study results are included in Appendix 26B.
The cover letter highlights any noteworthy results for the participant. To assist ARIC field center personnel in selecting the appropriate cover letter for participants, the summary report of results downloaded by staff from the ARIC website includes a cover sheet – which is not shared with the study participant – with an overview of the potentially abnormal study results in each report, listed according to whether they meet alert status (and thus previously reported), or “notifiable” (see Appendix 26B). The latter are results that meet established clinical guidelines for retesting or other type of follow-up by a health professional. Field center personnel are encouraged to place these results in context of a participant’s known medical history before reporting such results, and consult with a field center’s medical director as needed.
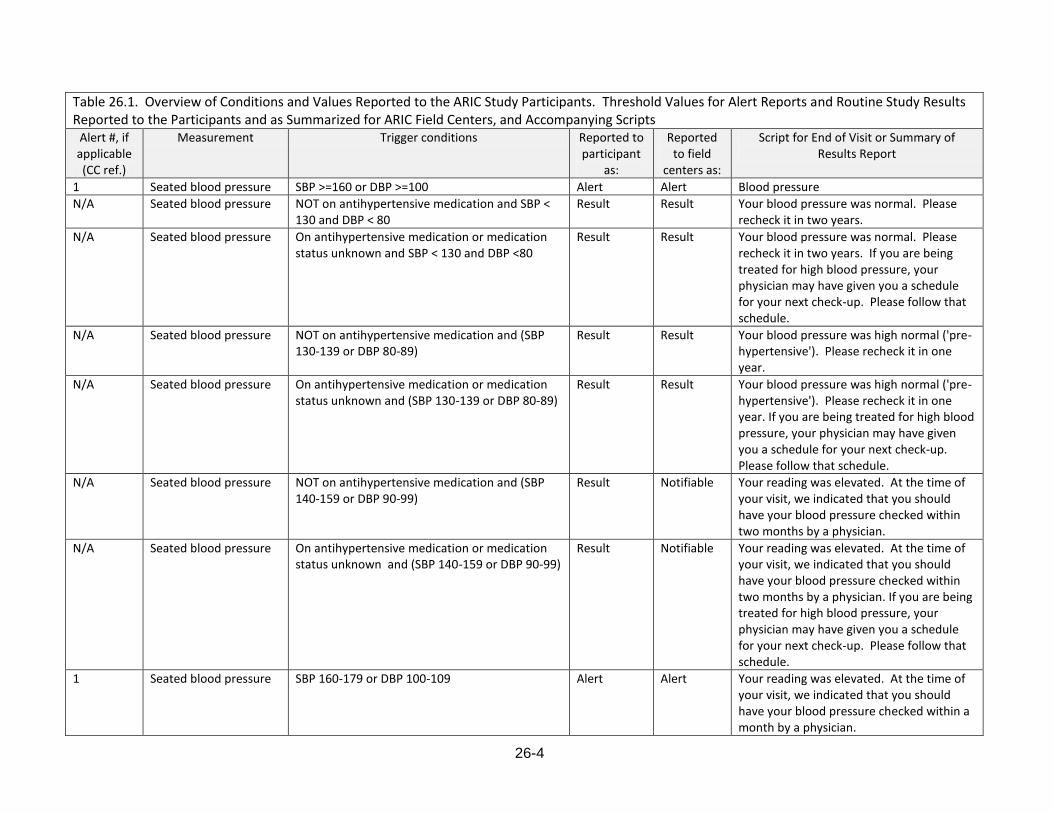
26-4
Table 26.1. Overview of Conditions and Values Reported to the ARIC Study Participants. Threshold Values for Alert Reports and Routine Study Results Reported to the Participants and as Summarized for ARIC Field Centers, and Accompanying Scripts
Alert #, if applicable (CC ref.)
Measurement Trigger conditions Reported to participant
as:
Reported to field
centers as:
Script for End of Visit or Summary of Results Report
1 Seated blood pressure SBP >=160 or DBP >=100 Alert Alert Blood pressure
N/A Seated blood pressure NOT on antihypertensive medication and SBP < 130 and DBP < 80
Result Result Your blood pressure was normal. Please recheck it in two years.
N/A Seated blood pressure On antihypertensive medication or medication status unknown and SBP < 130 and DBP <80
Result Result Your blood pressure was normal. Please recheck it in two years. If you are being treated for high blood pressure, your physician may have given you a schedule for your next check-up. Please follow that schedule.
N/A Seated blood pressure NOT on antihypertensive medication and (SBP 130-139 or DBP 80-89)
Result Result Your blood pressure was high normal ('pre-hypertensive'). Please recheck it in one year.
N/A Seated blood pressure On antihypertensive medication or medication status unknown and (SBP 130-139 or DBP 80-89)
Result Result Your blood pressure was high normal ('pre-hypertensive'). Please recheck it in one year. If you are being treated for high blood pressure, your physician may have given you a schedule for your next check-up. Please follow that schedule.
N/A Seated blood pressure NOT on antihypertensive medication and (SBP 140-159 or DBP 90-99)
Result Notifiable Your reading was elevated. At the time of your visit, we indicated that you should have your blood pressure checked within two months by a physician.
N/A Seated blood pressure On antihypertensive medication or medication status unknown and (SBP 140-159 or DBP 90-99)
Result Notifiable Your reading was elevated. At the time of your visit, we indicated that you should have your blood pressure checked within two months by a physician. If you are being treated for high blood pressure, your physician may have given you a schedule for your next check-up. Please follow that schedule.
1 Seated blood pressure SBP 160-179 or DBP 100-109 Alert Alert Your reading was elevated. At the time of your visit, we indicated that you should have your blood pressure checked within a month by a physician.
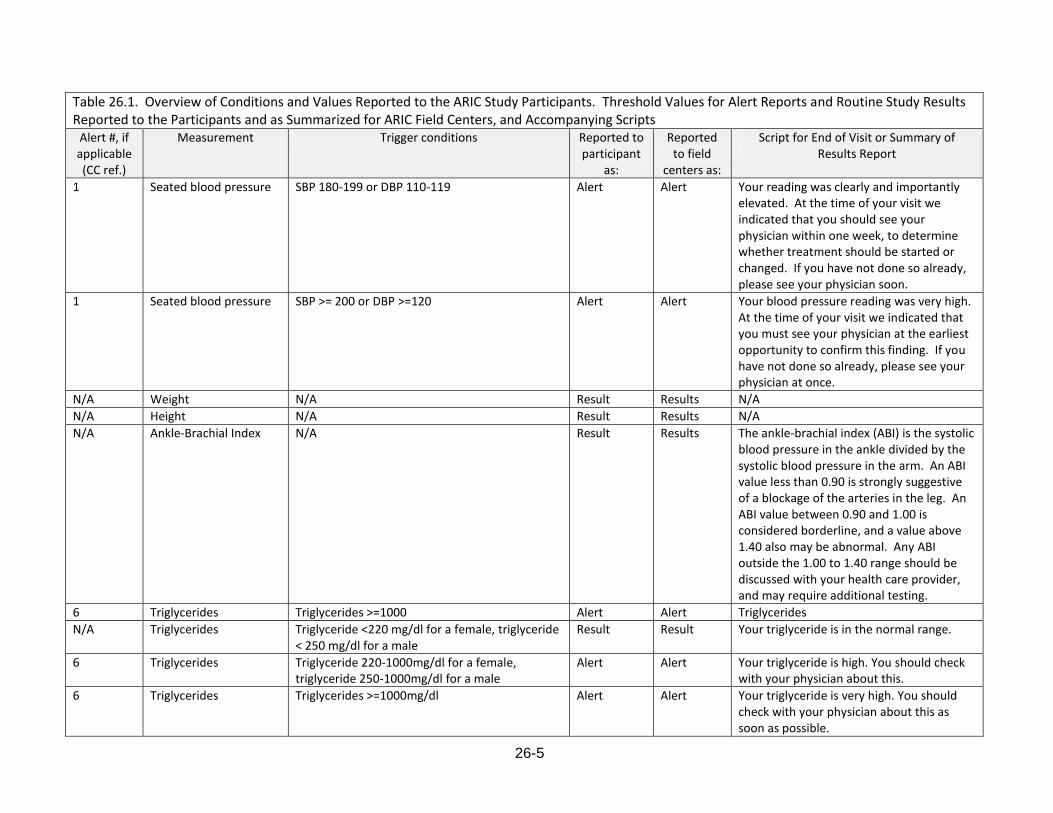
26-5
Table 26.1. Overview of Conditions and Values Reported to the ARIC Study Participants. Threshold Values for Alert Reports and Routine Study Results Reported to the Participants and as Summarized for ARIC Field Centers, and Accompanying Scripts
Alert #, if applicable (CC ref.)
Measurement Trigger conditions Reported to participant
as:
Reported to field
centers as:
Script for End of Visit or Summary of Results Report
1 Seated blood pressure SBP 180-199 or DBP 110-119 Alert Alert Your reading was clearly and importantly elevated. At the time of your visit we indicated that you should see your physician within one week, to determine whether treatment should be started or changed. If you have not done so already, please see your physician soon.
1 Seated blood pressure SBP >= 200 or DBP >=120 Alert Alert Your blood pressure reading was very high. At the time of your visit we indicated that you must see your physician at the earliest opportunity to confirm this finding. If you have not done so already, please see your physician at once.
N/A Weight N/A Result Results N/A
N/A Height N/A Result Results N/A
N/A Ankle-Brachial Index N/A Result Results The ankle-brachial index (ABI) is the systolic blood pressure in the ankle divided by the systolic blood pressure in the arm. An ABI value less than 0.90 is strongly suggestive of a blockage of the arteries in the leg. An ABI value between 0.90 and 1.00 is considered borderline, and a value above 1.40 also may be abnormal. Any ABI outside the 1.00 to 1.40 range should be discussed with your health care provider, and may require additional testing.
6 Triglycerides Triglycerides >=1000 Alert Alert Triglycerides
N/A Triglycerides Triglyceride <220 mg/dl for a female, triglyceride < 250 mg/dl for a male
Result Result Your triglyceride is in the normal range.
6 Triglycerides Triglyceride 220-1000mg/dl for a female, triglyceride 250-1000mg/dl for a male
Alert Alert Your triglyceride is high. You should check with your physician about this.
6 Triglycerides Triglycerides >=1000mg/dl Alert Alert Your triglyceride is very high. You should check with your physician about this as soon as possible.

26-6
Table 26.1. Overview of Conditions and Values Reported to the ARIC Study Participants. Threshold Values for Alert Reports and Routine Study Results Reported to the Participants and as Summarized for ARIC Field Centers, and Accompanying Scripts
Alert #, if applicable (CC ref.)
Measurement Trigger conditions Reported to participant
as:
Reported to field
centers as:
Script for End of Visit or Summary of Results Report
7 Fasting glucose Fasting glucose >=300mg/dl Alert Alert Lab (fasting glucose)
N/A Fasting glucose Fasting glucose < 100 mg/dl Result Result Your fasting blood glucose is in the normal range.
N/A Fasting glucose Fasting glucose 100 – 125 mg/dl Result Result Your fasting blood glucose is somewhat high. You may have a condition called pre-diabetes and should check with your physician about this.
N/A Fasting glucose Fasting glucose 126 – 300 mg/dl Result Notifiable Your fasting blood glucose is high. You should check with your physician about this.
7 Fasting glucose Fasting glucose >=300 mg/dl Alert Alert Your fasting blood glucose is very high. You should check with your physician about this as soon as possible.
N/A Hemoglobin A1C (%) Hemoglobin A1C value (%) Result Result Normal A1C levels can be from 4.5 to 6% for someone who does not have diabetes. A result between 5.7 and 6.4% can indicate prediabetes (a high risk of developing diabetes). If you have diabetes, please follow your physician's guidelines.
8 Creatinine Creatinine >2 mg/dl Alert Alert Lab (creatinine)
N/A Creatinine Creatinine <= 2mg/dl Result Result Normal levels of creatinine in the blood are approximately 0.6 to 1.2 mg/dL in adult males and 0.5 to 1.1 mg/dL in adult females.
8 Creatinine Creatinine > 2mg/dl Alert Alert Your serum creatinine value was high. This may indicate a decreased kidney function. Please discuss this result with your physician (and include the result of your glomerular filtration rate).

26-7
Table 26.1. Overview of Conditions and Values Reported to the ARIC Study Participants. Threshold Values for Alert Reports and Routine Study Results Reported to the Participants and as Summarized for ARIC Field Centers, and Accompanying Scripts
Alert #, if applicable (CC ref.)
Measurement Trigger conditions Reported to participant
as:
Reported to field
centers as:
Script for End of Visit or Summary of Results Report
N/A eGFR (creatinine) eGFR >=60 ml/min/1.73 m2 Result Result Your glomerular filtration rate (GFR) has
been estimated from a measurement of creatinine in your blood. Your GFR value is greater than 60 ml/min/1.73 m
2, which
suggests that your kidneys are working well.
N/A eGFR (creatinine) eGFR 30- < 60 ml/min/1.73m2 Result Notifiable Estimated kidney function persistently less
than 60 ml/min/1.73 m2 is an indicator of
Chronic Kidney Disease. You should check with your healthcare provider about this within a month.
N/A eGFR (creatinine) eGFR < 30 ml/min/1.73m2 Result Notifiable Estimated kidney function persistently less
than 30 ml/min/1.73 m\super 2}{ indicates severely decreased kidney function. You should discuss this result with your health care provider as soon as possible.
10 Albumin:creatinine ratio (albumin)
Ratio >=300 Alert Alert Lab (albumin:creatinine ratio)
N/A Albumin:creatinine ratio (albumin)
Ratio < 30 Result Result The level of albumin, the major protein in your urine, is in the normal range.
N/A Albumin:creatinine ratio (albumin)
Ratio 30 – 299 Result Notifiable The level of albumin, the major protein in your urine, is somewhat elevated. This may be an indicator of chronic kidney disease. You should discuss this result with your healthcare provider.
10 Albumin:creatinine ratio (albumin)
Ratio >= 300 Alert Alert The level of albumin, the major protein in your urine, is elevated. This may be an indicator of chronic kidney disease. You should discuss this result with your healthcare provider as soon as possible.
11 White blood cell count White blood cell count < 2x10⁹ or >25x10
9 Alert Alert Lab (white cell count)
N/A White blood cell count White blood cell count 4x10⁹-11x10
9 Result Result White blood counts values are usually
between 4.0 and 11.0 x 10⁹

26-8
Table 26.1. Overview of Conditions and Values Reported to the ARIC Study Participants. Threshold Values for Alert Reports and Routine Study Results Reported to the Participants and as Summarized for ARIC Field Centers, and Accompanying Scripts
Alert #, if applicable (CC ref.)
Measurement Trigger conditions Reported to participant
as:
Reported to field
centers as:
Script for End of Visit or Summary of Results Report
N/A White blood cell count White blood cell count 2x10⁹ – 4x10
9 Result Result Your white blood cell count is low, which
can result from many different situations. Please review this result with your physician.
N/A White blood cell count White blood cell count 11x109 – 25x10
9 Result Result Your white blood cell count is high, which
can result from many different situations. Please review this result with your physician.
11 White blood cell count White blood cell count < 2x10⁹ or >25x10
9 Alert Result Your white cell count is markedly outside
the normal range, which suggests that this exam should be repeated. You should check with your physician about this.
12 Hemoglobin Hemoglobin < 8 g/dl Alert Alert Lab (hemoglobin)
N/A Hemoglobin Hemoglobin 11.7g/dl – 15.7g/dl for females, hemoglobin 13.3g/dl – 17.7 for males
Result Result For men, hemoglobin values usually are between13.3 and 17.7 g/dL: For women, hemoglobin values usually are between 11.7 and 15.7 g/dL
N/A Hemoglobin Hemoglobin 8 g/dl - < 11.7g/dl for females, hemoglobin 8 g/dl - < 13.3 g/dl for males
Result Notifiable Your hemoglobin is low. You should check with your physician about this.
12 Hemoglobin Hemoglobin < 8 g/dl Alert Alert Your hemoglobin value is very low. You should check with your physician about this.
13 Platelet count Platelet count <50x109 or platelet count >
1000x109
Alert Alert Lab (platelet count)
N/A Platelet count Platelet count 150x109 – 450x10
9 Result Result Platelet counts are usually in the range 150
to 450 x 109
N/A Platelet count Platelet count 51x109 – 149x10
9 or platelet count
451x109 – 999x10
9
Result Notifiable Your platelet count is outside the normal range, which suggests that this exam should be repeated. Please check with your physician about this.
13 Platelet count Platelet count <50x109 or platelet count >
1000x109
Alert Alert Your platelet count is markedly outside the normal range, which suggests that this exam should be repeated. Please check with your physician about this.

26-9
Table 26.1. Overview of Conditions and Values Reported to the ARIC Study Participants. Threshold Values for Alert Reports and Routine Study Results Reported to the Participants and as Summarized for ARIC Field Centers, and Accompanying Scripts
Alert #, if applicable (CC ref.)
Measurement Trigger conditions Reported to participant
as:
Reported to field
centers as:
Script for End of Visit or Summary of Results Report
N/A Red blood cell percentage
Red blood cell percentage >=30 for females, red blood cell percentage >=35 for males
Result Result For men, hematocrit values usually are between 40 and 47%. For women, hematocrit values usually are between 35 and 47%.
N/A Red blood cell percentage
Red blood cell percentage < 30 for females, red blood cell percentage < 35 for males
Result Notifiable The percentage of red cells in your blood is low, which suggests that this test should be repeated. Please see your physician about this.
N/A Total cholesterol Total cholesterol < 200mg/dl Result Result Your blood cholesterol is in the normal range.
N/A Total cholesterol Total cholesterol >=200mg/dl Result Notifiable Your blood cholesterol is higher than the values recommended by national guidelines.
N/A HDL cholesterol HDL cholesterol >=40 mg/dl Result Result This blood test result is in the normal range.
N/A HDL cholesterol HDL cholesterol <40 mg/dl Result Notifiable Your HDL cholesterol is low, and in the undesirable range per national guidelines. You may want to check with your physician about this.
14 Active proliferative retinopathy
Retinal Pathology Notification Form Q4 is “Yes” Alert Alert Active proliferative retinopathy in <L, R> eye
14 Active proliferative retinopathy
Retinal Pathology Notification Form Q4 is “Yes” Alert Alert "There were changes in the retina (back of the eye) in your <left, right, both> eye<s> which are often found in people with diabetes. We strongly recommend that you see an ophthalmologist as soon as possible for further evaluation. The changes found were:
15 Pre-proliferative retinopathy
Retinal Pathology Notification Form Q5 is “Yes” Alert Alert Pre-proliferative retinopathy in <L, R> eye

26-10
Table 26.1. Overview of Conditions and Values Reported to the ARIC Study Participants. Threshold Values for Alert Reports and Routine Study Results Reported to the Participants and as Summarized for ARIC Field Centers, and Accompanying Scripts
Alert #, if applicable (CC ref.)
Measurement Trigger conditions Reported to participant
as:
Reported to field
centers as:
Script for End of Visit or Summary of Results Report
15 Pre-proliferative retinopathy
Retinal Pathology Notification Form Q5 is “Yes” Alert Alert There were changes in the retina (back of the eye) in your <left, right, both> eye which are often found in people with diabetes. We recommend that you see an ophthalmologist for further evaluation. The changes found were:
16 Macular edema Retinal Pathology Notification Form Q6 is “Yes” Alert Alert Macular edema in <L, R> eye
16 Macular edema Retinal Pathology Notification Form Q6 is “Yes” Alert Alert There is a swelling, called macular edema, in the retina (back of the eye) in your <left, right, both> eye. This swelling can cause a decrease in vision. You should see an ophthalmologist for further evaluation.
17 Treatable ARM Retinal Pathology Notification Form Q7 is “Yes” Alert Alert Treatable ARM in <L, R> eye
17 Treatable ARM Retinal Pathology Notification Form Q7 is “Yes” Alert Alert Signs of treatable age-related macular degeneration were found in the retina (the back layer of the eye) in your <left, right, both> eye. We strongly recommend you see an ophthalmologist for further evaluation. The changes found were:
18 Hollenhorst plaque Retinal Pathology Notification Form Q8a is “Yes” Alert Alert Hollenhorst plaque in <L, R> eye
18 Hollenhorst plaque Retinal Pathology Notification Form Q8a is “Yes” Alert Alert There a small piece of cholesterol lodged in a retinal blood vessel in your <left, right, both> eye suggesting the possibility of atherosclerotic changes In the carotid artery in your neck. This should be evaluated further by your primary care doctor.
19 Elevated nevus Retinal Pathology Notification Form Q8b is “Yes” Alert Alert Elevated nevus in <L, R> eye
19 Elevated nevus Retinal Pathology Notification Form Q8b is “Yes” Alert Alert A choroidal nevus, a small mole, like a birthmark, was found in your <left, right, both> eye. This nevus has an unusual appearance. We strongly recommend that you see an ophthalmologist for further evaluation.
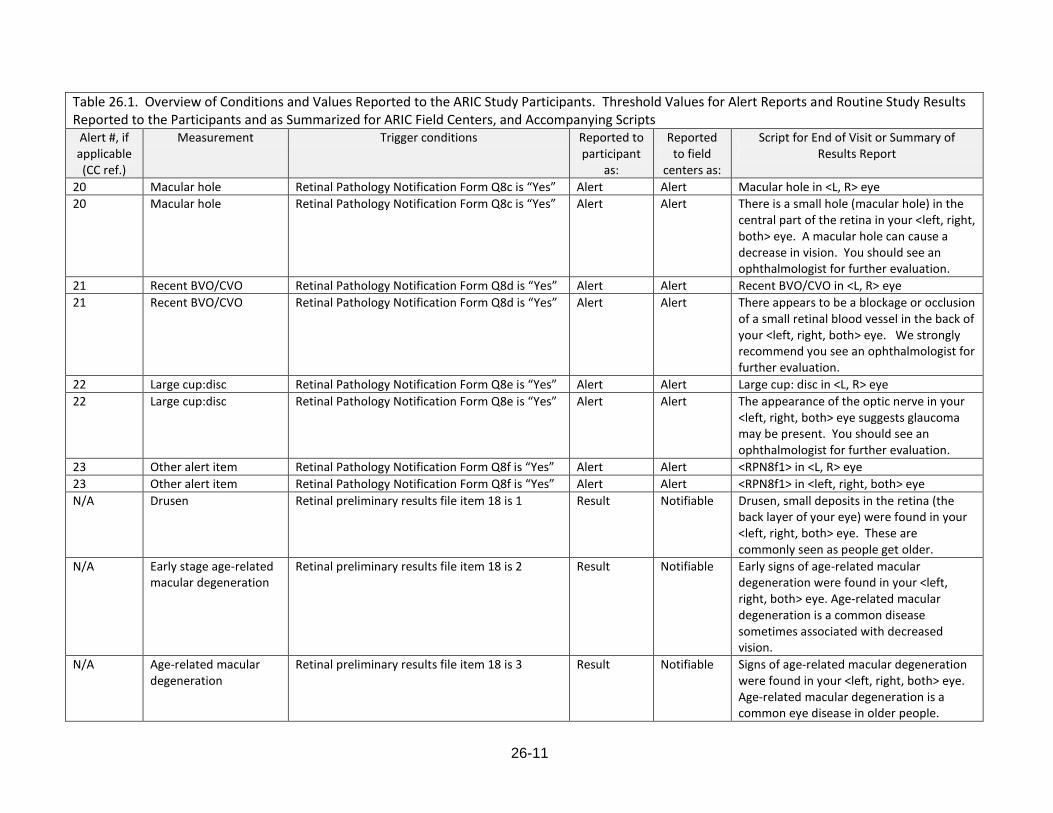
26-11
Table 26.1. Overview of Conditions and Values Reported to the ARIC Study Participants. Threshold Values for Alert Reports and Routine Study Results Reported to the Participants and as Summarized for ARIC Field Centers, and Accompanying Scripts
Alert #, if applicable (CC ref.)
Measurement Trigger conditions Reported to participant
as:
Reported to field
centers as:
Script for End of Visit or Summary of Results Report
20 Macular hole Retinal Pathology Notification Form Q8c is “Yes” Alert Alert Macular hole in <L, R> eye
20 Macular hole Retinal Pathology Notification Form Q8c is “Yes” Alert Alert There is a small hole (macular hole) in the central part of the retina in your <left, right, both> eye. A macular hole can cause a decrease in vision. You should see an ophthalmologist for further evaluation.
21 Recent BVO/CVO Retinal Pathology Notification Form Q8d is “Yes” Alert Alert Recent BVO/CVO in <L, R> eye
21 Recent BVO/CVO Retinal Pathology Notification Form Q8d is “Yes” Alert Alert There appears to be a blockage or occlusion of a small retinal blood vessel in the back of your <left, right, both> eye. We strongly recommend you see an ophthalmologist for further evaluation.
22 Large cup:disc Retinal Pathology Notification Form Q8e is “Yes” Alert Alert Large cup: disc in <L, R> eye
22 Large cup:disc Retinal Pathology Notification Form Q8e is “Yes” Alert Alert The appearance of the optic nerve in your <left, right, both> eye suggests glaucoma may be present. You should see an ophthalmologist for further evaluation.
23 Other alert item Retinal Pathology Notification Form Q8f is “Yes” Alert Alert <RPN8f1> in <L, R> eye
23 Other alert item Retinal Pathology Notification Form Q8f is “Yes” Alert Alert <RPN8f1> in <left, right, both> eye
N/A Drusen Retinal preliminary results file item 18 is 1 Result Notifiable Drusen, small deposits in the retina (the back layer of your eye) were found in your <left, right, both> eye. These are commonly seen as people get older.
N/A Early stage age-related macular degeneration
Retinal preliminary results file item 18 is 2 Result Notifiable Early signs of age-related macular degeneration were found in your <left, right, both> eye. Age-related macular degeneration is a common disease sometimes associated with decreased vision.
N/A Age-related macular degeneration
Retinal preliminary results file item 18 is 3 Result Notifiable Signs of age-related macular degeneration were found in your <left, right, both> eye. Age-related macular degeneration is a common eye disease in older people.

26-12
Table 26.1. Overview of Conditions and Values Reported to the ARIC Study Participants. Threshold Values for Alert Reports and Routine Study Results Reported to the Participants and as Summarized for ARIC Field Centers, and Accompanying Scripts
Alert #, if applicable (CC ref.)
Measurement Trigger conditions Reported to participant
as:
Reported to field
centers as:
Script for End of Visit or Summary of Results Report
N/A Diabetic retinopathy level
Retinal preliminary results file item 16 is between 20-41
Result Notifiable There were changes in the retina, the back of your eye, that are often found in people with diabetes and occasionally in people with hypertension. These changes were found in your <left, right, both> eye. Further evaluation by an ophthalmologist is recommended.
N/A Diabetic retinopathy level
Retinal preliminary results file item 16 is 51 Result Notifiable There were changes in the retina, the back of your eye, that are often found in people with diabetes. These changes were found in your <left, right, both> eye. Further evaluation by an ophthalmologist is within the next two months is recommended.
N/A Diabetic retinopathy level
Retinal preliminary results file item 16 is between 60 and 64
Result Notifiable There were changes in the retina, the back of your eye, that are often found in people with diabetes. These changes were found in your <left, right, both> eye and appeared to be old and inactive.
N/A Diabetic retinopathy level
Retinal preliminary results file item 16 is between 65 and 80
Result Notifiable There were changes in the retina, the back of your eye, that are often found in people with diabetes. These changes were found in your <left, right, both>. Further evaluation by an ophthalmologist as soon as possible is strongly recommended.
N/A Macular edema Retinal preliminary results file item 17 is 2 Result Notifiable There is a swelling in the retina in the back of your <left, right, both> eye called macular edema. This swelling can cause a decrease in vision. Further evaluation by an ophthalmologist in the next two months is recommended.
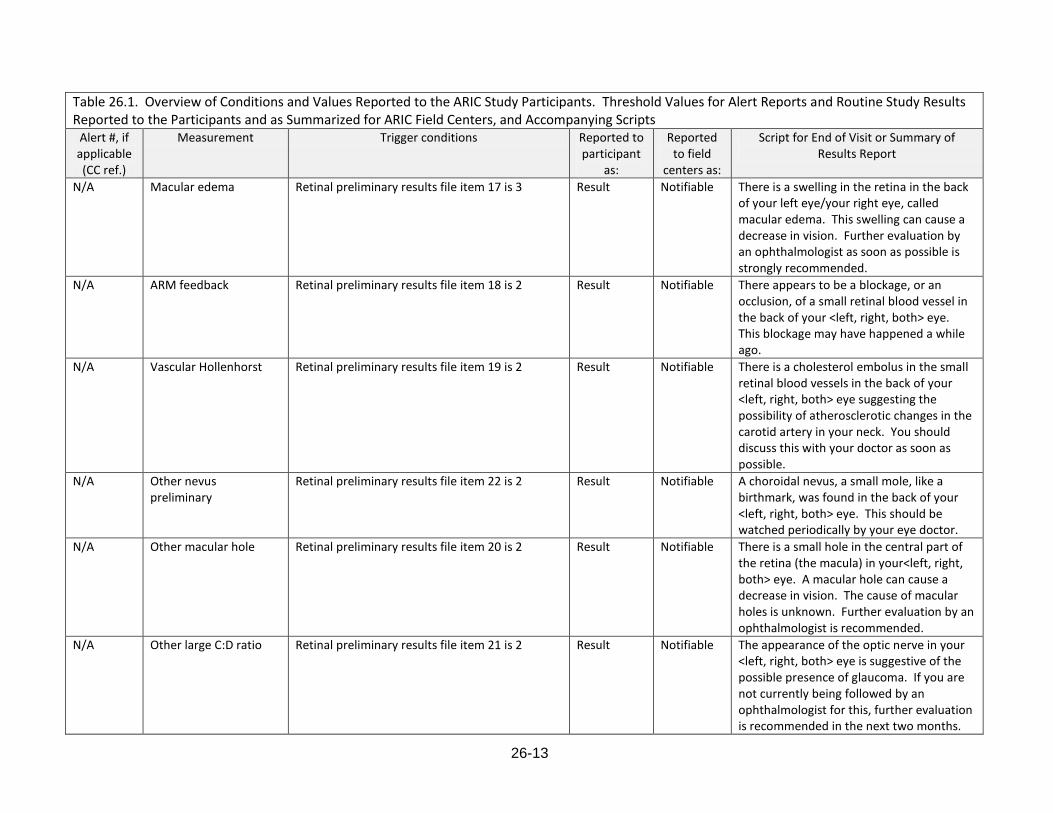
26-13
Table 26.1. Overview of Conditions and Values Reported to the ARIC Study Participants. Threshold Values for Alert Reports and Routine Study Results Reported to the Participants and as Summarized for ARIC Field Centers, and Accompanying Scripts
Alert #, if applicable (CC ref.)
Measurement Trigger conditions Reported to participant
as:
Reported to field
centers as:
Script for End of Visit or Summary of Results Report
N/A Macular edema Retinal preliminary results file item 17 is 3 Result Notifiable There is a swelling in the retina in the back of your left eye/your right eye, called macular edema. This swelling can cause a decrease in vision. Further evaluation by an ophthalmologist as soon as possible is strongly recommended.
N/A ARM feedback Retinal preliminary results file item 18 is 2 Result Notifiable There appears to be a blockage, or an occlusion, of a small retinal blood vessel in the back of your <left, right, both> eye. This blockage may have happened a while ago.
N/A Vascular Hollenhorst Retinal preliminary results file item 19 is 2 Result Notifiable There is a cholesterol embolus in the small retinal blood vessels in the back of your <left, right, both> eye suggesting the possibility of atherosclerotic changes in the carotid artery in your neck. You should discuss this with your doctor as soon as possible.
N/A Other nevus preliminary
Retinal preliminary results file item 22 is 2 Result Notifiable A choroidal nevus, a small mole, like a birthmark, was found in the back of your <left, right, both> eye. This should be watched periodically by your eye doctor.
N/A Other macular hole Retinal preliminary results file item 20 is 2 Result Notifiable There is a small hole in the central part of the retina (the macula) in your<left, right, both> eye. A macular hole can cause a decrease in vision. The cause of macular holes is unknown. Further evaluation by an ophthalmologist is recommended.
N/A Other large C:D ratio Retinal preliminary results file item 21 is 2 Result Notifiable The appearance of the optic nerve in your <left, right, both> eye is suggestive of the possible presence of glaucoma. If you are not currently being followed by an ophthalmologist for this, further evaluation is recommended in the next two months.

26-14
Table 26.1. Overview of Conditions and Values Reported to the ARIC Study Participants. Threshold Values for Alert Reports and Routine Study Results Reported to the Participants and as Summarized for ARIC Field Centers, and Accompanying Scripts
Alert #, if applicable (CC ref.)
Measurement Trigger conditions Reported to participant
as:
Reported to field
centers as:
Script for End of Visit or Summary of Results Report
N/A Other SWR traction preliminary
Retinal preliminary results file item 23 is 2 Result Notifiable There is a clear membrane present in the center of the retina (the macula) in your <left, right, both> eye that may be pulling on the retina and causing a decrease in vision.
4 Local MRI findings Procedures Completion Form Q19 is “Yes” Alert Alert <PRO19a> text
N/A Old infarct MRI Report and Referral Form Q6a is “Yes” Result Result An old infarct (blockage of a blood vessel) was seen on your MRI scan.
N/A Lacunar infarcts MRI Report and Referral Form Q6b is “Yes” Result Result Lacunar infarcts (blockages of blood vessels in your brain) were observed in your MRI scan.
N/A White matter changes MRI Report and Referral Form Q7a is “Yes” Result Result White matter ischemic changes were observed in your MRI scan.
N/A Atrophy MRI Report and Referral Form Q7b is “Yes” Result Result Some atrophy was observed in your MRI scan.
N/A Other MRI findings MRI Report and Referral Form Q8 is “Yes” Result Result <MRR8a> was observed in your MRI sc-an.
24 Acute hemispheric cerebral infarction
MRI Report and Referral Form Q4a is “Yes” Alert Alert Acute hemispheric cerebral infarction
24 Acute hemispheric cerebral infarction
MRI Report and Referral Form Q4a is “Yes” Alert Alert An acute hemispheric cerebral infarction was noted in your MRI scan. Please follow-up with your physician about this as soon as possible.
25 Significant space-occupying lesion
MRI Report and Referral Form Q4b is “Yes” Alert Alert Significant space-occupying lesion
25 Significant space-occupying lesion
MRI Report and Referral Form Q4b is “Yes” Alert Alert A significant space-occupying lesion was observed in your MRI scan. Please follow-up with your physician about this as soon as possible.
25a Acute subdural or epidural hematoma
MRI Report and Referral Form Q4c is “Yes” Alert Alert Acute subdural or epidural hematoma
25a Acute subdural or epidural hematoma
MRI Report and Referral Form Q4c is “Yes” Alert Alert An acute subdural or epidural hematoma was noted in your MRI scan. Please follow-up with your physician about this as soon as possible.
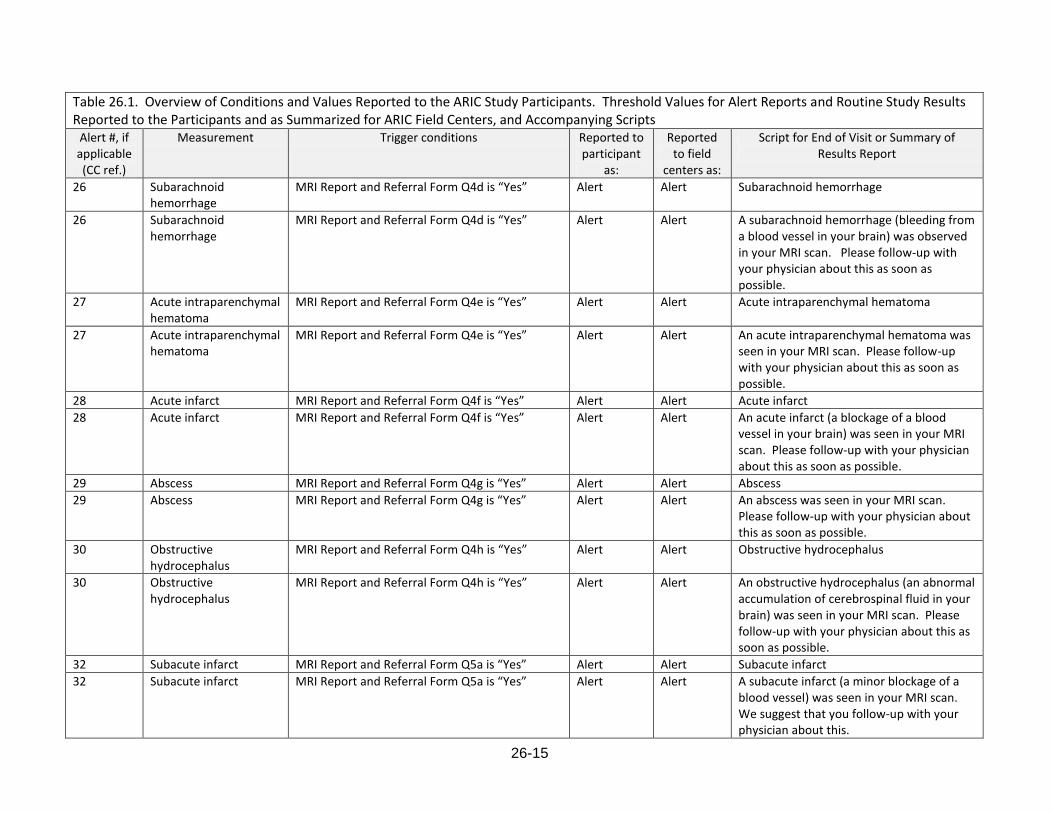
26-15
Table 26.1. Overview of Conditions and Values Reported to the ARIC Study Participants. Threshold Values for Alert Reports and Routine Study Results Reported to the Participants and as Summarized for ARIC Field Centers, and Accompanying Scripts
Alert #, if applicable (CC ref.)
Measurement Trigger conditions Reported to participant
as:
Reported to field
centers as:
Script for End of Visit or Summary of Results Report
26 Subarachnoid hemorrhage
MRI Report and Referral Form Q4d is “Yes” Alert Alert Subarachnoid hemorrhage
26 Subarachnoid hemorrhage
MRI Report and Referral Form Q4d is “Yes” Alert Alert A subarachnoid hemorrhage (bleeding from a blood vessel in your brain) was observed in your MRI scan. Please follow-up with your physician about this as soon as possible.
27 Acute intraparenchymal hematoma
MRI Report and Referral Form Q4e is “Yes” Alert Alert Acute intraparenchymal hematoma
27 Acute intraparenchymal hematoma
MRI Report and Referral Form Q4e is “Yes” Alert Alert An acute intraparenchymal hematoma was seen in your MRI scan. Please follow-up with your physician about this as soon as possible.
28 Acute infarct MRI Report and Referral Form Q4f is “Yes” Alert Alert Acute infarct
28 Acute infarct MRI Report and Referral Form Q4f is “Yes” Alert Alert An acute infarct (a blockage of a blood vessel in your brain) was seen in your MRI scan. Please follow-up with your physician about this as soon as possible.
29 Abscess MRI Report and Referral Form Q4g is “Yes” Alert Alert Abscess
29 Abscess MRI Report and Referral Form Q4g is “Yes” Alert Alert An abscess was seen in your MRI scan. Please follow-up with your physician about this as soon as possible.
30 Obstructive hydrocephalus
MRI Report and Referral Form Q4h is “Yes” Alert Alert Obstructive hydrocephalus
30 Obstructive hydrocephalus
MRI Report and Referral Form Q4h is “Yes” Alert Alert An obstructive hydrocephalus (an abnormal accumulation of cerebrospinal fluid in your brain) was seen in your MRI scan. Please follow-up with your physician about this as soon as possible.
32 Subacute infarct MRI Report and Referral Form Q5a is “Yes” Alert Alert Subacute infarct
32 Subacute infarct MRI Report and Referral Form Q5a is “Yes” Alert Alert A subacute infarct (a minor blockage of a blood vessel) was seen in your MRI scan. We suggest that you follow-up with your physician about this.
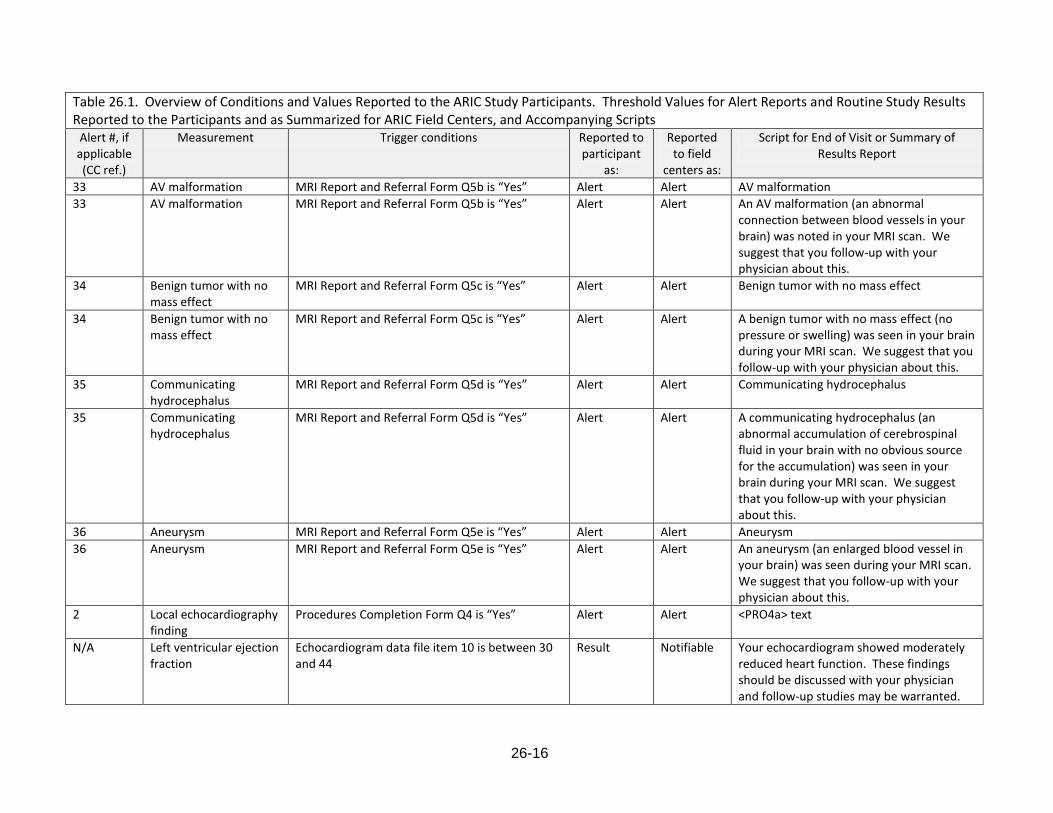
26-16
Table 26.1. Overview of Conditions and Values Reported to the ARIC Study Participants. Threshold Values for Alert Reports and Routine Study Results Reported to the Participants and as Summarized for ARIC Field Centers, and Accompanying Scripts
Alert #, if applicable (CC ref.)
Measurement Trigger conditions Reported to participant
as:
Reported to field
centers as:
Script for End of Visit or Summary of Results Report
33 AV malformation MRI Report and Referral Form Q5b is “Yes” Alert Alert AV malformation
33 AV malformation MRI Report and Referral Form Q5b is “Yes” Alert Alert An AV malformation (an abnormal connection between blood vessels in your brain) was noted in your MRI scan. We suggest that you follow-up with your physician about this.
34 Benign tumor with no mass effect
MRI Report and Referral Form Q5c is “Yes” Alert Alert Benign tumor with no mass effect
34 Benign tumor with no mass effect
MRI Report and Referral Form Q5c is “Yes” Alert Alert A benign tumor with no mass effect (no pressure or swelling) was seen in your brain during your MRI scan. We suggest that you follow-up with your physician about this.
35 Communicating hydrocephalus
MRI Report and Referral Form Q5d is “Yes” Alert Alert Communicating hydrocephalus
35 Communicating hydrocephalus
MRI Report and Referral Form Q5d is “Yes” Alert Alert A communicating hydrocephalus (an abnormal accumulation of cerebrospinal fluid in your brain with no obvious source for the accumulation) was seen in your brain during your MRI scan. We suggest that you follow-up with your physician about this.
36 Aneurysm MRI Report and Referral Form Q5e is “Yes” Alert Alert Aneurysm
36 Aneurysm MRI Report and Referral Form Q5e is “Yes” Alert Alert An aneurysm (an enlarged blood vessel in your brain) was seen during your MRI scan. We suggest that you follow-up with your physician about this.
2 Local echocardiography finding
Procedures Completion Form Q4 is “Yes” Alert Alert <PRO4a> text
N/A Left ventricular ejection fraction
Echocardiogram data file item 10 is between 30 and 44
Result Notifiable Your echocardiogram showed moderately reduced heart function. These findings should be discussed with your physician and follow-up studies may be warranted.

26-17
Table 26.1. Overview of Conditions and Values Reported to the ARIC Study Participants. Threshold Values for Alert Reports and Routine Study Results Reported to the Participants and as Summarized for ARIC Field Centers, and Accompanying Scripts
Alert #, if applicable (CC ref.)
Measurement Trigger conditions Reported to participant
as:
Reported to field
centers as:
Script for End of Visit or Summary of Results Report
N/A Left ventricular ejection fraction
Echocardiogram data file item 10 is less than 30 Result Notifiable Your echocardiogram showed severely reduced heart function. These findings should be discussed with your physician and follow-up studies may be warranted.
N/A Left ventricular diastolic diameter
Echocardiogram data file item 4 is between 6.4 and 6.8 for males, echocardiogram data file item 4 is between 5.8 and 6.1 for females
Result Notifiable Your echocardiogram showed moderately abnormal left ventricular (heart chamber) size. These findings should be discussed with your physician and follow-up studies may be warranted.
N/A Left ventricular diastolic diameter
Echocardiogram data file item 4 is 6.9 or greater for males, echocardiogram data file item 4 is 6.2 or greater for females
Result Notifiable Your echocardiogram showed severely abnormal left ventricular (heart chamber) size. These findings should be discussed with your physician and follow-up studies may be warranted.
N/A Left ventricular wall thickness
Echocardiogram data file item 14 is between 1.4 and 1.6 for males, echocardiogram data file item 14 is between 1.3 and 1.5 for females
Result Notifiable Your echocardiogram showed moderately abnormal left ventricular (heart chamber) wall thickness. These findings should be discussed with your physician and follow-up studies may be warranted.
N/A Left ventricular wall thickness
Echocardiogram data file item 14 is 1.7 or greater for males, echocardiogram data file item 4 is 1.6 or greater for females
Result Notifiable Your echocardiogram showed severely abnormal left ventricular (heart chamber) wall thickness. These findings should be discussed with your physician and follow-up studies may be warranted.
N/A Mitral valve leakiness Echocardiogram data file item 19 is greater than 30
Result Notifiable Your echocardiogram showed moderate-to-severe or severe leakiness of one of the heart valves (the mitral valve). These findings should be discussed with your physician and follow-up studies may be warranted.
26-18
Table 26.1. Overview of Conditions and Values Reported to the ARIC Study Participants. Threshold Values for Alert Reports and Routine Study Results Reported to the Participants and as Summarized for ARIC Field Centers, and Accompanying Scripts
Alert #, if applicable (CC ref.)
Measurement Trigger conditions Reported to participant
as:
Reported to field
centers as:
Script for End of Visit or Summary of Results Report
N/A Mitral valve stenosis Echocardiogram data file item 57 is “Yes” Result Notifiable Your echocardiogram showed moderate or greater stenosis (narrowing) of one of the heart valves (the mitral valve). These findings should be discussed with your physician and follow-up studies may be warranted.
N/A Aortic valve leakiness Echocardiogram data file item 56 is “Yes” Result Notifiable Your echocardiogram showed moderate or greater leakiness of one of the heart valves (the aortic valve). These findings should be discussed with your physician and follow-up studies may be warranted.
N/A Aortic valve stenosis Echocardiogram data file item 32 is greater than 300
Result Notifiable Your echocardiogram showed moderate or greater stenosis (narrowing) of one of the heart valves (the aortic valve), These findings should be discussed with your physician and follow-up studies may be warranted.
N/A Right ventricular enlargement
Echocardiogram data file item 59 is “Yes” Result Notifiable Your echocardiogram showed severe enlargement of the right side of the heart. These findings should be discussed with your physician and follow-up studies may be warranted.
N/A Pulmonary hypertension
Echocardiogram data file item 58 is “Yes” Result Notifiable Your echocardiogram showed moderate or severe pulmonary hypertension. These findings should be discussed with your physician and follow-up studies may be warranted.
N/A Other echocardiogram finding
Echocardiogram data file item 60 is not blank Result Notifiable <ECH item 60>
37 Tamponade Echocardiogram Alerts Form Q3a is “Yes” Alert Alert Fluid collection around heart causing increased pressure
26-19
Table 26.1. Overview of Conditions and Values Reported to the ARIC Study Participants. Threshold Values for Alert Reports and Routine Study Results Reported to the Participants and as Summarized for ARIC Field Centers, and Accompanying Scripts
Alert #, if applicable (CC ref.)
Measurement Trigger conditions Reported to participant
as:
Reported to field
centers as:
Script for End of Visit or Summary of Results Report
37 Tamponade Echocardiogram Alerts Form Q3a is “Yes” Alert Alert A fluid collection around your heart causing increased pressure was found on an echocardiogram performed according to a research protocol on <ECA1>. These findings should be discussed with your physician and follow-up studies may be warranted.
38 Aortic dissection Echocardiogram Alerts Form Q3b is “Yes” Alert Alert Aortic dissection
38 Aortic dissection Echocardiogram Alerts Form Q3b is “Yes” Alert Alert Aortic dissection was found on an echocardiogram performed according to a research protocol on <ECA1>. These findings should be discussed with your physician and follow-up studies may be warranted.
39 Thrombosed or frankly dysfunctional prosthetic valve
Echocardiogram Alerts Form Q3c is “Yes” Alert Alert Abnormal prosthetic valve function
39 Thrombosed or frankly dysfunctional prosthetic valve
Echocardiogram Alerts Form Q3c is “Yes” Alert Alert Abnormal prosthetic valve function was noted an echocardiogram performed according to a research protocol on <ECA1>. These findings should be discussed with your physician and follow-up studies may be warranted.
40 Pseudoaneurysm Echocardiogram Alerts Form Q3d is “Yes” Alert Alert Pseudoaneurysm
40 Pseudoaneurysm Echocardiogram Alerts Form Q3d is “Yes” Alert Alert Pseudoaneurysm was found on an echocardiogram performed according to a research protocol on <ECA1>. These findings should be discussed with your physician and follow-up studies may be warranted.
41 Intracardiac abscess or vegetation
Echocardiogram Alerts Form Q3e is “Yes” Alert Alert Intracardiac abscess or vegetation
26-20
Table 26.1. Overview of Conditions and Values Reported to the ARIC Study Participants. Threshold Values for Alert Reports and Routine Study Results Reported to the Participants and as Summarized for ARIC Field Centers, and Accompanying Scripts
Alert #, if applicable (CC ref.)
Measurement Trigger conditions Reported to participant
as:
Reported to field
centers as:
Script for End of Visit or Summary of Results Report
41 Intracardiac abscess or vegetation
Echocardiogram Alerts Form Q3e is “Yes” Alert Alert Intracardiac abscess or vegetation was found on an echocardiogram performed according to a research protocol on <ECA1>. These findings should be discussed with your physician and follow-up studies may be warranted.
42 Intracardiac thrombus Echocardiogram Alerts Form Q3f is “Yes” Alert Alert Intracardiac thrombus
42 Intracardiac thrombus Echocardiogram Alerts Form Q3f is “Yes” Alert Alert Intracardiac thrombus was found on an echocardiogram performed according to a research protocol on <ECA1>. These findings should be discussed with your physician and follow-up studies may be warranted.
43 Other echocardiogram finding
Echocardiogram Alerts Form Q3g is “Yes” Alert Alert <ECA3G1>
43 Other echocardiogram finding
Echocardiogram Alerts Form Q3g is “Yes” Alert Alert <ECA3G1> was found on an echocardiogram performed according to a research protocol on <ECA1>. These findings should be discussed with your physician and follow-up studies may be warranted.
3 Local electrocardiogram findings
Procedures Completion Form Q9 is “Yes” Alert Alert <PRO9a> text
N/A Abdominal aortic scan results
Abdominal Aortic Technician Form Q4 is “N” and either (no Abdominal Aortic Overread form or Abdominal Aortic Overread Form Q4f is “1”)
Result Result Your aortic ultrasound was normal or showed no clinically relevant finding.
44 Aortic aneurysm Abdominal Aortic Overread Form Q4a is “1” Alert Alert Possible aortic aneurysm
44 Aortic aneurysm Abdominal Aortic Overread Form Q4a is “1” Alert Alert Your aortic ultrasound showed a possible aortic aneurysm, which is a serious abnormality. Size and location information: <AAO4a1> . Please contact your physician soon for further evaluation.
45 Enlarged aortic diameter
Abdominal Aortic Overread Form Q4c is “1” Alert Alert Enlarged aortic diameter (maximum diameter = <calculated value>)
26-21
Table 26.1. Overview of Conditions and Values Reported to the ARIC Study Participants. Threshold Values for Alert Reports and Routine Study Results Reported to the Participants and as Summarized for ARIC Field Centers, and Accompanying Scripts
Alert #, if applicable (CC ref.)
Measurement Trigger conditions Reported to participant
as:
Reported to field
centers as:
Script for End of Visit or Summary of Results Report
45 Enlarged aortic diameter
Abdominal Aortic Overread Form Q4c is “1” Alert Alert Your aortic ultrasound showed an enlarged aortic diameter of between 3 and 5 cm, which is abnormal. Size and location information: <AAO4c1> . You should follow-up with your physician within a month.
46 Other abdominal aortic alert abnormality
Abdominal Aortic Overread Form Q4b is “1” Alert Alert <AAO4B1 text>
46 Other abdominal aortic alert abnormality
Abdominal Aortic Overread Form Q4b is “1” Alert Alert Your aortic ultrasound showed <AAO4b1 text>, which is a serious abnormality. Please contact your physician soon for further evaluation.
47 Saccular aneurysm Abdominal Aortic Overread Form Q4d is “1” Alert Alert Saccular aneurysm
47 Saccular aneurysm Abdominal Aortic Overread Form Q4d is “1” Alert Alert Your aortic ultrasound showed a saccular aneurysm at <AAO4d1>, which is abnormal. You should follow-up with your physician within a month.
48 Other non-alert clinically relevant abnormality
Abdominal Aortic Overread Form Q4e is “1” Alert Alert <AAO4E1 text>
48 Other non-alert clinically relevant abnormality
Abdominal Aortic Overread Form Q4e is “1” Alert Alert Your aortic ultrasound showed <AAO4e1>, which is abnormal. You should follow-up with your physician within a month.
49 Potentially dangerous abdominal aortic scan finding
Abdominal Aortic Technician Form Q6a is “1” Alert Alert Patient referred to ER for potentially dangerous finding
50 UMN Aortic Lab alerted Abdominal Aortic Technician Form Q6b is “1” Alert Alert UMN Aortic Lab alerted
5 Depression finding CES Form Q13 (sum) > 9 Alert Alert Value of <CES13>
Per http://www.clinchem.org/cgi/content/full/47/11/2031
Per http://pathcuric1.swmed.edu/pathdemo/nrrt.htm
Per http://www.cholestech.com/docs/test_info/hs-CRP%20TB.pdf
26-22
Upper number reported is the 95th percentile; per
http://www.diavant.com/diavant/CMSFront.html;jsessionid=B99E7D35801416D2BA217863EDB9EFC9?pgid=1,10006,10006,1
Per http://en.wikipedia.org/wiki/Glycated_hemoglobin
Per http://my.clevelandclinic.org/services/urine_protein_test/hic_urine_protein_microalbuminuria-proteinuria_test.aspx
Per http://www.michigan.gov/documents/LSGSyphilis_TP_8278_7.doc
Per http://thyroid.about.com/od/gettestedanddiagnosed/a/normaltshlevel.htm
Per http://www.yourhealthbase.com/vitamin_B13.html
Per http://en.wikipedia.org/wiki/Reference_ranges_for_blood_tests
Per http://labmed.ucsf.edu/labmanual/db/data/tests/1004.html
27-1
27. STUDY RESULTS REPORTING SCHEDULE
ARIC implements an expedited notification schedule for study results of potential medical significance that may require prompt attention by the participant and his/her physician.
Field centers download the notifications of alert values (and also study results not processed on an expedited schedule) daily, by accessing the web based study data management system. Field sites that fail to access the Alert Reports page and have pending notifications are contacted by the data management system at the Coordinating Center through email messages addressed to the project manager and the principal investigator until the pending notification has been acted on.
The study identifies certain conditions as carrying high risk or constituting medical emergencies that require immediate notification of both the participant and his/her primary physician (if the consent authorized contacting the physician). Results that require immediate action by field center personnel include two consecutive blood pressure measurements exceeding a systolic of 200 mm Hg or a diastolic of 130 mm Hg, certain echocardiographic, aortic ultrasound, or ECG abnormalities listed in their manuals, or an accident or medical emergency that occurs during the participant’s visit at the study field center. The response by the staff is to arrange for a transfer of the participant directly from the field center to their physician or a hospital emergency room. Consultation with the field center physician is also desirable.
Notification Process. Each time results are uploaded to the central database by an ARIC reading center or the central laboratories the data are scanned according to the threshold levels identified in Table 26.1. If a result defined as an alert notification is identified (for example, if a triglyceride value is >= 1000 m/dL) an Alert Notification is generated for the respective field center, identifying it as an Immediate Action. The alert notification is displayed on the results portal of the field center’s website maintained by the coordinating center, and an email notification is sent to the staff person at the field center designated for this purpose. Per study protocol, field centers review their alert notifications (and regular result reports) daily on their secure reports pages of the website maintained by the ARIC coordinating center. If a field center does not access a participant report flagged as an alert, daily email notifications are generated after 72 hours to notify the field center personnel, the field center manager, and the coordinating center manager. Certain reading centers (MRI, echocardiography and abdominal aorta scan reading centers) also contact field centers directly if ostensibly severe conditions are detected that require prompt attention by a medical practitioner. The list of these conditions is found in the respective protocol manuals.
Contacting the Study Participant and the Provider of Care. Study participants are notified of a potential medical alert by an ARIC study nurse or physician, within 24 hours of receipt of the result or notification of a condition that requires follow-up. Prior to contacting the study participant staff review the participant’s informed consent for restrictions placed on sharing results with the provider of medical care, and retrieve the Tracing Report to access the participant’s contact information and that of the physician, and proxy if applicable.
Field center staff initiates a phone call to the participant (or the proxy) to convey the information and its potential importance, and to recommend follow-up and verification of the result/condition. The telephone conversation first confirms the identity of the party and then communicates the alert result information in language appropriate to the level of comprehension on the part of the participant. The participant is asked to designate who should receive the letter documenting the result at issue, and authorization is requested to send the alert information to the participant’s physician, in a letter documenting this result. Depending on field center procedures, the letter to the physician’s office can be faxed prior to the phone call so that the caller can refer to the fax sent about an alert value obtained on the participant as part of a research study.
Referral of an immediate alert value – during the Exit Interview or subsequently on receipt of an Immediate Alert Notification from a central laboratory or reading center – is documented in the ARIC DMS and requires that field center staff follow up with the participant or a designated contact person within days to find out whether the recommended referral was understood / implemented. If
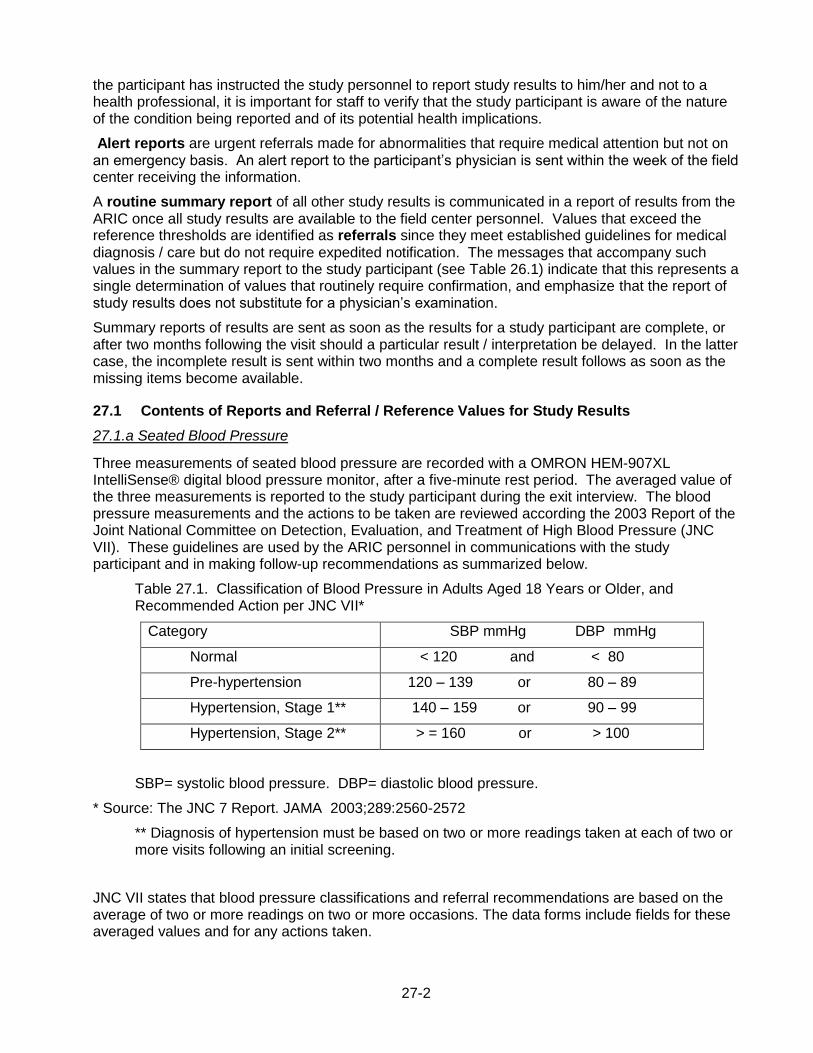
27-2
the participant has instructed the study personnel to report study results to him/her and not to a health professional, it is important for staff to verify that the study participant is aware of the nature of the condition being reported and of its potential health implications.
Alert reports are urgent referrals made for abnormalities that require medical attention but not on an emergency basis. An alert report to the participant’s physician is sent within the week of the field center receiving the information.
A routine summary report of all other study results is communicated in a report of results from the ARIC once all study results are available to the field center personnel. Values that exceed the reference thresholds are identified as referrals since they meet established guidelines for medical diagnosis / care but do not require expedited notification. The messages that accompany such values in the summary report to the study participant (see Table 26.1) indicate that this represents a single determination of values that routinely require confirmation, and emphasize that the report of study results does not substitute for a physician’s examination.
Summary reports of results are sent as soon as the results for a study participant are complete, or after two months following the visit should a particular result / interpretation be delayed. In the latter case, the incomplete result is sent within two months and a complete result follows as soon as the missing items become available.
27.1 Contents of Reports and Referral / Reference Values for Study Results
27.1.a Seated Blood Pressure
Three measurements of seated blood pressure are recorded with a OMRON HEM-907XL IntelliSense® digital blood pressure monitor, after a five-minute rest period. The averaged value of the three measurements is reported to the study participant during the exit interview. The blood pressure measurements and the actions to be taken are reviewed according the 2003 Report of the Joint National Committee on Detection, Evaluation, and Treatment of High Blood Pressure (JNC VII). These guidelines are used by the ARIC personnel in communications with the study participant and in making follow-up recommendations as summarized below.
Table 27.1. Classification of Blood Pressure in Adults Aged 18 Years or Older, and Recommended Action per JNC VII*
Category SBP mmHg DBP mmHg
Normal < 120 and < 80
Pre-hypertension 120 – 139 or 80 – 89
Hypertension, Stage 1** 140 – 159 or 90 – 99
Hypertension, Stage 2** > = 160 or > 100
SBP= systolic blood pressure. DBP= diastolic blood pressure.
* Source: The JNC 7 Report. JAMA 2003;289:2560-2572
** Diagnosis of hypertension must be based on two or more readings taken at each of two or more visits following an initial screening.
JNC VII states that blood pressure classifications and referral recommendations are based on the average of two or more readings on two or more occasions. The data forms include fields for these averaged values and for any actions taken.

27-3
Safety alert notifications based on blood pressure values are described below. Unless an immediate referral (Diastolic BP >130 mmHg or Systolic BP >200 mmHg) has been initiated at the time the participant’s blood pressure was measured, a referral may take place during the Exit Interview.
Table 27.2. Classification of Blood Pressure in Adults Aged 18 Years or Older per JNC VII, and Recommended Action by the ARIC
Category
Action Recommended During Exit Interview
Not on treatment for HTN
Normal
SBP <130 and
DBP <80
Have your blood pressure measured by a health professional at least every two years
Pre-hypertension
SBP 130-139 or
DBP 80-89
Have your blood pressure measured by a health professional every year
Hypertension, Stage 1
SBP 140-159 or DBP 90-99*
Your blood pressure is high (specify and show results on report). Please have your blood pressure checked by a physician within two months.
Hypertension, Stage 2
SBP >=160 or
DBP >=100*
See below
On treatment for HTN
Hypertension (2)
SBP <160 and
DBP <100*
If you are being treated for high blood pressure, your physician may have given you a schedule for your next check-up. Please follow that schedule.
Whether or not treated for HTN
Hypertension, Stage 2
SBP 160-179 or
DBP 100-109*
Your blood pressure is high (specify and show results on report). Please have your blood pressure checked by a physician within a month.
Whether or not treated for HTN
Hypertension, Stage 2
SBP 180-199 or
DBP 110-119*
Your blood pressure is very high (specify and show results on report). Please have your blood pressure checked by a physician within one week.
Whether or not treated for HTN
Hypertension, Stage 2
SBP >= 200 or
DBP >130*
Your blood pressure is very high (specify and show results on report). We strongly recommend that you see a physician at once. [Assist the participant in making an appointment for the same day, or at en emergency care facility]
* When recommendation for follow-up of DBP and SBP are different, the shorter recommended time for recheck and referral should take precedence. This classification applies only to participants not taking antihypertensive drugs.
27-4
27.1.b Ankle-Brachial Ratio
The presence of peripheral arterial disease (PAD) will be assessed with the ankle brachial index (ABI) using the OMRON VP-2000 device. A normal ABI range is 1.00 to 1.40, with progressively lower values below 1.00 corresponding to more severe arterial disease. Most persons in the group with an ABI >1.40 will also have a form of PAD. These higher ABIs reflect medial arterial calcification and partial or complete incompressibility of blood vessels, and primarily occur in persons with diabetes.
The ABI denominator for both the left and right ABI is the average of two brachial SBPs. If the difference between the average brachial SBPs in the two arms is 10 mm Hg or more, and one arm has a higher SBP for both measurements, the higher arm average SBP is used as the denominator. The right ABI numerator the average right posterior tibial SBP. The left ABI numerator is defined as the average left posterior tibial SBP. The right ABI is the right ABI numerator divided by the ABI denominator. The left ABI is the left ABI numerator divided by the ABI denominator. The report to the participant and the medical practitioner indicates that an ABI value <0.90 is strongly suggestive of a blockage of the arteries in the leg. An ABI value between 0.90and 1.00 is considered borderline, and a value above 1.40 also may be abnormal. It is further mentioned that an ABI outside the 1.00 to 1.40 range should be discussed with your health care provider as it may require additional testing.
27.1.c Twelve-Lead Electrocardiogram
A twelve-lead electrocardiogram will be acquired on all ARIC study participants according to the standardized study protocol, using the GEMSIT MAC 1300 portable electrocardiograph. The records will be transmitted via phone lines to the ECG reading center (EPICARE) for coding and a local ECG screening of the paper tracing for major abnormalities that require urgent referral will be conducted, first by the ECH technician and then by a medical practitioner at the field center. Following processing of the ECG record at EPICARE a report of the abnormalities listed below or their absence) will be transmitted to the ARIC Coordinating Center to be incorporated into the report to study participants that field center personnel download from the secure server maintained by the Coordinating Center. A paper tracing of the 12-lead ECG is enclosed with the report to the study participant’s physician.
27.1.d Respiratory Function Testing and DLCO
The main spirometry measurements are the forced vital capacity (FVC), the forced expiration volume in one second (FEV1), and the ratio between these two values (FEV1/FVC). Testing, interpretation of the results and reporting will follow the spirometry guidelines of the American Thoracic Society (ATS) and the European Thoracic Society (ERS) (combined ATS + ERS spirometry guideline published in 2005). The spirometry interpretation scheme in use for the MESA Lung Study and the HCHS/SOL will be used in ARIC, with the addition of an interpretation of the post-bronchodilator results. Per the ARIC manual of operations, the criteria for a post-bronchodilator spirometry is FEV1/FVC below fifth percentile for age and FEV1 <90% predicted.
If pre-bronchodilator spirometry shows mild obstruction or mild restriction, but post-bronchodilator spirometry is normal, restriction and COPD have been ruled out. Study participants with pre-bronchodilator obstruction and a ‘significant’ bronchodilator-response per ATS criteria, will be considered to have symptoms suggestive of asthma. If this is not previously known (diagnosed asthma) the ARIC participants will be advised to seek med cal attention within 4-6 weeks. The presence of pre-bronchodilator obstruction but no significant bronchodilator-response will be interpreted as not excluding the possibility of a clinical response to inhaled medications. Smoking cessation will be strongly advised to individuals with post-bronchodilator airway obstruction who are current smokers.

27-5
Care is taken to not "over-interpret" tests, e.g., borderline results are not interpreted as mild lung disease. In the case of suboptimal quality test sessions the report makes allowance for the associated uncertainty.
Reporting. A software-generated report is printed immediately after a satisfactory spirometry test is completed and a copy is given to the participant to discuss with the provider of care if desired. An electronic copy of the report is sent to the coordinating center to be integrated with other medically relevant test results for the consolidated report of study results four to six weeks later. A sample report is shown below.
Lung Function Measurements ARIC Study Spirometry Results
Study ID: xxxxxxx Acrostic: yyyyyyy
Age: < Your Age > Height: 173 cm
Session: 50 Gender: F
During your ARIC examination you did several tests of your lung function. The results of your best efforts are:
Pre Bronchodilator Post-BD Results
Measures Results % Predicted % Change
FVC 2762 mL 82.3 % +6.0 %
FEV1 1673 mL 60.8 % +13.1 %
FEV1/FVC 60.6% 82.5% ----
INTERPRETATION: Moderate airways obstruction indicated by the moderate reduction in FEV1.
Abbreviations: Post-BD = after albuterol
Spirometer: Sensormedics 922 / 1022, ID (Serial#): 4567888 OMI Version: 5.05
Normals Used: Hankinson(C)-1999 RA Factor: 1.00
Calibration date: 07/18/2007 Temp: 37.0 C. BP: 760 torr BTPS Factor: 1.000
Pre-Test
Effort = Maximal, Position = Standing, FVC Quality = B, FEV1 Quality = A
Post-Bronchodilator-Test
Effort = Maximal, Position = Sitting, FVC Quality = B, FEV1 Quality = A
Spirometry abnormalities assessed at the time of the ARIC examination have typically developed over many years; thus, no alerts or urgent referrals apply. However, when lung function is below 50% predicted, the participant will be told that they probably have a severe abnormality. If this is not previously known (diagnosed lung disease), the ARIC participants will be advised to seek medical attention within 4-6 weeks.

27-6
27.1.e Blood Chemistry Measurements
All laboratory assays are performed at the ARIC Central laboratories at Baylor University or the University of Minnesota, which also maintain the ARIC biospecimen repositories. The reference and alert values used by the Central Laboratory, summarized in Table 26.2, correspond to current recommendations by the National Cholesterol Education Program and national professional associations.
#Reference ranges for these tests are given in the form of a comment accompanying all result reports: National Cholesterol Education Program guidelines suggest that : 1) LDL-cholesterol values less than 100 mg/dL are optimal, 100-139 mg/dL are near or above optimal, 130-159 mg/dL are borderline high, 160-189 mg/dL are high. 190 mg/dL and above are very high; and 2) HDL-cholesterol values below 40 mg/dL are undesirable. (JAMA 2001; 285:2486-2497).
* Reported if requested by the study participant
27.2 Conveying the Results to the Study Participant
A shell of the reports of study results provided to the ARIC study participants are found in Appendices 27A, a limited set of results obtained at the time of the examination, and Appendix 27.B (‘Summary of Results for ARIC Participants and their Physicians’). The former is a brief report printed from the DMS at the conclusion of the participants exam visit, for review with ARIC staff during the Exit Interview (see above). This “end of visit” report includes height, weight, seated blood pressure, and at the discretion of the field center, also a copy of the ECG and a printout of the ankle-brachial values. The main purpose of the report is to remind the participant that a summary report of his/her study results will be mailed in approximately six weeks, to the person designated by the participant. Reviewing this report with staff also provides an opportunity to remind participants that the ARIC examination and its test results do not substitute for an examination by a physician.
The comprehensive Summary of Results for ARIC Participants and their Physicians, also shown below, is prefilled at the ARIC Coordinating Center with the study results as they are transferred from the field centers, the central laboratories and reading centers, and explanatory scripts specific to the result and pre-determined threshold levels per standard guidelines are inserted in the report for each participant. These summary reports of results are downloaded by the filed centers for printing and sent to the participants/physicians as soon as the results for a study participant are complete. Alternatively, should a particular result / interpretation be delayed field centers have the option of sending an incomplete reports of results, followed by the complete results as soon as the missing items become available.
27.2.a Support to Field Center Staff in Reporting Results to Participants
Given the relatively large number of results reported and the lack of familiarity of the public with such results, ARIC field centers highlight salient study results to the participants. For this purpose the Study provides a user-friendly overview of the report of study results to facilitate their comprehension and reduce the chance for study participants to miss potentially important results.
To implement this approach field centers prepare a personalized cover letter to accompany the report of results and identify key study results (if any are clinically significant). In turn, to assist field center personnel in reviewing a participant’s results and prepare the cover letter, an algorithm has been developed that prints the results that exceed laboratory or clinical guideline thresholds (see below). From this – and an awareness of the participants’ age, possible comorbidity and other elements – the field center clinician can ascertain whether a result that exceeds threshold is trivial or potentially important. This list for the field center personnel is printed as an extra page marked “not for distribution,” each time a report is downloaded at the field center. Examples of such overviews are attached.

27-7
List of the Messages Displayed for Field Center Clinical Personnel, Based on Result Values that Exceed Reporting Thresholds
- Not for Distribution to Participants -
- The blood pressure is very high.
- The blood pressure is high.
- The blood pressure is high (With Medication).
- The Right Ankle-brachial Index is low.
- The Right Ankle-brachial Index is high.
- The Left Ankle-brachial Index is low.
- The Left Ankle-brachial Index is high.
- The Glycosylated Hb is high
- The White Blood Cell count is high.
- The White Blood Cell count is low.
(Different for Men and Women)
- The Red Blood Cell count is high.
- The Red Blood Cell count is low.
- The Hemoglobin count is high.
- The Hemoglobin count is low.
- The Hematocrit is high.
- The Hematocrit is low.
- The triglyceride is very high.
- The triglyceride is high.
- The MCV is high.<BR>
- The MCV is low.<BR>
- The MCH is high.<BR>
- The MCH is low.
- The MCHC is high.
- The MCHC is low.
- The RCDW is high
- The RCDW is low.
- The Platelet count is high.
- The Platelet count is low.
- The fasting blood glucose is very high.
- The fasting blood glucose is high.
- The Total blood cholesterol is high.
- The HDL cholesterol is low.
27-8
- The LDL cholesterol is very high.
- The LDL cholesterol is high.
- Estimated kidney function less than 60 ml/min/1.73 m
- Estimated kidney function less than 30 ml/min/1.73 m
- The serum creatinine value is high.
- There is a mild elevation of protein in the urine.
- The protein in the urine is elevated.
27.3 Quality Assurance
Actions taken in response to an alert value are documented on the Report and Referral Tracking form. The occurrence of an alert condition and its processing from the originating laboratory or reading center to the notification of a study participant and/or the physician is journaled by the data management system maintained by the Coordinating Center. The timeliness of this process and its successful completion according to study protocol are included in the quality analyses performed by the Coordinating Center and are periodically reviewed by the Quality Control Committee.
Related Documents