UNIT C Windows 7 Managing Files and Folders File management is organizing and keeping track of files and folders. Working with poorly managed files is like looking for a needle in a haystack—it is frustrating and time consuming to search through irrelevant, misnamed, and out-of-date files to find the one you want. Windows allows you to organize folders and files in a file hierarchy, imitating the way you store paper documents in real folders. Just as a filing cabinet contains several folders, each containing a set of related documents and several dividers grouping related folders together, a file hierarchy allows you to place files in folders, then place folders in other folders, so that your files are organized and easier to find. Windows 7 provides you with a main file management window called Windows Explorer. Windows Explorer provides access to files, folders, drives, and disks on your local, Homegroup (a shared home network), and network computers. You have just been hired as a marketing special- ist. Ron Dawson, the vice president of Marketing, wants you to review the files on your computer and organize them for some upcoming projects. Quest Travel (folder) Advertising (folder) QST Ad Copy.rtf Company (folder) QST Company Info.rtf QST Fact Sheet.rtf QST People.rtf QST Press Release.rtf Letters (folder) Business Letters (folder) C&N Printing.rtf IRS Letter.rtf Personal Letters (folder) Eric Schubel.rtf Tracy Teyler.rtf Marketing (folder) QST Focus.rtf QST Logo.bmp QT New Logo.bmp Tours (folder) QST Tours.rtf To Do List.rtf Files You Will Need: Open Windows Explorer View files and folders Navigate a folders list Create and rename files and folders Search for files and folders Organize files and folders Copy and move files and folders Delete and restore files and folders Work with libraries OBJECTIVES Property of Cengage Learning

Welcome message from author
This document is posted to help you gain knowledge. Please leave a comment to let me know what you think about it! Share it to your friends and learn new things together.
Transcript

UNIT
CWindows 7
Managing Files
and Folders File management is organizing and keeping track of fi les and folders. Working with
poorly managed fi les is like looking for a needle in a haystack—it is frustrating and time
consuming to search through irrelevant, misnamed, and out-of-date fi les to fi nd the one
you want. Windows allows you to organize folders and fi les in a fi le hierarchy, imitating
the way you store paper documents in real folders. Just as a fi ling cabinet contains several
folders, each containing a set of related documents and several dividers grouping related
folders together, a file hierarchy allows you to place fi les in folders, then place folders in
other folders, so that your fi les are organized and easier to fi nd. Windows 7 provides you
with a main fi le management window called Windows Explorer. Windows Explorer
provides access to fi les, folders, drives, and disks on your local, Homegroup (a shared home
network), and network computers. You have just been hired as a marketing special-
ist. Ron Dawson, the vice president of Marketing, wants you to review the fi les on your
computer and organize them for some upcoming projects.
Quest Travel (folder)Advertising (folder)
QST Ad Copy.rtfCompany (folder)
QST Company Info.rtf
QST Fact Sheet.rtfQST People.rtfQST Press
Release.rtfLetters (folder)
Business Letters (folder)C&N Printing.rtfIRS Letter.rtf
Personal Letters (folder)Eric Schubel.rtfTracy Teyler.rtf
Marketing (folder)QST Focus.rtfQST Logo.bmpQT New
Logo.bmpTours (folder)
QST Tours.rtfTo Do List.rtf
Files You Will Need:
Open Windows Explorer
View fi les and folders
Navigate a folders list
Create and rename fi les and folders
Search for fi les and folders
Organize fi les and folders
Copy and move fi les and folders
Delete and restore fi les and folders
Work with libraries
OBJECTIVES
49040_UnitC_pp5.indd 4949040_UnitC_pp5.indd 49 11/30/09 6:42:23 PM11/30/09 6:42:23 PM
Propert
y of C
enga
ge Le
arning

UNIT
CWindows 7
Windows 50 Managing Files and Folders
Opening Windows ExplorerThe keys to organizing fi les and folders effectively within a fi le hierarchy are to store related items together and to name folders informatively. Proper hierarchy and relevant names allow you to get a good idea of what’s on your system just by looking at the higher levels of your fi le hierarchy; you don’t have to examine every individual fi le or memorize a coding system. Drives, folders, and fi les are represented by icons. Table C-1 lists the typical drives on a computer and how you use them. Each drive is assigned a drive letter, denoted with parentheses and a colon to help make it easier to identify. Typically, the hard drive is listed as Local Disk (C:), while the CD or DVD is (D:). If your computer includes additional hard or removable drives, they are assigned letters by your computer in alphabetical order. Windows Explorer provides access to fi les, folders, drives, and disks on your local, Homegroup (a shared home network), and network com-puters. The Windows Explorer window contains a toolbar, a Navigation pane, a Details pane, a menu bar (which might not be visible), a status bar (which might not be activated) providing information about the contents of the window, and a list of contents. The Navigation pane displays links to common folder and drive locations, including Favorites, Libraries, Homegroup, Computer, and Network. Libraries are special folders that catalog fi les and folders in a central location, regardless of where you actually store them on your hard drive, to make fi nding fi les easier. A library can contain links to fi les, other folders, and other subfolders anywhere on your computer. The fi le hierarchy on your disk contains several Quest Specialty Travel folders and fi les organized by topic. You want to open the Windows Explorer window and review its organization to see if it needs changes.
1. Click the Windows Explorer button on the taskbarThe Windows Explorer window opens, displaying the contents of the Libraries folder. Windows 7 comes with four default libraries: Documents, Music, Pictures, and Videos.
2. Point to Libraries, click the Expand indicator next to Libraries if necessary to expand the list, then click Documents in the Navigation pane under LibrariesThe contents of the Documents library folder open in your Windows Explorer window.
3. If you want to save your Data Files to a USB drive, make sure the USB drive where you store your Data Files is plugged into your computer, then click Computer in the Navigation paneThe Computer window opens, displaying the contents of your computer, including all disk drives, removable storage devices, and network locations.
4. Click the drive where you store your Data FilesThe bottom pane of the Computer window changes to display details about the selected drive, as shown in Figure C-1. This fi gure shows a USB drive labeled “Removable Disk (G:),” which might be different on your computer. Because computers differ, the contents of your Computer window are also probably different from the fi gure. If you selected a hard drive, the Details pane displays additional information, including free space and total disk size.
5. Double-click the drive where you store your Data FilesThe folders contained on the disk drive open in the Computer window. When you open a disk drive or folder, the Address bar adds the new location to the list. In this example, Removable Disk (G:) is listed in the Address bar after Computer.
6. Double-click the UnitC folder, then double-click the Quest Travel folderThe fi les and folders in the Quest Travel folder are represented by icons that indicate the application they were created with. For example, the To Do List.rtf fi le was created in WordPad.
7. Double-click the Company folderThe Company folder opens, displaying four fi les, which were created in WordPad.
STEPS
To display disks and drives, click the Start button on the taskbar, then click Computer.
QUICK TIP
If your Data Files are not stored on a USB drive, locate the drive where you store your Data Files, and sub-stitute that drive for “USB drive” in the steps in this unit.
TROUBLE
If Microsoft Word or another word- processing program is installed on your computer, your document icons might differ.
TROUBLE
49040_UnitC_pp5.indd 5049040_UnitC_pp5.indd 50 11/30/09 6:42:26 PM11/30/09 6:42:26 PM
Propert
y of C
enga
ge Le
arning

Windows 51Managing Files and Folders
Win
do
ws 7
Opening a document with a different program
Most documents on your desktop are associated with a specifi c pro-gram. For example, if you double-click a document whose fi lename ends with the three-letter extension “.txt,” Windows automatically opens the document with Notepad, a text-only editor. There are situa-tions, though, when you need to open a document with a program other than the one Windows chooses, or when you want to choose a
different default program. For example, you might want to open a text document in WordPad rather than Notepad so that you can add for-matting and graphics. To do this, right-click the document icon you want to open, point to Open with on the shortcut menu, then click the application you want to use to open the document, or click Choose default program to access more program options.
Computer
in the
Address bar
DVD RW
Drive
Navigation
pane
Hard Drive
CD Drive
Removable
Disk
Network Drive
Your devices
may differDetails pane
with information
about the
selected disk
drive
FIGURE C-1: Computer window
TABLE C-1: Typical disk drives on a computer
Local A hard magnetic disk on which you can store large amounts of data. The disk is typically not removable from the computer.
Removable A removable disk on which you can store computer data, such as a Flash memory card or Flash or USB drive.
Compact Disc-Read-Only An optical disc on which you can stamp, or burn, up to 1 GB (typical size is 650 MB) of data in Memory (CD-ROM) only one session. The read-only disc cannot be erased or burned again with additional new data.
Compact Disc-Recordable A type of read-only CD on which you can burn up to 1 GB of data in multiple sessions. The disc (CD-R) can be burned again with additional new data, but cannot be erased.
Compact Disc-Rewritable A type of CD on which you can read, write, and erase data, just like a removable or hard disk. (CD-RW)
Digital Video Disc (DVD) A type of read-only optical disc that holds a maximum of 4.7 GB, enough for a full-length movie.
Digital Video Disc-Recordable A type of read-only DVD on which you can burn up to 4.7 GB of data in multiple sessions. The (DVD-R) disc can be burned again with new data, but cannot be erased.
Digital Video Disc-Rewritable A type of DVD on which you can read, write, and erase data, just like a hard disk. (DVD-RW)
Network drive A location on a network drive.
icon type description
49040_UnitC_pp5.indd 5149040_UnitC_pp5.indd 51 11/30/09 6:42:26 PM11/30/09 6:42:26 PM
Propert
y of C
enga
ge Le
arning

UNIT
CWindows 7
Windows 52 Managing Files and Folders
Viewing Files and FoldersOnce you have opened more than one folder, the Address bar helps you move quickly between folders in a window. When you open a folder, Windows keeps track of where you have been. To go back or forward to a folder you already viewed, click the Back or Forward button to the left of the Address bar. To go to a folder you viewed two or more locations ago, click the Recent Pages list arrow next to the Forward button to dis-play a menu of places you viewed. The Address bar displays the path you have taken, separated by arrows, to get from a disk drive to your current folder location. To quickly go back to a folder within the path, click the folder name in the Address bar or click an arrow to view the contents of each folder. When you view a folder, you can use the Views button on the toolbar to change the way you view fi le and folder icons. The available views include Extra Large, Large, Medium, and Small Icons, and List, Details, Tiles, and Content. Icon views display icons in different sizes, sorted alphabetically in horizontal rows, with the name of the fi le or folder below each icon. When you view fi les using one of the Icon views, some fi le types, such as a bitmap, display Live icons (or thumbnails), which display the fi rst page of documents, the image of a photo, or the album art for individual songs, making it easier to fi nd exactly what you are looking for. The other views—Details, Tiles, and Content—display additional information, such as fi le type, date modifi ed, and size, about the fi le or folder. As you continue to browse company fi les and folders, you want to move between them and, depending upon the information you need, change the way you view your fi les and folders.
1. Click the Back button to the left of the Address barThe contents of the Quest Travel folder open in the Quest Travel window in Tiles view, as shown in Figure C-2. Each time you click , you are brought back to the previous folder or drive you viewed.
2. Click the drive where you store your Data Files in the Address barIn this example, Removable Disk (G:) is listed in the Address bar after Computer. The contents of the drive open in the window, which includes the UnitC folder. Instead of continuously double-clicking between folder icons, the will return you to the previous folder you viewed.
3. Click to the left of the Address barThe Quest Travel folder and its contents open in the Computer window.
4. Double-click the Advertising folder in the windowThe contents of the Advertising folder open in the window. Instead of using the Back button, you can use the Recent Pages list arrow to display a list of the drives and folders you recently viewed.
5. Click the Recent Pages list arrow between the Forward button and the Address barThe Recent Pages menu opens, displaying a list of drives and the folders you viewed recently.
6. Click Quest Travel in the menuThe contents of the Quest Travel folder reopens in the window.
7. Click the Views button arrow on the toolbar, then click DetailsThe Quest Travel window changes to Details view, which shows the name, the date that each fi le or folder was last modifi ed, and the type and size of fi le, as shown in Figure C-3.
8. Click the Views button on the toolbar, then click againThe display changes to Tiles view, which is the next view in the Views menu, then changes to Content view. When you click the Views button, you cycle through the following fi ve views: List, Details, Tiles, Content, and Large Icons. The Tiles and Content views display summary information next to each icon.
9. Click Computer in the Address bar or click the double arrow next to the folder icon in the Address bar and then click ComputerThe Computer window opens. The icon in the Address bar indicates the path is too big to fi t in the Address bar, similar to the way the ellipse (. . .) works in a limited space with text.
STEPS
If your window view is not Tiles, click the Views button arrow, then click Tiles.
TROUBLE
You can also press [Backspace] to go back to a previous folder you viewed.
QUICK TIP
If the double arrow is not in the Address bar, click the left-most arrow next to the folder icon in the Address bar, then click Computer.
TROUBLE
49040_UnitC_pp5.indd 5249040_UnitC_pp5.indd 52 11/30/09 6:42:27 PM11/30/09 6:42:27 PM
Propert
y of C
enga
ge Le
arning

Windows 53Managing Files and Folders
Win
do
ws 7
Back button
Forward button
Recent Pages
list arrow
Views button
arrow
Views button
FIGURE C-2: Viewing fi les and folders in Tiles view
Views
button
arrow
Files and
folder details;
yours might differ
Details view
FIGURE C-3: Viewing fi les and folders in Details view
Customizing Details view
When you view fi les and folders in Details view, a default list of fi le and folder information appears, which consists of Name, Size, Type, and Date Modifi ed. If the default list of fi le and folder details doesn’t provide you with the information you need, you can add and remove any fi le and folder information from Details view. If you need to change the way Windows sorts your fi les and folders, you can use the column indi-cator buttons in the right pane of Details view. Clicking one of the
column indicator buttons, such as Name, Size, Type, or Date Modifi ed, in Details view sorts the fi les and folders by the type of information listed in the column. To change the details shown, right-click a column heading in Details view, and then click the detail you want to show or hide. To see more details or to change the list order, right-click a column title, then click More. You can also drag a column heading to move it quickly to a new position.
49040_UnitC_pp5.indd 5349040_UnitC_pp5.indd 53 11/30/09 6:42:29 PM11/30/09 6:42:29 PM
Propert
y of C
enga
ge Le
arning

UNIT
CWindows 7
Windows 54 Managing Files and Folders
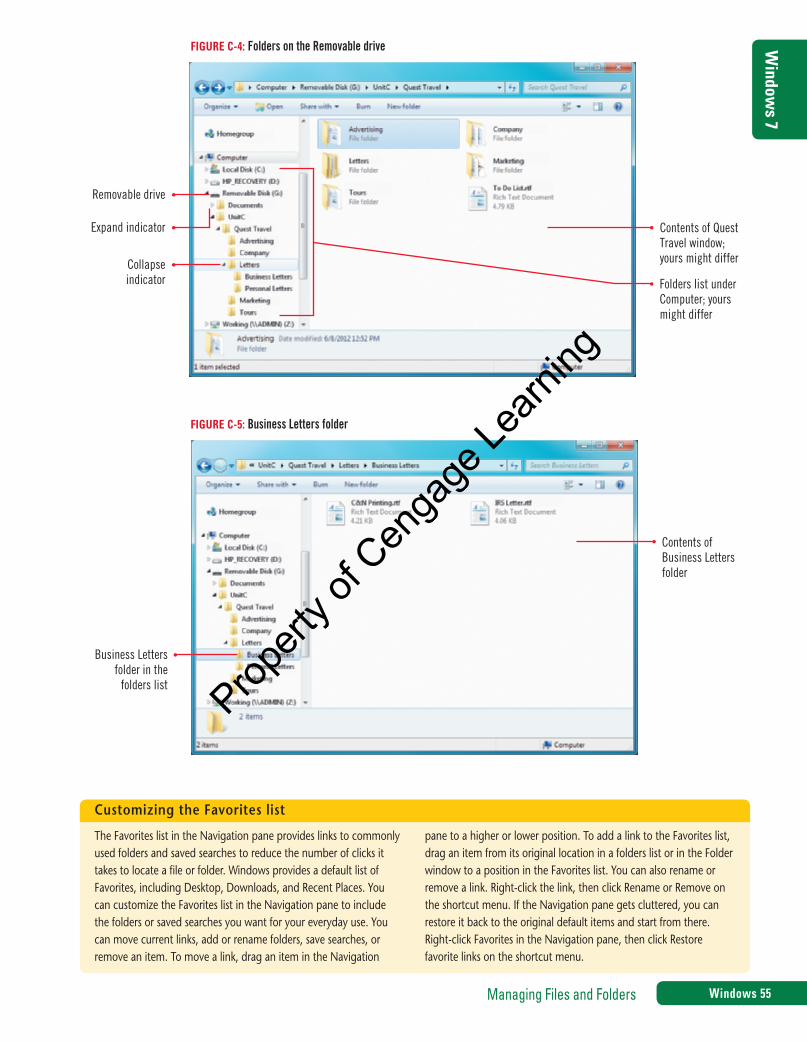
Navigating a Folders ListIf you are working in Windows Explorer, you can use the Navigation pane to display and manage fi les and folders. Windows Explorer splits the window into two panes, or frames, as shown in Figure C-4, which al-lows you to view information from two different locations. The Navigation pane on the left displays all drives and folders on your computer or network, and the right pane displays the contents of the selected drive or folder. This arrangement enables you to view the fi le hierarchy of your computer or network and the contents of a folder simultaneously. The Navigation pane is organized into fi ve categories: Favorites, Libraries, Homegroup, Computer, and Network. The Navigation pane displays the fi le hierarchy of the drives and folders for each category in a folders list. Using the Expand indicator and Collapse indica-tor to the left of an icon in the Navigation pane allows you to display different levels of the drives and folders on your computer without opening and displaying the contents of each folder. With its split window, the folders list in the Navigation pane makes it easy to copy, move, delete, and rename fi les and folders. In an effort to learn how to manage company fi les effectively, you want to use the folders list in the Navigation pane to quickly move to folders within folders without opening and displaying the contents of each folder in the fi le hierarchy.
Click the 1. Back button to the left of the Address bar, then click the Views button on the toolbar until Tiles view appearsThe Quest Travel folder opens, displaying folders and fi les in Tiles view.
2. Point to Computer in the folders list, then click the Expand indicator that appears next to it, if necessaryThe Computer folder expands to display its folder structure in the Navigation pane. The Navigation pane displays a fi le hierarchy of the currently selected folder or disk. You can access all folders and drives from the folders list in the Navigation pane. Note that the contents of your folders list will vary, depending on the programs and fi les installed on your computer and where Windows is installed.
3. Click the Expand indicator in the folders list to display the folder where you store your Data Files, then continue to click the Expand indicator to display the Letters folderThe Letters folder expands to display its folder structure, as shown in Figure C-4. The Expand indicator changes to the Collapse indicator , indicating the subfolders on the drive or in the folder are dis-played. When neither nor appears next to an icon, the item has no folders in it. However, it might contain fi les, whose names you can display in the right pane by clicking the folder name. Because you did not click the folder icon, the right pane still displays the contents of the Quest Travel folder as it did before.
4. Click Business Letters in the folders list under ComputerWhen you click a folder or drive in the folders list, its contents open in the right pane. Figure C-5 shows the contents of the Business Letters folder in the right pane.
5. Click next to the Letters folder in the folders list under ComputerThe folders in the Letters folder collapse and no longer appear in the folders list. Because you did not click the Letters folder icon, the right pane still displays the contents of the Business Letters folder.
6. Click Letters in the folders list under ComputerThe right pane shows the contents of the Letters folder.
7. Double-click the Business Letters folder in the right paneThe right pane now displays the contents of the Business Letters folder. When you double-click a drive or folder in the right pane, the right pane of the window shows the contents of that item. When you double-click a fi le, the program associated with the fi le starts and opens the fi le in the program window.
STEPS
To change the size of the Navigation pane, place the mouse pointer on the vertical bar sepa-rating the two win-dow panes so that it changes to , then drag to change the size of the panes.
QUICK TIP
To automatically expand folders in the Navigation pane, right-click a blank area in the Navigation pane, then click Expand to current folder to dis-play a check mark.
QUICK TIP
To show all folders in the Navigation pane, right-click a blank area in the Navigation pane, then click Show all folders to display a check mark.
QUICK TIP
49040_UnitC_pp5.indd 5449040_UnitC_pp5.indd 54 11/30/09 6:42:30 PM11/30/09 6:42:30 PM
Propert
y of C
enga
ge Le
arning
Windows 55Managing Files and Folders
Win
do
ws 7
Folders list under
Computer; yours
might differ
Removable drive
Expand indicator
Collapse
indicator
Contents of Quest
Travel window;
yours might differ
FIGURE C-4: Folders on the Removable drive
Business Letters
folder in the
folders list
Contents of
Business Letters
folder
FIGURE C-5: Business Letters folder
Customizing the Favorites list
The Favorites list in the Navigation pane provides links to commonly used folders and saved searches to reduce the number of clicks it takes to locate a fi le or folder. Windows provides a default list of Favorites, including Desktop, Downloads, and Recent Places. You can customize the Favorites list in the Navigation pane to include the folders or saved searches you want for your everyday use. You can move current links, add or rename folders, save searches, or remove an item. To move a link, drag an item in the Navigation
pane to a higher or lower position. To add a link to the Favorites list, drag an item from its original location in a folders list or in the Folder window to a position in the Favorites list. You can also rename or remove a link. Right-click the link, then click Rename or Remove on the shortcut menu. If the Navigation pane gets cluttered, you can restore it back to the original default items and start from there. Right-click Favorites in the Navigation pane, then click Restore favorite links on the shortcut menu.
49040_UnitC_pp5.indd 5549040_UnitC_pp5.indd 55 11/30/09 6:42:31 PM11/30/09 6:42:31 PM
Propert
y of C
enga
ge Le
arning
UNIT
CWindows 7
Windows 56 Managing Files and Folders
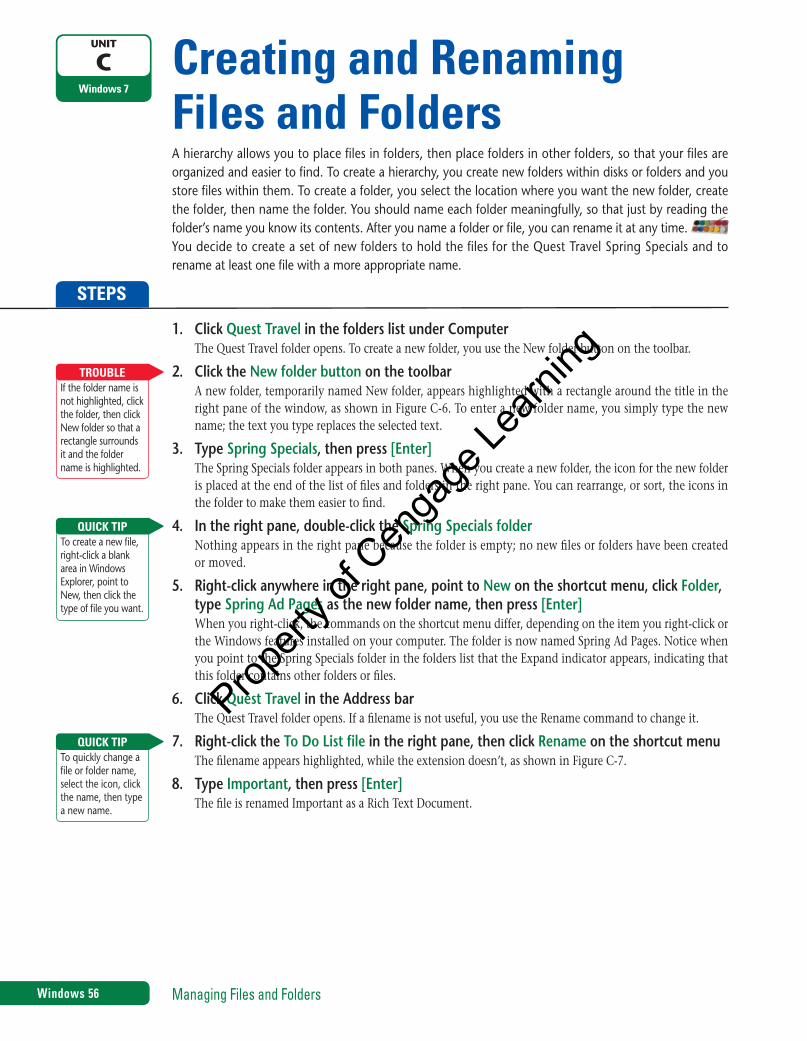
Creating and Renaming Files and FoldersA hierarchy allows you to place fi les in folders, then place folders in other folders, so that your fi les are organized and easier to fi nd. To create a hierarchy, you create new folders within disks or folders and you store fi les within them. To create a folder, you select the location where you want the new folder, create the folder, then name the folder. You should name each folder meaningfully, so that just by reading the folder’s name you know its contents. After you name a folder or fi le, you can rename it at any time. You decide to create a set of new folders to hold the fi les for the Quest Travel Spring Specials and to rename at least one fi le with a more appropriate name.
1. Click Quest Travel in the folders list under ComputerThe Quest Travel folder opens. To create a new folder, you use the New folder button on the toolbar.
2. Click the New folder button on the toolbarA new folder, temporarily named New folder, appears highlighted with a rectangle around the title in the right pane of the window, as shown in Figure C-6. To enter a new folder name, you simply type the new name; the text you type replaces the selected text.
3. Type Spring Specials, then press [Enter]The Spring Specials folder appears in both panes. When you create a new folder, the icon for the new folder is placed at the end of the list of fi les and folders in the right pane. You can rearrange, or sort, the icons in the folder to make them easier to fi nd.
4. In the right pane, double-click the Spring Specials folderNothing appears in the right pane because the folder is empty; no new fi les or folders have been created or moved.
5. Right-click anywhere in the right pane, point to New on the shortcut menu, click Folder, type Spring Ad Pages as the new folder name, then press [Enter]When you right-click, the commands on the shortcut menu differ, depending on the item you right-click or the Windows features installed on your computer. The folder is now named Spring Ad Pages. Notice when you point to the Spring Specials folder in the folders list that the Expand indicator appears, indicating that this folder contains other folders or fi les.
6. Click Quest Travel in the Address barThe Quest Travel folder opens. If a fi lename is not useful, you use the Rename command to change it.
7. Right-click the To Do List file in the right pane, then click Rename on the shortcut menuThe fi lename appears highlighted, while the extension doesn’t, as shown in Figure C-7.
8. Type Important, then press [Enter]The fi le is renamed Important as a Rich Text Document.
STEPS
If the folder name is not highlighted, click the folder, then click New folder so that a rectangle surrounds it and the folder name is highlighted.
TROUBLE
To create a new fi le, right-click a blank area in Windows Explorer, point to New, then click the type of fi le you want.
QUICK TIP
To quickly change a fi le or folder name, select the icon, click the name, then type a new name.
QUICK TIP
49040_UnitC_pp5.indd 5649040_UnitC_pp5.indd 56 11/30/09 6:42:32 PM11/30/09 6:42:32 PM
Propert
y of C
enga
ge Le
arning

Windows 57Managing Files and Folders
Win
do
ws 7
New folder button
Temporary name
of new folder
Date and time folder
was created; yours
will differ
FIGURE C-6: Creating a new folder
Filename selected
using the Rename
command
FIGURE C-7: Renaming a fi le
Changing the layout of Explorer windows
Windows gives you the option to customize the layout for each Explorer window depending on the information the window contains. The layout for each Explorer window can include a menu bar, Details pane, Preview pane, and Navigation pane. The Details and Navigation panes appear by default. The Organize menu shows or hides the layout elements. If you prefer working with menus like the previous version of
Windows, you can show the menu bar and use traditional menus. To change the Explorer layout, open the folder window you want to change, click the Organize button on the toolbar, point to Layout, then select the layout item you want to show or hide: Menu bar, Details pane, Preview pane, or Navigation pane. Layout options vary depending on the type of Explorer window.
49040_UnitC_pp5.indd 5749040_UnitC_pp5.indd 57 11/30/09 6:42:32 PM11/30/09 6:42:32 PM
Propert
y of C
enga
ge Le
arning

UNIT
CWindows 7
Windows 58 Managing Files and Folders
Searching for Files and FoldersSometimes remembering precisely where you stored a fi le can be diffi cult. Windows provides a Search box and Search Results folder to help you fi nd and view all of the fi les or folders that meet your search criteria in one place. The Search Results folder provides easy access to all of your fi les, such as documents, pictures, music, and e-mail, and folders that match search criteria you set in a single view. Items that match the search criteria appear highlighted. If you don’t fi nd the fi les or folders you’re looking for, you can perform an advanced search. An advanced search gives you the option to fi nd fi les or folders by other criteria, such as name, title, author, location, date (taken, modifi ed, or created), size, or tags, which are user-defi ned fi le properties. The Search Results folder is accessible from any folder window with the Search box to help you locate fi les and folders on your computer, Homegroups, and Internet. You want to fi nd a fi le you created several months ago with preliminary notes for the Spring Specials, so you can move it to the Spring Specials folder. You cannot remember the exact title of the fi le or where you stored it, so you perform a search.
1. Click in the Search box to the right of the Address barA Search box menu opens, displaying recently performed searches and advanced search options, known as filters. A filter narrows the search to display only items that meet the criteria. After a moment, the menu closes. By default, a search occurs in the folder that is currently open, as well as any subfolders in it, but you can specify any location on your computer to search. Just type the name of the folder or fi le you want to fi nd or the part you know for certain in the Search box. If you didn’t know the name of the fi le, but did know some text contained in the fi le, you could enter that text. You want to search in the Quest Travel folder, which is the current folder.
2. Type qst in the boxAs you type, fi les that contain the text you typed as part of their fi lename display highlighted in the win-dow, as shown in Figure C-8. You don’t have to press [Enter]. If any folders in the Quest Travel folder or its subfolders had names that contained QST, their names would appear as well. Notice that the Address bar displays “Search Results in Quest Travel” to indicate the location of the search. If you don’t fi nd the fi le you want, you can perform an advanced search.
3. Click in the Search boxA Search box menu opens, displaying recent searches and fi lter search options at the bottom. The current menu displays Date modifi ed and Size.
4. Click Size at the bottom of the Search box menuThe Search box menu now lists size options, which include Empty (0 KB), Tiny (0–10 KB), Small (10–100 KB), Medium (100 KB–1 MB), Large (1–16 MB), Huge (16–128 MB), and Gigantic (>128 MB).
5. Click Medium (100 KB–1 MB) on the Search box menu for SizeYou have specifi ed that you only want to fi nd document fi les that are larger than 100 KB, yet smaller than 1 MB in size. Once you select a search criteria fi lter, the Search program fi nds and lists all the corresponding fi les and folders that meet the criteria. See Figure C-9. Notice that the criteria in the Search box changes to “qst size:medium” to refl ect the search options in the Quest Travel folder.
6. Click the Close button in the Search boxThe search criteria are removed from the Search box. Windows Explorer displays all the fi les and folders in the Quest Travel folder.
STEPS
To delete an entry on the Search box menu, point to the entry on the menu, then press [Delete].
QUICK TIP
To expand the search to other locations or perform a search, scroll to the bottom, then click a search option, such as Li-braries, Homegroup, Computer, Internet, File Contents, and Custom (for location change).
QUICK TIP
Use the * (asterisk) symbol in a fi lename when you’re unsure of the entire name. For example, type “S*rs” to fi nd all fi les beginning with “S” and ending with “rs,” such as Stars and Sports cars.
QUICK TIP
49040_UnitC_pp5.indd 5849040_UnitC_pp5.indd 58 11/30/09 6:42:35 PM11/30/09 6:42:35 PM
Propert
y of C
enga
ge Le
arning

Windows 59Managing Files and Folders
Win
do
ws 7
Files with “qst” in
their filenames
Highlighted
search results
Filter options
Search criteriaAddress bar
changes to indicate
search results
FIGURE C-8: Performing a search
Filtered search
criteria Close button in
Search box
Filtered search
results
Search location
options
FIGURE C-9: Results from a fi ltered search
Saving a search
If you frequently perform the same search, you can save your search results like any fi le and perform or modify the search again later. Once your search is completed, click the Save search button on the toolbar to open the Save As dialog box. The default fi le type in the Save as type box is Saved Search (*.search-ms). Type a name for the search, then click Save. The search is saved by default in the Searches folder, which
you can open by clicking Favorites or Searches in the Navigation pane. To run a saved search, double-click it in the Searches window or click it in the Navigation pane. Like any fi le or folder icon, you can move a saved search from the Searches folder to the Favorites section in the Navigation pane to make it more accessible. When you no longer need a saved search, you can select it, press [Delete], then click Yes to confi rm.
49040_UnitC_pp5.indd 5949040_UnitC_pp5.indd 59 11/30/09 6:42:35 PM11/30/09 6:42:35 PM
Propert
y of C
enga
ge Le
arning

UNIT
CWindows 7
Windows 60 Managing Files and Folders
Organizing Files and FoldersIn Explorer windows, fi les appear in lists with headings at the top. You can use the headings to change how fi les are displayed in the window. There are several ways to organize your fi les by using fi le list head-ings, including sorting, fi ltering, and grouping. Sorting displays fi les and folders in alphabetical order, ei-ther A to Z or Z to A. Filtering displays only fi les and folders with the properties you select by heading type. When you apply a fi lter to a heading, a check mark appears in the column heading, indicating a fi lter is enabled. If a fi lter doesn’t display the fi les you want in the selected folder, you can use the Subfolders option to include them in an expanded search. You want to use sorting and fi ltering to help you fi nd specifi c Quest Specialty Travel fi les.
1. Click the Views button arrow, then click Details, if necessaryThe contents of the Quest Travel folder open in Details view.
2. Click the Name column heading to sort the listThe fi le list is sorted in alphabetical order from Z to A. When you click a column heading, the fi le list is sorted in order by that column. Clicking the column toggles between sorting the list in ascending to descending order and descending to ascending order.
3. Click the Name column heading again to re-sort the listThe fi le list is sorted in alphabetical order from A to Z. Notice that a list arrow appears at the end of the Name column heading. The list arrow allows you to access additional fi ltering and grouping commands.
4. Point to the Name column heading, then click the Name column heading list arrowA shortcut menu opens, as shown in Figure C-10. The menu displays commands to fi lter fi les and folders to help you fi nd what you’re looking for. If you only want to view fi les in a certain group, you can select one of the fi ltering options.
5. On the shortcut menu, click the I - P check box to select it, then click off the menu to close itThe window displays only the fi les that meet the I - P fi lter, as shown in Figure C-11. A check mark appears in the column heading to indicate a fi lter is applied to the view.
6. Click Subfolders at the bottom of the windowA search is applied to the I - P fi lter to include any fi les and folders in the Quest Travel subfolders. In this case, the IRS Letter.rtf fi le appears at the bottom of the list in Contents view. The Address bar displays “Search Results in Quest Travel > I - P” to indicate the results of the search along with the I - P fi lter.
7. Click the Back button , click the Name column heading check mark, click the I - P check box to clear it, then click off the menu to close itAll of the search results for the Quest Travel folder open in Details view.
8. Click Quest Travel in the folders list, then change the view to Tiles, if necessaryThe fi le list in the Quest Travel folder is restored back to its original state.
STEPS
49040_UnitC_pp5.indd 6049040_UnitC_pp5.indd 60 11/30/09 6:42:37 PM11/30/09 6:42:37 PM
Propert
y of C
enga
ge Le
arning

Windows 61Managing Files and Folders
Win
do
ws 7
Name column
heading list arrow
Click to sort by
heading type
Menu to filter files
and folders
FIGURE C-10: Menu to fi lter fi les and folders
Extends the filter to
subfolders in the
Quest Travel folder
Check mark indicates
a filter is applied
Files and folders in
the filtered list
FIGURE C-11: Filtering fi les and folders
Adding property tags to files
When you create a fi le, Windows automatically adds properties to the fi les, such as the fi lename, creation date, modifi ed date, and size. These properties are important to Windows; however, they might not be useful when you are searching for a fi le. You can create your own custom properties called tags to make it faster and easier to locate fi les in the future. A tag can be anything you choose, such as “QST” or “Important.” You can add or modify tag properties for most fi les.
However, there are some exceptions, such as plain text (.txt) or Rich Text Format (.rtf) fi les. You can add or modify properties using the Tags box in the Details pane in an Explorer window, the Details tab in the Properties dialog box, or in the Save As dialog box. If you want to remove some or all of the property information in a fi le, you can quickly remove it using the Properties dialog box. To open the Properties dialog box for a fi le, right-click the fi le, then click Properties.
49040_UnitC_pp5.indd 6149040_UnitC_pp5.indd 61 11/30/09 6:42:38 PM11/30/09 6:42:38 PM
Propert
y of C
enga
ge Le
arning

UNIT
CWindows 7
Windows 62 Managing Files and Folders
Copying and Moving Files and FoldersSometimes you will need to move or even copy a fi le from one folder to another. This can be accomplished using a variety of methods. If the fi le or folder and the location where you want to move it are visible in a window or on the desktop, you can simply drag the item from one location to the other. Moving a fi le or folder on the same disk relocates it, whereas dragging it from one disk to another copies it so that it appears in both locations. One way to make sure that you move or copy an item properly is to right-click the fi le or folder, drag the item to the destination location while still holding down the right mouse button, then choose the appropriate command from the shortcut menu. When the destination folder or drive is not visible, you can use the Cut, Copy, and Paste commands on the Edit menu or the Organize button on the toolbar. As you continue to organize Quest Specialty Travel fi les, you want to remove some fi les you no longer need, then make a copy of another fi le and place it in a folder.
1. Click Company in the folders listThe contents of the Company folder open in the window. When moving or copying fi les or folders, make sure the fi les or folders you want to move or copy appear in the right pane. To move a fi le, you drag it from the right pane to the destination folder in the folders list.
2. Drag the QST Press Release.rtf file in the right pane across the vertical line separating the two panes to the Marketing folder in the folders list, as shown in Figure C-12, then release the mouse buttonOnce you release the mouse button, the QST Press Release.rtf fi le is relocated to the Marketing folder, which is a more appropriate location for this type of information. If you decide that you don’t want the fi le moved, you could move it back easily using the Undo command on the Organize button menu.
3. Click Marketing in the folders listNotice that the QST Press Release fi le is now stored in the Marketing folder.
4. Point to the QST New Logo.bmp file, press and hold the right mouse button, drag the fi le across the vertical line separating the two panes to the Advertising folder, then release the mouse buttonAs shown in Figure C-13, a shortcut menu appears, offering a choice of options.
5. Click Copy here on the shortcut menuThe original QST New Logo fi le remains in the Marketing folder, and a copy of the fi le is in the Advertising folder. Another way to copy or move the fi le to a new location is by right-clicking a fi le in the right pane, then clicking the Copy or Cut command on the shortcut menu.
6. Click Advertising in the folders listA copy of the QST New Logo fi le is now located in the Advertising folder.
STEPS
To select fi les or folders that are not consecutive, press and hold [Ctrl], then click each item in the right pane.
QUICK TIP
To copy a fi le quickly from one folder to another on the same disk, select the fi le, press and hold [Ctrl], then drag the fi le to the folder.
QUICK TIP
49040_UnitC_pp5.indd 6249040_UnitC_pp5.indd 62 11/30/09 6:42:39 PM11/30/09 6:42:39 PM
Propert
y of C
enga
ge Le
arning

Windows 63Managing Files and Folders
Win
do
ws 7
File being moved
File moved to
Marketing folder
FIGURE C-12: Moving a fi le from one folder to another
Command to
copy the fileFile copied
to Advertising
folderCommand to
move the file
FIGURE C-13: Copying a fi le from one location to another
Sending files and folders
When you right-click most objects on the desktop or in the Windows Explorer window, the Send to command is one of the choices on the shortcut menu. This command enables you to move a fi le or folder to a new location on your computer. For example, you can send a fi le or folder to a USB drive to make a quick backup copy of the fi le or folder,
to a mail recipient as an electronic message, or to the desktop to create a shortcut. You can also use the Send to command to move a fi le or folder to the Documents folder. To send a fi le or folder, right-click the fi le or folder you want to send, point to Send to on the shortcut menu, then click the destination you want.
49040_UnitC_pp5.indd 6349040_UnitC_pp5.indd 63 11/30/09 6:42:40 PM11/30/09 6:42:40 PM
Propert
y of C
enga
ge Le
arning

UNIT
CWindows 7
Windows 64 Managing Files and Folders
Deleting and Restoring Files and FoldersWhen you organize the contents of a folder, disk, or the desktop, you might fi nd items that you no longer need. You can delete, or remove, these items from the disk. If you delete a fi le or folder from the desktop or from the hard drive, it goes into the Recycle Bin. The Recycle Bin, located on your desktop, is a tempo-rary storage area for deleted fi les. The Recycle Bin stores all the items you delete from your hard disk, so that if you accidentally delete an item, you can remove it from the Recycle Bin to restore it. If the deletion is a recent operation, you can also use the Undo command on the Organize button menu to restore a deleted fi le or folder. Be aware that if you delete a fi le from a removable disk, such as a USB drive, it is permanently deleted, not stored in the Recycle Bin. Table C-2 summarizes deleting and restoring options. You decide to delete some fi les from the Quest Travel folder you no longer need. When you delete a fi le by mistake, you use the Recycle Bin to restore it.
1. If necessary, move and resize the window so that you can see the Recycle Bin icon on the desktop, then click Personal Letters in the folders listBecause you cannot restore fi les deleted from a removable disk, you start by copying a fi le from the drive where your Data Files are located to the desktop.
2. Point to the Eric Schubel.rtf file in the right pane, press and hold [Ctrl], drag it to the desktop, then release [Ctrl]The Eric Schubel fi le is copied to the desktop, as shown in Figure C-14.
3. Drag the Eric Schubel.rtf file from the desktop to the Recycle BinThe Recycle Bin icon looks like it contains paper.
4. Click the Minimize button in the Personal Letters folder window5. Double-click the Recycle Bin icon on the desktop
The Recycle Bin window opens, containing the Eric Schubel.rtf fi le and any other deleted fi les. Like most other windows, the Recycle Bin window has an Address bar, a Search box, a toolbar, and the Details pane. Your deleted fi les remain in the Recycle Bin until you empty it, permanently removing the contents of the Recycle Bin from your hard drive.
6. Select the Eric Schubel.rtf file in the Recycle Bin window, as shown in Figure C-15, then click the Restore this item button on the toolbarThe fi le is restored back to its previous location on the desktop. It is intact and identical to the form it was in before you deleted it.
7. Click the Close button in the Recycle Bin window, then click the Personal Letters button on the taskbarThe Recycle Bin window closes, and the desktop opens with the Eric Schubel.rtf fi le and the Personal Letters window restored.
8. Select the Eric Schubel.rtf file on the desktop, press [Delete], then click Yes in the dialog box that opensThe Eric Schubel.rtf fi le is again moved to the Recycle Bin.
9. Right-click the Recycle Bin, click Empty Recycle Bin, then click Yes in the dialog box that opensThe Eric Schubel.rtf fi le is permanently deleted from the Recycle Bin and your computer.
STEPS
If not visible, click the Expand indicator
next to the Letters folder.
TROUBLE
If a message box appears, click Yes to confi rm the deletion.
TROUBLE
49040_UnitC_pp5.indd 6449040_UnitC_pp5.indd 64 11/30/09 6:42:43 PM11/30/09 6:42:43 PM
Propert
y of C
enga
ge Le
arning

Windows 65Managing Files and Folders
Win
do
ws 7
Selected file copied
from the Personal
Letters folder to
the desktop
Recycle Bin
FIGURE C-14: Selecting a fi le to drag to the Recycle Bin
Empty the
Recycle Bin button Restore this item
button
Contents of the
Recycle Bin; yours
might differ
FIGURE C-15: Deleted fi le from the desktop in the Recycle Bin
Recycle Bin properties
You can adjust several Recycle Bin settings by using the Properties option on the Recycle Bin shortcut menu. For example, if you do not want to place fi les in the Recycle Bin when you delete them, but, rather, want to delete them immediately, right-click the Recycle Bin, click Properties, then click the “Don’t move fi les to the Recycle Bin. Remove
fi les immediately when deleted.” option. Also, if you fi nd that the Recycle Bin is full and cannot accept any more fi les, you can increase the amount of disk space allotted to the Recycle Bin by changing the value in the Maximum size text box.
TABLE C-2: Deleting and restoring fi les
Select the file or folder, click the Organize Select the fi le or folder, then click a Restore button: Restore this item, Restore thebutton, then click Delete selected items, or Restore all items
Select the file or folder, then press [Delete] Click the Organize button, then click Undo
Right-click the file or folder, then click Delete Right-click the fi le or folder, then click Restore
Drag the file or folder to the Recycle Bin Drag the fi le or folder from the Recycle Bin to any location
ways to delete a file or folder ways to restore a file or folder from the Recycle Bin
49040_UnitC_pp5.indd 6549040_UnitC_pp5.indd 65 11/30/09 6:42:44 PM11/30/09 6:42:44 PM
Propert
y of C
enga
ge Le
arning

UNIT
CWindows 7
Windows 66 Managing Files and Folders
Working with LibrariesLibraries are special folders that catalog fi les and folders in a central location, regardless of where you actually store them on your hard drive. A library can contain links to fi les, other folders, and other subfolders anywhere on your system. You can also share entire libraries as easily as you can share individual directories or fi les. Windows 7 comes with four libraries already in place: Documents, Music, Pictures, and Videos. You can create additional ones at any time. After you have a library in place, you can use your mouse or the Properties dialog box to include or remove folders and set options to optimize, share, and display the library. After you add one or more folders to a library, Windows 7 tracks your selected folders and updates them automatically in libraries whenever you change their contents. When you open a library, a detailed grouping view of the library indicates the fi les and subfolders within the monitored folders, letting you easily browse for the fi le or folder you want to open. You access the same Quest Specialty Travel company fi les on a regular basis. Rather than locating the folder using the traditional method, you decide to create a library and place the folder in it for easy access and use.
1. Click UnitC in the folders list, then drag the Quest Travel folder to the desktopA duplicate of the Quest Travel folder appears on the desktop.
2. Click Libraries in the folders list, click the New library button on the toolbar, type Business, then press [Enter]The new Business library appears in both panes, as shown in Figure C-16.
3. Right-click the Quest Travel folder on the desktop, point to Include in library, then click BusinessThe Business library window opens, displaying the contents of the library in a detailed grouping view, as shown in Figure C-17. If you’re not sure where a fi le is located, you can use the Arrange by option to group and display the library contents by folder, date modifi ed, tag, type, or name. Grouping displays a sequential list of all of the fi les by heading type.
4. Click the Arrange by button in the upper corner of the right pane, then click NameAll the fi les within the Quest Travel folder appear in an alphabetical list.
5. Double-click the IRS Letter.rtf file, change the year from 2010 to 2011, click the Save button on the Quick Access toolbar, then click the Close button in the upper-right corner of the WordPad windowThe updated fi le and the WordPad program both close.
6. Double-click the Quest Travel folder on the desktop, double-click the Letters folder, double-click the Business Letters folder, double-click the IRS Letter.rtf file to see the change, add your name to the bottom of the document, print it, click the Save button, then click the Close button in WordPad and the Business Letters folder windowsThe fi le change you made appears when you access the fi le from the original or library location. The fi le and the WordPad program close.
7. Right-click the Quest Travel folder in the Business library in the Navigation pane, click Remove location from library, then click the Close button in the Business windowThe folder location monitored in the Business library is removed from the library.
8. Click the Business library in the Navigation pane, press [Delete], then click YesThe Business library is permanently deleted from your computer.
9. Click the Quest Travel folder on the desktop, press [Delete], click Yes to confi rm the deletion, then click the Close button in the Libraries windowThe Quest Travel folder on the desktop is deleted and the Libraries window closes.
STEPS
To restore default libraries, right-click Libraries in the Navi-gation pane, then click Restore default libraries.
QUICK TIP
Depending on your fi le association settings, another word-processing program might open instead of WordPad.
TROUBLE
49040_UnitC_pp5.indd 6649040_UnitC_pp5.indd 66 11/30/09 6:42:46 PM11/30/09 6:42:46 PM
Propert
y of C
enga
ge Le
arning

Windows 67Managing Files and Folders
Win
do
ws 7
Copy of Quest Travel
folder on the desktopNew library button
New library
FIGURE C-16: Creating a library
Arrange by button
Contents of
Business library
Actual location of
the Quest Travel
folder
Library name
FIGURE C-17: Adding a folder to a library
Creating and working with shortcuts
It could take you a while to access a fi le or folder buried several levels down in a fi le hierarchy. You can create shortcuts to the items you use frequently. A shortcut is a link that you can place in any location to gain instant access to a particular fi le, folder, or program on your hard disk or on a network just by double-clicking. The actual fi le, folder, or program remains stored in its original location, and you place an icon representing the shortcut in a convenient location, such as a folder or the desktop. To create a shortcut, right-click an icon, then click Create shortcut. All shortcuts are named the same as the fi les to which they link, but with the word “Shortcut” at the end of the original name and the fi le icon includes an arrow. You can also place shortcuts to
frequently used fi les, folders, and programs on the Start menu or taskbar. To do this on the Start menu, simply drag the shortcut fi le, folder, or program to the Start button, wait until the Start menu opens, drag the shortcut to a place on the Start menu or to the All Programs submenu, wait until the submenu opens, then drag the shortcut to the appropriate place on the menu. You can drag a shortcut to the taskbar using the same method. When you release the mouse, the item appears on the menu or toolbar. To run a program when Windows starts, right-click the Startup folder on the All Programs submenu, click Open, then drag the shortcut to the program into the Startup folder.
49040_UnitC_pp5.indd 6749040_UnitC_pp5.indd 67 11/30/09 6:42:47 PM11/30/09 6:42:47 PM
Propert
y of C
enga
ge Le
arning
Related Documents