-1 Management Console User's Guide BullSequana Edge 86 A1 99FR 08 - October 2021

Welcome message from author
This document is posted to help you gain knowledge. Please leave a comment to let me know what you think about it! Share it to your friends and learn new things together.
Transcript

-1
Management ConsoleUser's Guide
BullSequana Edge
86 A1 99FR 08 - October 2021

The following copyright notice protects this book under Copyright laws which prohibit such actionsas, but not limited to, copying, distributing, modifying, and making derivative works.
Copyright ©Bull SAS 2021
Printed in France
Trademarks and Acknowledgements
We acknowledge the right of proprietors of trademarks mentioned in this manual.
All brand names and software and hardware product names are subject to trademark and/orpatent protection.
Quoting of brand and product names is for information purposes only and does not representtrademark and/or patent misuse.
Bull Cedoc
357 avenue Patton
BP 20845
49008 Angers Cedex 01
FRANCE
October 2021
Hardware
The information in this document is subject to change without notice. Bull will not be liable for errors contained
herein, or for incidental or consequential damages in connection with the use of this material.

Contents i
Table of Contents
Preface p‐1. . . . . . . . . . . . . . . . . . . . . . . . . . . . . . . . . . . . . . . . . . . . . . . . . . . . . . . . . . . . . . . . . . . . . . . . . . . . . . .
Intended Readers p‐1. . . . . . . . . . . . . . . . . . . . . . . . . . . . . . . . . . . . . . . . . . . . . . . . . . . . . . . . . . . . . . . . .
Chapter 1. Installing the MISM console 1-1. . . . . . . . . . . . . . . . . . . . . . . . . . . . . . . . . . . . . . . .
1.1. Introduction 1-1. . . . . . . . . . . . . . . . . . . . . . . . . . . . . . . . . . . . . . . . . . . . . . . . . . . . . . . . . . .
1.2. Installing / Updating the MISM console 1-2. . . . . . . . . . . . . . . . . . . . . . . . . . . . . . . . .
1.2.1. Installing the MISM console 1-2. . . . . . . . . . . . . . . . . . . . . . . . . . . . . . . . . . .
1.2.2. Updating the MISM console 1-4. . . . . . . . . . . . . . . . . . . . . . . . . . . . . . . . . . . .
1.3. Controlling the MISM console 1-6. . . . . . . . . . . . . . . . . . . . . . . . . . . . . . . . . . . . . . . . . .
1.4. Changing the connection certificate 1-7. . . . . . . . . . . . . . . . . . . . . . . . . . . . . . . . . . . .
1.5. Configuring a proxy server 1-8. . . . . . . . . . . . . . . . . . . . . . . . . . . . . . . . . . . . . . . . . . . . .
1.6. Recovering MISM databases 1-9. . . . . . . . . . . . . . . . . . . . . . . . . . . . . . . . . . . . . . . . . . .
Chapter 2. Controlling resources 2-1. . . . . . . . . . . . . . . . . . . . . . . . . . . . . . . . . . . . . . . . . . . . . . .
2.1. Logging in 2-2. . . . . . . . . . . . . . . . . . . . . . . . . . . . . . . . . . . . . . . . . . . . . . . . . . . . . . . . . . . . .
2.2. Console description 2-3. . . . . . . . . . . . . . . . . . . . . . . . . . . . . . . . . . . . . . . . . . . . . . . . . . . .
2.2.1. Console overview 2-3. . . . . . . . . . . . . . . . . . . . . . . . . . . . . . . . . . . . . . . . . . . . .
2.2.2. Delivery content 2-4. . . . . . . . . . . . . . . . . . . . . . . . . . . . . . . . . . . . . . . . . . . . . .
2.3. Adding resources 2-5. . . . . . . . . . . . . . . . . . . . . . . . . . . . . . . . . . . . . . . . . . . . . . . . . . . . . .
2.3.1. Creating an inventory 2-5. . . . . . . . . . . . . . . . . . . . . . . . . . . . . . . . . . . . . . . . .
2.3.2. Adding a host to an inventory 2-7. . . . . . . . . . . . . . . . . . . . . . . . . . . . . . . . . .
2.3.3. Creating a group of hosts in an inventory 2-9. . . . . . . . . . . . . . . . . . . . . .
2.4. Controlling resources 2-11. . . . . . . . . . . . . . . . . . . . . . . . . . . . . . . . . . . . . . . . . . . . . . . . . .
2.4.1. Available job templates 2-11. . . . . . . . . . . . . . . . . . . . . . . . . . . . . . . . . . . . . . .
2.4.2. Launching a job 2-14. . . . . . . . . . . . . . . . . . . . . . . . . . . . . . . . . . . . . . . . . . . . . . .
2.4.3. Scheduling a job 2-17. . . . . . . . . . . . . . . . . . . . . . . . . . . . . . . . . . . . . . . . . . . . . .
2.5. Adding security 2-20. . . . . . . . . . . . . . . . . . . . . . . . . . . . . . . . . . . . . . . . . . . . . . . . . . . . . . . .
2.5.1. Creating a password for the BullSequana Edge Vault 2-20. . . . . . . . . . .
2.5.2. Creating an encrypted password for a host 2-22. . . . . . . . . . . . . . . . . . . . .
2.5.3. Deleting an encrypted password 2-23. . . . . . . . . . . . . . . . . . . . . . . . . . . . . . .
2.6. Setting up email alerts 2-24. . . . . . . . . . . . . . . . . . . . . . . . . . . . . . . . . . . . . . . . . . . . . . . . .
2.6.1. Creating an email notification template 2-24. . . . . . . . . . . . . . . . . . . . . . . .
2.6.2. Assigning a notification to a job template 2-26. . . . . . . . . . . . . . . . . . . . . .
2.7. Performing basic operations 2-27. . . . . . . . . . . . . . . . . . . . . . . . . . . . . . . . . . . . . . . . . . .
2.7.1. Performing power operations 2-27. . . . . . . . . . . . . . . . . . . . . . . . . . . . . . . . . .
2.7.2. Updating firmware 2-29. . . . . . . . . . . . . . . . . . . . . . . . . . . . . . . . . . . . . . . . . . . .
2.7.3. Enabling syslog forwarding 2-32. . . . . . . . . . . . . . . . . . . . . . . . . . . . . . . . . . . .

ii Management Console User's Guide
Chapter 3. Monitoring resources 3-1. . . . . . . . . . . . . . . . . . . . . . . . . . . . . . . . . . . . . . . . . . . . . . .
3.1. Logging in 3-2. . . . . . . . . . . . . . . . . . . . . . . . . . . . . . . . . . . . . . . . . . . . . . . . . . . . . . . . . . . . .
3.2. Console description 3-3. . . . . . . . . . . . . . . . . . . . . . . . . . . . . . . . . . . . . . . . . . . . . . . . . . . .
3.2.1. Console overview 3-3. . . . . . . . . . . . . . . . . . . . . . . . . . . . . . . . . . . . . . . . . . . . .
3.2.2. Delivery content 3-4. . . . . . . . . . . . . . . . . . . . . . . . . . . . . . . . . . . . . . . . . . . . . .
3.3. Preliminary configuration 3-5. . . . . . . . . . . . . . . . . . . . . . . . . . . . . . . . . . . . . . . . . . . . . .
3.3.1. Enabling automatic inventory 3-5. . . . . . . . . . . . . . . . . . . . . . . . . . . . . . . . .
3.3.2. Renaming the Zabbix server host 3-6. . . . . . . . . . . . . . . . . . . . . . . . . . . . . .
3.4. Managing the Atos LLD template 3-7. . . . . . . . . . . . . . . . . . . . . . . . . . . . . . . . . . . . . . .
3.4.1. Template description 3-7. . . . . . . . . . . . . . . . . . . . . . . . . . . . . . . . . . . . . . . . . .
3.4.2. Importing the Atos LLD template 3-7. . . . . . . . . . . . . . . . . . . . . . . . . . . . . .
3.5. Adding resources 3-9. . . . . . . . . . . . . . . . . . . . . . . . . . . . . . . . . . . . . . . . . . . . . . . . . . . . . .
3.5.1. Adding hosts with the zabbix discovery service 3-9. . . . . . . . . . . . . . . . .
3.5.2. Adding a host manually 3-14. . . . . . . . . . . . . . . . . . . . . . . . . . . . . . . . . . . . . . .
3.5.3. Linking a host to the Atos LLD template 3-15. . . . . . . . . . . . . . . . . . . . . . . .
3.5.4. Filling Atos template macros 3-16. . . . . . . . . . . . . . . . . . . . . . . . . . . . . . . . . .
3.6. Adding security 3-18. . . . . . . . . . . . . . . . . . . . . . . . . . . . . . . . . . . . . . . . . . . . . . . . . . . . . . . .
3.6.1. Activating PSK security 3-18. . . . . . . . . . . . . . . . . . . . . . . . . . . . . . . . . . . . . . . .
3.6.2. Enabling PSK security for a host 3-19. . . . . . . . . . . . . . . . . . . . . . . . . . . . . . .
3.6.3. Creating an encrypted password for a host 3-21. . . . . . . . . . . . . . . . . . . . .
3.7. Enabling syslog forwarding 3-23. . . . . . . . . . . . . . . . . . . . . . . . . . . . . . . . . . . . . . . . . . . .
3.7.1. Importing the Atos Rsyslog template 3-23. . . . . . . . . . . . . . . . . . . . . . . . . .
3.7.2. Linking the Zabbix server host to the Atos Rsyslog template 3-25. . . .
3.7.3. Displaying the logs 3-26. . . . . . . . . . . . . . . . . . . . . . . . . . . . . . . . . . . . . . . . . . . .
3.8. Configuring nmap 3-27. . . . . . . . . . . . . . . . . . . . . . . . . . . . . . . . . . . . . . . . . . . . . . . . . . . . .
3.8.1. Creating a nmap discovery rule 3-27. . . . . . . . . . . . . . . . . . . . . . . . . . . . . . . .
3.8.2. Creating a nmap action 3-29. . . . . . . . . . . . . . . . . . . . . . . . . . . . . . . . . . . . . . . .
3.9. Setting up email alerts 3-33. . . . . . . . . . . . . . . . . . . . . . . . . . . . . . . . . . . . . . . . . . . . . . . . .
3.9.1. Configuring an mail server 3-33. . . . . . . . . . . . . . . . . . . . . . . . . . . . . . . . . . . .
3.9.2. Creating an action 3-35. . . . . . . . . . . . . . . . . . . . . . . . . . . . . . . . . . . . . . . . . . . .
3.9.3. Configuring the user 3-38. . . . . . . . . . . . . . . . . . . . . . . . . . . . . . . . . . . . . . . . . .
3.10. Setting up SMS alerts 3-40. . . . . . . . . . . . . . . . . . . . . . . . . . . . . . . . . . . . . . . . . . . . . . . . . .
3.10.1. Configuring the SMS 3-40. . . . . . . . . . . . . . . . . . . . . . . . . . . . . . . . . . . . . . . . . .
3.10.2. Creating an action 3-43. . . . . . . . . . . . . . . . . . . . . . . . . . . . . . . . . . . . . . . . . . . .
3.10.3. Configuring the user 3-46. . . . . . . . . . . . . . . . . . . . . . . . . . . . . . . . . . . . . . . . . .
3.11. Monitoring resources 3-48. . . . . . . . . . . . . . . . . . . . . . . . . . . . . . . . . . . . . . . . . . . . . . . . . .
3.11.1. Dashboard 3-48. . . . . . . . . . . . . . . . . . . . . . . . . . . . . . . . . . . . . . . . . . . . . . . . . . . .
3.11.2. Problems 3-48. . . . . . . . . . . . . . . . . . . . . . . . . . . . . . . . . . . . . . . . . . . . . . . . . . . . .
3.11.3. Overview 3-48. . . . . . . . . . . . . . . . . . . . . . . . . . . . . . . . . . . . . . . . . . . . . . . . . . . . .
3.11.4. Web 3-49. . . . . . . . . . . . . . . . . . . . . . . . . . . . . . . . . . . . . . . . . . . . . . . . . . . . . . . . . .
3.11.5. Latest data 3-49. . . . . . . . . . . . . . . . . . . . . . . . . . . . . . . . . . . . . . . . . . . . . . . . . . .
3.11.6. Graphs 3-49. . . . . . . . . . . . . . . . . . . . . . . . . . . . . . . . . . . . . . . . . . . . . . . . . . . . . . .
3.11.7. Screens 3-49. . . . . . . . . . . . . . . . . . . . . . . . . . . . . . . . . . . . . . . . . . . . . . . . . . . . . . .
3.11.8. Maps 3-49. . . . . . . . . . . . . . . . . . . . . . . . . . . . . . . . . . . . . . . . . . . . . . . . . . . . . . . . .
3.11.9. Discovery 3-49. . . . . . . . . . . . . . . . . . . . . . . . . . . . . . . . . . . . . . . . . . . . . . . . . . . . .
3.11.10. Services 3-49. . . . . . . . . . . . . . . . . . . . . . . . . . . . . . . . . . . . . . . . . . . . . . . . . . . . . . . . . . . . .

p‐1Preface
Preface
This guide explains how to use the Machine Intelligence System Management(MISM) console to manage BullSequana Edge servers.
See The Bull support web site for the most uptodate product information,documentation, firmware updates, software fixes and service offers:http://support.bull.com
Intended Readers
This guide is intended for use by system administrators and operators.


Chapter 1. Installing the MISM console 1-1
Chapter 1. Installing the MISM console
1.1. Introduction
The Machine Intelligence System Management (MISM) console allows the userto manage BullSequana Edge servers.
MISM is delivered as docker containers and is based on two open-sourcesoftware:
• Ansible Tower to control servers through a graphical user interface
• Zabbix to monitor servers through a graphical user interface

1-2 Management Console User's Guide
1.2. Installing / Updating the MISM console
This section explains how to install the Machine Intelligence SystemManagement (MISM) console on the system selected to host it.
There are two separate deliverables for MISM:
• MISM_full_<version>.tar.gz for full installation
• MISM_light_<version>.tar.gz for update, which contains only AWXplaybooks, AWX plugins, Zabbix templates, Zabbix external scripts and shellscripts
Important On an existing installation, tower-cli should be installed torun add_awx_playbooks.sh.
1.2.1. Installing the MISM console
Prerequisites
• Docker CE version 17.12.0 or higher is installed and running
https://docs.docker.com/install/
• Docker Compose version 1.24.0 or higher is installed
https://docs.docker.com/compose/install/
• The MISM_full_<version>.tar.gz package is available
Estimated operation time
15 minutes
Procedure
1. Open a terminal window.
2. Go to the installation directory.
3. Extract the MISM file.
$ tar xzvf mism_full_<version>.tar.gz
4. Launch the installation.
$ ./install.sh
Notes • Performed on an existing installation, this operation preserves userdata such as inventories and user accounts
• Ansible installation is optional
5. When the request to confirm the installation of Ansible appears, answer Yesor No as required.
6. Start the MISM console.
$ ./start.sh

Chapter 1. Installing the MISM console 1-3
7. Open a web browser.
8. Connect to the MISM console by entering the name or IP address of theMISM console in the address bar, using the https protocol.
9. Wait until the update is complete and the authentication page opens.
10. Add the playbooks.
$ ./add_awx_playbooks.sh
$ ./add_ansible_playbooks_and_plugins.sh
Note Performed on an existing installation, this operation preserves anyplaybook created by the user. However, any playbook from theBullSequana Edge Playbooks project that has been modified by the useris restored to its original state.

1-4 Management Console User's Guide
1.2.2. Updating the MISM console
Prerequisites
• Docker CE version 17.12.0 or higher is installed and running
https://docs.docker.com/install/
• Docker Compose version 1.24.0 or higher is installed
https://docs.docker.com/compose/install/
• The MISM_light_<version>.tar.gz package is available
Estimated operation time
15 minutes
Procedure
1. Open a terminal window.
2. Go to the installation directory.
3. Stop the MISM console.
$ ./stop.sh
4. Extract the MISM file.
$ tar xzvf mism_light.<version>.tar.gz
5. Start the MISM console.
$ ./start.sh
6. Open a web browser.
7. Connect to the MISM console by entering the name or IP address of theMISM console in the address bar, using the https protocol.
8. Wait until the update is complete and the authentication page opens.
Chapter 1. Installing the MISM console 1-5
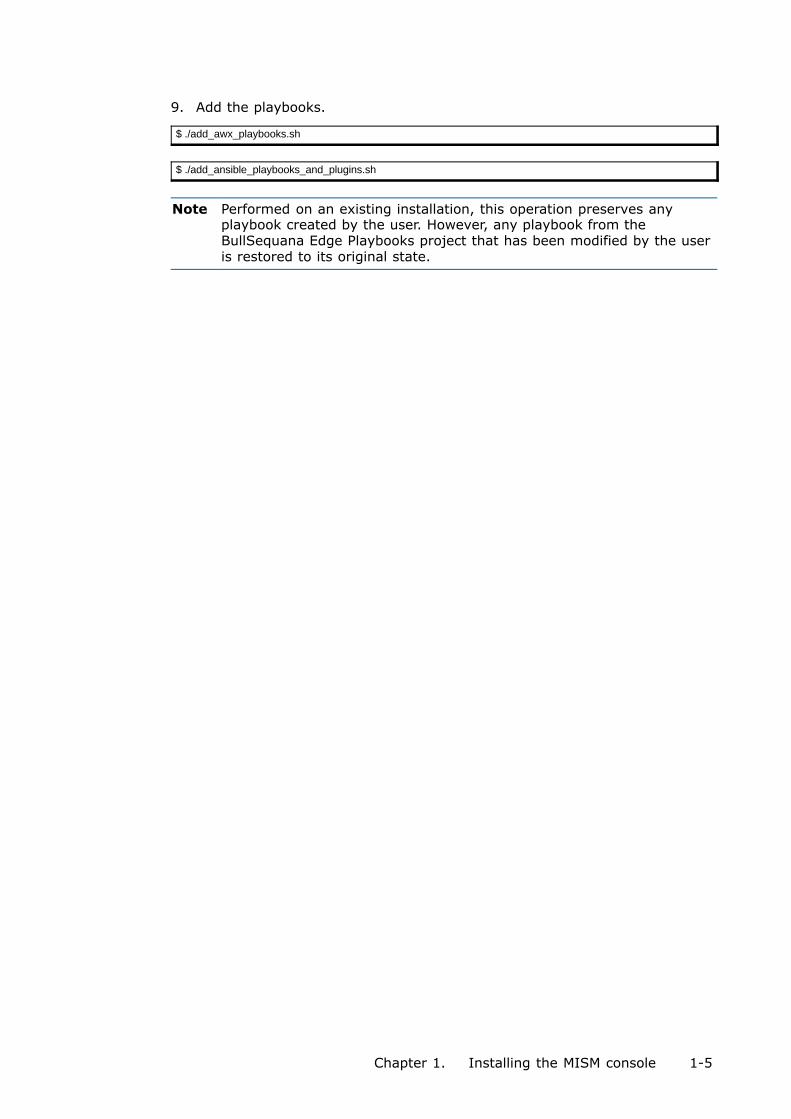
9. Add the playbooks.
$ ./add_awx_playbooks.sh
$ ./add_ansible_playbooks_and_plugins.sh
Note Performed on an existing installation, this operation preserves anyplaybook created by the user. However, any playbook from theBullSequana Edge Playbooks project that has been modified by the useris restored to its original state.
1-6 Management Console User's Guide
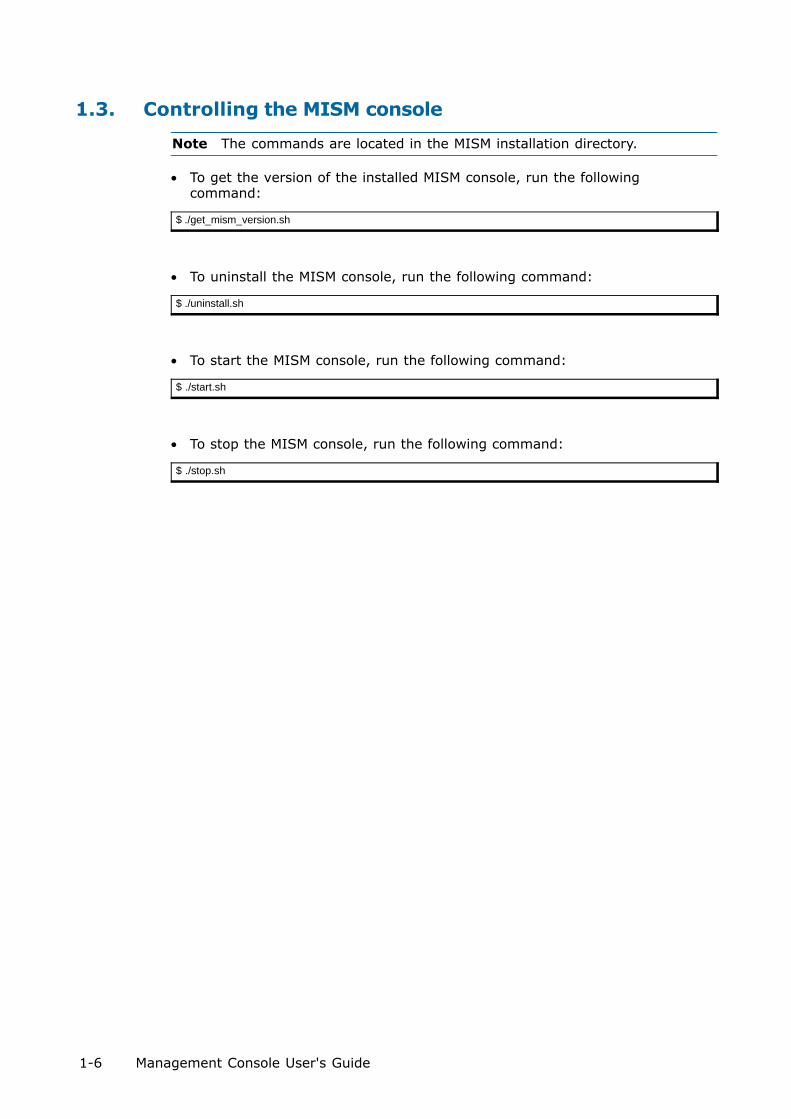
1.3. Controlling the MISM console
Note The commands are located in the MISM installation directory.
• To get the version of the installed MISM console, run the followingcommand:
$ ./get_mism_version.sh
• To uninstall the MISM console, run the following command:
$ ./uninstall.sh
• To start the MISM console, run the following command:
$ ./start.sh
• To stop the MISM console, run the following command:
$ ./stop.sh

Chapter 1. Installing the MISM console 1-7
1.4. Changing the connection certificate
1. Stop the MISM console.
a. Go to the MISM installation directory.
b. Run the following command.
$ ./stop.sh
2. Go to the SSL directory.
$ cd ansible/awx_ssl
3. Generate 2048 private key.
- Without a passphrase:
$ openssl genrsa -out nginx.key 2048
- With a passphrase:
$ openssl genrsa -out nginx.key -passout stdin 2048
The nginx.key file is generated.
4. Generate a request for a csr certificate.
$ openssl req -sha256 -new -key nginx.key -out nginx.csr -subj '/CN=awx.local'
The nginx.csr file is generated.
5. Generate a crt certificate.
$ openssl x509 -req -sha256 -days 365 -in nginx.csr -signkey nginx.key -out nginx.crt
The nginx.crt file is generated.
6. Start the MISM console.
a. Go to the MISM installation directory.
b. Run the following command.
$ ./start.sh

1-8 Management Console User's Guide
1.5. Configuring a proxy server
There is no proxy server delivered with the MISM console.
To configure a proxy server for the MISM console, perform the followingoperations:
1. Stop the MISM console.
a. Go to the MISM installation directory.
b. Run the following command.
$ ./stop.sh
2. Open the docker-compose-mism.yml file with a text editor.
3. In the environment sub-section of the awx_web section, add the followinglines:
---------------------------------------------------------------------------http_proxy: http://<proxy>:<port number>https_proxy: https://<proxy>:<port number>no_proxy: 127.0.0.1,localhost,zabbix-web,zabbix-server,zabbix-agent,awx_web,awx_task,rabbitmq,postgres,memcached, <IP address>---------------------------------------------------------------------------
4. In the environment sub-section of the awx_task section, add the followinglines:
---------------------------------------------------------------------------http_proxy: http://<proxy>:<port number>https_proxy: https://<proxy>:<port number>no_proxy: 127.0.0.1,localhost,zabbix-web,zabbix-server,zabbix-agent,awx_web,awx_task,rabbitmq,postgres,memcached, <IP address>---------------------------------------------------------------------------
5. Save and close the docker-compose-mism.yml file.
6. Start the MISM console.
$ ./start.sh
Chapter 1. Installing the MISM console 1-9
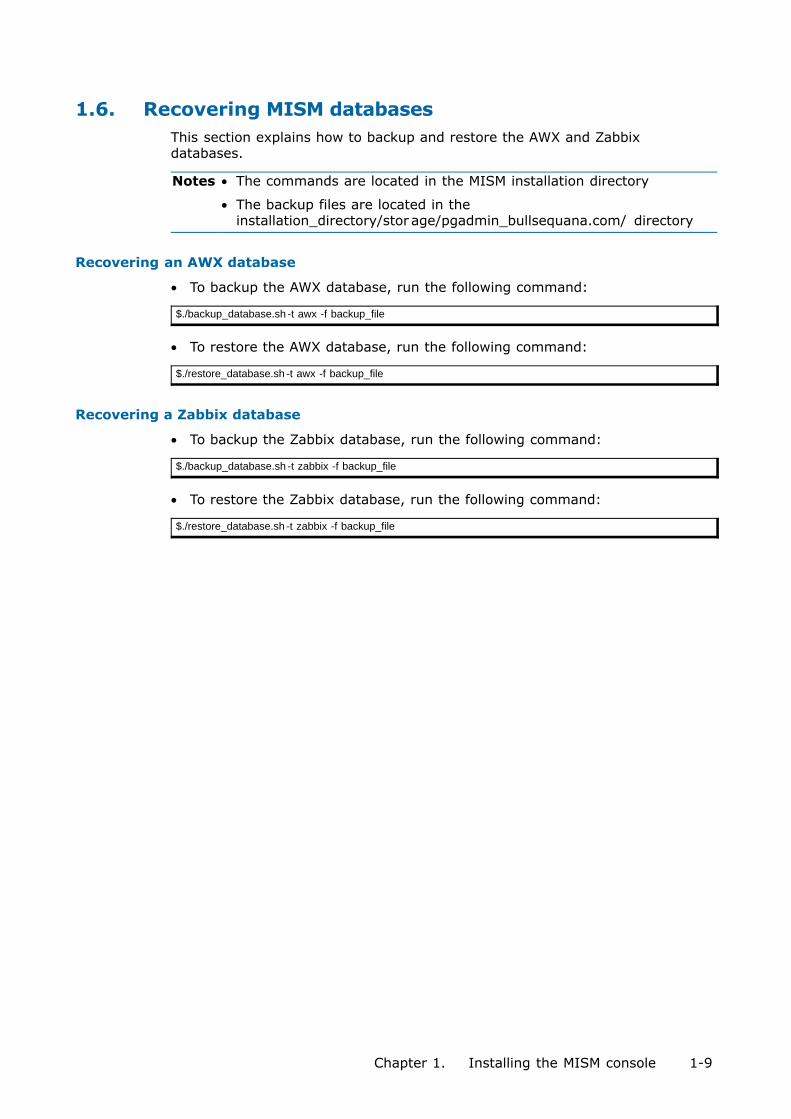
1.6. Recovering MISM databases
This section explains how to backup and restore the AWX and Zabbixdatabases.
Notes • The commands are located in the MISM installation directory
• The backup files are located in theinstallation_directory/stor age/pgadmin_bullsequana.com/ directory
Recovering an AWX database
• To backup the AWX database, run the following command:
$./backup_database.sh -t awx -f backup_file
• To restore the AWX database, run the following command:
$./restore_database.sh -t awx -f backup_file
Recovering a Zabbix database
• To backup the Zabbix database, run the following command:
$./backup_database.sh -t zabbix -f backup_file
• To restore the Zabbix database, run the following command:
$./restore_database.sh -t zabbix -f backup_file


Chapter 2. Controlling resources 2-1
Chapter 2. Controlling resources
To control systems, the Machine Intelligence System Management (MISM)console uses the Ansible Tower framework. Ansible Tower is agraphically-enabled framework accessible via a web interface and a REST APIendpoint for Ansible, the open source IT orchestration engine.
Important Consult the full Ansible Tower documentation before usingthe MISM console:https://docs.ansible.com/ansible-tower/

2-2 Management Console User's Guide
2.1. Logging in
Procedure
1. Launch the web browser and enter the name or IP address of the MISMconsole using the https protocol. The authentication page opens.
Controlling console
Username Default name: mism
Password Default password: mismpass
2. Complete the Username and Password fields and click Sign in. TheDashboard page opens.
What to do if an incident occurs?
If the connection to the MISM console cannot be made or if the web pages aredisplayed incorrectly, one of the following problems may be the cause:
• Network failure
• Incorrect network settings
• Incorrect browser settings (proxy configuration)
Important It is strongly recommended to change the default mismuser password once initial setup is completed, taking careto record the new account details for subsequentconnections.

Chapter 2. Controlling resources 2-3
2.2. Console description
2.2.1. Console overview
Mark Description
A Views
B Resources
C Access
D Administration
E Quick access
2-4 Management Console User's Guide
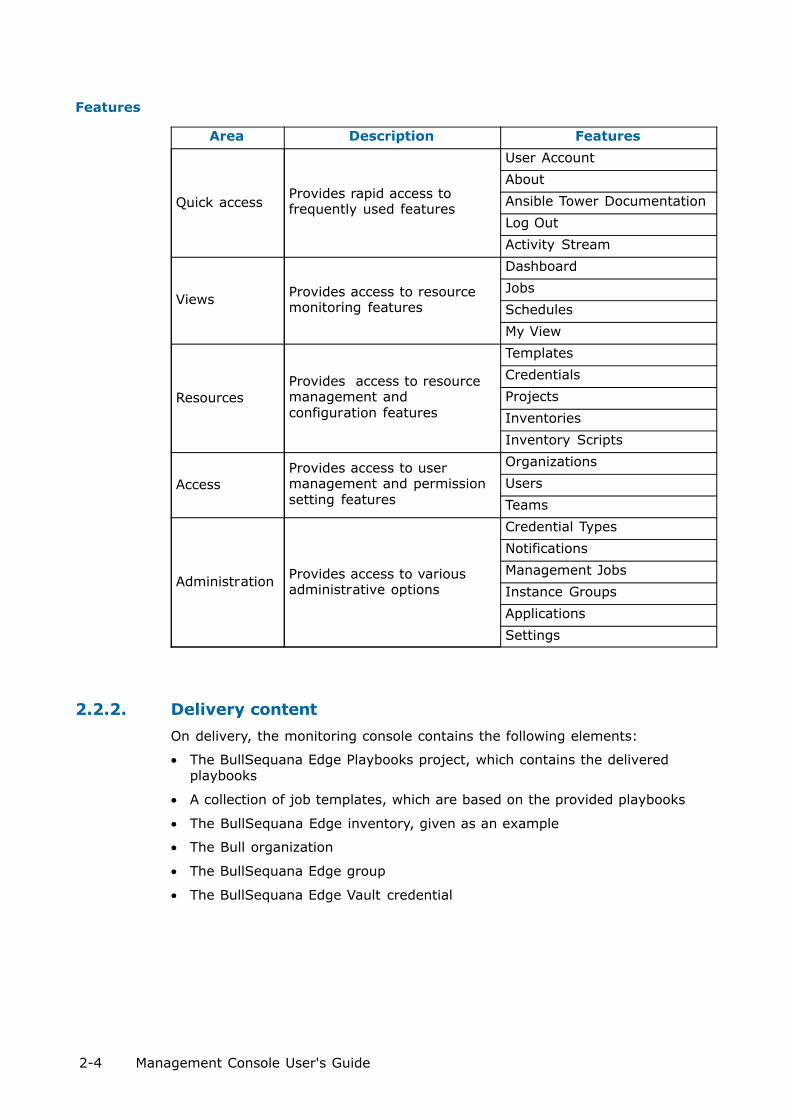
Features
Area Description Features
Quick accessProvides rapid access tofrequently used features
User Account
About
Ansible Tower Documentation
Log Out
Activity Stream
ViewsProvides access to resourcemonitoring features
Dashboard
Jobs
Schedules
My View
Resources
Provides access to resourcemanagement andconfiguration features
Templates
Credentials
Projects
Inventories
Inventory Scripts
Access
Provides access to usermanagement and permissionsetting features
Organizations
Users
Teams
AdministrationProvides access to variousadministrative options
Credential Types
Notifications
Management Jobs
Instance Groups
Applications
Settings
2.2.2. Delivery content
On delivery, the monitoring console contains the following elements:
• The BullSequana Edge Playbooks project, which contains the deliveredplaybooks
• A collection of job templates, which are based on the provided playbooks
• The BullSequana Edge inventory, given as an example
• The Bull organization
• The BullSequana Edge group
• The BullSequana Edge Vault credential

Chapter 2. Controlling resources 2-5
2.3. Adding resources
2.3.1. Creating an inventory
Note The Openbmc inventory is delivered as an example of how to set up aninventory.
1. From the left navigation bar, click Inventories. The Inventories pageopens.
2. Click the green + and select Inventory. The New Inventory page opens.
3. Complete the Name and Organization fields.

2-6 Management Console User's Guide
4. Complete the Variables field.
Variable DescriptionBullSequana Edgeinventory value
forceoff
Indicates if powering theserver off is necessary duringa job. Possible values:
• True: the host isautomatically powered off.
• False: the host is notautomatically powered offand the BIOS or CPLDupdate is effective only afterthe next power cycle.
True
power_capProvides the maximum valueallowed for powerconsumption
Not defined
poweroff_countdown
Indicates the delay beforechecking that the host issuccessfully powered off (inseconds).
15
poweron_countdown
Indicates the delay beforechecking that the host issuccessfully powered on (inseconds).
15
reboot
Indicates if rebooting the BMCis necessary during a job.Possible values:
• True: the BMC rebootsautomatically.
• False: the BMC does notautomatically reboot andthe BMC update is effectiveonly after the next reboot.
True
reboot_countdown
Indicates the delay beforechecking that the BMCrebooted successfully (inminutes).
3
rsyslog_server_ip Provide the networkparameters necessary forrsyslog
0.0.0.0
rsyslog_server_port 514
technical_state_pathProvides the path to theTechnical State file whenupdating firmware
/host/mnt
Note If these variables are not defined in the inventory, they must bedefined as extra variables when launching a job.
5. Complete the other fields as needed.
6. Click Save.

Chapter 2. Controlling resources 2-7
2.3.2. Adding a host to an inventory
1. From the Inventories page, click the newly created inventory. Theinventory page opens.
2. Click Hosts.
3. Click the green + button. The Create Host page opens.
4. Complete the Host Name field with the IP address of the server to beadded.

2-8 Management Console User's Guide
5. Complete the Variables field with the mandatory variables.
Mandatory host variables
baseuri Write “{{inventory_hostname}}”
username Write the host BMC username
password Write the host BMC password
Note If the host BMC password is not indicated here, set up the jobtemplates to prompt for it as an extra variable at launch.
See 2.5. Adding security if a encrypted password is necessary.
6. Click Save.
Chapter 2. Controlling resources 2-9
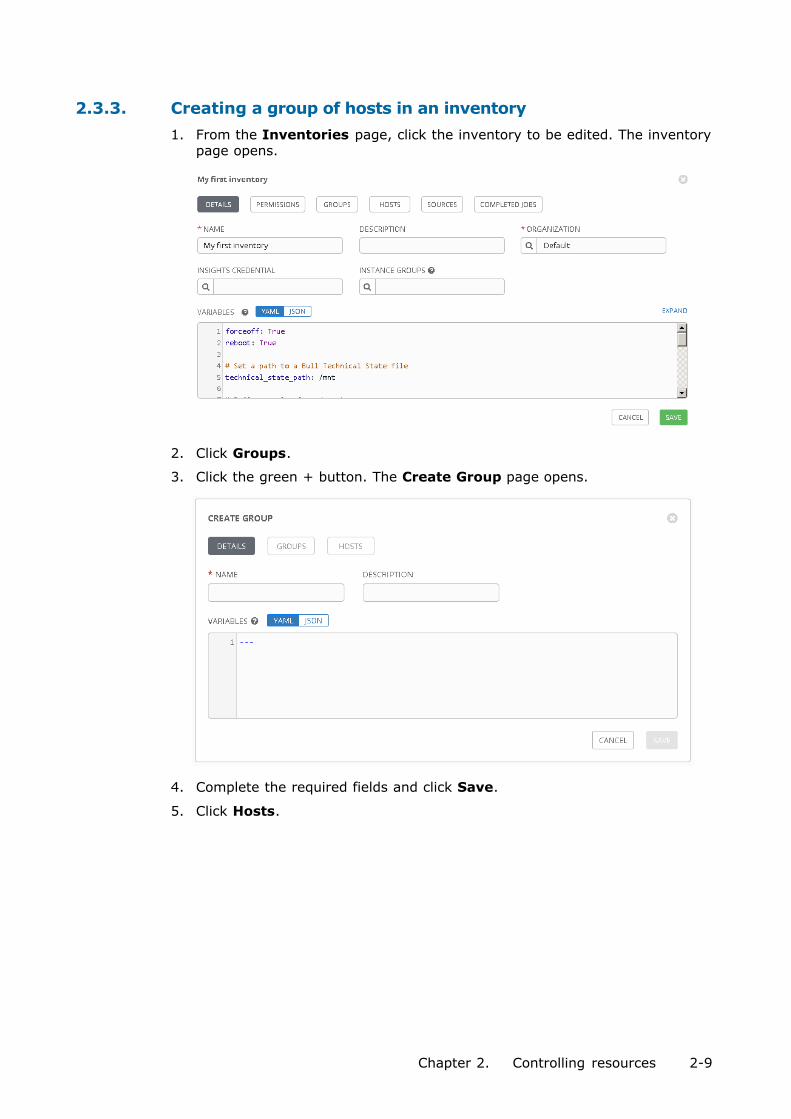
2.3.3. Creating a group of hosts in an inventory
1. From the Inventories page, click the inventory to be edited. The inventorypage opens.
2. Click Groups.
3. Click the green + button. The Create Group page opens.
4. Complete the required fields and click Save.
5. Click Hosts.
2-10 Management Console User's Guide
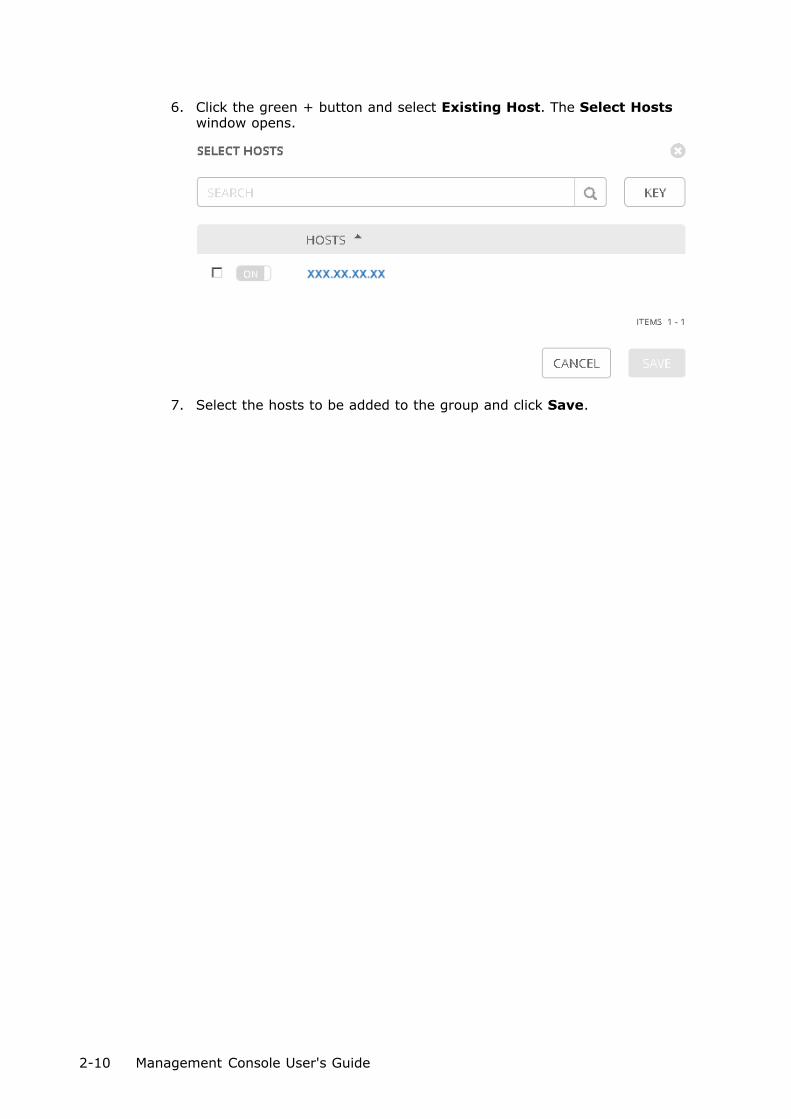
6. Click the green + button and select Existing Host. The Select Hostswindow opens.
7. Select the hosts to be added to the group and click Save.
Chapter 2. Controlling resources 2-11
2.4. Controlling resources
BullSequana Edge servers are controlled by launching jobs from different jobtemplates.
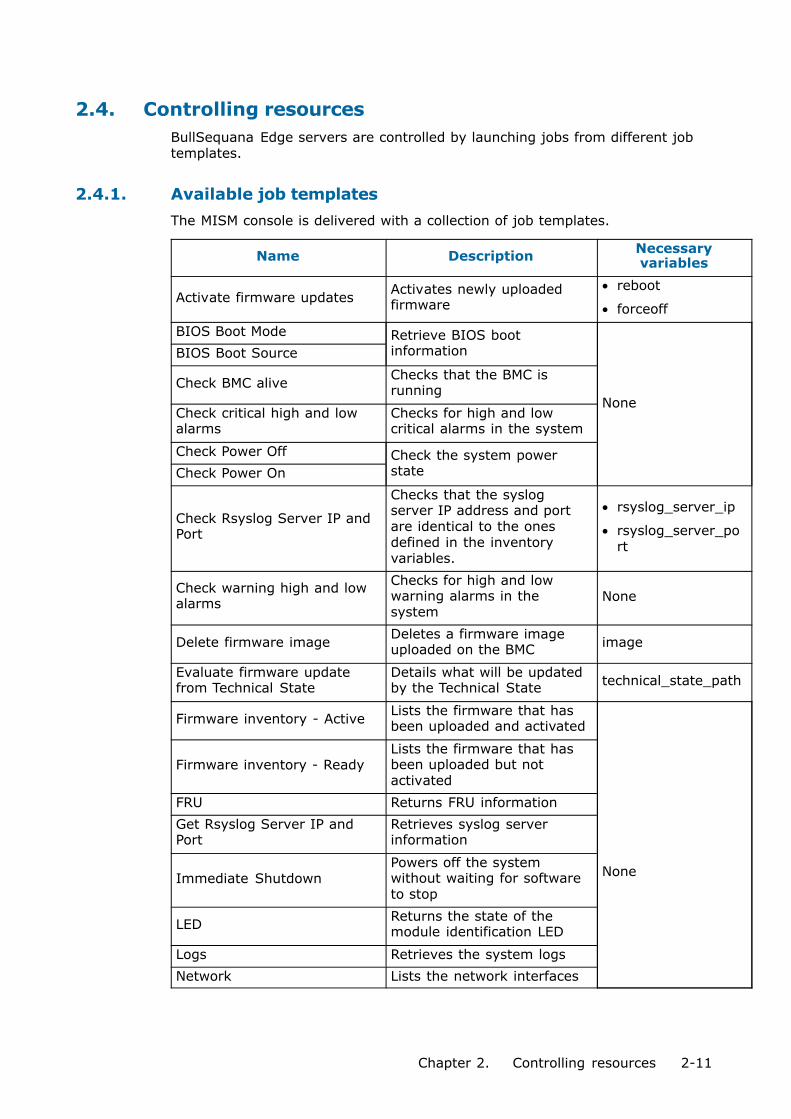
2.4.1. Available job templates
The MISM console is delivered with a collection of job templates.
Name DescriptionNecessaryvariables
Activate firmware updatesActivates newly uploadedfirmware
• reboot
• forceoff
BIOS Boot Mode Retrieve BIOS bootinformation
None
BIOS Boot Source
Check BMC aliveChecks that the BMC isrunning
Check critical high and lowalarms
Checks for high and lowcritical alarms in the system
Check Power Off Check the system powerstateCheck Power On
Check Rsyslog Server IP andPort
Checks that the syslogserver IP address and portare identical to the onesdefined in the inventoryvariables.
• rsyslog_server_ip
• rsyslog_server_port
Check warning high and lowalarms
Checks for high and lowwarning alarms in thesystem
None
Delete firmware imageDeletes a firmware imageuploaded on the BMC
image
Evaluate firmware updatefrom Technical State
Details what will be updatedby the Technical State
technical_state_path
Firmware inventory - ActiveLists the firmware that hasbeen uploaded and activated
None
Firmware inventory - ReadyLists the firmware that hasbeen uploaded but notactivated
FRU Returns FRU information
Get Rsyslog Server IP andPort
Retrieves syslog serverinformation
Immediate ShutdownPowers off the systemwithout waiting for softwareto stop
LEDReturns the state of themodule identification LED
Logs Retrieves the system logs
Network Lists the network interfaces

2-12 Management Console User's Guide
NameNecessaryvariables
Description
Orderly ShutdownStops all software on thesystem before removingpower
Power CapReturns the maximum valueallowed for powerconsumption
None
Power On Powers on the system
Reboot BMCStops and starts the BMCagain
Rsyslog Server IP and PortRetrieves syslog serverinformation
SensorsRetrieves the sensorinformation
Set BIOS Boot Mode toRegular
Select the BIOS boot modeSet BIOS Boot Mode to Safe
Set BIOS Boot Mode to Setup
Set BIOS Boot Source toDefault
Select the BIOS boot source
Set BIOS Boot Source to Disk
Set BIOS Boot Source toExternal Media
Set BIOS Boot Source toNetwork
Set LED offTurns the moduleidentification LED off
Set LED onTurns the moduleidentification LED on
Set Power Cap offRemoves the possibility ofsetting a maximum value forpower consumption
Set Power Cap onSets a maximum value forpower consumption
power_cap
Set Rsyslog Server IPSet up the syslog server
rsyslog_server_ip
Set Rsyslog Server Port rsyslog_server_port
State BMCCheck the state of thesystem components None
State Chassis
State Host
System Returns system information.
Update firmware from file Updates firmware from a file.
• file_to_update
• reboot
• forceoff

Chapter 2. Controlling resources 2-13
NameNecessaryvariables
Description
Update firmware fromTechnical State
Updates all the systemfirmware from the TechnicalState.
• technical_state_path
• reboot
• forceoff
Upload firmware images fromTechnical State
Uploads all the systemfirmware from the TechnicalState
technical_state_path

2-14 Management Console User's Guide
2.4.2. Launching a job
This section explains how to launch a job manually. Jobs can also be scheduledto launch automatically.
See The Ansible Tower documentation for more information:https://docs.ansible.com/ansible-tower/
1. Navigate to the My View or Templates page to display the job templatelist.

Chapter 2. Controlling resources 2-15
2. Click the required job template. The job template page opens.
3. Complete the Inventory field with the inventory containing the hosts to bemanipulated by the job.
4. If needed, complete the Limit field with a group in the selected inventory tofurther constrain the lists of hosts to be manipulated by the job.
5. Complete the Extra variables field.
See 2.4.1. Available job templates to review the variables needed for eachjob.
6. If the host password has not been provided as a host variable, selectPrompt at launch next to the Extra variables field. The user will beasked to give the password as a variable when the job launches.
7. Click Save.
2-16 Management Console User's Guide
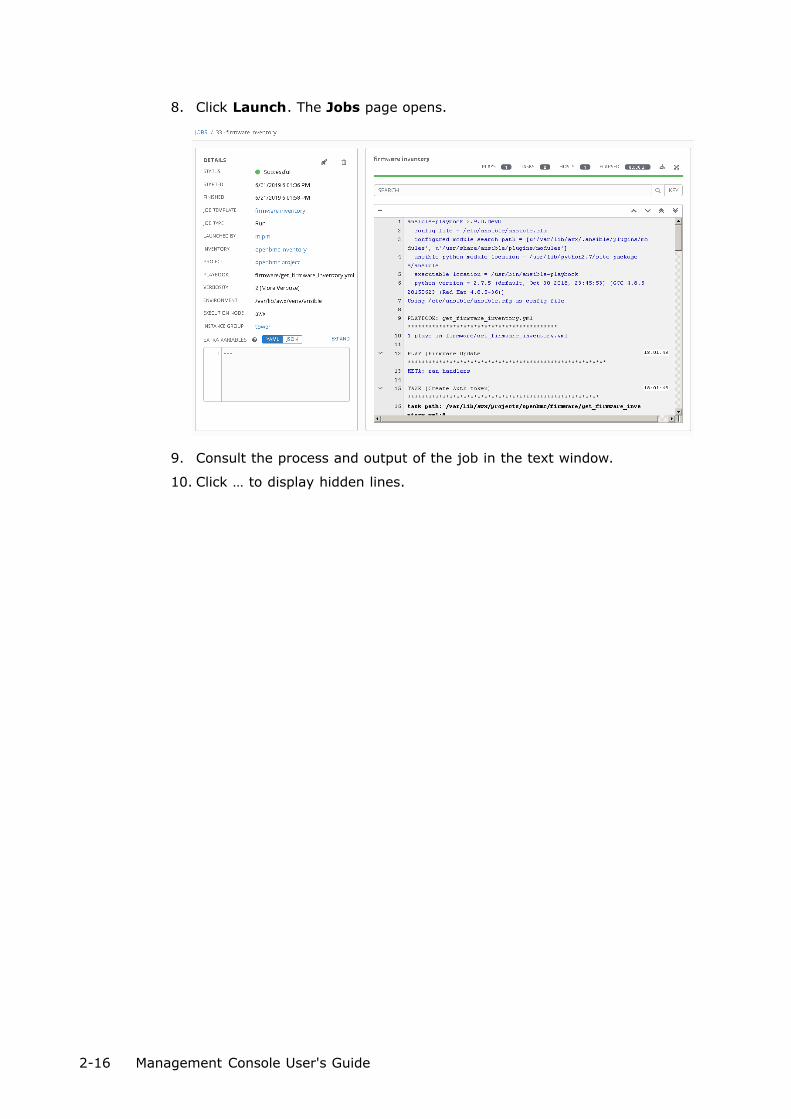
8. Click Launch. The Jobs page opens.
9. Consult the process and output of the job in the text window.
10. Click … to display hidden lines.

Chapter 2. Controlling resources 2-17
2.4.3. Scheduling a job
This section explains how to schedule a job so that it is launched automatically.
Note Job schedules are created from template, project or inventoryresources.
See The Ansible Tower documentation for more information:https://docs.ansible.com/ansible-tower/
1. From the left navigation bar, click a resource (Templates, Projects orInventories). A new page opens.
Templates example
2. Click a resource.

2-18 Management Console User's Guide
3. Click the Schedules tab.
4. Complete the fields as required.
Example
Important The schedules must be set in UTC time.
5. Click Save to complete changes.
The schedule is created for the resource.
6. Use the toggle button to enable or disable the schedule.

Chapter 2. Controlling resources 2-19
7. From the left navigation bar, click Schedules to manage the scheduledjobs.
2-20 Management Console User's Guide
2.5. Adding security
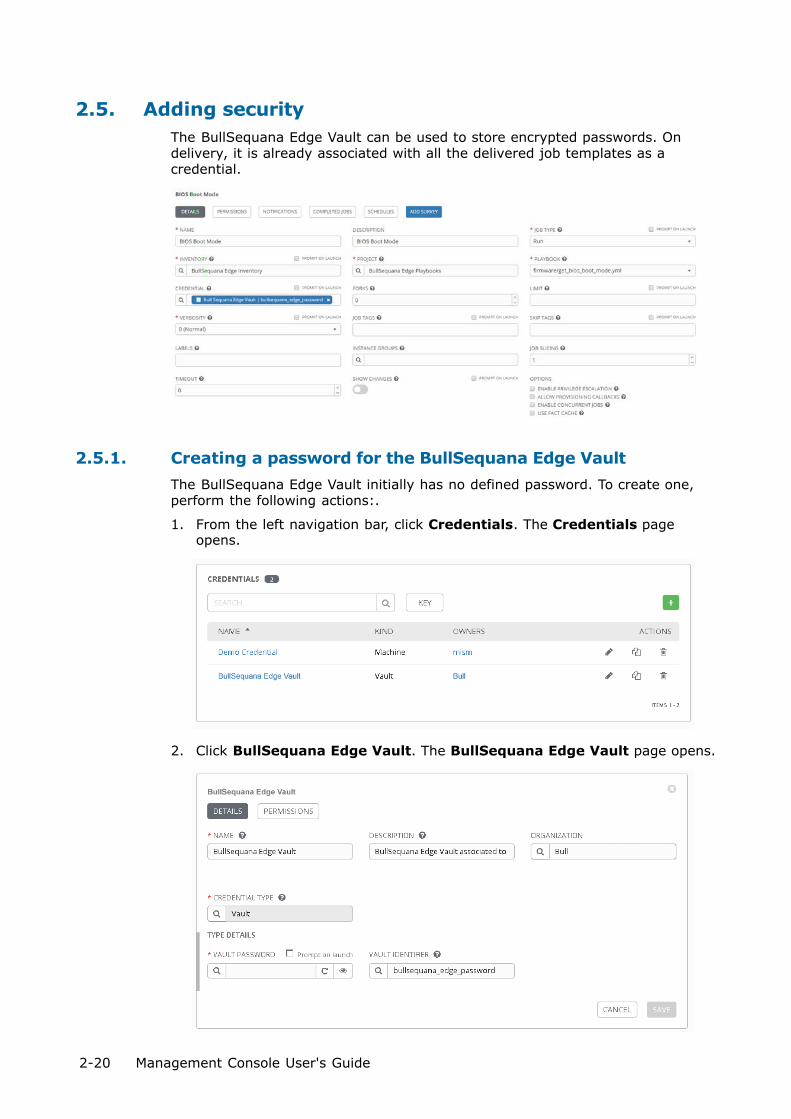
The BullSequana Edge Vault can be used to store encrypted passwords. Ondelivery, it is already associated with all the delivered job templates as acredential.
2.5.1. Creating a password for the BullSequana Edge Vault
The BullSequana Edge Vault initially has no defined password. To create one,perform the following actions:.
1. From the left navigation bar, click Credentials. The Credentials pageopens.
2. Click BullSequana Edge Vault. The BullSequana Edge Vault page opens.

Chapter 2. Controlling resources 2-21
3. Complete the Vault Password field.
4. Click Save. The Vault Password field is now encrypted.

2-22 Management Console User's Guide
2.5.2. Creating an encrypted password for a host
1. Choose a name for the password that is going to be encrypted.
2. Open a Terminal window.
3. Run the following command:
$ ./generate_encrypted_password_for_AWX.sh --name <password name> <host BMC password>
4. Enter the BullSequana Edge Vault password when asked. The encryptedpassword is generated.
5. From the left navigation bar, click Inventories. The Inventories pageopens.
6. Click the inventory which contains the host to be edited. The inventory pageopens.
7. Click Hosts and click the host to be edited. The host page opens.
8. Delete any previous passwords from the Variables field and add thefollowing line.
---------------------------------------------------------------------------password: '{{password name}}'---------------------------------------------------------------------------
9. Click Save.

Chapter 2. Controlling resources 2-23
2.5.3. Deleting an encrypted password
The encrypted passwords are stored in the passwords.yml file in the/ansible/vars sub-directory of the MISM installation directory. To delete one,perform the following actions:
1. Open the passwords.yml file in a text editor.
2. Locate the password to be deleted using the password name.
3. Delete the lines associated with the password.
4. Save and close the file.
5. Update the password in the host variables.

2-24 Management Console User's Guide
2.6. Setting up email alerts
2.6.1. Creating an email notification template
1. From the left navigation bar, click Notifications. The Notifications pageopens.
2. Click the green +. A new page opens.
3. Complete the Name and the organization fields.
4. Select Email from the Type drop-down list.

Chapter 2. Controlling resources 2-25
5. Complete the fields as required.
Example
Important TLS and SSL options are mutually exclusive. Be sure to onlyselect one option. Checking both causes the notification tofail with no warning message.
6. Click Save to complete changes.
The notification template is created.
7. Click the test notification button to send a test email.
2-26 Management Console User's Guide
2.6.2. Assigning a notification to a job template
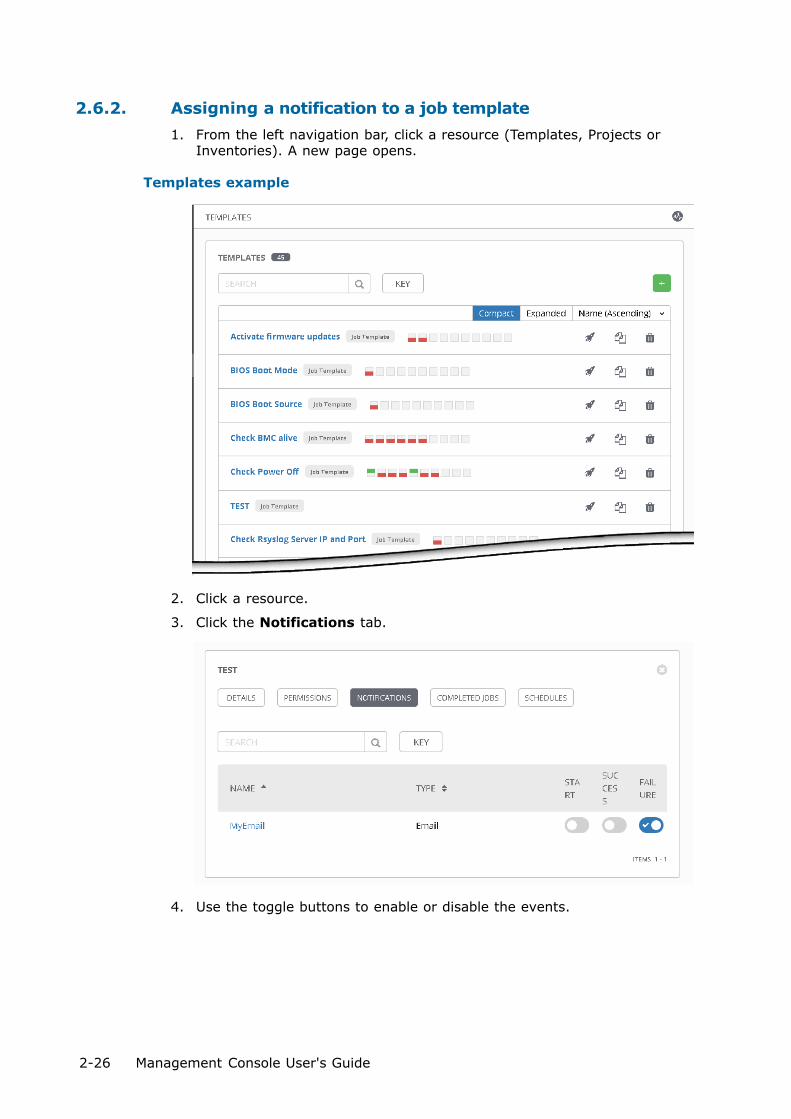
1. From the left navigation bar, click a resource (Templates, Projects orInventories). A new page opens.
Templates example
2. Click a resource.
3. Click the Notifications tab.
4. Use the toggle buttons to enable or disable the events.
Chapter 2. Controlling resources 2-27
2.7. Performing basic operations
2.7.1. Performing power operations
Important The https protocol must always be used to connect to theMISM console.
Powering servers on
1. Launch the Power On job.
2. Check that the job status is Successful.
If the job status is Failed, check the output of the job in the text window.
3. Launch the Check Power On job.
4. Check that the job status is Successful.
If the job status is Failed, check the output of the job in the text window.
W087 WARNINGW087:The immediate reboot and shutdown buttons should only be used if theOperating System is unable to respond to an orderly reboot orshutdown request. These sequences may result in data loss and file corruption.
Powering servers off
1. Select the power operation:
- Orderly Shutdown
- Immediate Shutdown
2. Launch the selected job.
3. Check that the job status is Successful.
If the job status is Failed, check the output of the job in the text window.
4. Launch the Check Power Off job.
5. Check that the job status is Successful.
If the job status is Failed, check the output of the job in the text window.

2-28 Management Console User's Guide
Rebooting BMCs
Important The date and time will be lost following a BMC reboot ifthey have been set manually. It is recommended to useNTP to set the date and time to preserve the settings whenthe BMC is rebooted.
1. Launch the Reboot bmc job.
2. Check that the job status is Successful.
If the job status is Failed, check the output of the job in the text window.
3. Launch the Check BMC alive job.
4. Check that the job status is Successful.
If the job status is Failed, check the output of the job in the text window.

Chapter 2. Controlling resources 2-29
2.7.2. Updating firmware
Important . The BMC must be rebooted after an update of its
firmware. If the reboot variable is set as False, it must bedone manually for the update to be effective.
. The host must be powered off before updating the BIOS
or CPLD firmware. If the forceoff variable is set as False,it must be done manually.
2.7.2.1. Updating firmware globally
Two-step operation
1. Review which firmware will be updated
1. Launch the Evaluate firmware update from Technical State job.
Note The path to the Technical State file must be indicated as an inventoryvariable or as a job extra variable.
2. Check that the job is Successful.
If the job status is Failed, check the output of the job in the text window.
2. Update the firmware
1. Launch the Update firmware from Technical State job.
Note The following variables must be indicated as inventory variables or asjob extra variables:
• technical_state_path
• reboot
• forceoff
2. Check that the job is Successful.
If the job status is Failed, check the output of the job in the text window.
3. Launch the Firmware inventory - Active job to get firmware versions.
4. Check that the job is Successful.
If the job status is Failed, check the output of the job in the text window.

2-30 Management Console User's Guide
Three-step operation
1. Review which firmware will be updated
1. Launch the Evaluate firmware update from Technical State job to knowwhich firmware will be updated.
Note The path to the Technical State file must be indicated as an inventoryvariable or as a job extra variable.
2. Check that the job is Successful.
If the job status is Failed, check the output of the job in the text window.
2. Upload the firmware
1. Launch the Upload firmware images from Technical State job.
Note The path to the Technical State file must be indicated as an inventoryvariable or as a job extra variable.
2. Check that the job is Successful.
If the job status is Failed, check the output of the job in the text window.
3. Launch the Firmware inventory - Ready job to get firmware versions.
4. Check that the job is Successful.
If the job status is Failed, check the output of the job in the text window.
3. Activate the firmware
1. Launch the Activate firmware updates job.
Note The following variables must be indicated as inventory variables or asjob extra variables:
• reboot
• forceoff
2. Check that the job is Successful.
If the job status is Failed, check the output of the job in the text window.
3. Launch the Firmware inventory - Active job to get firmware versions.
4. Check that the job is Successful.
If the job status is Failed, check the output of the job in the text window.

Chapter 2. Controlling resources 2-31
2.7.2.2. Updating firmware individually
1. Launch the Update firmware from file job.
Note The following variables must be indicated as inventory variables or asjob extra variables:
• reboot
• forceoff
• file_to_update
2. Check that the job is Successful.
If the job status is Failed, check the output of the job in the text window.
3. Launch the Firmware inventory - Active job to get firmware versions.
4. Check that the job is Successful.
If the job status is Failed, check the output of the job in the text window.

2-32 Management Console User's Guide
2.7.3. Enabling syslog forwarding
Prerequisites
The syslog server is configured for messaging
Procedure
1. Indicate the syslog server IP address and port as variables in the inventory.
2. Launch the Set Rsyslog Server IP job.
3. Check that the job is Successful.
If the job status is Failed, check the output of the job in the text window.
4. Launch the Set Rsyslog Server Port job.
5. Check that the job is Successful.
If the job status is Failed, check the output of the job in the text window.
6. Launch the Check Rsyslog Server IP and Port job to check the syslogserver parameters.
7. Check that the job is Successful.
If the job status is Failed, check the output of the job in the text window.

Chapter 3. Monitoring resources 3-1
Chapter 3. Monitoring resources
To monitor systems, the Machine Intelligence System Management (MISM)console uses Zabbix. Zabbix is an enterprise-class open source distributedmonitoring solution accessible via a web-based interface.
Important Consult the full Zabbix documentation before using theMISM console:https://www.zabbix.com/documentation/current/manual

3-2 Management Console User's Guide
3.1. Logging in
Procedure
1. Launch the web browser and enter the name or IP address of the MISMconsole followed by the port number 4443 using the https protocol:
https://<IP address>:4443
The authentication page opens.
Monitoring console
Username Default name: Admin
Password Default password: zabbix
2. Complete the Username and Password fields and click Sign in. TheDashboard page opens.
What to do if an incident occurs?
If the connection to the MISM console cannot be made or if the web pages aredisplayed incorrectly, one of the following problems may be the cause:
• Network failure
• Incorrect network settings
• Incorrect browser settings (proxy configuration)
Important It is strongly recommended to change the default Adminuser password once initial setup is completed, taking careto record the new account details for subsequentconnections.
Chapter 3. Monitoring resources 3-3
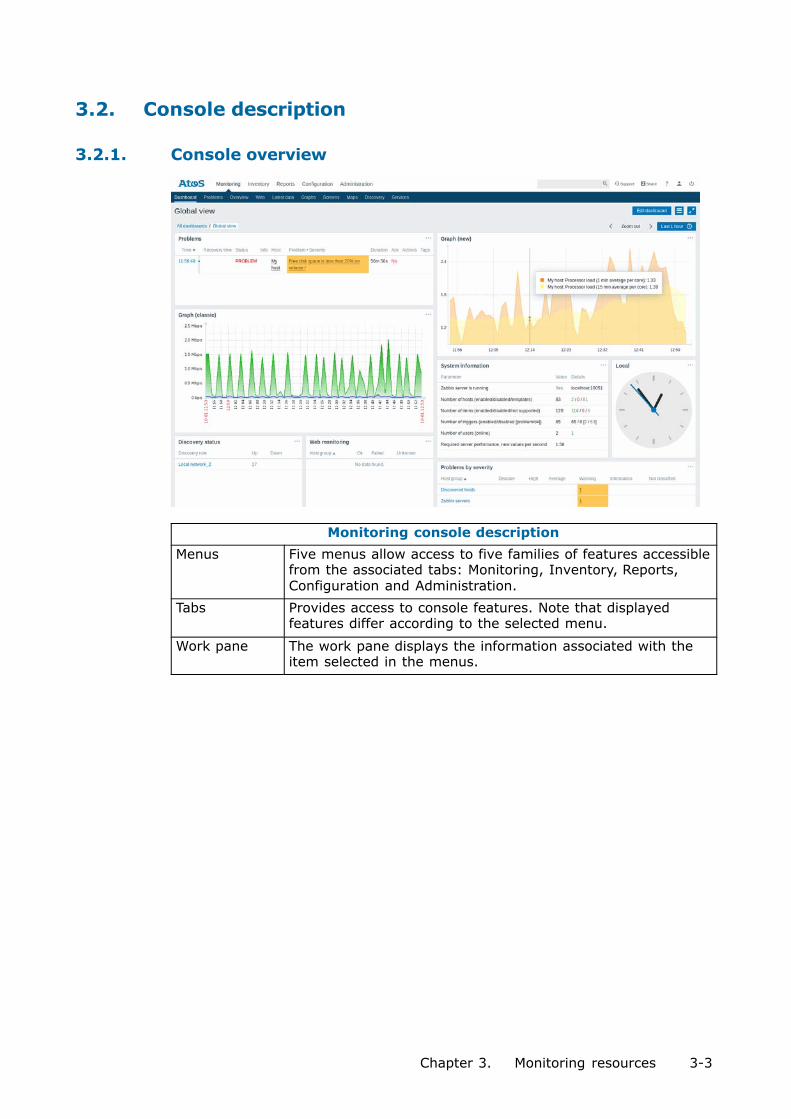
3.2. Console description
3.2.1. Console overview
Monitoring console description
Menus Five menus allow access to five families of features accessiblefrom the associated tabs: Monitoring, Inventory, Reports,Configuration and Administration.
Tabs Provides access to console features. Note that displayedfeatures differ according to the selected menu.
Work pane The work pane displays the information associated with theitem selected in the menus.
3-4 Management Console User's Guide
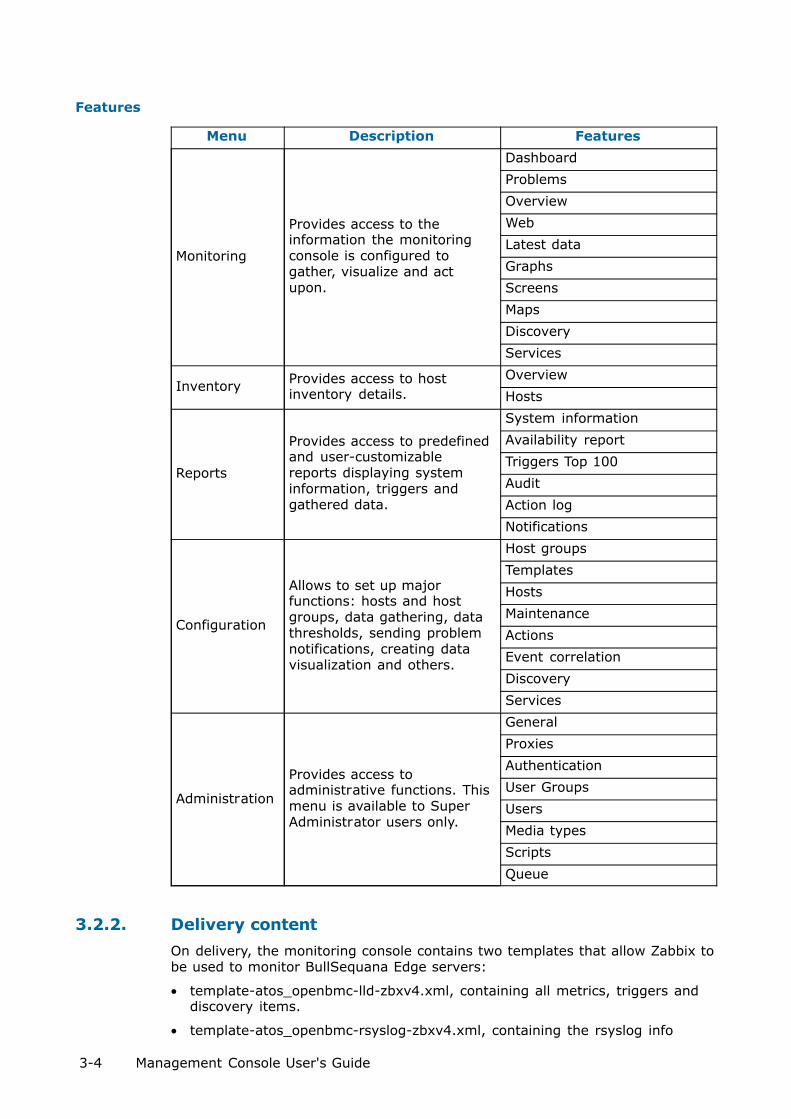
Features
Menu Description Features
Monitoring
Provides access to theinformation the monitoringconsole is configured togather, visualize and actupon.
Dashboard
Problems
Overview
Web
Latest data
Graphs
Screens
Maps
Discovery
Services
InventoryProvides access to hostinventory details.
Overview
Hosts
Reports
Provides access to predefinedand user-customizablereports displaying systeminformation, triggers andgathered data.
System information
Availability report
Triggers Top 100
Audit
Action log
Notifications
Configuration
Allows to set up majorfunctions: hosts and hostgroups, data gathering, datathresholds, sending problemnotifications, creating datavisualization and others.
Host groups
Templates
Hosts
Maintenance
Actions
Event correlation
Discovery
Services
Administration
Provides access toadministrative functions. Thismenu is available to SuperAdministrator users only.
General
Proxies
Authentication
User Groups
Users
Media types
Scripts
Queue
3.2.2. Delivery content
On delivery, the monitoring console contains two templates that allow Zabbix tobe used to monitor BullSequana Edge servers:
• template-atos_openbmc-lld-zbxv4.xml, containing all metrics, triggers anddiscovery items.
• template-atos_openbmc-rsyslog-zbxv4.xml, containing the rsyslog info

Chapter 3. Monitoring resources 3-5
3.3. Preliminary configuration
3.3.1. Enabling automatic inventory
1. From the Administration menu, click the General tab. The GUI pageopens.
2. From the drop-down list on the right, click Other. The Otherconfiguration parameters page opens.
3. Click Automatic for Default host inventory mode.
4. Click Update.
3-6 Management Console User's Guide
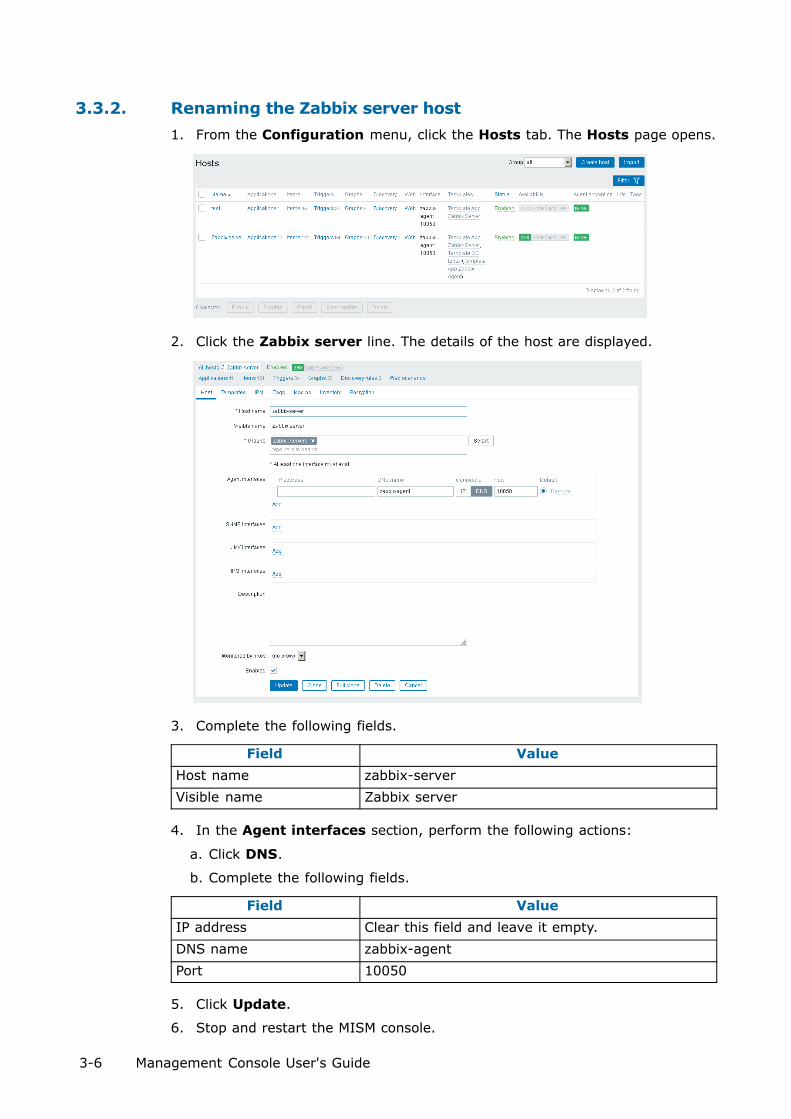
3.3.2. Renaming the Zabbix server host
1. From the Configuration menu, click the Hosts tab. The Hosts page opens.
2. Click the Zabbix server line. The details of the host are displayed.
3. Complete the following fields.
Field Value
Host name zabbix-server
Visible name Zabbix server
4. In the Agent interfaces section, perform the following actions:
a. Click DNS.
b. Complete the following fields.
Field Value
IP address Clear this field and leave it empty.
DNS name zabbix-agent
Port 10050
5. Click Update.
6. Stop and restart the MISM console.

Chapter 3. Monitoring resources 3-7
3.4. Managing the Atos LLD template
3.4.1. Template description
The template allows the following elements on the servers to be monitored:
• Fan, temperature and voltage information in Discovery applications
• Four discovered triggers:
- Critical high and low triggers, corresponding to Critical Alarm Thresholdsfor BullSequana Edge servers,that are enabled by default
- Warning high and low triggers, corresponding to Warning AlarmThresholds for BullSequana Edge servers, that are disabled by default
3.4.2. Importing the Atos LLD template
1. From the Configuration menu, click the Templates tab. The Templatespage opens.

3-8 Management Console User's Guide
2. On the right-hand side of the screen, click Import. The Import pageopens.
3. In Import file section, click Browse and indicate the path to the template.
Note The templates are delivered in a sub-directory of the MISM intallationdirectory: \zabbix\server\externalscripts. They can be copied to anylocal directory.
4. Click Import.
Chapter 3. Monitoring resources 3-9
3.5. Adding resources
3.5.1. Adding hosts with the zabbix discovery service
3.5.1.1. Creating a discovery rule
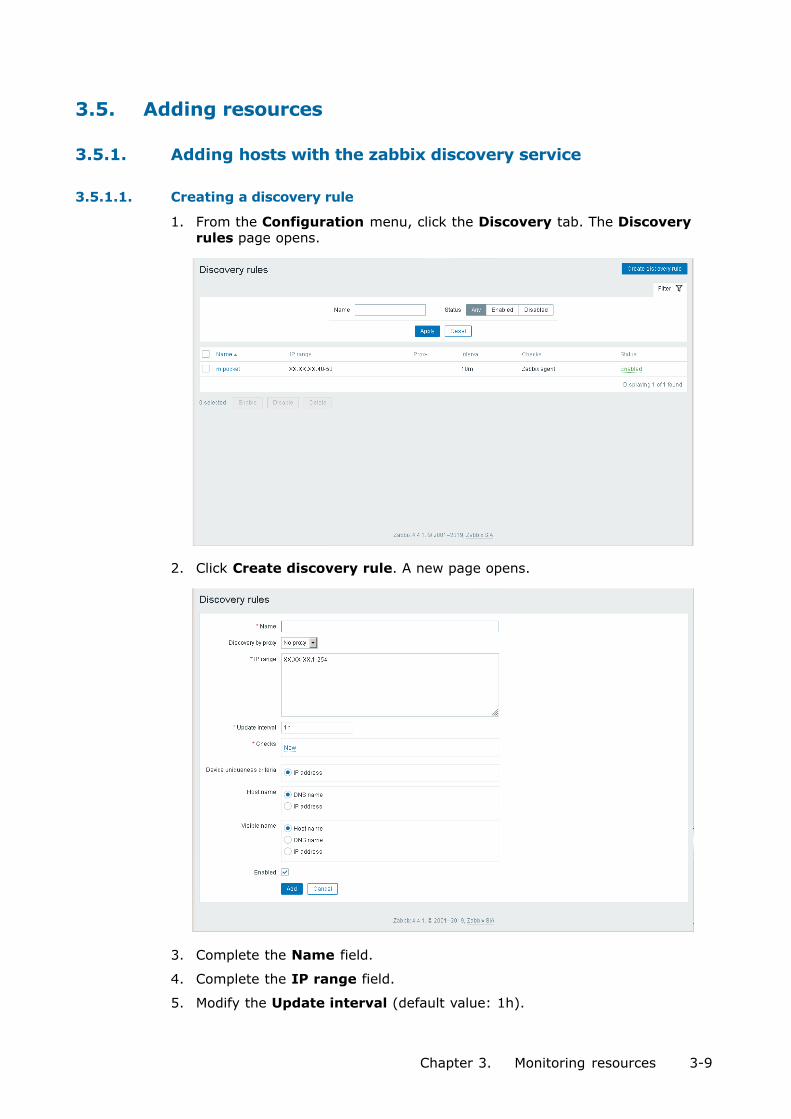
1. From the Configuration menu, click the Discovery tab. The Discoveryrules page opens.
2. Click Create discovery rule. A new page opens.
3. Complete the Name field.
4. Complete the IP range field.
5. Modify the Update interval (default value: 1h).

3-10 Management Console User's Guide
6. In the Checks section, perform the following actions:
a. Click New.
b. Select HTTPS from the Check type drop-down list.
c. Click Add.
7. Complete the Host name section as required.
Example
8. Click Add to complete changes.
The discovery rule is created.
Example
Chapter 3. Monitoring resources 3-11
3.5.1.2. Creating an action linked to the discovery rule
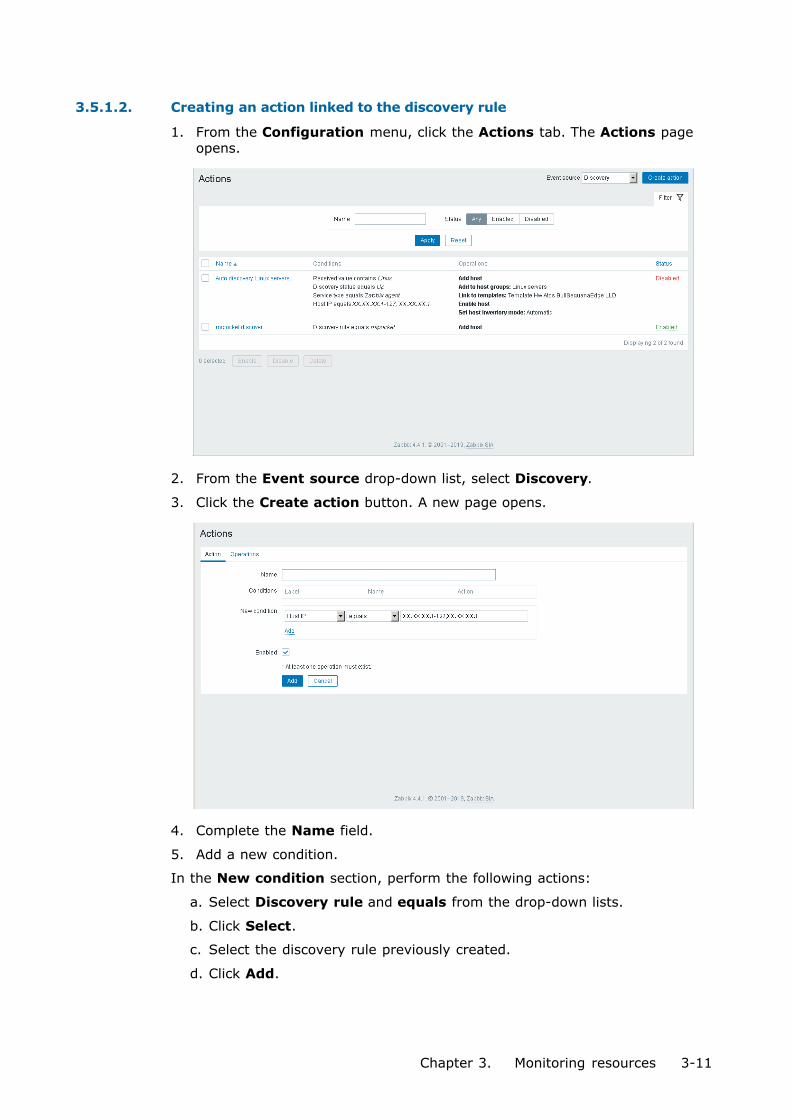
1. From the Configuration menu, click the Actions tab. The Actions pageopens.
2. From the Event source drop-down list, select Discovery.
3. Click the Create action button. A new page opens.
4. Complete the Name field.
5. Add a new condition.
In the New condition section, perform the following actions:
a. Select Discovery rule and equals from the drop-down lists.
b. Click Select.
c. Select the discovery rule previously created.
d. Click Add.

3-12 Management Console User's Guide
Example
4. Configure the operations
1. Click the Operations tab.
2. Add the operations.
For each required operation, perform the following steps:
a. In the Operations section, click New.
b. In the Operation details section, perform the following actions:
i. From the Operation type drop-down list, select an operation.
ii. Click Add.

Chapter 3. Monitoring resources 3-13
Example
Important When the Discovery action has been configured andenabled, it may later be disabled to prevent continuoushost discovery and also to allow changes to be made tohosts.
3. Save the action.
Click Add to complete changes.
Example
4. Complete the hosts with {$OPENBMC},{$USER}, {$PASSWORD}.
See 3.5.4. Filling Atos template macros
3-14 Management Console User's Guide
3.5.2. Adding a host manually
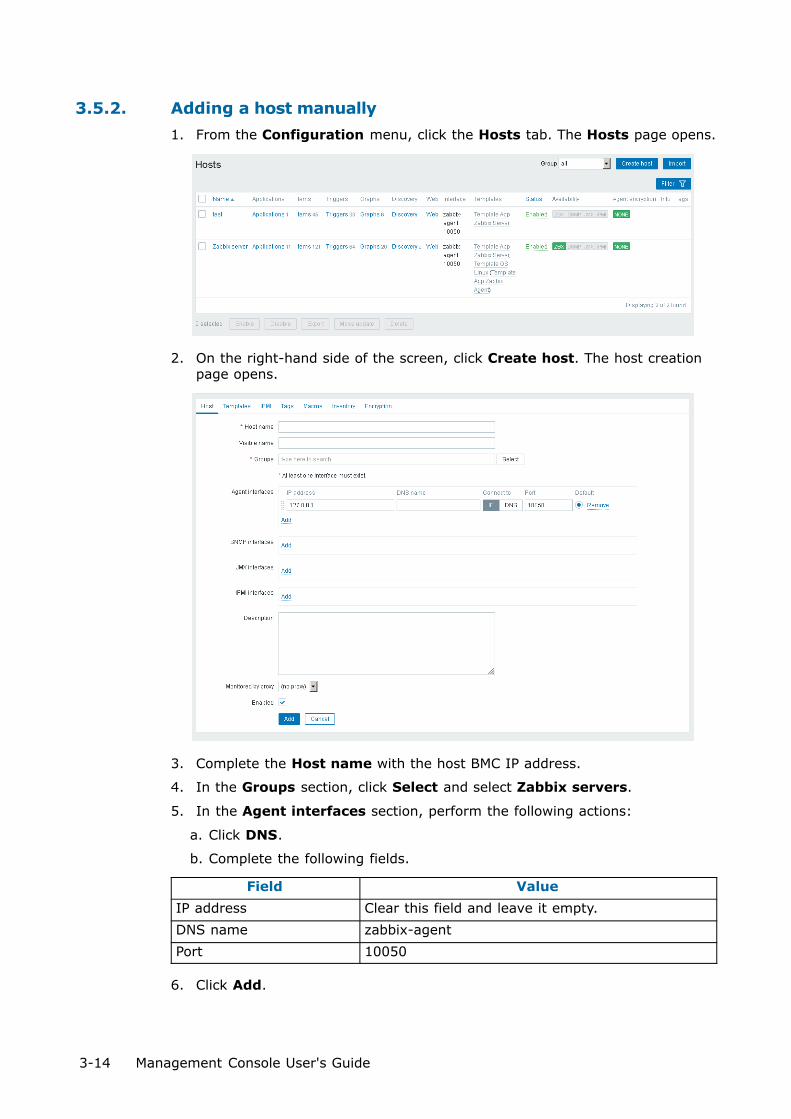
1. From the Configuration menu, click the Hosts tab. The Hosts page opens.
2. On the right-hand side of the screen, click Create host. The host creationpage opens.
3. Complete the Host name with the host BMC IP address.
4. In the Groups section, click Select and select Zabbix servers.
5. In the Agent interfaces section, perform the following actions:
a. Click DNS.
b. Complete the following fields.
Field Value
IP address Clear this field and leave it empty.
DNS name zabbix-agent
Port 10050
6. Click Add.

Chapter 3. Monitoring resources 3-15
3.5.3. Linking a host to the Atos LLD template
1. From the Hosts page, click on the newly created host. The host details aredisplayed.
2. Click the Template tab above the host details. The host Template pageopens.
3. In the Link new templates section, click Select and select the Atos LLDtemplate.
4. Click Add. The Atos LLD template appears in the Linked templatessection.
5. Click Update.
3-16 Management Console User's Guide
3.5.4. Filling Atos template macros
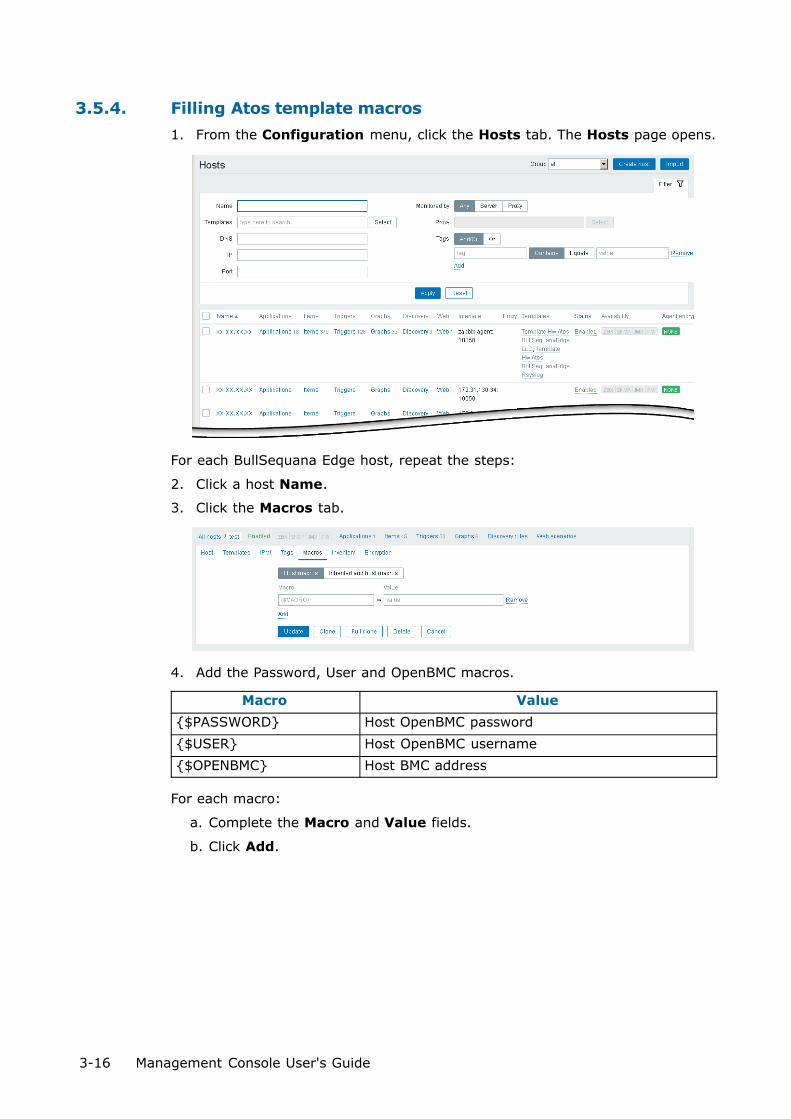
1. From the Configuration menu, click the Hosts tab. The Hosts page opens.
For each BullSequana Edge host, repeat the steps:
2. Click a host Name.
3. Click the Macros tab.
4. Add the Password, User and OpenBMC macros.
Macro Value
{$PASSWORD} Host OpenBMC password
{$USER} Host OpenBMC username
{$OPENBMC} Host BMC address
For each macro:
a. Complete the Macro and Value fields.
b. Click Add.

Chapter 3. Monitoring resources 3-17
Example
See 3.6. Adding security if an encrypted password is necessary.
5. Click Update to complete changes.

3-18 Management Console User's Guide
3.6. Adding security
3.6.1. Activating PSK security
1. Open a Terminal window.
2. Go the MISM installation directory.
3. Generate an encryption key using the following command:
$ generate_psk_key_for_zabbix.sh
The zabbix_agentd.psk file, containing the key, is generated in the/etc/zabbix/agent/ directory.
4. Go to the /etc/zabbix/agent/ directory and open the zabbix_agentd.conffile with a text editor.
5. In the TLS-RELATED PARAMETERS section of the file, uncomment thefollowing lines:
---------------------------------------------------------------------------TLSConnect=pskTLSAccept=pskTLSPSKIdentity=PSK_Mipocket_AgentTLSPSKFile=/etc/zabbix/zabbix_agentd.psk---------------------------------------------------------------------------
6. Save and close the file.
7. Stop and restart the MISM console.

Chapter 3. Monitoring resources 3-19
3.6.2. Enabling PSK security for a host
1. From the Configuration menu, click the Hosts tab. The Hosts page opens.
2. Click on the host. The host details are displayed.
3. Click the Encryption tab above the host details. The host Encryption pageopens.
4. In the Connections to host section, click PSK.
5. In the Connections from host, select PSK.

3-20 Management Console User's Guide
6. Complete the following fields.
Field Value
PSK Identity PSK_Mipocket_Agent
echo PSK Encryption key from the zabbix_agentd.psk file
7. Click Update.
8. Stop and restart the MISM console.

Chapter 3. Monitoring resources 3-21
3.6.3. Creating an encrypted password for a host
1. Go the MISM installation directory.
2. Generate an encrypted password using the following command:
$ generate_encrypted_password_for_zabbix.sh --password=<host BMC password>
3. Copy the encrypted password.
4. From the Configuration menu, click the Hosts tab. The Hosts page opens.
5. Click the host. The host details are displayed.

3-22 Management Console User's Guide
6. Click the Macros tab above the host details. The host Macros page opens.
7. Paste the encrypted password in the Value field of the {$PASSWORD}macro.
8. Click Update.

Chapter 3. Monitoring resources 3-23
3.7. Enabling syslog forwarding
3.7.1. Importing the Atos Rsyslog template
1. From the Configuration menu, click the Templates tab. The Templatespage opens.
2. On the right-hand side of the screen, click Import. The Import pageopens.

3-24 Management Console User's Guide
3. In the Import file section, click Browse and indicate the path to thetemplate.
Note The templates are delivered in a sub-directory of the MISM installationdirectory: \zabbix\server\externalscripts. They can be copied to anylocal directory.
4. Click Import.

Chapter 3. Monitoring resources 3-25
3.7.2. Linking the Zabbix server host to the Atos Rsyslog template
1. From the Hosts page, click on Zabbix server host. The host details aredisplayed.
2. Click the Template tab above the host details. The host Template pageopens.
3. In the Link new templates section, click Select and select the AtosRsyslog template.
4. Click Add. The Atos Rsyslog template appears in the Linked templatessection.
5. Click Update.

3-26 Management Console User's Guide
3.7.3. Displaying the logs
1. From the Monitoring menu, click the Dashboard tab. The last selecteddashboard opens.
2. If the displayed dashboard is not the Rsyslog dashboard, click Alldashboards and click Rsyslog dashboard in the dashboard list.

Chapter 3. Monitoring resources 3-27
3.8. Configuring nmap
3.8.1. Creating a nmap discovery rule
1. From the Configuration menu, click the Discovery tab. The Discoveryrules page opens.
2. Click the Create Discovery rule button. A new page opens.
3. Complete the Name and IP range fields.
4. Configure the check type.
In the Checks section, click New and perform the following actions:
a. From the Check type drop-down list, select HTTPS.
b. Click Add.

3-28 Management Console User's Guide
5. Save the discovery rule.
Click Add to complete changes.
The nmap discovery rule is created.

Chapter 3. Monitoring resources 3-29
3.8.2. Creating a nmap action
1. Configure a new action
1. From the Configuration menu, click the Actions tab. The Actions pageopens.
2. From the Event source drop-down list, select Discovery.
3. Click the Create action button. A new page opens.
4. Complete the Name field.
5. Add a new condition.
In the New condition section, perform the following actions:
a. Select Discovery rule and equals from the drop-down lists.
b. Click Select.
c. Select the nmap discovery rule.
d. Click Add.

3-30 Management Console User's Guide
2. Configure the operations
1. Click the Operations tab.
2. Add the Add host operation.
a. In the Operations section, click New.
b. In the Operation details section, perform the following actions:
i. From the Operation type drop-down list, select Add host.
ii. Click Add.
The Add host operation is added.

Chapter 3. Monitoring resources 3-31
3. Add the Add to host group operation.
a. In the Operations section, click New.
b. In the Operation details section, perform the following actions:
i. From the Operation type drop-down list, select Add to host group.
ii. In the Host groups field, click Select.
iii.Select Discovered hosts.
iv.Click Add.
The Add to host group operation is added.

3-32 Management Console User's Guide
4. Save the action.
From the main page, click Add to complete changes.
The nmap discovery action is created.
3. Check the hosts
From the Configuration menu, click Hosts.

Chapter 3. Monitoring resources 3-33
3.9. Setting up email alerts
3.9.1. Configuring an mail server
1. From the Administration menu, click the Media types tab. The Mediatypes page opens.
2. Click Create media type. A new page opens.
3. Complete the Name field.
4. Select Email from the Type drop-down list.

3-34 Management Console User's Guide
5. Complete the SMTP server, SMTP helo and SMTP email fields asrequired.
Example
6. Click Add to complete changes.
The media type is created.
Example
7. Click Test to send a test email.

Chapter 3. Monitoring resources 3-35
3.9.2. Creating an action
1. From the Configuration menu, click the Actions tab. The Actions pageopens.
2. From the Event source drop-down list, select Triggers.
3. Click the Create action button. A new page opens.
4. Complete the Name field.

3-36 Management Console User's Guide
5. Click the Operations tab.
6. In the Operations section, click New.

Chapter 3. Monitoring resources 3-37
7. In the Operation details section, perform the following actions:
a. Add the message recipient
If the recipient is a user:
i. In the Send to Users section, click Add.
ii. Select the user required.
If the recipient is a user group:
i. In the Send to User groups section, click Add.
ii. Select the user group required.
b. From the Send only to drop-down list, select the media type previouslycreated.
c. Click Add.
Example
8. Save the action.
Click Add to complete changes.
The action is created.
Example

3-38 Management Console User's Guide
3.9.3. Configuring the user
1. From the Administration menu, click the Users tab. The Users pageopens.
2. Select the user required. A new page opens.
3. Click the Media tab.

Chapter 3. Monitoring resources 3-39
4. In the Media section, click Add. The Media page opens.
Example
a. From the Type drop-down list, select the media type previously created.
b. Complete the fields as required.
c. Click Add.
Example
5. Click Update to complete changes.
3-40 Management Console User's Guide
3.10. Setting up SMS alerts
This procedure uses the zabbix-smsmode script. It allows a SMS to be sent viathe smsmode provider.
Note The zabbix-smsmode script is delivered in a sub-directory of the MISMinstallation directory: \zabbix\server\alertscripts.
Prerequisites
• Zabbix-smsmode script is available.
• https://www.smsmode.com/en/ is accessible by the server.
• An access key has been created.
See The smsmode site to generate an access key:https://ui.smsmode.com/.
3.10.1. Configuring the SMS
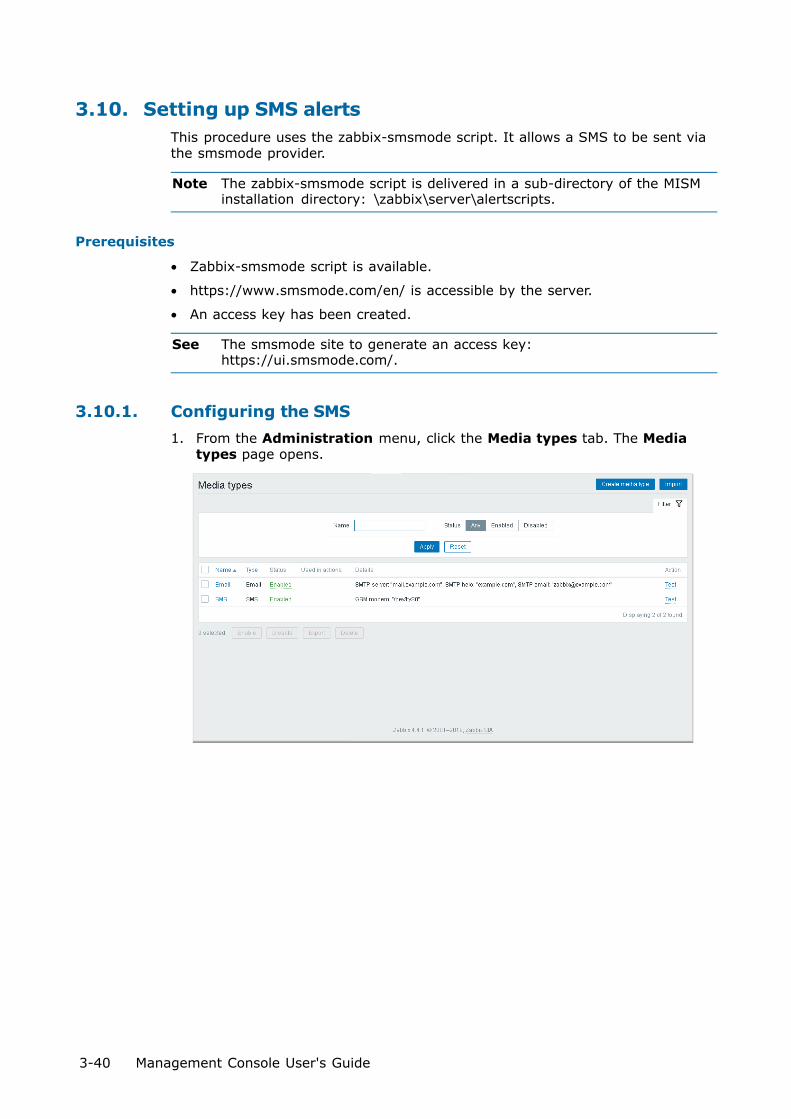
1. From the Administration menu, click the Media types tab. The Mediatypes page opens.

Chapter 3. Monitoring resources 3-41
2. Click Create media type. A new page opens.
3. Complete the Name field.
4. Select Script from the Type drop-down list.
5. Enter zabbix-smsmode in the Script name field.
6. In the Script parameters section, add the following settings.
Parameter Value
--message {ALERT.SUBJECT} - {ALERT.MESSAGE}
--to {ALERT.SENDTO}
--accessToken Acces key generated by smsmode
Example

3-42 Management Console User's Guide
7. Click Add to complete changes.
The media type is created.
Example
8. Click Test to send a test SMS.

Chapter 3. Monitoring resources 3-43
3.10.2. Creating an action
1. From the Configuration menu, click the Actions tab. The Actions pageopens.
2. From the Event source drop-down list, select Triggers.
3. Click the Create action button. A new page opens.
4. Complete the Name field.

3-44 Management Console User's Guide
5. Click the Operations tab.
6. In the Operations section, click New.
Chapter 3. Monitoring resources 3-45
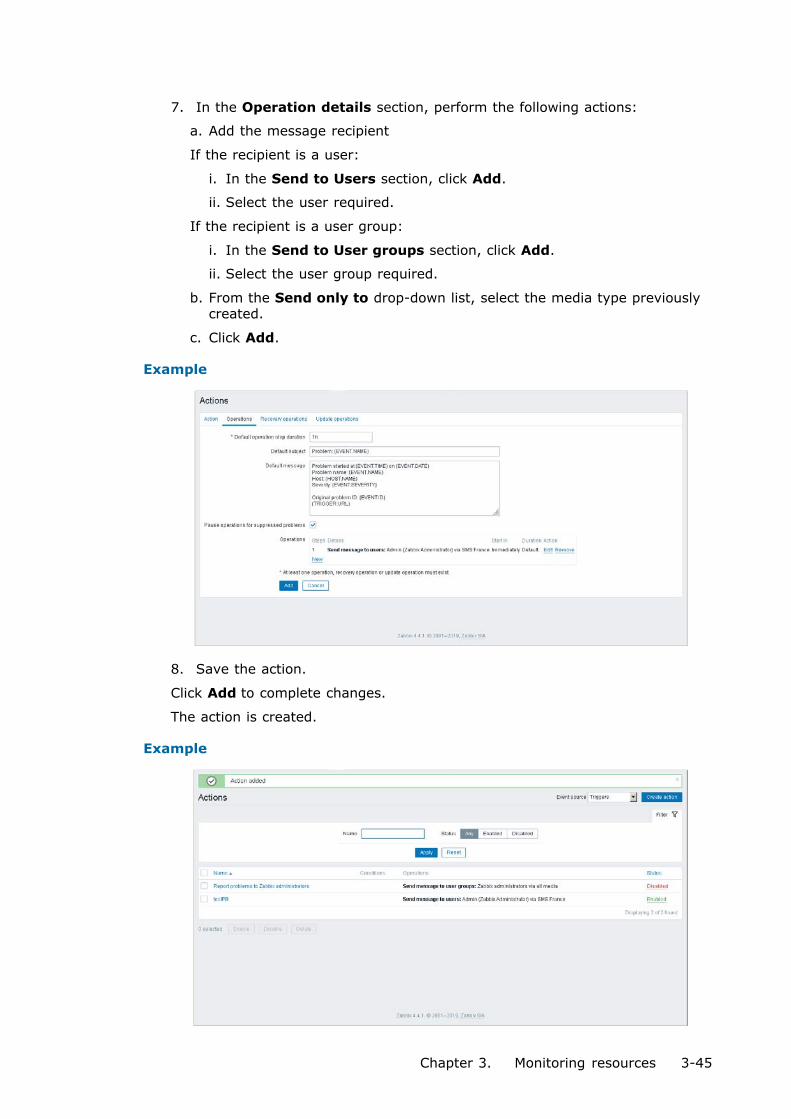
7. In the Operation details section, perform the following actions:
a. Add the message recipient
If the recipient is a user:
i. In the Send to Users section, click Add.
ii. Select the user required.
If the recipient is a user group:
i. In the Send to User groups section, click Add.
ii. Select the user group required.
b. From the Send only to drop-down list, select the media type previouslycreated.
c. Click Add.
Example
8. Save the action.
Click Add to complete changes.
The action is created.
Example

3-46 Management Console User's Guide
3.10.3. Configuring the user
1. From the Administration menu, click the Users tab. The Users pageopens.
2. Select the user required. A new page opens.
3. Click the Media tab.

Chapter 3. Monitoring resources 3-47
4. In the Media section, click Add. The Media page opens.
Example
a. From the Type drop-down list, select the media type previously created.
b. Complete the fields as required.
c. Click Add.
Example
5. Click Update to complete changes.

3-48 Management Console User's Guide
3.11. Monitoring resources
See Zabbix documentation for more information:https://www.zabbix.com/documentation/4.4/manual/web_interface/frontend_sections/monitoring
Click the Monitoring menu to display the information.
3.11.1. Dashboard
Click the Dashboard tab to display summaries of all the important information.
A dashboard consists of widgets and each widget is designed to displayinformation of a certain kind and source, which can be a summary, a map, agraph, the clock, etc.
Widgets are added and edited in the dashboard editing mode. Widgets areviewed in the dashboard viewing mode.
While in a single dashboard you can group widgets from various sources for aquick overview, it is also possible to create several dashboards containingdifferent sets of overviews and switch between them.
The time period that is displayed in graph widgets is controlled by the timeperiod section located above the widgets. The time period selector label,located to the right, displays the currently selected time period. Clicking the tablabel expands and collapses the time period selector.
Note that when the dashboard is displayed in kiosk mode (accessible from thefull screen mode) and widgets only are displayed, it is possible to zoom out thegraph period by double clicking in the graph.
Host menu
Click a host in the Problems widget to bring up the host menu. It includeslinks to inventory, latest data, problems, graphs and screens for the host.
3.11.2. Problems
Click the Problems tab to display current problems. Problems are triggers thatare in the Problem state.
Host menu
Click a host in the Problems section to bring up the host menu. It includeslinks to inventory, latest data, problems, graphs and screens for the host.
3.11.3. Overview
Click the Overview tab to display an overview of trigger states or a comparisonof data for various hosts at once.
Host menu
Click a host in the Overview section (Hosts: left) to bring up the host menu.It includes links to inventory, latest data, problems, graphs and screens for thehost.

Chapter 3. Monitoring resources 3-49
3.11.4. Web
Click the Web tab to display current information about web scenarios.
3.11.5. Latest data
Click the Latest data tab to view the latest values gathered by items as well asto access various graphs for the items.
Host menu
Click a host in the Latest data section to bring up the host menu. It includeslinks to inventory, latest data, problems, graphs and screens for the host.
3.11.6. Graphs
Click the Graphs tab to display any custom graph that has been configured.
3.11.7. Screens
Click the Screens tab to configure, manage and view Zabbix global screens andslide shows.
Host menu
Click a host in the Screens section (in Host issues and Host group issueswidgets) to bring up the host menu. It includes links to inventory, latest data,problems, graphs and screens for the host.
3.11.8. Maps
Click the Maps tab to configure, manage and view network maps.
Host menu
Click a host in the Maps section to bring up the host menu. It includes links toinventory, latest data, problems, graphs and screens for the host.
3.11.9. Discovery
Click the Discovery tab to review results of network discovery. Discovereddevices are sorted by the discovery rule.
3.11.10. Services
Click the Services to review the status of IT infrastructure or businessservices.


Bull Cedoc
357 avenue Patton
BP 20845
49008 Angers Cedex 01
FRANCE
Related Documents