Making Salt Lab Purpose: In this lab you will learn about the reaction between an acid and a base to produce a salt. ACID + BASE SALT + WATER In this lab you will react Hydrochloric Acid and Sodium Hydroxide to produce Salt and Water. You will then evaporate the salt water solution to obtain the pure salt crystals. After separating the salt and the water you will remix the salt with distilled water and test to determine if the salt solution is acidic, basic or neither. Read the whole procedure before you begin the lab. After reading the procedure, record your hypothesis on the back side of this paper. Materials: 1 flask of 1M Hydrochloric Acid (HCl); 1 flask of 1M Sodium Hydroxide (NaOH); one pipette for each flask; one evaporating dish; phenolphthalien solution (indicator); tongs to handle the hot evaporating dish; bunsen burner, ring stand, O-ring, wire mesh; distilled water; 10 ml graduated cylinder; Procedure: Pre-Step: Before beginning your lab, make sure the evaporating dish is safely placed on the table. DO NOT turn on the Bunsen burner yet. Mix chemicals in dish (as procedure indicates) before placing it on the ring stand. 1. Measure 5 ml of distilled water in the 10 mL graduated cylinder and then pour it into the evaporating dish. 2. Using the pipette add 10 drops of base (NaOH) the evaporating dish with the distilled water. 3. Put one drop of the indicator solution, Phenolphtalein, in the evaporating dish. 4. Swirl the dish slowly to mix the indicator and the base. To swirl the dish, DO NOT swirl it with the pipette! Instead, swirl it by holding the evaporating dish and moving your hand. Observe what happens. 5. Very slowly and very carefully add one drop at a time of the acid (HCl) to the solution in the evaporating dish until the solution just changes back to a clear color. STIR WHILE ADDING THE ACID BY REFERRING THE STIRRING METHOD ABOVE. DO NOT ADD ANY ADDITIONAL ACID AFTER THE SOLUTION TURNS CLEAR. 6. Put one more drop of the base in the solution. Observe what happens. If there is no color change add an additional drop UNTIL IT TURNS MAGENTA/ PINK. 7. Repeat step 5. You will NOT need as much acid as used previously. Put one drop of acid at a time to the solution until the color turns clear. Make sure you stir while adding the acid. DO NOT ADD ANY ADDITIONAL ACID AFTER THE COLOR TURNS CLEAR. 8. Your solution is neutral when there is no color JUST AFTER the solution turns clear. Place the solutions on the ring stand. 9. Now turn on the Bunsen burner and adjust the flame The flame such that a gentle boil will eventually be seen. Allow the liquid to evaporate slowly. DO NOT OVERHEAT OR YOU MAY BURN THE SALT THAT IS FORMED AND RUIN THE EXPERIMENT. 10. When the solution is almost completely gone remove the evaporating dish WITH YOUR TONGS from the hot plate and allow the residual heat to complete the evaporation process. Put the evaporating dish on the ring stand platform (move the Bunsen burner). DO NOT touch it because the evaporating plate is EXTREMLY HOT. 11. Inspect the crystals that form. DO NOT touch the crystals because they are still HOT. Observe them carefully so you can describe them later in the analysis section of the lab. 12. Put about 2 ml of distilled water into the evaporating dish and test the new solution with Red and Blue Litmus paper. Test the new solution by carefully dipping the Red and Blue Litmus Paper into the solution. Record any color changes. Is your new solution an acid, a base or neither?

Welcome message from author
This document is posted to help you gain knowledge. Please leave a comment to let me know what you think about it! Share it to your friends and learn new things together.
Transcript

Making Salt Lab
Purpose: In this lab you will learn about the reaction between an acid and a base to produce a salt. ACID + BASE à SALT + WATER
In this lab you will react Hydrochloric Acid and Sodium Hydroxide to produce Salt and Water. You will then evaporate the salt water solution to obtain the pure salt crystals. After separating the salt and the water you will remix the salt with distilled water and test to determine if the salt solution is acidic, basic or neither. Read the whole procedure before you begin the lab. After reading the procedure, record your hypothesis on the back side of this paper.
Materials: 1 flask of 1M Hydrochloric Acid (HCl); 1 flask of 1M Sodium Hydroxide (NaOH); one pipette for each flask; one evaporating dish; phenolphthalien solution (indicator); tongs to handle the hot evaporating dish; bunsen burner, ring stand, O-ring, wire mesh; distilled water; 10 ml graduated cylinder;
Procedure: Pre-Step: Before beginning your lab, make sure the evaporating dish is safely placed on the table. DO NOT turn on the Bunsen burner yet. Mix chemicals in dish (as procedure indicates) before placing it on the ring stand. 1. Measure 5 ml of distilled water in the 10 mL graduated cylinder and then pour it into the evaporating dish.
2. Using the pipette add 10 drops of base (NaOH) the evaporating dish with the distilled water.
3. Put one drop of the indicator solution, Phenolphtalein, in the evaporating dish.
4. Swirl the dish slowly to mix the indicator and the base. To swirl the dish, DO NOT swirl it with the pipette! Instead, swirl it by holding the evaporating dish and moving your hand. Observe what happens. 5. Very slowly and very carefully add one drop at a time of the acid (HCl) to the solution in the evaporating dish until the solution just
changes back to a clear color. STIR WHILE ADDING THE ACID BY REFERRING THE STIRRING METHOD ABOVE. DO NOT ADD ANY ADDITIONAL ACID AFTER THE SOLUTION TURNS CLEAR.
6. Put one more drop of the base in the solution. Observe what happens. If there is no color change add an additional drop UNTIL IT TURNS MAGENTA/ PINK. 7. Repeat step 5. You will NOT need as much acid as used previously. Put one drop of acid at a time to the solution until the color turns clear. Make sure you stir while adding the acid. DO NOT ADD ANY ADDITIONAL ACID AFTER THE COLOR TURNS CLEAR. 8. Your solution is neutral when there is no color JUST AFTER the solution turns clear. Place the solutions on the ring stand. 9. Now turn on the Bunsen burner and adjust the flame The flame such that a gentle boil will eventually be seen. Allow the liquid to evaporate slowly. DO NOT OVERHEAT OR YOU MAY BURN THE SALT THAT IS FORMED AND RUIN THE EXPERIMENT. 10. When the solution is almost completely gone remove the evaporating dish WITH YOUR TONGS from the hot plate and allow the residual heat to complete the evaporation process. Put the evaporating dish on the ring stand platform (move the Bunsen burner). DO NOT touch it because the evaporating plate is EXTREMLY HOT. 11. Inspect the crystals that form. DO NOT touch the crystals because they are still HOT. Observe them carefully so you can describe them later in the analysis section of the lab.
12. Put about 2 ml of distilled water into the evaporating dish and test the new solution with Red and Blue Litmus paper. Test the new solution by carefully dipping the Red and Blue Litmus Paper into the solution. Record any color changes. Is your new solution an acid, a base or neither?
Name Date Period
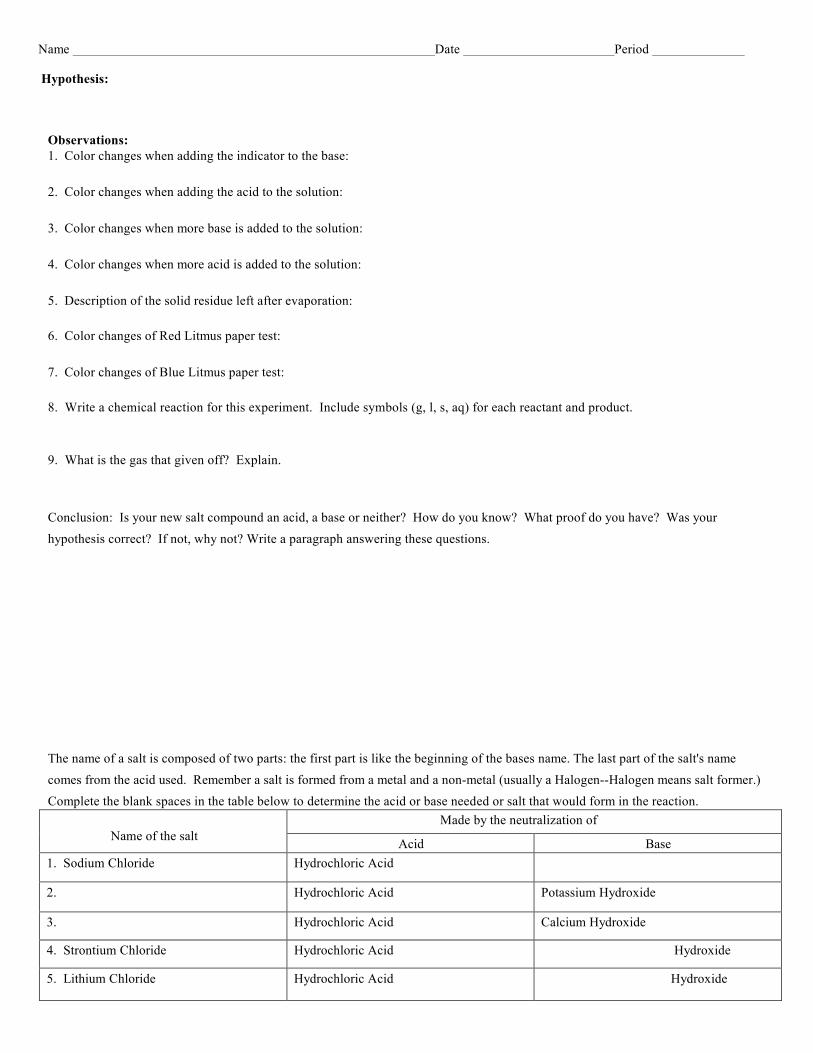
Hypothesis: Observations: 1. Color changes when adding the indicator to the base:
2. Color changes when adding the acid to the solution:
3. Color changes when more base is added to the solution:
4. Color changes when more acid is added to the solution:
5. Description of the solid residue left after evaporation: 6. Color changes of Red Litmus paper test:
7. Color changes of Blue Litmus paper test: 8. Write a chemical reaction for this experiment. Include symbols (g, l, s, aq) for each reactant and product. 9. What is the gas that given off? Explain.
Conclusion: Is your new salt compound an acid, a base or neither? How do you know? What proof do you have? Was your hypothesis correct? If not, why not? Write a paragraph answering these questions.
The name of a salt is composed of two parts: the first part is like the beginning of the bases name. The last part of the salt's name comes from the acid used. Remember a salt is formed from a metal and a non-metal (usually a Halogen--Halogen means salt former.) Complete the blank spaces in the table below to determine the acid or base needed or salt that would form in the reaction.
Name of the salt
Made by the neutralization of
Acid Base 1. Sodium Chloride Hydrochloric Acid
2. Hydrochloric Acid Potassium Hydroxide
3. Hydrochloric Acid Calcium Hydroxide
4. Strontium Chloride Hydrochloric Acid Hydroxide
5. Lithium Chloride Hydrochloric Acid Hydroxide
Related Documents