Instructions 2021423-503 Revision H GE Healthcare Mac-Lab/CardioLab/Centricity Cardiology INW Service Manual Version 6.5.6

Welcome message from author
This document is posted to help you gain knowledge. Please leave a comment to let me know what you think about it! Share it to your friends and learn new things together.
Transcript

GE Healthcare
Mac-Lab/CardioLab/Centricity Cardiology INW Service Manual
Version 6.5.6
Instructions
2021423-503 Revision H

The information in this manual only applies to Mac-Lab/CardioLab/Centricity Cardiology INW Service Manual software version 6.5.6. It does not apply to earlier software versions. Due to continuing product innovation, specifications in this manual are subject to change without notice.
Listed below are GE Medical Systems Information Technologies trademarks used in this document.
MAC-LAB®, CARDIOLAB®, CENTRICITY®, TRAM®, TRAMNET®, and TRAM-RAC® are trademarks of GE Medical Systems Information Technologies, a division of General Electric Company going to market as GE Healthcare.
All other trademarks contained herein are the property of their respective owners.
© GE Medical Systems Information Technologies, 2009 - 2014. All rights reserved.
T-2 Mac-Lab/CardioLab/Centricity Cardiology INW Service Manual 2021423-503H25 August 2014

CE Marking Information
CE Marking Information
Compliance
The Mac-Lab/CardioLab/ComboLab system bears CE mark CE-0459 indicating its conformity with the provisions of the Council Directive 93/42/EEC concerning medical devices and fulfills the essential requirements of Annex I of this directive.
For devices manufactured in the United States, the CE mark is applied under the authority of Notified Body GMED (0459).
The country of manufacture and appropriate Notified Body can be found on the equipment labeling.
The product complies with the requirements of standard IEC 60601-1-2.
The safety and effectiveness of this device has been verified against previously distributed devices. Although all standards applicable to presently marketed devices may not be appropriate for prior devices (that is, electromagnetic compatibility standards), this device will not impair the safe and effective use of those previously distributed devices. Refer to the user’s information.
Refer to the Mac-Lab/CardioLab Service Manual for Compliance Information.
Recommendations
Users should be aware of known RF sources, such as radio or TV stations and hand-held or mobile two-way radios, and consider them when installing a medical device or system.
Be aware that adding accessories or components, or modifying the medical device or system may degrade the EMI performance. Consult with qualified personnel regarding changes to the system configuration.
The Mac-Lab/CardioLab System, if operating under the conditions defined in the EMC Standard IEC 60601-1-2 (Radiated Immunity 3 V/m) and at field strengths above 3 volts per meter may cause waveform distortions at radio frequency (RF) electromagnetic interference (EMI).
MEDICAL ELECTRICAL EQUIPMENT needs special precautions regarding EMC and needs to be installed and put into service according to the EMC information provided in the ACCOMPANYING SERVICE MANUAL.
Portable and mobile RF communications equipment can affect MEDICAL ELECTRICAL EQUIPMENT.
2021423-503H Mac-Lab/CardioLab/Centricity Cardiology INW Service Manual CE-1

CE Marking Information
The use of ACCESSORIES, transducers and cables other than those specified, with the exception of transducers and cables sold by the manufacturer of the Mac-Lab/CardioLab System as replacement parts for internal components, may result in increased EMISSIONS or decreased IMMUNITY of the Mac-Lab/CardioLab System.
The Mac-Lab/CardioLab System should not be used adjacent to or stacked with other equipment and that if adjacent to or stacked use is necessary, the Mac-Lab/CardioLab System should be observed to verify normal operation in the configuration in which it will be used.
Review the AAMI Committee Technical Information Report (TIR) 18, “Guidance on Electromagnetic Compatibility of Medical Devices for Clinical/Biomedical Engineers”. This guidance document provides a means to evaluate and manage the EMI environment in the hospital.
The following actions can be taken to reduce the risk of medical device EMI and achieve EMC:
Assess the EMC environment of the healthcare facility (for example, identify radio transmitters in around the facility) and identify areas where critical medical devices are used (for example, ER, ICU, CCU, NICU).
Increase the distance between sources of EMI and susceptible devices.
Remove the devices that are highly susceptible to EMI.
Lower power transmitted from electrical and electronic equipment (EMI sources) under hospital control (that is, paging systems).
Label devices susceptible to EMI.
Educate healthcare facility staff (nurses and doctors) to be aware of, and to recognize, potential EMI related problems.
Exception
ECG Parameter
IEC 60601-1-2 clause 36.202.1 - Immunity: Radiated Immunity –
The level of compliance is less than 1V/m
If operating under the conditions defined in EMC Standard EN 60601-1-2 (Radiated Immunity 3V/m), field strengths less than 1V/m may cause waveform distortions and erroneous numeric data at various electromagnetic interference (EMI) frequencies.
CE-2 Mac-Lab/CardioLab/Centricity Cardiology INW Service Manual 2021423-503H

CE Marking Information
Recommendations
Review the AAMI EMC Committee technical information report (TIR-18) titled Guidance on electromagnetic compatibility of medical devices for clinical / biomedical engineers - Part 1: Radiated radio-frequency electromagnetic energy. This TIR provides a means to evaluate and manage the EMI environment in the hospital.
The following actions can be taken:
managing (increasing) distance between sources of EMI and susceptible devices
managing (removing) devices that are highly susceptible to EMI
lower power from internal EMI sources under hospital control (i.e. paging systems)
labeling devices susceptible to EMI
educating staff (nurses and doctors) to be aware of, and to recognize, potential EMI related problems
2021423-503H Mac-Lab/CardioLab/Centricity Cardiology INW Service Manual CE-3

CE Marking Information
CE-4 Mac-Lab/CardioLab/Centricity Cardiology INW Service Manual 2021423-503H

Contents1 Introduction . . . . . . . . . . . . . . . . . . . . . . . . . . . . . . . . . . . . .1-1
Manual Information . . . . . . . . . . . . . . . . . . . . . . . . . . . . . . . . . . . . . . . . . . . . . . . . . . . 1-2Purpose . . . . . . . . . . . . . . . . . . . . . . . . . . . . . . . . . . . . . . . . . . . . . . . . . . . . . . . . .1-2Intended Audience . . . . . . . . . . . . . . . . . . . . . . . . . . . . . . . . . . . . . . . . . . . . . . . . .1-2Revision History . . . . . . . . . . . . . . . . . . . . . . . . . . . . . . . . . . . . . . . . . . . . . . . . . . .1-2Conventions . . . . . . . . . . . . . . . . . . . . . . . . . . . . . . . . . . . . . . . . . . . . . . . . . . . . . .1-3Product References . . . . . . . . . . . . . . . . . . . . . . . . . . . . . . . . . . . . . . . . . . . . . . . .1-3Related Documents . . . . . . . . . . . . . . . . . . . . . . . . . . . . . . . . . . . . . . . . . . . . . . . .1-3Illustrations and Names . . . . . . . . . . . . . . . . . . . . . . . . . . . . . . . . . . . . . . . . . . . . .1-4Chapter Contents . . . . . . . . . . . . . . . . . . . . . . . . . . . . . . . . . . . . . . . . . . . . . . . . . .1-4
Safety Information. . . . . . . . . . . . . . . . . . . . . . . . . . . . . . . . . . . . . . . . . . . . . . . . . . . . 1-5Safety Messages. . . . . . . . . . . . . . . . . . . . . . . . . . . . . . . . . . . . . . . . . . . . . . . . . . 1-5ITE Conformance Statement . . . . . . . . . . . . . . . . . . . . . . . . . . . . . . . . . . . . . . . .1-12
Types of Systems . . . . . . . . . . . . . . . . . . . . . . . . . . . . . . . . . . . . . . . . . . . . . . . . . . . 1-13Mac-Lab System . . . . . . . . . . . . . . . . . . . . . . . . . . . . . . . . . . . . . . . . . . . . . . . . .1-13CardioLab EP System . . . . . . . . . . . . . . . . . . . . . . . . . . . . . . . . . . . . . . . . . . . . .1-13ComboLab System . . . . . . . . . . . . . . . . . . . . . . . . . . . . . . . . . . . . . . . . . . . . . . . .1-14CardioLab II Plus Amplifier . . . . . . . . . . . . . . . . . . . . . . . . . . . . . . . . . . . . . . . . . .1-14
Security Information . . . . . . . . . . . . . . . . . . . . . . . . . . . . . . . . . . . . . . . . . . . . . . . . . 1-15Non-Validated Software Applications . . . . . . . . . . . . . . . . . . . . . . . . . . . . . . . . . .1-15Policy . . . . . . . . . . . . . . . . . . . . . . . . . . . . . . . . . . . . . . . . . . . . . . . . . . . . . . . . . .1-15Validated Third Party Software . . . . . . . . . . . . . . . . . . . . . . . . . . . . . . . . . . . . . . 1-16
Service Information. . . . . . . . . . . . . . . . . . . . . . . . . . . . . . . . . . . . . . . . . . . . . . . . . . 1-19Service Requirements . . . . . . . . . . . . . . . . . . . . . . . . . . . . . . . . . . . . . . . . . . . . .1-19Product Identification. . . . . . . . . . . . . . . . . . . . . . . . . . . . . . . . . . . . . . . . . . . . . . 1-19Required Tools and Supplies . . . . . . . . . . . . . . . . . . . . . . . . . . . . . . . . . . . . . . . .1-22Power Input Requirements . . . . . . . . . . . . . . . . . . . . . . . . . . . . . . . . . . . . . . . . . .1-22
Safety Information. . . . . . . . . . . . . . . . . . . . . . . . . . . . . . . . . . . . . . . . . . . . . . . . . . . 1-23Electromagnetic Compatibility and Interference . . . . . . . . . . . . . . . . . . . . . . . . . .1-23Exception . . . . . . . . . . . . . . . . . . . . . . . . . . . . . . . . . . . . . . . . . . . . . . . . . . . . . . .1-23EU Battery Directive 2006/66/EC . . . . . . . . . . . . . . . . . . . . . . . . . . . . . . . . . . . . .1-24Responsibility of the Manufacturer . . . . . . . . . . . . . . . . . . . . . . . . . . . . . . . . . . . .1-25General . . . . . . . . . . . . . . . . . . . . . . . . . . . . . . . . . . . . . . . . . . . . . . . . . . . . . . . . .1-25Equipment Symbols . . . . . . . . . . . . . . . . . . . . . . . . . . . . . . . . . . . . . . . . . . . . . . .1-26
Compliance Information . . . . . . . . . . . . . . . . . . . . . . . . . . . . . . . . . . . . . . . . . . . . . . 1-29Mac-Lab/CardioLab System . . . . . . . . . . . . . . . . . . . . . . . . . . . . . . . . . . . . . . . . .1-29
2021423-503H Mac-Lab/CardioLab/Centricity Cardiology INW Service Manual i

2 Equipment Overview . . . . . . . . . . . . . . . . . . . . . . . . . . . . . .2-1
Typical System Configuration . . . . . . . . . . . . . . . . . . . . . . . . . . . . . . . . . . . . . . . . . . 2-2Control Room Components . . . . . . . . . . . . . . . . . . . . . . . . . . . . . . . . . . . . . . . . . .2-3Procedure Room Components . . . . . . . . . . . . . . . . . . . . . . . . . . . . . . . . . . . . . . . .2-3IT Control Room Equipment . . . . . . . . . . . . . . . . . . . . . . . . . . . . . . . . . . . . . . . . . .2-4Network Connections . . . . . . . . . . . . . . . . . . . . . . . . . . . . . . . . . . . . . . . . . . . . . . .2-4
System Hardware . . . . . . . . . . . . . . . . . . . . . . . . . . . . . . . . . . . . . . . . . . . . . . . . . . . . 2-5Acquisition Workstation System Components. . . . . . . . . . . . . . . . . . . . . . . . . . . . 2-5GE Client Workstation . . . . . . . . . . . . . . . . . . . . . . . . . . . . . . . . . . . . . . . . . . . . . 2-33Mobile Workstand . . . . . . . . . . . . . . . . . . . . . . . . . . . . . . . . . . . . . . . . . . . . . . . . .2-36Monitors . . . . . . . . . . . . . . . . . . . . . . . . . . . . . . . . . . . . . . . . . . . . . . . . . . . . . . . .2-37TRAMNet . . . . . . . . . . . . . . . . . . . . . . . . . . . . . . . . . . . . . . . . . . . . . . . . . . . . . . .2-37CardioLab II Plus Amplifier . . . . . . . . . . . . . . . . . . . . . . . . . . . . . . . . . . . . . . . . . 2-39CARTO™ System (Patient Interface Unit) . . . . . . . . . . . . . . . . . . . . . . . . . . . . . .2-45Analog Output Box . . . . . . . . . . . . . . . . . . . . . . . . . . . . . . . . . . . . . . . . . . . . . . . .2-47Network Components . . . . . . . . . . . . . . . . . . . . . . . . . . . . . . . . . . . . . . . . . . . . . 2-48
Cabling and Connections. . . . . . . . . . . . . . . . . . . . . . . . . . . . . . . . . . . . . . . . . . . . . 2-53HP z600 Computer I/O Backplane Connections . . . . . . . . . . . . . . . . . . . . . . . . .2-53HP xw8400 Computer I/O Backplane Connections . . . . . . . . . . . . . . . . . . . . . . .2-54Power Connections . . . . . . . . . . . . . . . . . . . . . . . . . . . . . . . . . . . . . . . . . . . . . . .2-55HP z600 Video Connections . . . . . . . . . . . . . . . . . . . . . . . . . . . . . . . . . . . . . . . .2-56HP xw8400 Video Connections . . . . . . . . . . . . . . . . . . . . . . . . . . . . . . . . . . . . . .2-57Communications Connections . . . . . . . . . . . . . . . . . . . . . . . . . . . . . . . . . . . . . . .2-58TRAM/Amplifier Connections . . . . . . . . . . . . . . . . . . . . . . . . . . . . . . . . . . . . . . . .2-59Amplifier/Stimulator Connections . . . . . . . . . . . . . . . . . . . . . . . . . . . . . . . . . . . . 2-60Audio . . . . . . . . . . . . . . . . . . . . . . . . . . . . . . . . . . . . . . . . . . . . . . . . . . . . . . . . . .2-64CARTO™XP System Connections . . . . . . . . . . . . . . . . . . . . . . . . . . . . . . . . . . .2-65CARTO™ 3 System Connections . . . . . . . . . . . . . . . . . . . . . . . . . . . . . . . . . . . .2-66Review Workstations. . . . . . . . . . . . . . . . . . . . . . . . . . . . . . . . . . . . . . . . . . . . . . 2-69
Software . . . . . . . . . . . . . . . . . . . . . . . . . . . . . . . . . . . . . . . . . . . . . . . . . . . . . . . . . . . 2-72Operating System . . . . . . . . . . . . . . . . . . . . . . . . . . . . . . . . . . . . . . . . . . . . . . . . .2-72Database . . . . . . . . . . . . . . . . . . . . . . . . . . . . . . . . . . . . . . . . . . . . . . . . . . . . . . .2-72Application Software . . . . . . . . . . . . . . . . . . . . . . . . . . . . . . . . . . . . . . . . . . . . . . .2-72
3 Maintenance . . . . . . . . . . . . . . . . . . . . . . . . . . . . . . . . . . . . .3-1
Mac-Lab/CardioLab Service Performance Testing . . . . . . . . . . . . . . . . . . . . . . . . . 3-2Configuration . . . . . . . . . . . . . . . . . . . . . . . . . . . . . . . . . . . . . . . . . . . . . . . . . . . . .3-2FRU Checkout Procedure Table . . . . . . . . . . . . . . . . . . . . . . . . . . . . . . . . . . . . . .3-3Tools Recommended . . . . . . . . . . . . . . . . . . . . . . . . . . . . . . . . . . . . . . . . . . . . . . .3-5Visual Inspection/Cleaning . . . . . . . . . . . . . . . . . . . . . . . . . . . . . . . . . . . . . . . . . . .3-6Electrical Safety Checks . . . . . . . . . . . . . . . . . . . . . . . . . . . . . . . . . . . . . . . . . . . . .3-6
Functional Checkout Procedure . . . . . . . . . . . . . . . . . . . . . . . . . . . . . . . . . . . . . . . . 3-8Mac-Lab SCOP (Standard Checkout Procedure) . . . . . . . . . . . . . . . . . . . . . . . . .3-8CardioLab SCOP (Standard Check Out Procedure) . . . . . . . . . . . . . . . . . . . . . .3-10TRAM Module Testing . . . . . . . . . . . . . . . . . . . . . . . . . . . . . . . . . . . . . . . . . . . . .3-12
ii Mac-Lab/CardioLab/Centricity Cardiology INW Service Manual 2021423-503H

CardioImage/Image Capture Testing . . . . . . . . . . . . . . . . . . . . . . . . . . . . . . . . . .3-12IEB Testing . . . . . . . . . . . . . . . . . . . . . . . . . . . . . . . . . . . . . . . . . . . . . . . . . . . . . .3-12Printer Testing . . . . . . . . . . . . . . . . . . . . . . . . . . . . . . . . . . . . . . . . . . . . . . . . . . .3-12CARTO Testing . . . . . . . . . . . . . . . . . . . . . . . . . . . . . . . . . . . . . . . . . . . . . . . . . .3-13Audible Indicators Testing . . . . . . . . . . . . . . . . . . . . . . . . . . . . . . . . . . . . . . . . . .3-13RF Ablation Testing . . . . . . . . . . . . . . . . . . . . . . . . . . . . . . . . . . . . . . . . . . . . . . .3-13Stimulator Testing . . . . . . . . . . . . . . . . . . . . . . . . . . . . . . . . . . . . . . . . . . . . . . . .3-14DASH / Solar Testing . . . . . . . . . . . . . . . . . . . . . . . . . . . . . . . . . . . . . . . . . . . . . .3-14Remote Operators Terminal Testing . . . . . . . . . . . . . . . . . . . . . . . . . . . . . . . . . .3-14Analog Out Testing . . . . . . . . . . . . . . . . . . . . . . . . . . . . . . . . . . . . . . . . . . . . . . . .3-14Centricity Cardiology INW Testing . . . . . . . . . . . . . . . . . . . . . . . . . . . . . . . . . . . .3-15Remote Connection Testing . . . . . . . . . . . . . . . . . . . . . . . . . . . . . . . . . . . . . . . . .3-16
Planned Maintenance . . . . . . . . . . . . . . . . . . . . . . . . . . . . . . . . . . . . . . . . . . . . . . . 3-16
Mobile Workstand Preventative Maintenance . . . . . . . . . . . . . . . . . . . . . . . . . . . . 3-18Tools Required . . . . . . . . . . . . . . . . . . . . . . . . . . . . . . . . . . . . . . . . . . . . . . . . . . .3-18Adjusting Tilt and Tilt Tension . . . . . . . . . . . . . . . . . . . . . . . . . . . . . . . . . . . . . . .3-18Adjusting Swivel or Pivot Tension . . . . . . . . . . . . . . . . . . . . . . . . . . . . . . . . . . . .3-18Routine Maintenance . . . . . . . . . . . . . . . . . . . . . . . . . . . . . . . . . . . . . . . . . . . . . .3-18
4 Troubleshooting . . . . . . . . . . . . . . . . . . . . . . . . . . . . . . . . .4-1
Initial Inspection . . . . . . . . . . . . . . . . . . . . . . . . . . . . . . . . . . . . . . . . . . . . . . . . . . . . . 4-2
Hardware . . . . . . . . . . . . . . . . . . . . . . . . . . . . . . . . . . . . . . . . . . . . . . . . . . . . . . . . . . . 4-3Clean Fiber Optic Cable . . . . . . . . . . . . . . . . . . . . . . . . . . . . . . . . . . . . . . . . . . . . .4-3Initial Check . . . . . . . . . . . . . . . . . . . . . . . . . . . . . . . . . . . . . . . . . . . . . . . . . . . . . .4-3Troubleshooting. . . . . . . . . . . . . . . . . . . . . . . . . . . . . . . . . . . . . . . . . . . . . . . . . . . 4-3Matrox Parhelia Fan Alert . . . . . . . . . . . . . . . . . . . . . . . . . . . . . . . . . . . . . . . . . . . .4-4Replace Main Video Board with Matrox M9140 Quad Video Board . . . . . . . . . . . 4-5Prevent Failure of the Matrox Odyssey Driver Service . . . . . . . . . . . . . . . . . . . .4-12
CardioLab Amplifier Troubleshooting. . . . . . . . . . . . . . . . . . . . . . . . . . . . . . . . . . . 4-13Noise on Intracardiac Signals . . . . . . . . . . . . . . . . . . . . . . . . . . . . . . . . . . . . . . . 4-15Real-Time Testing During a Case . . . . . . . . . . . . . . . . . . . . . . . . . . . . . . . . . . . . 4-15
CardioImage . . . . . . . . . . . . . . . . . . . . . . . . . . . . . . . . . . . . . . . . . . . . . . . . . . . . . . . 4-22Normal Operation and Setup . . . . . . . . . . . . . . . . . . . . . . . . . . . . . . . . . . . . . . . .4-22Troubleshooting. . . . . . . . . . . . . . . . . . . . . . . . . . . . . . . . . . . . . . . . . . . . . . . . . . 4-23
Switching Ablation Devices . . . . . . . . . . . . . . . . . . . . . . . . . . . . . . . . . . . . . . . . . . 4-29
Windows XP/2003 . . . . . . . . . . . . . . . . . . . . . . . . . . . . . . . . . . . . . . . . . . . . . . . . . . . 4-30Normal Operation . . . . . . . . . . . . . . . . . . . . . . . . . . . . . . . . . . . . . . . . . . . . . . . . .4-30Troubleshooting. . . . . . . . . . . . . . . . . . . . . . . . . . . . . . . . . . . . . . . . . . . . . . . . . . 4-30
GEMS_TaskMonitor Service . . . . . . . . . . . . . . . . . . . . . . . . . . . . . . . . . . . . . . . . . . 4-32
Networking. . . . . . . . . . . . . . . . . . . . . . . . . . . . . . . . . . . . . . . . . . . . . . . . . . . . . . . . . 4-33Normal Operation . . . . . . . . . . . . . . . . . . . . . . . . . . . . . . . . . . . . . . . . . . . . . . . . .4-33
2021423-503H Mac-Lab/CardioLab/Centricity Cardiology INW Service Manual iii

Troubleshooting. . . . . . . . . . . . . . . . . . . . . . . . . . . . . . . . . . . . . . . . . . . . . . . . . . 4-33
Centricity Cardiology INW Server . . . . . . . . . . . . . . . . . . . . . . . . . . . . . . . . . . . . . . 4-36
Replication. . . . . . . . . . . . . . . . . . . . . . . . . . . . . . . . . . . . . . . . . . . . . . . . . . . . . . . . . 4-37Normal Operation . . . . . . . . . . . . . . . . . . . . . . . . . . . . . . . . . . . . . . . . . . . . . . . . .4-37Troubleshooting . . . . . . . . . . . . . . . . . . . . . . . . . . . . . . . . . . . . . . . . . . . . . . . . . .4-37
Cleanup Database Corruption . . . . . . . . . . . . . . . . . . . . . . . . . . . . . . . . . . . . . . . . 4-37
INNOVA CENTRAL/Touch screen . . . . . . . . . . . . . . . . . . . . . . . . . . . . . . . . . . . . . . 4-39Check Connection Status . . . . . . . . . . . . . . . . . . . . . . . . . . . . . . . . . . . . . . . . . . .4-39Determine IP Addresses . . . . . . . . . . . . . . . . . . . . . . . . . . . . . . . . . . . . . . . . . . .4-39
CARTO XP/CARTO 3 System . . . . . . . . . . . . . . . . . . . . . . . . . . . . . . . . . . . . . . . . . . 4-40Normal Operation . . . . . . . . . . . . . . . . . . . . . . . . . . . . . . . . . . . . . . . . . . . . . . . . .4-40Troubleshooting . . . . . . . . . . . . . . . . . . . . . . . . . . . . . . . . . . . . . . . . . . . . . . . . . .4-40
EtCO2 . . . . . . . . . . . . . . . . . . . . . . . . . . . . . . . . . . . . . . . . . . . . . . . . . . . . . . . . . . . . . 4-43EtCO2 Overview . . . . . . . . . . . . . . . . . . . . . . . . . . . . . . . . . . . . . . . . . . . . . . . . . .4-43Capnostat Module Setup. . . . . . . . . . . . . . . . . . . . . . . . . . . . . . . . . . . . . . . . . . . 4-44Capnostat Module Calibration . . . . . . . . . . . . . . . . . . . . . . . . . . . . . . . . . . . . . . . 4-56Calibrate the CapnoFlex LF Module (Sensor + Pump) . . . . . . . . . . . . . . . . . . . .4-58Mac-Lab Interface . . . . . . . . . . . . . . . . . . . . . . . . . . . . . . . . . . . . . . . . . . . . . . . . 4-59Troubleshooting. . . . . . . . . . . . . . . . . . . . . . . . . . . . . . . . . . . . . . . . . . . . . . . . . . 4-61
CVIS to Mac-Lab/CardioLab Interface . . . . . . . . . . . . . . . . . . . . . . . . . . . . . . . . . . . 4-65Problem Scenarios . . . . . . . . . . . . . . . . . . . . . . . . . . . . . . . . . . . . . . . . . . . . . . . .4-67Test DICOM Connectivity (CVIS) . . . . . . . . . . . . . . . . . . . . . . . . . . . . . . . . . . . . .4-68Test DICOM Connectivity (X-Ray) . . . . . . . . . . . . . . . . . . . . . . . . . . . . . . . . . . . .4-70HL7 Export to CVIS . . . . . . . . . . . . . . . . . . . . . . . . . . . . . . . . . . . . . . . . . . . . . . .4-71
InSite ExC . . . . . . . . . . . . . . . . . . . . . . . . . . . . . . . . . . . . . . . . . . . . . . . . . . . . . . . . . 4-72Normal Operation . . . . . . . . . . . . . . . . . . . . . . . . . . . . . . . . . . . . . . . . . . . . . . . . .4-72GEMS Log Collector Task. . . . . . . . . . . . . . . . . . . . . . . . . . . . . . . . . . . . . . . . . . 4-72List of Log Events . . . . . . . . . . . . . . . . . . . . . . . . . . . . . . . . . . . . . . . . . . . . . . . . .4-75List of SNMP Faults . . . . . . . . . . . . . . . . . . . . . . . . . . . . . . . . . . . . . . . . . . . . . . .4-75
Application Repair . . . . . . . . . . . . . . . . . . . . . . . . . . . . . . . . . . . . . . . . . . . . . . . . . . 4-77Prerequisite . . . . . . . . . . . . . . . . . . . . . . . . . . . . . . . . . . . . . . . . . . . . . . . . . . . . .4-77
Option Codes. . . . . . . . . . . . . . . . . . . . . . . . . . . . . . . . . . . . . . . . . . . . . . . . . . . . . . . 4-78Normal Operation . . . . . . . . . . . . . . . . . . . . . . . . . . . . . . . . . . . . . . . . . . . . . . . . .4-78Troubleshooting. . . . . . . . . . . . . . . . . . . . . . . . . . . . . . . . . . . . . . . . . . . . . . . . . . 4-78
Event Viewer . . . . . . . . . . . . . . . . . . . . . . . . . . . . . . . . . . . . . . . . . . . . . . . . . . . . . . . 4-79
Log Files . . . . . . . . . . . . . . . . . . . . . . . . . . . . . . . . . . . . . . . . . . . . . . . . . . . . . . . . . . 4-80Application Logs . . . . . . . . . . . . . . . . . . . . . . . . . . . . . . . . . . . . . . . . . . . . . . . . . .4-80Install/Update Logs . . . . . . . . . . . . . . . . . . . . . . . . . . . . . . . . . . . . . . . . . . . . . . . .4-80Install Log Files . . . . . . . . . . . . . . . . . . . . . . . . . . . . . . . . . . . . . . . . . . . . . . . . . .4-81Upgrade Log Files . . . . . . . . . . . . . . . . . . . . . . . . . . . . . . . . . . . . . . . . . . . . . . . .4-82
iv Mac-Lab/CardioLab/Centricity Cardiology INW Service Manual 2021423-503H

Maintenance Log Files . . . . . . . . . . . . . . . . . . . . . . . . . . . . . . . . . . . . . . . . . . . . . 4-83Replication Log Files . . . . . . . . . . . . . . . . . . . . . . . . . . . . . . . . . . . . . . . . . . . . . . 4-84Device Log Files . . . . . . . . . . . . . . . . . . . . . . . . . . . . . . . . . . . . . . . . . . . . . . . . . 4-85
Log File Locations for Mac-Lab/CardioLab System . . . . . . . . . . . . . . . . . . . . . . . 4-86
5 Recovery Procedures . . . . . . . . . . . . . . . . . . . . . . . . . . . . . 5-1
Acquisition System Disaster Recovery . . . . . . . . . . . . . . . . . . . . . . . . . . . . . . . . . . 5-2High-Level Overview. . . . . . . . . . . . . . . . . . . . . . . . . . . . . . . . . . . . . . . . . . . . . . . 5-2Log On to the Acquisition System . . . . . . . . . . . . . . . . . . . . . . . . . . . . . . . . . . . . . 5-3Save Acquisition System Information . . . . . . . . . . . . . . . . . . . . . . . . . . . . . . . . . . 5-3INW Networked Acquisition Systems Only . . . . . . . . . . . . . . . . . . . . . . . . . . . . . . 5-8Restore System Software . . . . . . . . . . . . . . . . . . . . . . . . . . . . . . . . . . . . . . . . . . 5-10Set Default Baseline Phase . . . . . . . . . . . . . . . . . . . . . . . . . . . . . . . . . . . . . . . . . 5-31Install/Enable Software Options . . . . . . . . . . . . . . . . . . . . . . . . . . . . . . . . . . . . . . 5-32Configure the Acquisition System. . . . . . . . . . . . . . . . . . . . . . . . . . . . . . . . . . . . 5-32Configure the Acquisition System on the INW Network . . . . . . . . . . . . . . . . . . . 5-40Initialize Applications. . . . . . . . . . . . . . . . . . . . . . . . . . . . . . . . . . . . . . . . . . . . . . 5-48Confirm File Paths and Network Storage Settings . . . . . . . . . . . . . . . . . . . . . . . . 5-51Additional Installation for Purchased Options . . . . . . . . . . . . . . . . . . . . . . . . . . . 5-51Reconfigure Printer . . . . . . . . . . . . . . . . . . . . . . . . . . . . . . . . . . . . . . . . . . . . . . . 5-52Reconfigure Mapped Drives . . . . . . . . . . . . . . . . . . . . . . . . . . . . . . . . . . . . . . . . 5-52Configure Data Export . . . . . . . . . . . . . . . . . . . . . . . . . . . . . . . . . . . . . . . . . . . . 5-52Reload CVIS Client . . . . . . . . . . . . . . . . . . . . . . . . . . . . . . . . . . . . . . . . . . . . . . . 5-54Update Operator Manuals . . . . . . . . . . . . . . . . . . . . . . . . . . . . . . . . . . . . . . . . . . 5-54
Review System Disaster Recovery . . . . . . . . . . . . . . . . . . . . . . . . . . . . . . . . . . . . . 5-55High-Level Overview. . . . . . . . . . . . . . . . . . . . . . . . . . . . . . . . . . . . . . . . . . . . . . 5-55Log On to the Review System . . . . . . . . . . . . . . . . . . . . . . . . . . . . . . . . . . . . . . . 5-56Save Review System Information . . . . . . . . . . . . . . . . . . . . . . . . . . . . . . . . . . . . 5-56Gather Information from INW Server . . . . . . . . . . . . . . . . . . . . . . . . . . . . . . . . . 5-60Configure New Hardware . . . . . . . . . . . . . . . . . . . . . . . . . . . . . . . . . . . . . . . . . . 5-61Configure the Review System. . . . . . . . . . . . . . . . . . . . . . . . . . . . . . . . . . . . . . . 5-63Configure the Review System on the INW Network . . . . . . . . . . . . . . . . . . . . . . 5-75Initialize Applications. . . . . . . . . . . . . . . . . . . . . . . . . . . . . . . . . . . . . . . . . . . . . . 5-81Confirm Windows XP is Activated . . . . . . . . . . . . . . . . . . . . . . . . . . . . . . . . . . . . 5-84Confirm File Paths and Network Storage Settings . . . . . . . . . . . . . . . . . . . . . . . . 5-84Additional Installation for Purchased Options . . . . . . . . . . . . . . . . . . . . . . . . . . . 5-84Reconfigure Printer . . . . . . . . . . . . . . . . . . . . . . . . . . . . . . . . . . . . . . . . . . . . . . . 5-84Reconfigure Mapped Drives . . . . . . . . . . . . . . . . . . . . . . . . . . . . . . . . . . . . . . . . 5-85Configure Data Export . . . . . . . . . . . . . . . . . . . . . . . . . . . . . . . . . . . . . . . . . . . . . 5-85Reload CVIS Client . . . . . . . . . . . . . . . . . . . . . . . . . . . . . . . . . . . . . . . . . . . . . . . 5-85Update Operator Manuals . . . . . . . . . . . . . . . . . . . . . . . . . . . . . . . . . . . . . . . . . . 5-86Perform Necessary Software Updates . . . . . . . . . . . . . . . . . . . . . . . . . . . . . . . . . 5-86
System Checkout . . . . . . . . . . . . . . . . . . . . . . . . . . . . . . . . . . . . . . . . . . . . . . . . . . . 5-87Review Workstation Test . . . . . . . . . . . . . . . . . . . . . . . . . . . . . . . . . . . . . . . . . . 5-87
INW Server Disaster Recovery . . . . . . . . . . . . . . . . . . . . . . . . . . . . . . . . . . . . . . . . 5-88High-Level Overview. . . . . . . . . . . . . . . . . . . . . . . . . . . . . . . . . . . . . . . . . . . . . . 5-88Record Server Information . . . . . . . . . . . . . . . . . . . . . . . . . . . . . . . . . . . . . . . . . 5-90Reimaging Procedures . . . . . . . . . . . . . . . . . . . . . . . . . . . . . . . . . . . . . . . . . . . . 5-91
2021423-503H Mac-Lab/CardioLab/Centricity Cardiology INW Service Manual v

G4/G5/G6 Server Setup and Data Restore . . . . . . . . . . . . . . . . . . . . . . . . . . . . 5-98Reconfigure Centricity Cardiology INW Network . . . . . . . . . . . . . . . . . . . . . . . 5-119Post Configuration Procedures . . . . . . . . . . . . . . . . . . . . . . . . . . . . . . . . . . . . . 5-128Cardiovascular Information System (CVIS) Configuration . . . . . . . . . . . . . . . . 5-148Perform On Demand Backup . . . . . . . . . . . . . . . . . . . . . . . . . . . . . . . . . . . . . . . 5-155Verify Backups Ran Successfully . . . . . . . . . . . . . . . . . . . . . . . . . . . . . . . . . . . 5-156Update Operator Manuals . . . . . . . . . . . . . . . . . . . . . . . . . . . . . . . . . . . . . . . . . 5-157
System Checkout . . . . . . . . . . . . . . . . . . . . . . . . . . . . . . . . . . . . . . . . . . . . . . . . . . 5-158Verify Functionality . . . . . . . . . . . . . . . . . . . . . . . . . . . . . . . . . . . . . . . . . . . . . . 5-158
6 Parts List . . . . . . . . . . . . . . . . . . . . . . . . . . . . . . . . . . . . . . . 6-1
HP z600 Computer with ADA Drive . . . . . . . . . . . . . . . . . . . . . . . . . . . . . . . . . . . . . 6-2
HP z600 Computer with DVD-RAM Drive . . . . . . . . . . . . . . . . . . . . . . . . . . . . . . . . . 6-4
HP xw8400 Computer . . . . . . . . . . . . . . . . . . . . . . . . . . . . . . . . . . . . . . . . . . . . . . . . 6-6
GE Client Workstation . . . . . . . . . . . . . . . . . . . . . . . . . . . . . . . . . . . . . . . . . . . . . . . . 6-8
DASH Connection . . . . . . . . . . . . . . . . . . . . . . . . . . . . . . . . . . . . . . . . . . . . . . . . . . . 6-9
Solar Connection . . . . . . . . . . . . . . . . . . . . . . . . . . . . . . . . . . . . . . . . . . . . . . . . . . . . 6-9
Centricity Cardiology INW G6 Server . . . . . . . . . . . . . . . . . . . . . . . . . . . . . . . . . . . 6-9
Centricity Cardiology INW G5 Server . . . . . . . . . . . . . . . . . . . . . . . . . . . . . . . . . . 6-10
Centricity Cardiology INW G4 Server . . . . . . . . . . . . . . . . . . . . . . . . . . . . . . . . . . 6-11
Integrated Electronics Box (IEB) . . . . . . . . . . . . . . . . . . . . . . . . . . . . . . . . . . . . . . 6-12
Uninterrupted Power Source (UPS) . . . . . . . . . . . . . . . . . . . . . . . . . . . . . . . . . . . . 6-13
Monitors and Printers . . . . . . . . . . . . . . . . . . . . . . . . . . . . . . . . . . . . . . . . . . . . . . . 6-14
TRAMNet . . . . . . . . . . . . . . . . . . . . . . . . . . . . . . . . . . . . . . . . . . . . . . . . . . . . . . . . . . 6-15
Amplifier . . . . . . . . . . . . . . . . . . . . . . . . . . . . . . . . . . . . . . . . . . . . . . . . . . . . . . . . . . 6-17
MicroPace . . . . . . . . . . . . . . . . . . . . . . . . . . . . . . . . . . . . . . . . . . . . . . . . . . . . . . . . . 6-18
RMOT . . . . . . . . . . . . . . . . . . . . . . . . . . . . . . . . . . . . . . . . . . . . . . . . . . . . . . . . . . . . 6-19
Speakers and Miscellaneous . . . . . . . . . . . . . . . . . . . . . . . . . . . . . . . . . . . . . . . . . 6-19
vi Mac-Lab/CardioLab/Centricity Cardiology INW Service Manual 2021423-503H

A Abbreviations . . . . . . . . . . . . . . . . . . . . . . . . . . . . . . . . . . .A-1
Electrical and IT Abbreviations . . . . . . . . . . . . . . . . . . . . . . . . . . . . . . . . . . . . . . . . A-2
Hospital Staff . . . . . . . . . . . . . . . . . . . . . . . . . . . . . . . . . . . . . . . . . . . . . . . . . . . . . . . A-4
Medical Abbreviations . . . . . . . . . . . . . . . . . . . . . . . . . . . . . . . . . . . . . . . . . . . . . . . . A-5
Miscellaneous Abbreviations . . . . . . . . . . . . . . . . . . . . . . . . . . . . . . . . . . . . . . . . . A-18
2021423-503H Mac-Lab/CardioLab/Centricity Cardiology INW Service Manual vii

viii Mac-Lab/CardioLab/Centricity Cardiology INW Service Manual 2021423-503H

1 Introduction
2021423-503H Mac-Lab/CardioLab/Centricity Cardiology INW Service Manual 1-1

Introduction
Manual Information
Purpose
This manual contains the instructions necessary to operate and service the Mac-Lab/CardioLab system safely in accordance with its function and intended use. These instructions include but are not limited to:
Describing fundamental controls and indicators.
Operating procedures.
Connecting and disconnecting detachable parts and accessories.
Troubleshooting and service procedures.
Intended Audience
This manual is intended for the person who maintains and troubleshoots this equipment.
Revision History
Revision Date Comment
A 6 November 2009 Initial release of the manual.
B 21 April 2010 Updated with serviceability improvements.
C 1 August 2011 Updated to address new hardware.
D 8 November 2011 Added power cords.
E 28 February 2012 Updated Hard Drive, Memory and RMOT parts.
F 7 May 2013 Updated to include installation and troubleshooting procedures for the Matrox Quad video board.
G 18 November 2013
Updated to include information for new speakers.
H 24 March 2014 Updated to include information for EIZO monitors.
1-2 Mac-Lab/CardioLab/Centricity Cardiology INW Service Manual 2021423-503H

Introduction
Conventions
The following conventions are used throughout this manual.
Product References
The name of the product described in this manual is Mac-Lab/CardioLab/Centricity Cardiology INW System.
Related Documents
Bold Indicates keys on the keyboard, text to be entered, or hardware items such as buttons or switches on the equipment.
Italics Indicates software terms that identify menu items, buttons, or options in various windows.
[Key1] + [Key2] Indicates a keyboard operation. A (+) sign between the names of two keys indicates that you must press and hold the first key while pressing the second key once.
For example, “Press Ctrl + Esc” means to press and hold down the Ctrl key while pressing the Esc key.
<Space> Indicates you must press the spacebar on the keyboard when typing a precise text string with one or more spaces. The point where the spacebar must be pressed is indicated as: <Space>. The purpose of the < > brackets is to ensure you press the spacebar when required.
Enter Indicates you must press the “Enter” or “Return” key on the keyboard. Do not type “enter”.
Part Number Document
2021423-015 Mac-Lab Operator’s Manual
2021423-016 CardioLab Operator’s Manual
2021423-017 Centricity Cardiology INW Operator’s Manual
2021423-021 Mac-Lab/CardioLab/Centricity Cardiology INW Pre-Installation Manual
2021423-022 Mac-Lab/CardioLab/Centricity Cardiology INW Service Manual (v6.5.4 and earlier)
2027332-103 Mac-Lab/CardioLab Security Guide
2021423-503H Mac-Lab/CardioLab/Centricity Cardiology INW Service Manual 1-3

Introduction
Illustrations and Names
All illustrations in this manual are provided as examples only. They may not necessarily reflect your system’s configuration or the data on your system.
In this manual, all names appearing in examples and illustrations are fictitious. The use of any real person’s name is purely coincidental.
Chapter Contents
Chapter 1, Introduction: This chapter describes the Service manual and chapter contents. Also included are general safety requirements, service requirements, equipment symbols, and serial number identification information.
Chapter 2, Equipment Overview: This chapter describes the equipment and its technical characteristics, connector locations, and preparation for use.
Chapter 3, Maintenance: This chapter contains preventive maintenance information and cleaning guidelines.
Chapter 4, Troubleshooting: This chapter contains troubleshooting instructions and functional test directions.
Chapter 5, Recovery Procedures: This chapter details procedures to restore a workstation or server in the field after failure.
Chapter 6, Parts List: This chapter contains a list of Field Replaceable parts.
Appendix A, Abbreviations: This appendix lists all abbreviations used with the system.
1-4 Mac-Lab/CardioLab/Centricity Cardiology INW Service Manual 2021423-503H

Introduction
Safety Information
Safety Messages
Definitions
DANGER — Safety messages which indicate an imminently hazardous situation which, if not avoided, WILL result in death or serious injury.
WARNING — Safety messages which indicate a potentially hazardous situation which, if not avoided, COULD result in death or serious injury.
CAUTION — Safety messages which indicate a potentially hazardous situation which, if not avoided may result in minor or moderate injury, loss of data or system failure.
NOTE
Messages which provide additional user information.
Applicable Messages
DANGEREXPLOSION HAZARD — Using this equipment in the presences of flammable gasses (including anesthetics and oxygen) may cause an explosion or fire.
Always use this equipment in a well ventilated area away from the presence of potentially flammable gasses
WARNINGSYSTEM STABILITY — All systems should be installed and maintained according to installation instructions and manufacturers specifications. Any alterations may affect the stability of the system.
2021423-503H Mac-Lab/CardioLab/Centricity Cardiology INW Service Manual 1-5
Introduction
WARNINGPATIENT MONITORING — The system is intended to be used as a recording system for catheterization, electrophysiology and related specialty laboratories. A defibrillator or ECG monitor should be attached for patients in need of uninterrupted ECG display. An additional means to display SPO2 should be available for patients in need of uninterrupted SPO2 display. A temporary pacemaker needs to be available for patients in need of uninterrupted delivery of pacing.
WARNINGSUPERVISED USE — This device is intended for use under the direct supervision of a licensed health care practitioner.
WARNINGACCESSORIES — All system components sold by GE Healthcare for use with this system are tested to meet IEC 60601-1 when used with the system. All other components used with the system must meet IEC 60601-1.
WARNINGIEC — All equipment not complying with IEC 60601-1 should be placed outside the patient environment.
WARNINGSHOCK HAZARD — DO NOT allow hydraulic fluid from any device to contact any conductive surface. Hydraulic fluid is electrically conductive.
An electrical shock hazard exists between chassis ground and isolated (floating) ground when power is applied. Unplug the unit from the power source before proceeding. To reduce the risk of electric shock or damage to your equipment, do not disable the power cord grounding feature. This equipment is designed for connection to a earth grounded power outlet. The grounding plug is an important safety feature.
1-6 Mac-Lab/CardioLab/Centricity Cardiology INW Service Manual 2021423-503H

Introduction
WARNINGSHOCK HAZARD — Keep the conductive parts of lead electrodes and associated parts away from other conducting parts, including earth.
WARNINGSHOCK HAZARD — Total system earth leakage current must not exceed 500 microamperes.
Voltages between the three power outlet connections must be accurate BEFORE measuring power outlet ground-to-neutral loop resistance.
Electrostatic discharge (ESD) can damage electronic components. Be sure you are properly grounded when using or servicing the system.
WARNINGSHOCK HAZARD — To reduce the risk of electric shock or damage to the equipment, do not disable the power cord grounding feature. This equipment is designed for connection to a grounded (earthed) power outlet.
WARNINGSHOCK HAZARD — Use appropriate Lock Out/Tag Out procedures whenever an energy hazard exists, such as disconnecting equipment to perform maintenance.
WARNINGSHOCK HAZARD — Electrical shock hazard between chassis ground and isolated (floating) ground when power is applied. Unplug the unit from the power source before proceeding.
To reduce the risk of electric shock or damage to your equipment, do not disable the power cord grounding feature. This equipment is designed for connection to a grounded (earthed) power outlet. The grounding plug is an important safety feature.
2021423-503H Mac-Lab/CardioLab/Centricity Cardiology INW Service Manual 1-7
Introduction
WARNINGSHOCK HAZARD — High voltages exist in the unit. Use insulated tools. Remove jewelry and use only one hand when possible.
Always disconnect power from the equipment before attempting service.
WARNINGSHOCK HAZARD — Only connect IEC 60601-1 certified medical equipment. If fluid of any kind should leak into the system, discontinue use of the equipment and contact GE Healthcare immediately.
WARNINGSHOCK HAZARD — To reduce the risk of electric shock, DO NOT remove cover or back. This equipment contains no user serviceable parts. Refer servicing to qualified service personnel.
WARNINGSHOCK HAZARD — Proper connections to the patient are critical for the proper operation of the CardioLab II Plus Amplifier and patient safety. Use extreme caution when making patient connections. Do NOT connect non-isolated equipment to the amplifier. Proper connections to the stimulator are critical for the proper operation of the CardioLab II Plus Amplifier and patient safety. Use extreme caution when making stimulator connections. The stimulator must be a IEC 60601-1 certified product Ablation operations should NOT be executed when a stimulator unit is connected.
WARNINGSHOCK HAZARD — Do not allow any foreign materials such as fluids to come in contact with the CardioLab II Plus Amplifier. If fluid of any kind should leak into the CardioLab II Plus Amplifier, discontinue using the amplifier and contact GE Healthcare. DO NOT allow hydraulic fluid from any device to contact any conductive surface. Hydraulic fluid is electrically conductive.
1-8 Mac-Lab/CardioLab/Centricity Cardiology INW Service Manual 2021423-503H

Introduction
WARNINGSHOCK HAZARD — Use appropriate Lock Out/Tag Out procedures before performing any service on potentially energized equipment.
WARNINGSHOCK HAZARD — Remote speakers must be powered by a 60601-1 certified power supply.
WARNINGCONDUCTION HAZARD — Do not leave conductive parts of lead electrodes open. This condition could leave the patient or user more susceptible to shock.
WARNINGGROUNDING — Electrostatic discharge (ESD) can damage electronic components. Be sure you are properly grounded before opening any equipment.
WARNINGPOWER SUPPLY — The supply line must be fused and capable of delivering 16A.
Route the AC power cable away from moving parts.
Connect only to a properly earth grounded outlet.
WARNINGDEFIBRILLATOR PRECAUTIONS — DO NOT contact the amplifier or patient during defibrillation.
Defibrillation equipment is required in the event that the patient needs to be cardioverted or defibrillated.
WARNINGINTERNAL DEFIBRILLATION — Prior to internal defibrillation, disconnect the intercardiac catheters from the system to prevent damage to the amplifier.
2021423-503H Mac-Lab/CardioLab/Centricity Cardiology INW Service Manual 1-9

Introduction
WARNINGINTERPRETATION HAZARD — A qualified physician must overread all computer-generated measurements and tracings. Computerized interpretation is only significant when used in conjunction with clinical findings.
Signal quality should be checked only by a licensed health care practitioner.
All computer assisted measurement functions must be verified by a licensed health care practitioner.
WARNINGANNUAL EQUIPMENT MAINTENANCE — The system should be checked yearly to ensure compliance with medical device standards.
WARNINGPINCH POINT HAZARD — Keep hands, hair, jewelry and loose clothing away from moving parts. Otherwise, serious injury could result.
WARNINGREPLACEMENT PARTS — Replace only with the same type and rating of fuse.
WARNINGSOFTWARE — DO NOT add unauthorized software to the system. Doing so may make the software unstable.
WARNINGREMOVABLE MEDIA — Exit the software application properly before turning off the system. Failure to do so may result in loss of ability to store the data properly.
Follow recommended instructions when exiting the application or turning off the system to ensure data integrity.
1-10 Mac-Lab/CardioLab/Centricity Cardiology INW Service Manual 2021423-503H

Introduction
CAUTIONELECTROSTATIC SHOCK — Working on electronic devices while not properly grounded my cause damage to the equipment.
Always use a wrist grounding strap and grounding pad when working on electronic equipment.
CAUTIONSALE OF DEVICE — Federal (USA) law restricts this device to sale by or on the order of a physician.
CAUTIONEQUIPMENT CABLING DAMAGE — Route optical cables thorough conduit in the ceiling or floor to avoid damage to the cables or cable connectors.
CAUTIONEQUIPMENT USE — DO NOT reuse single use devices.
CAUTIONEMC — No known electromagnetic or other interference between the system exists. However, precautions should be taken to avoid the use of cellular telephones, pagers, or other transmitters.
CAUTIONTRANSDUCER — All air must be removed from the transducer or associated tubing before calibration for accuracy.
Pressure channels should be calibrated to a known pressure value if the pressure value is in question.
CAUTIONREMOTE MONITOR — Always power the system through separate isolation transformers which are independently connected to a wall outlet.
2021423-503H Mac-Lab/CardioLab/Centricity Cardiology INW Service Manual 1-11

Introduction
ITE Conformance Statement
The Mac-Lab/CardioLab/Centricity Cardiology INW Server software applications are intended to be installed and run on an applicable ITE compliant hardware platforms (minimum Hardware Essential Performance be ITE compliant) which may not meet leakage and/or EMC requirements of patient care area equipment. This means but is not limited to the following (unless the medical electrical standard [EN60601-1-1 and EN60601-1-2] is followed):
The Mac-Lab/CardioLab/Centricity Cardiology INW Server hardware does not directly deliver energy to the Patient.
The Mac-Lab/CardioLab/Centricity Cardiology INW Server hardware does not indirectly control energy delivered to the Patient.
The Mac-Lab/CardioLab/Centricity Cardiology INW Server hardware is not directly connected to the Patient.
The Mac-Lab/CardioLab/Centricity Cardiology INW Server hardware is not installed or used in the Patient vicinity.
Patient Vicinity summarized as follows:
A space, within a location intended for the examination and treatment of patients, extending 6 ft (1.83 m) beyond the normal location of the bed, chair, table, treadmill, or other device that supports the patient during examination and treatment and extending vertically to 8 ft 2.4 in. (2.5 m) above the floor.
Areas where health care staff members monitor patients and perform charting and administrative tasks are not considered to be Patient Vicinity areas.
1-12 Mac-Lab/CardioLab/Centricity Cardiology INW Service Manual 2021423-503H

Introduction
Types of Systems
Mac-Lab System
The Mac-Lab System is intended for use in a catheterization and related cardiovascular specialty laboratories under the direct supervision of a licensed healthcare practitioner. It is intended to monitor, calculate and/or record cardiovascular data from adult and pediatric patients undergoing cardiac catheterization procedures. The data may be manually entered or acquired via interfaced devices. Data includes: ECG, heart rate, pulse oximetry (SpO2), respiration rate, EtCO2, temperature, valve gradients and areas, cardiac output, hemodynamic measurements, invasive and noninvasive blood pressure and procedural information and optional intracardiac electrocardiogram (IECG). Physiological parameters such as diastolic, systolic, and mean blood pressure, heart rate, and cycle length may be derived from the signal data, displayed and recorded. The system allows the user to monitor the acquisition of data, review the data, and generate reports on the data. Additionally, the system may acquire, amplify, display and record data received from other interfaced medical devices typically used during these procedures, such as imaging devices. The Mac-Lab System does not control the delivery of energy, administer drugs, perform any life-supporting or life-sustaining functions, or analyze data acquired during the procedure. The Mac-Lab System does not transmit alarms or arrhythmias and does not have arrhythmia detection capabilities.
CardioLab EP System
The CardioLab EP System is intended for use in an electrophysiological laboratory and related specialty laboratories under the direct supervision of a licensed healthcare practitioner. It is intended to monitor, calculate and/or record electrophysiological data from adult and pediatric patients undergoing electrophysiological studies. Data includes: ECG, pressure, and intracardiac electrocardiogram (IECG) waveforms, heart rate, pulse oximetry (SpO2), respiration rate, EtCO2, temperature, invasive and noninvasive blood pressure, and procedural information. Physiological parameters such as diastolic, systolic, and mean blood pressure, heart rate, and cycle length may be derived from the signal data, displayed and recorded. The system allows the user to monitor the acquisition of data, review the data, and generate reports on the data. Additionally, the system may acquire, amplify, display and record data received from other interfaced medical devices typically used during these procedures, such as imaging devices and RF generators. The CardioLab EP System does not control the delivery of energy, administer drugs, perform any life-supporting or life-sustaining functions, or analyze data acquired during the procedure. The CardioLab EP System does not transmit alarms or arrhythmias and does not have arrhythmia detection capabilities.
2021423-503H Mac-Lab/CardioLab/Centricity Cardiology INW Service Manual 1-13

Introduction
ComboLab System
The ComboLab System is the combination of the both the Mac-Lab and CardioLab EP systems. The ComboLab System is intended for use in either a catheterization laboratory or electrophysiological laboratory and related speciality laboratories under the direct supervision of a licensed healthcare practitioner. The ComboLab System allows the user to run either the Mac-Lab System or the CardioLab EP System, although only one may be used at a time.
CardioLab II Plus Amplifier
The CardioLab II Plus Amplifier is intended for use in an electrophysiological catheter laboratory or catheterization laboratory where ECG, direct cardiac, intracardiac and pressure signals need to be recorded from a patient. This device is intended for use under the direct supervision of a licensed health care practitioner.
1-14 Mac-Lab/CardioLab/Centricity Cardiology INW Service Manual 2021423-503H
Introduction
Security Information
Validated configurations consist of product scenario implementations that are tested against GE product failure and sample cases run to simulate a real environment while conducting testing. GE provides service and support based on validated configurations only and bears responsibility for GE products only.
Non-Validated Software Applications
This is to detail the policy for non-validated software applications applied to the following products:
Mac-Lab Hemodynamic Systems
CardioLab Electrophysiology Systems
ComboLab Hemodynamic and Electrophysiology Systems
Centricity Cardiology INW Server
Policy
Our policy is that we do not recommend installations of any other third party software applications (that is, not mentioned above) on the products above as they could affect performance, warranty and serviceability. Examples of such might include other Anti-Virus programs, print servers, interface engines, anti-spyware, anti-adware, viruses, malware, and so on. GE does not support the use or installation of these non-validated applications or tools. If such programs are installed the customer bears the risk of the product not functioning properly and any risks that are introduced for patient safety. GE will not guarantee support for an environment that is different than a validated implementation. In cases where this is found and technical assistance is requested, GE will provide support, by first eliminating the third party software on the product and bringing it back to a known and validated configuration. If it is found that the third party software is the cause of product failure, any costs associated with this will be the responsibility of the hospital.
At GE Healthcare we understand the uniqueness of our customers and pride ourselves in the personalized solutions we provide to help you in your quest to care for patients. We hope this section will help you to better understand our policy on non-validated software applications and we hope you can work with us as we proceed in further developing our products for your future benefit.
2021423-503H Mac-Lab/CardioLab/Centricity Cardiology INW Service Manual 1-15

Introduction
Validated Third Party Software
Currently validated and allowed third party software such as Enterprise Back-up, Archival, Anti-virus and other applications to run on the same computer are:
Enterprise Backup Software
Validated Anti-Virus Software
The Mac-Lab/CardioLab 6.5.6 system has been validated to run with the software listed below. Except where noted, the software below supports English, French, German, Italian, Spanish, Swedish, Chinese, and Japanese:
The Antivirus Server software can be installed at a hospital domain level and the Centricity Cardiology INW server can be a client for the Antivirus software.
Mac-Lab/CardioLab/ComboLab IT (Version 6.5.6)
IBM Tivoli Storage Manager v6.1
Symantec Backup Exec for Windows Server v12.5
CA ARCserv Backup for Windows r12.5
EMC Networker v7.5 + SP1
Supported Anti-Virus Software Supported Anti-Virus Software Version
CA eTrust Antivirus r8.1
McAfee® VirusScan® (with McAfee ePolicy Orchestrator v4.0, Patch 5)
8.7i, Patch 2
Norton Antivirus™ 2009
Symantec EndPoint Protection 11.0.5 (English, French, German, Italian, Spanish, Chinese) 11.0.4 MR4 + MP2 (Japanese)
Trend Micro OfficeScan Client/Server Edition
10.0
1-16 Mac-Lab/CardioLab/Centricity Cardiology INW Service Manual 2021423-503H

Introduction
Previously Validated Anti-Virus Software
The Mac-Lab/CardioLab system has previously been validated to run with the software listed below. It is recommended that systems run with one of the currently validated Anti-Virus software packages to avoid any unforeseen issues. Please refer to “Validated Anti-Virus Software” on page 1-16.
Supported Anti-Virus Software Supported Anti-Virus Software Version
CA eTrust™ AntiVirus Enterprise (for a single Acquisition, Review, or Server)
r8.1
McAfee® VirusScan® (with McAfee ePolicy Orchestrator v4.0, Patch 3)
8.7i
McAfee Active VirusScan SMB Edition (for Acquisition, Review, or Server).
8.0
McAfee ProtectionPilot™ 1.0.1, 1.5
McAfee ViruScan Enterprise 8.5i
Norton AntiVirus Edition (for Acquisition and Review) (Norton AntiVirus software must be the boxed copy. Do not download the software from internet.)
2005
Norton Antivirus™ (Norton AntiVirus software must be the boxed copy. Do not download the software from internet.)
2007
Symantec EndPoint Protection 11.0.4
Symantec AntiVirus (for Acquisition, Review, or Server)
9.0
Symantec AntiVirus Corporate Edition (for Acquisition, Review, or Server)
10.2
Trend Micro OfficeScan Client/Server Edition
8.0 + SP1
Trend Micro OfficeScan Client/Server Edition (for Acquisition, Review, or Server)
8.0 (English)7.3 (non-English and non-Swedish)
2021423-503H Mac-Lab/CardioLab/Centricity Cardiology INW Service Manual 1-17

Introduction
3rd Party: PedCath
NOTE
Chinese systems will use the Japanese version of PedCath. Swedish and German systems will use the English version of PedCath.
Language PedCath Version
English v7.6.7
French v7.5.5
Swedish/German (see note) v7.6.5
Italian v7.5.5
Spanish v7.5.5
Japanese v7.4.3J
Chinese (see note) v7.4.3J
1-18 Mac-Lab/CardioLab/Centricity Cardiology INW Service Manual 2021423-503H

Introduction
Service Information
Service Requirements
Follow the service requirements listed below:
Equipment servicing should be performed by GE Healthcare authorized service personnel only.
Any unauthorized attempt to repair equipment under warranty voids that warranty.
It is the user’s responsibility to report the need for service to GE Healthcare or one of their authorized agents.
Failure on the part of the responsible individual, hospital, or institution using this equipment to implement a satisfactory maintenance schedule may cause undue equipment failure and possible health hazards.
Regular maintenance, irrespective of usage, is essential to ensure that the system is always functional when required.
Product Identification
Every system has a unique serial number for identification. The serial number appears on the product labels which are located on the top of the CPU, the back of the Integrated Electronics Box (IEB), the right side of the RAC 4A, the back of the TRAM and the back of the Amplifier.
Identification Tag
Item Name Description
1 Manufacture Date Date of manufacture in YYYY-MM format.
2 Part Number of Product GE Healthcare part number for product.
3 Product Code Description Identifier for type of product.
4 Serial Number Unique serial number for identification. Encoded as barcode below displayed number.
5 Manufacturer Information Name and address of device manufacturer.
1
2 3
4
5
2021423-503H Mac-Lab/CardioLab/Centricity Cardiology INW Service Manual 1-19

Introduction
Old Identification Tags
Systems manufactured earlier may have one of the two following styles of identification labels instead.
Identification Tag
Item Name
A Name of Device
B Manufacturer
C Serial Number
D 3-digit Product Code
E Year Manufactured
F Fiscal Week
G Product Sequence Number
H Manufacturing Site
I Miscellaneous
XXXXXXXXXXXXXX
XXXXXXXXXXXXXXXXXX
XXXXXXXXX XX XXXXXXXXXXX
XXXXXXXXXXXXX
A
B
C
DE
FG
H I
AA5 XX XXXX XXX X
1-20 Mac-Lab/CardioLab/Centricity Cardiology INW Service Manual 2021423-503H

Introduction
Identification Tag
Item Name
A Name of Device
B Manufacturer
C Serial Number
D Facility Code
E Product Sequence Number
F Product Code
G Year Manufactured
H Month Manufactured
XXXXXXXXXXXXXXX
XXXXXXXXXXXXXXXXXX
XXXXXXXXX XX XXXXXXXXXXX
XXXXXXXXX
A
B
C
DE
F
GH
A X XX XXXX XX
2021423-503H Mac-Lab/CardioLab/Centricity Cardiology INW Service Manual 1-21

Introduction
Required Tools and Supplies
The following is a list of tools needed to service the Mac-Lab/CardioLab system:
Adjustable wrench with a 1-inch capacity
Phillips screwdriver
Needle nose pliers
Pliers
Socket wrench (3/16 inch to 1 inch size bits)
Phillips head screwdriver (small and large sizes)
Flat head screwdriver (small and large sizes)
Cutting pliers
Power outlet ground tester
Grounding strap
Simulator with ECG, pressure, cardiac output, and temperature outputs
Cables to connect simulator to ECG inputs of amplifier and TRAM
Cables to connect the simulator to the catheter input modules (2 mm shielded)
Adapter cable to connect the simulator to the amplifier and TRAM pressure inputs
Cables to connect the simulator to the TRAM, cardiac output, and temperature inputs
Power Input Requirements
If the equipment is installed in the USA and uses 240V rather than 120V, the source must be a center-tapped, 240V single phase circuit (120V, 20A; 240V, 10A).
1-22 Mac-Lab/CardioLab/Centricity Cardiology INW Service Manual 2021423-503H

Introduction
Safety Information
Follow all of the instructions and warnings included in this manual and save these instructions for later use. However, these instructions in no way supersede current medical practices regarding patient care and safety.
Electromagnetic Compatibility and Interference
This catheterization system meets the requirements of the European Medical Device Directive, and by reference, the requirements for electromagnetic compatibility specified by EN 60601-1-2. This equipment is not likely to interfere with other equipment, except with certain types of rate adaptive pacemakers that rely on bioelectric impedance measurement (BIM) technology. Also, interference with the operation of this equipment is not likely to result from proximity to general equipment.
This equipment meets or exceeds Class A immunity levels. However, avoid the use of strong intentional radio transmitters in the immediate vicinity, including cellular telephones. The use of strong unintentional radiators, such as electrosurgical equipment, may cause some level of interference. GE Healthcare offers optional ECG patient cables with electrosurgical noise filtering, which reduces the level of interference on ECG traces.
The Mac-Lab/CardioLab system and CardioLab Plus II Amplifier meets the requirements of IEC 60601-1-2 Medical Electrical Equipment, Part 1: General Requirements for Safety, 2. Collateral Standard: Electromagnetic compatibility - Requirements and tests.
If using electrosurgical or RF ablation equipment in conjunction with this equipment, select an ESU filtered cable. For more information about management of the equipment in the clinical environment (from an electromagnetic compatibility perspective) consult the Association for the Advancement of Medical Instrumentation's technical information report Guidance on Electromagnetic Compatibility of Medical Devices for Clinical/Biomedical Engineers.
Exception
ECG Parameter
IEC 60601-1-2 clause 36.202.1 - Immunity: Radiated Immunity –
The level of compliance is less than 1V/m
If operating under the conditions defined in EMC Standard EN 60601-1-2 (Radiated Immunity 3V/m), field strengths less than 1V/m may cause waveform distortions and erroneous numeric data at various electromagnetic interference (EMI) frequencies.
2021423-503H Mac-Lab/CardioLab/Centricity Cardiology INW Service Manual 1-23

Introduction
Recommendations:
Review the AAMI EMC Committee technical information report (TIR-18) titled Guidance on electromagnetic compatibility of medical devices for clinical / biomedical engineers - Part 1: Radiated radio-frequency electromagnetic energy. This TIR provides a means to evaluate and manage the EMI environment in the hospital.
The following actions can be taken:
managing (increasing) distance between sources of EMI and susceptible devices
managing (removing) devices that are highly susceptible to EMI
lower power from internal EMI sources under hospital control (i.e. paging systems)
labeling devices susceptible to EMI
educating staff (nurses and doctors) to be aware of, and to recognize, potential EMI related problems
EU Battery Directive 2006/66/EC
The Mac-Lab/CardioLab product conforms to the EU Battery Directive 2006/66/EC.
The Uninterruptable Power Supply (UPS) supplied with the IEB of the Mac-Lab/CardioLab contains lead/acid storage batteries. These batteries are a permanent part of the UPS assembly and are not intended to be removed or changed. Attempting to remove or change these batteries may result in an unsafe condition.
http://www.gehealthcare.com/euen/weee-recycling/index.html
http://www.epa.gov/mercury/about.htm
http://www.cdc.gov/niosh/npg/npgd0383.html
http://www.epa.gov/lead/
http://www.cdc.gov/niosh/npg/npgd0368.html
http://www.cdc.gov/niosh/npg/npgd0087.html
http://www.epa.gov/waste/hazard/wastemin/minimize/factshts/cadmium.pdf
The separate collection symbol is affixed to a battery, or its packaging, to advise you that the battery must be recycled or disposed of in accordance with local or country laws. The letters below the separate collection symbol indicate whether certain elements (Pb=Lead, Cd=Cadmium, Hg=Mercury) are contained in the battery. To minimize potential effects on the environment and human health, it is important that all marked batteries that you remove from the product are properly recycled or disposed. Information on the potential effects on the environment and human health of the substances used in batteries is available at the urls below:
1-24 Mac-Lab/CardioLab/Centricity Cardiology INW Service Manual 2021423-503H

Introduction
Responsibility of the Manufacturer
GE Healthcare is responsible for the effects of safety, reliability, and performance only if:
Installation operations, extensions, readjustments, modifications, or repairs are performed by persons authorized by GE Healthcare.
The equipment is used in accordance with the instructions provided.
The user attaches only accessory equipment recommended for interaction with the amplifier.
General
This system is intended for use under the direct supervision of a licensed health care practitioner.
The Mac-Lab/CardioLab system, including the CardioLab Plus II Amplifier, maintains leakage currents below medical limits with an isolation transformer which is incorporated into the design of the integrated electronics box (IEB). The system power is supplied by a dedicated power supply on an isolated circuit for proper behavior of the system.
To ensure patient safety, use only parts and accessories manufactured or recommended by GE Healthcare. Parts and accessories used must meet the requirements for the applicable EN 60601 series safety standards, and the system configuration must meet the requirements of the EN 60601-1 medical electrical systems standard. Contact GE Healthcare before connecting any device to this system that is not recommended for use in this manual.
If the equipment is installed in the USA and uses 240V rather than 120V, the source must be a center-tapped, 240V single-phase circuit.
To ensure patient safety, use only parts and accessories manufactured or recommended by GE Healthcare.
This equipment should only be connected as specified by GE Healthcare. Installation of the equipment should only be performed by qualified GE Healthcare service representatives.
Contact GE Healthcare for information before connecting any device to this equipment that is not recommended in this manual. Only cables and accessory equipment purchased from GE Healthcare should be used in conjunction with the system.
It is important that all of the instructions in this manual be followed. However, these instructions in no way supersede current medical practices regarding patient care and safety.
Refer servicing of the equipment to GE Healthcare authorized service personnel. Any attempt to repair equipment under warranty will void that warranty.
2021423-503H Mac-Lab/CardioLab/Centricity Cardiology INW Service Manual 1-25

Introduction
Failure on the part of responsible individuals or institutions to implement a satisfactory equipment maintenance schedule may lead to undue equipment failure and possible health hazards.
The use of ACCESSORY equipment not complying with the equivalent safety requirements of this equipment may lead to a reduced level of safety of the resulting system. Consideration relating to the choice includes:
Use of the accessory in the Patient Vicinity.
Evidence that the safety certification of the Accessory is performed in accordance with the appropriate EN 60601-1 and EN 60601-1 harmonized national standard.
The CardioLab II Plus Amplifier is a component/accessory of a Class II medical device.
Equipment Symbols
Equipment Symbols Descriptions
CE Marking
Underwriters Laboratories, Inc.
Classified by Underwriters Laboratories Inc. with respect to electric shock, fire, mechanical and other specified hazards, only in accordance with UL 2601-1, CAN/CSA C22.2 No. 601.1, IEC 60601-1 and IEC 60601-1-1.
Power Ratings Chart:
V~ = V = Voltage, ~ = Alternating Current
I = Current
Fuse =
Equipotential Ground Point
A nonessential electrical connection which may be used to connect the chassis to other equipment to achieve the same potential.
1-26 Mac-Lab/CardioLab/Centricity Cardiology INW Service Manual 2021423-503H

Introduction
Type CF Equipment that is Defibrillator Proof
Type CF Applied Part: Isolated (floating) applied part suitable for intentional external and internal application to the patient excluding direct cardiac application. The “paddles” outside the box indicate that the part is defibrillator proof.
(Medical Standard Definition:) F-Type applied part (floating/isolated) complying with the specified requirements of IEC 60601-1/UL 2601-1/CSA 601.1 Medical Standards provide a higher degree of protection against electric shock than that provided by Type B applied parts.
Type CF Equipment
Type CF Applied Part: Isolated (floating) applied part suitable for intentional external and internal application to the patient excluding direct cardiac application.
(Medical Standard Definition:) F-Type applied part (floating/isolated) complying with the specified requirements of IEC 60601-1/UL 2601-1/CSA 601.1 Medical Standards provide a higher degree of protection against electric shock than that provided by Type B applied parts.
Type BF Equipment that is Defibrillator Proof
Type BF Applied Part that is defibrillator proof: Isolated (floating) applied part suitable for intentional external and internal application to the patient excluding direct cardiac application. “Paddles outside the box indicate the applied part is defibrillator proof.
(Medical Standard Definition:) F-Type applied part (floating/isolated) complying with the specified requirements of IEC 60601-1/UL 2601-1/CSA 601.1 Medical Standards provide a higher degree of protection against electric shock than that provided by Type B applied parts.
Atmospheric Pressure Limits
Temperature Limits
Humidity Limits
Attention
Pay attention to the documents delivered with the equipment.
Input Symbol
Equipment Symbols Descriptions
2021423-503H Mac-Lab/CardioLab/Centricity Cardiology INW Service Manual 1-27

Introduction
General Warning
Manufacturer
Date of Manufacture
Consult Instructions for Use
WARNING: SHOCK HAZARD
Remove power cord from the mains source by grasping the plug. Do not pull on the cable. This may cause cable damage, which could result in loss of protective earthing or exposure to mains voltage.
Equipment Symbols Descriptions
1-28 Mac-Lab/CardioLab/Centricity Cardiology INW Service Manual 2021423-503H

Introduction
Compliance Information
Mac-Lab/CardioLab System
Declaration - Electromagnetic Emissions
The Mac-Lab / CardioLab System is intended for use in the electromagnetic environment specified below. The customer or the user of the Mac-Lab / CardioLab System should assure that it is used in such an environment.
Emissions Tests Compliance Electromagnetic environment guidance
RF emissions CISPR 11 Group 1 The Mac-Lab / CardioLab System uses RF energy only for its internal function. Therefore, its RF emissions are very low and are not likely to cause any interference in nearby electronic equipment.
RF emissions CISPR 11 Class A The Mac-Lab / CardioLab System is suitable for use in all establishments other than domestic and those directly connected to the public low-voltage power supply network that supplies buildings used for domestic purposes.
Harmonic emissions IEC 61000-3-2 Class A
Voltage fluctuations/Flicker emissions IEC 61000-3-3
Complies
Declaration - Electromagnetic Immunity
The Mac-Lab / CardioLab System is intended for use in the electromagnetic environment specified below. The customer or the user of the Mac-Lab / CardioLab System should assure that it is used in such an environment.
Immunity TestIEC 60601 Test Level
Compliance Level
Electromagnetic Environment - Guidance
Electrostatic discharge (ESD) IEC 61000-4-2
± 6 kV contact ± 8 kV air
± 6 kV contact ±8 kV air
Floors should be wood, concrete or ceramic tile. If floors are covered with synthetic material, the relative humidity should be at least 30%.
Electrical fast transient/burst IEC 61000-4-4
± 2kV for power supply lines (signal lines exempt from testing, length is less than 3 m)
± 2kV for power supply lines
Mains power quality should be that of a typical commercial or hospital environment.
Surge IEC 61000-4-5
± 1kV differential mode ± 2kV common mode
± 1kV differential mode ±2kV common mode
Mains power quality should be that of a typical commercial or hospital environment.
2021423-503H Mac-Lab/CardioLab/Centricity Cardiology INW Service Manual 1-29

Introduction
Voltage dips, short interruptions and voltage variations on power supply input lines IEC 61000-4-11
<5% 100-120Vac<5% 200-240Vac(>95% dip) for 0.5 cycle
40% 100-120Vac40% 200-240Vac(>60% dip) for 5 cycles
70% 100-120Vac70% 200-240Vac(>30% dip) for 25 cycles
<5% 100-120Vac<5% 200-240Vac(>95% dip) for 5 seconds
<5% 100-120Vac<5% 200-240Vac(>95% dip) for 0.5 cycle
40% 100-120Vac40% 200-240Vac(>60% dip) for 5 cycles
70% 100-120Vac70% 200-240Vac(>30% dip) for 25 cycles
<5% 100-120Vac<5% 200-240Vac(>95% dip) for 5 seconds
Mains power quality should be that of a typical commercial or hospital environment. If the user of the Mac-Lab / CardioLab System requires continued operation during power mains interruptions, it is recommended that the Mac-Lab / CardioLab System be powered from an Uninterruptable power supply or a battery.
Power frequency (50/60 Hz) magnetic field IEC 61000-4-8
3 A/m 3 A/m Power frequency magnetic fields should be at levels characteristic of a typical location typical commercial or hospital environment.
Declaration - Electromagnetic Immunity
The Mac-Lab / CardioLab System is intended for use in the electromagnetic environment specified below. The customer or the user of the Mac-Lab / CardioLab System should assure that it is used in such an environment.
Immunity TestIEC 60601 Test Level
Compliance Level
Electromagnetic Environment - Guidance
1-30 Mac-Lab/CardioLab/Centricity Cardiology INW Service Manual 2021423-503H

Introduction
Portable and mobile RF communications equipment should be used no closer to any part of the Mac-Lab / CardioLab System, including cables, than the recommended separation distance calculated from the equation applicable to the frequency of the transmitter.
Recommended separation distance (d)
Conducted RF emissionsIEC 61000-4-6
3 Vrms105kHz to 80 MHz with 2 Hz modulation
3 Vrms d = 1.2 P
Radiated RF emissionsIEC 61000-4-3
3V/m80 MHz to 2.5 GHz
3 V/m d = 1.2 P
d = 2.3 P
where P is the maximum output power rating of the transmitter in watts (W) according to the transmitter manufacturer and d is the recommended separation distance in meters(m).Field Strengths from fixed RF
transmitters, as determined by a electromagnetic site survey1, should be
less than the compliance level in each frequency range2. Interference may occur in the vicinity of equipment marked with the following symbol:
NOTEAt 80 MHz and 800 MHz, the higher frequency range applies.
These guidelines may not apply in all situations. Electromagnetic propagation is affected by absorption and reflected from structures, objects and people.
1 Field strengths from fixed transmitters, such as base stations for radio (cellular/cordless) telephones and land mobile radios, amateur radio, AM and FM radio broadcast and TV broadcast cannot be predicted theoretically with accuracy. To assess the electromagnetic environment due to fixed RF transmitters, an electromagnetic site survey should be considered. If the measured field strength in the location in which the Mac-Lab / CardioLab System is used exceeds the applicable RF compliance level above the Mac-Lab / CardioLab System should be observed to verify normal operation. If abnormal perfor-mance is observed, additional measures may be necessary, such as re-orienting or relocating the Mac-Lab / CardioLab System.
2 Over the frequency range 150 kHz to 80 MHz. Field strengths should be less than 3 V/m
Declaration - Electromagnetic Immunity
The Mac-Lab / CardioLab System is intended for use in the electromagnetic environment specified below. The customer or the user of the Mac-Lab / CardioLab System should assure that it is used in such an environment.
Immunity TestIEC 60601 Test Level
Compliance Level
Electromagnetic Environment - Guidance
2021423-503H Mac-Lab/CardioLab/Centricity Cardiology INW Service Manual 1-31

Introduction
Recommended Separation Distances Between Portable and Mobile RF Communications Equipment and the Mac-Lab/CardioLab system
The Mac-Lab/CardioLab system is intended for use in an electromagnetic environment in which radiated RF disturbances are controlled. The customer or the user of the Mac-Lab/CardioLab system can help prevent electromagnetic interference by maintaining a minimum distance between portable and mobile RF communications equipment (transmitters) and the Mac-Lab/CardioLab system as recommended below, according to the maximum output power of the communications equipment.
Rated Maximum Output Power of Transmitter
W
Separation Distance According to Frequency of Transmitter m
150 kHz to 80 MHz 80 MHz to 800 MHz 800 MHz to 2.5 GHz
0.01 0.12 0.12 0.23
0.1 0.38 0.38 0.73
1 1.2 1.2 2.3
10 3.8 3.8 7.3
100 12 12 23
For transmitters rated at a maximum output power not listed above, the recommended separation distance d in meters (m) can be estimated using the equation applicable to the frequency of the transmitter, where P is the maximum output power rating of the transmitter in watts (W) according to the transmitter manufacturer.
NOTEAt 80 MHz and 800 MHz, separation distance for the higher frequency range applies.
These guidelines may not apply in all situations. Electromagnetic propagation is affected by absorption and reflected from structures, objects and people.
d 1.2 P= d 1.2 P= d 2.3 P=
1-32 Mac-Lab/CardioLab/Centricity Cardiology INW Service Manual 2021423-503H

2 Equipment Overview
2021423-503H Mac-Lab/CardioLab/Centricity Cardiology INW Service Manual 2-1

Equipment Overview
Typical System Configuration
NOTEFor configuration, component and connection information for HP xw8200 and HP xw8000 computers, refer to the Mac-Lab/CardioLab/Centricity Cardiology INW Service Manual v6.5 (PN 2021423-022).
This system may consist of either Mac-Lab (hemodynamic), CardioLab (electrophysiologic), or ComboLab (both systems).
The system may be standalone or connected to a network. Network installations include a Centricity Cardiology INW server. In this manual, INW refers to Centricity Cardiology INW. It may be connected to an optional CVIS server.
The system may also include a CardioLab II Plus Amplifier, also referred to as CLab II Plus.
The following block diagram shows a typical setup.
IEB
Amplifier
CIM
TRAMRAC4A
Bed
RFGenerator
Catheter
PersonalityModule
MousePrinter
Speakers
Stimulator
Real-TimeMonitor
ReviewMonitor
RemoteReal-Time
Monitor
3" Ceiling Conduit
3" Floor Conduit
3" Floor Conduit
RemoteReviewMonitor
ImageMonitor
INWServer CVISNetwork
Switch
To Hospital Network
Keyboard
Workstation
Dashed lines indicate CardioLab/ComboLab only
Procedure RoomControl Room
IT Control Room
MonitorBoom
HPCPU
UPS
2-2 Mac-Lab/CardioLab/Centricity Cardiology INW Service Manual 2021423-503H

Equipment Overview
Control Room Components
Acquisition Computer
USB Mouse
Keyboard
Barcode scanner
Integrated Electronics Box (IEB): The IEB provides power to local system components, signal pass through video and communications.
Uninterruptible Power Supply (UPS): The UPS provides emergency power to the HP computer.
Monitors: Two monitors (Real-Time and Review) are standard. A third Image monitor is optional.
Local speakers: Provide output for ECG QRS tone and optional audible indicators.
Laser Printer: Prints images or reports.
Cardiac Stimulator: Provides direct cardiac stimulation to assist the physician during an EP case.
Procedure Room Components
Monitors: One remote monitor is standard (and is software switchable between Real-Time and Review windows). A second monitor is optional.
Remote speakers: Provide output for ECG QRS tone and optional audible indicators in the procedure room.
TRAMNet: The TRAMNet gathers patient data for the Mac-Lab system. The TRAMNet consists of a Remote Acquisition Case (RAC-4A) and a Transport Remote Acquisition Module (TRAM).
CardioLab II Plus Amplifier: The Amplifier gathers data for both the ComboLab and CardioLab systems.
CARTO™ System (Patient Interface Unit): Provides 3D electroanatomical cardiac maps to the CardioLab.
Analog Output Box: Distributes Heart rate and blood pressure signals from the TRAMNet and Amplifier to other equipment.
Review Workstation: Client installed in physician office or outside lab. Provides post-procedure analysis capabilities such as generating reports.
Nurses Workstation: Client used during the study. Provides the operator with the ability to participate in an active study and perform actions such as document administered medications and supplies consumed.
2021423-503H Mac-Lab/CardioLab/Centricity Cardiology INW Service Manual 2-3

Equipment Overview
IT Control Room Equipment
Network Switch
Centricity Cardiology INW Server
CVIS Server
Network Connections
DMS Express Server(Interface Server)
INW Server
ReviewWorkstationMac-Lab CardioLab
HospitalEnterprise
OR
2-4 Mac-Lab/CardioLab/Centricity Cardiology INW Service Manual 2021423-503H

Equipment Overview
System Hardware
WARNINGSHOCK HAZARD — Use appropriate Lock Out/Tag Out procedures before performing any service on potentially energized equipment.
Acquisition Workstation System Components
HP Computer
The HP computer is used for either Acquisition systems or Review workstations and has the following components:
Primary Hard Drive with two partitions:
C: Application partition
D: Data partition
Optional Magneto-Optical drive (Drive E:).
NOTEThe optional Magneto-Optical drive is only available on HP xw8400 computers.
DVD-RAM drive (Drive F:).
NOTEThe drive used to store application studies is determined by the file paths set in under System Settings in the main application menu.
Secondary Hard Drive (Drive G:).
Four standard expansion cards (plus optional cards):
HP xw8400: Matrox Parhelia video board provides video out for the Real-Time (Video 1) and Review (Video 2) monitors.
HP z600: Matrox M9140 video board provides video out for the Real-Time (Video 1), Review (Video 2), and optional (Video 3) monitors.
TRAMNet to Ethernet Adapter board for communication with the TRAM in the RAC 4A.
PCI Communication board to provides Amplifier Communication, Analog and Digital I/O, and Switched video (video out from the IEB).
Dual NIC Adapter board provides Network connection.
Optional on HP xw8400: Adaptec Ultra320 SCSI PCIe board for
supporting MO drive.
Optional on HP xw8400: Matrox Odyssey XA board used to capture images from an X-Ray or other imaging system.
2021423-503H Mac-Lab/CardioLab/Centricity Cardiology INW Service Manual 2-5

Equipment Overview
Optional on HP xw8400: ATI FIREGL V5200 256MB PCI-E or ATI FIREGL V3350 256MB PCI-E Video board. Provides video out for optional (video 3) monitor.
Optional on HP z600: Matrox Odyssey EA board used to capture images from an X-Ray or other imaging system.
External Components and Connections for the HP z600
Label Part Number Description
1 2028599-002 DVD-RAM Drive
2 N/A Power Switch
3 N/A LEDs, USB, Firewire, and Audio connections
4 N/A Backplane I/O panel
5 N/A Board Slots
6 N/A AC Power
Not Shown 2026539-001 HP USB 2-Button Optical Mouse with Wheel
Not Shown Various Keyboard (dependent on language)
1
2
2
4
3
5
2-6 Mac-Lab/CardioLab/Centricity Cardiology INW Service Manual 2021423-503H

Equipment Overview
External Components and Connections for the HP xw8400
Label Part Number Description
1 2028599-002 DVD-RAM Drive
2 N/A Power Switch, LEDs, USB, Firewire, and Audio connections
3 N/A AC Power
4 N/A Backplane I/O panel
5 N/A Board Slots
Not Shown 2003340-001 Magneto-Optical Drive (optional)
Not Shown 2026539-001 HP USB 2-Button Optical Mouse with Wheel
Not Shown Various Keyboard (dependent on language)
2021423-503H Mac-Lab/CardioLab/Centricity Cardiology INW Service Manual 2-7

Equipment Overview
Disassembly
WARNINGGROUNDING HAZARD — Electrostatic discharge (ESD) can damage electronic components. Be sure you are properly grounded before opening any equipment.
Remove Case Side Panel
1. Lift the tab near the top.
2. Swing the side panel out.
Remove Front Panel - HP xw8400 only
1. Lift tabs indicated.
2. Swing the front panel out.
2-8 Mac-Lab/CardioLab/Centricity Cardiology INW Service Manual 2021423-503H

Equipment Overview
Remove Hard Drive - HP xw8400 only
1. Press tabs as indicated.
2. Slide drive out.
Remove Hard Drive - HP z600 only
1. Press tab to release handle.
2. Pull drive out.
Remove the AGP/PCI Card Support Assembly - HP xw8400 only:
1. Squeeze in the tabs, where indicated. Gently push in, then pull out.
2. Lift off the clamp.
1
2
1
2
2
2021423-503H Mac-Lab/CardioLab/Centricity Cardiology INW Service Manual 2-9

Equipment Overview
Remove PCI Boards
1. Open the PCI retainer by pressing down on the green tabs and moving the retainer away.
2. Matrox M9140 only: Carefully hold the board release tab toward the top of the case.
3. Gently pull the board out of the computer case.
Remove DVD-RAM Drive
1. Remove screw, if present.
2. Lift tab indicated.
3. Slide drive out.
Remove Power Supply - HP z600 only
1. Pull green handle to release power supply.
2. Slide power supply out.
1
1 2
2-10 Mac-Lab/CardioLab/Centricity Cardiology INW Service Manual 2021423-503H

Equipment Overview
DVD-RAM Drive
The DVD-RAM drive can also read/write to CDs. The recommended disks have a capacity of approximately 4.7 GB per side.
NOTEThe drive used to store application studies is determined by the file paths set in under System Settings in the main application menu.
1: DVD-RAM Drive Jumpers
2: IDE Connector
3: Power Connector
SATA-to-IDE Converter - HP z600 Only
The DVD-RAM drive is connected using a SATA-to-IDE converter.
Label Description
1 SATA Connection
2 4-pin Power Connection
Not Shown IDE Connection (on back of device)
1 2 3
12
2021423-503H Mac-Lab/CardioLab/Centricity Cardiology INW Service Manual 2-11
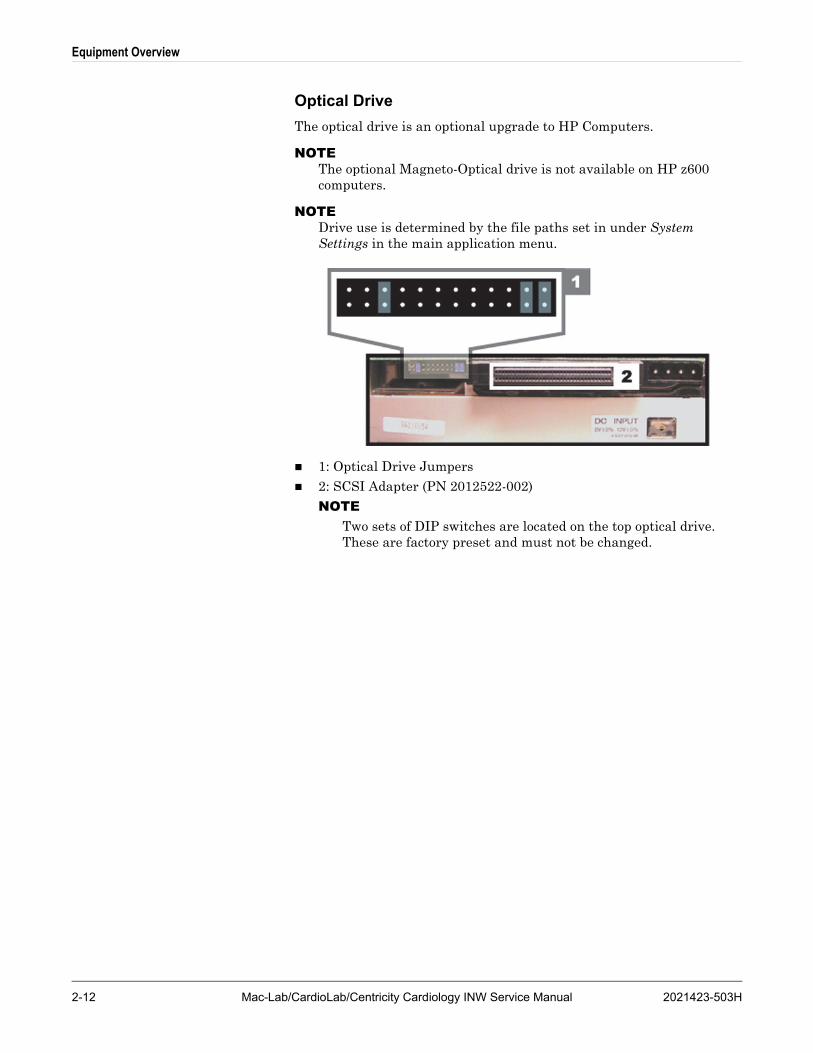
Equipment Overview
Optical Drive
The optical drive is an optional upgrade to HP Computers.
NOTEThe optional Magneto-Optical drive is not available on HP z600 computers.
NOTEDrive use is determined by the file paths set in under System Settings in the main application menu.
1: Optical Drive Jumpers
2: SCSI Adapter (PN 2012522-002)
NOTETwo sets of DIP switches are located on the top optical drive. These are factory preset and must not be changed.
2-12 Mac-Lab/CardioLab/Centricity Cardiology INW Service Manual 2021423-503H

Equipment Overview
HP z600 Installed Boards
HP z600 Custom Dual NIC Adapter Board
Part Number: 2047766-001
Location: Slot 1
Function: Network connection card, ablation connection card.
I/O: Two network connection jacks, one serial port (for connection to ablation devices)
Uses internal serial connection from motherboard:
1
2
3
4
5
6
2021423-503H Mac-Lab/CardioLab/Centricity Cardiology INW Service Manual 2-13

Equipment Overview
HP z600 Matrox Quad Board M9140 LP Video Board
Part Number: 2049434-001
Location: Slot 2
Function: Video out for Monitor 1, Monitor 2 and Monitor 3 (optional)
I/O: One proprietary connector. Provides four DVI/VGA output ports through a custom connector.
1
2
3
4
5
6
2-14 Mac-Lab/CardioLab/Centricity Cardiology INW Service Manual 2021423-503H

Equipment Overview
HP z600 Matrox Odyssey eA Board (Optional)
Part Number: 2049435-001
Location: Slot 3
Function: Image capture for X-Ray or other imaging systems
I/O: Two DVI connectors
1
2
3
4
5
6
2021423-503H Mac-Lab/CardioLab/Centricity Cardiology INW Service Manual 2-15

Equipment Overview
HP z600 TRAMNet to Ethernet Adapter board
Part Number: 2009937-003
Location: Slot 5
Function: Provides communication with the TRAM in the RAC 4A, and converts signals from the TRAM to the ethernet.
I/O: Network Interface Port and 9-Pin D connector
1
2
3
4
5
6
2-16 Mac-Lab/CardioLab/Centricity Cardiology INW Service Manual 2021423-503H

Equipment Overview
HP z600 PCI Communication Board
Part Number: 2014935-002
Location: Slot 6
Functions:
Communicates with the CardioLab II Plus Amplifier via the fiber optic connectors
Analog and Digital communication with the IEB via the D-Connector
Provides the video switching signal for the Switched Video output on the IEB via the D-Connector
I/O: D-Connector to IEB, Fiber Optic Jacks to the Amplifier
1
2
3
4
5
6
2021423-503H Mac-Lab/CardioLab/Centricity Cardiology INW Service Manual 2-17

Equipment Overview
HP xw8400 Installed Boards
HP xw8400 PCI Communication Board
Part Number: 2014935-002
Location: Slot 1
Functions:
Communicates with the CardioLab II Plus Amplifier via the fiber optic connectors
Analog and Digital communication with the IEB via the D-Connector
Provides the video switching signal for the Switched Video output on the IEB via the D-Connector
I/O: D-Connector to IEB, Fiber Optic Jacks to the Amplifier
2-18 Mac-Lab/CardioLab/Centricity Cardiology INW Service Manual 2021423-503H

Equipment Overview
HP xw8400 ATI FIREGL V5200 256MB PCI-E Video Board (Optional)
Part Number: 2026189-002
Location: Slot 2
Function: Video out for optional (video 3) monitor
I/O: Two DVI connectors (only the left one is used)
2021423-503H Mac-Lab/CardioLab/Centricity Cardiology INW Service Manual 2-19

Equipment Overview
HP xw8400 Dual NIC Adapter Board
Part Number: 2017795-002
Location: Slot 3
Function: Network connection card
I/O: Two network connection jacks
2-20 Mac-Lab/CardioLab/Centricity Cardiology INW Service Manual 2021423-503H

Equipment Overview
HP xw8400 PCIX 2 SCSI Card
NOTEThis board is optional with the MO upgrade kit (available only for 2034493-002 – 2034493-004 Acquisition configurations).
Part Number: 2038632-001
Location: Slot 4
Function: Provides SCSI cable connection internally to an optional MO Drive.
I/O: Two SCSI connectors (only internal SCSI is used)
2021423-503H Mac-Lab/CardioLab/Centricity Cardiology INW Service Manual 2-21

Equipment Overview
HP xw8400 Matrox Parhelia PCI 256 MB Video Card
Part Number: 2026188-001
Location: Slot 5 (PCI slot)
Function: Provides video out for the Real-Time (Video 1) and Review (Video 2) monitors. This board supports resolutions of 1280x1024 for Mac-Lab, 1600x1200 for CardioLab.
I/O: Two DVI connectors
Included adaptors: DVI to HD15 Video Adapter (2021697-001).
2-22 Mac-Lab/CardioLab/Centricity Cardiology INW Service Manual 2021423-503H

Equipment Overview
HP xw8400 Matrox Odyssey XA Board (Optional)
Part Number: 2030688-001
Location: Slot 6
Function: Image capture for X-Ray or other imaging systems
I/O: Two DVI connectors
2021423-503H Mac-Lab/CardioLab/Centricity Cardiology INW Service Manual 2-23

Equipment Overview
HP xw8400 TRAMNet to Ethernet Adapter board
Part Number: 2009937-002
Location: Slot 7
Function: Provides communication with the TRAM in the RAC 4A, and converts signals from the TRAM to the ethernet.
I/O: Network Interface Port and 9-Pin D connector
2-24 Mac-Lab/CardioLab/Centricity Cardiology INW Service Manual 2021423-503H

Equipment Overview
Integrated Electronics Box (IEB)
The IEB provides power to local system components and signal pass through video and communications. Three versions of the IEB are available to handle different line voltages: 100, 120, and 240 VAC.
The IEB consists of the following components:
Video Multiplexer (VID MUX) board to distribute video signals from the video cards in the HP computer to the monitors.
I/O board to provide signal pass through for other system components.
Isolation transformer:
Conforms to IEC 60601-1
2.0 kVA medical grade high-isolation transformation
Provides either 120 VAC (for 100 and 120 VAC systems) or 240 VAC. The primary and secondary windings are wired in parallel for 120 VAC and in series for 240 VAC.
CAUTIONCONNECTIONS — If the transformer must be disconnected for any reason, ensure the connections are correct.
UPS (either 100, 120, or 240 VAC) and Power Distribution panel provide conditioned power to local system components.
NOTEThe UPS is external to the IEB and provides uninterrupted power to the HP computer. The monitors and other peripherials will not remain on if power is lost.
Depending on which IEB is installed, a modem and modem power supply for dial-up communication may be present. The power supply accepts any line voltage and converts it into 9 VDC.
2021423-503H Mac-Lab/CardioLab/Centricity Cardiology INW Service Manual 2-25

Equipment Overview
External Components and Connections
Both the Main Power switch on the front of the IEB and the Thermal Overload circuit breaker on the back must be on for the system to power up.
Label Part Number Description
1 2003681-003 VID MUX board
2 2003680-001 I/O Board
3 N/A Power Connections. The bottom right connector is for the HP computer and the four vertical connectors on the right and left are for peripheral equipment.
4 N/A Thermal Overcurrent Circuit Breaker. This breaker protects all internal components and external devices connected to the IEB.
5 N/A Main Power Switch. This switch controls power to all internal components and external devices except the HP computer.
2-26 Mac-Lab/CardioLab/Centricity Cardiology INW Service Manual 2021423-503H
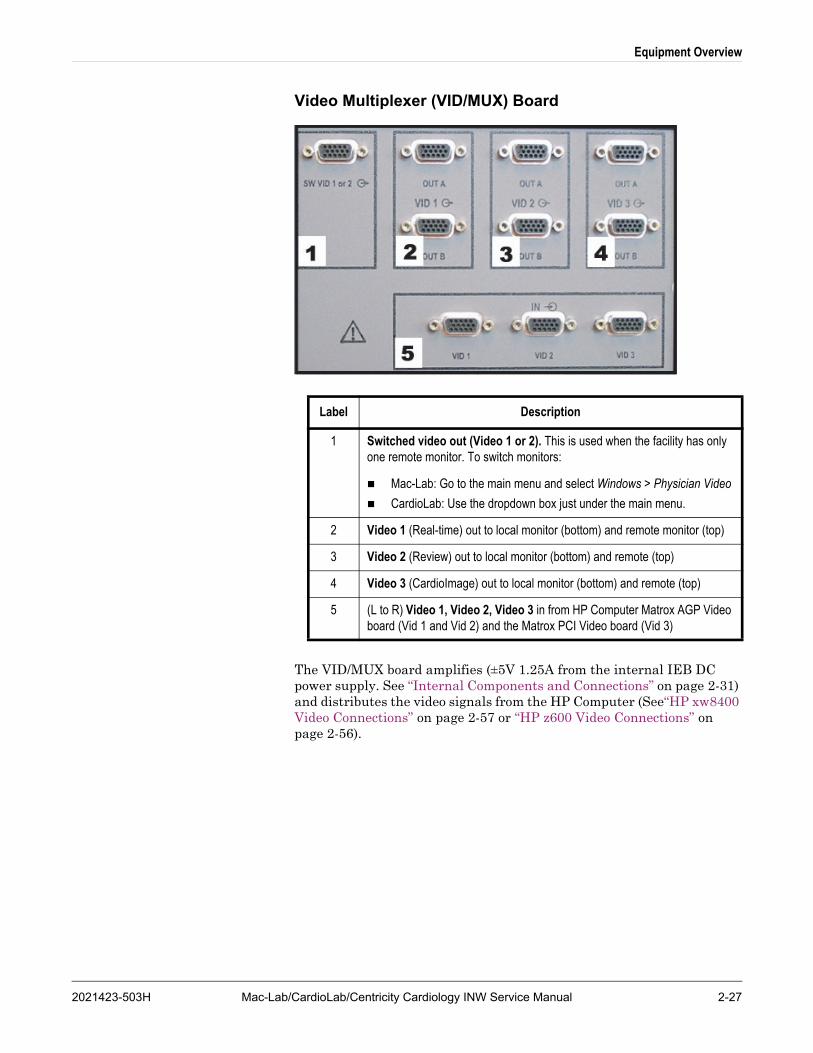
Equipment Overview
Video Multiplexer (VID/MUX) Board
The VID/MUX board amplifies (±5V 1.25A from the internal IEB DC power supply. See “Internal Components and Connections” on page 2-31) and distributes the video signals from the HP Computer (See“HP xw8400 Video Connections” on page 2-57 or “HP z600 Video Connections” on page 2-56).
Label Description
1 Switched video out (Video 1 or 2). This is used when the facility has only one remote monitor. To switch monitors:
Mac-Lab: Go to the main menu and select Windows > Physician Video
CardioLab: Use the dropdown box just under the main menu.
2 Video 1 (Real-time) out to local monitor (bottom) and remote monitor (top)
3 Video 2 (Review) out to local monitor (bottom) and remote (top)
4 Video 3 (CardioImage) out to local monitor (bottom) and remote (top)
5 (L to R) Video 1, Video 2, Video 3 in from HP Computer Matrox AGP Video board (Vid 1 and Vid 2) and the Matrox PCI Video board (Vid 3)
2021423-503H Mac-Lab/CardioLab/Centricity Cardiology INW Service Manual 2-27

Equipment Overview
I/O Board
Refer to the following cabling diagrams:
“Communications Connections” on page 2-58.
“TRAM/Amplifier Connections” on page 2-59.
Label Description
1 Analog I/0 Communications. Connects to the HP Computer PCI Comms board.
2 Analog in from another system (Fluoro, and so on).
3 Connection to the Analog Output Box.
4 Analog out (Stimulator, and so on).
5 I/O TRAM (includes 16.5VDC power).
6 Output to HP Computer TRAMNet to Ethernet to Adapter board.
2-28 Mac-Lab/CardioLab/Centricity Cardiology INW Service Manual 2021423-503H

Equipment Overview
Power Connections
Refer to the cabling diagram, “Power Connections” on page 2-55.
Label Description
1 and 5 AC out to local equipment (6A @ 120 VAC max.; 3A @ 240 VAC max.)
2 Thermal Overcurrent circuit breaker. Protects all internal components and external devices connected to the IEB.
3 AC main power in (15A @ 120 VAC max; 7A, @ 240 VAC max.)
4 AC power out to UPS (2A @ 120 VAC max; 1A, @ 240 VAC max.)
2021423-503H Mac-Lab/CardioLab/Centricity Cardiology INW Service Manual 2-29

Equipment Overview
Disassembly
WARNINGGROUNDING HAZARD — Electrostatic discharge (ESD) can damage electronic components. Be sure you are properly grounded before opening any equipment.
Open Case
1. Remove 7 side-panel screws.
2. Lift the side panel out.
Remove Connection Boards
1. Open the case.
2. Remove the board screws.
3. Disconnect interior cables.
2-30 Mac-Lab/CardioLab/Centricity Cardiology INW Service Manual 2021423-503H

Equipment Overview
Internal Components and Connections
Label Part Number Description
1 2003681-003
2003680-001
VID/MUX Board Assembly
I/O DB Connect Board Assembly
2 2013535-001 Power Supply: Provides ±5 VDC 1.25A for the Vid/ MUX board and +16.5 VDC for the RAC-4A.
2021423-503H Mac-Lab/CardioLab/Centricity Cardiology INW Service Manual 2-31

Equipment Overview
Uninterruptible Power Supply (UPS)
The UPS is designed to maintain power to the computer during a power outage.
NOTEThe UPS is external to the IEB and provides uninterrupted power to the HP computer. The monitors and other peripherials will not remain on if power is lost.
Part Number Description
2034077-001 UPS Powercom, 120V, 50/60 Hz, 1500 VA, BNT
2034078-001 UPS Powercom, 230V, 50/60 Hz, 1500 VA, BNT
2034079-001 UPS Powercom, 100V, 50/60 Hz, 1500 VA, BNT
2-32 Mac-Lab/CardioLab/Centricity Cardiology INW Service Manual 2021423-503H
Equipment Overview
GE Client Workstation
There are several configuration options for use of the Review workstations in a networked system environment.
Nursing Workstation software allows the user to join a Mac-Lab or CardioLab case in progress to chart and to document within the case log.
Remote Review Workstation software allows the user to review a Mac-Lab or CardioLab case in full disclosure in order to compose or complete reports or coronary diagrams or to review patient waveforms and measurements.
Pre/Post Procedure Workstation software allows the user to start or continue a Mac-Lab or CardioLab case in order to chart and to document within the case log.
NOTEAutomatic vitals logging is also available with the optional DASH and Solar monitor interface.
NOTEWhen used in a patient care area, the hardware must meet IEC60601-1. This can be achieved through the use of a medical grade computer, separate isolation transformer or other means as determined by appropriate hospital personal.
The GE Client Review computer has the following components:
Primary Hard Drive with two partitions:
C: Application partition
D: Data partition
DVD-RAM drive (Drive E:).
NOTEThe drive used to store application studies is determined by the file paths set in under System Settings in the main application menu.
Secondary Hard Drive (Drive G:).
2021423-503H Mac-Lab/CardioLab/Centricity Cardiology INW Service Manual 2-33

Equipment Overview
External Components and Connections for the GE Client Workstation
Label Part Number Description
1 N/A Power and Reset Switches
2 N/A DVD Drive
3 N/A USB and Audio connections (behind cover)
4 N/A AC Power
5 Various Keyboard (dependent on language)
6 N/A Com Port for DASH/Solar connection
7 N/A Video Input
8 N/A USB 2-Button Optical Mouse with Wheel
9 N/A RJ-45 Port to Network
1
2
3
4
5
2-34 Mac-Lab/CardioLab/Centricity Cardiology INW Service Manual 2021423-503H

Equipment Overview
Disassembly
WARNINGGROUNDING HAZARD — Electrostatic discharge (ESD) can damage electronic components. Be sure you are properly grounded before opening any equipment.
Remove Case Side Panel
1. Loosen thumbscrews.
2. Pull side panel off.
Remove Hard Drive
1. Remove screws for hard drive.
2. Slide drive out and disconnect cables.
Remove DVD Drive
1. Disconnect cables from DVD drive.
2. Remove DVD drive cage screws.
3. Remove DVD drive cage from case.
4. Remove screws for DVD drive.
5. Remove DVD drive from cage.
1
1
1 1
2
2021423-503H Mac-Lab/CardioLab/Centricity Cardiology INW Service Manual 2-35

Equipment Overview
Mobile Workstand
Refer to the instructions included with the mobile workstand for details on how to place the GE hardware on an assembled GE mobile workstand (PN 2008203-001).
4
1
5
6
232
Label Part Number Description
1 N/A DASH Monitor
2 N/A Mouse or Barcode Scanner location
3 N/A Keyboard location
4 2017588-001, 2021331-001, 2026192-001, 2037934-001 or 2048966-001
Review Workstation Computer
5 2004195-001 Isolation Transformer 120/220V 50/60HZ 600VA
6 2079070-002 LCD Monitor
2-36 Mac-Lab/CardioLab/Centricity Cardiology INW Service Manual 2021423-503H

Equipment Overview
Monitors
The standard workstation comes with two monitors and may have a third optional monitor. The monitors include:
A Real-Time monitor to display current patient information. It is usually located on the left.
A Review monitor to display past patient information.
An optional Image monitor (used with the CardioImage option) displays live or frozen video images.
A single remote monitor is standard and receives input from the switched video out (Video 1 or 2) jack on the IEB (see “External Components and Connections” on page 2-26). To switch video for the Mac-Lab go to the main menu and select
Windows > Physician Video.
To switch video for the CardioLab use the drop-down box just under the main menu.
TRAMNet
The TRAMNet consists of a Remote Acquisition Case (RAC-4A) and one or more TRAM modules. The TRAMNet is located in the procedure room near the procedure table.
Label Description
1 TRAM Module
2 To Analog Out Box
3 To IEB TRAM Connector
2021423-503H Mac-Lab/CardioLab/Centricity Cardiology INW Service Manual 2-37

Equipment Overview
The TRAM module receives patient inputs and then transmits signal data to the IEB and other equipment through the Analog Output Box (refer to the cabling diagrams in “TRAM/Amplifier Connections” on page 2-59.
TRAM Module Inputs:
Electrocardiogram (ECG) - green connector (5 or 10 leads)
Thermal Dilution Cardiac Output (TDCO) - brown connector
Invasive Blood Pressure (IBP) - 3 red connectors
Non-Invasive Blood Pressure (NIBP) - black connector
Pulse Oximetry (SpO2) - blue connector
2-38 Mac-Lab/CardioLab/Centricity Cardiology INW Service Manual 2021423-503H

Equipment Overview
Outputs: Analog output connector.
The following TRAM modules are supported by the Mac-Lab system:
200SL
400/450SL (Ohmeda, Nellcor)
451/451N/451M (Ohmeda, Nellcor, Massimo)
600/650SL (Ohmeda, Nellcor)
The following software versions are supported by the Mac-Lab system:
7A, 7B, 7C, 7D, 7E, 7F, 7H
8A, 8B, 8C, 8D
9A, 9B
10A, 10B
11A, 11B, 11C
CardioLab II Plus Amplifier
The CardioLab II Plus Amplifier is designed to amplify various types of cardiac signals that are acquired from a patient and transmit them back to the CardioLab system. These signals include 12 Lead ECG, intracardiac and pressure signals.
2021423-503H Mac-Lab/CardioLab/Centricity Cardiology INW Service Manual 2-39

Equipment Overview
Front View
Front View 64/32 Channels- CardioLab II Plus Amplifier
Name Description
Pressure Inputs Four pressure inputs will each accept a pressure transducer that is calibrated to 5uV/V/mmHg. See the Accessory Parts List for GE Healthcare Systems Information Technologies recommended pressure transducers.
ECG Input The ECG input connector will accept a 10 lead ECG input cable.
Stimulator Input The stimulator input will accept a stimulator input cable. Use the 3 ft, 15 ft or 30 ft Touchproof Stimulator Cables (part numbers, 301-00204-03, 301-00204-15, 301-00204-30, respectively) with the CardioLab II Plus Amplifier.
Catheter Inputs Up to three catheter inputs will each accept a 32 pole catheter input module. Use the CardioLab II Plus Catheter Input Modules (part number 301-00202-08) with the CardioLab II Plus Amplifier.
Auxiliary Inputs The auxiliary input will accept the Auxiliary Input Cable (part number 301-00205-08).
Power Indicator The power indicator is on as long as the CardioLab II Plus Amplifier is turned on.
Communication Indicators
Three communication indicators show the status of the communication between the acquisition computer and the CardioLab II Plus Amplifier.
When the XMT indicator is on, the CardioLab II Plus Amplifier is transmitting data to the acquisition computer. The XMT indicator should remain on as long as the power indicator is on.
When the RCV CMD indicator is on, the CardioLab II Plus Amplifier is receiving data from the acquisition computer. The RCV CMD indicator will turn on as long as an instruction is being received by the amplifier.
When the RCV ERR indictor is on, the CardioLab II Plus Amplifier may not be receiving data from the acquisition computer in a valid format or there may be a problem with the fiber optic cable.
2-40 Mac-Lab/CardioLab/Centricity Cardiology INW Service Manual 2021423-503H

Equipment Overview
Front View 128/96 Channels- CardioLab II Plus Amplifier
Name Description
Pressure Inputs Four pressure inputs will each accept a pressure transducer that is calibrated to 5uV/V/mmHg. See the Accessory Parts List for GE Healthcare Systems Information Technologies recommended pressure transducers.
ECG Input The ECG input connector will accept a 10 lead ECG input cable.
Stimulator Input The stimulator input will accept a stimulator input cable. Use the 3 ft, 15 ft or 30 ft Touchproof Stimulator Cables (part numbers, 301-00204-03, 301-00204-15, 301-00204-30, respectively) with the CardioLab II Plus Amplifier.
Catheter Inputs Up to seven catheter inputs will each accept a 32 pole catheter input module. Use the CardioLab II Plus Catheter Input Modules (part number 301-00202-08) with the CardioLab II Plus Amplifier.
Auxiliary Inputs The auxiliary input will accept the Auxiliary Input Cable (part number 301-00205-08).
Power Indicator The power indicator is on as long as the CardioLab II Plus Amplifier is turned on.
Communication Indicators
Three communication indicators show the status of the communication between the acquisition computer and the CardioLab II Plus Amplifier.
When the XMT indicator is on, the CardioLab II Plus Amplifier is transmitting data to the acquisition computer. The XMT indicator should remain on as long as the power indicator is on.
When the RCV CMD indicator is on, the CardioLab II Plus Amplifier is receiving data from the acquisition computer. The RCV CMD indicator will turn on as long as an instruction is being received by the amplifier.
When the RCV ERR indictor is on, the CardioLab II Plus Amplifier may not be receiving data from the acquisition computer in a valid format or there may be a problem with the fiber optic cable.
2021423-503H Mac-Lab/CardioLab/Centricity Cardiology INW Service Manual 2-41

Equipment Overview
Back View
Back View - CardioLab II Plus Amplifier
Name Description
FDDI Connection to Computer
This connector will accept a FDDI type fiber optic cable. The fiber optic cable allows for two-way communication between the amplifier and the CardioLab system.
Power Input The GE-supplied power cord connects to the Power Input.
Equipotentiality Terminal
The Equipotentiality Terminal is connected to earth ground.
2-42 Mac-Lab/CardioLab/Centricity Cardiology INW Service Manual 2021423-503H

Equipment Overview
CardioLab II Plus Catheter Input Module
The equivalent to the Stimulus Inputs 1-4 on the Stimulator Input Cable are labelled on the CardioLab II Plus Amplifier as Stimulus Inputs A1, A2, B1 and B2.
The four stimulus inputs on the Stimulator Input Cable connect to the stimulator.
Each Catheter Input Module is broken down into two groups of 16 poles each. For example, Block A is broken into A (1-16) and A (17-32).
Each pacing channel, requires one positive and one negative pole. In order to maximize the number of pacing channels, only one positive and one negative designation should be made for each group.
For detailed instructions on how to designate pacing channels and enable pacing for particular sites, refer to the on-line help in the software application.
2021423-503H Mac-Lab/CardioLab/Centricity Cardiology INW Service Manual 2-43

Equipment Overview
Accessory Parts List
GE Healthcare Systems Information Technologies recommends the following accessory parts be used with the CardioLab II Plus Amplifier:
Accessory Parts List
Accessory Name Part Number
Abbott Transpac IV Disposable Transducer with 4 ft extension Cable*
Abbott #42582-08
Abbott Transpac Reusable Cable* Abbott #42661-04-42
3M Disposable Electrode for ECG Monitoring*
3M Red Dot #2256
* This accessory is not stocked by GE Healthcare Systems Information Technologies.
2-44 Mac-Lab/CardioLab/Centricity Cardiology INW Service Manual 2021423-503H

Equipment Overview
CARTO™ System (Patient Interface Unit)
CAUTIONEXCESSIVE SIGNAL NOISE — Using a CARTO XP PIU earlier than version 10 with a crossover cable may cause excessive signal noise.
If this excessive signal noise occurs, then discontinue using the crossover cable until the PIU is replaced with a later version. (The new PIU must be purchased from Biosense Webster).
Label Description
1 CARTO XP PIU Output to Amplifier
Label Description
1 CARTO 3 PIU Output to Amplifier
1
2021423-503H Mac-Lab/CardioLab/Centricity Cardiology INW Service Manual 2-45

Equipment Overview
NOTEFor specific information related to the operation, troubleshooting, or repair of the CARTO System, refer to the OEM documentation. For information about the CardioLab/CARTO System interface, refer to the CardioLab Operator manual.
The CARTO System acquires and displays electroanatomical 3D images of heart chambers. This information is displayed on the CARTO System and can be exported into the CardioLab application.
Two connections are required: one from the CARTO System Patient Interface Unit to the CardioLab II Plus Amplifier and another from the CARTO System computer to the HP computer. Refer to the cabling diagram in “CARTO™XP System Connections” on page 2-65 or “CARTO™ 3 System Connections” on page 2-66 for specific information.
To quickly view the status of the interface, check the CARTO System icon at the bottom-right of the Real-Time window (a heart against a grid). The color changes, depending on the system state:
Gray: Disconnected
Blue: Standby
Green: Passive Interface
Yellow: Active Interface
2-46 Mac-Lab/CardioLab/Centricity Cardiology INW Service Manual 2021423-503H

Equipment Overview
Analog Output Box
The analog output box distributes heart rate and blood pressure signals to multiple outputs (refer to the connection diagram in “TRAM/Amplifier Connections” on page 2-59. This may be done to synch auxiliary equipment or display the information on a scope or other device.
Patient information comes from either the TRAMNet or the Amplifier (through the IEB) and is output through the output jacks on the top of the box:
Channels 2-4 and 13-16 are switchable between the TRAMNet (Mac-Lab) and CardioLab II Plus Amplifier (CardioLab).
The remaining channels are used exclusively by CardioLab.
Channels 1-12 may be distributed to up to 4 other devices using the selector switch.
Label Description
1 Input from TRAMNet
2 Input from Amplifier through the IEB
2021423-503H Mac-Lab/CardioLab/Centricity Cardiology INW Service Manual 2-47

Equipment Overview
Network Components
Centricity Cardiology INW Server provides
Network repository for patient studies
Acquisition system and Review workstation access to patient studies
CVIS Server provides
Central list management for staff, supplies, and so on.
Patient scheduling
Patient information
Inventory Management
Statistical Reports
Servers
Centricity Cardiology INW G6 Server
The G6 server has the following specifications:
Intel Xeon E5504, Quad-Core, 2.00 GHz, 4MB L3 Cache, 80W
Two tiers:
Low: Three 146GB Drives
High: Six 300GB Drives
Separate C: and D: drives (see the following chart):
The C: drive is RAID 1
The D: drive is RAID 5
RRAAIIDD 11++00((CC––DDrriivvee))
Mirror
DDiisskk 11114466GB
DDiisskk 22114466GB
DDiisskk 33330000GB
DDiisskk 88330000GB
DDiisskk 77330000GB
DDiisskk 66330000GB
DDiisskk 55330000GB
DDiisskk 44330000GB
Parity
Parity
Parity
Parity
Parity
Parity
2-48 Mac-Lab/CardioLab/Centricity Cardiology INW Service Manual 2021423-503H

Equipment Overview
Centricity Cardiology INW G5 Server
The G5 server has the following specifications:
Intel Dual-Core Xeon 5120/1.86 GHz (1066 MHz) with 4MB Level 2 cache (2MB per core)
Three tiers:
Low: Three 72 GB drives
Mid: Three 146 GB drives
High: Eight 146 GB drives
Separate C: and D: drives (see the following chart):
Label Description
1 CD/DVD Drive
2 Tape Drive
3 Power Switch, USB Connectors, External Monitor Connection
4 Hard Drives
1 2
4
3
Picture Name Description
HP Network Interface Card
Part Number: 2050659-001
Function: Network Interface Card
Location: Slot 4, 5
HP Tape Drive Controller
Part Number: 2050328-001
Function: Tape Drive Controller Card
Location: Slot 4, 5
2021423-503H Mac-Lab/CardioLab/Centricity Cardiology INW Service Manual 2-49

Equipment Overview
The C: drive is RAID 1 mirrored
The D: drive is RAID 5 mirrored
Label Description
1 Hard Drives
2 CD/DVD Drive
3 Floppy Disk Drive
4 Tape Drive
1 2
3
4
Picture Name Description
HP SMART ARRAY P/400
Part Number: 2036800-038
Function: Hard drive RAID controller
Location: Slot 4, 5
2-50 Mac-Lab/CardioLab/Centricity Cardiology INW Service Manual 2021423-503H

Equipment Overview
Centricity Cardiology INW G4 Server
The G4 server has the following specifications: 3.2 GHz Xeon processor with 1 GB RAM
Three tiers:
Low: Three 72 GB drives
Mid: Three 146 GB drives
High: Four 300 GB drives
Separate C: and D: drives (see the following chart):
The C: drive is RAID 1 mirrored
The D: drive is RAID 5 mirrored
Label Description
1 Hard Drives
2 AIT Drive
3 CD/DVD Drive
4 Floppy Drive (behind cover)
1
2 3
4
2021423-503H Mac-Lab/CardioLab/Centricity Cardiology INW Service Manual 2-51

Equipment Overview
Picture Name Description
HP PCI GIGABIT NIC
Part Number: 2026881-001
Function: Provides reliable network connection
NOTEOn G4 servers, connect the ethernet cable to the NIC card. Do not use the motherboard network port.
Location: Slot 5
HP SMART ARRAY 641
Part Number: 2016993-001
Function: Hard drive RAID controller
Location: Slot 2
HP BBWC ENABLE - MEM - 128 MB DDR
Part Number: 2026817-001
Function: Improves server performance and decreases data loss potential if power is lost
Location: Connected to the SMART ARRAY card in Slot 2
2-52 Mac-Lab/CardioLab/Centricity Cardiology INW Service Manual 2021423-503H

Equipment Overview
Cabling and Connections
WARNINGSHOCK HAZARD — Use appropriate Lock Out/Tag Out procedures before performing any service on potentially energized equipment.
HP z600 Computer I/O Backplane Connections
z600 ComputerI/O Backplane
1
2
3
4
6
5
Label Part Number Description
1 N/A PS2 Connection for Keyboard
2 2020280-001(Note: This number is
for the cable only)
PS2 connection for Barcode Scanner Y-Cable (other side connects to Keyboard)
3 HP 237241-001 USB Port for Mouse (Must use this port)
4 N/A RJ-45 Port to Network
5 N/A To Speakers
6 2025965-002 USB Port for Printer (cable to use depends on the printer)
2021423-503H Mac-Lab/CardioLab/Centricity Cardiology INW Service Manual 2-53

Equipment Overview
HP xw8400 Computer I/O Backplane Connections
Label Part Number Description
1 N/A PS2 Connection for Keyboard
2 2020280-001(Note: This number is
for the cable only)
PS2 connection for Barcode Scanner Y-Cable (other side connects to Keyboard)
3 6119-1012031697-001
HP xw8400 only: To Local Printer (cable to use depends on the printer).
4 HP 237241-001 USB Port for Mouse (Must use this port)
5 N/A To Speakers
6 N/A HP xw8400 only: To Ablation Interface
7 N/A RJ-45 Port to Network
8 2025965-002 USB Port for Printer (cable to use depends on the printer)
2-54 Mac-Lab/CardioLab/Centricity Cardiology INW Service Manual 2021423-503H
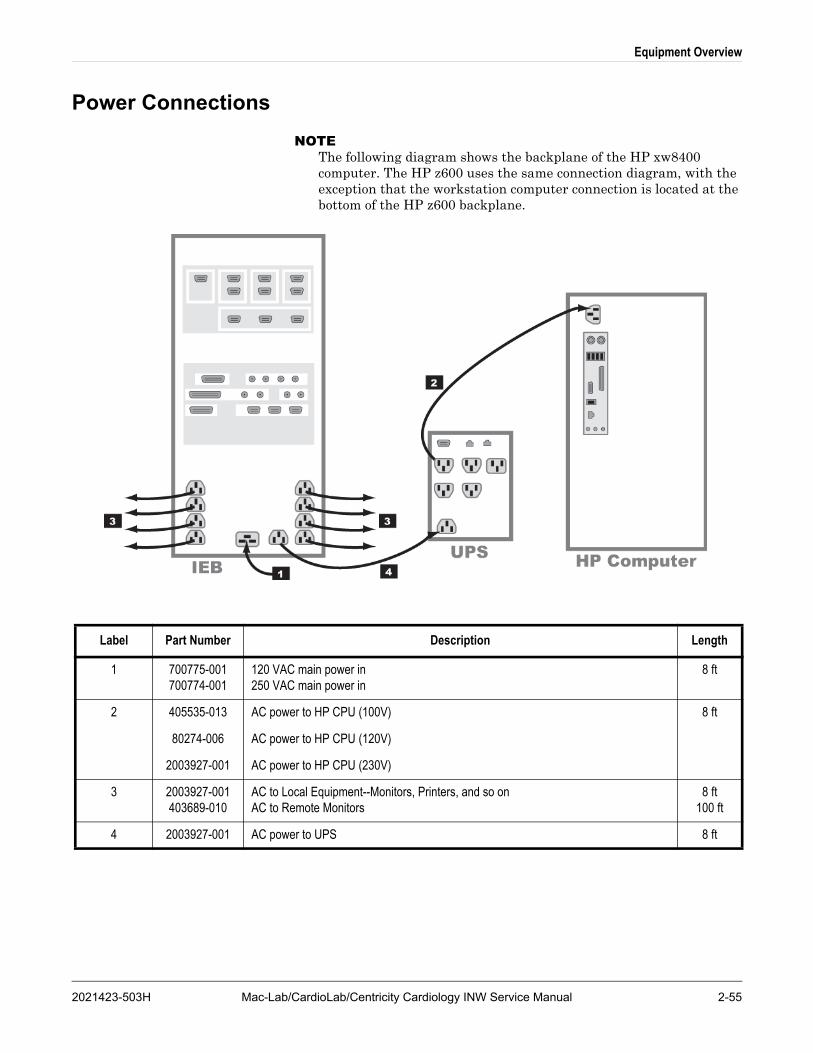
Equipment Overview
Power Connections
NOTEThe following diagram shows the backplane of the HP xw8400 computer. The HP z600 uses the same connection diagram, with the exception that the workstation computer connection is located at the bottom of the HP z600 backplane.
Label Part Number Description Length
1 700775-001700774-001
120 VAC main power in250 VAC main power in
8 ft
2 405535-013
80274-006
2003927-001
AC power to HP CPU (100V)
AC power to HP CPU (120V)
AC power to HP CPU (230V)
8 ft
3 2003927-001403689-010
AC to Local Equipment--Monitors, Printers, and so on AC to Remote Monitors
8 ft100 ft
4 2003927-001 AC power to UPS 8 ft
2021423-503H Mac-Lab/CardioLab/Centricity Cardiology INW Service Manual 2-55

Equipment Overview
HP z600 Video Connections
7
6 4
5
8
9b
9a 2
z600 Computer
IEB
3
1
Label Part Number Description Length
1 2003928-001 Real-Time display (Video 1) in to IEB 5 ft
2 2003928-001 Review display (Video 2) in to IEB 5 ft
3 2003928-001 Cardio Image display (Video 3) in to IEB 5 ft
4 2003928-001or
2081540-001
Out to Local Cardio Image Monitor (Video 3) 5 ftor6 ft
5 2003928-001or
2081540-001
Out to Local Review Monitor (Video 2) 5 ftor6 ft
6 2003928-001or
2081540-001
Out to Local Real-Time monitor (Video 1) 5 ftor6 ft
7 2003442-001 Out to remote monitor (switched Video 1 or Video 2) 100 ft
8 2003442-001 Out to optional remote monitors (Video 1, 2, or 3) 100 ft
9a 2018060-001 Image capture. DVI to 5-BNC female connector cable plugs into either DVI plug. Only one BNC connection is used to connect to the image input from another system (9b)
9b 2003411-001 BNC Cable to optional imaging system 50 ft
2-56 Mac-Lab/CardioLab/Centricity Cardiology INW Service Manual 2021423-503H

Equipment Overview
HP xw8400 Video Connections
7
6 4
5
8
3
1
9b
9a 2
HP8400 Computer
IEB
Label Part Number Description Length
1 2003928-001 Real-Time display (Video 1) in to IEB 5 ft
2 2003928-001 Review display (Video 2) in to IEB 5 ft
3 2003928-001 Cardio Image display (Video 3) in to IEB 5 ft
4 2003928-001or
2081540-001
Out to Local Cardio Image Monitor (Video 3) 5 ftor6 ft
5 2003928-001or
2081540-001
Out to Local Review Monitor (Video 2) 5 ftor6 ft
6 2003928-001or
2081540-001
Out to Local Real-Time monitor (Video 1) 5 ftor6 ft
7 2003442-001 Out to remote monitor (switched Video 1 or Video 2) 100 ft
8 2003442-001 Out to optional remote monitors (Video 1, 2, or 3) 100 ft
9a 2018060-001 Image capture. DVI to 5-BNC female connector cable plugs into either DVI plug. Only one BNC connection is used to connect to the image input from another system (9b)
9b 2003411-001 BNC Cable to optional imaging system 50 ft
2021423-503H Mac-Lab/CardioLab/Centricity Cardiology INW Service Manual 2-57

Equipment Overview
Communications Connections
HP8400 Computer
IEB
1
2
5
4
3
Label Part Number Description Length
1 N/A Network connection N/A
2 2018835-001
2003408-0022042981-0012035570-0012042214-001
RF Ablation Device Interface. Location shown is for the HP xw8400. HP z600 Ablation Interface will be located on the PCI NIC card.
50 ft Serial CableOptical Isolator Serial Cable for CryoCath Interface Serial Cable for RF Ablation Interface
50 ft
2 m6 ft
3 2003587-001 PCI Communications (DB-44) 2.5 ft
4 2003410-001 BNC coax. analog in (from Fluoro, and so on) 30 ft
5 2003410-001 Analog out (typically to Stimulator) 30 ft
2-58 Mac-Lab/CardioLab/Centricity Cardiology INW Service Manual 2021423-503H

Equipment Overview
TRAM/Amplifier Connections
HP8400 Computer
3a
4
6
5
3b
2
1
Amplifier
TRAM-RAC
Analog Output Box
IEB
PatientData
PatientData
AnalogData
Label Part Number Description Length
1* 2011129-001 TRAMNet to ethernet cable 1 ft
2* 2016133-001 HP Computer/IEB TRAMNet cable 9 ft
3a 417335-xxx Adapter cable to TRAM. Part number varies by length ordered (-001 to -007). Varies
3b* 2016134-001 15-pin to 9-pin adapter cable 1 ft
4 417335-002 TRAM-RAC to Analog Output Box cable 51 ft
4 417335-003 TRAM-RAC to Analog Output Box cable 70 ft
5 2007579-001 IEB to Analog Output Box cable 15 ft
6 2003434-001 Amplifier to HP fiber optic cable 75 ft
* These cables are contained in TRAMNet Cabling Kit (PN 2018683-001)
2021423-503H Mac-Lab/CardioLab/Centricity Cardiology INW Service Manual 2-59

Equipment Overview
Amplifier/Stimulator Connections
Typical Setup (with MicroPace)
IEBHP
Computer
MicroPaceStimulator
MicroPaceCPU
Amplifier
RFGenerator
19
6
24
5
CatheterConnection
Box
ExternalECG Auxiliary
Reference
3
7
8Catheter
InputModule
PersonalityModule
Label Part Number Description
1 2003411-001 A BNC Cable (30 ft). Connects back of MicroPace (ECG 1 Input) to back of IEB (Analog Out 1).
2 N/A Large Cable with D-Connectors. Connects back of MicroPace (Auxiliary Port) to side of Catheter Connection Box.
3 N/A Small Cable. Connects front of MicroPace (Green Connection Port or in emergencies Red Connection Port) to side of Catheter Connection Box.
4 301-00204-03 Red or Black leads connect to front of Catheter Connection Box to Amplifier Stimulator Input.
5 2003434-001 Fiber Optic Cable (75 ft)
6 2003857-001 DB44 Connect Cable
7 2003408-002 50 ft Serial Cable
8 301-00202-08 Catheter Input Module
2-60 Mac-Lab/CardioLab/Centricity Cardiology INW Service Manual 2021423-503H

Equipment Overview
Typical Setup (with Bloom)
IEBHPComputer
Bloom
PatientIsolation
Box
Amplifier
RFGenerator
Battery Battery
16
2
4
5
CatheterConnection
Box
ExternalECG Auxiliary
Reference
3
7
8Catheter
InputModule
PersonalityModule
Label Part Number Description
1 2003410-001 BNC Cable (30 ft). Connects Bloom and IEB.
2 N/A Large Cable with Square Connectors. Connects back of Bloom to back of Patient Isolation Box.
3 N/A Small Cable. Connects front of Patient Isolation Box to side of Catheter Connection Box.
4 301-00204-03 Red or Black leads connect to front of Catheter Connection Box to Amplifier Stimulator Input.
5 2003434-001 Fiber Optic Cable (75 ft)
6 2003587-001 DB44 Connect Cable
7 2003408-002 50 ft Serial Cable
8 301-00202-08 Catheter Input Module
2021423-503H Mac-Lab/CardioLab/Centricity Cardiology INW Service Manual 2-61

Equipment Overview
Equipment Setup
Label Part Number Description
C and C1 N/A Bloom (This is a typical example.Specific equipment may vary by location). Connects to the IEB (not shown) via the External Input BNC jack on the back (C1) and the Patient Isolation Box (D) via a large cable with square connectors. (See next section for detail.)
D N/A Patient Isolation Box. Rear connection to Bloom (C1) via large cable with square connectors. Front connection to Catheter Connection Box (E). Front panel provides access to internal batteries.
E N/A Catheter Connection Box. Side connection to the Patient Isolation Box (D) front connector. Red and Black leads connect from the front to the Amplifier (F) Stim Input.
F 301-00088-10 Amplifier Connected to:
(1) External ECG connection
(2) Catheter Input Module
(3) Auxiliary Reference Cable
(6) Catheter Connection Box
G 301-00202-08 Catheter Input Module. Catheter leads (not shown) plug into the block end. Connector on other end plugs into the Amplifier (4) Cardiac Input (Labeled A, B, C, and so on).
1 N/A Bloom connection to IEB (BNC cable not shown).
2 N/A Bloom connection to Patient Isolation Box.
3 N/A Patient Isolation box to Catheter Input Module cable.
4 301-00204-03 Catheter Connection Box to Amplifier cable.
5 301-00038-00 External ECG Connections. Colored leads connect to patient. Connector on other end connects into the Amplifier (4) ECG Input.
6 301-00205-08 Auxiliary Reference Cable. Plugs into the Amplifier (4) Auxiliary Input.
2-62 Mac-Lab/CardioLab/Centricity Cardiology INW Service Manual 2021423-503H

Equipment Overview
Bloom (Connection Detail)
Connector Description
1 External Input. BNC connection to the IEB (cable not shown).
2 J20. Connection to Patient Isolation Box (large square connector)
2021423-503H Mac-Lab/CardioLab/Centricity Cardiology INW Service Manual 2-63

Equipment Overview
Audio
1
3
26
5
HP Computer
LocalLeft
Speaker
LocalRight
Speaker
RemoteLeft
Speaker
RemoteRight
Speaker
IEB
44
to 60601-1CertifiedPowerSupply
5
Label Part Number Description
1 2018218-001 Y-connector (Connects to green jack on HP. One side to local speakers, the other to remote speakers.)
Location shown is for HP xw8400. HP z600 green speaker jack is located just above PCI card slots.
2 2018219-001 Audio Isolator
3 2078970-001 Speaker Set
4 2078970-001 Speaker Power Supply (included with speakers)
5 2003927-001
2003625-001
IEC (m) to IEC (f) Power Cord (8 ft)
NEMA to IEC Converter Cable (1 ft)
WARNING SHOCK HAZARD — Remote speakers must be powered by a 60601-1 certified power supply.
6 2011108-002 Speaker cable (50 ft)
2-64 Mac-Lab/CardioLab/Centricity Cardiology INW Service Manual 2021423-503H

Equipment Overview
CARTO™XP System Connections
NOTENot all CARTO XP System equipment or connections are shown. Refer to the CARTO XP System Installation Manual for additional information.
HP8400 Computer
12
ECG OUT
CARTO™ XP System Computer
Amplifier
CatheterInput
Module
CARTO™ XP System PatientInterface Unit
3
Label Part Number Description
1 2018217-001 CARTO XP System Crossover Network Cable (25 ft)
HP xw8400 Workstation is shown. For HP z600, use the right-hand NIC port as well; do not use the onboard NIC.
2 2015944-001 ECG Quick Connect Cable (ECG OUT connector on the PIU to the ECG connector on the Amplifier)
3 2024507-001 CardioLab II Plus to CARTO IC/Stim Cable
2021423-503H Mac-Lab/CardioLab/Centricity Cardiology INW Service Manual 2-65

Equipment Overview
CARTO™ 3 System Connections
The CARTO 3 System may be connected in one of two ways:
Configuration 1 (refer to the following figure) to acquire:
HIS, RVA, and HRA signals with the Catheter Input Module.
Surface ECG via the CARTO 3 system using the ECG connectivity cable.
Configuration 2 (refer to the following figure) to acquire:
HIS, RVA, and HRA signals, Navistar Cath (mapping), Coronary Sinus, or other signals via the CARTO 3 system using the IECG connectivity cable.
Surface ECG via the CARTO 3 system using the ECG connectivity cable.
Item Description
1 Catheter Input Module
2 CardioLab II Plus Amplifier
3 ECG Connectivity Cable
4 CARTO 3 PIU
3
1 2
4
2-66 Mac-Lab/CardioLab/Centricity Cardiology INW Service Manual 2021423-503H

Equipment Overview
NOTEThe CardioLab II Plus Amplifier remains connected to all body surface leads even if the CARTO 3 PIU is turned off.
Item Description
1 IECG Connectivity Cable
2 CardioLab II Plus Amplifier
3 Catheter Input Module
4 ECG Connectivity Cable
5 Stimulation Cables
6 CARTO 3 PIU Front
7 CARTO 3 PIU BackECG OUT
3
1 2
4
2021423-503H Mac-Lab/CardioLab/Centricity Cardiology INW Service Manual 2-67

Equipment Overview
HP8400 Computer
1
CARTO™ System Computer
Catheter InputModule
CARTO™ 3 System Patient Interface Unit
Amplifier
Configuration 2
Configuration 1
3
3
2
Amplifier
CARTO™ 3 System Patient Interface Unit
4
Item Manufacturer Part Number Description
1 GE PN 2018217-001 25’ CAT5 Crossover Cable (HP xw8400 Workstation is shown. For HP z600, use the right-hand NIC port as well; do not use the onboard NIC.)
2 Biosense Webster CA-5400-21 BW-GE ICEG Cable
3 Biosense Webster CA-5400-19 BW-GE BS-ECG Cable
4 Biosense Webster J-B PACINT AUX CA-4041-03
Two Pair STIM Cable (3m)
N/A GE 301-00204-03 Stimulator Interface Cable
2-68 Mac-Lab/CardioLab/Centricity Cardiology INW Service Manual 2021423-503H

Equipment Overview
Review Workstations
Review Workstation Connections
WARNINGSHOCK HAZARD — Do not place the isolation transformer on the floor.
WARNINGELECTRICAL HAZARDS — Connect equipment only as specified in connection diagrams. Failure to do so may result in excess leakage current, shock or fire.
NOTEThe DASH can also be connected to the isolation transformer as shown in the DASH connection diagram (“DASH Connection” on page 2-71).
4b4a
2
1
3
Isolation Transformer
Monitor
Review Workstation
Label Part Number Description
1 80274-006 Power Cord (connect to a dedicated power supply on an isolated circuit)
2 2003927-001 Power Cord
3 2003927-001 Power Cord
4a N/A DVI to VGA Adaptor
4b 2003928-001 Video Cable
2021423-503H Mac-Lab/CardioLab/Centricity Cardiology INW Service Manual 2-69

Equipment Overview
Solar Connection
GE Client WorkstationI/O Backplane
Solar Monitor1
Label Part Number Description
1 2003408-001 DB9M TO DB9F, 50 ft, Straight Thru
2-70 Mac-Lab/CardioLab/Centricity Cardiology INW Service Manual 2021423-503H

Equipment Overview
DASH Connection
Label Part Number Description
1 N/A Ethernet
2a 418335-002 RJ45 Cable
2b 420915-013 DIDCA ASM PC Interface Autoport
3 N/A Auxiliary
GE Client WorkstationI/O Backplane
1
3
2a
2b
DASH Monitor
2021423-503H Mac-Lab/CardioLab/Centricity Cardiology INW Service Manual 2-71

Equipment Overview
Software
Operating System
Acquisition/Review Workstations: Windows XP Professional with Service Pack 3.
Software Only Workstation: Windows XP Professional with Service Pack 3 or Windows Vista Business with Service Pack 2.
Centricity Cardiology INW Server: Windows Server 2003 Standard Edition with Service Pack 2.
Database
Acquisition/Review Workstations: Microsoft SQL 2000 Desktop Edition.
Software Only Workstations: Microsoft SQL 2000 Desktop Edition (on XP systems only) and SQL Express 2005 (on VISTA systems only).
Centricity Cardiology INW Server: Microsoft SQL 2000 Server Standard Edition.
Application Software
Acquisition/Review Workstations: Microsoft Office 2007 Professional.
Software Only Workstations: Microsoft Office 2007 Professional.
2-72 Mac-Lab/CardioLab/Centricity Cardiology INW Service Manual 2021423-503H

3 Maintenance
2021423-503H Mac-Lab/CardioLab/Centricity Cardiology INW Service Manual 3-1

Maintenance
Mac-Lab/CardioLab Service Performance Testing
WARNINGSHOCK HAZARD — Use appropriate Lock Out/Tag Out procedures before performing any service on potentially energized equipment.
Service performance testing should always be done after any service work is performed on the Mac-Lab / CardioLab / Centricity Cardiology INW system in order to ensure proper system functioning. The purpose of this section is to provide guidelines for proper service performance testing based on the service/repair that was completed. This section can also be printed and used as a form to provide objective evidence of the testing performed.
The “FRU Checkout Procedure Table” on page 3-3 provides a matrix to be followed in determining the tests and checks to perform based on the FRU replaced/service performed. Go to the appropriate row in the table and follow across that row’s column information to determine:
Tools Recommended to perform testing
Visual Inspection and Cleaning to perform
Electrical Safety Test to perform, if applicable
Checkout Procedures tests(s) to perform
Detailed lists of the tools/tests that are referenced in the FRU Checkout Procedure Table are found in the sections immediately following it.
Configuration
Customer _________________________________ SR Number __________________ Date ___________
Number of Mac-Labs____ CardioLabs____ ComboLabs____ Workstations____ SW Only Workstations____
Network Type____ Number of INW Servers____ Number of DMS Servers____ Number of DMS Clients____
3-2 Mac-Lab/CardioLab/Centricity Cardiology INW Service Manual 2021423-503H

Maintenance
FRU Checkout Procedure Table
FRU DescriptionTools
Recommended
Visual Inspection/Cleaning
Electrical Safety Tests
Checkout Procedure
Mac-Lab CardioLab ComboLab
Computer 1, 3, 4, 7 1, 2, 4, 5, 7 1-8, 12-17, 22-24
page 3-8, page 3-16
page 3-10, page 3-16
page 3-8, page 3-10, page 3-16
Computer Hard Drive 1, 2, 3, 4, 7, 8, 9 ALL 1-8, 12-17, 22-24
page 3-8, page 3-16
page 3-10, page 3-16
page 3-8, page 3-10, page 3-16
Drive Replaced (Floppy Drive, Optical Drive, DVD)
1, 2, 3, 4, 7, 8, 9 ALL 1-8, 12-17, 22-24
page 3-8 page 3-10 page 3-8, page 3-10
PCI Slot Card Replaced (Video, PCI Comm, Dual NIC Adapter)
1, 2, 3, 4, 7, 8, 9 ALL 1-8, 12-17, 22-24
page 3-8 page 3-10 page 3-8, page 3-10
TRAMNet to Ethernet Adapter Board
1, 2, 3, 4, 7, 8, 9 ALL 1-8, 12-17, 22-24
page 3-8, page 3-12
page 3-10, page 3-12
page 3-8, page 3-10, page 3-12
Image Capture Board 1, 2, 3, 4, 5, 7, 8, 9 ALL 1-8, 12-17, 22-24
page 3-8, page 3-12
page 3-10, page 3-12
page 3-8, page 3-10, page 3-12
Internal Computer Component (Memory, Power Supply, Fan)
1, 2, 3, 4, 7, 8, 9 ALL 1-8, 12-17, 22-24
page 3-8 page 3-10 page 3-8, page 3-10
External Computer Component (Mouse, Keyboard, Bar Code Scanner)
1, 2, 3, 4, 7, 8, 9 ALL — page 3-8 page 3-10 page 3-8, page 3-10
IEB (Vid Mux, I/O Board, Power Distribution/Supply, UPS)
1, 2, 3, 4, 7, 8, 9 1, 2, 3, 4, 6, 7 ALL page 3-8, page 3-12
page 3-10, page 3-12
page 3-8, page 3-10, page 3-12
Monitor 1, 7 2, 7 — page 3-8 page 3-10 page 3-8, page 3-10
Printer 1, 7 2, 7 — page 3-8, page 3-12
page 3-10, page 3-12
page 3-8, page 3-10, page 3-12
TRAM/TRAMNet 1, 3, 4, 7 1, 2, 4, 7 ALL page 3-8, page 3-12
page 3-10, page 3-12
page 3-8, page 3-10, page 3-12
Amplifier 3, 5, 7 2, 5, 7 ALL n/a page 3-10 page 3-8, page 3-10
2021423-503H Mac-Lab/CardioLab/Centricity Cardiology INW Service Manual 3-3

Maintenance
CARTO (cabling) 5, 7 1, 5, 7 — n/a page 3-10, page 3-13
page 3-8, page 3-10, page 3-13
Audible Indicators 7 2, 7 — page 3-8, page 3-13
page 3-10, page 3-13
page 3-8, page 3-10, page 3-13
RF Ablation (Serial Cable, Opto-isolator)
1, 7 1, 7 — n/a page 3-10, page 3-13
page 3-8, page 3-10, page 3-13
Stimulator 1, 3, 6, 7, 10 1, 2, 7 ALL n/a page 3-10, page 3-14
page 3-8, page 3-10, page 3-14
DASH/Solar 1, 5, 7 1, 2, 7 — page 3-8, page 3-14
page 3-10, page 3-14
page 3-8, page 3-10, page 3-14
RMOT 5, 7 1, 2, 7 — page 3-8, page 3-14
page 3-10, page 3-14
page 3-8, page 3-10, page 3-14
Analog Out 1, 7 1, 7 — page 3-8, page 3-14
page 3-10, page 3-14, page 3-14
page 3-8, page 3-10, page 3-14, page 3-14
INW Server 1, 5, 7 1, 2, 3, 7 — page 3-8, page 3-15, page 3-16
page 3-10, page 3-15, page 3-16
page 3-8, page 3-10, page 3-15, page 3-16
INW Server Parts (Memory, Disk Raid Adapter, Disk Drive, Tape Drive, UPS, UI Interface)
1, 2, 5, 7, 9 1, 2, 3, 7 — page 3-8, page 3-15
page 3-10, page 3-15
page 3-8, page 3-10, page 3-15
No Parts Replaced 7 1, 2, 3, 4, 5, 7 — page 3-8 page 3-10 page 3-8, page 3-10
Updates/Upgrades 7 1, 2, 3, 4, 5, 7 — page 3-8 page 3-10 page 3-8, page 3-10
FRU DescriptionTools
Recommended
Visual Inspection/Cleaning
Electrical Safety Tests
Checkout Procedure
Mac-Lab CardioLab ComboLab
3-4 Mac-Lab/CardioLab/Centricity Cardiology INW Service Manual 2021423-503H

Maintenance
Tools Recommended
1. Standard hand tools (PN: N/A)
a. Multi-headed Screwdriver
b. Allen Wrenches (English and Metric)
c. Dykes
d. Needle Nose Pliers
e. Crescent Wrench
f. Tie Wraps
g. Electrical Tape
2. Multimeter (PN: N/A)
3. Safety Analyzer (PN: N/A)
4. Leakage current tester (PN: MT-1216)
5. Service manual (PN: 2021423-503) for reference only
6. Installation manual (PN: 2021423-502, if available) for reference only
7. Micropace Quick Installation Manual (PN: MP3156) for reference only
8. Patient simulator (PN: MARQIII-kit)
9. Vacuum cleaner (PN: N/A) (HEPA Certified, if available)
10. ESD Mat/Strap
11. Test LEDs for Stimulator
2021423-503H Mac-Lab/CardioLab/Centricity Cardiology INW Service Manual 3-5

Maintenance
Visual Inspection/Cleaning
Inspect the following for excess wear and/or any visual signs of damage and/or clean as indicated:
1. Network/Serial/Communication cabling
2. AC power cord(s)/video cables
3. Inspect/Remove dust from fans on all computers
4. TRAM cables
5. CardioLab II Plus amplifier cables
6. Clean dust from all internals
7. Inspect external housing/case of all system components for damage
Electrical Safety Checks
Perform these checkouts as required.
1. Power down all devices.
2. Unplug the power cord of the device being checked (Computer, IEB, TRAM, Amplifier or Stimulator) from its power source and plug it into the Safety Analyzer.
3. Plug the Safety Analyzer into an AC power source.
4. Verify that the bottom two Outlet LEDs are illuminated and that the top LED is NOT illuminated.
5. Select LEAKAGE > EARTH on the Safety Analyzer.
6. Select NEUTRAL > CLOSED and then select POLARITY > NORMAL on the Safety Analyzer.
7. Record the leakage displayed in microamps (uA).
8. Verify the leakage is less than 300 uA.
9. Select POLARITY > REVERSED.
NOTEThis step is not required for the computers.
10. Record the leakage displayed in microamps (uA).
11. Verify the leakage is less than 300 uA.
12. On the Safety Analyzer select LEAKAGE > CHASSIS.
13. Connect the Chassis alligator clip (on the Safety Analyzer) to the Earth ground lug on the device.
14. Select NEUTRAL > CLOSED and then select POLARITY > NORMAL on the Safety Analyzer.
3-6 Mac-Lab/CardioLab/Centricity Cardiology INW Service Manual 2021423-503H

Maintenance
15. Verify the leakage is less than 100 uA.
16. Press and hold down the LIFT GND switch on the Safety Analyzer and record the leakage displayed in uA.
17. Verify the leakage is less than 300 uA.
18. Select POLARITY > REVERSED.
NOTEThis step is not required for the computers.
19. Verify the leakage is less than 100 uA.
20. Press and hold down the LIFT GND switch on the Safety Analyzer and record the leakage displayed in uA.
21. Verify the leakage is less than 300 uA.
22. Select - RESISTANCE on the Safety Analyzer.
23. Connect the Chassis alligator clip (on the Safety Analyzer) to the Earth ground lug on the device.
24. Verify the resistance is less than 0.2 ohms.
2021423-503H Mac-Lab/CardioLab/Centricity Cardiology INW Service Manual 3-7

Maintenance
Functional Checkout Procedure
Use this manual and the Mac-Lab, CardioLab and/or Centricity Cardiology INW Operator’s manual(s) for reference. Perform the following procedures for all applicable options. Ensure all test studies created are deleted upon checkout completion.
Mac-Lab SCOP (Standard Checkout Procedure)
1. Verify the Mac-Lab module is selected. Create a new study by clicking on New Study. Enter the required fields: patient last name, first name and medical record number.
2. If applicable, join the test study from a Nurse’s Review Workstation by highlighting the test study and clicking on Continue Study.
3. Add a Macro to the event log on the Acquisition. If applicable, verify that input comes across to the Nurse’s Review Workstation.
4. Add a list item to the study (for example, add a complication or staff member on the Acquisition). If applicable, verify that the item comes across on the Nurse’s Review Workstation.
5. If applicable, add Macro and list item to the study from a Nurse’s Review Workstation and verify that items come across to the Acquisition.
6. Connect the test cables from the patient simulator to the TRAM Module. The green connector is for ECG, red connectors for invasive blood pressures, blue connector for SpO2, black connector for non-invasive blood pressure (NIBP) and brown connector for cardiac output.
7. Verify that ECG traces display at 60 bpm, 120 bpm and 180 bpm for all 12 leads.
8. Verify blood pressure traces at two measurement points on P1, P2 and P3 inputs (0 mm/hg and 120/80 mm/hg).
9. Verify Cardiac Output traces at two measurement points.
10. Verify that NIBP readings are displayed by placing the pressure cuff over the left or right arm and initiating a measurement.
11. Verify SpO2 by placing the finger probe on the right or left index finger. Verify that oxygen saturation and pulse rate readings are displayed.
12. If applicable, perform the EtCO2 module Capnostat sensor check. Remove the adaptor from the sensor, but ensure that the sensor cable is still connected to the module. Ensure that the cell windows are clean and dry. Place the sensor on the cell marked REF. Verify that the reading is 38 mmHg +/- 2 on the display.
3-8 Mac-Lab/CardioLab/Centricity Cardiology INW Service Manual 2021423-503H

Maintenance
13. If applicable, verify the CardioImage/Image Capture feature:
a. Create an Image Window by clicking on the Windows menu > Image Window 1 or 2, in either the Real-Time, Review, or CardioImage monitor.
b. Drag and drop the window into the selected section of the monitor.
c. Verify that there is a trigger signal and an image from the fluoro monitor.
d. Click Snapshot to capture a fluoro image.
14. If applicable, verify real time vitals by initiating an NIBP measurement from a Nurse’s Review Workstation.
15. Press F2 (barcode) on the keyboard and scan a barcode to verify barcode reader functionality.
16. Generate a report and verify printer operation.
a. Select Study > Reports.
b. Click New and select a report.
c. Click a blank cell to add an X, which generates the report.
d. Click Generate to generate the selected report.
e. Highlight the report created and click View.
f. Click the Printer icon to print the report.
17. If applicable, close the study on the Nurse’s Review Workstation.
18. Close the study and verify that no error messages are displayed and that the study is listed in System, Optical and Network Catalog if networked to the Centricity Cardiology INW server.
19. Verify that the Patient is in the DMS Database.
20. If applicable, run Pushstudies to verify that the case successfully went to the server
21. If applicable, verify if Patient search is active by performing a Patient Search and picking a last name that exists on the Cathlab schedule.
22. If applicable, review a study from the optical disk.
2021423-503H Mac-Lab/CardioLab/Centricity Cardiology INW Service Manual 3-9

Maintenance
CardioLab SCOP (Standard Check Out Procedure)
1. Verify the CardioLab module is selected. Create a new study by clicking on New Study and then select a study configuration. Enter the required fields: patient last name, first name and medical record number.
2. If applicable, join the test study from a Nurse’s Review Workstation by highlighting the test study and clicking Continue Study.
3. Add a Macro to the event log on the Acquisition. If applicable, verify that input comes across to the Nurse’s Review Workstation.
4. Add a list item to the study (for example, add a complication or staff member on the Acquisition). If applicable, verify that the item comes across on the Nurse’s Review Workstation.
5. If applicable, add a Macro and list item to the study from a Nurse’s Review Workstation and verify that the items come across to the Acquisition.
6. Connect the test cables from the patient simulator to the TRAM Module. The blue connector is for SpO2 and the black connector is for the non-invasive blood pressure (NIBP). Also connect the radiotranslucent ECG lead wires and blood pressure cables from the CardioLab Amplifier to the patient simulator.
7. Verify communication between the amplifier and computer:
a. Select Administration > Amplifier Test.
b. Select Device Id and Detect > Read Amplifier Id EEPROM.
c. Verify readings.
d. Select Register Readback > Read Continuously.
e. Verify no failures.
f. Select Walking Ones > Walk Continuously.
g. Verify no failures.
h. Select Stim Walking Ones > Walk Continuously.
i. Verify no failures.
j. Select Calibration Pulse > Pulse All.
k. Verify calibration pulses are uniform in height.
8. Turn on the stimulator device (for example, Bloom or MicroPace or EP Med) and verify the sensing of the ECG signal. Stimulate inputs 1 – 4 and verify that pacing spikes are displayed.
9. Verify that ECG traces display at 60 bpm, 120 bpm and 180 bpm for all 12 leads.
10. Verify blood pressure traces at two measurement points on P1, P2 and P3 inputs (0 mm/hg and 120/80 mm/hg).
3-10 Mac-Lab/CardioLab/Centricity Cardiology INW Service Manual 2021423-503H

Maintenance
11. Verify that NIBP readings are displayed by placing the pressure cuff over the left or right arm and initiating a measurement.
12. Verify SpO2 by placing the finger probe on the left or right index finger. Verify that oxygen saturation and pulse rate readings are displayed.
13. If applicable, perform the EtCO2 module Capnostat sensor check. Remove the adaptor from the sensor, but ensure that the sensor cable is still connected to the module. Ensure that the cell windows are clean and dry. Place the sensor on the cell marked REF. Verify that the reading is 38 mmHg +/- 2 on the display.
14. If applicable, verify the CardioImage/Image Capture feature:
a. Create an Image Window by clicking on Windows menu > Image Window 1 or 2, in either the Real-Time, Review, or CardioImage monitor.
b. Drag and drop the window into the selected section of the monitor.
c. Verify that there is a trigger signal and an image from the fluoro monitor.
d. Click Snapshot to capture a fluoro image.
15. If applicable, verify that the CARTO icon is blue (located on the right side of the System Tray on the Real-Time screen).
16. If applicable, verify that the ablation device is selected and configured and that all required cabling is attached (for example, opto-isolator).
17. If applicable, verify real time vitals on the Nurse’s Review Workstation. Initiate an NIBP measurement from a Nurse’s Review Workstation.
18. Press F2 (barcode) on the keyboard and scan a barcode to verify barcode reader functionality.
19. Generate a report and verify printer operation.
a. Select Study > Reports.
b. Click New and select a report.
c. Click a blank cell to add an X, which generates the report.
d. Click Generate to generate the selected report.
e. Highlight the report created and click View.
f. Click the Printer icon to print the report.
20. If applicable, close the study on the Nurse’s Review Workstation.
21. Close the study and verify that no error messages are displayed and that the study is listed in the System, Optical and Network Catalog if networked to an Centricity Cardiology INW server.
2021423-503H Mac-Lab/CardioLab/Centricity Cardiology INW Service Manual 3-11

Maintenance
22. Verify that the Patient is in the DMS Database.
23. If applicable, run Pushstudies to verify that the case successfully went to the server
24. If applicable, verify if Patient search is active by performing a Patient Search and picking a last name that exists on the Cathlab schedule.
25. If applicable, review a study from the optical disk.
TRAM Module Testing
1. Verify that there is a connection.
2. Run the TRAMNet Test: C:\windows\utilities\tramtest\tramnetest.bat.
CardioImage/Image Capture Testing
1. Verify that the correct .dcf file is selected.
2. Create an Image Window by clicking Windows menu > Image Window 1 or 2, in either the Real-Time, Review, or CardioImage monitor.
3. Drag and drop the window into the selected section of the monitor.
4. Verify that there is a trigger signal and an image from the fluoro monitor.
5. Click Snapshot to capture a fluoro image.
IEB Testing
1. Verify that switched video is functional.
2. Verify UPS functionality by unplugging power from IEB and confirming that the acquisition computer remains powered.
Printer Testing
Verify that a test page prints.
3-12 Mac-Lab/CardioLab/Centricity Cardiology INW Service Manual 2021423-503H

Maintenance
CARTO Testing
NOTEWork with the customer to start up and connect the CARTO system, if needed, before proceeding.
1. Verify the ECG connections to the CARTO system.
2. Select Start > Settings > Network Connections. Verify the CARTO connection is 100Mbps.
3. Start a new case and verify that the CARTO icon is blue (located on the right side of the System Tray on the Real-Time screen).
Audible Indicators Testing
1. Open a study. Open the Vital Configuration window from the Measurements drop-down menu.
2. Verify that the Audible Indicators check box is selected, that the min/max settings are selected for the Vital Signs check box and that the ECG tone check box is selected for Mac-Lab.
3. If Mac-Lab, verify that ECG QRS tones are present.
4. Adjust the vital signs low and high to verify an audible tone when the min/max settings are reached.
RF Ablation Testing
NOTEYou need to perform the following test with the customer’s cooperation.
1. Open the Ablation window in CardioLab.
2. Generate an RF output.
3. Verify that the waveforms and values are properly displayed in the Ablation window.
2021423-503H Mac-Lab/CardioLab/Centricity Cardiology INW Service Manual 3-13

Maintenance
Stimulator Testing
1. Connect a Patient Stimulator.
2. Turn on the stimulator device (for example, Bloom or MicroPace or EP Med) and verify the sensing of the ECG signal.
3. Stimulate inputs 1 – 4 and verify that pacing spikes are displayed.
4. Refer to the vendor manual for configuration and checkout information.
DASH / Solar Testing
1. Connect NIBP and SpO2 to the DASH or Solar monitor.
2. Verify that the interface cable is properly connected.
3. Perform a Stat Vitals measurement and verify that a log entry is created in the log window of the Nurse’s Review Workstation.
Remote Operators Terminal Testing
1. Verify that the DIP-switch position 2 for the Normal Scroll Lock position is set to ON. Setting the Normal Scroll Lock position to ON ensures pressing the normal Scroll Lock key on the keyboard does not lock the remote keyboard.
2. Verify mouse and keyboard functionality at the RMOT.
3. Verify mouse and keyboard functionality at the local Acquisition after this testing is completed.
Analog Out Testing
NOTEDue to the various configurations and usages of this output, the customer’s cabling and test device is required to complete the verification.
1. Verify that there are signals coming out of DFIB Sync out from TRAM.
2. Verify that there are signals coming out of analog out on back of the TRAM RAC.
3. Verify that there are signals coming out of analog output in back of IEB.
3-14 Mac-Lab/CardioLab/Centricity Cardiology INW Service Manual 2021423-503H

Maintenance
Centricity Cardiology INW Testing
1. Log on to the server as Administrator (Contact GE Healthcare Technical Support or the system administrator for current password information).
2. Select Start > Programs > Microsoft SQL Server > Enterprise Manager.
3. Navigate to Microsoft SQL Servers > SQL Server Group > INW Server.
4. Click to expand the INW Server.
5. Verify that the Replication Monitor is present and is green.
6. Verify that the Archive Generator has been properly set up for each Acquisition System in replication.
7. Verify that Database Maintenance is configured properly.
8. Verify that backups have been configured.
NOTEFor Enterprise Backups, have the customer verify the backup of the folders listed in step 8c below was successful.
a. Select Start > Programs > Accessories > System Tools > Backup.
b. Expand the tape and navigate through the folder structure to verify that the proper directories and files are included in the tape backup.
c. Verify that the following directories and files are selected:
D:\Gemms\Prucka\Database\Maintenance\Backup
D:\Gemms\Prucka\Database\Maintenance\Log
D:\Gemms\Prucka\Studies
9. Verify that a full tape backup has been performed on the INW server and that no errors exist in the logs. Navigate to C:\Documents and Settings\Administrator\Local Settings\Application Data\Microsoft\Windows NT\NT Backup\Data for the log files.
10. Create a test study on one of the Acquisition system and close the study.
11. Verify that the new study is displayed on the Network catalog on the other systems (Acquisitions and Reviews).
12. Verify that lists and macros are present.
13. Verify that List Sharing and replication is working properly on all Acquisitions and Server by adding a supply item in the DMS and verify that item shows up on all Acquisition systems in replication. Remember to remove the item from the DMS after the test.
14. Verify that a study that has been archived to the INW server can be reviewed from all systems (Acquisitions and Reviews).
2021423-503H Mac-Lab/CardioLab/Centricity Cardiology INW Service Manual 3-15

Maintenance
15. Verify that a study that has been pushed to the Centricity Cardiology INW server can be reviewed from all systems (Acquisitions and Reviews).
Remote Connection Testing
Verify that InSite ExC and/or VPN is working for remote diagnostics.
Planned Maintenance
The following form is a list of inspection and planned maintenance tasks that should be performed once a year. Print out a copy of this form and leave the copy of the form with the customer. Ensure that the customer knows that performing these tasks once a year will help maintain the equipment properly.
3-16 Mac-Lab/CardioLab/Centricity Cardiology INW Service Manual 2021423-503H

Maintenance
2021423-503H Mac-Lab/CardioLab/Centricity Cardiology INW Service Manual 3-17

Maintenance
Mobile Workstand Preventative Maintenance
The following is preventative maintenance instructions for the mobile workstand (2008203-001).
Tools Required
1/2 inch socket wrench
9/64 inch hex wrench (provided with workstand)
Adjusting Tilt and Tilt Tension
1. For minor adjustments of the display tilt, loosen the Tilt Adjustment Lever, grasp the top and bottom of the display and tilt it to the desired angle. Tighten the Tilt Adjustment Lever.
2. To adjust tilt tension, equally tighten or loosen the two (2) Tension Adjustment Screws with the 9/64 inch hex wrench provided.
CAUTIONEquipment Damage — Tilt tension screws must be torqued to a minimum of 35 in-lbs [4.0 N-m].
NOTEThe Tilt Adjustment Lever is a multi-position, clamping lever that operates by lifting, rotating and releasing the handle.
Adjusting Swivel or Pivot Tension
Using a 1/2 inch socket wrench, tighten or loosen the pivot tension bolt swivel nut to the desired tension.
CAUTIONEquipment Damage — Swivel tension nut must be torqued to a minimum of 20 in-lbs [2.3 N-m].
NOTEThe Utility Hook must be removed to allow adjustment of the swivel nut.
Routine Maintenance
Periodically inspect all mounting hardware. Tighten or adjust as necessary for optimal operation and safety.
3-18 Mac-Lab/CardioLab/Centricity Cardiology INW Service Manual 2021423-503H

4 Troubleshooting
2021423-503H Mac-Lab/CardioLab/Centricity Cardiology INW Service Manual 4-1

Troubleshooting
Initial Inspection
WARNINGSHOCK HAZARD — Use appropriate Lock Out/Tag Out procedures before performing any service on potentially energized equipment.
CAUTIONEQUIPMENT DAMAGE — Do not disconnect or reconnect cables while the system is under power (especially the barcode scanner).
Always use the following username for troubleshooting the system:
mlcltechuser (Contact GE Healthcare Technical Support or the system administrator for current password information).
CAUTIONSECURITY BREACH — Never leave a system logged in as mlcltechuser. When done, always log out and leave the system at the custom shell.
Before performing any troubleshooting procedure, check the following:
The IEB is plugged in and power and ground are available at the wall outlet (also check the outlet circuit breaker).
The IEB, computer, monitors, keyboard, and any optional equipment are properly connected and all connections are tight. Be sure to check for:
Frayed cables
Exposed conductors
Bent prongs or pins
Damaged cable housings
Loose plug screws
Both IEB power switches (one in front and one in back) are on.
Computer power switch is on.
All monitors are turned on and set to the appropriate brightness and contrast.
Equipment housing for cracks, overheating, or other damage.
4-2 Mac-Lab/CardioLab/Centricity Cardiology INW Service Manual 2021423-503H

Troubleshooting
Hardware
Clean Fiber Optic Cable
1. Clean each end of the fiber optic cable connecting the amplifier to the HP computer with a soft, dry, clean cloth.
2. Use a can of compressed air to remove any dust accumulation from the connector at the amplifier.
Initial Check
1. Right-click My Computer and select Explore.
2. Navigate to C:\Windows\cpqdiag\cpqdiag.exe.
3. Run a complete hardware diagnostic test on the system.
NOTEThe tests also include an internal serial loopback test.
Troubleshooting
Problem: Unable to Communicate with the TRAM
The system cannot have an IP address in the range of 192.168.0.xxx.
Verify the IP address for the system network connection (in network properties) is not 192.168.0.xxx. For example, if one of the other adapters on the Acquisition system has the IP configured for 192.168.0.20, the TRAMNet connection will fail and TRAM communication will fail.
The IP address of the TRAMNet is 192.168.0.100 and cannot be changed.
Verify the TRAMNet jumper cable (1 ft yellow Ethernet cable) is connected into the left network port.
Review Installation manual (if available) and “TRAM/Amplifier Connections” on page 2-59 for proper cable connections.
Problem: System Locks Up After First Scan (with the Barcode Scanner) or the Barcode Scanner Does Not Work Properly
Ensure the barcode scanner is connected to a USB port. Otherwise, re-seat the connector. Refer to the Mac-Lab/CardioLab Barcode Scanner Configuration Instructions (PN: 2050508-001).
2021423-503H Mac-Lab/CardioLab/Centricity Cardiology INW Service Manual 4-3

Troubleshooting
Problem: No Video Display on the Review Stations with LCD Monitor
Check the video cable. The computer and monitors both have DVI connectors.
Use the DVI-VGA adapter with the DB15-HD15 cable.
Try the supplied DVI-HD15 cable.
Try a different cable with the monitor or test the monitor on a different station.
Problem: Scrambled Video Display after Upgrade
Incompatible refresh rate between the video card and the supported ranges on the monitor (if the monitor is older). The new Parhelia video board supports a high range of refresh rates, and may power up with a random rate.
Scan for hardware problems using the built-in HP diagnostic tool (on Acquisition systems and HP Review stations).
Matrox Parhelia Fan Alert
The following is a diagnostic message that is displayed by the Matrox Parhelia board driver if the cooling fan on the board fails:
1. If this message appears on an Acquisition or HP Review system, click Disable for 8 hours to temporarily disable this message.
NOTEDo not use the system for an extended period if this problem is reported.
2. The error message will continue to be displayed if the fan continues to malfunction. In order to fix this problem, replace the affected Parhelia display board on the system.
4-4 Mac-Lab/CardioLab/Centricity Cardiology INW Service Manual 2021423-503H

Troubleshooting
Replace Main Video Board with Matrox M9140 Quad Video Board
If the main video board is being replaced with the Matrox M9140, the previous video board’s drivers must be uninstalled and the board removed.
After the old video board is removed, install the Matrox M9140 Quad video board, connect the cables, power on the system and install the Matrox M9140 drivers. Then configure the display.
Uninstall Unused Display Drivers
Uninstall unused display drivers before installing the Matrox M9140 Quad video board drivers.
1. Log on to Windows and the Custom Shell as mlcltechuser.
2. Ignore any New Hardware found messages.
3. If an error message about stopping ONL display appears, click OK.
4. Click Start > Settings > Control Panel > Add or Remove Programs.
5. Uninstall the ATI – Software Uninstall Utility.
6. Ignore any New Hardware found messages.
7. Restart the system.
8. Log on to Windows and the Custom Shell as mlcltechuser.
9. Ignore any New Hardware found messages.
10. If an error message about stopping ONL display appears, click OK.
2021423-503H Mac-Lab/CardioLab/Centricity Cardiology INW Service Manual 4-5

Troubleshooting
11. Click Start > Settings > Control Panel > Add or Remove Programs.
12. Uninstall Powerdesk-HF and Driver.
13. Select No to restart in the Matrox Uninstaller for PowerDesk window.
Shut Down the System
WARNINGSHOCK HAZARD — To reduce the risk of shock and equipment damage, use safe working practices before servicing electrical equipment.
1. Close all open windows.
2. Select Start > Shutdown.
3. Click Shutdown.
4. Power off the computer and all peripheral devices.
5. Disconnect the AC main power cords from the computer and from all peripheral devices.
Remove and Install the Board
WARNINGSHOCK HAZARD — To reduce the risk of shock and equipment damage, use safe working practices before servicing electrical equipment.
1. Lift up on the tab near the top of the side panel.
4-6 Mac-Lab/CardioLab/Centricity Cardiology INW Service Manual 2021423-503H

Troubleshooting
2. Swing out the side panel and remove from the computer.
3. Disconnect all video cables (including adaptors) from the computer.
4. Place computer on side (open side up).
5. Squeeze in two tabs, gently push in, then pull, and lift off the clamp.
6. Gently pull the board from slot 5 of the computer.
7. Gently pull the video board from slot 2 of the computer (if present).
8. Slide the new M9140 video board into the computer slot 2.
9. Follow the instructions included with the Matrox Quad Graphics card for securing the bracket to the card. After the bracket is
Item Description Quantity
1 Tabs 1
2 Clamp 1
1
2
2
2021423-503H Mac-Lab/CardioLab/Centricity Cardiology INW Service Manual 4-7

Troubleshooting
installed, test to ensure the mating quad video cable can plug into the graphics card without any interference from the bracket.
10. Install the blank panel for the unused PCI slot 5.
11. Connect the new proprietary connector cable to the board.
12. Slide the clamp into the computer, swing the clamp toward the board end plates. Make sure the clamp is properly secured when the tabs “click” into their locked position.
13. Connect three video cables (including adaptors) to the proprietary connector cable on the board.
Video 1 cable to connector labeled 1/5
Video 2 cable to connector labeled 2/6
Video 3 cable to connector labeled 4/8
Connector labeled 3/7 not used
14. Re-install the side panel on the computer.
Power On the System
WARNINGSHOCK HAZARD — To reduce the risk of shock and equipment damage, use safe working practices before servicing electrical equipment.
1. Connect the AC main power cords to the computer and all peripheral devices.
2. Power on all peripheral devices.
3. Power on the Acquisition computer.
Install Matrox M9140 Quad Video Board Drivers V2.12.00.147
Install the Matrox M9140 Quad video board drivers using CD-R MATROX M9140 QUAD VIDEO CARD DRIVER, V2.12.00.147 (P/N 2074635-001).
1. Log on to Windows and the Custom Shell as mlcltechuser.
2. Ignore any New Hardware found messages.
3. If an error message about stopping ONL display appears, click OK.
4-8 Mac-Lab/CardioLab/Centricity Cardiology INW Service Manual 2021423-503H

Troubleshooting
4. Insert CD-R MATROX M9140 QUAD VIDEO CARD DRIVER, V2.12.00.147 (P/N 2074635-001) into the drive.
5. Browse to the CD drive and double-click Setup.exe.
6. At the Matrox Display Driver Installation - Matrox PowerDesk window, click Next.
7. At the Matrox Display Driver Selection window, click Next.
8. At the Ready to Install window, click Next.
9. At the Installation Completed Successfully window, click Next.
10. At the Installation Completed window, click the Restart Computer checkbox and click Finish.
2021423-503H Mac-Lab/CardioLab/Centricity Cardiology INW Service Manual 4-9

Troubleshooting
Post Installation Steps for Matrox M9140 Quad Video Board Drivers V2.12.00.147
After installing drivers for the Matrox M9140, the logon fields might not display properly when the computer first restarts. Restarting the computer again resolves the issue.
1. Log on as mlcltechuser.
NOTEThe logon fields are present, but might not display properly.
2. Shut down and restart the system again to resolve the issue.
3. Log on to Windows and the Custom Shell as mlcltechuser.
4. Reconfigure the monitor settings using “Set Display Configurations” on page 4-10.
Set Display Configurations
Two Monitor Systems
1. Right-click the Desktop and select Properties.
4-10 Mac-Lab/CardioLab/Centricity Cardiology INW Service Manual 2021423-503H

Troubleshooting
2. Select the Settings tab.
3. Click the icon for the second monitor (labeled “2”).
4. Select Extend the Windows desktop onto this monitor check box.
5. Click Apply.
6. Close all open windows.
Three Monitor Systems
1. Right-click the Desktop and select Properties.
2. Select the Settings tab.
3. Click the second monitor icon (labeled 2).
4. Select Extend the Windows desktop to this monitor check box.
5. Re-order the monitor icons so they appear in the following order: 1-2-4.
NOTEFor HP z600 and HP xw8400 systems, the order of monitors should be 1-2-4, the second monitor (“2”) and fourth monitor (“4”) need to be extended and the third monitor (“3”) should not be extended.
NOTETo re-order the icons, drag the monitor icons and drop them in the correct position.
6. Click Apply.
7. Click the third monitor icon (labeled 4).
8. Select Extend the Windows desktop to this monitor check box.
9. Click Apply.
10. Click Identify.
11. Verify the monitors are identified as 1-2-4 from left to right.
Set Display Resolution
1. Verify you are logged on as mlcltechuser (password: mlcl!techuser).
2. Right-click the Desktop and select Properties.
3. Select the Settings tab.
4. In the Screen Resolution section, select 1600x1200.
NOTEThis is the only supported resolution for new systems. If existing monitors do not support this resolution, 1280x1024 may be used for Mac-Lab systems. All monitors must be set to the same resolution.
2021423-503H Mac-Lab/CardioLab/Centricity Cardiology INW Service Manual 4-11
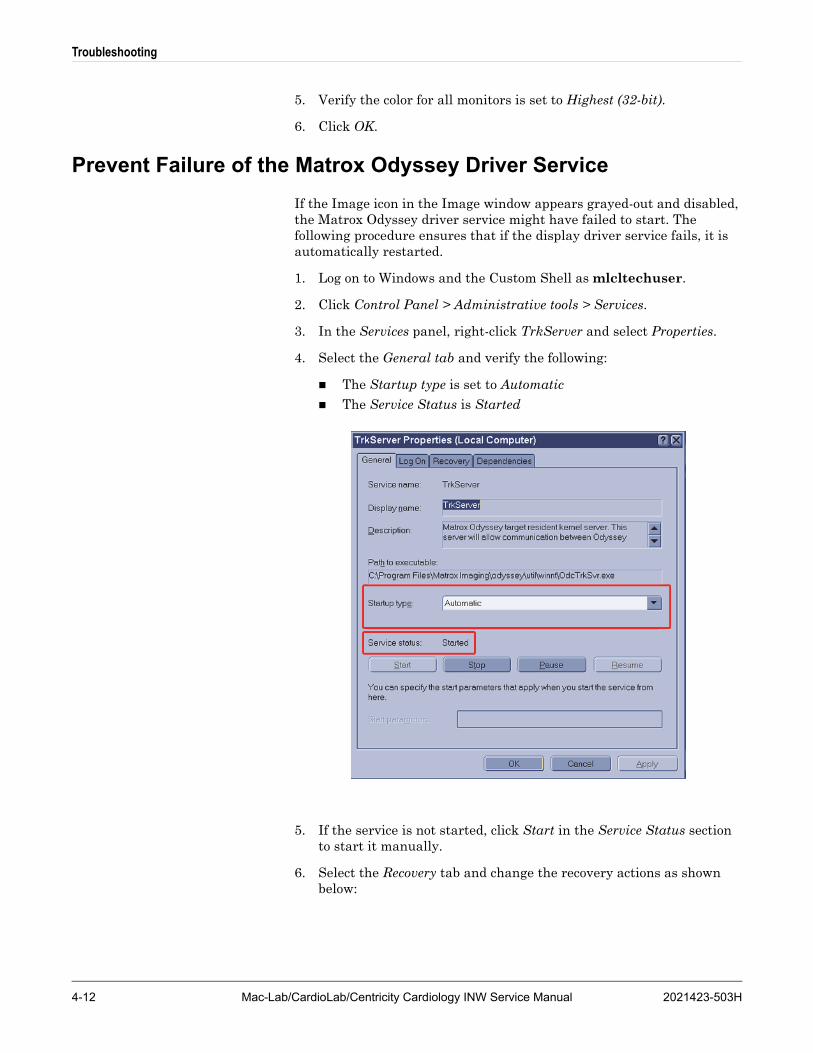
Troubleshooting
5. Verify the color for all monitors is set to Highest (32-bit).
6. Click OK.
Prevent Failure of the Matrox Odyssey Driver Service
If the Image icon in the Image window appears grayed-out and disabled, the Matrox Odyssey driver service might have failed to start. The following procedure ensures that if the display driver service fails, it is automatically restarted.
1. Log on to Windows and the Custom Shell as mlcltechuser.
2. Click Control Panel > Administrative tools > Services.
3. In the Services panel, right-click TrkServer and select Properties.
4. Select the General tab and verify the following:
The Startup type is set to Automatic
The Service Status is Started
5. If the service is not started, click Start in the Service Status section to start it manually.
6. Select the Recovery tab and change the recovery actions as shown below:
4-12 Mac-Lab/CardioLab/Centricity Cardiology INW Service Manual 2021423-503H

Troubleshooting
7. Click OK.
8. Log off and auto-logon to Windows.
CardioLab Amplifier Troubleshooting
If the amplifier does not send signals to the CardioLab system or you receive an unable to communicate with amplifier message:
Ensure that the amplifier is plugged in and turned on.
Verify that the external cables are connected properly and are securely attached.
Replace the fiber optic cable (FOC).
Clean the FOC with isopropyl (rubbing) alcohol and blow out the connectors with compressed air.
Disconnect the FOC from back of the computer and make sure that there is a light coming from the end of the cable that was plugged into CPU IN.
With the amplifier and computer turned on, the green LED next to the CPU IN port on the computer will turn green when connected properly.
If the problem is intermittent, this problem may indicate a dirty or broken FOC or connector.
If the problem persists, ensure that all connections inside the amplifier are secure and the boards are seated securely in their slots.
2021423-503H Mac-Lab/CardioLab/Centricity Cardiology INW Service Manual 4-13

Troubleshooting
Random spikes or square waveforms appear in signals when not stimulating the patient:
Clean the FOC contacts with a non-abrasive, lint-free cloth and isopropyl alcohol.
Replace the fiber optic cable.
If the waveforms only exist on one channel, try replacing either the catheter, catheter extender, or catheter junction box. You may also try another Catheter Input Module.
4-14 Mac-Lab/CardioLab/Centricity Cardiology INW Service Manual 2021423-503H

Troubleshooting
Noise on Intracardiac Signals
The noise should resemble 60 Hz or some other relatively consistent interference which are not associated with stim artifact.
Go to the amplifier test selection under Administration and perform a hardware reset on the amplifier (this is equivalent to turning the amplifier off and on, which would be the second option).
Verify that the catheter is correctly plugged into the Catheter Input Module (CIM) and that these poles have been correctly entered into the study configuration.
Remove/replace the catheter extender cables, especially if they have been re-sterilized.
Amplifier Communication (Choppy Signals in CardioLab)
Verify the PCI Comms board has the proper version number. Use the PCI Comms Tool (Start > Programs > PCI Comms Tool) to verify it is version 2.
Amplifier Signals Incomplete, Intermittent, and/or Noisy
Clean the fiber optic cable. Clean the pin ends of the fiber optic cable with a soft, dry clean cloth to remove any dust or debris that may be present. Do this at each end of the cable connecting to the amplifier and to the HP computer. Also remove any dust build up at the connector on the amplifier (use a can of compressed air).
NOTEIf a user is pacing and ablating simultaneously, noise may occur on the signals and interval sensing may be interrupted and log incorrectly due to this noise.
Real-Time Testing During a Case
Make Duplicate Channels
If the noisy signal is set to poles x and y, set up another channel (one with a high quality intracardiac signal, (for example, HRA or RVA) with the same poles and see if the noise is present there as well. This tests the channel.
While keeping the channels consistent, try inputting the catheters to different poles on the CIM and see if the noise follows the signal. This tests the CIM poles.
NOTEIf the last two tests make no difference, the problem may exist with the catheter itself. Try replacing the catheter.
2021423-503H Mac-Lab/CardioLab/Centricity Cardiology INW Service Manual 4-15

Troubleshooting
Detailed Testing: Amplifier Channel Test
Input a simulated signal into poles 1 and 2 of the CIM block A and connect the ground of the simulator to the RL limb lead
In the study configuration set all intracardiac channels to:
Poles 1 and 2
Bicath type setting
No notch filter and identical high and low pass settings.
Make sure each signals is displayed on an active page.
All of the signals should be identical. If one channel does not produce an identical signal, the channel may be bad.
Catheter Input Module Test
In the study configuration:
All channels should be set to Bicath type with equal filter settings.
Give each channel 2 poles in ascending order: Ch.1 (poles 1 and 2), Ch. 2 (poles 3 and 4), Ch. 3 (poles 5 and 6), and so on Continue to do this through all poles for all blocks.
Plug a simulated signal from channel to channel, from one pair of poles to the next pair of poles. Connect the simulator ground to the RL limb lead.
All of the signals should look the same, if one does not produce an identical signal, the pole in the catheter input module may be bad.
Ensure that you are not placing the CIM in sterile bags and then pushing the catheter pins through the plastic and into the CIM. This plastic can become lodged in the CIM and create problems.
Catheters with long pins (1/2 inch) normally produce less noise than catheters with short pins. This is due to the long pins’ deep penetration into the CIM.
Send a fax of any noise issues to customer support. Use calipers to demonstrate the cycle length of the noise. 60 Hz noise has a cycle length of 16.7 ms.
Noise on ECG Signals
When inspecting a full 12 lead, is there one signal which is particularly clean?
If Lead I is clean and all other signals are noisy, apply an new left leg patch.
If Lead II is clean and all other signals are noisy, apply a new left arm patch.
If Lead III is clean and all other signals are noisy, apply a new right arm patch.
If all signals are noisy, apply a new right leg patch.
Buff and clean the patient’s skin before applying the new patch.
4-16 Mac-Lab/CardioLab/Centricity Cardiology INW Service Manual 2021423-503H

Troubleshooting
If changing the patch does not help, swap the suspected limb lead with any of the other lead wires. For example, if Lead I is clean, and all other signals are noisy, swap the LL with a V wire.
Ensure that all patches on the patient are of the same type. Do not use different types of patches because this will cause the Common Mode Rejection Ratio (CMRR) to decrease, producing more noise.
In some cases, an abnormally high soft scale value in the study configuration can lead to noise. You can reduce this setting by one level and adjust your signal gains accordingly. For example, if you move from 1/4 to 1/8, you will have to increase the gain of your signals by 2 (for example, from 500 to 1000). Values of 1/8 or less are recommended.
Select hardware reset from the amplifier test window.
Ensure that neither the amplifier nor the computer/IEB is plugged into an emergency AC power outlet. While these may have good power, they may introduce noise into CardioLab due to the many extraneous circuits tied to them. Also, make sure the amplifier is not plugged into a power strip. The amplifier should always be plugged into its own dedicated outlet.
Install a harmonic filter isolation transformer between the power source and the amplifier to further reduce noise.
It may be necessary to replace the ECG cable (the cable from the front of the amplifier to the limb leads).
Ensure that all AC outlets which CardioLab interfaces with are properly grounded. To ensure this, a receptacle tester should be used to look for these wiring faults.
When testing for these problems, remember that auxiliary equipment such as RF pads and pulse oximeters may be adding noise to the patient. Therefore, remove all auxiliary equipment and add each piece individually while looking for signs of noise. Also, make certain that any auxiliary piece of equipment connected to the patient is not plugged into a power strip.
When using a simulator to test ECG channels, ensure that the Right Leg lead is always attached to the simulator. This is used as a reference channel by the amplifier.
Signals Offset from the Channel Labels
Go into the amplifier test option under the Administration menu and select Reset Hardware.
If this does not fix the problem, click on the Zero tab in the amplifier test window and zero the signals with the offset.
Ensure that the soft scale is no greater than 1/4. Also, abnormally high gain settings for ECGs may contribute to an offset problem.
Check the filter settings for the signal.
Continued problems with signal offset may mean that the amplifier needs calibration. Calibration must be performed by a trained GE Service personnel.
2021423-503H Mac-Lab/CardioLab/Centricity Cardiology INW Service Manual 4-17

Troubleshooting
ECGs are Flat
When inspecting a full 12 lead, is there any one signal which is flatline?
If Lead I is flat and all other signals are good, apply a new left leg patch.
If Lead II is flat and all other signals are good, apply a new left arm patch.
If Lead III is flat and all other signals are good, apply a new right arm patch.
If changing the patch doesn’t help, swap the suspected limb lead wire with any of the other lead wired.
In many cases, an abnormally low soft scale value can lead to flatlines. Values of 1/8 and 1/4 are recommended.
Select Reset Hardware from the amplifier test window under the Administration menu.
It may be necessary to replace the ECG cable (the cable between the amplifier and the limb leads).
If using a simulator to test the ECG signals, always make sure the right leg lead is attached to the ground of the simulator.
4-18 Mac-Lab/CardioLab/Centricity Cardiology INW Service Manual 2021423-503H

Troubleshooting
Stimulus Artifact on Intracardiac Channels
NOTEIf this is the first case in which you have seen this problem, the problem is most likely with a “case variable”. A case variable is something which has changed since the last case was performed. Catheters and catheter extenders are good examples of case variables. If the amplifier has worked properly in the past, it is doubtful that it has suddenly developed a stim artifact problem. New or re-sterilized catheters may have a short or bad connection.
Does the artifact occur when pacing from one catheter but not from others?
If yes, connect a catheter that is not producing stim artifact to the same inputs on the catheter input module (CIM) where the catheter with the stim artifact is connected. Pace through the new catheter.
If no artifact is present, the problem is with the original catheter.
If artifact is still present, move the catheter to poles on the CIM which are seldom used. If there is no stim artifact here, the problem may be with the original poles on the CIM. They may have loosened over time. The pacing poles at the bottom of the CIM may also be used for this purpose.
Replace the stim cable from the stimulator to the amp. If artifact is no longer present, the cable was bad.
Move the stim cable input for the stim channel with the artifact problem to another channel on the stimulator. If the artifact is no longer present, the stimulator channel may be bad.
Try using another stimulator. A hand held temporary pacemaker or another battery operated stimulator will work.
Connect the catheter directly to the stimulator. If the artifact is no longer present, the problem may be with the amplifier or one of the cables connected to the amplifier.
For continued problems with stim artifact, please fax a snapshot of the signals to customer support for evaluation.
2021423-503H Mac-Lab/CardioLab/Centricity Cardiology INW Service Manual 4-19

Troubleshooting
Stimulus Artifact on ECG Signals
Does the artifact appear on all of the surface leads?
If Lead I is clean and all other ECGs have artifact, replace the left leg patch.
If Lead II is clean and all other ECGs have artifact, replace the left arm patch.
If Lead III is clean and all other ECGs have artifact, replace the right arm patch.
If all ECGs have artifact, replace the right leg patch.
Buff and clean the patient’s skin before applying new patches.
If the artifact occurs at random times on random signals, this is further evidence that a faulty patch or lead may be causing the artifact. If changing the patch above does not help, try swapping the associated lead wire with one that is known to be producing a good signal.
Reduce the gain on the affected signals.
Select the Reset Hardware button in the amplifier test window under the Administration menu.
Ensure that you are not placing the CIM in sterile bags and pushing the catheters through the bag into the poles. This plastic can become lodged in the junction box and create problems.
Catheters with long pins (1/2 inch) normally produce less artifact than catheters with short pins. This is due to the long pins’ deep penetration into the CIM.
Replace the stim cable.
Cannot Stimulate the Patient
Ensure that the stimulator input cable is connected to the front of the amplifier and the opposite end is connected to the appropriate poles on the stimulator.
Ensure that the appropriate stim enable button at the top of the Real-Time window in the CardioLab application is turned on (red).
Check the study configuration to ensure that the stimulus is set to go to the correct catheter.
Check to make sure the stimulator is working properly. Bypass the amplifier by connecting the distal poles of the catheter to the stimulus poles at the bottom of the catheter input module. These poles are directly wired from the front of the amplifier.
If you are still unable to pace, connect the distal poles of the catheter directly to the stimulator, bypassing the amplifier. If you still cannot pace, the problem is not with the CardioLab equipment and most likely lies with the stimulator or catheter. Check the output of the stimulator with a multi-meter or oscilloscope.
4-20 Mac-Lab/CardioLab/Centricity Cardiology INW Service Manual 2021423-503H

Troubleshooting
General Hints to Reduce Noise in a Typical EP Lab
Good grounding is key. All equipment which is connected to the patient should be connected to the same electrical circuit (not the same outlet), if possible. By connecting all of the equipment to the same circuit, it is possible to prevent “grounding loops” from occurring which can cause noise.
Any light fixtures or other antenna-like devices above or around the bed can be connected to the same circuit mentioned above.
If possible, labs should not be positioned next to elevator generators, or any other power generators. Other major pieces of noise emitting equipment include MRI systems, and so on.
For ultimate noise protection, the lab can be enclosed in a “Faraday Cage”. This involves enclosing the lab in a metal box which is then grounded. While this is expensive, it is quite effective.
2021423-503H Mac-Lab/CardioLab/Centricity Cardiology INW Service Manual 4-21

Troubleshooting
CardioImage
Normal Operation and Setup
1. Connect the video output from the lab’s image source to the input of the Image Capture board (Odyssey board) on the CardioLab unit. The BNC connectors on the cable attached to the Odyssey board are color-coded to indicate the channels: Red = 1, Blue = 2. If more than two video outputs are present, use the second (right) connector on the Odyssey board with the following color-coding: Red = 3, Blue = 4.
2. Double-click Mac-Lab/CardioLab on the desktop.
3. Create a CardioLab test study.
4. Open the Image 1 window on the Review monitor by selecting the Windows menu and Image 1.
5. Select an area on the Review window to open the window.
6. Click the Toolkit on the Image window to open the Imaging Configuration screen.
7. For the selected channel, pick the correct video format (DCF) file that matches the input video source used.
For NTSC composite video, select RS170.DCF.
8. Click Freeze in the Image 1 window.
9. Ensure that an output is present from the lab’s image system.
Do this for all of the image inputs that are connected.
10. Verify that a single image is grabbed and displayed in the Image window.
11. Open an Image window on the Image monitor (third monitor).
12. Acquire a live image by clicking Live.
13. Ensure that a live image is displayed in the CardioImage window.
NOTEThis should be done for all of the image inputs that are connected.
14. If the image does not appear, or is not centered in the window, you may need to select a different video format (DCF) file.
4-22 Mac-Lab/CardioLab/Centricity Cardiology INW Service Manual 2021423-503H

Troubleshooting
Troubleshooting
Problem: Unable to Capture Image
The image grabber window is blank or displays an error (no video found).
1. Check the cables:
Red and blue cables are input 1 and input 2 (respectively).
Left DVI port on the Odyssey board is channels 1 and 2, right DVI port is channels 3 and 4.
2. Verify Odyssey Firmware Version:
a. Right-click My Computer and select Explore.
b. Navigate to C:\Program Files\Matrox Imaging\Odyssey\Util\Winnt and run MTXEDIT.exe.
c. Click OK at the Select Board window.
d. The title of the MTXEDIT application window displays the current firmware information. The format of the information displayed is: Grab:0x###A/B AN:1480.0, for example, this may look like: Grab:0x460A AN:1480.0. Please ensure that 1480.0 is the last part of this string.
e. If the firmware revision is not 1480 (or the information is not displayed), then you have not successfully upgraded. Do not continue, return to the Odyssey Board Setup section.
3. Verify Odyssey Driver:
a. Verify that you are logged into Windows as local mlcltechuser.
b. Right-click My Computer and select Manage.
c. Browse to Device Manager, and expand Matrox Imaging Adapter.
d. Verify that two Odyssey devices are listed under Matrox Imaging Adapter.
e. If these devices are not listed, do the following:
i. Expand and check the Other Devices folder.
ii. Right-click the devices listed and select Update driver.
iii. Click Next to install the default driver.
iv. Once the installation is complete, the devices should be listed under Matrox Imaging Adapter as listed previously.
4. Verify Odyssey Service:
a. Navigate to C:\Program files\Matrox imaging\odyssey\util\winnt and run the OdcMon.exe tool. The tool will be minimized to the system tray.
2021423-503H Mac-Lab/CardioLab/Centricity Cardiology INW Service Manual 4-23

Troubleshooting
b. Double-click OdcMonitor in the system tray (lower right corner of the first monitor) to open the tool.
c. If a red square icon is shown in the toolbar, no action is needed. This is the expected result.
d. If a green arrow icon is shown in the toolbar, it indicates a required system service is not running. Click the green arrow to start the service. Verify that the service is started, as indicated by a red square icon in the toolbar.
5. Navigate to D:\GEMMS\Prucka\Utilities and run the OdysseyTest.exe program to verify that the board and the driver are installed correctly:
NOTEThis procedure requires an external composite video source, such as a DVD player, to be connected to the first input of the Odyssey board.
Verify that the OdysseyTest program starts without errors.
Click the arrow icon in the toolbar to start a live image capture.
Verify that a live image is displayed.
Click the square icon to stop the capture.
Exit the test utility.
NOTEIf a different video source (not standard composite video) is used, replace the OdysseyTest.dcf file in the D:\GEMMS\Prucka\Utilities folder with a DCF file that matches the video source. All DCF files installed on the system are available in the D:\GEMMS\Prucka\System\Image\DCF folder on the system.
CAUTIONLOSS OF FUNCTION — Do not edit or change the original dcf files. They may be needed in the future.
Always create a copy of the original dcf file to work on.
6. Contact technical support if an X-Ray image is not properly displayed using any of the supplied .dcf files.
Provide all image source specifications (resolution size, video timing, frequency, and so on). Contact the X-Ray OEM if necessary.
Technical support may be able to create a custom dcf file based on the specifications.
4-24 Mac-Lab/CardioLab/Centricity Cardiology INW Service Manual 2021423-503H

Troubleshooting
Problem: Image Distorted
Use this procedure if you are able to capture images using one of the provided DCF files but the image is distorted or partially cut off.
1. Ensure you are logged on to Windows as mlcltechuser.
2. Attempt to capture using all provided DCF files. Identify the DCF file that gives the best image.
3. Select Start > Programs > Matrox Imaging > Intellicam > Intellicam.
4. Select the Options menu and choose System Selection. Choose Odyssey 0 Device and make it active.
5. Select the Open menu and browse to D:\GEMMS\Prucka\System\Image\Dcf.
6. Choose the DCF file that gave the best image.
7. Save the DCF file as a different name to prevent the original file from being modified.
8. Select the Digitizer menu and select Continuous Grab.
You should see an image at this time. If you do not see any image, check your connections and make sure the imaging system is sending out a signal.
NOTEIf Intellicam does not capture images using the dcf file, use the OdysseyTest utility (refer to “Problem: Unable to Capture Image” on page 4-23) or the CardioLab application to test the file.
9. Click the Pixel Clock tab in the configuration box.
If the image is a vertically elongated, increase the pixel clock value. This will make the image wider and shorter.
If the image is a horizontally elongated, decrease the pixel clock. This makes the image taller and narrower.
10. Click the Video Timing tab of the Configuration window.
NOTEAs you change the settings and modify the image, it may be necessary to close the grab window from time to time and open a new one for the changes to take effect. Most changes will take effect in real-time during the grab.
It may also be necessary to turn off the pixel clock Auto-adjust so you do not lose the pixel clock setting you just set.
To decrease the amount of blank space to the left of the image, click the lock active and total box in the horizontal section.
To move the image to the left, increase the back porch value.
To move it to the right, decrease it.
2021423-503H Mac-Lab/CardioLab/Centricity Cardiology INW Service Manual 4-25

Troubleshooting
With the lock active and total box checked, the software automatically computes the front porch value.
To decrease the amount of blank space above the image, click the Lock Active and Total box in the vertical section.
To move the image up, increase the back porch value.
With the lock active and total box checked, the software automatically calculates the back porch value.
11. Save changes made to the camera format once the image is set up correctly.
12. Return to the Mac-Lab/CardioLab software and start a study. Open the Study Configuration window, and select the Imaging tab. In the camera type field for image input 1, select the.DCF file you created in Intellicam utility.
13. Test the camera format by acquiring an image. If the image is not acceptable, you may need to go back to Intellicam to adjust the image.
NOTEThe brightness and contrast of the image can be adjusted by changing the controls in the image window.
14. If it is not possible to correct the image using manual adjustments, you need to contact the vendor of the imaging system. You will need the following details that can be directly entered in Intellicam to create a new DCF file:
Whether video is interlaced or non-interlaced
Pixel clock (dot clock) in MHz
Horizontal frequency (line rate) in kHz
Vertical frequency (frame rate) in Hz
Image width (both active and total) in pixels
Image height (both active and total) in lines
Horizontal sync, front porch and back porch duration, in pixels or microseconds
Vertical sync, front porch and back porch duration, in lines or microseconds
4-26 Mac-Lab/CardioLab/Centricity Cardiology INW Service Manual 2021423-503H

Troubleshooting
Problem: 3rd Monitor Set to Pan Mode After Reimaging
When the display resolution for the 3rd monitor was changed to 1600X1200, the display for the 3rd monitor changed to a pan mode where only a portion of the display was visible. The rest would be visible only when I used the mouse to pan the desktop area.
This problem is dependent on the monitor used. It does not occur with production CardioLab LCD monitors natively support 1600X1200 resolution. However, this may happen with older CRT monitors or with LCD monitors do not natively support 1600X1200. In this case, the following procedure can be used to fix the problem:
1. Install the ATI Control Panel utility:
a. Log in as local mlcltechuser.
b. Browse to the C:\windows\drivers\display\ATI FireGL[Driver Information] folder.
c. Double-click setup.exe and follow on-screen instructions.
d. Select the Custom option in the Select Components window.
e. Ensure the ATI Control Panel is selected and click Next.
Wait until the Setup Complete screen is displayed.
f. Click Finish to restart.
g. After the restart, login again as local mlcltechuser.
2. Change the Monitor settings:
a. Right-click the desktop and select Properties.
b. Select the 3rd monitor icon.
c. Click Advanced.
d. Select the ATI Displays tab.
e. Click the Monitor button corresponding to the active monitor shown.
f. Uncheck the Use DDC information check box if it is checked.
g. Set maximum resolution to 1600X1200.
h. Click OK to close all ATI dialogs.
i. Change the resolution of the 3rd monitor to 1280X1024 and then back to 1600X1200 using the Windows Display properties dialog.
j. Verify the whole desktop is visible (that is, not in pan mode).
2021423-503H Mac-Lab/CardioLab/Centricity Cardiology INW Service Manual 4-27

Troubleshooting
Problem: Missing Video for the 3rd Monitor on HP xw8400 Systems
Performs the following procedure if a site reports missing video for the 3rd monitor on HP xw8400 systems:
1. Check Windows Display settings to verify that the 3rd monitor is enabled.
2. Verify that the monitor is working correctly.
3. Verify that the motherboard BIOS is up-to-date (v2.35). Upgrade if necessary.
4. Verify that the monitor cable for the 3rd monitor is tightly connected on both ends. It may be connected to either port on the FireGL board, although we normally use the first (left) port by convention.
5. Verify that nothing is connected to the other (unused) connector on the FireGL board.
6. Completely power down the system. Disconnect the power cable, wait until the system powers off completely and reconnect the cable.
7. Video for the 3rd monitor should now be displayed correctly.
Problem: Image Buttons Are Grayed Out
The Live and Freeze buttons on the Image window toolbar are grayed out.
1. Check the Software options installed on the system. The CardioImage option should be enabled for Live capture support. The Image capture option must be enabled for single-image capture (Freeze).
NOTELive capture is supported only when the Image window is opened on the third monitor.
2. Check that the Odyssey Service is running on the system. Refer to the steps “Verify Odyssey Service” in the troubleshooting section “Problem: Unable to Capture Image” on page 4-23.
3. Check that the Imaging driver is installed correctly and the Odyssey board firmware is up-to-date. Refer to the steps “Verify Odyssey Firmware Version” and “Verify Odyssey Driver” in the troubleshooting section “Problem: Unable to Capture Image” on page 4-23.
4-28 Mac-Lab/CardioLab/Centricity Cardiology INW Service Manual 2021423-503H

Troubleshooting
Switching Ablation Devices
When switching ablation devices from the CryoCath to any other, the cable should be switched first followed by the ablation device driver. When switching from any RF ablation device to the CryoCath, the ablation device driver should be switched first followed by the cable. If an ablation device appears to not be receiving data, clicking on the ablation device driver in the ablation setup screen will reset the com port. They may resolve the ablation data transmission issue.
2021423-503H Mac-Lab/CardioLab/Centricity Cardiology INW Service Manual 4-29

Troubleshooting
Windows XP/2003
Normal Operation
Windows XP/2003 are extremely stable (if you delete system files, it puts them back, entire CD is built into the drive C:\windows\i386).
Three tools to use on 2003 are (refer to Installation manual):
Active Directory users and computers
Active Directory domains and trusts
DNS configuration
OEM images randomly generated name based on CLWS or CLSV and 4 digits – if a duplicate name on the network is found, there is a utility built in to change the name automatically (C:\windows\special\rename.hta).
Files may be dragged to the CD to write to re-writable media.
Troubleshooting
No login Through the Custom Shell
1. Log off and during log on, hold the Shift key to break the auto-logon sequence.
2. Logon through the windows logon dialog as MLCLTechUser from Centricity Cardiology INW domain (the following steps require administrative privileges).
3. Log into the Custom Shell as MLCLTechUser from INW domain.
4. Open a Command Prompt.
NOTE
If Explorer or the command prompt icon are not available in the Start Menu, open explorer by right-clicking Start and selecting Explore. Then go to C:\Windows\System32\Cmd.exe.
5. Type net time /set /domain:INW. Click Y for yes when prompted.
6. At the command prompt, type gpupdate /force. This command will take about 15-20 seconds to finish.
7. Reboot the computer.
4-30 Mac-Lab/CardioLab/Centricity Cardiology INW Service Manual 2021423-503H

Troubleshooting
Problem: How can you tell if the computer has the correct policies applied?
1. Open Help (Start > Help) from the Start menu.
2. Select Pick a Task > Use tools to view your computer information and diagnose problems.
3. Select Tools > Advanced System Information.
4. Select View Group Policy settings applied in the right window (may take up to 2 minutes to display).
5. Default_MLCL Computers_Policy must be listed under Applied Group Policy Objects.
6. If not, perform the following procedure:
a. Ensure the system is properly entered into the domain.
b. Reboot and allow computer to come to custom shell.
c. Press Ctrl+Alt+Delete and logoff while holding down Shift key.
d. Log back in as local mlcltechuser to the Windows OS.
e. Logon to the Mac-Lab/CardioLab Custom Shell as local mlcltechuser.
f. Log off and allow the system to auto-logon. The correct policies should now be applied.
Problem: Error message (User Does Not Have Appropriate Rights) while logged in the domain as MLCLTechUser.
1. Make sure you are in the OU.
2. If so, log out and log in to the systems as a local mlcltechuser.
Problem: Can not obtain proper policies on acquisition or review system.
1. Verify the DNS entry for the workstation is directed to the IP of the Centricity Cardiology INW server.
2. Verify the Centricity Cardiology INW server can be pinged by both name and IP address.
2021423-503H Mac-Lab/CardioLab/Centricity Cardiology INW Service Manual 4-31

Troubleshooting
GEMS_TaskMonitor Service
NOTETo start or stop the service, select Control Panel > Administrative Tools > Services > GEMS_TaskMonitor.
GEMS_TaskMonitor service monitors configured services. Based on configuration, this service could be used to start or stop any windows services.
On the Centricity Cardiology INW server, GEMS_TaskMonitor will be configured to monitor the CentralList Service. CentralList service will be used for communicating with CVIS server.
The GEMS_TaskMonitor service must be stopped for:
CentralList Service configuration or maintenance: GEMS_TaskMonitor service will try to start CentralList Service at every 15 minutes. The CentralList Service may be started while configuring the GEMS_TaskMonitor service if we didn't stop GEMS_TaskMonitor before configuration.
If the Centricity Cardiology INW server is not configured to communicate with CVIS: We don't need the monitoring service, as CentralList Service won't be running on Centricity Cardiology INW server. In this case you need to stop and then disable the GEMS_TaskMonitor service. Be sure to start GEMS_TaskMonitor service when you configure Centricity Cardiology INW server to communicate with CVIS.
4-32 Mac-Lab/CardioLab/Centricity Cardiology INW Service Manual 2021423-503H

Troubleshooting
Networking
Normal Operation
It is very important to understand the facilities IP Addressing scheme before equipment setup. If any IP setting is miss-typed the system may not be able to communicate on the network.
Troubleshooting
IP Troubleshooting
Ping 127.0.0.1 to ensure the TCP/IP is installed properly.
Ping the IP of the Local Computer to ensure the IP was entered correctly.
If applicable, ping the IP Address of the Default Gateway. If this ping fails then you may not be able to communicate with other devices on the network.
If applicable, ping the IP Address of a device located beyond the Default Gateway. This will ensure the Default Gateway is properly routing packets outside of your current network segment.
Attempt to ping a remote device by name. If the system can ping by IP, but not by name, there is probably an issue with the DNS configuration.
Slow Transfer/Ping Speeds
If the system is experiencing slow transfer speeds ensure the NIC is communicating at 100mb/s at Full Duplex. If the link is not 100mb/s then there may be a conflict between the NIC adapter and the network switch.
To ensure transfer speeds of 100mb/s Full Duplex, the NIC and the Switch port must BOTH be configured for either: Auto Negotiate or forced 100/Full Duplex.
DNS Troubleshooting (Client Side)
If unable to ping a system by name it may be the local DNS cache is out of date. To resolve this open a command prompt and type the following:
Ipconfig /flushdns Enter
Nbtstat –R Enter
If the problem persists after flushing the local DNS records the problem my reside on the server side.
2021423-503H Mac-Lab/CardioLab/Centricity Cardiology INW Service Manual 4-33

Troubleshooting
DNS Troubleshooting (Server Side)
Correct DNS Entry:
1. Launch Administrative Tools > DNS
2. Navigate to [Server Name] > Forward Lookup Zone > [Domain Name]
3. Ensure all records in the DNS table are accurate. If there is an IP / Name mismatch, the record can be updated by double-clicking it.
Clearing DNS Cache
1. Launch Administrative Tools > DNS.
2. Right-click the server name and select Clear the DNS Cache.
3. If the problem persists after flushing the local DNS records the problem my reside on the server side. Try a lengthy ping test to determine if packets are being dropped.
Operating System Troubleshooting
Group Policy at Local Computer: If policy is not correctly applied to the local computer, some or all of the following symptoms may occur:
Custom Shell is not displayed
Domain mlcltechuser does not have Administrative Rights
SQL Replication failures
Auto OS login failure
Verify the computer is the proper OU.
Verify all network settings are correct. If DNS, IP, Subnet or Gateway settings are not correct the policy may not push to the local computer.
Ensure the time of the local machine is synchronized with the time of the Domain Controller. To set the time open a command prompt and type net time /set /domain:[DOMAIN NAME].
If you are unsure if the policy has been applied perform the following:
1. Select Start > Help.
2. Select Pick a Task > Use Tools.
3. Select Tools > Advanced System Information.
4. Select View Group Policy Settings Applied (may take up to 2 minutes to display).
5. Ensure the Default_MLCL Computers_Policy is listed under Applied Group Policy Objects.
Unable to logon to the Custom Shell with a Hospital User: This is commonly caused by Default_MLCL Computers_Policy not containing the proper trusted user group information. To verify and correct policy edits perform the following:
1. Launch Administrative Tools > Group Policy Management Console.
4-34 Mac-Lab/CardioLab/Centricity Cardiology INW Service Manual 2021423-503H

Troubleshooting
2. Open the Group Policy Objects container.
3. View the Settings for the Default_MLCL Computers_Policy.
4. Ensure the MLCLAdmGrp, MLCLUsrGrp and MLCLSystemGrp contain their respective hospital group names (for example, Hospital\MLCLAdmGrp).
5. Ensure the Users group contains all hospital MLCL groups. This setting determines if the user has rights to interactively logon to the operating system. If this setting is incorrect the user will be unable to logon with their hospital account information.
Cardiolink Server Unavailable
Evidence of a Cardiolink Server Unavailable error is contained in the Application Event Log. These errors are not always consistent. The most common error is the following.
Verify that under System Settings, the network storage is checked and that the correct path is being used. (Example: \\clsvXXXX\pruckastudies\)
Verify that your primary DNS server is the INW server.
Ping the INW server by name (this will determine if it is a DNS/WINS resolution).
If you can ping by IP but not by name, then it is a WINS resolution problem.
2021423-503H Mac-Lab/CardioLab/Centricity Cardiology INW Service Manual 4-35

Troubleshooting
Net Message Sender Error
If a network system has an Acquisition system and a Nurse’s workstation both joined in a case and the case logs do not sync up, verify that netmessagesender.exe is running as a process on the acquisition system.
If it is not, go to D:\GEMMS\Prucka\Network and double-click netmessagesender.exe and start it manually.
Reboot the system and verify the process started after the reboot.
Centricity Cardiology INW Server
Refer to the Centricity Cardiology INW Operator’s Manual, 2021423-017, Chapter 4 for additional Troubleshooting information specific to INW servers.
4-36 Mac-Lab/CardioLab/Centricity Cardiology INW Service Manual 2021423-503H

Troubleshooting
Replication
Normal Operation
All clients must be in the domain before starting replication.
All clients must be in the correct Organization Unit and have the correct policies applied.
Troubleshooting
Problem: Archive Generator
If the Archive Generator is not functioning properly, please verify that the run times are not set up to a duplicate time or within 20 minutes of each other.
Verify on the Acquisition systems that the service SQL Server Agent is being ran by the [email protected] account (or inw.local).
Problem: Replication Errors
The replication tool must be able to see and connect with the clab database on the acquisition system.
Verify the acquisition system’s SQLServerAgent service has logon rights as INW\mlclsqluser.
Problem: SQL not running on clients (or fails)
Changing the SQL user password requires a replication update on all systems. If the update is not done, the SQL agent will not be run on the clients (and if you try to start it, the service will fail).
Problem: Putting an Acquisition into Replication
After replication is complete and you verify the replication monitor has a green X, go to the replication monitor/agents/merge agents.
Verify which agent has the green X on it and manually start it up.
Cleanup Database Corruption
The Database Repair Utility must be executed on a Centricity Cardiology INW Server with Administrator privileges.
1. Navigate to D:\GEMMS\Prucka\Database\Maintenance\DB Repair Utility.
2. Double-click the executable file GEHC_DBRepairUtility.exe.
2021423-503H Mac-Lab/CardioLab/Centricity Cardiology INW Service Manual 4-37

Troubleshooting
3. In the DB Repair Utility window, select both of the table names and then click Execute.
A command prompt will open. Do not close the command prompt. It will be closed automatically.
Once the operation is complete, the following message will be shown to the user:
In case of any failures, check the event log for the error details with the source as DB Repair Utility.
NOTEIf failures occur during the operation, then the backup of the CLAB database that was automatically restored is found in the D:\GEMMS\Prucka\Database\Maintenance\Backup folder.
In the event that any errors occur, especially if the database cannot automatically be restored, contact Technical Support. If possible, provide Technical Support with the backup of the database.
4. Click OK.
5. Close all open windows.
4-38 Mac-Lab/CardioLab/Centricity Cardiology INW Service Manual 2021423-503H

Troubleshooting
INNOVA CENTRAL/Touch screen
Check Connection Status
1. Open the Mac-Lab/CardioLab application.
2. Select Administration > System Settings.
3. Select the Connectivity screen.
4. Check the Connection Status in the Touchscreen section.
Connected is displayed if the INNOVA CENTRAL/Touch screen is connected.
If the connection status is disabled, ensure the INNOVA CENTRAL/Touch screen enable check box is checked. If the check box is grayed out, the software option is disabled. Any changes to items on this dialog require an application restart to update.
Listening on port nnn (where nnn is the port setting) is displayed if the INNOVA CENTRAL/Touch screen is not connected.
If the INNOVA CENTRAL/Touch screen is connected and this message is displayed, ensure the port listed is 889. This is the INNOVA CENTRAL/Touch screen connection port.
Determine IP Addresses
1. Press the Service button on the bottom of the INNOVA CENTRAL/Touch screen.
The INNOVA CENTRAL/Touch screen local service main page is displayed. Note the INNOVA CENTRAL/Touch screen IP address.
2. Determine Mac-Lab IP address
a. Open a browser and type the following URL:
http://TouchScreenIPAddress
b. Log onto the web application with the user id: service (password: service).
c. Touch the Configuration button.
d. Touch the Modalities IP configuration button.
Verify the Mac-Lab IP address is set correctly. Update if necessary.
e. Press the reset button on the bottom of the unit to reset the INNOVA CENTRAL/Touch screen.
2021423-503H Mac-Lab/CardioLab/Centricity Cardiology INW Service Manual 4-39

Troubleshooting
CARTO XP/CARTO 3 System
NOTEError messages on the CARTO System itself (such as a magnet positioning error) are the responsibility of the manufacturer — either refer to the documentation or call CARTO System technical support.
Normal Operation
The CARTO System has five states:
Gray and unclickable: Software option must be enabled.
Gray and clickable: Disconnected--No physical connection between the CARTO System and Mac-Lab/CardioLab systems.
Blue: Connected. If the icon does not turn blue automatically, check the connections.
Green: Passive interface. Must be activated from the Acquisition.
Yellow: Active interface. Must be activated from the CARTO System. Refer to OEM documentation for specific information.
In active mode, a point selected on the Acquisition system is also selected on the CARTO System (however, a point selected at the Review system is not select at the CARTO System).
One CARTO System study may only be synched to one Mac-Lab/CardioLab study (a 1 to 1 relationship). The same two studies may be independently stopped and restarted, but a new CARTO System study can not be added to an existing Mac-Lab/CardioLab study.
Netmsgsender is used to communicate between Acquisition and Review systems. Check the connection between Acquisition and Review systems before targeting problem as CARTO System issues (for example, log entries not being added).
A quick-connect cable is required to show ECG information.
CARTO System files are always less than 1MB.
Troubleshooting
Problem: CARTO System button inactive.
Verify normal operation.
Ensure the CARTO System interface is enabled on the Mac-Lab/CardioLab system.
The interface is only available in the CardioLab application (ensure you’re not in Mac-Lab).
The interface is only accessible from the Real-Time window.
The CARTO System must be version 7.0 or greater to be able to use this interface.
Patient demographics may be edited on the CARTO System.
4-40 Mac-Lab/CardioLab/Centricity Cardiology INW Service Manual 2021423-503H

Troubleshooting
CARTO System does not support import of foreign language demographics from Mac-Lab/CardioLab system (ENGLISH ONLY). Foreign languages are displayed as unrecognizable characters.
Problem: CARTO System connection failure.
Check cabling.
The CARTO System option requires a crossover cable connected from the acquisition system computer to the CARTO System computer. Ensure cable and connectors are good.
Verify the Ethernet lights are on.
Problem: CARTO System IP address conflict.
Use ping to test communication between the two systems.
The CARTO System interface uses hardcoded IP address on our system.
The IP of the CARTO System is 192.168.5.1
The IP of the Mac-Lab/CardioLab CARTO System adapter is 192.168.5.2
Problem: Cannot print from the Mac-Lab/CardioLab system to the CARTO System color printer.
This functionality is not supported. The Mac-Lab/CardioLab and CARTO System are completely independent and only send messages for points and waveform data.
Problem: Mapping points are unsynchronized or missing
At the Review system double-click points to see the data.
Regular CARTO System mapping points are not editable on Mac-Lab/CardioLab system.
Resynch at the CARTO System.
Check the CARTO System point filter on the log. Missing points may be filtered out.
Points missing from a report may have been manually deselected (the default is to include all points in a report).
During normal operation waveform point synchronization may be off by up to ± 50ms.
If it is off by more than ± 50ms, select a different channel (channel registered is the channel measured in CardioLab).
2021423-503H Mac-Lab/CardioLab/Centricity Cardiology INW Service Manual 4-41
Troubleshooting
Problem: Signal Noise
The following steps should be tried when troubleshooting noise associated with connectivity of the CARTO system. Each of these steps have proven to reduce or eliminate noise.
NOTEIf the 10 ft 2015944-001 ECG cable is used, the total ECG signal path will be lengthened significantly and in some clinical settings increased noise may appear on the ECG readout.
1. For Carto XP, make sure you are using Revision 10 or newer of the CARTO PIU. Earlier revisions of the PIU can make the overall system more susceptible to ECG noise. Revision 10 introduced an improved grounding scheme.
2. For Carto XP, if you are not using the CARTO IC cable (that is, if you are currently providing IC signals to the CARTO PIU by connecting the CARTO IC input leads to the CardioLab CIM terminals), try routing all catheter leads to the CARTO PIU IC inputs, then connect the CardioLab to the CARTO PIU using the blue CARTO-to-CardioLab cable (PN 2015944-001). This is the recommended system configuration.
3. For Carto XP, in some clinical settings, the use of the ECG cable that connects the CARTO PIU and the CardioLab II Plus amplifier (PN 2015944-001) can be a source of noise. In this case, noise may be reduced by removing this cable and instead connecting the CardioLab to the ECG terminals on the top of the CARTO PIU via the ECG cable assembly (PN 2003419-001) along with the ECG lead set (PN 2003421-001). This is a cleaner alternative to “double patching” the patient (10 electrodes for the CardioLab, 10 electrodes for the CARTO).
4. If noise is present during ablation, try using the RF Filter Box (PN 2004965-001).
Problem: Data import does not work on non-English systems
This is expected behavior. Patient demographics are shared only between English CardioLab systems and CARTO Systems.
For non-English CardioLab systems, the demographic data must be entered manually.
4-42 Mac-Lab/CardioLab/Centricity Cardiology INW Service Manual 2021423-503H

Troubleshooting
EtCO2
EtCO2 Overview
End tidal CO2 (EtCO2) is a continuous, noninvasive technique for determining the concentration of CO2 (carbon dioxide) in respiratory gas by measuring the absorption of infrared light.
The light generated in the analyzer bench is passed through respiratory gas samples. The amount of absorption by CO2 in the sample is measured and digitized by the photodetector. The EtCO2 module processes the electronic signal and displays a waveform and digital values for expired CO2 (EXP), inspired CO2 (INSP), and respiratory rate (RR) on the display.
NOTEIf the EtCO2 module is in the RAC, but Respiration, Inspired CO2, or Expired CO2 cannot be measured, the display will show two asterisks (**). If the EtCO2 module is not in the RAC, the values will be blank.
The EtCO2 module can accommodate both intubated and non-intubated patients using the Capnostat Dual CO2 module or the Mainstream CO2 module.
2021423-503H Mac-Lab/CardioLab/Centricity Cardiology INW Service Manual 4-43

Troubleshooting
Capnostat Module Setup
CAUTIONINACCURATE READINGS — Do not use the Capnostat CO2 sensor in close proximity to wireless networking equipment or in the presence of strong electromagnetic fields such as those generated by radio station transmitters, citizens band radios, cellular phones, and so on. Using the Capnostat sensor under the above conditions may cause one or all of the following to occur:
Artifact may be induced on the capnogram.
The CO2 parameter values may be replaced by ** (two asterisks).
The message, Please check/calibrate adaptor may be displayed in the parameter window.
Normal operation will resume when the source of interference is removed.
CAUTIONWIRELESS LAN INTERFERENCE — Capnostat sensors with a serial number of 26104 or greater require a separation distance of 10 inches (25 cm) from the Wireless LAN adaptor to minimize potential interference.
Capnostat sensors with a serial number less than 26104 require a separation distance of 8.2 feet (2.5 meters) and are not recommended for use on recording equipment equipped with the Wireless LAN option.
CAUTIONINACCURATE VALUES — Failure to perform a zero cell calibration may result in inaccurate CO2 values.
A zero cell calibration is required each time a sensor is connected.
After placing a EtCO2 module in the TRAMNet housing (RAC-4A) and connecting the patient cable, a two minute warm-up is required. The message WARMING UP is displayed in the EtCO2 window.
After the warm-up period, when the patient is properly connected and breath is detected, numerics are displayed in the EtCO2 window and a CO2 waveform may be displayed.
4-44 Mac-Lab/CardioLab/Centricity Cardiology INW Service Manual 2021423-503H

Troubleshooting
After the initial warm up period when a new Capnostat sensor is connected, the message Please calibrate sensor on the zero cell is displayed. You must zero the Capnostat sensor before recording, refer to “Zero the Capnostat Sensor” on page 4-56.
NOTETo assure accuracy, always perform a zero cell calibration when connecting a sensor to the module, even if the Please calibrate sensor message is not displayed.
NOTEAn EtCO2 module is either a Capnostat Mainstream or Dual CO2 Module.
NOTEThe signal input is isolated, but it is not defibrillator-proof.
The Capnostat modules must be used with a Capnostat sensor and airway adaptor. Two airway adaptors are available:
Mainstream adaptor (refer to the following illustration)
1 Capnostat Mainstream Module
2 Capnostat Connection
3 Sidestream Inlet Port
4 Exhaust Port to Scavenging System
5 Capnostat Dual Module
1
23 4
5
2021423-503H Mac-Lab/CardioLab/Centricity Cardiology INW Service Manual 4-45

Troubleshooting
Sidestream adaptor with sample tubing for sidestream recording.
The sensor cable is equipped with two cells. The -0- cell is used for zeroing (calibration) of the sensor, and the REF cell is used for verifying sensor accuracy.
1 Capnostat Sensor Cable to Module
2 -0- Cell
3 REF Cell
4 Capnostat Sensor Module
5 Capnostat Airway Adaptor
1
23
4
5
4-46 Mac-Lab/CardioLab/Centricity Cardiology INW Service Manual 2021423-503H

Troubleshooting
Mainstream Setup (Dual Module)
The mainstream setup is shown below:
To record EtCO2 using the mainstream setup:
1. Open the EtCO2 window in the application.
2. Securely insert the module into the RAC-4A.
The EtCO2 module can sit in either of the lower slots of the RAC-4A.
3. Connect the Capnostat sensor cable to the module. If the message Please calibrate sensor on the zero cell is displayed in the EtCO2 window, you must zero the sensor. Refer to “Zero the Capnostat Sensor” on page 4-56.
4. Snap the Capnostat airway adaptor into the Capnostat sensor. If the message Please check/calibrate adaptor is displayed in the EtCO2 window, you must calibrate the adaptor. Refer to“Calibrate the Capnostat Adaptor” on page 4-57.
5. Position the adaptor and sensor in the patient respiratory circuit between the endotracheal tube and the ventilator circuit (as close to the patient as possible).
1 Endotracheal Tube (to Patient)
2 Capnostat Airway Adaptor
3 Capnostat Sensor (Upright Position)
4 REF Cell
5 -0- Cell
6 Sensor Cable
7 Capnostat CO2 Module
12
3
45
6
7
2021423-503H Mac-Lab/CardioLab/Centricity Cardiology INW Service Manual 4-47

Troubleshooting
NOTEAlways position the sensor with the adaptor in an upright position to avoid collection of fluids on the windows of the adaptor. Large concentrations of fluids at this point will obstruct gas analysis.
Sidestream Setup (Dual Module)
CAUTIONMODULE SELECTION — Do not use this module with any patient who may be affected by the Capnostat dual CO2 module’s sidestream withdrawal rate of 180 milliliters per minute (normal).
1. Open the EtCO2 window in the Mac-Lab/CardioLab application.
2. Securely insert the module into the RAC-4A.
Wait two minutes for the module to warm up.
3. Connect the Capnostat sensor cable to the module. If the message: Please calibrate sensor on the zero cell is displayed in the EtCO2 window, you must zero the sensor. Refer to ““Zero the Capnostat Sensor” on page 4-56.
4. Connect the sidestream adaptor tubing to the inlet connector on the module.
5. When delivering anesthetics, connect the scavenging tube to EXHAUST connector on the module. Refer to “Gas Exhaust” on page 4-55.
6. Attach the 5-inch adaptor tubing (male-to-male) connector to the airway adaptor.
7. Secure the Aqua-Knot water trap to the 5-inch adaptor tubing.
The Aqua-Knot water trap must be used. The arrow on the water trap shows the direction of the gas flow. When inserting the water trap, the arrow must point toward the module.
8. Connect the nasal cannula or sample line to the Aqua-Knot water trap.
9. Select the Start/Stop EtCO2 Pump icon in the EtCO2 window to turn the pump on.
When the pump is on, the window title is Sidestream. (When the pump is off, the window title is Mainstream.)
4-48 Mac-Lab/CardioLab/Centricity Cardiology INW Service Manual 2021423-503H

Troubleshooting
10. Snap the Capnostat sidestream adaptor with its tubing into the Capnostat sensor. If the message Please check/calibrate adaptor is displayed in the EtCO2 window, you need to calibrate the adaptor. Refer to “Calibrate the Capnostat Adaptor” on page 4-57.
Always position the sensor with adaptor in an upright position to avoid collection of fluids on the windows of the adaptor. Large concentrations of fluids at this point will obstruct gas analysis.
11. Occlude the open end of the airway circuit. The message Pump is Blocked. Please Check must be displayed in the CO2 parameter window to ensure a blockage will be recognized during patient care.
12. Position the nasal cannula on the patient according to the manufacturer’s instructions or attach the patient sample line to the patient airway adaptor.
CAUTIONINACCURATE READINGS — A leak in the breathing circuit may cause inaccurate readings.The sidestream analyzer will not detect a leak in the breathing circuit.
Ensure all connections are tight.
2021423-503H Mac-Lab/CardioLab/Centricity Cardiology INW Service Manual 4-49

Troubleshooting
Sidestream Set Up (Non-intubated)
Refer to the following figure for sidestream setup of non-intubated patients.
1
2
3 4
56
7
8
109
11
1 Nasal Cannula
2 Aqua Knot II
3 12.7 cm Adapter Tubing
4 Sidestream Airway Adaptor
5 Capnostat Sensor (upright position)
6 REF Cell
7 -0- Cell
8 Sidestream Adaptor Tubing (30.5 cm)
9 Sensor Cable
10 Scavenging Tube
11 Capnostat CO2 Module
4-50 Mac-Lab/CardioLab/Centricity Cardiology INW Service Manual 2021423-503H

Troubleshooting
Sidestream Setup (Intubated)
Refer to the following figure for sidestream setup of intubated patients.
12
34
5
67
8
10
9
11
1 Patient Sample Line
2 Aqua Knot II
3 12.7 cm Adaptor Tubing
4 Sidestream Airway Adapter
5 Capnostat Sensor (upright position)
6 REF Cell
7 -0- Cell
8 Sidestream Adaptor Tubing (30.5 cm)
9 Sensor Cable
10 Scavenging Tube
11 Capnostat CO2 Module
2021423-503H Mac-Lab/CardioLab/Centricity Cardiology INW Service Manual 4-51

Troubleshooting
Mainstream Setup (Mainstream Module)
The mainstream setup using a mainstream module is identical to that using a dual module.
1 Airway Adaptor to Patient Endotracheal Tube
2 Mainstream Adapter
3 Mainstream Sensor (Upright Position)
4 Reference and Zero Cells
5 Sensor Cable
6 Module
3
1
2
4
56
4-52 Mac-Lab/CardioLab/Centricity Cardiology INW Service Manual 2021423-503H

Troubleshooting
Sidestream Setup (Mainstream Module)
CAUTIONMODULE SELECTION — Do not use this module with any patient who may be affected by the Capnostat Mainstream CO2 module’s sidestream withdrawal rate of 50 milliliters per minute (normal).
1. Open the EtCO2 window in the Mac-Lab application. Refer to “EtCO2 Window” on page 4-59.
2. Securely insert the module into the RAC-4A.
3. Connect the Dash CapnoFlex LF module (which contains both the Capnostat sensor and the pump for the sidestream operation) to the Mainstream CO2 module and plug in the sample line into the CapnoFlex LF module.
Wait two minutes for the module to warm up.
If the message Please calibrate sensor on the zero cell is displayed in the EtCO2 window, you must zero the sensor. Refer to “Calibrate the CapnoFlex LF Module (Sensor + Pump)” on page 4-58.
4. When delivering anesthetics, connect the scavenging tube to EXHAUST connector on the module. Refer to “Gas Exhaust” on page 4-55.
5. Attach the 5-inch adaptor tubing (male-to-male) connector to the airway adaptor.
6. Secure the Aqua-Knot water trap to the 5-inch adaptor tubing. The Aqua-Knot water trap must be used. The arrow on the water trap shows the direction of the gas flow. When inserting the water trap, the arrow must point toward the module.
7. Connect the nasal cannula or sample line to the Aqua-Knot water trap.
8. Occlude the open end of the airway circuit. The message Pump is Blocked. Please Check must be displayed in the CO2 parameter window to ensure a blockage will be recognized during patient care.
9. Position the nasal cannula on the patient according to the manufacturer’s instructions or attach the patient sample line to the patient airway adaptor.
2021423-503H Mac-Lab/CardioLab/Centricity Cardiology INW Service Manual 4-53

Troubleshooting
CAUTIONINACCURATE READINGS — A leak in the breathing circuit may cause inaccurate readings. The sidestream analyzer will not detect a leak in the breathing circuit. Ensure all connections are tight.
1 Nasal Cannula (non-intubated patients)
2 Airway Adaptor (intubated patients)
3 Patient Sample Line (intubated patients)
4 Sample Line
5 Capnoflex LF CO2 Adapter Cable
6 Capnostat Mainstream or Dual CO2 Module
7 Capnoflex LF CO2 Adapter
8 Sample Line Connector
9 Capnoflex LF CO2 Module
10 Scavenger Port
1
4
2
3 5
6 7 8 9 10 11
4-54 Mac-Lab/CardioLab/Centricity Cardiology INW Service Manual 2021423-503H

Troubleshooting
Gas Exhaust
CAUTIONINACCURATE READINGS/MODULE DAMAGE — Do not allow the exhaust line to become kinked or blocked.
Back pressure may cause inaccurate gas readings and also may cause serious damage to the module’s internal components.
CAUTIONINACCURATE READINGS/MODULE DAMAGE — Do not connect exhaust of the module to an unregulated, high vacuum source.
Pressure may cause inaccurate gas readings and also may cause serious damage to the equipment’s internal components.
CAUTIONINFECTIOUS DISEASE — Do not allow the exhaust to discharge in the direction of the patient or user.
When using the sidestream method for recording CO2 and anesthetics are being delivered, the gas exhaust must be considered. The gas exhaust may be scavenged using the scavenging adaptor package (PN 9504-016). Follow the steps below to properly connect the module to the anesthesia machine exhaust circuit.
1. Remove exhaust adaptor and tube from the package.
2. Attach the connector end of the exhaust tube to the outlet marked EXHAUST on the front of the module.
3. Install the exhaust adaptor into the gas scavenging system of the anesthesia delivery system.
Following the anesthesia machine manufacturer’s recommended procedure.
4. Drape the exhaust tube so that it does not obstruct the work area.
2021423-503H Mac-Lab/CardioLab/Centricity Cardiology INW Service Manual 4-55

Troubleshooting
Capnostat Module Calibration
CAUTIONLOSS OF FUNCTION — EtCO2 calibration interrupts the function of keyboard shortcuts. Once calibration has begun, please use the drop down menu commands to execute any desired functions (including saving).
If necessary, turn on save prior to EtCO2 calibration. Once calibration is complete all keyboard functions are available.
Zero the Capnostat Sensor
A sensor must be zeroed (calibrated) whenever it is connected to a Capnostat module, and whenever the message Please calibrate sensor on the zero cell or Not calibrated is displayed.
The sensor cable has two cells, as shown in the figure below. One is marked -0- (zero), and the other is marked REF (reference).
To zero the sensor:
1. Remove the adaptor from the sensor, but be certain that the sensor cable is still connected to the module.
2. Ensure that the cell windows are clean and dry.
3. Place the sensor on the cell marked -0-. (Refer to the previous illustration.)
4. Select the Calibrate EtCO2 Sensor icon.
1 Capnostat Sensor Cable to Module
2 -0- Cell
3 REF Cell
4 Capnostat Sensor Module
1
23
4
4-56 Mac-Lab/CardioLab/Centricity Cardiology INW Service Manual 2021423-503H

Troubleshooting
5. The message CALIBRATING is displayed in the EtCO2 window.
When calibration is complete, an EXP value of 0 is displayed.
6. Remove the sensor from the -0- cell and place it on the REF cell.
An EXP value of 38 mmHg (± 2 mmHg) is displayed. If the value is not within this range, the sensor is out of tolerance and must be replaced.
Calibrate the Capnostat Adaptor
An adaptor calibration is required under the following conditions:
Whenever you change adaptor types, for example, adult to low volume dead space, or mainstream to sidestream.
When the monitor displays the message Please check/calibrate adaptor.
Before calibrating, ensure the following:
The airway adaptor is clean and clear of foreign matter.
All sampling tubing is securely attached.
The pump is turned on.
Use the following procedure to calibrate the adaptor:
1. Place the sensor and the adaptor away from all sources of CO2, including:
Patient breath
Your breath
Ventilator exhaust valves
2. Click the Calibrate EtCO2 Adaptor icon.
The message Calibrating... is displayed in the EtCO2 parameter window.
2021423-503H Mac-Lab/CardioLab/Centricity Cardiology INW Service Manual 4-57

Troubleshooting
Calibrate the CapnoFlex LF Module (Sensor + Pump)
The sensor in the CapnoFlex LF module must be zeroed (calibrated) whenever it is connected to a Mainstream CO2 module, and whenever the message Please calibrate sensor on the zero cell or Not calibrated is displayed.
To zero the sensor:
1. Ensure that the sample line plugged into the CapnoFlex LF module is clean and dry.
2. Ensure that the pump in the CapnoFlex LF module is running.
3. Ensure that the sample line is NOT connected to a patient. Always position the airway adaptor in an upright position to avoid collection of fluids on the windows of the adaptor. Large concentrations of fluids at this point will obstruct gas analysis.
4. Select Calibrate EtCO2 Sensor.
5. The message CALIBRATING is displayed in the EtCO2 window.
When calibration is complete, an EXP value of 1 is displayed.
4-58 Mac-Lab/CardioLab/Centricity Cardiology INW Service Manual 2021423-503H

Troubleshooting
Mac-Lab Interface
EtCO2 Window
EtCO2 information is displayed in a separate window in the Mac-Lab application. To launch the EtCO2 window, from either the Real-Time or Review window, select End Tidal CO2 from the Windows menu.
The window is shown below:
Window Component
Description
Title Bar When a Capnostat Dual CO2 module is used, the EtCO2 window title displays the following:
SIDESTREAM when the pump is turned on
MAINSTREAM when the pump is turned off
When a Mainstream CO2 module is used, the EtCO2 window title does not indicate the operation mode (SIDESTREAM or MAINSTREAM).
EtCO2 Window Toolbar Tool bar icon descriptions are listed below.
RR Indicates Respiratory Rate (in breaths per minute).
INSP Inspired CO2 Value (in mmHg)
EXP Expired CO2 Value (in mmHg)
2021423-503H Mac-Lab/CardioLab/Centricity Cardiology INW Service Manual 4-59

Troubleshooting
EtCO2 Toolbar
Sweep Speed/Scale
This option selects sweep speed for the displayed CO2 waveform.
Start/Stop EtCO2 Pump
This icon is available for Dual CO2 modules only; it is disabled when a Mainstream CO2 module is used.This icon turns the module pump on and off. The pump must be on when using the sidestream method.NOTE
The EtCO2 window title will read:
Sidestream when the pump is turned on
Mainstream when the pump is turned off
A blocked line condition may cause the pump to shut off automatically. To restart the pump, clear or replace any blocked lines and, for Dual CO2 modules, select the Start/Stop ETCO2 Pump icon; for Mainstream CO2 modules, reinsert the sample line into the CapnoFlex LF module
Calibrate EtCO2 Sensor
Zeros the Capnostat sensor. This is required whenever a new sensor is connected to the module.
Calibrate EtCO2 Adaptor
Calibrates the Capnostat airway adaptor.
EtCO2 Waveform Range (Scale)
Selects the scale in mmHg.
If the waveform is too big, it will be clipped on the display. Adjust the scale to reduce the waveform size.
O2 Compensation
The presence of a high concentration of oxygen causes the CO2 value to appear lower than the actual value. Use this option to compensate for the presence of O2.
This is a direct action menu option that switches between 0-60% O2 and >60% O2. Your selection depends on the amount of O2 present.
O2 concentration can be obtained from the anesthesia machine.
4-60 Mac-Lab/CardioLab/Centricity Cardiology INW Service Manual 2021423-503H

Troubleshooting
EtCO2 and Log Window
The Inspired CO2, Respiration Rate, and Expired CO2 can be recorded in the Log window using the AutoLog Vitals and AutoLog NBP. You may insert the recorded events in your report.
To edit the vitals event, double-click in the Summary column on the event (or right-click in the Summary column and choose Edit Event). The Edit Vitals Event window is displayed.
Troubleshooting
Capnostat Sensor Check
WARNINGINCORRECT VALUE DISPLAY — The End-Tidal CO2 value (EtCO2) is in most cases considerably lower than the CO2 partial pressure determined by blood-gas analysis. The major clinical reasons are: Dead-space ventilation, ventilation/perfusion mismatch; drop in cardiac output; alveolar shunts; incomplete emptying of the alveoli.
It may also be lower due to the following technical reasons (which must be corrected): Leak in the respiration tube system; hypothermia, but blood-gas analysis at 37º C; anesthesia gases (correction possible for O2 only).
The sensor cable has two cells, as shown in the figure below. One is marked -0- (zero), and one is marked REF (reference). Whenever you suspect incorrect values or sensor failure, perform a sensor check.
2021423-503H Mac-Lab/CardioLab/Centricity Cardiology INW Service Manual 4-61

Troubleshooting
Follow these steps to perform a sensor check:
1. Remove the adaptor from the sensor, but be certain that the sensor cable is still connected to the module.
2. Ensure that the cell windows are clean and dry.
3. Place the sensor on the cell marked REF.
Depending on the units of measure, you should see a reading of 38 mmHg (± 2) on the display. If the displayed value is within range, you can resume recording.
If the sensor is not within range, the error message Not Calibrated is displayed. You must calibrate the sensor to the zero cell.
Error Messages
Following is a list of error messages that may be displayed in the EtCO2 window when recording CO2. The error message should clear when normal operating criteria are met or a solution is found. If a message persists, call GE Healthcare for service at 1-800-437-1171 option 4 (U.S. only). Outside the United States, please contact your sales/service office.
NOTEThe actual message that appears on your monitor depends on the module used and the installed software version.
1 Capnostat Sensor Cable to Module
2 -0- Cell
3 REF Cell
4 Capnostat Sensor Module
1
23
4
4-62 Mac-Lab/CardioLab/Centricity Cardiology INW Service Manual 2021423-503H

Troubleshooting
Message Cause Solution
Pump is blocked. Please check.
Nasal cannula, moisture filter, sidestream adaptor tube or exhaust line is blocked.
Check nasal cannula, moisture filter, sidestream adaptor tube and exhaust lines for blockage and replace if necessary. If the blocked line condition persists for a period of time, the module’s pump will automatically shut off. The pump must then be restarted to clear the message. To restart the pump, clear or replace any blocked lines and, for Dual CO2 modules, select the Start/Stop ETCO2 Pump icon; for Mainstream CO2 modules, reinsert the sample line into the CapnoFlex LF module. Repeat this process until the Pump is Blocked. Please Check. message clears.
Sensor cable is disconnected. Please check.
Sensor cable is not connected to module. Check sensor cable connection.
Please calibrate the sensor on the zero cell.
A new sensor was introduced into the system or there is a possible signal drift in sensor electronics.
Zero the CO2 sensor.
Cannot be calibrated.
Calibration cannot be performed during warm up or while there is an error.
Wait for the module to warm up or clear the error condition before calibrating.
Please check/calibrate adaptor
Adaptor is not attached to sensor
Adaptor is obstructed
Adaptor used is of a different type than the one last calibrated to the sensor
Ensure the sensor is securely snapped onto the adaptor.
Check for possible obstructions in the adaptor and clean if required.
Recalibrate the adaptor.
Please Check Sample Line
Sample line is disconnected
Sample line used is of a different type than the type used when adaptor was last calibrated.
Be sure the sample line is securely connected.
Recalibrate the adaptor using the new type of sample line.
Incompatible Sensor
Capnostat sensor is of older type and not supported by module software.
Use only a Capnostat 3 sensor.
Calibration Error Sensor
Sensor signal is out of tolerance. Calibrate the sensor.
Not calibrated Sensor signal is out of tolerance. Calibrate the sensor.
Service CO2 module CPU
Module failure. Contact GE Healthcare or contact your sales/ service representative for service.
Service CO2 module RAM
Module failure. Contact GE Healthcare or contact your sales/ service representative for service.
Service CO2 module ROM
Module failure. Contact GE Healthcare or contact your sales/ service representative for service.
Service CO2 module 2nd CPU
Module failure. Contact GE Healthcare or contact your sales/ service representative for service.
2021423-503H Mac-Lab/CardioLab/Centricity Cardiology INW Service Manual 4-63

Troubleshooting
Service CO2 module Sensor Temperature
Module failure. Contact GE Healthcare or contact your sales/ service representative for service.
CO 2 module is warming up...
Occurs when:
The Sensor is first plugged in
A module is placed in a RAC 4A
When a sensor is first powered on.
Message clears automatically. If it lasts more than 4 minutes, call GE Healthcare service or contact your sales/service representative.
Calibrating... Module is calibrating. Message clears automatically. If the message is displayed continuously, call GE Healthcare service or contact your sales/service representative.
Calibration Error The module cannot be calibrated. Call GE Healthcare service or contact your sales/service representative.
Please calibrate cannula
Calibrate the adaptor.
Unknown Error Module failure due to unknown cause. Call GE Healthcare service or contact your sales/service representative.
Message Cause Solution
4-64 Mac-Lab/CardioLab/Centricity Cardiology INW Service Manual 2021423-503H

Troubleshooting
CVIS to Mac-Lab/CardioLab Interface
NOTEFor Acquisition and Review systems, the Local System and Remote Hosts sections must be completed to perform a patient search and a schedule search.
The previous screen shows the Local System configuration settings with some sample settings. Enter each field as described in the following:
DICOM Settings: These settings are for this Mac-Lab/CardioLab system. You must fill in this section.
AE Title: The DICOM name for the Mac-Lab/CardioLab system. An AE Title typically only contains letters, numbers, and the underscore character, and must be 16 characters or less.
NOTEAE Titles are case sensitive, for example, Lab1 is not the same as LAB1.
Listen Port: Port number on which Mac-Lab/CardioLab listens for connections from the X-ray and U/S systems. Use the default of 1225.
Maximum search responses to accept: Defines the maximum number of DICOM search results displayed. Use the default value of 150.
Lock critical patient demographics fields from Modality Worklist host: Leave checked to prevent the operator from changing Patient Name, MRN, and Date of Birth when these values are provided by the CVIS.
Enable detailed logging of DICOM communications: If you are having problems with connectivity, turn this feature on to troubleshoot the system. When you are finished troubleshooting, turn off this feature. These log files can be found in D:\GEMMS\Prucka\Logs\DICOM.
2021423-503H Mac-Lab/CardioLab/Centricity Cardiology INW Service Manual 4-65

Troubleshooting
Include DOB in DICOM viewer patient context check: This is used to include the DOB parameter when searching for patient data with the DICOM viewer.
INNOVA CENTRAL/Touch Screen: If you have purchased this option, you should check the box to enable this feature.
The previous screen shows the Remote Hosts DICOM configuration settings with some sample settings. Enter each field as described in the following:
X-Ray System Settings: Fill in this section only if the X-ray system DICOM interface will be used. The typical X-ray systems are the GE Innova or the DLX.
Automatic Start Exam: Check this box only if you are using a GE Innova system. This feature sends a notification to the Innova to start an exam.
NOTEYou should only check this option if your version of Innova supports this feature, otherwise leave this box unchecked.
AE Title: The DICOM name for the X-ray system. This is found in the X-ray system’s configuration settings. (The default names are “dlx_root” for the DLX or “TERRA” for the Innova, but these values are typically changed).
Hostname or IP Address: X-ray system hostname or IP address. (Obtain this from the hospital administrator).
Port Number: Port number on which the X-ray system listens for connections from the Mac-Lab/CardioLab.
Modality: Imaging system’s modality. This should be left at the default of XA.
Text Encoding: How text sent to the X-ray system is encoded. This should be left at the default of Latin-1.
Ultrasound System Settings: Fill in this section if you are connecting to an ultrasound device.
4-66 Mac-Lab/CardioLab/Centricity Cardiology INW Service Manual 2021423-503H

Troubleshooting
AE Title: DICOM name for the Ultrasound system. Check Ultrasound system configuration to verify the name.
Hostname or IP Address: Ultrasound system hostname or IP address.
Port Number: Port number on which the ultrasound system listens for connections from the Mac-Lab/CardioLab.
Modality: Ultrasound system’s modality. This should be left at the default of US.
Text Encoding: How text sent to the Ultrasound system is encoded. This should be left at the default of Latin-1.
Modality Worklist Host: CVIS settings. You must fill in this section.
AE Title: DICOM name for the CVIS. Default is MWL_MPPS_SCP. Check CVIS configuration to verify the name.
Hostname or IP Address: CVIS hostname or IP address.
Port Number: Port number on which CVIS listens for connections from the Mac-Lab/CardioLab. Default values are:
Domestic CVIS is 1225.
Non-Domestic CVIS is 104.
Check the CVIS configuration to verify the value.
Text Encoding: How text sent to the CVIS is encoded. Leave at default of Latin-1 (exception: CVIS in China and Japan should be Unicode (UTF-8)).
MPPS Host: CVIS settings. You must fill in this section. Use exactly the same values you used to fill in the Modality Worklist Host section.
Maximum search responses to accept: Defines the maximum number of DICOM search results displayed. Use the default value of 150.
Lock critical patient demographics fields from Modality Worklist host: Leave checked to prevent the operator from changing Patient Name, MRN, and Date of Birth when these values are provided by the CVIS.
Problem Scenarios
Problem: My supplies or other list items I add to the CVIS system are not showing up on my Mac-Lab.
INW service that processes lists not configured or started
CVIS List Sharing Delta export not configured for the given location
Corrupt XML export from the CVIS system
CVIS List Sharing services on CVIS server not started
Replication errors/issues with INW Server and Mac-Labs
Network connection between CVIS and INW server lost (INW service can't find files even though they're getting created appropriately)
2021423-503H Mac-Lab/CardioLab/Centricity Cardiology INW Service Manual 4-67

Troubleshooting
Problem: Cases I do on Mac-Lab are not showing up in the CVIS system.
Interfaces on CVIS server not running or configured improperly
Data Export Utility on Mac-Lab not configured correctly
Data Export not turned on Mac-Lab in Sys Admin File Path setup
Network connection between Mac-Lab and CVIS Server not up
Problem: I scheduled the patient on the CVIS system, but I can't find them in the Schedule search.
DICOM settings not configured correctly on Mac-Lab
DICOM services not running on CVIS Server
Network connection lost between Mac-Lab and CVIS
Problem: I can't find a patient with the Patient search, but I know they are admitted...the Patient search isn't working.
DICOM settings on Mac-Lab not configured correctly
Network connection lost between Mac-Lab and CVIS
Patient Interface service not running
HIS feed to ADT Interface is down on CVIS
Test DICOM Connectivity (CVIS)
Steps 1 and 2 are only valid for US (English Canada) CVIS.
1. Open the Study > Patient Search at the Navigator.
2. Enter a Patient Last Name of Smith (or other common name) and press Start Search. One of the following outcomes will occur:
One or more patient records are returned and shown in the list. (If too many matches are found the list will be truncated.) The DICOM configuration settings are correct.
An error message is displayed indicating no matching patients were found. The DICOM configuration settings may be correct, but another name should be tried.
Some other error message is displayed:
The DICOM configuration settings are incorrect.
The CVIS system configuration settings are incorrect.
The CVIS system is not actively listening for connections.
Begin troubleshooting with the next step.
4-68 Mac-Lab/CardioLab/Centricity Cardiology INW Service Manual 2021423-503H

Troubleshooting
3. These substeps are valid for both US and Non-US (English Canada) CVIS.
a. Log in as MLCLTechUser (to OS).
b. Open command prompt.
c. Type dicomdiag and press Enter. The diagnostic tool will attempt to connect to all configured remote DICOM hosts. Failures and recommended solutions will be reported.
d. The diagnostic tool will tell you what to do next.
4. Check the DICOM server settings on the CVIS systems. Log in to the CVIS system using MuseAdmin (Contact GE Healthcare Technical Support or the system administrator for current password information). MuseAdmin is only valid for US (English Canada) CVIS.
a. Open the Interface Management Console tool (if it is not already running, look for it on the system tray).
b. Select the DICOM MWL SCP on the left side (it may be called something else).
c. Verify the DICOM server is running (it is shown on the right side). If it is not, click the + button on the toolbar.
d. Verify the AE Title and Network Port values match the Mac-Lab/CardioLab configuration.
e. Verify the CVIS application is running. If it is not, open the Centricity Cardiology DMS application on the desktop.
f. Go to Administrative > System Management > DICOM Maintenance.
g. Check the Location drop-down just above the DICOM Network group box. The Mac-Lab/CardioLab system should have the same AE Title configured earlier in CVIS (MLCL_LAB1 in the previous example).
h. If it does not, you need to either modify the AE Title back in CVIS or click the Add Net Device button and enter the following information:
AE Alias column: Enter a user-friendly name for the system (for example, Lab #1 or Mac-Lab 3).
AE Title column: Enter the AE Title of Mac-Lab/CardioLab system.
Modality column: Check the appropriate checkboxes: HD for Mac-Lab, EPS for CardioLab systems, or both for ComboLab systems.
i. Repeat the patient search. If all settings are correct, it should return a valid result.
2021423-503H Mac-Lab/CardioLab/Centricity Cardiology INW Service Manual 4-69

Troubleshooting
NOTEBy default, only errors from the DICOM interface are logged. To see additional error messages, you must edit the registry.
5. Add event log for DICOM traffic.
a. At the command prompt, run regedit.
b. Go to the following key:
HKEY_LOCAL_MACHINE\SOFTWARE\GEMS\DICOM\MWL_MPPS
c. Open Logging Filter. (It should have a default value of “08”.)
d. Change the value to “0F” (number zero, letter “F”) to enable logging of all events.
NOTEOnly change this value for troubleshooting because debug messages are also logged and the log will quickly fill up with unneeded information.
e. Restore the value to “08” when finished troubleshooting.
Test DICOM Connectivity (X-Ray)
Mac-Lab/CardioLab: After you configure (or re-configure) the “Local System” Settings tab, the “X-ray System Settings” section within the Mac-Lab/CardioLab application, you must either reboot the Acquisition system or manually restart the service called “MWL MPPS Service”. Note that you must be logged in as MLCLTechUser to manually start this service. MLCLLogonUser does not have the privilege to do this.
X-ray: You must configure the X-ray system to use the Mac-Lab/CardioLab Acquisition system as its destination for both MWL and MPPS transactions. The X-ray system must not get this information from the CVIS system.
NOTETo test with the Innova, use the dicomdiag tool, as described in the previous section.
1. PING (at the command prompt) the X-ray system using the same hostname or IP address previously configured.
PING fails: Possibly a networking problem, check if configuration is correct.
PING successful: Go to the next step.
NOTEThe dcmecho command (see previous for CVIS) will not work for to test the X-ray system interface. This is because the command tests connecting from Mac-Lab/CardioLab to X-ray systems, but the connections only go the other way. Therefore, the connection test must be done from the X-ray side.
4-70 Mac-Lab/CardioLab/Centricity Cardiology INW Service Manual 2021423-503H

Troubleshooting
2. On the X-ray system, use the DICOM Echo interface or a similar connectivity test, to verify that the connection with the Mac-Lab/CardioLab system can be established. If that works, the Mac-Lab/CardioLab system is configured correctly and is listening for and responding to requests.
3. In order to use the MWL interface on the X-ray system to request patient and study data from the Mac-Lab/CardioLab system, follow these steps:
a. Start a new study on the Mac-Lab/CardioLab system. (If you don’t, the MWL request from the X-ray system will fail because there is no patient and study data to report).
b. Make the MWL request from the X-ray system. Key patient attributes such as Name, MRN, Date of Birth, Height, and Weight should transfer from the Mac-Lab/CardioLab and should be displayed on the X-ray system.
4. If this doesn’t work, make sure the MWL MPPS Service is running on the Mac-Lab/CardioLab system.
5. Check the error log and look for errors reported by the DICOM layer.
6. Recheck the configuration on both systems (the values should match exactly):
Mac-Lab/CardioLab: Local AE Title and Listen Port, the X-ray system’s AE Title and Modality.
X-ray System: AE Title values, MWL/MPPS destination Hostname/IP Address, Port Number.
HL7 Export to CVIS
1. Perform a check on the Mac-Lab/CardioLab logs to verify successful HL7 export. Open Windows Explorer.
2. Check the CVIS Interface Console audit logs to see if the HL7 message was received.
3. Check the CVIS archive logs to see if the HL7 message was processed.
2021423-503H Mac-Lab/CardioLab/Centricity Cardiology INW Service Manual 4-71

Troubleshooting
InSite ExC
Normal Operation
Once the agents are configured and started after initial setup, any configuration problems will cause the agents to attempt to connect three times at two minute intervals before shutting down.
Once the agents are successfully configured and started:
If the system is restarted, the agents attempt to start three times and then shut down until manually restarted.
In the event of a failure (that is, the network or enterprise is server down), the service agent polls every 10 minutes until it can connect.
GEMS Log Collector Task
GEMS Log Collector Task Creation
The following steps are needed only if you want to configure InSite ExC Log Collection on GE Acquisition and Review systems only.
1. Select Start -> Settings -> Control Panel -> Scheduled Tasks. The Scheduled Tasks page opens.
2. If the GEMS_LogCollector_Task entry is present, right-click it and chose Properties.
3. If the GEMS_LogCollector_Task entry is not present, add a new entry as follows:
Select File > New to add a new scheduled task.
Rename the task GEMS_LogCollector_Task
Right-click the new entry and select Properties.
Browse to D:\GEMMS\Prucka\Bin and select the GEMS_LogCollector.exe program. Edit the run command line to add the –sendtobos option as shown in the following figure.
4. Select the Enabled check box.
4-72 Mac-Lab/CardioLab/Centricity Cardiology INW Service Manual 2021423-503H

Troubleshooting
5. In the Run as field, enter the account information as follows:
For a networked system (Acquisition or Review), enter the user name as <Domain Name>\MLCLSqlUser.
For a stand-alone system, enter the user name as <Computer name>/ MLCLSqlUser.
Click Set Password. When prompted, enter the password sql8273user in both fields.
Click OK.
2021423-503H Mac-Lab/CardioLab/Centricity Cardiology INW Service Manual 4-73

Troubleshooting
GEMS Log Collector Task Schedule Configuration
Select the Schedule tab and configure the task to run once every two weeks as shown in the following figure.
1. In the Schedule Task: field, select Weekly.
2. In the Start time: field, select 11:50PM.
3. In the Schedule Task Weekly section, select Every 2 week(s) on: Sat.
4-74 Mac-Lab/CardioLab/Centricity Cardiology INW Service Manual 2021423-503H

Troubleshooting
List of Log Events
Timed Out while waiting for network thread
GetFileAttributes failed for path
The Exception EXCEPTION_ACCESS_VIOLATION was generated by the application
Exit Code indicates failure for path
Central List Service not starting
The service cannot be started, either because it is disabled
disk space left in the network storage path
Maximum number of client connections reached
Unable to create the patient directory
truncating rdc file to
Failed to update client status
.rdb was denied
Failed to copy file from
List of SNMP Faults
1. SNMP_EVENT_LOG_FOUNDATION_AGENTS_267
2. SNMP_EVENT_LOG_FOUNDATION_AGENTS_399
3. SNMP_EVENT_LOG_FOUNDATION_AGENTS_1174
4. SNMP_EVENT_LOG_FOUNDATION_AGENTS_1176
5. SNMP_EVENT_LOG_FOUNDATION_AGENTS_1178
6. SNMP_EVENT_LOG_FOUNDATION_AGENTS_1180
7. SNMP_EVENT_LOG_NIC_AGENTS_258
8. SNMP_EVENT_LOG_NIC_AGENTS_259
9. SNMP_EVENT_LOG_NIC_AGENTS_260
10. SNMP_EVENT_LOG_NIC_AGENTS_269
11. SNMP_EVENT_LOG_NIC_AGENTS_296
12. SNMP_EVENT_LOG_STORAGE_AGENTS_399
13. SNMP_EVENT_LOG_STORAGE_AGENTS_1061
14. SNMP_EVENT_LOG_STORAGE_AGENTS_1062
15. SNMP_EVENT_LOG_STORAGE_AGENTS_1064
16. SNMP_EVENT_LOG_STORAGE_AGENTS_1067
17. SNMP_EVENT_LOG_STORAGE_AGENTS_1068
18. SNMP_EVENT_LOG_STORAGE_AGENTS_1070
2021423-503H Mac-Lab/CardioLab/Centricity Cardiology INW Service Manual 4-75

Troubleshooting
19. SNMP_EVENT_LOG_STORAGE_AGENTS_1075
20. SNMP_EVENT_LOG_STORAGE_AGENTS_1076
21. SNMP_EVENT_LOG_STORAGE_AGENTS_1077
22. SNMP_EVENT_LOG_STORAGE_AGENTS_1152
23. SNMP_EVENT_LOG_STORAGE_AGENTS_1153
24. SNMP_EVENT_LOG_SERVER_AGENTS_399
25. SNMP_EVENT_LOG_SERVER_AGENTS_1024
26. SNMP_EVENT_LOG_SERVER_AGENTS_1082
27. SNMP_EVENT_LOG_SERVER_AGENTS_1085
28. SNMP_EVENT_LOG_SERVER_AGENTS_1088
29. SNMP_EVENT_LOG_SERVER_AGENTS_1123
30. SNMP_EVENT_LOG_SERVER_AGENTS_1137
31. SNMP_EVENT_LOG_SERVER_AGENTS_1138
32. SNMP_EVENT_LOG_SERVER_AGENTS_1139
4-76 Mac-Lab/CardioLab/Centricity Cardiology INW Service Manual 2021423-503H

Troubleshooting
Application Repair
NOTEFor repairing corrupted or missing Operator’s manual files, run the UserManualUpdate.wsf from the root of the DVD ML/CL APPLICATION INSTALL 6.5.6 (PN 2049051-001). A message stating “User manuals updated” will be displayed once the manuals are repaired.
Prerequisite
To run repair, set the current DVD drive letter in the registry at the location HKEY_LOCAL_MACHINE\SOFTWARE\Microsoft\Windows\CurrentVersion\Uninstall\{A826E79B-2E00-4538-847B-D88A3DB98E6F} as:
Value Name: InstallSource
Value Data: <DVD Drive letter>:\
For example if the DVD drive letter has changed to F, the Value data shall be F:\.
1. Log on as a local Administrator.
Ensure all programs are closed.
2. Insert the DVD ML/CL APPLICATION INSTALL 6.5.6 (PN 2049051-001) into the DVD-ROM drive.
3. Browse to the DVD drive and double-click mlcl.msi.
4. Click Next at the Mac-Lab/CardioLab-Installation Wizard Welcome window.
5. Click Next at the Setup Type window.
6. Enter the sa password (contact the Hospital administrator for current logon information) in the Database Password window and click Next.
7. Click Next at the Repair window. The Installing Mac-Lab/CardioLab progress bar opens.
8. Click Finish at the Installation Complete window.
9. Remove the DVD from the drive.
10. Reboot the system.
2021423-503H Mac-Lab/CardioLab/Centricity Cardiology INW Service Manual 4-77
Troubleshooting
Option Codes
Normal Operation
IMPORTANT: Always make a backup options CD after system setup. Refer to the Installation manual for detailed procedures.
Invalid key message indicates key was entered incorrectly.
Functions are enabled only when checkboxes are checked.
If Option codes are changed while in the applications: Log out and log back in to see the changes.
Troubleshooting
Fix Corrupt Option Codes
If options somehow become corrupted, then the following procedure can be used to reset the Mac-Lab CardioLab/Options.
1. Login as mlcltechuser (to the OS and Custom Shell)
2. Open a command prompt and type: regedit.exe [enter]
3. Navigate to HKEY_LOCAL_MACHINE\Software\GEMS\CardioLab\Options.
4. Delete Option List.
5. Launch the Service Console from the desktop and select the Options Manager.
6. Launch the Software Options from the CD and apply the changes.
If Serial Numbered Entered Incorrectly
1. Open command prompt
2. Navigate to D:\GEMMS\Prucka\Bin
3. Type: GEMS_ChangeSerialNum [SERIAL NUMBER]
4-78 Mac-Lab/CardioLab/Centricity Cardiology INW Service Manual 2021423-503H

Troubleshooting
Event Viewer
The Event Viewer maintains logs about program, security, and system events on the computer. You can use Event Viewer to view and manage the event logs, gather information about hardware and software problems, and monitor Windows security events.
1. To open the Event Viewer, on the Desktop, right-click My Computer and select Manage. The Computer Management window comes up.
2. Click the Event Viewer to expand the menu so you can see the following items: Application, Security and System.
Application Log - The application log contains events logged by applications or programs. For example, a database program might record a file error in the application log.
Security Log - The security log records events such as valid and invalid logon attempts, as well as events related to resource use such as creating, opening, or deleting files or other objects. For example, if you have enabled logon auditing, attempts to log on to the system are recorded in the security log.
System Log - The system log contains events logged by Windows XP system components. For example, the failure of a driver or other system component to load during startup is recorded in the system log.
3. All logons are logged to the Security section, you will need administrator rights in order to view the security logs. The Mac-Lab/CardioLab system handles its own errors.
4. You can choose View > Filter to filter logs that you want to see.
You also have to have administrator rights in order to save log files.
5. Click Computer Management and then select Connect to another computer on the Toolbar in order to connect to another computer.
2021423-503H Mac-Lab/CardioLab/Centricity Cardiology INW Service Manual 4-79

Troubleshooting
Log Files
Application Logs
Information, Warning, and Error messages are logged during different states of Mac-Lab/CardioLab (Acquisition and Review) and INW server systems. These messages can be used for checking: the state of the system, success of a command, or for debugging.
The Mac-Lab/CardioLab application writes messages to the Windows Event Log while running. These event logs can be accessed through the Event Viewer and appear in the Application Event Log with source GEMS. These messages may be of type information, warning, or error. The number of information or warning messages can be controlled through Audit Log settings inside the application. Error messages are always logged.
Install/Update Logs
Messages are written to Windows Event Log during installation or upgrade of Mac-Lab/CardioLab software. These event logs can be accessed through the Event Viewer and appear in the Application Event Log with the source GEMS and the category Setup.
File Name Origin or Location Usage DescriptionServer/
Workstation
DICOM log files D:\GEMMS\Prucka\Logs\DICOM Logs the status/details about the DICOM interface. These logs are created only if the option is checked in the Connectivity section of System Settings.
Workstation
Data Export Audit Log Files
D:\GEMMS\Prucka\Exportdata Logs the status/details about the Data Export operation. Workstation
Mini Dump Files D:\GEMMS\Prucka\Bin\Remote Service\Insite2\outgoing
Logs the mini dump when there is an application crash. Workstation
SQL Server log files
C:\Program Files\Microsoft SQL Server\MSSQL\log
Logs the status/details about the operation of the SQL server. Both
4-80 Mac-Lab/CardioLab/Centricity Cardiology INW Service Manual 2021423-503H
Troubleshooting
Install Log Files
Test log files are created during the installation of Mac-Lab/CardioLab software. These files contain information regarding: the actions performed during an install, result (success/failure) of the install, and error information (if any). These files are created in D:\GEMMS\Prucka\Setup and include the following:
Audit.log
GEMS_Droplinkedserver.log
GEMS_Dropreplblaster.log
GEMS_Replcheck.log
GEMS_CLAB_Export.log
GEMS_archiveuser.log
GEMS_clabsys.log
GEMS_clabuser.log
GEMS_StartServices.log
GEMS_CmdExecNT.log
GEMS_CmdExecSQLAcq.log
GEMS_CmdExecSQLRev.log
LMT_Update.log
Details of purpose and information contained in these files can be found in the following table.
File Name Origin Usage DescriptionServer/
Workstation
CMD_RESULT.log D:\GEMMS\Prucka\ Bin\GEMS_Install
Config.dll
Reads the CMD_RESULT.log file after the script execution during the application install to check whether the operation is successful or failure.
Both
CMD_RESULT.log GEMS_SysProfiler.bat Always creates the new CMD_RESULT.log file and logs GEMS_SUCCESS or GEMS_ERROR depending on the System Profiler operation during the application install.
Both
CMD_RESULT.log GEMS_SQLJOBS.bat Always creates the new CMD_RESULT.log file and logs GEMS_SUCCESS or GEMS_ERROR depending on the System Profiler operation during the database maintenance.
Server
GEMS_SW Install.log
GEMS_SysProfiler.bat Logs the steps performed and errors that occurred during the application install.
Both
GEMS_SWError.log GEMS_SysProfiler.bat Logs the errors occurred during the application install. Both
GEMS_HWProfile%TDYY%%TDMM%
%TDDD%.log
GEMS_SysProfiler.bat Logs the Hardware profile of the system during the application install. Both
MLCL_Set_ Language.log
MLCLSetLang.cpp Logs the details of the operation performed while setting the language.
Both
2021423-503H Mac-Lab/CardioLab/Centricity Cardiology INW Service Manual 4-81

Troubleshooting
Upgrade Log Files
Text log files are created during the upgrade of Mac-Lab/CardioLab software. These files contain information regarding the actions performed during the upgrade, result (success/failure) of the upgrade, and error information (if any). These files are created in D:\Upgrade60 and include the following:
capture_settings.log
capture_settings_rev.log
detach_5.x.log
migrate_acq.log
migrate_rev.log
migrate_srv.log
pre_install.log
reattach_5x.log
MLCL_Set Language.log
MLCL_Set_Language.bat
Logs the details of the operation performed while setting the language.
Both
GEMS_CREATE_ CLAB_OPTICAL_
6011.log
MLCL_Set_Language.bat
Logs the status/details about the v6.0 Clab Optical database creation operation.
Both
GEMS_CLAB_ OPTICAL_6500.log
MLCL_Set_Language.bat
Logs the status/details about the v6.5 Clab Optical database upgrade operation.
Both
GEMS_CLAB_ INSTALL.log
Logs the status/details about the database creation/upgrade during application install.
Both
GEMS_CLAB_ INSTALL.log
MLCL_Set_Language.bat
Logs the error if any problems in creating/updating the database while switching languages.
Both
GEMS_DROP_ DATABASE.log
Logs the error if any problems in dropping the database. Workstation
File Name Origin Usage DescriptionServer/
Workstation
4-82 Mac-Lab/CardioLab/Centricity Cardiology INW Service Manual 2021423-503H
Troubleshooting
Maintenance Log Files
Text log files are created during the maintenance operations performed on the Mac-Lab/CardioLab systems. These maintenance activities include Database Maintenance, Backup, Archive, Running Scheduled Jobs, and so on. These log files contain information regarding the actions performed during maintenance, result (success/failure) of the maintenance, and error information (if any). These files are created in the folder D:\GEMMS\Prucka\Database\Maintenance\Log and include the following:
GEMS_BKP.log
GEMS_TAPEBKP.log
GEMS_backup_clabdb.log
GEMS_backup_masterdb.log
GEMS_DBMAINT_PROCS.log
GEMS_db_maint_reindexdb_clab.log
GEMS_db_maint_recompile_clab.log
GEMS_db_maint_checks_master.log
scheduled_jobs_on_’ + @subscriber + ‘.log
Gems_backupclab.log
Gems_restoreclab.log
Listjobs.log
GEMMS_tmparchive.log
GEMMS_tmppurge.log
sp_detach_5x.log
sp_attach_cb.log
sp_attached_5x.log
Details of purpose and information contained in these files can be found in the following table.
2021423-503H Mac-Lab/CardioLab/Centricity Cardiology INW Service Manual 4-83

Troubleshooting
Replication Log Files
Text log files are created during the replication setup and configure operations on the Centricity Cardiology INW server. These log files contain information regarding the actions performed during replication setup, result (success/failure) of the setup, and error information (if any). These files include the following:
GEMS_Acq_ReplRemove.log
GEMS_ReplicationCheck.log
GEMS_Server_ReplRemove.log
File Name Origin Usage DescriptionServer/
Workstation
Database Maintenance.log
GEMS_SQLJOBS.bat Logs the status and details about the database maintenance operation.
Server
GEMS_sqljobs. log
GEMS_SQLJOBS.bat Logs the status and details about SQL Jobs during the database maintenance operation.
Server
GEMS_WS_DBMAINT.log
GEMS_2GBLimitPatch.bat Logs the status and details of the operation performed during the database maintenance for 2 GB Limit.
Workstation
GEMS_WS_DBMAINT.log
GEMS_WS_DBMAINT.bat Logs the status and details of all the operations performed during the database maintenance.
Workstation
GEMS_WS_DBMAINT.log
GEMS_WS_DBMAINTJ OB.bat
Logs the error if any problems in starting the database maintenance operation.
Workstation
GEMS_db_maint_backup.log
GEMS_WS_DBMAINT.bat Logs the status/details about backup operation performed during the database maintenance.
Workstation
GEMS_db _maint_ REINDEX.log
GEMS_WS_DBMAINT.bat Logs the status/details about re-index operation performed during the database maintenance.
Workstation
GEMS_db_maint_checks.log
GEMS_WS_DBMAINT.bat Logs the status/details about maintenance checks operation performed during the database maintenance.
Workstation
GEMS_db_maint_updatestats.log
GEMS_WS_DBMAINT.bat Logs the status/details about update stats operation performed during the database maintenance.
Workstation
GEMS_db_maint_recompile.log
GEMS_WS_DBMAINT.bat Logs the status/details about recompile operation performed during the database maintenance.
Workstation
Archive Generator Log Files
Logs the status/details about Archive Generator operation. Workstation
2GBLimit.log Logs the status/details about the operation of the 2GB Utility. Workstation (Acquisition)
4-84 Mac-Lab/CardioLab/Centricity Cardiology INW Service Manual 2021423-503H

Troubleshooting
Device Log Files
These are errors that are created from devices that are hooked up to the Mac-Lab/CardioLab system.
File Name Origin or Location Usage DescriptionServer/
Workstation
TramErr.log D:\GEMMS\Prucka\Bin\PEITram.dll
Logs the device status and errors occurred on the TRAM. Workstation
TramNetErr.log D:\GEMMS\Prucka\Bin\PEITramNet.dll
Logs the connection status and failures on the TRAMNet Driver. Workstation
DashErr.log D:\GEMMS\Prucka\Bin\PEIDash.dll
Logs the device status and errors occurred on the DASH/Solar. Workstation
2021423-503H Mac-Lab/CardioLab/Centricity Cardiology INW Service Manual 4-85

Troubleshooting
Log File Locations for Mac-Lab/CardioLab System
The following log files may exist on workstations and INW servers:
D:\GEMMS\Prucka\Setup\GEMS_CLAB_INSTALL.log
D:\GEMMS\Prucka\Setup\GEMS_DROP_DATABASE.log
D:\GEMMS\Prucka\Database\Maintenance\Log\GEMS_DBMAINT_PROCS.log
D:\GEMMS\Prucka\Bin\TramNetErr.log
D:\GEMMS\Prucka\Bin\Gems_backupclab.log
D:\GEMMS\Prucka\Bin\Gems_restoreclab.log
D:\GEMMS\Prucka\Bin\Audit.log
C:\DFCtest\merge.log
C:\clabdbsizecheck.log
D:\GEMMS\Prucka\Bin\CMD_RESULT.log
D:\GEMMS\Prucka\setup\GEMS_Droplinkedserver.log
D:\GEMMS\Prucka\setup\GEMS_Dropreplblaster.log
D:\GEMMS\Prucka\setup\GEMS_Replcheck.log
D:\GEMMS\Prucka\SETUP\GEMS_CLAB_Export.Log
D:\GEMMS\Prucka\Setup\GEMS_CLAB_INSTALL.Log
D:\GEMMS\Prucka\Setup\GEMS_archiveuser.log
D:\GEMMS\Prucka\Bin\DATABASE\MAINTENANCE\LOG\GEMS_BKP.Log
D:\GEMMS\Prucka\Bin\DATABASE\MAINTENANCE\LOG\GEMS_TAPEBKP.Log
D:\GEMMS\Prucka\Bin\build.log
D:\GEMMS\Prucka\Bin\DashErr.log
D:\GEMMS\Prucka\Bin\TramErr.log
C:\STATS.LOG
C:\QUERY.LOG
C:\SQL.LOG
D:\GEMMS\Prucka\2GBUtility\Log\2GBLimit.log
D:\GEMMS\Pruckaa\Bin\GEMMS_tmparchive.log
D:\GEMMS\Prucka\Bin\GEMMS_tmppurge.log
D:\GEMMS\Prucka\Bin\log\gems_ws_dbmaint.log
D:\GEMMS\Prucka\Bin\log\GEMS_DBMAINT_PROCS.log
D:\GEMMS\Prucka\Bin\log\GEMS_WS_DBMAINT.log
D:\GEMMS\Prucka\Bin\log\GEMS_db_maint_checks.log
GEMS_db_maint_backup.log
GEMS_db_maint_REINDEX.log
GEMS_db_maint_updatestats.log
D:\GEMMS\Prucka\log\GEMS_db_maint_recompile.log
D:\GEMMS\Prucka\DICOM\merge.log
D:\GEMMS\Prucka\Ntos\logs\GEMS_Policy.log
4-86 Mac-Lab/CardioLab/Centricity Cardiology INW Service Manual 2021423-503H

Troubleshooting
D:\Upgrade65\capture_settings.log
D:\GEMMS\Prucka\Database\maintenance\log\Listjobs.log
D:\GEMMS\Prucka\Database\maintenance\log\sp_detach_5x.log
D:\Upgrade60\migrate_acq.log
D:\Upgrade60\migrate_rev.log
D:\Upgrade60\migrate_srv.log
D:\GEMMS\Prucka\Database\maintenance\log\sp_attach_cb.log
D:\GEMMS\Prucka\Bin\log\sp_attach_5x.log
C:\windows\security\logs\resetup.log
C:\windows\special\cardiosec.log
D:\GEMMS\Prucka\setup\LMT_Update.log
D:\GEMMS\Prucka\Setup\MLCL_Set_Language.log
D:\GEMMS\Prucka\Setup\history.log
D:\GEMMS\Prucka\Bin\GEMS_SWInstall.log
D:\GEMMS\Prucka\Bin\GEMS_SW_D.log
D:\GEMMS\Prucka\Setup\GEMS_clabsys.log
D:\GEMMS\Prucka\Setup\GEMS_clabuser.log
D:\GEMMS\Prucka\Setup\GEMS_CmdExecNT.log
D:\GEMMS\Prucka\Setup\GEMS_StartServices.log
D:\GEMMS\Prucka\Setup\GEMS_CmdExecNT.log
D:\GEMMS\Prucka\Setup\GEMS_CmdExecSQLAcq.log
D:\GEMMS\Prucka\Setup\GEMS_CmdExecSQLRev.log
D:\GEMMS\Prucka\Setup\GEMS_netshare.log
D:\GEMMS\Prucka\Database\Maintenance\Log\DatabaseMaintenanace.log
D:\GEMMS\Prucka\Database\Maintenance\Log\GEMS_sqljobs.log
D:\GEMMS\Prucka\Database\Maintenance\Log\GEMS_backup_clabdb.log
D:\GEMMS\Prucka\Database\Maintenance\Log\GEMS_backup_masterdb.log
D:\GEMMS\Prucka\Database\Maintenance\Log\GEMS_db_maint_reindexdb_clab.log
D:\GEMMS\Prucka\Database\Maintenance\Log\GEMS_db_maint_recompile_clab.log
D:\GEMMS\Prucka\Database\Maintenance\Log\GEMS_db_maint_checks_master.log
D:\GEMMS\Prucka\Database\Maintenance\Log\GEMS_SrvNameChanger.log
D:\GEMMS\Prucka\Database\Maintenance\Log\GEMS_SrvNameChanger.log
D:\GEMMS\Prucka\Database\Maintenance\Log\NameChanger.log
D:\GEMMS\Prucka\Database\Maintenance\Log\GEMS_Acq_ReplRemove.log
D:\GEMMS\Prucka\Database\Maintenance\Log\GEMS_ReplicationCheck.log
2021423-503H Mac-Lab/CardioLab/Centricity Cardiology INW Service Manual 4-87

Troubleshooting
D:\GEMMS\Prucka\Database\Maintenance\Log\GEMS_Server_ReplRemove.log
D:\GEMMS\Prucka\Setup\MLCLInstallerDbg.log
Navigate to D:\GEMMS\Prucka\ExportData
Double-click DataExportConfig.exe.
Check the audit.log file in the directory in the Audit Log tab.
Domestic CVIS Only: Perform a check on the CVIS Interface Management Console to verify the HL7 messages were processed/ received.
Navigate to Administrative > System Management > Audit Logs.
Then go to respective tab page to find the log files.
4-88 Mac-Lab/CardioLab/Centricity Cardiology INW Service Manual 2021423-503H

5 Recovery Procedures
2021423-503H Mac-Lab/CardioLab/Centricity Cardiology INW Service Manual 5-1

Recovery Procedures
Acquisition System Disaster Recovery
The decision to perform an Acquisition system recovery should only be made after consultation with GE Technical Support by the on-site Field Engineer. The high-level steps for a complete 6.5.6 Acquisition system recovery are listed below. Detailed instructions for each step follow.
High-Level Overview
Required Parts
Verify the appropriate media is available. Double-check all part numbers before you begin.
DVD ML/CL APPLICATION INSTALL 6.5.6: 2049051-001
DVD MLAB/CLAB HPXW8000 IMG DVD v6.5.6: 2049072-001
DVD MLAB/CLAB HPXW8000 IMG DVD v6.5.6 #2: 2049072-002
DVD MLAB/CLAB HPXW8200 IMG DVD v6.5.6: 2049074-001
DVD MLAB/CLAB HPXW8200 IMG DVD v6.5.6 #2: 2049074-002
DVD MLAB/CLAB HPXW8400 IMG DVD v6.5.6: 2049076-001
DVD MLAB/CLAB HPXW8400 IMG DVD v6.5.6 #2: 2049076-002
DVD MLAB/CLAB HPZ600 IMG DVD v6.5.6: 2049080-001
DVD MLAB/CLAB HPZ600 MG DVD v6.5.6 #2: 2049080-002
CD-R DRIVERS, PANASONIC LKM-KB23 ADA DRV: 2057762-001 (If applicable)
Recovery Scenario
Perform the following steps on an acquisition that needs to be reimaged.
Step 1: Save Acquisition System Information. Backed up data from the second hard drive (drive G:) is used later on to restore the system.
Step 2: Take the Acquisition systems out of replication and set systems to standalone (if necessary). Go to “Obtain System Information at the Server” on page 5-8.
Step 3: Reimage the Acquisition System. Go to “Restore System Software” on page 5-10.
Step 4: Perform all the procedures in “Configure the Acquisition System” on page 5-32.
Step 5: If necessary, perform all the procedures in “Configure the Acquisition System on the INW Network” on page 5-40.
5-2 Mac-Lab/CardioLab/Centricity Cardiology INW Service Manual 2021423-503H

Recovery Procedures
Log On to the Acquisition System
When starting up an Acquisition system, an auto-logon sequence starts and you are automatically logged on to Windows XP. You must stop the auto-logon so you can log on to Windows XP as mlcltechuser.
1. Power on the Acquisition system.
The system boots up to the Mac-Lab/CardioLab Custom Shell screen.
2. Press Ctrl + Action + Delete.
3. Click Logoff and select Logoff.
4. Immediately hold down the Shift key.
5. Log on to the Windows OS as local mlcltechuser (contact GE Technical Support or the system administrator for current password information).
To log on locally, select the computer name in the Domain field.
6. Log on to the Mac-Lab/CardioLab Custom Shell as local mlcltechuser (contact GE Technical Support or the system administrator for current password information).
Save Acquisition System Information
If the system will not boot up or drives C: or D: are unavailable:
For INW networked systems, go to “Obtain System Information at the Server” on page 5-8.
For standalone systems, go to “Reimage the Acquisition System” on page 5-10.
If the system boots up and the C: and D: drives are available, use the following procedures to back up system information.
Export Custom Data
Use this procedure to save custom data to the G: (backup) drive.
If the system is being completely replaced, save the custom data to removable media to be moved to the replacement system after recovery. It is recommended to use a USB Flash Drive.
2021423-503H Mac-Lab/CardioLab/Centricity Cardiology INW Service Manual 5-3

Recovery Procedures
Export Custom Lists
NOTEIf prompted for an administrative logon, enter domain mlcladmuser (password: mlcl!admuser).
1. Double-click Mac-Lab/CardioLab to start the Mac-Lab/CardioLab application.
2. In the Navigator window, select Utilities > Export Lists.
The Data Export Wizard is displayed.
3. Select the G: drive and click New Folder.
4. Enter List_ Backup for the folder name and click Ok.
5. Click OK when the Success message is displayed.
Export Custom Forms
1. In the Navigator window, select Utilities > Export Custom Form Layouts.
The Data Export Wizard is displayed.
2. Select the G: drive and click New Folder.
3. Enter Forms_ Backup for the folder name and click OK.
4. Click Export.
5. Click OK when the Success message is displayed.
Export Custom Report Formats
1. In the Navigator window, select Utilities > Export Report Formats.
The Data Export wizard is displayed.
2. Select the G: drive and click New Folder.
3. Enter Report_ Backup for the folder name and click Ok.
4. Click OK when the Success message is displayed.
5. Close the application.
Back Up System Information Manually
Run Database Maintenance (if applicable)
Check to see if there is a recent backup in the G:\GEMMS folder. This backup would have been created by the Database Maintenance task. If there is not a recent backup, run the Database Maintenance task.
1. Select Start > Settings > Control Panel.
5-4 Mac-Lab/CardioLab/Centricity Cardiology INW Service Manual 2021423-503H

Recovery Procedures
2. Double-click Scheduled Tasks.
3. Right-click the Database Maintenance task.
4. Click Run.
5. Wait for the database maintenance job to complete.
6. After the job completes, close all open windows.
Backup Image Capture Settings
This procedure is only necessary on a Image Capture/CardioImage system.
Backup any custom DCF files in the D:\GEMMS\Prucka\System\Image\DCF folder to the G: drive.
Record CVIS Information
On the Desktop, verify whether or not the Centricity Cardiology DMS shortcut is installed.
Back up Third-Party Software
A manual backup must be created for Third Party Software:
1. Check for the PedCath database:
a. Open the PedCath application and select File > Show Data Folder Path from the main menu.
If the data folder path is on the local C: or D: drive, then perform the next steps:
b. Right-click My Computer and select Explore.
c. Navigate to the PedCath database folder location.
d. Drag and drop the PedCath Data folder into the G: drive.
2. Check for the ACCAccess database:
a. Right-click My Computer and select Search.
b. Search the C: and D: drives for the file acc.mdb.
c. If the ACCAccess database is found, drag and drop the file into the G: drive.
3. Backup any other third-party software to the G: drive.
NOTEThis disaster recovery procedure will only save Mac-Lab/CardioLab files. Any other files must be backed up manually to the G: drive and restored later.
2021423-503H Mac-Lab/CardioLab/Centricity Cardiology INW Service Manual 5-5

Recovery Procedures
Back Up Software Options
1. Double-click Service Console on the Desktop.
2. Navigate to Software Options Manager > Software Options.
3. Click Create Backup.
4. In the Save In drop-down box navigate to G: drive.
5. In the File Name field, type Software_Options and click Save.
6. Close the Service Console.
Back Up Desktop Files
1. Right-click My Computer on the Desktop and select Explore.
2. Navigate to G: drive and click the New Folder button.
3. Enter the folder name as Desktop_Items.
4. Copy any customer created documents or folders from the desktop to the Desktop_Items folder.
5. Repeat this procedure logged in as any other applicable user (local mlcllogonuser, INW mlcllogonuser, and INW mlcltechuser).
Record Network Settings
1. Verify that you are logged in to both the Windows OS and the Custom Shell as local mlcltechuser.
2. From the Desktop, right-click My Computer.
3. Choose Properties.
4. Click the Computer Name tab.
5. Record the computer name in the table below.
6. Record the Domain/Workgroup information and click Ok.
7. From the Desktop, right-click My Network Places.
8. Choose Properties.
9. Right-click Local Area Connection.
10. Choose Properties.
11. Highlight the Internet Protocol (TCP/IP) and click Properties.
12. Record the IP Address, Subnet Mask, Default Gateway, WINS (if used) and DNS Server information.
5-6 Mac-Lab/CardioLab/Centricity Cardiology INW Service Manual 2021423-503H

Recovery Procedures
Record Mapped Drives and Printer
1. Press Ctrl + Action + Delete.
2. Click Logoff and select Logoff.
3. Allow the system to auto-logon to Windows.
4. Log on to the Mac-Lab/CardioLab Custom Shell as a local user.
5. Double-click My Computer.
6. Go to Network Drives. All mapped drives will be listed.
7. Record all mapped drives.
Drive letter
Share name
Hostname of the computer that owns the share
8. Record the configured printers.
Network Settings
Computer name
Domain\Workgroup
IP Address _______-_______-_______-_______
Subnet Mask _______-_______-_______-_______
Default Gateway _______-_______-_______-_______
WINS (if used)
DNS Server _______-_______-_______-_______
_______-_______-_______-_______
_______-_______-_______-_______
2021423-503H Mac-Lab/CardioLab/Centricity Cardiology INW Service Manual 5-7

Recovery Procedures
INW Networked Acquisition Systems Only
Use these procedures only if the Acquisition system is part of an INW network. For a Standalone Acquisition, continue with “Restore System Software” on page 5-10.
You must log on to the server as the INW domain Administrator to perform this procedure (contact GE Technical Support or the system administrator for current password information).
Obtain System Information at the Server
Use this procedure to obtain network settings only if the Acquisition system will not boot or the C: or D: drives are unavailable.
1. Select Start > Programs > Microsoft SQL Server > Enterprise Manager.
2. Open Microsoft SQL Servers > SQL Server Group.
3. Highlight the server name.
4. Expand Replication Monitor > Agents > Merge Agents.
The failed Acquisition has a red X displayed next to system’s Merge Agent.
5. Record the system name in one of the Merge Agents with the red X under the Subscription tab.
_____________________________
6. Close the Enterprise Manager.
7. Open a command prompt (Start > Programs > Accessories > Command Prompt).
8. Type:
Ping [System Name]
recorded in step 5.
9. Record the Acquisition system IP address.
_____________________________
NOTEIgnore the request timeout.
10. Close all open windows.
11. Go to another Acquisition or Review system on the network within the same subnet, and use the procedure “Record Network Settings” on page 5-6 to obtain and record DNS, Default Gateway, and Subnet information.
5-8 Mac-Lab/CardioLab/Centricity Cardiology INW Service Manual 2021423-503H

Recovery Procedures
NOTEA system on the network within the same subnet will have the same network information as the system being recovered.
Remove the Acquisition System from Replication
1. At the server, select Start > Programs > Microsoft SQL Server > Enterprise Manager.
2. Open Microsoft SQL Servers > SQL Server Group.
3. Highlight the server name.
4. From the menu Select Tools/Replication/Configure Publishing, Subscribers, and Distribution.
5. Select the Subscribers tab.
6. Deselect the checkbox next to the Acquisition system name.
7. Click Yes.
8. Click OK.
9. In the Enterprise Manager, right-click the Acquisition system in the left pane.
10. Select Delete SQL server registration.
11. Select Yes.
12. Close the Enterprise Manager.
Remove the Acquisition System from the GE MLCL Organizational Unit
1. At the server Desktop, go to Start > Control Panel.
2. Double-click Administrative tools.
3. Double-click Active Directory Users and Computers.
4. Expand the domain name (default is inw.local).
5. Expand the GE Medical Systems (MLCL) organizational unit.
6. Expand the MLCL Computers.
7. Expand the MLCL Workstations
8. Expand the MLCL Acquisition Workstations
9. Delete the Acquisition system name from the MLCL Acquisition Workstations folder.
10. Click Yes to confirm.
11. Close all open windows.
2021423-503H Mac-Lab/CardioLab/Centricity Cardiology INW Service Manual 5-9

Recovery Procedures
Restore System Software
Reimage the Acquisition System
CAUTIONSHOCK HAZARD — Use appropriate Lock Out/Tag Out procedures before performing any service on potentially energized equipment.
CAUTIONEQUIPMENT DAMAGE — Electrostatic discharge (ESD) can damage electronic components. Be sure you are properly grounded before opening any equipment.
CAUTIONLOSS OF DATA — If drive G:, the second hard drive, is physically connected during reimaging, all data contained on it will be lost.
You must physically disconnect the second hard drive before reimaging.
NOTEThe HP z600 computer must be reimaged because it will have 6.8.1 software installed.
For the reimaging process you’ll need the following media depending on system type (HP xw8000, HP xw8200, HP xw8400 and HP z600).
DVD ML/CL APPLICATION INSTALL 6.5.6: 2049051-001
DVD MLAB/CLAB HPXW8000 IMG DVD v6.5.6: 2049072-001
DVD MLAB/CLAB HPXW8000 IMG DVD v6.5.6 #2: 2049072-002
DVD MLAB/CLAB HPXW8200 IMG DVD v6.5.6: 2049074-001
DVD MLAB/CLAB HPXW8200 IMG DVD v6.5.6 #2: 2049074-002
DVD MLAB/CLAB HPXW8400 IMG DVD v6.5.6: 2049076-001
DVD MLAB/CLAB HPXW8400 IMG DVD v6.5.6 #2: 2049076-002
DVD MLAB/CLAB HPZ600 IMG DVD v6.5.6: 2049080-001
DVD MLAB/CLAB HPZ600 MG DVD v6.5.6 #2: 2049080-002
1. Shut down the system, if necessary.
2. Open the computer case and disconnect the second hard drive (drive G:) before reimaging.
The second hard drive is physically located below the primary hard drive.
5-10 Mac-Lab/CardioLab/Centricity Cardiology INW Service Manual 2021423-503H

Recovery Procedures
3. Restart the system.
NOTEPress F1 (Help) at the Intel Boot Agent screen, if displayed.
4. Log on to the Windows OS and the Mac-Lab/CardioLab Custom Shell locally as mlcltechuser.
NOTEIf the Systems Settings Change window is displayed, click Yes to restart. Log on again as mlcltechuser. At this point of the setup, you may see a Windows New Hardware Found wizard dialog. Please ignore this dialog. This window will be closed by Windows during the system shutdown.
5. Right-click My Computer, select Explore and verify the G: drive is no longer available.
6. Insert the appropriate Image DVD.
7. Shut down the system and replace the faulty hard drive.
NOTEFor the HP xw8000 only: Ensure the jumpers are set to cable select.
8. Restart the system.
9. If the system is an HP z600, the following needs to be changed in the BIOS in order to boot from the image DVD:
a. Restart the system and press F10 to enter BIOS.
b. Select Storage > Storage Options.
c. Select SATA Emulation. Change the default of RAID+AHCI to IDE.
d. Press F10 to accept changes in BIOS.
The system will reboot.
10. Select Erase System Data and press Enter to begin reimaging.
The Symantec Ghost screen is displayed monitoring the progress of the image process. If necessary, insert the remaining image DVDs as prompted. When the installation is complete, the computer will automatically restart. Remove the DVD.
NOTEDuring the setup process a blank Windows DOS-Prompt window is displayed. Do not close this window as setup is being performed.
11. If the system is an HP z600, the following needs to be changed in the BIOS:
a. Restart the system and press F10 to enter BIOS.
b. Select Storage > Storage Options.
2021423-503H Mac-Lab/CardioLab/Centricity Cardiology INW Service Manual 5-11

Recovery Procedures
c. Select SATA Emulation. Change the default of IDE to RAID+AHCI.
d. Press F10 to accept changes in BIOS.
The system will reboot.
12. Shut down the system.
13. Reconnect the G: drive.
14. Restart the system.
NOTEPress F1 (Help) at the Intel Boot Agent screen, if displayed.
15. Log on to the Windows OS and the Mac-Lab/CardioLab Custom Shell locally as mlcltechuser.
16. If any devices were not automatically installed during re-imaging, a New Hardware Found message may be displayed at restart. If this happens, use the following procedure for each wizard:
Select Install the software automatically and click Next.
If a choice of drivers is presented, pick the default selection and click Next.
If prompted about Windows Logo testing or driver signing, click Continue anyway.
If prompted by Matrox Powerdesk Installation about enabling independent mode for Matrox graphics hardware, click Yes.
Click Finish when the installation is complete.
Restart the computer if prompted and log on again as local mlcltechuser.
5-12 Mac-Lab/CardioLab/Centricity Cardiology INW Service Manual 2021423-503H

Recovery Procedures
Install the ADA Driver (Only for HP z600 with ADA Drive)
If the system is an HP z600 with an ADA drive installed, install this driver.
1. Insert CD-R DRIVERS, PANASONIC LKM-KB23 ADA DRV (PN 2057762-001) into the CD/DVD drive.
2. Right-click My Computer and select Explore.
3. Navigate to the Panasonic ADA Driver CD.
4. Double-click Setup.exe.
5. Select the Driver and Formatter Setup.
6. Uninstall the previous driver and confirm the uninstall.
7. Restart the computer when prompted.
8. After the computer restarts, log on as local mlcltechuser for both Windows and the Mac-Lab CardioLab custom shell.
9. Navigate to the Panasonic ADA Driver CD.
10. Double-click Setup.exe.
11. Select the Driver and Formatter Setup.
12. When prompted,
a. Click Next.
b. Click Yes to accept the license agreement.
c. Click Next to accept the default destination.
d. Click Next to accept the default Program Folder.
e. Click Next to start copying files.
13. Close ReadmeXP.txt.
14. Click Next to restart the computer and Finish.
15. After the computer restarts, log on as local mlcltechuser for both Windows and Mac-Lab CardioLab custom shell.
16. Remove CD-R DRIVERS, PANASONIC LKM-KB23 ADA DRV (PN 2057762-001) from the CD/DVD drive.
2021423-503H Mac-Lab/CardioLab/Centricity Cardiology INW Service Manual 5-13

Recovery Procedures
Verify Drive Order
1. Right-click My Computer and select Manage.
2. Select Storage > Disk Management in the left pane.
3. In the right pane, verify each drive is assigned the correct drive letter.
C: Primary Hard Drive
D: Data Hard Drive
E: MO Drive (if installed)
F: DVD-RAM Drive or ADA Drive
G: Second Hard Drive
NOTEIf the C: or D: drive letters are not correctly set, security settings were not properly applied. Do not change the drive letter. The system must be reimaged.
4. If a drive does not have the correct letter perform the following steps for each drive not assigned the correct letter:
a. Right-click the drive in the right pane and select Change drive letter and paths.
b. Click Change.
c. Select the new drive letter in the drop-down menu and click OK.
d. Click Yes to the confirmation message.
5. Close the Computer Management window.
Required Updates for Systems Using the Matrox M9140 Quad Video Board
For systems using the Matrox M9140 Quad video board, the video board drivers installed with the reimage must be uninstalled. After uninstalling the old video board drivers, install the Matrox M9140 Quad video board drivers. If the system is not using the Matrox M9140 Quad video board, proceed to “Set Display Configurations” on page 5-18.
Uninstall Unused Display Drivers
Uninstall unused display drivers before installing the Matrox M9140 Quad video board drivers.
1. Log on to Windows and the Custom Shell as mlcltechuser.
2. Ignore any New Hardware found messages.
3. If an error message about stopping ONL display appears, click OK.
5-14 Mac-Lab/CardioLab/Centricity Cardiology INW Service Manual 2021423-503H

Recovery Procedures
4. Click Start > Settings > Control Panel > Add or Remove Programs.
5. Uninstall the ATI – Software Uninstall Utility.
6. Ignore any New Hardware found messages.
7. Restart the system.
8. Log on to Windows and the Custom Shell as mlcltechuser.
9. Ignore any New Hardware found messages.
10. If an error message about stopping ONL display appears, click OK.
11. Click Start > Settings > Control Panel > Add or Remove Programs.
12. Uninstall Powerdesk-HF and Driver.
13. Select No to restart in the Matrox Uninstaller for PowerDesk window.
14. Shutdown the system.
2021423-503H Mac-Lab/CardioLab/Centricity Cardiology INW Service Manual 5-15

Recovery Procedures
Install Matrox M9140 Quad Video Board Drivers V2.12.00.147
Install the Matrox M9140 Quad video board drivers using CD-R MATROX M9140 QUAD VIDEO CARD DRIVER, V2.12.00.147 (P/N 2074635-001).
1. Power on the system.
2. Log on to Windows and the Custom Shell as mlcltechuser.
3. Ignore any New Hardware found messages.
4. If an error message about stopping ONL display appears, click OK.
5. Insert CD-R MATROX M9140 QUAD VIDEO CARD DRIVER, V2.12.00.147 (P/N 2074635-001) into the drive.
6. Browse to the CD drive and double-click Setup.exe.
7. At the Matrox Display Driver Installation - Matrox PowerDesk window, click Next.
8. At the Matrox Display Driver Selection window, click Next.
9. At the Ready to Install window, click Next.
5-16 Mac-Lab/CardioLab/Centricity Cardiology INW Service Manual 2021423-503H

Recovery Procedures
10. At the Installation Completed Successfully window, click Next.
11. At the Installation Completed window, click the Restart Computer checkbox and click Finish.
Post Installation Steps for Matrox M9140 Quad Video Board Drivers V2.12.00.147
After installing drivers for the Matrox M9140, the logon fields might not display properly when the computer first restarts. Restarting the computer again resolves the issue.
1. Log on as mlcltechuser.
NOTEThe logon fields are present, but might not display properly.
2. Shut down and restart the system again to resolve the issue.
3. Log on to Windows and the Custom Shell as mlcltechuser.
4. Reconfigure the monitor settings using “Set Display Configurations” on page 5-18.
2021423-503H Mac-Lab/CardioLab/Centricity Cardiology INW Service Manual 5-17

Recovery Procedures
Set Display Configurations
Two Monitor Systems
1. Right-click the Desktop and select Properties.
2. Select the Settings tab.
3. Click the icon for the second monitor (labeled “2”).
4. Select Extend the Windows desktop onto this monitor check box.
5. Click Apply.
6. Close all open windows.
Three Monitor Systems
1. Right-click the Desktop and select Properties.
2. Select the Settings tab.
3. For systems with the Matrox Parhelia and ATI FireGL video boards re-order the monitor icons as: 1-3-2.
a. Click the icon for the third monitor (labeled “3”).
b. Select Extend the Windows desktop onto this monitor check box.
c. Click Apply.
d. Click the second monitor icon (labeled 2).
e. Select the Extend the Windows desktop to this monitor check box.
f. Click Apply.
g. Click Identify.
h. Verify the monitors are identified as 1-3-2 from left to right.
i. Close all open windows.
NOTETo re-order the icons, drag the monitor icons and drop them in the correct position.
4. For systems with the Matrox M9140 Quad video board, do the following:
a. Click the second monitor icon (labeled 2).
b. Select Extend the Windows desktop to this monitor check box.
c. Re-order the monitor icons so they appear in the following order: 1-2-4.
5-18 Mac-Lab/CardioLab/Centricity Cardiology INW Service Manual 2021423-503H
Recovery Procedures
NOTEFor HP z600 and HP xw8400 systems, the order of monitors should be 1-2-4, the second monitor (“2”) and fourth monitor (“4”) need to be extended and the third monitor (“3”) should not be extended.
NOTETo re-order the icons, drag the monitor icons and drop them in the correct position.
d. Click Apply.
e. Click the third monitor icon (labeled 4).
f. Select Extend the Windows desktop to this monitor check box.
g. Click Apply.
h. Click Identify.
i. Verify the monitors are identified as 1-2-4 from left to right.
Set Display Resolution
1. Verify you are logged on as mlcltechuser (password: mlcl!techuser).
2. Right-click the Desktop and select Properties.
3. Select the Settings tab.
4. In the Screen Resolution section, select 1600x1200.
NOTEThis is the only supported resolution for new systems. If existing monitors do not support this resolution, 1280x1024 may be used for Mac-Lab systems. All monitors must be set to the same resolution.
5. Verify the color for all monitors is set to Highest (32-bit).
6. Click OK.
Configure the Matrox Odyssey Driver Service
The following procedure ensures that if the display driver service fails, it is automatically restarted.
1. Log on to Windows and the Custom Shell as mlcltechuser.
2. Click Control Panel > Administrative tools > Services.
3. In the Services panel, right-click TrkServer and select Properties.
4. Select the General tab and verify the following:
The Startup type is set to Automatic
The Service Status is Started
2021423-503H Mac-Lab/CardioLab/Centricity Cardiology INW Service Manual 5-19

Recovery Procedures
5. If the service is not started, click Start in the Service Status section to start it manually.
6. Select the Recovery tab and change the recovery actions as shown below:
5-20 Mac-Lab/CardioLab/Centricity Cardiology INW Service Manual 2021423-503H

Recovery Procedures
7. Click OK.
Install Microsoft Operating System Updates
Instructions for downloading and installing Microsoft security patches and service packs are listed by product type on Support Central. Download and install all applicable patches and service packs.
Change Computer Name
Use this procedure to change the computer name, if required.
CAUTIONPROCEDURE FAILURE — If the computer name is to be changed, this procedure must be completed at this time. If the computer’s name is changed at a later time the system must be reimaged.
Also note the following naming conventions:
The name cannot begin with a number
The name cannot contain hyphens or underscore characters
The name cannot contain spaces or special characters
The name cannot exceed 15 characters in length
2021423-503H Mac-Lab/CardioLab/Centricity Cardiology INW Service Manual 5-21

Recovery Procedures
1. Verify you are logged on to the Windows OS and the Mac-Lab/CardioLab Custom Shell as local mlcltechuser.
2. Right-click My Computer and select Explore.
3. Navigate to C:\Windows\Special.
4. Double-click ManualRename.hta.
5. Enter the new Acquisition system name.
6. Click OK at the confirmation messages.
The system automatically restarts.
7. At the Mac-Lab/CardioLab Custom Shell screen, press Ctrl + Action + Delete.
8. Click Logoff.
9. Click Logoff.
10. Immediately hold down the Shift key.
11. Log on to the Windows OS as local mlcltechuser.
12. Log on to the Mac-Lab/CardioLab Custom Shell as local mlcltechuser.
Change Language
Use these procedures to change the language, if necessary. If the language remains English, continue with “Check/Set Time” on page 5-26.
Delete User Profiles
1. Select Start > Settings > Control Panel.
2. Double-click System.
3. Click the Advanced tab.
4. Click Settings in the User Profiles section.
5. Select each profile in the list and click Delete, if enabled, to delete the profile.
The MLCLTechUser profile cannot be deleted.
6. Click OK to close the User Profiles dialog.
7. Click OK to close the System Properties dialog.
Set Operating System Language
For setting the languages the following must be applied for the application to function properly:
Language: Country/Locale
5-22 Mac-Lab/CardioLab/Centricity Cardiology INW Service Manual 2021423-503H

Recovery Procedures
English: United States/United Kingdom
French: France
German: Germany
Italian: Italy
Spanish: Spain
Swedish: Sweden
Chinese: China (PRC)
Japanese: Japan
1. Verify you are logged on as local mlcltechuser (password: mlcl!techuser).
2. Double-click Regional and Language Options.
3. Select the Regional Options tab.
4. In the Standards and formats section, select the correct language and locale (for example, French (France)) from the drop-down list.
5. In the Location section, select the correct locale (for example, France).
6. Select the Languages tab.
7. Click Details.
8. For Chinese systems only:
If the use of the IME is required, the following steps must be taken to set it up in a manner which is compatible with the operation of the Mac-Lab/CardioLab software:
a. Click Add.
b. Change the Input Language to Chinese (PRC).
c. Select the Keyboard Layout/IME check box.
d. Select Chinese (Simplified) - Enhanced Unicode IME from the drop-down list.
e. Click OK.
f. Click Add.
g. Select the Keyboard Layout/IME check box.
h. Select the Chinese (Simplified) - US Keyboard check box.
i. Click OK.
j. Select Chinese (PRC) - Chinese (Simplified) - US Keyboard in the Default input language drop-down.
If the use of the IME is not required, select the desired keyboard layout as appropriate.
2021423-503H Mac-Lab/CardioLab/Centricity Cardiology INW Service Manual 5-23

Recovery Procedures
9. For all other languages:
Determine if the desired language and locale is listed in the Default input language section. If it is not:
a. Click Add.
b. Select the appropriate language and locale in the Input language list. If necessary, configure other settings (for example, Keyboard layout/IME) as appropriate.
c. Click OK.
10. Select the language and locale in the Default input language section.
11. Click OK.
12. Select the correct language (for example, Francais) in the Languages used in menus and dialogs section.
13. Select the Advanced tab.
14. Select the correct language (for example, French (France)) in the Language for non-Unicode programs section.
15. Select the Apply all settings... check box in the Default user account settings section.
16. Click OK if prompted.
17. Click OK to close the Regional and Language Options window.
18. Click OK at the changes will not take effect until you reboot prompt.
19. Click Yes, if prompted about copying required files, to use the files that are already on the system.
20. Click Yes to reboot.
Set Mac-Lab/CardioLab Application Language
1. At the Mac-Lab/CardioLab Custom Shell screen, press Ctrl + Action + Delete.
2. Click Logoff.
3. Click Logoff.
4. Immediately hold down the Shift key.
5. Log on to the Windows Operating System as local mlcltechuser (password: mlcl!techuser).
6. Log on to the Mac-Lab/CardioLab Custom Shell as local mlcltechuser (password: mlcl!techuser).
7. Right-click My Computer and select Explore.
8. Browse to the D:\GEMMS\Prucka\Setup\Language directory.
5-24 Mac-Lab/CardioLab/Centricity Cardiology INW Service Manual 2021423-503H

Recovery Procedures
9. Double-click MLCL_Set_Language.bat to start the process of setting the Mac-Lab/CardioLab application language.
10. Verify the language listed is correct (for example, French). If so, press any key to begin the process of setting the application language.
NOTEThe process takes a few minutes to complete.
11. Press Enter at the success prompt.
Both the Operating System language and the Mac-Lab/CardioLab application language should now be set correctly.
Install International Ablation files
This procedure must be performed on systems using ablation that are located outside of the United States and English Canada.
1. Right-click My Computer and select Explore.
2. Navigate to D:\GEMMS\Prucka\Bin\Ablation\International.
3. Double-click the InstallAblation.bat file.
4. Verify no errors occurred.
The installer runs without confirmation. To confirm the install was successful, proceed with “Verify Ablation Files” below.
Adjust Japanese Ablation file
This procedure must be performed on Japanese systems.
1. Navigate to D:\GEMMS\Prucka\Bin\Ablation.
2. Right-click the PEIAtakr.dll file and select Copy.
3. Right-click in the white space on the right side of the window and select Paste.
4. Right-click the Copy Of PEIAtakr.dll file and select Rename.
5. Type JLLCABL-IT.dll and press Enter.
Verify Ablation Files
1. Navigate to D:\GEMMS\Prucka\Bin\Ablation.
2. Verify the files in the following table are in the directory:
Ablation File Locale = US Locale = Japan Locale = Other
CryoCath.dll Yes Yes Yes
PEIAtakr.dll Yes, as PEIAtakr.dll Yes, as JLLCABL-IT.dll Yes, as PEIAtakr.dll
PEIEpt1000.dll Yes Yes Yes
PEIStockert.dll Yes Yes Yes
2021423-503H Mac-Lab/CardioLab/Centricity Cardiology INW Service Manual 5-25

Recovery Procedures
3. Close the Windows Explorer window.
Install kPa Label (Chinese Systems Only)
1. Clean the area above the pressure keys if necessary.
2. Apply the kPa label as shown.
Check/Set Time
1. Verify you are logged on as local mlcltechuser (password: mlcl!techuser).
2. Select Start > Programs > Accessories > Command Prompt.
3. Type net stop w32time and press Enter.
4. Select Start > Settings > Control Panel > Date and Time.
5. Select the Date & Time tab.
6. Set the time and date.
7. Click Apply.
8. Select the Time Zone tab.
9. Select the correct time zone and daylight savings setting.
10. Click Apply.
11. Select the Internet Time tab.
PEIHat300S.dll No Yes Yes
PEIIbi1500T.dll Yes Yes Yes
Ablation File Locale = US Locale = Japan Locale = Other
Label
5-26 Mac-Lab/CardioLab/Centricity Cardiology INW Service Manual 2021423-503H

Recovery Procedures
12. Clear the Automatically synchronize with an Internet Time Server check box.
13. Click OK.
14. Type net start w32time at the command prompt and press Enter.
15. Close the command window.
Initialize Applications
Adobe Reader, Microsoft Word, and Microsoft Word Reports must be initialized under both mlcllogonuser and mlcltechuser logons for standalone system and only as local mlcltechuser for networked Acquisition system. For networked systems, more initialization will be done after the system as been added into the network.
mlcllogonuser
Adobe Reader
1. Press Ctrl + Action + Delete.
2. Click Logoff.
3. Click Logoff.
Allow the system to auto-log on to Windows as mlcllogonuser.
4. Log on to the Mac-Lab/CardioLab Custom Shell as local mlcllogonuser (password: mlcl!logonuser).
5. Select Start > Programs > Adobe Reader 9.
6. Click Accept if the End User License Agreement opens.
7. Close Adobe Reader.
Microsoft Word
1. Select Start > Programs > Microsoft Word.
NOTEFor Microsoft Office 2007 Professional, select Start > Programs > Microsoft Office Word 2007.
2. Click Accept if the End User License Agreement opens.
3. Click OK if the User Initial dialog box opens.
4. If the Privacy Option dialog box opens, clear the Search Microsoft Online For Help check box, if it appears.
5. Close Microsoft Word.
Microsoft Word Reports
Perform this procedure on multiple monitor systems only.
1. Double-click Mac-Lab/CardioLab.
2021423-503H Mac-Lab/CardioLab/Centricity Cardiology INW Service Manual 5-27

Recovery Procedures
2. Select Administration > Reports > Templates.
If prompted for an administrator password enter mlcladmuser (password: mlcl!admuser).
3. Click Retry if a server busy message opens. Microsoft Word will open.
4. Configure the Microsoft Word window for the review monitor:
a. Right-click the Microsoft Word title bar and select Restore.
b. Move the Microsoft Word window to the next monitor (from the real-time monitor to the review monitor).
c. Right-click the Microsoft Word title bar and select Maximize.
5. Close Microsoft Word.
6. Click No when prompted to save the report.
7. Close the Mac-Lab/CardioLab application.
mlcltechuser
Adobe Reader
1. Press Ctrl + Action + Delete.
2. Click Logoff.
3. Click Logoff.
4. Immediately hold down the Shift key.
5. Log on to Windows as local mlcltechuser (password: mlcl!techuser).
6. Log on to the Mac-Lab/CardioLab Custom Shell as local mlcltechuser (password: mlcl!techuser).
7. Select Start > Programs > Adobe Reader 9.
8. Click Accept if the End User License Agreement opens.
9. Close Adobe Reader.
Microsoft Word
1. Select Start > Programs > Microsoft Word.
NOTEFor Microsoft Office 2007 Professional, select Start > Programs > Microsoft Office Word 2007.
2. Click Accept if the End User License Agreement opens.
3. Click OK if the User Initial dialog box opens.
4. If the Privacy Option dialog box opens, clear the Search Microsoft Online For Help check box, if it appears.
5. Close Microsoft Word.
5-28 Mac-Lab/CardioLab/Centricity Cardiology INW Service Manual 2021423-503H
Recovery Procedures
Microsoft Word Reports
Perform this procedure on multiple monitor systems only.
1. Double-click Mac-Lab/CardioLab.
2. Select Administration > Reports > Templates.
If prompted for an administrator password, enter mlcladmuser (password: mlcl!admuser).
3. Click Retry if a server busy message opens. Microsoft Word will open.
4. Configure the Microsoft Word window for the review monitor:
a. Right-click the Microsoft Word title bar and select Restore.
b. Move the Microsoft Office Word 2007 window to the next monitor (from the real-time monitor to the review monitor).
c. Right-click the Microsoft Word title bar and select Maximize.
5. Close Microsoft Word.
6. Click No when prompted to save the report.
7. Close the Mac-Lab/CardioLab application.
Additional Installation for Purchased Options
The purchased options may include:
PedCath: the instructions to complete the install are found at the following website: http://www.pedcath.com/manual.php
For the following purchased options, refer to the Mac-Lab/CardioLab/Centricity Cardiology INW Installation Manual:
Install the CARTO System
Install RMOT
Install EtCO2
Analog Output Installation
INNOVA CENTRAL/Touch Screen Installation
Perform Necessary Software Updates
Apply all necessary software updates to the Acquisition system. Refer to the Mac-Lab/CardioLab 6.5.6/6.8.1 Release 3 Update (PN 2027332-533 ) for the instructions.
Restore Data to the Acquisition System
Restore Clab Database, Registry, and Patient Folders
1. Verify you are logged on as local mlcltechuser (password: mlcl!techuser).
2021423-503H Mac-Lab/CardioLab/Centricity Cardiology INW Service Manual 5-29

Recovery Procedures
2. Right-click My Computer and select Explore.
3. Using Windows Explorer, copy the contents of the following folders:
G:\GEMMS\Prucka\Database\Maintenance\Backup folder
to the
D:\GEMMS\Prucka\Database\Maintenance\Backup folder
4. Copy the contents of the following folders:
G:\GEMMS\Prucka\Database\Maintenance\Log folder
to the
D:\GEMMS\Prucka\Database\Maintenance\Log folder.
NOTEIf a confirmation message is displayed, click Yes and continue.
5. Copy the contents of the following folders:
G:\GEMMS\Prucka\Studies folder
to the
D:\GEMMS\Prucka\Studies folder.
6. Restore the clab database by executing the D:\GEMMS\Prucka\Bin\gems_restoreclab.bat file.
A command prompt window opens.
7. Press Enter at the prompt. When the process is complete, a confirmation screen is displayed.
8. Press Enter to close the command prompt window.
9. In the Windows Explorer window, navigate to: D:\GEMMS\Prucka\Database\Maintenance\Backup.
10. Double-click gemsback.reg to restore the registry.
A confirmation message is displayed.
11. Click Yes. A completion message is displayed.
12. Click OK and close any open windows.
13. On networked Acquisition systems only:
a. Navigate to D:\GEMMS\Prucka\network.
b. Double-click stoprepl.bat.
NOTEIgnore any reported errors. The file will run successfully even if errors are reported.
5-30 Mac-Lab/CardioLab/Centricity Cardiology INW Service Manual 2021423-503H

Recovery Procedures
Restore the Clink Database
Use the following steps to restore the Clink database if clinkbackup.bak is present in the backup folder.
1. Select Start > Programs > Accessories > Command Prompt.
2. Type (case sensitive):
OSQL -S -Usa -Pgemssqladmin
and press Enter.
3. Type:
Restore database Clink from Disk = ‘D:\gemms\prucka\database\maintenance\backup\Clinkbackup.bak’
and press Enter.
4. Type:
Go
and press Enter.
Wait for the database to restore.
5. Type:
Exit
and press Enter.
6. Type:
Exit
and press Enter.
Set Default Baseline Phase
This section has to be executed only if GEMS registry key (gemsback.reg) was not restored in “Restore Clab Database, Registry, and Patient Folders” on page 5-29.
1. Open the Mac-Lab/CardioLab application and select the Mac-Lab Module.
2. Select Administration > Lists > Phases.
3. Click Edit.
4. If prompted for an administrator logon, use mlcladmuser (password mlcl!admuser).
5. Select Baseline in the Default drop-down box.
6. Close all open windows.
2021423-503H Mac-Lab/CardioLab/Centricity Cardiology INW Service Manual 5-31

Recovery Procedures
Install/Enable Software Options
This section has to be executed only if GEMS registry key (gemsback.reg) was not restored in “Restore Clab Database, Registry, and Patient Folders” on page 5-29.
NOTEThe software options backup that was made when the system was installed can be used in this section.
1. Double-click Service Console from the Desktop.
2. Browse to Software Options Manager > Software Options.
NOTEIf prompted for the GEMS Serial Number, enter the serial number and click OK. The serial number can be found on a label on the top of the computer.
3. In the Software Options form, click Read License File.
4. Insert the Software Options CD into the F: drive.
5. In the Look In dropdown box, select the F:\ drive.
6. Double-click the Options.txt file.
7. Ensure the correct options are enabled.
8. Click Update and Save changes to Software options to save the options.
9. At the Save changes? message, click Yes.
Configure the Acquisition System
Configure Network Settings on the Acquisition System
A Standalone Acquisition system is NOT a member of the hospital Domain. It is a member of the CARDIOLAN workgroup. Do not add the Acquisition system to the hospital Domain.
1. Right-click My Computer on the Desktop and select Properties.
2. Select the Computer Name tab, and check the computer name.
3. Record the name of the Acquisition system and the workgroup.
Computer Name: ____________________________
Workgroup: ______________________________
4. In Computer Description textbox, type an easily identifiable name for the system.
5. Click OK to close the Properties window.
6. Select Start > Settings > Network Connections.
5-32 Mac-Lab/CardioLab/Centricity Cardiology INW Service Manual 2021423-503H

Recovery Procedures
7. Verify that Local area connection is enabled.
8. If the network connections for TRAMNet or CARTO System are required, connect the necessary network cables and verify that the corresponding items are enabled as well.
9. Right-click Local Area Connection and select Properties.
10. Select Internet Protocol (TCP/IP), and click Properties.
11. Select the Use the following IP Address radio button.
12. If system is to be attached to a network, enter the following information from the “Record Network Settings” on page 5-6, or “Obtain System Information at the Server” on page 5-8, as appropriate:
a. Static IP address
b. Subnet mask
c. Default gateway
d. DNS server
13. In the Internet Protocol (TCP/IP) Properties window, click OK.
14. In the Local Area Connection Properties window, click Close.
The following steps must ALWAYS be performed regardless if the CARTO System or TRAMNet connections are being used.
15. Right-click the TRAMNET connection and select Properties.
16. Uncheck all components except Internet Protocol (TCP/IP).
17. Select Internet Protocol (TCP/IP) and click Properties.
18. Click the Advanced button.
19. Click the WINS tab.
20. Uncheck Enable LMHOSTS Lookup.
21. In the NetBIOS setting, select the Disable NetBIOS over TCP/IP radio button.
22. Click OK in the Advanced TCP/IP Settings window.
23. Click OK in the Internet Protocol (TCP/IP) Properties window.
24. Click Close.
25. If the TRAMNet option is not being used, right-click the TRAMNET connection and select Disable.
26. Right-click the CARTO System connection and select Properties.
27. Uncheck all components except Internet Protocol (TCP/IP).
28. Select Internet Protocol (TCP/IP) and click Properties.
2021423-503H Mac-Lab/CardioLab/Centricity Cardiology INW Service Manual 5-33

Recovery Procedures
29. Click the Advanced button.
30. Click the WINS tab.
31. Uncheck Enable LMHOSTS Lookup.
32. In the NetBIOS setting, select the Disable NetBIOS over TCP/IP radio button.
33. Click OK in the Advanced TCP/IP Settings window.
34. Click OK in the Internet Protocol (TCP/IP) Properties window.
35. Click Close.
36. If the CARTO System option was not purchased, right-click the CARTO System connection and select Disable.
Set Network Connection Order
The following steps must performed on every Acquisition system:
1. In the Network Connections window, click the Advanced menu, then click the Advanced Settings... option.
2. In the Advanced Settings window, click the Adapters and Bindings tab.
3. In the Connections section of the window, select the item Local Area Connection.
4. Click the up arrow button just to the right of the Connections section until Local Area Connection is at the top of the list.
5. Click OK.
Verify NIC Connection Speed
1. Right-click Local Area Connections and select Status.
2. Verify with the hospital IT department that the hospital switch speed settings exactly match the NIC speed settings on the Mac-Lab/CardioLab system. Acceptable speeds are 100Mbps Full Duplex or Auto Negotiate.
3. Click Close.
4. Close the Network Connections window.
5. Restart the Acquisition system.
NOTEThe restart is required for the previous settings to take effect.
6. At the Mac-Lab/CardioLab Custom Shell screen, press Ctrl + Action + Delete.
7. Click Logoff.
5-34 Mac-Lab/CardioLab/Centricity Cardiology INW Service Manual 2021423-503H

Recovery Procedures
8. Select Logoff... and click OK.
9. Immediately hold down the Shift key.
10. Log on to the Windows OS as local mlcltechuser.
11. Log on to the Mac-Lab/CardioLab Custom Shell as local mlcltechuser.
12. Right-click Local Area Connection and select Properties.
13. Click Configure.
14. Select the Advanced tab.
15. Highlight the Link Speed & Duplex property.
16. Verify the value is set to Auto.
17. Click OK.
18. Close all open windows.
Verify Amplifier Settings
1. Verify you are logged on as local mlcltechuser (password: mlcl!techuser).
2. Double-click Select Amplifier.
3. Verify the Amplifier settings and click OK.
4. Click Yes if the message You have chosen a different amplifier then what has been detected is displayed.
Configure Database Maintenance
For networked or standalone Acquisition systems
1. Select Start > Settings > Control Panel.
2. Double-click Scheduled Tasks.
3. Double-click Add Scheduled Task.
4. At the Scheduled Task Wizard window, click Next.
5. Click Browse.
6. Browse to the file that needs to be scheduled. To schedule database maintenance on the system browse to:
D:\GEMMS\Prucka\Database\Maintenance\GEMS_WS_DBMAINTJOB.bat.
7. Click Open.
8. In the textbox, type Database Maintenance to name the job.
2021423-503H Mac-Lab/CardioLab/Centricity Cardiology INW Service Manual 5-35

Recovery Procedures
9. Select the radio button Weekly to perform this task on a weekly basis. Click Next.
10. Select the time and day to begin the task. Click Next.
NOTEThe recommended time is 10:00 pm and the day is Saturday. Acquisitions that will be networked should be scheduled to run database maintenance one-half hour apart (Lab 1: 10:00 p.m., Lab 2: 10:30 p.m., Lab 3: 11:00 p.m.). Ensure the schedule does not overlap with the following jobs:
Archive Generator on all Acquisition systems
Archive Utility on the server
DB Maintenance on the server
Backups on the server
11. Enter the local mlcltechuser information for the Administrator user name and password and click Next.
12. Click Finish to successfully schedule the Database Maintenance job. It will appear in the Scheduled Tasks folder.
Setup Purge on Standalone Acquisition Systems
The next steps are for standalone Acquisition systems only. Skip these steps if the system will be connected to a Centricity Cardiology INW server later in the installation, close all open windows, and proceed to “Configure InSite ExC” on page 5-36. Perform the following steps to update the job to purge studies on a regular basis.
The task below will purge studies only after the clab database reaches 1,350 MB.
1. Right-click Database Maintenance and select Properties.
2. The Database Maintenance window appears. In the Run: field, add <space> purge to the end of the existing command.
3. Click OK.
4. The Set Account Information window appears. Enter the local mlcltechuser information as the Administrator user name and password and select OK to save the modified job.
5. Close all open windows.
Configure InSite ExC
Verify the customer will be using InSite ExC as the Remote Support Service. If no Remote Service Support is needed, proceed to “Import Report Formats” on page 5-39.
5-36 Mac-Lab/CardioLab/Centricity Cardiology INW Service Manual 2021423-503H

Recovery Procedures
1. Verify you are logged on to the Windows Operating System and the Mac-Lab/CardioLab Custom Shell as mlcltechuser (password: mlcl!techuser).
2. Double-click Service Console.
3. Expand the InSite 2.0 folder and select the Device Manager folder in the left pane of the Service Console window.
4. Click Generate Device Information in the Device Information window.
5. Click OK in the Device Manager Confirmation window.
6. Verify the Serial Number, Name, and Type fields.
7. Select the Configuration Utility folder in the left pane under InSite 2.0.
8. If the hospital uses a proxy server perform the following steps, otherwise continue with step 13.
9. Click the Proxy Configuration tab and check Use a Proxy Server to connect to the Enterprise
10. Enter proxy server information.
NOTEContact the Hospital IT Department for the proxy address, proxy port, and authentication information.
11. Click Update Proxy after entering the proxy server information.
12. Click OK at the InSite 2.0 Message window.
13. Select the Service Controller tab in the Configuration Utility.
14. Click Start Service.
15. Verify the Service has started:
a. Wait 10 seconds.
b. Select Check Service Status.
A confirmation window opens indicating the service is running.
c. Click OK.
16. Select Initiate Remote Service and verify that it connects and a Request submitted successfully message is displayed.
17. Close the Service Console.
NOTEPerform the following steps only if the customer requests InSite ExC access control.
18. Right-click VNC in the System Tray and select Options.
2021423-503H Mac-Lab/CardioLab/Centricity Cardiology INW Service Manual 5-37

Recovery Procedures
19. Select the Authentication tab and check Prompt local user to accept incoming connections.
20. Click OK.
GEMS Log Collector Task
GEMS Log Collector Task Creation
The following steps are needed only if you want to configure InSite ExC Log Collection on GE Acquisition and Review systems only.
1. Select Start -> Settings -> Control Panel -> Scheduled Tasks. The Scheduled Tasks page opens.
2. If the GEMS_LogCollector_Task entry is present, right-click it and chose Properties.
3. If the GEMS_LogCollector_Task entry is not present, add a new entry as follows:
Select File > New to add a new scheduled task.
Rename the task GEMS_LogCollector_Task.
Right-click the new entry and select Properties.
Browse to D:\GEMMS\Prucka\Bin and select the GEMS_LogCollector.exe program. Edit the run command line to add the –sendtobos option as shown in the following figure.
4. Select the Enabled check box.
5. In the Run as field, enter the account information as follows:
For a networked system (Acquisition or Review), enter the user name as <Domain Name>\MLCLSqlUser.
5-38 Mac-Lab/CardioLab/Centricity Cardiology INW Service Manual 2021423-503H

Recovery Procedures
For a stand-alone system, enter the user name as <Computer name>/ MLCLSqlUser.
Click Set Password. When prompted, enter the password sql8273user in both fields.
Click OK.
GEMS Log Collector Task Schedule Configuration
Select the Schedule tab and configure the task to run once every two weeks as shown in the following figure.
1. In the Schedule Task: field, select Weekly.
2. In the Start time: field, select 11:50PM.
3. In the Schedule Task Weekly section, select Every 2 week(s) on: Sat.
Import Report Formats
Perform these steps to import report formats on recovered network or standalone Acquisition systems. Report Formats are not replicated in the INW networked environment. Obtain the backups from one of the following sources:
Use the backup saved to the G: drive.
Check with the Lab administrator to see if a backup they made earlier is available.
Make a copy from a Review workstation in the same lab.
2021423-503H Mac-Lab/CardioLab/Centricity Cardiology INW Service Manual 5-39
Recovery Procedures
If any other backups are unavailable and for English systems only, report formats must be imported from the CD-R MLABCLAB CLIN APP DEFAULTS V6.5.6 (PN 2049104-001).
1. Double-click Mac-Lab/CardioLab to open the application.
2. Select Utilities > Import Report Formats in the Navigator window.
3. At the Report Wizard window, click Next.
4. Click Change Folder.
5. Select the drive G (or the appropriate folder location).
6. Navigate to the Report_Backup folder (or other location).
7. Click OK.
8. Select No when asked whether to merge with existing data.
9. Click OK at success message.
10. Close the application.
Configure Central List Management
If the system was configured in CVIS mode, perform this procedure only on standalone Acquisition systems (Options can be used to find out if the system was configured in CVIS mode.
1. At the Acquisition system, double-click Service Console on the Desktop.
2. Navigate to GEMS Central List Management > Central List Setup
3. In the CVIS Server Export Directory click the... button to browse.
4. Browse to the path on the CVIS server.
NOTEThis may be a mapped drive or the UNC name (for example, \\DMSexp001\ListSharing).
5. In the Location dropdown box, select the appropriate location for the hospital.
6. Click Update Lists.
7. Close the Service Console window.
Configure the Acquisition System on the INW Network
If the Acquisition system is part of an INW network, use these procedures to configure the system. If configuring Standalone Acquisition systems, go to “Initialize Applications” on page 5-48.
5-40 Mac-Lab/CardioLab/Centricity Cardiology INW Service Manual 2021423-503H

Recovery Procedures
Add the System to the Domain
1. Verify that you are logged on to the Windows OS and the Mac-Lab/CardioLab Custom Shell as local mlcltechuser.
2. Right-click My Computer on the Desktop and select Properties.
3. Select the Computer Name tab.
4. Click the Change button.
5. In the Member of section, select the Domain radio button, enter the name of the INW Domain to join and click OK.
NOTEThe default Domain is inw.local.
6. When prompted, type the username mlcltechuser and password.
7. At the Welcome to inw message, click OK.
8. At the restart message click OK.
9. At the System Properties window, click OK.
10. At the Do you want to restart now? message click Yes.
11. After the system restarts, at the Mac-Lab/CardioLab Custom Shell window, press Ctrl + Action + Del and click Logoff.
12. Click Logoff and immediately hold the Shift key to stop the auto-logon sequence.
13. Logon to Windows and the Mac-Lab/CardioLab Custom Shell as the local mlcltechuser.
Synchronize Time
1. Select Start > Programs > Accessories > Command Prompt.
2. Type net time /set and press Enter.
3. When asked to sync with the server, type y and press Enter.
NOTEThis step may take up to 2 minutes to complete.
4. Close the Command Prompt window.
Add Acquisition System to GE MLCL Organizational Unit
1. Log on to the server as the INW domain Administrator (contact GE Technical Support or the system administrator for current password information).
2. Select Start > Settings > Control Panel.
3. Double-click Administrative tools.
2021423-503H Mac-Lab/CardioLab/Centricity Cardiology INW Service Manual 5-41

Recovery Procedures
4. Double-click Active Directory Users and Computers.
5. Expand inw.local (this is an example, the actual domain name may be different).
6. Click the Computers folder and locate the Acquisition system to add.
7. Expand the GE Medical Systems (MLCL) organizational unit.
8. Expand the MLCL Computers.
9. Expand the MLCL Workstations.
10. Drag and drop the computer name from the Computers folder to the MLCL Acquisition workstations.
11. Close all open windows.
12. Restart the Acquisition system added to the organizational unit in the previous step.
13. After restart, press Ctrl + Action + Delete, logoff as mlcllogonuser.
14. Click Logoff.
15. Immediately hold down the Shift key.
16. Log on to the Windows OS and the Mac-Lab/CardioLab Custom Shell locally as mlcltechuser.
Confirm Domain Security Policy
Verify Security Policy
To verify the security policy at the Acquisition system:
1. Right-click My Computer on the Desktop and select Manage.
2. Select System Tools > Local Users and Groups > Groups.
3. Right-click Administrators and select Properties.
4. Verify that the following members are shown in the list:
[domain name]\Domain Admins
[domain name]\mlcltechuser
[domain name]\mlclsqluser
NOTEThe default domain name is inw.local.
NOTEIf the members are not shown, follow the troubleshooting steps below.
5-42 Mac-Lab/CardioLab/Centricity Cardiology INW Service Manual 2021423-503H

Recovery Procedures
Troubleshooting
1. Verify that the Acquisition system is in the correct Domain:
a. Right-click My Computer on the Desktop and select Properties.
b. Verify that on the Computer Name tab the INW Domain is present.
2. Verify that the Acquisition system shows up in the GE Medical Systems (MLCL) Organizational Unit on the server.
3. On the server, open a command prompt window and type gpupdate /force and press Enter.
4. Restart the Acquisition systems, wait approximately 7 minutes and check the policy again as described in “Verify Security Policy” on page 5-42. If the policy is still not correct proceed to the next step.
5. Verify that the TCP/IP properties on the server are set correctly
a. The Centricity Cardiology INW server IP must be configured as the preferred DNS server.
b. The subnet mask must be correct as defined be the hospital IT staff.
6. Verify that the TCP/IP properties on the Acquisition are set correctly
a. The IP subnet mask of the Acquisition system MUST match exactly the subnet mask of the server.
b. The IP address of the Acquisition system must be manually configured and must fall within the subnet of the server as defined by the subnet mask.
c. The gateway of the Acquisition system must be set to the IP address of the server or another machine on the hospital network.
d. The DNS of the Acquisition system must be set to the IP address of the Centricity Cardiology INW server.
e. In the CARTO System and TRAMNet IP settings, make sure that the Internet Protocol (TCP/IP) checkbox is the ONLY item selected in the This connection uses the following items: list.
7. Verify that the server and Acquisition system can communicate.
8. Open a command window on the Acquisition system and type ping <servername> and press Enter.
a. A Request timed out message indicates failure, a Reply from message indicates success.
NOTEIf successful, verify that the reply from IP address shown matches the server's IP address and if correct skip the reset of the sub-steps below
2021423-503H Mac-Lab/CardioLab/Centricity Cardiology INW Service Manual 5-43

Recovery Procedures
b. If step a failed, repeat with the servername replaced with the correct IP address of the server ping <###.###.###.###> and press Enter.
c. If step a and step b both failed, there is a problem with the IP address or the physical network. Repeat the above steps to verify the TCP/IP properties of the server and Acquisition system.
d. If step a fails and step b succeeds, there is a problem with DNS setup. Repeat the TCP/IP properties steps above paying careful attention to the DNS setup.
9. Verify that the time and time zone settings on the server and the Acquisition system match.
a. If they do not match, open a command prompt on the Acquisition system and type net time /set and press Enter.
b. Restart the Acquisition system, wait 7 minutes and check the policy again in “Verify Security Policy” on page 5-42. If the policy is still not correct proceed to the next step.
10. If the policy is still not correct after all above steps:
a. Remove the Acquisition system from the Domain and add it back to the CARDIOLAN workgroup.
b. Restart the Acquisition system.
c. Delete the Acquisition system name for the OU on the server.
d. Repeat the instructions for adding the Acquisition system to the Domain.
Register the Acquisition System and Update Acquisition Database on the Server
Use this procedure to register the recovered Acquisition system and update the Acquisition database at the server.
1. At the server go to Start > Programs > Microsoft SQL Server > Enterprise Manager.
2. Open Microsoft SQL Servers and right-click SQL Server Group.
3. Select New SQL Server Registration.
4. Click Next.
5. Select the Acquisition system name and click Add.
6. Click Next.
7. Select SQL Server Authentication.
8. Click Next.
9. Type sa as the account name and enter the password (contact GE Technical Support or the system administrator for current password information).
5-44 Mac-Lab/CardioLab/Centricity Cardiology INW Service Manual 2021423-503H

Recovery Procedures
10. Follow onscreen confirmation messages. When complete the Acquisition system is displayed in the machine list in the left pane.
11. Expand SQL Server Group.
12. Open [Acquisition computer name] > Databases > Clab > Tables.
13. Right-click Detail Version and select Open Table > Return All Rows.
14. Set the following fields:
NetVersion = 0
MachineDBVersion = 00
NOTEMachineDBVersion must be 00 (two zeros) or the restore will fail.
15. Close the Table window.
16. Close Enterprise Manager.
Add Acquisition System to Replication on the INW Server
Perform the rest of these steps only if you are adding the Acquisition to the INW network.
1. Logon to the Windows OS and Mac-Lab/CardioLab Custom Shell as domain mlcltechuser.
2. Double- click Service Console on the Desktop.
3. Navigate to Console Root > Create Replica > Replication Setup in the left hand frame.
4. The right frame should show the Replication utility with the top Service User Login section active.
5. In the password box enter the password and click Login.
6. The top Login section should now be inactive and the bottom section will be active with a password validated message.
7. Click Add.
8. Browse to My Network Places > Entire Network > Microsoft Windows Network > <current domain> and select an Acquisition system and click OK.
9. When prompted for consolidation, click Yes to move all studies on the currently selected Acquisition system up to the server.
10. The selected machine should now appear in the Add to replication list box.
11. Click Apply.
12. Click Yes to confirm replication.
2021423-503H Mac-Lab/CardioLab/Centricity Cardiology INW Service Manual 5-45

Recovery Procedures
13. Wait while the progress bar and text indicate the operations performed.
NOTEThis may take 5 minutes to complete.
14. When complete, a Replication setup complete message will be displayed above the progress bar and the server and all Acquisition systems will appear in the Currently replicating list.
15. Close out of the Service Console window.
Verify Replication Started Correctly
Verify
1. Select Start > Programs > Microsoft SQL Server > Enterprise Manager.
2. Open Microsoft SQL Servers > SQL Server Group.
3. Highlight the server name.
4. Expand Replication Monitor > Agents > Merge Agents.
5. Verify that there are no red X’s displayed against any system’s Merge agent.
6. If there are no errors in the replication monitor, continue with “Configure Archive Generator” on page 5-47.
7. If there are red X’s displayed against all merge agents, verify that SQLSERVERAGENT service is running on the server. If the SQLSERVRAGENT service is not running on the server, start the service and restart replication setup (refer to “Stop Replication” on page 5-46.
Stop Replication
To stop replication, launch the replication setup:
1. At the server, open the Service Console and select Create Replica > Replication Setup.
2. Log on to the Service Console as mlclsqluser (password sql8273user).
3. If necessary, highlight all acquisition systems (for example, CLWS0001) in the list of currently replicating systems. Click the Remove. Click Yes at the confirmation window.
4. Refresh the window (click another folder in the tree and then click Replication Setup again) to verify all acquisition systems have been taken out of replication.
5. Close the Service Console.
5-46 Mac-Lab/CardioLab/Centricity Cardiology INW Service Manual 2021423-503H

Recovery Procedures
6. Go to the Enterprise Manager and stop server replication:
a. Select Start > Programs > Microsoft SQL Server > Enterprise Manager.
b. Expand Microsoft SQL Servers and the SQL Server Group. Highlight the INW Server (in the left window).
c. Select Tools > Replication > Disable Publishing.
d. Click Next.
e. Select Yes, disable publishing on [Server name] and click Next.
f. Click Next in the Confirm Dropping of Publications window.
g. Click Finish in the Completing the Disable Publishing and Distribution Wizard window.
h. Click OK to the Successfully Disabled window.
i. Right-click the server name and select Refresh.
j. Verify the Replication Monitor is not visible.
k. Close the SQL Server Enterprise Manager window. Proceed to “Add Acquisition System to Replication on the INW Server” on page 5-45.
Configure Archive Generator
Perform the following steps to configure the archiving of studies to the Centricity Cardiology INW server.
CAUTIONARCHIVE GENERATOR FAILURE — If the time for the archive generator process is set at the same time on more than one Acquisition system, the studies will not be moved properly because different systems will be attempting to move studies simultaneously.
NOTEIf the archive generator process is started while a study is in progress, that specific study will not be archived to the server until the next archive generator process is run.
1. On the server, select Start > Programs > Microsoft SQL Server> Enterprise Manager.
2. Expand the SQL Server group, click to expand the Acquisition system that is scheduling the archive generator task.
3. Expand the Management folder.
4. Expand the SQL Server Agent.
5. Click Jobs.
2021423-503H Mac-Lab/CardioLab/Centricity Cardiology INW Service Manual 5-47

Recovery Procedures
6. Right-click Run Archive Generator.
7. Choose Properties.
8. Select the Schedule tab.
9. Click Edit.
10. Click Change.
11. In the Edit Recurring Job Schedule window, enter the following information:
a. In the Occurs: section, select the Daily radio button.
b. In the Daily: section, type 1.
c. In the Daily Frequency: section, enter a time.
NOTEThe time must be set to at least 5 to 10 minutes after the hour (for example, 1:05 am, 1:35 am). Ensure the job schedule does not overlap other scheduled jobs. Do not schedule any jobs at 12:05 am as other system jobs are scheduled at this time.
12. Click OK.
13. At the Run Archive Generator Properties window, click OK.
Initialize Applications
Adobe Reader, Microsoft Word, and Microsoft Word Reports must be initialized under both mlcllogonuser and mlcltechuser logons.
Adobe Reader
1. Press Ctrl + Action + Delete.
2. Click Logoff.
3. Click Logoff.
Allow the system to auto-log on to the Windows Operating System as mlcllogonuser.
4. Log on to the Mac-Lab/CardioLab Custom Shell as domain mlcllogonuser (password: mlcl!logonuser).
5. Select Start > Programs > Adobe Reader 9.
6. Accept the End User License Agreement if displayed.
After Adobe Reader opens, wait one minute to ensure a Check for Update dialog box is not displayed. If the dialog box is displayed, click Cancel.
7. Close Adobe Reader.
5-48 Mac-Lab/CardioLab/Centricity Cardiology INW Service Manual 2021423-503H

Recovery Procedures
Microsoft Word
1. Select Start > Programs > Microsoft Word.
NOTEFor Microsoft Office 2007 Professional, select Start > Programs > Microsoft Office Word 2007.
2. Accept the End User License Agreement if displayed.
3. Click OK if the User Initial dialog box is displayed.
4. If the Privacy Option dialog box is displayed, uncheck Search Microsoft Online for Help, if it appears.
5. Close Microsoft Word.
Microsoft Word Reports
Perform this procedure on multiple monitor systems only.
1. Double-click Mac-Lab CardioLab.
2. Select Administration > Reports > Templates.
If prompted for an administrator password enter mlcladmuser (password: mlcl!admuser).
3. Click Retry if a server busy message is displayed. Microsoft Word will open.
4. Configure the Microsoft Word window for the review monitor:
a. Right-click the Microsoft Word title bar and select Restore.
b. Move the Microsoft Word window to the next monitor (from the real-time monitor to the review monitor).
c. Right-click the Microsoft Word title bar and select Maximize.
5. Close Microsoft Word.
6. When prompted to save the report, click No.
7. Close the Mac-Lab/CardioLab application.
Adobe Reader
1. Press Ctrl + Action + Delete.
2. Click Logoff.
3. Click Logoff.
4. Immediately hold down the Shift key.
5. Log on to the Windows Operating System as domain mlcltechuser (password: mlcl!techuser).
2021423-503H Mac-Lab/CardioLab/Centricity Cardiology INW Service Manual 5-49

Recovery Procedures
6. Log on to the Mac-Lab/CardioLab Custom Shell as domain mlcltechuser (password: mlcl!techuser).
7. Select Start > Programs > Adobe Reader 9.
8. Accept the End User License Agreement if displayed.
After Adobe Reader opens, wait one minute to ensure a Check for Update dialog box is not displayed. If the dialog box is displayed, click Cancel.
9. Close Adobe Reader.
Microsoft Word
1. Select Start > Programs > Microsoft Word.
NOTEFor Microsoft Office 2007 Professional, select Start > Programs > Microsoft Office Word 2007.
2. Accept the End User License Agreement if displayed.
3. Click OK if the User Initial dialog box is displayed.
4. Close Microsoft Word.
Microsoft Word Reports
Perform this procedure on multiple monitor systems only.
1. Double-click Mac-Lab CardioLab.
2. Select Administration > Reports > Templates.
If prompted for an administrator password enter domain mlcladmuser (password: mlcl!admuser).
3. Click Retry if a server busy message is displayed. Microsoft Word will open.
4. Configure the Microsoft Word window for the review monitor:
a. Right-click the Microsoft Word title bar and select Restore.
b. Move the Microsoft Word window to the next monitor (from the real-time monitor to the review monitor).
c. Right-click the Microsoft Word title bar and select Maximize.
5. Close Microsoft Word.
6. When prompted to save the report, click No.
7. Close the Mac-Lab/CardioLab application.
5-50 Mac-Lab/CardioLab/Centricity Cardiology INW Service Manual 2021423-503H

Recovery Procedures
Confirm File Paths and Network Storage Settings
Perform this procedure for network and standalone Acquisitions. For standalone systems do not enable network storage.
1. Log on to the Windows OS and the Mac-Lab/CardioLab Custom Shell as INW domain mlcltechuser.
2. Double-click Mac-Lab/CardioLab on the Desktop to start the Mac-Lab/CardioLab application.
3. Select Administration > System Settings.
4. Browse to the File Paths section.
5. Set the Local Storage Optical Study Path.
6. Check the Enable Acquisition checkbox, if unchecked.
7. Check the Enable Network Storage checkbox.
8. Click Browse.
9. If not already configured, browse to the Centricity Cardiology INW server and select the PruckaStudies share as the network storage path.
10. Click OK.
11. Select the Audit Log section.
12. Move all items in the list to the right Events selected for audit by clicking the >> button.
13. Close the application.
Additional Installation for Purchased Options
The purchased options may include:
PedCath: The instructions to complete the installation are found at the following website: http://www.pedcath.com/manual.php
Refer to the Installation manual for the following:
Install the CARTO System.
Install RMOT.
Install EtCO2.
Analog Output Installation.
INNOVA CENTRAL/Touch Screen Installation.
2021423-503H Mac-Lab/CardioLab/Centricity Cardiology INW Service Manual 5-51

Recovery Procedures
Reconfigure Printer
If the printer information was recorded, refer to the list of printers recorded in “Record Mapped Drives and Printer” on page 5-7. Also refer to the setup instructions included with the printer to install the appropriate printer driver.
Reconfigure Mapped Drives
If any mapped drives were recorded in “Record Mapped Drives and Printer” on page 5-7, perform this procedure.
1. Log off the system and allow the auto-logon run and log on to the Mac-Lab/CardioLab Custom Shell as a local user.
2. Verify any mapped drives still exist.
If they do not, perform the steps in this procedure.
3. Right-click My Computer on the Desktop and select Map Network Drive.
4. In the Drive section, select the drive letter.
5. In the Folder section, enter the path.
6. Click Finish.
7. Close all open windows.
8. Log off the system and allow the auto-logon run.
Configure Data Export
Refer to the appropriate subsection below to reconfigure Data Export of either a standalone Acquisition system or a networked Acquisition system.
Create Active Translation on Standalone Acquisition Workstation
If the Acquisition system was a standalone system and connected to the CVIS server, the following must be reconfigured (refer to the appropriate CVIS installation/configuration documentation for specific information/procedures):
Re-establish CVIS connectivity.
Reconfigure shares. Ensure the share permissions are correct. On the CVIS server the following must be reconfigured with proper permissions:
List Sharing share
Export share
Perform the following steps on the standalone Mac-Lab/CardioLab systems.
5-52 Mac-Lab/CardioLab/Centricity Cardiology INW Service Manual 2021423-503H

Recovery Procedures
1. Map a drive to the English (and US Canada) CVIS Full Interface or English (and US Canada) CVIS Express server Import Share, which was configured in the interfaces console.
2. Right-click My Computer and select Explore.
3. Click Tools.
4. Click Map Network Drive > Browse.
5. In the Network, locate the English (and US Canada) CVIS server.
6. Double-click the English (and US Canada) CVIS server name (you may enter the unc path to the share as well, that is, \\dmsint001\import or \\dmsexp001\import).
7. Highlight the import directory.
8. Click OK.
9. Select drive letter S from the drive letter drop-down list.
10. Verify that the Reconnect at Login checkbox is checked.
11. Select Connect using a different user name.
12. In the Connect As . . . window, enter the user: [DMS Server Name (for example, DMSINT001 or DMSEXP001)]\mlcllogonuser in the User Name field and the password in the Password field.
13. Click OK.
14. Click Finish.
15. Close any mapped drive windows that may automatically open.
16. Navigate to D:\GEMS\Prucka\Bin in Windows Explorer.
17. Double-click DataExportConfig.exe.
18. Click the Active Translations tab.
19. Select HL7 Cath.
20. Browse to the drive letter for the mapped drive created above followed by:\ (that is, S:\).
21. Select the following check boxes: Study Reports (R), Images (I) and Snapshots (S).
22. Click Add translation.
23. Click Done.
2021423-503H Mac-Lab/CardioLab/Centricity Cardiology INW Service Manual 5-53

Recovery Procedures
Create Active Translation on Networked Acquisition System
NOTEPerform the following steps on each of the networked Mac-Lab/CardioLab Acquisition systems.
1. Open Windows Explorer.
2. Navigate to D:\GEMMS\Prucka\Bin.
3. Double-click DataExportConfig.exe.
4. Click the Active Translations tab.
5. Verify that any previously configured translations are still present.
6. Click Done.
Reload CVIS Client
If a CVIS client needs to be reloaded onto the computer, refer to the appropriate CVIS Installation manual for installation steps.
Update Operator Manuals
This script has to be executed for updating the Mac-Lab, CardioLab or Centricity Cardiology INW Operator's manual. To apply these changes, use the DVD ML/CL APPLICATION INSTALL 6.5.6 (PN 2049051-001).
1. Log on as a local mlcltechuser to Windows as well the Custom Shell.
Ensure all programs are closed.
2. Insert the DVD ML/CL APPLICATION INSTALL 6.5.6 (PN 2049051-001) into the DVD-ROM drive.
3. Browse to the DVD drive and double-click UserManualUpdate.wsf.
4. A message box will open stating, System will now update the user manuals.
Click Yes to install, No to quit.
5. Click Yes at the message box.
6. On completion of the update, a message box stating User manuals updated will open.
7. Click OK.
5-54 Mac-Lab/CardioLab/Centricity Cardiology INW Service Manual 2021423-503H

Recovery Procedures
Review System Disaster Recovery
The decision to perform a Review system recovery should only be made after consultation with GE Technical Support by the on-site Field Engineer. The high-level steps for a complete 6.5.6 Review system recovery are listed below. Detailed instructions for each step follow.
High-Level Overview
Recovery Scenario
Perform the following steps on review that needs to be reimaged.
Step 1: Save Review System Information. Backed up data from the second hard drive (drive G:) is used later on to restore the system.
Step 2: Take the Review systems out of GE MLCL OU. Go to “Obtain System Information at the Server” on page 5-60.
Step 3: Configure New Hardware. Go to “Configure New Hardware” on page 5-61 if the existing Review system is being replaced with a new Review system.
Step 4: Reimage the Review System. Go to “Restore System Software” on page 5-63.
Step 5: Perform all the procedures in “Configure the Review System” on page 5-63.
Step 6: Perform all the procedures in “Configure the Review System on the INW Network” on page 5-75.
2021423-503H Mac-Lab/CardioLab/Centricity Cardiology INW Service Manual 5-55

Recovery Procedures
Log On to the Review System
When starting up a Review system, an auto-logon sequence starts and you are automatically logged on to Windows XP. You must stop the auto-logon so you can log on to Windows XP as mlcltechuser.
1. Power on the Review system.
The system boots up to the Mac-Lab/CardioLab Custom Shell screen.
2. Press Ctrl + Action + Delete.
3. Click Logoff and select Logoff.
4. Immediately hold down the Shift key.
5. Log on to the Windows OS as local mlcltechuser (contact GE Technical Support or the system administrator for current password information).
To log on locally, select the computer name in the Domain field.
6. Log on to the Mac-Lab/CardioLab Custom Shell as local mlcltechuser (contact GE Technical Support or the system administrator for current password information).
Save Review System Information
If the system will not boot up or drives C: or D: are unavailable go to “Obtain System Information at the Server” on page 5-8.
If the system boots up and the C: and D: drives are available, use the following procedures to back up system information.
Export Custom Data
Use this procedure to save custom data to the G: (backup) drive.
If the system is being completely replaced, save the custom data to removable media to be moved to the replacement system after recovery. It is recommended to use a USB Flash Drive.
Export Custom Report Formats
1. In the Navigator window, select Utilities > Export Report Formats.
The Data Export wizard is displayed.
2. Select the G: drive and click New Folder.
3. Enter Report_ Backup for the folder name and click Ok.
4. Click OK when the Success message is displayed.
5. Close the application.
5-56 Mac-Lab/CardioLab/Centricity Cardiology INW Service Manual 2021423-503H

Recovery Procedures
Back Up System Information Manually
Record CVIS Information
On the Desktop, verify whether or not the Centricity Cardiology DMS shortcut is installed.
Record Anti-Virus Information
Record whether or not there is anti-virus software installed on the system.
Back up Third-Party Software
A manual backup must be created for Third Party software:
1. Check for the PedCath database:
a. Open the PedCath application and select File > Show Data Folder Path from the main menu.
If the data folder path is on the local C: or D: drive, then perform the next steps:
b. Right-click My Computer and select Explore.
c. Navigate to the PedCath database folder location.
d. Drag and drop the PedCath Data folder into the G: drive.
2. Check for the ACCAccess database:
a. Right-click My Computer and select Search.
b. Search the C: and D: drives for the file acc.mdb.
c. If the ACCAccess database is found, drag and drop the file into the G: drive.
3. Backup any other third-party software to the G: drive.
NOTEThis disaster recovery procedure will only save Mac-Lab/CardioLab files. Any other files must be backed up manually to the G: drive and restored later.
2021423-503H Mac-Lab/CardioLab/Centricity Cardiology INW Service Manual 5-57

Recovery Procedures
Back Up Software Options
1. Double-click Service Console on the Desktop.
2. Navigate to Software Options Manager > Software Options.
3. Click Create Backup.
4. In the Save In drop-down box navigate to G: drive.
5. In the File Name field, type Software_Options and click Save.
6. Close the Service Console.
Back Up Desktop Files
1. Right-click My Computer on the Desktop and select Explore.
2. Navigate to G: drive and click the New Folder button.
3. Enter the folder name as Desktop_Items.
4. Copy any customer created documents or folders from the desktop to the Desktop_Items folder.
5. Repeat this procedure logged in as any other applicable user (local mlcllogonuser, INW mlcllogonuser, and INW mlcltechuser).
Record Data Export Settings
You only need to verify that the HL7 translation was configured per the normal instruction.
1. Right-click My Computer and select Explore.
2. Navigate to D:\GEMMS\Prucka\Bin.
3. Double-click DataExportConfig.exe.
4. Record only the information listed for the four tabs: CardioLab Files, Audit Logs (track errors only or track all activity), Active Translations and HL7.
Record Network Settings
1. Verify that you are logged in to both the Windows OS and the Custom Shell as local mlcltechuser.
2. From the Desktop, right-click My Computer.
3. Choose Properties.
4. Click the Computer Name tab.
5. Record the computer name in the table below.
6. Record the Domain/Workgroup information and click Ok.
7. From the Desktop, right-click My Network Places.
5-58 Mac-Lab/CardioLab/Centricity Cardiology INW Service Manual 2021423-503H

Recovery Procedures
8. Choose Properties.
9. Right-click Local Area Connection.
10. Choose Properties.
11. Highlight the Internet Protocol (TCP/IP) and click Properties.
12. Record the IP Address, Subnet Mask, Default Gateway, WINS (if used) and DNS Server information.
Record Mapped Drives and Printer
1. Press Ctrl + Action + Delete.
2. Click Logoff and select Logoff.
3. Allow the system to auto-logon to Windows.
4. Log on to the Mac-Lab/CardioLab Custom Shell as a local user.
5. Double-click My Computer.
6. Go to Network Drives. All mapped drives will be listed.
7. Record all mapped drives.
Drive letter
Share name
Hostname of the computer that owns the share
8. Record the configured printers.
Network Settings
Computer name
Domain\Workgroup
IP Address _______-_______-_______-_______
Subnet Mask _______-_______-_______-_______
Default Gateway _______-_______-_______-_______
WINS (if used)
DNS Server _______-_______-_______-_______
_______-_______-_______-_______
_______-_______-_______-_______
2021423-503H Mac-Lab/CardioLab/Centricity Cardiology INW Service Manual 5-59

Recovery Procedures
Gather Information from INW Server
You must log on to the server as the INW domain Administrator to perform this procedure (contact GE Technical Support or the system administrator for current password information).
Obtain System Information at the Server
Use this procedure to obtain network settings only if the Review system will not boot or the C: or D: drives are unavailable.
Go to another Acquisition or Review system on the network within the same subnet, and use the procedure “Record Network Settings” on page 5-6 to obtain and record DNS, Default Gateway, and Subnet information.
NOTEA system on the network within the same subnet will have the same network information as the system being recovered.
Remove the Review System from the GE MLCL Organizational Unit
1. At the server Desktop, go to Start > Control Panel.
2. Double-click Administrative tools.
3. Double-click Active Directory Users and Computers.
4. Expand the domain name (default is inw.local).
5. Expand the GE Medical Systems (MLCL) organizational unit.
6. Expand the MLCL Computers.
7. Expand the MLCL Workstations.
8. Expand the MLCL Review Workstations.
9. Record the name of the review system which is being restored.
10. Delete the Review system name from the MLCL Review Workstations folder.
Network Settings
Subnet Mask _______-_______-_______-_______
Default Gateway _______-_______-_______-_______
WINS (if used)
DNS Server _______-_______-_______-_______
_______-_______-_______-_______
_______-_______-_______-_______
5-60 Mac-Lab/CardioLab/Centricity Cardiology INW Service Manual 2021423-503H

Recovery Procedures
11. Click Yes to confirm.
12. Close all open windows.
Configure New Hardware
Inspect Computer
NOTEIf the mobile cart (PN 2008203-001) option was ordered, the cart must be assembled first and then the computer configured on the cart.
1. Open the case.
2. Remove and reseat all boards in the computer. Boards can shift during shipping.
3. Check all ribbon cable and power connections.
4. Close the case.
Connections
1. Connect the keyboard to the keyboard PS/2 connection on the computer.
CAUTIONEQUIPMENT DAMAGE — Do not plug the keyboard to the keyboard PS/2 connection in with the computer turned on. If it is connected, when the computer is turned on, the cable must be replaced.
2. Connect the USB mouse to the top right USB port.
3. Connect the barcode scanner to an available USB port.
4. Connect the network cable to the computer.
5. Attach power cord to the computer if the isolation transformer is used:
a. Plug the power cable from the computer into the isolation transformer.
b. Plug the power cable from the monitor into the isolation transformer.
c. Plug the isolation transformer into the wall outlet.
6. Connect the video cable from the monitor to the computer.
2021423-503H Mac-Lab/CardioLab/Centricity Cardiology INW Service Manual 5-61

Recovery Procedures
Connect Solar or DASH Monitors
This section only applies if installing an optional Solar Monitor or an optional DASH Monitor.
CAUTIONAVOID PERFORMANCE DEGRADATION — The Solar and DASH monitors must only be connected to Review workstations. Do not connect a Solar or DASH monitor to an Acquisition workstation.
Connect Solar System
1. Connect one end of the cable (PN 2003408-001) to the 9-pin COM port on the back of the HP computer.
2. Connect the other end of the cable to the 9-pin RS-232 port on the back of the Solar monitor.
Connect DASH System
1. Connect the interface adapter (PN 420915-013) to the 9-pin COM port on the back of the HP computer.
2. Connect one end of the CAT5 cable (PN 418335-002) to the interface adapter.
3. Connect the other end of the CAT5 cable to the AUX port on the back of the DASH Monitor.
Interface Adapter
5-62 Mac-Lab/CardioLab/Centricity Cardiology INW Service Manual 2021423-503H

Recovery Procedures
Configure the Review System
Restore System Software
Reimage the Review System
CAUTIONSHOCK HAZARD — Use appropriate Lock Out/Tag Out procedures before performing any service on potentially energized equipment.
CAUTIONEQUIPMENT DAMAGE — Electrostatic discharge (ESD) can damage electronic components. Be sure you are properly grounded before opening any equipment.
CAUTIONLOSS OF DATA — If drive G:, the second hard drive, is physically connected during reimaging, all data contained on it will be lost.
You must physically disconnect the second hard drive before reimaging.
NOTEThe GE Client Review computer (DCGCW) must be reimaged because it will have 6.8.1 software installed.
For the reimaging process you’ll need the following media depending on system type (HP xw8000, HP xw8200, HP xw8400 and DCGCW).
DVD ML/CL APPLICATION INSTALL 6.5.6: 2049051-001
DVD MLAB/CLAB HPXW8000 IMG DVD v6.5.6: 2049072-001
DVD MLAB/CLAB HPXW8000 IMG DVD v6.5.6 #2: 2049072-002
DVD MLAB/CLAB HPXW8200 IMG DVD v6.5.6: 2049074-001
DVD MLAB/CLAB HPXW8200 IMG DVD v6.5.6 #2: 2049074-002
DVD MLAB/CLAB HPXW8400 IMG DVD v6.5.6: 2049076-001
DVD MLAB/CLAB HPXW8400 IMG DVD v6.5.6 #2: 2049076-002
DVD MLAB/CLAB DCGCW IMG DVD V6.5.6: 2049068-001
DVD MLAB/CLAB DCGCW IMG DVD V6.5.6 #2: 2049068-002
1. Shut down the system, if necessary.
2. Open the computer case and disconnect the second hard drive (drive G:) before reimaging.
2021423-503H Mac-Lab/CardioLab/Centricity Cardiology INW Service Manual 5-63

Recovery Procedures
The second hard drive is physically located at the bottom of the disk bay.
3. Restart the system.
NOTEPress F1 (Help) at the Intel Boot Agent screen, if displayed.
4. Log on to the Windows OS and the Mac-Lab/CardioLab Custom Shell locally as mlcltechuser.
NOTEIf the Systems Settings Change window is displayed, click Yes to restart. Log on again as mlcltechuser. At this point of the setup, you may see a Windows New Hardware Found wizard dialog. Please ignore this dialog. This window will be closed by Windows during the system shutdown.
5. Right-click My Computer, select Explore and verify the G: drive is no longer available.
6. Insert the appropriate Image DVD.
7. Shut down the system and replace the faulty hard drive.
NOTEFor the HP8000 only: Ensure the jumpers are set to cable select.
8. Restart the system.
9. Select Erase System Data and press Enter to begin reimaging.
The Symantec Ghost screen is displayed monitoring the progress of the image process. If necessary, insert the remaining image DVDs as prompted. When the installation is complete, the computer will automatically restart. Remove the DVD.
NOTEDuring the setup process a blank Windows DOS-Prompt window is displayed. Do not close this window as setup is being performed.
10. Shut down the system.
11. Reconnect the second hard disk.
12. Restart the system.
NOTEPress F1 (Help) at the Intel Boot Agent screen, if displayed.
13. Log on to the Windows OS and the Mac-Lab/CardioLab Custom Shell locally as mlcltechuser.
14. If any devices were not automatically installed during re-imaging, a New Hardware Found message may be displayed at restart. If this happens, use the following procedure for each wizard:
Select Install the software automatically and click Next.
5-64 Mac-Lab/CardioLab/Centricity Cardiology INW Service Manual 2021423-503H

Recovery Procedures
If a choice of drivers is presented, pick the default selection and click Next.
If prompted about Windows Logo testing or driver signing, click Continue anyway.
If prompted by Matrox Powerdesk Installation about enabling independent mode for Matrox graphics hardware, click Yes.
Click Finish when the installation is complete.
Restart the computer if prompted and log on again as local mlcltechuser.
Verify Drive Order
1. Right-click My Computer and select Manage.
2. Select Storage > Disk Management in the left pane.
3. In the right pane, verify each drive is assigned the correct drive letter.
C: Primary Hard Drive
D: Data Hard Drive
F: DVD-RAM Drive
G: Second Hard Drive
NOTEIf the C: or D: drive letters are not correctly set, security settings were not properly applied. Do not change the drive letter. The system must be reimaged.
4. If a drive does not have the correct letter perform the following steps for each drive not assigned the correct letter:
a. Right-click the drive in the right pane and select Change drive letter and paths.
b. Click Change.
c. Select the new drive letter in the drop-down menu and click OK.
d. Click Yes to the confirmation message.
5. Close the Computer Management window.
Set Display Resolution
1. Verify you are logged on as mlcltechuser (password: mlcl!techuser).
2. Right-click the Desktop and select Properties.
3. Select the Settings tab.
4. In the Screen Resolution section, select 1600x1200.
2021423-503H Mac-Lab/CardioLab/Centricity Cardiology INW Service Manual 5-65

Recovery Procedures
NOTEThis is the only supported resolution for new systems. If existing monitors do not support this resolution, 1280x1024 may be used for Mac-Lab systems. All monitors must be set to the same resolution.
5. Verify the color for all monitors is set to Highest (32-bit).
6. Click OK.
Install Microsoft Operating System Updates
Instructions for downloading and installing Microsoft security patches and service packs are listed by product type on Support Central. Download and install all applicable patches and service packs.
Change Computer Name
Use this procedure to change the computer name, if required.
CAUTIONPROCEDURE FAILURE — If the computer name is to be changed, this procedure must be completed at this time. If the computer’s name is changed at a later time the system must be reimaged.
Also note the following naming conventions:
The name cannot begin with a number
The name cannot contain hyphens or underscore characters
The name cannot contain spaces or special characters
The name cannot exceed 15 characters in length.
1. Verify you are logged on to the Windows OS and the Mac-Lab/CardioLab Custom Shell as local mlcltechuser.
2. Right-click My Computer and select Explore.
3. Navigate to C:\Windows\Special.
4. Double-click ManualRename.hta.
5. Enter the new Review system name.
NOTEIf the customer needs the previously used name to be used then enter the system name recorded in “Remove the Review System from the GE MLCL Organizational Unit” on page 5-60.
6. Click OK at the confirmation messages.
The system automatically restarts.
7. At the Mac-Lab/CardioLab Custom Shell screen, press Ctrl + Action + Delete.
5-66 Mac-Lab/CardioLab/Centricity Cardiology INW Service Manual 2021423-503H

Recovery Procedures
8. Click Logoff.
9. Click Logoff.
10. Immediately hold down the Shift key.
11. Log on to the Windows OS as local mlcltechuser.
12. Log on to the Mac-Lab/CardioLab Custom Shell as local mlcltechuser.
Change Language
Use these procedures to change the language, if necessary. If the language remains English, continue with “Check/Set Time” on page 5-70.
Delete User Profiles
1. Select Start > Settings > Control Panel.
2. Double-click System.
3. Click the Advanced tab.
4. Click Settings in the User Profiles section.
5. Select each profile in the list and click Delete, if enabled, to delete the profile.
The MLCLTechUser profile cannot be deleted.
6. Click OK to close the User Profiles dialog.
7. Click OK to close the System Properties dialog.
Set Operating System Language
For setting the languages the following must be applied for the application to function properly:
Language: Country/Locale
English: United States/United Kingdom
French: France
German: Germany
Italian: Italy
Spanish: Spain
Swedish: Sweden
Chinese: China (PRC)
Japanese: Japan
1. Verify you are logged on as local mlcltechuser (password: mlcl!techuser).
2. Double-click Regional and Language Options.
3. Select the Regional Options tab.
2021423-503H Mac-Lab/CardioLab/Centricity Cardiology INW Service Manual 5-67

Recovery Procedures
4. In the Standards and formats section, select the correct language and locale (for example, French (France)) from the drop-down list.
5. In the Location section, select the correct locale (for example, France).
6. Select the Languages tab.
7. Click Details.
8. For Chinese systems only:
If the use of the IME is required, the following steps must be taken to set it up in a manner which is compatible with the operation of the Mac-Lab/CardioLab software:
a. Click Add.
b. Change the Input Language to Chinese (PRC).
c. Select the Keyboard Layout/IME check box.
d. Select Chinese (Simplified) - Enhanced Unicode IME from the drop-down list.
e. Click OK.
f. Click Add.
g. Select the Keyboard Layout/IME check box.
h. Select the Chinese (Simplified) - US Keyboard check box.
i. Click OK.
j. Select Chinese (PRC) - Chinese (Simplified) - US Keyboard in the Default input language drop-down.
If the use of the IME is not required, select the desired keyboard layout as appropriate.
9. For all other languages:
Determine if the desired language and locale is listed in the Default input language section. If it is not:
a. Click Add.
b. Select the appropriate language and locale in the Input language list. If necessary, configure other settings (for example, Keyboard layout/IME) as appropriate.
c. Click OK.
10. Select the language and locale in the Default input language section.
11. Click OK.
12. Select the correct language (for example, Francais) in the Languages used in menus and dialogs section.
5-68 Mac-Lab/CardioLab/Centricity Cardiology INW Service Manual 2021423-503H

Recovery Procedures
13. Select the Advanced tab.
14. Select the correct language (for example, French (France)) in the Language for non-Unicode programs section.
15. Select the Apply all settings... check box in the Default user account settings section.
16. Click OK if prompted.
17. Click OK to close the Regional and Language Options window.
18. Click OK at the changes will not take effect until you reboot prompt.
19. Click Yes, if prompted about copying required files, to use the files that are already on the system.
20. Click Yes to reboot.
Set Mac-Lab/CardioLab Application Language
1. At the Mac-Lab/CardioLab Custom Shell screen, press Ctrl + Action + Delete.
2. Click Logoff.
3. Click Logoff.
4. Immediately hold down the Shift key.
5. Log on to the Windows Operating System as local mlcltechuser (password: mlcl!techuser).
6. Log on to the Mac-Lab/CardioLab Custom Shell as local mlcltechuser (password: mlcl!techuser).
7. Right-click My Computer and select Explore.
8. Browse to the D:\GEMMS\Prucka\Setup\Language directory.
9. Double-click MLCL_Set_Language.bat to start the process of setting the Mac-Lab/CardioLab application language.
10. Verify the language listed is correct (for example, French). If so, press any key to begin the process of setting the application language.
NOTEThe process takes a few minutes to complete.
11. Press Enter at the success prompt.
Both the Operating System language and the Mac-Lab/CardioLab application language should now be set correctly.
2021423-503H Mac-Lab/CardioLab/Centricity Cardiology INW Service Manual 5-69

Recovery Procedures
Install kPa Label (Chinese Systems Only)
1. Clean the area above the pressure keys if necessary.
2. Apply the kPa label as shown.
Check/Set Time
1. Verify you are logged on as local mlcltechuser (password: mlcl!techuser).
2. Select Start > Programs > Accessories > Command Prompt.
3. Type net stop w32time and press Enter.
4. Select Start > Settings > Control Panel > Date and Time.
5. Select the Date & Time tab.
6. Set the time and date.
7. Click Apply.
8. Select the Time Zone tab.
9. Select the correct time zone and daylight savings setting.
10. Click Apply.
11. Select the Internet Time tab.
12. Clear the Automatically synchronize with an Internet Time Server check box.
13. Click OK.
14. Type net start w32time at the command prompt and press Enter.
15. Close the command window.
Label
5-70 Mac-Lab/CardioLab/Centricity Cardiology INW Service Manual 2021423-503H

Recovery Procedures
Install/Enable Software Options
.
NOTEThe software options backup that was made when the system was installed can be used in this section or you can also use the backed up option file at the beginning of Review system restore.
1. Double-click Service Console from the Desktop.
2. Browse to Software Options Manager > Software Options.
NOTEIf prompted for the GEMS Serial Number, enter the serial number and click OK. The serial number can be found on a label on the top of the computer.
3. In the Software Options form, click Read License File.
4. Insert the Software Options CD into the F: drive.
5. In the Look In dropdown box, select the F:\ drive.
6. Double-click the Options.txt file.
7. Ensure the correct options are enabled.
8. Click Update and Save changes to Software options to save the options.
9. At the Save changes? message, click Yes.
Configure InSite ExC
Verify with the customer that InSite ExC will be used for Remote Service Support. If no Remote Service Support is needed, proceed to “GEMS Log Collector Task” on page 5-72.
1. Verify you are logged on to the Windows Operating System and the Mac-Lab/CardioLab Custom Shell as local mlcltechuser (password: mlcl!techuser).
2. Double-click Service Console.
3. Expand the InSite 2.0 folder and select the Device Manager folder in the left pane of the Service Console window.
4. Click Generate Device Information in the Device Information window.
5. Click OK in the Device Manager Confirmation window.
6. Verify the Serial Number, Name, and Type fields.
7. Select the Configuration Utility folder in the left pane under InSite 2.0.
8. If the hospital uses a proxy server perform the next steps, otherwise continue with step 13.
2021423-503H Mac-Lab/CardioLab/Centricity Cardiology INW Service Manual 5-71

Recovery Procedures
9. Click the Proxy Configuration tab and select Use a Proxy Server to connect to the Enterprise.
10. Enter the proxy server information.
NOTEContact the Hospital IT Department for the proxy address, proxy port, and authentication information.
11. Click Update Proxy after entering the proxy server information.
12. Click OK at the InSite 2.0 Message window.
13. Select the Service Controller tab in the Configuration Utility.
14. Click Start Service.
15. Verify the Service has started:
a. Wait 10 seconds.
b. Select Check Service Status.
A confirmation window opens indicating the service is running.
c. Click OK.
16. Select Initiate Remote Service and verify that it connects and a Request submitted successfully message is displayed.
17. Close the Service Console.
NOTEPerform the following steps only if the customer requests InSite ExC access control.
18. Right-click VNC in the System Tray and select Options.
19. Select the Authentication tab.
20. Select Prompt local user to accept incoming connections and click OK.
GEMS Log Collector Task
GEMS Log Collector Task Creation
The following steps are needed only if you want to configure InSite ExC Log Collection on GE Acquisition and Review systems only.
1. Select Start -> Settings -> Control Panel -> Scheduled Tasks. The Scheduled Tasks page opens.
2. If the GEMS_LogCollector_Task entry is present, right-click it and chose Properties.
5-72 Mac-Lab/CardioLab/Centricity Cardiology INW Service Manual 2021423-503H

Recovery Procedures
3. If the GEMS_LogCollector_Task entry is not present, add a new entry as follows:
Select File > New to add a new scheduled task.
Rename the task GEMS_LogCollector_Task
Right-click the new entry and select Properties.
Browse to D:\GEMMS\Prucka\Bin and select the GEMS_LogCollector.exe program. Edit the run command line to add the –sendtobos option as shown in the following figure.
4. Select the Enabled check box.
5. In the Run as field, enter the account information as follows:
For a networked system (Acquisition or Review), enter the user name as <Domain Name>\MLCLSqlUser.
For a stand-alone system, enter the user name as <Computer name>/ MLCLSqlUser.
Click Set Password. When prompted, enter the password sql8273user in both fields.
Click OK.
2021423-503H Mac-Lab/CardioLab/Centricity Cardiology INW Service Manual 5-73

Recovery Procedures
GEMS Log Collector Task Schedule Configuration
Select the Schedule tab and configure the task to run once every two weeks as shown in the following figure.
1. In the Schedule Task: field, select Weekly.
2. In the Start time: field, select 11:50PM.
3. In the Schedule Task Weekly section, select Every 2 week(s) on: Sat.
Import Report Formats
Perform these steps to import report formats on recovered Review systems. Report Formats are not replicated in the INW networked environment. Obtain the backups from one of the following sources:
Use the backup saved to the G: drive.
Check with the Lab administrator to see if a backup they made earlier is available.
Make a copy from a Review workstation in the same lab.
If any other backups are unavailable and for English systems only, report formats must be imported from the CD-R MLABCLAB CLIN APP DEFAULTS V6.5.6 (PN 2049104-001).
1. Double-click Mac-Lab/CardioLab to open the application.
2. Select Utilities > Import Report Formats in the Navigator window.
5-74 Mac-Lab/CardioLab/Centricity Cardiology INW Service Manual 2021423-503H

Recovery Procedures
3. At the Report Wizard window, click Next.
4. Click Change Folder.
5. Select the drive G (or the appropriate folder location).
6. Navigate to the Report_Backup folder (or other location).
7. Click OK.
8. Select No when asked whether to merge with existing data.
9. Click OK at success message.
10. Close the application.
Configure the Review System on the INW Network
Add the Review System to the Domain
1. Verify that you are logged on to the Windows OS and the Mac-Lab/CardioLab Custom Shell as local mlcltechuser.
2. Right-click My Computer on the Desktop and select Properties.
3. Select the Computer Name tab.
4. Click the Change button.
5. In the Member of section, select the Domain radio button, enter the name of the INW Domain to join and click OK.
NOTEThe default Domain is inw.local.
6. When prompted, type the username mlcltechuser and password.
7. At the Welcome to inw message, click OK.
8. At the restart message click OK.
9. At the System Properties window, click OK.
10. At the Do you want to restart now? message click Yes.
11. After the system restarts, at the Mac-Lab/CardioLab Custom Shell window, press Ctrl + Action + Del and click Logoff.
12. Click Logoff and immediately hold the Shift key to stop the auto-logon sequence.
13. Logon to Windows and the Mac-Lab/CardioLab Custom Shell as the local mlcltechuser.
2021423-503H Mac-Lab/CardioLab/Centricity Cardiology INW Service Manual 5-75

Recovery Procedures
Synchronize Time
1. Select Start > Programs > Accessories > Command Prompt.
2. Type net time /set and press Enter.
3. When asked to sync with the server, type y and press Enter.
NOTEThis step may take up to 2 minutes to complete.
4. Close the Command Prompt window.
Add Review System to GE MLCL Organizational Unit
1. Log on to the server as the INW domain Administrator (contact GE Technical Support or the system administrator for current password information).
2. Select Start > Settings > Control Panel.
3. Double-click Administrative tools.
4. Double-click Active Directory Users and Computers.
5. Expand inw.local (this is an example, the actual domain name may be different).
6. Click the Computers folder and locate the Review system to add.
7. Expand the GE Medical Systems (MLCL) organizational unit.
8. Expand the MLCL Computers.
9. Expand the MLCL Workstations.
10. Drag and drop the computer name from the Computers folder to the MLCL Review workstations.
11. Close all open windows.
12. Restart the Review system added to the organizational unit in the previous step.
13. After restart, press Ctrl + Action + Delete, logoff as mlcllogonuser.
14. Click Logoff.
15. Immediately hold down the Shift key.
16. Log on to the Windows OS and the Mac-Lab/CardioLab Custom Shell locally as mlcltechuser.
5-76 Mac-Lab/CardioLab/Centricity Cardiology INW Service Manual 2021423-503H

Recovery Procedures
Synchronize Time
This procedure applies to all Review systems.
1. Right-click My Computer and select Explore.
2. Navigate to D:\GEMMS\Prucka\Setup\TimeSynchronization.
3. Double-click TimeClientConfig.exe. This tool will perform the following:
Check for Administrator logon.
Performs a backup of the existing registry entries pertaining to Windows Time Service.
Update the required registry entries to configure Windows Time Service.
Verify one of the registry keys to ensure the registry update was successful.
Enable/configure UDP port 123 in the Windows Firewall on Windows XP SP3 system.
Stop and Start the W32Time service.
Run the w32tm command to update the Windows Time Service to look at the update configuration, re synchronize, and rediscover the time source.
2021423-503H Mac-Lab/CardioLab/Centricity Cardiology INW Service Manual 5-77

Recovery Procedures
4. In a fixed-IP network, select IP Address and enter the IP address of the INW server. For a DHCP network, select the UNC name and enter the name of the INW server.
NOTEIn a DHCP environment, the UNC name must be used since it is likely that the IP address will change.
5. Click Configure.
6. When the configuration completes, the status will indicate that the time settings were updated successfully.
7. Close all open windows.
8. Time Sync Configuration is now complete.
5-78 Mac-Lab/CardioLab/Centricity Cardiology INW Service Manual 2021423-503H

Recovery Procedures
Confirm Domain Security Policy
Verify Security Policy
To verify the security policy at the Review system:
1. Right-click My Computer on the Desktop and select Manage.
2. Select System Tools > Local Users and Groups > Groups.
3. Right-click Administrators and select Properties.
4. Verify that the following members are shown in the list:
[domain name]\Domain Admins
[domain name]\mlcltechuser
[domain name]\mlclsqluser
NOTEThe default domain name is inw.local.
NOTEIf the members are not shown, follow the troubleshooting steps below.
Troubleshooting
1. Verify that the Review system is in the correct Domain:
a. Right-click My Computer on the Desktop and select Properties.
b. Verify that on the Computer Name tab the INW Domain is present.
2. Verify that the Review system shows up in the GE Medical Systems (MLCL) Organizational Unit on the server.
3. On the server, open a command prompt window and type gpupdate /force and press Enter.
4. Restart the Review systems, wait approximately 7 minutes and check the policy again as described in “Verify Security Policy” on page 5-42. If the policy is still not correct proceed to the next step.
5. Verify that the TCP/IP properties on the server are set correctly
a. The INW server IP must be configured as the preferred DNS server.
b. The subnet mask must be correct as defined be the hospital IT staff.
2021423-503H Mac-Lab/CardioLab/Centricity Cardiology INW Service Manual 5-79

Recovery Procedures
6. Verify that the TCP/IP properties on the Review are set correctly
a. The IP subnet mask of the Review system MUST match exactly the subnet mask of the server.
b. The IP address of the Review system must be manually configured and must fall within the subnet of the server as defined by the subnet mask.
c. The gateway of the Review system must be set to the IP address of the server or another machine on the hospital network.
d. The DNS of the Review system must be set to the IP address of the INW server.
7. Verify that the server and Review system can communicate.
8. Open a command window on the Review system and type ping <servername> and press Enter.
a. A Request timed out message indicates failure, a Reply from message indicates success.
NOTEIf successful, verify that the reply from IP address shown matches the server's IP address and if correct skip the reset of the sub-steps below
b. If step a failed, repeat with the servername replaced with the correct IP address of the server ping <###.###.###.###> and press Enter.
c. If step a and step b both failed, there is a problem with the IP address or the physical network. Repeat the above steps to verify the TCP/IP properties of the server and Review system.
d. If step a fails and step b succeeds, there is a problem with DNS setup. Repeat the TCP/IP properties steps above paying careful attention to the DNS setup.
9. Verify that the time and time zone settings on the server and the Review system match.
a. If they do not match, open a command prompt on the Review system and type net time /set and press Enter.
b. Restart the Review system, wait 7 minutes and check the policy again in “Verify Security Policy” on page 5-42. If the policy is still not correct proceed to the next step.
10. If the policy is still not correct after all above steps:
a. Remove the Review system from the Domain and add it back to the CARDIOLAN workgroup.
b. Restart the Review system.
c. Delete the Review system name for the OU on the server.
5-80 Mac-Lab/CardioLab/Centricity Cardiology INW Service Manual 2021423-503H

Recovery Procedures
d. Repeat the instructions for adding the Review system to the Domain.
Initialize Applications
Adobe Reader, Microsoft Word, and Microsoft Word Reports must be initialized under both mlcllogonuser and mlcltechuser logons.
Adobe Reader
1. Press Ctrl + Action + Delete.
2. Click Logoff.
3. Click Logoff.
Allow the system to auto-log on to the Windows Operating System as mlcllogonuser.
4. Log on to the Mac-Lab/CardioLab Custom Shell as domain mlcllogonuser (password: mlcl!logonuser).
5. Select Start > Programs > Adobe Reader 9.
6. Accept the End User License Agreement if displayed.
After Adobe Reader opens, wait one minute to ensure a Check for Update dialog box is not displayed. If the dialog box is displayed, click Cancel.
7. Close Adobe Reader.
Microsoft Word
1. Select Start > Programs > Microsoft Word.
NOTEFor Microsoft Office 2007 Professional, select Start > Programs > Microsoft Office Word 2007.
2. Accept the End User License Agreement if displayed.
3. Click OK if the User Initial dialog box is displayed.
4. If the Privacy Option dialog box is displayed, uncheck Search Microsoft Online for Help, if it appears.
5. Close Microsoft Word.
Microsoft Word Reports
Perform this procedure on multiple monitor systems only.
1. Double-click Mac-Lab CardioLab.
2. Select Administration > Reports > Templates.
2021423-503H Mac-Lab/CardioLab/Centricity Cardiology INW Service Manual 5-81

Recovery Procedures
If prompted for an administrator password enter mlcladmuser (password: mlcl!admuser).
3. Click Retry if a server busy message is displayed. Microsoft Word will open.
4. Configure the Microsoft Word window for the review monitor:
a. Right-click the Microsoft Word title bar and select Restore.
b. Move the Microsoft Word window to the next monitor (from the real-time monitor to the review monitor).
c. Right-click the Microsoft Word title bar and select Maximize.
5. Close Microsoft Word.
6. When prompted to save the report, click No.
7. Close the Mac-Lab/CardioLab application.
Adobe Reader
1. Press Ctrl + Action + Delete.
2. Click Logoff.
3. Click Logoff.
4. Immediately hold down the Shift key.
5. Log on to the Windows Operating System as domain mlcltechuser (password: mlcl!techuser).
6. Log on to the Mac-Lab/CardioLab Custom Shell as domain mlcltechuser (password: mlcl!techuser).
7. Select Start > Programs > Adobe Reader 9.
8. Accept the End User License Agreement if displayed.
After Adobe Reader opens, wait one minute to ensure a Check for Update dialog box is not displayed. If the dialog box is displayed, click Cancel.
9. Close Adobe Reader.
Microsoft Word
1. Select Start > Programs > Microsoft Word.
NOTEFor Microsoft Office 2007 Professional, select Start > Programs > Microsoft Office Word 2007.
2. Accept the End User License Agreement if displayed.
3. Click OK if the User Initial dialog box is displayed.
5-82 Mac-Lab/CardioLab/Centricity Cardiology INW Service Manual 2021423-503H

Recovery Procedures
4. Confirm that Office is activated using the following steps:
For Office 2007
a. Click on the Office button (left topmost corner).
b. Select Word Options.
c. Choose Resources.
d. Click Activate.
e. Verify that this product has already been activated.
For Office XP
a. Select Help > Activate Word.
b. Verify that this product has already been activated.
5. Close Microsoft Word.
Microsoft Word Reports
Perform this procedure on multiple monitor systems only.
1. Double-click Mac-Lab CardioLab.
2. Select Administration > Reports > Templates.
If prompted for an administrator password enter domain mlcladmuser (password: mlcl!admuser).
3. Click Retry if a server busy message is displayed. Microsoft Word will open.
4. Configure the Microsoft Word window for the review monitor:
a. Right-click the Microsoft Word title bar and select Restore.
b. Move the Microsoft Word window to the next monitor (from the real-time monitor to the review monitor).
c. Right-click the Microsoft Word title bar and select Maximize.
5. Close Microsoft Word.
6. When prompted to save the report, click No.
7. Close the Mac-Lab/CardioLab application.
2021423-503H Mac-Lab/CardioLab/Centricity Cardiology INW Service Manual 5-83

Recovery Procedures
Confirm Windows XP is Activated
1. Open a command prompt and from the command prompt run c:\windows\system32\oobe\msoobe.exe /A
2. Confirm Windows XP has already been activated.
Confirm File Paths and Network Storage Settings
Perform this procedure for a networked Review system.
1. Log on to the Windows OS and the Mac-Lab/CardioLab Custom Shell as INW domain mlcltechuser.
2. Double-click Mac-Lab/CardioLab on the Desktop to start the Mac-Lab/CardioLab application.
3. Select Administration > System Settings.
4. Browse to the File Paths section.
5. Check the Enable Network Storage checkbox.
6. Click Browse.
7. Browse to the INW server and select the PruckaStudies share as the network storage path.
8. Click OK.
9. Select the Audit Log section.
10. Move all items in the list to the right Events selected for audit by clicking the >> button.
11. Close the application.
Additional Installation for Purchased Options
The purchased options may include PedCath. The instructions to complete the installation are found at the following website: http://www.pedcath.com/manual.php
Reconfigure Printer
If the printer information was recorded, refer to the list of printers recorded in “Record Mapped Drives and Printer” on page 5-59. Also refer to the setup instructions included with the printer to install the appropriate printer driver.
5-84 Mac-Lab/CardioLab/Centricity Cardiology INW Service Manual 2021423-503H

Recovery Procedures
Reconfigure Mapped Drives
If any mapped drives were recorded in “Record Mapped Drives and Printer” on page 5-59, perform this procedure.
1. Log off the system and allow the auto-logon run and log on to the Mac-Lab/CardioLab Custom Shell as a local user.
2. Verify any mapped drives still exist.
If they do not, perform the steps in this procedure.
3. Right-click My Computer on the Desktop and select Map Network Drive.
4. In the Drive section, select the drive letter.
5. In the Folder section, enter the path.
6. Click Finish.
7. Close all open windows.
8. Log off the system and allow the auto-logon run.
Configure Data Export
Perform the following steps on each of the networked Mac-Lab/CardioLab Review systems.
1. Open Windows Explorer.
2. Navigate to D:\GEMMS\Prucka\Bin.
3. Double-click DataExportConfig.exe.
4. Configure to the settings captured earlier in “Record Data Export Settings” on page 5-58.
Reload CVIS Client
If a CVIS client needs to be reloaded onto the computer, refer to the appropriate CVIS Installation manual for installation steps.
2021423-503H Mac-Lab/CardioLab/Centricity Cardiology INW Service Manual 5-85

Recovery Procedures
Update Operator Manuals
This script has to be executed for updating the Mac-Lab, CardioLab or Centricity Cardiology INW Operator's manual. To apply these changes, use the DVD ML/CL APPLICATION INSTALL 6.5.6 (PN 2049051-001).
1. Log on as a local mlcltechuser to Windows as well the Custom Shell.
Ensure all programs are closed.
2. Insert the DVD ML/CL APPLICATION INSTALL 6.5.6 (PN 2049051-001) into the DVD-ROM drive.
3. Browse to the DVD drive and double-click UserManualUpdate.wsf.
4. A message box will open stating, System will now update the user manuals.
Click Yes to install, No to quit.
5. Click Yes at the message box.
6. On completion of the update, a message box stating User manuals updated will open.
7. Click OK.
Perform Necessary Software Updates
Apply all necessary software updates to the Acquisition system. Refer to the Mac-Lab/CardioLab 6.5.6/6.8.1 Release 3 Update (PN 2027332-533 ) for the instructions.
5-86 Mac-Lab/CardioLab/Centricity Cardiology INW Service Manual 2021423-503H

Recovery Procedures
System Checkout
Review Workstation Test
Solar and DASH Checkout
1. Verify the Mac-Lab or CardioLab module is selected for a Cath or EP study respectively. Perform a patient search or create a new study by clicking New Study. Enter the required fields: patient last name, first name and medical record number.
2. Connect the ECG, NIBP and SpO2 cables from the patient simulator to the TRAM Module or DASH monitor. Place the SpO2 finger probe on the right or left index finger. Place the NIBP pressure cuff over the left or right arm.
3. Perform a Stat Vitals Measurement from the Nurses Review Workstation by selecting Measurements > Stat Vitals or by pressing the Action + L keys on the keyboard.
4. Verify that the vitals information is displayed in the log window.
5. Close the study.
2021423-503H Mac-Lab/CardioLab/Centricity Cardiology INW Service Manual 5-87

Recovery Procedures
INW Server Disaster Recovery
The decision to perform server recovery should only be made after consultation with GE Technical Support by the on-site Field Engineer. The high-level steps for a complete 6.5.6 INW server recovery are listed below. Detailed instructions for each step follow.
High-Level Overview
Required Parts
Verify the appropriate media is available. Double-check part numbers before you begin.
DVD MLAB/CLAB G4 IMG DVD V6.5.6: 2049064-001
DVD MLAB/CLAB G5 IMG DVD V6.5.6: 2049060-001
DVD MLAB/CLAB G6 IMG DVD V6.5.6: 2049056-001
DVD ML/CL APPLICATION INSTALL 6.5.6: 2049051-001
Backup tapes (Full and Incremental, if applicable)
NOTEThe G6 server must be reimaged because it will have 6.8.1 software installed.
Depending on the site configuration server failure will fall into one of two scenarios:
Scenario 1
Failure of a single drive in a disk array on a G4/G5 low- mid- or high-end server and G6 low or high-end Server.
Replace the drive (See “Replace the Server Hard Drive” on page 5-96); the RAID automatically rebuilds the replacement drive. No further action is required.
Scenario 2
Perform the steps listed below if the failure involves multiple drives in a disk array on a G4/G5/G6 server.
Step 1: Record Server Information. Go to “Record Server Information” on page 5-90.
Step 2: Take the Acquisition systems out of replication and set systems to standalone.
Perform the following steps to take the Acquisitions systems out of replication:
5-88 Mac-Lab/CardioLab/Centricity Cardiology INW Service Manual 2021423-503H

Recovery Procedures
If the server is still running (for example, the hard drive is corrupt, rather than completely failed), remove all Acquisition systems from replication (See “Take All Acquisition Systems out of Replication at the Server” on page 5-91) and then continue with the “Set All Acquisition Systems to Standalone” on page 5-93.
If the server is not running, go to each Acquisition system and remove the system from replication (See “Set All Acquisition Systems to Standalone” on page 5-93).
Step 3: See procedures: “Backup Custom Lists” on page 5-95 for detailed steps.
Step 4: Replace the hard drive (See “Replace the Server Hard Drive” on page 5-96).
Step 5: Reimage the hard drive. Depending on the type of server, perform the associated steps.
Compaq ML370 G4 Servers: “Load G4 Server Image” on page 5-96
HP ProLiant ML370 G5 Servers: “Load G5 Server Image” on page 5-97
HP ProLiant DL370 G6 Servers: “Load G6 Server Image” on page 5-97
Step 6: Perform all the procedures in “G4/G5/G6 Server Setup and Data Restore” on page 5-98.
Step 7: Perform all the procedures in“Reconfigure Centricity Cardiology INW Network” on page 5-119.
Step 8: Perform all the procedures in“Post Configuration Procedures” on page 5-128.
2021423-503H Mac-Lab/CardioLab/Centricity Cardiology INW Service Manual 5-89

Recovery Procedures
Record Server Information
Record the Server IP Information
The Server IP information is required for the “G4/G5/G6 Server Setup and Data Restore” on page 5-98 procedure. The Server IP can be found on any Acquisition system or Review workstation connected to the network. Use the following procedure to find and record the information:
1. Log on to the Windows OS and the Mac-Lab/CardioLab Custom Shell as local mlcltechuser.
2. Right-click My Network Places and select Properties.
3. Right-click Local Area Connection and select Properties.
4. Highlight TCP/IP and select Properties.
5. Record the following information:
Preferred DNS Server: ___________________________
(This is the server IP)
IP Subnet Mask:_________________________________
Record the Server and Domain Names
Record the server name for the “G4/G5/G6 Server Setup and Data Restore” on page 5-98.
1. Go to any Acquisition system or Review workstation.
2. Launch the Mac-Lab/CardioLab application and go to Administration > System Settings.
3. Select File Paths and look at the Network Study Path field.
CAUTIONPROCEDURE FAILURE — The entire server disaster recovery procedure will fail if you record the wrong server name below. Be sure to double-check the name you recorded.
4. Record the server name. It has this format:
\\CLSV[four digit number]\Prucka\Studies
CLSVxxxx is the server name.:______________________
5. Close all open windows.
5-90 Mac-Lab/CardioLab/Centricity Cardiology INW Service Manual 2021423-503H

Recovery Procedures
6. Right-click My Computer, select Properties and click the Computer Name tab.
7. Record the domain name. It has this format: CLWSxxxx.<Domain name>.
Domain name:____________________
On the INW Server, Back Up User Profiles (if possible)
Save the INW Server account profiles:
1. Log on to the domain as Administrator.
2. Launch Explorer and navigate to C:\Documents and Settings.
3. Highlight the user profile/profiles except Administrator from this directory and choose copy. Paste the profiles on a USB storage device.
4. Log off from the Server.
5. Log on to the domain as mlcltechuser.
6. Launch Explorer and navigate to C:\Documents and Settings.
7. Highlight the Administrator profile from this directory and choose copy. Paste the profile on a USB storage device.
8. Log off from the INW Server.
Reimaging Procedures
Take All Acquisition Systems out of Replication at the Server
If the server is available (that is, can be booted and the service console can be run), use this procedure to take all Acquisitions out of replication at the server, and then continue with to “Set All Acquisition Systems to Standalone” on page 5-93.
If the server is not available, skip this procedure and continue with “Set All Acquisition Systems to Standalone” on page 5-93.
CAUTIONPROCEDURE FAILURE — If either this procedure or “Stop Replication” on page 5-93 is not performed to stop replication on the Acquisition system, the Acquisition systems cannot be added back into replication later.
Adding or removing a system from replication requires administrative privileges. Contact the facility IT department for current logons if necessary.
2021423-503H Mac-Lab/CardioLab/Centricity Cardiology INW Service Manual 5-91

Recovery Procedures
1. At the server, double-click Service Console from the Desktop and navigate to Create Replica > Replication Setup.
2. Log on to the Service Console as mlclsqluser (contact GE Technical Support or the system administrator for current password information).
3. Highlight all Acquisition systems (for example, CLWS0001, and so on) in the list of currently replicating systems.
4. Click the Remove button.
5. Click Yes at the confirmation window.
NOTEStopping replication could take several minutes to complete.
6. Once all Acquisitions have been taken out of replication, the message Replication Removal Complete will appear and all Acquisitions are no longer listed as being replicated.
7. Refresh the window (click another folder in the tree and then click Replication Setup again) to verify all Acquisition systems have been taken out replication.
8. Close the Service Console.
9. Go to the Enterprise Manager and stop server replication.
a. Select Start > Programs > Microsoft SQL Server > Enterprise Manager.
b. Expand Microsoft SQL Servers > SQL Server Group. Highlight the INW Server (in the left window).
c. Select Tools > Replication > Disable Publishing.
d. Click Next.
e. Select Yes, disable publishing on [Server name] and click Next.
f. Click Next in the Confirm Dropping of Publications window.
g. Click Finish in the Completing the Disable Publishing and Distribution Wizard window.
h. Click OK to the Successfully Disabled window.
i. Right-click the server name and select Refresh.
5-92 Mac-Lab/CardioLab/Centricity Cardiology INW Service Manual 2021423-503H

Recovery Procedures
Set All Acquisition Systems to Standalone
While the server is down communicate the following to the users and lab administrator:
Review workstations will not be functional while the server is being recovered.
Acquisitions systems will function in standalone mode (but will have no access to the network catalog).
Switching users or logging on using some usernames may fail. If this happens users should either use the emergency logon or the temporary logon set up in this step (username: Tempuser, Password: password).
To set the Acquisition systems to standalone while the server is down perform the following procedures at each Acquisition system:
“Stop Replication” on page 5-93 (This step is not required if the Acquisition systems were taken out of replication at the server in the previous procedure).
“Set Up a Temporary User on Each Acquisition System” on page 5-93.
“Disable Networking” on page 5-94.
“Backup LMT Custom Reports” on page 5-94.
At the Acquisition system, log on to the Windows OS and the Mac-Lab/CardioLab Custom Shell as local mlcltechuser (contact GE Technical Support or the system administrator for current password information).
Stop Replication
This procedure is not required if the Acquisition systems were taken out of replication at the server in the procedure “Take All Acquisition Systems out of Replication at the Server” on page 5-91.
1. Verify you are logged in as local mlcltechuser.
2. Right-click My Computer and select Explore.
3. Navigate to D:\GEMMS\Prucka\Network.
4. Double-click StopRepl.bat.
5. A Command Prompt window opens and the file runs.
6. Press the Enter key when prompted to press any key.
Set Up a Temporary User on Each Acquisition System
1. Right-click My Computer and select Manage.
2. Expand Local Users and Groups.
3. Highlight Users.
2021423-503H Mac-Lab/CardioLab/Centricity Cardiology INW Service Manual 5-93

Recovery Procedures
4. Right-click Users and select New User.
5. Enter the following information in the New User window:
User ID: Tempuser
Password: password
Uncheck the option to require the user to change the password at the first logon.
6. Click Create.
7. Click Close.
8. Double-click the user you just created and go to Member of tab.
9. Click Add.
10. Click Advanced.
11. Verify the Location field displays the local computer name.
12. Click Find Now.
13. Multi-Select the following groups:
Administrators
MLCLAdmgrp
14. Click Ok three times.
15. Double-Click the user, go to the Member of tab and ensure the following groups are listed:
Administrators
MLCLAdmgrp
Users
16. Close all open windows.
Disable Networking
1. Open the Mac-Lab/CardioLab application.
2. Select Administration > System Settings.
3. When prompted, log on as Tempuser (Password: password) to the local computer.
4. Select File Paths.
5. Uncheck the Enable Network Storage option and click close.
Backup LMT Custom Reports
Skip this procedure if the customer is not using LMT Custom reports or the customer has previously backed up the clink_drk.mdb file. The customer is responsible for backing up the clink_drk.mdb file because it is not backed up as part of the INW backup procedure.
1. Connect a USB drive.
5-94 Mac-Lab/CardioLab/Centricity Cardiology INW Service Manual 2021423-503H

Recovery Procedures
2. Right-click My Computer and select Search.
3. Search for clink_drk.mdb and copy the file (most commonly the file will be found in D:\Program Files\GEMMS\LMT\Client\Resource Kit).
4. Navigate to the USB drive and select Paste.
5. Remove the USB drive.
Backup Database, Log and Studies
Ensure that the following folders are backed-up by Tape Backup or Enterprise Backup Agents.
D:\GEMMS\Prucka\Database\Maintenance\Backup
D:\GEMMS\Prucka\Database\Maintenance\Log
D:\GEMMS\Prucka\Studies
Backup Custom Lists, Custom Reports, and Custom Forms
Backup Custom Lists
This procedure is done in case the custom lists, custom reports, and custom forms are lost during the recovery. It may be completed at any one of the Acquisition systems.
NOTEIf prompted for an administrator password enter domain mlcladmuser. If mlcladmuser does not work, log on as Tempuser.
1. Double-click Mac-Lab/CardioLab to start the Mac-Lab/CardioLab application.
2. In the Navigator window, select Utilities > Export Lists.
3. Click Next in the Data Export wizard window.
4. Select the G: drive and click New Folder.
5. Enter List_ Backup for the folder name and click OK.
6. Click OK at the Data Export wizard window.
7. Click OK when the Success message is displayed.
Backup Custom Reports
1. In the Navigator window, select Utilities > Export Report Formats.
2. Click Next in the Data Export wizard window.
3. Select the G: drive and click the New Folder.
4. Enter Reports_ Backup for the folder name and click OK.
5. Click OK at the Data Export wizard window.
6. Click OK when the Success message is displayed.
2021423-503H Mac-Lab/CardioLab/Centricity Cardiology INW Service Manual 5-95

Recovery Procedures
Backup Custom Forms
1. In the Navigator window, select Utilities > Export Custom Form Layouts.
2. Click Next in the Data Export wizard window.
3. Select the G: drive and click New Folder.
4. Enter Forms_ Backup for the folder name and click OK.
5. Click Export at the Data Export wizard window.
6. Click OK when the Success message is displayed.
Replace the Server Hard Drive
WARNINGSHOCK HAZARD — Use appropriate Lock Out/Tag Out procedures before performing any service on potentially energized equipment.
WARNINGGROUNDING HAZARD — Electrostatic discharge (ESD) can damage electronic components. Be sure you are properly grounded before opening any equipment.
Ensure the new hard drive is exactly the same as the old one (type, size, and so on). Consult GE Technical support with any drive replacement questions.
Reimage G4/G5/G6 Server
Load G4 Server Image
The following media is needed to reimage the G4 server: DVD MLAB/CLAB G4 IMG DVD V6.5.6 (PN 2049064-001).
1. Restart or power on the server, as necessary.
2. Insert DVD MLAB/CLAB G4 IMG DVD V6.5.6 (PN 2049064-001) during the restart or power on. The Ghost 11.5 Boot CD 2.2 prompt is displayed.
3. Select Erase System Data... and press Enter to begin reimaging.
A command prompt is displayed when reimaging is complete.
4. Remove the G4 Image DVD from the drive.
5. Manually restart the server.
5-96 Mac-Lab/CardioLab/Centricity Cardiology INW Service Manual 2021423-503H

Recovery Procedures
NOTEThe Initial Windows Configuration (SysPrep) process will be completed without any input from the user.
6. Log on as Administrator, if necessary.
Load G5 Server Image
The following media is needed to reimage the G5 server: DVD MLAB/CLAB G5 IMG DVD V6.5.6 (PN 2049060-001).
1. Restart or power on the server, as necessary.
2. Insert DVD MLAB/CLAB G5 IMG DVD V6.5.6 (PN 2049060-001) during the restart or power on. The Ghost 11.5 Boot CD 2.2 prompt is displayed.
3. Select Erase System Data... and press Enter to begin reimaging.
A command prompt is displayed when reimaging is complete.
4. Remove the G5 Image DVD from the drive.
5. Manually restart the server.
NOTEThe Initial Windows Configuration (SysPrep) process will be completed without any input from the user.
6. Log on as Administrator if necessary
Load G6 Server Image
The following media is needed to reimage the G6 server: DVD MLAB/CLAB G6 IMG DVD V6.5.6 (PN 2049056-001).
1. Restart or power on the server, as necessary.
2. Insert DVD MLAB/CLAB G6 IMG DVD V6.5.6 (PN 2049056-001) during the restart or power on. The Ghost 11.5 Boot CD 2.2 prompt is displayed.
3. Select Erase System Data... and press Enter to begin reimaging.
A command prompt is displayed when reimaging is complete.
4. Remove the G6 Image DVD from the drive.
5. Manually restart the server.
NOTEThe Initial Windows Configuration (SysPrep) process will be completed without any input from the user.
6. Log on as Administrator if necessary.
2021423-503H Mac-Lab/CardioLab/Centricity Cardiology INW Service Manual 5-97
Recovery Procedures
G4/G5/G6 Server Setup and Data Restore
Check/Set Time
1. Select Start > Settings > Control Panel > Date and Time.
2. Select the Date & Time tab.
3. Set the time and date.
4. Click Apply.
5. Select the Time Zone tab.
6. Select the correct time zone and daylight savings setting.
7. Click Apply.
8. Select the Internet Time tab.
9. Clear the Automatically synchronize with an Internet Time Server check box.
10. Click OK.
Confirm Time Service
1. Select Start > Programs > Accessories > Command Prompt.
2. Type net stop w32time and press Enter.
3. Type regedit and press Enter.
4. Navigate to HKEY_LOCAL_MACHINE\SYSTEM\CurrentControlSet\Services\W32Time\TimeProviders\NTPServer.
5. Double-click ENABLED.
6. Change the value to 1, if necessary.
7. Navigate to HKEY_LOCAL_MACHINE\SYSTEM\CurrentControlSet\Services\W32Time\Parameters.
8. Double-click TYPE.
9. Change the value to NT5DS, if necessary.
10. Close the Registry Editor.
11. At the command prompt, type net start w32time and press Enter.
12. Close the command prompt.
5-98 Mac-Lab/CardioLab/Centricity Cardiology INW Service Manual 2021423-503H

Recovery Procedures
Configure NIC Connections
1. Verify you are logged on to the server as local administrator (password: MLCL8273!admin).
2. Select Start > Settings > Network Connections.
3. Verify that Local Area Connection is enabled.
4. Right-click Local Area Connection 2 and select Disable.
Rename Server
The server is automatically named during the imaging procedure. The name must be changed back to the old name. Use the server name recorded earlier.
To rename the server to the old name:
1. Right-click My Computer and select Explore.
2. Navigate to C:\Windows\Special.
3. Double-click manualRename.hta.
4. Enter the old server name and click OK.
5. The system will reboot when the script completes.
NOTEThe old server name was recorded in “Record the Server and Domain Names” on page 5-90.
6. Log on to the server as local Administrator (password: MLCL8273!admin)
Configure Static IP
1. At the server, Select Start > Settings > Network Connections.
2. Right-click Local Area Connection and select Properties.
3. Highlight Internet Protocol (TCP/IP), and click Properties.
4. Select the Use the following IP Address radio button.
5. Enter the IP Address, subnet mask, default gateway, and preferred DNS server as recorded in “Record the Server IP Information” on page 5-90.
NOTEThe IP addresses for the primary DNS server should be set to be the same as the Centricity Cardiology INW server’s IP address. The secondary DNS server should be set to the Hospital DNS server if applicable.
6. Click Advanced.
2021423-503H Mac-Lab/CardioLab/Centricity Cardiology INW Service Manual 5-99

Recovery Procedures
7. Select the DNS tab.
8. Add any additional DNS servers previously recorded.
9. Select the WINS tab.
10. Add any WINS servers previously recorded.
11. Click OK.
12. Close the Properties windows.
13. Select Start > Programs > Accessories > Command Prompt.
14. Verify that you can ping (by IP address) all of the following:
a. Hospital Domain Controller (required if using a trust).
b. Hospital DNS Server (required if using DNS forwarding).
NOTETo do this type ping <IP Address> in the Command Prompt window and press Enter.
Verify NIC Connection Speed
1. Right-click Local Area Connections and select Status.
2. Verify with the hospital IT department that the hospital switch speed settings exactly match the NIC speed settings on the Mac-Lab/CardioLab system. Acceptable speeds are 100Mbps Full Duplex or Auto Negotiate.
3. Click Close.
4. Close the Network Connections window.
Promote Server to Domain Controller
1. Insert CD-R I386 FOR MS WIN SERVER 2003 SP2 (PN 2046386-001) into the CD drive.
2. If the content of the CD in E:\ drive is displayed, close the window.
3. Select Start > Programs > Accessories > Command Prompt
4. Type dcpromo and press Enter.
5. At the Welcome To Active Directory Installation Wizard window, click Next.
6. At the Operating System Compatibility window, click Next.
7. At the Domain Controller Type window, select the Domain controller for a new domain radio button and click Next.
8. At the Create New Domain window, select the Domain in a new forest radio button and click Next.
5-100 Mac-Lab/CardioLab/Centricity Cardiology INW Service Manual 2021423-503H

Recovery Procedures
9. Enter the domain as recorded in “Record Server Information” on page 5-90 and click Next at the New Domain Name window is displayed.
10. At the NetBIOS Domain name window, click Next.
11. At the Database and Log folders window, click Next.
12. At the Shared System Volume window, click Next.
13. At the DNS Registration Diagnostics window, select Install and configure the DNS server on this computer, and set this computer to use this DNS server as the preferred DNS server and click Next.
14. At the Permissions window, click Next.
15. At the Directory Services Restore Mode Administrator Password window, click Next.
16. At the Summary window, click Next.
The Active Directory Installation Wizard is displayed while the installation runs for several minutes.
NOTEIf prompted for the I386 folder, browse to the I386 folder on the CD. It may appear to be selected, but you must select the CD/DVD drive, then select the I386 folder and then click OK. (This prompt may occur more than once.)
17. At the Completing the Active Directory Installation Wizard window, click Finish.
18. At the Active Directory Installation Wizard window, click Restart now.
19. Log on to the server as INW domain administrator (password: MLCL8273!admin).
20. Remove CD-R I386 FOR MS WIN SERVER 2003 SP2 (PN 2046386-001) from the CD drive.
Update Policies
1. Log on to the server as Administrator.
2. Right-click My Computer on the Desktop and select Explore.
3. Browse to the C:\Windows\special folder.
4. Double-click the ADConfig.hta script to create the Active Directory users, groups and policies.
5. At the AD Creation Script window, click OK to run the script.
NOTEThe script will take about a minute to run. Wait for the success message before continuing.
2021423-503H Mac-Lab/CardioLab/Centricity Cardiology INW Service Manual 5-101

Recovery Procedures
6. At the message, The ADConfig script for Mac-Lab/CardioLab Product completed successfully, click OK.
This message may appear behind the Windows Explorer window.
7. Close the Windows Explorer window.
8. Select Start > Settings > Control Panel.
9. Double-click Administrative Tools.
10. Double-click Active Directory Users and Computers.
11. Verify that the new inw.local Domain is listed.
12. Expand the inw.local Domain and verify the GE Medical Systems (MLCL) organizational unit is listed.
13. Browse to inw.local > GE Medical Systems (MLCL) > MLCL Users and verify that the following MLCL users are present:
MLCLAdmUser
MLCLEmergency
MLCLLogonUser
MLCLSqlUser
MLCLTechUser
MLCLUser
14. Browse to inw.local > GE Medical Systems (MLCL) > MLCL Software Groups and verify that the following MLCL groups are present.
MLCLAdmGrp
MLCLEmergencyGrp
MLCLSystemGrp
MLCLUsrGrp
15. Close all open windows.
16. Restart the system to allow policies to take effect.
17. Log on as Administrator.
Install MS09-008 for INW Server Domain Controller with DNS Server
1. Ensure you are logged into the INW Server as Administrator.
2. Navigate to C:\Temp.
3. Install the MS09-008 security patch. Double-click WindowsServer2003- KB961063-x86-ENU.exe.
4. Follow the installation instructions, and reboot the INW Server if requested.
5-102 Mac-Lab/CardioLab/Centricity Cardiology INW Service Manual 2021423-503H

Recovery Procedures
Install Microsoft Operating System Updates
Instructions for downloading and installing Microsoft security patches and service packs are listed by product type on http://www.gehealthcare.com/usen/security/products/modality_links.html. Download and install all applicable patches and service packs.
Change Language
Delete User Profiles
Perform this procedure to change the operating system language if necessary.
All of the following steps to set the Operating System and Mac-Lab/CardioLab language and locale must not be done until the server has been promoted to an Active Directory Domain Controller and the ADConfig tool has been run to configure security and policy settings on the system. Only when this is complete should you follow the steps listed here.
1. Log on to the server as mlcltechuser.
2. Select Start > Settings > Control Panel.
3. Select Switch to Classic View, if not in Classic view.
4. Double-click System.
5. Click the Advanced tab.
6. In the User Profiles section, click Settings.
7. Select each profile in the list, and click the Delete button if it is enabled to delete the profile.
NOTEThe mlcltechuser profile cannot be deleted.
8. Click OK to close the User Profiles dialog.
9. Click OK to close the System Properties dialog.
2021423-503H Mac-Lab/CardioLab/Centricity Cardiology INW Service Manual 5-103

Recovery Procedures
Set Operating System Language
NOTEThe following language settings must be applied for the application to function properly:
English: United States/United Kingdom
French: France
German: Germany
Italian: Italy
Spanish: Spain
Swedish: Sweden
Chinese: China (PRC)
Japanese: Japan
1. Double-click Regional and Language Options.
2. Select the Regional Options tab.
3. In the Standards and formats section, select the correct language and locale (for example, French (France)) from the dropdown list.
4. In the Location section, select the correct locale (for example, France).
5. Select the Languages tab.
6. Click Details button.
7. For Chinese systems only:
If the use of the IME is required, the following steps must be taken to set it up in a manner which is compatible with the operation of the Mac-Lab/CardioLab software:
a. Click the Add button.
b. Change the Input Language to Chinese (PRC).
c. Click the Keyboard Layout/IME checkbox.
d. Select Chinese (Simplified) - Enhanced Unicode IME from the drop down box.
e. Click OK.
f. Click the Add button.
g. Click the Keyboard Layout/IME checkbox.
h. Select Chinese (Simplified) - US Keyboard checkbox.
i. Click OK.
5-104 Mac-Lab/CardioLab/Centricity Cardiology INW Service Manual 2021423-503H

Recovery Procedures
j. In the Default input language dropdown, select Chinese (PRC) - Chinese (Simplified) - US Keyboard.
If the use of the IME is not required, select the desired keyboard layout as appropriate.
8. For all other languages:
In the Default input language section, determine if the desired language and locale is listed. If it is not:
a. Click the Add button.
b. In the Input language list, select the appropriate language and locale. If necessary, configure other settings (for example, Keyboard layout/IME) as appropriate.
c. Click OK to close this dialog.
9. In the Default input language section, select the language and locale.
10. Press OK to close this dialog.
11. In the Languages used in menus and dialogs section, select the correct language (for example, Francais).
12. Select the Advanced tab.
13. In the Language for non-Unicode programs section, select the correct language (for example, French (France)).
14. In the Default user account settings section, check the Apply all settings... checkbox.
15. If prompted after doing this, click OK.
16. Click OK to close the Regional and Language Options window.
17. If the prompt that the changes will not take effect until you reboot, click OK.
18. If prompted about copying required files; click Yes to use the files that are already on the system.
19. When prompted to restart, click Yes.
Set Mac-Lab/CardioLab Database Language
1. Log on to the server as mlcltechuser.
2. Right-click My Computer and select Explore.
3. Browse to the D:\GEMMS\Prucka\Setup\Language directory.
4. Double-click the batch file MLCL_Set_Language.bat to start the process of setting the Mac-Lab/CardioLab application language.
5. Verify that the language listed is correct (for example, French). If so, press any key to begin the process of setting the application language.
2021423-503H Mac-Lab/CardioLab/Centricity Cardiology INW Service Manual 5-105

Recovery Procedures
NOTEThe process takes several minutes to complete.
6. At the Language Switch Completed Successfully message, click OK.
7. Log on as Administrator. Both the Operating System language and the Mac-Lab/CardioLab application language should now be set correctly.
Restore User Profiles on the INW Server (if backed up previously)
Follow this procedure to restore INW Server account profiles, if previously backed-up.
1. Connect the USB storage device to the INW Server.
2. Log on to the domain as Administrator.
3. Launch Explorer and navigate to C:\Documents and Settings.
4. Copy all profiles, except Administrator, from the USB device and paste the profiles in C:\Documents and Settings. If prompted to overwrite, click Yes to All.
5. Log off the destination INW Server.
6. Log on to the domain as mlcltechuser
7. Copy the profile of Administrator from the USB storage device and paste in C:\Documents and Settings. If prompted to overwrite, click Yes to All.
8. Log off from the INW Server, all profiles are restored.
Configure InSite ExC
Verify with the customer that InSite ExC will be used for Remote Service Support. If no Remote Service Support is needed, proceed to “Add SQL Licenses (if needed)” on page 5-107.
1. Verify you are logged on to the server as Centricity Cardiology INW domain Administrator (password: MLCL8273!admin).
2. Double-click Service Console.
3. Expand the InSite 2.0 folder and select the Device Manager folder in the left pane of the Service Console window.
4. Enter the serial number of the Centricity Cardiology INW server and click Update Serial Number.
5. Click OK in the Device Manager Confirmation window.
6. Verify the Serial Number, Name and Type fields.
7. Select the Configuration Utility folder in the left pane under InSite 2.0.
5-106 Mac-Lab/CardioLab/Centricity Cardiology INW Service Manual 2021423-503H

Recovery Procedures
8. If the hospital uses a proxy server perform the following steps, otherwise continue with step 13.
9. Click the Proxy Configuration tab and check Use a Proxy Server to connect to the Enterprise.
10. Enter proxy server information.
NOTEContact the Hospital IT Department for the proxy address, proxy port and authentication information.
11. Click Update Proxy after entering the proxy server information.
12. Click OK at the InSite 2.0 Message window.
13. Select the Service Controller tab in the Configuration Utility.
14. Click Start Service.
15. Verify the Service has started:
a. Wait 10 seconds.
b. Select Check Service Status.
A confirmation window opens indicating the service is running.
c. Click OK.
16. Select the Initiate Remote Service tab and click Initiate Remote Service. Verify that it connects and a Request submitted successfully message opens.
17. Close the Service Console.
Add SQL Licenses (if needed)
1. Select Start > Settings > Control Panel.
2. Double-click SQL Server 2000 Licensing Setup.
3. Choose Licensing Mode.
4. In the Licensing Mode section increase Per Seat for number (default is 5) to the total number of licenses needed.
5. Click Continue.
6. Once finished, close all open windows.
Perform Necessary Software Updates
Apply all necessary software updates to the Centricity Cardiology INW Server. Refer to the Mac-Lab/CardioLab 6.5.6/6.8.1 Release 3 Update (PN 2027332-533) for the instructions.
2021423-503H Mac-Lab/CardioLab/Centricity Cardiology INW Service Manual 5-107

Recovery Procedures
Restore Data to the Server
Restore Tape Backup from INW Server
A backup may be restored locally from AIT or from an enterprise backup agent.
The high-level steps for restoring from the backup tapes are:
Step 1: Restore the last full backup first.
Step 2: Then restore the oldest incremental backup made after the full backup.
Step 3: Finally, restore each succeeding incremental backup up to the previous night.
Step 4: Verify the restore is successful. If it is not, restore the full backup from the previous week.
1. For a single-tape backup, insert the Full Backup tape. If your system requires a multiple-tape backup, insert the first tape.
2. Select Start > Programs > Accessories > System Tools > Backup to open the Backup and Restore wizard. After a few minutes at the Backup and Restore wizard, the Recognizable Media Found screen opens.
3. Select Allow Backup Utility to use all recognized media and click OK.
4. Click Next to start the restore process.
5. Select Restore files and settings and click Next.
6. Expand the 8mm AIT (for AIT-2 TURBO tapes) or 8mm AIT1 (for all other AIT tapes) to list the tape names under items to restore.
7. Double-click the tape name to catalog the tape.
8. Double-click D: Data to catalog the GEMMS directory.
9. Select the folders to restore:
D:\GEMMS\Prucka\Database\Maintenance\Backup
D:\GEMMS\Prucka\Database\Maintenance\Log
D:\GEMMS\Prucka\Studies
and click Next.
10. Click Advanced.
11. Select Original location and click Next.
12. Select Replace existing files and click Next.
13. Ensure the following are selected:
Restore security settings
Restore junction points, but not the folders and file data they reference
Preserve existing volume mount points
5-108 Mac-Lab/CardioLab/Centricity Cardiology INW Service Manual 2021423-503H

Recovery Procedures
and click Next, Finish. The restore begins and the Restore Progress screen is displayed.
If the backup spans multiple tapes, insert each tape as requested.
NOTEIgnore the Mount Waiting message--just insert the next tape. The window closes automatically.
14. Click close when the restore is complete.
15. Eject the tape.
16. Repeat steps 1-14 for each incremental backup tape.
Restore Enterprise backup agents
All procedures regarding enterprise backup are the responsibility of the facility Enterprise Backup Manager.
1. Ensure the Enterprise backup folders are restored from previous full, differential, or incremental backups to ensure all data has been recovered to the server.
2. These folders are:
D:\GEMMS\Prucka\Database\Maintenance\Backup
D:\GEMMS\Prucka\Database\Maintenance\Log
D:\GEMMS\Prucka\Studies
Restore Backup Files
Restore the Database Files
Once all previously backed-up files are restored to the server, the database and registry must be restored for the INW server to become fully functional.
1. Right-click My Computer and select Explore.
2. Go to the D:\GEMMS\Prucka\Netconfig folder.
3. Run the gems_restoreclab.bat. A command prompt screen is displayed.
4. Press Enter to continue.
When the restore is complete a confirmation message is displayed.
5. Press Enter to continue and close the window.
6. Go to Start > Programs > Microsoft SQL Server > Enterprise Manager.
7. Go to Microsoft SQL Servers > SQL Server Group.
8. Expand SQL Server Group.
9. Expand the local server.
2021423-503H Mac-Lab/CardioLab/Centricity Cardiology INW Service Manual 5-109

Recovery Procedures
10. Expand Databases > Clab and highlight Tables.
11. Right-click the Detail Version table and select:
Open Table > Return All Rows.
5-110 Mac-Lab/CardioLab/Centricity Cardiology INW Service Manual 2021423-503H

Recovery Procedures
12. Set the following fields:
NetVersion = 0
MachineDBVersion = 00
NOTEMachineDBVersion must be “00” (two zeros) or the restore will fail.
13. Close all open windows.
14. Run the stop replication batch file on the server:
D:\GEMMS\Prucka\Network\stoprepl.bat
NOTEThis file must be run on the server to complete this procedure. Ignore any error messages displayed.
There will be no indication the batch file ran successfully.
Restore the GEMS Registry Key
1. Double-click the gems.reg file located in:
D:\GEMMS\Prucka\Database\Maintenance\Backup
2. Follow on-screen prompts and confirmation messages.
Restore Clink Database
If the file clinkbackup.bak exists in D:\GEMMS\Prucka\Database\Maintenance\Backup, then perform this procedure. If it does not, proceed to “Restore LMT Custom Reports” on page 5-113.
1. Select Start > Programs > Microsoft SQL Server >Enterprise Manager.
2. In Enterprise Manager, navigate to: Microsoft SQL Servers > SQL Server Group > [Server Name] (local).
3. Right-click Databases and select All Tasks > Restore Databases.
2021423-503H Mac-Lab/CardioLab/Centricity Cardiology INW Service Manual 5-111

Recovery Procedures
The Restore Databases window is displayed.
4. Type clink in the Restore as database field.
5. Select the Restore from device radio button.
6. If necessary, select and delete any entries in the Devices field.
7. Click Select Device.
8. Click Add.
9. Browse to the clinkbackup.bak file under D:\GEMMS\Prucka\Database\Maintenance\Backup.
Before continuing, check the window selections with the screenshot above.
10. Click OK.
11. Click OK.
A status display indicates restore progress. A confirmation window is displayed when complete.
12. Click OK.
13. Right-click Databases and select Refresh.
14. Expand Databases and verify clink is shown.
5-112 Mac-Lab/CardioLab/Centricity Cardiology INW Service Manual 2021423-503H

Recovery Procedures
Restore LMT Custom Reports
Skip this procedure if the customer is not using LMT Custom reports. If the customer is using LMT Custom Reports, restore the customer backup of the clink_drk.mdb file (or the file backed up earlier in “Backup LMT Custom Reports” on page 5-94) as indicated below.
1. Right-click My Computer and select Explore.
2. Restore the file to the location from which it was backed up. Refer to “Backup LMT Custom Reports” on page 5-94.
Set Software Options
This section has to be executed only if GEMS registry key was not restored in “Restore the GEMS Registry Key” on page 5-111.
1. Right-click My Computer and select Explore.
2. Navigate to D:\GEMMS\Prucka\bin.
3. Double-click GEMS_SetServerOptions.exe.
4. Enter the system HP Proliant Server Serial Number and click Generate Options.
5. At completed message, click OK.
6. Close the GEMS_SetServerOptions program.
7. This utility installed and enabled the CVIS Integration software option. If the hospital is not using CVIS, Launch the Service Console >GEMS Software Options Management Console to disable CVIS Integration.
8. Close all open windows.
Configure INW DNS Server with a Forwarder to the Hospital DNS Server IP Address (if applicable)
The trust must be removed from the hospital Domain controller before re-establishing the trust between the INW server and the hospital Domain controller. The trust must be set up on the INW server before re-establishing the trust on the Hospital Domain Controller (contact the hospital system administrator).
The DNS Server IP address is provided by the Hospital Administrator.
1. Log onto the INW server as Administrator.
2. Select Start > Settings > Control Panel > Administrative Tools > DNS.
3. Right-click the INW Domain Name Server (for example, CLSV####), and select Properties.
4. In the Properties window, select the Forwarders tab.
2021423-503H Mac-Lab/CardioLab/Centricity Cardiology INW Service Manual 5-113

Recovery Procedures
5. Enter the IP address of the Hospital DNS Server in the forwarders IP Address List and click the Add button.
6. Click OK.
7. Close the DNS Management window.
8. Close the Administrative Tools window.
9. Select Start > Programs > Accessories > Command Prompt.
10. Verify that from a command prompt you can ping the following by name:
a. Hospital Domain Controller (supplied by hospital).
b. Hospital DNS Server (supplied by hospital).
NOTETo do this type ping <name> and press Enter.
Create Two-Way Trust with Hospital Domain
Before setting up the trust, the INW server must have the hospital server configured as a DNS forwarder as well as the hospital server must have the INW server configured as a DNS forwarder.
1. Select Start > Settings > Control Panel.
2. Double-click Administrative Tools.
3. Double-click Active Directory Domains and Trusts.
4. Right-click the Domain name (that is, inw.local), and select Properties.
5. In the Domain Properties window, select the Trusts tab.
6. From the Open window, click the New Trust button to start the New Trust Wizard.
7. At the Welcome to the New Trust Wizard window, click Next.
8. Enter the DNS name of the Hospital Domain Controller (if trusting to a Windows 2003/2008 server) in the Trust Name window and click Next.
9. In the Direction of Trust window, leave the default setting Two-Way selected and click Next.
10. In the Outgoing Trust Authentication window, ensure Domain Wide Authentication is selected and click Next.
11. At the Trust Password window, enter the password (contact GE Technical Support or the system administrator for current password information) and click Next.
12. At the Trust Selection Complete window, click Next.
13. At the Trust Creation Complete window, click Next.
5-114 Mac-Lab/CardioLab/Centricity Cardiology INW Service Manual 2021423-503H

Recovery Procedures
14. At the Confirm Outgoing Trust window, select Yes and click Next.
15. At the Confirm Incoming Trust window, select Yes and click Next.
NOTEThe hospital admin will need to provide the password for the site.
16. At the Completing The New Trust Wizard window, click Finish to complete.
Create One-Way Trust with Hospital Domain
Before setting up the trust, the INW server must have the hospital server configured as a DNS forwarder as well as the hospital server must have the INW server configured as a DNS forwarder.
1. Select Start > Settings > Control Panel. Double-click Administrative Tools.
2. Double-click Active Directory Domains and Trusts.
3. Right-click the Domain name (that is, inw.local), and select Properties.
4. In the Domain Properties window, select the Trusts tab.
5. From the Open window, click the New Trust button to start the New Trust Wizard.
6. At the Welcome to the New Trust Wizard window, click Next.
7. Enter the DNS name of the Hospital Domain Controller (if trusting to a Windows 2003/2008 server) in the Trust Name window and click Next.
8. In the Direction of Trust window, select One-Way (outgoing) and click Next.
9. If the Sides of Trust window appears, ensure that This Domain Only is selected and click Next.
10. In the Outgoing Trust Authentication Level window, select domain-wide authentication and click Next.
11. At the Trust Password window, enter the password and click Next.
12. At the Trust Selections Complete window, click Next.
13. At the Trust Creation Complete window, click Next.
14. At the Confirm Outgoing Trust window, select Yes and click Next.
NOTEThe hospital administrator will need to provide the password for the site.
15. At the Completing The New Trust Wizard window, click Finish to complete.
2021423-503H Mac-Lab/CardioLab/Centricity Cardiology INW Service Manual 5-115

Recovery Procedures
Hospital IT Department Setup
Have the Domain Administrator from the Hospital Domain Complete the Domain Trust on the Hospital Domain using the same password that was used on the INW side.
Modify Default_MLCL Computer_Policy
1. Select Start > Settings > Control Panel.
2. Double-click Administrative Tools.
3. Double-click Active Directory Users and Computers.
4. Right-click the INW Domain server and select Properties.
5. Select the Group Policy tab.
6. Click Open.
7. In the GPMC Interface window, expand the server Domain tree and locate the Group Policy Objects folder.
8. Expand all Group Policy Objects.
9. Right-click the Default_MLCL Computer_Policy and select Edit.
10. In the Group Policy Object Editor window, navigate to Computer Configuration > Windows Settings > Security Settings > Restricted Groups.
11. Double-click MLCLAdmGrp.
12. In the MLCLAdmGrp Properties window, under members of this group section, click Add.
13. In the Add Member window, type in the name of the Hospital Users Groups that was created for you in the Hospital Domain by the Hospital Administrator and click OK.
NOTEFor example: HOSPITALDOMAIN\MLCLAdmGrp
14. Click OK to the MLCLAdmGrp Properties window.
15. Double-click MLCLEmergencyGrp.
16. In the MLCLEmergencyGrp Properties window, under members of this group section, click Add.
17. In the Add Member window, type in the name of the Hospital Users Groups that was created for you in the Hospital Domain by the Hospital Administrator and click OK.
NOTEFor example: HOSPITALDOMAIN\MLCLEmergencyGrp
18. Click OK to the MLCLEmergencyGrp Properties window.
5-116 Mac-Lab/CardioLab/Centricity Cardiology INW Service Manual 2021423-503H

Recovery Procedures
19. Double-click MLCLUsrGrp.
20. In the MLCLUsrGrp Properties window, under members of this group section, click Add.
21. In the Add Member window, type in the name of the Hospital Users Groups that was created for you in the Hospital Domain by the Hospital Administrator and click OK.
NOTEFor example: HOSPITALDOMAIN\MLCLUsrGrp
22. Click OK to the MLCLUsrGrp Properties window.
23. Double-click Users.
24. In the Users Properties window, under members of this group section, click Add.
25. In the Add Member window, type in the name of the Hospital Administrators group previously entered(for example, HOSPITALDOMAIN\MLCLAdmGrp) and click OK.
26. In the Add Member window, type in the name of the Hospital Emergency group previously entered(for example, HOSPITALDOMAIN\MLCLEmergencyGrp) and click OK.
27. In the Add Member window, type in the name of the Hospital Users group previously entered (for example, HOSPITALDOMAIN\MLCLUsrGrp) and click OK.
28. Click OK to the Users Properties window.
29. Close all open windows.
30. Select Start > Programs > Accessories > Command Prompt.
31. Type gpupdate /force and press Enter.
32. Close the Command Prompt.
Modify Default_MLCL SoftwareOnly_Policy
1. Select Start > Settings > Control Panel.
2. Double-click Administrative Tools.
3. Double-click Active Directory Users and Computers.
4. Right-click the INW Domain server and select Properties.
5. Select the Group Policy tab.
6. Click Open.
7. In the GPMC Interface window, expand the server Domain tree and locate the Group Policy Objects folder.
8. Expand all Group Policy Objects.
2021423-503H Mac-Lab/CardioLab/Centricity Cardiology INW Service Manual 5-117

Recovery Procedures
9. Right-click the Default_MLCL SoftwareOnly_Policy and select Edit.
10. In the Group Policy Editor window, navigate to Computer Configuration > Windows Settings > Security Settings > Restricted Groups.
11. Double-click MLCLAdmGrp.
12. In the MLCLAdmGrp Properties window, under members of this group section, click Add.
13. In the Add Member window, type in the name of the Hospital Users Groups that was created for you in the Hospital Domain by the Hospital Administrator and click OK.
NOTEFor example: HOSPITALDOMAIN\MLCLAdmGrp
14. Click OK to the MLCLAdmGrp Properties window.
15. Double-click MLCLEmergencyGrp.
16. In the MLCLEmergencyGrp Properties window, under members of this group section, click Add.
17. In the Add Member window, type in the name of the Hospital Users Groups that was created for you in the Hospital Domain by the Hospital Administrator and click OK.
NOTEFor example: HOSPITALDOMAIN\MLCLEmergencyGrp
18. Click OK to the MLCLEmergencyGrp Properties window.
19. Double-click MLCLUsrGrp.
20. In the MLCLUsrGrp Properties window, under members of this group section, click Add.
21. In the Add Member window, type in the name of the Hospital Users Groups that was created for you in the Hospital Domain by the Hospital Administrator and click OK.
NOTEFor example: HOSPITALDOMAIN\MLCLUsrGrp
22. Click OK to the MLCLUsrGrp Properties window.
23. Double-click Users.
24. In the Users Properties window, under members of this group section, click Add.
25. In the Add Member window, type in the name of the Hospital Administrators group previously entered(for example, HOSPITALDOMAIN\MLCLAdmGrp) and click OK.
5-118 Mac-Lab/CardioLab/Centricity Cardiology INW Service Manual 2021423-503H

Recovery Procedures
26. In the Add Member window, type in the name of the Hospital Emergency group previously entered (for example, HOSPITALDOMAIN\MLCLEmergencyGrp) and click OK.
27. In the Add Member window, type in the name of the Hospital Users group previously entered (for example, HOSPITALDOMAIN\MLCLUsrGrp) and click OK.
28. Click OK to the Users Properties window.
29. Close all open windows.
30. Select Start > Programs > Accessories > Command Prompt.
31. Type gpupdate /force and press Enter.
32. Close the Command Prompt.
Reconfigure Centricity Cardiology INW Network
Remove each Acquisition System and Review Workstation from the Domain
Each Acquisition system and Review (as well as Software Only reviews configured in the INW domain) workstation must be removed from the Domain, and then added back to the Domain.
Change the System from a Domain to Workgroup
1. At the Acquisition system or Review workstation, log on to the Windows OS and the Mac-Lab/CardioLab Custom Shell as local mlcltechuser.
2. Right-click My Computer and select Properties.
3. Select the Computer Name tab.
NOTEDo not change the computer name in the next step.
4. Click the Change button.
The Computer Name Changes window is displayed.
5. In the Member of section, select the Workgroup radio button, enter MLCL as the workgroup name and click OK.
Enter the log on as mlcltechuser when prompted.
6. Click OK.
7. Click OK at the confirmation message to restart the computer.
8. Click OK.
The member change takes about 1 minute. A Welcome to the workgroup window is displayed when complete.
9. Click OK at the System Properties window to close.
2021423-503H Mac-Lab/CardioLab/Centricity Cardiology INW Service Manual 5-119

Recovery Procedures
10. Click Yes to restart the system.
Windows will attempt to auto-logon, but the logon will fail.
11. Click OK to the message and log on to the Windows OS and the Mac-Lab/CardioLab Custom Shell as local mlcltechuser.
Delete Unrecognizable User Names
1. Right-click My Computer and select Manage.
2. Expand Local Users and Groups and select Groups.
3. Open the first group and delete any member names that begin with ??.
4. Repeat for all other groups.
5. Close the Computer Management window.
Reset sqlserveragent Service (Acquisition Systems only)
Perform this procedure on Acquisition systems only.
1. Verify you are logged on as mlcltechuser.
2. Select Start > Settings > Control Panel.
3. Double-click Administrative Tools.
4. Double-click Services.
5. Right-click sqlserveragent and select Properties.
6. Select the Log On tab.
7. Select the Local System Account radio button and click Apply.
8. Select the General tab and click Start to start the sqlserveragent service.
9. Click OK to close the dialog.
Configure DNS Entry on Each Acquisition System and Review Workstation
1. Select Start > Settings > Network Connections.
2. Right-click Local Area Connection and select Properties.
3. Highlight Internet Protocol (TCP/IP) and click Properties.
4. Verify that the entry for the preferred DNS server is the IP address of the Centricity Cardiology INW Server.
5. Click OK.
6. Click OK to close the Local Area Connections Properties window.
7. Close the Network Connections window.
5-120 Mac-Lab/CardioLab/Centricity Cardiology INW Service Manual 2021423-503H

Recovery Procedures
Add Each Acquisition and Review (including Software Only) back into the Domain
1. Verify that you are logged on to Windows as mlcltechuser.
NOTEThis should be the local mlcltechuser account (that is, log on to the computer not the Domain.)
2. Right-click My Computer on the desktop and select Properties.
3. Select the Computer Name tab.
4. Click the Change button.
5. In the Member of section, select the Domain radio button, enter the name of the INW Domain to join and click OK.
NOTEThe default Domain is inw.local
6. When prompted, type the username mlcltechuser and password.
7. At the Welcome to inw message, click OK.
8. At the restart message click OK.
9. At the System Properties window, click OK.
10. At the Do you want to restart now? message click Yes.
11. After the system restarts, at the Mac-Lab/CardioLab Custom Shell window, press Ctrl + Action + Delete and click Logoff.
12. Click Logoff.
13. Immediately hold the Shift key to stop the auto-logon sequence.
14. Log on to the Windows OS and the Mac-Lab/CardioLab Custom Shell as local mlcltechuser.
Run Scripts
Perform the following steps on both Acquisition and Review (including Software only) systems.
The next steps are required to reset internal settings changed by previously run scripts.
1. Ensure you are logged on as local mlcltechuser.
2. Open a command prompt.
2021423-503H Mac-Lab/CardioLab/Centricity Cardiology INW Service Manual 5-121

Recovery Procedures
3. Type:
secedit[sp]/configure[sp]/db[sp]“C:\Windows\Special\secedit.sdb”[sp]/cfg[sp]“C:\Windows\Security\Templates\cardiosec.inf”[sp]/overwrite[sp]/quiet
and press Enter (Note: [sp] = one space).
This command takes about 5 minutes to run. The scripts are complete when the C: prompt returns.
4. Restart the system.
Windows will attempt to auto-logon, but the logon may fail.
5. If necessary, click OK to the message.
6. Log on to Windows and the Mac-Lab/CardioLab Custom Shell as domain mlcltechuser.
Synchronize Time
Perform the following steps on both Acquisition and Review (including Software Only) systems.
1. Select Start > Programs > Accessories > Command Prompt.
2. Type net time /set and press Enter.
3. When asked to sync with the server, type y and press Enter.
NOTEThis process may take up to 2 minutes to complete.
4. Close the Command Prompt window.
Add Acquisition System and Reviews (including Software Only) to GE MLCL Organizational Unit
1. At the server, log on as Administrator.
2. Select Start > Settings > Control Panel.
3. Double-click Administrative tools.
4. Double-click Active Directory Users and Computers.
5. Expand the domain name (default is inw.local).
6. Click the Computers folder and locate the Acquisition system/Review workstations to add.
7. Expand the GE Medical Systems (MLCL) organizational unit.
8. Expand the MLCL Computers.
9. Expand the MLCL Workstations.
5-122 Mac-Lab/CardioLab/Centricity Cardiology INW Service Manual 2021423-503H

Recovery Procedures
10. Drag and drop the computer names from the Computers folder to the MLCL Acquisition workstations or MLCL Review workstations folder as appropriate.
11. Close all open windows.
12. Restart each Acquisition system and Review workstation that was added to the organizational unit in the previous step.
13. After restart on each system, press Ctrl + Action + Delete, logoff as mlcllogonuser.
14. Click Logoff.
15. Immediately hold down the Shift key.
16. Log on to the Windows OS and the Mac-Lab/CardioLab Custom Shell as local mlcltechuser.
Confirm Domain Security Policy
On the Acquisition and Review (including Software Only) systems, perform the following steps:
1. Right-click My Computer on the Desktop and select Manage.
2. Select System Tools > Local Users and Groups > Groups.
3. Right-click Administrators and select Properties.
4. Verify that the following members are shown in the list:
INW\Domain Admins
INW\mlclsqluser
INW\mlcltechuser
5. If the members are not shown, go to the “Domain Troubleshooting” on page 5-124.
6. If the members were displayed correctly, log on to the Domain using the steps below and skip“Domain Troubleshooting” on page 5-124. Go to “Register SQL Server” on page 5-125
a. Press Ctrl + Action + Delete and click Logoff.
b. Click Logoff.
c. Immediately hold the Shift key to stop the auto-logon sequence.
d. Log on to Windows and the Mac-Lab/CardioLab Custom Shell as domain mlcltechuser.
2021423-503H Mac-Lab/CardioLab/Centricity Cardiology INW Service Manual 5-123

Recovery Procedures
Domain Troubleshooting
1. Verify that the Acquisition system is in the correct Domain:
a. Right-click My Computer on the Desktop and select Properties.
b. Verify that on the Computer Name tab the INW Domain is present.
2. Verify that the Acquisition system shows up in the GE Medical Systems (MLCL) Organizational Unit on the server.
3. On the server, open a command prompt window and type gpupdate /force and press Enter.
4. Restart the Acquisition systems, wait 7 minutes and check the policy again as described in “Confirm Domain Security Policy” on page 5-123. If the policy is still not correct proceed to the next step.
5. Verify that the TCP/IP properties on the server are set correctly:
a. The INW server IP must be configured as the preferred DNS server.
b. The subnet mask must be correct as defined by the hospital IT staff.
6. Verify that the TCP/IP properties on the Acquisition are set correctly:
a. The IP subnet mask of the Acquisition system MUST match exactly the subnet mask of the server.
b. The IP address of the Acquisition system must be manually configured and must fall within the subnet of the server as defined by the subnet mask.
c. The gateway of the Acquisition system must be set to the IP address of the server or another machine on the hospital network.
d. The DNS of the Acquisition system must be set to the IP address of the INW server.
e. In the CARTO System and TRAMNet IP settings, make sure that the Internet Protocol (TCP/IP) checkbox is the ONLY item selected in the This connection uses the following items: list.
7. Verify that the INW server and Acquisition system can communicate.
5-124 Mac-Lab/CardioLab/Centricity Cardiology INW Service Manual 2021423-503H

Recovery Procedures
8. Open a command window on the Acquisition system and type ping <servername> and press Enter.
a. A Request timed out message indicates failure, a Reply from message indicates success.
NOTEIf success, verify that the reply from IP address shown matches the server's IP address and if correct skip the reset of the sub steps below.
b. If step a failed, repeat with the servername replaced with the correct IP address of the server ping <###.###.###.###> and press Enter.
c. If steps a and b both failed, there is a problem with the IP address or the physical network. Repeat the above steps to verify the TCP/IP properties of the server and Acquisition system.
d. If step a fails and step b succeeds, there is a problem with DNS setup. Repeat the TCP/IP properties steps above paying careful attention to the DNS setup.
9. Verify that the time and time zone settings on the server and the Acquisition system match:
a. If they do not match, open a command prompt on the Acquisition system and type net time /set and press Enter.
b. Restart the Acquisition system, wait 7 minutes and check the policy again in “Confirm Domain Security Policy” on page 5-123- if the policy is still not correct proceed to the next step.
10. If the policy is still not correct after all previous steps:
a. Remove the Acquisition system from the Domain and back to workgroup CARDIOLAN.
b. Restart the Acquisition system.
c. Delete the Acquisition system name for the OU on the server.
d. Repeat the instructions for adding the Acquisition system to the Domain.
Start Replication
Register SQL Server
Verify you are logged on to each Acquisition system as domain mlcltechuser before adding the system to replication.
1. At the Server, select Start > Programs > Microsoft SQL Server > Enterprise Manager.
2. Navigate to Microsoft SQL Servers > SQL Server Group.
3. Right-click the default (LOCAL) server entry if present and select Delete SQL Server Registration.
2021423-503H Mac-Lab/CardioLab/Centricity Cardiology INW Service Manual 5-125

Recovery Procedures
4. At the confirmation window, click Yes.
5. Right-click SQL Server Group and select New SQL Server Registration.
6. At the Welcome screen, click Next.
7. Click Add to select the server.
Server name should show up automatically in the textbox.
8. In the Select SQL Server window, select the Acquisition system and click Add.
If the Acquisition system name does not appear in the list, type the name in the textbox and click Add.
9. Once all systems are added, click Next.
10. At the Select an Authentication mode window, select SQL Server login information and click Next.
11. At the Select Connection Option window, select Logon automatically.
12. Type sa as the account and enter the password (contact GE Technical Support or the system administrator for current password information) and click Next.
13. At the Select SQL Server Group window, click Next.
14. At the Completing the Register SQL Server Wizard window, click Finish.
15. Close the Register SQL Server Messages window.
16. Close Enterprise Manager.
Add each Acquisition System to Replication on the INW Server
1. Double-click Service Console on the Desktop.
2. Navigate to Console Root > Create Replica > Replication Setup in the left frame.
The right frame should show the Replication utility with the top Service User Login section active.
3. Log on as mlclsqluser (Contact GE Technical Support or the system administrator for current password information) and click the Login button.
The top Login section should now be inactive and the bottom section will be active with a password validated message.
4. Click Add.
5. Browse to My Network Places > Entire Network > Microsoft Windows Network > [current Domain] and select an Acquisition system to add to replication and click OK.
5-126 Mac-Lab/CardioLab/Centricity Cardiology INW Service Manual 2021423-503H

Recovery Procedures
6. When prompted for consolidation, click Yes to move all studies on the currently selected Acquisition system up to the server.
7. The selected machine is now shown in the Add to replication list box.
8. Repeat the steps above for each additional Acquisition system to add to replication.
9. Click Apply.
10. Click Yes to confirm replication.
The process may take up to 5 minutes per Acquisition system. A progress bar indicates replication status.
When complete, a Replication setup complete message will be displayed above the progress bar and the server and all Acquisition systems will appear in the Currently replicating list.
11. Close the Service Console window.
Verify Replication Started Correctly
Verify
1. Select Start > Programs > Microsoft SQL Server > Enterprise Manager.
2. Open Microsoft SQL Servers > SQL Server Group.
3. Highlight the server name.
4. Expand Replication Monitor > Agents > Merge Agents.
5. Verify that there are no red X’s displayed against any system’s Merge agent.
6. If there are no errors in the replication monitor, continue with “Post Configuration Procedures” on page 5-128.
7. If there are red X’s displayed against all merge agents, verify that SQLSERVERAGENT service is running on the server. If the SQLSERVRAGENT service is not running on the server, start the service and restart replication setup (refer to “Stop Replication” on page 5-127.
Stop Replication
To stop replication, launch the replication setup:
1. At the server, open the Service Console and select Create Replica > Replication Setup.
2. Log on to the Service Console as mlclsqluser (password sql8273user).
3. If necessary, highlight all acquisition systems (for example, CLWS0001) in the list of currently replicating systems. Click Remove. Click Yes at the confirmation window.
2021423-503H Mac-Lab/CardioLab/Centricity Cardiology INW Service Manual 5-127

Recovery Procedures
4. Refresh the window (click another folder in the tree and then click Replication Setup again) to verify all acquisition systems have been taken out of replication.
5. Close the Service Console.
6. Go to the Enterprise Manager and stop server replication:
a. Select Start > Programs > Microsoft SQL Server > Enterprise Manager.
b. Expand Microsoft SQL Servers and the SQL Server Group. Highlight the INW Server (in the left window).
c. Select Tools > Replication > Disable Publishing.
d. Click Next.
e. Select Yes, disable publishing on [Server name] and click Next.
f. Click Next in the Confirm Dropping of Publications window.
g. Click Finish in the Completing the Disable Publishing and Distribution Wizard window.
h. Click OK to the Successfully Disabled window.
i. Right-click the server name and select Refresh.
j. Verify the Replication Monitor is not visible.
k. Close the SQL Server Enterprise Manager window. Proceed to “Add each Acquisition System to Replication on the INW Server” on page 5-126.
Post Configuration Procedures
Reconfigure Hospital Mapped Drives on the Server (If Applicable)
1. At the server, right-click My Computer and select Map Network Drive.
2. In the Drive section, select an available drive letter.
3. In the Folder section, enter the path to the folder set up on the foreign server.
4. Click Finish.
Configure Archive Utility User
1. Select Start > Settings > Control Panel.
2. Double-click Administrative Tools.
3. Double-click Services.
4. Double-click the GEMS Task Scheduler service.
5-128 Mac-Lab/CardioLab/Centricity Cardiology INW Service Manual 2021423-503H

Recovery Procedures
5. Set the Startup Type to Automatic.
6. Select the Log On tab.
7. Click the This account radio button.
8. In the UNDER THIS ACCOUNT TYPE box, enter <Domain>\MLCLSQLUSER.
9. Type the password: sql8273user.
10. Click OK.
11. Right-click GEMS Task Scheduler service and click Start.
12. Close all open windows.
Configure Database Maintenance on the Server
1. At the server Desktop, go to Start > Programs > Microsoft SQL Server > Enterprise Manager.
2. Expand the INW server.
3. Expand Management.
4. Expand SQL Server Agent.
5. Select Jobs.
6. Right-click Database Maintenance Job and select Properties.
7. Select the Schedules tab.
8. Click New Schedule.
9. In the Name: textbox, type Database Maintenance.
10. Click the Change button.
11. In the Occurs: section, select the Weekly radio button.
12. In the Weekly: section, select only the Sat checkbox.
13. In the Daily Frequency: section, select a time at least 30 minutes after the last archive generator is run.
14. Click OK.
15. At the New Job Schedule window, verify Enable is checked and click OK.
16. Select the General tab, and verify Enable is checked.
17. At the Database Maintenance Properties window, click OK.
2021423-503H Mac-Lab/CardioLab/Centricity Cardiology INW Service Manual 5-129

Recovery Procedures
NOTE Ensure the schedule does not overlap with the following jobs:
Archive Generator on all Acquisition systems
Archive Utility on the server
Backups on the server
Configure Database Backup Job
1. Right-click Backup clab, clink databases and GEMS registry job and select Properties.
2. Select the Schedules tab.
3. Click New Schedule.
4. In the Name: textbox, type Database Backup.
5. Click Change.
6. In the Occurs: section, select the Daily radio button.
7. In the Daily Frequency: section, select a time at least 30 minutes after the last Archive Generator is run and must not overlap with the server Database Maintenance schedule.
8. Click OK.
9. At the New Job Schedule window, verify Enabled is checked and click OK.
10. Select the General tab, and verify Enable is checked.
11. In the Backup clab, clink databases and GEMS registry job window click OK.
12. Right-click Backup Master and MSDB Databases job and select Properties.
13. Select the Schedules tab.
14. Click New Schedule.
15. In the Name: textbox, type Backup Master and MSDB Databases.
16. Click Change.
17. In the Occurs: section, select the Monthly radio button.
18. In the Monthly Frequency: Last Sunday of “1” Month.
19. In the Daily Frequency: section, set the time to 3:10 pm.
20. Click OK.
21. At the New Job Schedule window, verify Enabled is checked and click OK.
22. Select the General tab, and verify Enable is checked.
5-130 Mac-Lab/CardioLab/Centricity Cardiology INW Service Manual 2021423-503H

Recovery Procedures
23. Click OK.
24. Close Enterprise Manager.
Recommended Backup Schedule
GE Healthcare recommends the following schedule for a facility with a server and four Acquisition systems based on a 5-day, single-shift work-week.
NOTEThe following schedules are staggered because the Archive Generator must not be scheduled to start within 5 minutes of the clock hour and at 12:05 am. Also, more than one Archive Generator must not run at the same time.
1. Daily (Monday Night-Tuesday Morning through Thursday Night-Friday Morning):
11:10 pm: Archive Generator on AC1 (the archive generator schedule was set when the Acquisition computer was installed or upgraded).
11:40 pm: Archive Generator on AC2
12:10 am: Archive Generator on AC3
12:40 am: Archive Generator on AC4
2:10 am: Run the Backup clab, clink databases and GEMS registry job.
3:10 am: Incremental Backup on the Server.
2. Weekly (Friday Night-Saturday Morning)
11:10 pm: Archive Generator on AC1
11:40 pm: Archive Generator on AC2
12:10 am: Archive Generator on AC3
12:40 am: Archive Generator on AC4
1:10 am: Run the Database Maintenance job.
2:10 am: Run the Backup clab, clink databases and GEMS registry job.
3:10 am: Full Backup on the Server. 50 GB of data takes approximately 2 hours.
3. Monthly (Last Sunday of the Month)
3:10 pm: Run the Backup Master and MSDB databases job.
This job may be run concurrently with other jobs.
2021423-503H Mac-Lab/CardioLab/Centricity Cardiology INW Service Manual 5-131

Recovery Procedures
Create Backup Tapes and Schedule Backups
These instructions show how to configure a full tape backup using single or multiple tapes as well as the incremental tape backups.
CAUTIONPROCEDURE FAILURE — Please be advised that tape backup requires human intervention.
For full backups that use single tape and incremental backups the user has to insert appropriate tapes on daily basis for backups to run successfully.
For full backups that use multiple tapes, in addition to inserting the appropriate tapes the user has to manually prepare the additional tapes.
Determine Number of Tapes Needed for Full Backup
1. Login on to the server as Administrator.
2. Right-click My Computer and select Explore.
3. Browse to
a. D:\GEMMS\Prucka\Studies
b. D:\GEMMS\Prucka\Database\Maintenace\Backup
c. D:\GEMMS\Prucka\Database\Maintenace\Log
For each of these folders right-click the folder and choose Properties to view the size of the folder.
4. If the total size of the Studies, Backup and Log folders from the above step is greater than the tape size, then multiple tapes will be needed for full backups.
Physically Label the Backup Tapes
Place a sticker on each tape with the labels listed below, then perform the procedures below for each tape.
Tuesday Incremental. Backups normally run in the early morning, so the tape is actually put in the drive at the end of the previous day (in this case, Monday evening.)
Wednesday Incremental
Thursday Incremental
Friday Incremental
Full Backup 1 (Full Backup 1 - 2, Full Backup 1 - 3, and so on for additional tapes in case of multiple tape backups)
Full Backup 2 (Full Backup 2 - 2, Full Backup 2 - 3, and so on for additional tapes in case of multiple tape backups)
5-132 Mac-Lab/CardioLab/Centricity Cardiology INW Service Manual 2021423-503H

Recovery Procedures
On Demand Backup (On Demand Backup - 2, On Demand Backup - 3, and so on for additional tapes in case of multiple tape backups)
NOTEWhen labeling the tapes, it is important to use a consistent naming convention. If consistent names are not used, the procedures below will fail.
Catalog Backup Tapes
This procedure runs a dummy backup to label (name) the tape and create an initial catalog. This backup will be overwritten when the actual backup is run.
NOTEThe tapes are automatically formatted during this procedure.
1. Open the Backup Utility by selecting Start > Programs > Accessories > System Tools > Backup.
2. If the Backup application opens in Wizard mode, click Advanced Mode.
3. Insert the first tape (for example the one labeled Full Backup 1) into the tape drive. Wait for a message to be displayed.
4. If the message Unrecognized Media Found is displayed, accept any confirmation messages and check the Restore and Manage Media tab and confirm the tape is listed under Free Media. Skip the next step.
5. If the message Recognizable Media Found is displayed:
a. Select Allow Backup Utility to Use this Media
b. Click OK. The media is displayed under 8mm AIT (for AIT-2 TURBO tapes) or 8mm AIT1 (for all other AIT tapes).
c. Right-click the media and select Mark as Free and click Yes to confirm.
6. Go to the Backup Utility Welcome tab.
7. Click Backup Wizard.
8. Click Next.
9. Select Backup selected files, drives, or network data and click Next.
10. In the Items to Back Up window expand My Computer and select a sample folder to backup (this is done just to assign a name to the tape. The actual backup is performed below. Use the D:/Gemms/Prucka/Database/Maintenance/Log folder for example). Click Next.
11. Select 8mm AIT (for AIT-2 TURBO tapes) or 8mm AIT1 (for all other AIT tapes) for the backup type and New for the tape to use. Then click Next.
12. Click Advanced.
2021423-503H Mac-Lab/CardioLab/Centricity Cardiology INW Service Manual 5-133

Recovery Procedures
13. Click Next for the next three screens (accept the defaults).
CAUTIONBACKUP FAILURE — All label names must be written exactly the same or the backup will fail.
Ensure the name written on the outside of the tape, the backup label, the media label, and the job name all match exactly.
14. Change the backup label and media label to the name written on the label on the outside of the tape (In this case Full Backup 1). Click Next.
NOTEFor multiple tape backups, name the first tape as Full Backup 1 or Full Backup 2 or On Demand Backup as the case might be. Then for additional tapes:
For Full Backup -1 as Full Backup 1 - 2, Full Backup 1 - 3, and so on
For Full Backup -2 as Full Backup 2 - 2, Full Backup 2 - 3, and so on
For On Demand Backup as On Demand Backup - 2, On Demand Backup - 3, and so on
15. At the When To Backup dialog box, click Now.
16. Click Finish. When the backup is complete, click Close.
17. Eject the tape.
5-134 Mac-Lab/CardioLab/Centricity Cardiology INW Service Manual 2021423-503H

Recovery Procedures
18. Repeat this procedure for each remaining tape so that all tapes labeled earlier in “Physically Label the Backup Tapes” on page 5-132 are cataloged (including the additional tapes that will be used in multiple tape backups).
Configure storage to Automatically Return Backup Media to the Free Media Pool
1. Right-click My Computer and select Manage.
2. Double-click Removable Storage.
3. Double-click Media Pools.
4. Double-click Backup.
5. Right-click the media pool 8mm AIT (for AIT-2 TURBO tapes) or 8mm AIT1 (for all other AIT tapes) and choose Properties.
6. In the General tab check the Return media to Free media pool check box.
7. Press Apply and choose OK.
8. Close the Computer Management dialog box.
Schedule Backups
This procedure sets the schedule for the backups to run. When performing this procedure for each tape note the following:
Ensure the tape labels are typed in accurately. If the tape name is different the backups won’t run.
Be sure to set the start time for Full Backup 2 to one week after Full Backup 1, otherwise both backups will try to run on the same day.
Check all backup options carefully. When performing this procedure for each tape, the defaults may reset.
NOTEIf the full backup for this server is a single tape backup you can start with an incremental backup -- a full backup is not necessary to start the backups. All selected files and folders are backed up, so an initial full backup is not required. But if you expect to use multiple tapes for full backup then a full backup should be executed first, as incremental backups are not configured to span multiple tapes. Based on this suggested schedule, the “On Demand Backup” (a full backup) is executed after scheduling the jobs, and will serve as the first full backup.
1. Go to the Backup Utility Welcome tab.
2. Click Backup Wizard.
3. Click Next.
4. Select Backup selected files, drives, or network data and click Next.
2021423-503H Mac-Lab/CardioLab/Centricity Cardiology INW Service Manual 5-135

Recovery Procedures
5. In the Items to Back Up window click My Computer and select the following folders:
D:\Gemms\Prucka\Database\Maintenance\Backup
D:\Gemms\Prucka\Database\Maintenance\Log
D:\Gemms\Prucka\Studies
6. Click Next.
7. Select 8mm AIT (for AIT-2 TURBO tapes) or 8mm AIT1 (for all other AIT tapes) and select the name of the backup tape (for example, Full Backup 1) from the dropdown list. For multiple tape full backups pick the first tape. For example for Full Backup 1 pick the tape that is labeled as Full Backup 1. Then click Next.
NOTEIt is very easy in this step to forget to select the tape name and leave the default 'New' in.
8. Click the Advanced button.
9. Select the type of backup:
Normal for Full Backup 1, Full Backup 2, and On Demand Backup.
Incremental for daily Incremental backups.
and click Next.
10. Select Verify Data after Backup and Use Hardware Compression (if available) and click Next.
11. Select Replace Existing Backups and click Next.
CAUTIONBACKUP FAILURE — All label names must be written exactly the same or the backup will fail.
Ensure the name written on the outside of the tape, the backup label, the media label, and the job name all match exactly.
12. Change both the backup label and media label to the tape name used when labeling the tape (for example, Full Backup 1) and click Next.
13. Select Later and enter the job name (for example, Full Backup 1 or Tuesday Incremental) for the backup name. Then click Set Schedule.
14. Schedule the task:
For Full Backup 1 select:
Weekly
Every 2 Weeks
Saturday (ensure no other days are checked)
Appropriate Start Time
5-136 Mac-Lab/CardioLab/Centricity Cardiology INW Service Manual 2021423-503H

Recovery Procedures
For Full Backup 2 select:
Weekly
Every 2 Weeks
Saturday (ensure no other days are checked)
Appropriate Start Time
Click the Advanced button and change the start day to the Friday following the first Full Backup 1. For example, if Full Backup 1 runs Saturday, May 1, then the start day for Full Backup 2 must be Friday May 7 (the start day should be the day before the backup is scheduled to run).
For each incremental backup, select:
Weekly
Every 1 Week
The appropriate day (Tuesday-Friday)
Appropriate Start Time
For On Demand Backup select:
Once
Tonight
Appropriate Start Time
15. Click OK.
16. Enter the administrator password (MLCL8273!admin) and click Next (the password will be requested again) and click OK.
17. Click Finish.
18. Repeat the above steps for the remaining tapes. DO NOT repeat for all tapes in multiple tape full backups. Create only one job for a set of full backup tapes.
19. When all jobs are created continue with the next procedure below.
Multiple Tape Preparation
Execute these instructions for multiple tape full backup scenarios. It prepares the additional tapes for first time use. Not preparing the tape will cause failure of the full tape backup that uses multiple tapes.
NOTENothing has to be changed for the first tape that will be used for full backup and for the tapes that will be used in incremental backups.
1. Ensure all tapes of a multi-tape backup are the same model.
2. Verify that you are logged on to the server as Administrator.
2021423-503H Mac-Lab/CardioLab/Centricity Cardiology INW Service Manual 5-137

Recovery Procedures
3. Prepare the additional tapes in the order they will be used, First prepare additional tapes for On Demand Backup (On Demand Backup - 2, On Demand Backup - 3, and so on) then additional tapes for full backup 1 (Full Backup 1 - 2, Full Backup 1 - 3, and so on) and then for Full Backup 2 (Full Backup 2- 2, Full Backup 2- 3, and so on).
NOTEIt is important that the additional tapes are prepared in the order they will be used by the backup jobs otherwise the backup job will prompt for a wrong tape.
a. Insert the tape.
b. Right-click My Computer and select Manage.
c. Drop-down the Removable Storage under Storage.
d. Click Media.
NOTEIt may take up to 1 minute for the system to recognize the tape.
e. Right-click the Media (tape) that was just inserted and select Properties.
f. Ensure Enable Media is checked.
g. Click OK and close the Properties dialog.
h. Right-click the tape being prepared and select All Tasks > Deallocate. Select Yes to the confirmation dialogs.
i. Verify that the tape just de-allocated is listed under Free\8mm AIT/AIT1 Media pool.
j. Eject the tape.
k. Repeat these steps for each additional tape (2nd and 3rd tape) that will be part of the full backups.
Add the /UP Switch
1. In the Control Panel, under Scheduled Tasks right-click a scheduled full backup task and select Properties (since Incremental backups do not exceed one tape in length, those tasks will not be altered. Even if the current full backup doesn't exceed one tape add the /UP switch, this will prompt for additional tape when the size of backup grows in future and exceeds the size of a single tape).
The following dialog box appears (the values within quotes on the command line in the run text box will be different between all systems).
5-138 Mac-Lab/CardioLab/Centricity Cardiology INW Service Manual 2021423-503H

Recovery Procedures
2. In the Run text box, locate the /n switch right after the path for the *.bks file.
2021423-503H Mac-Lab/CardioLab/Centricity Cardiology INW Service Manual 5-139

Recovery Procedures
3. After the .bks" and before the /n place the /UP (case-sensitive) switch.
NOTEMake sure there is a space before and after the /UP switch. Example: .bks"<space>/UP<space>/n
4. Click Apply. Enter the Administrator password when prompted for it and close out of the dialog box.
5. Repeat these steps to set the /UP switch for each full backup task (including the On Demand Backup).
5-140 Mac-Lab/CardioLab/Centricity Cardiology INW Service Manual 2021423-503H

Recovery Procedures
Verify Backup Schedule
NOTEThe Schedule Jobs tab may not always refresh automatically. If the jobs are not displayed correctly, close the Backup Utility and then reopen it.
Click the Schedule Jobs tab. The schedule should look like this:
The schedule can be verified or modified in the following ways:
The blue “N” indicates a Normal (that is, Full) backup. The green “I” indicates an Incremental backup.
Roll the cursor over each backup event. The name of the backup schedule is displayed. Ensure each incremental backup takes place on the appropriate day and Full Backup 1 and Full Backup 2 occur on alternate Saturdays.
Click on one instance of each event to view the details. Go to the Schedule tab to ensure the schedule is correct.
At the schedule tab, the schedule may be adjusted, if necessary.
An incorrect schedule name (typo, and so on) can not be changed. The backup must be deleted and recreated.
2021423-503H Mac-Lab/CardioLab/Centricity Cardiology INW Service Manual 5-141

Recovery Procedures
Run the Backup Job at the Server
This procedure creates database and registry backup files.
1. Select Start>Programs>Microsoft SQL Server>Enterprise Manager.
2. Expand Microsoft SQL Servers and the SQL Server Group. Highlight INW Server in the left pane.
3. Under the server, navigate to Management>SQL Server Agent>Jobs.
4. Right-click the Backup clab, clink databases, and GEMS registry job and select Start Job.
5. Click Start at the confirmation window.
6. Wait for the Backup job to complete before continuing with the next step.
NOTEThis job can take up to 20 minutes to run. The status will not automatically update. To view the status, right-click the job and select Refresh Job. When the job is completed Succeeded is displayed in the Last Run Status column.
7. Minimize the Enterprise Manager.
8. Verify the following files with the timestamp from today are in the backup directory: D:\GEMMS\Prucka\Database\Maintenance\Backup.
clabbackup.bak
clinkbackup.bak (if the LMT database is installed)
Gems.reg
9. Close all open windows.
For Each Acquisition System and Review System (Including Software Only)
The time has to be re-synchronized using this section only if the environment uses static IP and the server IP was changed during disaster recovery.
1. Log in to both the OS and custom shell as domain mlcltechuser. Ensure the Mac-Lab/CardioLab application is not running.
2. Right-click My Computer and select Explore.
3. Navigate to D:\GEMMS\Prucka\Setup\TimeSynchronization.
5-142 Mac-Lab/CardioLab/Centricity Cardiology INW Service Manual 2021423-503H

Recovery Procedures
4. Double-click the file TimeClientConfig.exe. This tool will perform the following:
Checks for Administrator logon.
Does a backup of the existing registry entries pertaining to Windows Time Service.
Updates the required registry entries to configure Windows Time Service.
Verifies one of the registry keys to ensure the registry update was successful.
Enables/Configures UPD port 123 in the Windows Firewall on Windows XP SP3 system.
Stops and Starts the W32Time service.
Runs the w32tm command to update the Windows Time Service to look at the update configuration, re synchronize, and rediscover the time source.
2021423-503H Mac-Lab/CardioLab/Centricity Cardiology INW Service Manual 5-143

Recovery Procedures
5. In a fixed-IP network, select the radio button for IP Address, and enter the IP address of the INW server. For a DHCP network, select the radio button for the UNC name and enter the name of the INW server.
NOTEIn a DHCP environment, the UNC name must be used since it is likely that the IP address will change.
6. Click the Configure button.
7. When the configuration completes, the status will indicate that the time settings were updated successfully.
8. Close all open windows.
9. Time Sync Configuration is now complete. Proceed to the next section.
Initialize Applications
Adobe Reader, Microsoft Word, and Microsoft Word Reports must be initialized under both mlcllogonuser and mlcltechuser logons.
Adobe Reader
1. Press Ctrl + Action + Delete.
2. Click Logoff.
3. Click Logoff.
4. Immediately hold down the Shift key.
5. Log on to the Windows as domain mlcltechuser (password: mlcl!techuser).
6. Log on to the Mac-Lab/CardioLab Custom Shell as domain mlcltechuser (password: mlcl!techuser).
7. Select Start > Programs and select Adobe Reader 9.
8. Accept the End User License Agreement if displayed.
After Adobe Reader opens, wait one minute to ensure a Check for Update dialog box is not displayed. If the dialog box is displayed, click Cancel.
9. Close Adobe Reader.
Microsoft Word
1. Select Start > Programs and select Microsoft Word.
NOTEFor Microsoft Office 2007 Professional, select Start > Programs > Microsoft Office Word 2007.
2. Accept the End User License Agreement if displayed.
5-144 Mac-Lab/CardioLab/Centricity Cardiology INW Service Manual 2021423-503H

Recovery Procedures
3. Click OK if the User Initial dialog box is displayed.
4. If the Privacy Option dialog box opens, clear the Search Microsoft Online For Help check box, if it appears.
5. Close Microsoft Word.
Microsoft Word Reports
Perform this procedure on multiple monitor systems only.
1. Double-click Mac-Lab/CardioLab.
2. Select Administration > Reports > Templates.
If prompted for an administrator password enter local mlcltechuser (password: mlcl!techuser).
3. If a server busy message is displayed. Click Retry. Microsoft Word will open.
4. Configure the Microsoft Word window for the Review monitor:
a. Right-click the Microsoft Word title bar and select Restore.
b. Move the Microsoft Word window to the next monitor (from the real-time monitor to the Review monitor).
c. Right-click the Microsoft Word title bar and select Maximize.
5. Close Microsoft Word.
6. When prompted to save the report, click No.
7. Close the Mac-Lab/CardioLab application.
Adobe Reader
1. Press Ctrl + Action + Delete.
2. Click Logoff.
3. Click Logoff.
Allow the system to auto-log on to Windows as domain mlcllogonuser.
4. Log on to the Mac-Lab/CardioLab Custom Shell as domain mlcluser (password: mlcl!user).
5. Select Start > Programs and select Adobe Reader 9.
6. Accept the End User License Agreement if displayed.
After Adobe Reader opens, wait one minute to ensure a Check for Update dialog box is not displayed. If the dialog box is displayed, click Cancel.
7. Close Adobe Reader.
2021423-503H Mac-Lab/CardioLab/Centricity Cardiology INW Service Manual 5-145

Recovery Procedures
Microsoft Word
1. Select Start > Programs and select Microsoft Word.
NOTEFor Microsoft Office 2007 Professional, select Start > Programs > Microsoft Office Word 2007.
2. Accept the End User License Agreement if displayed.
3. Click OK if the User Initial dialog box is displayed.
4. If the Privacy Option dialog box opens, clear the Search Microsoft Online For Help check box, if it appears.
5. Close Microsoft Word.
Microsoft Word Reports
Perform this procedure on multiple monitor systems only.
1. Double-click Mac-Lab/CardioLab.
2. Select Administration > Reports > Templates.
If prompted for an administrator password enter local mlcltechuser (password: mlcl!techuser).
3. If a server busy message is displayed. Click Retry. Microsoft Word will open.
4. Configure the Microsoft Word window for the Review monitor:
a. Right-click the Microsoft Word title bar and select Restore.
b. Move the Microsoft Word window to the next monitor (from the real-time monitor to the Review monitor).
c. Right-click the Microsoft Word title bar and select Maximize.
5. Close Microsoft Word.
6. When prompted to save the report, click No.
7. Close the Mac-Lab/CardioLab application.
5-146 Mac-Lab/CardioLab/Centricity Cardiology INW Service Manual 2021423-503H

Recovery Procedures
Enable the Network Path on each Acquisition System
1. Go to each Acquisition system and log on to Windows and the Mac-Lab/CardioLab Custom Shell as INW domain mlcltechuser.
2. Open the Mac-Lab/CardioLab application.
3. Go to Administration > System Settings.
4. Select File Paths.
5. Select Enable Network Storage checkbox.
6. Close the System Settings window.
7. Switch the Catalog View from System to Network to verify the network catalog is displayed.
Review Studies on Acquisition Systems
All studies performed on the Acquisition system since the last successful server backup (full or incremental) that were restored must be reviewed from optical or DVD. These are the studies performed since the last backup and not restored as part of the recovery procedure. This procedure must be performed on each Acquisition system.
NOTEThis procedure must also be performed for studies performed while the server was being recovered.
1. At the Acquisition system double-click Mac-Lab/CardioLab to open the Mac-Lab/CardioLab application.
2. Switch the catalog to optical.
3. Select the first patient on the list and verify the proper module is selected (Mac-Lab or CardioLab).
4. Click Review Study.
5. After the study loads, select Study > Close Study.
6. Select Yes at the confirmation window.
7. Repeat this procedure for the remainder of the studies listed.
Delete Temporary Users from each Acquisition System
1. Log on to the Windows OS and the Mac-Lab/CardioLab Custom Shell as INW domain mlcltechuser.
2. Right-click My Computer and select Manage.
3. Choose Local Users and Groups.
4. Choose Users.
5. Highlight Tempuser.
2021423-503H Mac-Lab/CardioLab/Centricity Cardiology INW Service Manual 5-147

Recovery Procedures
6. Right-click Tempuser and delete. A confirmation message is displayed.
7. Click Yes to delete.
Cardiovascular Information System (CVIS) Configuration
If configuring a CVIS system outside of the US or English Canada, use the “Non-US (or English Canada) CVIS Configuration” on page 5-153.
Use this procedure to re-configure CVIS systems in the US and English Canada. If no configuration is required, go to “Perform On Demand Backup” on page 5-155.
US (or English Canada) CVIS Reconfiguration
Remove INW Users/Groups from the DMS Shared Directories
If the system included a CVIS server it must be reconfigured. Determine the CVIS Network configuration. Possible configurations include:
The CVIS server is part of the INW domain. On the CVIS server, right-click My Computer, go to Properties > Network Identification tab and check to see if the CVIS server was part of the INW domain.
The CVIS Server was part of a two-way trust relationship with the facility and the INW server.
1. Logon to the DMS server as local MuseAdmin (password Muse!Admin).
2. Open Windows Explorer in the DMS Express server.
3. Navigate to D:\Mac-Lab\Import.
4. Right-click the Import folder.
5. Select Sharing.
6. Select the Permissions button.
7. Highlight all INW Users and Groups and click Remove.
8. Click OK.
9. Select the Security tab.
10. Highlight all INW Users and Groups and click Remove.
11. Click OK.
12. Navigate to D:\Program Files\GE Medical Systems\Report_Router\Bin\List Sharing.
13. Right-click the List Sharing folder.
14. Select Sharing.
5-148 Mac-Lab/CardioLab/Centricity Cardiology INW Service Manual 2021423-503H

Recovery Procedures
15. Select the Permissions button.
16. Highlight all INW Users and Groups and click Remove.
17. Click OK.
18. Select the Security tab.
19. Highlight all INW Users and Groups and click Remove.
20. Click OK.
21. Close all open windows.
Remove the CVIS Server from the INW Domain
If the CVIS is in the INW Active Directory Domain, it must be removed from the Domain, and then added back to the Domain.
1. Log on as local MuseAdmin (password: Muse!Admin).
2. Right-click My Computer and select Properties.
3. Select the Computer Name tab.
4. Click the Change button.
The Computer Name Changes window is displayed.
5. In the Member of section, select the Workgroup radio button, enter CARDIOLAN as the workgroup name and click OK.
Enter the log on as MuseAdmin (password Muse!Admin) if prompted.
6. Click OK.
The member change takes about 1 minute. A Welcome to the workgroup window is displayed when complete.
7. Click OK.
8. Click OK at the confirmation message to restart the computer.
9. Click OK.
10. Click OK at the System Properties window to close.
11. Click Yes to restart the system.
12. Log on as local MuseAdmin (password: Muse!Admin).
Delete Unrecognizable User Names
1. Right-click My Computer and select Manage.
2. Expand Local Users and Groups and select Groups.
3. Open the first group and delete any member names that begin with a question mark “?”.
4. Repeat for all other groups.
2021423-503H Mac-Lab/CardioLab/Centricity Cardiology INW Service Manual 5-149

Recovery Procedures
5. Close the Computer Management window.
Add CVIS Server to the INW Domain
1. Right-click My Computer and select Properties.
2. Select the Computer Name tab.
3. Click the Change button.
The Computer Name Changes window is displayed.
4. In the Member of section, select the Domain radio button, enter the INW Domain name and click OK.
5. Click OK.
The member change takes about 1 minute. A Welcome to the Domain window is displayed when complete.
6. Click OK.
7. Click OK at the confirmation message to restart the computer.
8. Click OK.
9. Click OK at the System Properties window to close.
10. Click Yes to restart the system.
Configure the Import Share on the CVIS Server
The following users or groups are from the INW domain:
MLCLTechUser
MLCLUsrGrp
MLCLAdmGrp
MLCLSystemGrp
1. Log onto as local MuseAdmin to the English US (and English Canada) CVIS server (Contact GE Technical Support or the system administrator for current password information).
2. Open Windows Explorer on the US (and English Canada) CVIS server Interface or Express Server.
3. Navigate to D:\Mac-Lab\Import.
4. Right-click the Import folder.
5. Select Sharing.
6. Remove all existing entries.
7. Click the Permissions button.
8. Click the Add button.
9. Select the INW domain from the dropdown.
5-150 Mac-Lab/CardioLab/Centricity Cardiology INW Service Manual 2021423-503H

Recovery Procedures
10. Multi-select the following users/groups:
MLCLTechUser
MLCLUsrGrp
MLCLAdmGrp
MLCLSystemGrp
11. Click the Add button.
12. Click the OK button.
13. Highlight each added user and check the Full Control checkbox.
14. Remove the Everyone group if listed under the Share.
15. Click OK.
16. Select the Security tab.
17. Remove all existing entries.
18. Click Add.
19. Select the INW domain from the dropdown.
20. Multi-select the following users/groups:
MLCLTechUser
MLCLUsrGrp
MLCLAdmGrp
MLCLSystemGrp
21. Click Add.
22. Click OK.
23. Highlight each added user and check the Full Control checkbox.
24. Click OK.
25. Click OK.
Configure the US (and English Canada) CVIS List Sharing Share
The following users or groups are from the INW domain:
MLCLTechUser
Administrator
MLCLSqlUser
1. Log onto as local MuseAdmin to the US (and English Canada) CVIS server.
2. Open Windows Explorer on the US (and English Canada) CVIS server Interface or Express Server.
3. Navigate to D:\Program Files\GE Medical Systems\Report_Router\Bin\List Sharing.
2021423-503H Mac-Lab/CardioLab/Centricity Cardiology INW Service Manual 5-151

Recovery Procedures
4. Right-click the List Sharing folder.
5. Select Sharing.
6. Select the Permissions button.
7. Remove all existing entries.
8. Click Add.
9. Select the INW domain from the dropdown.
10. Multi-select the following users/groups:
MLCLTechUser
Administrator
MLCLSqlUser
11. Click Add.
12. Click OK.
13. Highlight each added user and check Full Control checkbox.
14. Remove the Everyone group if listed under the Share.
15. Click OK.
16. Select the Security tab.
17. Remove all existing entries.
18. Click Add.
19. Select the INW domain from the dropdown.
20. Multi-select the following users/groups:
MLCLTechUser
Administrator
MLCLSqlUser
21. Click Add.
22. Click Close.
23. Highlight each added user and check Full Control checkbox.
24. Click OK.
25. Click OK.
Add CVIS Server to Centricity Organizational Unit on the INW Server
1. At the server, log on as Administrator.
2. Select Start > Settings > Control Panel.
3. Double-click Administrative tools.
4. Double-click Active Directory Users and Computers.
5-152 Mac-Lab/CardioLab/Centricity Cardiology INW Service Manual 2021423-503H

Recovery Procedures
5. Expand the domain name (default is inw.local).
6. Click the Computers folder and locate the DMS server to add.
7. Drag and drop the DMS server from the Computers folder to the Centricity OU folder.
8. Close all open windows.
9. Restart the DMS server.
Configure CVIS Central List Management on the INW Server
1. At the INW server, double-click Service Console on the Desktop.
2. Navigate to GEMS Central List Management > Central List Setup.
3. In the CVIS Server Export Directory click the... button to browse.
4. Browse to the path on the US (and English Canada) CVIS server.
This may be a mapped drive or the UNC name.
5. In the Location dropdown box, select the appropriate location for the hospital.
6. Click Update Lists.
7. Close the Service Console window.
Check List Management Service Status
1. Go to Control Panel > Administrative Tools > Services.
2. Verify the Gems Task Scheduler is running.
3. Verify the Central List Management Service is running.
Non-US (or English Canada) CVIS Configuration
Refer to Non-US (or English Canada) CVIS Installation manual for steps to install the Server and its clients.
Record the following information for the Non-US (or English Canada) CVIS Server:
Configure Central List Management
Perform the following steps to configure Central List Management:
1. Double-click Service Console on the Desktop.
2. Navigate to GEMS Central List Management > Central List Setup.
3. In the CVIS Server Export Directory click the... button to browse.
4. Browse to the path on the non-US (or English Canada) CVIS server.
This may be a mapped drive or the UNC name.
2021423-503H Mac-Lab/CardioLab/Centricity Cardiology INW Service Manual 5-153

Recovery Procedures
5. In the Location dropdown box, select the appropriate location for the hospital.
6. Click Update Lists.
The Update Lists button must be clicked on the Mac-Lab/CardioLab system each time the lists are updated on the US (or English Canada) CVIS server. Ensure this is done while the application is not running.
7. Close the Service Console window.
Check List Management Service Status
1. Go to Control Panel > Administrative Tools > Services.
2. Verify the GEMS Task Scheduler is running.
3. Verify the Central List Management Service is running.
5-154 Mac-Lab/CardioLab/Centricity Cardiology INW Service Manual 2021423-503H

Recovery Procedures
Perform On Demand Backup
CAUTIONSYSTEM PERFORMANCE DEGRADATION — A full backup takes several hours (depending on the amount of data to backup. Running a full backup while procedures are being performed may cause the system to slow unacceptably.
Always perform a full backup at a time when no procedures will be performed for several hours.
1. For single tape On Demand Backup insert the On Demand Backup tape and for multiple tape On Demand Backup insert the first tape.
2. Open the Control Panel by browsing to Start > Settings > Control Panel.
3. In the Control Panel double-click Scheduled Tasks.
4. To start the backup job:
a. Right-click the On Demand Backup task.
b. Select Properties.
c. Select the Schedule tab.
d. Assign a schedule to start the job in 3 to 5 minutes.
e. When prompted for the Administrator password, enter the password.
f. Select Apply.
g. Click OK to close the dialog.
5. For multiple tape On Demand Backup: When prompted for the additional tape, insert the additional tape.
6. For multiple tape On Demand Backup: When the multiple tape backup finishes the backup tape must be verified. To verify the backup, insert the tapes as prompted.
7. For single and multiple tape On Demand Backup: Check the On Demand Backup job log to verify that it completed successfully. To view the log file:
a. Launch backup from Start > Programs > Accessories > System Tools > Backup.
b. In the backup utility drop down Tools menu click Reports. This will list the reports for each backup job.
c. Open the log file for the On Demand Backup job.
2021423-503H Mac-Lab/CardioLab/Centricity Cardiology INW Service Manual 5-155

Recovery Procedures
Verify Backups Ran Successfully
After each backup tape runs for the first time, check the following the next day to ensure the backup ran successfully:
1. View the tape backup log file. To view the log file:
a. Launch backup from Start > Programs > Accessories > System Tools > Backup.
b. In the backup utility drop down Tools menu click Reports. This will list the reports for each backup job.
c. Review the log file for the tape backup job to verify that the backup was performed successfully.
2. For Full Backups: Restore several files from the tape to an alternate location (such as D:\Temp). Only restore the Backup folder and the 20 most recent patient folders.
NOTEDo not restore the whole backup as the server hard drive may run out of space. Make sure you delete the files after verification.
3. Verify the following files are in the backup directory: D:\GEMMS\Prucka\Database\Maintenance\Backup.
clabbackup.bak
NOTECheck the timestamp and the size of the clabbackup.bak file after every backup to ensure the database was backed up successfully.
clinkbackup.bak (if the LMT database is installed)
Gems.reg
5-156 Mac-Lab/CardioLab/Centricity Cardiology INW Service Manual 2021423-503H

Recovery Procedures
Update Operator Manuals
This script has to be executed for updating the Mac-Lab, CardioLab or Centricity Cardiology INW Operator's manual. To apply these changes, use the DVD ML/CL APPLICATION INSTALL 6.5.6 (PN 2049051-001).
1. Log on as a local Administrator to Windows as well the Custom Shell.
Ensure all programs are closed.
2. Insert the DVD ML/CL APPLICATION INSTALL 6.5.6 (PN 2049051-001) into the DVD-ROM drive.
3. Browse to the DVD drive and double-click UserManualUpdate.wsf.
4. A message box will open stating, System will now update the user manuals.
Click Yes to install, No to quit.
5. Click Yes at the message box.
6. On completion of the update, a message box stating User manuals updated will open.
7. Click OK.
2021423-503H Mac-Lab/CardioLab/Centricity Cardiology INW Service Manual 5-157

Recovery Procedures
System Checkout
Verify Functionality
At Acquisition or Review systems, all system testing should be done as mlcllogonuser (not mlcltechuser). Before starting the checkout procedure, verify you are logged on to Custom Shell as mlcllogonuser (password: mlcl!logonuser).
General
1. Verify that a full tape backup has been performed on the Centricity Cardiology INW server, and that no errors exist in the logs.
2. Verify all systems (Acquisitions and Reviews) are set to the Network catalog.
3. Create a test study on one of the Acquisition system and close the study.
4. Verify the new study is displayed on the network catalog on the other systems (Acquisitions and Reviews).
5. Verify that a study that has been archived to the Centricity Cardiology INW server can be reviewed from all systems (Acquisitions and Reviews).
5-158 Mac-Lab/CardioLab/Centricity Cardiology INW Service Manual 2021423-503H

6 Parts List
2021423-503H Mac-Lab/CardioLab/Centricity Cardiology INW Service Manual 6-1

Parts List
NOTEFor parts information for HP xw8200 and HP xw8000 computers, refer to the Mac-Lab/CardioLab/Centricity Cardiology INW Service Manual v6.5 (PN 2021423-022).
HP z600 Computer with ADA Drive
Part Number Description
2057729-002 ASSY CL/ML ACQ CMPTR Z600 ADA
2057729-004 ASSY CL/ML IMAGECAP CMPTR Z600 ADA
2057729-005 ASSY CL/ML CARDIOICE CMPTR Z600 ADA
MAC-LAB/CARDIOLAB Computers
2050338-001 160GB SATA HDD, 7200 RPM, 3.5” (Hard Drive)
2050338-002 FRU WD 600GB SATA HDD, 10K RPM, 3.5”
2057730-001 DISK DRIVE PANASONIC ADA LKM-KB23
2021462-001 DISK DVD-RAM CARTRIDGE 9.4 GB FORMATTED
2026539-001 OPTICAL USB SCROLL MOUSE ALL (HP #32617-005)
2050334-001 FRU HP REAR SYSTEM FAN KIT (HP #519559-001)
422310-001 MOUSEPAD GE HEALTHCARE
2038834-001 EQPMT, BARCODE SCANNER 3800G USB (replaces PS2 Version 2003417-001 EQPMT, BARCODE SCANNER)
2014935-002 PCB COMM PCI
2009937-003 PCB TRAMNET TO ETHERNET ADAPTER
2003587-001 CABLE, MULTICONDUCTOR, DB-44, M-M, 2.5 FT.
2047766-001 BRACKET NIC/COMM ML/CL COMPUTER
2049434-001 CARD VIDEO, MATROX M9120 QUAD PCIE 512MB
2017899-001 KIT, IMAGE CABLING ACCESSORIESCABLE DVI-I MALE TO 5 BNC FEMALES (2018060-001)CABLE BNCM TO BNCM, MIN RG-59 COAX, 50FT (2003411-001)
2050333-001 FRU HP 1GB DDR3-1333, 240-PIN, ECC DIMM
2050333-002 FRU HP 2GB DDR3-1333, 240-PIN, ECC DIMM
2050335-001 FRU HP MEMORY MODULE FAN KIT
2050336-001 FRU HP Z600 POWER SUPPLY 650-WATT, PFC
2050337-001 FRU HP Z600 MOTHERBOARD, 1333MHZ FSB
6-2 Mac-Lab/CardioLab/Centricity Cardiology INW Service Manual 2021423-503H

Parts List
CARDIOIMAGE Computer
2049435-001 CARD, VIDEO, MATROX ODYSSEY eA
CARDIOICE Computer
2031725-001 CARD, VIDEO, MATROX SOLIOS EA
Keyboards
2045812-001 LABEL KEYBOARD CUSTOMER SUPPORT ML/CL
CARDIOLAB Keyboards from Language Kits
2045802-002 CARDIOLAB KEYBOARD (replaces 2003809-002)
2045802-009 GERMAN CARDIOLAB KEYBOARD (replaces 2003810-009)
2045802-008 FRENCH CARDIOLAB KEYBOARD (replaces 2003810-008)
2045802-011 ITALIAN CARDIOLAB KEYBOARD (replaces 2003810-011)
2045802-010 SPANISH CARDIOLAB KEYBOARD (replaces 2003810-010)
2045802-019 CHINESE CARDIOLAB KEYBOARD (replaces 2003810-019)
2045802-016 SWEDISH CARDIOLAB KEYBOARD (replaces 2003810-016)
COMBOLAB Keyboards from Language Kits
2045802-003 COMBOLAB KEYBOARD (replaces 2003809-003)
2045802-005 GERMAN COMBOLAB KEYBOARD (replaces 2003809-005)
2045802-004 FRENCH COMBOLAB KEYBOARD (replaces 2003809-004)
2045802-007 ITALIAN COMBOLAB KEYBOARD (replaces 2003809-007)
2045802-006 SPANISH COMBOLAB KEYBOARD (replaces 2003809-006)
2045802-021 CHINESE COMBOLAB KEYBOARD (replaces 2003809-021)
2045802-018 SWEDISH COMBOLAB KEYBOARD (replaces 2003809-018)
MAC-LAB Keyboards from Language Kits
2045802-001 MACLAB KEYBOARD (replaces 2003809-001)
2045802-013 GERMAN MACLAB KEYBOARD (replaces 2003809-013)
2045802-012 FRENCH MACLAB KEYBOARD (replaces 2003809-012)
2045802-015 ITALIAN MACLAB KEYBOARD (replaces 2003809-015)
2045802-014 SPANISH MACLAB KEYBOARD (replaces 2003809-014)
2045802-020 CHINESE MACLAB KEYBOARD (replaces 2003809-020)
2045802-017 SWEDISH MACLAB KEYBOARD (replaces 2003809-017)
Part Number Description
2021423-503H Mac-Lab/CardioLab/Centricity Cardiology INW Service Manual 6-3

Parts List
HP z600 Computer with DVD-RAM Drive
Part Number Description
2048962-002
2055263-002
ASSY CL/ML ACQ CMPTR HP Z600
ASSY CL/ML ACQ CMPTR Z600 PURCH
2048962-004
2055263-004
ASSY CL/ML CARDIOIMAGE CMPTR HP Z600
ASSY CL/ML CARDIOIMAGE CMPTR Z600 PURCH
2048962-005
2055263-005
ASSY CL/ML CARDIOICE CMPTR HP Z600
ASSY CL/ML CARDIOICE CMPTR Z600 PURCH
MAC-LAB/CARDIOLAB Computers
2050338-001 160GB SATA HDD, 7200 RPM, 3.5” (Hard Drive)
2050338-002 FRU WD 600GB SATA HDD, 10K RPM, 3.5”
2028599-002 DISK DRIVE PANASONIC SW-9576
2021462-001 DISK DVD-RAM CARTRIDGE 9.4 GB FORMATTED
2026539-001 OPTICAL USB SCROLL MOUSE ALL (HP #32617-005)
2050334-001 FRU HP REAR SYSTEM FAN KIT (HP #519559-001)
422310-001 MOUSEPAD GE HEALTHCARE
2038834-001 EQPMT, BARCODE SCANNER 3800G USB (replaces PS2 Version 2003417-001 EQPMT, BARCODE SCANNER)
2014935-002 PCB COMM PCI
2009937-003 PCB TRAMNET TO ETHERNET ADAPTER
2003587-001 CABLE, MULTICONDUCTOR, DB-44, M-M, 2.5 FT.
2047766-001 BRACKET NIC/COMM ML/CL COMPUTER
2049434-001 CARD VIDEO, MATROX M9120 QUAD PCIE 512MB
2017899-001 KIT, IMAGE CABLING ACCESSORIESCABLE DVI-I MALE TO 5 BNC FEMALES (2018060-001)CABLE BNCM TO BNCM, MIN RG-59 COAX, 50FT (2003411-001)
2050333-001 FRU HP 1GB DDR3-1333, 240-PIN, ECC DIMM
2050333-002 FRU HP 2GB DDR3-1333, 240-PIN, ECC DIMM
2050335-001 FRU HP MEMORY MODULE FAN KIT
2050336-001 FRU HP Z600 POWER SUPPLY 650-WATT, PFC
2050337-001 FRU HP Z600 MOTHERBOARD, 1333MHZ FSB
6-4 Mac-Lab/CardioLab/Centricity Cardiology INW Service Manual 2021423-503H

Parts List
CARDIOIMAGE Computer
2049435-001 CARD, VIDEO, MATROX ODYSSEY eA
Keyboards
2045812-001 LABEL KEYBOARD CUSTOMER SUPPORT ML/CL
CARDIOLAB Keyboards from Language Kits
2045802-002 CARDIOLAB KEYBOARD (replaces 2003809-002)
2045802-009 GERMAN CARDIOLAB KEYBOARD (replaces 2003810-009)
2045802-008 FRENCH CARDIOLAB KEYBOARD (replaces 2003810-008)
2045802-011 ITALIAN CARDIOLAB KEYBOARD (replaces 2003810-011)
2045802-010 SPANISH CARDIOLAB KEYBOARD (replaces 2003810-010)
2045802-019 CHINESE CARDIOLAB KEYBOARD (replaces 2003810-019)
2045802-016 SWEDISH CARDIOLAB KEYBOARD (replaces 2003810-016)
COMBOLAB Keyboards from Language Kits
2045802-003 COMBOLAB KEYBOARD (replaces 2003809-003)
2045802-005 GERMAN COMBOLAB KEYBOARD (replaces 2003809-005)
2045802-004 FRENCH COMBOLAB KEYBOARD (replaces 2003809-004)
2045802-007 ITALIAN COMBOLAB KEYBOARD (replaces 2003809-007)
2045802-006 SPANISH COMBOLAB KEYBOARD (replaces 2003809-006)
2045802-021 CHINESE COMBOLAB KEYBOARD (replaces 2003809-021)
2045802-018 SWEDISH COMBOLAB KEYBOARD (replaces 2003809-018)
MAC-LAB Keyboards from Language Kits
2045802-001 MACLAB KEYBOARD (replaces 2003809-001)
2045802-013 GERMAN MACLAB KEYBOARD (replaces 2003809-013)
2045802-012 FRENCH MACLAB KEYBOARD (replaces 2003809-012)
2045802-015 ITALIAN MACLAB KEYBOARD (replaces 2003809-015)
2045802-014 SPANISH MACLAB KEYBOARD (replaces 2003809-014)
2045802-020 CHINESE MACLAB KEYBOARD (replaces 2003809-020)
2045802-017 SWEDISH MACLAB KEYBOARD (replaces 2003809-017)
Part Number Description
2021423-503H Mac-Lab/CardioLab/Centricity Cardiology INW Service Manual 6-5

Parts List
HP xw8400 Computer
Part Number Description
2034493-001 ASSY CL/ML REVIEW CMPTR HP XW8400
2034493-002 ASSY CL/ML ACQ CMPTR HP XW8400
2034493-004 ASSY CL/ML CARDIOIMAGE CMPTR HP XW8400
2037934-001 ASSY CMPTR CLAB/MLAB REVIEW (DVD-RAM drive)
2037934-002 ASSY CMPTR CLAB/MLAB ACQUISITION (DVD-RAM drive)
2037934-003 ASSY CMPTR CLAB/MLAB ACQUISITION W/ IMAGE IN (DVD-RAM drive)
2037934-004 ASSY CMPTR CLAB/MLAB ACQ. W/ IMAGE IN/OUT (DVD-RAM drive)
MAC-LAB/CARDIOLAB Computers
2032742-001 80GB SATA/7200 ALL (Hard Drive) (HP #390595-001)
2028599-002 DISK DRIVE PANASONIC SW-9576 DVD-RAM
2021462-001 DVD Disk Cartridge. 9.4 GB, Formatted
2038813-001 MEMORY INVASIVE HPXW8400 2GB FRU KIT (HP #EMil60AA)
2026539-001 OPTICAL USB SCROLL MOUSE ALL (HP #32617-005)
2038827-001 FAN HPXW8400 FAN KIT
2026188-001 CARD, VIDEO, MATROX PCI PARHELIA
422310-001 MOUSEPAD GE
2038834-001 EQPMT, BARCODE SCANNER 3800G USB (replaces PS2 Version 2003417-001 EQPMT, BARCODE SCANNER)
2021697-001 DVI TO DB15 VIDEO ADAPTER
2014935-002 PCB COMM PCI
2009937-002 PCB TRAMNET TO ETHERNET ADAPTER
2003587-001 CABLE, MULTICONDUCTOR, DB-44, M-M, 2.5 FT.
2017795-002 CARD DUAL NIC ADAPTER PCI-E GIGABIT
IMAGE CAPTURE/CARDIOIMAGE Computers
2030688-001 CARD, VIDEO, MATROX ODYSSEY XA
2026189-004 CARD, VIDEO, ATI FIREGL V3350 25MB
2017899-001 KIT, IMAGE CABLING ACCESSORIES
CABLE DVI-I MALE TO 5 BNC FEMALES (2028060-001)
CABLE BNCM TO BNCM, MIN RG-59 COAX, 50FT (2003411-001)
UPGRADES
6-6 Mac-Lab/CardioLab/Centricity Cardiology INW Service Manual 2021423-503H

Parts List
UP-MODK-A UPGRADE KIT: MO DRIVEKit is used to add MO drive to computers (for backward compatibility)
2003888-001 DISK OPTICAL FAT 16 FMT DRV4 MLAB 2.6 GB VIA
2003340-001 DISK DRIVE OPT 5 1/4 SONY SMO-F551SD (Black bezel)
2038632-001 CARD SCSI PCI-E
CARDIOLAB Keyboards from Language Kits
2003809-002 CARDIOLAB KEYBOARD
2003810-009 GERMAN CARDIOLAB KEYBOARD
2003810-008 FRENCH CARDIOLAB KEYBOARD
2003810-011 ITALIAN CARDIOLAB KEYBOARD
2003810-010 SPANISH CARDIOLAB KEYBOARD
2003810-019 CHINESE CARDIOLAB KEYBOARD
2003810-016 SWEDISH CARDIOLAB KEYBOARD
COMBOLAB Keyboards from Language Kits
2003809-003 COMBOLAB KEYBOARD
2003810-005 GERMAN COMBOLAB KEYBOARD
2003810-004 FRENCH COMBOLAB KEYBOARD
2003810-007 ITALIAN COMBOLAB KEYBOARD
2003810-006 SPANISH COMBOLAB KEYBOARD
2003810-021 CHINESE COMBOLAB KEYBOARD
2003810-018 SWEDISH COMBOLAB KEYBOARD
MACLAB Keyboards from Language Kits
2003809-001 MACLAB KEYBOARD
2003810-013 GERMAN MACLAB KEYBOARD
2003810-012 FRENCH MACLAB KEYBOARD
2003810-015 ITALIAN MACLAB KEYBOARD
2003810-014 SPANISH MACLAB KEYBOARD
2003810-020 CHINESE MACLAB KEYBOARD
2003810-017 SWEDISH MACLAB KEYBOARD
Part Number Description
2021423-503H Mac-Lab/CardioLab/Centricity Cardiology INW Service Manual 6-7

Parts List
GE Client Workstation
Part Number Description
2048962-001 ASSY CL/ML GE CLIENT WORKSTATION D COMP
Keyboards
2045812-001 LABEL KEYBOARD CUSTOMER SUPPORT ML/CL
CARDIOLAB Keyboards from Language Kits
2045802-002 CARDIOLAB KEYBOARD (replaces 2003809-002)
2045802-009 GERMAN CARDIOLAB KEYBOARD (replaces 2003810-009)
2045802-008 FRENCH CARDIOLAB KEYBOARD (replaces 2003810-008)
2045802-011 ITALIAN CARDIOLAB KEYBOARD (replaces 2003810-011)
2045802-010 SPANISH CARDIOLAB KEYBOARD (replaces 2003810-010)
2045802-019 CHINESE CARDIOLAB KEYBOARD (replaces 2003810-019)
2045802-016 SWEDISH CARDIOLAB KEYBOARD (replaces 2003810-016)
COMBOLAB Keyboards from Language Kits
2045802-003 COMBOLAB KEYBOARD (replaces 2003809-003)
2045802-005 GERMAN COMBOLAB KEYBOARD (replaces 2003809-005)
2045802-004 FRENCH COMBOLAB KEYBOARD (replaces 2003809-004)
2045802-007 ITALIAN COMBOLAB KEYBOARD (replaces 2003809-007)
2045802-006 SPANISH COMBOLAB KEYBOARD (replaces 2003809-006)
2045802-021 CHINESE COMBOLAB KEYBOARD (replaces 2003809-021)
2045802-018 SWEDISH COMBOLAB KEYBOARD (replaces 2003809-018)
MAC-LAB Keyboards from Language Kits
2045802-001 MACLAB KEYBOARD (replaces 2003809-001)
2045802-013 GERMAN MACLAB KEYBOARD (replaces 2003809-013)
2045802-012 FRENCH MACLAB KEYBOARD (replaces 2003809-012)
2045802-015 ITALIAN MACLAB KEYBOARD (replaces 2003809-015)
2045802-014 SPANISH MACLAB KEYBOARD (replaces 2003809-014)
2045802-020 CHINESE MACLAB KEYBOARD (replaces 2003809-020)
2045802-017 SWEDISH MACLAB KEYBOARD (replaces 2003809-017)
6-8 Mac-Lab/CardioLab/Centricity Cardiology INW Service Manual 2021423-503H

Parts List
DASH Connection
Solar Connection
Centricity Cardiology INW G6 Server
Part Number Description
2000453-001 KIT DOWNLOAD DASH
418335-002 OCTACOMM, SERIAL PORT CABLE
420915-013 DIDCA ASM PC INTERFACE AUTOPORT
Part Number Description
2003408-001 DB9M TO DB9F, 50FT, STRAIGHT THRU
Part Number Description
2048968-001
2055264-001
ASSY SERVER CL/ML INW G6 HI
2048968-003
2055264-003
ASSY SERVER CL/ML INW G6 LO
2049045-001 HARD DRIVE HP 300GB 10K 6G 2.5
2048609-001 HP 146GB 10K 6G 2.5 SAS DP HDD
2024244-002 TAPE DRIVE SONY AIT-3 SDX-700V/RB INTERNAL (HIGH)
2024244-003 TAPE DRIVE SONY AIT-2T TURBO INT SCSI (LOW)
2050327-001 FRU HP SERVER PWR SUPPLY 460W, HOT PLUG
2050328-001 FRU HP SC11XE SCSI HOST BUS ADAPTER
2050329-001 FRU HP SMART ARRAY P410, 512MB, BBWC
2050330-001 FRU HP IDE DVD-ROM, 16X
2050331-001 FRU HP ML370 G6 FAN ASSEMBLY
2050332-001 FRU HP 2GB 1333MHz PC3-10600R,DDR3 DIMM
2021423-503H Mac-Lab/CardioLab/Centricity Cardiology INW Service Manual 6-9

Parts List
Centricity Cardiology INW G5 Server
Part Number Description
2038168-0012050580-0012045708-001
CMPTR SERVER CL/ML INW G5 HI
2038168-002 CMPTR SERVER CL/ML INW G5 MID
2038168-0032050580-003
2045708-003
CMPTR SERVER CL/ML INW G5 LO
2038630-001 CMPTR SERVER ML/CL INW G5 BASE
2036800-038 HP SMARTARRAY P400 CNTRLLR CACHE MOD
2034798-001 HP 72GB 10K SAS 2.5 HOT PLUG HARDDRIVE
2034806-001 HP 146GB 10K SAS 2.5 HOT PLUG HARDDRIVE
2024244-002 TAPE DRIVE SONY AIT-3 SDX-700V/RB INTERNAL (HIGH/MID)
2024244-003 TAPE DRIVE AIT-2 turbo SDX-550V INTERNAL (LOW)
2036798-017 MEMORY HP 2GB Fully Buffered DIMM PC2-5300F (2x1GB Memory)
2036800-025 HP ML370 DVD-RW DRIVE
414582-222 POWER ADAPTER 230VAC/DC ME (FOR EUROPE)
414582-223 POWER ADAPTER 100VAC/DC JAP (FOR JAPAN)
414582-224 POWER ADAPTER 240VAC/DC AA (FOR ASIA/AUSTRALIA)
414582-225 POWER ADAPTER 240VAC/DC UK (FOR UNITED KINGDOM)
421572-028 CABLE ETHERNET
2018135-005 TAPE CARTRIDGE AIT-2 TURBO 80GB
2018135-003 AIT-3 TAPE CARTRIDGES - Single
2025078-001 INTERFACE ADAPTORS
2025079-001 CAT5 ETHERNET PATCH CABLE 10FT.
2025080-001 Keyboard, Mouse, and Video Zip Cable
2036800-014 HP ML370 1000-W HOT-PLUG POWER SUPPLY
2036800-015 HP ML370 HOT-PLUG FAN, 120-MM
6-10 Mac-Lab/CardioLab/Centricity Cardiology INW Service Manual 2021423-503H
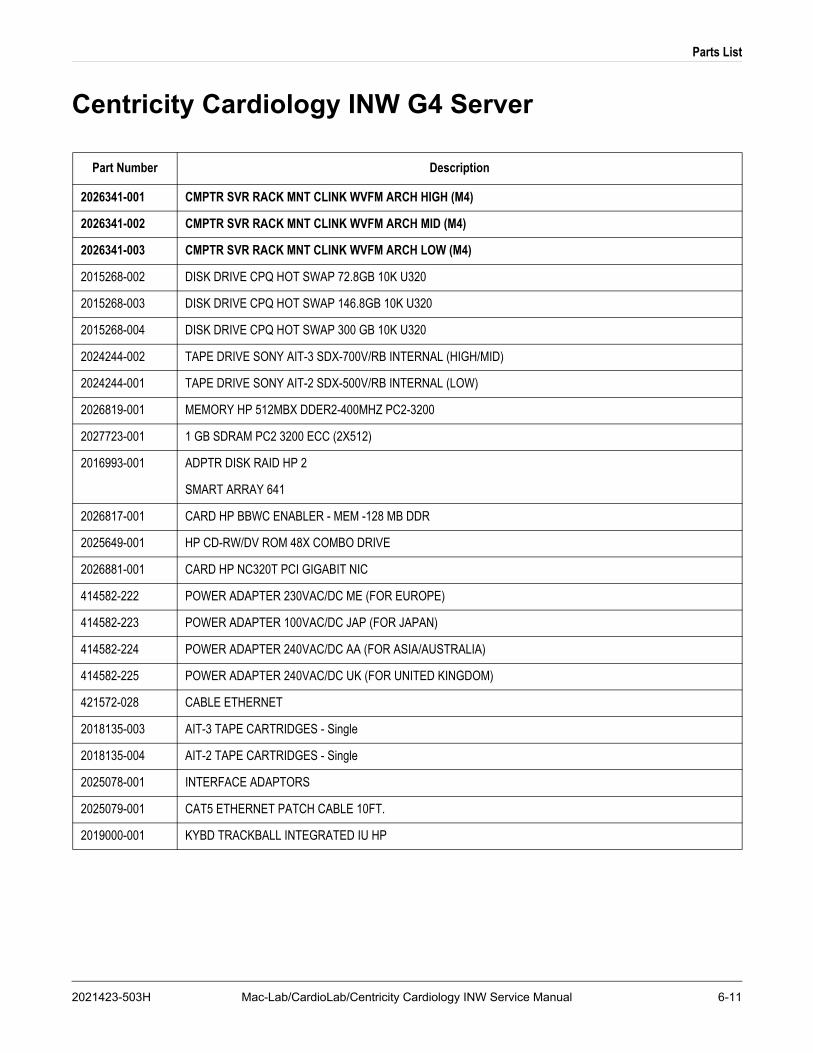
Parts List
Centricity Cardiology INW G4 Server
Part Number Description
2026341-001 CMPTR SVR RACK MNT CLINK WVFM ARCH HIGH (M4)
2026341-002 CMPTR SVR RACK MNT CLINK WVFM ARCH MID (M4)
2026341-003 CMPTR SVR RACK MNT CLINK WVFM ARCH LOW (M4)
2015268-002 DISK DRIVE CPQ HOT SWAP 72.8GB 10K U320
2015268-003 DISK DRIVE CPQ HOT SWAP 146.8GB 10K U320
2015268-004 DISK DRIVE CPQ HOT SWAP 300 GB 10K U320
2024244-002 TAPE DRIVE SONY AIT-3 SDX-700V/RB INTERNAL (HIGH/MID)
2024244-001 TAPE DRIVE SONY AIT-2 SDX-500V/RB INTERNAL (LOW)
2026819-001 MEMORY HP 512MBX DDER2-400MHZ PC2-3200
2027723-001 1 GB SDRAM PC2 3200 ECC (2X512)
2016993-001 ADPTR DISK RAID HP 2
SMART ARRAY 641
2026817-001 CARD HP BBWC ENABLER - MEM -128 MB DDR
2025649-001 HP CD-RW/DV ROM 48X COMBO DRIVE
2026881-001 CARD HP NC320T PCI GIGABIT NIC
414582-222 POWER ADAPTER 230VAC/DC ME (FOR EUROPE)
414582-223 POWER ADAPTER 100VAC/DC JAP (FOR JAPAN)
414582-224 POWER ADAPTER 240VAC/DC AA (FOR ASIA/AUSTRALIA)
414582-225 POWER ADAPTER 240VAC/DC UK (FOR UNITED KINGDOM)
421572-028 CABLE ETHERNET
2018135-003 AIT-3 TAPE CARTRIDGES - Single
2018135-004 AIT-2 TAPE CARTRIDGES - Single
2025078-001 INTERFACE ADAPTORS
2025079-001 CAT5 ETHERNET PATCH CABLE 10FT.
2019000-001 KYBD TRACKBALL INTEGRATED IU HP
2021423-503H Mac-Lab/CardioLab/Centricity Cardiology INW Service Manual 6-11

Parts List
Integrated Electronics Box (IEB)
Part Number Description
2033852-001 PWR BOX IEB, W/VIDEO, ANALOG I/O 100V (replaces 2010698-001 IEB)Includes parts listed under 120V IEB, except the following parts are changed:
2006323-001 CABLE POWER, IEC C19 TO UNTERMINATED
2033852-002 PWR BOX IEB, W/VIDEO, ANALOG I/O 120V (replaces 2010698-002 IEB)
2003253-002 XFMR, ISO, 100-240VAC, 50/60HZ, 2.0KVA
2003680-001 ASSY DB CONNECT FOR IEB
2003681-003 ASSY VID/MUX FOR IEB
2013535-001 PWR SPLY SW 90-265VAC 50-60HZ 16.5/-5/5V
700775-001 PWR CORD 125V 15A 2.5M
2003410-001 CABLE BNCM TO BNCM, MIN RG-59 COAX, 30FT
2003927-001 POWER CORD IEC (M)-IEC(F) 8FT
2003928-001 CABLE, VIDEO, DB15MHD-DB15MHD; 5FT
2081540-001 CABLE, VIDEO, DB15MHD-DB15MHD, 6FT
2033852-003 PWR BOX IEB, W/VIDEO, ANALOG I/O 240V (replaces 2010698-003 IEB)Includes parts listed under 120V IEB, except the following parts are changed:
2011055-001 IEB SHELF ASSY 100V & 120V Use this replacement part for repair of an RAU power supply (2003264-001) and/or Vid/mux power supply (2003266-001)
2011055-002 IEB SHELF ASSY 240V Use this replacement part for repair of an RAU power supply and/or Vid/mux power supply.
2003825-006 BRACKET, BLANKING PANEL FOR IEB
2006323-001 CABLE POWER, IEC C19 TO UNTERMINATED
2033852-004 IEB, MAC-LAB, NO MDM, 240V CHINESE Includes parts listed under 120V IEB, except the following parts are changed:
401855-110 PWR SPLY CRD ST AUSTRALIAN 10A 250V 2.5M
401855-101 PWR SPLY CRD ST CONT EURO 10A 250V 2.5M-AUSTRIA, BELGIUM, FINLAND, FRANCE, GERMANY, GREECE, HUNGARY, LUXUMBERG, NETHERLAND, POLAND, PORTUGAL, SPAIN, SWEDEN
401855-102 PWR SPLY CRD ST BRITSH 10A 250V 2.5M FSD
401855-104 PWR SPLY CRD ST ISRAELI 10A 250V 2.5M
401855-103 PWR SPLY CRD ST ITALIAN 10A 250V 2.5M
401855-039 PWR SPLY CRD ST ARGENTINA 10A 250V 2.5M
401855-041 PWR SPLY CRD ST BRAZIL 10A 250V 2.5M
6-12 Mac-Lab/CardioLab/Centricity Cardiology INW Service Manual 2021423-503H

Parts List
Uninterrupted Power Source (UPS)
401855-018 PWR CRD ST CHINA RA PLUG 10A 250V 2.5M
401855-109 PWR SPLY CRD ST DANISH 10A 250V 2.5M
401855-108 PWR SPLY CRD ST INDIA 10A 250V 2.5M
401855-037 PWR SPLY CRD ST S.AFRICA 10A 250V 2.5M
401855-107 PWR SPLY CRD ST SWISS 10A 250V 2.5M
2059901-003 IEB, w VIDEO, ANA LOG IO, C14 CONN, 240V
2059901-004 IEB, MAC-LAB, C14 CONN, 240V CHINESE(Repalces 2033852-004)
2059901-005 IEB, CARDIOLAB, C14 CONN, 240V CHINESE(Replaces 2033852-005)
2059901-006 IEB, COMBOLAB, C14 CONN, 240V CHINESE(Replaces 2033852-006)
2059901-007 IEB, CADIO-LAB, C14 CONN, 240V KOREAN(Replaces 2033852-007)
2059901-008 IEB, MAC-LAB, C14 CONN, 240V KOREAN(Replaces 2033852-008)
2059901-009 IEB, COMBOLAB, C14 CONN, 240V KOREAN(Replaces 2033852-009)
Part Number Description
Part Number Description
2034260-001 KIT 120V IEB UPS REPLACEMENT EXTERNAL — includes 2034077-001 UPS POWERCOM, 120V, 50/60 Hz, 1500VA, BNT (replaces:
2033849-001 UPS POWERCOM, 120V, 1000VA
2031037-001 UPS POWERCOM, 115V, 800VA
2023532-001 BTRY UPS, 115V, MI800)
2034261-001 KIT 230V IEB UPS REPLACEMENT EXTERNAL — includes 2034078-001 UPS POWERCOM, 230V, 50/60 Hz, 1500VA, BNT (replaces:
2033850-001 UPS POWERCOM, 240V, 1000VA
2031038-001 UPS POWERCOM, 230V, 800VA
2023533-001 BTRY UPS, 230V, MI800)
2034259-001 KIT 100V IEB UPS REPLACEMENT EXTERNAL — includes 2034079-001 UPS POWERCOM, 100V, 50/60 Hz, 1500VA, BNT (replaces:
2033851-001 UPS POWERCOM, 100V, 1000VA
2031039-001 UPS POWERCOM, 100V, 800VA
2023534-001 BTRY UPS, 100V, MI800)
2021423-503H Mac-Lab/CardioLab/Centricity Cardiology INW Service Manual 6-13

Parts List
Monitors and Printers
Part Number Description
2079070-002 MONITOR, EIZO S2133, LED 21 INCH, BOOM MOUNTABLE
2081124-001 MOUNTING KIT, MONITOR ON MAVIG GD60 SUSPENSION
2044863-001 MONITOR VIEWSONIC CRT (Used for real-time scrolling) (Replaces NEC 2027200-001)
2030604-002 DSPL LCD 20 INCH NEC LCD 2090UX+ (replaces 2080UX 20” LCD - PN 2020737-002)
2003442-001 CABLE VIDEO, DB15MHD-DB15MHD; 100FT
403689-010 CABLE ASSY, MON PWR, 100FT
2004036-001 POWER CABLE
6119-101 CABLE PARALLEL PRNTR 8-12 FT
2031697-001 CABLE EPP DB25M/MDR36M 10 FT
9242-101 PAPER 20LB BOND WHITE 8 1/2x11
2046140-001 HP LaserJet P2035n (120V) (Replaces 2037296-001 RICOH 4100N - US)
2046141-001 HP Color LaserJet CP2025n (120V) (Replaces 2030606-001 RICOH CL3500N)
2046141-002 HP Color LaserJet CP2025n (220V) (Replaces 2030606-002 RICOH CL3500N 220V)
2046677-002 HP LaserJet P2035 (220V)
2025965-002 CABLE USB 3.0M
6-14 Mac-Lab/CardioLab/Centricity Cardiology INW Service Manual 2021423-503H

Parts List
TRAMNet
Part Number Description
2018683-001 2011129-001 2016133-001 2016134-001
Kit MLCL TRAMNet Cabling AccessoriesCABLE ETHERNET PATCH - 1FTASSY CABLE TNET TO IEB D 9M/9FASSY CABLE IEB TO RAC 4A ADAPTOR
2019445-001 TRAM 451 CABLE KIT (AHA): includes ACQ CABLE, TRAMNET CABLES, AND MOUNTING KIT
2019446-001 TRAM 451N CABLE KIT (AHA): includes ACQ CABLE, TRAMNET CABLES, AND MOUNTING KIT
2019447-001 TRAM 451M CABLE KIT (AHA): includes ACQ CABLE, TRAMNET CABLES, AND MOUNTING KIT
2021597-001 TRAM 451N CABLE KIT (IEC): includes ACQ CABLE AND MOUNTING KIT
2021598-001 TRAM 451M CABLE KIT (IEC): includes ACQ CABLE AND MOUNTING KIT
2021599-001 TRAM 451N CABLE KIT (IEC)
2021600-001 TRAM 451M CABLE KIT (IEC)
417335-003 ASM, ACQUISITION CABLE 70 FT (Standard)
417335-001 ASM, ACQUISITION CABLE 10 FT
417335-002 ASM, ACQUISITION CABLE 51 FT
417335-004 ASM, ACQUISITION CABLE 100 FT
417335-005 ASM, ACQUISITION CABLE 125 FT
417335-006 ASM, ACQUISITION CABLE 150 FT
417335-007 ASM, ACQUISITION CABLE 20 FT
2007759-002 MOUNTING KIT
900031-006 ASSY TRAM RAC 4A W/PWR SPLY
2000633-001 CABLE ASSY CINCH MDC-7P15
412931-005 MAC-LAB 5LD STRTR KIT, RADIOTRANSLUCENT
416035-003 MAC-LAB 12LD STARTER KIT AHA
2025248-002 CABLE ASSY CARDIAC OUTPUT 2.7M (replaces 2002973-004 CABLE ASSY PATIENT CARDIAC OUTPUT 9FT)
9446-909 BATH PROBE TR INJ TEMP 6FT MEI
9446-910 CA TRAM INLINE INJ EDW 3FT MEI
415265-003 KIT NBP ADULT STARTER
900079-006 SYNC CBL, TRAM 3 'Y' ADAPTER
2008991-001 ADPTR MINI DIN TO CONN RCPT 6P PHG 1B
2006644-001 CABLE ASSY PATIENT ADAPTER NELLCOR SPO2
2021423-503H Mac-Lab/CardioLab/Centricity Cardiology INW Service Manual 6-15

Parts List
407705-006 DURASENSOR ADULT DS-100A INDV
2017002-001 CABLE ASSY SPO2 MASIMO 3.6M (replaces 2016041-001 CABLE ASSY PATIENT ADPT MASIMO SPO2 12FT)
2017002-003 CABLE ASSY SPO2 MASIMO (replaces 2016041-002 CABLE ASSY PATIENT ADPTR MASIMO SPO2 8FT)
2002800-001 MASIMO REUSABLE FINGER SENSOR ADULT
2002799-001 MASIMO REUSABLE FINGER SENSOR PED
2017006-003 CABLE ASSY ECG MLT-LNK 10 LEAD 3.6M IEC (replaces 416035-002 PATIENT CABLE 12SL IEC)
403751-026 LD RT GRB/MNK IEC 60L 10/SET
414873-001 TUBE NBP CUFF
9461-601 BP CUFF DL TUBE ADULT - DURA-CUF
9446-911 CA TR INLINE INJ GOULD 3FT MEI
Part Number Description
6-16 Mac-Lab/CardioLab/Centricity Cardiology INW Service Manual 2021423-503H

Parts List
Amplifier
Part Number Description
2003232-001 ASSY CLAB II PLUS 32 AMP 110-240V 50/60HZ
2003232-002 ASSY CLAB II PLUS 64 AMP 110-240V 50/60HZ
2003232-003 ASSY CLAB II PLUS AMPLIFIER 96 CHANNEL
2003232-004 ASSY CLAB II PLUS AMPLIFIER 128 CHANNEL
2004965-001 ASSY PACING ENABLED RF FILTER BOX
301-00207-03 CABLE STIM EXTENDER, 3FT DUAL TOUCHPROOF
2003419-001 CABLE, ECG, 10LEAD, SHIELDED 10FT
2003421-001 CABLE LEAD SET, ECG, SHIELDED, 36" WIRES
2003434-001 CABLE FIBER, ST TO FDDI, DUPLEX, 75FT
2007857-001 PRUCKA CATHETER INPUT MODULE LABELS
301-00202-08 CABLE CATHTR INPT MOD3 TPRF 8FT M CLBII+
301-00204-03 CABLE STIM INPT TCHPRF 3FT CLABII+
301-00205-08 CABLE AUX INPT RF RCRD UNIPLR CLABII+
80274-006405535-013 (Japan)
POWER CORD
301-00204-15 15 FT TOUCHPROOF STIMULATOR INPUT CABLE
301-00204-30 30 FT TOUCHPROOF STIMULATOR INPUT CABLE
401855-110 PWR SPLY CRD ST AUSTRALIAN 10A 250V 2.5M
401855-101 PWR SPLY CRD ST CONT EURO 10A 250V 2.5M-AUSTRIA, BELGIUM, FINLAND, FRANCE, GERMANY, GREECE, HUNGARY, LUXUMBERG, NETHERLAND, POLAND, PORTUGAL, SPAIN, SWEDEN
401855-102 PWR SPLY CRD ST BRITSH 10A 250V 2.5M FSD
401855-104 PWR SPLY CRD ST ISRAELI 10A 250V 2.5M
401855-103 PWR SPLY CRD ST ITALIAN 10A 250V 2.5M
401855-039 PWR SPLY CRD ST ARGENTINA 10A 250V 2.5M
401855-041 PWR SPLY CRD ST BRAZIL 10A 250V 2.5M
401855-018 PWR CRD ST CHINA RA PLUG 10A 250V 2.5M
401855-109 PWR SPLY CRD ST DANISH 10A 250V 2.5M
401855-108 PWR SPLY CRD ST INDIA 10A 250V 2.5M
2021423-503H Mac-Lab/CardioLab/Centricity Cardiology INW Service Manual 6-17

Parts List
MicroPace
401855-037 PWR SPLY CRD ST S.AFRICA 10A 250V 2.5M
401855-107 PWR SPLY CRD ST SWISS 10A 250V 2.5M
Part Number Description
Part Number Description
MicroPace FRUs
2032778-001 FRU MICROPACE STIMULATOR - SGU, NO PS MFG - MP3008
2032779-001 FRU MICROPACE ACC KIT, SGU PWR, CABLS, US MFG - MP3055-GE-US
2032780-001 FRU MICROPACE BONA LIGHT PC, PSU MFG - MP3093
2032781-001 FRU MICROPACE DIAMOND TOUCH KEYBOARD MFG - MP3015
2032782-001 FRU MICROPACE NEC MONITOR MFG - MP3076
2031041-001 MICROPACE TOUCHSCREEN FOR STIMULATOR MFG - MP3113-GE
2032783-001 FRU MICROPACE 4CH SM-BOX, CABLES MFG - MP3091
2032784-001 FRU MICROPACE 2CH STIMULATOR CONNECT BOX MFG - MP3014
2032785-001 FRU MICROPACE UNIVERSAL ISOLATION XFMR MFG - MP3107
MicroPace Cables
2049323-001 CABLE STIM EXTENSION FOR MICROPACE, 13M (MP3070-13)
2049324-001 CABLE STIM EXTENSION FOR MICROPACE, 17M (MP3070-17)
2037660-001 CABLE MUX CNTRL FOR MICROPACE, 15M MFG - MP3090
2037661-001 CABLE MUX CNTRL FOR MICROPACE, 27M MFG - MP3146
2037662-001 CABLE SERIAL RS232 EXT MICROPACE, 25M MFG - MP3084-25
6-18 Mac-Lab/CardioLab/Centricity Cardiology INW Service Manual 2021423-503H

Parts List
RMOT
Speakers and Miscellaneous
Part Number Description
RMOT
2022144-002 MOUSE USB OPTICAL SCROLL LIGHTED
2022144-003 MOUSE USB SCROLL BLACK
2022144-004 MOUSE MICROSOFT BASIC OPTICAL SCROLL BLACK USB/PS2
2003927-001 POWER CORD IEC (M) - IEC (F) 8FT
2026972-002 KIT RMOT, CAT5, 100FT W/ ISOLATOR
Part Number Description
2018835-001
2003408-002
2042981-001
2042214-001
2035570-001
RF ABLATION DEVICE INTERFACE KIT
CABLE DB25M TO DB9F, 50 FT, SERIAL
OPTO ISOLATOR KIT, SERIAL DB25
CABLE ASSY SERIAL RF ABLATION INTERFACE
CABLE ASSY SERIAL CRYOCATH INTERFACE
2018971-001 16CH ANALOG OUTPUT CPU INTERFACE OPTION
2007557-002
2010476-001
2007579-001
417335-002
2011355-001
2003410-001
KIT ANALOG OUTPUT BOX W/CABLES
BOX CARDIOLAB/MACLAB ANALOG OUTPUT
CABLE DB 37 MALE/FEMALE 15 FT
ASM, ACQUISITION CABLE 51'
CABLE PHONE-BNC M 10FT RG-174 COAX 20 PC
CABLE BNCM TO BNCM, MIN RG-59 COAX, 30FT
2018216-001 KIT, CARTO™ XP System CABLES
2015944-001 AMPLIFIER TO PIU QUICK CONNECT 10 FT
2018217-001 CABLE RJ45 CROSSOVER CAT5 25FT
2024507-001 IC TO PIU QUICK CONNECT 10FT
2021423-503H Mac-Lab/CardioLab/Centricity Cardiology INW Service Manual 6-19

Parts List
2017900-001 KIT, AUDIO CABLING ACCESSORIES
2011108-002 CABLE AUDIO 50 FT.
2018218-001 STEREO AUDIO SPLITTER 1M-2F
2018219-001 MONO AUDIO ISOLATOR
2018856-001 AUDIBLE INDICATORS 120V
2078970-001 POWERED SPEAKERS, 120V (replaces 2039003-001, 2036113-001, 2029281-001, 2049499-002 and 2026555-001)
2003625-001 CABLE, NEMA 5-15R TO IEC320P, 1FT
2018857-001 AUDIBLE INDICATORS 240V
2078970-001 POWERED SPEAKERS, 240V (replaces 2039004-001, 2036113-002, 2029281-002, 2049499-002 and 2026555-002)
2003625-001 CABLE, NEMA 5-15R TO IEC320P, 1FT
EtCO2
412340-002 SNSR CBL CO2 CAPNOSTAT 3 W/AGND
412554-003 LABEL MODULE CO2 CAPNOSTAT
412832-001 ASSEMBLY MODULE CO2 CAPNOSTAT
418747-001 STARTER KIT EAGLE 3X00 CO2
2032243-004
900553-001
2013427-001
2027759-001
412340-002
9504-016
ASSY SOLAR CAPNO MDL ADPTR CO2 MDL SNSR
ASSY MOD MS C02 CAPNOSTAT
OEM ASSY DASH CAPNOFLEX LF CO2
ASSY SOLAR CAPNOFLEX ADAPTER
SNSR CBL CO2 CAPNOSTAT 3 W/AGND
GAS SCAVENGER 10FT TGB W/CPLG
2008203-001 MOBILE WORKSTAND CART
2018892-003 65 IN WORKSTATION DESK
2018892-002 47 IN WORKSTATION DESK
2018892-001 MOBILE CABINET
2004195-001 ISO Transformer, 120V/220V 50/60HZ 600VA
Part Number Description
6-20 Mac-Lab/CardioLab/Centricity Cardiology INW Service Manual 2021423-503H

A Abbreviations
2021423-503H Mac-Lab/CardioLab/Centricity Cardiology INW Service Manual A-1

Abbreviations
Electrical and IT Abbreviations
Abbreviation Description
AD Active Directory
AC Alternating Current
AE Application Entity
AIT Advanced Intelligent Tape
Com Communication
CMC Crystal Management Console
CNDT Conduit
CPU Central Processing Unit
DAT Digital Audio Tape
DC Direct Current
DICOM Digital Imaging and Communication in Medicine
DMS Data Management System
DOS Disk Operating System
D-Sub hardware connector
dV/dT change in Voltage over Time
EMC Electromagnetic Compatibility
EMI ElectroMagnetic Interference
ESD Electrostatic Discharge
GB gigabytes
HW/SW Hardware/Software
Hz Hertz
IEB Integrated Electronics Box
IEC International Electrotechnical Commission
INW Invasive Net Work formerly known as CardioLink
IT Information Technology
kB Kilobytes
kOhm kilo-ohms
kV Kilovolts
LCD Liquid Crystal Display
A-2 Mac-Lab/CardioLab/Centricity Cardiology INW Service Manual 2021423-503H

Abbreviations
LMT Lab Management Tools
MB Megabytes
MHz Mega Hertz
ML/CL Mac-Lab/CardioLab
MWL Modality Work List
MPPS Modality Performed Procedure Step
ms milliseconds
MSDE MicroSoft Data Engine
mV millivolts
OD Optical Disk
OS Operating System
OU Organizational Unit
PC Personal Computer
pcb Printed Circuit Board
PDF Portable Document Format
RAC-4A Remote Acquisition Case
RAU Remote Acquisition Unit
RF Radio frequency
TCP/IP Internet Protocol
UI User Interface
UPS Uninterruptible Power Supply
VIDMUX Video Multiplexer
V Volts
VPN Virtual Private Network
Abbreviation Description
2021423-503H Mac-Lab/CardioLab/Centricity Cardiology INW Service Manual A-3

Abbreviations
Hospital Staff
Abbreviation Description
CNS cardiac nurse specialist
CRNA certified registered nurse anesthetist
CVT cardiovascular technologist
CVVT certified cardiovascular technologist
DO doctor of osteopathic medicine
DR doctor
LPN licensed practical nurse
LVN licensed vocational nurse
MD doctor of medicine
MD/PhD Physician/Doctor
NA nurse's assistant
NP nurse practitioner
PA physician's assistant
PhD doctor of philosophy
RCIS registered cardiac interventional specialist
RCPT registered cardiopulmonary technologist
RCS registered cardiac sonographer
RCVT registered cardiovascular technologist
RN registered nurse
RRT registered respiratory therapist
RT radiology technologist
RTR radiologic technologist registered cardiovascular
RTRCV radiologic technologist registered cardiovascular
A-4 Mac-Lab/CardioLab/Centricity Cardiology INW Service Manual 2021423-503H
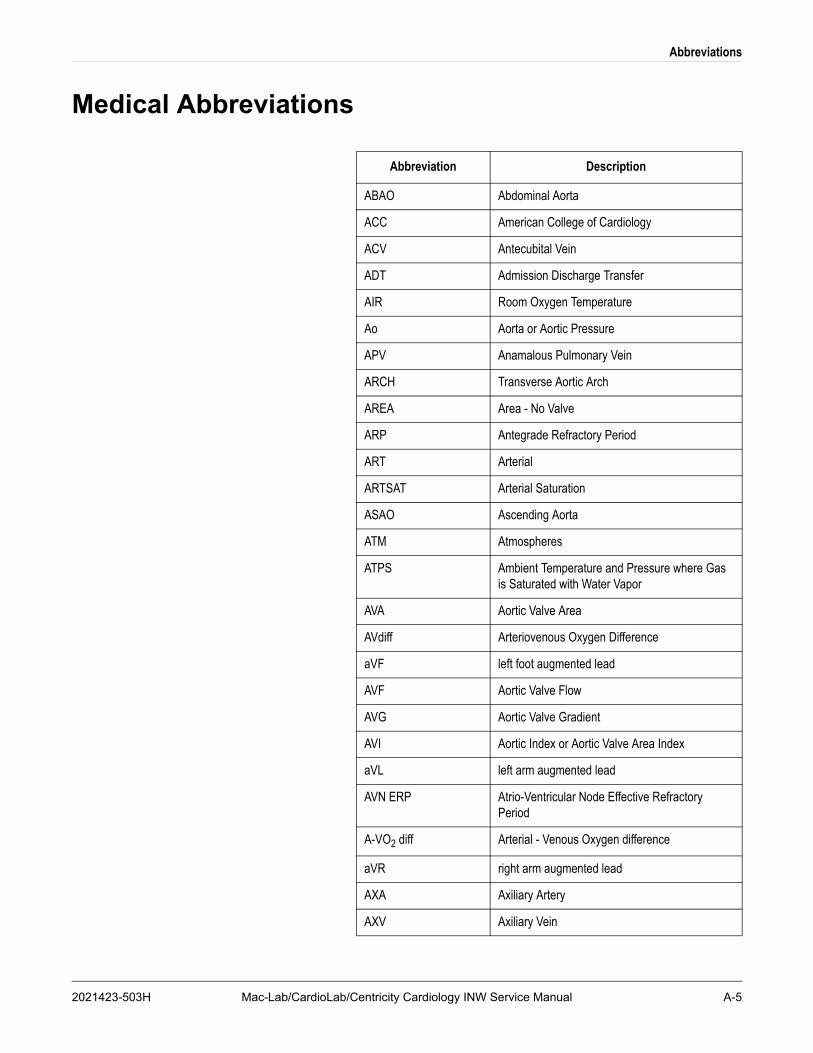
Abbreviations
Medical Abbreviations
Abbreviation Description
ABAO Abdominal Aorta
ACC American College of Cardiology
ACV Antecubital Vein
ADT Admission Discharge Transfer
AIR Room Oxygen Temperature
Ao Aorta or Aortic Pressure
APV Anamalous Pulmonary Vein
ARCH Transverse Aortic Arch
AREA Area - No Valve
ARP Antegrade Refractory Period
ART Arterial
ARTSAT Arterial Saturation
ASAO Ascending Aorta
ATM Atmospheres
ATPS Ambient Temperature and Pressure where Gas is Saturated with Water Vapor
AVA Aortic Valve Area
AVdiff Arteriovenous Oxygen Difference
aVF left foot augmented lead
AVF Aortic Valve Flow
AVG Aortic Valve Gradient
AVI Aortic Index or Aortic Valve Area Index
aVL left arm augmented lead
AVN ERP Atrio-Ventricular Node Effective Refractory Period
A-VO2 diff Arterial - Venous Oxygen difference
aVR right arm augmented lead
AXA Axiliary Artery
AXV Axiliary Vein
2021423-503H Mac-Lab/CardioLab/Centricity Cardiology INW Service Manual A-5

Abbreviations
AZV Azygos Vein
BA Brachial Artery
BIM bioelectric impedance measurement
BP Blood Pressure
BPM Beats Per Minute
BSA Body Surface Area
BV Brachial Vein
C.I. Cardiac Index
C.O. Cardiac Output
CA Common Atrium
CARA Carotid Artery
cath catheterization
CCU Coronary Care Unit
CI Cardiac Index
CIM Catheter Input Modules
Clin Proc Clinical Procedures
CO Cardiac Output
COFICK Cardiac Output by Fick
COL Systemic Collateral Artery to Lungs
Comp Complications
Cond Intvls Conduction Intervals
Cons Sed Conscious Sedation
COR Coronary Artery
COtd Cardiac Output obtained by Thermodilution
COUT Cardiac Output
COUTI Cardiac Index
CPT Current Procedural Terminology
CS Coronary Sinus
CSNRT Corrected Sinus Node Recovery Time
CV Common Ventricle
CVIS Cardiovascular Information System
Abbreviation Description
A-6 Mac-Lab/CardioLab/Centricity Cardiology INW Service Manual 2021423-503H

Abbreviations
CVP Central Venous Pressure
DCS Distal Coronary Sinus
DFP Diastolic Filling Period
DFPm Mitral Diastolic Filling Period
DFPt Tricuspid Diastolic Filling Period
DFT Diastolic Filling Time
Dias Diastolic
dp/dt change in pressure per unit in time
DSAO Descending Aorta
ECG ElectroCardioGram
EDP End Diastolic Point
Emerg Emergency
EP electrophysiology
ER Emergency Room
ERP Effective Refractory Period
ESU Electrosurgical Unit
EtCO2 End tidal CO2
EXP CO2 Expired CO2
FA Femoral Artery
FCa Arterial Content
FCI Fick Cardiac Index
FCLA Fistula Coronary to the Left Atrium
FCLV Fistula Coronary to the Left Ventricle
FCpa Pulmonary Artery Content
FCpv Pulmonary Venous Content
FCRA Fistula Coronary to the Right Atrium
FCRV Fistula Coronary to the Right Ventricle
FCv Venous Content
FEO2 Oxygen of Expired Air
FIO2 Oxygen of Inspired Air
Abbreviation Description
2021423-503H Mac-Lab/CardioLab/Centricity Cardiology INW Service Manual A-7

Abbreviations
FIS Arterial Fistula
FLOW Flow - No Gradient
FRZ Freeze
FV Femoral Vein
Gcm2 Gray-centimeter squared
HABAO High Abdominal Aorta
HAO High Aorta
HARCH High Transverse Aortic Aorch
HASAO High Ascending Aorta
HAZ Hemiazygos Vein
Hb Hemaglobin
HDSAO High Descending Aorta
HEPA Hepatic Artery
HEPV Hepatic Vein
HIPAA Health Insurance Portability and Accountability Act
HIS Hospital Information System
HIVC High Inferior Vena Cava
HLA Hight Left Atrium
HLV Hight Left Ventricle
HLVA High Left Ventricular Apex
HLVIN High Left Ventricle Inflow
HLVOC High Left Ventricle Outflow
HNAO High Neo-Aorta
HR Heart Rate
HRA High Right Atrium
HRAO Heart Rate
HRf Fick Heart Rate
HRU Hybrid Resistance Units
HRV Hight Right Ventricle
HRVA High Right Ventricular Apex
Abbreviation Description
A-8 Mac-Lab/CardioLab/Centricity Cardiology INW Service Manual 2021423-503H

Abbreviations
HRVIN High Right Ventricular Inflow
HRVIN High Right Ventricle Inflow
HRVOT Hight Right Ventricular Outflow
HSVC High Superior Vena Cava
HUA High Umbilical Artery
HUV High Umbilical Vein
HVC High Vena Cava
I/O Intake/output
IABP Intra-Aortic Balloon Pump
IB Inferior Baffle
IC Intra-cardiacs
ICU Intensive Care Unit
IM Internal Mammary
IMA Internal Mammary Artery
INDEX Valve Index or Area Index - No Valve
INNA Innominate Artery
INNV Innominate Vein
INSP CO2 Inspired CO2
IVC Inferior Vena Cava
JX Juxtaposed Appendage
LA Left Atrium
LACV Left Antecubital Vein
LaM Mean Left Atrial Pressure
LAO Low Aorta
LAPV Left Anamolous Pulmonary Vein
LARCH Low Transverse Aortic Arch
LART Left Arterial
LASAO Low Ascending Aorta
LAXA Left Auxiliary Artery
LAXV Left Auxiliary Vein
LAZV Left Azygos Vein
Abbreviation Description
2021423-503H Mac-Lab/CardioLab/Centricity Cardiology INW Service Manual A-9

Abbreviations
LBA Left Brachial Artery
LBAO Low Abdominal Aorta
LBV Left Brachial Vein
LCA Left Common Atrium or Left Coronary Artery
LCARA Left Carotid Artery
LCNDT Left Conduit
LCOR Left Coronary Artery
LCV Left Common Ventricle
LDSAO Low Descending Aorta
LED Light Emitting Diode
LFCLV Left Fistula Coronary to Left Ventricle
LFCRA Left Fistula Coronary to Right Atrium
LFCRV Left Fistula Coronary to Right Ventricle
LFIS Left Arterial Fistula
LFV Left Femoral Vein
LHAZ Left Hemiazygos Vein
LHEPA Left Hepatic Artery
LHEPV Left Hepatic Vein
LIB Left Inferior Baffle
LIMA Left Internal Mammary Artery
LINNA Left Innominate Artery
LINNV Left Innominate Vein
LIVC Low Inferior Vena Cava
LJX Left Juxtaposed Appendage
LLA Low Left Atrium
LLV Low Left Ventricle
LLVA Low Left Ventricular Apex
LLVIN Low Left Ventricle Inflow
LLVOT Low Left Ventricle Outflow
LNAO Left Neo-Aorta
LNPA Left Neo Pulmonary Artery
Abbreviation Description
A-10 Mac-Lab/CardioLab/Centricity Cardiology INW Service Manual 2021423-503H

Abbreviations
LOC Level of Consciousness
LPA Left Pulmonary Artery
LPAB Left Pulmonary Artery Branch
LPACN Left Pulmonary Artery Conduit
LPAVF Left Pulmonary Artery Venous Fistula
LPAW Left Pulmonary Artery Wedge
LPDA Left Patent Ductus Arteriosus
LPV Left Pulmonary Vein
LPVAT Left Pulmonary Venous Atrium
LPVC Left Pulmonary Vein chamber in Cor Triatriatum
LPVCN Left Pulmonary Vein Confluence
LPVW Left Pulmonary Vein Wedge
LRA Low Right Atrium
LRADA Left Radial Artery
LRENV Left Renal Vein
LRFLOW Left to Right Flow
LRFLOWI Left To Right Shunt Flow Index
LRV Low Right Ventricle
LRVA Low Right Ventricular Apex
LRVIN Low Right Ventricular Inflow
LRVOT Low Right Ventricular Outflow
LSBCA Left Subclavian Artery
LSCLV Left Subclavian Vein
LSHNT Left Systemic Pulmonary Shunt
LSP Left Special
LSPHV Left Saphenous Vein
LSVC Low Superior Vena Cava
LTAC Left Truncus Arteriosus Communis
LUA Low Umbilical Artery
LUV Low Umbilical Vein
LV Left Ventricle
Abbreviation Description
2021423-503H Mac-Lab/CardioLab/Centricity Cardiology INW Service Manual A-11

Abbreviations
LVA Left Ventricle Apex
LVC Low Vena Cava
LVEDP Left Ventricular End Diastolic Period
LVEN Left Venous
LVET Left Ventricle Ejection Time
LVFT Left Ventricle Filling Time
LVIN Left Ventricle Inflow
LVOC Left Ventricle Outflow Chamber
LVOT Left Ventricle Outflow
LVRTA Left Vertebral Artery
LVSW Left Ventricular Stroke Work
LVSWI Left Ventricle Stroke Work Index
MAP Mean Arterial Pressure
Meds Medications
MMF Mean Maximum Flow
MRN Medical Record Number
MV Mixed Venous
MVA Mitral Valve Area
MVF Mitral Valve Flow
MVG Mitral Valve Gradient
MVGpcws Mitral Valve Splice Pulmonary Capillary Wedge
MVI Mitral Index or Mitral Valve Area Index
NAO Neo Aortic Arch
NIBP Non-Invasive Blood Pressure
NICU Neuro Intensive Care Unit
NPA Neo Pulmonary Artery
O2 Oxygen
Op Operative
PA Pulmonary Artery
Pa Pressure Artery for FFR
PAB Pulmonary Artery Branch
Abbreviation Description
A-12 Mac-Lab/CardioLab/Centricity Cardiology INW Service Manual 2021423-503H

Abbreviations
PACN Pulmonary Artery Conduit
PAFV Pulmonary Arteovenous Fistula
PAm Mean Pulmonary Arterial Pressure
PAO2 Mixed Venous Oxygen Saturation a/k/a Pulmonary Artery Saturation
PAW Pulmonary Artery Wedge
Pb Barometric Pressure
PCI Percutaneous Coronary Intervention
PCS Proximal Coronary Sinus
PCW Pulmonary Capillary Wedge Pressure
PDA Patent Ductus Arteriosus
PER Period - No Value
PID Patient Identification
PO2 Dissolved Oxygen Tension a/k/a Partial Pressure of Oxygen
PV Pulmonary Vein
PVA Pulmonary Valve Area
PVAT Pulmonary Venous Atrium
PVCH Pulmonary Vein Chamber in Cor Triatriatum
PVCN Pulmonary Vein Confluence
PVF Pulmonary Valve Flow
PVG Pulmonary Valve Gradient
PVGs Pulmonary Valve Splice
PVI Pulmonary Index or Pulmonary Valve Area Index
PVO2 Pulmonary Vein Saturation
PVR Peripheral Vascular Resistance
PVR_SVR ratio Pulmonary Vascular Resistance, Systemic Vascular Ratio
PVR_W Pulmonary Vascular Resistance in Wood Units
PVRI Pulmonary Vascular Resistance Index
PVRI_W Pulmonary Vascular Resistance in Wood Units
PVW Pulmonary Vein Wedge
Abbreviation Description
2021423-503H Mac-Lab/CardioLab/Centricity Cardiology INW Service Manual A-13

Abbreviations
Qeff Effective Pulmonary Flow
Qp Pulmonary Flow
Qp/Qs Flow Ratio
QPEFFI Effective Pulmonary Flow Index
Qpl Pulmonary Flow Index
Qs Systemic Flow
Qsl Systemic Flow Index
R Report
RA Right Atrium
RACV Right Antecubital Vein
Rad Radiology
RADA Radial Artery
RaM Mean Right Atrial Pressure
RAPV Right Anamolous Pulmonary Vein
RART Right Arterial
RAVZ Right Azygos Vein
RAXA Right Auxiliary Artery
RAXV Right Auxiliary Vein
RBA Right Brachial Artery
RCA Right Common Atrium or Right Coronary Artery
RCARA Right Carotid Artery
RCNDT Right Conduit
RCOR Right Coronary Artery
RCV Right Common Ventricle
RENA Renal Artery
RENV Renal Vein
RFA Right Femoral Artery
RFCLA Right Fistula Coronary to Left Atrium
RFCLV Right Fistula Coronary to Left Ventricle
RFCRA Right Fistula Coronary to Right Atrium
RFV Right Femoral Vein
Abbreviation Description
A-14 Mac-Lab/CardioLab/Centricity Cardiology INW Service Manual 2021423-503H

Abbreviations
RHAZ Right Hemiazygos Vein
RHEPA Right Hepatic Artery
RHEPV Right Hepatic Vein
RIB Right Inferior Baffle
RIMA Right Internal Mammary Artery
RINNA Right Innominate Artery
RINNV Right Innominate Vein
RJX Right Juxtaposed Appendage
RLFLOW Right to Left Flow
RLFLOWI Right to Left Shunt Flow Index
RMOT Remote Operators Terminal
RNPA Right Neo Pulmonary Artery
ROI Region of Interest
RPA Right Pulmonary Artery
RPAB Right Pulmonary Artery Branch
RPACN Right Pulmonary Artery Conduit
RPAVF Right Pulmonary Artery Venous Fistula
RPAW Right Pulmonary Artery Wedge
RPDA Right Patent Ductus Arteriosus
RPV Right Pulmonary Vein
RPVAT Right Pulmonary Venous Atrium
RPVC Right Pulmonary Vein chamber in Cor Triatriatum
RPVCN Right Pulmonary Vein Confluence
RPVW Right Pulmonary Vein Wedge
RR Respiratory Rate
RRADA Right Radial Artery
RRENV Right Renal Vein
RRP Retrograde Refractory Period
RSCLV Right Subclavian Vein
RSHNT Right Systemic Pulmonary Shunt
RSP Right Special
Abbreviation Description
2021423-503H Mac-Lab/CardioLab/Centricity Cardiology INW Service Manual A-15

Abbreviations
RSPHV Right Saphenous Vein
RT Room Temperature
RTAC Right Truncus Arteriosus Communis
RVA Right Ventricle Apex
RVEN Right Venous
RVET Right Ventricle Ejection Time
RVFT Right Ventricle Filling Time
RVIN Right Ventricle Inflow
RVOT Right Ventricle Outflow
RVSW Right Ventricular Stroke Work
RVSWI Right Ventricle Stroke Work Index
RVTRA Right Vertebral Artery
SA Systemic Artery
SAm Mean Systemic Arterial Pressure
Sat Saturation
SB Superior Baffle
SBCA Subclavian Artery
SCL Sinus Cycle Length
SCLV Subclavian Vein
SCV Superior Vena Cava
SEP Systolic Ejection Period
Sep/Dfp Systolic Ejection Period divided by Diastolic Filling Period
SEPa Aortic Systolic Ejection Period
SEPp Systolic Ejection Period
SHNT Systemic Pulmonary Shunt
SNRT Sinus Node Recovery Time
SP Special Pressure
SPHV Saphenous Vein
SpO2 Peripheral Oxygen Saturation
Stat statim (Latin for immediately)
Abbreviation Description
A-16 Mac-Lab/CardioLab/Centricity Cardiology INW Service Manual 2021423-503H

Abbreviations
Stim Stimulus
STPD Standard Temperature and Pressure of Dry Gas
STS Society of Thorasic Surgeons
SV Stroke Volume
SVA Systemic Venous Atrium
SVI Stroke Index
SVR Systemic Vascular Resistance
SVR_W Systemic Vascular Resistance in Wood Units
SVRI Systemic Vascular Resistance Index
SVRI_W Systemic Vascular Index in Wood Units
sync synchronis
Sys Systolic
T Room Temperature
TAC Truncus Arteriosus Communis
TDCI Thermodilution Cardiac Index
TDCO Thermodilution Cardiac Output
TPR Total Peripheral Resistance
TPR_TVR ratio Total Pulmonary Resistance, Total Vascular Resistance Ratio
TPR_W Total Pulmonary Resistance, Wood Units
TPRI Total Pulmonary Resistance Index
TPRI_W Total Pulmonary Index, Wood Units
TPVR_W Total Pulmonary Vascular Resistance in Wood Units
TPVRI_W Total Pulmonary Vascular Resistance Index in Wood Units
TRAM Transport Remote Acquisition Monitor
Trig Trigger
TSVR Total System Vascular Resistance
TSVR_W Total Systemic Vascular Resistance in Wood Units
TVA Tricuspid Valve Area
Abbreviation Description
2021423-503H Mac-Lab/CardioLab/Centricity Cardiology INW Service Manual A-17

Abbreviations
Miscellaneous Abbreviations
TVF Tricuspid Valve Area
TVG Tricuspid Valve Gradient
TVGs Tricuspid Valve Splice
TVI Tricuspid Index or Tricuspid Valve Area Index
TVR Total Vascular Resistance
TVRI Total Vascular Resistance Index
TVRI_W Total Vascular Resistance Index in Wood Units
UA Umbilical Artery
UV Umbilical Vein
VA Valve Area
VC Vena Cava
VeATPS Minute volume at ATPS
VEN Venous
VENSAT Venous Saturation
VeSTPD Minute volume
VeSTPD Volume of Gas (Corrected)
VF Valve Flow or Ventricular Fibrillation
VGs Valve Splice
VI Valve Index
VO2 Oxygen Consumption
VRTA Vertebral Artery
WCT Wilson Central Terminal
WU Wood Units
Abbreviation Description
Abbreviation Description
3-D Three Dimensional
Accts Accounts
C Centigrade
A-18 Mac-Lab/CardioLab/Centricity Cardiology INW Service Manual 2021423-503H
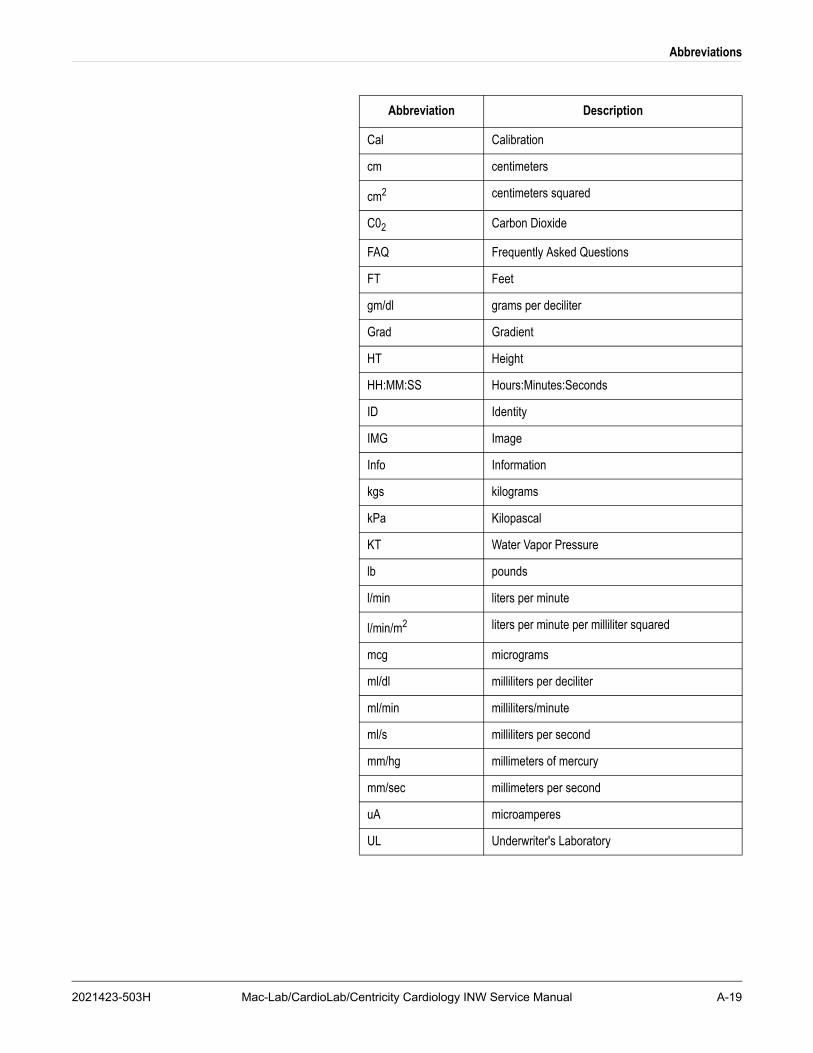
Abbreviations
Cal Calibration
cm centimeters
cm2 centimeters squared
C02 Carbon Dioxide
FAQ Frequently Asked Questions
FT Feet
gm/dl grams per deciliter
Grad Gradient
HT Height
HH:MM:SS Hours:Minutes:Seconds
ID Identity
IMG Image
Info Information
kgs kilograms
kPa Kilopascal
KT Water Vapor Pressure
lb pounds
l/min liters per minute
l/min/m2 liters per minute per milliliter squared
mcg micrograms
ml/dl milliliters per deciliter
ml/min milliliters/minute
ml/s milliliters per second
mm/hg millimeters of mercury
mm/sec millimeters per second
uA microamperes
UL Underwriter's Laboratory
Abbreviation Description
2021423-503H Mac-Lab/CardioLab/Centricity Cardiology INW Service Manual A-19

Abbreviations
A-20 Mac-Lab/CardioLab/Centricity Cardiology INW Service Manual 2021423-503H


GE Medical SystemsInformation Technologies, Inc.8200 West Tower AvenueMilwaukee, WI 53223 USATel: + 1 414 355 5000
1 800 558 7044 (US Only)Fax: + 1 414 355 3790
GE Medical SystemsInformation Technologies GmbHMunzinger Straße 5D-79111 FreiburgGermanyTel: + 49 761 45 43 - 0Fax: + 49 761 45 43 - 233
Asia HeadquartersGE Medical SystemsInformation Technologies Asia; GE (China) Co., Ltd.No. 1 Huatuo Road, Zhangjiang Hi-tech Park Pudong Shanghai, People’s Republic of China 201203Tel: + 86 21 3877 7888Fax: + 86 21 3877 7402
www.gehealthcare.com
Related Documents