LU-1 Effective date 6/1/99 LUMINETTE ® PRIVACY SHEERS LUMINETTE PRIVACY SHEERS ® SHEER BRILLIANCE An elegant combination of sheer fabric with soft fabric vanes, Luminette Privacy Sheers provide all the radiance of a sheer … and privacy. Unmatched Light Control The soft fabric vanes create sheer magic with the twist of a wand. By rotating the vanes from completely open to completely closed, or to any increment in between, your customers can enjoy a level of light control never before possible in a sheer. Two Sheer Face Fabrics The face fabric is available in two distinct styles. Angelica is a traditional elegant sheer, while Linéa is a soft texture which accents the vertical lines of the product. Both fabrics are 100% polyester for durability and easy care. Each fabric style has its own palette of 12 colors that range from neutral to soft, subtle tones. The 100% polyester vanes are a neutral white, providing a uniform appearance to the home’s exterior (Fig. 1). The vanes are permanently bonded to the rear of the face fabric. Finished Fabric Header The sheer fabric is topped by a tailored 5" fabric header, which is an integral part of the softly sculptured fabric folds (Fig. 2). This unique design conceals the operating mechanism when the sheer is drawn closed. Bottom Finish Luminette sheers feature a crisp, neat bottom finish that is designed to resist fraying. Rear view of fabric showing neutral white vanes. Fig. 1 A whole new view on privacy. • Luminette Privacy Sheers ® allow your customers to enjoy the beauty of sheers without sacrificing privacy. • Sheer face fabrics beautifully filter the light and neutral white fabric vanes rotate for privacy. • Operation is easy using the innovative combination wand and cord. • Experience a level of light control never before possible in a sheer. • Ideal for most window or door openings in virtually any decor. • Remarkably durable and designed to stay that way. CONTENTS Product Summary . . . . . . . . . . . . . . LU-1 Pricing . . . . . . . . . . . . . . . . . . . . . . LU-2 Product Specifications . . . . . . . . . . . LU-3 Measuring Guidelines . . . . . . . . . . . LU-7 Installation . . . . . . . . . . . . . . . . . . LU-10 Care & Warranty . . . . . . . . . . . . . LU-14 Luminette Fabric by the Yard . . . . LU-17 A tailored 5" header tops the sheer fabric. Fig. 2

Welcome message from author
This document is posted to help you gain knowledge. Please leave a comment to let me know what you think about it! Share it to your friends and learn new things together.
Transcript

LU-1Effective date 6/1/99
LUMINETTE®
PRIVACY SHEERS
LUMINETTE
PRIVACY SHEERS®
SHEER BRILLIANCEAn elegant combination of sheerfabric with soft fabric vanes,Luminette Privacy Sheers provideall the radiance of a sheer … and privacy.
Unmatched Light ControlThe soft fabric vanes create sheermagic with the twist of a wand.By rotating the vanes from completely open to completelyclosed, or to any increment inbetween, your customers canenjoy a level of light control never before possible in a sheer.
Two Sheer Face FabricsThe face fabric is available in two distinct styles. Angelica is a
traditional elegant sheer, whileLinéa is a soft texture whichaccents the vertical lines of theproduct. Both fabrics are 100%polyester for durability and easy care.
Each fabric style has its ownpalette of 12 colors that rangefrom neutral to soft, subtle tones.The 100% polyester vanes are a neutral white, providing a uniform appearance to the home’s exterior (Fig. 1). The vanes arepermanently bonded to the rear of the face fabric.
Finished Fabric HeaderThe sheer fabric is topped by atailored 5" fabric header, which is an integral part of the softly
sculptured fabric folds (Fig. 2).This unique design conceals theoperating mechanism when thesheer is drawn closed.
Bottom Finish Luminette sheers feature a crisp,neat bottom finish that isdesigned to resist fraying.
Rear view of fabric showing neutral white vanes.
Fig. 1
A whole new view on privacy.
• Luminette Privacy Sheers® allow your customers to enjoythe beauty of sheers without sacrificing privacy.
• Sheer face fabrics beautifully filter the light and neutralwhite fabric vanes rotate for privacy.
• Operation is easy using the innovative combinationwand and cord.
• Experience a level of light control never before possiblein a sheer.
• Ideal for most window or door openings in virtually any decor.
• Remarkably durable and designed to stay that way.
C O N T E N T SProduct Summary. . . . . . . . . . . . . . LU-1Pricing . . . . . . . . . . . . . . . . . . . . . . LU-2Product Specifications . . . . . . . . . . . LU-3Measuring Guidelines . . . . . . . . . . . LU-7
Installation . . . . . . . . . . . . . . . . . . LU-10Care & Warranty . . . . . . . . . . . . . LU-14Luminette Fabric by the Yard . . . . LU-17
A tailored 5" header tops the sheer fabric.
Fig. 2

LU-3Effective date 6/1/99
LUMINETTE®LUM
INETTEPRIVACY SHEERS
®
Unobstructed view when sheers are stackedback.
Soft, diffused light when sheers are drawnclosed and vanes are open.
Partially private view when vanes are slightly rotated.
Complete privacy when vanes are closed. Lighttransmission through the closed sheer is theequivalent of a semi-opaque honeycomb fabric.
SofTrak™ SystemThe exclusive SofTrak system from Hunter Douglas is designed forreliability and ease of operation.The scissors on top of the sleek,low-profile rod expand (Fig. 3a)or compress (Fig. 3b) when thecord is pulled to cover or uncoverthe window opening. The scissorsensure consistent vane spacing.
The SofTrak system also includes a mechanism for vane rotation.Turning the wand rotates the pinion clips on the fabric carriers toopen and close the vanes (Fig. 4).The vanes can be rotated from fully closed in one direction to fully closed in the other, or can bestopped at any position in between.
Combination Wand and CordOur innovativecombinationwand and cordallows your customer to usea single controlto traverse thefabric or rotatethe vanes (Fig. 5).
Automatic Vane AlignmentThe SofTrak system also featuresautomatic vane alignment. If avane becomes misaligned, it caneasily be repositioned. Using thewand, simply rotate the vanes first to one side, and then to theother to realign the vanes.
Design and Mounting VersatilityLuminette sheers are available inside stack or split stack designs.Side stacks may be specified todraw open to the left or right side;split stacks draw open to bothsides equally (Fig. 6). Either typeof design can be mounted insideor outside the opening.
Wand PlacementWith side stack designs, the wandmust be placed on the side wherethe fabric stacks. With split stackdesigns, the wand may be placedon either side.
P R O D U C T S P E C I F I C A T I O N S
The scissors compress to uncover the opening.
TRAVERSEFABRIC
ROTATEVANES
LEFT STACK RIGHT STACK
SPLIT STACK
Fig. 3a
Fig. 3b
Fig. 5
Fig. 6
The scissors expand tocover the opening.
SCISSOR ARMS
SOFTRAK ROD
FABRIC CARRIER
PINION CLIP
SHEER FABRICATTACHED TOFRONT EDGE
OF VANE
SOFT FABRICVANE
Fig. 4

LUMINETTE
LU-4 Effective date 6/1/99
®LU
MIN
ETTE
PRIV
ACY
SHEE
RS®
APPLICATIONS• Rectangular windows or doors
SIZE STANDARDS• Minimum ordered width: 12"
• Maximum ordered width: 192"Two side stacks (one left and oneright) may be mounted side by side to achieve a maximum widthof 384" in a configuration thatsimulates a split stack design.
• Maximum ordered width, end mount: 36"
• Minimum ordered height: 24"
• Maximum ordered height: 120"
MOUNTINGREQUIREMENTSInside Mount• Minimum casement depth: 1"
(Fig. 7a)
• Minimum casement depth, fullyrecessed: 61⁄4" (Fig. 7b)
Outside Mount• Minimum mounting surface
height: 11⁄8" (Fig. 7c)
• Recommended width overlap:4" per side – Important!
• Recommended bottom overlapwhen product does not hang tofloor: 4"
• Recommended bottom clearancewhen product hangs to floor: 1⁄2"(deduct before ordering)
End Mount• Minimum mounting surface
depth: 11⁄4"
WAND/CORD DROPSStandard Wand/Cord DropsStandard drops are provided asshown unless an optional drop is specified. Wand/cord drop is measured from top of fabric tobottom of wand.
Optional Wand/Cord Drops• Any standard drop may be
specified (no surcharge)
• Non-standard drops may bespecified at 30", 60", 80", 90",98", 120" or 144"
• Non-standard drops: $46 surcharge per sheer
• Any optional drop must bespecified on the order formunder “Special Instructions”
FINISHED DIMENSIONSAll deductions shown are taken atthe factory (See Fig. 8). Widthand height may vary ± 1⁄8".
Inside Mount• Fabric width: 1⁄4" less than
ordered width
• Headrail width– Side stack: 11⁄4" less than
ordered width– Split stack: 3⁄4" less than ordered width
• Fabric height: 3⁄4" less thanordered height (1⁄4" for top clear-ance, 1⁄2" for bottom clearance)
Outside Mount• Fabric width: Ordered width
• Headrail width– Side stack: 1" less than
ordered width– Split stack: 1⁄2" less than
ordered width
• Fabric height: 1⁄4" less thanordered height for top clearance
End Mount• Fabric width: 1⁄4" less than
ordered width
• Headrail width– Side stack: 11⁄4" less than
ordered width– Split stack: 3⁄4" less than
ordered width
• Fabric height: 1⁄4" less thanordered height for top clearance
1" MINIMUM CASEMENT DEPTH REQUIRED FOR BRACKET ATTACHMENT VANE
SOFTRAK SYSTEM
BRACKET
INSIDE MOUNT
1"
OUTSIDE MOUNT
11/8"
11/8" MINIMUM FLAT VERTICALSURFACE REQUIRED FOR BRACKET ATTACHMENT
INSIDE MOUNT – FULLY RECESSED
61/4" MINIMUM CASEMENT DEPTH
FRONT OF FABRIC(WHEN STACKED)
P R O D U C T S P E C I F I C A T I O N S
Ordered StandardHeight of Wand/Cord
Sheer Drop
24" - 41" 23"411⁄8" - 84" 40"
841⁄8" - 103" 50"1031⁄8" - 120" 70"
Fig. 7c
Fig. 7bFig. 7a

LU-5Effective date 6/1/99
LUMINETTE®LUM
INETTEPRIVACY SHEERS
®
RETURN GAPThe return gap is the distancefrom the rear of the end treatmentto the rear of the installationbracket (Fig. 8).
Side Stack• Active (wand/cord) end: 2"
• Passive (traveling) end: 11⁄2"
Split Stack• Active sides: 2"
TILTBACKThe Luminette fabric is attachedto the pinion clips in the center of the vanes to provide completeprivacy when the vanes are fullyrotated in either direction.
The additional weight of the facefabric in front causes the sheer
to hang at a slight angle, called“tiltback” (Fig. 9). This is aninherent characteristic of theproduct.
ENERGY EFFICIENCYAngelica Fabric• Winter R-value, double glazing: 2.3
• Summer shading coefficient,double glazing: 0.36
• Closed vane UV reduction: 98%
• Open vane UV reduction: 56%
• Sound absorption (NRC): 0.45
Linéa Fabric• Winter R-value, double
glazing: 2.4
• Summer shading coefficient,double glazing: 0.33
• Closed vane UV reduction: 99%
• Open vane UV reduction: 67%
• Sound absorption (NRC): 0.50
P R O D U C T S P E C I F I C A T I O N S
FINISHED HEADRAIL WIDTH
FINISHED FABRIC WIDTH
1/4"3/4"
11/2"RETURN
GAP
2"RETURN
GAP
Fig. 8
This illustration shows the finished dimensionsand return gaps for a right side stack design.With a split stack design (two active ends), thedifference between the finished fabric width andthe finished headrail width is 1⁄4" at each end, andthe return gap is 2" at each end.
TILTBACK
Fig. 9
Right Side StackFinished Dimensions and Return Gaps
PASSIVEEND ACTIVE
END

LUMINETTE®LU
MIN
ETTE
PRIV
ACY
SHEE
RS®
P R O D U C T S P E C I F I C A T I O N S
The innovative combinationwand and cord is easy to operate and ensures a full range of light control.
The proprietary SofTrak system, concealedbehind the fabric header, ensures reliabilityand consistent vane spacing.
Fabric header
This technical drawing shows howLuminette Privacy Sheers actually work.
Optionalceiling mountbracket
Installationbracket
Optionalspacerblock
Optionalextensionbracket
LU-6 Effective date 6/1/99
LU-7Effective date 6/1/99
LUMINETTE®LUM
INETTEPRIVACY SHEERS
®
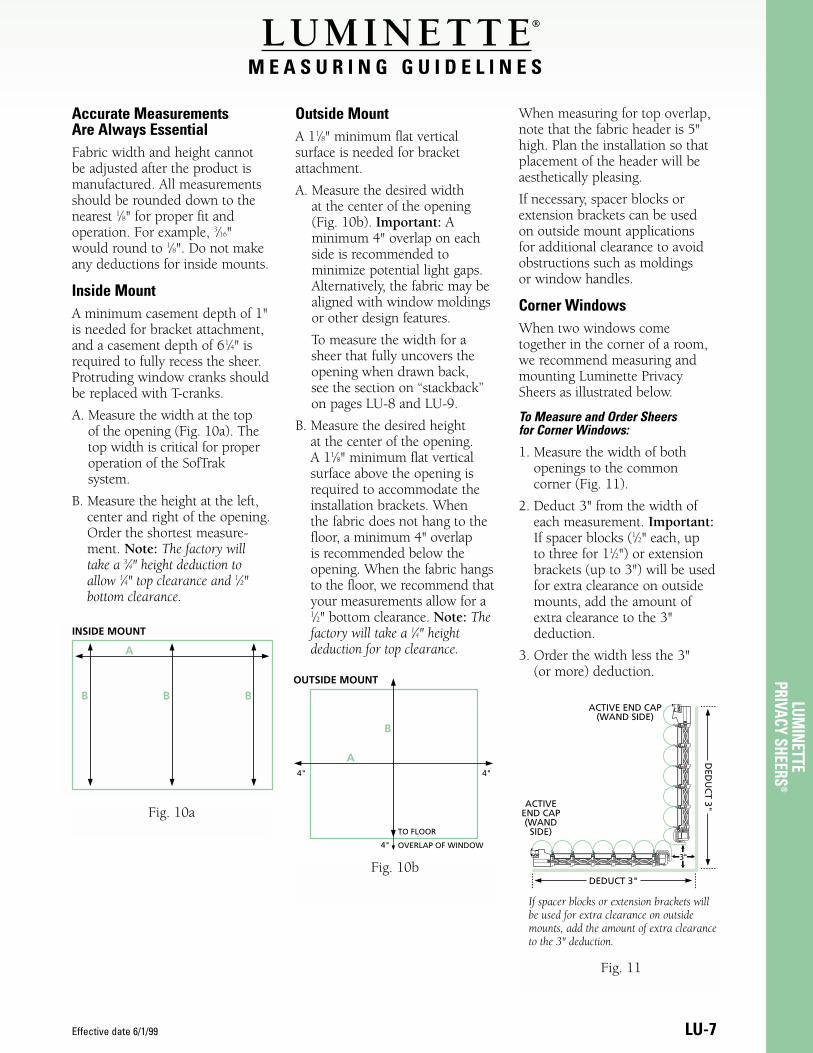
Accurate Measurements Are Always Essential Fabric width and height cannot be adjusted after the product ismanufactured. All measurementsshould be rounded down to thenearest 1⁄8" for proper fit and operation. For example, 3⁄16"would round to 1⁄8". Do not makeany deductions for inside mounts.
Inside MountA minimum casement depth of 1"is needed for bracket attachment,and a casement depth of 61⁄4" isrequired to fully recess the sheer.Protruding window cranks shouldbe replaced with T-cranks.
A. Measure the width at the top of the opening (Fig. 10a). Thetop width is critical for properoperation of the SofTrak system.
B. Measure the height at the left,center and right of the opening.Order the shortest measure-ment. Note: The factory willtake a 3⁄4" height deduction toallow 1⁄4" top clearance and 1⁄2"bottom clearance.
Outside MountA 11⁄8" minimum flat vertical surface is needed for bracketattachment.
A. Measure the desired width at the center of the opening(Fig. 10b). Important: A minimum 4" overlap on eachside is recommended to minimize potential light gaps.Alternatively, the fabric may bealigned with window moldingsor other design features.
To measure the width for asheer that fully uncovers theopening when drawn back, see the section on “stackback”on pages LU-8 and LU-9.
B. Measure the desired height at the center of the opening. A 11⁄8" minimum flat verticalsurface above the opening isrequired to accommodate theinstallation brackets. When the fabric does not hang to thefloor, a minimum 4" overlap is recommended below theopening. When the fabric hangsto the floor, we recommend thatyour measurements allow for a1⁄2" bottom clearance. Note: Thefactory will take a 1⁄4" heightdeduction for top clearance.
When measuring for top overlap,note that the fabric header is 5"high. Plan the installation so thatplacement of the header will beaesthetically pleasing.
If necessary, spacer blocks orextension brackets can be used on outside mount applications for additional clearance to avoidobstructions such as moldings or window handles.
Corner WindowsWhen two windows come together in the corner of a room,we recommend measuring andmounting Luminette PrivacySheers as illustrated below.
To Measure and Order Sheers for Corner Windows:
1. Measure the width of bothopenings to the common corner (Fig. 11).
2. Deduct 3" from the width ofeach measurement. Important:If spacer blocks (1⁄2" each, up to three for 11⁄2") or extensionbrackets (up to 3") will be usedfor extra clearance on outsidemounts, add the amount ofextra clearance to the 3" deduction.
3. Order the width less the 3" (or more) deduction.
Fig. 10a
M E A S U R I N G G U I D E L I N E S
INSIDE MOUNT
A
B B B
Fig. 10b
OUTSIDE MOUNT
A
B
TO FLOOR
4" 4"
4" OVERLAP OF WINDOW
DEDUCT 3"
DED
UC
T 3"
ACTIVE END CAP(WAND SIDE)
ACTIVEEND CAP(WAND SIDE)
3"
Fig. 11
If spacer blocks or extension brackets willbe used for extra clearance on outsidemounts, add the amount of extra clearanceto the 3" deduction.

LUMINETTE
LU-8 Effective date 6/1/99
®LU
MIN
ETTE
PRIV
ACY
SHEE
RS®
Bay WindowsWith bay windows, locations of the sheers are marked as illustrated below, and the orderedwidth is measured using themarks (Fig. 12).
To Measure Sheers for Bay Windows:
1. Cut two pieces of poster board31⁄8" wide by 12" long.Important: If spacer blocks (1⁄2" each, up to three for 11⁄2")or extension brackets (up to 3")will be used for extra clearanceon outside mounts, add theamount of extra clearance tothe 31⁄8" width dimension of theposter board before measuring.
2. Place the strips in the left anglefirst, and bring them togetheruntil the front corners of theposter board meet. Mark points“A” and “B”.
3. Repeat this step for the rightside angle, marking points “C” and “D”.
4. Measure between points “B” and “C” to obtain the width measurement of the center sheer.
5. Measure from point “A” outward to the desired width to obtain the width measurement of the left sheer.
6. Measure from point “D” outward to the desired width to obtain the width measurement of the right sheer.
Side-by-Side (Abutted) SheersWhen two or more sheers areordered for a side-by-side installa-tion, where the sheers will abut, use the guidelines below to allowfor enough clearance between therods for proper operation whileminimizing the light gap betweenthe sheers.
To Measure and Order Two or More Sheers for a Side-By-Side Installation:
1. Measure the desired width ofeach sheer.
2. For outside mounts, order eachsheer 1⁄8" less than its measuredwidth to allow space for theSofTrak system to operate properly. No special deductionsare necessary for inside mountapplications.
Measuring for Stackback(Outside Mounts Only)For a window or door opening to be fully uncovered when anoutside mounted Luminette sheeris drawn open, the width of thefabric stack(s), called “stackback,”must be taken into account. TheStackback Chart is your tool toproperly order sheers for fullyuncovered openings.
This chart can also be used toalign the fabric stack(s) withmoldings or other design features.The key is to measure the openingfor the total desired uncoveredwidth. Important: With side stackdesigns, the uncovered widthmeasurement should include theamount of overlap desired on theside opposite the fabric stack. Aminimum of 4" is recommended.
Understanding the Stackback ChartThe Stackback Chart at rightincludes ranges of measurementsfor “Uncovered Width.” Beginusing the chart by locating your
measurement in one of the rangeslisted for either a side stack design(top chart) or split stack design(bottom chart). For example, for aside stack width of 81", locate the80"-821⁄4" range in the top chart.
The column to the right of“Uncovered Width” shows the“Stackback” width for the rangesof uncovered width. To determinewhat your ordered width shouldbe, add the amount of stackbackto your uncovered width mea-surement.
For example, if your “UncoveredWidth” for a side stack design is72", the “Stackback” amount is201⁄4". Add these two amountstogether to determine the orderedwidth. In this case, the correctordered width is 921⁄4".
For a split stack design, if the“Uncovered Width” is 72", the“Stackback” amount is 115⁄8" foreach panel, or 231⁄4" total. Thus,the correct ordered width is 951⁄4".
Stackback ExampleThe customer wants her 77" widepatio doors to be fully uncoveredwhen her left stack Luminettesheer is drawn open. To minimizeany light gap on the side oppositethe fabric stack when the sheer isdrawn closed, she wants 4" ofoverlap on the right side.
1. Opening Width + Overlap onRight Side: 77" + 4" = 81"
2. “Uncovered Width” Range forSide Stack Units: 80" - 821⁄4"
3. “Stackback” for Side StackUnits: 221⁄4"
4. The correct ordered width isthe uncovered width plus thestackback: 81" + 221⁄4" = 1031⁄4"
M E A S U R I N G G U I D E L I N E S
B C DA
POSTER BOARD STRIPS
Fig. 12
If spacer blocks or extension brackets will beused for extra clearance on outside mounts,add the amount of extra clearance to the31⁄8" width dimension of the poster boardbefore measuring.

LU-9Effective date 6/1/99
LUMINETTE®LUM
INETTEPRIVACY SHEERS
®
M E A S U R I N G G U I D E L I N E S
* The maximum uncovered width of split stack Luminette Privacy Sheers is 1513/4".
* The maximum uncovered width of side stack Luminette Privacy Sheers is 1541/4".
Uncovered StackbackWidth Per Panel
23/4-71/8 45/8 (x2)71/4-117/8 51/8 (x2)12-165/8 55/8 (x2)
163/4-213/8 61/8 (x2)211/2-261/8 65/8 (x2)261/4-303/4 71/8 (x2)307/8-351/2 75/8 (x2)355/8-401/4 81/8 (x2)403/8-45 85/8 (x2)
451/8-493/4 91/8 (x2)497/8-541/2 95/8 (x2)545/8-591/4 101/8 (x2)593/8-637/8 105/8 (x2)64-685/8 111/8 (x2)
683/4-733/8 115/8 (x2)731/2-781/8 121/8 (x2)
Uncovered StackbackWidth Per Panel
781/4-827/8 125/8 (x2)83-875/8 131/8 (x2)
873/4-921/4 135/8 (x2)923/8-97 141/8 (x2)
971/8-1013/4 145/8 (x2)1017/8-1061/2 151/8 (x2)1065/8-1111/4 155/8 (x2)1113/8-116 161/8 (x2)
1161/8-1205/8 165/8 (x2)1203/4-1253/8 171/8 (x2)1251/2-1301/8 175/8 (x2)1301/4-1347/8 181/8 (x2)135-1395/8 185/8 (x2)
1393/4-1443/8 191/8 (x2)1441/2-149 195/8 (x2)
1491/8-1513/4* 201/8 (x2)
UncoveredWidth Stackback
53/4-61/2 61/465/8-87/8 63/49-111/4 71/4
113/8-135/8 73/4133/4-16 81/4
161/8-183/8 83/4181/2-203/4 91/4207/8-231/8 93/4231/4-251/2 101/4255/8-277/8 103/428-301/4 111/4
303/8-325/8 113/4323/4-347/8 121/435-371/4 123/4
373/8-395/8 131/4393/4-42 133/4
421/8-443/8 141/4441/2-463/4 143/4467/8-491/8 151/4491/4-511/2 153/4515/8-537/8 161/454-561/4 163/4
563/8-585/8 171/4583/4-61 173/4
611/8-631/4 181/4633/8-655/8 183/4653/4-68 191/4
681/8-703/8 193/4701/2-723/4 201/4727/8-751/8 203/4751/4-771/2 211/4775/8-797/8 213/4
UncoveredWidth Stackback
80-821/4 221/4823/8-845/8 223/4843/4-87 231/4
871/8-893/8 233/4891/2-913/4 241/4917/8-94 243/4
941/8-963/8 251/4961/2-983/4 253/4987/8-1011/8 261/41011/4-1031/2 263/41035/8-1057/8 271/4106-1081/4 273/4
1083/8-1105/8 281/41103/4-113 283/4
1131/8-1153/8 291/41151/2-1173/4 293/41177/8-1201/8 301/41201/4-1223/8 303/41221/2-1243/4 311/41247/8-1271/8 313/41271/4-1291/2 321/41295/8-1317/8 323/4132-1341/4 331/4
1343/8-1365/8 333/41363/4-139 341/4
1391/8-1413/8 343/41411/2-1433/4 351/41437/8-1461/8 353/41461/4-1481/2 361/41485/8-1507/8 363/4151-1531/8 371/4
1531/4-1541/4* 373/4
Stackback Chart – Outside Mounts Only Stackback Measuring Procedures
Follow these four easy steps:
1. Measure the desired uncovered width, rounding yourmeasurement down to the nearest 1⁄8". With sidestack units, include in this measurement the desiredamount of overlap on the side opposite the fabricstack. A minimum of 4" is recommended.
2. Locate your measurement from Step 1 in one of theranges in the “Uncovered Width” column on theStackback Chart for either a side stack or split stackdesign.
3. Follow the line across to find the correct “Stackback”for that range.
4. Add the stackback to the desired uncovered width todetermine the correct width to order.
After determining the correct width to order, confirmthat there is enough room to outside mount the sheer atthat width.
SPLIT STACKNOT MEASURED FOR STACKBACK
SPLIT STACKMEASURED FOR STACKBACK
STACKBACK STACKBACK
ORDERED WIDTH
UNCOVERED WIDTH
STACKBACKSTACKBACK
ORDERED WIDTH
UNCOVERED WIDTH
STACKBACK
ORDERED WIDTH
UNCOVERED WIDTH
SIDE STACKNOT MEASURED FOR STACKBACK
STACKBACK
ORDERED WIDTH
UNCOVERED WIDTH
SIDE STACKMEASURED FOR STACKBACK
SIDE STACK
SPLIT STACK

Complete installation instructionsare included with each order of Luminette Privacy Sheers. The purpose of the followingguidelines is to help you discussbasic installation considerationswith your customers.
Three Basic StepsThere are three basic steps in theinstallation process:
1. Mounting the installationbrackets;
2. Attaching the SofTrak system to the installation brackets; and
3. Attaching the fabric panel(s) to the SofTrak rod.
Each Luminette sheer includes all needed components andmounting hardware. The number of installation bracketsand other types of mountinghardware depends upon unitwidth, as shown in the tablebelow.
Phillips hexhead screws are provided with the installationbrackets. Wall anchors or plugsare required when mounting toplaster, drywall, concrete, brick or tile.
Bracket SpacingThe installation brackets on the right and left ends (Fig. 13)should be positioned on the
mounting surface so that theircenterlines will be located 31⁄2" from the ends of the SofTrak rod.If more than two brackets arerequired, space the additionalbracket(s) evenly between the end brackets.
Mounting the Installation Brackets or Ceiling Mount BracketsInstallation brackets are attachedto the mounting surface in twoapplications:
• Outside mounts with no added clearance
• Outside mounts withspacer blocks
Ceiling mount brackets areattached to the mounting surfacein four applications:
• Outside mounts with extension brackets
• Inside mounts• Ceiling mounts• End mounts
After the ceiling mount bracketsare attached, installation bracketsare snapped into them.
Use a carpenter’s level to checkthat the bottoms of the bracketsare level on an outside mount,and that the mounting surface is level on an inside mount orceiling mount.
Outside Mount ApplicationsWith outside mounts, installationbrackets are attached directly tothe mounting surface. A flat vertical surface at least 11⁄8" high is required (Fig. 14). The bracketsmust be level and aligned at the
same height. Note: When installed,the top of the fabric header will beeven with the top of the brackets, notincluding the tab.
The tab serves as a spacer to pre-vent the sheer from being mount-ed too closely to the ceiling. Ifdesired, the tab may be broken offafter bracket attachment.
Spacer BlocksSpacer blocks can be used withoutside mounts to project theinstallation bracket away from themounting surface when additional clearance is needed (Fig. 15). Each spacer block adds 1⁄2" clear-ance. A maximum of three blocksmay be used to gain a total of 11⁄2".
LUMINETTE
LU-10 Effective date 6/1/99
®LU
MIN
ETTE
PRIV
ACY
SHEE
RS®
I N S T A L L A T I O N
11/8"
11/8" MINIMUM FLATVERTICAL SURFACE
REMOVABLETAB
31/2" 31/2"SPACE EVENLY
SOFTRAK ROD
SPACE EVENLY CEILINGMOUNT
BRACKET
EXTENSIONBRACKET
Unit Number of Width Brackets
Up to 44" 2
441/8" - 81" 3
811/8" - 118" 4
1181/8" - 155" 5
1551/8" - 192" 6
SPACERBLOCKS
Fig. 13
Fig. 14
Fig. 15
Fig. 16
Important: For proper opera-tion, it is essential that theSofTrak rod be mounted level.

Extension BracketsCeiling mount brackets are usedwith extension brackets to projectinstallation brackets up to 3" fromthe mounting surface (Fig. 16).
The tops of the extension bracketsmust be level and aligned at thesame height. Before mounting theextension brackets, any unneededlength may be cut off along theindentations cast between each set of two holes.
If possible, the screws provided toattach the ceiling mount bracketsshould be mounted pointingdown for best appearance.
Inside Mount and CeilingMount ApplicationsTo attach the ceiling mount brackets, the flat surface of thesoffit must be at least 1" deep. To fully recess the sheer inside the opening, the flat surface mustbe at least 61⁄4" deep (Fig. 17).
If the mounting surface is notlevel, shims must be used whenattaching the ceiling mount brackets to ensure level mountingof the SofTrak rod.
End Mount ApplicationsEnd mounting (Fig. 18) is usedwhen conventional mountingtechniques will not work – forexample, in a window with anarch-shaped top.
Extension brackets are mountedto the sides of the window opening, which must be at least11⁄4" wide. Ceiling mount bracketsare then attached to the extensionbrackets, and installation bracketsare snapped into the ceilingmount brackets.
If possible, the screws provided toattach the ceiling mount bracketsto the extension brackets shouldbe mounted pointing down forbest appearance.
Snapping Installation Bracketsinto Ceiling Mount BracketsBreak off the small tab at the top ofeach installation bracket (Fig. 19a).Then fit the mounting holes on theinstallation bracket over the ovaltabs on the ceiling mount bracket(Fig. 19b). While pushing the
installation bracket onto the ovaltabs, press down until the bracketsnaps into the rectangular tabs atthe bottom of the ceiling mountbracket (Fig. 19c).
If removal is necessary, push upon the installation bracket torelease it.
Installing the SofTrak SystemGrooves on the back of theSofTrak rod are designed to snap into the installation brackets. The front of the rod (the side withthe fabric carriers) is tilted up sothat the top groove fits onto eachinstallation bracket’s locking tab(Fig. 20a). With the groove inplace on all the brackets, the rodis tilted down to level it so that its bottom groove fits into the bottom tabs on the installationbrackets (Fig. 20b).
The rod is then locked in positionby tightening the locking tabscrew on the bottom of eachbracket, just until it is snug.
LU-11Effective date 6/1/99
LUMINETTE®LUM
INETTEPRIVACY SHEERS
®
I N S T A L L A T I O N
BOTTOMTAB
CEILING MOUNTBRACKET
BRACKETASSEMBLY
INSTALLATIONBRACKET
MOUNTING HOLES
REMOVE TABOVAL TABS
1"
61/4" MINIMUMFULLY RECESSED DEPTH
1" MINIMUMINSIDE MOUNTING
DEPTH
Fig. 17
Fig. 19a Fig. 19b Fig. 19c
Important: Before tightening themounting screws, the front edgesof the brackets must be aligned.This ensures secure installationand reliable operation.
EXTENSIONBRACKET
CEILINGMOUNT
BRACKET
ENDMOUNT
11/4"MINIMUMFig. 18
TILT UP LOCKINGTAB
TILT DOWN
SOFTRAK ROD
SOFTRAK ROD
LOCKINGSCREW
Fig. 20a
Fig. 20b

Positioning the SofTrak RodAfter the SofTrak rod is installedinto the installation brackets,check the clearance at each end.The recommended amount ofclearance varies according tomounting style and application, as described below.
Inside Mounts and Wall-to-Wall Outside MountsThe recommended clearancedepends upon whether the end ofthe rod is “active” or “passive.”The fabric stacks at the active end.
With a split stack design, bothends are active, and the minimumrecommended clearance at eachend is 1⁄4" (Fig. 21a). The SofTrakrod should be centered in theopening.
With side stack designs, the rodshould not be centered in theopening. More clearance is neededat the passive end to allow theswivel arm and end treatment toclose around the passive end cap.A minimum clearance of 3⁄4" is recommended at the passive end.The minimum recommendedclearance at the active end is still1⁄4". See Fig. 21b and Fig. 21c forillustrations of right stack and leftstack designs.
Corner Windows and Bay WindowsWhen attaching the installation orceiling mount brackets for corneror bay window applications, besure to allow for the clearancesrequired between sheers. Refer tothe measuring guidelines on pagesLU-7 and LU-8.
Remember that the clearancesshown on those pages willincrease if extension brackets orspacer blocks are used. Theamount of the increase dependsupon how far the brackets areprojected from the mounting surface.
Side-by-Side (Abutted)InstallationsFor side-by-side installations,spacing between end caps shouldbe 1⁄2" when two active end capsmeet (Fig. 22a); 1" when an activeand passive end cap meet (Fig.22b); or 11⁄2" when two passiveend caps meet (Fig. 22c). Thesespacings allow the clearance needed for proper swivel armoperation.
Be sure to measure the spacingfrom end cap to end cap, not fromthe swivel arms.
Simulated Split Stack DesignsA simulated split stack is the sameas a passive/passive side-by-sideinstallation. For best appearance,the sheers should be drawn openor closed the same distance oneach side. In addition, the vanesshould be rotated to the samedirection at the same angle.
LUMINETTE
LU-12 Effective date 6/1/99
®LU
MIN
ETTE
PRIV
ACY
SHEE
RS®
I N S T A L L A T I O N
ACTIVEEND CAP
PASSIVEEND CAP
SWIVELARM
SWIVELARM
1"
ACTIVE/PASSIVE
PASSIVEEND CAP
PASSIVEEND CAP
SWIVELARM
SWIVELARM
11/2"
PASSIVE/PASSIVE
ACTIVEEND CAP
ACTIVEEND CAP
SWIVELARM
SWIVELARM
ACTIVE/ACTIVE
Fig. 22a
Fig. 22b
Fig. 22c
1/2"
Note: The illustrations below relate to theinstallation of side-by-side sheers, not to theirordered measurements. Measuring for side-by-side sheers is explained on page LU-8.
SPLIT STACK DESIGN – MINIMUM CLEARANCES1/4"
ACTIVE END ACTIVE END
1/4"
RIGHT STACK DESIGN – MINIMUM CLEARANCES3/4"
PASSIVE END ACTIVE END
1/4"
LEFT STACK DESIGN – MINIMUM CLEARANCES1/4"
ACTIVE END PASSIVE END
3/4"
Fig. 21a
Fig. 21b
Fig. 21c

LU-13Effective date 6/1/99
LUMINETTE®LUM
INETTEPRIVACY SHEERS
®
I N S T A L L A T I O N
For best closure, however, thevanes should be rotated in opposite directions (Fig. 23). This minimizes the light gap inthe center.
Simulated split stacks cannotoperate, nor will they appear,exactly like a split stack design.
Attaching the Fabric Panel(s)Remove the protectivewrapping from the fabric but do not unroll it from the cardboardtube. Stand the tubeon end on a clean surface with the headerand the slotted vane openings at the top(Fig. 24). Position thetube on the end of theSofTrak system wherethe fabric stacks. If thetube is too long to bepositioned vertically,trim the excess lengthwith a sharp knife.
Use the wand to rotate the pinionclips about 90° from either oftheir extreme positions to theapproximate midpoint position.Then pull the cord to move thefabric carriers to the full stackbackposition.
Unroll the fabric to gain enoughslack to attach the first vane to thefirst pinion clip. To attach thevanes, insert the slotted tab on thevane into the pinion clip until itsnaps securely in place (Fig. 25).
Unroll the fabric as you clip therest of the vanes into the pinionclips in sequence. Be careful notto skip any pinion clips or vanes.
Attaching the End TreatmentSwivel PlatesRemove the swivel plate fromeach fabric end treatment by separating the mating strips ofVelcro®. The swivel plates are right and left specific.
Attach the end treatment swivelplate to the rivet connected to theswivel arm. On a side stack sheer,there is a swivel arm on the activeend cap (Fig. 26a) and on the leadfabric carrier (Fig. 26b). On a splitstack sheer, there is a swivel armon both active end caps.Push up the rivet so that the clipson the end treatment swivel platecan snap onto it above and belowthe swivel arm, as shown.
Attaching End Treatments to the Swivel PlatesHold the end treatment near theswivel plate at a height where theend vanes hang straight and thetop of the end treatment isapproximately 1⁄8" above the top ofthe swivel plate. Attach the endtreatment to the swivel plate bypressing together the two strips ofVelcro (Fig. 27).
If an end treatment is not hanging straight or if the adjacent vanesare not uniform, simply separatethe Velcro attachment and reposi-tion the end treatment.
Testing and AdjustmentWith the vanes open, traverse thefabric back and forth across thewindow or door opening. Then,with the opening fully covered, tiltthe vanes to the left and right toobserve their closure. Traversingand tilting should be smooth andeasy, with no sticking or jamming.
If there is a problem, first checkthat the mounting brackets arelevel and their front edges arealigned. If protruding windowcranks obstruct movement,replace them with T-cranks.
Complete testing, adjustment, andtroubleshooting procedures areincluded with each order.
VANE
PINIONCLIP
INSTALLEDVANE
Fig. 25
Fig. 27TUBE
FABRICPANEL(S)
Fig. 24
ENDTREATMENT
ENDTREATMENT
SWIVEL PLATE
VELCRO
RIVET
RIVET
END TREATMENTSWIVEL PLATE
END TREATMENTSWIVEL PLATE
SWIVEL ARM
SWIVELARM
Fig. 26a
Fig. 26b
VANES ROTATED IN SAME DIRECTION
LIGHT GAP
VANES ROTATED IN OPPOSITE DIRECTIONS
LIGHT GAP MINIMIZED
Fig. 23

LUMINETTE
LU-14 Effective date 6/1/99
®LU
MIN
ETTE
PRIV
ACY
SHEE
RS®
CARE ANDMAINTENANCELuminette Privacy Sheers are asdurable as they are beautiful. With proper installation and care,they will provide many years ofbeauty and performance. Thesheer fabric and vane fabric are100% polyester. They are resilient,anti-static and dust resistant.Periodic cleaning is recommendedto help keep Luminette PrivacySheers looking like new.
The BasicsFor any type of cleaning, the sheer should remain hanging tominimize handling, wrinkling, orpuckering. Disposable glovesshould be worn.
Routine Cleaning• Regular light dusting with a
feather duster is suggested.
• A hand-held vacuum with lowsuction may also be used. Whenvacuuming, avoid pulling orstretching the fabric.
• Starting in the upper corner,work across the sheer usingshort horizontal strokes, cleaning approximately thewidth of two or three vanes with each stroke. Do not uselong horizontal strokes or vertical strokes.
• Rigorous vacuuming or using a brush attachment is not recommended, since eithercould distort the sheer fabric.
Deep Cleaning• Only professional detergent-
based cleaning solutions shouldbe used. Do not use dry cleaning solvents.
• For deep cleaning, professionalin-home drapery cleaning services that use portable
injection/extraction machinesgive the best results. WhileHunter Douglas cannot attest to the quality of any equipmentor procedure, we have seenfavorable results using injection/extraction-type equipment,which injects a heated cleaningsolution into the fabric andextracts the dirty solution in the same motion. This reducesthe contact time between thesolution and the sheer, whichprevents deep soaking andallows for drying within a fewhours.*
Preparation
• Traverse the sheer closed.
• Blow off any loose particles fromthe fabric.
• Vacuum with low suction or usea lint roller to remove pet hair orother types of debris that do notblow off.
• Hang plastic behind the sheer toprotect the area.
Cleaning the Vertical Vanes
• Clean vertical vanes from theback of the sheer.
• Set and maintain cleaning solution temperature just belowthe steam level.
• Rotate the vanes to the fullyopen position.
• Begin cleaning the vanes, working from the center out.
• Using a 3" upholstery tool, startat the top of the center vane andclean in a downward direction,one vane at a time. It does notmatter which side of the vane is cleaned, as the injection/extraction machine will cleanboth sides at the same time. Useyour free hand to support eachvane.
• Continue cleaning in this manner until you reach the end treatment. Then, repeat this procedure for the rest of the vanes.
Cleaning the Face Fabric
• Clean the face fabric from thefront of the sheer.
• Change to a drapery tool, ormodify the suction area of theupholstery tool to 4".
• Set and maintain cleaning solution temperature just belowthe steam level.
• Close the vanes by rotating themin the direction you are working.For example, if you are workingfrom left to right, close the vanesto the right.
• Starting in the upper corner,work across the sheer usingshort horizontal strokes, cleaning approximately thewidth of two to three vanes with each stroke. Do not uselong horizontal strokes or vertical strokes, as these actionswill crease the fabric. Steady the fabric with your free hand.Continue to the bottom of thesheer.
• If necessary after deep cleaning,remove wrinkles from the fabricaccording to the followinginstructions.
Wrinkle and Crease RemovalBoth the hand and steaming methods described on the nextpage are suitable for wrinkle andcrease removal. The hand method, however, is more appropriate forsmaller areas.
F O R Y O U R I N F O R M A T I O N
* While Hunter Douglas cannot attest to the quality of any equipment or procedure, we would like to acknowledge ON-SITE CORPORATION and On-Site Drapery Cleaning and More of Hayden Lake, Idaho (800-233-7452) for their efforts in establishing a deep cleaning procedure for Luminette Privacy Sheers.

LU-15Effective date 6/1/99
LUMINETTE®LUM
INETTEPRIVACY SHEERS
®
Hand Method
• Rotate vanes to the open position.
• Apply warm distilled or bottledwater to a clean white cloth.
• Support the fabric from behindusing another clean cloth that is dry.
• Use a gentle, blotting action to apply the wet cloth to thewrinkle or crease on the sheer fabric.
• Let air dry.
Steam Method
• Rotate vanes to the openposition.
• From behind, direct the steamfrom a portable steam machineto penetrate the sheer fabric.
• Use slow, short vertical move-ments. Begin at the top of thesheer and work your way down.Several passes over the creasedarea may be needed.
• Let air dry.
Spot CleaningTo reduce the potential for permanent staining, spots shouldbe treated and cleaned as soon aspossible with a clothing stain pre-treatment solution.
• Apply pre-treatment solution toa clean white cloth.
• Support the fabric from behindusing another clean cloth that isdry.
• Clean the spot using a gentleblotting action. Avoid rubbingthe fabric since any abrasiveaction may cause it to distort.
• Let area air dry.
• After area is dry, blot with distilled or bottled water appliedto a clean white cloth to removeexcess solution.
LIFETIME LIMITED WARRANTYHunter Douglas Inc. warrants thatLuminette Privacy Sheers will befree from defects in materials andworkmanship for as long as theoriginal retail purchaser owns theproduct, provided that (i) suchproducts are properly installed inresidential dwellings; and (ii) suchproducts are made or assembledexclusively from Hunter Douglasmaterials and components.
The obligation of Hunter Douglasand its licensed fabricators/distributors is limited to repair or replacement of the sheers orcomponents found to be defectiveand excludes shipping charges andlabor costs for measuring andinstallation. Repairs will be madewith like or similar parts.
To obtain warranty service, contact the dealer from whom youpurchased the product. The dealerwill work with Hunter Douglas orits licensed Luminette fabricator/distributor to promptly repair orreplace any defective parts or components without charge. If you require further assistance,contact Hunter Douglas at OneDuette Way, Broomfield, CO,80020, or call 1-800-205-8225.Warranty claims must be accompanied by proof of purchase, as well as details regarding the nature of the problem, location of the sheer, etc.
This warranty does not include anyconditions or damages resultingfrom accidents, alterations, misuse,abuse, motorized devices, or failureto follow our instructions withrespect to measurement, installa-tion, cleaning or maintenance. This warranty also does not coverany condition or damage resultingfrom removal of the sheer andreinstallation in the same or another window.
This warranty also does not applyto conditions caused by normalwear and tear upon the product.
THIS WARRANTY IS EXCLUSIVEAND IN LIEU OF ALL OTHEROBLIGATIONS, LIABILITIES, ORWARRANTIES. In no event shallHunter Douglas or its licensed fabricators/distributors be liable orresponsible for INCIDENTAL ORCONSEQUENTIAL DAMAGESor for any other direct or indirectdamage, loss, cost, expense or fee. Some states do not allow the exclusion or limitation of incidental or consequential damages, so this exclusion or limitation may not apply to you.
This warranty gives you specificlegal rights, and you may also haveother rights which vary from stateto state.
F O R Y O U R I N F O R M A T I O N

LUMINETTE
LU-16 Effective date 6/1/99
®LU
MIN
ETTE
PRIV
ACY
SHEE
RS®
Matching Luminette fabric, of course.
What goes perfectly withLuminette Privacy Sheers?What goes perfectly withLuminette Privacy Sheers?
Matching Luminette fabric, of course.
PRIVACY SHEERS
Related Documents


