Low Bandwidth Lessons and KnowledgePresenter X KnowledgePresenter Page 1 Contents Contents................................................................................................................................................. 1 Why Low Bandwidth Lessons? ............................................................................................................... 3 Doesn’t Low Bandwidth Mean Low Quality?....................................................................................... 3 Customer Satisfaction with Quicker Loading.......................................................................................... 4 Loading View ..................................................................................................................................... 4 A Note about Loading View................................................................................................................ 4 The Loading Indicator......................................................................................................................... 6 Image Compression ................................................................................................................................ 8 Graphics Format on the Web.............................................................................................................. 8 Photographic Images – Automatic Compression................................................................................. 9 Photographic Images – Manual Compression ..................................................................................... 9 Other Hints for Photographic Images ................................................................................................ 10 Screen Shots......................................................................................................................................12 Automatic Screen Shot Compression .................................................................................................13 Semi Automatic Screen Shot Compression .........................................................................................13 Manual Screen Shot Compression .....................................................................................................14 Spatial Compression..............................................................................................................................17 Images with Alpha Transparency ..........................................................................................................19 What is Alpha Transparency? ............................................................................................................19 Using Online Images..............................................................................................................................20 Other Techniques Used to Compress Images ........................................................................................21 Imported PowerPoint Presentations and Word Documents ............................................................... 21 Created Graphics .............................................................................................................................. 21 Thumbnails, Certificates, and Handouts ............................................................................................ 22 Text and Compression in KnowledgePresenter® ...................................................................................23 Rendering Text as an Image ..............................................................................................................23 Semi Automatic Text Compression ....................................................................................................24 Manually Compressing Text That Renders as an Image .....................................................................25 Audio Compression. ..............................................................................................................................26 Audio Compression Hints...................................................................................................................26 Audio Compression When Exporting Whole Lesson as a Movie ..........................................................26 Audio Preloading............................................................................................................................... 26 Reusable Playbars ............................................................................................................................. 26

Welcome message from author
This document is posted to help you gain knowledge. Please leave a comment to let me know what you think about it! Share it to your friends and learn new things together.
Transcript
Low Bandwidth Lessons and KnowledgePresenter X
KnowledgePresenter Page 1
ContentsContents................................................................................................................................................. 1
Why Low Bandwidth Lessons? ............................................................................................................... 3Doesn’t Low Bandwidth Mean Low Quality?....................................................................................... 3
Customer Satisfaction with Quicker Loading.......................................................................................... 4Loading View ..................................................................................................................................... 4A Note about Loading View................................................................................................................ 4The Loading Indicator......................................................................................................................... 6
Image Compression................................................................................................................................ 8Graphics Format on the Web.............................................................................................................. 8Photographic Images – Automatic Compression................................................................................. 9Photographic Images – Manual Compression..................................................................................... 9Other Hints for Photographic Images ................................................................................................10Screen Shots......................................................................................................................................12Automatic Screen Shot Compression .................................................................................................13Semi Automatic Screen Shot Compression.........................................................................................13Manual Screen Shot Compression .....................................................................................................14
Spatial Compression..............................................................................................................................17
Images with Alpha Transparency ..........................................................................................................19What is Alpha Transparency?............................................................................................................19
Using Online Images..............................................................................................................................20
Other Techniques Used to Compress Images ........................................................................................21Imported PowerPoint Presentations and Word Documents ...............................................................21Created Graphics ..............................................................................................................................21Thumbnails, Certificates, and Handouts ............................................................................................22
Text and Compression in KnowledgePresenter® ...................................................................................23Rendering Text as an Image ..............................................................................................................23Semi Automatic Text Compression ....................................................................................................24Manually Compressing Text That Renders as an Image .....................................................................25
Audio Compression. ..............................................................................................................................26Audio Compression Hints...................................................................................................................26Audio Compression When Exporting Whole Lesson as a Movie..........................................................26Audio Preloading...............................................................................................................................26Reusable Playbars.............................................................................................................................26
Low Bandwidth Lessons and KnowledgePresenter X
KnowledgePresenter Page 2
Audio Examples.................................................................................................................................26
Movie Compression ..............................................................................................................................28How well do Movies Compress? ........................................................................................................28Reusable Playbars.............................................................................................................................28KP-Simulator Movies.........................................................................................................................29KP-Documentary Movies ...................................................................................................................29Creating a Movie From KnowledgePresenter®...................................................................................30Hints for Better Quality / Lower Bandwidth Movies...........................................................................31Some Movie Examples.......................................................................................................................32
Miscellaneous Compression Methods Employed by KnowledgePresenter® .........................................34Duplication Compression...................................................................................................................34Redundancy Compression .................................................................................................................34Mouseover and Mousedown Compression ........................................................................................34
Lesson Preloading .................................................................................................................................35Global Preloading .............................................................................................................................35Preloading Individual Objects............................................................................................................36
HTML Compression ...............................................................................................................................37
KnowledgePresenter Effects – and How They Affect Bandwidth ..........................................................38Drop Shadows (Objects/Drop Shadow)..............................................................................................38Movement (Movement button, from toolbar on right-hand side of screen)........................................38Transparency (Transparency button, from toolbar on right-hand side of screen) ...............................38Sparkles (Sparkle Effect button, from toolbar on right-hand side of screen) .......................................39Rotation (Rotation button, from toolbar on right-hand side of screen) ..............................................39Textures (Texture and Outline button, from toolbar on right-hand side of screen) .............................40Outlines (Texture and Outline button, from toolbar on right-hand side of screen)..............................40Animation (Animation button, from toolbar on right-hand side of screen) .........................................41Reflective Shadows (Special Effects button, from toolbar on right-hand side of screen) .....................42Shadows (Special Effects button, from toolbar on right-hand side of screen).....................................42
Summary of Compression Techniques Employed by KP ........................................................................44Loading View / Loading Indicator / Startup View...............................................................................44Automatic Photographic Image Compression. ...................................................................................44Manual Photograph Compression. ....................................................................................................44Color Compression. ...........................................................................................................................44Format Compression .........................................................................................................................44Alpha Transparency Compression......................................................................................................44Spatial Compression..........................................................................................................................44Duplication Compression...................................................................................................................44Text as Image Compression Techniques.............................................................................................44Other Manual Image and Text as Image Compression Techniques.....................................................44Web Objects and Online Images........................................................................................................44Multimedia Compression. .................................................................................................................44Preloading Options ...........................................................................................................................45HTML Compression ...........................................................................................................................45
Low Bandwidth Lessons and KnowledgePresenter X
KnowledgePresenter Page 3
Why Low Bandwidth Lessons?Everyone has broadband these days, right? Well, not quite. In many office environments, bandwidth through office networks is limited or throttled. In remote locations, or locations where bandwidth is shared among multiple users, bandwidth can also be limited.
There are a number of other reasons why KnowledgePresenter® considers low bandwidth lessons important:
The lower the bandwidth of the lesson, the quicker it loads, and the less frustrated the user is.
The lower the bandwidth of the lesson, the lower the load on your server.
The less bandwidth use by your server, your users, and your service provider, the more money everyone saves.
In this white paper, we look at many of the ways that KnowledgePresenter® uses to create low bandwidth lessons and media – and some of the ways in which you can help.
Doesn’t Low Bandwidth Mean Low Quality?
Not really, no. Many of the features used by KnowledgePresenter® to reduce the bandwidth of a lesson will not affect quality one bit. There are compressions techniques available in KnowledgePresenter® –where you have control, that do reduce quality to achieve lower bandwidth results – but you get to determine the trade-off.
Low Bandwidth Lessons and KnowledgePresenter X
KnowledgePresenter Page 4
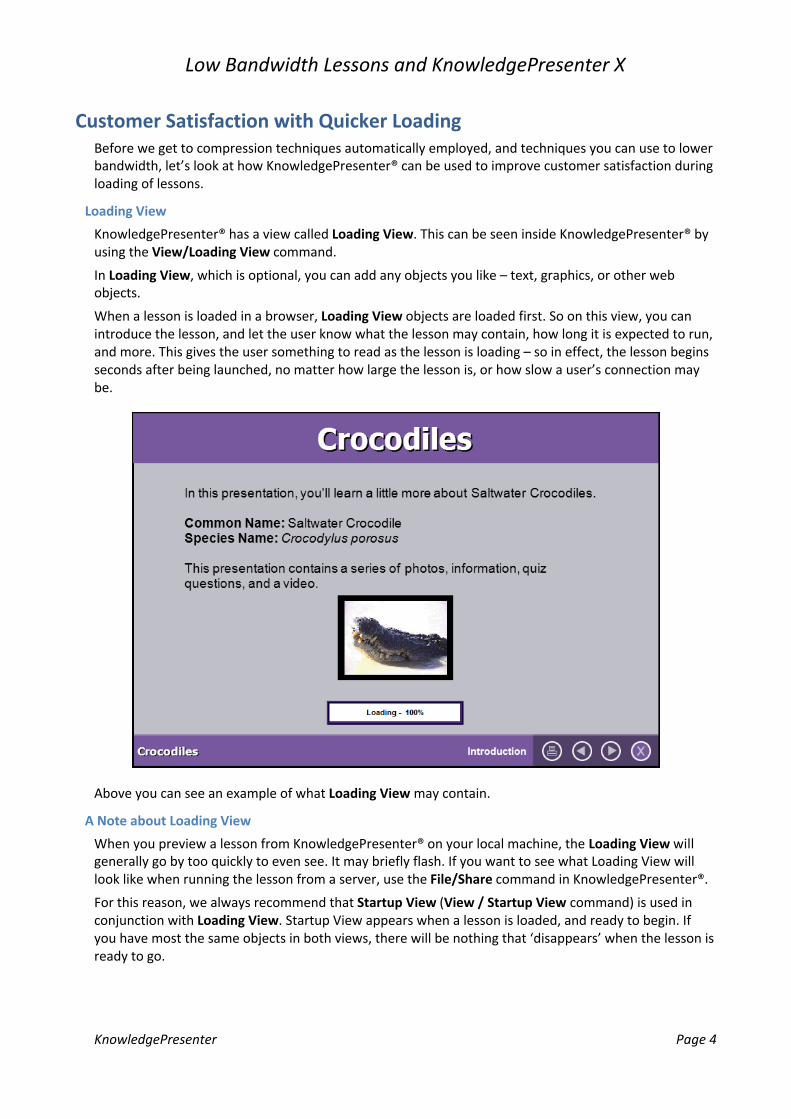
Customer Satisfaction with Quicker LoadingBefore we get to compression techniques automatically employed, and techniques you can use to lower bandwidth, let’s look at how KnowledgePresenter® can be used to improve customer satisfaction during loading of lessons.
Loading View
KnowledgePresenter® has a view called Loading View. This can be seen inside KnowledgePresenter® by using the View/Loading View command.
In Loading View, which is optional, you can add any objects you like – text, graphics, or other web objects.
When a lesson is loaded in a browser, Loading View objects are loaded first. So on this view, you can introduce the lesson, and let the user know what the lesson may contain, how long it is expected to run, and more. This gives the user something to read as the lesson is loading – so in effect, the lesson begins seconds after being launched, no matter how large the lesson is, or how slow a user’s connection may be.
Above you can see an example of what Loading View may contain.
A Note about Loading View
When you preview a lesson from KnowledgePresenter® on your local machine, the Loading View will generally go by too quickly to even see. It may briefly flash. If you want to see what Loading View will look like when running the lesson from a server, use the File/Share command in KnowledgePresenter®.
For this reason, we always recommend that Startup View (View / Startup View command) is used in conjunction with Loading View. Startup View appears when a lesson is loaded, and ready to begin. If you have most the same objects in both views, there will be nothing that ‘disappears’ when the lesson is ready to go.
Low Bandwidth Lessons and KnowledgePresenter X
KnowledgePresenter Page 5
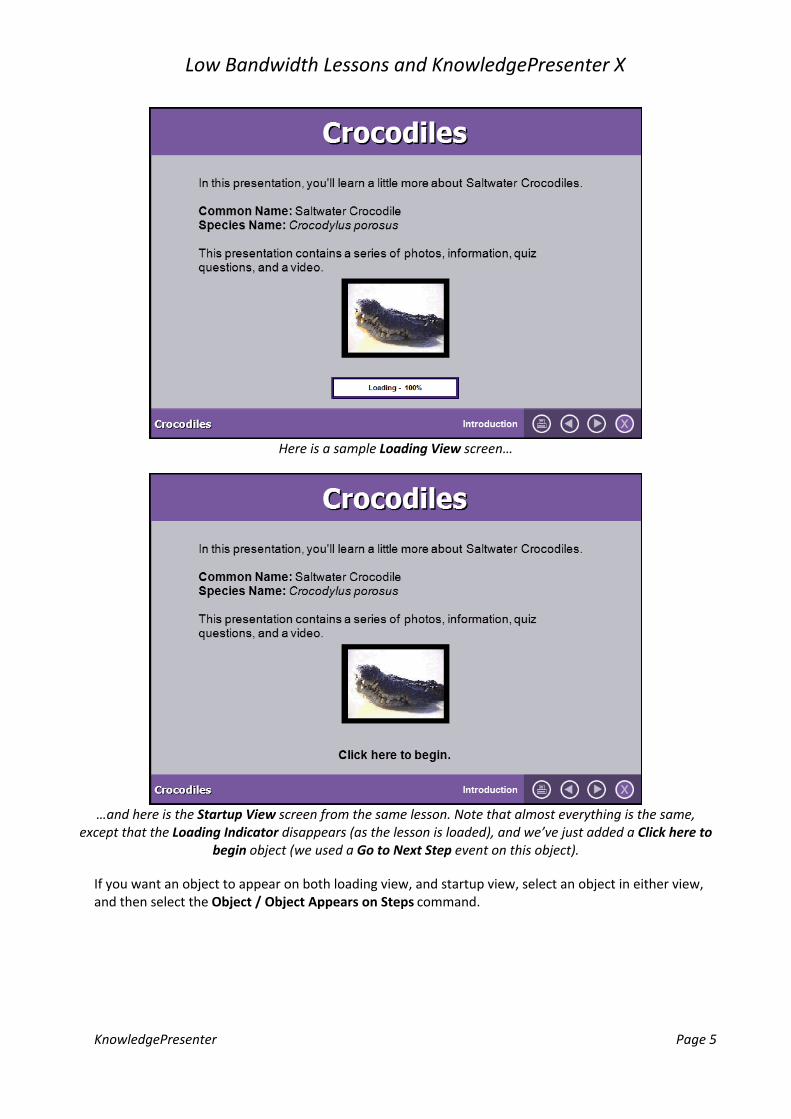
Here is a sample Loading View screen…
…and here is the Startup View screen from the same lesson. Note that almost everything is the same, except that the Loading Indicator disappears (as the lesson is loaded), and we’ve just added a Click here to
begin object (we used a Go to Next Step event on this object).
If you want an object to appear on both loading view, and startup view, select an object in either view, and then select the Object / Object Appears on Steps command.

Low Bandwidth Lessons and KnowledgePresenter X
KnowledgePresenter Page 6
You can then select the Object Appears in Loading View, and Object Appears in Startup View options.
Alternatively, add all the objects you want to Loading View, and then select the View / Loading View Options command.
If you select Copy All Objects from Loading View to Startup View command, the objects will appear in both views.
The Loading Indicator
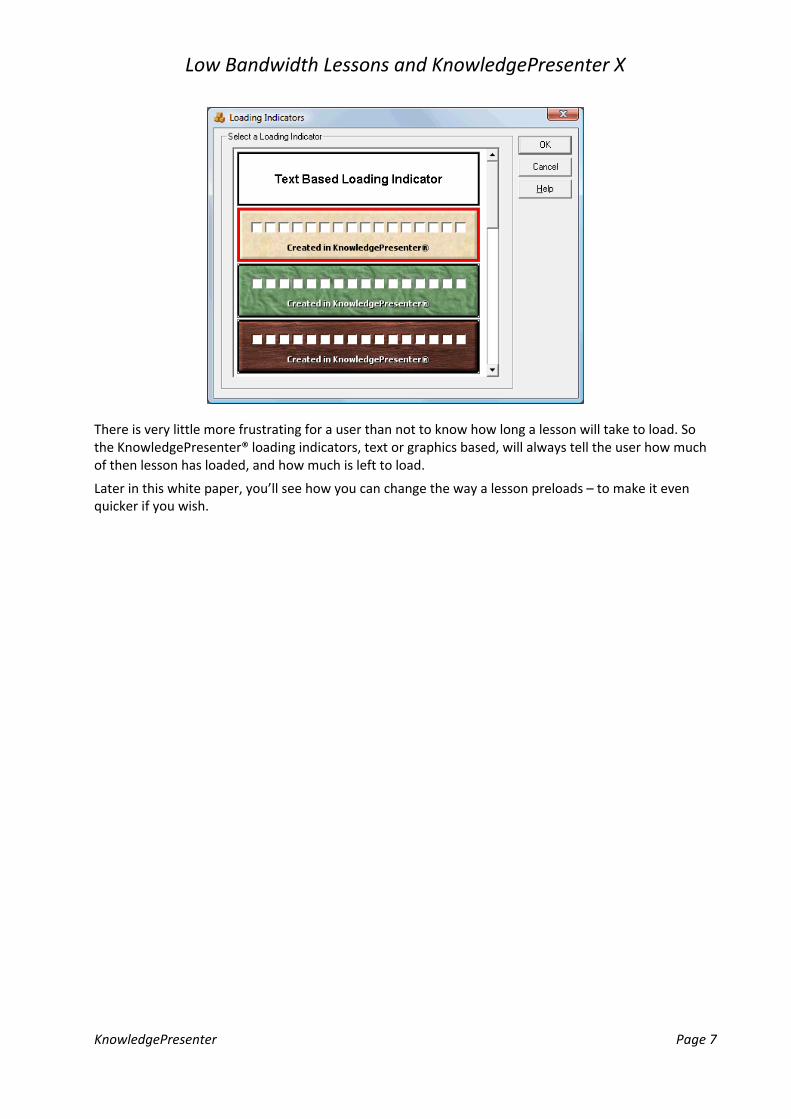
There is one very important thing KnowledgePresenter® adds by default to Loading View – it can be hidden (using the View / Loading Indicator / Show Loading Indicator command), and that is the loading indicator. Using the View / Loading Indicator / Select a Loading Indicator command, you can select a text or graphics based loading indicator for your lesson.
Low Bandwidth Lessons and KnowledgePresenter X
KnowledgePresenter Page 7
There is very little more frustrating for a user than not to know how long a lesson will take to load. So the KnowledgePresenter® loading indicators, text or graphics based, will always tell the user how much of then lesson has loaded, and how much is left to load.
Later in this white paper, you’ll see how you can change the way a lesson preloads – to make it even quicker if you wish.
Low Bandwidth Lessons and KnowledgePresenter X
KnowledgePresenter Page 8
Image CompressionGraphics Format on the Web
On the web there are basically three formats of images used, including JPEG, PNG and GIF.
JPEG (or JPG) is used for photographic images, and is a lossy format, meaning that the more the image is compressed, and the more quality it loses.
PNG and GIF are generally used for screen shots, and other types of graphics other than the photographic type. Although PNG and GIF can be used to store photographs, you will generally get better results and lower files size with JPEG.
GIF is the old standard, and has been around as long as the World Wide Web. PNG was introduced a little later to do much the same job, but in most cases, its compression is better than GIF for the same image.
The more compressed images are, the quicker they will load. Below we discuss how KnowledgePresenter® can compress images.
Before we do this, a couple of pointers when using images in KnowledgePresenter®:
Use high quality, high resolution images if they are available.
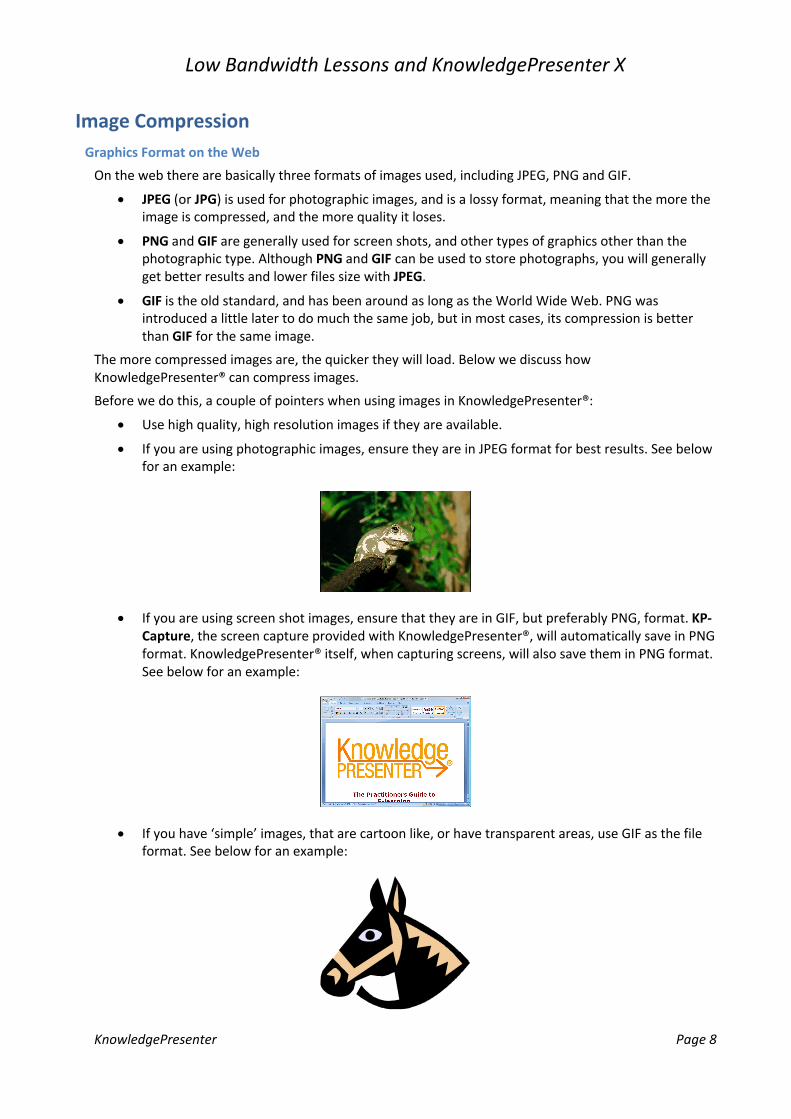
If you are using photographic images, ensure they are in JPEG format for best results. See below for an example:
If you are using screen shot images, ensure that they are in GIF, but preferably PNG, format. KP-Capture, the screen capture provided with KnowledgePresenter®, will automatically save in PNG format. KnowledgePresenter® itself, when capturing screens, will also save them in PNG format.See below for an example:
If you have ‘simple’ images, that are cartoon like, or have transparent areas, use GIF as the fileformat. See below for an example:
Low Bandwidth Lessons and KnowledgePresenter X
KnowledgePresenter Page 9
Photographic Images – Automatic Compression
When you load an image into a KnowledgePresenter® lesson, you can load a very high resolution version of the image. In fact, we recommend this. This allows you to resize and use then image any way you like, and always get the highest quality possible.
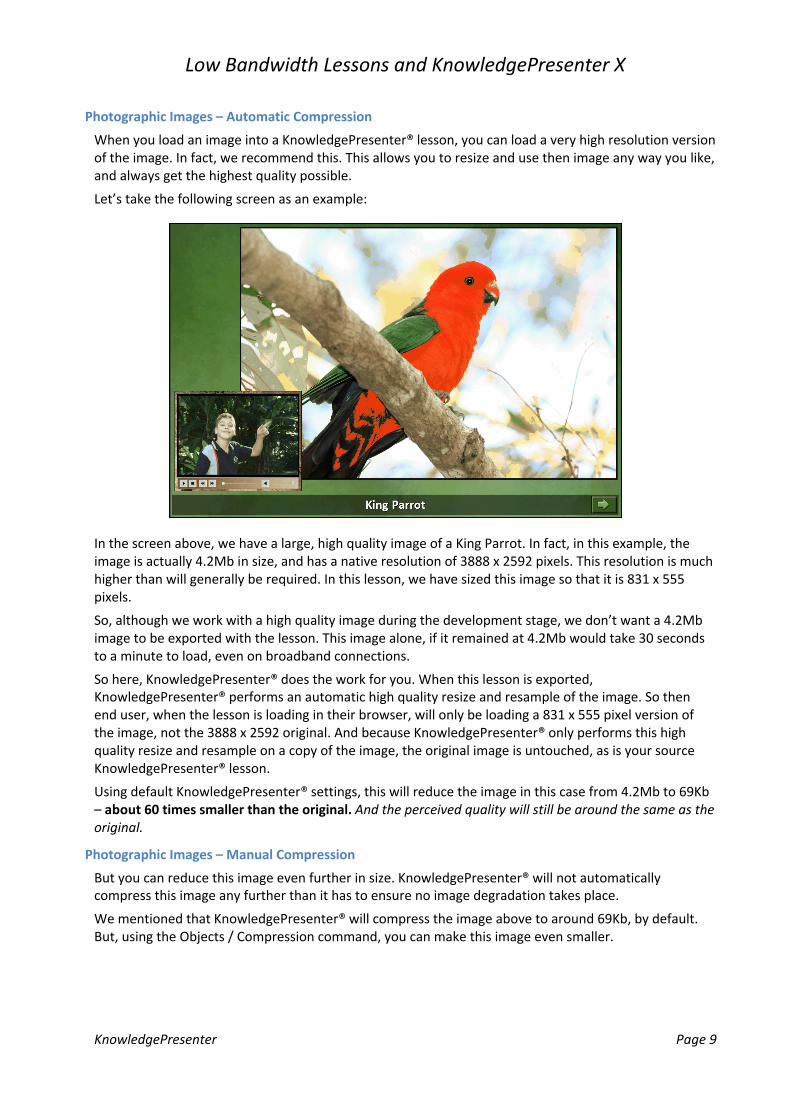
Let’s take the following screen as an example:
In the screen above, we have a large, high quality image of a King Parrot. In fact, in this example, the image is actually 4.2Mb in size, and has a native resolution of 3888 x 2592 pixels. This resolution is much higher than will generally be required. In this lesson, we have sized this image so that it is 831 x 555 pixels.
So, although we work with a high quality image during the development stage, we don’t want a 4.2Mb image to be exported with the lesson. This image alone, if it remained at 4.2Mb would take 30 seconds to a minute to load, even on broadband connections.
So here, KnowledgePresenter® does the work for you. When this lesson is exported, KnowledgePresenter® performs an automatic high quality resize and resample of the image. So then end user, when the lesson is loading in their browser, will only be loading a 831 x 555 pixel version of the image, not the 3888 x 2592 original. And because KnowledgePresenter® only performs this high quality resize and resample on a copy of the image, the original image is untouched, as is your source KnowledgePresenter® lesson.
Using default KnowledgePresenter® settings, this will reduce the image in this case from 4.2Mb to 69Kb – about 60 times smaller than the original. And the perceived quality will still be around the same as the original.
Photographic Images – Manual Compression
But you can reduce this image even further in size. KnowledgePresenter® will not automatically compress this image any further than it has to ensure no image degradation takes place.
We mentioned that KnowledgePresenter® will compress the image above to around 69Kb, by default. But, using the Objects / Compression command, you can make this image even smaller.
Low Bandwidth Lessons and KnowledgePresenter X
KnowledgePresenter Page 10
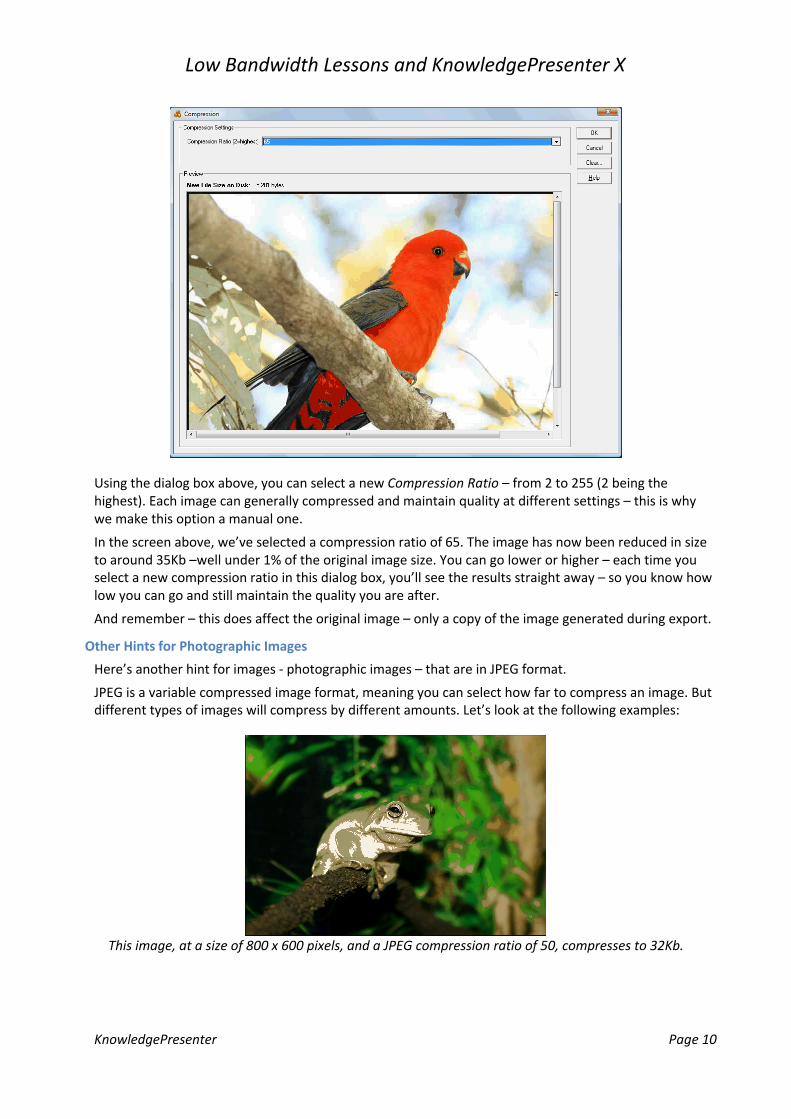
Using the dialog box above, you can select a new Compression Ratio – from 2 to 255 (2 being the highest). Each image can generally compressed and maintain quality at different settings – this is why we make this option a manual one.
In the screen above, we’ve selected a compression ratio of 65. The image has now been reduced in size to around 35Kb –well under 1% of the original image size. You can go lower or higher – each time you select a new compression ratio in this dialog box, you’ll see the results straight away – so you know how low you can go and still maintain the quality you are after.
And remember – this does affect the original image – only a copy of the image generated during export.
Other Hints for Photographic Images
Here’s another hint for images - photographic images – that are in JPEG format.
JPEG is a variable compressed image format, meaning you can select how far to compress an image. But different types of images will compress by different amounts. Let’s look at the following examples:
This image, at a size of 800 x 600 pixels, and a JPEG compression ratio of 50, compresses to 32Kb.

Low Bandwidth Lessons and KnowledgePresenter X
KnowledgePresenter Page 11
This image, at a size of 800 x 600 pixels, and a JPEG compression ratio of 50, compresses to 79Kb.
The top image compresses to 32Kb, the bottom one to 79Kb – around 2.5 times the size, using all the same settings. Why?
Here are a few things about JPEG compression – what it likes, and what it does not like in terms of getting good compression:
JPEG loves blurry area. If you look at the top image of the frog, the frog itself is in focus, the background is not. This blurry area is the main reason why this image compresses well.
JPEG hates details. Look at the second image above – everything is in focus, and the image itself is quite detailed. There is a lot of information in this image, the sort of information JPEG finds hard to compress as efficiently as other sorts of images. In fact, for some reason, JPEG compression is least efficient with images that contain grass, leaves, trees – images with a lot of detail.
JPEG does not work well with non-photographic images. Cartoon like images, or simple geometric images should be saved in PNG or GIF format.
If images are too highly compressed in JPEG format, you get what is called artefacting – see a close-up of an image too highly compressed, below.
A very highly compressed JPEG image (see the artefacting?)…
Low Bandwidth Lessons and KnowledgePresenter X
KnowledgePresenter Page 12
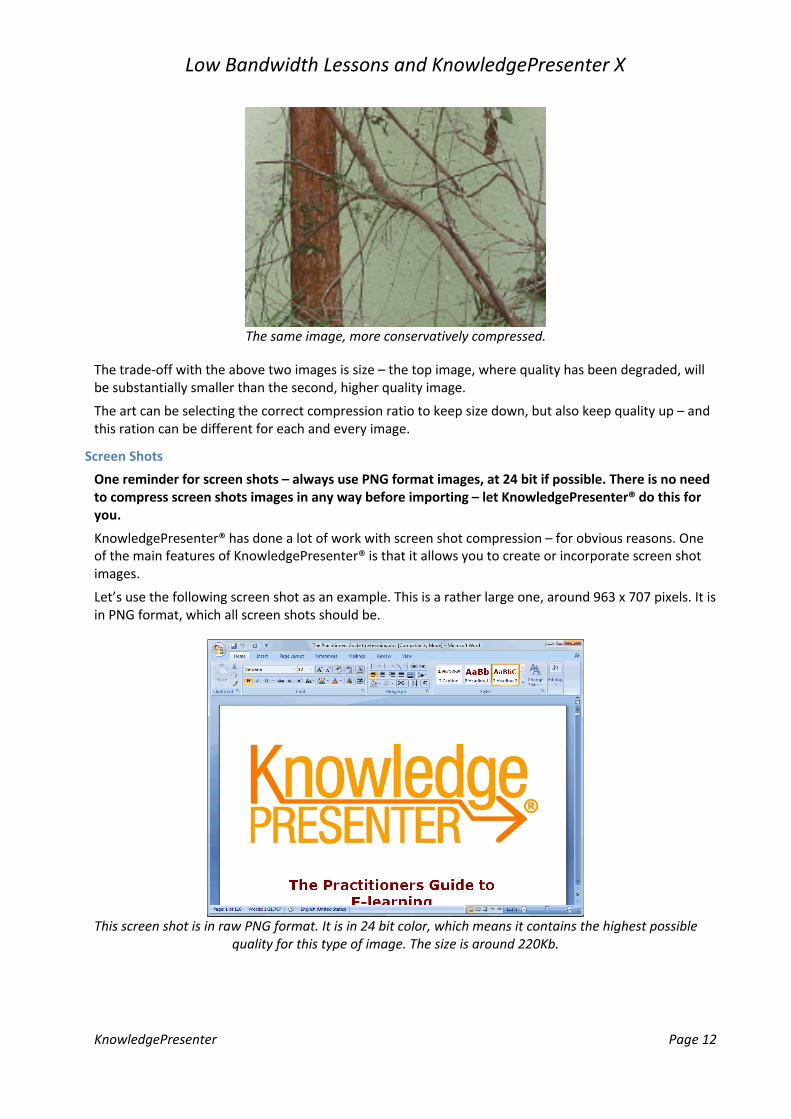
The same image, more conservatively compressed.
The trade-off with the above two images is size – the top image, where quality has been degraded, will be substantially smaller than the second, higher quality image.
The art can be selecting the correct compression ratio to keep size down, but also keep quality up – and this ration can be different for each and every image.
Screen Shots
One reminder for screen shots – always use PNG format images, at 24 bit if possible. There is no need to compress screen shots images in any way before importing – let KnowledgePresenter® do this for you.
KnowledgePresenter® has done a lot of work with screen shot compression – for obvious reasons. One of the main features of KnowledgePresenter® is that it allows you to create or incorporate screen shot images.
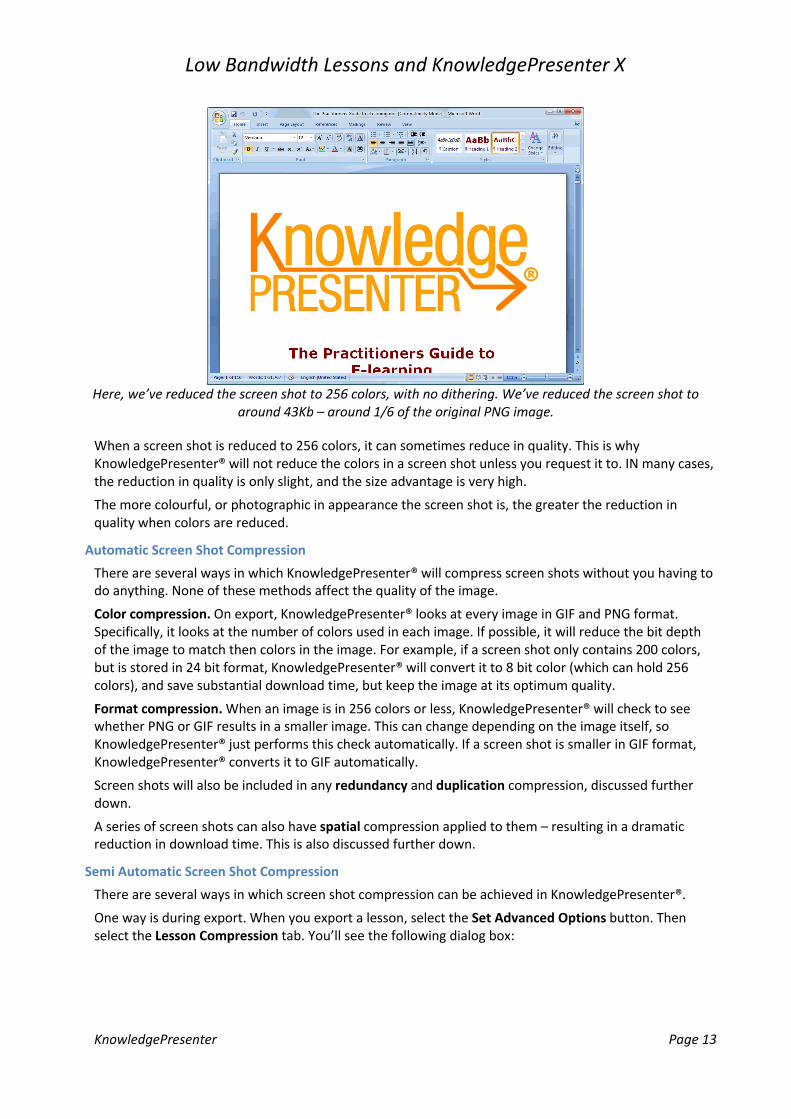
Let’s use the following screen shot as an example. This is a rather large one, around 963 x 707 pixels. It is in PNG format, which all screen shots should be.
This screen shot is in raw PNG format. It is in 24 bit color, which means it contains the highest possible quality for this type of image. The size is around 220Kb.
Low Bandwidth Lessons and KnowledgePresenter X
KnowledgePresenter Page 13
Here, we’ve reduced the screen shot to 256 colors, with no dithering. We’ve reduced the screen shot to around 43Kb – around 1/6 of the original PNG image.
When a screen shot is reduced to 256 colors, it can sometimes reduce in quality. This is why KnowledgePresenter® will not reduce the colors in a screen shot unless you request it to. IN many cases, the reduction in quality is only slight, and the size advantage is very high.
The more colourful, or photographic in appearance the screen shot is, the greater the reduction in quality when colors are reduced.
Automatic Screen Shot Compression
There are several ways in which KnowledgePresenter® will compress screen shots without you having to do anything. None of these methods affect the quality of the image.
Color compression. On export, KnowledgePresenter® looks at every image in GIF and PNG format. Specifically, it looks at the number of colors used in each image. If possible, it will reduce the bit depth of the image to match then colors in the image. For example, if a screen shot only contains 200 colors, but is stored in 24 bit format, KnowledgePresenter® will convert it to 8 bit color (which can hold 256 colors), and save substantial download time, but keep the image at its optimum quality.
Format compression. When an image is in 256 colors or less, KnowledgePresenter® will check to see whether PNG or GIF results in a smaller image. This can change depending on the image itself, so KnowledgePresenter® just performs this check automatically. If a screen shot is smaller in GIF format, KnowledgePresenter® converts it to GIF automatically.
Screen shots will also be included in any redundancy and duplication compression, discussed further down.
A series of screen shots can also have spatial compression applied to them – resulting in a dramatic reduction in download time. This is also discussed further down.
Semi Automatic Screen Shot Compression
There are several ways in which screen shot compression can be achieved in KnowledgePresenter®.
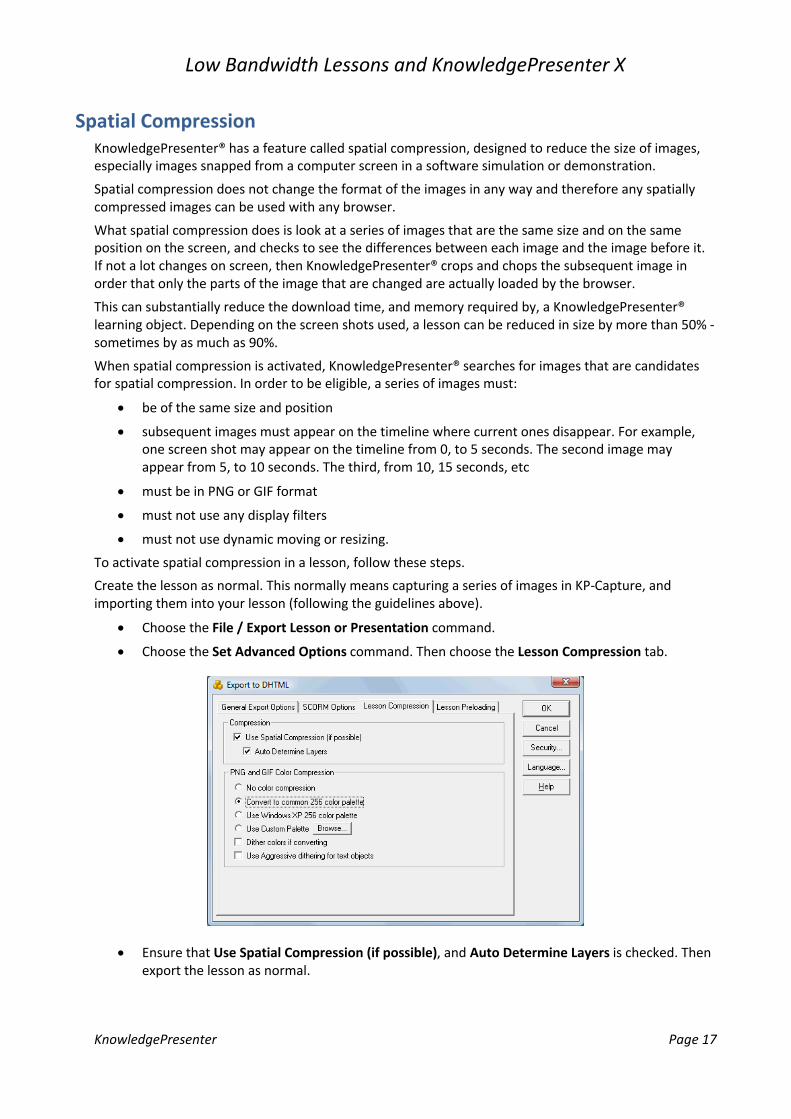
One way is during export. When you export a lesson, select the Set Advanced Options button. Then select the Lesson Compression tab. You’ll see the following dialog box:
Low Bandwidth Lessons and KnowledgePresenter X
KnowledgePresenter Page 14
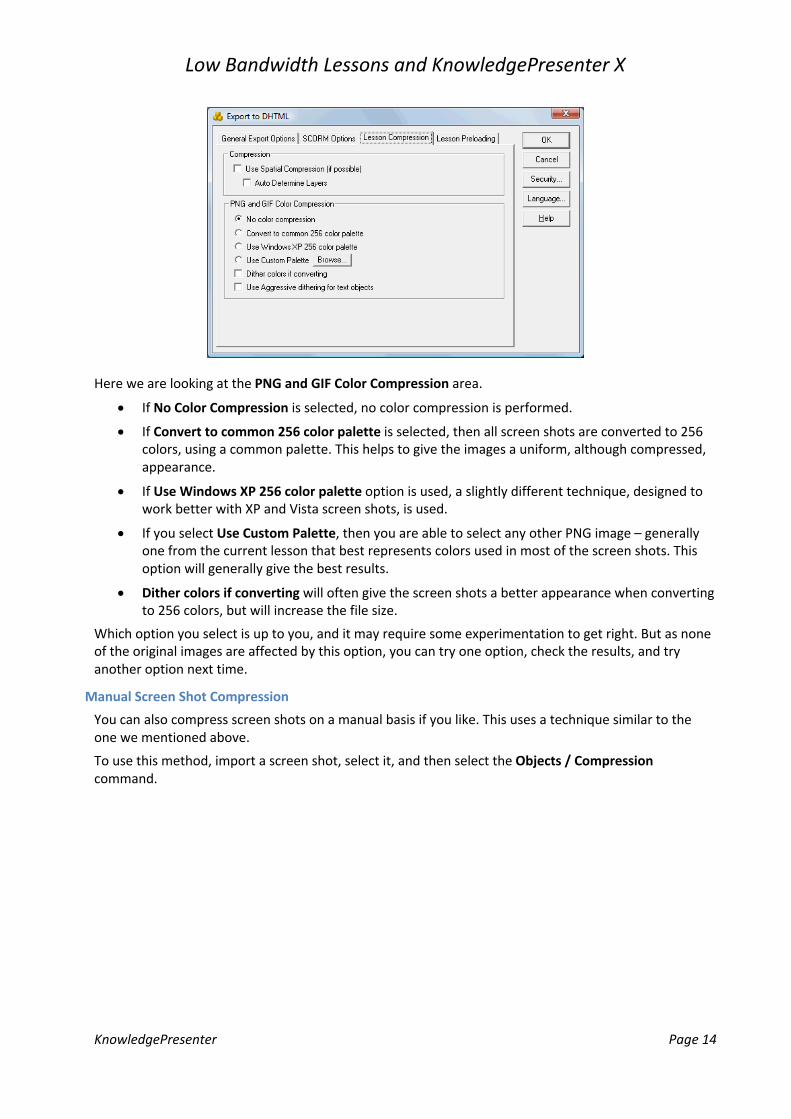
Here we are looking at the PNG and GIF Color Compression area.
If No Color Compression is selected, no color compression is performed.
If Convert to common 256 color palette is selected, then all screen shots are converted to 256 colors, using a common palette. This helps to give the images a uniform, although compressed, appearance.
If Use Windows XP 256 color palette option is used, a slightly different technique, designed to work better with XP and Vista screen shots, is used.
If you select Use Custom Palette, then you are able to select any other PNG image – generally one from the current lesson that best represents colors used in most of the screen shots. This option will generally give the best results.
Dither colors if converting will often give the screen shots a better appearance when converting to 256 colors, but will increase the file size.
Which option you select is up to you, and it may require some experimentation to get right. But as none of the original images are affected by this option, you can try one option, check the results, and try another option next time.
Manual Screen Shot Compression
You can also compress screen shots on a manual basis if you like. This uses a technique similar to the one we mentioned above.
To use this method, import a screen shot, select it, and then select the Objects / Compressioncommand.
Low Bandwidth Lessons and KnowledgePresenter X
KnowledgePresenter Page 15
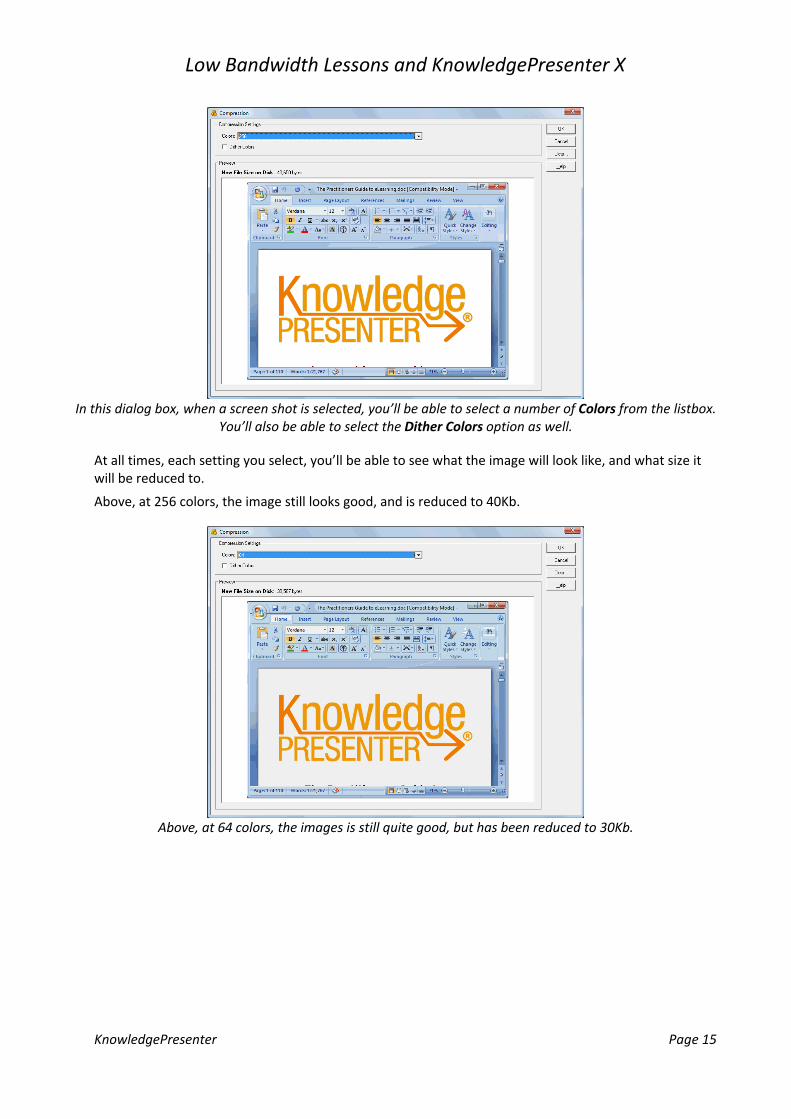
In this dialog box, when a screen shot is selected, you’ll be able to select a number of Colors from the listbox. You’ll also be able to select the Dither Colors option as well.
At all times, each setting you select, you’ll be able to see what the image will look like, and what size itwill be reduced to.
Above, at 256 colors, the image still looks good, and is reduced to 40Kb.
Above, at 64 colors, the images is still quite good, but has been reduced to 30Kb.
Low Bandwidth Lessons and KnowledgePresenter X
KnowledgePresenter Page 16
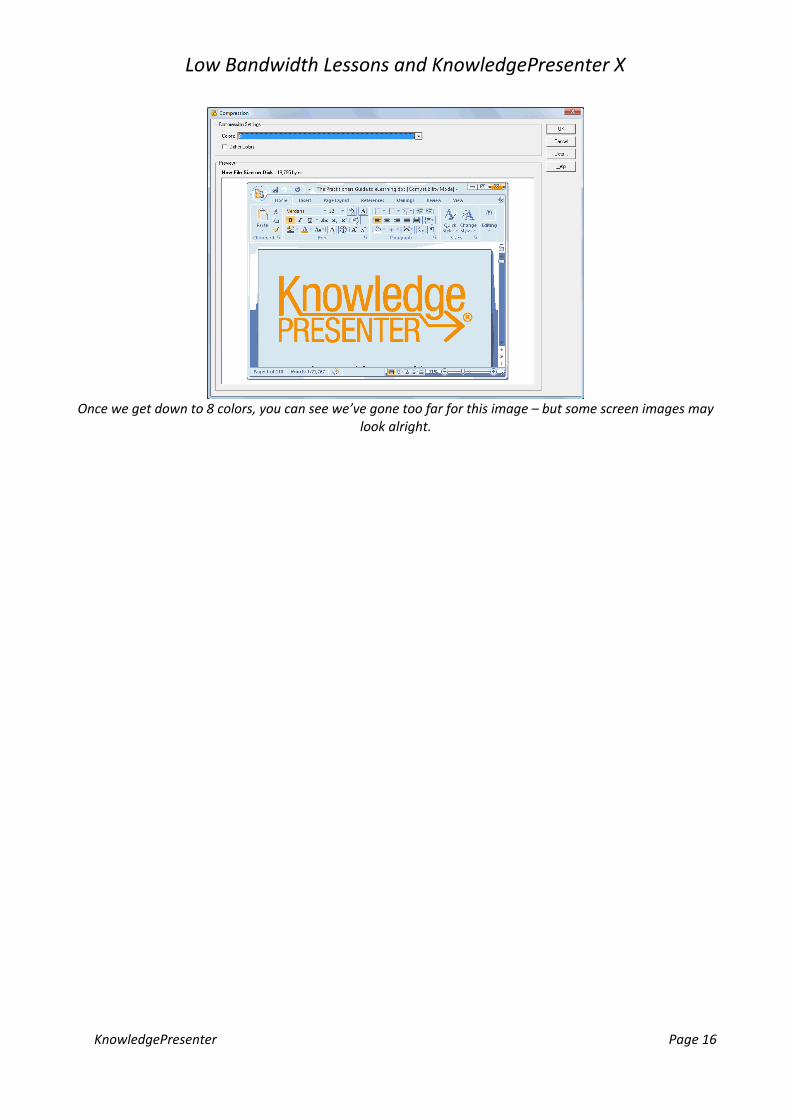
Once we get down to 8 colors, you can see we’ve gone too far for this image – but some screen images may look alright.
Low Bandwidth Lessons and KnowledgePresenter X
KnowledgePresenter Page 17
Spatial CompressionKnowledgePresenter® has a feature called spatial compression, designed to reduce the size of images, especially images snapped from a computer screen in a software simulation or demonstration.
Spatial compression does not change the format of the images in any way and therefore any spatially compressed images can be used with any browser.
What spatial compression does is look at a series of images that are the same size and on the same position on the screen, and checks to see the differences between each image and the image before it. If not a lot changes on screen, then KnowledgePresenter® crops and chops the subsequent image in order that only the parts of the image that are changed are actually loaded by the browser.
This can substantially reduce the download time, and memory required by, a KnowledgePresenter®learning object. Depending on the screen shots used, a lesson can be reduced in size by more than 50% -sometimes by as much as 90%.
When spatial compression is activated, KnowledgePresenter® searches for images that are candidates for spatial compression. In order to be eligible, a series of images must:
be of the same size and position
subsequent images must appear on the timeline where current ones disappear. For example, one screen shot may appear on the timeline from 0, to 5 seconds. The second image may appear from 5, to 10 seconds. The third, from 10, 15 seconds, etc
must be in PNG or GIF format
must not use any display filters
must not use dynamic moving or resizing.
To activate spatial compression in a lesson, follow these steps.
Create the lesson as normal. This normally means capturing a series of images in KP-Capture, and importing them into your lesson (following the guidelines above).
Choose the File / Export Lesson or Presentation command.
Choose the Set Advanced Options command. Then choose the Lesson Compression tab.
Ensure that Use Spatial Compression (if possible), and Auto Determine Layers is checked. Then export the lesson as normal.
Low Bandwidth Lessons and KnowledgePresenter X
KnowledgePresenter Page 18
During export, KnowledgePresenter® will then examine all images in the lesson, and determine if spatial compression is possible. If it is, KnowledgePresenter® will apply spatial compression to the images.
After export, you can view a report on the lesson, and see how much space is saved by spatial compression. It may look something like this:
Spatial Compression StatisticsFiles compressed:software006.png: 28789 bytes down to 1142 bytessoftware010.png: 37766 bytes down to 3140 bytessoftware013.png: 29822 bytes down to 397 bytesTotal Saving: 91698 bytes
Low Bandwidth Lessons and KnowledgePresenter X
KnowledgePresenter Page 19
Images with Alpha TransparencyWhat is Alpha Transparency?
Web browsers are not always able to display images with an alpha transparency. While web browsers can display GIF images with a transparent color, this is limited to a single color, not multiple colors, and certainly not shades of colors.
Alpha Transparency differs from standard GIF transparency is that images with Alpha Transparency are able to blend perfectly onto any background – similar to anti-aliasing you may have seen, used, or heard of.
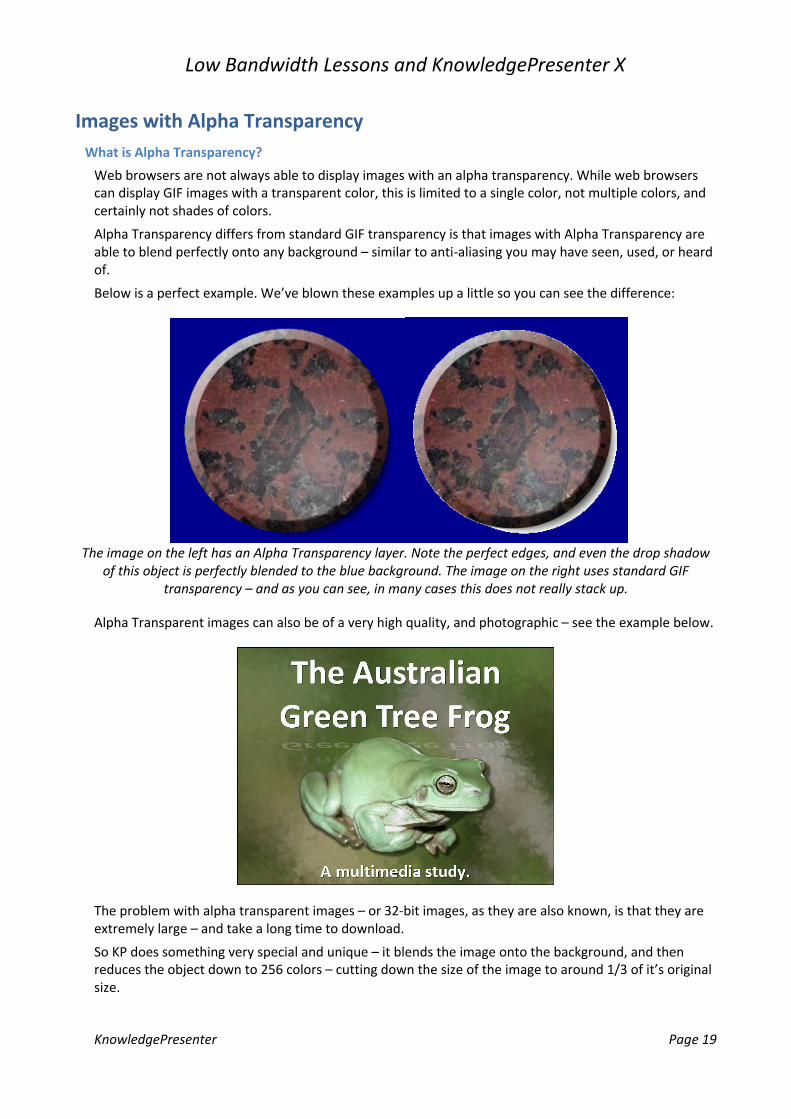
Below is a perfect example. We’ve blown these examples up a little so you can see the difference:
The image on the left has an Alpha Transparency layer. Note the perfect edges, and even the drop shadow
of this object is perfectly blended to the blue background. The image on the right uses standard GIF transparency – and as you can see, in many cases this does not really stack up.
Alpha Transparent images can also be of a very high quality, and photographic – see the example below.
The problem with alpha transparent images – or 32-bit images, as they are also known, is that they are extremely large – and take a long time to download.
So KP does something very special and unique – it blends the image onto the background, and then reduces the object down to 256 colors – cutting down the size of the image to around 1/3 of it’s original size.
Low Bandwidth Lessons and KnowledgePresenter X
KnowledgePresenter Page 20
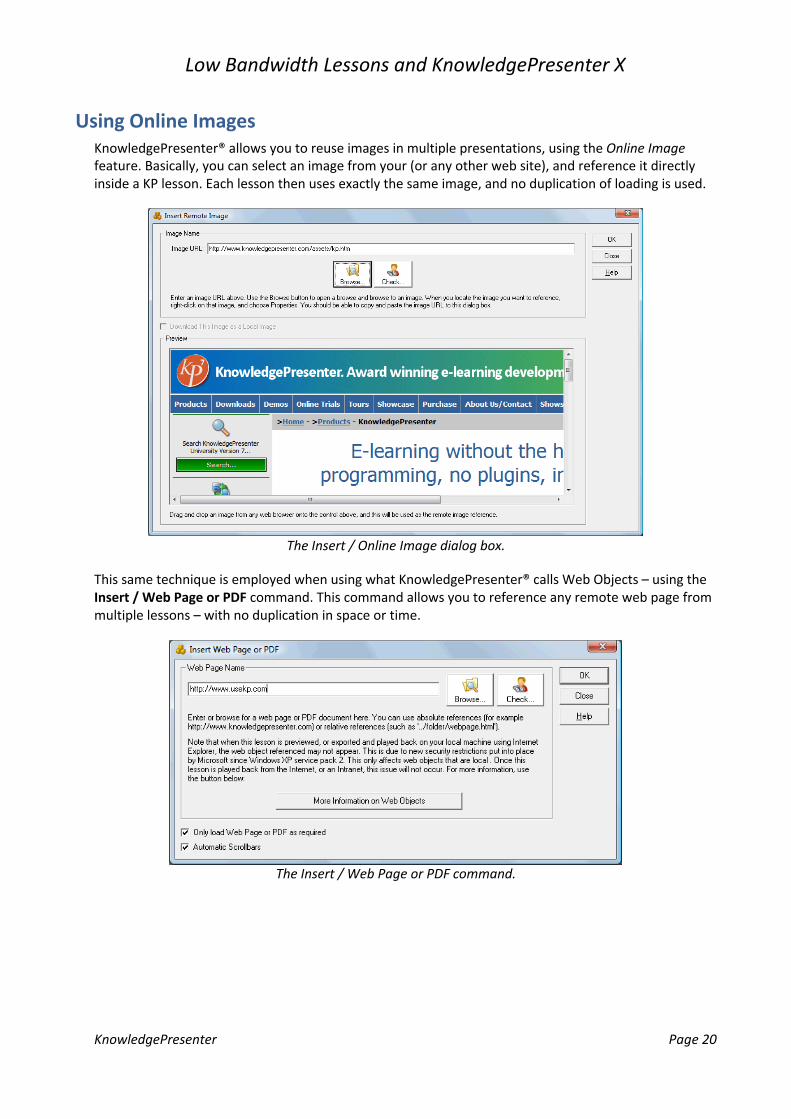
Using Online ImagesKnowledgePresenter® allows you to reuse images in multiple presentations, using the Online Imagefeature. Basically, you can select an image from your (or any other web site), and reference it directly inside a KP lesson. Each lesson then uses exactly the same image, and no duplication of loading is used.
The Insert / Online Image dialog box.
This same technique is employed when using what KnowledgePresenter® calls Web Objects – using the Insert / Web Page or PDF command. This command allows you to reference any remote web page from multiple lessons – with no duplication in space or time.
The Insert / Web Page or PDF command.
Low Bandwidth Lessons and KnowledgePresenter X
KnowledgePresenter Page 21
Other Techniques Used to Compress ImagesImported PowerPoint Presentations and Word Documents
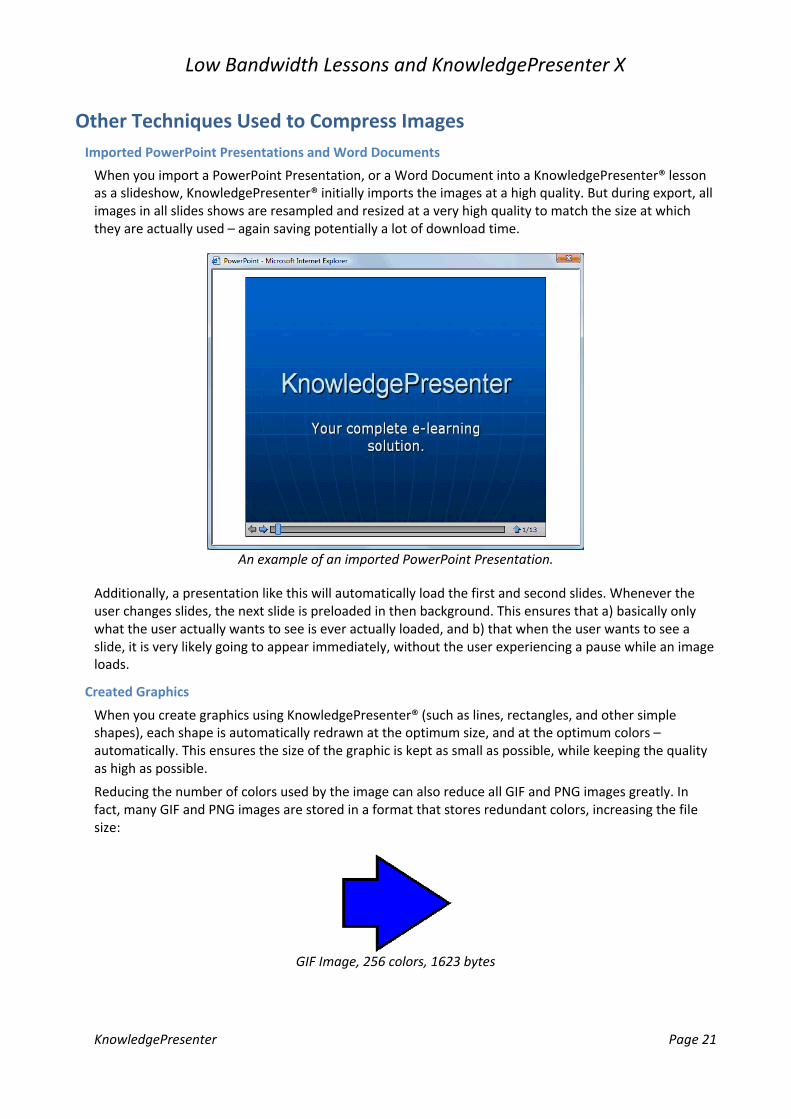
When you import a PowerPoint Presentation, or a Word Document into a KnowledgePresenter® lesson as a slideshow, KnowledgePresenter® initially imports the images at a high quality. But during export, all images in all slides shows are resampled and resized at a very high quality to match the size at which they are actually used – again saving potentially a lot of download time.
An example of an imported PowerPoint Presentation.
Additionally, a presentation like this will automatically load the first and second slides. Whenever the user changes slides, the next slide is preloaded in then background. This ensures that a) basically only what the user actually wants to see is ever actually loaded, and b) that when the user wants to see a slide, it is very likely going to appear immediately, without the user experiencing a pause while an image loads.
Created Graphics
When you create graphics using KnowledgePresenter® (such as lines, rectangles, and other simple shapes), each shape is automatically redrawn at the optimum size, and at the optimum colors –automatically. This ensures the size of the graphic is kept as small as possible, while keeping the quality as high as possible.
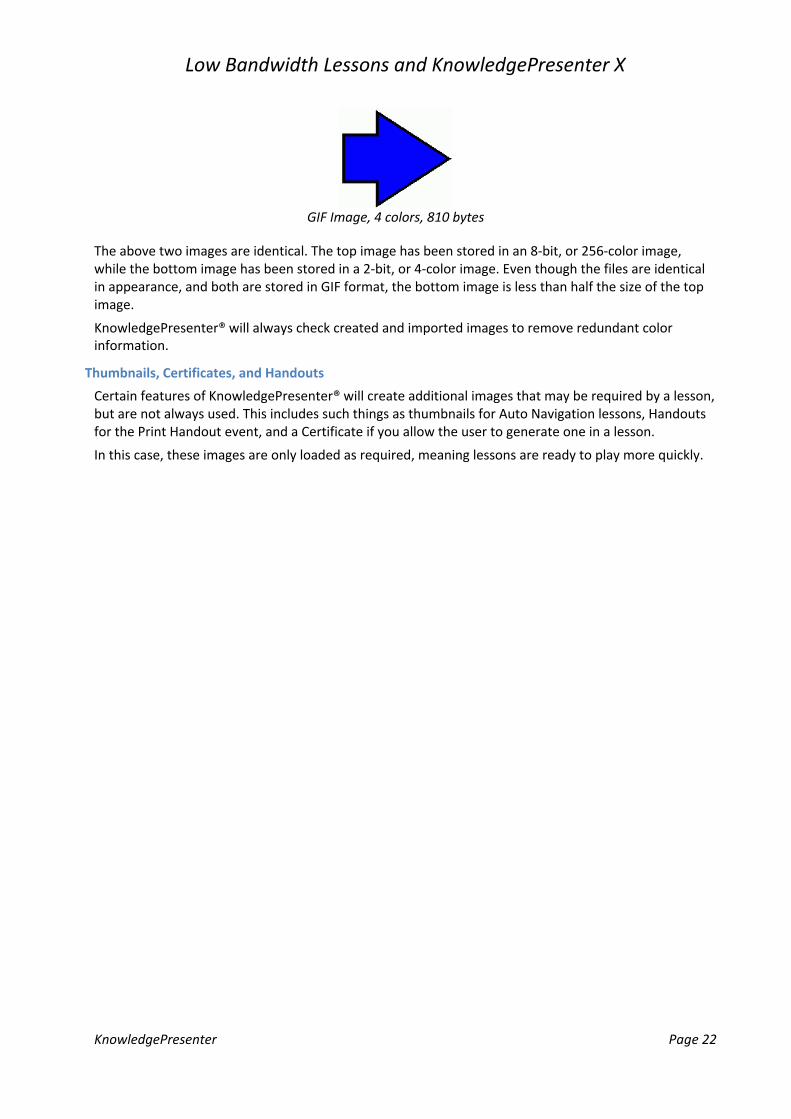
Reducing the number of colors used by the image can also reduce all GIF and PNG images greatly. In fact, many GIF and PNG images are stored in a format that stores redundant colors, increasing the file size:
GIF Image, 256 colors, 1623 bytes
Low Bandwidth Lessons and KnowledgePresenter X
KnowledgePresenter Page 22
GIF Image, 4 colors, 810 bytes
The above two images are identical. The top image has been stored in an 8-bit, or 256-color image, while the bottom image has been stored in a 2-bit, or 4-color image. Even though the files are identical in appearance, and both are stored in GIF format, the bottom image is less than half the size of the top image.
KnowledgePresenter® will always check created and imported images to remove redundant color information.
Thumbnails, Certificates, and Handouts
Certain features of KnowledgePresenter® will create additional images that may be required by a lesson, but are not always used. This includes such things as thumbnails for Auto Navigation lessons, Handouts for the Print Handout event, and a Certificate if you allow the user to generate one in a lesson.
In this case, these images are only loaded as required, meaning lessons are ready to play more quickly.
Low Bandwidth Lessons and KnowledgePresenter X
KnowledgePresenter Page 23
Text and Compression in KnowledgePresenter®When you use text in KnowledgePresenter®, there are two ways it can be rendered – as text, and as a graphic.
Undoubtedly, the smaller of these two options is when text is rendered as text. But this is not always the most flexible way to render text.
The reason for this is quite simple. Different browsers can render text slightly differently. So, how text appears in Internet Explorer may be slightly different to how text displays in Firefox, or Safari, or Opera. In most cases, this does not matter, but it some cases, it is very important that text renders exactly as you’ve create it. This includes:
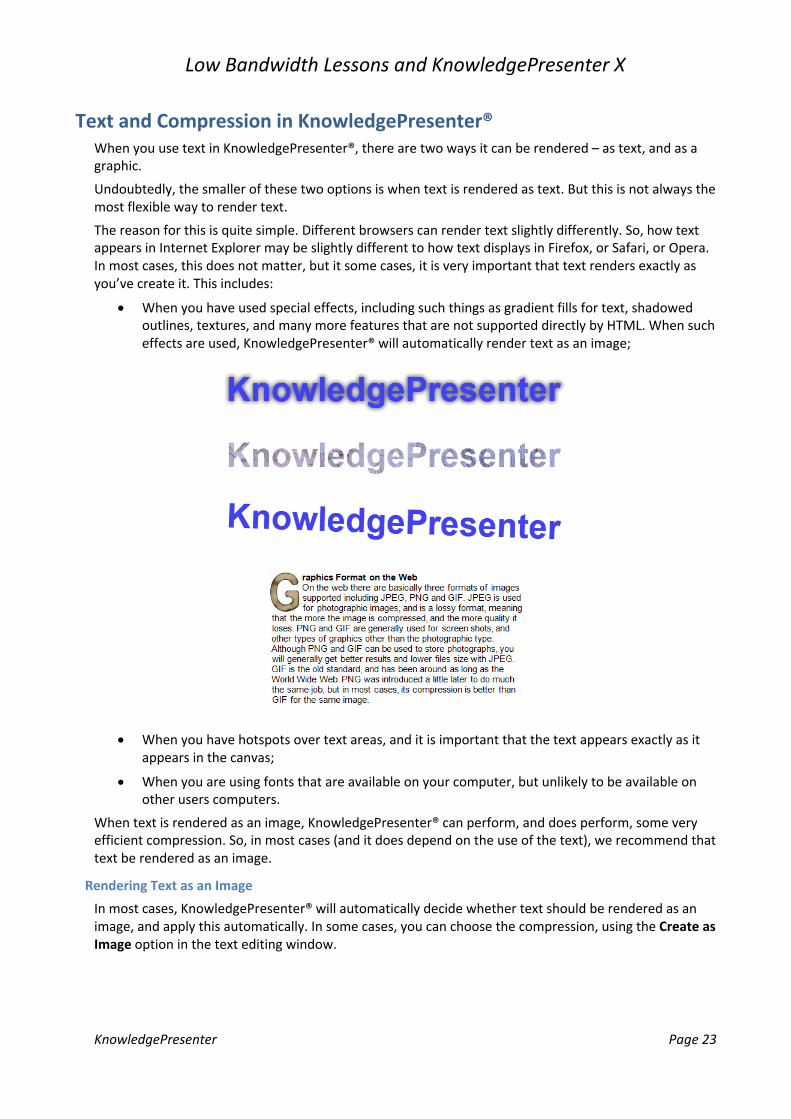
When you have used special effects, including such things as gradient fills for text, shadowed outlines, textures, and many more features that are not supported directly by HTML. When such effects are used, KnowledgePresenter® will automatically render text as an image;
When you have hotspots over text areas, and it is important that the text appears exactly as it appears in the canvas;
When you are using fonts that are available on your computer, but unlikely to be available on other users computers.
When text is rendered as an image, KnowledgePresenter® can perform, and does perform, some very efficient compression. So, in most cases (and it does depend on the use of the text), we recommend that text be rendered as an image.
Rendering Text as an Image
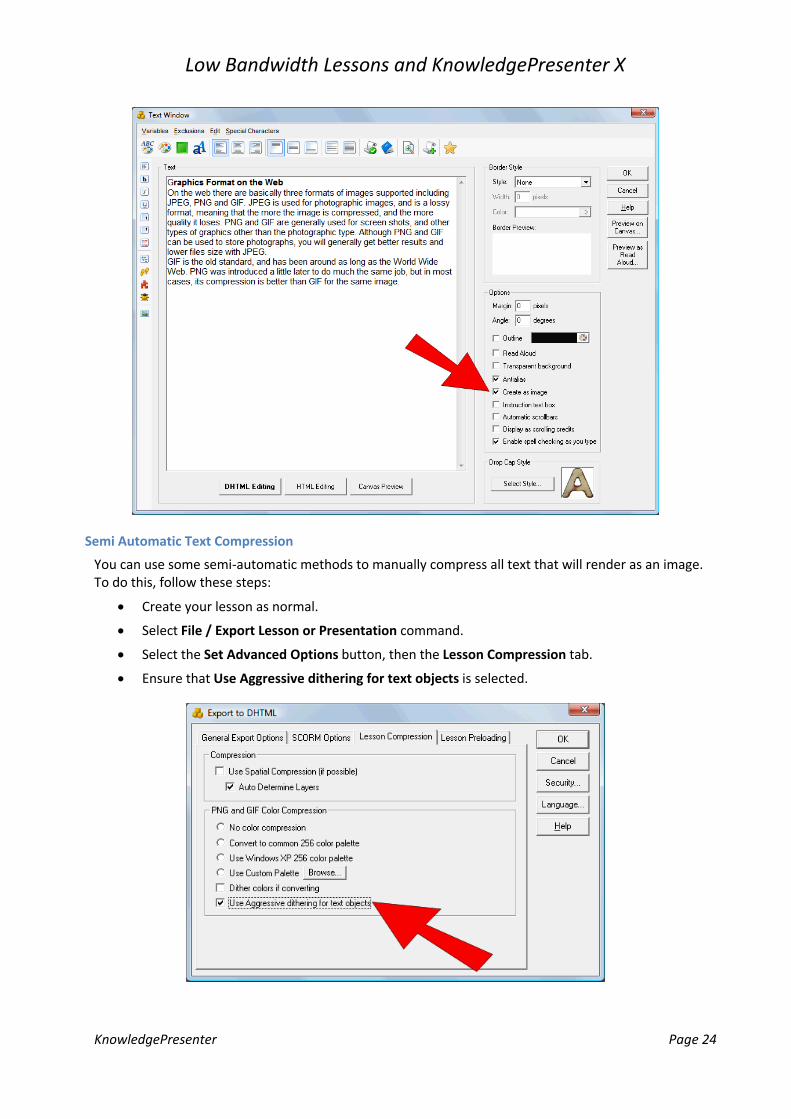
In most cases, KnowledgePresenter® will automatically decide whether text should be rendered as an image, and apply this automatically. In some cases, you can choose the compression, using the Create as Image option in the text editing window.
Low Bandwidth Lessons and KnowledgePresenter X
KnowledgePresenter Page 24
Semi Automatic Text Compression
You can use some semi-automatic methods to manually compress all text that will render as an image. To do this, follow these steps:
Create your lesson as normal.
Select File / Export Lesson or Presentation command.
Select the Set Advanced Options button, then the Lesson Compression tab.
Ensure that Use Aggressive dithering for text objects is selected.
Low Bandwidth Lessons and KnowledgePresenter X
KnowledgePresenter Page 25
KnowledgePresenter® will then use a more aggressive color reduction to compress text as images –often without any perceived visual difference at all.
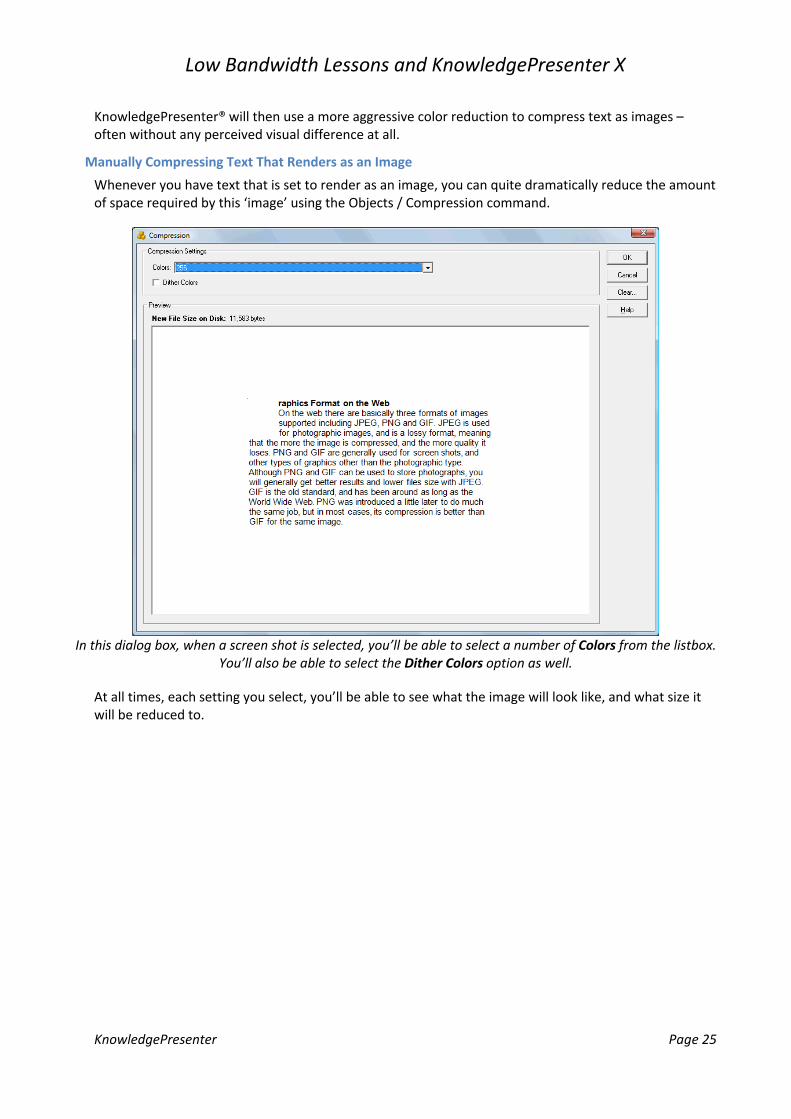
Manually Compressing Text That Renders as an Image
Whenever you have text that is set to render as an image, you can quite dramatically reduce the amount of space required by this ‘image’ using the Objects / Compression command.
In this dialog box, when a screen shot is selected, you’ll be able to select a number of Colors from the listbox. You’ll also be able to select the Dither Colors option as well.
At all times, each setting you select, you’ll be able to see what the image will look like, and what size it will be reduced to.
Low Bandwidth Lessons and KnowledgePresenter X
KnowledgePresenter Page 26
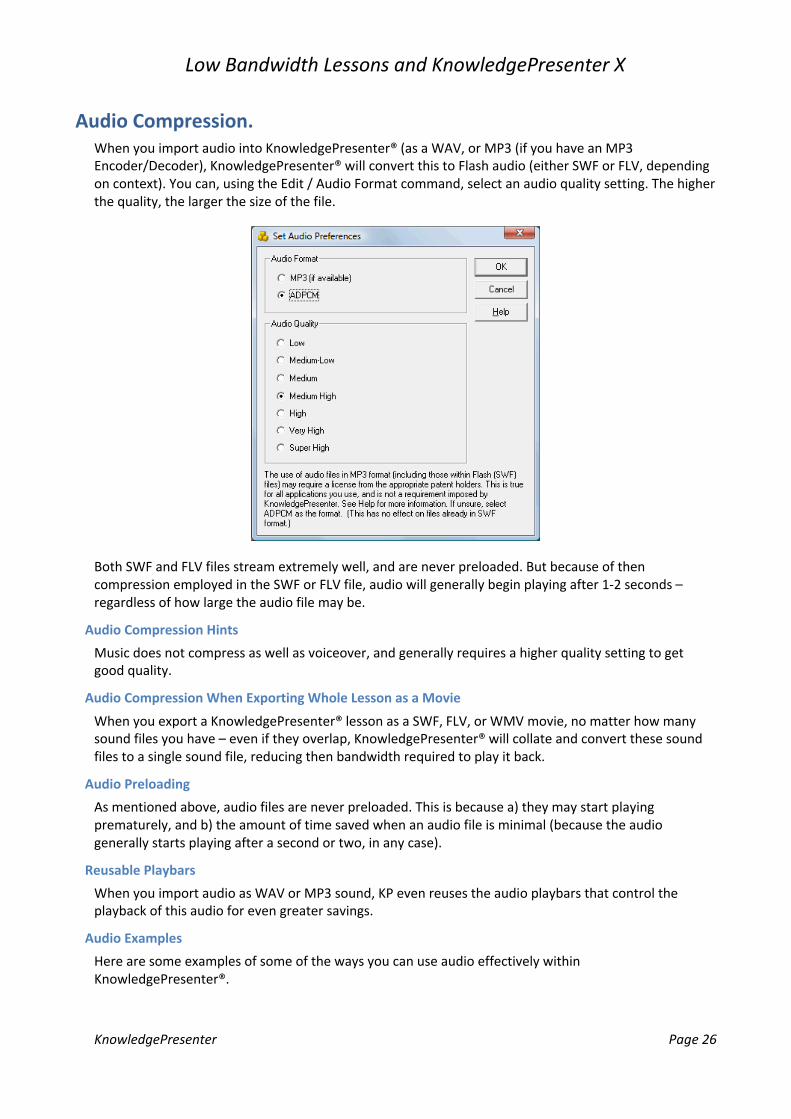
Audio Compression.When you import audio into KnowledgePresenter® (as a WAV, or MP3 (if you have an MP3 Encoder/Decoder), KnowledgePresenter® will convert this to Flash audio (either SWF or FLV, depending on context). You can, using the Edit / Audio Format command, select an audio quality setting. The higher the quality, the larger the size of the file.
Both SWF and FLV files stream extremely well, and are never preloaded. But because of then compression employed in the SWF or FLV file, audio will generally begin playing after 1-2 seconds –regardless of how large the audio file may be.
Audio Compression Hints
Music does not compress as well as voiceover, and generally requires a higher quality setting to get good quality.
Audio Compression When Exporting Whole Lesson as a Movie
When you export a KnowledgePresenter® lesson as a SWF, FLV, or WMV movie, no matter how many sound files you have – even if they overlap, KnowledgePresenter® will collate and convert these sound files to a single sound file, reducing then bandwidth required to play it back.
Audio Preloading
As mentioned above, audio files are never preloaded. This is because a) they may start playing prematurely, and b) the amount of time saved when an audio file is minimal (because the audio generally starts playing after a second or two, in any case).
Reusable Playbars
When you import audio as WAV or MP3 sound, KP even reuses the audio playbars that control the playback of this audio for even greater savings.
Audio Examples
Here are some examples of some of the ways you can use audio effectively within KnowledgePresenter®.
Low Bandwidth Lessons and KnowledgePresenter X
KnowledgePresenter Page 27
http://www.knowledgepresenter.com/2006demos/automatic%20audio/. Illustrates how, when you add audio to a lesson, you can get the lessons or presentation to move to the next step automatically when the audio for the current step has finished playing.
http://www.knowledgepresenter.com/v7demos/GreenTreeFrogsAutoNavigation2/. Here we have a lesson about Green Tree Frogs. It includes audio voiceovers, recorded directly in KnowledgePresenter®. This example uses one of 28 different possible playbars - and uses the long playbar version, complete with volume and mute controls.
http://www.knowledgepresenter.com/v7demos/GreenTreeFrogsAutoNavigation/. Here we have the same lesson as above about Green Tree Frogs. It includes audio voiceovers, recorded directly in KnowledgePresenter®. This example uses one of 28 different possible playbars - and uses the small playbar version.
http://www.knowledgepresenter.com/v7demos/swfdemo/. KnowledgePresenter® can import and export Flash (SWF) animations. This example is of a lesson created totally in KnowledgePresenter®. It includes audio, synchronization, images, text, and more.
http://www.knowledgepresenter.com/v7demos/aussiegreentreefrogquiz/. Here is an example of how an assessment can be created with audio and video.
http://www.knowledgepresenter.com/v7demos/crocodilesreadaloud/. KnowledgePresenter®allows you to create computer generated audio for all, or selected text objects.
http://www.knowledgepresenter.com/v7demos/canvas/. KnowledgePresenter® allows you to create computer generated audio for all, or selected text objects. This example incorporates this with a software simulation. Note that you can disable to enable audio from the bottom toolbar.
http://www.knowledgepresenter.com/v7demos/audioandtext/. This example is a subset of the one above - but done a little differently. In this lesson, with a single click, the user can change from voiceover to text displayed on screen - and vice versa.
http://www.knowledgepresenter.com/2006demos/soundeffects/. Apply sounds to mouseover, mousedown, mouseup, or double-click events.
http://www.knowledgepresenter.com/v7demos/kirksanimals/. Similar to an earlier example, but this example illustrates how images can be included with audio.
Low Bandwidth Lessons and KnowledgePresenter X
KnowledgePresenter Page 28
Movie CompressionWhen you import movie into a KnowledgePresenter® lesson, you can do so in the following formats:
SWF (Flash Animation)
FLV (Flash Movie)
MP4
WMV (Windows Media Format)
AVI (an earlier Windows Media Format).
While each of these files have certain advantages and disadvantages, we recommend that FLV format be used (for movies), or SWF (if the movie is more of an animation than a movie perse).
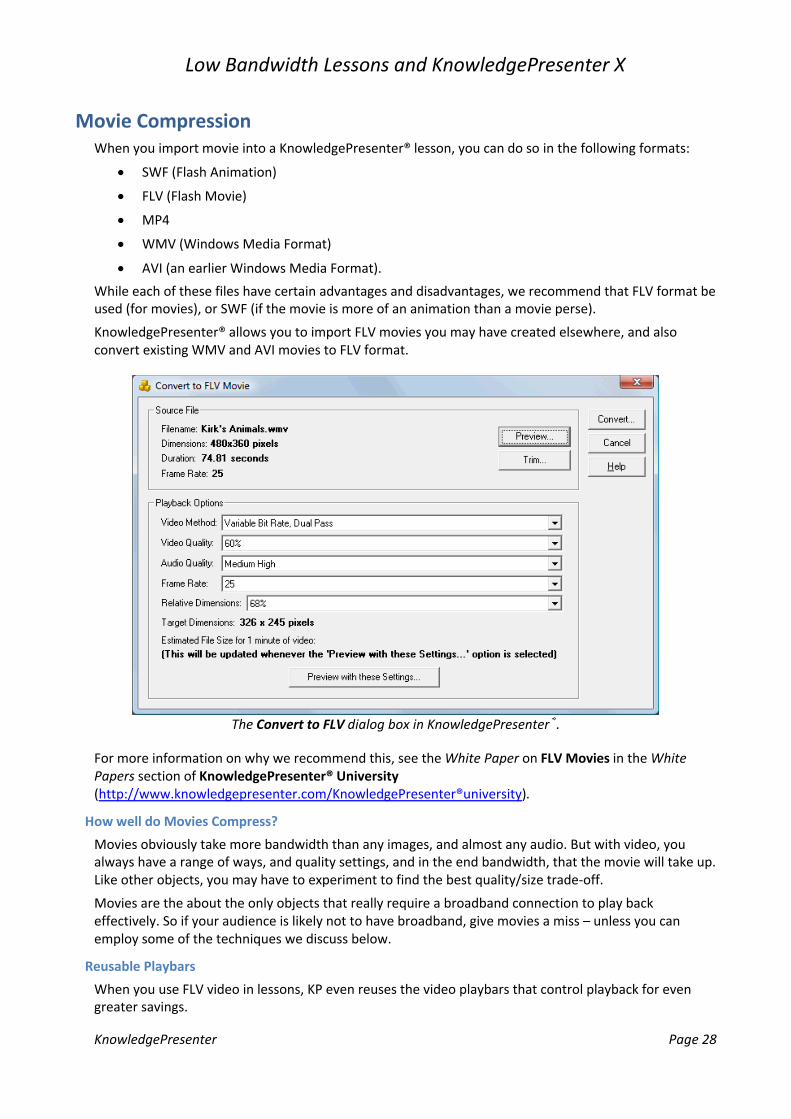
KnowledgePresenter® allows you to import FLV movies you may have created elsewhere, and also convert existing WMV and AVI movies to FLV format.
The Convert to FLV dialog box in KnowledgePresenter®.
For more information on why we recommend this, see the White Paper on FLV Movies in the White Papers section of KnowledgePresenter® University(http://www.knowledgepresenter.com/KnowledgePresenter®university).
How well do Movies Compress?
Movies obviously take more bandwidth than any images, and almost any audio. But with video, you always have a range of ways, and quality settings, and in the end bandwidth, that the movie will take up. Like other objects, you may have to experiment to find the best quality/size trade-off.
Movies are the about the only objects that really require a broadband connection to play back effectively. So if your audience is likely not to have broadband, give movies a miss – unless you can employ some of the techniques we discuss below.
Reusable Playbars
When you use FLV video in lessons, KP even reuses the video playbars that control playback for even greater savings.
Low Bandwidth Lessons and KnowledgePresenter X
KnowledgePresenter Page 29
KP-Simulator Movies
KP-Simulator is a part of the KnowledgePresenter® suite that captures movies from your desktop, allows you to edit, add text, add extra audio, add arrows, logos, and watermarks, etc, and then export in a format that allows the movie to be played back in KnowledgePresenter®.
KP-Simulator allows you to export in a number of formats. Here is a good idea on when to use each format:
SWF (Flash). If you intend to play back the movie from a browser, or import it back into a KnowledgePresenter® lesson, then export as a Flash Animation. This gives nearly perfect quality, and also at a much smaller size than any other format. KP-Simulator employs some high-tech temporal compression on screen movies to ensure that this is the case.
FLV (Flash). This can also be used if playing back in a KnowledgePresenter® lesson, but will not give the same quality as SWF format.
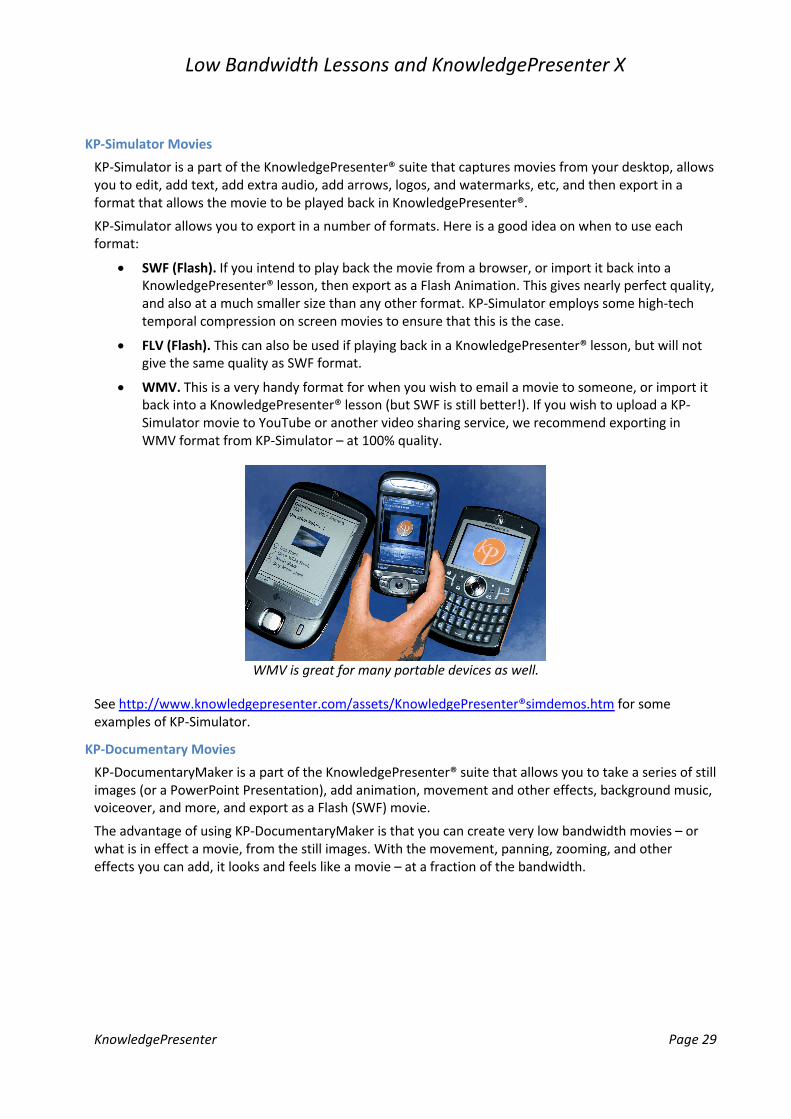
WMV. This is a very handy format for when you wish to email a movie to someone, or import it back into a KnowledgePresenter® lesson (but SWF is still better!). If you wish to upload a KP-Simulator movie to YouTube or another video sharing service, we recommend exporting in WMV format from KP-Simulator – at 100% quality.
WMV is great for many portable devices as well.
See http://www.knowledgepresenter.com/assets/KnowledgePresenter®simdemos.htm for some examples of KP-Simulator.
KP-Documentary Movies
KP-DocumentaryMaker is a part of the KnowledgePresenter® suite that allows you to take a series of still images (or a PowerPoint Presentation), add animation, movement and other effects, background music, voiceover, and more, and export as a Flash (SWF) movie.
The advantage of using KP-DocumentaryMaker is that you can create very low bandwidth movies – or what is in effect a movie, from the still images. With the movement, panning, zooming, and other effects you can add, it looks and feels like a movie – at a fraction of the bandwidth.
Low Bandwidth Lessons and KnowledgePresenter X
KnowledgePresenter Page 30
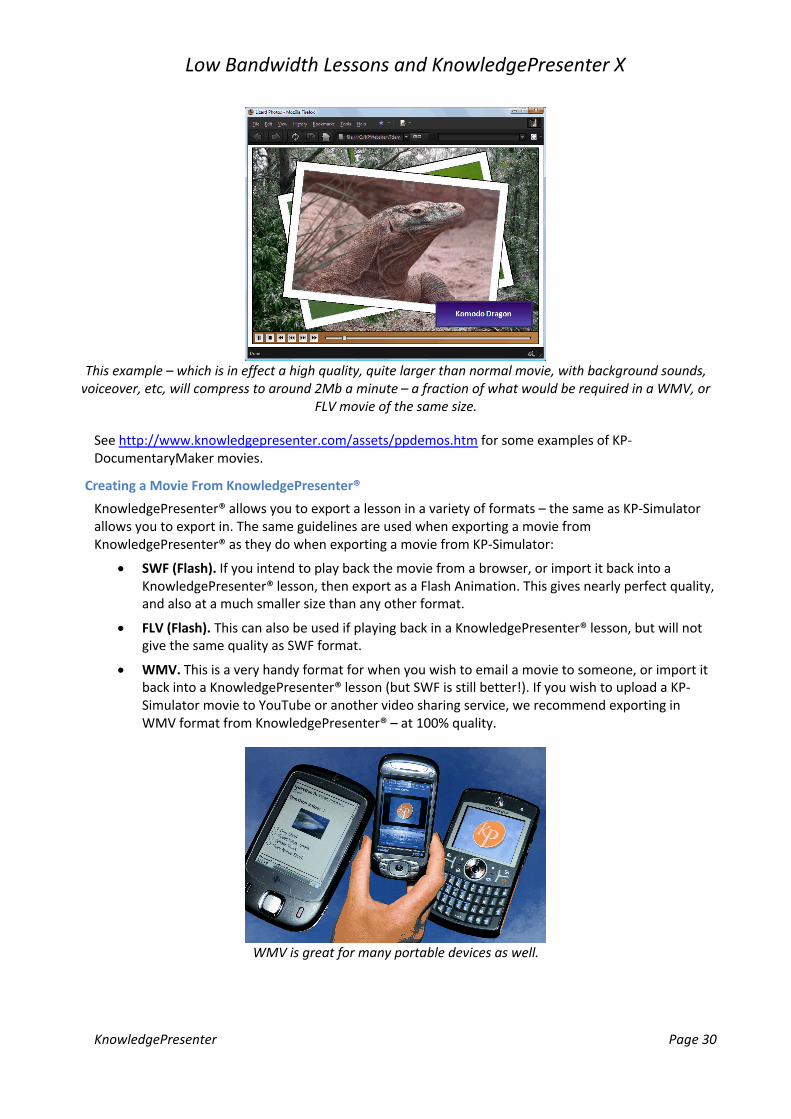
This example – which is in effect a high quality, quite larger than normal movie, with background sounds, voiceover, etc, will compress to around 2Mb a minute – a fraction of what would be required in a WMV, or
FLV movie of the same size.
See http://www.knowledgepresenter.com/assets/ppdemos.htm for some examples of KP-DocumentaryMaker movies.
Creating a Movie From KnowledgePresenter®
KnowledgePresenter® allows you to export a lesson in a variety of formats – the same as KP-Simulator allows you to export in. The same guidelines are used when exporting a movie from KnowledgePresenter® as they do when exporting a movie from KP-Simulator:
SWF (Flash). If you intend to play back the movie from a browser, or import it back into a KnowledgePresenter® lesson, then export as a Flash Animation. This gives nearly perfect quality, and also at a much smaller size than any other format.
FLV (Flash). This can also be used if playing back in a KnowledgePresenter® lesson, but will not give the same quality as SWF format.
WMV. This is a very handy format for when you wish to email a movie to someone, or import it back into a KnowledgePresenter® lesson (but SWF is still better!). If you wish to upload a KP-Simulator movie to YouTube or another video sharing service, we recommend exporting in WMV format from KnowledgePresenter® – at 100% quality.
WMV is great for many portable devices as well.
Low Bandwidth Lessons and KnowledgePresenter X
KnowledgePresenter Page 31
Hints for Better Quality / Lower Bandwidth Movies
Movies are a bit like images. The more information in each frame, the larger the movie will have to be to maintain quality. The added note with movies is that the more this information changes from frame to frame, the larger the movie needs to be again.
Here are some great hints for using video that will be imported into KnowledgePresenter®.
Whenever you compress a video (either in KnowledgePresenter® itself, or in some other program), always start off with the highest quality movie you can. Compressing a movie that has already been compressed can give disappointing results.
If you are taking your own movies, use a tripod. This helps remove any camera shake, and reduces the amount of information that will change from frame to frame – giving you better quality, and lower bandwidth.
Talking heads compress really well. This is because generally, the background does not change, and not a lot of information changes from frame to frame.
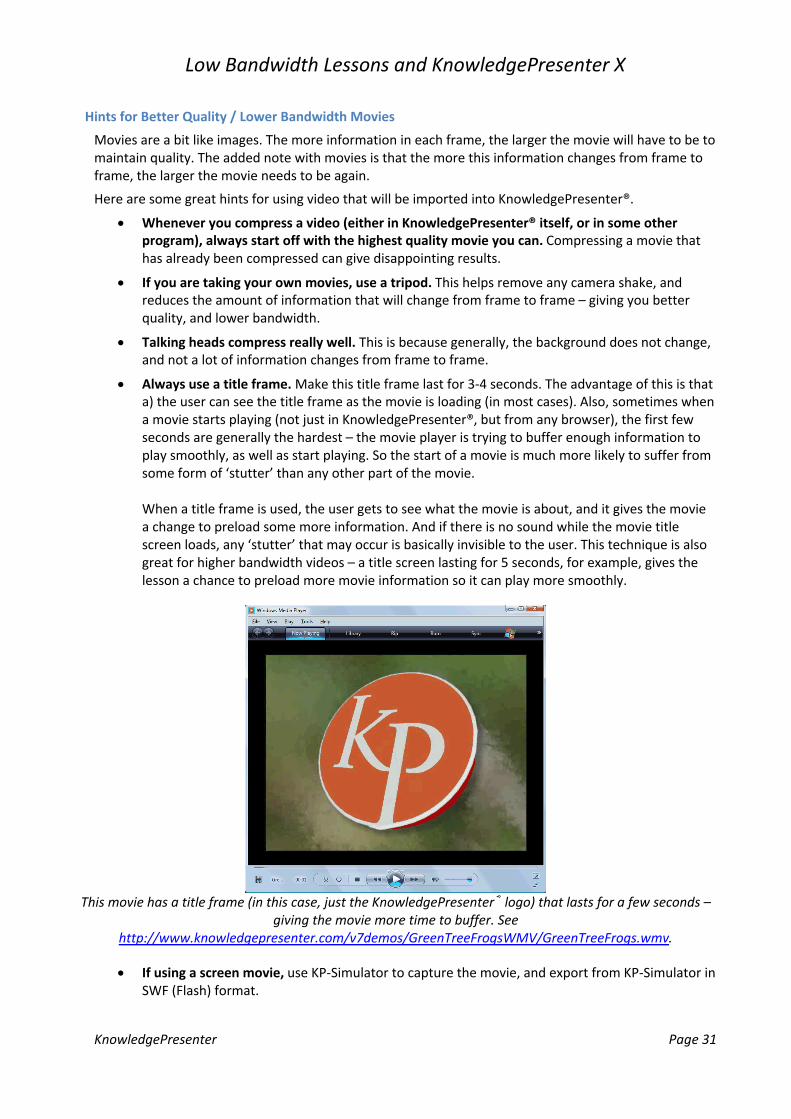
Always use a title frame. Make this title frame last for 3-4 seconds. The advantage of this is that a) the user can see the title frame as the movie is loading (in most cases). Also, sometimes when a movie starts playing (not just in KnowledgePresenter®, but from any browser), the first few seconds are generally the hardest – the movie player is trying to buffer enough information to play smoothly, as well as start playing. So the start of a movie is much more likely to suffer from some form of ‘stutter’ than any other part of the movie.
When a title frame is used, the user gets to see what the movie is about, and it gives the movie a change to preload some more information. And if there is no sound while the movie title screen loads, any ‘stutter’ that may occur is basically invisible to the user. This technique is also great for higher bandwidth videos – a title screen lasting for 5 seconds, for example, gives the lesson a chance to preload more movie information so it can play more smoothly.
This movie has a title frame (in this case, just the KnowledgePresenter® logo) that lasts for a few seconds –giving the movie more time to buffer. See
http://www.knowledgepresenter.com/v7demos/GreenTreeFrogsWMV/GreenTreeFrogs.wmv.
If using a screen movie, use KP-Simulator to capture the movie, and export from KP-Simulator in SWF (Flash) format.
Low Bandwidth Lessons and KnowledgePresenter X
KnowledgePresenter Page 32
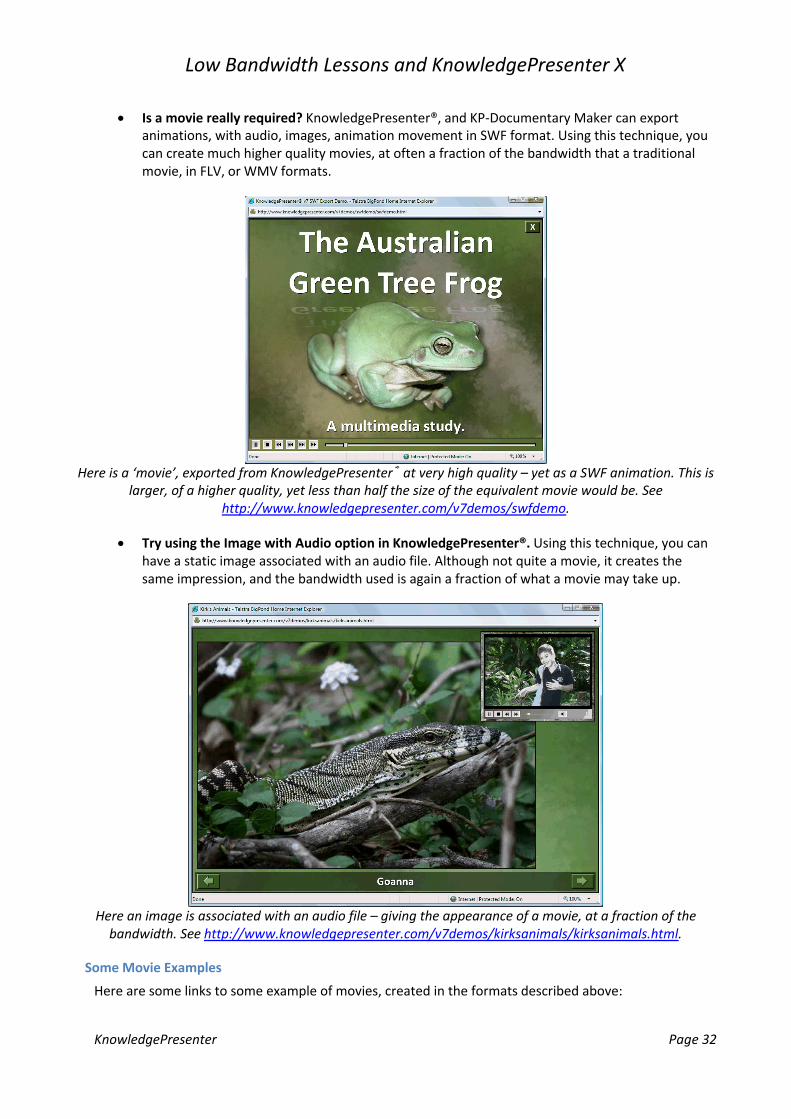
Is a movie really required? KnowledgePresenter®, and KP-Documentary Maker can export animations, with audio, images, animation movement in SWF format. Using this technique, you can create much higher quality movies, at often a fraction of the bandwidth that a traditional movie, in FLV, or WMV formats.
Here is a ‘movie’, exported from KnowledgePresenter® at very high quality – yet as a SWF animation. This is larger, of a higher quality, yet less than half the size of the equivalent movie would be. See
http://www.knowledgepresenter.com/v7demos/swfdemo.
Try using the Image with Audio option in KnowledgePresenter®. Using this technique, you can have a static image associated with an audio file. Although not quite a movie, it creates the same impression, and the bandwidth used is again a fraction of what a movie may take up.
Here an image is associated with an audio file – giving the appearance of a movie, at a fraction of the bandwidth. See http://www.knowledgepresenter.com/v7demos/kirksanimals/kirksanimals.html.
Some Movie Examples
Here are some links to some example of movies, created in the formats described above:
Low Bandwidth Lessons and KnowledgePresenter X
KnowledgePresenter Page 33
Flash (SWF) Example: http://www.knowledgepresenter.com/v7demos/swfdemo/
FLV Example: http://www.knowledgepresenter.com/v7demos/flvdemo/
WMV Example:http://www.knowledgepresenter.com/v7demos/GreenTreeFrogsWMV/GreenTreeFrogs.wmv
Low Bandwidth Lessons and KnowledgePresenter X
KnowledgePresenter Page 34
Miscellaneous Compression Methods Employed by KnowledgePresenter®
Duplication Compression
When a KnowledgePresenter® lesson is exported, after the export, KnowledgePresenter® will compare every single image in the exported lesson with every other image. If there are any duplicates, KnowledgePresenter® will remove the duplicates, and rewrite the exported file to update all references.
Where images are duplicated, or similar graphics or text boxes, or particularly buttons, are used in lessons, this can result in sometimes over 100 images being removed from the final export.
Redundancy Compression
This one may seem obvious – but worth mentioning. Where objects are imported into a lesson, but not used, or appear outside of the used timeline, or are in a hidden group, they are simply not exported as a part of the final lesson.
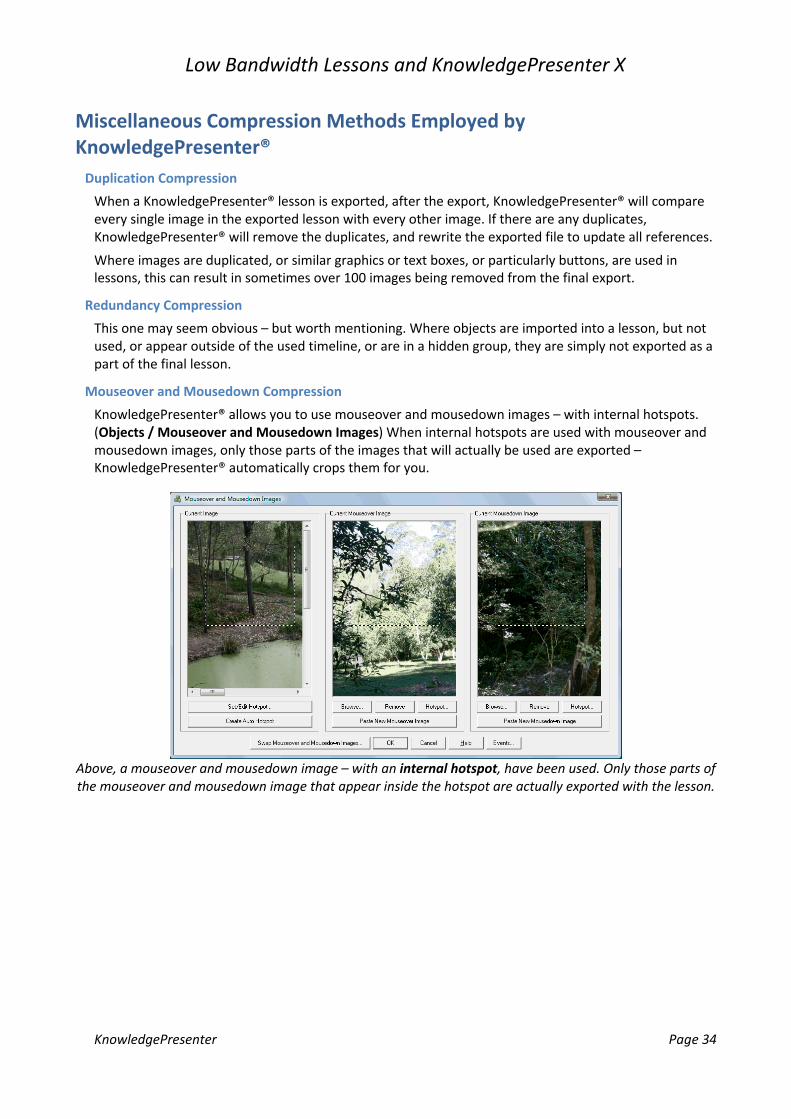
Mouseover and Mousedown Compression
KnowledgePresenter® allows you to use mouseover and mousedown images – with internal hotspots. (Objects / Mouseover and Mousedown Images) When internal hotspots are used with mouseover and mousedown images, only those parts of the images that will actually be used are exported –KnowledgePresenter® automatically crops them for you.
Above, a mouseover and mousedown image – with an internal hotspot, have been used. Only those parts of the mouseover and mousedown image that appear inside the hotspot are actually exported with the lesson.
Low Bandwidth Lessons and KnowledgePresenter X
KnowledgePresenter Page 35
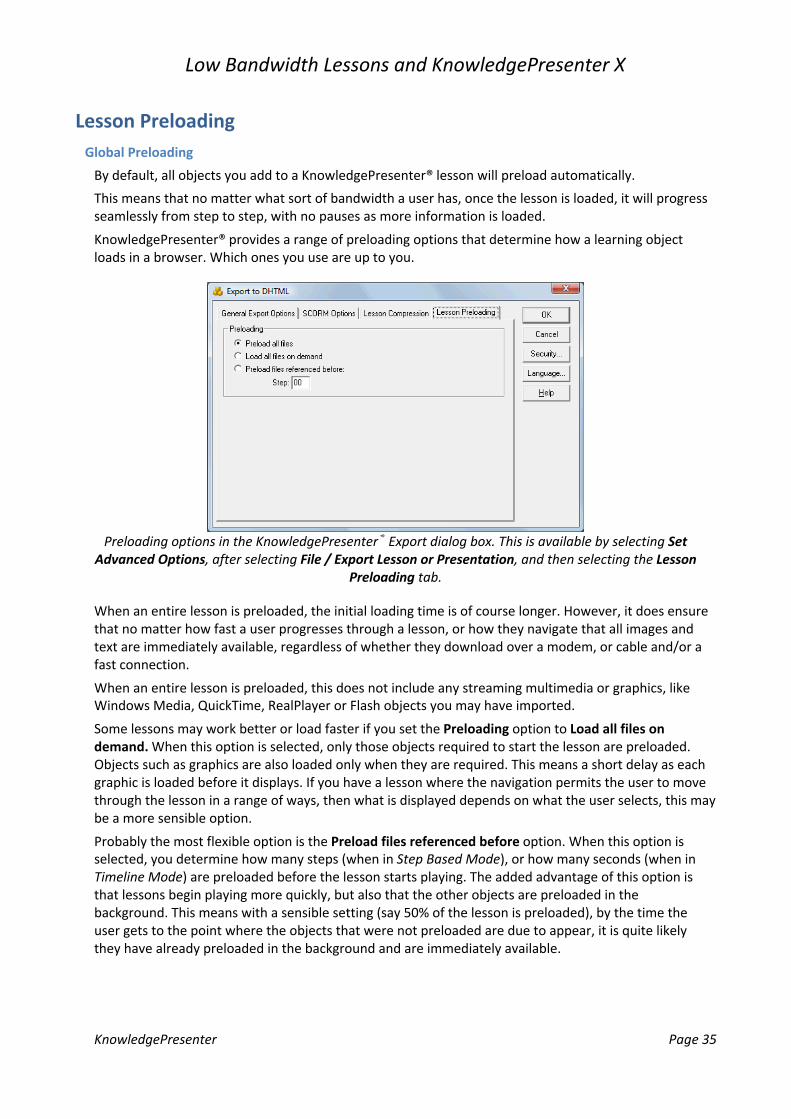
Lesson PreloadingGlobal Preloading
By default, all objects you add to a KnowledgePresenter® lesson will preload automatically.
This means that no matter what sort of bandwidth a user has, once the lesson is loaded, it will progress seamlessly from step to step, with no pauses as more information is loaded.
KnowledgePresenter® provides a range of preloading options that determine how a learning object loads in a browser. Which ones you use are up to you.
Preloading options in the KnowledgePresenter® Export dialog box. This is available by selecting Set Advanced Options, after selecting File / Export Lesson or Presentation, and then selecting the Lesson
Preloading tab.
When an entire lesson is preloaded, the initial loading time is of course longer. However, it does ensure that no matter how fast a user progresses through a lesson, or how they navigate that all images and text are immediately available, regardless of whether they download over a modem, or cable and/or a fast connection.
When an entire lesson is preloaded, this does not include any streaming multimedia or graphics, like Windows Media, QuickTime, RealPlayer or Flash objects you may have imported.
Some lessons may work better or load faster if you set the Preloading option to Load all files on demand. When this option is selected, only those objects required to start the lesson are preloaded. Objects such as graphics are also loaded only when they are required. This means a short delay as each graphic is loaded before it displays. If you have a lesson where the navigation permits the user to move through the lesson in a range of ways, then what is displayed depends on what the user selects, this may be a more sensible option.
Probably the most flexible option is the Preload files referenced before option. When this option is selected, you determine how many steps (when in Step Based Mode), or how many seconds (when in Timeline Mode) are preloaded before the lesson starts playing. The added advantage of this option is that lessons begin playing more quickly, but also that the other objects are preloaded in the background. This means with a sensible setting (say 50% of the lesson is preloaded), by the time the user gets to the point where the objects that were not preloaded are due to appear, it is quite likely they have already preloaded in the background and are immediately available.
Low Bandwidth Lessons and KnowledgePresenter X
KnowledgePresenter Page 36
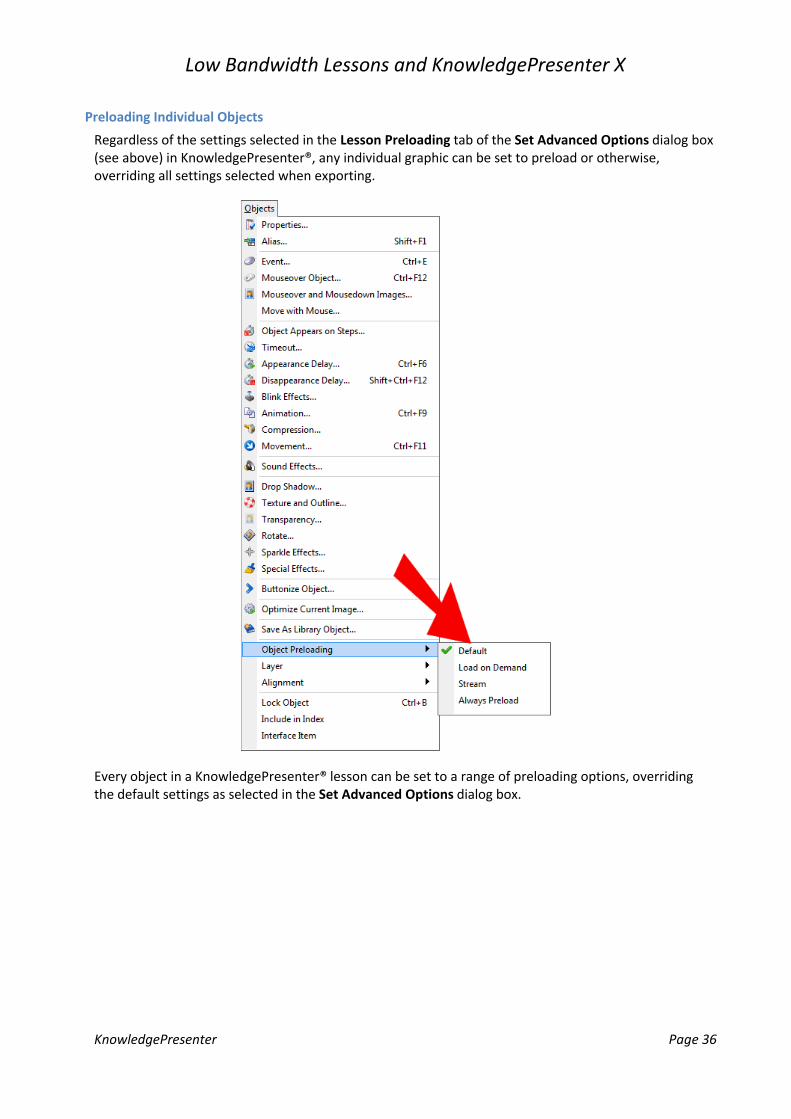
Preloading Individual Objects
Regardless of the settings selected in the Lesson Preloading tab of the Set Advanced Options dialog box (see above) in KnowledgePresenter®, any individual graphic can be set to preload or otherwise, overriding all settings selected when exporting.
Every object in a KnowledgePresenter® lesson can be set to a range of preloading options, overriding the default settings as selected in the Set Advanced Options dialog box.
Low Bandwidth Lessons and KnowledgePresenter X
KnowledgePresenter Page 37
HTML CompressionFinally, when KP writes the HTML that will control your lesson, it even white space compresses this file for faster loading. All unnecessary spaces, carriage returns, tab characters, quotes, and more are removed during export. Some other techniques are employed to also make the HTML quicker to load.
When writing the HTML, KP will generally only add those routines required by the lesson – again resulting in smaller files.
Low Bandwidth Lessons and KnowledgePresenter X
KnowledgePresenter Page 38
KnowledgePresenter Effects – and How They Affect BandwidthKnowledgePresenter allows you to apply all sorts of effects to text and images. Below, we summarize how some of these may affect bandwidth and lesson size.
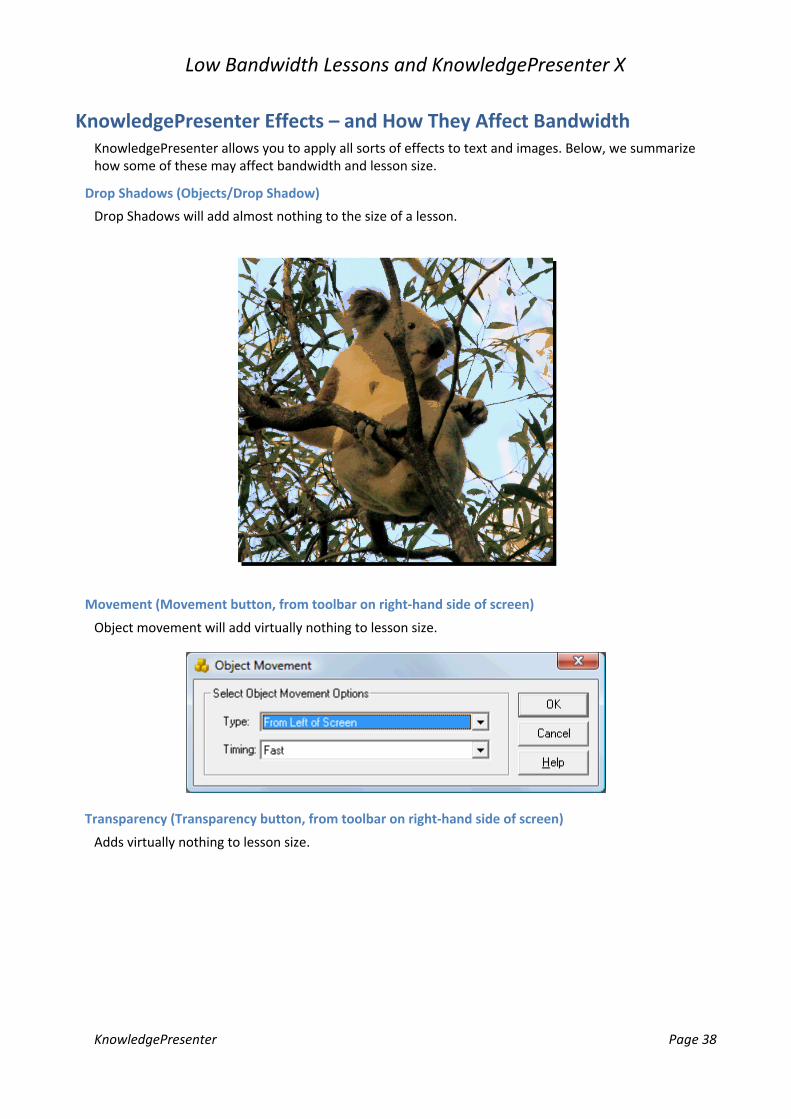
Drop Shadows (Objects/Drop Shadow)
Drop Shadows will add almost nothing to the size of a lesson.
Movement (Movement button, from toolbar on right-hand side of screen)
Object movement will add virtually nothing to lesson size.
Transparency (Transparency button, from toolbar on right-hand side of screen)
Adds virtually nothing to lesson size.
Low Bandwidth Lessons and KnowledgePresenter X
KnowledgePresenter Page 39
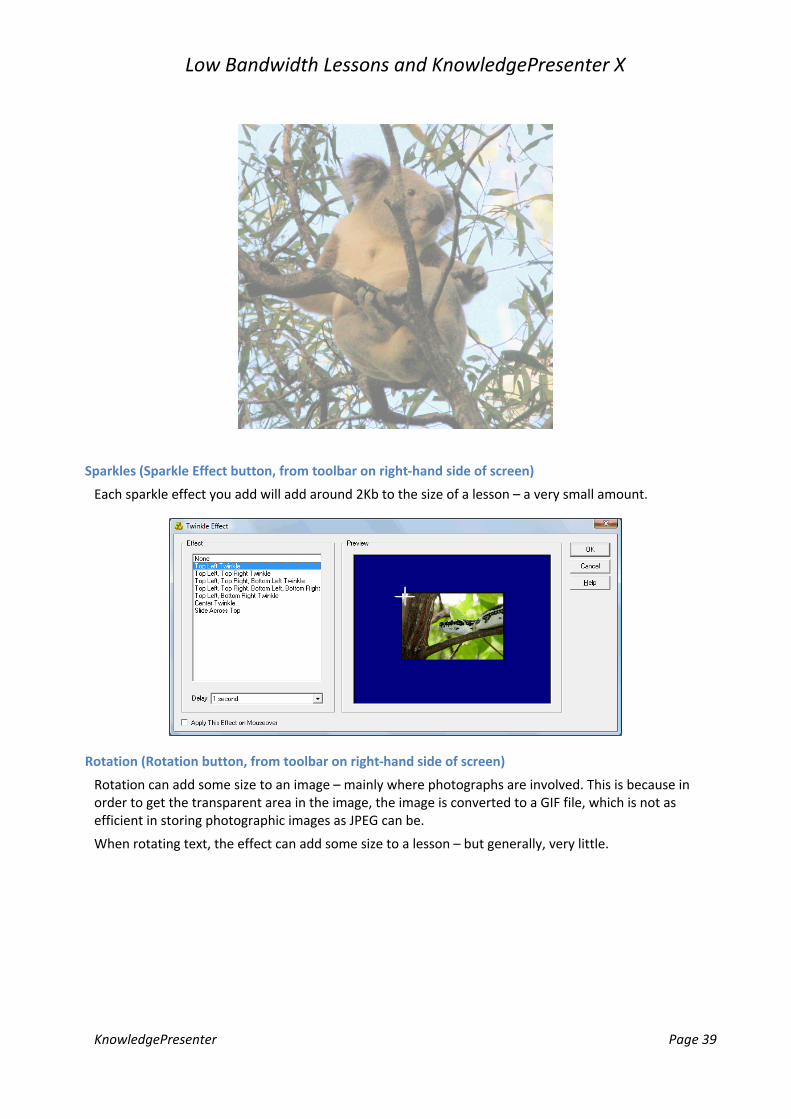
Sparkles (Sparkle Effect button, from toolbar on right-hand side of screen)
Each sparkle effect you add will add around 2Kb to the size of a lesson – a very small amount.
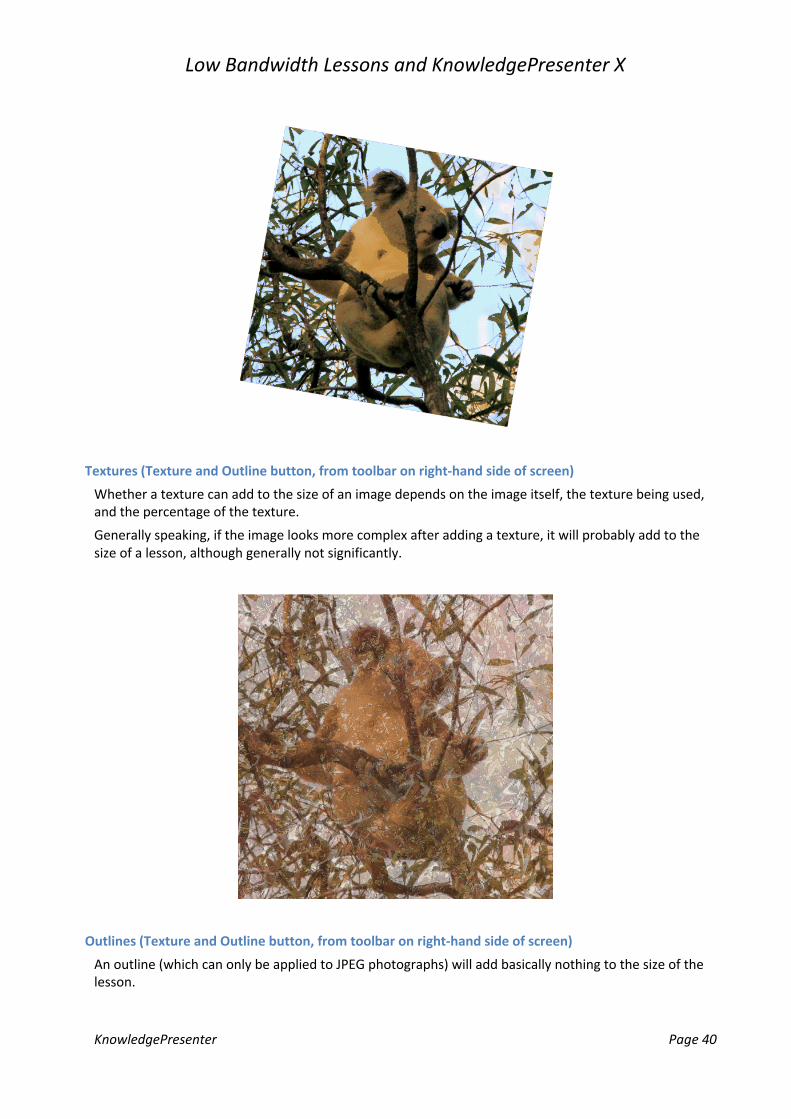
Rotation (Rotation button, from toolbar on right-hand side of screen)
Rotation can add some size to an image – mainly where photographs are involved. This is because in order to get the transparent area in the image, the image is converted to a GIF file, which is not as efficient in storing photographic images as JPEG can be.
When rotating text, the effect can add some size to a lesson – but generally, very little.
Low Bandwidth Lessons and KnowledgePresenter X
KnowledgePresenter Page 40
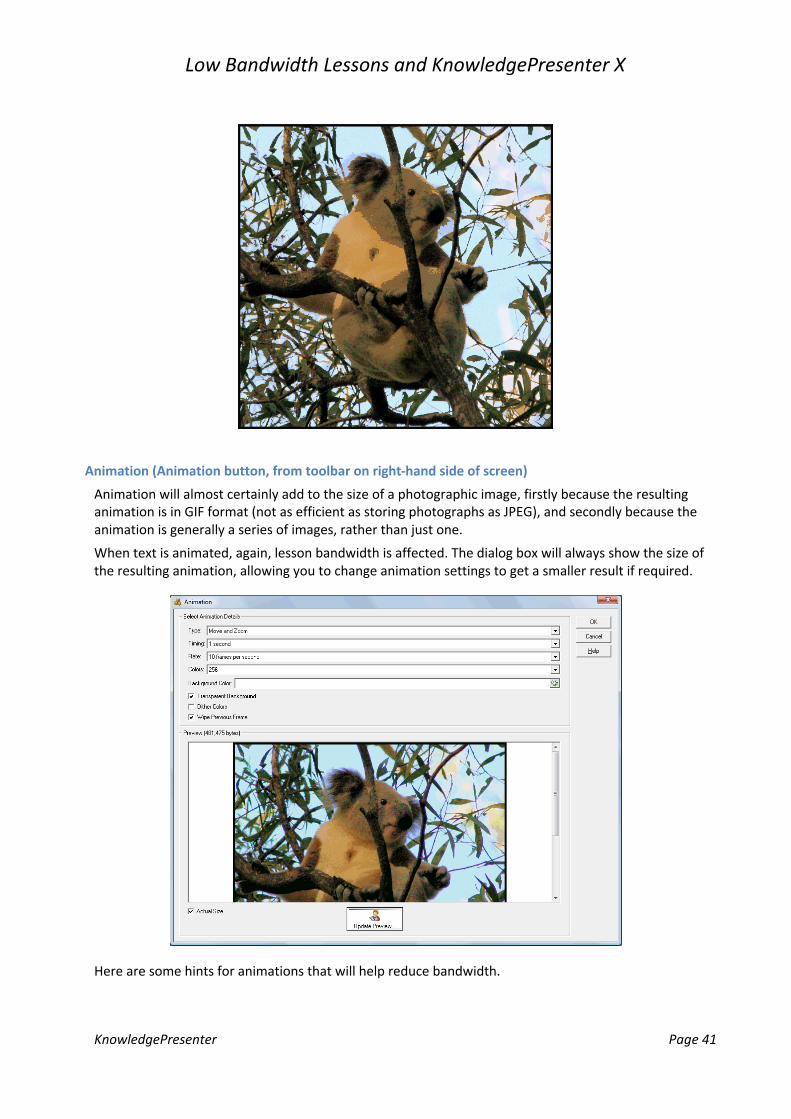
Textures (Texture and Outline button, from toolbar on right-hand side of screen)
Whether a texture can add to the size of an image depends on the image itself, the texture being used, and the percentage of the texture.
Generally speaking, if the image looks more complex after adding a texture, it will probably add to the size of a lesson, although generally not significantly.
Outlines (Texture and Outline button, from toolbar on right-hand side of screen)
An outline (which can only be applied to JPEG photographs) will add basically nothing to the size of the lesson.
Low Bandwidth Lessons and KnowledgePresenter X
KnowledgePresenter Page 41
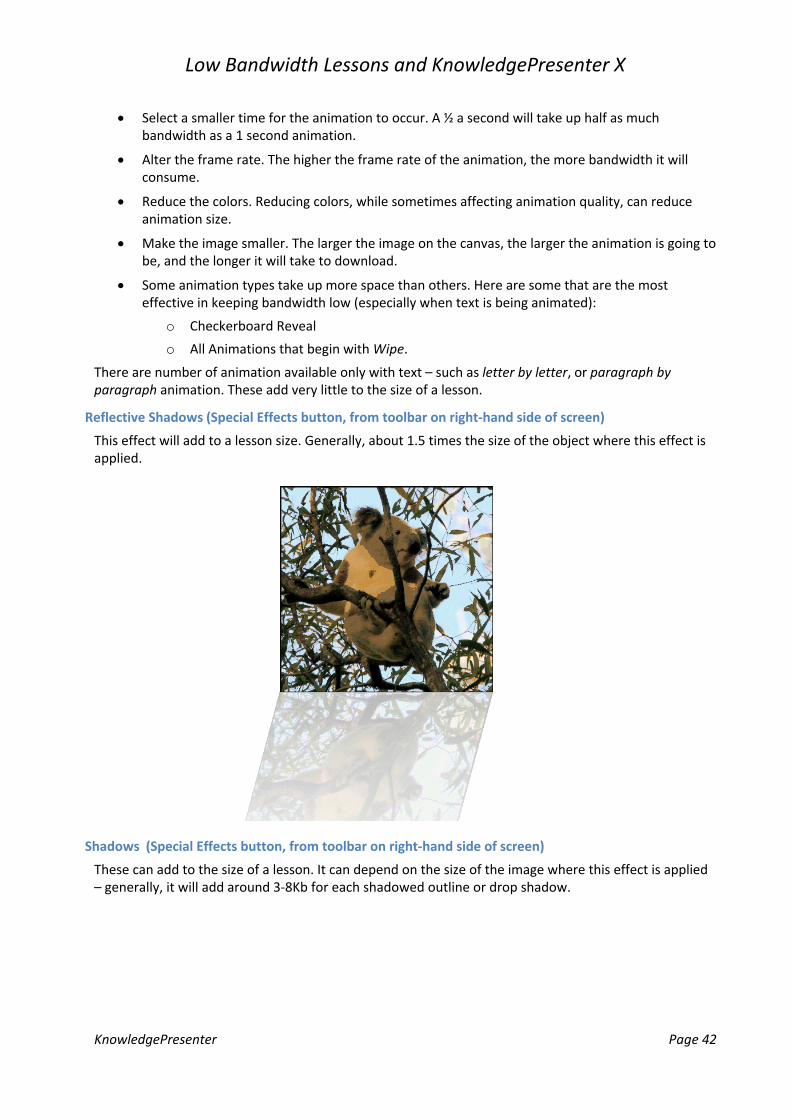
Animation (Animation button, from toolbar on right-hand side of screen)
Animation will almost certainly add to the size of a photographic image, firstly because the resulting animation is in GIF format (not as efficient as storing photographs as JPEG), and secondly because the animation is generally a series of images, rather than just one.
When text is animated, again, lesson bandwidth is affected. The dialog box will always show the size of the resulting animation, allowing you to change animation settings to get a smaller result if required.
Here are some hints for animations that will help reduce bandwidth.
Low Bandwidth Lessons and KnowledgePresenter X
KnowledgePresenter Page 42
Select a smaller time for the animation to occur. A ½ a second will take up half as much bandwidth as a 1 second animation.
Alter the frame rate. The higher the frame rate of the animation, the more bandwidth it will consume.
Reduce the colors. Reducing colors, while sometimes affecting animation quality, can reduce animation size.
Make the image smaller. The larger the image on the canvas, the larger the animation is going to be, and the longer it will take to download.
Some animation types take up more space than others. Here are some that are the most effective in keeping bandwidth low (especially when text is being animated):
o Checkerboard Reveal
o All Animations that begin with Wipe.
There are number of animation available only with text – such as letter by letter, or paragraph by paragraph animation. These add very little to the size of a lesson.
Reflective Shadows (Special Effects button, from toolbar on right-hand side of screen)
This effect will add to a lesson size. Generally, about 1.5 times the size of the object where this effect is applied.
Shadows (Special Effects button, from toolbar on right-hand side of screen)
These can add to the size of a lesson. It can depend on the size of the image where this effect is applied – generally, it will add around 3-8Kb for each shadowed outline or drop shadow.
Low Bandwidth Lessons and KnowledgePresenter X
KnowledgePresenter Page 43
Low Bandwidth Lessons and KnowledgePresenter X
KnowledgePresenter Page 44
Summary of Compression Techniques Employed by KPThe final result of course is that you have lessons that are still of a high quality, but are smaller in size, quicker to download, save you money, and save your users frustration.
In most cases, lessons can be made to fit well under 500Kb – and in many more cases, substantially smaller than that. (Streaming media not included in this calculation).
The advantage of many of the techniques described above depend on the sort of information in your lessons. So we’ve had to take some sample lessons into account when coming up with these figures.
Loading View / Loading Indicator / Startup View.
Using these techniques, there is no actual compression applied. However, the advantage here is customer satisfaction – as lessons can basically be begun before they have finished loading, and the loading indicator increase customer satisfaction by letting the user know how long the lesson has to load.
Automatic Photographic Image Compression.
Can reduce an image down to less than 1% of its original size (for larger images).
Manual Photograph Compression.
Can reduce the size of an image down by another 50% or more.
Color Compression.
Can reduce the size of images down by up to two thirds of original size.
Format Compression
Can reduce the size of images down by up to 20%.
Alpha Transparency Compression
Can reduce images with alpha transparency down to around a third of their original size.
Spatial Compression.
Can reduce the size of screen shots in a lesson by 30%-90%.
Duplication Compression.
Depends a lot on the lesson – in some cases it can remove well over 100 objects from a lesson, and save over 100 – 200Kb of download size.
Text as Image Compression Techniques
Reduces the download time of text rendered as an image by up to 50%.
Other Manual Image and Text as Image Compression Techniques
Can reduce the size of images down by up to another 50%.
Web Objects and Online Images
Potentially saves you megabytes.
Multimedia Compression.
A variety of techniques can apply here, which can reduce movies and audio dramatically. Some techniques can reduce media size by well over 50%, while other ideas we’ve come up can reduce the size of media down by 90% or more. Reusable playbars can also reduce the download time by up to 8Kb per audio/video file.
Low Bandwidth Lessons and KnowledgePresenter X
KnowledgePresenter Page 45
Preloading Options
Depending on settings, judicial preloading can cut initial download times by up to 80%.
HTML Compression
The white space and other compression techniques employed by KP can shave another 25Kb from the standard lesson.
Related Documents