Low Angle Rescue Operations Level Presented by: Mukilteo Fire Department

Welcome message from author
This document is posted to help you gain knowledge. Please leave a comment to let me know what you think about it! Share it to your friends and learn new things together.
Transcript

Low Angle Rescue
Operations Level
Presented by: Mukilteo Fire Department

Contents
• Standard Operating Guideline
• Low Angle
• High Angle
• Equipment Review
• Skills Review
• Practical Application

Low Angle Rescue
Standard Operating Guideline Low angle shall be defined as any angle that is less than vertical;
or an angle or incline in which a rope or system failure would
not result in the rescuer falling to his/her death or sustaining
serious injury.
Personnel trained, to the Operations level, in low angle rescue
may attempt to gain access to patients in low angle situations.
This access will be limited to those actions necessary to stabilize
and/or treat the patient. Packaging and extrication of the patient
shall be done with the assistance and direction of the Technical
Rescue Team.
Operations level personnel shall employ the following guidelines
when faced with a low angle rescue incident:
1.

1. Request a technical rescue response from dispatch.
2. Initiate the Incident Management System (IMS)- including the
establishment of a staging area for incoming units and personnel,
as well as the implementation of the passport accountability
system.
3. Isolate the scene and deny entry to prevent further danger to
victim(s), personnel and bystanders.
4. Gather information:
Low angle –vs- High angle
Number of victims
Specific victim information
Possible or potential injuries
Reason for rescue situation

Location of victim(s)
Last seen or heard
Rescue –vs- recovery
Most logical access to victim(s)
5. Establish an equipment area in close proximity to the access/retrieval point.
6. Ensure that all personnel working within 5’ of the edge are secured to an
anchor with a “travel-limiting device”.
7. Locate and establish a safe anchor point from which to rappel using one of the
following anchors
3-bite
Multi-wrap
Anchor strap (1 or 2 carabiner method)
Direct Tie
8. Gain access to the patient utilizing an 8-plate rappel, bringing
all necessary equipment to secure the patient to the mainline.
9. Safety-check all rope systems prior to loading them. Begin at
the anchor point and work towards the rescuer.
10. Assist the Technical Rescue Team as directed, staying within
the scope of Operations level training. Tasks to include:
Identify and locate potential anchor points
Acting as a haul team member
Assist in the rigging of raising/lowering systems
11. Keep all unnecessary communications to a minimum during
rescue operations.
Please note that only “life safety” rope and equipment shall be
used for any low angle rescue operation.

High Angle Rescue
Standard Operating Guideline
High angle shall be defined as any angle that is vertical or near
vertical; or any angle or incline in which a rope or system failure
would result in the rescuer falling to his/her death or sustaining
serious injury.
No attempt shall be made by operations level personnel to gain
access to a victim in a high angle rescue situation.
High angle rescue shall require personnel trained to the Technician
level to perform any attempts at rescue.
Operations level personnel shall employ the following guidelines
when faced with a high angle rescue incident:

1. Request a technical rescue response from dispatch.
2. Initiate the Incident Management System (IMS)- including the
establishment of a staging area for incoming units and personnel, as
well as the implementation of the passport accountability system.
3. Isolate the scene and deny entry to prevent further danger to
victim(s), personnel and bystanders.
4. Gather information:
Low angle –vs- High angle
Number of victims
Specific victim information
Possible or potential injuries
Reason for rescue situation
Location of victim(s)

Last seen or heard
Rescue –vs- recovery
Most logical access point to victim(s)
5. Establish an equipment area in close proximity to the
access/retrieval point.
6. Ensure that all personnel working within 5’ of the edge are secured
to an anchor with a “travel-limiting device”.
7. Identify and locate at least two independent and secure anchor
points to be used for the mainline and belay line.
8. If possible, lower a rope to the victim only if it appears that they
have a harness on and they are able to follow directions. Direct the
victim to clip an already tied-in carabiner to a safe location on their
harness.

9. Assist the Technical Rescue Team as directed, staying within the
scope of Operations level training. Tasks to include:
Serving as a haul team member
Edge position
Rope management
Securing of rescue site
Serving as a belayer on a single person load
Equipment gathering and supply
10. Keep all unnecessary communications to a minimum during
rescue operations.

Equipment Review
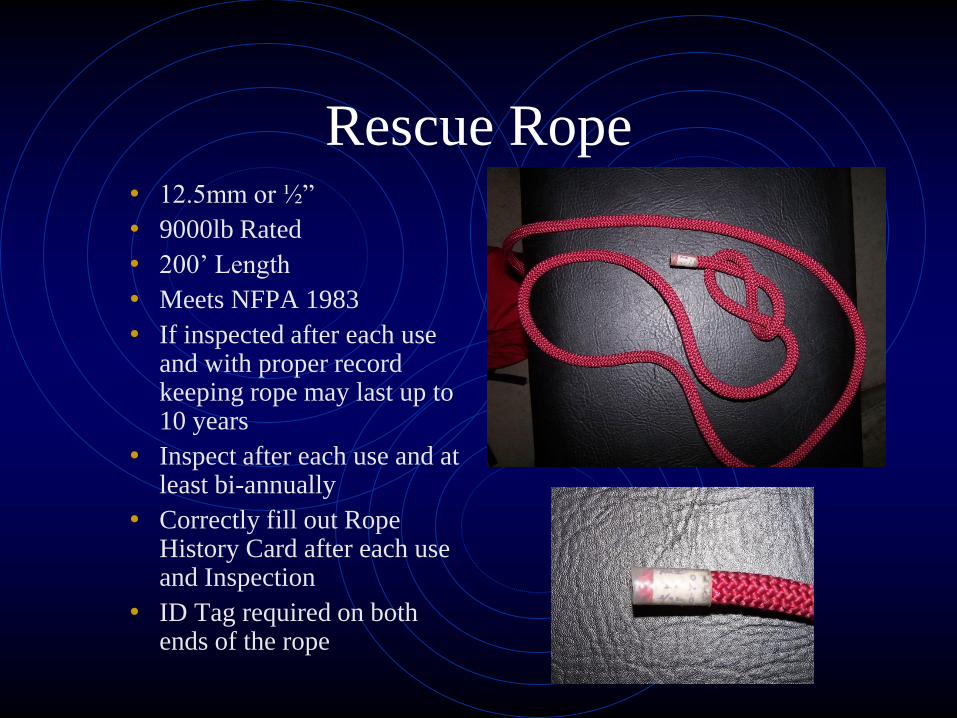
Rescue Rope • 12.5mm or ½”
• 9000lb Rated
• 200’ Length
• Meets NFPA 1983
• If inspected after each use and with proper record keeping rope may last up to 10 years
• Inspect after each use and at least bi-annually
• Correctly fill out Rope History Card after each use and Inspection
• ID Tag required on both ends of the rope

Carabiners
• 9000lb Rated
• Steel- Locking
• Use long axis only
• DO NOT side load
• If dropped from 6’ or
greater remove from service
and send to Station 25
• (A-shift) with an
explanation – including
Date, From Whom, What
Happened and Unit #
Side Loaded
Carabiner Loaded
Long-Axis

Rescue 8 with Ears
• 9000lb Rated
• Aluminum or Steel
• Steel will have less friction
than the aluminum
• If dropped from 6’ or
greater remove from service
and send to Station 25 with
an explanation- including
Date, From Whom, What
Happened and Unit #
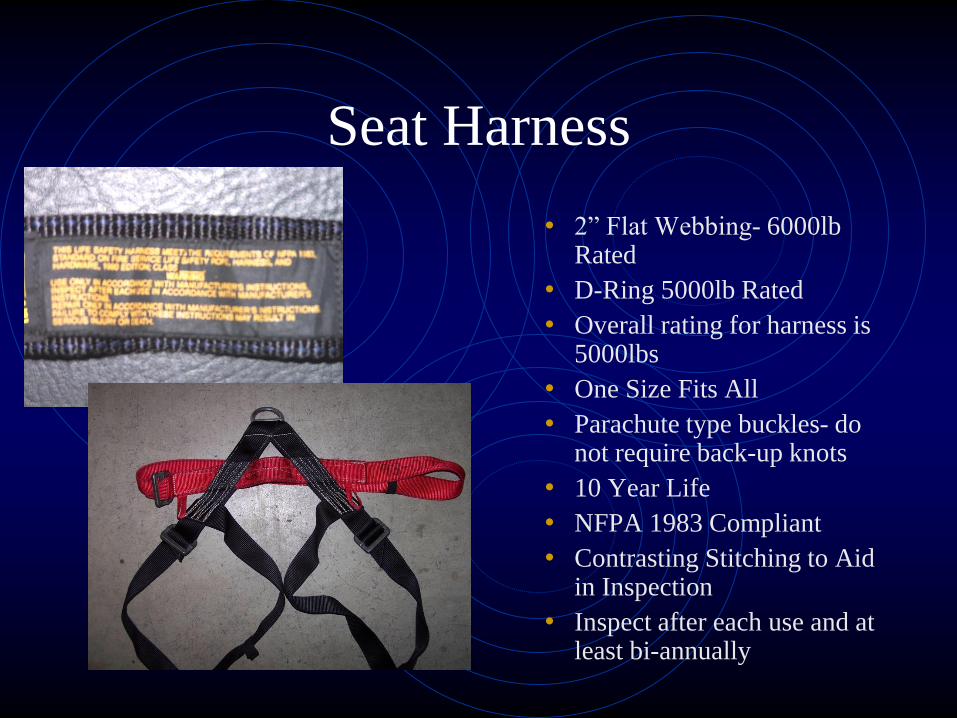
Seat Harness
• 2” Flat Webbing- 6000lb Rated
• D-Ring 5000lb Rated
• Overall rating for harness is 5000lbs
• One Size Fits All
• Parachute type buckles- do not require back-up knots
• 10 Year Life
• NFPA 1983 Compliant
• Contrasting Stitching to Aid in Inspection
• Inspect after each use and at least bi-annually
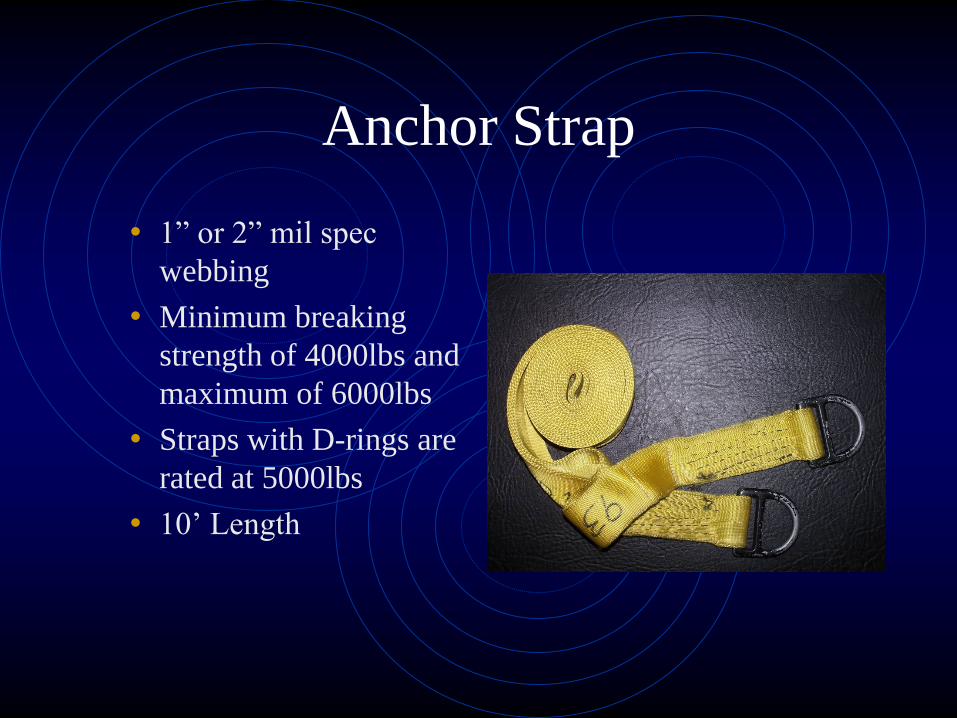
Anchor Strap
• 1” or 2” mil spec
webbing
• Minimum breaking
strength of 4000lbs and
maximum of 6000lbs
• Straps with D-rings are
rated at 5000lbs
• 10’ Length

Prusik Loops
• Two Sizes
• 4’5” and 5’6”
• 8mm Cord
• Breaking Strength of 3300lbs
• Joined with a Double Overhand Bend and pre-tensioned
• Do not untie prusik loops
• Used as a rope grab device for Hauling, Belaying and as an attachment to the Stokes
• When used as a 3-Wrap Prusik it will slip at 1000-1200lbs

Webbing
• Three Lengths
• 5’- Green
• 12’- Yellow
• 20’- Red
• 1” Tubular Webbing
• 4000lb Rated
• Other sizes not carried on the engine company
• 15’ – Blue
• 25’- Black
• 30’- Orange

Rope Bag
• Double Ended
• Ensure that rope is knotted, with Figure 8 Stopper knots, prior to stuffing
• MUST have Rope History Card attached
• Lifetime Warranty- If damaged please return to Station 25 for repair or replacement
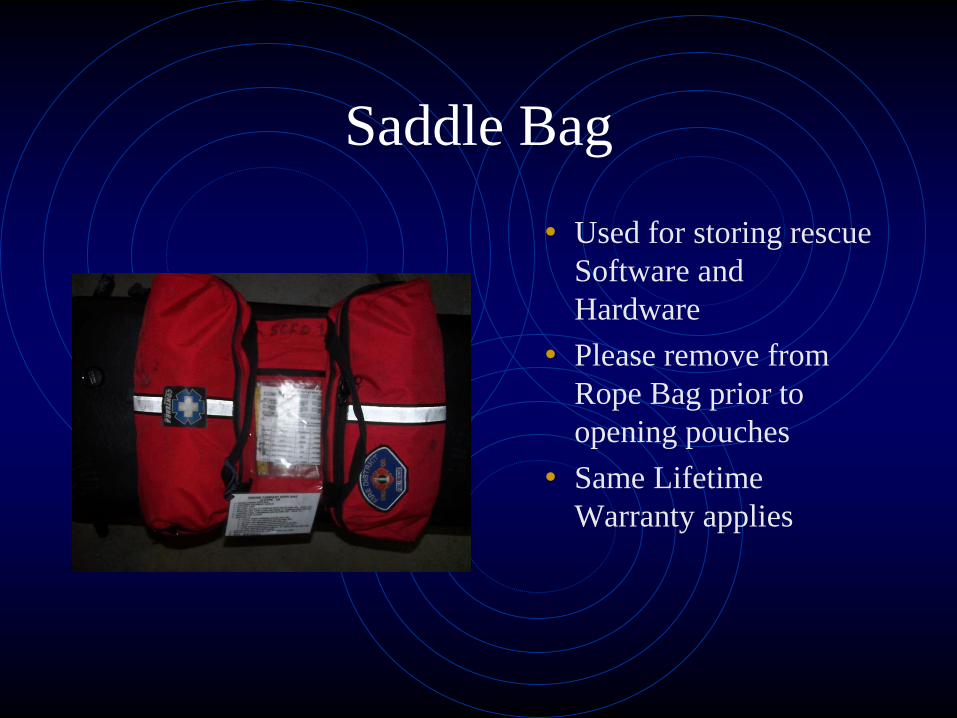
Saddle Bag
• Used for storing rescue
Software and
Hardware
• Please remove from
Rope Bag prior to
opening pouches
• Same Lifetime
Warranty applies

Edge Protection
• Used to prevent
damage to rope
• Protects rope where it
moves over an edge
• Two styles
• Rope Sleeve
• Canvas
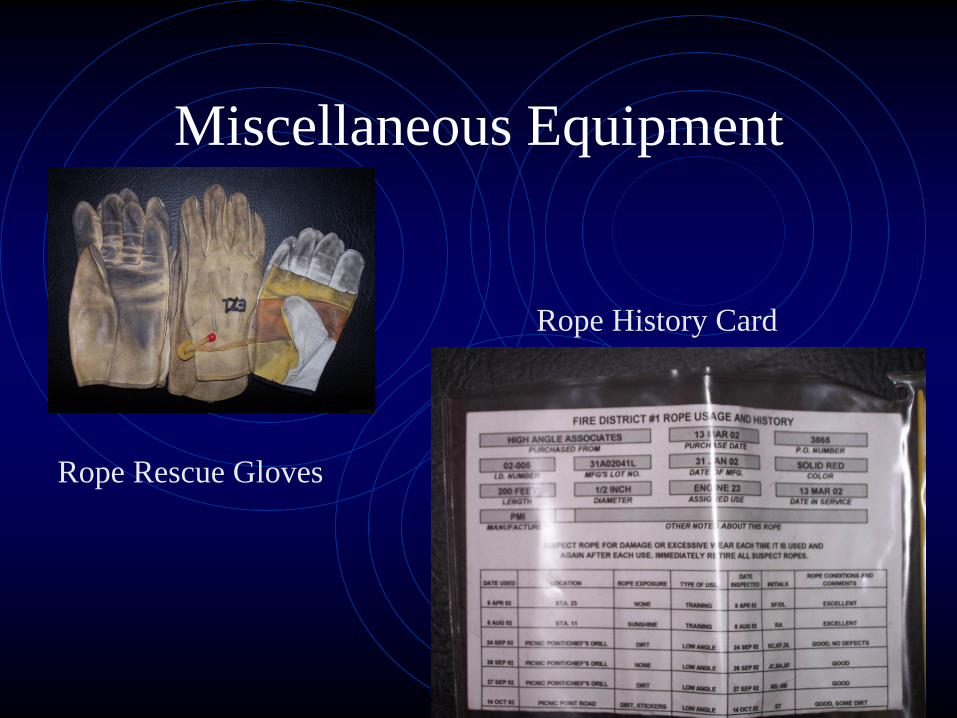
Miscellaneous Equipment
Rope Rescue Gloves
Rope History Card

Skills Review
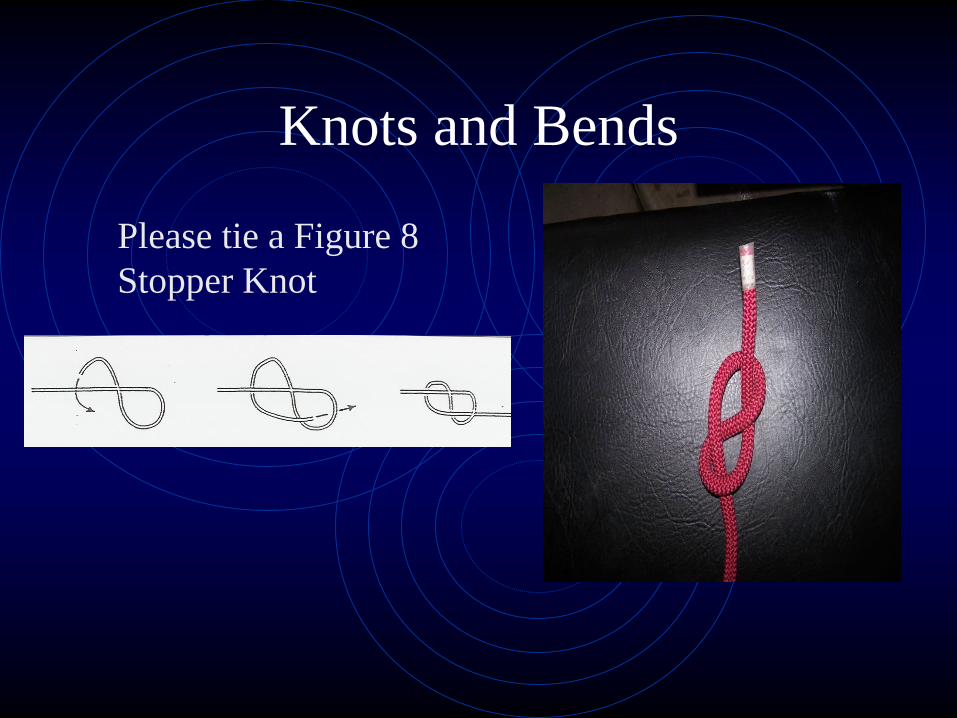
Knots and Bends
Please tie a Figure 8
Stopper Knot

Knots and Bends
Please tie a Figure 8 Follow Through
Please note that a Safety Back-Up is NOT required when
tying the Figure 8 Family of Knots
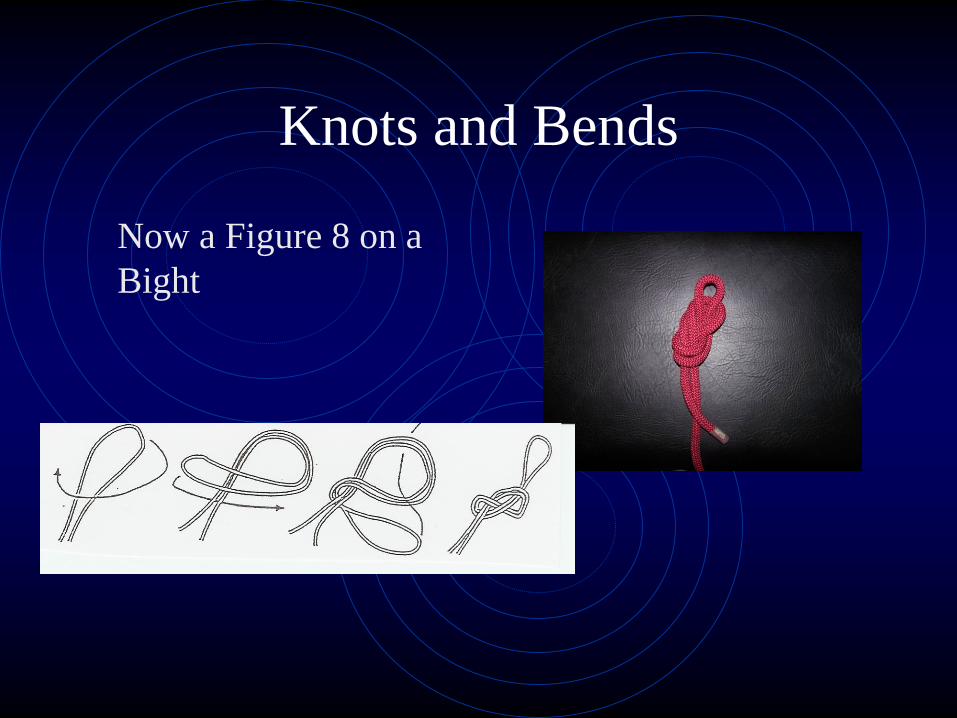
Knots and Bends
Now a Figure 8 on a
Bight
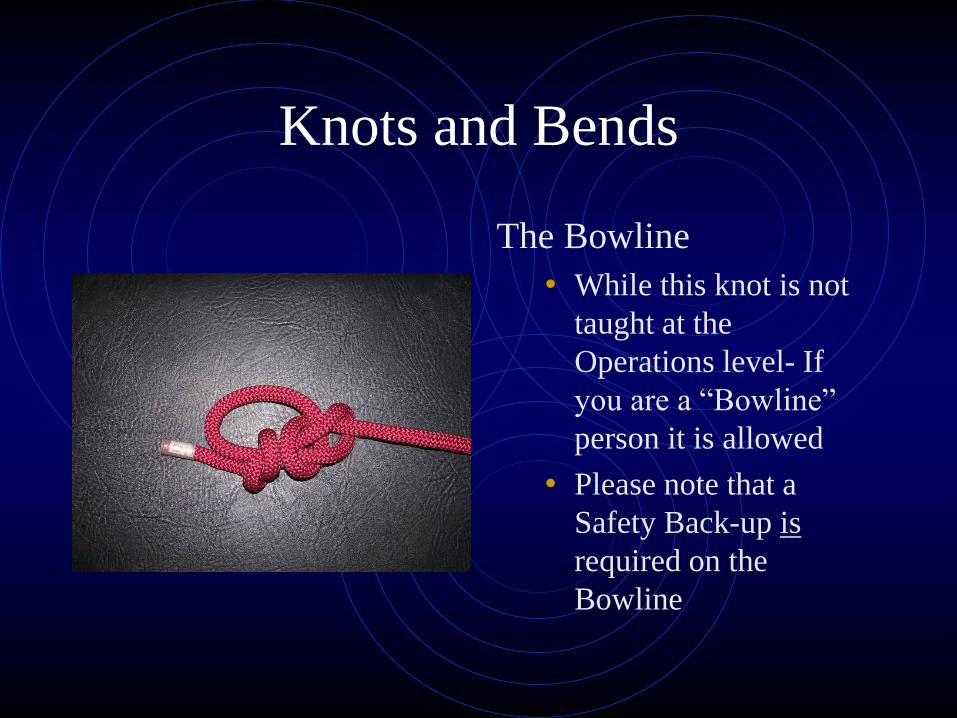
Knots and Bends
The Bowline
• While this knot is not
taught at the
Operations level- If
you are a “Bowline”
person it is allowed
• Please note that a
Safety Back-up is
required on the
Bowline

Knots and Bends The Waterbend
Begin by forming an overhand
bend in one end of the webbing
then, with the opposite end of
the webbing follow through
your overhand bend so that
when finished the two ends are
opposite from each other
1 2 3
4 5
Please note that a Safety Back-up
is not required when the tails are
at least a palms width in length

Anchors
The 3-Bight
• Begin with a length of webbing and tie a waterbend into it
• Next, wrap your anchor, ensuring that your knot/bend is running up one of the sides and place a carabiner through the two looped ends
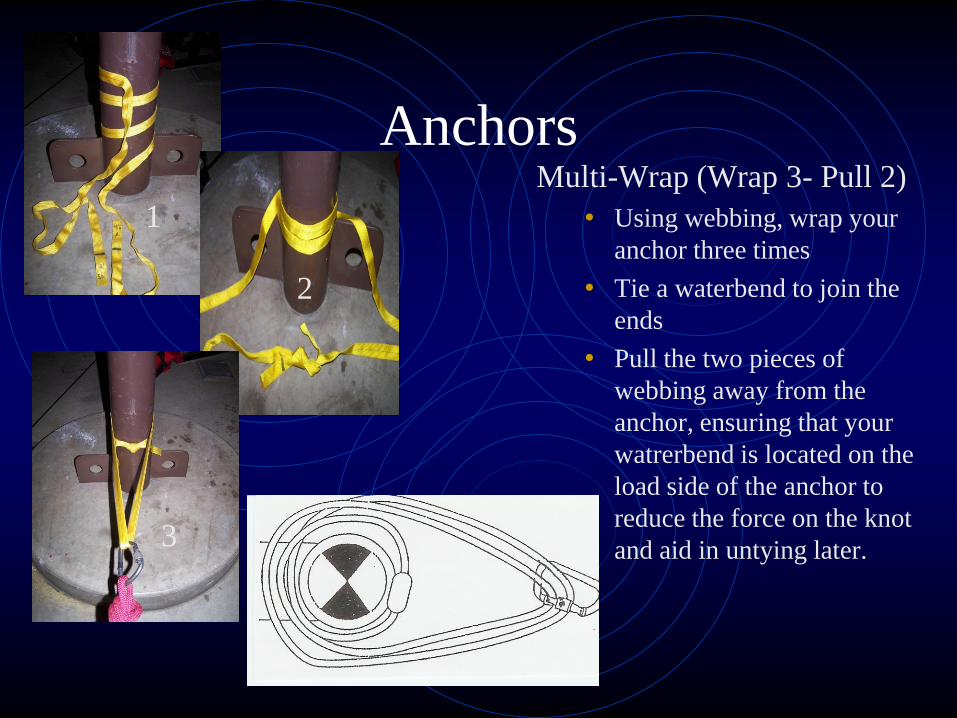
Anchors Multi-Wrap (Wrap 3- Pull 2)
• Using webbing, wrap your
anchor three times
• Tie a waterbend to join the
ends
• Pull the two pieces of
webbing away from the
anchor, ensuring that your
watrerbend is located on the
load side of the anchor to
reduce the force on the knot
and aid in untying later.
1
2
3
Anchors
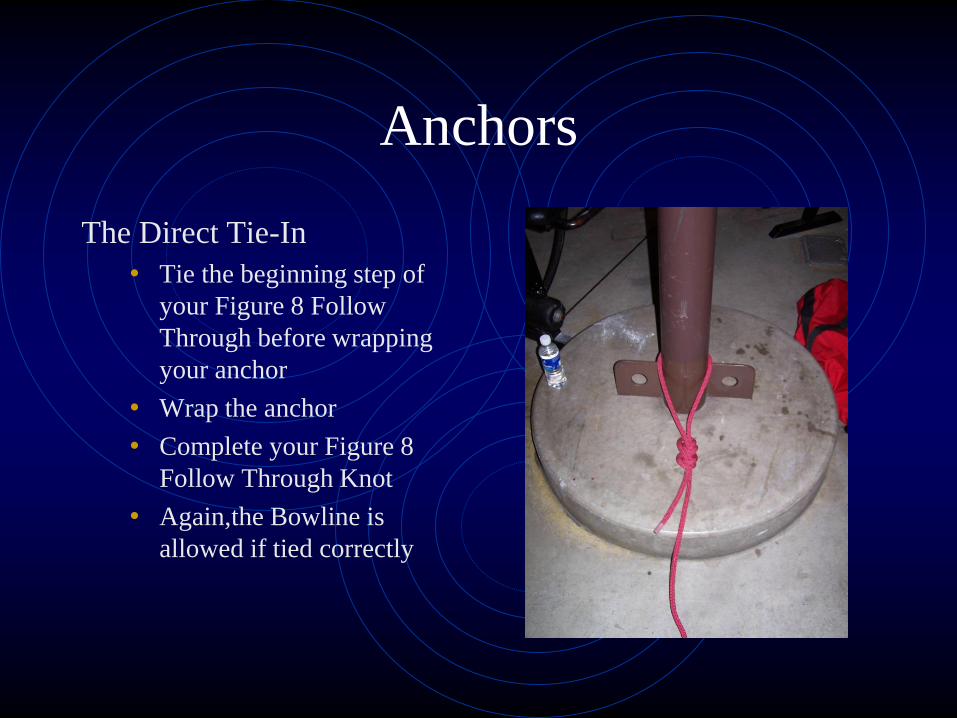
The Direct Tie-In
• Tie the beginning step of
your Figure 8 Follow
Through before wrapping
your anchor
• Wrap the anchor
• Complete your Figure 8
Follow Through Knot
• Again,the Bowline is
allowed if tied correctly
Anchors
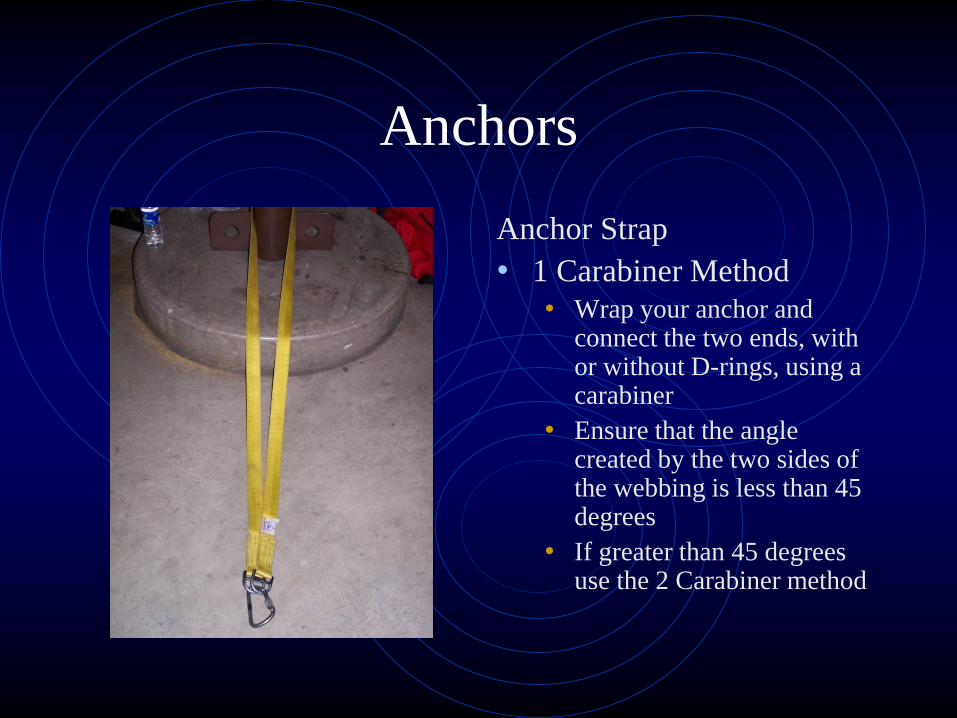
Anchor Strap
• 1 Carabiner Method
• Wrap your anchor and connect the two ends, with or without D-rings, using a carabiner
• Ensure that the angle created by the two sides of the webbing is less than 45 degrees
• If greater than 45 degrees use the 2 Carabiner method

Anchors
Anchor Strap
• 2 Carabiner Method
• Use the same process as
described in the 1 Carabiner
method
• Once connected, with a
carabiner, simply slide the
strap to one side and place a
second carabiner into the
system to act as your
attachment point for the
rope

Rescue 8 with Ears
Rigging Run a bight of rope up and through the back
of the 8-Plate. Ensure that the “running” end
of the rope is on your Right if you are Right
handed; and to the Left if you are Left handed
Pull the bight around the bottom of the 8-Plate
Attach the 8-Plate to your Carabiner,
ensuring that you lock the gate.

Rescue 8 with Ears
Rappelling
Pictured is the “maximum
friction” position. In this
case a “R” handed person
on rappel has his “R” hand
behind him and on his hip.
The left hand is placed
under the 8-Plate, to aid in
braking and rope control. To reduce the friction, and increase the speed of
descent, while on rappel simply move the brake hand
away from the body. For “R” handed rappel your hand
would come off the hip, out and forward
simultaneously
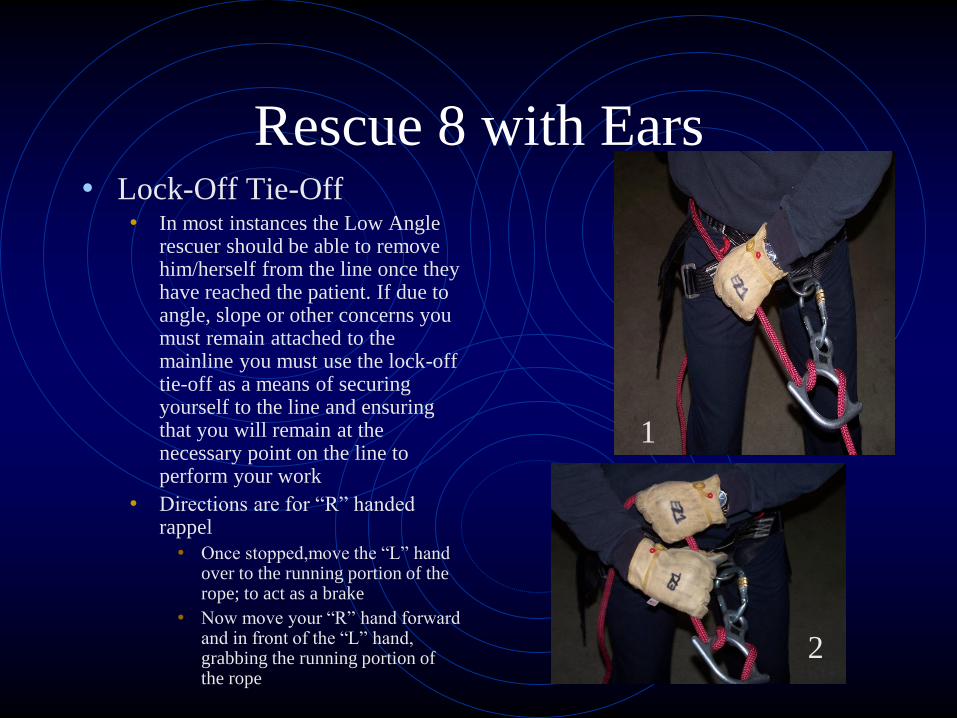
Rescue 8 with Ears • Lock-Off Tie-Off
• In most instances the Low Angle rescuer should be able to remove him/herself from the line once they have reached the patient. If due to angle, slope or other concerns you must remain attached to the mainline you must use the lock-off tie-off as a means of securing yourself to the line and ensuring that you will remain at the necessary point on the line to perform your work
• Directions are for “R” handed rappel
• Once stopped,move the “L” hand over to the running portion of the rope; to act as a brake
• Now move your “R” hand forward and in front of the “L” hand, grabbing the running portion of the rope
1
2
Rescue 8 with Ears
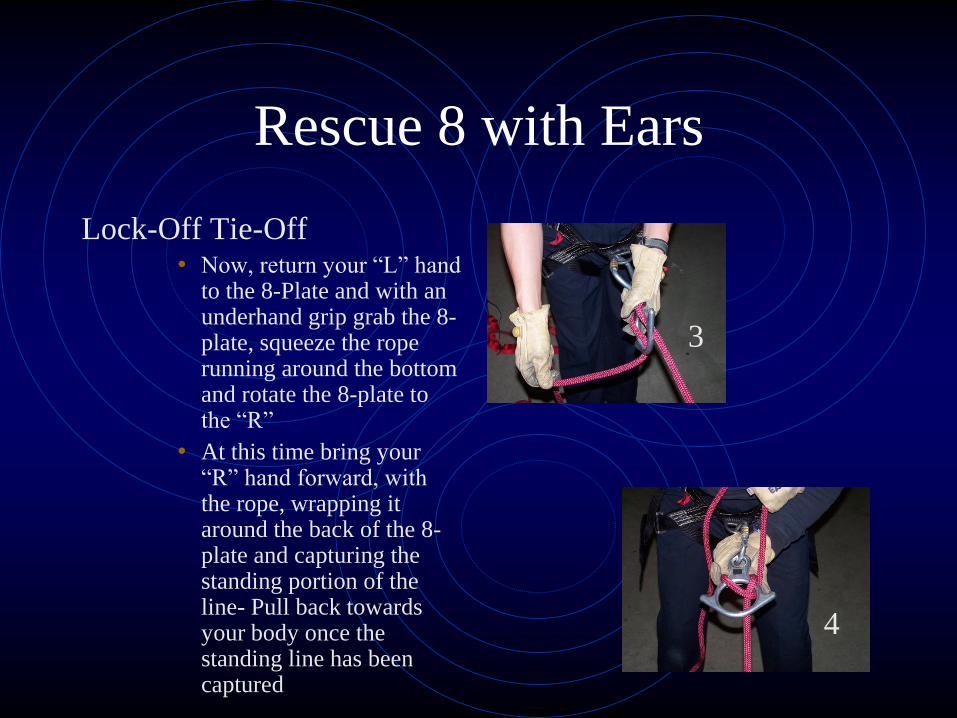
Lock-Off Tie-Off • Now, return your “L” hand
to the 8-Plate and with an underhand grip grab the 8-plate, squeeze the rope running around the bottom and rotate the 8-plate to the “R”
• At this time bring your “R” hand forward, with the rope, wrapping it around the back of the 8-plate and capturing the standing portion of the line- Pull back towards your body once the standing line has been captured
3
4
Rescue 8 with Ears
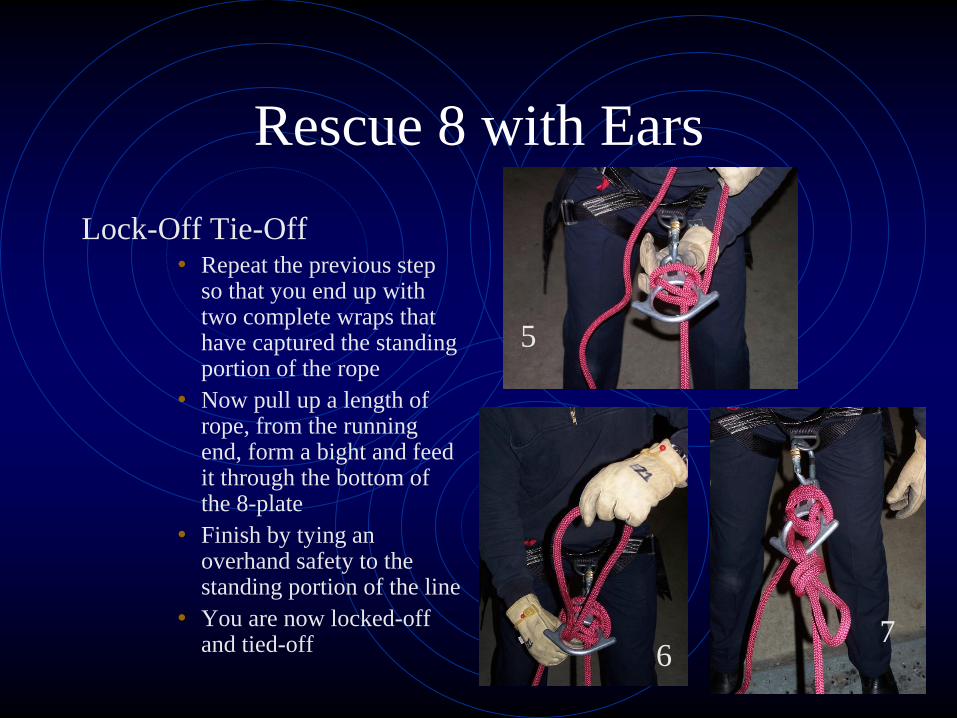
Lock-Off Tie-Off • Repeat the previous step
so that you end up with two complete wraps that have captured the standing portion of the rope
• Now pull up a length of rope, from the running end, form a bight and feed it through the bottom of the 8-plate
• Finish by tying an overhand safety to the standing portion of the line
• You are now locked-off and tied-off
5
6 7

3- Wrap Prusik
1 2
3 4
Begin by
placing the
knot of the
prusik loop
onto the rope.
Wrap the
prusik onto
the rope three
times, then
pull off-
center so that
your knot
ends up
running up
one of the
sides, as
shown

The Emergency or Hasty Harness This harness may be tied
using either red (20’) or yellow (12’) webbing. The yellow webbing allows the harness to be completed with a carabiner only, while the red webbing requires a square knot and a safety back-up to complete.
Please note that the yellow webbing may not fit all individuals while the red should be long
enough for most all sizes of people
The Emergency or Hasty Harness
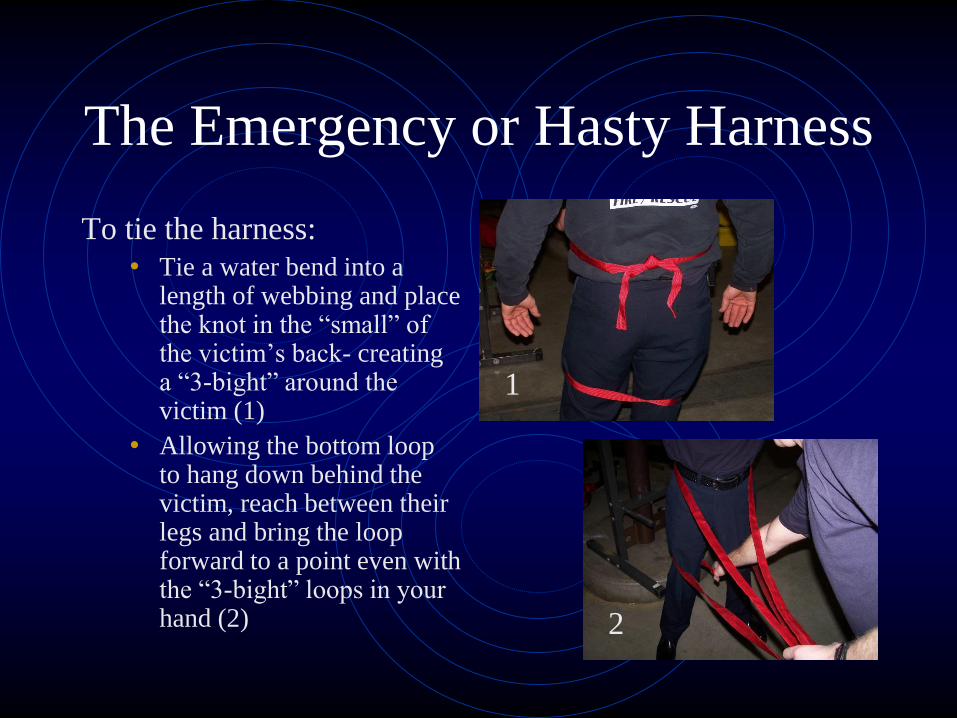
To tie the harness:
• Tie a water bend into a length of webbing and place the knot in the “small” of the victim’s back- creating a “3-bight” around the victim (1)
• Allowing the bottom loop to hang down behind the victim, reach between their legs and bring the loop forward to a point even with the “3-bight” loops in your hand (2)
1
2
The Emergency or Hasty Harness
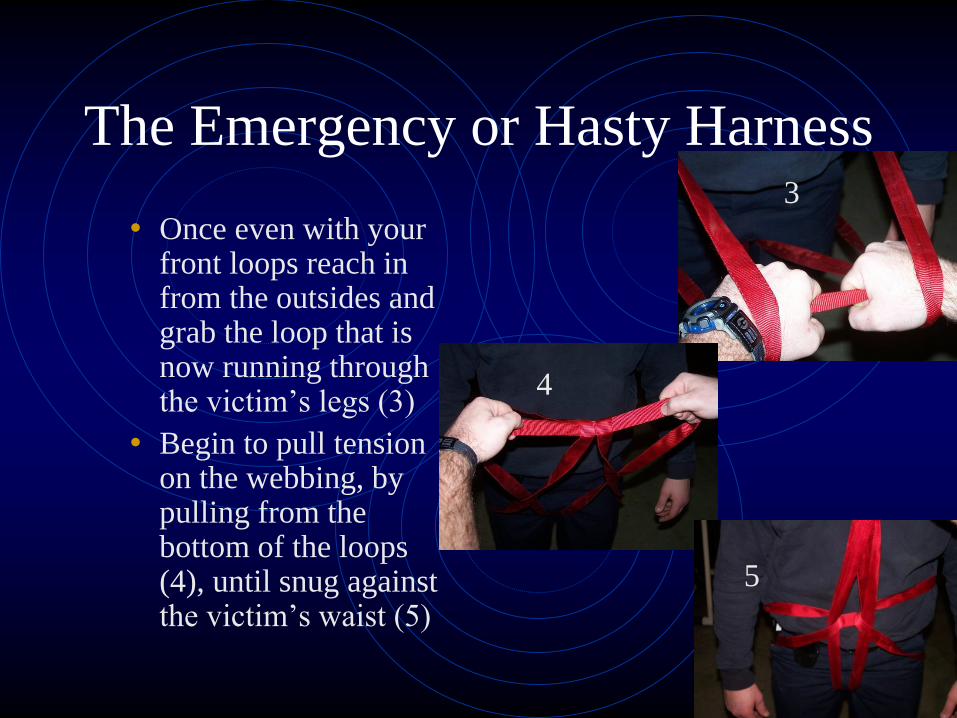
• Once even with your front loops reach in from the outsides and grab the loop that is now running through the victim’s legs (3)
• Begin to pull tension on the webbing, by pulling from the bottom of the loops (4), until snug against the victim’s waist (5)
3
4
5

The Emergency or Hasty Harness • At this time, if you have
used the yellow webbing, you may simply connect the loops with a carabiner to complete your emergency harness (6). (Red webbing users will need to tie off their excess webbing with a square knot and safety back-up)
• The square knot is formed by tying two overhand knots in a specific order. Begin by placing the piece of webbing in your “L” hand over the piece in your “R” hand (6a) and tying an overhand knot (6b)
6
6a
6b

The Emergency or Hasty Harness
• Now, take the piece of
webbing in your “R” hand
and place it over the top of
the piece in your “L” hand
(7a) and tie the second
overhand (7b).
• The subsequent tightening
of the knot should result in
the formation of a “V”
shape; thus letting you
know that the knot has been
tied correctly
7a
7b
V-shape

The Emergency or Hasty Harness
• Complete your, red,
webbing harness by
tying a safety back-up
on either side of your
square knot and
placing a carabiner
around the square knot.
(8)
Safety
Overhand 8

Internal/External Lash
• The Internal lash (yellow
webbing) is meant to keep
the patient from sliding up
or down while in the
Stokes basket.
• The External lash (orange
webbing) is intended to
secure the patient into the
Stokes basket
Internal/External Lash
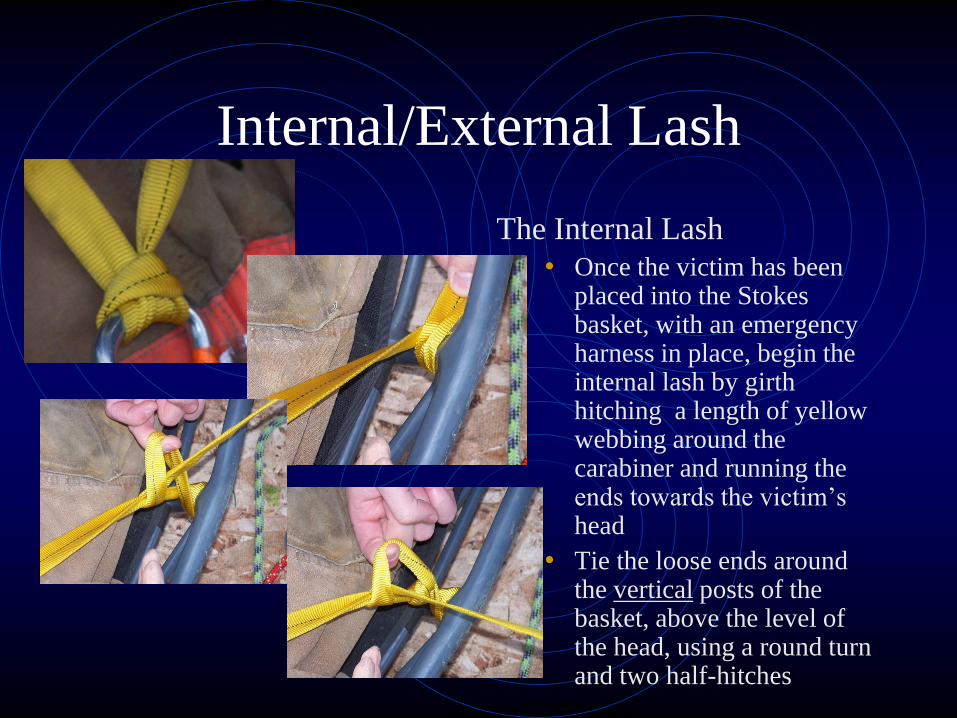
The Internal Lash
• Once the victim has been placed into the Stokes basket, with an emergency harness in place, begin the internal lash by girth hitching a length of yellow webbing around the carabiner and running the ends towards the victim’s head
• Tie the loose ends around the vertical posts of the basket, above the level of the head, using a round turn and two half-hitches

Internal/External Lash
The Internal Lash
• Once both sides of the head
of the basket have been
tied, girth hitch a second
length of webbing around
the first and run towards the
foot of the basket
• Again tie off around the
vertical posts, near the
knees of the victim, using a
round turn and two half-
hitches
Internal/External Lash
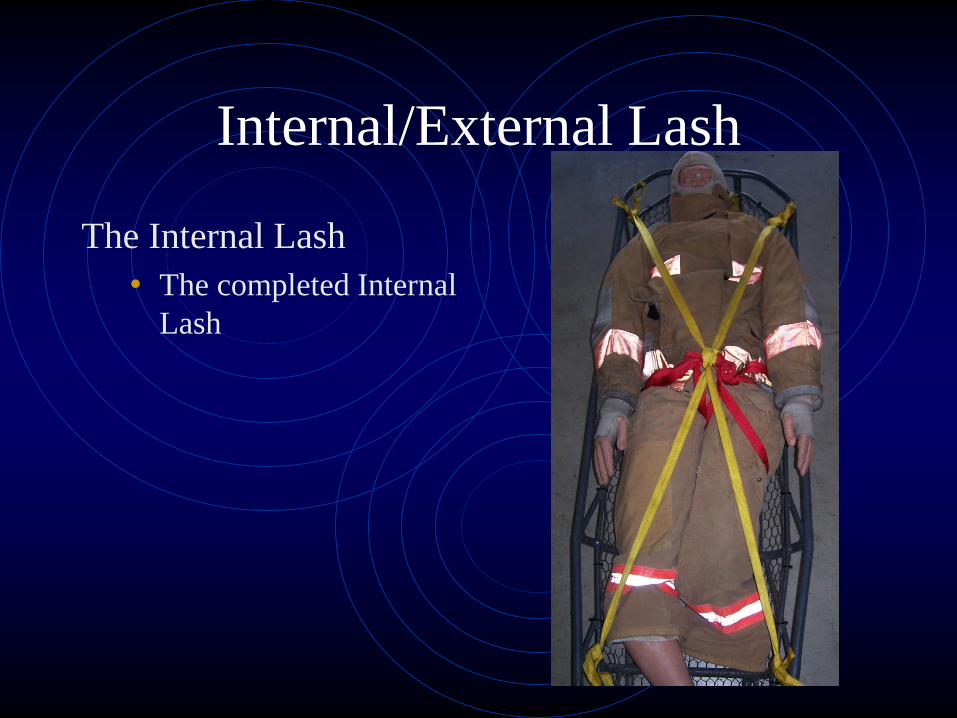
The Internal Lash
• The completed Internal
Lash

Internal/External Lash
The External Lash
• Using a length of Orange
webbing, supplied by the
Technical Rescue Team,
find the center of the length
and place it on the victim’s
chest.
• Begin to run the ends
around the vertical posts
and cross ends over the
victim’s body forming an
“X” at each cross

Internal/External Lash
The External Lash
• Once you have reached the victim’s feet tie-off one end of the webbing using a round turn and two half-hitches
• Tension the webbing beginning at the secured end and working yourself to the running end
• Once all of the slack has been removed from the system secure the remaining end with a round turn and two half-hitches.

Internal/External Lash
The External Lash
• The completed
Internal/External Lash
Securing the Mainline to the
Stokes Once the patient has been
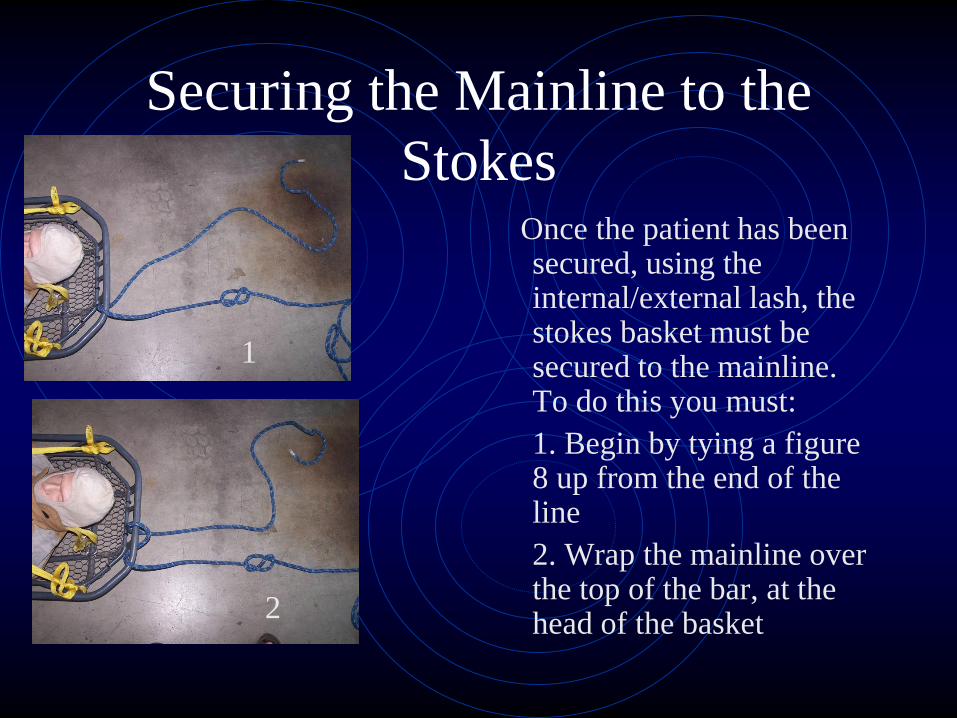
secured, using the internal/external lash, the stokes basket must be secured to the mainline. To do this you must:
1. Begin by tying a figure 8 up from the end of the line
2. Wrap the mainline over the top of the bar, at the head of the basket
1
2

Securing the Mainline to the
Stokes 3. Continue to wrap as you
move across the head of
the basket. Wrapping over
the top of the bar to form
multiple loops around the
head of the basket;
ensuring that you DO
NOT wrap around the
area at the center of the
basket. (See photo 4)
3
4
Securing the Mainline to the
Stokes 5. Once all loops have
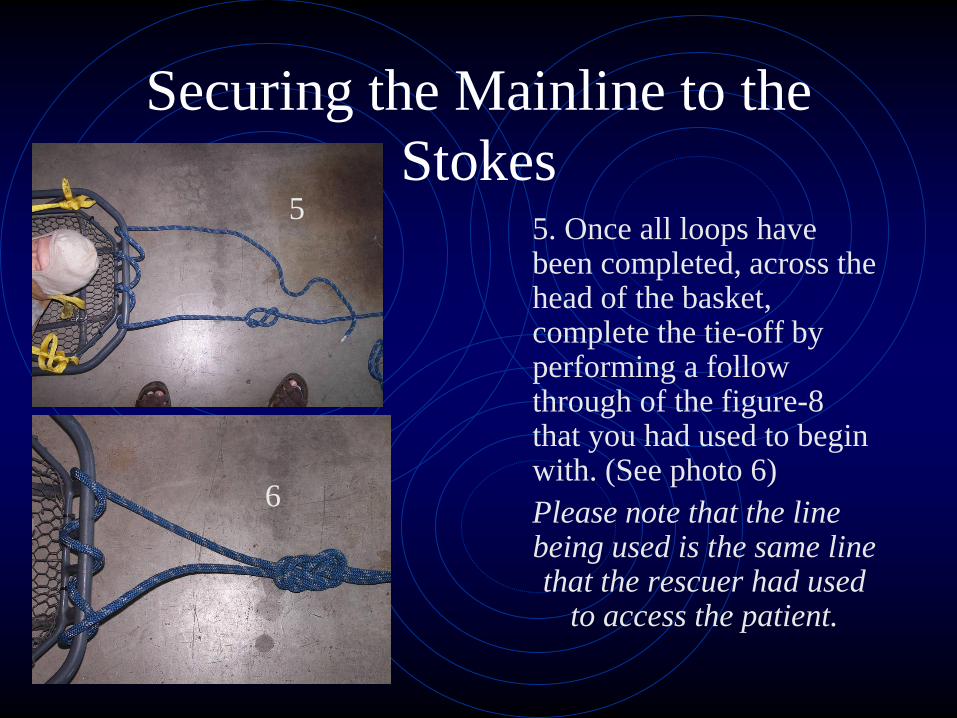
been completed, across the head of the basket, complete the tie-off by performing a follow through of the figure-8 that you had used to begin with. (See photo 6)
Please note that the line being used is the same line that the rescuer had used
to access the patient.
5
6

Practical Application
• Knots and Bends
• Figure-8
• Figure-8 Follow Through
• Figure-8 on a Bight
• Bowline
• Waterbend
• Anchors
• 3-Bight
• Multi-Wrap (Wrap 3 Pull 2)
• Direct Tie-In
• Anchor Strap ( 1 and 2 Crabiner
Methods)
• Rappelling
• 8-Plate
– Rigging
– Rappeling
– Lock-Off Tie-Off
• Prusik
– 3-Wrap Prusik
• Emergency or Hasty Harness
• Use both Red and Yellow
webbing
• Tie onto yourself and to a crew
member
Upon completion of this presentation please assemble
your Engine Company Rope Bag and practice the
following skills:
Contact your shift’s Rescue Tech if you need assistance.
Related Documents