This PDF is generated from authoritative online content, and is provided for convenience only. This PDF cannot be used for legal purposes. For authoritative understanding of what is and is not supported, always use the online content. To copy code samples, always use the online content. Genesys Care/Support current Log File Management Tool Deployment and User's Guide 5/11/2022

Welcome message from author
This document is posted to help you gain knowledge. Please leave a comment to let me know what you think about it! Share it to your friends and learn new things together.
Transcript

This PDF is generated from authoritative online content, andis provided for convenience only. This PDF cannot be usedfor legal purposes. For authoritative understanding of whatis and is not supported, always use the online content. Tocopy code samples, always use the online content.
Genesys Care/Support current
Log File Management ToolDeployment and User's Guide
5/11/2022
www.princexml.com
Prince - Non-commercial License
This document was created with Prince, a great way of getting web content onto paper.
Table of ContentsLog File Management Tool Deployment and User's Guide 8.5.105 4Overview 5
Architecture 9New in this Release 13Downloading LFMT 17Known Issues and Limitations 18Migration to LFMT 8.5.105 21LFMT Checklist 22
Log File Management Tool Deployment Planning 25LFMT Client - GAX Dependencies 26LFMT RDBMS Database Sizing 28LFMT Storage and Resource Sizing 30
Log File Management Tool General Deployment 34Prerequisites 35Deployment of the LFMT Client 37Deployment of the LFMT Indexer 40Deployment of the LFMT Collector 44Configuration of the LFMT Database 49
Initializing the DBMS 56Deployment of Workbench Agent for LFMT 8.5.1 60Installing Workbench Agent (Mass Deployment) for LFMT 8.5.1 66LFMT Application Connections 77
Log File Management Tool Configuration Options 78LFMT Host Object Configuration Options 79LFMT GAX Configuration Options 80LFMT Indexer Configuration Options 85LFMT Collector Configuration Options 89LFMT DAP Object Configuration Options 96Workbench Agent Configuration Options (for LFMT 8.5.1) 98Workbench Agent Host Object Configuration Options (for LFMT 8.5.102) 102
Log File Management Tool User's Guide 103Configuration of Access Control for LFMT Users 104Site Configuration 109Collection Schedules 113Force Collection 117
Indexing and Scrubbing 121Log File Packaging 126Available Packages 129Custom Log Collection using the [log]/lfmt_X option 135LFMT Audit Information 139LFMT Alarms 142
Additional Information 143Troubleshooting 144Configuration of TLS Connections 146Best Practices 150Regular Expressions 151Release Notes 153FAQ's 154
Log File Management Tool Deployment andUser's Guide 8.5.105The Log File Management Tool (LFMT) is an intelligent, configurable, centralized log collection tooldeveloped by Genesys Customer Care for Genesys Engage On-Premise platforms.
Log File Management Tool Deployment and User's Guide 8.5.105
Log File Management Tool Deployment and User's Guide 4
OverviewThe Log File Management Tool (LFMT) essentially copies Genesys Application log files, from theirrespective Hosts, via the Workbench Agent 8.5 component(s), and stores the log files in a centralizedrepository, thereby enabling search, filter and .zip packaging capabilities to expedite the analysis,progression and resolution of Genesys platform questions/issues.
Genesys Application (SIP, URS, GVP, Chat, IxN etc) log files are an integral part of Genesys software.These Genesys Application log files are the main sources of diagnostic information whentroubleshooting Genesys application issues. The faster that relevant, accurate, and consistent logfiles are provided, the sooner an issue can be resolved. Unfortunately, many problems can occurwhen trying to retrieve the log files necessary for troubleshooting; common problems include:
• The log files for the time when the problem occurred have been overwritten or otherwise lost.• Log files delivered are not within the event time frame.• Log files provided were created with log levels not detailed enough for the investigation.• The set of log files provided is inaccurate or incomplete.
LFMT is intended to minimize the above challenges and thereby reduce the time required to progressand resolve customer queries/issues.
Sections within this Overview chapter:
• Architecture• New in this Release• Downloading LFMT• Known Issues• Migration Guidance
Data Privacy
ImportantThe Genesys Customer Care LFMT product currently does not support access orerasure requests for data that is stored for an extended period. In order to meet EUGDPR (European Union General Data Protection Regulation) compliance, customers/partners should ensure that the ‘LFMT Indexer’ application “retention_period” option isset to 30 days or less (if adherence to EU GDPR is required).
Overview
Log File Management Tool Deployment and User's Guide 5
LFMT Components
The LFMT has four main components: LFMT Client, LFMT Collector, LFMT Indexer and WorkbenchAgent.
LFMT Client performs the following functions:
• Deploys as a plug-in to Genesys Administrator Extension (GAX).• Genesys recommends LFMT is deployed on its own separate GAX instance so that it does not affect any
other GAX Plugins that are used to manage/operate the contact center.• Provides a graphical user interface to configure and control the LFMT solution.
• Schedule log file collections.• Configure custom indexing on application log files.• Configure masking of sensitive data in application log files.• Search, select, and download log files collected by the LFMT Collector.
Important• Genesys recommends LFMT is deployed on its own separate GAX instance so that it
does not affect any other GAX Plugins that are used to manage/operate the contactcenter.
ImportantOne LFMT Client can serve multiple LFMT Collector/LFMT Indexer pairs.
ImportantLFMT components should be running the same 8.5.1xx release - i.e. do NOT run an8.5.104 LFMT Collector with a 8.5.101 LFMT Client.
LFMT Collector performs the following functions:
• Deploys on the LFMT Server Host(s).• Initiates scheduled and real-time collection requests by the LFMT Client
• Application hosts are queried for new or modified log files only.• Log files are copied from application servers to the LFMT Server Host(s).
Overview
Log File Management Tool Deployment and User's Guide 6
• Log files are compressed for transfer (~10:1).• Log files are encrypted for transfer (default is AES128-cbc).
• Creates log file packages resulting from user queries in the LFMT Client.• Masks sensitive data in log file packages created by a user in the LFMT Client.
LFMT Indexer performs the following functions:
• Deploys on the LFMT Server Host(s).• Indexes log files collected by LFMT Collector.• Compresses log files for reduced storage.• Purges log files based on a user specified retention period.
Workbench Agent performs the following functions:
• Deploys on the Genesys applications’ hosts• Receives scheduled or real-time log collection requests from the LFMT Collector• Identifies new or modified log files to be sent to the LFMT Collector• Log files can be compressed for transfer based on configuration (review the configuration section
<name section>)• Log files can be transferred securely or as plain text based on configuration (review the configuration
section <name section>)
Supported File Types
The type of log files that can be managed by the LFMT are:
• Application log files—*.log (including those that have been configured for circularlogging)
• Application snapshot log files that can be opened for writing—*.snapshot.log.• Core and dump files created after an application terminates unexpectedly—core.* and dmp.*.• Log files from third party applications configured in Configuration Server.
ImportantFor log files to be accessible by the LFMT, the application must be provisioned inConfiguration Server with a configuration option of all set in the [log] section. Thevalue of this option should be set to the absolute path of the application log files.
Overview
Log File Management Tool Deployment and User's Guide 7
Important• Genesys does not create, validate or support customer regular expressions required
within LFMT• Genesys regex guidance made be provided, but the customer is responsible for creation,
validation, testing and support of user defined LFMT regexes• Genesys strongly recommends the customer comprehensively tests the regular
expressions that you want to use for LFMT Indexing and Scrubbing before you definethem in the LFMT Client
• A good resource to test LFMT Regexes would be the Genesys Log File Masking Utility(LFMU) as it uses the same Regex Engine approach for masking log files
Overview
Log File Management Tool Deployment and User's Guide 8
ArchitectureThe following section describes the recommended architecture for an LFMT deployment.
LFMT components can be deployed on a single host for lab/test environments.
The recommended production architecture shows three hosts: the LFMT Server Host, the LFMT ClientHost, and the LFMT Database Host.
LFMT Server Host
The LFMT Server Host consists of the following components:
• Central Log Storage (CLS) repository, the central repository in which all log files for all applications usingthe tool are stored.
• LFMT Collector, which collects the log files for storage in the Central Log Storage (CLS) repository andcreates packages for user downloads.
• LFMT Indexer, which monitors the CLS repository, indexes the files as they arrive at the CLS, andcompresses the CLS files for storage.
• LFMT Collector connections to the Workbench Agent 8.5 components that are installed on the GenesysApplication Servers (i.e. sip, urs, gvp etc) can be TLS enabled
• Workbench Agent 8.5 components can be installed on Linux or Windows Genesys Application Servers(i.e. sip, urs, gvp etc)
Important• LFMT Collector and LFMT Indexer must be deployed on the same dedicated LFMT host.• Multiple LFMT Indexer/Collector pairs can be deployed to service one LFMT solution.• Only one LFMT Indexer/Collector pair should be deployed on a each dedicated LFMT
host(s).
Overview Architecture
Log File Management Tool Deployment and User's Guide 9
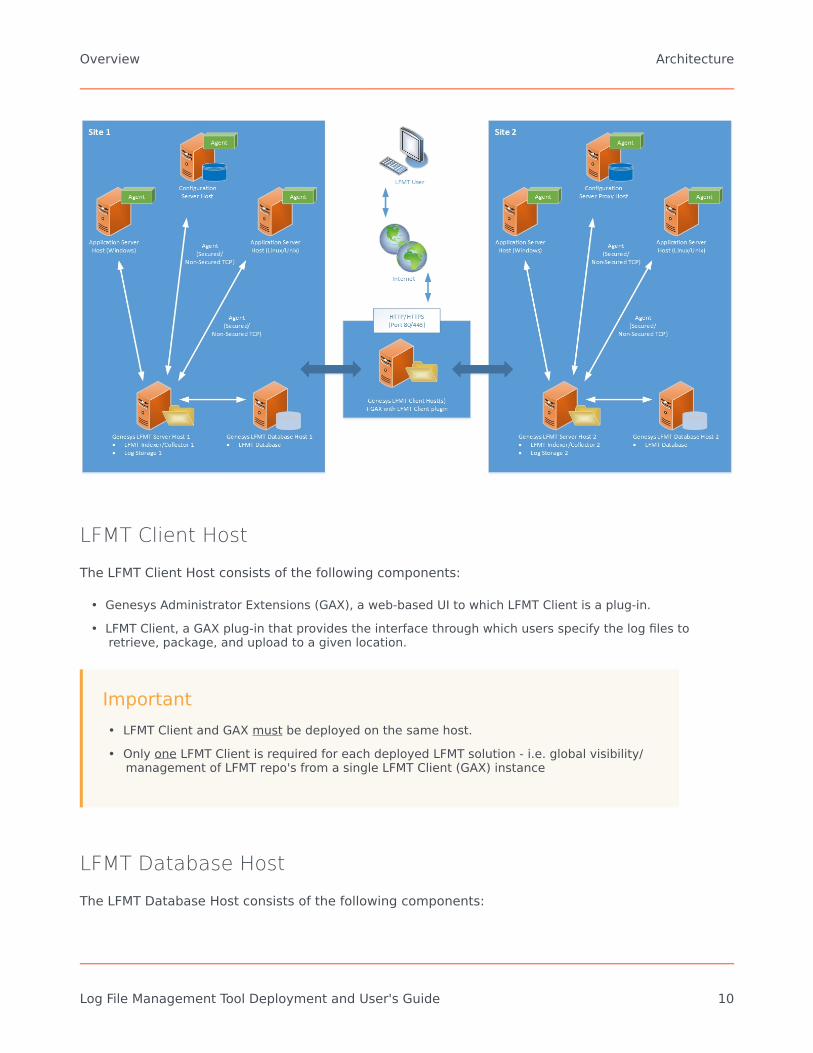
LFMT Client Host
The LFMT Client Host consists of the following components:
• Genesys Administrator Extensions (GAX), a web-based UI to which LFMT Client is a plug-in.• LFMT Client, a GAX plug-in that provides the interface through which users specify the log files to
retrieve, package, and upload to a given location.
Important• LFMT Client and GAX must be deployed on the same host.• Only one LFMT Client is required for each deployed LFMT solution - i.e. global visibility/
management of LFMT repo's from a single LFMT Client (GAX) instance
LFMT Database Host
The LFMT Database Host consists of the following components:
Overview Architecture
Log File Management Tool Deployment and User's Guide 10
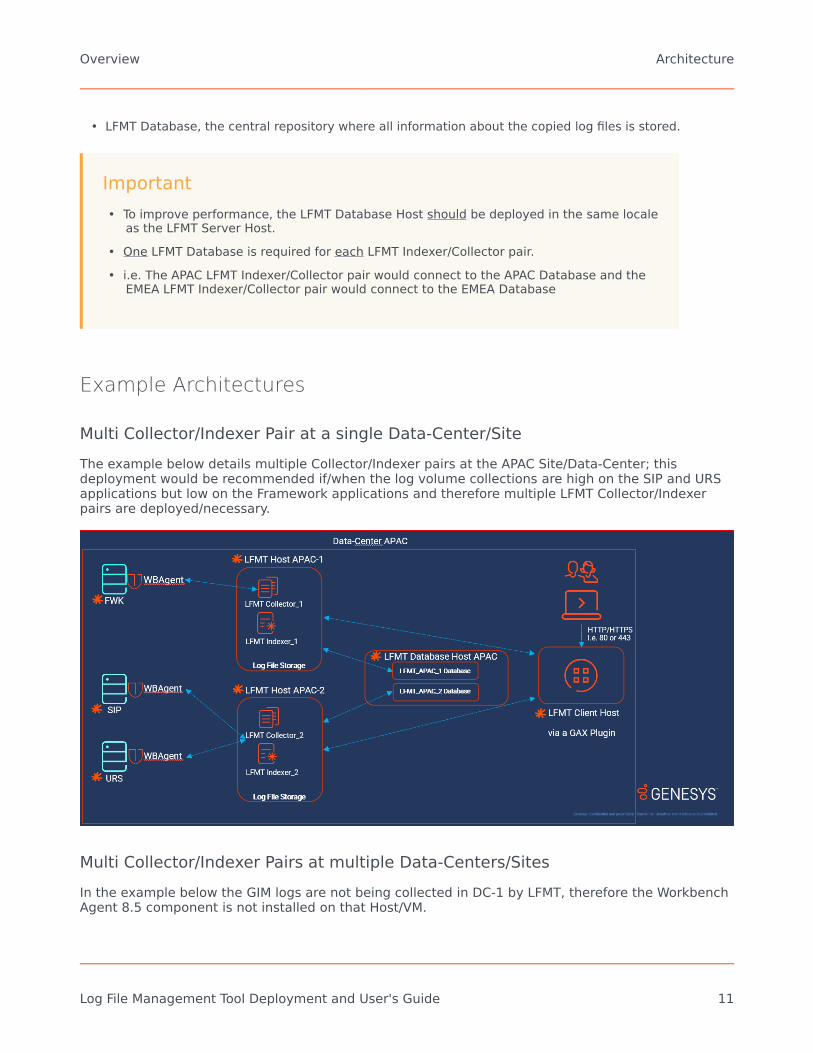
• LFMT Database, the central repository where all information about the copied log files is stored.
Important• To improve performance, the LFMT Database Host should be deployed in the same locale
as the LFMT Server Host.• One LFMT Database is required for each LFMT Indexer/Collector pair.• i.e. The APAC LFMT Indexer/Collector pair would connect to the APAC Database and the
EMEA LFMT Indexer/Collector pair would connect to the EMEA Database
Example Architectures
Multi Collector/Indexer Pair at a single Data-Center/SiteThe example below details multiple Collector/Indexer pairs at the APAC Site/Data-Center; thisdeployment would be recommended if/when the log volume collections are high on the SIP and URSapplications but low on the Framework applications and therefore multiple LFMT Collector/Indexerpairs are deployed/necessary.
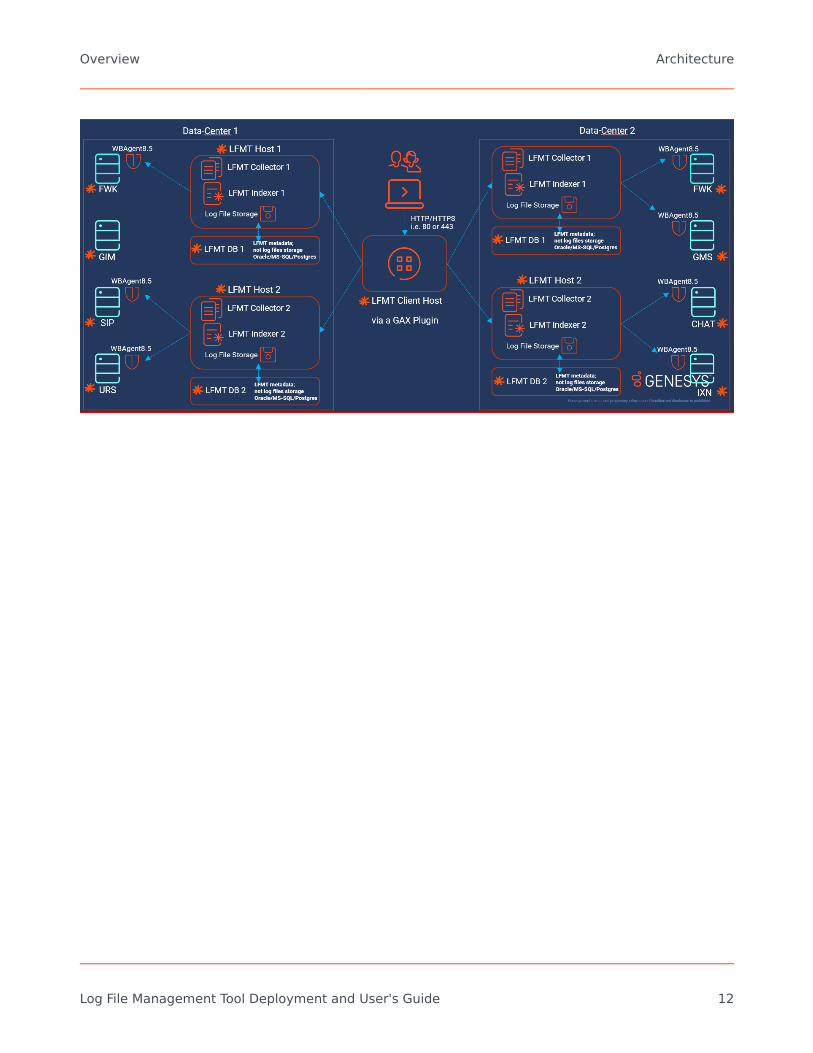
Multi Collector/Indexer Pairs at multiple Data-Centers/SitesIn the example below the GIM logs are not being collected in DC-1 by LFMT, therefore the WorkbenchAgent 8.5 component is not installed on that Host/VM.
Overview Architecture
Log File Management Tool Deployment and User's Guide 11
Overview Architecture
Log File Management Tool Deployment and User's Guide 12
New in this ReleaseThis section describes the new functionality for each release.
Release 8.5.105.10
The 8.5.105.10 Log File Management Tool release has an update to the LFMT Client, specifically theLFMT Packages extension has been reverted to ".lfm".
• Log File Management Tool (LFMT) Package 8.5.105.10 contains:• LFMT Client release 8.5.105.07 (requires GAX 9.0.104.15+)• LFMT Collector release 8.5.105.00• LFMT Indexer release 8.5.105.00• Workbench Agent release 8.5.105.00 (support for Oracle Linux 7 - *LFMT Collector, Indexer and
Client are NOT supported on Oracle Linux 7)
• Please see the Release Notes for further details.
Release 8.5.105.00
The 8.5.105.00 Log File Management Tool release supports an FTP Proxy via the Available PackagesUI.
• Log File Management Tool (LFMT) Package 8.5.105.00 contains:• LFMT Client release 8.5.105.03• LFMT Collector release 8.5.105.00• LFMT Indexer release 8.5.105.00• Workbench Agent release 8.5.105.00 (support for Oracle Linux 7 - *LFMT Collector, Indexer and
Client are NOT supported on Oracle Linux 7)
• Please see the Release Notes for further details.
Release 8.5.104.12
The 8.5.104.12 Log File Management Tool release supports GAX 9.0.104.xx. Please see the Release
Overview New in this Release
Log File Management Tool Deployment and User's Guide 13
Notes for further details.
Release 8.5.104.11
The 8.5.104.11 Log File Management Tool release supports log4j 2.16. Please see the Release Notesfor further details.
Release 8.5.104.10
The 8.5.104.10 Log File Management Tool release enables TLS support for connections to the LFMTdatabase. Several bug fixes and performance improvements have also been made. Please see theRelease Notes for further details.
Release 8.5.104
The 8.5.104 Log File Management Tool release primarily enables support for Oracle 19c. Several bugfixes and performance improvements have also been made. Please see the Release Notes for furtherdetails.
Release 8.5.103
The 8.5.103 Log File Management Tool release primarily enables support for OpenJDK 8 and 11.Several bug fixes and performance improvements have also been made. Please see the ReleaseNotes for further details.
Release 8.5.102
The 8.5.102.00 Log File Management Tool release enables support for GAX 9.0.100.52 and later byusing the LFMT Client 8.5.102.00 component; for GAX versions 8.5.209 to 9.0.001.37, please use theLFMT Client 8.5.101.06 component (also included in the 8.5.102.00 LFMT package). Several bug fixesand performance improvements have also been made. Please refer to the Release Notes for furtherdetails.
Overview New in this Release
Log File Management Tool Deployment and User's Guide 14
Release 8.5.101
The 8.5.101 Log File Management Tool release enables support for GAX 8.5.290.09 and later. Thisrelease also enables audit capabilities for all configuration changes made within the Log FileManagement Tool. Several bug fixes and performance improvements have also been made. Pleaserefer to the Release Notes for further details.
Release 8.5.100
The 8.5.100 Log File Management Tool release significantly improves log file collection by moving toan agent-based transfer. By using an agent to perform the log file transfers, the Log File ManagementTool no longer leverages rsync over SSH to transfer files. The transfers are now performed over a TCP/TLS connection to the agent, which prevents the need for public-key authentication between hosts.
In addition to the moving to an agent-based transfer, the following features have been added to the8.5.1 release:
• Removed the requirement for Cygwin to be deployed to Windows application hosts• Support for user roles to enable/disable LFMT functionality for different user groups• Collection from multiple log file locations for a single app• Support for circular log file types i.e. (File.log, File.1.log, File.1.log, File.x.log)• Internet Explorer/Edge Support• Resolved compatibility issues with other GAX plugins• Raise alarms for collection failures• Overall stability improvements
Release 8.5.000.XX
• LFMT Build 8.5.000.XX requires the Java 8 Runtime Environment (JRE).• LFMT Build 8.5.000.XX requires a new LFMT database.
• LFMT database(s) are configured using Database Access Point (DAP) configuration objects.
• LFMT Build 8.5.000.XX supports Windows 2012.• LFMT Build 8.5.000.XX supports TLS connections to Configuration Server.• LFMT Build 8.5.000.XX supports a distributed LFMT deployment.• LFMT Client requires GAX 8.5.• LFMT Client can schedule/force collections for multiple connected LFMT Collectors.
Overview New in this Release
Log File Management Tool Deployment and User's Guide 15
• LFMT Client can search multiple connected LFMT databases.• LFMT Client provides ILIKE operation when filtering on custom indexes.• LFMT Client allows setting time zone for scheduled collections.• LFMT Client allows for the creation of custom regular expressions.• LFMT Client displays to which applications custom regular expressions have been assigned.• LFMT Client has new section 'Available Packages' for downloading previously created packages.• LFMT Collector and LFMT Indexer are configured as separate applications in Configuration Server.
Overview New in this Release
Log File Management Tool Deployment and User's Guide 16
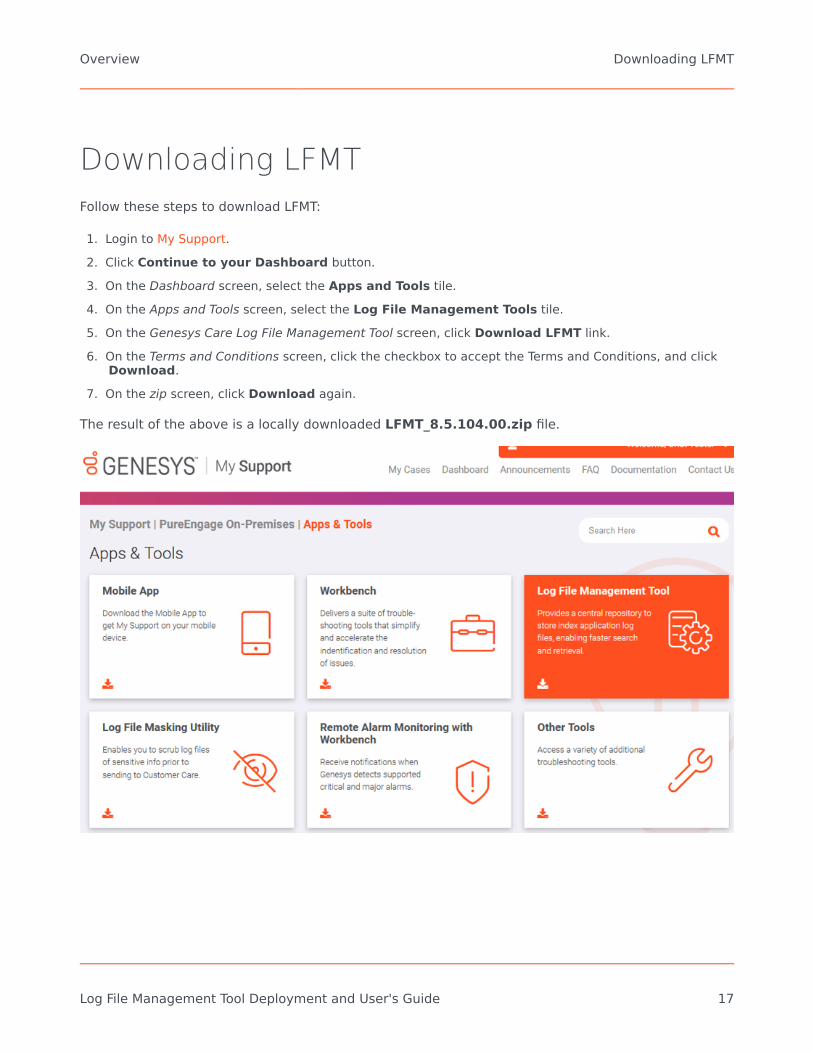
Downloading LFMTFollow these steps to download LFMT:
1. Login to My Support.2. Click Continue to your Dashboard button.3. On the Dashboard screen, select the Apps and Tools tile.4. On the Apps and Tools screen, select the Log File Management Tools tile.5. On the Genesys Care Log File Management Tool screen, click Download LFMT link.6. On the Terms and Conditions screen, click the checkbox to accept the Terms and Conditions, and click
Download.7. On the zip screen, click Download again.
The result of the above is a locally downloaded LFMT_8.5.104.00.zip file.
Overview Downloading LFMT
Log File Management Tool Deployment and User's Guide 17
Known Issues and Limitations• If/when using GAX 9.0.103.08+ and LFMT 8.5.104 or above, ensure the respective GAX Application with
LFMT Client Plug-in object, [lfmt]/use_lfm_extension=true option is set, so that .lfm files and not .zip(default as of 8.5.104) LFMT Package files are created and therefore downloadable via GAX; per GAXRN's GAX-11260 the GAX app now filters unnecessary .gz, .jar, .zip, and .rar API requests.)
• The LFMT Client requires the netty-3.2.3.Final.jar library in the <GAX InstallDirectory>/webapp/WEB-INF/lib folder to be renamed or deleted. This is applicable for GAX versions8.5.220.20 and earlier.
• In a multisite environment, if one or more of the databases are down, the LFMT Client does not populatepanes correctly.
• LFMT does not support changes to the GAX root URL.
CVE-2022-22965 vulnerability
• LFMT is deemed to be not impacted by the CVE-2022-22965 vulnerability.
log4j CVE-2021-44832 vulnerability
Important• LFMT Package 8.5.104.13, released Feb 2022, now utilises log4j 2.17.1 - please upgrade
to this LFMT release or later• LFMT 8.5.101.xx+ is/was deemed NOT impacted by CVE-2021-44832
log4j CVE-2021-45105 vulnerability
Important• LFMT Package 8.5.104.13, released Feb 2022, now utilises log4j 2.17.1 - please upgrade
Overview Known Issues and Limitations
Log File Management Tool Deployment and User's Guide 18
to this LFMT release or later• LFMT 8.5.101.xx+ is/was deemed NOT impacted by CVE-2021-44832
LFMT Packages 8.5.101.xx to 8.5.104.10 - mitigation for the log4jCVE-2021-44228 vulnerability
Important• LFMT Package 8.5.104.13, released Feb 2022, now utilises log4j 2.17.1 - please upgrade
to this LFMT release or later• LFMT 8.5.104.13 Package supports/requires GAX version 9.0.104.xx• If your upgrade to the latest LFMT 8.5.104.13+ Package is delayed, in the meantime
please follow the mitigation steps below
Important• LFMT 8.5.104.12 Package, released 17th December 2021 supports log4j 2.16 and
therefore avoids/remediates the mitigation steps below.• LFMT 8.5.104.12 Package supports/requires GAX version 9.0.104.xx• LFMT 8.5.104.11 Package, released 10th December 2021, supports log4j 2.16 but is
restricted to GAX versions 9.0.100.52 to 9.0.103.xx
This page relates to the Genesys Advisory detailed here: https://genesys.my.salesforce.com/articles/Product_Advisories/Apache-Log4j-2-Java-library
Please follow the mitigation steps below in addition to the guidance in the Genesys Advisory above.
LFMT Collector
• Stop the LFMT Collector application(s)• Run (i.e. with a tool such as 7Zip) the following command:
Overview Known Issues and Limitations
Log File Management Tool Deployment and User's Guide 19
• zip -q -d <LFMT_COLLECTOR_INSTALL_LOCATION>/bin/lib/log4j-core-* org/apache/logging/log4j/core/lookup/JndiLookup.class
• Restart the LFMT Collector application(s)
LFMT Indexer
• Stop the LFMT Indexer application(s)• Run (i.e. with a tool such as 7Zip) the following command:
• zip -q -d <LFMT_INDEXER_INSTALL_DIRECTORY>/bin/lib/log4j-core-* org/apache/logging/log4j/core/lookup/JndiLookup.class
• Restart the LFMT Indexer application(s)
LFMT Client
• Given that the LFMT Client is a GAX Plugin and GAX logging is used for the LFMT Client, please consultthe GAX Release Notes/Documentation and/or raise a Genesys Support Case regarding GAX mitigation/remediation.
Workbench Agent 8.5
• Stop the Workbench Agent 8.5 application(s)• Run (i.e. with a tool such as 7Zip) the following command:
• zip -q -d <WORKBENCH_AGENT_INSTALL_LOCATION>/lib/log4j-core-* org/apache/logging/log4j/core/lookup/JndiLookup.class
• Restart the Workbench Agent 8.5 application(s)
Overview Known Issues and Limitations
Log File Management Tool Deployment and User's Guide 20
Migration to LFMT 8.5.105
Moving from 8.5.xxx to 8.5.105.xx
LFMT Components
It is required that the LFMT Client, Collector, Indexer and Workbench Agents are updated to8.5.105.xx and that the GAX instance in which the Client is installed upon is at least version9.0.100.52 or greater. These components are not backwards compatible with the previous 8.5.100.xx,8.5.101.xx, 8.5.102.xx,8.5.103.xx or 8.5.104.xx LFMT components.
ImportantAfter updating the LFMT Client to 8.5.105.xx, please ensure that there is not an"original-gax-lfmt.jar" file in the {GAXInstall}/webapp/WEB-INF/lib directory. If this filedoes exist, please delete the file.
Database
Moving from LFMT 8.5.xxx to 8.5.105.xx does require a schema update to the already existingdatabase tables. The update scripts are provided in the {CollectorInstall}/utilities/dbscripts folder.After the scripts have been run, all data will be preserved in the existing database.
Moving from 8.1.xxx to 8.5.104.xx
LFMT 8.5.xxx encompasses major changes to the tool's design and deployment. Currently, amigration path from LFMT 8.1.xxx to LFMT 8.5.xxx does not exist. For questions concerning how tobest move to the LFMT 8.5.xxx architecture, please contact Genesys Customer Care.
Overview Migration to LFMT 8.5.105
Log File Management Tool Deployment and User's Guide 21
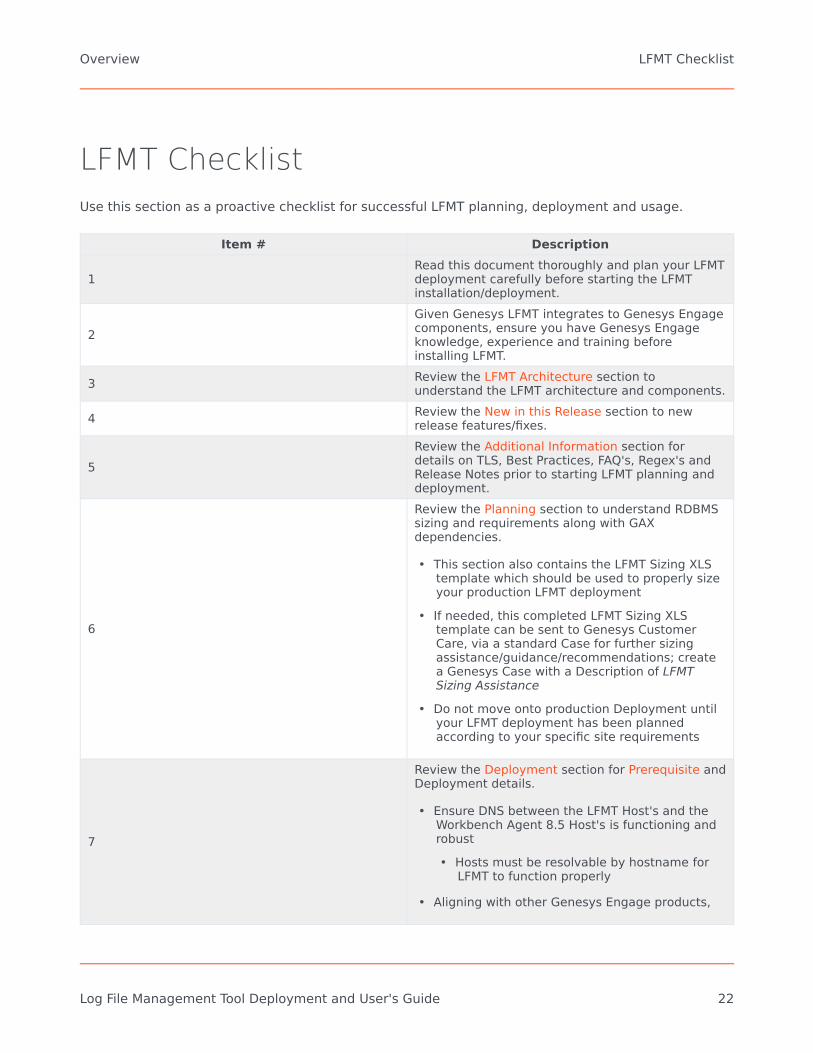
LFMT ChecklistUse this section as a proactive checklist for successful LFMT planning, deployment and usage.
Item # Description
1Read this document thoroughly and plan your LFMTdeployment carefully before starting the LFMTinstallation/deployment.
2Given Genesys LFMT integrates to Genesys Engagecomponents, ensure you have Genesys Engageknowledge, experience and training beforeinstalling LFMT.
3 Review the LFMT Architecture section tounderstand the LFMT architecture and components.
4 Review the New in this Release section to newrelease features/fixes.
5Review the Additional Information section fordetails on TLS, Best Practices, FAQ's, Regex's andRelease Notes prior to starting LFMT planning anddeployment.
6
Review the Planning section to understand RDBMSsizing and requirements along with GAXdependencies.
• This section also contains the LFMT Sizing XLStemplate which should be used to properly sizeyour production LFMT deployment
• If needed, this completed LFMT Sizing XLStemplate can be sent to Genesys CustomerCare, via a standard Case for further sizingassistance/guidance/recommendations; createa Genesys Case with a Description of LFMTSizing Assistance
• Do not move onto production Deployment untilyour LFMT deployment has been plannedaccording to your specific site requirements
7
Review the Deployment section for Prerequisite andDeployment details.
• Ensure DNS between the LFMT Host's and theWorkbench Agent 8.5 Host's is functioning androbust• Hosts must be resolvable by hostname for
LFMT to function properly
• Aligning with other Genesys Engage products,
Overview LFMT Checklist
Log File Management Tool Deployment and User's Guide 22
Item # Description
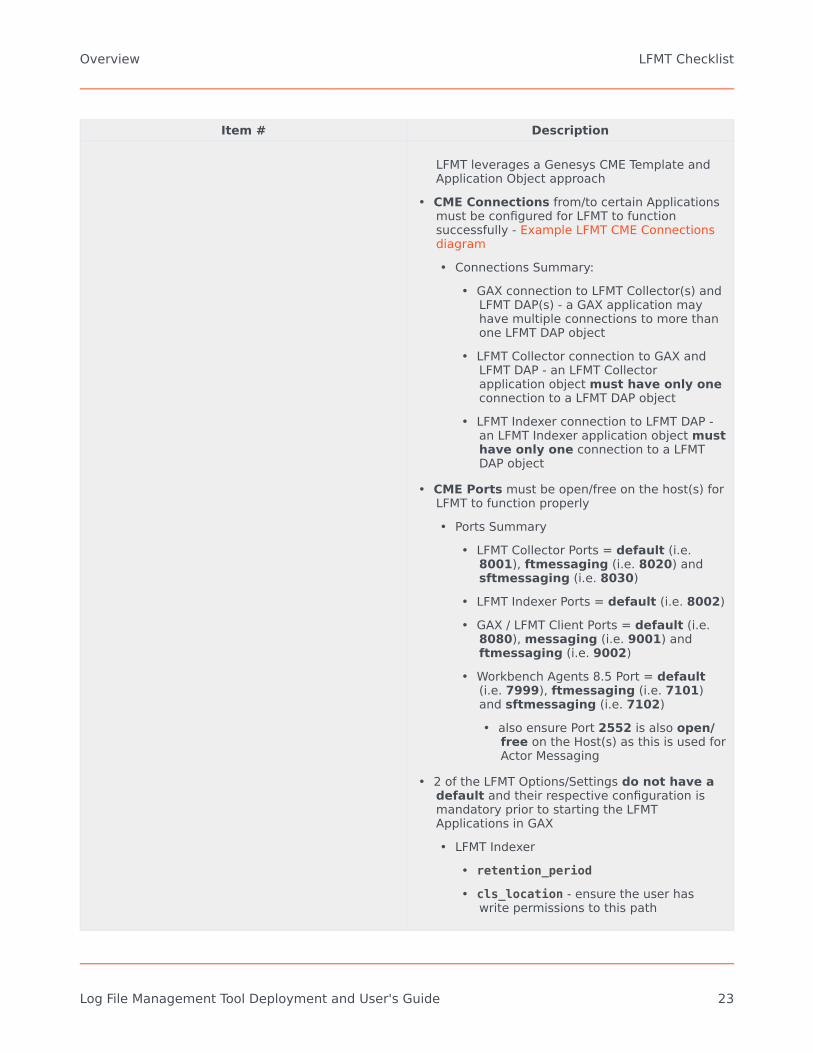
LFMT leverages a Genesys CME Template andApplication Object approach
• CME Connections from/to certain Applicationsmust be configured for LFMT to functionsuccessfully - Example LFMT CME Connectionsdiagram• Connections Summary:
• GAX connection to LFMT Collector(s) andLFMT DAP(s) - a GAX application mayhave multiple connections to more thanone LFMT DAP object
• LFMT Collector connection to GAX andLFMT DAP - an LFMT Collectorapplication object must have only oneconnection to a LFMT DAP object
• LFMT Indexer connection to LFMT DAP -an LFMT Indexer application object musthave only one connection to a LFMTDAP object
• CME Ports must be open/free on the host(s) forLFMT to function properly• Ports Summary
• LFMT Collector Ports = default (i.e.8001), ftmessaging (i.e. 8020) andsftmessaging (i.e. 8030)
• LFMT Indexer Ports = default (i.e. 8002)• GAX / LFMT Client Ports = default (i.e.
8080), messaging (i.e. 9001) andftmessaging (i.e. 9002)
• Workbench Agents 8.5 Port = default(i.e. 7999), ftmessaging (i.e. 7101)and sftmessaging (i.e. 7102)• also ensure Port 2552 is also open/
free on the Host(s) as this is used forActor Messaging
• 2 of the LFMT Options/Settings do not have adefault and their respective configuration ismandatory prior to starting the LFMTApplications in GAX• LFMT Indexer
• retention_period
• cls_location - ensure the user haswrite permissions to this path
Overview LFMT Checklist
Log File Management Tool Deployment and User's Guide 23
Item # Description
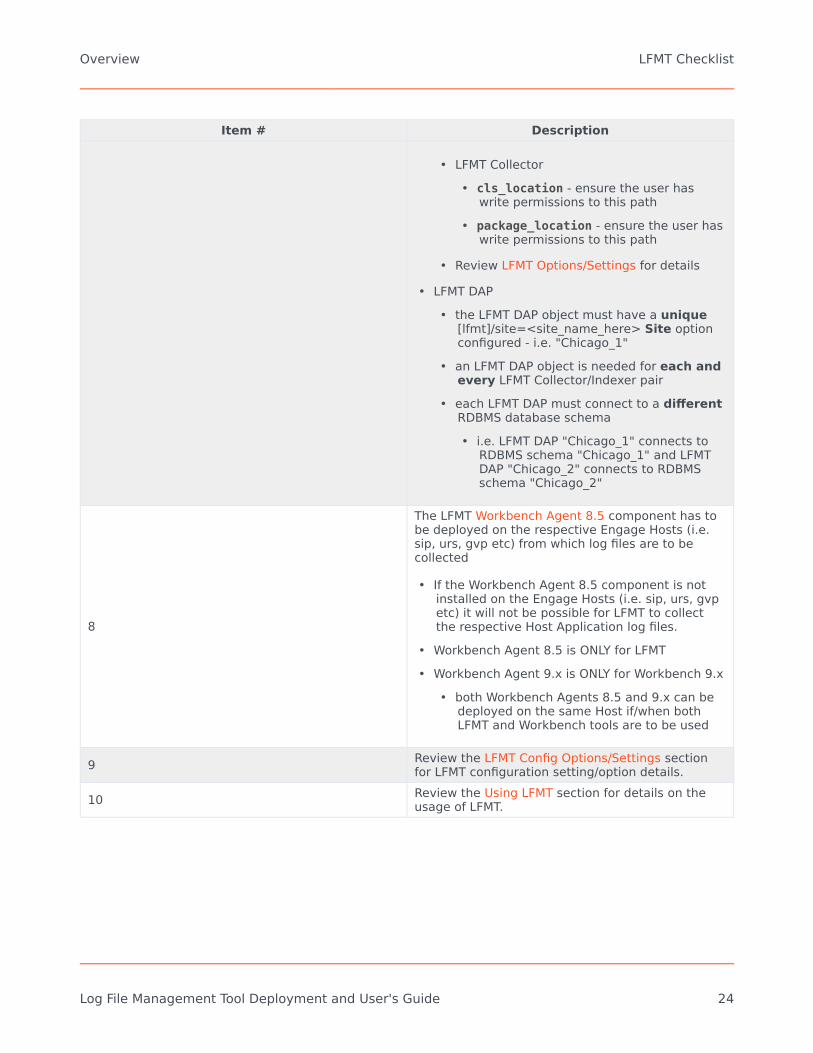
• LFMT Collector• cls_location - ensure the user has
write permissions to this path• package_location - ensure the user has
write permissions to this path
• Review LFMT Options/Settings for details
• LFMT DAP• the LFMT DAP object must have a unique
[lfmt]/site=<site_name_here> Site optionconfigured - i.e. "Chicago_1"
• an LFMT DAP object is needed for each andevery LFMT Collector/Indexer pair
• each LFMT DAP must connect to a differentRDBMS database schema• i.e. LFMT DAP "Chicago_1" connects to
RDBMS schema "Chicago_1" and LFMTDAP "Chicago_2" connects to RDBMSschema "Chicago_2"
8
The LFMT Workbench Agent 8.5 component has tobe deployed on the respective Engage Hosts (i.e.sip, urs, gvp etc) from which log files are to becollected
• If the Workbench Agent 8.5 component is notinstalled on the Engage Hosts (i.e. sip, urs, gvpetc) it will not be possible for LFMT to collectthe respective Host Application log files.
• Workbench Agent 8.5 is ONLY for LFMT• Workbench Agent 9.x is ONLY for Workbench 9.x
• both Workbench Agents 8.5 and 9.x can bedeployed on the same Host if/when bothLFMT and Workbench tools are to be used
9 Review the LFMT Config Options/Settings sectionfor LFMT configuration setting/option details.
10 Review the Using LFMT section for details on theusage of LFMT.
Overview LFMT Checklist
Log File Management Tool Deployment and User's Guide 24
Log File Management Tool DeploymentPlanningThis chapter describes how to properly size storage and system resources for an LFMT deployment.
Sections within this Planning chapter:
• LFMT Client - GAX Dependencies• LFMT Storage and Resource Sizing• LFMT Database Sizing
Important• Please note that the sizing and performance recommendations are based on tests
performed in an environment of up to 1000 agents; therefore these should be used asguidelines only.
• Please monitor your environment and apply your observations and experience to theformulas presented here to extrapolate the actual sizing of your LFMT environment.
Log File Management Tool Deployment Planning LFMT Checklist
Log File Management Tool Deployment and User's Guide 25
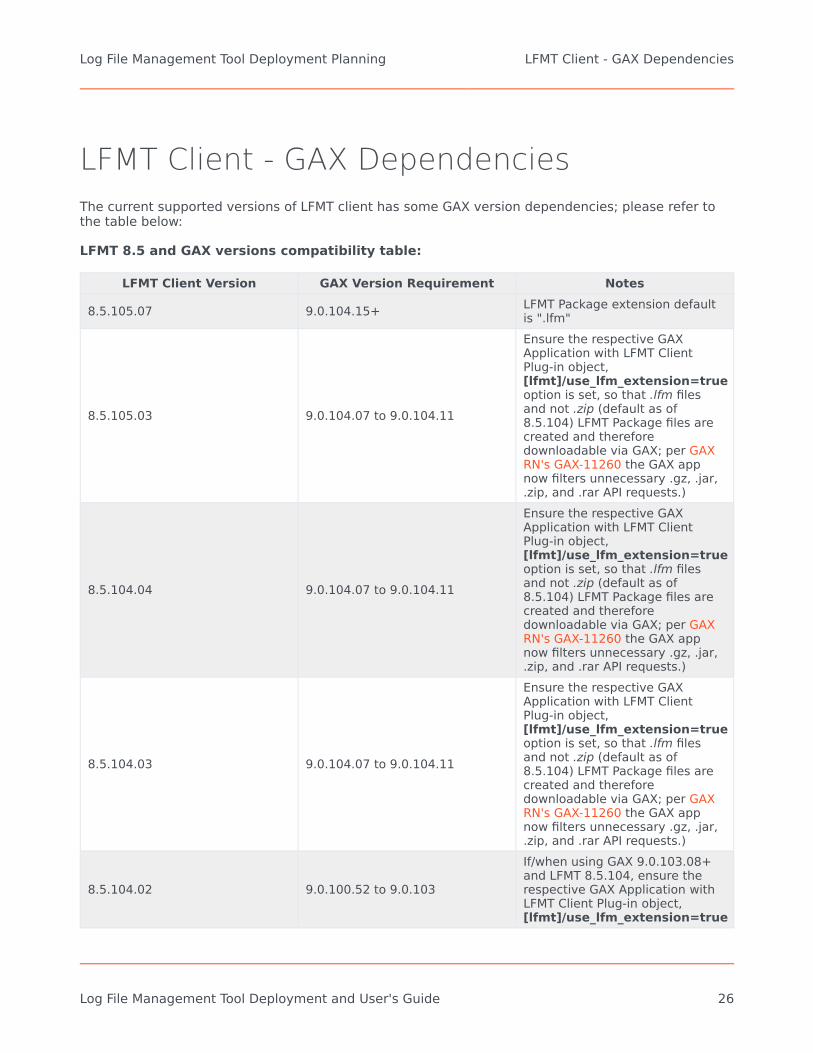
LFMT Client - GAX DependenciesThe current supported versions of LFMT client has some GAX version dependencies; please refer tothe table below:
LFMT 8.5 and GAX versions compatibility table:
LFMT Client Version GAX Version Requirement Notes
8.5.105.07 9.0.104.15+ LFMT Package extension defaultis ".lfm"
8.5.105.03 9.0.104.07 to 9.0.104.11
Ensure the respective GAXApplication with LFMT ClientPlug-in object,[lfmt]/use_lfm_extension=trueoption is set, so that .lfm filesand not .zip (default as of8.5.104) LFMT Package files arecreated and thereforedownloadable via GAX; per GAXRN's GAX-11260 the GAX appnow filters unnecessary .gz, .jar,.zip, and .rar API requests.)
8.5.104.04 9.0.104.07 to 9.0.104.11
Ensure the respective GAXApplication with LFMT ClientPlug-in object,[lfmt]/use_lfm_extension=trueoption is set, so that .lfm filesand not .zip (default as of8.5.104) LFMT Package files arecreated and thereforedownloadable via GAX; per GAXRN's GAX-11260 the GAX appnow filters unnecessary .gz, .jar,.zip, and .rar API requests.)
8.5.104.03 9.0.104.07 to 9.0.104.11
Ensure the respective GAXApplication with LFMT ClientPlug-in object,[lfmt]/use_lfm_extension=trueoption is set, so that .lfm filesand not .zip (default as of8.5.104) LFMT Package files arecreated and thereforedownloadable via GAX; per GAXRN's GAX-11260 the GAX appnow filters unnecessary .gz, .jar,.zip, and .rar API requests.)
8.5.104.02 9.0.100.52 to 9.0.103
If/when using GAX 9.0.103.08+and LFMT 8.5.104, ensure therespective GAX Application withLFMT Client Plug-in object,[lfmt]/use_lfm_extension=true
Log File Management Tool Deployment Planning LFMT Client - GAX Dependencies
Log File Management Tool Deployment and User's Guide 26

LFMT Client Version GAX Version Requirement Notesoption is set, so that .lfm filesand not .zip (default as of8.5.104) LFMT Package files arecreated and thereforedownloadable via GAX; per GAXRN's GAX-11260 the GAX appnow filters unnecessary .gz, .jar,.zip, and .rar API requests.)
8.5.104.00 9.0.100.52 to 9.0.103
If/when using GAX 9.0.103.08+and LFMT 8.5.104, ensure therespective GAX Application withLFMT Client Plug-in object,[lfmt]/use_lfm_extension=trueoption is set, so that .lfm filesand not .zip (default as of8.5.104) LFMT Package files arecreated and thereforedownloadable via GAX; per GAXRN's GAX-11260 the GAX appnow filters unnecessary .gz, .jar,.zip, and .rar API requests.)
8.5.103.03 9.0.100.52 to 9.0.1038.5.102.00 9.0.100.52 to 9.0.1038.5.101.06 8.5.290.09 to 9.0.001.378.5.101.05 8.5.280.07 to 8.5.290.08
Log File Management Tool Deployment Planning LFMT Client - GAX Dependencies
Log File Management Tool Deployment and User's Guide 27
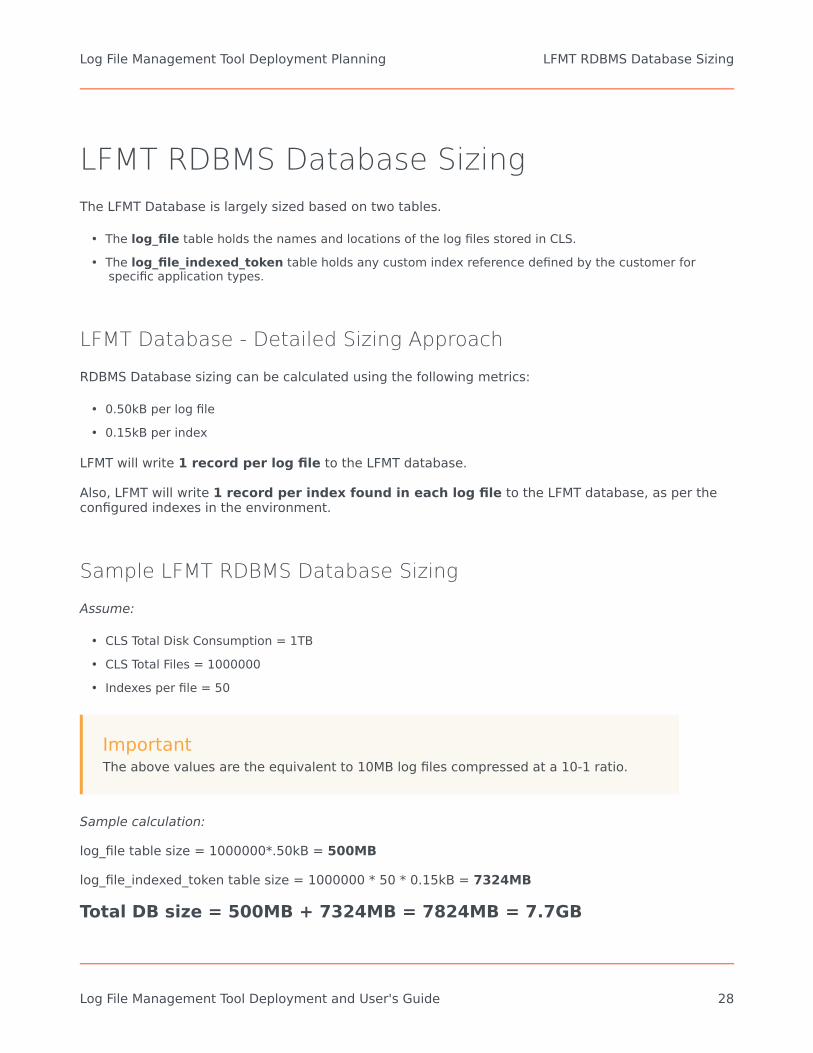
LFMT RDBMS Database SizingThe LFMT Database is largely sized based on two tables.
• The log_file table holds the names and locations of the log files stored in CLS.• The log_file_indexed_token table holds any custom index reference defined by the customer for
specific application types.
LFMT Database - Detailed Sizing Approach
RDBMS Database sizing can be calculated using the following metrics:
• 0.50kB per log file• 0.15kB per index
LFMT will write 1 record per log file to the LFMT database.
Also, LFMT will write 1 record per index found in each log file to the LFMT database, as per theconfigured indexes in the environment.
Sample LFMT RDBMS Database Sizing
Assume:
• CLS Total Disk Consumption = 1TB• CLS Total Files = 1000000• Indexes per file = 50
ImportantThe above values are the equivalent to 10MB log files compressed at a 10-1 ratio.
Sample calculation:
log_file table size = 1000000*.50kB = 500MB
log_file_indexed_token table size = 1000000 * 50 * 0.15kB = 7324MB
Total DB size = 500MB + 7324MB = 7824MB = 7.7GB
Log File Management Tool Deployment Planning LFMT RDBMS Database Sizing
Log File Management Tool Deployment and User's Guide 28
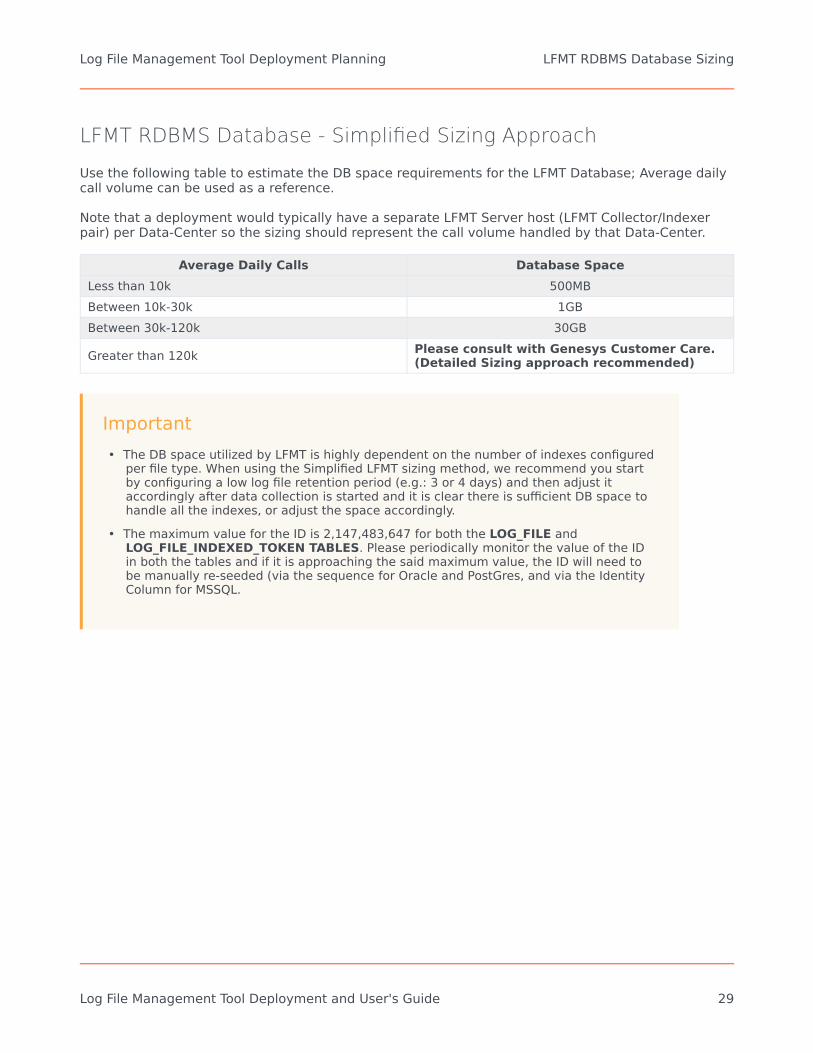
LFMT RDBMS Database - Simplified Sizing Approach
Use the following table to estimate the DB space requirements for the LFMT Database; Average dailycall volume can be used as a reference.
Note that a deployment would typically have a separate LFMT Server host (LFMT Collector/Indexerpair) per Data-Center so the sizing should represent the call volume handled by that Data-Center.
Average Daily Calls Database SpaceLess than 10k 500MBBetween 10k-30k 1GBBetween 30k-120k 30GB
Greater than 120k Please consult with Genesys Customer Care.(Detailed Sizing approach recommended)
Important• The DB space utilized by LFMT is highly dependent on the number of indexes configured
per file type. When using the Simplified LFMT sizing method, we recommend you startby configuring a low log file retention period (e.g.: 3 or 4 days) and then adjust itaccordingly after data collection is started and it is clear there is sufficient DB space tohandle all the indexes, or adjust the space accordingly.
• The maximum value for the ID is 2,147,483,647 for both the LOG_FILE andLOG_FILE_INDEXED_TOKEN TABLES. Please periodically monitor the value of the IDin both the tables and if it is approaching the said maximum value, the ID will need tobe manually re-seeded (via the sequence for Oracle and PostGres, and via the IdentityColumn for MSSQL.
Log File Management Tool Deployment Planning LFMT RDBMS Database Sizing
Log File Management Tool Deployment and User's Guide 29
LFMT Storage and Resource SizingThe following section describes how to size hardware for the LFMT Server Host(s).
For information on storage requirements for the LFMT Client Host(s), please refer to the GenesysAdministrator Extension (GAX) Deployment Guide.
Sizing Approach
LFMT Sizing can be approached in two ways:
Detailed Sizing
• The Detailed Sizing (i.e. production) procedure facilitated by the sizing table below will guide you tocollect the information required to produce a strong estimate for your LFMT sizing needs. This will allowyou to factor in your expected call volumes including peaks, your preferred log retention period, etc.
Simplified Sizing
• If a more expedient LFMT Sizing is preferred (i.e. a lab/test environment), the Simplified sizing canprovide a guide to get you started more quickly, however, please note:• These are approximate, and you may need to adjust your data LFMT Retention Period so that your
log producing rate does not overfill the CLS central file storage.• It is recommended that you provision the hardware in a way that is easily extendable in the future
so you can adjust it to your preferences.• e.g. Perhaps your environment data generation rate only allows for 6 days of logs stored on the
default proposed storage but your company prefers a longer period, then additional storagemay need to be planned.
LFMT - Detailed Sizing Approach (i.e. Production environment)
The Storage requirements for LFMT consists of two parts:
• The first is the space for the host Operating System and the LFMT applications installation.• The seconds is the CLS storage – the space used by LFMT as workspace and storage for the Log Files it
collects and manages.
For the first part, Genesys recommends that the LFMT Indexer and LFMT Collector be installed on thesame drive where the host Operating System resides. Minimum recommended storage for this driveis as follows:
Log File Management Tool Deployment Planning LFMT Storage and Resource Sizing
Log File Management Tool Deployment and User's Guide 30
• 100GB for hosts running a Linux Operating System• 160GB for hosts running a Windows Operating System
A separate/additional drive (local to the Collector Host and not a mapped network drive) isrecommended for housing the Central Log Storage (CLS).
Important• To calculate the LFMT Central Log Storage (CLS) requirements, download and refer to the
Genesys Log File Management Tool Sizing Template
• The LFMT Sizing XLS requires details of:• Site Tab
• Provide Customer Name and Site/Data-Center
• Application Tab• Provide Application Name (i.e. EMEA_sip_a, APAC_urs_b, Chicago_stat_1), Hostname, Host IP
Address, Local Log Path (i.e. /home/genesys/gcti/_logs/Chicago_sip_a/Chicago_sip_a)
• Volume of Logs Tab• Provide Application Name with Approx. Daily Log Volume
• Number of calls per week Tab• Provide the Number of Calls per Week
• Calculations Tab• Provide Number of Days for which Logs will be stored (Retention Period), Average File Size,
Indexes per File
• Results Tab• Shows the recommended number of LFMT Hosts/Nodes along with CPUs, RAM, Storage, IO,
Throughput
• Disk IO notes Tab• Explanation of Disk IO
• Additional Information Tab• Provide HDD Capacity (MB), Application Name, Version, Segment (MB), Expire, Log Level (not
used for Sizing but useful)
Use the following table to estimate the Memory and CPU requirements for the LFMT Server Host(s).
Log File Management Tool Deployment Planning LFMT Storage and Resource Sizing
Log File Management Tool Deployment and User's Guide 31
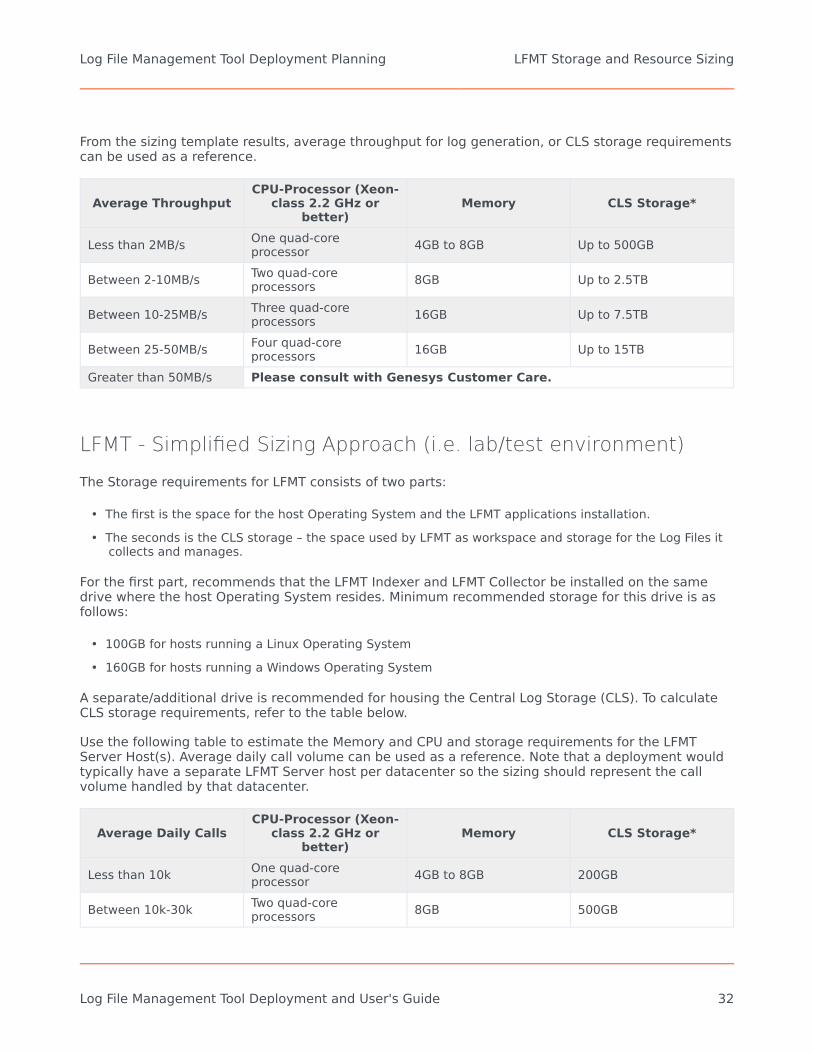
From the sizing template results, average throughput for log generation, or CLS storage requirementscan be used as a reference.
Average ThroughputCPU-Processor (Xeon-
class 2.2 GHz orbetter)
Memory CLS Storage*
Less than 2MB/s One quad-coreprocessor 4GB to 8GB Up to 500GB
Between 2-10MB/s Two quad-coreprocessors 8GB Up to 2.5TB
Between 10-25MB/s Three quad-coreprocessors 16GB Up to 7.5TB
Between 25-50MB/s Four quad-coreprocessors 16GB Up to 15TB
Greater than 50MB/s Please consult with Genesys Customer Care.
LFMT - Simplified Sizing Approach (i.e. lab/test environment)
The Storage requirements for LFMT consists of two parts:
• The first is the space for the host Operating System and the LFMT applications installation.• The seconds is the CLS storage – the space used by LFMT as workspace and storage for the Log Files it
collects and manages.
For the first part, recommends that the LFMT Indexer and LFMT Collector be installed on the samedrive where the host Operating System resides. Minimum recommended storage for this drive is asfollows:
• 100GB for hosts running a Linux Operating System• 160GB for hosts running a Windows Operating System
A separate/additional drive is recommended for housing the Central Log Storage (CLS). To calculateCLS storage requirements, refer to the table below.
Use the following table to estimate the Memory and CPU and storage requirements for the LFMTServer Host(s). Average daily call volume can be used as a reference. Note that a deployment wouldtypically have a separate LFMT Server host per datacenter so the sizing should represent the callvolume handled by that datacenter.
Average Daily CallsCPU-Processor (Xeon-
class 2.2 GHz orbetter)
Memory CLS Storage*
Less than 10k One quad-coreprocessor 4GB to 8GB 200GB
Between 10k-30k Two quad-coreprocessors 8GB 500GB
Log File Management Tool Deployment Planning LFMT Storage and Resource Sizing
Log File Management Tool Deployment and User's Guide 32

Average Daily CallsCPU-Processor (Xeon-
class 2.2 GHz orbetter)
Memory CLS Storage*
Between 30k-120k Three quad-coreprocessors 16GB 2TB
Greater than 120k Please consult with Genesys Customer Care. (Detailed Sizingapproach recommended)
ImportantStorage is based on calculations for 7 days of log files and includes allowance for theoperation of the application. When using the Simplified LFMT sizing method, werecommend you start by configuring a low log file retention period (e.g. 3 or 4 days)and then adjust it accordingly after data collection is started and it is clear there issufficient space for additional retention.
Log File Management Tool Deployment Planning LFMT Storage and Resource Sizing
Log File Management Tool Deployment and User's Guide 33
Log File Management Tool GeneralDeploymentThis section contains general information for the deployment, configuration, and installation of theLog File Management Tool (LFMT).
It is recommended that you are familiar with LFMT architecture and nomenclature prior to proceedingwith its installation.
Sections within this Deployment chapter:
1. LFMT Prerequisites.2. Deployment of LFMT Client.3. Deployment of LFMT Indexer.4. Deployment of LFMT Collector.5. Configuration of the LFMT Database.6. Initializing the DBS Initializing the RDBMS.7. Deployment of Workbench Agent 8.5 Deployment of Workbench Agent 8.5.8. Mass/Bulk Deployment of Workbench Agent 8.5 Mass Deployment of Workbench Agent 8.5.9. summary of LFMT CME Connections LFMT CME Connections.
Log File Management Tool General Deployment LFMT Storage and Resource Sizing
Log File Management Tool Deployment and User's Guide 34
Prerequisites
Software Requirements
LFMT supports the following Operating Systems:
• Windows 2012 and 2016• Red Hat Enterprise Linux (RHEL) and CentOS 7
LFMT supports the following database management systems:
• PostgreSQL 9.1 or later• Oracle DBMS 11 to 19c• Microsoft SQL Server 2005 or later
The following software must be installed before deploying the Log File Management Tool:
• Genesys Administrator Extension 9.x and all of its associated components.• Genesys recommends LFMT is deployed on its own separate GAX instance so that it does not affect any
other GAX Plugins that are used to manage/operate the contact center.• JRE 1.8 (or later) or OpenJDK 8 or OpenJDK 11
The LFMT Client is web-based, and is compatible with the following web browsers:
• latest Google Chrome• latest Microsoft Edge• latest Mozilla Firefox
Genesys Engage Requirements
LFMT integrates to Genesys Engage Configuration Server, Solution Control Server and MessageServer 8.5 versions.
Important• Prior to planning and installing LFMT, please ensure you have sufficient knowledge and
Log File Management Tool General Deployment Prerequisites
Log File Management Tool Deployment and User's Guide 35

experience with Genesys Engage architecture, components and functions.
Network and Security Requirements
1. Ensure all hostnames in the environment can be resolved by DNS from the LFMT Server Host(s).2. Ensure the following access ports are available for LFMT operation.
a. The DBMS access port (Required if the DBMS is located on a different host than LFMT Indexer):• PostgreSQL - default: Port 5432• Oracle - default: Port 1521• MSSQL- default: Port 1433
b. The GAX configuration port (default: Port 8080)
3. (Optional) Open the following external ports for the LFMT (S)FTP/S operation.a. Ports 20 and 21
4. (Optional) Assign dedicated NICs on each Genesys application server for LFMT operation.5. (Optional) To enable Log File Retrieval services, configure ports 80 & 443 for outbound TCP access.
Log File Management Tool General Deployment Prerequisites
Log File Management Tool Deployment and User's Guide 36
Deployment of the LFMT ClientThis section describes how to deploy and configure the LFMT Client software.
The LFMT Client is a GAX Plug-in that provides the LFMT user interface through which users specifythe log files to retrieve, package, and upload to a given location.
Important• Genesys recommends LFMT is deployed on its own separate GAX instance so that it
does not affect any other GAX Plugins that are used to manage/operate the contactcenter.
Installing the LFMT Client
The following directories in the LFMT Client distributable contain the LFMT installation packages:
• For Linux:• /LFMT_8.5.10x/LFMTClient/8.5.10x.xx (GAX 9.0.100.52+ within GAX 9.0.100.xx
family)/linux/ip.
• For Windows:• \LFMT_8.5.10x\LFMTClient\8.5.10x.xx (GAX 9.0.100.52+ within GAX 9.0.100.xx
family)\windows\ip.
Important• LFMT Client places GAX Plug-in files in the <GAX Installation Directory>\webapp\gax\
WEB-INF\lib folder; this folder is created the first time GAX is started.• Please ensure GAX has been started at least once prior to the installation of the
LFMT Client.
Installing the LFMT Client on Linux
1. In the directory to which the LFMT Client installation package was copied, execute the install.sh script2. Enter the location to the GAX installation directory (i.e. /opt/Genesys/gax)
Log File Management Tool General Deployment Deployment of the LFMT Client
Log File Management Tool Deployment and User's Guide 37
3. Enter the Destination Folder for the LFMT Client installation (i.e. /home/genesys/gcti/LFMT_Client_8510400)
4. Ensure the .jar files in the <LFMT Client Install Directory> have been copied to <GAX InstallationDirectory>/webapp/WEB-INF/lib
Installing the LFMT Client on Windows
1. In the directory to which the LFMT Client installation package was copied, double-click setup.exe tostart the installation.a. On the Welcome screen, click Next.b. Enter the Destination Folder for the LFMT Client installation and click Next.c. On the Ready to Install screen, click Next.d. On the Installation Complete screen, click Finish.
5. Ensure the .jar files in the <LFMT Client Install Directory> have been copied to <GAX InstallationDirectory>\webapp\WEB-INF\lib.
Configuring GAX for use with the LFMT Client
Important• If/when using LFMT Client 8.5.104.00 thru LFMT Client 8.5.105.03 and GAX 9.0.103.08+
• Please ensure the respective GAX Application, with the LFMT Client Plug-in installed,has the [lfmt]/use_lfm_extension option set to true
• So that .lfm files and not .zip (the default as of 8.5.104) LFMT Package files arecreated and therefore downloadable via GAX• This avoids a "Failed Forbidden" error when trying to download LFMT Packages
• This change is required because GAX 9.0.103.08+ filters .gz, .jar, .zip, and .rar APIrequests
• Log into GAX• Navigate to Configuration Manager.• From the Environment section, select Applications.• In the Applications section, select the GAX Application (i.e. GAX_LFMT) to be configured for use with
the LFMT Client.• In the Application Properties pane, select the Ports tab.• In the Ports tab, add the following listening ports.
Log File Management Tool General Deployment Deployment of the LFMT Client
Log File Management Tool Deployment and User's Guide 38
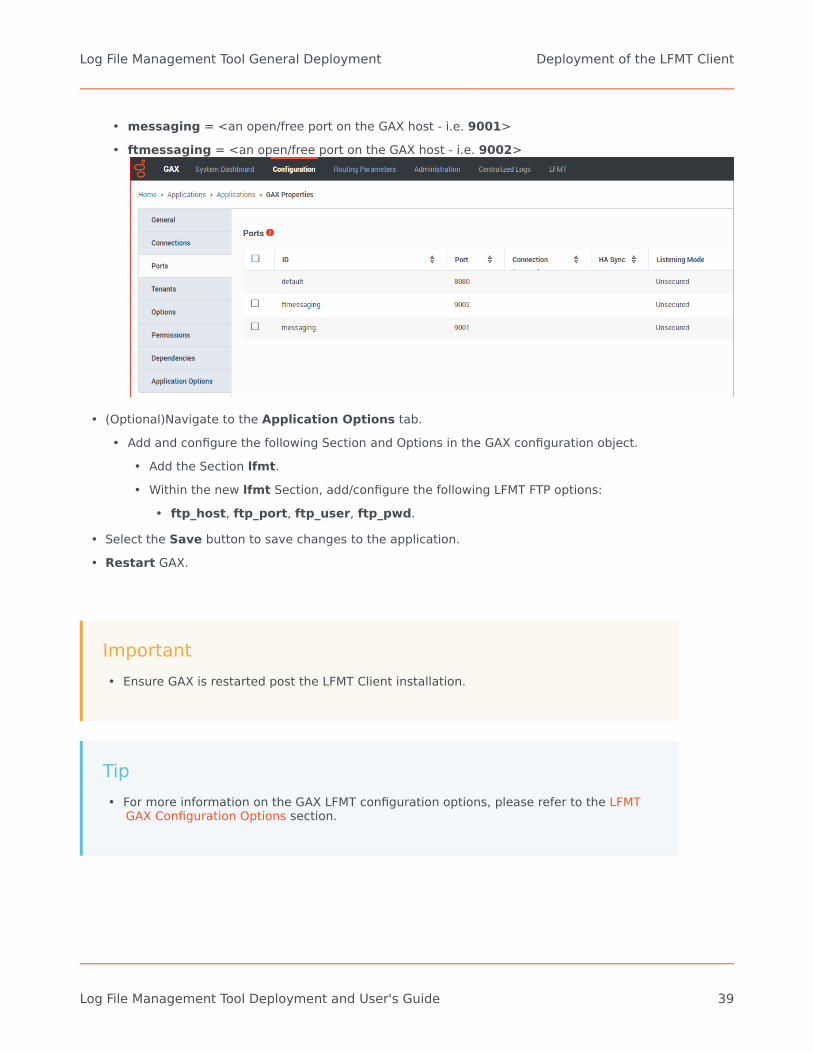
• messaging = <an open/free port on the GAX host - i.e. 9001>• ftmessaging = <an open/free port on the GAX host - i.e. 9002>
• (Optional)Navigate to the Application Options tab.• Add and configure the following Section and Options in the GAX configuration object.
• Add the Section lfmt.• Within the new lfmt Section, add/configure the following LFMT FTP options:
• ftp_host, ftp_port, ftp_user, ftp_pwd.
• Select the Save button to save changes to the application.• Restart GAX.
Important• Ensure GAX is restarted post the LFMT Client installation.
Tip• For more information on the GAX LFMT configuration options, please refer to the LFMT
GAX Configuration Options section.
Log File Management Tool General Deployment Deployment of the LFMT Client
Log File Management Tool Deployment and User's Guide 39
Deployment of the LFMT IndexerThis section describes how to deploy and configure the LFMT Indexer software.
The LFMT Indexer component which monitors the LFMT CLS repository, indexes the log files as theyarrive at the CLS, and compresses the CLS files for storage.
Provisioning the LFMT Indexer(s)
The following directories in the LFMT Indexer distributable contain the LFMT Indexer Templates:
• For Linux:• /LFMT_8.5.10x/LFMTIndexer/8.5.10x.xx/templates
• For Windows:• \LFMT_8.5.10x\LFMTIndexer\8.5.10x.xx\templates
Provisioning the LFMT Indexer(s) in GAX
Before installing the LFMT Indexer(s) software you must first create an LFMT Collector Template andApplication in CME.
1. Log into GAX, and navigate to Configuration Manager.2. From the Environment section, select Application Templates.3. In the Application Templates section, select New.4. In the New Properties pane, select Import Application Template.5. In the Import Application Template dialog, click the Choose File file button and navigate to the LFMT
Indexer .apd template. Select the template, and click the OK button to confirm the template import.6. In the New Properties pane, select the Save button to save the new application template.7. Once the Application Template has been imported, navigate to Configuration Manager.8. From the Environment section, select Applications.9. In the Applications section, select New.
10. In the New Properties pane, complete the following:a. In the General tab, enter a name for the LFMT Indexer application in the Name field,.b. Click on the Template field and navigate to the application template created above.c. In the Working Directory field, enter "." .d. In the Command Line field, enter "." .
Log File Management Tool General Deployment Deployment of the LFMT Indexer
Log File Management Tool Deployment and User's Guide 40
e. Click on the Host field and navigate to the host where LFMT Indexer will be installed.f. In the Application Options tab, review and configure the LFMT Indexer options.
g. In the Ports tab, add the following listening ports:i. default = <an open/free port on the LFMT Indexer host>
h. Select the Save button to save the new application.
Tip• For more information on the LFMT Indexer configuration options, please refer to the
LFMT Indexer Configuration Options section.
Installing the LFMT Indexer(s)
The following directories in the LFMT Indexer distributable contain the LFMT installation packages:
• For Linux:• /LFMT_8.5.10x/LFMTIndexer/8.5.10x.xx/linux/ip
• For Windows:• \LFMT_8.5.10x\LFMTIndexer\8.5.10x.xx\windows\ip
Installing the LFMT Indexer(s) on Linux
1. In the directory to which the LFMT Indexer installation package was copied, execute the install.shscript.
2. When prompted, confirm the hostname of the computer on which LFMT Indexer is to be installed.3. When prompted, specify the host and port to the Configuration Server associated with this LFMT
Indexer.4. When prompted, specify the username and password to access the Configuration Server.5. When prompted, specify the host and port to the Backup Configuration Server associated with this
LFMT Indexer.6. When prompted, select the respective LFMT Indexer Application object (i.e.
LFMT_Indexer_Chicago_1) you configured in “Provisioning the LFMT Indexer” from the list ofapplications.
7. Enter the Destination Folder (i.e. /home/genesys/gcti/LFMT_Indexer_Chicago_1) for the LFMTIndexer installation.
Log File Management Tool General Deployment Deployment of the LFMT Indexer
Log File Management Tool Deployment and User's Guide 41
Installing the LFMT Indexer(s) on Windows
1. In the directory to which the LFMT Indexer installation package was copied, double-click setup.exe tostart the installation.
2. On the Welcome screen, click Next.3. When prompted, specify the connection parameters to the Configuration Server associated with this
LFMT Indexer and click Next.4. When prompted, select the LFMT Indexer Application object you configured in “Provisioning the LFMT
Indexer” from the list of applications and click Next.5. Enter the Destination Folder for the LFMT Indexer installation and click Next.6. (Optional) Enter the Hostname and Port of the Backup Configuration Server associated with this
LFMT Indexer and click Next.7. On the Ready to Install screen, click Install.8. On the Installation Complete screen, click Finish.
Verifying the LFMT Indexer(s) installation
After completing the installation of the LFMT Indexer, its configuration should be verified through theGAX interface.
1. Log into GAX, and navigate to Configuration Manager.2. From the Environment section, select Applications.3. In the Applications section, locate and open the LFMT Indexer application.4. In the General tab, verify that the following parameters have been updated by the installation process.
• Working Directory: The LFMT Indexer installation path• Command Line: indexer_startup.bat or ./indexer_startup.sh• Command Line Arguments: -app <LFMT Indexer Application Name> -host <Configuration
Server Host> -port <Configuration Server Port> -backuphost <Backup Configuration ServerHost> -backupport <Backup Configuration Server Port>
ImportantThe backuphost and backupport options are optional. These options are read fromthe Command Line Arguments field of the LFMT Indexer object only.
Log File Management Tool General Deployment Deployment of the LFMT Indexer
Log File Management Tool Deployment and User's Guide 42
Post LFMT Indexer Configuration
Ensure you configure, these default blank options below, with valid paths, within the LFMT Indexerapplication(s), before starting the LFMT Indexer application(s):
• cls_location - this value does NOT have a default therefore you need to assign a valid path
Please review here https://docs.genesys.com/Documentation/ST/latest/DeploymentGuide/IndexerOptions for further details.
Log File Management Tool General Deployment Deployment of the LFMT Indexer
Log File Management Tool Deployment and User's Guide 43
Deployment of the LFMT CollectorThis section describes how to deploy and configure the LFMT Collector software.
The LFMT Collector is the component which collects the log files from the Genesys ApplicationServers (i.e. sip, urs, gvp etc), via the Workbench Agent 8.5 component, for storage in the CentralLog Storage (CLS) repository and creates packages for user downloads.
Important• LFMT Collector applications must be installed in pairs (LFMT Collector / LFMT Indexer),
on the same host as the associated LFMT Indexer.
Provisioning the LFMT Collector(s)
The following directories in the LFMT Collector distributable contain the LFMT Collector templates:
• For Linux:• /LFMT_8.5.10x/LFMTCollector/8.5.10x.xx/templates
• For Windows:• \LFMT_8.5.10x\LFMTCollector\8.5.10x.xx\templates
Provisioning the LFMT Collector(s) in GAX
Before installing the LFMT Collector(s) software you must first create an LFMT Collector Template andApplication in CME.
1. Log into GAX, and navigate to Configuration Manager.2. From the Environment section, select Application Templates.3. In the Application Templates section, select New.4. In the New Properties pane, select Import Application Template.5. In the Import Application Template dialog, click the Choose File file button and navigate to the
LFMT Collector .apd template. Select the template, and click the OK button to confirm the templateimport.
6. In the New Properties pane, select the Save button to save the new application template.7. Once the application template has been imported, navigate to Configuration Manager.
Log File Management Tool General Deployment Deployment of the LFMT Collector
Log File Management Tool Deployment and User's Guide 44
8. From the Environment section, select Applications.9. In the Applications section, select New.
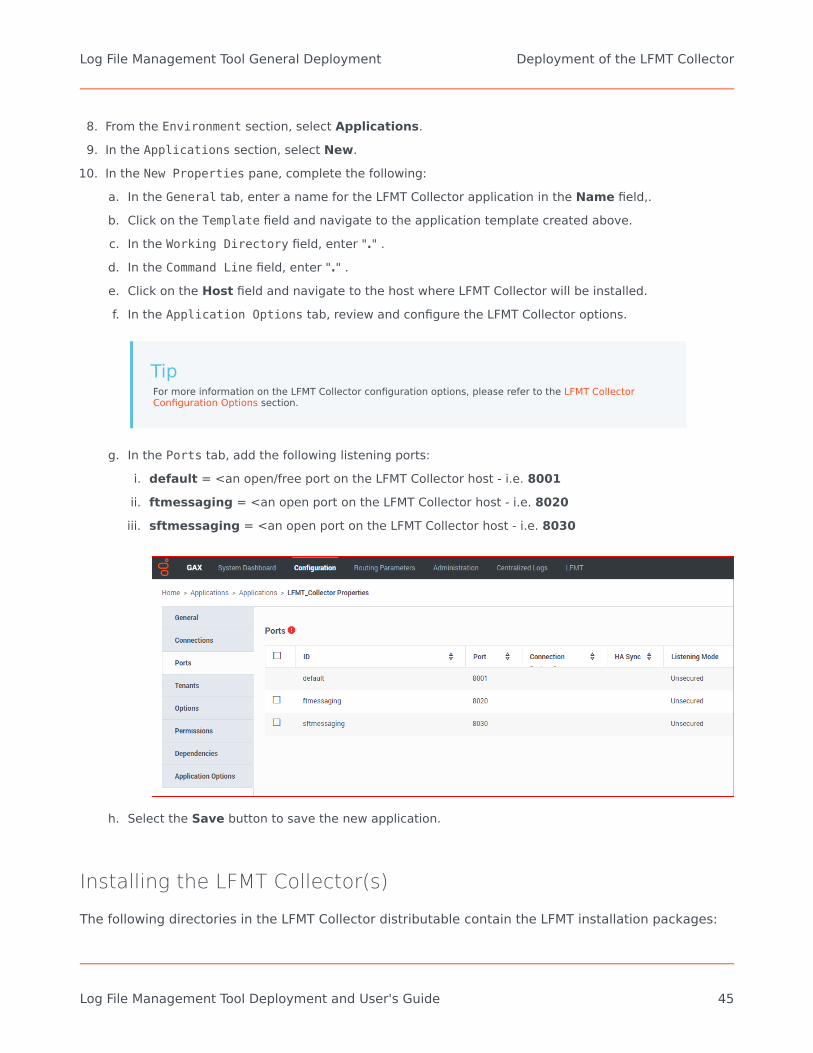
10. In the New Properties pane, complete the following:a. In the General tab, enter a name for the LFMT Collector application in the Name field,.b. Click on the Template field and navigate to the application template created above.c. In the Working Directory field, enter "." .d. In the Command Line field, enter "." .e. Click on the Host field and navigate to the host where LFMT Collector will be installed.f. In the Application Options tab, review and configure the LFMT Collector options.
TipFor more information on the LFMT Collector configuration options, please refer to the LFMT CollectorConfiguration Options section.
g. In the Ports tab, add the following listening ports:i. default = <an open/free port on the LFMT Collector host - i.e. 8001ii. ftmessaging = <an open port on the LFMT Collector host - i.e. 8020iii. sftmessaging = <an open port on the LFMT Collector host - i.e. 8030
h. Select the Save button to save the new application.
Installing the LFMT Collector(s)
The following directories in the LFMT Collector distributable contain the LFMT installation packages:
Log File Management Tool General Deployment Deployment of the LFMT Collector
Log File Management Tool Deployment and User's Guide 45
• For Linux:• /LFMT_8.5.10x/LFMTcollector/8.5.10x.xx/linux/ip
• For Windows:• \LFMT_8.5.10x\LFMTCollector\8.5.10x.xx\windows\ip
Installing the LFMT Collector(s) on Linux
1. In the directory to which the LFMT Collector installation package was copied, execute the install.shscript.
2. When prompted, confirm the hostname of the computer on which LFMT Collector is to be installed.3. When prompted, specify the host and port to the Configuration Server associated with this LFMT
Collector.4. When prompted, specify the username and password to access the Configuration Server.5. When prompted, specify the host and port to the Backup Configuration Server associated with this
LFMT Collector.6. When prompted, select the LFMT Collector Application object (i.e. LFMT_Collector_Chicago_1) you
configured in “Provisioning the LFMT Collector” from the list of applications.7. Enter the Destination Folder (i.e. /home/genesys/gcti/LFMT_Collector_Chicago_1) for the LFMT
Collector installation.
Installing the LFMT Collector(s) on Windows
1. In the directory to which the LFMT Collector installation package was copied, double-click setup.exe tostart the installation.
2. On the Welcome screen, click Next.3. When prompted, specify the connection parameters to the Configuration Server associated with this
LFMT Collector and click Next.4. When prompted, select the LFMT Indexer Application object you configured in “Provisioning the LFMT
Collector” from the list of applications and click Next.5. Enter the Destination Folder for the LFMT Collector installation and click Next.6. (Optional) Enter the Hostname and Port of the Backup Configuration Server associated with this
LFMT Collector and click Next.7. On the Ready to Install screen, click Install.8. On the Installation Complete screen, click Finish.
Configuring GAX for use with the LFMT Collector(s)
1. Log into GAX, and navigate to Configuration Manager.2. From the Environment section, select Applications.
Log File Management Tool General Deployment Deployment of the LFMT Collector
Log File Management Tool Deployment and User's Guide 46
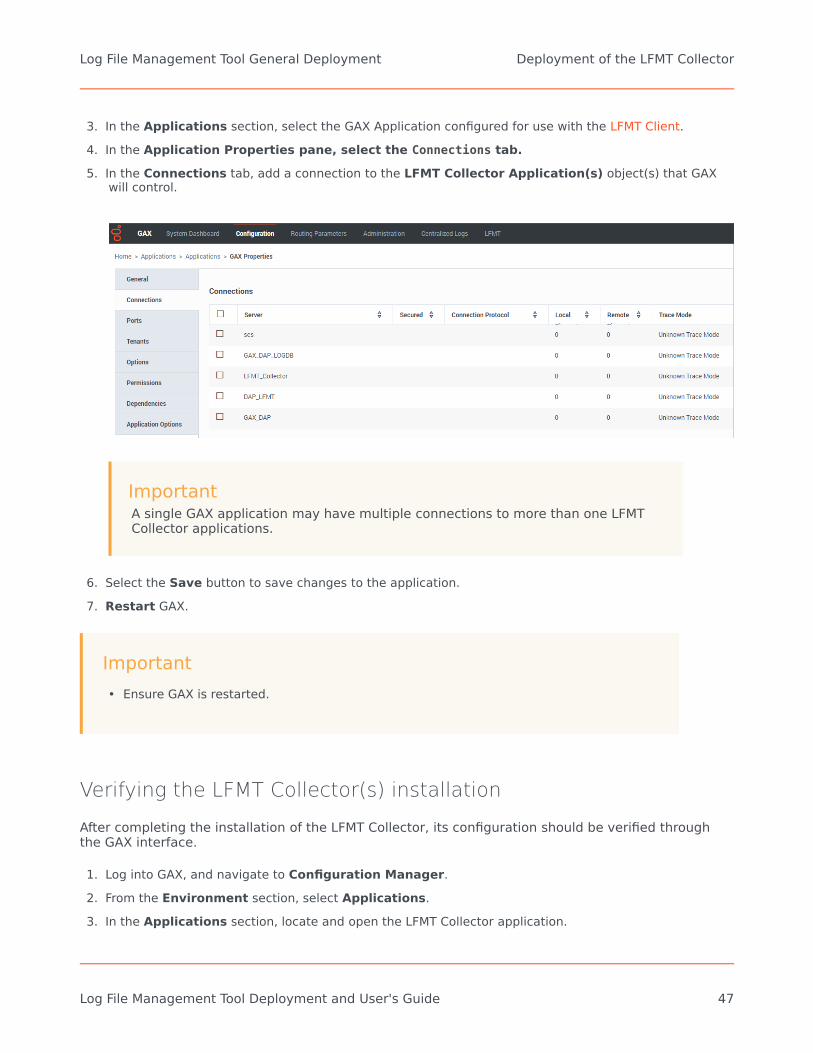
3. In the Applications section, select the GAX Application configured for use with the LFMT Client.4. In the Application Properties pane, select the Connections tab.5. In the Connections tab, add a connection to the LFMT Collector Application(s) object(s) that GAX
will control.
ImportantA single GAX application may have multiple connections to more than one LFMTCollector applications.
6. Select the Save button to save changes to the application.7. Restart GAX.
Important• Ensure GAX is restarted.
Verifying the LFMT Collector(s) installation
After completing the installation of the LFMT Collector, its configuration should be verified throughthe GAX interface.
1. Log into GAX, and navigate to Configuration Manager.2. From the Environment section, select Applications.3. In the Applications section, locate and open the LFMT Collector application.
Log File Management Tool General Deployment Deployment of the LFMT Collector
Log File Management Tool Deployment and User's Guide 47
4. In the General tab, verify that the following parameters have been updated by the installation process.
• Working Directory: The LFMT Collector installation path• Command Line: collector_startup.bat or ./collector_startup.sh• Command Line Arguments: -app <LFMT Collector Application Name> -host <Configuration
Server Host> -port <Configuration Server Port> -backuphost <Backup Configuration ServerHost> -backupport <Backup Configuration Server Port>
ImportantThe backuphost and backupport options are optional. These options are read fromthe Command Line Arguments field of the LFMT Collector object only.
Post LFMT Collector Configuration
Ensure you configure, these default blank options below, with valid paths, within the LFMT Collectorapplication(s), before starting the LFMT Collector application(s):
• cls_location - this value does NOT have a default therefore you need to assign a valid path• package_location - this value does NOT have a default therefore you need to assign a valid path
Please review here https://docs.genesys.com/Documentation/ST/latest/DeploymentGuide/CollectorOptions for further details.
Log File Management Tool General Deployment Deployment of the LFMT Collector
Log File Management Tool Deployment and User's Guide 48
Configuration of the LFMT DatabaseFor each LFMT Indexer/Collector pair, a separate LFMT database is required. New Comment
This section describes how to initialize a LFMT Database.
The configuration of a Database Access Point (DAP) for a LFMT Database is also detailed.
Important• The LFMT Database (Oracle, MS-SQL or Postgres) is NOT the same as the GAX Database
- its a different/separate database solely for LFMT Collector/Indexer pairs• The GAX database is still required for GAX functionality• A new Database must be created for LFMT functionality - a new/separate database for
each LFMT Collector/Indexer pair (i.e. LFMT_Chicago_1)• LFMT supports TLS database connections as of LFMT package version 8.5.104.10 (LFMT
Collector 8.5.104.04+, LFMT Indexer 8.5.104.02+, LFMT Client 8.5.104.02+)
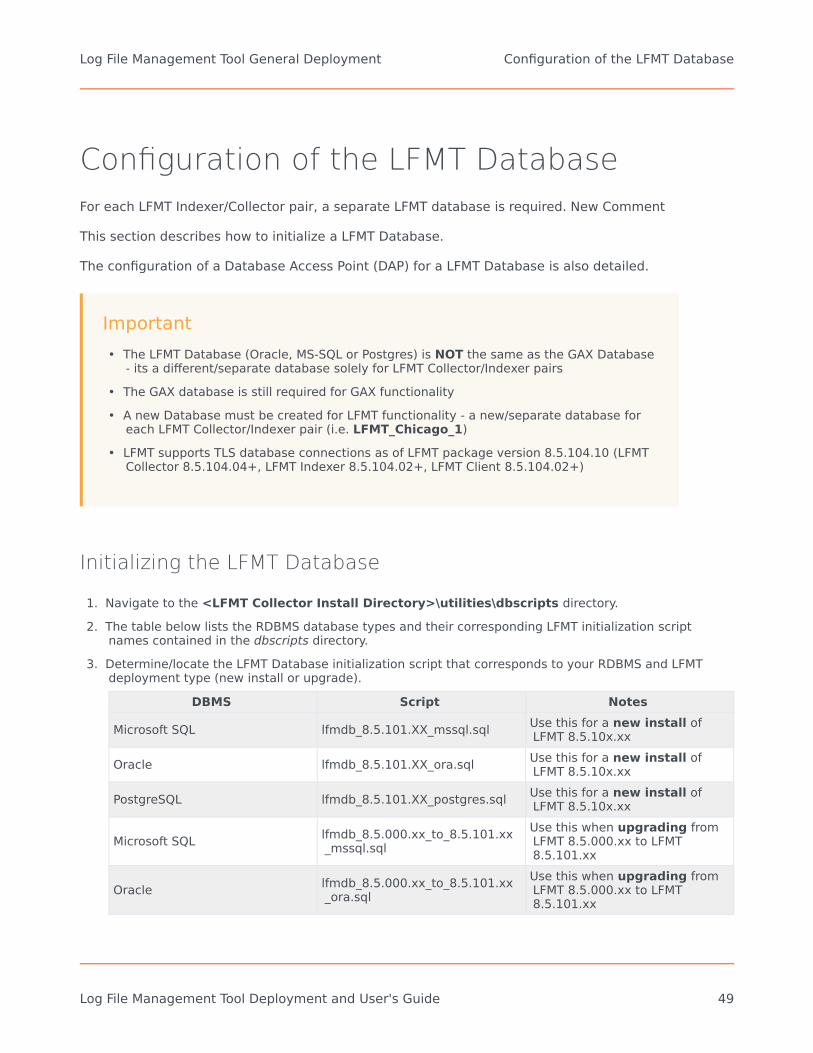
Initializing the LFMT Database
1. Navigate to the <LFMT Collector Install Directory>\utilities\dbscripts directory.2. The table below lists the RDBMS database types and their corresponding LFMT initialization script
names contained in the dbscripts directory.3. Determine/locate the LFMT Database initialization script that corresponds to your RDBMS and LFMT
deployment type (new install or upgrade).DBMS Script Notes
Microsoft SQL lfmdb_8.5.101.XX_mssql.sql Use this for a new install ofLFMT 8.5.10x.xx
Oracle lfmdb_8.5.101.XX_ora.sql Use this for a new install ofLFMT 8.5.10x.xx
PostgreSQL lfmdb_8.5.101.XX_postgres.sql Use this for a new install ofLFMT 8.5.10x.xx
Microsoft SQL lfmdb_8.5.000.xx_to_8.5.101.xx_mssql.sql
Use this when upgrading fromLFMT 8.5.000.xx to LFMT8.5.101.xx
Oracle lfmdb_8.5.000.xx_to_8.5.101.xx_ora.sql
Use this when upgrading fromLFMT 8.5.000.xx to LFMT8.5.101.xx
Log File Management Tool General Deployment Configuration of the LFMT Database
Log File Management Tool Deployment and User's Guide 49
DBMS Script Notes
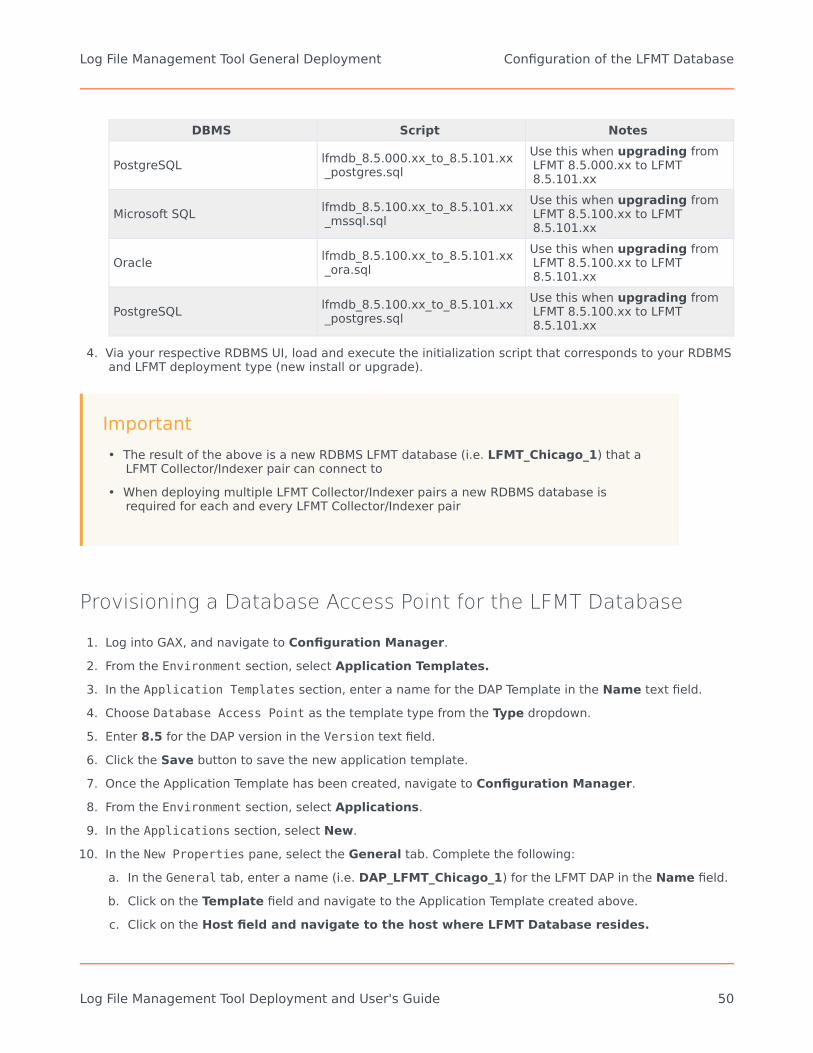
PostgreSQL lfmdb_8.5.000.xx_to_8.5.101.xx_postgres.sql
Use this when upgrading fromLFMT 8.5.000.xx to LFMT8.5.101.xx
Microsoft SQL lfmdb_8.5.100.xx_to_8.5.101.xx_mssql.sql
Use this when upgrading fromLFMT 8.5.100.xx to LFMT8.5.101.xx
Oracle lfmdb_8.5.100.xx_to_8.5.101.xx_ora.sql
Use this when upgrading fromLFMT 8.5.100.xx to LFMT8.5.101.xx
PostgreSQL lfmdb_8.5.100.xx_to_8.5.101.xx_postgres.sql
Use this when upgrading fromLFMT 8.5.100.xx to LFMT8.5.101.xx
4. Via your respective RDBMS UI, load and execute the initialization script that corresponds to your RDBMSand LFMT deployment type (new install or upgrade).
Important• The result of the above is a new RDBMS LFMT database (i.e. LFMT_Chicago_1) that a
LFMT Collector/Indexer pair can connect to• When deploying multiple LFMT Collector/Indexer pairs a new RDBMS database is
required for each and every LFMT Collector/Indexer pair
Provisioning a Database Access Point for the LFMT Database
1. Log into GAX, and navigate to Configuration Manager.2. From the Environment section, select Application Templates.3. In the Application Templates section, enter a name for the DAP Template in the Name text field.4. Choose Database Access Point as the template type from the Type dropdown.5. Enter 8.5 for the DAP version in the Version text field.6. Click the Save button to save the new application template.7. Once the Application Template has been created, navigate to Configuration Manager.8. From the Environment section, select Applications.9. In the Applications section, select New.
10. In the New Properties pane, select the General tab. Complete the following:a. In the General tab, enter a name (i.e. DAP_LFMT_Chicago_1) for the LFMT DAP in the Name field.b. Click on the Template field and navigate to the Application Template created above.c. Click on the Host field and navigate to the host where LFMT Database resides.
Log File Management Tool General Deployment Configuration of the LFMT Database
Log File Management Tool Deployment and User's Guide 50
d. Choose JDBC as the connection type from the Connection Type dropdown.e. Choose Any as the case conversion type from the Case Conversion dropdown.f. Choose Main as the role from the Role dropdown.
g. Choose False as the role from the Debug dropdown.h. Enter 15 for the DB timeout in the JDBC Query Timeout text field.i. Choose your DBMS type (i.e. postgres) from the DBMS Type dropdown.j. Enter the LFMT Database Name (i.e. LFMT_Chicago_1) in the Database Name text field.k. Enter the LFMT Database Username in the Username text field.l. Enter the LFMT Database Password in the User Password text field.
11. Select the Ports tab. Complete the following:a. Set the value of the default communication port to the listening port of your DBMS. Default ports
are listed below:• For PostgreSQL the default listening port is 5432.• For Oracle the default listening port is 1521.• For MSSQL the default listening port is 1433.
b. As of LFMT package version 8.5.104.10, TLS can be enabled for the connection to the LFMTdatabase. To enable TLS, set the listening mode for the defined port to "secure".
12. Select the Application Options tab. Review and configure the LFMT DAP options.a. Create the section lfmt.b. Create the option site.c. Set the value of the site option (i.e. Chicago_1) to a unique identifier for the LFMT Database.
ImportantEnsure that the site option for each LFMT DAP in the LFMT solution is different.
TipFor more information on the LFMT DAP configuration options, please refer to theLFMT DAP Configuration Options section.
Examples:
Log File Management Tool General Deployment Configuration of the LFMT Database
Log File Management Tool Deployment and User's Guide 51
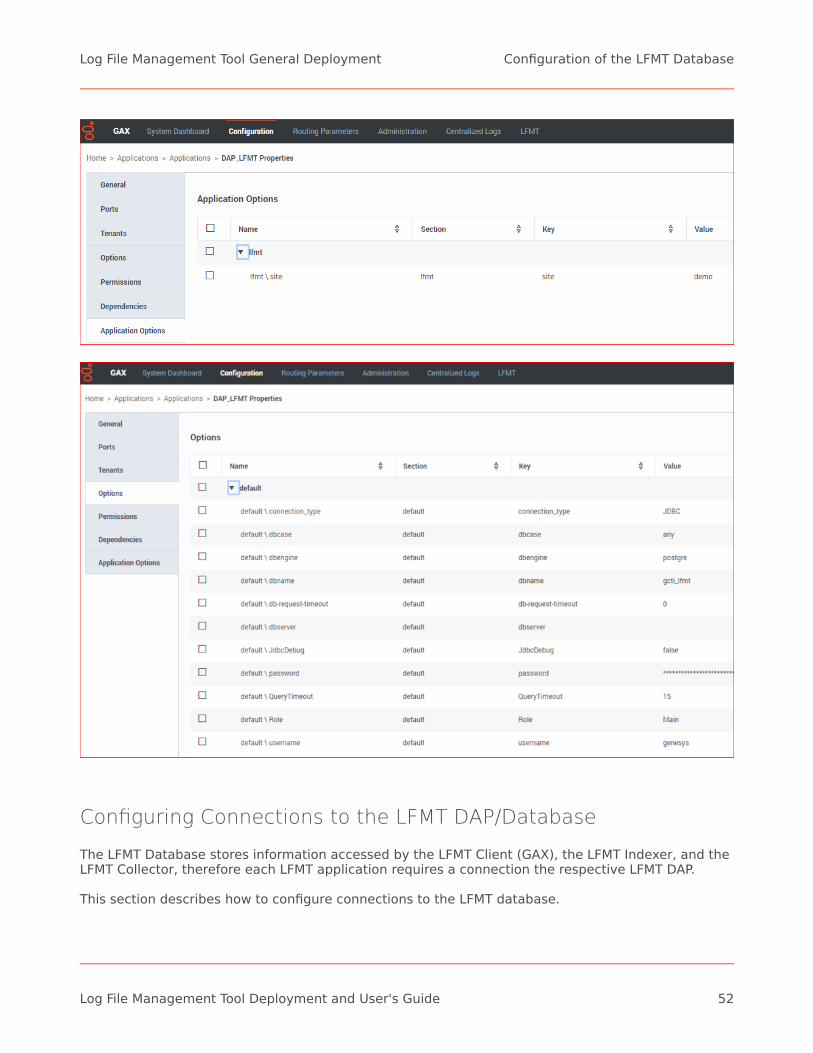
Configuring Connections to the LFMT DAP/Database
The LFMT Database stores information accessed by the LFMT Client (GAX), the LFMT Indexer, and theLFMT Collector, therefore each LFMT application requires a connection the respective LFMT DAP.
This section describes how to configure connections to the LFMT database.
Log File Management Tool General Deployment Configuration of the LFMT Database
Log File Management Tool Deployment and User's Guide 52
Configuring GAX for use with the LFMT Database
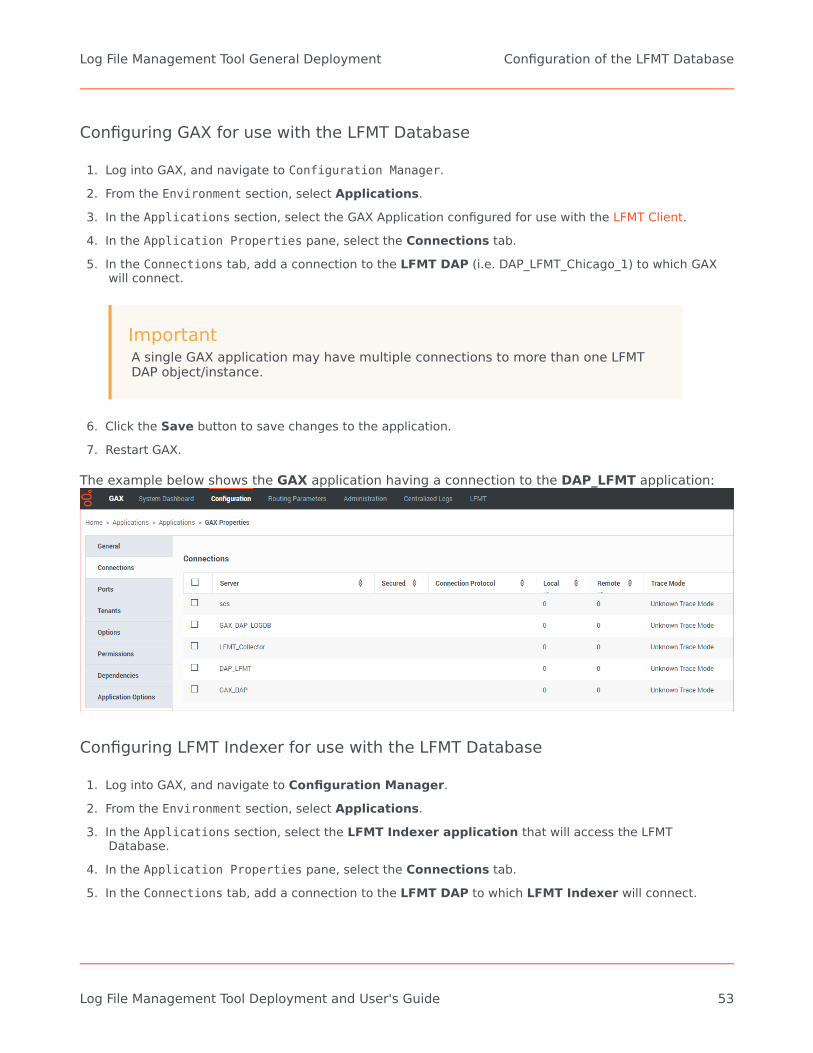
1. Log into GAX, and navigate to Configuration Manager.2. From the Environment section, select Applications.3. In the Applications section, select the GAX Application configured for use with the LFMT Client.4. In the Application Properties pane, select the Connections tab.5. In the Connections tab, add a connection to the LFMT DAP (i.e. DAP_LFMT_Chicago_1) to which GAX
will connect.
ImportantA single GAX application may have multiple connections to more than one LFMTDAP object/instance.
6. Click the Save button to save changes to the application.7. Restart GAX.
The example below shows the GAX application having a connection to the DAP_LFMT application:
Configuring LFMT Indexer for use with the LFMT Database
1. Log into GAX, and navigate to Configuration Manager.2. From the Environment section, select Applications.3. In the Applications section, select the LFMT Indexer application that will access the LFMT
Database.4. In the Application Properties pane, select the Connections tab.5. In the Connections tab, add a connection to the LFMT DAP to which LFMT Indexer will connect.
Log File Management Tool General Deployment Configuration of the LFMT Database
Log File Management Tool Deployment and User's Guide 53
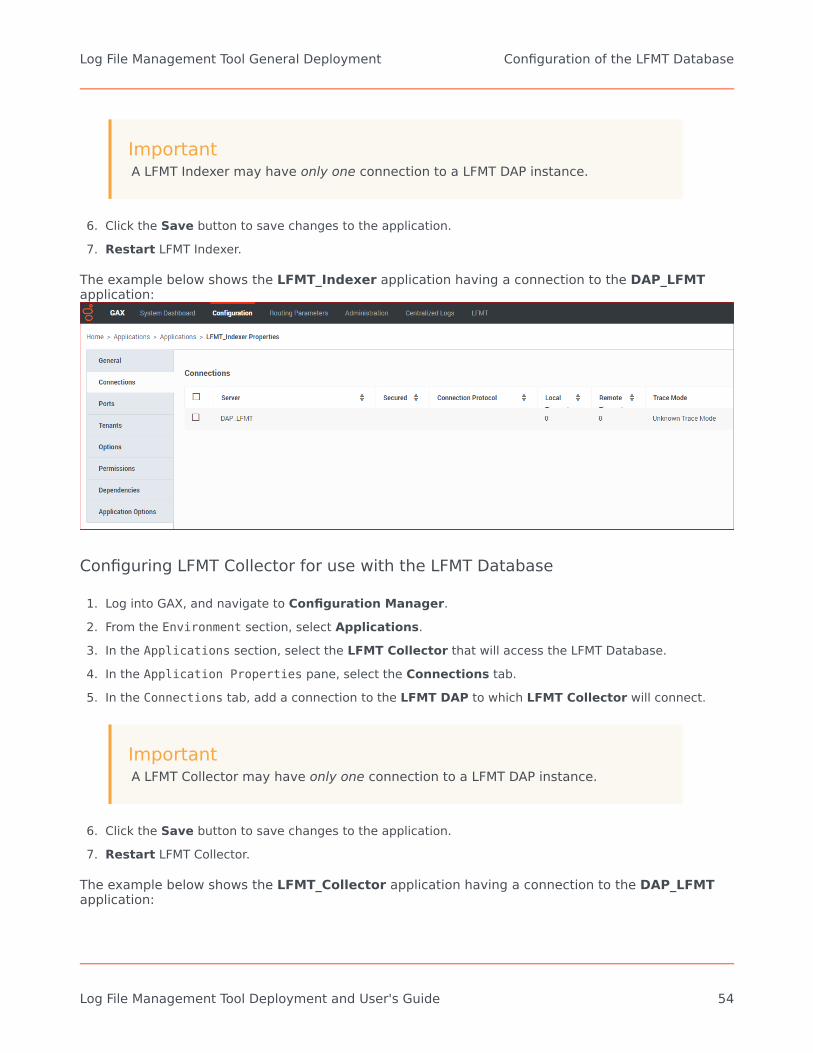
ImportantA LFMT Indexer may have only one connection to a LFMT DAP instance.
6. Click the Save button to save changes to the application.7. Restart LFMT Indexer.
The example below shows the LFMT_Indexer application having a connection to the DAP_LFMTapplication:
Configuring LFMT Collector for use with the LFMT Database
1. Log into GAX, and navigate to Configuration Manager.2. From the Environment section, select Applications.3. In the Applications section, select the LFMT Collector that will access the LFMT Database.4. In the Application Properties pane, select the Connections tab.5. In the Connections tab, add a connection to the LFMT DAP to which LFMT Collector will connect.
ImportantA LFMT Collector may have only one connection to a LFMT DAP instance.
6. Click the Save button to save changes to the application.7. Restart LFMT Collector.
The example below shows the LFMT_Collector application having a connection to the DAP_LFMTapplication:
Log File Management Tool General Deployment Configuration of the LFMT Database
Log File Management Tool Deployment and User's Guide 54

Log File Management Tool General Deployment Configuration of the LFMT Database
Log File Management Tool Deployment and User's Guide 55

Initializing the DBMSThis section describes the how to create and initialize the LFMT database:
• On Linux• On Windows
On Linux
Setting up the LFMT databasePurpose: To create and initialize the data model (the database structure) for the LFMT Database.
Prerequisites
• The RDBMS (i.e. Oracle, MS-SQL or Postgres) is installed, and the service is running.
PostgreSQL
1. If the postgres user is not already created, create it now by entering the following commands at theprompt, and press Enter after each command:adduser postgressu -postgres
2. Navigate to the postgresql folder.3. Create the database called lfm by entering the following command at the prompt:
./bin/createdb lfm
and press Enter.
Warning• The database name of lfm is chosen as an example in this procedure for simplicity,
and is used throughout these instructions.• You do not have to use lfm, but if you choose to use a different name, be careful to
use the correct name in subsequent steps.• This database name is case sensitive
4. Locate the PostgreSQL intitialization script lfmdb_XXXXX_postgres.sql from <LFMT Collector Install
Log File Management Tool General Deployment Configuration of the LFMT Database
Log File Management Tool Deployment and User's Guide 56
Directory>\utilities\dbscripts directory.5. Enter the command ./bin/psql -d lfm, and press Enter. This creates the tables required in the LFMT
Database.6. Initialize the LFMT database, as follows:
a. For PostgreSQL, enter the command \i <LFMT Collector Install Directory>/utilities/dbscripts/lfmdb_XXXXX_postgres.sql.
b. Confirm that the script has executed without errors or warnings.
Oracle
1. Refer to the Oracle documentation to install the Oracle Database Management System on the hostmachine that corresponds to the Host that you want to create the Database that will be used by LFMT.
2. Use the following SQL commands to create the users and ensure that they do not have excessivepermissions:1. create user <username> identified by <password>;2. grant connect, resource to <username>;
3. Initialize the database by executing the following script: lfmdb_XXXXX_ora.sql , available in thefollowing folder: <LFMT Server Install Directory>/utilities/dbscripts/
4. invoke SQLPLUS, and type @<LFMT Collector Install Directory>/utilities/dbscripts/lfmdb_XXXXX_ora.sql.
Microsoft SQL
1. Refer to the MSSQL documentation to install the MSSQL Database Management System on the hostmachine that corresponds to the Host that you want to create the Database that will be used by LFMT.
2. Initialize the database by executing the following script:
lfmdb_XXXXX_mssql.sql , available in the following folder:
<LFMT Collector Install Directory>/utilities/dbscripts/
On Windows
Setting up the LFMT databasePurpose: To create the data model (the database structure) for the LFMT Database and initialize itwith base operational data. Base operational data includes the known log file types that will beretrieved by LFMT, and the associated tokens to be targeted for indexing or scrubbing for each logtype.
Prerequisites
• The DBMS is installed, and the service is running.
Log File Management Tool General Deployment Configuration of the LFMT Database
Log File Management Tool Deployment and User's Guide 57
PostgreSQL
1. Create a new database called lfm, as follows:a. From the Windows Start menu, navigate to All Programs > PostgreSQL and select pgAdmin
III.b. In the Object browser, navigate to Server Groups > Servers and double-click PostgreSQL
v.<version number> <local host>:<default port>, providing your particular version, host,and port information.
c. Enter the password for the user postgres.d. Right-click Databases and select New Database.e. Enter the name lfm and leave the other fields blank.f. Click OK. A new database called lfm is created.
7. In a separate text editor, open the lfmdb_XXXXX_postgres.sql file found in the <LFMT CollectorInstall Directory>\utilities\dbsripts directory.
8. Right-click lfm and select Create Script.9. Initialize the LFMT database as follows:
a. For PostgreSQL:i. Copy the contents of the lfmdb_XXXXX_postgres.sql file and paste it into the SQL script
editor.ii. Select Query > Execute.iii. Confirm that the script has executed without errors or warnings, and that the database has
been successfully initialized with the correct data model.iv. When prompted to save the script, click No.
Important• The database name is case-sensitive.• In the line, change only the IP address, port, and database name information.• To connect to a remote database, you must modify the pg_hba.conf file, located in the
data directory of your PostgreSQL installation. Open the file in a text editor, and add thefollowing line at the end of the file: host all all 0.0.0.0/0 trust.
• You must also ensure that the value of listen_addresses contained in thepostgresql.conf file contains the IP Address of any host connecting to the LFMTdatabase.
• Ensure that the firewall allows this connection.• More information can be gathered from http://www.postgresql.org/docs/8.2/
static/auth-pg-hba-conf.html.
Log File Management Tool General Deployment Configuration of the LFMT Database
Log File Management Tool Deployment and User's Guide 58
Oracle
1. Refer to the Oracle documentation to install the Oracle Database Management System on the hostmachine that corresponds to the Host that you want to create the Database that will be used by LFMT.
2. Use the following SQL commands to create the users and ensure that they do not have excessivepermissions:1. create user <username> identified by <password>;2. grant connect, resource to <username>;
3. Initialize the database by executing the following script: lfmdb_XXXXX_ora.sql , available in thefollowing folder: <LFMT Collector Install Directory>\utilities\dbscripts\
4. invoke SQLPLUS, and type @<LFMT Server Install Directory>\utilities\dbscripts\lfmdb_XXXXX_ora.sql.
Microsoft SQL
1. Refer to the MSSQL documentation to install the MSSQL Database Management System on the hostmachine that corresponds to the Host that you want to create the Database that will be used by LFMT.
2. Initialize the database by executing the following script:
lfmdb_XXXXX_mssql.sql , available in the following folder:
<LFMT Collector Install Directory>/utilities/dbscripts/
Log File Management Tool General Deployment Configuration of the LFMT Database
Log File Management Tool Deployment and User's Guide 59
Deployment of Workbench Agent for LFMT8.5.1
Tip• Before working with Workbench Agent 8.5, please refer to the Software Requirements
section.
Important• Workbench Agent 8.5 must be installed on all the hosts running Genesys Platform
applications from which you want to collect log files.• Workbench Agent 8.5 is ONLY for LFMT• Workbench Agent 9.x is ONLY for Workbench 9.x Hosts• If/when Workbench and LFMT is deployed, both Workbench Agents 8.5 and 9.x would be
needed on each remote host• The Workbench Agent 8.5 would be required for LFMT to collect log files from the
remote hosts (i.e. sip, urs, gvp etc)• The Workbench Agent 9.x would be required for Workbench ingestion of data from
the remote hosts (i.e. sip, urs, gvp etc)
• When a new Workbench Agent 8.5 is deployed or when any configuration changes aremade to a Workbench Agent 8.5 application, the LFMT Collector must be restarted, forthe changes to be accepted/propogated by LFMT.
The following directories in the Workbench installation package contain the Workbench Agenttemplates:
• For Linux:• /LFMT_8.5.10x/WBAgent/8.5.10x.xx/templates
• For Windows:• \LFMT_8.5.10x\WBAgent\8.5.10x.xx\templates
Log File Management Tool General Deployment Deployment of Workbench Agent for LFMT 8.5.1
Log File Management Tool Deployment and User's Guide 60
Important• The Workbench Agent 8.5 can be deployed manually or by using the Agent Mass
Deployer.• The Mass Deployer is included within the utilities directory found inside the LFMT
Collector working directory.• If you use the Mass Deployer, you do not need to provision the Workbench Agent
application in GAX, as this will be done automatically during the deployment process.Please see the https://docs.genesys.com/Documentation/ST/latest/DeploymentGuide/DepMassDeployWorkbenchAgent section for further details.
Provisioning the Workbench Agent
1. Log into GAX, and navigate to Configuration Manager.2. In the Environment section, select Application Templates.3. In the Application Templates section, select New.4. In the New Properties pane, select Import Application Template.5. In the Import Application Template dialog, click the Choose File button and navigate to the
CC_Agent.apd template.Select the Template and keep the Template name as CC_Agent.*For pre 8.5.103, if the Template name is not CC_Agent, please change the name to CC_Agent; this isimportant for the LFMT Collector application to identify the Workbench Agents 8.5 within theenvironment.Click the OK button to confirm the Template import.
Important*For pre 8.5.103, the Workbench Agent 8.5 Template must be named "CC_Agent"-- Workbench Agent 8.5.103+ does not rely on the Template name
6. In the New Properties pane, click Save to save the new Application Template.7. Once the Application Template has been imported, navigate to Configuration Manager.8. In the Environment section, select Applications.9. In the Applications section, select New.
10. In the New Properties pane, complete the following (some of these are temporary values and will beupdated once the actual Workbench Agent software has been installed on the desired host)::a. In the General tab, enter a name (i.e. "LFMT_WBA_CHICAGO_SIP_A") for the Workbench Agent
Log File Management Tool General Deployment Deployment of Workbench Agent for LFMT 8.5.1
Log File Management Tool Deployment and User's Guide 61
application in the Name field.b. Click on the Template field and navigate to the application template created above.c. In the Working Directory field, enter "."d. In the Command Line field, enter "."e. Click on the Host field and navigate to the host where Workbench Agent will be installed.f. In the Application Options tab, review and configure the Workbench Agent options.
Tip• For more information on the Workbench Agent configuration options, please
refer to the Workbench Agent Configuration Options section
g. In the Ports tab, add the following listening ports: default = <an open port on the WorkbenchAgent host> (select whether this should be a Secured port or an Unsecured port)
h. In the Permissions tab, grant the SYSTEM account (or the defined “Login As” account) FullControl
i. Select the Save button to save the new application
Important• If the “default” port identified above is selected to be Secured, the LFMT Collector(s) will
communicate with this Agent using TLS, otherwise, the communication will be Non-TLS.
Installing the Workbench Agent
The following directories in the Workbench Agent component contain the installation packages:
• For Linux:• /LFMT_8.5.10x/WBAgent/8.5.10x.xx/linux
• For Windows:• \LFMT_8.5.10x\WBAgent\8.5.10x.xx\windows
Installing the Workbench Agent on Linux
1. In the directory to which the LFMT Agent installation package was copied, execute the install.sh script.2. On the Welcome screen, press Enter to continue.
Log File Management Tool General Deployment Deployment of Workbench Agent for LFMT 8.5.1
Log File Management Tool Deployment and User's Guide 62

3. Read the Genesys Terms and Conditions, and enter Y to accept.4. Enter the Workbench Server application name (i.e. "Workbench_Server") defined in GAX (Configuration
Server) and click Next.
Important• Workbench Server is optional; please enter "Workbench_Server" to progress if
Workbench is not deployed.
5. Enter the Hostname and Port of the Primary Configuration Server.6. Enter the destination folder where the Workbench Agent application will be installed, and click Next.7. After the installation completes, go to the Workbench Agent installation directory and start the
Workbench Agent by running the command wbagent_startup.sh -host <cfghost> -port <cfgport> -app<wbAgentapp> where:a. <cfghost> is the IP address of the Configuration Serverb. <cfgport> is the port used to connect to the Configuration Serverc. <wbAgentapp> is the name of the Workbench Agent application you created
Installing the Workbench Agent on Windows
1. In the directory to which the Workbench Agent installation package was copied, double-click setup.exeto start the installation.
2. On the Welcome screen, press Enter to continue.3. Read the Genesys Terms and Conditions, and enter Y to accept.4. Enter the Workbench Server application name (i.e. "Workbench_Server") defined in GAX (Configuration
Server) and click Next.
Important• Workbench Server is optional; please enter "Workbench_Server" to progress if
Workbench is not deployed.
5. Enter the Hostname and Port of the Primary Configuration Server.6. Enter the destination folder where the Workbench Agent application will be installed, and click Next.7. After the installation completes, go to the Workbench Agent installation directory and start the
Workbench Agent by running the command startServer.bat
Log File Management Tool General Deployment Deployment of Workbench Agent for LFMT 8.5.1
Log File Management Tool Deployment and User's Guide 63
Important• You can also use GAX to start and stop the Workbench Agent.
Configuring LFMT Collector for use with the Workbench Agent
1. LFMT Collector(s) automatically identify any Workbench Agents configured in your environment, butport information requires to be updated based on the type of communication between the LFMTCollector and the associated Workbench Agent
2. Log into GAX, and navigate to Configuration Manager3. From the Environment section, select Applications4. In the Applications section, select the LFMT Collector application5. In the Ports tab, add if not already present
ftmessaging = <an open port on the LFMT Collector host> (this port will be used byagents that will transfer the file in plain text)sftmessaging = <an open port on the LFMT Collector host> (this port will be used by
agents that will encrypt the file before transfer)
6. Click the Save button to save changes to the application
Important• Ensure that the ftmessaging port is identified as an “Unsecured” port in its
properties• Ensure that the sftmessaging port is identified as a “Secured” port in its properties
7. Repeat the above steps for all LFMT Collector applications in your environment.
Verifying the Workbench Agent installation
After completing the installation of the Workbench Agent, its configuration should be verifiedthrough the GAX interface.
1. Log into GAX, and navigate to Configuration Manager2. From the Environment section, select Applications3. In the Applications section, locate and open the Workbench Agent application
Log File Management Tool General Deployment Deployment of Workbench Agent for LFMT 8.5.1
Log File Management Tool Deployment and User's Guide 64
4. In the General tab, verify that the following parameters have been updated by the installationprocess.Working Directory : The Workbench Agent installation pathCommand Line : agent_startup.bat or ./agent_startup.shCommand Line Arguments : -app <Workbench Agent Application Name> -host<Configuration Server Host> -port <Configuration Server Port> -backuphost <BackupConfiguration Server Host> - backupport <Backup Configuration Server Port>
Important• The backuphost and backupport options are optional; these options are read
from the Command Line Arguments field of the Workbench Agent object only.
Log File Management Tool General Deployment Deployment of Workbench Agent for LFMT 8.5.1
Log File Management Tool Deployment and User's Guide 65
Installing Workbench Agent (MassDeployment) for LFMT 8.5.1The Mass Deployer allows the installation of the Workbench Agent to multiple hosts. It includes thefollowing elements:
Mass Deployer Central Host The server where the mass deployer will be executed. It connects tothe Remote hosts via different protocols depending on the Remote Host operating system. It requiresa configuration file that provides credentials and connection details about the remote hosts.
Remote Hosts The hosts where the Workbench agent will be deployed. The agent will be extractedin the working directory specified in the Mass Deployer configuration file.
Configuration Server The properties of Remote hosts are retrieved from this server, including theirIP address in order to connect to them. Every Workbench Agent deployed in Remote Hosts isprovisioned in this Configuration Server.
Log File Management Tool GeneralDeployment
Installing Workbench Agent (Mass Deployment) for LFMT8.5.1
Log File Management Tool Deployment and User's Guide 66

Prerequisites
Software Requirements The Central and Remote hosts should have one of the following operatingsystems:
Windows
• Windows Server 2008 R2• Windows Server 2012
Linux
• Red Hat Enterprise Linux (RHEL) 7 or later
Log File Management Tool GeneralDeployment
Installing Workbench Agent (Mass Deployment) for LFMT8.5.1
Log File Management Tool Deployment and User's Guide 67
Important• If the central host is a Linux host it will only be able to mass deploy the agent to Linux
Remote hosts.• If the central host is a Windows host, it can mass deploy to other Windows and Linux
Remote hosts.• If a Workbench Agent is already deployed to a remote host, the agent must be
uninstalled prior to running the Mass Deployer. This is a limitation that will be addressedin a future release.
Before using the Mass Deployer, the following software must be installed in the central and remotehosts:
• Java™ Platform Standard Edition Runtime Environment 8, 64-bit (JRE™ 8)• If using a Windows Server, make sure that Powershell is enabled. The Mass Deployer requires
Powershell v2.0 or a later version.
Communication Requirements
Linux Mass Deployer Central Host:
• The central host should be able to reach the Linux remote hosts using SSH.
Linux Remote hosts:
• The remote hosts where the agent will be deployed should be able to receive SSH connections from theMass Deployer Host. An SSH Server (e.g. OpenSSH) should be enabled. Commands and files will be sentusing SSH and SFTP respectively.
Windows Mass Deployer Central Host:
• Powershell should be enabled. The Mass Deployer requires v2.0 or a later version.• The remote hosts should be included in the Trusted Hosts List of the central host in order to correctly
connect to them using Powershell Remoting (Windows Remote Management – WinRM).• The Mass Deployer will try to temporarily modify the trusted host list in order to connect to the
remote hosts. To do this, the Mass Deployer should be executed from a command prompt withadministrative privileges. Otherwise, the Mass Deployer will continue to execute, but the trustedhost list should be modified by the user before starting the Mass Deployer.
• You can use the following command replacing the “*” with the list of remote host IP addresses. The“*” would indicate that all hosts are trusted.
Set-Item WSMan:\localhost\Client\TrustedHosts -Value "*" –Force
Windows Remote Hosts:
• Powershell should be enabled, v2.0 or later is required.
Log File Management Tool GeneralDeployment
Installing Workbench Agent (Mass Deployment) for LFMT8.5.1
Log File Management Tool Deployment and User's Guide 68

• The remote hosts should be able to receive remote Powershell commands. The WinRM service should beenabled to allow this remote access. A way of enabling it is running the following command fromPowershell with administrative privileges:• Enable-PSRemoting –Force• This will start or restart the WinRM service and create the listener to accept requests from any IP
address.
• The Mass Deployer will copy the Installation Package and extract it in a folder called “tmp_install” insidethe provided working directory. If it doesn’t exist, the Mass Deployer will try to create it.
Execute the following command in Powershell on the central host to ensure that WinRM remoting isproperly configured in a remote host and is accepting requests:
Test-WSMan -ComputerName <Remote Host IP address>
It should print an output similar to:
• wsmid: http://schemas.dmtf.org/wbem/wsman/identity/1/wsmanidentity.xsd• ProtocolVersion: http://schemas.dmtf.org/wbem/wsman/1/wsman.xsd• ProductVendor: Microsoft Corporation• ProductVersion: OS: 0.0.0 SP: 0.0 Stack: 3.0
The “Stack” version will change depending on the remote host WinRM service.
Installing the Mass Deployer
The Mass Deployment software is available in the Utilities folder of the Collector installationdirectory, post installation of the Collector.
For Example: C:\Program Files\GCTI\collector\LFMT_Collector_8.5.100.05_Alt\utilities\agent_mass_deployer
The working directory of the Mass Deployer in the central host should have the following structure:
/<Mass Deployer working directory>Mass Deployer-x.x.xxx.xx.jar
/deployments Stores the silent install configuration files for each remote host wherethe agent is deployed
/silent installgenesys silent.ini A template for the silent install configuration file.config.json The Mass Deployer configuration file. See “Configuring the Mass
Deployer” for details about this file.WB Agentg x.x.xxxx.xx.zip The agent ZIP distribution
/lib Directory with the Mass Deployer runtime dependencies
Configuring the Mass Deployer
The configuration of the Mass Deployer is stored in a JSON file used by the tool at runtime.
Log File Management Tool GeneralDeployment
Installing Workbench Agent (Mass Deployment) for LFMT8.5.1
Log File Management Tool Deployment and User's Guide 69
The configuration file has the following sections:
{ “config_server” : CfgServer,
“app_template_name” : <string>,
“app_name_prefix” : <string>,
“app_parent_folder” : <string>,
“deployments”:Deployments,
“agent” : <string>,
“linux_ip_path” : <string>,
“windows_ip_path” : <string>,
“wb_server_app” : <string>,
“global_listening_ports” : GlobalListeningPorts,
“global_options” : GlobalOptions,
“windows_global_options” : WindowsGlobalOptions,
“linux_global_options” : LinuxGlobalOptions }
CfgServer section:
Includes the connection parameters required to interact with the Configuration Server.
Required: Yes
{ "ip_addr": <string>
"port" : <number>,
"username" : <string>,
"password" : <string>,
"app_client_name" : <string> }
• ip_addr - The IP address of the Configuration Server• port - The port where the Configuration Server is listening• username -The username used to connect to Configuration Server• password -The password of the associated username• app_client_name - The Application object used to connect to Configuration Server
Log File Management Tool GeneralDeployment
Installing Workbench Agent (Mass Deployment) for LFMT8.5.1
Log File Management Tool Deployment and User's Guide 70
app_template_name The name of the Workbench Agent Application Template. This template will beused to provision all agents. Required: If provisioning to Configuration Server.
app_name_prefix The prefix that will be used to name the new Workbench Agent Applications thatwill be provisioned. The name of the Application will be <app_name_prefix><Remote Host name>Required: If provisioning to Configuration Server.
app_parent_folder The folder where the application object will be stored in Configuration Server. Ifthis folder doesn’t exist, the Mass Deployer will try to create it. If not provided the application will becreated in the root of the Applications section. Required: No
Deployments section:
Includes the properties of the hosts where the Agent will be deployed. It is a list with one object perdeployment.
Required: Yes
[ { "cfg_server_host_name": <string>
"username" : <string>,
"password" : <string>,
" working_dir" : <string>
}, . . . ]
• cfg_server_host_name - The name of the remote host as it appears in Configuration Server• username - The username used to connect to the remote host using SSH or a Powershell Remote
session.
• password - The password of the username• working_dir - The directory where the agent will be extracted and from where it will be executed
Important• Please ensure that each CME Host in Configuration Server has an Operating System in
the “OS Version” property; this is used by the Mass Deployer to decide how to connectto the remote host.
agent
Path to the Workbench Agent distribution. If deploying from Windows, the path should have doublebackslashes (\\). For example: /home/genesys/WBAgent_8.5.000.31.zip.
Log File Management Tool GeneralDeployment
Installing Workbench Agent (Mass Deployment) for LFMT8.5.1
Log File Management Tool Deployment and User's Guide 71
Required: If deploying to remote hosts.
linux_ip_path
Relative path to the Linux installation package directory inside the agent package. For example: /IPs/WBAgent_UNIX_8.5.000.31/linux/b1/ip.
Required: If deploying to remote hosts.
windows_ip_path
Relative path to the Windows installation package directory inside the agent package. It requiresdouble blackslashes. For example: \\IPs\\WBAgent_Windows_8.5.000.31\\windows\\b1\\ip.
Required: If deploying to remote hosts.
wb_server_app
Name of the Workbench Server application that will interact with the Agent being deployed/provisioned, as it appears in Configuration Server. This is used during the installation of theWorkbench Agent.
Required: If deploying to remote hosts.
GlobalListeningPorts section:
The list of listening ports that will be used when provisioning the Workbench Agents in ConfigurationServer. Each port is a JSON Object with an ID and a value.
Required: If provisioning to Configuration Server.
[ { "ID": <string>
"value" : <number>
} ]
• ID - A unique identification for each port• value - The listening port number
GlobalOptions section:
A JSON object with the options that will be assigned to the Workbench Agents being provisioned.Options are grouped by sections and all values should be strings.
Required: If provisioning to Configuration Server.
{ <section_name_1> :
{ <option_name_1>: <option_value_1>,
Log File Management Tool GeneralDeployment
Installing Workbench Agent (Mass Deployment) for LFMT8.5.1
Log File Management Tool Deployment and User's Guide 72
<option_name_2>: <option_value_2>,
… <option_name_n>: <option_value_n>
}, <section_name_2> :
{ <option_name_1>: <option_value_1>,
… <option_name_n>: <option_value_n>
}, …, <section_name_n> :
{ <option_name_1>: <option_value_1>,
… <option_name_n>: <option_value_n>
} }
For example, these options:
• Option: log/all – Value: C:\logs\workbench_logs• Option: log/expire – Value: 20• Option: general/customer_name – Value: default
Would be configured as follows:
{ “log” :
{ “all”: “C:\\logs\\workbench_logs”,
“expire”: “20” }, “general” : { “customer_name”: “default” } }
WindowsGlobalOptions section:
A JSON object with the options that will be assigned to the Workbench Agents if being provisioned toa Windows host. The structure of this JSON object is the same as the one described in theGlobalOptions section. If the same property is set in both the GlobalOptions and theWindowsGlobalOptions section, the latter will be used.
Required: No.
LinuxGlobalOptions section:
A JSON object with the options that will be assigned to the Workbench Agents if being provisioned toa Linux host. The structure of this JSON object is the same as the one described in the GlobalOptionssection. If the same property is set in both the GlobalOptions and the LinuxGlobalOptions section, thelatter will be used.
Required: No.
Log File Management Tool GeneralDeployment
Installing Workbench Agent (Mass Deployment) for LFMT8.5.1
Log File Management Tool Deployment and User's Guide 73
Executing the Mass Deployer
Run the Mass Deployer by executing the following command from the directory where the executablewas placed:
java -jar <MassDeployer-x.x.xxx.xx.jar> , followed by these arguments:
Short argument: -c
Long argument: --cfgFile
Mandatory: Yes
Valid Values: A path to a valid configuration JSON file
Description: Path to the Mass Deployment Configuration file
Short argument: -m
Long argument: --mode
Mandatory: Yes
Valid Values: provision, deploy, provision_deploy
Description: Mass Deployment mode.
*provision: Connects to configuration server and provisions the Agent apps inthe configuration file.
*deploy: Copies the agent to the remote hosts and installs it.
*provision_deploy: Provisions the agent apps in Configuration server and theninstalls the agents on the remote hosts.
Short argument: -e
Long argument: --failOnError
Mandatory: No
Log File Management Tool GeneralDeployment
Installing Workbench Agent (Mass Deployment) for LFMT8.5.1
Log File Management Tool Deployment and User's Guide 74
Description: Cancels the execution if one of the deployments fail. If notincluded, the mass deployer will continue deploying to other hosts even ifone of the previous deployments failed.
Short argument: -o
Long argument: --overwriteApps
Mandatory: No
Description: Overwrites the Config Server Apps if they are alreadyprovisioned. If not included, the mass deployer will fail if an applicationpreviously existed.
Examples:java –jar MassDeployer-x.x.xxx.xx.jar –c /home/genesys/MD/config.json –m provision_deployjava –jar MassDeployer-x.x.xxx.xx.jar –c C:\Users\genesys\MD\config.json –m provision –e –ojava –jar MassDeployer-x.x.xxx.xx.jar –-cfgFile /home/genesys/MD/config.json –m provision_deploy --failOnError
Important• The Mass Deployer executes the installer of the Workbench Agent in silent mode.• This version of the Mass Deployer will not monitor the outcome of the silent installation;
this is accomplished by checking the genesys_install_result.log file that is generatedin the working directory of the Agent Application.
Important• As a known issue, the Mass Deployer might not work properly if there are disconnected
Network drives in the central host.• Try removing these network drives before running the Mass Deployer.• If you see an error message similar to: “Attempting to perform the
InitializeDefaultDrives operation on the 'FileSystem' provider failed” when opening anew Powershell terminal, then the Mass Deployer will not function appropriately.
Log File Management Tool GeneralDeployment
Installing Workbench Agent (Mass Deployment) for LFMT8.5.1
Log File Management Tool Deployment and User's Guide 75

• It has also been observed in some occasions that Powershell processes will remainactive after the Mass Deployer has finished executing.• Please check the running applications after finishing deployment and manually
clean-up any open Powershell processes
Log File Management Tool GeneralDeployment
Installing Workbench Agent (Mass Deployment) for LFMT8.5.1
Log File Management Tool Deployment and User's Guide 76
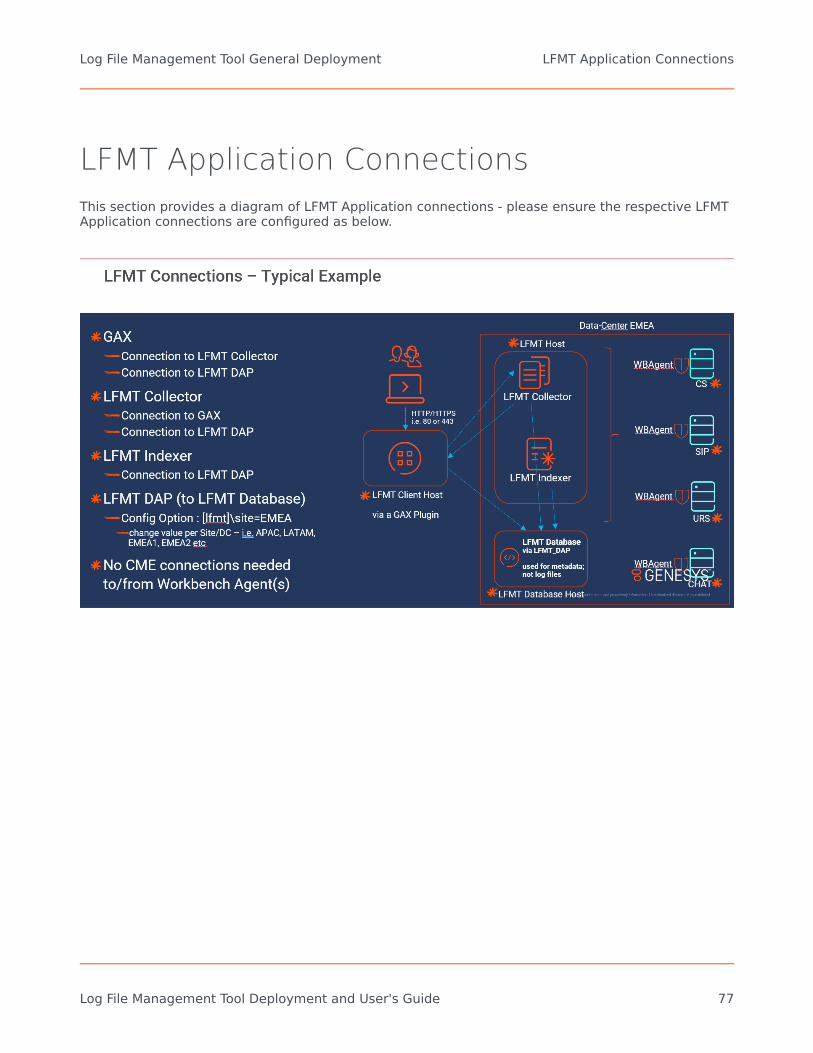
LFMT Application ConnectionsThis section provides a diagram of LFMT Application connections - please ensure the respective LFMTApplication connections are configured as below.
Log File Management Tool General Deployment LFMT Application Connections
Log File Management Tool Deployment and User's Guide 77
Log File Management Tool ConfigurationOptionsThis section describes the configuration options used to configure the Log File Management Tool(LFMT).
Sections within this Configuration Options chapter:
1. LFMT Host Object Configuration Options.2. LFMT GAX Configuration Options.3. LFMT Indexer Configuration Options.4. LFMT Collector Configuration Options.5. LFMT DAP Configuration Options.
Log File Management Tool Configuration Options LFMT Application Connections
Log File Management Tool Deployment and User's Guide 78

LFMT Host Object Configuration OptionsThis section contains options used to configure the hosts to which LFMT Collector will connect. Unlessotherwise stated, all configuration options are set using GAX in the Options tab of the Host object.
lfmt Section
The options in this section correspond to the Host object to which LFMT Collector will connect; thissection must be called lfmt.
nicDefault Value: No default valueValid Values: A valid host nameChanges Take Effect: At the next execution LFMT Collector.Description: Specifies the hostname/IP of the Network Interface Card (NIC). Use this option if you areusing a dedicated network interface for file transfer from this host.
Log File Management Tool Configuration Options LFMT Host Object Configuration Options
Log File Management Tool Deployment and User's Guide 79
LFMT GAX Configuration OptionsThis section contains options used to configure the GAX for use with LFMT. Unless otherwise stated,all configuration options are set using GAX in the Application Options tab of the GAX object.
lfmt Section
This section contains options for general configuration of the application.
This section must be called lfmt.
http_request_timeoutDefault Value: 60000 (60 seconds)Valid Values: a millisecond integer value (i.e. 120000 for 120 seconds)Changes Take Effect: After restart of GAX.Description: Increases the client timeout value when performing a Force Collection; if/when a ForceCollection timeout error is presented, add this option to increase the timeout. Note when a timeoutmessage appears in the Client, the collection still continues to run on the server/Collector. Thetimeout simply indicates that the server-side collection has not finished before the client timeout haselapsed.
collection_timeoutDefault Value: 3600000 (1 hour)Valid Values: a millisecond integer value (i.e. 3600000 for 1 hour)Changes Take Effect: After restart of GAX.Description: This is specifically for the Force Collection API, which will keep the connection open for<x> milliseconds.
use_lfm_extension
Important• Only relevant for LFMT Client 8.5.104.00 thru LFMT Client 8.5.105.03 - option removed in
LFMT Client 8.5.105.07 given ".lfm" is now the default/only extension used
Default Value: falseValid Values: true or falseChanges Take Effect: After restart of GAX.Description: If set to true, the created log file package(s) will use the .lfm extension else the default
Log File Management Tool Configuration Options LFMT GAX Configuration Options
Log File Management Tool Deployment and User's Guide 80
.zip extension is used.
ftp_hostDefault Value: No default valueValid Values: Valid (S)FTP/S IP/hostname addressChanges Take Effect: After restart of GAX.Description: Specifies the IP/hostname of the default (S)FTP/S server.
ftp_portDefault Value: No default valueValid Values: Valid (S)FTP/S port number, must be an integerChanges Take Effect: After restart of GAX.Description: Specifies the default port of the (S)FTP/S server.
ftp_pwdDefault Value: No default valueValid Values: Valid (S)FTP/S passwordChanges Take Effect: After restart of GAX.Description: Specifies the password of the (S)FTP/S server.
ftp_userDefault Value: No default valueValid Values: Valid (S)FTP/S usernameChanges Take Effect: After restart of GAX.Description: Specifies the username of the (S)FTP/S server.
Note
Important• The "ftp_host", "ftp_port", "ftp_user" and "ftp_pwd" options relate to LFMT sending log
packages to an FTP Server - review this section for further detailshttps://docs.genesys.com/Documentation/ST/current/DeploymentGuide/AvailablePackages#Sending_an_LFMT_package_via_FTP(S)/SFTP
Log File Management Tool Configuration Options LFMT GAX Configuration Options
Log File Management Tool Deployment and User's Guide 81

security Section
This section contains all options relating to securing communication between the Client and theCollector as well as securing connections to the LFMT database (as of version 8.5.104.01). Thesection is optional and is required only if the communication between the LFMT Client and the LFMTCollector or connections to the LFMT database has to be secured; this section must be calledsecurity.
enable_tlsDefault value: NoneValid Values: true,falseChanges Take Effect: After restart of GAX.Description: Indicates whether TLS is enabled for messaging and file transfer. Note, the "messaging"and "ftmessaging" ports should also have their listening modes set to secure.
mutual_tlsDefault value: NoneValid Values: true,falseChanges Take Effect: After restart of GAX.Description: Indicates whether mutual TLS is enabled for messaging and file transfer between theClient/GAX and the LFMT Collector.
protocolDefault value: NoneValid Values: TLSv1.2Changes Take Effect: After restart of GAX.Description: Identifies the protocol to be used for the SSL communication between the LFMT Clientand the LFMT Collector.
Log File Management Tool Configuration Options LFMT GAX Configuration Options
Log File Management Tool Deployment and User's Guide 82
enabled_ciphersDefault value: NoneValid Values: Any valid Java cipher suite. i.e "TLS_RSA_WITH_AES_256_CBC_SHA256" (see Javadocumentation for valid list)Changes Take Effect: After restart of GAX.Description: Identifies the cipher suite to be used for TLS communication between the LFMT Clientand LFMT Collector.
Note: Ensure any configured cipher suite is enabled to be used by the Java instance on the host. SeeJava documentation for enabling/disabling cipher suites. The Collector that the Client is connecting towill need to be configured with the same cipher suite.
security.keystore Section
The security.keystore section of the LFMT Client application options is used to identify the keystoreproperties through which LFMT Collector will load the necessary keys for secure communications; thissection must be called security.keystore.
Important• If GAX has https enabled for client connections, ensure that the same Java keystore/
truststore is used for configuring LFMT TLS. If a different keystore/trustore is used forLFMT TLS configuration, then these values will override the keystore/truststore pathsspecified for GAX https config.
pathDefault value: No default valueValid Values: A file path to the keystore located on the host. Note: The security certificates must begenerated using the SHA-2 secure hash algorithm.Changes Take Effect: After restart of GAX.Description: Identifies the path to the local keystore to be used by the LFMT Client to load thenecessary keys.
passwordDefault value: No default valueValid Values: A valid password associated with the keystore defined in the path option of thesecurity.keystore sectionChanges Take Effect: After restart of GAX.Description: The password to be used by the LFMT Client to access the keystore.
Log File Management Tool Configuration Options LFMT GAX Configuration Options
Log File Management Tool Deployment and User's Guide 83
security.truststore Section
The security.truststore section of the LFMT Client application options is used to identify the truststoreproperties through which LFMT Collector will load the necessary certificates for securecommunications; this section must be called security.truststore.
Important• If GAX has https enabled for client connections, ensure that the same Java keystore/
truststore is used for configuring LFMT TLS. If a different keystore/trustore is used forLFMT TLS configuration, then these values will override the keystore/truststore pathsspecified for GAX https config.
pathDefault value: No default valueValid Values: A file path to the truststore located on the host. Note: The security certificates must begenerated using the SHA-2 secure hash algorithm.Changes Take Effect: After restart of GAX.Description: Identifies the path to the truststore to be used by the LFMT Client to load the necessarycertificates.
passwordDefault value: No default valueValid Values: A valid password associated with the truststore identified in the path option of thesecurity.truststore sectionChanges Take Effect: After restart of GAX.Description: The password to be used by the LFMT Client to access the truststore.
Log File Management Tool Configuration Options LFMT GAX Configuration Options
Log File Management Tool Deployment and User's Guide 84
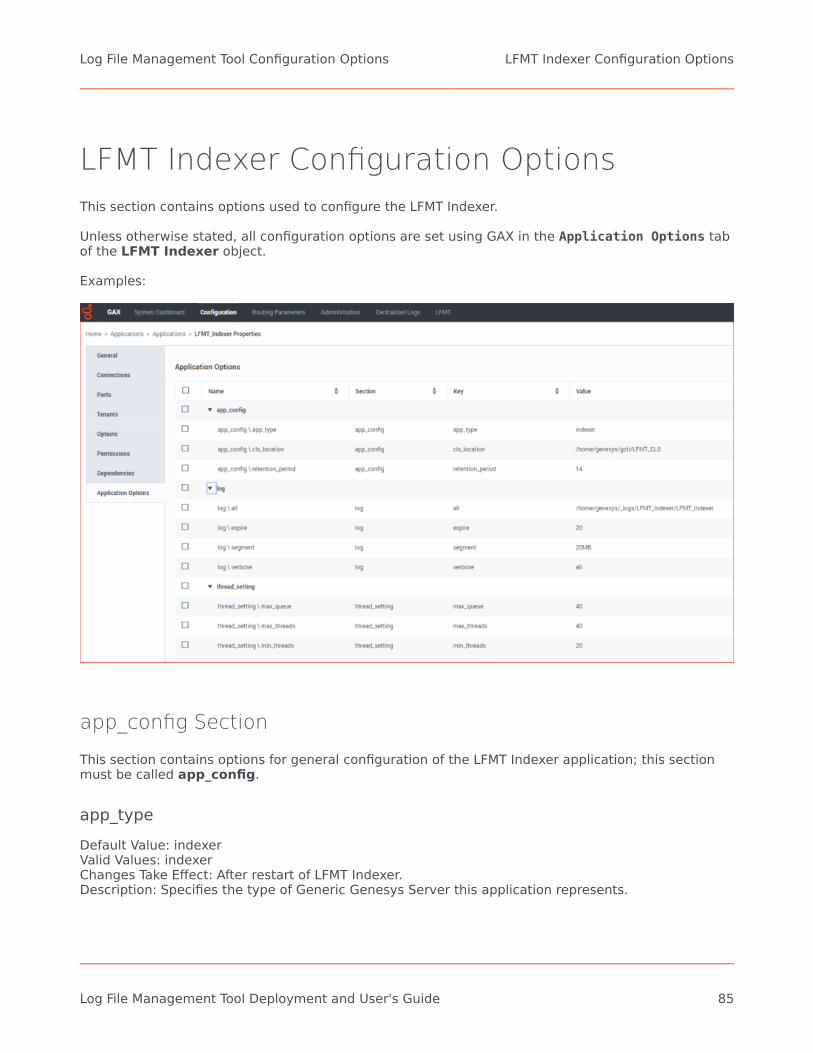
LFMT Indexer Configuration OptionsThis section contains options used to configure the LFMT Indexer.
Unless otherwise stated, all configuration options are set using GAX in the Application Options tabof the LFMT Indexer object.
Examples:
app_config Section
This section contains options for general configuration of the LFMT Indexer application; this sectionmust be called app_config.
app_typeDefault Value: indexerValid Values: indexerChanges Take Effect: After restart of LFMT Indexer.Description: Specifies the type of Generic Genesys Server this application represents.
Log File Management Tool Configuration Options LFMT Indexer Configuration Options
Log File Management Tool Deployment and User's Guide 85
cls_locationDefault Value: No default value - please enter a value hereValid Values: Valid path through the system (i.e. C:\CLS or /home/genesys/gcti/LFMT_CLS)Changes Take Effect: After restart of LFMT Indexer.Description: Specifies the path (local to Collector Host and not a mapped network drive) through thesystem to the folder or directory where the CLS is located; for example, C:/GCTI/CLS.
Important• Please ensure this option is set with a valid path, and the user has write permissions to
the path, before starting the LFMT Indexer(s) application
retention_periodDefault Value: 3Valid Values: Any positive integerChanges Take Effect: After restart of LFMT Indexer.Description: Specifies the number of days that the unmodified files are stored in CLS before they aredeleted permanently; this value should be greater than or equal to the value of the LFMTCollector application collection_period option.
log Section
This section contains all options relating to creating, viewing, and otherwise using the Centralized Logfacility in Genesys software; this section must be called log.
allDefault value: No default valueValid Values: [path/filename] (i.e. /home/genesys/gcti/_logs/LFMT_Indexer/LFMT_Indexer)Changes Take Effect: After restart of LFMT Indexer.Description: Specifies the file location to which the application sends all log events.
expireDefault value: 10Valid Values: [number] Specify a number from 1–1000.Changes Take Effect: After restart of LFMT Indexer.Description: Determines how many log files are kept before they are deleted.
segmentDefault value: 5000
Log File Management Tool Configuration Options LFMT Indexer Configuration Options
Log File Management Tool Deployment and User's Guide 86

Valid Values: [number] - Specify a value in kilobytes.Changes Take Effect: After restart of LFMT Indexer.Description: Determines the rollover size of the log files.
verboseDefault value: allValid Values:
• all - All log events are printed.• trace - All log events are printed.• debug - DEBUG, INFO, WARN, FATAL, and ERROR log events are printed.• info - INFO, WARN, FATAL, and ERROR log events are printed.• warn - WARN, FATAL, and ERROR log events are printed.• error - FATAL and ERROR log events are printed.• fatal - Only FATAL log events are printed.• off - No log events are printed.
Changes Take Effect: After restart of LFMT Indexer.Description: Specifies the log level.
thread_setting Section
This section defines the number of threads required for the indexed to process files in parallel; thissection must be called thread_setting.
max_queueDefault value: 40Valid Values: Any integerChanges Take Effect: After restart of LFMT Indexer.Description: Specifies the number of files to keep in the queue when all the threads are busy beforethe indexer starts generating exceptions.
max_threadsDefault value: 40Valid Values: Any integerChanges Take Effect: After restart of LFMT Indexer.Description: Specifies the maximum number of threads required to process the files in parallel.
min_threadsDefault value: 20Valid Values: Any integer
Log File Management Tool Configuration Options LFMT Indexer Configuration Options
Log File Management Tool Deployment and User's Guide 87

Changes Take Effect: After restart of LFMT Indexer.Description: Specifies the minimum number of threads required to process files in parallel.
Log File Management Tool Configuration Options LFMT Indexer Configuration Options
Log File Management Tool Deployment and User's Guide 88
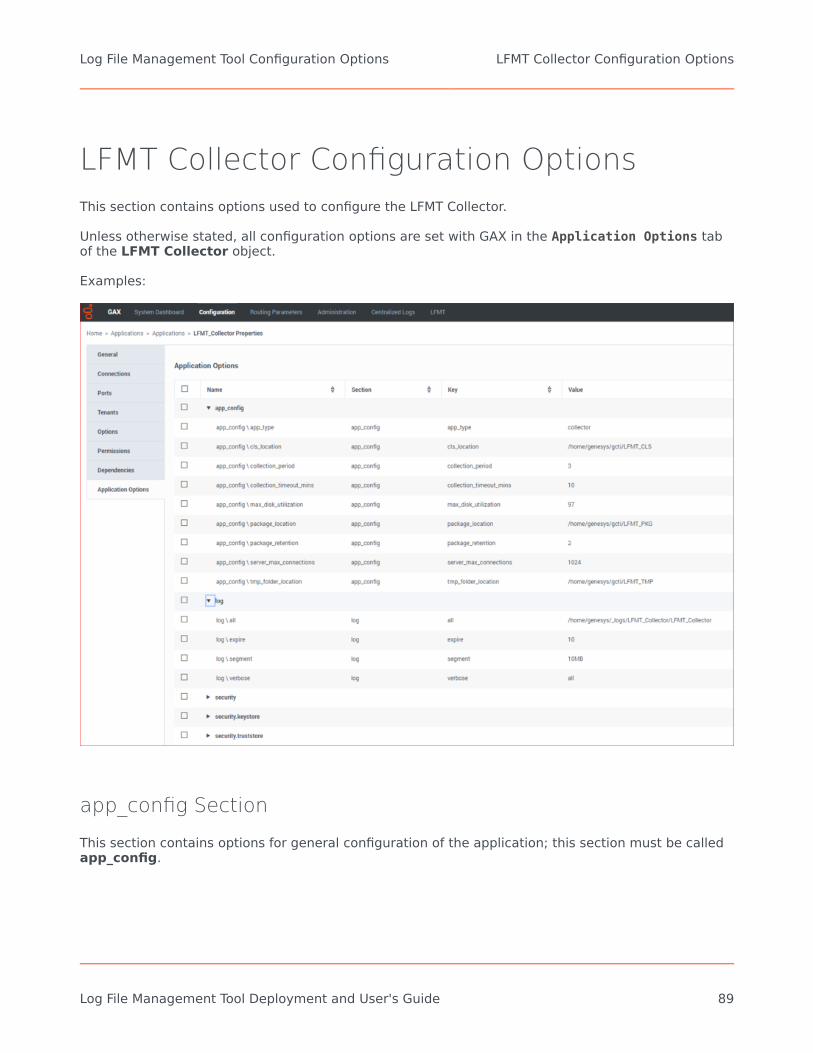
LFMT Collector Configuration OptionsThis section contains options used to configure the LFMT Collector.
Unless otherwise stated, all configuration options are set with GAX in the Application Options tabof the LFMT Collector object.
Examples:
app_config Section
This section contains options for general configuration of the application; this section must be calledapp_config.
Log File Management Tool Configuration Options LFMT Collector Configuration Options
Log File Management Tool Deployment and User's Guide 89
app_typeDefault Value: collectorValid Values: collectorChanges Take Effect: After restart of LFMT Collector.Description: Specifies the type of Generic Genesys Server this application represents.
cls_locationDefault Value: No default value - please enter a value hereValid Values: Valid path through the system (i.e. C:\CLS or /home/genesys/gcti/LFMT_CLS)Changes Take Effect: After restart of LFMT Collector.Description: Specifies the path (local to the Collector Host and not a mapped network drive) throughthe system to the folder or directory where the CLS is located, the Workbench Agent 8.5 will transferfiles to this location. For example, C:/GCTI/CLS.
Important• Please ensure this option is set with a valid path, and the user has write permissions to
the path, before starting the LFMT Collector(s) application
collection_periodDefault Value: 3Valid Values: Any positive integerChanges Take Effect: After restart of LFMT Collector.Description: Specifies the maximum number of historical days that LFMT Collector will attempt tocollect log files; this value should less than or equal to the value of the LFMT Indexer applicationretention_period option.
collection_timeout_minsDefault Value: 2Valid Values: Any positive integerChanges Take Effect: After restart of LFMT Collector.Description: This option controls the length of time in minutes for which a transfer should becancelled if the global collection request has not fully completed. For example, if 5 applications areselected in a collection request (scheduled or manual), the logs from all 5 of these applications mustbe fully transferred to the LFMT host before this time-out period elapses.
file_transfer_timeoutDefault Value: 5Valid Values: Any positive integerChanges Take Effect: After restart of LFMT Collector.Description: This option controls when the connection between the collector and the workbenchagent is terminated because of timeout conditions. If terminated prematurely, the transfer of files
Log File Management Tool Configuration Options LFMT Collector Configuration Options
Log File Management Tool Deployment and User's Guide 90
from agent(s) will be terminated and not all files may be transferred.
max_disk_utilizationDefault Value: 85Valid Values: Any positive integerChanges Take Effect: After restart of LFMT Collector.Description: Specifies the maximum percentage of HDD space that will be utilized for storing log filesin the CLS. The default value 85 indicates that, up to 85% of the HDD space will be used. Afterreaching this threshold, further transfers will not be executed.
package_locationDefault Value: No default value - please enter a value here (i.e. /home/genesys/gcti/LFMT_PKG)Valid Values: Valid path through the system (network)Changes Take Effect: After restart of LFMT Collector.Description: Specifies the path through the system to the folder or directory where the LFMT Collectorpackages will be created.
Important• Please ensure this option is set with a valid path, and the user has write permissions to
the path, before starting the LFMT Collector(s) application
package_retentionDefault Value: 2Valid Values: Any positive integerChanges Take Effect: After restart of LFMT Collector.Description: Specifies the number days that LFMT Collector will keeps log file packages created fromthe LFMT Client before deletion.
server_max_connectionsDefault Value: 1024Valid Values: Any positive integer greater than 0.Changes Take Effect: After restart of LFMT Collector.Description: Identifies the total number of connections allowed from all LFMT agents to transfer files.
tmp_folder_locationDefault Value: OS Temp folder (if no option configured) - (i.e. /home/genesys/gcti/LFMT_TMP)Valid Values: Valid path through the system (network)Changes Take Effect: After restart of LFMT Collector.Description: Specifies the path through the system to the folder or directory where the temporary
Log File Management Tool Configuration Options LFMT Collector Configuration Options
Log File Management Tool Deployment and User's Guide 91
files for LFMT are to be located. For example, /home/genesys/gcti/LFMT_TMP.
Important• If set, please ensure this is different/separate to the "cls_location" option else LFMT
Collector(s) will incorrectly process .tmp files• also ensure this option is set with a valid path, and the user has write permissions to
the path
log Section
This section contains all options relating to creating, viewing, and otherwise using the Centralized Logfacility in Genesys software; this section must be called log.
allDefault value: No default valueValid Values: [path/filename] (i.e. /home/genesys/gcti/_logs/LFMT_Collector/LFMT_Collector)Changes Take Effect: After restart of LFMT Indexer.Description: Specifies the file location to which the application sends all log events.
expireDefault value: 10Valid Values: [number] Specify a number from 1–1000.Changes Take Effect: After restart of LFMT Indexer.Description: Determines how many log files are kept before they are deleted.
segmentDefault value: 5000Valid Values: [number] - Specify a value in kilobytes.Changes Take Effect: After restart of LFMT Indexer.Description: Determines the rollover size of the log files.
verboseDefault value: allValid Values:
• all - All log events are printed.• trace - All log events are printed.• debug - DEBUG, INFO, WARN, FATAL, and ERROR log events are printed.
Log File Management Tool Configuration Options LFMT Collector Configuration Options
Log File Management Tool Deployment and User's Guide 92
• info - INFO, WARN, FATAL, and ERROR log events are printed.• warn - WARN, FATAL, and ERROR log events are printed.• error - FATAL and ERROR log events are printed.• fatal - Only FATAL log events are printed.• off - No log events are printed.
Changes Take Effect: After restart of LFMT Indexer.Description: Specifies the log level.
security Section
This section contains all options relating to securing communication between the LFMT Collector andthe Workbench Agent. The section is optional and is required only if the communication between theWorkbench and the LFMT Collector has to be secured; this section must be called security.
mutual_tlsDefault value: NoneValid Values: true,falseChanges Take Effect: After restart of LFMT Collector.Description: Indicates whether mutual TLS is enabled for messaging and file transfer.
providerDefault value: NoneValid Values: JKS,Changes Take Effect: After restart of LFMT Collector.Description: The key provider.
protocolDefault value: NoneValid Values: TLSv1.2Changes Take Effect: After restart of LFMT Collector.Description: Identifies the protocol to be used for the SSL communication between the LFMT Collectorand the LFMT Agent.
enabled_ciphersDefault value: NoneValid Values: Any valid Java cipher suite. i.e "TLS_RSA_WITH_AES_256_CBC_SHA256" (see Javadocumentation for valid list)Changes Take Effect: After restart of LFMT Collector.Description: Identifies the cipher suite to be used for TLS communication between the LFMT Collector/LFMT Client and LFMT Collector/Workbench Agent.
Log File Management Tool Configuration Options LFMT Collector Configuration Options
Log File Management Tool Deployment and User's Guide 93
Note: Ensure any configured cipher suite is enabled to be used by the Java instance on the host. SeeJava documentation for enabling/disabling cipher suites. The Client and Agent(s) that the Collector isconnecting to will need to be configured with the same cipher suite.
security.keystore Section
The security.keystore section of the LFMT Collector application options is used to identify the keystoreproperties through which LFMT Collector will load the necessary keys for secure communications; thissection must be called security.keystore.
pathDefault value: No default valueValid Values: A file path to the keystore located on the host. Note: The security certificates must begenerated using the SHA-2 secure hash algorithm.Changes Take Effect: After restart of LFMT Collector.Description: Identifies the path to the local keystore to be used by LFMT Agent to load the necessarykeys.
passwordDefault value: No default valueValid Values: A valid password associated with the keystore defined in the path option of thesecurity.keystore sectionChanges Take Effect: After restart of LFMT Collector.Description: The password to be used by LFMT Agent to access the keystore.
security.truststore Section
The security.truststore section of the LFMT Collector application options is used to identify thetruststore properties through which LFMT Collector will load the necessary certificates for securecommunications; this section must be called security.truststore.
pathDefault value: No default valueValid Values: A file path to the truststore located on the host. Note: The security certificates must begenerated using the SHA-2 secure hash algorithm.Changes Take Effect: After restart of LFMT Collector.Description: Identifies the path to the truststore to be used by LFMT Collector to load the necessarycertificates.
passwordDefault value: No default valueValid Values: A valid password associated with the truststore identified in the path option of the
Log File Management Tool Configuration Options LFMT Collector Configuration Options
Log File Management Tool Deployment and User's Guide 94
security.truststore sectionChanges Take Effect: After restart of LFMT Collector.Description: The password to be used by LFMT Collector to access the truststore.
Log File Management Tool Configuration Options LFMT Collector Configuration Options
Log File Management Tool Deployment and User's Guide 95
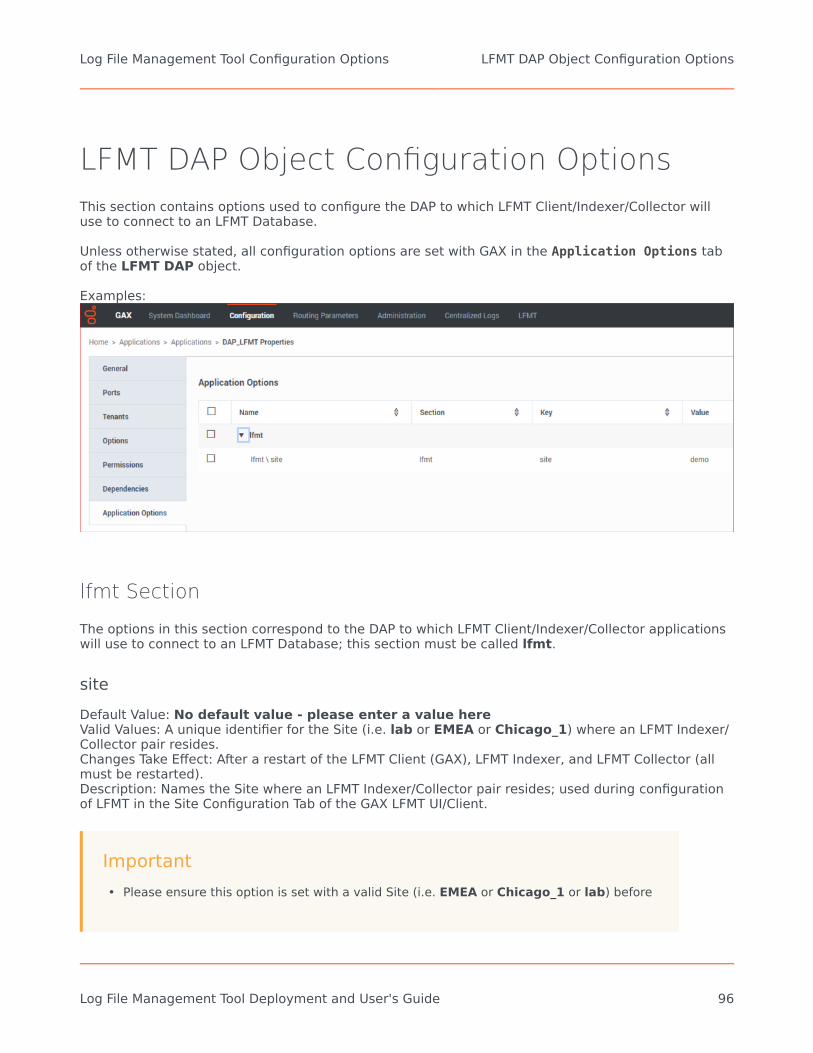
LFMT DAP Object Configuration OptionsThis section contains options used to configure the DAP to which LFMT Client/Indexer/Collector willuse to connect to an LFMT Database.
Unless otherwise stated, all configuration options are set with GAX in the Application Options tabof the LFMT DAP object.
Examples:
lfmt Section
The options in this section correspond to the DAP to which LFMT Client/Indexer/Collector applicationswill use to connect to an LFMT Database; this section must be called lfmt.
siteDefault Value: No default value - please enter a value hereValid Values: A unique identifier for the Site (i.e. lab or EMEA or Chicago_1) where an LFMT Indexer/Collector pair resides.Changes Take Effect: After a restart of the LFMT Client (GAX), LFMT Indexer, and LFMT Collector (allmust be restarted).Description: Names the Site where an LFMT Indexer/Collector pair resides; used during configurationof LFMT in the Site Configuration Tab of the GAX LFMT UI/Client.
Important• Please ensure this option is set with a valid Site (i.e. EMEA or Chicago_1 or lab) before
Log File Management Tool Configuration Options LFMT DAP Object Configuration Options
Log File Management Tool Deployment and User's Guide 96
starting the LFMT Collector(s)/Indexer(s) applications
use_oracle_service (optional)Default Value: FalseValid Values: True, False.Changes Take Effect: After a restart of the LFMT Client (GAX), LFMT Indexer, and LFMT Collector (allmust be restarted).Description: Indicates that an Oracle database connection is to be made using a Service Name ratherthan an SID; the name of the Service is indicated by the “Database Name” property of the DatabaseAccess Point.
Note
Important• Ensure that the site option for each LFMT DAP object within the LFMT deployment is
different• i.e. do not have site set to EMEA in more than 1 DAP Object
• Please ensure the LFMT Collector/Indexer pair and the GAX application has a connectionto this DAP before starting the respective LFMT Collector/Indexer applications
• An LFMT Collector application object must have only one connection to a LFMT DAPobject
• An LFMT Indexer application object must have only one connection to a LFMT DAPobject.
• A single GAX application may have multiple connections to more than one LFMT DAPobject - so that GAX and the LFMT UI can control/manage multiple LFMT Collector/Indexer pairs, essentially an holistic view
Log File Management Tool Configuration Options LFMT DAP Object Configuration Options
Log File Management Tool Deployment and User's Guide 97
Workbench Agent Configuration Options(for LFMT 8.5.1)This section contains options used to configure the Workbench Agent. Unless otherwise stated, allconfiguration options are set using GAX in the Application Options tab of the LFMT Agent object.
app_config Section
This section contains options for general configuration of the application. This section must be calledapp_config.
agent_max_open_requestsDefault Value: 4096Valid Values: Any positive integer greater than 0 and a power of 2. (i.e 1024, 2048, 4096 etc.)Changes Take Effect: After restart of Workbench Agent.Identifies the maximum number of open requests accepted into the connection pool of theworkbench agent.
agent_max_outgoing_connectionsDefault Value: 1Valid Values: Any positive integer greater than 0Changes Take Effect: After restart of Workbench Agent.Identifies the maximum number of concurrent outgoing connections from the workbench agent.
agent_max_pipelining_limitDefault Value: 1Valid Values: Any positive integer greater than 0Changes Take Effect: After restart of Workbench Agent.Identifies the maximum number of requests that are accepted (and dispatched to the collector) onone single connection before the first request is completed.
security Section
This section contains all options relating to securing communication between the LFMT Collector andthe Workbench Agent. The section is optional and is required only if the communication between theLFMT Collector and the Workbench Agent has to be secured. This section must be called security.
Log File Management Tool ConfigurationOptions
Workbench Agent Configuration Options (for LFMT8.5.1)
Log File Management Tool Deployment and User's Guide 98
mutual_tlsDefault value: NoneValid Values: true,falseChanges Take Effect: After restart of Workbench Agent.Indicates whether mutual TLS is enabled for messaging and file transfer.
providerDefault value: NoneValid Values: JKSChanges Take Effect: After restart of Workbench Agent.The key provider.
protocolDefault value: NoneValid Values: TLSv1.2Changes Take Effect: After restart of Workbench Agent.Identifies the protocol to be used for the SSL communication between the LFMT Collector and theWorkbench Agent.
enabled_ciphersDefault value: NoneValid Values: Any valid Java cipher suite. i.e "TLS_RSA_WITH_AES_256_CBC_SHA256" (see Javadocumentation for valid list)Changes Take Effect: After restart of Workbench Agent.Description: Identifies the cipher to be used for TLS communication between the LFMT Collector andWorkbench Agent.
Note: Ensure any configured cipher suite is enabled to be used by the Java instance on the host. SeeJava documentation for enabling/disabling cipher suites. The LFMT Collector that the WorkbenchAgent is connecting to will need to be configured with the same cipher suite.
security.keystore Section
The security.keystore section of the Workbench Agent application options is used to identify thekeystore properties through which Workbench Agent will load the necessary keys for securecommunications. This section must be called security.keystore.
pathDefault value: No default valueValid Values: A file path to the keystore located on the hostChanges Take Effect: After restart of Workbench Agent.
Log File Management Tool ConfigurationOptions
Workbench Agent Configuration Options (for LFMT8.5.1)
Log File Management Tool Deployment and User's Guide 99

Identifies the path to the local keystore to be used by Workbench Agent to load the necessary keys.
passwordDefault value: No default valueValid Values: A valid password associated with the keystore defined in the path option of thesecurity.keystore sectionChanges Take Effect: After restart of Workbench Agent.The password to be used by Workbench Agent to access the keystore.
security.truststore Section
The security.truststore section of the Workbench Agent application options is used to identify thetruststore properties through which Workbench Agent will load the necessary certificates for securecommunications. This section must be called security.truststore.
pathDefault value: No default valueValid Values: A file path to the truststore located on the hostChanges Take Effect: After restart of Workbench Agent.Identifies the path to the truststore to be used by Workbench Agent to load the necessarycertificates.
passwordDefault value: No default valueValid Values: A valid password associated with the truststore identified in the path option of thesecurity.truststore sectionChanges Take Effect: After restart of Workbench Agent.The password to be used by Workbench Agent to access the truststore.
log Section
This section contains all options relating to creating, viewing, and otherwise using the Centralized Logfacility in Genesys software. This section must be called log.
allDefault value: No default valueValid Values: [filename]Changes Take Effect: After restart of Workbench Agent.Specifies the file location to which the application sends all log events.
Log File Management Tool ConfigurationOptions
Workbench Agent Configuration Options (for LFMT8.5.1)
Log File Management Tool Deployment and User's Guide 100
expireDefault value: 10Valid Values: [number] Specify a number from 1–1000.Changes Take Effect: After restart of Workbench Agent.Determines how many log files are kept before they are deleted.
segmentDefault value: 5000Valid Values: [number] - Specify a value in kilobytes.Changes Take Effect: After restart of Workbench Agent.Determines the rollover size of the log files.
verboseDefault value: allValid Values:
• all - All log events are printed.• trace - All log events are printed.• debug - DEBUG, INFO, WARN, FATAL, and ERROR log events are printed.• info - INFO, WARN, FATAL, and ERROR log events are printed.• warn - WARN, FATAL, and ERROR log events are printed.• error - FATAL and ERROR log events are printed.• fatal - Only FATAL log events are printed.• off - No log events are printed.
Changes Take Effect: After restart of Workbench Agent.Specifies the host IP address of the configuration server.
Log File Management Tool ConfigurationOptions
Workbench Agent Configuration Options (for LFMT8.5.1)
Log File Management Tool Deployment and User's Guide 101

Workbench Agent Host ObjectConfiguration Options (for LFMT 8.5.102)This page contains options used to configure the host objects to which LFMT Collector will connect.This assumes that the Workbench Agent is running on this host. Unless otherwise stated, allconfiguration options are set using GAX in the Options tab of the Host object.
lfmt Section
This section must be called lfmt.
nic (optional)
Default Value: No default valueValid Values: A valid network address (IP or Host) for a specific Network InterfaceChanges Take Effect: After restart of the Collector and the Workbench Agent that is located on thishost.
This option is configured on the Host object where the Workbench Agent is located. If the Host has asecondary NIC dedicated for transfer of log files from the Host (using the Workbench Agent), the usercan specify the same here through this value.
Log File Management Tool ConfigurationOptions
Workbench Agent Host Object Configuration Options (forLFMT 8.5.102)
Log File Management Tool Deployment and User's Guide 102
Log File Management Tool User's GuideOnce the all LFMT components have been successfully deployed, users can utilize the sectionsprovided by the LFMT Client to configure and control the solution.
To access the LFMT Client, in a web browser, navigate to the GAX application enabled with the LFMTClient plugin.
http://<GAX Host IP>:<GAX Port>/gax
Important• Genesys recommends LFMT is deployed on its own separate GAX instance so that it
does not affect any other GAX Plugins that are used to manage/operate the contactcenter.
Sections within this User Guide chapter:
1. Site Configuration - To associate hosts/applications to specific LFMT Indexer and LFMT Collector pairs.2. Collection Schedules - To configure and control scheduled log file collections by LFMT Collectors.3. Force Collection - To run real-time log file collections by LFMT Collectors.4. Indexing and Scrubbing - To configure and control indexing by LFMT Indexer and scrubbing by LFMT
Collector.5. Log File Packaging - To search, select, and build log files packages from files collected by LFMT Collector.6. Available Packages - To download, or FTP file packages built using in the Log File Packaging section.
Access to the LFMT Client will be available on both the main page and in the upper toolbar.
The feature access will be dictated by the role defined for the user of LFMT.
To set the role of a given user, please see the Configuration of Access Control for LFMT Users section.
Log File Management Tool User'sGuide
Workbench Agent Host Object Configuration Options (for LFMT8.5.102)
Log File Management Tool Deployment and User's Guide 103
Configuration of Access Control for LFMTUsersThis section describes where and how to configure GAX Role privileges to restrict/grant access toLFMT functionalities.
Role-based access control using Genesys AdministrationExtension (GAX)
1. Log into GAX, and navigate to Configuration2. From the Environment section, select Application Templates3. Find and click the GAX Template associated with the particular GAX instance that is being used for LFMT
- i.e. "Genesys_Administrator_Extension_900"4. Click Import Metadata and import the lfmt-gax-template-metadata.xml file5. Click Save6. From Configuration / Accounts / Roles - add a new LFMT Role - i.e LFMT7. From the Role Members tab - add the relevant Users/Groups to the new LFMT Role8. From the Assigned Privileges tab - locate the gax-lfmt section and check the relevant privileges (i.e.
only "Available log packages") for this new LFMT Role9. Click Save
10. On GAX re-login, the respective Users/Groups will be assigned the functionality based on the LFMT Roleprivileges
Example
Log File Management Tool User's Guide Configuration of Access Control for LFMT Users
Log File Management Tool Deployment and User's Guide 104
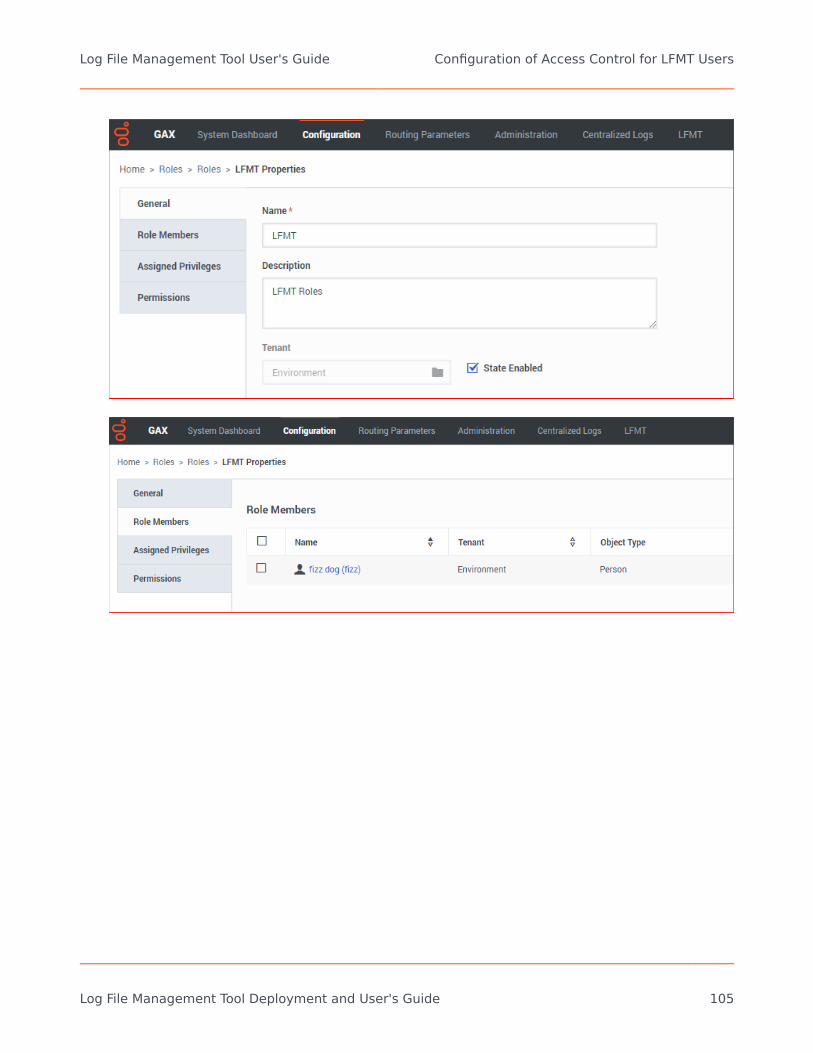
Log File Management Tool User's Guide Configuration of Access Control for LFMT Users
Log File Management Tool Deployment and User's Guide 105

List of Available Privileges
The following role privileges can be allowed/denied for the role configuration:
Log File Management Tool User's Guide Configuration of Access Control for LFMT Users
Log File Management Tool Deployment and User's Guide 106

* Available log packages
* Collection schedules
* Create Collection Schedules
* Delete Collection Schedules
* Force log collection
* Indexing and scrubbing configurations
* Log file packaging
* Site configuration
* Start scheduled collections
*Stop scheduled collections
Role-based access control using Genesys Administration (GA)
Use these steps to enable Role-based access control in Genesys Administrator.
1. Login to GA, and select the Provisioning tab.2. Select Environment > Application Templates in the left navigation menu.3. Select the Genesys Administration Extension template and click Edit.4. Click Import Metadata to import the metadata for the LFMT client application template.5. Click Add on the “choose metadata XML file to import” dialog.6. Select the lfmt-gax-template-metadata.xml file and click Open. The file is uploaded.7. Click Save in the top menu to save the metadata.8. Select Roles in the left navigation menu.9. Click New and add a name for this role, such as LFMTTest.
10. Select the Role Privileges tab. In the Add/Remove Product section, scroll to the entry for the currentGenesys Administrator Extension – LFMT Plug-in release (such as Genesys Administrator Extension– LFMT Plug-in 8.1.3000.00) and select it. A new section called “Genensys Administrator Extension– LFMT Plug-in ” is added.
The following role privileges can be allowed/denied for the role configuration:
* Available log packages
Log File Management Tool User's Guide Configuration of Access Control for LFMT Users
Log File Management Tool Deployment and User's Guide 107
* Collection schedules
* Create Collection Schedules
* Delete Collection Schedules
* Force log collection
* Indexing and scrubbing configurations
* Log file packaging
* Site configuration
* Start scheduled collections
* Stop scheduled collections1. Click Save in the top menu.2. In the Roles tab, select the LFMTTest role and click Edit.3. In the Configuration tab, expand the Members section and click Add, to add this LFMTTest role to
the desired user profiles.4. In the list of user names, select one or more users and click Ok.5. The selected users will be displayed in the Members list as enabled for this LFMTTest role.6. Click Save in the top menu to save the member assignments to this role.
Log File Management Tool User's Guide Configuration of Access Control for LFMT Users
Log File Management Tool Deployment and User's Guide 108
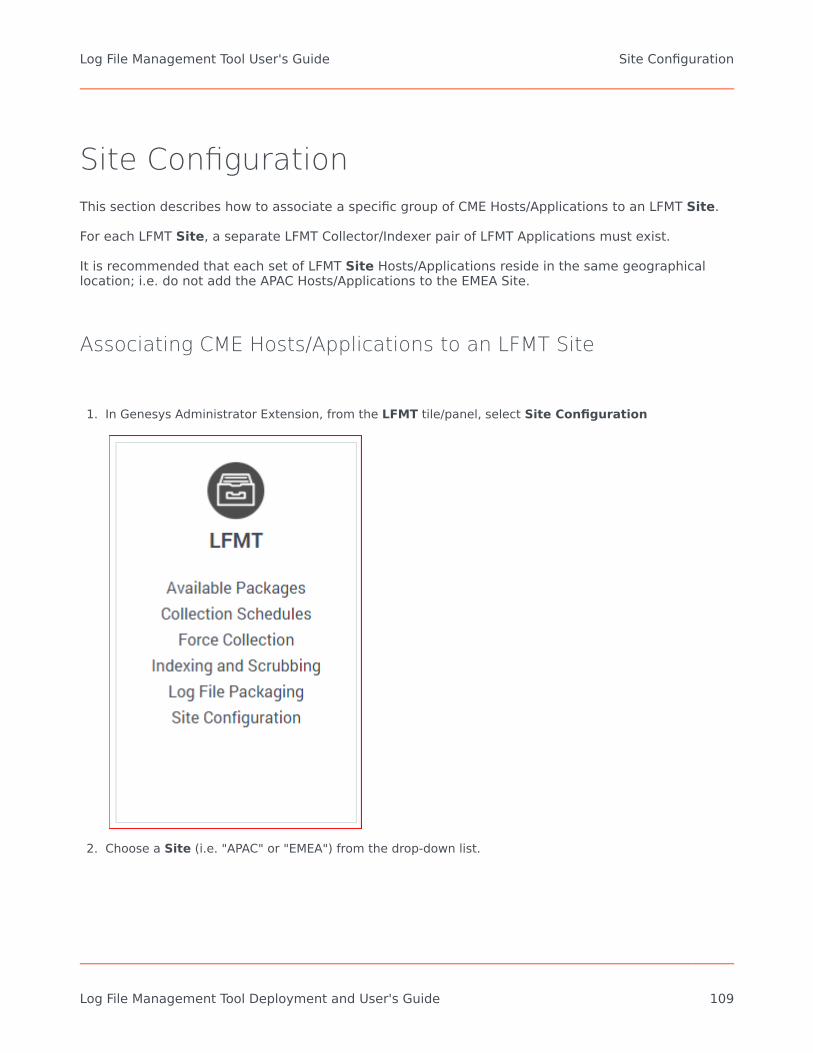
Site ConfigurationThis section describes how to associate a specific group of CME Hosts/Applications to an LFMT Site.
For each LFMT Site, a separate LFMT Collector/Indexer pair of LFMT Applications must exist.
It is recommended that each set of LFMT Site Hosts/Applications reside in the same geographicallocation; i.e. do not add the APAC Hosts/Applications to the EMEA Site.
Associating CME Hosts/Applications to an LFMT Site
1. In Genesys Administrator Extension, from the LFMT tile/panel, select Site Configuration
2. Choose a Site (i.e. "APAC" or "EMEA") from the drop-down list.
Log File Management Tool User's Guide Site Configuration
Log File Management Tool Deployment and User's Guide 109
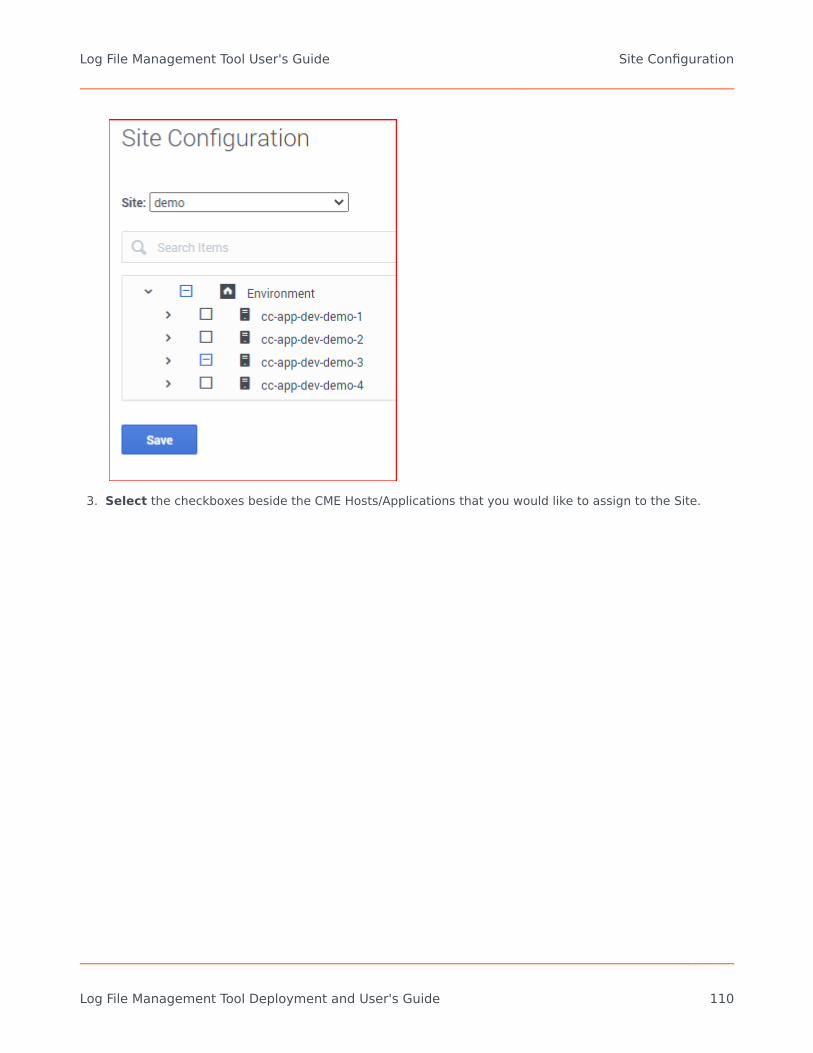
3. Select the checkboxes beside the CME Hosts/Applications that you would like to assign to the Site.
Log File Management Tool User's Guide Site Configuration
Log File Management Tool Deployment and User's Guide 110
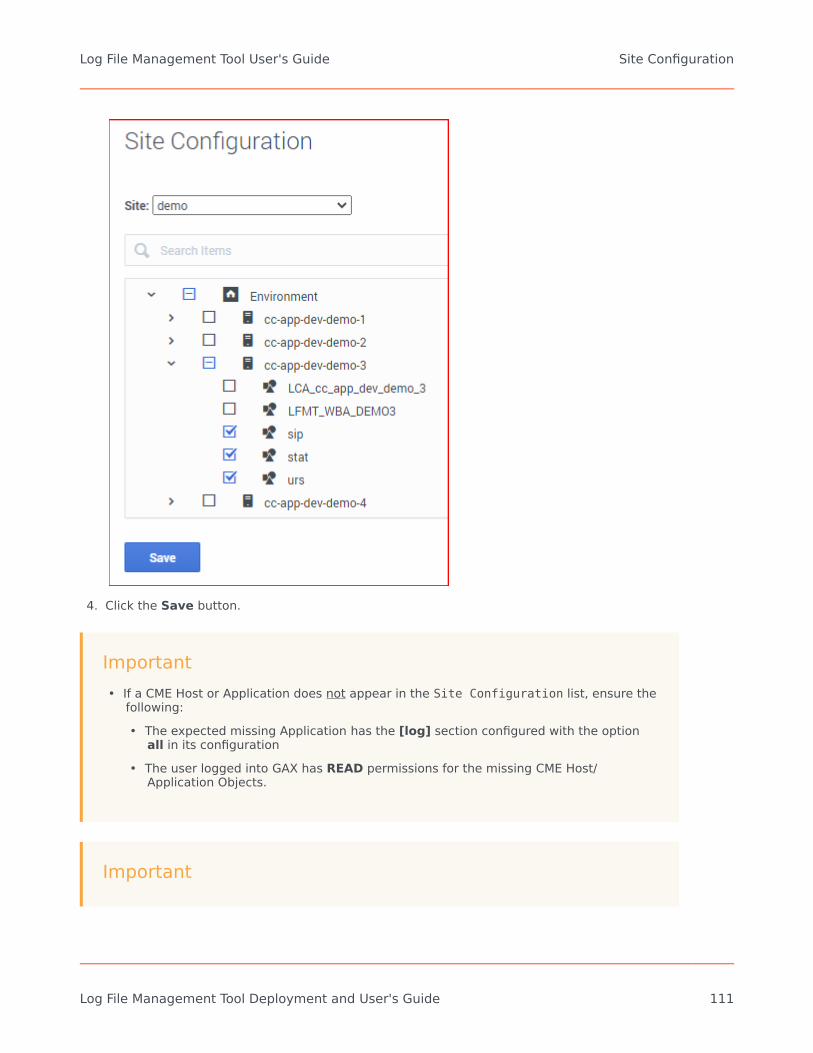
4. Click the Save button.
Important• If a CME Host or Application does not appear in the Site Configuration list, ensure the
following:• The expected missing Application has the [log] section configured with the option
all in its configuration• The user logged into GAX has READ permissions for the missing CME Host/
Application Objects.
Important
Log File Management Tool User's Guide Site Configuration
Log File Management Tool Deployment and User's Guide 111
• Only Hosts/Applications assigned to an LFMT Site appear for lists in other LFMT Clientsections.
Log File Management Tool User's Guide Site Configuration
Log File Management Tool Deployment and User's Guide 112
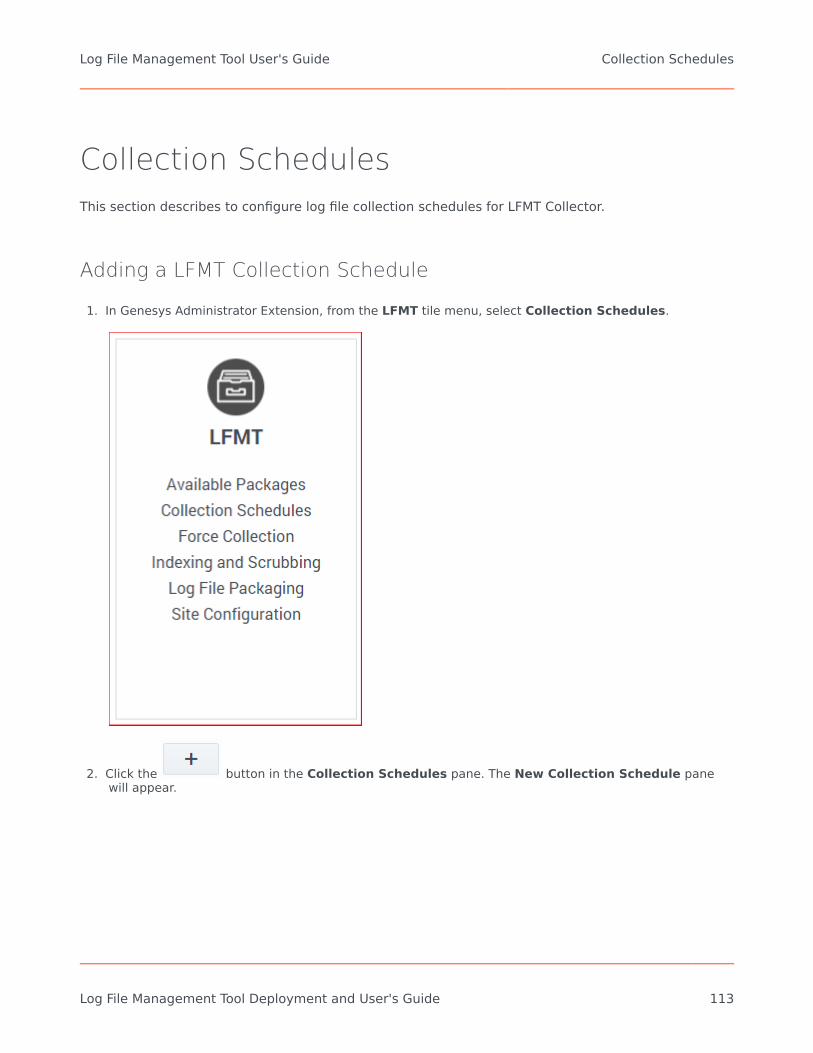
Collection SchedulesThis section describes to configure log file collection schedules for LFMT Collector.
Adding a LFMT Collection Schedule
1. In Genesys Administrator Extension, from the LFMT tile menu, select Collection Schedules.
2. Click the button in the Collection Schedules pane. The New Collection Schedule panewill appear.
Log File Management Tool User's Guide Collection Schedules
Log File Management Tool Deployment and User's Guide 113
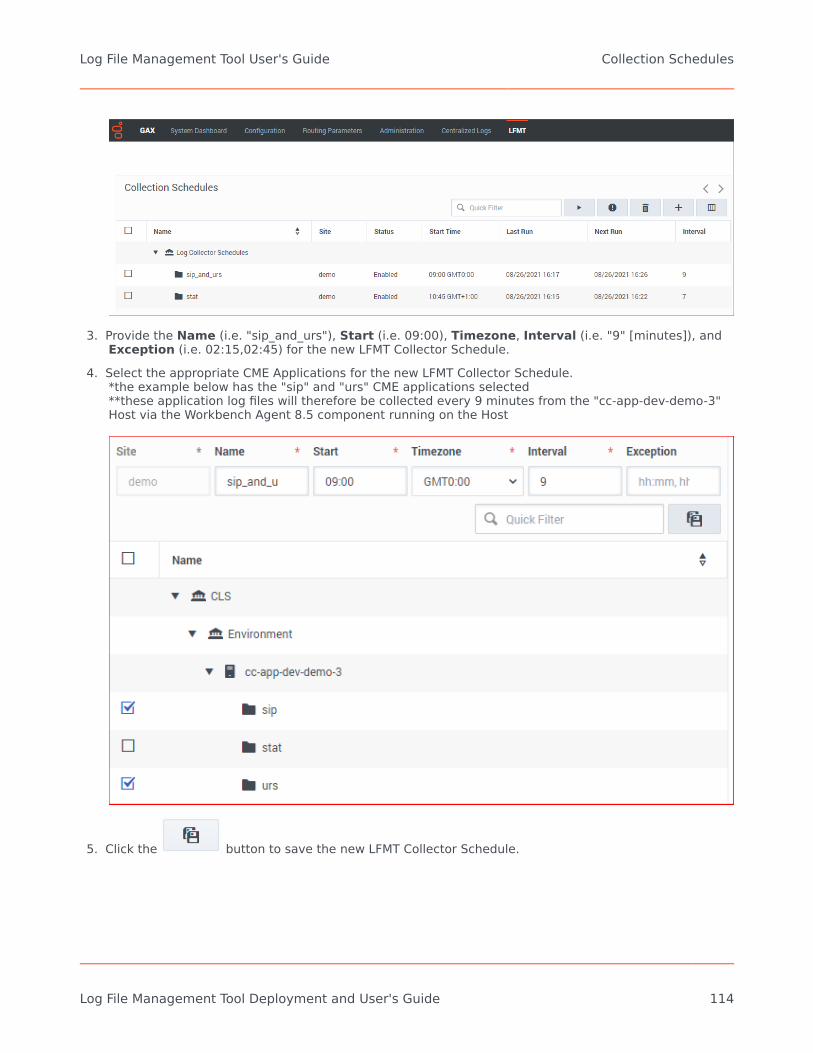
3. Provide the Name (i.e. "sip_and_urs"), Start (i.e. 09:00), Timezone, Interval (i.e. "9" [minutes]), andException (i.e. 02:15,02:45) for the new LFMT Collector Schedule.
4. Select the appropriate CME Applications for the new LFMT Collector Schedule.*the example below has the "sip" and "urs" CME applications selected**these application log files will therefore be collected every 9 minutes from the "cc-app-dev-demo-3"Host via the Workbench Agent 8.5 component running on the Host
5. Click the button to save the new LFMT Collector Schedule.
Log File Management Tool User's Guide Collection Schedules
Log File Management Tool Deployment and User's Guide 114
Important• Genesys recommends staggering each Collection Schedule so that LFMT Collections do
not start/run at the same time.• The maximum number of simultaneous connections from all Agents should not exceed
more than 10-12 during a single Schedule Collection.• Each Agent on a host will create the number of connections as defined by the agent's
[app_config]/agent_max_outgoing_connections] configuration option.• For example, if this value is set to 1 for each Agent, then a Collection of up to 10-12
hosts can be completed at once. If this option is set to 4, then 3 hosts should only becollected from at once. Ensure Collection Schedules are configured to not exceed thisconnection maximum at any given time.
Editing a LFMT Collection Schedule
1. In Genesys Administrator Extension, from the LFMT tile menu, select Collection Schedules.2. Click on the row text of the LFMT Collector Schedule in the Collection Schedules pane that you wish
to edit; the Edit Collection Schedule pane will appear.3. As required, edit the Name, Start, Timezone, Interval or Exception fields for this LFMT Collector
Schedule.4. Add/Remove the appropriate CME Applications from the LFMT Collector Schedule as required.
5. Select the button to save any changes to the LFMT Collector Schedule.
Important• Once saved, the edited Collection Schedule will be Stopped/Disabled and will need to be
manually Enabled/Started.
Deleting a LFMT Collection Schedule
1. In Genesys Administrator Extension, from the LFMT tile menu, select Collection Schedules.2. Select the appropriate checkbox associated with the LFMT Collector Schedule in the Collection
Schedules pane that you wish to delete.
Log File Management Tool User's Guide Collection Schedules
Log File Management Tool Deployment and User's Guide 115
3. Click the button to Delete the Collection Schedule.
Important• The Collection Schedule will be permanently deleted.• There is no undo delete Collection Schedule capability.
Enabling and disabling a LFMT Collection Schedule
• To enable an LFMT Collector Schedule, select the checkbox associated with Collection Schedule, and
click the button.• To disable an LFMT Collector Schedule, select the checkbox associated with Collection Schedule, and
click the button.
Log File Management Tool User's Guide Collection Schedules
Log File Management Tool Deployment and User's Guide 116
Force CollectionThis section describes how to initiate a real-time log file collection by LFMT Collector.
Important• This is useful if/when troubleshooting critical issues and expediting (not awaiting) the
next Collection Schedule interval• This feature was designed for ad-hoc usage as opposed to regular usage, as Force
Collecting logs files could result in significant retrieval time if Collection Schedules arenot frequently collecting the respective log files
Warning• When using the LFMT Force Collection feature, Genesys recommends to consider:• The LFMT Collector(s) application [app_config]/collection_period] option is set to a
sensible/minimal number of historical days• i.e. if Application log files are not being frequently collected by LFMT Collection
Schedules, and a Force Collection is initiated, with a LFMT Collector(s)[app_config]/collection_period] value of for example 30 days, the LFMTCollector(s) will obviously collect the last 30 days of the logs, for ALL Applicationsselected in the Force Collection dialog, which will likely result in a very large numberof log files being collected/transmitted, which could, in turn, result in a considerableamount of time before the Force Collection process is completed• This is why LFMT was designed with a recommended Collection Schedules
approach, the log files are being regularly collected, and therefore seldom ad-hocForce Collection request collections/transmissions are minimized, in terms ofamount and time to complete
• The possible increase in network bandwidth consumption when using the LFMT ForceCollection method of updating the LFMT CLS.
• The maximum number of simultaneous connections from all agents should not exceedmore than 10-12 during a single collection. Each agent on a host will create the numberof connections as defined by the agent's[app_config]/agent_max_outgoing_connections] configuration option. For example,if this value is set to 1 for each agent, then a collection of up to 10-12 hosts can becompleted at once. If this option is set to 4, then 3 hosts should only be collected fromat once.
Log File Management Tool User's Guide Force Collection
Log File Management Tool Deployment and User's Guide 117

Forcing a collection of log files for specific applications
1. In Genesys Administrator Extension, from the LFMT tile menu, select Force Collection.
2. Select the Hosts/Applications for which the log files are to be Force/Immediately collected.
Log File Management Tool User's Guide Force Collection
Log File Management Tool Deployment and User's Guide 118
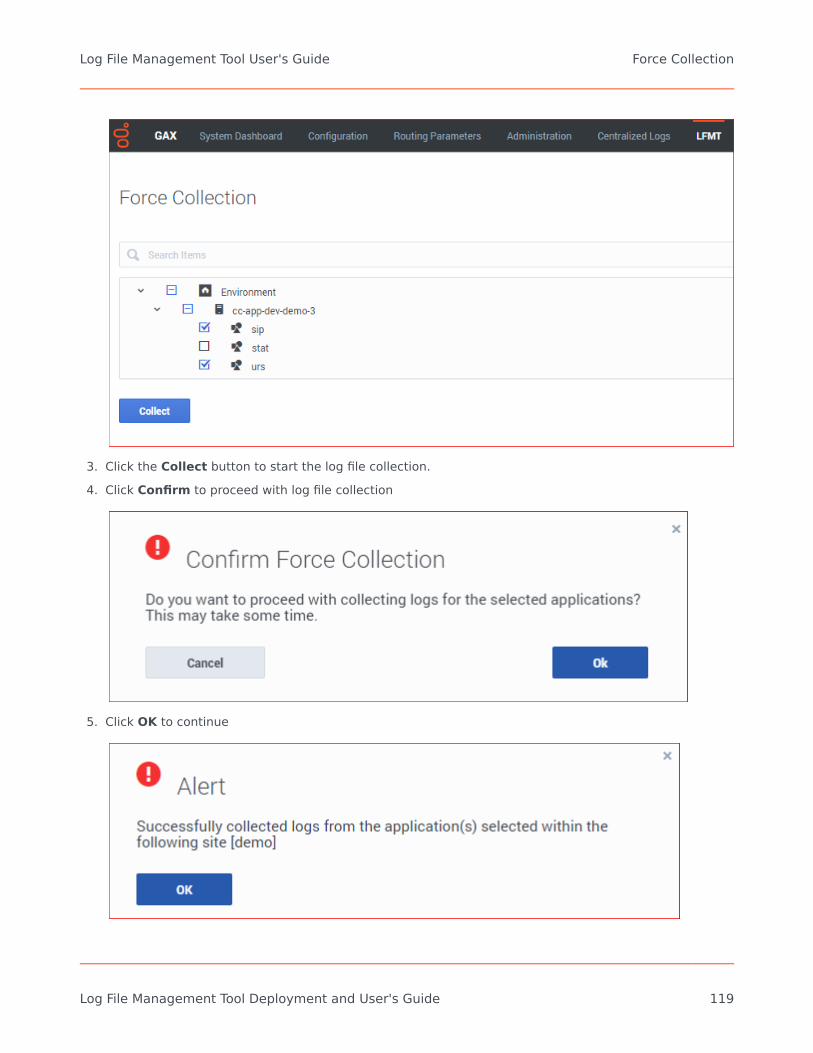
3. Click the Collect button to start the log file collection.4. Click Confirm to proceed with log file collection
5. Click OK to continue
Log File Management Tool User's Guide Force Collection
Log File Management Tool Deployment and User's Guide 119
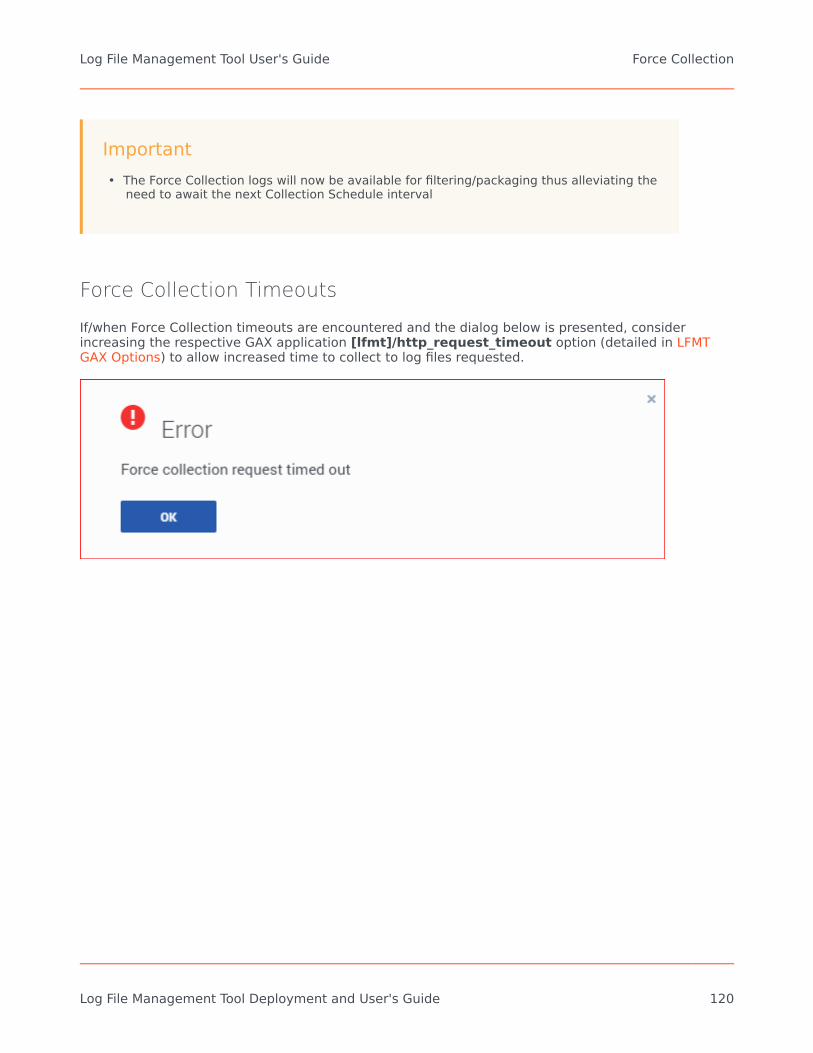
Important• The Force Collection logs will now be available for filtering/packaging thus alleviating the
need to await the next Collection Schedule interval
Force Collection Timeouts
If/when Force Collection timeouts are encountered and the dialog below is presented, considerincreasing the respective GAX application [lfmt]/http_request_timeout option (detailed in LFMTGAX Options) to allow increased time to collect to log files requested.
Log File Management Tool User's Guide Force Collection
Log File Management Tool Deployment and User's Guide 120
Indexing and ScrubbingLFMT uses user-defined regular expressions for both log file indexing and log file scrubbing. Thissection describes how to manage these regular expressions.
Important• Genesys does not create, validate or support customer regular expressions required
within LFMT• Genesys regex guidance made be provided, but the customer is responsible for creation,
validation, testing and support of user defined LFMT regexes• Genesys strongly recommends the customer comprehensively tests the regular
expressions that you want to use for LFMT Indexing and Scrubbing before you definethem in the LFMT Client
• A good resource to test LFMT Regexes would be the Genesys Log File Masking Utility(LFMU) as it uses the same Regex Engine approach for masking log files
Adding a new Regular Expression for Indexing and Scrubbing
1. In Genesys Administrator Extension, from the LFMT tile menu, select Indexing and Scrubbing.
Log File Management Tool User's Guide Indexing and Scrubbing
Log File Management Tool Deployment and User's Guide 121
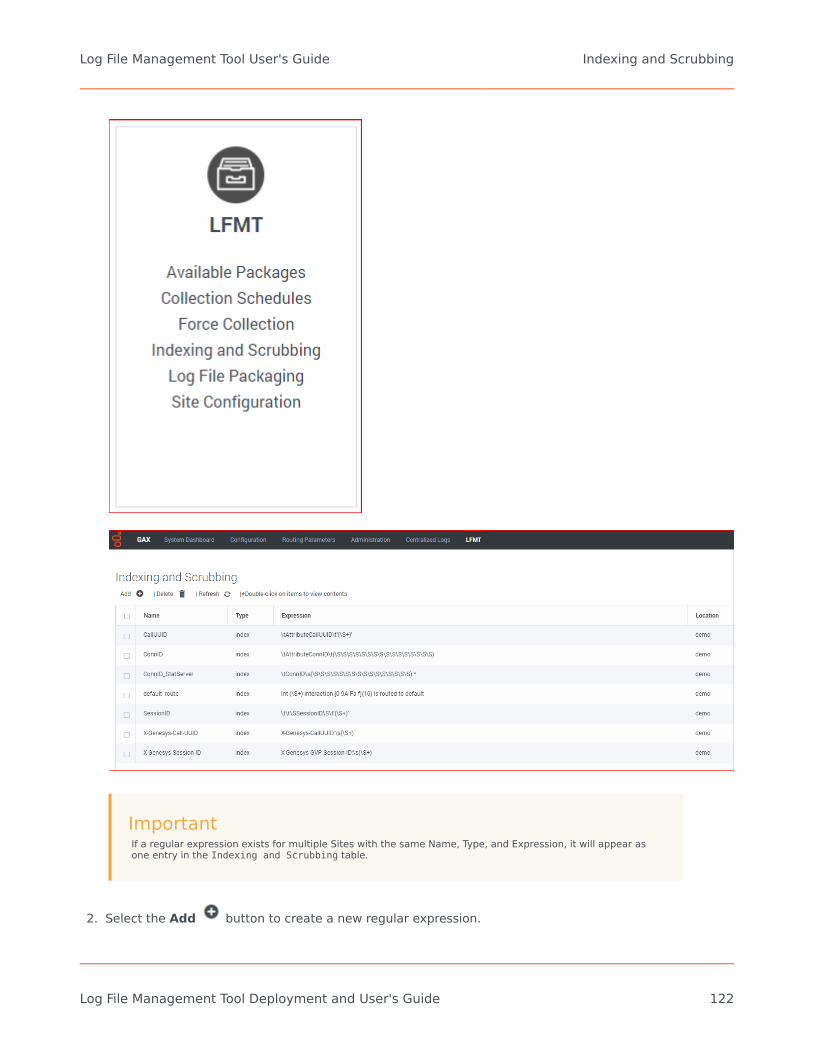
ImportantIf a regular expression exists for multiple Sites with the same Name, Type, and Expression, it will appear asone entry in the Indexing and Scrubbing table.
2. Select the Add button to create a new regular expression.
Log File Management Tool User's Guide Indexing and Scrubbing
Log File Management Tool Deployment and User's Guide 122
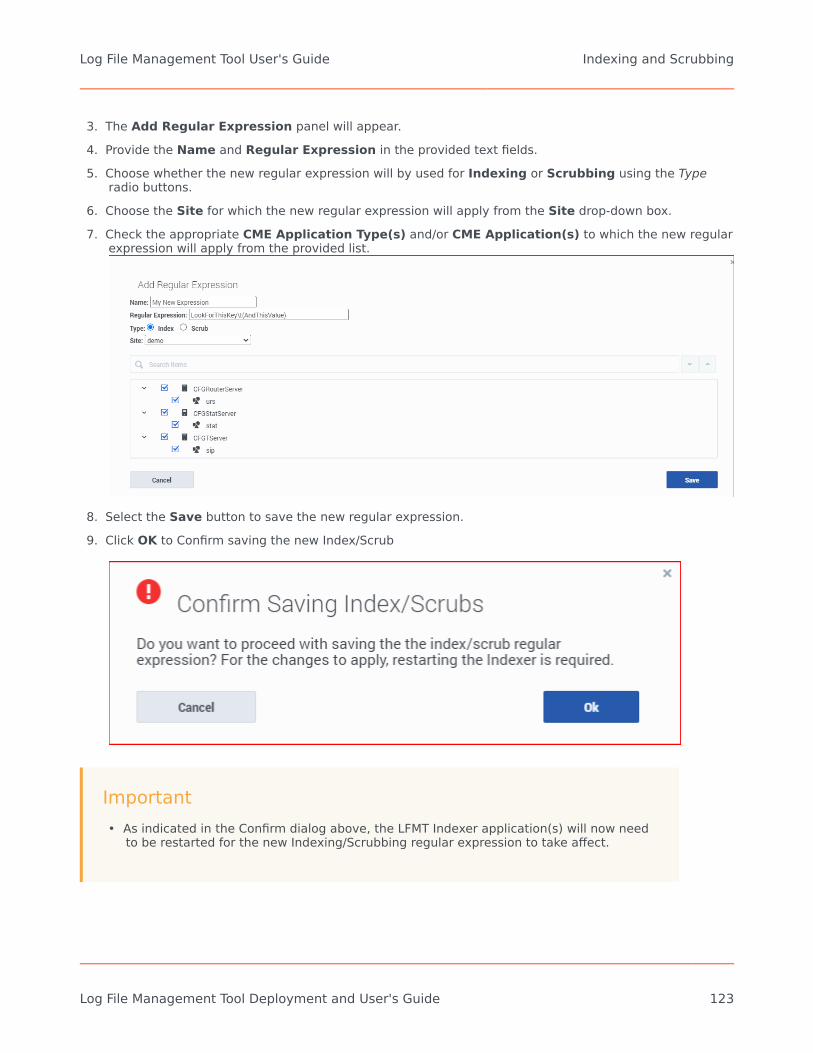
3. The Add Regular Expression panel will appear.4. Provide the Name and Regular Expression in the provided text fields.5. Choose whether the new regular expression will by used for Indexing or Scrubbing using the Type
radio buttons.6. Choose the Site for which the new regular expression will apply from the Site drop-down box.7. Check the appropriate CME Application Type(s) and/or CME Application(s) to which the new regular
expression will apply from the provided list.
8. Select the Save button to save the new regular expression.9. Click OK to Confirm saving the new Index/Scrub
Important• As indicated in the Confirm dialog above, the LFMT Indexer application(s) will now need
to be restarted for the new Indexing/Scrubbing regular expression to take affect.
Log File Management Tool User's Guide Indexing and Scrubbing
Log File Management Tool Deployment and User's Guide 123
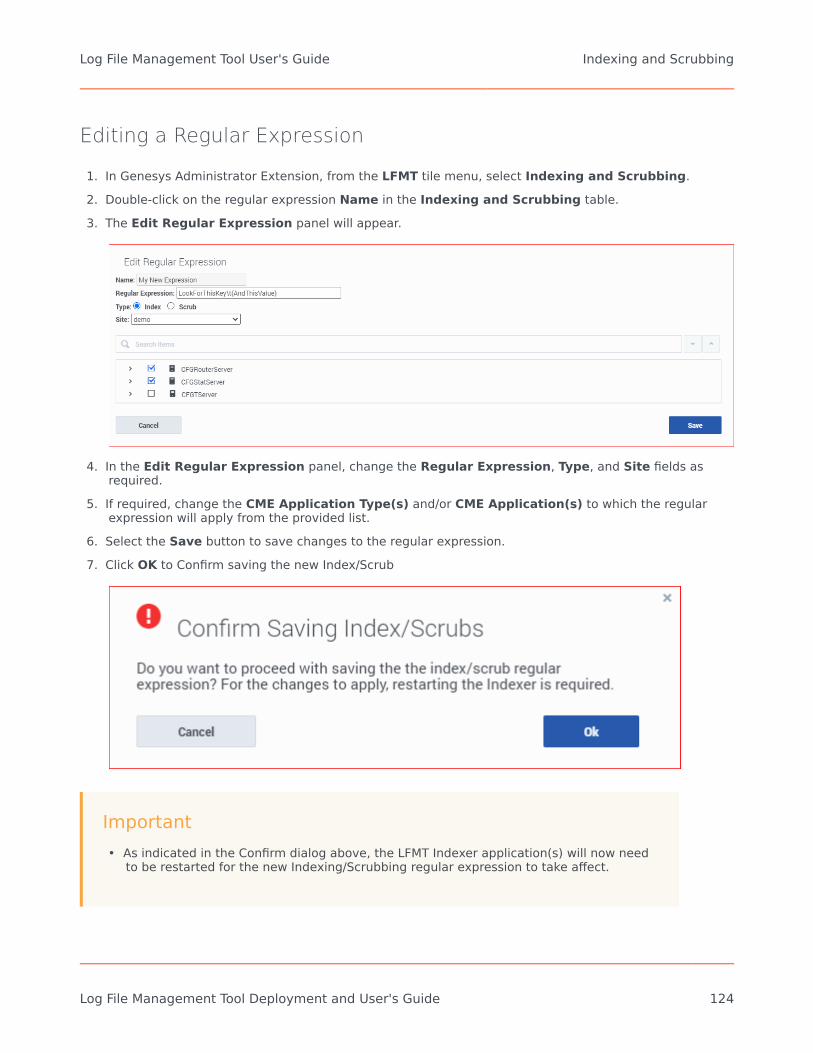
Editing a Regular Expression
1. In Genesys Administrator Extension, from the LFMT tile menu, select Indexing and Scrubbing.2. Double-click on the regular expression Name in the Indexing and Scrubbing table.3. The Edit Regular Expression panel will appear.
4. In the Edit Regular Expression panel, change the Regular Expression, Type, and Site fields asrequired.
5. If required, change the CME Application Type(s) and/or CME Application(s) to which the regularexpression will apply from the provided list.
6. Select the Save button to save changes to the regular expression.7. Click OK to Confirm saving the new Index/Scrub
Important• As indicated in the Confirm dialog above, the LFMT Indexer application(s) will now need
to be restarted for the new Indexing/Scrubbing regular expression to take affect.
Log File Management Tool User's Guide Indexing and Scrubbing
Log File Management Tool Deployment and User's Guide 124
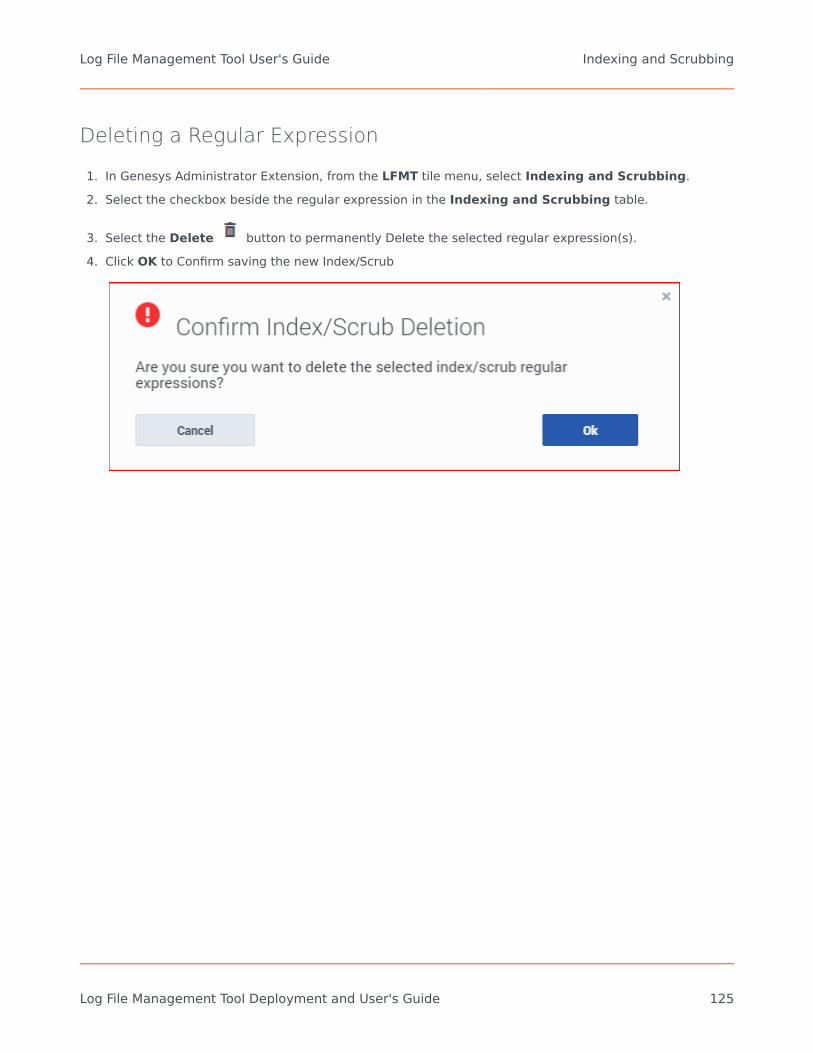
Deleting a Regular Expression
1. In Genesys Administrator Extension, from the LFMT tile menu, select Indexing and Scrubbing.2. Select the checkbox beside the regular expression in the Indexing and Scrubbing table.
3. Select the Delete button to permanently Delete the selected regular expression(s).4. Click OK to Confirm saving the new Index/Scrub
Log File Management Tool User's Guide Indexing and Scrubbing
Log File Management Tool Deployment and User's Guide 125

Log File PackagingThis section describes how to search, select, and build log file packages from files in Central LogStorage - this is the core feature of LFMT whereby Genesys Application log files can be:
• Packaged into a .zip LFMT package file based on DateTime search and other Regex criteria• The .zip LFMT package file can be downloaded locally to your laptop for extraction/analysis/
troubleshooting• The .zip LFMT package file can be shared within your organization for extraction/analysis/
troubleshooting• The .zip LFMT package file can be uploaded to Genesys Customer Care for for extraction/analysis/
troubleshooting
Creating Log Packages
1. In Genesys Administrator Extension, from the LFMT tile menu, select Log File Packaging.
2. Use the 3 Step process to Filter, Select Applications, Select Log Files and then Build an LFMTPackage using dates and/or custom-defined Indexes.
Log File Management Tool User's Guide Log File Packaging
Log File Management Tool Deployment and User's Guide 126
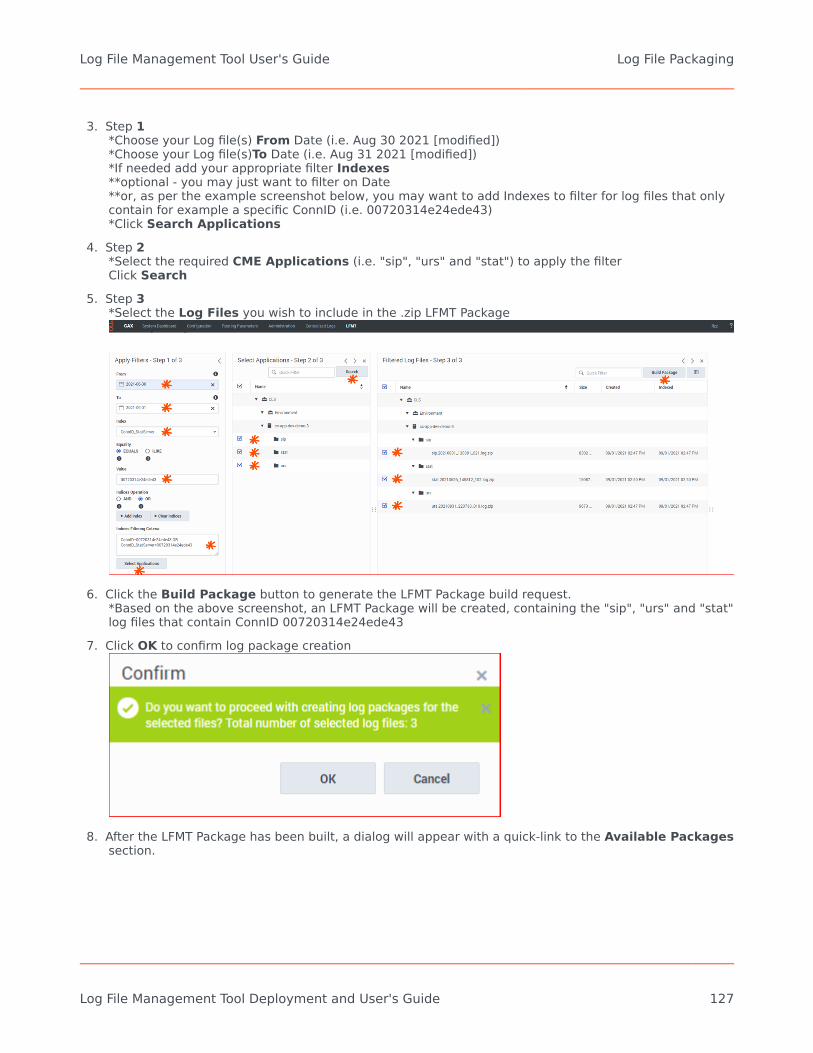
3. Step 1*Choose your Log file(s) From Date (i.e. Aug 30 2021 [modified])*Choose your Log file(s)To Date (i.e. Aug 31 2021 [modified])*If needed add your appropriate filter Indexes**optional - you may just want to filter on Date**or, as per the example screenshot below, you may want to add Indexes to filter for log files that onlycontain for example a specific ConnID (i.e. 00720314e24ede43)*Click Search Applications
4. Step 2*Select the required CME Applications (i.e. "sip", "urs" and "stat") to apply the filterClick Search
5. Step 3*Select the Log Files you wish to include in the .zip LFMT Package
6. Click the Build Package button to generate the LFMT Package build request.*Based on the above screenshot, an LFMT Package will be created, containing the "sip", "urs" and "stat"log files that contain ConnID 00720314e24ede43
7. Click OK to confirm log package creation
8. After the LFMT Package has been built, a dialog will appear with a quick-link to the Available Packagessection.
Log File Management Tool User's Guide Log File Packaging
Log File Management Tool Deployment and User's Guide 127

9. Review the Log Packages section for details on downloading the LFMT Package to your local machineand FTP(S)/SFTP capability.
ImportantIt is possible to search using multiple custom-defined Indexes by selecting the AND orOR radio button options.
TipThe ILIKE option allows users to search with SQL type wildcards.
Log File Management Tool User's Guide Log File Packaging
Log File Management Tool Deployment and User's Guide 128
Available PackagesThis section describes how to download and send LFMT packages built in the Log File Packagingsection.
Important• If/when using LFMT Client 8.5.104.00 thru LFMT Client 8.5.105.03 and GAX 9.0.103.08+
• Please ensure the respective GAX Application, with the LFMT Client Plug-in installed,has the [lfmt]/use_lfm_extension option set to true
• So that .lfm files and not .zip (the default as of 8.5.104) LFMT Package files arecreated and therefore downloadable via GAX• This avoids a "Failed Forbidden" error when trying to download LFMT Packages
• This change is required because GAX 9.0.103.08+ filters .gz, .jar, .zip, and .rar APIrequests
Downloading an LFMT package
1. In Genesys Administrator Extension, from the LFMT tile menu, select Available Packages
Log File Management Tool User's Guide Available Packages
Log File Management Tool Deployment and User's Guide 129

2. Review the entries in the Available Packages table.*In the example below there are 2 LFMT Packages Available
ImportantThe Available Packages window is scrollable should the package not be initially visible
*Packages marked as Pending are still being built by LFMT Collector.*Packages marked as Available can be downloaded by the user.
*To view an updated status of a package, click the Refresh button.
3. To view the contents of a LFMT Package, double-click on the LFMT Package name
Log File Management Tool User's Guide Available Packages
Log File Management Tool Deployment and User's Guide 130
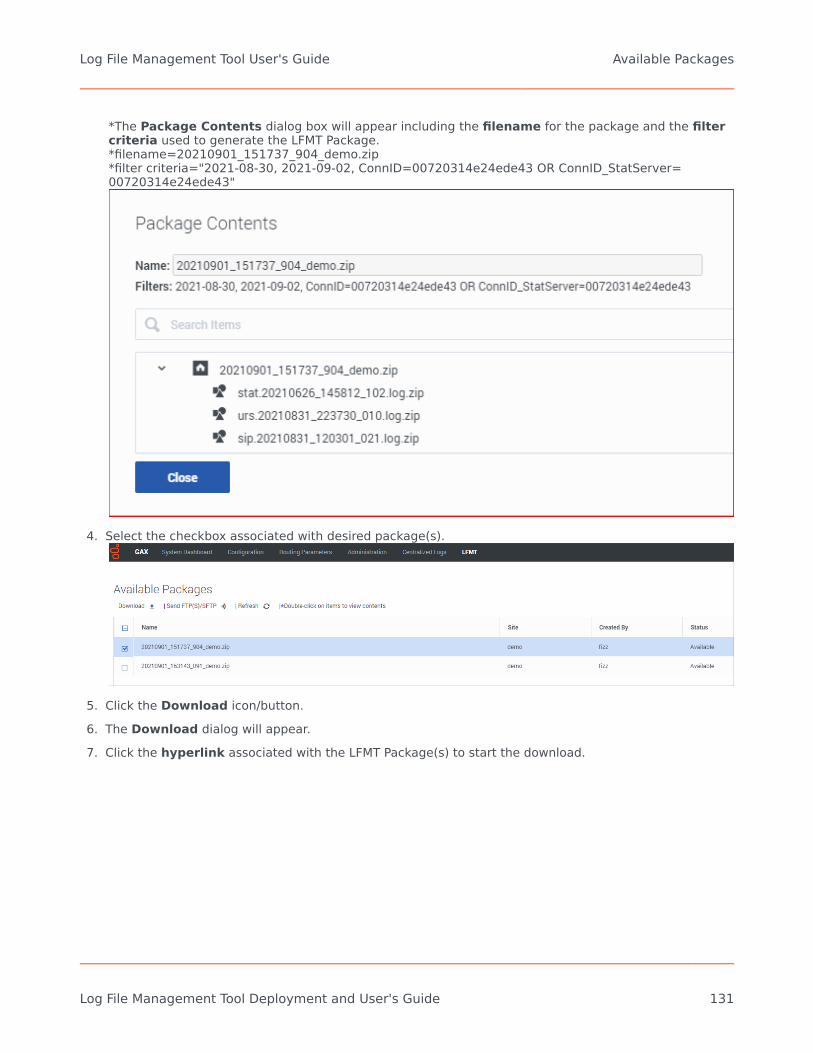
*The Package Contents dialog box will appear including the filename for the package and the filtercriteria used to generate the LFMT Package.*filename=20210901_151737_904_demo.zip*filter criteria="2021-08-30, 2021-09-02, ConnID=00720314e24ede43 OR ConnID_StatServer=00720314e24ede43"
4. Select the checkbox associated with desired package(s).
5. Click the Download icon/button.6. The Download dialog will appear.7. Click the hyperlink associated with the LFMT Package(s) to start the download.
Log File Management Tool User's Guide Available Packages
Log File Management Tool Deployment and User's Guide 131
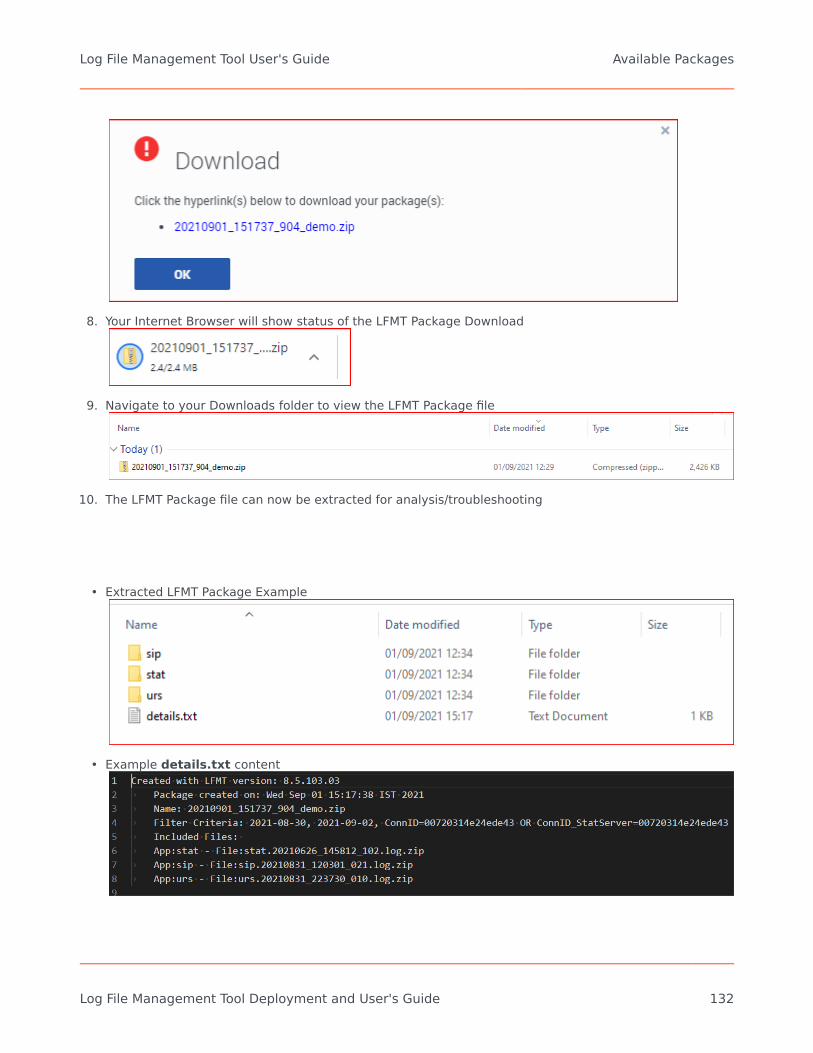
8. Your Internet Browser will show status of the LFMT Package Download
9. Navigate to your Downloads folder to view the LFMT Package file
10. The LFMT Package file can now be extracted for analysis/troubleshooting
• Extracted LFMT Package Example
• Example details.txt content
Log File Management Tool User's Guide Available Packages
Log File Management Tool Deployment and User's Guide 132
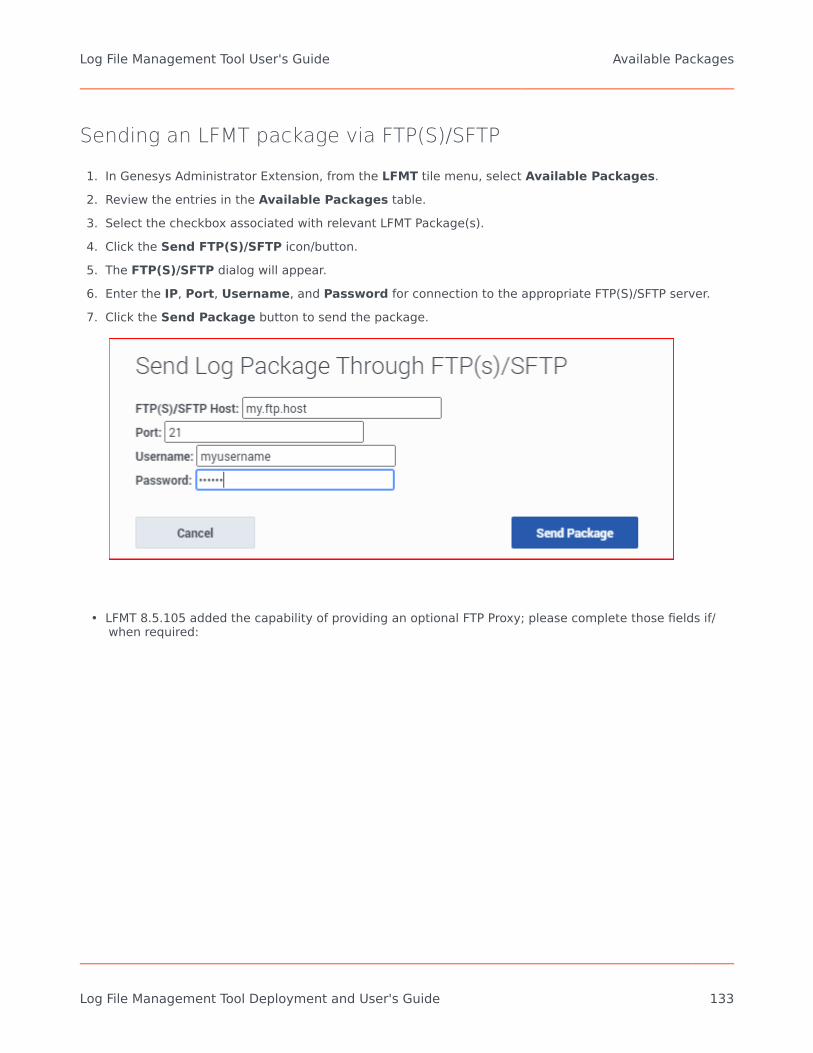
Sending an LFMT package via FTP(S)/SFTP
1. In Genesys Administrator Extension, from the LFMT tile menu, select Available Packages.2. Review the entries in the Available Packages table.3. Select the checkbox associated with relevant LFMT Package(s).4. Click the Send FTP(S)/SFTP icon/button.5. The FTP(S)/SFTP dialog will appear.6. Enter the IP, Port, Username, and Password for connection to the appropriate FTP(S)/SFTP server.7. Click the Send Package button to send the package.
• LFMT 8.5.105 added the capability of providing an optional FTP Proxy; please complete those fields if/when required:
Log File Management Tool User's Guide Available Packages
Log File Management Tool Deployment and User's Guide 133
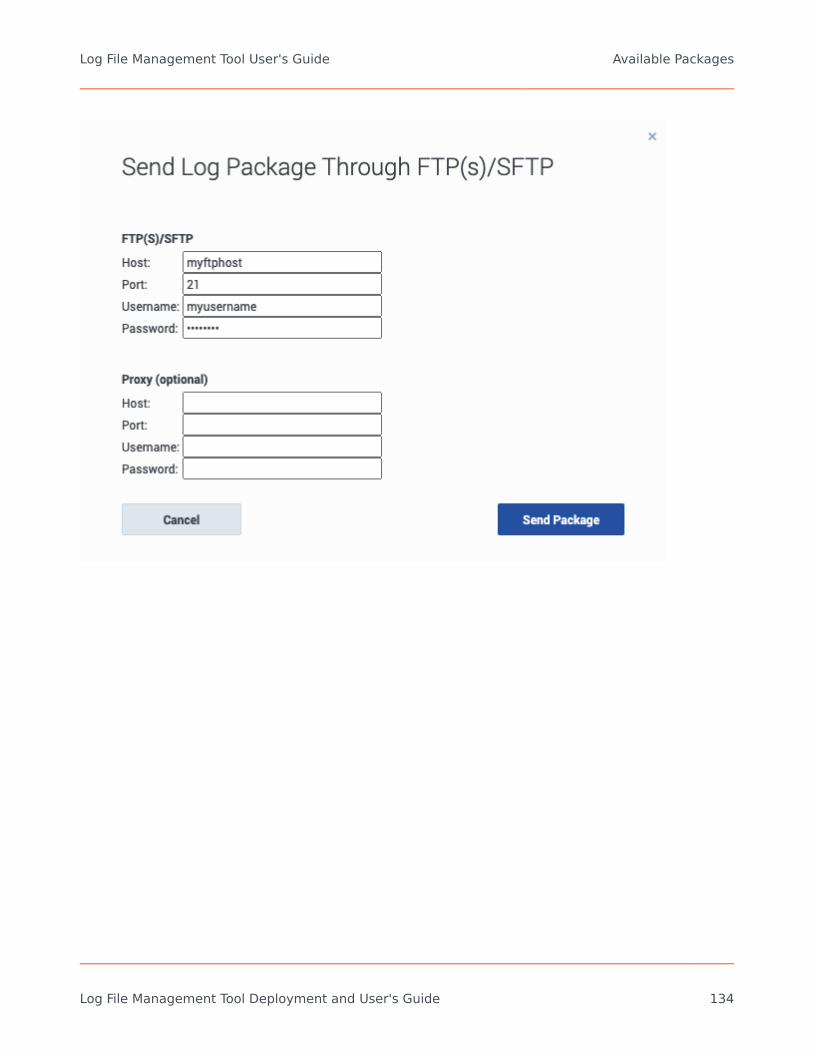
Log File Management Tool User's Guide Available Packages
Log File Management Tool Deployment and User's Guide 134
Custom Log Collection using the[log]/lfmt_X optionThis article details how LFMT can be used to collect custom log files.
Based on the LFMT Site Configuration UI, LFMT collects log files based on Engage Applications andtheir respective [log]/all option.
If an Application is not present in the Site Configuration page, ensure the particular Application has a[log]/all section accurately configured.
In addition to LFMT collecting the standard [log]/all option log file(s), LFMT can collect custom logfiles by adding a new [log]/lfmt_X=<log path> option to a corresponding CME Application, such asGAX or LCA or any other CME Application object.
Standard Log Collection
For example, the screens below detail the standard configuration to collect the GAX Application logfiles:
1. The LFMT Site Configuration page has the GAX Application selected
Log File Management Tool User's Guide Custom Log Collection using the [log]/lfmt_X option
Log File Management Tool Deployment and User's Guide 135
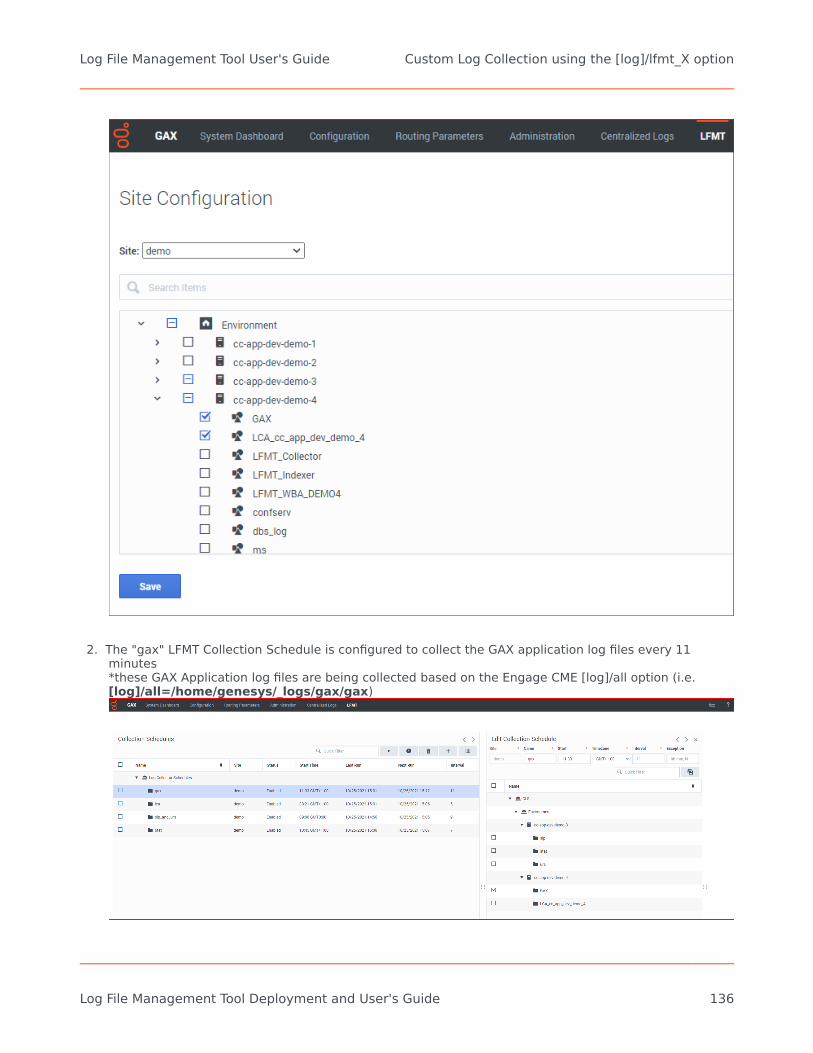
2. The "gax" LFMT Collection Schedule is configured to collect the GAX application log files every 11minutes*these GAX Application log files are being collected based on the Engage CME [log]/all option (i.e.[log]/all=/home/genesys/_logs/gax/gax)
Log File Management Tool User's Guide Custom Log Collection using the [log]/lfmt_X option
Log File Management Tool Deployment and User's Guide 136
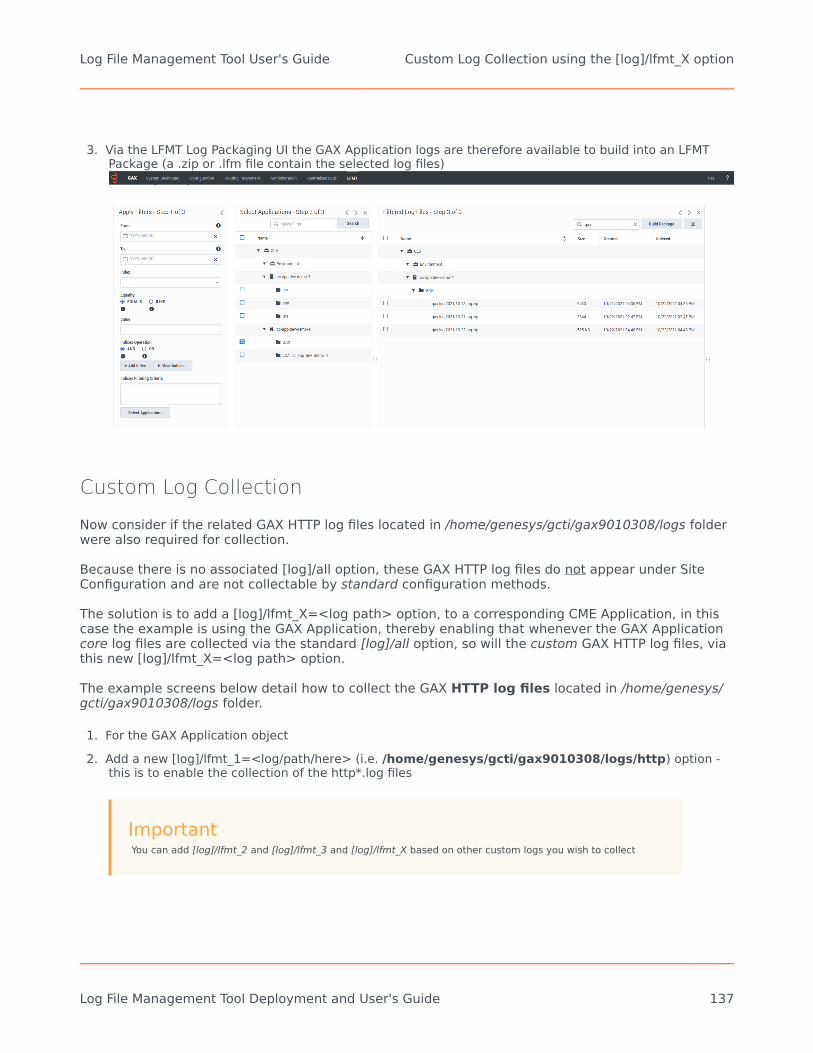
3. Via the LFMT Log Packaging UI the GAX Application logs are therefore available to build into an LFMTPackage (a .zip or .lfm file contain the selected log files)
Custom Log Collection
Now consider if the related GAX HTTP log files located in /home/genesys/gcti/gax9010308/logs folderwere also required for collection.
Because there is no associated [log]/all option, these GAX HTTP log files do not appear under SiteConfiguration and are not collectable by standard configuration methods.
The solution is to add a [log]/lfmt_X=<log path> option, to a corresponding CME Application, in thiscase the example is using the GAX Application, thereby enabling that whenever the GAX Applicationcore log files are collected via the standard [log]/all option, so will the custom GAX HTTP log files, viathis new [log]/lfmt_X=<log path> option.
The example screens below detail how to collect the GAX HTTP log files located in /home/genesys/gcti/gax9010308/logs folder.
1. For the GAX Application object2. Add a new [log]/lfmt_1=<log/path/here> (i.e. /home/genesys/gcti/gax9010308/logs/http) option -
this is to enable the collection of the http*.log files
ImportantYou can add [log]/lfmt_2 and [log]/lfmt_3 and [log]/lfmt_X based on other custom logs you wish to collect
Log File Management Tool User's Guide Custom Log Collection using the [log]/lfmt_X option
Log File Management Tool Deployment and User's Guide 137
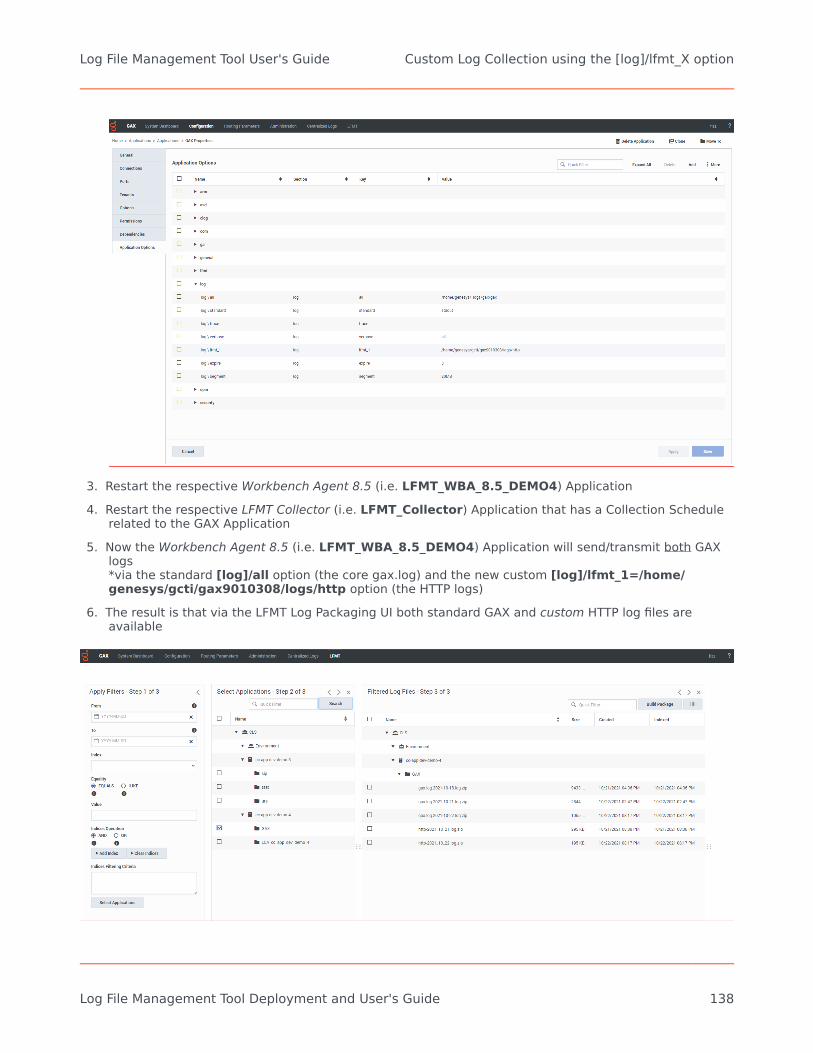
3. Restart the respective Workbench Agent 8.5 (i.e. LFMT_WBA_8.5_DEMO4) Application4. Restart the respective LFMT Collector (i.e. LFMT_Collector) Application that has a Collection Schedule
related to the GAX Application5. Now the Workbench Agent 8.5 (i.e. LFMT_WBA_8.5_DEMO4) Application will send/transmit both GAX
logs*via the standard [log]/all option (the core gax.log) and the new custom [log]/lfmt_1=/home/genesys/gcti/gax9010308/logs/http option (the HTTP logs)
6. The result is that via the LFMT Log Packaging UI both standard GAX and custom HTTP log files areavailable
Log File Management Tool User's Guide Custom Log Collection using the [log]/lfmt_X option
Log File Management Tool Deployment and User's Guide 138
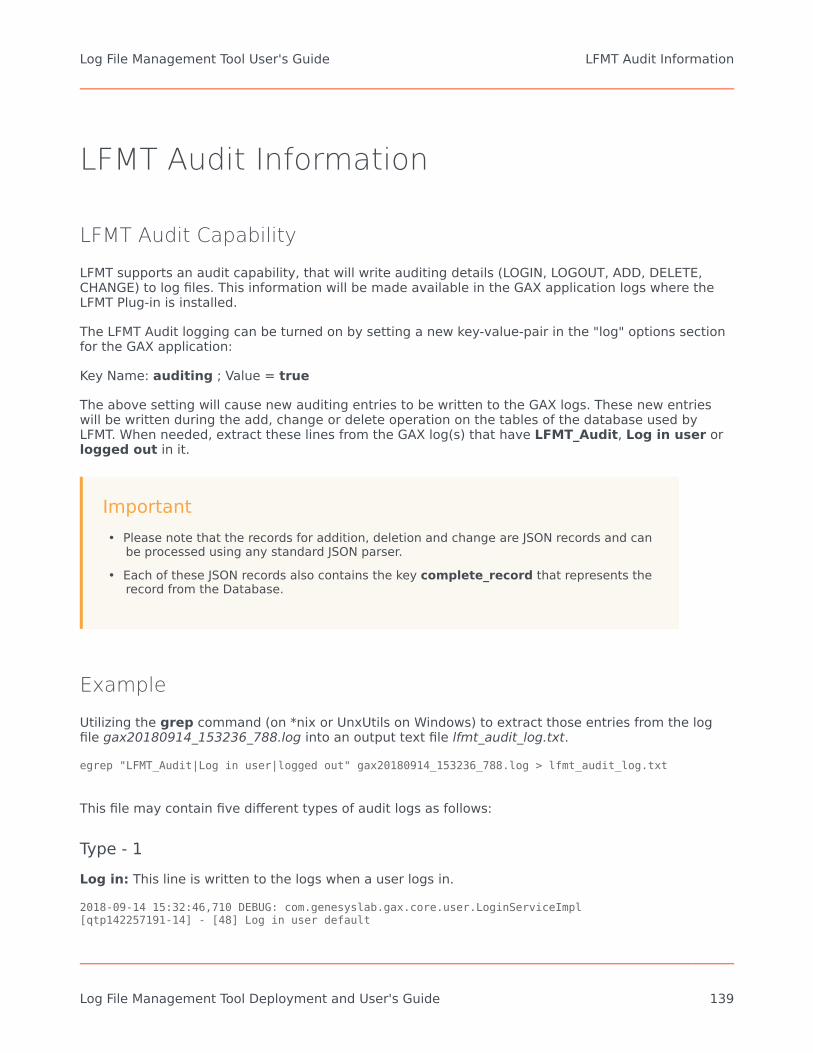
LFMT Audit Information
LFMT Audit Capability
LFMT supports an audit capability, that will write auditing details (LOGIN, LOGOUT, ADD, DELETE,CHANGE) to log files. This information will be made available in the GAX application logs where theLFMT Plug-in is installed.
The LFMT Audit logging can be turned on by setting a new key-value-pair in the "log" options sectionfor the GAX application:
Key Name: auditing ; Value = true
The above setting will cause new auditing entries to be written to the GAX logs. These new entrieswill be written during the add, change or delete operation on the tables of the database used byLFMT. When needed, extract these lines from the GAX log(s) that have LFMT_Audit, Log in user orlogged out in it.
Important• Please note that the records for addition, deletion and change are JSON records and can
be processed using any standard JSON parser.• Each of these JSON records also contains the key complete_record that represents the
record from the Database.
Example
Utilizing the grep command (on *nix or UnxUtils on Windows) to extract those entries from the logfile gax20180914_153236_788.log into an output text file lfmt_audit_log.txt.
egrep "LFMT_Audit|Log in user|logged out" gax20180914_153236_788.log > lfmt_audit_log.txt
This file may contain five different types of audit logs as follows:
Type - 1Log in: This line is written to the logs when a user logs in.
2018-09-14 15:32:46,710 DEBUG: com.genesyslab.gax.core.user.LoginServiceImpl[qtp142257191-14] - [48] Log in user default
Log File Management Tool User's Guide LFMT Audit Information
Log File Management Tool Deployment and User's Guide 139
This line shows that the user default logged in at 2018-09-14 15:32:46,710.
2018-09-14 15:47:03,524 DEBUG: com.genesyslab.gax.core.user.LoginServiceImpl[qtp142257191-12] - [48] Log in user ndatar
This line shows that the user ndatar logged in at 2018-09-14 15:32:46,710.
Type - 2:Log out: This line is written to the logs when a user logs out.
2018-09-14 15:40:48,617 INFO : com.genesyslab.gax.webservice.UserController [qtp142257191-74]- [273] User default logged out
This line shows that the user default logged out at 2018-09-14 15:40:48,617.
2018-09-14 15:48:07,165 INFO : com.genesyslab.gax.webservice.UserController[qtp142257191-128] - [273] User ndatar logged out
This line shows that the user ndatar logged out at 2018-09-14 15:48:07,165.
Type - 3:Added Record: This line is written to the logs when a new record is added.
2018-09-14 15:33:28,538 INFO : com.genesyslab.gax.lfmt.audit_log_util.AuditLogUtil[qtp142257191-73] - [34] {"type":"LFMT_Audit_Log","complete_record":"IndexToRegex {[id:1066,index:null, indexName:test, indexType:index, regularExpression:dds-asdas,applicationTypes:,258,147,567,994,259,956,989,1004,1003,403,351,997,]}","timestamp":"Fri Sep14 15:33:28 ADT 2018","mode":"Added","username":"default"}
This line shows that a new record was added (mode : Added) to the table IndexToRegex at Fri Sep14 15:33:28 ADT 2018 by the user default.
2018-09-14 15:47:39,071 INFO : com.genesyslab.gax.lfmt.audit_log_util.AuditLogUtil[qtp142257191-128] - [34] {"type":"LFMT_Audit_Log","complete_record":"IndexToRegex {[id:1068,index:null, indexName:for_testing, indexType:scrub, regularExpression:a=kjkj,applicationTypes:,1013,916,]}","timestamp":"Fri Sep 14 15:47:39 ADT2018","mode":"Added","username":"ndatar"}
This line shows that a new record was added (mode : Added) to the table IndexToRegex at Fri Sep14 15:47:39 ADT 2018 by the user ndatar.
Type - 4:Changed Record: This line is written to the logs when the contents of an existing record is changed.
2018-09-14 15:36:39,319 INFO : com.genesyslab.gax.lfmt.audit_log_util.AuditLogUtil[qtp142257191-17] - [34] {"type":"LFMT_Audit_Log","complete_record":"IndexToRegex {[id:1059,index:null, indexName:sdsd, indexType:index, regularExpression:as=df,applicationTypes:,258,147,567,1013,916,994,259,956,989,1004,1003,403,351,997,]}","change_details":[{"old_value":"asd","new_value":"as=df","column_name":"regularExpression"},{"old_value":",258,147,567,994,259,956,989,1004,1003,403,351,997,","new_value":",258,147,567,1013,916,994,259,956,989,1004,1003,403,351,997,","column_name":"applicationTypes"}],"timestamp":"Fri Sep 14 15:36:39 ADT2018","mode":"Changed","username":"default"}
This line shows that the entry with name asd was changed (mode : Changed) in the tableIndexToRegex at Fri Sep 14 15:36:39 ADT 2018 by the user default.
Log File Management Tool User's Guide LFMT Audit Information
Log File Management Tool Deployment and User's Guide 140
The changes were:
• Column regularExpression was changed from asd to as=df.• Column applicationTypes was changed from
,258,147,567,994,259,956,989,1004,1003,403,351,997, to,258,147,567,1013,916,994,259,956,989,1004,1003,403,351,997,.
2018-09-14 15:47:51,243 INFO : com.genesyslab.gax.lfmt.audit_log_util.AuditLogUtil[qtp142257191-127] - [34] {"type":"LFMT_Audit_Log","complete_record":"IndexToRegex {[id:1068,index:null, indexName:for_testing, indexType:scrub, regularExpression:a=kjkj 123,applicationTypes:,258,147,567,994,259,956,989,1004,1003,403,351,997,]}","change_details":[{"old_value":"a=kjkj","new_value":"a=kjkj123","column_name":"regularExpression"},{"old_value":",1013,916,","new_value":",258,147,567,994,259,956,989,1004,1003,403,351,997,","column_name":"applicationTypes"}],"timestamp":"FriSep 14 15:47:51 ADT 2018","mode":"Changed","username":"ndatar"}
This line shows that the entry with name asd was changed (mode : Changed) in the tableIndexToRegex at Fri Sep 14 15:47:51 ADT 2018 by the user ndatar.
The changes were:
• Column regularExpression was changed from a=kjkj to a=kjkj 123.• Column applicationTypes was changed from ,1013,916, to
,258,147,567,994,259,956,989,1004,1003,403,351,997,.
Type - 5:Deleted Record: This line is written to the logs when an existing record content is deleted.
2018-09-14 15:46:30,618 INFO : com.genesyslab.gax.lfmt.audit_log_util.AuditLogUtil[qtp142257191-117] - [34] {"type":"LFMT_Audit_Log","complete_record":"IndexToRegex {[id:1067,index:null, indexName:ggh, indexType:index, regularExpression:ghgh-jkjk001,applicationTypes:,258,147,567,994,259,956,989,1004,1003,403,351,997,]}","timestamp":"Fri Sep14 15:46:30 ADT 2018","mode":"Deleted","username":"default"}
This line shows that the entry with name ggh from the table IndexToRegex was deleted (mode :Deleted) at Fri Sep 14 15:46:30 ADT 2018 by the user default.
2018-09-14 15:48:01,180 INFO : com.genesyslab.gax.lfmt.audit_log_util.AuditLogUtil[qtp142257191-117] - [34] {"type":"LFMT_Audit_Log","complete_record":"IndexToRegex {[id:1068,index:null, indexName:for_testing, indexType:scrub, regularExpression:a=kjkj 123,applicationTypes:,258,147,567,994,259,956,989,1004,1003,403,351,997,]}","timestamp":"Fri Sep14 15:48:01 ADT 2018","mode":"Deleted","username":"ndatar"}
This line shows that the entry with name for_testing from the table IndexToRegex was deleted(mode : Deleted) at Fri Sep 14 15:48:01 ADT 2018 by the user ndatar.
Log File Management Tool User's Guide LFMT Audit Information
Log File Management Tool Deployment and User's Guide 141
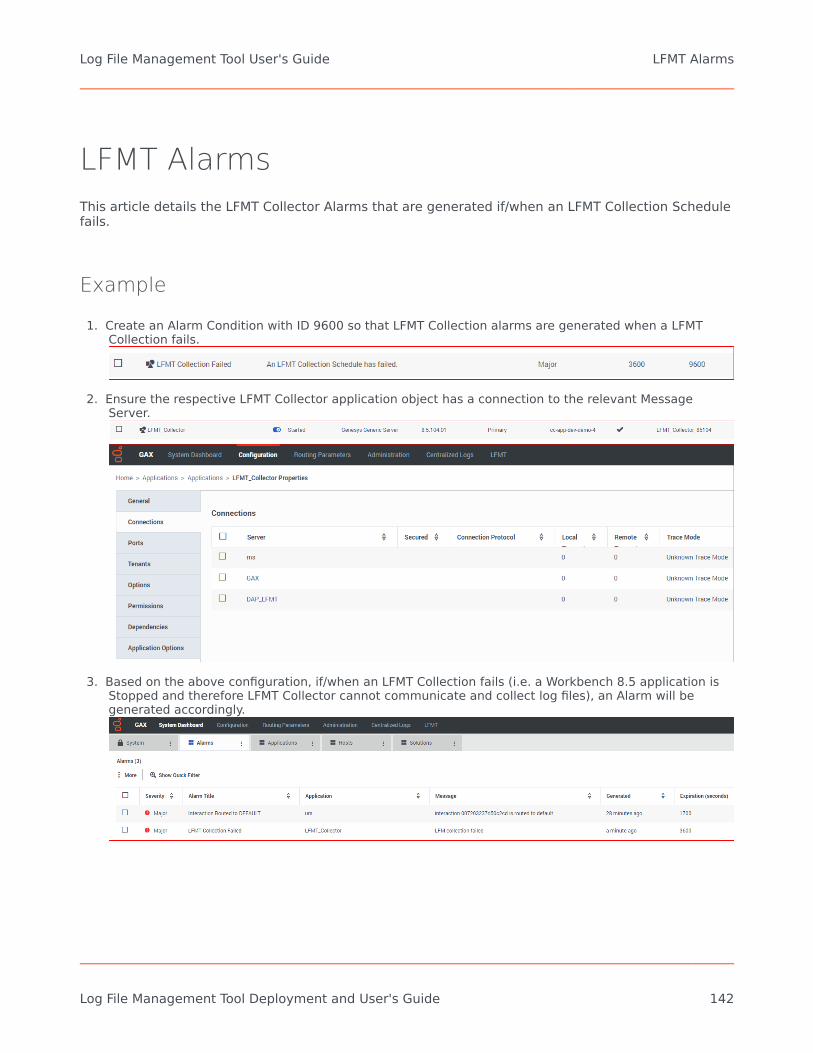
LFMT AlarmsThis article details the LFMT Collector Alarms that are generated if/when an LFMT Collection Schedulefails.
Example
1. Create an Alarm Condition with ID 9600 so that LFMT Collection alarms are generated when a LFMTCollection fails.
2. Ensure the respective LFMT Collector application object has a connection to the relevant MessageServer.
3. Based on the above configuration, if/when an LFMT Collection fails (i.e. a Workbench 8.5 application isStopped and therefore LFMT Collector cannot communicate and collect log files), an Alarm will begenerated accordingly.
Log File Management Tool User's Guide LFMT Alarms
Log File Management Tool Deployment and User's Guide 142

Additional InformationThis section gives additional information to administrators and users for deploying, configuring, andusing the LFMT.
Sections within this Additional Information chapter:
1. Configuration of TLS Connections2. Best Practices3. Regular Expressions4. Release Notes5. FAQ's
Additional Information LFMT Alarms
Log File Management Tool Deployment and User's Guide 143
Troubleshooting
Important• As a first troubleshooting step, please review and double-check the LFMT Checklist
section.
• LFMT Collector will not Start - always reverts back to Stopped?• Answer: Please check if the LFMT Collector application(s) has a connection to a DAP that connects to
the LFMT Database
• LFMT Indexer will not Start - always reverts back to Stopped?• Answer: Please check if the LFMT Indexer application(s) has a connection to a DAP that connects to
the LFMT Database
• LFMT shows "Failed to retrieve applications list" error?• LFMT configuration is blank?
• Answer: Please double-check:• There's an assigned Tenant on the Server Info on all the LFMT Application objects (i.e. LFMT
Collector, LFMT Indexer, the LFMT GAX instance).• LFMT Collector has ftmessaging and sftmessaging listening Ports configured and these ports
are free/open• The DAP LFMT application object - Database Name, Database Username, Database Password is
correct• The DAP LFMT application object - if/when using Oracle Database and if/when using Service
Name and not SID - add the [lfmt].use_oracle_service = true option/setting - detailed herehttps://docs.genesys.com/Documentation/ST/latest/DeploymentGuide/DAPOptions
• The GAX application(s) has a connection to a DAP that connects to the LFMT Database• Ensure GAX has been restarted post LFMT Connection, Port, Option changes
• LFMT newly added Index not working?
Additional Information Troubleshooting
Log File Management Tool Deployment and User's Guide 144
• Answer: Please double-check:• The CME Application for which the Index is to apply has been checked/selected in the Indexing
and Scrubbing section• i.e. if you wish to filter the chicago_URS_a application based on ConnID - the chicago_URS_a
application has been checked for the respective ConnID Index
• The respective LFMT Indexer application(s) has been restarted• The Regex has been reviewed and tested independently of LFMT on the respective log file text
and the desired output is presented
• Log files are not being collected?• Ensure a Workbench Agent 8.5 application has been installed on the respective Host(s) from which
log files will be collected from (i.e. sip, urs, stat etc)• Double-check the Workbench Agent 8.5 (if using 8.5.102 or below) Application object Template is
named CC_Agent• if not LFMT Collector will not identify/connect to the Workbench Agent 8.5 application(s) and
therefore log files will not be collected• an indication of the Workbench Agent 8.5 Template being incorrect is the entry Remote agents
available [null] being written to the respective Workbench Agent 8.5 log file(s)
• If using TLS ensure Certs have not expired
• Unable to create LFMT Packages - "Error in creating package details file" is present in Collector log• Check LFMT Collector option "[app_config]package_location = <packages location or path>" is valid
and/or write permissions to the path are sufficient
• Unable to download LFMT Package - Failed Forbidden error• If/when using LFMT 8.5.104 thru LFMT Client 8.5.105.03 and GAX 9.0.103.08+
• Ensure the respective GAX Application with LFMT Client Plug-in object, hasthe [lfmt]/use_lfm_extension option set to true
• So that .lfm files and not .zip (default as of 8.5.104) LFMT Package files are created and thereforedownloadable via GAX
• As per GAX RN's GAX-11260 the GAX application now filters unnecessary .gz, .jar, .zip, and .rarAPI requests.
Additional Information Troubleshooting
Log File Management Tool Deployment and User's Guide 145
Configuration of TLS Connections
TLS Connections to Configuration Server
LFMT Indexer and LFMT Collector both support secure connections to Configuration Server's Auto-Detect port. This section describes how to configure these secure connections. It is assumed that theperson configuring the secure connection has already become familiar with the Genesys SecurityDeployment Guide and configured the Configuration Server Auto-Detect port.
ImportantWhen creating certificates using OpenSSL as described in the Genesys SecurityDeployment Guide ensure the default Secure Hash Algorithm is at minimum SHA-2.This can be done by editing the .\ca_conf\ca.conf file created by the create_ca.shscript so default_md = sha256 prior to creating certificates.
ImportantIf LFMT Indexer and LFMT Collector are to be deployed on a Linux host, ensure theprivate key is in PKCS #8 format. For more information on converting keys to PKCS #8for use with Java based Genesys PSDK applications, refer to the Genesys SecurityDeployment Guide.
Installing Certificates and Certificate Authorities on the LFMT Server HostThis section describes how to install the certificates and certificate authorities used for secureconnections on the LFMT Server Host.
On Linux
1. If not already completed, install the Genesys Security on UNIX package and configure the systemenvironment variable LD_LIBRARY_PATH as per the Genesys Security Deployment Guide.
2. Copy the certificate, the certificate key, and the certificate authority file to a location on the LFMTServer Host.
3. Ensure the certificate, the certificate key, and the certificate authority file are readable by the user thatstarts LFMT Indexer and LFMT Collector.
On Windows
1. Copy the certificate, the certificate key, and the certificate authority file to a location on the LFMT
Additional Information Configuration of TLS Connections
Log File Management Tool Deployment and User's Guide 146
Server Host.2. Ensure the certificate, the certificate key, and the certificate authority file are readable by the user that
starts LFMT Indexer and LFMT Collector.3. From the Windows Start menu, select Run, and then execute the mmc command to start the Microsoft
Management Console (MMC).
• The Microsoft Management Console should be opened under the user who starts LFMT Indexer andLFMT Collector. If this is the Local System account, you will need to open the console as the LocalSystem user. This can be done using the PSTools psexec application with the following command:psexec.exe –i –s mmc.exe
• PSTools can be downloaded from http://technet.microsoft.com/en-US/sysinternals.
• Select File > Add/Remove Snap-in.• In the left pane choose Certificates. Click the Add button.• Add a Certificates snap-in for Computer account. Click Finish.• As above, add an additional Certificates snap-in for My user account.• In the Computer Account snap-in right-click the Trusted Root Certification Authorities folder, and select All
Tasks > Import from the shortcut menu. This starts the Certificate Import Wizard.• On the first Wizard page, click Next.• On the File to Import page, browse to the certificate authority file (Ex. ca_cert.pem), and then click Next.• On the Certificate Store page, select Place all certificates in the following store. Make sure that the
Certificate store text box is set to Trusted Root Certification Authorities. Click Next.• Click Finish.• In the My user account snap-in open the Certificates folder.• Right-click the Personal folder, and select All Tasks > Import from the shortcut menu. This starts the
Certificate Import Wizard.• On the first Wizard page, click Next.• On the File to Import page, browse to the certificate file (Ex. collector_host.pfx). Click Next.• On the Password page, click Next. No password is needed.• On the Certificate Store page, select Place all certificates in the following store. Make sure that the
Certificate store text box is set to Personal. Click Next.• Click Finish.• Press F5 to update the MMC view.• On the left pane, select Certificates > Personal > Certificates.• On the right pane, locate the imported certificate in the list, and double-click it.• In the Certificate dialog box, click the Details tab.• To view the certificate thumbprint, select Thumbprint from the list. The thumbprint, consisting of a string of
hexadecimal digits, appears in the lower part of the dialog box. The same process can be used to view thethumbprint for the certificate authority.
Additional Information Configuration of TLS Connections
Log File Management Tool Deployment and User's Guide 147
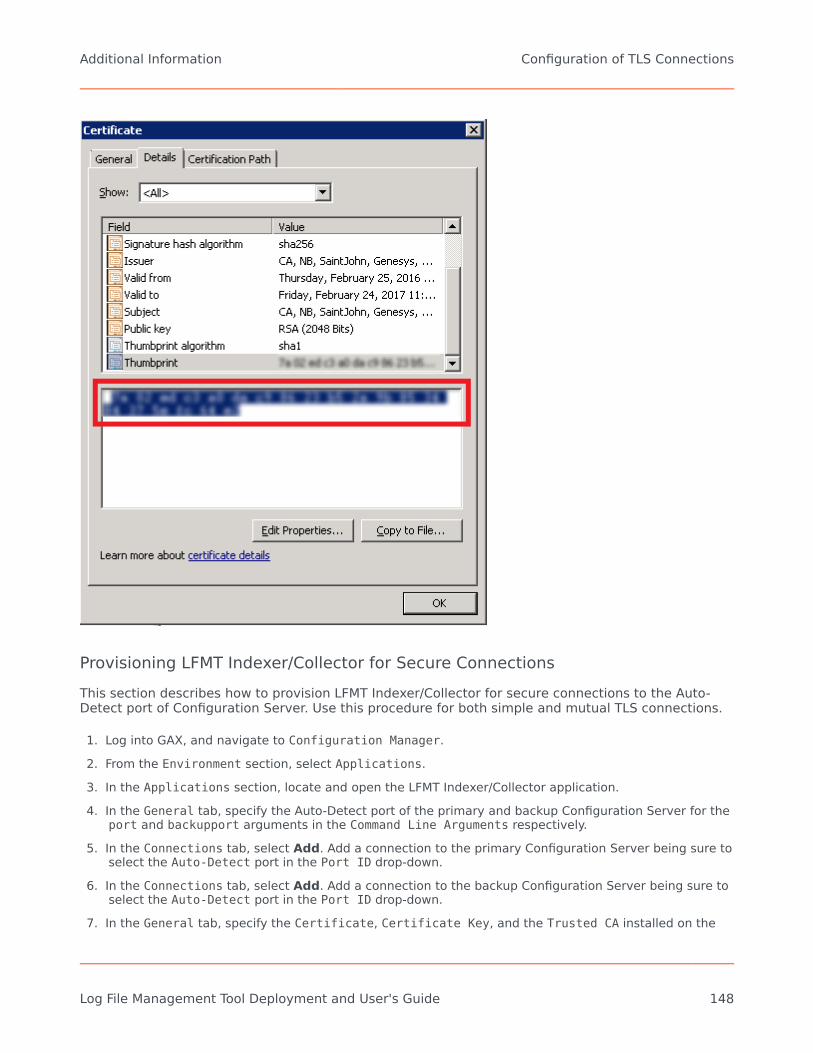
Provisioning LFMT Indexer/Collector for Secure ConnectionsThis section describes how to provision LFMT Indexer/Collector for secure connections to the Auto-Detect port of Configuration Server. Use this procedure for both simple and mutual TLS connections.
1. Log into GAX, and navigate to Configuration Manager.2. From the Environment section, select Applications.3. In the Applications section, locate and open the LFMT Indexer/Collector application.4. In the General tab, specify the Auto-Detect port of the primary and backup Configuration Server for the
port and backupport arguments in the Command Line Arguments respectively.5. In the Connections tab, select Add. Add a connection to the primary Configuration Server being sure to
select the Auto-Detect port in the Port ID drop-down.6. In the Connections tab, select Add. Add a connection to the backup Configuration Server being sure to
select the Auto-Detect port in the Port ID drop-down.7. In the General tab, specify the Certificate, Certificate Key, and the Trusted CA installed on the
Additional Information Configuration of TLS Connections
Log File Management Tool Deployment and User's Guide 148

LFMT Server Host.• Certificate: For Windows this will be the thumbprint of the certificate shown in the Properties of
the certificate in MMC Certificates snap-in. For Linux, this will be the complete path to the certificatefile. Ex. /home/genesys/certs/collector_host.pem
• Certificate Key: For Windows this will be the thumbprint of the certificate shown in the Propertiesof the certificate in MMC Certificates snap-in (this normally the same value as used in theCertificate field). For Linux, this will be the complete path to the certificate key file. Ex. /home/genesys/certs/collector_host_java_priv_key.pem
• Trusted CA: For Windows this will be the thumbprint of the Trusted Root Certificate Authority shownin the Properties of the certificate authority in MMC Certificates snap-in. For Linux, this will be thecomplete path to the certificate authority file. Ex. /home/genesys/certs/ca_cert.pem
8. Click Save to commit the changes.
TipAs an alternative to configuring the Certificate, Certificate Key, and the TrustedCA for the LFMT Indexer and Collector at the application level, certificates andcertificate authorities can be assigned on the LFMT Server Host Object in GAX.
Additional Information Configuration of TLS Connections
Log File Management Tool Deployment and User's Guide 149
Best PracticesThis section lists some best practices administrators and users should review for optimal deployment,configuration, and operation of LFMT.
• Deploy a separate LFMT Indexer/Collector pair(s) at each Data-Center if they are geographicallydistributed.
• Deploy each LFMT Database in a RDBMS within the same local as the associated LFMT Indexer/Collectorpair.
• During the initial deployment of LFMT, consider a phased approach for adding Application servers (i.e.sip, urs, stat, gvp etc) to the log collection process.
• Monitor the performance impact of LFMT on each Application server (i.e. sip, urs, stat, gvp etc) duringthe initial deployment.
• To reduce the performance impact of log file collection set the LFMT Collection Schedule Interval to betwice the required log file transfer time.
• Limit the LFMT custom Indexes for each Application/Application type; a general rule is 3 perApplication.
• Set up LFMT Scrubbing and Indexing for only those Application Types that are required.• Turn off Anti-virus checking on the LFMT Server Host(s).• Ensure that network traffic generated by Genesys application servers has a higher priority LFMT traffic.• Set a low quality of service (QoS) value for network traffic generated by LFMT.• If possible, use a dedicated VLAN or LAN for LFMT traffic.
Additional Information Best Practices
Log File Management Tool Deployment and User's Guide 150
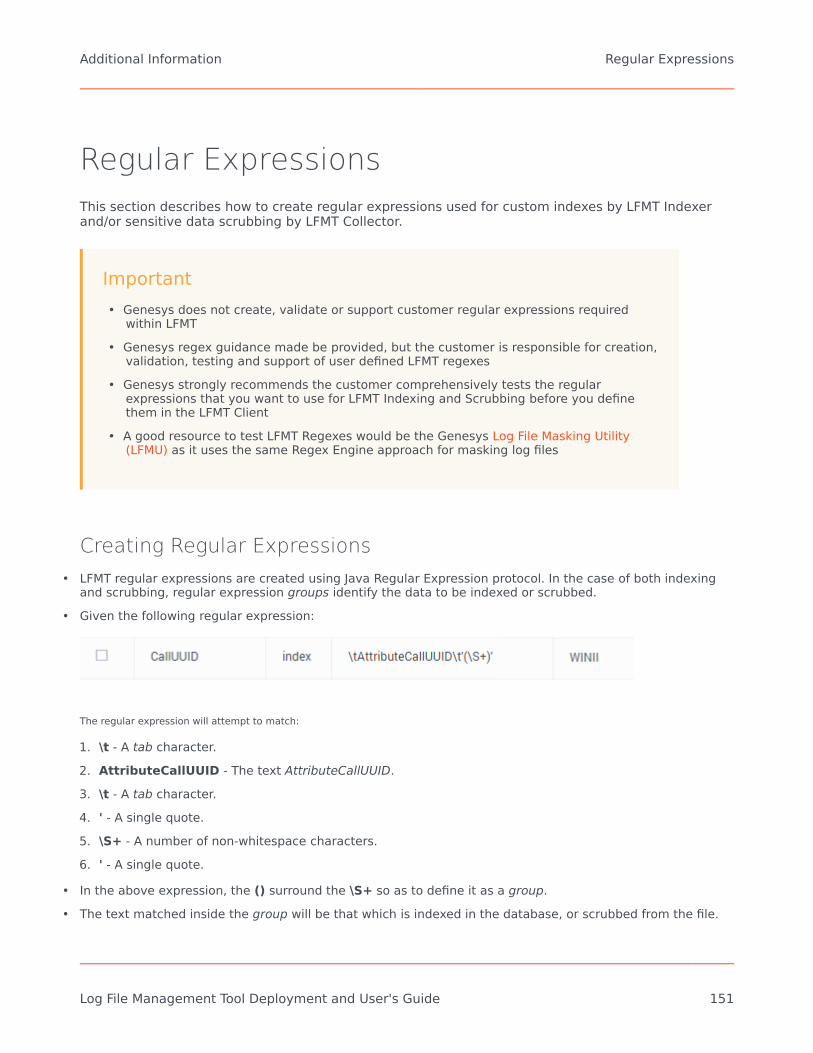
Regular ExpressionsThis section describes how to create regular expressions used for custom indexes by LFMT Indexerand/or sensitive data scrubbing by LFMT Collector.
Important• Genesys does not create, validate or support customer regular expressions required
within LFMT• Genesys regex guidance made be provided, but the customer is responsible for creation,
validation, testing and support of user defined LFMT regexes• Genesys strongly recommends the customer comprehensively tests the regular
expressions that you want to use for LFMT Indexing and Scrubbing before you definethem in the LFMT Client
• A good resource to test LFMT Regexes would be the Genesys Log File Masking Utility(LFMU) as it uses the same Regex Engine approach for masking log files
Creating Regular Expressions• LFMT regular expressions are created using Java Regular Expression protocol. In the case of both indexing
and scrubbing, regular expression groups identify the data to be indexed or scrubbed.• Given the following regular expression:
The regular expression will attempt to match:
1. \t - A tab character.2. AttributeCallUUID - The text AttributeCallUUID.3. \t - A tab character.4. ' - A single quote.5. \S+ - A number of non-whitespace characters.6. ' - A single quote.
• In the above expression, the () surround the \S+ so as to define it as a group.• The text matched inside the group will be that which is indexed in the database, or scrubbed from the file.
Additional Information Regular Expressions
Log File Management Tool Deployment and User's Guide 151
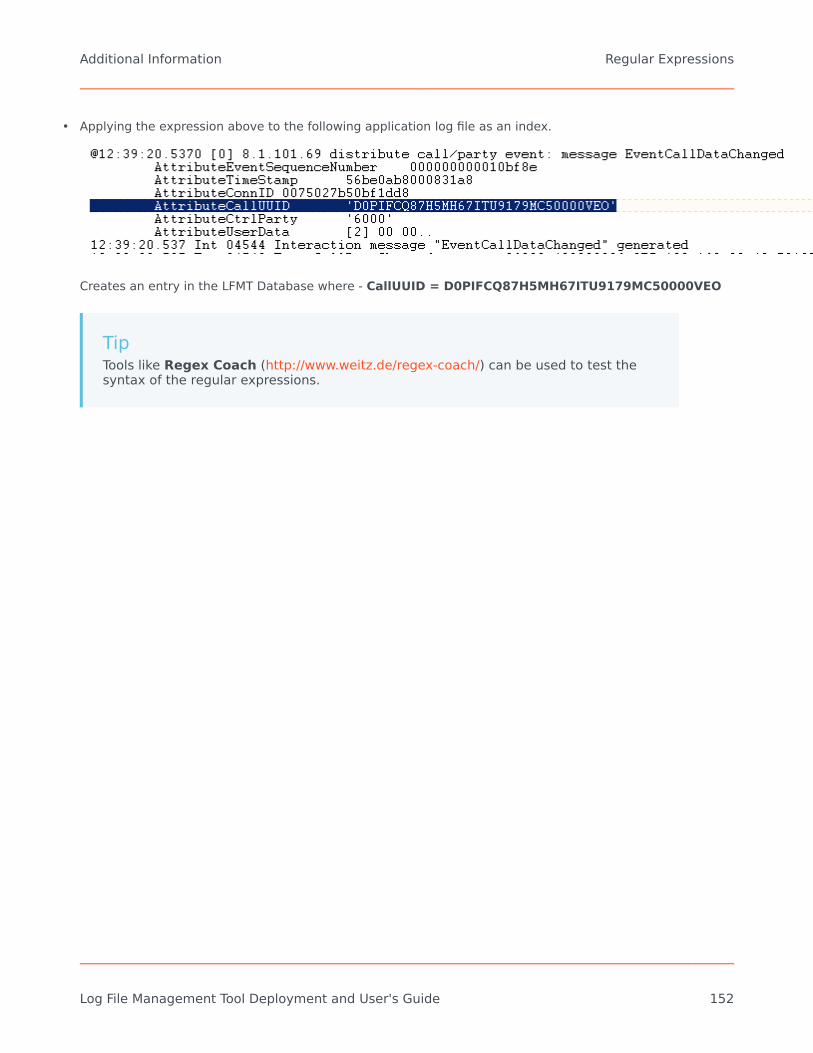
• Applying the expression above to the following application log file as an index.
Creates an entry in the LFMT Database where - CallUUID = D0PIFCQ87H5MH67ITU9179MC50000VEO
TipTools like Regex Coach (http://www.weitz.de/regex-coach/) can be used to test thesyntax of the regular expressions.
Additional Information Regular Expressions
Log File Management Tool Deployment and User's Guide 152
Release NotesThis section provides links to the LFMT Release Notes.
• LFMT Client Release Note• LFMT Indexer Release Note• LFMT Collector Release Note
Additional Information Release Notes
Log File Management Tool Deployment and User's Guide 153

FAQ'sThis section provides a useful list of LFMT Frequently Asked Question’s (FAQ’s):
What is LFMT
• What is LFMT?• Answer: Please review: https://docs.genesys.com/Documentation/ST/DRAFT2/DeploymentGuide/
Overview
Components
• What are the LFMT components and their respective functions?• Answer: Please review: https://docs.genesys.com/Documentation/ST/latest/DeploymentGuide/
Overview#LFMT_Components
Prerequisites
• What software must be installed before deploying the LFMT?• Answer:
• Genesys Administrator Extension and all of its associated components - LFMT uses GAX for theUI
• JRE 1.8 (or later) or OpenJDK 8 or OpenJDK 11 - LFMT components are Java based
Workbench Host/Server Operating System Support
• Which Operating Systems are supported by LFMT?• Answer:
• Windows 2012 and 2016• RHEL 7 and CentOS 7
LFMT Database
• Which 3rd Party Databases are supported by LFMT?• Answer:
• PostgreSQL 9.1 or later• Oracle DBMS 11 to 19c• Microsoft SQL Server 2005 or later
• Does the Database contain log files or just metadata?• Answer: Only metadata - log files are stored on disk based on the LFMT Collector cls_location
setting/option
Additional Information FAQ's
Log File Management Tool Deployment and User's Guide 154
• Does LFMT support TLS database connections (to Oracle, MS-SQL and Postgres) via the respective DAP?• Answer: Yes - as of LFMT Collector 8.5.104.04, LFMT Indexer 8.5.104.02, LFMT Client 8.5.104.02
Browser Support
• Which Internet Browsers are supported by LFMT?• Answer: Chrome, Edge, Firefox - latest versions recommended
Sizing
• Where can I find details on LFMT Sizing?• Answer: Please review this section: https://docs.genesys.com/Documentation/ST/latest/
DeploymentGuide/Sizing
• Where can I download the LFMT Sizing Template?• Answer: Please click here: Genesys Log File Management Tool Sizing Template
Architecture
• Are the LFMT Collector and LFMT Indexer applications deployed in pairs on the same host/VM?• Answer: Yes - please review this section: https://docs.genesys.com/Documentation/ST/latest/
DeploymentGuide/Architecture
• Can multiple LFMT Collector and LFMT Indexer applications pairs be deployed in the same Data-Center?• Answer: Yes
• i.e. there could be 3 LFMT hosts/VM's at the "Chicago" Data-Center - "Chicago_1", "Chicago_2"and "Chicago_3"• each Host with an LFMT Collector/Indexer pair installed• each LFMT Collector/Indexer pair is backed by a "Chicago_1", "Chicago_2" and "Chicago_3"
database• each LFMT Host would be collecting log files from different Genesys Applications Servers
• "Chicago_1" is collecting SIP logs - "Chicago_2" is collecting URS logs - "Chicago_3" iscollecting GVP logs
• Can multiple LFMT Collector and LFMT Indexer applications pairs be deployed on the same host/VM?• Answer: No
• i.e. you should not deploy an "LFMT_Collector_1" application and "LFMT_Collector_2" applicationon the same "Chicago_1" Host
Deployment
• Does Genesys recommend a lab/test deployment before production?• Answer: Yes - please determine if LFMT and its features/limitations are useful for production use
before considering a production deployment
• Does LFMT need its own dedicated host/VM infrastructure?
Additional Information FAQ's
Log File Management Tool Deployment and User's Guide 155

• Answer: Yes - please review this section: https://docs.genesys.com/Documentation/ST/latest/DeploymentGuide/Sizing
• Is the Workbench Agent 8.5 application required on the remote Genesys Application Server hosts (i.e.sip, urs, gvp, fwk etc etc)?• Answer: Yes
• if not LFMT cannot collect/send the respective log files to the LFMT Host(s) for storage
• Is the Workbench Agent 8.5 application different to the Workbench Agent 9.x component?• Answer: Yes
• use only Workbench Agent 8.5 for LFMT• use only Workbench Agent 9.x for Workbench
• Can both the Workbench Agent 8.5 and 9.x applications run on the same host/VM?• Answer: Yes
• Workbench Agent 8.5 and 9.x can run on the same host/VM - i.e. if you wish to use both theLFMT and Workbench tools - e.g:
• The Workbench Agent 8.5 would be collecting log files for the LFMT Host(s) to store in its CLsRepo
• The Workbench Agent 9.x would be sending Metric data (i.e. CPU, RAM, DISK, NETWORK) toWorkbench 9.x Server/Cluster
• Should all LFMT components be running the same version?• Answer: Yes - i.e. do not mix LFMT Client 8.5.103 with LFMT Collector 8.5.104 - all versions must be
the same
• Can the Workbench Agent 8.5 applications be installed in bulk as opposed to one at a time?• Answer: Yes - please review: https://docs.genesys.com/Documentation/ST/latest/DeploymentGuide/
DepMassDeployWorkbenchAgent• Also an automation deployment solution such as Ansible could be used
• Does Genesys recommend a separate GAX instance for LFMT• Answer: Yes - this will make LFMT upgrades easier as the only installed Plug-in will/should be LFMT
and not other Plug-ins used to manage the contact center• Also if many Users are regularly creating LFMT Log Packages a separate GAX instance is
recommended
• Where can I find a list of the LFMT settings/options?• Answer: Please review: https://docs.genesys.com/Documentation/ST/latest/DeploymentGuide/
Options
Log Transfer/Upload
• Are the LFMT collected log files compressed during transfer from the Genesys Application Server(s) (i.e.sip, urs, gvp etc) to the LFMT Host(s)?• Answer: Yes - typically at a ratio of ~10:1 - therefore a ~10 MB log file would be transferred at a
compressed ~1 MB
Additional Information FAQ's
Log File Management Tool Deployment and User's Guide 156
Log Storage
• Are the LFMT collected log files compressed at storage/rest?• Answer: Yes - typically at a ratio of ~10:1 - therefore a ~10 MB log file would be stored at a
compressed ~1 MB
Genesys Platform Integration
• Which Genesys platforms does LFMT currently support integration with?• Answer: Genesys Engage On-Premise.
CME Connections for LFMT
• Is there a diagram detailing CME Connections for LFMT• Answer: Yes - please review: https://docs.genesys.com/Documentation/ST/latest/DeploymentGuide/
ApplicationConnections
• What is the CME Connections summary?• Answer:
• GAX connection to LFMT Collector(s) and LFMT DAP(s) - a GAX application may have multipleconnections to more than one LFMT DAP object
• LFMT Collector connection to GAX and LFMT DAP - an LFMT Collector application object musthave only one connection to a LFMT DAP object
• LFMT Indexer connection to LFMT DAP - an LFMT Indexer application object must have onlyone connection to a LFMT DAP object
Ports
• Which Ports are used by LFMT?• Answer: This would depend on the Ports assigned when creating the CME Applications
• Please ensure these Ports are open in the firewall and not used by any existing applications - asan example in our lab we use:• LFMT Collector = 8001 (default), 8020 (ftmessaging) and 8030 (sftmessaging)• LFMT Indexer = 8002 (default)• Workbench Agent 8.5 = 7999 (default), 7101 (ftmessaging) and 7102 (sftmessaging) - also
open 2552 for Actor messaging• DAP_LFMT = 5432 (default)• GAX / LFMT Client = 8080 (default), 9001 (messaging) and 9002 (ftmessaging)
LFMT Authentication
• How do users log into LFMT?• Answer: Via GAX - a new LFMT tile will be presented within GAX post the installation of the LFMT
Client application
Additional Information FAQ's
Log File Management Tool Deployment and User's Guide 157
Data Retention
• How/when is data purged/deleted from LFMT?• Answer: This is based on the LFMT Indexer retention_period setting
• please review https://docs.genesys.com/Documentation/ST/latest/DeploymentGuide/IndexerOptions
GDPR
• How does LFMT accommodate the GDPR policy?• Answer: LFMT currently does not support access or erasure requests for data that is stored for an
extended period. In order to meet EU GDPR (European Union General Data Protection Regulation)compliance, customers/partners should ensure that the ‘LFMT Indexer’ application“retention_period” option is set to 30 days or less (if adherence to EU GDPR is required).
Licenses
• Does LFMT need a separate license?• Answer: No - not a separate license, simply an active Genesys maintenance subscription
Using LFMT
• Is there a guide on using the LFMT features?• Answer: Yes - please review: https://docs.genesys.com/Documentation/ST/latest/DeploymentGuide/
Using
• Should I stagger the LFMT Collection Schedules of my Genesys Application (i.e. sip, urs, gvp etc) logfiles or can they all be run simultaneously?• Answer: Yes - LFMT Collection Schedules should be staggered based on the Start Time and/or
Interval settings• Details on Collection Schedules can be found here: https://docs.genesys.com/Documentation/ST/
latest/DeploymentGuide/ColSched
• If an LFMT Collection Schedule is edited and saved, is it Disabled/Stopped and therefore does it need tobe manually Enabled/Started thereafter?• Answer: Yes - please review: https://docs.genesys.com/Documentation/ST/latest/DeploymentGuide/
ColSched
• If an LFMT Index (type Index or Scrub) is added/edited and saved, does the LFMT Indexer(s) applicationneed to be restarted?• Answer: Yes - if not the Index will not be applied - please review: https://docs.genesys.com/
Documentation/ST/latest/DeploymentGuide/IndScrub
TLS
• Does LFMT support TLS?• Answer: Yes - please review: https://docs.genesys.com/Documentation/ST/latest/DeploymentGuide/
TLS
Additional Information FAQ's
Log File Management Tool Deployment and User's Guide 158
Best Practices
• Does LFMT have any Best Practices guidance?• Answer: Yes - https://docs.genesys.com/Documentation/ST/latest/DeploymentGuide/BestPractices
LFMT Release Notes
• Where can I find the LFMT Release Notes?• Answer: Please review: https://docs.genesys.com/Documentation/ST/latest/DeploymentGuide/
ReleaseNotes
Additional Information FAQ's
Log File Management Tool Deployment and User's Guide 159
Related Documents


![LOG Storm Studio - Byte Paradigm · 2013-01-02 · LOG Storm Studio User's Guide References [] History Version Date Description 1.00 22 Feb 2012 Initial revision 1.01 12 April 2012](https://static.cupdf.com/doc/110x72/5f43cb0b382a3635c76d9fb6/log-storm-studio-byte-paradigm-2013-01-02-log-storm-studio-users-guide-references.jpg)