Locomotive Building at St Annes RC Primary School June 2014 v3.doc 1 Report on Locomotive Building at St Annes RC Primary School, Ormskirk 16, 19 June 2014 Brian Farrimond (Edge Hill University) Mark Anderson (Edge Hill University) Ella Pereira (Edge Hill University) Contact [email protected] Contents INTRODUCTION .................................................................................................................................. 2 AIMS ....................................................................................................................................................... 2 OBJECTIVES......................................................................................................................................... 3 THE SESSION........................................................................................................................................ 3 1. REAL STEAM LOCOMOTIVES ............................................................................................................. 4 2. DEMONSTRATION OF LOCOMOTIVES IN THINGBUILDER AND SCENARIOBUILDER ............................ 5 3. RAILWAYS AND THE LOCOMOTIVES IN AND AROUND ORMSKIRK ..................................................... 6 4. THE VOCABULARY OF LOCOMOTIVES ............................................................................................... 7 5. ANNOTATION OF A DRAWING OF A STEAM LOCOMOTIVE .................................................................. 7 6. CHILDREN MAKING MEASUREMENTS FROM ENGINEERING DRAWINGS OF A LOCOMOTIVE ................ 8 7. CHILDREN USING THINGBUILDER TO BUILD THE LOCOMOTIVE ...................................................... 10 8. CHILDREN ADDING THEIR LOCOMOTIVES TO A SCENARIO ............................................................... 10 9. TENDER ENGINES AND INSIDE CYLINDERS ...................................................................................... 11 OUTCOMES......................................................................................................................................... 13 COMMENTS AND CONCLUSIONS ................................................................................................ 14 NEXT TIME ......................................................................................................................................... 15 APPENDIX 1 - RAPID SHUNTER DRAWINGS ............................................................................. 16 APPENDIX 2 RAPID SHUNTER MEASUREMENTS................................................................. 18 APPENDIX 3 ASPINALL 0-6-0 DRAWINGS .................................................................................. 19 APPENDIX 4 ASPINALL 0-6-0 MEASUREMENTS ....................................................................... 22 REFERENCES ..................................................................................................................................... 24

Welcome message from author
This document is posted to help you gain knowledge. Please leave a comment to let me know what you think about it! Share it to your friends and learn new things together.
Transcript
Locomotive Building at St Annes RC Primary School June 2014 v3.doc
1
Report on Locomotive Building at St Annes RC Primary
School, Ormskirk
16, 19 June 2014
Brian Farrimond (Edge Hill University)
Mark Anderson (Edge Hill University)
Ella Pereira (Edge Hill University)
Contact [email protected]
Contents
INTRODUCTION ..................................................................................................................................2
AIMS .......................................................................................................................................................2
OBJECTIVES.........................................................................................................................................3
THE SESSION........................................................................................................................................3
1. REAL STEAM LOCOMOTIVES .............................................................................................................4 2. DEMONSTRATION OF LOCOMOTIVES IN THINGBUILDER AND SCENARIOBUILDER ............................5 3. RAILWAYS AND THE LOCOMOTIVES IN AND AROUND ORMSKIRK .....................................................6 4. THE VOCABULARY OF LOCOMOTIVES ...............................................................................................7 5. ANNOTATION OF A DRAWING OF A STEAM LOCOMOTIVE ..................................................................7 6. CHILDREN MAKING MEASUREMENTS FROM ENGINEERING DRAWINGS OF A LOCOMOTIVE ................8 7. CHILDREN USING THINGBUILDER TO BUILD THE LOCOMOTIVE ......................................................10 8. CHILDREN ADDING THEIR LOCOMOTIVES TO A SCENARIO ...............................................................10 9. TENDER ENGINES AND INSIDE CYLINDERS ......................................................................................11
OUTCOMES.........................................................................................................................................13
COMMENTS AND CONCLUSIONS ................................................................................................14
NEXT TIME .........................................................................................................................................15
APPENDIX 1 - RAPID SHUNTER DRAWINGS .............................................................................16
APPENDIX 2 RAPID SHUNTER MEASUREMENTS.................................................................18
APPENDIX 3 ASPINALL 0-6-0 DRAWINGS ..................................................................................19
APPENDIX 4 ASPINALL 0-6-0 MEASUREMENTS.......................................................................22
REFERENCES .....................................................................................................................................24
Locomotive Building at St Annes RC Primary School June 2014 v3.doc
2
Introduction The Locomotive Builder embedded within the software suite comprising
ThingBuilder and ScenarioBuilder was trialled with Year 6 at St Annes Primary
School Ormskirk on 16 and 19 June 2014. Locomotive building is an extension of the
capabilities of the software the children had met six months earlier when they
successfully built and sailed paddle steamers through Liverpool Docks. This was a
repeat of a session held for the previous Year 6 in June 2013i.
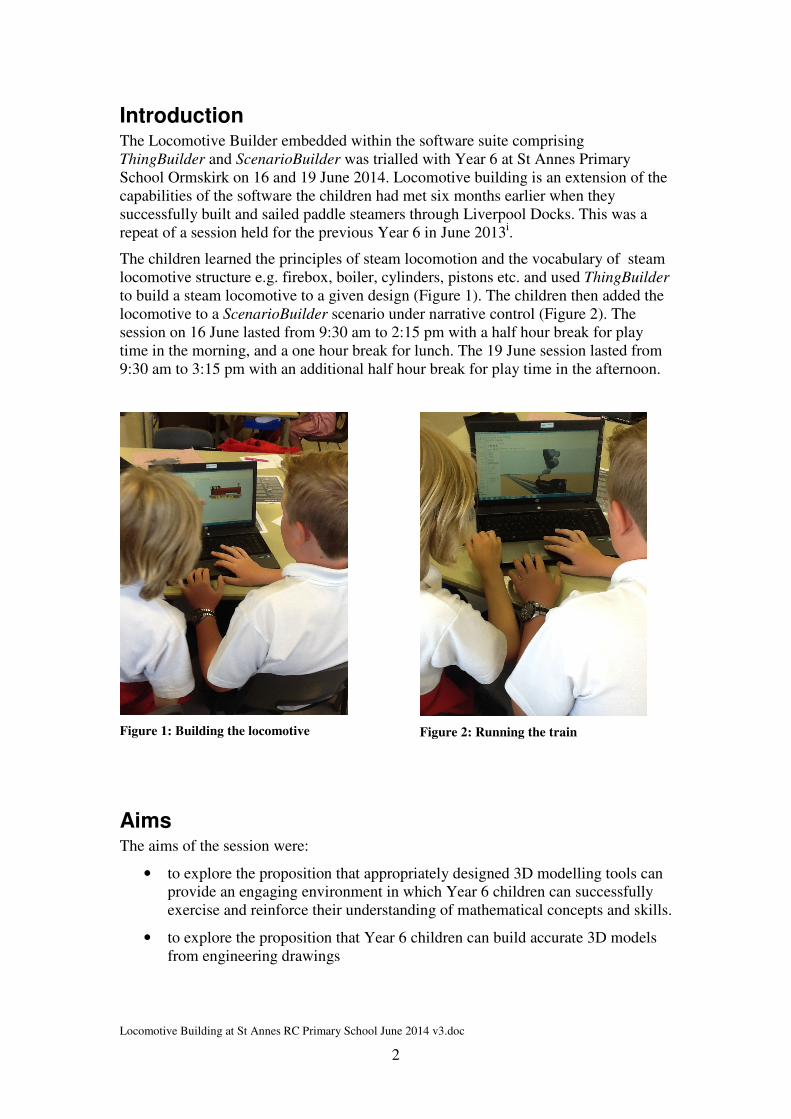
The children learned the principles of steam locomotion and the vocabulary of steam
locomotive structure e.g. firebox, boiler, cylinders, pistons etc. and used ThingBuilder
to build a steam locomotive to a given design (Figure 1). The children then added the
locomotive to a ScenarioBuilder scenario under narrative control (Figure 2). The
session on 16 June lasted from 9:30 am to 2:15 pm with a half hour break for play
time in the morning, and a one hour break for lunch. The 19 June session lasted from
9:30 am to 3:15 pm with an additional half hour break for play time in the afternoon.
Figure 1: Building the locomotive
Figure 2: Running the train
Aims The aims of the session were:
• to explore the proposition that appropriately designed 3D modelling tools can
provide an engaging environment in which Year 6 children can successfully
exercise and reinforce their understanding of mathematical concepts and skills.
• to explore the proposition that Year 6 children can build accurate 3D models
from engineering drawings
Locomotive Building at St Annes RC Primary School June 2014 v3.doc
3
Objectives The objectives of the session were:
• to introduce the children to the principles and vocabulary of steam
locomotives and their use on the railways around Ormskirk with special
reference to the Lancashire & Yorkshire Railway that developed those
railways
• to introduce the children to the use of engineering drawings to extract
measurements for creating 3D models. Knowledge of symmetry and properties
of circles to be exercised.
• to enable the children to build 3D models of historic steam locomotives by
interpreting and manipulating tables of locomotive component attributes.
• to enable the children to place and run their models in a given visualisation
within ScenarioBuilder
The session The session consisted of 9 stages:
1. Real steam locomotives
o video clips of locomotives in action
o animation of how steam locomotion works
2. Demonstration of locomotives in ThingBuilder and ScenarioBuilder
3. Railways and locomotives in and around Ormskirk
o Lancashire and Yorkshire Railway
4. The vocabulary of steam locomotives
5. Annotation of a drawing of a steam locomotive
Play time
6. Children making measurements from engineering drawings of a locomotive
7. Children using ThingBuilder to build the locomotive (continued after lunch)
Lunch time
8. Children adding their locomotives to a scenario
9. Tender engines and inside cylinders
o video clips of tender engines
o pictures of locomotives with no visible cylinders
o demonstration using the Builder tools of building and running tender
engines and adding inside cylinders to locomotives
A PowerPoint presentation (Locomotive Builder Introductory slide show June
2014.ppt) was used on the Smart board to structure and illustrate the session.

Locomotive Building at St Annes RC Primary School June 2014 v3.doc
4
1. Real steam locomotives
Most of the children had seen a steam locomotive before. They had been to a visit at
the National Railway Museum in York the year before. The children were shown
video clips of steam locomotives in action in order to remind them what these things
could do. The children saw passenger locomotives (Figure 3) and shunting engines in
Southampton docks (Figure 3).
Figure 3: Express passenger locomotive Figure 4: Southampton docks
The next step was to get across the principle of how steam locomotion works using an
animation (Figure 5). This was run several times and discussed in order that the
children had a good grasp of how it worked.
Figure 5: Steam locomotion animation
Locomotive Building at St Annes RC Primary School June 2014 v3.doc
5
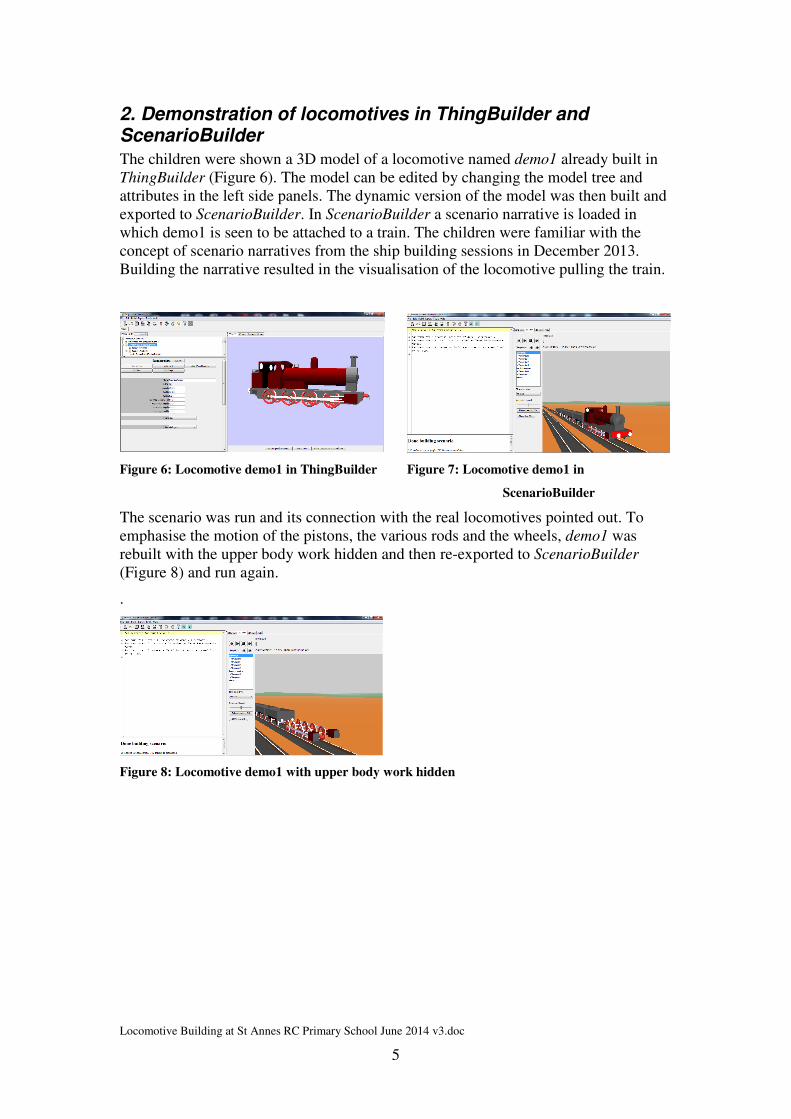
2. Demonstration of locomotives in ThingBuilder and ScenarioBuilder
The children were shown a 3D model of a locomotive named demo1 already built in
ThingBuilder (Figure 6). The model can be edited by changing the model tree and
attributes in the left side panels. The dynamic version of the model was then built and
exported to ScenarioBuilder. In ScenarioBuilder a scenario narrative is loaded in
which demo1 is seen to be attached to a train. The children were familiar with the
concept of scenario narratives from the ship building sessions in December 2013.
Building the narrative resulted in the visualisation of the locomotive pulling the train.
Figure 6: Locomotive demo1 in ThingBuilder Figure 7: Locomotive demo1 in
ScenarioBuilder
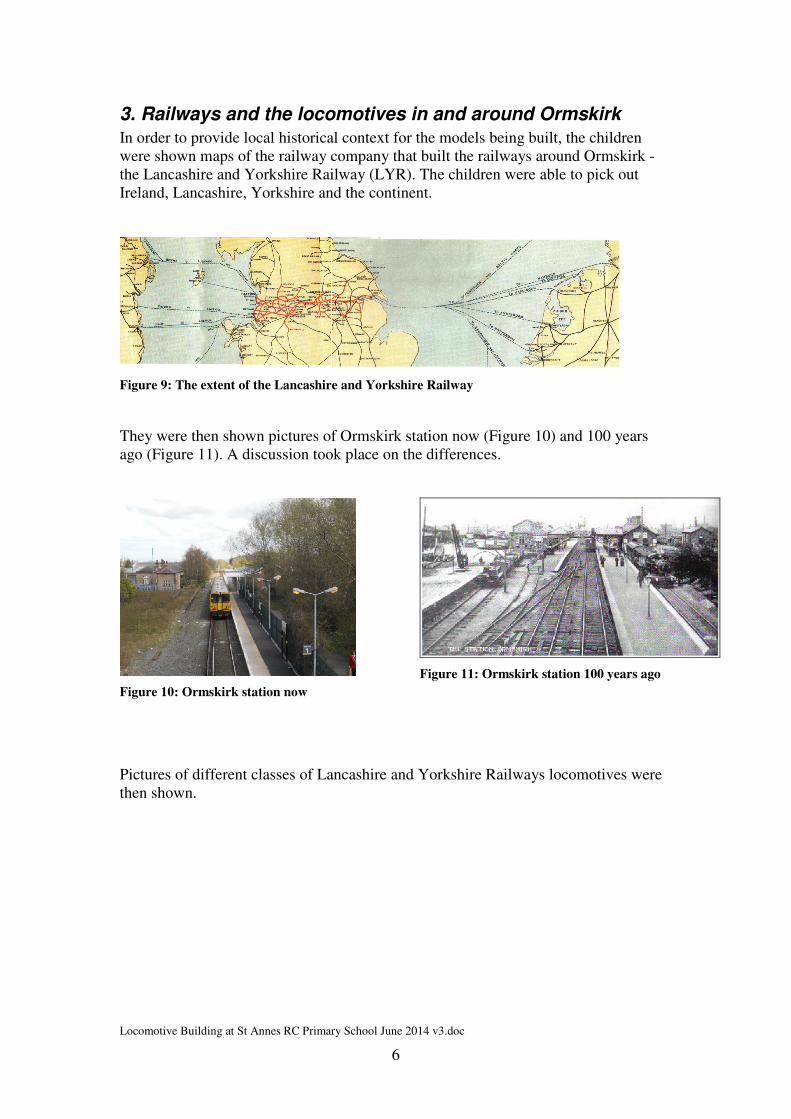
The scenario was run and its connection with the real locomotives pointed out. To
emphasise the motion of the pistons, the various rods and the wheels, demo1 was
rebuilt with the upper body work hidden and then re-exported to ScenarioBuilder
(Figure 8) and run again.
.
Figure 8: Locomotive demo1 with upper body work hidden
Locomotive Building at St Annes RC Primary School June 2014 v3.doc
6
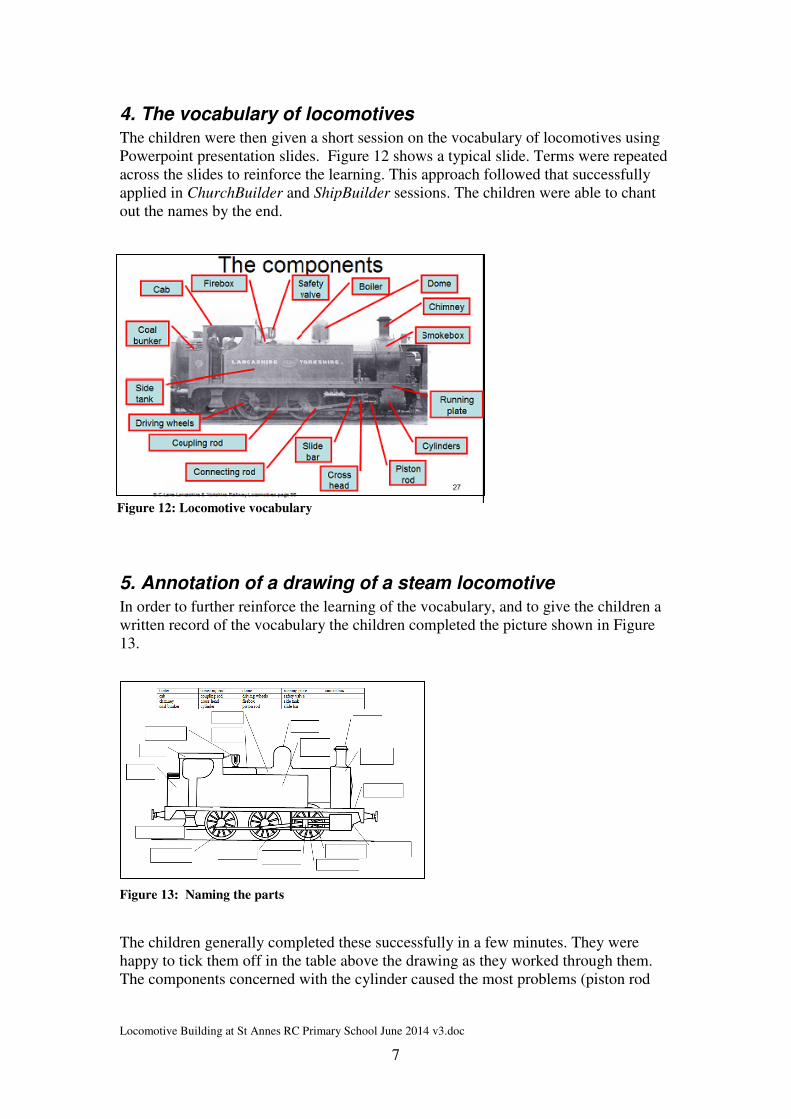
3. Railways and the locomotives in and around Ormskirk In order to provide local historical context for the models being built, the children
were shown maps of the railway company that built the railways around Ormskirk -
the Lancashire and Yorkshire Railway (LYR). The children were able to pick out
Ireland, Lancashire, Yorkshire and the continent.
Figure 9: The extent of the Lancashire and Yorkshire Railway
They were then shown pictures of Ormskirk station now (Figure 10) and 100 years
ago (Figure 11). A discussion took place on the differences.
Figure 10: Ormskirk station now
Figure 11: Ormskirk station 100 years ago
Pictures of different classes of Lancashire and Yorkshire Railways locomotives were
then shown.
Locomotive Building at St Annes RC Primary School June 2014 v3.doc
7
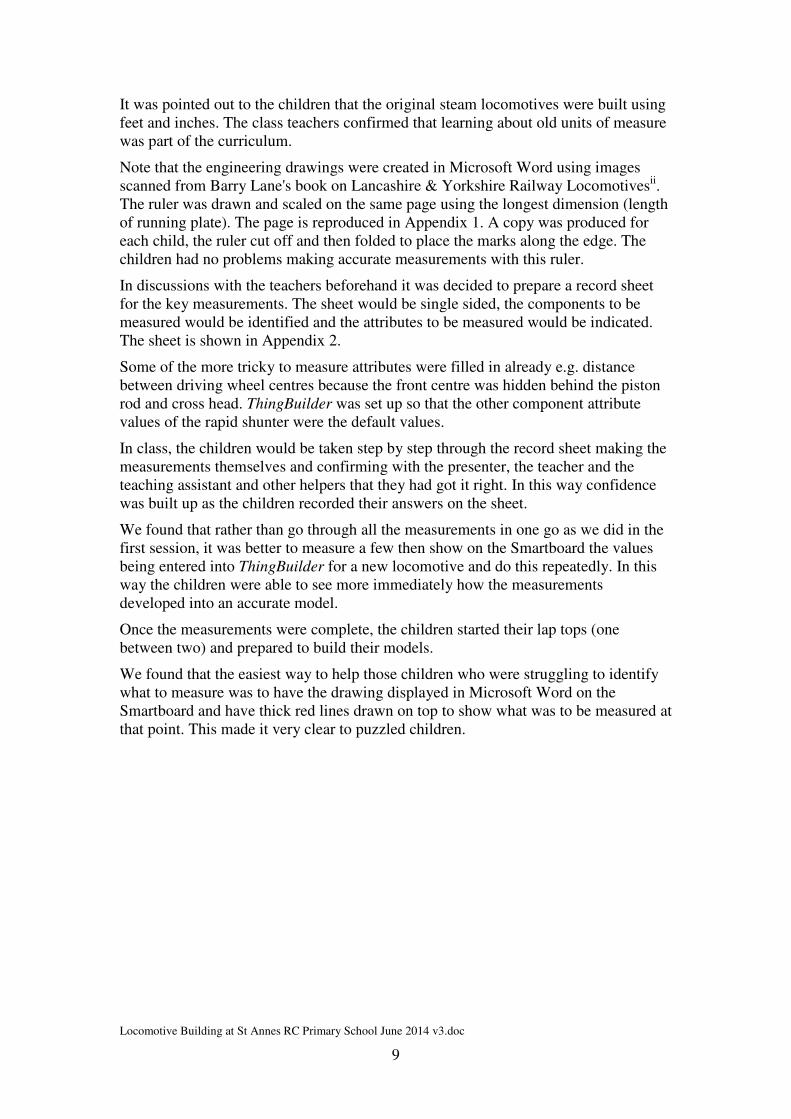
4. The vocabulary of locomotives The children were then given a short session on the vocabulary of locomotives using
Powerpoint presentation slides. Figure 12 shows a typical slide. Terms were repeated
across the slides to reinforce the learning. This approach followed that successfully
applied in ChurchBuilder and ShipBuilder sessions. The children were able to chant
out the names by the end.
5. Annotation of a drawing of a steam locomotive In order to further reinforce the learning of the vocabulary, and to give the children a
written record of the vocabulary the children completed the picture shown in Figure
13.
Figure 13: Naming the parts
The children generally completed these successfully in a few minutes. They were
happy to tick them off in the table above the drawing as they worked through them.
The components concerned with the cylinder caused the most problems (piston rod
Figure 12: Locomotive vocabulary

Locomotive Building at St Annes RC Primary School June 2014 v3.doc
8
and cross head). Misspellings were corrected and names completed with the help of
staff.
Morning play time break
6. Children making measurements from engineering drawings of a locomotive The children were now guided through making measurements on engineering
drawings of the model to be built. The drawings are shown in Figure 14.
Figure 14: Engineering drawings of Lancashire & Yorkshire Railway Rapid Shunter
The Lancashire & Yorkshire Railway rapid shunter was chosen as the first model
because it has visible external cylinders and motion, does not have leading or trailing
wheels and does not have a tender. Thus the children are seeing the means by which
the locomotive moves but are not distracted by wheels of different sizes and
behaviours and the tender. Inside cylinders and tenders were introduced in the
afternoon session.
The children quickly appreciated the right hand drawing which shows on the left the
rear of the locomotive and on the right the front of the locomotive. They were familiar
with the concept of symmetry and were able to apply it successfully when measuring.
The drawing is made to an arbitrary scale and so the children are provided with a
paper "ruler" indicating scale lengths in inches as shown in Figure 15.
Figure 15: The measuring ruler
Locomotive Building at St Annes RC Primary School June 2014 v3.doc
9
It was pointed out to the children that the original steam locomotives were built using
feet and inches. The class teachers confirmed that learning about old units of measure
was part of the curriculum.
Note that the engineering drawings were created in Microsoft Word using images
scanned from Barry Lane's book on Lancashire & Yorkshire Railway Locomotivesii.
The ruler was drawn and scaled on the same page using the longest dimension (length
of running plate). The page is reproduced in Appendix 1. A copy was produced for
each child, the ruler cut off and then folded to place the marks along the edge. The
children had no problems making accurate measurements with this ruler.
In discussions with the teachers beforehand it was decided to prepare a record sheet
for the key measurements. The sheet would be single sided, the components to be
measured would be identified and the attributes to be measured would be indicated.
The sheet is shown in Appendix 2.
Some of the more tricky to measure attributes were filled in already e.g. distance
between driving wheel centres because the front centre was hidden behind the piston
rod and cross head. ThingBuilder was set up so that the other component attribute
values of the rapid shunter were the default values.
In class, the children would be taken step by step through the record sheet making the
measurements themselves and confirming with the presenter, the teacher and the
teaching assistant and other helpers that they had got it right. In this way confidence
was built up as the children recorded their answers on the sheet.
We found that rather than go through all the measurements in one go as we did in the
first session, it was better to measure a few then show on the Smartboard the values
being entered into ThingBuilder for a new locomotive and do this repeatedly. In this
way the children were able to see more immediately how the measurements
developed into an accurate model.
Once the measurements were complete, the children started their lap tops (one
between two) and prepared to build their models.
We found that the easiest way to help those children who were struggling to identify
what to measure was to have the drawing displayed in Microsoft Word on the
Smartboard and have thick red lines drawn on top to show what was to be measured at
that point. This made it very clear to puzzled children.

Locomotive Building at St Annes RC Primary School June 2014 v3.doc
10
7. Children using ThingBuilder to build the locomotive The children had met ThingBuilder six months before and used it to build paddle
steamers. The first ThingBuilder trials had confirmed that the children are
comfortable with manipulating the component tree employed by ThingBuilder. The
tree's structure is similar to the folder/directory structure used by File Open/Save
dialogs and the Windows Explorer view of the files on a disc. Thus they were happy
with finding the various components in the component tree and using the
measurements as attribute values in the component forms.
Some had difficulty working out where to go to add particular components. Dialogues
between helpers and children took place along the following lines:
Pupil: "How do I add the safety valve?"
Teacher: "What is it attached to?"
Pupil: "The boiler"
Teacher: "Well there you go then!"
Pupil: "Oh yes"
Pupil clicks on the boiler in the component tree and the "add safety valve" button is
revealed.
It was found that the extra time dedicated to demonstrating adding the measurements
in ThingBuilder in the second session was rewarded by the children needing less help
when building their models. This particularly applied to the mechanism for adding
and positioning wheel sets.
8. Children adding their locomotives to a scenario The children found little difficulty in adding their models to the scenario. A few had
forgotten that they needed to build the dynamic model and export it but were soon
reminded. They found editing the narrative to use their own model straightforward.
The editing required them to replace AAA in the sentence:
Railway: Train train101 consists of rapid shunter, 15 x wagon1.
with the name of their own locomotive.

Locomotive Building at St Annes RC Primary School June 2014 v3.doc
11
9. Tender engines and inside cylinders Drawings and measurement sheets have been prepared for Aspinall's class 'A' 0-6-0
tender engine (see Appendix 3). This is available for use if the teachers wish to extend
the work themselves in the future.
Besides having a tender, this locomotive has inside cylinders. We completed the day
by showing the children these two features.
Tender
The children were shown a video of the preserved Aspinall class 'A' in action on the
East Lancashire Railway. They were shown photographs and diagrams of other tender
engines including the National Railway Museum's cut away tender (Figure 16).
Figure 16: Merchant Navy Class Locomotive at the National Railway Museum
The water scoop was explained and video shown of locomotives using water troughs.
The children were shown how tenders are added in ThingBuilder. One or two had
already discovered this while building the rapid shunter!
Locomotive Building at St Annes RC Primary School June 2014 v3.doc
12
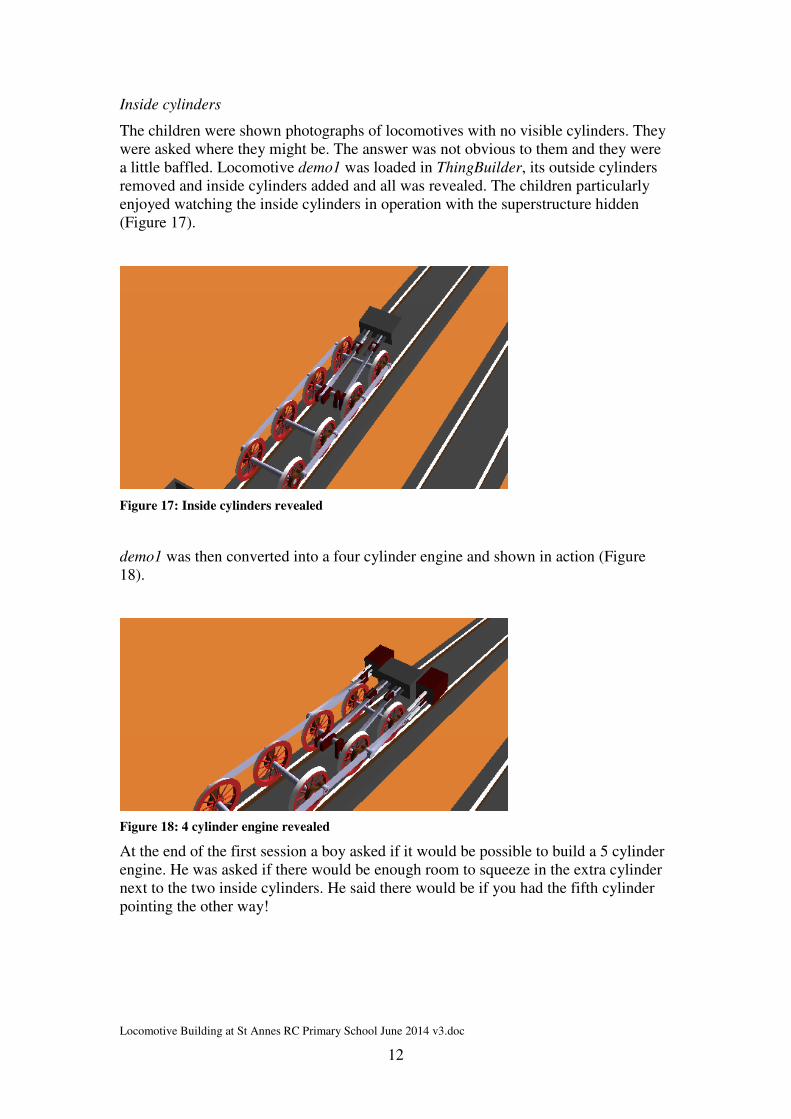
Inside cylinders
The children were shown photographs of locomotives with no visible cylinders. They
were asked where they might be. The answer was not obvious to them and they were
a little baffled. Locomotive demo1 was loaded in ThingBuilder, its outside cylinders
removed and inside cylinders added and all was revealed. The children particularly
enjoyed watching the inside cylinders in operation with the superstructure hidden
(Figure 17).
Figure 17: Inside cylinders revealed
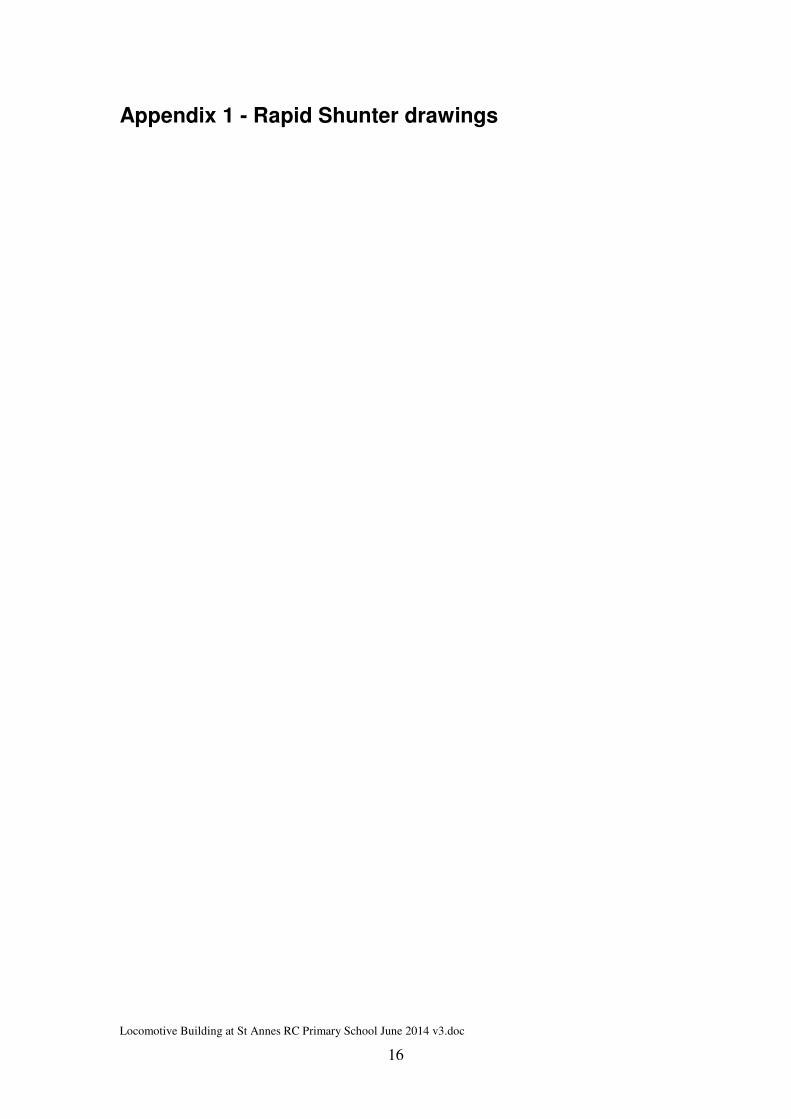
demo1 was then converted into a four cylinder engine and shown in action (Figure
18).
Figure 18: 4 cylinder engine revealed
At the end of the first session a boy asked if it would be possible to build a 5 cylinder
engine. He was asked if there would be enough room to squeeze in the extra cylinder
next to the two inside cylinders. He said there would be if you had the fifth cylinder
pointing the other way!

Locomotive Building at St Annes RC Primary School June 2014 v3.doc
13
Outcomes By the end of the day the children had
• completed the labelling of the locomotive drawing
• completed the measurements from the engineering drawings
• worked on building the model from the drawings
• run their models in a scenario
All the children were able to make some sort of locomotive and run it in the Scenario.
A few children in the first session and more in the second session were able to
complete accurate, models. The colours they used were ... original. Figure 19 shows
what the children started with when they selected menu option File | New in
ThingBuilder and selected the type locomotive:
Figure 19: Starting point for locomotive building
Figure 20 shows a model that a pair of children completed. The colour they chose was
black but this has been changed to dark red by us to show the detail more clearly in
this document.
Figure 20: Model of rapid shunter completed by two Year 6 children

Locomotive Building at St Annes RC Primary School June 2014 v3.doc
14
Figure 21 shows an attempt that was not completed (no side tanks or cylinders).
Figure 21: Partially completed model
Comments and conclusions This trial was a considerable step up from the previous, ship building trial. It required
the children to learn many new, technical words, make careful measurements and
make models using those measurements.
Vocabulary
In the ship building trial the children met some new words e.g. hull, superstructure but
not half as many as they met this time. We were uncertain how they would cope with
all these words but the way they were able after 15 minutes to chant the names of
components as they were pointed to in photographs was very encouraging.
Making Measurements
In the previous trial the children were free to build their ships by using approximate
numbers. In this new trial they were expected to make accurate measurements in order
to create accurate models. This was quite challenging but we found that with careful
guidance the children were able to pick up confidence. The quickest children found
little to trouble them and they raced away. Other children needed more help. It was
interesting that there was a bit of variation in the measurements e.g. 330 was
measured as 331 or 329. This was put down to the rulers not being folded accurately.
Future sessions may use prepared laminated rulers.
One girl asked if they had to use the measurements. When told that they did have to -
as happened in the real world - but that she could use any colours she liked she was
quite happy.
Applying the measurements in ThingBuilder
In the first session the children went through all the measurements before being
shown how the first few were applied in ThingBuilder. We found that this was all that
was needed for a few children but most of the children needed more guidance.
Consequently, in the second session we went through the measurements a few at a
time and showed them being applied in ThingBuilder. The children were generally
much happier with this approach which helped the children gain confidence and
expertise in building the models accurately with ThingBuilder.

Locomotive Building at St Annes RC Primary School June 2014 v3.doc
15
Mathematical skills
The children were able to demonstrate their ability to measure accurately. They were
also able to show their familiarity with symmetry when using the front and back
drawings and the properties of circles. Transference of 2D measurements into 3D was
successfully achieved.
Overall the teachers and teaching assistants agreed that the sessions had been a great
success, fully engaging and challenging the children. All the children were able to
make some sort of locomotive and run it in the Scenario. Some children were able to
complete accurate models. They all felt they had got something valuable out of the
day.
Next time It is intended to repeat the builder sessions with next year's Year 6 classes. Ship
building would take place in the first term and locomotive building at some point after
that. Further development of the Builder tools may offer appropriate follow-up
sessions on particular topics e.g. programming shunting operations for locomotives in
the Ormskirk goods yard of 1914, determining the effect of driving wheel diameter on
the performance of locomotives pulling heaving trains up hills.
Regarding the measurements and model building, further reflection will take place
regarding the best way to show the children how to measure the drawings and create
the models.
Locomotive Building at St Annes RC Primary School June 2014 v3.doc
16
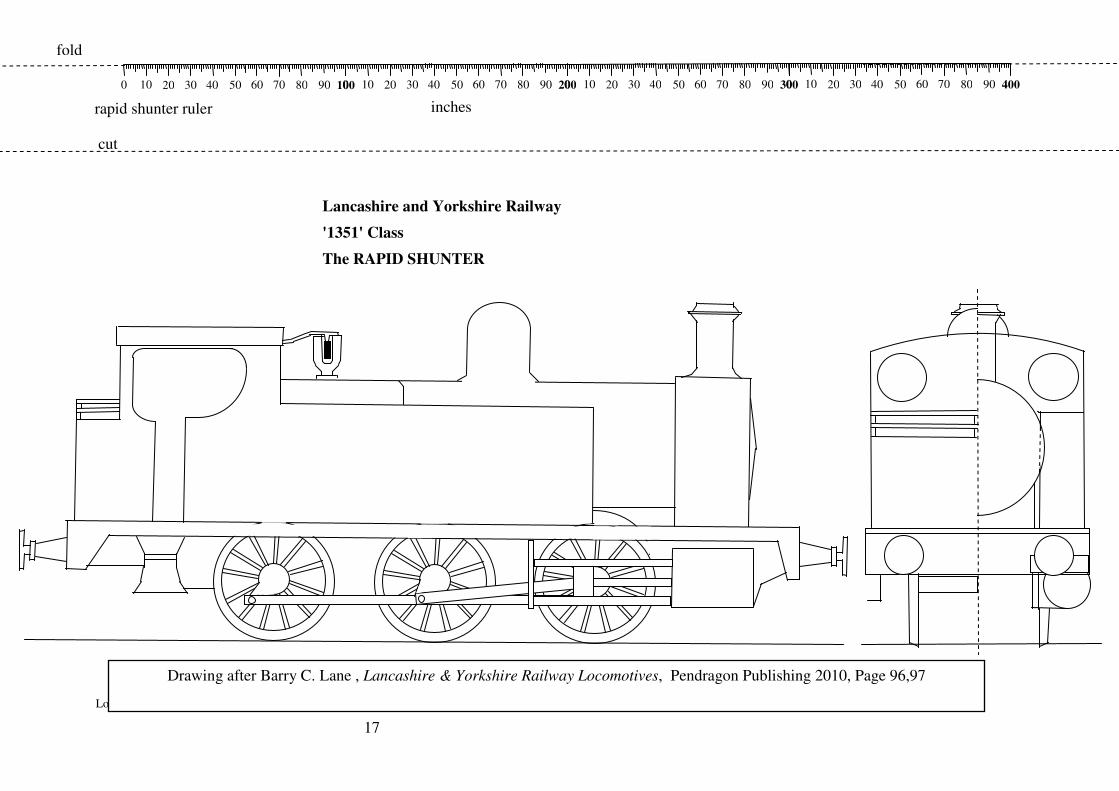
Appendix 1 - Rapid Shunter drawings
Locomotive Building at St Annes RC Primary School June 2014 v3.doc
17
Lancashire and Yorkshire Railway
'1351' Class
The RAPID SHUNTER
Drawing after Barry C. Lane , Lancashire & Yorkshire Railway Locomotives, Pendragon Publishing 2010, Page 96,97
cut
fold
0 10 20 30 40 50 60 70 80 90 300
0 10 20 30 40 50 60 70 80 90 200
inches
0 10 20 30 40 50 60 70 80 90 100
0 10 20 30 40 50 60 70 80 90 400
rapid shunter ruler

Locomotive Building at St Annes RC Primary School June 2014 v3.doc
18
Appendix 2 Rapid shunter measurements Units = inches
Running plate length = Boiler length =
width =
height = Smoke box diameter =
top height above rail =
length =
saddle centre height =
Frame length = saddle width =
Driving wheels offset from running
plate back = Chimney offset from back of
smokebox =
distance between axles
(from rear) = 72, 72
wheel outer diameter =
55 Dome offset from back of
boiler =
diameter =
Cab offset of cab front from
back of running plate =
straight height =
Cab side wall type = front and back Side tank offset from back of
running plate =
height =
Cab rear wall Add this. length =
width =
Bunker offset from back of
running plate = 5
height = Engine Driving wheel number 2
length =
Outside cylinders Add this
Bunker Coal Add this. Change
height. case type = half round
bottom
offset to driving wheel
centre = 105
Bunker Rails Add this.
num of rear vertical
posts =
height above driving
wheel centre = 0
Safety valve offset of base from back
of boiler = Steps back offset =
base type = round type = LYR type 1
valve type =
Ramsbottom
Wheel splashers axle number from back =
3
Firebox length = number of axles = 1
type = Belpaire (square)
Locomotive Building at St Annes RC Primary School June 2014 v3.doc
19
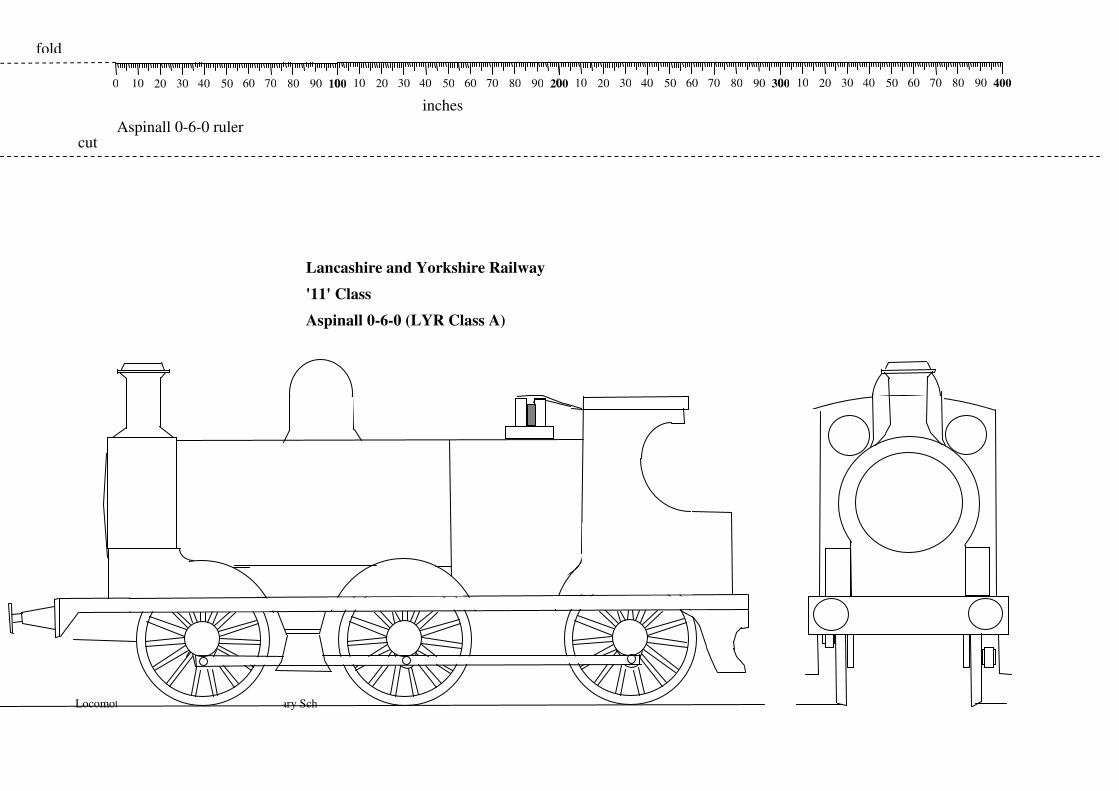
Appendix 3 Aspinall 0-6-0 drawings
Locomotive Building at St Annes RC Primary School June 2014 v3.doc
20
0 10 20 30 40 50 60 70 80 90 300
0 10 20 30 40 50 60 70 80 90 200
inches
0 10 20 30 40 50 60 70 80 90 100
0 10 20 30 40 50 60 70 80 90 400
Lancashire and Yorkshire Railway
'11' Class
Aspinall 0-6-0 (LYR Class A)
cut
fold
Aspinall 0-6-0 ruler

Locomotive Building at St Annes RC Primary School June 2014 v3.doc
21
Lancashire and Yorkshire Railway
'11' Class
Aspinall 0-6-0 (LYR Class A)
- Hughes Class 27 -
Locomotive Building at St Annes RC Primary School June 2014 v3.doc
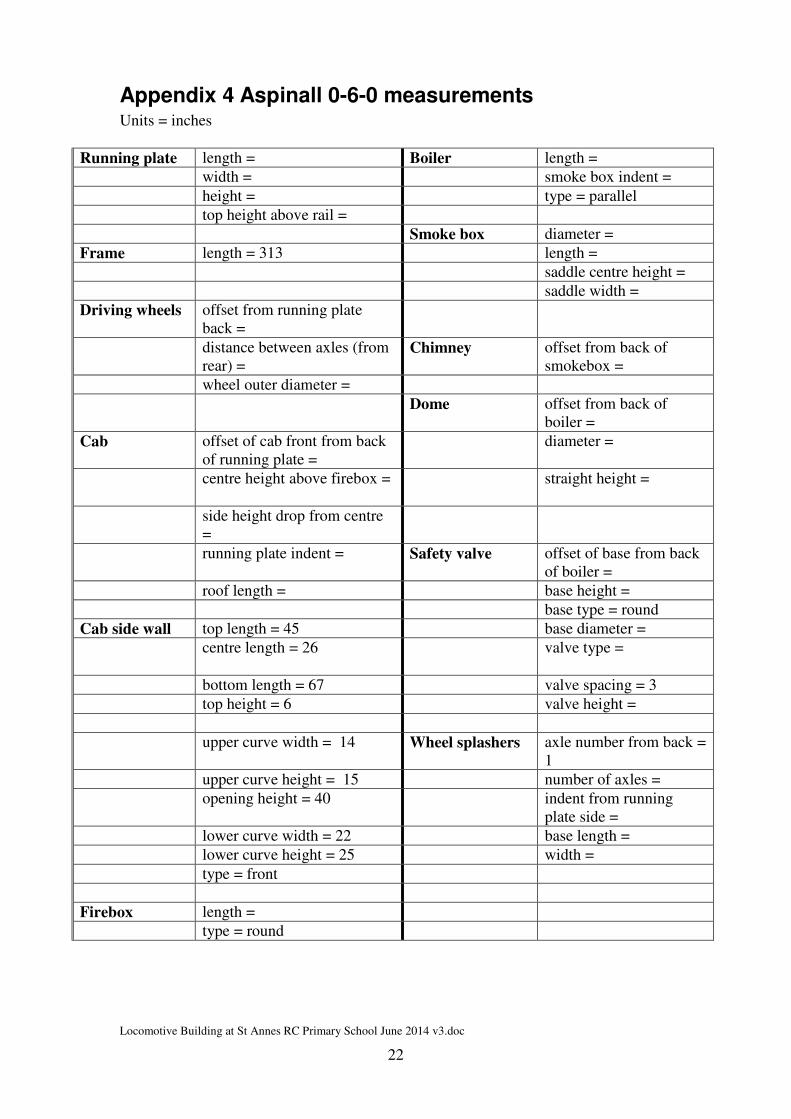
22
Appendix 4 Aspinall 0-6-0 measurements Units = inches
Running plate length = Boiler length =
width = smoke box indent =
height = type = parallel
top height above rail =
Smoke box diameter =
Frame length = 313 length =
saddle centre height =
saddle width =
Driving wheels offset from running plate
back =
distance between axles (from
rear) = Chimney offset from back of
smokebox =
wheel outer diameter =
Dome offset from back of
boiler =
Cab offset of cab front from back
of running plate = diameter =
centre height above firebox =
straight height =
side height drop from centre
=
running plate indent = Safety valve offset of base from back
of boiler =
roof length = base height =
base type = round
Cab side wall top length = 45 base diameter =
centre length = 26 valve type =
bottom length = 67 valve spacing = 3
top height = 6 valve height =
upper curve width = 14 Wheel splashers axle number from back =
1
upper curve height = 15 number of axles =
opening height = 40 indent from running
plate side =
lower curve width = 22 base length =
lower curve height = 25 width =
type = front
Firebox length =
type = round
Locomotive Building at St Annes RC Primary School June 2014 v3.doc
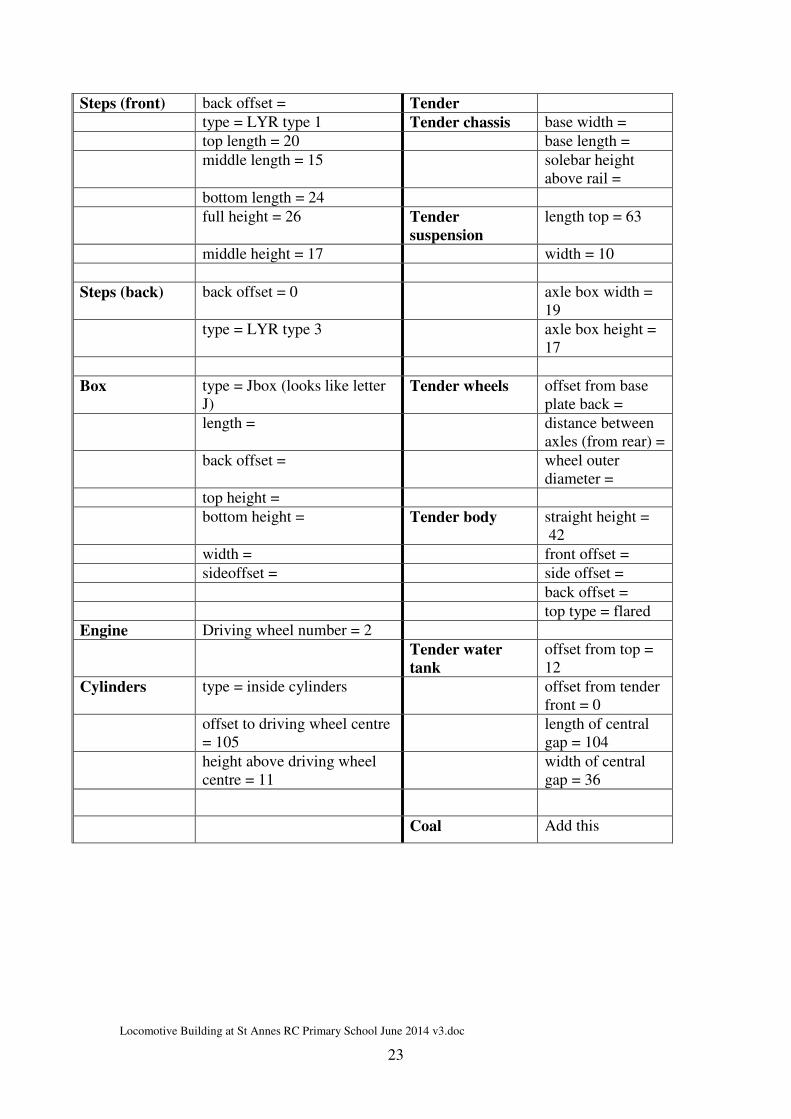
23
Steps (front) back offset = Tender
type = LYR type 1 Tender chassis base width =
top length = 20 base length =
middle length = 15 solebar height
above rail =
bottom length = 24
full height = 26 Tender
suspension
length top = 63
middle height = 17 width = 10
Steps (back) back offset = 0 axle box width =
19
type = LYR type 3 axle box height =
17
Box type = Jbox (looks like letter
J) Tender wheels offset from base
plate back =
length = distance between
axles (from rear) =
back offset = wheel outer
diameter =
top height =
bottom height = Tender body straight height =
42
width = front offset =
sideoffset = side offset =
back offset =
top type = flared
Engine Driving wheel number = 2
Tender water
tank
offset from top =
12
Cylinders type = inside cylinders offset from tender
front = 0
offset to driving wheel centre
= 105
length of central
gap = 104
height above driving wheel
centre = 11
width of central
gap = 36
Coal Add this

Locomotive Building at St Annes RC Primary School June 2014 v3.doc
24
References i Farrimond B., Anderson M., Report on Builder Session at St Annes RC Primary School, Ormskirk 5
June 2013
(http://www.edgehill.ac.uk/computing/files/2013/06/Report-on-Builder-Session-at-St-Annes-RC-
Primary-School.pdf)
ii Lane B.C. 2010, Lancashire & Yorkshire Railway Locomotives, Easingwold: Pendragon Publishing
Related Documents