LoadRunner ® Creating Vuser Scripts Windows and UNIX Version 7.02

Welcome message from author
This document is posted to help you gain knowledge. Please leave a comment to let me know what you think about it! Share it to your friends and learn new things together.
Transcript
LoadRunner®
Creating Vuser ScriptsWindows and UNIX
Version 7.02
LoadRunner—Creating Vuser Scripts—Windows and UNIX, Version 7.02
© Copyright 1994 - 2001 by Mercury Interactive Corporation
All rights reserved. All text and figures included in this publication are the exclusive property of Mercury Interactive Corporation, and may not be copied, reproduced, or used in any way without the express permission in writing of Mercury Interactive. Information in this document is subject to change without notice and does not represent a commitment on the part of Mercury Interactive.
Mercury Interactive may have patents or pending patent applications covering subject matter in this document. The furnishing of this document does not give you any license to these patents except as expressly provided in any written license agreement from Mercury Interactive.
WinRunner, XRunner, LoadRunner, TestDirector, TestSuite, WebTest, and Astra are registered trademarks of Mercury Interactive Corporation in the United States and/or other countries. Astra SiteManager, Astra SiteTest, Astra QuickTest, Astra LoadTest, Topaz, RapidTest, QuickTest, Visual Testing, Action Tracker, Link Doctor, Change Viewer, Dynamic Scan, Fast Scan, and Visual Web Display are trademarks of Mercury Interactive Corporation in the United States and/or other countries.
This document also contains registered trademarks, trademarks and service marks that are owned by their respective companies or organizations. Mercury Interactive Corporation disclaims any responsibility for specifying which marks are owned by which companies or organizations.
If you have any comments or suggestions regarding this document, please send them via e-mail to [email protected].
Mercury Interactive Corporation1325 Borregas Avenue Sunnyvale, CA 94089 USA
LRDBUG7.02/01

iii
Table of Contents
Welcome to LoadRunner.....................................................................xvOnline Resources .................................................................................xvLoadRunner Documentation Set........................................................xviUsing the LoadRunner Documentation Set ......................................xviiTypographical Conventions...............................................................xix
PART I: INTRODUCING VUSER SCRIPTS
Chapter 1: Developing Vuser Scripts ....................................................3Introducing Vusers ................................................................................3Looking at Vuser Types .........................................................................5Developing Vuser Scripts.......................................................................7Using this Guide....................................................................................8
PART II: WORKING WITH VUGEN
Chapter 2: Introducing VuGen............................................................13About VuGen.......................................................................................13Recording Vuser Scripts with VuGen ..................................................14Running Vuser Scripts with VuGen ....................................................15Understanding VuGen Code...............................................................16Using General Vuser Functions...........................................................18
Chapter 3: Recording with VuGen ......................................................21About Recording with VuGen.............................................................21Vuser Script Sections ...........................................................................22Recording Vuser Scripts .......................................................................24Recording Scripts with Multiple Actions ............................................28Importing Actions ...............................................................................33Regenerating a Vuser Script.................................................................33
Creating Vuser Scripts
iv
Chapter 4: Enhancing Vuser Scripts....................................................35About Enhancing Vuser Scripts...........................................................36Inserting Transactions into a Vuser Script ..........................................37Inserting Rendezvous Points into a Vuser Script ................................39Inserting Comments into a Vuser Script.............................................40Obtaining Vuser Information .............................................................41Sending Messages to Output ...............................................................42Handling Errors in Vuser Scripts During Execution ...........................43Synchronizing Vuser Scripts................................................................45Emulating User Think Time ................................................................46Handling Command Line Arguments ................................................46Using C Functions in Vuser Scripts.....................................................47
Chapter 5: Defining Parameters .........................................................49About Defining Parameters .................................................................50Understanding Parameter Limitations................................................51Creating Parameters ............................................................................52Defining Parameter Properties ...........................................................56Understanding Parameter Types .........................................................59Setting Parameter Properties for Internal Data Types ........................61Setting Parameter Properties for Data Files ........................................67Importing Data from Existing Databases ............................................72User-Defined Functions.......................................................................76Parameterization Options ...................................................................78
Chapter 6: Correlating Statements.....................................................81About Correlating Statements.............................................................81Using Correlation Functions for C Vusers ..........................................83Using Correlation Functions for Java Vusers ......................................84Comparing Vuser Scripts using WDiff ................................................85Modifying Saved Parameters ...............................................................86
Chapter 7: Configuring Run-Time Settings .......................................89About Run-Time Settings ....................................................................89Configuring the Pacing Run-Time Settings ........................................91Configuring Actions ............................................................................93Configuring the Log Run-Time Settings .............................................99Configuring the Think Time Settings ...............................................102Configuring the General Run-Time Settings ....................................104
Chapter 8: Selecting A Scripting Language......................................111About Selecting a Scripting Language...............................................111Enabling Script Recording Options...................................................111Setting the VB Run-Time Settings .....................................................114
Table of Contents
v
Chapter 9: Running Vuser Scripts in Stand-Alone Mode ................117About Running Vuser Scripts in Stand-Alone Mode.........................117Running a Vuser Script in VuGen.....................................................118Using VuGen’s Debugging Features .................................................121Using VuGen’s Debugging Features for Web Vuser Scripts ..............122Working with VuGen Windows........................................................125Running a Vuser Script from a Command Prompt...........................125Running a Vuser Script from a UNIX Command Line .....................126Integrating a Vuser Script into a Scenario ........................................128
Chapter 10: Managing Scripts Using TestDirector...........................131Working with TestDirector................................................................131About Managing Scripts Using TestDirector .....................................133Opening a Connection to a TestDirector Project..............................133Opening a Script using TestDirector .................................................136Saving Scripts to the TestDirector Project .........................................137Managing your Script in TestDirector...............................................139
PART III : WEB VUSER SCRIPTS
Chapter 11: Introducing Web Vuser Scripts .....................................143About Developing Web Vuser Scripts ...............................................143Introducing Web Vusers....................................................................145Understanding Web Vuser Technology ............................................146Getting Started with Web Vuser Scripts............................................146Viewing Web Scripts in the Tree View .............................................148Using Web Vuser Scripts in the Script View .....................................152Using Web Functions .......................................................................153
Chapter 12: Recording Web Vuser Scripts........................................159About Recording Web Vuser Scripts..................................................159Recording a Web Session...................................................................160Inserting Transactions ......................................................................165Inserting Rendezvous Points .............................................................167
Chapter 13: Setting Recording Options for Web Vusers..................169About Setting Recording Options .....................................................169Specifying which Browser to Use for Recording ...............................170Working with Proxy Settings ............................................................171Understanding the Recording Modes ...............................................174Advanced URL-Based Script Options ................................................177Specifying the Information to Record...............................................182Setting Advanced Recording Options ...............................................183

Creating Vuser Scripts
vi
Chapter 14: Configuring Web Run-Time Settings ...........................193About Web Run-Time Settings..........................................................193Setting Proxy Options .......................................................................194Setting Browser and Modem Options ...............................................196Setting Preferences ............................................................................201
Chapter 15: Recording Multi-Protocol Vuser Scripts........................205About Recording Multi-Protocol Vuser Scripts .................................205Getting Started with Web/WinSock Vuser Scripts ............................206Setting Browser and Proxy Recording Options .................................208Setting Web Trapping Recording Options ........................................211Recording a Multi-Protocol Session ..................................................213
Chapter 16: Verifying Web Pages Under Load ................................217About Verification Under Load.........................................................217Adding a Text Check ........................................................................220The web_reg_find Function...............................................................224Adding an Image Check ...................................................................224Adding a Java Applet Check .............................................................228Defining Additional Properties ........................................................231Specifying a Text Check with a Regular Expression ........................233
Chapter 17: Modifying Web Vuser Scripts .......................................237About Modifying Web Vuser Scripts.................................................237Adding a Step to a Web Vuser Script ................................................238Deleting Steps from a Web Vuser Script ...........................................239Modifying Action Steps ....................................................................240Modifying Control Steps ...................................................................254Modifying Service Steps ...................................................................257Modifying Web Checks ....................................................................258
Chapter 18: Correlating Web Statements ........................................259About Correlating Statements...........................................................260Choosing a Correlation Method .......................................................261Auto-Detect Correlation....................................................................264Rule-Based Correlation......................................................................264Correlating All Statements ................................................................266Setting Correlation Options ..............................................................267Testing Rules......................................................................................267Setting the Correlation Recording Options ......................................268Performing Manual Correlation........................................................271Defining the Boundaries of Dynamic Data.......................................274

Table of Contents
vii
Chapter 19: Correlating Web Vusers with Snapshots ......................277About Correlating with Snapshots....................................................277Understanding Snapshots .................................................................278Setting Up VuGen for Correlation ....................................................282Performing Correlation .....................................................................285
Chapter 20: Testing XML Pages........................................................289About Testing XML Pages..................................................................289Viewing XML as URL steps................................................................290Inserting XML as a Custom Request .................................................291Viewing XML Custom Request Steps ................................................292
Chapter 21: Using Reports to Debug Vuser Scripts .........................295About Using Reports to Debug Vuser Scripts ....................................296Understanding the Results Summary Report ...................................297Filtering Report Information ............................................................299Managing Execution Results ............................................................300
Chapter 22: Power User Tips for Web Vusers...................................303Security Issues....................................................................................303Handling Cookies ..............................................................................306The Run-Time Viewer (Online Browser) ...........................................309Browsers.............................................................................................310Configuration Issues..........................................................................313Compatibility Issues ..........................................................................314
PART IV: WIRELESS PROTOCOLS
Chapter 23: Introducing Wireless Vusers .........................................317About Wireless Vusers .......................................................................317Understanding the WAP Protocol.....................................................318Understanding the i-mode System....................................................320i-mode vs. WAP .................................................................................321
Chapter 24: Recording Wireless Vuser Scripts..................................323About Recording Wireless Vuser Scripts ...........................................323Recording a Wireless Script ...............................................................324Viewing Vuser Scripts ........................................................................329Displaying Vuser Scripts in Script View ............................................333Enhancing Your Script for Measuring Performance .........................334Using Vuser Functions .....................................................................334
Creating Vuser Scripts
viii
Chapter 25: Working with WAP Vuser Scripts..................................343About WAP Vusers ............................................................................343Recording Over a Phone....................................................................344Bearers Support..................................................................................345RADIUS Support ................................................................................346Push Support .....................................................................................346LoadRunner Push Support ................................................................348MMSC Support ..................................................................................349
Chapter 26: Setting Recording Options for Wireless Vusers ...........351About Setting Recording Options .....................................................351Specifying the Recording Mode (WAP only) ....................................352Specifying the Information to Record (i-mode, VoiceXML).............353Specifying a Toolkit...........................................................................353Specifying the Recording Proxy Settings...........................................355Setting Advanced Recording Options ...............................................357
Chapter 27: Configuring Wireless Run-Time Settings......................363About Configuring Wireless Run-Time Settings ...............................363Setting Proxy Options (i-mode, VoiceXML only) .............................364Setting Browser and Modem Options ...............................................366Setting Preferences ............................................................................371Obtaining Debug Information ..........................................................373
Chapter 28: Configuring WAP Run-Time Settings ...........................375About WAP Run-Time Settings .........................................................375Configuring Gateway Options ..........................................................376Configuring Bearer Information .......................................................379Configuring RADIUS Connection Data ............................................381Obtaining Debug Information ..........................................................383
Chapter 29: Modifying Wireless Vuser Scripts .................................385About Modifying Wireless Vuser Scripts...........................................385Adding Steps to Wireless Vuser Scripts ............................................385Deleting Steps from Wireless Vuser Scripts.......................................387Modifying Action Steps.....................................................................387Modifying Control Steps ...................................................................394Modifying Service Steps ...................................................................397
Chapter 30: Correlating Statements in Wireless Scripts ..................399About Correlating Statements...........................................................399Using Correlation Functions .............................................................400Performing Manual Correlation........................................................402Defining the Boundaries of Dynamic Data.......................................404Correlation Example .........................................................................405
Table of Contents
ix
PART V: DATABASE VUSER SCRIPTS
Chapter 31: Developing Database Vuser Scripts ..............................409About Recording Database Vuser Scripts ..........................................409Introducing Database Vusers.............................................................410Understanding Database Vuser Technology .....................................411Getting Started with Database Vuser Scripts.....................................412Setting LRD Recording Options ........................................................413Using LRD Functions.........................................................................417Understanding Database Vuser Scripts .............................................421Evaluating Error Codes......................................................................425Handling Errors .................................................................................426Correlating Database Queries and COM Functions..........................429Automatic Correlation for Database and COM Scripts.....................430
Chapter 32: Correlating Database Vuser Scripts ..............................435About Correlating Database Vuser Scripts ........................................435Scanning a Script for Correlations ....................................................436Correlating a Known Value...............................................................438Database Vuser Correlation Functions..............................................440
PART VI: WINDOWS SOCKETS VUSER SCRIPTS
Chapter 33: Developing WinSock Vuser Scripts ...............................443About Recording Windows Sockets Vuser Scripts.............................444Getting Started with Windows Sockets Vuser Scripts .......................444Setting the Recording Options ..........................................................445Using LRS Functions..........................................................................449Viewing Windows Sockets Data ........................................................452Understanding the Data File Format.................................................454Viewing Buffer Data in Hexadecimal format ....................................455Setting the Display Format................................................................457Debugging Tips..................................................................................460Correlating WinSock Scripts .............................................................461
Creating Vuser Scripts
x
PART VII: ORACLE NCA VUSER SCRIPTS
Chapter 34: Creating Oracle NCA Vuser Scripts ..............................467About Creating Oracle NCA Vuser Scripts ........................................467Getting Started with Oracle NCA Vusers ..................................... 469Recording Guidelines ........................................................................470Specifying which Browser to Use for Recording ...............................472Using Oracle NCA Vuser Functions ..................................................473Understanding Oracle NCA Vusers................................................. 477Switching Between Tree View and Script View.................................478Configuring the Run Time Settings ..................................................479Using Load Balancing in Oracle NCA ...............................................481
PART VIII : JAVA VUSER SCRIPTS
Chapter 35: Programming Java Scripts.............................................487About Programming Java Scripts ......................................................487Creating a Java Vuser ........................................................................488Editing a Java Vuser Script ................................................................489LoadRunner’s Java API ......................................................................491Working with Java Vuser Functions .................................................494Setting your Java Environment.........................................................500Running Java Vuser Scripts ...............................................................500Compiling and Running a Script as Part of a Package......................501Programming Tips .............................................................................501
Chapter 36: Performing EJB Testing .................................................505About EJB Testing..............................................................................505Working with the EJB Detector.........................................................506Understanding EJB Vuser Scripts.......................................................509Creating an EJB Testing Vuser...........................................................513Setting EJB Recording Options..........................................................516Viewing the Java Methods ................................................................517Inserting Java Methods Manually .....................................................519Configuring Script Generation Settings............................................521Running EJB Testing Vuser Scripts....................................................524
Table of Contents
xi
Chapter 37: Developing CORBA and RMI Vuser Scripts...................527About CORBA and RMI Vuser Scripts ...............................................527Recording RMI over IIOP...................................................................528Getting Started with CORBA and RMI Vusers ..................................529Recording a CORBA or RMI Vuser ....................................................530Understanding CORBA and RMI Vuser Scripts .................................533Running a Script as Part of a Package ...............................................534Working with CORBA Vuser Scripts .................................................534Working with RMI Vuser Scripts.......................................................537
Chapter 38: Setting Java Recording Options ...................................539About Setting Java Recording Options..............................................539Java Virtual Machine Options ..........................................................540Recorder Options ..............................................................................541Serialization Options ........................................................................544Correlation Options .........................................................................546Debug Options .................................................................................547
Chapter 39: Configuring Java Run-Time Settings ............................549About Java Run-Time Settings...........................................................549Understanding the Java VM Settings ................................................550Specifying Virtual Machine Settings .................................................550
Chapter 40: Correlating Java Scripts.................................................553About Correlating Java Scripts ..........................................................553Standard Correlation.........................................................................554Advanced Correlation .......................................................................555String Correlation..............................................................................556Using the Serialization Mechanism ..................................................558
PART IX: COM VUSER SCRIPTS
Chapter 41: Recording COM Vuser Scripts.......................................567About Recording COM Vuser Scripts ................................................567COM Overview..................................................................................568Getting Started with COM Vusers.....................................................569Selecting COM Objects to Record ....................................................571Setting COM Recording Options.......................................................573
Chapter 42: Understanding COM Vuser Scripts ...............................583About COM Vuser Scripts..................................................................583Understanding VuGen COM Script Structure...................................584Examining Sample VuGen COM Scripts...........................................586Scanning a Script for Correlations ....................................................592Correlating a Known Value...............................................................594
Creating Vuser Scripts
xii
Chapter 43: Understanding COM Vuser Functions ..........................597About COM Vuser Functions ............................................................598Creating Instances.............................................................................598IDispatch Interface Invoke Method ..................................................598Type Assignment Functions ..............................................................599Variant Types.....................................................................................600Assignment from Reference to Variant .............................................601Parameterization Functions ..............................................................602Extraction from Variants...................................................................603Assignment of Arrays to Variants......................................................604Array Types and Functions................................................................604Byte Array Functions .........................................................................606ADO RecordSet Functions .................................................................606Debug Functions ...............................................................................606VB Collection Support.......................................................................607
PART X: STREAMING DATA VUSER SCRIPTS
Chapter 44: Developing RealPlayer Vuser Scripts ............................611About Recording RealPlayer Virtual Player Scripts ...........................611Getting Started with RealPlayer Virtual Player Scripts......................612Using LREAL Functions .....................................................................613
PART XI: TUXEDO VUSER SCRIPTS
Chapter 45: Developing TUXEDO Vuser Scripts ..............................617About TUXEDO Vuser Scripts ...........................................................617Getting Started with TUXEDO Vuser Scripts ....................................618Using LRT Functions .........................................................................619Understanding TUXEDO Vuser Scripts.............................................624Viewing TUXEDO Buffer Data ..........................................................626Defining Environment Settings for TUXEDO Vusers .......................627Debugging TUXEDO Applications ....................................................628Correlating TUXEDO Scripts.............................................................629
Table of Contents
xiii
PART XII: JOLT VUSER SCRIPTS
Chapter 46: Developing Jolt Vuser Scripts .......................................637About Jolt Vuser Scripts.....................................................................637Getting Started with Jolt Vuser Scripts..............................................638Using lrjolt Functions........................................................................639Understanding Jolt Vuser Scripts ......................................................642Viewing Jolt Parameter Arrays...........................................................643Running Jolt Vuser Scripts ................................................................645Correlating Jolt Scripts ......................................................................645
PART XIII : BAAN VUSER SCRIPTS
Chapter 47: Creating Baan Vuser Scripts..........................................651About Developing Baan Vuser Scripts...............................................651Getting Started with Baan Vusers .....................................................652Baan Vuser Functions........................................................................652Creating a Baan Vuser Script .............................................................656Understanding Baan Vuser Scripts ....................................................657Customizing Baan Vuser Scripts........................................................658
PART XIV: RTE VUSER SCRIPTS
Chapter 48: Introducing RTE Vuser Scripts ......................................663About Developing RTE Vuser Scripts ................................................663Introducing RTE Vusers.....................................................................664Understanding RTE Vuser Technology .............................................664Getting Started with RTE Vuser Scripts .............................................665Using TE Functions ...........................................................................666Mapping Terminal Keys to PC Keyboard Keys..................................668
Chapter 49: Recording RTE Vuser Scripts .........................................671About Recording RTE Vuser Scripts...................................................671Creating a New RTE Vuser Script ......................................................672Recording the Terminal Setup and Connection Procedure ..............673Recording Typical User Actions ........................................................676Recording the Log Off Procedure ......................................................677Setting the Recording Options ..........................................................678Typing Input into a Terminal Emulator ...........................................681Generating Unique Device Names ....................................................684Setting the Field Demarcation Characters ........................................685
Creating Vuser Scripts
xiv
Chapter 50: Configuring RTE Run-Time Settings ............................687About Terminal Emulator Run-Time Settings ..................................687Modifying Connection Attempts......................................................688Specifying an Original Device Name ................................................688Setting the Typing Delay...................................................................689Configuring the X-System Synchronization.....................................689
Chapter 51: Synchronizing RTE Vuser Scripts ..................................691About Synchronizing Vuser Scripts...................................................691Synchronizing Block-Mode (IBM) Terminals....................................692Synchronizing Character-Mode (VT) Terminals ...............................696
Chapter 52: Reading Text from the Terminal Screen ......................701About Reading Text from the Terminal Screen ................................701Searching for Text on the Screen ......................................................701Reading Text from the Screen ...........................................................702
PART XV: GUI VUSER SCRIPTS
Chapter 53: Developing GUI Vuser Scripts.......................................705About Developing GUI Vuser Scripts ................................................705Introducing GUI Vusers ....................................................................706Understanding GUI Vuser Technology.............................................707Getting Started with GUI Vusers.......................................................708Using WinRunner to Create GUI Vuser Scripts ...............................709Measuring Server Performance: Transactions ...................................710Generating Heavy User Load: Rendezvous Points ............................711Understanding GUI Vuser Scripts .....................................................711Using Vuser Functions in GUI Vuser Scripts.....................................713Sending Messages to the Controller..................................................713Obtaining Information about Vusers and Load Generators.............715
PART XVI: INFORMATION FOR ADVANCED USERS
Chapter 54: Programming Vuser Scripts ..........................................719About Programming Vuser Scripts ....................................................719Creating a Vuser Script with Visual C...............................................720Creating a Vuser Script with Visual Basic .........................................722Configuring Runtime Settings and Parameters.................................723

Table of Contents
xv
Chapter 55: VuGen Debugging Tips.................................................725General Debugging Tip .....................................................................725Using C Functions for Tracing ..........................................................725Examining Replay Output.................................................................726Debugging Database Applications ...................................................726Working with Oracle Applications....................................................728Solving Common Problems with Oracle Applications .....................729
Chapter 56: Advanced Topics ...........................................................733Files Generated During Recording ....................................................733Files Generated During Replay..........................................................735Running a Vuser from the Unix Command Line .............................737Specifying the Vuser Behavior ..........................................................738Command Line Parameters...............................................................740Recording OLE Servers.......................................................................741Examining the .dat Files....................................................................743Adding a New Vuser Type .................................................................746
PART XVII: APPENDIXES
Appendix A: The Java Environment: A Comprehensive Guide.........753About the Java Environment ............................................................753Terminology ......................................................................................754JDK Versions ......................................................................................757Browsers.............................................................................................761Java Plug-In........................................................................................764Other Environments..........................................................................766Frequently Asked Questions..............................................................767
Appendix B: Calling External Functions............................................771Loading a DLL—Locally ....................................................................771Loading a DLL—Globally ..................................................................773
Appendix C: Programming Scripts on UNIX Platforms....................775About Programming Vuser Scripts to Run on UNIX Platforms........776Generating Templates ......................................................................777Programming Vuser Actions into a Script.........................................777Configuring Vuser Run-Time Settings ..............................................779Defining Transactions and Rendezvous Points.................................783Compiling Scripts ..............................................................................784
Appendix D: Using Keyboard Shortcuts ...........................................785
Index ..................................................................................................787

Creating Vuser Scripts
xvi

xv
Welcome to LoadRunner
Welcome to LoadRunner, Mercury Interactive’s tool for testing the performance of applications. LoadRunner stresses your application to isolate and identify potential client, network, and server bottlenecks.
LoadRunner enables you to test your system under controlled and peak load conditions. To generate load, LoadRunner runs thousands of Virtual Users that are distributed over a network. Using a minimum of hardware resources, these Virtual Users provide consistent, repeatable, and measurable load to exercise your application just as real users would. LoadRunner’s in-depth reports and graphs provide the information that you need to evaluate the performance of your application.
Online Resources
LoadRunner includes the following online tools:
Read Me First provides last-minute news and information about LoadRunner.
Books Online displays the complete documentation set in PDF format. Online books can be read and printed using Adobe Acrobat Reader, which is included in the installation package. Check Mercury Interactive’s Customer Support Web site for updates to LoadRunner online books. The URL for this Web site is http://support.mercuryinteractive.com.
LoadRunner Online Function Reference gives you online access to all of LoadRunner’s functions that you can use when creating Vuser scripts, including examples of how to use the functions. Check Mercury Interactive’s Customer Support Web site for updates to the LoadRunner Online Function Reference.
Creating Vuser Scripts
xvi
LoadRunner Context Sensitive Help provides immediate answers to questions that arise as you work with LoadRunner. It describes dialog boxes, and shows you how to perform LoadRunner tasks. To activate this help, click in a window and press F1. Check Mercury Interactive’s Customer Support Web site for updates to LoadRunner help files.
Technical Support Online uses your default web browser to open Mercury Interactive’s Customer Support web site. The URL for this Web site is http://support.mercuryinteractive.com.
Support Information presents the locations of Mercury Interactive’s Customer Support web site and home page, and a list of Mercury Interactive’s offices around the world.
Mercury Interactive on the Web uses your default Web browser to open Mercury Interactive’s home page. The URL for this Web site is http://www.mercuryinteractive.com.
LoadRunner Documentation Set
LoadRunner is supplied with a set of documentation that describes how to:
➤ install LoadRunner
➤ create Vuser scripts
➤ use the LoadRunner Controller
➤ use the LoadRunner Analysis

Welcome to LoadRunner
xvii
Using the LoadRunner Documentation Set
The LoadRunner documentation set consists of one installation guide, a Controller user’s guide, and three guides for creating Virtual User scripts.
Installation Guide
For instructions on installing LoadRunner, refer to the LoadRunner Installation Guide. The installation guide explains how to install:
➤ the LoadRunner Controller—on a Windows-based machine
➤ Virtual User components—for both Windows and UNIX platforms
Controller User’s Guide
The LoadRunner documentation pack includes one Controller user’s guide:
The LoadRunner Controller User’s Guide (Windows) describes how to create and run LoadRunner scenarios using the LoadRunner Controller in a Windows environment. The Vusers can run on UNIX and Windows-based platforms. The Controller user’s guide presents an overview of the LoadRunner testing process.
Analysis User’s Guide
The LoadRunner documentation pack includes one Analysis user’s guide:
The LoadRunner Analysis User’s Guide describes how to use the LoadRunner Analysis graphs and reports after running a scenario in order to analyze system performance.

Creating Vuser Scripts
xviii
Guides for Creating Vuser Scripts
The LoadRunner documentation pack has two guides that describe how to create Vuser scripts:
➤ The Creating Vuser Scripts guide describes how to create all types of Vuser scripts. When necessary, supplement this document with the LoadRunner Online Function Reference and one or more of the following guides:
➤ The WinRunner User’s Guide describes in detail how to use WinRunner to create GUI Vuser scripts. The resulting Vuser scripts run on Windows platforms. The TSL Online Reference should be used in conjunction with this document.
For information on Look here...
Installing LoadRunner LoadRunner Installation Guide
The LoadRunner testing process
LoadRunner Controller User’s Guide (Windows)
Creating Vuser scripts Creating Vuser Scripts guide
Creating and running scenarios, and analyzing results using a:
Windows-based Controller LoadRunner Controller User’s Guide (Windows)

Welcome to LoadRunner
xix
Typographical Conventions
This book uses the following typographical conventions:
1, 2, 3 Bold numbers indicate steps in a procedure.
➤ Bullets indicate options and features.
> The greater than sign separates menu levels (for example, File > Open).
Stone Sans The Stone Sans font indicates names of interface elements in a procedure (for example, “Click the Run button.”).
Italics Italic text indicates names (for example, names of variables or books).
Helvetica The Helvetica font is used for examples and strings that are to be typed in literally.
<> Angle brackets enclose a part of a URL address that needs to be typed in.
[ ] Square brackets enclose optional parameters.
... In a line of syntax, an ellipsis indicates that more items of the same format may be included.

Creating Vuser Scripts
xx

Part I
Introducing Vuser Scripts

2
3
1Developing Vuser Scripts
LoadRunner emulates an environment in which thousands of users work with a client/server system concurrently. To do this, LoadRunner replaces the human user with a virtual user (Vuser). The actions that a Vuser performs are described in a Vuser script. LoadRunner supplies a variety of tools to help you develop your Vuser scripts.
This chapter includes:
➤ Introducing Vusers
➤ Looking at Vuser Types
➤ Developing Vuser Scripts
➤ Using this Guide
Introducing Vusers
LoadRunner replaces human users with virtual users or Vusers. Vusers emulate the actions of human users by performing typical business processes. Each action that a Vusers performs submits input to the client/server system. By increasing the number of Vusers, you increase the load on the system. While a workstation accommodates only a single human user, many Vusers can run concurrently on a single workstation.
To emulate conditions of heavy user load, you create a large number of Vusers that perform a series of tasks. For example, you can observe how a server behaves when one hundred Vusers simultaneously withdraw cash from a bank’s ATMs.

Creating Vuser Scripts • Introducing Vuser Scripts
4
Using LoadRunner, you divide your client/server performance testing requirements into scenarios. A scenario defines the events that occur during each testing session. Thus, for example, a scenario defines and controls the number of users to emulate, the actions that they perform, and the machines on which they run their emulations.
LoadRunner has a variety of Vuser types, each type suited to a particular load testing environment. This enables you to use Vusers to accurately model and emulate real world situations. The actions that a Vuser performs during the scenario are described in a Vuser script. The Vuser scripts include functions that measure and record the performance of the server during the scenario. Each Vuser type requires a particular type of Vuser script. Creating the Vuser scripts required for a scenario is part of the LoadRunner testing process.
Chapter 1 • Developing Vuser Scripts
5
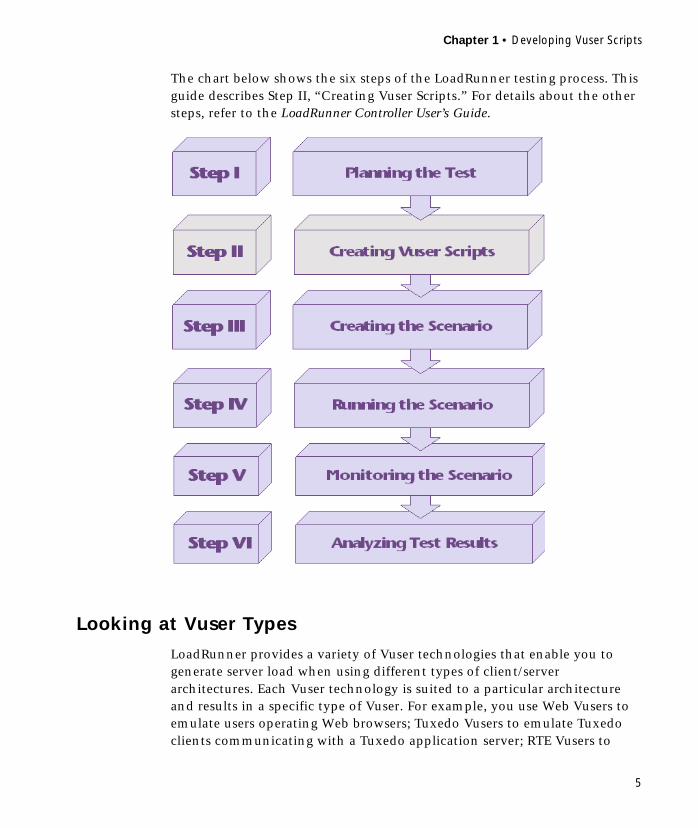
The chart below shows the six steps of the LoadRunner testing process. This guide describes Step II, “Creating Vuser Scripts.” For details about the other steps, refer to the LoadRunner Controller User’s Guide.
Looking at Vuser Types
LoadRunner provides a variety of Vuser technologies that enable you to generate server load when using different types of client/server architectures. Each Vuser technology is suited to a particular architecture and results in a specific type of Vuser. For example, you use Web Vusers to emulate users operating Web browsers; Tuxedo Vusers to emulate Tuxedo clients communicating with a Tuxedo application server; RTE Vusers to

Creating Vuser Scripts • Introducing Vuser Scripts
6
operate terminal emulators. The various Vuser technologies can be used alone or together, to create effective load testing scenarios.
The Vuser types are divided into the following categories:
➤ E-business: For Web (HTTP, HTML), LDAP, POP3, Multi Protocol Web/WS, RealPlayer and FTP protocols.
➤ Wireless: For i-Mode and WAP protocols.
➤ Enterprise Java Beans: For EJB Testing and Rmi-Java protocols.
➤ Distributed Components: For COM/DCOM, Corba-Java, and Rmi-Java protocols.
➤ Middleware: For Jolt, and Tuxedo (6, 7) protocols.
➤ ERP: For SAP, Baan, Oracle NCA, Peoplesoft (Tuxedo or Web), and Siebel protocols.
➤ Client/Server: For Informix, MSSQLServer, ODBC, Oracle (2-tier), DB2 CLI, Sybase Ctlib, Sybase Dblib, and Windows Sockets protocols.
➤ Legacy: For Terminal Emulation (RTE).
➤ Custom: For C template and Java template type scripts.
To view a list of all supported protocols in alphabetical order, choose File > New and click All Protocols.

Chapter 1 • Developing Vuser Scripts
7
Developing Vuser Scripts
The structure and content of a Vuser script differ from one Vuser type to another. For example, Database Vuser scripts always have three sections, are written in a code that resembles C, and include SQL calls to a database server. In contrast, GUI Vuser scripts have only one section, and are written in TSL (test script language).
The following diagram outlines the process of developing a Vuser script.
You begin the process of developing a Vuser script by recording a basic script. LoadRunner provides you with a number of tools for recording Vuser scripts (see the table below for a list of the tools). You enhance the basic script by adding control-flow structures, and by inserting transactions and rendezvous points into the script. You then configure the run-time settings. The run-time settings include iteration, log, and timing information, and define how the Vuser will behave when it executes the Vuser script. To verify that the script runs correctly, you run it in stand-alone mode. When your script runs correctly, you incorporate it into a LoadRunner scenario.
Incorporate the Vuser scriptinto a LoadRunner scenario
Run the Vuser script instand-alone mode
Configure Run-Time settings
Enhance/edit the Vuserscript
Record a basic Vuser script

Creating Vuser Scripts • Introducing Vuser Scripts
8
Using this Guide
This guide is divided into several parts:
➤ Part I, “Introducing Vuser Scripts,” is applicable to all types of Vuser scripts.
➤ Part II, “Working with VuGen,” is applicable only to those Vuser scripts that are recorded and/or run using VuGen. Part II is not applicable when developing GUI Vuser scripts.
➤ Parts III to XV apply to specific Vuser script types. Refer to the Table of Contents to locate the part describing your Vuser type.
You use the following LoadRunner tools to develop Vuser scripts:
VuGen LoadRunner’s primary tool for developing Vuser scripts. The Vuser Script Generator, also known as VuGen, is a Windows-based application which enables you to develop a wide variety of Vuser scripts. VuGen not only records scripts, but can also run them. Many of the scripts generated by VuGen can be run on both Windows and UNIX platforms.VuGen creates Database, Tuxedo, Windows Sockets, Baan, Java, RTE (Windows) and Web Vuser scripts.
WinRunner Mercury Interactive’s tool for automated testing of Windows-based GUI applications. You enhance the test scripts that WinRunner generates to produce GUI Vuser scripts that run on Windows platforms.
Astra LoadTest Virtual User Recorder
Mercury Interactive’s tool for load testing of Web-based applications. A scaled-down version of LoadRunner. LoadRunner can run Vuser scripts created using the Astra LoadTest Virtual User Recorder.
Astra QuickTest Mercury Interactive’s icon-based tool for testing dynamically changing Web applications. LoadRunner can run Vuser scripts created using Astra QuickTest.

Chapter 1 • Developing Vuser Scripts
9
➤ Part XVI contains information for advanced users. It provides some general debugging tips, describes the files generated by VuGen, and explains how to program scripts in Visual C and Visual Basic.
Note: To develop GUI Vuser scripts, you need to refer to the WinRunner User’s Guide.

Creating Vuser Scripts • Introducing Vuser Scripts
10
Part II
Working with VuGen

12

13
2Introducing VuGen
The Virtual User Generator, also known as VuGen, enables you to develop Vuser scripts for a variety of application types and communication protocols.
This chapter describes:
➤ Recording Vuser Scripts with VuGen
➤ Running Vuser Scripts with VuGen
➤ Understanding VuGen Code
➤ Using General Vuser Functions
The following information applies to all types of Vuser scripts except for GUI.
About VuGen
The Vuser Script Generator, also known as VuGen, is LoadRunner’s primary tool for developing Vuser scripts.
VuGen not only records Vuser scripts, but also runs them. Running scripts from VuGen is useful when debugging. It enables you to emulate how a Vuser script will run when executed as part of a scenario.
Note: VuGen records sessions on Windows platforms only. However, a recorded Vuser script can run on either a Windows or a UNIX platform.
Creating Vuser Scripts • Working with VuGen
14
When you record a Vuser script, VuGen generates various functions that define the actions that you perform during the recording session. VuGen inserts these functions into the VuGen editor to create a basic Vuser script. The inserted functions include general Vuser functions and protocol-specific Vuser functions:
➤ The general Vuser functions are also known as LR functions. They can be used in any type of Vuser script. There are separate LoadRunner functions for C and Java.
➤ The protocol-specific Vuser functions are specific to the Vuser type. For example, VuGen uses LRT functions in a TUXEDO script, and LRS functions in a Windows Sockets script.
The general Vuser functions and the protocol-specific functions together form the LoadRunner API and enable Vusers to communicate directly with a server. VuGen displays a list of all of the supported protocols when you create a new script. For syntax information about all of the Vuser functions, see the LoadRunner Online Function Reference (available from the VuGen Help menu).
Recording Vuser Scripts with VuGen
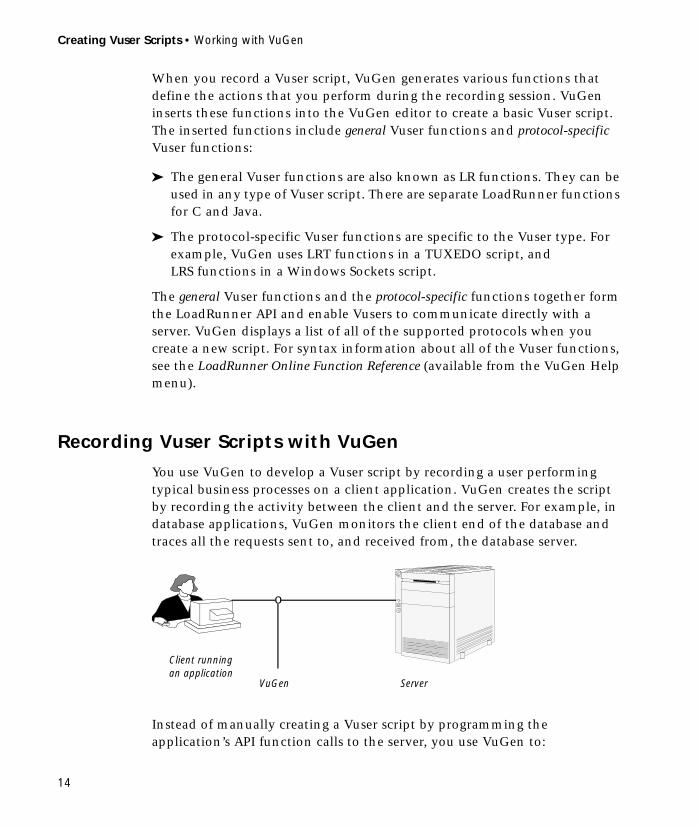
You use VuGen to develop a Vuser script by recording a user performing typical business processes on a client application. VuGen creates the script by recording the activity between the client and the server. For example, in database applications, VuGen monitors the client end of the database and traces all the requests sent to, and received from, the database server.
Instead of manually creating a Vuser script by programming the application’s API function calls to the server, you use VuGen to:
o
Client running an application
VuGen Server

Chapter 2 • Introducing VuGen
15
➤ monitor the communication between the application and the server
➤ generate the required function calls
➤ insert the generated function calls into a Vuser script
Each Vuser script that you create with VuGen can communicate directly with a server by executing calls to the server API—without relying on client software. You can therefore use Vusers to check server performance even before the user interface of the client software has been fully developed.
In addition, when a Vuser communicates directly with a server, system resources are not used on a user interface. This lets you run a large number of Vusers simultaneously on a single workstation. This in turn allows you to use only a few testing machines to emulate large server loads.
Running Vuser Scripts with VuGen
In order to perform load testing with your Vuser script, you need to incorporate the script into a LoadRunner scenario. Before integrating the script into a scenario, you can check the script’s functionality by running it from VuGen. If the script execution is successful, you can then incorporate it into the scenario. For more information on LoadRunner scenarios, refer to your LoadRunner Controller User’s Guide.
Before you run a Vuser script, you can modify its run-time settings. These settings include the number of iterations that the Vuser performs, and the pacing and the think time that will be applied to the Vuser when the script is run. For more information on configuring run-time settings, see Chapter 7, “Configuring Run-Time Settings.”
When you run a Vuser script, it is processed by an interpreter and then executed. You do not need to compile the script. If you modify a script, any
ServerClient running
an application

Creating Vuser Scripts • Working with VuGen
16
syntax errors introduced into the script are noted by the interpreter. You can also call external functions from your script that can be recognized and executed by the interpreter. For more information, see Appendix B, “Calling External Functions.”
Advanced users can compile a recorded script to create an executable program. For more information, see Chapter 4, “Enhancing Vuser Scripts.”
Understanding VuGen Code
When you record a Vuser script, VuGen generates Vuser functions and inserts them into the script. There are two types of Vuser functions:
➤ General Vuser Functions
➤ Protocol-Specific Vuser Functions
General Vuser Functions
The general Vuser functions are also called LR functions because each LR function has an lr prefix. The LR functions can be used in any type of Vuser script. The LR functions enable you to:
➤ Get run-time information about a Vuser, its Vuser Group, and its host.
➤ Add transactions and rendezvous points to a Vuser script. For example, the lr_start_transaction (lr.start_transaction in Java) function marks the beginning of a transaction, and the lr_end_transaction (lr.end_transaction in Java) function marks the end of a transaction.
➤ Send messages to the output, indicating an error or a warning.
See “Using General Vuser Functions,” on page 18 for a list of LR functions, and for details refer to the LoadRunner Online Function Reference (available from the VuGen Help menu).
Chapter 2 • Introducing VuGen
17
Protocol-Specific Vuser Functions
In addition to the general Vuser functions, VuGen also generates and inserts protocol-specific functions into the Vuser script while you record.
The protocol-specific functions are particular to the type of Vuser that you are recording. For example, VuGen inserts LRD functions into a database script, LRT functions into a TUXEDO script and LRS functions into a Windows Sockets script.
Refer to the LoadRunner Online Function Reference (available from the VuGen Help menu) for details of the protocol-specific functions.
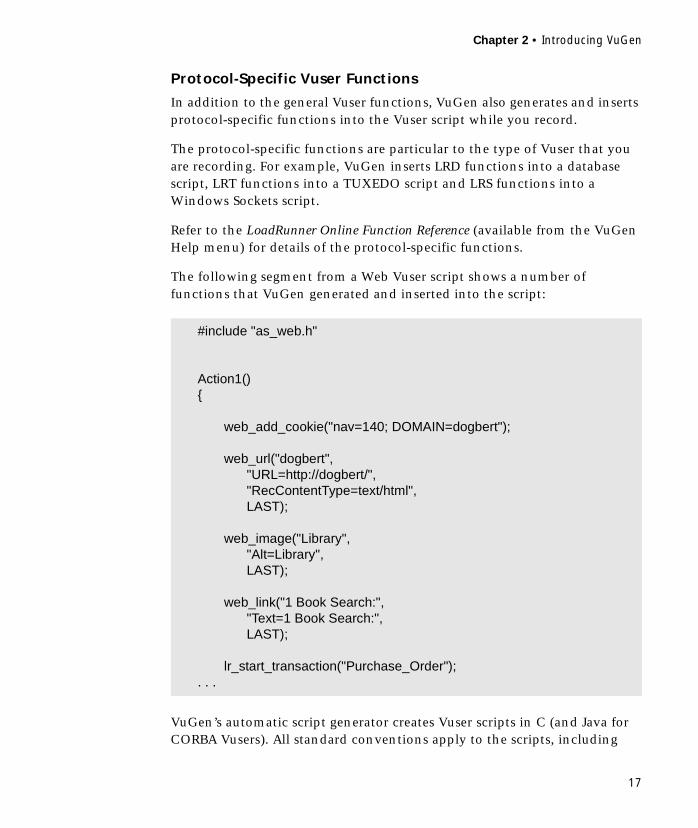
The following segment from a Web Vuser script shows a number of functions that VuGen generated and inserted into the script:
VuGen’s automatic script generator creates Vuser scripts in C (and Java for CORBA Vusers). All standard conventions apply to the scripts, including
#include "as_web.h"
Action1(){
web_add_cookie("nav=140; DOMAIN=dogbert");
web_url("dogbert","URL=http://dogbert/","RecContentType=text/html",LAST);
web_image("Library","Alt=Library",LAST);
web_link("1 Book Search:","Text=1 Book Search:",LAST);
lr_start_transaction("Purchase_Order");. . .

Creating Vuser Scripts • Working with VuGen
18
control flow and syntax. You can add comments and conditional statements to the script just as you do in other C or Java programs. For more information about using C functions in your Vuser scripts, refer to Chapter 4, “Enhancing Vuser Scripts.” For more information about modifying a Java script, see Chapter 35, “Programming Java Scripts.”
Note: The C Interpreter used to run Vuser scripts supports ANSI C language only. No Microsoft extensions to ANSI C are supported.
Using General Vuser Functions
You can add general Vuser functions to any Vuser script in order to enhance the script. VuGen generates only a few of the general Vuser functions while you record. If required, the remaining functions can be manually programmed into a script. For details on the general Vuser functions, see Chapter 4, “Enhancing Vuser Scripts.”
The following list shows the general LoadRunner functions for ANSI C scripts. This includes all protocols except for General-Java. For a list of the Java LoadRunner functions, see Chapter 35, “Programming Java Scripts.”
Transaction Functions
Command Line Parsing Functions
lr_start_transaction Marks the beginning of a transaction.
lr_end_transaction Marks the end of a transaction.
lr_get_attrib_double Retrieves a double type variable used on the script command line.
lr_get_attrib_long Retrieves a long type variable used on the script command line.
lr_get_attrib_string Retrieves a string used on the script command line.
Chapter 2 • Introducing VuGen
19
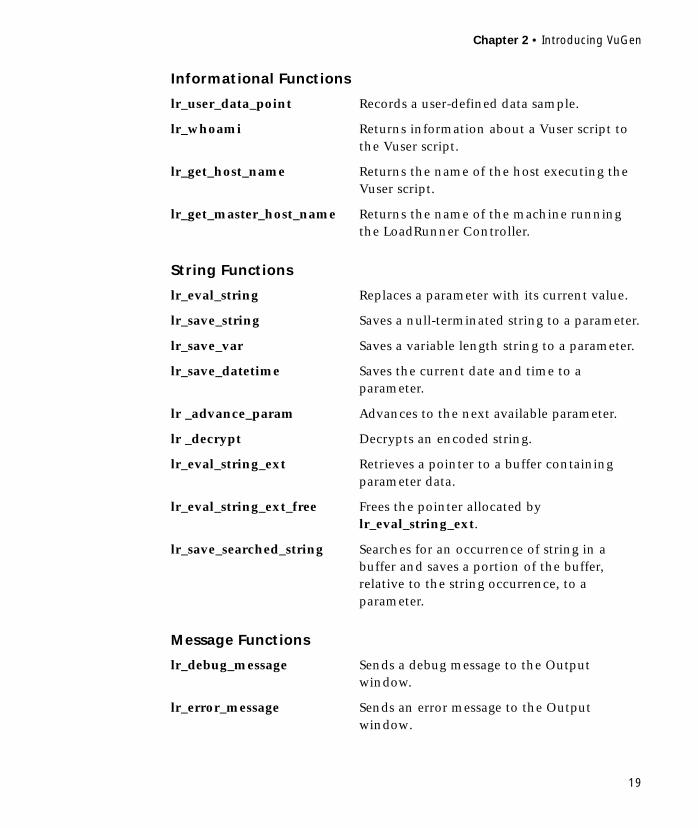
Informational Functions
String Functions
Message Functions
lr_user_data_point Records a user-defined data sample.
lr_whoami Returns information about a Vuser script to the Vuser script.
lr_get_host_name Returns the name of the host executing the Vuser script.
lr_get_master_host_name Returns the name of the machine running the LoadRunner Controller.
lr_eval_string Replaces a parameter with its current value.
lr_save_string Saves a null-terminated string to a parameter.
lr_save_var Saves a variable length string to a parameter.
lr_save_datetime Saves the current date and time to a parameter.
lr _advance_param Advances to the next available parameter.
lr _decrypt Decrypts an encoded string.
lr_eval_string_ext Retrieves a pointer to a buffer containing parameter data.
lr_eval_string_ext_free Frees the pointer allocated by lr_eval_string_ext.
lr_save_searched_string Searches for an occurrence of string in a buffer and saves a portion of the buffer, relative to the string occurrence, to a parameter.
lr_debug_message Sends a debug message to the Output window.
lr_error_message Sends an error message to the Output window.

Creating Vuser Scripts • Working with VuGen
20
Run-Time Functions
lr_get_debug_message Retrieves the current message class.
lr_log_message Sends a message to a log file.
lr_output_message Sends a message to the Output window.
lr_set_debug_message Sets a debug message class.
lr_vuser_status_message Generates and prints formatted output to the Controller Vuser status area.
lr_message Sends a message to the Vuser log and Output window.
lr_load_dll Loads an external DLL.
lr_peek_events Indicates where a Vuser script can be paused.
lr_think_time Pauses script execution to emulate think time—the time a real user pauses to think between actions.
lr_continue_on_error Specifies an error handling method.
lr_rendezvous Sets a rendezvous point in a Vuser script.

21
3Recording with VuGen
VuGen creates a Vuser script by recording the communication between a client application and a server.
This chapter describes:
➤ Vuser Script Sections
➤ Recording Vuser Scripts
➤ Recording Scripts with Multiple Actions
➤ Importing Actions
➤ Regenerating a Vuser Script
The following information applies to all types of Vuser scripts except for GUI.
About Recording with VuGen
VuGen creates a Vuser script by recording the actions that you perform on a client application. When you run the recorded script, the resulting Vuser emulates the user activity between the client and server.
Each Vuser script that you create contains at least three sections: vuser_init, one or more Actions, and vuser_end. During recording, you can select the section of the script into which VuGen will insert the recorded functions. In general, you record a login to a server into the vuser_init section, client activity into the Actions sections, and the logoff procedure into the vuser_end section.

Creating Vuser Scripts • Working with VuGen
22
While recording, you can insert transactions, comments, and rendezvous points into the script. For details, see Chapter 4, “Enhancing Vuser Scripts.”
Vuser Script Sections
Each Vuser script contains at least three sections: vuser_init, one or more Actions, and vuser_end. Before and during recording, you can select the section of the script into which VuGen will insert the recorded functions. The following table shows what to record into each section, and when each section is executed.
When you run multiple iterations of a Vuser script, only the Actions sections of the script are repeated—the vuser_init and vuser_end sections are not repeated. For more information on the iteration settings, see Chapter 7, “Configuring Run-Time Settings.”
You use the VuGen script editor to display and edit the contents of each of the script sections. You can display the contents of only a single section at a time. To display a section, highlight its name in the Sections box.
When working with Vuser scripts that use Java classes (General-Java, JDBC, and CORBA), you place all your code in the Actions class. The Actions class contains three methods: init, action, and end. These methods correspond to the sections of scripts developed using other protocols—you insert initialization routines into the init method, client actions into the action
Script Section Used when recording... Is executed when...
vuser_init a login to a server the Vuser is initialized (loaded)
Actions client activity the Vuser is in “Running” status
vuser_end a logoff procedure the Vuser finishes or is stopped

Chapter 3 • Recording with VuGen
23
method, and log off procedures in the end method. For more information, see Chapter 35, “Programming Java Scripts.”
In the following example, the VuGen script editor displays the Actions section of a Web Vuser script.
Some protocols support only one action section, while others support multiple actions.
public class Actions{public int init() {
return 0;}public int action() {
return 0;}public int end()
return 0;}}
Creating Vuser Scripts • Working with VuGen
24
Recording Vuser Scripts
The recording procedure varies slightly between protocols:
➤ For Vuser types that do not support multiple actions, see the section below.
➤ For Vuser types that support multiple actions, see “Recording Scripts with Multiple Actions” on page 28.
➤ For Web Vuser scripts, see Chapter 12, “Recording Web Vuser Scripts.”
➤ For WAP Vuser scripts, see Chapter 26, “Setting Recording Options for Wireless Vusers.”
➤ For multi-protocol scripts, see Chapter 15, “Recording Multi-Protocol Vuser Scripts.”
➤ For RTE Vuser scripts, see Chapter 49, “Recording RTE Vuser Scripts.”
➤ For CORBA-Java and RMI-Java scripts, see Chapter 37, “Developing CORBA and RMI Vuser Scripts.”
Chapter 3 • Recording with VuGen
25
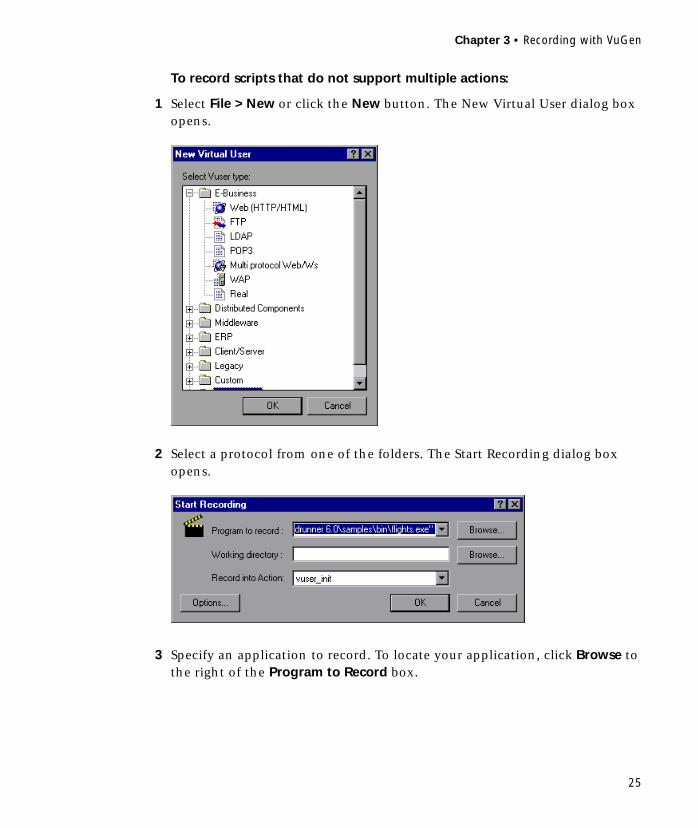
To record scripts that do not support multiple actions:
1 Select File > New or click the New button. The New Virtual User dialog box opens.
2 Select a protocol from one of the folders. The Start Recording dialog box opens.
3 Specify an application to record. To locate your application, click Browse to the right of the Program to Record box.
Creating Vuser Scripts • Working with VuGen
26
Note that you can add command line parameters to your application by filling them in manually in the Program to Record box, to the right of the application name. For example, the following command line options start plus32.exe, and then connect the user Peter to the server Neptune:
4 Specify a working directory for your application. This is necessary only if your application must know the location of the working directory.
5 In the Start Recording into Section box, select the section in which you want to begin recording. The available sections are vuser_init, Actions, and vuser_end.
6 If the selected protocol has recording options, an Options button appears in the Start Recording dialog box. Click Options to specify the recording options.
Refer to the chapters about each specific Vuser type for information about the recording options.
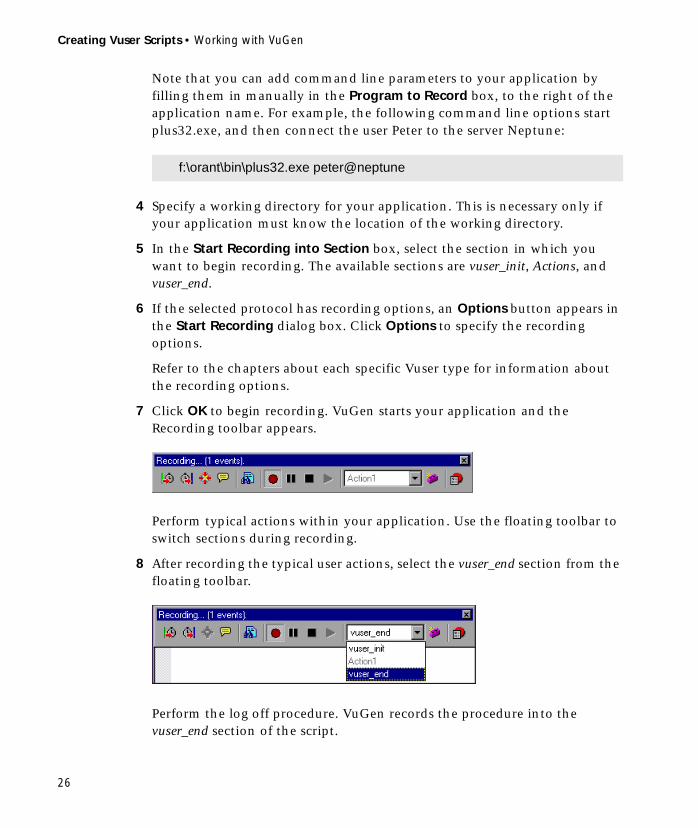
7 Click OK to begin recording. VuGen starts your application and the Recording toolbar appears.
Perform typical actions within your application. Use the floating toolbar to switch sections during recording.
8 After recording the typical user actions, select the vuser_end section from the floating toolbar.
Perform the log off procedure. VuGen records the procedure into the vuser_end section of the script.
f:\orant\bin\plus32.exe peter@neptune
Chapter 3 • Recording with VuGen
27
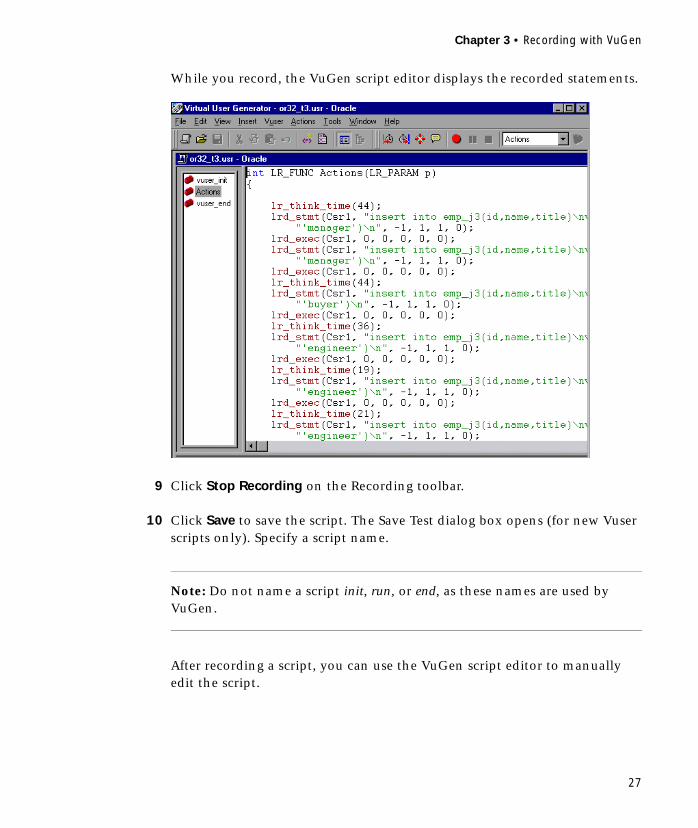
While you record, the VuGen script editor displays the recorded statements.
9 Click Stop Recording on the Recording toolbar.
10 Click Save to save the script. The Save Test dialog box opens (for new Vuser scripts only). Specify a script name.
Note: Do not name a script init, run, or end, as these names are used by VuGen.
After recording a script, you can use the VuGen script editor to manually edit the script.
Creating Vuser Scripts • Working with VuGen
28
While you record, VuGen creates a series of configuration, data, and source code files. These files contain Vuser run-time and setup information. VuGen saves these files together with the script.
Recording Scripts with Multiple Actions
The procedure for recording multiple action scripts differs slightly from other Vuser script types. Refer to Chapter 47, “Creating Baan Vuser Scripts” or Chapter 34, “Creating Oracle NCA Vuser Scripts” for additional information about recording these Vusers.
Creating a Skeleton Vuser Script
For most Vuser types, you can begin recording into a new Vuser script only—you cannot record into an existing script. However, if you are recording a Baan, Java, CORBA-Java, RMI-Java, Web, WAP, Oracle NCA or RTE Vuser script, you can record either into a new Vuser script, or into an existing one.
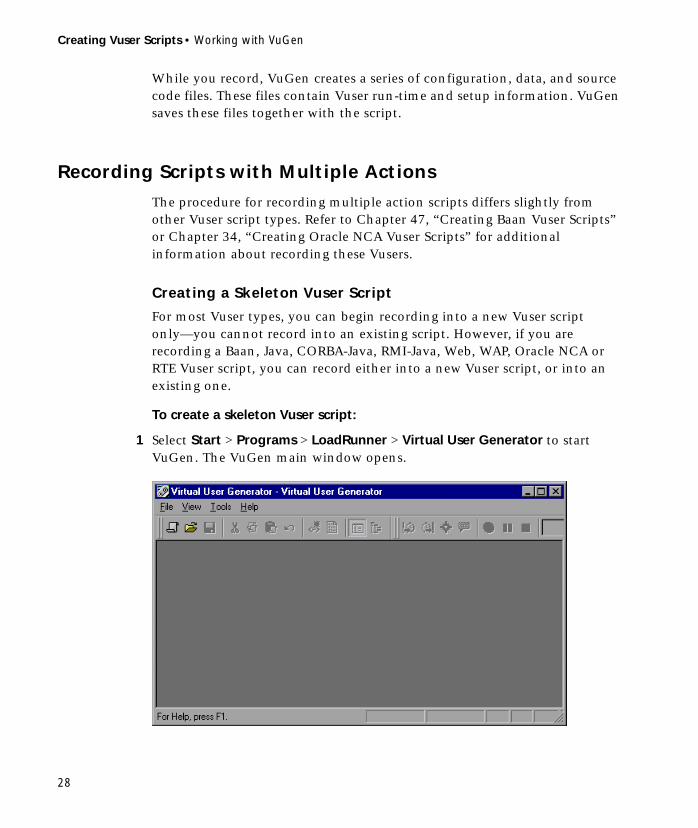
To create a skeleton Vuser script:
1 Select Start > Programs > LoadRunner > Virtual User Generator to start VuGen. The VuGen main window opens.

Chapter 3 • Recording with VuGen
29
2 Click the New button on the VuGen toolbar. The New Virtual User dialog box opens and displays a list of the supported Vuser script types.
3 Select a Vuser script type from one of the folders and then click OK. VuGen displays a skeleton script for the Vuser type that you selected.

Creating Vuser Scripts • Working with VuGen
30
After creating a new Baan or Oracle NCA Vuser script, perform the following procedure:
To record Baan and Oracle NCA Vuser scripts:
1 In the Sections box, select the section into which you want to record. Initially, the available sections are vuser_init, Action1, and vuser_end. To add a new action, select Actions > Create New Action and specify an action name.
Chapter 3 • Recording with VuGen
31
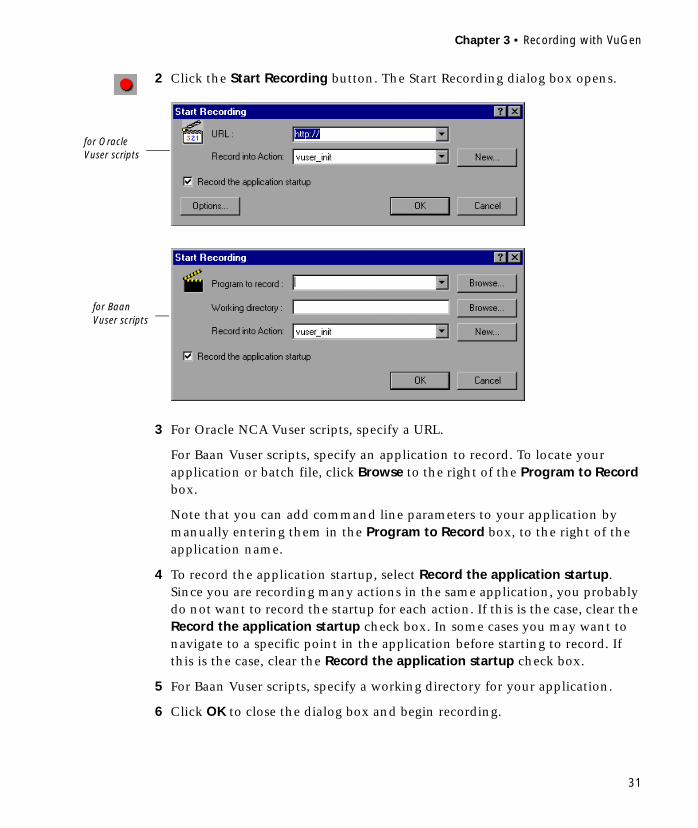
2 Click the Start Recording button. The Start Recording dialog box opens.
3 For Oracle NCA Vuser scripts, specify a URL.
For Baan Vuser scripts, specify an application to record. To locate your application or batch file, click Browse to the right of the Program to Record box.
Note that you can add command line parameters to your application by manually entering them in the Program to Record box, to the right of the application name.
4 To record the application startup, select Record the application startup. Since you are recording many actions in the same application, you probably do not want to record the startup for each action. If this is the case, clear the Record the application startup check box. In some cases you may want to navigate to a specific point in the application before starting to record. If this is the case, clear the Record the application startup check box.
5 For Baan Vuser scripts, specify a working directory for your application.
6 Click OK to close the dialog box and begin recording.
for Oracle Vuser scripts
for Baan Vuser scripts

Creating Vuser Scripts • Working with VuGen
32
7 If you cleared the Record the application startup check box, the Recording Suspended dialog box appears. When you reach the point at which you want to start recording, click Record. If you decide not to record, click Abort.
8 Perform all of the desired user activities within the application. VuGen simultaneously fills in the selected action section of the Vuser script.
9 Click Stop Recording on the Recording toolbar. The VuGen script editor displays all the recorded statements.
10 When you complete all of the actions, select the vuser_end section and perform the log off procedure.
11 Click Save to save the recorded session. The Save Test dialog box opens (for new Vuser scripts only). Specify a script name.
Note: Do not name the script init, run or end, since these names are used by VuGen.
After recording a script, you can manually edit it in the VuGen editor. You can also record more actions at any time.
VuGen creates a series of configuration, data, and source code files during recording. These files are used to execute the Vuser actions.
After recording, you can view the contents of the vuser_init, Actions, and vuser_end sections in the VuGen script editor. To display a section, highlight its name in the Sections box.

Chapter 3 • Recording with VuGen
33
Importing Actions
For Vuser types that support multiple actions, you can import actions into your script from another Vuser script. You can only import actions from Vusers of the same type. Note that any parameters associated with the imported section will be merged with the script.
To import actions into the current script:
1 Select Actions > Import Action into Vuser. The Import Action dialog box opens.
2 Click Browse to select a Vuser. A list of the script’s actions appears in the Actions to Import section.
3 Highlight an action and click OK. The action appears in your script.
Regenerating a Vuser Script
After recording a script, you can enhance it by adding transactions, rendezvous, messages, or comments. For more information, see Chapter 4, “Enhancing Vuser Scripts.”
In addition, you can parameterize the script and correlate variables. For more information, see Chapter 5, “Defining Parameters.”
Creating Vuser Scripts • Working with VuGen
34
If you need to revert back to your original script, you regenerate it. This feature is ideal for debugging, or fixing a corrupted script.
When you regenerate a script, it removes all of the manually added enhancements. Note that if you added parameters to your script, VuGen restores the original values. The parameter list, however, is not deleted; you can reinsert parameters that you created earlier.
To regenerate a Vuser script, choose Tools > Regenerate Vuser. VuGen issues a warning indicating that all manual changes will be overwritten.
35
4Enhancing Vuser Scripts
You can enhance a Vuser script—either during or after recording—by adding General Vuser functions, Protocol-Specific Vuser functions, and Standard ANSI C functions.
This chapter describes:
➤ Inserting Transactions into a Vuser Script
➤ Inserting Rendezvous Points into a Vuser Script
➤ Inserting Comments into a Vuser Script
➤ Obtaining Vuser Information
➤ Sending Messages to Output
➤ Handling Errors in Vuser Scripts During Execution
➤ Synchronizing Vuser Scripts
➤ Emulating User Think Time
➤ Handling Command Line Arguments
➤ Using C Functions in Vuser Scripts
The following information applies to all types of Vuser scripts except for GUI and Java.

Creating Vuser Scripts • Working with VuGen
36
About Enhancing Vuser Scripts
While you are recording a Vuser script, or after you record it, you can enhance its capabilities by adding the following types of functions:
➤ General Vuser Functions
➤ Protocol-Specific Vuser functions
➤ Standard ANSI C functions
General Vuser Functions
General Vuser functions greatly enhance the functionality of any Vuser script. For example, you can use General Vuser functions to measure server performance, control server load, add debugging code, or retrieve run-time information about the Vusers participating in the scenario.
You can use General Vuser functions in any type of Vuser script. All General Vuser functions have an LR prefix. VuGen generates some General Vuser functions and inserts them into a Vuser script during recording. To use additional functions that were not automatically generated, choose Insert > New Step from VuGen’s main window and select the desired function.
This chapter discusses the use of only the most common General Vuser functions. For additional information about Vuser functions, refer to the LoadRunner Online Function Reference (available from the VuGen Help menu).
Protocol-Specific Vuser functions
There are several libraries of functions that you can use to enhance a Vuser script. Each library is specific to a type of Vuser. For example, you use the LRS functions in a Windows Sockets Vuser script, LRT functions in a TUXEDO Vuser script, and LRA functions in an APPC script. For details on the protocol-specific Vuser functions, see the LoadRunner Online Function Reference (available from the VuGen Help menu).

Chapter 4 • Enhancing Vuser Scripts
37
Standard ANSI C functions
You can enhance your Vuser scripts by adding standard ANSI C functions. ANSI C functions allow you to add comments, control flow statements, conditional statements, and so forth to your Vuser scripts. You can add standard ANSI C functions to any type of Vuser script. For details, see “Using C Functions in Vuser Scripts,” on page 47.
Inserting Transactions into a Vuser Script
You define transactions to measure the performance of the server. Each transaction measures the time it takes for the server to respond to specified Vuser requests. These requests can be simple tasks such as waiting for a response for a single query, or complex tasks, such as submitting several queries and generating a report.
To measure a transaction, you insert Vuser functions to mark the beginning and the end of a task. Within a script, you can mark an unlimited number of transactions, each transaction with a different name.
During scenario execution, the Controller measures the time that it takes to perform each transaction. After the scenario run, you analyze the server’s performance per transaction using LoadRunner’s graphs and reports.
To mark the start of a transaction:
1 While recording a Vuser script, click the Start Transaction button on the Recording toolbar. The Start Transaction dialog box opens.
2 Type a transaction name in the Transaction Name box.
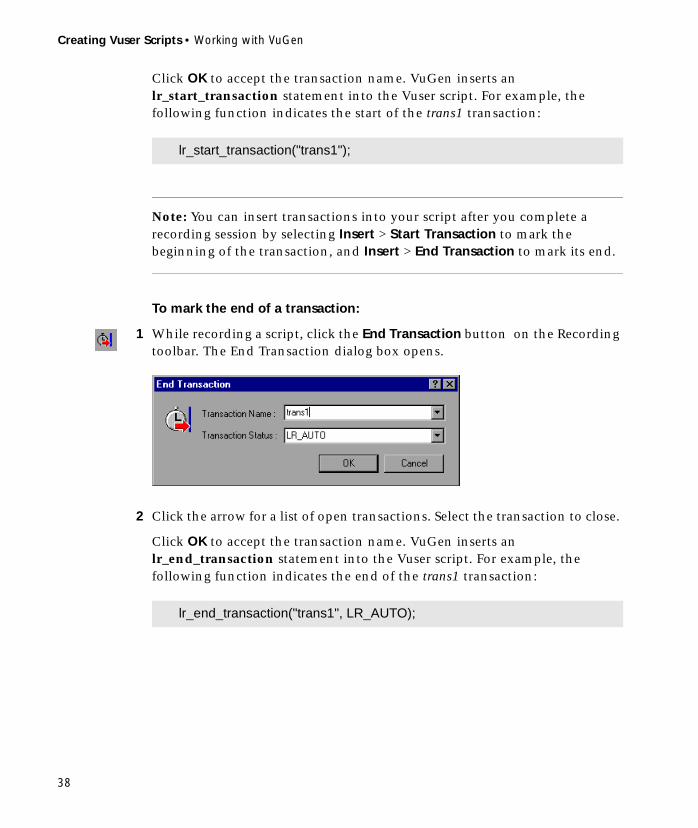
Creating Vuser Scripts • Working with VuGen
38
Click OK to accept the transaction name. VuGen inserts an lr_start_transaction statement into the Vuser script. For example, the following function indicates the start of the trans1 transaction:
Note: You can insert transactions into your script after you complete a recording session by selecting Insert > Start Transaction to mark the beginning of the transaction, and Insert > End Transaction to mark its end.
To mark the end of a transaction:
1 While recording a script, click the End Transaction button on the Recording toolbar. The End Transaction dialog box opens.
2 Click the arrow for a list of open transactions. Select the transaction to close.
Click OK to accept the transaction name. VuGen inserts an lr_end_transaction statement into the Vuser script. For example, the following function indicates the end of the trans1 transaction:
lr_start_transaction("trans1");
lr_end_transaction("trans1", LR_AUTO);
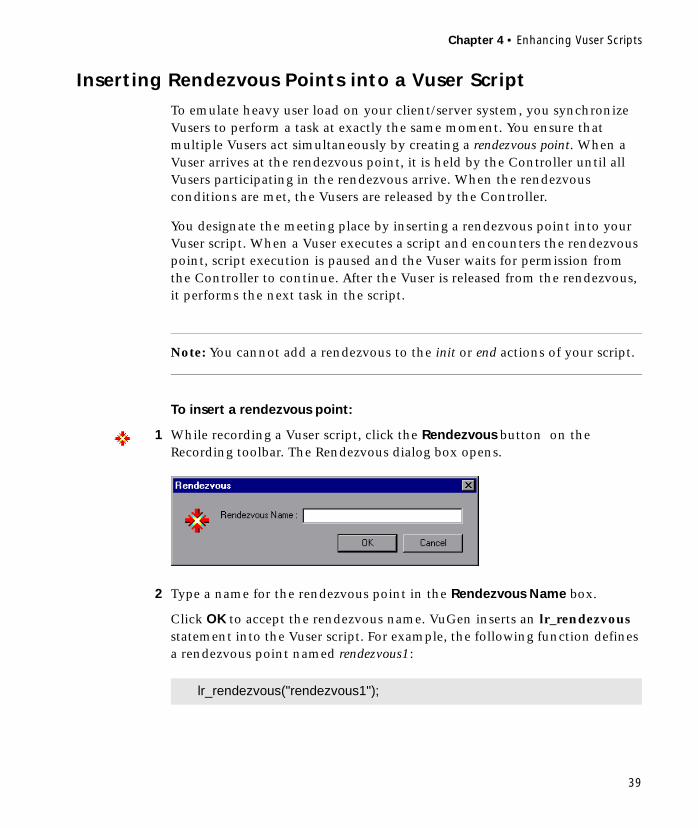
Chapter 4 • Enhancing Vuser Scripts
39
Inserting Rendezvous Points into a Vuser Script
To emulate heavy user load on your client/server system, you synchronize Vusers to perform a task at exactly the same moment. You ensure that multiple Vusers act simultaneously by creating a rendezvous point. When a Vuser arrives at the rendezvous point, it is held by the Controller until all Vusers participating in the rendezvous arrive. When the rendezvous conditions are met, the Vusers are released by the Controller.
You designate the meeting place by inserting a rendezvous point into your Vuser script. When a Vuser executes a script and encounters the rendezvous point, script execution is paused and the Vuser waits for permission from the Controller to continue. After the Vuser is released from the rendezvous, it performs the next task in the script.
Note: You cannot add a rendezvous to the init or end actions of your script.
To insert a rendezvous point:
1 While recording a Vuser script, click the Rendezvous button on the Recording toolbar. The Rendezvous dialog box opens.
2 Type a name for the rendezvous point in the Rendezvous Name box.
Click OK to accept the rendezvous name. VuGen inserts an lr_rendezvous statement into the Vuser script. For example, the following function defines a rendezvous point named rendezvous1:
lr_rendezvous("rendezvous1");

Creating Vuser Scripts • Working with VuGen
40
Note: You can insert rendezvous points into your script after you complete a recording session, by selecting Insert > Rendezvous from the VuGen menu.
Inserting Comments into a Vuser Script
VuGen allows you to insert comments between Vuser activities. You can insert a comment to describe an activity or to provide information about a specific operation. For example, if you are recording database actions, you could insert a comment to mark the first query, such as “This is the first query.”
To insert a comment:
1 While recording a script, click the Comment button on the Recording tool bar. The Insert Comment dialog box opens.
2 Type the comment into the text box.
3 Click OK to insert the comment and close the dialog box. The text is placed at the current point in the script, enclosed by comment markers. The following script segment shows how a comment appears in a Vuser script:
/** This is the first query*/

Chapter 4 • Enhancing Vuser Scripts
41
Note: You can insert comments into your script after you complete a recording session, by selecting Insert > Comment from the VuGen menu.
Obtaining Vuser Information
You can add the following functions to your Vuser scripts to retrieve Vuser information:
In the following example, the lr_get_host_name function retrieves the name of the computer on which the Vuser is running.
For more information about the above functions, refer to the LoadRunner Online Function Reference (available from the VuGen Help menu).
lr_get_attrib_string Returns a string containing command line argument values or run-time information such as the Vuser ID or the load generator name (as an alternate to the above functions).
lr_get_host_name Returns the name of the load generator for the Vuser.
lr_get_master_host_name Returns the name of the LoadRunner Controller load generator.
lr_whoami Returns the Vuser ID, Vuser Group, and scenario ID for a Vuser.
my_host = lr_get_host_name( );
Creating Vuser Scripts • Working with VuGen
42
Sending Messages to Output
When you run a scenario, the Controller’s Output window displays information about script execution. You can include statements in a Vuser script to send error and notification messages to the Controller. The Controller displays these messages in the Output window. For example, you could insert a message that displays the current state of the client application. You can also save these messages to a file.
Note: Do not to send messages from within a transaction. Doing so lengthens the transaction execution time and may skew the actual transaction results.
You can use the following message functions in your Vuser scripts:
lr_debug_message Sends a debug message to the output window.
lr_error_message Sends an error message to the output window.
lr_get_debug_message Retrieves the current message class.
lr_log_message Sends an output message directly to a file, output.txt, located in the Vuser script directory. This function is useful in preventing output messages from interfering with TCP/IP traffic.
lr_output_message Sends a message to the Output window.
lr_set_debug_message Sets a message class for output messages.
lr_vuser_status_message Generates and prints formatted output to the Controller Vuser status area.
lr_message Sends a message to the Vuser log and Output window.
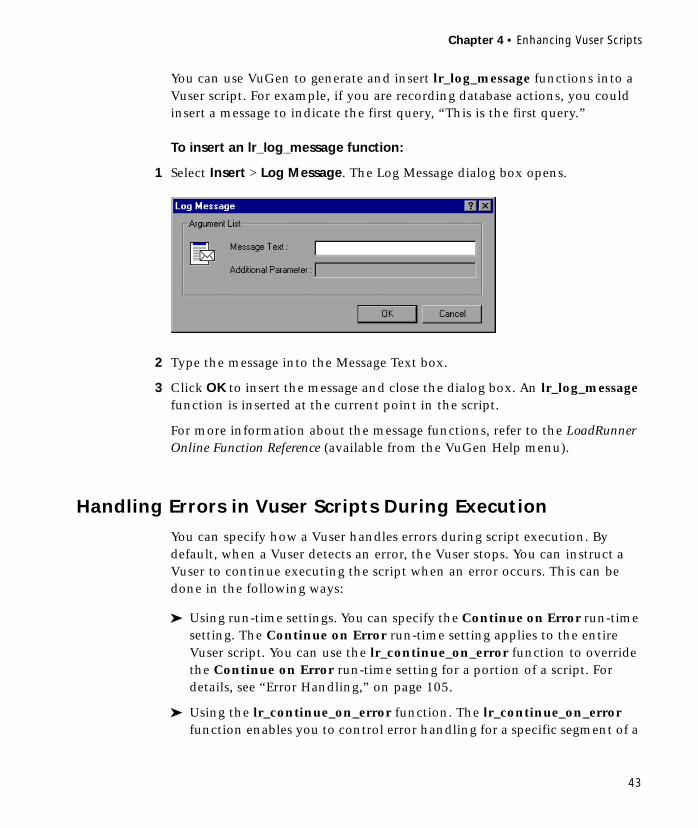
Chapter 4 • Enhancing Vuser Scripts
43
You can use VuGen to generate and insert lr_log_message functions into a Vuser script. For example, if you are recording database actions, you could insert a message to indicate the first query, “This is the first query.”
To insert an lr_log_message function:
1 Select Insert > Log Message. The Log Message dialog box opens.
2 Type the message into the Message Text box.
3 Click OK to insert the message and close the dialog box. An lr_log_message function is inserted at the current point in the script.
For more information about the message functions, refer to the LoadRunner Online Function Reference (available from the VuGen Help menu).
Handling Errors in Vuser Scripts During Execution
You can specify how a Vuser handles errors during script execution. By default, when a Vuser detects an error, the Vuser stops. You can instruct a Vuser to continue executing the script when an error occurs. This can be done in the following ways:
➤ Using run-time settings. You can specify the Continue on Error run-time setting. The Continue on Error run-time setting applies to the entire Vuser script. You can use the lr_continue_on_error function to override the Continue on Error run-time setting for a portion of a script. For details, see “Error Handling,” on page 105.
➤ Using the lr_continue_on_error function. The lr_continue_on_error function enables you to control error handling for a specific segment of a

Creating Vuser Scripts • Working with VuGen
44
Vuser script. To mark the segment, enclose it with lr_continue_on_error(1); and lr_continue_on_error(0); statements. The new error settings apply to the enclosed Vuser script segment. See the paragraphs below for details.
For example, if you enable the Continue on Error run-time setting and a Vuser encounters an error during replay of the following script segment, the Vuser continues executing the script.
To instruct the Vuser to continue on error for the entire script, except for the above segment, enclose the segment with the appropriate lr_continue_on_error statements:
web_link("EBOOKS","Text=EBOOKS","Snapshot=t2.inf",LAST);
web_link("Find Rocket eBooks","Text=Find Rocket eBooks","Snapshot=t3.inf",LAST);
lr_continue_on_error(1);web_link("EBOOKS",
"Text=EBOOKS","Snapshot=t2.inf",LAST);
web_link("Find Rocket eBooks","Text=Find Rocket eBooks","Snapshot=t3.inf",LAST);
lr_continue_on_error(0);

Chapter 4 • Enhancing Vuser Scripts
45
Synchronizing Vuser Scripts
You can add synchronization functions to synchronize the execution of the Vuser script with the output from your application. Synchronization applies to Baan and RTE Vuser scripts only.
The following synchronization functions exist:
For details on using synchronization functions in RTE Vuser scripts, see Chapter 51, “Synchronizing RTE Vuser Scripts.”
obj_wait_info Waits for the value of an object property. (Baan only)
tbl_wait_selected_cell Waits for the specified cell to appear in focus. (Baan only)
win_wait_info Waits for the value of a window property. (Baan only)
TE_wait_cursor Waits for the cursor to appear at a specified location in the terminal window. (RTE only)
TE_wait_silent Waits for the client application to be silent for a specified number of seconds. (RTE only)
TE_wait_sync Waits for the system to return from X-SYSTEM or Input Inhibited mode. (RTE only)
TE_wait_text Waits for a string to appear in a designated location. (RTE only)
TE_wait_sync_transaction Records the time that the system remained in the most recent X SYSTEM mode. (RTE only)

Creating Vuser Scripts • Working with VuGen
46
Emulating User Think Time
The time that a user waits between performing successive actions is known as the think time. Vusers use the lr_think_time function to emulate user think time. When your record a Vuser script, VuGen records the actual think times and inserts appropriate lr_think_time statements into the Vuser script. You can edit the recorded lr_think_time statements, and manually add more lr_think_time statements to a Vuser script.
Note: When you record a Baan or Java Vuser script, lr_think_time statements are not generated in the Vuser script.
You can use the think time settings to influence how the lr_think_time statements operate when you execute a Vuser script. To access the think time settings, select Vuser > Run-time Settings from the VuGen main menu, and then click the Think Time tab.
For more information about the lr_think_time function, refer to the LoadRunner Online Function Reference (available from the VuGen Help menu).
Handling Command Line Arguments
You can pass values to a Vuser script at run-time by specifying command line arguments when you run the script. There are three functions that allow you to read the command line arguments, and then to pass the values to a Vuser script:
lr_get_attrib_double Retrieves double precision floating point type arguments
lr_get_attrib_long Retrieves long integer type arguments
lr_get_attrib_string Retrieves character strings

Chapter 4 • Enhancing Vuser Scripts
47
Your command line should have one of the following two formats where the arguments and their values are listed in pairs, after the script name:
The following example shows the command line string used to repeat script1 five times on the load generator pc4:
For more information on the command line parsing functions, or for details on including arguments on a command line, refer to the LoadRunner Online Function Reference (available from the VuGen Help menu).
Using C Functions in Vuser Scripts
VuGen generates Vuser scripts in C. All standard ANSI C conventions apply to the scripts, including control flow and syntax. You can add comments and conditional statements to the script just as you do in other C programs. You declare and define variables using ANSI C conventions.
The C Interpreter that is used to run Vuser scripts accepts the standard ANSI C language. It does not support any Microsoft extensions to ANSI C.
Before you add any C functions to a Vuser script, note the following limitations:
➤ A Vuser script cannot pass the address of one of its functions as a callback to a library function.
➤ The stdargs, longjmp, and alloca functions are not supported in Vuser scripts.
➤ Vuser scripts do not support structure arguments or return types. Pointers to structures are supported.
script_name -argument argument_value -argument argument_value
script_name /argument argument_value /argument argument_value
script1 -host pc4 -loop 5

Creating Vuser Scripts • Working with VuGen
48
➤ In Vuser scripts, string literals are read-only. Any attempt to write to a string literal generates an access violation.
Calling libc Functions
In a Vuser script, you can call libc functions. However, since the interpreter that is used to run Vuser scripts does not support any Microsoft extensions to ANSI C, you cannot use Microsoft’s include files. You can either write your own prototypes when necessary, or ask Mercury Interactive Customer Support to send you ANSI-compatible include files containing prototypes for libc functions.
Linking Mode
The C interpreter that is used to run Vuser scripts uses a “lazy” linking mode in the sense that a function need not be defined at the start of a run, as long as the function is defined before it is used. For example:
lr_load_dll("mydll.dll");myfun(); /* defined in mydll.dll -- can be called directly,
immediately after myfun.dll is loaded. */

49
5Defining Parameters
When you record a business process, VuGen generates a script that contains the actual values used during recording. Suppose you want to perform the script’s actions (query, submit, and so forth) using different values from those recorded. To do this, you replace the recorded values with parameters. This is known as parameterizing the script.
This chapter describes:
➤ Understanding Parameter Limitations
➤ Creating Parameters
➤ Defining Parameter Properties
➤ Understanding Parameter Types
➤ Setting Parameter Properties for Internal Data Types
➤ Setting Parameter Properties for Data Files
➤ Importing Data from Existing Databases
➤ User-Defined Functions
➤ Parameterization Options
The following information applies to all types of Vuser scripts except for GUI.

Creating Vuser Scripts • Working with VuGen
50
About Defining Parameters
When you record a business process, VuGen generates a Vuser script composed of functions. The values of the arguments in the functions are the actual values used during the recording session.
For example, assume that you recorded a Vuser script while operating a Web application. VuGen generated the following statement that searches a library’s database for the title “UNIX”:
When you replay the script using multiple Vusers and iterations, you do not want to repeatedly use the same value, UNIX. Instead, you replace the constant value with a parameter:
web_submit_form("db2net.exe",ITEMDATA,"name=library.TITLE","value=UNIX",ENDITEM,"name=library.AUTHOR","value=",ENDITEM,"name=library.SUBJECT","value=",ENDITEM,LAST);
;
web_submit_form("db2net.exe",ITEMDATA,"name=library.TITLE","value={Book_Title}",ENDITEM,"name=library.AUTHOR","value=",ENDITEM,"name=library.SUBJECT","value=",ENDITEM,LAST);
Chapter 5 • Defining Parameters
51
The resulting Vusers then substitute the parameter with values from a data source that you specify. The data source can be either a file, or internally generated variables. For more information about data sources, see “Understanding Parameter Types” on page 59.
Parameterizing a Vuser script has two advantages:
➤ It reduces the size of the script.
➤ It provides the ability to test your script with different values. For example, if you want to search a library’s database for several titles, you only need to write the submit function once. Instead of instructing your Vuser to search for a specific item, use a parameter. During replay, VuGen substitutes different values for the parameter.
Parameterization involves the following two tasks:
➤ Replacing the constant values in the Vuser script with parameters
➤ Setting the properties and data source for the parameters
Understanding Parameter Limitations
You can use parameterization only for the arguments within a function. You cannot parameterize text strings that are not function arguments. In addition, not all function arguments can be parameterized. For details on which arguments you can parameterize, see the LoadRunner Online Function Reference (available from the VuGen Help menu).
For example, consider the lrd_stmt function. The function has the following syntax:
The LoadRunner Online Function Reference indicates that you can parameterize only the mpcText argument.
lrd_stmt ( LRD_CURSOR FAR *mptCursor, char FAR *mpcText, long mli-TextLen, LRDOS_INT4 mjOpt1, LRDOS_INT4 mjOpt2, int miDBErrorSe-verity );

Creating Vuser Scripts • Working with VuGen
52
A recorded lrd_stmt function could look like this:
You could parameterize the recorded function to look like this:
Note: You can use the lr_eval_string function to “parameterize” a function argument that you cannot parameterize by using standard parameterization. In addition, you can use the lr_eval_string function to “parameterize” any string in a Vuser script. For more information on the lr_eval_string function, see the LoadRunner Online Function Reference.
Creating Parameters
You create a parameter by specifying its name and type. There is no limit to the number of parameters you can create in a Vuser script.
In Web Vuser scripts, you can create parameters in the text-based script view using the procedure below, or you can create parameters in the icon-based tree view. For details on creating parameters in the tree view of Web Vuser scripts, see “Creating Parameters in the Tree View of Web Vuser Scripts” on page 55.
lrd_stmt( Csr4, "select name from sysobjects where name =\"Kim\" ", -1, 148, -99999, 0);
lrd_stmt( Csr4, "select name from sysobjects where name =\"<name>\" ", -1, 148, -99999, 0);

Chapter 5 • Defining Parameters
53
To create a parameter:
1 Right-click on the string to parameterize. The right-click pop-up menu opens.
2 From the pop-up menu, select Replace with a Parameter. The Select or Create Parameter dialog box opens.
3 Type a name for the parameter in the Parameter name box, or select an existing parameter name from the list.
4 Select a parameter type from the Parameter type list.
For information on the parameter types and their properties, see “Understanding Parameter Types” on page 59.
5 Click OK to close the Select or Create Parameter dialog box. VuGen replaces the selected string in your script with the name of the parameter, surrounded by angle brackets.
Note that when parameterizing CORBA or General-Java Vuser scripts, you must parameterize complete strings, not parts of a string.
Note: The default parameter braces are angle brackets for all types of Vusers, except for Web or WAP, where the default is curly braces. You define parameter braces from the Parameterization tab in the General Options dialog box (select Tools > General Options). For more information, see “Parameterization Options” on page 78.
6 To replace additional occurrences of the string with the same parameter, right-click on the parameter.
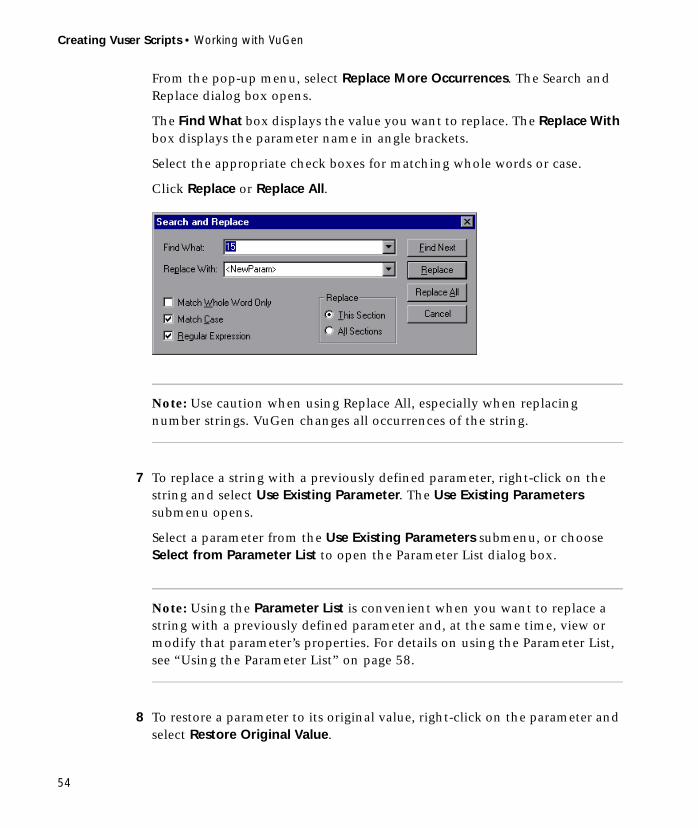
Creating Vuser Scripts • Working with VuGen
54
From the pop-up menu, select Replace More Occurrences. The Search and Replace dialog box opens.
The Find What box displays the value you want to replace. The Replace With box displays the parameter name in angle brackets.
Select the appropriate check boxes for matching whole words or case.
Click Replace or Replace All.
Note: Use caution when using Replace All, especially when replacing number strings. VuGen changes all occurrences of the string.
7 To replace a string with a previously defined parameter, right-click on the string and select Use Existing Parameter. The Use Existing Parameters submenu opens.
Select a parameter from the Use Existing Parameters submenu, or choose Select from Parameter List to open the Parameter List dialog box.
Note: Using the Parameter List is convenient when you want to replace a string with a previously defined parameter and, at the same time, view or modify that parameter’s properties. For details on using the Parameter List, see “Using the Parameter List” on page 58.
8 To restore a parameter to its original value, right-click on the parameter and select Restore Original Value.
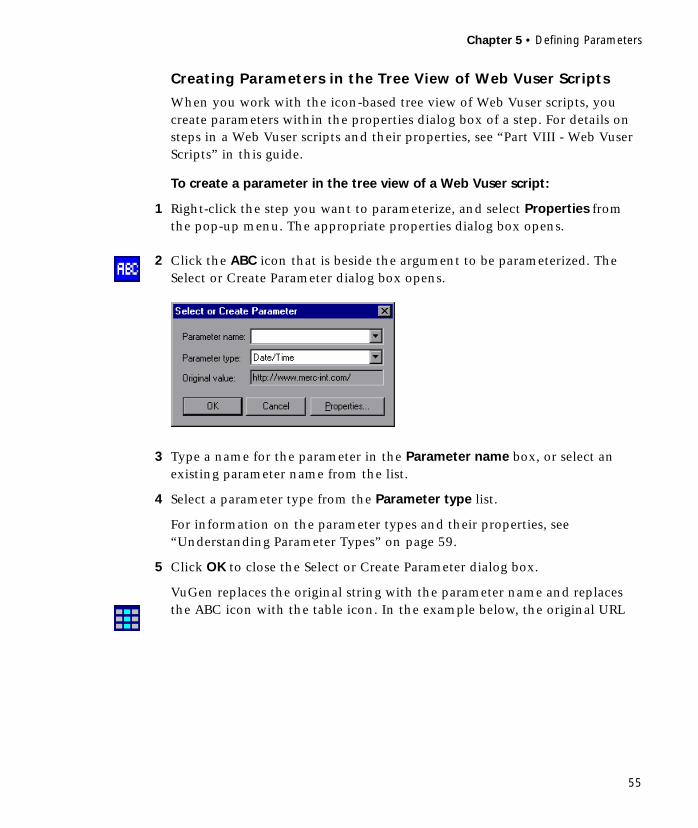
Chapter 5 • Defining Parameters
55
Creating Parameters in the Tree View of Web Vuser Scripts
When you work with the icon-based tree view of Web Vuser scripts, you create parameters within the properties dialog box of a step. For details on steps in a Web Vuser scripts and their properties, see “Part VIII - Web Vuser Scripts” in this guide.
To create a parameter in the tree view of a Web Vuser script:
1 Right-click the step you want to parameterize, and select Properties from the pop-up menu. The appropriate properties dialog box opens.
2 Click the ABC icon that is beside the argument to be parameterized. The Select or Create Parameter dialog box opens.
3 Type a name for the parameter in the Parameter name box, or select an existing parameter name from the list.
4 Select a parameter type from the Parameter type list.
For information on the parameter types and their properties, see “Understanding Parameter Types” on page 59.
5 Click OK to close the Select or Create Parameter dialog box.
VuGen replaces the original string with the parameter name and replaces the ABC icon with the table icon. In the example below, the original URL

Creating Vuser Scripts • Working with VuGen
56
value, “http://www.merc-int.com/,” has been replaced with the parameter {url}.
6 To restore a parameter to its original value, click the table icon and select Undo Parameter from the pop-up menu. The original value is restored.
Defining Parameter Properties
After you create a parameter, you define its properties. A parameter’s properties define the data source the parameter uses during script execution.
In Web Vuser scripts, you can define parameter properties in the text-based script view using the procedure below, or you can define parameter properties in the icon-based tree view. For details on defining parameter properties in the tree view of Web Vuser scripts, see “Defining Properties in the Tree View of Web Vuser Scripts” on page 57.
To define a parameter’s properties:
1 Right-click the parameter. The right-click pop-up menu opens.
2 From the pop-up menu, select Parameter Properties. The Parameter Properties dialog box opens and displays the properties that are relevant for
Parameter name Table icon

Chapter 5 • Defining Parameters
57
the current parameter type. In the following example, the properties of a file type parameter are displayed.
3 Enter the properties of the parameter. For more information, see “Understanding Parameter Types” on page 59.
4 Click Close to close the Parameter Properties dialog box.
Defining Properties in the Tree View of Web Vuser Scripts
When you work with the icon-based tree view of Web Vuser scripts, you define parameter properties within the properties dialog box of a step. For details on steps in a Web Vuser scripts and their properties, see “Part VIII - Web Vuser Scripts” in this guide.
To define a parameter’s properties in the tree view of Web Vuser scripts:
1 Right-click the step containing the parameter whose properties you want to define, and select Properties. The appropriate step properties dialog box opens.
2 Click the table icon beside the parameter whose properties you want to define, and select Parameter Properties from the pop-up menu. The

Creating Vuser Scripts • Working with VuGen
58
Parameter Properties dialog box opens and displays the properties that are relevant for the parameter type.
3 Enter the properties of the parameter. For more information, see “Understanding Parameter Types” on page 59.
4 Click Close to close the Parameter Properties dialog box.
Using the Parameter List
Use the Parameter List to examine all of the parameters, create a new parameter, delete a parameter, or change the properties of an existing parameter at any time.
To use the Parameter List:
1 Click the Parameter List button or select Vuser > Parameter List. The Parameter List dialog box opens with the properties of the selected parameter. In the following example, the properties of a date type parameter are displayed.
2 To create a new parameter, click New. The new parameter appears in the parameter tree with a temporary name.

Chapter 5 • Defining Parameters
59
Type a name for the new parameter, and press ENTER.
Note: Do not name a parameter unique, since this name is used by VuGen.
Set the parameter’s type and properties, and then click OK to close the Parameter List dialog box.
Note: VuGen creates a new parameter, but does not automatically replace any selected string in the script.
3 To delete an existing parameter, select the parameter from the parameter tree, click Delete, and confirm your action.
4 To modify an existing parameter, select the parameter from the parameter tree and edit the parameter’s type and properties.
For more information on setting a parameter’s properties, see “Understanding Parameter Types” on page 59.
Understanding Parameter Types
When you define a parameter’s properties, you specify the source for the parameter data. You can specify any one of the following data source types:
Internal Data Data that is generated internally by the Vuser.
Data Files Data that is contained in a file—either an existing file or one that you create with VuGen.
User-Defined Functions Data that is generated using a function from an external DLL. For more information about user-defined functions, see “User-Defined Functions” on page 76.

Creating Vuser Scripts • Working with VuGen
60
Internal Data
Internal data is generated automatically while a Vuser runs. The available internal data types are:
➤ Date/Time
Date/Time replaces the parameter with the current date and/or time. To specify a date/time format, you can select a format from the menu list or specify your own format. The format should correspond to the date/time format recorded in your script.
➤ Group Name
Group Name replaces the parameter with the name of the Vuser Group. You specify the name of the Vuser Group when you create a scenario. When you run a script from VuGen, the Group name is always None.
➤ Load Generator Name
Load Generator Name replaces the parameter with the name of the Vuser script’s load generator. The load generator is the computer on which the Vuser is running.
➤ Iteration Number
Iteration Number replaces the parameter with the current iteration number.
➤ Random Number
Random Number replaces the parameter with a random number. You set a range of random numbers by specifying minimum and maximum values.
➤ Unique Number
Unique Number replaces the parameter with a unique number. You specify a start number and a block size.
➤ Vuser ID
Vuser ID replaces the parameter with the ID assigned to the Vuser by the Controller during a scenario run. When you run a script from VuGen, the Vuser ID is always -1.
For details on setting parameter properties for internal data types, see “Setting Parameter Properties for Internal Data Types” on page 61.
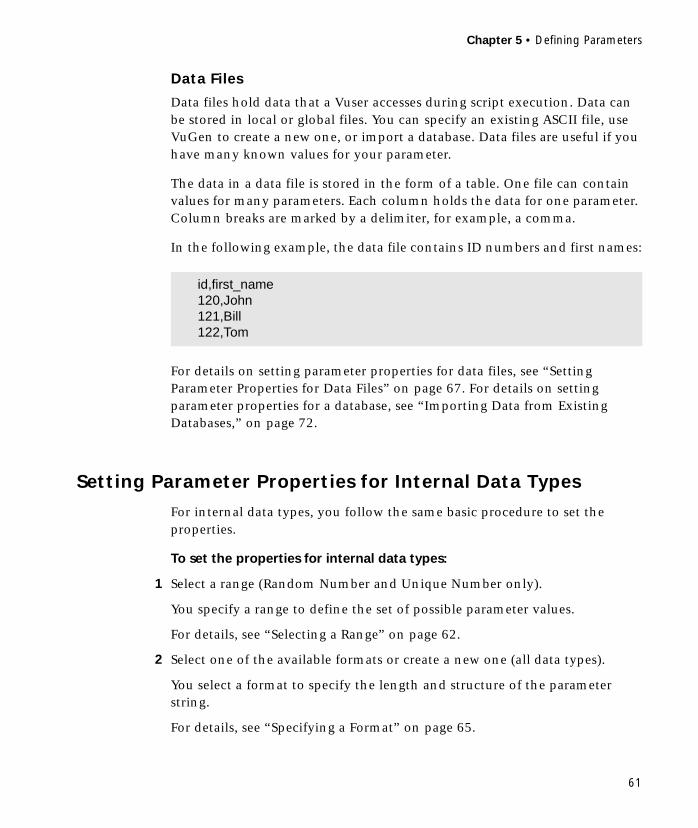
Chapter 5 • Defining Parameters
61
Data Files
Data files hold data that a Vuser accesses during script execution. Data can be stored in local or global files. You can specify an existing ASCII file, use VuGen to create a new one, or import a database. Data files are useful if you have many known values for your parameter.
The data in a data file is stored in the form of a table. One file can contain values for many parameters. Each column holds the data for one parameter. Column breaks are marked by a delimiter, for example, a comma.
In the following example, the data file contains ID numbers and first names:
For details on setting parameter properties for data files, see “Setting Parameter Properties for Data Files” on page 67. For details on setting parameter properties for a database, see “Importing Data from Existing Databases,” on page 72.
Setting Parameter Properties for Internal Data Types
For internal data types, you follow the same basic procedure to set the properties.
To set the properties for internal data types:
1 Select a range (Random Number and Unique Number only).
You specify a range to define the set of possible parameter values.
For details, see “Selecting a Range” on page 62.
2 Select one of the available formats or create a new one (all data types).
You select a format to specify the length and structure of the parameter string.
For details, see “Specifying a Format” on page 65.
id,first_name120,John121,Bill122,Tom

Creating Vuser Scripts • Working with VuGen
62
3 Select an update method for the values (Date/Time, Random Number and Unique Number only).
You specify an update method to instruct the Vuser when to update parameter values—on each occurrence of the parameter in the script, on each iteration of a scenario run, or once per scenario run.
For details, see “Updating Parameter Values” on page 66.
4 Click Close to accept the settings and close the Parameter Properties dialog box.
Selecting a Range
When using the Random Number parameter type, you specify a range of minimum and maximum values. When using the Unique Number parameter type, you specify a start number and a block size.
Random Number
When you use a Random Number parameter type, you specify a minimum and a maximum value for the parameter.
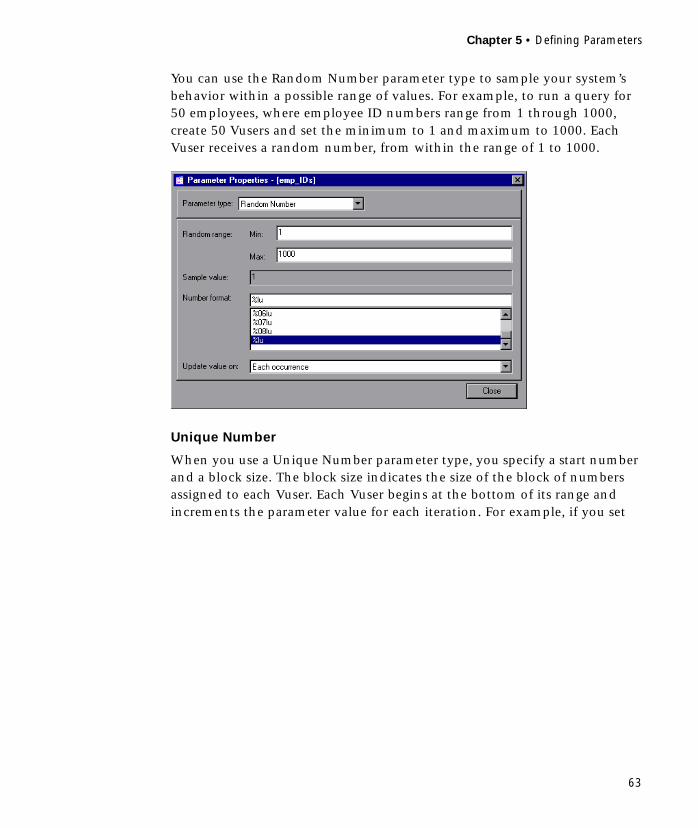
Chapter 5 • Defining Parameters
63
You can use the Random Number parameter type to sample your system’s behavior within a possible range of values. For example, to run a query for 50 employees, where employee ID numbers range from 1 through 1000, create 50 Vusers and set the minimum to 1 and maximum to 1000. Each Vuser receives a random number, from within the range of 1 to 1000.
Unique Number
When you use a Unique Number parameter type, you specify a start number and a block size. The block size indicates the size of the block of numbers assigned to each Vuser. Each Vuser begins at the bottom of its range and increments the parameter value for each iteration. For example, if you set
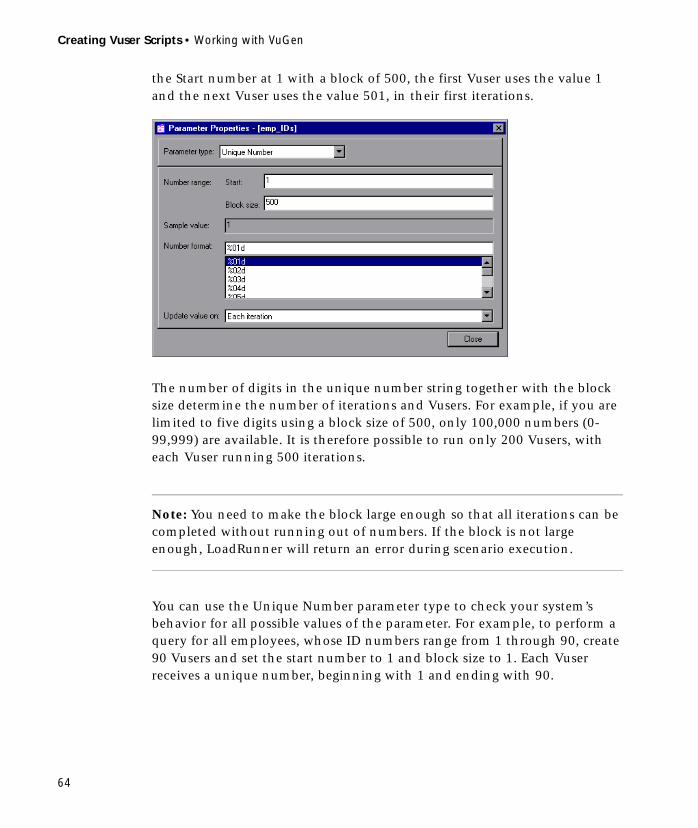
Creating Vuser Scripts • Working with VuGen
64
the Start number at 1 with a block of 500, the first Vuser uses the value 1 and the next Vuser uses the value 501, in their first iterations.
The number of digits in the unique number string together with the block size determine the number of iterations and Vusers. For example, if you are limited to five digits using a block size of 500, only 100,000 numbers (0-99,999) are available. It is therefore possible to run only 200 Vusers, with each Vuser running 500 iterations.
Note: You need to make the block large enough so that all iterations can be completed without running out of numbers. If the block is not large enough, LoadRunner will return an error during scenario execution.
You can use the Unique Number parameter type to check your system’s behavior for all possible values of the parameter. For example, to perform a query for all employees, whose ID numbers range from 1 through 90, create 90 Vusers and set the start number to 1 and block size to 1. Each Vuser receives a unique number, beginning with 1 and ending with 90.
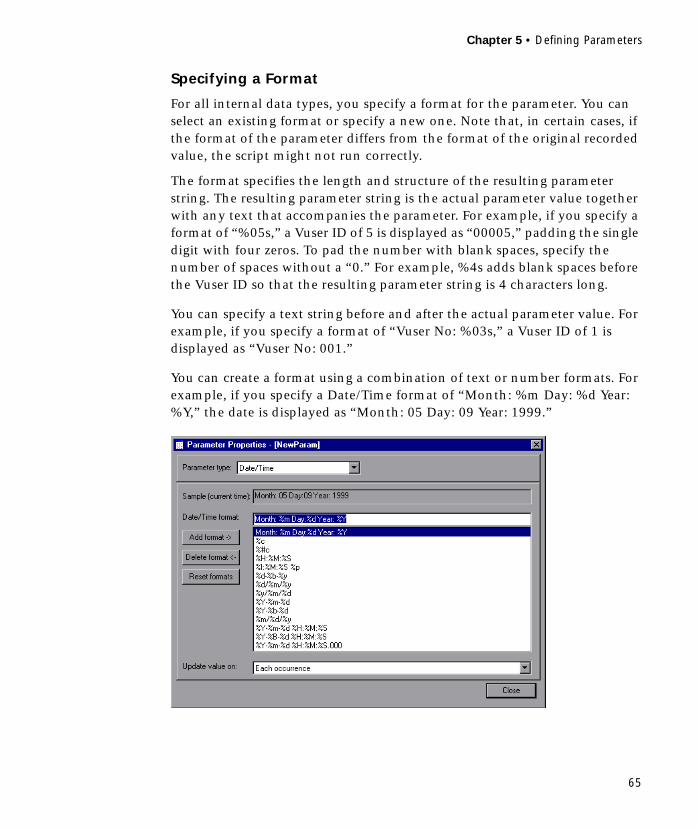
Chapter 5 • Defining Parameters
65
Specifying a Format
For all internal data types, you specify a format for the parameter. You can select an existing format or specify a new one. Note that, in certain cases, if the format of the parameter differs from the format of the original recorded value, the script might not run correctly.
The format specifies the length and structure of the resulting parameter string. The resulting parameter string is the actual parameter value together with any text that accompanies the parameter. For example, if you specify a format of “%05s,” a Vuser ID of 5 is displayed as “00005,” padding the single digit with four zeros. To pad the number with blank spaces, specify the number of spaces without a “0.” For example, %4s adds blank spaces before the Vuser ID so that the resulting parameter string is 4 characters long.
You can specify a text string before and after the actual parameter value. For example, if you specify a format of “Vuser No: %03s,” a Vuser ID of 1 is displayed as “Vuser No: 001.”
You can create a format using a combination of text or number formats. For example, if you specify a Date/Time format of “Month: %m Day: %d Year: %Y,” the date is displayed as “Month: 05 Day: 09 Year: 1999.”

Creating Vuser Scripts • Working with VuGen
66
Tip: Once you create a format, you can save it to the list for future use. You can also edit existing formats, or remove formats from the list.
Updating Parameter Values
When using the Date/Time, Random, Unique, and User-Defined Function parameter types, VuGen lets you specify the update method for the parameters. To set the update method, select a method from the Update value on drop-down list. The available parameter update methods are:
➤ Each Occurrence
➤ Each Iteration
➤ Once
Each Occurrence
The Each occurrence method instructs the Vuser to use a new value for each occurrence of the parameter. This is useful when the statements using a parameter are unrelated. For example, for random data, it may be useful to use a new value for each occurrence of the parameter.
Each Iteration
The Each iteration method instructs the Vuser to use a new value for each script iteration. If a parameter appears in a script several times, the Vuser uses the same value for all occurrences of the parameter, for the entire iteration. This is useful when the statements using a parameter are related.
Once
The Once method instructs the Vuser to update the parameter value only once during the scenario run. The Vuser uses the same parameter value for all occurrences and all iterations of the parameter. This type may be useful when working with dates and times.

Chapter 5 • Defining Parameters
67
Setting Parameter Properties for Data Files
When you use a file as the source of data for a parameter, you must specify the following:
➤ the name and location of the file
➤ the column containing the data
➤ the file format, including column delimiter
➤ an update method
When the parameter type is File, the File property settings appear when you open the Parameter Properties dialog box.
Only the first 100 rows of the data are displayed. To view all of the data, click Edit and view the data in Notepad.
To set the File properties:
1 Type a name for the data file in the File path box, or click Browse to specify the file location of an existing data file. By default, all new data files are named parameter_name.dat and stored in the script’s directory. Note that existing data files must have a .dat extension.
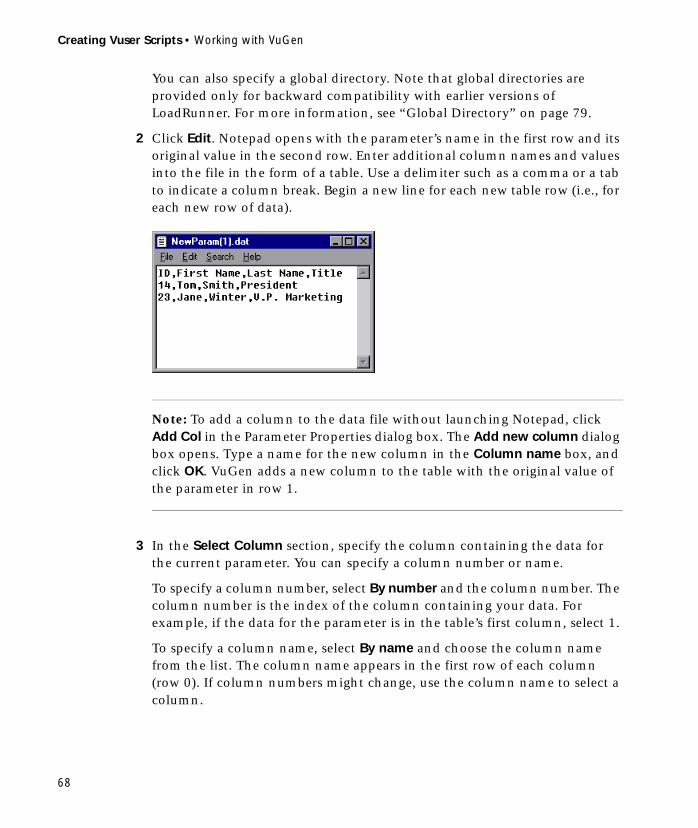
Creating Vuser Scripts • Working with VuGen
68
You can also specify a global directory. Note that global directories are provided only for backward compatibility with earlier versions of LoadRunner. For more information, see “Global Directory” on page 79.
2 Click Edit. Notepad opens with the parameter’s name in the first row and its original value in the second row. Enter additional column names and values into the file in the form of a table. Use a delimiter such as a comma or a tab to indicate a column break. Begin a new line for each new table row (i.e., for each new row of data).
Note: To add a column to the data file without launching Notepad, click Add Col in the Parameter Properties dialog box. The Add new column dialog box opens. Type a name for the new column in the Column name box, and click OK. VuGen adds a new column to the table with the original value of the parameter in row 1.
3 In the Select Column section, specify the column containing the data for the current parameter. You can specify a column number or name.
To specify a column number, select By number and the column number. The column number is the index of the column containing your data. For example, if the data for the parameter is in the table’s first column, select 1.
To specify a column name, select By name and choose the column name from the list. The column name appears in the first row of each column (row 0). If column numbers might change, use the column name to select a column.
Chapter 5 • Defining Parameters
69
4 In the Column delimiter box of the File Format section, enter the column delimiter—the character used to separate the columns in the table. You can specify a comma, tab, or space.
5 In the First data line box of the File Format section, select the first line of data to be used during Vuser script execution. The header is line 0. To begin with the first line after the header, specify 1. If there is no header, specify 0.
6 Select an update method from the Select next row list to instruct the Vuser how to select the table data during Vuser script execution. The options are: Sequential, Random, Unique, or Same Line As. For more information, see “Updating Parameter Values from Files” below.
7 Select the Advance row each iteration check box to have the Vuser use a new row of data for each iteration rather than the same value for all iterations.
Note: You can also set the properties for a File parameter type from the Parameter List dialog box. If you are creating a new File parameter, VuGen prompts you to create the data file. Click Create. An Edit button replaces the Create button. Click Edit to open Notepad and fill in your data, as described above.
Updating Parameter Values from Files
When using values from a file, VuGen lets you specify the way in which you assign values to the parameters. The available methods are:
➤ Sequential
➤ Random
➤ Use Random Sequence with Seed
➤ Unique
➤ Same Line As <parameter>
Sequential
The Sequential method assigns parameter values to a Vuser sequentially. As a running Vuser accesses the data table, it takes the next available row of data.
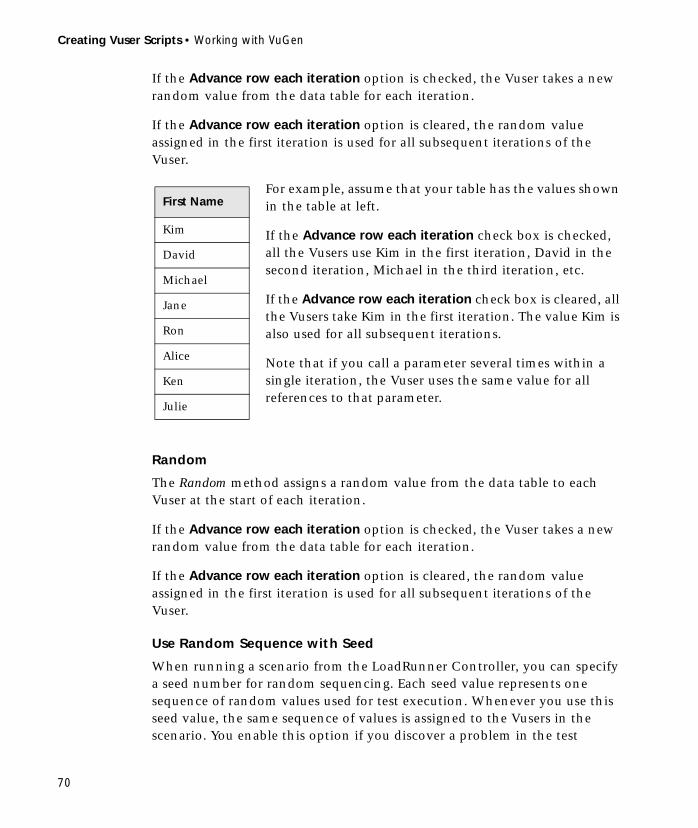
Creating Vuser Scripts • Working with VuGen
70
If the Advance row each iteration option is checked, the Vuser takes a new random value from the data table for each iteration.
If the Advance row each iteration option is cleared, the random value assigned in the first iteration is used for all subsequent iterations of the Vuser.
For example, assume that your table has the values shown in the table at left.
If the Advance row each iteration check box is checked, all the Vusers use Kim in the first iteration, David in the second iteration, Michael in the third iteration, etc.
If the Advance row each iteration check box is cleared, all the Vusers take Kim in the first iteration. The value Kim is also used for all subsequent iterations.
Note that if you call a parameter several times within a single iteration, the Vuser uses the same value for all references to that parameter.
Random
The Random method assigns a random value from the data table to each Vuser at the start of each iteration.
If the Advance row each iteration option is checked, the Vuser takes a new random value from the data table for each iteration.
If the Advance row each iteration option is cleared, the random value assigned in the first iteration is used for all subsequent iterations of the Vuser.
Use Random Sequence with Seed
When running a scenario from the LoadRunner Controller, you can specify a seed number for random sequencing. Each seed value represents one sequence of random values used for test execution. Whenever you use this seed value, the same sequence of values is assigned to the Vusers in the scenario. You enable this option if you discover a problem in the test
First Name
Kim
David
Michael
Jane
Ron
Alice
Ken
Julie
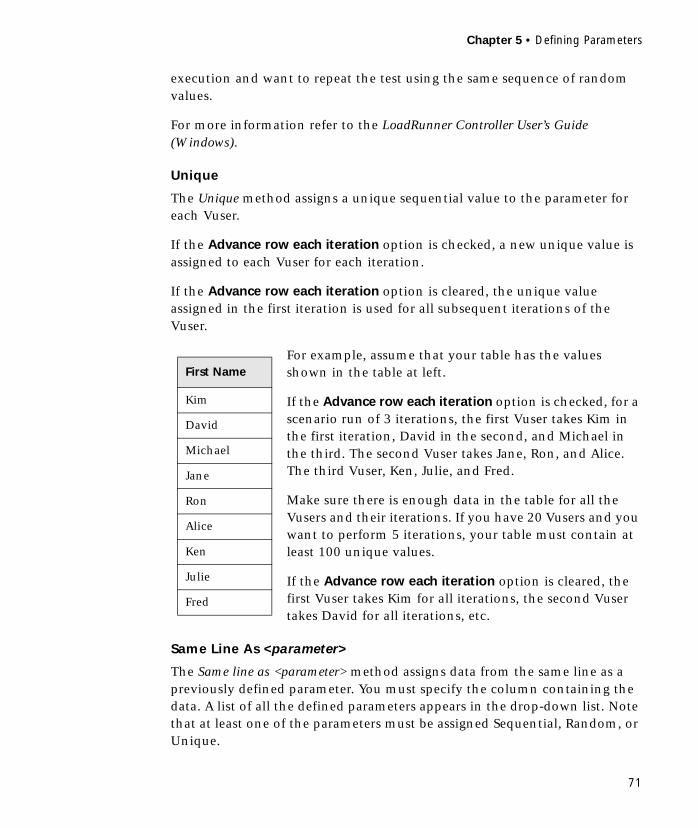
Chapter 5 • Defining Parameters
71
execution and want to repeat the test using the same sequence of random values.
For more information refer to the LoadRunner Controller User’s Guide (Windows).
Unique
The Unique method assigns a unique sequential value to the parameter for each Vuser.
If the Advance row each iteration option is checked, a new unique value is assigned to each Vuser for each iteration.
If the Advance row each iteration option is cleared, the unique value assigned in the first iteration is used for all subsequent iterations of the Vuser.
For example, assume that your table has the values shown in the table at left.
If the Advance row each iteration option is checked, for a scenario run of 3 iterations, the first Vuser takes Kim in the first iteration, David in the second, and Michael in the third. The second Vuser takes Jane, Ron, and Alice. The third Vuser, Ken, Julie, and Fred.
Make sure there is enough data in the table for all the Vusers and their iterations. If you have 20 Vusers and you want to perform 5 iterations, your table must contain at least 100 unique values.
If the Advance row each iteration option is cleared, the first Vuser takes Kim for all iterations, the second Vuser takes David for all iterations, etc.
Same Line As <parameter>
The Same line as <parameter> method assigns data from the same line as a previously defined parameter. You must specify the column containing the data. A list of all the defined parameters appears in the drop-down list. Note that at least one of the parameters must be assigned Sequential, Random, or Unique.
First Name
Kim
David
Michael
Jane
Ron
Alice
Ken
Julie
Fred

Creating Vuser Scripts • Working with VuGen
72
In the following example the data table has three columns, and three parameters are defined in the list: id1, name1, and title1.
You could instruct the Vuser to assign Random for id1, while specifying that the name1 and title1 parameters use a parameter from the Same Line as id1. When an ID of 132 is used, the name Kim and the title Manager are also used.
Importing Data from Existing Databases
LoadRunner allows you to import data from a database for use with parameterization. You can import the data in one of two ways:
➤ Using Microsoft Query (requires the installation of MS Query on your system)
➤ Specifying a database connection string and an SQL statement.
VuGen provides a wizard that guides you through the procedure of importing data from a database. In the wizard, you specify how to import the data—create a new query via MS Query or specifying an SQL statement After you import the data, it is saved as a file with a .dat extension and stored as a regular parameter file.
ID Name Title
132 Kim Manager
187 David Engineer
189 Michael Clerk
193 Jane VP
238 Rina Sales

Chapter 5 • Defining Parameters
73
To begin the procedure of importing a database, click Import DB in the Parameter Properties dialog box. The Database Query Wizard opens.
To create a new query:
1 Select Create new query. If you need instructions for Microsoft Query, select Show me how to use Microsoft Query. Click Finish.
If Microsoft Query is not installed on your machine, LoadRunner issues a message indicating that it is not available. Install MS Query from Microsoft Office before proceeding.
2 Follow the instructions in Microsoft Query, importing the desired tables and columns.
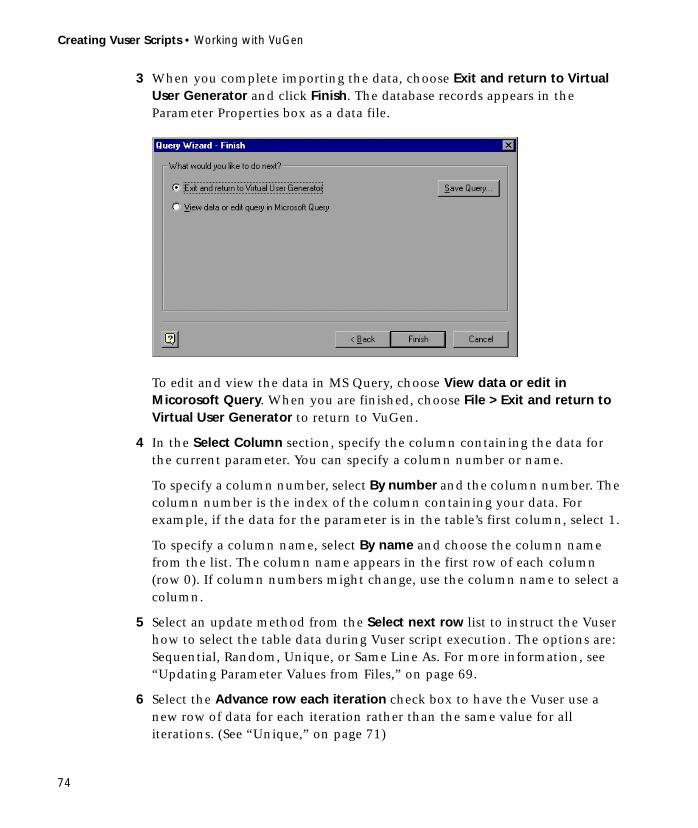
Creating Vuser Scripts • Working with VuGen
74
3 When you complete importing the data, choose Exit and return to Virtual User Generator and click Finish. The database records appears in the Parameter Properties box as a data file.
To edit and view the data in MS Query, choose View data or edit in Micorosoft Query. When you are finished, choose File > Exit and return to Virtual User Generator to return to VuGen.
4 In the Select Column section, specify the column containing the data for the current parameter. You can specify a column number or name.
To specify a column number, select By number and the column number. The column number is the index of the column containing your data. For example, if the data for the parameter is in the table’s first column, select 1.
To specify a column name, select By name and choose the column name from the list. The column name appears in the first row of each column (row 0). If column numbers might change, use the column name to select a column.
5 Select an update method from the Select next row list to instruct the Vuser how to select the table data during Vuser script execution. The options are: Sequential, Random, Unique, or Same Line As. For more information, see “Updating Parameter Values from Files,” on page 69.
6 Select the Advance row each iteration check box to have the Vuser use a new row of data for each iteration rather than the same value for all iterations. (See “Unique,” on page 71)

Chapter 5 • Defining Parameters
75
To specify a database connection and SQL statement:
1 Select Specify SQL Statement. Click Next.
2 Click Create to specify a new connection string. The Select Data Source window opens.
3 Select a data source, or click New to create a new one. The wizard guides you through the procedure for creating an ODBC data source. When you are finished, the connection string appears in the Connection String box.
4 In the SQL box, type or paste an SQL statement.
5 Click Finish to process the SQL statement and import the data. The database records appears in the Parameter Properties box as a data file.
6 In the Select Column section, specify the column containing the data for the current parameter. You can specify a column number or name.
To specify a column number, select By number and the column number. The column number is the index of the column containing your data. For example, if the data for the parameter is in the table’s first column, select 1.
To specify a column name, select By name and choose the column name from the list. The column name appears in the first row of each column (row 0). If column numbers might change, use the column name to select a column.
Creating Vuser Scripts • Working with VuGen
76
7 Select an update method from the Select next row list to instruct the Vuser how to select the table data during Vuser script execution. The options are: Sequential, Random, Unique, or Same Line As. For more information, see “Updating Parameter Values from Files,” on page 69.
8 Select the Advance row each iteration check box to have the Vuser use a new row of data for each iteration rather than the same value for all iterations. (See “Unique,” on page 71)
User-Defined Functions
A user-defined function replaces the parameter with a value returned from a function located in an external DLL.
Before you assign a user-defined function as a parameter, you create the external library (DLL) with the function. The function should have the following format:
The arguments sent to this function are both NULL.
When you create the library, it is recommended that you use the default dynamic library path. That way, you do not have to enter a full path name for the library, but rather, just the library name. The Virtual User Generator bin directory is on the default dynamic library path. You can add your library to this directory.
The following are examples of user-defined functions:
__declspec( dllexport ) char *<functionName>( char *, char * )
__declspec( dllexport ) char *UF_GetVersion( char *x1, char *x2 ) {return "Ver2.0";}
__declspec( dllexport ) char *UF_GetCurrentTime( char *x1, char *x2 ) {time_t x = time( NULL ); static char t[35]; strcpy( t, ctime( &x ) ); t[24] = ’\0’; return t;}

Chapter 5 • Defining Parameters
77
When you select the User-Defined Function type, the user-defined function properties tab opens:
To set the properties for user-defined functions:
1 Specify the function name in the Function Name box. Use the name of the function as it appears in the DLL file.
2 In the Library Names section, specify a library in the relevant Library box. If necessary, locate the file using the Browse command.
3 Select an update method for the values. For more information on update methods for user-defined functions, see “Updating Parameter Values” on page 66.
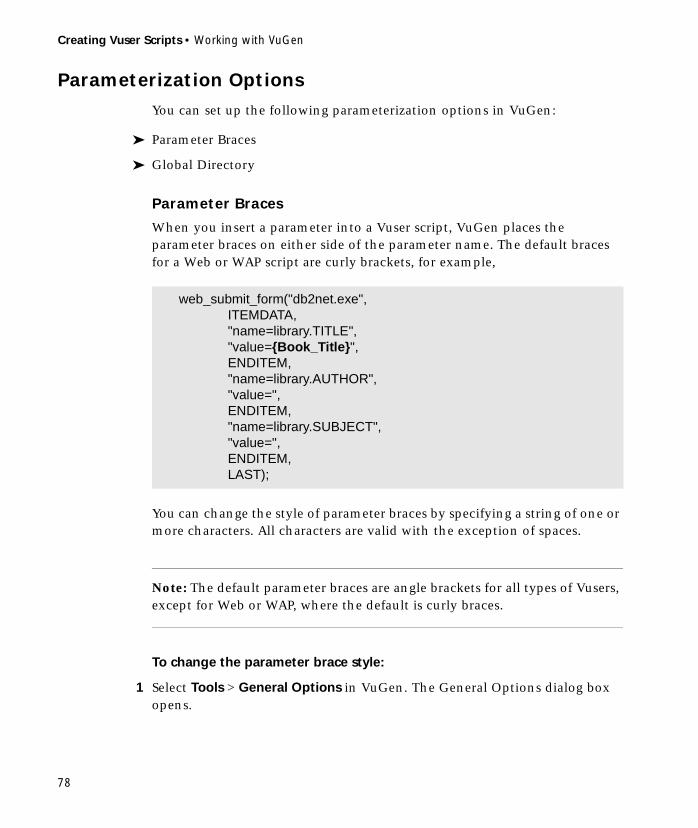
Creating Vuser Scripts • Working with VuGen
78
Parameterization Options
You can set up the following parameterization options in VuGen:
➤ Parameter Braces
➤ Global Directory
Parameter Braces
When you insert a parameter into a Vuser script, VuGen places the parameter braces on either side of the parameter name. The default braces for a Web or WAP script are curly brackets, for example,
You can change the style of parameter braces by specifying a string of one or more characters. All characters are valid with the exception of spaces.
Note: The default parameter braces are angle brackets for all types of Vusers, except for Web or WAP, where the default is curly braces.
To change the parameter brace style:
1 Select Tools > General Options in VuGen. The General Options dialog box opens.
web_submit_form("db2net.exe",ITEMDATA,"name=library.TITLE","value={Book_Title}",ENDITEM,"name=library.AUTHOR","value=",ENDITEM,"name=library.SUBJECT","value=",ENDITEM,LAST);

Chapter 5 • Defining Parameters
79
2 Select the Parameterization tab and enter the desired brace.
3 Click OK to accept the settings and close the dialog box.
Global Directory
This option is provided only for backward compatibility with earlier versions of LoadRunner. In earlier versions, (4.51 and below), when you created a new data table, you specified local or global. A local table is saved in the current Vuser script directory and is only available to Vusers running that script. A global table is available to all Vuser scripts. The global directory can be on a local or network drive. Make sure that the global directory is available to all machines running the script. Using the General Options dialog box, you can change the location of the global tables at any time.
In newer versions of LoadRunner, you specify the location of the data table in either the Parameter Properties or the Parameter List dialog box. LoadRunner is able to retrieve the data from any location that you specify—the default script directory or another directory on the network. For more information, see “Data Files” on page 61.

Creating Vuser Scripts • Working with VuGen
80
To set the global directory:
1 Select Tools > General Options in VuGen. The General Options dialog box opens.
2 Select the Parameterization tab.
3 Select the Define global data tables directory check box, and specify the directory containing your global data tables.
4 Click OK to accept the settings and close the dialog box.
81
6Correlating Statements
You can optimize Vuser scripts by correlating statements. VuGen’s Correlated Query feature allows you to link statements by using the results of one statement as input to another.
This chapter describes:
➤ Using Correlation Functions for C Vusers
➤ Using Correlation Functions for Java Vusers
➤ Comparing Vuser Scripts using WDiff
➤ Modifying Saved Parameters
The following information applies to all types of Vuser scripts except for GUI.
About Correlating Statements
The primary reasons for correlating statements are:
➤ to simplify or optimize your code
For example, if you perform a series of dependent queries one after another, your code may become very long. In order to reduce the size of the code, you can nest the queries, but then you lose precision and the code becomes complex and difficult to understand. Correlating the statements enables you to link queries without nesting.
➤ for dynamic data
Many applications and Web sites identify a session by the current date and time. If you try to replay a script, it will fail, because the current time is

Creating Vuser Scripts • Working with VuGen
82
different than the recorded time. Correlating the data enables you to save the dynamic data and use it throughout the scenario run.
➤ to accommodate unique data records
Certain database applications require the use of unique values. A value which was unique during recording is no longer unique for script execution. For example, suppose you record the process of opening a new bank account. Each new account is assigned a unique number which is unknown to the user. This account number is inserted into a table with a unique key constraint during recording. If you try to run the script as recorded, it will try to create an account with the recorded number, rather than a new unique number. An error will result because the account number already exists.
If you encounter an error when running your script, examine the script at the point where the error occurred. In many cases, a correlated query will solve the problem, by enabling you to use the results of one statement as input to another.
The main steps in correlating a statements are:
1 Determine which value to correlate.
For Database Vuser scripts, VuGen helps you decide what to correlate. You can double-click an error message in the execution log to jump to the problematic statement in your script and search for possible values to correlate.
Alternatively, you can use the WDiff utility supplied with VuGen to determine the inconsistencies within your script. For more information, see “Comparing Vuser Scripts using WDiff” on page 85.
2 Save the results.
You save the value of a query to a variable using the appropriate function. For database scripts, VuGen automatically inserts the functions into your script.
3 Reference the saved values.
Replace the constants in the query or statement with the saved variables.
The correlating functions for each protocol are protocol specific. Currently, there are correlating functions for Database, COM, TUXEDO, Jolt,
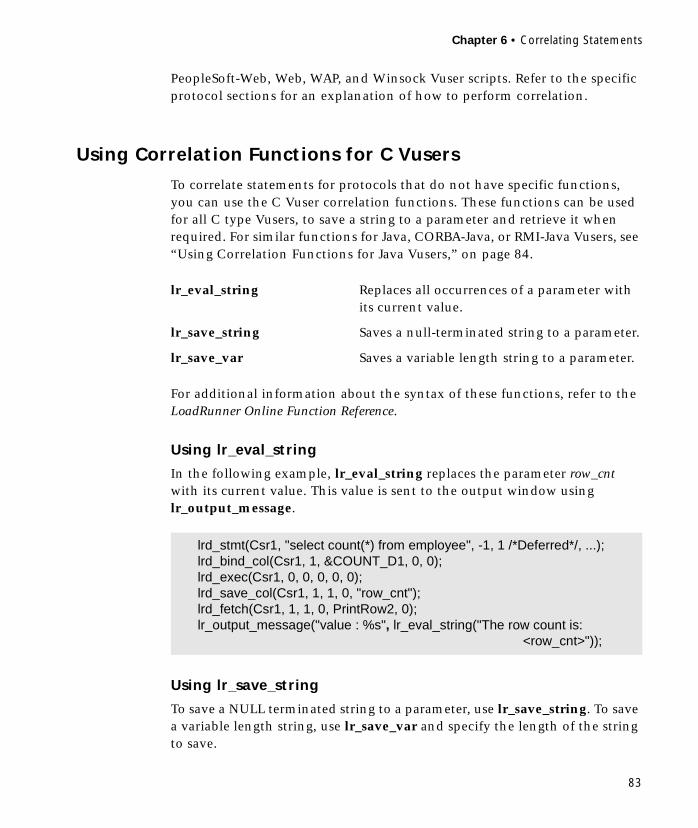
Chapter 6 • Correlating Statements
83
PeopleSoft-Web, Web, WAP, and Winsock Vuser scripts. Refer to the specific protocol sections for an explanation of how to perform correlation.
Using Correlation Functions for C Vusers
To correlate statements for protocols that do not have specific functions, you can use the C Vuser correlation functions. These functions can be used for all C type Vusers, to save a string to a parameter and retrieve it when required. For similar functions for Java, CORBA-Java, or RMI-Java Vusers, see “Using Correlation Functions for Java Vusers,” on page 84.
For additional information about the syntax of these functions, refer to the LoadRunner Online Function Reference.
Using lr_eval_string
In the following example, lr_eval_string replaces the parameter row_cnt with its current value. This value is sent to the output window using lr_output_message.
Using lr_save_string
To save a NULL terminated string to a parameter, use lr_save_string. To save a variable length string, use lr_save_var and specify the length of the string to save.
lr_eval_string Replaces all occurrences of a parameter with its current value.
lr_save_string Saves a null-terminated string to a parameter.
lr_save_var Saves a variable length string to a parameter.
lrd_stmt(Csr1, "select count(*) from employee", -1, 1 /*Deferred*/, ...);lrd_bind_col(Csr1, 1, &COUNT_D1, 0, 0);lrd_exec(Csr1, 0, 0, 0, 0, 0);lrd_save_col(Csr1, 1, 1, 0, "row_cnt");lrd_fetch(Csr1, 1, 1, 0, PrintRow2, 0);lr_output_message("value : %s", lr_eval_string("The row count is:
<row_cnt>"));

Creating Vuser Scripts • Working with VuGen
84
In the following example, lr_save_string assigns 777 to a parameter emp_id. This parameter is then used in another query or for further processing.
Using Correlation Functions for Java Vusers
To correlate statements for Java, CORBA-Java, and RMI-Java Vusers, you can use the Java Vuser correlation functions. These functions may be used for all Java type Vusers, to save a string to a parameter and retrieve it when required.
When recording a CORBA-Java or RMI-Java script, VuGen performs correlation internally. For more information see Chapter 40, “Correlating Java Scripts.”
Using the Java String Functions
When programming Java Vuser scripts, you can use the Java Vuser string functions to correlate your scripts.
lrd_stmt(Csr1, "select id from employees where name=’John’", ...);lrd_bind_col(Csr1,1,&ID_D1,...);lrd_exec(Csr1, ...);lrd_fetch(Csr1, 1, ...);/* GRID showing returned value "777" */lr_save_string("777", "emp_id");
lr.eval_string Replaces a parameter with its current value.
lr.eval_data Replaces a parameter with a byte value.
lr.eval_int Replaces a parameter with an integer value.
lr.eval_string Replaces a parameter with a string.
lr.save_data Saves a byte as a parameter.
lr.save_int Saves an integer as a parameter.
lr.save_string Saves a null-terminated string to a parameter.

Chapter 6 • Correlating Statements
85
In the following example, lr.eval_int substitutes the variable ID_num with its value, defined at an earlier point in the script.
In the following example, lr.save_string assigns John Doe to the parameter Student. This parameter is then used in an output message.
Comparing Vuser Scripts using WDiff
A useful tool in determining which values to correlate is WDiff. This utility lets you compare recorded scripts and results to determine which values need to be correlated.
When working with database or COM protocols, you can scan the script automatically for correlations. For more information, see Chapter 32, “Correlating Database Vuser Scripts” or Chapter 42, “Understanding COM Vuser Scripts.”
If you are working with other protocols, you can view the Execution log to determine where the script failed and then use the WDiff utility to assist you in locating the values that need to be correlated.
To use WDiff effectively, you record the identical operation twice, and compare the scripts (or data files for TUXEDO, WinSock, and Jolt). WDiff displays differences in yellow. Note that not all differences indicate a value to correlate. For example, certain receive buffers that indicate the time of execution do not require correlation.
To search for correlations using WDiff:
1 Record a script and save it.
2 Create a new script and record the identical operations. Save the script.
lr.message(" Track Stock : " + lr.eval_int(ID_num) );
lr.save_string("John Doe" , "Student" );// ...lr.message("Get report card for " + lr.eval_string("<Student>") );classroom.getReportCard

Creating Vuser Scripts • Working with VuGen
86
3 Select the section you want to compare (Actions, data.ws, etc.)
4 Select Tools > Compare with Vuser. The Open Test box opens.
5 Specify a Vuser script for comparison (other than the one in the current VuGen window) and click OK. WDiff opens and the differences between the Vuser scripts are highlighted in yellow.
6 To display the differences only, double-click in the WDiff window.
7 Determine which values need to be correlated.
Note that in the above example, WDiff is comparing the data.ws from two Winsock Vuser scripts. In this instance, the value to be correlated is the PID for the clock processes which differs between the two recordings.
To continue with correlation, refer to the appropriate section for Database, Winsock, TUXEDO, or General Vuser types.
Modifying Saved Parameters
After you save a value to a parameter, you may need to modify it before using it in your script. If you need to perform arithmetical operations on a
PID 1
PID 2
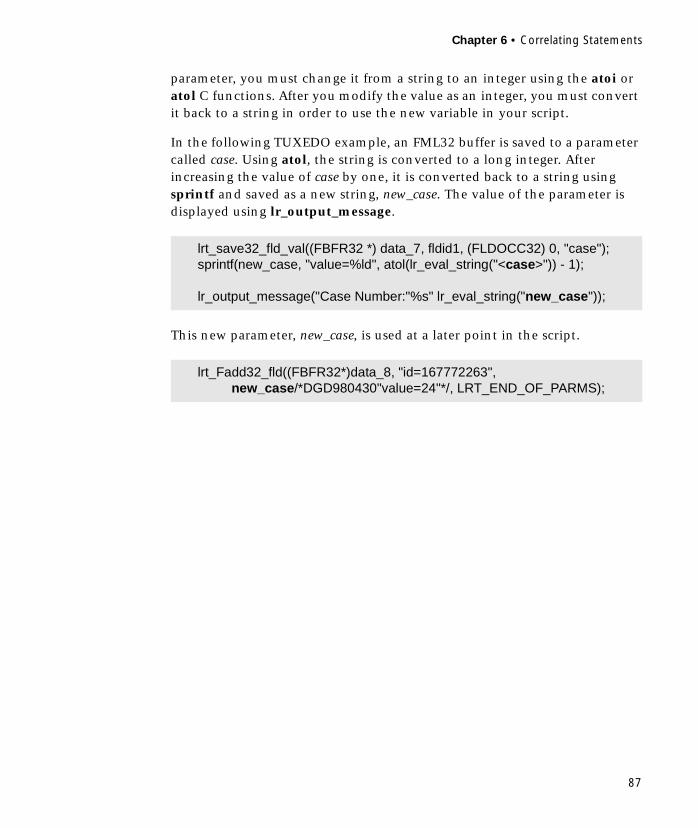
Chapter 6 • Correlating Statements
87
parameter, you must change it from a string to an integer using the atoi or atol C functions. After you modify the value as an integer, you must convert it back to a string in order to use the new variable in your script.
In the following TUXEDO example, an FML32 buffer is saved to a parameter called case. Using atol, the string is converted to a long integer. After increasing the value of case by one, it is converted back to a string using sprintf and saved as a new string, new_case. The value of the parameter is displayed using lr_output_message.
This new parameter, new_case, is used at a later point in the script.
lrt_save32_fld_val((FBFR32 *) data_7, fldid1, (FLDOCC32) 0, "case");sprintf(new_case, "value=%ld", atol(lr_eval_string("<case>")) - 1);
lr_output_message("Case Number:"%s" lr_eval_string("new_case"));
lrt_Fadd32_fld((FBFR32*)data_8, "id=167772263", new_case/*DGD980430"value=24"*/, LRT_END_OF_PARMS);

Creating Vuser Scripts • Working with VuGen
88

89
7Configuring Run-Time Settings
After you record a Vuser script, you configure the run-time settings for the script. These settings specify how the script behaves when it runs.
This chapter describes:
➤ Configuring the Pacing Run-Time Settings
➤ Configuring Actions
➤ Configuring the Log Run-Time Settings
➤ Configuring the Think Time Settings
➤ Configuring the General Run-Time Settings
The following information applies to all types of Vuser scripts except for GUI.
About Run-Time Settings
After you record a Vuser script, you can configure its run-time settings. The run-time settings define the way that the script runs. These settings are stored in the file default.cfg, located in the Vuser script directory. Run-time settings are applied to Vusers when you run a script using VuGen or the Controller.
Creating Vuser Scripts • Working with VuGen
90
Configuring run-time settings allows you to emulate different kinds of user activity. For example, you could emulate a user who responds immediately to output from the server, or a user who stops and thinks before each response. You can also configure the run-time settings to specify how many times the Vuser should repeat its set of actions.
You use the Run-Time Settings dialog box to display and configure the run-time settings. To display the Run-Time Settings dialog box, click the Run-Time Settings button on the VuGen toolbar.
You can also modify the run-time settings from the LoadRunner Controller. Click the Design tab and click the Run-Time Settings button.
Note: Vuser scripts have individual run-time setting defaults for VuGen and the Controller, to support the debugging environment of VuGen and the load testing environment of the Controller.
These are the default settings for Vuser scripts in VuGen and the Controller:
Think Time - Off in VuGen and replay as recorded in the Controller.
Log - Standard in VuGen and off in the Controller.
Enable Loading of Web Resources - On in both VuGen and the Controller.
The run-time settings that you set in the following areas are applicable to all types of Vuser scripts:
➤ Pacing
➤ Log
➤ Think Time
➤ General
Java, RTE, Web, and WAP protocols have additional run-time settings. For information about the specific settings for these protocols, see the appropriate sections.

Chapter 7 • Configuring Run-Time Settings
91
Configuring the Pacing Run-Time Settings
Every Vuser script contains three sections: vuser_init, Run (Actions), and vuser_end. You can instruct a Vuser to repeat the Run section when you run the script. Each repetition is known as an iteration.
Note: The vuser_init and vuser_end sections of a Vuser script are not repeated when you run multiple iterations.
Click the Run-Time Settings button on the VuGen toolbar or select Vuser > Run-Time Settings. Click the Pacing tab to display the iteration and pacing options. The following example shows the Run-Time settings for a Web Vuser. The actual run-time setting tabs may differ, depending on the Vuser type.
Specify the number of iterations in the Iteration Count box. LoadRunner repeats all of the Actions the specified number of times.

Creating Vuser Scripts • Working with VuGen
92
Note: If you specify a scenario duration in the Controller’s Scheduling settings, then the duration setting overrides the Vuser iteration settings. This means that if the duration is set to five minutes (the default setting), the Vusers will continue to run as many iterations as required in five minutes, even if the run-time settings specify only one iteration.
You can also set an iteration pace for your script. The iteration pace tells the Vuser how long to wait between iterations. The pacing options are:
➤ Start a new iteration as soon as possible.
➤ Start a new iteration a specified amount of time after the start of the previous iteration.
➤ Start a new iteration a specified amount of time after the end of the previous iteration.
Start a new iteration as soon as possible
The new iteration begins as soon as possible after the previous iteration ends.
Start a new iteration a specified amount of time after the start of the previous iteration
You specify either an exact number of seconds or a range of time. For example, you can specify to begin a new iteration at any time between 60 and 90 seconds after the previous iteration ends.
The actual amount of time that the Vuser waits between the end of one iteration and the start of the next one appears in the Execution Log when you run the script.
The period that you specify is the time that a Vuser waits between the start of one iteration and the start of the next iteration—unless the period of the previous iteration exceeds the time period that you specify.
For example, assume that you specify to start a new iteration 4 seconds after the previous iterations begins:
Chapter 7 • Configuring Run-Time Settings
93
➤ If the first iteration takes three seconds, the Vuser waits one second.
➤ If the first iteration takes two seconds to complete, the Vuser waits two seconds.
➤ If the first iteration takes 8 seconds to complete, then the second iteration will start 8 seconds after the first iteration began. LoadRunner displays a message in the Execution Log to indicate that the iteration pacing could not be achieved.
Start a new iteration a specified amount of time after the end of the previous iteration
Starts each new iteration a specified amount of time after the end of the previous iteration. Specify either an exact number of seconds or a range of time. For example, you can specify to begin a new iteration at any time between 60 and 90 seconds after the previous iteration ends.
The actual amount of time that the Vuser waits between the end of one iteration and the start of the next one appears in the Execution Log when you run the script.
Configuring Actions
Note: The following section only applies to Vusers with a tree view in the Pacing tab.
When you run scripts with multiple actions, you can indicate how to execute the actions, and you can configure the way a Vuser executes actions:
Action Blocks: Action blocks are groups of actions within your script. You can set the properties of each block independently—its sequence, weighting, and iterations.
Sequence: You can set the order of actions within your script. You can also indicate whether to perform actions sequentially or randomly.

Creating Vuser Scripts • Working with VuGen
94
Weighting: When working in random mode, you can set the number of times a particular action is executed in relation to another. The weighting is expressed as the percentage of executed actions. For example, if you have two actions, VuGen randomly execute each action 50% of the time. You can specify your own percentages to create custom weighting settings. If you have three actions, you can specify 20% for one action and 40% for each of the other actions. The sum of the ratios must equal 100%.
Iterations: In addition to setting the number of iterations for the entire Run section, you can set iterations for individual actions or action blocks.
Creating Action Blocks
Action blocks are groups of actions within the Vuser script. You can create separate action blocks for groups of actions, adding the same action to several blocks. In the following example, Block0 performs a deposit, Block1 performs a transfer, and Block2 submits a balance request. The Login and Logout actions are common to the three blocks.
You configure each block independently—its sequence, weighting, and iterations.
To create an action block:
1 In the Pacing tab, right-click the word Run in the tree view and choose Insert Actions Block. VuGen inserts a new Action block with the next available index (Block0, Block1, Block2).

Chapter 7 • Configuring Run-Time Settings
95
2 Add actions to the block. Note that you can only add actions that exist and are displayed in the Actions section in VuGen’s left pane. Right-click the word Block and choose Insert Into Block > Actions. The Select Actions list opens.
3 Select an action to add to the block and click OK.
4 Repeat steps 2-3 for each action you want to add to the block.
5 To remove an action or an action block, select the item and perform a right-click. Choose Remove Item.
Setting an Action Sequence
You can instruct VuGen to execute action blocks or individual actions sequentially or randomly. In the default sequential mode, the Vuser executes the blocks or actions in the order in which they appear in the iteration tree view.

Creating Vuser Scripts • Working with VuGen
96
To change the sequential order of blocks or actions:
1 In the Pacing tree view, select the item you want to move and perform a right-click. A menu opens.
2 Choose Move Item Up or Move Item Down to modify the item’s position.
3 Repeat the above steps to move another item or to move the same item an additional step.
You can also run blocks or actions randomly. When you set actions to run randomly, VuGen assigns an even weighting to all the items—all items are given equal execution time. For more information on weighting, see the “Setting Action Weighting” section below.
To run items randomly:
1 In the Iteration’s tab tree view, right-click the item whose elements you want to randomly execute. If you want to set blocks or actions that reside directly in the Run section, select the word Run. If you want to set random mode for actions within a block, select the block number. A menu opens.

Chapter 7 • Configuring Run-Time Settings
97
2 Choose Properties. The Run Properties dialog opens.
3 Select Random from the Run Logic list.
4 Click OK.
Setting Action Weighting
When you run actions randomly, you can indicate the rate at which LoadRunner executes each action. By default, LoadRunner assigns an equal weighting to all the actions.
To set the weighting of blocks or actions:
1 Make sure that the run logic for the item you want to set is Random. If a percentage appears next to the item, it is in random mode.

Creating Vuser Scripts • Working with VuGen
98
2 Right click the item whose percentage you want to change, and choose Properties. The Action Properties dialog opens.
3 Specify the desired percent for the selected block or action.
4 Click OK.
5 Repeat steps 2 and 3 to adjust the other actions so that the total percentages equal 100.
Specifying Block Iterations
In addition to setting the number of iterations for the entire Run section, you can set iterations for blocks or individual actions.
To set the iterations for an action or block:
1 In the Iteration’s tab tree view, right-click the item whose elements you want to randomly execute. If you want to set blocks or actions that reside directly in the Run section, select the word Run. If you want to set random mode for actions within a block, select a block number. A menu opens.

Chapter 7 • Configuring Run-Time Settings
99
2 Choose Properties. The Run Properties dialog opens.
3 Specify the number of iterations in the Iterations box.
4 Click OK.
5 Repeat the above procedure for each element whose iterations you want to set.
Configuring the Log Run-Time Settings
During execution, Vusers log information about themselves and their communication with the server. In a Windows environment, this information is stored in a file called output.txt in the script directory. In UNIX environments, the information is directed to the standard output. The log information is useful for debugging purposes.
The Log run-time settings let you determine how much information is logged to the output. You can select Standard or Extended log, or you can disable logging completely. Disabling the log is useful when working with many Vusers. When you create a load test scenario in the Controller, logging is automatically disabled. If you have tens or hundreds of Vusers logging their run-time information to disk, the system may work slower than normal. You should only disable logging after verifying that the script is functional.
Note: You can program a Vuser script to send messages to the output by using the lr_error_message and lr_output_message functions.

Creating Vuser Scripts • Working with VuGen
100
Click the Run-Time Settings button or select Vuser > Run-Time Settings to display the Run-Time Settings dialog box. Click the Log tab to display the log options.
Log Options
You can specify the type of information that is logged, or you can disable logging altogether.
Note: If you set Error Handling to “Continue on error” in the General Run-Time Settings folder, error messages are still sent to the Output window.
Standard Log Option
When you select Standard log, it creates a standard log of functions and messages sent during script execution to use for debugging. Disable this option for large load testing scenarios. When you copy a script to a scenario, logging is automatically disabled.
Chapter 7 • Configuring Run-Time Settings
101
Extended Log Options
Select Extended log to create an extended log, including warnings and other messages. Disable this option for large load testing scenarios. When you copy a script to a scenario, logging is automatically disabled. You can specify which additional information should be added to the extended log using the Extended log options:
➤ Parameter Substitution: Select this option to log all parameters assigned to the script along with their values. For more information on parameters, see Chapter 5, “Defining Parameters.”
➤ Data Returned by Server: Select this option to log all of the data returned by the server.
➤ Advanced Trace: Select this option to log all of the functions and messages sent by the Vuser during the session. This option is useful when you debug a Vuser script.
The degree to which VuGen logs events (Standard, Parameter substitution, and so forth) is also known as the message class. There are five message classes: Brief, Extended, Parameters, Result Data, and Full Trace.
You can manually set the message class within your script using the lr_set_debug_message function. This is useful if you to want to receive debug information about a small section of the script only.
For example, suppose you set Log run-time settings to Brief and you want to get an extended log for a specific section of the script. You would then use the lr_set_debug_message function to set the Extended message class at the desired point in your script. You must call the function again to specify what type of extended mode (Parameter, Result Data, or Full Trace). Return to the Brief Log mode by calling lr_set_debug_message, specifying Brief mode. For more information about setting the message class, refer to the Online Function Reference (available from the VuGen Help menu).
Disable Logging
Once you verify that your script is functional, you can use this setting to disable logging and avoid unnecessary resource usage. When you copy a script to a scenario, logging is automatically disabled.
Creating Vuser Scripts • Working with VuGen
102
Logging CtLib Server Messages
When you run a CtLib script, all messages generated by the CtLib client are logged in the Standard log and in the output file. By default, server messages are not logged. To enable logging of server messages (for debugging purposes), insert the following line into your Vuser script:
VuGen logs all server messages in the Brief log.
To send the server messages to the Controller Output window (in addition to the Brief log), type:
To return to the default mode of not logging server errors, type the following line into your script:
Note: Activate server message logging for only a specific block of code within your script, since the generated server messages are long and the logging can slow down your system.
Configuring the Think Time Settings
Vuser think time emulates the time that a real user waits between actions. For example, when a user receives data from a server, the user may wait several seconds to review the data before responding. This delay is known as the think time. VuGen uses lr_think_time functions to record think time values into your Vuser scripts. The following recorded function indicates that the user waited 8 seconds before performing the next action:
lr_think_time(8);
LRD_CTLIB_DB_SERVER_MSG_LOG;
LRD_CTLIB_DB_SERVER_MSG_ERR;
LRD_CTLIB_DB_SERVER_MSG_NONE;

Chapter 7 • Configuring Run-Time Settings
103
When you run the Vuser script and the Vuser encounters the above lr_think_time statement, by default, the Vuser waits 8 seconds before performing the next action. You can use the Think Time run-time settings to influence how the Vuser uses the recorded think time when you run the script.
For more information about the lr_think_time function and how to modify it manually, refer to the Online Function Reference (available from the VuGen Help menu).
Note: (Baan Vuser scripts only) In addition to the recorded think time, you can set internal think time using the set_think_time function. For details, see “Customizing Baan Vuser Scripts,” on page 658.
Click the Run-Time Settings button on the VuGen toolbar or select Vuser > Run-Time Settings. Click the Think Time tab to display the Think Time options:
Creating Vuser Scripts • Working with VuGen
104
Think Time Options
By default, when you run a Vuser script, the Vuser uses the think time values that were recorded into the script during the recording session. VuGen allows you to use the recorded think time, ignore it, or use a value related to the recorded time:
Ignore think time: Ignore the recorded think time—replay the script ignoring all lr_think_time functions.
Replay the think time as recorded: During replay, use the argument that appears in the lr_think_time function (e.g., lr_think_time(10) waits ten seconds.
Multiply recorded think time by: During replay, use a multiple of the recorded think time. This can increase or decrease the think time applied during playback. For example, if a think time of four seconds was recorded, you can instruct your Vuser to multiply that value by two, for a total of eight seconds. To reduce the think time to two seconds, multiply the recorded time by 0.5.
Use random percentage of the recorded think time: Use a random percentage of the recorded think time. You set a range for the think time value by specifying a range for the think time. For example, if the think time argument is 4, and you specify a minimum of 50% and a maximum of 150%, the lowest think time can be two (50%) and the highest value six (150%).
Limit think time to: Limit the think time’s maximum value.
Configuring the General Run-Time Settings
You can set the following general run-time options for a Vuser script:
➤ Error Handling
➤ Multithreading
➤ Automatic Transactions
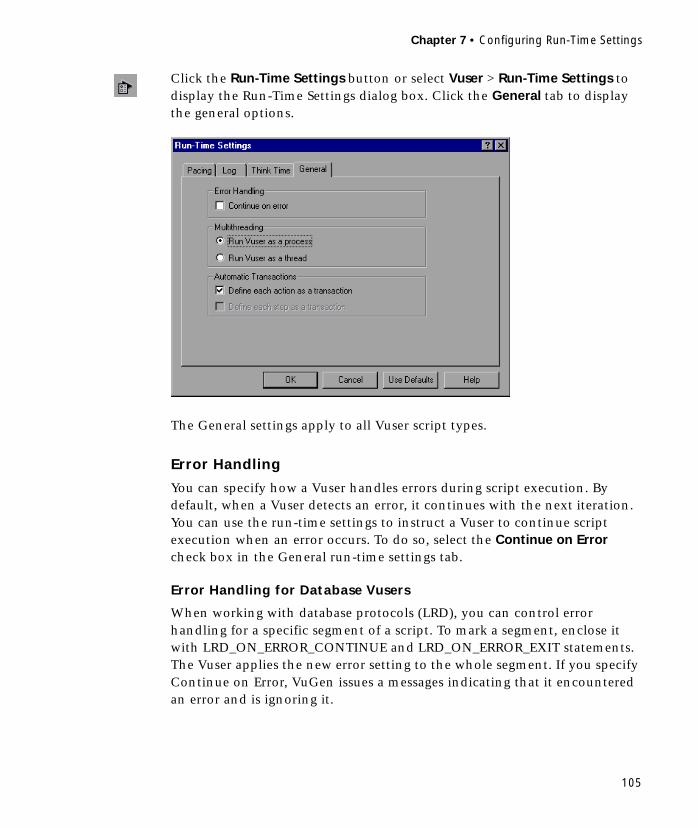
Chapter 7 • Configuring Run-Time Settings
105
Click the Run-Time Settings button or select Vuser > Run-Time Settings to display the Run-Time Settings dialog box. Click the General tab to display the general options.
The General settings apply to all Vuser script types.
Error Handling
You can specify how a Vuser handles errors during script execution. By default, when a Vuser detects an error, it continues with the next iteration. You can use the run-time settings to instruct a Vuser to continue script execution when an error occurs. To do so, select the Continue on Error check box in the General run-time settings tab.
Error Handling for Database Vusers
When working with database protocols (LRD), you can control error handling for a specific segment of a script. To mark a segment, enclose it with LRD_ON_ERROR_CONTINUE and LRD_ON_ERROR_EXIT statements. The Vuser applies the new error setting to the whole segment. If you specify Continue on Error, VuGen issues a messages indicating that it encountered an error and is ignoring it.
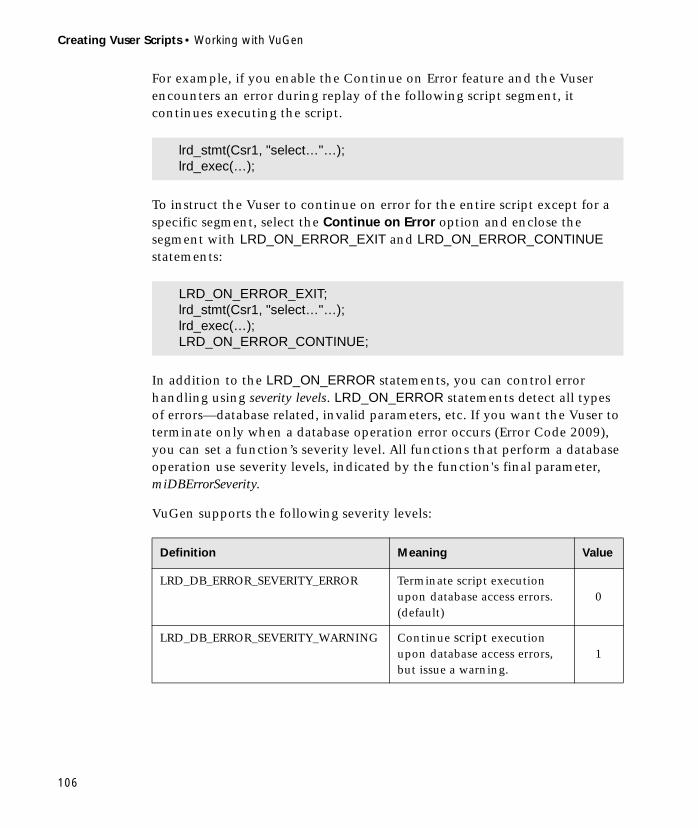
Creating Vuser Scripts • Working with VuGen
106
For example, if you enable the Continue on Error feature and the Vuser encounters an error during replay of the following script segment, it continues executing the script.
To instruct the Vuser to continue on error for the entire script except for a specific segment, select the Continue on Error option and enclose the segment with LRD_ON_ERROR_EXIT and LRD_ON_ERROR_CONTINUE statements:
In addition to the LRD_ON_ERROR statements, you can control error handling using severity levels. LRD_ON_ERROR statements detect all types of errors—database related, invalid parameters, etc. If you want the Vuser to terminate only when a database operation error occurs (Error Code 2009), you can set a function’s severity level. All functions that perform a database operation use severity levels, indicated by the function's final parameter, miDBErrorSeverity.
VuGen supports the following severity levels:
lrd_stmt(Csr1, "select…"…);lrd_exec(…);
LRD_ON_ERROR_EXIT;lrd_stmt(Csr1, "select…"…);lrd_exec(…);LRD_ON_ERROR_CONTINUE;
Definition Meaning Value
LRD_DB_ERROR_SEVERITY_ERROR Terminate script execution upon database access errors. (default)
0
LRD_DB_ERROR_SEVERITY_WARNING Continue script execution upon database access errors, but issue a warning.
1

Chapter 7 • Configuring Run-Time Settings
107
For example, if the following database statement fails (e.g. the table does not exist), the script execution terminates.
To instruct VuGen to continue script execution, even when a database operation error occurs, change the statement’s severity level from 0 to 1.
Note: When you enable Continue on Error, it overrides the “0” severity level; script execution continues even when database errors occur. However, if you disable Continue on Error, but you specify a severity level of “1”, script execution continues when database errors occur.
Error Handling for RTE Vusers
When working with RTE Vusers, you can control error handling for specific functions. You insert an lr_continue_on_error(0); statement before the function whose behavior you want to change. The Vuser uses the new setting until the end of the script execution or until another lr_continue_on_error statement is issued.
For example, if you enable the Continue on Error feature and the Vuser encounters an error during replay of the following script segment, it continues executing the script.
To instruct the Vuser to continue on error for the entire script, except for the following segment, select the Continue on Error option and enclose the
lrd_stmt(Csr1, "insert into EMP values (’Smith’,301)\n", -1, 1 , 1 , 0);
lrd_stmt(Csr1, "insert into EMP values (’Smith’,301)\n", -1, 1 , 1 , 1);
TE_wait_sync();TE_type(...);

Creating Vuser Scripts • Working with VuGen
108
segment with lr_continue_on_error statements, using 0 to turn off Continue on Error and 1 to turn it back on:
Multithreading
Vusers support multithread environments. The primary advantage of a multithread environment is the ability to run more Vusers per load generator. Only threadsafe protocols should be run as threads. Refer to the ReadMe file for details about running specific threadsafe protocols.
➤ To enable multithreading, click Run Vuser as a thread.
➤ To disable multithreading and run each Vuser as a separate process, click Run Vuser as a process.
The Controller uses a driver program (e.g., mdrv.exe, r3vuser.exe) to run your Vusers. If you run each Vuser as a process, then the same driver program is launched (and loaded) into the memory again and again for every instance of the Vuser. Loading the same driver program into memory uses up large amounts of RAM (random access memory) and other system resources. This limits the numbers of Vusers that can be run on any load generator.
Alternatively, if you run each Vuser as a thread, the Controller launches only one instance of the driver program (e.g., mdrv.exe), for every 50 Vusers (by default). This driver process/program launches several Vusers, each Vuser running as a thread. These threaded Vusers share segments of the memory of the parent driver process. This eliminates the need for multiple re-loading of the driver program/process saves much memory space, thereby enabling more Vusers to be run on a single load generator.
lr_continue_on_error(0);TE_wait_sync();lr_continue_on_error(1);....
Chapter 7 • Configuring Run-Time Settings
109
Automatic Transactions
You can instruct the Controller to handle every step or action in a Vuser script as a transaction. This is called using automatic transactions. The Controller assigns the step or action name as the name of the transaction. By default, automatic transactions per action are enabled.
Automatic transactions per action can be defined for all protocols. Automatic transactions per step can be defined only for Web Vusers.
➤ To enable automatic transactions per step, check the Define each step as a transaction check box.
➤ To disable automatic transactions per action, clear the Define each action as a transaction check box.
If you disable automatic transactions, you can still insert transactions manually during and after recording. For more information on manually inserting transactions, see Chapter 12, “Recording Web Vuser Scripts.”

Creating Vuser Scripts • Working with VuGen
110
111
8Selecting A Scripting Language
When working with specific protocols, VuGen lets you specify the language in which the script will be created: C or Visual Basic.
This chapter describes:
➤ Enabling Script Recording Options
➤ Setting the VB Run-Time Settings
The following information applies to DCOM, FTP, SMTP, IMAP, MAPI, and POP3 Vuser scripts.
About Selecting a Scripting Language
Using VuGen, you can record several low level protocols such as FTP, SMTP, DCOM and mail protocols (IMAP, POP3, and SMTP). VuGen generates a script with functions that emulate your actions. Before recording, you can indicate the preferred script language: C (default) or Visual Basic.
After the recording session, you can modify the script with other C, Visual Basic, or JScript functions as well as control flow for each of these languages.
Enabling Script Recording Options
You can set the Script recording options in the following areas:
➤ Basic
➤ Correlation
➤ DCOM Scripting

Creating Vuser Scripts • Working with VuGen
112
➤ VBScript and JScript
Basic Options
The Basic script options apply to all of the languages and Vuser types. These options allow you to control the level of detail in the generated script.
Record User think times: Insert user think time and delays to simulate real user behavior. (enabled by default)
Insert pre-invocation info: Insert informative logging messages before each message invocation. (VB/JS only, enabled by default)
Insert post-invocation info: Insert informative logging messages after each message invocation. (VB/JS only, enabled by default)
Record primary thread only: Record only events running on the application’s main or primary thread. (disabled by default)
Correlation Options
The Correlation options apply to the VBScript and JScript programming languages. These settings let you configure the extent of automatic correlation performed by VuGen while recording. All correlation options are disabled by default.
Correlate small numbers: Correlate short data types such as bytes, characters, and short integers. (disabled by default)
Correlate large numbers: Correlate long data types such as integers, long integers, 64-bit characters, float, and double. (disabled by default)
Correlate simple strings: Correlate simple, non-array strings and phrases. (disabled by default)
Correlate arrays: Track and correlate arrays of all data types, such as string, structures, numbers, etc. (disabled by default)
Correlate structures: Track and correlate complex structures. (disabled by default)

Chapter 8 • Selecting A Scripting Language
113
DCOM Scripting Options
The DCOM scripting options apply to all programming languages. These settings let you configure the scripting options for DCOM methods and interface handling.
ADO Recordset filtering: Condense multiple recordset operations into a single-line fetch statement. (enabled by default)
Record COM Exceptions/Errors: Record COM functions and methods that generate exceptions and errors during recording. (disabled by default)
Release COM Objects: Record the release of COM objects when they are no longer in use. (disabled by default)
Limit size of SafeArray log: Limit the number of elements printed in the safearray log per COM call, to 16. (enabled by default)
Generate COM statistics: Generate recording time performance statistics and summary information. (enabled by default)
VBScript and JScript Options
The VBScript and JScript options allow you to control the use of type helpers in scripting environments.
Use Helpers for objects: Use helper functions to extract object references from variants when passed as function arguments. (disabled by default)
Use Helpers for arrays: Use helper functions to extract components from variants arrays. (disabled by default)

Creating Vuser Scripts • Working with VuGen
114
To set the script recording options:
1 Choose Tools > Recording Options from the main menu or click Options... in the Start Recording dialog box. The Recording Options dialog box opens. Click the Script tab.
2 In the Select Script Language box, select a mode of code generation — C Language or Visual Basic Scripting. Use C for recording applications that use complex constructs and C++ code. Use Visual Basic Scripting mode to record script-based applications.
3 In the Select all scripting options to enable section, choose the desired options by selecting the check box adjacent to the option. The Basic, Correlation, DCOM, and VBScript/JScript options are described in the previous section.
4 Click OK to save your settings and close the dialog box.
Setting the VB Run-Time Settings
Before running your Visual Basic script, you indicate which libraries to reference during replay.

Chapter 8 • Selecting A Scripting Language
115
You use the Run-Time Settings dialog box to display and configure the run-time settings. To display the Run-Time Settings dialog box, click the Run-Time Settings button on the VuGen toolbar.
You can also modify the run-time settings from the LoadRunner Controller. Click the Design tab and click the Run-Time Settings button.
To set the VBA Run-Time settings:
1 Open the Run-Time Settings dialog box and select the VBA tab.
2 In the VBA References section, select the reference library that you want to use while running the script. Select a library to display its description and version in the bottom of the dialog box.
3 Select the appropriate compiler options:
Select Debug script through VBA IDE to enable debugging through the Visual Basic IDE (Integrated Development Environment).
Creating Vuser Scripts • Working with VuGen
116
Select On Error keep VBA IDE visible to keep the Visual Basic IDE visible during script execution.
4 Choose OK to apply the run-time settings.
117
9Running Vuser Scripts in Stand-Alone Mode
After you develop a Vuser script and set its run-time settings, you test the Vuser script by running it in stand-alone mode.
This chapter describes:
➤ Running a Vuser Script in VuGen
➤ Using VuGen’s Debugging Features
➤ Using VuGen’s Debugging Features for Web Vuser Scripts
➤ Working with VuGen Windows
➤ Running a Vuser Script from a Command Prompt
➤ Running a Vuser Script from a UNIX Command Line
➤ Integrating a Vuser Script into a Scenario
The following information applies to all types of Vuser scripts except for GUI.
About Running Vuser Scripts in Stand-Alone Mode
In order to perform load testing with a Vuser script, you use the Controller to incorporate the script into a scenario. Before integrating the script into a scenario, you check its functionality by running the script in stand-alone mode.
Running a script in stand-alone mode means running the script without using the Controller. This is done to establish how the script will execute when run from the Controller. To run GUI Vusers in stand-alone mode, use

Creating Vuser Scripts • Working with VuGen
118
WinRunner. For details, see Chapter 53, “Developing GUI Vuser Scripts.” For all other Windows-based scripts, you use VuGen to run scripts in stand-alone mode. If the script is UNIX-based, you run it from a UNIX command line.
When the stand-alone execution is successful, you incorporate the script into a scenario. For more information on scenarios, refer to your LoadRunner Controller User’s Guide.
Before you run a script in stand-alone mode, you can:
➤ enhance the script with Vuser functions (see Chapter 4, “Enhancing Vuser Scripts”)
➤ parameterize the script (see Chapter 5, “Defining Parameters”)
➤ correlate queries in the script (see Chapter 6, “Correlating Statements”)
The above steps are optional and may not apply to all scripts.
Running a Vuser Script in VuGen
After developing a Vuser script, run it using VuGen to ensure that it executes correctly.
Note: VuGen runs Vuser scripts on Windows platforms only. To run UNIX-based Vuser scripts, see “Running a Vuser Script from a UNIX Command Line,” on page 126.
You can run a Vuser script in animated mode or non-animated mode. When you run in animated mode, VuGen highlights the line of the Vuser script being executed at the current time. When you run in non-animated mode, VuGen executes the Vuser script, but does not indicate the line being executed.
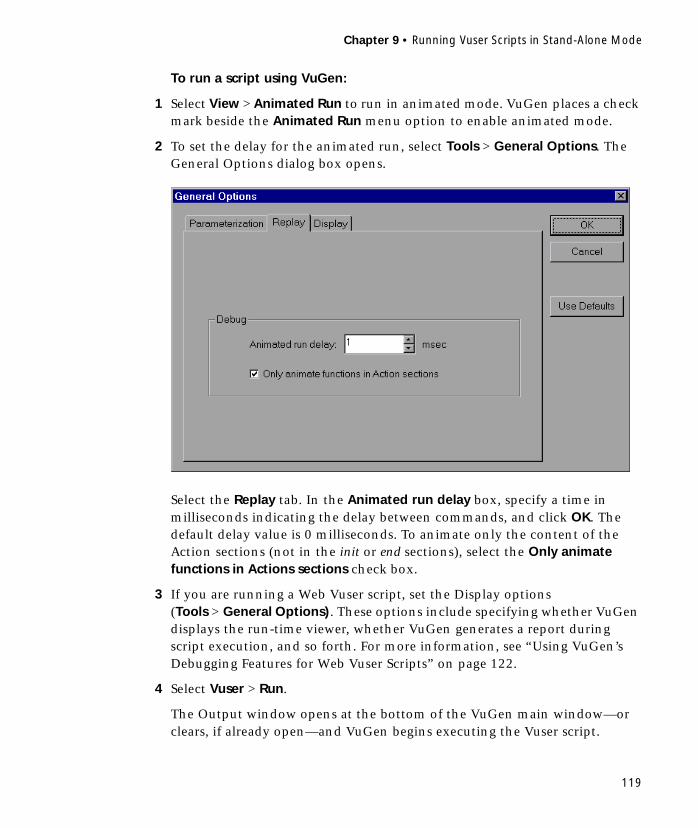
Chapter 9 • Running Vuser Scripts in Stand-Alone Mode
119
To run a script using VuGen:
1 Select View > Animated Run to run in animated mode. VuGen places a check mark beside the Animated Run menu option to enable animated mode.
2 To set the delay for the animated run, select Tools > General Options. The General Options dialog box opens.
Select the Replay tab. In the Animated run delay box, specify a time in milliseconds indicating the delay between commands, and click OK. The default delay value is 0 milliseconds. To animate only the content of the Action sections (not in the init or end sections), select the Only animate functions in Actions sections check box.
3 If you are running a Web Vuser script, set the Display options (Tools > General Options). These options include specifying whether VuGen displays the run-time viewer, whether VuGen generates a report during script execution, and so forth. For more information, see “Using VuGen’s Debugging Features for Web Vuser Scripts” on page 122.
4 Select Vuser > Run.
The Output window opens at the bottom of the VuGen main window—or clears, if already open—and VuGen begins executing the Vuser script.

Creating Vuser Scripts • Working with VuGen
120
VuGen runs the Vuser script from the first line of the script. The Execution Log displays messages that describe the actions of the Vuser as it runs. This information shows you how the script will run when executed in a scenario.
Note: For protocols that support the tree view - When you run a Vuser script in the tree view, VuGen runs the Vuser script from the first icon in the script.
5 To hide the Output window during or after a script run, select View > Output Window. VuGen closes the Output window and removes the check mark from next to Output Window on the View menu.
6 To interrupt a Vuser script that is running, select Vuser > Pause, to temporarily pause the script run, or Vuser > Stop, to end the script run.
When script execution is complete, you examine the messages in the execution log to see whether your script ran without errors. The following example shows execution log messages from a Web Vuser script run.
Execution log messages

Chapter 9 • Running Vuser Scripts in Stand-Alone Mode
121
Using VuGen’s Debugging Features
VuGen contains two options to help debug Vuser scripts—the Run Step by Step command and breakpoints.
VuGen contains two additional features to help debug Web Vuser scripts. For details, see “Using VuGen’s Debugging Features for Web Vuser Scripts” on page 122.
The Run Step by Step Command
The Run Step by Step Command runs the script one line at a time. This enables you to follow the script execution.
To run the script step by step:
1 Select Vuser > Run Step by Step, or click the Step button.
VuGen executes the first line of the script.
2 Continue script execution by clicking the Step button until the script run completes.
Breakpoints
Breakpoints pause execution at specific points in the script. This enables you to examine the effects of the script on your application at pre-determined points during execution.
To set breakpoints:
1 Place the cursor on the line in the script at which you want execution to stop.
2 Click the Breakpoint button. The Breakpoint symbol ( ) appears in the left margin of the script.
3 To remove the breakpoint, place the cursor on the line with the breakpoint symbol, and click the Breakpoint button.

Creating Vuser Scripts • Working with VuGen
122
To run the script with breakpoints:
1 Begin running the script as you normally would.
VuGen pauses script execution when it reaches a breakpoint. You can examine the effects of the script run up to the breakpoint, make any necessary changes, and then restart the script from the breakpoint.
2 To resume execution, select Vuser > Run.
Once restarted, the script continues until the next breakpoint is encountered or until the script is completed.
Using VuGen’s Debugging Features for Web Vuser Scripts
VuGen provides two additional tools to help you debug Web Vuser scripts—the run-time viewer (online browser) and the Results Summary report.
➤ You can instruct VuGen to display a run-time viewer when you run a Web Vuser script. The run-time viewer is developed by Mercury Interactive specifically for use with VuGen—it is unrelated to the browser that you use to record your Vuser scripts. The run-time viewer shows each Web page as it is accessed by the Vuser. This is useful when you debug Web Vuser scripts because it allows you to check that the Vuser accesses the correct Web pages. For additional information on the run-time viewer, see Chapter 22, “Power User Tips for Web Vusers.”
Note: To display a run-time viewer you must have Microsoft Internet Explorer 4.0 or higher installed.
➤ You can specify whether or not a Web Vuser generates a Results Summary report during script execution. The Results Summary report summarizes the success or failure of each step in the Web Vuser scripts and allows you to view the Web page returned by each step. For additional details on working with the Results Summary report, see Chapter 21, “Using Reports to Debug Vuser Scripts.”
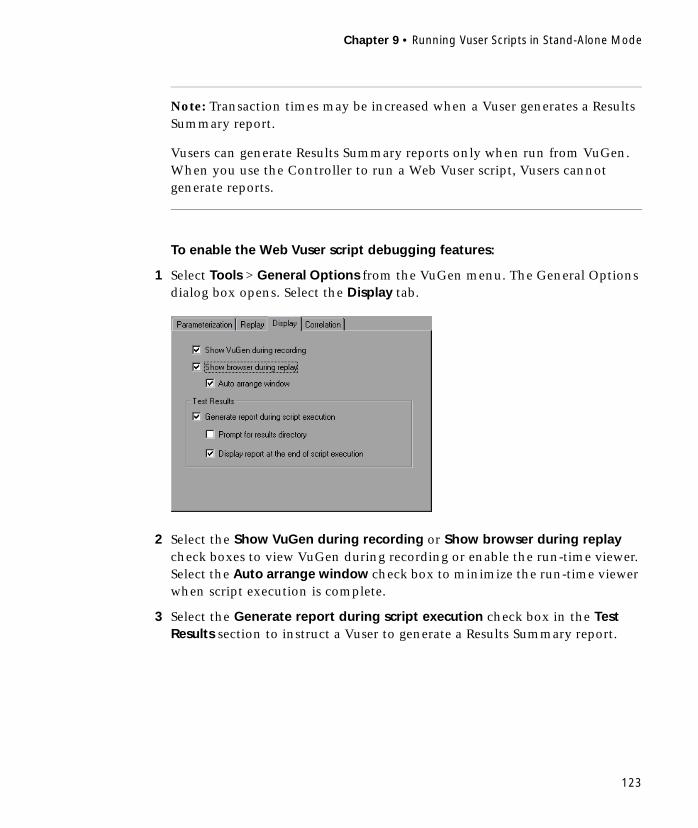
Chapter 9 • Running Vuser Scripts in Stand-Alone Mode
123
Note: Transaction times may be increased when a Vuser generates a Results Summary report.
Vusers can generate Results Summary reports only when run from VuGen. When you use the Controller to run a Web Vuser script, Vusers cannot generate reports.
To enable the Web Vuser script debugging features:
1 Select Tools > General Options from the VuGen menu. The General Options dialog box opens. Select the Display tab.
2 Select the Show VuGen during recording or Show browser during replay check boxes to view VuGen during recording or enable the run-time viewer. Select the Auto arrange window check box to minimize the run-time viewer when script execution is complete.
3 Select the Generate report during script execution check box in the Test Results section to instruct a Vuser to generate a Results Summary report.

Creating Vuser Scripts • Working with VuGen
124
4 Select the Prompt for result directory check box to display the Select Results Directory dialog box before you execute a Vuser script.
Type a name for the folder where the execution results will be stored, or accept the default name and click OK.
If the Prompt for results directory check box is not selected, VuGen automatically names the folder result1. Subsequent script executions will automatically overwrite previous ones unless a different result file is specified. Note that results are always stored in a subfolder of the script folder.
5 Select the Display report at the end of script execution check box to automatically display the Results Summary report at the end of script execution. If you do not select this option, you can open the Results Summary report after script execution by selecting View > Visual Log.
6 For the Web Correlation Studio, select the Save correlation information during replay check box to save the replay information as snapshots. You can compare each snapshot to your original recorded script.
7 Click OK to accept the settings and close the General Options dialog box.
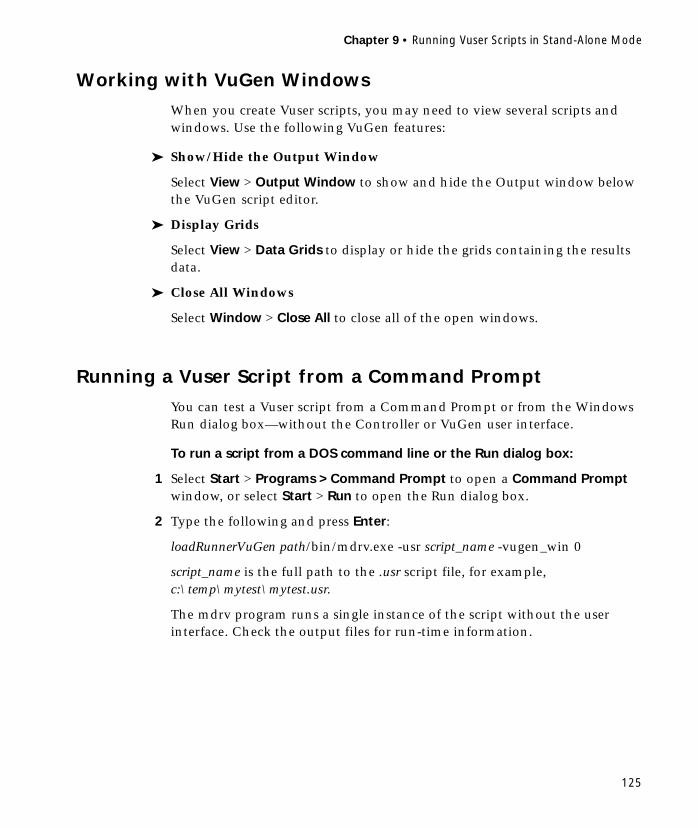
Chapter 9 • Running Vuser Scripts in Stand-Alone Mode
125
Working with VuGen Windows
When you create Vuser scripts, you may need to view several scripts and windows. Use the following VuGen features:
➤ Show/Hide the Output Window
Select View > Output Window to show and hide the Output window below the VuGen script editor.
➤ Display Grids
Select View > Data Grids to display or hide the grids containing the results data.
➤ Close All Windows
Select Window > Close All to close all of the open windows.
Running a Vuser Script from a Command Prompt
You can test a Vuser script from a Command Prompt or from the Windows Run dialog box—without the Controller or VuGen user interface.
To run a script from a DOS command line or the Run dialog box:
1 Select Start > Programs > Command Prompt to open a Command Prompt window, or select Start > Run to open the Run dialog box.
2 Type the following and press Enter:
loadRunnerVuGen path/bin/mdrv.exe -usr script_name -vugen_win 0
script_name is the full path to the .usr script file, for example, c:\temp\mytest\mytest.usr.
The mdrv program runs a single instance of the script without the user interface. Check the output files for run-time information.
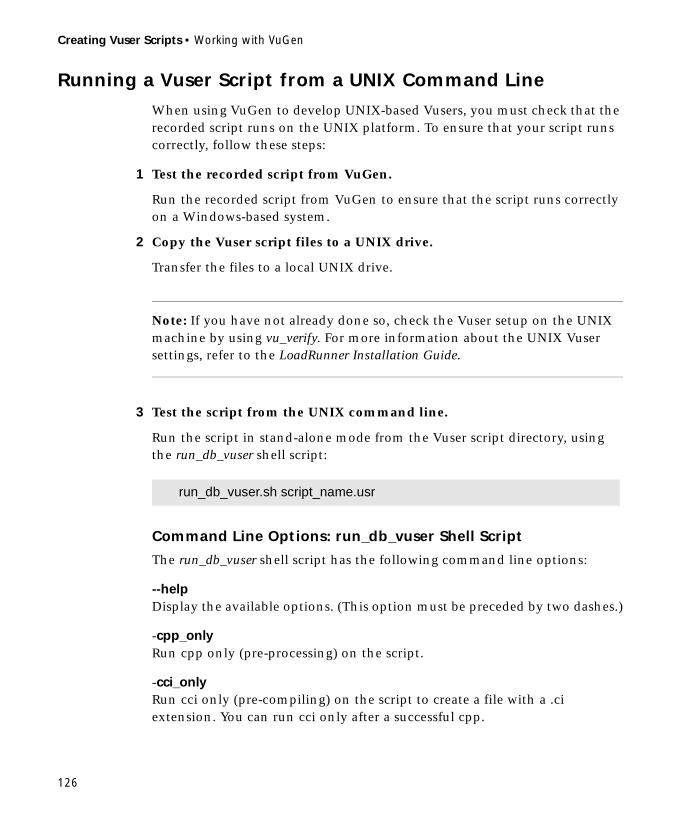
Creating Vuser Scripts • Working with VuGen
126
Running a Vuser Script from a UNIX Command Line
When using VuGen to develop UNIX-based Vusers, you must check that the recorded script runs on the UNIX platform. To ensure that your script runs correctly, follow these steps:
1 Test the recorded script from VuGen.
Run the recorded script from VuGen to ensure that the script runs correctly on a Windows-based system.
2 Copy the Vuser script files to a UNIX drive.
Transfer the files to a local UNIX drive.
Note: If you have not already done so, check the Vuser setup on the UNIX machine by using vu_verify. For more information about the UNIX Vuser settings, refer to the LoadRunner Installation Guide.
3 Test the script from the UNIX command line.
Run the script in stand-alone mode from the Vuser script directory, using the run_db_vuser shell script:
Command Line Options: run_db_vuser Shell Script
The run_db_vuser shell script has the following command line options:
--help Display the available options. (This option must be preceded by two dashes.)
-cpp_onlyRun cpp only (pre-processing) on the script.
-cci_onlyRun cci only (pre-compiling) on the script to create a file with a .ci extension. You can run cci only after a successful cpp.
run_db_vuser.sh script_name.usr
Chapter 9 • Running Vuser Scripts in Stand-Alone Mode
127
-driver driver_pathUse a specific driver program. Each database has its own driver program located in the /bin directory. For example, the driver for CtLib located in the /bin directory, is mdrv. This option lets you specify an external driver.
-exec_onlyExecute the Vuser .ci file. This option is available only when a valid .ci file exists.
-ci ci_file_nameExecute a specific .ci file.
-out output_pathPlace the results in a specific directory.
By default, run_db_vuser.sh runs cpp, cci, and execute in verbose mode. It uses the driver in the LoadRunner installation/bin directory, and saves the results to an output file in the Vuser script directory. You must always specify a .usr file. If you are not in the script directory, specify the full path of the .usr file.
For example, the following command line executes a Vuser script called test1, and places the output file in a directory called results1. The results directory must be an existing directory—it will not be created automatically:
run_db_vuser.sh -out /u/joe/results1 test1.usr
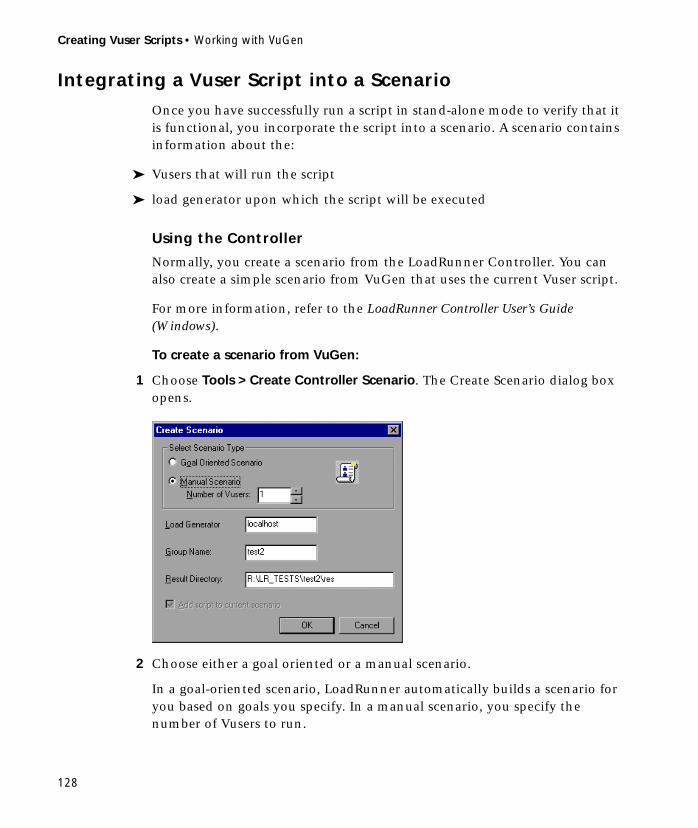
Creating Vuser Scripts • Working with VuGen
128
Integrating a Vuser Script into a Scenario
Once you have successfully run a script in stand-alone mode to verify that it is functional, you incorporate the script into a scenario. A scenario contains information about the:
➤ Vusers that will run the script
➤ load generator upon which the script will be executed
Using the Controller
Normally, you create a scenario from the LoadRunner Controller. You can also create a simple scenario from VuGen that uses the current Vuser script.
For more information, refer to the LoadRunner Controller User’s Guide (Windows).
To create a scenario from VuGen:
1 Choose Tools > Create Controller Scenario. The Create Scenario dialog box opens.
2 Choose either a goal oriented or a manual scenario.
In a goal-oriented scenario, LoadRunner automatically builds a scenario for you based on goals you specify. In a manual scenario, you specify the number of Vusers to run.

Chapter 9 • Running Vuser Scripts in Stand-Alone Mode
129
3 For a manual scenario, enter the number of Vusers you want to execute the script.
4 Enter the name of the machine upon which you want the Vusers to run, in the Load Generator box.
5 For a manual scenario, users with common traits are organized into groups. Specify a new group name for the Vusers in the Group Name box.
6 For a goal-oriented scenario, specify a Script Name.
7 Enter the desired location for the results in the Result Directory box.
8 If a scenario is currently open in the Controller and you want to add the script to this scenario, select the Add script to current scenario check box. If you clear the check box, LoadRunner opens a new scenario with the specified number of Vusers.
9 Click OK. VuGen opens the Controller in the Vuser view.
10 If you configured the Controller to save the script on a shared network drive, you may need to perform path translation.

Creating Vuser Scripts • Working with VuGen
130

131
10Managing Scripts Using TestDirector
LoadRunner’s integration with TestDirector lets you manage LoadRunner Vuser scripts using TestDirector. TestDirector helps you organize and manage all scripts, scenarios, and results using a repository.
This chapter describes:
➤ Opening a Connection to a TestDirector Project
➤ Opening a Script using TestDirector
➤ Saving Scripts to the TestDirector Project
➤ Managing your Script in TestDirector
The following information applies to all types of Vuser scripts except for GUI.
For detailed information on using TestDirector to manage your scripts, refer to the TestDirector User’s Guide.
Working with TestDirector
TestDirector is a powerful test management tool that lets you manage and control all phases of software testing. It provides a comprehensive view of the testing process so you can make strategic decisions about the human and material resources needed to test the application and repair defects.
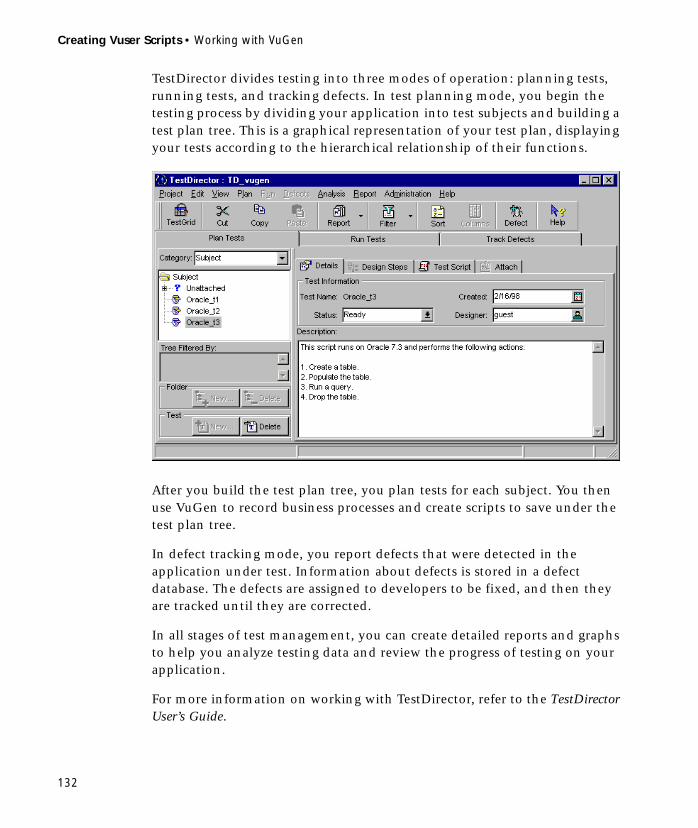
Creating Vuser Scripts • Working with VuGen
132
TestDirector divides testing into three modes of operation: planning tests, running tests, and tracking defects. In test planning mode, you begin the testing process by dividing your application into test subjects and building a test plan tree. This is a graphical representation of your test plan, displaying your tests according to the hierarchical relationship of their functions.
After you build the test plan tree, you plan tests for each subject. You then use VuGen to record business processes and create scripts to save under the test plan tree.
In defect tracking mode, you report defects that were detected in the application under test. Information about defects is stored in a defect database. The defects are assigned to developers to be fixed, and then they are tracked until they are corrected.
In all stages of test management, you can create detailed reports and graphs to help you analyze testing data and review the progress of testing on your application.
For more information on working with TestDirector, refer to the TestDirector User’s Guide.
Chapter 10 • Managing Scripts Using TestDirector
133
About Managing Scripts Using TestDirector
TestDirector and LoadRunner work together to integrate all aspects of the testing process. In LoadRunner, you can create scripts and save them in your TestDirector project database. After a test has been run, the results are viewed and analyzed in TestDirector.
When LoadRunner is connected to TestDirector, you can save a test by associating it with a subject in the test plan tree, instead of assigning the test to a folder in the file system. This makes it easy to organize tests by subject for your application. When you open a test, you search for it according to its position in the test plan tree. You can also save Scenarios from the LoadRunner Controller in your TestDirector project. After you run a scenario from the Controller, results are sent directly to your TestDirector project.
The following sections describe how to:
➤ connect to the TestDirector project
➤ open scripts from the TestDirector repository
➤ save scripts to the TestDirector repository
Opening a Connection to a TestDirector Project
Before you can work with a TestDirector project, you must open a connection to the server hosting the project.

Creating Vuser Scripts • Working with VuGen
134
To open a connection to a TestDirector project:
1 Choose Tools > TestDirector Connection from VuGen’s main window.
2 In the Server box, type the name of the TestDirector server and then click Connect. A message appears indicating that LoadRunner is connecting to the server, and the Project list is filled with available projects on the server.

Chapter 10 • Managing Scripts Using TestDirector
135
3 In the Project Connection box, select a project.
4 Provide the user login and password.
5 Select the Reconnect on Startup check box to automatically open the connection to the TestDirector server and project when you start LoadRunner.
6 If you select Reconnect on Startup, you can save the specified password to the vugen.ini file to automate the login process. Select the Save Password for Reconnection on Startup check box.
7 Click Connect. A message appears indicating that LoadRunner is connecting to the project.
8 Click Close to close the Connection to TestDirector dialog box.

Creating Vuser Scripts • Working with VuGen
136
Opening a Script using TestDirector
You can open a script through the standard file system or the TestDirector repository. Before opening a script through TestDirector, make sure you have opened a connection to the project.
To open a script from the TestDirector repository:
1 Choose File > Open or click the File Open button. The Open from Test Director Project dialog box opens.
2 Select a Vuser script from the project.
3 Click OK. VuGen loads the script. The name of the script appears in the VuGen’s banner.
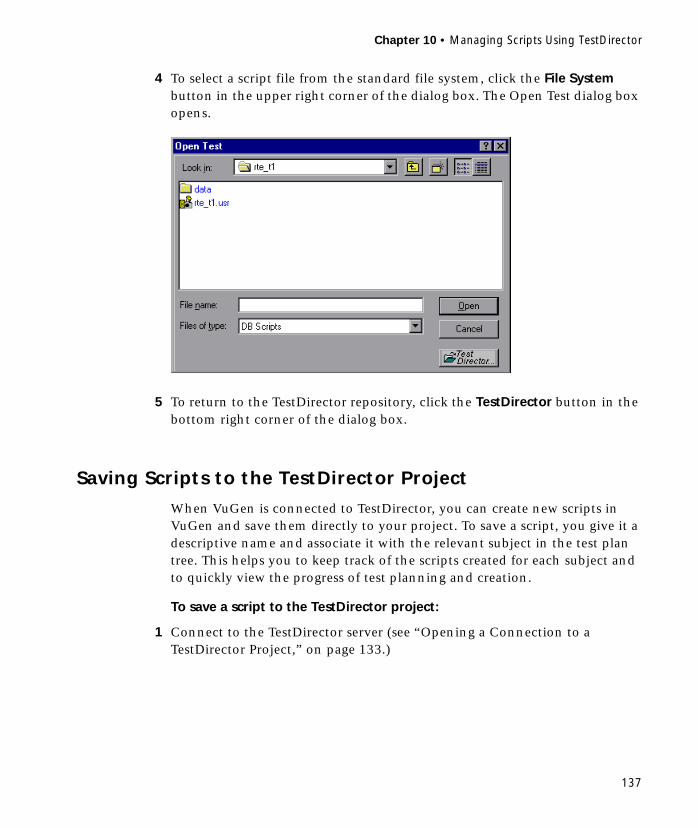
Chapter 10 • Managing Scripts Using TestDirector
137
4 To select a script file from the standard file system, click the File System button in the upper right corner of the dialog box. The Open Test dialog box opens.
5 To return to the TestDirector repository, click the TestDirector button in the bottom right corner of the dialog box.
Saving Scripts to the TestDirector Project
When VuGen is connected to TestDirector, you can create new scripts in VuGen and save them directly to your project. To save a script, you give it a descriptive name and associate it with the relevant subject in the test plan tree. This helps you to keep track of the scripts created for each subject and to quickly view the progress of test planning and creation.
To save a script to the TestDirector project:
1 Connect to the TestDirector server (see “Opening a Connection to a TestDirector Project,” on page 133.)

Creating Vuser Scripts • Working with VuGen
138
2 Choose File > Save As. The Save Test to TestDirector Project dialog box opens.
3 Type a script name, select a folder and click OK.
4 To save the script to disk, click File System and save the file as you would on a standard file system.

Chapter 10 • Managing Scripts Using TestDirector
139
Managing your Script in TestDirector
You can further utilize TestDirector to manage script and test information. After you save a script to the TestDirector project, you can enter details about the script and its status.
To enter script details, start TestDirector and select a script.
You can enter information about the test level, version, owner, and designer.
TestDirector enables you to manage the user access to a Test project. By creating a list of authorized users and assigning each user a password and user type, you control the kinds of additions and modifications each user makes to the project. The user type determines the privileges that the user has within TestDirector.
For more information on using TestDirector to manage your scripts, refer to the TestDirector User’s Guide.

Creating Vuser Scripts • Working with VuGen
140
Part III
Web Vuser Scripts

142
143
11Introducing Web Vuser Scripts
You use VuGen to develop Web Vuser scripts. VuGen creates Vuser scripts by recording your actions while you operate a client browser.
This chapter describes:
➤ Introducing Web Vusers
➤ Understanding Web Vuser Technology
➤ Getting Started with Web Vuser Scripts
➤ Viewing Web Scripts in the Tree View
➤ Using Web Vuser Scripts in the Script View
➤ Using Web Functions
The following information applies to Web Vuser scripts.
About Developing Web Vuser Scripts
You use VuGen to develop Web Vuser scripts. While you navigate through a site performing typical user activities, VuGen records your actions and generates a Vuser script. When you run the script, the resulting Vuser emulates a user accessing the Internet.
VuGen can display a Web Vuser script in two ways:
➤ As an icon-based representation of the Vuser script. This is the default view, and is known as the tree view.
➤ As a text-based representation of the Vuser script. This is known as the script view.
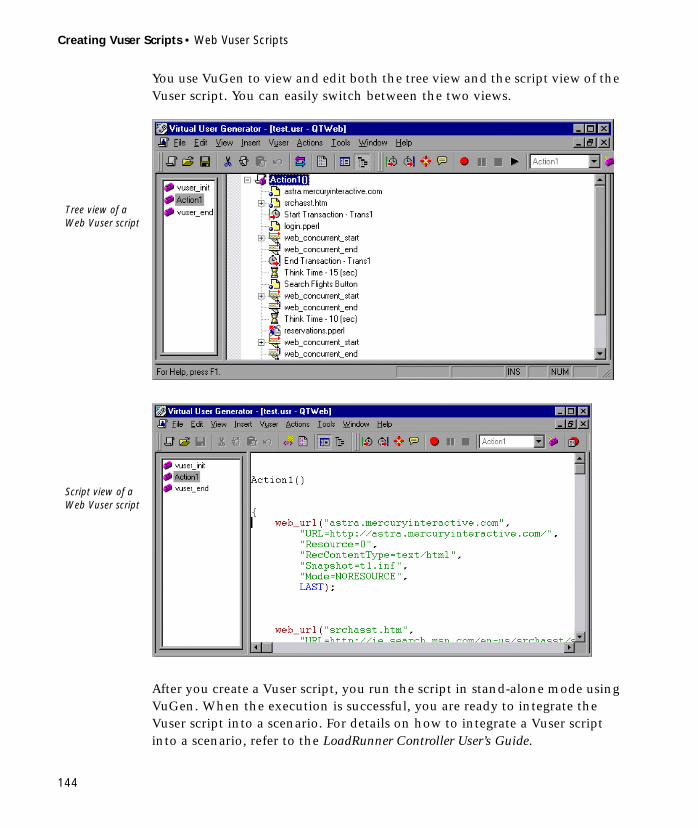
Creating Vuser Scripts • Web Vuser Scripts
144
You use VuGen to view and edit both the tree view and the script view of the Vuser script. You can easily switch between the two views.
After you create a Vuser script, you run the script in stand-alone mode using VuGen. When the execution is successful, you are ready to integrate the Vuser script into a scenario. For details on how to integrate a Vuser script into a scenario, refer to the LoadRunner Controller User’s Guide.
Tree view of a Web Vuser script
Script view of a Web Vuser script

Chapter 11 • Introducing Web Vuser Scripts
145
Introducing Web Vusers
Suppose you have a Web site that displays product information for your company. The site is accessed by potential customers. You want to ensure that the response time for any customer query is less than a specified value (say 20 seconds)—even when a large number of users (say 200) access the site simultaneously. You use Vusers to emulate this scenario, in which the Web server services the simultaneous requests for information. Each Vuser could:
➤ load your home page
➤ navigate to the page containing the product information
➤ submit a query
➤ wait for a response from the server
You can distribute several hundred Vusers among the available testing machines, each Vuser accessing the server by using its API. This enables you to measure the performance of the server under the load of many users.
The program that contains the calls to the server API is called a Vuser script. It emulates a browser application and all of the actions performed by the browser. Using the Controller, you assign the script to multiple Vusers. The Vusers execute the script and emulate user load on the Web server.
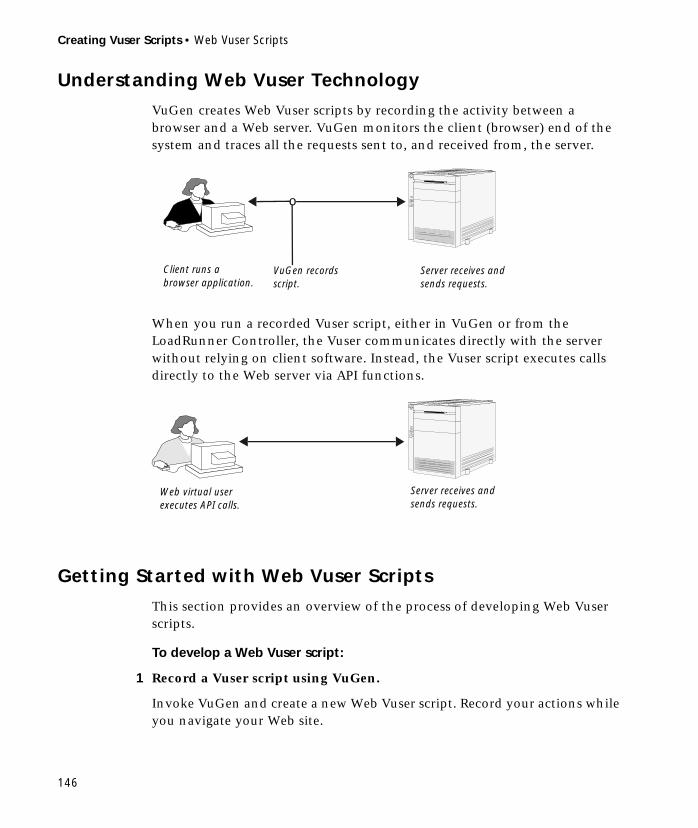
Creating Vuser Scripts • Web Vuser Scripts
146
Understanding Web Vuser Technology
VuGen creates Web Vuser scripts by recording the activity between a browser and a Web server. VuGen monitors the client (browser) end of the system and traces all the requests sent to, and received from, the server.
When you run a recorded Vuser script, either in VuGen or from the LoadRunner Controller, the Vuser communicates directly with the server without relying on client software. Instead, the Vuser script executes calls directly to the Web server via API functions.
Getting Started with Web Vuser Scripts
This section provides an overview of the process of developing Web Vuser scripts.
To develop a Web Vuser script:
1 Record a Vuser script using VuGen.
Invoke VuGen and create a new Web Vuser script. Record your actions while you navigate your Web site.
Client runs a browser application.
VuGen records script.
Server receives and sends requests.
o
Web virtual user executes API calls.
Server receives and sends requests.

Chapter 11 • Introducing Web Vuser Scripts
147
For details, see Chapter 12, “Recording Web Vuser Scripts.”
2 Enhance the recorded Vuser script.
Enhance the Vuser script by inserting transactions, rendezvous points, checks, and service steps.
For details, see Chapter 12, “Recording Web Vuser Scripts,” Chapter 16, “Verifying Web Pages Under Load,” Chapter 17, “Modifying Web Vuser Scripts,” and Chapter 18, “Correlating Web Statements.”
3 Define parameters (optional).
Define parameters for the fixed values recorded into your script. By substituting fixed values with parameters, you can repeat the same Vuser action many times using different values.
For details, see Chapter 5, “Defining Parameters.”
4 Configure the run-time settings.
The run-time settings control Vuser behavior during script execution. These settings include general run-time settings (iteration, log, think time, and general information), and Web-related settings (proxy, network, and HTTP details).
For details, see Chapter 7, “Configuring Run-Time Settings.”
5 Run and debug the Vuser script using VuGen.
Run the Vuser script from VuGen to verify that it runs correctly. For details, see Chapter 9, “Running Vuser Scripts in Stand-Alone Mode” and Chapter 21, “Using Reports to Debug Vuser Scripts.”
After you create a Vuser script, you integrate it into a LoadRunner scenario. For more information on integrating Vuser scripts into a scenario, refer to the LoadRunner Controller User’s Guide.

Creating Vuser Scripts • Web Vuser Scripts
148
Viewing Web Scripts in the Tree View
When viewing and editing Web Vuser scripts in VuGen, you choose between viewing the script in the icon-based tree view or the text-based script view. For details on viewing scripts in the script view, see “Using Web Vuser Scripts in the Script View” on page 152.
To display the tree view of a Web Vuser script:
➤ From the VuGen main menu, select View > Tree View, or click the View script as tree icon. The Vuser script is displayed in the icon-based tree view. If you are already in the tree view, the menu item is disabled.
The tree view of a Vuser script is composed of icons. Each icon represents an action of the Vuser or a step in the Web Vuser script. The icons are divided into four categories:
➤ Action Icons
➤ Control Icons
➤ Service Icons
➤ Web Check Icons
Tree view of a Web Vuser script

Chapter 11 • Introducing Web Vuser Scripts
149
Action Icons
Each Action icon in the Vuser script represents a user action during recording, that is, a jump to a new Web page or a change in the Web context. When you record a Web Vuser script, VuGen adds an Action icon to the script for each action step—each time you click a hypertext or hypergraphic link or submit a form. When you run a Web Vuser script, each action step displays a new Web page or frame in the browser.
VuGen uses five different Action icons, each one representing a different user action during recording and playback:
Icon Type Description
URL A URL icon is added to the Vuser script when you type in a URL or use a bookmark to access a specific Web page. Each URL icon represents a web_url function in the Vuser script. The default label of a URL icon is the last part of the URL of the target page.
Link A Link icon is added to the Vuser script when you click a hypertext link while recording. Each Link icon represents a web_link function in the Vuser script. The default label of the icon is the text string of the hypertext link.
Image An Image icon is added to the Vuser script when you click a hypergraphic link while recording. Each Image icon represents a web_image function in the Vuser script. If the image in the HTML code has an ALT attribute, then this attribute is used as the default label of the icon. If the image in the HTML code does not have an ALT attribute, then the last part of the SRC attribute is used as the icon’s label.
Form/Data Submission
A Submit Form or Submit Data icon is added to the Vuser script when you submit a form while recording. Each icon represents either a web_submit_form function or a web_submit_data function in the Vuser script. The default label of the icon is the name of the executable program used to process the form.
Custom Request
VuGen adds a Custom Request icon to a Vuser script when you record an action that VuGen can not recognize as any of the standard actions (i.e., URL, link, image, or form submission). This is applicable to non-standard HTTP applications.
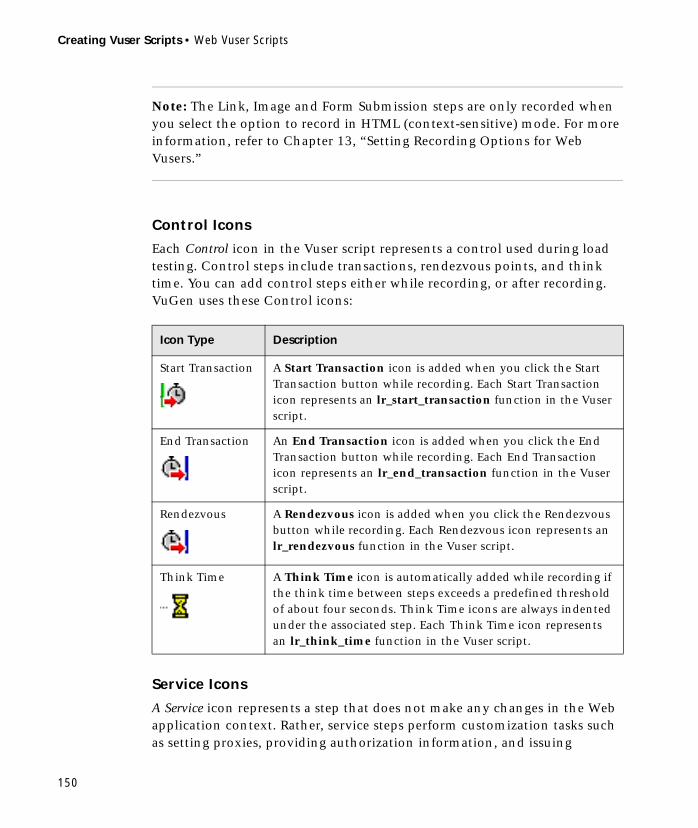
Creating Vuser Scripts • Web Vuser Scripts
150
Note: The Link, Image and Form Submission steps are only recorded when you select the option to record in HTML (context-sensitive) mode. For more information, refer to Chapter 13, “Setting Recording Options for Web Vusers.”
Control Icons
Each Control icon in the Vuser script represents a control used during load testing. Control steps include transactions, rendezvous points, and think time. You can add control steps either while recording, or after recording. VuGen uses these Control icons:
Service Icons
A Service icon represents a step that does not make any changes in the Web application context. Rather, service steps perform customization tasks such as setting proxies, providing authorization information, and issuing
Icon Type Description
Start Transaction A Start Transaction icon is added when you click the Start Transaction button while recording. Each Start Transaction icon represents an lr_start_transaction function in the Vuser script.
End Transaction An End Transaction icon is added when you click the End Transaction button while recording. Each End Transaction icon represents an lr_end_transaction function in the Vuser script.
Rendezvous A Rendezvous icon is added when you click the Rendezvous button while recording. Each Rendezvous icon represents an lr_rendezvous function in the Vuser script.
Think Time A Think Time icon is automatically added while recording if the think time between steps exceeds a predefined threshold of about four seconds. Think Time icons are always indented under the associated step. Each Think Time icon represents an lr_think_time function in the Vuser script.

Chapter 11 • Introducing Web Vuser Scripts
151
customized headers. Service steps in a Vuser script override any run-time settings that are set for the script. For details on the run-time settings, see Chapter 7, “Configuring Run-Time Settings.”
All service steps are represented by a variation of the Service icon. Each Service icon represents a service function. VuGen records only a subset of the service functions. In addition, you can manually program service functions into a Vuser script after recording. For a list of service functions, see “Service Functions” on page 155.
Web Check Icons
When you add a Web check during or after recording, VuGen adds a Web Check icon to the current step in the Vuser script. Web Check icons are always indented under the associated step.
When you run the Vuser script, VuGen conducts the check on the Web page that is displayed after the associated step is executed. For details on adding Web checks to a Web Vuser script, see Chapter 16, “Verifying Web Pages Under Load.”
VuGen uses three different Web Check icons, each one representing a different check type:
Web Check Icon Description
Text A text check is a search for a specified text string on a Web page.

Creating Vuser Scripts • Web Vuser Scripts
152
Using Web Vuser Scripts in the Script View
To view and edit the text-based representation of a Web Vuser script, you select the script view.
To display the script view of a Web Vuser script:
From the VuGen main menu, select View > Script View, or click the View script as text icon. The Vuser script is displayed in the text-based script view. If you are already in the script view, the menu item is disabled.
Image An image check is a search for a specified image on a Web page.
Java Applet A Java check is a search for a specified Java applet on a Web page.
Web Check Icon Description
Script view of a Web Vuser script
Chapter 11 • Introducing Web Vuser Scripts
153
In the script view, you can see the functions that were generated by your browser application, and you can make changes to the script as required.
Note: If you make changes to a Vuser script while in the script view, VuGen makes the corresponding changes in the tree view of the Vuser script. If VuGen is unable to comprehend the text-based changes that were made, VuGen will be unable to convert the script view into the tree view.
Using Web Functions
The functions developed to emulate communication between a browser and a Web server are called WEB Vuser functions. Each WEB Vuser function has a web prefix. Some WEB functions are generated when you record a script; others you must manually insert into the script. For syntax and examples of the WEB functions, refer to the LoadRunner Online Function Reference (available from the VuGen Help menu).
You can also add LoadRunner message functions and custom C functions to your Web Vuser scripts after recording. For details, see Chapter 4, “Enhancing Vuser Scripts.”
Action Functions
When you record a Web Vuser script, VuGen generates the following action functions, and inserts them into the script:
web_custom_request Allows you to create a custom HTTP request with any method supported by HTTP.
web_image Emulates a mouse click on the defined image.
web_link Emulates a mouse click on the defined text link.

Creating Vuser Scripts • Web Vuser Scripts
154
Control Functions
Each control icon in the Vuser script represents a control function used during load testing. Controls include transactions, rendezvous points, and think time. VuGen uses the following General Vuser functions as control functions:
For more information on adding general Vuser functions to Vuser scripts, see Chapter 4, “Enhancing Vuser Scripts.”
web_submit_data Performs an "unconditional" or "contextless" form submission.
web_submit_form Emulates the submission of a form.
web_url Loads the URL specified by the "URL" attribute.
lr_start_transaction Marks the beginning of a transaction for performance analysis.
lr_end_transaction Marks the end of a transaction for performance analysis.
lr_rendezvous Sets a rendezvous point in the Vuser script.
lr_think_time Pauses execution between commands in a Vuser script.

Chapter 11 • Introducing Web Vuser Scripts
155
Service Functions
You can manually program the service functions into a Web Vuser script:
Header Functions
Authentication Functions
web_add_header Adds a customized header to the next HTTP request.
web_add_auto_header Adds a customized header to all subsequent HTTP requests.
web_cleanup_auto_headers Stops adding customized headers to subsequent HTTP requests.
web_remove_auto_header Stops adding a specific header to subsequent HTTP requests.
web_revert_auto_header Stops adding a specific header to subsequent HTTP requests, but generates implicit headers.
web_save_header Saves request and response headers to a variable.
web_set_user Specifies a login string and password for a Web server, for user-authenticated areas in the Web server.
web_set_certificate Causes a Vuser to use a specific certificate that is listed in the Internet Explorer registry.
web_set_certificate_ex Specifies location and format information of a certificate and key file.
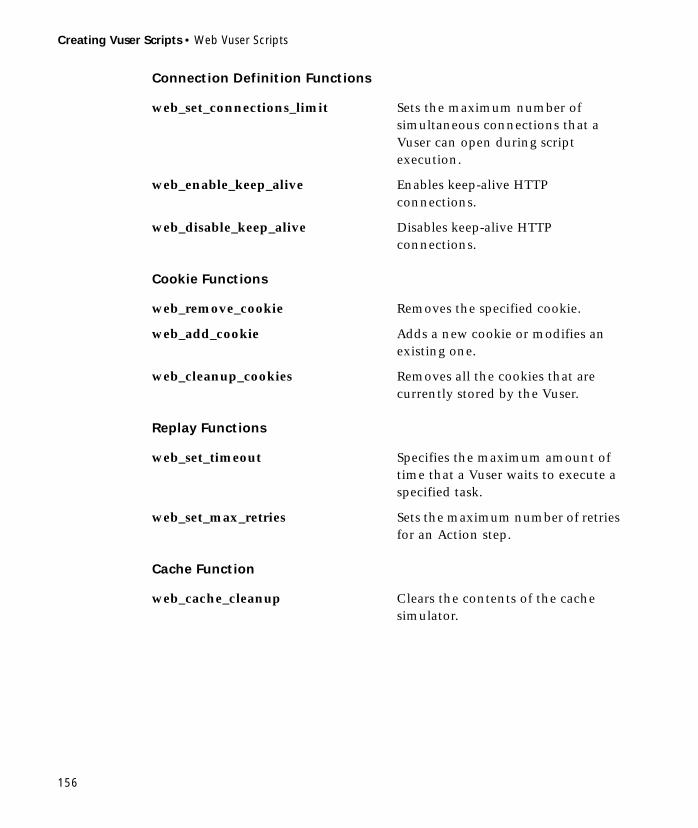
Creating Vuser Scripts • Web Vuser Scripts
156
Connection Definition Functions
Cookie Functions
Replay Functions
Cache Function
web_set_connections_limit Sets the maximum number of simultaneous connections that a Vuser can open during script execution.
web_enable_keep_alive Enables keep-alive HTTP connections.
web_disable_keep_alive Disables keep-alive HTTP connections.
web_remove_cookie Removes the specified cookie.
web_add_cookie Adds a new cookie or modifies an existing one.
web_cleanup_cookies Removes all the cookies that are currently stored by the Vuser.
web_set_timeout Specifies the maximum amount of time that a Vuser waits to execute a specified task.
web_set_max_retries Sets the maximum number of retries for an Action step.
web_cache_cleanup Clears the contents of the cache simulator.

Chapter 11 • Introducing Web Vuser Scripts
157
Correlation Functions
Proxy Server Functions
web_create_html_param Saves dynamic information on an HTML page to a parameter.
web_create_html_param[_ex] Creates a parameter based on the dynamic information contained in an HTML page - uses embedded boundaries.
web_reg_save_param Creates a parameter based on the dynamic information contained in an HTML page - does not use embedded boundaries.
web_set_max_html_param_len Sets the maximum length of retrieved dynamic HTML information.
web_set_proxy Specifies that all subsequent HTTP requests be directed to the specified proxy server.
web_set_secure_proxy Specifies that all subsequent HTTPS requests be directed to the specified secure proxy server.
web_set_proxy_bypass Specifies the list of servers that Vusers access directly, that is, not via the specified proxy server.
web_set_proxy_bypass_local Specifies whether or not Vusers should bypass the proxy for local (intranet) addresses.

Creating Vuser Scripts • Web Vuser Scripts
158
Web Check Functions
You can use the following Web check functions in a Web Vuser script:
Concurrent Group Functions
Miscellaneous Functions
web_find Searches inside an HTML page for a specified text string.
web_image_check Verifies the presence of a specified image inside an HTML page.
web_java_check Checks for the appearance of a Java applet in an HTML page and the correctness of the parameters of the applet.
web_reg_find Registers a search for a text string on an HTML page.
web_concurrent_start Marks the beginning of a concurrent group.
web_concurrent_end Marks the end of a concurrent group.
web_get_int_property Returns specific information about the previous HTTP request.
web_set_sockets_option Sets an option for sockets.

159
12Recording Web Vuser Scripts
You use VuGen to create a Web Vuser script by recording a Web browser session.
This chapter describes:
➤ Recording a Web Session
➤ Inserting Transactions
➤ Inserting Rendezvous Points
The following information only applies to Web Vuser scripts.
About Recording Web Vuser Scripts
VuGen enables you to generate Web Vuser scripts by recording typical processes that users perform on your Web site. When you run a Web Vuser script, the resulting Vuser emulates activity between a Web browser and your Web server.
After you record a Web Vuser script, you can edit it—either by making changes directly in the icon-based tree view, or by modifying the text of the script in the script view. For more information on the Web Vuser script viewing modes, see Chapter 11, “Introducing Web Vuser Scripts.”
VuGen’s multiple action support allows you to record into an existing Web Vuser script. You can add an unlimited number of Action sections to your script in any number or Web browser recording sessions. For more information on VuGen’s multiple action support, see Chapter 3, “Recording with VuGen.”
Creating Vuser Scripts • Web Vuser Scripts
160
If you intend to correlate your Web Vuser script, set the Correlation recording options. For details, see Chapter 18, “Correlating Web Statements.”
For advanced information about transaction file, see Chapter 22, “Power User Tips for Web Vusers.”
Recording a Web Session
When you record a Web session, VuGen monitors all the actions that you perform in your Web browser. Your activities can include hyperlink jumps (both hypertext and hypergraphic) and form submissions. While recording, VuGen saves the recorded actions in a Web Vuser script.
Each Vuser script that you create contains at least three sections: vuser_init, one or more Actions, and vuser_end. During recording, you can select the section of the script into which VuGen will insert the recorded functions. The vuser_init and vuser_end sections are generally used for recording server login and logoff procedures, which are not repeated when you run a Vuser script with multiple iterations. You should therefore record a Web session into the Actions sections so that the complete browser session is repeated for each iteration.

Chapter 12 • Recording Web Vuser Scripts
161
To record a Web session:
1 Select Start > Programs > LoadRunner > Virtual User Generator. The VuGen main window opens.
2 Select File > New or click the New button . The New Virtual User dialog box opens.
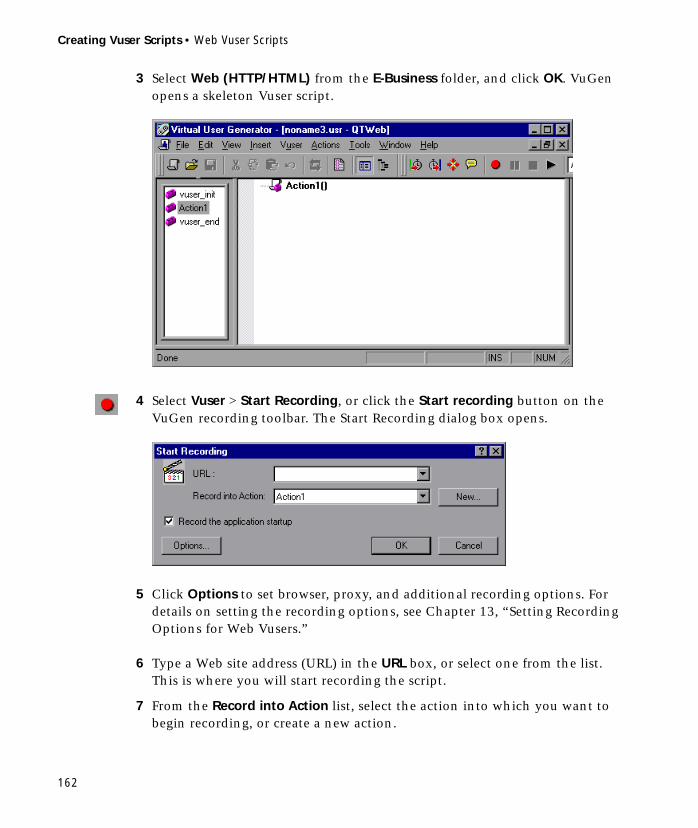
Creating Vuser Scripts • Web Vuser Scripts
162
3 Select Web (HTTP/HTML) from the E-Business folder, and click OK. VuGen opens a skeleton Vuser script.
4 Select Vuser > Start Recording, or click the Start recording button on the VuGen recording toolbar. The Start Recording dialog box opens.
5 Click Options to set browser, proxy, and additional recording options. For details on setting the recording options, see Chapter 13, “Setting Recording Options for Web Vusers.”
6 Type a Web site address (URL) in the URL box, or select one from the list. This is where you will start recording the script.
7 From the Record into Action list, select the action into which you want to begin recording, or create a new action.
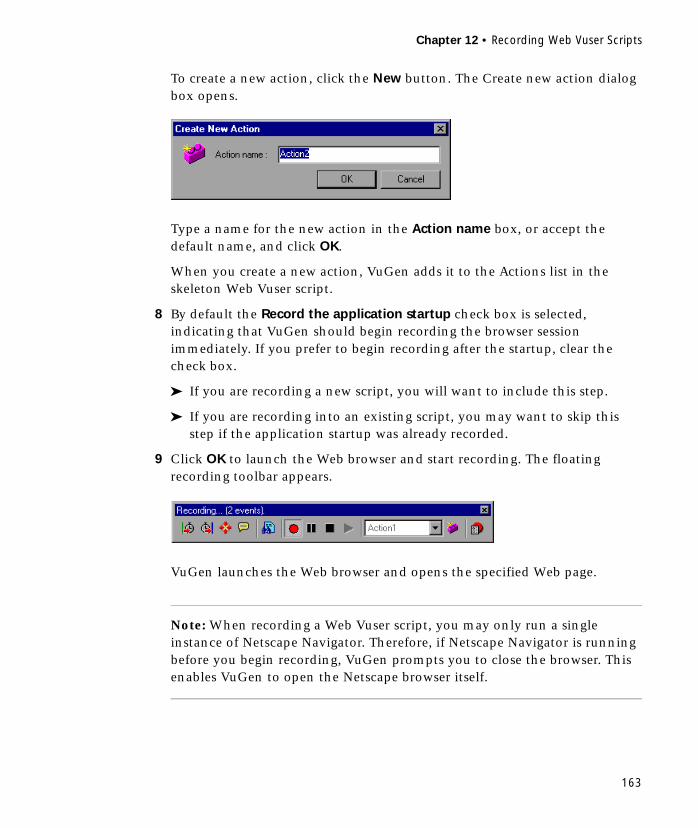
Chapter 12 • Recording Web Vuser Scripts
163
To create a new action, click the New button. The Create new action dialog box opens.
Type a name for the new action in the Action name box, or accept the default name, and click OK.
When you create a new action, VuGen adds it to the Actions list in the skeleton Web Vuser script.
8 By default the Record the application startup check box is selected, indicating that VuGen should begin recording the browser session immediately. If you prefer to begin recording after the startup, clear the check box.
➤ If you are recording a new script, you will want to include this step.
➤ If you are recording into an existing script, you may want to skip this step if the application startup was already recorded.
9 Click OK to launch the Web browser and start recording. The floating recording toolbar appears.
VuGen launches the Web browser and opens the specified Web page.
Note: When recording a Web Vuser script, you may only run a single instance of Netscape Navigator. Therefore, if Netscape Navigator is running before you begin recording, VuGen prompts you to close the browser. This enables VuGen to open the Netscape browser itself.

Creating Vuser Scripts • Web Vuser Scripts
164
10 Navigate through your Web site by clicking hypertext and hypergraphic links, and submitting forms. Each link you click adds an Action icon to the Web Vuser script. Each form you submit adds a Submit Form icon to the Vuser script.
While recording, use the VuGen floating toolbar to insert transactions, rendezvous points, and instant text checks. For details on inserting transactions and rendezvous points, see below. For details on inserting text, image, and Java checks, see Chapter 16, “Verifying Web Pages Under Load.”
11 After performing all the required user processes, click the Stop Recording button on the floating recording toolbar. VuGen closes the browser and restores the VuGen main window.
By default, your recorded script appears in the tree view. If your script appears in the text-based script view, select View > Tree View to switch to the tree view.
12 Select File > Save, or click the Save button to save the Vuser script. Specify a file name and location in the Save Test dialog box, and click Save.
After recording, you can edit the Vuser script. You can do so in either the tree view or the script view. For details on the two modes, see Chapter 11, “Introducing Web Vuser Scripts.”

Chapter 12 • Recording Web Vuser Scripts
165
Inserting Transactions
You insert transactions into a Web Vuser script to enable the Controller to measure the performance of your Web server under various load conditions. Each transaction measures the time that it takes for the server to respond to one or more tasks submitted by Vusers. You can create transactions to measure simple tasks, such as accessing a URL, or complex processes, such as submitting several queries and waiting for a response.
To define a transaction, you insert a Start Transaction and End Transaction icon into the Vuser script.
Within a Vuser script, you can mark an unlimited number of transactions. You insert transaction statements into your script either while recording or after the recording session.
During a scenario execution, the Controller measures the time it takes to perform each transaction. After a scenario run, you use LoadRunner’s graphs and reports to analyze the server’s performance.
During load testing, you can instruct the Controller to handle every step in a Web Vuser script as a transaction. This is called using automatic transactions. The steps that the Controller includes in transactions are URLs, hypertext links, hypergraphic links, and form submissions. The Controller assigns the step name as the name of the transaction. By default, automatic transactions are enabled. For details on automatic transactions, see Chapter 7, “Configuring Run-Time Settings.”
Start Transaction icon
End Transaction icon
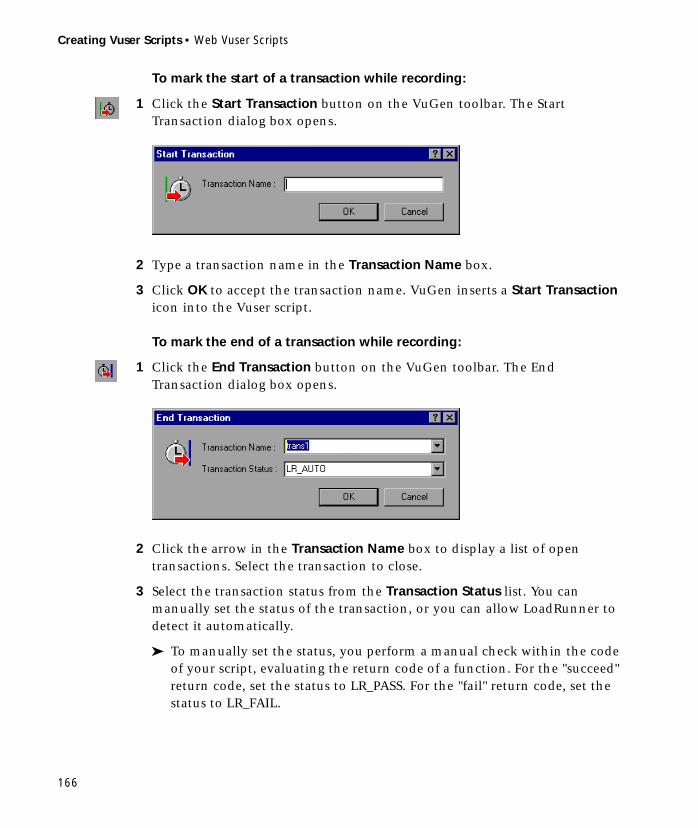
Creating Vuser Scripts • Web Vuser Scripts
166
To mark the start of a transaction while recording:
1 Click the Start Transaction button on the VuGen toolbar. The Start Transaction dialog box opens.
2 Type a transaction name in the Transaction Name box.
3 Click OK to accept the transaction name. VuGen inserts a Start Transaction icon into the Vuser script.
To mark the end of a transaction while recording:
1 Click the End Transaction button on the VuGen toolbar. The End Transaction dialog box opens.
2 Click the arrow in the Transaction Name box to display a list of open transactions. Select the transaction to close.
3 Select the transaction status from the Transaction Status list. You can manually set the status of the transaction, or you can allow LoadRunner to detect it automatically.
➤ To manually set the status, you perform a manual check within the code of your script, evaluating the return code of a function. For the "succeed" return code, set the status to LR_PASS. For the "fail" return code, set the status to LR_FAIL.

Chapter 12 • Recording Web Vuser Scripts
167
➤ To instruct LoadRunner to automatically detect the status, specify LR_AUTO. LoadRunner returns the detected status to the Controller.
For more information, see the LoadRunner Online Function Reference.
4 Click OK to accept the transaction name and status. VuGen inserts an End Transaction icon into the Vuser script.
Note: You can insert transactions into your script after you complete the recording session. To do so, right-click a step and then select Insert After or Insert Before from the pop-up menu. In the Add Step dialog box, select Start Transaction from the Step Type tree. For details, see Chapter 17, “Modifying Web Vuser Scripts.”
Inserting Rendezvous Points
In order to emulate a specific user load while measuring server performance, you synchronize Vusers to perform a task at exactly the same moment. You ensure that multiple Vusers act simultaneously by creating a meeting place, known as a rendezvous point. When a Vuser arrives at the rendezvous point, it is held by the Controller until all the Vusers participating in the rendezvous arrive. When the rendezvous conditions are met, the Vusers are released by the Controller.
You designate the meeting place by inserting a Rendezvous icon into your Web Vuser script.
Rendezvous icon
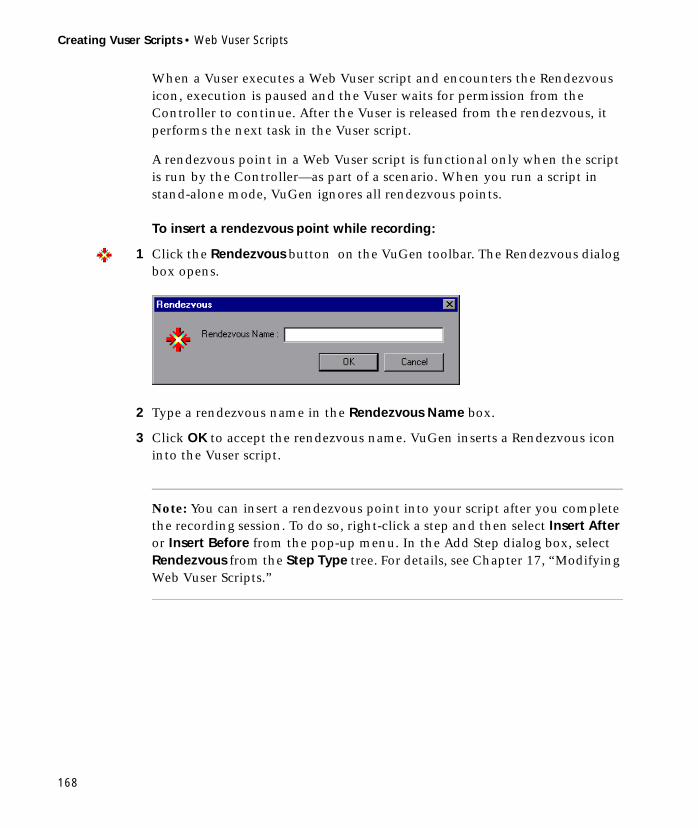
Creating Vuser Scripts • Web Vuser Scripts
168
When a Vuser executes a Web Vuser script and encounters the Rendezvous icon, execution is paused and the Vuser waits for permission from the Controller to continue. After the Vuser is released from the rendezvous, it performs the next task in the Vuser script.
A rendezvous point in a Web Vuser script is functional only when the script is run by the Controller—as part of a scenario. When you run a script in stand-alone mode, VuGen ignores all rendezvous points.
To insert a rendezvous point while recording:
1 Click the Rendezvous button on the VuGen toolbar. The Rendezvous dialog box opens.
2 Type a rendezvous name in the Rendezvous Name box.
3 Click OK to accept the rendezvous name. VuGen inserts a Rendezvous icon into the Vuser script.
Note: You can insert a rendezvous point into your script after you complete the recording session. To do so, right-click a step and then select Insert After or Insert Before from the pop-up menu. In the Add Step dialog box, select Rendezvous from the Step Type tree. For details, see Chapter 17, “Modifying Web Vuser Scripts.”

169
13Setting Recording Options for Web Vusers
Before recording a Web session, you can customize the recording options.
This chapter describes:
➤ Specifying which Browser to Use for Recording
➤ Working with Proxy Settings
➤ Understanding the Recording Modes
➤ Advanced URL-Based Script Options
➤ Specifying the Information to Record
➤ Setting Advanced Recording Options
The following information only applies to Web Vuser scripts.
About Setting Recording Options
VuGen enables you to generate Web Vuser scripts by recording typical processes that users perform on your Web site.
Before recording, you can configure the Recording Options and specify the information to record, the browser or client with which to record, set the global proxy settings, and designate the content for your scripts.
You can also set Correlation recording options for Web Vuser scripts. For more information, see Chapter 18, “Correlating Web Statements.”
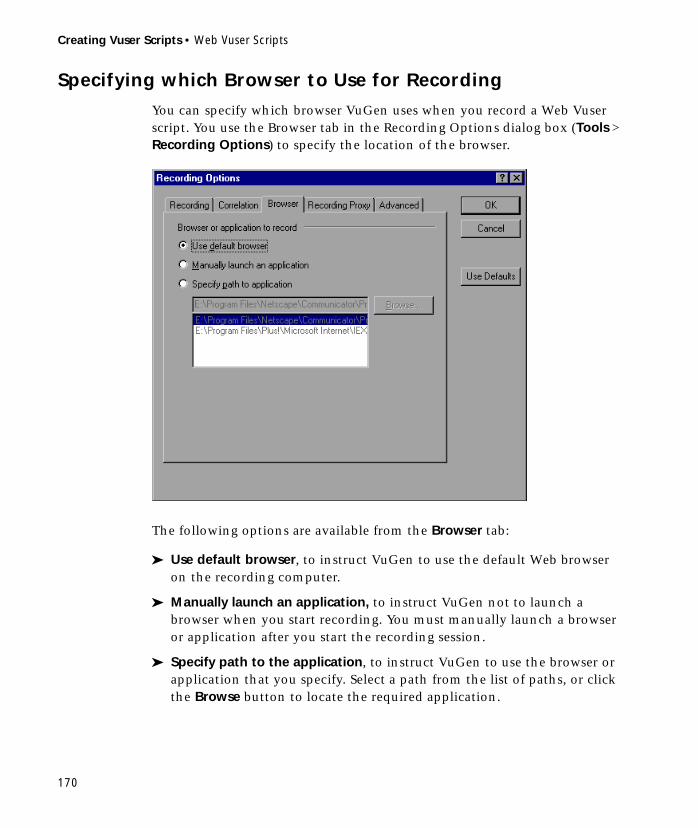
Creating Vuser Scripts • Web Vuser Scripts
170
Specifying which Browser to Use for Recording
You can specify which browser VuGen uses when you record a Web Vuser script. You use the Browser tab in the Recording Options dialog box (Tools > Recording Options) to specify the location of the browser.
The following options are available from the Browser tab:
➤ Use default browser, to instruct VuGen to use the default Web browser on the recording computer.
➤ Manually launch an application, to instruct VuGen not to launch a browser when you start recording. You must manually launch a browser or application after you start the recording session.
➤ Specify path to the application, to instruct VuGen to use the browser or application that you specify. Select a path from the list of paths, or click the Browse button to locate the required application.
Chapter 13 • Setting Recording Options for Web Vusers
171
Working with Proxy Settings
A proxy server is a server that resides between a client (such as a Web browser) and a Web server. It intercepts all requests sent to the server and attempts to fulfill these requests. Proxy servers are used for two primary reasons—to improve performance and filter requests. To improve performance, it stores Web pages accessed by one user and makes them available to another user without accessing the server a second time. A proxy server also lets an administrator filter the content that can be viewed in browsers.
To use a proxy server, you specify its name or IP address in your browser’s preferences. In typical cases, Internet Service Providers recommend that their users connect through a proxy server, and companies require their employees to access the Internet through a proxy server.
By default, VuGen uses the proxy settings from the recording browser. VuGen also lets you customize the proxy settings for the recording session. If you know in advance that your users access the Internet directly without going through a proxy server, or that users will be using a specific proxy server, other than your browser’s default, you can customize the proxy settings. To customize the settings, select the Recording Proxy tab in the

Creating Vuser Scripts • Web Vuser Scripts
172
Recording Options dialog box (Tools > Recording Options) and modify the recording proxy settings.
You can choose one of the following proxy options:
➤ No proxy (direct connection to the Internet): Always use a direct connection to the Internet. This means that a direct connection is made without using a proxy server.
➤ Obtain the proxy settings from the recording browser: Use the proxy settings from the recording browser. This is the default option. This option is not available for Multi-protocol Web/WinSock Vusers.
➤ Use custom proxy. This section is only enabled when the two above options are cleared.
You supply the details of the proxy servers in the Use custom proxy section. You can specify one proxy server for all HTTP sites and another proxy server for all secure (HTTPS) sites.
If the HTTP and HTTPS proxy servers are the same, specify only the HTTP address and port, and select the Use the same proxy server for all protocols check box.
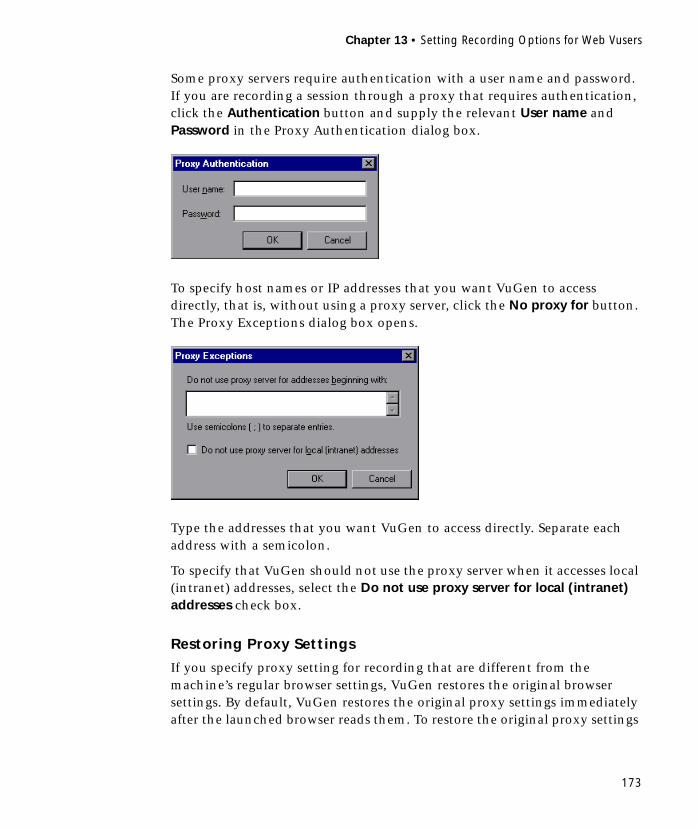
Chapter 13 • Setting Recording Options for Web Vusers
173
Some proxy servers require authentication with a user name and password. If you are recording a session through a proxy that requires authentication, click the Authentication button and supply the relevant User name and Password in the Proxy Authentication dialog box.
To specify host names or IP addresses that you want VuGen to access directly, that is, without using a proxy server, click the No proxy for button. The Proxy Exceptions dialog box opens.
Type the addresses that you want VuGen to access directly. Separate each address with a semicolon.
To specify that VuGen should not use the proxy server when it accesses local (intranet) addresses, select the Do not use proxy server for local (intranet) addresses check box.
Restoring Proxy Settings
If you specify proxy setting for recording that are different from the machine’s regular browser settings, VuGen restores the original browser settings. By default, VuGen restores the original proxy settings immediately after the launched browser reads them. To restore the original proxy settings
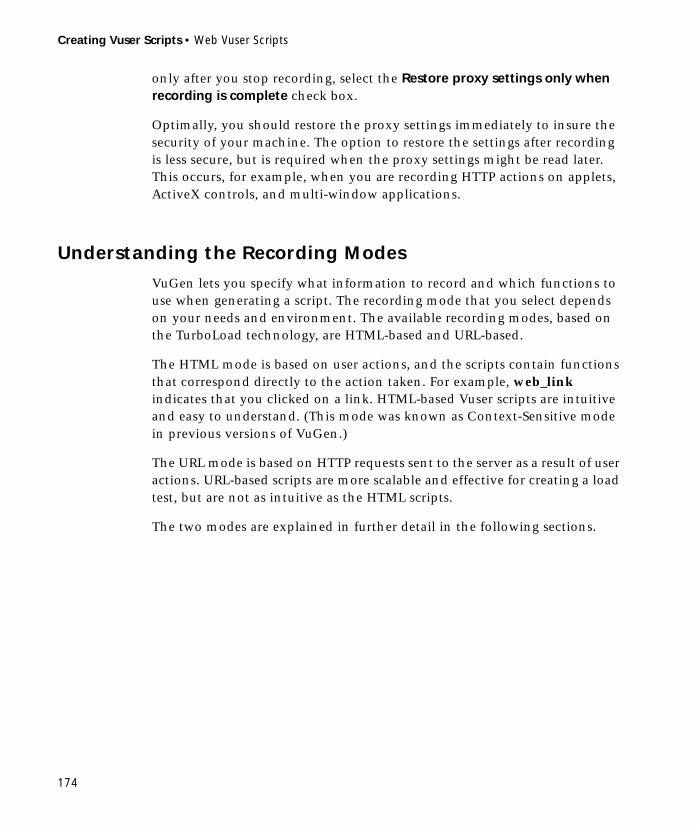
Creating Vuser Scripts • Web Vuser Scripts
174
only after you stop recording, select the Restore proxy settings only when recording is complete check box.
Optimally, you should restore the proxy settings immediately to insure the security of your machine. The option to restore the settings after recording is less secure, but is required when the proxy settings might be read later. This occurs, for example, when you are recording HTTP actions on applets, ActiveX controls, and multi-window applications.
Understanding the Recording Modes
VuGen lets you specify what information to record and which functions to use when generating a script. The recording mode that you select depends on your needs and environment. The available recording modes, based on the TurboLoad technology, are HTML-based and URL-based.
The HTML mode is based on user actions, and the scripts contain functions that correspond directly to the action taken. For example, web_link indicates that you clicked on a link. HTML-based Vuser scripts are intuitive and easy to understand. (This mode was known as Context-Sensitive mode in previous versions of VuGen.)
The URL mode is based on HTTP requests sent to the server as a result of user actions. URL-based scripts are more scalable and effective for creating a load test, but are not as intuitive as the HTML scripts.
The two modes are explained in further detail in the following sections.

Chapter 13 • Setting Recording Options for Web Vusers
175
HTML-Based Scripts
The HTML based script option, which is the default recording mode, instructs VuGen to record HTML actions in the context of the current Web page. The actions are recorded as URL steps (web_url), link steps (web_link), image steps (web_image), and form submission steps (web_submit_form). VuGen records only the HTTP requests that return HTML pages, but not javascript or applications.
URL-Based Scripts
The URL based script option instructs VuGen to record all requests from the server as URL steps (web_url statements). It does not generate the web_link, web_image, and web_submit_form functions, nor does it record frames or concurrent groups.
The following segment illustrates a recording session where the user clicked on a text link Click Here for Additional Restrictions, and a graphical button
/* HTML-based *//... web_link("Click Here For Additional Restrictions",
"Text=Click Here For Additional Restrictions","Snapshot=t4.inf",LAST);
web_image("buttonhelp.gif","Src=/images/buttonhelp.gif","Snapshot=t5.inf",LAST);
. . .
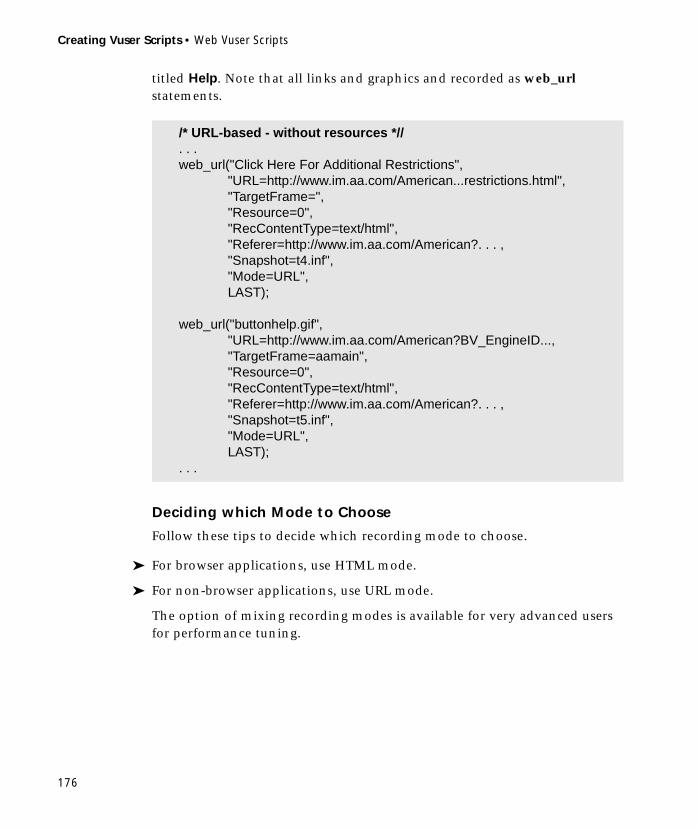
Creating Vuser Scripts • Web Vuser Scripts
176
titled Help. Note that all links and graphics and recorded as web_url statements.
Deciding which Mode to Choose
Follow these tips to decide which recording mode to choose.
➤ For browser applications, use HTML mode.
➤ For non-browser applications, use URL mode.
The option of mixing recording modes is available for very advanced users for performance tuning.
/* URL-based - without resources *//. . . web_url("Click Here For Additional Restrictions",
"URL=http://www.im.aa.com/American...restrictions.html","TargetFrame=","Resource=0","RecContentType=text/html","Referer=http://www.im.aa.com/American?. . . ,"Snapshot=t4.inf","Mode=URL",LAST);
web_url("buttonhelp.gif","URL=http://www.im.aa.com/American?BV_EngineID...,"TargetFrame=aamain","Resource=0","RecContentType=text/html","Referer=http://www.im.aa.com/American?. . . ,"Snapshot=t5.inf","Mode=URL",LAST);
. . .

Chapter 13 • Setting Recording Options for Web Vusers
177
Advanced URL-Based Script Options
VuGen lets you set advanced option for the URL-based mode script for the recording of resources.
➤ Custom requests
➤ Concurrent groups
➤ Browser cache
Recording Web Resources
In URL mode, you can instruct VuGen to capture all resources downloaded as a result of an HTTP request. If you do not select this option, resources will not be recorded and will not be listed in the script. They will, however, be downloaded automatically during replay (provided that the Run Time settings indicate to load resources).

Creating Vuser Scripts • Web Vuser Scripts
178
The following segment illustrates a session recorded with Record Web Resource Requests enabled:
Note that the script includes gif, and js files. This mode also includes other graphic files and imported file such as imp, txt, or cascading style sheet (css) files.
When you record without resources, only the content of the current frame is recorded. To indicate the name of the frame that is recorded, VuGen inserts the TargetFrame attribute in the web_url statement.
/* URL-based - with resources *//. . . web_url("spacer.gif",
"URL=http://graphics.aa.com/images/spacer.gif","Resource=1","RecContentType=image/gif","Referer=http://www.im.aa.com/American?BV_EngineID...","Mode=NORESOURCE",LAST);
web_url("calendar_functions.js","URL=http://www.im.aa.com/travelp/calendar_functions.js","Resource=1","RecContentType=application/x-javascript","Referer=http://www.im.aa.com/American?BV_Operation=...l","Mode=NORESOURCE",LAST);
. . .
web_url("buttonhelp.gif","URL=http://www.im.aa.com/American?BV_EngineID=...”,"TargetFrame=aamain","Resource=0","RecContentType=text/html","Referer=http://www.im.aa.com/American?BV_EngineID=..l","Snapshot=t5.inf","Mode=URL",LAST);
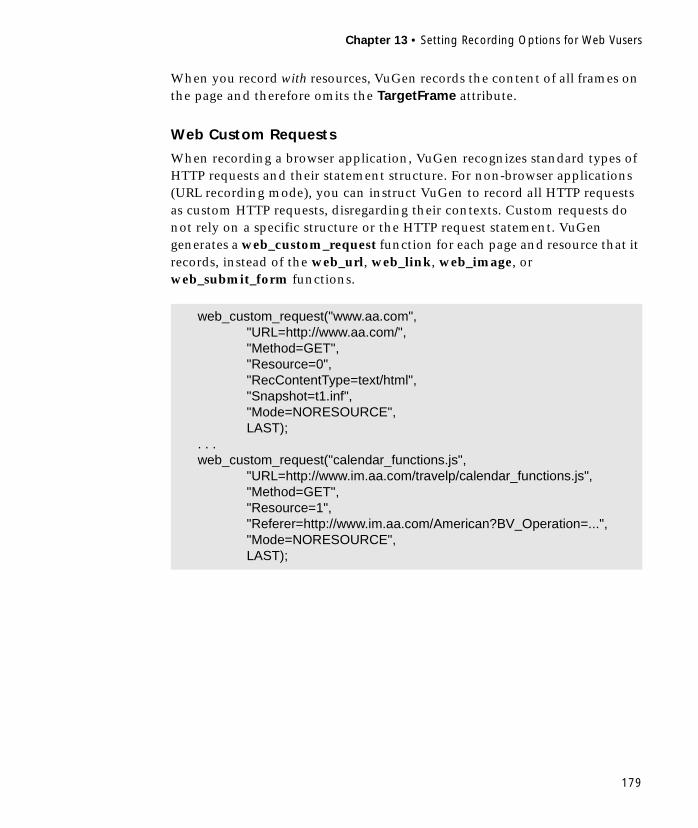
Chapter 13 • Setting Recording Options for Web Vusers
179
When you record with resources, VuGen records the content of all frames on the page and therefore omits the TargetFrame attribute.
Web Custom Requests
When recording a browser application, VuGen recognizes standard types of HTTP requests and their statement structure. For non-browser applications (URL recording mode), you can instruct VuGen to record all HTTP requests as custom HTTP requests, disregarding their contexts. Custom requests do not rely on a specific structure or the HTTP request statement. VuGen generates a web_custom_request function for each page and resource that it records, instead of the web_url, web_link, web_image, or web_submit_form functions.
web_custom_request("www.aa.com","URL=http://www.aa.com/","Method=GET","Resource=0","RecContentType=text/html","Snapshot=t1.inf","Mode=NORESOURCE",LAST);
. . . web_custom_request("calendar_functions.js",
"URL=http://www.im.aa.com/travelp/calendar_functions.js","Method=GET","Resource=1","Referer=http://www.im.aa.com/American?BV_Operation=...","Mode=NORESOURCE",LAST);

Creating Vuser Scripts • Web Vuser Scripts
180
Concurrent Groups
In URL recording mode, you can instruct VuGen to record URLs and their resources in Concurrent Groups. A concurrent group represents links and resources that are loaded on a page at the same time. For example, it is common for browsers to begin loading a second or third image while the first image is being loaded. You can instruct VuGen to mark the statements in a concurrent group by enclosing them with web_start_concurrent and web_end_concurrent statements. When LoadRunner encounters a web_start_concurrent statement, it registers the functions, but does not execute them until the group is closed with web_end_concurrent.
To accurately emulate a browser session, you should enable Concurrent Groups. VuGen allows you to disable the option for debugging purposes. This option only applies to URL-based script mode.
For more information, see the web_concurrent_start and web_concurrent_end functions in the LoadRunner Online Function Reference.
web_concurrent_start(NULL);web_url("American2",
"URL=http://www.im.aa.com/American?BV_EngineID=...","Resource=0","RecContentType=text/html","Referer=http://www.im.aa.com/American?BV_Operation=..","Snapshot=t3.inf","Mode=NORESOURCE",LAST);
web_url("American3","URL=http://www.im.aa.com/American?BV_Operation=...l","Resource=0","RecContentType=text/html","Referer=http://www.im.aa.com/American?BV_Operation=..","Snapshot=t4.inf","Mode=NORESOURCE",LAST);
web_concurrent_end(NULL);

Chapter 13 • Setting Recording Options for Web Vusers
181
Using the Browser Cache
A browser cache stores recently viewed pages in the machine’s memory, in order to reduce the time required to access the Web page. By default, VuGen retrieves all pages directly from the server, and doesn’t use the browser cache during recording, so the Enable browser cache option is disabled.
Select this option to use the browser cache and only retrieve the newly-modified pages directly from the server. This option is not widely used, since the contents of the cache varies for each user, and the recorded script may not be predictable.
Clearing the Browser Cache
By default, VuGen clears the browser cache before recording. This means that it makes all of the items in the cache expired, so the browser must retrieve them directly from the server.
Clearing the cache requires VuGen to access all pages directly from their Web sites, even if the page had been recently accessed. If you are recording a Vuser that accesses a site repeatedly, you may choose not to clear the browser cache before recording.
To instruct VuGen not to clear the browser cache before recording, select the Do not clear browser cache check box.

Creating Vuser Scripts • Web Vuser Scripts
182
Specifying the Information to Record
The previous section described the recording modes and their advanced options.
To set the recording options:
1 Choose Tools > Recording Options to open the Recording Options. Select the Recording tab.
2 Select a recording mode: HTML-based script or URL-based script (see “Understanding the Recording Modes,” on page 174).
3 For URL-based mode, click URL Advanced to set additional script options for resources, custom requests, and concurrent groups (see “Advanced URL-Based Script Options,” on page 177).

Chapter 13 • Setting Recording Options for Web Vusers
183
Setting Advanced Recording Options
Use the Advanced recording options tab to record custom headers, apply a content type filter, specify non-resources, and set the think-time threshold.
Recording Think Time
Think time emulates the time that a real user waits between actions. To record user think time, select Record think time. You can specify the minimum amount of time that a user waits that should be recorded as think time by defining a Think time threshold. For example, you can set the think time threshold to 5, so if a user waits for less than five seconds, think time is not recorded.
Use the Think Time run-time settings to influence how the Vuser uses the recorded think time when you run the script.
Reset Context for Each Action
You can instructs VuGen to reset all HTTP contexts between Actions, to their states before the initial recording. This setting allows the Vuser to more accurately emulate a new user beginning a browsing session. It resets all
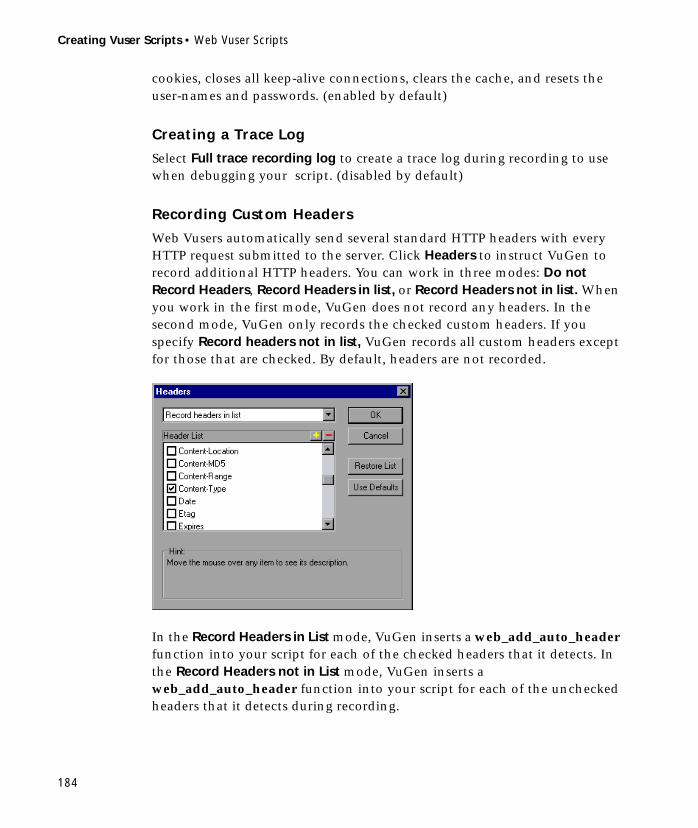
Creating Vuser Scripts • Web Vuser Scripts
184
cookies, closes all keep-alive connections, clears the cache, and resets the user-names and passwords. (enabled by default)
Creating a Trace Log
Select Full trace recording log to create a trace log during recording to use when debugging your script. (disabled by default)
Recording Custom Headers
Web Vusers automatically send several standard HTTP headers with every HTTP request submitted to the server. Click Headers to instruct VuGen to record additional HTTP headers. You can work in three modes: Do not Record Headers, Record Headers in list, or Record Headers not in list. When you work in the first mode, VuGen does not record any headers. In the second mode, VuGen only records the checked custom headers. If you specify Record headers not in list, VuGen records all custom headers except for those that are checked. By default, headers are not recorded.
In the Record Headers in List mode, VuGen inserts a web_add_auto_header function into your script for each of the checked headers that it detects. In the Record Headers not in List mode, VuGen inserts a web_add_auto_header function into your script for each of the unchecked headers that it detects during recording.
Chapter 13 • Setting Recording Options for Web Vusers
185
To determine which custom headers to record, check the HTML source of the pages you intend to record. Alternatively, you can perform a recording session indicating to VuGen to record all headers (see procedure below). Afterwards, you can decide which headers to record and which to exclude.
In this example, the Content-type header was specified in the Record Headers in List mode. VuGen detected the header and added the following statement to the script:
web_add_auto_header("Content-Type","application/x-www-form-urlencoded");
indicating to the server that the Content-type of the application is x-www-form-urlencode.
To control the recording of custom headers:
1 In the Recording Options, click the Advanced tab.
2 Click Headers. The Headers dialog box opens.
3 Use one of the following methods:
➤ To instruct VuGen not to record any Headers, choose Do not Record Headers.
➤ To record only specific headers, select Record Headers in list and select the desired custom headers in the header list. Note that standard headers (such as Accept), are selected by default.
➤ To record all headers, select Record Headers not in list and do not select any items in the list.
➤ To exclude only specific headers, select Record Headers not in list and select the headers you want to exclude.
4 Click Restore List to restore the list to the corresponding default list. The Record Headers in list and Record Headers not in list each have a corresponding default list.
5 Click OK to accept the settings and close the Headers dialog box.
Filtering Content Type
VuGen allows you to filter the content type for your recorded script. You specify the type of the content you wish to record or exclude from your

Creating Vuser Scripts • Web Vuser Scripts
186
script. You can work in three modes: Do not Filter Content Types, Exclude content types in list, or Exclude content types not in list. When you work in the first mode, VuGen does not filter any content type. In the second mode, VuGen only excludes the selected content types. If you specify Exclude content types not in list, VuGen filters all content type except for the ones that are checked. By default, no filters are active.
For example, if you are only interested in the text and images on your Web site, you select Exclude content types not in list and specify the types text/html, image/gif, and image/jpeg. VuGen will record all HTML pages and images, and exclude resources such as text/css, application/x-javascript or other resources that appear on the site.
To control the recording of custom headers:
1 In the Recording Options, click the Advanced tab.
2 Click Content Types. The Content Type Filters dialog box opens.
3 Use one of the following methods:
➤ To instruct VuGen not to filter any content, choose Do not Filter Content Types.
➤ To exclude only specific content types, select Exclude content types in list and select the desired content types from the list.
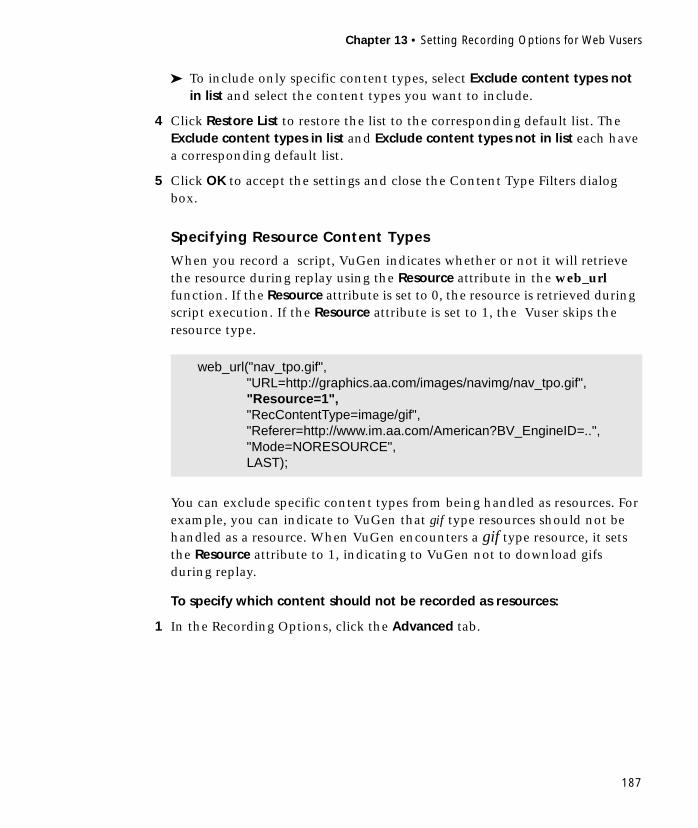
Chapter 13 • Setting Recording Options for Web Vusers
187
➤ To include only specific content types, select Exclude content types not in list and select the content types you want to include.
4 Click Restore List to restore the list to the corresponding default list. The Exclude content types in list and Exclude content types not in list each have a corresponding default list.
5 Click OK to accept the settings and close the Content Type Filters dialog box.
Specifying Resource Content Types
When you record a script, VuGen indicates whether or not it will retrieve the resource during replay using the Resource attribute in the web_url function. If the Resource attribute is set to 0, the resource is retrieved during script execution. If the Resource attribute is set to 1, the Vuser skips the resource type.
You can exclude specific content types from being handled as resources. For example, you can indicate to VuGen that gif type resources should not be handled as a resource. When VuGen encounters a gif type resource, it sets the Resource attribute to 1, indicating to VuGen not to download gifs during replay.
To specify which content should not be recorded as resources:
1 In the Recording Options, click the Advanced tab.
web_url("nav_tpo.gif","URL=http://graphics.aa.com/images/navimg/nav_tpo.gif","Resource=1","RecContentType=image/gif","Referer=http://www.im.aa.com/American?BV_EngineID=..","Mode=NORESOURCE",LAST);

Creating Vuser Scripts • Web Vuser Scripts
188
2 Click Non-Resources to open the dialog box and display the list of content types which should not be recorded as resources.
3 Click the “+” sign to add a content type to the list. Click the “-” sign to remove an existing entry.
4 Select the check boxes adjacent to the items you want to enable.
5 Click Restore List to restore the list to the default list.
6 Click OK to accept the settings and close the Non-Resources list.
Handling Non-HTML Resources
Many Web pages contain non-HTML elements, such as applets, XML, or javascript. These elements usually contain or retrieve their own resources. For example, a javascript js file, called from the recorded web page, may load several images. An applet may load an external text file. Using the Advanced options, you can control how VuGen records non-HTML elements. The following options are available:
➤ Do not record non-HTML elements
➤ Record non-HTM elements as separate functions
➤ Record non-HTML elements in current HTML function (default)

Chapter 13 • Setting Recording Options for Web Vusers
189
To set the non-HTML options:
1 In the Web recording options Advanced tab, click non-HTML. The non-HTML elements dialog box opens.
2 Select the desired option and click OK.
The following section describes the non-HTML options in greater detail.
Do not record non-HTML elements: Do not record any non-HTML elements or the resources that they retrieve. In the following example, the recorded page index.asp, includes javascript and applet files, but they are not recorded:
Record non-HTM elements as separate functions: Generate separate web_url functions for non-HTML elements and each one of their resources. This option is useful for testing the non-HTML elements in your script and their influence on your site’s performance. The generated script provides a lot of information, but it is longer script and utilizes more resources. Therefore, if you are not testing the non-HTML elements, you should
web_url("index.asp","URL=http://www.daisy.com/index.asp","TargetFrame=","Resource=0","RecContentType=text/html","Referer=","Snapshot=t2.inf","Mode=HTML",LAST);

Creating Vuser Scripts • Web Vuser Scripts
190
disable this option. In the following example, the above session was recorded with this option selected. A web_url function was generated for the applet and text file loaded with the applet:
Record non-HTML elements in current HTML function: This option generates a list of the non-HTML elements and their resources as arguments of the recorded Web function. When you record a page with non-HTML elements, they are all listed in your script within that page’s Web function. The list of resources is marked by the STARTRES flag. In the following
web_url("index.asp","URL=http://www.daisy.com/index.asp","TargetFrame=","Resource=0","RecContentType=text/html","Snapshot=t2.inf","Mode=HTML",LAST);
web_url("ScrollApplet.class","URL=http://www.daisy.com/ScrollApplet.class","TargetFrame=","Resource=1","RecContentType=application/octet-stream",LAST);
web_url("board.txt","URL=http://www.daisy.com/board.txt","TargetFrame=","Resource=1","RecContentType=text/plain",LAST);

Chapter 13 • Setting Recording Options for Web Vusers
191
example, the web_url function lists all of the non-HTML resources loaded on the page:
web_url("index.asp","URL=http://www.daisy.com/index.asp","TargetFrame=","Resource=0","RecContentType=text/html","Referer=","Snapshot=t2.inf","Mode=HTML",STARTRES,"Url=http://www.daisy.com/ScrollApplet.class", "Referer=", ENDITEM,"Url=http://www.daisy.com/board.txt", "Referer=", ENDITEM,"Url=http://www.daisy.com/nav_login1.gif", ENDITEM,. . . LAST);

Creating Vuser Scripts • Web Vuser Scripts
192

193
14Configuring Web Run-Time Settings
After you record a Web Vuser script, you configure its run-time settings.
This chapter describes the following Web Vuser run-time settings:
➤ Setting Proxy Options
➤ Setting Browser and Modem Options
➤ Setting Preferences
The following information only applies to Web Vuser types.
For information about the run-time settings that apply to all Vusers, see Chapter 7, “Configuring Run-Time Settings.”
About Web Run-Time Settings
After developing a Web Vuser script, you set the run-time settings. These settings let you control the behavior of the Vuser when running the script. Web run-time settings allow you to configure your Web Vusers so that they accurately emulate real users accessing your Web site. You can set Web run-time settings for HTTP, Proxy, and Network related areas.
You set the Web-related run-time settings from the Run-Time Settings dialog box. You click the appropriate tab to view and specify the desired settings.
To display the Run-Time Settings dialog box, click the Run-Time Settings button on the VuGen toolbar. Note that you can also modify the run-time settings from the LoadRunner Controller. In the Controller window, click the Design tab and click the Runtime Settings button.

Creating Vuser Scripts • Web Vuser Scripts
194
Note: A run-time setting that is set by using Vuser functions overrides the corresponding setting set via the Run-Time Settings dialog box. For more information on using Vuser functions, see “Using Web Vuser Scripts in the Script View,” on page 152.
Setting Proxy Options
You use the Proxy tab in the Run-Time Settings dialog box to set the proxy-related settings:
By default, the Vuser uses the proxy settings of the browser used for recording in the Web recording options. For more information, “Working with Proxy Settings,” on page 171.

Chapter 14 • Configuring Web Run-Time Settings
195
The following proxy options are available in the Run-Time settings.
➤ All Vusers always use direct connections to the Internet. This means that the connection is made without using a proxy server.
➤ All Vusers use the proxy settings of the default browser on the machine upon which they are running.
➤ All Vusers use a custom proxy server. You supply the details of the server—its IP address and port. You can specify one proxy server for all HTTP sites, and another proxy server for all HTTPS (secure) sites. For URLs that you want Vusers to access directly, that is, without using the proxy server, click Exceptions and then supply the list of these URLs. In the Exceptions dialog box, you can also specify that the Vusers should not use a proxy server for local (intranet) addresses.
➤ If the proxy server requires authentication, click Authentication, and then supply the relevant password and user name.
Select the Use the HTTP proxy server for HTTPS check box to instruct LoadRunner to use the HTTP proxy server for HTTPS sites, rather than specifying a specific server for secure sites.
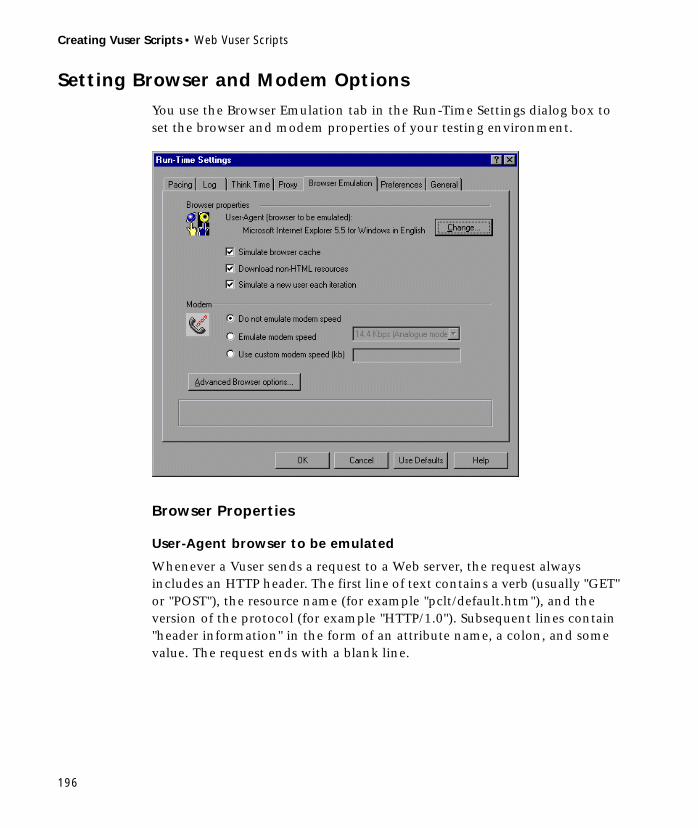
Creating Vuser Scripts • Web Vuser Scripts
196
Setting Browser and Modem Options
You use the Browser Emulation tab in the Run-Time Settings dialog box to set the browser and modem properties of your testing environment.
Browser Properties
User-Agent browser to be emulated
Whenever a Vuser sends a request to a Web server, the request always includes an HTTP header. The first line of text contains a verb (usually "GET" or "POST"), the resource name (for example "pclt/default.htm"), and the version of the protocol (for example "HTTP/1.0"). Subsequent lines contain "header information" in the form of an attribute name, a colon, and some value. The request ends with a blank line.

Chapter 14 • Configuring Web Run-Time Settings
197
All Web Vuser headers include a "user-agent" header that identifies the type of browser that is being emulated. For example,
User-Agent: Mozilla/3.01Gold (WinNT; I)
identifies the Browser as Netscape Navigator Gold version 3.01 running under Windows NT on an Intel machine.
Click Change.. to specify the browser information to include in the header. You can specify that a Web Vuser emulate any of the standard browsers. Alternatively, for non-browser HTTP applications, you can specify the HTTP client to match a specific user’s application. In this case, you must supply a Custom User Agent string that is included in all subsequent HTTP headers. By default, the Vuser uses the Internet Explorer 4.0 browser agent.
Simulate browser cache
This option instructs the Vuser to simulate a browser with a cache. A cache is used to keep local copies of frequently accessed documents and thereby reduces the time connected to the network. By default, cache simulation is enabled. If you disable this option, all Vusers emulate a browser with no cache available.
Note: Unlike a regular browser cache, the cache assigned to a Vuser simulates storage of graphic files only. The cache does not store text or other page contents associated with the Web page. Every Vuser has its own cache—every Vuser must save and retrieve images from the cache. When the cache is disabled, LoadRunner still downloads each page image only once.
Download non-HTML resources
This option instructs Vusers to load graphic images when accessing a Web page during replay. This includes both graphic images that were recorded with the page, and those which were not explicitly recorded (URL-based mode with Record Web Resource Requests disabled) along with the page. When real users access a Web page, they wait for the images to load. Therefore, enable this option if you are trying to test the entire system,

Creating Vuser Scripts • Web Vuser Scripts
198
including end-user time (enabled by default). To increase performance and not emulate real users, disable this option.
Note: Disable this option if you experience discrepancies in image checks, since some images vary each time you access a Web page (for example, advertiser banners).
Simulate a new user each iteration
Instructs VuGen to reset all HTTP contexts between iterations to their states at the end of the init section. This setting allows the Vuser to more accurately emulate a new user beginning a browsing session. It resets all cookies, closes all keep-alive connections, clears the cache, and resets the user-names and passwords (enabled by default).
Modem
The modem speed should emulate the bandwidth used in the environment under test. By default, the modem emulation is disabled and the Vusers run at maximum network speed.
Do not emulate modem speed
If you choose not to emulate a modem speed, all Vusers access the Web using the maximum network speed.
Emulate modem speed
Indicate a specific bandwidth level for your Vuser to emulate. You can enter any speed from 1.44 to 256 kbs.
Advanced Browser Options
Click Advanced Browser options.. to view and modify the following settings: DNS caching, HTTP version, Keep-Alive HTTP connections, Concurrent connections limit, Connect timeout, Receive timeout, Network buffer size, Check for newer pages when simulating browser cache and Step download timeout.

Chapter 14 • Configuring Web Run-Time Settings
199
DNS caching
Instructs the Vuser to save a host’s IP addresses to a cache after resolving its value from the Domain Name Server. This saves time in subsequent calls to the same server. In situations where the IP address changes, as with certain load balancing techniques, be sure to clear this option to prevent Vusers from using the value in the cache. (enabled by default)
HTTP version
Specifies which version HTTP to use - HTTP 1.0 or HTTP 1.1. This information is included in the HTTP request header whenever a Vusertransaction file sends a request to a Web server. The default is HTTP 1.1.
Keep-Alive HTTP connections
Keep-alive is a term used for an HTTP extension that allows persistent or continuous connections. These long-lived HTTP sessions allow multiple requests to be sent over the same TCP connection. This improves the performance of the Web server and clients.
The keep-alive option works only with Web servers that support keep-alive connections. This setting specifies that all Vusers that run the Vuser script have keep-alive HTTP connections enabled. (enabled by default)
Concurrent connections limit
Sets the maximum number of network connections to use in parallel during script execution. Multiple connections are opened when loading page resources, loading the frames in the frameset page, and so forth. The default limit for all Vusers is 4 simultaneous connections. To process each request in turn (not concurrently), set this value to 1.
This setting is primarily for advanced users who have determined that the number of simultaneous connections may be different in their specific environment.
Connect timeout (seconds)
The time, in seconds, that a Vuser will wait for the connection of a specific HTTP request within a step before aborting. Timeouts provide an

Creating Vuser Scripts • Web Vuser Scripts
200
opportunity for the server to stabilize and respond to the user. The default value is 120 seconds.
Receive timeout (seconds)
The time, in seconds, that a Vuser will wait to receive the response of a specific HTTP request within a step before aborting. Timeouts provide an opportunity for the server to stabilize and respond to the user. The default value is 120 seconds.
The timeout settings are primarily for advanced users who have determined that acceptable timeout values should be different for their environment. The default settings should be sufficient in most cases. If the server does not respond in a reasonable amount of time, check for other connection-related issues, rather than setting a very long timeout which could cause the scripts wait unnecessarily.
Network Buffer Size
Sets the maximum size of the buffer used to receive the HTTP response. The default is 12K bytes. This setting is primarily for advanced users who have determined that the network buffer size may affect their script’s performance.
Check for newer pages when simulating browser cache
Use the “If-modified-since” HTTP header to conditionally download pages that have been modified since they have been cached. This option guarantees that the most recent version of the page always appears, but it generates more traffic during scenario execution. Configure this option to match the settings in the browser that you wish to emulate.
Step download timeout (seconds)
The time that the Vuser will wait before aborting a step in the script. This option can be used to emulate a user behavior of not waiting for more than x seconds for a page.

Chapter 14 • Configuring Web Run-Time Settings
201
Setting Preferences
You use the Preferences tab in the Run-Time Settings dialog box to set the settings related to checks, graph information, and advanced settings.
Verification Checks
Allows the Vuser to perform verification checks during replay, by executing the verification functions: web_find, web_image_check, or web_java_check. This option only applies to statements recorded in HTML-based mode. Vusers running with verification checks use more memory than Vusers who do not perform checks (disabled by default).
Generate Web Performance Graphs
Instructs a Vuser to collect data used to create Web Performance graphs. You view the Hits per Second, Pages per Second and Response Bytes per Second graphs during the scenario run using the online monitors and after test

Creating Vuser Scripts • Web Vuser Scripts
202
execution using the Analysis. You view the Component Breakdown graph after test execution using the Analysis. Select the types of graph data for the Vuser to collect.
Note: If you do not use the Web performance graphs, disable these options to save memory.
Advanced
WinInet Replay (instead of Sockets)
Instructs VuGen to use the WinInet replay engine. VuGen has two HTTP replay engines: Sockets-based (default) or WinInet based. The WinInet is the engine used by Internet Explorer and it supports all of the features incorporated into the IE browser. The limitations of the WinInet replay engine are that it is not scalable, nor does it support UNIX. In addition, when working with threads, the WinInet engine incorrectly emulates the modem speed and number of connections.
VuGen’s proprietary sockets-based replay is a lighter engine that is scalable for load testing. It is also accurate when working with threads. The limitations of the sockets-based engine are that it does not support NTLM, SOCKS proxy, or proxy automatic configuration. If you are recording in one of these environments, you need to use the WinInet replay engine.
File and line in automatic transaction names
Creates unique transaction names for automatic transactions by adding file name and line number to the transaction name (enabled by default).
Note: This option places additional information in the log file, and therefore requires more memory.
Chapter 14 • Configuring Web Run-Time Settings
203
Non-critical item errors as warnings
Returns a warning status for a function which failed on an item that is not critical for load testing, such as an automatically downloaded image that failed to load, or a Java applet that failed to start. This setting is primarily for advanced users who have determined that a non-critical error should fail in their environment (warning enabled by default).

Creating Vuser Scripts • Web Vuser Scripts
204

205
15Recording Multi-Protocol Vuser Scripts
VuGen lets you create a multi-protocol Vuser script that emulates applications accessing the Web and Windows Sockets.
This chapter describes:
➤ Getting Started with Web/WinSock Vuser Scripts
➤ Setting Browser and Proxy Recording Options
➤ Setting Web Trapping Recording Options
➤ Recording a Multi-Protocol Session
The following information only applies to Multi-Protocol Web/Windows Sockets Vuser scripts.
About Recording Multi-Protocol Vuser Scripts
VuGen’s multi-protocol Vuser enables you to successfully record non-HTML Web applications. VuGen records these applications using both Web and Windows Sockets protocol functions and creates a script that emulates access to Web pages and socket activity. When you run a multi-protocol script, the Vuser emulates activity between a Web browser, the non-HTML application, and the Web Server. This protocol is especially useful for recording streaming data such as Real Player, Microsoft Media Player and Apple QuickTime. The multi-protocol capabilities allow you to record only once for both the Web and WinSock protocols, thus avoiding any duplicate calls. VuGen synchronizes the recordings of the two protocols and creates a single script containing both Web and WinSock Vuser functions.
The WinSock functions represent in low level code the socket activity during the recorded session. Each WinSock function begins with an lrs
Creating Vuser Scripts • Web Vuser Scripts
206
prefix and relates to the sockets, data buffers, and environment. You can also view the actual data that was sent and received during the session by selecting data.ws in VuGen’s left pane.
The Web functions begins with a web prefix. These functions relate to standard Web actions such as going to a URL (web_url), submitting data (web_submit_data), and adding cookies (web_add_cookie).
For more information about the WinSock and Web functions, see the LoadRunner Online Function Reference.
After you record a multi-protocol script, you can edit it by modifying the text of the script in the script view. Note that tree view and the Correlation Studio, which are available for standard Web Vuser scripts, are not supported for multi-protocol scripts.
You correlate values in your multi-protocol Vuser script just as you would in a single protocol script. You must, however, correlate Web functions according to the Web correlation procedure, and the WinSock functions according to their procedure. For information on correlating Web functions, see Chapter 18, “Correlating Web Statements.” For details on correlating WinSock functions, see Chapter 6, “Correlating Statements.”
Getting Started with Web/WinSock Vuser Scripts
This section provides an overview of the process of developing a multi-protocol Web/WinSock Vuser script using VuGen.
To develop a multi-protocol Vuser script:
1 Record the basic script using VuGen.
Invoke VuGen and create a new Vuser script. Specify Multi-Protocol Web/Ws as the type of Vuser. Choose an application to record and set the Web and WinSock recording options. Record typical operations on your application.
For details, see “Setting Browser and Proxy Recording Options,” on page 208
2 Enhance the script.
Enhance the Vuser script by inserting transactions, rendezvous points, and control-flow structures into the script.

Chapter 15 • Recording Multi-Protocol Vuser Scripts
207
For details, see Chapter 4, “Enhancing Vuser Scripts.”
3 Define parameters (optional).
Define parameters for the fixed values recorded into your script. By substituting fixed values with parameters, you can repeat the same business process many times using different values.
For details, see Chapter 5, “Defining Parameters.”
4 Correlate statements (optional).
Correlating statements enables you to use the result of one business process in a subsequent one.
For details, see Chapter 6, “Correlating Statements” or Chapter 18, “Correlating Web Statements.”
5 Configure the run-time settings.
The run-time settings control the Vuser behavior during script execution. These settings include loop, log, and timing information.
For details, see Chapter 7, “Configuring Run-Time Settings.”
6 Run the script from VuGen.
Save and run the script from VuGen to verify that it runs correctly.
For details, see Chapter 9, “Running Vuser Scripts in Stand-Alone Mode.”
After you create a Vuser script, you integrate it into a scenario. For more information on integrating Vuser scripts in a scenario, refer to the LoadRunner Controller User’s Guide.

Creating Vuser Scripts • Web Vuser Scripts
208
Setting Browser and Proxy Recording Options
Before recording a script, you set the Web and WinSock recording options. You set the Web recording options in the following areas: Browser, Proxy, Recording Information, and Correlation. You set the WinSock recording options to exclude sockets, set a think time threshold value and specify a translation table. This section describes the Browser and Proxy recording options. For information on additional Web recording options, see Chapter 13, “Setting Recording Options for Web Vusers.” For information on WinSock recording options, see Chapter 33, “Developing WinSock Vuser Scripts.”
To view the recording options, choose Tools > Recording Options or click the Options button in the Start Recording dialog box. The Recording Options dialog box opens.
Setting the Browser Recording Option
The Browser recording options let you specify which browser VuGen uses when you record a Vuser script.

Chapter 15 • Recording Multi-Protocol Vuser Scripts
209
Select one of the following three browser options on the Browser tab:
➤ Use default browser, to instruct VuGen to use the default Web browser on the recording computer. Use this option to record Active-X applications or Java templates. If this option is selected, the entry in the Program to Record field of the Start Recording dialog box is ignored. Note that you must enter a value into this field, even though it is not used.
➤ Manually launch a browser, to instruct VuGen not to launch a browser when you start recording. You must manually launch a browser after you start the recording session. To record a non-browser application, specify its path in the Program to Record field of the Start Recording dialog box. Use this option for a standalone desktop application or for a standalone application that invokes a browser.
➤ Specify path to the browser, to instruct VuGen to use the browser that you specify. Select a browser path from the list, or click the Browse button to locate the desired browser. Use this option to use a browser other than the default one. If this option is selected, the entry in the Program to Record field of the Start Recording dialog box is ignored. Note that you must enter a value into this field, even though it is not used.

Creating Vuser Scripts • Web Vuser Scripts
210
Specifying the Recording Proxy Settings
If you set the recording option to manually launch the browser (see previous section), you may need to adjust the proxy setting. Since you are not automatically invoking a browser, you cannot instruct VuGen to obtain the proxy settings from the recording browser. Instead, select the Always use direct connection to the Internet option.
After you begin recording, VuGen issues a message indicating that you should change your browser’s proxy settings and what those settings should be.
Chapter 15 • Recording Multi-Protocol Vuser Scripts
211
If you click OK without modifying your browser’s settings, VuGen will only record the application and not the browser actions. To set the proxy settings, abort the recording and set the browser settings.
To modify the proxy settings:
➤ For Netscape, choose Edit > Preferences > Advanced > Proxies > Manual Proxy Configuration and enter localhost (lower case) for the host name and the port number provided in the above dialog box.
➤ For Internet Explorer, choose Tools > Internet Options > Connections > LAN Settings and select Use a Proxy Server. Enter localhost (lower case) for the host name and the port number provided in the above dialog box.
For information on additional Web recording options, see Chapter 13, “Setting Recording Options for Web Vusers.” For information on WinSock recording options, see Chapter 33, “Developing WinSock Vuser Scripts.”
Setting Web Trapping Recording Options
When VuGen records a script for a Web/WinSock Vuser, it configures internal proxy settings. These settings, which cannot be modified by the user, are restored after the recording session. VuGen directs all HTTP and HTTPS requests through these internal proxy ports. The internal proxy settings should not be confused with the user-configurable proxy settings in the Recording Proxy tab. After directing Web requests through the internal proxy ports, it directs them to the ports specified in the Recording Proxy tab. All requests that are not sent or received via the specified proxy ports, are recorded as WinSock functions.
Certain applications issue Web events, but do not support proxy configuration, such as certain Java applets. VuGen cannot set the required internal proxy settings for these applications. As a result, these applications are not recorded as Web events and the events are recorded as WinSock requests, making them less readable and less intuitive.
The Web Trapping settings allow you to trap or save an event that would normally be recorded as a WinSock function, as a Web function. When you enable the trapping option, VuGen waits for events at a specific port, marks

Creating Vuser Scripts • Web Vuser Scripts
212
them as Web events, and generates the appropriate Web functions. This results in a more readable and intuitive script.
You need to specify the port at which VuGen should listen for Web events. All communications on that port are handled as Web events, represented by Web Vuser functions. You can use the default ports-80 for HTTP and 443 for HTTPS, or you can specify any IP:port combination. VuGen supports wildcard combinations, to include all ports on a particular host.
For example 207.232.15.30:* indicates all ports on the host machine 207.232.15.30. The entry 207.232.*.*:80 indicates standard port 80 on all machines in the domain of 207.232. Note that you cannot mix digits and wildcards within the sections of an IP address. For example, 207.2*.32.9 is an invalid entry.
To determine whether or not to enable Web trapping, first perform a recording session. View the data file, data.ws. If you see HTTP or HTTPS data that was recorded as WinSock buffer data, this may indicate that the request was made over a different port. In this instance, you should enable Web trapping to allow VuGen to generate Web functions for those requests.
This option is especially useful when you manually launch the application to record, instead of recording through a browser. For information about manually launching an application, see “Setting the Browser Recording Option,” on page 208.
Note that when you enable Web trapping, all Windows Sockets communication on the specified ports is ignored.
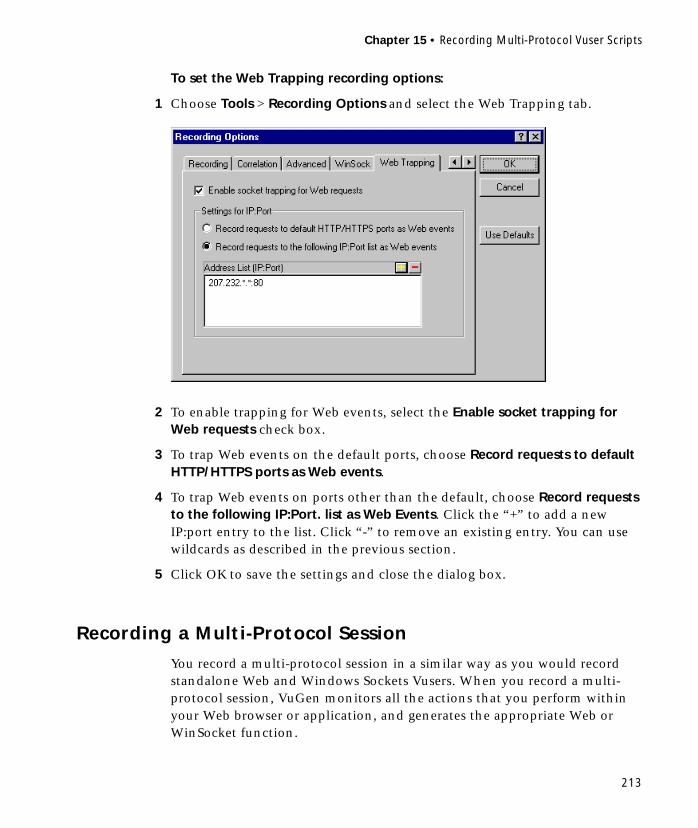
Chapter 15 • Recording Multi-Protocol Vuser Scripts
213
To set the Web Trapping recording options:
1 Choose Tools > Recording Options and select the Web Trapping tab.
2 To enable trapping for Web events, select the Enable socket trapping for Web requests check box.
3 To trap Web events on the default ports, choose Record requests to default HTTP/HTTPS ports as Web events.
4 To trap Web events on ports other than the default, choose Record requests to the following IP:Port. list as Web Events. Click the “+” to add a new IP:port entry to the list. Click “-” to remove an existing entry. You can use wildcards as described in the previous section.
5 Click OK to save the settings and close the dialog box.
Recording a Multi-Protocol Session
You record a multi-protocol session in a similar way as you would record standalone Web and Windows Sockets Vusers. When you record a multi-protocol session, VuGen monitors all the actions that you perform within your Web browser or application, and generates the appropriate Web or WinSocket function.
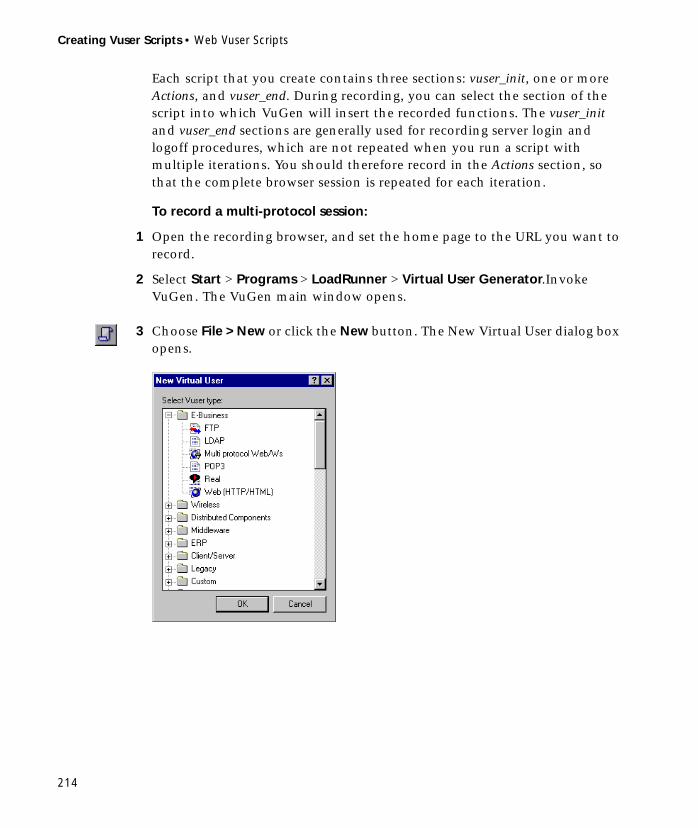
Creating Vuser Scripts • Web Vuser Scripts
214
Each script that you create contains three sections: vuser_init, one or more Actions, and vuser_end. During recording, you can select the section of the script into which VuGen will insert the recorded functions. The vuser_init and vuser_end sections are generally used for recording server login and logoff procedures, which are not repeated when you run a script with multiple iterations. You should therefore record in the Actions section, so that the complete browser session is repeated for each iteration.
To record a multi-protocol session:
1 Open the recording browser, and set the home page to the URL you want to record.
2 Select Start > Programs > LoadRunner > Virtual User Generator.Invoke VuGen. The VuGen main window opens.
3 Choose File > New or click the New button. The New Virtual User dialog box opens.

Chapter 15 • Recording Multi-Protocol Vuser Scripts
215
4 Select Multi Protocol Web/WS from the E-Business folder, and click OK. VuGen opens a skeleton Vuser script and displays the Start Recording dialog box.
5 Click Options to set the recording options for the socket, browser, proxy, or other advanced settings. If you are recording with a browser, specify a browser. If you are recording a non-browser application (such as streaming data), set the Browser Recording Option to manually launch a browser. For manual launching, set the proxy option to Always use direct connection to the Internet Proxy tab and modify your browser’s proxy setting to localhost. Refer to “Setting Browser and Proxy Recording Options,” on page 208 for additional information on setting these recording options.
6 Click Browse to select the program to record. Note that this entry is only used when you specify manually launch a browser in the recording options (Browser tab). Specify the path and name of the non-browser application in the Program to Record box. If you are recording with a browser, this entry is ignored; you must, however, enter a value into this box.
7 From the Record into Action list, select the section into which you want to begin recording.
8 Click OK to launch the application and start recording. The floating recording toolbar appears.

Creating Vuser Scripts • Web Vuser Scripts
216
Note: When recording a Web Vuser script, you can only run a single instance of Netscape Navigator. Therefore, if Netscape Navigator is running before you begin recording, VuGen prompts you to close the browser. This enables VuGen to open the Netscape browser itself.
9 Navigate through your Web site by clicking hypertext and hypergraphic links, and submitting forms. Each link you click adds a web_url function to the script. Each form you submit adds a web_submit_data function to the Vuser script. If you are recording a non-browser application, perform actions within the application. These actions are recorded as socket data.
During recording, you can use the VuGen floating toolbar to insert transactions, rendezvous points, and instant text checks. For more details, see below. For details on inserting text, image, and Java checks, see Chapter 16, “Verifying Web Pages Under Load.”
10 After performing all the required user processes, click the Stop recording button on the floating recording toolbar. VuGen closes the browser and restores the VuGen main window.
11 Choose File > Save or click the Save button to save the Vuser script. Specify a file name and location in the Save Test dialog box, and click Save.
After recording, you can edit the Vuser script by inserting transactions, rendezvous points, and control-flow structures into the script. For details, see Chapter 4, “Enhancing Vuser Scripts.”
After modifying a script, you can revert back to the originally recorded version of the script, using the Regenerate Vuser utility. This utility only regenerates the WinSock statements; it does not affect the Web statements. For more information, see “Regenerating a Vuser Script,” on page 33.
217
16Verifying Web Pages Under Load
You can add Web checks to your Web Vuser scripts to determine whether or not the correct Web pages are returned by the server when you run the Vuser script.
This chapter describes:
➤ Adding a Text Check
➤ The web_reg_find Function
➤ Adding an Image Check
➤ Adding a Java Applet Check
➤ Defining Additional Properties
➤ Specifying a Text Check with a Regular Expression
The following information only applies to Web Vuser scripts.
About Verification Under Load
VuGen enables you to add Web checks to your Web Vuser scripts. A Web check verifies the presence of a specific object on a Web page. The object can be a text string, an image, or a Java applet.
Web checks enable you to determine whether or not your Web site is functioning correctly while it is being accessed by numerous Vusers—that is, does the server return the correct Web pages? This is particularly important while your site is under the load of many users, when the server is more likely to return incorrect pages.

Creating Vuser Scripts • Web Vuser Scripts
218
For example, assume that your Web site displays information on the temperatures in major cities around the world. You use VuGen to create a Vuser script that accesses your Web site. In the script segment below, the Vuser accesses the hypertext link labeled Temperatures-Europe.
The browser displays a new page with information on the temperatures in major cities in Europe. The Vuser then executes a text check on this Web page. For example, if the word London appears on the page, the check passes. If London does not appear because, for example, the correct page was not returned by the server, the check fails. In this way, you can check that clicking the Temperatures-Europe link displays the correct page.
Although the server may display the correct page when you record the script and when a single Vuser executes the script, it is possible that the correct page will not be returned when the server is under the load of many Vusers. The server may be overloaded and may therefore return meaningless or incorrect HTML code. Alternatively, in some instances when a server is overloaded, the server may return a 500 Server Error page. In both of these scenarios, you can insert a check to determine whether or not the correct page is returned by the server.
Note: Web checks increase the work of a Vuser, and therefore you may need to run fewer Vusers per load generator. You should use Web checks only where experience has shown that the server sometimes returns an incorrect page.
You can define Web checks during or after recording a Vuser script. It is generally more convenient to define checks while recording—when the Web page that you want to check is visible.

Chapter 16 • Verifying Web Pages Under Load
219
When you add a Web check, VuGen adds a Web check icon to the current step in the tree view of the Vuser script. Web check icons are always indented under the associated step. When you run the Vuser script, VuGen conducts the check on the Web page that is displayed after the step is executed.
Note: A Vuser conducts Web checks during script execution only if checks are enabled, and if the script runs in HTML mode. You enable checks from the Performance tab in the Run-Time Settings dialog box, and in the HTTP tab in the Advanced Options dialog box. For details, see Chapter 7, “Configuring Run-Time Settings.”
VuGen uses three different Web check icons, each one representing a different check type:
This chapter describes how to use VuGen to add Web checks in the tree view. For information about adding checks to the script in the text-based script view, see the LoadRunner Online Function Reference.
Web Check Icon Description
Text A text check is a search for a specified text string on a Web page.
Image An image check is a search for a specified image on a Web page.
Java Applet A Java check is a search for a specified Java applet on a Web page.

Creating Vuser Scripts • Web Vuser Scripts
220
Adding a Text Check
VuGen allows you to add a check that searches for a text string on a Web page. You can add the text check either during or after recording.
When you create a text check, you define the name of the check, the scope of the check, the text you want to check for, and the search conditions.
To add a text check after recording:
1 In the VuGen main window, right-click the step corresponding to the Web page on which you want to perform a check. Select Insert After from the pop-up menu. The Add Step dialog box opens.
Note: During a Web browser recording session, the VuGen main window may be minimized. To add a text check during recording, restore the VuGen main window.

Chapter 16 • Verifying Web Pages Under Load
221
2 Expand Web Checks in the Step Type tree.
3 Select Text Check, and click OK. The Text Check Properties dialog box opens. Ensure that the Specification tab is visible.
4 In the Search for box, type the string whose presence you want to verify. An ABC icon indicates that the string in the Search for box has not been assigned a parameter. For details on assigning parameters, see Chapter 5, “Defining Parameters.”
5 Assign a context if you want to limit the scope of the search to a specific location within the Web page.
Creating Vuser Scripts • Web Vuser Scripts
222
➤ To look for the search string within a hypertext link or list box, select the Inside check box. Then select a context from the list:
Any link text: searches for the text string as part of a hypertext link
Any list or combo box: searches for the text string in a list or combo box
To search the entire page for the required text string—including all text, links, lists, and tables—make sure that the Inside check box is cleared.
➤ To specify the position of the search string relative to adjacent text, select the Right of or Left of check box. Then type the text in the appropriate field. For example, to verify that the string “[email protected]” appears to the right of the word “e-mail:,” select Right of and then type “e-mail:” in the Right of box.
An ABC icon indicates that the string in the Right of or Left of box has not been assigned a parameter. For details on assigning parameters, see Chapter 5, “Defining Parameters.”
Note: You can use a combination of context criteria to limit your search. For example, you could use all three context criteria to search for a hypertext link that appears between two other links.
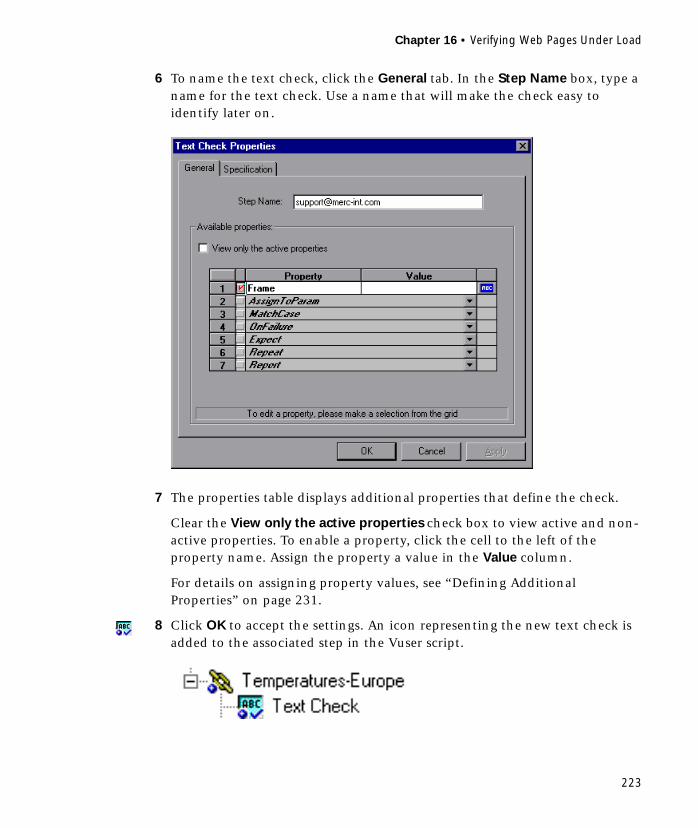
Chapter 16 • Verifying Web Pages Under Load
223
6 To name the text check, click the General tab. In the Step Name box, type a name for the text check. Use a name that will make the check easy to identify later on.
7 The properties table displays additional properties that define the check.
Clear the View only the active properties check box to view active and non- active properties. To enable a property, click the cell to the left of the property name. Assign the property a value in the Value column.
For details on assigning property values, see “Defining Additional Properties” on page 231.
8 Click OK to accept the settings. An icon representing the new text check is added to the associated step in the Vuser script.
Creating Vuser Scripts • Web Vuser Scripts
224
To add a text check during recording:
1 Using the mouse, mark the desired text.
2 Click the Insert text check icon on the recording toolbar.
The web_reg_find Function
In the text-based script view, the web_reg_find function searches for a text string on a Web page indicated by the next web_url statement. It helps you verify whether or not the page you received is the desired page by searching for an expected text string. For example, you can search for the text "Welcome" to check if your home page opened properly. You can check for the word "Error" to check if the browser encountered an error. You can also use this function to count the number of times the text appeared.
This function differs from the web_find function, in that it is not limited to HTML-based scripts (see Recording Options > Recording tab). When performing a standard text search, web_reg_find is the preferred function.
The web_reg_find function is a registration type function. It registers a request to find a text string within the Web page that was retrieved. It performs the check only after executing the next action function, such as web_url. Note that if you are working with a concurrent functions group, the web_reg_find function is only executed at the end of the grouping. See the LoadRunner Online Function Reference for more information.
In the following example, web_reg_find function searches for the text string "Welcome". If the string is not found, it fails and the script execution stops.
web_reg_find("Text=Welcome", LAST);web_url("Step", "URL=...", LAST);
Adding an Image Check
VuGen allows you to add a user-defined check that searches for an image on a Web page. The image can be identified by the ALT attribute, the SRC attribute, or both.
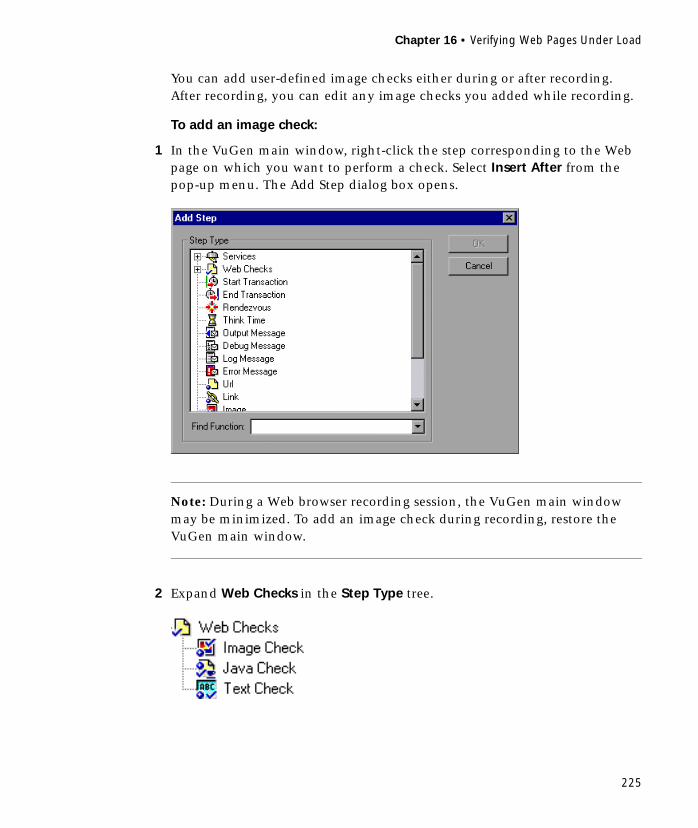
Chapter 16 • Verifying Web Pages Under Load
225
You can add user-defined image checks either during or after recording. After recording, you can edit any image checks you added while recording.
To add an image check:
1 In the VuGen main window, right-click the step corresponding to the Web page on which you want to perform a check. Select Insert After from the pop-up menu. The Add Step dialog box opens.
Note: During a Web browser recording session, the VuGen main window may be minimized. To add an image check during recording, restore the VuGen main window.
2 Expand Web Checks in the Step Type tree.
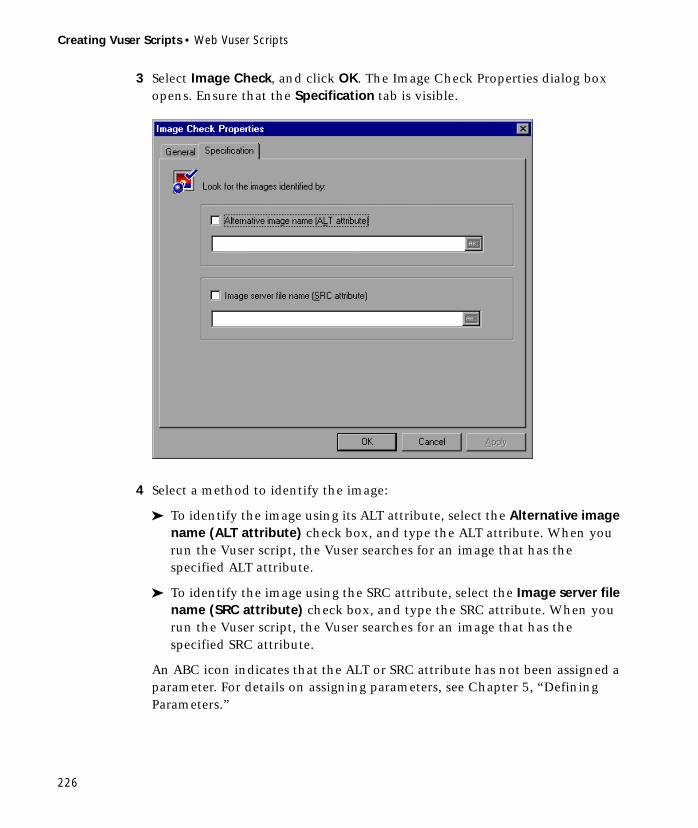
Creating Vuser Scripts • Web Vuser Scripts
226
3 Select Image Check, and click OK. The Image Check Properties dialog box opens. Ensure that the Specification tab is visible.
4 Select a method to identify the image:
➤ To identify the image using its ALT attribute, select the Alternative image name (ALT attribute) check box, and type the ALT attribute. When you run the Vuser script, the Vuser searches for an image that has the specified ALT attribute.
➤ To identify the image using the SRC attribute, select the Image server file name (SRC attribute) check box, and type the SRC attribute. When you run the Vuser script, the Vuser searches for an image that has the specified SRC attribute.
An ABC icon indicates that the ALT or SRC attribute has not been assigned a parameter. For details on assigning parameters, see Chapter 5, “Defining Parameters.”
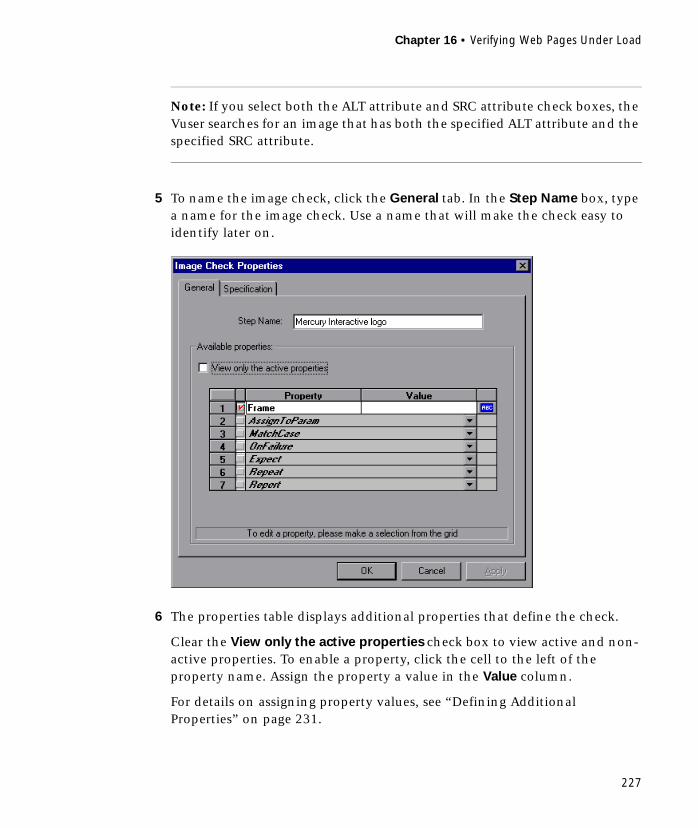
Chapter 16 • Verifying Web Pages Under Load
227
Note: If you select both the ALT attribute and SRC attribute check boxes, the Vuser searches for an image that has both the specified ALT attribute and the specified SRC attribute.
5 To name the image check, click the General tab. In the Step Name box, type a name for the image check. Use a name that will make the check easy to identify later on.
6 The properties table displays additional properties that define the check.
Clear the View only the active properties check box to view active and non- active properties. To enable a property, click the cell to the left of the property name. Assign the property a value in the Value column.
For details on assigning property values, see “Defining Additional Properties” on page 231.
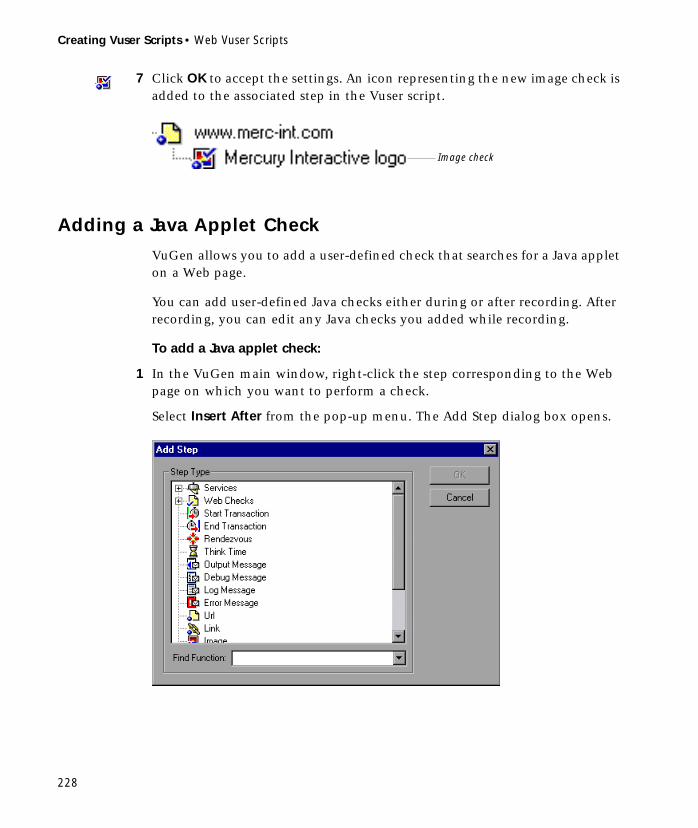
Creating Vuser Scripts • Web Vuser Scripts
228
7 Click OK to accept the settings. An icon representing the new image check is added to the associated step in the Vuser script.
Adding a Java Applet Check
VuGen allows you to add a user-defined check that searches for a Java applet on a Web page.
You can add user-defined Java checks either during or after recording. After recording, you can edit any Java checks you added while recording.
To add a Java applet check:
1 In the VuGen main window, right-click the step corresponding to the Web page on which you want to perform a check.
Select Insert After from the pop-up menu. The Add Step dialog box opens.
Image check

Chapter 16 • Verifying Web Pages Under Load
229
Note: During a Web browser recording session, the VuGen main window may be minimized. To add a Java applet check during recording, restore the VuGen main window.
2 Expand Web Checks in the Step Type tree.
3 Select Java Check, and click OK. The Java Check Properties dialog box opens. Ensure that the General tab is visible.

Creating Vuser Scripts • Web Vuser Scripts
230
4 In the Step Name box, type a name for the Java check. Use a name that will make the check easy to identify later on.
5 In the ClassName Value field, type a class name for the Java applet.
6 The properties table displays additional properties that define the check.
Clear the View only the active properties check box to view active and non- active properties. To enable a property, click the cell to the left of the property name. Assign the property a value in the Value column.
For details on assigning property values, see “Defining Additional Properties” on page 231.
7 Click the Applet Parameters tab to define data passed to the applet.
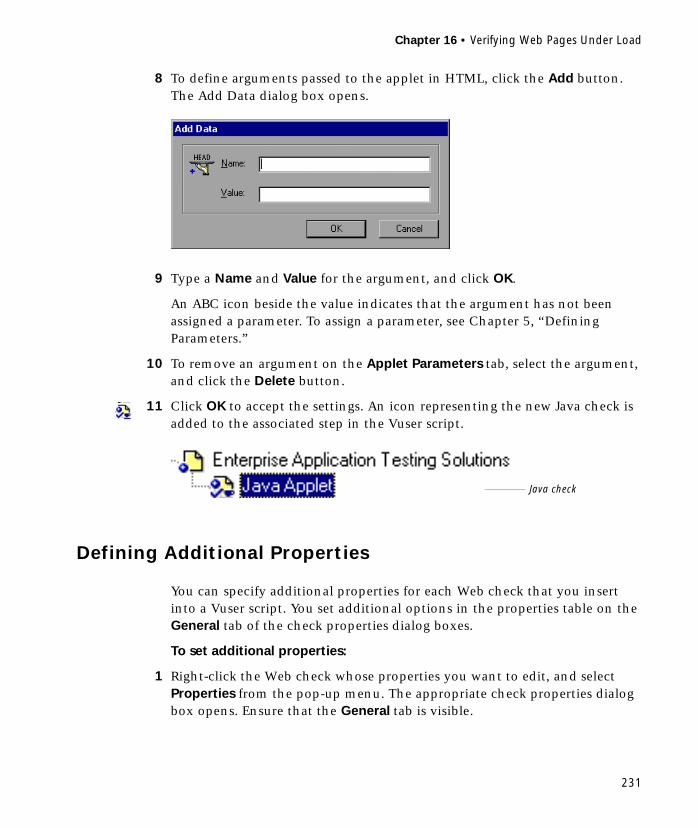
Chapter 16 • Verifying Web Pages Under Load
231
8 To define arguments passed to the applet in HTML, click the Add button. The Add Data dialog box opens.
9 Type a Name and Value for the argument, and click OK.
An ABC icon beside the value indicates that the argument has not been assigned a parameter. To assign a parameter, see Chapter 5, “Defining Parameters.”
10 To remove an argument on the Applet Parameters tab, select the argument, and click the Delete button.
11 Click OK to accept the settings. An icon representing the new Java check is added to the associated step in the Vuser script.
Defining Additional Properties
You can specify additional properties for each Web check that you insert into a Vuser script. You set additional options in the properties table on the General tab of the check properties dialog boxes.
To set additional properties:
1 Right-click the Web check whose properties you want to edit, and select Properties from the pop-up menu. The appropriate check properties dialog box opens. Ensure that the General tab is visible.
Java check
Creating Vuser Scripts • Web Vuser Scripts
232
2 Clear the View only the active properties check box to view all the available properties.
3 To enable a property, click the cell to the left of the property name. A red check mark appears beside the property.
4 Assign the property a value in the Value column:
➤ Frame: Type the name of the frame where the check object is located.
➤ AssignToParam (applicable to text checks only): Select YES to assign the check result to a parameter. The default value is NO. This check requires boundaries and parameters, as described in “Adding a Text Check,” on page 220.
➤ MatchCase: Select YES to conduct a case-sensitive search. Select NO to conduct a non-case-sensitive search. The default value is NO.

Chapter 16 • Verifying Web Pages Under Load
233
➤ OnFailure: Select Abort to abort the entire Vuser script if the check fails. VuGen aborts the Vuser script regardless of the error-handling method that has been set in the run-time settings. Select Continue to have the error-handling method defined in the run-time settings determine whether or not the script is aborted if the check fails. The default value is Continue. For details on defining the error handling method, see Chapter 7, “Configuring Run-Time Settings.”
➤ Expect: Select NotFound to indicate that the check is successful if the Vuser does not find the specified check object. Select Found to indicate that the check is successful if the Vuser finds the specified check object. The default value is Found.
➤ Repeat: Select YES to search for multiple occurrences of the specified check object. Select NO to end the check as soon as one occurrence of the specified check object is found. The Vuser script continues with the next step. This option is useful when searching through a Web page that may have multiple occurrences of the check object. The default value is YES.
➤ Report: Select Always to always view a detailed description of the check results in the Execution Log. Select Failure to view detailed check results only when the check fails. Select Success to view detailed check results only when the check succeeds. The default value is Always.
An ABC icon indicates that the property value has not been assigned a parameter. To assign a parameter, see Chapter 5, “Defining Parameters.”
Specifying a Text Check with a Regular Expression
When adding a text check, you can specify the value type as a regular expression. Using a regular expression increases the flexibility and adaptability of a check.
In a regular expression, any character that is not one of the special characters described below is searched for literally. When a special character is preceded by a backslash (\), the Vuser searches for the literal character.
Creating Vuser Scripts • Web Vuser Scripts
234
The following options can be used to create regular expressions:
➤ Matching Any Single Character
➤ Matching Any Single Character within a Range
➤ Matching One or More Specific Characters
Matching Any Single Character
A period (.) instructs VuGen to search for any single character. For example,
welcome.
matches welcomes, welcomed, or welcome followed by a space or any other single character. A series of periods indicates a sequence of unspecified characters. The length of the sequence is equal to the number of periods.
Matching Any Single Character within a Range
In order to match a single character within a range, you can use square brackets ([ ]). For example, to search for a date that is either 1968 or 1969, write:
196[89]
You can use a hyphen (-) to indicate an actual range. For instance, to match any year in the 1960s, write:
196[0-9]
A hyphen does not signify a range if it appears as the first or last character within brackets, or after a caret (^).
A caret (^) instructs VuGen to match any character except for the ones specified in the string. For example:
[^A-Za-z]
matches any non-alphabetic character. The caret has this special meaning only when it appears first within the brackets.
Chapter 16 • Verifying Web Pages Under Load
235
Note that within brackets, the following characters are literal:
If the right bracket is the first character in the range, it is also literal. For example:
[]g-m]
matches the right bracket, and g through m.
Matching One or More Specific Characters
An asterisk (*) instructs VuGen to match zero or more occurrences of the preceding character. For example:
Q*
causes VuGen to match Q, QQ, QQQ, and so forth.
period (.)
asterisk (*)
left bracket ([)
backslash (\)

Creating Vuser Scripts • Web Vuser Scripts
236

237
17Modifying Web Vuser Scripts
After recording a Web Vuser script, you use VuGen to modify the recorded script. You can add new steps, and edit, rename, and delete existing steps.
This chapter describes:
➤ Adding a Step to a Web Vuser Script
➤ Deleting Steps from a Web Vuser Script
➤ Modifying Action Steps
➤ Modifying Control Steps
➤ Modifying Service Steps
➤ Modifying Web Checks
The following information only applies to Web Vuser scripts.
About Modifying Web Vuser Scripts
After recording a browser session, you can modify the recorded script in VuGen by editing a step’s properties or adding and deleting steps.
You can do the modifications either in the icon-based tree view or in the text-based script view. For details on the two viewing modes, see Chapter 11, “Introducing Web Vuser Scripts.”
This chapter describes how to use VuGen to modify the script in the tree view. For information about modifying the script in the text-based script view, see the LoadRunner Online Function Reference.
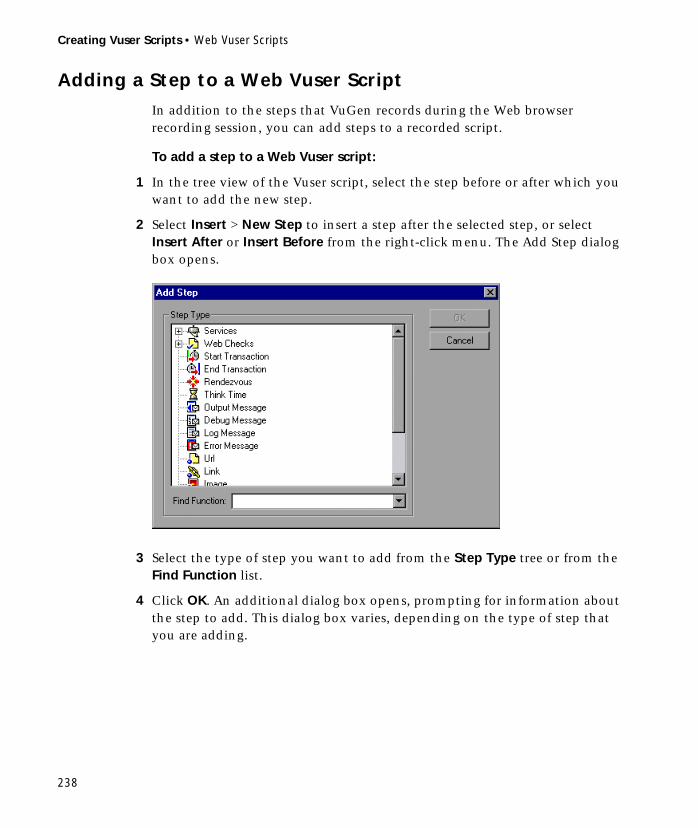
Creating Vuser Scripts • Web Vuser Scripts
238
Adding a Step to a Web Vuser Script
In addition to the steps that VuGen records during the Web browser recording session, you can add steps to a recorded script.
To add a step to a Web Vuser script:
1 In the tree view of the Vuser script, select the step before or after which you want to add the new step.
2 Select Insert > New Step to insert a step after the selected step, or select Insert After or Insert Before from the right-click menu. The Add Step dialog box opens.
3 Select the type of step you want to add from the Step Type tree or from the Find Function list.
4 Click OK. An additional dialog box opens, prompting for information about the step to add. This dialog box varies, depending on the type of step that you are adding.

Chapter 17 • Modifying Web Vuser Scripts
239
For details on using these dialog boxes, see the appropriate section, as listed below:
Deleting Steps from a Web Vuser Script
After recording a browser session, you can use VuGen to delete any step from the Vuser script.
To delete a step from a Web Vuser script:
1 In the tree view of the Vuser script, right-click the step you want to delete, and select Delete from the pop-up menu.
2 Click OK to confirm that you want to delete the step.
The step is deleted from the script.
To add a(n)... See...
LoadRunner function Chapter 4, “Enhancing Vuser Scripts”
Service step “Modifying Service Steps” on page 257
Web Check “Modifying Web Checks” on page 258
Transaction “Modifying a Transaction” on page 254
Rendezvous point “Modifying a Rendezvous Point” on page 256
Think time step “Modifying Think Time” on page 256
URL step “Modifying a URL Step” on page 240
Link step “Modifying a Hypertext Link Step” on page 242
Image step “Modifying an Image Step” on page 244
Submit form step “Modifying a Submit Form Step” on page 246
Submit data step “Modifying a Submit Data Step” on page 249
Custom request step “Modifying a Custom Request Step” on page 252
User-defined step Chapter 4, “Enhancing Vuser Scripts”

Creating Vuser Scripts • Web Vuser Scripts
240
Modifying Action Steps
An action step represents a user action during recording, that is, a jump to a new Web page or a change in the Web context.
Action steps, represented in the tree view of the Vuser script by Action icons, are added to your script automatically during recording. After recording, you can modify the recorded action steps.
This section includes:
➤ Modifying a URL Step
➤ Modifying a Hypertext Link Step
➤ Modifying an Image Step
➤ Modifying a Submit Form Step
➤ Modifying a Submit Data Step
➤ Modifying a Custom Request Step
Modifying a URL Step
A URL step is added to the Vuser script when you type in a URL or use a bookmark to access a specific Web page.
The properties that you can modify are the name of the step, the address of the URL, target frame, and record mode.
By default, VuGen runs the URL step based on the mode in which it was recorded: HTML, URL (URL mode with resources), and NORESOURCE (URL mode without resources). For information on the recording modes, see “Understanding the Recording Modes,” on page 174.
Setting the Replay Mode
In the URL step’s Properties dialog box, you can modify the mode settings to instruct LoadRunner to execute the Vuser in a mode other than the recorded mode. To customize the replay mode, select the Record mode check box. The available replay modes are:

Chapter 17 • Modifying Web Vuser Scripts
241
HTML: Automatically download all resources and images and store the required HTTP information for the steps that follow. This is ideal for scripts with Web links.
URL: Automatically download all resources and images associated with the current URL. This mode downloads each URL and its resources as a standalone URL and does not store information for the following steps. This option is not appropriate for steps that are followed by Web links.
NORESOURCE: Do not download any resources for this step during replay. Download only resources that are explicitly represented by functions.
You can also indicate that a certain step should not be counted as a resource. For example, if you have a step that represents a specific image that you want to skip, you can instruct VuGen to exclude it as a resource. For more information, see the “Specifying the Information to Record,” on page 182.
To modify the properties of a URL step:
1 In the tree view of the Vuser script, select the URL step you want to edit. URL steps are shown using the URL icon.
2 Click the Properties button on the VuGen toolbar. The URL Step Properties dialog box opens.
Creating Vuser Scripts • Web Vuser Scripts
242
3 To change the step name, type a new name in the Step name box. The default name during recording is the last part of the URL.
4 In the URL box, type the Web address (URL) of the Web page that is accessed by the URL step. An ABC icon indicates that the URL has not been assigned a parameter. For details on assigning parameters, see Chapter 5, “Defining Parameters.”
5 In the Target frame list, select one of the following values:
➤ _PARENT: replaces the parent of the last (changed) frame
➤ _TOP: replaces the whole page
➤ _BLANK: opens a new window
6 To customize the replay mode, select the Record mode check box.
Choose the desired mode: HTML, NORESOURCE, or URL.
7 To exclude an item from being downloaded as a resource, clear the Resource check box.
8 Click OK to close the URL Step Properties dialog box.
Modifying a Hypertext Link Step
A hypertext link step is added to the Web Vuser script when you click a hypertext link. This step is only recorded when you select the option to record in HTML based script mode. For more information, refer to Chapter 12, “Recording Web Vuser Scripts.”
The properties that you can modify are the name of the step, how the hypertext link is identified, and where it is located.
To modify the properties of a hypertext link step:
1 In the tree view of the Vuser script, select the hypertext link step you want to edit. Hypertext link steps are shown using the Hypertext Link icon.

Chapter 17 • Modifying Web Vuser Scripts
243
2 Select Properties from the right-click menu. The Link Step Properties dialog box opens.
3 To change the step name, type a new name in the Step Name box. The default name during recording is the text string of the hypertext link.
4 The properties table displays the properties that identify the link.
Clear the View only the active properties check box to view active and non-active properties. To enable a property, click the cell to the left of the property name. Assign the property a value in the Value column:
➤ Text: the exact string of the hypertext link
➤ Frame: the name of the frame where the link is located
➤ TargetFrame: the target frame:
_TOP: replaces the whole page
_BLANK: opens a new window
_PARENT: replaces the parent of the last (changed) frame

Creating Vuser Scripts • Web Vuser Scripts
244
➤ Ordinal: a number that uniquely identifies the link when all the other property attributes are identical to one or more other links on the Web page. See the LoadRunner Online Function Reference for details.
An ABC icon indicates that the link property value has not been assigned a parameter. For details on assigning parameters, see Chapter 5, “Defining Parameters.”
5 Click OK to close the Link Step Properties dialog box.
Modifying an Image Step
An image step is added to the Vuser script when you click a hypergraphic link. This step is only recorded when you select the option to record in HTML (context-sensitive) mode. For more information, refer to Chapter 12, “Recording Web Vuser Scripts.”
The properties that you can modify are the name of the step, how the hypergraphic link is identified, and where it is located.
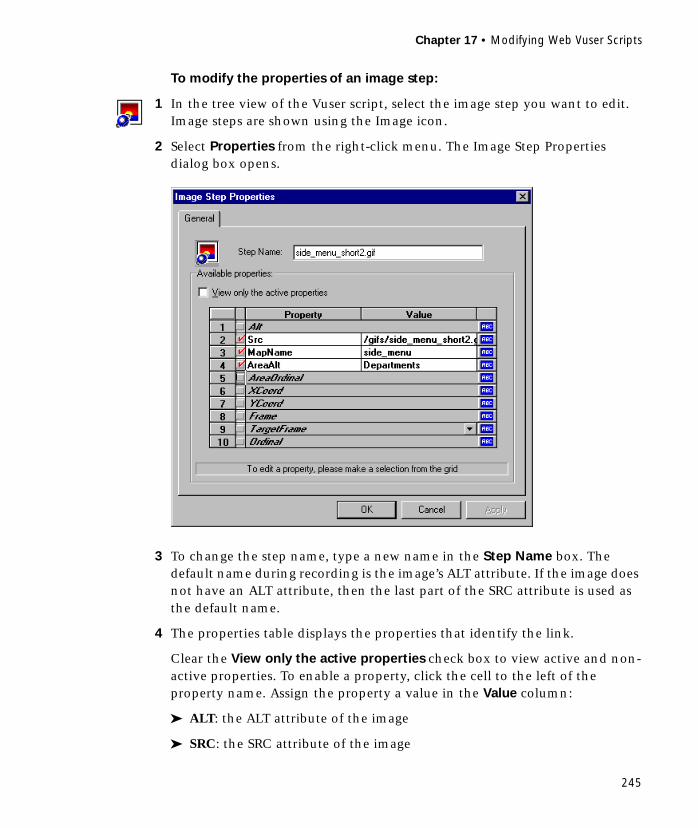
Chapter 17 • Modifying Web Vuser Scripts
245
To modify the properties of an image step:
1 In the tree view of the Vuser script, select the image step you want to edit. Image steps are shown using the Image icon.
2 Select Properties from the right-click menu. The Image Step Properties dialog box opens.
3 To change the step name, type a new name in the Step Name box. The default name during recording is the image’s ALT attribute. If the image does not have an ALT attribute, then the last part of the SRC attribute is used as the default name.
4 The properties table displays the properties that identify the link.
Clear the View only the active properties check box to view active and non-active properties. To enable a property, click the cell to the left of the property name. Assign the property a value in the Value column:
➤ ALT: the ALT attribute of the image
➤ SRC: the SRC attribute of the image

Creating Vuser Scripts • Web Vuser Scripts
246
➤ MapName: the name of the map related to the image. Applies to client-side image maps only.
➤ AreaAlt: the ALT attribute of the area to click. Applies to client-side image maps only.
➤ AreaOrdinal: the serial number of the area to click. Applies to client-side image maps only.
➤ Frame: the name of the frame where the image is located
➤ TargetFrame: the target frame:
_TOP: replaces the whole page
_BLANK: opens a new window
_PARENT: replaces the parent of the last (changed) frame
_SELF: replaces the last (changed) frame
➤ Ordinal: a number that uniquely identifies the image when all other property attributes are identical to one or more other images on the Web page. See the LoadRunner Online Function Reference for details.
➤ XCoord, YCoord: the coordinates of the mouse-click on the image
An ABC icon indicates that the link property value has not been assigned a parameter. For details on assigning parameters, see Chapter 5, “Defining Parameters.”
5 Click OK to close the Image Step Properties dialog box.
Modifying a Submit Form Step
A submit form step is added to the Vuser script when you submit a form. This step is only recorded when you select the option to record in HTML (context-sensitive) mode. For more information, refer to Chapter 12, “Recording Web Vuser Scripts.”
The properties that you can modify are the name of the step, the form location, how the form submission is identified, and the form data.
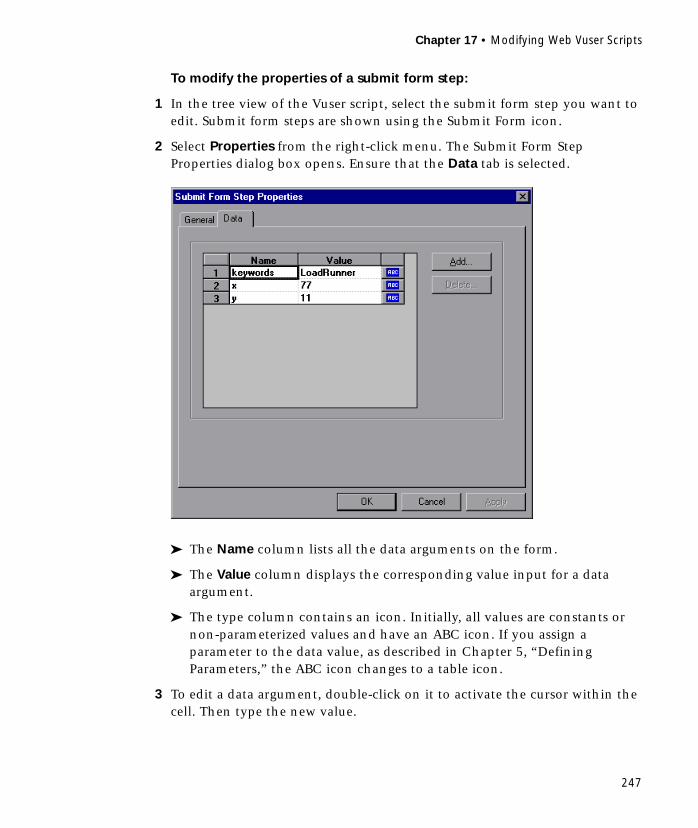
Chapter 17 • Modifying Web Vuser Scripts
247
To modify the properties of a submit form step:
1 In the tree view of the Vuser script, select the submit form step you want to edit. Submit form steps are shown using the Submit Form icon.
2 Select Properties from the right-click menu. The Submit Form Step Properties dialog box opens. Ensure that the Data tab is selected.
➤ The Name column lists all the data arguments on the form.
➤ The Value column displays the corresponding value input for a data argument.
➤ The type column contains an icon. Initially, all values are constants or non-parameterized values and have an ABC icon. If you assign a parameter to the data value, as described in Chapter 5, “Defining Parameters,” the ABC icon changes to a table icon.
3 To edit a data argument, double-click on it to activate the cursor within the cell. Then type the new value.
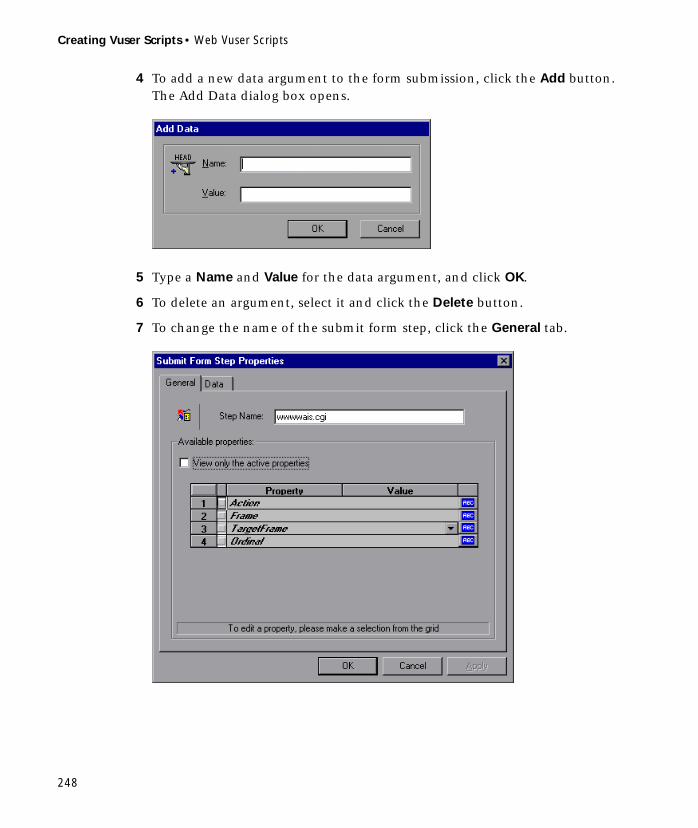
Creating Vuser Scripts • Web Vuser Scripts
248
4 To add a new data argument to the form submission, click the Add button. The Add Data dialog box opens.
5 Type a Name and Value for the data argument, and click OK.
6 To delete an argument, select it and click the Delete button.
7 To change the name of the submit form step, click the General tab.

Chapter 17 • Modifying Web Vuser Scripts
249
8 To change the step name, type a new name in the Step Name box. The default name during recording is the name of the executable program used to process the form.
9 The properties table displays the properties that identify the form submission.
Clear the View only the active properties check box to view active and non- active properties. To enable a property, click the cell to the left of the property name. Assign the property a value in the Value column:
➤ Action: the address to be used to carry out the action of the form
➤ Frame: the name of the frame where the form submission is located
➤ TargetFrame: the target frame:
_TOP: replaces the whole page
_BLANK: opens a new window
_PARENT: replaces the parent of the last (changed) frame
_SELF: replaces the last (changed) frame
➤ Ordinal: a number that uniquely identifies the form when all other property attributes are identical to one or more other forms on the same Web page. See the LoadRunner Online Function Reference for details.
An ABC icon indicates that the submit form step property value has not been assigned a parameter. For details on assigning parameters, see Chapter 5, “Defining Parameters.”
10 Click OK to close the Submit Form Step Properties dialog box.
Modifying a Submit Data Step
A submit data step represents the submission of a form of data to your Web site for processing. This is different from a Submit Form step because you don’t need to have a form context to execute this request.
The properties that you can modify are the name of the step, the method, the action, the target frame, and the data items on the form.

Creating Vuser Scripts • Web Vuser Scripts
250
To modify the properties of a submit data step:
1 In the tree view of the Vuser script, select the submit data step you want to edit. Submit data steps are shown using the Submit Data icon.
2 Select Properties from the right-click menu. The Submit Data Step Properties dialog box opens. Ensure that Data tab is visible.
➤ The Name column lists all the data arguments on the form. This includes all hidden fields.
➤ The Value column displays the corresponding value input for a data argument.
➤ The type column contains an icon. Initially, all values are constants or non-parameterized values and have an ABC icon. If you assign a parameter to the data value, as described in Chapter 5, “Defining Parameters,” the ABC icon changes to a table icon.
3 To edit a data argument, double-click on it to activate the cursor within the cell. Then type the new value.

Chapter 17 • Modifying Web Vuser Scripts
251
4 To add new data, click Add. The Add Data dialog box opens.
5 Type a Name and Value for the data argument, and click OK.
6 To delete an argument, select it and click the Delete button.
7 To change the name of the submit data step, click the General tab.
8 To change the step name, type a new name in the Step name box.
9 Under Method, click POST or GET. The default method is POST.
10 In the Action box, type the address to be used to carry out the action of the data submission. An ABC icon indicates that the action has not been

Creating Vuser Scripts • Web Vuser Scripts
252
assigned a parameter. For details on assigning parameters, see Chapter 5, “Defining Parameters.”
11 Select a Target frame from the list:
_SELF: replaces the last (changed) frame
_PARENT: replaces the parent of the last (changed) frame
_TOP: replaces the whole page
_BLANK: opens a new window
12 The Support frames check box is selected by default when you record a Web Vuser script in HTML based mode. The Support frames check box is cleared by default when you record a Vuser script in URL mode. You can select or clear the Support frames check box if you want to override the default setting during script execution.
13 Click OK to close the Submit Data Step Properties dialog box.
Modifying a Custom Request Step
A custom request represents a custom HTTP request for a URL, with any method supported by HTTP. A custom request step is contextless.
The properties that you can modify are the name of the step, method, URL, target frame, and body.
To modify the properties of a custom request step:
1 In the tree view of the Vuser script, select the custom request step you want to edit. Custom request steps are shown using the Custom Request icon.

Chapter 17 • Modifying Web Vuser Scripts
253
2 Select Properties from the right-click menu. The Custom Request Properties dialog box opens.
3 To change the step name, type a new name in the Step name box. The default name during recording is the last part of the URL.
4 In the Method box, type any method supported by HTTP. For example, GET, POST or HEAD.
5 In the URL box, type the URL being requested.
6 Select a Target frame from the list:
_SELF: replaces the last (changed) frame
_PARENT: replaces the parent of the last (changed) frame
_TOP: replaces the whole page
_BLANK: opens a new window
Creating Vuser Scripts • Web Vuser Scripts
254
7 In the Body box, type the body of the request. If you select the Binary data check box, the text is treated as binary and not as ASCII. For details on using binary data, see the LoadRunner Online Function Reference.
8 To customize the replay mode, select the Record mode check box.
Choose the desired mode: HTML, NORESOURCE, or URL. For more information, see “Setting the Replay Mode,” on page 240.
9 To exclude an item from being downloaded as a resource, clear the Resource check box.
10 Click OK to close the Custom Request Properties dialog box.
Modifying Control Steps
A control step represents a control used during load testing. Control steps include transactions, rendezvous points, and think time.
You add control steps, represented in the tree view of the Vuser script by Control icons, to your script during and after recording.
This section includes:
➤ Modifying a Transaction
➤ Modifying a Rendezvous Point
➤ Modifying Think Time
Modifying a Transaction
A transaction is a task or set of actions whose server response time you want to measure.
The properties that you can modify are the name of the transaction (start transaction and end transaction) and its status (end transaction only).
To modify a start transaction control step:
1 In the tree view of the Vuser script, select the start transaction control step you want to edit. Start transaction control steps are shown using the Start Transaction icon.

Chapter 17 • Modifying Web Vuser Scripts
255
2 Select Properties from the right-click menu. The Start Transaction dialog box opens.
3 To change the transaction name, type a new name in the Transaction Name box, and click OK.
To modify an end transaction control step:
1 In the tree view of the Vuser script, select the end transaction control step you want to edit. End transaction control steps are shown using the End Transaction icon.
2 Select Properties from the right-click menu. The End Transaction dialog box opens.
3 Select the name of the transaction you want to end from the Transaction Name list.
4 Select a transaction status from the Transaction Status list:
LR_PASS: returns a "succeed" return code
LR_FAIL: returns a "fail" return code
LR_ABORT: returns an "abort" return code
LR_AUTO: automatically returns the detected status
For more information, see the LoadRunner Online Function Reference.

Creating Vuser Scripts • Web Vuser Scripts
256
5 Click OK to close the End Transaction dialog box.
Modifying a Rendezvous Point
Rendezvous points enable you to synchronize Vusers to perform a task at exactly the same moment.
The property that you can modify is the name of the rendezvous point.
To modify a rendezvous point:
1 In the tree view of the Vuser script, select the rendezvous point you want to edit. Rendezvous points are shown using the Rendezvous icon .
2 Select Properties from the right-click menu. The Rendezvous dialog box opens.
3 To change the rendezvous name, type a new name in the Rendezvous Name box, and click OK.
Modifying Think Time
Think time emulates the time that a real user waits between actions. During recording, VuGen automatically adds think time to the Vuser script after each user action—if the time between that action and the subsequent action exceeds a predefined threshold of about four seconds.
The property that you can modify is the think time, in seconds.
To modify the think time:
1 In the tree view of the Vuser script, select the think time step you want to edit. Think time steps are shown using the Think Time icon.
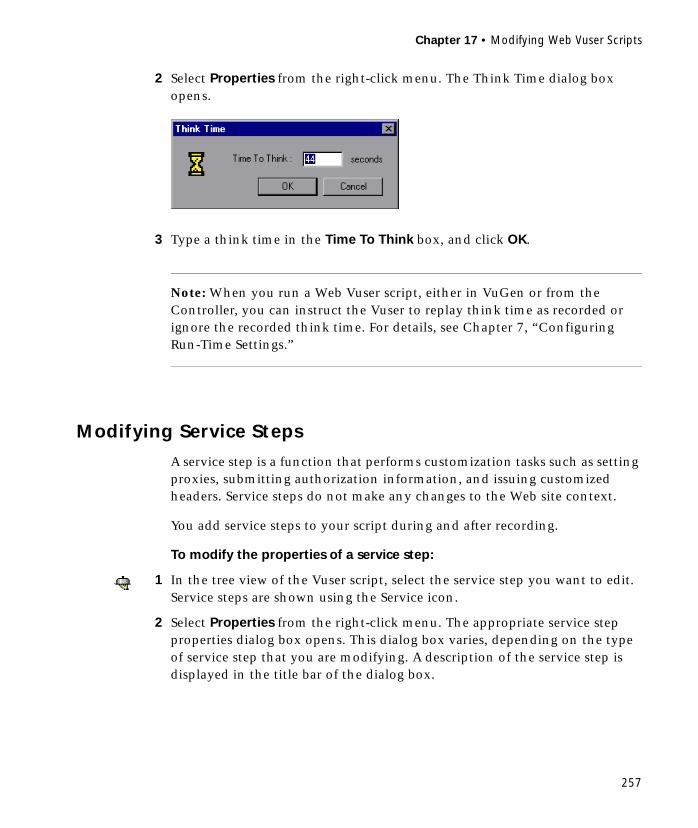
Chapter 17 • Modifying Web Vuser Scripts
257
2 Select Properties from the right-click menu. The Think Time dialog box opens.
3 Type a think time in the Time To Think box, and click OK.
Note: When you run a Web Vuser script, either in VuGen or from the Controller, you can instruct the Vuser to replay think time as recorded or ignore the recorded think time. For details, see Chapter 7, “Configuring Run-Time Settings.”
Modifying Service Steps
A service step is a function that performs customization tasks such as setting proxies, submitting authorization information, and issuing customized headers. Service steps do not make any changes to the Web site context.
You add service steps to your script during and after recording.
To modify the properties of a service step:
1 In the tree view of the Vuser script, select the service step you want to edit. Service steps are shown using the Service icon.
2 Select Properties from the right-click menu. The appropriate service step properties dialog box opens. This dialog box varies, depending on the type of service step that you are modifying. A description of the service step is displayed in the title bar of the dialog box.

Creating Vuser Scripts • Web Vuser Scripts
258
Note: Some service step functions have no arguments. In these cases, the Properties menu item is disabled.
3 Type or select the arguments required for the service step. See the LoadRunner Online Function Reference for details of each function.
4 Click OK to close the service step properties dialog box.
Modifying Web Checks
A Web check is a function that verifies the presence of a specific object on a Web page. The object can be a text string, an image, or a Java applet.
You add Web checks to your script during and after recording.
To modify the properties of a Web check:
1 In the tree view of the Vuser script, select the Web check you want to edit. Web checks are shown using Web Check icons.
2 Select Properties from the right-click menu. The appropriate Web check properties dialog box opens. This dialog box varies, depending on the type of check that you are modifying.
3 Type or select the properties required for the check. For details, see Chapter 16, “Verifying Web Pages Under Load.”
4 Click OK to close the check properties dialog box.
Image Check icon
Java Check icon
Text Check icon

259
18Correlating Web Statements
VuGen’s correlation feature allows you to link Web statements by using the results of one statement as input to another.
This chapter describes how to correlate statements during recording. It discusses:
➤ Choosing a Correlation Method
➤ Auto-Detect Correlation
➤ Rule-Based Correlation
➤ Correlating All Statements
➤ Testing Rules
➤ Setting the Correlation Recording Options
➤ Performing Manual Correlation
➤ Defining the Boundaries of Dynamic Data
The following information only applies to Web Vuser scripts.

Creating Vuser Scripts • Web Vuser Scripts
260
About Correlating Statements
HTML pages often contain dynamic data, which is data that changes each time you access a site. For example, certain Web servers use links comprised of the current date and time.
When you record a Web Vuser script, dynamic data may be recorded into the script. Your script tries to present the recorded variables to the Web server, but they are no longer valid. The Web server rejects them and issues an error. These errors are not always obvious, and you may only detect them by carefully examining Vuser log files.
If you encounter an error when running your Vuser, examine the script at the point where the error occurred. In many cases, correlation will solve the problem by enabling you to use the results of one statement as input to another.
The dynamic data in an HTML page can be in the form of:
➤ a URL that changes each time you access the associated Web page
➤ a field (sometimes hidden) recorded during a form submission
➤ javascript cookies
Case 1
Suppose a Web page contains a hypertext link with text: "Buy me now!" When you record a Vuser script with HTTP data, the URL is recorded by VuGen as:
"http://host//cgi-bin/purchase.cgi?date=170397&ID=1234"
Since the date “170397” and ID “1234” are created dynamically during recording, each new browser session recreates the date and ID. When you run the script, the link "Buy me now!" is no longer associated with the same URL that was recorded—but with a new one. The Web server is therefore unable to retrieve the URL.
Chapter 18 • Correlating Web Statements
261
Case 2
Consider a case where a user fills in his name and account ID into a form, and then submits the form.
When the form is submitted, a unique serial number is also sent to the server together with the user’s data. Although this serial number is contained in a hidden field in the HTML code, it is recorded by VuGen into the script. Because the serial number changes with each browser session, LoadRunner is unable to successfully replay the recorded script.
You can use correlated statements to resolve the difficulties in both of the above cases. Replace the dynamic data in the recorded script with one or more parameters. When the Vuser script runs, LoadRunner assigns parameter values.
Choosing a Correlation Method
When recording a browser session, you should first try recording in HTML mode. This mode decreases the need for correlation. If you cannot run a script recorded in HTML mode, then use the URL script mode in conjunction with the methods described in this chapter. For more information about the various recording modes, see “Understanding the Recording Modes,” on page 174.
You can instruct LoadRunner to correlate the statements in your script either during or after recording. The recording-time solutions described in this chapter automatically correlate the statements in your script. You can also use VuGen’s correlation mechanism to correlate scripts after recording. For more information, see Chapter 19, “Correlating Web Vusers with Snapshots.”
This chapter discusses recording-time correlation.

Creating Vuser Scripts • Web Vuser Scripts
262
The LoadRunner correlation engine provides three types of automatic recording-time solutions.
➤ Auto-Detect Correlation
➤ Rule-Based Correlation
➤ Correlating All Statements
You enable recording-time correlation and choose the correlation method from the Correlation recording options.
If you are working with an application server, you may already know the context of the string you need to replace. The context refers to the syntax rules of the application server. Certain servers have clear syntax rules, or a context, that they always use when creating links and referrals. For example, BroadVision servers create session IDs that are always placed between the same delimiters: BV_SessionID=@@@@ on the left, session_id, and @@@@ on the right.
If you are recording a session with a known context, or if you can determine rules for correlation, you should set the recording options before recording. In addition, if you are recording a session on a popular application server, such as BroadVision, NetDynamics, or BlueMartini, you should set the
BV_SessionID=@@@@1303778278.0969956817@@@@&
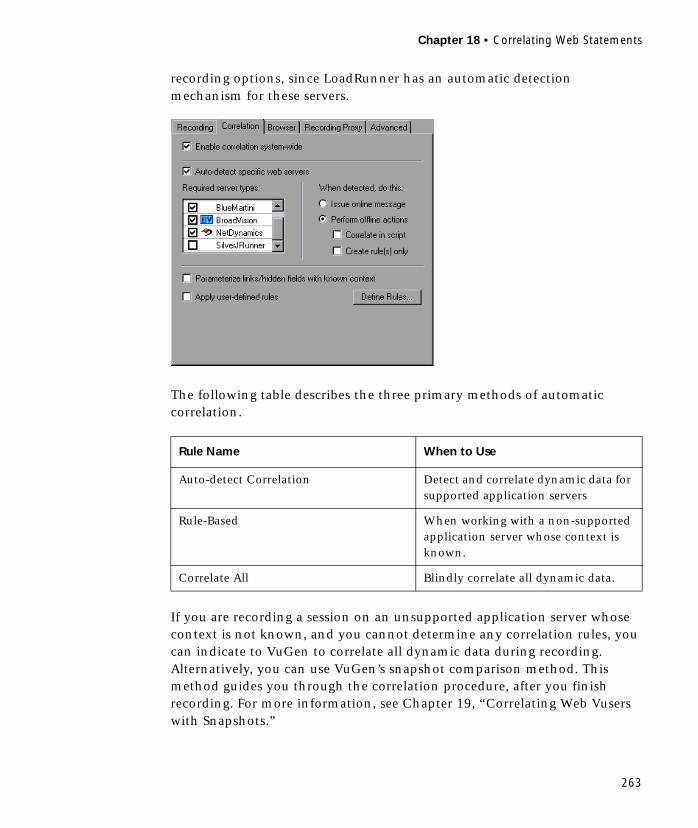
Chapter 18 • Correlating Web Statements
263
recording options, since LoadRunner has an automatic detection mechanism for these servers.
The following table describes the three primary methods of automatic correlation.
If you are recording a session on an unsupported application server whose context is not known, and you cannot determine any correlation rules, you can indicate to VuGen to correlate all dynamic data during recording. Alternatively, you can use VuGen’s snapshot comparison method. This method guides you through the correlation procedure, after you finish recording. For more information, see Chapter 19, “Correlating Web Vusers with Snapshots.”
Rule Name When to Use
Auto-detect Correlation Detect and correlate dynamic data for supported application servers
Rule-Based When working with a non-supported application server whose context is known.
Correlate All Blindly correlate all dynamic data.

Creating Vuser Scripts • Web Vuser Scripts
264
Auto-Detect Correlation
You can configure VuGen to automatically correlate the recorded statements, for application servers whose contexts are known. (For an explanation of contexts, see the previous section.) The semi-automatic correlation solution is based on automatic detection of Web pages generated by specific application servers. Currently, automatic detection is implemented for popular Web application servers such as BlueMartini, NetDynamics, BroadVision, SilverJrunner, and AribaBuyer servers. When you enable automatic detection, the recorder creates rules for the server variables.
For example, when you record a BroadVision session, it may create a rule which indicates that all data between “BV_SessionID” and “&” should be saved to a parameter.
Rule-Based Correlation
Rule-based correlation requires you to define correlation rules before you record a session. You create the correlation rules in the Recording Options dialog box. The rules include information such as the boundaries of the dynamic data you want to correlate and other specifications about the match such as binary, case matching, and the instance number.There are three types of correlation rules:
➤ Parameterize Token in Link/Form
➤ Parameterize Value Extracted from Cookie
➤ Parameterize Form Field Value
Parameterize Token in Link/Form
The Parameterize token in link/form action text method specifies criteria for replacement of a token in any string with a parameter. This method is for application servers where you know the context rules. You define a left boundary, a right boundary, an alternate right boundary, and an instance (occurrence) of the left boundary.

Chapter 18 • Correlating Web Statements
265
For example, suppose you want to replace any text between the second occurrence of the string “sessionid=” and “@” with a parameter. Specify sessionid= as a left boundary in the Right of box, and @ as a right boundary in the Left of box. Since you are looking for the second occurrence, specify 2 in the Instance box.
If the right boundary is not consistent, you can specify an alternate right boundary in the Or box. It uses this value when it cannot uniquely determine the specified right boundary.
For example, suppose the Web page contains links in the following formats:
"[email protected]""Page.htm@SessionID=122&test.htm"
Specifying right boundary alone is not sufficient, since it is not consistent—sometimes it is "@" and other times it is "&". In this case, you specify "&" as the alternate right boundary.
The left and right boundaries should uniquely identify the string. Do not include dynamic data in the boundaries. You can also specify End of String or Newline Character as a right boundary, available as options in the pull-down list. If none of the right boundaries are located, the text from the left boundary to the end of source string is saved to the parameter.
Parameterize Value Extracted from Cookie
The Parameterize Value extracted from cookie method is similar to the token rule, except that the value is extracted from cookie text (exactly as it appears in the recording log) instead of from the link/form action.
In addition, the token rule parameterizes only the part of URL which matches the rule boundaries; the cookie rule looks for the extracted value in links/form and actions/form fields and replaces it with a parameter without having to specify any boundaries.
Parameterize Form Field Value
The Parameterize form field value method instructs the recorder to save all form fields that have names to a parameter. It creates a parameter and places
Creating Vuser Scripts • Web Vuser Scripts
266
it in the script before the form’s action step. This method is ideal for recording sites with many forms.
In addition to the above rules, you can further control the type of match for your correlation by setting the following flags:
Match Case: Match the case when looking for boundaries.
Reverse Search: Search for left boundary from the end of the string backwards.
Use Parameter Prefix: Use a prefix in all automatically generated parameters based on this rule. Prefixes prevent you from overwriting existing user parameters. In addition, prefixes allow you to recognize the parameter in your script more easily.
Always create new parameter: Create a new parameter for this rule even if the value replaced by the parameter has not changed from the previous instance. This option should be set if the Web server assigns the token a different value for each page. For example, NetDynamics servers may change the session ID from page to page to minimize fraud.
Correlating All Statements
If you are not working with a popular Web application server, or if you are unable to determine specific rules for your dynamic data, you can instruct VuGen to correlate all statements. To enable this type of correlation, you select the Parameterize links/hidden fields with known context check box in the Recording options dialog box.
This method applies to scripts for which HTML mode recording was suitable, but which for scalability reasons, were recorded in URL script mode to avoid recording the pages’ images. LoadRunner inserts web_reg_save_param statements into the script which save the dynamic data to parameters.
This correlation method blindly parameterizes all Web addresses and hidden field values—including those which are not session IDs or site-generated values. As a result, it generates many web_reg_save_param statements which may affect the scalability and performance of your script.
Chapter 18 • Correlating Web Statements
267
Although this method is useful when you need to replay your script quickly, it is not recommended that you use it on a regular basis because of the large amount of resources it requires.
Note: Automatic correlation does not parameterize URLs for which the context cannot be determined.
Setting Correlation Options
When VuGen tries to automatically determine a correlation rule, it first checks to see if the rule already exists. If the dynamic data does not conform to an existing rule, a new rule is created. You can configure several automatic detection settings, indicating to VuGen what action to perform when detecting a value that needs to be correlated:
➤ Issue online message: Issue a message during the recording when detecting dynamic data, before creating a rule.
➤ Perform offline action: Perform an offline action after detecting the dynamic data. The possible actions are Correlate in script and Create rule only. The first option, creates a rule and then correlates the statement within the script. The second option only creates a rule (without correlation). You can use the latter option to determine the context of the application server and perform correlation at a later stage.
Testing Rules
This section applies to user-defined rules that you created for a server with a known context. After you define a new rule in the Correlation Rule dialog box, you can test it before recording your session by applying the rules to a sample string.
To use the testpad:
1 Click Test in the Rules dialog box.
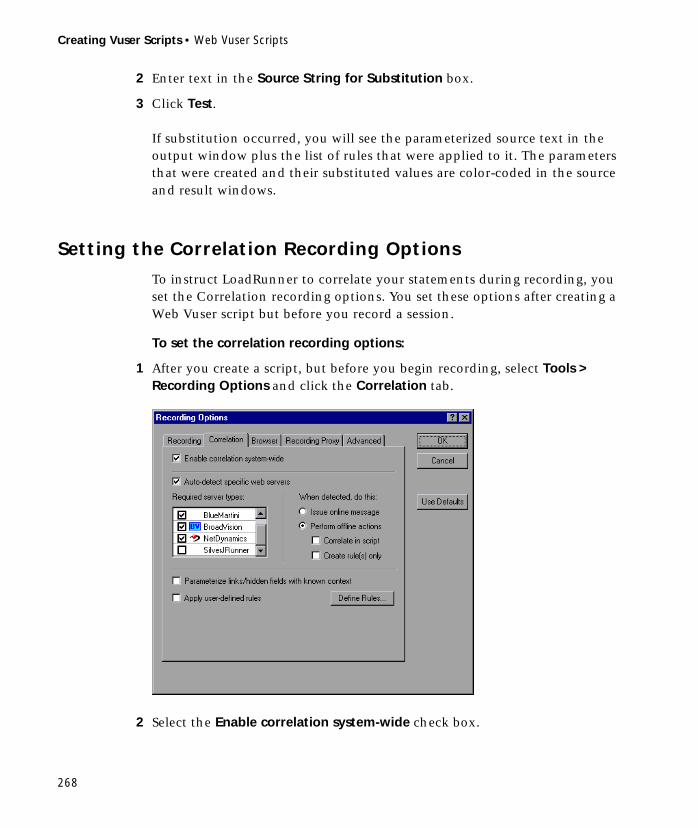
Creating Vuser Scripts • Web Vuser Scripts
268
2 Enter text in the Source String for Substitution box.
3 Click Test.
If substitution occurred, you will see the parameterized source text in the output window plus the list of rules that were applied to it. The parameters that were created and their substituted values are color-coded in the source and result windows.
Setting the Correlation Recording Options
To instruct LoadRunner to correlate your statements during recording, you set the Correlation recording options. You set these options after creating a Web Vuser script but before you record a session.
To set the correlation recording options:
1 After you create a script, but before you begin recording, select Tools > Recording Options and click the Correlation tab.
2 Select the Enable correlation system-wide check box.

Chapter 18 • Correlating Web Statements
269
3 Choose one of the correlation options: (see “Choosing a Correlation Method,” on page 261)
Auto-detect specific Web servers: Enables automatic correlation for popular application server environments. In these environments, the recorder recognizes all values that need to be correlated but does not automatically correlate these values.
Define Rules: Defines the correlation rules, This option is useful when you are not working in an application server environment, but you know the string that precedes and follows the dynamic data.
Parameterize links/hidden fields with known context. Instructs the recorder to blindly correlate all the dynamic data.
4 If you selected the Auto-detect option, indicate what VuGen should do when it detects a value that needs to be correlated: Issue online message, Perform offline actions. Choose the type of offline action(s): Correlate in script, or Create rule only. By default, LoadRunner issues an online message to the user.
5 If you defined your own rules, Click Test in the Correlation Rules dialog box to test the user-defined rules. For guidelines on defining rules, see the following section, “Setting Correlation Rules,” on page 269.
6 Click OK.
Setting Correlation Rules
You can add and remove rules from the Correlation Rules dialog box. Note that you can also edit rules that were created automatically for application server environments.
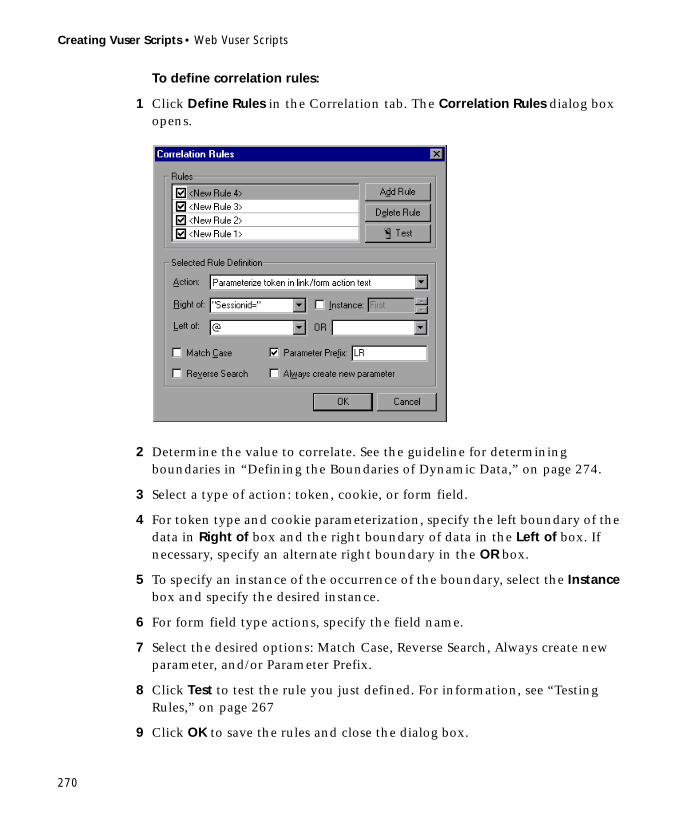
Creating Vuser Scripts • Web Vuser Scripts
270
To define correlation rules:
1 Click Define Rules in the Correlation tab. The Correlation Rules dialog box opens.
2 Determine the value to correlate. See the guideline for determining boundaries in “Defining the Boundaries of Dynamic Data,” on page 274.
3 Select a type of action: token, cookie, or form field.
4 For token type and cookie parameterization, specify the left boundary of the data in Right of box and the right boundary of data in the Left of box. If necessary, specify an alternate right boundary in the OR box.
5 To specify an instance of the occurrence of the boundary, select the Instance box and specify the desired instance.
6 For form field type actions, specify the field name.
7 Select the desired options: Match Case, Reverse Search, Always create new parameter, and/or Parameter Prefix.
8 Click Test to test the rule you just defined. For information, see “Testing Rules,” on page 267
9 Click OK to save the rules and close the dialog box.

Chapter 18 • Correlating Web Statements
271
Performing Manual Correlation
In most cases, automatic or rule-based correlation helps you successfully run scripts that contain dynamic data. You can perform correlation after the recording using VuGen’s snapshot comparison. (See Chapter 19, “Correlating Web Vusers with Snapshots.”)
VuGen also allows you to manually correlate your scripts by adding the code for the correlation functions to your scripts. The function that allows you to dynamically save data to a parameter is web_reg_save_param. For non-HTML applications, you can also use are web_create_html_param.
Follow these steps to manually correlate your script:
1 Identify the statement that contains dynamic data and the patterns that characterize the boundaries of the data. See “Defining the Boundaries of Dynamic Data,” on page 274.
2 In the script, replace the dynamic data with your own parameter name. See “Replacing Dynamic Data with a Parameter” on page 271.
3 Add web_reg_save_param or another correlation function into the script before the statement that contains the dynamic data. See “Adding a Correlation Function,” on page 272 or the LoadRunner Online Function Reference.
Replacing Dynamic Data with a Parameter
First, identify the actual dynamic data. After you locate the dynamic data in the recorded statement, search the entire script for the dynamic data, and replace it with a parameter. Give the parameter any name, and enclose it with braces: {param_name}. You can include a maximum of 64 parameters per script.
To replace dynamic data with a parameter:
Select Edit > Replace from the VuGen main window to display the Search and Replace dialog box. Search the entire script for the dynamic data, and replace it with a parameter.

Creating Vuser Scripts • Web Vuser Scripts
272
Adding a Correlation Function
You insert the web_reg_save_param statement to save dynamic data in a script. This functions tell VuGen to create a parameter that saves the run-time value of the dynamic data during replay.
Note: Always insert the correlation statement into the script before the statement that retrieves the Web page with the dynamic data.
The web_reg_save_param statement has the following syntax:
int web_reg_save_param (const char *mpszParamName, <List of Attributes>, LAST);
The following table lists the available attributes. Note that the attribute value strings (e.g. Search=all) are not case sensitive.
NOTFOUND The handling method when a boundary is not found and an empty string is generated. "ERROR", the default, indicates that LoadRunner should issue an error when a boundary is not found. When set to "EMPTY", no error message is issued and script execution continues. Note that if Continue on Error is enabled for the script, then even when NOTFOUND is set to "ERROR", the script continues when the boundary is not found, but it writes an error message to the Extended log file.
LB The left boundary of the parameter or the dynamic data. This parameter must be a non-empty, null-terminated character string. Boundary parameters are case sensitive; to ignore the case, add "/IC" after the boundary. Specify "/BIN" after the boundary to specify binary data.
Chapter 18 • Correlating Web Statements
273
When you run the script, the web_reg_save_param function scans the subsequent HTML page that is accessed. It searches for an occurrence of the left boundary, followed by any string, followed by the right boundary. When such an occurrence is found, VuGen assigns the string between the left and right boundaries to the parameter named in the attributes. After finding the specified number of occurrences, web_reg_save_param does not search any more HTML pages and continues with the next step in the script.
Note: Each correlation function retrieves dynamic data once, for the subsequent HTTP request. If another HTTP request at a later point in the script generates new dynamic data, you must insert another correlation function.
RB The right boundary of the parameter or the dynamic data. This parameter must be a non-empty, null-terminated character string. Boundary parameters are case sensitive; to ignore the case, add "/IC" after the boundary. Specify "/BIN" after the boundary to specify binary data.
RELFRAMEID The hierarchy level of the HTML page relative to the requested URL. The possible values are ALL or a number.
SEARCH The scope of the search—where to search for the delimited data. The possible values are Headers (Search only the headers), Body (search only Body data, not headers), or ALL (search Body and headers). The default value is ALL.
ORD This optional parameter indicates the ordinal or occurrence number of the match. The default ordinal is 1. If you specify "All", it saves the parameter values in an array.

Creating Vuser Scripts • Web Vuser Scripts
274
Suppose the script contains a dynamic session ID:
You insert a web_reg_save_param statement before the above statement:
After implementing correlated statements, the modified script looks like this:
Defining the Boundaries of Dynamic Data
Use these guidelines to determine the boundaries of the dynamic data:
➤ Always analyze the location of the dynamic data within the HTML code itself, and not in the recorded script.
➤ Identify the string that is immediately to the left of the dynamic data. This string defines the left boundary of the dynamic data.
➤ Identify the string that is immediately to the right of the dynamic data. This string defines the right boundary of the dynamic data.
web_url("FirstTimeVisitors", "URL=/exec/obidos/subst/help/first-time-visitors.html/002-8481703-
4784428>Buy books for a penny ","TargetFrame=","RecContentType=text/html","SupportFrames=0",LAST);
web_req_save_param ("user_access_number", "NOTFOUND=ERROR", "LB=first-time-visitors.html/","RB=>Buy books for a penny" , "ORD=6", LAST );
web_url("FirstTImeVisitors", "URL=/exec/obidos/subst/help/first-time-”“visitors.html/user_access_number> Buy books for a penny ",
"TargetFrame=","RecContentType=text/html","SupportFrames=0",LAST);
Chapter 18 • Correlating Web Statements
275
➤ The dynamic text should be contained between the left and right boundaries, that is, the left and right boundaries define the position of the dynamic text within the HTML code.
➤ web_reg_save_param is a service function used for correlating HTML statements in Web Vuser scripts. This function retrieves dynamic information from the downloaded page, and saves it to a parameter.
The web_create_html_param(_ex) function is used in older scripts. It differs from web_reg_save_param in the way it handles boundaries. web_create_html_param_ex supports embedded boundaries—it searches for the next occurrence after the previous left boundary, whereas web_reg_save_param looks for the characters between (but not including) the specified boundaries and saves the information beginning one byte after the left boundary and ending one byte before the right boundary. web_reg_save_param does not support embedded boundary characters. For example, if the input buffer is {a{b{c} and "{" is specified as a left boundary, and "}" as a right border.
For web_reg_save_param: Instance 1 is c and there are no further instances—it found the right and left boundaries but it does not allow embedded boundaries, so "c" is the only valid match.
For web_create_html_param_ex: Instance 1 is a{b{c, instance 2 is b{c, and instance 3 is c. Since it allows embedded boundaries, there are three matches.
➤ By default, the maximum length of any boundary string is 256 characters. Include a web_set_max_html_param_len function in your script to increase the maximum permitted length. For example, the following function increases the maximum length to 1024 characters:web_set_max_html_param_len(“1024”);

Creating Vuser Scripts • Web Vuser Scripts
276

277
19Correlating Web Vusers with Snapshots
When correlation was not performed during recording, VuGen’s built-in Web Correlation mechanism allows you to correlate Vuser scripts after a recording session.
This chapter describes:
➤ Understanding Snapshots
➤ Setting Up VuGen for Correlation
➤ Performing Correlation
The following information only applies to Web Vuser scripts.
About Correlating with Snapshots
VuGen provides several correlation mechanisms for Web Vuser scripts. The automatic method discussed in Chapter 18, “Correlating Web Statements”, detects dynamic values during recording and allows you to correlate them immediately. If you disabled automatic correlation, or if the automatic method did not detect all of the differences, you can use VuGen’s built-in correlation mechanism, described in this chapter, to find differences and correlate the values. You can also use this mechanism for scripts that were only partially correlated.
The correlation mechanism uses snapshots to track the results of script execution. Snapshots are graphical representations of Web pages. VuGen creates a base snapshot during recording, and generates a new snapshot every time you execute the script. You compare the recorded snapshot to any one of the replay snapshots to determine which values you need to correlate in order to insure a successful execution of the script.

Creating Vuser Scripts • Web Vuser Scripts
278
The Web correlation mechanism has a built-in comparison utility that allows you to view the text or binary differences between the snapshots. You can then correlate the differences one-by-one or all at once.
Understanding Snapshots
The correlation mechanism uses snapshots to track the results of script execution. VuGen creates a base snapshot during recording, and generates a new snapshot every time you execute the script. You compare the snapshots and their HTML code to find the dynamic values that need to be correlated in order to run the script.
The snapshot files are stored under the script directory with an .inf extension. Snapshots created during recording are stored in the Vuser script’s data folder. The Replay snapshots are located in the script’s Iteration folders: Iteration1, Iteration2, etc. for each set of results. By default, VuGen compares the Recording snapshot to the first replay snapshot. You may, however, choose a different snapshot for comparison.
If there is no recording snapshot displayed for the selected step, check the following possible reasons:
➤ The script was recorded with a VuGen version 6.02 or earlier.
➤ Snapshots are not generated for certain types of steps.
➤ The imported actions do not contain snapshots.
If there is no replay snapshot displayed for the selected step, check the following possible reasons:
➤ The script was recorded with VuGen version 6.02 or earlier.
➤ The imported actions do not contain snapshots.
➤ The Vuser files are stored in a read-only directory, and VuGen could not save the replay snapshots.
➤ The step represents navigation to a resource.
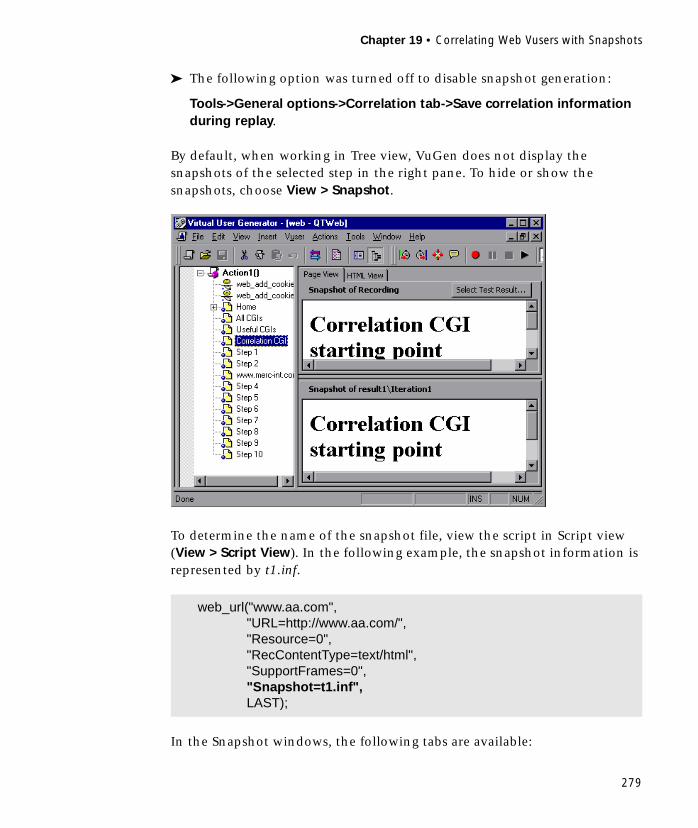
Chapter 19 • Correlating Web Vusers with Snapshots
279
➤ The following option was turned off to disable snapshot generation:
Tools->General options->Correlation tab->Save correlation information during replay.
By default, when working in Tree view, VuGen does not display the snapshots of the selected step in the right pane. To hide or show the snapshots, choose View > Snapshot.
To determine the name of the snapshot file, view the script in Script view (View > Script View). In the following example, the snapshot information is represented by t1.inf.
In the Snapshot windows, the following tabs are available:
web_url("www.aa.com","URL=http://www.aa.com/","Resource=0","RecContentType=text/html","SupportFrames=0","Snapshot=t1.inf",LAST);

Creating Vuser Scripts • Web Vuser Scripts
280
Page View: Display the snapshot in HTML as it would appear in a browser. This button is available for both the Recording and Replay snapshots. Use this view to make sure you are viewing the correct snapshot. In this view, however, you do not see the values that need to be correlated.
HTML View: Display the HTML code of the snapshot. This button is available for both the Recording and Replay snapshots. Use this view to view the actual HTML code of the recorded pages. The HTML view also shows a tree hierarchy of the script, with a breakdown of the document’s components: title, links, forms, etc.
Select Test Result: Lets you select a Replay snapshot to compare with the recording snapshot. This button opens a dialog box which lists the results folders for the active script. The Replay snapshots are located in the script’s Iteration folders: Iteration1, Iteration2, etc. for each set of results.
When you instruct VuGen to scan the script for correlations, it opens the Output window and displays the Correlation Results tab. In the Correlation Results tab it displays the differences between the Record and Replay snapshots.
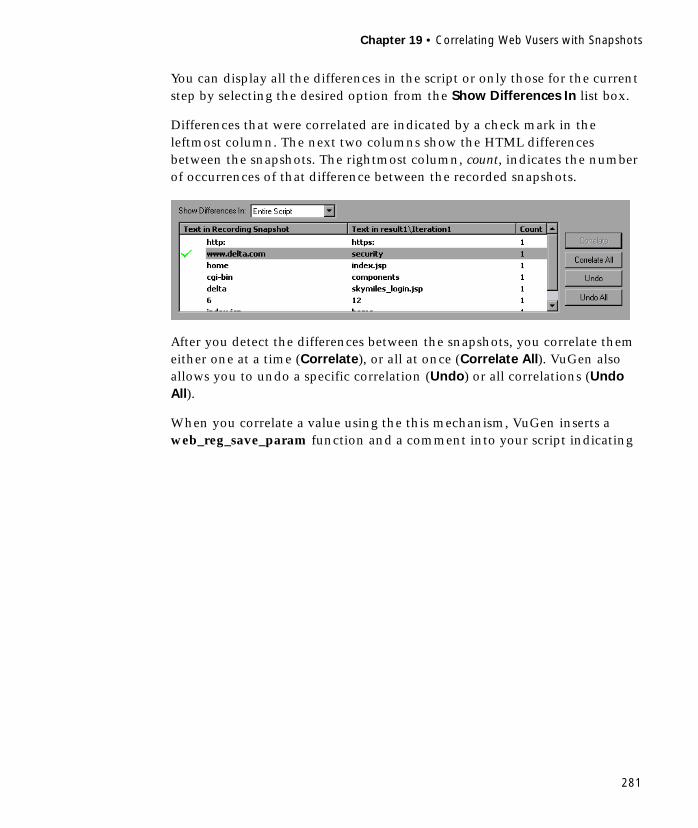
Chapter 19 • Correlating Web Vusers with Snapshots
281
You can display all the differences in the script or only those for the current step by selecting the desired option from the Show Differences In list box.
Differences that were correlated are indicated by a check mark in the leftmost column. The next two columns show the HTML differences between the snapshots. The rightmost column, count, indicates the number of occurrences of that difference between the recorded snapshots.
After you detect the differences between the snapshots, you correlate them either one at a time (Correlate), or all at once (Correlate All). VuGen also allows you to undo a specific correlation (Undo) or all correlations (Undo All).
When you correlate a value using the this mechanism, VuGen inserts a web_reg_save_param function and a comment into your script indicating

Creating Vuser Scripts • Web Vuser Scripts
282
that a correlation was done for the parameter. It also indicates the original value.
Setting Up VuGen for Correlation
Before Recording you set up the general correlation options. These options instruct the Vusers to save correlation information during recording, to be used at a later stage. You can specify the type of comparison to perform when comparing snapshots: HTML or text. In the Correlation tab, you can also indicate which characters should be treated as delimiters.
Note: In most cases, it is recommended that you work with the default HTML comparison method. If your script contains non-HTML tags, you can use the Text comparison method.
// Correlation Studio created parameter {WCSParam_Diff1}; replaced value:falillgidgkbfdlcflmcfkgdgff.0web_reg_save_param( "WCSParam_Diff1", "LB=BV_EngineID=", "RB=&", "Ord=1", "Search=body", LAST );web_url("American2",
"URL=http://www.im.aa.com/Ameri-can?BV_EngineID={WCSParam_Diff1}&BV_Operation=Dyn_Frame&form%25framespacing=0&BV_SessionID=%40%40%40%401303778278.0969956817%40%40%40%40&form%25destination=%2fnavguest.tmpl&form%25destination_type=tem-plate&form%25border=0&BV_ServiceName=Ameri-can&form%25frameborder=no",
"TargetFrame=","Resource=0","RecContentType=text/html","SupportFrames=0","Referer=http://www.im.aa.com/American?BV_Operation=Dyn_AAPage&referer=index.html&form%25referrer_site=None","Snapshot=t3.inf",LAST);
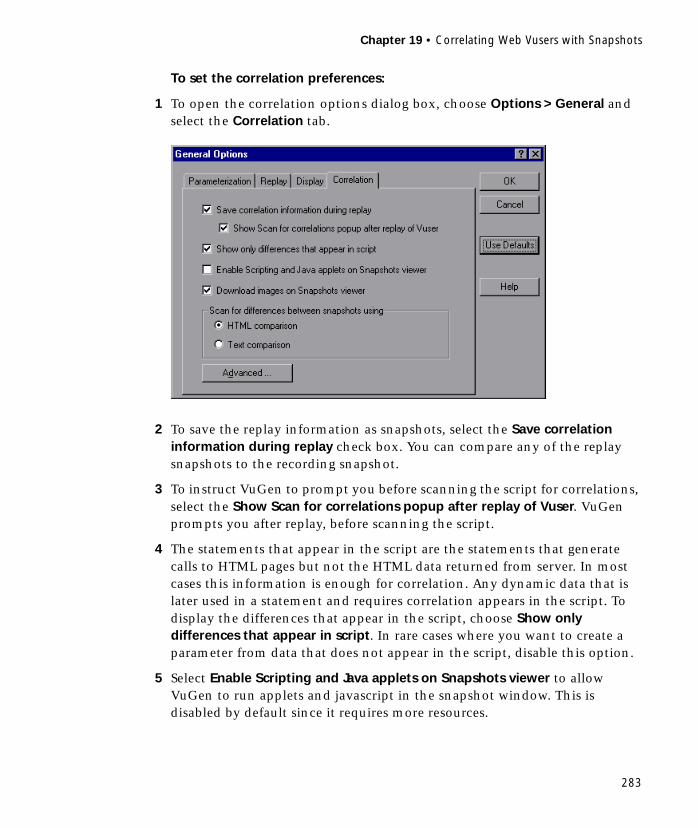
Chapter 19 • Correlating Web Vusers with Snapshots
283
To set the correlation preferences:
1 To open the correlation options dialog box, choose Options > General and select the Correlation tab.
2 To save the replay information as snapshots, select the Save correlation information during replay check box. You can compare any of the replay snapshots to the recording snapshot.
3 To instruct VuGen to prompt you before scanning the script for correlations, select the Show Scan for correlations popup after replay of Vuser. VuGen prompts you after replay, before scanning the script.
4 The statements that appear in the script are the statements that generate calls to HTML pages but not the HTML data returned from server. In most cases this information is enough for correlation. Any dynamic data that is later used in a statement and requires correlation appears in the script. To display the differences that appear in the script, choose Show only differences that appear in script. In rare cases where you want to create a parameter from data that does not appear in the script, disable this option.
5 Select Enable Scripting and Java applets on Snapshots viewer to allow VuGen to run applets and javascript in the snapshot window. This is disabled by default since it requires more resources.
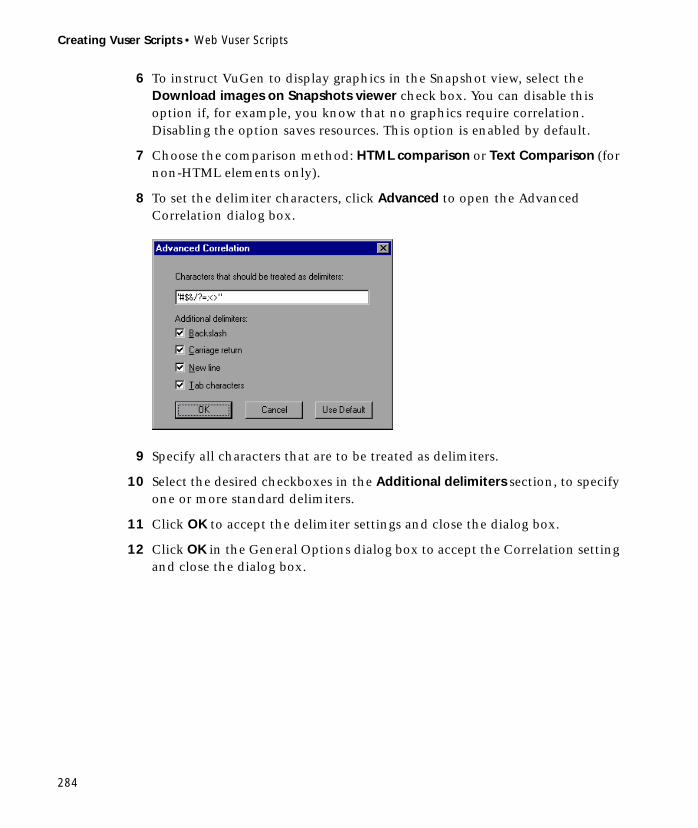
Creating Vuser Scripts • Web Vuser Scripts
284
6 To instruct VuGen to display graphics in the Snapshot view, select the Download images on Snapshots viewer check box. You can disable this option if, for example, you know that no graphics require correlation. Disabling the option saves resources. This option is enabled by default.
7 Choose the comparison method: HTML comparison or Text Comparison (for non-HTML elements only).
8 To set the delimiter characters, click Advanced to open the Advanced Correlation dialog box.
9 Specify all characters that are to be treated as delimiters.
10 Select the desired checkboxes in the Additional delimiters section, to specify one or more standard delimiters.
11 Click OK to accept the delimiter settings and close the dialog box.
12 Click OK in the General Options dialog box to accept the Correlation setting and close the dialog box.
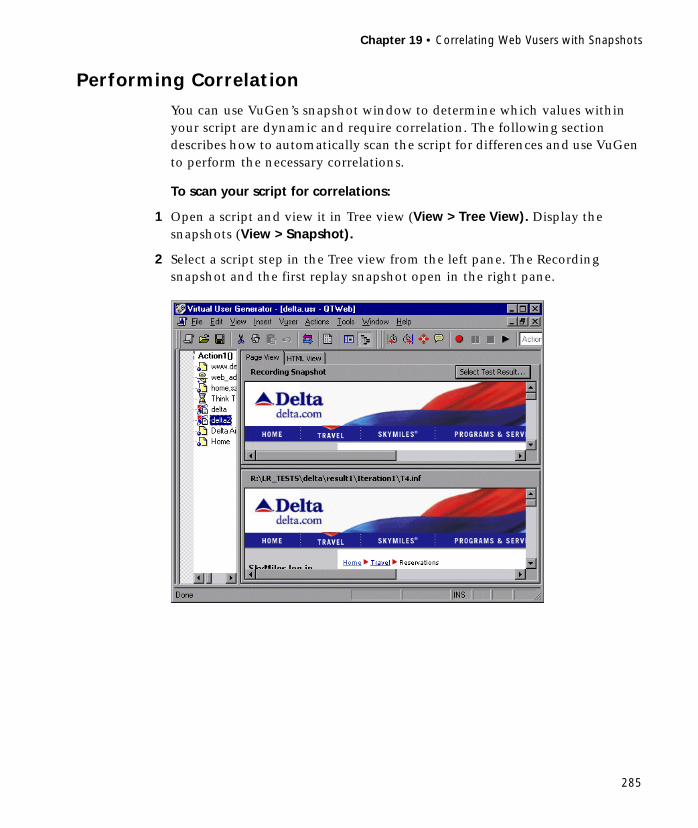
Chapter 19 • Correlating Web Vusers with Snapshots
285
Performing Correlation
You can use VuGen’s snapshot window to determine which values within your script are dynamic and require correlation. The following section describes how to automatically scan the script for differences and use VuGen to perform the necessary correlations.
To scan your script for correlations:
1 Open a script and view it in Tree view (View > Tree View). Display the snapshots (View > Snapshot).
2 Select a script step in the Tree view from the left pane. The Recording snapshot and the first replay snapshot open in the right pane.
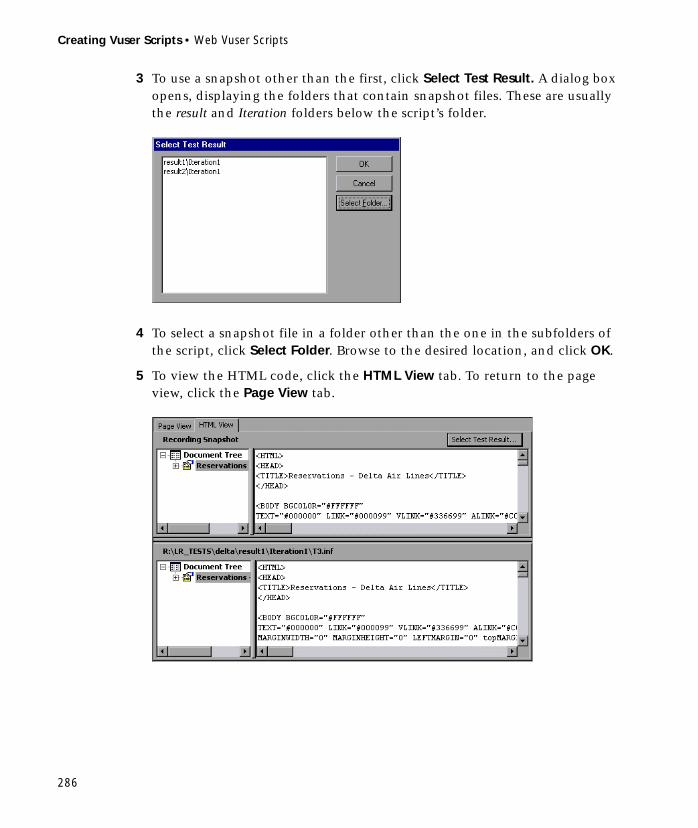
Creating Vuser Scripts • Web Vuser Scripts
286
3 To use a snapshot other than the first, click Select Test Result. A dialog box opens, displaying the folders that contain snapshot files. These are usually the result and Iteration folders below the script’s folder.
4 To select a snapshot file in a folder other than the one in the subfolders of the script, click Select Folder. Browse to the desired location, and click OK.
5 To view the HTML code, click the HTML View tab. To return to the page view, click the Page View tab.
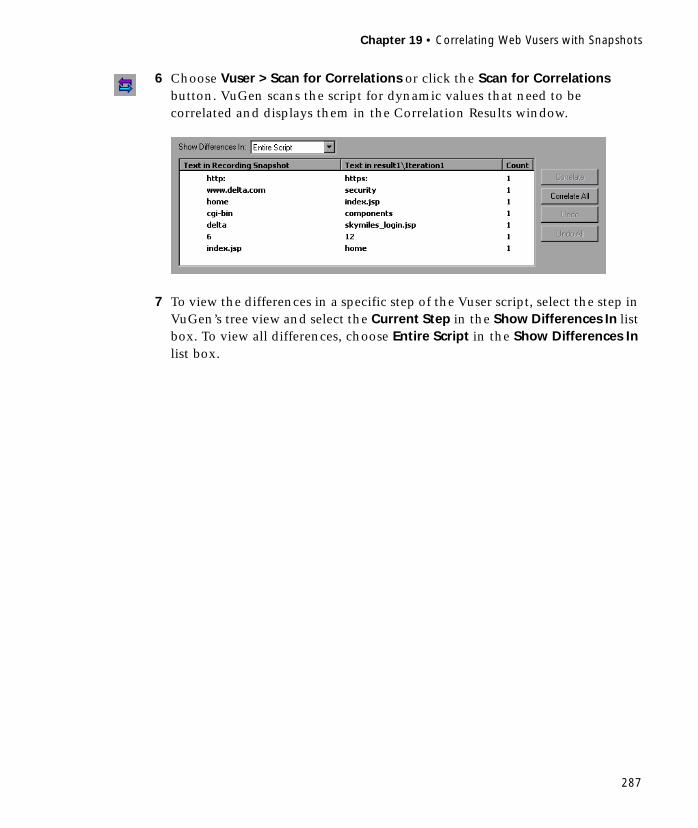
Chapter 19 • Correlating Web Vusers with Snapshots
287
6 Choose Vuser > Scan for Correlations or click the Scan for Correlations button. VuGen scans the script for dynamic values that need to be correlated and displays them in the Correlation Results window.
7 To view the differences in a specific step of the Vuser script, select the step in VuGen’s tree view and select the Current Step in the Show Differences In list box. To view all differences, choose Entire Script in the Show Differences In list box.

Creating Vuser Scripts • Web Vuser Scripts
288
8 To correlate all differences, click Correlate All. To correlate a specific difference, select it and click Correlate. VuGen places a green check mark next to differences that were correlated and inserts web_reg_save_param functions into the Vuser script.
9 To undo a correlation, select the difference and click Undo. To undo all correlations, click Undo All.
10 Choose File > Save to save the changes.
289
20Testing XML Pages
VuGen’s Web Vusers support Web pages containing XML code.
This chapter describes:
➤ Viewing XML as URL steps
➤ Inserting XML as a Custom Request
➤ Viewing XML Custom Request Steps
The following information only applies to Web Vuser scripts.
About Testing XML Pages
VuGen supports record and replay for XML code within Web pages.
The XML code can appear in the script as a regular URL step or as a custom request. VuGen detects the HTML and allows you to view each document type definition (DTD), its entities, and its attributes. The DTD is color coded, allowing you to easily identify the elements. You can also expand and collapse the tree view of the DTD. Note that VuGen can detect the XML even when the MIME type displayed in the RecContentType attribute is not set to text/xml.
When you expand the DTD, you can parameterize the attribute values. You can also save the values in order to perform correlation using the standard correlation functions. For more information about the correlation functions, see the LoadRunner Online Function Reference.

Creating Vuser Scripts • Web Vuser Scripts
290
Viewing XML as URL steps
One way to test a page with XML code, is to record it with VuGen. You record the XML pages as you would record a standard Web page. VuGen records the DTD and all of the XML elements. It does not create a snapshot for the XML page. Instead, for each XML step it displays the XML code in the snapshot frame.
VuGen creates a color-coded expandable hierarchy of the DTD in the snapshot frame. Click on the "+" to expand an item, and click on the "-" to collapse it. VuGen displays all XML tags in brown, and values in black.
Chapter 20 • Testing XML Pages
291
To replace any of the constant values with a parameter, select a value, perform a right-click, and select Replace with a Parameter. Follow the standard procedure for parameterization. For more information, see the chapter on parameterization.
Inserting XML as a Custom Request
You can also test your XML pages by inserting the XML code as a custom request. In this mode, the Custom Request properties box displays the elements of the DTD in either text or XML format.
To add XML code as a Custom Request:
1 View the script in tree view mode, place the cursor at the desired location, and choose Insert > Add Step. The Add Step dialog box opens.
2 Scroll to the bottom of the list and select Custom Request. Click OK. The Custom Request Properties dialog box opens.
3 Enter a step name, method (GET or POST), URL, and target frame (optional).

Creating Vuser Scripts • Web Vuser Scripts
292
4 Copy the XML code from your browser or editor and paste it into the Body section of the Custom Request Properties box.
5 Select the applicable replay options: Record mode, Resource, or Binary data. For more information, see Chapter 17, “Modifying Web Vuser Scripts”.
6 Click OK. VuGen places the custom request step into your script.
Viewing XML Custom Request Steps
You can view or modify the XML code implemented as a custom request step, at any time. VuGen provides a viewer that allows you to view the hierarchy of the DTD, and expand and collapse the elements as needed.
To view the XML code of a custom request step:
1 View the script in tree view mode, and select the desired step.

Chapter 20 • Testing XML Pages
293
2 Choose Properties from the right-click menu. The Custom Request Properties dialog box appears.
The bottom section of the dialog box displays the XML code. If the RecContentType attribute is set to text/xml, by default VuGen displays the code in an XML format hierarchy. In this mode, the XML code is not editable.
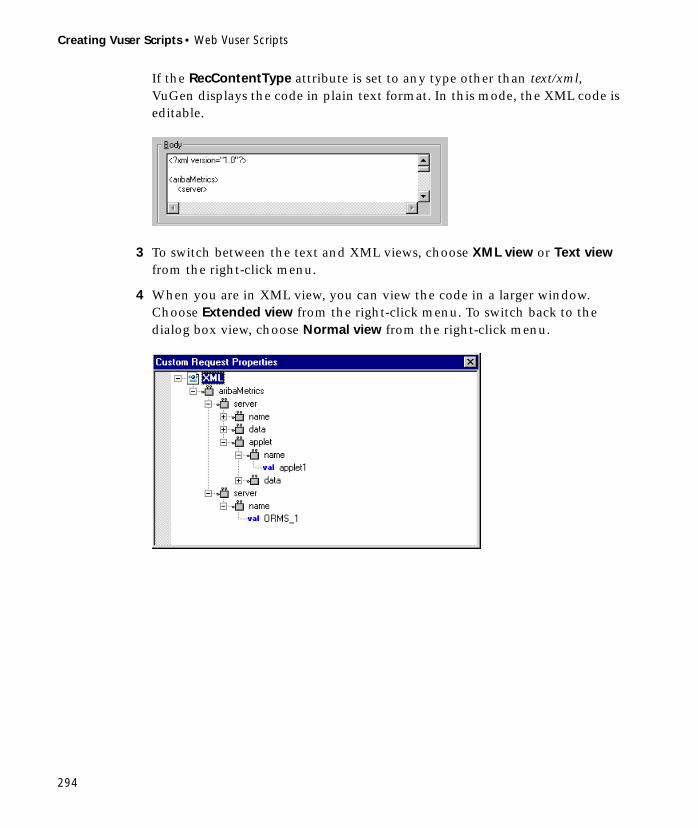
Creating Vuser Scripts • Web Vuser Scripts
294
If the RecContentType attribute is set to any type other than text/xml, VuGen displays the code in plain text format. In this mode, the XML code is editable.
3 To switch between the text and XML views, choose XML view or Text view from the right-click menu.
4 When you are in XML view, you can view the code in a larger window. Choose Extended view from the right-click menu. To switch back to the dialog box view, choose Normal view from the right-click menu.

295
21Using Reports to Debug Vuser Scripts
To assist with debugging a Web Vuser script, you can view a report that summarizes the results of your script run. VuGen generates the report during the Web Vuser script execution, and you view the report when script execution is complete.
This chapter describes:
➤ Understanding the Results Summary Report
➤ Filtering Report Information
➤ Managing Execution Results
Note: To enable all the VuGen Web report features, it is recommended that you install Microsoft Internet Explorer 4.0 or higher.
The following information only applies to Web Vuser scripts.
Creating Vuser Scripts • Web Vuser Scripts
296
About Using Reports to Debug Vuser Scripts
When you debug a Web Vuser script using VuGen, you specify whether or not to generate a Results Summary report during script execution. The Results Summary report contains details of all the Web pages that the Vuser visited as well as any checks that the Vuser performed. Examining this information is useful when debugging the Web Vuser script. For details on running Vuser scripts using VuGen, see Chapter 9, “Running Vuser Scripts in Stand-Alone Mode.”
After you run a Vuser script using VuGen, you view the Results Summary report.
If Microsoft Internet Explorer 4.0 or higher is installed on your machine, VuGen generates the results in VuGen report format—with a .qtp extension—and you view the results in the Virtual User Generator Report window. This is the recommended option because VuGen’s Report window provides you with a more sophisticated interface and additional features.
You set the Visual Log options (Tools > General Options) to specify whether or not VuGen should generate a Results Summary report, and if so, whether the report opens automatically after script execution. For details on setting the Visual Log options, see Chapter 9, “Running Vuser Scripts in Stand-Alone Mode.”

Chapter 21 • Using Reports to Debug Vuser Scripts
297
Understanding the Results Summary Report
After running your Vuser script, you view the Results Summary report. The report displays a summary of the results of the script execution.
➤ The left pane displays the report tree—a graphical representation of the results. In the report tree, a green check mark represents a successful step, and a red X represents a failed step.
➤ The right pane displays the report details—an overall summary of the script run, as well as additional information for a selected branch of the report tree.
Report toolbar
Report tree
Report details

Creating Vuser Scripts • Web Vuser Scripts
298
You select a branch of the report tree to view the information for that branch.
You can collapse or expand a branch in the report tree in order to change the level of detail that the tree displays.
➤ To collapse a branch, click the Collapse (-) sign to the left of the branch you want to collapse. The report tree hides the details of the branch, and the Collapse sign changes to an Expand (+) sign.
➤ To collapse all the branches in the report tree, select View > Collapse All.
➤ To expand a branch, click the Expand (+) sign to the left of the branch you want to expand. The report tree displays the details of the branch, and the Expand sign changes to a Collapse (-) sign.
➤ To expand all the branches in the report tree, select View > Expand All.
Select the branch... To view the following details:
Test Name the overall results summary of the script execution
Test Iteration the execution summary for a specific iteration
Test Step or Check the Web page for the selected step or check in the Vuser script

Chapter 21 • Using Reports to Debug Vuser Scripts
299
Filtering Report Information
You can filter the information that is displayed in a VuGen Results Summary report. The filter can be based either on the iteration number or on the status of the iteration.
To filter the information contained in your report:
1 Click the Filter button on the Report toolbar, or select View > Filters. The Filters dialog box opens.
2 Set the desired filter options. The default filter options are All, as shown in the above example.
To limit the report to a specified range of iterations, select Iteration Range in the Iterations section, and specify a range in the From and To boxes.
To limit the report to iterations that failed, select Fail Only in the Status section.
3 Click OK to accept the settings and close the Filters dialog box.
Creating Vuser Scripts • Web Vuser Scripts
300
Managing Execution Results
You use the commands in the File menu to open, print, and exit Results Summary reports.
For details on setting Results Summary report options, see “Using VuGen’s Debugging Features for Web Vuser Scripts” on page 122 of Chapter 9, “Running Vuser Scripts in Stand-Alone Mode.”
Opening a Results Summary Report
When you run a Web Vuser script, VuGen saves the Results Summary report files in a results subfolder of the script folder. The report file has the format: script_name.qtp.
To open a Results Summary report:
1 Select File > Open, or click the Open button on the Report toolbar. The Open dialog box opens.
2 Select the name of the report file that you want to open, and click Open.
3 To open a recently viewed report, select it from the report history list on the File menu.

Chapter 21 • Using Reports to Debug Vuser Scripts
301
Printing Report Results
You can print a VuGen Results Summary report.
To print a Results Summary report:
1 Select File > Print, or click the Print button on the Report toolbar. The Print dialog box opens.
2 Select a range from the Print Range box:
All—prints the entire report. This includes the Web page for each step in an iteration.
Selection—prints the selected branch in the Report tree.
Iterations—prints the specified range of iterations. Specify the range in the From and To boxes.
3 Click OK to print.
4 To change your printer’s setup options, select File > Print Setup, and change the settings in the Print Setup dialog box.
Closing a Results Summary Report
To close a Results Summary report, select File > Exit. The report window closes.

Creating Vuser Scripts • Web Vuser Scripts
302

303
22Power User Tips for Web Vusers
This chapter answers some of the questions that are asked most frequently by advanced users of Web Vusers. The questions and answers are divided into the following sections:
➤ Security Issues
➤ Handling Cookies
➤ The Run-Time Viewer (Online Browser)
➤ Browsers
➤ Configuration Issues
➤ Compatibility Issues
The following information applies to Web Vuser scripts.
Security Issues
Question 1: Do Web Vusers support both secure (HTTPS) and unsecure (HTTP) transactions?
Answer: Yes, Web Vusers do support both secure (HTTPS) and unsecure (HTTP) transactions.
Question 2: Do Web Vusers support digital certificates?
Answer: Yes, Web Vusers support client-side digital certificates. A digital certificate is an attachment to an electronic message used for security purposes. The most common use of a digital certificate is to verify that a user

Creating Vuser Scripts • Web Vuser Scripts
304
sending a message is who he or she claims to be, and to provide the receiver with the means to encode a reply.
VUGen supports client-side certificates with the following limitations:
➤ Recording: The client certificates are always taken from the IE database, regardless of the actual browser used during the recording. Therefore, if you record using a browser or application other than IE, you must first export the certificate from the recording browser and import it into IE. When importing a certificate into IE, be sure to make its private key exportable:
➤ Recording: In versions prior to LoadRunner 7.0, web_set_certificate was generated whenever a client certificate was used. This function has only one argument: the ordinal number of the certificate in the certificate list. This function can be only be replayed in WinInet mode.
In versions 7.0and higher, web_set_certificate_ex is generated. This function has an additional parameter—the path of the file containing the certificate. The certificate file is generated automatically during recording and is saved with the Vuser script. Whenever using WinInet replay mode, the first parameter is used. For socket replay (default), the second parameter is used (certificate file). Note, that if the particular certificate cannot be dumped, for example, if its private key is not exportable, web_set_certificate_ex is generated without a file name. In this case, only WinInet replay mode should be used.
Replay: If web_set_certificate_ex is used and it has filename argument, it can be used only with socket replay and does not require any custom configuration on the load machines. If web_set_certificate is used, or web_set_certificate_ex without file name, it can be used only with WinInet based replay. In this case, you need to install all the certificates you have on the recording machine in the same order as they appear in its certificate list. This is done through export/import.
Question 3: When I record a Vuser script that accesses an SSL-enabled site, a number of pop-up warning messages appear. Should these messages appear? If so, what do I do with them?
Answer: In order to be able to record access to SSL-enabled sites, VuGen provides its own server certificate instead of the original server certificate. This causes two security violations:
Chapter 22 • Power User Tips for Web Vusers
305
➤ The certificate that is issued is not for the site to which the user is connecting.
➤ The certificate is issued by an unknown authority.
These security violations cause the recording browser to display the pop-up warnings messages.
If you are using Netscape 3.0 or higher, or Internet Explorer 4.0 or higher, then you have the option of ignoring these warnings. You can safely ignore the messages.
Note: The pop-up messages appear only when you record the script, not when you execute it.
You can suppress some of the pop-up messages—not all of them.
Question 4: I am using a Web application other than IE and Netscape. When I access a secure site without a recognized certificate, the application automatically aborts. Can I record this application?
Answer: When you access a secure site without a recognized certificate, IE and Netscape issue a warning. Certain browsers and applications do not issue a warning for unrecognized certificates—they simply exit the secure site. To record these sites you must obtain the pem file(s) of the certificate and key, and add it to the certs directory under LoadRunner/bin. List the pem files to the index.txt file in a format similar to the existing entries: a section name with the hostname and port followed by the name of the pem file(s).
[demoserver:443]Certfile=xxx.pemKeyfile=yyy.pem
Question 5: Does VuGen support 128-bit encryption?
Answer: Yes, but you must install a US-only version of Internet Explorer on the recording machine and on any load generators that run the Vuser scripts. Both Netscape and Internet Explorer use 40-bit encryption keys in the international versions of their browsers.

Creating Vuser Scripts • Web Vuser Scripts
306
Question 6: Does VuGen support client-side certificates for Internet Explorer?
Answer: Yes, VuGen supports client-side certificates for Internet Explorer.
Question 7: Does VuGen support client-side certificates for Netscape?
Answer: No, VuGen supports client-side certificates only for Internet Explorer. If you have only Netscape certificates, first export the required certificates from Netscape, and then import them into Internet Explorer. Make sure to export and import the certificates in the same order. You must repeat this process on every computer that will record or run a Web Vuser script that requires a certificate.
Question 8: If I look at a Web Vuser script, can I tell whether the Vuser accesses a regular (HTTP) server or an SSL-enabled (HTTPS) server?
Answer: Sometimes. Web Vuser scripts do not distinguish between secure requests and non-secure requests: Graphical Vuser scripts use the same icons for secure requests and non-secure requests; text-based Vuser scripts use the same functions for secure requests and non-secure requests. However, if a step in a Vuser script contains a URL, then you may be able to distinguish from the URL whether the step accesses a regular (HTTP) server or an SSL-enabled (HTTPS) server.
Question 9: What types of authentication do Web Vusers support?
Answer: Web Vusers support Basic authentication and NTLM authentication (NT challenge response authentication).
Handling Cookies
Question 10: Does VuGen handle cookies when I record a Vuser script?
Answer: VuGen automatically handles all cookies that are set via HTTP headers. However, VuGen is unable to always correctly handle cookies that are set by JavaScripts or <meta- > tags. See Question 14 for details.
Chapter 22 • Power User Tips for Web Vusers
307
Question 11: When I run a Web Vuser script, does the Vuser reuse the same cookies that were used when I recorded the Vuser script?
Answer: Yes and No, depending on the type of cookie. Cookies can be divided into two categories: persistent cookies and session cookies:
When you record a Web Vuser script, VuGen detects all cookies that are sent to your browser. VuGen distinguishes between persistent cookies and session cookies as follows:
Question 12: Does each Vuser have its own unique cookie cache?
Answer: Yes, each Vuser has its own unique cookie cache—session cookies are not shared, even if the Vusers are running on the same load generator.
persistent cookies Text-only strings that identify you to a Web server, and are valid for a limited time period. Persistent cookies are stored on your hard disk.
session cookies Text-only strings that identify you to a Web server only during your current visit (session). Session cookies are not stored on your hard disk.
persistent cookies VuGen records the details of persistent cookies directly into the Vuser script. VuGen uses web_add_cookie to include a persistent cookie in a Vuser script. When you run the Vuser script, the Vuser uses these persistent cookies when required.
session cookies VuGen does not save the session cookies that are used during the recording session. Instead, the session cookies are cached while you record, and are then discarded when you stop recording.
When you run the Vuser script, the Vuser uses new session cookies that it receives from the Web server. That is, Vusers do not re-use the same session cookies that were generated when the script was recorded. The session cookies are stored in the Vusers cookie cache, and are then discarded when the Vuser stops. The Vuser does not save these session cookies.

Creating Vuser Scripts • Web Vuser Scripts
308
Question 13: Must I parameterize the cookies in my recorded Vuser script before I can run the script?
Answer: Sometimes. As described in Question 11, VuGen copies persistent cookies into the Vuser script when you record the script. When you run the Vuser script, the Vuser uses the recorded persistent cookies. If each Vuser requires a unique persistent cookie, then you need to parameterize the cookies in your Vuser script.
Question 14: Do Web Vusers handle cookies that are set inside JavaScripts?
Answer: VuGen automatically handles all cookies that are set via HTTP headers. However, VuGen is unable to always correctly handle cookies that are set by a JavaScript contained in an HTML page. Cookies that are set via JavaScripts create unique problems during recording and replay:
Recording VuGen should record persistent cookies—not session cookies—into a Vuser script (via web_add_cookie statements). However, due to technological constraints, all cookies that are set by JavaScripts are recorded by VuGen as persistent cookies—even if the cookies are session cookies.
Workaround: After recording a Vuser script, insert correlation statements to correlate all web_add_cookie statements that set session cookies. Do not delete web_add_cookie statements that set persistent cookies.
Replay Web Vusers do not run JavaScripts that are embedded inside HTML pages. Therefore any session cookies that are created by such JavaScripts are not created when the Vuser runs.
Workaround: After recording a Vuser script, insert correlation statements into the script to determine the appropriate cookies. Then insert web_add_cookie statements into the Vuser script to set the appropriate cookies.
Chapter 22 • Power User Tips for Web Vusers
309
Question 15: Can a Vuser manipulate cookies during run-time?
Answer: Yes, while a Vuser is running, the Vuser can manipulate the cookies that are stored in its cookie cache. You can use the following functions in a Vuser script to manipulate the cookie cache:
➤ web_add_cookie()
➤ web_remove_cookie()
➤ web_cleanup_cookies()
Refer to the LoadRunner Online Function Reference (available from the VuGen Help menu) for details on the above functions.
The Run-Time Viewer (Online Browser)
Question 16: How does the run-time viewer display Web pages?
Answer: When you run a Web Vuser script, the Web servers accessed by the Vuser download information to the Vuser. This information is usually in HTML format. The Vuser saves this information to the Vuser’s results directory. Each Web page is saved in HTML format as a separate .htm file. While the Vuser runs, the run-time viewer loads the .htm files that are saved in the Vuser results directory, and displays the resulting Web pages.
Question 17: JavaScript errors frequently appear when I use the run-time viewer. What causes this, and what can I do to prevent it?
Answer: When you use the run-time viewer, make sure that the Enable Scripting option from the Runtime Browser’s Options menu is not checked. This instructs the run-time viewer not to run any JavaScripts and ensures that JavaScript errors no longer appear in your run-time viewer.
As described in the answer to Question 16, when you run a Vuser script, VuGen saves the information that is returned by the server. The run-time viewer displays this saved information—not the information that is returned directly by the server.
Creating Vuser Scripts • Web Vuser Scripts
310
Question 18: What types of data can the run-time viewer display?
Answer: The run-time viewer can display HTML pages only. It cannot display any other information types.
Question 19: What should I install on my load generator so that I will be able to display a run-time viewer?
Answer: Since the run-time viewer uses an Internet Explorer ActiveX control, you must have Microsoft Internet Explorer 4.0 or higher installed in order to use the run-time viewer.
Question 20: When I run a Vuser script, why does the run-time viewer not display the data that the Vuser submits to the Web server?
Answer: The run-time viewer shows only the HTML page that is returned by the server to the Vuser. The run-time viewer does not show any data that the Vuser submits to the Web server. For further details, see the answer to Question 16.
Question 21: Does the run-time viewer correctly display multi-window applications?
Answer: No, the run-time viewer currently does not correctly display multi-window applications.
Browsers
Question 22: Why is it recommended that I have Internet Explorer 4.0 or higher installed on my computer—even if I always use Netscape to record my scripts?
Answer: VuGen relies heavily on WinInet, the Microsoft Internet API. This applies to both recording and replaying Web Vuser scripts. The WinInet.dll is the Microsoft infrastructure for Internet connections.
LoadRunner installs version 3.0 of the WinInet.dll—unless a newer version is already installed on the computer. Version 3.0 has many limitations. Version 4.0 is far superior, so we recommend that you install version 4.0 for
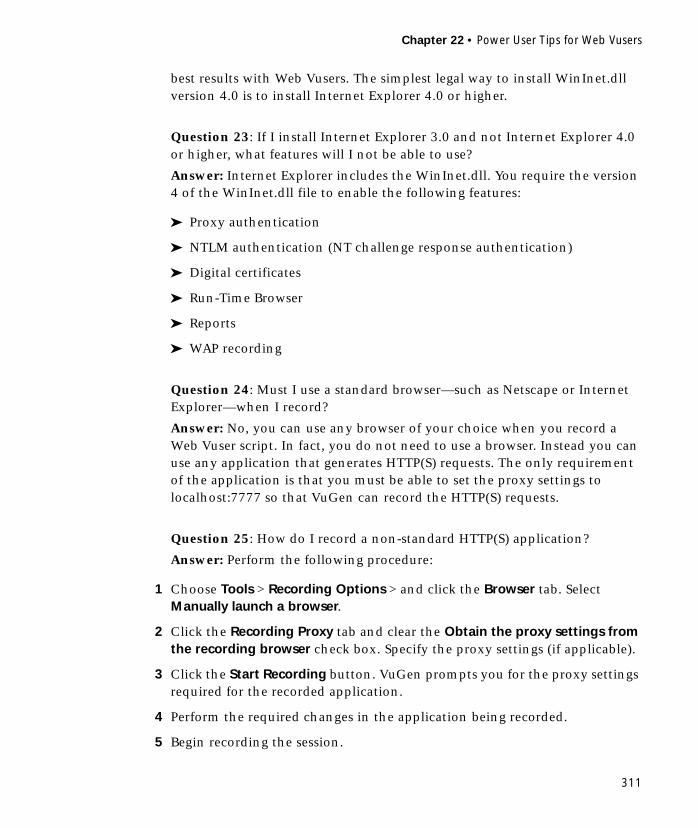
Chapter 22 • Power User Tips for Web Vusers
311
best results with Web Vusers. The simplest legal way to install WinInet.dll version 4.0 is to install Internet Explorer 4.0 or higher.
Question 23: If I install Internet Explorer 3.0 and not Internet Explorer 4.0 or higher, what features will I not be able to use?
Answer: Internet Explorer includes the WinInet.dll. You require the version 4 of the WinInet.dll file to enable the following features:
➤ Proxy authentication
➤ NTLM authentication (NT challenge response authentication)
➤ Digital certificates
➤ Run-Time Browser
➤ Reports
➤ WAP recording
Question 24: Must I use a standard browser—such as Netscape or Internet Explorer—when I record?
Answer: No, you can use any browser of your choice when you record a Web Vuser script. In fact, you do not need to use a browser. Instead you can use any application that generates HTTP(S) requests. The only requirement of the application is that you must be able to set the proxy settings to localhost:7777 so that VuGen can record the HTTP(S) requests.
Question 25: How do I record a non-standard HTTP(S) application?
Answer: Perform the following procedure:
1 Choose Tools > Recording Options > and click the Browser tab. Select Manually launch a browser.
2 Click the Recording Proxy tab and clear the Obtain the proxy settings from the recording browser check box. Specify the proxy settings (if applicable).
3 Click the Start Recording button. VuGen prompts you for the proxy settings required for the recorded application.
4 Perform the required changes in the application being recorded.
5 Begin recording the session.

Creating Vuser Scripts • Web Vuser Scripts
312
6 Close the application when you are finished recording and restore the original proxy settings (failure to do so may prevent it from working).
Question 26: Does VuGen ever modify any of the proxy settings in my recording browser?
Answer: Yes. When you start to record a Web Vuser script, VuGen launches the browser that you specified. VuGen then directs the browser to go through the VuGen proxy server. To do this, VuGen modifies the proxy settings on the recording browser. VuGen changes the proxy setting to localhost:7777 immediately, by default. After recording, VuGen restores the original proxy settings to the recording browser. You must not change the proxy settings while VuGen is recording.
Question 27: My browser crashed while I was recording. I can now not access any sites with my browser—even if I do not record. Why not?
Answer: The answer to Question 26 describes how VuGen changes the proxy settings in your browser during recording. If your browser crashes while you record, VuGen may not be able to restore your original proxy settings for your browser. Your browser will then still have the localhost:7777 setting—which prevents it from accessing any sites. You must manually restore the original proxy settings for your browser.
Question 28: Does VuGen support Socks proxies?
Answer: Yes, VuGen does support Socks proxies. To use a Socks proxy you must use Internet Explorer—not Netscape—as the recording browser. In addition:
➤ Use Internet Explorer 4.0 or higher to define the Socks proxy.
In Internet Explorer, select View > Internet Options. Click the Connection tab, and then click Advanced in the Proxy Server group. In the Proxy Settings dialog box, enter the appropriate Socks proxy server settings.
This step applies to the computer that you use to record the Vuser scripts, as well as to all the computers that will run Vusers that access the Socks proxy server.
➤ Define Internet Explorer as the default browser.

Chapter 22 • Power User Tips for Web Vusers
313
You can do this by associating all files that have a .htm extension with Internet Explorer.
This step applies to the computer that you use to record the Vuser scripts, as well as to all the computers that will run Vusers that access the Socks proxy server.
➤ Instruct VuGen to take the proxy settings from the recording browser when you record a Vuser script.
In VuGen, select Tools > Recording Options. Click the Recording Proxy tab. Select the Obtain the proxy setting from the recording browser check box.
This step applies only to the computer that you use to record the Vuser script—not to the computers that will run the Vusers.
➤ Instruct all Vusers that run the script to obtain the proxy setting from the default browser.
In VuGen, select Vuser > Run Time Settings. Click the Proxy tab, and then select the Obtain the proxy setting from the default browser check box.
This setting applies to all Vusers that run the Vuser script.
Question 29: If I have Netscape installed—and not Internet Explorer—can I display execution reports?
Answer: In order for VuGen to display execution reports, you need Internet Explorer, Version 4.0 or higher.
Configuration Issues
Question 30: I performed a snapshot comparison and the results were very inaccurate.
Answer: Check the Correlation tab in the General Options dialog box (Options > General). Make sure the Comparison mode is set to HTML—not Text. The Text comparison mode is only applicable to non-HTMelements of the snapshot.
Creating Vuser Scripts • Web Vuser Scripts
314
Compatibility Issues
Question 31: I used VuGen to record a Web Vuser script. Can I replay the script on a UNIX system?
Answer: If you record a Vuser script using VuGen, with the recording option set to record all HTTP information, you can run the script on a UNIX system. To set this option, select HTTP (All requests from the server) in the Recording Options Recording tab.
Note that client-side digital certificates and NTLM authentication are not supported.

Part IV
Wireless Protocols

316

317
23Introducing Wireless Vusers
You use VuGen to develop scripts for wireless applications using the WAP or i-mode protocols. VuGen creates Vuser scripts by recording your actions over a wireless network.
This chapter describes:
➤ Understanding the WAP Protocol
➤ Understanding the i-mode System
➤ i-mode vs. WAP
About Wireless Vusers
VuGen supports two wireless protocols:
➤ WAP (Wireless Application Protocol)
➤ i-mode
Each protocol has specific characteristics, differing in both the implementation and development of user content.
Developers use toolkits that serve as a development environment for creating content and applications for the wireless protocols.
Creating Vuser Scripts • Wireless Protocols
318
Understanding the WAP Protocol
The Wireless Application Protocol (WAP) is an open, global specification that enables mobile users with wireless devices to instantly access and interact with information and services.
The WAP protocol specifies a microbrowser thin-client using a new standard called WML that is optimized for wireless handheld mobile terminals. WML is a stripped-down version of XML.
WAP also specifies a proxy server that:
➤ acts as a gateway between the wireless network and the wire-line Internet
➤ provides protocol translation
➤ optimizes data transfer for the wireless handset
WAP architecture closely resembles the WWW model. All content is specified in formats that are similar to the standard Internet formats. Content is transported using standard protocols in the WWW domain and an optimized HTTP-like protocol in the wireless domain (Wireless Session Protocol). You locate all WAP content using WWW standard URLs.
WAP uses many WWW standards, including authoring and publishing methods. WAP enhances some of the WWW standards in ways that reflect the device and network characteristics. WAP extensions are added to support Mobile Network Services such as Call Control and Messaging. It accounts for the memory and CPU processing constraints that are found in mobile terminals. WAP also supports low bandwidth and high latency networks.

Chapter 23 • Introducing Wireless Vusers
319
WAP assumes the existence of a gateway that is responsible for encoding and decoding data transferred to and from the mobile client. The purpose of encoding content delivered to the client is to minimize the size of data sent to the client over-the-air, as well as to minimize the computational energy required by the client to process that data. The gateway functionality can be added to origin servers, or placed in dedicated gateways as illustrated below.
WAP Toolkits
To assist developers in producing WAP applications and services, the leading companies such as Nokia, Ericsson, and Phone.com, have developed toolkits. The WAP Toolkit provides an environment for developers who want to provide Internet services and content for mobile terminals. It allows developers to write, test, debug, and run applications on a PC-based simulator phone. The toolkit allows users to browse WAP sites through an HTTP connection or a WAP gateway.
A mobile phone communicates with a gateway in WSP protocol; a toolkit can communicate with the gateway, or directly with the server. VuGen lets your record in two modes: WSP and HTTP. If you are interested in the traffic to the gateway, you record in WSP mode. If you want to check the server and the content providers, you can record your toolkit session in HTTP mode, and bypass the gateway.
Creating Vuser Scripts • Wireless Protocols
320
LoadRunner uses custom API functions to emulate a user session. Most functions are the standard Web protocol functions utilizing the HTTP protocol. Several WAP functions emulate actions specific to WAP Vusers. For a list of the supported functions, see “Using Vuser Functions,” on page 334.
Understanding the i-mode System
The i-mode protocol is NTT DoCoMo's mobile Internet access system. Technically, i-mode is an overlay over ordinary mobile voice systems. While the voice systems are circuit-switched (that is, you need to dial-up) i-mode is packet-switched. This means that i-mode is in principle always connected, provided the i-mode signal can reach you. When you select an i-mode item on the handset menu, the data is usually downloaded immediately, without the usual dial-up delay. However, there may be a delay in receiving the data, depending on the size of the data and network bandwidth.
Working with i-mode is similar to accessing the Internet with a browser. For example, they send e-mail, look at the weather forecasts, sports results, play games, execute online stock trades, purchase air tickets, and search for restaurants.
The i-mode protocol uses cHTML (compact HTML), a subset of ordinary HTML. In addition to standard HTML tags, there are several i-mode specific tags. For example, one i-mode tag sets up a link, which dials up to a telephone number. Another i-mode-specific tag informs search engines that a particular web page is an i-mode page.
In addition, there are many DoCoMo special characters which serve as symbols. For example, there are special characters that represent joy, love, sadness, telephone, trains, encircled numbers, and so forth.
Since cHTML is a subset of HTML, you can use your Netscape or IE browser to view i-mode pages, such as http://www.eurotechnology.com/i/ or http://www.eu-japan.com/i/. However, since nearly all i-mode users are Japanese, almost all i-mode content is in the Japanese language. Therefore, you will need Japanese Text Display support in your browser. When you view i-mode content in a regular browser, you will not be able to see i-mode- specific tags. In addition, you cannot display the special DoCoMo-i-mode symbols.
Chapter 23 • Introducing Wireless Vusers
321
i-mode Toolkits
To assist developers in producing i-mode services, several toolkits are available and supported by LoadRunner. The i-mode toolkits provide an environment for developers who want to provide Internet services and content for mobile terminals. Toolkits allow developers to write, test, debug, and run applications on a PC-based simulator phone. The toolkit allows users to browse i-mode sites through a standard HTTP connection. A partial list of the supported toolkits are CompactViewer, and Pixo versions 2.0 and 2.1.
i-mode vs. WAP
There are several important differences in the way i-mode and WAP based services are presently implemented. i-mode uses cHTML, a subset of HTML which is relatively easier to master than WAP’s markup language WML. Currently, i-mode is implemented with a packet-switched system, which is in principle "always on" while WAP systems use a circuit-switched model, that is, dial-up. Note that packet-switching or circuit-switching is a technical difference of the telecommunication system on which the services are based. In principle, i-mode and WAP encoded web pages can be delivered over packet or circuit switched systems.
An additional difference is in the pricing methods: an i-mode user is charged for the amount of information downloaded, plus various premium service charges. WAP users are charged by the connection time.

Creating Vuser Scripts • Wireless Protocols
322

323
24Recording Wireless Vuser Scripts
You use VuGen to create a wireless Vuser script by recording a WAP or i-mode session.
This chapter describes:
➤ Recording a Wireless Script
➤ Viewing Vuser Scripts
➤ Displaying Vuser Scripts in Script View
➤ Enhancing Your Script for Measuring Performance
➤ Using Vuser Functions
The following information only applies to Wireless Vuser scripts.
About Recording Wireless Vuser Scripts
Suppose you have a Web site that displays purchase request status by customers. You want to ensure that the response time for any customer query is less than a specified value (for example, 20 seconds)—even when a large number of users (for example 200) access the site simultaneously. You use Vusers to emulate this scenario, in which the Web or WAP server services the simultaneous requests for information. Each Vuser could:
➤ load an opening page
➤ submit a request
➤ wait for a response from the server
Creating Vuser Scripts • Wireless Protocols
324
You can distribute several hundred Vusers among the available testing machines, each Vuser accessing the server by using its API. This enables you to measure the performance of the server under the load of many users.
The program that contains the calls to the server API is called a Vuser script. It emulates a toolkit application and all of the actions performed by the toolkit. Using the LoadRunner Controller, you assign the script to many Vusers. The Vusers execute the script and emulate user load on the Web server.
VuGen enables you to generate Wireless Vuser scripts by recording typical Wireless sessions. When you run a script, the resulting Vuser emulates activity between your toolkit or phone and Web server (or gateway for WAP).
After you record a Vuser script, you can edit it—either by making changes directly in the icon-based tree view, or by modifying the text of the script in the script view.
VuGen’s multiple action support allows you to record into an existing Vuser script. When working in HTTP mode, you can add an unlimited number of Action sections to your script in any number of recording sessions. For more information on VuGen’s multiple action support, see Chapter 3, “Recording with VuGen.”
For advanced information about recording, see Chapter 22, “Power User Tips for Web Vusers.”
Recording a Wireless Script
When you record a Wireless script, VuGen monitors all the actions that you perform in your toolkit. Your activities can include hyperlink jumps and form submissions. While recording, VuGen saves the recorded actions in a WAP or i-mode Vuser script.
Each Vuser script that you create contains at least three sections: vuser_init, one or more Actions, and vuser_end. During recording, you can select the section of the script into which VuGen will insert the recorded functions. The vuser_init and vuser_end sections are generally used for recording server login and logoff procedures, which are not repeated when you run a
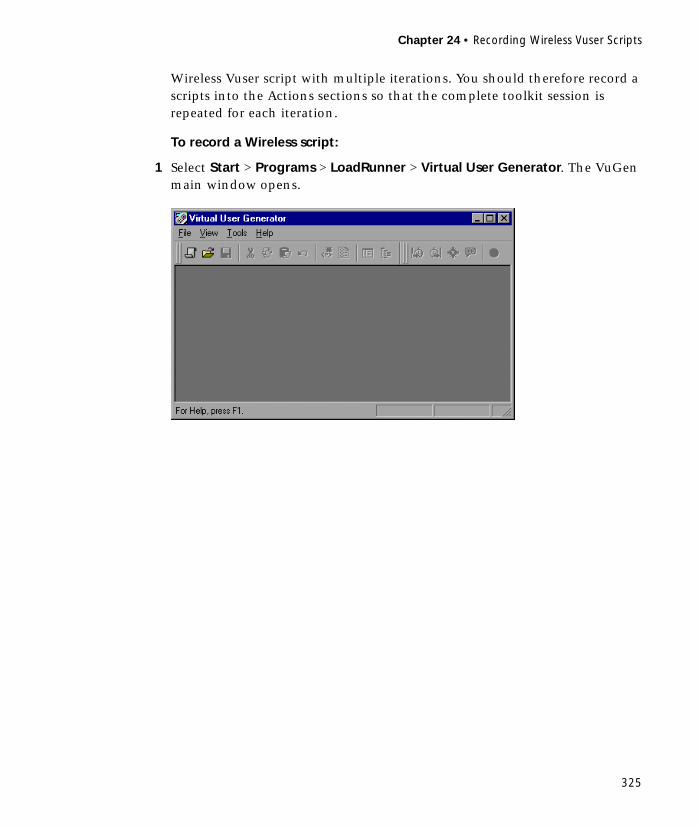
Chapter 24 • Recording Wireless Vuser Scripts
325
Wireless Vuser script with multiple iterations. You should therefore record a scripts into the Actions sections so that the complete toolkit session is repeated for each iteration.
To record a Wireless script:
1 Select Start > Programs > LoadRunner > Virtual User Generator. The VuGen main window opens.
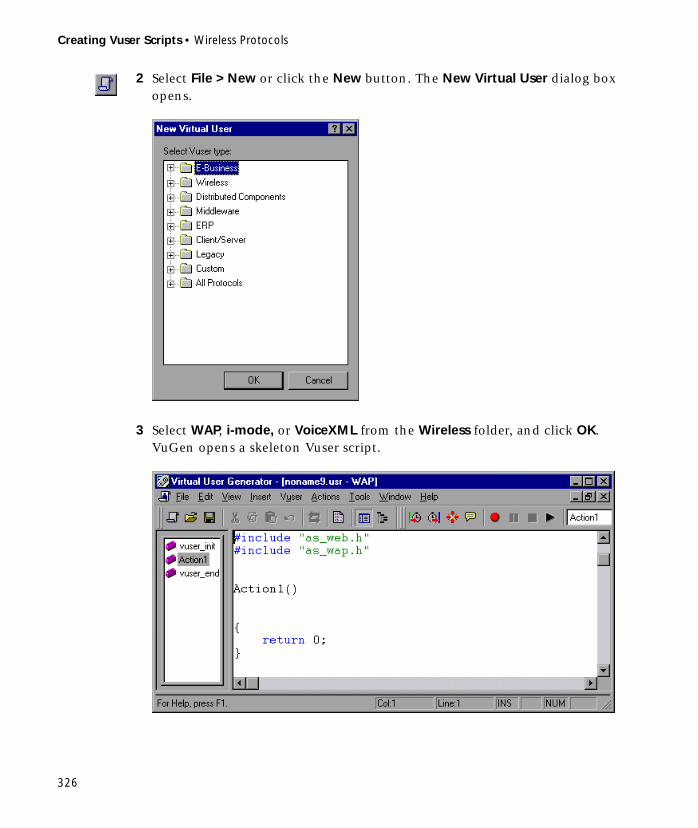
Creating Vuser Scripts • Wireless Protocols
326
2 Select File > New or click the New button. The New Virtual User dialog box opens.
3 Select WAP, i-mode, or VoiceXML from the Wireless folder, and click OK. VuGen opens a skeleton Vuser script.

Chapter 24 • Recording Wireless Vuser Scripts
327
4 Select Vuser > Start Recording, or click the Start recording button on the VuGen recording toolbar. The Start Recording dialog box opens.
5 Click Options to set the toolkit, proxy, and additional recording options. For details on setting the recording options, see Chapter 26, “Setting Recording Options for Wireless Vusers.”
6 From the Record into Action list, select the action into which you want to begin recording, or create a new action.
To create a new action, click the New button. The Create new action dialog box opens.
Type a name for the new action in the Action name box, or accept the default name, and click OK.
When you create a new action, VuGen adds it to the Actions list in the skeleton Vuser script.
7 By default the Record the application on startup check box is selected, indicating that VuGen should begin recording the toolkit session immediately. If you prefer to begin recording after the startup, clear the check box.
➤ If you are recording a new script, you will want to include this step.
➤ If you are recording into an existing script, you may want to skip this step if the application startup was already recorded.
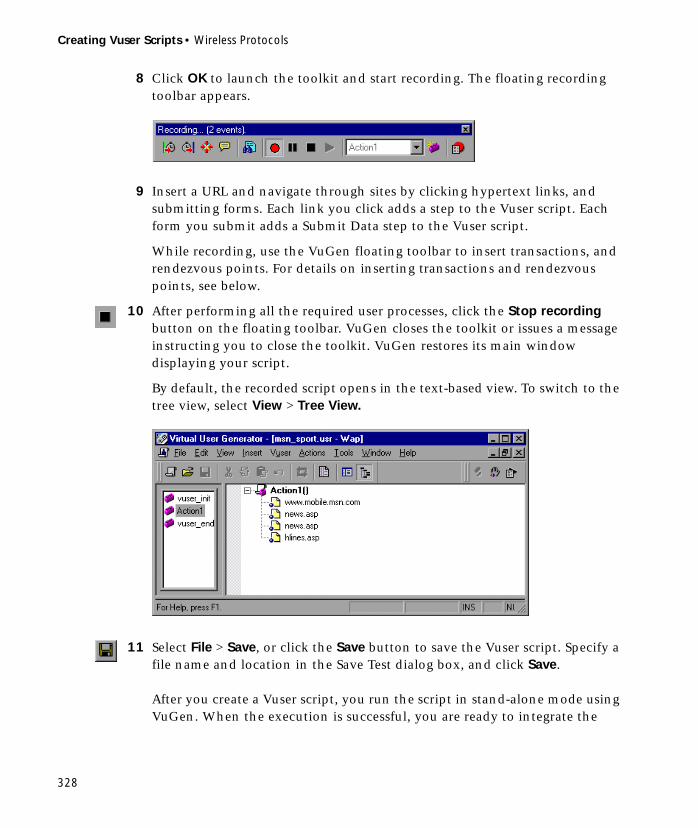
Creating Vuser Scripts • Wireless Protocols
328
8 Click OK to launch the toolkit and start recording. The floating recording toolbar appears.
9 Insert a URL and navigate through sites by clicking hypertext links, and submitting forms. Each link you click adds a step to the Vuser script. Each form you submit adds a Submit Data step to the Vuser script.
While recording, use the VuGen floating toolbar to insert transactions, and rendezvous points. For details on inserting transactions and rendezvous points, see below.
10 After performing all the required user processes, click the Stop recording button on the floating toolbar. VuGen closes the toolkit or issues a message instructing you to close the toolkit. VuGen restores its main window displaying your script.
By default, the recorded script opens in the text-based view. To switch to the tree view, select View > Tree View.
11 Select File > Save, or click the Save button to save the Vuser script. Specify a file name and location in the Save Test dialog box, and click Save.
After you create a Vuser script, you run the script in stand-alone mode using VuGen. When the execution is successful, you are ready to integrate the

Chapter 24 • Recording Wireless Vuser Scripts
329
Vuser script into a scenario. For details on how to integrate a Vuser script into a scenario, refer to the LoadRunner Controller User’s Guide.
Viewing Vuser Scripts
After recording, you can edit the Vuser script. You can do so in either the tree view or the script view. VuGen can display a Vuser script in two ways:
➤ As an icon-based representation of the Vuser script. This is the default view, and is known as the tree view. (not available for WAP scripts)
➤ As a text-based representation of the Vuser script. This is known as the script view.
Viewing Scripts in the Tree View
When viewing and editing Vuser scripts in VuGen, you choose between viewing the script in the icon-based tree view or the text-based script view. For details on viewing scripts in the script view, see “Displaying Vuser Scripts in Script View” on page 333.

Creating Vuser Scripts • Wireless Protocols
330
To display the tree view of a Vuser script:
➤ From the VuGen main menu, select View > Tree View, or click the View script as tree icon. The Vuser script is displayed in the icon-based tree view. If you are already in the tree view, the menu item is disabled.
The tree view of a Vuser script is composed of icons. Each icon represents an action of the Vuser or a step in the Vuser script. The icons are divided into four categories:
➤ Action Icons
➤ Control Icons
➤ Service Icons
Action Icons
Each Action icon in the Vuser script represents a user action during recording, that is, a jump to a new Web page or a change in the Web context. When you record a Vuser script, VuGen adds an Action icon to the script for each action step—each time you click a hypertext or hypergraphic link or submit a form. When you run a Vuser script, each action step displays a new page.
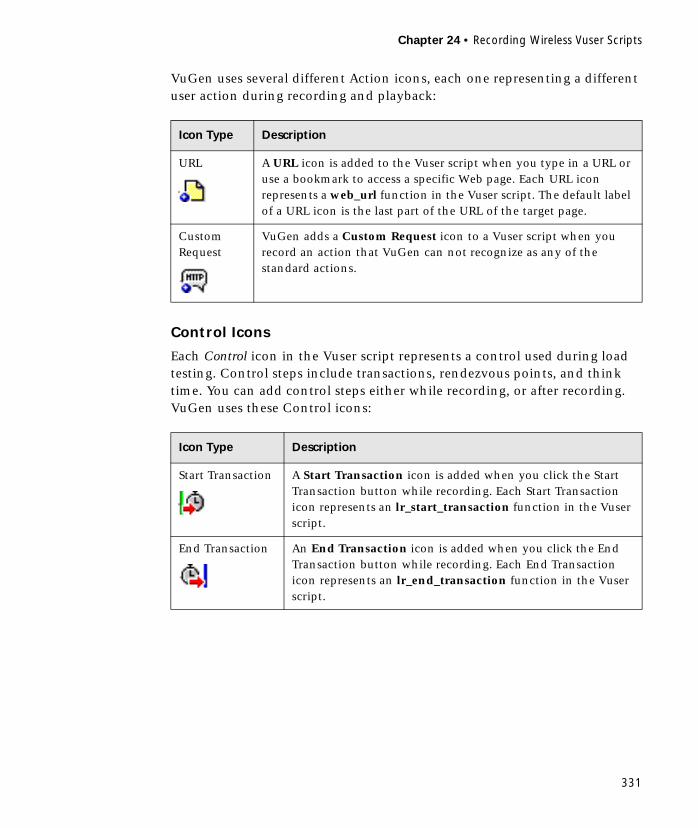
Chapter 24 • Recording Wireless Vuser Scripts
331
VuGen uses several different Action icons, each one representing a different user action during recording and playback:
Control Icons
Each Control icon in the Vuser script represents a control used during load testing. Control steps include transactions, rendezvous points, and think time. You can add control steps either while recording, or after recording. VuGen uses these Control icons:
Icon Type Description
URL A URL icon is added to the Vuser script when you type in a URL or use a bookmark to access a specific Web page. Each URL icon represents a web_url function in the Vuser script. The default label of a URL icon is the last part of the URL of the target page.
Custom Request
VuGen adds a Custom Request icon to a Vuser script when you record an action that VuGen can not recognize as any of the standard actions.
Icon Type Description
Start Transaction A Start Transaction icon is added when you click the Start Transaction button while recording. Each Start Transaction icon represents an lr_start_transaction function in the Vuser script.
End Transaction An End Transaction icon is added when you click the End Transaction button while recording. Each End Transaction icon represents an lr_end_transaction function in the Vuser script.
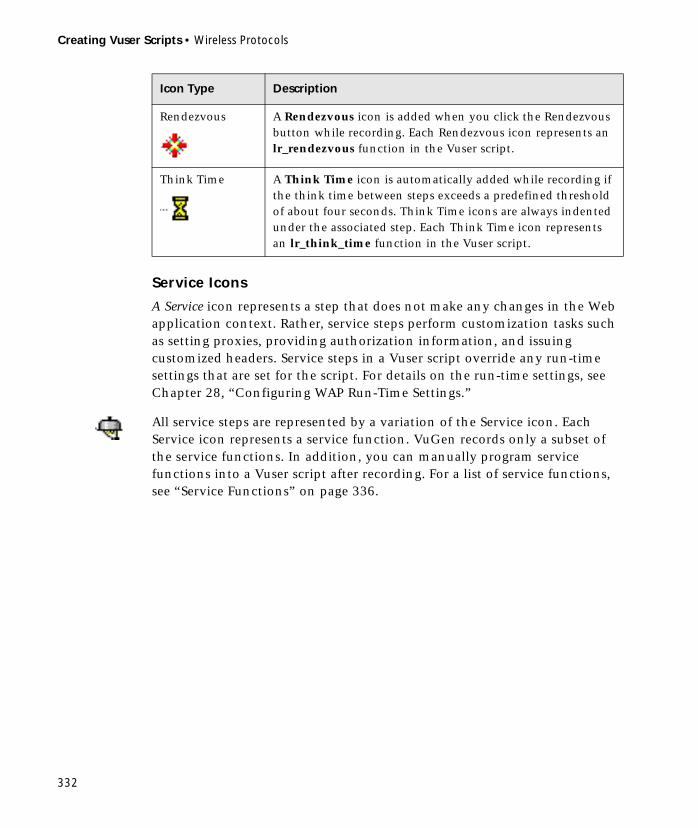
Creating Vuser Scripts • Wireless Protocols
332
Service Icons
A Service icon represents a step that does not make any changes in the Web application context. Rather, service steps perform customization tasks such as setting proxies, providing authorization information, and issuing customized headers. Service steps in a Vuser script override any run-time settings that are set for the script. For details on the run-time settings, see Chapter 28, “Configuring WAP Run-Time Settings.”
All service steps are represented by a variation of the Service icon. Each Service icon represents a service function. VuGen records only a subset of the service functions. In addition, you can manually program service functions into a Vuser script after recording. For a list of service functions, see “Service Functions” on page 336.
Rendezvous A Rendezvous icon is added when you click the Rendezvous button while recording. Each Rendezvous icon represents an lr_rendezvous function in the Vuser script.
Think Time A Think Time icon is automatically added while recording if the think time between steps exceeds a predefined threshold of about four seconds. Think Time icons are always indented under the associated step. Each Think Time icon represents an lr_think_time function in the Vuser script.
Icon Type Description

Chapter 24 • Recording Wireless Vuser Scripts
333
Displaying Vuser Scripts in Script View
To view and edit the text-based representation of a Wireless Vuser script, you select the Script view.
To display the script view of a Vuser script:
From the VuGen main menu, select View > Script View, or click the View script as text icon. The Vuser script is displayed in the text-based script view. If you are already in the script view, the menu item is disabled.
In the script view, you can see the functions that were generated by your toolkit application, and you can make changes to the script as required.
Note: If you make changes to a Vuser script while in the script view, VuGen makes the corresponding changes in the tree view of the Vuser script. If VuGen is unable to comprehend the text-based changes that were made, VuGen will be unable to convert the script view into the tree view.
Script view of a WAP Vuser script

Creating Vuser Scripts • Wireless Protocols
334
Enhancing Your Script for Measuring Performance
You can add functionality to your script in order to measure performance under various load conditions using:
➤ Transactions
➤ Rendezvous
You insert transactions into a Vuser script to enable the Controller to measure the performance of your Web server. Each transaction measures the time that it takes for the server to respond to one or more tasks submitted by Vusers.
Within a Vuser script, you can mark an unlimited number of transactions. You insert transaction statements into your script either while recording or after the recording session.
During a scenario execution, the Controller measures the time it takes to perform each transaction. After a scenario run, you use LoadRunner’s graphs and reports to analyze the server’s performance.
In order to emulate a specific user load while measuring server performance, you synchronize Vusers to perform a task at exactly the same moment. You ensure that multiple Vusers act simultaneously by creating a meeting place, known as a rendezvous point. When a Vuser arrives at the rendezvous point, it is held by the Controller until all the Vusers participating in the rendezvous arrive. When the rendezvous conditions are met, the Vusers are released by the Controller.
For information on how to insert transactions and rendezvous points, see Chapter 12, “Recording Web Vuser Scripts.”
Using Vuser Functions
The functions developed to emulate communication between a wireless instrument and Web server (or gateway for WAP), are called Vuser functions. The functions representing standard HTTP actions, have a web prefix. The functions representing WAP specific actions, have a wap prefix. General Vuser functions begin with an lr prefix. Some functions are generated when
Chapter 24 • Recording Wireless Vuser Scripts
335
you record a script; others you must manually insert into the script. You can also add LoadRunner message functions and custom C functions to your Vuser scripts after recording. For syntax and examples of all the functions, refer to the LoadRunner Online Function Reference (available from the VuGen Help menu).
The functions are categorized in the following way:
➤ Action Functions
➤ Control Functions
➤ Service Functions
➤ WAP Specific Functions
Action Functions
When you record a Vuser script, VuGen generates the following action functions, and inserts them into the script:
Control Functions
Each control icon in the Vuser script represents a control function used during load testing. Controls include transactions, rendezvous points, and
web_custom_request Allows you to create a custom HTTP request with any method supported by HTTP.
web_submit_data Performs an "unconditional" or "contextless" form submission.
web_url Loads the URL specified by the "URL" attribute.

Creating Vuser Scripts • Wireless Protocols
336
think time. VuGen uses the following General Vuser functions as control functions:
Service Functions
You can manually program the following service functions into a WAP or i-mode Vuser script: There are several Service function categories:
➤ Header
➤ Authentication
➤ Connection Definition
➤ Cookie
➤ Replay
➤ Cache
➤ Concurrent Group
➤ Correlation
➤ Proxy Server
➤ Miscellaneous
lr_start_transaction Marks the beginning of a transaction for performance analysis.
lr_end_transaction Marks the end of a transaction for performance analysis.
lr_rendezvous Sets a rendezvous point in the Vuser script.
lr_think_time Pauses execution between commands in a Vuser script.
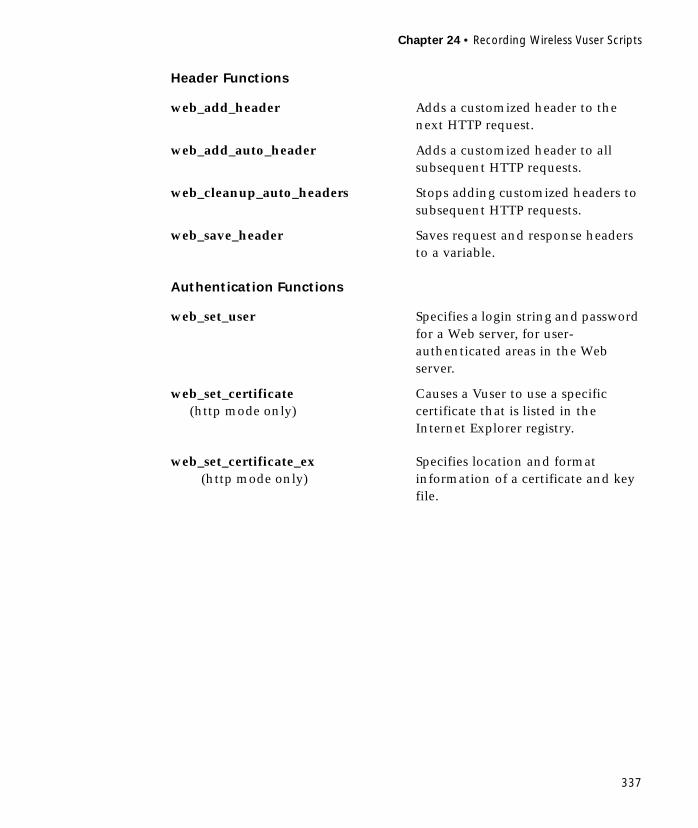
Chapter 24 • Recording Wireless Vuser Scripts
337
Header Functions
Authentication Functions
web_add_header Adds a customized header to the next HTTP request.
web_add_auto_header Adds a customized header to all subsequent HTTP requests.
web_cleanup_auto_headers Stops adding customized headers to subsequent HTTP requests.
web_save_header Saves request and response headers to a variable.
web_set_user Specifies a login string and password for a Web server, for user-authenticated areas in the Web server.
web_set_certificate(http mode only)
Causes a Vuser to use a specific certificate that is listed in the Internet Explorer registry.
web_set_certificate_ex(http mode only)
Specifies location and format information of a certificate and key file.

Creating Vuser Scripts • Wireless Protocols
338
Connection Definition Functions
Cookie Functions
Replay Functions
Cache Function
web_set_connections_limit Sets the maximum number of simultaneous connections that a Vuser can open during script execution.
web_enable_keep_alive(http mode only)
Enables keep-alive HTTP connections.
web_disable_keep_alive(http mode only)
Disables keep-alive HTTP connections.
web_remove_cookie Removes the specified cookie.
web_add_cookie Adds a new cookie or modifies an existing one.
web_cleanup_cookies Removes all the cookies that are currently stored by the Vuser.
web_set_timeout Specifies the maximum amount of time that a Vuser waits to execute a specified task.
web_set_max_retries Sets the maximum number of retries for an Action step.
web_cache_cleanup Clears the contents of the cache simulator.
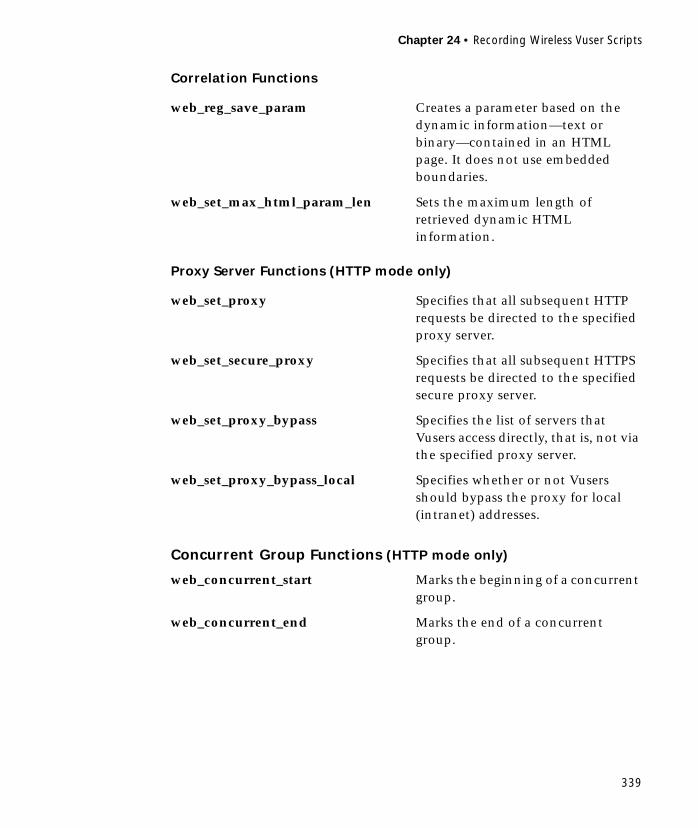
Chapter 24 • Recording Wireless Vuser Scripts
339
Correlation Functions
Proxy Server Functions (HTTP mode only)
Concurrent Group Functions (HTTP mode only)
web_reg_save_param Creates a parameter based on the dynamic information—text or binary—contained in an HTML page. It does not use embedded boundaries.
web_set_max_html_param_len Sets the maximum length of retrieved dynamic HTML information.
web_set_proxy Specifies that all subsequent HTTP requests be directed to the specified proxy server.
web_set_secure_proxy Specifies that all subsequent HTTPS requests be directed to the specified secure proxy server.
web_set_proxy_bypass Specifies the list of servers that Vusers access directly, that is, not via the specified proxy server.
web_set_proxy_bypass_local Specifies whether or not Vusers should bypass the proxy for local (intranet) addresses.
web_concurrent_start Marks the beginning of a concurrent group.
web_concurrent_end Marks the end of a concurrent group.
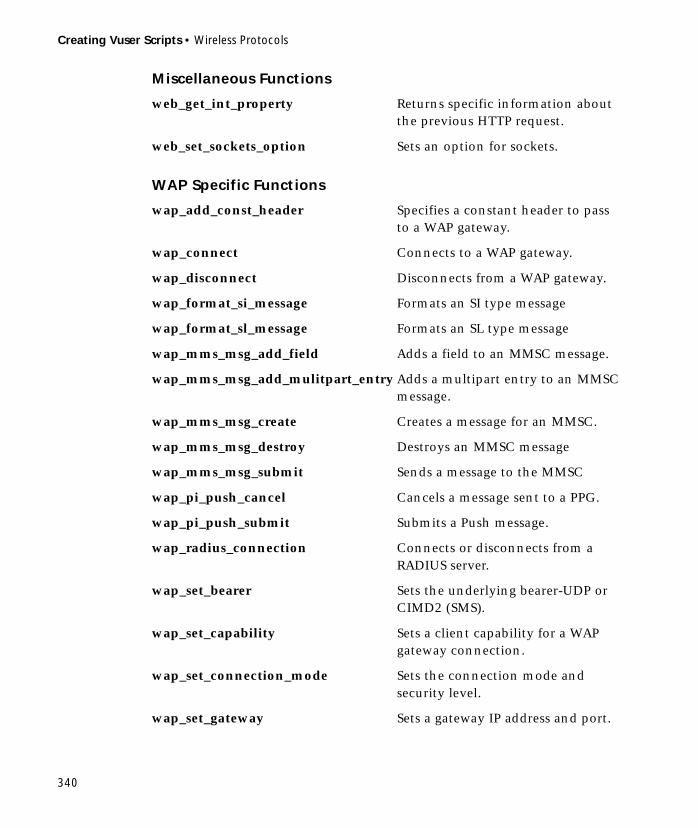
Creating Vuser Scripts • Wireless Protocols
340
Miscellaneous Functions
WAP Specific Functions
web_get_int_property Returns specific information about the previous HTTP request.
web_set_sockets_option Sets an option for sockets.
wap_add_const_header Specifies a constant header to pass to a WAP gateway.
wap_connect Connects to a WAP gateway.
wap_disconnect Disconnects from a WAP gateway.
wap_format_si_message Formats an SI type message
wap_format_sl_message Formats an SL type message
wap_mms_msg_add_field Adds a field to an MMSC message.
wap_mms_msg_add_mulitpart_entry Adds a multipart entry to an MMSC message.
wap_mms_msg_create Creates a message for an MMSC.
wap_mms_msg_destroy Destroys an MMSC message
wap_mms_msg_submit Sends a message to the MMSC
wap_pi_push_cancel Cancels a message sent to a PPG.
wap_pi_push_submit Submits a Push message.
wap_radius_connection Connects or disconnects from a RADIUS server.
wap_set_bearer Sets the underlying bearer-UDP or CIMD2 (SMS).
wap_set_capability Sets a client capability for a WAP gateway connection.
wap_set_connection_mode Sets the connection mode and security level.
wap_set_gateway Sets a gateway IP address and port.
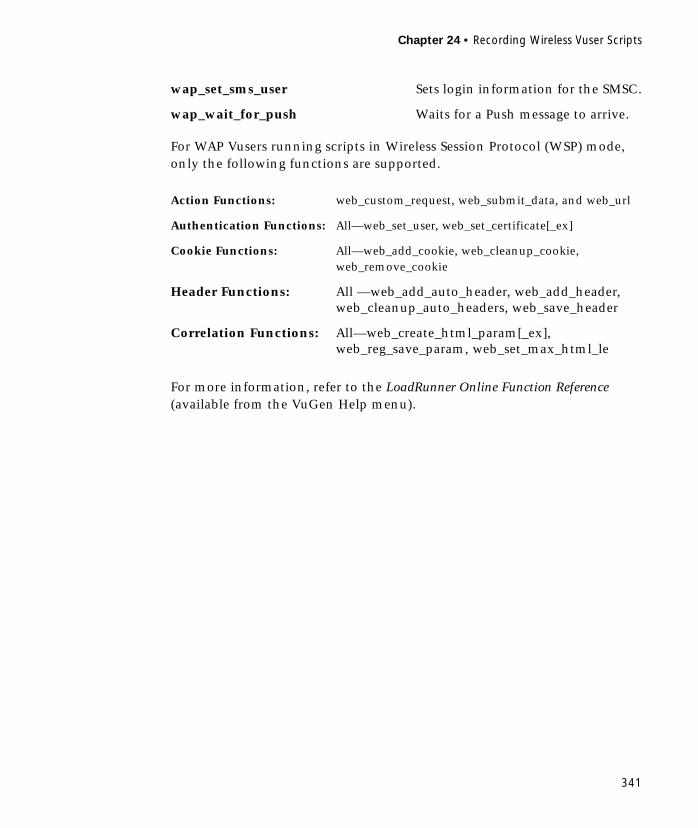
Chapter 24 • Recording Wireless Vuser Scripts
341
For WAP Vusers running scripts in Wireless Session Protocol (WSP) mode, only the following functions are supported.
For more information, refer to the LoadRunner Online Function Reference (available from the VuGen Help menu).
wap_set_sms_user Sets login information for the SMSC.
wap_wait_for_push Waits for a Push message to arrive.
Action Functions: web_custom_request, web_submit_data, and web_url
Authentication Functions: All—web_set_user, web_set_certificate[_ex]
Cookie Functions: All—web_add_cookie, web_cleanup_cookie, web_remove_cookie
Header Functions: All —web_add_auto_header, web_add_header, web_cleanup_auto_headers, web_save_header
Correlation Functions: All—web_create_html_param[_ex], web_reg_save_param, web_set_max_html_le

Creating Vuser Scripts • Wireless Protocols
342

343
25Working with WAP Vuser Scripts
You use VuGen to develop WAP (Wireless Application Protocol) Vuser scripts. VuGen creates Vuser scripts by recording your actions while you operate a WAP device.
This chapter describes:
➤ Recording Over a Phone
➤ Bearers Support
➤ RADIUS Support
➤ Push Support
➤ LoadRunner Push Support
➤ MMSC Support
About WAP Vusers
The Wireless Application Protocol (WAP) is an open specification that enables mobile users with wireless devices to access and interact with information and services instantly. For an overview of WAP technology, see Chapter 23, “Introducing Wireless Vusers.”.
LoadRunner uses custom API functions to emulate a user session. Most functions are the standard Web protocol functions utilizing the HTTP protocol. Several WAP functions emulate actions specific to WAP Vusers. For a list of the supported functions, see “Using Vuser Functions,” on page 334.
Creating Vuser Scripts • Wireless Protocols
344
You can record a WAP session using a toolkit or through your phone. For information about recording through a toolkit, see Chapter 26, “Setting Recording Options for Wireless Vusers.” For information about recording over a phone, see the following section.
You can program scripts to emulate WAP sessions using the wap Vuser functions. For more information and sample scripts, see the LoadRunner Online Function Reference.
LoadRunner support for WAP allows you to choose a bearer, identify a RADIUS server, and emulate a Push mechanism. This support is described in this chapter.
Recording Over a Phone
You can record a WSP session between phones or toolkits and a WAP gateway. In order to record the WSP session, make sure that the toolkit or phone gateways settings are configurable.
During recording, VuGen launches a pseudo gateway. VuGen captures the WSP traffic on this gateway and creates a script.
To configure VuGen for a WSP recording session, you must enable WSP in the Recording Mode tab of the recording options (see Chapter 26, “Setting Recording Options for Wireless Vusers.”
You enter an origin gateway IP address and set the recording mode to CO or CL. Make sure that the recording mode you select is supported by your toolkit or phone.
To record over a phone through wireless connection, you must first dial in to your ISP to get Internet access. Configure the phone to the IP address of the VuGen machine and set the phone to the desired recording mode (CO or CL).
The VuGen machine can exist in one of the following configurations:
➤ If you connect through a third party ISP, the VuGen machine with the pseudo gateway should be open to Internet access—it must not sit beyond a firewall.

Chapter 25 • Working with WAP Vuser Scripts
345
➤ If you dial in through a Remote Access Server (RAS), you can access the VuGen machine as part of the network.
For auto recording with WSP, we currently support Nokia (1.3 and 2.0) and Phone.com (4.0 or higher) toolkits. You can also record on any other toolkit using the manual launching mode.
WSP auto-recording has the following limitation:
➤ Make sure there is no gateway running on the VuGen machine. Another gateway may block the port for the pseudo gateway.
Bearers Support
The Transport layer protocol in the WAP architecture consists of the Wireless Transaction Protocol (WTP) and the Wireless Datagram Protocol (WDP).
An underlying bearer is a data transport mechanism used to carry the WDP protocols between two devices. Examples of underlying bearers include SMS-CIMD2, UDP, CSD, GSM GPRS, GSM CSD, and Packet Data.
LoadRunner WAP Vusers currently support the UDP (User Datagram Protocol) and SMS-CIMD2 (Short Message Service) bearers.
UDP bearers do not require a separate connection- they operate over an IP network. To work with SMS-CIMD2 however, you must connect to an SMS Center (SMSC) and provide the appropriate information:
➤ IP and Port Information: For UDP bearers, you define the port and login information in the Run-Time Setting’s Bearers tab. (see “Configuring Bearer Information,” on page 379)
➤ Login Information for the SMS Center: You define the SMS login information in the Run-Time Setting's Bearers tab. You can also set this information through the wap_set_sms_user function. This is useful for load testing when you need to set the login information for many Vusers using parameterization.
➤ Login Information for the CIMD2: You set the CIMD2 bearer information in the Run-Time settings Bearers tab. (see Chapter 28, “Configuring WAP Run-Time Settings.”)
Creating Vuser Scripts • Wireless Protocols
346
In some instances, you may need to work with several types of bearers. For example, someone sends you a message in UDP protocol when your phone is off. When you turn your phone on, you retrieve it through the SMS protocol. You can use the wap_set_bearer function to switch bearer types during script execution.
RADIUS Support
RADIUS (Remote Authentication Dial-In User Service) is a client/server protocol and software that enables remote access servers to communicate with a central server to authenticate dial-in users and authorize their access to the requested system or service.
RADIUS allows a company to maintain user profiles in a central database that all remote servers can share. It provides better security, allowing a company to set up a policy that can be applied at a single administered network point. Using a central service makes it easier to track usage for billing and store network statistics.
RADIUS has two sub-protocols:
➤ Authentication: Authorizes and controls user access.
➤ Accounting: Tracks usage for billing and for keeping network statistics.
In LoadRunner, the RADIUS protocol is only supported for WSP replay for both Radius sub-protocols—authentication and accounting.
You supply the dial-in information in the Run-Time Settings Radius tab. For more information see Chapter 28, “Configuring WAP Run-Time Settings.”
Push Support
In the normal client/server model, a client requests information or a service from a server. The server responds by transmitting information or performing a service to the client. This is known as pull technology—the client pulls information from the server.

Chapter 25 • Working with WAP Vuser Scripts
347
In contrast to this, there is also push technology. The WAP push framework transmits information to a device without a previous user action. This technology is also based on the client/server model, but there is no explicit request from the client before the server transmits its content.
To perform a push operation in WAP, a Push Initiator (PI) transmits content to a client. However, the Push Initiator protocol is not fully compatible with the WAP Client—the Push Initiator is on the Internet, and the WAP Client is in the WAP domain. Therefore, we need to insert a translating gateway to serve as an intermediary between the Push Initiator and the WAP Client. The translating gateway is known as the Push Proxy Gateway (PPG).
The access protocol on the Internet side is called the Push Access Protocol (PAP).
The protocol on the WAP end is called the Push Over-The-Air (OTA) protocol.
The Push Initiator contacts the Push Proxy Gateway (PPG) over the Internet using the PAP Internet protocol. PAP uses XML messages that may be tunneled through various well-known Internet protocols such as HTTP. The PPG forwards the pushed content to the WAP domain. The content is then transmitted using the OTA protocol over the mobile network to the destination client. The OTA protocol is based on WSP services.
In addition to providing simple proxy gateway services, the PPG is capable of notifying the Push Initiator about the final status of the push operation. In two-way mobile networks, it can also wait for the client to accept or reject the content.
Push Services Types
Push services can be of the SL or SI type:
➤ SL - The Service Loading (SL) content type provides the ability to cause a user agent on a mobile client to load and execute a service—for example, a WML deck. The SL contains a URI indicating the service to be loaded by the user agent without user intervention when appropriate.
➤ SI - The Service Indication (SI) content type provides the ability to send notifications to end-users in an asynchronous manner. For example, the notifications may be about new e-mails, changes in stock price, news headlines, and advertising.

Creating Vuser Scripts • Wireless Protocols
348
In its most basic form, an SI contains a short message and a URI indicating a service. The message is presented to the end-user upon reception, and the user is given the choice to either start the service indicated by the URI immediately, or postpone the SI for later handling. If the SI is postponed, the client stores it and the end-user is given the ability to act upon it at a later point of time.
LoadRunner Push Support
Push support for LoadRunner is divided into three parts:
➤ Push support at the client end—the ability to accept push messages.
➤ Push support to WAP HTTP Vusers—emulating Push Initiators.
➤ Push messages (SI & SL) format services—formatting push messages.
Client Push Support
At the client end, LoadRunner supports both push services (SL and SI) for all replay modes (CO and CL). The wap_wait_for_push function instructs the Vuser to wait for a push message to arrive. You set the timeout for this function in the run-time settings.
When a push message arrives, LoadRunner parses it to determine its type and to retrieve its attributes. If parsing was successful, it generates and executes a pull transaction to retrieve the relevant data. You can disable the pull event, indicating to LoadRunner not to retrieve the message data by configuring the Run-Time settings. For more information, see Chapter 28, “Configuring WAP Run-Time Settings.”
Emulating a Push Initiator
LoadRunner push support for WAP HTTP Vusers enables you to perform load testing of the PPG. Push support allows Vusers to function as Push Initiators supporting the Push Access Protocol (PAP). The PAP defines the following sets of operations between the PI and the PPG:
1 Submit a Push request
2 Cancel a Push request

Chapter 25 • Working with WAP Vuser Scripts
349
3 Submit a query for the status of a push request
4 Submit a query for the status of a wireless device’s capabilities
5 Initiate a result notification message from the PPG to the PI.
All operations are request/response—for every initiated message, a response is issued back to the PI. PI operations are based on the regular HTTP POST method supported by LoadRunner. Currently, only the first two operations are supported through wap_push_submit and wap_push_cancel.
You can submit data to a Web server using the web_submit_data function. It is difficult, however, to send long and complex data structures using this function. To overcome this difficulty and provide a more intuitive API function, several new API functions were added to properly format the XML message data: wap_format_si_msg and wap_format_sl_msg. For more information about these functions, see the LoadRunner Online Function Reference.
MMSC Support
(Multimedia Message Service Center) MMSC is the means for transmitting multimedia content over wireless networks. LoadRunner support for MMSC is divided into three parts:
➤ External Application (EA) side emulation
➤ Mobile station side emulation
➤ MMS message formatting services
External Application Emulation
There are three different types of EA emulation:
➤ Originating Applications - send messages to the MMSC.
➤ Terminating Application - receive messages from the MMSC.
➤ Filtering Application - receive messages from the MMSC, process them, and send them back.
Creating Vuser Scripts • Wireless Protocols
350
Currently only the Originating and Terminating emulation is supported. Originating Applications support is based on the wap_mms_msg_xxx API functions. Terminating Application support is essentially a CGI running on a web server.
Mobile Station Emulation and Formatting Services
Mobile stations send messages to the MMSC through a WAP gateway, and receive message from the MMSC through the Push facility.
Support for Mobile stations and message formatting services, is implemented using the wap_mms_msg_xxx API functions.
MMSC Functions
The MMSC emulation is implemented with the following Vuser functions. For more information, see the LoadRunner Online Function Reference.
wap_mms_msg_add_field Adds a field to an MMSC message.
wap_mms_msg_add_mulitpart_entry Adds a multipart entry to an MMSC message.
wap_mms_msg_create Creates a message for an MMSC.
wap_mms_msg_destroy Destroys an MMSC message
wap_mms_msg_submit Sends a message to the MMSC

351
26Setting Recording Options for Wireless Vusers
Before recording a Wireless session, you can customize the recording options.
This chapter describes:
➤ Specifying the Recording Mode (WAP only)
➤ Specifying the Information to Record (i-mode, VoiceXML)
➤ Specifying a Toolkit
➤ Specifying the Recording Proxy Settings
➤ Setting Advanced Recording Options
About Setting Recording Options
VuGen enables you to generate Wireless Vuser scripts by recording typical processes that users perform on your Web site using their wireless interfaces.
Before recording, you can configure the Recording Options and specify the information to record, the toolkit with which to record, and the global proxy settings.

Creating Vuser Scripts • Wireless Protocols
352
Specifying the Recording Mode (WAP only)
Use the Recording tab in the Recording Options dialog box (Tools > Recording Options) to define the information that VuGen records during a recording session for WAP Vusers.
To define recording information for WAP Vusers:
Select one of the following options on the Recording Mode tab:
➤ WSP: Instructs VuGen to record all WSP traffic between the toolkit or phone and the gateway. The actions are recorded as URL steps. Enter the IP address of the gateway, and select Connectionless or Connection-Oriented from the WSP mode box.
➤ HTTP: Instructs VuGen to record the HTTP traffic between the toolkit and the Web server as URL steps. Select the Record all HTTP requests as custom requests check box to record all HTTP requests as contextless custom HTTP requests, generating web_custom_request functions.
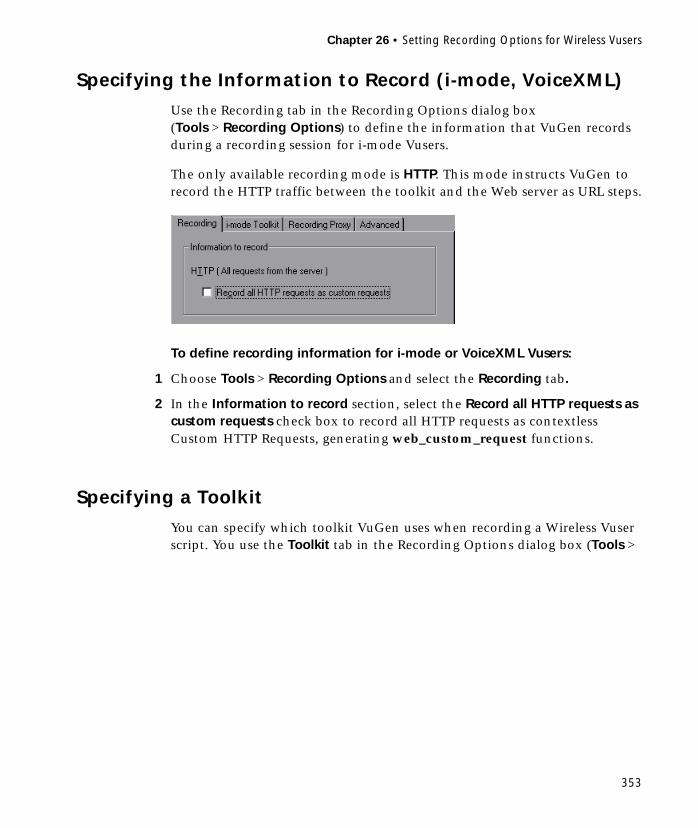
Chapter 26 • Setting Recording Options for Wireless Vusers
353
Specifying the Information to Record (i-mode, VoiceXML)
Use the Recording tab in the Recording Options dialog box (Tools > Recording Options) to define the information that VuGen records during a recording session for i-mode Vusers.
The only available recording mode is HTTP. This mode instructs VuGen to record the HTTP traffic between the toolkit and the Web server as URL steps.
To define recording information for i-mode or VoiceXML Vusers:
1 Choose Tools > Recording Options and select the Recording tab.
2 In the Information to record section, select the Record all HTTP requests as custom requests check box to record all HTTP requests as contextless Custom HTTP Requests, generating web_custom_request functions.
Specifying a Toolkit
You can specify which toolkit VuGen uses when recording a Wireless Vuser script. You use the Toolkit tab in the Recording Options dialog box (Tools >

Creating Vuser Scripts • Wireless Protocols
354
Recording Options) to specify the desired WAP, i-mode, or VoiceXML toolkit.
To specify the toolkit for recording a Wireless Vuser script:
1 Choose Tools > Recording Options and select the WAP (i-mode or VoiceXML) Toolkit tab.
2 Select one of the following options in the Toolkit Location section:
➤ Use default WAP (i-mode or VoiceXML) Toolkit: Instructs VuGen to use the default toolkit on the recording computer (currently disabled).
➤ Manually launch a WAP (i-mode or VoiceXML) Toolkit: Instructs VuGen not to launch a toolkit when you start recording. You must manually launch a WAP toolkit after you start the recording session.
➤ Use supported WAP (i-mode or VoiceXML) Toolkits: Instructs VuGen to use a specific toolkit installed on the machine. Select one of the available toolkits listed in the dialog box.

Chapter 26 • Setting Recording Options for Wireless Vusers
355
Specifying the Recording Proxy Settings
VuGen requires a set of proxy settings to use when you record a Wireless Vuser script. By default, VuGen uses the proxy settings from the WAP toolkit. You use the Recording Proxy tab in the Recording Options dialog box (Tools > Recording Options) to change the recording proxy settings.
To set the recording proxy settings:
1 Choose one of the following proxy options:
➤ No proxy (direct connection to the Internet): Always use a direct connection to the Internet. This means that a direct connection is made without using a proxy server.
➤ Obtain the proxy settings from the WAP(i-mode, VoiceXML) Toolkit: Use the proxy settings from the toolkit. This is the default option.
➤ Use Custom Proxy: This section is only enabled when the above two options are cleared.
Supply the details of the proxy servers in the Use Custom Proxy section. You can specify one proxy server for all HTTP sites and another proxy server for all secure (HTTPS) sites.

Creating Vuser Scripts • Wireless Protocols
356
If the HTTP and HTTPS proxy servers are the same, specify only the HTTP address and port, and select the Use the same proxy server for all protocols check box.
2 If you are recording a session through a proxy that requires authentication, click the Authentication button and supply the relevant User name and Password in the Proxy Authentication dialog box.
3 To specify host names or IP addresses that you want VuGen to access directly—that is, without using a proxy server—click the No proxy for button. The Proxy Exceptions dialog box opens.
Type the addresses that you want VuGen to access directly. Separate each address with a semicolon.
To specify that VuGen should not use the proxy server when it accesses local (intranet) addresses, select the Do not use proxy server for local (intranet) addresses check box.
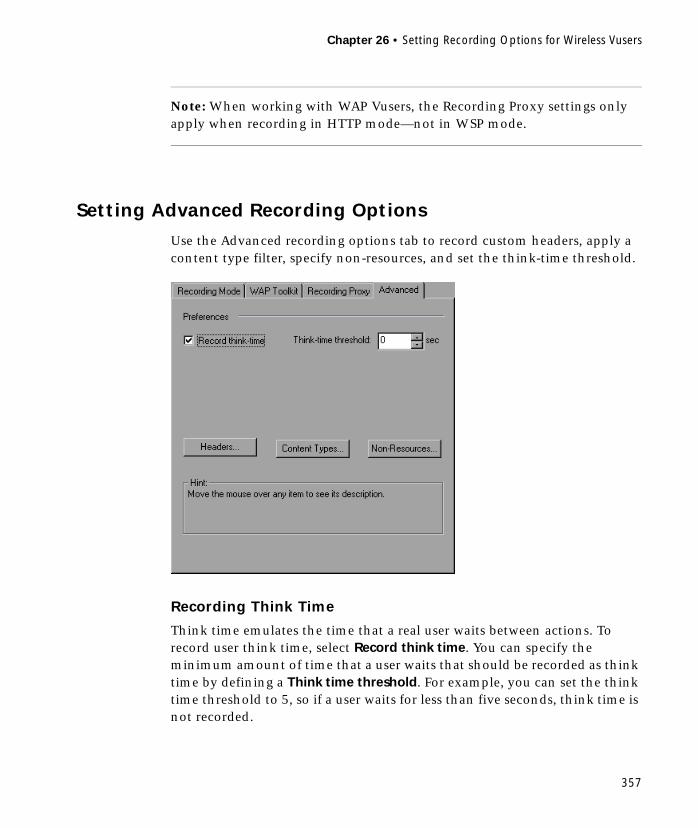
Chapter 26 • Setting Recording Options for Wireless Vusers
357
Note: When working with WAP Vusers, the Recording Proxy settings only apply when recording in HTTP mode—not in WSP mode.
Setting Advanced Recording Options
Use the Advanced recording options tab to record custom headers, apply a content type filter, specify non-resources, and set the think-time threshold.
Recording Think Time
Think time emulates the time that a real user waits between actions. To record user think time, select Record think time. You can specify the minimum amount of time that a user waits that should be recorded as think time by defining a Think time threshold. For example, you can set the think time threshold to 5, so if a user waits for less than five seconds, think time is not recorded.
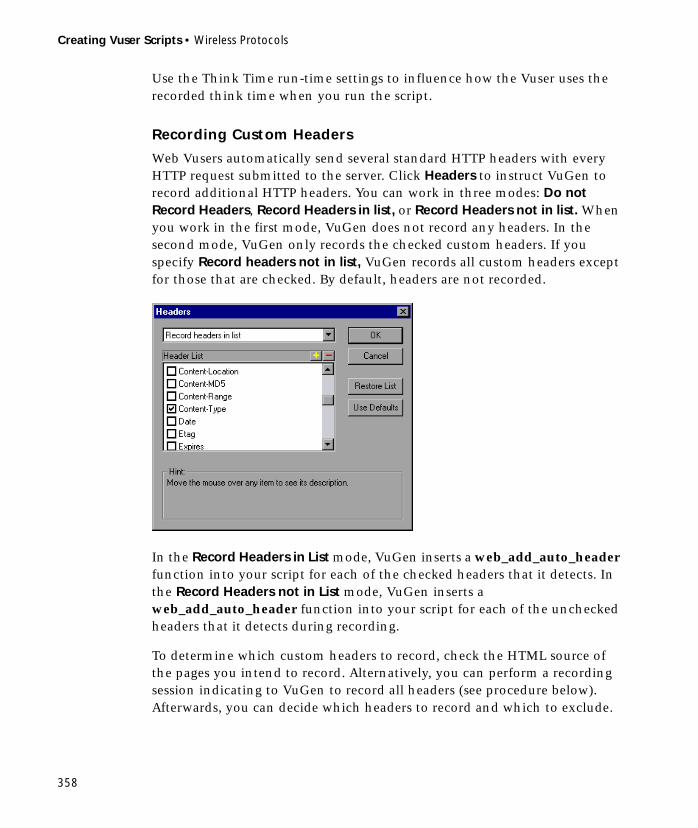
Creating Vuser Scripts • Wireless Protocols
358
Use the Think Time run-time settings to influence how the Vuser uses the recorded think time when you run the script.
Recording Custom Headers
Web Vusers automatically send several standard HTTP headers with every HTTP request submitted to the server. Click Headers to instruct VuGen to record additional HTTP headers. You can work in three modes: Do not Record Headers, Record Headers in list, or Record Headers not in list. When you work in the first mode, VuGen does not record any headers. In the second mode, VuGen only records the checked custom headers. If you specify Record headers not in list, VuGen records all custom headers except for those that are checked. By default, headers are not recorded.
In the Record Headers in List mode, VuGen inserts a web_add_auto_header function into your script for each of the checked headers that it detects. In the Record Headers not in List mode, VuGen inserts a web_add_auto_header function into your script for each of the unchecked headers that it detects during recording.
To determine which custom headers to record, check the HTML source of the pages you intend to record. Alternatively, you can perform a recording session indicating to VuGen to record all headers (see procedure below). Afterwards, you can decide which headers to record and which to exclude.

Chapter 26 • Setting Recording Options for Wireless Vusers
359
In this example, the Content-type header was specified in the Record Headers in List mode. VuGen detected the header and added the following statement to the script:
web_add_auto_header("Content-Type","application/x-www-form-urlencoded");
indicating to the server that the Content-type of the application is x-www-form-urlencode.
To control the recording of custom headers:
1 In the Recording Options, click the Advanced tab.
2 Click Headers. The Headers dialog box opens.
3 Use one of the following methods:
➤ To instruct VuGen not to record any Headers, choose Do not Record Headers.
➤ To record only specific headers, select Record Headers in list and select the desired custom headers in the header list. Note that standard headers (such as Accept), are selected by default.
➤ To record all headers, select Record Headers not in list and do not select any items in the list.
➤ To exclude only specific headers, select Record Headers not in list and select the headers you want to exclude.
4 Click Restore List to restore the list to the corresponding default list. The Record Headers in list and Record Headers not in list each have a corresponding default list.
5 Click OK to accept the settings and close the Headers dialog box.
Filtering Content Type
VuGen allows you to filter the content type for your recorded script. You specify the type of the content you wish to record or exclude from your script. You can work in three modes: Do not Filter Content Types, Exclude content types in list, or Exclude content types not in list. When you work in the first mode, VuGen does not filter any content type. In the second mode, VuGen only excludes the selected content types. If you specify Exclude

Creating Vuser Scripts • Wireless Protocols
360
content types not in list, VuGen filters all content type except for the ones that are checked. By default, no filters are active.
For example, if you are only interested in the text and images on your Web site, you select Exclude content types not in list and specify the types text/html, image/gif, and image/jpeg. VuGen will record all HTML pages and images, and exclude resources such as text/css, application/x-javascript or other resources that appear on the site.
To control the recording of custom headers:
1 In the Recording Options, click the Advanced tab.
2 Click Content Types. The Content Type Filters dialog box opens.
3 Use one of the following methods:
➤ To instruct VuGen not to filter any content, choose Do not Filter Content Types.
➤ To exclude only specific content types, select Exclude content types in list and select the desired content types from the list.
➤ To include only specific content types, select Exclude content types not in list and select the content types you want to include.
4 Click Restore List to restore the list to the corresponding default list. The Exclude content types in list and Exclude content types not in list each have a corresponding default list.
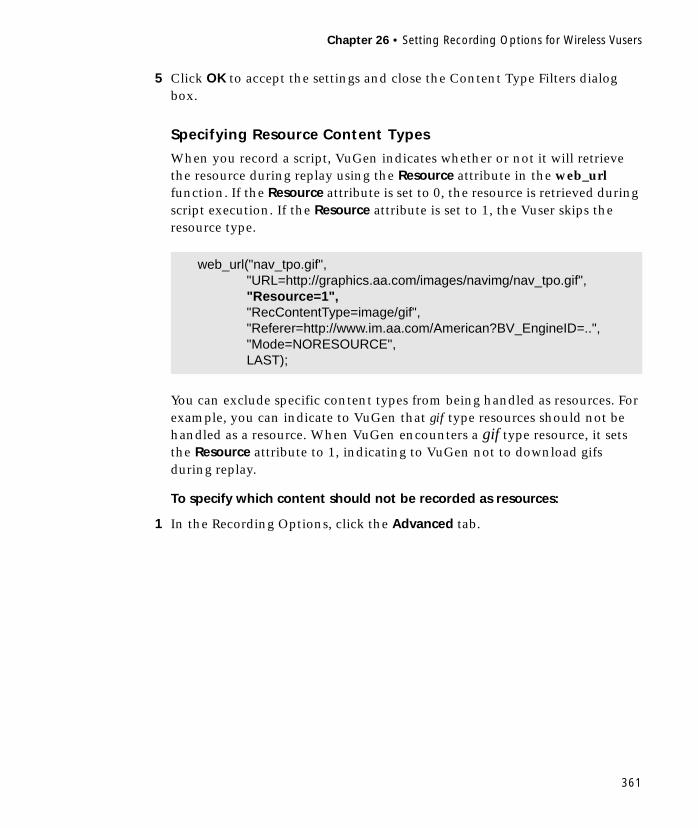
Chapter 26 • Setting Recording Options for Wireless Vusers
361
5 Click OK to accept the settings and close the Content Type Filters dialog box.
Specifying Resource Content Types
When you record a script, VuGen indicates whether or not it will retrieve the resource during replay using the Resource attribute in the web_url function. If the Resource attribute is set to 0, the resource is retrieved during script execution. If the Resource attribute is set to 1, the Vuser skips the resource type.
You can exclude specific content types from being handled as resources. For example, you can indicate to VuGen that gif type resources should not be handled as a resource. When VuGen encounters a gif type resource, it sets the Resource attribute to 1, indicating to VuGen not to download gifs during replay.
To specify which content should not be recorded as resources:
1 In the Recording Options, click the Advanced tab.
web_url("nav_tpo.gif","URL=http://graphics.aa.com/images/navimg/nav_tpo.gif","Resource=1","RecContentType=image/gif","Referer=http://www.im.aa.com/American?BV_EngineID=..","Mode=NORESOURCE",LAST);

Creating Vuser Scripts • Wireless Protocols
362
2 Click Non-Resources to open the dialog box and display the list of content types which should not be recorded as resources.
3 Click the “+” sign to add a content type to the list. Click the “-” sign to remove an existing entry.
4 Select the check boxes adjacent to the items you want to enable.
5 Click Restore List to restore the list to the default list.
6 Click OK to accept the settings and close the Non-Resources list.

363
27Configuring Wireless Run-Time Settings
After you record a Wireless Vuser script, you configure its run-time settings which indicate its behavior during replay.
This chapter describes:
➤ Setting Proxy Options (i-mode, VoiceXML only)
➤ Setting Browser and Modem Options
➤ Setting Preferences
➤ Obtaining Debug Information
About Configuring Wireless Run-Time Settings
After developing a Vuser script, you set the run-time settings. These settings let you control the behavior of the Vuser when running the script. WAP and i-mode run-time settings allow you to configure your Wireless Vusers so that they accurately emulate real users on a wireless device. In addition to the standard run-time settings (see Chapter 7, “Configuring Run-Time Settings”) you can configure wireless run-time settings in the areas of Browser Emulation and HTTP preferences.
For i-mode users, you can also configure proxy settings. For WAP Vusers you can set run-time preferences for Bearers, Radius, and Push support. For more information, see Chapter 28, “Configuring WAP Run-Time Settings.”
You set the WAP run-time settings from the Run-Time Settings dialog box. You click on the appropriate tab to view and specify the desired settings.
To display the Run-Time Settings dialog box, click the Run-Time Settings button on the VuGen toolbar. You can also modify the run-time settings

Creating Vuser Scripts • Wireless Protocols
364
from the LoadRunner Controller by clicking the Runtime Settings button in the Design tab.
Setting Proxy Options (i-mode, VoiceXML only)
You use the Proxy tab in the Run-Time Settings dialog box to set the proxy-related settings for i-mode Vusers:
By default, the Vuser uses the proxy settings of the browser used for recording in the Web recording options. For more information, “Working with Proxy Settings,” on page 171.
Chapter 27 • Configuring Wireless Run-Time Settings
365
The following proxy options are available in the Run-Time Settings dialog box:
➤ All Vusers always use direct connections to the Internet. This means that the connection is made without using a proxy server.
➤ All Vusers use the proxy settings of the default browser on the machine upon which they are running.
➤ All Vusers use a custom proxy server. You supply the details of the server—its IP address and port. You can specify one proxy server for all HTTP sites, and another proxy server for all HTTPS (secure) sites. For URLs that you want Vusers to access directly, that is, without using the proxy server, click Exceptions and then supply the list of these URLs. In the Exceptions dialog box, you can also specify that the Vusers should not use a proxy server for local (intranet) addresses.
➤ If the proxy server requires authentication, click Authentication, and supply the relevant password and user name.
Select the Use the HTTP proxy server for HTTPS check box to instruct LoadRunner to use the HTTP proxy server for HTTPS sites, rather than specifying a specific server for secure sites.
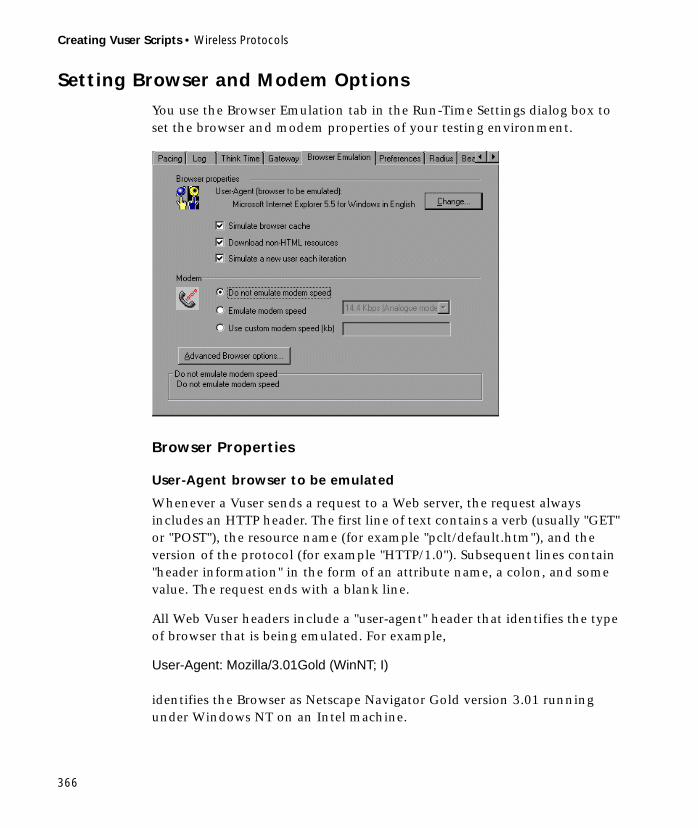
Creating Vuser Scripts • Wireless Protocols
366
Setting Browser and Modem Options
You use the Browser Emulation tab in the Run-Time Settings dialog box to set the browser and modem properties of your testing environment.
Browser Properties
User-Agent browser to be emulated
Whenever a Vuser sends a request to a Web server, the request always includes an HTTP header. The first line of text contains a verb (usually "GET" or "POST"), the resource name (for example "pclt/default.htm"), and the version of the protocol (for example "HTTP/1.0"). Subsequent lines contain "header information" in the form of an attribute name, a colon, and some value. The request ends with a blank line.
All Web Vuser headers include a "user-agent" header that identifies the type of browser that is being emulated. For example,
User-Agent: Mozilla/3.01Gold (WinNT; I)
identifies the Browser as Netscape Navigator Gold version 3.01 running under Windows NT on an Intel machine.

Chapter 27 • Configuring Wireless Run-Time Settings
367
Click Change to specify the browser information to include in the header. You can specify that a Web Vuser emulate any of the standard browsers. Alternatively, for non-browser HTTP applications, you can specify the HTTP client to match a specific user’s application. In this case, you must supply a Custom User Agent string that is included in all subsequent HTTP headers. By default, the Vuser uses the Internet Explorer 4.0 browser agent.
Simulate browser cache
This option instructs the Vuser to simulate a browser with a cache. A cache is used to keep local copies of frequently accessed documents and thereby reduces the time connected to the network. By default, cache simulation is enabled. If you disable this option, all Vusers emulate a browser with no cache available.
Note: Unlike a regular browser cache, the cache assigned to a Vuser simulates storage of graphic files only. The cache does not store text or other page contents associated with the Web page. Every Vuser has its own cache—every Vuser must save and retrieve images from the cache. When the cache is disabled, LoadRunner still downloads each page image only once.

Creating Vuser Scripts • Wireless Protocols
368
Download non-HTML resources
This option instructs Vusers to load graphic images when accessing a Web page during replay. This includes both graphic images that were recorded with the page, and those which were not explicitly recorded (URL-based mode with Record Web Resource Requests disabled) along with the page. When real users access a Web page, they wait for the images to load. Therefore, enable this option if you are trying to test the entire system, including end-user time (enabled by default). To increase performance and not emulate real users, disable this option.
Note: Disable this option if you experience discrepancies in image checks, since some images vary each time you access a Web page (for example, advertiser banners).
Simulate a new user each iteration
Instructs VuGen to reset all HTTP contexts between iterations to their states at the end of the init section. This setting allows the Vuser to more accurately emulate a new user beginning a browsing session. It resets all cookies, closes all keep-alive connections, clears the cache, and resets the user-names and passwords (enabled by default).
Modem
The modem speed should match the speed used in the environment under test. By default, the modem emulation is disabled and it tries to emulate the maximum speed.
Do not emulate modem speed
If you choose not to emulate a modem speed, all Vusers access the Web using the maximum speed that the system allows.
Emulate modem speed
Indicate a specific modem speed for your Vuser to emulate. You can enter any speed from 1.44 to 256 kbs.

Chapter 27 • Configuring Wireless Run-Time Settings
369
Advanced Browser Options
Click Advanced Browser options to view and modify the following settings: DNS caching, HTTP version, Keep-Alive HTTP connections, Concurrent connections limit, Connect timeout, Receive timeout and Network buffer size.
DNS caching
Instructs the Vuser to save a host’s IP addresses to a cache after resolving its value from the Domain Name Server. This saves time in subsequent calls to the same server. In situations where the IP address changes, as with certain load balancing techniques, be sure to clear this option to prevent Vusers from using the value in the cache (enabled by default).
HTTP version
Specifies the version of the protocol (for example "HTTP/1.0"). This information is included in the HTTP request header whenever a Vuser sends a request to a Web server.
Keep-Alive HTTP connections
Keep-alive is a term used for an HTTP extension that allows persistent or continuous connections. These long-lived HTTP sessions allow multiple requests to be sent over the same TCP connection. This improves the performance of the Web server and clients.
The keep-alive option works only with Web servers that support keep-alive connections. This setting specifies that all Vusers that run the Vuser script have keep-alive HTTP connections enabled (enabled by default).
Concurrent connections limit
Sets the maximum number of simultaneous keep-alive connections (see “Keep-Alive HTTP connections,” on page 369) that a Vuser can maintain during script execution. Multiple connections are opened when loading page resources, loading the frames in the frameset page, and so forth. The default limit for all Vusers is 4 simultaneous keep-alive connections. To process each request in turn (not concurrently), set this value to 1.

Creating Vuser Scripts • Wireless Protocols
370
This setting is primarily for advanced users who have determined that the number of simultaneous connections may be different in their specific environment.
Connect timeout (seconds)
Timeouts provide an opportunity for the server to stabilize and respond to the user. The maximum amount of time in seconds, that a Vuser waits to connect to a server, before issuing an error. The default value is 120 seconds.
Receive timeout (seconds)
Timeouts provide an opportunity for the server to stabilize and respond to the user. The maximum amount of time in seconds, that a Vuser waits to receive information from a server, before issuing an error. The default value is 120 seconds.
Network Buffer Size
Sets the maximum size of the network buffer that may be used by the Vuser. The default is 12288 bytes. This setting is primarily for advanced users who have determined that the network buffer size may affect Vuser performance.
The timeout settings are primarily for advanced users who have determined that acceptable timeout values should be different for their environment. The default settings should be sufficient in most cases. If the server does not respond in a reasonable amount of time, check for other connection-related issues, rather than setting a very long timeout which could cause the Vuser to wait unnecessarily.

Chapter 27 • Configuring Wireless Run-Time Settings
371
Setting Preferences
You use the Preferences tab in the Run-Time Settings dialog box to set the settings related to checks, graph information, and advanced settings.
Verification Checks
Allows the Vuser to perform verification checks during replay by executing the standard verification functions. This option only applies to Web Vusers, recorded in HTML-based mode. Vusers running with verification checks use more memory than those who do not perform checks (disabled by default).
Generate Web Performance Graphs
Instructs a Vuser to collect data used to create Web Performance graphs. You view the Hits per Second, Pages Downloaded per Second, and Throughput graphs during the scenario run using the online monitors, and after test execution using the Analysis. You view the Component Breakdown graph after test execution using the Analysis. Select the types of graph data for the Vuser to collect.

Creating Vuser Scripts • Wireless Protocols
372
Note: If you don’t use the Web performance graphs, disable these options to save memory.
Advanced
WinInet Replay (instead of Sockets)
Instructs VuGen to use the WinInet replay engine. VuGen has two HTTP replay engines: Sockets-based (default) or WinInet based. The WinInet is the engine used by Internet Explorer and it supports all of the features incorporated into the IE browser. The limitations of the WinInet replay engine are that it is not scalable, nor does it support UNIX. In addition, when working with threads, the WinInet engine incorrectly emulates the modem speed and number of connections.
VuGen’s proprietary sockets-based replay is a lighter engine that is scalable for load testing. It is also accurate when working with threads. The limitations of the sockets-based engine are that it does not support NTLM, SOCKS proxy, or proxy automatic configuration. If you are recording in one of these environments, you need to use the WinInet replay engine.
File and line in automatic transaction names
Creates unique transaction names for automatic transactions by adding file name and line number to the transaction name (enabled by default).
Note: This option places additional information in the log file, and therefore requires more memory.
Non-critical item errors as warnings
Returns a warning status for a function which failed on an item that is not critical for load testing, such as an automatically downloaded image that failed to load, or a Java applet that failed to start. This setting is primarily for

Chapter 27 • Configuring Wireless Run-Time Settings
373
advanced users who have determined that a non-critical error should fail in their environment (warning enabled by default).
Obtaining Debug Information
When you run a Vuser script, the execution information is displayed in the LoadRunner Controller’s Output window. You control the amount of information sent to the Output window and log files, using the Run-Time Settings Log tab.
Debug information includes:
➤ log information
➤ the connection status with the gateway (connecting, disconnecting, or redirecting)
➤ transaction failures
To obtain more information for debugging, edit the default.cfg file. Locate the WEB section and set the LogFileWrite flag to 1. The resulting trace file documents all events in the execution of the script.
When performing load testing, make sure to clear the LogFileWrite flag to prevent LoadRunner from wasting resources by creating a large trace file.

Creating Vuser Scripts • Wireless Protocols
374

375
28Configuring WAP Run-Time Settings
After you record a WAP Vuser script, you configure the WAP specific run-time settings.
This chapter describes:
➤ Configuring Gateway Options
➤ Configuring Bearer Information
➤ Configuring RADIUS Connection Data
➤ Obtaining Debug Information
About WAP Run-Time Settings
After developing a WAP Vuser script, you set the WAP specific run-time settings. These settings let you control the behavior of the WAP Vusers so that they accurately emulate real users on a WAP device. You can configure WAP run-time settings in the areas of Gateway, Radius, and Bearer, and Push settings.
You set the WAP run-time settings from the Run-Time Settings dialog box. You click on the appropriate tab to view and specify the desired settings.
To display the Run-Time Settings dialog box, click the Run-Time Settings button on the VuGen toolbar. You can also modify the run-time settings from the LoadRunner Controller by clicking the Runtime Settings button in the Design tab.
This chapter discusses the Gateway Run-Time settings for WAP Vusers. For information about the general run-time settings that apply to all wireless Vusers, see Chapter 27, “Configuring Wireless Run-Time Settings.”

Creating Vuser Scripts • Wireless Protocols
376
Configuring Gateway Options
You use the Gateway tab in the Run-Time Settings dialog box to set the gateway settings:
The Gateway tab is only relevant if you want to run the Vusers using WSP protocol, accessing a Web server via a WAP Gateway. If you are running Vusers in HTTP mode, accessing a Web server directly the settings on this tab do not apply.
If you are running a script through a WAP gateway, you specify an IP and port address.
Setting a Gateway Address and Connection Options
When running your Vusers through a WAP gateway, VuGen automatically sets default port numbers, depending on the selected mode. However, you can customize the settings and specify a custom IP address and port for the gateway.
You can also indicate the desired replay connection mode. The supported connections modes are Connection-Oriented (CO) or Connectionless mode

Chapter 28 • Configuring WAP Run-Time Settings
377
(CL). In addition, you can indicate whether or not the connection should be secure.
Setting Advanced Gateway Settings
In the Capabilities dialog box, you can configure the WAP Capabilities and advanced gateway options:
➤ Server SDU size - the largest transaction service data unit that may be sent to the server during the session (4000 by default).
➤ Client SDU size - the largest transaction service data unit that may be sent to the client during the session (4000 by default).
➤ Acknowledgement Headers - return standard headers that provide information to the gateway (disabled by default).
➤ Push Support - Enables push type messages across the gateway (disabled by default).
➤ Confirm Push Support - In CO mode, if a push message is received, this option instructs the Vuser to confirm the receipt of the message (disabled by default).
➤ Retrieve Messages - When a push messages is received, this option instructs the Vuser to retrieve the message data from the URL indicated in the push message (disabled by default).
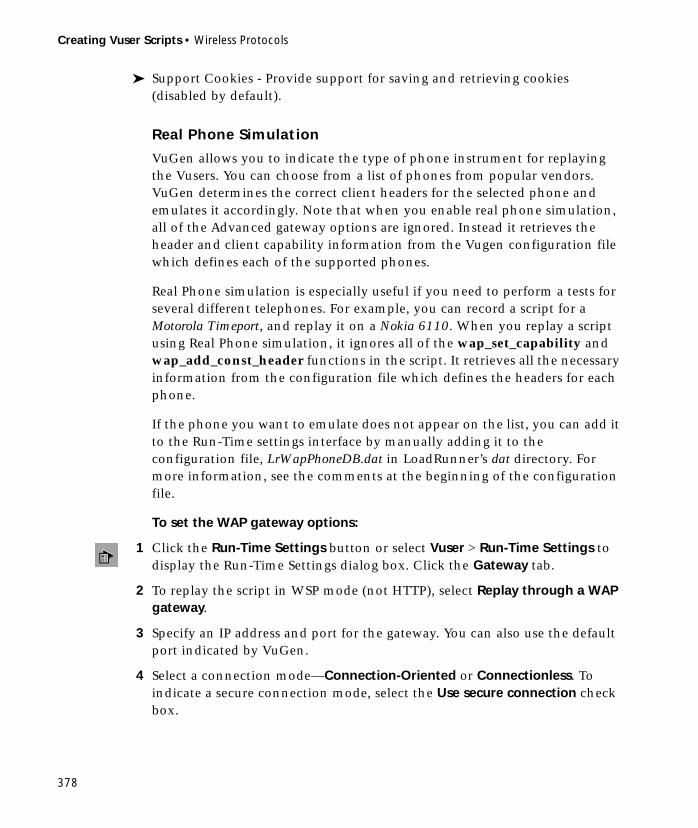
Creating Vuser Scripts • Wireless Protocols
378
➤ Support Cookies - Provide support for saving and retrieving cookies (disabled by default).
Real Phone Simulation
VuGen allows you to indicate the type of phone instrument for replaying the Vusers. You can choose from a list of phones from popular vendors. VuGen determines the correct client headers for the selected phone and emulates it accordingly. Note that when you enable real phone simulation, all of the Advanced gateway options are ignored. Instead it retrieves the header and client capability information from the Vugen configuration file which defines each of the supported phones.
Real Phone simulation is especially useful if you need to perform a tests for several different telephones. For example, you can record a script for a Motorola Timeport, and replay it on a Nokia 6110. When you replay a script using Real Phone simulation, it ignores all of the wap_set_capability and wap_add_const_header functions in the script. It retrieves all the necessary information from the configuration file which defines the headers for each phone.
If the phone you want to emulate does not appear on the list, you can add it to the Run-Time settings interface by manually adding it to the configuration file, LrWapPhoneDB.dat in LoadRunner’s dat directory. For more information, see the comments at the beginning of the configuration file.
To set the WAP gateway options:
1 Click the Run-Time Settings button or select Vuser > Run-Time Settings to display the Run-Time Settings dialog box. Click the Gateway tab.
2 To replay the script in WSP mode (not HTTP), select Replay through a WAP gateway.
3 Specify an IP address and port for the gateway. You can also use the default port indicated by VuGen.
4 Select a connection mode—Connection-Oriented or Connectionless. To indicate a secure connection mode, select the Use secure connection check box.

Chapter 28 • Configuring WAP Run-Time Settings
379
5 To emulate a popular phone, select Simulate a Real Phone and select the desired phone from the pull-down list.
6 If you are not emulating a popular phone, click Advanced to set the client capabilities and other advanced gateway options.
➤ Enter values for the Server SDU and Client SDU.
➤ To instruct Vusers to retrieve Acknowledgement Headers, select the Acknowledgement Headers check box.
➤ To allow push messages, choose True in the column adjacent to Push Support.
➤ To allow confirmations for push messages, select True in the column adjacent to Confirm Push Support.
➤ To retrieve data from push message URLs, select True in the column adjacent to Retrieve Messages.
➤ To enable cookies, select True in the column adjacent to Support Cookies.
Configuring Bearer Information
LoadRunner supports both UDP and SMS bearers. In the Run-Time Settings you indicate the initial bearer. You can switch between bearers during replay using the wap_set_bearer function. Note that if you want to use both bearers, you must enable them before replay in the Run-Time settings.
To work with the SMS-CIMD2 bearer, you must connect to a Short Message System Center (SMSC) and provide login information. You define the port information in the Run-Time Settings’ Bearers tab.
You can set the SMS login information using the wap_set_sms_user API function or through the run-time settings. The advantage of setting the login information through a function, is that you can use parameters to run the script. with many values. The values in the API function override the run-time settings. You set the bearer attributes in the Run-Time Settings’ Bearers tab:
Enable UDP Bearer Open a connection to a UDP bearer
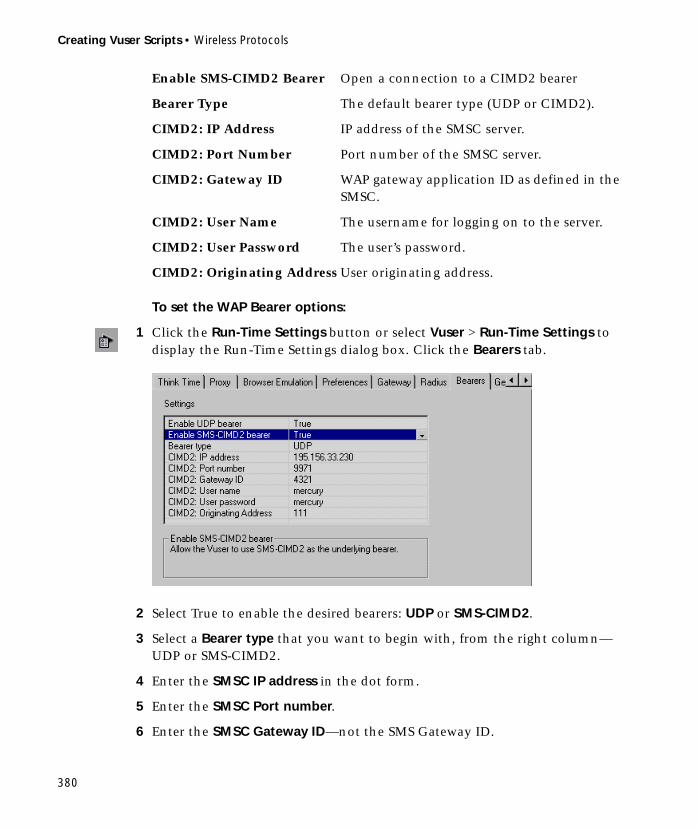
Creating Vuser Scripts • Wireless Protocols
380
Enable SMS-CIMD2 Bearer Open a connection to a CIMD2 bearer
Bearer Type The default bearer type (UDP or CIMD2).
CIMD2: IP Address IP address of the SMSC server.
CIMD2: Port Number Port number of the SMSC server.
CIMD2: Gateway ID WAP gateway application ID as defined in the SMSC.
CIMD2: User Name The username for logging on to the server.
CIMD2: User Password The user’s password.
CIMD2: Originating Address User originating address.
To set the WAP Bearer options:
1 Click the Run-Time Settings button or select Vuser > Run-Time Settings to display the Run-Time Settings dialog box. Click the Bearers tab.
2 Select True to enable the desired bearers: UDP or SMS-CIMD2.
3 Select a Bearer type that you want to begin with, from the right column—UDP or SMS-CIMD2.
4 Enter the SMSC IP address in the dot form.
5 Enter the SMSC Port number.
6 Enter the SMSC Gateway ID—not the SMS Gateway ID.
Chapter 28 • Configuring WAP Run-Time Settings
381
7 Enter the SMSC User name.
8 Enter the SMSC User password.
9 Enter the SMSC originating address.
10 Click OK to accept the setting and close the dialog box.
Configuring RADIUS Connection Data
RADIUS (Remote Authentication Dial-In User Service) is a client/server protocol and software that enables remote access servers to communicate with a central server to authenticate dial-in users and authorize their access to the requested system or service.
You supply the dial-in information in Run-Time Settings’ Radius tab:
Radius Authentication A flag indicating whether or not to use the authentication protocol.
IP Address IP address of the Radius server.
Authentication Port Number
Authentication port of the Radius server.
Accounting Port Number
Accounting port of the Radius server.
Secret Key The secret key of the Radius server.
User Name The username for logging on to the Radius server.
User Password The user's password.
MSISDN MSISDN number.
Network Type Accounting network type: GPRS (General Packet Radio Service) or CSD (Circuit-Switched Data).

Creating Vuser Scripts • Wireless Protocols
382
To set the WAP Radius options:
1 Click the Run-Time Settings button or select Vuser > Run-Time Settings to display the Run-Time Settings dialog box. Click the Radius tab.
2 In the Radius Authentication section, choose True to enable authentication, or False to disable it.
3 Enter the IP address of the Radius server in dot form.
4 Enter the Authentication Port number and Accounting Port number of the Radius server.
5 Type in the Secret key for Radius or Accounting Authentication.
6 Enter the User name for logging into the Radius server.
7 Enter the User password for the user name.
8 Enter the MSISDN identification number.
9 Choose an accounting Network type: GPRS (General Packet Radio Service) or CSD (Circuit-Switched Data).
10 Click OK to accept the settings and close the dialog box.

Chapter 28 • Configuring WAP Run-Time Settings
383
Obtaining Debug Information
When you run a WAP Vuser script, the execution information is displayed in the LoadRunner Controller’s Output window. You control the amount of information sent to the Output window and log files, using the Run-Time Settings Log tab.
Debug information includes:
➤ log information
➤ the connection status with the gateway (connecting, disconnecting, or redirecting)
➤ transaction failures
To obtain more information for debugging, edit the default.cfg file. Locate the WEB section and set the LogFileWrite flag to 1. The resulting trace file documents all events in the execution of the script.
When performing load testing, make sure to clear the LogFileWrite flag to prevent LoadRunner from wasting resources by creating a large trace file.

Creating Vuser Scripts • Wireless Protocols
384
385
29Modifying Wireless Vuser Scripts
After recording a Wireless Vuser script, you use VuGen to modify the recorded script. You can add new steps, and edit, rename, and delete existing steps.
This chapter describes:
➤ Adding Steps to Wireless Vuser Scripts
➤ Deleting Steps from Wireless Vuser Scripts
➤ Modifying Action Steps
➤ Modifying Control Steps
➤ Modifying Service Steps
About Modifying Wireless Vuser Scripts
After recording a browser session, you can modify the recorded script in VuGen by editing a step’s properties or adding and deleting steps.
This chapter describes how to use VuGen to modify the script in the tree view. For information about modifying the script in the text-based script view, see the LoadRunner Online Function Reference.
Adding Steps to Wireless Vuser Scripts
In addition to the steps that VuGen records during the recording session, you can add steps to a recorded script.

Creating Vuser Scripts • Wireless Protocols
386
To add a step to a Vuser script:
1 In the tree view of the Vuser script, select the step before or after which you want to add the new step.
2 Select Insert > New Step to insert a step after the selected step, or select Insert After or Insert Before from the right-click menu. The Add Step dialog box opens.
3 Select the type of step you want to add from the Step Type tree or from the Find Function list.
4 Click OK. An additional dialog box opens, prompting for information about the step to add. This dialog box varies, depending on the type of step that you are adding.
For details on using these dialog boxes, see the appropriate section, as listed below:
To add a(n)... See...
LoadRunner function The Online Function Reference
Service step “Modifying Service Steps” on page 397
Transaction “Modifying a Transaction” on page 394
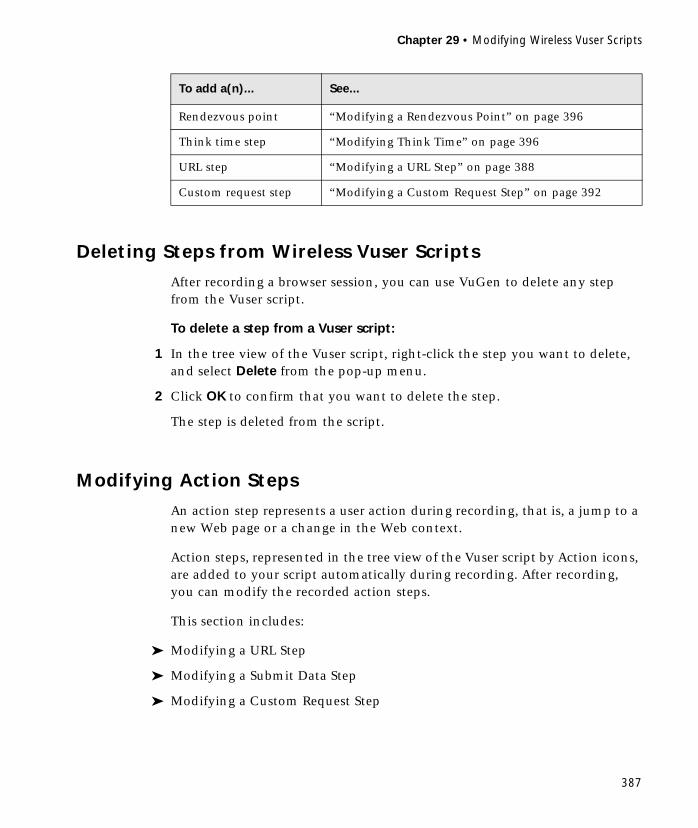
Chapter 29 • Modifying Wireless Vuser Scripts
387
Deleting Steps from Wireless Vuser Scripts
After recording a browser session, you can use VuGen to delete any step from the Vuser script.
To delete a step from a Vuser script:
1 In the tree view of the Vuser script, right-click the step you want to delete, and select Delete from the pop-up menu.
2 Click OK to confirm that you want to delete the step.
The step is deleted from the script.
Modifying Action Steps
An action step represents a user action during recording, that is, a jump to a new Web page or a change in the Web context.
Action steps, represented in the tree view of the Vuser script by Action icons, are added to your script automatically during recording. After recording, you can modify the recorded action steps.
This section includes:
➤ Modifying a URL Step
➤ Modifying a Submit Data Step
➤ Modifying a Custom Request Step
Rendezvous point “Modifying a Rendezvous Point” on page 396
Think time step “Modifying Think Time” on page 396
URL step “Modifying a URL Step” on page 388
Custom request step “Modifying a Custom Request Step” on page 392
To add a(n)... See...

Creating Vuser Scripts • Wireless Protocols
388
Modifying a URL Step
A URL step is added to the Vuser script when you access a specific Web page.
The properties that you can modify are the name of the step, the address of the URL.
To modify the properties of a URL step:
1 In the tree view of the Vuser script, select the URL step you want to edit. URL steps are shown using the URL icon.
2 Click the Properties button on the VuGen toolbar. The URL Step Properties dialog box opens.
3 To change the step name, type a new name in the Step name box. The default name during recording is the last part of the URL.
4 In the URL box, type the Web address (URL) of the Web page that is accessed by the URL step. An ABC icon indicates that the URL has not been assigned a parameter.
5 In the Target frame list, select one of the following values:
➤ _PARENT: replaces the parent of the last (changed) frame
➤ _TOP: replaces the whole page
➤ _BLANK: opens a new window

Chapter 29 • Modifying Wireless Vuser Scripts
389
6 To exclude an item from being downloaded as a resource, clear the Resource check box.
7 Click OK to close the URL Step Properties dialog box.
8 To change the step name, type a new name in the Step Name box. The default name during recording is the text string of the hypertext link.
9 The properties table displays the properties that identify the link.
Clear the View only the active properties check box to view active and non-active properties. To enable a property, click the cell to the left of the property name. Assign the property a value in the Value column:
➤ Text: the exact string of the hypertext link
➤ Frame: the name of the frame where the link is located
➤ TargetFrame: the target frame:
_TOP: replaces the whole page
_BLANK: opens a new window
_PARENT: replaces the parent of the last (changed) frame
Modifying a Submit Data Step
A submit data step represents the submission of a form of data to your Web site for processing.
The properties that you can modify are the name of the step, the method, the action, the target frame, and the data items on the form.
To modify the properties of a submit data step:
1 In the tree view of the Vuser script, select the submit data step you want to edit. Submit data steps are shown using the Submit Data icon .

Creating Vuser Scripts • Wireless Protocols
390
2 Select Properties from the right-click menu. The Submit Data Step Properties dialog box opens. Ensure that Data tab is visible.
➤ The Name column lists all the data arguments on the form. This includes all hidden fields.
➤ The Value column displays the corresponding value input for a data argument.
➤ The type column contains an icon. Initially, all values are constants or non-parameterized values and have an ABC icon. If you assign a parameter to the data value, the ABC icon changes to a table icon.
3 To edit a data argument, double-click it to activate the cursor within the cell, and type the new value.

Chapter 29 • Modifying Wireless Vuser Scripts
391
4 To add new data, click Add. The Add Data dialog box opens.
5 Type a Name and Value for the data argument, and click OK.
6 To delete an argument, select it and click the Delete button.
7 To change the name of the submit data step, click the General tab.
8 To change the step name, type a new name in the Step name box.
9 Under Method, click POST or GET. The default method is POST.
10 In the Action box, type the address to be used to carry out the action of the data submission. An ABC icon indicates that the action has not been
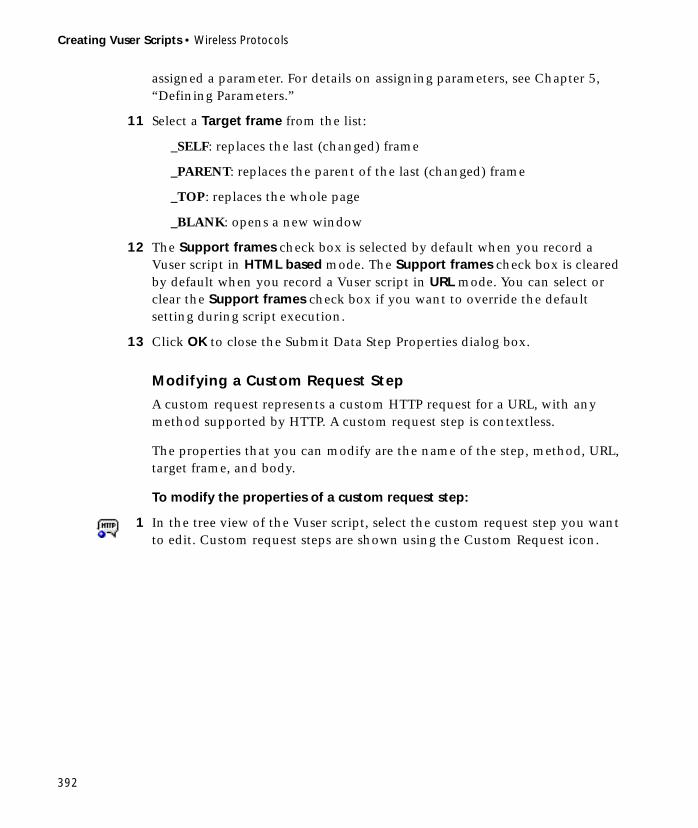
Creating Vuser Scripts • Wireless Protocols
392
assigned a parameter. For details on assigning parameters, see Chapter 5, “Defining Parameters.”
11 Select a Target frame from the list:
_SELF: replaces the last (changed) frame
_PARENT: replaces the parent of the last (changed) frame
_TOP: replaces the whole page
_BLANK: opens a new window
12 The Support frames check box is selected by default when you record a Vuser script in HTML based mode. The Support frames check box is cleared by default when you record a Vuser script in URL mode. You can select or clear the Support frames check box if you want to override the default setting during script execution.
13 Click OK to close the Submit Data Step Properties dialog box.
Modifying a Custom Request Step
A custom request represents a custom HTTP request for a URL, with any method supported by HTTP. A custom request step is contextless.
The properties that you can modify are the name of the step, method, URL, target frame, and body.
To modify the properties of a custom request step:
1 In the tree view of the Vuser script, select the custom request step you want to edit. Custom request steps are shown using the Custom Request icon.
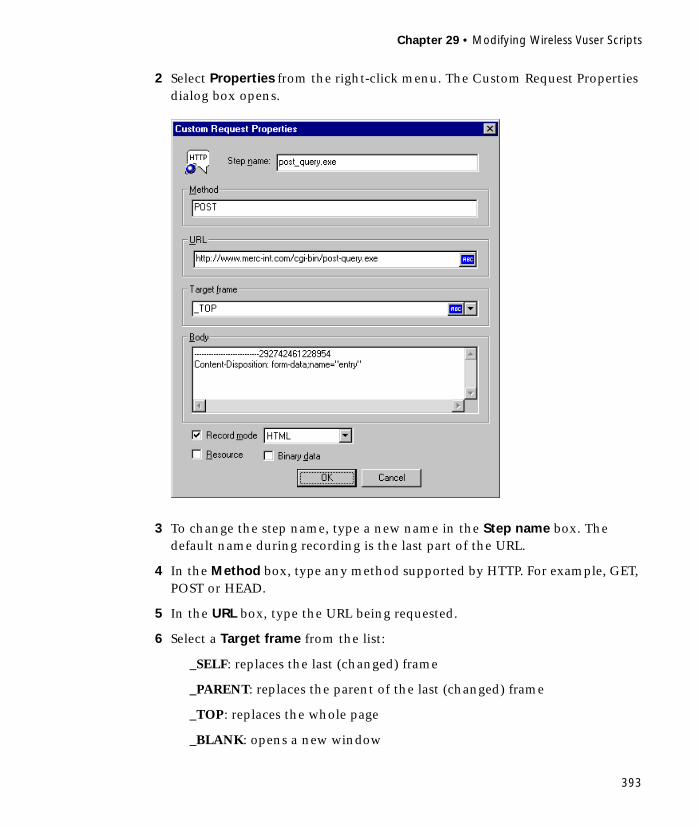
Chapter 29 • Modifying Wireless Vuser Scripts
393
2 Select Properties from the right-click menu. The Custom Request Properties dialog box opens.
3 To change the step name, type a new name in the Step name box. The default name during recording is the last part of the URL.
4 In the Method box, type any method supported by HTTP. For example, GET, POST or HEAD.
5 In the URL box, type the URL being requested.
6 Select a Target frame from the list:
_SELF: replaces the last (changed) frame
_PARENT: replaces the parent of the last (changed) frame
_TOP: replaces the whole page
_BLANK: opens a new window
Creating Vuser Scripts • Wireless Protocols
394
7 In the Body box, type the body of the request. If you select the Binary data check box, the text is treated as binary and not as ASCII. For details on using binary data, see the LoadRunner Online Function Reference.
8 To exclude an item from being downloaded as a resource, clear the Resource check box.
9 Click OK to close the Custom Request Properties dialog box.
Modifying Control Steps
A control step represents a control used during load testing. Control steps include transactions, rendezvous points, and think time.
You add control steps, represented in the tree view of the Vuser script by Control icons, to your script during and after recording.
This section includes:
➤ Modifying a Transaction
➤ Modifying a Rendezvous Point
➤ Modifying Think Time
Modifying a Transaction
A transaction is a task or set of actions whose server response time you want to measure.
The properties that you can modify are the name of the transaction (start transaction and end transaction) and its status (end transaction only).
To modify a start transaction control step:
1 In the tree view of the Vuser script, select the start transaction control step you want to edit. Start transaction control steps are shown using the Start Transaction icon.
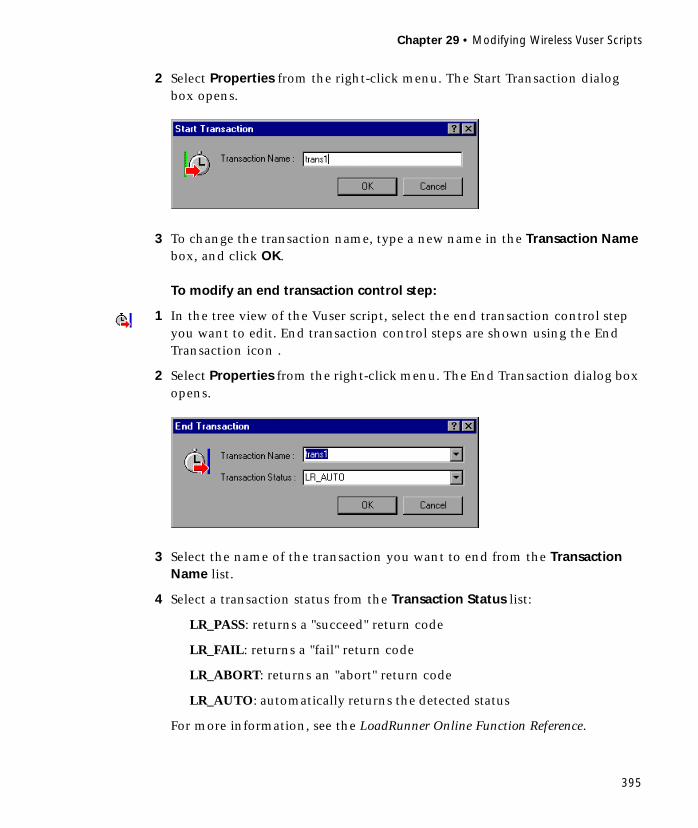
Chapter 29 • Modifying Wireless Vuser Scripts
395
2 Select Properties from the right-click menu. The Start Transaction dialog box opens.
3 To change the transaction name, type a new name in the Transaction Name box, and click OK.
To modify an end transaction control step:
1 In the tree view of the Vuser script, select the end transaction control step you want to edit. End transaction control steps are shown using the End Transaction icon .
2 Select Properties from the right-click menu. The End Transaction dialog box opens.
3 Select the name of the transaction you want to end from the Transaction Name list.
4 Select a transaction status from the Transaction Status list:
LR_PASS: returns a "succeed" return code
LR_FAIL: returns a "fail" return code
LR_ABORT: returns an "abort" return code
LR_AUTO: automatically returns the detected status
For more information, see the LoadRunner Online Function Reference.
Creating Vuser Scripts • Wireless Protocols
396
5 Click OK to close the End Transaction dialog box.
Modifying a Rendezvous Point
Rendezvous points enable you to synchronize Vusers to perform a task at exactly the same moment.
The property that you can modify is the name of the rendezvous point.
To modify a rendezvous point:
1 In the tree view of the Vuser script, select the rendezvous point you want to edit. Rendezvous points are shown using the Rendezvous icon .
2 Select Properties from the right-click menu. The Rendezvous dialog box opens.
3 To change the rendezvous name, type a new name in the Rendezvous Name box, and click OK.
Modifying Think Time
Think time emulates the time that a real user waits between actions. During recording, VuGen automatically adds think time to the Vuser script after each user action—if the time between that action and the subsequent action exceeds a predefined threshold of about four seconds.
The property that you can modify is the think time, in seconds.
To modify the think time:
1 In the tree view of the Vuser script, select the think time step you want to edit. Think time steps are shown using the Think Time icon.

Chapter 29 • Modifying Wireless Vuser Scripts
397
2 Select Properties from the right-click menu. The Think Time dialog box opens.
3 Type a think time in the Time To Think box, and click OK.
Note: When you run a Vuser script, either in VuGen or from the Controller, you can instruct the Vuser to replay think time as recorded or ignore the recorded think time. For details, see Chapter 7, “Configuring Run-Time Settings.”
Modifying Service Steps
A service step is a function that performs customization tasks such as setting proxies, submitting authorization information, and issuing customized headers. Service steps do not make any changes to the Web site context.
You add service steps to your script during and after recording.
To modify the properties of a service step:
1 In the tree view of the Vuser script, select the service step you want to edit. Service steps are shown using the Service icon.
2 Select Properties from the right-click menu. The appropriate service step properties dialog box opens. This dialog box varies, depending on the type of service step that you are modifying. A description of the service step is displayed in the title bar of the dialog box.
Creating Vuser Scripts • Wireless Protocols
398
Note: Some service step functions have no arguments. In these cases, the Properties menu item is disabled.
3 Type or select the arguments required for the service step. See the LoadRunner Online Function Reference for details of each function.
4 Click OK to close the service step properties dialog box.

399
30Correlating Statements in Wireless Scripts
VuGen’s correlation feature allows you to link statements by using the results of one statement as input to another.
This chapter describes how to correlate statements after recording. It discusses:
➤ Using Correlation Functions
➤ Performing Manual Correlation
➤ Defining the Boundaries of Dynamic Data
➤ Correlation Example
About Correlating Statements
HTML pages often contain dynamic data, which is data that changes each time you record. For example, certain Web servers use links comprised of the current date and time.
When you record a WAP or i-mode Vuser script, the dynamic data is recorded into the script. Your script tries to present the recorded variables to the Web server, but they are no longer valid. The Web server rejects them and issues an error.
If you encounter an error when running your Vuser, examine the script at the point where the error occurred. In many cases, correlation will solve the problem by enabling you to use the results of one statement as input to another.
Creating Vuser Scripts • Wireless Protocols
400
The dynamic data in an HTML page can be in the form of:
➤ a URL that changes each time you access the page
➤ a cookie
Consider a case where a user logs into a site. The login ID string has another string appended to it based on the date and time of login. Since the id number changes with each session, LoadRunner is unable to successfully replay the recorded script.
You can use correlated statements to resolve the difficulties in the above cases. Replace the dynamic data in the recorded script with one or more parameters. When the Vuser script runs, LoadRunner assigns parameter values.
Using Correlation Functions
VuGen allows you to manually correlate your scripts by adding the code for the correlation functions to your scripts. The function that allows you to dynamically save data to a parameter is web_reg_save_param. Note that you should always insert the correlation statement into the script before the statement that retrieves the page with the dynamic data.
The web_reg_save_param statement has the following syntax:
int web_reg_save_param (const char *mpszParamName, <List of Attributes>, LAST);

Chapter 30 • Correlating Statements in Wireless Scripts
401
The following table lists the available attributes. Note that the attribute value strings (e.g. Search=all) are not case sensitive.
NOTFOUND The handling method when a boundary is not found and an empty string is generated. "ERROR", the default, indicates that LoadRunner should issue an error when a boundary is not found. When set to "EMPTY", no error message is issued and script execution continues. Note that if Continue on Error is enabled for the script, then even when NOTFOUND is set to "ERROR", the script continues when the boundary is not found, but it writes an error message to the Extended log file.
LB The left boundary of the parameter or the dynamic data. This parameter must be a non-empty, null-terminated character string. Boundary parameters are case sensitive; to ignore the case, add "/IC" after the boundary. Specify "/BIN" after the boundary to specify binary data.
RB The right boundary of the parameter or the dynamic data. This parameter must be a non-empty, null-terminated character string. Boundary parameters are case sensitive; to ignore the case, add "/IC" after the boundary. Specify "/BIN" after the boundary to specify binary data.
RELFRAMEID The hierarchy level of the HTML page relative to the requested URL. The possible values are ALL or a number.
SEARCH The scope of the search—where to search for the delimited data. The possible values are Headers (Search only the headers), Body (search only Body data, not headers), or ALL (search Body and headers). The default value is ALL.
ORD This optional parameter indicates the ordinal or occurrence number of the match. The default ordinal is 1. If you specify "All", it saves the parameter values in an array.
Creating Vuser Scripts • Wireless Protocols
402
When you run the script, the web_reg_save_param function scans the subsequent HTML page that is accessed. It searches for an occurrence of the left boundary, followed by any string, followed by the right boundary. When such an occurrence is found, VuGen assigns the string between the left and right boundaries to the parameter named in the attributes. After finding the specified number of occurrences, web_reg_save_param does not search any more HTML pages and continues with the next step in the script.
Note: Each correlation function retrieves dynamic data once, for the subsequent HTTP request. If another HTTP request at a later point in the script generates new dynamic data, you must insert another correlation function.
Performing Manual Correlation
Follow these steps to manually correlate your script:
1 Identify the statement that contains dynamic data and the patterns that characterize the boundaries of the data. See “Defining the Boundaries of Dynamic Data,” on page 404.
2 In the script, replace the dynamic data with your own parameter name. See “Replacing Dynamic Data with a Parameter” on page 402.
3 Add one of the correlation statements into the script before the statement that contains the dynamic data.
For additional information about the correlation functions, see the LoadRunner Online Function Reference.
Replacing Dynamic Data with a Parameter
First, identify the actual dynamic data. After you locate the dynamic data in the recorded statement, search the entire script for the dynamic data, and replace it with a parameter. Give the parameter any name, and enclose it
Chapter 30 • Correlating Statements in Wireless Scripts
403
with braces: {param_name}. You can include a maximum of 64 parameters per script.
To replace dynamic data with a parameter:
Select Edit > Replace from the VuGen main window to display the Search and Replace dialog box. Search the entire script for the dynamic data, and replace it with a parameter.
Adding a Correlation Function
Insert one or more correlation statements to save dynamic data in a script. The functions that allow you to dynamically save data to a parameter is web_reg_save_param. The web_create_html_param and web_create_html_param_ex functions are supported for earlier versions of the product. For more information, see the LoadRunner Online Function Reference.
Always insert the correlation statement into the script before the statement that retrieves the page with the dynamic data. Each correlation function retrieves dynamic data once, for the subsequent HTTP request. If another HTTP request at a later point in the script generates new dynamic data, you must insert another correlation function.
Creating Vuser Scripts • Wireless Protocols
404
Defining the Boundaries of Dynamic Data
Use these guidelines to determine the boundaries of the dynamic data:
➤ Always analyze the location of the dynamic data within the HTML code itself, and not in the recorded script.
➤ Identify the string that is immediately to the left of the dynamic data. This string defines the left boundary of the dynamic data.
➤ Identify the string that is immediately to the right of the dynamic data. This string defines the right boundary of the dynamic data.
➤ The dynamic text should be contained between the left and right boundaries, that is, the left and right boundaries define the position of the dynamic text within the HTML code.
➤ web_reg_save_param and web_create_html_param(_ex) are service functions that are used for correlating HTML statements in Vuser scripts. These functions retrieve dynamic information from the downloaded page, and save it to a parameter.
The web_reg_save_param function looks for the characters between (but not including) the specified boundaries and saves the information beginning one byte after the left boundary and ending one byte before the right boundary. Embedded boundary characters are not supported. This is in contrast to web_create_html_param_ex which supports embedded boundaries. It searches for the next occurrence after the previous left boundary. For example, if the input buffer is {a{b{c} and "{" is specified as a left boundary, and "}" as a right border.
For web_reg_save_param: Instance 1 is c and there are no further instances—it found the right and left boundaries but it does not allow embedded boundaries, so "c" is the only valid match.
For web_create_html_param_ex: Instance 1 is a{b{c, instance 2 is b{c, and instance 3 is c. Since it allows embedded boundaries, there are three matches.
➤ By default, the maximum length of any boundary string is 256 characters. Include a web_set_max_html_param_len function in your script to increase the maximum permitted length. For example, the following function increases the maximum length to 1024 characters:web_set_max_html_param_len(“1024”);

Chapter 30 • Correlating Statements in Wireless Scripts
405
Correlation Example
Suppose your script contains a dynamic session ID:
You insert a web_reg_save_param statement before the above statement and replace the dynamic value with the parameter. In the following example, the web_reg_save_param functions saves the login ID string to a variable called SK. It saves binary data, denoted by the RB/BIN attribute, and sets the left boundary as “sk=”.:
web_url("login.po;sk=IuZSuuRlHUMnpF-wpK8PzEpy(1YOSBSMy)","URL=http://room33.com/portal/login.po;sk=IuZSuuRlHUMnpF-
wpK8PzEpy(1YOSBSMy)","Resource=0","RecContentType=text/vnd.wap.wml","Mode=NORESOURCE",LAST);
web_reg_save_param( "SK",
"LB=sk=", "RB/BIN=#login\\x00\\x01\\x03", "Ord=1", LAST);
web_url("login.po;sk={SK}","URL=http://room33.com/portal/login.po;sk={SK}","Resource=0","RecContentType=text/vnd.wap.wml","Mode=NORESOURCE",LAST);

Creating Vuser Scripts • Wireless Protocols
406
Part V
Database Vuser Scripts

408

409
31Developing Database Vuser Scripts
You use VuGen to record communication between a database client application and a server. The resulting script is called a Database Vuser script.
This chapter describes:
➤ Introducing Database Vusers
➤ Understanding Database Vuser Technology
➤ Getting Started with Database Vuser Scripts
➤ Setting LRD Recording Options
➤ Using LRD Functions
➤ Understanding Database Vuser Scripts
➤ Evaluating Error Codes
➤ Handling Errors
➤ Correlating Database Queries and COM Functions
➤ Automatic Correlation for Database and COM Scripts
The following information applies to Database (CtLib, DbLib, Informix, Oracle, and ODBC, DB2-CLI) Vuser scripts only.
About Recording Database Vuser Scripts
When you record a database application communicating with a server, VuGen generates a Database Vuser script. VuGen supports the following database types: CtLib, DbLib, Informix, Oracle, ODBC, and DB2-CLI. The resulting Vuser script contains LRD functions that describe the database

Creating Vuser Scripts • Database Vuser Scripts
410
activity. Each LRD function has an lrd prefix, and represents one or more database functions. For example, the lrd_fetch function represents a fetch operation.
When you run a recorded session, the Vuser script communicates directly with the database server, performing the same operations as the original user. You can set the Vuser behavior (run-time settings) to indicate the number of times to repeat the operation and the interval between the repetitions. For more information, see Chapter 7, “Configuring Run-Time Settings.”
Using VuGen, you can parameterize a script, replacing recorded constants with parameters. For more information, see Chapter 5, “Defining Parameters.”
In addition, you can correlate queries or other database statements in a script, linking the results of one query with another. For more information, see Chapter 6, “Correlating Statements.”
Introducing Database Vusers
Suppose that you have a database of customer information that is accessed by customer service personnel located throughout the country. You use Database Vusers to emulate this scenario in which the database server services many requests for information. A Database Vuser could:
➤ connect to the server
➤ submit an SQL query
➤ retrieve and process the information
➤ disconnect from the server
You distribute several hundred Database Vusers among the available load generators, each Vuser accessing the database by using the server API. This enables you to measure the performance of your server under the load of many users.
The program that contains the calls to the server API is called a Database Vuser script. It emulates the client application and all of the actions
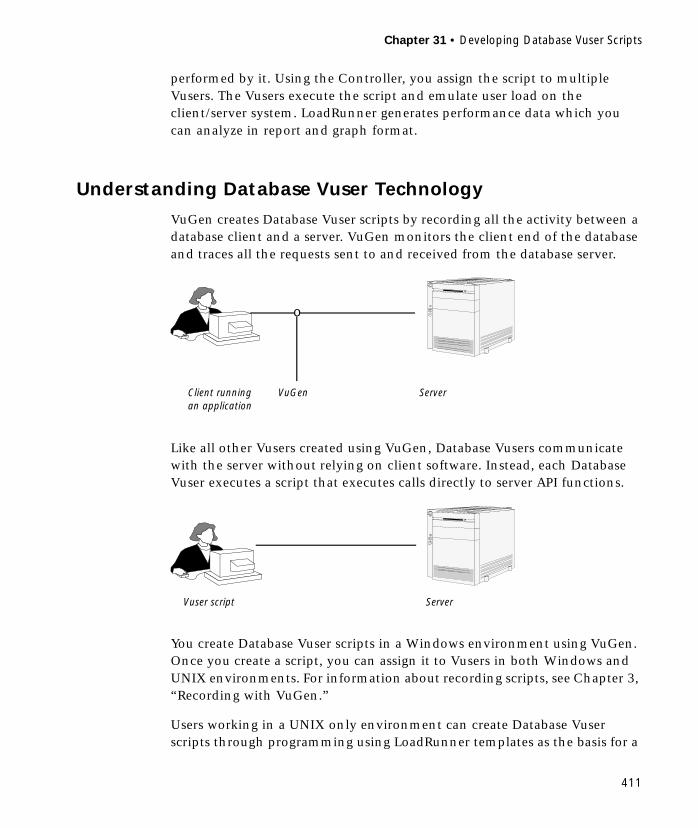
Chapter 31 • Developing Database Vuser Scripts
411
performed by it. Using the Controller, you assign the script to multiple Vusers. The Vusers execute the script and emulate user load on the client/server system. LoadRunner generates performance data which you can analyze in report and graph format.
Understanding Database Vuser Technology
VuGen creates Database Vuser scripts by recording all the activity between a database client and a server. VuGen monitors the client end of the database and traces all the requests sent to and received from the database server.
Like all other Vusers created using VuGen, Database Vusers communicate with the server without relying on client software. Instead, each Database Vuser executes a script that executes calls directly to server API functions.
You create Database Vuser scripts in a Windows environment using VuGen. Once you create a script, you can assign it to Vusers in both Windows and UNIX environments. For information about recording scripts, see Chapter 3, “Recording with VuGen.”
Users working in a UNIX only environment can create Database Vuser scripts through programming using LoadRunner templates as the basis for a
o
Client running an application
VuGen Server
ServerVuser script

Creating Vuser Scripts • Database Vuser Scripts
412
script. For information about programming Database Vuser scripts on UNIX, see Appendix C, “Programming Scripts on UNIX Platforms.”
Getting Started with Database Vuser Scripts
This section provides an overview of the process of developing Database Vuser scripts using VuGen.
To develop a Database Vuser script:
1 Record the basic script using VuGen.
Invoke VuGen and create a new Vuser script. Specify the type of Vuser (CtLib, DbLib, Informix, Oracle, and ODBC). Choose an application to record and set the recording options. Record typical operations on your application.
For details, see Chapter 3, “Recording with VuGen.”
2 Enhance the script.
Enhance the Vuser script by inserting transactions, rendezvous points, and control-flow structures into the script.
For details, see Chapter 4, “Enhancing Vuser Scripts.”
3 Define parameters (optional).
Define parameters for the fixed-values recorded into your script. By substituting fixed-values with parameters, you can repeat the same query many times using different values.
For details, see Chapter 5, “Defining Parameters.”
4 Correlate queries (optional).
Correlating database statements allows you to use the result of a query in a subsequent one. This feature is useful when working on a database with user constraints.
For details, see Chapter 6, “Correlating Statements.”
5 Configure the run-time settings.
The run-time settings control the Vuser behavior during script execution. These settings include loop, log, and timing information.
Chapter 31 • Developing Database Vuser Scripts
413
For details, see Chapter 7, “Configuring Run-Time Settings.”
6 Run the script from VuGen.
Save and run the script from VuGen to verify that it runs correctly.
For details, see Chapter 9, “Running Vuser Scripts in Stand-Alone Mode.”
After you create a Database Vuser script, you integrate it into a scenario on either a Windows or UNIX platform. For more information on integrating Vuser scripts in a scenario, refer to your LoadRunner Controller User’s Guide.
Setting LRD Recording Options
Before you record a database session, you set the recording options. You can set recording options in the following areas:
Automatic Transactions: You can instruct VuGen to mark every lrd_exec and lrd_fetch function as a transaction. When these options are enabled, VuGen inserts lr_start_transaction and lr_end_transaction around every lrd_exec or lrd_fetch function. By default, automatic transactions are disabled.
Script Options: You can instruct VuGen to generate comments into recorded scripts, describing the lrd_stmt option values. In addition, you can specify the maximum length of a line in the script. The default length is 80 characters.
Think Time: VuGen automatically records the operator’s think time. You can set a threshold level, below which the recorded think time will be ignored. If the recorded think time exceeds the threshold level, VuGen places an lr_think_time statement before LRD functions. If the recorded think time is below the threshold level, an lr_think_time statement is not generated. The default value is five seconds.
The Advanced Recording options include:
Recording Log Options: You can set the detail level for the trace and ASCII log files. The available levels for the trace file are Off, Error Trace, Brief Trace, or Full Trace. The error trace only logs error messages. The Brief Trace logs
Creating Vuser Scripts • Database Vuser Scripts
414
errors and lists the functions generated during recording. The Full Trace logs all messages, notifications, and warnings.
You can also instruct VuGen to generate ASCII type logs of the recording session. The available levels are Off, Brief Detail and Full Detail. The Brief setting logs all of the functions, and the Full setting logs all of the generated functions and messages in ASCII code.
CtLib Function Options: You can instruct VuGen to generate a send data time stamp or to generate an extended result set statement.
Time Stamp: By default, VuGen generates lrd_send_data statements with the TotalLen and Log keywords for the mpszReqSpec parameter. The Advanced Recording Options dialog box lets you instruct VuGen to also generate the TimeStamp keyword. If you change this setting on an existing script, you must regenerate the Vuser by choosing Tools > Regenerate. It is not recommended to generate the Timestamp keyword by default. The timestamp generated during recording is different than that generated during replay and script execution will fail. You should use this option only after a failed attempt in running a script, where an lrd_result_set following an lrd_send_data fails. The generated timestamp can now be correlated with a timestamp generated by an earlier lrd_send_data.
Extended Result Set: By default, VuGen generates an lrd_result_set function when preparing the result set. This setting instructs VuGen to generate the extended form of the lrd_result_set function, lrd_result_set_ext. In addition to preparing a result set, this function also issues a return code and type from ct_results.
Code Generation Buffer Size: Specify in kilobytes the maximum size of the code generation buffer. The default value is 128 kilobytes. For long database sessions, you can specify a larger size.
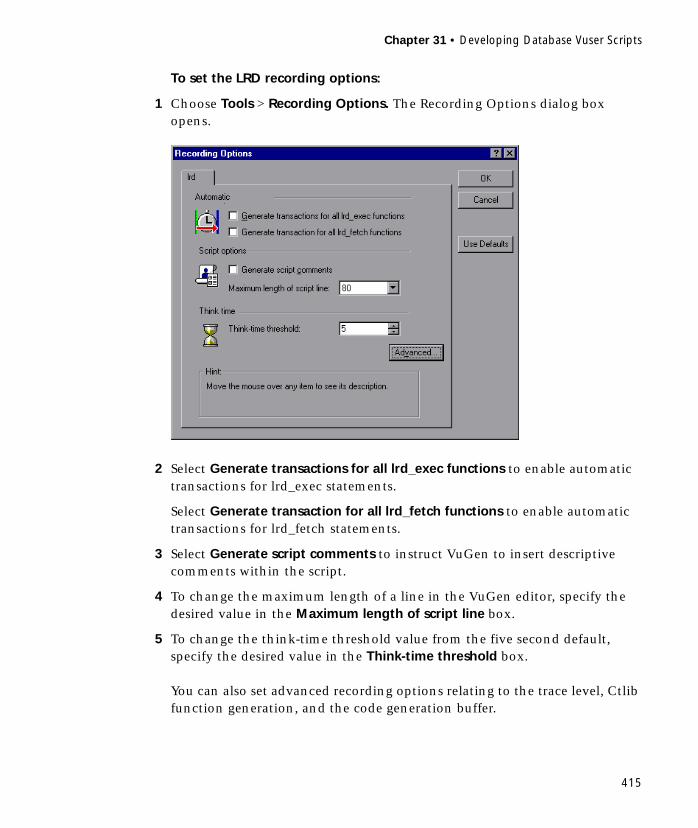
Chapter 31 • Developing Database Vuser Scripts
415
To set the LRD recording options:
1 Choose Tools > Recording Options. The Recording Options dialog box opens.
2 Select Generate transactions for all lrd_exec functions to enable automatic transactions for lrd_exec statements.
Select Generate transaction for all lrd_fetch functions to enable automatic transactions for lrd_fetch statements.
3 Select Generate script comments to instruct VuGen to insert descriptive comments within the script.
4 To change the maximum length of a line in the VuGen editor, specify the desired value in the Maximum length of script line box.
5 To change the think-time threshold value from the five second default, specify the desired value in the Think-time threshold box.
You can also set advanced recording options relating to the trace level, Ctlib function generation, and the code generation buffer.

Creating Vuser Scripts • Database Vuser Scripts
416
To set advanced recording options:
1 Click the Advanced button in the Recording Options dialog box. The Advanced Recording Options dialog box opens.
2 To generate a trace file, select the desired detail level from the Trace file detail level box.
3 To generate an ASCII log file, select the desired detail level from the ASCII file detail level box.
4 To instruct VuGen to generate the TimeStamp keyword for lrd_send_data functions, select the Generate send data time stamp check box.
5 To instruct VuGen to generate lrd_result_set_ext instead of lrd_result_set, select the Generate extended result set statement check box.
6 To modify the size of the code generation buffer from the default value of 128 kilobytes, enter the desired value in the Code generation buffer size box.
7 Click OK to save your settings and close the Advanced Recording Options dialog box.
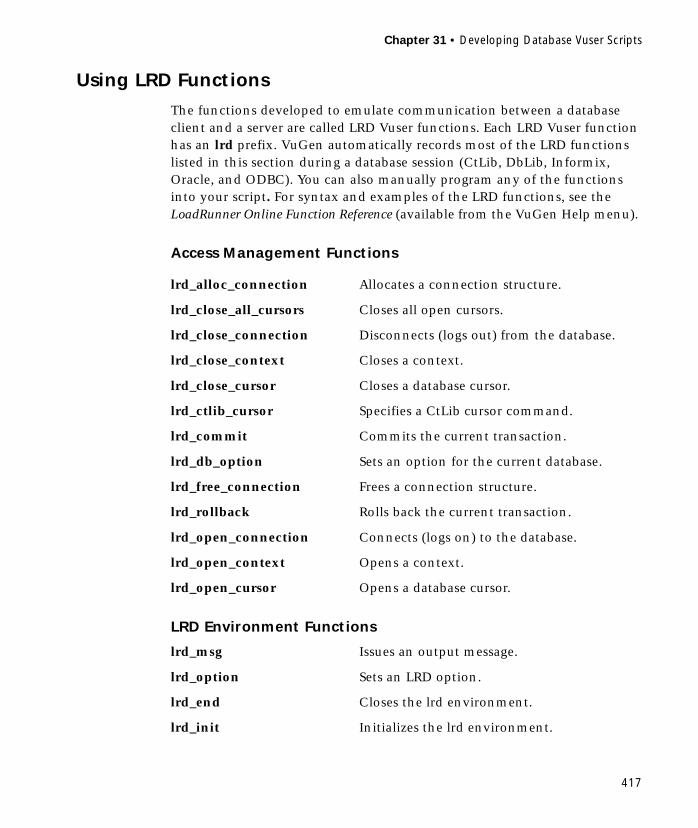
Chapter 31 • Developing Database Vuser Scripts
417
Using LRD Functions
The functions developed to emulate communication between a database client and a server are called LRD Vuser functions. Each LRD Vuser function has an lrd prefix. VuGen automatically records most of the LRD functions listed in this section during a database session (CtLib, DbLib, Informix, Oracle, and ODBC). You can also manually program any of the functions into your script. For syntax and examples of the LRD functions, see the LoadRunner Online Function Reference (available from the VuGen Help menu).
Access Management Functions
LRD Environment Functions
lrd_alloc_connection Allocates a connection structure.
lrd_close_all_cursors Closes all open cursors.
lrd_close_connection Disconnects (logs out) from the database.
lrd_close_context Closes a context.
lrd_close_cursor Closes a database cursor.
lrd_ctlib_cursor Specifies a CtLib cursor command.
lrd_commit Commits the current transaction.
lrd_db_option Sets an option for the current database.
lrd_free_connection Frees a connection structure.
lrd_rollback Rolls back the current transaction.
lrd_open_connection Connects (logs on) to the database.
lrd_open_context Opens a context.
lrd_open_cursor Opens a database cursor.
lrd_msg Issues an output message.
lrd_option Sets an LRD option.
lrd_end Closes the lrd environment.
lrd_init Initializes the lrd environment.
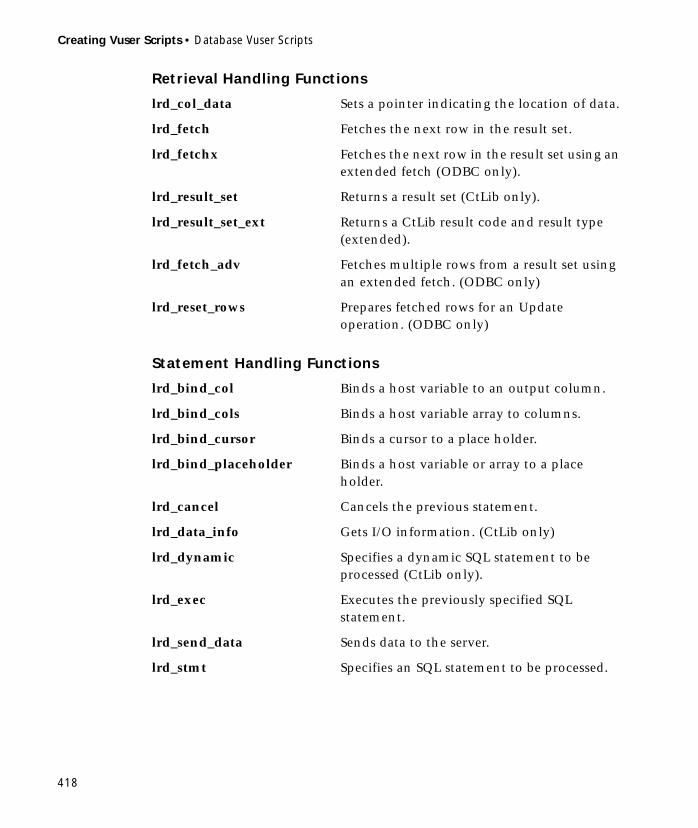
Creating Vuser Scripts • Database Vuser Scripts
418
Retrieval Handling Functions
Statement Handling Functions
lrd_col_data Sets a pointer indicating the location of data.
lrd_fetch Fetches the next row in the result set.
lrd_fetchx Fetches the next row in the result set using an extended fetch (ODBC only).
lrd_result_set Returns a result set (CtLib only).
lrd_result_set_ext Returns a CtLib result code and result type (extended).
lrd_fetch_adv Fetches multiple rows from a result set using an extended fetch. (ODBC only)
lrd_reset_rows Prepares fetched rows for an Update operation. (ODBC only)
lrd_bind_col Binds a host variable to an output column.
lrd_bind_cols Binds a host variable array to columns.
lrd_bind_cursor Binds a cursor to a place holder.
lrd_bind_placeholder Binds a host variable or array to a place holder.
lrd_cancel Cancels the previous statement.
lrd_data_info Gets I/O information. (CtLib only)
lrd_dynamic Specifies a dynamic SQL statement to be processed (CtLib only).
lrd_exec Executes the previously specified SQL statement.
lrd_send_data Sends data to the server.
lrd_stmt Specifies an SQL statement to be processed.

Chapter 31 • Developing Database Vuser Scripts
419
Statement Correlating Functions
Variable Handling Functions
Oracle 8 Functions
VuGen provides partial support for Oracle 8.x. All database actions that were recorded in previous versions of Oracle are recorded. In many instances, the recorded function is specific for Oracle 8.x. For example for a fetch operation, instead of lrd_fetch, VuGen records lrd_ora8_fetch.
lrd_save_col Saves the value of a table cell to a parameter.
lrd_save_value Saves a place holder descriptor value to a parameter.
lrd_save_ret_param Saves the value of a return-parameter to a parameter (CtLib only).
lrd_save_last_rowid Saves the last rowid to a parameter. (Oracle)
lrd_assign Assigns a null-terminated string to a variable.
lrd_assign_ext Assigns a storage area to a variable.
lrd_assign_literal Assigns a literal string (containing null-characters) to a variable.
lrd_assign_bind Assigns a null-terminated string to a variable and binds it to a place holder.
lrd_assign_bind_ext Assigns a storage area value to a variable and binds it to a place holder.
lrd_assign_bind_literal Assigns a literal string (containing null-characters) to a variable and binds it to a place holder.
lrd_to_printable Converts a variable to a printable string.
lrd_attr_set Sets an attribute for an LRDDBI handle.
lrd_attr_set_from_handle Sets an attribute using an LRDDBI handle pointer.

Creating Vuser Scripts • Database Vuser Scripts
420
lrd_attr_set_literal Sets an LRDDBI handle attribute using a literal string.
lrd_env_init Allocates and initializes an LRDDBI handle.
lrd_handle_alloc Explicitly allocates and initializes an LRDDBI handle.
lrd_handle_free Explicitly frees an LRDDBI handle.
lrd_initialize_db Initializes the database process environment.
lrd_logoff Terminates a simple database session.
lrd_logon Begins a simple database session.
lrd_logon_ext Begins a simple database session (extended).
lrd_ora8_attr_set Sets an attribute for an LRDDBI handle—shorthand.
lrd_ora8_attr_set_from_handle
Sets an attribute using an LRDDBI handle pointer.
lrd_ora8_attr_set_literal Sets an LRDDBI handle attribute using a literal string—shorthand.
lrd_ora8_bind_col Binds a host variable to an output column.
lrd_ora8_bind_placeholder Binds a host variable to a placeholder.
lrd_ora8_commit Commits the current transaction for an Oracle 8.x client.
lrd_ora8_exec Executes an SQL statement in Oracle 8.x.
lrd_ora8_fetch Fetches the next row in the result set.
lrd_ora8_handle_alloc Explicitly allocates and initializes an LRDDBI handle—shorthand.
lrd_ora8_rollback Rolls back the current transaction for an Oracle 8.x client.
lrd_ora8_save_col Saves the value of a table cell to a parameter.

Chapter 31 • Developing Database Vuser Scripts
421
Understanding Database Vuser Scripts
After you record a database session, you can view the recorded code in VuGen’s built-in editor. You can scroll through the script, see the SQL statements that were generated by your application, and examine the data returned by the server. The VuGen window provides you with the following information about the recorded database session:
➤ the sequence of functions recorded
➤ grids displaying the data returned by database queries
➤ the number of rows fetched during a query
Function Sequence
When you view a Vuser script in the VuGen window, you see the sequence in which VuGen recorded your activities. For example, the following sequence of functions is recorded during a typical Oracle database session:
lrd_ora8_stmt Prepares a null-terminated SQL statement for execution.
lrd_ora8_stmt_ext Prepares an SQL statement with null characters for execution.
lrd_ora8_stmt_literal Prepares a literal SQL statement string for execution.
lrd_server_attach Creates an access path to a data source for database operations
lrd_server_detach Deletes an access path to a data source for database operations
lrd_session_begin Creates and begins a user session for a server.
lrd_session_end Terminates a user session for a server.
lrd_init Initializes the environment.
lrd_open_connection Connects to the database server.

Creating Vuser Scripts • Database Vuser Scripts
422
In the following script, VuGen recorded the actions of an operator who opened a connection to an Oracle server and then performed a query requesting the local settings.
Grids
The data returned by a database query during a recording session is displayed in a grid. By viewing the grid you can determine how your
lrd_open_cursor Opens a database cursor.
lrd_stmt Associates an SQL statement with a cursor.
lrd_bind_col Binds a host variable to a column.
lrd_exec Executes an SQL statement.
lrd_fetch Fetches the next record in the result set.
lr_commit Commits a database transaction.
lr_close_cursor Closes a cursor.
lrd_close_connection Disconnects from the database server.
lrd_end Cleans up the environment.
lrd_init(&InitInfo, DBTypeVersion);lrd_open_connection(&Con1, LRD_DBTYPE_ORACLE, "s1", "tiger", "hp1", "", 0, 0, 0);lrd_open_cursor(&Csr1, Con1, 0);lrd_stmt(Csr1, "select parameter, value from v$nls_parameters "
" where (upper(parameter) in (’NLS_SORT’,’NLS_CURRENCY’,""’NLS_ISO_CURRENCY’, ’NLS_DATE_LANGUAGE’,""’NLS_TERRITORY’))", -1, 0 /*Non deferred*/, 1 /*Dflt Ora Ver*/, 0);
lrd_bind_col(Csr1, 1, &D1, 0, 0);lrd_bind_col(Csr1, 2, &D2, 0, 0);lrd_exec(Csr1, 0, 0, 0, 0, 0);lrd_fetch(Csr1, 7, 7, 0, PrintRow2, 0);. . . lrd_close_cursor(&Csr1, 0);lrd_commit(0, Con1, 0);lrd_close_connection(&Con1, 0, 0);lrd_end(0);
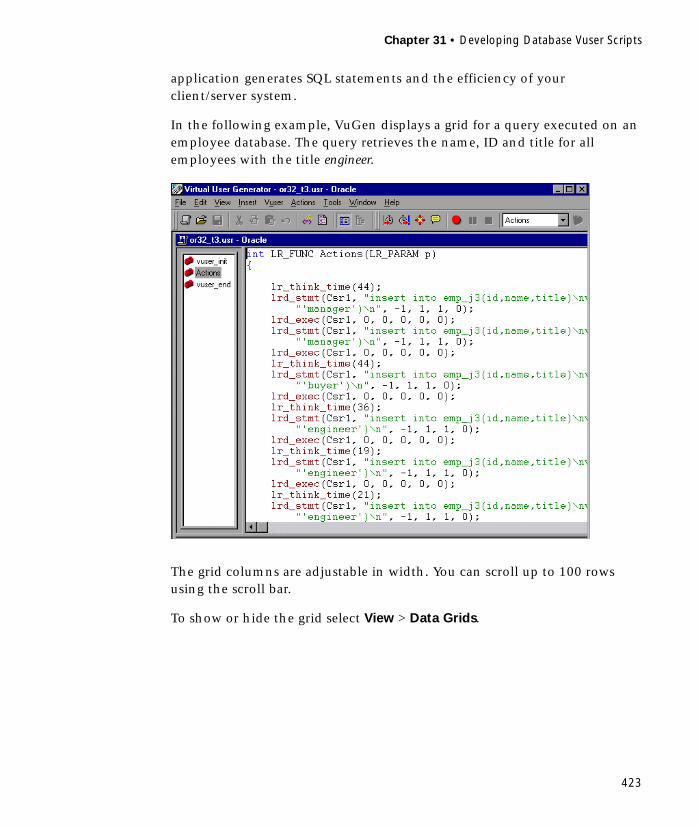
Chapter 31 • Developing Database Vuser Scripts
423
application generates SQL statements and the efficiency of your client/server system.
In the following example, VuGen displays a grid for a query executed on an employee database. The query retrieves the name, ID and title for all employees with the title engineer.
The grid columns are adjustable in width. You can scroll up to 100 rows using the scroll bar.
To show or hide the grid select View > Data Grids.

Creating Vuser Scripts • Database Vuser Scripts
424
Row Information
VuGen generates an lrd_fetch function for each SQL query.
The second parameter of the function indicates the number of rows fetched. This number can be positive or negative.
Positive Row Values
A positive value shows the number of rows fetched during recording, and indicates that not all rows were fetched. (For example, if the operator cancelled the query before it was completed.)
In the following example, four rows were retrieved during the database query, but not all of the data was fetched.
During execution, the script always retrieves the number of rows indicated by the positive value (provided the rows exist.)
Negative Row Values
A negative row value indicates that all available rows were fetched during recording. The absolute value of the negative number is the number of rows fetched.
In the following example, all four rows of the result set were retrieved:
When you execute an lrd_fetch statement containing a negative row value, it retrieves all of the available rows in the table at the time of the run—not necessarily the number at the time of recording. In the above example, all four rows of the table were retrieved during the recording session. However, if more rows are available during script execution, they are all retrieved.
For more information about lrd_fetch, refer to the LoadRunner Online Function Reference (available from the VuGen Help menu).
lrd_fetch(Csr1, -4, 1, 0, PrintRow7, 0);
lrd_fetch(Csr1, 4, 1, 0, PrintRow7, 0);
lrd_fetch(Csr1, -4, 1, 0, PrintRow7, 0);

Chapter 31 • Developing Database Vuser Scripts
425
Evaluating Error Codes
When a Vuser executes an LRD function, the function always generates a return code. A return code of 0 indicates that the function succeeded. For example, a return code of 0 indicates that another row is available from the result set. If an error occurs, the return code indicates the type of error. For example, a return code of 2014 indicates that an error occurred in the initialization.
There are four types of return codes, each represented by a numerical range:
For more detailed information on the return codes, refer to the LoadRunner Online Function Reference (available from the VuGen Help menu).
You can evaluate the return code of an LRD function to determine if the function succeeded. The following script segment evaluates the return code of an lrd_fetch function:
Type of Return Code Range
Informational 0 to 999
Warning 1000 to 1999
Error 2000 to 2999
Internal Error 5000 to 5999
static int rc;rc=lrd_fetch(Csr15, -13, 0, 0, PrintRow4, 0);if (rc==0)
lr_output_message("The function succeeded");else
lr_output_message("The function returned an error code:%d",rc);
Creating Vuser Scripts • Database Vuser Scripts
426
Handling Errors
You can control how database Vusers handle errors when you run a database Vuser script. By default, if an error occurs during script execution, the script execution is terminated. To change the default behavior, you can instruct the Vuser to continue when an error occurs. You can apply this behavior:
➤ globally—to the entire script, or to a segment of the script
➤ locally—to a specific function only
Modifying Error Handling Globally
You can change the way that Vusers handle errors by issuing an LRD_ON_ERROR_CONTINUE or LRD_ON_ERROR_EXIT statement. By default, a Vuser aborts the script execution when it encounters any type of error—database, parameter related, etc. To change the default behavior, insert the following line into your script:
From this point on, the Vuser continues script execution, even when an error occurs.
You can also specify that the Vuser continue script execution when an error occurs only within a segment of the script. For example, the following code tells the Vuser to continue script execution even if an error occurs in the lrd_stmt or lrd_exec functions:
Use the LRD_ON_ERROR_CONTINUE statement with caution, as significant and severe errors may be missed.
LRD_ON_ERROR_CONTINUE;
LRD_ON_ERROR_CONTINUE;lrd_stmt(Csr1, "select…"…);lrd_exec(…);LRD_ON_ERROR_EXIT;

Chapter 31 • Developing Database Vuser Scripts
427
Modifying Error Handling Locally
You can set error handling for a specific function by modifying the severity level. Functions such as lrd_stmt and lrd_exec, which perform database operations, use severity levels. The severity level is indicated by the function’s final parameter, miDBErrorSeverity. This parameter tells the Vuser whether or not to continue script execution when a database error occurs (error code 2009). The default, 0, indicates that the Vuser should abort the script when an error occurs.
For example, if the following database statement fails (e.g., the table does not exist), then the script execution terminates.
To tell a Vuser to continue script execution, even when a database operation error occurs for that function, change the statement’s severity parameter from 0 to 1.
When the severity is set to 1 and a database error occurs, a warning is issued. Note that the severity level set for a particular function applies only to that function.
CtLib Result Set Errors
In CtLib recording, the application retrieves all of the available result sets after executing a statement. If the returned result set contains fetchable
lrd_stmt(Csr1, "insert into EMP values (’Smith’,301)\n", -1, 1 /*Deferred*/, 1 /*Dflt Ora Ver*/, 0);
lrd_stmt(Csr1, "insert into EMP values (’Smith’,301)\n", -1, 1 /*Deferred*/, 1 /*Dflt Ora Ver*/, 1);

Creating Vuser Scripts • Database Vuser Scripts
428
data, the application performs bind and fetch operations on the data as indicated in the following example:
If a result set does not contain fetchable data, bind and fetch operations cannot be performed.
When you parametrize your script, result data may become unfetchable (depending on the parameters). Therefore, a CtLib session that recorded bind and fetch operations for a particular statement, may not be able to run, if the new data is unfetchable. If you try to execute an lrd_bind_col or an lrd_fetch operation, an error will occur (LRDRET_E_NO_FETCHABLE_DATA — error code 2064) and the Vuser will terminate the script execution.
You can override the error by telling the Vuser to continue script execution when this type of error occurs. Insert the following line into your script:
To return to the default mode of terminating the script execution, type the following line into your script:
Use this option with caution, as significant and severe errors may be missed.
lrd_stmt(Csr15, "select * from all_types", -1, 148, -99999, 0);lrd_exec(Csr15, 0, 0, 0, 0, 0);lrd_result_set(Csr15, 1 /*Succeed*/, 4040 /*Row*/, 0);lrd_bind_col(Csr15, 1, &tinyint_D41, 0, 0);lrd_bind_col(Csr15, 4, &numeric_D42, 0, 0);. . . lrd_fetch(Csr15, -9, 0, 0, PrintRow3, 0);
LRD_ON_FETCHABLE_SET_ERR_CONT;
LRD_ON_FETCHABLE_SET_ERR_EXIT;

Chapter 31 • Developing Database Vuser Scripts
429
Correlating Database Queries and COM Functions
When working with Database Vuser scripts, (DbLib, CtLib, Oracle, Informix, etc.) you can use VuGen’s automated correlation feature to insert the appropriate functions into your script. The correlating functions are:
➤ lrd_save_col saves a query result appearing in a grid, to a parameter. This function is placed before fetching the data. It assigns the value retrieved by the subsequent lrd_fetch to the specified parameter.
➤ lrd_save_value saves the current value of a placeholder descriptor to a parameter. It is used with database functions that set output placeholders (such as certain stored procedures under Oracle).
➤ lrd_save_ret_param saves a stored procedure’s return value to a parameter. It is used primarily with database procedures stored in DbLib that generate return values.
Note: Correlated statements are not supported if the saved value is invalid or NULL (no rows are returned).
For more information about these functions and their arguments, refer to the LoadRunner Online Function Reference.
When working with COM Vuser scripts, you can use VuGen’s automated correlation feature to insert the appropriate function into your script. The correlating function is:
➤ lrc_save_<type> saves a value to a parameter, where type indicates the data type such as integer, double, etc. For more information about this function, see Chapter 41, “Recording COM Vuser Scripts.”

Creating Vuser Scripts • Database Vuser Scripts
430
Automatic Correlation for Database and COM Scripts
When you use the automatic correlation process, VuGen:
➤ scans for potential correlations
➤ inserts the appropriate correlation function to save the results to a parameter
➤ replaces the statement value with the parameter
Correlating a Specific Value
This procedure correlates an entire statement or the entire script. If you already know which value you want to correlate, proceed to the next section for instructions on correlating a specific value. If you are uncertain which values need to be correlated, continue with the following procedure.
To correlate a statement using the automatic correlation process:
1 View the execution output to check for errors.
Select View > Output to display the output folders at the bottom of the window. Check for errors in the Execution Log folder.
2 To scan a particular statement, place the cursor on the statement you want to correlate.
You can double-click an error or output message to jump to the corresponding statement in the script.
3 Select either Vuser > Scan for Correlations (at cursor) or Vuser > Scan for Correlations (entire script).
VuGen scans the script and lists all possible values to correlate in the selected statement, or the entire script, along with the matching results from previous statements.
The correlation values are listed in the Correlated Query tab.

Chapter 31 • Developing Database Vuser Scripts
431
In the following example, VuGen found several possible values to correlate for the lrd_stmt (Csr6, "UPDATE...) statement.
4 Begin Automatic Correlation.
In the Correlated Query folder, highlight (double-click) the result you want to correlate (the value in the grid) and select Vuser > Create Correlation.
VuGen prompts you to enter a parameter name for the result value.
5 Specify a name, or accept the default. Click OK to continue.
VuGen inserts a statement (lrd_save_value, lrd_save_col, or lrd_save_ret_param for Database Vusers and lrc_save_type for COM Vusers) saving the result value to a parameter.
6 Click Yes to confirm the correlation.
A message appears asking if you want to search for all occurrences of the value in the script.
Creating Vuser Scripts • Database Vuser Scripts
432
7 Click No to replace only the value in the selected statement.
8 To search for additional occurrences ,click Yes.
A Search and Replace dialog box opens. Confirm any replacements, including your original statement.
VuGen replaces the statement value with a reference to the parameter. Note that if you choose to cancel the correlation, VuGen also erases the statement created in the previous step.
Correlating a Specific Value
If you know which value needs to be correlated, perform the following procedure:
To correlate a specific value using the automatic correlation process:
1 View the Execution Log to check for errors.
Select View > Output to display the output folders at the bottom of the window. Check for errors in the Execution Log folder.
2 In the Vuser script, highlight a specific value to correlate.
You can double-click an output message to jump to the corresponding statement in the script.
3 Select Vuser > Scan for Correlations (at cursor) or select Scan for Correlations from the right-click menu.
VuGen scans the script and lists all results from previous statements which match this value. The correlation values are listed in the Correlated Query tab.
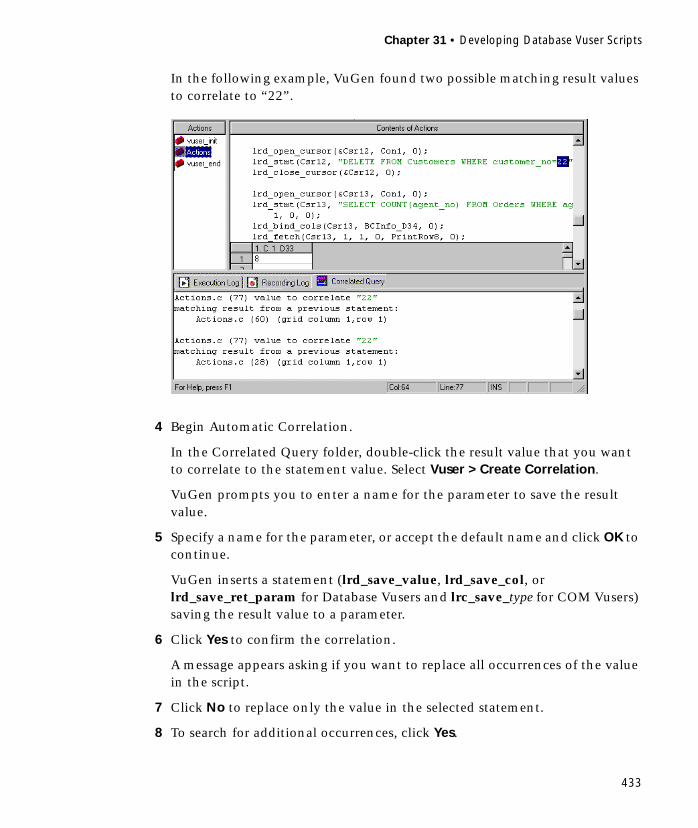
Chapter 31 • Developing Database Vuser Scripts
433
In the following example, VuGen found two possible matching result values to correlate to “22”.
4 Begin Automatic Correlation.
In the Correlated Query folder, double-click the result value that you want to correlate to the statement value. Select Vuser > Create Correlation.
VuGen prompts you to enter a name for the parameter to save the result value.
5 Specify a name for the parameter, or accept the default name and click OK to continue.
VuGen inserts a statement (lrd_save_value, lrd_save_col, or lrd_save_ret_param for Database Vusers and lrc_save_type for COM Vusers) saving the result value to a parameter.
6 Click Yes to confirm the correlation.
A message appears asking if you want to replace all occurrences of the value in the script.
7 Click No to replace only the value in the selected statement.
8 To search for additional occurrences, click Yes.

Creating Vuser Scripts • Database Vuser Scripts
434
A Search and Replace dialog box opens. Confirm any replacements, including your original statement.
VuGen replaces the statement value with a reference to the parameter. Note that if you choose to cancel the correlation, VuGen also erases the statement created in the previous step.
Note: The following data types are not supported for a referenced correlation parameter in an lrd_stmt function: date, time, and binary (RAW, VARRAW).

435
32Correlating Database Vuser Scripts
After you record a database session, you may need to correlate one or more queries within your script—use a value that was retrieved during the database session, at a later point in the session.
This chapter describes:
➤ Scanning a Script for Correlations
➤ Correlating a Known Value
➤ Database Vuser Correlation Functions
The following information only applies to Database (CtLib, DbLib, Informix, Oracle, and ODBC, DB2-CLI) Vuser scripts.
About Correlating Database Vuser Scripts
If you encounter an error when running your script, examine the script at the point where the error occurred. In many cases, you can overcome the problem by correlating the query and using the results of one statement as input to another. The two primary reasons for correlating Database Vuser scripts are:
➤ duplicate values are illegal
Suppose your script creates a new employee record in your database and assigns a unique ID for each employee. The database requires that each record be unique and not duplicated. If you try to replay this script, it will fail because that employee ID was already created during the recording session and it cannot be duplicated.
Creating Vuser Scripts • Database Vuser Scripts
436
To overcome this problem, you use correlation to capture the ID assigned to the new employee, and use it for the remainder of the database session. In addition, you could use parameterization to retrieve unique data for each employee. (see Chapter 5, “Defining Parameters”).
➤ to simplify or optimize your code
If you perform a series of dependent queries one after another, your code may become very long. In order to reduce the size of the code, you can nest the queries, but then you lose preciseness and the code becomes complex and difficult to understand. Correlating the statements enables you to link queries without nesting.
Scanning a Script for Correlations
VuGen provides a correlation utility to help you repair your script to ensure a successful replay. It performs the following steps:
➤ scans for potential correlations
➤ insert the appropriate correlation function to save the results to a parameter
➤ replace the statement value with the parameter
You can perform automatic correlation on the entire script, or at a specific location in your script.
This section describes how to determine the statement which needs to be correlated. If you already know which value you want to correlate, proceed to the next section for instructions on correlating a specific value.
To scan and correlate a script with automatic correlation:
1 Open the Output window.
Select View > Output to display the output tabs at the bottom of the window. Check for errors in the Execution Log folder. Often, these errors can be corrected by correlation.
2 Select Vuser > Scan for Correlations.
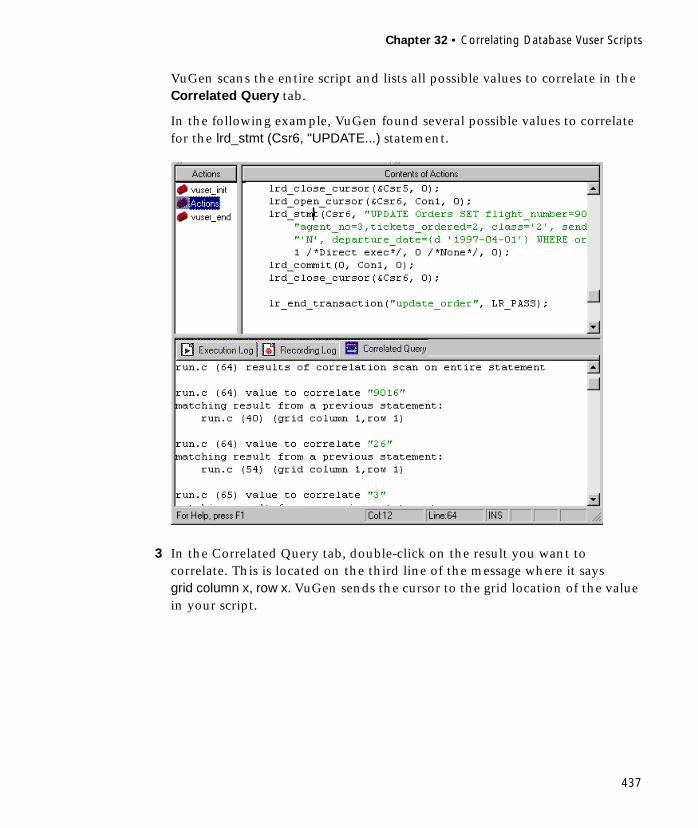
Chapter 32 • Correlating Database Vuser Scripts
437
VuGen scans the entire script and lists all possible values to correlate in the Correlated Query tab.
In the following example, VuGen found several possible values to correlate for the lrd_stmt (Csr6, "UPDATE...) statement.
3 In the Correlated Query tab, double-click on the result you want to correlate. This is located on the third line of the message where it says grid column x, row x. VuGen sends the cursor to the grid location of the value in your script.
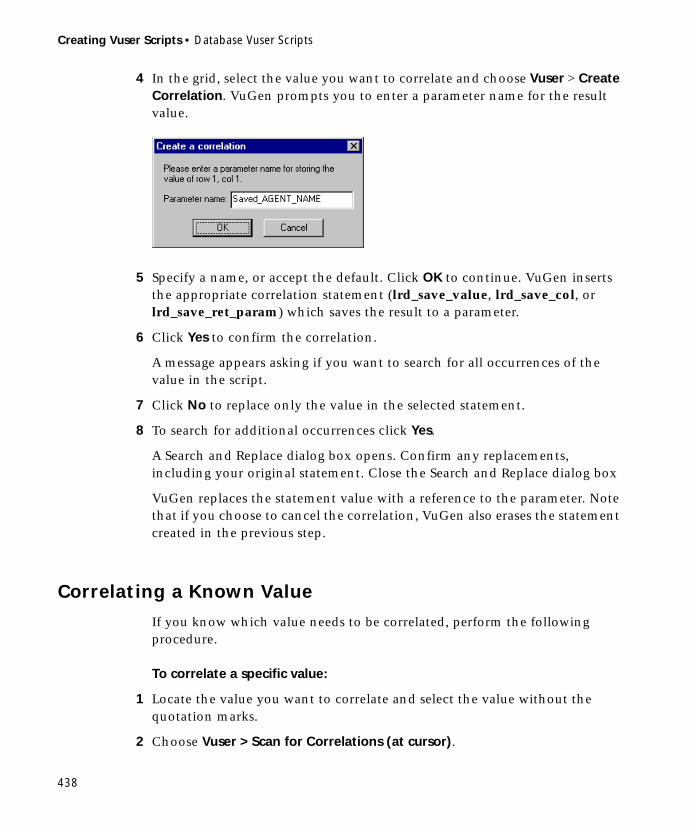
Creating Vuser Scripts • Database Vuser Scripts
438
4 In the grid, select the value you want to correlate and choose Vuser > Create Correlation. VuGen prompts you to enter a parameter name for the result value.
5 Specify a name, or accept the default. Click OK to continue. VuGen inserts the appropriate correlation statement (lrd_save_value, lrd_save_col, or lrd_save_ret_param) which saves the result to a parameter.
6 Click Yes to confirm the correlation.
A message appears asking if you want to search for all occurrences of the value in the script.
7 Click No to replace only the value in the selected statement.
8 To search for additional occurrences click Yes.
A Search and Replace dialog box opens. Confirm any replacements, including your original statement. Close the Search and Replace dialog box
VuGen replaces the statement value with a reference to the parameter. Note that if you choose to cancel the correlation, VuGen also erases the statement created in the previous step.
Correlating a Known Value
If you know which value needs to be correlated, perform the following procedure.
To correlate a specific value:
1 Locate the value you want to correlate and select the value without the quotation marks.
2 Choose Vuser > Scan for Correlations (at cursor).
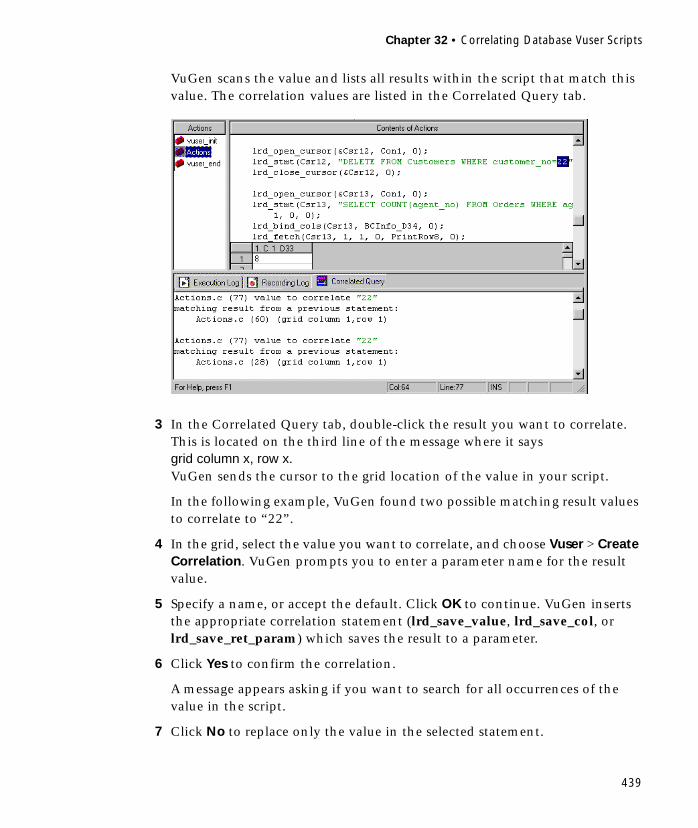
Chapter 32 • Correlating Database Vuser Scripts
439
VuGen scans the value and lists all results within the script that match this value. The correlation values are listed in the Correlated Query tab.
3 In the Correlated Query tab, double-click the result you want to correlate. This is located on the third line of the message where it says grid column x, row x. VuGen sends the cursor to the grid location of the value in your script.
In the following example, VuGen found two possible matching result values to correlate to “22”.
4 In the grid, select the value you want to correlate, and choose Vuser > Create Correlation. VuGen prompts you to enter a parameter name for the result value.
5 Specify a name, or accept the default. Click OK to continue. VuGen inserts the appropriate correlation statement (lrd_save_value, lrd_save_col, or lrd_save_ret_param) which saves the result to a parameter.
6 Click Yes to confirm the correlation.
A message appears asking if you want to search for all occurrences of the value in the script.
7 Click No to replace only the value in the selected statement.

Creating Vuser Scripts • Database Vuser Scripts
440
8 To search for additional occurrences, click Yes.
A Search and Replace dialog box opens. Confirm any replacements, including your original statement. Close the Search and Replace dialog box.
VuGen replaces the statement value with a reference to the parameter. Note that if you choose to cancel the correlation, VuGen also erases the statement created in the previous step.
Note: If you are correlating a value from an lrd_stmt function, the following data types are not supported: date, time, and binary (RAW, VARRAW).
Database Vuser Correlation Functions
When working with Database Vuser scripts, (DbLib, CtLib, Oracle, Informix, etc.) you can use VuGen’s automated correlation feature to insert the appropriate functions into your script. The correlating functions are:
➤ lrd_save_col saves a query result appearing in a grid, to a parameter. This function is placed before fetching the data. It assigns the value retrieved by the subsequent lrd_fetch to the specified parameter.
➤ lrd_save_value saves the current value of a placeholder descriptor to a parameter. It is used with database functions that set output placeholders (such as certain stored procedures under Oracle).
➤ lrd_save_ret_param saves a stored procedure’s return value to a parameter. It is used primarily with database procedures stored in DbLib that generate return values.
Note: Correlated statements are not supported if the saved value is invalid or NULL (no rows are returned).
For more information about these functions and their arguments, refer to the LoadRunner Online Function Reference.
Part VI
Windows Sockets Vuser Scripts

442
443
33 Developing WinSock Vuser Scripts
You use VuGen to record communication between a client application and a server that communicate using the Windows Sockets protocol. The resulting script is called a Windows Sockets Vuser script.
This chapter describes:
➤ Getting Started with Windows Sockets Vuser Scripts
➤ Setting the Recording Options
➤ Using LRS Functions
➤ Viewing Windows Sockets Data
➤ Understanding the Data File Format
➤ Viewing Buffer Data in Hexadecimal format
➤ Setting the Display Format
➤ Debugging Tips
➤ Correlating WinSock Scripts
The following information applies to all protocols recorded on a Windows Sockets level.

Creating Vuser Scripts • Windows Sockets Vuser Scripts
444
About Recording Windows Sockets Vuser Scripts
The Windows Sockets protocol is ideal for analyzing the low level code of an application. For example, to check your network, you can use a Windows Sockets (WinSock) script to see the actual data sent and received by the buffers. The WinSock type can also be used for recording other low level communication sessions such as LDAP. In addition, you can record and replay applications that are not supported by any of the other Vuser types.
When you record an application which uses the Windows Sockets protocol, VuGen generates functions that describe the recorded actions. Each function begins with an lrs prefix. The LRS functions relate to the sockets, data buffers, and the Windows Sockets environment. Using VuGen, you record your application’s API calls to the Winsock.dll or Wsock32.dll. For example, you could create a script by recording the actions of a telnet application.
In the following example, lrs_send sends data to a specified socket:
You can view and edit the recorded script from VuGen’s main window. The Windows Sockets API calls that were recorded during the session are displayed in the window, allowing you to track your network activities.
Getting Started with Windows Sockets Vuser Scripts
This section provides an overview of the process of developing Windows Sockets Vuser scripts using VuGen.
To develop a Windows Sockets script:
1 Record the actions using VuGen.
Invoke VuGen and create a new Vuser script, specifying Windows Sockets as the type. Choose an application to record and set the recording options. Record typical operations on your application.
For details, see Chapter 3, “Recording with VuGen.”
lrs_send("socket22", "buf44", LrsLastArg);

Chapter 33 • Developing WinSock Vuser Scripts
445
2 Enhance the Vuser script.
Enhance the Vuser script by inserting transactions, rendezvous points, and control-flow structures into the script.
For details, see Chapter 4, “Enhancing Vuser Scripts.”
3 Define parameters (optional).
Define parameters for the fixed-values recorded into your Vuser script. By substituting fixed-values with parameters, you can repeat the same business process many times using different values.
For details, see Chapter 5, “Defining Parameters.”
4 Correlate statements (optional).
Correlating statements enables you to use the result of one business process in a subsequent one.
For details, see Chapter 6, “Correlating Statements.”
5 Configure the run-time settings.
The run-time settings control the Vuser behavior during script execution. These settings include loop, log, and timing information.
For details, see Chapter 7, “Configuring Run-Time Settings.”
6 Run the Vuser script from VuGen.
Save and run the Vuser script from VuGen to verify that it runs correctly.
For details, see Chapter 9, “Running Vuser Scripts in Stand-Alone Mode.”
After you create a Windows Sockets Vuser script, you integrate it into a scenario on either a Windows or UNIX platform. For more information on integrating Vuser scripts into a scenario, refer to the LoadRunner Controller User’s Guide.
Setting the Recording Options
You can set the following recording options for your WinSock Vuser.
➤ Translation Table
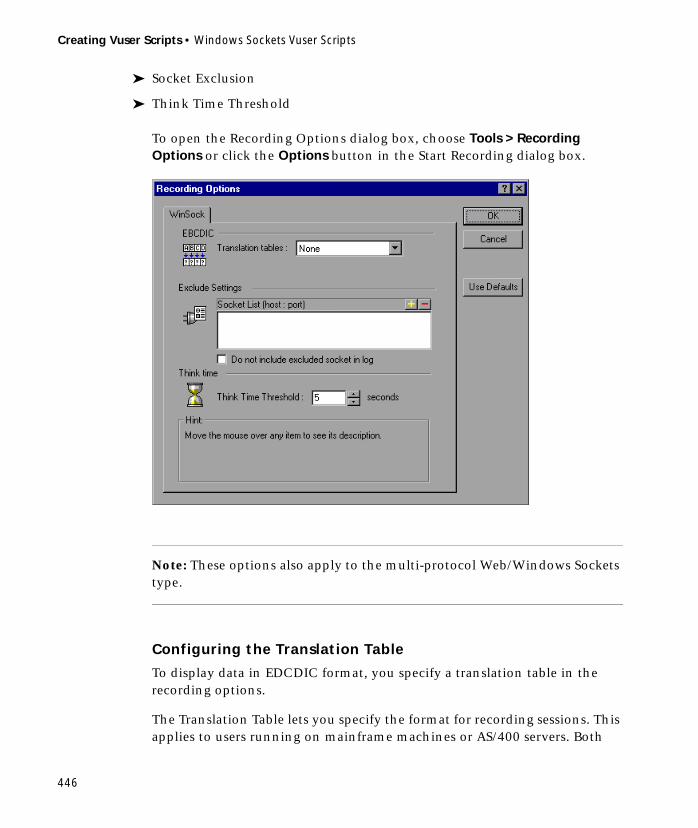
Creating Vuser Scripts • Windows Sockets Vuser Scripts
446
➤ Socket Exclusion
➤ Think Time Threshold
To open the Recording Options dialog box, choose Tools > Recording Options or click the Options button in the Start Recording dialog box.
Note: These options also apply to the multi-protocol Web/Windows Sockets type.
Configuring the Translation Table
To display data in EDCDIC format, you specify a translation table in the recording options.
The Translation Table lets you specify the format for recording sessions. This applies to users running on mainframe machines or AS/400 servers. Both

Chapter 33 • Developing WinSock Vuser Scripts
447
the server and client machines determine the format of the data from translation tables installed on your system. Choose a translation option from the list box.
The first four digits of the listbox item represent the server format. The last four digits represent the client format. In the above example, the selected translation table is 002501b5. The server format is 0025 and the client format is 01b5 indicating a transfer from the server to the client. In a transmission from the client to the server, you would choose the item that reverses the formats—01b50025 indicating that the client’s 01b5 format needs to be translated to the server’s 0025 format.
The translation tables are located in the ebcdic directory under the LoadRunner installation directory. If your system uses different translation tables, copy them to the ebcdic directory.
Note: If your data is in ASCII format, it does not require translation. You must select the None option, the default value. If you do select a translation table, VuGen will translate the ASCII data.
When working on Solaris machines, you must set the following environment variables: on all machines running the Vuser scripts.
setenv LRSDRV_SERVER_FORMAT 0025setenv LRSDRV_CLIENT_FORMAT 04e4
Excluding Sockets
VuGen supports the Exclude Socket feature, allowing you to exclude a specific socket from your recording session. To exclude all actions on a socket from your script, you specify the socket address in the Exclude Socket
Creating Vuser Scripts • Windows Sockets Vuser Scripts
448
list. To add a socket to the list, click the plus sign in the upper right corner of the box and enter the socket address in one of the following formats:
You can exclude multiple hosts and ports by adding them to the list. To remove a socket form the excluded list, select the socket address and click the minus sign in the upper right corner of the box.
By default, VuGen does not log the actions of the excluded sockets in the ws.log file. To instruct VuGen to log the actions of the excluded socket(s) select the Do not include excluded sockets in log check box. When logging is enabled for the excluded sockets, their actions are preceded by “Excluded” in the log file.
Setting the Think Time Threshold
During recording, VuGen automatically inserts the operator’s think time. You can set a threshold level, below which the recorded think time will be ignored. If the recorded think time exceeds the threshold level, VuGen places an lr_think_time statement before LRS functions. If the recorded think time is below the threshold level, an lr_think_time statement is not generated.
To set the think time threshold, enter the desired value (in seconds) in the Think Time Threshold box. The default value is five seconds.
Value Meaning
host:port Exclude only the specified port on the specified host.
host Exclude all ports for the specified host.
:port Exclude the specified port number on the local host.
*:port Exclude the specified port number on all hosts.
Exclude : /* recv(): 15 bytes were received from socket 116 using flags 0 */

Chapter 33 • Developing WinSock Vuser Scripts
449
Using LRS Functions
The functions developed to emulate communication between a client and a server by using the Windows Sockets protocol are called LRS Vuser functions. Each LRS Vuser function has an lrs prefix. VuGen automatically records most of the LRS functions listed in this section during a Windows Sockets session. You can also manually program any of the functions into your Vuser script. For more information about the LRS functions, refer to the Online Function Reference (available from the VuGen Help menu).
Socket Functions
lrs_accept_connection Accepts a connection on a listening socket.
lrs_close_socket Closes an open socket.
lrs_create_socket Initializes a socket.
lrs_disable_socket Disables an operation on a socket.
lrs_exclude_socket Excludes a socket during replay.
lrs_get_socket_attrib Gets a socket’s attributes.
lrs_get_socket_attrib Gets a socket’s attributes.
lrs_length_receive Receives data from a buffer of a specified length.
lrs_receive_ex Receives data of a specific length from a datagram or stream socket.
lrs_send Sends data on a datagram or to a stream socket.
lrs_set_receive_option Sets a socket receive option.
lrs_set_socket_options Sets a socket option.
lrs_get_socket_handler Gets a socket handler for the specified socket.
lrs_set_socket_handler Sets a socket handler for the specified socket.

Creating Vuser Scripts • Windows Sockets Vuser Scripts
450
Buffer Functions
Environment Functions
Correlating Statement Functions
lrs_get_buffer_by_name Gets a buffer and its size from the data file.
lrs_get_last_received_buffer Gets the last buffer received on the socket and its size.
lrs_get_received_buffer Gets the last received buffer or a part of it.
lrs_get_static_buffer Gets a static buffer or a part of it.
lrs_get_user_buffer Gets the contents of the user data for a socket.
lrs_get_user_buffer_size Gets the size of the user data for a socket.
lrs_free_buffer Frees the memory allocated for the buffer.
lrs_set_send_buffer Specifies a buffer to send on a socket.
lrs_ascii_to_ebcdic Converts buffer data from ASCII format to EBCDIC format.
lrs_ebcdic_to_ascii Converts buffer data from EBCDIC format to ASCII format.
lrs_startup Initializes the Windows Sockets DLL.
lrs_cleanup Terminates the use of the Windows Sockets DLL.
lrs_save_param Saves a static or received buffer (or part of it) to a parameter.
lrs_save_param_ex Saves a user, static, or received buffer (or part of it) to a parameter.
lrs_save_searched_string Searches for an occurrence of strings in a static or received buffer and saves a portion of the buffer, relative to the string occurrence, to a parameter.

Chapter 33 • Developing WinSock Vuser Scripts
451
Conversion Functions
Timeout Functions
After you record a session, VuGen’s built-in editor lets you view the recorded code. You can scroll through the script, view the functions that were generated by your application, and examine the transferred data. When you view the script in the main window, you see the sequence in which VuGen recorded your activities. The following function sequence is recorded during a typical session:
lrs_ascii_to_ebcdic Converts buffer data from ASCII format to EBCDIC format.
lrs_decimal_to_hex_string Converts a decimal integer to a hexadecimal string.
lrs_ebcdic_to_ascii Converts buffer data from EBCDIC format to ASCII format.
lrs_hex_string_to_int Converts a hexadecimal string to an integer.
lrs_set_accept_timeout Sets a timeout for accepting a socket.
lrs_set_recv_timeout Sets a timeout for receiving the initial expected data on a socket.
lrs_set_recv_timeout2 Sets a timeout for receiving the expected data on a socket after a connection was established.
lrs_set_send_timeout Sets a timeout for sending data on a socket.
lrs_startup Initializes the WinSock DLL.
lrs_create_socket Initializes a socket.
lrs_send Sends data on a datagram or to a stream socket.
lrs_receive Receives data from a datagram or stream socket.
lrs_disable_socket Disables an operation on a socket.

Creating Vuser Scripts • Windows Sockets Vuser Scripts
452
VuGen supports record and replay for applications using the Windows Socket protocol on Windows; on UNIX platforms, only replay is supported.
Viewing Windows Sockets Data
When you use VuGen to create a Windows Sockets Vuser script, your actions are recorded into the three sections of the script: vuser_init, Actions, and vuser_end. In addition to the Vuser script, VuGen also creates a data file, data.ws, that contains the data that was transmitted or received during the recording session. You can use VuGen to view the contents of the data file by selecting data.ws in the Data Files box of the main VuGen window.
The option to view a data file is available by default for WinSock scripts.
Several LRS functions, such as lrs_receive and lrs_send, handle the actual data that is transferred between servers and clients. The data that is received
lrs_close_socket Closes an open socket.
lrs_cleanup Terminates the use of the WinSock DLL.

Chapter 33 • Developing WinSock Vuser Scripts
453
or transmitted is stored in data buffers, which can be very large. In order to simplify the appearance of the Vuser script, the actual data is stored in external files—not in the C file. When a data transfer occurs, the data is copied from the external file into a temporary buffer.
The external file, data.ws, contains the contents of all the temporary buffers. The buffers’ contents are stored as sequential records. The records are marked by identifiers indicating whether the data was sent or received, and the buffer descriptor. The LRS functions use the buffer descriptors to access the data.
The descriptors have one of the following formats:
recv bufindex number of bytes receivedsend bufindex
The buffer index begins with 0 (zero), and all subsequent buffers are numbered sequentially (1,2,3 etc.) regardless of whether they are send or receive buffers.
In the following example, an lrs_receive function was recorded during a Vuser session:
In this example, lrs_receive handled data that was received on socket1. The data was stored in the fifth receive record(buf4)—note that the index number is zero-based. The corresponding section of the data.ws file shows the buffer and its contents.
lrs_receive("socket1", "buf4", LrsLastArg)
recv buf4 39"\xff\xfb\x01\xff\xfb\x03\xff\xfd\x01""\r\n""\r\n""SunOS UNIX (sunny)\r\n""\r""\x0""\r\n""\r""\x0"

Creating Vuser Scripts • Windows Sockets Vuser Scripts
454
Understanding the Data File Format
The data.ws data file has the following format:
➤ File header
➤ A list of buffers and their contents
The file header includes an internal version number of the data file format. The current version is 2. If you try to access data from a data file with format version 1, an error is issued.
An identifier precedes each record, indicating whether the data was received or sent, followed by the buffer descriptor, and the number of bytes received (for lrs_receive only). The buffer descriptor contains a number identifying the buffer. For example,
indicates that the buffer contains data that was received. The record number is 5, indicating that this receive operation was the sixth data transfer (the index is zero based), and twenty-five bytes of data were received.
If your data is in ASCII format, then the descriptor is followed by the actual ASCII data that was transferred by the sockets.
If your data is in EBCDIC format, it must be translated through a look-up table. For information on setting the translation table, refer to “Setting the Recording Options” on page 445. The EBCDIC whose ASCII value (after translation) is printable, is displayed as an ASCII character. If the ASCII value corresponds to a non-printable character, then VuGen displays the original EBCDIC value.
;WSRData 2 1
recv buf5 25
recv buf6 39"\xff\xfb\x01\xff\xfb\x03\xff\xfd\x01""\r\n""SunOS UNIX (sunny)\r\n"
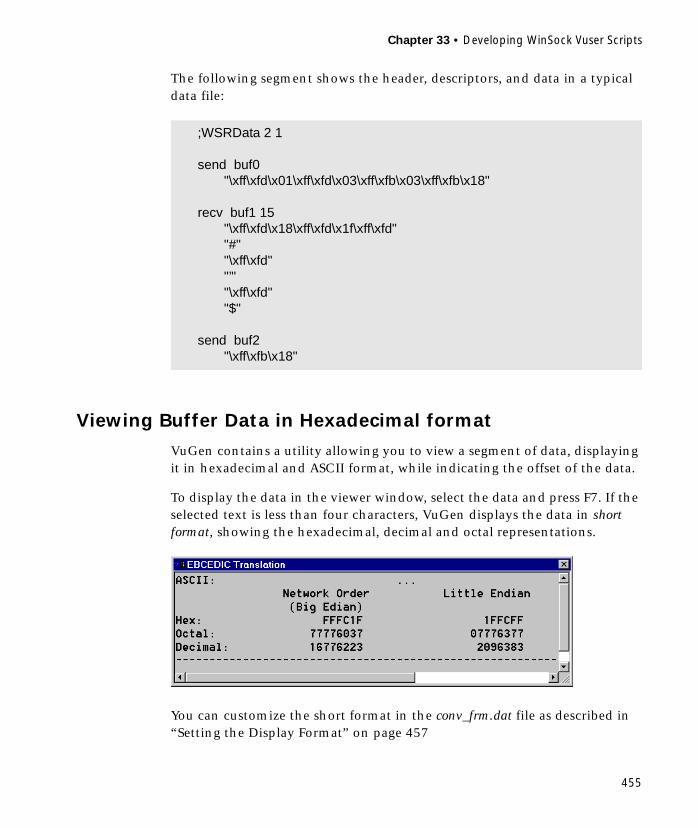
Chapter 33 • Developing WinSock Vuser Scripts
455
The following segment shows the header, descriptors, and data in a typical data file:
Viewing Buffer Data in Hexadecimal format
VuGen contains a utility allowing you to view a segment of data, displaying it in hexadecimal and ASCII format, while indicating the offset of the data.
To display the data in the viewer window, select the data and press F7. If the selected text is less than four characters, VuGen displays the data in short format, showing the hexadecimal, decimal and octal representations.
You can customize the short format in the conv_frm.dat file as described in “Setting the Display Format” on page 457
;WSRData 2 1
send buf0"\xff\xfd\x01\xff\xfd\x03\xff\xfb\x03\xff\xfb\x18"
recv buf1 15"\xff\xfd\x18\xff\xfd\x1f\xff\xfd""#""\xff\xfd""’""\xff\xfd""$"
send buf2"\xff\xfb\x18"

Creating Vuser Scripts • Windows Sockets Vuser Scripts
456
If the selected text is more than four characters, VuGen displays the data in several columns in long format. You can customize the long format by modifying the conv_frm.dat file, as described in “Setting the Display Format” on page 457.
In the default format, the first column displays the character offsets from the beginning of the marked section. The second column displays the hexadecimal representation of the data. The third column shows the data in ASCII format. When displaying EBCDIC data, all non-printable ASCII characters (such as /n), are represented by dots.
The F7 viewer utility is especially useful for parameterization. It allows you to determine the offset of the data that you want to save to a parameter.
To determine the offset of a specific character:
1 View data.ws and select the data from the beginning of the buffer.
Offset Hexadecimal representation ASCII format

Chapter 33 • Developing WinSock Vuser Scripts
457
2 Press F7 to display the data and the character offsets. Since more than four characters were selected, the data is displayed in long format.
3 Locate the value you want to correlate in the ASCII data. In this example, we will correlate the number 13546 (a process ID during a UNIX session) which begins at the 31st character—the last character in the second line.
4 Use the offset value in the lrs_save_param_ex function in order to correlate the value of the process ID. For more information, see Chapter 6, “Correlating Statements.”
Setting the Display Format
You can specify how VuGen will display the buffer data in the viewer (F7) window. The conv_frm.dat file in the lrun/dat directory contains the following display parameters:
LongBufferFormat: The format used to display five or more characters. Use nn for offset, XX for the hex data, and aa for ASCII data.
LongBufferHeader: A header to precede each buffer in Long buffer format.
LongBufferFooter: A footer to follow each buffer in Long buffer format.
ShortBufferFormat: The format used to display four characters or less. You can use standard escape sequences and conversion characters.
The supported escape sequence characters are:
\a Bell (alert)\b Backspace\f Formfeed\n New line
Creating Vuser Scripts • Windows Sockets Vuser Scripts
458
\r Carriage return\t Horizontal tab\v Vertical tab\’ Single quotation mark\" Double quotation mark\\ Backslash\? Literal question mark\ooo ASCII character -octal
The supported conversion characters are:
%a ASCII representation%BX Big Endian (Network Order) Hex%BO Big Endian (Network Order) Octal%BD Big Endian (Network Order) Decimal%LX Little Endian Hex%LO Little Endian Octal%LD Little Endian Decimal
AnyBufferHeader: A header to precede each buffer.
AnyBufferFooter: A footer to follow each buffer.
NonPrintableChar: The character with which to represent non-printable ASCII characters.
PrintAllAscii: Set to 1 to force the printing of non-printable ASCII characters.

Chapter 33 • Developing WinSock Vuser Scripts
459
In the default settings, long and short formats are set, and a dot is specified for non-printable characters.
The default LongBufferFormat is displayed as:
The default ShortBufferFormat is displayed as:
[BufferFormats]LongBufferFormat=nnnnnnnn XX XX XX XX XX XX XX XX XX XX XX XX XX XX XX XX aaaaaaaaaaaaaaaa\r\nLongBufferHeader=LongBufferFooter=ShortBufferFormat=ASCII:\t\t\t%a\r\n\t\tNetwork Order\t\tLittle Endian\r\n\t\t (Big Edian)\r\nHex:\t\t%BX\t\t%LX\r\nOc-tal:\t\t%BO\t\t%LO\r\nDecimal:\t%BD\t\t%LD\r\nAnyBufferHeader=AnyBufferFooter=----------------------------------------------------------------------\r\nNonPrintableChar=.PrintAllAscii=0
Offset Hexadecimal representation ASCII format

Creating Vuser Scripts • Windows Sockets Vuser Scripts
460
Debugging Tips
VuGen offers several means which allow you to debug your script. You can view the various output logs and windows for detailed messages issued during execution.
Specifically for WinSock Vuser script, Vugen provides additional information about buffer mismatches. A buffer mismatch indicates a variation in the received buffer size (generated during replay) and the expected buffer (generated during record). However, if the received and expected buffer are the same size, even though the contents are different, a mismatch message is not issued. This information can help you locate a problem with your system, or with your script.
You can view the buffer mismatch information in the Execution log. Choose View > Output to display the Execution log if it is not visible.
Note that a buffer mismatch may not always indicate a problem. For example, if a buffer contains insignificant data such as previous login times, this type of mismatch can be ignored.
However, if there is a very large discrepancy between the size of the Expected and Received buffers, this could indicate a problem with your system. Check the data in the corresponding buffer for discrepancies.
In order for you to determine whether or not the mismatch is significant, you must thoroughly understand your application.
Mismatch (expected 54 bytes, 58 bytes actually received)The expected buffer is:=================\r\n Last login: Wed Sep 2 10:30:18 from acme.mercury.c\r\n=================The received buffer is:=================\r\n Last login: Thu Sep 10 11:19:50 from dolphin.mercury.c\r\n
Chapter 33 • Developing WinSock Vuser Scripts
461
Correlating WinSock Scripts
A common issue with WinSock Vuser scripts is dynamic ports—ports whose numbers are assigned dynamically. While certain applications always use the same port, others use the next available port. If you try to replay a script and the recorded port is no longer available, your test will fail. To overcome this issue, you must perform correlation—save the actual run-time values and use them within the script.
LoadRunner provides several functions that allow you to correlate data by saving the dynamic values to a parameter. The lrs_save_param function lets you save the data based on the offset of the data in the received buffer. An advanced correlation function lrs_save_searched_string lets you designate the data by specifying its boundaries and indicating which occurrence of the matched pattern to save to a parameter. The following example describes correlation using lrs_save_param_ex. For information about using other correlation functions, see the Online Function Reference.
To correlate the WinSock Vuser statements:
1 Insert the lrs_save_param_ex statement into your script at the point where you want to save the buffer contents. You can save user, static, or received type buffers.
lrs_save_param_ex (socket, type, buffer, offset, length, encoding, parameter);
2 Reference the parameter.
View the buffer contents by selecting the data.ws file in the Data Files box of the main VuGen window. Locate the data that you want to replace with the contents of the saved buffer. Replace all instances of the value with the parameter name in angle brackets (< >).

Creating Vuser Scripts • Windows Sockets Vuser Scripts
462
In the following example, a user performed a telnet session. The user used a ps command to determine the process ID (PID), and killed an application based on that PID.
During execution, the PID of the procedure is different (UNIX assigns unique PIDs for every execution), so killing the recorded PID will be ineffective. To overcome this problem, use lrs_save_param_ex to save the current PID to a parameter. Replace the constant with the parameter.
To correlate the statements:
1 In the data.ws file, determine the buffer in which the data was received, buf47.
2 In the Actions section, determine the socket used by buf47, socket1.
frodo:/u/jay>ps PID TTY TIME CMD14602 pts/18 0:00 clock14569 pts/18 0:03 tcsh
frodo:/u/jay>kill 14602[3] Exit 1 clockfrodo:/u/jay>
recv buf47 98"\r""\x00""\r\n"" PID TTY TIME CMD\r\n"" 14602 pts/18 0:00 clock\r\n"" 14569 pts/18 0:02 tcsh\r\n""frodo:/u/jay>"
.
.
.send buf58
"kill 14602"
lrs_receive("socket1", "buf47", LrsLastArg);
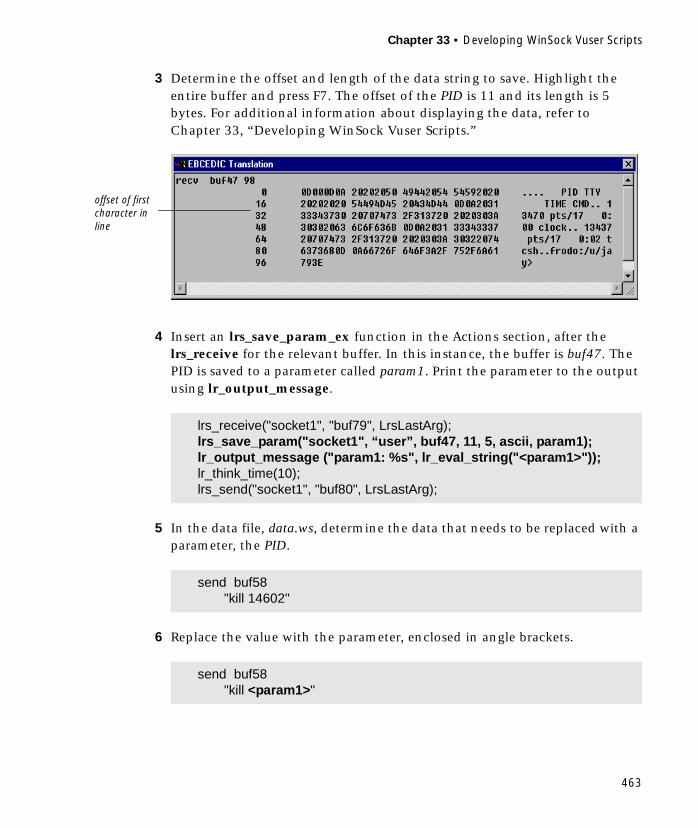
Chapter 33 • Developing WinSock Vuser Scripts
463
3 Determine the offset and length of the data string to save. Highlight the entire buffer and press F7. The offset of the PID is 11 and its length is 5 bytes. For additional information about displaying the data, refer to Chapter 33, “Developing WinSock Vuser Scripts.”
4 Insert an lrs_save_param_ex function in the Actions section, after the lrs_receive for the relevant buffer. In this instance, the buffer is buf47. The PID is saved to a parameter called param1. Print the parameter to the output using lr_output_message.
5 In the data file, data.ws, determine the data that needs to be replaced with a parameter, the PID.
6 Replace the value with the parameter, enclosed in angle brackets.
lrs_receive("socket1", "buf79", LrsLastArg);lrs_save_param("socket1", “user”, buf47, 11, 5, ascii, param1);lr_output_message ("param1: %s", lr_eval_string("<param1>")); lr_think_time(10);lrs_send("socket1", "buf80", LrsLastArg);
send buf58"kill 14602"
send buf58"kill <param1>"
offset of first character in line

Creating Vuser Scripts • Windows Sockets Vuser Scripts
464

Part VII
Oracle NCA Vuser Scripts

466

467
34 Creating Oracle NCA Vuser Scripts
You can use VuGen to create scripts that emulate an Oracle NCA user. You record typical NCA business processes with VuGen. You then run the script to emulate your system.
This chapter describes:
➤ Getting Started with Oracle NCA Vusers
➤ Recording Guidelines
➤ Specifying which Browser to Use for Recording
➤ Using Oracle NCA Vuser Functions
➤ Understanding Oracle NCA Vusers
➤ Switching Between Tree View and Script View
➤ Configuring the Run Time Settings
➤ Using Load Balancing in Oracle NCA
The following information applies only to the Oracle NCA protocol.
About Creating Oracle NCA Vuser Scripts
Oracle NCA is a Java-based database protocol. Using your browser, you launch the database client, an applet viewer. You perform actions on the NCA database through its applet viewer. This eliminates the need for client software and allows you to perform database actions from all platforms that support the applet viewer. There is a Vuser type specifically designed to emulate an Oracle NCA client.

Creating Vuser Scripts • Oracle NCA Vuser Scripts
468
The NCA environment is a three-tier environment. The user first sends an http call from his browser to a Web server. This call accesses the startup HTML page which invokes the Oracle Applications applet. The applet runs locally on the client machine—all subsequent calls are communicated between the client and the Forms server through the proprietary NCA protocol.
The client (applet viewer) communicates with the application server (Oracle Forms server) which then submits information to the database server (Oracle 8.x).
VuGen records and replays the NCA communication between the client and the Forms server (application server).
VuGen can display an Oracle NCA script in two ways:
➤ As an icon-based representation of the script. This is the default view, and is known as the tree view.
➤ As a text-based representation of the script. This is known as the script view.
You use VuGen to view and edit both the tree view and the script view of the script. You can easily switch between the two views. See “Switching Between Tree View and Script View,” on page 478 for more information.
Note: Due to a Netscape limitation, you cannot launch NCA using Netscape when another Netscape browser is already running on the machine.
client: applet viewer
NCA protocol
Forms server Oracle database
database calls
VuGen
Chapter 34 • Creating Oracle NCA Vuser Scripts
469
Getting Started with Oracle NCA Vusers
The following procedure outlines how to create an Oracle NCA Vuser script.
1 Ensure that the recording machine is properly configured.
Make sure that your machine is configured to run the Oracle NCA applet viewer, before you start VuGen. You must also make sure your version of Oracle Forms is supported by LoadRunner. For more information, see “Recording Guidelines,” on page 470 and the Readme file.
2 Create a skeleton Oracle NCA Vuser script.
Use VuGen to create a skeleton Oracle NCA Vuser script. For details, see “Vuser Script Sections,” on page 22.
3 Record typical user actions.
Begin recording, and perform typical actions and business processes from the applet viewer. VuGen records your actions and generates a Vuser script. For details, see “Specifying which Browser to Use for Recording,” on page 472 and “Recording Vuser Scripts,” on page 24.
4 Enhance the Vuser script.
Use the Insert menu to add transactions, rendezvous points, comments, and messages in order to enhance the Vuser script. For details, see Chapter 4, “Enhancing Vuser Scripts.”
5 Parameterize the script.
Replace recorded constants with parameters. For details, see Chapter 5, “Defining Parameters.”
6 Set the run-time properties for the script.
Configure run-time settings for the Vuser script. The run-time settings define certain aspects of the script execution. For details, see Chapter 7, “Configuring Run-Time Settings.”
7 Save and run the Vuser script.
Run the script from VuGen and view the execution log for run-time information. For details, see Chapter 9, “Running Vuser Scripts in Stand-Alone Mode.”
Creating Vuser Scripts • Oracle NCA Vuser Scripts
470
Recording Guidelines
When you record an Oracle NCA Vuser script, follow these guidelines:
➤ To enable VuGen to record the names of NCA objects, you must configure the application server to provide additional data. Edit the startup.html file that is called when the applet viewer begins. Locate the code:
<PARAM name="serverArgs ............ fndnam=APPS”>
and add the Oracle key “record=names”:
<PARAM name="serverArgs ............ fndnam=APPS record=names">
If you do not have access to the startup.html file, or on servers that run CGI scripts with NCA objects, add "?record=names" at the end of the URL. For example, replace the original URL,
<http://OracleApps>
with
<http://OracleApps?record=names>.
Note: This only works if the startup HTML file doe not reference another file while loading.
➤ By default, LoadRunner uses forms 6 support for Oracle NCA replay. To change the replay to forms 4.5 support, set the following in the mdrv.dat file:
[Oracle_NCA]
ExtPriorityType=protocol
WINNT_EXT_LIBS=ncarp110.dll
WIN95_EXT_LIBS=ncarp110.dll
LINUX_EXT_LIBS=liboranca.so
SOLARIS_EXT_LIBS=liboranca.so
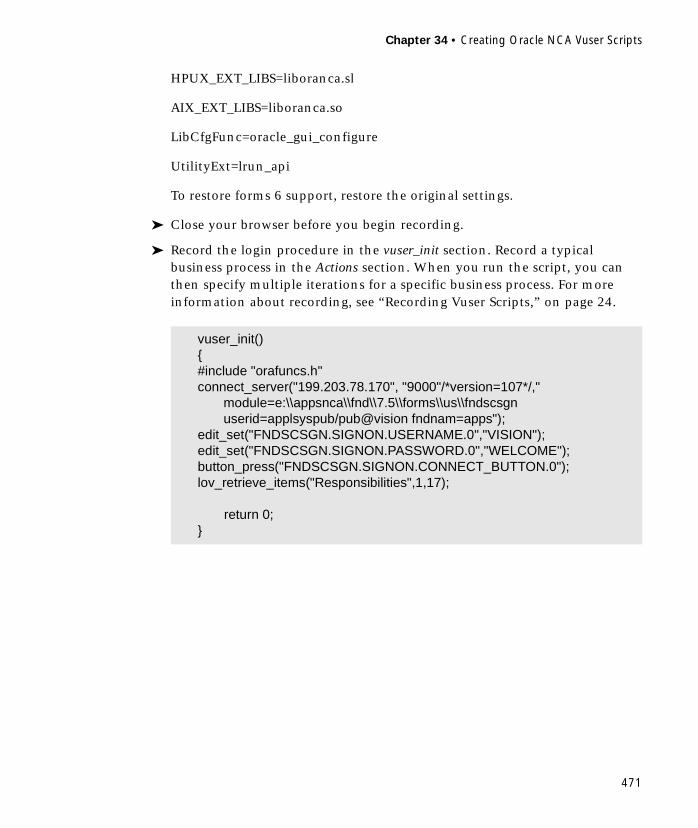
Chapter 34 • Creating Oracle NCA Vuser Scripts
471
HPUX_EXT_LIBS=liboranca.sl
AIX_EXT_LIBS=liboranca.so
LibCfgFunc=oracle_gui_configure
UtilityExt=lrun_api
To restore forms 6 support, restore the original settings.
➤ Close your browser before you begin recording.
➤ Record the login procedure in the vuser_init section. Record a typical business process in the Actions section. When you run the script, you can then specify multiple iterations for a specific business process. For more information about recording, see “Recording Vuser Scripts,” on page 24.
vuser_init(){#include "orafuncs.h"connect_server("199.203.78.170", "9000"/*version=107*/,"
module=e:\\appsnca\\fnd\\7.5\\forms\\us\\fndscsgn userid=applsyspub/pub@vision fndnam=apps");
edit_set("FNDSCSGN.SIGNON.USERNAME.0","VISION");edit_set("FNDSCSGN.SIGNON.PASSWORD.0","WELCOME");button_press("FNDSCSGN.SIGNON.CONNECT_BUTTON.0");lov_retrieve_items("Responsibilities",1,17);
return 0;}
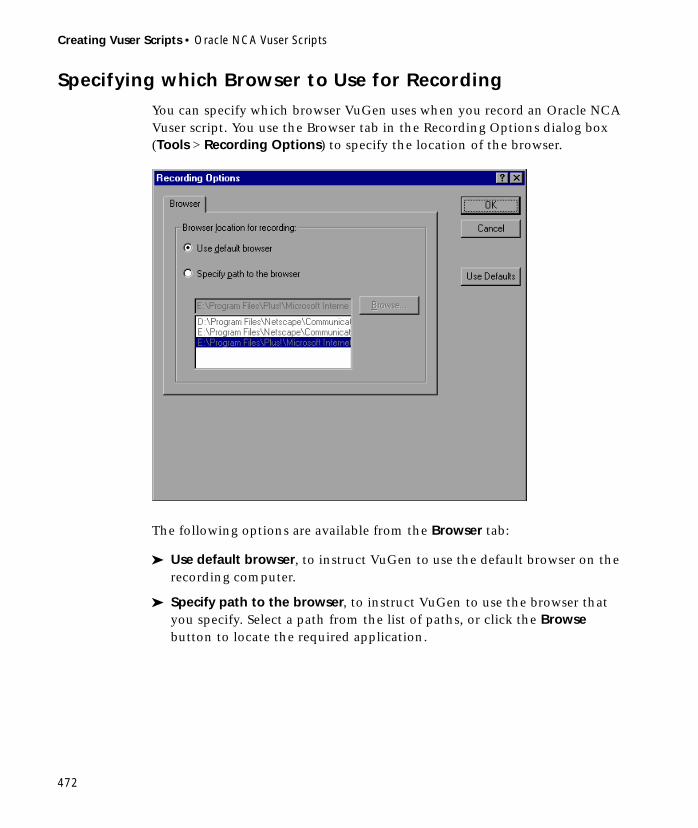
Creating Vuser Scripts • Oracle NCA Vuser Scripts
472
Specifying which Browser to Use for Recording
You can specify which browser VuGen uses when you record an Oracle NCA Vuser script. You use the Browser tab in the Recording Options dialog box (Tools > Recording Options) to specify the location of the browser.
The following options are available from the Browser tab:
➤ Use default browser, to instruct VuGen to use the default browser on the recording computer.
➤ Specify path to the browser, to instruct VuGen to use the browser that you specify. Select a path from the list of paths, or click the Browse button to locate the required application.
Chapter 34 • Creating Oracle NCA Vuser Scripts
473
Using Oracle NCA Vuser Functions
VuGen automatically records most of the functions listed in this section while you perform typical NCA business processes. You can also manually program any of the functions into your Vuser script. When working in tree view, click the graphical icon for the appropriate step. In text view, you can manually add the desired function. For more information about the Oracle NCA Vuser functions, refer to the Online Function Reference (available from the VuGen Help menu).
Button Object Functions
Combo Box Object Functions
Connection Functions
Edit Object Functions
button_double_press Performs a double press on a push button.
button_press Activates a push button.
button_set Sets the state of the specified button.
combo_set_item Selects an item in a combo box.
connect_server Connects to an Oracle NCA server.
logon_connect Performs a login to an Oracle NCA database.
logon_cancel Disconnects from an Oracle NCA database.
edit_box_press Presses on an edit box message.
edit_click Clicks in an edit object.
edit_get_text Returns the text in an edit object.
edit_press Activates the browse button in an edit field.
edit_set Replaces the entire contents of an edit object.

Creating Vuser Scripts • Oracle NCA Vuser Scripts
474
Flex Object Functions
List Item Functions
java Object Functions
Menu Object Functions
flex_click_cell Clicks a table cell in a Flexfield window.
flex_get_cell_data Gets data from a Flexfield cell.
flex_press_clear Clicks Clear in a Flexfield window.
flex_press_find Clicks Find in a Flexfield window.
flex_press_help Clicks Help in a Flexfield window.
flex_press_lov Clicks on the List of Values button in a Flexfield window.
flex_press_ok Clicks OK in a Flexfield window.
flex_set_cell_data Inserts data in a Flexfield window.
flex_set_cell_data_press_ok Clicks OK in a Flexfield window after data is entered.
list_activate_item Activates an item in a list (double-click).
list_select_item Selects a list item.
lov_auto_select Specifies the first letter of an item.
lov_find_value Clicks Find in a List of Values window.
lov_retrieve_items Retrieves a list of values.
lov_select_item Selects an item from a list of values.
lov_select_random_item Selects a random item from a list of values.
java_action Performs an event on a Java object.
java_set_reply_property Sets a reply property for a Java object.
menu_select_item Selects an item from a menu.

Chapter 34 • Creating Oracle NCA Vuser Scripts
475
Message Functions
Object Functions
Response Object Functions
Scroll Object Functions
Session Functions
popup_message_press Presses a button in a popup window.
message_box_press Presses a button in a message window.
obj_get_info Returns the value of an object property.
obj_mouse_click Clicks within an object.
obj_mouse_dbl_click Double-clicks within an object.
obj_status Returns the status of the specified object.
obj_type Types special characters into an edit box.
response_press_lov Clicks a drop down arrow in a Response box.
response_press_ok Presses OK inside a Response box.
response_set_cell_data Inserts data into a cell in a Response box.
response_set_data Inserts data into a cell of a Response box.
scroll_drag_from_min Drags the scroll the specified distance from the minimum position.
scroll_line Moves the scroll the specified number of lines.
scroll_page Moves the scroll the specified number of pages.
console_get_text Retrieves the console message
set_iteration_offset Sets an offset value for an object ID.
set_server_response_time Sets the server response time.
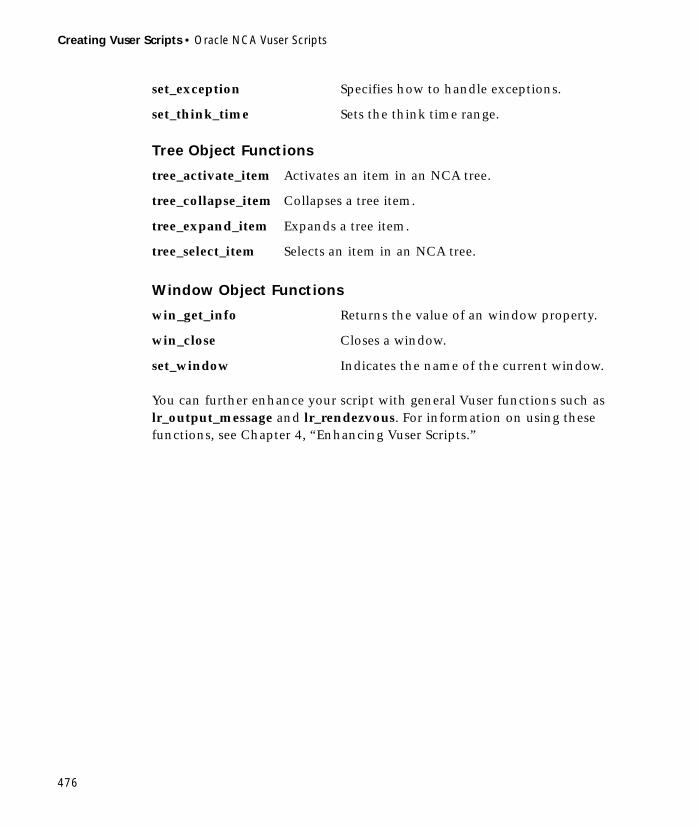
Creating Vuser Scripts • Oracle NCA Vuser Scripts
476
Tree Object Functions
Window Object Functions
You can further enhance your script with general Vuser functions such as lr_output_message and lr_rendezvous. For information on using these functions, see Chapter 4, “Enhancing Vuser Scripts.”
set_exception Specifies how to handle exceptions.
set_think_time Sets the think time range.
tree_activate_item Activates an item in an NCA tree.
tree_collapse_item Collapses a tree item.
tree_expand_item Expands a tree item.
tree_select_item Selects an item in an NCA tree.
win_get_info Returns the value of an window property.
win_close Closes a window.
set_window Indicates the name of the current window.

Chapter 34 • Creating Oracle NCA Vuser Scripts
477
Understanding Oracle NCA Vusers
When you create an Oracle NCA Vuser script, VuGen records all of the NCA communication between the client and the application server. While you record, VuGen generates context sensitive functions. These functions describe your actions on the database in terms of GUI objects (such as windows, lists, and buttons). As you record, VuGen inserts the context sensitive functions into the Vuser script.
After you finish recording, you can modify the functions in your script, or add additional functions to enhance it. For information about enhancing Vuser script, see Chapter 4, “Enhancing Vuser Scripts.” For a list of the available Oracle NCA Vuser functions, see “Using Oracle NCA Vuser Functions,” on page 473. For details of these functions, see the Online Function Reference (available from the VuGen Help menu).
In the following segment, the user selected an item from a list (list_activate_item), pressed a button (button_press), retrieved a list value (lov_retrieve_items), and performed a click in an edit field (edit_click). The logical names of the objects are the parameters of these functions.
. . . lov_select_item("Responsibilities","General Ledger, Vision Operations");list_activate_item("FNDSCSGN.NAVIGATOR.LIST.0","+ Journals");list_activate_item("FNDSCSGN.NAVIGATOR.LIST.0"," Enter");button_press("GLXJEENT.TOOLBAR.LIST.0");lov_find_value("Batches","");lov_retrieve_items("Batches",1,9);lov_select_item("Batches","AR 1020 Receivables 2537: A 1020");edit_click("GLXJEENT.FOLDER_QF.BATCH_NAME.0");. . .

Creating Vuser Scripts • Oracle NCA Vuser Scripts
478
Switching Between Tree View and Script View
When viewing and editing Oracle NCA Vuser script in VuGen, you choose between viewing the script in the icon-based tree view or the text-based script view.
To display the tree view of an Oracle NCA Vuser script:
From the VuGen main menu, select View > Tree View, or click the View script as tree icon. The Vuser script is displayed in the icon-based tree view. If you are already in the tree view, the menu item is disabled.
Tree view
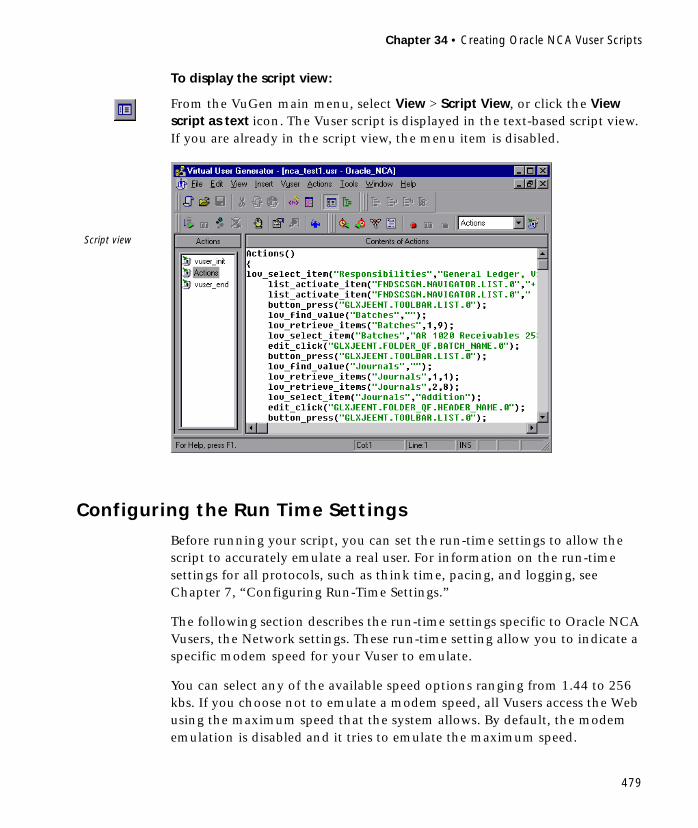
Chapter 34 • Creating Oracle NCA Vuser Scripts
479
To display the script view:
From the VuGen main menu, select View > Script View, or click the View script as text icon. The Vuser script is displayed in the text-based script view. If you are already in the script view, the menu item is disabled.
Configuring the Run Time Settings
Before running your script, you can set the run-time settings to allow the script to accurately emulate a real user. For information on the run-time settings for all protocols, such as think time, pacing, and logging, see Chapter 7, “Configuring Run-Time Settings.”
The following section describes the run-time settings specific to Oracle NCA Vusers, the Network settings. These run-time setting allow you to indicate a specific modem speed for your Vuser to emulate.
You can select any of the available speed options ranging from 1.44 to 256 kbs. If you choose not to emulate a modem speed, all Vusers access the Web using the maximum speed that the system allows. By default, the modem emulation is disabled and it tries to emulate the maximum speed.
Script view

Creating Vuser Scripts • Oracle NCA Vuser Scripts
480
To set the modem emulation settings:
1 Open the Run-Time Settings dialog box. Choose Vuser > Run-Time Settings or click the Run-Time Settings button on the VuGen toolbar. To open the Run-Time Settings dialog box from the LoadRunner Controller, click the Runtime Settings button.
2 Click the Network tab.
3 To enable emulation, click in the right column and select True.
4 Select a modem speed in the right column of the second row.
5 Click OK to accept the settings and run the script.

Chapter 34 • Creating Oracle NCA Vuser Scripts
481
Using Load Balancing in Oracle NCA
LoadRunner supports load balancing using a combination of Web and Oracle NCA virtual users. Use this load balancing feature only if you use more than one application server.
To simulate the load balancing feature in Oracle NCA:
1 Enable Web replay for Oracle NCA Vusers.
➤ Edit the mdrv.dat file (found in the dat directory of the LoadRunner installation).
➤ Find the section called "[Oracle_NCA]". In this section you should have the line:
UtilityExt=lrun_api.
➤ Replace this line with the following line:
UtilityExt= lrun_api,Web
2 Record the connection process into a Web Vuser script.
➤ Launch VuGen.
➤ Open a new Web Vuser script.
➤ In the Recording Options dialog box, set the option to record a URL-based script.
➤ In the Application to record box, enter the same path as used to record the Oracle NCA script.
➤ Start recording.
➤ When you reach the login screen of Oracle Applications, stop recording.
➤ Your Vuser script should look something like this:
web_url("step_name","URL=http://server.domain.com/oa/begin.htm",LAST);
… additional web_url functions …
➤ Save the Vuser script.
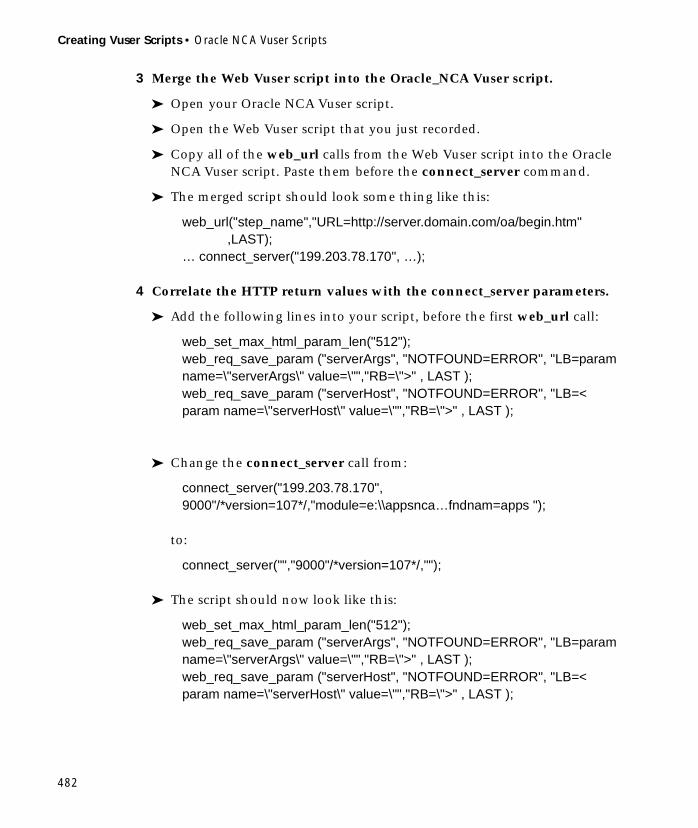
Creating Vuser Scripts • Oracle NCA Vuser Scripts
482
3 Merge the Web Vuser script into the Oracle_NCA Vuser script.
➤ Open your Oracle NCA Vuser script.
➤ Open the Web Vuser script that you just recorded.
➤ Copy all of the web_url calls from the Web Vuser script into the Oracle NCA Vuser script. Paste them before the connect_server command.
➤ The merged script should look some thing like this:
web_url("step_name","URL=http://server.domain.com/oa/begin.htm",LAST);
… connect_server("199.203.78.170", …);
4 Correlate the HTTP return values with the connect_server parameters.
➤ Add the following lines into your script, before the first web_url call:
web_set_max_html_param_len("512"); web_req_save_param ("serverArgs", "NOTFOUND=ERROR", "LB=param name=\"serverArgs\" value=\"","RB=\">" , LAST ); web_req_save_param ("serverHost", "NOTFOUND=ERROR", "LB=< param name=\"serverHost\" value=\"","RB=\">" , LAST );
➤ Change the connect_server call from:
connect_server("199.203.78.170", 9000"/*version=107*/,"module=e:\\appsnca…fndnam=apps ");
to:
connect_server("","9000"/*version=107*/,"");
➤ The script should now look like this:
web_set_max_html_param_len("512"); web_req_save_param ("serverArgs", "NOTFOUND=ERROR", "LB=param name=\"serverArgs\" value=\"","RB=\">" , LAST ); web_req_save_param ("serverHost", "NOTFOUND=ERROR", "LB=< param name=\"serverHost\" value=\"","RB=\">" , LAST );

Chapter 34 • Creating Oracle NCA Vuser Scripts
483
web_url("step_name","URL=http://server.domain.com/oa/begin.htm",LAST);
… connect_server("< serverhost>","9000"/*version=107*/,"");

Creating Vuser Scripts • Oracle NCA Vuser Scripts
484
Part VIII
Java Vuser Scripts

486

487
35Programming Java Scripts
VuGen supports Java type users on a protocol level. This chapter explains how to create a Java Vuser script by programming. For information on creating a protocol-level Java script for CORBA or RMI by recording, see Chapter 37, “Developing CORBA and RMI Vuser Scripts.”
This chapter describes how to work with a Java Vuser to program a Vuser script in Java:
➤ Creating a Java Vuser
➤ Editing a Java Vuser Script
➤ LoadRunner’s Java API
➤ Working with Java Vuser Functions
➤ Setting your Java Environment
➤ Running Java Vuser Scripts
➤ Compiling and Running a Script as Part of a Package
➤ Programming Tips
The following information applies to Java, EJB Testing, CORBA-Java, and RMI-Java Vuser scripts.
About Programming Java Scripts
To prepare Vuser scripts using Java code, use the Java, CORBA-Java, or RMI-Java type Vusers. These Vuser types support Java on a protocol level. The Vuser script is compiled by a Java compiler and supports all of the standard
Creating Vuser Scripts • Java Vuser Scripts
488
Java conventions. For example, you can insert a comment by preceding the text with two forward slashes “//”.
The chapter for CORBA-Java and RMI-Java Vusers explains how to create a script through recording. To prepare a Java coded script through programming, see the following sections.
The first step in creating a Java compatible Vuser script, is to create a new Vuser script template of the type: Java Vuser Then, you program or paste the desired Java code into the script template. You can add LoadRunner Java Vuser functions to enhance the script and parameterize the arguments to use different values during iterations.
The Java Vuser script runs as a scalable multi-threaded application. If you include a custom class in your script, ensure that the code is thread-safe. Code that is not thread-safe may cause inaccurate results. For code that is not thread-safe, run the Java Vusers as processes. This creates a separate Java Virtual Machine for each process, resulting in a script that is less scalable.
After you prepare a script, run it as a standalone test from VuGen. A Java compiler (Sun’s javac), checks it for errors and compiles the script. Once you verify that the script is functional, you incorporate it into a LoadRunner scenario.
Creating a Java Vuser
The first step in creating a Java-compatible Vuser script is creating a Java Vuser template.
To create a Java Vuser script:
1 Open VuGen.
2 Choose File > New or click the New button. The New Virtual User dialog box opens.
3 Select Custom > Java Vuser from the Select Vuser type list, and click OK. VuGen displays a blank Java Vuser script.
4 Click the Actions section in the left frame to display the Actions class.
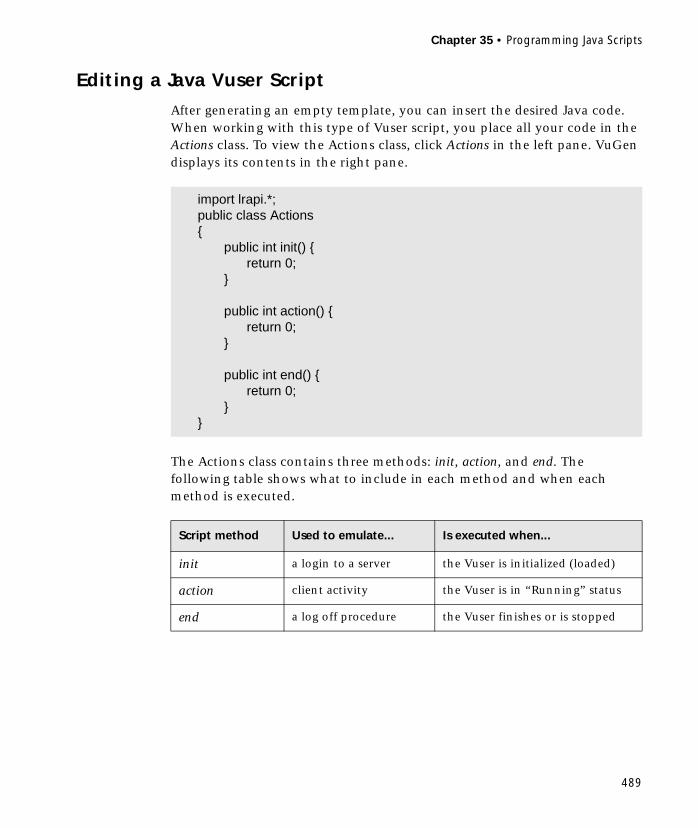
Chapter 35 • Programming Java Scripts
489
Editing a Java Vuser Script
After generating an empty template, you can insert the desired Java code. When working with this type of Vuser script, you place all your code in the Actions class. To view the Actions class, click Actions in the left pane. VuGen displays its contents in the right pane.
The Actions class contains three methods: init, action, and end. The following table shows what to include in each method and when each method is executed.
import lrapi.*;public class Actions{
public int init() {return 0;
}
public int action() {return 0;
}
public int end() {return 0;
}}
Script method Used to emulate... Is executed when...
init a login to a server the Vuser is initialized (loaded)
action client activity the Vuser is in “Running” status
end a log off procedure the Vuser finishes or is stopped

Creating Vuser Scripts • Java Vuser Scripts
490
Init Method
Place all the login procedures and one-time configuration settings in the init method. The init method is only executed once—when the Vuser begins running the script. The following sample init method initializes an applet.
Action Method
Place all Vuser actions in the action method. The action method is executed according to the number of iterations you set in the runtime settings. For more information on the iteration settings, see Chapter 7, “Configuring Run-Time Settings.” The following sample action method retrieves and prints the Vuser ID.
End Method
In the end method, place the code you want LoadRunner to execute at the end of the scenario such as logging off from a server, cleaning up the environment, and so forth. The end method is only executed once—when
import org.omg.CORBA.*;import org.omg.CORBA.ORB.*;import lrapi.lr;
// Public function : init public int init() throws Throwable {
// Initialize Orb instance...MApplet mapplet = new MApplet("http://chaos/classes/", null);orb = org.omg.CORBA.ORB.init(mapplet, null);
...
public int action() {lr.message("vuser: " + lr.get_vuser_id() + " xxx"); return 0;
}

Chapter 35 • Programming Java Scripts
491
the Vuser finishes running the script. In the following example, the end method closes and prints the end message to the execution log.
LoadRunner’s Java API
LoadRunner provides a specific Java API for accessing Vuser functions. These functions are all static methods of the lrapi.lr class . The following section lists LoadRunner’s Java Vuser functions. For further information about each of these functions, see the Online Function Reference available from VuGen. Note that when you create a new Java Vuser script, the import lrapi.* is already inserted into script.
Transaction Functions
Command Line Parsing Functions
Informational Functions
public int end() { lr.message("End"); return 0; }
lr.start_transaction Marks the beginning of a transaction.
lr.end_transaction Marks the end of a transaction.
lr.get_attrib_double Retrieves a double type variable used on the script command line.
lr.get_attrib_long Retrieves a long type variable used on the script command line.
lr.get_attrib_string Retrieves a string used on the script command line.
lr.value_check Checks the value of a parameter.
lr.user_data_point Records a user-defined data sample.
lr.get_group_name Returns the name of the Vuser’s group.
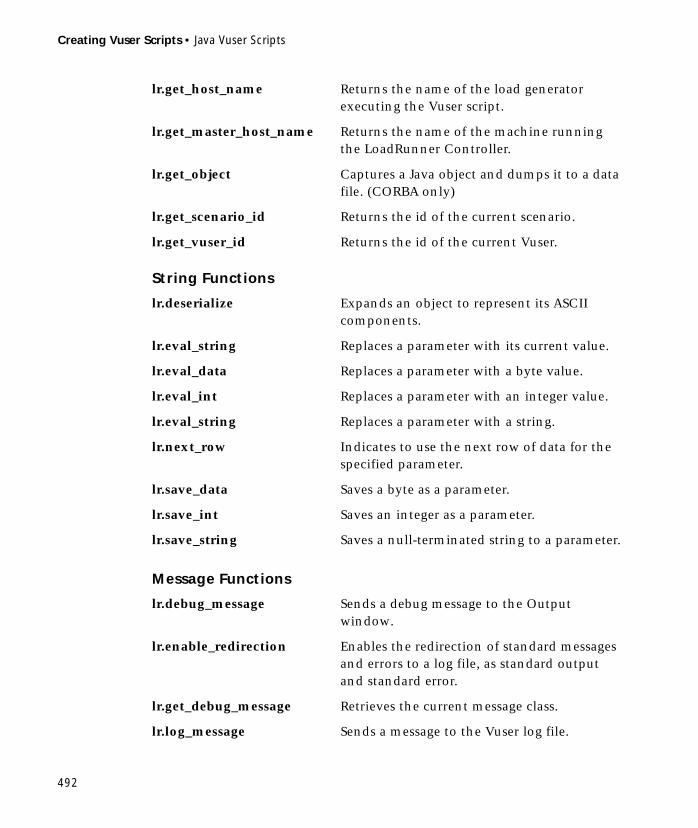
Creating Vuser Scripts • Java Vuser Scripts
492
String Functions
Message Functions
lr.get_host_name Returns the name of the load generator executing the Vuser script.
lr.get_master_host_name Returns the name of the machine running the LoadRunner Controller.
lr.get_object Captures a Java object and dumps it to a data file. (CORBA only)
lr.get_scenario_id Returns the id of the current scenario.
lr.get_vuser_id Returns the id of the current Vuser.
lr.deserialize Expands an object to represent its ASCII components.
lr.eval_string Replaces a parameter with its current value.
lr.eval_data Replaces a parameter with a byte value.
lr.eval_int Replaces a parameter with an integer value.
lr.eval_string Replaces a parameter with a string.
lr.next_row Indicates to use the next row of data for the specified parameter.
lr.save_data Saves a byte as a parameter.
lr.save_int Saves an integer as a parameter.
lr.save_string Saves a null-terminated string to a parameter.
lr.debug_message Sends a debug message to the Output window.
lr.enable_redirection Enables the redirection of standard messages and errors to a log file, as standard output and standard error.
lr.get_debug_message Retrieves the current message class.
lr.log_message Sends a message to the Vuser log file.
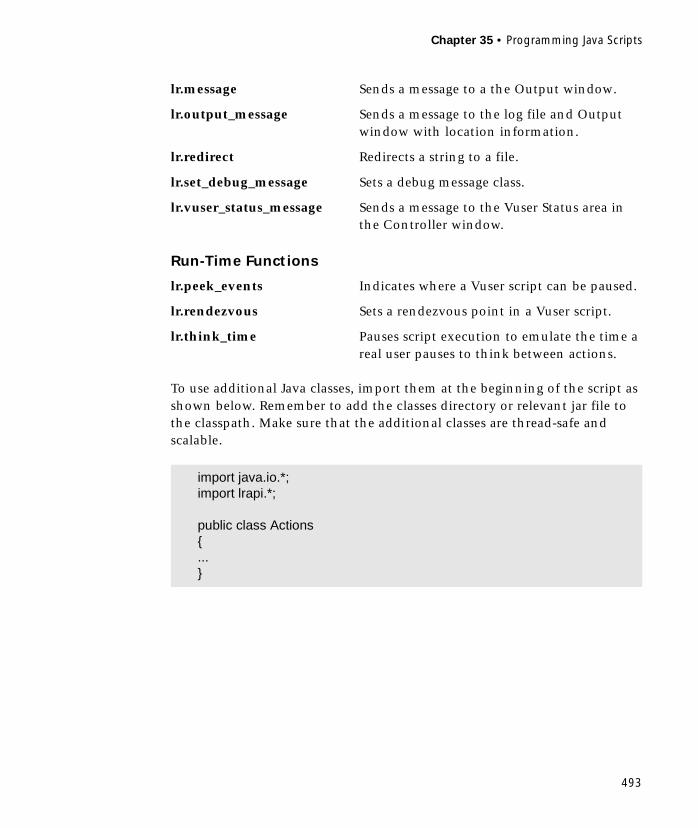
Chapter 35 • Programming Java Scripts
493
Run-Time Functions
To use additional Java classes, import them at the beginning of the script as shown below. Remember to add the classes directory or relevant jar file to the classpath. Make sure that the additional classes are thread-safe and scalable.
lr.message Sends a message to a the Output window.
lr.output_message Sends a message to the log file and Output window with location information.
lr.redirect Redirects a string to a file.
lr.set_debug_message Sets a debug message class.
lr.vuser_status_message Sends a message to the Vuser Status area in the Controller window.
lr.peek_events Indicates where a Vuser script can be paused.
lr.rendezvous Sets a rendezvous point in a Vuser script.
lr.think_time Pauses script execution to emulate the time a real user pauses to think between actions.
import java.io.*;import lrapi.*;
public class Actions{...}

Creating Vuser Scripts • Java Vuser Scripts
494
Working with Java Vuser Functions
You can use Java Vuser functions to enhance your scripts by:
➤ Inserting Transactions
➤ Inserting Rendezvous Points
➤ Obtaining Vuser Information
➤ Issuing Output Messages
➤ Emulating User Think Time
➤ Handling Command Line Arguments
Inserting Transactions
You define transactions to measure the performance of the server. Each transaction measures the time it takes for the server to respond to specified requests. These requests can be simple or complex tasks. During and after the scenario run, you can analyze the performance per transaction using LoadRunner’s online monitor and graphs.
You can also specify a transaction status: lr.PASS or lr.FAIL. You can let LoadRunner determine if the transaction was successful, or you can incorporate it into a conditional loop. For example, in your code you can check for a specific return code. If the code is correct, you issue a lr.PASS status. If the code is wrong, you issue an lr.FAIL status.
To mark a transaction:
1 Insert lr.start_transaction into the script, at the point where you want to begin measuring the timing of a task.
2 Insert lr.end_transaction into the script, at the point where you want to stop measuring the task. Use the transaction name as it appears in the lr.start_transaction function.

Chapter 35 • Programming Java Scripts
495
3 Specify the desired status for the transaction: lr.PASS or lr.FAIL.
Inserting Rendezvous Points
To emulate heavy user load on your client/server system, you synchronize Vusers to perform a task at exactly the same moment by creating a rendezvous point. When a Vuser arrives at the rendezvous point, it is held by the Controller until all Vusers participating in the rendezvous arrive.
You designate the meeting place by inserting a rendezvous function into your Vuser script.
To insert a rendezvous point:
1 Insert an lr.rendezvous function into the script, at the point where you want the Vusers to perform a rendezvous.
public int action() {
for(int i=0;i<10;i++){
lr.message("action()"+i);lr.start_transaction("trans1");lr.think_time(2);lr.end_transaction("trans1",lr.PASS);
}return 0;
}
public int action() {
for(int i=0;i<10;i++){
lr.rendezvous("rendz1");lr.message("action()"+i);lr.think_time(2);
}return 0;
}

Creating Vuser Scripts • Java Vuser Scripts
496
Obtaining Vuser Information
You can add the following functions to your Vuser scripts to retrieve Vuser information:
In the following example, the lr.get_host_name function retrieves the name of the computer on which the Vuser is running.
For more information about the above functions, refer to the Online Function Reference (available from the VuGen Help menu).
Issuing Output Messages
When you run a scenario, the Controller’s Output window displays information about script execution. You can include statements in a Vuser script to send error and notification messages to the Controller. The Controller displays these messages in the Output window. For example, you could insert a message that displays the current state of the client application. You can also save these messages to a file.
lr.get_attrib_string Returns a string containing command line argument values or runtime information such as the Vuser ID or the load generator name.
lr.get_group_name Returns the name of the Vuser’s group.
lr.get_host_name Returns the name of the load generator executing the Vuser script.
lr.get_master_host_name Returns the name of the machine running the LoadRunner Controller.
lr.get_scenario_id Returns the id of the current scenario.
lr.get_vuser_id Returns the id of the current Vuser.
String my_host = lr.get_host_name( );

Chapter 35 • Programming Java Scripts
497
Note: Do not send messages from within a transaction. Doing so lengthens the transaction execution time and may skew the actual transaction results.
You can use the following message functions in your Vuser script:
In the following example, lr.message sends a message to the output indicating the loop number.
For more information about the message functions, see “Message Functions,” on page 492 or refer to the Online Function Reference (available from the VuGen Help menu).
You can instruct LoadRunner to redirect the Java standard output and standard error streams to the VuGen execution log. This is especially helpful, when you need to paste existing Java code or use ready-made classes containing System.out and System.err calls in your Vuser scripts. In the execution log, standard output messages are colored blue, while standard errors are shown in red.
lr.debug_message Sends a debug message to the Output window.
lr.log_message Sends a message to the Vuser log file.
lr.message Sends a message to a the Output window.
lr.output_message Sends a message to the log file and Output window with location information.
for(int i=0;i<10;i++){
lr.message("action()"+i);lr.think_time(2);
}

Creating Vuser Scripts • Java Vuser Scripts
498
The following example shows how to redirect specific messages to the standard output and standard error using lr.enable_redirection.
Note: When you set lr.enable_redirection to true, it overrides all previous redirections. To restore the former redirections, set this function to false.
For additional information about this function, refer to the Online Function Reference.
Emulating User Think Time
The time that a user waits between performing successive actions is known as the think time. Vusers use the lr.think_time function to emulate user think time. In the following example, the Vuser waits two seconds between loops.
You can use the think time settings as they appear in the script, or a factor of these values. To configure how LoadRunner handles think time functions, open the runtime settings dialog box. For more information, see Chapter 7, “Configuring Run-Time Settings.”
lr.enable_redirection(true);
System.out.println("This is an informatory message…"); // RedirectedSystem.err.println("This is an error message…"); // Redirected
lr.enable_redirection(false);
System.out.println("This is an informatory message…"); // Not redirectedSystem.err.println("This is an error message…"); // Not redirected
for(int i=0;i<10;i++){
lr.message("action()"+i);lr.think_time(2);
}

Chapter 35 • Programming Java Scripts
499
For more information about the lr.think_time function, refer to the Online Function Reference (available from the VuGen Help menu).
Handling Command Line Arguments
You can pass values to a Vuser script at runtime by specifying command line arguments when you run the script. You can insert command line options after the script path in the LoadRunner Controller. There are three functions that allow you to read the command line arguments, and then to pass the values to a Vuser script:
Your command line should have one of the following two formats where the arguments and their values are listed in pairs, after the script name:
The following example shows the command line string used to repeat script1 five times on the machine pc4:
For more information on the command line parsing functions, refer to the Online Function Reference (available from the VuGen Help menu). For additional details on including arguments on a command line, refer to the LoadRunner Controller User’s Guide (Windows).
lr.get_attrib_double Retrieves double precision floating point type arguments
lr.get_attrib_long Retrieves long integer type arguments
lr.get_attrib_string Retrieves character strings
script_name -argument argument_value -argument argument_value
script_name /argument argument_value /argument argument_value
script1 -host pc4 -loop 5
Creating Vuser Scripts • Java Vuser Scripts
500
Setting your Java Environment
Before running your Java Vuser script, ensure that the environment variables, PATH and CLASSPATH, are properly set on all machines running Vusers:
➤ To compile and replay the scripts, you must have complete JDK installation, either version 1.1 or 1.2, or 1.3. The installation of the JRE alone is not sufficient. It is preferable not to have more than one JDK or JRE installation on a machine. If possible, uninstall all unnecessary versions.
➤ The PATH environment variable must contain an entry for JDK/bin.
➤ For JDK 1.1.x, the CLASSPATH environment variable must include the classes.zip path, (JDK/lib) and all of the LoadRunner classes (loadrunner/classes).
➤ All classes used by the Java Vuser must be in the classpath—either set in the machine’s CLASSPATH environment variable or in the Java VM tab in the Run-Time settings.
Running Java Vuser Scripts
Java Vuser scripts differ from C Vuser scripts in that they are first compiled and then executed; C Vuser scripts are interpreted. Vugen locates the "javac" compiler from within the JDK installation and compiles the Java code inside the script. This stage is indicated by the Compiling… status message in the bottom of the Vugen window. If errors occur during compilation, they are listed in the execution log. To go to the code in your script that caused the error, double-click on the error message containing the line number of the error. Fix the error and run the script again.
If the compilation succeeds, the status message Compiling… changes to Running… and VuGen begins to execute the script. When you run the script again, VuGen runs the script without recompiling it, provided that no changes were made to the script. To debug your script further, you can use breakpoints and animated run type execution using the step option.

Chapter 35 • Programming Java Scripts
501
Compiling and Running a Script as Part of a Package
When creating a Java Vuser script, you may need to use methods in other classes in which the class or method is protected. If you try to compile this type of script, you will receive errors in the compilation stage indicating that the methods are inaccessible. To make sure that your script can access these methods, insert the package name containing these methods at the top of the script, just as you would do in a standard Java program— <package_name>. In the following example, the script defines the just.do.it package which consists of a path:
In the above example, Vugen, automatically creates the just/do/it directory hierarchy under the Vuser directory, and copies the Actions.java file to just/do/it/Actions.java, allowing it to compile with the relevant package. Note that the package statement must be the first line in the script, similar to Java (excluding comments).
Programming Tips
When programming a Java Vuser script, you can paste in ready-made code segments into scripts or import ready-made classes in order to invoke their methods. If Vusers need to run as threads under the Controller (for scalability reasons), you need to ensure that all of the imported code is thread-safe.
Thread-safety is usually easy to implement, but harder to detect. A Java Vuser may run flawlessly under Vugen and under the Controller with a limited number of Vusers. Problems occur with a large number of users.
package just.do.it;
import lrapi.*;public class Actions{ :}

Creating Vuser Scripts • Java Vuser Scripts
502
Code that is not thread-safe is usually the result of static class member usage as shown in the following example:
When you run one Vuser, the iteration_counter member accurately determines the number of iterations that were executed. When multiple Vusers run together as threads on a single virtual machine, the static class member iteration_counter is shared by all threads, resulting in an incorrect counting. The total number of all Vusers iterations is counted.
If code is known to be non thread-safe and you still want to import it into your script, you can run the Vusers as processes. For more information on running Vusers as threads or processes, see Chapter 7, “Configuring Run-Time Settings.”
When you run a simple Java Vuser script, it usually consists of a single thread—the main thread. Only the main thread can access the LoadRunner Java API. If a Java Vuser spawns secondary worker threads, using the LoadRunner API may cause unpredictable results. Therefore, it is recommended to use the LoadRunner Java API only in the main thread. Note that this limitation also affects the lr.enable_redirection function.
import lrapi.*;public class Actions{
private static int iteration_counter = 0;
public int init() {return 0;
}
public int action() {iteration_counter++;return 0;
}
public int end() {lr.message("Number of Vuser iterations: "+iteration_counter);return 0;
}}
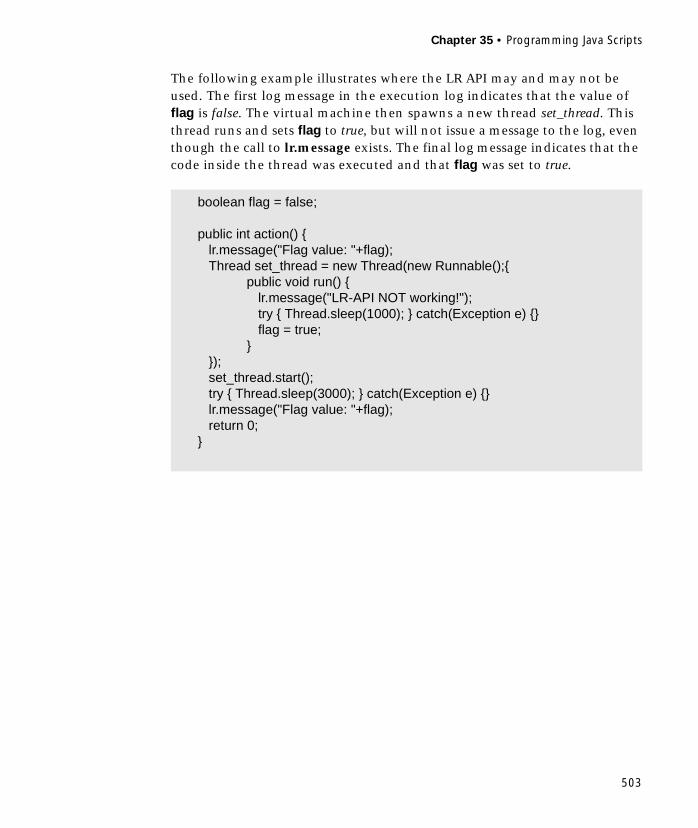
Chapter 35 • Programming Java Scripts
503
The following example illustrates where the LR API may and may not be used. The first log message in the execution log indicates that the value of flag is false. The virtual machine then spawns a new thread set_thread. This thread runs and sets flag to true, but will not issue a message to the log, even though the call to lr.message exists. The final log message indicates that the code inside the thread was executed and that flag was set to true.
boolean flag = false;
public int action() {lr.message("Flag value: "+flag);Thread set_thread = new Thread(new Runnable();{
public void run() {lr.message("LR-API NOT working!");try { Thread.sleep(1000); } catch(Exception e) {}flag = true;
}});set_thread.start();try { Thread.sleep(3000); } catch(Exception e) {}lr.message("Flag value: "+flag);return 0;
}

Creating Vuser Scripts • Java Vuser Scripts
504

505
36Performing EJB Testing
The Enterprise Java Beans (EJB) testing tool generates scripts for testing EJB objects.
This chapter describes:
➤ Working with the EJB Detector
➤ Understanding EJB Vuser Scripts
➤ Creating an EJB Testing Vuser
➤ Setting EJB Recording Options
➤ Viewing the Java Methods
➤ Inserting Java Methods Manually
➤ Configuring Script Generation Settings
➤ Running EJB Testing Vuser Scripts
The following information only applies to EJB Testing Vuser scripts.
About EJB Testing
To prepare Vuser scripts to test Java applications, you use the Java, EJB Testing, CORBA-Java, or RMI-Java type Vusers.
For generating a Vuser script through recording, use the CORBA or RMI Vusers. For creating a script through programming, use the standard Java Vusers. To create a script for EJB modules, use the EJB Testing Vuser type.
EJB Testing Vusers differ from the standard Java Vusers in that VuGen automatically creates a script to test EJB functionality without recording or
Creating Vuser Scripts • Java Vuser Scripts
506
programming. Before you generate a script, you specify the JNDI properties and other information about your application server. LoadRunner’s EJB Detector scans the application server and determines which EJBs are available. You select the EJB that you want to test, and LoadRunner generates a script that tests each of the EJB’s methods. It creates transactions for each method so that you can measure its performance and locate problems. In addition, each method is wrapped in a try and catch block for exception handling.
Note that in order to create EJB testing scripts, the LoadRunner EJB Detector must be installed and active on the application server host. The Detector is described in the following sections.
VuGen also has a built-in utility for inserting classes and methods into your script. Using this utility, you display all of the available packages, select the desired methods, and insert them into your script. For more information, see “Viewing the Java Methods,” on page 517.
Working with the EJB Detector
The EJB Detector is a separate agent that must be installed on each machine that is being scanned for EJBs. This agent detects the EJBs on the machine. Before installing the EJB Detector, verify that you have valid JDK environment on the machine.
To set up the JDK environment:
1 Create a home directory for the EJB Detector, for example, DETECTOR_HOME, and unzip the ejbdetector.jar file into that directory.
2 Add the DETECTOR_HOME\classes and the DETECTOR_HOME\classes\xerces.jar file. to the CLASSPATH directory as defined by the CLASSPATH environment variable.
3 If you are working with EJB1.0 (Weblogic4x, WebSphere), add the vendor EJB classes to CLASSPATH and the classes of the EJBs that are being tested.
The vendor classes are:
➤ WebLogic4x: the path is <weblogic_dir>\lib\weblogicaux.jar.
➤ WebSphere: the path is <websphere_dir>\lib\ujc.jar.
Chapter 36 • Performing EJB Testing
507
Running the EJB Detector from the Command-line
To run the EJB Detector from the command-line, use the following string:
java EJBDetector [search root dir] [listen port]
search root dir one or more directories or files in which to search for EJBs (separated by semicolons). Follow these guidelines:
BEA WebLogic Servers 4.x and 5.x: Specify the application server root directory.
BEA WebLogic Servers 6.x: Specify full path of the domain folder.
WebSphere Servers: Specify the full path of the deployed EJBs folder.
You can also specify a search list of directories and/or files to search. If unspecified, the classpath will be searched.
listen port The listening port of the EJB Detector.The default port is 2001. If you change this port number, you must also specify it in the Host name box of the Generate EJB Test dialog box.
For example, if your host is metal, if you are using the default port, you can specify metal. If you are using a different port, for example, port 2002, enter metal:2002.

Creating Vuser Scripts • Java Vuser Scripts
508
Note: The EJB Detector must be running before you start the EJB script generation process in VuGen. You can either run the EJB detector on the application server or on the client machine. When running it on the client machine, mount to the application server from the EJB Detector (client) machine, specify the mount directory in the search root directory, and change the generated script to connect to the mounted machine instead of the local machine.
EJB Detector Output and Log Files
You can examine the output of the EJB Detector to see if it has detected all the active EJBs. The output log shows the paths being checked for EJBs. At the end of the scan, it displays a list of the EJBs that were found, their names and locations.
For Example:
Checking EJB Entry: f:/weblogic/myserver/ejb_basic_beanManaged.jar .....Checking EJB Entry: f:/weblogic/myserver/ejb_basic_statefulSession.jar .....Checking EJB Entry: f:/weblogic/myserver/ejb_basic_statelessSession.jar
.....------------------------- Found 3 EJBs --------------------------- ** PATH: f:/weblogic/myserver/ejb_basic_beanManaged.jar - BEAN: examples.ejb.basic.beanManaged.AccountBean ** PATH: f:/weblogic/myserver/ejb_basic_statefulSession.jar - BEAN: examples.ejb.basic.statefulSession.TraderBean ** PATH: f:/weblogic/myserver/ejb_basic_statelessSession.jar - BEAN: examples.ejb.basic.statelessSession.TraderBean
If no EJBs were detected (that is, "Found 0 EJBs"), check that the EJB jar files are listed in the "Checking EJB Entry: ..." lines. If they are not listed, check that the search root dir path is correct. If they are being inspected but still no EJBs are detected, check that these EJB jar files are deployable (can be successfully deployed into an application server). A deployable jar file should contain the Home Interface, Remote Interface, Bean implementation, Stub and Skeleton classes, and the Deployment Descriptor files (xml files, or .ser files).
Chapter 36 • Performing EJB Testing
509
If you still encounter problems, set the debug properties in the detector.properties file, located in the DETECTOR_HOME\classes directory, to retrieve additional debug information.
After the EJBs are detected, the HTTP Server is initialized and waits for requests from the VuGen EJB-Testing Vuser. If there are problems in this communication process, enable the property webserver.enableLog in the webserver.properties file located in the DETECTOR_HOME\classes directory.
This enables printouts of additional debug information, and other potentially important error messages in the webserver.log file.
EJB Detector Limitations
The following limitations apply to the EJB detector.
➤ The EJB Detector requires EJBs packed in archives; EJBs in open directories may not be detected properly.
Understanding EJB Vuser Scripts
VuGen generates a script that tests your EJB, based on the JNDI (Java Naming and Directory Interface) properties you specified when creating the Vuser script. JNDI is Sun’s programming interface used for connecting Java programs to naming and directory services such as DNS and LDAP.
Each EJB Vuser script contains three primary parts:
➤ Locating the EJB Home Using JNDI
➤ Creating an Instance
➤ Invoking the EJB Methods
Locating the EJB Home Using JNDIThe first section of the script contains the code that retrieves the JNDI properties. Using the specified context factory and provider URL, it connects to the application server, looks up the specified EJB and locates the EJB Home.
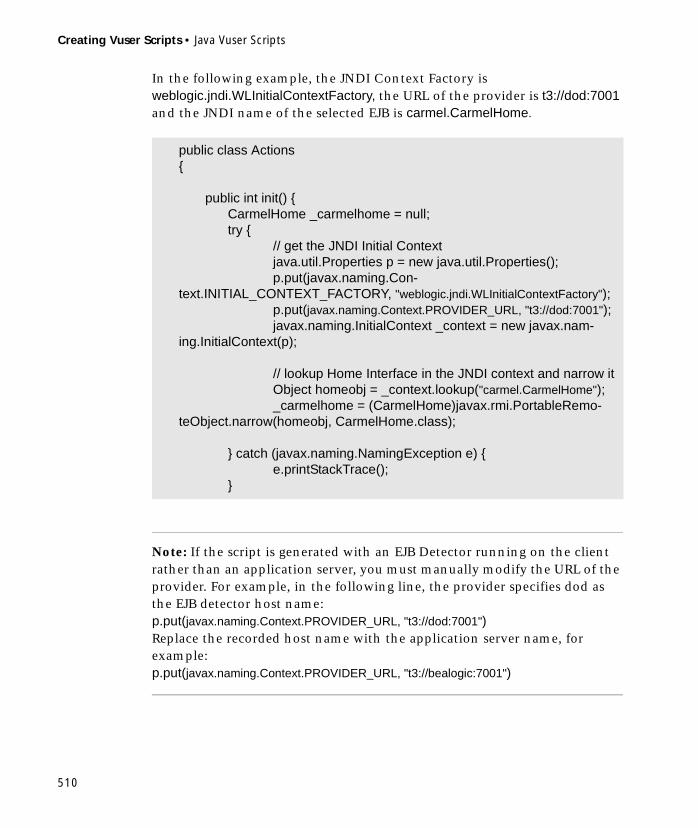
Creating Vuser Scripts • Java Vuser Scripts
510
In the following example, the JNDI Context Factory is weblogic.jndi.WLInitialContextFactory, the URL of the provider is t3://dod:7001 and the JNDI name of the selected EJB is carmel.CarmelHome.
Note: If the script is generated with an EJB Detector running on the client rather than an application server, you must manually modify the URL of the provider. For example, in the following line, the provider specifies dod as the EJB detector host name:p.put(javax.naming.Context.PROVIDER_URL, "t3://dod:7001")Replace the recorded host name with the application server name, for example:p.put(javax.naming.Context.PROVIDER_URL, "t3://bealogic:7001")
public class Actions{
public int init() {CarmelHome _carmelhome = null;try {
// get the JNDI Initial Contextjava.util.Properties p = new java.util.Properties();p.put(javax.naming.Con-
text.INITIAL_CONTEXT_FACTORY, "weblogic.jndi.WLInitialContextFactory");p.put(javax.naming.Context.PROVIDER_URL, "t3://dod:7001");javax.naming.InitialContext _context = new javax.nam-
ing.InitialContext(p);
// lookup Home Interface in the JNDI context and narrow itObject homeobj = _context.lookup("carmel.CarmelHome");_carmelhome = (CarmelHome)javax.rmi.PortableRemo-
teObject.narrow(homeobj, CarmelHome.class);
} catch (javax.naming.NamingException e) {e.printStackTrace();
}
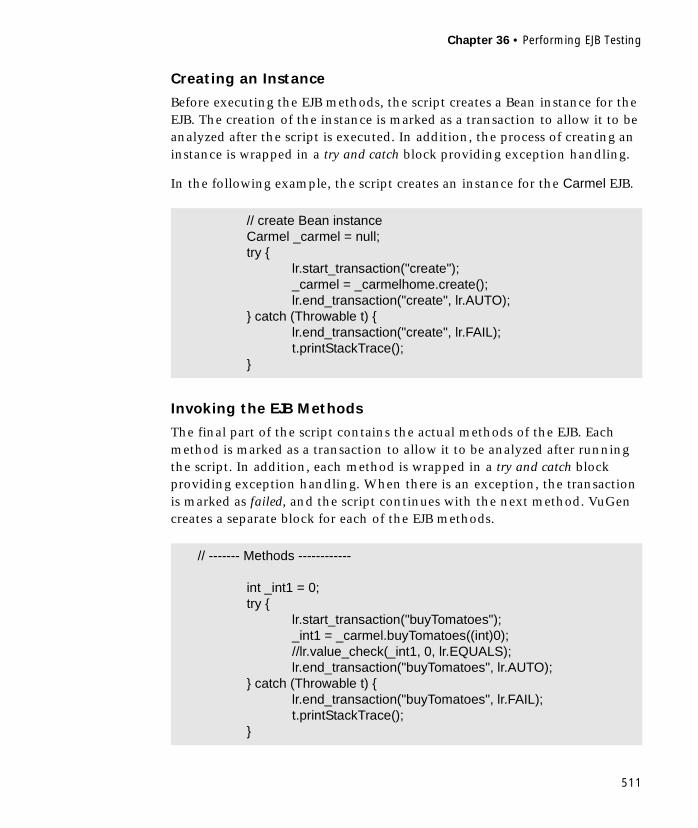
Chapter 36 • Performing EJB Testing
511
Creating an Instance
Before executing the EJB methods, the script creates a Bean instance for the EJB. The creation of the instance is marked as a transaction to allow it to be analyzed after the script is executed. In addition, the process of creating an instance is wrapped in a try and catch block providing exception handling.
In the following example, the script creates an instance for the Carmel EJB.
Invoking the EJB Methods
The final part of the script contains the actual methods of the EJB. Each method is marked as a transaction to allow it to be analyzed after running the script. In addition, each method is wrapped in a try and catch block providing exception handling. When there is an exception, the transaction is marked as failed, and the script continues with the next method. VuGen creates a separate block for each of the EJB methods.
// create Bean instanceCarmel _carmel = null;try {
lr.start_transaction("create");_carmel = _carmelhome.create();lr.end_transaction("create", lr.AUTO);
} catch (Throwable t) {lr.end_transaction("create", lr.FAIL);t.printStackTrace();
}
// ------- Methods ------------
int _int1 = 0;try {
lr.start_transaction("buyTomatoes");_int1 = _carmel.buyTomatoes((int)0);//lr.value_check(_int1, 0, lr.EQUALS);lr.end_transaction("buyTomatoes", lr.AUTO);
} catch (Throwable t) {lr.end_transaction("buyTomatoes", lr.FAIL);t.printStackTrace();
}

Creating Vuser Scripts • Java Vuser Scripts
512
VuGen inserts default values for the methods, for example, 0 for an integer, empty strings ("") for Strings, and NULL for complex Java objects. If necessary, modify the default values within the generated script.
For methods that return a primitive, non-complex value or string, VuGen inserts a commented method lr.value_check. This LoadRunner method allows you to specify an expected value for the EJB method. To use this verification method, remove the comment marks (//) and specify the expected value. For example, the carmel.buyTomatoes method returns an integer.
If you expect the method to return a value of 500, modify the code as follows
If you want to check if the method does not return a certain value, modify the code as follows:
If the expected value is not detected, an exception occurs and the information is logged in the output window.
EJB Vuser scripts support all of the standard Java conventions. For example, you can insert a comment by preceding the text with two forward slashes “//”.
_int1 = _carmel.buyTomatoes((int)0);
_int1 = _carmel.buyTomatoes((int)0);//lr.value_check(_int1, 0, lr.EQUALS);
_int1 = _carmel.buyTomatoes((int)0);lr.value_check(_int1, 500, lr.EQUALS);
_int1 = _carmel.buyTomatoes((int)0);lr.value_check(_int1, 10, lr.NOT_EQUALS);
System.err: java.lang.Exception: lr.value_check failed.[Expected:500 Actual:5000]

Chapter 36 • Performing EJB Testing
513
The Java Vuser script runs as a scalable multi-threaded application. If you include a custom class in your script, ensure that the code is thread-safe. Code that is not thread-safe may cause inaccurate results. For code that is not thread-safe, run the Java Vusers as processes. (see Run-Time settings) This creates a separate Java Virtual Machine for each process, resulting in a script that is less scalable.
Creating an EJB Testing Vuser
The first step in creating an EJB Testing Vuser script is specifying the details of your application server vendor, context factory, and other JNDI properties. Then you indicate which EJB you want to test. LoadRunner automatically creates a script that tests the EJB’s methods.
To create an EJB Vuser script:
1 Choose File > New or click the New button. The New Virtual User dialog box opens.

Creating Vuser Scripts • Java Vuser Scripts
514
2 Select EJB Testing from the Enterprise Java Beans category and click OK. VuGen displays a blank Java Vuser script and opens the Generate EJB Script dialog box.
3 Specify a machine on which the LoadRunner EJB Detector is installed. Note that the Detector must be running in order to connect. Click Connect. The JNDI properties section is enabled.
4 The EJB Detector automatically detects the default JNDI properties. You can manually modify these properties in the appropriate edit boxes. The properties you can modify are a string for the Initial Context Factory and the Provider URL.

Chapter 36 • Performing EJB Testing
515
If your application server requires authentication, enter the user name in the Security Principal box and a password in the Security Credentials box.
5 To set advanced properties for the JNDI, click Advanced to open the JNDI Advanced Properties dialog box.
Specify the desired properties: Object Factory, State Factory, URL Package Prefixes, Security Protocol, and Security Authentication. Click OK.
6 In the EJB section of the dialog box, click Select to choose the EJB for which you want to create a test. A dialog box opens with a list of all the EJBs currently available to you from the application server.

Creating Vuser Scripts • Java Vuser Scripts
516
7 Highlight the EJB you want to test and click Select.
8 In the Generate EJB Script dialog box, click Generate. VuGen creates a script with LoadRunner Java Vuser functions. The script contains code that connects to the application server and executes the EJB’s methods.
9 Save the script.
Note that you cannot generate test code for an additional EJB, within an existing script. To create a test for another EJB, open a new script and repeat steps 2-9.
Setting EJB Recording Options
The EJB Code Generation tab allows you to set the code generation properties for the script generation. You can set properties in the area of automatic transactions and value checks. You can also indicate where to store the initialization method.
To set the EJB Code Generation recording options:
1 Click Options in the Start Recording dialog box. Select the Code Generation tab.

Chapter 36 • Performing EJB Testing
517
2 Enable the Auto Transaction option to automatically mark all EJB methods as transactions. This encloses all methods with lr.start_transaction and lr.end_transaction functions. By default, this option is enabled (true).
3 Enable the Insert Value Check option to automatically insert an lr.value_check function after each EJB method. This function checks for the expected return value for primitive values and strings.
4 Choose an EJB Initialization Method. This is the method to which the EJB/JNDI initialization properties are written. The available methods are init (default) and action.
Viewing the Java Methods
VuGen provides a navigator that lets you view all of the Java classes and methods in your application’s packages.
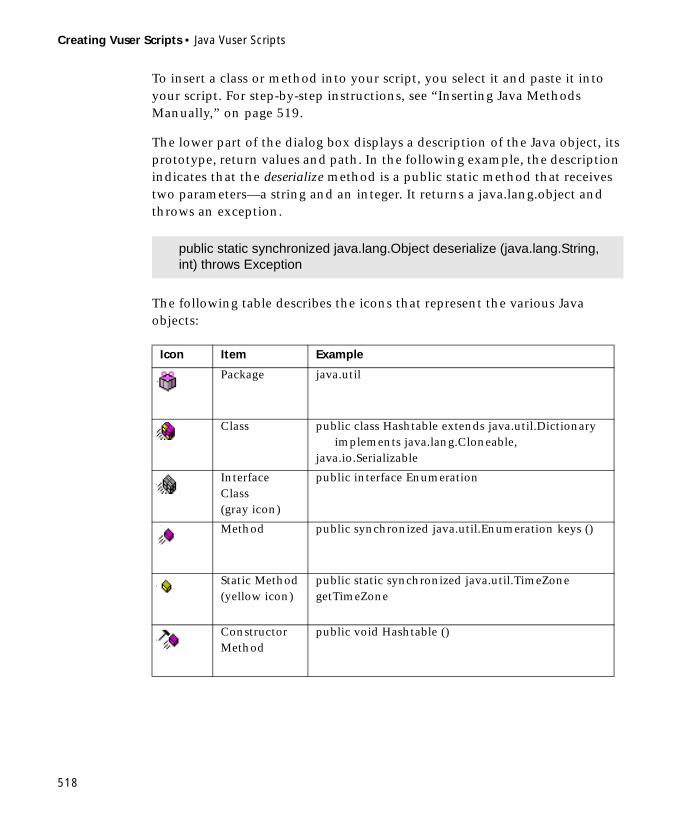
Creating Vuser Scripts • Java Vuser Scripts
518
To insert a class or method into your script, you select it and paste it into your script. For step-by-step instructions, see “Inserting Java Methods Manually,” on page 519.
The lower part of the dialog box displays a description of the Java object, its prototype, return values and path. In the following example, the description indicates that the deserialize method is a public static method that receives two parameters—a string and an integer. It returns a java.lang.object and throws an exception.
The following table describes the icons that represent the various Java objects:
public static synchronized java.lang.Object deserialize (java.lang.String, int) throws Exception
Icon Item Example
Package java.util
Class public class Hashtable extends java.util.Dictionaryimplements java.lang.Cloneable,
java.io.Serializable
Interface Class(gray icon)
public interface Enumeration
Method public synchronized java.util.Enumeration keys ()
Static Method(yellow icon)
public static synchronized java.util.TimeZone getTimeZone
Constructor Method
public void Hashtable ()
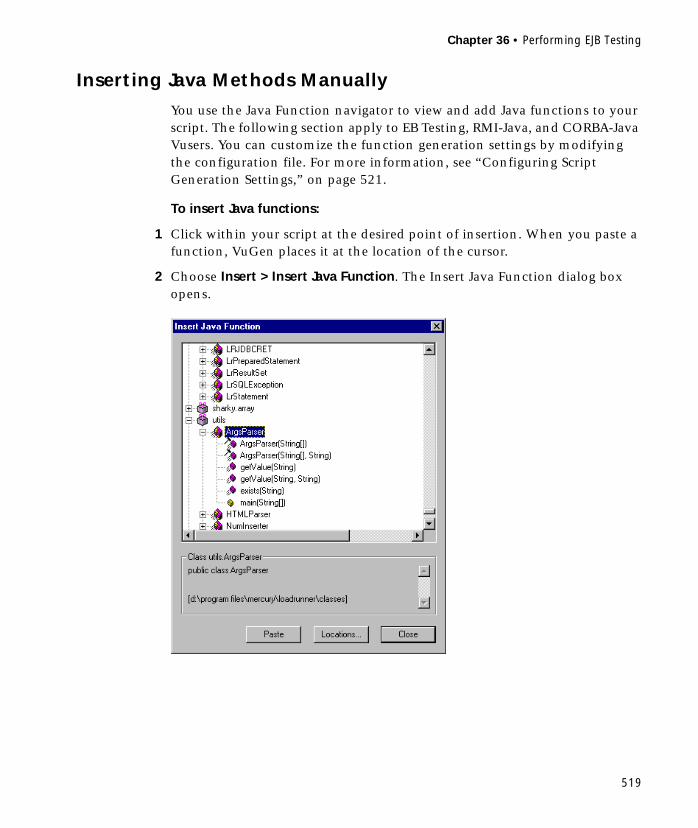
Chapter 36 • Performing EJB Testing
519
Inserting Java Methods Manually
You use the Java Function navigator to view and add Java functions to your script. The following section apply to EB Testing, RMI-Java, and CORBA-Java Vusers. You can customize the function generation settings by modifying the configuration file. For more information, see “Configuring Script Generation Settings,” on page 521.
To insert Java functions:
1 Click within your script at the desired point of insertion. When you paste a function, VuGen places it at the location of the cursor.
2 Choose Insert > Insert Java Function. The Insert Java Function dialog box opens.

Creating Vuser Scripts • Java Vuser Scripts
520
3 Click Locations. The Locations dialog box opens. By default, VuGen lists the paths defined in the CLASSPATH environment variable.
4 Click Browse to add another path or archive to the list. To add a path, choose Browse > Folder. To add an archive (jar or zip), choose Browse > File. When you select a folder or a file, VuGen inserts it in the Add Location box.
5 Click Add to add the item to the list.
6 Repeat steps 4 and 5 for each path or archive you want to add.
7 Select or clear the checkboxes to the left of each item in the list. If an item is checked, its members will be listed in the Java Class navigator.
8 Click OK to close the Locations dialog box and view the available packages.
9 Click the plus and minus signs to the left of each item in the navigator, to expand or collapse the trees.
10 Select an object and click Paste. VuGen places the object at the location of the cursor in the script. To paste all the methods of a class into your script, select the class and click Paste.
11 Repeat the previous step for all of the desired methods or classes.

Chapter 36 • Performing EJB Testing
521
12 Modify the parameters of the methods. If the script generation settings DefaultValues is set to true, you can use the default values inserted by VuGen. If DefaultValues is set to false, you must add parameters for all methods you insert into the script.
In addition, modify any return values. For example, if your script generated the following statement “(String)=LavaVersion.getVersionId();”, replace (String) with a string type variable.
13 Add any necessary statements to your script such as imports or LoadRunner Java functions (described in Chapter 35, “Programming Java Scripts.”)
14 Save the script and run it from VuGen.
Configuring Script Generation Settings
You can customize the way the navigator adds methods to your script in the following areas:
➤ Class Name path
➤ Automatic Transactions
➤ Default Parameter Values
➤ Class Pasting
To view the configuration setting, open the jquery.ini file in LoadRunner’s dat directory.
Class Name path
The FullClassName option displays the complete package and class name in the Java Function navigator. This option does not affect the way the
[Display]FullClassName=False
[Insert]AutoTransaction=FalseDefaultValues=TrueCleanClassPaste=False
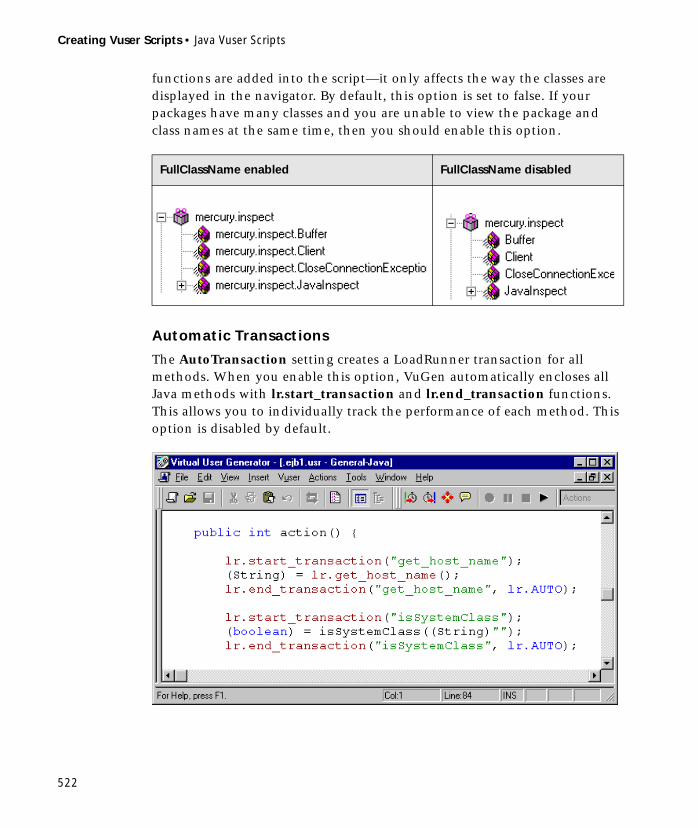
Creating Vuser Scripts • Java Vuser Scripts
522
functions are added into the script—it only affects the way the classes are displayed in the navigator. By default, this option is set to false. If your packages have many classes and you are unable to view the package and class names at the same time, then you should enable this option.
Automatic Transactions
The AutoTransaction setting creates a LoadRunner transaction for all methods. When you enable this option, VuGen automatically encloses all Java methods with lr.start_transaction and lr.end_transaction functions. This allows you to individually track the performance of each method. This option is disabled by default.
FullClassName enabled FullClassName disabled

Chapter 36 • Performing EJB Testing
523
Default Parameter Values
The DefaultValues setting includes default values for all methods you paste into your script. This option is enabled by default and inserts a null for all objects. If you disable this option, you must manually insert parameter values for all functions in the script. The following table illustrates the DefaultValues flag enabled and disabled.
Class Pasting
The CleanClassPaste setting pastes a class so that it will compile cleanly: with an instance returning from the constructor, with default values as parameters, and without a need for import statements. Using this option, you will most likely be able to run your script without any further modifications. If you disable this option (default), you may need to manually define parameters and include import statements. Note that this setting is only effective when you paste an entire class into your script—not when you paste a single method.
The following segment shows the toString method pasted into the script with the CleanClassPaste option enabled.
The same method with the CleanClassPaste option disabled is pasted as follows:
DefaultValues enabled DefaultValues disabled
lr.message((String)"");lr.think_time((int)0);lr.enable_redirection((boolean)false); lr.save_data((byte[])null, (String)"");
lr.message((String));lr.think_time((int));lr.enable_redirection((boolean));lr.save_data((byte[]), (String));
_class.toString();// Returns: java.lang.String
(String) = toString();

Creating Vuser Scripts • Java Vuser Scripts
524
The next segment shows the NumInserter Constructor method pasted into the script with the CleanClassPaste option enabled.
The same method with the CleanClassPaste option disabled is pasted as:
Running EJB Testing Vuser Scripts
After you generate a script for your EJB testing, and make the necessary modifications, you are ready to run your script. The EJB script allows you to perform two types of testing: functional and load. The functional testing verifies that the EJB, functions properly within your environment. The load testing allows you to evaluate the performance of the EJB when executing many users at one time.
To run a functional test:
1 Modify the default values that were automatically generated.
2 Insert value checks using the lr.value_check method. These methods were generated as comments in the script (see “Invoking the EJB Methods,” on page 511).
3 Insert additional methods, and modify their default values. (see “Viewing the Java Methods,” on page 517).
4 Set the general run-time settings for the script. For more information, see Chapter 7, “Configuring Run-Time Settings.”
5 Set the Java VM run-time settings: Specify all additional classpaths and additional VM parameters. Make sure to include your application server EJB classes. The actual classes of the EJB under test are saved in the Vuser directory and retrieved automatically during replay. For information about
utils.NumInserter _numinserter = new utils.NumInserter ((java.lang.String)"", (java.lang.String)"", (java.lang.String)"". . . );
// Returns: void
new utils.NumInserter((String)"", (String)"", (String)"",...);

Chapter 36 • Performing EJB Testing
525
specifying additional classpaths and setting the Java VM run-time settings, see Chapter 39, “Configuring Java Run-Time Settings.”
6 For Websphere users:
Using the IBM JDK 1.2 or higher:
Using the Sun JDK 1.2.x.
where <WS> is the home folder of the WebSphere installation and <JDK> is the home folder of the JDK installation.
Note: If your application server is installed on a UNIX machine or if you are using WebSphere 3.0.x, you must install IBM JDK 1.2.x on the client machine to obtain the required files.
7 For WebLogic Users: Open the Run-Time Settings dialog box and select the Java VM tab. Add the following two entries to the Additional Classpath section:
<WL>/classes;<WL>/lib/weblogicaux.jar
where <WL> is the home folder of the WebLogic installation.
8 Run the script. Click the Run button or choose Vuser > Run. View the Execution Log tab to view any run-time errors. The execution log is stored in
1) Add the <WS>\lib\ujc.jar to the classpath.
1) Remove the file <JDK>\jre\lib\ext\iiimp.jar2) Copy the following files from the <WS>\jdk\jre\lib\ext directory to the <JDK>\jre\lib\ext directory: iioprt.jar, rmiorb.jar.
2) Copy the The ’ujc.jar’ from the <WS>\lib directory, to <JDK>\jre\lib\ext.
3) Copy the file <WS>\jdk\jre\bin\ioser12.dll to the <JDK>\jre\bin directory.

Creating Vuser Scripts • Java Vuser Scripts
526
the mdrv.log file in the script’s folder. A Java compiler (Sun’s javac), checks it for errors and compiles the script.
After you verify that your EJB is functional, you can perform Load Testing by assigning it to multiple Vusers in a load scenario. For more information, see the LoadRunner Controller User’s Guide.
527
37Developing CORBA and RMI Vuser Scripts
VuGen allows you to record applications or applets written in Java that use CORBA or RMI. You can run the recorded script or enhance it using standard Java library functions and LoadRunner-specific Java functions.
This chapter describes:
➤ Recording RMI over IIOP
➤ Getting Started with CORBA and RMI Vusers
➤ Recording a CORBA or RMI Vuser
➤ Understanding CORBA and RMI Vuser Scripts
➤ Running a Script as Part of a Package
➤ Working with CORBA Vuser Scripts
➤ Working with RMI Vuser Scripts
The following information applies to CORBA-Java and RMI-Java Vuser scripts.
About CORBA and RMI Vuser Scripts
Using VuGen, you can record a CORBA (Common Object Request Broker Architecture) or RMI (Remote Method Invocation) Java application or applet. VuGen creates a pure Java script enhanced with LoadRunner-specific Java functions. After recording, you can enhance or modify the script with standard Java code using JDK libraries or custom classes.
After you prepare your script, you run it in standalone mode from VuGen. Sun’s standard Java compiler, javac.exe, checks the script for errors and
Creating Vuser Scripts • Java Vuser Scripts
528
compiles it. Once you verify that the script is functional, you incorporate it into a LoadRunner scenario.
When you create a script through recording and manual enhancements, all of the guidelines and limitations associated with Java Vuser scripts apply. In addition, any specific classes used in the script (for example, org.omg.CORBA.ORB) must be present on the machine executing the Vusers and indicated by the classpath environment variable. Please refer to Chapter 35, “Programming Java Scripts” for important information about function syntax and system configuration.
When you modify a recorded script, its memory requirements may increase. As a result, fewer Vusers can run per machine. Modifications such as transactions and comments are insignificant, but complex modifications such as additional coding and new variable declarations, increase a script’s overhead.
The next few chapters discuss the Java recording options, run-time settings, and correlation.
Recording RMI over IIOP
The Internet Inter-ORB Protocol (IIOP) technology was developed to allow implementation of CORBA solutions over the World Wide Web. IIOP lets browsers and servers exchange complex objects such as arrays, unlike HTTP, which only supports transmission of text.
RMI over IIOP technology makes it possible for a single client to access services which were only accessible from either RMI or CORBA clients in the past. This technology is a hybrid of the JRMP protocol used with RMI and IIOP used with CORBA. RMI over IIOP allows CORBA clients to access new technologies such as Enterprise Java Beans (EJB) among other J2EE standards.
VuGen provides full support for recording and replaying Vusers using the RMI over IIOP protocol. Depending on what you are recording, you can utilize VuGen’s RMI/CORBA recorder to create a script that will optimally emulate a real user:
➤ Pure CORBA client: recording a client written according to IDL Java standards.

Chapter 37 • Developing CORBA and RMI Vuser Scripts
529
➤ Pure RMI client: recording a client that uses native JRMP protocol for remote invocations
➤ RMI over IIOP client: recording a client application that was compiled using the IIOP protocol instead of JRMP (for compatibility with CORBA servers).
For pure CORBA clients, use the CORBA-Java Vuser type.
For all other client types, use the RMI-Java Vuser type.
Getting Started with CORBA and RMI Vusers
The following procedure outlines how to create CORBA or RMI Vuser scripts.
1 Ensure that the recording machine is properly configured.
Make sure that your machine is configured properly for Java before you begin recording. For more information, see Chapter 35, “Programming Java Scripts” and the Read Me file.
2 Create a new CORBA or RMI Vuser script.
Select a CORBA-Java or RMI-Java type Vuser from the Distributed Components group.
3 Set the recording parameters and options for the script.
You specify the parameters for your applet or application such as working directory and paths. You can also set JVM, serialization, correlation, recorder, and debug recording options. For more information, see Chapter 38, “Setting Java Recording Options.”
4 Record typical user actions.
Set the Java Recording options and begin recording a script. Perform typical actions within your applet or application. VuGen records your actions and generates a Vuser script.
5 Enhance the Vuser script.
Add LoadRunner specific functions to enhance the Vuser script. For details, see Chapter 35, “Programming Java Scripts.” RMI-Java Vusers can use the
Creating Vuser Scripts • Java Vuser Scripts
530
built-in Java function Navigator. For more information, see Chapter 36, “Performing EJB Testing.”
6 Parameterize the Vuser script.
Replace recorded constants with parameters. You can parameterize complete strings or parts of a string. Note that you can define more than one parameter for functions with multiple arguments. For details, see Chapter 5, “Defining Parameters.”
7 Configure the run-time setting for the script.
Configure run-time settings for the Vuser script. The run-time settings define the run-time aspects of the script execution. For the specific run-time settings for Java, see Chapter 39, “Configuring Java Run-Time Settings.”
8 Save and run the Vuser script.
Run the script from VuGen and view the execution log for run-time information. For details, see Chapter 9, “Running Vuser Scripts in Stand-Alone Mode.”
Recording a CORBA or RMI Vuser
Before recording a CORBA or RMI Vuser, verify that your application or applet functions properly on the recording machine.
Ensure that you have properly installed a JDK version from Sun on the machine running LoadRunner—JRE alone is insufficient. You must complete this installation before recording a Vuser script. Verify that the classpath and path environment variables are set according to the JDK installation instructions.
Before you record, verify that your environment is configured properly. Make sure that the required classes are in the classpath and that you have a full installation of JDK. For more information on the required environment settings, see Chapter 35, “Programming Java Scripts.”
Note that when you load an applet or application from VuGen during recording, it may take several seconds longer than if you were to load it independent of LoadRunner.
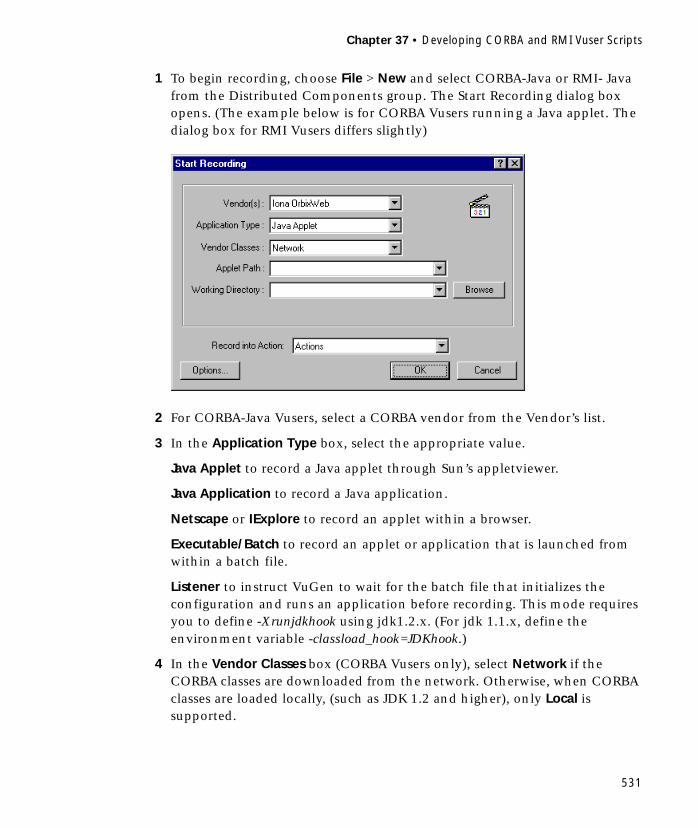
Chapter 37 • Developing CORBA and RMI Vuser Scripts
531
1 To begin recording, choose File > New and select CORBA-Java or RMI- Java from the Distributed Components group. The Start Recording dialog box opens. (The example below is for CORBA Vusers running a Java applet. The dialog box for RMI Vusers differs slightly)
2 For CORBA-Java Vusers, select a CORBA vendor from the Vendor’s list.
3 In the Application Type box, select the appropriate value.
Java Applet to record a Java applet through Sun’s appletviewer.
Java Application to record a Java application.
Netscape or IExplore to record an applet within a browser.
Executable/Batch to record an applet or application that is launched from within a batch file.
Listener to instruct VuGen to wait for the batch file that initializes the configuration and runs an application before recording. This mode requires you to define -Xrunjdkhook using jdk1.2.x. (For jdk 1.1.x, define the environment variable -classload_hook=JDKhook.)
4 In the Vendor Classes box (CORBA Vusers only), select Network if the CORBA classes are downloaded from the network. Otherwise, when CORBA classes are loaded locally, (such as JDK 1.2 and higher), only Local is supported.
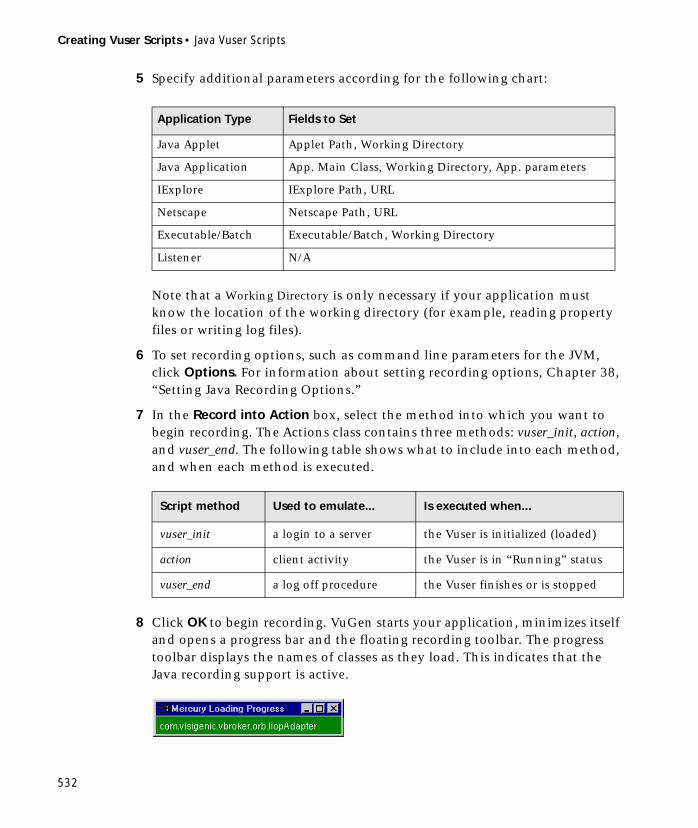
Creating Vuser Scripts • Java Vuser Scripts
532
5 Specify additional parameters according for the following chart:
Note that a Working Directory is only necessary if your application must know the location of the working directory (for example, reading property files or writing log files).
6 To set recording options, such as command line parameters for the JVM, click Options. For information about setting recording options, Chapter 38, “Setting Java Recording Options.”
7 In the Record into Action box, select the method into which you want to begin recording. The Actions class contains three methods: vuser_init, action, and vuser_end. The following table shows what to include into each method, and when each method is executed.
8 Click OK to begin recording. VuGen starts your application, minimizes itself and opens a progress bar and the floating recording toolbar. The progress toolbar displays the names of classes as they load. This indicates that the Java recording support is active.
Application Type Fields to Set
Java Applet Applet Path, Working Directory
Java Application App. Main Class, Working Directory, App. parameters
IExplore IExplore Path, URL
Netscape Netscape Path, URL
Executable/Batch Executable/Batch, Working Directory
Listener N/A
Script method Used to emulate... Is executed when...
vuser_init a login to a server the Vuser is initialized (loaded)
action client activity the Vuser is in “Running” status
vuser_end a log off procedure the Vuser finishes or is stopped
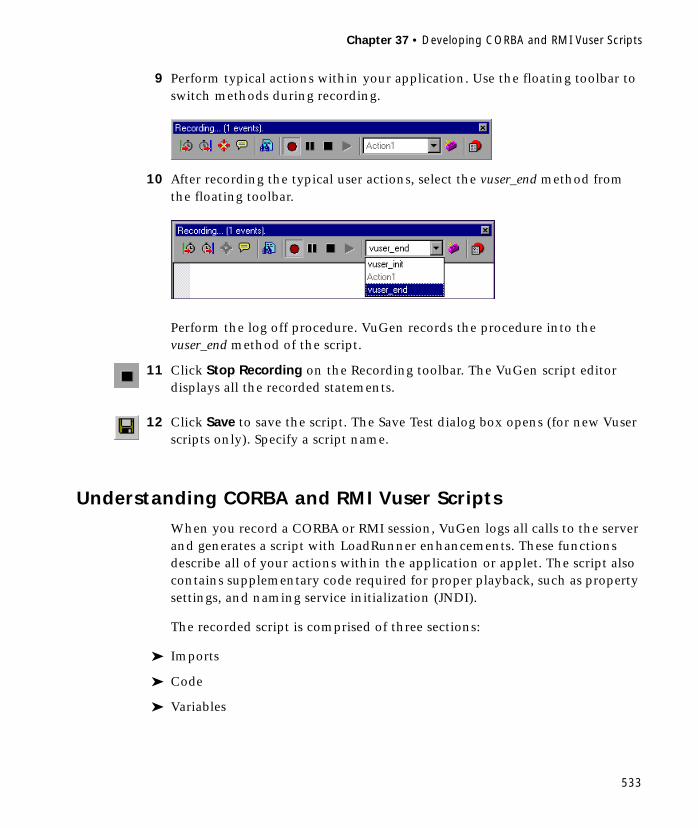
Chapter 37 • Developing CORBA and RMI Vuser Scripts
533
9 Perform typical actions within your application. Use the floating toolbar to switch methods during recording.
10 After recording the typical user actions, select the vuser_end method from the floating toolbar.
Perform the log off procedure. VuGen records the procedure into the vuser_end method of the script.
11 Click Stop Recording on the Recording toolbar. The VuGen script editor displays all the recorded statements.
12 Click Save to save the script. The Save Test dialog box opens (for new Vuser scripts only). Specify a script name.
Understanding CORBA and RMI Vuser Scripts
When you record a CORBA or RMI session, VuGen logs all calls to the server and generates a script with LoadRunner enhancements. These functions describe all of your actions within the application or applet. The script also contains supplementary code required for proper playback, such as property settings, and naming service initialization (JNDI).
The recorded script is comprised of three sections:
➤ Imports
➤ Code
➤ Variables

Creating Vuser Scripts • Java Vuser Scripts
534
The Imports section is at the beginning of the script. It contains a reference to all the packages required for compiling the script. The Code section contains the Actions class and the recorded code within the init, actions, and end methods. The Variables section, after the end method, contains all the type declarations for the variables used in the code.
After you finish recording, you can modify the functions in your script, or add additional Java or LoadRunner functions to enhance the script. Note that if you intend to run Java Vusers as threads, the Java code you add to your script must be thread-safe. For details about function syntax, see the Online Function Reference (available from the VuGen Help menu). In addition, you can modify your script to enable it to run as part of another package. For more information, see “Compiling and Running a Script as Part of a Package,” on page 501.
Running a Script as Part of a Package
When creating or recording a Java script, you may need to use methods from classes in which the method or class is protected. When attempting to compile such a script, you receive compilation errors indicating that the methods are not accessible.
To use the protected methods, add the Vuser to the package of required methods. At the beginning of your script, add the following line:
where a.b.c represents a directory hierarchy. VuGen creates the a/b/c directory hierarchy in the user directory and compiles the Actions.java file there, thus making it part of the package. Note that the package statement is not recorded—you need to insert it manually.
Working with CORBA Vuser Scripts
This section describes the elements of the Java Vuser script that are specific to CORBA Vusers. CORBA-specific scripts usually have a well-defined pattern. The first section contains the ORB initialization and configuration.
package a.b.c;
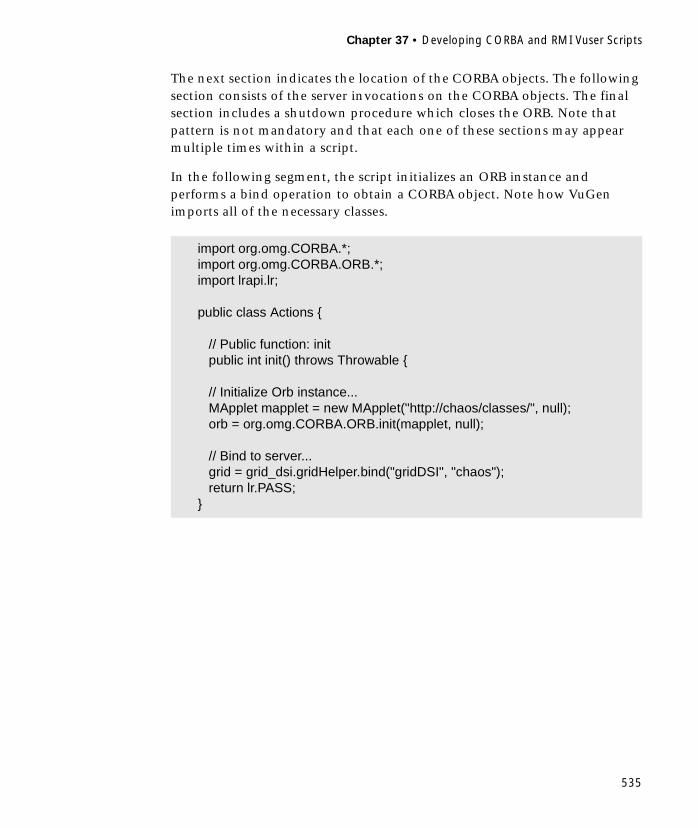
Chapter 37 • Developing CORBA and RMI Vuser Scripts
535
The next section indicates the location of the CORBA objects. The following section consists of the server invocations on the CORBA objects. The final section includes a shutdown procedure which closes the ORB. Note that pattern is not mandatory and that each one of these sections may appear multiple times within a script.
In the following segment, the script initializes an ORB instance and performs a bind operation to obtain a CORBA object. Note how VuGen imports all of the necessary classes.
import org.omg.CORBA.*;import org.omg.CORBA.ORB.*;import lrapi.lr;
public class Actions {
// Public function: init public int init() throws Throwable {
// Initialize Orb instance...MApplet mapplet = new MApplet("http://chaos/classes/", null);orb = org.omg.CORBA.ORB.init(mapplet, null);
// Bind to server...grid = grid_dsi.gridHelper.bind("gridDSI", "chaos");return lr.PASS;
}

Creating Vuser Scripts • Java Vuser Scripts
536
In the following section, VuGen recorded the actions performed upon a grid CORBA object.
At the end of the session, VuGen recorded the shutdown of the ORB. The variables used through out the entire recorded code appear after the end method and before the Actions class closing curly bracket.
Note that the ORB shutdown statement was customized for LoadRunner. This customization prevents a single Vuser’s shutdown from shutting down all other Vusers.
// Public function: action public int action() throws Throwable {
grid.width();grid.height();grid.set(2, 4, 10);grid.get(2, 4);
return lr.PASS;}
// Public function: end public int end() throws Throwable {
if ( lr.get_vuser_id() == -1 ) orb.shutdown();
return lr.PASS;}
// Variable section org.omg.CORBA.ORB orb; grid_dsi.grid grid;}
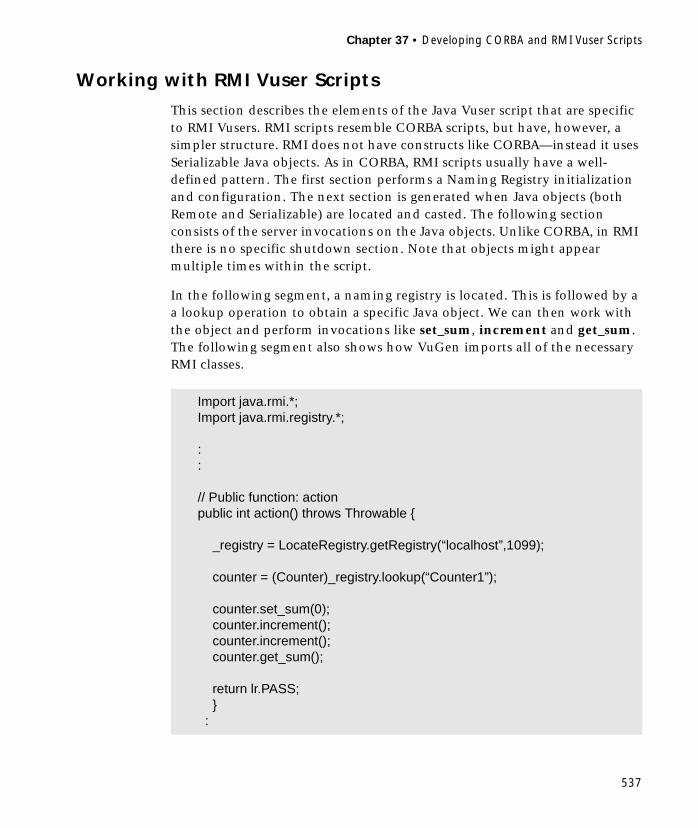
Chapter 37 • Developing CORBA and RMI Vuser Scripts
537
Working with RMI Vuser Scripts
This section describes the elements of the Java Vuser script that are specific to RMI Vusers. RMI scripts resemble CORBA scripts, but have, however, a simpler structure. RMI does not have constructs like CORBA—instead it uses Serializable Java objects. As in CORBA, RMI scripts usually have a well-defined pattern. The first section performs a Naming Registry initialization and configuration. The next section is generated when Java objects (both Remote and Serializable) are located and casted. The following section consists of the server invocations on the Java objects. Unlike CORBA, in RMI there is no specific shutdown section. Note that objects might appear multiple times within the script.
In the following segment, a naming registry is located. This is followed by a a lookup operation to obtain a specific Java object. We can then work with the object and perform invocations like set_sum, increment and get_sum. The following segment also shows how VuGen imports all of the necessary RMI classes.
Import java.rmi.*;Import java.rmi.registry.*;
::
// Public function: action public int action() throws Throwable {
_registry = LocateRegistry.getRegistry(“localhost”,1099);
counter = (Counter)_registry.lookup(“Counter1”);
counter.set_sum(0);counter.increment();counter.increment();counter.get_sum();
return lr.PASS;}
:
Creating Vuser Scripts • Java Vuser Scripts
538
When recording RMI Vusers, your script may contain several calls to lr.deserialize, which deserializes all of the relevant objects. The lr.deserialize calls are generated because the object being passed to the next invocation could not be correlated to a return value from any of the previous calls. VuGen therefore records its state and uses lr.deserialize call to represent these values during replay. The deserialization is done before VuGen passes the objects as parameters to invocations. For more information, see “Using the Serialization Mechanism,” on page 558.

539
38Setting Java Recording Options
VuGen allows you to control the way in which you record your CORBA or RMI application. You can use the default recording options, or customize them for your specific needs.
This chapter describes:
➤ Java Virtual Machine Options
➤ Recorder Options
➤ Serialization Options
➤ Correlation Options
➤ Debug Options
The following information applies to CORBA-Java and RMI-Java Vuser scripts.
About Setting Java Recording Options
Using VuGen, you record a CORBA (Common Object Request Broker Architecture) or RMI (Remote Method Invocation) Java application or applet. For recording an EJB test, see Chapter 36, “Performing EJB Testing.”
Before recording, VuGen lets you set recording options for the Java Virtual Machine (JVM) and for the code generation stage. Setting the recording options is not mandatory; if you do not set them, VuGen uses the default values.
The options described in this chapter were previously handled by modifying the mercury.properties file.

Creating Vuser Scripts • Java Vuser Scripts
540
You can set recording options in the following areas:
➤ Java Virtual Machine (JVM)
➤ Recorder
➤ Serialization
➤ Correlation
➤ Debug
Java Virtual Machine Options
The Java VM tab indicates additional classpaths and parameters to run Java applications and insure proper recording. When you record a Vuser, VuGen automatically sets the Xbootclasspath variable with default parameters. If you use this dialog box to set the Xbootclasspath with different parameters, it will use those command parameters—not the default ones.
By default, VuGen uses the classic VM during recording. You can also instruct VuGen to use another virtual machine (Sun’s Java Hotspot VM).
To set the Java Virtual Machine recording options:
1 Click Options in the Start Recording dialog box. Select the Java VM tab.

Chapter 38 • Setting Java Recording Options
541
2 In the Additional Classpath box, list additional classpath locations. This dialog box allows you to specify a classpath location without closing VuGen. If you already added the class location to the classpath variable, you do not need to specify it again in this dialog box.
3 In the Additional VM Parameters box, list the Java command line parameters. These parameters may be any Java VM argument. The common arguments are the debug flag (-verbose) or memory settings (-ms, -mx). For more information about the Java VM flags, see the JVM documentation. In additional, you may also pass properties to Java applications in the form of a -D flag.
VuGen automatically sets the -Xbootclasspath variable ( for JDK 1.2 and higher) with default parameters. When you specify -Xbootclasspath with parameter values as an additional parameter, VuGen uses this setting instead of the default one.
4 To use the same Additional VM parameters in replay, select the Use the specified Additional VM Parameters during replay check box.
5 To use the classic VM, select the Use classic Java VM checkbox (default). To use another VM, (Sun’s Java HotSpot ) clear the checkbox.
6 Click OK to close the dialog box and begin recording.
Recorder Options
The Recorder tab provides guidelines to VuGen for generating a Vuser script. You can set options in the following areas:
Record Exception Handling: When an exception occurs, wrap the invocation with a “try-catch” block. (true by default)
Record Think Time: Records think times and includes think time function, lr.think_time, in the script. (true by default)
Record Properties: Records system and custom properties related to the protocol. For example, if you specified additional Virtual Machine parameters in the VM tab, enabling this option instructs VuGen to record the parameters in your script. (true by default)

Creating Vuser Scripts • Java Vuser Scripts
542
Record Return Value: Generates a comment in the script indicating the return value for each invocation. (false by default)
Record Progress Messages: Records an lr.log_message function before each invocation to allow you to follow the replay progress. (false by default)
Insert Functional Check: Inserts verification code that compares the return value received during replay, to the expected return value generated during recording. This option only applies to primitive return values. (false by default)
Use Block Semantics: Places each invocation in a separate scope by wrapping it with curled brackets. If this option is disabled, the entire Action method is wrapped with curled brackets—not each invocation. (false by default)
Unreadable Strings as Bytes: Represents strings containing unreadable characters as byte arrays. This option applies to strings that are passed as parameters to invocations. (true by default)
Bytes as Characters: Displays readable characters as characters with the necessary casting—not in byte or hexadecimal form. (true by default)
Implicit Casting: Instructs VuGen to automatically apply casting to all invocations. When you enable this option, casting is not added to the recorded invocations—the compiler handles it implicitly. If you disable this option, VuGen adds casting to the invocations, resulting in a longer script. (false by default)
Max Line Length: The maximum length of a recorded line. If any recorded line exceeds this value, it is truncated. VuGen applies a smart truncation, in order not to break any code consistency such as quotes or function parameters. The default value is 1000 characters. The maximum length is 25600 characters.
Underscored Variable Names: Precedes all variables generated in the script with an underscore prefix. This is necessary to prevent conflicts with a package of the same name. (true by default)
Show IDL Constructs: Displays the Interface Definition Language (IDL) construct used for passing a parameter to a CORBA invocation. Objects in the CORBA object environment are defined by an IDL, which describes the

Chapter 38 • Setting Java Recording Options
543
services performed by the object and how the data is to be passed to it. (true by default)
Comment Lines Containing: Comment out all lines in the script containing one of the specified strings. To specify multiple strings, separate the entries with commas. By default, any line with a string containing <undefined>, will be commented out.
Remove Lines Containing: Remove all lines containing one of the specified strings from the script. To specify multiple strings, separate the entries with commas. This feature is useful for customizing the script for a specific testing goal.
Record Callback Connection: Records a connect statement to the ORB for each Callback object. (true by default)
Generate Recording Log: Generates a recording log displayed in the Output window’s Recording tab. If you disable this option, your performance may improve, but no information will be sent to the Output window during recording. (true by default)
Extensions List: A list of all the supported extensions. Each extension has its own hook file. To specify additional extensions, add them to the list of default extensions. If you add extensions to the list, make sure its hook file is available to the Vuser. The default extensions are JNDI, JMS, and EJB.

Creating Vuser Scripts • Java Vuser Scripts
544
To set the Java Recorder options:
1 Click Options in the Start Recording dialog box and select the Recorder tab.
2 Set the options as desired. For the options with boolean values, click in the right column to open the list box, and select True or False.
3 To set all options to their default values, click Use Defaults.
4 Click OK to close the dialog box and begin recording.
Serialization Options
The Serialization tab allows you to control how elements are serialized. For an overview of serialization, see “Using the Serialization Mechanism,” on page 558. The following options are available:
Serialization Delimiter: Indicates the delimiter separating the elements in the ASCII representation of objects. VuGen will only parameterize strings contained within these delimiters. The default delimiter is ‘#’.
Unfold Serialized Objects: Expands serialized objects in ASCII representation. This option allows you to view the ASCII values of the objects in order to perform parameterization. (true by default)
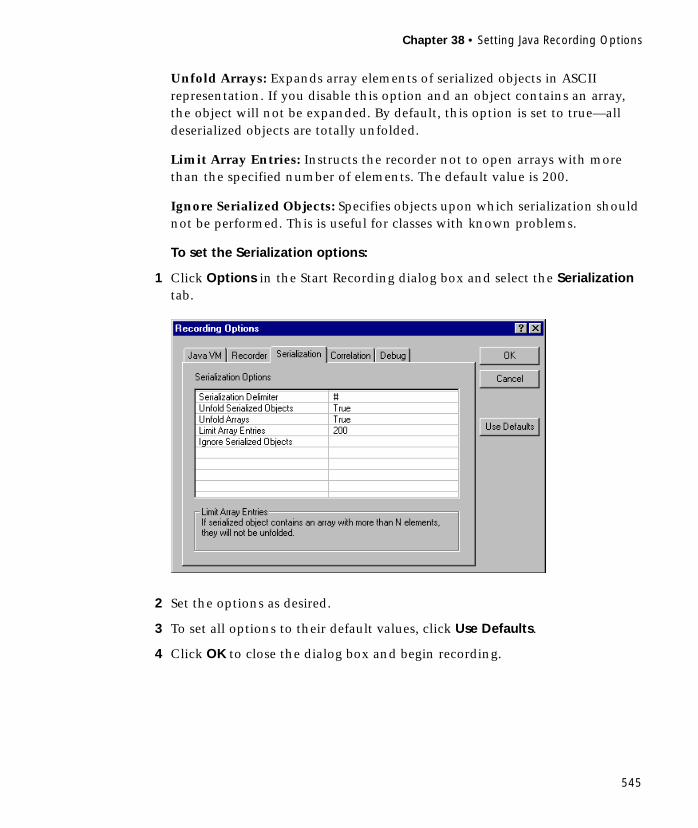
Chapter 38 • Setting Java Recording Options
545
Unfold Arrays: Expands array elements of serialized objects in ASCII representation. If you disable this option and an object contains an array, the object will not be expanded. By default, this option is set to true—all deserialized objects are totally unfolded.
Limit Array Entries: Instructs the recorder not to open arrays with more than the specified number of elements. The default value is 200.
Ignore Serialized Objects: Specifies objects upon which serialization should not be performed. This is useful for classes with known problems.
To set the Serialization options:
1 Click Options in the Start Recording dialog box and select the Serialization tab.
2 Set the options as desired.
3 To set all options to their default values, click Use Defaults.
4 Click OK to close the dialog box and begin recording.
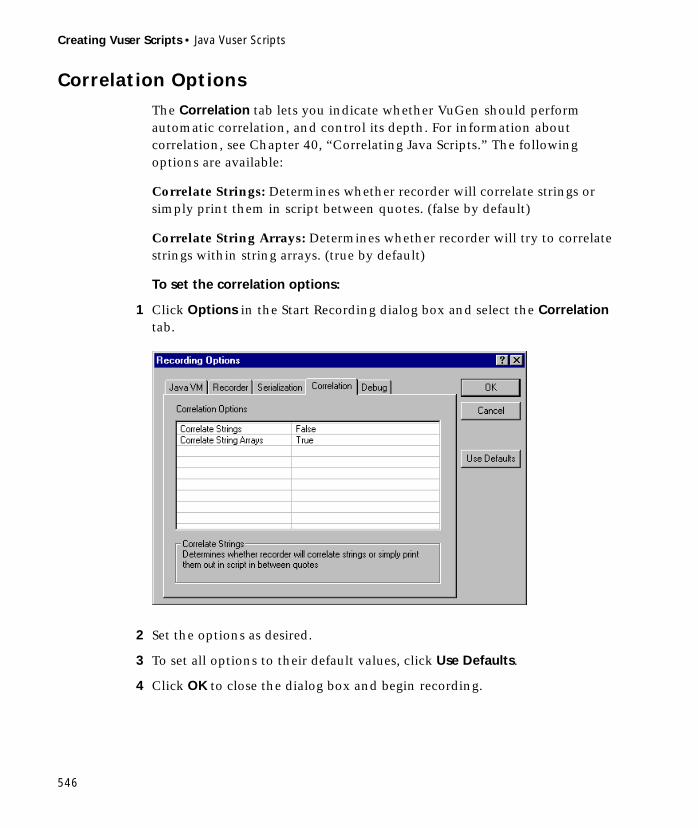
Creating Vuser Scripts • Java Vuser Scripts
546
Correlation Options
The Correlation tab lets you indicate whether VuGen should perform automatic correlation, and control its depth. For information about correlation, see Chapter 40, “Correlating Java Scripts.” The following options are available:
Correlate Strings: Determines whether recorder will correlate strings or simply print them in script between quotes. (false by default)
Correlate String Arrays: Determines whether recorder will try to correlate strings within string arrays. (true by default)
To set the correlation options:
1 Click Options in the Start Recording dialog box and select the Correlation tab.
2 Set the options as desired.
3 To set all options to their default values, click Use Defaults.
4 Click OK to close the dialog box and begin recording.

Chapter 38 • Setting Java Recording Options
547
Debug Options
The Debug tab lets you determine the level of debug information generate during recording. The following options are available:
Stack Trace: Logs all invocations in a stack trace. This setting provides a Java stack trace for every recorded function. Use this option in conjunction with Class Dumping, to determine the context for the hooked parts in the application. This trace can help you solve cases where a parameter is not correlated and to determine where to place additional hooks. Note that enabling this option slows down the application. (false by default)
Stack Trace Limit: The maximum number of calls stored in the stack. When a stack trace is enabled, and the number of calls exceeds the specified value, the stack trace is truncated. The default value is 20 calls.
To set the debug options:
1 Click Options in the Start Recording dialog box and select the Debug tab.
2 Set the options as desired.
3 To set all options to their default values, click Use Defaults.
4 Click OK to close the dialog box and begin recording.

Creating Vuser Scripts • Java Vuser Scripts
548

549
39Configuring Java Run-Time Settings
After you record a Java Vuser script, you configure the run-time settings for the Java Virtual Machine.
This chapter describes:
➤ Understanding the Java VM Settings
➤ Specifying Virtual Machine Settings
The following information applies to Java, EJB Testing, CORBA-Java, and RMI-Java type Vusers.
About Java Run-Time Settings
After developing a Java Vuser script, you set the run-time settings for the Java VM (Virtual Machine). These settings let you set additional paths and parameters, and determine the run mode.
You set the Java related run-time settings through the Java VM tab in the Run-Time Settings dialog box.
To display the Run-Time Settings dialog box, click the Run-Time Settings button on the VuGen toolbar. You can also modify the run-time settings from the LoadRunner Controller. In the Controller window, select the script whose setting you want to modify, and click the Run-Time settings button.
This chapter only discusses the Run-Time settings for Java type Vusers—Java, EJB Testing, Corba-Java, and RMI-Java. For information about run-time settings that apply to all Vusers, see Chapter 7, “Configuring Run-Time Settings.”

Creating Vuser Scripts • Java Vuser Scripts
550
Understanding the Java VM Settings
In the Java VM tab, you provide information about the Java virtual machine settings. The following settings are available:
Additional Classpath: Additional classpath not defined in the environment variables.
Additional VM Parameters: Enter any optional parameters used by the virtual machine.
When you run a Vuser, VuGen automatically sets the Xbootclasspath variable. You use this dialog box to specify a classpath and parameters, in addition to the ones defined in Xbootclasspath. If you specified additional VM parameters for recording, you can instruct VuGen to save the parameters and use them during replay. For more information, see Chapter 38, “Setting Java Recording Options.”
Specifying Virtual Machine Settings
To set the Java VM settings:
1 Choose Vuser > Run-Time Settings to open the Run-Time settings dialog box. Click the Java VM tab.

Chapter 39 • Configuring Java Run-Time Settings
551
2 In the Additional Classpath box, enter any additional classpath not defined in the environment variables.
3 In the Additional VM Parameters box, enter any optional parameters used by the Load Generator machine.

Creating Vuser Scripts • Java Vuser Scripts
552

553
40Correlating Java Scripts
VuGen’s correlation allows you to link Java Vuser functions by using the results of one statement as input to another.
This chapter describes:
➤ Standard Correlation
➤ Advanced Correlation
➤ String Correlation
➤ Using the Serialization Mechanism
The following information only applies to CORBA-Java and RMI-Java Vuser scripts.
About Correlating Java Scripts
Vuser scripts containing Java code often contain dynamic data. When you record a CORBA or RMI Vuser script, the dynamic data is recorded into scripts, but cannot be re-used during replay. If you encounter an error when running your Vuser, examine the script at the point where the error occurred. In many cases, correlation will solve the problem by enabling you to use the results of one statement as input to another.
VuGen’s CORBA recorder attempts to automatically correlate statements in the generated script. It only performs correlation on Java objects. When it encounters a Java primitive (byte, character, boolean, integer, float, double, short, and long) during recording, the argument values appear in the script without association to variables. VuGen automatically correlates all objects, arrays of objects, and arrays of primitives. Note that Java arrays and strings are also considered objects.

Creating Vuser Scripts • Java Vuser Scripts
554
VuGen employs several levels of correlation: Standard, Enhanced, Strings. You enable or disable correlation from the Recording options. An additional method of Serialization can be used to handle scripts where none of the former methods can be applied. For more information, see “Using the Serialization Mechanism,” on page 558.
Standard Correlation
Standard correlation refers to the automatic correlation performed during recording for simple objects, excluding object arrays, vectors, and container constructs.
When the recorded application invokes a method that returns an object, VuGen’s correlation mechanism records these objects. When you run the script, VuGen compares the generated objects to the recorded objects. If the objects match, the same object is used. The following example shows two CORBA objects my_bank and my_account. The first object, my_bank, is invoked; the second object, my_account, is correlated and passed as a parameter in final line of the segment:
public class Actions {
// Public function: init public int init() throws Throwable {
Bank my_bank = bankHelper.bind(“bank”, “shunra”);Account my_account = accountHelper.bind(“account”,”shunra”);
my_bank.remove_account(my_account); }:}
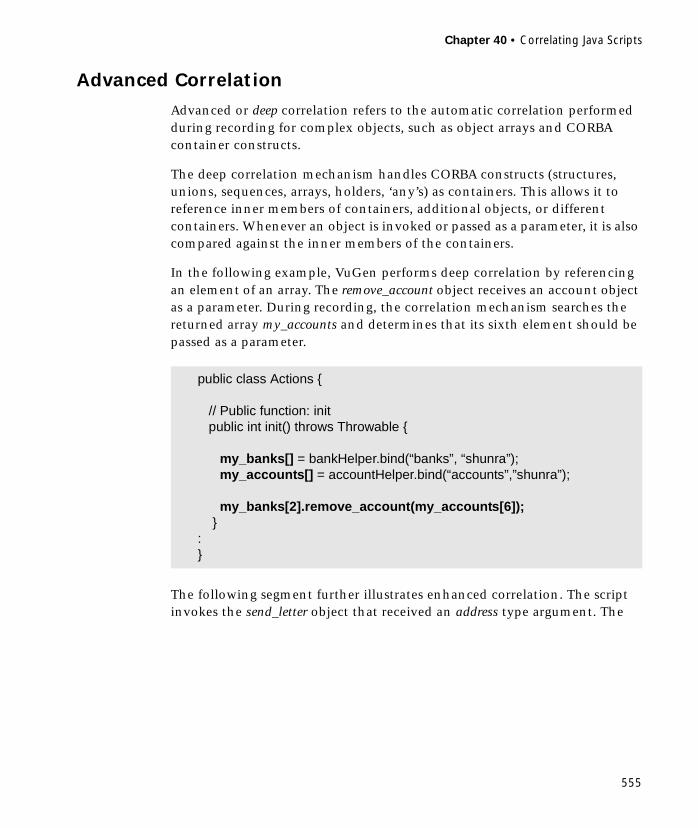
Chapter 40 • Correlating Java Scripts
555
Advanced Correlation
Advanced or deep correlation refers to the automatic correlation performed during recording for complex objects, such as object arrays and CORBA container constructs.
The deep correlation mechanism handles CORBA constructs (structures, unions, sequences, arrays, holders, ‘any’s) as containers. This allows it to reference inner members of containers, additional objects, or different containers. Whenever an object is invoked or passed as a parameter, it is also compared against the inner members of the containers.
In the following example, VuGen performs deep correlation by referencing an element of an array. The remove_account object receives an account object as a parameter. During recording, the correlation mechanism searches the returned array my_accounts and determines that its sixth element should be passed as a parameter.
The following segment further illustrates enhanced correlation. The script invokes the send_letter object that received an address type argument. The
public class Actions {
// Public function: init public int init() throws Throwable {
my_banks[] = bankHelper.bind(“banks”, “shunra”);my_accounts[] = accountHelper.bind(“accounts”,”shunra”);
my_banks[2].remove_account(my_accounts[6]);}
:}

Creating Vuser Scripts • Java Vuser Scripts
556
correlation mechanism retrieves the inner member, address, in the sixth element of the my_accounts array.
String Correlation
String correlation refers to the representation of a recorded value as an actual string or a variable. When you disable string correlation (the default setting), the actual recorded value of the string is indicated explicitly within the script. When you enable string correlation, it creates a variable for each string, allowing you to use it at a later point in the script.
public class Actions {
// Public function: init public int init() throws Throwable {
my_banks = bankHelper.bind(“bank”, “shunra”);my_accounts = accountHelper.bind(“account”,”shunra”);
my_banks[2].send_letter(my_accounts[6].address);}
:}
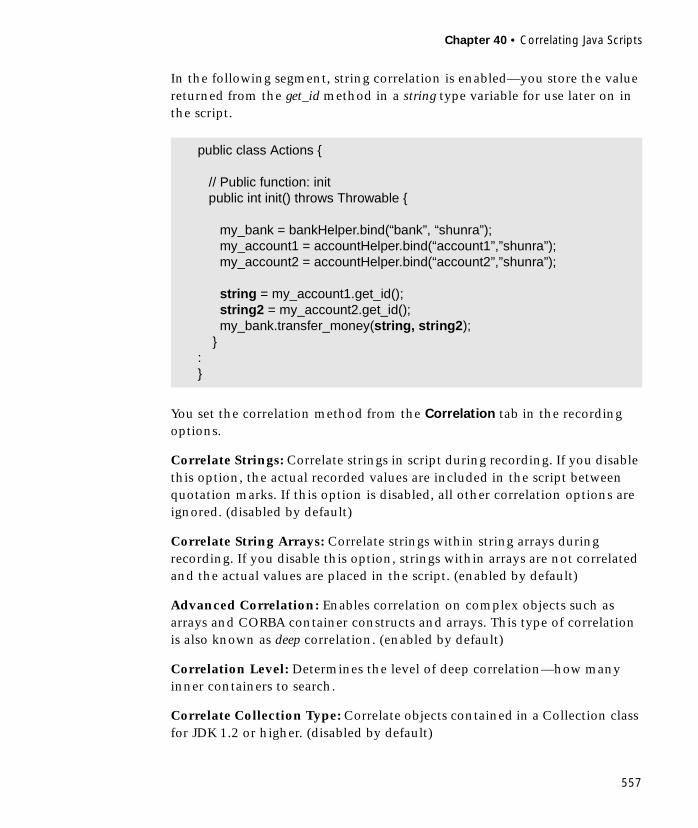
Chapter 40 • Correlating Java Scripts
557
In the following segment, string correlation is enabled—you store the value returned from the get_id method in a string type variable for use later on in the script.
You set the correlation method from the Correlation tab in the recording options.
Correlate Strings: Correlate strings in script during recording. If you disable this option, the actual recorded values are included in the script between quotation marks. If this option is disabled, all other correlation options are ignored. (disabled by default)
Correlate String Arrays: Correlate strings within string arrays during recording. If you disable this option, strings within arrays are not correlated and the actual values are placed in the script. (enabled by default)
Advanced Correlation: Enables correlation on complex objects such as arrays and CORBA container constructs and arrays. This type of correlation is also known as deep correlation. (enabled by default)
Correlation Level: Determines the level of deep correlation—how many inner containers to search.
Correlate Collection Type: Correlate objects contained in a Collection class for JDK 1.2 or higher. (disabled by default)
public class Actions {
// Public function: init public int init() throws Throwable {
my_bank = bankHelper.bind(“bank”, “shunra”);my_account1 = accountHelper.bind(“account1”,”shunra”);my_account2 = accountHelper.bind(“account2”,”shunra”);
string = my_account1.get_id();string2 = my_account2.get_id();my_bank.transfer_money(string, string2);
}:}
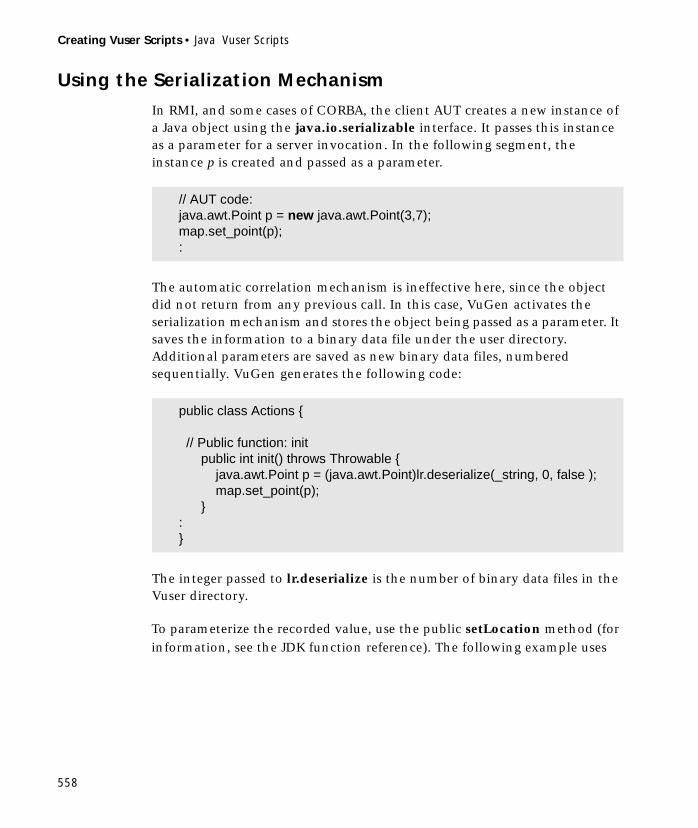
Creating Vuser Scripts • Java Vuser Scripts
558
Using the Serialization Mechanism
In RMI, and some cases of CORBA, the client AUT creates a new instance of a Java object using the java.io.serializable interface. It passes this instance as a parameter for a server invocation. In the following segment, the instance p is created and passed as a parameter.
The automatic correlation mechanism is ineffective here, since the object did not return from any previous call. In this case, VuGen activates the serialization mechanism and stores the object being passed as a parameter. It saves the information to a binary data file under the user directory. Additional parameters are saved as new binary data files, numbered sequentially. VuGen generates the following code:
The integer passed to lr.deserialize is the number of binary data files in the Vuser directory.
To parameterize the recorded value, use the public setLocation method (for information, see the JDK function reference). The following example uses
// AUT code:java.awt.Point p = new java.awt.Point(3,7); map.set_point(p);:
public class Actions {
// Public function: init public int init() throws Throwable { java.awt.Point p = (java.awt.Point)lr.deserialize(_string, 0, false ); map.set_point(p); }:}
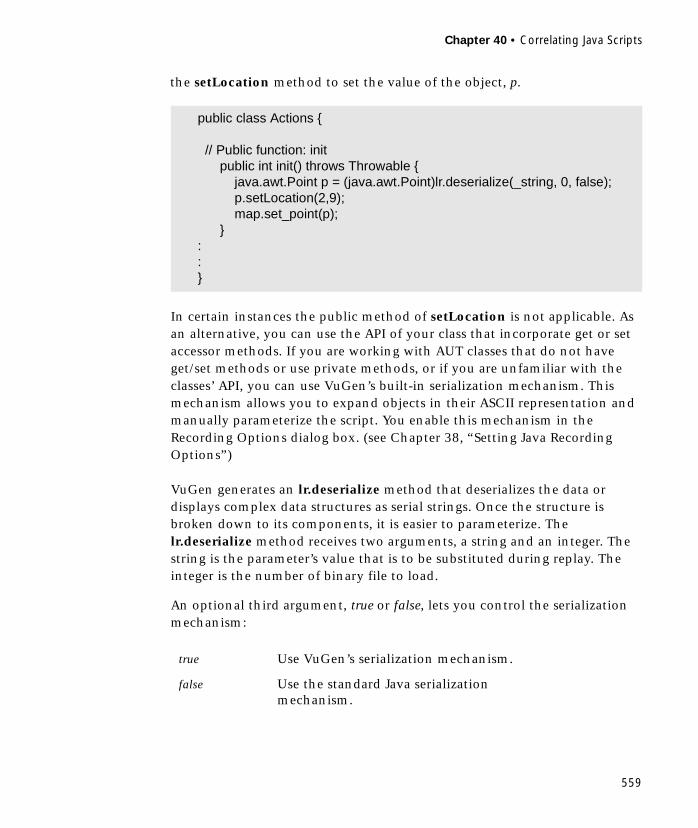
Chapter 40 • Correlating Java Scripts
559
the setLocation method to set the value of the object, p.
In certain instances the public method of setLocation is not applicable. As an alternative, you can use the API of your class that incorporate get or set accessor methods. If you are working with AUT classes that do not have get/set methods or use private methods, or if you are unfamiliar with the classes’ API, you can use VuGen’s built-in serialization mechanism. This mechanism allows you to expand objects in their ASCII representation and manually parameterize the script. You enable this mechanism in the Recording Options dialog box. (see Chapter 38, “Setting Java Recording Options”)
VuGen generates an lr.deserialize method that deserializes the data or displays complex data structures as serial strings. Once the structure is broken down to its components, it is easier to parameterize. The lr.deserialize method receives two arguments, a string and an integer. The string is the parameter’s value that is to be substituted during replay. The integer is the number of binary file to load.
An optional third argument, true or false, lets you control the serialization mechanism:
public class Actions {
// Public function: init public int init() throws Throwable { java.awt.Point p = (java.awt.Point)lr.deserialize(_string, 0, false); p.setLocation(2,9); map.set_point(p); }::}
true Use VuGen’s serialization mechanism.
false Use the standard Java serialization mechanism.

Creating Vuser Scripts • Java Vuser Scripts
560
The following segment shows a generated script in which the serialization mechanism was enabled.
The string values are placed between delimiters.The default delimiter is ’#’. You can change the delimiter in the Serialization tab of the recording options. Delimiters are used to speed up the parsing of the string during replay.
When modifying the string, you must maintain the following rules:
➤ Order of lines may not be changed. The parser reads the values one-by-one—not the member names.
➤ Only values between two delimiters may be modified.
➤ Object references may not be modified. Object references are indicated only to maintain internal consistency.
➤ "_NULL_" can appear as a value, representing the Java null constant. You can replace it with string type values only.
➤ Objects may be deserialized anywhere in the script. For example, you can deserialize all objects in the init method and use the values in the Actions method.
➤ Maintain internal consistency for the objects. For example, if a member of a vector is element count and you add an element, you must modify the element count.
public class Actions {
// Public function: init public int init() throws Throwable { _string = “java.awt.Point __CURRENT_OBJECT = {“ + “int x = “#5#” + “int y = “#8#” + “}”; java.awt.Point p = (java.awt.Point)lr.deserialize(_string,0); map.set_point(p); }:}

Chapter 40 • Correlating Java Scripts
561
In the following segment, a vector contains two elements.
public class Actions {
// Public function: init public int init() throws Throwable { _string = “java.util.Vector CURRENTOBJECT = {“ + “int capacityIncrement = “#0#” + “int elementCount = #2#” + “java/lang/Object elementData[] = {“ + “elementData[0] = #First Element#” + “elementData[1] = #Second Element#” + “elementData[2] = _NULL_” +
.... “elementData[9] = _NULL_” +
“}” + “}”; _vector = (java.util.Vector)lr.deserialize(_string,0); map.set_vector(_vector); }:}

Creating Vuser Scripts • Java Vuser Scripts
562
In the following example, one of the vector’s elements was changed—a "_NULL_" value was changed to "Third element". In coordination with the addition of the new element, the "elementCount" member was modified to "3".
Due to the complexity of the serialization mechanism, which opens up the objects to ASCII representation, opening large objects while recording may increase the time required for script generation. To decrease this time, you can specify flags which will improve the performance of the serialization mechanism.
When adding lr.deserialize to your script, it is recommended that you add it to the init method—not the action method. This will improve performance since VuGen will only deserialize the strings once. If it appears in the action method, VuGen would deserialize strings for every iteration.
public class Actions {
// Public function: init public int init() throws Throwable { _string = “java.util.Vector CURRENTOBJECT = {“ + “int capacityIncrement = “#0#” + “int elementCount = #3#” + “java/lang/Object elementData[] = {“ + “elementData[0] = #First Element#” + “elementData[1] = #Second Element#” + “elementData[2] = #Third Element#” +
.... “elementData[9] = _NULL_” + “}” + “}”; _vector = (java.util.Vector)lr.deserialize(_string,0); map.set_vector(_vector); }:}

Chapter 40 • Correlating Java Scripts
563
The following list shows the available options which you set in Serialization tab of the recording options.
➤ Serialization Delimiter
➤ Unfold Serialized Objects
➤ Unfold Arrays
➤ Limit Array Entries
➤ Ignore Serialized Objects
For complete information on the recording options, see Chapter 38, “Setting Java Recording Options.”

Creating Vuser Scripts • Java Vuser Scripts
564

Part IX
COM Vuser Scripts

566

567
41Recording COM Vuser Scripts
Many Windows applications use COM-based functions either directly, or through library calls. You can use VuGen to record a script that emulates a COM-based client accessing a COM server. The resulting script is called a COM Vuser script. You can also create COM Vuser scripts using LoadRunner’s Visual Basic add-on. For more information about the Visual Basic add-on, refer to Chapter 54, “Programming Vuser Scripts.”
Chapter 42, “Understanding COM Vuser Scripts,” explains how VuGen COM scripts work and provides a brief function reference.
This chapter describes:
➤ COM Overview
➤ Getting Started with COM Vusers
➤ Selecting COM Objects to Record
➤ Setting COM Recording Options
The following information applies only to COM Vuser scripts.
About Recording COM Vuser Scripts
When you record COM client applications, VuGen generates functions that describe COM client-server activity. The recorded script contains interface declarations, API calls and instance calls to methods. Each COM function begins with an lrc prefix.
You can view and edit the recorded script from the VuGen’s main window. The COM API/method calls that were recorded during the session are
Creating Vuser Scripts • COM Vuser Scripts
568
displayed in the window, allowing you to visually track application COM/DCOM calls.
COM Overview
This section provides an outline of COM technology. This should be enough to get you started with COM Vuser scripts. Refer to Microsoft Developer’s Network (MSDN) and other documentation for further details.
COM (Component Object Model) is a technology for developing reusable software components ("plug-ins"). DCOM (Distributed COM) allows use of COM components on remote computers. Microsoft transaction servers (MTS), Visual Basic and Explorer all use COM/DCOM technology. Thus, the application you are testing may use COM technology indirectly, even though you don’t know it. You will probably have to include some, but certainly not all, of the COM calls made by your application in the load testing script.
Objects, Interfaces and Type Libraries
COM objects are binary code modules. Each COM object implements one or more interfaces that allow client programs to communicate with it. You need to know about these interfaces in order to follow the COM calls in the LoadRunner scripts. Type libraries, used as a reference for accessing COM interface methods and parameters, contain descriptions of COM objects and interfaces. Each COM class, interface, and type library is identified by a Global Unique Identifier (GUID).
COM Interfaces
A COM interface provides a grouped collection of related methods. For example, a Clock object may have Clock, Alarm and Timer interfaces. Each interface has one or more methods. For example the Alarm interface may have AlarmOn and AlarmOff methods.
An interface may also have one or more properties. Sometimes, the same function may be performed by calling a method or by setting or getting the value of a property. For example, you can set the Alarm Status property to On or call the AlarmOn method.
Chapter 41 • Recording COM Vuser Scripts
569
A COM object may support many interfaces. The IUnknown interface is implemented by all components and is used to find out about other interfaces. Many components also implement the IDispatch interface, which exposes all other interfaces and methods of the object, allowing implementation of COM automation in scripting languages.
COM Class Context and Location Transparency
COM objects can run on the same machine as the client application, or on a remote server. COM objects that an application creates may be in a local library, a local process or a remote machine (“Remote Object Proxy”). The location of the COM object, known as the “Context,” can be transparent to the application. You are probably using LoadRunner to check load on remote servers. Therefore, objects accessed by Remote Object Proxy are usually the most interesting for your purposes.
COM Data Types
COM also provides several special data types, including safe arrays, BSTR strings and variants. You may need to use these data types for debugging, parameterization and similar tasks.
Getting Started with COM Vusers
This section provides an overview of the process of using VuGen to develop COM Vuser scripts.
To develop a COM Vuser script:
1 Record the basic script using VuGen.
Start VuGen and create a new Vuser script. Specify COM as the type of Vuser. Choose an application to record and set the recording options and object filter. Use the filter to include any objects that you know to be relevant. Record typical operations using your application.
For details about recording, see Chapter 3, “Recording with VuGen.”
2 Refine the Object Filter.

Creating Vuser Scripts • COM Vuser Scripts
570
Use the log file that was generated to refine your choice of objects to be recorded in the filter. See the following section, “Selecting COM objects to Record,” for details.
3 Enhance the script.
Enhance the Vuser script by inserting transactions, rendezvous points, and control-flow structures into the script.
For details, see Chapter 4, “Enhancing Vuser Scripts.”
4 Define parameters (optional).
Define parameters for the fixed-values recorded into your script. By substituting fixed-values with parameters, you can repeat the same business process many times using different values.
For details, see Chapter 5, “Defining Parameters.”
5 Configure the run-time settings.
The run-time settings control the Vuser behavior during script execution. These settings include loop, log, and timing information.
For details, see Chapter 7, “Configuring Run-Time Settings.”
6 Run the script from VuGen.
Save and run the script from VuGen to verify that it runs correctly.
For details, see Chapter 9, “Running Vuser Scripts in Stand-Alone Mode.”
After you create a COM Vuser script, you integrate it into a scenario on a Windows platform. For more information on integrating Vuser scripts in a scenario, refer to your LoadRunner Controller User’s Guide.
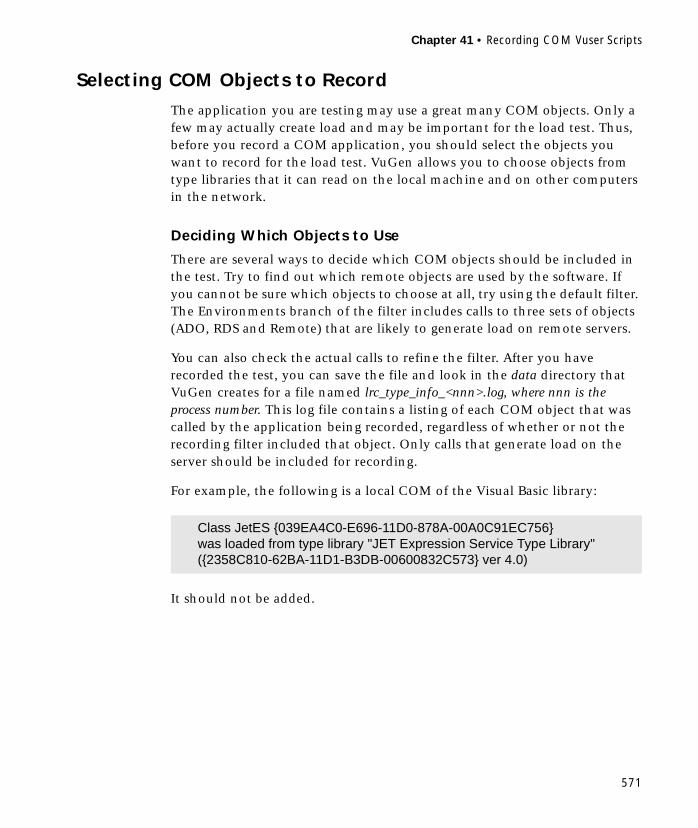
Chapter 41 • Recording COM Vuser Scripts
571
Selecting COM Objects to Record
The application you are testing may use a great many COM objects. Only a few may actually create load and may be important for the load test. Thus, before you record a COM application, you should select the objects you want to record for the load test. VuGen allows you to choose objects from type libraries that it can read on the local machine and on other computers in the network.
Deciding Which Objects to Use
There are several ways to decide which COM objects should be included in the test. Try to find out which remote objects are used by the software. If you cannot be sure which objects to choose at all, try using the default filter. The Environments branch of the filter includes calls to three sets of objects (ADO, RDS and Remote) that are likely to generate load on remote servers.
You can also check the actual calls to refine the filter. After you have recorded the test, you can save the file and look in the data directory that VuGen creates for a file named lrc_type_info_<nnn>.log, where nnn is the process number. This log file contains a listing of each COM object that was called by the application being recorded, regardless of whether or not the recording filter included that object. Only calls that generate load on the server should be included for recording.
For example, the following is a local COM of the Visual Basic library:
It should not be added.
Class JetES {039EA4C0-E696-11D0-878A-00A0C91EC756}was loaded from type library "JET Expression Service Type Library"({2358C810-62BA-11D1-B3DB-00600832C573} ver 4.0)
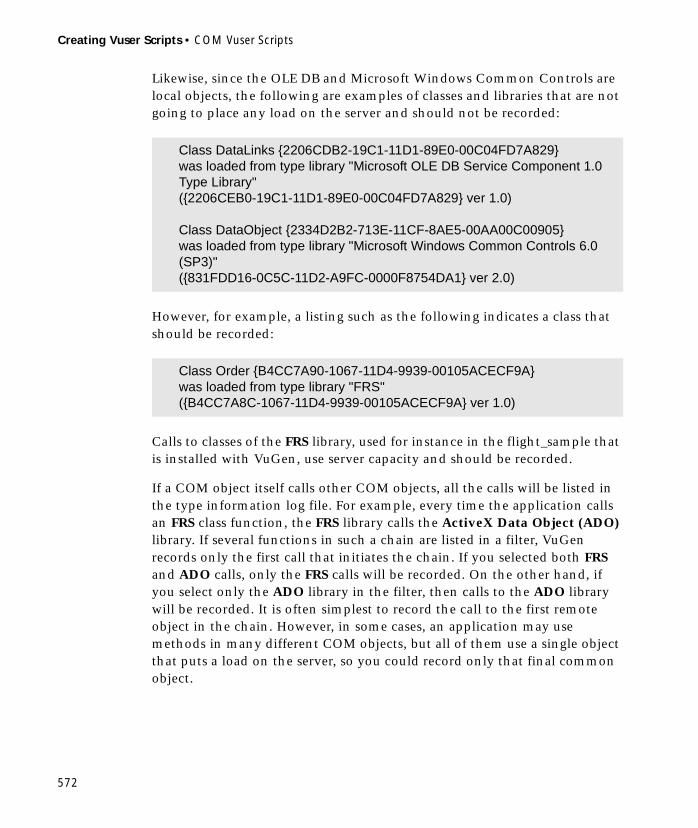
Creating Vuser Scripts • COM Vuser Scripts
572
Likewise, since the OLE DB and Microsoft Windows Common Controls are local objects, the following are examples of classes and libraries that are not going to place any load on the server and should not be recorded:
However, for example, a listing such as the following indicates a class that should be recorded:
Calls to classes of the FRS library, used for instance in the flight_sample that is installed with VuGen, use server capacity and should be recorded.
If a COM object itself calls other COM objects, all the calls will be listed in the type information log file. For example, every time the application calls an FRS class function, the FRS library calls the ActiveX Data Object (ADO) library. If several functions in such a chain are listed in a filter, VuGen records only the first call that initiates the chain. If you selected both FRS and ADO calls, only the FRS calls will be recorded. On the other hand, if you select only the ADO library in the filter, then calls to the ADO library will be recorded. It is often simplest to record the call to the first remote object in the chain. However, in some cases, an application may use methods in many different COM objects, but all of them use a single object that puts a load on the server, so you could record only that final common object.
Class DataLinks {2206CDB2-19C1-11D1-89E0-00C04FD7A829} was loaded from type library "Microsoft OLE DB Service Component 1.0 Type Library"({2206CEB0-19C1-11D1-89E0-00C04FD7A829} ver 1.0)
Class DataObject {2334D2B2-713E-11CF-8AE5-00AA00C00905}was loaded from type library "Microsoft Windows Common Controls 6.0 (SP3)"({831FDD16-0C5C-11D2-A9FC-0000F8754DA1} ver 2.0)
Class Order {B4CC7A90-1067-11D4-9939-00105ACECF9A}was loaded from type library "FRS"({B4CC7A8C-1067-11D4-9939-00105ACECF9A} ver 1.0)

Chapter 41 • Recording COM Vuser Scripts
573
Which Objects Can be Selected
VuGen can only record objects if it can read their type libraries. If the type libraries were not installed in the system or VuGen cannot find them, the COM objects will not be listed in the Recording Options dialog box. If they are used by your application, VuGen will not be able to identify these objects and will identify them as INoTypeInfo in the files.
Which Interfaces Can be Excluded
For each object, the Recording Options dialog box will show you all interfaces that are listed in the Type Library, and allow you to specify inclusion or exclusion of each one. However, ADO, RDS and Remote Objects can be included in the filter as a group. The filter will not show the individual objects of those environments or their interfaces. Objects that you included from type libraries may also have interfaces that are not listed in the type library and therefore not shown in the Recording Options dialog. After generating a VuGen script, you can identify these interfaces in the script and get their GUID numbers from the interfaces.h file that VuGen generates. Using this information, you can exclude the interfaces as explained below.
Setting COM Recording Options
Use the COM Recording Options dialog box to tell VuGen which COM objects to record and to set scripting options.
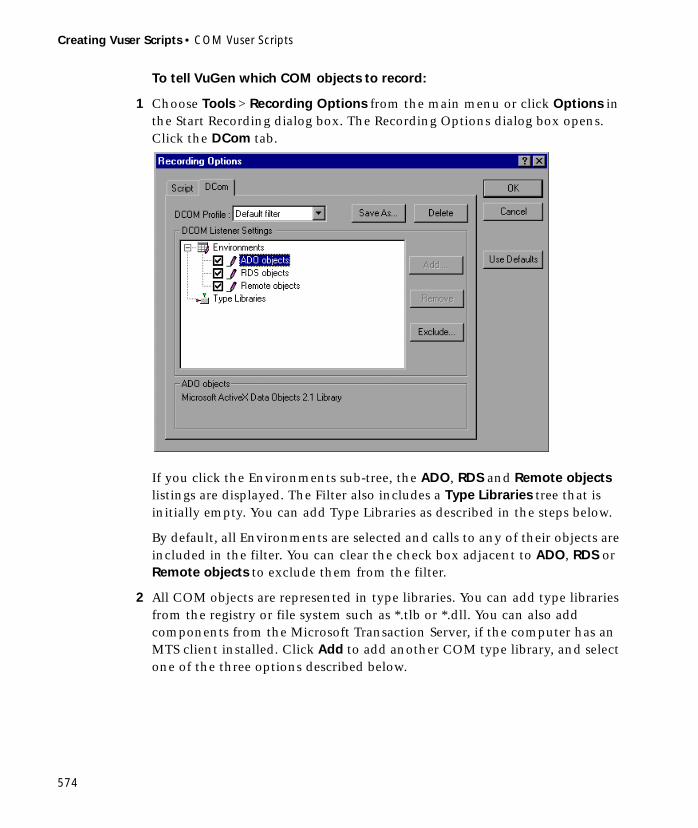
Creating Vuser Scripts • COM Vuser Scripts
574
To tell VuGen which COM objects to record:
1 Choose Tools > Recording Options from the main menu or click Options in the Start Recording dialog box. The Recording Options dialog box opens. Click the DCom tab.
If you click the Environments sub-tree, the ADO, RDS and Remote objects listings are displayed. The Filter also includes a Type Libraries tree that is initially empty. You can add Type Libraries as described in the steps below.
By default, all Environments are selected and calls to any of their objects are included in the filter. You can clear the check box adjacent to ADO, RDS or Remote objects to exclude them from the filter.
2 All COM objects are represented in type libraries. You can add type libraries from the registry or file system such as *.tlb or *.dll. You can also add components from the Microsoft Transaction Server, if the computer has an MTS client installed. Click Add to add another COM type library, and select one of the three options described below.

Chapter 41 • Recording COM Vuser Scripts
575
3 Select Browse Registry to display a list of type libraries found in the registry of the local computer.
Select the checkbox next to the desired library or libraries and click OK.
4 To add a type library from the file system, click Add and select Browse file system.
Select the desired file and click OK.
5 Once the type library appears in the list of Type Libraries, you can expand the tree to show all of the available classes in the type library. You can expand the class tree to show all of the interfaces supported by that class.
To exclude a type library, clear the check box next to the library name. This excludes all of its classes in that type library. By expanding the tree, you can exclude individual classes or interfaces by clearing the check box next to the item.

Creating Vuser Scripts • COM Vuser Scripts
576
Note that when you clear the check box adjacent to an interface, it is equivalent to selecting it in the Excluded Interfaces dialog box.
6 An interface can be implemented differently by various classes. When you exclude an interface that is implemented by other classes that have not been excluded, VuGen displays the following warning:
If you check Don’t ask me again and close the dialog, then the status of all instances of the interface in all other classes will be changed automatically for this filter, whenever you change the status of the interface in one object. Click Yes to all to change the status of all instances of this interface for all other classes, click No to all to leave the status of all other instances
Type library
Class
Interfaces

Chapter 41 • Recording COM Vuser Scripts
577
unchanged. Click Next Instance to view the next class that uses this interface.
7 To add a component from a Microsoft Transaction Server, click Add and select Browse MTS. The MTS Components dialog box prompts you to enter the name of the MTS server.
Type the name of the MTS server and click Connect. Remember that to record MTS components you need an MTS client installed on your machine.
Select one or more packages of MTS components from the list of available packages and click Add. Once the package appears in the list of Type Libraries, you can select specific components from the package.
8 In addition to disabling and enabling recording of interfaces in the tree display, you can also click Exclude in the Recording Options dialog to include or exclude interfaces in the filter, whatever their origin. Note that
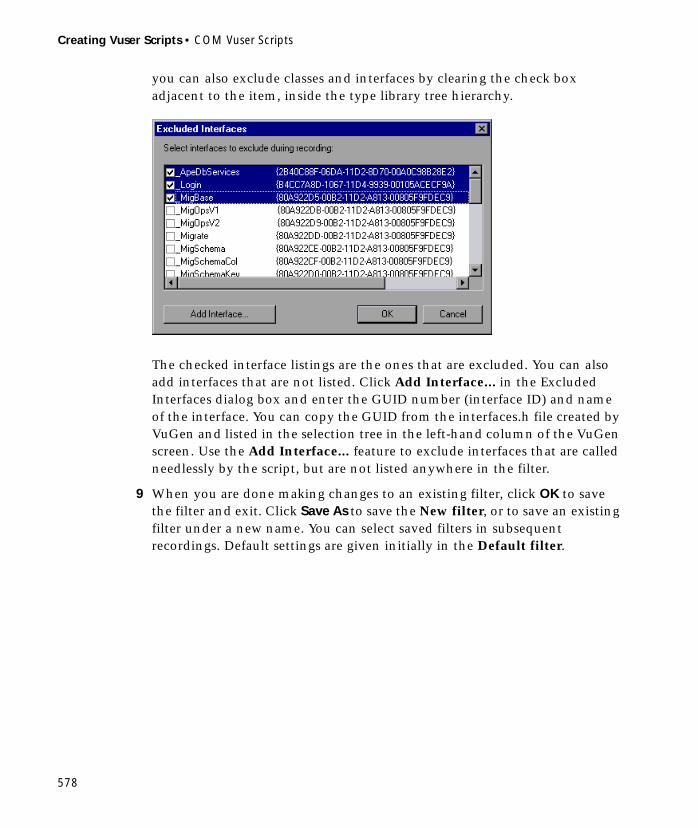
Creating Vuser Scripts • COM Vuser Scripts
578
you can also exclude classes and interfaces by clearing the check box adjacent to the item, inside the type library tree hierarchy.
The checked interface listings are the ones that are excluded. You can also add interfaces that are not listed. Click Add Interface... in the Excluded Interfaces dialog box and enter the GUID number (interface ID) and name of the interface. You can copy the GUID from the interfaces.h file created by VuGen and listed in the selection tree in the left-hand column of the VuGen screen. Use the Add Interface... feature to exclude interfaces that are called needlessly by the script, but are not listed anywhere in the filter.
9 When you are done making changes to an existing filter, click OK to save the filter and exit. Click Save As to save the New filter, or to save an existing filter under a new name. You can select saved filters in subsequent recordings. Default settings are given initially in the Default filter.
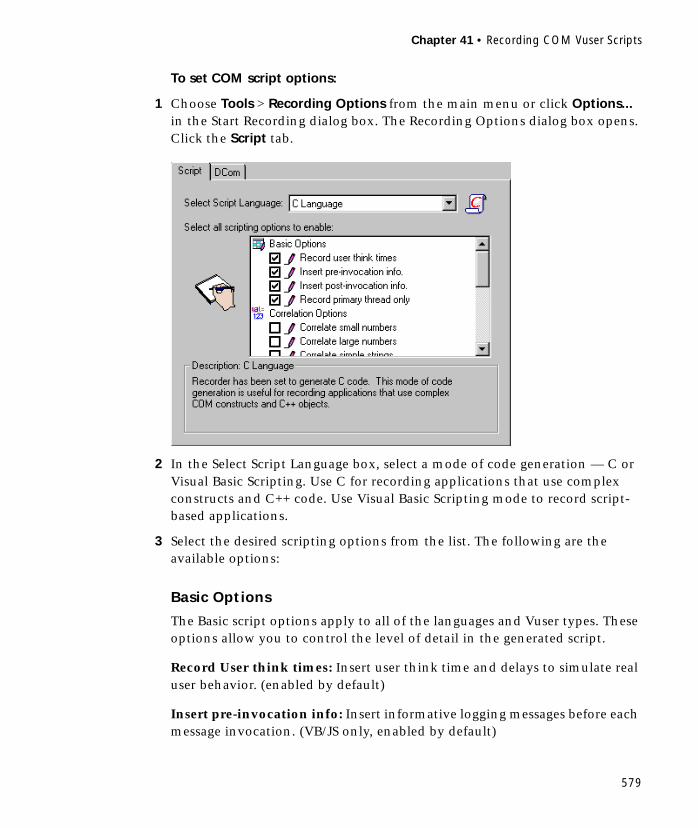
Chapter 41 • Recording COM Vuser Scripts
579
To set COM script options:
1 Choose Tools > Recording Options from the main menu or click Options... in the Start Recording dialog box. The Recording Options dialog box opens. Click the Script tab.
2 In the Select Script Language box, select a mode of code generation — C or Visual Basic Scripting. Use C for recording applications that use complex constructs and C++ code. Use Visual Basic Scripting mode to record script-based applications.
3 Select the desired scripting options from the list. The following are the available options:
Basic Options
The Basic script options apply to all of the languages and Vuser types. These options allow you to control the level of detail in the generated script.
Record User think times: Insert user think time and delays to simulate real user behavior. (enabled by default)
Insert pre-invocation info: Insert informative logging messages before each message invocation. (VB/JS only, enabled by default)

Creating Vuser Scripts • COM Vuser Scripts
580
Insert post-invocation info: Insert informative logging messages after each message invocation. (VB/JS only, enabled by default)
Record primary thread only: Record only events running on the application’s main or primary thread. (disabled by default)
Correlation Options
The Correlation options apply to the VBScript and JScript programming languages. These settings let you configure the extent of automatic correlation performed by VuGen while recording. All correlation options are disabled by default.
Correlate small numbers: Correlate short data types such as bytes, characters, and short integers. (disabled by default)
Correlate large numbers: Correlate long data types such as integers, long integers, 64-bit characters, float, and double. (disabled by default)
Correlate simple strings: Correlate simple, non-array strings and phrases. (disabled by default)
Correlate arrays: Track and correlate arrays of all data types, such as string, structures, numbers, etc. (disabled by default)
Correlate structures: Track and correlate complex structures. (disabled by default)
DCOM Scripting Options
The DCOM scripting options apply to all programming languages. These settings let you configure the scripting options for DCOM methods and interface handling.
ADO Recordset filtering: Condense multiple recordset operations into a single-line fetch statement. (enabled by default)
Record COM Exceptions/Errors: Record COM functions and methods that generate exceptions and errors during recording. (disabled by default)
Release COM Objects: Record the release of COM objects when they are no longer in use. (disabled by default)
Chapter 41 • Recording COM Vuser Scripts
581
Limit size of SafeArray log: Limit the number of elements printed in the safearray log per COM call, to 16. (enabled by default)
Generate COM statistics: Generate recording time performance statistics and summary information. (enabled by default)
VBScript and JScript Options
The VBScript and JScript options allow you to control the use of type helpers in scripting environments.
Use Helpers for objects: Use helper functions to extract object references from variants when passed as function arguments. (disabled by default)
Use Helpers for arrays: Use helper functions to extract components from variants arrays. (disabled by
When you are done selecting script options, click OK to save your settings and exit.

Creating Vuser Scripts • COM Vuser Scripts
582

583
42Understanding COM Vuser Scripts
This chapter provides details about the scripts VuGen generates for COM client communications, including an explanation of the function calls and examples. For basic information about getting started with COM Vuser scripts, refer to Chapter 41, “Recording COM Vuser Scripts.”
This chapter describes:
➤ Understanding VuGen COM Script Structure
➤ Examining Sample VuGen COM Scripts
➤ Scanning a Script for Correlations
The following information applies only to COM Vuser scripts.
About COM Vuser Scripts
When you record COM client communications, VuGen creates a script with calls to COM API functions and interface methods. In addition, you can program COM type conversion functions. Each function call has an lrc prefix, such as lrc_CoCreateInstance or lrc_long. This chapter provides an overview of COM API and type conversion calls. Refer to the LoadRunner Online Function Reference, available from the VuGen Help menu, for syntax and examples of each function.
Calls to interface methods have the following names and syntax conventions:
lrc_<interface name>_<method name>(instance, ...);
Note that the instance is always the first parameter passed.
Creating Vuser Scripts • COM Vuser Scripts
584
The vendors of the respective COM components usually supply documentation for the interface functions.
For each COM Vuser script, VuGen creates the following:
➤ interface pointer and other declarations declaration in file interfaces.h
➤ function calls that you can record in the vuser_init, actions or vuser_end sections.
➤ a user.h file containing the translation of the Vuser script into low level calls
After you record the script, you can view any of these files by selecting them from the tree on the left-hand side of the VuGen screen.
Understanding VuGen COM Script Structure
VuGen COM scripts are structured in a special way to meet the needs of COM interfaces.
Interface Methods
Calls to interface methods have the following names and syntax conventions:
lrc_<interface name>_<method name>(instance, ...);
Note that the instance is always the first parameter passed.
The vendors of the respective COM components usually supply documentation for the interface functions.
Interface Pointers
The interfaces.h file defines the interface pointers, as well as other variables, that will be used later on in the script. Each interface has an Interface ID (IID) which uniquely identifies the interface.
The format of the interface definition is:
<interface type>*<interface name> = 0; //”{<IID of the interface type>}”

Chapter 42 • Understanding COM Vuser Scripts
585
In the following example, the interface type is IDispatch, the name of the interface instance is IDispatch_0, and the IID of IDispatch type is the long number string:
Vuser Script Statements
The COM Vuser scripts consist of code that creates object instances, retrieves interface pointers and calls the interface methods. Each user action may generate one or more COM calls. Each COM call is coded by VuGen as a group of statements. Each such group is contained in a separate scope enclosed in braces. Several different statements prepare for the main call by assigning values and performing type conversions. For example, the group of calls needed to create an object may look like this:
Error Checking
Each COM method or API call returns an error value. Vugen will set a flag to check or not to check errors during replay, depending upon whether the call succeeded during the original recording. The flag appears as the last argument of the function call and has these values:
IDispatch* IDispatch_0= 0;//"{00020400-0000-0000-C000-000000000046}"
{GUID pClsid = lrc_GUID("student.student.1");IUnknown * pUnkOuter = (IUnknown*)NULL;unsigned long dwClsContext = lrc_ulong("7");GUID riid = IID_IUnknown;lrc_CoCreateInstance(&pClsid, pUnkOuter, dwClsContext, &riid, (void**)&IUnknown_0, CHECK_HRES);}
CHECK_HRES This value is inserted if the function passed during recording and errors should be checked during replay.
DONT_CHECK_HRES This value is inserted if the function failed during recording and errors should not be checked during replay.
Creating Vuser Scripts • COM Vuser Scripts
586
Examining Sample VuGen COM Scripts
This section shows examples of how VuGen emulates a COM client application.
Basic COM Script Operations
The basic operations are:
➤ Instantiation of the object
➤ Retrieving interface pointers
➤ Calling interface methods
Each type of operation is done within a separate scope.
Instantiation of the Object
To use a COM object, the application must first instantiate it and get a pointer to an interface of that object.
VuGen does the following to instantiate an object:
1 VuGen calls lrc_GUID to get a unique ProgID for the object, to be stored in pClsid:
pClsid is the unique global CLSID of the object, which was converted from the ProgID “student.student.1”
1 If the unknown interface pointer is a pointer to an aggregated object, VuGen retrieves the pointer to that object, or else it sets it to NULL:
2 VuGen sets the contexts of the object to be created:
GUID pClsid = lrc_GUID("student.student.1");
IUnknown * pUnkOuter = (IUnknown*)NULL;
unsigned long dwClsContext = lrc_ulong("7");

Chapter 42 • Understanding COM Vuser Scripts
587
dwClsContext contains the context of the object (in process, local, remote or combinations of these.)
1 VuGen sets a variable to hold the requested interface ID, which is IUnknown in this case:
riid contains the interface ID of the IUnknown interface.
1 After the input parameters are prepared, a call to lrc_CoCreateInstance creates an object using the parameters defined in the preceding statements. It returns a pointer to the IUnknown interface needed for the next stage:
The input parameters were prepared and explained above. Since the call succeeded, VuGen sets error checking on during the user simulation by inserting the CHECK_HRES value. The call returns a pointer to the IUnknown interface in IUnknown_0, that can be used in subsequent calls.
Retrieving an Interface
After creating an object, VuGen has access only to the IUnknown interface. VuGen will use the IUnknown interface for communicating with the object. This is done using the QueryInterface method of the IUnknown standard interface. The first parameter in a VuGen method call is the interface instance. In this case it is the IUnknown_0 pointer returned previously by CoCreateInstance. The QueryInterface call requires as input the ID of the interface to be retrieved, and returns a pointer to the interface designated by that ID.
To get the interface:
1 First, VuGen sets a parameter, riid, equal to the ID of the Istudent interface:
GUID riid = IID_IUnknown;
lrc_CoCreateInstance(&pClsid, pUnkOuter, dwClsContext, &riid, (void**)&IUnknown_0, CHECK_HRES);
GUID riid = IID_Istudent;

Creating Vuser Scripts • COM Vuser Scripts
588
2 A call to QueryInterface returns a pointer to the Istudent interface if the Istudent object has such an interface:
Using an Interface to Set Data
Here is an example of using the methods of the interface to set data. Suppose that in the application, the user is supposed to input a name. This activates a method for setting the name. VuGen records this in two statements. One statement is used for setting up the name string and the second one sets the name property.
To set up the entire function call:
1 First, VuGen sets a variable (Prop Value) equal to the string. The parameter is of type BSTR, a string type used in COM files:
In subsequent stages, you will probably parameterize this call, replacing “John Smith” with a parameter, so that different names are used each time the virtual user script is run.
1 Next, VuGen calls the Put_Name method of the Istudent interface to enter the name:
Using an Interface to Return Data
Returning data from an application is different than entering the data, because you might want to store these values and use them as inputs in subsequent calls for parameterization.
lrc_IUnknown_QueryInterface(IUnknown_0, &riid, (void**)&Istudent_0, CHECK_HRES);
BSTR PropValue = lrc_BSTR("John Smith");
lrc_Istudent_put_name(Istudent_0, PropValue, CHECK_HRES);

Chapter 42 • Understanding COM Vuser Scripts
589
This is an example of what VuGen may do when the application retrieves data:
1 Create a variable of the appropriate type (in this case a BSTR) that will contain the value of the property:
2 Get the value of the property, in this case a name, into the pVal variable created above, using the get_name method of the Istudent interface in this example:
3 VuGen then generates a statement for saving the values:
The statement is commented out. You can remove the comments and change param-name to a variable with a meaningful name to be used for storing this value. Vugen will use the variable to save the value of pVal returned by the previous call. You can then use the variable as a parameterized input in subsequent calls to other methods.
The IDispatch Interface
Most COM objects have specific interfaces. Many of them also implement a general-purpose interface called IDispatch, which VuGen translates in a special way. IDispatch is a “superinterface” that exposes all of the other interfaces and methods of a COM object. Calls to the IDispatch::Invoke method from VuGen scripts are implemented using lrc_Disp functions. These calls are constructed somewhat differently from calls to other interfaces.
The IDispatch interface Invoke method can execute a method, it can get a property value, or it can set a value or reference value for a property. In the standard IDispatch::Invoke method these different uses are signalled in a wflags parameter. In the VuGen implementation they are implemented in different procedure calls that invoke a method or put or get a property.
BSTR pVal;
lrc_Istudent_get_name(Istudent_0, &pVal, CHECK_HRES);
//lrc_save_BSTR("param-name",pVal);
Creating Vuser Scripts • COM Vuser Scripts
590
For example, a call to IDispatch to activate the GetAgentsArray method may look like this:
The parameters in the above call are:
In addition, there might be another parameter, OPTIONAL_ARGS. This signals that in addition to any standard parameters, VuGen is sending some
retValue = lrc_DispMethod1((IDispatch*)IDispatch_0, "GetAgentsArray", /*locale*/1033, LAST_ARG, CHECK_HRES);
IDispatch_0 This is the pointer to the IDispatch interface returned by a previous call to the IUnknown::Queryinterface method.
GetAgentsArray This is the name of the method to invoke. Behind the scenes, VuGen will get the ID of the method from the name.
1033 This is the language locale
LAST_ARG This is a flag to tell the IDispatch interface that there are no more arguments.
CHECK_HRES This flag turns on checking of HRES, since the call succeeded when it was recorded.
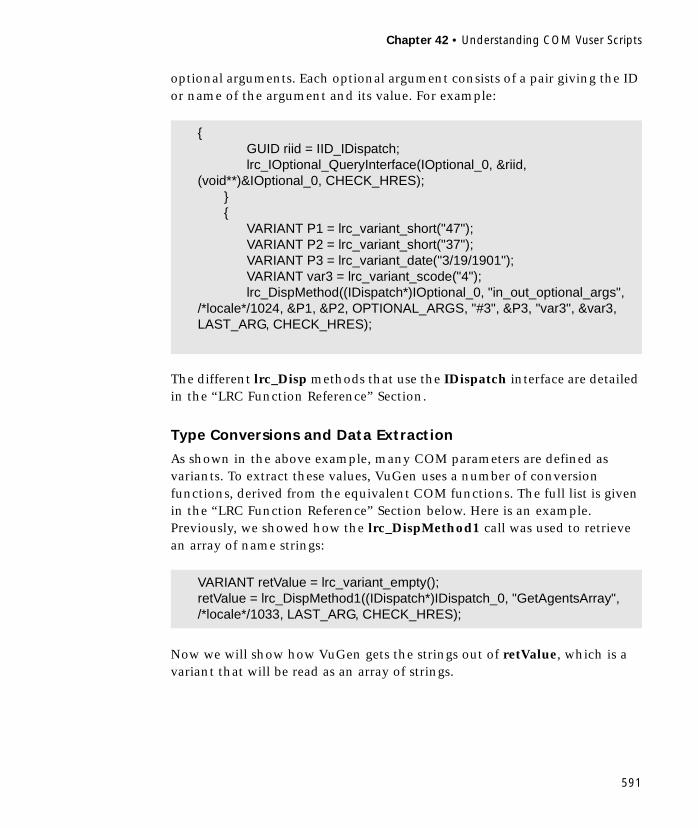
Chapter 42 • Understanding COM Vuser Scripts
591
optional arguments. Each optional argument consists of a pair giving the ID or name of the argument and its value. For example:
The different lrc_Disp methods that use the IDispatch interface are detailed in the “LRC Function Reference” Section.
Type Conversions and Data Extraction
As shown in the above example, many COM parameters are defined as variants. To extract these values, VuGen uses a number of conversion functions, derived from the equivalent COM functions. The full list is given in the “LRC Function Reference” Section below. Here is an example. Previously, we showed how the lrc_DispMethod1 call was used to retrieve an array of name strings:
Now we will show how VuGen gets the strings out of retValue, which is a variant that will be read as an array of strings.
{GUID riid = IID_IDispatch;lrc_IOptional_QueryInterface(IOptional_0, &riid,
(void**)&IOptional_0, CHECK_HRES);}{
VARIANT P1 = lrc_variant_short("47");VARIANT P2 = lrc_variant_short("37");VARIANT P3 = lrc_variant_date("3/19/1901");VARIANT var3 = lrc_variant_scode("4");lrc_DispMethod((IDispatch*)IOptional_0, "in_out_optional_args",
/*locale*/1024, &P1, &P2, OPTIONAL_ARGS, "#3", &P3, "var3", &var3, LAST_ARG, CHECK_HRES);
VARIANT retValue = lrc_variant_empty();retValue = lrc_DispMethod1((IDispatch*)IDispatch_0, "GetAgentsArray", /*locale*/1033, LAST_ARG, CHECK_HRES);

Creating Vuser Scripts • COM Vuser Scripts
592
First, VuGen extracts the BSTR array from the variant:
With all the values in array0, VuGen provides you with code that you can use to extract the elements from the array for later use in parameterization, as in the example below:
VuGen has numerous type conversion functions and functions for extracting conventional types from variants. These are detailed in Chapter 43, “Understanding COM Vuser Functions” or refer to the LoadRunner Online Function Reference.
Scanning a Script for Correlations
VuGen provides a correlation utility to help you repair your script to ensure a successful replay. It performs the following steps:
➤ scans for potential correlations
➤ insert the appropriate correlation function to save the results to a parameter
➤ replace the statement value with the parameter
You can perform automatic correlation on the entire script, or at a specific location in your script.
This section describes how to determine the statement which needs to be correlated. If you already know which value you want to correlate, proceed to the next section for instructions on correlating a specific value.
To scan and correlate a script with automatic correlation:
1 Open the Output window.
BstrArray array0 = 0;array0 = lrc_GetBstrArrayFromVariant(&retValue);
//GetElementFrom1DBstrArray(array0, 0); // value: Alex//GetElementFrom1DBstrArray(array0, 1); // value: Amanda....
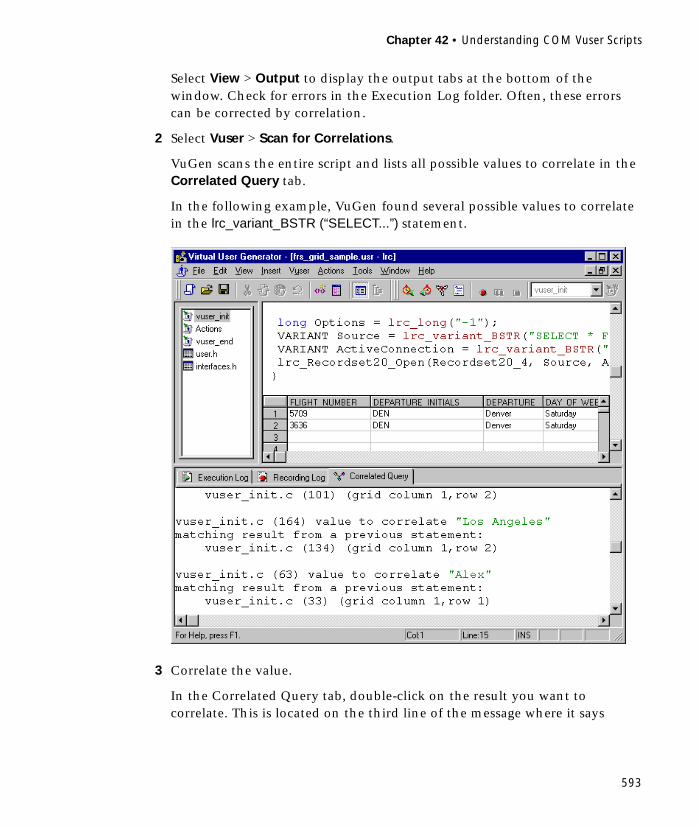
Chapter 42 • Understanding COM Vuser Scripts
593
Select View > Output to display the output tabs at the bottom of the window. Check for errors in the Execution Log folder. Often, these errors can be corrected by correlation.
2 Select Vuser > Scan for Correlations.
VuGen scans the entire script and lists all possible values to correlate in the Correlated Query tab.
In the following example, VuGen found several possible values to correlate in the lrc_variant_BSTR (“SELECT...”) statement.
3 Correlate the value.
In the Correlated Query tab, double-click on the result you want to correlate. This is located on the third line of the message where it says
Creating Vuser Scripts • COM Vuser Scripts
594
grid column x, row x. VuGen sends the cursor to the grid location of the value in your script.
1 In the grid, select the value you want to correlate, and choose Vuser > Create Correlation. VuGen prompts you to enter a parameter name for the result value.
2 Specify a name, or accept the default. Click OK to continue. VuGen inserts the appropriate correlation statement (lrc_save_<type>) which saves the result to a parameter.
3 Click Yes to confirm the correlation.
A message appears asking if you want to search for all occurrences of the value in the script.
4 Click No to replace only the value in the selected statement.
5 To search for additional occurrences click Yes.
A Search and Replace dialog box opens. Confirm any replacements, including your original statement. After you replace all the desired values, click Cancel to close the Search and Replace dialog box.
VuGen replaces the statement value with a reference to the parameter. Note that if you choose to cancel the correlation, VuGen also erases the statement created in the previous step.
Correlating a Known Value
If you know which value needs to be correlated, perform the following procedure:
To correlate a specific value:
1 Locate the value you want to correlate and select the value without the quotation marks.
2 Choose Vuser > Scan for Correlations (at cursor).
VuGen scans the value and lists all results within the script that match this value. The correlation values are listed in the Correlated Query tab.

Chapter 42 • Understanding COM Vuser Scripts
595
In the following example, VuGen found one matching result value to correlate to “Alex”.
In the Correlated Query tab, double-click on the result you want to correlate. This is located on the third line of the message where it says grid column x, row x. VuGen sends the cursor to the grid location of the value in your script.
3 In the grid, select the value you want to correlate and choose Vuser > Create Correlation. VuGen prompts you to enter a parameter name for the result value.

Creating Vuser Scripts • COM Vuser Scripts
596
4 Specify a name, or accept the default. Click OK to continue. VuGen inserts the appropriate correlation statement (lrc_save_<type>) which saves the result to a parameter.
5 Click Yes to confirm the correlation.
A message appears asking if you want to search for all occurrences of the value in the script.
6 Click No to replace only the value in the selected statement.
7 To search for additional occurrences click Yes.
A Search and Replace dialog box opens. Confirm any replacements, including your original statement. After you replace all the desired values, click Cancel to close the Search and Replace dialog box.
VuGen replaces the statement value with a reference to the parameter. Note that if you choose to cancel the correlation, VuGen also erases the statement created in the previous step.
lrc_save_rs_param (Recordset20_0, 1, 1, 0, “Saved_AGENT_NAME”);

597
43Understanding COM Vuser Functions
The COM Vuser functions emulate the actions of a user running a COM application.
This chapter describes:
➤ Creating Instances
➤ IDispatch Interface Invoke Method
➤ Type Assignment Functions
➤ Variant Types
➤ Assignment from Reference to Variant
➤ Parameterization Functions
➤ Extraction from Variants
➤ Assignment of Arrays to Variants
➤ Array Types and Functions
➤ Byte Array Functions
➤ ADO RecordSet Functions
➤ Debug Functions
➤ VB Collection Support
The following information applies only to COM Vuser scripts.
Creating Vuser Scripts • COM Vuser Scripts
598
About COM Vuser Functions
Each VuGen COM function has an lrc prefix. VuGen records the COM API and method calls listed in this section. You can also manually program program lrc type conversion calls. For syntax and examples of the lrc functions, refer to the LoadRunner Online Function Reference, available from the VuGen Help menu.
Creating Instances
There are several functions for creating and releasing objects, derived from the corresponding COM functions:
IDispatch Interface Invoke Method
The following calls invoke the IDispatch interface using the Invoke method, setting different flag values in the wflags parameter of Invoke:
lrc_CoCreateInstance Creates an instance of an object and returns the unknown interface.
lrc_CreateInstanceEx Creates an instance of an object on a remote machine and can return multiple interfaces.
lrc_CoGetClassObject Fetches the class factory for the specified class. The class factory can then be used to create multiple objects of that class.
lrc_Release_Object Releases a COM object no longer in use.
lrc_DispMethod Invokes a method of an interface using the IDispatch:Invoke method.
lrc_DispMethod1 Invokes a method and gets a property of the same name using the IDispatch interface.
lrc_DispPropertyGet Gets a property using the IDispatch interface.

Chapter 43 • Understanding COM Vuser Functions
599
Type Assignment Functions
To supplement the functions that VuGen automatically records, you can manually program type-assignment functions into your script. The type conversion functions assign string data to the specified type. The function names are:
lrc_<Type-Name>
where <Type-Name> can be one of the following data types:
lrc_DispPropertyPut Sets a property using the IDispatch interface.
lrc_DispPropertyPutRef Sets a property by reference using the IDispatch interface.
ascii_BSTR ascii BSTR
bool boolean
BSTR BSTR
BYTE byte
char character variable
currency currency
date a date
double double
dword double word
float floating point number
GUID Returns the GUID of a named object.
hyper hyper integer
int integer
long long integer
short short integer

Creating Vuser Scripts • COM Vuser Scripts
600
Variant Types
A variant can contain any type of information. For example, a variant may be an array of strings or a double word. A variant can also be an array of variants. VuGen can convert string data to various variant types. The functions are named:
lrc_variant_<Type-Name>
where <Type-Name> can be any of the following:
uint unsigned integer
ulong unsigned long integer
uhyper unsigned 64-bit hyper integer
ushort unsigned short integer
ascii BSTR ascii BSTR variant
bool boolean variant
BSTR BSTR variant
BYTE unsigned char (BYTE ) variant
char character
CoObject an IUnknown interface pointer
currency currency variant
date date variant
DispObject an IDispatch interface pointer
float floating point number variant
int integer variant
long long integer variant
scode error code variant
short short integer variant

Chapter 43 • Understanding COM Vuser Functions
601
In addition to the variant type conversion functions, there are three functions that create new variants:
Assignment from Reference to Variant
VuGen can assign variables to a reference stored inside a variant. The functions are named:
lrc_variant_<Type-Name>_by_ref
where <Type-Name> can be any of the following:
uint unsigned integer variant
ulong unsigned long variant
ushort unsigned short variant
lrc_variant_empty Creates an empty variant.
lrc_variant_null Creates a null variant.
lrc_variant_variant_by_ref
Creates a new variant containing an existing variant.
ascii BSTR ascii BSTR variant
bool boolean variant
BSTR BSTR variant
BYTE BYTE variant
char char variant
CoObject an IUnknown interface pointer
currency currency variant
date date variant
DispObject an IDispatch interface pointer
float floating point number variant

Creating Vuser Scripts • COM Vuser Scripts
602
Parameterization Functions
Parameterization functions save a value of the specified type to a character string parameter. The syntaxes of parameterization functions are the following:
lrc_save_<Type-Name>
lrc_save_VARIANT_<Type-Name>
Saves a variable of the given <Type-Name> as a variant.
lrc_save_VARIANT_<Type-Name>_by_ref
Saves a variant of the given <Type-Name> as a reference within a variant.
The value is converted from the <type-name> to a character string. It is stored in a parameter. The statements are commented out by VuGen. To use them, change the name of the parameter to something meaningful and remove the statement’s comments. You can then use the parameter as an input to subsequent calls. The <type-name> can be one of the following:
int integer variant
long long integer variant
scode scode variant
short short integer variant
uint unsigned integer variant
ulong unsigned long variant
ushort unsigned short variant
from_variant retrieves a variant from within a variant.
ascii_BSTR ascii BSTR
bool boolean
BSTR BSTR
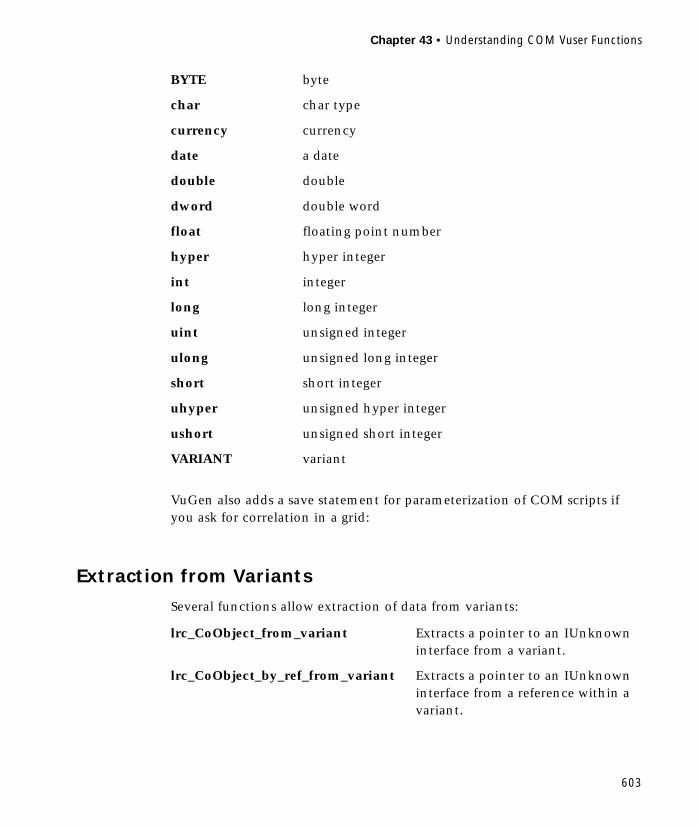
Chapter 43 • Understanding COM Vuser Functions
603
VuGen also adds a save statement for parameterization of COM scripts if you ask for correlation in a grid:
Extraction from Variants
Several functions allow extraction of data from variants:
BYTE byte
char char type
currency currency
date a date
double double
dword double word
float floating point number
hyper hyper integer
int integer
long long integer
uint unsigned integer
ulong unsigned long integer
short short integer
uhyper unsigned hyper integer
ushort unsigned short integer
VARIANT variant
lrc_CoObject_from_variant Extracts a pointer to an IUnknown interface from a variant.
lrc_CoObject_by_ref_from_variant Extracts a pointer to an IUnknown interface from a reference within a variant.

Creating Vuser Scripts • COM Vuser Scripts
604
Assignment of Arrays to Variants
These functions convert arrays to variants:
Array Types and Functions
VuGen COM supports the functions for safe arrays:
lrc_DispObject_from_variant Extracts a pointer to an IDispatch interface from a variant.
lrc_DispObject_by_ref_from_variant Extracts a pointer to an IDispatch interface from a reference within a variant.
lrc_variant_<Type-Name>Array Assigns an array of type <Type-Name> to a variant.
lrc_variant_<Type-Name>Array_by_ref Assigns an array of type <Type-Name> to a variant, where the array is passed by reference.
Create<n>D<Type-Name>Array Create an array of n dimensions of the type specified in Type-Name
Destroy<Type-Name>Array Destroy an array of the type indicated in Type-Name.
GetElementFrom<n>D<Type-Name>Array Retrieves an element of the specified type from a SafeArray.
PutElementIn<n>D<Type-Name>Array Stores an element in an array of the appropriate type.
lrc_Get<Type-Name>ArrayFromVariant Extracts an array of Type-Name from a variant.

Chapter 43 • Understanding COM Vuser Functions
605
In the above functions, <Type-Name> can be one of the following data types:
lrc_Get<Type-Name>Array_by_refFromVariant
Extracts an array of Type-Name from a pointer reference in a variant.
Fill<n>DbyteArray Fills the last dimension of a byte array with a buffer beginning at the specified n-1 indices.
Bstr BSTR
Byte a byte (unsigned char)
Char a character array
CoObject an IUnknown interface
Currency Currency (CY)
Date a Date variable
DispObject an IDispatch interface
Double double
Dword double word
Error an scode error
Float floating point number
Int integer
Long long integer
Short short integer
UInt unsigned integer
ULong unsigned long integer
UShort unsigned short integer
Variant a variant type
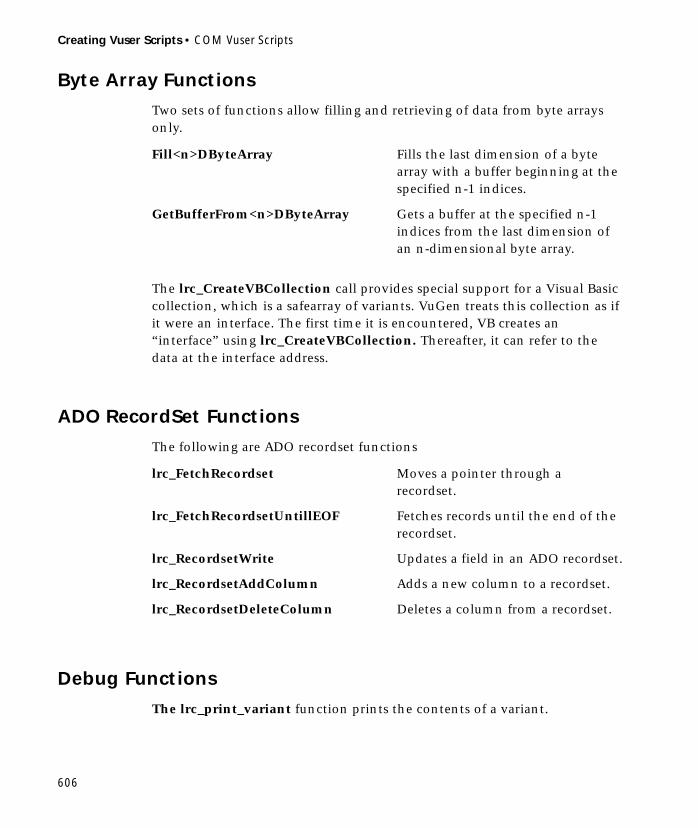
Creating Vuser Scripts • COM Vuser Scripts
606
Byte Array Functions
Two sets of functions allow filling and retrieving of data from byte arrays only.
The lrc_CreateVBCollection call provides special support for a Visual Basic collection, which is a safearray of variants. VuGen treats this collection as if it were an interface. The first time it is encountered, VB creates an “interface” using lrc_CreateVBCollection. Thereafter, it can refer to the data at the interface address.
ADO RecordSet Functions
The following are ADO recordset functions
Debug Functions
The lrc_print_variant function prints the contents of a variant.
Fill<n>DByteArray Fills the last dimension of a byte array with a buffer beginning at the specified n-1 indices.
GetBufferFrom<n>DByteArray Gets a buffer at the specified n-1 indices from the last dimension of an n-dimensional byte array.
lrc_FetchRecordset Moves a pointer through a recordset.
lrc_FetchRecordsetUntillEOF Fetches records until the end of the recordset.
lrc_RecordsetWrite Updates a field in an ADO recordset.
lrc_RecordsetAddColumn Adds a new column to a recordset.
lrc_RecordsetDeleteColumn Deletes a column from a recordset.
Chapter 43 • Understanding COM Vuser Functions
607
VB Collection Support
The lrc_CreateVBCollection function creates a Visual Basic Collection object.

Creating Vuser Scripts • COM Vuser Scripts
608
Part X
Streaming Data Vuser Scripts

610

611
44Developing RealPlayer Vuser Scripts
Streaming media is a rapidly growing market that allows for the delivery of audio/visual content over the Internet. The idea behind streaming is that the audio/video content can be transmitted to the end user without having to download the file in its entirety first. Streaming works by having the server continuously stream the content to the client as it displays it.
RealPlayer is an application that displays the streaming content.
You use VuGen to record communication between a client application and a server that communicate using the RealPlayer protocol. The resulting script is called a RealPlayer Virtual Player script.
This chapter describes:
➤ Getting Started with RealPlayer Virtual Player Scripts
➤ Using LREAL Functions
The following information applies only to RealPlayer Virtual Player scripts.
About Recording RealPlayer Virtual Player Scripts
The RealPlayer protocol allows you to emulate a user playing media or streaming data files.
When you record an application which uses the RealPlayer protocol, VuGen generates LREAL functions that describe the recorded actions. Each function begins with an lreal prefix.
Creating Vuser Scripts • RealPlayer Vuser Scripts
612
Getting Started with RealPlayer Virtual Player Scripts
This section provides an overview of the process of developing RealPlayer Virtual Player scripts using VuGen.
To develop a RealPlayer Virtual Player script:
1 Record the basic script using VuGen.
Invoke VuGen and create a new Virtual Player script. Specify Real as the type of Vuser (Virtual Player). Choose an application to record. Record typical operations on your application.
For details, see Chapter 3, “Recording with VuGen.”
2 Enhance the script.
Enhance the Virtual Player script by inserting transactions, rendezvous points, and control-flow structures into the script.
For details, see Chapter 4, “Enhancing Vuser Scripts.”
3 Define parameters (optional).
Define parameters for the fixed-values recorded into your script. By substituting fixed-values with parameters, you can repeat the same business process many times using different values.
For details, see Chapter 5, “Defining Parameters.”
4 Correlate statements (optional).
Correlating statements enables you to use the result of one business process in a subsequent one.
For details, see Chapter 6, “Correlating Statements.”
5 Configure the run-time settings.
The run-time settings control the Virtual Player behavior during script execution. These settings include loop, log, and timing information.
For details, see Chapter 7, “Configuring Run-Time Settings.”
6 Run the script from VuGen.
Save and run the script from VuGen to verify that it runs correctly.
For details, see Chapter 9, “Running Vuser Scripts in Stand-Alone Mode.”
Chapter 44 • Developing RealPlayer Vuser Scripts
613
After you create a RealPlayer Virtual Player script, you integrate it into a scenario on either a Windows or UNIX platform. For more information on integrating Virtual Player scripts in a scenario, refer to your LoadRunner Controller User’s Guide.
Using LREAL Functions
The functions developed to emulate communication between a client and a server by using the RealPlayer protocol are called LREAL Virtual Player functions. Each LREAL Virtual Player function has an lreal prefix. VuGen automatically records most of the LREAL functions listed in this section during a RealPlayer session. You can also manually program any of the functions into your script. For more information about the LREAL functions, refer to the Online Function Reference (available from the VuGen Help menu).
For example, the lreal_play function takes the form
int lreal_play ( int miplayerID, long mulPauseTime );
To play the clip until the end, use any negative value for mulPauseTime. To play the clip for a certain number of milliseconds, use the number of milliseconds. miplayerID represents a unique ID of a RealPlayer instance.
lreal_clip_size Returns the size of the current clip.
lreal_close_player Closes a RealPlayer instance.
lreal_open_player Creates a new RealPlayer instance.
lreal_open_url Opens a URL in the RealPlayer.
lreal_pause Pauses a RealPlayer instance.
lreal_play Plays a RealPlayer instance.
lreal_seek Seeks a position within the current clip.
lreal_stop Stops a RealPlayer instance.

Creating Vuser Scripts • RealPlayer Vuser Scripts
614

Part XI
TUXEDO Vuser Scripts

616

617
45Developing TUXEDO Vuser Scripts
You use VuGen to record communication between a TUXEDO client application and a TUXEDO application server. The resulting script is called a TUXEDO Vuser script.
This chapter describes:
➤ Getting Started with TUXEDO Vuser Scripts
➤ Using LRT Functions
➤ Understanding TUXEDO Vuser Scripts
➤ Viewing TUXEDO Buffer Data
➤ Defining Environment Settings for TUXEDO Vusers
➤ Debugging TUXEDO Applications
➤ Correlating TUXEDO Scripts
The following information applies only to Tuxedo Vuser scripts.
About TUXEDO Vuser Scripts
When you record a TUXEDO application, VuGen generates LRT functions that describe the recorded actions. These functions emulate communication between a TUXEDO client and a server. Each LRT function begins with an lrt prefix.
In addition to the lrt prefix, certain functions use an additional prefix of tp, tx or F. These sub-prefixes indicate the function type, similar to the actual TUXEDO functions. The tp sub-prefix indicates a TUXEDO client tp session. For example, lrt_tpcall sends a service request and awaits its reply. The tx

Creating Vuser Scripts • TUXEDO Vuser Scripts
618
sub-prefix indicates a global tx session. For example, lrt_tx_begin begins a global transaction. The F sub-prefix indicates an FML buffer related function. For example, lrt_Finitialize initializes an existing buffer.
Functions without an additional prefix emulate standard C functions. For example, lrt_strcpy copies a string, similar to the C function strcpy.
You can view and edit the recorded script from VuGen’s main window. The LRT functions that are recorded during the session are displayed in the VuGen window, allowing you to visually track your network activities.
Before You Record
Before you record, verify that the TUXEDO directory, %TUXDIR%\bin is in the path.
If the environment variables have changed since the last time you restarted VuGen, VuGen may record the original variable value rather than the current value.
To avoid any inconsistencies, you should restart VuGen before recording TUXEDO applications.
Getting Started with TUXEDO Vuser Scripts
This section provides an overview of the process of developing TUXEDO Vuser scripts using VuGen.
To develop a TUXEDO Vuser script:
1 Record the basic script using VuGen.
Invoke VuGen and create a new Vuser script. Specify TUXEDO or TUXEDO63 (for recording TUXEDO Version 6.3) as the type of Vuser. Choose an application to record. Record typical operations on your application.
For details, see Chapter 3, “Recording with VuGen.”
2 Enhance the script.

Chapter 45 • Developing TUXEDO Vuser Scripts
619
Enhance the Vuser script by inserting transactions, rendezvous points, and control-flow structures into the script.
For details, see Chapter 4, “Enhancing Vuser Scripts.”
3 Define parameters (optional).
Define parameters for the fixed-values recorded into your script. By substituting fixed-values with parameters, you can repeat the same business process many times using different values.
For details, see Chapter 5, “Defining Parameters.”
4 Correlate statements (optional).
Correlating statements enables you to use the result of one business process in a subsequent one.
For details, see Chapter 6, “Correlating Statements.”
5 Configure the run-time settings.
The run-time settings control the Vuser behavior during script execution. These settings include loop, log, and timing information.
For details, see Chapter 7, “Configuring Run-Time Settings.”
6 Run the script from VuGen.
Save and run the script from VuGen to verify that it runs correctly.
For details, see Chapter 9, “Running Vuser Scripts in Stand-Alone Mode.”
After you create a TUXEDO Vuser script, you integrate it into a scenario on either a Windows or UNIX platform. For more information on integrating Vuser scripts in a scenario, refer to your LoadRunner Controller User’s Guide.
Using LRT Functions
The functions developed to emulate a TUXEDO client communications with a server are called LRT functions. Each LRT Vuser function has an lrt prefix. VuGen automatically records most of the LRT functions listed in this section during a TUXEDO session. You can also manually program any of the functions into your script. For syntax and examples of the LRT
Creating Vuser Scripts • TUXEDO Vuser Scripts
620
functions, refer to the LoadRunner Online Function Reference (available from the VuGen Help menu).
Note: Some of the FML buffer functions indicate an optional “32” in the function name. These are the FML32 versions of the functions.
Buffer Manipulation Functions
Client/Server Session Functions
lrt_Fadd[32]_fld Adds a new field to an FML buffer.
lrt_Finitialize[32] Initializes an existing FML buffer fbfr.
lrt_Fldid[32] Maps a field name to a field identifier.
lrt_Fname[32] Provides a map field identifier to field name.
lrt_memcpy Copies the specified amount of bytes from the source to the destination.
lrt_strcpy Copies a string like the C function strcpy.
lrt_tpalloc Returns a pointer to a buffer of type type.
lrt_tprealloc Changes the size of a typed buffer.
lrt_tpfree Frees a typed buffer.
lrt_tptypes Determines information about a typed buffer.
lrt_tpchkauth Checks if authentication is required by the application.
lrt_tpinitialize Enables a client to join a System/T application.
lrt_tpterm Removes a client from a System/T application.

Chapter 45 • Developing TUXEDO Vuser Scripts
621
Communication Functions
lrt_tpacall Sends a service request.
lrt_tpbroadcast Broadcasts notification by name.
lrt_tpcall Sends a service request and awaits its reply.
lrt_tpcancel Cancels a call descriptor.
lrt_tpchkunsol Checks for an unsolicited message.
lrt_tpconnect Establishes a conversational service connection.
lrt_tpdequeue Dequeues a message from a queue.
lrt_tpdiscon Terminates a conversational service connection.
lrt_tpenqueue Stores a message in the queue.
lrt_tpgetrply Returns a reply from a previously sent request.
lrt_tpgprio Returns the priority for the last request sent or received.
lrt_tpnotify Sends notification to a client.
lrt_tppost Posts an event.
lrt_tprecv Receives a message in a conversational connection.
lrt_tpsend Sends a message in a conversational connection.
lrt_tpsetunsol Sets the method for handling unsolicited messages.
lrt_tpsprio Sets the priority for the next request sent or forwarded.
lrt_tpsubscribe Subscribes to an event.
lrt_tpunsubscribe Unsubscribes to an event.

Creating Vuser Scripts • TUXEDO Vuser Scripts
622
Environment Variable Functions
Error Processing Functions
Transaction Handling Functions
lrt_set_env_list Sets a list of environment variables.
lrt_tuxgetenv Returns a value corresponding to an environment name.
lrt_tuxputenv Modifies an existing environment value or adds a value to the environment.
lrt_tuxreadenv Adds variables to the environment from a file.
lrt_abort_on_error Aborts the current transaction, if the previous TUXEDO function call resulted in an error.
lrt_Fstrerror[32] Retrieves error message string for FML error.
lrt_getFerror[32] Retrieves the error status code for the last FML operation that failed.
lrt_gettperrno Retrieves the error status code for the last TUXEDO transaction monitor function.
lrt_gettpurcode Retrieves the application return code.
lrt_tpstrerror Retrieves error message string for System/T error.
lrt_tpabort Aborts the current transaction.
lrt_tpbegin Begins a transaction.
lrt_tpcommit Commits the current transaction.
lrt_tpgetlev Checks if a transaction is in progress.
lrt_tpresume Resumes a global transaction.
lrt_tpscmt Sets when lrt_tpcommit should return.
lrt_tpsuspend Suspends a global transaction.
lrt_tx_begin Begins a global transaction.

Chapter 45 • Developing TUXEDO Vuser Scripts
623
Correlating Statement Functions
lrt_tx_close Closes a set of resource managers.
lrt_tx_commit Commits a global transaction.
lrt_tx_info Returns global transaction information.
lrt_tx_open Opens a set of resource managers.
lrt_tx_rollback Rolls back a global transaction.
lrt_tx_set_commit_return Sets the commit_return characteristic to the value specified in when_return.
lrt_tx_set_transaction_control
Sets the transaction_control characteristic to the value specified in control.
lrt_tx_set_transaction_timeout
Sets the transaction_timeout characteristic to the value specified in timeout.
lrt_display_buffer Stores buffer information in a file.
lrt_save[32]_fld_val Saves the current value of an FML buffer to a parameter.
lrt_save_parm Saves a portion of a character array (such as a STRING or CARRAY buffer) to a parameter.
lrt_save_searched_string Searches for an occurrence of a string in a buffer and saves a portion of the buffer, relative to the string occurrence, to a parameter.

Creating Vuser Scripts • TUXEDO Vuser Scripts
624
Note: In general, it is recommended to use lrt_save_parm to save a portion of a character array to a parameter. Use lrt_save_searched_string when you want to save information, relative to the position of a particular string in a character array. For PeopleSoft Vusers, it is recommended to use lrt_save_searched_string, since the reply buffers returned from the PeopleSoft server often differ in size during replay from what was seen during recording.
Understanding TUXEDO Vuser Scripts
After you record a session, VuGen’s built-in editor lets you view the recorded code. You can scroll through the script, see TUXEDO statements that were generated by your application, and examine the data that was returned by the server. The VuGen window provides you with valuable information about the recorded TUXEDO session. When you view the script in the main window, you see the sequence in which VuGen recorded your activities.
In the following example, VuGen recorded a client’s actions in a TUXEDO bank application. The client performed an action of opening a bank account and specifying all the necessary details. The session was aborted when the client specified a zero opening balance.
lrt_abort_on_error();lr_think_time(65);tpresult_int = lrt_tpbegin(30, 0);data_0 = lrt_tpalloc("FML", "", 512);lrt_Finitialize((FBFR*)data_0);

Chapter 45 • Developing TUXEDO Vuser Scripts
625
Using Parameters in TUXEDO Scripts
You can define parameters in TUXEDO scripts, as described in Chapter 5, “Defining Parameters.” Note that TUXEDO scripts contain strings of type “name=...” or “value=...”. You can only define parameters for the portion of the string following the equal sign (=). For example:
/* Fill the data buffer data_0 with new account information */lrt_Fadd_fld((FBFR*)data_0, "name=BRANCH_ID", "value=8", LRT_END_OF_PARMS);lrt_Fadd_fld((FBFR*)data_0, "name=ACCT_TYPE", "value=C", LRT_END_OF_PARMS);lrt_Fadd_fld((FBFR*)data_0, "name=MID_INIT", "value=Q", LRT_END_OF_PARMS);lrt_Fadd_fld((FBFR*)data_0,"name=PHONE","value=123-456-7890",
LRT_END_OF_PARMS);
lrt_Fadd_fld((FBFR*)data_0, "name=ADDRESS", "value=1 BroadwayNew York, NY 10000", LRT_END_OF_PARMS);
lrt_Fadd_fld((FBFR*)data_0,"name=SSN","value=111111111", LRT_END_OF_PARMS);
lrt_Fadd_fld((FBFR*)data_0,"name=LAST_NAME", "value=Doe",LRT_END_OF_PARMS);
lrt_Fadd_fld((FBFR*)data_0,"name=FIRST_NAME", "value=BJ",LRT_END_OF_PARMS);
lrt_Fadd_fld((FBFR*)data_0, "name=SAMOUNT", "value=0.00",LRT_END_OF_PARMS);
/* Open a new account */tpresult_int = lrt_tpcall("OPEN_ACCT", data_0, 0, &data_0, &olen_2, 0);lrt_tpabort(0);lrt_tpcommit(0);lrt_tpfree(data_0);lrt_tpterm();
lrt_Fadd_fld((FBFR*)data_0,"name=PHONE","value=<parameter_1>", LRT_END_OF_PARMS);
Creating Vuser Scripts • TUXEDO Vuser Scripts
626
Running TUXEDO Scripts
If you encounter problems recording or running TUXEDO applications, check that the TUXEDO application runs without VuGen, and that the environment variables have been defined correctly. For more information, see “Viewing TUXEDO Buffer Data,” on page 626. Note that after you set or modify the TUXEDO variables, you should restart VuGen and your application, in order for the changes to take effect. If your application is 16-bit, then you also need to kill the NTVDM process.
If you experience problems during execution, check the TUXEDO log file on the side of the server for error messages. By default, this file is found in the directory indicated by the environment variable APPDIR. The file name has the form ULOG.mmddyy, where mmddyy indicates the current month, day, and year. The file for March 12, 1999 would be ULOG.031299. The default location of this file can be changed by setting the environment variable ULOGPFX on the server. A log file can also be found on the client side, in the current directory, unless the ULOGPFX variable changes its location.
Viewing TUXEDO Buffer Data
When you use VuGen to create a Tuxedo Vuser script, your actions are recorded into the three sections of the script: vuser_init, Actions, and vuser_end.
The data that is received or transmitted is stored in data buffers, which can be very large. In order to simplify the appearance of the script, the actual data is stored in external files—not in the C file. When a data transfer occurs, the data is copied from the external file into a temporary buffer.
The external file is called replay.vdf, and it contains the contents of all the temporary buffers. The buffers’ contents are stored as sequential records. The records are marked by identifiers indicating whether the data was sent or received, and the buffer descriptor. The LRT functions use the buffer descriptors to access the data.
You can use VuGen to view the contents of the data file by selecting the replay.vdf file in the left pane’s tree view.
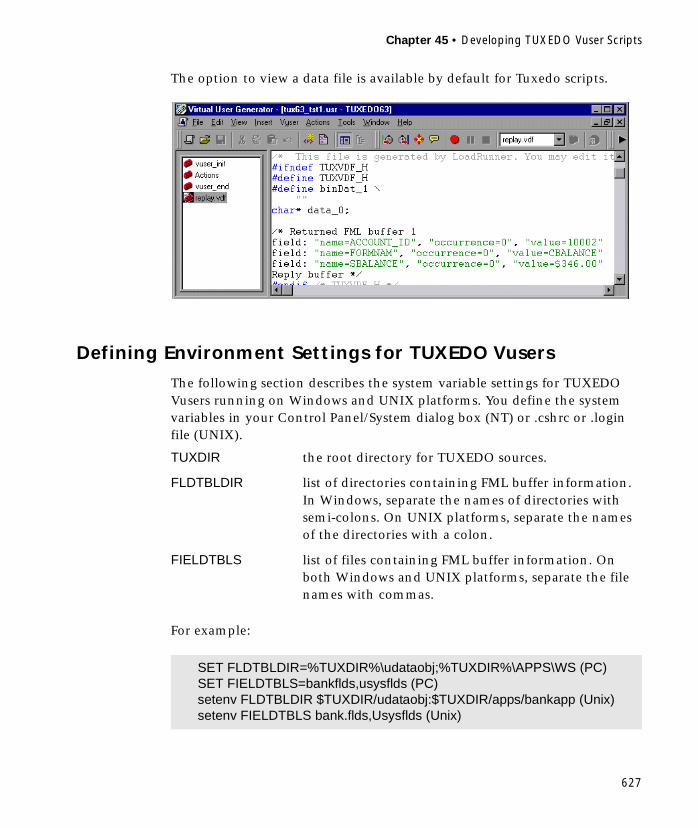
Chapter 45 • Developing TUXEDO Vuser Scripts
627
The option to view a data file is available by default for Tuxedo scripts.
Defining Environment Settings for TUXEDO Vusers
The following section describes the system variable settings for TUXEDO Vusers running on Windows and UNIX platforms. You define the system variables in your Control Panel/System dialog box (NT) or .cshrc or .login file (UNIX).
For example:
TUXDIR the root directory for TUXEDO sources.
FLDTBLDIR list of directories containing FML buffer information. In Windows, separate the names of directories with semi-colons. On UNIX platforms, separate the names of the directories with a colon.
FIELDTBLS list of files containing FML buffer information. On both Windows and UNIX platforms, separate the file names with commas.
SET FLDTBLDIR=%TUXDIR%\udataobj;%TUXDIR%\APPS\WS (PC)SET FIELDTBLS=bankflds,usysflds (PC)setenv FLDTBLDIR $TUXDIR/udataobj:$TUXDIR/apps/bankapp (Unix)setenv FIELDTBLS bank.flds,Usysflds (Unix)
Creating Vuser Scripts • TUXEDO Vuser Scripts
628
You must define the following system variables for TUXEDO clients using TUXEDO/WS workstation extensions during execution:
For example:
Debugging TUXEDO Applications
If you encounter problems recording or replaying TUXEDO applications, consider that TUXEDO applications for Win32 can be built using one of two different sets of DLLs:
➤ One way uses the DLL wtuxws32.dll and possibly other DLLs.
➤ The other way does not use wtuxws32.dll, but may use others (libwsc.dll, libfml.dll, libgp.dll) instead.
When you create a TUXEDO Vuser, you select either TUXEDO or TUXEDO63. Use TUXEDO users if the application uses wtuxws32.dll. Otherwise, use TUXEDO63.
You should always try using the TUXEDO63 type, and only revert to the TUXEDO type if there are problems using TUXEDO63.
WSNADDR specifies the network address of the workstation listener process. This enables the client application to access TUXEDO. Note that to define multiple addresses in a WSNADDR statement, each address must be separated by a comma.
WSDEVICE specifies the device that accesses the network. Note that you do not need to define this variable for some network protocols.
SET WSNADDR=0x0002ffffc7cb4e4a (PC)setenv WSNADDR 0x0002ffffc7cb4e4a (Unix)setenv WSDEVICE /dev/tcp (Unix)
Chapter 45 • Developing TUXEDO Vuser Scripts
629
Correlating TUXEDO Scripts
VuGen supports correlation for Vuser scripts recorded with TUXEDO applications. Correlated statements enable you to link statements by saving a portion of a buffer and use it in subsequent statements.
To correlate statements, you modify your recorded script within the VuGen editor using one of the following LRT functions:
➤ lrt_save[32]_fld_val saves the current value of an FML or FML32 buffer (a string in the form “name=<NAME>” or “id=<ID>”) to a parameter.
➤ lrt_save_parm saves a portion of a character array (such as a STRING or CARRAY buffer) to a parameter.
➤ lrt_save_searched_string searches for an occurrence of a string in a buffer and saves a portion of the buffer, relative to the string occurrence, to a parameter.
For additional information about the syntax of these functions, refer to the LoadRunner Online Function Reference.
Correlating FML and FML32 Buffers
Use lrt_save_fld_val or lrt_save32_fld_val to save the contents of the FML or FML32 buffer.
To correlate statements using lrt_save_fld_val:
1 Insert the lrt_save_fld_val statement in your script where you want to save the contents of the current FML (or FML32) buffer.
lrt_save_fld_val (fbfr, "name", occurrence, "param_name");
2 Reference the parameter.
Locate the lrt statements with the recorded values that you want to replace with the contents of the saved buffer. Replace all instances of the recorded values with the parameter name in angle brackets.

Creating Vuser Scripts • TUXEDO Vuser Scripts
630
In the following example, a bank account was opened and the account number was stored to a parameter, account_id.
In the above example, the account id was represented by a field name, ACCOUNT_ID. Some systems represent a field by an ID number rather than a field name during recording.
You can correlate by field id as follows:
lrt_save_fld_val((FBFR*)data_0, "id=8302", 0, "account_id");
Correlating Character Strings
Use lrt_save_parm or lrt_save_searched_string to correlate character strings.
/* Fill the data_0 buffer with new account information*/data_0 = lrt_tpalloc("FML", "", 512);lrt_Finitialize((FBFR*)data_0);lrt_Fadd_fld((FBFR*)data_0, "name=BRANCH_ID", "value=1", LRT_END_OF_PARMS);lrt_Fadd_fld((FBFR*)data_0, "name=ACCT_TYPE", "value=S", LRT_END_OF_PARMS);. . .
LRT_END_OF_PARMS);lrt_Fadd_fld((FBFR*)data_0, "name=LAST_NAME", "value=Doe", ...);lrt_Fadd_fld((FBFR*)data_0, "name=FIRST_NAME", "value=John", ...);lrt_Fadd_fld((FBFR*)data_0, "name=SAMOUNT", "value=234.12", ...);
/* Open a new account and save the new account number*/tpresult_int = lrt_tpcall("OPEN_ACCT", data_0, 0,&data_0, &olen_2, 0);lrt_abort_on_error();lrt_save_fld_val((FBFR*)data_0, "name=ACCOUNT_ID", 0, "account_id");
/* Use result from first query to fill buffer for the deposit*/lrt_Finitialize((FBFR*)data_0);lrt_Fadd_fld((FBFR*)data_0, "name=ACCOUNT_ID", "value=<account_id>", LRT_END_OF_PARMS);lrt_Fadd_fld((FBFR*)data_0, "name=SAMOUNT", "value=200.11", ...);
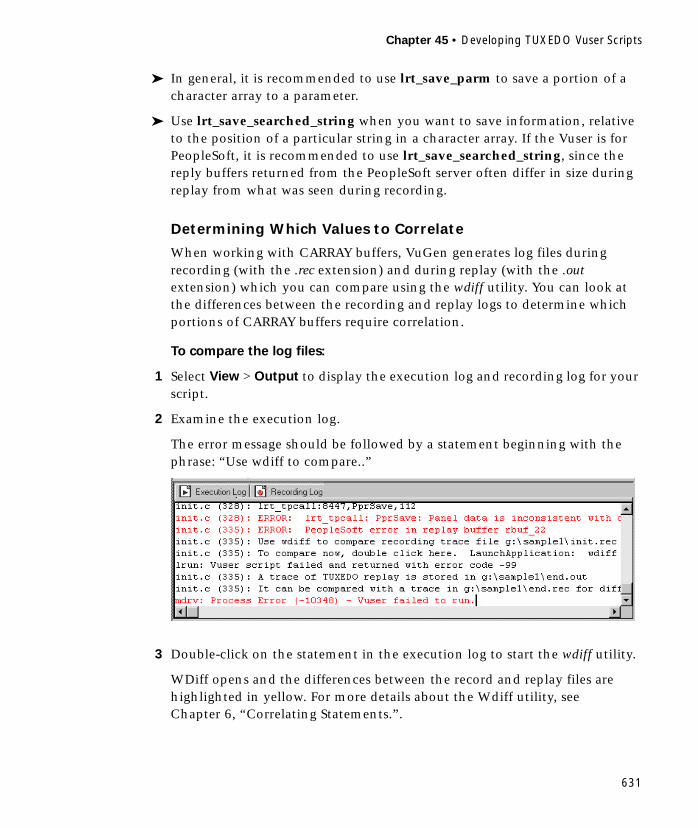
Chapter 45 • Developing TUXEDO Vuser Scripts
631
➤ In general, it is recommended to use lrt_save_parm to save a portion of a character array to a parameter.
➤ Use lrt_save_searched_string when you want to save information, relative to the position of a particular string in a character array. If the Vuser is for PeopleSoft, it is recommended to use lrt_save_searched_string, since the reply buffers returned from the PeopleSoft server often differ in size during replay from what was seen during recording.
Determining Which Values to Correlate
When working with CARRAY buffers, VuGen generates log files during recording (with the .rec extension) and during replay (with the .out extension) which you can compare using the wdiff utility. You can look at the differences between the recording and replay logs to determine which portions of CARRAY buffers require correlation.
To compare the log files:
1 Select View > Output to display the execution log and recording log for your script.
2 Examine the execution log.
The error message should be followed by a statement beginning with the phrase: “Use wdiff to compare..”
3 Double-click on the statement in the execution log to start the wdiff utility.
WDiff opens and the differences between the record and replay files are highlighted in yellow. For more details about the Wdiff utility, see Chapter 6, “Correlating Statements.”.
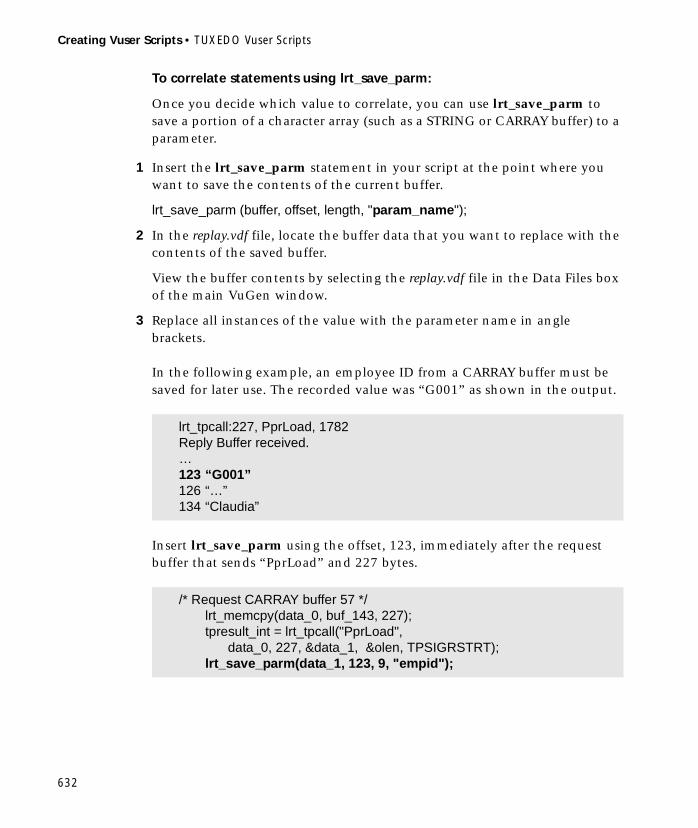
Creating Vuser Scripts • TUXEDO Vuser Scripts
632
To correlate statements using lrt_save_parm:
Once you decide which value to correlate, you can use lrt_save_parm to save a portion of a character array (such as a STRING or CARRAY buffer) to a parameter.
1 Insert the lrt_save_parm statement in your script at the point where you want to save the contents of the current buffer.
lrt_save_parm (buffer, offset, length, "param_name");
2 In the replay.vdf file, locate the buffer data that you want to replace with the contents of the saved buffer.
View the buffer contents by selecting the replay.vdf file in the Data Files box of the main VuGen window.
3 Replace all instances of the value with the parameter name in angle brackets.
In the following example, an employee ID from a CARRAY buffer must be saved for later use. The recorded value was “G001” as shown in the output.
Insert lrt_save_parm using the offset, 123, immediately after the request buffer that sends “PprLoad” and 227 bytes.
lrt_tpcall:227, PprLoad, 1782Reply Buffer received.…123 “G001”126 “…”134 “Claudia”
/* Request CARRAY buffer 57 */lrt_memcpy(data_0, buf_143, 227);tpresult_int = lrt_tpcall("PprLoad",
data_0, 227, &data_1, &olen, TPSIGRSTRT);lrt_save_parm(data_1, 123, 9, "empid");
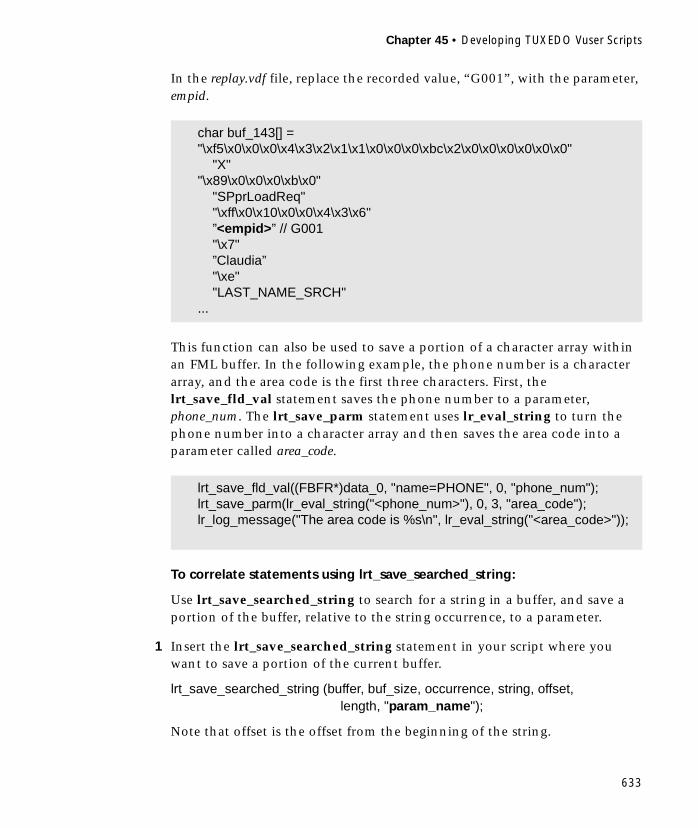
Chapter 45 • Developing TUXEDO Vuser Scripts
633
In the replay.vdf file, replace the recorded value, “G001”, with the parameter, empid.
This function can also be used to save a portion of a character array within an FML buffer. In the following example, the phone number is a character array, and the area code is the first three characters. First, the lrt_save_fld_val statement saves the phone number to a parameter, phone_num. The lrt_save_parm statement uses lr_eval_string to turn the phone number into a character array and then saves the area code into a parameter called area_code.
To correlate statements using lrt_save_searched_string:
Use lrt_save_searched_string to search for a string in a buffer, and save a portion of the buffer, relative to the string occurrence, to a parameter.
1 Insert the lrt_save_searched_string statement in your script where you want to save a portion of the current buffer.
lrt_save_searched_string (buffer, buf_size, occurrence, string, offset,length, "param_name");
Note that offset is the offset from the beginning of the string.
char buf_143[] = "\xf5\x0\x0\x0\x4\x3\x2\x1\x1\x0\x0\x0\xbc\x2\x0\x0\x0\x0\x0\x0" "X""\x89\x0\x0\x0\xb\x0" "SPprLoadReq" "\xff\x0\x10\x0\x0\x4\x3\x6" ”<empid>” // G001 "\x7" ”Claudia” "\xe" "LAST_NAME_SRCH"...
lrt_save_fld_val((FBFR*)data_0, "name=PHONE", 0, "phone_num");lrt_save_parm(lr_eval_string("<phone_num>"), 0, 3, "area_code");lr_log_message("The area code is %s\n", lr_eval_string("<area_code>"));

Creating Vuser Scripts • TUXEDO Vuser Scripts
634
2 In the replay.vdf file, locate the buffer data that you want to replace with the contents of the saved buffer.
View the buffer contents by selecting the replay.vdf file in the Data Files box of the main VuGen window.
3 Replace all instances of the value with the parameter name in angle brackets.
In the following example, a Certificate is saved to a parameter for a later use. The lrt_save_searched_string function saves 16 bytes from the specified olen buffer, to the parameter cert1. The saved string location in the buffer, is 9 bytes past the first occurrence of the string “SCertRep”.
This application is useful when the buffer’s header information is different depending on the recording environment.
The certificate will always come 9 bytes past the first occurrence of “SCertRep”, but the length of the information before this string varies.
/* Request CARRAY buffer 1 */lrt_memcpy(data_0, sbuf_1, 41);lrt_display_buffer("sbuf_1", data_0, 41, 41);data_1 = lrt_tpalloc("CARRAY", "", 8192);tpresult_int = lrt_tpcall("GetCertificate",
data_0,41,&data_1,&olen,TPSIGRSTRT);
/* Reply CARRAY buffer 1 */lrt_display_buffer("rbuf_1", data_1, olen, 51);lrt_abort_on_error();
lrt_save_searched_string(data_1, olen, 0, "SCertRep", 9, 16, "cert1");

Part XII
Jolt Vuser Scripts

636
637
46Developing Jolt Vuser Scripts
You use VuGen to record communication between a Jolt client application and a TUXEDO application server or a PeopleSoft-Web application. The resulting script emulates the actions with lrjolt functions.
This chapter describes:
➤ Getting Started with Jolt Vuser Scripts
➤ Using lrjolt Functions
➤ Understanding Jolt Vuser Scripts
➤ Viewing Jolt Parameter Arrays
➤ Running Jolt Vuser Scripts
➤ Correlating Jolt Scripts
The following information applies to Jolt and PeopleSoft-Web Vuser scripts.
About Jolt Vuser Scripts
When you record a Jolt application, VuGen generates LRJOLT functions that describe the recorded actions. These functions emulate communication between a Jolt client and a server. Each Jolt Vuser function begins with an lrjolt prefix.
You can view and edit the recorded script from VuGen’s main window. The functions that are recorded during the session are displayed in the VuGen window, allowing you to visually track your network activities.
Creating Vuser Scripts • Jolt Vuser Scripts
638
Getting Started with Jolt Vuser Scripts
This section provides an overview of the process of developing Jolt Vuser scripts using VuGen.
To develop a Jolt Vuser script:
1 Record the basic script using VuGen.
Invoke VuGen and create a new Vuser script. Specify Jolt as the type of Vuser. Choose an application to record. Record typical operations on your application.
For details, see Chapter 3, “Recording with VuGen.”
2 Enhance the script.
Enhance the Vuser script by inserting transactions, rendezvous points, and control-flow structures into the script.
For details, see Chapter 4, “Enhancing Vuser Scripts.”
3 Define parameters (optional).
Define parameters for the fixed-values recorded into your script using the lrjolt_add_param_value function. By substituting fixed-values with parameters, you can repeat the same business process many times using different values.
For details, see the LoadRunner Online Function Reference.
4 Correlate statements (optional).
Use the lrjolt_save_param_value function to save the specified value to a parameter. Correlating statements enables you to use the result of one business process in a subsequent one.
For details, see Chapter 6, “Correlating Statements.”
5 Set session attributes (optional).
Use the lrjolt_set_* function to set session attribute values. To apply the values to the entire script, set them in the vuser_init section.
For details, see LoadRunner Online Function Reference
6 Configure the run-time settings.

Chapter 46 • Developing Jolt Vuser Scripts
639
The run-time settings control the Vuser behavior during script execution. These settings include loop, log, and timing information.
For details, see Chapter 7, “Configuring Run-Time Settings.”
7 Run the script from VuGen.
Save and run the script from VuGen to verify that it runs correctly.
For details, see Chapter 9, “Running Vuser Scripts in Stand-Alone Mode.”
After you create a Jolt Vuser script, you integrate it into a LoadRunner scenario on either a Windows or UNIX platform. For more information on integrating Vuser scripts in a scenario, refer to your LoadRunner Controller User’s Guide.
Using lrjolt Functions
The functions developed to emulate a Jolt client communicating with a TUXEDO server are called lrjolt functions. Each Jolt Vuser function has an lrjolt prefix. VuGen automatically records most of the LRJOLT functions listed in this section during a Jolt session. You can also manually program any of the functions into your script. For more information about the Jolt Vuser functions, refer to the LoadRunner Online Function Reference (available from the VuGen Help menu).
Conversion Functions
Correlation Functions
lrjolt_calc_conv_dest_size Calculates the buffer size for converting a data type.
lrjolt_convert Converts from one data type to another.
lrjolt_save_param_value Saves the specified value to a parameter.
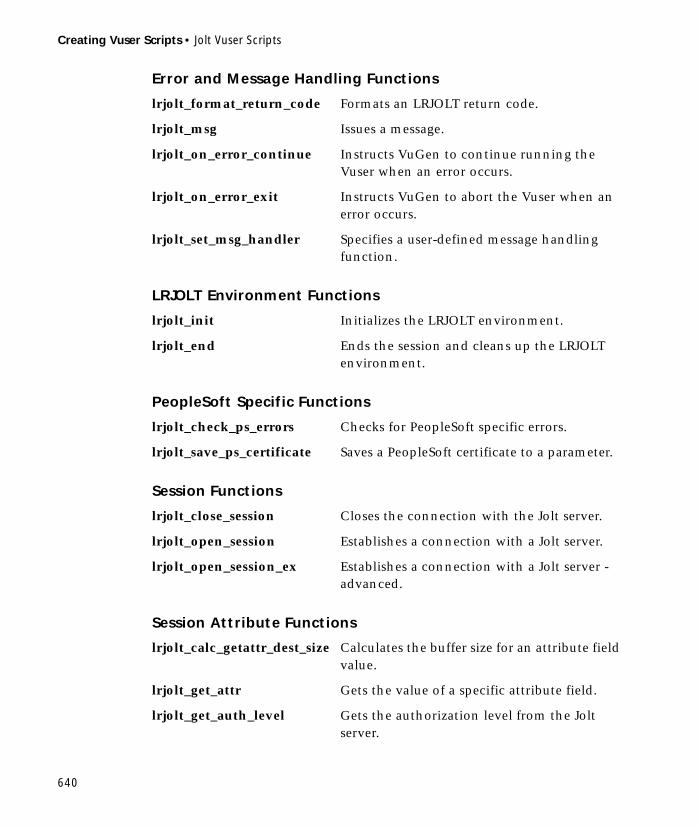
Creating Vuser Scripts • Jolt Vuser Scripts
640
Error and Message Handling Functions
LRJOLT Environment Functions
PeopleSoft Specific Functions
Session Functions
Session Attribute Functions
lrjolt_format_return_code Formats an LRJOLT return code.
lrjolt_msg Issues a message.
lrjolt_on_error_continue Instructs VuGen to continue running the Vuser when an error occurs.
lrjolt_on_error_exit Instructs VuGen to abort the Vuser when an error occurs.
lrjolt_set_msg_handler Specifies a user-defined message handling function.
lrjolt_init Initializes the LRJOLT environment.
lrjolt_end Ends the session and cleans up the LRJOLT environment.
lrjolt_check_ps_errors Checks for PeopleSoft specific errors.
lrjolt_save_ps_certificate Saves a PeopleSoft certificate to a parameter.
lrjolt_close_session Closes the connection with the Jolt server.
lrjolt_open_session Establishes a connection with a Jolt server.
lrjolt_open_session_ex Establishes a connection with a Jolt server -advanced.
lrjolt_calc_getattr_dest_size Calculates the buffer size for an attribute field value.
lrjolt_get_attr Gets the value of a specific attribute field.
lrjolt_get_auth_level Gets the authorization level from the Jolt server.
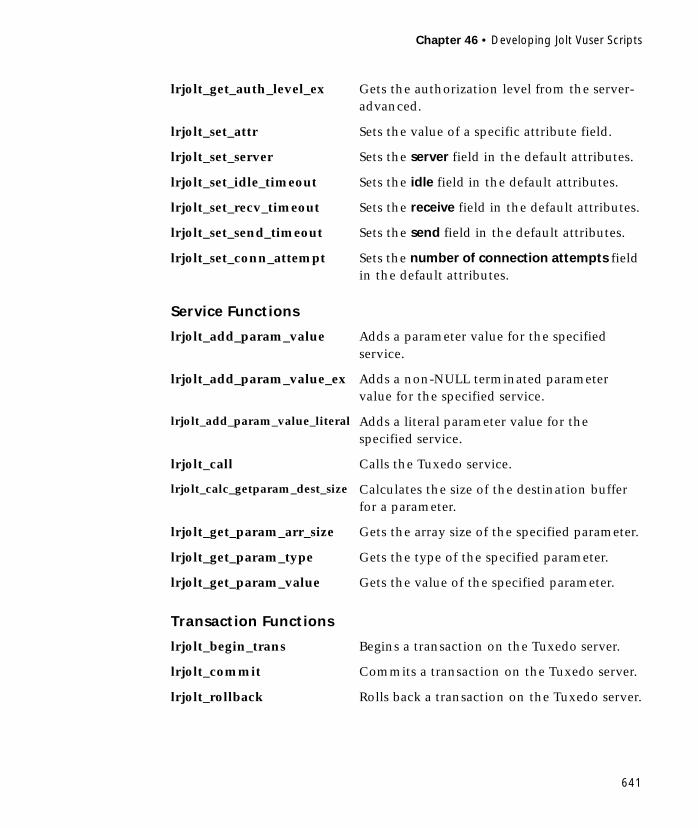
Chapter 46 • Developing Jolt Vuser Scripts
641
Service Functions
Transaction Functions
lrjolt_get_auth_level_ex Gets the authorization level from the server-advanced.
lrjolt_set_attr Sets the value of a specific attribute field.
lrjolt_set_server Sets the server field in the default attributes.
lrjolt_set_idle_timeout Sets the idle field in the default attributes.
lrjolt_set_recv_timeout Sets the receive field in the default attributes.
lrjolt_set_send_timeout Sets the send field in the default attributes.
lrjolt_set_conn_attempt Sets the number of connection attempts field in the default attributes.
lrjolt_add_param_value Adds a parameter value for the specified service.
lrjolt_add_param_value_ex Adds a non-NULL terminated parameter value for the specified service.
lrjolt_add_param_value_literal Adds a literal parameter value for the specified service.
lrjolt_call Calls the Tuxedo service.
lrjolt_calc_getparam_dest_size Calculates the size of the destination buffer for a parameter.
lrjolt_get_param_arr_size Gets the array size of the specified parameter.
lrjolt_get_param_type Gets the type of the specified parameter.
lrjolt_get_param_value Gets the value of the specified parameter.
lrjolt_begin_trans Begins a transaction on the Tuxedo server.
lrjolt_commit Commits a transaction on the Tuxedo server.
lrjolt_rollback Rolls back a transaction on the Tuxedo server.
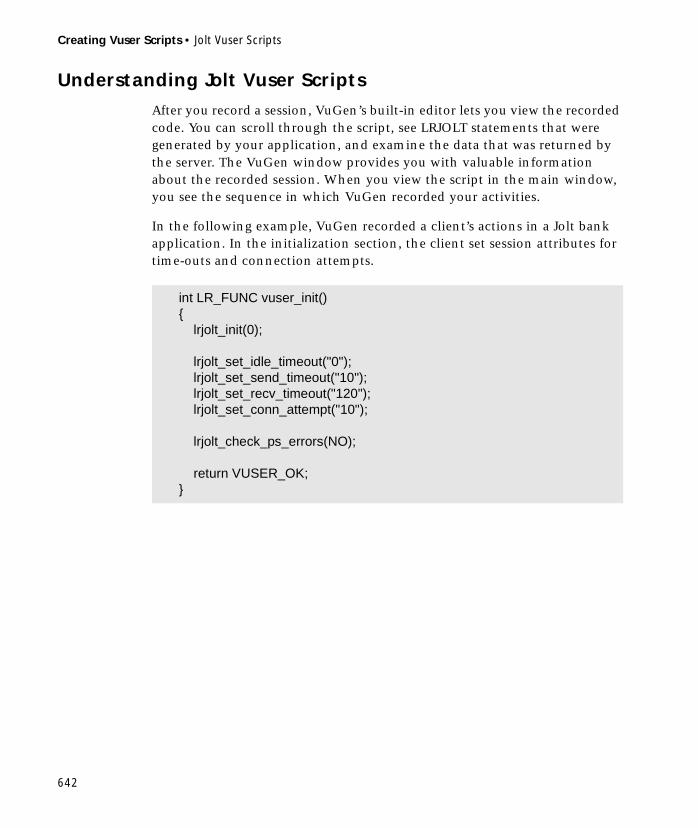
Creating Vuser Scripts • Jolt Vuser Scripts
642
Understanding Jolt Vuser Scripts
After you record a session, VuGen’s built-in editor lets you view the recorded code. You can scroll through the script, see LRJOLT statements that were generated by your application, and examine the data that was returned by the server. The VuGen window provides you with valuable information about the recorded session. When you view the script in the main window, you see the sequence in which VuGen recorded your activities.
In the following example, VuGen recorded a client’s actions in a Jolt bank application. In the initialization section, the client set session attributes for time-outs and connection attempts.
int LR_FUNC vuser_init(){ lrjolt_init(0);
lrjolt_set_idle_timeout("0"); lrjolt_set_send_timeout("10"); lrjolt_set_recv_timeout("120"); lrjolt_set_conn_attempt("10");
lrjolt_check_ps_errors(NO);
return VUSER_OK;}

Chapter 46 • Developing Jolt Vuser Scripts
643
In the next section, the client connected to the server and performed a withdraw and deposit operation using an existing account.
Viewing Jolt Parameter Arrays
When you use VuGen to create a Jolt Vuser script, your actions are recorded into the three sections of the script: vuser_init, Actions, and vuser_end.
In addition to the Vuser script, VuGen also creates a data file, bindata.jlt. When using the lrjolt_add_param_* functions (lrjolt_add_param_value, lrjolt_add_param_value_ex, lrjolt_add_param_value_literal), you specify a parameter and its value.
lrjolt_add_param_value(mliSessionID, mpszServiceName,mpszParamName, mpsValue, mliOptions, miErrorSeverity)
The parameter value is an array of values. You can use VuGen to view the contents of the parameter by selecting bindata.jlt in the Data Files box of the main VuGen window.
int LR_FUNC Actions(){
lrjolt_set_server("//camelot.acme.com:8000"); lrjolt_get_auth_level(0); lrjolt_set_idle_timeout("60"); lrjolt_open_session(1, 0, "myapp", 0, 0, 0); lrjolt_begin_trans(1, 5, 0); lrjolt_add_param_value(1, "WITHDRAWAL", "SAMOUNT",. . . ); lrjolt_add_param_value(1, "WITHDRAWAL", "ACCOUNT_ID",. . . ); lrjolt_call(1, "WITHDRAWAL", 0, 0, 0, 0);
lrjolt_add_param_value(1, "DEPOSIT", "ACCOUNT_ID", . . . ); lrjolt_add_param_value(1, "DEPOSIT", "SAMOUNT", "100.00", 0, 0); lrjolt_call(1, "DEPOSIT", 0, 0, 0, 0);
lrjolt_rollback(1, 0); lrjolt_close_session(1, 0 /* None */, 0);
return VUSER_OK;}

Creating Vuser Scripts • Jolt Vuser Scripts
644
The option to view a data file is available by default for Jolt scripts.
In the following example, the lrjolt_add_param_value_literal function adds a value to the PURCHASE_send1 parameter array using the system service, PURCHASE.
lrjolt_add_param_value_literal(1, "GetCertificate", "PURCHASE",PURCHASE_send1, 0, 0);
The external file, bindata.jlt, contains the prototype, name, and contents of the array.
static const char PURCHASE_send1[] = "\x00\x00\x00H\x01\x02\x03\x04\x00\x00\x00\x00\x00\x00\x02\xBC\n""\xFF\x00\x00\x00\x1F\x00\x04SCTX\n""JavaClient\x02PS\x02PS\x00\x00\x00\x00\x00\x00\x00\x15\x00\b""SCertReq\x02PS\x02PS\x00";
Chapter 46 • Developing Jolt Vuser Scripts
645
Running Jolt Vuser Scripts
If you encounter problems recording or running Jolt applications, check that the application runs without LoadRunner, and that the TUXEDO environment variables were defined correctly. For more information, see Chapter 45, “Developing TUXEDO Vuser Scripts.” Note that after you set or modify the TUXEDO variables, you must exit and restart your application along with VuGen.
Correlating Jolt Scripts
Correlating Jolt and PeopleSoft-Web scripts requires the configuring of several files and an understanding of the correlation process.
To correlate a PeopleSoft -Web script:
1 Modify the vugen.ini file to instruct VuGen to store data returned by server in a file called bindata.jlt. You can analyze this data file to determine where correlation is required. Insert the following lines:
[JoltInspector]GenBinaryReturn=YES
2 Modify vugen.dat to enable the EBCDIC translator and assist you in determining the offset of the dynamic data in the buffer.
Locate the [PeopleSoft-Web] or [Jolt] section (depending on your Vuser type) in vugen.dat file under LoadRunner’s dat folder and add the following lines.
SELECTION_TRANS_DLL = wsconv32.dllSELECTION_TRANS_FUNC = lrs_proccess_selectionSELECTION_TRANS_FREE_FUNC = lrs_free_selection_buffer.
3 Record the same business process twice and compare the bindata.jlt files using the Wdiff utility. (see Chapter 6, “Correlating Statements”)
It is recommended that you record both sessions with different input data with the same length. Ignore any differences in receive buffers containing SCertRep. The SCertRep differences usually relate to the PURCHASE_recv1 buffer, which are automatically correlated during script generation.
For differences between send buffers, buffer names with the prefix PURCHASE_send, are most likely suitable for correlation.
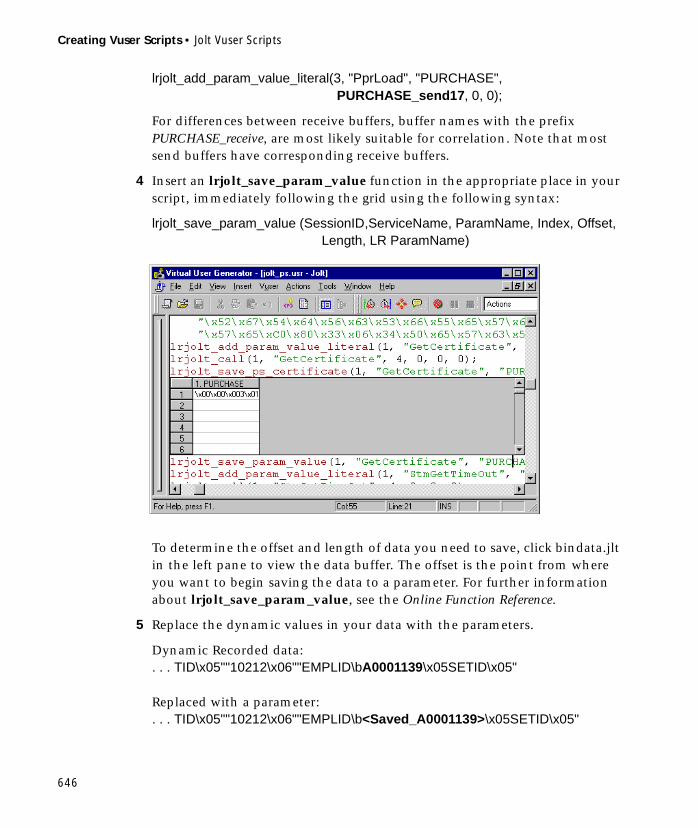
Creating Vuser Scripts • Jolt Vuser Scripts
646
lrjolt_add_param_value_literal(3, "PprLoad", "PURCHASE", PURCHASE_send17, 0, 0);
For differences between receive buffers, buffer names with the prefix PURCHASE_receive, are most likely suitable for correlation. Note that most send buffers have corresponding receive buffers.
4 Insert an lrjolt_save_param_value function in the appropriate place in your script, immediately following the grid using the following syntax:
lrjolt_save_param_value (SessionID,ServiceName, ParamName, Index, Offset, Length, LR ParamName)
To determine the offset and length of data you need to save, click bindata.jlt in the left pane to view the data buffer. The offset is the point from where you want to begin saving the data to a parameter. For further information about lrjolt_save_param_value, see the Online Function Reference.
5 Replace the dynamic values in your data with the parameters.
Dynamic Recorded data: . . . TID\x05""10212\x06""EMPLID\bA0001139\x05SETID\x05"
Replaced with a parameter: . . . TID\x05""10212\x06""EMPLID\b<Saved_A0001139>\x05SETID\x05"
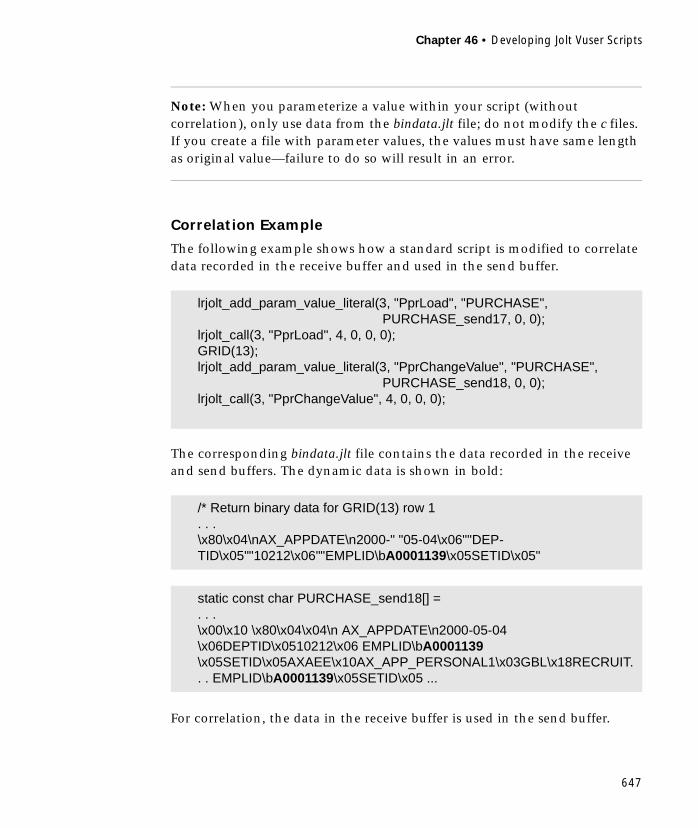
Chapter 46 • Developing Jolt Vuser Scripts
647
Note: When you parameterize a value within your script (without correlation), only use data from the bindata.jlt file; do not modify the c files. If you create a file with parameter values, the values must have same length as original value—failure to do so will result in an error.
Correlation Example
The following example shows how a standard script is modified to correlate data recorded in the receive buffer and used in the send buffer.
The corresponding bindata.jlt file contains the data recorded in the receive and send buffers. The dynamic data is shown in bold:
For correlation, the data in the receive buffer is used in the send buffer.
lrjolt_add_param_value_literal(3, "PprLoad", "PURCHASE", PURCHASE_send17, 0, 0);
lrjolt_call(3, "PprLoad", 4, 0, 0, 0);GRID(13);lrjolt_add_param_value_literal(3, "PprChangeValue", "PURCHASE",
PURCHASE_send18, 0, 0);lrjolt_call(3, "PprChangeValue", 4, 0, 0, 0);
/* Return binary data for GRID(13) row 1. . . \x80\x04\nAX_APPDATE\n2000-" "05-04\x06""DEP-TID\x05""10212\x06""EMPLID\bA0001139\x05SETID\x05"
static const char PURCHASE_send18[] = . . . \x00\x10 \x80\x04\x04\n AX_APPDATE\n2000-05-04 \x06DEPTID\x0510212\x06 EMPLID\bA0001139 \x05SETID\x05AXAEE\x10AX_APP_PERSONAL1\x03GBL\x18RECRUIT. . . EMPLID\bA0001139\x05SETID\x05 ...
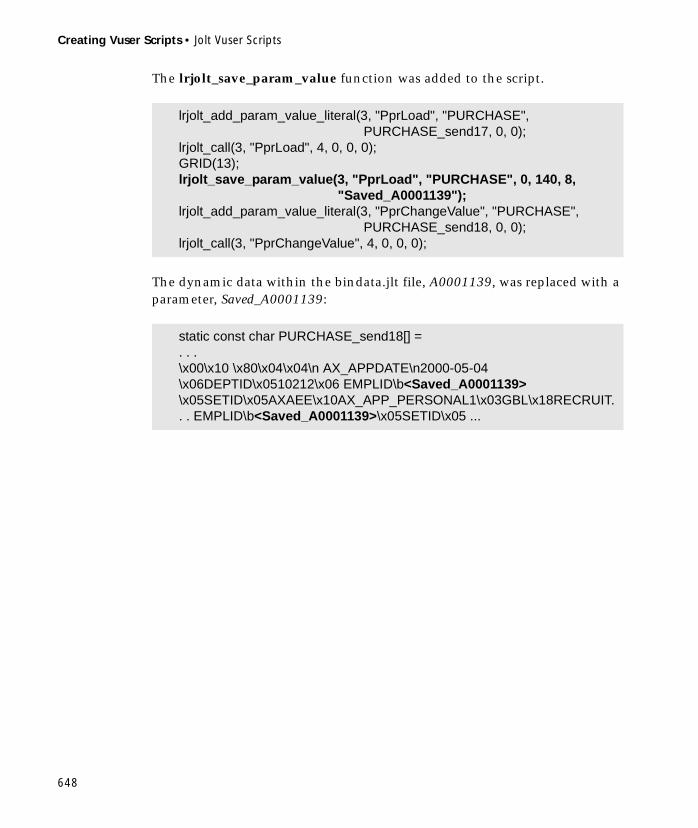
Creating Vuser Scripts • Jolt Vuser Scripts
648
The lrjolt_save_param_value function was added to the script.
The dynamic data within the bindata.jlt file, A0001139, was replaced with a parameter, Saved_A0001139:
lrjolt_add_param_value_literal(3, "PprLoad", "PURCHASE", PURCHASE_send17, 0, 0);
lrjolt_call(3, "PprLoad", 4, 0, 0, 0);GRID(13);lrjolt_save_param_value(3, "PprLoad", "PURCHASE", 0, 140, 8,
"Saved_A0001139");lrjolt_add_param_value_literal(3, "PprChangeValue", "PURCHASE",
PURCHASE_send18, 0, 0);lrjolt_call(3, "PprChangeValue", 4, 0, 0, 0);
static const char PURCHASE_send18[] = . . . \x00\x10 \x80\x04\x04\n AX_APPDATE\n2000-05-04 \x06DEPTID\x0510212\x06 EMPLID\b<Saved_A0001139> \x05SETID\x05AXAEE\x10AX_APP_PERSONAL1\x03GBL\x18RECRUIT. . . EMPLID\b<Saved_A0001139>\x05SETID\x05 ...

Part XIII
Baan Vuser Scripts

650
651
47Creating Baan Vuser Scripts
You use VuGen to develop Baan Vuser scripts. You record typical Baan sessions with VuGen and you enhance the scripts with Baan Vuser functions.
This chapter describes:
➤ Getting Started with Baan Vusers
➤ Baan Vuser Functions
➤ Creating a Baan Vuser Script
➤ Understanding Baan Vuser Scripts
➤ Customizing Baan Vuser Scripts
The following information applies only to Baan Vuser scripts.
About Developing Baan Vuser Scripts
The Baan type Vuser lets you test your Baan application and test your system under load. Vugen records your entire Baan session, including the login information to the Baan server.
When you record actions, VuGen creates a script using Context Sensitive functions. Context Sensitive functions depict actions in the application under test in terms of GUI objects (such as windows, lists, and buttons). Each time you record an operation, a function is generated which describes the object selected and the action performed.

Creating Vuser Scripts • Baan Vuser Scripts
652
Getting Started with Baan Vusers
Before recording a Baan Vuser script in VuGen, make sure that your machine can open a Baan session.
To create a Baan Vuser script, follow these steps:
1 Create a Baan Vuser in VuGen.
Create a new Baan Vuser template.
2 Record user actions.
Record typical user actions.
3 Add transactions, rendezvous, comments, and messages.
Use the Insert menu to add transactions, rendezvous, comments, and messages in order to enhance your script.
4 Add exception handling and set run-time properties.
Add functions to handle exceptions, set think time, and specify timeout periods. Configure run-time settings for logging and iterations.
5 Perform parameterization on your script.
Replace recorded constants with parameters.
6 Save and run the Vuser script.
Run the script from VuGen and view the execution log for run-time information.
Baan Vuser Functions
VuGen automatically records most of the functions listed in this section during a Baan user session. You can also manually program any of the functions into your script. For more information about the Baan Vuser functions, refer to the LoadRunner Online Function Reference (available from the VuGen Help menu).

Chapter 47 • Creating Baan Vuser Scripts
653
Session Functions
Button Object Functions
Edit Object Functions
List Object Functions
Menu Object Functions
init_session Initializes a Baan session.
close_session Closes all Baan sessions and windows.
start_session Begins a specific Baan session.
set_exception Specifies how to handle exceptions.
set_think_time Sets the think time range.
set_default_timeout Sets the default timeout.
button_press Activates a push button.
button_set Sets the state of the specified radio or check button.
edit_get_text Returns the text in an edit object.
edit_set Replaces the entire contents of an edit object.
edit_set_insert_pos Places the cursor at the specified point.
edit_set_selection Selects text in an edit object.
edit_type Types a string in an edit object.
list_activate_item Activates items in a list.
list_select_item Selects a list item.
list_get_selected Returns the currently selected item in a list.
list_expand_item Shows hidden items in a list.
list_collapse_item Hides items in a list.
menu_select_item Selects an item from a menu.

Creating Vuser Scripts • Baan Vuser Scripts
654
Object Functions
Scroll Object Functions
Tab and Toolbar Object Functions
Static Object Functions
Synchronization Functions
obj_get_info Returns the value of an object attribute.
obj_get_text Reads text from an object.
obj_mouse_click Clicks within an object.
obj_mouse_dbl_click Double-clicks within an object.
obj_mouse_drag Drags the mouse within an object.
obj_type Sends keyboard input to an object.
scroll_drag_from_min Drags a scroll object to the specified distance from the minimum position.
scroll_line Scrolls the specified number of lines.
scroll_page Moves a scroll object the specified number of pages.
tab_select_item Selects a tab in the active window.
toolbar_button_press Clicks a toolbar button.
static_get_text Returns the contents of a static text object.
obj_wait_info Waits for the value of an object attribute.
tbl_wait_selected_cell Waits for the specified cell to appear in focus.
win_wait_info Waits for the value of a window attribute.

Chapter 47 • Creating Baan Vuser Scripts
655
Table Functions
Window Object Functions
tbl_activate_cell Clicks Enter in the specified cell.
tbl_get_cell_data Retrieves the contents of the specified cell from a table.
tbl_get_selected_cell Returns the cell currently in focus in a table.
tbl_press_zoom_button Clicks the table’s zoom button.
tbl_set_cell_data Sets the contents of a cell to the specified text in a table.
tbl_set_selected_cell Selects a table cell.
tbl_set_selected_ rows Selects the specified rows in a table.
set_window Specifies the window that receives subsequent input.
win_activate Activates a window.
win_close Closes a window.
win_get_text Reads text from a window.
win_get_info Returns the value of a window attribute.
win_max Maximizes a window to fill the entire screen.
win_min Minimizes a window to an icon.
win_mouse_click Clicks within a window.
win_mouse_dbl_click Double-clicks within a window.
win_mouse_drag Drags the mouse within a window.
win_move Moves a window to a new absolute location.
win_resize Resizes a window.
win_restore Restores a window from an iconized or maximized state to its previous size.
win_type Sends keyboard input to a window.

Creating Vuser Scripts • Baan Vuser Scripts
656
Miscellaneous Functions
You can further enhance your script with general Vuser functions such as lr_output_message and lr_rendezvous. For information on the Vuser functions, refer to the LoadRunner Online Function Reference.
Creating a Baan Vuser Script
After you create a new Baan Vuser script you begin recording user actions.
To create a new Baan Vuser script:
1 Select the vuser_init section, in order to record the login procedure into that section.
2 Click the Record button and specify the location of the Baan application in the Start Recording dialog box.
3 Switch to the Actions section and record typical user actions.
4 Insert Baan Vuser functions for think time, handling exceptions, and setting timeouts.
5 Add transactions to the script. Choose Insert > Start Transaction to specify the beginning of a transaction, and Insert > End Transaction to specify the end of a transaction.
wait Causes script execution to pause for a specified amount of time.
set_think_time(MINTHINK,MAXTHINK);set_window ("Menu browser [User: bsp ] [812]", 10);menu_select_item ("File;Run Program...");. . .
lr_start_transaction("all_str_ses");button_press0 ("F1_OK");set_window ("tdpur4101m000 : Maintain Purchase Orders [812]", 300);
lr_end_transaction("all_str_ses", LR_PASS);
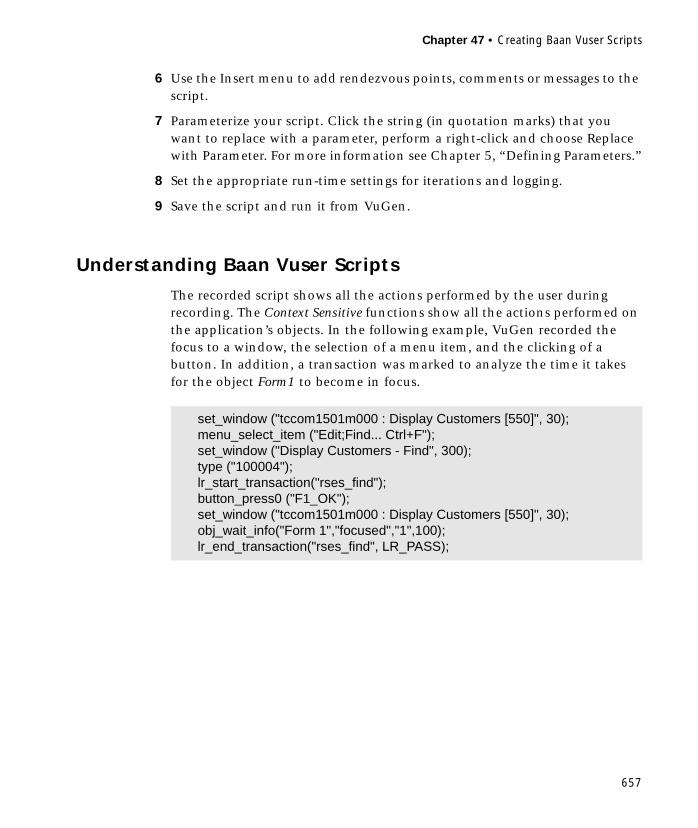
Chapter 47 • Creating Baan Vuser Scripts
657
6 Use the Insert menu to add rendezvous points, comments or messages to the script.
7 Parameterize your script. Click the string (in quotation marks) that you want to replace with a parameter, perform a right-click and choose Replace with Parameter. For more information see Chapter 5, “Defining Parameters.”
8 Set the appropriate run-time settings for iterations and logging.
9 Save the script and run it from VuGen.
Understanding Baan Vuser Scripts
The recorded script shows all the actions performed by the user during recording. The Context Sensitive functions show all the actions performed on the application’s objects. In the following example, VuGen recorded the focus to a window, the selection of a menu item, and the clicking of a button. In addition, a transaction was marked to analyze the time it takes for the object Form1 to become in focus.
set_window ("tccom1501m000 : Display Customers [550]", 30);menu_select_item ("Edit;Find... Ctrl+F");set_window ("Display Customers - Find", 300);type ("100004");lr_start_transaction("rses_find");button_press0 ("F1_OK");set_window ("tccom1501m000 : Display Customers [550]", 30);obj_wait_info("Form 1","focused","1",100);lr_end_transaction("rses_find", LR_PASS);

Creating Vuser Scripts • Baan Vuser Scripts
658
You can add control flow logic to create loops within your script, instead of performing an iteration on the entire script.
Note that you may need to parameterize statements, in order to avoid duplicating data to a database. For more information, see Chapter 5, “Defining Parameters.”
Customizing Baan Vuser Scripts
You can view and edit your script from VuGen at any time. You can use the Baan-specific functions to customize the script execution in the following areas:
➤ Think Time
➤ Handling Exceptions
➤ Setting Timeouts
Think Time
You can set the think time range for script execution. The think time emulates the work pattern of an actual user—the time the user pauses between actions. You set the beginning and end of a think time range using the set_think_time function. After each statement the Vuser pauses for the duration of the think time, a random value within the specified range.
for (loop = 0 ; loop < READLOOP; loop++){set_window ("tccom1501m000 : Display Customers [550]", 30);menu_select_item ("Edit;Find... Ctrl+F");set_window ("Display Customers - Find", 300);type ("100004");lr_start_transaction("rses_find");button_press0 ("F1_OK");set_window ("tccom1501m000 : Display Customers [550]", 30);obj_wait_info("Form 1","focused","1",100);lr_end_transaction("rses_find", LR_PASS);
. . . .

Chapter 47 • Creating Baan Vuser Scripts
659
If your desired think time range is constant throughout the script, you can define the beginning and end ranges as constants as shown in the example below.
In the following example, the think time range was set from 500 to 1000 milliseconds:
Handling Exceptions
You can instruct a Baan Vuser how to handle exceptions that occur during replay, such as a message or error windows.
Using the set_exception function, you specify a function to be executed when the exception is encountered.
In the following example, the set_exception function instructs the Vuser to execute the close function when the Print Sales Invoices window opens. The close function is defined earlier in the script.
#define MINTHINK 500#define MAXTHINK 1000
int LR_FUNC Actions(LR_PARAM p){
set_think_time(MINTHINK,MAXTHINK);set_window ("Menu browser [User: bsp ] [812]", 10);
. . .
int close(char title[]){
win_close(title);}Actions( ){
set_exception("ttstps0014 : Print Sales Invoices",close);set_window ("Menu browser [User: bsp ] [812]", 10);menu_select_item ("File;Run Program...");set_window ("ttdsk2080m000 : Run Program [812]", 10);type ("tdsls4101m000");. . . ;

Creating Vuser Scripts • Baan Vuser Scripts
660
Setting Timeouts
You can set the default timeout period for your functions. This timeout is applied to all functions using synchronization, such as obj_wait_info, win_wait_info, etc.
In functions containing a parameter specifying a timeout period (such as set_window), the specified timeout overrides the default timeout.
button_press ("F3_Continue");win_wait_info("ttstpsplopen : Select Device [000]","displayed","0",10);

Part XIV
RTE Vuser Scripts

662
663
48Introducing RTE Vuser Scripts
RTE Vusers operate terminal emulators in Windows environments. This chapter describes the development of Windows-based RTE Vuser scripts.
This chapter describes:
➤ Introducing RTE Vusers
➤ Understanding RTE Vuser Technology
➤ Getting Started with RTE Vuser Scripts
➤ Using TE Functions
➤ Mapping Terminal Keys to PC Keyboard Keys
The following information applies only to RTE (Windows) Vuser scripts.
About Developing RTE Vuser Scripts
RTE Vusers operate terminal emulators in order to load client/server systems.
You record a terminal emulator session with VuGen to represent a true user’s actions. You can then enhance your recorded script with transaction and synchronization functions.
This chapter describes the development of Windows-based RTE Vuser scripts.

Creating Vuser Scripts • RTE Vuser Scripts
664
Introducing RTE Vusers
An RTE Vuser types character input into a terminal emulator, submits the data to a server, and then waits for the server to respond. For instance, suppose that you have a server that maintains customer information for a maintenance company. Every time a field service representative makes a repair, he accesses the server database by modem using a terminal emulator. The service representative accesses information about the customer and then records the details of the repair that he performs.
You could use RTE Vusers to emulate this scenario. An RTE Vuser would:
1 Type "60" at the command line to open an application program.
2 Type "F296", the field service representative’s number.
3 Type "NY270", the customer number.
4 Wait for the word "Details" to appear on the screen. The appearance of "Details" indicates that all the customer details are displayed on the screen.
5 Type "Changed gasket P249, and performed Major Service" the details of the current repair.
6 Type "Q" to close the application program.
You use VuGen to create RTE Vuser scripts. The script generator records the actions of a human user in a terminal emulator. It records the keyboard input from the terminal window, generates the appropriate statements, and inserts them into the Vuser script. While you record, the script generator automatically inserts synchronization functions into the script. For details, see Chapter 51, “Synchronizing RTE Vuser Scripts.”
Understanding RTE Vuser Technology
An RTE Vuser emulates the actions of a real user. Human users use terminals or terminal emulators to operate application programs.
TerminalApplication Human UserEmulatorProgram
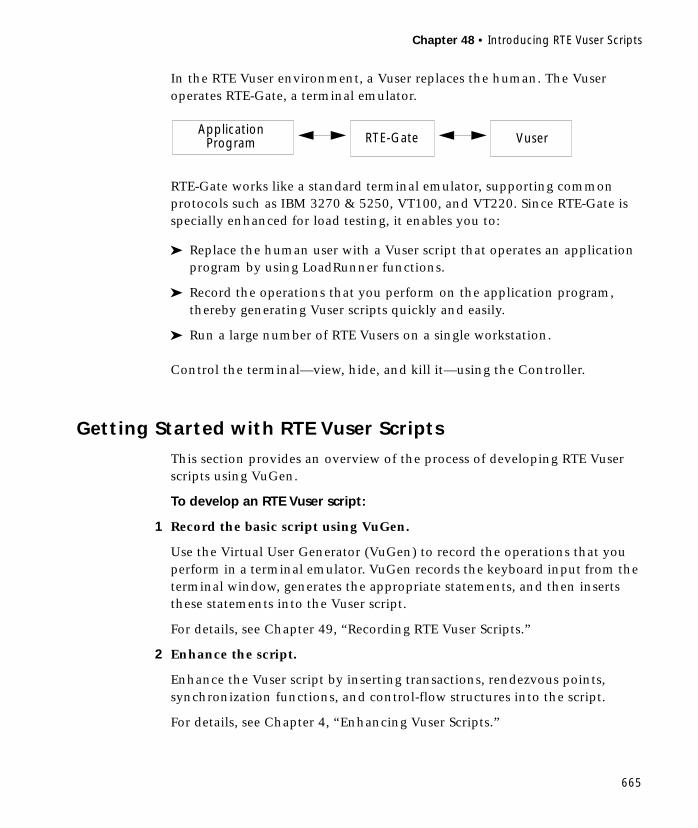
Chapter 48 • Introducing RTE Vuser Scripts
665
In the RTE Vuser environment, a Vuser replaces the human. The Vuser operates RTE-Gate, a terminal emulator.
RTE-Gate works like a standard terminal emulator, supporting common protocols such as IBM 3270 & 5250, VT100, and VT220. Since RTE-Gate is specially enhanced for load testing, it enables you to:
➤ Replace the human user with a Vuser script that operates an application program by using LoadRunner functions.
➤ Record the operations that you perform on the application program, thereby generating Vuser scripts quickly and easily.
➤ Run a large number of RTE Vusers on a single workstation.
Control the terminal—view, hide, and kill it—using the Controller.
Getting Started with RTE Vuser Scripts
This section provides an overview of the process of developing RTE Vuser scripts using VuGen.
To develop an RTE Vuser script:
1 Record the basic script using VuGen.
Use the Virtual User Generator (VuGen) to record the operations that you perform in a terminal emulator. VuGen records the keyboard input from the terminal window, generates the appropriate statements, and then inserts these statements into the Vuser script.
For details, see Chapter 49, “Recording RTE Vuser Scripts.”
2 Enhance the script.
Enhance the Vuser script by inserting transactions, rendezvous points, synchronization functions, and control-flow structures into the script.
For details, see Chapter 4, “Enhancing Vuser Scripts.”
RTE-GateApplication
VuserProgram

Creating Vuser Scripts • RTE Vuser Scripts
666
3 Define parameters (optional).
Define parameters for the fixed-values recorded into your script. By substituting fixed-values with parameters, you can repeat the same business process many times using different values.
For details, see Chapter 5, “Defining Parameters.”
4 Configure the run-time settings.
The run-time settings control the Vuser behavior during script execution. These settings include loop, log, and timing information.
For details, see Chapter 7, “Configuring Run-Time Settings.”
5 Run the script from VuGen.
Run the script from VuGen to verify that it runs correctly. View the standard output to verify that the program is communicating properly with the server.
For details, see Chapter 9, “Running Vuser Scripts in Stand-Alone Mode.”
After you successfully create an RTE script, you integrate it into a scenario. For more information on integrating scripts in a scenario, refer to your LoadRunner Controller User’s Guide.
Using TE Functions
The functions developed to emulate a terminal communicating with a server are called TE Vuser functions. Each TE Vuser function has a TE prefix. VuGen automatically records most of the TE functions listed in this section during an RTE session. You can also manually program any of the functions into your script. For syntax and examples of the TE functions, refer to the Online Function Reference (available from the VuGen Help menu).
Terminal Emulator Connection Function
TE_connect Connects the terminal emulator to the specified host.

Chapter 48 • Introducing RTE Vuser Scripts
667
Text Retrieval Functions
System Variable Functions
Error Code Functions
Typing Functions
Synchronization Functions
TE_find_text Searches for text in a designated area of the screen.
TE_get_text_line Reads text from a designated line on the screen.
TE_get_cursor_pos Returns the current location of the cursor.
TE_get_line_attribute Returns information about text formatting.
TE_getvar Returns the value of an RTE system variable.
TE_setvar Sets the value of an RTE system variable.
TE_perror Prints an error code to the Output window.
TE_sperror Translates an error code into a string.
TE_type Sends a formatted string to the client application.
TE_typing_style Determines the way text is typed into the terminal emulator.
TE_wait_cursor Waits for the cursor to appear at a specified location in the terminal window.
TE_wait_silent Waits for the client application to be silent for a specified number of seconds.
TE_wait_sync Waits for the system to return from X-SYSTEM or Input Inhibited mode.
Creating Vuser Scripts • RTE Vuser Scripts
668
The following TE functions can be parameterized: TE_connect, TE_find_text, TE_get_text_line, and TE_type. For details on parameterizing function in Vuser scripts, see Chapter 5, “Defining Parameters.”
Mapping Terminal Keys to PC Keyboard Keys
Because you are using a terminal emulator, you will be using a PC keyboard in place of a terminal keyboard. Many keys that are found on the terminal keyboard are not available on a PC keyboard. Examples of such keys are HELP, AUTOR, and PUSH, which are found on the IBM 5250 keyboard. To successfully operate the terminal emulator and any associated application programs, you may have to map certain terminal keys to keys on the PC keyboard.
TE_wait_text Waits for a string to appear in a designated location.
TE_wait_sync_transaction Records the time that the system remained in the most recent X SYSTEM mode.
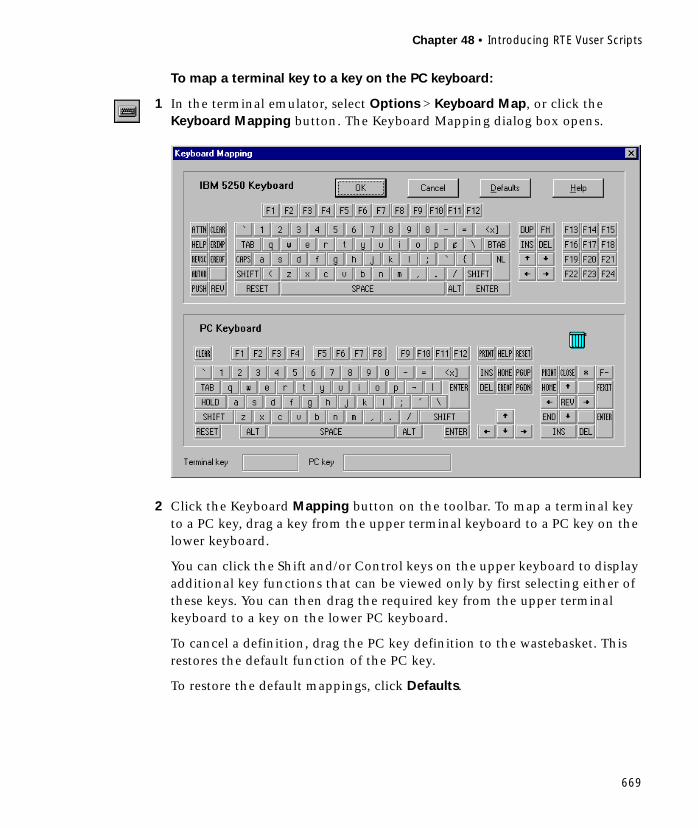
Chapter 48 • Introducing RTE Vuser Scripts
669
To map a terminal key to a key on the PC keyboard:
1 In the terminal emulator, select Options > Keyboard Map, or click the Keyboard Mapping button. The Keyboard Mapping dialog box opens.
2 Click the Keyboard Mapping button on the toolbar. To map a terminal key to a PC key, drag a key from the upper terminal keyboard to a PC key on the lower keyboard.
You can click the Shift and/or Control keys on the upper keyboard to display additional key functions that can be viewed only by first selecting either of these keys. You can then drag the required key from the upper terminal keyboard to a key on the lower PC keyboard.
To cancel a definition, drag the PC key definition to the wastebasket. This restores the default function of the PC key.
To restore the default mappings, click Defaults.

Creating Vuser Scripts • RTE Vuser Scripts
670

671
49Recording RTE Vuser Scripts
You use VuGen to record Windows-based RTE Vuser scripts.
This chapter describes:
➤ Creating a New RTE Vuser Script
➤ Recording the Terminal Setup and Connection Procedure
➤ Recording Typical User Actions
➤ Recording the Log Off Procedure
➤ Setting the Recording Options
➤ Typing Input into a Terminal Emulator
➤ Generating Unique Device Names
➤ Setting the Field Demarcation Characters
The following information applies only to RTE (Windows) Vuser scripts.
About Recording RTE Vuser Scripts
You use VuGen to record Windows-based RTE Vuser scripts. VuGen uses the PowerTerm terminal emulator to emulate a wide variety of terminal types. You use PowerTerm to perform a typical terminal connection, followed by typical business processes. Thereafter, you perform the log off procedure. While you perform typical user actions in the terminal emulator, VuGen generates the appropriate statements, and inserts them into a Vuser script. You can view and edit the script while recording.
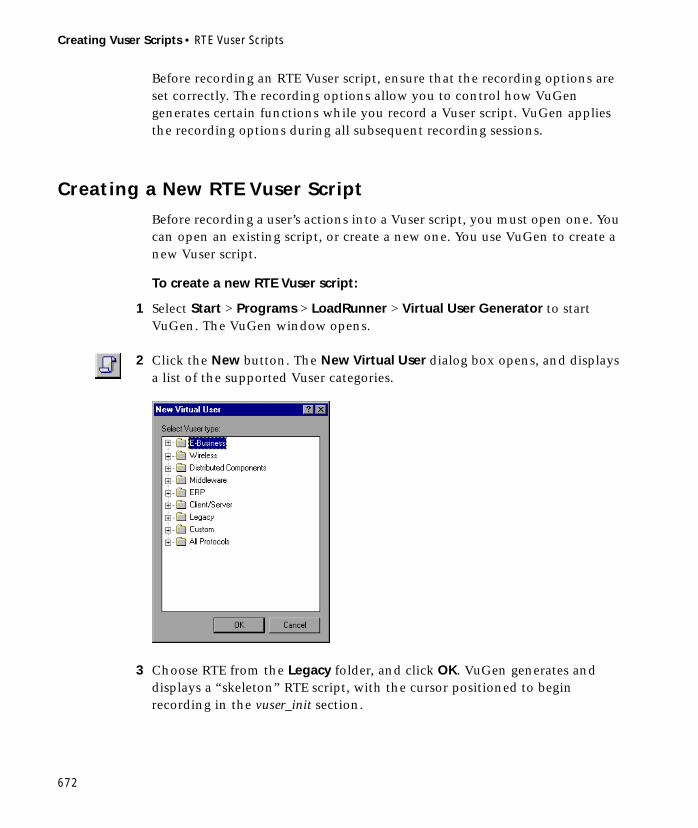
Creating Vuser Scripts • RTE Vuser Scripts
672
Before recording an RTE Vuser script, ensure that the recording options are set correctly. The recording options allow you to control how VuGen generates certain functions while you record a Vuser script. VuGen applies the recording options during all subsequent recording sessions.
Creating a New RTE Vuser Script
Before recording a user’s actions into a Vuser script, you must open one. You can open an existing script, or create a new one. You use VuGen to create a new Vuser script.
To create a new RTE Vuser script:
1 Select Start > Programs > LoadRunner > Virtual User Generator to start VuGen. The VuGen window opens.
2 Click the New button. The New Virtual User dialog box opens, and displays a list of the supported Vuser categories.
3 Choose RTE from the Legacy folder, and click OK. VuGen generates and displays a “skeleton” RTE script, with the cursor positioned to begin recording in the vuser_init section.

Chapter 49 • Recording RTE Vuser Scripts
673
Recording the Terminal Setup and Connection Procedure
After you create a skeleton Vuser script, you record the terminal setup and connection procedure into the script. VuGen uses the PowerTerm terminal emulator when you record an RTE Vuser script.
To record the terminal setup and connection procedure:
1 Open an existing RTE Vuser script, or create a new one.
2 In the Sections box, select the section into which you want VuGen to insert the recorded statements. The available sections are vuser_init, Actions, and vuser_end.
Note: Always record the terminal setup and connection procedure into the vuser_init section. The vuser_init section is not repeated when you run multiple iterations of a Vuser script—only the Actions section is repeated. For more information on the iteration settings, see Chapter 7, “Configuring Run-Time Settings.”
3 In the Vuser script, place the cursor at the location where you want to begin recording.

Creating Vuser Scripts • RTE Vuser Scripts
674
4 Click the Record button. The PowerTerm main window appears.
5 From the PowerTerm menu bar, select Terminal > Setup to display the Terminal Setup dialog box.
6 Select the type of emulation from the VT Terminal and IBM Terminal types, and then click OK.
Note: Select an IBM terminal type to connect to an AS400 machine or an IBM mainframe; select a VT terminal type to connect to a UNIX workstation.

Chapter 49 • Recording RTE Vuser Scripts
675
7 Select Communication > Connect to display the Connect dialog box.
8 Under Session Type, select the type of communication to use.
9 Under Parameters, specify the required options. The available parameters vary depending on the type of session that you select. For details on the parameters, click Help.
Note: You can save the parameters that you define for re-use in the future. To save the parameters, click Save As. The parameter-sets that you save are displayed in the Sessions List box.

Creating Vuser Scripts • RTE Vuser Scripts
676
10 Click Connect. PowerTerm connects to the specified system, and VuGen inserts a TE_connect function into the script, at the insertion point.
The inserted TE_connect statement looks something like the following:
/* *** The terminal type is VT220-7. */TE_connect("comm-type = telnet;host-name = frodo;
terminal-type = vt220-7;terminal-model = vt320;", 60000);if (TE_errno != TE_SUCCESS)
return -1;
The inserted TE_connect statement is always followed by an if statement that checks whether or not the TE_connect function succeeds during replay.
Note: Do not record more than one connection to a server (TE_connect) in a Vuser script.
The terminal setup and connection procedure is complete. You are now ready to begin recording typical user actions into the Vuser script, as described below.
Recording Typical User Actions
After recording the setup procedure, you perform typical user actions or business processes. You record these processes into the Actions section of the Vuser script. Only the Actions section of a Vuser script is repeated when you run multiple iterations of the script. For details on setting iterations, see Chapter 7, “Configuring Run-Time Settings.”
To record user actions:
1 Open an existing RTE Vuser script, and then click Actions in the Section box.
2 Proceed to perform typical user actions in the terminal emulator. VuGen generates the appropriate statements, and inserts them into the Vuser script while you type. If necessary, you can edit the recorded statements while you record the script.

Chapter 49 • Recording RTE Vuser Scripts
677
Note: By default, VuGen waits a maximum of 5 seconds between successive keystrokes before generating the appropriate TE_type function. To change the waiting time, see “Setting the Recording Options,” on page 678.
When you finish recording the typical user actions, proceed to record the log off procedure, as described in the next section.
Recording the Log Off Procedure
You record the Vuser log off process into the vuser_end section of the Vuser script. The vuser_end section is not repeated when you run many iterations of the script. For details on setting iterations, see Chapter 7, “Configuring Run-Time Settings.”
To record the log off procedure:
1 Ensure that you have performed and recorded the typical user actions as described in the previous section.
2 In the VuGen main window, click vuser_end in the Section box.
3 Perform the log off procedure. VuGen records the procedure into the vuser_end section of the script.
4 Click Stop Recording on the Recording toolbar. The main VuGen window displays all the recorded statements.
5 Click Save to save the recorded session. The Save As dialog box opens (for new Vuser scripts only). Specify a script name. After recording a script, you can manually edit it in VuGen’s main window.

Creating Vuser Scripts • RTE Vuser Scripts
678
Setting the Recording Options
By setting the recording options, you can customize the code that VuGen generates for RTE functions. You use the Recording Options dialog box to set the recording options. To open the Recording Options dialog box, click the Recording Options button on the toolbar, or select Tools > Recording Options.
Automatic Synchronization Commands
VuGen can automatically generate a number of TE-synchronization functions, and insert them into the script while you record.
1 You can specify that VuGen generate a TE_wait_sync function each time a new screen is displayed while recording. To do so, select the “X-System” check box in the Recording Options dialog box.
By default, VuGen does automatically generate a TE_wait_sync function each time a new screen is displayed while recording.
Note: VuGen generates TE_wait_sync functions when recording IBM block mode terminals only.

Chapter 49 • Recording RTE Vuser Scripts
679
2 You can specify that VuGen generate a TE_wait_cursor function before each TE_type function. To do so, select the Cursor check box in the Recording Options dialog box.
By default, VuGen does not automatically generate TE_wait_cursor functions.
3 You can specify that VuGen generate a TE_wait_text function before each TE_type function (where appropriate). To do so, select the Prompt check box in the Recording Options dialog box.
By default, VuGen does not automatically generate a TE_wait_text function before each TE_type function.
Note: VuGen generates meaningful TE_wait_text functions when recording VT type terminals only. Do not use automatic TE_wait_text function generation when recording block-mode (IBM) terminals.
Automatic Screen Header Comments (IBM terminals only)
You can instruct VuGen to automatically generate screen header comments while recording a Vuser script, and insert the comments into the script. Generated comments make a recorded script easier to read by identifying each new screen as it is displayed in the terminal emulator. A generated comment contains the text that appears on the first line of the terminal emulator window. The following generated comment shows that the Office Tasks screen was displayed in the terminal emulator:
To ensure that VuGen automatically generates comments while you record a script, select the “Generate screen header comments” check box in the Recording Options dialog box.
By default, VuGen does not automatically generate screen comments.
/* OFCTSK Office Tasks */
Creating Vuser Scripts • RTE Vuser Scripts
680
Note: You can generate comments automatically only when using block-mode terminal emulators such as the IBM 5250.
Automatic X-System Transactions (IBM terminals only)
You can specify that VuGen record the time that the system was in the X SYSTEM mode during a scenario run. To do so, VuGen inserts a TE_wait_sync_transaction function after each TE_wait_sync function. Each TE_wait_sync_transaction function creates a transaction with the name “default”. Each TE_wait_sync_transaction function records the time that the system spent in the previous X SYSTEM state.
To instruct VuGen to insert TE_wait_sync_transaction statements while recording, select the “Generate automatic X SYSTEM transactions” check box in the Recording Options dialog box.
By default, VuGen does not automatically generate transactions.
Keyboard Recording Timeout
When you type text into a terminal emulator while recording, VuGen monitors the text input. After each keystroke, VuGen waits up to a specified amount of time for the next key stroke. If there is no subsequent keystroke within the specified time, VuGen assumes that the command is complete. VuGen then generates and inserts the appropriate TE_type function into the script.
To set the maximum amount of time that VuGen waits between successive keystrokes, enter an amount in the “Keyboard record timeout” box.
By default, VuGen waits a maximum of 5 seconds between successive keystrokes before generating the appropriate TE_type function.
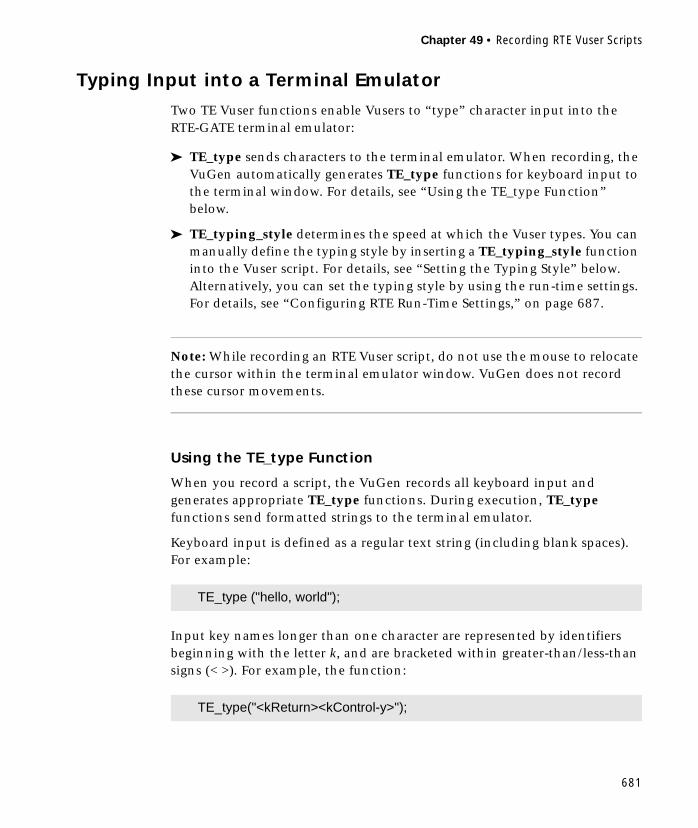
Chapter 49 • Recording RTE Vuser Scripts
681
Typing Input into a Terminal Emulator
Two TE Vuser functions enable Vusers to “type” character input into the RTE-GATE terminal emulator:
➤ TE_type sends characters to the terminal emulator. When recording, the VuGen automatically generates TE_type functions for keyboard input to the terminal window. For details, see “Using the TE_type Function” below.
➤ TE_typing_style determines the speed at which the Vuser types. You can manually define the typing style by inserting a TE_typing_style function into the Vuser script. For details, see “Setting the Typing Style” below. Alternatively, you can set the typing style by using the run-time settings. For details, see “Configuring RTE Run-Time Settings,” on page 687.
Note: While recording an RTE Vuser script, do not use the mouse to relocate the cursor within the terminal emulator window. VuGen does not record these cursor movements.
Using the TE_type Function
When you record a script, the VuGen records all keyboard input and generates appropriate TE_type functions. During execution, TE_type functions send formatted strings to the terminal emulator.
Keyboard input is defined as a regular text string (including blank spaces). For example:
Input key names longer than one character are represented by identifiers beginning with the letter k, and are bracketed within greater-than/less-than signs (< >). For example, the function:
TE_type ("hello, world");
TE_type("<kReturn><kControl-y>");
Creating Vuser Scripts • RTE Vuser Scripts
682
depicts the input of the Return key followed by the Control and y keys. Some other examples include: <kF1>, <kUp>, <kF10>, <kHelp>, <kTab>.
To determine a key name, record an operation on the key, and then check the recorded statement for its name.
Note: When you program a TE_type statement (rather than recording it), use the key definitions provided in the Online Function Reference (available from the VuGen Help menu).
Setting the Timeout Value for TE_type
If a Vuser attempts to submit a TE_type statement while the system is in X SYSTEM (or input inhibited) mode, the Vuser will wait until the X SYSTEM mode ends before typing. If the system stays in X SYSTEM mode for more than TE_XSYSTEM_TIMEOUT milliseconds, then the TE_type function returns a TE_TIMEOUT error. You can set the value of TE_XSYSTEM_TIMEOUT by using TE_setvar. The default value for TE_XSYSTEM_TIMEOUT is 30 seconds.
Allowing a Vuser to Type Ahead
Under certain circumstances you may want a Vuser to submit a keystroke even though the system is in X SYSTEM (or input inhibited) mode. For example, you may want the Vuser to press the Break key. You use the TE_ALLOW_TYPEAHEAD variable to enable the Vuser to submit a keystroke even though the system is in X SYSTEM mode.
Set TE_ALLOW_TYPEAHEAD to zero to disable typing ahead, and to any non-zero number to permit typing ahead. You use TE_setvar to set the value of TE_ALLOW_TYPEAHEAD. By default, TE_ALLOW_TYPEAHEAD is set to zero, preventing keystrokes from being sent during X SYSTEM mode.
For more information about the TE_type function and its conventions, refer to the Online Function Reference (available from the VuGen Help menu).

Chapter 49 • Recording RTE Vuser Scripts
683
Setting the Typing Style
You can set two typing styles for RTE Vusers: FAST and HUMAN. In the FAST style, the Vuser types input into the terminal emulator as quickly as possible. In the HUMAN style, the Vuser pauses after typing each character. In this way, the Vuser more closely emulates a human user typing at the keyboard.
You set the typing style using the TE_typing_style function. The syntax of the TE_typing_style function is:
int TE_typing_style (char *style );
where style can be FAST or HUMAN. The default typing style is HUMAN. If you select the HUMAN typing style, the format is:
HUMAN, delay [,first_delay]
The delay indicates the interval (in milliseconds) between keystrokes. The optional parameter first_delay indicates the wait (in milliseconds) before typing the first character in the string. For example,
means that the Vuser will wait 0.5 seconds before typing the letter A; it will then wait 0.1 seconds before typing “B” and then a further 0.1 seconds before typing “C”.
For more information about the TE_typing_style function and its conventions, refer to the Online Function Reference (available from the VuGen Help menu).
In addition to setting the typing style by using the TE_typing_style function, you can also use the run-time settings. For details, see “Configuring RTE Run-Time Settings,” on page 687.
TE_typing_style ("HUMAN, 100, 500");TE_type ("ABC");
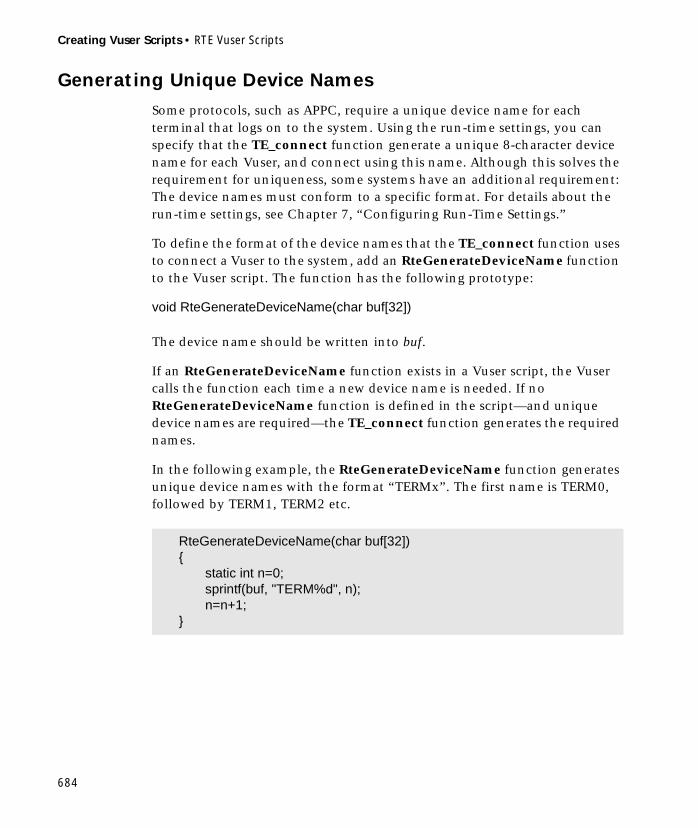
Creating Vuser Scripts • RTE Vuser Scripts
684
Generating Unique Device Names
Some protocols, such as APPC, require a unique device name for each terminal that logs on to the system. Using the run-time settings, you can specify that the TE_connect function generate a unique 8-character device name for each Vuser, and connect using this name. Although this solves the requirement for uniqueness, some systems have an additional requirement: The device names must conform to a specific format. For details about the run-time settings, see Chapter 7, “Configuring Run-Time Settings.”
To define the format of the device names that the TE_connect function uses to connect a Vuser to the system, add an RteGenerateDeviceName function to the Vuser script. The function has the following prototype:
void RteGenerateDeviceName(char buf[32])
The device name should be written into buf.
If an RteGenerateDeviceName function exists in a Vuser script, the Vuser calls the function each time a new device name is needed. If no RteGenerateDeviceName function is defined in the script—and unique device names are required—the TE_connect function generates the required names.
In the following example, the RteGenerateDeviceName function generates unique device names with the format “TERMx”. The first name is TERM0, followed by TERM1, TERM2 etc.
RteGenerateDeviceName(char buf[32]){
static int n=0;sprintf(buf, "TERM%d", n);n=n+1;
}
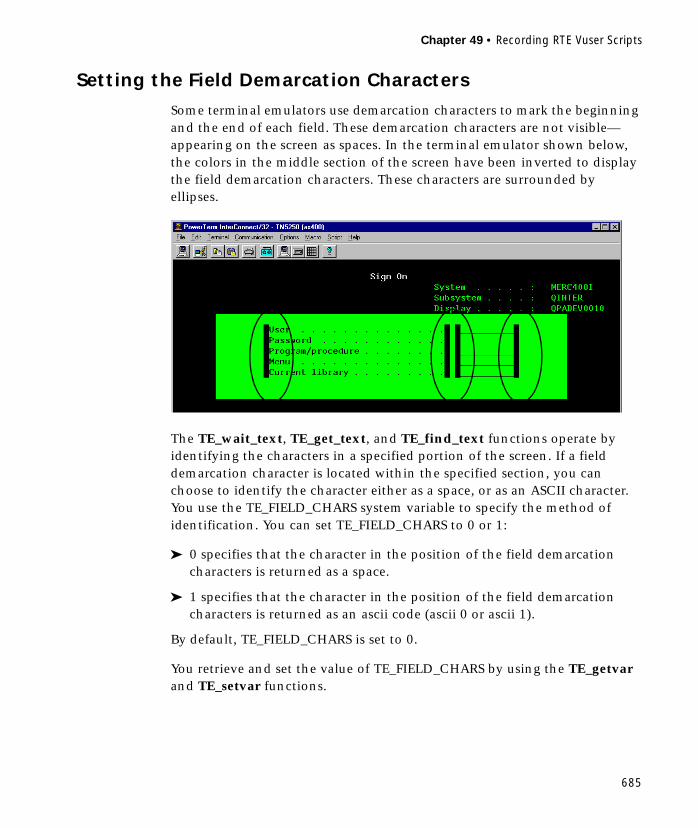
Chapter 49 • Recording RTE Vuser Scripts
685
Setting the Field Demarcation Characters
Some terminal emulators use demarcation characters to mark the beginning and the end of each field. These demarcation characters are not visible—appearing on the screen as spaces. In the terminal emulator shown below, the colors in the middle section of the screen have been inverted to display the field demarcation characters. These characters are surrounded by ellipses.
The TE_wait_text, TE_get_text, and TE_find_text functions operate by identifying the characters in a specified portion of the screen. If a field demarcation character is located within the specified section, you can choose to identify the character either as a space, or as an ASCII character. You use the TE_FIELD_CHARS system variable to specify the method of identification. You can set TE_FIELD_CHARS to 0 or 1:
➤ 0 specifies that the character in the position of the field demarcation characters is returned as a space.
➤ 1 specifies that the character in the position of the field demarcation characters is returned as an ascii code (ascii 0 or ascii 1).
By default, TE_FIELD_CHARS is set to 0.
You retrieve and set the value of TE_FIELD_CHARS by using the TE_getvar and TE_setvar functions.

Creating Vuser Scripts • RTE Vuser Scripts
686
687
50Configuring RTE Run-Time Settings
After you record a Terminal Emulator script, you configure its run-time settings. This chapter describes the following Terminal Emulator Vuser run-time settings:
➤ Modifying Connection Attempts
➤ Specifying an Original Device Name
➤ Setting the Typing Delay
➤ Configuring the X-System Synchronization
The following information only applies to Terminal Emulator (TE) type Vusers.
About Terminal Emulator Run-Time Settings
After developing a Terminal Emulator Vuser script, you set the run-time settings. These settings let you control the behavior of the Vuser when running the script. Terminal Emulator run-time settings allow you to configure your TE Vusers so that they accurately emulate real users performing remote terminal emulation. You can configure settings for connection attempts, typing delay, and X-System synchronization.
You set the Terminal Emulator related run-time settings through the RTE tab in the Run-Time Settings dialog box.
To display the Run-Time Settings dialog box, click the Run-Time Settings button on the VuGen toolbar. You can also modify the run-time settings from the LoadRunner Controller. In the Controller window, click the Runtime Settings button.
Creating Vuser Scripts • RTE Vuser Scripts
688
This chapter only discusses the Run-Time settings for Terminal Emulator Vusers. For information about run-time settings that apply to all Vusers, see Chapter 7, “Configuring Run-Time Settings.”
Modifying Connection Attempts
The TE_connect function is generated by VuGen when you record a connection to a host. When you replay an RTE Vuser script, the TE_connect function connects the terminal emulator to the specified host. If the first attempt to connect is not successful, the Vuser retries a number of times to connect successfully. Details of each connection are recorded in the report file output.txt.
To set the maximum number of times that a Vuser will try to connect, enter a number in the Maximum number of connection attempts box on the RTE tab of the Run-Time settings dialog box.
By default, a Vuser will try to connect 5 times.
For details about the TE_connect function, see the Online Function Reference (available from the VuGen Help menu).
Specifying an Original Device Name
In certain environments, each session (Vuser) requires a unique device name. The TE_connect function generates a unique 8-character device name for each Vuser, and connects using this name. To connect using the device name (that is contained within the com_string parameter of the TE_connect function), select the Use original device name check box on the RTE tab of the Run-Time settings dialog box.
Note: The original device name setting applies to IBM block-mode terminals only.
By default, Vusers use original device names to connect.

Chapter 50 • Configuring RTE Run-Time Settings
689
For details about the TE_connect function, see the Online Function Reference (available from the VuGen Help menu).
Setting the Typing Delay
The delay setting determines how Vusers execute TE_type functions:
To specify the amount of time that a Vuser waits before entering the first character in a string, enter a value in the First key box, in milliseconds.
To specify the amount of time that a Vuser waits between submitting successive characters, enter a value in the Subsequent keys box, in milliseconds.
If you enter zero for both the first key and the subsequent key delays, the Vuser will send characters as a single string, with no delay between characters.
You can use the TE_typing_style function to override the Delay settings for a portion of a Vuser script.
For details about the TE_type and TE_typing_style functions, see the Online Function Reference (available from the VuGen Help menu).
Configuring the X-System Synchronization
RTE Vuser scripts use the TE_wait_sync function for synchronization. You can set a timeout value and a stable-time value that VuGen applies to all TE_wait_sync functions. For details about the TE_wait_sync function, see the Online Function Reference (available from the VuGen Help menu).
Timeout
When you replay a TE_wait_sync function, if the system does not stabilize before the synchronization timeout expires, the TE_wait_sync function returns an error code. To set the synchronization timeout, enter a value (in seconds) in the Timeout box of the RTE Run-Time settings tab.
The default timeout value is 60 seconds.

Creating Vuser Scripts • RTE Vuser Scripts
690
Stable Time
After a Vuser executes a TE_wait_sync function, the Vuser waits until the terminal is no longer in the X-SYSTEM mode. After the terminal returns from the X-SYSTEM mode, the Vuser still monitors the system for a short time. This ensures that the terminal has become stable, that is, that the system has not returned to the X-SYSTEM mode. Only then does the TE_wait_sync function terminate.
To set the time that a Vuser continues to monitor the system after the system has returned from the X-SYSTEM mode, enter a value (in milliseconds) in the Stable time box of the RTE Run-Time settings tab.
The default stable time is 1000 milliseconds.

691
51Synchronizing RTE Vuser Scripts
Synchronization functions in an RTE Vuser script ensure that the input that a Vuser submits to a terminal emulator is synchronized with the responses from the server.
This chapter describes:
➤ Synchronizing Block-Mode (IBM) Terminals
➤ Synchronizing Character-Mode (VT) Terminals
The following information applies only to RTE (Windows) Vuser scripts.
About Synchronizing Vuser Scripts
Depending on the system you are testing, you may need to synchronize the input that a Vuser sends to a terminal emulator with the subsequent responses from the server. When you synchronize input, you instruct the Vuser to suspend script execution and wait for a cue from the system, before the Vuser performs its next action. For instance, suppose that a human user wants to submit the following sequence of key strokes to a bank application:
1 Type 1 to select “Financial Information” from the menu of a bank application.
2 When the message “What information do you require?” appears, type 3 to select “Dow Jones Industrial Average” from the menu.
3 When the full report has been written to the screen, type 5 to exit the bank application.
In this example, the input to the bank application is synchronized because at each step, the human user waits for a visual cue before typing. This cue
Creating Vuser Scripts • RTE Vuser Scripts
692
can be either the appearance of a particular message on the screen, or stability of all the information on the screen.
You can synchronize the input of a Vuser in the same way by using the TE-synchronization functions, TE_wait_sync, TE_wait_text, TE_wait_silent, and TE_wait_cursor. These functions effectively emulate a human user who types into a terminal window and then waits for the server to respond, before typing in the next command.
The TE_wait_sync function is used to synchronize block-mode (IBM) terminals only. The other TE-synchronization functions are used to synchronize character-mode (VT) terminals.
When you record an RTE Vuser script, VuGen can automatically generate and insert TE_wait_sync, TE_wait_text, and TE_wait_cursor statements into the script. You use VuGen’s recording options to specify which synchronization functions VuGen should insert.
Note: Do not include any synchronization statements in the Vuser_end section of a Vuser script. Since a Vuser can be aborted at any time, you cannot predict when the Vuser_end section will be executed.
Synchronizing Block-Mode (IBM) Terminals
The TE_wait_sync function is used for synchronization RTE Vusers operating block-mode (IBM) terminals. Block-mode terminals display the “X SYSTEM” message to indicate that the system is in Input Inhibited mode. When a system is in the Input Inhibited mode no typing can take place because the terminal emulator is waiting for a transfer of data from the server.
When you record a script on a block-mode terminal, by default, VuGen generates and inserts a TE_wait_sync function into the script each time the “X SYSTEM” message appears. You use VuGen’s recording options to specify whether or not VuGen should automatically insert TE_wait_sync functions.

Chapter 51 • Synchronizing RTE Vuser Scripts
693
When you run a Vuser script, the TE_wait_sync function checks if the system is in the X SYSTEM mode. If the system is in the X SYSTEM mode, the TE_wait_sync function suspends script execution. When the “X SYSTEM” message is removed from the screen, script execution continues.
Note: You can use the TE_wait_sync function only with IBM block-mode terminals emulators (5250 and 3270).
In general, the TE_wait_sync function provides adequate synchronization for all block-mode terminal emulators. However, if the TE_wait_sync function is ineffective in a particular situation, you can enhance the synchronization by including a TE_wait_text function. For more information on the TE_wait_text function, see “Waiting for Text to Appear on the Screen,” on page 697, and the Online Function Reference (available from the VuGen Help menu).
The syntax of the TE_wait_sync function is:
TE_wait_sync ( );
In the following script segment, the Vuser logs on with the user name “QUSER” and the password “MERCURY“. The Vuser then presses Enter to submit the login details to the server. The terminal emulator displays the X SYSTEM message while the system waits for the server to respond. The TE_wait_sync statement causes the Vuser to wait until the server has responded to the login request, that is, for the X SYSTEM message to be removed—before executing the next line of the script.
TE_type("QUSER");lr_think_time(2);TE_type("<kTab>MERCURY");lr_think_time(3);TE_type("<kEnter>");TE_wait_sync();....
Creating Vuser Scripts • RTE Vuser Scripts
694
When a TE_wait_sync function suspends the execution of a script while an X SYSTEM message is displayed, the Vuser continues to monitor the system—waiting for the X SYSTEM message to disappear. If the X SYSTEM message does not disappear before the synchronization timeout expires, the TE_wait_sync function returns an error code. The default timeout is 60 seconds.
To set the TE_wait_sync synchronization timeout:
1 Select Vuser > Run-Time Settings. The Run-Time Settings dialog box appears.
2 Ensure that the RTE tab is visible.
3 Under X SYSTEM Synchronization, enter a value (in seconds) in the Timeout box.
4 Click OK to close the Run-Time Settings dialog box.
After a Vuser executes a TE_wait_sync function, the Vuser waits until the terminal is no longer in the X SYSTEM mode. When the terminal returns from the X SYSTEM mode, the Vuser continues to monitor the system for a short period to ensure that the terminal is fully stable, that is, that the system does not return to the X SYSTEM mode. Only then does the TE_wait_sync function terminate and allow the Vuser to continue executing its script. The period that the Vuser continues to monitor the system, after the system has returned from the X SYSTEM mode, is known as the stable time. The default stable time is 1000 milliseconds.
You may need to increase the stable time if your system exhibits the following behavior:
When a system returns from the X SYSTEM mode, some systems “flickers” to and from the X SYSTEM for a short period of time until the system stabilizes. If the system remains out of the X SYSTEM mode for more than one second, and then returns to the X SYSTEM mode, the TE_wait_sync function will assume that the system is stable. If a Vuser then tries to type information to the system, the system will shift into keyboard-locked mode.
Alternatively, if your system never flickers when it returns from the X SYSTEM mode, you can reduce the stable time to less than the default value of one second.
Chapter 51 • Synchronizing RTE Vuser Scripts
695
To change the stable time for TE_wait_sync functions:
1 Select Vuser > Run-Time Settings. The Run-Time Settings dialog box appears.
2 Ensure that the RTE tab is visible.
3 Under X SYSTEM Synchronization, enter a value (in milliseconds) in the Stable Time box.
4 Click OK to close the Run-Time Settings dialog box.
For more information on the TE_wait_sync function, refer to the Online Function Reference (available from the VuGen Help menu).
You can instruct VuGen to record the time that the system remains in the X SYSTEM mode each time that the X SYSTEM mode is entered. To do so, VuGen inserts a TE_wait_sync_transaction function after each TE_wait_sync function, as shown in the following script segment:
Each TE_wait_sync_transaction function creates a transaction with the name “default.” This allows you to analyze how long the terminal emulator waits for responses from the server during a scenario run. You use the recording options to specify whether VuGen should generate and insert TE_wait_sync_transaction statements.
To instruct VuGen to insert TE_wait_sync_transaction statements:
1 Select Vuser > Recording Options. The Recording Settings dialog box appears.
2 Select the Generate Automatic X SYSTEM transactions check box, and then click OK.
TE_wait_sync();TE_wait_sync_transaction("default");

Creating Vuser Scripts • RTE Vuser Scripts
696
Synchronizing Character-Mode (VT) Terminals
There are three types of synchronization that you can use for character-mode (VT) terminals. The type of synchronization that you select depends on:
➤ the design of the application that is running in the terminal emulator
➤ the specific action to be synchronized
Waiting for the Cursor to Appear at a Specific Location
The preferred method of synchronization for VT type terminals is cursor synchronization. Cursor synchronization is particularly useful with full-screen or form-type applications, as opposed to scrolling or TTY-type applications.
Cursor synchronization uses the TE_wait_cursor function. When you run an RTE Vuser script, the TE_wait_cursor function instructs a Vuser to suspend script execution until the cursor appears at a specified location on the screen. The appearance of the cursor at the specified location means that the application is ready to accept the next input from the terminal emulator.
The syntax of the TE_wait_cursor function is:
int TE_wait_cursor ( int col, int row, int stable, int timeout );
During script execution, the TE_wait_cursor function waits for the cursor to reach the location specified by col, row.
The stable parameter specifies the time (in milliseconds) that the cursor must remain at the specified location. If you record a script using VuGen, stable is set to 100 milliseconds by default. If the client application does not become stable in the time specified by the timeout parameter, the function returns TIMEOUT. If you record a script using VuGen, timeout is set by default to the value of TIMEOUT, which is 90 seconds. You can change the value of both the stable and timeout parameters by directly editing the recorded script.

Chapter 51 • Synchronizing RTE Vuser Scripts
697
The following statement waits for the cursor to remain stable for three seconds. If the cursor doesn’t stabilize within 10 seconds, the function returns TIMEOUT.
For more information on the TE_wait_cursor function, refer to the Online Function Reference (available from the VuGen Help menu).
You can instruct VuGen to automatically generate TE_wait_cursor statements, and insert them into a script, while you record the script. The following is an example of a TE_wait_cursor statement that was automatically generated by VuGen:
To instruct VuGen to automatically generate TE_wait_cursor statements, and insert them into a script while recording:
1 Select Vuser > Recording Options. The Recording Settings dialog box appears.
2 Under Generate Automatic Synchronization Commands select the Cursor check box, and then click OK.
Waiting for Text to Appear on the Screen
You can use text synchronization to synchronize an RTE Vuser script running on a VT terminal emulator. Text synchronization uses the TE_wait_text function. During script execution, the TE_wait_text function suspends script execution and waits for a specific string to appear in the terminal window before continuing with script execution. Text synchronization is useful with those applications in which the cursor does not consistently appear in a predefined area on the screen.
TE_wait_cursor (10, 24, 3000, 10);
TE_wait_cursor(7, 20, 100, 90);

Creating Vuser Scripts • RTE Vuser Scripts
698
Note: Although text synchronization is designed to be used with character mode (VT) terminals, it can also be used with IBM block-mode terminals. Do not use automatic text synchronization with block-mode terminals.
The syntax of the TE_wait_text function is:
int TE_wait_text ( char *pattern, int timeout, int col1, int row1, int col2, int row2, int *retcol, int *retrow, char *match );
This function waits for text matching pattern to appear within the rectangle defined by col1, row1, col2, row2. Text matching the pattern is returned to match, and the actual row and column position is returned to retcol and retrow. If the pattern does not appear before the timeout expires, the function returns an error code. The pattern can include a regular expression. Refer to the Online Function Reference for details on using regular expressions. Besides the pattern and timeout parameters, all the other parameters are optional.
If pattern is passed as an empty string, the function will wait for timeout if it finds any text at all within the rectangle. If there is no text, it returns immediately.
If the pattern does appear, then the function waits for the emulator to be stable (finish redrawing, and not display any new characters) for the interval defined by the TE_SILENT_SEC and TE_SILENT_MILLI system variables. This, in effect, allows the terminal to become stable and emulates a human user.
If the terminal does not become stable within the interval defined by TE_SILENT_TIMEOUT, script execution continues. The function returns 0 for success, but sets the TE_errno variable to indicate that the terminal was not silent after the text appeared.
To modify or retrieve the value of any of the TE_SILENT system variables, use the TE_getvar and TE_setvar functions. For more information, refer to the Online Function Reference (available from the VuGen Help menu).
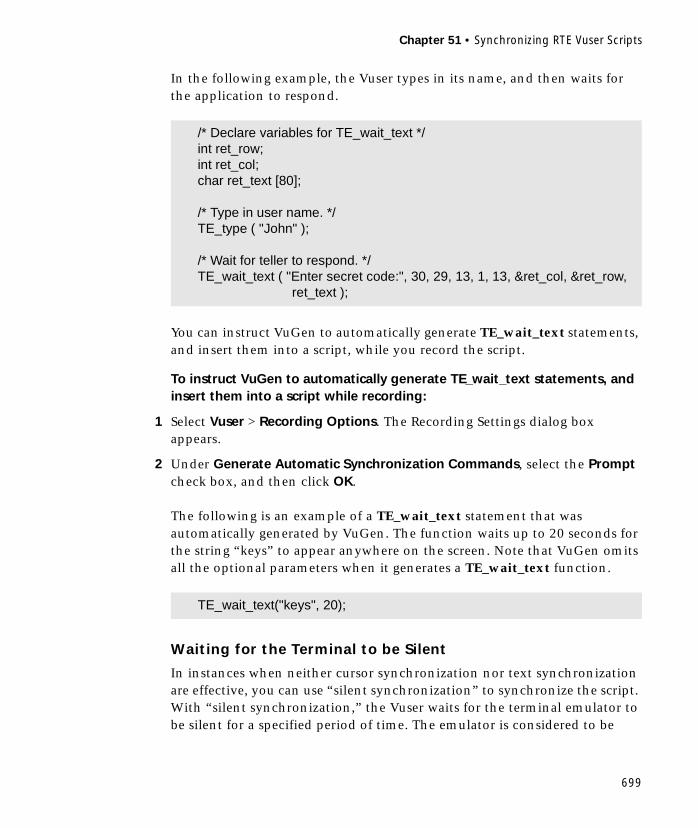
Chapter 51 • Synchronizing RTE Vuser Scripts
699
In the following example, the Vuser types in its name, and then waits for the application to respond.
You can instruct VuGen to automatically generate TE_wait_text statements, and insert them into a script, while you record the script.
To instruct VuGen to automatically generate TE_wait_text statements, and insert them into a script while recording:
1 Select Vuser > Recording Options. The Recording Settings dialog box appears.
2 Under Generate Automatic Synchronization Commands, select the Prompt check box, and then click OK.
The following is an example of a TE_wait_text statement that was automatically generated by VuGen. The function waits up to 20 seconds for the string “keys” to appear anywhere on the screen. Note that VuGen omits all the optional parameters when it generates a TE_wait_text function.
Waiting for the Terminal to be Silent
In instances when neither cursor synchronization nor text synchronization are effective, you can use “silent synchronization” to synchronize the script. With “silent synchronization,” the Vuser waits for the terminal emulator to be silent for a specified period of time. The emulator is considered to be
/* Declare variables for TE_wait_text */int ret_row;int ret_col;char ret_text [80];
/* Type in user name. */TE_type ( "John" );
/* Wait for teller to respond. */TE_wait_text ( "Enter secret code:", 30, 29, 13, 1, 13, &ret_col, &ret_row,
ret_text );
TE_wait_text("keys", 20);

Creating Vuser Scripts • RTE Vuser Scripts
700
silent when it does not receive any input from the server for a specified period of time.
Note: Use silent synchronization only when neither cursor synchronization nor text synchronization are effective.
You use the TE_wait_silent function to instruct a script to wait for the terminal to be silent. You specify the period for which the terminal must be silent. If the terminal is silent for the specified period, then the TE_wait_silent function assumes that the application has stopped printing text to the terminal screen, and that the screen has stabilized.
The syntax of the function is:
int TE_wait_silent ( int sec, int milli, int timeout );
The TE_wait_silent function waits for the terminal emulator to be silent for the time specified by sec (seconds) and milli (milliseconds). The emulator is considered silent when it does not receive any input from the server. If the emulator does not become silent (i.e. stop receiving characters) during the time specified by the time timeout variable, then the function returns an error.
For example, the following statement waits for the screen to be stable for three seconds. If after ten seconds, the screen has not become stable, the function returns an error.
For more information, refer to the Online Function Reference (available from the VuGen Help menu).
TE_wait_silent (3, 0, 10);

701
52Reading Text from the Terminal Screen
RTE Vusers can read text from the user interface of a terminal emulator, and then perform various tasks with that text.
This chapter describes:
➤ Searching for Text on the Screen
➤ Reading Text from the Screen
The following information applies only to RTE (Windows) Vuser scripts.
About Reading Text from the Terminal Screen
There are several Vuser functions that RTE Vusers can use to read text from the terminal screen. You can use these functions, TE_find_text and TE_get_text_line, to check that the terminal emulator is responding correctly, or to enhance the logic in your scripts.
After recording, you can manually insert TE_find_text and TE_get_text_line statements directly into your RTE Vuser scripts.
Searching for Text on the Screen
The TE_find_text function searches for a line of text on the screen. The syntax of the function is:
int TE_find_text ( char *pattern, int col1, int row1, int col2, int row2,int *retcol, int *retrow, char *match );

Creating Vuser Scripts • RTE Vuser Scripts
702
This function searches for text matching pattern within the rectangle defined by col1, row1, col2, row2. Text matching the pattern is returned to match, and the actual row and column position is returned to retcol and retrow. The search begins in the top-left corner. If more than one string matches pattern, the one closest to the top-left corner is returned.
The pattern can include a regular expression. Refer to the Online Function Reference for details on using regular expressions.
You must manually type TE_find_text statements into your Vuser scripts. For details on the syntax of the TE_find_text function, refer to the Online Function Reference (available from the VuGen Help menu).
Reading Text from the Screen
The TE_get_text_line function reads a line of text from the area of the screen that you designate. The syntax of the function is:
char *TE_get_text_line ( int col, int row, int width, char *text );
This function copies a line of text from the terminal screen to a buffer text. The first character in the line is defined by col, row. The column coordinate of the last character in the line is indicated by width. The text from the screen is returned to the buffer text. If the line contains tabs or spaces, the equivalent number of spaces is returned.
In addition, the TE_get_cursor_position function can be used to retrieve the current position of the cursor on the terminal screen. The TE_get_line_attribute function returns the character formatting (for instance, bold or underline) of a line of text.
You must manually type TE_get_text_line statements into your Vuser scripts. For details on the syntax of the TE_get_text_line function, refer to the Online Function Reference (available from the VuGen Help menu).

Part XV
GUI Vuser Scripts

704

705
53Developing GUI Vuser Scripts
GUI Vusers operate graphical user interface (GUI) applications in Windows-based environments. You create GUI Vuser scripts by using WinRunner, Mercury Interactive’s automated testing tool for GUI applications.
This chapter describes:
➤ Introducing GUI Vusers
➤ Understanding GUI Vuser Technology
➤ Getting Started with GUI Vusers
➤ Using WinRunner to Create GUI Vuser Scripts
➤ Measuring Server Performance: Transactions
➤ Generating Heavy User Load: Rendezvous Points
➤ Understanding GUI Vuser Scripts
➤ Using Vuser Functions in GUI Vuser Scripts
➤ Sending Messages to the Controller
➤ Obtaining Information about Vusers and Load Generators
The following information applies only to GUI Vuser scripts.
About Developing GUI Vuser Scripts
GUI Vusers enable you to measure and monitor end-to-end user response times while your client/server system is under load. A GUI Vuser emulates the complete environment of a human user. For example, a human user sits at a machine, operates applications using the keyboard and the mouse, and reads information on the machine’s monitor. Similarly, a GUI Vuser runs on
Creating Vuser Scripts • GUI Vuser Scripts
706
its own machine and operates applications. A Vuser can be programmed to read and act on information that appears on its machine’s display.
The actions of each GUI Vuser are described in a GUI Vuser script. You use WinRunner to create GUI Vuser scripts. WinRunner is an automated GUI testing tool that allows you to create, edit, and debug GUI Vuser scripts.
GUI Vuser scripts are created using Mercury Interactive’s Test Script Language (TSL). TSL is a C-like programming language that is high-level and easy to use. It combines the power and flexibility of a conventional programming language with functions designed for testing client/server systems.
After recording a basic Vuser script, you insert statements into the script that measure the performance of the server (transactions), and ensure that specific user load is emulated (rendezvous points). For more details about GUI Vusers, refer to your LoadRunner Controller User’s Guide.
Introducing GUI Vusers
Suppose that you have a bank server that services many automatic teller machines (ATMs). You could create a GUI Vuser script that:
➤ opens the ATM application
➤ enters an account number
➤ enters the amount of cash to be withdrawn
➤ withdraws cash from the account
➤ checks the balance of the account
➤ closes the ATM application
➤ repeats the process
You monitor and manage GUI Vusers using the Controller only. For instance, you can use the Controller to run, pause, or view Vusers, and to monitor scenario status.
GUI Vuser Scripts
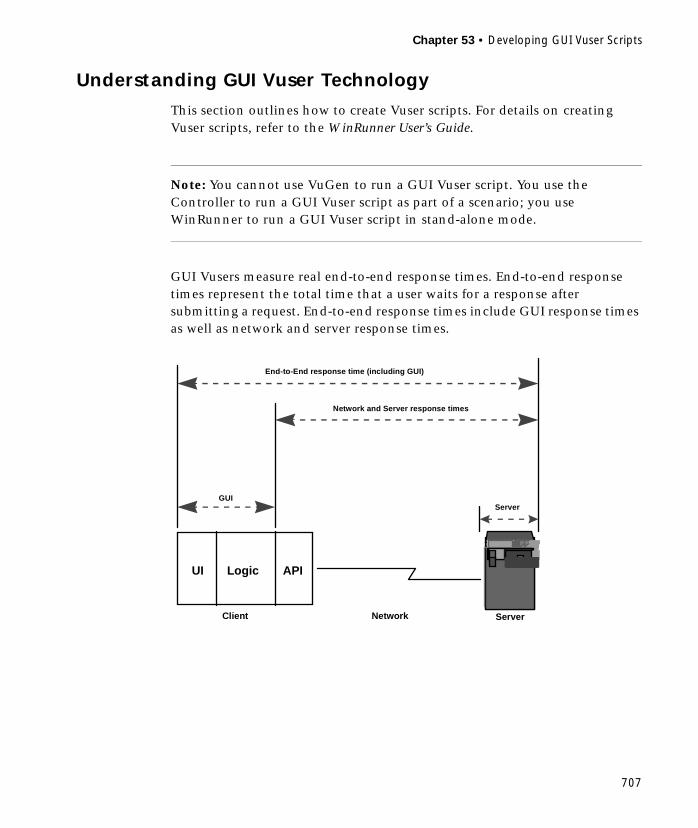
Chapter 53 • Developing GUI Vuser Scripts
707
Understanding GUI Vuser Technology
This section outlines how to create Vuser scripts. For details on creating Vuser scripts, refer to the WinRunner User’s Guide.
Note: You cannot use VuGen to run a GUI Vuser script. You use the Controller to run a GUI Vuser script as part of a scenario; you use WinRunner to run a GUI Vuser script in stand-alone mode.
GUI Vusers measure real end-to-end response times. End-to-end response times represent the total time that a user waits for a response after submitting a request. End-to-end response times include GUI response times as well as network and server response times.
ServerClient
UI Logic
End-to-End response time (including GUI)
Network and Server response times
GUIServer
API
Network

Creating Vuser Scripts • GUI Vuser Scripts
708
GUI Vusers
A GUI Vuser consists of a copy of WinRunner—Mercury Interactive’s GUI testing tool for Windows-based applications—and a GUI-based application.
WinRunner replaces the human user and operates the application. For example, WinRunner can select a command from a menu, click an icon, or type text. The application that WinRunner operates can be any application that accesses a server.
Getting Started with GUI Vusers
This section outlines how to create a GUI Vuser script and then integrate it into a scenario.
1 Create a GUI Vuser script using WinRunner.
Use WinRunner to record your keyboard and mouse operations on a GUI based application. For details, refer to the WinRunner User’s Guide.
2 Program additional TSL statements into the script.
Enhance the Vuser script by using loops and other control-flow structures. For details about editing scripts, refer to the WinRunner User’s Guide. For details about TSL, refer to the TSL Online Reference.
WinRunner
A GUI Vuser
Input
GUI-based application

Chapter 53 • Developing GUI Vuser Scripts
709
Insert transactions to measure system performance.
Measure the performance of the server by inserting transactions into your Vuser scripts.
Insert Rendezvous points to generate intense user load on the server.
Rendezvous points instruct multiple Vusers to perform tasks at exactly the same time.
3 Run the Vuser script.
Run the script to make sure it works correctly. If necessary, debug the script. For more information, refer to the WinRunner User’s Guide.
After you create a GUI Vuser script, you integrate it into a scenario. For more information on integrating Vuser scripts in a scenario, refer to your LoadRunner Controller User’s Guide.
Using WinRunner to Create GUI Vuser Scripts
You use WinRunner to create GUI Vuser scripts. After recording a basic Vuser script using WinRunner, you manually insert:
➤ transaction statements into the script to measure the performance of the server. For details, see “Measuring Server Performance: Transactions,” on page 710.
➤ rendezvous statements into the script to ensure that specific user load is emulated. For details, see “Generating Heavy User Load: Rendezvous Points,” on page 711.
Creating GUI Vuser Scripts
WinRunner is a complete development environment for creating, editing, and debugging Windows-based GUI Vuser scripts. Using WinRunner, you record the actions of a human user on an application. For example, you could record a user entering an account number into an ATM and then withdrawing fifty dollars. These actions are automatically transcribed into a script in Mercury Interactive’s Test Script Language (TSL).
Creating Vuser Scripts • GUI Vuser Scripts
710
Measuring Server Performance: Transactions
You define transactions to measure the performance of the server. Each transaction measures the time it takes for the server to respond to specified Vuser requests. These requests can be simple tasks such as waiting for a response for a single query, or complex tasks, such as submitting several queries and generating a report.
To measure a transaction, you insert Vuser functions to mark the beginning and end of a task. Within a script, you can mark an unlimited number of transactions for analysis, each with a different name, and starting and ending in different places.
During scenario execution, the Controller measures the time that it takes to perform each transaction. For instance, you could define a transaction to measure the time it takes for a bank server to process a Vuser’s request to view the balance of an account. After the scenario run, you analyze the server’s performance per transaction using LoadRunner’s graphs and reports.
Once you have defined a transaction, you use it to measure how the server performs under different loads. For example, you can measure how the server performs under the load of a single user, a hundred users, or a thousand users.While the scenario runs, LoadRunner accumulates performance data for the transactions. Later, you use this information to generate performance analysis reports and graphs.
To mark the start of a transaction:
Insert a start_transaction statement into the Vuser script.
To mark the end of a transaction:
Insert a end_transaction statement into the Vuser script.
For the syntax of the start_transaction and end_transaction functions, refer to the TSL Online Reference (available from the WinRunner Help menu) or the Creating GUI Virtual User Scripts (UNIX) guide.
transactions

Chapter 53 • Developing GUI Vuser Scripts
711
Generating Heavy User Load: Rendezvous Points
In order to emulate heavy user load and measure server performance, you synchronize Vusers to perform a query at exactly the same moment. You ensure that multiple Vusers act simultaneously by creating a meeting place, known as a rendezvous point. When a Vuser arrives at the rendezvous point, it is held by the Controller until all Vusers participating in the rendezvous arrive. When the rendezvous conditions are met, the Vusers are released by the Controller.
You designate the meeting place by inserting a rendezvous point into your Vuser script. When a Vuser executes a script and encounters the rendezvous point, script execution is paused and the Vuser waits for permission from the Controller to continue. After the Vuser is released from the rendezvous, it performs the next task in the script.
For example, to generate peak load on a bank server, you could insert rendezvous points into the Vuser scripts to instruct all the Vusers to simultaneously deposit cash into their accounts.
To insert a rendezvous point:
Insert a rendezvous statement into the Vuser script.
For the syntax of the rendezvous function, refer to the TSL Online Reference (available from the WinRunner Help menu) or the Creating GUI Virtual User Scripts (UNIX) guide.
Understanding GUI Vuser Scripts
GUI Vuser scripts are written in TSL—Mercury Interactive’s Test Script Language. TSL is a C-like programming language that is high-level and easy to use. It combines the power and flexibility of a conventional programming language with functions designed specifically for testing. For additional information about TSL, refer to the TSL Online Reference.
This section presents a simple Vuser script, created in WinRunner. Note that this script will not work on a Unix machine. The script starts an ATM application (mratm.exe), enters an account number, deposits fifty dollars, and then closes the application.
rendezvouspoints

Creating Vuser Scripts • GUI Vuser Scripts
712
The first section of the script starts an application and moves it to a new location on the screen. The system function starts the ATM application. The win_move function moves the ATM application to a specified location on the screen.
Next, the Vuser enters an account number into the ATM. The set_window function activates the ATM window. The edit_set function instructs the Vuser to enter the account number into the ATM’s account field.
After entering the account number, the Vuser enters the amount it wants to deposit and presses the deposit button. The edit_set function enters the amount to be deposited in the amount field. The button_press function tells the Vuser to press the ATM’s Deposit button.
The final section of the test tells the Vuser to close the ATM application. The menu_select_item function selects the Exit command from the File menu.
# Initialize and invoke ATM client application.system ( "mratm.exe" );win_move ( "Mercury ATM", 325, 0 );
# Type in account number in the Account field.account = 100;set_window ( "Mercury ATM" );edit_set ( "Account", account );
# Enter the amount to be deposited in the amount field.amount = 50;set_window ( "Mercury ATM" );edit_set ( "Amount", amount );# Press the Deposit button.button_press ( "Deposit" );
# Close client application.menu_select_item ( "File; Exit" );
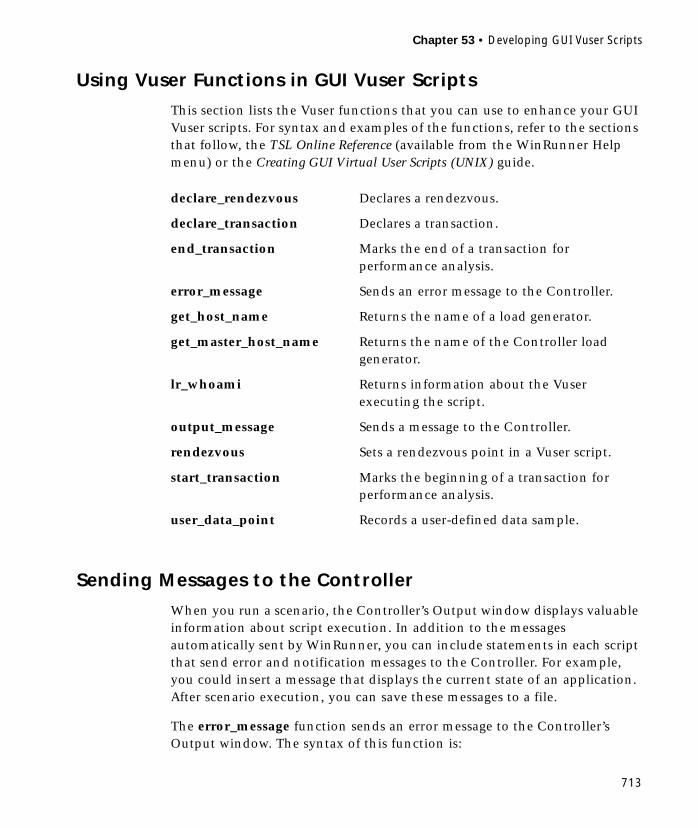
Chapter 53 • Developing GUI Vuser Scripts
713
Using Vuser Functions in GUI Vuser Scripts
This section lists the Vuser functions that you can use to enhance your GUI Vuser scripts. For syntax and examples of the functions, refer to the sections that follow, the TSL Online Reference (available from the WinRunner Help menu) or the Creating GUI Virtual User Scripts (UNIX) guide.
Sending Messages to the Controller
When you run a scenario, the Controller’s Output window displays valuable information about script execution. In addition to the messages automatically sent by WinRunner, you can include statements in each script that send error and notification messages to the Controller. For example, you could insert a message that displays the current state of an application. After scenario execution, you can save these messages to a file.
The error_message function sends an error message to the Controller’s Output window. The syntax of this function is:
declare_rendezvous Declares a rendezvous.
declare_transaction Declares a transaction.
end_transaction Marks the end of a transaction for performance analysis.
error_message Sends an error message to the Controller.
get_host_name Returns the name of a load generator.
get_master_host_name Returns the name of the Controller load generator.
lr_whoami Returns information about the Vuser executing the script.
output_message Sends a message to the Controller.
rendezvous Sets a rendezvous point in a Vuser script.
start_transaction Marks the beginning of a transaction for performance analysis.
user_data_point Records a user-defined data sample.

Creating Vuser Scripts • GUI Vuser Scripts
714
error_message ( message );
where message is a text string. In the following example, the Vuser script sends a message when a fatal error occurs during script execution.
The output_message function is used to send a special notification that is not an error message. The syntax of this function is:
output_message ( message );
where message is a text string.
For the further information on the error_message and the output_message functions, refer to the TSL Online Reference (available from the WinRunner Help menu) or the Creating GUI Virtual User Scripts (UNIX) guide.
if ( fatal_error < 0 ){mess = sprintf ( "fatal error - Exiting." );error_message ( mess );texit (1);
}
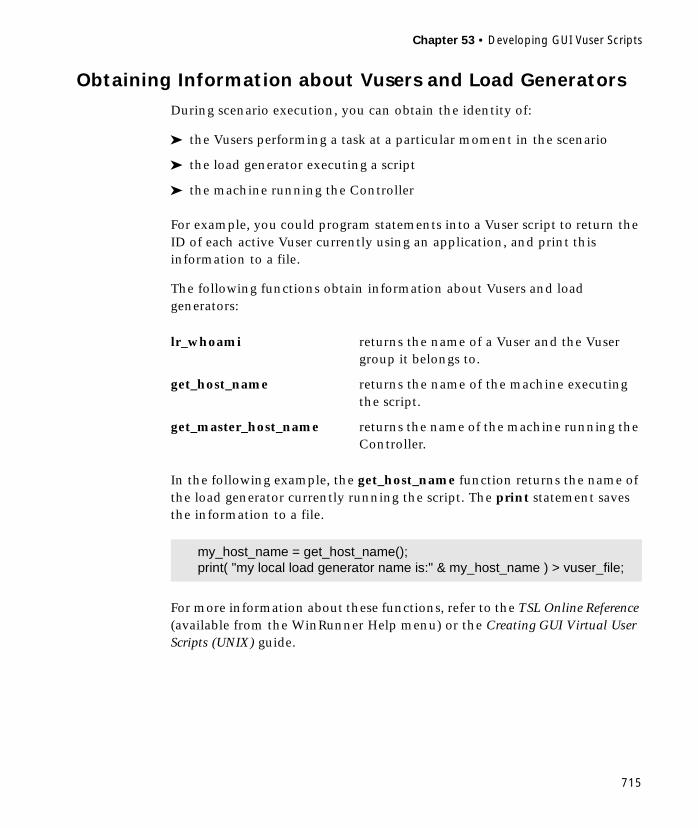
Chapter 53 • Developing GUI Vuser Scripts
715
Obtaining Information about Vusers and Load Generators
During scenario execution, you can obtain the identity of:
➤ the Vusers performing a task at a particular moment in the scenario
➤ the load generator executing a script
➤ the machine running the Controller
For example, you could program statements into a Vuser script to return the ID of each active Vuser currently using an application, and print this information to a file.
The following functions obtain information about Vusers and load generators:
In the following example, the get_host_name function returns the name of the load generator currently running the script. The print statement saves the information to a file.
For more information about these functions, refer to the TSL Online Reference (available from the WinRunner Help menu) or the Creating GUI Virtual User Scripts (UNIX) guide.
lr_whoami returns the name of a Vuser and the Vuser group it belongs to.
get_host_name returns the name of the machine executing the script.
get_master_host_name returns the name of the machine running the Controller.
my_host_name = get_host_name();print( "my local load generator name is:" & my_host_name ) > vuser_file;

Creating Vuser Scripts • GUI Vuser Scripts
716
Part XVI
Information for Advanced Users

718

719
54Programming Vuser Scripts
You can create a Vuser script template using Visual C or Visual Basic. You compile it as you would a regular C or Basic program.
This chapter describes:
➤ Creating a Vuser Script with Visual C
➤ Creating a Vuser Script with Visual Basic
➤ Configuring Runtime Settings and Parameters
About Programming Vuser Scripts
There are two ways to create Vuser script: recording or programming.
This appendix describes how to develop a Vuser script by programming.
VuGen You can use VuGen to create Vuser script that run on Windows or UNIX platforms. You record your application in a Windows environment and run it in either Windows or UNIX—recording is not supported on UNIX (excluding UNIX RTE Vusers).
programming For users working with Visual Studio, you can program in Visual Basic, C or C++. The programs must be compiled into a dynamic link library (dll).

Creating Vuser Scripts • Information for Advanced Users
720
To create a Vuser script through programming, you can use a LoadRunner template as a basis for a larger Vuser script. The template provides:
➤ correct program structure
➤ LoadRunner API calls
➤ source code and makefiles for creating a dynamic library
After creating a basic Vuser script from a template, you can enhance the script to provide run-time information and statistics. For more information, see Chapter 4, “Enhancing Vuser Scripts.”
Creating a Vuser Script with Visual C
Please note that you can create Vuser scripts using Visual C version 6.0 or higher.
To create a Vuser script with Visual C:
1 In Visual C, create a new project - dynamic link library (dll). Choose File > New and click the Projects tab.
2 In the Wizard, choose empty dll.
3 Add the following files to the project:
➤ A new cpp file with 3 exported function: init, run, end (the names may be customized).
➤ A library :lrun50.lib (located in the <lr installation dir>/lib).
4 In the project settings change the following:
➤ Select the C/C++ tab and choose Code generation (Category) > Use Run Time library (List) change to: Multithreaded dll
➤ Select the C/C++ tab and choose Preprocessor (Category) > Preprocessor definitions (edit field) Remove _DEBUG
5 Add code from your client application, or program as you normally would.
6 Enhance your script with General LoadRunner functions. For example, lr_output_message to issue messages, lr_start_transaction to mark
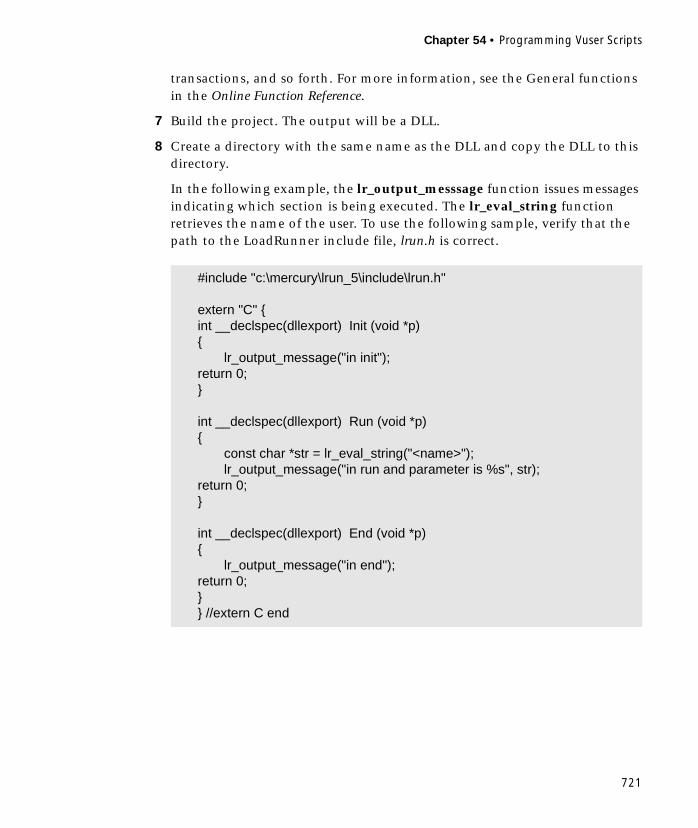
Chapter 54 • Programming Vuser Scripts
721
transactions, and so forth. For more information, see the General functions in the Online Function Reference.
7 Build the project. The output will be a DLL.
8 Create a directory with the same name as the DLL and copy the DLL to this directory.
In the following example, the lr_output_messsage function issues messages indicating which section is being executed. The lr_eval_string function retrieves the name of the user. To use the following sample, verify that the path to the LoadRunner include file, lrun.h is correct.
#include "c:\mercury\lrun_5\include\lrun.h"
extern "C" {int __declspec(dllexport) Init (void *p){
lr_output_message("in init");return 0;}
int __declspec(dllexport) Run (void *p){
const char *str = lr_eval_string("<name>");lr_output_message("in run and parameter is %s", str);
return 0;}
int __declspec(dllexport) End (void *p){
lr_output_message("in end");return 0;}} //extern C end
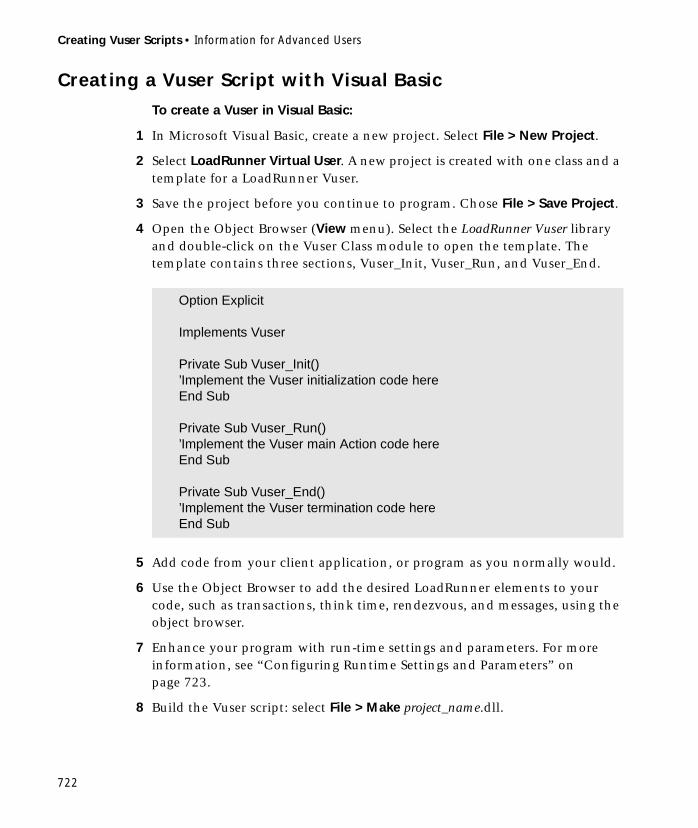
Creating Vuser Scripts • Information for Advanced Users
722
Creating a Vuser Script with Visual Basic
To create a Vuser in Visual Basic:
1 In Microsoft Visual Basic, create a new project. Select File > New Project.
2 Select LoadRunner Virtual User. A new project is created with one class and a template for a LoadRunner Vuser.
3 Save the project before you continue to program. Chose File > Save Project.
4 Open the Object Browser (View menu). Select the LoadRunner Vuser library and double-click on the Vuser Class module to open the template. The template contains three sections, Vuser_Init, Vuser_Run, and Vuser_End.
5 Add code from your client application, or program as you normally would.
6 Use the Object Browser to add the desired LoadRunner elements to your code, such as transactions, think time, rendezvous, and messages, using the object browser.
7 Enhance your program with run-time settings and parameters. For more information, see “Configuring Runtime Settings and Parameters” on page 723.
8 Build the Vuser script: select File > Make project_name.dll.
Option Explicit
Implements Vuser
Private Sub Vuser_Init()’Implement the Vuser initialization code hereEnd Sub
Private Sub Vuser_Run()’Implement the Vuser main Action code hereEnd Sub
Private Sub Vuser_End()’Implement the Vuser termination code hereEnd Sub

Chapter 54 • Programming Vuser Scripts
723
The project is saved in the form of a LoadRunner Vuser script (.usr). The script resides in the same directory as the project.
Configuring Runtime Settings and Parameters
After you create the DLL for your script, you create a script file (.usr) and configure its settings. The lrbin.bat utility provided with LoadRunner lets you define parameters and configure runtime settings for scripts created with Visual C and Basic. This utility is located in the bin directory of the LoadRunner installation.
To configure runtime settings and parameterize scripts:
1 In the LoadRunner bin directory, double-click on lrbin.bat. The Standalone Vuser Configuration dialog box opens.
2 Choose File > New. Specify a script name for the usr file. The script name must be identical to the name of the directory to which you saved the DLL.
3 Choose Vuser > Advanced and enter the DLL name in the Configuration dialog box .
4 Choose Vuser > Run-time Settings to define run-time settings. The Run-time Settings dialog box is identical to that displayed in the VuGen interface. For more information, see Chapter 7, “Configuring Run-Time Settings.”
5 Choose Vuser > Parameter List to define parameters for your script. The Parameter dialog boxes are identical to those in VuGen. For more information, see Chapter 5, “Defining Parameters.”
Test the script by running it in standalone mode. Choose Vuser > Run Vuser. The Vuser execution window appears while the script runs.
6 Choose File > Exit to close the configuration utility.

Creating Vuser Scripts • Information for Advanced Users
724

725
55VuGen Debugging Tips
This chapter contains a few methods for obtaining more detailed debugging information to help you produce error-free Vuser scripts.
➤ General Debugging Tip
➤ Using C Functions for Tracing
➤ Examining Replay Output
➤ Debugging Database Applications
➤ Working with Oracle Applications
➤ Solving Common Problems with Oracle Applications
General Debugging Tip
VuGen can be used as a regular text editor. You can open any text file in it and edit it. When an error message is displayed during replay in the output window below, you can double click on it and VuGen jumps the cursor to the line of the test that caused the problem. You can also place the cursor on the error code and press F1 to view the online help explanation for the error code.
Using C Functions for Tracing
You can use the C interpreter trace option (in version 230 or higher) to debug your Vuser scripts. The ci_set_debug statement allows trace and debug to be turned on and off at specific points in the script.
ci_set_debug(ci_this_context, int debug, int trace);
Creating Vuser Scripts • Information for Advanced Users
726
For example, you could add the following statements to your script:
ci_set_debug(ci_this_context, 1, 1) /* turn ON trace & debug */ci_set_debug(ci_this_context, 0, 0) /* turn OFF trace & debug */
To view the output of the trace information, use the print callback function, ci_set_print_CB().
Examining Replay Output
Look at the replay output (either from within VuGen, or the file output.txt representing the output of the LoadRunner driver run). You may also change the run-time settings options in VuGen to select more extensive logging in order to obtain a more detailed log output of the replayed test.
Debugging Database Applications
The following tips apply to database applications only (Oracle, ODBC, Ctlib):
➤ Generating Debugging Information
➤ Examining Compiler Information
Generating Debugging Information
Note: You can now set options to view most of the information described in this section using VuGen’s user interface.
VuGen contains an inspector “engine.” You can force VuGen recorder to create “inspector” output by editing \WINDOWS_DIR\vugen.ini as follows:
[LogMode]EnableAscii=ASCII_LOG_ON
Chapter 55 • VuGen Debugging Tips
727
When this option is enabled, VuGen creates a file, vuser.asc in the Data directory at the end of the recording. Note that this option should be used for debugging purposes only. This output file can become very large (several MB) and have serious effects on machine performance and disk space.
For cases like ODBC-based applications, it is possible to configure the ODBC Administrator (located in the Windows Control Panel) to provide a similar trace output. Open the ODBC options, and select ‘Trace ODBC calls’ to ON. Similarly the ODBC Developer Kit provides a Spy utility for call tracing.
To enable further debug information, add the following section to the \WINDOWS_DIR\vugen.ini file
[INSPECTOR]TRACE_LEVEL=3TRACE_FILENAME=c:\tmp\sqltrace.txt
The file (sqltrace.txt) will include useful internal information regarding the hooking calls made during recording. The trace_level is between 1 and 3, with 3 representing the most detailed debug level. Note that in LR versions 5.02 and higher, you can set the trace level from the user interface.
Examining Compiler Information
You can view information about each stage of code generation, preprocessing and compilation to determine the source of any errors.
Code Generation Information
Look at the vuser.log file under the Data directory. This file, which contains a log of the code generation phase, is automatically created at the end of every lrd recording (i.e. all database protocols). The following is an example of a log file:
lrd_init: OKlrd_option: OKlrd_option: OKlrd_option: OKCode generation successfullrd_option: OKlrd_end: OK
Creating Vuser Scripts • Information for Advanced Users
728
If any of the messages are not OK or successful, then a problem occurred during the code generation.
Preprocessing and Compilation Information
During runtime, VuGen displays information about both the preprocessing and compilation processes.
Working with Oracle Applications
Oracle Applications is a two-tier (’fat’ client) packaged application, made up of 35 different modules (Oracle Human Resources, Oracle Financials, and so forth).
There are a number of issues that you should be aware of while recording and replaying Vusers for Oracle Applications:
➤ A typical script contains thousands of events, binds and assigns.
➤ A typical script has many db connections per user session.
➤ scripts almost always require correlated queries.
➤ Oracle Applications’ clients are 16-bit only (developed with Oracle Developer 2000). This means that for debugging, if you don’t have the Oracle 32bit client, you need to use VuGen’s Force 16-bit options.
When a new window is created, the application retrieves an .xpf file from the file system for display. Currently, VuGen does not take this into consideration since it records at the client/server level. Therefore, there is a fairly significant inaccuracy in performance measurements since in most cases performance problems are related to the network bottleneck between clients and file server. We are currently thinking about this problem and how, if at all, to solve it.

Chapter 55 • VuGen Debugging Tips
729
Solving Common Problems with Oracle Applications
This section contains a list of common problems that you may encounter while working with Oracle Applications, and suggested solutions.
ORA-20001 and ORA-06512
Errors ORA-20001 and ORA-06512 appear during replay when the lrd_stmt contains the pl/sql block: fnd_signon.audit_responsibility(...)
This statement fails during replay because the sign-on number is unique for each new connection.
Solution
In order to solve this problem you need to use the new correlation tool for the sign-on number. This is second assigned value in the statement.
After you scan for possible values to correlate, highlight the value of the second lrd_assign_bind() for the failed statement. Note that the values in the "correlated query" window may not appear in the same order as the actual recorded statements.
The grid containing the substitution value should appear after the lrd_stmt which contains the pl/sql block: fnd_signon.audit_user(...).
Note: Since the sign-on number is unique for every connection, you need to use correlation for each new connection that you record.
Example of Solution
The following statement failed in replay because the second value, "1498224" is the unique sign-on number for every new connection.
lrd_stmt(Csr6, "begin fnd_signon.audit_responsibility(:s,:l,:f,:a,:r,:t,:p)" "; end;", -1, 1, 1, 0); lrd_assign_bind(Csr6, "s", "D", &s_D216, 0, 0, 0); lrd_assign_bind(Csr6, "l", "1498224", &l_D217, 0, 0, 0); lrd_assign_bind(Csr6, "f", "1", &f_D218, 0, 0, 0);
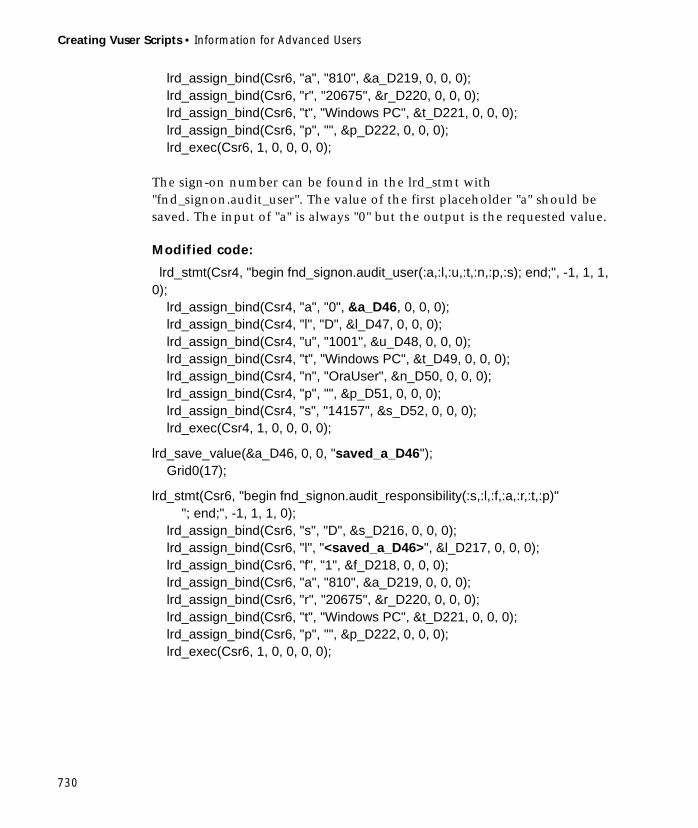
Creating Vuser Scripts • Information for Advanced Users
730
lrd_assign_bind(Csr6, "a", "810", &a_D219, 0, 0, 0); lrd_assign_bind(Csr6, "r", "20675", &r_D220, 0, 0, 0); lrd_assign_bind(Csr6, "t", "Windows PC", &t_D221, 0, 0, 0); lrd_assign_bind(Csr6, "p", "", &p_D222, 0, 0, 0); lrd_exec(Csr6, 1, 0, 0, 0, 0);
The sign-on number can be found in the lrd_stmt with "fnd_signon.audit_user". The value of the first placeholder "a" should be saved. The input of "a" is always "0" but the output is the requested value.
Modified code:
lrd_stmt(Csr4, "begin fnd_signon.audit_user(:a,:l,:u,:t,:n,:p,:s); end;", -1, 1, 1, 0); lrd_assign_bind(Csr4, "a", "0", &a_D46, 0, 0, 0); lrd_assign_bind(Csr4, "l", "D", &l_D47, 0, 0, 0); lrd_assign_bind(Csr4, "u", "1001", &u_D48, 0, 0, 0); lrd_assign_bind(Csr4, "t", "Windows PC", &t_D49, 0, 0, 0); lrd_assign_bind(Csr4, "n", "OraUser", &n_D50, 0, 0, 0); lrd_assign_bind(Csr4, "p", "", &p_D51, 0, 0, 0); lrd_assign_bind(Csr4, "s", "14157", &s_D52, 0, 0, 0); lrd_exec(Csr4, 1, 0, 0, 0, 0);
lrd_save_value(&a_D46, 0, 0, "saved_a_D46"); Grid0(17);
lrd_stmt(Csr6, "begin fnd_signon.audit_responsibility(:s,:l,:f,:a,:r,:t,:p)" "; end;", -1, 1, 1, 0); lrd_assign_bind(Csr6, "s", "D", &s_D216, 0, 0, 0); lrd_assign_bind(Csr6, "l", "<saved_a_D46>", &l_D217, 0, 0, 0); lrd_assign_bind(Csr6, "f", "1", &f_D218, 0, 0, 0); lrd_assign_bind(Csr6, "a", "810", &a_D219, 0, 0, 0); lrd_assign_bind(Csr6, "r", "20675", &r_D220, 0, 0, 0); lrd_assign_bind(Csr6, "t", "Windows PC", &t_D221, 0, 0, 0); lrd_assign_bind(Csr6, "p", "", &p_D222, 0, 0, 0); lrd_exec(Csr6, 1, 0, 0, 0, 0);
Chapter 55 • VuGen Debugging Tips
731
Working with large numbers
Large numbers (NUMBER data type) sometimes appear in different format in the GRID and in the ASCII file. This difference makes it more difficult to identify numbers while searching for values to save for correlation.
For example, you could have a value appear as 1000003 in the grid, but as 1e+0006 in the Recording Log (ASCII file).
Workaround
If you have an error during replay and the correlation tool cannot locate the value in previous results, look for this value in the other format in grid.
ORA-00960
This error can occur if the column names in the recorded script are not unique. For example:
lrd_stmt(Csr9, "SELECT UOM_CODE, UOM_CODE, DESCRIPTION FROM " "MTL_UNITS_OF_MEASURE " "WHERE NVL(DISABLE_DATE, SYSDATE + 1) > " "SYSDATE ORDER BY UOM_CODE", -1, 1, 1, 0);
In this case you receive the following error:
"lrdo.c/fjParse: "oparse" ERROR return-code=960, oerhms=ORA-00960: ambiguous column naming in select list".
Workaround
Change the statement by adding an alias to at least one of the non-unique columns, thus mapping it to a new unique name. For example:
lrd_stmt(Csr9, "SELECT UOM_CODE, UOM_CODE second, DESCRIPTION FROM " "MTL_UNITS_OF_MEASURE " "WHERE NVL(DISABLE_DATE, SYSDATE + 1) > " "SYSDATE ORDER BY UOM_CODE", -1, 1, 1, 0);
Alternate Workaround: remove ORDER BY from the lrd statement

Creating Vuser Scripts • Information for Advanced Users
732
ORA-2002
Error 2002 appears when you try to use an unopened cursor. It occurs when you replay a user more than one iteration and you recorded into more than one section of the script.
Specifically, if a cursor is opened in the vuser_init section and closed in the Actions section, then you will encounter this error on the second iteration if you try to use the cursor. This is because it was closed but not re-opened.
For example: You have lrd_open_cursor in the vuser_init section and lrd_close_cursor in the Actions section. If you replay this user more than one iteration, you are going to get an error in the second iteration because you try using an unopened cursor (it was closed in first iteration, but not re-opened in the second).
Workaround
The easiest way to solve this is to move the lrd_close_cursor or/and lrd_close_connection of the problem cursor to the vuser_end section.
733
56Advanced Topics
This chapter contains additional information for advanced LoadRunner users.
➤ Files Generated During Recording
➤ Files Generated During Replay
➤ Running a Vuser from the Unix Command Line
➤ Specifying the Vuser Behavior
➤ Command Line Parameters
➤ Recording OLE Servers
➤ Examining the .dat Files
➤ Adding a New Vuser Type
Files Generated During Recording
Assume that the recorded test has been given the name ‘vuser’ and is stored under c:\tmp. Following is a list of the more important files that are generated after recording:
vuser.usr Contains information about the virtual user: type, AUT, action files, and so forth.
vuser.bak A copy of Vuser.usr before the last save operation.
default.cfg Contains a listing of all run-time settings as defined in the VuGen application (think time, iterations, log, web).

Creating Vuser Scripts • Information for Advanced Users
734
Example of Vuser.usr File
[General]Type=Oracle_NCADefaultCfg=default.cfgAppName=C:\PROGRA~1\Netscape\COMMUN~1\Program\netscape.exeBuildTarget=ParamRightBrace=>ParamLeftBrace=<NewFunctionHeader=0MajorVersion=5MinorVersion=0ParameterFile=nca_test3.prmGlobalParameterFile=[Transactions]Connect=[Actions]vuser_init=init.c
vuser.asc The original recorded API calls.
vuser.grd Contains the column headers for grids in database scripts.
default.usp Contains the script’s run logic, including how the actions sections run.
init.c Exact copy of the Vuser_init function as seen in the VuGen main window.
run.c Exact copy of the Action function as seen in the VuGen main window.
end.c Exact copy of the Vuser_end function as seen in the VuGen main window.
vdf.h A header file of C variable definitions used in the script.
\Data The Data directory stores all of the recorded data used primarily as a backup. Once the data is in this directory, it is not touched or used. For example, Vuser.c is a copy of run.c.
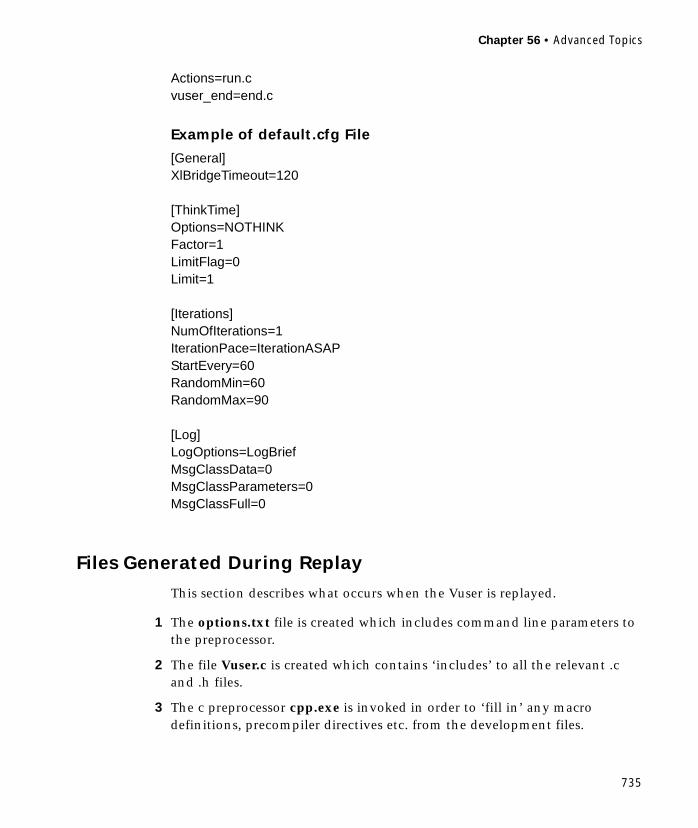
Chapter 56 • Advanced Topics
735
Actions=run.cvuser_end=end.c
Example of default.cfg File
[General]XlBridgeTimeout=120
[ThinkTime]Options=NOTHINKFactor=1LimitFlag=0Limit=1
[Iterations]NumOfIterations=1IterationPace=IterationASAPStartEvery=60RandomMin=60RandomMax=90
[Log]LogOptions=LogBriefMsgClassData=0MsgClassParameters=0MsgClassFull=0
Files Generated During Replay
This section describes what occurs when the Vuser is replayed.
1 The options.txt file is created which includes command line parameters to the preprocessor.
2 The file Vuser.c is created which contains ‘includes’ to all the relevant .c and .h files.
3 The c preprocessor cpp.exe is invoked in order to ‘fill in’ any macro definitions, precompiler directives etc. from the development files.
Creating Vuser Scripts • Information for Advanced Users
736
Note: The patch cpp.exe for beta2 is a totally different shareware executable than the earlier version, which was very problematic.
The following command line is used:
cpp -foptions.txt
4 The file pre_cci.c is created which is also a C file (pre_cci.c is defined in the options.txt file). The file logfile.log (also defined in options.txt) is created containing any output of this process. This file should be empty if there are no problems with the preprocessing stage. If the file is not empty then its almost certain that the next stage of compilation will fail due to a fatal error.
5 The cci.exe C compiler is now invoked to create a platform-dependent pseudo-binary file (.ci) to be used by the virtual user driver program that will interpret it at run-time. The cci takes the pre_cci.c file as input.
6 The file pre_cci.ci is created as follows:
cci -errout c:\tmp\Vuser\logfile.log -c pre_cci.c
7 The file logfile.log is the log file containing output of the compilation.
8 The file pre_cci.ci is now renamed to Vuser.ci.
Since the compilation can contain both warnings and errors, and since the driver does not know the results of this process, the driver first checks if there are entries in the logfile.log file. If there are, it then checks if the file Vuser.ci has been built. If the file size is not zero, it means that the cci has succeeded to compile - if not then compilation has failed and an error message will be given.
9 The relevant driver is now run taking both the .usr file and the Vuser.ci file as input. For example:
mdrv.exe -usr c:\tmp\Vuser\Vuser.usr -out c:\tmp\Vuser -file c:\tmp\Vuser\Vuser.ci
The .usr file is needed since it tells the driver program which database is being used. From here it can then know which libraries need to be loaded for the run.

Chapter 56 • Advanced Topics
737
10 The output.txt file is created (in the path defined by the ‘out’ variable) containing all the output messages of the run. This is the same output as seen in both the VuGen runtime output window and the VuGen main lower window.
Example of options.txt file
-DCCI-D_IDA_XL-DWINNT-Ic:\tmp\Vuser (name and location of Vuser include files)-IE:\LRUN45B2\include (name and location of LoadRunner include files)-ec:\tmp\Vuser\logfile.log (name and location of output logfile) c:\tmp\Vuser\VUSER.c (name and location of file to be processed)
Example of Vuser.c file
#include "E:\LRUN45B2\include\lrun.h"#include "c:\tmp\web\init.c"#include "c:\tmp\web\run.c"#include "c:\tmp\web\end.c"
Running a Vuser from the Unix Command Line
LoadRunner includes a Unix shell script utility, run_db_Vuser.sh, that automatically performs the same operations as the virtual user but from the command line. It can perform each of the replay steps optionally and independently. This is a useful tool for debugging tests to be replayed on Unix.
Place the file run_db_Vuser.sh in the $M_LROOT/bin directory. To replay a Vuser type:
run_db_Vuser.sh Vuser.usr
Creating Vuser Scripts • Information for Advanced Users
738
You can also use the following command line options:
Note that only one of the first 3 options can be used at a time for running the run_db_vuser.
Specifying the Vuser Behavior
Since VuGen creates the Vuser script and the Vuser behavior as two independent sources, you can configure user behavior without directly referencing the Vuser script, for example, wait times, pacing times, looping iterations, logging, and so forth. This means that it is very easy to make configuration changes to a Vuser, as well as store several such ‘profiles’ for the same Vuser script.
The ‘Vuser.cfg’ file, by default, is responsible for defining this behavior - as specified in VuGen’s Runtime settings dialog box. You can save several
-cpp_only This option will start the prepocessing phase. The output of this process is the file ‘Vuser.c’.
-cci_only This option runs the compilation phase. The ‘Vuser.c’ file is used as input, and the output produced is the ‘Vuser.ci’ file.
-exec_only This option runs the Vuser, by taking as input the ‘Vuser.ci’ file and running it via the replay driver.
-ci ci_file This option allows you to specify the name and location of a .ci file to be run. The second parameter contains the location of the .ci file.
-out output_directory This option allows you to determine the location of any output files created throughout the various processes. The second parameter is the directory name and location.
-driver driver_path This option allows you to specify the actual driver executable to be used for running the Vuser. By default the driver executable is taken from the settings in the VuGen.dat file.

Chapter 56 • Advanced Topics
739
versions of this file for different user behavior and then run the Vuser script referencing the relevant .cfg file.

Creating Vuser Scripts • Information for Advanced Users
740
You can run the Vuser script with the relevant configuration file from the LoadRunner Controller. To do this, add the following to the Vuser command line:
-cfg c:\tmp\profile2.cfg
For information on command line parameters, refer to “Command Line Parameters,” on page 740.
Note that you cannot control the behavior file from VuGen. VuGen automatically uses the .cfg file with the same name as the Vuser. (You can, of course, rename the file to be ‘Vuser.cfg’). However you can do this manually from the command line by adding the -cfg parameter mentioned above to the end of the driver command line.
Note: The Unix utility, run_db_vuser, does not yet support this option.
Command Line Parameters
The Vusers can accept command line parameters when invoked. There are several LoadRunner functions available to reference them (lr_get_attrib_double etc…). Using the LoadRunner Controller you can send command line parameters to the Vuser by adding them to the command line entry of the script window.
When running the Vuser from VuGen, you cannot control the command line parameters. You can do this manually however from the Windows command line by adding the parameters at the end of the line, after all the other driver parameters, for example:
mdrv.exe -usr c:\tmp\Vuser\Vuser.usr -out c:\tmp\vuser vuser_command_line_params

Chapter 56 • Advanced Topics
741
Note: The Unix utility, run_db_vuser, does not yet support this option.
Recording OLE Servers
VuGen currently does not support recording for OLE applications. These are applications where the actual process is not launched by the standard process creation routines, but by the OLE Automation system. However, you can create a Vuser script for OLE applications based on the following guidelines.
There are two types of OLE servers: executables, and DLLs.
DLL Servers
If the server is the DLL, it will eventually be loaded into the application process space, and VuGen will record the call to LoadLibrary. In this case, you may not even realize that it was an OLE application.
Executable Servers
If the server is the executable, you must invoke the executable in the VuGen in a special way:
➤ First, determine which process actually needs to be recorded. In most cases, the customer knows the name of the application’s executable. If the customer doesn’t know the name of the application, invoke it and determine its name from the NT Task Manager.
➤ After you identify the required process, click Start Recording in VuGen. When prompted for the Application name, enter the OLE application followed by the flag "/Automation". Next, launch the user process in the usual way (not via VuGen). VuGen records the running OLE server and does not invoke another copy of it. In most cases, these steps are sufficient to enable VuGen to record the actions of an OLE server.
➤ If you still are experiencing difficulties with recording, you can use the CmdLine program to determine the full command line of a process which is

Creating Vuser Scripts • Information for Advanced Users
742
not directly launched. (The program is available Patches section of the CSO web site, http://support.mercuryinteractive.com)
Using CmdLine
In the following example, CmdLine.exe is used to determine the full command line for the process MyOleSrv.exe, which is launched by some other process.
To determine its full command line:
1 Rename MyOleSrv.exe to MyOleSrv.orig.exe.
2 Place CmdLine.exe in the same directory as the application, and rename it to MyOleSrv.exe.
3 Launch MyOleSrv.exe. It issues a popup with a message containing the complete command line of the original application, (including additional information), and writes the information into c:\temp\CmdLine.txt.
4 Restore the old names, and launch the OLE server, MyOleSrv.exe, from VuGen with the correct command line parameters. Launch the user application in a regular way - not through VuGen. In most cases, VuGen will record properly.
If you still are experiencing difficulties with recording, proceed with the following steps:
1 Rename the OLE server to MyOleSrv.1.exe, and CmdLine to MyOleSrv.exe.
2 Set the environment variables "CmdStartNotepad" and "CmdNoPopup" to 1. Refer to “CmdLine Environment Variables,” on page 743 for a list of the CmdLine environment variables.
3 Start the application (not from VuGen). Notepad opens with the full command line. Check the command line arguments. Start the application several times and compare the command line arguments. If the arguments are the same each time you invoke the application, then you can reset the CmdStartNotepad environment variable. Otherwise, leave it set to "1".
4 In VuGen, invoke the program, MyOleSrv.1.exe with the command line parameters (use Copy/Paste from the Notepad window).
5 Start the application (not from within VuGen).

Chapter 56 • Advanced Topics
743
CmdLine Environment Variables
You can control the execution of CmdLine through the following environment variables:
Examining the .dat Files
There are two .dat files used by VuGen: vugen.dat and mdrv.dat.
vugen.dat
This vugen.dat file resides in the M_LROOT\dat directory and contains general information about VuGen, to be used by both the VuGen and the Controller.
[VuserTypes] ctlib=GeneralTemplateoracle=GeneralTemplate……
The VuserTypes section contains a list of currently supported protocols. The contents of this list will appear in the File > New window of the VuGen when you begin recording.
Each protocol lists a template for the script structure. Most of the protocols specify GeneralTemplate, which is the default template with three script sections: init, actions, end.
[GlobalFiles]main.c=main.c@@TestName@@.usr=test.usr@@TestName@@.cfg=test.cfg
CmdNoPopup If set, the popup window will not appear.
CmdOutFileName If set, and non-empty, CmdLine will attempt to create this file instead of c:\temp\CmdLine.txt
CmdStartNotepad If set, the output file will be displayed in the notepad. (Best used with CmdNoPopup)

Creating Vuser Scripts • Information for Advanced Users
744
The GlobalFiles section contains a list of files that VuGen copies to the test directory whenever you create a new test. For example, if you have a test called "user1", then VuGen will copy main.c, user1.usr and user1.cfg to the test directory.
The GeneralTemplate section contains the default settings for VuGen. Each subsequent section (dblib, ctlib, oracle, etc.) contains the settings for that specific Vuser type. The following example shows the section used for a General type Vuser script.
[General]DLL=insp_gen.dll;CFG_TAB_DLL=gen_tab.dll;ExtraSectionsExt=.log,.dat32BitRecord=FALSE16BitRecord=FALSEInsp32DLL=Insp16DLL=TemplateDir=generalSupportMultipleAction=TRUE
LINUX=mdrvWINNT=mdrv.exeWIN95=mdrv.exeSOLARIS=mdrvHPUX=mdrvAIX=mdrv;;EnableThreads=1
Note that not all options are present for every protocol. For example, there are several options specific to Web Vusers.
DLLThe inspector DLL. Do not modify this setting.
CFG_TAB_DLLThe specific Vuser types contain this option, which defines the dll for creating dynamic tabs in the runtime settings folders.
Chapter 56 • Advanced Topics
745
32BitRecord, 16BitRecordThese options specify whether VuGen supports 32 or 16-bit recording for the specific Vuser type.
CodeGen32DLL, CodeGen16DLL, Insp32DLL, Insp16DLLThese options specify the DLL for a 32-bit or 16-bit recorder and code generator.
EnableRecordingLog, RecordingLogFileThese options lets you specify whether to generate a log file during recording (in addition to the standard log file generated during replay). You can also specify a name for the file.
EnableCorrelationIf this option is set to Yes, automatic correlation can be performed (through the right click menu)
SectionComboIf this option is set to 1, Vugen displays a floating combo box with the section names.
NoSection SwitchIf this option is set to TRUE, then the user will not be able to switch from the "Actions" section during VuGen recording.
GUIRecordThis option is for Java Vuser only. If it is set to TRUE, VuGen performs GUI context sensitive recording.
NoWorkDirThis option is for Web Vusers only. If this option is set to TRUE, then the user will not be able to change the working directory.
FindDefaultAppThis option is for Web Vuser only. If it is set to TRUE, then VuGen will look for the default Web application for record/replay.
TemplateDirThis option specifies the name of the templates directory for this Vuser type. The Templates directories reside under \templates\.
Creating Vuser Scripts • Information for Advanced Users
746
ExtraSectionExtBy default, the VuGen main window displays the init, Actions and end sections of the Vuser script. You can use this option to display additional Vuser files. For example, by default, the".ws" file is displayed for Winsocket Vusers, and the ".vdf" file for TUXEDO Vuser scripts. You can edit these additional sections in VuGen. All modifications are saved when you save the Vuser.
WIN16, WINNT, WIN95, SUNOS, SOLARIS, HPUX, AIX….These options define which driver to run for the Vuser type on each platform.
platform_EXT_LIB, platform_DLL, platform_ENG_LIBThese options define the external, dynamic, and language libraries for each platform.
EnableThreadsIf this option is set to 1, multiple threads can be executed for this Vuser type.
In addition to the settings shown above, vugen.dat contains settings that indicate the operating system and other compilation related settings.
mdrv.dat
The mdrv.dat file contains a separate section for each protocol defining the location of the library files and driver executables.
Adding a New Vuser Type
To add a new Vuser type/protocol to VuGen, you need to edit vugen.dat and mdrv.dat which reside in the M_LROOT\dat directory.
First, you add the new Vuser type to the [VuserTypes] section of vugen.dat and the main section of mdrv.dat. For example, for an Oracle Vuser type, add the following line to vugen.dat:
oracle=GeneralTemplate

Chapter 56 • Advanced Topics
747
Then, you add a new section to vugen.dat for this type, for example:
[Oracle]DLL=insp_gen.dll;CFG_TAB_DLL=tab_sql.dllREC_OPTN_TAB_DLL=lrd_tab.dllTemplateDir=dblib32BitRecord=TRUE16BitRecord=TRUEInsp32DLL=vugora32.dllInsp16DLL=vugora.dllCodeGen32DLL=codsql32.dllCodeGen16DLL=;GuiRecord=ONLY_COMMENTSEnableRecordingLog=yesRecordingLogFile=data\@@TestName@@.ascEnableCorrelation=yesSectionCombo=1;ExtraSectionsExt=.inl,.c,.h
WIN16=lrddrv16.exeWINNT=mdrv.exeWIN95=mdrv.exeSUNOS=lrddrvoci7aSOLARIS=oramdrvHPUX=mdrvAIX=mdrvUNIX_SV=OSF1=;;EnableThreads=1
WINNT_EXT_LIBS=lrd32.dllWIN95_EXT_LIBS=lrd32.dllSOLARIS_EXT_LIBS=liblrdsol.soHPUX_EXT_LIBS=liblrdhp.slAIX_EXT_LIBS=liblrdibm.a;;LibCfgFunc=lrd_configure
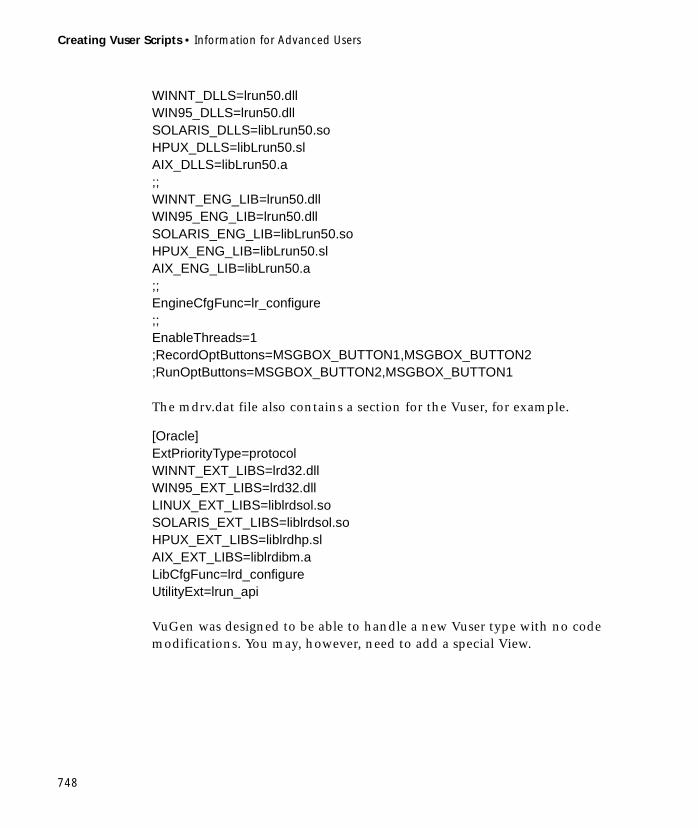
Creating Vuser Scripts • Information for Advanced Users
748
WINNT_DLLS=lrun50.dllWIN95_DLLS=lrun50.dllSOLARIS_DLLS=libLrun50.soHPUX_DLLS=libLrun50.slAIX_DLLS=libLrun50.a;;WINNT_ENG_LIB=lrun50.dllWIN95_ENG_LIB=lrun50.dllSOLARIS_ENG_LIB=libLrun50.soHPUX_ENG_LIB=libLrun50.slAIX_ENG_LIB=libLrun50.a;;EngineCfgFunc=lr_configure;;EnableThreads=1;RecordOptButtons=MSGBOX_BUTTON1,MSGBOX_BUTTON2;RunOptButtons=MSGBOX_BUTTON2,MSGBOX_BUTTON1
The mdrv.dat file also contains a section for the Vuser, for example.
[Oracle]ExtPriorityType=protocolWINNT_EXT_LIBS=lrd32.dllWIN95_EXT_LIBS=lrd32.dllLINUX_EXT_LIBS=liblrdsol.soSOLARIS_EXT_LIBS=liblrdsol.soHPUX_EXT_LIBS=liblrdhp.slAIX_EXT_LIBS=liblrdibm.aLibCfgFunc=lrd_configureUtilityExt=lrun_api
VuGen was designed to be able to handle a new Vuser type with no code modifications. You may, however, need to add a special View.

Chapter 56 • Advanced Topics
749
There is no generic driver supplied with VuGen, but you can customize one of the existing drivers. To use a customized driver, modify mdrv.dat. Add a line with the platform and existing driver, then add a new line with your customized driver name, in the format <platform>_DLLS=<my_replay.dll name>. For example, if your SAP replay dll is called SAPPLAY32.DLL, add the following two lines to the [sap] section of mdrv.dat:
WINNT=sapdrv32.exeWINNT_DLLS=sapplay32.dll

Creating Vuser Scripts • Information for Advanced Users
750
Part XVII
Appendixes

752
753
AThe Java Environment: A Comprehensive Guide
This chapter discusses the Java environment. It explains terms that are necessary in order to understand and configure an existing Java environment for certain Java applications. Although the Java language is cross platform, this document only describes issues for Windows NT.
➤ Terminology
➤ JDK Versions
➤ Browsers
➤ Java Plug-In
➤ Other Environments
➤ Frequently Asked Questions
About the Java Environment
The Java programming language is a high-level object-oriented language. The language is known to be simple to develop, distributed, interpreted, secure, portable, and multi-threaded.
Although Java may appear simple for developers, the evolving technology surrounding it causes the environment settings to be complex. SUN, the developer of Java, continues to release new versions of Java, APIs, and tools, making the Java world less manageable.
Creating Vuser Scripts • Appendixes
754
Terminology
JDK: Java Development Kit. A software development environment developed by SUN Microsystems for producing Java programs. Each release of the JDK contains the Java Compiler, the Java Interpreter, Java Class Libraries, Java Applet Viewer, Java Debugger, and other tools. The JDK cannot be redistributed.
JRE: Java Runtime Environment. A subset of the JDK for end-users and developers who want to redistribute the runtime environment. The JRE consists of the Java Virtual Machine, the core classes, and supporting files.
JVM: Java Virtual Machine. The part of the Java runtime environment responsible for interpreting bytecode.
CLASSPATH: An environment variable that tells the Java Virtual Machine where to find the class files. It should include the JDK core libraries and the class libraries used by the Java program. The classpath variable is constructed from a set of entries separated by semicolons. Each entry can be a directory or an archive name (jar or zip files). The current directory ‘.’ should also be included. In JDK 1.1.x the classpath variable should also contain <JDK>\lib\classes.zip. The classes are searched for in the CLASSPATH in the order of entry.
PATH: An environment variable containing a list of directories, in which the operating system looks for executable files if it is unable to find the file in the working directory. Use semicolons to separate the directory names. When working with the JDK, <JDK>\bin should be placed in the PATH variable in order to make the JDK tools (java.exe, javac.exe, appletviewer.exe, etc.) available.
JAR: Java Archive. A file format used to bundle all components and resources required by a Java applet or application (class files, images, sounds, etc.). In addition, JAR supports data compression, which further decreases download times. By convention, JAR files end with a .jar extension. Jar files can be viewed and extracted with the jar.exe tool, which comes with the JDK installation, or by using the standard WinZip tool.
JIT: Just-In-Time Compiler. A JIT compiler is an alternative to using a standard Java interpreter. It converts all of the bytecode into native machine code ‘just in time’- when the Java program is run. This results in run-time

Appendix A • The Java Environment: A Comprehensive Guide
755
speed improvements over code that is interpreted by a Java Virtual Machine. This is now included with all versions of JVMs and browsers. In some cases you may want to disable the JIT compiler, e.g., when you want to obtain line numbers in a stack trace instead of“(Compiled Code)” printing, or when you suspect that the JIT is causing bugs.
Applet: A Java program that can be included in an HTML page, and run in the context of a Java-capable browser or the Applet viewer. A security manager restricts the actions of Java applets.
Application: A stand-alone executable program. It has no security or I/O restrictions (unless specifically applied). A Java application requires an interpreter to execute.
bytecode: Machine-independent code generated by the Java compiler and executed by the Java interpreter.
class file: A file containing machine-independent Java byte codes. The Java compiler generates *.class files for the Java interpreter to read.
Exception: An event that occurs during program execution which prevents the program from continuing its normal flow. Generally, this is an unexpected error, followed by a printout of the stack trace to locate the exact place in the code that the exception occurred. The programmer can use the try, catch, and throw keywords to create an exception handler that reacts to a specific type of exception. The programmer can choose to resume executing after the exception handler has executed.
Garbage Collection: The automatic detection and freeing of memory that is no longer in use.
The Java runtime system performs garbage collection so that programmers never have to explicitly free objects.
java.exe: The java interpreter that comes with the SUN’s JDK.
appletviewer.exe: A tool for running applets without a browser. It comes with SUN Microsystems’ JDK. The Appletviewer receives an HTML page as an argument and searches it for an <Applet> tag. It then loads this applet.
javap.exe: A tool that disassembles Java .class files. It comes with SUN's JDK. This tool is useful for verifying API classes in the absence of sources.
Creating Vuser Scripts • Appendixes
756
javac.exe: The Java compiler that is provided with SUN’s JDK.
jview.exe: Microsoft’s Java Virtual Machine. It is integrated in the Internet Explorer.
HTML Attribute: HTML pages that load Java Applets must include an <Applet> tag that specifies details about the name, the place, and other properties of the applet. The three attributes in this tag that give a complete specification of where to find the main applet class files are:
The code attribute specifies the name of the main applet class file.
The codebase attribute specifies the URL of the directory containing the file, and other files.
The archives attribute specifies any additional archives: jar/zip/cab files that contain classes and resource files. These archives are placed under the codebase.
classes.zip: The zip file that contains all the Java core classes of JDK1.1.x. It can be found under <JDK>\/lib\classes.zip.These classes are essential for running any Java application and must be placed in CLASSPATH.
rt.jar: The jar file that contains all the Java core classes of JDK1.2.x and JDK1.3. It can be found under <JDK>\jre\lib\rt.jar. This jar does not need to be in the CLASSPATH, because it is retrieved automatically by the JVM. However, if the Xboot classpath (see below) is replaced, make sure rt.jar is present.
JavaScript: An extension to HTML that allows you to incorporate some dynamic functionality on a Web page. Do not confuse this term with the Java language. JavaScript is usually interpreted by a special mechanism in the browser that has nothing to do with the Java language Virtual Machine. However, it is possible to call from within JavaScript to static methods in Java’s standard JDK. This will eventually cause the loading of the JVM and its DLLs.

Appendix A • The Java Environment: A Comprehensive Guide
757
JDK Versions
The following section describes the various versions of the Java Development Kit, JDK.
JDK 1.1
The following are the command line arguments for java.exe executable file in JDK1.1:
JDK1.1 versions:
The first generation of JDK, versions 1.0.1 and 1.0.2, used the old event model. The JDK1.1 generation introduced the new event model. Today, older versions through JDK1.15 are not supported officially by SUN.
The supported versions are: 1.1.6, 1.1.7a, 1.1.7b and 1.1.8. JDK1.1.6 is known to be unstable. The other versions have slight differences among them, mainly regarding security fixes.
Command Line Argument Description
-version prints the exact build version-verbose turns on verbose mode and produces
printouts from the system class loader about the name and path of each class being loaded.
-noasyncgc disables asynchronous garbage collection
-verbosegc prints a message when garbage collection occurs
-noclassgc disables class garbage collection-ms<number> sets the initial Java heap size. For
example: -ms256M-mx<number> sets the maximum Java heap size-classpath <dirs separated by ;> lists directories in which to look for
classes instead of the CLASSPATH variable.
-noverify does not verify any class-nojit disables the JIT compiler-D<name>=<value> sets a system property
Creating Vuser Scripts • Appendixes
758
JDK 1.1 Examples:
The following example demonstrates how to run an application named TestApp with no JIT compiler, and to take the classes from jdk and the current directory.
The following example demonstrates running the TestApp application with Java initial, and with maximum heap size set to 256M. The Test application has two arguments. Classes are taken from the global CLASSPATH variable.
Example 3
The following example demonstrates checking the current Java version placed in PATH:
JDK 1.2
In JDK1.1.x, the search for classes was done according to the CLASSPATH environment variable. For applets, the search for classes was also done in the codebase and archives specified in HTML. In JDK1.2.x, a new element determines the place of classes: the ‘bootstrap classpath’. The bootstrap classpath precedes the classpath. By default, it contains the JDK core classes, placed under <JDK>\jre\lib\rt.jar. The bootstrap classpath can be changed using the –Xbootclasspath command line variable. In addition, javac supports a similar option (‘–bootclasspath’) which can be used to change the platform classes you compile.
JDK1.2.x includes the classes of the JFC1.1 library, and Java IDL CORBA classes. All are placed in the system’s rt.jar file.
In JDK1.2 or higher there are two types of virtual machines: the Classic virtual machine, which is located under <JDK>/jre/bin/classic/jvm.dll, and the HotSpot virtual machine, which is located under
java –nojit –classpath d:/jdk1.1.7b/lib/classes.zip;. TestApp
java –ms256M –mx256M TestApp apparg1 apparg2
java –version
Appendix A • The Java Environment: A Comprehensive Guide
759
<JDK>/jre/bin/hotspot/jvm.dll. The HotSpot technology produces superior performance compared to that of the Classic VM. To use the Classic VM, use the -classic java command-line option.
In JDK1.2, you can run a Java application by specifying only a jar name: java.exe –jar <jar file name>. In this case, the JVM opens the jar and searches for a manifest file (Manifest.mf). This file should specify the name of the class containing the main method. The JVM then loads that specific class and runs the main method.
JDK 1.2 also has improvements in functionality, performance, security, and global support over previous versions of the Java platform.
The following table shows the non-standard command line options for java.exe in JDK 1.2.
Usage of -Xbootclasspath
The _Xbootclasspath parameter is very powerful, and should be used with caution. Make sure that the appropriate Java platform classes are being used. These classes are placed in <JDK>\jre\lib\rt.jar.
If you use –Xbootclasspath:<…>, you must specify the full path to the rt.jar file. If you do not, you will not be able to launch the VM. You also cannot specify classes that are part of a JDK of another version in this parameter. If you use the prepend (/p) or append (/a) format, you can omit the rt.jar path.
Command Line Argument Description
-Xbootclasspath:<dirs and zip/jar files separated by ;>
sets the search path for bootstrap classes and resources
-Xbootclasspath/p:<dirs and zip/jar files separated by ;>
prepend the default search path for bootstrap classes and resources
-Xbootclasspath/a:<dirs and zip/jar files separated by ;>
appends the default search path for bootstrap classes and resources
-Xnoclassgc disables class garbage collection-Xms<size> sets the initial Java heap size.
For example: -Xms128M -Xmx<size> sets maximum Java heap size-Xrunhprof[:help]|[:<option>=<value>, ...]
performs heap, CPU, or monitor profiling

Creating Vuser Scripts • Appendixes
760
The syntax of the parameter is similar to the use of the CLASSPATH environment variable. Quotes should be used when an entry includes spaces.
Installing JDK1.2.x
The installation of JDK1.2.x requires places the java.exe file under the <Winnt>\system32 directory, so that the user is not obligated to place the <JDK>\bin directory in the PATH variable. This should be noted especially when working with other JDK versions. The <Winnt>\system32 directory is in the PATH variable and may appear prior to other <JDK>\bin directories of other versions. This is very likely to cause unexpected runtime conflicts (runtime classes that don’t match the JVM) when switching between JDK versions.
JDK1.2 versions:
The existing JDK1.2 versions are 1.2, 1.2.1, and 1.2.2. There are only slight differences between them.
JDK1.2 examples:
The following example illustrates running the TestApp application and using the LoadRunner classes before the JDK1.2.2 Java platform classes. The two statements perform the same task:
The following example illustrates running the TestApp application with initial and maximum Java heap size set to 256M. Use the –D parameter to set a system property in the Java application:
JDK 1.3
JDK1.3 differs from previous versions, primarily in its Virtual Machine (VM). JDK1.3 is shipped with the Java HotSpot Client VM as their default VM
java –Xbootclasspath:c:\LoadRunner\classes;c:\jdk1.2.2\jre\lib\rt.jar TestAppjava –Xbootclasspath/p:c:\LoadRunner\classes TestApp
java –Xms256M –Xmx256M –Dtestprop=propvalue TestApp
Appendix A • The Java Environment: A Comprehensive Guide
761
implementation. To switch to the Classic VM, use the -classic option. The Java plug-in 1.3 VM, only provides the HotSpot VM. To use the Classic VM in the plug-in, copy the <JDK>/jre/bin/classic directory from the JDK directory into the <plug-in>/bin directory, and set the -classic flag in the control panel.
JNDI classes and RMI/IIOP are included in the rt.jar file.
This version contains Improvements in functionality, performance, GUI, security and global support over previous versions of the Java platform.
JDK1.3 versions:
The JDK1.3 existing versions are 1.3, 1.3.0_01. There are slight differences between them.
JDK1.3 Examples
The following example illustrates running the TestApp application with no JIT compiler, and with verbose printouts about classes source directories.
The following example illustrates running the TestApp application with the Classic VM TestApp:
Browsers
The following section describes how to use Netscape and Internet Explorer with java applets or applications.
Appletviewer
Appletviewer is a command-line tool that enables running Java applets without a browser. It accepts a URL address (HTML or file) with an <Applet> tag in it.
java –verbose –Djava.compiler=NONE TestApp
java –classic TestApp
Creating Vuser Scripts • Appendixes
762
The Appletviewer tool supports most of the java.exe command-line parameters, but to use them, you must use a ‘-J’ prefix. For example: -J-verbose, -J-Xbootclasspath:<…>, etc.
Appletviewer Examples
The following example shows the running of an applet that is referenced from an HTML file on the Web.
The following example shows the running of an applet that is referenced from a local HTML file, and prepending classes to rt.jar (JDK1.2 and higher only).
The following example shows the running of an applet that is referenced from an HTML file in the current directory, with classes displayed in verbose printouts, and with specified maximum and minimum heap size (JDK1.1 style).
Internet Explorer
Java Console
The output messages sent by a Java applet to stdout or stderr are printed to the Internet Explorer Java console. You open the Java Console by using the [View] menu in your browser.
If you do not see the Java Console option in your browser, then you must enable the Java Console option in the Internet Explorer configuration. To do this, right-click the Internet Explorer icon and choose the ‘Properties’ option. Then, in the ‘Advanced’ tab, locate the ‘Java VM’ section. Select the ‘Java console enabled’ checkbox, and restart the browser.
appletviewer http://www.apptest.com/test/test.html
appletviewer –J-Xbootclasspath/p:c:\LoadRunner\classes file:c:\apptest\test.html
appletviewer –J-verbose –J-ms256M –J-mx256M test.html
Appendix A • The Java Environment: A Comprehensive Guide
763
Internet Explorer Java Virtual Machine version
One of the components installed in your Internet Explorer is the Microsoft Java VM. The version of the JVM installed in your browser is independent and different from your browser’s version. It is specified in the first line of the Java Console. For example, ‘Microsoft (R) VM for Java, 5.0 Release 5.0.0.3176’ means that you have a JVM that supports IE5, and whose specific build number is 3176.
You can choose to update just the JVM component in your Internet Explorer to work with a newer build, but you cannot downgrade it.
Internet Explorer Java classes
Internet Explorer’s JVM has its own system classes. These classes can be found in the zip files placed under the <Winnt>\Java\Packages directory. All of these zip files are inserted automatically in the CLASSPATH by the browser.
Some applets may download zip files and place them under the browser directories. These zip files may contain classes that cause conflicts.
Netscape
Java Console
The output messages sent by a Java applet to stdout or stderr are printed on the Netscape Java console. To open the Java Console, Choose Communicator > Tools > Java Console.
The Java console offers several options that can be activated by typing a certain letter on your keyboard. All options can be viewed by typing ‘?’. The options include:
b: Break into the debugger (Windows only)c: Clear console windowd: Dump applet context state to consolef: Finalize objects on finalization queueg: Garbage collecth: Print this help message l: Capture all classes loaded by an applet to a
directorym: Print current memory use to console
Creating Vuser Scripts • Appendixes
764
Note that the console refreshes frequently, making it difficult to copy text from it. If you select a block of text and the browser sends a printout, it will replace the selected text. Try to wait until the browser has nothing else to send.
Netscape Java classes
The Netscape installation comes with its own JVM classes. These classes can be found in all the jar files located under the <Netscape folder>\Communicator\Programs\java\classes directory. The main jar containing the Java system classes is called java40.jar. Netscape also contains CORBA Visigenic3.0 classes in a jar file called iiop10.jar. Occasionally, this jar file causes conflicts in CORBA applications that use other CORBA classes. The user may therefore choose to remove it from this directory. All the jar files are inserted automatically to the CLASSPATH by the browser.
Note that some environments may include additional jars, which do not come with Netscape, but rather were placed there by other installations. These jars may contain classes that cause conflicts. The verbose flag (debug level: 0-9) can be analyzed to understand the source of a particular class.
Java Plug-In
The Java Plug-in is a tool that enables you to run Java Applets in Internet Explorer or Netscape using SUN’s JRE, and not using the browser’s internal JVM. The first time the Web browser encounters a Web page that specifies the use of the Java Plug-in, the browser must download and install the required files. In subsequent encounters of Web pages that specify the use of the Java Plug-in, it is invoked instantaneously from the user’s hard drive and the applet is rendered using SUN’s installed JRE.
q: Hide consoles: Dump memory summary to "memory.out"t: Dump thread info to "memory.out"x: Dump memory to "memory.out"X: Dump memory (detailed) to "memory.out"0-9: Set applet debug level to <n>

Appendix A • The Java Environment: A Comprehensive Guide
765
The Java Plug-in Control Panel
The Java Plug-in comes with a Control Panel that enables you to configure some options. Open the Control Panel from Start Menu > Programs > The Java Plug-in Control Panel.
The configurable options include the following: enabling a Java Console, using command-line parameters, changing the version of SUN’s JVM runtime, enabling the JIT compiler, and more.
Starting from Plug-in 1.3, the control panel is opened from the Windows Control Panel by choosing the Java Plug-in Control Panel item.
Java Console
The output messages sent by a Java applet to stdout or stderr are printed to the Plug-in Java Console. Enabling the Java Console is done from the Java Plug-in Control Panel in the Basic tab. When an applet is running using the Plug-in, the only console that needs to be invoked is the Plug-in Console, and not the browser console.
Java Plug-in JVM Versions
When using the Java Plug-in, you can switch between different SUN JVM versions. The selection of which JVM to run is performed in the Advanced tab of the Java Plug-in Control Panel. You can choose to work with any of the JREs/JDKs installed on your machine. To verify which version is currently running in your Java Plug-in, look at the first two lines in the Java Console. For example, the following shows the output of a Java Plug-in of version 1.2.2, currently running the 1.1.7B JVM:
HTML Java Plug-in Tags
For the browser to identify a Web page that should use a Java Plug-in, certain tags must replace the <Applet> tag. Each browser suggests its own HTML tags to handle the Java Plug-in. Internet Explorer looks for an <Object> tag with the specific Java Plug-in and Applet attributes, and then uses Microsoft's COM/ActiveX technology to load it. Netscape Navigator
Java(TM) Plug-in: Version 1.2.2.pxUsing JRE version 1.1.7B

Creating Vuser Scripts • Appendixes
766
looks for an <Embed> tag with the specific Java Plug-in and Applet attributes, in order to use Navigator’s plug-ins architecture to load the applet. You can combine both of the tags in your html page so that the applet can be loaded through the Java Plug-in in both Netscape and Internet Explorer.
There is a simple tool called the Java Plug-in HTML Converter that easily converts html pages to work with the Java Plug-in.
Other Environments
IBM
IBM has its own Java tools. These tools include a Java compiler, a virtual machine and slightly different JDK runtime classes.
Oracle Jinitiator
Oracle has its own virtual machine called Jinitiator. This virtual machine can be used for applications or as a plug-in in browsers. It has its own JDK classes, based on SUN’s JDK 1.1.5 or JDK 1.1.7, with various changes. This virtual machine can be identified by using “java –version”. This should result in the JDK version with an “o” at the end (e.g., “java version 1.1.5o”). The Jinitiator plug-in can be identified by looking at the HTML pages or by looking for the directory “<Drive>:\Program Files\Oracle\Jinitiator <version>”.
BEA WebLogic
BEA has its own set of tools, although it does not have a virtual machine. It has its own RMI compiler (rmic.exe). This is used to generate stubs and skeletons, which are different than the ones produced by SUN’s rmic tool.
VBJ, OWJAVA
Visigenic and Iona have their own java.exe. Usually, they come with their CORBA packages and installations. These are not newly implemented virtual machines, but rather wrappers of SUN’s virtual machine with some additional functionality related to CORBA. They receive the same arguments as SUN’s virtual machine.

Appendix A • The Java Environment: A Comprehensive Guide
767
Gemstone/J
Gemstone has its own JVM and JDK versions. If you run the java –version command the following messages are issued:
Frequently Asked Questions
Question 1: How do I redirect the output from an application to a file?
To redirect the stdout and stderr of a Java Application into a file, add “>out.txt 2>&1” at the end of the java.exe command-line. This redirects the output to a file named out.txt. (NT only)
Answer: In Internet Explorer, you can redirect the output by enabling the Java logging option: Right-click on the Internet Explorer icon and choose Properties. Click the Advanced tab of the Java VM section, and select the Java logging enabled checkbox. Restart the browser.
The output is now redirected to the file <Winnt>\Java\javalog.txt.
Question 2: How do I know whether a certain class is in the classpath?
Answer: You can use the javap.exe command-line tool. Run javap.exe <full class name> (without the “.class” suffix). When the class is not in the CLASSPATH, you will receive the following error message: ‘Class <name> not found’. If the class is in the CLASSPATH, you will receive all its fields and methods.
Question 3: How do I dump classes from the browser?
Answer: Netscape allows you to capture server classes while running an applet, and to dump them on your local machine. Typing the letter ‘L’ on the Java Console enables and disables this option. You will see the message: ‘# Class file capture enabled’ in the Java Console, and all of the server classes
java version "3.2p2"HotSpot VM (3.2p2, mixed mode, build 3.2p2-Wed-Feb-23-17:58:31-PST-2000-build-97)

Creating Vuser Scripts • Appendixes
768
will be dumped into <Netscape folder>\Communicator\Programs\<directory name constructed from the URL address>.
Question 4: I don’t see an option in my browser to open a Java console. Where is it?
Answer: In Internet Explorer, if you don’t see the option under the [View] menu, you need to enable this option in the Internet Explorer configuration. To enable the option, right-click the Internet Explorer icon and select the Properties option. Then, in the ‘Advanced’ tab, in the ‘Java VM’ section, select the ‘Java console enabled’ checkbox. Restart the browser. In Netscape, the option is usually placed under the [Communicator > Tools] menu, or, in earlier versions, directly under the [Tools] or [Communicator] menu.
Question 5: Why don’t I see any printouts in the browser’s Java Console when running with the Java Plug-in?
Answer: The browser’s Java Console only shows messages sent from the browser’s VM. When using the plug-in, you should work with the Java Console of the Java Plug-in.
Question 6: How can I open the Java Console when I use a Java Plug-in?
Answer: In the Plug-in’s control panel, select Start Menu > Programs > The Java Plug-in Control Panel. In the ‘Basic’ tab, select the ‘Show Java Console’ checkbox.
Question 7: I have both JDK1.1 and JDK 1.2 installed on my machine. The “PATH” points to <JDK1.1>\bin. Why do I still see JDK1.2 when I run “java –version”? How can I negate JDK1.2 without uninstalling it?
Answer: During the installation of JDK1.2.x, its java.exe is also placed under the <Winnt>\system32 directory. Because this directory is also in the PATH, the java.exe of JDK1.2 is being used. You can negate JDK1.2 without uninstalling it by renaming/removing the java.exe under the \system32 directory.
Appendix A • The Java Environment: A Comprehensive Guide
769
Question 8: I get an error with stack-trace. How do I know if the JIT is operative?
Answer: The stack-trace contains the stack of invocations that lead to an error. Each line contains the name of the class and the method involved. The line number of the invocation should appear in parenthesis. If the parenthesis contains “Compiled Code” instead, this means that the bytecode was compiled to native code and the JIT is operative.
Question 9: How do I disable the JIT in java.exe?
Answer: Use the java.exe ‘–nojit’ command-line option. In JDK1.2.x and JDK1.3, there is no ‘-nojit’ option. In these versions, use the java.exe command line with the following argument:
–Djava.compiler=NONE
Question 10: How do I disable the JIT in browsers?
Answer: The solution depends on your browser:
Internet Explorer – Right-click the Internet Explorer icon and choose the Properties option. In the Advanced tab, in the Java VM section, select the ‘JIT compiler for virtual machine enabled’ checkbox. Restart the browser.
Netscape – Rename the DLL that is responsible for the JIT, so that it will not be found. The full path to the DLL is: <Netscape folder>\Communicator\Programs\java\bin\jit3240.dll
Question 11: Why do I get “NoClassDefFoundError”?
“Can't find class java.lang.NoClassDefFoundError. (Wrong class path?)”
“Exception in thread "main" java.lang.NoClassDefFoundError: Files”
Answer: These error messages are most likely to appear because of wrong usage of the –Xbootclasspath argument of JDK1.2. Check whether you specified the full path to the rt.jar file, located under <JDK>\jre\lib\rt.jar. Check for spaces in your parameter. If you have spaces, you must use quotes as follows: -Xbootclasspath:”<…>”

Creating Vuser Scripts • Appendixes
770
Question 12: Why do I get “Unable to initialize threads” Error?
Answer: If you are using JDK1.1.x, check that you have <JDK>\lib\classes.zip in the CLASSAPATH environment variable. If you are using JDK1.2.x and the –Xbootclasspath option, check that you specified the full path for the rt.jar file, located in <JDK>\jre\lib\rt.jar.
Question 13: Why do I get ”UnsatisfiedLinkError”?
This error occurs if a Java application uses native methods of a certain library (or DLL) and the library file cannot be found, is corrupted, or is inaccessible from a specific class due to Java security restrictions.
Question 14: How can I solve “OutOfMemoryError”?
Answer: The OutOfMemoryError can occur if the virtual machine runs out of stack or heap size during application execution. Most virtual machines initiate their heap and stack size between 16M to 64M. Some applications may need more memory due to heavy memory usage or long recursive calls. Applications that load a large number of classes (or jars) may also consume memory at startup. In order to solve the problem, run the virtual machine with “-ms” and “-mx” arguments (“-Xms”, “-Xmx” in JDK 1.2). Note that the maximum stack and heap size is 512M (virtual memory).
This section mentioned several issues that may shortly become obsolete. Although we do attempt to keep the information current, we would appreciate all feedback regarding this document at [email protected].
771
BCalling External Functions
When working with VuGen, you can call functions that are defined in external DLLs. By calling external functions from your script, you can reduce the memory footprint of your script and the overall run-time.
To call the external function, you load the DLL in which the function is defined.
You can load a DLL:
➤ locally—for one script, using the lr_load_dll function
➤ globally—for all scripts, by adding statements to the vugen.dat file
Loading a DLL—Locally
You use the lr_load_dll function to load the DLL in your Vuser script. Once the DLL is loaded, you can call any function defined within the DLL, without having to declare it in your script.
To call a function defined in a DLL:
1 Use the lr_load_dll function to load the DLL at the beginning of your script. Place the statement at the beginning of the vuser_init section. lr_load_dll replaces the ci_load_dll function.
Use the following syntax:
lr_load_dll(library_name);
Note that for UNIX platforms, DLLs are known as shared libraries. The extension of the libraries is platform dependent.
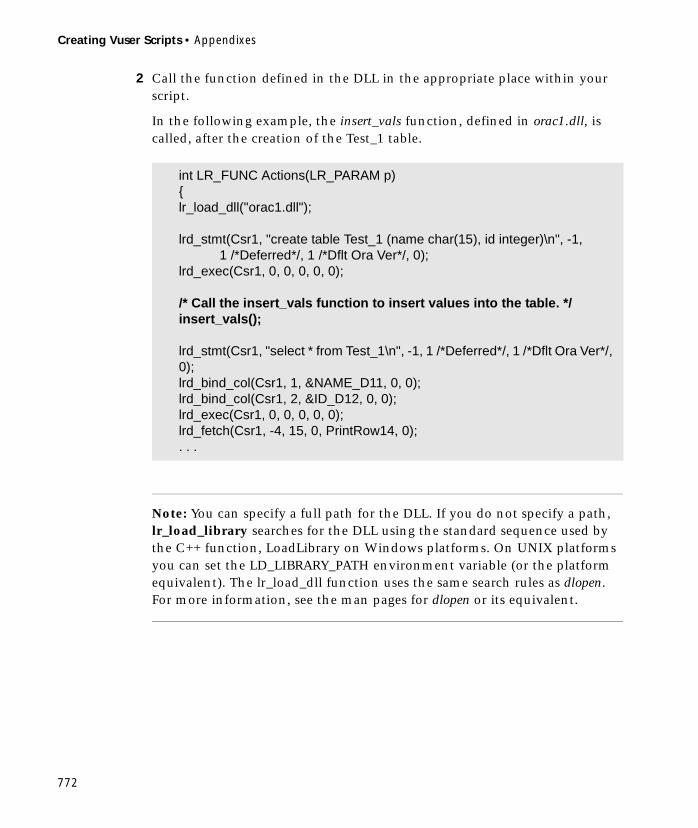
Creating Vuser Scripts • Appendixes
772
2 Call the function defined in the DLL in the appropriate place within your script.
In the following example, the insert_vals function, defined in orac1.dll, is called, after the creation of the Test_1 table.
Note: You can specify a full path for the DLL. If you do not specify a path, lr_load_library searches for the DLL using the standard sequence used by the C++ function, LoadLibrary on Windows platforms. On UNIX platforms you can set the LD_LIBRARY_PATH environment variable (or the platform equivalent). The lr_load_dll function uses the same search rules as dlopen. For more information, see the man pages for dlopen or its equivalent.
int LR_FUNC Actions(LR_PARAM p){lr_load_dll("orac1.dll");
lrd_stmt(Csr1, "create table Test_1 (name char(15), id integer)\n", -1, 1 /*Deferred*/, 1 /*Dflt Ora Ver*/, 0);
lrd_exec(Csr1, 0, 0, 0, 0, 0);
/* Call the insert_vals function to insert values into the table. */insert_vals();
lrd_stmt(Csr1, "select * from Test_1\n", -1, 1 /*Deferred*/, 1 /*Dflt Ora Ver*/, 0);lrd_bind_col(Csr1, 1, &NAME_D11, 0, 0);lrd_bind_col(Csr1, 2, &ID_D12, 0, 0);lrd_exec(Csr1, 0, 0, 0, 0, 0);lrd_fetch(Csr1, -4, 15, 0, PrintRow14, 0);. . .

Appendix B • Calling External Functions
773
Loading a DLL—Globally
You can load a DLL globally, to make its functions available to all your Vuser scripts. Once the DLL is loaded, you can call any function defined within the DLL, without having to declare it in your script.
To call a function defined in a DLL:
1 Add a list of the DLLs you want to load to the appropriate section of the vugen.dat file, located in the LoadRunner/dat directory.
Use the following syntax:
PLATFORM_DLLS=my_dll1.dll, my_dll2.dll, ...
For example, to load DLLs for Winsocket Vusers on an NT platform, add the following statement to the vugen.dat file:
2 Call the function defined in the DLL in the appropriate place within your script.
[winsock]DLL=insp_gen.dllCFG_TAB_DLL=ExtraSectionsExt=.ws32BitRecord=TRUE16BitRecord=TRUEInsp32DLL=vugsck32.dllInsp16DLL=vugsock.dllTemplateDir=winsockWIN16=wsdrv16.exeWINNT=wsdrv32.exeWIN95=wsdrv32.exeWINNT_DLLS=user_dll1.dll, user_dll2.dll, ...

Creating Vuser Scripts • Appendixes
774

775
CProgramming Scripts on UNIX Platforms
LoadRunner users on UNIX platforms can create Vuser scripts through programming. To create a script through programming, you use a LoadRunner template.
This appendix describes:
➤ Generating Templates
➤ Programming Vuser Actions into a Script
➤ Configuring Vuser Run-Time Settings
➤ Defining Transactions and Rendezvous Points
➤ Compiling Scripts
Creating Vuser Scripts • Appendixes
776
About Programming Vuser Scripts to Run on UNIX Platforms
There are two ways to create Vuser scripts that run on UNIX platforms: by using VuGen, or by programming.
This appendix describes how to develop a Vuser script by programming.
To create a script through programming, you can use a LoadRunner template as a basis for a larger Vuser script. The template provides:
➤ correct program structure
➤ LoadRunner API calls
➤ source code and makefiles for creating a dynamic library
After creating a basic script from a template, you can enhance the script to provide run-time Vuser information and statistics. For more information, see Chapter 4, “Enhancing Vuser Scripts.”
VuGen You can use VuGen to create Vuser scripts that run on UNIX platforms. You record your application in a Windows environment and run it in UNIX—recording is not supported on UNIX.
programming Users working in UNIX-only environments can program Vuser scripts. Scripts can be programmed in C or C++ and they must be compiled into a dynamic library.
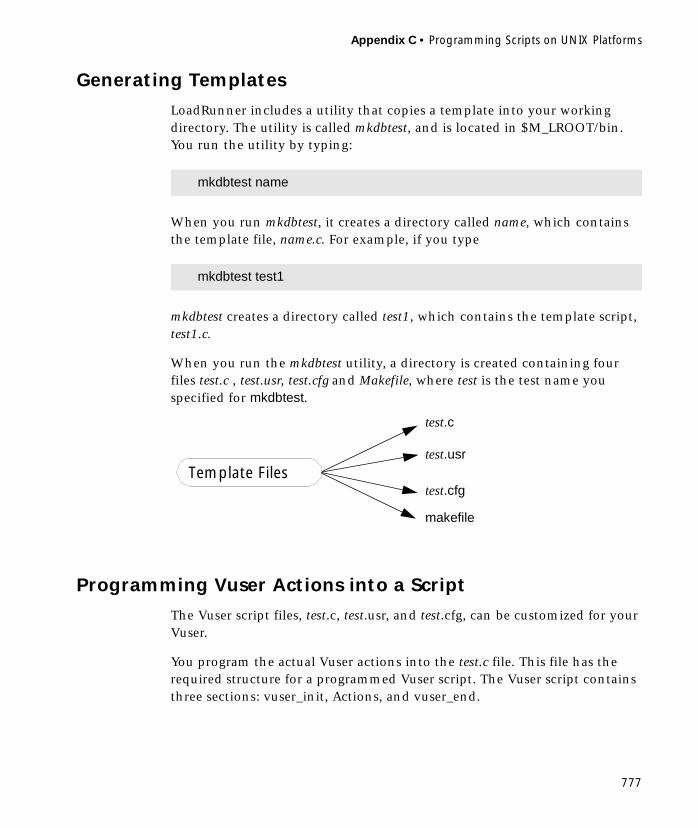
Appendix C • Programming Scripts on UNIX Platforms
777
Generating Templates
LoadRunner includes a utility that copies a template into your working directory. The utility is called mkdbtest, and is located in $M_LROOT/bin. You run the utility by typing:
When you run mkdbtest, it creates a directory called name, which contains the template file, name.c. For example, if you type
mkdbtest creates a directory called test1, which contains the template script, test1.c.
When you run the mkdbtest utility, a directory is created containing four files test.c , test.usr, test.cfg and Makefile, where test is the test name you specified for mkdbtest.
Programming Vuser Actions into a Script
The Vuser script files, test.c, test.usr, and test.cfg, can be customized for your Vuser.
You program the actual Vuser actions into the test.c file. This file has the required structure for a programmed Vuser script. The Vuser script contains three sections: vuser_init, Actions, and vuser_end.
mkdbtest name
mkdbtest test1
test.c
makefile
Template Filestest.usr
test.cfg
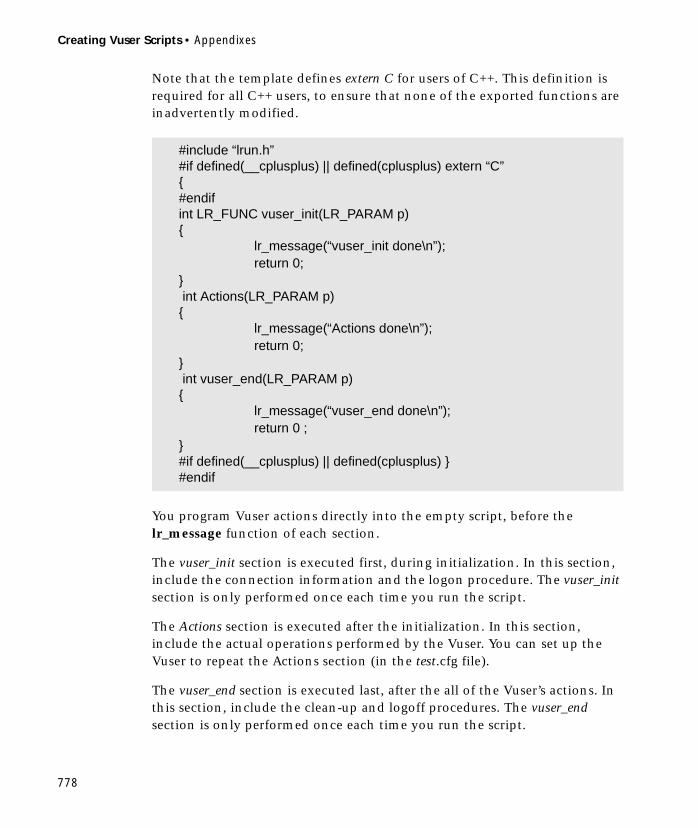
Creating Vuser Scripts • Appendixes
778
Note that the template defines extern C for users of C++. This definition is required for all C++ users, to ensure that none of the exported functions are inadvertently modified.
You program Vuser actions directly into the empty script, before the lr_message function of each section.
The vuser_init section is executed first, during initialization. In this section, include the connection information and the logon procedure. The vuser_init section is only performed once each time you run the script.
The Actions section is executed after the initialization. In this section, include the actual operations performed by the Vuser. You can set up the Vuser to repeat the Actions section (in the test.cfg file).
The vuser_end section is executed last, after the all of the Vuser’s actions. In this section, include the clean-up and logoff procedures. The vuser_end section is only performed once each time you run the script.
#include “lrun.h”#if defined(__cplusplus) || defined(cplusplus) extern “C” { #endifint LR_FUNC vuser_init(LR_PARAM p) {
lr_message(“vuser_init done\n”); return 0;
} int Actions(LR_PARAM p){
lr_message(“Actions done\n”); return 0;
} int vuser_end(LR_PARAM p) {
lr_message(“vuser_end done\n”); return 0 ;
}#if defined(__cplusplus) || defined(cplusplus) } #endif
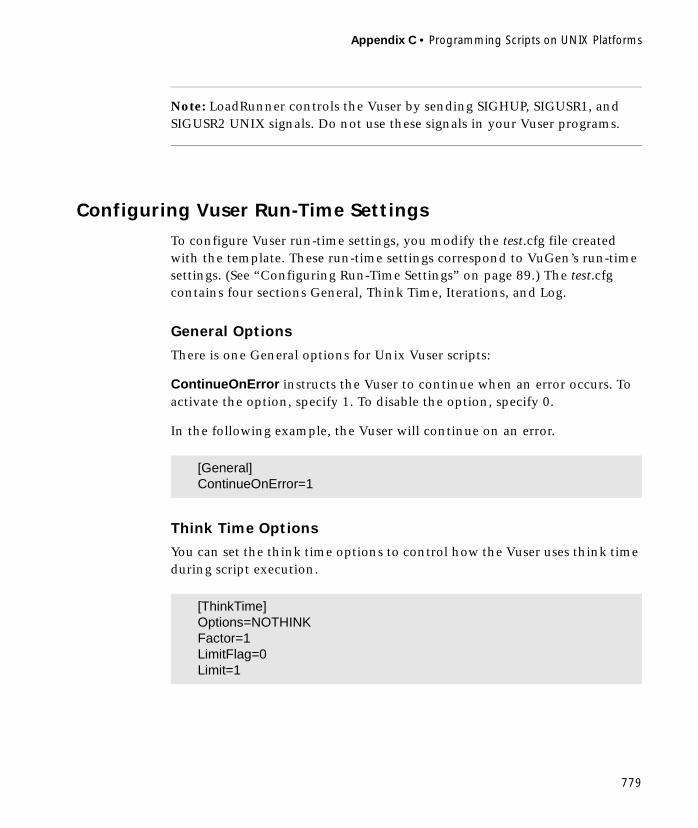
Appendix C • Programming Scripts on UNIX Platforms
779
Note: LoadRunner controls the Vuser by sending SIGHUP, SIGUSR1, and SIGUSR2 UNIX signals. Do not use these signals in your Vuser programs.
Configuring Vuser Run-Time Settings
To configure Vuser run-time settings, you modify the test.cfg file created with the template. These run-time settings correspond to VuGen’s run-time settings. (See “Configuring Run-Time Settings” on page 89.) The test.cfg contains four sections General, Think Time, Iterations, and Log.
General Options
There is one General options for Unix Vuser scripts:
ContinueOnError instructs the Vuser to continue when an error occurs. To activate the option, specify 1. To disable the option, specify 0.
In the following example, the Vuser will continue on an error.
Think Time Options
You can set the think time options to control how the Vuser uses think time during script execution.
[General]ContinueOnError=1
[ThinkTime]Options=NOTHINKFactor=1LimitFlag=0Limit=1
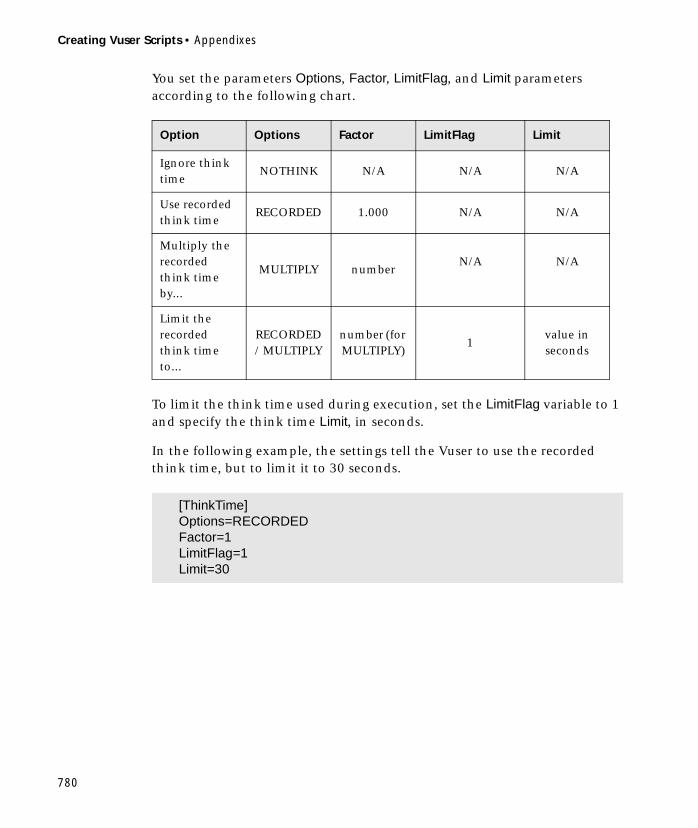
Creating Vuser Scripts • Appendixes
780
You set the parameters Options, Factor, LimitFlag, and Limit parameters according to the following chart.
To limit the think time used during execution, set the LimitFlag variable to 1 and specify the think time Limit, in seconds.
In the following example, the settings tell the Vuser to use the recorded think time, but to limit it to 30 seconds.
Option Options Factor LimitFlag Limit
Ignore think time
NOTHINK N/A N/A N/A
Use recorded think time
RECORDED 1.000 N/A N/A
Multiply the recorded think time by...
MULTIPLY numberN/A N/A
Limit the recorded think time to...
RECORDED/ MULTIPLY
number (for MULTIPLY)
1value in seconds
[ThinkTime]Options=RECORDEDFactor=1LimitFlag=1Limit=30

Appendix C • Programming Scripts on UNIX Platforms
781
Log Options
You can set the log options to create a brief or detailed log file for the script’s execution.
You set the parameters LogOptions, MsGClassData, MsgClassParameters, and MsgClassFull variables according to the following chart.
[Log]LogOptions=LogBriefMsgClassData=0MsgClassParameters=0MsgClassFull=0
Logging Type
LogOptions MsgClassData MsgClassParameters MsgClassFull
Disable Logging
LogDisabled N/A N/A N/A
Standard Log
LogBrief N/A N/A N/A
Parameter Substitution (only)
LogExtended 0 1 0
Data Returned by Server (only)
LogExtended 1 0 0
Advanced Trace (only)
LogExtended 0 0 1
All LogExtended 1 1 1
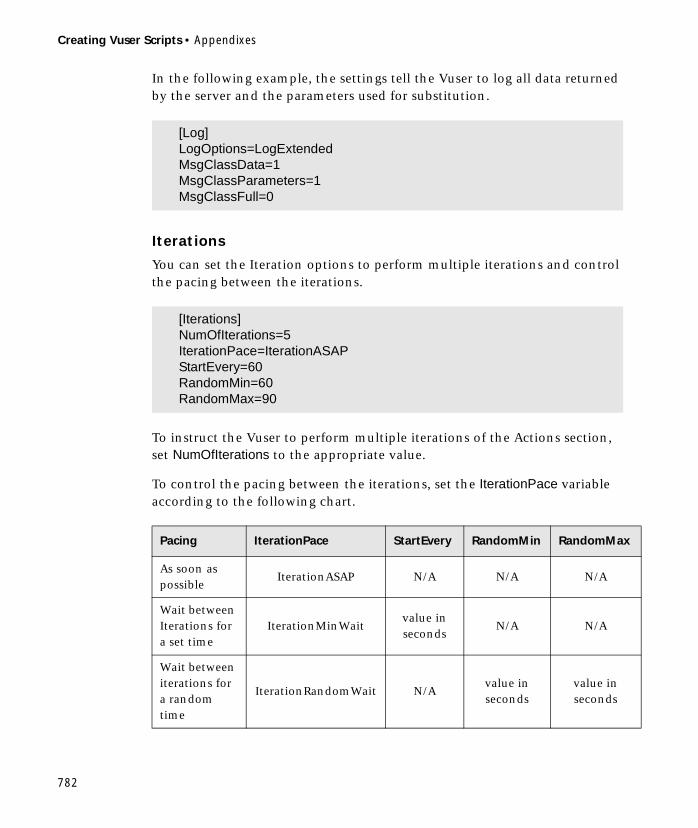
Creating Vuser Scripts • Appendixes
782
In the following example, the settings tell the Vuser to log all data returned by the server and the parameters used for substitution.
Iterations
You can set the Iteration options to perform multiple iterations and control the pacing between the iterations.
To instruct the Vuser to perform multiple iterations of the Actions section, set NumOfIterations to the appropriate value.
To control the pacing between the iterations, set the IterationPace variable according to the following chart.
[Log]LogOptions=LogExtendedMsgClassData=1MsgClassParameters=1MsgClassFull=0
[Iterations]NumOfIterations=5IterationPace=IterationASAPStartEvery=60RandomMin=60RandomMax=90
Pacing IterationPace StartEvery RandomMin RandomMax
As soon as possible
IterationASAP N/A N/A N/A
Wait between Iterations for a set time
IterationMinWaitvalue in seconds
N/A N/A
Wait between iterations for a random time
IterationRandomWait N/Avalue in seconds
value in seconds

Appendix C • Programming Scripts on UNIX Platforms
783
In the following example, the settings tell the Vuser to perform six iterations, while waiting a random number of seconds between iterations. The range of the random number is from 60 to 90 seconds.
Defining Transactions and Rendezvous Points
When programming a Vuser script without VuGen, you must manually configure the Vuser file in order to enable transactions and rendezvous. The configuration settings are listed in the test.usr file.
Each transaction and rendezvous must be defined in the usr file. Add the transaction name to the Transactions section (followed by an “=”). Add each rendezvous name to the Rendezvous section (followed by an “=”). If the sections are not present, add them to the usr file as shown above.
[Iterations]NumOfIterations=6IterationPace=IterationRandomWaitStartEvery=50RandomMin=60RandomMax=90
[General]Type=anyDefaultCfg=Test.cfgBinVuser=libtest.libsuffixRunType=Binary
[Actions]vuser_init=Actions=vuser_end=
[Transactions]transaction1=
[Rendezvous]Meeting=

Creating Vuser Scripts • Appendixes
784
Compiling Scripts
After you modify the template, you compile it with the appropriate Makefile in the script’s directory. Note that for C++ compiling, you must use the native compiler (not gnu). The compiler creates a dynamic library called:
➤ libtest.so (solaris)
➤ libtest.a (AIX)
➤ libtest.sl (HP)
You can modify the Makefile and assign additional compiler flags and libraries by modifying the appropriate sections.
If you are working with a general template, you must include your application’s libraries and header files. For example, if your application uses a library called testlib, include it in the LIBS section.
After you modify the makefile, type Make from the command line in the working directory to create the dynamic library files for the Vuser script.
You can now run the script from the LoadRunner Controller. The Vuser script is the script.usr file located in the script’s directory. For information on how to integrate a Vuser script into a scenario, refer to the appropriate LoadRunner Controller User’s Guide.
Before integrating a script into a scenario, you should run it from the command line to verify that it works properly.
To run a Vuser script from the UNIX command line, type:
where pwd is the full path to the directory containing the Vuser script and test.usr is the name of the Vuser file. Check that your script communicates with the server and performs all the required tasks.
LIBS = \-testlib \-lLrun50 \-lm
mdrv -usr ‘pwd’ test.usr
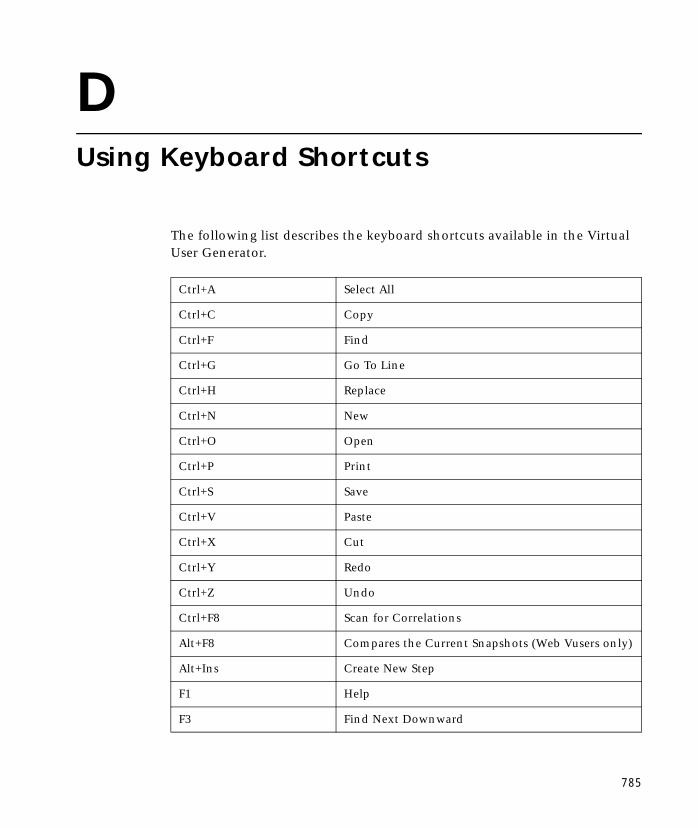
785
DUsing Keyboard Shortcuts
The following list describes the keyboard shortcuts available in the Virtual User Generator.
Ctrl+A Select All
Ctrl+C Copy
Ctrl+F Find
Ctrl+G Go To Line
Ctrl+H Replace
Ctrl+N New
Ctrl+O Open
Ctrl+P Print
Ctrl+S Save
Ctrl+V Paste
Ctrl+X Cut
Ctrl+Y Redo
Ctrl+Z Undo
Ctrl+F8 Scan for Correlations
Alt+F8 Compares the Current Snapshots (Web Vusers only)
Alt+Ins Create New Step
F1 Help
F3 Find Next Downward

Creating Vuser Scripts • Appendixes
786
Shift+F3 Find Next Upward
F5 Run Vuser
F6 Move Between Panes
F7 Show EBCDIC Translation Dialog (in Winsocket scripts)
F9 Toggle Breakpoint
F10 Run Vuser Step by Step

787
A
ABC icon 55Acrobat Reader xvAction functions (Web) 153Action functions (Wireless) 335Action icons (Web) 149Action icons (Wireless) 330action method 490action steps, modifying (Web Vusers) 240action steps, modifying (Wireless) 387actions
importing 33new, in Web scripts 163new, in Wireless scripts 327recording multiple 30weighting 97
Actions section of Vuser script 22Add Argument dialog box 248Add Data dialog box 231Add New Column dialog box 68Add Step dialog box 220, 225, 228Add Step dialog box, Web scripts 238Add Step dialog box, Wireless scripts 386adding steps to Web scripts 238adding steps to Wireless scripts 385ADO recordset filtering 113, 580animated run
defined 118enabling 119mode 118setting the delay 119
Animated Run command 119ANSI C support in Vuser scripts 47applet checks
defined 219Web Vuser scripts 152, 228–231
Applet Parameters tab, Add Data dialog box 231
application server, Oracle NCA 470AssignToParam property 232Astra LoadTest Virtual User Recorder 8Astra QuickTest 8auto-detect sites 269Automatic transactions 202
Database Vuser scripts 413Web Vuser scripts 109
automatic transactions 372
B
Baan Vuser Functionsusing 652
Baan Vuser scriptscreating 651–659customizing 658getting started with 652think time 658understanding 657
Bearers Support 345Books Online xvBoundaries, defining for dynamic data 274,
404braces, using in parameterization 78Breakpoint button 121Breakpoint symbol 121breakpoints 121Brief log run-time setting 101browser
manually launching 170, 311manually launching(Web/WinSock)
209specifying location (Oracle NCA) 472specifying location (Web) 170
Index
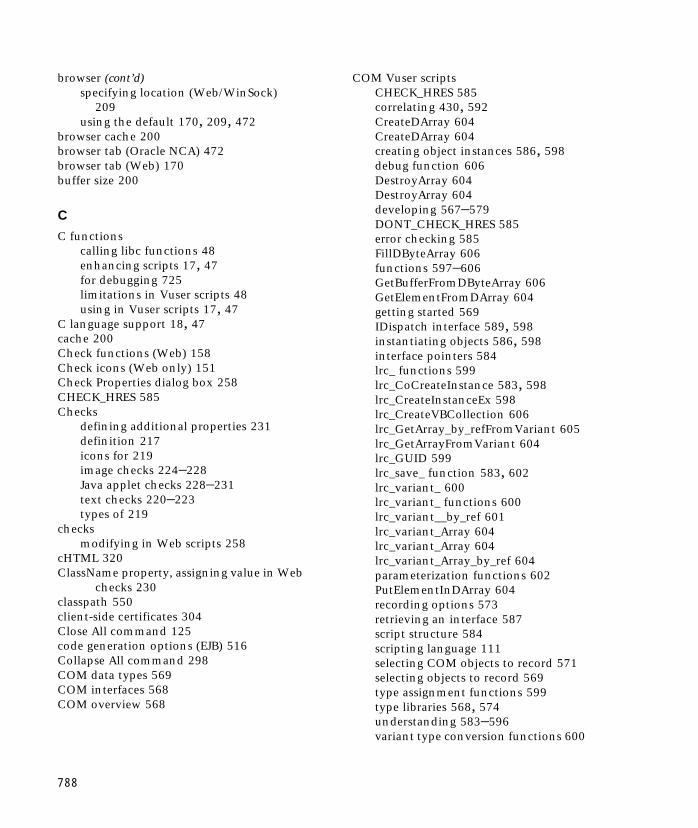
788
browser (cont’d)specifying location (Web/WinSock)
209using the default 170, 209, 472
browser cache 200browser tab (Oracle NCA) 472browser tab (Web) 170buffer size 200
C
C functionscalling libc functions 48enhancing scripts 17, 47for debugging 725limitations in Vuser scripts 48using in Vuser scripts 17, 47
C language support 18, 47cache 200Check functions (Web) 158Check icons (Web only) 151Check Properties dialog box 258CHECK_HRES 585Checks
defining additional properties 231definition 217icons for 219image checks 224–228Java applet checks 228–231text checks 220–223types of 219
checksmodifying in Web scripts 258
cHTML 320ClassName property, assigning value in Web
checks 230classpath 550client-side certificates 304Close All command 125code generation options (EJB) 516Collapse All command 298COM data types 569COM interfaces 568COM overview 568
COM Vuser scriptsCHECK_HRES 585correlating 430, 592CreateDArray 604CreateDArray 604creating object instances 586, 598debug function 606DestroyArray 604DestroyArray 604developing 567–579DONT_CHECK_HRES 585error checking 585FillDByteArray 606functions 597–606GetBufferFromDByteArray 606GetElementFromDArray 604getting started 569IDispatch interface 589, 598instantiating objects 586, 598interface pointers 584lrc_ functions 599lrc_CoCreateInstance 583, 598lrc_CreateInstanceEx 598lrc_CreateVBCollection 606lrc_GetArray_by_refFromVariant 605lrc_GetArrayFromVariant 604lrc_GUID 599lrc_save_ function 583, 602lrc_variant_ 600lrc_variant_ functions 600lrc_variant__by_ref 601lrc_variant_Array 604lrc_variant_Array 604lrc_variant_Array_by_ref 604parameterization functions 602PutElementInDArray 604recording options 573retrieving an interface 587script structure 584scripting language 111selecting COM objects to record 571selecting objects to record 569type assignment functions 599type libraries 568, 574understanding 583–596variant type conversion functions 600

Index
789
command line argumentshandling 46handling (Java Vusers) 499UNIX Vuser scripts 126
command prompt 125Comment button 40Comment command 41comments
inserting into RTE Vuser scripts 679inserting into Vuser scripts 40
comparing Vusers 85comparison method 282, 313Compiler flags 784Compiling Vuser scripts 784Component Breakdown graph 371concurrent connections 199concurrent group functions 339concurrent group functions (Web only) 158Connect dialog box 675Connecting to a TestDirector server 133connection attempts 688Connection to TestDirector dialog box 135content type filtering 185, 359Context Sensitive Help xvicontext, resetting 183Continue on error 43, 105control (Web Vusers)
functions 154icons 150steps 254
control (Wireless Vusers)functions 335icons 331
control steps, modifying 394Controller
Output window 713sending messages to 713sending output messages from 714
CORBA-Java correlation options 546CORBA-Java debug options 547CORBA-Java recorder options 541CORBA-Java serialization options 544CORBA-Java Vuser scripts 527–538
creating 529recording 530–533recording options 539–547understanding 533
correlatingscripting language options 112, 580
correlating (COM Vusers) 592correlating (Database and COM Vusers) 430correlating (Database Vusers) 436correlating (Web Vusers)
Correlation Studio 277–288correlating HTML statements 259–275,
399–405correlating Java statements 553–563
automatically 553enhanced correlation 555–556serialization 558–563simple correlation 554string correlation 556
correlating queries 81–87database Vusers 429general 83, 84modifying parameters 86
correlating TUXEDO scriptsbuffer strings 633CARRAY buffers 630
correlation optionsJava (CORBA,RMI Java) 546
Correlation Studio 277–288CreateDArray 604Creating COM object instances 586, 598creating parameters
all Vusers 52Web Vusers 55
CtLiblogging server messages 102options 414result set errors 427
custom headers 184, 358Custom Request Properties dialog box 253,
393Custom Request step
defined 149, 331modifying 252, 392
custom requests, XML 291
D
data buffersJolt Vuser scripts 644TUXEDO Vuser scripts 627WinSock Vuser scripts 452
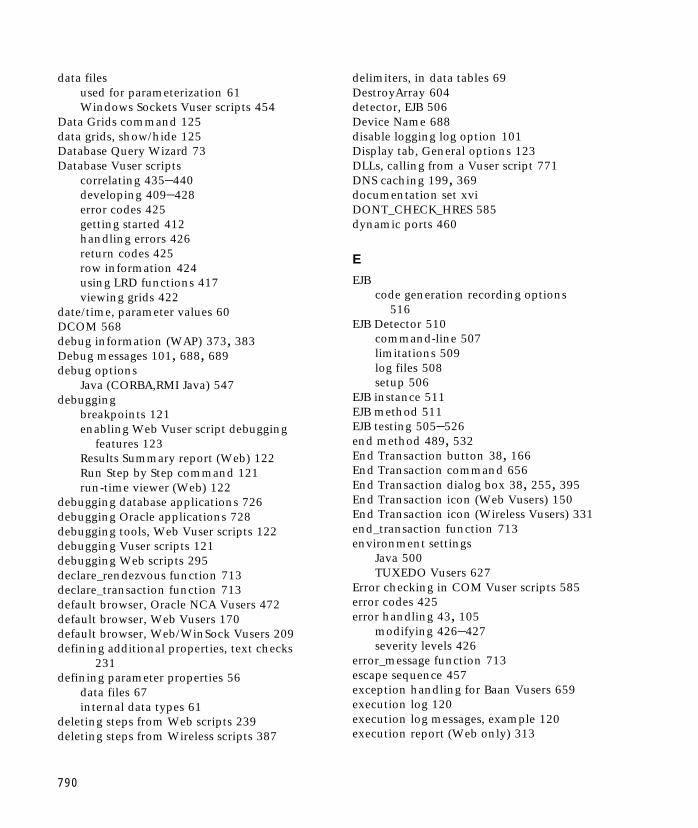
790
data filesused for parameterization 61Windows Sockets Vuser scripts 454
Data Grids command 125data grids, show/hide 125Database Query Wizard 73Database Vuser scripts
correlating 435–440developing 409–428error codes 425getting started 412handling errors 426return codes 425row information 424using LRD functions 417viewing grids 422
date/time, parameter values 60DCOM 568debug information (WAP) 373, 383Debug messages 101, 688, 689debug options
Java (CORBA,RMI Java) 547debugging
breakpoints 121enabling Web Vuser script debugging
features 123Results Summary report (Web) 122Run Step by Step command 121run-time viewer (Web) 122
debugging database applications 726debugging Oracle applications 728debugging tools, Web Vuser scripts 122debugging Vuser scripts 121debugging Web scripts 295declare_rendezvous function 713declare_transaction function 713default browser, Oracle NCA Vusers 472default browser, Web Vusers 170default browser, Web/WinSock Vusers 209defining additional properties, text checks
231defining parameter properties 56
data files 67internal data types 61
deleting steps from Web scripts 239deleting steps from Wireless scripts 387
delimiters, in data tables 69DestroyArray 604detector, EJB 506Device Name 688disable logging log option 101Display tab, General options 123DLLs, calling from a Vuser script 771DNS caching 199, 369documentation set xviDONT_CHECK_HRES 585dynamic ports 460
E
EJBcode generation recording options
516EJB Detector 510
command-line 507limitations 509log files 508setup 506
EJB instance 511EJB method 511EJB testing 505–526end method 489, 532End Transaction button 38, 166End Transaction command 656End Transaction dialog box 38, 255, 395End Transaction icon (Web Vusers) 150End Transaction icon (Wireless Vusers) 331end_transaction function 713environment settings
Java 500TUXEDO Vusers 627
Error checking in COM Vuser scripts 585error codes 425error handling 43, 105
modifying 426–427severity levels 426
error_message function 713escape sequence 457exception handling for Baan Vusers 659execution log 120execution log messages, example 120execution report (Web only) 313
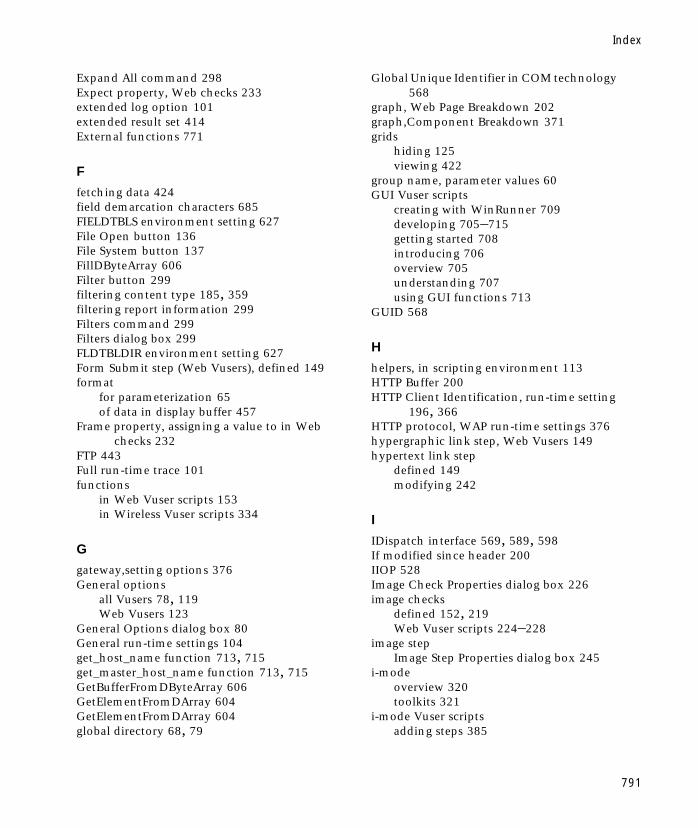
Index
791
Expand All command 298Expect property, Web checks 233extended log option 101extended result set 414External functions 771
F
fetching data 424field demarcation characters 685FIELDTBLS environment setting 627File Open button 136File System button 137FillDByteArray 606Filter button 299filtering content type 185, 359filtering report information 299Filters command 299Filters dialog box 299FLDTBLDIR environment setting 627Form Submit step (Web Vusers), defined 149format
for parameterization 65of data in display buffer 457
Frame property, assigning a value to in Web checks 232
FTP 443Full run-time trace 101functions
in Web Vuser scripts 153in Wireless Vuser scripts 334
G
gateway,setting options 376General options
all Vusers 78, 119Web Vusers 123
General Options dialog box 80General run-time settings 104get_host_name function 713, 715get_master_host_name function 713, 715GetBufferFromDByteArray 606GetElementFromDArray 604GetElementFromDArray 604global directory 68, 79
Global Unique Identifier in COM technology 568
graph, Web Page Breakdown 202graph,Component Breakdown 371grids
hiding 125viewing 422
group name, parameter values 60GUI Vuser scripts
creating with WinRunner 709developing 705–715getting started 708introducing 706overview 705understanding 707using GUI functions 713
GUID 568
H
helpers, in scripting environment 113HTTP Buffer 200HTTP Client Identification, run-time setting
196, 366HTTP protocol, WAP run-time settings 376hypergraphic link step, Web Vusers 149hypertext link step
defined 149modifying 242
I
IDispatch interface 569, 589, 598If modified since header 200IIOP 528Image Check Properties dialog box 226image checks
defined 152, 219Web Vuser scripts 224–228
image stepImage Step Properties dialog box 245
i-modeoverview 320toolkits 321
i-mode Vuser scriptsadding steps 385

792
importing actions 33importing data from a database 72Information to record (i-mode) 353init method 489, 532Insert Comment dialog box 40Instantiating COM objects 586, 598internal data, parameterization 60iteration number, parameter values 60iterations
defined 91pacing 92run-time settings 91
IUnknown interface 569
J
Javacorrelating statements 553–563virtual machine recording options
540Java (CORBA, RMI) correlation options 546Java (CORBA, RMI) debug options 547Java (CORBA, RMI) recorder options 541Java (CORBA, RMI) serialization options 544Java applet check
defined 219Web Vuser scripts 152, 228–231
Java Check Properties dialog box 229Java environment 500Java methods 489Java virtual machine settings 550Java VM recording options 540Java Vuser 487–503
inserting rendezvous points 495run-time settings 549–551template 488, 513
JDNI 509JDNI properties 514Jolt Vuser scripts
data buffers 644recording 637–648understanding 642using LRJOLT (Jolt) functions 639viewing arrays 643
Jscript 111JVM settings 550
K
keep-alive connections (Web) 199keep-alive connections (Wireless) 369keyboard mapping (RTE) 668keyboard shortcuts 785
L
LDAP 443libc functions, calling 48libraries, for scripting 115Link Step Properties dialog box 243load balancing
Oracle NCA protocol 481load generator name, parameter values 60loading DLLs
globally 773locally 771overview 771
logrecording 184
log optionsdisable logging 101extended 101standard 100
log, run-time settings 100, 781lr.get_attrib_double function 499lr.get_attrib_long function 499lr.get_attrib_string function 496lr.start_transaction function 495lr_end_transaction function 38, 150, 154,
331, 336lr_eval_string 83lr_get_attrib_double function 46lr_get_attrib_long function 46lr_get_attrib_string function 41lr_get_host_name function 41lr_get_master_host_name function 41lr_log_message function 43lr_rendezvous function 39, 150, 154, 332,
336lr_save_string 83lr_save_var 83lr_set_debug_message function 101lr_start_transaction function 38, 150, 154,
331, 336

Index
793
lr_think_time function 154, 336lr_whoami function 41, 713, 715lrbin.bat utility 723lrc_ functions 599lrc_CoCreateInstance 583, 598lrc_CreateInstanceEx 598lrc_CreateVBCollection 606lrc_GetArray_by_refFromVariant 605lrc_GetArrayFromVariant 604lrc_GUID 599lrc_Release_Object 598lrc_save_ function 583, 602lrc_variant_ 600lrc_variant_Array 604lrc_variant_Array_by_ref 604lrc_variant_by_ref 601LRD (Database) functions 417LRD_ON_ERROR_CONTINUE 426LRD_ON_FETCHABLE_SET_ERR_CONT 428lrd_send_data 414lrd_stmt 413LREAL functions 613LRJOLT functions 639LRS functions 449lrs_save_param_ex 461LRT functions 619lrt_save_fld_val function 629lrt_save_parm 632lrt_save_searched_string 633
M
mapping keyboard 668MatchCase property 232Message command 43messages
error 42, 713sending 713sending to output 42
methods, Java 489Microsoft Query, importing data using 72miscellaneous functions (Web) 158miscellaneous functions (Wireless) 340mkdbtmpl script 777MMSC 349Mobile station emulation 349
Modem Speed, run-time setting 198, 368modifying saved parameters 86modifying WAP scripts
rendezvous points 396submit data steps 389think time 396transactions 394URL steps 388
modifying Web scripts 240–258image steps 244rendezvous points 256submit data steps 249submit form steps 246think time 256transactions 254URL steps 240
modifying Wireless Vuser scripts 385–398MTS components 577Multi-protocol scripts 205–216multithreading 108
N
NCA Vusers, see Oracle NCANew button 29, 672New Virtual User dialog box 29, 672non-printable characters 458non-standard HTTP applications 311
O
offset of data in buffer 455OnFailure property, Web checks 233online browser 122, 309Online Function Reference xvOpen button 300Open command 136, 300Open from TestDirector Project dialog box
136options
CtLib 414lrd log 413lrd recording 413parameterization 78recording (RTE) 678
Oracle 8 419

794
Oracle application debugging 728Oracle NCA
load balancing 481run time settings 479text view 468, 479tree view 468, 478
Oracle NCA Vuser scriptscreating 467–483installation tips 470recording guidelines 470specifying a browser for recording 472using Vuser functions 473
OTA, Over-The-Air 347Output window 42, 119, 496
hiding 120show/hide 125
output_message function 713, 714
P
pacing 91PAP, Push Access Protocol 347parameter arrays, Jolt 643parameter list 58Parameter List button 58Parameter List dialog box 54, 58, 69Parameter Properties dialog box 56, 58, 67parameterization 49–80
brace style 78CORBA and Java 53creating a new parameter 52creating a new parameter in a Web
Vuser script 55data files 61defining properties 56defining properties Web Vusers 57global directory 79internal data 60internal data properties 61internal data type formats 65naming a parameter 53naming a parameter (Web) 55options 78parameter list 58random sequence with seed 70restoring the original value 54
parameterization (cont’d)same line as parameter method 71selecting a parameter type 53selecting a parameter type (Web) 55selecting range for internal data 62setting properties for data files 67understanding parameter types 59undoing (Web) 56updating at random 70updating on each iteration 66updating on each occurrence 66updating once 66updating parameter values for
internal data types 66updating sequentially 69updating values from files 69updating with unique values 71
parametersdata files 61date/time 60group name 60in TUXEDO scripts 625iteration number 60load generator name 60random number 60, 62types 59unique number 60, 63Vuser ID 60
Pause 120persistent connections 199, 369phone, recording over 344POP3 443PPG, Push Proxy Gateway 347Print button 301Print command 301printing Results Summary reports 301privileges 139programming
using templates 720, 777Vuser actions 777
programming scripts 719properties
AssignToParam-Web 232ClassName (Web) 230Expect (Web) 233Frame (Web) 232
Index
795
properties (cont’d)MatchCase (Web) 232OnFailure (Web) 233Repeat (Web) 233Report (Web) 233text checks, 231
properties of parametersdefining 56defining for data files 67defining for internal data types 61
protocols, See Vuser typesProxy Server
run-time settings 195, 365proxy server
recording options (Web) 171recording options (Web/WinSock)
210recording options (Wireless) 355
proxy tab (i-mode, VoiceXML) 364push support 346PutElementInDArray 604
Q
queries, correlating 81–87
R
radius support 346random number, parameter values 60, 62random parameter assignment 70reading text from the screen (RTE) 701–702RealPlayer Virtual Player scripts
getting started 612recording 611using LREAL functions 613
Record button 656, 674recorder options
Java (CORBA,RMI Java) 541recording options
non-HTML resources 188RTE Vuser scripts 678scripting language 111–116Web Vusers 169–191WinSocket 445Wireless Vusers 351–362
Recording Options command 678, 695Recording Options dialog box 678, 679, 697Recording Proxy tab 171, 355Recording tab, Recording Options dialog box
352, 353recording Vuser scripts
Database 409–428information to record (Web) 174information to record (Wireless) 352Jolt 637–648multiple actions 30Oracle NCA browser setting 472proxy setting 171, 210proxy setting (Wireless) 355RealPlayer 611–613RTE 671–685TUXEDO 617–626using VuGen 21Web 159–168Web browser setting 170Web/ WinSock 205–216Web/WinSock browser setting 208Window Sockets 443–463Wireless 323–341
recording, See recording Vuser scriptsregenerating Vusers 33, 216regular expressions, in text checks 233Rendezvous button 39, 168Rendezvous command 40Rendezvous dialog box 39, 256, 396rendezvous function 713Rendezvous icon, WAP Vusers 332Rendezvous icon, Web Vusers 150rendezvous points
defined 39, 711inserting 39, 711inserting in Web scripts 167Java Vusers 495modifying in WAP scripts 396modifying in Web scripts 256
Repeat property, Web Vusers 233Replace More Occurrences command 54Replay tab, General Options dialog box 119Report details, Results Summary report
(Web) 297Report property, Web checks 233

796
Report toolbar 297, 300report tree, Results Summary report (Web)
297reset context 183resources
excluding 187non-HTML 188
Restore Original Value command 54Results Summary report 122, 295–301
debugging Web scripts 295filtering information 299opening 300printing 301report details 297report tree 297Report tree branches 298understanding 297
return codes 425RMI over IIOP 528RMI-Java correlation options 546RMI-Java debug options 547RMI-Java recorder options 541RMI-Java serialization options 544RMI-Java Vuser scripts 527–538
creating 529recording 530–533recording options 539–547understanding 533
row information, Database Vusers 424RTE run-time settings 687–690RTE Vuser scripts
getting started 665introducing 664mapping PC keyboard 668overview 663reading text from the screen 701–702recording 671–685steps in creating 665synchronizing 691using TE functions 666
rules for correlating 264Run command 119run_db_vuser shell script 126running Vuser scripts
animated mode 118in stand-alone mode 117step by step 121using VuGen 117–124
Run-Time Options command 694, 695Run-Time settings 89–109
Bearer Options (WAP) 379configuring manually 779debug information (WAP) 373, 383dialog box 90Gateway settings (WAP) 376General 104iterations 91Java 549–551Java VM tab 550Log 99network (Web) 196, 366Oracle NCA 479overview 89Preferences (Web) 201, 371radius (WAP) 381RTE tab 694RTE Vuser scripts 687–690server (Web) 194, 364server settings 194think time 102VBA scripting 115WAP 375–383Web 193–203Wireless 363–373
Run-Time Settings button 90, 100, 103, 105, 193, 687
Run-Time Settings command 46run-time viewer 122, 309
S
safearray log 113, 581same line as parameter assignment method
71Save As command 138Save button, Multi-protocol scripts 216Save button, Web scripts 164Save button, Wireless scripts 328Save Test to TestDirector Project dialog box
138scenarios
create from VuGen 128integrating Vuser scripts into 128
Script Generator, See VuGen

Index
797
scripting languageDCOM 111selecting 111–116
Search and Replace dialog box 54searching for text on the screen (RTE only)
701sections of a Vuser script 22Select or Create Parameter dialog box 53, 55Select Results Directory dialog box 124sending messages 713sequential parameter assignment 69serialization 558–563serialization options
Java (CORBA,RMI Java) 544Service functions (Web) 155Service functions (Wireless) 336Service icons (Web) 150Service icons (Wireless) 332Service Step Properties dialog box 257, 397service steps
modifying (WAP Vusers) 397modifying (Web Vusers) 257
settings, See Run-Time settingsshortcut keys 785skeleton Vuser scripts 28SMS - Short Message Service 379snapshots 278, 290Solaris, ASCII translations 447SQL, importing data using 72stand-alone mode, running Vuser scripts 117standard log option 100Start Recording button 25, 31Start Recording dialog box
Web 162Wireless 327
Start Transaction button 37, 166Start Transaction command 38, 656Start Transaction dialog box 37, 255, 395Start Transaction icon, Web Vusers 150Start Transaction icon, Wireless Vusers 331start_transaction function 713step
modifying Web scripts 244Step button 121Stop 120
Submit Data Stepdefined 149dialog box 250, 390modifying 249, 389
Submit Form Stepdialog box 247modifying 246
Support Information xviSupport Online xvisynchronization functions (Baan) 654synchronizing Vuser scripts
block-mode (IBM) terminals 692character-mode (VT) terminals 696overview 45overview (RTE) 691waiting for terminal to be silent 699waiting for text to appear on the
screen 697waiting for the cursor to appear 696
synchronizing, See rendezvous pointssystem variables
TE_SILENT_MILLI 698TE_SILENT_SEC 698TE_SILENT_TIMEOUT 698
T
table icon 55TE (RTE) functions 666TE_connect function 688TE_find_text function 701TE_get_cursor_position function 702TE_get_line_attribute function 702TE_get_text_line function 702TE_SILENT_MILLI system variable 698TE_SILENT_SEC system variable 698TE_SILENT_TIMEOUT system variable 698TE_type function 681TE_typing_style function 681, 683, 689TE_wait_cursor function 696TE_wait_silent function 700TE_wait_sync function 689, 692, 693TE_wait_sync_transaction function 695TE_wait_text function 693, 696, 698

798
templateJava Vuser 488, 513programming in "C" 720, 777
Terminal Setup dialog box 674Test plan tree (TestDirector) 132Test Script Language, see TSLTestDirector command 134TestDirector integration 131–139
connecting to TestDirector server 133opening scripts 136saving scripts 137
TestDirector, Test plan tree 132Text
reading text from the screen (RTE) 702searching for text on the screen (RTE
only) 701Text Check Properties dialog box 221text checks
defined 151, 219defining additional properties 231
text checks, Web Vuser scripts 220–223text comparison 313think time
defined 102function 20, 493modifying in WAP scripts 396modifying in Web scripts 256recording 183, 357run-time settings 102threshold, Database 413threshold, WinSock 448
Think Time dialog box 257, 397thread, main 502thread-safe code 501timeout
Baan Vusers 660timestamp 414token, parameterizing 264transactions
automatic, for LRD functions 413automatic, for Web Vuser scripts 109defined 710for Web Vusers 109inserting 37inserting in Web scripts 165modifying in WAP scripts 394modifying in Web scripts 254
Translation table settings 446translation, ASCII on UNIX 447trapping 211troubleshooting Web Vuser scripts 303–314TSL, defined 709, 711TurbLoad 174TUXDIR environment setting 627TUXEDO 6.3 628TUXEDO Vuser scripts
data buffers 627environment settings 627log file 626recording 617–626running 626understanding 624using LRT (TUXEDO) functions 619viewing data files 626
Type conversion functions in COM Vuser scripts 599
types of parameters, understanding 59Typing style (RTE Vusers) 683
U
Undo Parameter command 56unique number, parameter values 60, 63unique value parameter assignment 71UNIX command line 126update methods, in parameterization 66, 69URL Step Properties dialog box 241, 388URL steps
defined (Web Vusers) 149defined (Wireless Vusers) 331modifying 240, 388
Use Existing Parameters command 54user privileges 139user types 139user_data_point function 713
V
Variant type conversion in COM Vuser scripts 600
VBA references 115verification checks 201, 371verification under load, See Checksverification, text 701
Index
799
verifying Web pages under load 217–235virtual machine recording options 540Virtual Player scripts 611Virtual User Generator, See VuGenVisual Basic 111
programming 719Vuser scripts 719
Visual Cprogramming 719Vuser scripts 719
Visual Log options, Web Vusers 119, 122, 296
VM 540VuGen 289
introducing 8, 13–20overview 13parameterization 49–80recording Vuser scripts 14, 21–34running Vuser scripts 15toolbar 26
Vuser functionsBaan 652COM 586Database 417external, user defined 771general 16GUI 713Jolt 639LRD (Database) 417LREAL (RealPlayer) 613LRJOLT (Jolt) 639LRS (Windows Sockets) 449LRT (TUXEDO) 619Oracle NCA 473protocol specific 17RealPlayer 613TE (RTE) 666TUXEDO 620Windows Sockets 449See Also Online Function Reference
Vuser Generator, See VuGenVuser ID, parameter values 60Vuser information, obtaining 41Vuser information, obtaining (Java) 496
Vuser scriptsActions section of 22adding functions 35–47ANSI C support 47C support 47COM 586compiling 784CORBA-Java 527–538creating CORBA-Java 529creating on UNIX 775–784creating RMI-Java 529debugging 121developing 7, 709EJB testing 505–526enhancing 35–47inserting comments 40inserting rendezvous points 39inserting transactions 37integrating into a scenario 128Java Vuser 487–503obtaining Vuser information 715opening from TestDirector 136programming 775–784recording CORBA-Java 530–533recording options (CORBA, RMI Java)
539–547recording options (language
selection) 111–116recording RMI-Java 530–533regenerating 33RMI-Java 527–538running 117–124running from command prompt 125running on UNIX 126run-time settings 89run-time settings, WAP 375run-time settings, Wireless 363run-time settings-Java 549–551sample 711sections 22sending messages to controller 713steps in creating for Web Vusers 146three sections 21tools for developing 8TSL 709verifying 784vuser_end section 22
800
Vuser scripts (cont’d)vuser_init section 22Web run-time settings 193See Also TSL Online Function
ReferenceVuser types 5vuser_end section of Vuser script 22vuser_init section of Vuser script 22Vusers
GUI Vusers 705introducing 3–5types of 5
W
waiting for terminal to stabilize 699WAP debug information 373, 383WAP gateway options 376WAP run-time settings 375–383WAP toolkit
default 354manually launching 354using a specific 354
WAP Toolkit tab 353WAP Vuser scripts
adding steps 385custom request steps 392introducing 343–350modifying rendezvous points 396modifying service steps 397modifying submit data steps 389modifying think time 396modifying transactions 394modifying URL steps 388understanding 317, 343
Wdiff 85Web correlation 259–275Web functions, using 153Web Page Breakdown graphs, generating 202Web performance graphs 201, 371Web run-time settings 193–203Web scripts
modifying control steps 254modifying custom request steps 252
Web trapping 211
Web Vuser scriptsabout 143Action icons 149adding steps 238advanced tips 303–314Check icons 151checks 217content filtering 185Control icons 150correlating 261creating parameters 55custom headers 184custom request steps 252debugging features, enabling 123debugging tools 122defining parameter properties 57deleting steps 239image checks 224–228introducing 143–158Java applet checks 228–231modifying 240–258modifying action steps 240modifying checks 258modifying hypertext link steps 242modifying image steps 244modifying rendezvous points 256modifying service steps 257modifying submit data steps 249modifying submit form steps 246modifying think time 256modifying transactions 254modifying URL steps 240non-HTML resources 188parameter properties, defining 57recording 159–168recording options 169–191regular expressions in text checks 233Results Summary report 122,
295–301run-time viewer 122Script view 152sections 160Service icons 150setting Visual Log options 119, 122specifying a browser for recording 170specifying proxy settings 171
Index
801
Web Vuser scripts (cont’d)specifying what to record 174Start Recording button 162steps in creating 146text checks 220–223Tree view 148understanding 146verifying Web pages under load
217–235Web/ WinSock Vuser scripts,recording
205–216Web/WinSock Vuser scripts
getting started 206sections 214specifying a browser for recording 208
Web/WinSock Vusers,specifying proxy settings 210
web_add_auto_header function 155, 337web_add_cookie function 156, 338web_add_header function 155, 337web_cache_cleanup function 156, 338web_cleanup_auto_headers function 155,
337web_cleanup_cookies function 156, 338web_concurrent_end function 158, 339web_concurrent_start function 158, 339web_create_html_param _ex function 157,
339web_create_html_param function 157web_custom_request function 153, 335web_disable_keep_alive function 156, 338web_enable_keep_alive function 156, 338web_find function 158web_get_int_property function 158, 340web_image function 149, 153web_image_check function 158web_java_check function 158web_link function 149, 153web_reg_find function 158, 224web_reg_save_param 271, 400, 403web_remove_cookie function 156, 338web_save_header function 155, 337web_set_certificate function 155, 337web_set_certificate_ex function 155, 337web_set_connections_limit function 156,
338
web_set_max_html_param_len function 157, 339
web_set_max_retries function 156, 338web_set_proxy function 157, 339web_set_proxy_bypass function 157, 339web_set_proxy_bypass_local function 157,
339web_set_secure_proxy function 157, 339web_set_sockets_option function 158, 340web_set_timeout function 156, 338web_set_user function 155, 337web_submit_data function 154web_submit_form function 149, 154web_url function 149, 154, 331, 335weighting 97Windows Sockets Vuser scripts
data buffers 452data files 454excluding sockets 447getting started 444recording 443–463using LRS functions 449viewing data files 452
WinInet 202, 372WinRunner
creating GUI Vuser scripts 709editing scripts 708GUI Vuser technology 711See Also WinRunner User’s guide
Wireless functions, using 334Wireless run-time settings 363–373Wireless Vuser scripts
Action icons 330content filtering 359Control icons 331custom headers 358deleting steps 387modifying 385–398modifying action steps 387recording 323–341recording options 351–362Script view 333sections 324Service icons 332specifying a WAP toolkit 353specifying proxy settings 355

802
Wireless Vuser scripts (cont’d)specifying what to record 352Start Recording button 327Start Recording dialog box 327Tree view 329
Wireless Vusersintroducing 317–321
WSDEVICE TUXEDO system variable 628WSNADDR TUXEDO system variable 628WSP protocol, WAP run-time settings 376WSP recording mode 352WSP Sessions 344wtuxws32.dll TUXEDO DLL 628
X
XML as custom requests 291XML pages, testing 289–294X-SYSTEM message 690, 693
C-Interpreter Copyright Agreement
The Virtual User Generator generates standard C code which can be compiled with any ANSI C compiler. However, for the convenience of our customers we have provided a C Interpreter for running the generated code, without charge. The cci executable which is the front end of the interpreter is based on the freely available "lcc Retargetable C Compiler" by Christopher Fraser and David Hanson, and is covered by the lcc Copyright included below. Any bugs in cci should be reported to Mercury Interactive. The author’s copyright notice is below.
THIS SOFTWARE IS BEING PROVIDED "AS IS", WITHOUT ANY EXPRESS OR IMPLIED WARRANTY. IN PARTICULAR, NEITHER THE AUTHORS NOR MERCURY INTERACTIVE MAKE ANY REPRESENTATION OR WARRANTY OF ANY KIND CONCERNING THE MERCHANTABILITY OF THIS SOFTWARE OR ITS FITNESS FOR ANY PARTICULAR PURPOSE.
The authors of this software are Christopher W. Fraser and David R. Hanson.
Copyright (c) 1991,1992,1993,1994,1995 by AT&T, Christopher W. Fraser, and David R. Hanson. All Rights Reserved.
Permission to use, copy, modify, and distribute this software for any purpose, subject to the provisions described below, without fee is hereby granted, provided that this entire notice is included in all copies of any software that is or includes a copy or modification of this software and in all copies of the supporting documentation for such software.
THIS SOFTWARE IS BEING PROVIDED "AS IS", WITHOUT ANY EXPRESS OR IMPLIED WARRANTY. IN PARTICULAR, NEITHER THE AUTHORS NOR AT&T MAKE ANY REPRESENTATION OR WARRANTY OF ANY KIND CONCERNING THE MERCHANTABILITY OF THIS SOFTWARE OR ITS FITNESS FOR ANY PARTICULAR PURPOSE.
lcc is not public-domain software, shareware, and it is not protected by a ‘copyleft‘ agreement, like the code from the Free Software Foundation. lcc is available free for your personal research and instructional use under the ‘fair use’ provisions of the copyright law. You may, however, redistribute the lcc in whole or in part provided you acknowledge its source and include this COPYRIGHT file.
You may not sell lcc or any product derived from it in which it is a significant part of the value of the product. Using the lcc front end to build a C syntax checker is an example of this kind of product.
You may use parts of lcc in products as long as you charge for only those components that are entirely your own and you acknowledge the use of lcc clearly in all product documentation and distribution media. You must state clearly that your product uses or is based on parts of lcc and that lcc is available free of charge. You must also request that bug reports on your product be reported to you. Using the lcc front end to build a C compiler for the Motorola 88000 chip and charging for and distributing only the 88000 code generator is an example of this kind of product. Using parts of lcc in other products is more problematic. For example, using parts of lcc in a C++ compiler could save substantial time and effort and therefore contribute significantly to the profitability of the product. This kind of use, or any use where others stand to make a profit from what is primarily our work, is subject to negotiation.
Chris Fraser / [email protected] Hanson / [email protected]

Creating Vuser Scripts
804


Mercury Interactive Corporation1325 Borregas Avenue Sunnyvale, CA 94089 USA
Main Telephone: (408) 822-5200Sales & Information: (800) TEST-911Customer Support: (877) TEST-HLPFax: (408) 822-5300
Home Page: www.mercuryinteractive.comCustomer Support: support.mercuryinteractive.com /5'%8*�� ��� ��
Related Documents