LIVESCRIBE™ DESKTOP FOR WINDOWS USER GUIDE VERSION 1.7

Welcome message from author
This document is posted to help you gain knowledge. Please leave a comment to let me know what you think about it! Share it to your friends and learn new things together.
Transcript
LIVESCRIBE™ DESKTOP FOR WINDOWS
USER GUIDE
VERSION 1.7
Livescribe™ Desktop for Windows User Guide
ii
COPYRIGHT AND TRADEMARKS
LIVESCRIBE, PULSE, and PAPER REPLAY are trademarks or registered trademarks of Livescribe, Inc.
Anoto is a trademark of Anoto Group AB. Microsoft and Microsoft Word are either registered trademarks or trademarks of Microsoft Corporation in the United States or other countries. Apple and iTunes are either registered trademarks or trademarks of Apple Computer Inc. in the United States or other countries. MyScript is a registered trademark of Vision Objects, Inc. All other brand and product names are trademarks of their respective owners.
Copyright © 2007-2009 Livescribe, Inc. All rights reserved.
NOTE: Please read the End User License Agreement with this product before using the accompanying software program(s). You accept the terms of the End User License Agreement by using any part of the software. Using any non-authorized charging accessories or ink cartridges may damage your Pulse smartpen and voids your Pulse smartpen’s warranty.
Software Downloads Available
To download Livescribe™ Desktop software, go to www.livescribe.com/install.
205-00002-000-A-WINLD-01.7.0-LDUG-REV-I
9/24/2009 1:19 PM

Livescribe™ Desktop for Windows User Guide
iii
TABLE OF CONTENTS
WELCOME TO LIVESCRIBE™ DESKTOP 1
What is New in this Version? 2
GETTING STARTED WITH LIVESCRIBE DESKTOP 2
Installing Livescribe Desktop 2
Running Livescribe Desktop 3
Registering Your Pulse Smartpen 4
Copying Content from Your Pulse Smartpen 5
Quitting Livescribe Desktop 6
Uninstalling Livescribe Desktop 6
GETTING TO KNOW LIVESCRIBE DESKTOP 7
Views 7
Page Viewer 7
Sessions View 8
Livescribe Online 9
Smartpen Manager 9
Page Viewer Windows 10
Content Window 10
Navigation Window 11
Menus and Tool Bars 13
Main Menu 13
Main Tool Bar 13
Page Control Tool Bar 14
Audio Control Tool Bar 14
Memory Manager Tool Bar 14
PAPER REPLAY IN LIVESCRIBE DESKTOP 14
About Active Ink 15
Livescribe™ Desktop for Windows User Guide
iv
Viewing Pages 15
Paging through a Notebook 16
Viewing Thumbnails 16
Viewing a Single Page 17
Playing Audio while Viewing Pages 18
Zooming Pages 19
Searching Pages 22
Exporting Pages as a PDF file 23
Exporting a Page as an Image 24
Copying and Pasting Pages 24
Printing Pages 24
Converting Handwriting to Text 25
Using the Page Control Tool Bar 26
Working with Sessions 27
Viewing a List of Sessions 27
Renaming a Session 28
Deleting a Session from Livescribe Desktop 29
Removing a Session from Your Pulse Smartpen 29
Viewing a Session's Pages 30
Exporting Recorded audio 30
Playing Audio from Sessions View 31
Using the Audio Control Tool Bar 31
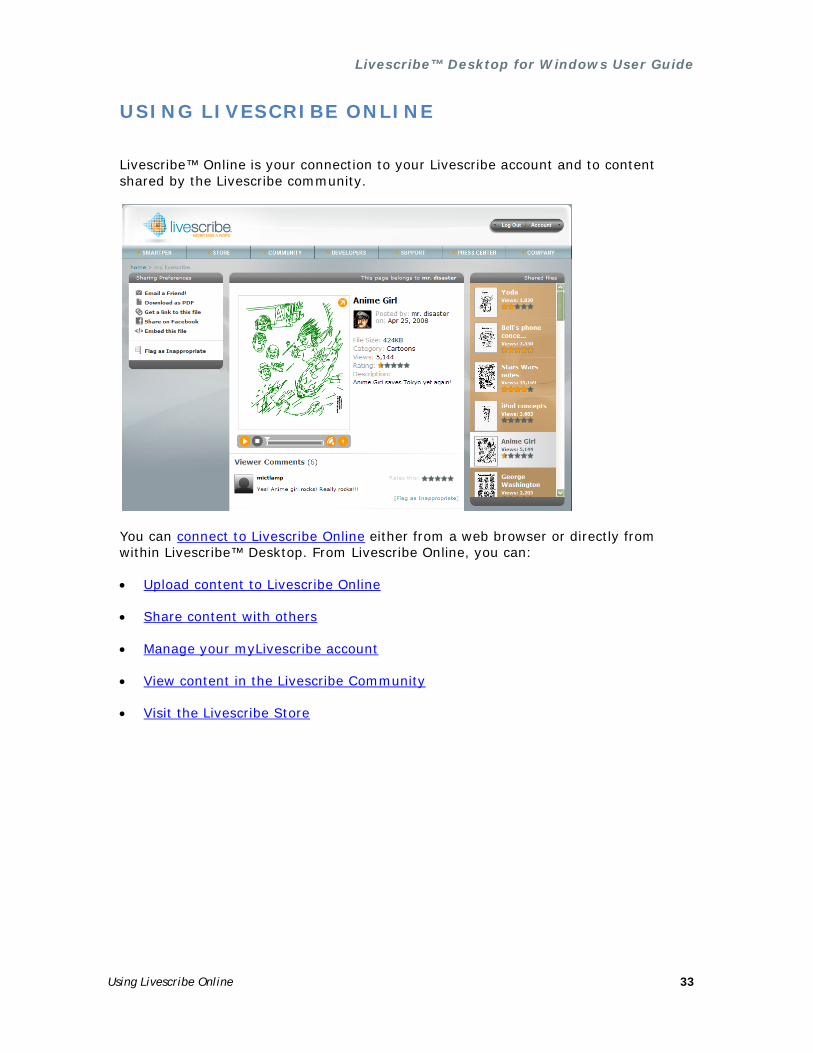
USING LIVESCRIBE ONLINE 33
Connecting to Livescribe Online 34
Uploading Content to Livescribe Online 34
Pencasting 34
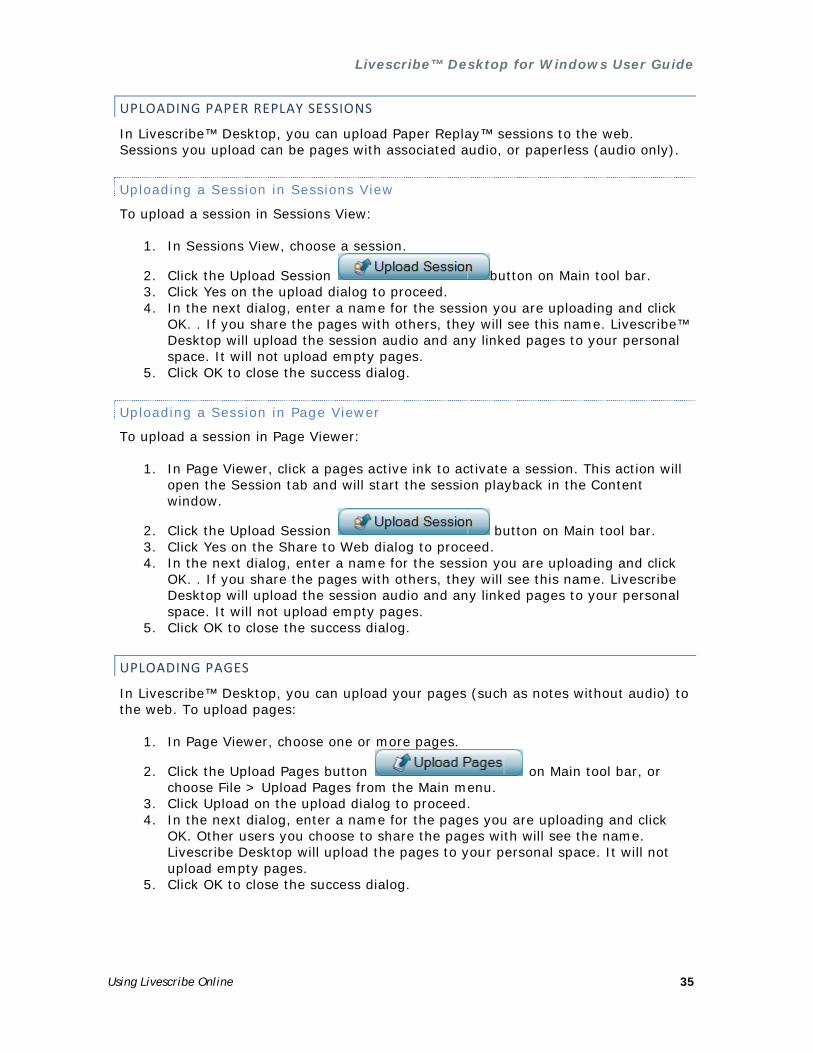
Uploading Paper Replay Sessions 35
Uploading Pages 35
Livescribe™ Desktop for Windows User Guide
v
Sharing Content Using Livescribe Online 36
Emailing Content to a Friend 36
Download Content as a PDF Document 37
Get a Web Link to your Content 37
Sharing Content on Facebook 38
Embedding Content into a Website, Forum, or Blog 38
Making Content Public or Private 39
Editing Your Access List 40
Managing your Livescribe Account 40
Setting Up a Livescribe Account 40
Using your myLivescribe Profile 41
Managing Your Uploaded Content 41
Managing Your Account Details 42
Viewing Livescribe Community Content 42
Visit the Livescribe Store 43
WORKING WITH PAPER PRODUCTS 44
Printing Your Own Notepads 45
Three Simple Guidelines for Managing Paper Products 46
Checking Paper Product Usage with the Notebook Status Label 46
About Livescribe Dot Paper Product Naming 47
Archiving Paper Products 48
Managing Paper Products with the Same Dot Pattern 49
Using Packs of Notebooks and Journals 49
Mapping Colors and Series to Groups and Numbers 50
Backing Up Your My Livescribe Folder 51
MANAGING YOUR PULSE SMARTPEN 52
Managing Applications 52
Viewing Installed Applications and Software 52

Livescribe™ Desktop for Windows User Guide
vi
Installing Software Updates 53
Installing New Applications and Software 54
Viewing Queued Applications and Software 54
Other Pulse Smartpen Commands 55
Managing Memory 55
Viewing Memory Usage 55
Freeing Memory 56
GLOSSARY 56

Livescribe™ Desktop for Windows User Guide
vii
ABOUT THIS GUIDE
This guide describes Livescribe Desktop software you can use to work with your Pulse smartpen. Use this guide along with the Getting Started Guide and Pulse Smartpen User Guide.

Livescribe™ Desktop for Windows User Guide
Welcome to Livescribe™ Desktop 1
WELCOME TO LIVESCRIBE™ DESKTOP
Livescribe Desktop is software that runs on your computer to view and listen to the content you create and capture using your Pulse™ smartpen. With Livescribe Desktop, you can view your notes, listen to your recorded audio, manage applications, and more. Livescribe Desktop is also a portal to Livescribe Online, where you can upload and share content, purchase new applications and paper products, and connect to the Pulse smartpen user community.
Livescribe Desktop is one component of a paper-based mobile computing platform. This platform bridges the gap between the paper and digital worlds, and enables a broad range of new applications in personal productivity, learning, communication, and self expression.
The Livescribe mobile computing platform includes:
• Pulse smartpen: a pen-size computer with advanced processing power, audio/visual feedback, and substantial memory for handwriting capture, audio recording, and applications
• Livescribe™ Dot Paper: technology that enables interactive, “live” documents using plain paper printed with micro-dots
Livescribe™ Desktop for Windows User Guide
Getting Started with Livescribe Desktop 2
• Livescribe Desktop, Livescribe Online, and Pulse™ smartpen applications: a breadth of software and web solutions that leverage ink and audio capture, handwriting recognition, and Internet connectivity to enhance personal productivity, learning, communication, and self expression
• Development tools: easy-to-use tools for consumers and developers to create, publish, and share or sell new applications and content online.
WHAT IS NEW IN THIS VERSION?
Livescribe made improvements to Livescribe Desktop to add new features, correct known issues, and improve usability.
GETTING STARTED WITH LIVESCRIBE DESKTOP
To begin using Livescribe Desktop, follow these steps:
1. Install Livescribe Desktop. 2. Run Livescribe Desktop. 3. Register your Pulse smartpen. 4. Learn about copying content from your Pulse smartpen. 5. Get to know Livescribe Desktop.
INSTALLING LIVESCRIBE DESKTOP
If you have not already done so, install Livescribe™ Desktop on your computer.
Livescribe Desktop requires a PC running either Windows® XP SP2 or SP3 or Windows Vista® (32-bit or 64-bit). For Windows XP, you will need to install Livescribe Desktop with administrator rights.
Your computer will also need:
• a 600 MHz CPU or higher
• 300 MB of free disk space
• available USB port
• Internet connection

Livescribe™ Desktop for Windows User Guide
Getting Started with Livescribe Desktop 3
To install Livescribe Desktop:
1. Verify that your computer meets the software and hardware requirements for Livescribe Desktop.
2. Download the Livescribe Desktop installer from http://www.livescribe.com/install.
3. Open the installer and follow the on-screen instructions to complete the installation. During the installation, the installer will ask you to connect your USB mobile charging cradle to your computer and dock your Pulse™ smartpen. In addition to installing Livescribe Desktop software, the installer will install other required software and drivers.
NOTE: During installation, the Livescribe Desktop installer will link your Pulse smartpen with one computer only. Be sure to download and install Livescribe Desktop on the computer where you want your notes and recorded audio to reside.
Make sure to use the USB Mobile charging cradle that came in the box with your
product. Smartpen models that have a power symbol printed on the power button are only compatible with USB mobile charging cradles that have SKU: AAA-00012 printed underneath. These cradles are compatible with all Pulse smartpens.
RUNNING LIVESCRIBE DESKTOP
To run Livescribe Desktop for the first time:
1. On your desktop, double-click the Livescribe Desktop shortcut or go to Start > Programs > Livescribe > Livescribe Desktop.
2. Connect your USB mobile charging cradle to your computer and dock your Pulse™ smartpen to the cradle.
NOTE: Docking your Pulse smartpen will transfer your notes and audio to Livescribe Desktop automatically. Once you dock your smartpen, do not remove it from the cradle until the transfer is complete. Livescribe Desktop will display a message confirming the transfer was successful.
3. Livescribe Desktop will ask you to name your Pulse smartpen. 4. If you have not registered your Pulse smartpen with Livescribe, Livescribe™
Desktop will prompt you to do so. Once you register, you will be able to upload notes, download applications, and create a personal account on Livescribe Online. See Registering Your Pulse Smartpen.
5. Click the Pulse Smartpen Selector in the Main tool bar to choose which Pulse smartpen to view in Livescribe Desktop. If you have one smartpen installed, Livescribe Desktop will select it by default.
6. When you dock your Pulse smartpen, Livescribe Desktop will automatically check for software updates for the smartpen you have selected. You also must have a Livescribe user account to receive updates. If updates are available, Livescribe Desktop will prompt you to install these now or later.
Livescribe™ Desktop for Windows User Guide
Getting Started with Livescribe Desktop 4
NOTE: Each installation of Livescribe Desktop can link to more than one smartpen. For example, if you have two or more smartpens, you can link them all to one computer running Livescribe Desktop. If you have another smartpen to install, follow the steps above for each smartpen.
Date and Decimal Formats
Beginning in version 1.4, Livescribe Desktop supports international date and decimal formats. If you are upgrading from a prior version, Livescribe Desktop will check the date and decimal formats you use on your computer. If needed, Livescribe Desktop will convert your data to use its internal formats. Livescribe Desktop will perform this operation one time only and will notify you when the conversion begins and ends. This conversion does not outwardly affect the date and decimal formats you use. You can continue to use the formats that you prefer.
Auto-Launching Livescribe Desktop
If Livescribe™ Desktop is already running, docking your Pulse™ smartpen will begin transferring your smartpen content to your computer. If not running, Livescribe Desktop will automatically launch and begin transferring content when you dock your smartpen.
To disable auto-launch:
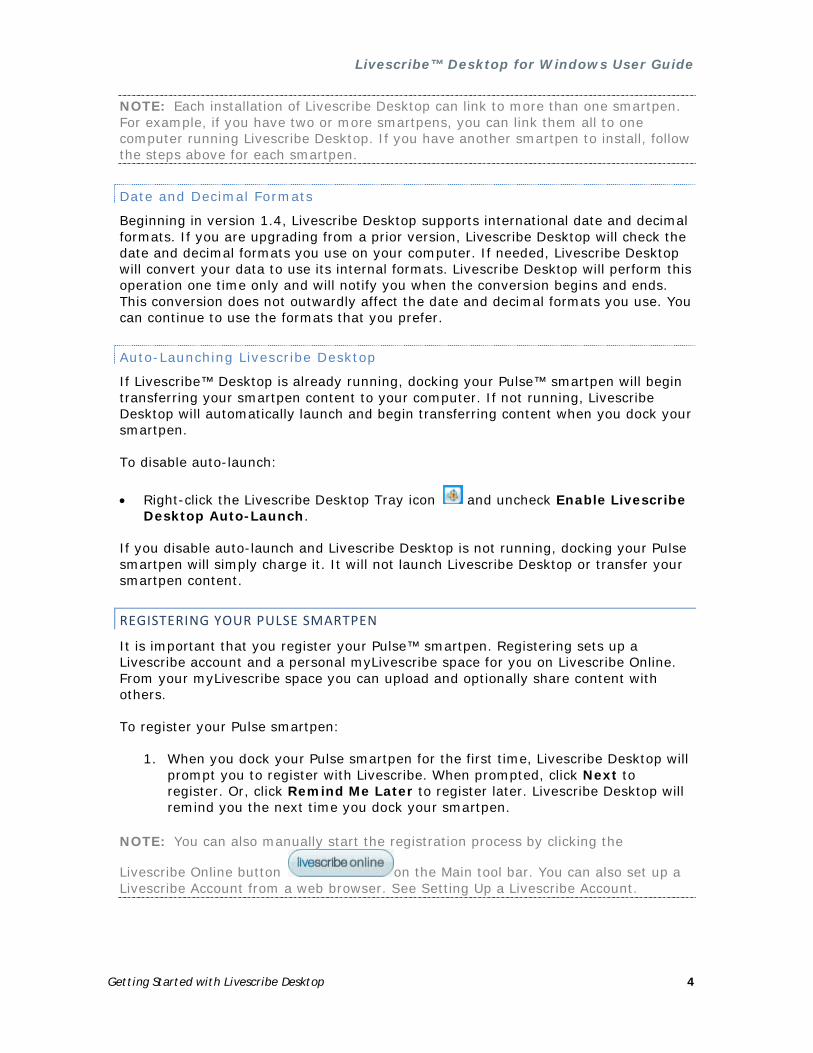
• Right-click the Livescribe Desktop Tray icon and uncheck Enable Livescribe Desktop Auto-Launch.
If you disable auto-launch and Livescribe Desktop is not running, docking your Pulse smartpen will simply charge it. It will not launch Livescribe Desktop or transfer your smartpen content.
REGISTERING YOUR PULSE SMARTPEN
It is important that you register your Pulse™ smartpen. Registering sets up a Livescribe account and a personal myLivescribe space for you on Livescribe Online. From your myLivescribe space you can upload and optionally share content with others.
To register your Pulse smartpen:
1. When you dock your Pulse smartpen for the first time, Livescribe Desktop will prompt you to register with Livescribe. When prompted, click Next to register. Or, click Remind Me Later to register later. Livescribe Desktop will remind you the next time you dock your smartpen.
NOTE: You can also manually start the registration process by clicking the
Livescribe Online button on the Main tool bar. You can also set up a Livescribe Account from a web browser. See Setting Up a Livescribe Account.

Livescribe™ Desktop for Windows User Guide
Getting Started with Livescribe Desktop 5
2. On the registration dialog, choose Create a new account and click Next. If you already have an account with Livescribe, choose Use my existing account and enter your email address and password. If you forgot your password, click the Forgot Password button, and Livescribe will email your password to you. When creating your user name and password, follow these guidelines:
• Your user name is your email address. It cannot be greater than 128 characters and is not case sensitive. For example, [email protected] and [email protected] are the same.
• Your password must be at least four characters long and no longer than 64 characters. Your password is case sensitive, and cannot start with a space or contain characters that are not printable. Your password and user name cannot be the same.
3. On the account information dialog, fill in the required fields and click Continue to complete the registration process. When the registration process is complete, Livescribe Desktop will open your personal myLivescribe space on www.livescribe.com.
COPYING CONTENT FROM YOUR PULSE SMARTPEN
When you dock your Pulse™ smartpen to your computer, by default, Livescribe™ Desktop automatically launches and begins transferring content from your smartpen to your computer. When transferring content to Livescribe Desktop, the original content remains on your smartpen. In this sense, transferring content actually means copying the content from your smartpen to Livescribe Desktop.
Important: Once you have docked your Pulse smartpen, do not remove it from the cradle until the content transfer is complete. Livescribe Desktop will display a message confirming the transfer was successful and it is safe to undock your smartpen. Also, make sure to use the USB Mobile charging cradle that came in the box with your product. Smartpen models that have a power symbol printed on the power button are only compatible with USB mobile charging cradles that have SKU: AAA-00012 printed underneath. These cradles are compatible with all Pulse smartpens.
If you are connected to the internet, Livescribe™ Desktop will also automatically check the Livescribe web site to see if your version of Livescribe Desktop is current and if the software and firmware on your Pulse™ smartpen are up to date. If your system needs updates, Livescribe Desktop will ask if you want to update now or be reminded later. See Installing Updates.

Livescribe™ Desktop for Windows User Guide
Getting Started with Livescribe Desktop 6
Copying Pulse Smartpen Content to another Computer
You can link your Pulse smartpen to only one instance of Livescribe Desktop at a time. This means that the first time you install Livescribe Desktop and dock your smartpen, Livescribe Desktop will associate (or link) your smartpen to that computer.
To copy content from your Pulse smartpen to another computer:
1. Dock your smartpen to the other computer. Livescribe Desktop presents a dialog asking if you want to copy your Pulse smartpen contents to this computer.
2. To copy your smartpen contents to this computer, click the Copy Data button. Livescribe Desktop will ask you to name your smartpen (the first time only) and will automatically copy your smartpen content to Livescribe Desktop.
NOTE: To charge your smartpen through the computer's USB port without copying your data, click the Charge Only button.
Important: If you transfer Pulse smartpen content to multiple computers, be sure to do it consistently. Dock your smartpen and transfer your data to each computer on a regular basis. Also, every time you delete data from Livescribe Desktop or archive a notebook, be sure to do the same operations on your other computers.
QUITTING LIVESCRIBE DESKTOP
Quitting Livescribe™ Desktop ends the connection between your computer and your Pulse™ smartpen. It also disconnects from Livescribe Online.
To quit Livescribe Desktop:
• Click the close button at the top right-hand corner of the Livescribe Desktop window, or
• Choose File > Exit.
UNINSTALLING LIVESCRIBE DESKTOP
If you need to uninstall Livescribe Desktop from your computer, follow the steps below:
To uninstall Livescribe Desktop:
1. Choose Start > Settings > Control Panel. In the Control Panel window, locate and double-click on Add or Remove Programs.
2. The Livescribe Desktop InstallShield Wizard will ask you to confirm the removal of the application. Click Yes to proceed.
3. Follow the on-screen instructions to complete the uninstall process.

Livescribe™ Desktop for Windows User Guide
Getting to Know Livescribe Desktop 7
GETTING TO KNOW LIVESCRIBE DESKTOP
To use Livescribe™ Desktop, you should become familiar with its user interface (UI). Key components of the UI are:
• Views
• Page Viewer Windows
• Menus and Tool Bars
VIEWS
Livescribe Desktop provides four primary views for viewing and managing your Pulse™ smartpen and its content:
• Page Viewer
• Sessions View
• Livescribe Online
• Smartpen Manager
As you work with your Livescribe Desktop, you will use all of these views at various times.
PAGE VIEWER
Page Viewer is the default view when you run Livescribe Desktop. You will use this view to look at pages in your notebooks. You can also play back audio linked to your pages.
In Page Viewer, you can upload pages to your personal space on livescribe.com. In this view, you can view your notes either as single pages (Single Page mode) or as thumbnails of multiple pages (Thumbnail mode). In Thumbnail mode, Livescribe Desktop shows only pages with content as thumbnails. It displays empty contiguous pages as overlapping stacks of single blank pages. For more information, see Viewing Pages.

Livescribe™ Desktop for Windows User Guide
Getting to Know Livescribe Desktop 8
SESSIONS VIEW
In Sessions View, you can view a list of your Paper Replay™ sessions. In this view, you can also play back recorded audio from your sessions, and upload sessions to your livescribe.com personal space. For more information, see Working with Sessions.

Livescribe™ Desktop for Windows User Guide
Getting to Know Livescribe Desktop 9
LIVESCRIBE ONLINE
Livescribe™ Online is your connection to the web. Use this view to manage your personal Livescribe space, share content with others, and access the Livescribe Online Store. For more information, see Livescribe Online.
SMARTPEN MANAGER
Smartpen Manager is for viewing and managing applications and other software on your Pulse™ smartpen. Use this view to update and install software on your smartpen. You can also view the memory status of your smartpen. For more information, see Managing Your Pulse Smartpen.

Livescribe™ Desktop for Windows User Guide
Getting to Know Livescribe Desktop 10
PAGE VIEWER WINDOWS
In Page Viewer, Livescribe™ Desktop provides two primary windows for viewing and navigating content:
• Content Window
• Navigation Window
CONTENT WINDOW
The Content window is the central area where you view and interact with your notes. For example, this window is where you view Pulse™ smartpen content, such as notes and Paper Replay™ sessions. You can also play back Paper Replay sessions by clicking on your notes in this window.

Livescribe™ Desktop for Windows User Guide
Getting to Know Livescribe Desktop 11
NAVIGATION WINDOW
In Page Viewer, Livescribe™ Desktop provides a Navigation window on the left side of the Content window. The Navigation window lists items that you can navigate to or view in more detail in the Content window. For example, clicking one of the notebooks in the Navigation window opens the notebook and displays all of its pages as thumbnails.
Using the Navigation window, you can view your library of notebooks, view pages that contain search results, and view active Paper Replay™ sessions and optionally upload them to your personal space on livescribe.com. The Navigation window uses tabs to organize its content:
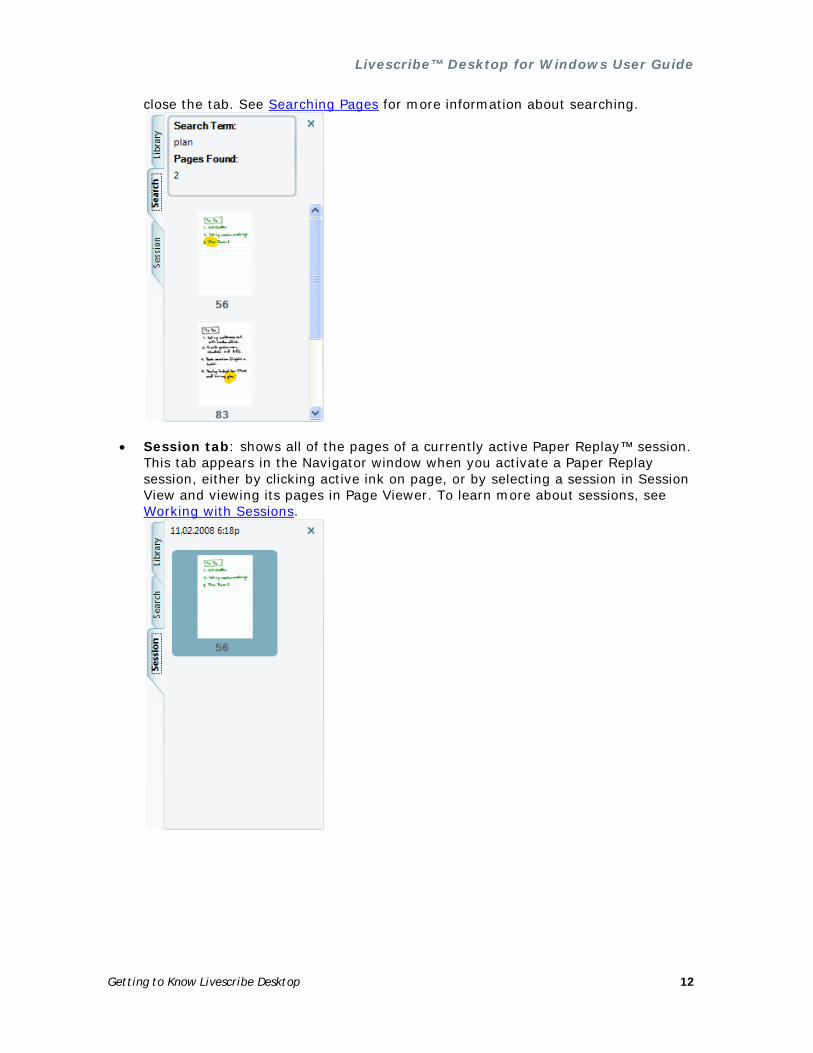
• Library tab: shows your entire library of notebooks, journals, and other paper products you have used with your Pulse™ smartpen. Use the Library tab to select which notebook you want to view in the Content window.
• Search tab: shows the pages found using the Search feature. This tab shows the pages found with the search text highlighted in yellow. This tab appears in the Navigation window the first time you initiate a search. The tab's content refreshes during a search and holds one set of search results at a time. The results remain within the Search tab until you either initiate another search or
Livescribe™ Desktop for Windows User Guide
Getting to Know Livescribe Desktop 12
close the tab. See Searching Pages for more information about searching.
• Session tab: shows all of the pages of a currently active Paper Replay™ session. This tab appears in the Navigator window when you activate a Paper Replay session, either by clicking active ink on page, or by selecting a session in Session View and viewing its pages in Page Viewer. To learn more about sessions, see Working with Sessions.
Livescribe™ Desktop for Windows User Guide
Getting to Know Livescribe Desktop 13
MENUS AND TOOL BARS
The Livescribe™ Desktop UI has the following menus and tool bars:
• Main Menu
• Main Tool Bar
• Page Control Tool Bar
• Audio Control Tool Bar
• Memory Manager Tool Bar
MAIN MENU
The Main Menu provides different menu items based on the view you choose. You can use these menus to access features of Livescribe Desktop. Depending on the view, the Main Menu includes File, Edit, View, Navigation, Tools, and Help menus.
MAIN TOOL BAR
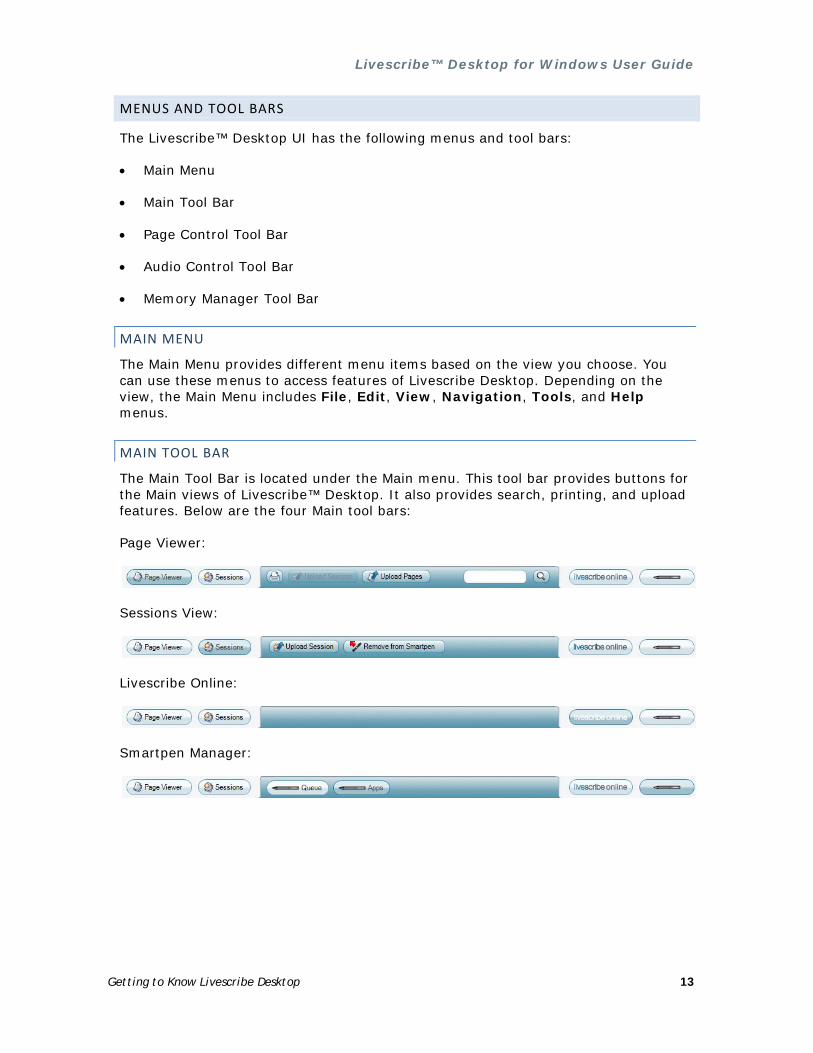
The Main Tool Bar is located under the Main menu. This tool bar provides buttons for the Main views of Livescribe™ Desktop. It also provides search, printing, and upload features. Below are the four Main tool bars:
Page Viewer:
Sessions View:
Livescribe Online:
Smartpen Manager:

Livescribe™ Desktop for Windows User Guide
Paper Replay in Livescribe Desktop 14
PAGE CONTROL TOOL BAR
The Page Control Tool Bar is for paging through notebooks, zooming pages, and toggling between single page and thumbnail views. For more information, see Using the Page Control Tool Bar.
AUDIO CONTROL TOOL BAR
The Audio Control Tool Bar is located at the bottom of the Livescribe Desktop screen. This tool bar is for controlling playback of recorded audio. For more information, see Playing Audio.
MEMORY MANAGER TOOL BAR
The Memory Manager Tool Bar in Smartpen Manager displays the memory state of your Pulse™ smartpen. See Managing Memory for more information.
PAPER REPLAY IN LIVESCRIBE DESKTOP
Paper Replay™ is a Pulse™ smartpen application that allows you to write notes in your notebook and record audio at the same time. As you write, your smartpen indexes (or links) your notes to the recorded audio. The information you capture during Paper Replay is called a session.
Typically, a session consists of the recorded audio and associated notes. However, you can also create paperless sessions, which consist of the recorded audio only. You can also play back a session on your Pulse smartpen and write additional notes in your notebook. Paper Replay associates these additional notes with the session’s original audio. See the Pulse Smartpen User Guide for more information about using Paper Replay.
You can view and play back Paper Replay sessions in Livescribe Desktop. When you view a Paper Replay session, you can click your notes to begin playback of the audio recorded as you wrote the notes. This is similar to the way you can tap your actual notes in your notebook to begin audio playback.
Livescribe™ Desktop for Windows User Guide
Paper Replay in Livescribe Desktop 15
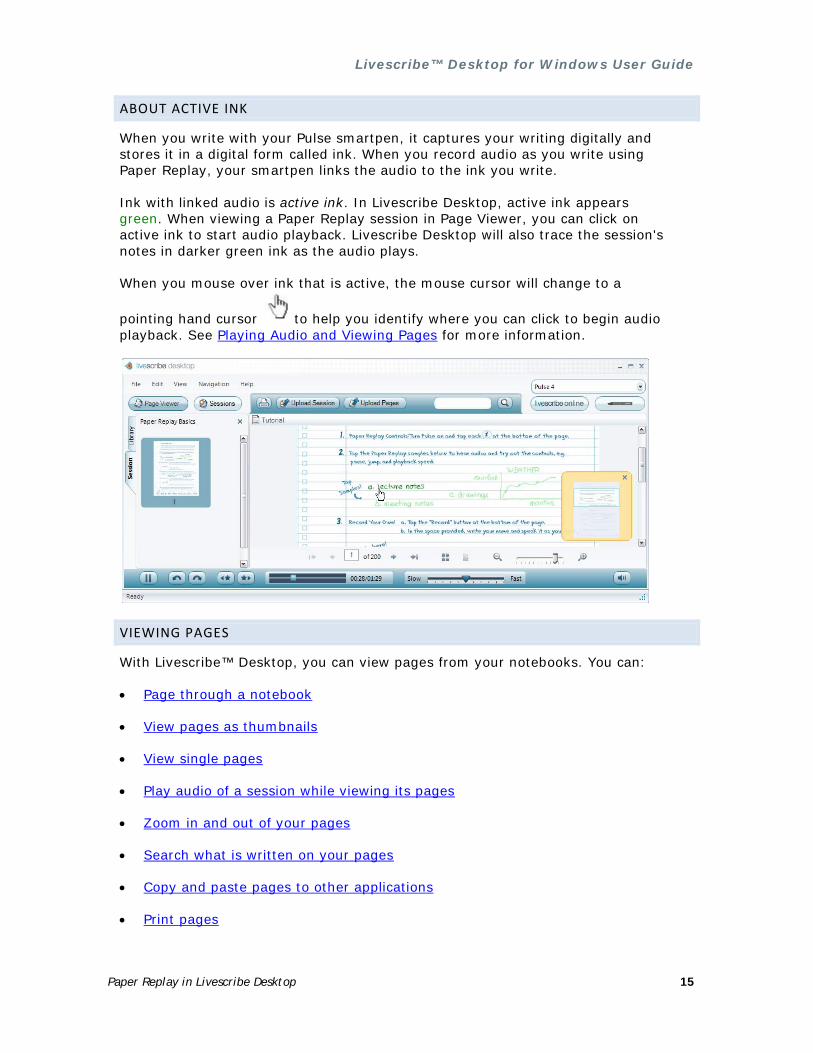
ABOUT ACTIVE INK
When you write with your Pulse smartpen, it captures your writing digitally and stores it in a digital form called ink. When you record audio as you write using Paper Replay, your smartpen links the audio to the ink you write.
Ink with linked audio is active ink. In Livescribe Desktop, active ink appears green. When viewing a Paper Replay session in Page Viewer, you can click on active ink to start audio playback. Livescribe Desktop will also trace the session's notes in darker green ink as the audio plays.
When you mouse over ink that is active, the mouse cursor will change to a
pointing hand cursor to help you identify where you can click to begin audio playback. See Playing Audio and Viewing Pages for more information.
VIEWING PAGES
With Livescribe™ Desktop, you can view pages from your notebooks. You can:
• Page through a notebook
• View pages as thumbnails
• View single pages
• Play audio of a session while viewing its pages
• Zoom in and out of your pages
• Search what is written on your pages
• Copy and paste pages to other applications
• Print pages
Livescribe™ Desktop for Windows User Guide
Paper Replay in Livescribe Desktop 16
• Use the page control tool bar
PAGING THROUGH A NOTEBOOK
In Livescribe™ Desktop, you can page through your notebooks and view either single pages or thumbnails. Paging only displays pages that contain content and skips empty pages.
To page through a notebook:
• Click the Page Viewer button in the Main tool bar to go to Page Viewer. Then, use one of the following methods:
• Type a page number into the page field and press the Enter key to go to a specific page. Blank pages are not valid.
• Using the Page Control tool bar at the bottom of the Content window, click the next page button or previous page button. Or, choose View > Next Page or View > Previous Page from the Main tool bar.
• Using the Page Control tool bar bottom of the Content window, click the first page button or last page button. Or, choose View > First Page or View > Last Page from the Main tool bar.
For more information about the Page Control tool bar, see Using the Page Control Tool Bar.
VIEWING THUMBNAILS
By default, notebook pages will display as thumbnails when viewed in Page Viewer. Livescribe™ Desktop displays as thumbnails only pages with content. Livescribe Desktop displays empty contiguous pages as overlapping stacks of single blank pages.
To view pages as thumbnails:
1. Click the Page Viewer button in the Main tool bar to go to Page Viewer.
2. Click the Library tab of the Navigation window and click the notebook you want to view.
3. Click the Thumbnails button in the Page Control tool bar, or choose View > Thumbnails from the Main tool bar.
NOTE: Click a thumbnail to select it. Use Control-click to select multiple, non-sequential thumbnails. Use Shift-click to select a sequential set of thumbnails.
Livescribe™ Desktop for Windows User Guide
Paper Replay in Livescribe Desktop 17
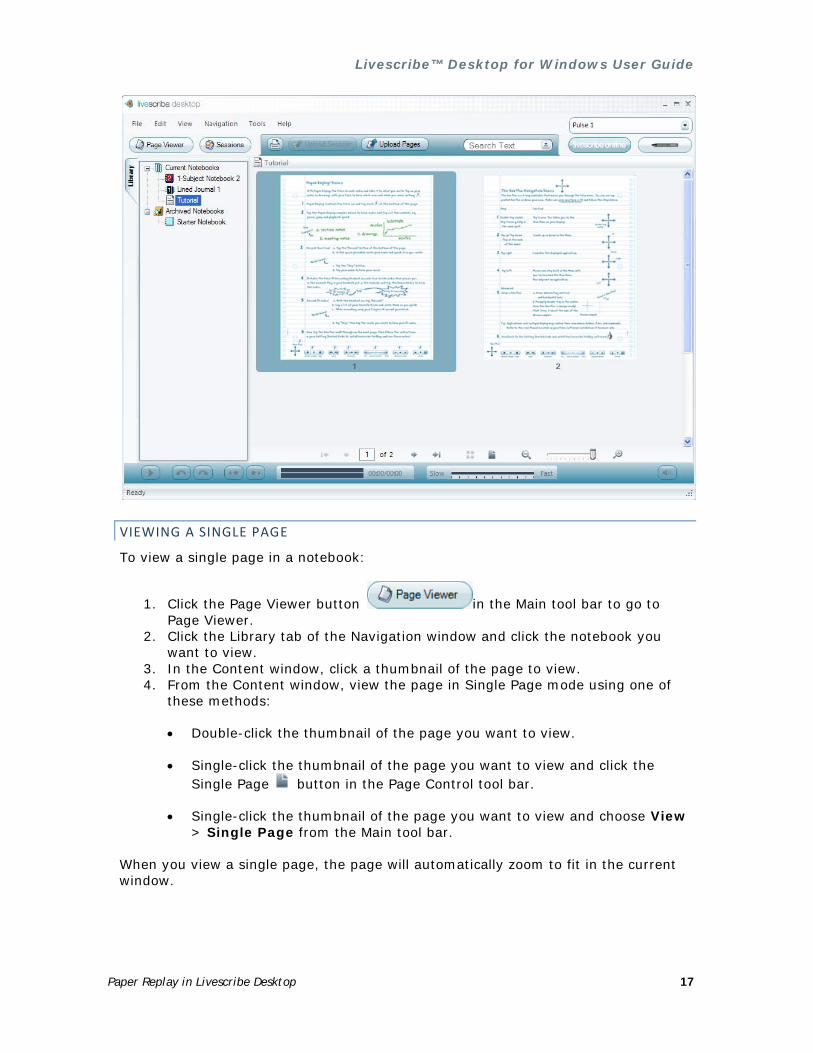
VIEWING A SINGLE PAGE
To view a single page in a notebook:
1. Click the Page Viewer button in the Main tool bar to go to Page Viewer.
2. Click the Library tab of the Navigation window and click the notebook you want to view.
3. In the Content window, click a thumbnail of the page to view. 4. From the Content window, view the page in Single Page mode using one of
these methods:
• Double-click the thumbnail of the page you want to view.
• Single-click the thumbnail of the page you want to view and click the Single Page button in the Page Control tool bar.
• Single-click the thumbnail of the page you want to view and choose View > Single Page from the Main tool bar.
When you view a single page, the page will automatically zoom to fit in the current window.
Livescribe™ Desktop for Windows User Guide
Paper Replay in Livescribe Desktop 18
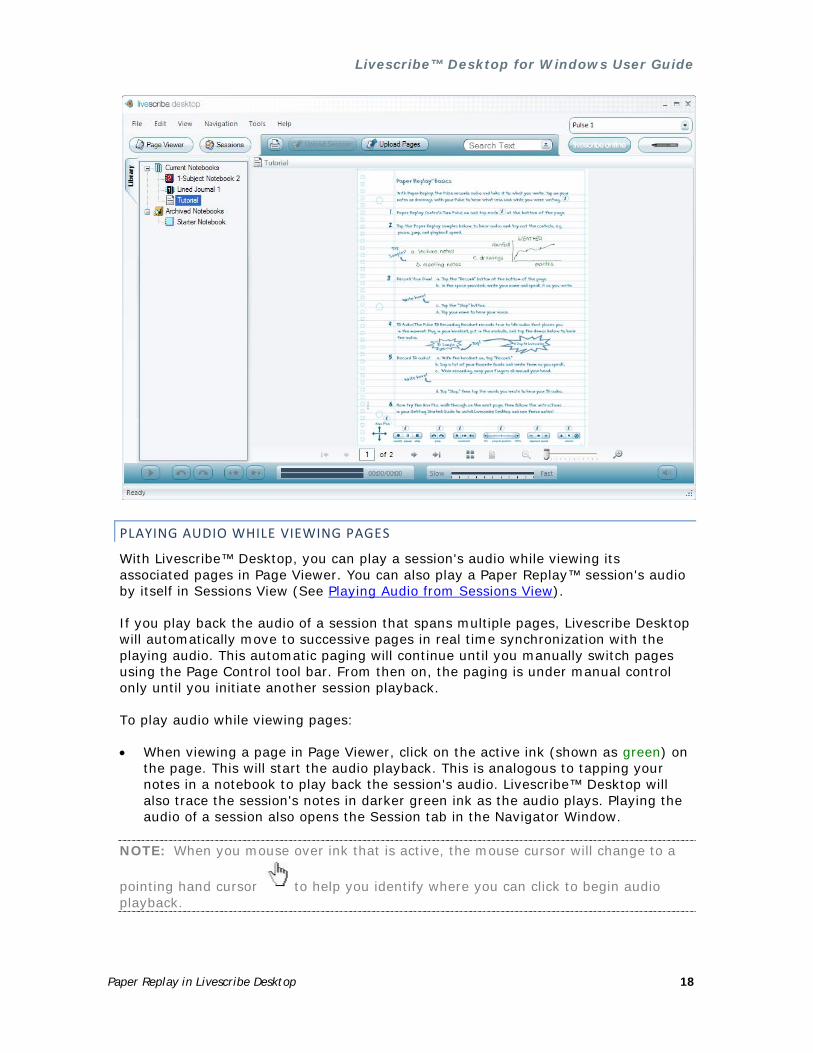
PLAYING AUDIO WHILE VIEWING PAGES
With Livescribe™ Desktop, you can play a session's audio while viewing its associated pages in Page Viewer. You can also play a Paper Replay™ session's audio by itself in Sessions View (See Playing Audio from Sessions View).
If you play back the audio of a session that spans multiple pages, Livescribe Desktop will automatically move to successive pages in real time synchronization with the playing audio. This automatic paging will continue until you manually switch pages using the Page Control tool bar. From then on, the paging is under manual control only until you initiate another session playback.
To play audio while viewing pages:
• When viewing a page in Page Viewer, click on the active ink (shown as green) on the page. This will start the audio playback. This is analogous to tapping your notes in a notebook to play back the session's audio. Livescribe™ Desktop will also trace the session's notes in darker green ink as the audio plays. Playing the audio of a session also opens the Session tab in the Navigator Window.
NOTE: When you mouse over ink that is active, the mouse cursor will change to a
pointing hand cursor to help you identify where you can click to begin audio playback.
Livescribe™ Desktop for Windows User Guide
Paper Replay in Livescribe Desktop 19
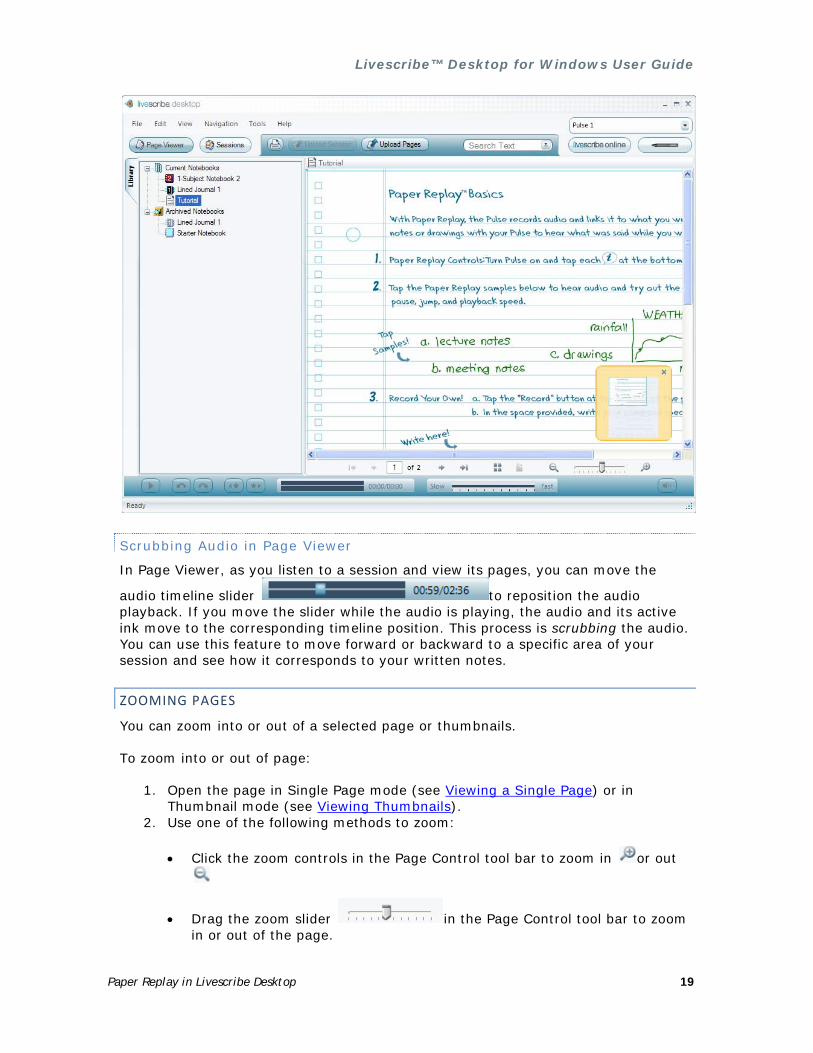
Scrubbing Audio in Page Viewer
In Page Viewer, as you listen to a session and view its pages, you can move the
audio timeline slider to reposition the audio playback. If you move the slider while the audio is playing, the audio and its active ink move to the corresponding timeline position. This process is scrubbing the audio. You can use this feature to move forward or backward to a specific area of your session and see how it corresponds to your written notes.
ZOOMING PAGES
You can zoom into or out of a selected page or thumbnails.
To zoom into or out of page:
1. Open the page in Single Page mode (see Viewing a Single Page) or in Thumbnail mode (see Viewing Thumbnails).
2. Use one of the following methods to zoom:
• Click the zoom controls in the Page Control tool bar to zoom in or out
• Drag the zoom slider in the Page Control tool bar to zoom in or out of the page.

Livescribe™ Desktop for Windows User Guide
Paper Replay in Livescribe Desktop 20
• Choose View > Zoom In or Zoom Out from the Main tool bar.
Repositioning a Zoomed Page
When you zoom a page to a size that is larger than the Content window, Livescribe™ Desktop will crop some of the page. You may want to reposition the page to view its content.
To reposition a zoomed page:
• Use the vertical and horizontal scroll bars in the window to move the page to your preferred location in the window.
• Instead of using the scroll bars, you can reposition a zoomed page by hand using
the open hand cursor . This cursor replaces the standard arrow cursor when the page is zoomed to be larger than the current Content window. The open hand cursor appears when you move over empty areas on the page. To move the page, click-and-drag the page to the desired position.
NOTE: When you move the cursor over active ink, the cursor changes to a pointing
hand to identify the active ink.
Livescribe™ Desktop for Windows User Guide
Paper Replay in Livescribe Desktop 21
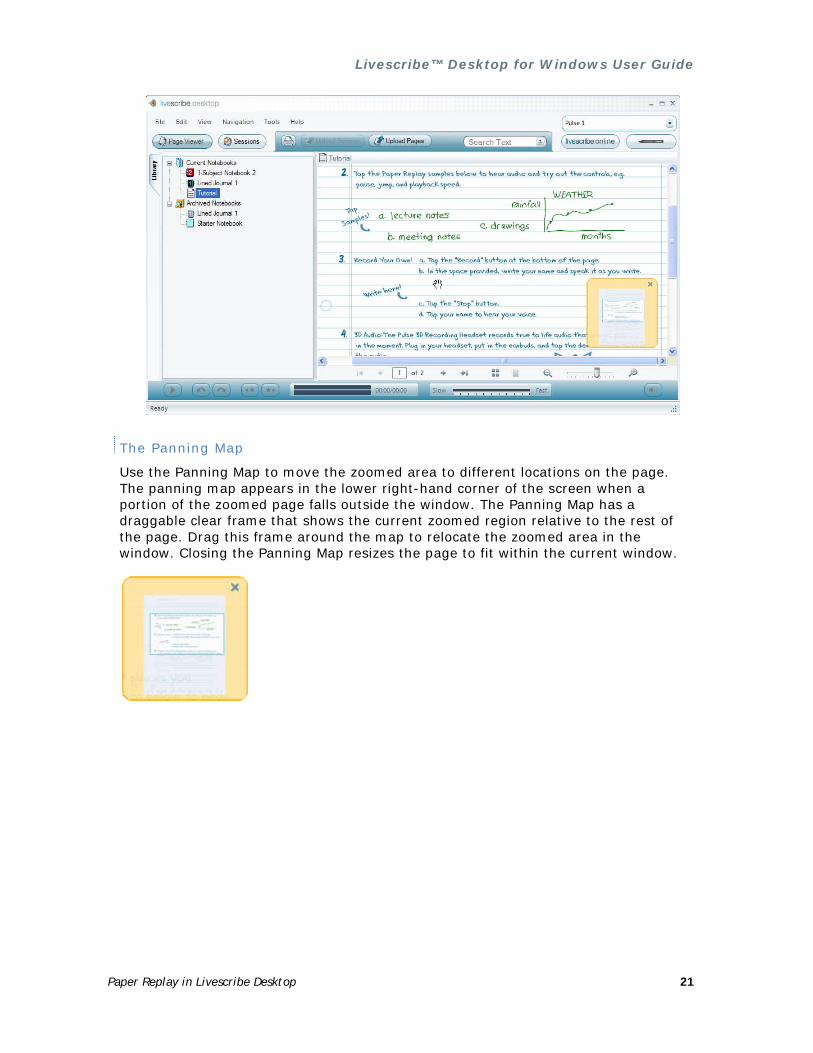
The Panning Map
Use the Panning Map to move the zoomed area to different locations on the page. The panning map appears in the lower right-hand corner of the screen when a portion of the zoomed page falls outside the window. The Panning Map has a draggable clear frame that shows the current zoomed region relative to the rest of the page. Drag this frame around the map to relocate the zoomed area in the window. Closing the Panning Map resizes the page to fit within the current window.

Livescribe™ Desktop for Windows User Guide
Paper Replay in Livescribe Desktop 22
SEARCHING PAGES
In Page Viewer, you can search your written pages. Search can work on notes written in cursive, print, or a combination. Obviously, search accuracy depends on the neatness and consistency of your notes. You can search a currently-selected notebook or journal.
To search, use one of these methods:
1. Type search text into the search text box in the Main tool bar. By default, this search method finds whole words in the currently-selected notebook or journal. For example, entering "top" would find instances of "top" only. Search would not fine other words that contain the letters "top", like "topographic", and "mountaintop". Search is not case sensitive, so if you search for "Top", it will return the same results as "top" and "TOP".
2. Press the Enter key to initiate the search.
Or,
1. Click the Search button in the search text box. This displays a search dialog:
2. Type the search text into the Search dialog. By default, this search method
finds whole words in the current notebook or journal. If desired, you can choose to search for partial words. To search for partial words, uncheck the Match Whole Word checkbox. For partial word searches, entering "top" would find "top" and other words that contain the search string like "topographic", and "mountaintop". Because Search is not case sensitive, "Top", "top", and "TOP" return the same results.
3. Click OK to initiate the search.
Viewing Search Results
When you perform a search in the current notebook or journal, Livescribe™ Desktop searches through all its pages.
When Search finds one or more hits (text matches), it displays the results in the Search tab in the Navigation window. Livescribe™ Desktop shows thumbnails of the pages where it found the search text. The results remain within the Search tab until you either initiate another search or close the tab. The Search tab holds one set of search results at a time.
Livescribe™ Desktop for Windows User Guide
Paper Replay in Livescribe Desktop 23
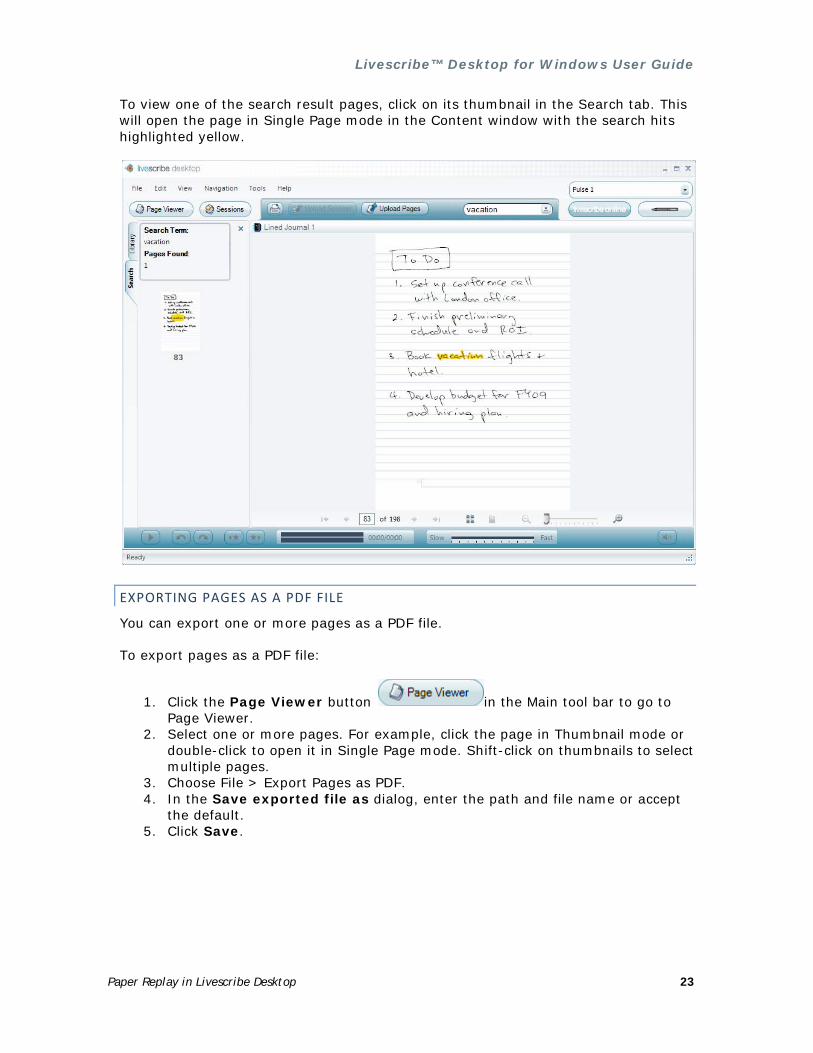
To view one of the search result pages, click on its thumbnail in the Search tab. This will open the page in Single Page mode in the Content window with the search hits highlighted yellow.
EXPORTING PAGES AS A PDF FILE
You can export one or more pages as a PDF file.
To export pages as a PDF file:
1. Click the Page Viewer button in the Main tool bar to go to Page Viewer.
2. Select one or more pages. For example, click the page in Thumbnail mode or double-click to open it in Single Page mode. Shift-click on thumbnails to select multiple pages.
3. Choose File > Export Pages as PDF. 4. In the Save exported file as dialog, enter the path and file name or accept
the default. 5. Click Save.

Livescribe™ Desktop for Windows User Guide
Paper Replay in Livescribe Desktop 24
EXPORTING A PAGE AS AN IMAGE
You can export a page as an image and save it in several standard image formats, including bmp, gif, png, and so on. Currently, you can export one page at a time.
To export a page as an image:
1. Click the Page Viewer button in the Main tool bar to go to Page Viewer.
2. Select a page. For example, click the page in Thumbnail mode or double-click to open it in Single Page mode.
3. Choose File > Export Page as Image > With Background or Without Background. If you choose to include the background, the image will include anything shown on the page of the actual notebook. For example, an image from a college-ruled notebook will contain ruled lines.
4. In the Save As dialog, enter the path and file name or accept the default. 5. Choose the format for the image using the Save as type drop-down menu.
You can save the images as .bmp, .gif, .jpg, .png, .emf, .ico, tiff, or .wmf. 6. Click Save.
COPYING AND PASTING PAGES
You can copy your pages to the Clipboard of your operating system (such as Windows® Clipboard) and paste them into other applications like Microsoft Word®. Livescribe Desktop saves the content you copy as an image to the Clipboard.
To copy and paste a page:
1. Click the Page Viewer button in the Main tool bar to go to Page Viewer.
2. Choose a page. For example, click the page in Thumbnail mode or double-click to open it in Single Page mode.
3. Choose Edit > Copy > With Background or Without Background. If you choose to include the background, the copied image will include anything shown on the page of the actual notebook. For example, an image from a college-ruled notebook will contain ruled lines.
4. Open a document in any application that handles images (for example, Microsoft Word®, most email programs, Microsoft® Paint, and so on)
5. Use the application's Paste feature to paste the copied image into the document.
PRINTING PAGES
In Page Viewer, you can print pages from your notebooks. Although active ink appears as green in the Content window, Livescribe™ Desktop prints it in black, just like non-active ink. Your printed page will not be interactive with your Pulse smartpen.
To print a single page:

Livescribe™ Desktop for Windows User Guide
Paper Replay in Livescribe Desktop 25
1. In Page Viewer, view the page as a single page (see Viewing a Single Page), or choose the thumbnail of the page (see Viewing Thumbnails).
2. In the Main menu, choose File > Print, or click the print icon . On the
print dialog, choose a printer and click the Print button. By default, the page will print showing the page background. To print the page without the background, uncheck the Print Page Background checkbox. If you choose to include the background, the printed pages will include anything shown on the pages of the actual notebook. For example, an image from a college-ruled notebook will contain ruled lines.
To print multiple pages:
1. In Page Viewer, view pages as thumbnails (see Viewing Thumbnails) 2. Use Control-click to select multiple, non-sequential thumbnails. Use Shift-click
to select a sequential set of thumbnails.
3. In the Main menu, choose File > Print, or click the print icon . On the
print dialog, choose a printer and click the Print button. By default, the page will print showing the page background. To print the page without the background, uncheck the Print Page Background checkbox. If you choose to include the background, the printed pages will include anything shown on the pages of the actual notebook. For example, the college-ruled notebook the printed pages will contain ruled lines.
CONVERTING HANDWRITING TO TEXT
Starting in Livescribe Desktop Version 1.4, you can use MyScript® for Livescribe to convert your handwritten notes to digital text. MyScript for Livescribe is a desktop application from Vision Objects® that is sold separately (visit http://www.visionobjects.com). Once you have purchased and installed MyScript for Livescribe, you can export your notes using Livescribe Desktop by clicking the
MyScript button on the Main toolbar. This button is available only if you have MyScript installed.
To convert a single page:
1. View it as a single page in Page Viewer or select it as a thumbnail.
2. Click the MyScript button . This launches MyScript for Livescribe and converts your page.
To convert multiple pages:
1. Select multiple thumbnails. 2. Click the MyScript button to convert your pages. For more information on how
to set up and configure MyScript® for Livescribe, refer the Help provided with it.
Livescribe™ Desktop for Windows User Guide
Paper Replay in Livescribe Desktop 26
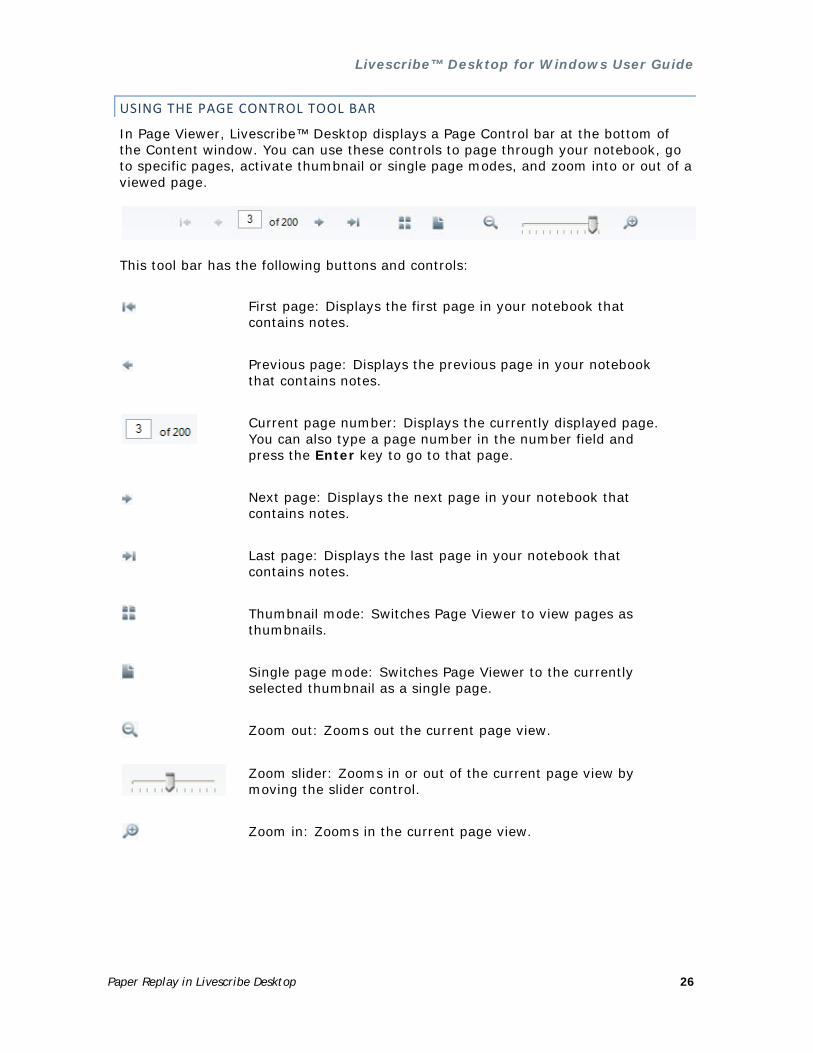
USING THE PAGE CONTROL TOOL BAR
In Page Viewer, Livescribe™ Desktop displays a Page Control bar at the bottom of the Content window. You can use these controls to page through your notebook, go to specific pages, activate thumbnail or single page modes, and zoom into or out of a viewed page.
This tool bar has the following buttons and controls:
First page: Displays the first page in your notebook that contains notes.
Previous page: Displays the previous page in your notebook that contains notes.
Current page number: Displays the currently displayed page. You can also type a page number in the number field and press the Enter key to go to that page.
Next page: Displays the next page in your notebook that contains notes.
Last page: Displays the last page in your notebook that contains notes.
Thumbnail mode: Switches Page Viewer to view pages as thumbnails.
Single page mode: Switches Page Viewer to the currently selected thumbnail as a single page.
Zoom out: Zooms out the current page view.
Zoom slider: Zooms in or out of the current page view by moving the slider control.
Zoom in: Zooms in the current page view.

Livescribe™ Desktop for Windows User Guide
Paper Replay in Livescribe Desktop 27
WORKING WITH SESSIONS
With Livescribe™ Desktop, you can manage and manipulate Paper Replay™ sessions. Specifically, you can:
• View a list of all sessions
• Rename a session
• Delete a session from Livescribe Desktop
• Remove a session from your Pulse smartpen
• View pages of your sessions
• Play audio of your sessions
• Use the audio control tool bar
VIEWING A LIST OF SESSIONS
To view a list of all Paper Replay™ sessions:
• Click the Sessions button , or choose Navigation > Sessions from the Main menu. This opens the Sessions View and brings up a list of all sessions.
Livescribe™ Desktop for Windows User Guide
Paper Replay in Livescribe Desktop 28
Anatomy of a Sessions View List
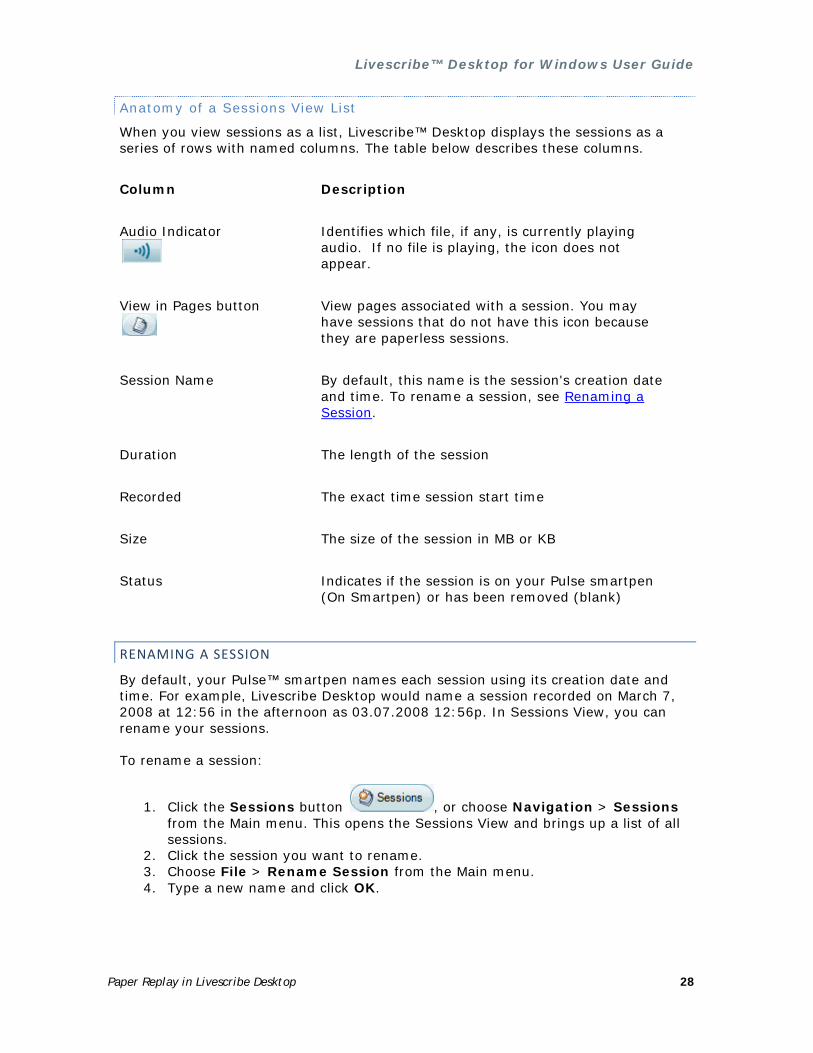
When you view sessions as a list, Livescribe™ Desktop displays the sessions as a series of rows with named columns. The table below describes these columns.
Column Description
Audio Indicator
Identifies which file, if any, is currently playing audio. If no file is playing, the icon does not appear.
View in Pages button
View pages associated with a session. You may have sessions that do not have this icon because they are paperless sessions.
Session Name By default, this name is the session's creation date and time. To rename a session, see Renaming a Session.
Duration The length of the session
Recorded The exact time session start time
Size The size of the session in MB or KB
Status Indicates if the session is on your Pulse smartpen (On Smartpen) or has been removed (blank)
RENAMING A SESSION
By default, your Pulse™ smartpen names each session using its creation date and time. For example, Livescribe Desktop would name a session recorded on March 7, 2008 at 12:56 in the afternoon as 03.07.2008 12:56p. In Sessions View, you can rename your sessions.
To rename a session:
1. Click the Sessions button , or choose Navigation > Sessions from the Main menu. This opens the Sessions View and brings up a list of all sessions.
2. Click the session you want to rename. 3. Choose File > Rename Session from the Main menu. 4. Type a new name and click OK.
Livescribe™ Desktop for Windows User Guide
Paper Replay in Livescribe Desktop 29
DELETING A SESSION FROM LIVESCRIBE DESKTOP
In Sessions View, you can delete a session from Livescribe™ Desktop. You can also remove a session from your Pulse™ smartpen (see Removing a Session from Your Pulse Smartpen).
To delete a session from Livescribe Desktop follow the steps below. Deleting a session from Livescribe Desktop will not affect your Pulse smartpen:
1. Click the Sessions button , or choose Navigation > Sessions from the Main menu. This opens the Sessions View and brings up a list of all sessions.
2. Single-click the session you wish to delete. 3. Choose File> Delete Session from Livescribe Desktop. 4. To confirm the deletion, click Yes, otherwise click No.
REMOVING A SESSION FROM YOUR PULSE SMARTPEN
You can remove a session from your Pulse™ smartpen with Livescribe™ Desktop. You can also delete a session from Livescribe Desktop itself (see Deleting a Session from Livescribe Desktop).
To remove all sessions from your Pulse smartpen for a specific notebook, journal or other paper product, use the Archive feature. See Managing and Archiving Paper Products.
Removing a session from your Pulse smartpen does the following:
• frees up storage space on your smartpen
• removes the audio for the session from your smartpen. Because of this, your smartpen will no longer interact with the notes on the physical paper product for the removed session. That is, when you tap the notes associated with the removed session, they will not play back any audio.
To remove a session from your Pulse smartpen:
1. Update your Pulse smartpen software. To update your software, choose Help > Check for Updates in the Main menu.
2. Click the Sessions button , or choose Navigation > Sessions from the Main menu. This opens the Sessions View and brings up a list of all sessions.
3. Single-click the session to delete. 4. Choose File > Remove Session from Smartpen, or click the Remove from
Smartpen button. 5. To confirm the removal, click Remove from Smartpen, otherwise click
Cancel.
Livescribe™ Desktop for Windows User Guide
Paper Replay in Livescribe Desktop 30
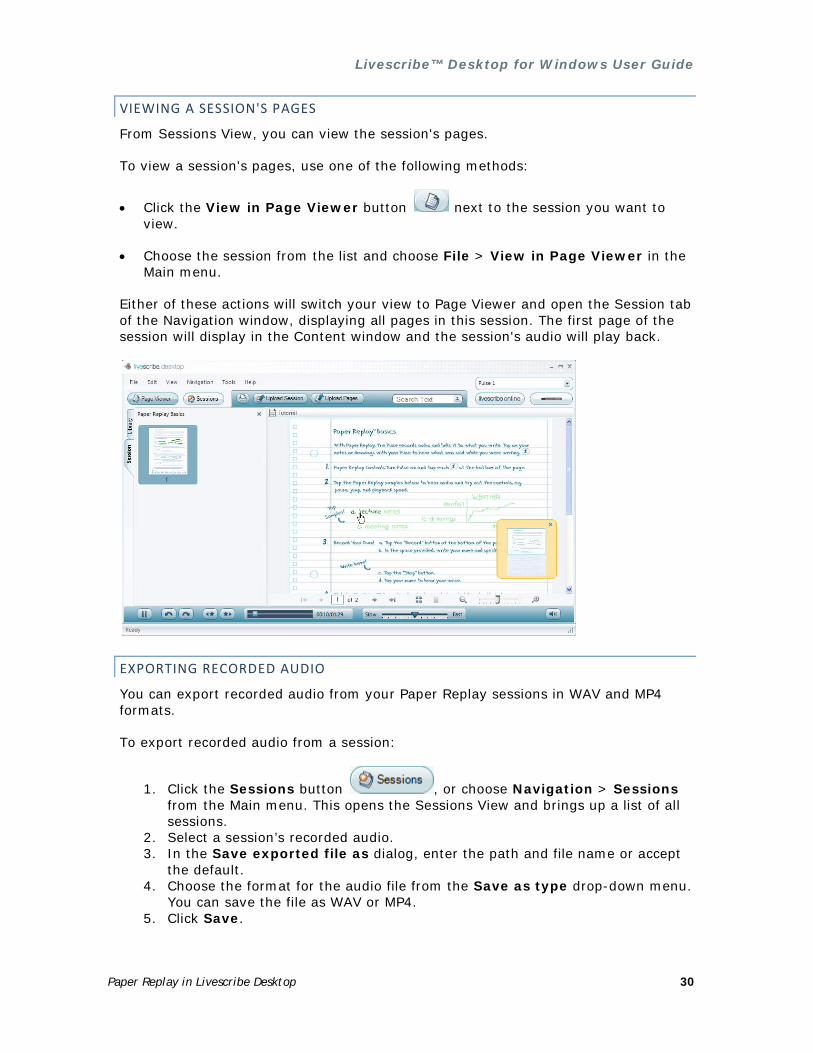
VIEWING A SESSION'S PAGES
From Sessions View, you can view the session's pages.
To view a session's pages, use one of the following methods:
• Click the View in Page Viewer button next to the session you want to view.
• Choose the session from the list and choose File > View in Page Viewer in the Main menu.
Either of these actions will switch your view to Page Viewer and open the Session tab of the Navigation window, displaying all pages in this session. The first page of the session will display in the Content window and the session's audio will play back.
EXPORTING RECORDED AUDIO
You can export recorded audio from your Paper Replay sessions in WAV and MP4 formats.
To export recorded audio from a session:
1. Click the Sessions button , or choose Navigation > Sessions from the Main menu. This opens the Sessions View and brings up a list of all sessions.
2. Select a session’s recorded audio. 3. In the Save exported file as dialog, enter the path and file name or accept
the default. 4. Choose the format for the audio file from the Save as type drop-down menu.
You can save the file as WAV or MP4. 5. Click Save.

Livescribe™ Desktop for Windows User Guide
Paper Replay in Livescribe Desktop 31
6. To listen to your exported file, double click the file or drag it into an audio player application that supports the file type you exported.
PLAYING AUDIO FROM SESSIONS VIEW
With Livescribe™ Desktop, you can play audio while viewing the session's pages in Page Viewer (see Playing Audio while Viewing Pages), or you can play the audio by itself in the Sessions View.
To play audio when viewing a list of sessions in Sessions View:
• Double-click the session in the list. The left-most column will show the audio
playing icon when the session begins to play.
USING THE AUDIO CONTROL TOOL BAR
Livescribe™ Desktop displays an audio control tool bar at the bottom of its screen. You can use these controls to start, pause, stop, and control audio playback. Livescribe Desktop disables these controls unless you select the session.
This tool bar has the following buttons and controls:
Begin playing audio
Pause audio
Jump back (in 10 second increments)
Jump forward (in 10 second increments)
Livescribe™ Desktop for Windows User Guide
Paper Replay in Livescribe Desktop 32
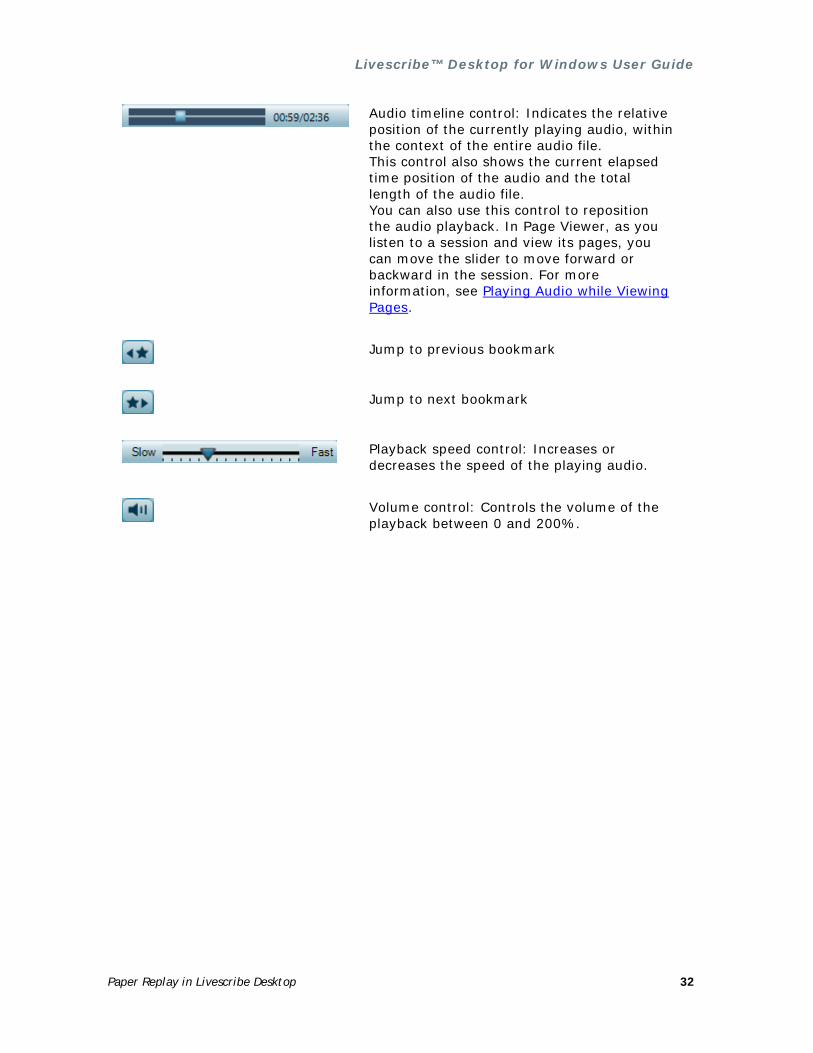
Audio timeline control: Indicates the relative position of the currently playing audio, within the context of the entire audio file. This control also shows the current elapsed time position of the audio and the total length of the audio file. You can also use this control to reposition the audio playback. In Page Viewer, as you listen to a session and view its pages, you can move the slider to move forward or backward in the session. For more information, see Playing Audio while Viewing Pages.
Jump to previous bookmark
Jump to next bookmark
Playback speed control: Increases or decreases the speed of the playing audio.
Volume control: Controls the volume of the playback between 0 and 200%.
Livescribe™ Desktop for Windows User Guide
Using Livescribe Online 33
USING LIVESCRIBE ONLINE
Livescribe™ Online is your connection to your Livescribe account and to content shared by the Livescribe community.
You can connect to Livescribe Online either from a web browser or directly from within Livescribe™ Desktop. From Livescribe Online, you can:
• Upload content to Livescribe Online
• Share content with others
• Manage your myLivescribe account
• View content in the Livescribe Community
• Visit the Livescribe Store

Livescribe™ Desktop for Windows User Guide
Using Livescribe Online 34
CONNECTING TO LIVESCRIBE ONLINE
To connect to Livescribe Online:
• From Livescribe Desktop, click the Livescribe Online button in the Main tool bar. This will connect you to the Livescribe Community page and open your personal space (called myLivescribe) within the Content window of Livescribe Desktop.
• Alternatively, go to www.livescribe.com from your web browser and click on the Community tab to go to Community page. From there, click the Log In button
to go to your myLivescribe space.
NOTE: If you do not already have a Livescribe account, follow the steps in Creating a Livescribe Account to set it up.
UPLOADING CONTENT TO LIVESCRIBE ONLINE
Using Livescribe Desktop, you can upload Pulse smartpen content to Livescribe Online. You can:
• Upload Paper Replay sessions and optionally share them as pencasts.
• Upload pages
PENCASTING
Pencasting is the general term for sharing your Paper Replay™ sessions (notes and associated audio) with others. When you pencast, Livescribe Online converts your Paper Replay session into an Adobe® Flash® movie. You can decide if you want to share the files with everyone, or with only specified recipients. You can also decide to share the content on Facebook™, blogs, or other social networks.
To pencast:
1. Upload a Paper Replay session to Livescribe Online by following the steps in Uploading Paper Replay Sessions.
2. Use one of the techniques described in Sharing Content Using Livescribe Online to share your pencast with others.
Livescribe™ Desktop for Windows User Guide
Using Livescribe Online 35
UPLOADING PAPER REPLAY SESSIONS
In Livescribe™ Desktop, you can upload Paper Replay™ sessions to the web. Sessions you upload can be pages with associated audio, or paperless (audio only).
Uploading a Session in Sessions View
To upload a session in Sessions View:
1. In Sessions View, choose a session.
2. Click the Upload Session button on Main tool bar. 3. Click Yes on the upload dialog to proceed. 4. In the next dialog, enter a name for the session you are uploading and click
OK. . If you share the pages with others, they will see this name. Livescribe™ Desktop will upload the session audio and any linked pages to your personal space. It will not upload empty pages.
5. Click OK to close the success dialog.
Uploading a Session in Page Viewer
To upload a session in Page Viewer:
1. In Page Viewer, click a pages active ink to activate a session. This action will open the Session tab and will start the session playback in the Content window.
2. Click the Upload Session button on Main tool bar. 3. Click Yes on the Share to Web dialog to proceed. 4. In the next dialog, enter a name for the session you are uploading and click
OK. . If you share the pages with others, they will see this name. Livescribe Desktop will upload the session audio and any linked pages to your personal space. It will not upload empty pages.
5. Click OK to close the success dialog.
UPLOADING PAGES
In Livescribe™ Desktop, you can upload your pages (such as notes without audio) to the web. To upload pages:
1. In Page Viewer, choose one or more pages.
2. Click the Upload Pages button on Main tool bar, or choose File > Upload Pages from the Main menu.
3. Click Upload on the upload dialog to proceed. 4. In the next dialog, enter a name for the pages you are uploading and click
OK. Other users you choose to share the pages with will see the name. Livescribe Desktop will upload the pages to your personal space. It will not upload empty pages.
5. Click OK to close the success dialog.

Livescribe™ Desktop for Windows User Guide
Using Livescribe Online 36
SHARING CONTENT USING LIVESCRIBE ONLINE
Livescribe Desktop and Livescribe Online provide several ways to share content with others. The Sharing Preferences area on your myLivescribe page lists the available methods for sharing your content.
EMAILING CONTENT TO A FRIEND
Choose the Email a Friend preference to share content with a friend via email:
1. Select a file. To select a file from the Livescribe Online Community, click the file’s thumbnail to view it in the central viewing area. To select a file from your personal myLivescribe space, click the file’s thumbnail in the My Files area to view it in the central viewing area.
2. On your myLivescribe page, click on Email a Friend. 3. Enter your friend’s email address in the To field. 4. Optionally, add a message in the Personalize It section. 5. Click Send. Your friend will receive an email that links him or her to your file
on Livescribe Online. If your content is private, your friend will be required to create a Livescribe Online account (See Setting Up a Livescribe Account). Their username must be the email address you sent the invitation to..
NOTE: To select multiple friends to send a file to, just check the box next to each friends email address in your Address Book before clicking the Send button.
When you send the invitation, Livescribe Online will automatically add your friend to your Contact list for future ease of sharing. As you share more files, your Address Book contact list will grow. Use the gray Edit a Contact button to add a friend’s name or edit an email address. Use the red Delete a Contact button to remove an email address from the list.
Livescribe™ Desktop for Windows User Guide
Using Livescribe Online 37
DOWNLOAD CONTENT AS A PDF DOCUMENT
You can use the Download as PDF preference to download to your computer your uploaded content in PDF format. You can then share this PDF file with others via email or other means.
NOTE: You can also export pages in PDF format directly using Livescribe Desktop (see Exporting Pages as a PDF file).
To download your content as PDF:
1. Select a file. To select a file from the Livescribe Online Community, click the file’s thumbnail to view it in the central viewing area. To select a file from your personal myLivescribe space, click the file’s thumbnail in the My Files area to view it in the central viewing area.
2. Click on Download as PDF. The file will be downloaded in PDF format to your computer.
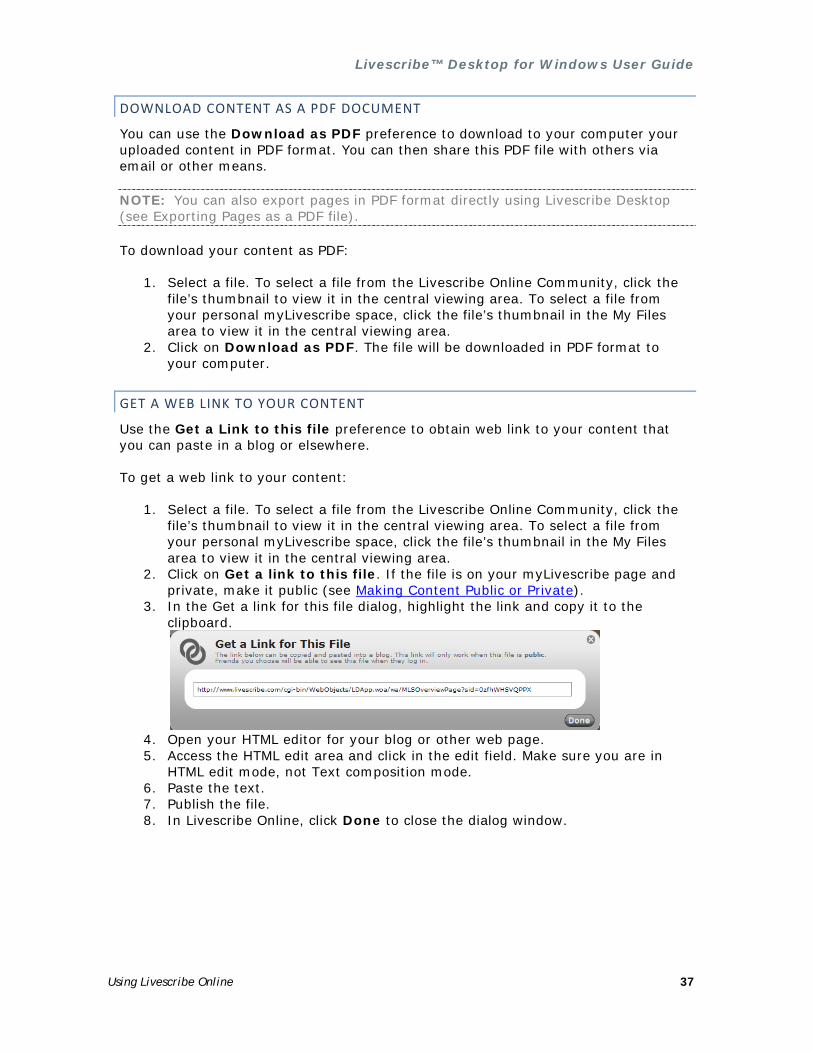
GET A WEB LINK TO YOUR CONTENT
Use the Get a Link to this file preference to obtain web link to your content that you can paste in a blog or elsewhere.
To get a web link to your content:
1. Select a file. To select a file from the Livescribe Online Community, click the file’s thumbnail to view it in the central viewing area. To select a file from your personal myLivescribe space, click the file’s thumbnail in the My Files area to view it in the central viewing area.
2. Click on Get a link to this file. If the file is on your myLivescribe page and private, make it public (see Making Content Public or Private).
3. In the Get a link for this file dialog, highlight the link and copy it to the clipboard.
4. Open your HTML editor for your blog or other web page. 5. Access the HTML edit area and click in the edit field. Make sure you are in
HTML edit mode, not Text composition mode. 6. Paste the text. 7. Publish the file. 8. In Livescribe Online, click Done to close the dialog window.

Livescribe™ Desktop for Windows User Guide
Using Livescribe Online 38
SHARING CONTENT ON FACEBOOK
Use the Share on Facebook preference to embedded content into your website, forum, or blog. You can only embed public files.
Files posted to the Livescribe Online Community are already public. Therefore, all of these files are available for embedding. If the file you want to embed is on your myLivescribe page, you must first make it public (see Making Content Public or Private).
To publish content to Facebook:
1. Select a file. To select a file from the Livescribe Online Community, click the file’s thumbnail to view it in the central viewing area. To select a file from your personal myLivescribe space, click the file’s thumbnail in the My Files area to view it in the central viewing area.
2. Click Share on Facebook. 3. Facebook will prompt you to log in unless you are already logged in. 4. If you would like to share content by posting to your Facebook page, use the
Post to Profile tab. The posting will appear on your Facebook Home page. 5. If you would just like to share content by email, use the Send a Message
tab. The recipient will get an email with a link that they can use to access the file.
EMBEDDING CONTENT INTO A WEBSITE, FORUM, OR BLOG
Use the Embed this file preference to embedded content into your website, forum, or blog. You can only embed public files.
Files posted to the Livescribe Online Community are already public. Therefore, all of these files are available for embedding. If the file you want to embed is on your myLivescribe page, you must first make it public (see Making Content Public or Private).
To embed a file into a website, forum, or blog:
1. Select a file. To select a file from the Livescribe Online Community, click the file’s thumbnail to view it in the central viewing area. To select a file from your personal myLivescribe space, click the file’s thumbnail in the My Files area to view it in the central viewing area.
2. Click the Embed this file link. If the file is on your myLivescribe page and private, make it public (see Making Content Public or Private).
3. In the Embed this file dialog, highlight the HTML code and copy it to the clipboard.
4. Open your HTML editor for your website, forum, or blog.
Livescribe™ Desktop for Windows User Guide
Using Livescribe Online 39
5. Access the HTML edit area and click in the edit field. Make sure you are in HTML edit mode, not Text composition mode.
6. Paste the text. 7. Preview the posting in your HTML editor. 8. If the pencast displays and plays back properly, publish the file. 9. Click Done to close the Embed this file window.
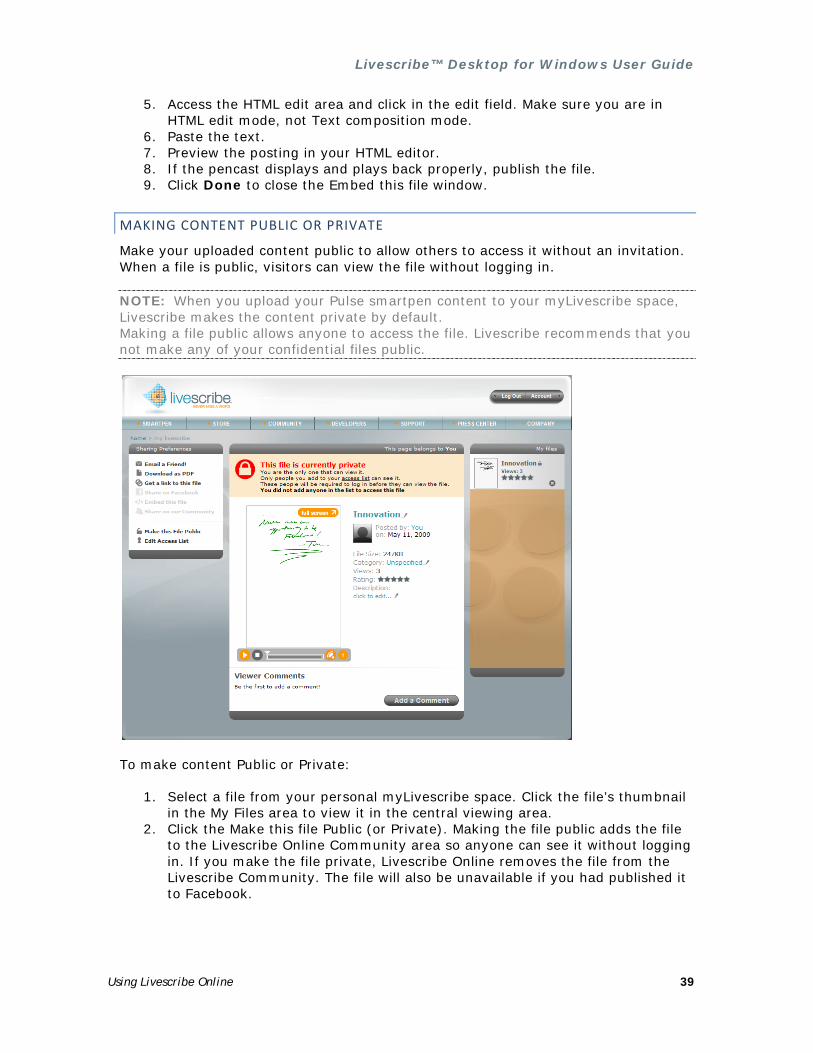
MAKING CONTENT PUBLIC OR PRIVATE
Make your uploaded content public to allow others to access it without an invitation. When a file is public, visitors can view the file without logging in.
NOTE: When you upload your Pulse smartpen content to your myLivescribe space, Livescribe makes the content private by default. Making a file public allows anyone to access the file. Livescribe recommends that you not make any of your confidential files public.
To make content Public or Private:
1. Select a file from your personal myLivescribe space. Click the file’s thumbnail in the My Files area to view it in the central viewing area.
2. Click the Make this file Public (or Private). Making the file public adds the file to the Livescribe Online Community area so anyone can see it without logging in. If you make the file private, Livescribe Online removes the file from the Livescribe Community. The file will also be unavailable if you had published it to Facebook.
Livescribe™ Desktop for Windows User Guide
Using Livescribe Online 40
EDITING YOUR ACCESS LIST
The Access List preference controls who can and cannot see a file when it is private. To give your friends permission to see a private file, add your friend to this list. They will be able to see the file when they log into their Livescribe account.
To edit your Access list:
1. Select a file from your personal myLivescribe space. Click the file’s thumbnail in the My Files area to view it in the central viewing area.
2. Click the Edit Access List preference to set create an access list for this file. 3. In the Access List dialog, click Add Contact button and type a friend’s email
address. Use the gray Edit a Contact button to add a friend’s name or edit an email address. Use the red Delete a Contact button to remove an address from the list.
MANAGING YOUR LIVESCRIBE ACCOUNT
Expand the world of your Pulse smartpen by using your myLivescribe spa .
SETTING UP A LIVESCRIBE ACCOUNT
When you register your Pulse smartpen through Livescribe Desktop, the registration process prompts you to create a Livescribe account. If you need to, you can also create an account manually without registering (or even owning a Pulse smartpen).
When you set up a Livescribe account, Livescribe creates a personal space for you called your myLivescribe space. From your myLivescribe space, you can set up your profile on Livescribe Online, upload and store content to share with your friends, the community, or anyone on the Web.
You can manually set up a Livescribe account either from Livescribe Desktop or directly from a web browser. To set up a Livescribe account from Livescribe Desktop:
1. From Livescribe Desktop, click the Livescribe Online button in the Main tool bar. This will connect you to the Livescribe Community page. When prompted, click Create an Account.
2. Provide a username and password. The username must be a valid email address.
To set up a Livescribe account from a web browser:
1. Go to www.livescribe.com from your web browser and navigate to the Community page by clicking the Community tab. From there, click the Sign
Up button . 2. Provide a username and password. The username must be a valid email
address.
When creating your user name and password, follow these guidelines:

Livescribe™ Desktop for Windows User Guide
Using Livescribe Online 41
• Your user name is your email address. It cannot be greater than 128 characters and is not case sensitive. For example, [email protected] and [email protected] are the same.
• Your password must be at least four characters long and no longer than 64 characters. Your password is case sensitive, and cannot start with a space or contain characters that are not printable. Your password and user name cannot be the same.
USING YOUR MYLIVESCRIBE PROFILE
When you create a myLivescribe user profile, you will receive space to store content.
To view your profile:
• Select Account in the upper right corner of Livescribe Online. On your myLivescribe profile page you will see a list of sharing options, viewer comments, and how much space you have used and you have available.
MANAGING YOUR UPLOADED CONTENT
From your myLivescribe space, you can manage content in your Livescribe account as described in the following table:
Task Do this
Rename files Select the filename in the central viewing pane and edit it in place.
Delete files Click the thumbnail X icon next to the file name to delete it. This does not remove the files from your Livescribe Desktop application or your Pulse smartpen, only from your online account.
Choose categories for files Choose a category in which to place your file by clicking on the category name in the description area and choosing one of the pre-defined categories.
Add/Edit file descriptions You can add short descriptions of your uploaded files by selecting click to edit… under the Description area and typing a name into the text field. Edit existing descriptions by clicking on the existing description and typing into the text field.

Livescribe™ Desktop for Windows User Guide
Using Livescribe Online 42
MANAGING YOUR ACCOUNT DETAILS
From your myLivescribe space, you can manage your Livescribe account and perform other administrative tasks described in the following table:
Task Do this
Change your user name Select the name and edit it in place in the upper left area under the My Account section.
Unlink your Pulse smartpen from your account
Click on the unlink option under My Pens in the lower left area under the My Account section.
Change your password Go to the Edit Login tab in the central Details section and click Change Your Password.
Upload an Avatar Go to the Profile tab in the central Details section and click Upload an Avatar User Picture. You may need to log in using a web browser to see this option.
Change your contact and personal information
Go to the Profile tab in the central Details section to edit your contact information and optionally details about you.
Subscribe or unsubscribe to Livescribe news and offers
Check or uncheck the option to receive news and offers about Livescribe and related products.
VIEWING LIVESCRIBE COMMUNITY CONTENT
In the Livescribe Community, you can see what others are doing with their Pulse smartpens and post your own creations for others to rate and comment on.

Livescribe™ Desktop for Windows User Guide
Using Livescribe Online 43
The Community page has several sections:
Featured Files Livescribe will randomly choose files to feature on the front page of the Community area.
Featured Contributors Lists members of the Livescribe Community who provide the highest-rated submissions. Click on a Featured Contributor to go their myLivescribe profile.
Top Rated Shows the top-rated content in the Livescribe Community.
Most Viewed Shows visitors which content has been viewed the most.
VISIT THE LIVESCRIBE STORE
At the Livescribe Online Store - www.livescribe.com/store - you can purchase additional smartpens, paper products, applications, and more. At checkout you will need to log into your account, or create an account if you have not already.
Livescribe™ Desktop for Windows User Guide
Working with Paper Products 44
WORKING WITH PAPER PRODUCTS
Livescribe prints notebooks, journals, flip notepads, and other Livescribe™ dot paper products for your Pulse™ smartpen. There is nothing special about the composition of the paper used for Livescribe dot paper products. However, each page of Livescribe dot paper is printed with thousands of nearly-invisible microdots arranged in a special pattern. Your Pulse smartpen reads these dots to determine which page you are using and where on that page you are tapping or writing. With this information, your smartpen can capture your notes, link audio to them, and perform other paper-based operations.
Livescribe dot paper products sometimes re-use dot pattern. As a general rule, do not use Livescribe dot paper products with the same dot pattern at the same time. This prevents a potential problem that can happen when viewing your notebooks in Livescribe™ Desktop: when you write in two notebooks with the same pattern, your notes from the second notebook will be superimposed on your notes from the first notebook when you view them in Livescribe Desktop.
Because Livescribe dot paper Products are important to working with your Pulse smartpen, you should learn to manage and archive them.
In this section, you will learn:
• How to print your own notepads
• Three simple steps to manage your paper products
• How to check a new Livescribe dot paper product with its Notebook Status Label to see if you can safely use it
• How to identify Livescribe dot paper products by their names
• When and how to archive your paper products in Livescribe Desktop
• How to manage paper products with the same dot pattern
• How to map Livescribe dot paper product series names to new group names
• Back up strategies for your My Livescribe folder
Livescribe™ Desktop for Windows User Guide
Working with Paper Products 45
PRINTING YOUR OWN NOTEPADS
Using Livescribe™ Desktop, you can print your own notepads using a qualified color laser printer that can print 600 dpi or greater.
To print a notepad, first verify that your printer can correctly print Livescribe dot paper:
1. In Page Viewer select a notebook on the left to activate the “Tools” menu option and choose Tools > Printable Notepads > Test Page (1 page).
2. Livescribe Desktop displays the Print dialog and automatically selects the first qualified printer you have in your printer list.
3. Click Print. 4. When the test page is finished printing, follow the instructions printed on the
page using your Pulse™ smartpen. The instructions ask you to write some words in each of four areas and then dock your Pulse smartpen to your computer.
5. Next, in Livescribe Desktop, examine the test page after it has transferred from your Pulse smartpen. If all of your words transfer successfully, then your printer can print Livescribe dot paper and you can begin printing your own notepads.
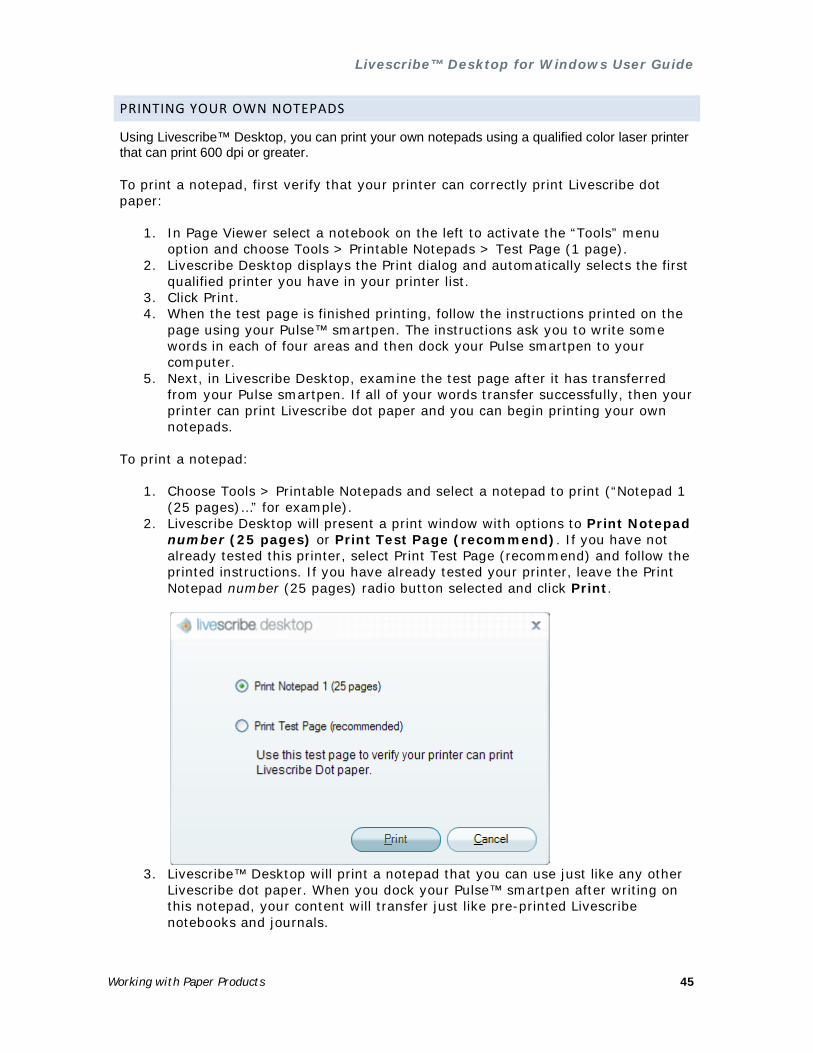
To print a notepad:
1. Choose Tools > Printable Notepads and select a notepad to print (“Notepad 1 (25 pages)…” for example).
2. Livescribe Desktop will present a print window with options to Print Notepad number (25 pages) or Print Test Page (recommend). If you have not already tested this printer, select Print Test Page (recommend) and follow the printed instructions. If you have already tested your printer, leave the Print Notepad number (25 pages) radio button selected and click Print.
3. Livescribe™ Desktop will print a notepad that you can use just like any other
Livescribe dot paper. When you dock your Pulse™ smartpen after writing on this notepad, your content will transfer just like pre-printed Livescribe notebooks and journals.

Livescribe™ Desktop for Windows User Guide
Working with Paper Products 46
THREE SIMPLE GUIDELINES FOR MANAGING PAPER PRODUCTS
Understanding how your Pulse™ smartpen interacts with Livescribe™ dot paper can challenging. Fortunately, you do not need to know how it all works. All you need to do is follow three simple guidelines before using a new Livescribe dot paper notebook or journal:
• When purchasing Livescribe dot paper, buy notebooks or journals that have different numbers from the ones you are currently using. For example, if you are already using Lined Notebook numbered 1 through 4, you should purchase Lined Notebooks number 5 through 8. Notebooks are sold separately or in packs of four (numbered 1-4, 5-8, and so on.). For more information about Livescribe dot paper numbering, see About Paper Product Naming.
• Before using the new paper product, tap on the Notebook Status Label. If it says you are already using a notebook with the same number, be sure to archive your old notebooks on Livescribe Desktop first. See Checking Paper Product Usage with the Notebook Status Label.
• Archive your notebooks and journals after you have finished with them before using another paper product of the same kind and number. After archiving, set aside your old notebook, you still have a digital copy on the Livescribe Desktop, but you no longer can tap an play paper replay sessions on your previous notebook. To learn how to archive, see Archiving Paper Products.
CHECKING PAPER PRODUCT USAGE WITH THE NOTEBOOK STATUS LABEL
Each Livescribe™ dot paper product has a Notebook Status Label. Using the Notebook Status Label is the best way to tell if you are currently using a Livescribe dot paper product that has the same dot pattern.
To use the Notebook Status Label:
1. When you open a new Livescribe dot paper product, tap on its Notebook Status Label with your Pulse™ smartpen.
2. Your Pulse smartpen display will show whether you are using another Livescribe dot paper product with the same dot pattern. If you are, archive the older Livescribe dot paper product before using the new one. See Archiving Paper Products.
3. In some cases, your Pulse smartpen will need to be updated to use a new paper product. If this occurs, your smartpen display will indicate this when you tap the Notebook Status Label. To use the new paper product, run Livescribe Desktop, dock your Pulse smartpen, and accept the option to update your smartpen firmware and software.

Livescribe™ Desktop for Windows User Guide
Working with Paper Products 47
ABOUT LIVESCRIBE DOT PAPER PRODUCT NAMING
Livescribe identifies a Livescribe™ dot paper product by a group (such as Lined Notebook) and a number (from 1 to 8). Any two Livescribe dot paper products labeled with the same group and number have the same dot pattern.
Groups
Livescribe dot paper products belong to a group based on their printed format (lined, unlined, grid ...) and form factor (notebook, journal, notepad …). Paper product groups include:
• Lined Notebooks
• Unlined Notebooks
• Lined Journals
• Unlined Journals
• Lined Notepads
• Unlined Notepads
Numbers
Livescribe identifies each notebook or journal with a number. Within a group, paper products labeled with the same number have the same dots. Paper products labeled with different numbers have different dot patterns. Currently, numbers in a group run from 1 to 8. For example, the Lined Notebooks group contains the following notebooks:
• Lined Notebook 1
• Lined Notebook 2
• . . .
• Lined Notebook 8
As described above, if you want to use two paper products that have the same dot pattern, you must archive the first before using the next. For example, if you have two notebooks named Lined Notebook 1 you must archive one before using the other because they have same dot pattern. Similarly, all journals identified as Unlined Journal 3 have the same dot pattern. If you have two Unlined Journal 3 journals, then you must archive one before starting on the next.
If two paper products have different dot patterns, you can use them at the same time without archiving. For example, Lined Notebook 1 has a different dot pattern from Lined Notebook 2, so you can use them at the same time. Similarly, Lined Notebook 3 has a different dot pattern from Unlined Journal 3.
Livescribe™ Desktop for Windows User Guide
Working with Paper Products 48
ARCHIVING PAPER PRODUCTS
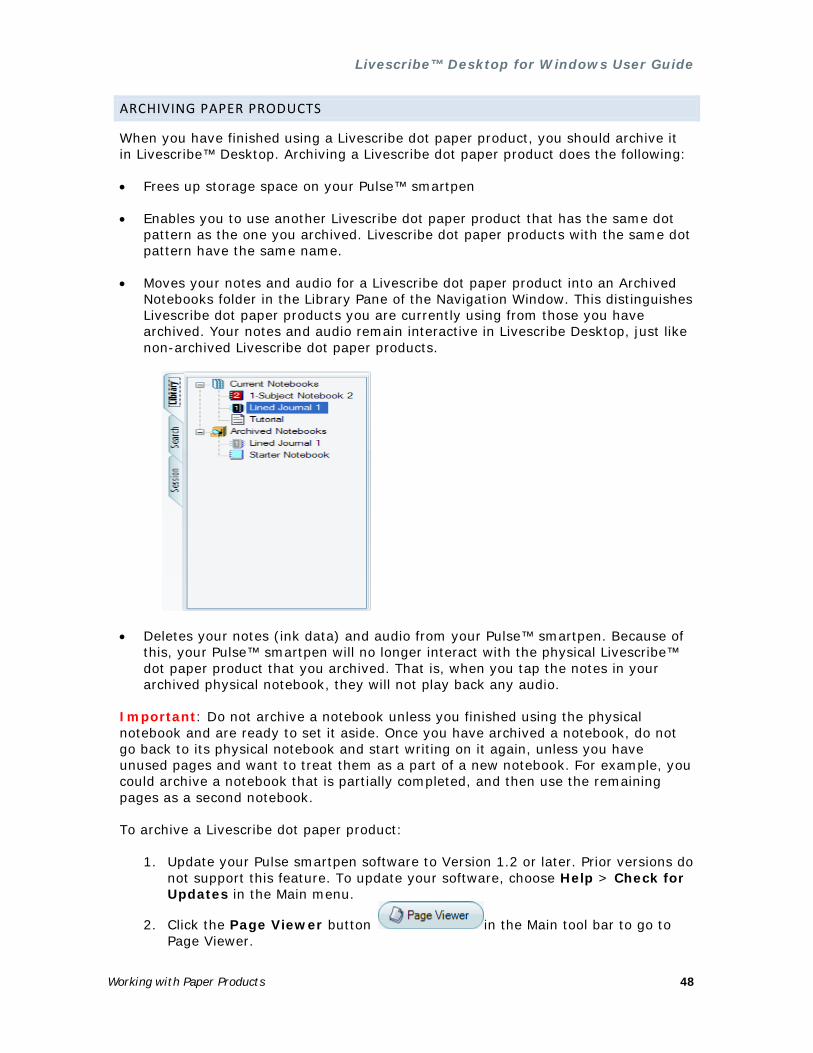
When you have finished using a Livescribe dot paper product, you should archive it in Livescribe™ Desktop. Archiving a Livescribe dot paper product does the following:
• Frees up storage space on your Pulse™ smartpen
• Enables you to use another Livescribe dot paper product that has the same dot pattern as the one you archived. Livescribe dot paper products with the same dot pattern have the same name.
• Moves your notes and audio for a Livescribe dot paper product into an Archived Notebooks folder in the Library Pane of the Navigation Window. This distinguishes Livescribe dot paper products you are currently using from those you have archived. Your notes and audio remain interactive in Livescribe Desktop, just like non-archived Livescribe dot paper products.
• Deletes your notes (ink data) and audio from your Pulse™ smartpen. Because of this, your Pulse™ smartpen will no longer interact with the physical Livescribe™ dot paper product that you archived. That is, when you tap the notes in your archived physical notebook, they will not play back any audio.
Important: Do not archive a notebook unless you finished using the physical notebook and are ready to set it aside. Once you have archived a notebook, do not go back to its physical notebook and start writing on it again, unless you have unused pages and want to treat them as a part of a new notebook. For example, you could archive a notebook that is partially completed, and then use the remaining pages as a second notebook.
To archive a Livescribe dot paper product:
1. Update your Pulse smartpen software to Version 1.2 or later. Prior versions do not support this feature. To update your software, choose Help > Check for Updates in the Main menu.
2. Click the Page Viewer button in the Main tool bar to go to Page Viewer.
Livescribe™ Desktop for Windows User Guide
Working with Paper Products 49
3. Click the Library tab of the Navigation window and click the notebook you want to archive.
4. Choose File > Archive Notebook. 5. When prompted, click OK to confirm the archive operation, otherwise click
Cancel. 6. When prompted, click Archive this notebook, otherwise click Cancel. 7. Livescribe™ Desktop will confirm your notebook has been archived, and you
will see the archived notebook in your Library tab in an Archived Notebooks group.
MANAGING PAPER PRODUCTS WITH THE SAME DOT PATTERN
If you own two Livescribe™ dot paper products with the same Group and Number (such as two Lined Notebook 2 paper products), you should follow these guidelines:
• Use only one of the Livescribe dot paper products at a time. Do not use the two paper products at the same time.
• Before starting on the second paper product, archive the first one with Livescribe Desktop.
For example, do not use two Lined Notebook 1 paper products at the same time. Instead, use another lined notebook with a different Number, such as a Lined Notebook 2, Lined Notebook 3, and so on.
If you have used all the Numbers in the Lined Notebook group, you may wish to start a second, unused Lined Notebook 1. To do so, archive the first Lined Notebook 1. Then you can use your Pulse smartpen on the second Lined Notebook 1.
USING PACKS OF NOTEBOOKS AND JOURNALS
A pack of notebooks or journals contains Livescribe dot paper products of the same group. For example, Lined Notebooks come in packs of four (Notebooks 1-4, 5-8, and so on.
If you want to buy two or more packs of Lined Notebooks, verify that the Numbers on the Notebook covers are different. For example, buy and use Notebooks 1-4 and Notebooks 5-8 before buying another pack of 1-4 or 5-8.
If you have purchased two packs with the same numbering, the packs will have the same dot pattern. In this case, you should proceed as follows:
• Use all the Livescribe dot paper products in the first pack before starting on the second pack.
• When you have finished with the first pack, archive each Notebook from the first pack and then start using the second pack.
Livescribe™ Desktop for Windows User Guide
Working with Paper Products 50
MAPPING COLORS AND SERIES TO GROUPS AND NUMBERS
Some Livescribe™ dot paper products use a naming convention based on Color, Name, and Series. New printings instead use Groups and Numbers for naming. If you have a notebook or journal with the Series naming convention, use the following table to map it to the new Group and Number model.
Notebook Type
Color Series Has the same dot pattern as
Color Group Number
1-Subject Notebook
Teal None <=> Any Starter Notebook
N/A
1-Subject Notebook
Dark Blue Series 1 <=> Any Notebook 1
1-Subject Notebook
Red Series 1 <=> Any Notebook 2
1-Subject Notebook
Black Series 1 <=> Any Notebook 3
1-Subject Notebook
Orange Series 1 <=> Any Notebook 4
1-Subject Notebook
Dark Blue Series 2 <=> Any Notebook 5
1-Subject Notebook
Red Series 2 <=> Any Notebook 6
1-Subject Notebook
Black Series 2 <=> Any Notebook 7
1-Subject Notebook
Orange Series 2 <=> Any Notebook 8
Journal A Black Series 1 <=> Any Lined Journal 1
Journal B Black Series 1 <=> Any Lined Journal 2
Journal A Black Series 2 <=> Any Lined Journal 3
Journal B Black Series 2 <=> Any Lined Journal 4
Journal A Black Series 1 <=> Any Unlined Journal
1
Livescribe™ Desktop for Windows User Guide
Working with Paper Products 51
Journal B Black Series 1 <=> Any Unlined Journal
2
Journal A Red Series 1 <=> Any Unlined Journal
3
Journal B Red Series 1 <=> Any Unlined Journal
4
With the new Group and Number model, the color or design on the front cover of a paper product does not matter. For example:
• A red Series 1 notebook is the same as notebooks of any color named Notebook 2.
• A lined black Journal A Series 1 journal is the same as lined journals of any color named Lined Journal 1.
• An unlined black Journal A Series 1 journal is the same as unlined journals of any color named Unlined Journal 1.
• An unlined red Journal A Series 1 journal is the same as unlined journals of any color named Unlined Journal 3.
BACKING UP YOUR MY LIVESCRIBE FOLDER
You should back up Livescribe™ Desktop files just like other important files on your computer. Backing up your files protects you from losing important files in case your computer becomes damaged or is stolen.
You can find all files associated with Livescribe Desktop in your My Livescribe folder. This folder contains your notes and audio, as well as important information about your Pulse smartpen and Livescribe Desktop.
By default, Livescribe Desktop creates the My Livescribe folder here:
C:\Documents and Settings\your_user_name\My Documents\My Livescribe
To back up your My Livescribe folder:
1. Exit Livescribe Desktop. 2. Locate your My Livescribe folder. 3. Copy the folder to a backup device, such as a CD, DVD, or external drive. 4. If you later need to restore your Livescribe Desktop files, contact Livescribe
Customer Service for instructions.
Livescribe™ Desktop for Windows User Guide
Managing Your Pulse Smartpen 52
MANAGING YOUR PULSE SMARTPEN
Your Pulse™ smartpen stores your notes and recorded audio, applications like Paper Replay™, and internal software and firmware. With Livescribe Desktop, you can view and manage what is installed and stored on your smartpen, including:
• View and manage applications installed on your Pulse smartpen
• View and free up Pulse smartpen memory
MANAGING APPLICATIONS
Using Smartpen Manager, you can manage your Pulse™ smartpen applications. With Smartpen Manager, you can:
• View all applications you own
• Install software updates
• Install new software
VIEWING INSTALLED APPLICATIONS AND SOFTWARE
To view all applications you own and other software installed on your Pulse™ smartpen:
1. Click the Smartpen Manager button in the Main tool bar.
2. Click the Apps View button. You will see a list of all the applications and software you currently own.
Anatomy of an Apps View List
When you view a list of applications and software in Smartpen Manager, Livescribe™ Desktop displays them as a list of rows with named columns. The table below describes the columns of the Apps View list.

Livescribe™ Desktop for Windows User Guide
Managing Your Pulse Smartpen 53
Column Description
Application Name
The name of the application
Version Version of the application
Size The size of the application in MB or KB
Status Smartpen Only indicates that the application is only on your Pulse™ smartpen and no backup copy is available in Livescribe™ Desktop.
On Smartpen indicates that the application is on your Pulse smartpen and a backup copy is available in Livescribe Desktop.
Transferring indicates Livescribe Desktop is transferring the application to your Pulse smartpen.
Updating indicates the application is in the queue and Livescribe Desktop is ready to transfer it to your Pulse smartpen.
Action You will be able to move purchased applications on and off
your Pulse smartpen. The lock icon indicates the application is locked and you cannot remove it from your Pulse smartpen. You cannot unlock a locked application.
INSTALLING SOFTWARE UPDATES
Livescribe will periodically update Pulse™ smartpen applications (such as Paper Replay™) and underlying Pulse smartpen firmware. When you run Livescribe™ Desktop, it will automatically check livescribe.com for these updates. If you choose to download them, Livescribe Desktop will queue the updates and transfer them to your Pulse smartpen when you dock it to your computer.
NOTE: If you choose to postpone transferring updates to your Pulse smartpen, you can re-initiate the transfer process by undocking and re-docking your Pulse smartpen. Livescribe Desktop will prompt you to transfer the queued items.

Livescribe™ Desktop for Windows User Guide
Managing Your Pulse Smartpen 54
Manually Checking for Updates
To check for updates to your Pulse smartpen:
• Choose Help > Check for Updates in the Main menu. Livescribe Desktop will check for updates. Updates can include newer versions of your applications or new internal software and firmware used by your Pulse smartpen.
INSTALLING NEW APPLICATIONS AND SOFTWARE
Livescribe and other companies will offer new applications for your Pulse smartpen. You can purchase and download these from the Livescribe Online Store. When you purchase a new application from the Livescribe Online Store, the application will be automatically downloaded to Livescribe Desktop. After the download, the application will appear in Smartpen Manager Apps View and in Queue View. You can install these applications to your Pulse smartpen when you dock it.
VIEWING QUEUED APPLICATIONS AND SOFTWARE
Items in your Smartpen Manager queue will be acted on immediately when you dock your Pulse smartpen. If your Pulse smartpen is not docked but there are items in your queue, Livescribe Desktop will act on the items the next time you dock your Pulse smartpen.
To view all pending actions in the Smartpen Manager queue:
Click the Smartpen Manager button in the Main tool bar.
Click the Queue View button. You will see a list of all the actions currently queued. The Status column will indicate the action that is to be performed with the application.
Anatomy of a Queue View List
When you view a list of queued applications in Smartpen Manager, Livescribe Desktop displays the queued applications as a list of rows with named columns. The table below describes the columns of the Queue View list.
Column Description
Application/File Name
The name of the application or file
Version The version of the application
Type The type of file, such as an application or firmware
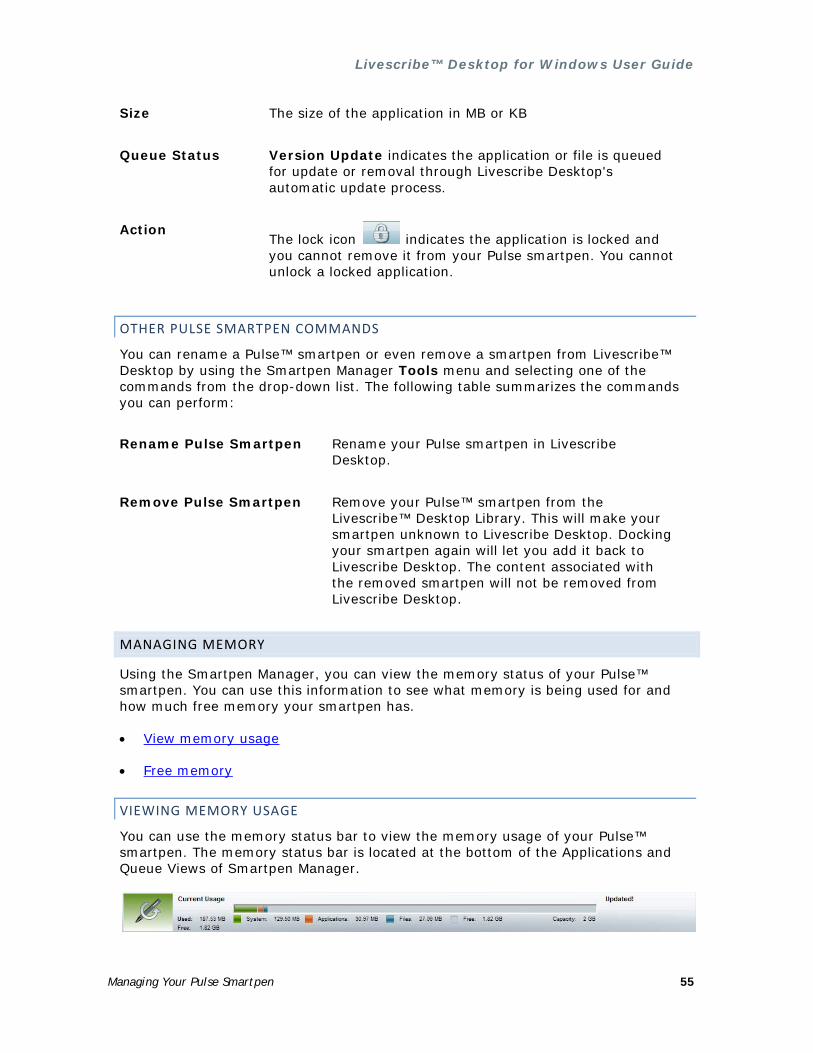
Livescribe™ Desktop for Windows User Guide
Managing Your Pulse Smartpen 55
Size The size of the application in MB or KB
Queue Status Version Update indicates the application or file is queued for update or removal through Livescribe Desktop's automatic update process.
Action The lock icon indicates the application is locked and you cannot remove it from your Pulse smartpen. You cannot unlock a locked application.
OTHER PULSE SMARTPEN COMMANDS
You can rename a Pulse™ smartpen or even remove a smartpen from Livescribe™ Desktop by using the Smartpen Manager Tools menu and selecting one of the commands from the drop-down list. The following table summarizes the commands you can perform:
Rename Pulse Smartpen Rename your Pulse smartpen in Livescribe Desktop.
Remove Pulse Smartpen Remove your Pulse™ smartpen from the Livescribe™ Desktop Library. This will make your smartpen unknown to Livescribe Desktop. Docking your smartpen again will let you add it back to Livescribe Desktop. The content associated with the removed smartpen will not be removed from Livescribe Desktop.
MANAGING MEMORY
Using the Smartpen Manager, you can view the memory status of your Pulse™ smartpen. You can use this information to see what memory is being used for and how much free memory your smartpen has.
• View memory usage
• Free memory
VIEWING MEMORY USAGE
You can use the memory status bar to view the memory usage of your Pulse™ smartpen. The memory status bar is located at the bottom of the Applications and Queue Views of Smartpen Manager.

Livescribe™ Desktop for Windows User Guide
Glossary 56
This bar shows:
• Total memory capacity of the Pulse smartpen (both used and free)
• Memory used by system software (shown in green)
• Memory used by applications (shown in orange)
• Memory used by content you created (shown in blue)
• Available memory (shown in gray)
FREEING MEMORY
Your Pulse™ smartpen uses flash memory to your notes and audio, as well as applications and system files. Recorded audio from Paper Replay™ sessions require the most space. If you are running out of space on your Pulse™ smartpen, then can delete these sessions.
To remove a Paper Replay session from your Pulse smartpen, use one of the following methods:
• Choose and remove a session in Sessions View. See Removing a Session from your Pulse Smartpen.
• Archive any notebooks, journals and other paper products you are finished with. See Managing and Archiving Paper Products.
• On your Pulse™ smartpen, use the Main Menu to select the session you want to delete and remove it. See the Pulse Smartpen User Guide for more information.
GLOSSARY
Refer to the list below for Livescribe terms and their definitions.
3D Recording Headset Earphones with embedded microphones that capture multi-directional, far-field audio and place objects in the sound landscape surrounding you.
active ink The markings of the Pulse smartpen’s ballpoint on dot paper associated to recorded audio. . By default, this ink is displayed as green in Livescribe Desktop. See inactive ink.
archiving The process of moving your notes and audio for a Livescribe dot paper product into an Archived Notebooks folder in the Navigation panel. This process also deletes your notes (ink data) and audio from your Pulse™ smartpen. Because of this, your Pulse™ smartpen will no longer interact with the physical Livescribe™ dot paper product that you archived.
Livescribe™ Desktop for Windows User Guide
Glossary 57
audio Sound of any kind that is captured by the Pulse™ smartpen’s microphone.
black text Writings or drawings in a Livescribe Desktop notebook that are not linked with audio. (See green text.)
browsing Going through a notebook’s pages in Page view.
docking Connecting a Pulse smartpen to a personal computer by inserting the smartpen into its charging cradle, which is connected to the computer by a USB cable.
downloading Receiving data from a remote location.
export Converting Paper Replay™ files containing audio, writing, or a combination of the two, to file format. Files can then be sent to remote locations.
firmware Software that manages the internal operations of a smartpen. This software is not accessible to the user but can improve the smartpen’s functionality.
flash memory Non-volatile storage of computer files, not dependent on electric charge.
inactive ink The markings of the Pulse smartpen’s ballpoint on dot paper linked with captured audio. By default, this ink is displayed as black in Livescribe Desktop. See active ink
ink The markings of the Pulse smartpen’s ballpoint on dot paper. See active ink and inactive ink.
linking Connecting a Pulse smartpen to a computer. A Pulse smartpen can be linked with only one computer. It can dock and transfer data with other computers, but this process is not supported by Livescribe and risks the overwriting of existing recorded audio on the unlinked computer.
Livescribe Desktop The computer component of the Livescribe™ platform. Livescribe Desktop allows you to transfer, store, search, and replay notes from your computer. You can also upload your content to the Web, and manage applications and content on your Pulse smartpen.
Livescribe™ dot paper Plain paper printed with microdots the Pulse smartpen reads. Invented by Anoto AB, and used under license by Livescribe. Dot paper is covered by patters of millions of

Livescribe™ Desktop for Windows User Guide
Glossary 58
barely visible microdots that enable the Pulse™ smartpen to link writing or drawing with audio.
Livescribe™ Online Livescribe Web community. Pulse smartpen owners have free membership in Livescribe Online, where members can store up to 500 MB of their sesssions. In addition, members can share sessions with others and participate in user forums.
microdot The basic unit of Livescribe’s dot paper: a small, light-gray circular marking that is arranged with others like it into millions of patterns. These are printed on Livescribe paper products for use with the Pulse smartpen.
myLivescribe profile 500 MB of personal space a Livescribe Pulse smartpen user is allotted at Livescribe Online to store and share notes.
Nav Plus A pre-printed or hand-drawn plus sign that lets you navigate your Pulse smartpen applications and files.
notebook A generic term used in this guide that represents any Livescribe dot paper type: Lined Notebook, Lined Black Journal, Unlined Black Journal, or Unlined Red journal.
Notebook Status label An elliptical paper seal that prevents a Livescribe paper product from be opened until detached by the owner. This label defines the product’s status (paper type and series number), so you can be aware of potential conflict with paper products of the same status that are already in use.
notes Anything written or drawn on dot paper.
OLED display 18pixel x 98pixel Organic Liquid Crystal Diode display screen of your Pulse smartpen.
Page view Smartpen sessions presented in viewable form, with linked audio accessible by clicking active ink with the mouse cursor.
Paper Replay™ An application that associates what you write on paper to audio you record.
PDF A graphic file format that is used to export writings and drawings saved in Livescribe Desktop. PDF files can be viewed on or printed from any computer with Adobe Acrobat Reader® installed.

Livescribe™ Desktop for Windows User Guide
Glossary 59
pencast A general term for sharing your sessions (recorded audio and associated notes, if any) with others.
preferences Settings of Livescribe Desktop that conform to your way of working.
Pulse™ The model of smartpen, manufactured by Livescribe Inc., that is used with Livescribe Desktop.
Quick Commands A series of commands you can write on dotted paper to quickly learn the current status of your Pulse smartpen.
Quick Record A method of quickly recording with your Pulse smartpen. Acti-vate Quick Record by pressing and holding your smartpen power button for two seconds.
Session A single, complete audio recording that begins with the Record command and ends with the Stop command on your Pulse smartpen. A Session always contains audio and optionally can contains associated written notes (pages).
Sessions view Sessions presented as a list of files with details about each.
thumbnail A small representation of a page.
transfer Copying data from a Pulse smartpen to a computer using Livescribe Desktop. (In this context, the sessions remain on the smartpen.)
updating Installing a new version of software or firmware via Livescribe Desktop to your computer or smartpen.
uploading Sending data to a remote location, such as the web.
USB Universal Serial Bus, a standard for wired connection between personal computers and peripheral devices like printers and the Pulse smartpen.
USB Mobile Charging Cradle The included cradle that charges and connects your Pulse smartpen to your computer.
zooming The process or magnifying or reducing pages in Livescribe Desktop.
Related Documents