Free Paern Download Available 7/24/15 1384 Broadway New York, NY 10018 Tel. (800) 223-5678 • andoverfabrics.com Little House on the Prairie® BY KATHY HALL Cabin in the Woods Quilt Design: Heidi Pridemore Quilt Size: 56 ¾" x 68" andoverfabrics.com LITTLE HOUSE ON THE PRAIRIE® and associated character names and trademarks are owned and licensed by Friendly Family Productions, LLC. All rights reserved. ©2015 Friendly Family Productions, LLC

Welcome message from author
This document is posted to help you gain knowledge. Please leave a comment to let me know what you think about it! Share it to your friends and learn new things together.
Transcript
Free Pattern Download Available
7/24/15
1384 Broadway New York, NY 10018Tel. (800) 223-5678 • andoverfabrics.com
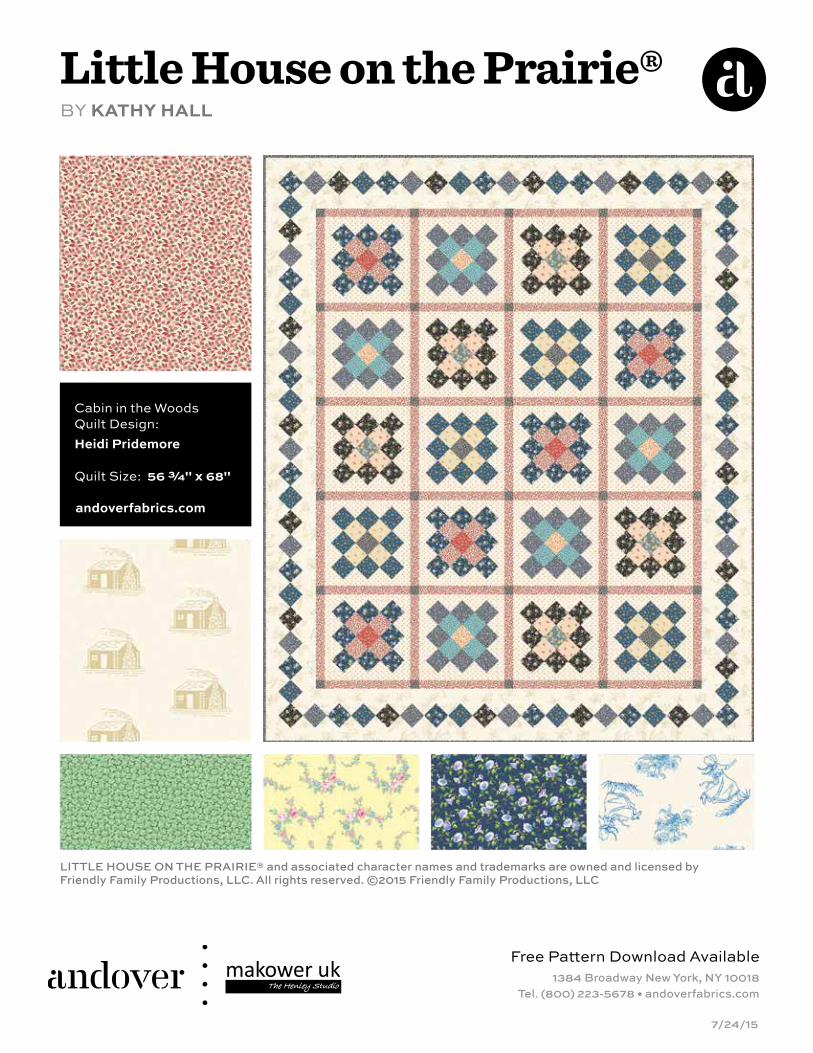
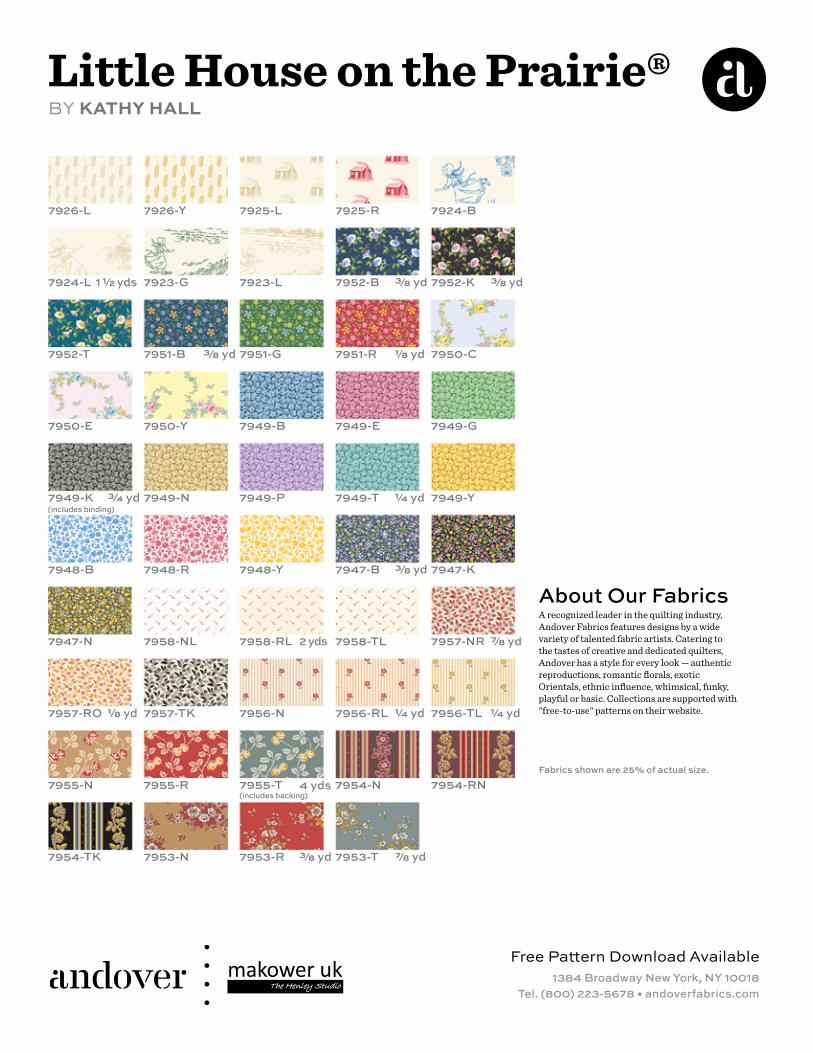
Little House on the Prairie®BY KATHY HALL
Cabin in the WoodsQuilt Design:Heidi Pridemore
Quilt Size: 56 ¾" x 68"
andoverfabrics.com
LITTLE HOUSE ON THE PRAIRIE® and associated character names and trademarks are owned and licensed by Friendly Family Productions, LLC. All rights reserved. ©2015 Friendly Family Productions, LLC
Free Pattern Download Available at www.andoverfabrics.com 7/24/15
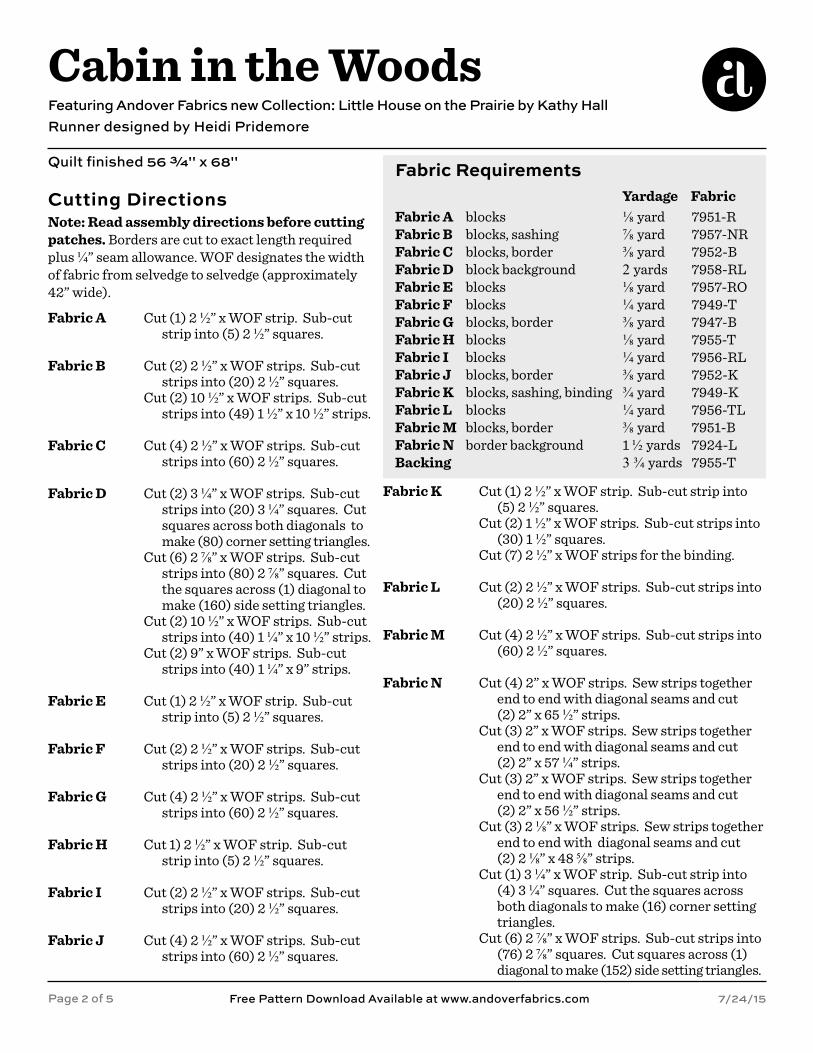
Cabin in the WoodsFeaturing Andover Fabrics new Collection: Little House on the Prairie by Kathy HallRunner designed by Heidi Pridemore
Quilt finished 56 ¾" x 68"
Cutting Directions Yardage Fabric
Fabric Requirements
Fabric A Fabric B Fabric C Fabric DFabric E Fabric FFabric GFabric HFabric IFabric JFabric KFabric LFabric MFabric NBacking
Page 2 of 5
blocksblocks, sashingblocks, borderblock backgroundblocksblocksblocks, borderblocksblocksblocks, borderblocks, sashing, bindingblocksblocks, borderborder background
⅛ yard ⅞ yard⅜ yard2 yards⅛ yard¼ yard⅜ yard⅛ yard¼ yard⅜ yard¾ yard¼ yard⅜ yard1 ½ yards3 ¾ yards
7951-R7957-NR7952-B7958-RL7957-RO7949-T7947-B7955-T7956-RL7952-K7949-K7956-TL7951-B7924-L7955-T
Note: Read assembly directions before cutting patches. Borders are cut to exact length required plus ¼” seam allowance. WOF designates the width of fabric from selvedge to selvedge (approximately 42” wide).
Fabric A Cut (1) 2 ½” x WOF strip. Sub-cut strip into (5) 2 ½” squares.
Fabric B Cut (2) 2 ½” x WOF strips. Sub-cut strips into (20) 2 ½” squares. Cut (2) 10 ½” x WOF strips. Sub-cut strips into (49) 1 ½” x 10 ½” strips.
Fabric C Cut (4) 2 ½” x WOF strips. Sub-cut strips into (60) 2 ½” squares.
Fabric D Cut (2) 3 ¼” x WOF strips. Sub-cut strips into (20) 3 ¼” squares. Cut squares across both diagonals to make (80) corner setting triangles. Cut (6) 2 ⅞” x WOF strips. Sub-cut strips into (80) 2 ⅞” squares. Cut the squares across (1) diagonal to make (160) side setting triangles. Cut (2) 10 ½” x WOF strips. Sub-cut strips into (40) 1 ¼” x 10 ½” strips. Cut (2) 9” x WOF strips. Sub-cut strips into (40) 1 ¼” x 9” strips.
Fabric E Cut (1) 2 ½” x WOF strip. Sub-cut strip into (5) 2 ½” squares.
Fabric F Cut (2) 2 ½” x WOF strips. Sub-cut strips into (20) 2 ½” squares.
Fabric G Cut (4) 2 ½” x WOF strips. Sub-cut strips into (60) 2 ½” squares.
Fabric H Cut 1) 2 ½” x WOF strip. Sub-cut strip into (5) 2 ½” squares.
Fabric I Cut (2) 2 ½” x WOF strips. Sub-cut strips into (20) 2 ½” squares.
Fabric J Cut (4) 2 ½” x WOF strips. Sub-cut strips into (60) 2 ½” squares.
Fabric K Cut (1) 2 ½” x WOF strip. Sub-cut strip into (5) 2 ½” squares. Cut (2) 1 ½” x WOF strips. Sub-cut strips into (30) 1 ½” squares. Cut (7) 2 ½” x WOF strips for the binding.
Fabric L Cut (2) 2 ½” x WOF strips. Sub-cut strips into (20) 2 ½” squares.
Fabric M Cut (4) 2 ½” x WOF strips. Sub-cut strips into (60) 2 ½” squares.
Fabric N Cut (4) 2” x WOF strips. Sew strips together end to end with diagonal seams and cut (2) 2” x 65 ½” strips. Cut (3) 2” x WOF strips. Sew strips together end to end with diagonal seams and cut (2) 2” x 57 ¼” strips. Cut (3) 2” x WOF strips. Sew strips together end to end with diagonal seams and cut (2) 2” x 56 ½” strips. Cut (3) 2 ⅛” x WOF strips. Sew strips together end to end with diagonal seams and cut (2) 2 ⅛” x 48 ⅝” strips. Cut (1) 3 ¼” x WOF strip. Sub-cut strip into (4) 3 ¼” squares. Cut the squares across both diagonals to make (16) corner setting triangles. Cut (6) 2 ⅞” x WOF strips. Sub-cut strips into (76) 2 ⅞” squares. Cut squares across (1) diagonal to make (152) side setting triangles.
Cabin in the Woods
Free Pattern Download Available at www.andoverfabrics.com 7/24/15
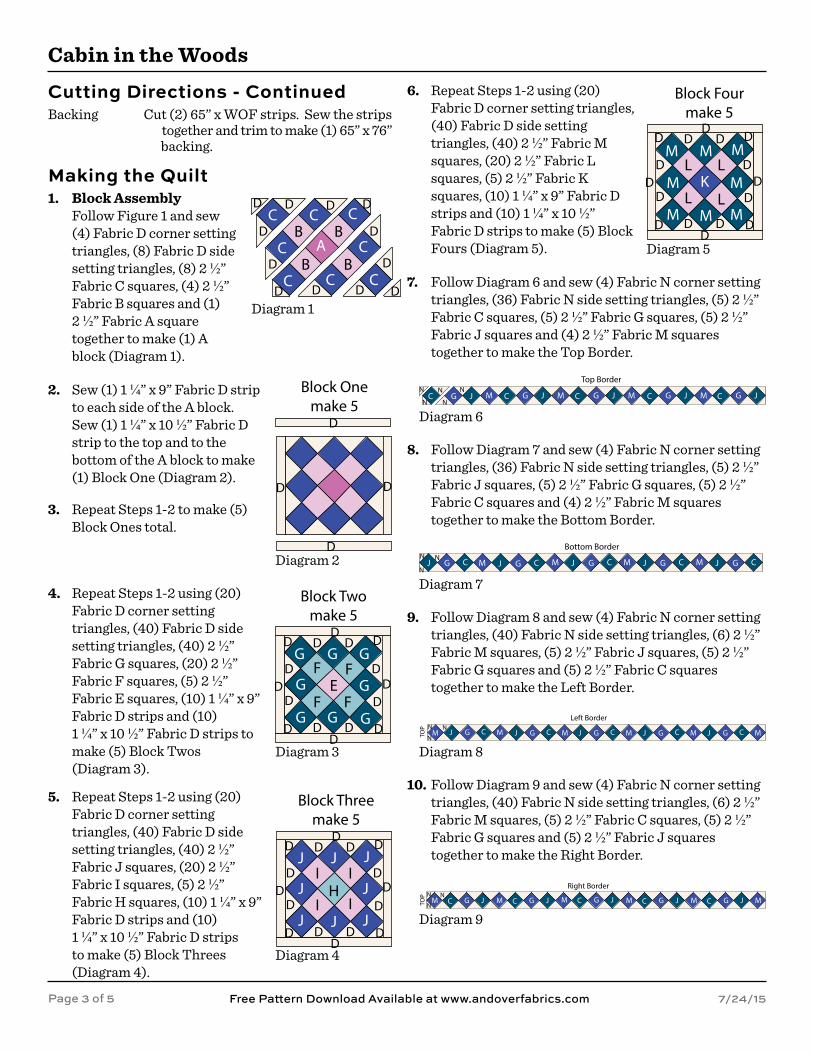
Making the Quilt
Cutting Directions - Continued
1.
2.
3.
4.
5.
6.
7.
8.
Diagram 1
Diagram 3
Diagram 4
Diagram 5
Diagram 6
Diagram 7
Diagram 8
Diagram 9
Diagram 2
Page 3 of 5
Backing Cut (2) 65” x WOF strips. Sew the strips together and trim to make (1) 65” x 76” backing.
Block AssemblyFollow Figure 1 and sew (4) Fabric D corner setting triangles, (8) Fabric D side setting triangles, (8) 2 ½” Fabric C squares, (4) 2 ½” Fabric B squares and (1) 2 ½” Fabric A square together to make (1) A block (Diagram 1).
A
C
C
C
C C
C
C C
D
D D D D
D
D
D D D
D
D
B B
B B
Sew (1) 1 ¼” x 9” Fabric D strip to each side of the A block. Sew (1) 1 ¼” x 10 ½” Fabric D strip to the top and to the bottom of the A block to make (1) Block One (Diagram 2).
Block Onemake 5
D D
D
D
Repeat Steps 1-2 to make (5) Block Ones total.
Repeat Steps 1-2 using (20) Fabric D corner setting triangles, (40) Fabric D side setting triangles, (40) 2 ½” Fabric G squares, (20) 2 ½” Fabric F squares, (5) 2 ½” Fabric E squares, (10) 1 ¼” x 9” Fabric D strips and (10) 1 ¼” x 10 ½” Fabric D strips to make (5) Block Twos (Diagram 3).
Block Twomake 5
G G G
G
G G G
G
D
D
D D
DD
D
D
D D D
D
D
D
DD
EF
F F
F
Block Threemake 5
J J J
J
JJJ
J D
D
D
D
DD
D
D
D D D
D
D
D
DD
HI I
I I
Repeat Steps 1-2 using (20) Fabric D corner setting triangles, (40) Fabric D side setting triangles, (40) 2 ½” Fabric J squares, (20) 2 ½” Fabric I squares, (5) 2 ½” Fabric H squares, (10) 1 ¼” x 9” Fabric D strips and (10) 1 ¼” x 10 ½” Fabric D strips to make (5) Block Threes (Diagram 4).
Repeat Steps 1-2 using (20) Fabric D corner setting triangles, (40) Fabric D side setting triangles, (40) 2 ½” Fabric M squares, (20) 2 ½” Fabric L squares, (5) 2 ½” Fabric K squares, (10) 1 ¼” x 9” Fabric D strips and (10) 1 ¼” x 10 ½” Fabric D strips to make (5) Block Fours (Diagram 5).
Block Fourmake 5
K
M M M
M
MMM
M D
D
D
D
DD
D
D
D D D
D
D
D
DD
L L
L L
Top Border
N
NN
N
NG J G J MMC C G J MC G J MC G JC
Follow Diagram 6 and sew (4) Fabric N corner setting triangles, (36) Fabric N side setting triangles, (5) 2 ½” Fabric C squares, (5) 2 ½” Fabric G squares, (5) 2 ½” Fabric J squares and (4) 2 ½” Fabric M squares together to make the Top Border.
Follow Diagram 7 and sew (4) Fabric N corner setting triangles, (36) Fabric N side setting triangles, (5) 2 ½” Fabric J squares, (5) 2 ½” Fabric G squares, (5) 2 ½” Fabric C squares and (4) 2 ½” Fabric M squares together to make the Bottom Border.
Bottom BorderN
N
NM GJ CM GJ CM GJ CM GJ CGJ C
Follow Diagram 8 and sew (4) Fabric N corner setting triangles, (40) Fabric N side setting triangles, (6) 2 ½” Fabric M squares, (5) 2 ½” Fabric J squares, (5) 2 ½” Fabric G squares and (5) 2 ½” Fabric C squares together to make the Left Border.
9.
10.
Left BorderN
N
NGJ C MGJ C MGJ C MGJ C MGJ C MMTO
P
Follow Diagram 9 and sew (4) Fabric N corner setting triangles, (40) Fabric N side setting triangles, (6) 2 ½” Fabric M squares, (5) 2 ½” Fabric C squares, (5) 2 ½” Fabric G squares and (5) 2 ½” Fabric J squares together to make the Right Border.
Right BorderN
N
NM G JC M G JC M G JC M G JC M MG JCTO
P

Cabin in the Woods
Free Pattern Download Available at www.andoverfabrics.com 7/24/15Page 4 of 5
14.
15.
16.
11.
12.
13.
23.
24.
25.
Quilt Layout
Finishing the QuiltLayer and quilt as desired.
Bind as desired.
Quilt Top Assembly: (Refer to the Quilt Layout when assembling the quilt top.)
Diagram 10
Sew (5) 1 ½” Fabric K squares and (4) 1 ½” x 10 ½” Fabric B strips together, alternating them, to make (1) sashing strip (Diagram 10). Repeat to make (6) sashing strips total.
Sew (5) 1 ½” x 10 ½” Fabric B strips and (4) assorted Blocks together, alternating them, to make (1) row. Repeat to make (5) rows total.
Sew (6) sashing strips and (5) rows together, alternating them, to make the quilt top.
Sew (1) 2” x 56 ½” Fabric N strip to each side of the quilt top. Sew (1) 2 ⅛” x 48 ⅝” Fabric N strip to the top and to the bottom of the quilt top.
Sew the Left Border and Right Border to the quilt top. Sew the Top Border and Bottom to the quilt top.
Sew (1) 2” x 65 ½” Fabric N strip to each side of the quilt top. Sew (1) 2” x 57 ¼” Fabric N strip to the top and to the bottom of the quilt top.
Sew the (7) 2 ½” x WOF Fabric K strips together, end to end with a 45-degree seams, to make the binding. Fold this long strip in half lengthwise with wrong sides together and press.
B B B BK K K K Ksashing -make 6
N
B B B B B
B B B B B
B B B B B
B B B B B
B B B B B
N
N
N
NN N N
Little House on the Prairie®BY KATHY HALL
Free Pattern Download Available1384 Broadway New York, NY 10018
Tel. (800) 223-5678 • andoverfabrics.com
Fabrics shown are 25% of actual size.
A recognized leader in the quilting industry,Andover Fabrics features designs by a wide variety of talented fabric artists. Catering to the tastes of creative and dedicated quilters, Andover has a style for every look — authentic reproductions, romantic florals, exotic Orientals, ethnic influence, whimsical, funky, playful or basic. Collections are supported with "free-to-use" patterns on their website.
About Our Fabrics
7926-L 7926-Y 7925-L 7925-R
7924-L 7923-G 7923-L 7952-B 7952-K
7952-T 7951-B 7951-G 7951-R 7950-C
7950-E 7950-Y 7949-B 7949-E 7949-G
7949-K
7948-B 7948-R 7948-Y 7947-B 7947-K
7947-N 7958-NL 7958-RL 7958-TL 7957-NR
7957-RO 7957-TK 7956-N 7956-RL 7956-TL
7955-N 7955-R 7955-T 7954-N 7954-RN
7954-TK 7953-N 7953-R 7953-T
7949-N 7949-P 7949-T 7949-Y
1 1/2 yds
2 yds
¾ yd
7/8 yd
3/8 yd
3/8 yd
7/8 yd
3/8 yd 1/8 yd
3/8 yd
1/8 yd 1/4 yd1/4 yd
1/4 yd
3/8 yd
4 yds(includes backing)
(includes binding)
7924-B
Related Documents