71-1080-250 6/08 Lionel Hogwarts Express G Gauge Owner's Manual Lionel Hogwarts Express G Gauge Owner's Manual Adult Assembly Required Adult Assembly Required

Welcome message from author
This document is posted to help you gain knowledge. Please leave a comment to let me know what you think about it! Share it to your friends and learn new things together.
Transcript

71-1080-2506/08
LionelHogwarts Express
G GaugeOwner's Manual
LionelHogwarts Express
G GaugeOwner's Manual
Adult Assembly RequiredAdult Assembly Required

Congratulations!
Congratulations on your purchase of The Hogwarts Express G Gauge Train Set. This set features everything you need to get started – a wireless remote control, a huge loop of
easy-to-assemble track, a string of detailed cars, a tender and locomotive.
Read this instruction manual thoroughly for important tips on operating and maintaining your ‘G’ Gauge set.
The Hogwarts Express Set Inventory• 1 The Hogwarts Express steam locomotive• 1 Tender • 1 Combo car• 1 Passenger car• 12 curved tracks• 4 strait tracks• 1 Wireless remote controller• 2 ‘AA’ batteries (for the wireless remote)• 6 ‘C’ batteries for the tender• 1 Owners manual
HARRY POTTER, characters, names and related indicia aretrademarks of and © Warner Bros. Entertainment Inc.Harry Potter Publishing Rights © JRK.WB SHIELD: TM & © Warner Bros. Entertainment Inc. (s08)

�
Table of contentsTrack assembly and layoutJoining the track sections 4Layouts 5
Battery installation and optionsInstallation and optionsInstalling 'AA' batteries into the wireless controller 6Installing 'C' batteries into the tender 7
Operating your Hogwarts Express trainConnecting the engine and coal tender 8Power switches on the wireless controller 9Power activation button on the engine 10Operating your wireless controller 11
Maintenance and operationsUsing 9.6 volt rechargeable batteries (not included) 12Cleaning the track 13Troubleshooting 14Notes 15Limited Warranty/Lionel Service 16
The following Lionel marks may be used throughout this instruction manual and are protected under law. All rights reserved.
Lionel®, TrainMaster®, Odyssey®, RailSounds®, CrewTalk™, TowerCom™, DynaChuff™, StationSounds™, Pullmor®, ElectroCoupler™, Magne-Traction®, CAB-1® Remote Controller, PowerMaster®, Lionel ZW®, ZW®, PowerHouse®, TMCC®, Lionelville™, Lockon®, Wireless Tether™, LionMaster®, FatBoy™, American Flyer®, TrainSounds™, PowerMax™, LEGACY™, PowerMax™ Plus
The name FasTrack® is used with permission from Pitsco, Inc.

�
Track assembly and layout
Joining the track sections
Join the track sections together by placing them on a flat surface and inserting the plastic tabs of each track section into the corresponding openings of the next section. Press or
squeeze the ties together to connect. This may require the help of an adult. Recheck all track connection points upon completing your layout to be sure they are secure.
To disassemble the track just lift one of the track sections slightly at an angle where they join together and they will snap apart. See Figure 1.
The rails should be kept clean, dry, and free from oil, grease, and dirt. Clean the track periodically with a clean soft cloth.
Figure 1. Assembling and disassembling the track

5
Track assembly and layout
Layouts
These are three possible layouts you can make with the track provided. See Figure 2.
Circle
• Connect all curved track
Extended Circle
• Make 4 ninety degree curve sections by joining 3 curved sections each
• Connect each ninety degree curve section by using 1 section of strait to join each 3 section curve.
Oval
• Make 2 half circle using 6 curve tracks for each. Make 2 long strait tracks using 2 sections each. Join the curves using the 2 long strait sections.
Figure 2. Possible track layouts

6
Battery installation and options
Installing ‘AA’ batteries into the wireless controller
Push the tab toward the door and lift to open battery compartment (as shown in Figure 5). Insert two ‘AA’ batteries orientating the +/- as shown in the bottom of the battery
compartment. Replace the battery door by first inserting the two tabs at the top of the door into the notches in the top of the battery compartment. Then close the door being sure the tab lock closes securely. See Figure 3.
When replacing the original batteries use Alkaline ‘AA’ batteries. Use only new batteries. Never mix new and used batteries or use different types together.
Figure 3. Opening and closing the battery compartment
7
Battery installation and options
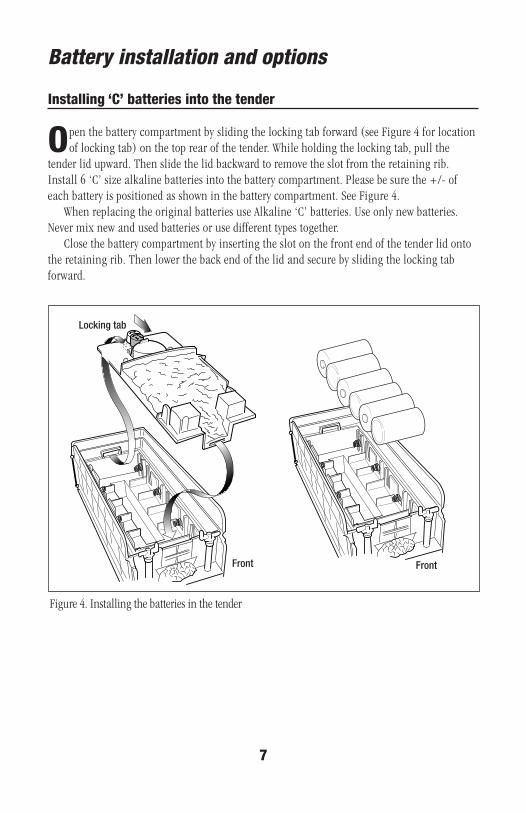
Installing ‘C’ batteries into the tender
Open the battery compartment by sliding the locking tab forward (see Figure 4 for location of locking tab) on the top rear of the tender. While holding the locking tab, pull the
tender lid upward. Then slide the lid backward to remove the slot from the retaining rib. Install 6 ‘C’ size alkaline batteries into the battery compartment. Please be sure the +/- of each battery is positioned as shown in the battery compartment. See Figure 4.
When replacing the original batteries use Alkaline ‘C’ batteries. Use only new batteries. Never mix new and used batteries or use different types together.
Close the battery compartment by inserting the slot on the front end of the tender lid onto the retaining rib. Then lower the back end of the lid and secure by sliding the locking tab forward.
Figure 4. Installing the batteries in the tender
Locking tab
FrontFront

8
Operation your Hogwarts Express train
Connecting the engine and coal tender
P lace the engine on the track first. Be sure that all wheels are within the track rails. Next insert the power plug into the receptacle in the center back of the engine platform. See
Figure 5.
The engine will not run without this power plug inserted into the engine.
Place the Coal Tender on the track behind the Engine and connect the couplers. Be sure all the Coal Tenders wheels are all on the track rails.
Remove all batteries when the train will not be used for an extended period of time.
Figure 5. Connecting the engine and the coal tender
Note!
IMPORTANT!
Connecting the couplers
�
Operation your Hogwarts Express train
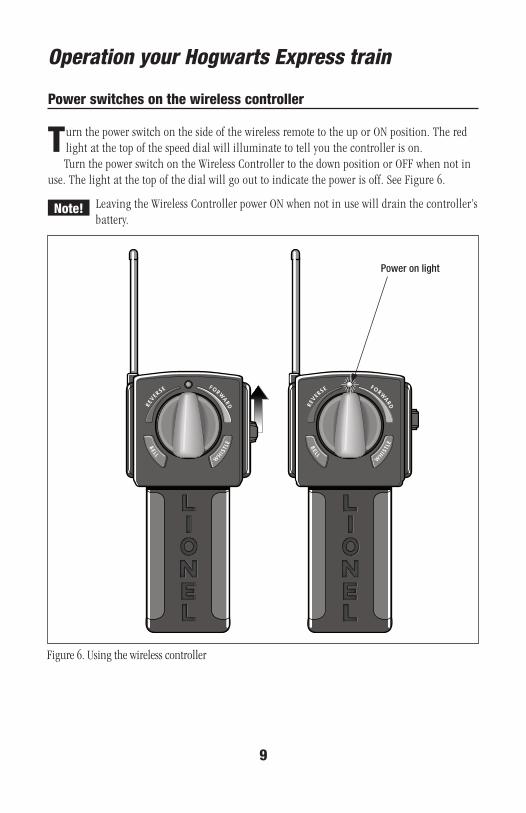
Power switches on the wireless controller
Turn the power switch on the side of the wireless remote to the up or ON position. The red light at the top of the speed dial will illuminate to tell you the controller is on. Turn the power switch on the Wireless Controller to the down position or OFF when not in
use. The light at the top of the dial will go out to indicate the power is off. See Figure 6.
Leaving the Wireless Controller power ON when not in use will drain the controller’s battery.
Figure 6. Using the wireless controller
Note!
FORWA
RDREV ERS E
W
HISTL
EB E L L
FORWA
RDREV ERS E
W
HISTL
EB E L L
Power on light

10
Operation your Hogwarts Express train
Power activation button on the engine
Press the red Power Activation button located on top of the boiler just in front of the cab area of the engine. The light in the front of the engine and stationary sounds will come
on to indicate the train is operational. See Figure 7.
The engine power automatically turns off if not used after 10 minutes. When the engine automatically times out into the off mode the light and stationary sounds turn off.
Just press the start button again to continue to play. Pressing the start button again will not shut the train off. You can either let it time out for 10 minutes or if required, disconnect the power cord from the back of the engine. Note the engine was designed to use the auto shut off to turn the engine off. Very little power is used during the time out period if Wireless Controller is not activating any operations. The stationary sounds and light will continue during this time out period until the engine shuts off at the end of the ten minutes.
Note!
Figure 7. Power Activation Button
11
Operation your Hogwarts Express train
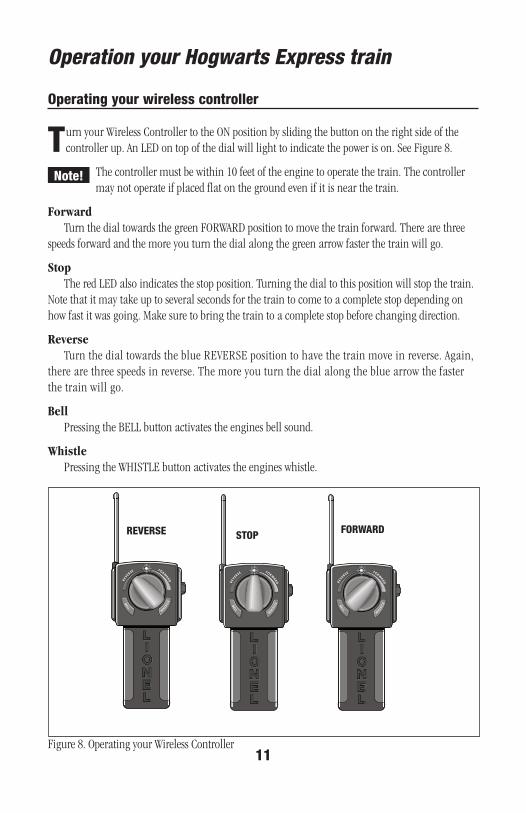
Operating your wireless controller
Turn your Wireless Controller to the ON position by sliding the button on the right side of the controller up. An LED on top of the dial will light to indicate the power is on. See Figure 8.
The controller must be within 10 feet of the engine to operate the train. The controller may not operate if placed flat on the ground even if it is near the train.
ForwardTurn the dial towards the green FORWARD position to move the train forward. There are three
speeds forward and the more you turn the dial along the green arrow faster the train will go.
StopThe red LED also indicates the stop position. Turning the dial to this position will stop the train.
Note that it may take up to several seconds for the train to come to a complete stop depending on how fast it was going. Make sure to bring the train to a complete stop before changing direction.
ReverseTurn the dial towards the blue REVERSE position to have the train move in reverse. Again,
there are three speeds in reverse. The more you turn the dial along the blue arrow the faster the train will go.
BellPressing the BELL button activates the engines bell sound.
WhistlePressing the WHISTLE button activates the engines whistle.
Note!
Figure 8. Operating your Wireless Controller
FORWA
RDREV ERS E
W
HIST L
EB E L L
FORWA
RDREV ER S E
W
HISTL
EB E L L
FORWA
RDREV ER S E
W
HISTL
EB E L L
FORWARDSTOPREVERSE

12
Maintenance and operations
Using �.6 Volt rechargeable batteries (not included)
Open the battery compartment by sliding the locking tab forward (see Figure 4 on page 7 for location of locking tab) on the top rear of the tender.While holding the locking tab,
pull the tender lid upward. Then slide the lid backward to remove the slot from the retaining rib. Refer to Figure 4 on page 7.
Place the 9.6 Volt rechargeable battery in the center slot of the large battery compartment connecting battery power plug into it’s receptacle. See Figure 10.
Close the battery compartment by inserting the slot on the rear end of the tender lid onto the retaining rib. Then lower the front end of the lid and secure by sliding the locking tab backward.
The 9.6 Volt battery should be removed from the tender for charging as this produces heat that could damage your tender.
It should be noted that the battery life of the rechargeable will be significantly less when using 6 Alkaline ‘C’ batteries.
When using a 9.6V rechargeable battery DO NOT place any ‘C’ batteries in the lower portion of the battery box. This could result in damage to the engines electronics.
IMPORTANT!
Figure 10. Using a 9.6 Volt Rechargeable Batteries
�.6v batteries must be placed vertically in the slot provided as shown. Do not lay the horizontally as this may cause damage to your tender.
IMPORTANT!

1�
Maintenance and operations
Cleaning the track
I t is very important to keep the track and wheels free from dirt and grease. Wipe them with a soft cloth whenever they get dirty. This will help the engine run more efficiently.

1�
Maintenance and operations
Troubleshooting
Train will not run and engine light is not on.
1. Check if engine automatically timed out and shut off by pressing the engines Power Activation button (see page 10).
2. Check that the wire connecting the engine and coal tender is securely in its socket. After checking this connection press the Power Activation button (see page 8).
3. After checking the above and if the light is still not on replace the 6 ‘C’ batteries in the tender. Be sure the batteries are oriented as indicated in the battery compartments. After replacing batteries press the Power Activation Button (see page 7).
Train will not run but engine light and sounds are on.
1. Check the to be sure the Wireless Controller power is in the On position. This will be indicated by the red LED being illuminated.
2. Try moving the controller closer to the engine. Although designed for an optimal range of 10 feet the signal can be weakened with by metal object or other interference.
3. Be sure the controller is not lying flat on floor or on the same surface as the train. Try picking the controller upright.
4. Replace the 2 AA batteries in the controller. Be sure the batteries are oriented as indicated in the battery compartment.
Train runs but wheels slip on track.
1. Check top of track rails and rubberized drive wheels for dirt or grease. Clean with a soft dry or slightly dampened cloth.
2. Check to see that all wheels of both engine, tender and cars are located properly on the track.

15
Notes

Limited Warranty/Lionel Service
T his Lionel product, including all mechanical and electrical components, moving parts, motors and structural components, except for light bulbs, is warranted to the original consumer-purchaser, for one
year against original defects in materials or workmanship when purchased through an authorized Lionel merchant.
This warranty does NOT cover normal wear and tear, light bulbs, defects appearing in the course of commercial use, or damage resulting from abuse or misuse of the product by the purchaser. Transfer of this product by the original consumer-purchaser to another person voids this warranty. Modification of this product voids this warranty.
Any warranted product which is defective in original materials or workmanship and is delivered by the original consumer-purchaser to Lionel L.L.C. or an authorized Lionel L.L.C. Service Center, together with proof of original purchase will, at the option of Lionel L.L.C., be repaired or replaced, without charge for parts or labor. In the event the defective product cannot be repaired, and a replacement is not available, a refund of the original purchase price will be granted. Any products on which warranty service is sought must be sent freight or postage prepaid, as transportation and shipping charges are not covered by the warranty.
In no event shall Lionel L.L.C. be liable for incidental or consequential damages. Some states do not allow the exclusion or limitation of incidental or consequential damages, so the above
exclusion may not apply to you.This limited warranty gives you specific legal rights, and you may have other rights which vary from state
to state.
Instructions for Obtaining ServiceIf service for this Lionel L.L.C. product is required, bring the item, along with your dated sales receipt and
completed warranty information to the nearest Authorized Lionel Service Center. Your nearest Lionel Service Center can be found by calling 1-800-4-Lionel, or by accessing our Website at www.lionel.com.
If you prefer to send your product back to Lionel L.L.C. for repair in Michigan, you must first call 586-949-4100 or FAX 586-949-5429, or write to Customer Service, P.O. Box 748, New Baltimore, MI 48047-0748, stating what the item is, when it was purchased and what seems to be the problem. You will be sent a return authorization letter and label to ensure your merchandise will be properly handled upon receipt.
Once you have received your return authorization and label, make sure that the item is packed to prevent damage during shipping and handling. We suggest that you use the product’s original packaging. This shipment must be prepaid and we recommend that it be insured.
Please make sure you have followed all of the above instructions carefully before returning any merchandise for service. You may choose to have your product repaired by one of our Authorized Lionel Service Centers after its warranty has expired. A reasonable service fee will be charged.
Warranty InformationPlease complete the information below and keep it, along with your dated sales receipt. You must present
this and your dated sales receipt when requesting warranty service.
Name ������������������������������������������������������������������������
Address �����������������������������������������������������������������������
Place of Purchase ����������������������������������������������������������������
Date of Purchase �����������������������������������������������������������������
Product Number �����������������������������������������������������������������
Product Description ���������������������������������������������������������������
©2008 LIONEL L.L.C., CHESTERFIELD, MI 48051-2493UNITED STATES OF AMERICAPRINTED IN CHINA
Related Documents