71-19749-250 3/98 Lionel Bay Window Crew Talk Caboose Owner’s Manual

Welcome message from author
This document is posted to help you gain knowledge. Please leave a comment to let me know what you think about it! Share it to your friends and learn new things together.
Transcript
71-19749-2503/98
Lionel Bay WindowCrew Talk Caboose
Owner’s Manual
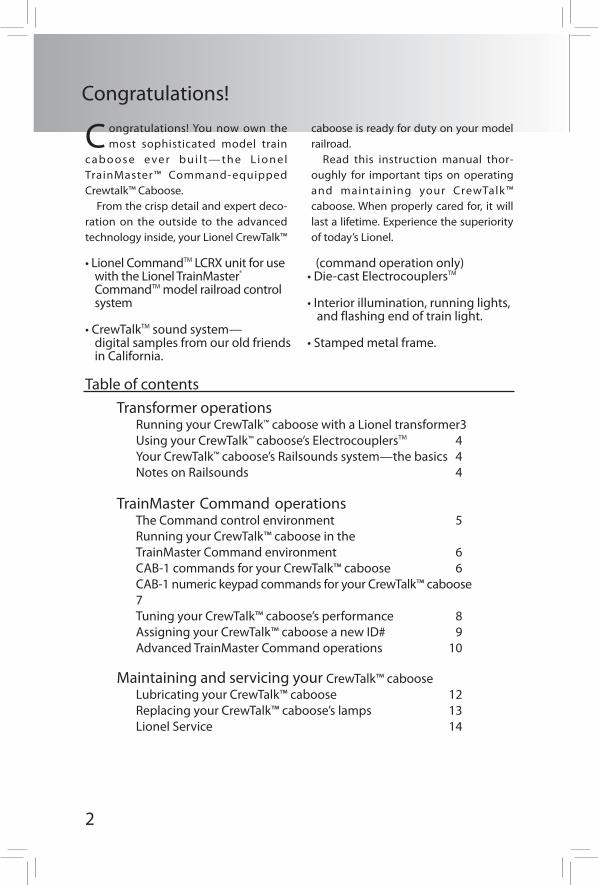
Table of contents
Congratulations! Transformer operations
2
C ongratulations! You now own the most sophisticated model train
c a b o o s e e ve r b u i l t— t h e L i o n e l TrainMaster™ Command-equipped Crewtalk™ Caboose.
From the crisp detail and expert deco-ration on the outside to the advanced technology inside, your Lionel CrewTalk™
caboose is ready for duty on your model railroad.
Read this instruction manual thor-oughly for important tips on operating and maintaining your CrewTalk™ caboose. When properly cared for, it will last a lifetime. Experience the superiority of today’s Lionel.
• Lionel CommandTM LCRX unit for use with the Lionel TrainMaster® CommandTM model railroad control system
• CrewTalkTM sound system—digital samples from our old friends in California.
(command operation only)• Die-cast ElectrocouplersTM
• Interior illumination, running lights, and flashing end of train light.
• Stamped metal frame.
Transformer operationsRunning your CrewTalk™ caboose with a Lionel transformer 3Using your CrewTalk™ caboose’s ElectrocouplersTM 4Your CrewTalk™ caboose’s Railsounds system—the basics 4Notes on Railsounds 4
TrainMaster Command operationsThe Command control environment 5Running your CrewTalk™ caboose in theTrainMaster Command environment 6CAB-1 commands for your CrewTalk™ caboose 6CAB-1 numeric keypad commands for your CrewTalk™ caboose 7Tuning your CrewTalk™ caboose’s performance 8Assigning your CrewTalk™ caboose a new ID# 9Advanced TrainMaster Command operations 10
Maintaining and servicing your CrewTalk™ cabooseLubricating your CrewTalk™ caboose 12Replacing your CrewTalk™ caboose’s lamps 13Lionel Service 14

Congratulations! Transformer operations
3
Running your CrewTalk™ caboose with a Lionel transformer
Place your CrewTalk™ caboose on Lionel or Lionel- • For prototypical operation your CrewTalk caboose should have the run-
ning lights and flashing end of train light towards the rear.
2 Power up your CrewTalk™ caboose with your transformer.• Your CrewTalk™ caboose is designed to operate on 7-18 volts alternating
current. Virtually all Lionel and Lionel-compatible alternating-current transformers are suitable; we recommend the TrainMaster Command model railroad control system.
• Do not power your Crewtalk™ Caboose with DireCt Current (DC). Damage to sensitive electronic components may occur.
• When you first power up your track, the CrewTalk™ caboose will wait between 3 and 8 seconds as it “listens” for digital language from the TrainMaster Command Base (available separately). When it’s determined that it’s on a conventional (nonCommand) railroad, the CrewTalk™ caboose’s interior lights will illuminate, and an air release sound will occur.
3 Move ‘em out!
• Get your CrewTalk™ caboose moving, attach it to the end of a train. As your train moves along, any stop will produce an air release sound automatically.
1

Notes on Railsounds • Use the volume control knob on the underside of the CrewTalk™ caboose to adjust sound output. (See page 12 for its location.)
• F o r e v e n m o r e a u t h e n t i c Railsounds effects, operate in the TrainMaster Command environment.
Your CrewTalk™ caboose’s Railsounds system—the basics
L ionel Railsounds is the most realistic model railroad sound system in the
world. Your CrewTalk™ caboose features d i g i t a l s a m p l e s , f o r the ultimate in realism. Apply track power
and the CrewTalk caboose delivers an authentic air release sound. This occurs at start up, and every time you stop the train.
Transformer operations
4
Using your CrewTalk™ caboose’s Electrocouplers in the non-Command
To use your CrewTalk™ caboose’s Electrocoupler in the non-Command
environment, you must first couple a piece of rolling stock equipped with Lionel magnetic couplers directly to your
CrewTalk™ caboose. The magnetic cou-pler on the rolling stock will then react to the magnetic field generated by a Lionel remote-control track section (available separately). Place your rolling stock’s cou-pler “trigger disc” over the central coil of a remote-control track section and press uncouple on the controller. The magnetic field pulls the disc downward, and the coupler opens.
Yo u r C r e w Ta l k ™ c a b o o s e Electrocouplers will NOT open manually or by using a remote-control track sec-
Magnetic coupler on the rolling stock cou-pled to your CrewTalk™ caboose
Note!
Remote-control track section
Using your CrewTalk™ caboose’s Electrocoupler in the TrainMaster Command
Your Lionel CrewTalk™ caboose is equipped with front and rear
Electrocouplers that respond to the COUPLER F (front) and COUPLER R (rear) button on your CAB-1 remote when operated in the Trainmaster Command environment. Simply press either button on your CAB-1
remote, and that coupler opens.
Your CrewTalk™ caboose Electrocouplers are NOT designed to be opened manually.
Note!
There are no features in your CrewTalk caboose which respond to the horn or bell controls.Note!
TrainMaster Command opera-
5
Transformer operationsThe Command control environment
L ionel T rainMaster Command is the advanced model railroad control sys-
tem from Lionel. Your CrewTalk™ caboose is equipped with the Lionel LCRX for coil coupler and lighting control, and access to additional Railsounds features.
TrainMaster Command gives you the power to operate multiple
Command-equipped locomotives on the same track, at the same time.
to operate in CommanD, you neeD a CommanD base anD a Cab-1 remote. Find them both at your authorized Lionel retailer.
Place your CrewTalk™ caboose on Lionel or Lionel- • Make sure track power is OFF before placing your CrewTalk™ caboose on the
track.• Make sure your Lionel Command Base is ON and its communications
wire is connected to the COMMON post on your Lionel transformer or the U post on any of your installed PowerMasters.
• Once positioned on the track, increase track voltage to FULL (on PowerMaster, slide the CMD/CONV switch to CMD).
2 Address your CrewTalk™ caboose using CAB-1.
• Press ENG and 1 on the numeric keypad of your CAB-1 remote. This com-mand is sent by CAB-1 to the Command Base, which then translates your command into digital code. That code is sent around your railroad’s out-side rails in the form of a digital “halo.” All Command-equipped Lionels lis-ten to this digital communication, but they do not respond until they hear their individual ID number—in this case, “1.”
• The digital language of TrainMaster Command—and not track power—con-trols the actions of Command-equipped Lionels. Track power is simply like gasoline in the tank of your car—it gives you the power to go places, but it doesn’t tell you where to go or how fast to get there.
• All Command-equipped Lionels come factory-programmed with an ID# of “1.” To change the ID# of your CrewTalk™ caboose (equipped with an LCRX, designed to control lighting, coil couplers, and Railsounds features), see page 9.
3 Move ‘em out!• Throttle up or press any command button on CAB-1. Your CrewTalk™
caboose will respond to your every command. Read on.
1
TrainMaster Command opera-
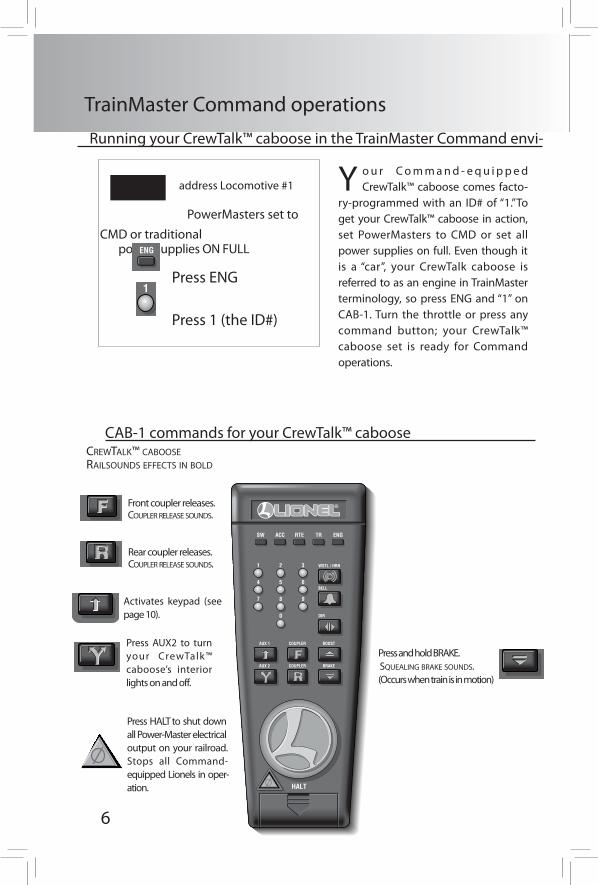
Press AUX2 to turn your CrewTalk™ caboose’s interior lights on and off.
Activates keypad (see page 10).
Press HALT to shut down all Power-Master electrical output on your railroad. Stops all Command-equipped Lionels in oper-ation.
CAB-1 commands for your CrewTalk™ caboose
HALT
Press and hold BRAKE. squealing brake sounDs.(Occurs when train is in motion)
Crewtalk™ Caboose railsounDs effeCts in bolD
Rear coupler releases. Coupler release sounDs.
Front coupler releases. Coupler release sounDs.
Y o u r C o m m a n d - e q u i p p e d CrewTalk™ caboose comes facto-
ry-programmed with an ID# of “1.”To get your CrewTalk™ caboose in action, set PowerMasters to CMD or set all power supplies on full. Even though it is a “car”, your CrewTalk caboose is referred to as an engine in TrainMaster terminology, so press ENG and “1” on CAB-1. Turn the throttle or press any command button; your CrewTalk™ caboose set is ready for Command operations.
address Locomotive #1
PowerMasters set to CMD or traditional power supplies ON FULL
Press ENG
Press 1 (the ID#)
TrainMaster Command operations TrainMaster Command operations
6
Running your CrewTalk™ caboose in the TrainMaster Command envi-

TrainMaster Command operations TrainMaster Command operations
7
0 Resets the CrewTalk™ caboose. air release sounD
1 R aises the volume of R ai l - sounds. sounD vol-
ume inCreases.
2 CrewTalk™ is the sound of inaudible
walkie-talkie communica-tion. When your CrewTalk caboose is programmed as part of a “train” (see pages 10-11) with an engine equipped with CrewTalk, the caboose and engine will “talk” to each other.
4 Lowers the volume of Rail- sounds. sounD volume DeCreases.
7 In your CrewTalk™ caboose, this command
produces a status announcement which preceeeds the delayed TowerCom™ announcement from an engine equipped with TowerCom™ feature. We call this Caboose Chatter.
8 Turns strobe light off.
9 Turns strobe light on.
W hen you press AUX1 on CAB-1, you turn the numeric
keypad into 10 command but-tons. The keypad lets you control extra command features (until you press any top-row button like SW, ACC, RTE, TR, or ENG). The CAB-1 keypad overlays
included with your CrewTalk™ caboose are designed to help you
learn the auxiliary features spe-cific to this locomotive. railsounDs sounDs in bolD italiC.
CAB-1 numeric keypad commands for your CrewTalk™ caboose
DIESELENGINERESET
VOLUME
STROBE
RPMS
SHUTDOWN
OFF ON
�
�
�
�
START-UP
TOWERCOM
There are different announcements which are activated by the numeric commands 2 and 7. See how many variations you can detect.
Note!

Tuning your CrewTalk™ caboose’s performance
SOUND QUALITYTo achieve your preferred Rail-
sounds master volume level, use the vol-ume control knob on the underside of the CrewTalk™ caboose (see page 12 for its location). Turn the knob left or right to adjust the volume to your liking.
For quick remote-control of volume below the master setting—like muting—use the CAB-1 numeric keypad’s volume control. Pressing AUX1 and then 4 on the numer ic keypad lowers overa l l Railsounds output.
TrainMaster Command operations TrainMaster Command operations
8

TrainMaster Command operations TrainMaster Command operations
9
Assigning your CrewTalk™ caboose a new ID#
As your fleet of Command-equipped Lionels grows, give your CrewTalk™
caboose its own ID#. Choose from any between 1 and 99. Turn the Command Base On and place the CrewTalk™ caboose on track. Power up, then slide the CrewTalk™ caboose reverse unit control switch to PROGRAM.
Using CAB-1, press ENG, the locomotive ID#, then press the SET button located under CAB-1’s removable panel. See the CrewTalk™ caboose’s interior lights flash; that’s your signal that the programming has been accepted. Slide the control switch to RUN. Your CrewTalk™ caboose is now programmed to respond to the num-ber you selected.
Set the CrewTalk caboose’s reverse unit program switch to PROGRAM. When you’ve finished program-ming the ID#, set the switch to RUN.
Assign a new I D# to your LCRX-equipped CrewTalk caboose
Command Base ON
Place the CrewTalk caboose on track
PowerMasters set to CMD or traditional power supplies ON FULL
Set the CrewTalk caboose reverse unit
control switch to PROGRAM
Turn track power on (PowerMasters):
Press BOOST
Program the CrewTalk caboose with a
new ID#:
Press ENGPress a number you choose (the ID#)
Press SET
Set reverse unit control switch to
FORWARD/RUN
We recommend that you choose an easy to remember ID# for your caboose. Some possibilities are part of the road number, your age, any two digit number that is not used by anoth-er engine. If you like, write the number on a small piece of tape and put this on the bottom of the frame to aid in remembering.
CrewTalk Caboose’sLCRX switch
Front of caboose Rear of caboose
PRO
G L
OC
K
FORW
ARD
RU
N
CrewTalk volume con-trol adjustment knob

Building “TRAINS”
Advanced TrainMaster Command operations Advanced TrainMaster Command operations
To experience the most from your Lionel CrewTalk™ caboose, you
should program it as part of a ”TRAIN” so your caboose will work together with a CrewTalk equipped engine.
In the TrainMaster Command system, ”TRAINS” are addressed using the TR button on CAB-1. When you build ”TRAINS” with TrainMaster Command, several Comand equipped cars or engines are grouped under a single TR ID#. ”TRAIN” building should be attempted only after you’ve mastered ordinary TrainMaster Command opera-tions.
Position your train on the track as you intend to run it. Select a “TRAIN”number you will use for programming. Because CAB-1’s TR button also means ”TRACK” for PowerMaster control, select a TRAIN (TR) ID# that is NOT a number identifying PowerMaster TRACKs. For example, if you’re using four PowerMasters and have named their TRACKs 1,2,3, and 4, choose a number between 5 and 9 for your TRAIN ID#.
Finally, make certain the locomotive’s and CrewTalk caboose’s direction switch is set to FORWARD/RUN.
All “ENGINES” reverse unit control switches set to FORWARD
Position your train on the track as
In Train # (you select), assign the engine using the F (front) button:
H e a r the horn/whis-
Press TR
Press SET
Press ? (the train num-ber you select)
Press F
”Front“ locomotive should be positioned in the forward direc-tion (headlight in front); caboose should be positioned at the end of your train with the running lights
build a Train # (you select) using engine numbers you
”Wrong” ENTRIES. If you press a wrong button while building a train, start over
with that particular locomotive assign-ment at the TR command; the assign-ment isn’t sent until you press SET.
Note!
10
CrewTalk engine CrewTalk
Press ?? (the engine number you assigned

Advanced TrainMaster Command operations Advanced TrainMaster Command operations
Press ? (the train num-ber you selected)
Press ? (the train num-ber you select)
11
Building “TRAINS”
Assigning the caboose
Now all “engines” respond together when you address them with their train number
If an engine is out of sync after a TR reset, read “lash-up trouble-shooting” on page 26 of your Trainmaster Instruction Manual
Press TR
Press SET
Press 0
Press
It‘s still an “ENGINE”. Whenever an ”ENGINE” is in a “TRAIN”, you can still individ-
ually address it (using its ENG ID#) to adjust lighting, open individual cou-plers, and tune performance.
Note!
Reset the direction of the lash-
Press TR
Press ?? (the engine number you assigned

12
Advanced TrainMaster Command operations Maintaining and servicing your CrewTalk™
Lubricating your CrewTalk™ caboose
Help your Lionel CrewTalk™ caboose lead a long and productive life on
your railroad by maintaining it properly.We recommend you purchase a Lionel
929 Lubrication and Maintenance kit (no. 6-62927), available from your Lionel dealer. Two basic rules to keep in mind: never over-lubricate (a small amount will do), and avoid getting grease or oil on the CrewTalk™ caboose’s wheels, contact roll-
ers, or your track.You’ll know your CrewTalk™ caboose
requires lubrication when visual inspection reveals dryness on the parts indicated in the illustration. Remove accumulated dirt and dust before lubricating, and always lubricate all rolling stock emerging from prolonged storage.
Lubricate with Lionel oil sparingly
Lubricate with Lionel oil sparingly
CrewTalk Caboose’s LCRX switchCrewTalk volume con-
trol adjustment knob
Underside of CrewTalk™ caboose
Front of CrewTalk™ caboose Rear of CrewTalk™ caboose
PRO
G L
OC
K
FORW
ARD
RU
N

13
Advanced TrainMaster Command operations Maintaining and servicing your CrewTalk™
To replace the lamps in your Bay-Window Caboose, remove the 2 end screws (see illus-
tration below). Then pull out both end ladders from their slots on the roof. Carefully lift the caboose body off the frame. be careful of the wires between the frame and body. Grasp the lamp base and pull the bulb straight up.
Replace the bulb with Lionel par t
no. 610-8049-300, available at your local Lionel Dealer or Lionel Service. Insert the new bulb into the lamp socket and reassemble the caboose.
Note! Press Aux2 to make sure lamps were not accidently turned off, before replacing bulb
Lionel part no. 600-8049-300
Lionel part no. 600-8049-300
Rear of CrewTalk™ caboose
Front of CrewTalk™ caboose

Limited Warranty/Lionel Service
T his Lionel product including all mechanical and electrical components, moving parts,
motors and structural components, except for light bulbs, is warranted to the original consumer-pur-chaser, for 1 year against original defects in materi-als or workmanship when purchased through an authorized Lionel merchant. This warranty does NOT cover normal wear and tear, light bulbs, defects appearing in the course of commercial use, or damage resulting from abuse or misuse of the product by the purchaser. Transfer of this product by the original consumer-purchaser to another person voids this warranty. Modification of this product voids this warranty. Any warranted product which is defective in original materials or workmanship and is delivered by the original consumer-purchaser to Lionel L.L.C. or an authorized Lionel L.L.C. service center, togetherwith proof of original purchase, will at the option of Lionel L.L.C. be repaired or replaced, without charge for parts or labor. In the event the defective product cannot be repaired, and a replacement is not available, a refund of the original purchase price will be granted. Any products on which war-ranty service is sought must be sent freight or postage prepaid, as transportation and shipping charges are not covered by the warranty.IN NO EVENT SHALL LIONEL L.L.C. BE LIABLE FOR INCIDENTAL OR CONSEQUENTIAL DAMAGES. Some states do not allow the exclusion or limita-tion of incidental or consequential damages, so the above exclusion may not apply to you.This limited warranty gives you specific legal rights, and you may have other rights which vary from state to state. INSTRUCTIONS FOR OBTAINING SERVICE If service for this Lionel L.L.C. product is required, bring the item, along with your dated sales receipt and completed warranty information to the near-est Authorized Lionel Service Center. Your nearest Lionel Service Center can be found by calling 1-800-4-Lionel, or by contacting our Website @
www.Lionel.com If you prefer to send it back to Lionel L.L.C. for factory repair, you must first call 810-949-4100 or FAX 810-949-5429 or write to Customer Service, P.O. Box 748 New Baltimore, MI 48047-0748 stating what the item is, when it was purchased and what seems to be the problem. You will be sent a return authorization letter and label to assure your mer-chandise will be properly handled upon receipt.Once you have received your return authorization and label, make sure that the item is packed to pre-vent damage during shipping and handling. We suggest that you use the products original packag-ing. This shipment must be prepaid and we rec-ommend that it be insured.Please make sure you have followed all of the above instructions carefully before returning any merchandise for service.
WARRANTY INFORMATIONPlease complete the information below and keep it, along with your dated sales receipt. You must present this and your dated sales receipt when requesting warranty service.
NAME___________________________________
ADDRESS________________________________
PLACE OF PURCHASE____________________
DATE OF PURCHASE _____________________
PRODUCT NUMBER _____________________
PRODUCT DESCRIPTION _________________________________________
© 1998 lionel llC, ChesterfielD mi 48051-2493uniteD states of ameriCa
Related Documents