OpenStack with Kolla GitHub Web Hooks with Bash Run GNOME in a Container What Exactly Is DevOps? Building a Successful Infrastructure Configuration Management with Ansible CI/CD with FOSS Tools Calculating the ROI of DevSecOps PLUS GEEK GUIDE ISSUE 301 | AUGUST 2019 www.linuxjournal.com Since 1994: The original magazine of the Linux community

Welcome message from author
This document is posted to help you gain knowledge. Please leave a comment to let me know what you think about it! Share it to your friends and learn new things together.
Transcript

OpenStack with Kolla
GitHub Web Hooks with Bash
Run GNOME in a Container
What Exactly Is DevOps?
Building a Successful Infrastructure
Configuration Management with Ansible
CI/CD with FOSS Tools
Calculating the ROI of DevSecOps
PLUS GEEK GUIDE ISSUE 301 | AUGUST 2019
www.linuxjournal.com
Since 1994: The original magazine of the Linux community

CONTENTS AUGUST 2019ISSUE 301
2 | August 2019 | https://www.linuxjournal.com
61 Experts Attempt to Explain DevOps—and Almost Succeed by Bryan Lunduke
What is DevOps? How does it relate to other ideas and methodologies within software development?
68 Continuous Integration/Continuous Development with FOSS Tools by Quentin Hartman
Up your DevOps game! Get the fundamentals of CI/CD with FOSS tools now!
78 Digging Through the DevOps Arsenal: Introducing Ansible by Petros Koutoupis
If you need to deploy hundreds of server or client nodes in parallel, maybe on premises or in the cloud, and you need to configure each and every single one of them, what do you do?
88 My Favorite Infrastructure by Kyle Rankin
Take a tour through the best infrastructure I ever built with stops in architecture, disaster recovery, configuration management, orchestration and security.
60 DEEP DIVE: DevOps
BONUS: GEEK GUIDE Calculating the ROI of DevSecOps by Petros Koutoupis

LINUX JOURNAL (ISSN 1075-3583) is published monthly by Linux Journal, LLC. Subscription-related correspondence may be sent to 9597 Jones Rd, #331, Houston, TX 77065 USA. Subscription rate is $34.50/year. Subscriptions start with the next issue.
CONTENTS
3 | August 2019 | https://www.linuxjournal.com
6 The DevOps Issue by Bryan Lunduke
8 From the Editor by Doc SearlsWhere the Internet Gets Real
UPFRONT14 DNA Geometry with cadnano
by Joey Bernard
21 Patreon and Linux Journal
22 Loadsharers: Funding the Load-Bearing Internet Person by Eric S. Raymond
27 Reality 2.0: a Linux Journal Podcast
28 News Briefs
COLUMNS32 Kyle Rankin’s Hack and /
RV Offsite Backup Update
37 Reuven M. Lerner’s At the Forge
Understanding Python’s asyncio
44 Dave Taylor’s Work the Shell
Bash Shell Games: Continuing Development of the Go Fish! Game
51 Zack Brown’s diff -u
What’s New in Kernel Development
166 Glyn Moody’s Open Sauce
Open Source Is Good, but How Can It Do Good?
AT YOUR SERVICESUBSCRIPTIONS: Linux Journal is available as a digitalmagazine, in PDF, EPUB and MOBI formats. Renewing your subscription, changing your email address for issue delivery, paying your invoice, viewing your account details or other subscription inquiries can be done instantly online: https://www.linuxjournal.com/subs. Email us [email protected] or reach us via postal mail at Linux Journal, 9597 Jones Rd #331, Houston, TX 77065 USA. Please remember to include your complete name and address when contacting us.
ACCESSING THE DIGITAL ARCHIVE: Your monthly downloadnotifications will have links to the different formats and to the digital archive. To access the digital archive at any time, log in at https://www.linuxjournal.com/digital.
LETTERS TO THE EDITOR: We welcome your lettersand encourage you to submit them at https://www.linuxjournal.com/contact or mail them toLinux Journal, 9597 Jones Rd #331, Houston, TX 77065 USA. Letters may be edited for space and clarity.
SPONSORSHIP: We take digital privacy and digitalresponsibility seriously. We've wiped off all old advertising from Linux Journal and are starting with a clean slate. Ads we feature will no longer be of the spying kind you find on most sites, generally called "adtech". The one form of advertising we have brought back is sponsorship. That's where advertisers support Linux Journal because they like what we do and want to reach our readers in general. At their best, ads in a publication and on a site like Linux Journal provide useful information as well as financial support. There is symbiosis there. For further information, email: [email protected] or call +1-360-890-6285.
WRITING FOR US: We always are looking for contributedarticles, tutorials and real-world stories for the magazine. An author’s guide, a list of topics and due dates can be found online: https://www.linuxjournal.com/author.
NEWSLETTERS: Receive late-breaking news, technical tipsand tricks, an inside look at upcoming issues and links to in-depth stories featured on https://www.linuxjournal.com. Subscribe for free today: https://www.linuxjournal.com/enewsletters.
CONTENTS
4 | August 2019 | https://www.linuxjournal.com
ARTICLES106 Build a Versatile OpenStack Lab with Kolla
by John S. TonelloHone your OpenStack skills with a full deployment in a single virtual machine.
127 Running GNOME in a Container by Adam VerslypeContainerizing the GUI separates your work and play.
141 Writing GitHub Web Hooks with Bash by Andy CarlsonBring your GitHub repository to the next level of functionality.
151 Words, Words Words—Introducing OpenSearchServer by Marcel GagnéHow to create your own search engine combined with a crawler that will index all sorts of documents.

EDITOR IN CHIEF: Doc Searls, [email protected]
EXECUTIVE EDITOR: Jill Franklin, [email protected]
DEPUTY EDITOR: Bryan Lunduke, [email protected]
TECH EDITOR: Kyle Rankin, [email protected]
ASSOCIATE EDITOR: Shawn Powers, [email protected]
EDITOR AT LARGE: Petros Koutoupis, [email protected]
CONTRIBUTING EDITOR: Zack Brown, [email protected]
SENIOR COLUMNIST: Reuven Lerner, [email protected]
SENIOR COLUMNIST: Dave Taylor, [email protected]
PUBLISHER: Carlie Fairchild, [email protected]
ASSOCIATE PUBLISHER: Mark Irgang, [email protected]
DIRECTOR OF DIGITAL EXPERIENCE: Katherine Druckman, [email protected]
DIRECTOR OF SALES: Danna Vedder, [email protected]
GRAPHIC DESIGNER: Garrick Antikajian, [email protected]
ACCOUNTANT: Candy Beauchamp, [email protected]
COMMUNITY ADVISORY BOARDJohn Abreau, Boston Linux & UNIX Group; John Alexander, Shropshire Linux User Group;
Robert Belnap, Classic Hackers UGA Users Group; Lawrence D’Oliveiro, Waikato Linux Users Group; Chris Ebenezer, Silicon Corridor Linux User Group; David Egts, Akron Linux Users Group;
Michael Fox, Peterborough Linux User Group; Braddock Gaskill, San Gabriel Valley Linux Users’ Group; Roy Lindauer, Reno Linux Users Group; James Mason, Bellingham Linux User Group;
Scott Murphy, Ottawa Canada Linux Users Group; Andrew Pam, Linux Users of Victoria; Bob Proulx, Northern Colorado Linux User's Group; Ian Sacklow, Capital District Linux Users Group; Ron Singh, Kitchener-Waterloo Linux User Group; Jeff Smith, Kitchener-Waterloo Linux User Group;
Matt Smith, North Bay Linux Users’ Group; James Snyder, Kent Linux User Group; Paul Tansom, Portsmouth and South East Hampshire Linux User Group;
Gary Turner, Dayton Linux Users Group; Sam Williams, Rock River Linux Users Group; Stephen Worley, Linux Users’ Group at North Carolina State University;
Lukas Yoder, Linux Users Group at Georgia Tech
Linux Journal is published by, and is a registered trade name of, Linux Journal, LLC. 4643 S. Ulster St. Ste 1120 Denver, CO 80237
SUBSCRIPTIONSE-MAIL: [email protected]
URL: www.linuxjournal.com/subscribeMail: 9597 Jones Rd, #331, Houston, TX 77065
SPONSORSHIPSE-MAIL: [email protected]: Director of Sales Danna Vedder
Phone: +1-360-890-6285
LINUX is a registered trademark of Linus Torvalds.
Private Internet Access is a proud sponsor of Linux Journal .
Join a community with a deep
appreciation for open-source
philosophies, digital
freedoms and privacy.
Subscribe to Linux Journal Digital Edition
for only $2.88 an issue.
SUBSCRIBE TODAY!
5 | August 2019 | https://www.linuxjournal.com
6 | August 2019 | https://www.linuxjournal.com
Bryan Lunduke is a former Software Tester, former Programmer, former VP of Technology, former Linux Marketing Guy (tm), former openSUSE Board Member... and current Deputy Editor of Linux Journal, Marketing Director for Purism, as well as host of the popular Lunduke Show. More details: http://lunduke.com.
By Bryan Lunduke
Every few years a new term is coined within the computer industry—big data, machine learning, agile development, Internet of Things, just to name a few. You’d be forgiven for not knowing them all.
Some of these are new ideas. Some are refinements on existing ideas. Others still are simply notions we’ve all had for a long time, but now we have a new word to describe said notions.
Which brings me to a topic we cover in depth in this issue of Linux Journal: DevOps.
Not sure what DevOps is? Need it explained to you? It’s okay, I was in the same boat. Start off by reading “Experts Attempt to Explain DevOps—and Almost Succeed” to get a high-level explanation of what this whole DevOps brouhaha is all about.
Once you’ve got the concept of DevOps firmly implanted in your brain, it’s time to dive in and look at how specific parts of DevOps can be implemented, starting with “Continuous Integration/Continuous Development with FOSS Tools” by
The DevOps Issue

7 | August 2019 | https://www.linuxjournal.com
The DevOps Issue
Quentin Hartman, Director of Infrastructure and DevOps at Finalze.
Next, turn to Linux Journal’s very own Editor at Large (and senior performance software engineer at Cray), Petros Koutoupis, for a look at how to install and utilize Ansible to deploy and configure large numbers of Linux servers all at once. It’s a nifty tool to have in your toolbelt, especially when looking to do things “The DevOps Way”.
Okay, you’ve got the idea of DevOps, and you know some of the tools you can utilize with it as you build out a big, expansive online service. But what does a truly excellent system really look like? What components does it consist of? How does one go about selecting said components?
Luckily, we’ve got Kyle Rankin’s aptly titled “My Favorite Infrastructure” to answer those questions. Linux Journal ’s illustrious Tech Editor (and Chief Security Officer at Purism) gives a tour of, what he considers to be, the best infrastructure he ever built. Including details on the architecture, configuration management, security and disaster recovery.
Oh, but we’re not done! Ever want to build an OpenStack implementation on top of Fedora, openSUSE or Debian? John S. Tonello, the Global Technical Marketing Manager at SUSE, walks through exactly that with the help of free software tools like Kolla, Docker, qemu and pip. It’s a veritable smorgasbord of Linux server-y goodness.
Looking for something a little less DevOps-y? Marcel Gagné describes how to build your own search engine (seriously) in “Words, Words, Words—Introducing OpenSearchServer”, Andy Carlson writes about “Writing GitHub Web Hooks with Bash”, and Adam Verslype shows how to run GNOME (the whole desktop environment) within a container in “Running GNOME in a Container”. Oh, and be sure to check out the piece from Eric S. Raymond, titled “Loadshares: Funding the Load-Bearing Internet Person”, on the sustainability problem with having a small collection of individuals maintaining projects critical to the global internet infrastructure. ◾
Send comments or feedback via https://www.linuxjournal.com/contact or email [email protected].

8 | August 2019 | https://www.linuxjournal.com
Doc Searls is a veteran journalist, author and part-time academic who spent more than two decades elsewhere on the Linux Journal masthead before becoming Editor in Chief when the magazine was reborn in January 2018. His two books are The Cluetrain Manifesto, which he co-wrote for Basic Books in 2000 and updated in 2010, and The Intention Economy: When Customers Take Charge, which he wrote for Harvard Business Review Press in 2012. On the academic front, Doc runs ProjectVRM, hosted at Harvard’s Berkman Klein Center for Internet and Society, where he served as a fellow from 2006–2010. He was also a visiting scholar at NYU’s graduate school of journalism from 2012–2014, and he has been a fellow at UC Santa Barbara’s Center for Information Technology and Society since 2006, studying the internet as a form of infrastructure.
FROM THE EDITOR
Where the Internet Gets Real Local is the frontier of truth at the dawn of our Digital Age.
By Doc Searls
The internet showed up in our house in 1995. When that happened, I mansplained to my wife that it was a global drawstring through all the phone and cable companies of the world, pulling everybody and everything together—and that this was going to be good for the world.
My wife, who ran a global business, already knew plenty of things about the internet and expected good things to happen as well. But she pushed back on the global thing, saying “the sweet spot of the internet is local.” Her reason: “Local is where the internet gets real.” By which she meant the internet wasn’t real in the physical sense anywhere, and we still live and work in the physical world, and that was a huge advantage.
Later I made a big thing about how the internet was absent of distance, an observation I owe to Craig Burton. Here’s Craig in a 1999 interview for a Linux Journal newsletter that I sourced later in this 2000 column:

9 | August 2019 | https://www.linuxjournal.com
FROM THE EDITOR
I see the Net as a world we might see as a bubble. A sphere. It’s growing larger and larger, and yet inside, every point in that sphere is visible to every other one. That’s the architecture of a sphere. Nothing stands between any two points. That’s its virtue: it’s empty in the middle. The distance between any two points is functionally zero, and not just because they can see each other, but because nothing interferes with operation between any two points. There’s a word I like for what’s going on here: terraform. It’s the verb for creating a world. That’s what we’re making here: a new world. Now the question is, what are we going to do to cause planetary existence? How can we terraform this new world in a way that works for the world and not just ourselves?
In Linux Journal (see my article “The Giant Zero, Part 0.x”) and elsewhere, I joined Craig in calling that world “the giant zero”. Again my wife weighed in with a helpful point: the internet has no gravity as well as no distance—meaning we are not only placeless when we’re on the net, but that prepositions such as on (uttered earlier in this sentence) were literally wrong, even though they made metaphorical sense. See, most prepositions express spatial relations that require distance, gravity or both. Over, under, through, around, beside and within are all examples. The one preposition that does apply for the net is with, because we are clearly with another person (or whatever) when we are engaged with them on (can’t help using that word) the net.
Anyway, her main point about gravity’s absence on the internet was that we eventually would learn to adapt to it, much as astronauts learn to adapt to the weightlessness of life in space. She also noted that adaptation for a whole civilization takes time, and living on the internet in the meantime requires a wariness akin to broken field running while naked, except that there’s no field and we’re not running. We are, however, naked, unless we use protections to conceal our private spaces and activities. While most wizards (for example, Linux Journal readers) are good at that, most muggles are not.
But all of us are still vulnerable to cons, and those are easier to perpetrate on the net—or with the help of it—than off of it.
To explain what I mean, recall “On the Internet, nobody knows you’re a dog”, first uttered in the 1993 New Yorker cartoon by Peter Steiner. Bob Mankoff, the magazine’s cartoon

10 | August 2019 | https://www.linuxjournal.com
FROM THE EDITOR
editor at the time, said it “resonated with our wariness about the facile façade that could be thrown up by anyone with a rudimentary knowledge of html”.
Think about that: a facile façad.
Building these has become a big thing in the past few years. So big, in fact, that lying is strategically opportune nearly everywhere on the net, largely because there’s no “where” there.
Note: to make my main points, I’m bypassing technical details such as latencies and ways to tell roughly (or even exactly) where in the world an IP address is. The fact remains that the experience of using the net is fundamentally a placeless one.
Scott Adams, who does the Dilbert comic strip, explains why, and how, in his latest book, called Win Bigly: Persuasion in a World Where Facts Don’t Matter. That world is the same internet where nobody knows you’re a dog. Or if they do know you’re a dog, they don’t care that you’re a dog—or that you’re lying. On the internet, you can build such a facile façade that people—lots of them—actually like what you say, and agree with it, whether you’re lying or not, or maybe even because you’re lying. They just like your act.
But here’s a thing: you can’t play that dog with your neighbors, or in a firefight, or anywhere in the physical world where facts do matter, and life depends on them. Facile or not, façades don’t work there.
So, a local real-world corollary to Scott’s book might be Play Nicely: Putting the Internet to Work Where Facts Matter Most. Which is locally.
There are lots of examples I can point to, but I’ll keep it to three.
The first is a simple service that showed up at our house in the Bay Area back in 1995: Craigslist. While Craigslist now works in dozens of countries and languages, it’s local in every one of them, and it works the same simple ways, with plain and simple HTML that loads in an instant. It’s also human. On Craigslist, people easily can tell when a seller is a dog, or trying to sell one.
11 | August 2019 | https://www.linuxjournal.com
FROM THE EDITOR
I had my own experience with that when my old car died last year and I went looking for a new one. A guy I contacted on Craigslist tried to sell me a bad car. His façade was facile, but it fell down when we took the car to a mechanic who told us it was a dog, and so was the guy.
Right after that, I bought another car on Craigslist from an honest seller—and sold my old car on Craigslist as well. No dogs involved.
My second example is what’s being done for water in some of Africa’s arid regions. Water is hard to find, and it can sometimes be hard to trust when people do find it. In many of these places, there are also few if any sanitation facilities, and grazing animals can contribute waste to the few streams that flow. So the only sure way to get safe water is to drill a well deep in the ground.
To gather facts about the quality of that water, people are using monitors from a company called SweetSense, which sells monitors that measure real-time water quality. Data from the monitors is gathered and visualized on a platform by another company called mWater, over a smartphone data connection. This gives everybody concerned an easy way to monitor water quality in real time. The result isn’t just safe water, but better sanitation practices, better irrigation systems and so on. My point is that there’s nothing fake in this system: no facile façades or dogs selling dogs. It’s just about what people do with tech where they live, and for each other.
My third example is what happened in January 2018, in Montecito, California, which is one zip code away from our home in Santa Barbara. After a massive wildfire in December burned all the vegetation off the mountains above Montecito, big rains hit, washing down half a million tons of mud and rocks, destroying almost 200 homes and killing 23 people, two of whom were never found.
Immediately after that happened, Montecito was evacuated, and access to it was blocked to everybody other than rescue, law enforcement, utility workers and other officials. A few local media folks were let in, but the shock was so massive that it was hard for anybody to make full sense of it. After all, nothing like this had ever happened in recorded history, which around there goes back to the 1700s. But still, in times like this, we all do what we can.

12 | August 2019 | https://www.linuxjournal.com
FROM THE EDITOR
Because I know some geology, and not much was being said in any media about how a mountain face could slop across a town, I published a long blog post titled “Making sense of what happened in Montecito”. In it, I explained why these kinds of events are called debris flows (rather than mudslides or landslides), and listed all the addresses of all the structures (mostly homes) that local officials said were destroyed. (The county produced an excellent map, but the addresses were under mouse-overs.) That way, owners, friends and relatives could find those addresses in a search engine.
Visits to my blog jumped from dozens per day to dozens of thousands. Far as I could tell, nearly all those visits were by local residents or people who cared personally about happened to Montecito.
My point here is that I did what I could, as did all the other locals posting their own forms of help on the net. Together we scaffolded up a shared understanding of the event and progress toward full recovery.
As it happens, I started writing this column in Santa Barbara, continued writing it in New York, and am finishing it now in Córdoba, a beautiful city in southern Spain. I was brought here to give a talk on exactly this subject, titled “The Future of the Internet Is Local”. In the audience were local officials, businesses and organizations. I framed the talk with a historical perspective: the internet we know—the one with e-commerce, ISPs and graphical browsers—is about 1/1000th the age of Córdoba. We are still at the dawn of life in a non-place that is absent of distance and gravity, but which we still use and experience in the physical world.
The first rule of every new technology is what can be done will be done—until we realize what shouldn’t be done. This has been true for everything from stone tools through nuclear power. And, now it’s true of digital technology and the internet. We’ll never rid the net of lies or facile façades, any more than we’ll rid hammers of their ability to kill somebody with a whack on the head. But we can and will get more civilized about it. And my wife is right: local is where that will start. ◾
Send comments or feedback via http://www.linuxjournal.com/contact or email [email protected].

12 monthly digital issues
Join the Open-Source Crusade
You subscription includes:
Fully searchable access to our entire archive (nearly 300 issues)
Bonus ebook, Sys Admin Fundamentals sent with your paid order
Subscr ibe .L inuxJourna l . com

14 | August 2019 | https://www.linuxjournal.com
UPFRONT
DNA Geometry with cadnano This article introduces a tool you can use to work on three-dimensional DNA origami. The package is called cadnano, and it’s currently being developed at the Wyss Institute. With this package, you’ll be able to construct and manipulate the three-dimensional representations of DNA structures, as well as generate publication-quality graphics of your work.
Because this software is research-based, you won’t likely find it in the package repository for your favourite distribution, in which case you’ll need to install it from the GitHub repository.
Since cadnano is a Python program, written to use the Qt framework, you’ll need to install some packages first. For example, in Debian-based distributions, you’ll want to run the following commands:
sudo apt-get install python3 python3-pip
I found that installation was a bit tricky, so I created a virtual Python environment to manage module installations.
Once you’re in your activated virtualenv, install the required Python modules with the command:
pip3 install pythreejs termcolor pytz pandas pyqt5 sip
UPFRONT

15 | August 2019 | https://www.linuxjournal.com
UPFRONT
After those dependencies are installed, grab the source code with the command:
git clone https://github.com/cadnano/cadnano2.5.git
This will grab the Qt5 version. The Qt4 version is in the repository https://github.com/cadnano/cadnano2.git.
Changing directory into the source directory, you can build and install cadnano with:
python setup.py install
Now your cadnano should be available within the virtualenv.
Figure 1. When you first start cadnano, you get a completely blank work space.

16 | August 2019 | https://www.linuxjournal.com
UPFRONT
You can start cadnano simply by executing the cadnano command from a terminal window. You’ll see an essentially blank workspace, made up of several empty view panes and an empty inspector pane on the far right-hand side.
In order to walk through a few of the functions available in cadnano, let’s create a six-strand nanotube. The first step is to create a background that you can use to build upon. At the top of the main window, you’ll find three buttons in the toolbar that will let you create a “Freeform”, “Honeycomb” or “Square” framework. For this example, click the honeycomb button.
You might notice that the initial rendering of the framework is not ideal for further work. You can zoom in and out using your mouse wheel within the view pane of interest. You’ll also notice that the Create button in the toolbar is selected, meaning
Figure 2. Start your construction with one of the available geometric frameworks.
17 | August 2019 | https://www.linuxjournal.com
UPFRONT
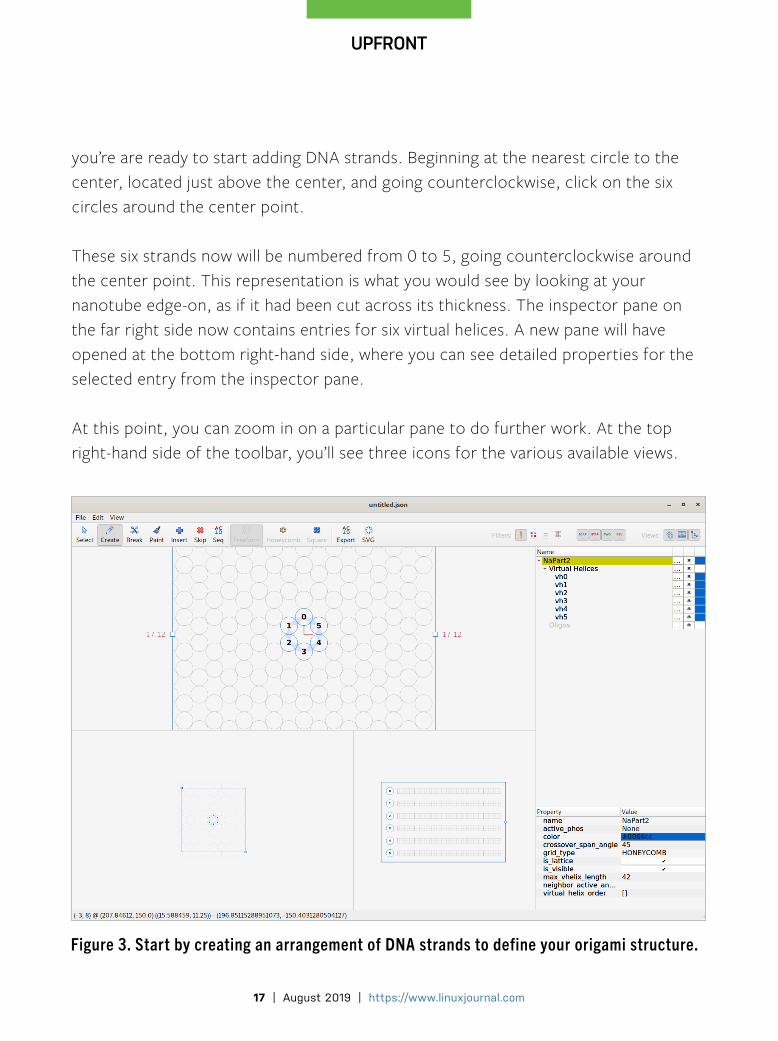
you’re are ready to start adding DNA strands. Beginning at the nearest circle to the center, located just above the center, and going counterclockwise, click on the six circles around the center point.
These six strands now will be numbered from 0 to 5, going counterclockwise around the center point. This representation is what you would see by looking at your nanotube edge-on, as if it had been cut across its thickness. The inspector pane on the far right side now contains entries for six virtual helices. A new pane will have opened at the bottom right-hand side, where you can see detailed properties for the selected entry from the inspector pane.
At this point, you can zoom in on a particular pane to do further work. At the top right-hand side of the toolbar, you’ll see three icons for the various available views.
Figure 3. Start by creating an arrangement of DNA strands to define your origami structure.
18 | August 2019 | https://www.linuxjournal.com
UPFRONT
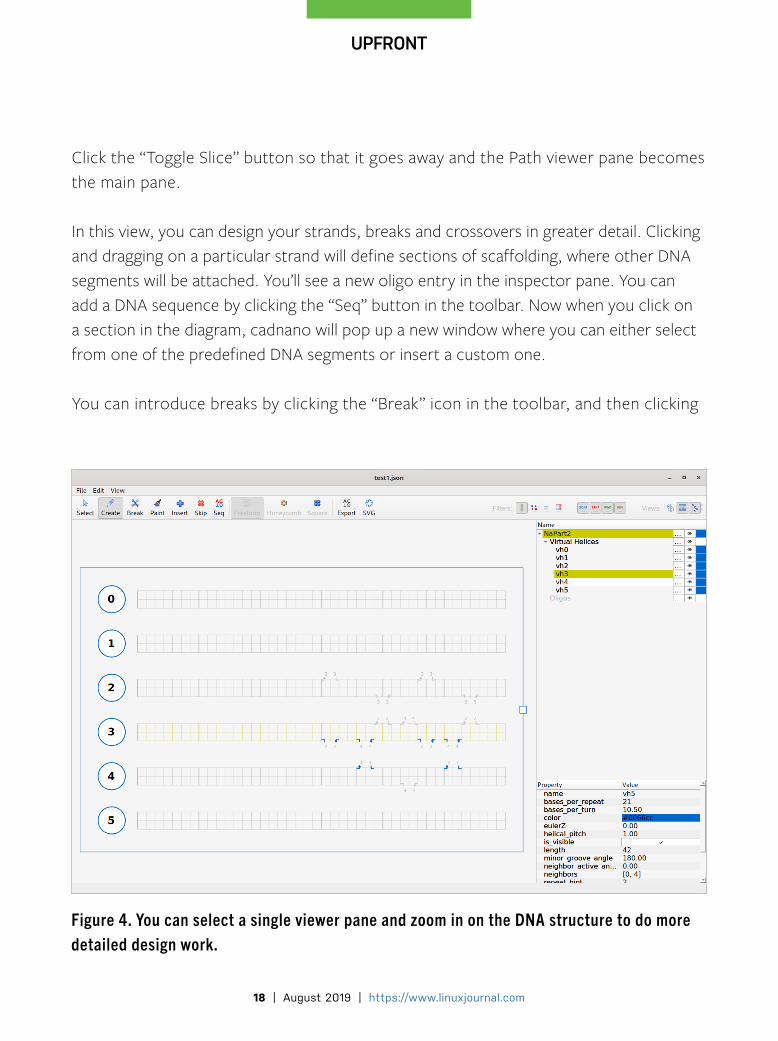
Click the “Toggle Slice” button so that it goes away and the Path viewer pane becomes the main pane.
In this view, you can design your strands, breaks and crossovers in greater detail. Clicking and dragging on a particular strand will define sections of scaffolding, where other DNA segments will be attached. You’ll see a new oligo entry in the inspector pane. You can add a DNA sequence by clicking the “Seq” button in the toolbar. Now when you click on a section in the diagram, cadnano will pop up a new window where you can either select from one of the predefined DNA segments or insert a custom one.
You can introduce breaks by clicking the “Break” icon in the toolbar, and then clicking
Figure 4. You can select a single viewer pane and zoom in on the DNA structure to do more detailed design work.

19 | August 2019 | https://www.linuxjournal.com
UPFRONT
on the section of scaffolding where you want to introduce the break. Continue repeating these steps to build your entire origami structure.
When you have built a system, you’ll want to save all of this work. Click File→Save As to save your work and give it a filename. Cadnano uses JSON as the file format for the structures within your system. This means you easily can look at the file and even make manual changes if needed. You also can export the DNA sequences themselves by clicking the Export button in the toolbar. This writes the sequences out as a CSV file of each segment. You then can use this in other genomics software. Another way
Figure 5. You can add DNA segments to the scaffolding you’ve built within your strands.

20 | August 2019 | https://www.linuxjournal.com
UPFRONT
to save your work is to click the SVG button in the toolbar, which generates an image file in SVG format that you then can use in publications or reports.
Although I’ve been describing using the GUI provided with cadnano, that’s not the only way to play with DNA origami. cadnano was written to act as a standard Python module, which means that you can import cadnano into your own Python code and use it to create and manipulate your DNA structures programmatically. This makes most sense in cases when you’ll be generating a large number of systems, or if you’re making more complicated systems that are difficult to create using a mouse and a GUI. A basic boilerplate looks like the following:
import cadnanofrom cadnano.document import Documentapp = cadnano.app()doc = app.document = Document()doc.readFile('myfile.json')part = doc.activePart()
This boilerplate code creates a new app, and then a new Document within the app. The Document object contains everything for your DNA origami structure. The fifth line reads in a JSON file that contains the structure that you wanted to manipulate. The last line gets the parent Part object that contains all of the other parts, strands crossovers and so on. You also can use this Python module to create completely new systems that you can save for later use.
Hopefully, this short article shows you a bit of the functionality available with cadnano. Because it is used as research software and developed as such, it may not be as heavily worked on as other projects. But, if genomics and building DNA structures is part of your work, cadnano is definitely a good place to start.
See the cadnano documentation for more details.
—Joey Bernard

21 | August 2019 | https://www.linuxjournal.com
UPFRONT
Patreon and Linux Journal
Together with the help of Linux Journal supporters and subscribers, we can offer trusted reporting for the world of open-source today, tomorrow and in the future. To our subscribers, old
and new, we sincerely thank you for your continued support. In addition to magazine subscriptions, we are now receiving support from readers via Patreon on our website. LJ community members who pledge $20 per month or more will be featured each month in the magazine. A very special thank you this month goes to:
• Appahost.com • Brian Goodrich• Chris Short • Christel Dahlskjaer • David Breakey • Dr. Stuart Makowski • Fred • Henrik Halbritter (Albritter) • James Mayes
• Jay M• Joe• Josh Simmons • LinuxMagic Inc.• Lorin Ricker• Oleksandr Suvorov• Paul Wood• Taz Brown
Now also find @linuxjournal on Liberapay. Thank you to our very first Liberapay supporter and the person who gave us this great suggestion: Mostly_Linux.

22 | August 2019 | https://www.linuxjournal.com
UPFRONT
Loadsharers: Funding the Load-Bearing Internet Person
The internet has a sustainability problem. Many of its critical services depend on the dedication of unpaid volunteers, because they can’t be monetized and thus don’t have any revenue stream for the maintainers to live on. I’m talking about services like DNS, time synchronization, crypto libraries—software without which the net and the browser you’re using couldn’t function.
These volunteer maintainers are the Load-Bearing Internet People (LBIP). Underfunding
them is a problem, because underfunded critical services tend to have gaps and holes that could have been fixed if there were more full-time attention on them. As our civilization becomes increasingly dependent on this software infrastructure, that attention shortfall could lead to disastrous outages.
I’ve been worrying about this problem since 2012, when I watched a hacker I know wreck his health while working on a critical infrastructure problem nobody else understood at the time. Billions of dollars in e-commerce hung on getting the particular software problem he had spotted solved, but because it masqueraded as

23 | August 2019 | https://www.linuxjournal.com
UPFRONT
network undercapacity, he had a lot of trouble getting even technically-savvy people to understand where the problem was. He solved it, but unable to afford medical insurance and literally living in a tent, he eventually went blind in one eye and is now prone to depressive spells.
More recently, I damaged my ankle and discovered that although there is such a thing as minor surgery on the medical level, there is no such thing as “minor surgery” on the financial level. I was looking—still am looking—at a serious prospect of either having my life savings wiped out or having to leave all 52 of the open-source projects I’m responsible for in the lurch as I scrambled for a full-time job. Projects at risk include the likes of GIFLIB, GPSD and NTPsec.
That refocused my mind on the LBIP problem. There aren’t many Load-Bearing Internet People—probably on the close order of 1,000 worldwide—but they’re a systemic vulnerability made inevitable by the existence of common software and internet services that can’t be metered. And, burning them out is a serious problem. Even under the most cold-blooded assessment, civilization needs the mean service life of an LBIP to be long enough to train and acculturate a replacement.
(If that made you wonder—yes, in fact, I am training an apprentice. Different problem for a different article.)
Alas, traditional centralized funding models have failed the LBIPs. There are a few reasons for this:
• LBIPs don’t tend to be visible to funding organizations, which generally lack the expertise and on-the-ground connections to identify and evaluate them.
• Most LBIP projects don’t exist as legal entities, and LBIPs are poorly positioned to deal with bureaucratic overhead or reporting requirements.
• Funding organizations near this space are notoriously prone to capture by corporations, political factions and internal vanity projects. The money tends to

24 | August 2019 | https://www.linuxjournal.com
UPFRONT
run out before it gets to the LBIPs who actually need it.
Some of you might think “But what about The Internet Society?” or the “Core Infrastructure Initiative (CII)?” Unfortunately, those organizations turn out to illustrate the problem perfectly. Funding LBIPs isn’t in ISOC’s charter at all. For every high-visibility infrastructure project like the Linux kernel where CII can satisfy itself there’s a need, a dozen others never even make its radar.
The prospect of being flat broke with treatment for a serious injury unfinished concentrates the mind wonderfully. I’ve invented a solution not just for my own troubles but for LBIPs in general. It’s the Loadsharers network.
Loadsharers is a social network that has agreed to fund LBIPs through remittance services like Patreon, SubscribeStar, Liberapay and PayPal.
People with the most direct incentive to join Loadsharers are those in the tech industries and adjacent who have some grasp of how dependent their jobs and their nice lives are on critical open-source infrastructure. If you are one of those people—and, as a reader of LJ you almost certainly are—you should consider Loadsharers to be not mere altruism but a kind of risk insurance.
Loadsharers take the following pledge:
“While I am gainfully employed, I will remit at least $30 a month to one, two, or three LBIPs, preferably three.” (It is understood that $30 may need to be inflation-adjusted in the future—it’s the cost of one moderately priced restaurant meal.)
Because discovering where to direct support most efficiently isn’t easy, the Loadsharers network has a tier of advisers (experienced LBIPs themselves) who collect information on worthy people and projects from the network and make recommendations about good targets.
Distributed discovery means that as many eyes as there are Loadsharers are on

25 | August 2019 | https://www.linuxjournal.com
UPFRONT
the problem of identifying potential LBIPs; the advisers then can apply their expert knowledge to suggest priorities. Three-way fanout should avoid the problem of having all the funding be captured by a few high-visibility people.
Every Loadsharer has total control of where his or her money goes at all times, and loadsharers can choose which advisers to follow (or to follow none). This avoids the organizational-capture problem.
As I write this, the Loadsharers network is still small. At present growth rates, it’s likely to be in the low three digits when you read this. That’s only a start; it needs to scale up from there by about a factor of a thousand, which, actually, should be readily achievable.
Here is how the numbers look. 160 Loadsharers can cover $5K per month basic maintenance for one LBIP. That means the need for Loadsharers should start to top out at about 160K. But in the US alone, there are around 7 million people with jobs in the technology sector that are directly dependent on LBIP work. That means we just need less than 3% of US tech workers to become Loadsharers to cover the problem, even leaving out the rest of the world.
Now consider the social and political effects if Loadsharers scaled up fully. Wouldn’t you like to have an internet that’s less beholden to the mercy of large corporations and governments? Loadsharers would create a tier of maintainer/engineers answerable only to the individuals who might choose to fund them. A second-order effect would be to create a counterweight against special-interest domination of organizations like ICANN and the IETF.
Even if you don’t care that a lot of LBIPs are hardship cases, that might be a sufficient reason to join up right there.
Here’s how you can help. Go to loadsharers.net, read our goals and FAQ to be sure you agree, and then, take the pledge. Find three LBIPs through our advisor pages and start funding them immediately.

26 | August 2019 | https://www.linuxjournal.com
UPFRONT
Some optional things:
• Join the feeds of one or more advisers, on whatever remittance service they’re using, so you can use their on-the-ground knowledge to identify worthy LBIPs.
• Identify a potential LBIP so we know who to fund. Or you can update our information on candidate LBIPs. Tell an adviser so he or she can spread the word.
• Send me email telling me you’re joining up, with a link to your contributor page or pages. I’m keeping an honor roll of early contributers.
• Explain to your friends why they should become loadsharers too.
That last part—getting the word out to others—is really important. Until we’ve scaled up enough to support multiple LBIPs, Loadsharers will be a cute hack but not yet a solution. But pulling together, we can make it work. And, the civilization you save might be your own.
—Eric S. Raymond

27 | August 2019 | https://www.linuxjournal.com
UPFRONT
Reality 2.0: a Linux Journal PodcastJoin us each week as Doc Searls and Katherine Druckman navigate the realities of the new digital world: https://www.linuxjournal.com/podcast.

28 | August 2019 | https://www.linuxjournal.com
UPFRONT
News Briefs• Akraino Edge Stack Release 1.0 is now available. Light Reading reports that
“Akraino’s premiere release unlocks the power of intelligent edge with deployable, self-certified blueprints for a diverse set of edge use cases.” In addition, “Akraino R1 delivers the first iteration towards new levels of flexibility to scale edge cloud services quickly, maximize efficiency, and deliver high availability for deployed services. It delivers a deployable and fully functional edge stack for edge use cases ranging from Industrial IoT, Telco 5G Core & vRAN, uCPE, SDWAN, edge media processing, and carrier edge media processing. As the premiere release, it opens doors to further enhancements and development to support edge infrastructure.” For more information, go to https://www.lfedge.org.
• MariaDB announced the release of MariaDB Enterprise Server 10.4, “code-named ‘Restful Nights’ for the peace of mind it brings enterprise customers”. The press release notes that this version “is a new, hardened and secured Server (different from MariaDB Community Server aka MariaDB Server) and has never been available before. MariaDB Enterprise Server 10.4 includes features not available in the community version that are focused on solving enterprise customer needs, providing them with greater reliability, stability and long-term support in production environments.”
• KDE launched the latest version of its desktop environment, Plasma 5.16. This release features many changes, such as a completely rewritten notification system including a Do Not Disturb Mode, themes have been greatly improved, widgets have been modernized, and now when any app accesses your microphone, an icon appears in the system tray to warn you. In addition, “Plasma 5.16 is also spectacular to look at, with our new wallpaper called Ice Cold. Designed by Santiago Cézar, it is the winner of a contest with more than 150 entries.” See the Release Announcement and Complete Changelog for all the details.
• Slimbook, the Spanish Linux computer company, just unveiled a brand-new
Visit LinuxJournal.com for daily news briefs.

29 | August 2019 | https://www.linuxjournal.com
UPFRONT
29 | August 2019 | https://www.linuxjournal.com
all-in-one Linux PC called the “Apollo”. It has a 23.6-inch IPS LED display with a 1920x1080 resolution, and a choice between an Intel i5-8500 and i7-8700 processors. It comes with up to 32GB of RAM and integrated Intel UHD 630 4K graphics. Pricing starts at $799.
• Security researchers over at Netflix uncovered some troubling security vulnerabilities inside the Linux (and FreeBSD) TCP subsystem, the worst of which is being called SACK. It can permit remote attackers to induce a kernel panic from within your Linux operating system. Patches are available for affected Linux distributions. See Beta News for details.
• Konstantin Ryabitsev announced the launch of people.kernel.org to replace Google+ for kernel developers. people.kernel.org is “an ActivityPub-enabled federated platform powered by WriteFreely and hosted by very nice and accommodating folks at write.as.” Initially the service is being rolled out to those listed in the kernel’s MAINTAINERS file. See the about page for more information.
• GitLab 12.0 was released. From the announcement: “GitLab 12.0 marks a key step in our journey to create an inclusive approach to DevSecOps, empowering “everyone to contribute”. For the past year, we’ve been on an amazing journey, collaborating and creating a solution that brings teams together. There have been thousands of community contributions making GitLab more lovable. We believe everyone can contribute, and we’ve enabled cross-team collaboration, faster delivery of great code, and bringing together Dev, Ops, and Security.”
• Nextcloud announced a new collaborative rich text editor called Nextcloud Text. Nextcloud Text is described as not “a replacement to a full office suite, but rather a distraction-free, focused way of writing rich-text documents alone or together with others.” See the Nextcloud blog post for more details.
• The Linux Mint folks announced that they’re working with Compulab again on the next MintBox mini, the most powerful MintBox ever. MintBox 3 will be based on Airtop 3. The release date has yet to be announced. The unfinalized specs are

30 | August 2019 | https://www.linuxjournal.com
UPFRONT
30 | August 2019 | https://www.linuxjournal.com
listed as: “1. Basic configuration: $1543 with a Core i5 (6 cores), 16 GB RAM, 256 GB EVO 970, Wi-Fi and FM-AT3 FACE Module. 2. High end: $2698 with Core i9, GTX 1660 Ti, 32 GB RAM, 1TB EVO 970, WiFi and FM-AT3 FACE Module.”
• Tutanota launched a fully encrypted free calendar. Matthias Pfau, co-founder and developer of Tutanota, says this of the new calendar: “With our encryption expertise, we have not only made sure that all data people enter is encrypted, we are also encrypting the notifications for upcoming events. In contrast to other calendar services (e.g. Google), we do not know when, where, and with whom people have an appointment. Basically, we as the provider remain completely blind to people’s daily habits.” See the Tutanota Blog for more information.
• Valve launched Steam Labs, which gives users a peek at new experiments in development. According to TechCrunch, “Valve is quick to point out that all of these experiments are just that—there’s no promising that any of the stuff that hits the Labs will make it all the way to the official client. They also say that even ‘Steam Labs is itself an experiment’, which will probably change and evolve a bunch over time.” The first three experiments on Steam Labs are Micro Trailers, Interactive Recommender and Automatic Show.
• The Bank of England announced that Alan Turing will be on the new £50 note in the UK. Gizmodo quotes Bank of England Governor Mark Carney: “Why Turing? Turing was an outstanding mathematician whose works had an enormous impact on how we live today. As the father of computer science and artificial intelligence, Alan Turing’s contributions were far-ranging and path-breaking. His genius lay in a unique ability to link the philosophical and the abstract with the practical and the concrete. And all around us his legacy continues to build. Turing is a giant on whose shoulders so many now stand.”
Send comments or feedback via https://www.linuxjournal.com/contact or email [email protected].

Thanks to Sponsor PULSEWAY
for Supporting Linux Journal
Want to see your company's logo here? Find out more, https://www.linuxjournal.com/sponsors.
System Managementat Your Fingertips.
www.pulseway.com

32 | August 2019 | https://www.linuxjournal.com
RV Offsite Backup Update Having an offsite backup in your RV is great, and after a year of use, I’ve discovered some ways to make it even better.
By Kyle Rankin
Last year I wrote a feature-length article on the data backup system I set up for my RV (see Kyle’s “DIY RV Offsite Backup and Media Server” from the June 2018 issue of LJ). If you haven’t read that article yet, I recommend checking it out first so you can get details on the system. In summary, I set up a Raspberry Pi media center PC connected to a 12V television in the RV. I connected an 8TB hard drive to that system and synchronized all of my files and media so it acted as a kind of off-site backup. Finally, I set up a script that would attempt to sync over all of those files from my NAS whenever it detected that the RV was on the local network. So here, I provide an update on how that system is working and a few tweaks I’ve made to it since.
What WorksOverall, the media center has worked well. It’s been great to have all of my media with me when I’m on a road trip, and my son appreciates having access to his favorite cartoons. Because the interface is identical to the media center we have at home, there’s no learning curve—everything just works. Since the
Kyle Rankin is a Tech Editor and columnist at Linux Journal and the Chief Security Officer at Purism. He is the author of Linux Hardening in Hostile Networks, DevOps Troubleshooting, The Official Ubuntu Server Book, Knoppix Hacks, Knoppix Pocket Reference, Linux Multimedia Hacks and Ubuntu Hacks, and also a contributor to a number of other O’Reilly books. Rankin speaks frequently on security and open-source software including at BsidesLV, O’Reilly Security Conference, OSCON, SCALE, CactusCon, Linux World Expo and Penguicon. You can follow him at @kylerankin.
HACK AND /

HACK AND /
Raspberry Pi is powered off the TV in the RV, you just need to turn on the TV and everything fires up.
It’s also been great knowing that I have a good backup of all of my files nearby. Should anything happen to my house or my main NAS, I know that I can just get backups from the RV. Having peace of mind about your important files is valuable, and it’s nice knowing in the worst case when my NAS broke, I could just disconnect my USB drive from the RV, connect it to a local system, and be back up and running.
The WiFi booster I set up on the RV also has worked pretty well to increase the range of the Raspberry Pi (and the laptops inside the RV) when on the road. When we get to a campsite that happens to offer WiFi, I just reset the booster and set up a new access point that amplifies the campsite signal for inside the RV. On one trip, I even took it out of the RV and inside a hotel room to boost the weak signal.
Room for ImprovementFor the most part, I leave my RV plugged in when I’m at home, but because the Raspberry Pi is powered off the TV, I don’t necessarily leave it on all the time. Every week or so, I tend to turn it on for a day or two to make sure that files are in sync, but I realize it would be a lot better if I just left the Raspberry Pi on independent from the TV. Even though OSMC boots up quickly on the Raspberry Pi, it would be pretty nice for it to be ready to go the moment I turned on the TV. Since the Raspberry Pi doesn’t draw much power when idle, I don’t really need to worry about it draining my house batteries if I leave it on at home—especially since the RV is typically plugged in at home.
The WiFi booster works, but by default, it just adds “_8C” to the remote access point’s SSID. It also, by default, reuses the remote access point’s password. This means you risk other people nearby using your access point, thinking it’s one of the official repeaters. I’ve taken to changing the default SSID it picks to something custom to me, but unfortunately so far, I haven’t found a way in the interface to give my boosted AP a different password, which means that even if I pick a consistent SSID for my WiFi booster, I still have to reconfigure laptops and the
33 | August 2019 | https://www.linuxjournal.com

HACK AND /
Raspberry Pi to use a different password.
I’ve started to wonder whether it might make more sense to connect a higher-powered USB WiFi card with an external antenna to the Raspberry Pi and turn it into the repeater instead. Then I could use the OSMC interface to connect to remote access points and route connections over the access point I set up on the Raspberry Pi.
Another issue I’ve run into when on long road trips is that while I’m the road, my RV is no longer in sync with my home NAS. That means if any new media shows up on my home NAS, I won’t have it on the road. For example, if I followed a lot of podcasts and stored them on my NAS, it would be nice if new ones would also show up on my RV when I’m on the road.
Syncing from the RoadI was planning to take an epic multi-week road trip across America, and I realized a simple way I could make sure I had new media with me on the road—a VPN. These days, many people think of VPNs just in the context of security and privacy as a way to protect their systems from snooping by their ISP or from a local coffee shop they are connected to. VPNs though are just a way for you to connect two trusted networks securely over a potentially untrusted network. This is exactly what I needed for my RV.
By having a VPN connection between my Raspberry Pi and my home NAS, it could connect to my home network wherever it was out in the world, provided it had a WiFi connection. What’s more, since OpenVPN can be configured to assign clients a consistent IP when they connect, once I set it up, all I had to do on the server side was modify a local hosts entry to point to the VPN IP instead of the RV’s normal IP on the local network, and the sync script could stay the same.
I already had set up a simple local Puppet server on my home network and added a module to manage my VPN configuration, so it was relatively simple to add a new client for my RV and generate a set of keys and configuration files. On the RV side, I just copied over that client key and configuration, and I made sure that OpenVPN
34 | August 2019 | https://www.linuxjournal.com

HACK AND /
was installed on the RV’s Raspberry Pi. Finally, I edited the /etc/default/openvpn file to make sure my client configuration was set up to start by default, and I also used systemctl to enable that OpenVPN client so it started at boot.
Once I set up the VPN, I confirmed that the sync script still worked over the new VPN IP while I was on my home network. The great thing about OpenVPN clients is that they are persistent—if a connection drops, it continually will try to reconnect. This meant that once the Raspberry Pi was connected to a WiFi access point, it was just a matter of time before the VPN connection was restored.
We finally took our epic summer road trip, and about a week into it, we realized there was some new media at home we’d like to have in the RV. We happened to be at a campsite that offered WiFi, so when we camped there that evening, before we went to bed, I reconnected the Raspberry Pi so it was powered off a 12V USB adapter instead of the TV. That way, I could leave it on overnight without the glow from the TV making it hard to sleep. I logged in to my NAS at home and confirmed I could ssh in to my RV from there and then went to bed. When I woke up, I checked the media center, and sure enough, new files had been copied over to the RV overnight while we slept!
OopsThis story wouldn’t be complete though without a mistake. At some point in our previous travels, I had connected the Raspberry Pi to my cell phone’s tethering plan, and it had remembered that access point. We happened to be at another campground that offered WiFi, so I decided to leave the Raspberry Pi on overnight again to get synced back up. Unfortunately, the WiFi at the campsite didn’t work, and so we had been tethering our laptops off of my phone. When I went to bed that night, I forgot to disable tethering on my phone, and when I woke up that morning, I discovered the phone’s battery was completely drained!
The moment I realized the battery was drained, I realized what had happened. I checked my data plan, and sure enough, I had a huge spike over the past evening. The Raspberry Pi had remembered that access point, had tethered over my cell phone,
35 | August 2019 | https://www.linuxjournal.com
36 | August 2019 | https://www.linuxjournal.com
HACK AND /
and it had synced a bunch of media over while we were sleeping! Fortunately, even though my plan is metered, it has a cap in place that converts into “unlimited mode” once you use a certain amount of data, but if that hadn’t been in place, it would have been a disaster. Suffice it to say, I went into the Raspberry Pi configuration and removed that access point so it wouldn’t happen again.
ConclusionI’ve been very pleased with using my RV media center as an offsite backup, and with the addition of a VPN, it’s been even better to have new media while I’m on the road. I just need to find a cost-effective way to keep the Raspberry Pi on and online without racking up a huge cell-phone bill, and then I’ll truly have an always-up-to-date off-site backup. Since my last road trip, I’ve thought of a number of improvements to this setup, so stay tuned for future articles where I’ll describe even more updates. ◾
Send comments or feedback via http://www.linuxjournal.com/contact or email [email protected].

37 | August 2019 | https://www.linuxjournal.com
UPFRONTAT THE FORGE
Understanding Python’s asyncio How to get started using Python’s asyncio.
By Reuven M. Lerner
Earlier this year, I attended PyCon, the international Python conference. One topic, presented at numerous talks and discussed informally in the hallway, was the state of threading in Python—which is, in a nutshell, neither ideal nor as terrible as some critics would argue.
A related topic that came up repeatedly was that of “asyncio”, a relatively new approach to concurrency in Python. Not only were there formal presentations and informal discussions about asyncio, but a number of people also asked me about courses on the subject.
I must admit, I was a bit surprised by all the interest. After all, asyncio isn’t a new addition to Python; it’s been around for a few years. And, it doesn’t solve all of the problems associated with threads. Plus, it can be confusing for many people to get started with it.
And yet, there’s no denying that after a number of years when people ignored asyncio, it’s starting to gain steam. I’m sure part
AT THE FORGE
Reuven Lerner teaches Python, data science and Git to companies around the world. You can subscribe to his free, weekly “better developers” e-mail list, and learn from his books and courses at http://lerner.co.il. Reuven lives with his wife and children in Modi’in, Israel.

38 | August 2019 | https://www.linuxjournal.com
AT THE FORGE
of the reason is that asyncio has matured and improved over time, thanks in no small part to much dedicated work by countless developers. But, it’s also because asyncio is an increasingly good and useful choice for certain types of tasks—particularly tasks that work across networks.
So with this article, I’m kicking off a series on asyncio—what it is, how to use it, where it’s appropriate, and how you can and should (and also can’t and shouldn’t) incorporate it into your own work.
What Is asyncio?Everyone’s grown used to computers being able to do more than one thing at a time—well, sort of. Although it might seem as though computers are doing more than one thing at a time, they’re actually switching, very quickly, across different tasks. For example, when you ssh in to a Linux server, it might seem as though it’s only executing your commands. But in actuality, you’re getting a small “time slice” from the CPU, with the rest going to other tasks on the computer, such as the systems that handle networking, security and various protocols. Indeed, if you’re using SSH to connect to such a server, some of those time slices are being used by sshd to handle your connection and even allow you to issue commands.
All of this is done, on modern operating systems, via “pre-emptive multitasking”. In other words, running programs aren’t given a choice of when they will give up control of the CPU. Rather, they’re forced to give up control and then resume a little while later. Each process running on a computer is handled this way. Each process can, in turn, use threads, sub-processes that subdivide the time slice given to their parent process.
So on a hypothetical computer with five processes (and one core), each process would get about 20% of the time. If one of those processes were to have four threads, each thread would get 5% of the CPU’s time. (Things are obviously more complex than that, but this is a good way to think about it at a high level.)
Python works just fine with processes via the “multiprocessing” library. The problem

39 | August 2019 | https://www.linuxjournal.com
AT THE FORGE
with processes is that they’re relatively large and bulky, and you cannot use them for certain tasks, such as running a function in response to a button click, while keeping the UI responsive.
So, you might want to use threads. And indeed, Python’s threads work, and they work well, for many tasks. But they aren’t as good as they might be, because of the GIL (the global interpreter lock), which ensures that only one thread runs at a time. So sure, Python will let you run multithreaded programs, and those even will work well when they’re doing lots of I/O. That’s because I/O is slow compared with the CPU and memory, and Python can take advantage of this to service other threads. If you’re using threads to perform serious calculations though, Python’s threads are a bad idea, and they won’t get you anywhere. Even with many cores, only one thread will execute at a time, meaning that you’re no better off than running your calculations serially.
The asyncio additions to Python offer a different model for concurrency. As with threads, asyncio is not a good solution to problems that are CPU-bound (that is, that need lots of CPU time to crunch through calculations). Nor is it appropriate when you absolutely must have things truly running in parallel, as happens with processes.
But if your programs are working with the network, or if they do extensive I/O, asyncio just might be a good way to go.
The good news is if it’s appropriate, asyncio can be much easier to work with than threads.
The bad news is you’ll need to think in a new and different way to work with asyncio.
Cooperative Multitasking and CoroutinesEarlier, I mentioned that modern operating systems use “pre-emptive multitasking” to get things done, forcing processes to give up control of the CPU in favor of another process. But there’s another model, known as “cooperative multitasking”, in which the system waits until a program voluntarily gives up control of the CPU. Hence the word “cooperation”—if the function decided to perform oodles of calculations, and never

40 | August 2019 | https://www.linuxjournal.com
AT THE FORGE
gives up control, then there’s nothing the system can do about it.
This sounds like a recipe for disaster; why would you write, let alone run, programs that give up the CPU? The answer is simple. When your program uses I/O, you can pretty much guarantee that you’ll be waiting around idly until you get a response, given how much slower I/O is than programs running in memory. Thus, you can voluntarily give up the CPU whenever you do something with I/O, knowing that soon enough, other programs similarly will invoke I/O and give up the CPU, returning control to you.
In order for this to work, you’re going to need all of the programs within this cooperating multitasking universe to agree to some ground rules. In particular, you’ll need them to agree that all I/O goes through the multitasking system, and that none of the tasks will hog the CPU for an extended period of time.
But wait, you’ll also need a bit more. You’ll need to give tasks a way to stop executing voluntarily for a little bit, and then restart from where they left off.
This last bit actually has existed in Python for some time, albeit with slightly different syntax. Let’s start the journey and exploration of asyncio there.
A normal Python function, when called, executes from start to finish. For example:
def foo(): print("a") print("b") print("c")
If you call this, you’ll see:
abc
41 | August 2019 | https://www.linuxjournal.com
AT THE FORGE
Of course, it’s usually good for functions not just to print something, but also to return a value:
def hello(name): return f'Hello, {name}'
Now when you invoke the function, you’ll get something back. You can grab that returned value and assign it to a variable:
s = hello('Reuven')
But there’s a variation on return that will prove central to what you’re doing here, namely yield. The yield statement looks and acts much like return, but it can be used multiple times in a function, even within a loop:
def hello(name): for i in range(5): yield f'[{i}] Hello, {name}'
Because it uses yield, rather than return, this is known as a “generator function”. And when you invoke it, you don’t get back a string, but rather a generator object:
>>> g = hello('Reuven')>>> type(g)generator
A generator is a kind of object that knows how to behave inside a Python for loop. (In other words, it implements the iteration protocol.)
When put inside such a loop, the function will start to run. However, each time the generator function encounters a yield statement, it will return the value to the loop and go to sleep. When does it wake up again? When the for loop asks for the next value to be returned from the iterator:

42 | August 2019 | https://www.linuxjournal.com
AT THE FORGE
for s in g: print(s)
Generator functions thus provide the core of what you need: a function that runs normally, until it hits a certain point in the code. At that point, it returns a value to its caller and goes to sleep. When the for loop requests the next value from the generator, the function continues executing from where it left off (that is, just after the yield statement), as if it hadn’t ever stopped.
The thing is that generators as described here produce output, but can’t get any input. For example, you could create a generator to return one Fibonacci number per iteration, but you couldn’t tell it to skip ten numbers ahead. Once the generator function is running, it can’t get inputs from the caller.
It can’t get such inputs via the normal iteration protocol, that is. Generators support a send method, allowing the outside world to send any Python object to the generator. In this way, generators now support two-way communication. For example:
def hello(name): while True: name = yield f'Hello, {name}' if not name: break
Given the above generator function, you now can say:
>>> g = hello('world')
>>> next(g)'Hello, world'
>>> g.send('Reuven')'Hello, Reuven'
43 | August 2019 | https://www.linuxjournal.com
AT THE FORGE
>>> g.send('Linux Journal')'Hello, Linux Journal'
In other words, first you run the generator function to get a generator object (“g”) back. You then have to prime it with the next function, running up to and including the first yield statement. From that point on, you can submit any value you want to the generator via the send method. Until you run g.send(None), you’ll continue to get output back.
Used in this way, the generator is known as a “coroutine”—that is, it has state and executes. But, it executes in tandem with the main routine, and you can query it whenever you want to get something from it.
Python’s asyncio uses these basic concepts, albeit with slightly different syntax, to accomplish its goals. And although it might seem like a trivial thing to be able to send data into generators, and get things back on a regular basis, that’s far from the case. Indeed, this provides the core of an entire infrastructure that allows you to create efficient network applications that can handle many simultaneous users, without the pain of either threads or processes.
In my next article, I plan to start to look at asyncio’s specific syntax and how it maps to what I’ve shown here. Stay tuned. ◾
Send comments or feedback via http://www.linuxjournal.com/contact or email [email protected].

44 | August 2019 | https://www.linuxjournal.com
UPFRONT
Bash Shell Games: Continuing Development of the Go Fish! Game This article picks up where I left off developing the Go Fish! game and considers ways to cheat.
By Dave Taylor
In my last article, I began describing how to write a simple Go Fish! game as a shell script. It turns out that there’s not much complicated in a game where you and another player take turns asking each other for cards by rank order until a player gets a full set of four. The play continues until all cards have been matched up, and the player with the most sets wins—easy enough. Heck, you’ve probably played it dozens of times with younger gamers in your family!
Building Out the FunctionsI hadn’t gotten too far on the gofish script last time. The code basically creates a random array that represents a deck of cards and then allocates seven to each player. A quick run reveals:
$ sh gofish.shcomputer hand: 2 of Spades 9 of Spades
Dave Taylor has been hacking shell scripts on Unix and Linux systems for a really long time. He’s the author of Learning Unix for Mac OS X and Wicked Cool Shell Scripts. You can find him on Twitter as @DaveTaylor, and you can reach him through his tech Q&A site Ask Dave Taylor.
WORK THE SHELL
45 | August 2019 | https://www.linuxjournal.com
WORK THE SHELL
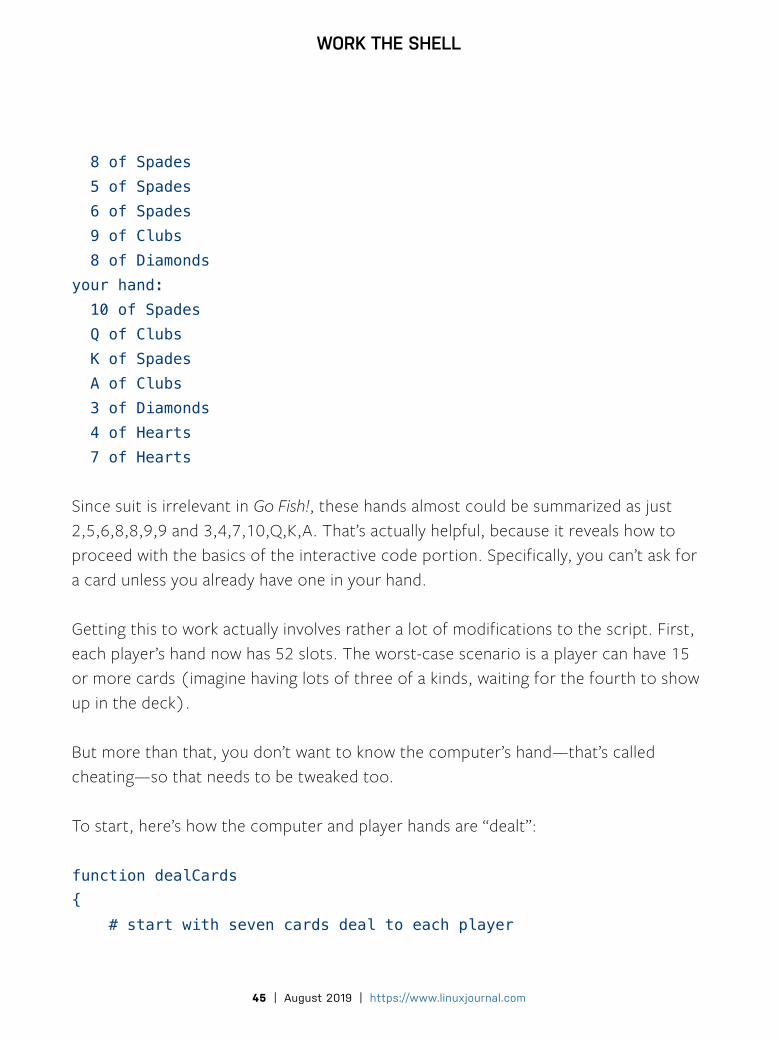
8 of Spades 5 of Spades 6 of Spades 9 of Clubs 8 of Diamondsyour hand: 10 of Spades Q of Clubs K of Spades A of Clubs 3 of Diamonds 4 of Hearts 7 of Hearts
Since suit is irrelevant in Go Fish!, these hands almost could be summarized as just 2,5,6,8,8,9,9 and 3,4,7,10,Q,K,A. That’s actually helpful, because it reveals how to proceed with the basics of the interactive code portion. Specifically, you can’t ask for a card unless you already have one in your hand.
Getting this to work actually involves rather a lot of modifications to the script. First, each player’s hand now has 52 slots. The worst-case scenario is a player can have 15 or more cards (imagine having lots of three of a kinds, waiting for the fourth to show up in the deck).
But more than that, you don’t want to know the computer’s hand—that’s called cheating—so that needs to be tweaked too.
To start, here’s how the computer and player hands are “dealt”:
function dealCards{ # start with seven cards deal to each player

46 | August 2019 | https://www.linuxjournal.com
WORK THE SHELL
i=1
while [ $i -lt 8 ] ; do # first 8 slots = cards myhand[$i]=${newdeck[$i]} yourhand[$i]=${newdeck[$(( $i + 7 ))]} i=$(( $i + 1 )) done
while [ $i -le 52 ] ; do # all other slots empty myhand[$i]=-1 yourhand[$i]=-1 i=$(( $i + 1 )) done}
The first block deals card 1 to the computer and card 1+7 to the player, then 2 and 2+7, and so on, until seven cards are in each hand. From this point, all available slots in both the myhand and yourhand arrays are set to -1 to indicate they’re empty.
Your hand, at any time, can be shown with the function showHands. Add an argument, and it’ll show both hands (yes, handy for cheating), but without it, the following few lines of code are all that’s invoked:
echo "Your Hand:"for i in {1..52} ; do if [ ${yourhand[$i]} -gt 0 ] ; then showCard ${yourhand[$i]} ; echo " $cardname" fidone
You can see that each time the hand is analyzed, all 52 slots are examined. Is that efficient? No. Does it matter on modern hardware? No.

47 | August 2019 | https://www.linuxjournal.com
WORK THE SHELL
The next and perhaps most important function is to convert the common one-letter abbreviations for face cards and other special cards into their corresponding numeric value—a perfect use for a Bash case statement:
case $1 in j|J) fixedrequest=11 ;; q|Q) fixedrequest=12 ;; k|K) fixedrequest=13 ;; a|A) fixedrequest=1 ;; *) fixedrequest=$1 ;;esac
Don't ask me why the end of a case statement is the only place in all of the Bash shell where a word is used backwards (well, other than fi to end an if statement, I suppose). It’s just odd.
Asking for CardsNow you can (finally) have a loop that lets users specify what card they want to ask for and checks to verify that they already have at least one of that card in their hand (recall that the rules of Go Fish! require you to have a card from a given rank before you can request more):
function doYouHave{ # check if you have the card rank you're asking for
for i in {1..52} ; do if [ $(( ${yourhand[$i]} % 13 )) -eq $1 ] ; then return 1 fi done return 0}

48 | August 2019 | https://www.linuxjournal.com
WORK THE SHELL
Key to remember with the above code snippet is that the card value % 13 = card rank, so all the complexity above is simply comparing cards against the requested card ($1). Once there’s a match, you’re done, and return true (value = 1), and if you fall out of the loop after testing all 52 possible card slots for yourhand, it returns false.
Using the return code and testing function call results is a really common way to accept return values from functions in shell scripts. Why? Because there aren’t more sophisticated function parameter mechanisms like more sophisticated programming languages have. I miss them, but you’ve got to work with what Bash gives you.
How does this look in a query loop asking players what they want to ask the computer? It looks like this:
echo -n "You ask me if I have a: "read requestfixFacecards $request
doYouHave $fixedrequest
if [ $? -eq 1 ] ; then echo "you have $request you can ask"else echo "you don't have $request, you can't ask for it"fi
The echo command is, of course, the standard way to push out information to users, but add the -n flag, and it skips the usual CR/LF at the end of the output. The result is that that the cursor sits on the same line as what was output. That’s perfect for input:
You ask me if I have a: [cursor]
Problem: if the user types in something like king of hearts, it’s going to fail, and

WORK THE SHELL
there’s no error code to prevent an ugly error situation. Robust code is good, but this is a prototype, so it can defer a more sophisticated parsing system until the last phase of development. When the time comes, however, let’s also not forget to allow the user to type quit to end the game.
Go back to the code block above. The fixFacecards function is what ensures that users can type a “J” or “A” or similar, however. Then doYouHave is invoked with the numerical rank value to test against your own hand, not that of the computer player. The result is tucked neatly into the function return value, and that’s accessible with the $? special variable notation.
This means that if [ $? -eq 1 ] ; then is the same as saying “if the function returns true”, which means that yes, you do have at least one card of
W E B I N A R | O N D E M A N D
S e c u r i n g Y o u r
A p p l i c a t i o n s A c r o s s t h e
D e v S e c O p s L i f e c y c l e
Watch Now www.linuxjournal.com/twistlock
50 | August 2019 | https://www.linuxjournal.com
WORK THE SHELL
the rank you’re requesting.
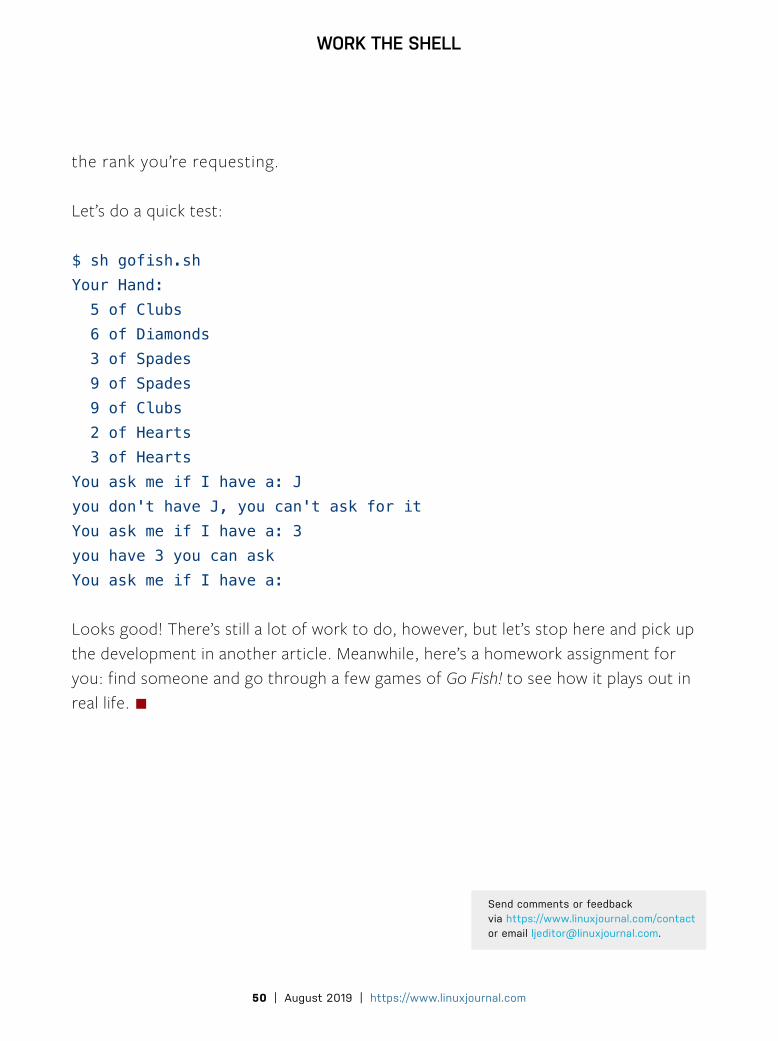
Let’s do a quick test:
$ sh gofish.shYour Hand: 5 of Clubs 6 of Diamonds 3 of Spades 9 of Spades 9 of Clubs 2 of Hearts 3 of HeartsYou ask me if I have a: Jyou don't have J, you can't ask for itYou ask me if I have a: 3you have 3 you can askYou ask me if I have a:
Looks good! There’s still a lot of work to do, however, but let’s stop here and pick up the development in another article. Meanwhile, here’s a homework assignment for you: find someone and go through a few games of Go Fish! to see how it plays out in real life. ◾
Send comments or feedback via https://www.linuxjournal.com/contact or email [email protected].

51 | August 2019 | https://www.linuxjournal.com
diff -u
What’s New in Kernel DevelopmentBy Zack Brown
Documenting Proper Git Usage Jonathan Corbet wrote a document for inclusion in the kernel tree, describing best practices for merging and rebasing git-based kernel repositories. As he put it, it represented workflows that were actually in current use, and it was a living document that hopefully would be added to and corrected over time.
The inspiration for the document came from noticing how frequently Linus Torvalds was unhappy with how other people—typically subsystem maintainers—handled their git trees.
It’s interesting to note that before Linus wrote the git tool, branching and merging was virtually unheard of in the Open Source world. In CVS, it was a nightmare horror of leechcraft and broken magic. Other tools were not much better. One of the primary motivations behind git—aside from blazing speed—was, in fact, to make branching and merging trivial operations—and so they have become.
One of the offshoots of branching and merging, Jonathan wrote, was rebasing—altering the patch history of a local repository. The benefits of rebasing are fantastic. They can
diff -u
Zack Brown is a tech journalist at Linux Journal and Linux Magazine, and is a former author of the “Kernel Traffic” weekly newsletter and the “Learn Plover” stenographic typing tutorials. He first installed Slackware Linux in 1993 on his 386 with 8 megs of RAM and had his mind permanently blown by the Open Source community. He is the inventor of the Crumble pure strategy board game, which you can make yourself with a few pieces of cardboard. He also enjoys writing fiction, attempting animation, reforming Labanotation, designing and sewing his own clothes, learning French and spending time with friends‘n’family.

52 | August 2019 | https://www.linuxjournal.com
diff -u
make a repository history cleaner and clearer, which in turn can make it easier to track down the patches that introduced a given bug. So rebasing has a direct value to the development process.
On the other hand, used poorly, rebasing can make a big mess. For example, suppose you rebase a repository that has already been merged with another, and then merge them again—insane soul death.
So Jonathan explained some good rules of thumb. Never rebase a repository that’s already been shared. Never rebase patches that come from someone else’s repository. And in general, simply never rebase—unless there’s a genuine reason.
Since rebasing changes the history of patches, it relies on a new “base” version, from which the later patches diverge. Jonathan recommended choosing a base version that was generally thought to be more stable rather than less—a new version or a release candidate, for example, rather than just an arbitrary patch during regular development.
Jonathan also recommended, for any rebase, treating all the rebased patches as new code, and testing them thoroughly, even if they had been tested already prior to the rebase.
“If”, he said, “rebasing is limited to private trees, commits are based on a well-known starting point, and they are well tested, the potential for trouble is low.”
Moving on to merging, Jonathan pointed out that nearly 9% of all kernel commits were merges. There were more than 1,000 merge requests in the 5.1 development cycle alone.
He pointed out in the doc that, although “many projects require that branches in pull requests be based on the current trunk so that no merge commits appear in the history”, the kernel had no such requirement. Merges were considered perfectly orderly ways of doing business, and developers should not try to rebase their branches to avoid merges.

53 | August 2019 | https://www.linuxjournal.com
diff -u
An interesting thing about kernel development is that the hierarchy of maintainership tends to favor a hierarchy of git repository maintainers. It’s not uncommon for one or a few people to manage a branched kernel repository, and to have developers managing branches of that tree, with other developers in turn managing branches of those.
For mid-level maintainers, Jonathan pointed out, there are two relevant situations: merging a tree from lower in the hierarchy into your own and merging your own tree higher up toward Linus’ top-level tree.
Jonathan recommended that for mid-level maintainers accepting merges from lower trees, maintainers not seek to hide the merge request and, in fact, should add a commit message or changelog entry, explaining the patches that went into the merge.
Jonathan also pointed out that the “Signed-Off-By” tags were crucial elements of commit messages that helped track responsibility as well as important debugging information. He suggested that all maintainers should continue to use them and to verify them when merging from other trees. Jonathan said, “Failure to do so threatens the security of the development process as a whole.”
That advice referred to downstream trees, but Jonathan had some very interesting points to make about merging from upstream trees. This is when you’re working on your tree, and you want to make sure you’re up to date with the latest-and-greatest tree from Linus or someone close to him. Of course, doing so would make your own life slightly easier, because you’d be up to date, you could test your code against the tip of the tree, and so on. Still, Jonathan counseled against it.
For one thing, you could be bringing other people’s bugs into your own tree, destabilizing your test code, and then you’d have the uncertainty of knowing that your code was actually solid and ready to submit further upstream.
Another temptation is to do a merge from the upstream source right before submitting your own merge request to ensure that your request won’t encounter any
54 | August 2019 | https://www.linuxjournal.com
diff -u
conflicts. However, as Jonathan said, “Linus is adamant that he would much rather see merge conflicts than unnecessary back merges. Seeing the conflicts lets him know where potential problem areas are. He does a lot of merges (382 in the 5.1 development cycle) and has gotten quite good at conflict resolution—often better than the developers involved.”
Instead, if you do notice a conflict that will show up when Linus does the merge, you should say something about it in the pull request, so Linus sees that you see the situation.
As a last resort, for particularly nutty cases, Jonathan said, you could create another branch, with your own conflict resolutions, and point Linus to that so he can see how you’d resolve the problems yourself. The pull request, however, should be for the unresolved branch.
Doing a test merge in that way is fine, he said. It helps you know if there will be any conflicts, so you can communicate better to the upstream maintainers.
He offered some more good advice and closed by saying:
The guidelines laid out above are just that: guidelines. There will always be situations that call out for a different solution, and these guidelines should not prevent developers from doing the right thing when the need arises. But one should always think about whether the need has truly arisen and be prepared to explain why something abnormal needs to be done.
And...Linus replied that he liked the whole doc.
David Rientjes from Google reported that he actually had been in the process of writing an internal doc for use by Google engineers, discussing this very topic. He was thrilled that Jonathan had done a better job explaining it than his own effort.
Geert Uytterhoeven also liked the new doc, and he offered some spelling and

55 | August 2019 | https://www.linuxjournal.com
diff -u
grammar corrections.
Only Theodore Ts’o had any significant criticism to offer. He felt a clear distinction should be made between reordering patches (which he felt was what most people thought of when they talked about rebasing), versus actually changing or removing commits that have already gone into the tree. Both were technically rebasing, yet both were really quite different operations.
Jonathan replied to this, suggesting that maybe the doc could refer separately to “rebasing” and “history modification”. And, Ted agreed this would be better.
End of thread. I love seeing this sort of documentation go into the kernel. It’s not the same as general-purpose git advice, because it’s specific to kernel development processes and policies that are already in place. At the same time, it’s potentially very useful to other large-scale projects that might want to mimic the Linux kernel development process. All open-source projects essentially mimic the kernel development process anyway—Linus is the one who first discovered and popularized the methods of how to run an open-source project—and there tends to be a lot of wisdom in his development policy decisions even now.
Another Episode of “Seems Perfectly Feasible and Then Dies”—Script to Simplify the Process of Changing System Call Tables David Howells put in quite a bit of work on a script, ./scripts/syscall-manage.pl, to simplify the entire process of changing the system call tables. With this script, it was a simple matter to add, remove, rename or renumber any system call you liked. The script also would resolve git conflicts, in the event that two repositories renumbered the system calls in conflicting ways.
Why did David need to write this patch? Why weren’t system calls already fairly easy to manage? When you make a system call, you add it to a master list, and then you add it to the system call “tables”, which is where the running kernel looks up which kernel function corresponds to which system call number. Kernel developers need to make

56 | August 2019 | https://www.linuxjournal.com
diff -u
sure system calls are represented in all relevant spots in the source tree. Renaming, renumbering and making other changes to system calls involves a lot of fiddly little details. David’s script simply would do everything right—end of story no problemo hasta la vista.
Arnd Bergmann remarked, “Ah, fun. You had already threatened to add that script in the past. The implementation of course looks fine, I was just hoping we could instead eliminate the need for it first.” But, bowing to necessity, Arnd offered some technical suggestions for improvements to the patch.
However, Linus Torvalds swooped in at this particular moment, saying:
Ugh, I hate it.
I’m sure the script is all kinds of clever and useful, but I really think the solution is not this kind of helper script, but simply that we should work at not having each architecture add new system calls individually in the first place.
IOW, we should look at having just one unified table for new system call numbers, and aim for the per-architecture ones to be for “legacy numbering”.
Maybe that won’t happen, but in the _hope_ that it happens, I really would prefer that people not work at making scripts for the current nasty situation.
And the portcullis came crashing down.
It’s interesting that, instead of accepting this relatively obvious improvement to the existing situation, Linus would rather leave it broken and ugly, so that someone someday somewhere might be motivated to do the harder-yet-better fix. And, it’s all the more interesting given how extreme the current problem is. Without actually being broken, the situation requires developers to put in a tremendous amount of care and effort into something that David’s script could make trivial and easy. Even for such an obviously “good” patch, Linus gives thought to the policy and cultural implications, and

57 | August 2019 | https://www.linuxjournal.com
diff -u
the future motivations of other people working in that region of code.
Warnings and Warning Signs—Eliminating Unnecessary Warning in the Kernel’s Core Driver Code A minor fix, but an interesting exchange: Thierry Reding posted a patch to the core driver code to eliminate an unnecessary warning so users wouldn’t get confused and think it was important.
It all started one day long ago and far away with the probe() function. The kernel generally calls probe() to trigger a device initialization and get some basic information about it for use by kernel operations. This generally happens very early in the boot process, as soon as the device comes online—or later, if it’s a hotplug device.
But some drivers, Thierry pointed out, had to defer the relevant kernel probe() call until the resources needed by that driver had been initialized. If they didn’t get initialized—if they were a hotplug device, for example—then the driver that depends on them might need to defer the probe() call indefinitely. Thierry remarked:
One example of this can be seen on Tegra, where the DPAUX hardware contains pinmuxing controls for pins that it shares with an I2C controller. The I2C controller is typically used for communication with a monitor over HDMI (DDC). However, other instances of the I2C controller are used to access system critical components, such as a PMIC. The I2C controller driver will therefore usually be a built-in driver, whereas the DPAUX driver is part of the display driver that is loaded from a module to avoid bloating the kernel image with all of the DRM/KMS subsystem.
In this particular case the pins used by this I2C/DDC controller become accessible very late in the boot process. However, since the controller is only used in conjunction with display, that’s not an issue.
In other words, deferring probe() in this case is perfectly fine, for as long as it takes for DPAUX actually to come up. The delay should be considered a regular part of normal kernel operation. As Thierry went on to say, “unfortunately the driver core

58 | August 2019 | https://www.linuxjournal.com
diff -u
currently outputs a warning message when a device fails to get the pinctrl before the end of the init stage. That can be confusing for the user because it may sound like an unwanted error occurred, whereas it’s really an expected and harmless situation.”
Thierry’s patch added a flag to the driver_deferred_probe_check_state() helper function to let callers indicate they want to continue to defer probe().
Rob Herring liked the patch, and Rafael J. Wysocki offered some constructive technical criticism.
Greg Kroah-Hartman, on the other hand, was disgruntled.
He and Thierry had apparently had a discussion on this topic before, because he accused Thierry of not following his requirements. Specifically, Greg had said that Thierry should not use “odd flags”. He said an earlier version of the patch had used a boolean flag, and now it used a bitmap. To which he remarked, “That did not make the api any easier to understand at all.” And Greg concluded, “Anyway, this isn’t ok, do it correctly please, like I asked for the first time.”
Thierry was unfazed by this rebuke, and he pointed out that Greg had really said “no boolean flag”, and Thierry had diligently replaced the boolean flag with a bitmap.
Thierry went on, “To avoid further back and forth, what exactly is it that you would have me do? That is, what do you consider to be the correct way to do this?”
He offered to avoid using flags of any kind and simply rely on function return values. And, Rafael proposed a set of changes that might accomplish this. The main point of Rafael’s suggestion is that very clearly named functions would check the state of a given driver and return a very clear value indicating that yes, indeed, the driver would continue to defer the probe() call. The idea being that now, no longer might the error message confuse people at runtime, but the code itself would not confuse people at development time.

59 | August 2019 | https://www.linuxjournal.com
diff -u
Greg took a look at Rafael’s suggestion and replied, “Yes, that’s much more sane. Self-describing apis are the key here, I did not want a boolean flag, or any other flag, as part of the public api as they do not describe what the call does at all.”
And that was the end of the thread. Presumably, Thierry doesn’t mind the new direction, as long as his itch gets scratched, and the unnecessary warning no longer appears.
The interesting thing about this exchange is that Greg’s initial requirement was vague, or at least ambiguous, and Thierry just barrelled ahead, adhering to the letter of it without guessing at the deeper significance (clear code). Then finally when Greg got steamed up about it, the opportunity arose to get some clarification from him. I’m not entirely sure Thierry didn’t implement his patch specifically to draw out that clarification. Anyway, it did the trick, and the next incarnation of the patch almost certainly will go straight into the tree.
Note: if you’re mentioned in this article and want to send a response, please send a message with your response text to [email protected], and we’ll run it in the next Letters section and post it on the website as an addendum to the original article.
Send comments or feedback via http://www.linuxjournal.com/contact or email [email protected].


DEEPDIVE
DEEPDIVE
61 | August 2019 | https://www.linuxjournal.com
Experts Attempt to Explain DevOps—and Almost SucceedWhat is DevOps? How does it relate to other ideas and methodologies within software development? Linux Journal Deputy Editor and longtime software developer, Bryan Lunduke isn’t entirely sure, so he asks some experts to help him better understand the DevOps phenomenon.
By Bryan Lunduke
The word DevOps confuses me.
I’m not even sure confuses me quite does justice to the pain I experience—right in the center of my brain—every time the word is uttered.
It’s not that I dislike DevOps; it’s that I genuinely don’t understand what in tarnation it actually is. Let me demonstrate. What follows is the definition of DevOps on Wikipedia as of a few moments ago:
DevOps is a set of software development practices that combine software development (Dev) and information technology operations (Ops) to shorten the systems development life cycle while delivering features, fixes, and updates frequently in close alignment with business objectives.
I’m pretty sure I got three aneurysms just by copying and pasting that sentence, and
I still have no clue what DevOps really is. Perhaps I should back up and give a little context on where I’m coming from.
My professional career began in the 1990s when I got my first job as a Software Test Engineer (the people that find bugs in software, hopefully before the software ships, and tell the programmers about them). During the years that followed, my title, and responsibilities, gradually evolved as I worked my way through as many software-industry job titles as I could:
• Automation Engineer: people that automate testing software.
• Software Development Engineer in Test: people that make tools for the testers to use.
• Software Development Engineer: aka “Coder”, aka “Programmer”.
• Dev Lead: “Hey, you’re a good programmer! You should also manage a few other programmers but still code just as much as you did before, but, don’t worry, we won’t give you much of a raise! It’ll be great!”
• Dev Manager: like a Dev Lead, with less programming, more managing.
• Director of Engineering: the manager of the managers of the programmers.
• Vice President of Technology/Engineering: aka “The big boss nerd man who gets to make decisions and gets in trouble first when deadlines are missed.”
During my various times with fancy-pants titles, I managed teams that included:
• SysOps: used to stand for “System Operator”, a person who ran and maintained a network accessible system, but now has been redefined as “System Operations”, which has an utterly confusing definition that nobody seems to agree on.
DEEPDIVE
62 | August 2019 | https://www.linuxjournal.com

63 | August 2019 | https://www.linuxjournal.com
DEEPDIVE
• SysAdmins: aka “System Administrators”, which is similar to SysOps, only newer.
• Project Managers: people who document requirements for a project and help engineers, testers and other people working on a team to ship whatever it is they’re working on.
All of which is a long way of saying, “I should know what the heck DevOps means.”
But I don’t. I really, really don’t. Maybe it’s a defect in my brain. Perhaps I’m simply from a different era in the computer industry when different words and ideas were used. And, clearly, I’m not alone. If you do a Google search for “define DevOps”, you get more than 43 million results. I’ve clicked on roughly 42 million of them (although I did the search via DuckDuckGo) and got no closer to understanding the elusive meaning of this term.
Luckily, I’m in a position to know some pretty doggone smart people who work in DevOps in one way or another. So I reached out to them with a simple challenge:
“Explain to me what DevOps means. Bonus points for not using any buzz words.”
What followed were wonderful conversations with four “DevOps experts” during the course of several weeks. To make it all easier to follow for everyone, I’ve taken the key bits of those conversations and edited them together into one semi-real, semi-fictional chat with a singular DevOps expert that is a combination of all four of them.
Let’s call him “Ted”.
Note: as we go along, some software engineering terms will be used that some readers may not be familiar with. When that happens, I’ve included the definition.
Lunduke: Okay, Ted. What is DevOps?
Ted: Wikipedia defines DevOps as “a set of software development practices that

64 | August 2019 | https://www.linuxjournal.com
combine software development”.
Lunduke: Whoaaa! Gotta stop you right there. I’ve read the Wikipedia entry. I’ve read articles and the various DevOps yearly reports. I’ve gone to conferences and watched presentations with slide decks filled with enough buzz words to make my head spin. Give it to me in your own words.
Ted: Luckily, DevOps is a simple idea. Take Developers and Operations people and integrate them together.
Lunduke: I assume we’re not talking traditional “Operations” within a company (supply chain stuff and whatnot)? Chief Operating Officers and the like?
Ted: No. More System Operations. SysAdmin work.
Lunduke: Oh, okay. So it’s Developers working with SysAdmins?
Ted: And QA (testers)—everyone involved in the software development lifecycle working together to achieve continuous integration and faster releases.
Lunduke: That sounds like Agile. Also, the phrase “continuous integration” causes physical pain to say—almost as much as “enhancing corporate synergy”.
Wikipedia defines Agile Software Development as follows:
Agile software development is an approach to software development under which requirements and solutions evolve through the collaborative effort of self-organizing and cross-functional teams and their customer(s)/end user(s). It advocates adaptive planning, evolutionary development, early delivery, and continual improvement, and it encourages rapid and flexible response to change.
Ted: I know, it’s a terrible term, but the idea is still good. As for being like Agile, there are some similarities, but the focus is different. Agile is more about making it easier
DEEPDIVE

65 | August 2019 | https://www.linuxjournal.com
DEEPDIVE
and faster for the engineering teams to work with project managers and customers, and DevOps is about having the engineering teams working closely with the people handling all the IT infrastructure required by a project (such as the sysadmins).
Lunduke: So, what I’m hearing is that DevOps is a way of saying “sysadmins and engineers should talk”. That can’t be right though. That’s too simple (and obvious) of an idea that has been around since before Jimmy Carter was President (though not always actually acted upon). There has to be more to it than that; otherwise, there wouldn’t be entire conferences and companies dedicated to DevOps.
Ted: A lot of ideas and best practices have evolved around DevOps to help make teams successful, but that really is the basic idea. Sometimes, in the quest for better integration of the Dev with the Ops, the two get completely merged into the same time and even the same roles.
Lunduke: That’s such a simple idea (and one that’s existed since before most computers had a GUI). Why does it need a new term? When I ran my own business, I wore both dev and sysadmin hats. Technically that made me a DevOps...in retrospect?
Ted: Yep. Technically! But don’t get too hung up on the term. The important part is the idea and the best practices that help facilitate it. Think of it simply as a set of ideas and tools to help software run properly in both development and production environments. It’s also a way of enforcing that engineers are in a place to maintain the code they produce.
Lunduke: I think a circuit in my brain is getting tripped as I look for something new here. From what you’re describing, DevOps seems like a basic idea (or small set of ideas) that have been around for longer than most engineers working today have been alive. Maybe if you could give me an example of a DevOps-y best practice, that’ll help me wrap my head around this.
Ted: Sure. One obvious best practice is to publish small, incremental and frequent changes. Engineers, testers and admins (or DevOps engineers) working together,

66 | August 2019 | https://www.linuxjournal.com
DEEPDIVE
releasing tiny changes rapidly. This makes each release a little less risky and bug-prone. And it gets improvements (even if smaller ones) to the users faster.
Lunduke: At the risk of being annoying (I know, it’s too late), that sounds exactly like Agile Development. Everyone involved in the production working on the same team (or very closely) to release small, iterative updates on a rapid schedule.
Ted: Except it’s faster than Agile—or it can be. It’s certainly faster than Waterfall.
Wikipedia defines the Waterfall model of software development as follows:
The waterfall model is a breakdown of project activities into linear sequential phases, where each phase depends on the deliverables of the previous one and corresponds to a specialization of tasks. In software development, it tends to be among the less iterative and flexible approaches, as progress flows in largely one direction (“downwards” like a waterfall) through the phases of conception, initiation, analysis, design, construction, testing, deployment and maintenance.
Lunduke: But technically, Agile doesn’t have any restrictions on how frequently you can release. You can do an Agile Sprint every day—heck, every hour—if you want to.
Here’s the Wikipedia definition of Sprint:
A sprint (or iteration) is the basic unit of development in Scrum (a framework typically used in Agile development). The sprint is a timeboxed effort; that is, it is restricted to a specific duration. The duration is fixed in advance for each sprint and is normally between one week and one month, with two weeks being the most common.
Ted: The Agile vs DevOps debate will rage on for ages. Luckily, the core idea of DevOps is a helpful one. And the series of best practices that gets exchanged (in books and conferences and whatnot) really can be helpful for engineering teams.
67 | August 2019 | https://www.linuxjournal.com
DEEPDIVE
Lunduke: I mean, I guess I get it. It still sounds like Agile (to me). Hey, Ted, could you do me a favor?
Ted: Heh, sure, Lunduke.
Lunduke: Could you tie DevOps into Linux somehow? You know, what with this being for an article in Linux Journal and all.
Ted: Well, most DevOps people I know run Linux—especially on the server side. Does that count?
Lunduke: Yes, yes it does. ◾
Bryan Lunduke is a former Software Tester, former Programmer, former VP of Technology, former Linux Marketing Guy (tm), former openSUSE Board Member... and current Deputy Editor of Linux Journal, Marketing Director for Purism, as well as host of the popular Lunduke Show. More details: http://lunduke.com.
Send comments or feedback via http://www.linuxjournal.com/contact or email [email protected].

DEEPDIVE
Continuous Integration/ Continuous Development with FOSS Tools Up your DevOps game! Get the fundamentals of CI/CD with FOSS tools now!
By Quentin Hartman
One of the hottest topics within the DevOps space is Continuous Integration and Continuous Deployment (CI/CD). This attention has drawn lots of investment dollars, and a vast array of proprietary Software As A Service (SaaS) tools have been created in the CI/CD space, which traditionally has been dominated by free open-source software (FOSS) tools. Is FOSS still the right choice with the low cost of many of these SaaS options?
It depends. In many cases, the cost of self-hosting these FOSS tools will be greater than the cost to use a non-FOSS SaaS option. However, even in today’s cloud-centric and SaaS-saturated world, you may have good reasons to self-host FOSS. Whatever those reasons may be, just don’t forget that “Free” isn’t free when it comes to keeping a service running reliably 24/7/365. If you’re looking at FOSS as a
68 | August 2019 | https://www.linuxjournal.com

DEEPDIVE
69 | August 2019 | https://www.linuxjournal.com
means to save money, make sure you account for those costs.
Even with those costs accounted for, FOSS still delivers a lot of value, especially to small and medium-sized organizations that are taking their first steps into DevOps and CI/CD. Starting with a commercialized FOSS product is a great middle ground. It gives a smooth growth path into the more advanced proprietary features, allowing you to pay for those only once you need them. Often called Open Core, this approach isn’t universally loved, but when applied well, it has allowed for a lot of value to be created for everyone involved.
Narrowing the FieldWhen talking with clients or peers about DevOps concepts, it’s useful to break things into “lanes” to help simplify the conversation and provide rough boundaries
An Embarrassment of RichesThe DevOps concept exploded in the past several years. The term quickly saturated the mainstream technology industry. With this increased mindshare comes a corresponding increase in the number of tools available to accomplish DevOps-related tasks. That’s a blessing and a curse as a DevOps practitioner. Thanks to the endless buffet of options, you’re sure to find something that meets your needs, but to a newcomer, the multitude of choices is overwhelming. Combine that with the vast scope of tasks that fall under the DevOps umbrella and the competing claims of “best” from all sides, and you have a recipe for paralysis. A good place for finding tools and filtering by a variety of criteria is DevOpsBookmarks.com. The content is all open source, and the maintainers are diligent about merging contributions, but it hasn’t seen a lot of updates lately. Despite that, it makes a great jumping off point. If you find something noteworthy that should be included, a pull request would be appreciated!

70 | August 2019 | https://www.linuxjournal.com
DEEPDIVE
for defining where tasks fall or how tools might be applied. At the highest levels, you have the “infrastructure”, “code” and “visibility” lanes. CI/CD is primarily in the code lane, with some bits getting into infrastructure and visibility. The topic of CI/CD breaks down into lanes of “Source Code Management”, “Build/Package/Deployment Automation” and “Test Automation”.
Most organizations focus their DevOps journey on CI/CD because it has the largest perceived return on investment and is the one most obviously related to the goal of “get good code out faster”. By and large, they are right, but they ignore the other lanes at their peril. Some organizations pour hundreds of thousands of dollars into implementing CI/CD tools and processes, only to have the whole effort stymied by shortcomings in the infrastructure lane. Perhaps even worse, multi-month deployment and training projects bear no fruit, because no one bothers to make sure the tools actually are getting used. This is where paying attention to your visibility lane comes into play. When doing DevOps, it’s important to measure and report on as many metrics as you can that are relevant to your goals. Process and tool adoption metrics are critical to include.
CI/CD Put SimplyCI/CD aims to reduce the amount of time in between when a code change is made and when it is deployed and in use. The Holy Grail that many on the path of CI/CD are pursuing is to reduce the time from commit to production down to minutes, without the need for human intervention along the way. To do this, many types of automation are employed to test, build, package and deploy code changes. To really get there though, your application architecture has to be amenable to this potential rate of change.
Microservices and serverless architectures are two design patterns that can handle it well, but if your application is a single monolithic service, odds are you won’t get there without either changing that design first or having remarkably mature test automation. There will be times though, even in the most mature organizations, when you actually may not want to deploy a change right when it’s made. For this reason, some people like to differentiate between “delivery” and “deployment”, calling the process “CI/CD/CD”.

71 | August 2019 | https://www.linuxjournal.com
DEEPDIVE
Source Code ManagementMany Source Code Management (SCM) systems exist. Mercurial, Microsoft Team Foundation Server and Perforce all come to mind. However, Git has become the de
Focus on What Matters MostWhen adopting DevOps practices, the tools are the easy part. That isn’t to say that selecting and implementing them is objectively “easy”, only that it’s a lot easier than the accompanying task of making sure that an organization’s culture and processes are supportive of DevOps practices. When selecting tools, it’s easy to get wrapped around the axle worrying about doing things “right”. They say “You’re not doing it right if you don”t have unit tests!”, or “You’re not doing it right if you don’t have your infrastructure defined in code!”
Don’t be overly worried about “right” until your organization has a fairly mature DevOps culture in place. Focus on the tools and practices that will give you the shortest time to value and provide the most quality of life improvement for your developers and ops people. Writing and maintaining unit tests takes a ton of effort, and the value it provides often lies in the far future. If you have only a few servers deployed behind a simple load balancer and that’s not likely to change soon, automating your infrastructure may not pay. Go for the quickest wins possible in the beginning. Nothing encourages support like success. Just make sure you do plan to come back to fill in those gaps. They become more important as your organization matures. Don’t let perfect get in the way of better.
The biggest payoff is usually found in automating build and deployment, so that’s the best place for most folks start. Those are tasks that need to be done over and over as you iterate through the development process, often many times a day. The sooner the pain of these tasks can be reduced as near as possible to zero, the happier everyone will be. This is the core of a CI/CD pipeline.
72 | August 2019 | https://www.linuxjournal.com
DEEPDIVE
facto standard SCM, and GitHub is the dominant management layer people use on top of it. However, GitHub is not FOSS, so let’s turn to its worthy competitor GitLab CE, also known as GitLab Core.
The rate at which GitLab has matured and features are added is staggering. GitLab is licensed under an Open Core model, which means many of those features exist only in their commercial offering, which is a shame, but an understandable one. The FOSS offering is still robust enough to be quite compelling though. It approaches feature parity with GitHub as a Git management tool, and it even surpasses it by offering a suite of additional DevOps-enabling features, such as CI/CD orchestration, Slack-like messaging, artifact repositories, tight Kubernetes integration and even a Function as a Service (FaaS) or “serverless”. But for SCM, it offers everything you need to perform the core code development management tasks of branching, reviewing, approving and merging code changes and much more. A full-feature comparison matrix of the various editions of self-hosted and GitLab-hosted products is available here.
Other FOSS options exist, but GitLab is probably the place to start since it is mature and fully featured. One that I’m aware of that is also quite nice is Gitea, which is a very lightweight implementation of Git done in Go with a nice management interface. It’s likely most useful if GitLab’s admittedly large system requirements are too much for your use case.
Build/Package/Deployment AutomationThis is where the rubber really meets the road, and where people working on CI/CD tasks likely will spend the bulk of their energy. The most well known tool in this space also happens to be FOSS, and that is Jenkins. Thanks in large part to its vast library of plugins, Jenkins can be much more than a CI/CD tool. It really is a Swiss Army knife of automation orchestration. The extensibility and flexibility of Jenkins can’t be overstated. It’s so flexible in fact, that CloudBees, a company that is a significant contributor to the FOSS project, uses it as the foundation for its primary commercial offerings. These offerings address some of the shortcomings of Jenkins FOSS, making it more appealing for very large, enterprise-class deployments.

73 | August 2019 | https://www.linuxjournal.com
DEEPDIVE
Recently, complaints have started surfacing about Jenkins being “not modern” and “too hard to manage”, especially when compared to very focused SaaS offerings like CircleCI or Shippable. Those arguments have some merit. HA isn’t easily possible without moving to CloudBees, large Jenkins deployments can become unwieldy, the UI is dated, and its old-school Java roots do show from time to time. However, much of that can be ameliorated by running the Blue Ocean interface and running smaller, team-focused deployments in containers. Moving to competing SaaS tools also would lose a lot of the power that Jenkins brings to the table as a general automation orchestration tool, which is a role those options don’t fill as well.
GitLab appears in this lane too. GitLab first introduced CI features in 2015, and they have matured rapidly since then. It has become a well regarded tool in this space and is a particularly easy choice if you’ve already deployed GitLab for source code management, as the CI tool is included.
There are several other notables in this space, each with their own particular take on CI/CD and a different set of strengths and weaknesses. One that is particularly interesting is Drone, because it aims to be “container native”. It defines pipelines using YAML very similar to Docker Compose, which should make it accessible to anyone comfortable using Docker for local development. Like Gitea above, it is written in Go and has a very light footprint, and so it would be an appropriate choice for resource-constrained environments.
Test AutomationTest automation is a cornerstone of a true CI/CD pipeline; however, it’s a very complicated topic. The tools vary by the language in which the application is written, the nature of the application itself, and even the composition of the team or teams writing the software. Of all the problems in the CI/CD space, this is the most challenging one. Not only is it a challenge to decide what to test, it’s difficult to determine how best to test it. There are unit tests, integration tests, functional tests, system tests, validation tests, regression tests, black box testing, white box testing, static code analysis, dynamic code analysis and even open-source license, compliance and security analysis. The list could continue, opening this space up to
74 | August 2019 | https://www.linuxjournal.com
DEEPDIVE
become another seemingly endless array of choices. In the end though, it is best to stay focused on answering the question, “Is this code ready to be used?” and then come up with your own organization’s definition of “ready”. That will help you make decisions about what kinds of testing you should be doing now, later and perhaps not at all. As you journey down the road of test automation, your definition of “ready” likely will become more and more strict, and you’ll iteratively bring on additional tools to meet the evolving criteria. The most common classes of automated testing, unit testing, system testing and functional testing are all great places to start. They all have lots of good FOSS options available.
Hundreds of different unit test frameworks are available, with at least a handful for nearly every language that has seen any amount of real world use. There is an incredible list of these frameworks available at Wikipedia. Start your search for a tool there, or search for “unit testing for $my_language” in your search engine of choice, and choose one that seems to be actively used and developed, and one that can be made to integrate with the other tools you intend to use. Many of them are “xUnit” style, which is a very common model for unit testing. If you choose one of that type, it’s more likely that your developers will be comfortable writing tests for it, and there’s a good chance it will create a results report in a JUnit-compatible XML file. JUnit XML reports are the lingua franca of the unit test world, and having reports in that format makes it far more likely that whatever tool you want to record your results in will be able to parse the report.
System testing isn’t quite so tightly defined. Here again is a wide-open problem space with a multitude of possible solutions that will be heavily influenced by your particular situation. My preferred starting approach is fairly repeatable and broadly applicable. Deploy a disposable instance of your application (usually in containers) and run a load test with a tool like Gatling or Postman to run through the core functionality of your app quickly. If those tests fail, there’s a good chance you have an system issue. Postman itself isn’t a FOSS tool, but it is free for most uses, and the Postman folks release a lot of supporting tools as FOSS and generally seem to be a good FOSS community members.

75 | August 2019 | https://www.linuxjournal.com
DEEPDIVE
It’s also worth noting that system testing is often mistakenly called “integration testing”. Integration testing is a step that would traditionally come between unit testing and system testing, but one should consider skipping it early in the adoption of automated testing practices, as it usually provides tangible value only in very complicated software written by very large teams or composed of the work from several separate teams.
For functional testing, the standout FOSS tool is Selenium, which forms the core of many other testing automation tools, both FOSS and commercial. If your application exposes anything through a webpage, Selenium or something like it should be in your toolkit.
And finally, all the testing in the world doesn’t mean much if you can’t view the results. Jenkins can display test results itself, but running Sonarqube adds a lot of value. Not only does it give you a great view of how your test results have changed over time, it can perform various kinds of static analysis on your code if you are using a supported language. It’s another Open-Core-licensed tool, and some very useful features have been moved into the commercial version recently—perhaps most notably the ability to track multiple branches of a single codebase easily.
ConclusionOne could use a selection of the tools from each of the lanes listed above and provide the framework for an effective CI/CD pipeline. The options here are only a few of the possible choices; however, they are ones with a proven record of delivering value. And ultimately, that’s the point: getting to value. In the end, that’s what a CI/CD pipeline is for, delivering value to your users as quickly and smoothly as possible, by reducing friction within your development and deployment process. And that is an effective early step in embracing DevOps. ◾
Quentin Hartman is a lifelong technology enthusiast who has been working in one aspect or another of network and system administration for more than 20 years. The vast majority of that time has been spent using Linux and other FOSS tools to help meet the needs of organizations large and small. Quentin is currently working as the Director of Infrastructure and DevOps at Finalze where he helps the team build great software with a soul. He lives near Denver, Colorado, with his wife, three daughters and five chickens. He can be reached as “qhartman” on twitter.com and keybase.io.

76 | August 2019 | https://www.linuxjournal.com
DEEPDIVE
Send comments or feedback via http://www.linuxjournal.com/contact or email [email protected].
Resources• Open Source Business Models Considered Harmful
• DevOps Bookmarks
• GitLab Core
• GitLab Features Matrix
• Gitea
• Jenkins
• CloudBees
• Jenkins Blue Ocean
• Drone
• List of Unit Testing Frameworks (Wikipedia)
• Gatling
• Postman
• Overview of Integration Testing (Wikipedia)
• Selenium
• Sonarqube

The largest Open Source | Open Tech | Open Web conference on the U.S. east coast
More than 4,000 technologists expected from all over the world
Nearly 250 sessions
More than 240 speakers
Priced affordably to encourage and
enable access
O C T O B E R 1 3 - 1 5 , 2 0 1 9R A L E I G H , N C U S A
R E G I S T R AT I O N I S J U S T $ 1 7 9 T H R O U G H A U G U S T 3 1E n t e r p r o m o c o d e L i n u x J o u r n a l f o r 2 0 % d i s c o u n t
F O R M O R E I N F O : A L LT H I N G S O P E N . O R G

78 | August 2019 | https://www.linuxjournal.com
DEEPDIVE
Digging Through the DevOps Arsenal: Introducing Ansible If you need to deploy hundreds of server or client nodes in parallel, maybe on-premises or in the cloud, and you need to configure each and every single one of them, what do you do? How do you do it? Where do you even begin? Many configuration management frameworks exist to address most, if not all, of these questions and concerns. Ansible is one such framework.
By Petros Koutoupis
You may have heard of Ansible already, but for those who haven’t or don’t know what it is, Ansible is a configuration management and provisioning tool. (I’ll get to exactly what that means shortly.) It’s very similar to other tools, such as Puppet, Chef and Salt.
Why use Ansible? Well, because it’s simple to master. I don’t mean that the others are not simple, but Ansible makes it easy for individuals to pick up quickly. That’s because Ansible uses YAML as its base to provision, configure and deploy. And because of this approach, tasks are executed in a specific order. During execution, if you trip over a syntax error, it will fail once you hit it, potentially making it easier to debug.
Now, what’s YAML? YAML (or YAML Ain’t Markup Language) is a human-readable data-serialization language mostly used to capture configuration files. You know how JSON is easier to implement and use over XML? Well, YAML takes a more simplistic

79 | August 2019 | https://www.linuxjournal.com
DEEPDIVE
approach than JSON. Here’s an example of a typical YAML structure containing a list:
data: - var1: a: 1 b: 2 - var2: a: 1 b: 2 c: 3
Now, let’s swing back to Ansible. Ansible is an open-source automation platform freely available for Linux, macOS and BSD. Again, it’s very simple to set up and use, without compromising any power. Ansible is designed to aid you in configuration management, application deployment and the automation of assorted tasks. It works great in the realm of IT orchestration, in which you need to run specific tasks in sequence and create a chain of events that must happen on multiple and different servers or devices.
Here’s a good example: say you have a group of web servers behind a load balancer. You need to upgrade those web servers, but you also need to ensure that all but one server remains online for the upgrade process. Ansible can handle such a complex task.
Ansible uses SSH to manage remote systems across the network, and those systems are required to have a local installation of not only SSH but also Python. That means you don’t have to install and configure a client-server environment for Ansible.
Install AnsibleAlthough you can build the package from source (either from the public Git repository or from a tarball), most modern Linux distributions will have binary packages available in their local package repositories. You need to have Ansible installed on at least one machine (your control node). Remember, all that’s required on the remote machines are SSH and Python.

80 | August 2019 | https://www.linuxjournal.com
DEEPDIVE
To install on Red Hat or CentOS:
$ sudo yum install ansible
To install on Ubuntu:
$ sudo apt install ansible
Configure Your SSH Keys and Install Them on the Remote HostsLife will be much easier once you install SSH keys on each node as an authorized key. The purpose of this exercise is to provision access to each node from the other without requiring a password for each login. This feature facilitates automated and passwordless logins using the SSH protocol. Another name for key-based authentication in SSH is called public key authentication.
Create an RSA key pair:
$ ssh-keygen -t rsa
For the sake of simplicity, let’s leave the defaults to both the location of the key and the passphrase. Proceed by pressing enter for every requested input until you return back to the shell prompt.
Once the SSH key has been created, copy the public key to the remote server. In this exercise, you’re required to do this from the control node over to the remote node:
$ cat ~/.ssh/id_rsa.pub | ssh [email protected] "cat >> ↪~/.ssh/authorized_keys"
Replace the user name and IP address as needed. You can make sure that everything works by SSHing to the remote node from your designated control node. If done

81 | August 2019 | https://www.linuxjournal.com
DEEPDIVE
correctly, you won’t be prompted for a password, and you’ll automatically log in to the shell of the remote machine.
Define the Remote MachinesLet’s define which nodes are going to be the remote nodes from the control node. But before doing that, let’s first relocate the default hosts configuration file:
$ sudo mv /etc/ansible/hosts /etc/ansible/hosts.orig
Create a new /etc/ansible/hosts file, and define a new group with a list of the IP addresses to be identified under that same group. In this case, let’s define a group called web, and underneath it, let’s have a single remote node, 192.168.1.109:
[web]192.168.1.109
If you want to add more to this group, you would do so on a new line. For example:
[web]192.168.1.109192.168.1.110192.168.1.111
If you want to test this on a local machine instead of two or more separate nodes, create a group called local, and add the localhost IP address:
[local]127.0.0.1
Run Basic TasksNow that you’ve done all of this, you should be able to run tasks on the defined remote servers. But, first let’s make sure that all is well. Remember, Ansible

82 | August 2019 | https://www.linuxjournal.com
DEEPDIVE
needs to be able to log in directly to the remote nodes via SSH and without a password. If you haven’t already, please refer to the SSH key section above. Run the following command:
$ ansible all -m ping
Your response should look something like this JSON output for all the nodes in all the groups defined in the /etc/ansible/hosts file:
192.168.1.109 | SUCCESS => { "ansible_facts": { "discovered_interpreter_python": "/usr/bin/python" }, "changed": false, "ping": "pong"}
If you want to run a command to all of your nodes under the group web, and you know that each node in that group is a Debian-based distribution, you would run the following:
$ ansible web -m shell -a 'cat /etc/debian_version'
Note: the -m option defines the module to be used. The first attempt used the ping module, and this example shows invoking the shell for a shell-based command.
The output of the above command will look similar to the following:
192.168.1.109 | CHANGED | rc=0 >>buster/sid
Now let’s say you need to run a command as a completely different user:

83 | August 2019 | https://www.linuxjournal.com
DEEPDIVE
$ ansible web --become-user=root -m shell -a 'tail -n5 ↪/var/log/syslog'
You can rely on the --become-user option and append the desired user to the perimeter. The tail command above will output what you would typically expect:
192.168.1.109 | CHANGED | rc=0 >>Jun 15 20:17:51 ubuntu-test systemd 1 : Started Session ↪of user petros.Jun 15 20:17:52 ubuntu-test ansible-command: Invoked with ↪creates=None executable=None _uses_shell=True ↪strip_empty_ends=True _raw_params=cat ↪/etc/debian_version removes=None argv=None warn=True ↪chdir=None stdin_add_newline=True stdin=NoneJun 15 20:25:12 ubuntu-test systemd 1 : Started Session 10 ↪of user petros.Jun 15 20:25:1 ubuntu-test ansible-command: Invoked with ↪creates=None executable=None _uses_shell=True ↪strip_empty_ends=True _raw_params=tail -n5 ↪/var/log/messages removes=None argv=None warn=True ↪chdir=None stdin_add_newline=True stdin=NoneJun 15 20:25: 4 ubuntu-test ansible-command: Invoked with ↪creates=None executable=None _uses_shell=True ↪strip_empty_ends=True _raw_params=tail -n5 ↪/var/log/syslog removes=None argv=None warn=True ↪chdir=None stdin_add_newline=True stdin=None
Create PlaybooksUsing these basic functions, you easily can batch a few commands to various nodes across your network, but often you’ll find yourself in need of running more than one or two shell commands. This is where Playbooks come into the picture. Playbooks run multiple tasks and provide more advanced functionality than your ad hoc commands.

84 | August 2019 | https://www.linuxjournal.com
DEEPDIVE
Say you want to install a few packages when a remote node comes online. You’ll need to create a YAML file to capture those actions. Using a text editor, create a file named package-install.yml with the following YAML structure:
---- hosts: web tasks: - name: Install Make apt: pkg=make state=present update_cache=true become: yes - name: Install GCC apt: pkg=gcc state=present update_cache=true become: yes
You’re essentially going to tell Ansible that you want to install both the Make and GCC packages (alongside its dependencies) on all nodes in the group web. You also are telling Ansible that you need to install these two packages as a privileged user with the become: yes field.
Now it’s time to kick off the Ansible Playbook. If you’re not executing as a privileged user already, you need to add the --ask-become-pass option, which will prompt you for a password to su into root to execute the desired actions. This works only if all nodes under the same group share the same user and password schemes:
$ ansible-playbook --ask-become-pass package-install.ymlBECOME password:
PLAY [web]**************************************************************
TASK [Gathering Facts]**************************************************************ok: [192.168.1.109]
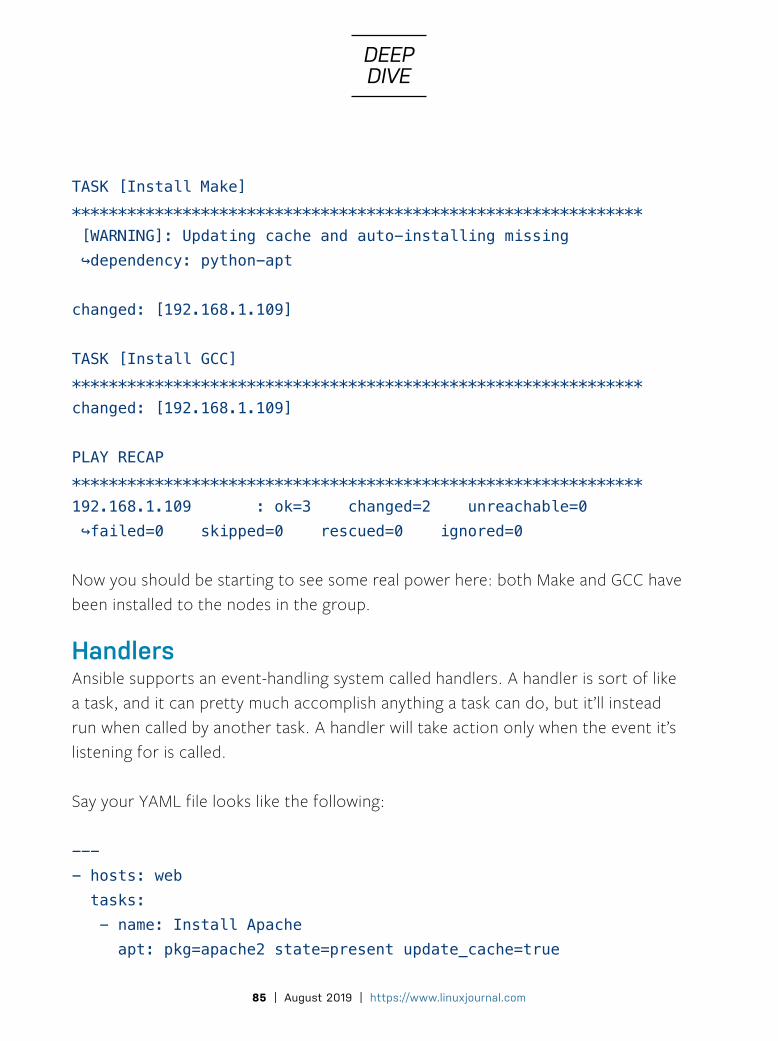
85 | August 2019 | https://www.linuxjournal.com
DEEPDIVE
TASK [Install Make]************************************************************** [WARNING]: Updating cache and auto-installing missing ↪dependency: python-apt
changed: [192.168.1.109]
TASK [Install GCC]**************************************************************changed: [192.168.1.109]
PLAY RECAP**************************************************************192.168.1.109 : ok=3 changed=2 unreachable=0 ↪failed=0 skipped=0 rescued=0 ignored=0
Now you should be starting to see some real power here: both Make and GCC have been installed to the nodes in the group.
HandlersAnsible supports an event-handling system called handlers. A handler is sort of like a task, and it can pretty much accomplish anything a task can do, but it’ll instead run when called by another task. A handler will take action only when the event it’s listening for is called.
Say your YAML file looks like the following:
---- hosts: web tasks: - name: Install Apache apt: pkg=apache2 state=present update_cache=true
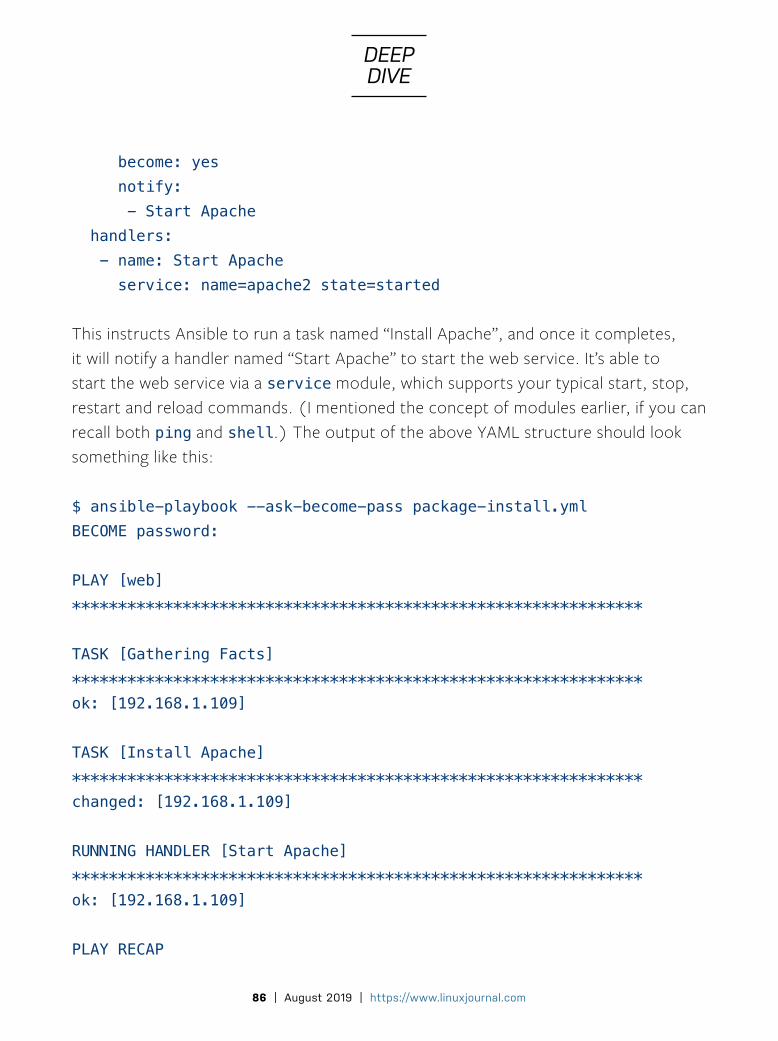
86 | August 2019 | https://www.linuxjournal.com
DEEPDIVE
become: yes notify: - Start Apache handlers: - name: Start Apache service: name=apache2 state=started
This instructs Ansible to run a task named “Install Apache”, and once it completes, it will notify a handler named “Start Apache” to start the web service. It’s able to start the web service via a service module, which supports your typical start, stop, restart and reload commands. (I mentioned the concept of modules earlier, if you can recall both ping and shell.) The output of the above YAML structure should look something like this:
$ ansible-playbook --ask-become-pass package-install.ymlBECOME password:
PLAY [web]**************************************************************
TASK [Gathering Facts]**************************************************************ok: [192.168.1.109]
TASK [Install Apache]**************************************************************changed: [192.168.1.109]
RUNNING HANDLER [Start Apache]**************************************************************ok: [192.168.1.109]
PLAY RECAP

87 | August 2019 | https://www.linuxjournal.com
DEEPDIVE
**************************************************************192.168.1.109 : ok=3 changed=1 unreachable=0 ↪failed=0 skipped=0 rescued=0 ignored=0
SummaryThe examples here are quite small and limited. As you likely have guessed, you are able to add more tasks and notify more handlers from within a single YAML file. It doesn’t need to be limited to just a few. It may take some time and trial and error to build up enough of a list to handle every action in your automated environment. There is so much more that you can do with Ansible and so much more to cover. Although this guide provides a good foundation to get you started, I barely scraped the surface of this extremely powerful configuration management framework. ◾
Petros Koutoupis, LJ Editor at Large, is currently a senior performance software engineer at Cray for its Lustre High Performance File System division. He is also the creator and maintainer of the RapidDisk Project. Petros has worked in the data storage industry for well over a decade and has helped pioneer the many technologies unleashed in the wild today.
Resources• Ansible
• “Ansible: the Automation Framework that Thinks Like a Sysadmin” by Shawn Powers, LJ, August 2017
• “Ansible: Making Things Happen” by Shawn Powers, LJ, September 2017
• “Ansible, Part III: Playbooks” by Shawn Powers, LJ, October 2017
• Ansible, Part IV, Putting It All Together” by Shawn Powers, LJ, November 2017
Send comments or feedback via http://www.linuxjournal.com/contact or email [email protected].

88 | August 2019 | https://www.linuxjournal.com
My Favorite Infrastructure Take a tour through the best infrastructure I ever built with stops in architecture, disaster recovery, configuration management, orchestration and security.
By Kyle Rankin
Working at a startup has many pros and cons, but one of the main benefits over a traditional established company is that a startup often gives you an opportunity to build a completely new infrastructure from the ground up. When you work on a new project at an established company, you typically have to account for legacy systems and design choices that were made for you, often before you even got to the company. But at a startup, you often are presented with a truly blank slate: no pre-existing infrastructure and no existing design choices to factor in.
Brand-new, from-scratch infrastructure is a particularly appealing prospect if you are at a systems architect level. One of the distinctions between a senior-level systems administrator and architect level is that you have been operating at a senior level long enough that you have managed a number of different high-level projects personally and have seen which approaches work and which approaches don’t. When you are at this level, it’s very exciting to be able to build a brand-new infrastructure from scratch according to all of the lessons you’ve learned from past efforts without having to support any legacy infrastructure.
During the past decade, I’ve worked at a few different startups where I was asked to develop new infrastructure completely from scratch but with high security, uptime and compliance requirements, so there was no pressure to cut corners for speed

89 | August 2019 | https://www.linuxjournal.com
DEEPDIVE
like you might normally face at a startup. I’ve not only gotten to realize the joy of designing new infrastructure, I’ve also been able to do it multiple times. Each time, I’ve been able to bring along all of the past designs that worked, leaving behind the bits that didn’t, and updating all the tools to take advantage of new features. This series of infrastructure designs culminated in what I realize looking back on it is my favorite infrastructure—the gold standard on which I will judge all future attempts.
In this article, I dig into some of the details of my favorite infrastructure. I describe some of the constraints around the design and explore how each part of the infrastructure fits together, why I made the design decisions I did, and how it all worked. I’m not saying that what worked for me will work for you, but hopefully you can take some inspiration from my approach and adapt it for your needs.
ConstraintsWhenever you describe a solution you think works well, it’s important to preface it with your design constraints. Often when people are looking for infrastructure cues, the first place they look is how “big tech companies” do it. The problem with that approach is that unless you also are a big tech company (and even if you are), your constraints are likely very different from theirs. What works for them with their budget, human resources and the problems they are trying to solve likely won’t work for you, unless you are very much like them.
Also, the larger an organization gets, the more likely it is going to solve problems in-house instead of using off-the-shelf solutions. There is a certain stage in the growth of a tech company, when it has enough developers on staff, that when it has a new problem to solve, it likely will use its army of developers to create custom, proprietary tools just for itself instead of using something off the shelf—even if an off-the-shelf solution would get the company 90% there. This is a shame, because if all of these large tech companies put that effort into improving existing tools and sharing their changes, we would all spend less time reinventing wheels. If you’ve ever interviewed people who have spent a long time at a large tech company, you quickly realize that they are really well trained to administer that specific infrastructure, but without those custom tools, they may have a hard time working anywhere else.

90 | August 2019 | https://www.linuxjournal.com
DEEPDIVE
Startup constraints also are very different from large company constraints, so it might equally be a mistake to apply solutions that work for a small startup to a large-scale company. Startups typically have very small teams but also need to build infrastructure very quickly. Mistakes that make their way to production often have a low impact on startups. They are most concerned about getting some kind of functioning product out to attract more investment before they run out of money. This means that startups are more likely to favor not only off-the-shelf solutions, but also favor cutting corners.
All that is to say, what worked for me under my constraints might not work for you under your constraints. So before I go into the details, you should understand the constraints I was working under.
Constraint 1: Seed Round Financial Startup This infrastructure was built for a startup that was developing a web application in the financial space. We had limitations both on the amount of time we could spend on building the infrastructure and the size of the team we had available to build it. In many cases, there were single-member teams. In previous iterations of building my ideal infrastructure, I had a team of at least one other person if not multiple people to help me build out the infrastructure, but here I was on my own.
The combination of a time constraint along with the fact that I was doing this alone meant I was much more likely to pick stable solutions that worked for me in the past using technologies I was deeply familiar with. In particular, I put heavy emphasis on automation so I could multiply my efforts. There is a kind of momentum you can build when you use configuration management and orchestration in the right way.
Constraint 2: Non-Sysadmin Emergency Escalation I was largely on my own not just to build the infrastructure, but also when it came to managing emergencies. Normally I try to stick to a rule that limits production access to system administrators, but in this case, that would mean we would have no redundancy if I was unavailable. This constraint meant that if I was unavailable for whatever reason, alerts needed to escalate up to someone who primarily had a developer background with only some

91 | August 2019 | https://www.linuxjournal.com
DEEPDIVE
Linux server experience. Because of this, I had to make sure that it was relatively straightforward to respond to the most common types of emergencies.
Constraint 3: PCI Compliance I love the combination of from-scratch infrastructure development you get to do in a startup with tight security constraints that prevent you from cutting corners. A lot of people in the security space look down a bit on PCI compliance, because so many companies think of it as a box to check and hire firms known for checking that box with minimal fuss. However, there are a lot of good practices within PCI-DSS if you treat them as a minimum security bar to manage honestly, instead of a maximum security bar to skirt by. We had a hard dependency on PCI compliance, so meeting and exceeding that policy had some of the greatest impact on the design.
Constraint 4: Custom Rails Web Applications The development team had a strong background in Rails, so most of the in-house software development was for custom middleware applications based on a standard database-backed Rails application stack. A number of different approaches exist for packaging and distributing this kind of application, so this also factored into the design.
Constraint 5: Minimal Vendor Lock-in It’s somewhat common for venture-capital-backed startups to receive credits from cloud providers to help them get started. It not only helps startups manage costs while they’re trying to figure out their infrastructure, but also if the startup manages to use cloud-specific features, it has the side benefit of making it harder for the startup to move to a different provider down the road once they have larger cloud bills.
Our startup had credits with more than one cloud provider, so we wanted the option to switch to another provider in case we were cash-strapped when we ran out of credits. This meant our infrastructure had to be designed for portability and use as few cloud-specific features as possible. The cloud-specific features we did use needed to be abstracted away and easily identified, so we could port them to another provider more easily later.

92 | August 2019 | https://www.linuxjournal.com
DEEPDIVE
ArchitecturePCI policy pays a lot of attention to systems that manage sensitive cardholder data. These systems are labeled as “in scope”, which means they must comply with PCI-DSS standards. This scope extends to systems that interact with these sensitive systems, and there is a strong emphasis on compartmentation—separating and isolating the systems that are in scope from the rest of the systems, so you can put tight controls on their network access, including which administrators can access them and how.
Our architecture started with a strict separation between development and production environments. In a traditional data center, you might accomplish this by using separate physical network and server equipment (or using abstractions to virtualize the separation). In the case of cloud providers, one of the easiest, safest and most portable ways to do it is by using completely separate accounts for each environment. In this way, there’s no risk that a misconfiguration would expose production to development, and it has a side benefit of making it easy to calculate how much each environment is costing you per month.
When it came to the actual server architecture, we divided servers into individual roles and gave them generic role-based names. We then took advantage of the Virtual Private Cloud feature in Amazon Web Services to isolate each of these roles into its own subnet, so we could isolate each type of server from others and tightly control access between them.
By default, Virtual Private Cloud servers are either in the DMZ and have public IP addresses, or they have only internal addresses. We opted to put as few servers as possible in the DMZ, so most servers in the environment only had a private IP address. We intentionally did not set up a gateway server that routed all of these servers’ traffic to the internet—their isolation from the internet was a feature!
Of course, some internal servers did need some internet access. For those servers, it was only to talk to a small number of external web services. We set up a series of HTTP proxies in the DMZ that handled different use cases and had strict whitelists in place. That way we could restrict internet access from outside the host itself to just

93 | August 2019 | https://www.linuxjournal.com
DEEPDIVE
the sites it needed, while also not having to worry about collecting lists of IP blocks for a particular service (particularly challenging these days since everyone uses cloud servers).
Fault ToleranceCloud services often are unreliable, but it was critical that our services could scale and survive an outage on any one particular server. We started by using a minimum of three servers for every service, because fault-tolerance systems designed for two systems tend to fall into a traditional primary/failover architecture that doesn’t scale well past two. A design that could account for three servers probably also could accommodate four or six or more.
Cloud systems rely on virtualization to get the most out of bare metal, so any servers you use aren’t real physical machines, but instead some kind of virtual machine running alongside others on physical hardware. This presents a problem for fault tolerance: what happens if all of your redundant virtual machines end up on the same physical machine, and that machine goes down?
To address this concern, some cloud vendors separate a particular site into multiple standalone data centers, each with its own hardware, power and network that are independent from the others. In the case of Amazon, these are called Availability Zones, and it’s considered a best practice to spread your redundant servers across Availability Zones. We decided to set up three Availability Zones and divided our redundant servers across them.
In our case, we wanted to spread out the servers consistently and automatically, so we divided our servers into threes based on the number at the end of their hostname. The software we used to spawn instances would look at the number in the hostname, apply a modulo three to it, and then use that to decide which Availability Zone a host would go to. Hosts like web1, web4 and web7 would be on one group; web2, web5 and web8 in another; and web3, web6 and web9 in a third zone.
When you have multiple servers, you also need some way for machines to fail over
94 | August 2019 | https://www.linuxjournal.com
DEEPDIVE
to a different server if one goes down. Some cloud providers offer in-house load balancing, but because we needed portability, we didn’t want to rely on any cloud-specific features. Although we could have added custom load-balancing logic to our applications, instead we went with a more generic approach using the lightweight and fast HAProxy service.
One approach to using HAProxy would be to set up a load-balancing server running HAProxy and have applications talk to it on various ports. This would behave a lot like some of the cloud-provided load-balancing services (or a load-balancing appliance in a traditional data center). Of course, if you use that approach, you have another problem: what happens when the load balancer fails? For true fault tolerance, you’d need to set up multiple load balancers and then configure the hosts with their own load-balancing logic so they could fail over to the redundant load balancer in the case of a fault, or otherwise rely on a traditional primary/secondary load-balancer failover with a floating IP that would be assigned to whichever load balancer was active.
This traditional approach didn’t work for us, because we realized that there might be cases where one entire Availability Zone might be segregated from the rest of the network. We also didn’t want to add additional failover logic to account for a load-balancer outage. Instead, we realized that because HAProxy was so lightweight (especially compared to the regular applications on the servers), we could just embed an HAProxy instance on every server that needed to talk to another service redundantly. That HAProxy instance would be aware of any downstream service that local server needed to talk to and present ports on the localhost that represented each downstream service.
Here’s how this worked in practice: if webappA needed to talk to middlewareB, it would just connect to localhost port 8001. HAProxy would take care of health checks for downstream services, and if a service went down, it would automatically connect to another. In that circumstance, webappA might see that its connection dropped and would just need to reconnect. This meant that the only fault-tolerance logic our applications needed was the ability to detect when a connection dropped and retry.

95 | August 2019 | https://www.linuxjournal.com
DEEPDIVE
We also organized the HAProxy configuration so that each host favored talking to a host within its own Availability Zone. Hosts in other zones were designated as “backup” hosts in HAProxy, so it would use those hosts only if the primary host was down. This helped optimize network traffic as it stayed within the Availability Zone it started with under normal circumstances. It also made analyzing traffic flows through the network much easier, as we could assume that traffic that entered through frontend2 would be directed to middleware2, which would access database2. Since we made sure that traffic entering our network was distributed across our front-end servers, we could be assured that load was relatively evenly distributed, yet individual connections would tend to stick on the same set of servers throughout a particular request.
Finally, we needed to factor disaster recovery into our plans. To do this, we created a complete disaster recovery environment in a totally separate geographic region from production that otherwise mimicked the servers and configuration in production. Based on our recovery time lines, we could get away with syncing our databases every few hours, and because these environments were independent of each other, we could test our disaster recovery procedure without impacting production.
Configuration ManagementOne of the most important things to get right in this infrastructure was the configuration management. Because I was building and maintaining everything largely by myself and had some tight time lines, the very first thing I focused on was a strong foundation of configuration management using Puppet. I had a lot of experience with Puppet through the years from before it was the mature and robust product it is today. Today though, I could take advantage of all of the high-quality modules the Puppet community has written for common tasks to get a head start. Why reinvent an nginx configuration when the main Puppetlabs module did everything I needed already? One of the keys to this approach was making sure that we started with a basic vanilla image with no custom configuration on it and set it so that all configuration changes that turned a vanilla server into, say, a middleware app server was done through Puppet.

96 | August 2019 | https://www.linuxjournal.com
DEEPDIVE
Another critical reason why I chose Puppet was precisely for the reason many people avoid it: the fact that the Puppetmaster can sign Puppet clients using TLS certificates. Many people hit a big roadblock when they try to set up Puppetmasters to sign clients and opt for a masterless setup instead. In my use case, I would have been missing a great opportunity. I had a hard requirement that all communication over the cloud network be protected using TLS, and by having a Puppetmaster that signed hosts, I would get a trusted local Certificate Authority (the Puppetmaster) and have valid local and signed certificates on every host in my network for free!
Many people open themselves up to vulnerabilities when they enable autosigning on Puppet clients, yet having to sign new Puppet clients manually, particularly in a cloud instance, can be cumbersome. I took advantage of a feature within Puppet that lets you add custom valid headers into the Certificate Signing Request (CSR) the Puppet client would generate. I used a particular x509 header that was designed to embed a pre-shared key into the CSR. Then I used Puppet’s ability to specify a custom autosigning script. This script then gets passed the client CSR and decides whether to sign it. In my script, we inspected the CSR for the client’s name and the pre-shared key. If they matched the values in the copy of that hostname/pre-shared key pair on the Puppetmaster, we signed it; otherwise, we didn’t.
This method worked because we spawned new hosts from the Puppetmaster itself. When spawning the host, the spawning script would generate a random value and store it in the Puppet client’s configuration as a pre-shared key. It would also store a copy of that value in a local file named after the client hostname for the Puppetmaster autosign script to read. Since each pre-shared key was unique and used only for a particular host, once it was used, we deleted that file.
To make configuring TLS on each server simple, I added a simple in-house Puppet module that let me copy the local Puppet client certificate and local Certificate Authority certificate wherever I needed it for a particular service, whether it was nginx, HAProxy, a local webapp or Postgres. Then I could enable TLS for all of my internal services knowing that they all had valid certificates they could use to trust each other.

97 | August 2019 | https://www.linuxjournal.com
DEEPDIVE
I used the standard role/profile pattern to organize my Puppet modules and made sure that whenever I had a Puppet configuration that was based on AWS-specific features, I split that off into an AWS-specific module. That way, if I needed to migrate to another cloud platform, I easily could identify which modules I’d need to rewrite.
All Puppet changes were stored in Git with the master branch acting as the production configuration and with additional branches for the other environments. In the development environment, the Puppetmaster would apply any changes that got pushed automatically, but since that Git repository was hosted out of the development environment, we had a standing rule that no one should be able to change production directly from development. To enforce this rule, changes to the master branch would get synced to production Puppetmasters but never automatically applied—a sysadmin would need to log in to production and explicitly push the change using our orchestration tool.
OrchestrationPuppet is great when you want to make sure that a certain set of servers all have the same changes, as long as you don’t want to apply changes in a particular order. Unfortunately, a lot of changes you’ll want to make to a system follow a certain order. In particular, when you perform software updates, you generally don’t want them to arrive across your servers in a random order over 30 minutes. If there is a problem with the update, you want the ability to stop the update process and (in some environments) roll back to the previous version. When people try to use Puppet for something it’s not meant to do, they often get frustrated and blame Puppet, when really they should be using Puppet for configuration management and some other tool for orchestration.
In the era when I was building this environment, MCollective was the most popular orchestration tool to pair with Puppet. Unlike some orchestration tools that are much closer to the SSH for loop scripts everyone used a few decades ago, MCollective has a strong security model where sysadmins are restricted to a limited set of commands within modules they have enabled ahead of time. Every command runs in parallel across the environment, so it’s very fast to push changes, whether it’s to one host or

98 | August 2019 | https://www.linuxjournal.com
DEEPDIVE
every host.
The MCollective client doesn’t have SSH access to hosts; instead, it signs each command it issues and pushes it to a job queue. Each server checks that queue for commands intended for it and validates the signature before it executes it. In this way, compromising the host on which the MCollective client runs doesn’t give you remote SSH root access to the rest of the environment—it gives you access only to the restricted set of commands you have enabled.
We used our bastion host as command central for MCollective, and the goal was to remove the need for sysadmins to have to log in to individual servers to an absolute minimum. To start, we wanted to make sure that all of the common sysadmin tasks could be performed using MCollective on the bastion host. MCollective already contains modules that let you query the hosts on your network that match particular patterns and pull down facts about them, such as what version a particular software package is.
The great thing about MCollective commands is that they let you build a library of individual modules for particular purposes that you then can chain together in scripts for common workflows. I’ve written in the past about how you can use MCollective to write effective orchestration scripts, and this was an environment where it really shined. Let’s take one of the most common sysadmin tasks: updating software. Because MCollective already had modules in place to query and update packages using the native package manager, we packaged all of our in-house tools as Debian packages as well and put them in internal package repositories. To update an in-house middleware package, a sysadmin would normally perform the following series of steps by hand:
• Get a list of servers that run that software.
• Start with the first server on the list.
• Set a maintenance mode in monitoring for that server.
99 | August 2019 | https://www.linuxjournal.com
DEEPDIVE
• Tell any load balancers to move traffic away from the server.
• Stop the service.
• Update the software.
• Confirm the software is at the correct version.
• Start the service.
• Test the service.
• Tell any load balancers to move traffic back to the server.
• End the maintenance mode.
• Repeat for the rest of the hosts.
All I did was take each of the above steps and make sure there was a corresponding MCollective command for it. Most of the steps already had built-in MCollective plugins for them, but in a few cases, such as for the load balancers, I wrote a simple MCollective plugin for HAProxy that would control the load balancers. Remember, many of the servers in the environment had their own embedded HAProxy instance, but because MCollective runs in parallel, I could tell them all to redirect traffic at the same time.
Once each of these steps could be done with MCollective, the next step was to combine them all into a single generic script to deploy an application. I also added appropriate checks at each of the stages, so in the event of an error, the script would stop and exit with a descriptive error. In the development environment, we automatically pushed out updates once they passed all of their tests, so I also made sure that our continuous integration server (we used Jenkins) used this same script to deploy our app updates for dev. That way I could be sure the script was being

100 | August 2019 | https://www.linuxjournal.com
DEEPDIVE
tested all the time and could stage improvements there first.
Having a single script that would automate all of these steps for a single app was great, but the reality is that a modern service-oriented architecture has many of these little apps. You rarely deploy one at a time; instead, you have a production release that might contain five or more apps, each with their own versions. After doing this by hand a few times, I realized there was room to automate this as well.
The first step in automating production releases was to provide a production manifest my script could use to tell it what to do. A production manifest lists all of the different software a particular release will have and which versions you will use. In well organized companies, this sort of thing will be tracked in your ticketing system, so you can have proper approval and visibility into what software went to production when. This is especially handy if you have a problem later, because you more easily can answer the question “what changed?”
I decided to make the right approach the easy approach and use our actual production manifest ticket as input for the script. That meant if you wanted an automated production release, the first step was to create a properly formatted ticket with an appropriate title, containing a bulleted list of each piece of software you want to deploy and which version you intend on deploying, in the order you want them to be deployed. You then would log in to production (thereby proving you were authorized to perform production changes) and run the production deploy script, which would take as input the specific ticket number it should read. It would perform the following steps:
• Parse the ticket and prompt the sysadmin with the list of packages it will deploy as a sanity check and not proceed until the sysadmin says “yes”.
• Post a message in group chat alerting the team that a production release is starting, using the ticket title as a description.
• Update the local package repository mirrors so they have the latest version of

101 | August 2019 | https://www.linuxjournal.com
DEEPDIVE
the software.
• For each app: 1) notify group chat that the app is being updated, 2) run the app deployment automation script and 3) notify group chat that the app updated successfully.
• Once all apps have been updated successfully, notify group chat.
• Email the log of all updates to a sysadmin alias and also as a comment to the ticket.
Like with the individual app deploy script, if there were any errors, we’d immediately abort the script and send alerts with full logs to email, chat and in the ticket itself, so we could investigate what went wrong. We would perform deployments first in a hot disaster recovery environment located in a separate region, and if it succeeded, in production as well. Once the script successfully worked in production, the script was smart enough to close the ticket. In the end, performing a production deployment, whether you wanted to update one app or ten, involved the following steps:
• Create a properly formatted ticket.
• Log in to the disaster recovery environment and run the production deploy script.
• Log in to the production environment and run the production deploy script.
The automation made the process so easy, production deploys were relatively painless while still following all of our best practices. This meant when I went on vacation or was otherwise unavailable, even though I was the only sysadmin on the team, my boss with a strong development background easily could take over production deployments. The consistent logging and notifications also made it so that everyone was on the same page, and we had a nice audit trail for every software change in production.
I also automated the disaster recovery procedure. You’ve only really backed something

102 | August 2019 | https://www.linuxjournal.com
DEEPDIVE
up if you’ve tested recovery. I set as a goal to test our disaster recovery procedure quarterly, although in practice, I actually did it monthly, because it was useful to have fresh data in the disaster recovery environment, so we could better catch any data-driven bugs in our software updates before they hit production. Compared to many environments, this is a much more frequent test, but I was able to do it because I wrote MCollective modules that would restore the disaster recovery databases from backup and then wrapped the whole thing in a master script that turned it all into a single command that would log the results into a ticket, so I could keep track of each time I restored the environment.
SecurityWe had very tight security requirements for our environment that started (but didn’t end) with PCI-DSS compliance. This meant that all network communication between services was encrypted using TLS (and the handy internal certificate authority Puppet provided), and all sensitive data was stored on disks that were encrypted at rest. It also meant that each server generally performed only one role.
Most of the environment was isolated from the internet, and we went further to define ingress and egress firewall rules both on each host and enforced them in Amazon’s security groups. We started with a “deny by default” approach and opened up ports between services only when they were absolutely necessary. We also employed the “principle of least privilege”, so only a few employees had production access, and we developers did not have access to the bastion host.
Each environment had its own VPN, so to access anything but public-facing services, you started by connecting to a VPN that was protected with two-factor authentication. From there, you could access the web interfaces for our log aggregation server and other monitoring and trending dashboards. To log in to any particular server, you first had to ssh in to a bastion host, which only accepted SSH keys and also required its own two-factor authentication. It was the only host that was allowed access to the SSH ports on other machines, but generally, we used orchestration scripts whenever possible, so we didn’t have to go further than the bastion host to administer production.

103 | August 2019 | https://www.linuxjournal.com
DEEPDIVE
Each host had its own Host-based Intrusion Detection System (HIDS) using ossec, which not only would alert on suspicious activity on a server, but it also would parse through logs looking for suspicious activity. We also used OpenVAS to perform routine network vulnerability scans across the environment.
To manage secrets, we used Puppet’s hiera-eyaml module that allows you to store a hierarchy of key:value pairs in encrypted form. Each environment’s Puppetmaster had its own GPG key that it could use to decrypt these secrets, so we could push development or production secrets to the same Git repository, but because these files were encrypted for different recipients, development Puppetmasters couldn’t view production secrets, and production Puppetmasters couldn’t view development secrets. The nice thing about hiera is that it allowed you to combine plain text and encrypted configuration files and very carefully define which secrets would be available to which class of hosts. The clients would never be able to access secrets unless the Puppetmaster allowed them.
Data that was sent between production and the disaster recovery environment was GPG-encrypted with a key in the disaster recovery environment and also used an encrypted transport between the environments. The disaster recovery test script did all the heavy lifting required to decrypt backups and apply them, so the administrator didn’t have to deal with them. All of these keys were stored in Puppet’s hiera-eyaml module, so we didn’t have to worry about losing them in the event a host went down.
ConclusionAlthough I covered a lot of ground in this infrastructure write-up, I still covered only a lot of the higher-level details. For instance, deploying a fault-tolerant, scalable Postgres database could be an article all by itself. I also didn’t talk much about the extensive documentation I wrote that, much like my articles in Linux Journal, walks the reader through how to use all of these tools we built.
As I mentioned at the beginning of this article, this is only an example of an infrastructure design that I found worked well for me with my constraints. Your constraints might be different and might lead to a different design. The goal here is
104 | August 2019 | https://www.linuxjournal.com
DEEPDIVE
to provide you with one successful approach, so you might be inspired to adapt it to your own needs. ◾
Kyle Rankin is a Tech Editor and columnist at Linux Journal and the Chief Security Officer at Purism. He is the author of Linux Hardening in Hostile Networks, DevOps Troubleshooting, The Official Ubuntu Server Book, Knoppix Hacks, Knoppix Pocket Reference, Linux Multimedia Hacks and Ubuntu Hacks, and also a contributor to a number of other O’Reilly books. Rankin speaks frequently on security and open-source software including at BsidesLV, O’Reilly Security Conference, OSCON, SCALE, CactusCon, Linux World Expo and Penguicon. You can follow him at @kylerankin.
Send comments or feedback via http://www.linuxjournal.com/contact or email [email protected].
Resources• “Orchestration with MCollective” by Kyle Rankin, LJ, December 2016
• “Orchestration with MCollective, Part II” by Kyle Rankin, LJ, January 2017
• “Using Hiera with Puppet” by Scott Lackey, LJ, March 2015
• Puppet
• Hiera
• MCollective
• Official PCI Security Standards Council Site
• HAProxy: the Reliable, High Performance TCP/HTTP Load Balancer
• “Puppet Redefines Infrastructure Automation” by Petros Koutoupis

Decentralized Certificate Authority
and Naming
Free and open source contributors only:
handshake.org/signup

106 | August 2019 | https://www.linuxjournal.com
Build a Versatile OpenStack Lab with Kolla
Build a Versatile OpenStack Lab with Kolla Hone your OpenStack skills with a full deployment in a single virtual machine.
By John S. Tonello
It’s hard to go anywhere these days without hearing something about the urgent need to deploy on-premises cloud environments that are agile, flexible and don’t cost an arm and a leg to build and maintain, but getting your hands on a real OpenStack cluster—the de facto standard—can be downright impossible.
Enter Kolla-Ansible, an official OpenStack project that allows you to deploy a complete cluster successfully—including Keystone, Cinder, Neutron, Nova, Heat and Horizon—in Docker containers on a single, beefy virtual machine. It’s actually just one of an emerging group of official OpenStack projects that containerize the OpenStack control plane so users can deploy complete systems in containers and Kubernetes.
To date, for those who don’t happen to have a bunch of extra servers loaded with RAM and CPU cores handy, DevStack has served as the go-to OpenStack lab environment, but it comes with some limitations. Key among those is your inability to reboot a DevStack system effectively. In fact, rebooting generally bricks your instances and renders the rest of the stack largely unusable. DevStack also limits your ability to experiment beyond core OpenStack modules, where Kolla lets you build systems that can mimic full production capabilities, make changes and pick up where you left off after a shutdown.

107 | August 2019 | https://www.linuxjournal.com
Build a Versatile OpenStack Lab with Kolla
In this article, I explain how to deploy Kolla, starting from the initial configuration of your laptop or workstation, to configuration of your cluster, to putting your OpenStack cluster into service.
Why OpenStack?As organizations of all shapes and sizes look to speed development and deployment of mission-critical applications, many turn to public clouds like Amazon Web Services (AWS), Microsoft Azure, Google Compute Engine, RackSpace and many others. All make it easy to build the systems you and your organization need quickly. Still, these public cloud services come at a price—sometimes a steep price you only learn about at the end of a billing cycle. Anyone in your organization with a credit card can spin up servers, even ones containing proprietary data and inadequate security safeguards.
OpenStack, a community-driven open-source project with thousands of developers worldwide, offers a robust, enterprise-worthy alternative. It gives you the flexibility of public clouds in your own data center. In many ways, it’s also easier to use than public clouds, particularly when OpenStack administrators properly set up networks, carve out storage and compute resources, and provide self-service capabilities to users. It also has tons of add-on capabilities to suit almost any use case you can imagine. No wonder 75% of private clouds are built using OpenStack.
The challenge remains though in getting OpenStack up and running. Even though it doesn’t rely on any particular brand of hardware, it does require machines with plenty of memory and CPU cores. That alone creates a roadblock to many looking to try it. The Kolla project gets you past hurdle.
What You’ll NeedKolla can be run in a single virtual machine (or bare-metal box), known as an “all-in-one” deployment. You also can set it up to use multiple VMs, which is called “multinode”. In this article, I show how to deploy the former using a virtual machine deployed with KVM, the Linux virtualization service based on libvirtd. I successfully deployed Kolla on a Dell 5530 with 32GB of RAM and an i7 CPU with

108 | August 2019 | https://www.linuxjournal.com
Build a Versatile OpenStack Lab with Kolla
12 cores, but I also did it on a machine with 16GB of RAM and four cores. You can allocate whatever you have. Obviously, the more RAM and cores, the better your OpenStack cluster will perform.
I used KVM for this deployment, but theoretically, you could use VirtualBox, VMware Desktop or another hypervisor. The base of the system is Docker, so just make sure you’re using a system that can run it. Don’t worry if you don’t know much about Docker; Kolla uses Ansible to automate the creation of images and the containers themselves.
To install KVM, check the requirements for your distribution, keeping in mind you’ll need libvirtd, qemu and virt-manager (for GUI management). On Ubuntu, this would be:
$ sudo apt-get install qemu-kvm libvirt-bin bridge-utils ↪virt-manager
On Fedora, you’d use:
$ sudo dnf -y install bridge-utils libvirt virt-install ↪qemu-kvm
On openSUSE, you’d install the KVM patterns:
$ sudo zypper -n install patterns-openSUSE-kvm_server ↪patterns-server-kvm_tools
As part of your workstation configuration, I recommend setting up bridged networking. This will enable you to connect to the Kolla VM (and the OpenStack instances you create on it) directly from the host machine. Without this, KVM defaults to a NAT configuration that isolates VMs from the host. (You’ll see how to set up bridged network connections below.)
Finally, Kolla supports two Linux distributions for deployment: CentOS and Ubuntu.

109 | August 2019 | https://www.linuxjournal.com
Build a Versatile OpenStack Lab with Kolla
Your host machine can be any flavor of Linux you want (or even Windows or Mac), but the main VM will be one of the two flavors listed above. That doesn’t mean you can’t create OpenStack images for your OpenStack instances based on other Linux flavors. You can, and you have a lot of options. For this lab though, I’m using CentOS 7 for the main Kolla VM.
Prepare Your WorkstationTo work properly, Kolla wants two NICs active, and in a perfect world, these would be distinct subnets, but they don’t need to be. More important for this lab is that you can access your Kolla VM and your OpenStack instances, and to do that, set up a bridge.
In my case, my workstation has two distinct networks, one internal and one external. For the internal, I used 10.128.1.0/24, but you can create a subnet that suits your needs. My subnet spans several physical and virtual servers on my lab network, including DNS servers, so I was able to take advantage of those resources automatically. Just be careful to carve out enough network resources to suit your needs. I needed only about 50 IPs, so creating a /24 was plenty for OpenStack instances and all my other servers.
You have several options on how to set up bridging depending on your Linux distribution. Most bridges can be done simply by editing config files from the command line, and others make it easy with graphical tools, like openSUSE’s YaST. Regardless, the premise is the same. Instead of assigning network parameters to the physical network device—eth0, eth1, enps01 and so on—you bind the unconfigured physical device to a separate bridge device, which gets the static IP, netmask, gateway, DNS servers and other network parameters.
Historically, Ubuntu users would edit /etc/network/interfaces to set up a bridge, which might look something like this:
auto eth0iface eth0 inet manual

110 | August 2019 | https://www.linuxjournal.com
Build a Versatile OpenStack Lab with Kolla
auto br0iface br0 inet staticaddress 10.128.1.10netmask 255.255.255.0gateway 10.128.1.1dns-nameservers 10.128.1.2 10.128.1.3 8.8.8.8dns-search example.combridge_ports eth0bridge_stp offbridge_fd 0bridge_maxwait 0
Current versions of Ubuntu (and other distributions) use netplan, which might look something like this:
network: version: 2 renderer: networkd ethernets: enp3s0: dhcp4: no bridges: br0: dhcp4: yes interfaces: - enp3s0
See the Resources section at the end of this article for more information on using Netplan.
For distributions that use /etc/sysconfig /network/ configuration files (such as CentOS and openSUSE), a separate bridge file references a physical device. For

111 | August 2019 | https://www.linuxjournal.com
Build a Versatile OpenStack Lab with Kolla
example, ifcfg-br0 would be created along with ifcfg-eth0:
$ sudo vi /etc/sysconfig/network-scripts/ifcfg-br0:
BOOTPROTO='static'BRIDGE='yes'BRIDGE_FORWARDDELAY='0'BRIDGE_PORTS='eth0'BRIDGE_STP='off'BROADCAST='10.128.1.255'ETHTOOL_OPTIONS=''IPADDR='10.128.1.10/24'STARTMODE='auto'
$ sudo vi /etc/sysconfig/network/ifcfg-eth0:
BOOTPROTO='none'NAME='AX88179 Gigabit Ethernet'STARTMODE='hotplug'
Depending on how your network is managed (NetworkManager, Wicked, Networkd), you should restart the service before proceeding. If things seem to be out of whack, try rebooting.
Create the Kolla Virtual MachineThis deployment of OpenStack using Kolla relies on a single, beefy virtual machine. The more resources you can commit to it, the better OpenStack will perform. Here’s the minimum you should assign:
• CentOS 7 (the minimal .iso is fine).
• 8GB of RAM.

112 | August 2019 | https://www.linuxjournal.com
Build a Versatile OpenStack Lab with Kolla
• Four vCPU.
• Two NICs (can be on the same network).
• Two virtual disks (at least 40GB for the host VM OS and at least 40GB for the Cinder volumes).
This is a bare minimum. I strongly suggest at least 10GB of RAM and six vCPU. Also, if you have an SSD or NVMe drive, use that for your VM storage. Solid-state drives will improve performance dramatically and speed the initial deployment. Remember to size the disks based on your anticipated use cases. If you plan to create 200GB worth of volumes for your OpenStack instances, create a second virtual disk that’s at least 200GB.
Figure 1. When creating your KVM virtual machine, remember to check the “Customize configuration before install” box, so you can add a second storage device and a second network interface.

113 | August 2019 | https://www.linuxjournal.com
Build a Versatile OpenStack Lab with Kolla
Prepare CentOSStep through the basic configuration of CentOS and reboot. To save resources and time, don’t bother installing a desktop environment. Once the system restarts, log in and perform a couple housekeeping tasks, including setting up a static IP address—no bridging here, just a static address for eth0. Don’t configure the eth1 interface, but verify that it exists:
DEVICE='eth0'HWADDR='00:AA:0C:28:46:6B:91'Type=EthernetUUID=25a7bad9-616a-40a0-ace5-52aa0af9fdb7ONBOOT=yesNM_CONTROLLED=noBOOTPROTO=staticIPADDR=10.128.1.20NETMASK=255.255.255.0GATEWAY=10.128.1.1
A few times when I created the CentOS 7 VM, I found that it would rename eth0 to eth1 automatically and persist that way. Kolla requires you to specify and hard-code the interface names in the configuration file, so this unwanted name change breaks the install. If that happens, just run the following to fix it (no reboot required):
$ sudo ip link set eth1 down$ sudo ip link set eth1 name eth0$ sudo ip link set eth0 up
Install the Required PackagesYou theoretically can run the following install commands in one fell swoop, but it’s better to do them individually to isolate any errors. The epel-release and other packages are required for Kolla, and if any fail, the rest of the installation will fail:

114 | August 2019 | https://www.linuxjournal.com
Build a Versatile OpenStack Lab with Kolla
$ sudo yum update$ sudo yum install epel-release$ sudo yum install python-pip$ sudo yum install python-devel libffi-devel gcc openssl-devel ↪libselinux-python$ sudo yum install ansible git
Update pip to avoid issues later:
$ sudo pip install --upgrade pip
Install kolla-ansibleYou’ll need elements of the kolla-ansible package for the install, but you won’t use this system version of the application to execute the individual commands later. Keep that in mind if you run into errors during the deployment steps:
$ sudo pip install kolla-ansible --ignore-installed
Set Up Git and Clone the Kolla ReposThe installation is done primarily from code stored in GitHub, so you’ll need GitHub credentials—namely a public SSH key from your Kolla host VM added to your GitHub settings:
$ git config --global user.name "Your Name"$ git config --global user.email "your@github-email"$ git clone https://github.com/openstack/kolla$ git clone https://github.com/openstack/kolla-ansible

115 | August 2019 | https://www.linuxjournal.com
Build a Versatile OpenStack Lab with Kolla
Copy Some Configuration Files and Install kolla-ansible RequirementsSeveral configuration files provided by the kolla-ansible Git repo must be copied to locations on your Kolla host VM. The requirements.txt files checks for all necessary packages and installs any that aren’t satisfied:
$ sudo cp -r /usr/share/kolla-ansible/etc_examples/kolla /etc/$ sudo cp /usr/share/kolla-ansible/ansible/inventory/* .$ sudo pip install -r kolla/requirements.txt$ sudo pip install -r kolla-ansible/requirements.txt
Figure 2. Your working directory now should look like this, containing the kolla and kolla-ansible directories from GitHub.
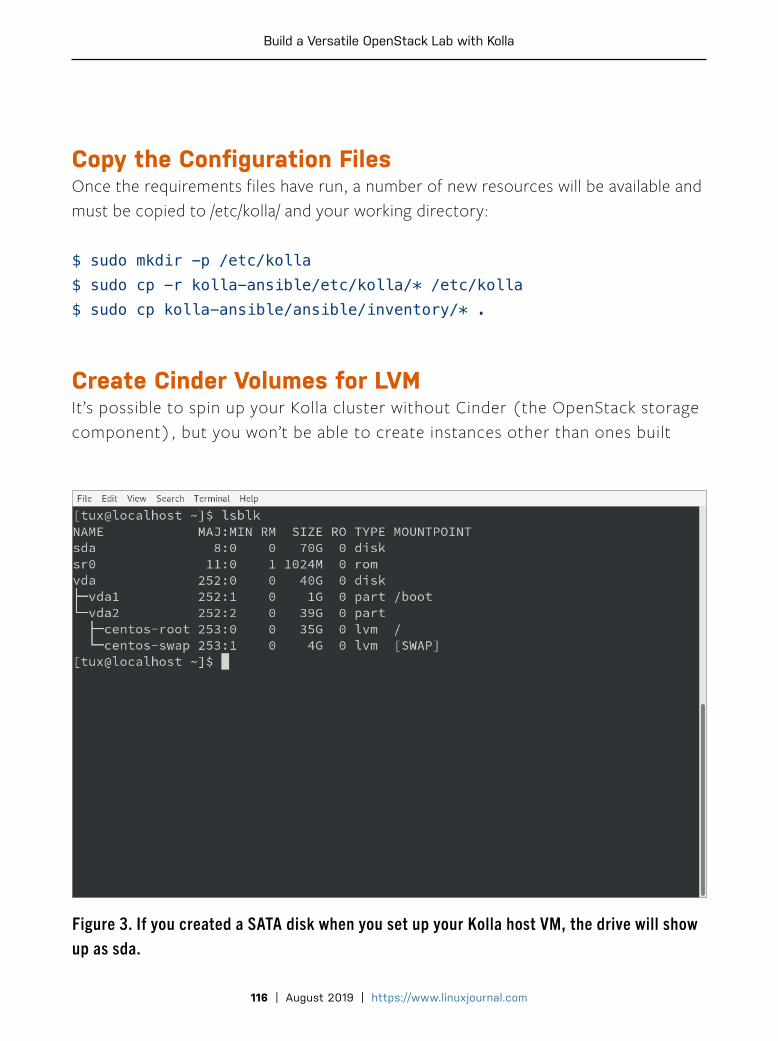
116 | August 2019 | https://www.linuxjournal.com
Build a Versatile OpenStack Lab with Kolla
Copy the Configuration FilesOnce the requirements files have run, a number of new resources will be available and must be copied to /etc/kolla/ and your working directory:
$ sudo mkdir -p /etc/kolla$ sudo cp -r kolla-ansible/etc/kolla/* /etc/kolla$ sudo cp kolla-ansible/ansible/inventory/* .
Create Cinder Volumes for LVMIt’s possible to spin up your Kolla cluster without Cinder (the OpenStack storage component), but you won’t be able to create instances other than ones built
Figure 3. If you created a SATA disk when you set up your Kolla host VM, the drive will show up as sda.

117 | August 2019 | https://www.linuxjournal.com
Build a Versatile OpenStack Lab with Kolla
with the tiny Cirros image. Since this particular lab will use LVM for the back end, a volume group should be created. This will be deployed on the second virtual disk you created in your Kolla host VM. Use pvcreate and vgcreate to create the volume group (to learn more, see the Cinder guide link in the Resources section):
$ sudo pvcreate /dev/sda$ sudo vgcreate cinder-volumes /dev/sda
Edit the Main Kolla Configuration SettingsKolla gets information about your virtual environment from the main configuration file, /etc/kolla/globals.yml. Ensure that the following items are set and the lines are uncommented:
# Define the installation typeconfig_strategy: "COPY_ALWAYS"kolla_base_distro: "centos"kolla_install_type: "binary"openstack_release: "master" # "master" ensures you're # pulling the latest release. # You also can designate specific # OpenStack versions
network_interface: "eth0" # This must match the name of your # first NIC
# Match first NIC on hostneutron_external_interface: "eth1" # This should match the # name of your second NIC
# Match second NIC on hostkolla_internal_vip_address: "10.128.1.250" # Any free IP

118 | August 2019 | https://www.linuxjournal.com
Build a Versatile OpenStack Lab with Kolla
# address on your # subnet
# An unused address in eth0 subnetkeepalived_virtual_router_id: "51" # If initial deployment # fails to get the vip # address, change "51" # to "251"enable_cinder: "yes"enable_cinder_backend_iscsi: "yes"enable_cinder_backend_lvm: "yes"enable_heat: "yes"
Note: you can enable a wide variety of other OpenStack resources here, but for an initial deployment, I recommend this relatively minimal configuration. Also note that this configuration provides Heat and Cinder.
Auto-Generate PasswordsOpenStack requires a number of different credentials, and Kolla provides a script to generate them for you. It also provides them, as necessary, to various components during deployment:
$ sudo kolla-ansible/tools/generate_passwords.py
Later, you’ll need the Horizon dashboard login credentials, which are created along with the rest of the passwords. Issue the following command to get the “admin” user password:
$ grep keystone_admin_password /etc/kolla/passwords.yml

119 | August 2019 | https://www.linuxjournal.com
Build a Versatile OpenStack Lab with Kolla
Install the Heat PackagesHeat enables ready automation of full stacks within your OpenStack environment. I recommend adding this component so you can experiment with building stacks, not just instances:
$ sudo pip install openstack-heat
Set Up qemu as the VM TypeBecause you’re running a nested installation of OpenStack in a virtual machine, you need to tell Kolla to use qemu as the hypervisor instead of KVM, the default. Create a new directory and a configuration file:
$ sudo mkdir -p /etc/kolla/config/nova
Create the file /etc/kolla/config /nova/nova-compute.conf and include the following:
[libvirt]virt_type=qemu
Bootstrap the Kolla ContainersYou’re now ready to deploy OpenStack! If all the installation steps up to now have completed without errors, your environment is good to go.
When executing the following commands, be sure to use the version of kolla-ansible located in the folder you downloaded from GitHub, not the system version. The system version will not work properly.
Note that you’re instructing the system to bootstrap the “all-in-one” deployment, not “multinode”. The deploy command can take some time depending on your system resources and whether you’re using an SSD or spinning disk for storage. Kolla is

120 | August 2019 | https://www.linuxjournal.com
Build a Versatile OpenStack Lab with Kolla
Figure 4. Each step offers details as it’s happening, so you can follow along and troubleshoot any issues.
Figure 5. Run sudo docker ps in a separate shell to follow along as Kolla deploys the containers it needs to build your OpenStack.

121 | August 2019 | https://www.linuxjournal.com
Build a Versatile OpenStack Lab with Kolla
launching about 40 Docker containers, so be patient:
$ sudo kolla-ansible/tools/kolla-ansible -i all-in-one ↪bootstrap-servers$ sudo kolla-ansible/tools/kolla-ansible -i all-in-one ↪prechecks$ sudo kolla-ansible/tools/kolla-ansible -i all-in-one ↪deploy
Again, the deploy step can take some time—an hour or more. You can follow that progress by running sudo docker ps from a separate shell. Some containers may appear to be “stuck” or show lots of restarts. This is normal. Avoid any urge to halt the install.
When the all-in-one deploy steps complete successfully (failed=0), you may want to make a snapshot of the VM at this point. It’s a good place to roll back to in case you run into problems later.
Install the OpenStack Client Tools and Run post-deployWhen the bootstrapping is complete, your OpenStack cluster will be up and running. It’s actually accessible and usable in its current form, but the Kolla project provides some additional automation that adds resources and configures networking for you:
$ sudo pip install python-openstackclient --ignore-installed ↪python-glanceclient python-neutronclient$ sudo kolla-ansible/tools/kolla-ansible post-deploy
Kolla provides an initialization step that brings everything together. The init-runonce script creates networks, keys and image flavors, among other things. Be sure to edit the file to match your public network configuration before proceeding. This way, your OpenStack instances will immediately have access to your network, not the default, which won’t do you any good if your

122 | August 2019 | https://www.linuxjournal.com
Build a Versatile OpenStack Lab with Kolla
subnet doesn’t match it:
$ vi kolla-ansible/tools/init-runonce
Edit the following lines to match your own network. Using the previous example network (10.128.1.0/24), your entries might look like this:
EXT_NET_CIDR='10.128.1.0/24' # This will become public1EXT_NET_RANGE='start=10.128.1.100,end=10.128.1.149' # These 50 # addresses will be # floating IPsEXT_NET_GATEWAY='10.128.1.1' # Your network gateway
Run the Final InitializationThis is a good time to take a second snapshot of your Kolla host VM. Once you run init-runonce in the next step, you can’t roll back.
Figure 6. A sample of the output from the init-runonce script.

123 | August 2019 | https://www.linuxjournal.com
Build a Versatile OpenStack Lab with Kolla
Start by sourcing the admin user’s openrc.sh file, and then kick off the init script:
$ source /etc/kolla/admin-openrc.sh$ kolla-ansible/tools/init-runonce
Launch the Horizon DashboardIf everything goes well, you now have a working OpenStack cluster. You can access it via Horizon at the kolla_internal_vip_address you set in the /etc/kolla/globals.yml file (10.128.1.250 in this example):
Figure 7. The OpenStack Horizon Login

124 | August 2019 | https://www.linuxjournal.com
Build a Versatile OpenStack Lab with Kolla
http://kolla_internal_vip_address
Username: adminPassword: $ grep keystone_admin_password ↪/etc/kolla/passwords.yml
After a moment, you’ll be taken to the main OpenStack overview dashboard. Go ahead and explore the interface, including the Compute→Instance and Network→Network Topology. In the latter, you’ll notice your public network already configured along with a private subnet and a router that connects them. Also be sure to look at the Compute→Images, where you’ll see cirros, a small OS you can deploy immediately as a working instance.
As you explore, try to keep in mind that this whole cluster is running on a single VM,
Figure 8. The OpenStack Horizon Dashboard

125 | August 2019 | https://www.linuxjournal.com
Build a Versatile OpenStack Lab with Kolla
and it may be slow to respond at times. Be patient, or if you can’t be patient and you have more resources available, power off the cluster, and add more RAM and CPU to your virtual machine.
Restarting Your ClusterIf you want to shut down your cluster, be sure there are no running processes (like an instance in mid-launch), and just issue a sudo poweroff command on the Kolla host. This will shut down the Docker containers and take everything offline. You also can issue sudo docker stop $(docker ps -q) to stop all the containers before shutting down. When you restart the Kolla VM, your OpenStack cluster will take a little time to restart all the containers, but the system will be intact with all the resources just as you left them. In most cases, your instances won’t auto-start, so you’ll need to
Figure 9. Launch an instance using the provided cirros qcow2 image.

126 | August 2019 | https://www.linuxjournal.com
Build a Versatile OpenStack Lab with Kolla
start them from the dashboard. To restart your Kolla cluster after a shut down, you need to start all the related OpenStack containers. Issue this command to do that:
sudo docker start $(docker ps -q)
This will find all the existing images and start them. ◾
John Tonello is a Global Technical Marketing Manager for SUSE, where he specializes in software-defined infrastructure. He’s been a Linux user and enthusiast since building his first Slackware system from diskette more than 20 years ago.
Resources• CentOS 7 Download Page
• Official Kolla Install Guide
• Additional Setup Information (describing Ocata, not Rocky): “Install and configure OpenStack Ocata with Kolla as a standalone” by Simon Guyennet
• Set Up Ceph with Kolla
• Cinder Guide
• Netplan How-to
Send comments or feedback via http://www.linuxjournal.com/contact or email [email protected].

127 | August 2019 | https://www.linuxjournal.com
Running GNOME in a Container
Running GNOME in a ContainerContainerizing the GUI separates your work and play.
By Adam Verslype
Virtualization has always been a rich man’s game, and more frugal enthusiasts—unable to afford fancy server-class components—often struggle to keep up. Linux provides free high-quality hypervisors, but when you start to throw real workloads at the host, its resources become saturated quickly. No amount of spare RAM shoved into an old Dell desktop is going to remedy this situation. If a properly decked-out host is out of your reach, you might want to consider containers instead.
Instead of virtualizing an entire computer, containers allow parts of the Linux kernel to be portioned into several pieces. This occurs without the overhead of emulating hardware or running several identical kernels. A full GUI environment, such as GNOME Shell can be launched inside a container, with a little gumption.
You can accomplish this through namespaces, a feature built in to the Linux kernel. An in-depth look at this feature is beyond the scope of this article, but a brief example sheds light on how these features can create containers. Each kind of namespace segments a different part of the kernel. The PID namespace, for example, prevents processes inside the namespace from seeing other processes running in the kernel. As a result, those processes believe that they are the only ones running on the computer. Each namespace does the same thing for other areas of the kernel as well. The mount namespace isolates the filesystem of the processes inside of it. The network namespace provides a unique network stack to processes running inside of them. The IPC, user, UTS and cgroup namespaces do the same for those areas of the kernel as well. When the seven namespaces are combined, the result is a container: an

128 | August 2019 | https://www.linuxjournal.com
Running GNOME in a Container
environment isolated enough to believe it is a freestanding Linux system.
Container frameworks will abstract the minutia of configuring namespaces away from the user, but each framework has a different emphasis. Docker is the most popular and is designed to run multiple copies of identical containers at scale. LXC/LXD is meant to create containers easily that mimic particular Linux distributions. In fact, earlier versions of LXC included a collection of scripts that created the filesystems of popular distributions. A third option is libvirt’s lxc driver. Contrary to how it may sound, libvirt-lxc does not use LXC/LXD at all. Instead, the libvirt-lxc driver manipulates kernel namespaces directly. libvirt-lxc integrates into other tools within the libvirt suite as well, so the configuration of libvirt-lxc containers resembles those of virtual machines running in other libvirt drivers instead of a native LXC/LXD container. It is easy to learn as a result, even if the branding is confusing.
I chose libvirt-lxc for this tutorial for a couple reasons. In the first place, Docker and LXC/LXD already have published guides for running GNOME Shell inside a container. I was unable to locate similar documentation for libvirt-lxc. Second, libvirt is the ideal framework for running containers alongside traditional virtual machines, as they are both managed through the same set of tools. Third, configuring a container in libvirt-lxc provides a good lesson in the trade-offs involved in containerization.
The biggest decision to make is whether to run a privileged or unprivileged container. A privileged container uses the user namespace, and it has identical UIDS both on the inside of the container as on the outside. As a result, containerized applications run by a user with administrative privileges could do significant damage if a security hole allowed it to break out of the container. Given this, running an unprivileged container may seem like an obvious choice. However, an unprivileged container will not be able to access the acceleration functions of the GPU. Depending on the container’s purpose—photo editing, for example—that may not be useful. There is an argument to be made for running only software you trust in a container, while leaving untrusted software for the heavier isolation of a proper virtual machine. Although I consider the GNOME desktop to be trustworthy, I demonstrate creating an unprivileged container here so the process can be applied when needed.

129 | August 2019 | https://www.linuxjournal.com
Running GNOME in a Container
The next thing to decide is whether to use a remote display protocol, like spice or VNC, or to let the container render its contents into one of the host’s virtual terminals. Using a display protocol allows access to the container from anywhere and increases its isolation. On the other hand, there is probably no additional risk from the container accessing host hardware than from two different processes running outside a namespace. Again, if the software you are running is untrustworthy, use a full virtual machine instead. I use the latter option of libvirt-lxc accessing the host’s hardware in this article.
The last consideration is somewhat smaller. First, libvirt-lxc will not share /run/udev/data through to the container, which prevents libinput from running inside it (it’s possible to mount /run, but that causes other problems). You’ll need to write a brief xorg.conf to use the input devices as a result. Should the arrangement of nodes under the host’s /dev/input directory ever change, the container configuration and xorg.conf file will need to be adjusted accordingly. With that all settled, let’s begin.
Prepare the Container HostA base install of Fedora 29 Workstation includes libvirt, but a couple extra components are necessary. The libvirt-lxc driver itself needs to be installed. Let’s use the virt-manager and virt-bootstrap tools to accelerate creation of the container. There are also some ancillary utilities you’ll need for later. They aren’t necessary, but they’ll help you monitor the container’s resource utilization. Refer to your package manager’s documentation, but I ran this:
sudo dnf install libvirt-daemon-driver-lxc virt-manager ↪virt-bootstrap virt-top evtest iotop
Note: libvirt-lxc was deprecated as Red Hat Enterprise Linux’s container framework in version 7.1. It’s still being developed upstream and available to be installed in the RHEL/Fedora family of distributions.
Before you create the container though, you also need to modify /etc/systemd/logind.conf to ensure that getty does not start on the virtual terminal you would

130 | August 2019 | https://www.linuxjournal.com
Running GNOME in a Container
like to pass to the container. Uncomment the NautoVTs line and set it to 3, so that it will only start ttys on the first three terminals. Set ReserveVT to 3 so that it will reserve the third vt instead of the sixth. You’ll need to reboot the computer after modifying this file. After rebooting, check that getty is active only on ttys 1 through 3. Change these parameters as your setup requires. The modified lines of my logind.conf file look like this:
AutoVTs=3ReserveVT=3
Prepare the Container FilesystemYou can create the container’s filesystem directly through virt-manager, but a couple tweaks on the command line are needed anyway, so let’s run virt-bootstrap there as well. virt-bootstrap is a great libvirt tool that downloads base images from Docker. That gives you a well maintained filesystem for the distribution you’d like to run in the container. I found that on Fedora 29, I had to turn off SELinux to get virt-bootstrap to run properly. Additional packages will have to be added to the Docker base image (such as x.org, and gnome-shell), and some systemd services will have to be unmasked:
sudo setenforce 0mkdir containervirt-bootstrap docker://fedora /path/to/containersudo dnf --installroot /path/to/container install xorg-x11-server-Xorgxorg-x11-drv-evdev xorg-x11-drv-fbdev gnome-session-xsession xtermnet-tools iputils dhcp-client passwd sudosudo chroot /path/to/containerpasswd root#unmask the getty and logind servicescd /etc/systemd/servicerm getty.targetrm systemd-logind.service

131 | August 2019 | https://www.linuxjournal.com
Running GNOME in a Container
rm console-getty.serviceexit# make sure all of the files in the container are accessiblesudo chown -R user:user /path/to/containersudo setenforce 1
Note: there are a number of alternative ways to create the operating system filesystem. Many package managers have options that allow packages to be installed into a local directory. In dnf, this is the installroot option. In apt-get, it is the -o Root= option. There is also an alternate tool that works similar to virt-bootstrap called distrobuilder.
Figure 1. Add the libvirt-lxc driver to virt-manager.

132 | August 2019 | https://www.linuxjournal.com
Running GNOME in a Container
Create the ContainerWhen you open virt-manager, you’ll see that the lxc hypervisor is missing. You add it by selecting File from the menu and Add Connection. Select “LXC (Linux Containers)” from the drop-down, and click Connect. Next, return to the File menu and click New Virtual Machine.
The first step in making a new virtual machine/container in virt-manager is to select the hypervisor under which it will run. Select “LXC” and the option for an operating system container. Click Next.
Figure 2. Make sure you select Operating System Container.
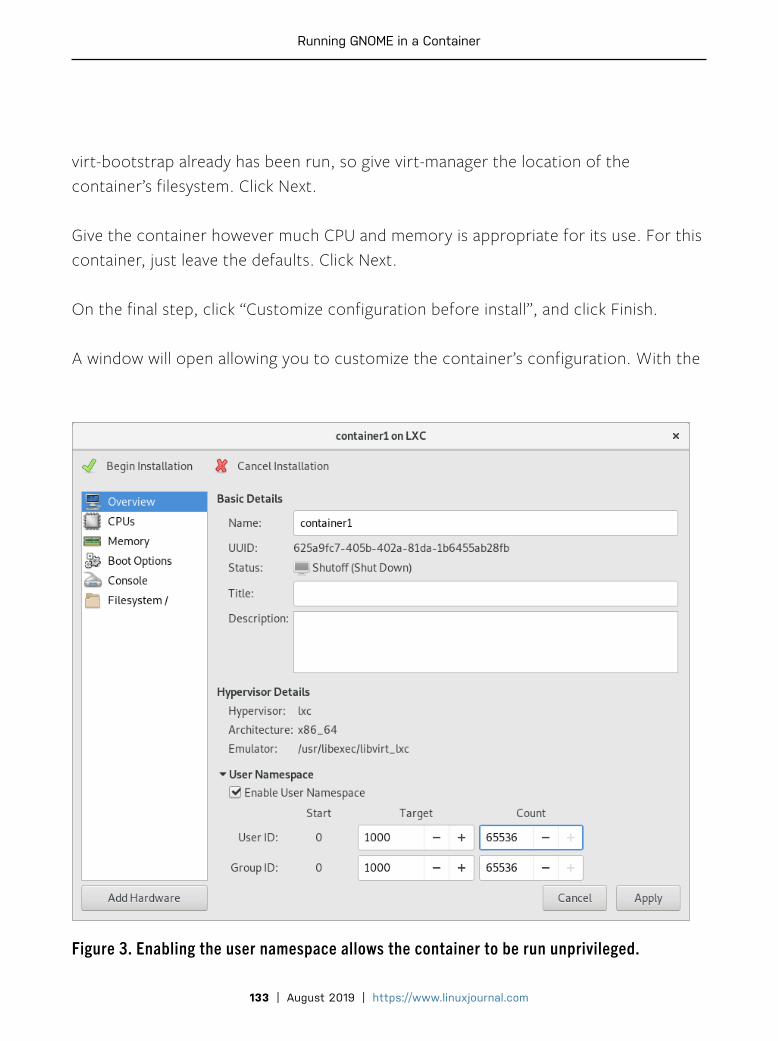
133 | August 2019 | https://www.linuxjournal.com
Running GNOME in a Container
virt-bootstrap already has been run, so give virt-manager the location of the container’s filesystem. Click Next.
Give the container however much CPU and memory is appropriate for its use. For this container, just leave the defaults. Click Next.
On the final step, click “Customize configuration before install”, and click Finish.
A window will open allowing you to customize the container’s configuration. With the
Figure 3. Enabling the user namespace allows the container to be run unprivileged.

134 | August 2019 | https://www.linuxjournal.com
Running GNOME in a Container
Overview option selected, expand the area that says “User Namespace”. Click “Enable User Namespace”, and type 65336 in the Count field for both User ID and Group ID. Click apply, then click “Begin Installation”. virt-manager will launch the container. You aren’t quite ready to go though, so turn off the container, and exit out of libvirt.
You need to modify the container’s configuration in order to share the host’s devices. Specifically, the target tty (tty6), the loopback tty (tty0), the mouse, keyboard and framebuffer (/dev/fb0) need entries created in the configuration. Quickly identify which items under /dev/input are the mouse and keyboard by running sudo evtest and pressing Ctrl-c after it has enumerated the devices. From the output, I could see that my mouse is at /dev/input/event3, and my keyboard is /dev/input/event6.
Figure 4. A List of Input Devices on My Workstation
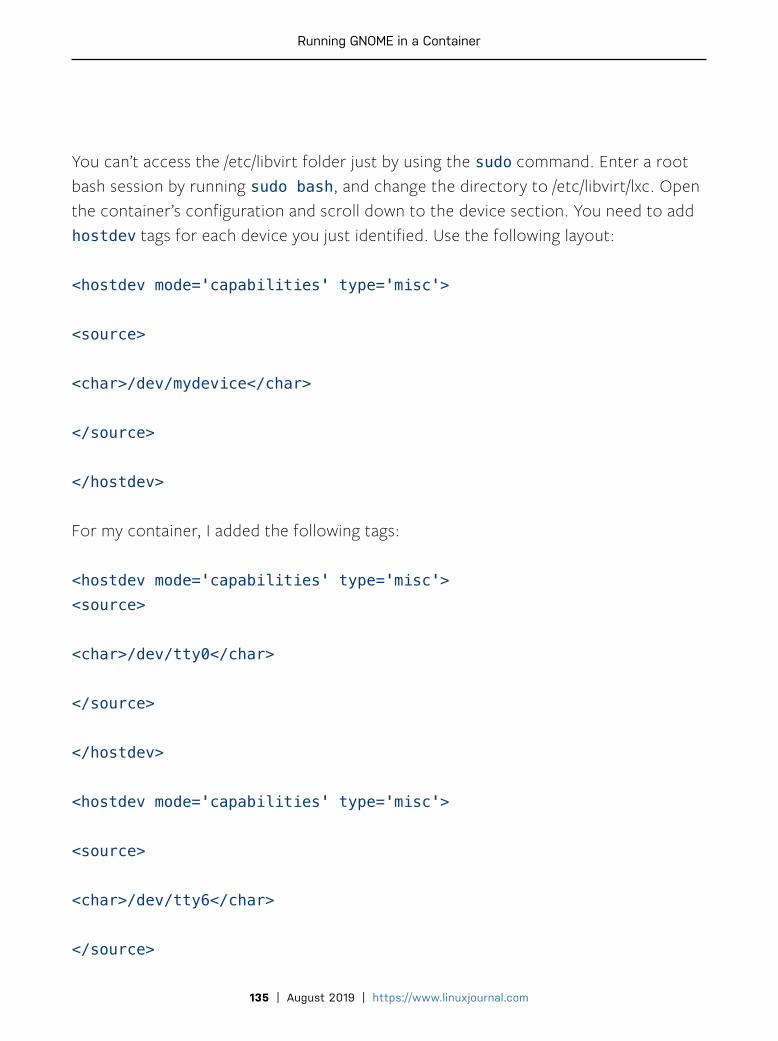
135 | August 2019 | https://www.linuxjournal.com
Running GNOME in a Container
You can’t access the /etc/libvirt folder just by using the sudo command. Enter a root bash session by running sudo bash, and change the directory to /etc/libvirt/lxc. Open the container’s configuration and scroll down to the device section. You need to add hostdev tags for each device you just identified. Use the following layout:
<hostdev mode='capabilities' type='misc'>
<source>
<char>/dev/mydevice</char>
</source>
</hostdev>
For my container, I added the following tags:
<hostdev mode='capabilities' type='misc'><source>
<char>/dev/tty0</char>
</source>
</hostdev>
<hostdev mode='capabilities' type='misc'>
<source>
<char>/dev/tty6</char>
</source>

136 | August 2019 | https://www.linuxjournal.com
Running GNOME in a Container
</hostdev>
<hostdev mode='capabilities' type='misc'>
<source>
<char>/dev/input/event3</char>
</source>
</hostdev>
<hostdev mode='capabilities' type='misc'>
<source>
<char>/dev/input/event6</char>
</source>
</hostdev>
<hostdev mode='capabilities' type='misc'>
<source>
<char>/dev/fb0</char>
</source>
</hostdev>

137 | August 2019 | https://www.linuxjournal.com
Running GNOME in a Container
Running the ContainerIt’s time to start the container! Open it in virt-manger and click the Start button. Once a container has the option of using the host’s tty, it’s not unusual for it to present the login prompt only on that tty. So press Ctrl-Alt-F6 to switch over to tty6 and log in to the container. As I mentioned above, you need to write an xorg.conf with an input section. For your reference, here’s the one I wrote:
Section "ServerFlags"Option "AutoAddDevices" "False"EndSectionSection "InputDevice"Identifier "event3"Option "Device" "/dev/input/event3"Option "AutoServerLayout" "true"Driver "evdev"EndSectionSection "InputDevice"Identifier "event6"Option "Device" "/dev/input/event6"Option "AutoServerLayout" "true"Driver "evdev"EndSection
Don’t neglect to perform the usual housekeeping a new Linux system requires with the container. The steps you take will depend on the distribution you run inside the container, but at the very least, make sure you create a separate user and add it to the wheel group, and configure the container’s network interface. With that out of the way, run startx to launch GNOME Shell.
Now that GNOME is running, check on the container’s use of system resources. Tools like top are not container-aware. In order to get a true impression of the memory usage of the container, use virt-top instead. Connect virt-top to the libvirt-lxc driver by running virt-top -c lxc:/// outside the container.
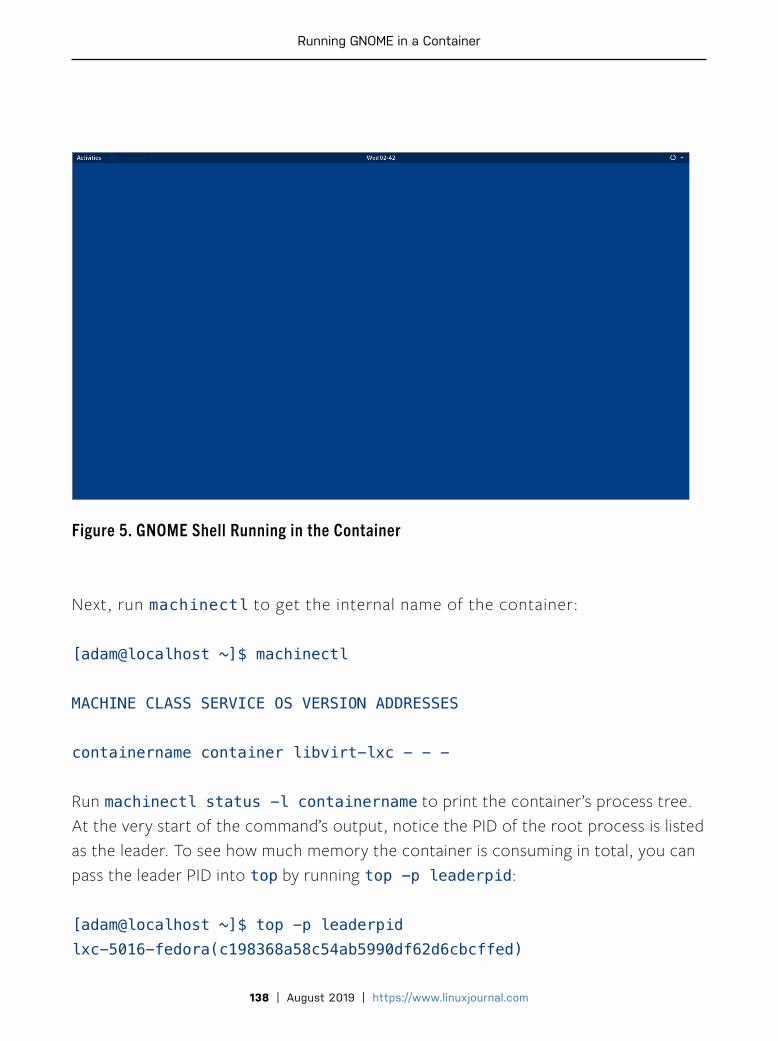
138 | August 2019 | https://www.linuxjournal.com
Running GNOME in a Container
Next, run machinectl to get the internal name of the container:
[adam@localhost ~]$ machinectl
MACHINE CLASS SERVICE OS VERSION ADDRESSES
containername container libvirt-lxc - - -
Run machinectl status -l containername to print the container’s process tree. At the very start of the command’s output, notice the PID of the root process is listed as the leader. To see how much memory the container is consuming in total, you can pass the leader PID into top by running top -p leaderpid:
[adam@localhost ~]$ top -p leaderpidlxc-5016-fedora(c198368a58c54ab5990df62d6cbcffed)
Figure 5. GNOME Shell Running in the Container

139 | August 2019 | https://www.linuxjournal.com
Running GNOME in a Container
Since: Mon 2018-12-17 22:03:24 EST; 19min ago
Leader: 5017 (systemd)
Service: libvirt-lxc; class container
Unit: machine-lxc\x2d5016\x2dfedora.scope
[adam@localhost ~]$ top -p 5017
top - 22:43:11 up 1:11, 1 user, load average: 1.57, 1.26, 0.95
Tasks: 1 total, 0 running, 1 sleeping, 0 stopped, 0 zombie
%Cpu(s): 1.4 us, 0.3 sy, 0.0 ni, 98.2 id, 0.0 wa, 0.1 hi, ↪0.0 si, 0.0 st
MiB Mem : 15853.3 total, 11622.5 free, 2363.5 used, 1867.4 ↪buff/cache
MiB Swap: 7992.0 total, 7992.0 free, 0.0 used. 12906.4 avail Mem
PID USER PR NI VIRT RES SHR S %CPU %MEM TIME+ COMMAND
5017 root 20 0 163.9m 10.5m 8.5m S 0.0 0.1 0:00.22 systemd
The container uses 163MB of virtual memory total—pretty lean compared to the resources used by a full virtual machine! You can monitor I/O in a similar way by running sudo iotop -p leaderpid. You can calculate the container’s disk size with du -h /path/to/container. My fully provisioned container weighed in at 1.4GB.
These numbers obviously will increase as additional software and workloads are given

140 | August 2019 | https://www.linuxjournal.com
Running GNOME in a Container
to the container. I like having a separate environment to install build dependencies into, and my most common use for these containers is running gnome-builder. I also occasionally set up a privileged container to run darktable for photo editing. I edit photos rarely enough that it doesn’t make sense to keep darktable installed outside a container, and I find the notion that I could tar the container filesystem up and re-create it on another computer if I wanted to be reassuring. If you find yourself strapped for cash and needing to get the most out of your host, consider using a container instead of a virtual machine. ◾
Adam Verslype is a Systems Administrator in Western Pennsylvania.
Resources• libvirt-lxc Driver Documentation
• virt-bootstrap on GitHub
• “The TTY demystified” by Linus Akesson
• “The Pros and Cons of Virtualization” by Andreas Rivera
Send comments or feedback via http://www.linuxjournal.com/contact or email [email protected].

141 | August 2019 | https://www.linuxjournal.com
Writing GitHub Web Hooks with Bash
Writing GitHub Web Hooks with BashBring your GitHub repository to the next level of functionality.
By Andy Carlson
For the past year since Microsoft has acquired GitHub, I’ve been hosting my Git repositories on a private server. Although I relished the opportunity and challenge of setting it all up, and the end product works well for my needs, doing this was not without its sacrifices. GitHub offers a clean interface for configuring many Git features that otherwise would require more time and effort than simply clicking a button. One of the features made easier to implement by GitHub that I was most fond of was web hooks. A web hook is executed when a specific event occurs within the GitHub application. Upon execution, data is sent via an HTTP POST to a specified URL.
This article walks through how to set up a custom web hook, including configuring a web server, processing the POST data from GitHub and creating a few basic web hooks using Bash.
Preparing ApacheFor the purpose of this project, let’s use the Apache web server to host the web hook scripts. The module that Apache uses to run server-side shell scripts is mod_cgi, which is available on major Linux distributions.
Once the module is enabled, it’s time to configure the directory permissions and virtual host within Apache. Use the /opt/hooks directory to host the web hooks, and give ownership of this directory to the user that runs Apache. To determine the user running an Apache instance, run the following command (provided

142 | August 2019 | https://www.linuxjournal.com
Writing GitHub Web Hooks with Bash
Apache is currently running):
ps -e -o %U%c| grep 'apache2\|httpd'
These commands will return a two-column output containing the name of the user running Apache and the name of the Apache binary (typically either httpd or apache2). Grant directory permission with the following chown command (where USER is the name of the user shown in the previous ps command):
chown -R USER /opt/hooks
Within this directory, two sub-directories will be created: html and cgi-bin. The html folder will be used as a web root for the virtual host, and cgi-bin will contain all shell scripts for the virtual host. Be aware that as new sub-directories and files are created under /opt/hooks, you may need to rerun the above chown to verify proper access to files and sub-directories.
Here’s the configuration for the virtual host within Apache:
<VirtualHost *:80> ServerName SERVERNAME ScriptAlias "/cgi-bin" "/opt/hooks/cgi-bin" DocumentRoot /opt/hooks/html</VirtualHost>
Change the value of the ServerName directive from SERVERNAME to the name of the host that will be accessed via the web hook. This configuration provides base functionality to host files and executes shell scripts. The DocumentRoot directive specifies the root of the virtual host using an absolute path on the local system. The ScriptAlias directive takes two arguments: an absolute path within the virtual host and an absolute path on the local system. The path within the virtual host is mapped to the local system path. mod_cgi handles all requests made to the path specified in the ScriptAlias directive. (Note: any additional

143 | August 2019 | https://www.linuxjournal.com
Writing GitHub Web Hooks with Bash
configuration including SSL or logging isn’t covered in this article.)
CGI BasicsYou’ll need a basic understanding of the HTTP protocol and Bash scripting to understand how CGI scripts work. When a request is made to an HTTP server, a response is generated and sent back to the client. The HTTP request contains headers that instruct the server how to handle the request. Likewise, the HTTP response contains headers that instruct the client how to handle the response. Viewing and analyzing HTTP traffic can be very simple using the developer tools on any modern browser. Here’s a simple example of an HTTP request and response:
Request:
POST /cgi-bin/clone.cgi HTTP/1.1Host: hooks.andydoestech.comContent-length: 86
{"repository":{"name":webhook-test","url":https://github.com/↪bng44270/webhook-test"}}
Response:
HTTP/1.1 200 OKDate: Tue, 11 Jun 2019 02:44:52 GMTContent-Length: 18Content-Type: text/json
{"success":"true"}
The request is making a POST request to the clone.cgi file located in http://hooks.andydoestech.com//cgi-bin/. The response contains the response code, date/time when the request was handled, the length of the content body
144 | August 2019 | https://www.linuxjournal.com
Writing GitHub Web Hooks with Bash
(in bytes) and the content body itself. Although there are instances when binary data may be sent via HTTP, the examples in this article deal only with clear-text transmissions.
Given the robust text-processing capabilities and commands available, Bash is well suited for constructing and manipulating the text in an HTTP transaction. If the above HTTP request were to be handled by a Bash script, it might look like this:
#!/bin/bash
JSONPOST="$(cat -)"
echo "Date: $(date)"echo "Content-Length: 18"echo "Content-Type: text/json"echo ""echo "{\"success\":\"true\"}"
Although this script is lacking in logic, it nicely illustrates how the HTTP POST data is captured as the JSONPOST variable, and how the HTTP response headers and data are returned to the client via standard script output.
Parsing JSONAlthough many GitHub resources can trigger web hooks, this article focuses specifically on the push event that fires when data is remotely pushed into a code repository. When the HTTP POST request of a web hook is made, a JSON object is posted to the URL. This JSON object contains many pieces of information relating to the push operation, including information about the repository and commits contained in the data push. The command to parse individual values out of the POST JSON is jq, which is available on major Linux distributions. The syntax for the command requires the desired property to be specified in dot notation. As an example, consider the following snippet of the JSON object
145 | August 2019 | https://www.linuxjournal.com
Writing GitHub Web Hooks with Bash
returned from GitHub:
{ "repository": { "name": "webhook-test", "git_url": "git://github.com/bng44270/webhook-test.git", "ssh_url": "[email protected]:bng44270/webhook-test.git", "clone_url": "https://github.com/bng44270/webhook-test.git", }}
To return the value of the attribute named clone_url using jq, you would use the following syntax:
jq -r '.repository.clone_url' <<< 'JSON'
After replacing JSON with the text representation of the JSON object, this command would return the HTTP repository clone URL. Using command substitution, the value of a JSON attribute can be assigned to a Bash variable for use within a script.
Hook #1: Simple BackupThe first hook I want to cover will create a backup of the repository on the Apache server hosting the web hook scripts. The above VirtualHost configuration will be used in this example. Here’s the repository backup web hook script:
1 #!/bin/bash23 REPODIR="/opt/hooks/html/repos"45 json_resp() {6 echo '{"result":"'"$([[ $1 -eq 0 ]] && echo "success" ↪|| echo "failure")"'"}'7 }

146 | August 2019 | https://www.linuxjournal.com
Writing GitHub Web Hooks with Bash
89 POSTJSON="$(cat -)"1011 REPOURL="$(jq -r ".repository.clone_url" <<< "$POSTJSON")"12 REPONAME="$(jq -r ".repository.name" <<< "$POSTJSON")"1314 echo "Content-type: text/json"15 echo ""1617 if [ -d $REPODIR/$REPONAME ]; then18 pushd .19 cd $REPODIR/$REPONAME20 git pull21 json_resp $?22 popd23 else24 mkdir $REPODIR/$REPONAME25 git clone $REPOURL $REPODIR/$REPONAME26 json_resp $?27 fi
The REPODIR variable at the beginning of the script indicates the directory that will contain all repository directories. The json_resp function allows the code that generates a JSON response to be reused multiple times in the script. Just like in the example above, the HTTP POST data is captured in the POSTJSON variable. In lines 11 and 12, the clone_url and name attributes are pulled from the POSTJSON variable using jq. Line 14 begins the creation of HTTP response headers. The if block on lines 17–27 determines whether the repository already has been cloned. If it has, the script moves to the repository folder, pulls down repository changes and returns to the original working directory. If the folder does not exist, the directory is created, and the repository is cloned to the new directory. Note the use of the $REPODIR variable that was set at the beginning of the script. Whether the repositor is cloned or updates are pulled down, the

147 | August 2019 | https://www.linuxjournal.com
Writing GitHub Web Hooks with Bash
json_resp function is called to generate the response JSON, which will contain a single attribute named “success” with a value of “true” or “false” depending on the outcome of the respective git commands.
Hook #2: Build and PackageBacking up repositories can be useful. With the vast number of build tools available on the command line, it makes sense to create a web hook that will deliver a built package for code in a repository. This could be built out into a robust solution filling the need for Continuous Integration/Deployment (CI/CD). Here’s the build/deploy web hook script:
1 #!/bin/bash23 WEBROOT="/opt/hooks/html/archive"4 REPODIR="/opt/hooks/html/repos"5 WEBURL="http://hooks.andydoestech.com/archive"67 json_package() {8 echo '{"result":"'$([[ $1 -eq 0 ]] && echo ↪"\"success\",\"url\":\"$1\"" || ↪echo "\"package failure\"")"'}' }1011 run_make() {12 [[ -d $REPODIR/$REPONAME/build ]] && make -s -C ↪$REPODIR/$REPONAME clean13 if [ $1 -eq 0 ]; then14 make -s -C $REPODIR/$REPONAME15 if [ -d $REPODIR/$REPONAME/build ]; then16 FILENAME="$REPONAME-$COMMITTIME.tar.gz"17 tar -czf $WEBROOT/$FILENAME -C ↪$REPODIR/$REPONAME/build .18 json_package "$?" "$WEBURL/$FILENAME"

148 | August 2019 | https://www.linuxjournal.com
Writing GitHub Web Hooks with Bash
19 else20 echo '{"result":"build failure"}'21 fi22 else23 echo '{"result":"clone/pull failure"}'24 fi25 }2627 POSTJSON="$(cat -)"2829 REPOURL="$(jq -r ".repository.url" <<< "$POSTJSON")"30 REPONAME="$(jq -r ".repository.name" <<< "$POSTJSON")"31 COMMITTIME="$(jq -r '.commits[0].timestamp' <<< ↪"$POSTJSON" | date -d "$(cat -)" +"%m-%d-%YT%H-%M-%S")"3233 echo "Content-type: text/json"34 echo ""3536 if [ -d $REPODIR/$REPONAME ]; then37 pushd .38 cd $REPODIR/$REPONAME39 git pull40 run_make $?41 popd42 else43 mkdir $REPODIR/$REPONAME44 git clone $REPOURL $REPODIR/$REPONAME45 run_make $?46 fi
In a similar manner to Hook #1, variables are defined at the beginning of the script to specify the directory where repositories will be cloned, the directory where build packages will be stored and the base URL of build packages. The

149 | August 2019 | https://www.linuxjournal.com
Writing GitHub Web Hooks with Bash
two functions defined on lines 7–25 will be used later in the script. Lines 27–31 are capturing the JSON POST data and parsing out attributes into shell variables using jq. Note that the format of the date in COMMITTIME is being modified from its original form (this will make sense later). Lines 33–46 are almost identical to Hook #1 in terms of setting HTTP headers and cloning /pulling repository with an addition of a call to the run_make function. The return status of the clone/pull is passed to the run_make function. If the clone/pull ran successfully, the function assumes there is a Makefile in the root of the repository. The Makefile is assumed to behave in the following manner:
• When make is executed, the solution is built into a folder named “build” within the repository.
• When make clean is executed, the “build” folder is deleted.
Beginning on line 12, if the build folder exists, make clean is executed to remove it. If the make in line 13 is successful, an archive filename is constructed using REPONAME and COMMITTIME. Note that the value of COMMITTIME contains no spaces for a proper filename. The status code of the tar command on line 17 is passed into the json_package function. If the archive was created successfully, a JSON object containing two JSON attributes are defined: result is set to “success”, and url is set to the URL of the archive. If the archive was unable to be created, the result attribute is set to “package failure”.
GitHub provides many features, but without question, web hooks provides the DevOps engineer with tools to accomplish almost any task. Leveraging the functionality of Apache with CGI and Bash scripting in such a way that it can be consumed by GitHub allows for almost endless possibilities. ◾
Andy Carlson has worked in IT for the past 15 years doing networking and server administration along with occasional coding. He is thankful to have chosen a career that he loves, grows in and learns from. He currently resides in Cincinnati, Ohio, with his wife, three daughters and his son. His family is currently in the process of adopting two children internationally. He enjoys playing the guitar, coding, and spending time with family and friends.

150 | August 2019 | https://www.linuxjournal.com
Writing GitHub Web Hooks with Bash
ResourcesFor more information on topics mentioned in this article, refer to the following links:
• Github Web Hooks Documentation
• Apache mod_alias (contains ScriptAlias directive)
• Apache mod_cgi
• “Building a Bare-Bones Git Environment” by Andy Carlson, LJ, July 2018

151 | August 2019 | https://www.linuxjournal.com
Words, Words, Words—Introducing OpenSearchServer
Words, Words, Words—Introducing OpenSearchServer How to create your own search engine combined with a crawler that will index all sorts of documents.
By Marcel Gagné
In William Shakespeare’s Hamlet, one of my favorite plays, Prince Hamlet is approached by Polonius, chief counselor to Claudius, King of Denmark, who happens to be Hamlet’s stepfather, and uncle, and the new husband of his mother, Queen Gertrude, whose recently deceased last husband was the previous King of Denmark. That would be Hamlet’s biological father for those who might be having trouble following along. He was King Hamlet. Polonius, I probably should mention, is also the father of Hamlet’s sweetheart, Ophelia. Despite this hilarious sounding setup, Hamlet is most definitely not a comedy. (Note: if you need a refresher, you can read Hamlet here.)
For reasons I won’t go into here, Hamlet is doing a great job of trying to convince people that he’s completely lost it and is pretending to be reading a book when Polonius approaches and asks, “What do you read, my lord?”
Hamlet replies by saying, “’Words, words, words.” In other words, ahem, nothing of any importance, you annoying little man.
Shakespeare wrote a lot of words. In fact, writers, businesses and organizations of any size tend to amass a lot of words in the form of countless documents, many of

152 | August 2019 | https://www.linuxjournal.com
Words, Words, Words—Introducing OpenSearchServer
which seem to contain a great deal of importance at the time they are written and subsequently stored on some lonely corporate server. There, locked in their digital prisons, these many texts await the day when somebody will seek out their wisdom. Trouble is, there are so many of them, in many different formats, often with titles that tell you nothing about the content inside. What you need is a search engine.
Google is a pretty awesome search engine, but it’s not for everybody, especially if the documents in question aren’t meant for consumption by the public at large. For those times, you need your own search engine, combined with a crawler that will index all sorts of documents, from OpenDocument format, to old Microsoft Docs, to PDFs and even plain text. That’s where OpenSearchServer comes into play. OpenSearchServer is, as the name implies, an open-source project designed to perform the function of crawling through and indexing large collections of documents, such as you would find on a website.
I’m going to show you how to go about getting this documentation site set up from scratch so that you can see all the steps. You may, of course, already have a web server up and running, and that’s fine. I’ve gone ahead and spun up a Linode server running Ubuntu 18.04 LTS. This is a great way to get a server up and running quickly without spending a lot of money if you don’t want to, and if you’ve never done this, it’s also kind of fun.
First, you’re going to need a web server, and since I usually install Apache, today I’m going to go with nginx for a change:
sudo apt install nginx
This is going to be a fairly simple setup, since you’ll be running only one website on this server. You still need to make sure the configuration for the server is correct, since you’ll have a whole collection of documents to store on this server. In the spirit of this article, I created a DNS entry for my server, which I’ve called “thebard”, and placed it under my domain. So, to get this server up and running, I create a host configuration file, referred to as a “server block” under the /etc/nginx/conf.d directory,

153 | August 2019 | https://www.linuxjournal.com
Words, Words, Words—Introducing OpenSearchServer
called thebard.marcelgagne.com.conf.
Using your favorite text editor (for example, vim), edit the file to look something like this:
server { listen 80; listen [::]:80; server_name thebard.marcelgagne.com; root /var/www/thebard; index index.html; gzip on; gzip_comp_level 3; gzip_types text/plain text/css application/javascriptimage/*;}
If you’re following along, you’re obviously going to assign server_name something other than what I did. Furthermore, you can use any folder you want for your files. I created a directory called thebard to store my documents under the classic /var/www. Nginx’s default user, on Ubuntu anyhow, is www-data, so you’ll want to change ownership of whatever directory you chose, so that the files belong to that user and group:
chown -R www-data:www-data /var/www/thebard
One last thing and you’re ready to go. To make sure everything works, create a tiny index.html file for the default directory:
<html> <head> <title>My Shakespearean Site</title> </head>
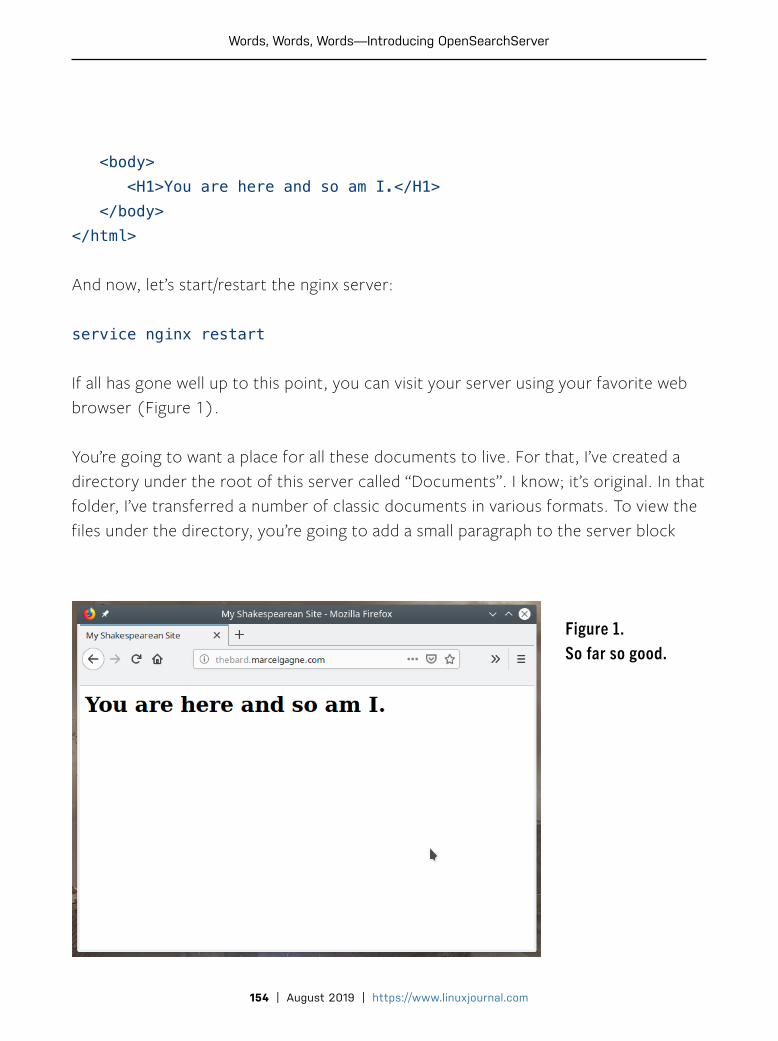
154 | August 2019 | https://www.linuxjournal.com
Words, Words, Words—Introducing OpenSearchServer
<body> <H1>You are here and so am I.</H1> </body></html>
And now, let’s start/restart the nginx server:
service nginx restart
If all has gone well up to this point, you can visit your server using your favorite web browser (Figure 1).
You’re going to want a place for all these documents to live. For that, I’ve created a directory under the root of this server called “Documents”. I know; it’s original. In that folder, I’ve transferred a number of classic documents in various formats. To view the files under the directory, you’re going to add a small paragraph to the server block
Figure 1. So far so good.

155 | August 2019 | https://www.linuxjournal.com
Words, Words, Words—Introducing OpenSearchServer
created above. Just before the final bracket, add this paragraph:
location /Documents { autoindex on; }
Save the file and restart the nginx process, then point your browser to http://yourserver.dom/Documents. You should see a directory listing like the one shown in Figure 2.
Pretend for a moment, that you have the entire catalog of Shakespeare’s works here
Figure 2. The Bard’s Documents

156 | August 2019 | https://www.linuxjournal.com
Words, Words, Words—Introducing OpenSearchServer
instead of the handful I added for demonstration. Add to that a few thousand other documents, and it starts to look like a good reason for a search engine that can index all of those things. Your own organization or company (or yourself, if you’re a writer) may have hundreds and even several thousand documents. Furthermore, those documents likely will be in a variety of formats, which is why I uploaded versions in PDF, Microsoft Word and plain-old text for my demonstration.
So let’s install that search engine, shall we?
From the OpenSearchServer site at http://www.opensearchserver.com, download the latest package for your particular distribution. The code for OpenSearchServer
Figure 3. The Default OpenSearchServer Front Page

157 | August 2019 | https://www.linuxjournal.com
Words, Words, Words—Introducing OpenSearchServer
is written in Java, so to make it all work, you’re also going to need a recent JDK. Let’s install both now:
sudo apt install openjdk-8-jdksudo dpkg -i opensearchserver-1.5.14-d0d167e.deb
Once installed, you can just start the server like this:
sudo service opensearchserver start
It does take a few seconds for the server to start up, so you might want to grab something to drink here. By default, OpenSearchServer runs on port 9090, but you can change that default by editing /etc/opensearchserver and changing SERVER_PORT=9090 to something that suits your particular network. If you
Figure 4. Creating an Index

158 | August 2019 | https://www.linuxjournal.com
Words, Words, Words—Introducing OpenSearchServer
do, make sure you restart the opensearchserver before you try connecting. Assuming the default port, pointing your browser to http://yourserver.dom:9090 should give you something that looks like Figure 3.
This is where things get even more exciting. On that first page, notice where it says “Index name”, where you are invited to “Create a new index” (see close up Figure 4). You can call your index whatever you like, but I’m calling mine “ManyWords”, not to be confused with ManyWorlds, which I’d use if I were creating an index of all the documents written about the Many World Interpretation (MWI) of quantum mechanics. But, I digress.
Directly under the Index name, there’s a drop-down from which you can define the type of index you are creating. Select “web crawler” as the type. Click Create, and in a few seconds, you’ll have an empty index on which to start building your search database. You also may notice that there are now a number of additional tabs running along the top that were not there before (Figure 5).
Go ahead and click the “Crawler” tab. Doing this will once again open up another large group of tabs. It’s at this point that you are probably starting to think there’s an awful lot to this OpenSearchServer, and you would be right. I’m going to concentrate on just the basics here so you can get your search engine up and running quickly.
Front and center, there’s a tab labeled “Pattern list”, and this is where you’re going to tell the crawler how and where to crawl. Several examples are included as a
Figure 5. Tabs, tabs, tabs—once created, the new index generates many new options.
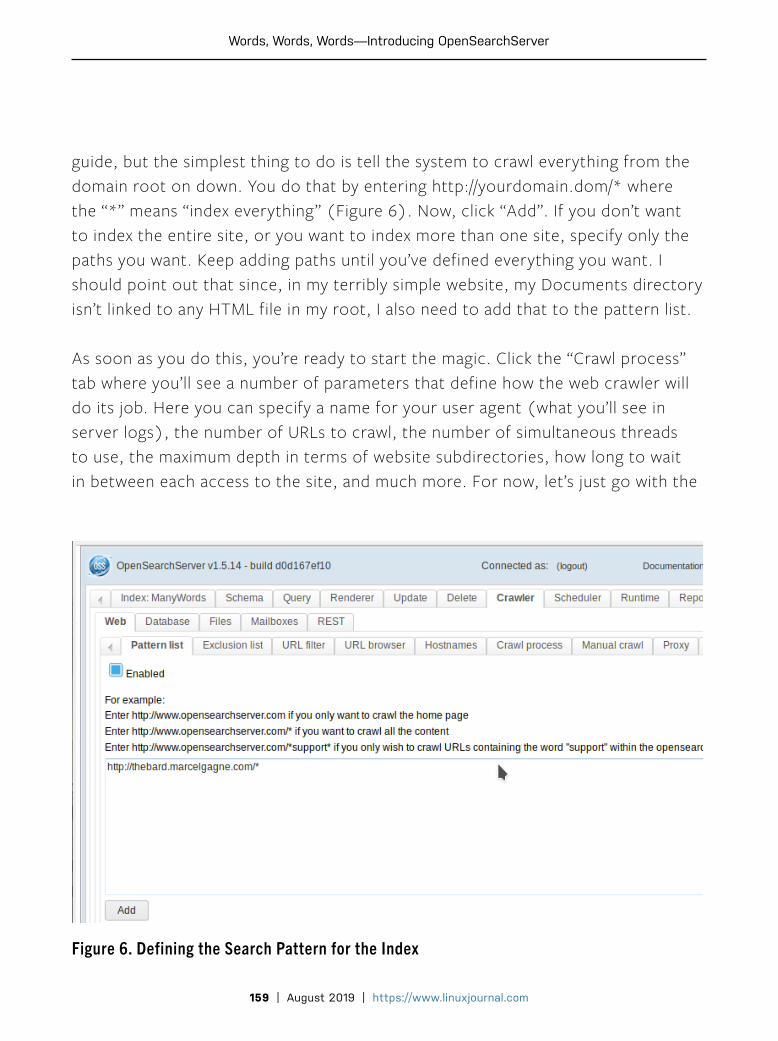
159 | August 2019 | https://www.linuxjournal.com
Words, Words, Words—Introducing OpenSearchServer
guide, but the simplest thing to do is tell the system to crawl everything from the domain root on down. You do that by entering http://yourdomain.dom/* where the “*” means “index everything” (Figure 6). Now, click “Add”. If you don’t want to index the entire site, or you want to index more than one site, specify only the paths you want. Keep adding paths until you’ve defined everything you want. I should point out that since, in my terribly simple website, my Documents directory isn’t linked to any HTML file in my root, I also need to add that to the pattern list.
As soon as you do this, you’re ready to start the magic. Click the “Crawl process” tab where you’ll see a number of parameters that define how the web crawler will do its job. Here you can specify a name for your user agent (what you’ll see in server logs), the number of URLs to crawl, the number of simultaneous threads to use, the maximum depth in terms of website subdirectories, how long to wait in between each access to the site, and much more. For now, let’s just go with the
Figure 6. Defining the Search Pattern for the Index
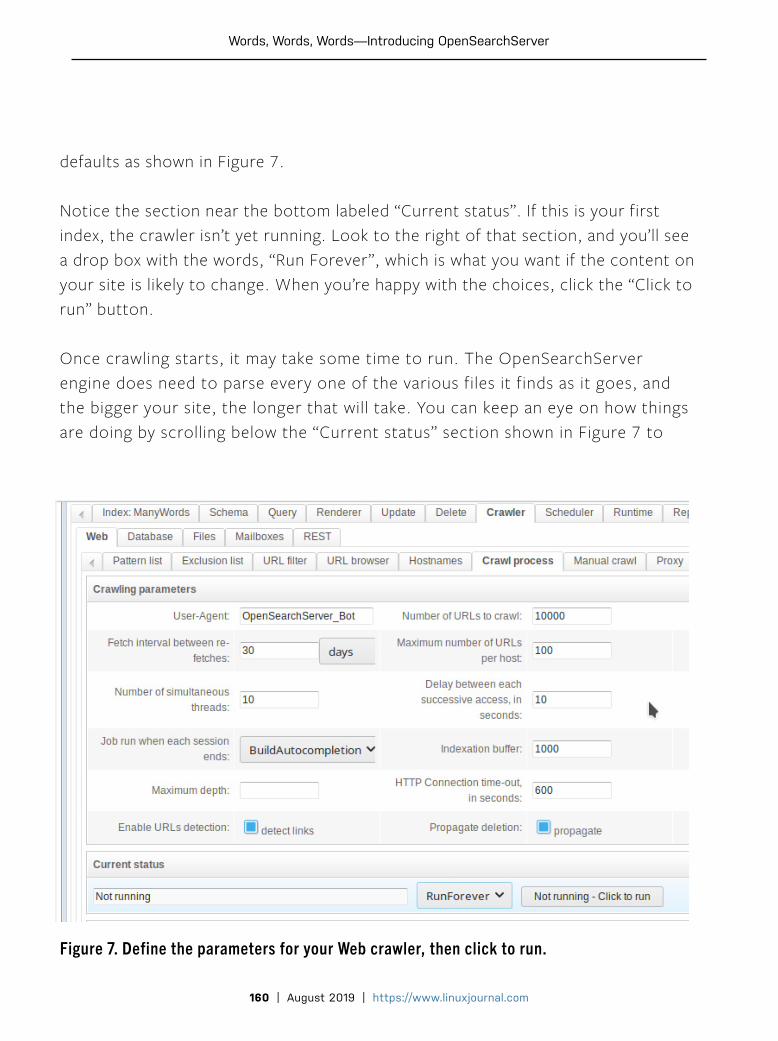
160 | August 2019 | https://www.linuxjournal.com
Words, Words, Words—Introducing OpenSearchServer
defaults as shown in Figure 7.
Notice the section near the bottom labeled “Current status”. If this is your first index, the crawler isn’t yet running. Look to the right of that section, and you’ll see a drop box with the words, “Run Forever”, which is what you want if the content on your site is likely to change. When you’re happy with the choices, click the “Click to run” button.
Once crawling starts, it may take some time to run. The OpenSearchServer engine does need to parse every one of the various files it finds as it goes, and the bigger your site, the longer that will take. You can keep an eye on how things are doing by scrolling below the “Current status” section shown in Figure 7 to
Figure 7. Define the parameters for your Web crawler, then click to run.

161 | August 2019 | https://www.linuxjournal.com
Words, Words, Words—Introducing OpenSearchServer
where the crawler statistics are displayed (Figure 8).
Eventually, the crawler will finish its job and you’ll want to search your site, and this is where I need to discuss renderers. Click back on the main tab near the top, the one that bears the name of the index you created. (In my case, that’s “ManyWords”.) This will collapse several tab bars and take you back to the top to the options specific to that index. Click the tab labeled “Renderer”.
Figure 8. Watching the Progress of Index-Building
Figure 9. A Default Search Renderer Already Exists
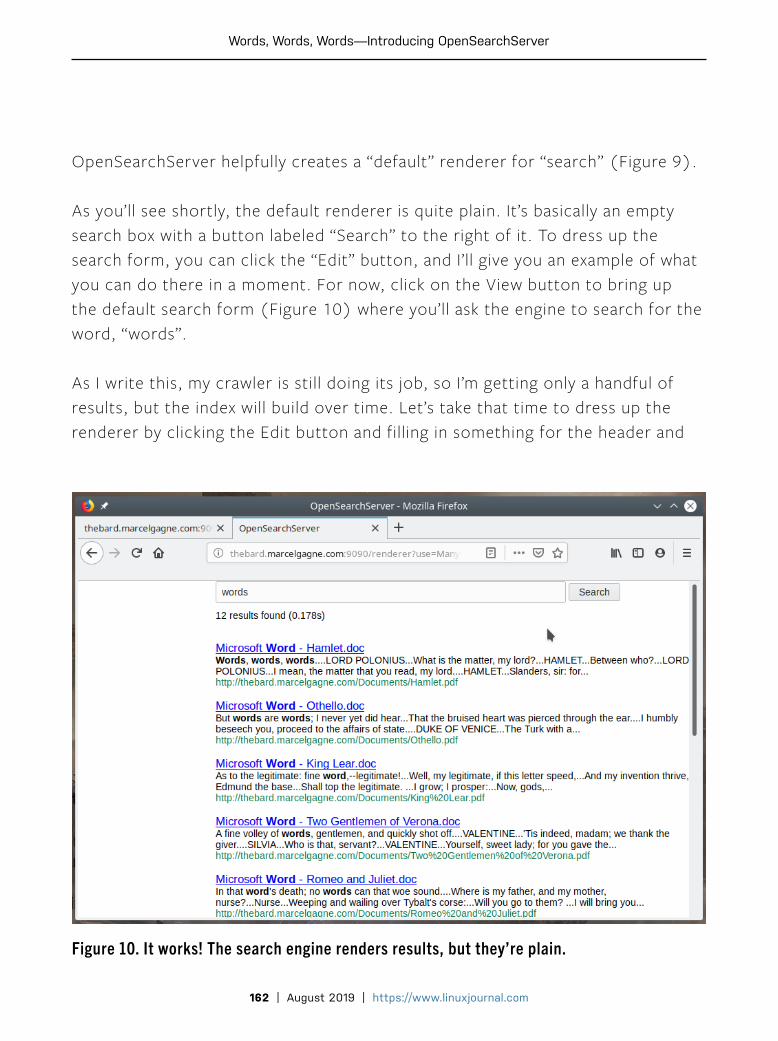
162 | August 2019 | https://www.linuxjournal.com
Words, Words, Words—Introducing OpenSearchServer
OpenSearchServer helpfully creates a “default” renderer for “search” (Figure 9).
As you’ll see shortly, the default renderer is quite plain. It’s basically an empty search box with a button labeled “Search” to the right of it. To dress up the search form, you can click the “Edit” button, and I’ll give you an example of what you can do there in a moment. For now, click on the View button to bring up the default search form (Figure 10) where you’ll ask the engine to search for the word, “words”.
As I write this, my crawler is still doing its job, so I’m getting only a handful of results, but the index will build over time. Let’s take that time to dress up the renderer by clicking the Edit button and filling in something for the header and
Figure 10. It works! The search engine renders results, but they’re plain.

163 | August 2019 | https://www.linuxjournal.com
Words, Words, Words—Introducing OpenSearchServer
footer (Figure 11).
At the bottom, on the main Edit tab, there’s a section for “Header HTML” and for “Footer HTML”. I won’t pretend to be the world’s best (or thousandth best) website creator, so forgive my rather simple attempts at dressing up my web search form. Starting with the header, I might do the following:
<header width:100%><h2>%nbsp;</h2></header><img src="http://proman-erp.com/sites/default/files/↪ProMan_logo_150.png" hspace=5 vspace=2><p>
The HTML footer, much simpler, looks like this:
<footer width:100%><h2>Merely this, and nothing ↪more.</h2></footer>
Figure 11. Editing the renderer HTML to create a better-looking search page.

164 | August 2019 | https://www.linuxjournal.com
Words, Words, Words—Introducing OpenSearchServer
That’s it. And yes, I know that last line is Poe and not Shakespeare.
What does the search form look like now? Take a look at Figure 12 for the finished product.
Not bad, if I do say so myself. And, this is where I will leave you. As the Bard, William Shakespeare, might have said, I bid you good night, sweet Princes and Princesses. May flights of penguins sing you to sleep with their sweet songs.
What? Penguins don’t fly? This video from the BBC disagrees with you.
Next thing you know, you’ll be telling me penguins don’t sing and dance either.
Figure 12. The Finished Search Form

165 | August 2019 | https://www.linuxjournal.com
Words, Words, Words—Introducing OpenSearchServer
Until next time! ◾
Marcel Gagné is Writer and Free Thinker at Large. The Cooking With Linux guy. Ruggedly handsome! Science, Linux and technology geek. Occasionally opinionated. Always confused. Loves wine, food, music and the occasional single malt Scotch.
Figure 13. Flying Penguins

Glyn Moody has been writing about the internet since 1994, and about free software since 1995. In 1997, he wrote the first mainstream feature about GNU/Linux and free software, which appeared in Wired. In 2001, his book Rebel Code: Linux And The Open Source Revolution was published. Since then, he has written widely about free software and digital rights. He has a blog, and he is active on social media: @glynmoody on Twitter or identi.ca, and +glynmoody on Google+.
OPEN SAUCE
Open Source Is Good, but How Can It Do Good? Open-source coders: we know you are good—now do good.
By Glyn Moody
The ethical use of computers has been at the heart of free software from the beginning. Here’s what Richard Stallman told me when I interviewed him in 1999 for my book Rebel Code:
The free software movement is basically a movement for freedom. It’s based on values that are not purely material and practical. It’s based on the idea that freedom is a benefit in itself. And that being allowed to be part of a community is a benefit in itself, having neighbors who can help you, who are free to help you—they are not told that they are pirates if they help you—is a benefit in itself, and that that’s even more important than how powerful and reliable your software is.
The Open Source world may not be so explicit about the underlying ethical aspect, but most coders probably would
166 | August 2019 | https://www.linuxjournal.com
167 | August 2019 | https://www.linuxjournal.com
OPEN SAUCE
hope that their programming makes the world a better place. Now that the core technical challenge of how to write good, world-beating open-source code largely has been met, there’s another, trickier challenge: how to write open-source code that does good.
One obvious way is to create software that boosts good causes directly. A recent article on opensource.com discussed eight projects that are working in the area of the environment. Helping to tackle the climate crisis and other environmental challenges with free software is an obvious way to make the world better in a literal sense, and on a massive scale. Particularly notable is Greenpeace’s Platform 4—not just open-source software, but an entire platform for doing good. And external coders are welcome:
Co-develop Planet 4!
Planet 4 is 100% open source. If you would like to get involved and show us what you’ve got, you’re very welcome to join us.
Every coder can contribute to the success of P4 by joining forces to code features, review plugins or special functionalities. The help of Greenpeace offices with extra capacity and of the open source community is most welcome!
This is a great model for doing good with open source, by helping established groups build powerful codebases that have an impact on a global scale. In addition, it creates communities of like-minded free software programmers interested in applying their skills to that end. The Greenpeace approach to developing its new platform, usefully mapped out on the site, provides a template for other organizations that want to change the world with the help of ethical coders.
There’s a similar site that provides guidelines for those working in the area of international development. One of its key principles is “Use Open Standards, Open Data, Open Source, and Open Innovation”. As that underlines, alongside open source, there are other major open movements that are critically important for making the

168 | August 2019 | https://www.linuxjournal.com
OPEN SAUCE
world a better place. These include open data, open access, open science and open standards. For anyone in the Open Source community who wants to have a real impact on the world, working with these other “opens” is a great option. Writing code for these sibling movements has another important benefit: it strengthens the whole open ecosystem and confirms the power of distributed development in many different fields.
Those are all very general ways of helping good causes. For some people though, that might be too diffuse and vague. They might want to help a highly targeted project that is trying to solve a particular problem. There are plenty of them these days, discoverable with a bit of online searching. For example, if you are worried about the decline of magnificent animals like elephants—and who isn’t?—you might be highly motivated to start coding for something like the Open Collar Initiative:
We want the development of wildlife monitoring collars to enter the world of the cooperative, Internet-based community. By making the collars’ hardware and software and other information available online, we aim to attract and inspire talented students, researchers, and tech-savvy conservationists to develop tracking systems that are more customizable and a better fit for use on different animals.
The big advantage of helping out with these projects is that an individual free software programmer’s contribution might be limited in absolute terms, and yet provide a relatively massive boost because the number of people helping out is small.
Finally, it’s worth noting that there is another, rather novel way of trying to make the world a better place using open source, albeit indirectly, by means of its infrastructure. A group of tech activists recently issued a call for action using GitHub, asking for “digital protesters” to post a prepared message to Palantir’s GitHub boards. The action was in response to allegations that Palantir’s software has been used to help deport families of migrant children at the Mexican border. The idea was to draw attention to the issue, and to persuade the company to change.
Nor is this the only example of people turning to GitHub to flag social problems and push for solutions. In China, a group of coders set up the GitHub repository called
169 | August 2019 | https://www.linuxjournal.com
OPEN SAUCE
996.ICU. The name refers to the punishing work culture in many digital companies in China, where coders are expected to work from 9am to 9pm, six days a week—“996”. As for the ICU part, it refers to the Intensive Care Unit where people may end up if they don’t break free of the 996 culture. One of the ways the group hopes to fight 996 culture is by using the “Anti 996” License. It’s a permissive software license in most respects, but its key element is that it requires users of code released under the license to “strictly comply with all applicable laws, regulations, rules and standards of the jurisdiction relating to labor and employment”.
That goes against the generally accepted requirement that free software must be freely available for anyone—including companies that try to impose a 996 culture on their workers. But, it’s undeniably a clever idea. It’s just one of ways programmers are going beyond doing good coding with open source, and using it to do good. ◾
Send comments or feedback via http://www.linuxjournal.com/contact or email [email protected].


GEEK GUIDE f Calculating the ROI of DevSecOps
2
About the Sponsor ............................................................4
Introduction ......................................................................5
DevSecOps .......................................................................6
Why DevSecOps? ..............................................................................................6
Containers ........................................................................9
The Benefits of Continers ..................................................................................9
Container Adoption ..........................................................................................11
Container Security Considerations ..................................................................14
A Return on Investment? ................................................15
Where Does the Money Go? ............................................................................16
Bringing the Sec to DevSecOps .....................................19
Summary .........................................................................23
Table of Contents

GEEK GUIDE f Calculating the ROI of DevSecOps
3
GEEK GUIDES: Mission-critical information for the most technical people on the planet.
Copyright Statement© 2019 Linux Journal. All rights reserved.
This site/publication contains materials that have been created, developed or
commissioned by, and published with the permission of, Linux Journal (the “Materials”),
and this site and any such Materials are protected by international copyright and
trademark laws.
THE MATERIALS ARE PROVIDED “AS IS” WITHOUT WARRANTY OF ANY KIND,
EITHER EXPRESS OR IMPLIED, INCLUDING BUT NOT LIMITED TO, THE IMPLIED
WARRANTIES OF MERCHANTABILITY, FITNESS FOR A PARTICULAR PURPOSE,
TITLE AND NON-INFRINGEMENT. The Materials are subject to change without
notice and do not represent a commitment on the part of Linux Journal or its Web site
sponsors. In no event shall Linux Journal or its sponsors be held liable for technical
or editorial errors or omissions contained in the Materials, including without limitation,
for any direct, indirect, incidental, special, exemplary or consequential damages
whatsoever resulting from the use of any information contained in the Materials.
No part of the Materials (including but not limited to the text, images, audio and/or
video) may be copied, reproduced, republished, uploaded, posted, transmitted or
distributed in any way, in whole or in part, except as permitted under Sections 107
& 108 of the 1976 United States Copyright Act, without the express written consent
of the publisher. One copy may be downloaded for your personal, noncommercial
use on a single computer. In connection with such use, you may not modify or
obscure any copyright or other proprietary notice.
The Materials may contain trademarks, services marks and logos that are the
property of third parties. You are not permitted to use these trademarks, services
marks or logos without prior written consent of such third parties.
Linux Journal and the Linux Journal logo are registered in the US Patent & Trademark
Office. All other product or service names are the property of their respective owners. If
you have any questions about these terms, or if you would like information about licensing
materials from Linux Journal, please contact us via e-mail at [email protected].

GEEK GUIDE f Calculating the ROI of DevSecOps
4
About the Sponsor
Palo Alto Networks’ mission is to protect our way of life in the
digital age by preventing cyberattacks with our pioneering Security
Operating Platform, providing highly effective cybersecurity in the
cloud, across networks, and for mobile devices.

GEEK GUIDE f Calculating the ROI of DevSecOps
5
IntroductionIn the beginning came DevOps. By streamlining both
Software Development and IT Operations, it merged
two extremely important roles to deliver software
effectively and efficiently. The DevOps role shortened the
development l ifecycle to deliver vital bug fixes, software
updates and much needed features quickly. DevOps
reduced the bottleneck of the entire process with the
exception of one key component: security.
Calculating the ROI of DevSecOps PETROS KOUTOUPIS

GEEK GUIDE f Calculating the ROI of DevSecOps
6
DevSecOpsDevSecOps expands beyond the practice of DevOps
by introducing the practice and mindset of security into
the process. Its primary goal is to distribute security
decisions safely at the necessary speed and scale while
not sacrificing the required security. Remember, DevOps is
centered around development and operations. If you need
to take advantage of both the agility and responsiveness
that DevOps offers, security needs to play a role in the
software lifecycle.
Why DevSecOps? Typically, security becomes an
afterthought in the software development/delivery lifecycle,
and it’s often pushed off to the final stages of the process.
Before the DevOps concept emerged, when the entire
process consumed many months to even years, this was
not considered problematic. Now that more companies have
adopted Continuous Delivery/Continuous Integration (CD/CI)
models, releases tend to occur a lot more frequently. I’m
talking about weeks, if not days, before a new revision of an
application drops into the public domain. Waiting until the
very last minute to ensure that the application is safe and
secure to deploy destroys the entire process and potentially
could derail the delivery of the application. What could have
been a few weeks, might end up being a few months of
development, testing and integration.
What does DevSecOps look like? Basically with

GEEK GUIDE f Calculating the ROI of DevSecOps
7
DevSecOps, security is designed into the application or
feature at the onset of the process. A good strategy is
to determine risk tolerance and conduct a risk analysis
of a given feature. How much security are you willing to
provide the feature? And how consistent are you going
to be with that requirement throughout the lifecycle of
that same feature? Now, what happens when you scale
that model across multiple features, sometimes being
worked on simultaneously? Automation certainly will help
out a lot here. Ideally, this automation would maintain
short and frequent development models while also
integrating your security measures with minimal to no
disruptions to your operations.
DevSecOps introduces many other advantages, including
but not limited to the following:
n Increased speed and agil ity for security teams.
n Decreased response time to address change and needs.
n Increased or better collaboration and communication
across teams.
n Increased opportunities for automated builds and
quality assurance testing.
n Early identification of vulnerabilities in application code.

GEEK GUIDE f Calculating the ROI of DevSecOps
8
n Resources and talent are freed to work on
high-value work.
DevSecOps is a critical component in markets where
software updates already are performed multiple times a
day. Older security models just cannot keep up.
The six most important components that make up the
DevSecOps approach are:
1. The ability to deliver code in small chunks so
vulnerabilities are identified quickly.
2. Increased speed and efficiency to source code
management, determining whether a recently submitted
change is good or bad.
3. Being in a constant state of compliance (that is,
audit-ready).
4. The ability to identify potential emerging threats with every
code update and then being able to respond quickly.
5. The ability to identify new vulnerabilities with code
analysis and then being able to understand how to
respond and patch the affected code.
6. Always being up to date with training engineers on
GEEK GUIDE f Calculating the ROI of DevSecOps
9
security guidelines for set routines.
Some may argue that the “security” piece is nothing more
than a mindset or philosophy. Even if that were the case,
a large part of the challenge is identifying risks early on
and using the right tools to guide you through the entire
process—from the very beginning to the very end.
ContainersContainers and container technologies have redefined the
way many organizations conduct business. The technology
brings unprecedented agility and scalability. It should
come as no surprise that container technologies are widely
adopted and continue to thrive in the wild. They even form
the foundations to many of the cloud native, mobile and
cross-platform applications that we take for granted today.
Knowing this, it does raise the question, how can you be
sure that each deployment is safe and secured?
The Benefits of Containers To recap, containers decouple
software applications or services (often referred to as
microservices) from the operating system, which gives users
a clean and minimal Linux environment while running the
desired application(s) in one or more isolated “containers”.
Containers were and still are an ideal technology for the
ability to isolate processes within a respective container.
This process isolation prevents a misbehaving application in
one container from affecting processes running in another

GEEK GUIDE f Calculating the ROI of DevSecOps
10
container. Also, containerized services are designed not to
influence or disturb the host machine.
Another key feature of containers is portability. This is
typically accomplished by abstracting away the networking,
storage and operating system details from the application,
resulting in a truly configuration-independent application,
guaranteeing that the application’s environment always will
remain the same, regardless of the machine on which it is
enabled. With an orchestration framework behind it, one
or more container images can be deployed simultaneously
and at scale.
Containers are designed to benefit both developers and
system administrators. The technology has made itself
an integral part of many DevOps toolchains. Developers
can focus on writing code without having to worry about
the system ultimately hosting it. There is no need to
install and configure complex databases or worry about
switching between incompatible language toolchain
versions. Containers streamline software delivery and give
the operations staff flexibility, often reducing the number of
physical systems needed to host some of the smaller and
more basic applications.
The beauty of containers is that they are completely
platform-agnostic. As a result of their portability, they can
be deployed on-premises in local data centers or out in the

GEEK GUIDE f Calculating the ROI of DevSecOps
11
cloud. Under the same management framework, they can
be managed and monitored seamlessly across both hybrid
and multi-cloud environments. You even can run containers
within virtual machines or serverless in cloud native
applications. The possibilities are endless.
Container Adoption According to a 2018 survey conducted
by the Gartner research firm, by the year 2020, more than
50% of the IT organizations that were surveyed will be using
container technologies. This is up from less than 20% in
the 2017 survey. Without a doubt these and many other
organizations are seeing the value in using containers.
In addition, a 2017 Forrester report, “Containers: Real
Adoption and Use Cases in 2017”, commissioned by Dell
EMC, Intel and Red Hat, revealed that of the 195 US/
European managers or IT decision-makers responsible
for public/private cloud decisions surveyed, at least 63%
used containers with more than 100 instances deployed.
That number was projected to grow in the coming years.
The very same survey listed “security” as the number one
roadblock to container technology deployment (37%).
Think about it. A “build once, run everywhere” application
can be affected (alongside the many other container
applications) by an infected or vulnerable kernel hosting
it. It also can be affected by the applications and libraries
it’s packaged with. This would not be the case in a virtual
https://www.gartner.com/en/documents/3865408-survey-analysis-container-adoption-and-deployment-20180

GEEK GUIDE f Calculating the ROI of DevSecOps
12
machine, as the application would be fully isolated from
the other(s). And now that more workloads have moved
to the cloud, where organizations have less control over
the system(s) hosting their containers and cloud native
applications, this becomes more of a risk.
What’s driving this adoption?
A Portworx “2018 Container
Adoption Survey” may provide
the answer. Out of the 519 IT
professionals that were surveyed,
nearly 82% were already running
container technologies, and 84%
of those who were running them
were running them in production.
And of those, 30.2% claimed it
was to enable their applications
to run on multiple cloud platforms
and to avoid vendor lock-in. The
rest stated that it was to increase
developer efficiency (32.3%),
save on their infrastructure costs
(25.9%) and support microservices architectures (11.6%).
For those hosting their containers in the cloud, 12.8% were
running them in three separate clouds (Google + Azure +
AWS), while 22.5% were running them in two clouds (AWS +
Google, Google + Azure or Azure + AWS).
FIGURE 1. IT Professionals
Already Using Container
Technologies
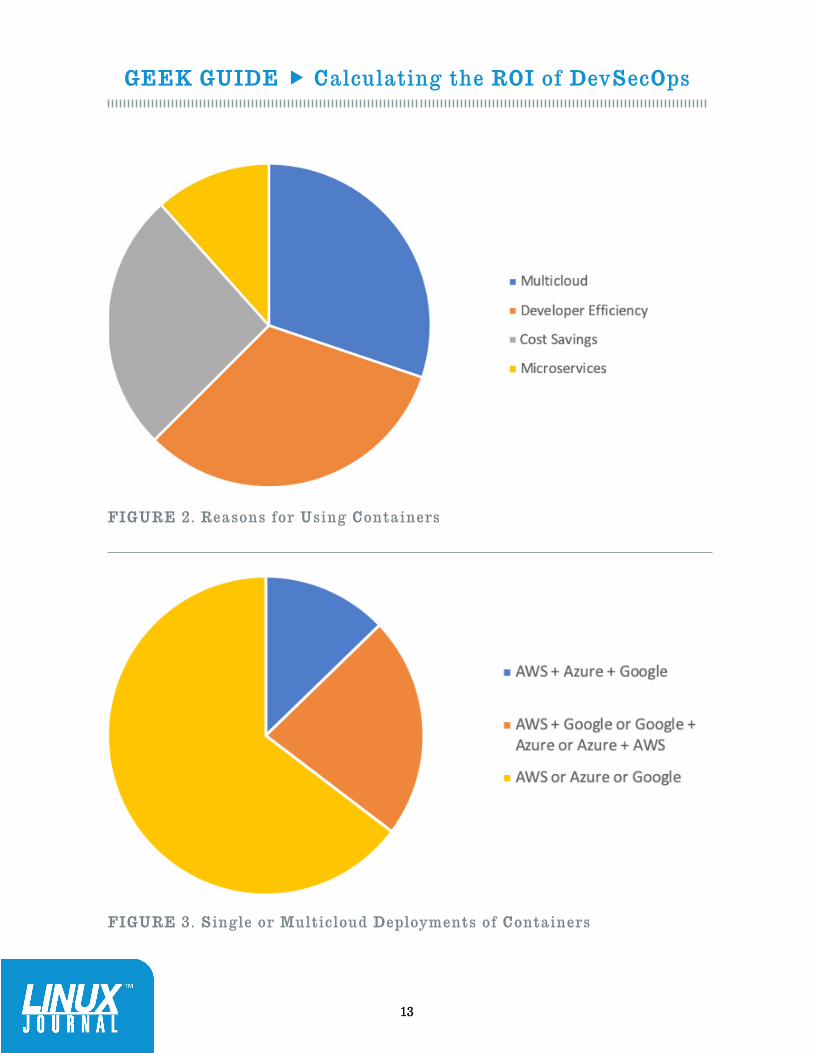
GEEK GUIDE f Calculating the ROI of DevSecOps
13
FIGURE 2. Reasons for Using Containers
FIGURE 3. Single or Multicloud Deployments of Containers

GEEK GUIDE f Calculating the ROI of DevSecOps
14
Container Security Considerations Although container
technologies bring an added layer of security for running
applications in an isolated environment, containers alone are
not an alternative to taking proper security measures. Unlike
traditional hypervisors, a container can have a more direct
path to the host operating system’s kernel, which is why it is
standard procedure to drop privileges as quickly as possible
and run all the services as non-root wherever possible. Also,
note that whenever a containerized process requires access
to the underlying filesystem, you should make it a good habit
of mounting that filesystem as read-only.
The state of a container image also raises concern, which
is why it’s improper to run containers (be it Docker or
anything else) from an untrusted source. When deploying
an unknown or unofficial image, you increase the risk of
running vulnerable or buggy code in your environment.
And if that container is configured to host a privileged
process, any attack exposing a potential vulnerability
eventually could cost the data center an entire host system
(and maybe more).
There also exists the potential for a container to run system
binaries that it probably shouldn’t be touching in the first
place, at least without your knowledge. Another similar
scenario is when a rogue application or attacker gains
container access through an application vulnerability and
replaces some of the underlying system binaries with one

GEEK GUIDE f Calculating the ROI of DevSecOps
15
that does not belong or was not intended to run in that
container image—all of which will continue to run during the
life of that container. This can result in additional system
and network compromises or worse.
Having the right tools to enable the Sec in DevSecOps
will go a long way and can potentially save your firm or
your customer tons of hours of headache (and downtime),
and in turn, lots of dollars to repair the damage done.
Damage is not confined only to software or data. It can
also destroy reputation.
A Return on Investment?Costs are one of the key factors to container adoption. At
least, that’s what 37% of respondents stated according
to the Survata “Container Adoption and Drivers” survey
conducted in 2016. Another 21% cited the increase in
frequency of software releases. Regardless of how you
look at it, the main takeaway is a decrease in spending and
increase in profit.
Clearly, if it were not for the many benefits, industries would
not be deploying container technologies. Such benefits
cited in the same survey include improved flexibility for
IT infrastructure (63%), overall IT cost savings (53%),
increased speed/productivity for developers deploying code
(52%), greater responsiveness to business needs (40%) and
more ROI from the cloud (38%).

GEEK GUIDE f Calculating the ROI of DevSecOps
16
At the time, two-thirds of IT professionals expected
their company to save at least 16% on IT costs by using
containers, while one-fifth indicated that their savings would
exceed 30%.
Where Does the Money Go? At the end of the day, the initial
investment into building a container-friendly infrastructure
can be quite expensive. Costs include the following:
n Commercially supported and managed container products.
n The hardware servers, storage, network switches and
so forth.
n Container orchestration/management tools (to enable
multi-cloud or hybrid clusters).
n The hardware and software to support and manage the
image registry.
n Experienced personnel to manage/maintain and even
consult or design the services around containers.
I’m talking about an up-front Capex with an ongoing Opex
here, much like any other technology deployment inside the
data center. Either way, it’s important to assess the ROI for
these Capex and Opex charges.
GEEK GUIDE f Calculating the ROI of DevSecOps
17
Digging deeper into the key aspects of a container-friendly
infrastructure, you need to consider the following aspects
of containers:
n Runtime engine: the runtime engine operates and
manages (for example, clone, suspend and snapshot)
the deployed container. Often, you will find container
runtime engines included in modern operating system
distributions and virtualization platforms.
n Image repository: an image repository will provide a
single location for container image distribution. It also
will provide long-term storage and version control for
those same container images.
n Orchestration framework or workload manager: a
container management system (such as Kubernetes,
OpenShift, Rancher and so on) will automate the
deployment of container images across multiple hosts,
balance workloads across those systems, restart
containers on crashes and provision additional copies of
a container to handles increased application usage.
n Virtual network overlay: to enable inter-container
communication, you must enable a virtual network
overlay over shared physical network interfaces.
n Hardware infrastructure: one of the most important

GEEK GUIDE f Calculating the ROI of DevSecOps
18
pieces to building a container-friendly infrastructure
is provisioning and configuring the right amount of
hardware with the right amount of horsepower and
enough room for expansion or growth. At the end
of the day, no matter how abstracted a container is
from the underlying hardware, the application itself
must eventually be deployed on physical (or virtual)
machines—that is, servers, switches and storage
systems to hold the persistent application data. These
workloads can live on-premises, in one or more public
clouds or both, which leads to a significant investment
in meta-management tools to manage those same
workloads across multiple disparate platforms.
n Support and expertise: various elements are required
to run production-scale container deployments. And
although the previous sections of this ebook cover a
large portion of the upfront costs involved in deploying
container technologies either locally, in the cloud or
both, there will be a time when you need to make an
investment on the operations piece to support the
infrastructure, and finding the talent to maintain or debug
said infrastructure can be a challenge all on its own.
Most organizations tend to seek consultants or vendor
professional services to assist with container strategies,
architectural design, implementation and support.
Once you make all the investments to define, implement,

GEEK GUIDE f Calculating the ROI of DevSecOps
19
secure and support a container-ready infrastructure
properly, ROI will immediately follow. The amount of
time it takes for a return on that investment is reduced
further once you enable the security piece of DevSecOps.
It’s simple. The less resources spent on investigating,
debugging and addressing production code, the less money
spent in general.
Bringing the Sec to DevSecOpsNow, what do you look for to add security to your
DevOps ecosystem? You’ll need a product that focuses
on container security across an application’s l ifecycle—
FIGURE 4. The Kubernetes Web UI Dashboard Source: kubernetes.io
GEEK GUIDE f Calculating the ROI of DevSecOps
20
one that’s fully committed to providing enterprise security
with DevSecOps agil ity and able to integrate with any
modern CI tool or registry. It also should be designed to
be deployed alongside your virtual machines, containers
and cloud native applications.
I’m talking about an end-to-end security solution built for
containerized environments that protects against software
exploits, malware and active threats through its advanced
intelligence and machine-learning capabilities. One that
will profile expected container behavior automatically, and
create and enforce security models at runtime. The goal
would be to build security models of expected behavior and
enforce them automatically via whitelisting. Ideally, security
can be introduced much earlier in the development lifecycle
to identify and block threats from developer workstations
through to production.
The following are some key features to look for:
n Runtime protection: defends your containers against
detected exploits, compromises, application flaws and
configuration errors, and actively monitors container
activities and detects policy violations. With reporting of
all anomalous behaviors while also taking the appropriate
actions to disconnect or isolate them, runtime protection
prevents disruption to any and all other containers
across the Kubernetes cluster (or other workload

GEEK GUIDE f Calculating the ROI of DevSecOps
21
manager). The solution should identify when a container
does something it shouldn’t be doing. For instance, if a
container running nginx suddenly invokes netstat, and
netstat isn’t a whitelisted process for that image, the
security platform should detect it.
n Vulnerability management: constant scanning of
container images in registries, workstations and servers
for known vulnerabilities and misconfigurations is a
must with detected vulnerabilities being reported. How
nice would it be to break the Docker image apart and
parse each individual layer, specifically searching for
these threats? The platform would take remediation
actions based on the severity of the vulnerability during
runtime and provide users with granular control when
managing the types of vulnerabilities beyond their
severity ratings. You can block individual CVEs explicitly
while ignoring others.
n Continuous integration: to integrate directly into your
CI process (such as Jenkins). This way, it can find and
report problems before they ever make it into production.
In some cases, when a package with an open CVE is
reported, it would be an excellent feature to receive a
report with the package version that has the fix, giving
developers clear insight into the vulnerabilities present in
every build. These plugins should allow you to define and
enforce your vulnerability policies at build time.

GEEK GUIDE f Calculating the ROI of DevSecOps
22
n Compliance: the Center for Internet Security (CIS)
Docker and CIS Kubernetes Benchmarks provide
guidance for establishing a secure configuration of a
Docker container. In short, this benchmark provides
the best security practices for deploying Docker.
Having a solution with built-in checks to validate the
recommended practices from this benchmark is another
must. In parallel to this, the solution should include
an extensive list of configuration checks for the host
machine, Docker dæmon, Docker files and directories.
Organizations would be able to enforce Trusted
Registries and Trusted Images. And when configured, it
should enforce that the images from these trusted lists
are the only ones deployed on production servers.
n Cloud native firewalls: as workloads move to hybrid
or cloud deployments, you’ll need a platform to enable
security teams to move beyond the manual management
of whitelisted IP addresses by offering firewalls for cloud
native environments—that is, having both layer 3 and
layer 7 firewalls that automatically learn the network
topology of your applications and provide application-
tailored microsegmentation for all of your microservices.
n Access control: the ability to define and enforce
policies governing user access to both container and
workload management resources, limiting specific users
to individual functions or APIs. This allows you to specify

GEEK GUIDE f Calculating the ROI of DevSecOps
23
access policies to container resources without the need
to create new identities and groups. You can monitor
detailed user access audit trails, action types, services
requested and more from the console.
n Analytics: to visualize all relevant data and enable you
to enforce standard configurations, container best
practices and recommend deployment templates. This
way your containers will remain compliant to industry or
company policies.
SummaryDevSecOps is a natural and necessary response to the
bottleneck effect introduced by older security models layered
on top of modern CD pipelines. Its goal is to bridge the
gap between IT and security while also ensuring fast and
safe delivery of code. It is meant to address the security
concerns in every phase of the development lifecycle. As
more organizations rely on containerized applications to keep
operations up and running, security efforts outside traditional
methods are crucial to prevent costly downtimes. n
PETROS KOUTOUPIS, LJ Editor at Large, is currently a senior performance
software engineer at Cray for its Lustre High Performance File System division.
He is also the creator and maintainer of the RapidDisk Project. Petros has
worked in the data storage industry for well over a decade and has helped
pioneer the many technologies unleashed in the wild today.
Related Documents