Linux Cluster Manager Operations Manual Revision 2.90-11 February 9, 2008

Welcome message from author
This document is posted to help you gain knowledge. Please leave a comment to let me know what you think about it! Share it to your friends and learn new things together.
Transcript

Linux Cluster ManagerOperations Manual
Revision 2.9011February 9, 2008

ContentsIntroduction.............................................................................................................................................................3
About.................................................................................................................................................................3Features.............................................................................................................................................................3Software Packages............................................................................................................................................4
Installation...............................................................................................................................................................5Tested Platforms................................................................................................................................................5Prerequisites......................................................................................................................................................5
Compiled LCM Server:.................................................................................................................................5Source LCM Server:.....................................................................................................................................5Compiled LCM Client:...................................................................................................................................6Source LCM Client:.......................................................................................................................................6
Platform Notes...................................................................................................................................................6Debian..........................................................................................................................................................6
Package Installation...........................................................................................................................................6LCM Applications....................................................................................................................................................7
LCM...................................................................................................................................................................7LCMclient...........................................................................................................................................................7LCMexec............................................................................................................................................................7
Examples......................................................................................................................................................8Deploy................................................................................................................................................................8Get_Host / WOL................................................................................................................................................8
Cluster Management...............................................................................................................................................9Managing Nodes................................................................................................................................................9Main Status......................................................................................................................................................10Monitoring........................................................................................................................................................11Searching Processes.......................................................................................................................................13Execute Command...........................................................................................................................................13Inventory Management....................................................................................................................................13
System Imaging....................................................................................................................................................15Image Server Setup.........................................................................................................................................15Image Creation................................................................................................................................................16
Block Level Images.....................................................................................................................................16File Level Images........................................................................................................................................17
Image Information and Locations.....................................................................................................................18Customizing Images........................................................................................................................................18Image Deployment...........................................................................................................................................19
Deployment Operations..............................................................................................................................20Creating A Custom Boot Kernel.......................................................................................................................20
LCM Configuration................................................................................................................................................22LCM.conf.........................................................................................................................................................22Log Information................................................................................................................................................23
Acknowledgments.................................................................................................................................................24Michael England..............................................................................................................................................24
Appendix A...........................................................................................................................................................25LCM Image Capture.........................................................................................................................................25LCM Image Deploy..........................................................................................................................................26

Introduction 1
About
Linux Cluster Manager (LCM) is a management application intended for setup, administration, and monitoring of Linux based, high performance compute clusters. While development has been centered around clusters, LCM's functions are useful for a number of deployment and monitoring projects.
Features
• Monitoring• Real time status and recording for all nodes in a cluster• CPU, memory, network, and I/O performance• Search for running processes across the cluster
• Remote Execution• Allows for any script or command to be run across the cluster• Requires no client software utilizing existing connection methods such as
ssh, telnet, or rsh.• Imaging
• Remote WakeonLAN and Preboot Execution Environment (PXE) boot of clients for collection or deployment of images
• File based images allow changes to target attributes such as file system sizes, destination devices, or file system types
• Block based images allow for nonstandard configurations or alternate operating systems such as unsupported Linux distributions, Solaris x86, or Windows
• Hardware Inventory Reports• CPU speed, type, and core count• L1 and L2 cache size• Memory capacity, speed, and chip layout• Expansion slot layout and usage
Software Packages
There are two primary formats for distribution, either as a source package or compiled binary. The compiled binaries are often easier to run as they reduce dependency requirements, however, source packages produce more debugging information and provide greater customization. Both are equal in functionality.
Within each of these groups there is either a server or client package. The server contains the graphical interface, code required for software deployments, and a client agent. It is meant to be installed on a management system either a workstation or management node in the cluster. The client software is simply a client agent meant to be installed on managed nodes.
Complete packages are built as either an RPM, Debian package, or Solaris package format producing seven possible installations:
• lcm<version><build>.i586.rpm• lcmsource<version><build>.i586.rpm• lcmsource_<version>_<build>.i386.deb• lcmclient<version><build>.i586.rpm• lcmclientsource<version><build>.i586.rpm• lcmclientsource_<version>_<build>.i386.deb• lcmclient<version>sol10x86.pkg
Debian packages are only distributed using source files, if binaries are desired, RPM packages can be installed using alien. Solaris is only available as a client using source code only. It is tested only on x86 based systems but should function on SPARC as well.
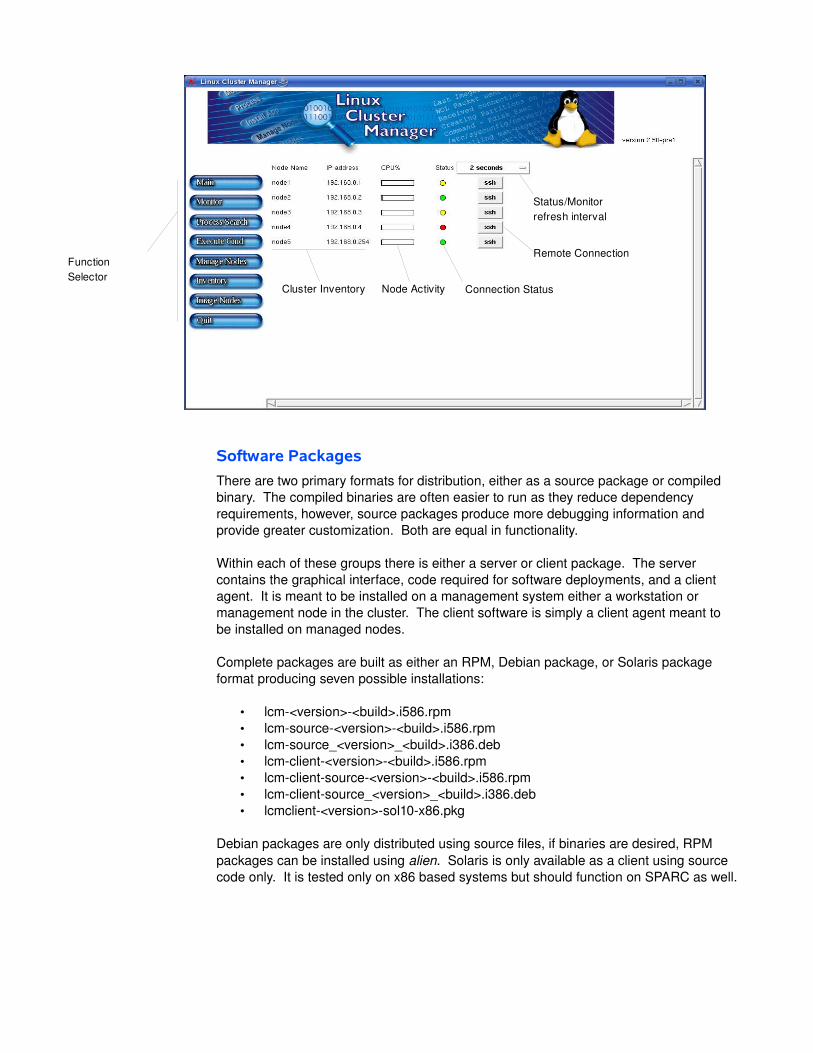
Function Selector
Cluster Inventory Connection Status
Remote Connection
Status/Monitor refresh interval
Node Activity
Installation 2
Tested Platforms
LCM Graphical Interface (LCM Server) has been tested with the following operating systems and versions:
• Fedora Core 8• openSUSE 10.3• Debian 4.0r2 “etch”
It should also work well with SUSE Linux Enterprise Server and RedHat Enterprise but is not actively tested.
LCM Client has been tested on all server platforms plus:• Solaris 10 update 3 (x86/x64)• Solaris 10 update 4 (x86/x64)
Prerequisites
Compiled LCM Server:
Basic Operations:• Bash shell• X server• libstdc++libc which is generally part of either the compat2004 or compat2006
rpm○ Note: If you are running RedHat or Fedora you will have to manually
link /usr/lib/libstdc++3libc6.222.10.0 to /usr/lib/libstdc++libc6.11.so.2○ ln -s /usr/lib/libstdc++-3-libc6.2-2-2.10.0 /usr/lib/libstdc++-libc6.1-1.so.2
Imaging Functions:• NFS server• DHCP server (version 3 or higher)• TFTP server
Advanced Inventory Functions:• /usr/sbin/hwinfo (from hwinfo rpm package)
Source LCM Server:
Basic Operations:• Bash shell• X server• TCL 8.4• TK 8.4• iwidgets 4.0.1• iTCL 3.3• expect 5.43• tcllib 1.953
Imaging Functions:• As per compiled package
Advanced Inventory Functions:• As per compiled package
Compiled LCM Client:
• libstdc++libc which is generally part of either the compat2004 or compat2006 rpm
○ Note: If you are running RedHat or Fedora you will have to manually link /usr/lib/libstdc++3libc6.222.10.0 to /usr/lib/libstdc++libc6.11.so.2
○ ln -s /usr/lib/libstdc++-3-libc6.2-2-2.10.0 /usr/lib/libstdc++-libc6.1-1.so.2
Source LCM Client:
• TCL 8.4
Platform Notes
Debian
Debian's packages are slightly different than that of RedHat or SUSE, the following is a list of additional or specific packages tested:
• itk3• nfskernelserver• dhcp3server• tftpdhpa
Package Installation
The decision to run either from source or a compiled binary is a matter of convenience. They are both functionally equivalent, one simply has fewer dependencies.
To install either, type rpm - -i <package name> or dpkg - -install <package name> as root. If you do not wish to use all of the features in LCM you can force a dependency override with the - -nodeps option when using an RPM. Regardless of the type of package (source or compiled binary), LCM is installed in four directories:
• /etc – configuration and startup scripts• /tftpboot – software required for PXE boot and imaging• /usr/local/lcm – lcm programs• /var/log/lcm LCM specific logs

LCM Applications 3
LCM
LCM is the main graphical application running from a management node. It will call other applications as needed and generate any required configurations files at runtime. Several TCP ports are opened for functions as listed below:
• 60,003 – as a control port during block or file level image collection• 60,004 – as a control port during block or file level image deployments• 60,005 – used to push images to clients during the deployment process• 60,006 – used to receive image data from clients during either a file or block
based image collection
A more complete flow chart of imaging functions can be found in Appendix A.
LCMclient
The client portion of LCM that runs on every managed node in the cluster. LCMclient allows the management station to gather information such as CPU or network statistics, search running processes, hardware inventory, and provides the mans to create file based images. Three TCP ports are required for these functions:
• 60,000 – for monitoring, inventory, and general control functions• 60,002 – to search the local system for running processes• 60,003 – to create file based images
LCMexec
LCMexec is used to run commands on remote nodes using a user specified shell. It is called from LCM but can also be run from the command line. As an external shell is used, such as ssh or telnet, no client agent is needed. This is particularly useful to install or configure applications to a running system. For example installing the lcmclient RPM to an already installed cluster. In order to access nodes, all clients must be populated in /etc/cluster.conf as external host name resolution is not used.
Tip: Be sure to commit changes to newly managed nodes in the “Manage Nodes” page as LCMexec requires an updated /etc/cluster.conf file to operate properly
Usage: lcmexec [n node_list] [c command] [u user] [p password] [l log_file] [h help] [s shell]
• n node_list• Nodes can be listed as either a single node, comma separated list, range
using '', or the keyword all. For example:• n node1• n node1,node3,node10• n node1node10• n all
• c command• Where command is any executable available on a node either referenced as
an absolute path or in the path environment variable of the specified user. Any data required to complete the command must be accessible by each

node. Enclose commands with spaces in single quotes, for example:• c 'rpm i myapp.rpm'• c 'ls l /work | grep file_group | wc l'
• u / p• An optional entry to specify a user name and corresponding password. If
your remote protocol doesn't require a password (as is possible with ssh) you can omit one or both of these options.
• l• An optional entry to record the output from each node in a log file stored on
the machine LCMexec is being run from. If this option is omitted, the output will be displayed to standard out.
• h• The command usage as listed above
• s• An optional parameter to specify the shell to be used in the connection. This
value can be any remote capable shell installed on your system such as telnet, ssh, or rsh. If this option is omitted, the value specified in /etc/cluster.conf will be used allowing different shells to be used by different hosts
• t• Specify a timeout interval to wait for the command to complete
Examples
lcmexec n cluster_node1cluster_node5 c 'rpm i /nfs_share/lcmclient2.904i586.rpm' u root p root_password s ssh
This will install lcmclient on cluster nodes 1 through 5 with root credentials over the ssh protocol and display the results to the screen. Note the password fields are not obfuscated at the command line but are not retained beyond your normal shell history. If this is executed through the LCM GUI, passwords are obfuscated with no history maintained.
lcmexec n cluster_node6 c 'echo “new_cluster_node 192.168.0.4” >> /etc/hosts' u root p root_password s ssh l /root/edit_hosts.txt
This command will add a new entry to the /etc/hosts file and log the results to a file called edit_hosts.txt in root's home directory.
Deploy
Used only in image management, this is the client portion executed when a node is booted for either block image creation or file / block level deployment. This application is installed as a source file to be interpreted by the included operating environment located in /tftpboot/bootimage
Get_Host / WOL
These are both helper applications to LCM and are not meant to be executed directly. Get_Host is used for name resolution when nodes are added to a cluster, WOL issues wake on LAN packets for imaging nodes.

Cluster Management 4
Managing Nodes
To populate a cluster, select Manage Nodes from the main menu and right click on the Hosts label at the top of the window. From the drop down menu, select Add Host. A New Host label will appear, highlight this label and type in a name for the first client system. If the host name entered can be resolved, additional information will automatically be populated in the subsequent categories. Name resolution is handled by a small C program called get_host by running gethostbyname() which in turn resolves names as defined through nsswitch.conf. If a node cannot be resolved, a default IP of 123.123.123.123 is shown, highlight this address and change to the actual or desired value.
If the newly added node will be imaged before it fully joins the cluster (by running lcmclient) you will also have to enter a MAC address by clicking right of the IP address. Remember to enter the address as XX:XX:XX:XX:XX:XX, e.g. 00:11:11:1F:D3:58. If lcmclient will be used on an existing node, additional information including the MAC address will be automatically populated.
Other node options include Host Connection which defaults to ssh and Storage Groups. A storage group can be created by right clicking the Storage Groups label and selecting Add Storage Group. A New Group is added which, like the host name, can be highlighted and changed to a more desirable label. Once a system connects through lcmclient, individual Disk Drives will appear which can be dragged into a storage group. Both individual disk drives and user defined groups are made available for monitoring.
Right Click to Add Nodes or Commit Changes
Highlight to changeRight click to remove
Auto detected from lcmclient
Drag and drop to add to storage groups

This is particularly useful when drives are combined into a logical group and require monitoring as a single group.
Note: Detected devices from lcmclient such as a complete network configuration or available disk drives cannot be manually modified.
Host icons will also change colour depending on the status of a given system as follows:
• Blue – a fully connected system running lcmclient• Yellow – a system that is responding to a ping but not running lcmclient• Gray – a system that is unavailable
Hint: Nodes can be fully opened or closed by holding the 'shift' key when opening or closing the handle next to the host name.
Hint: Status information is updated every 15 seconds
Hint: Information is updated (such as IP address) when a field is released from focus so click on white space when you have finished updating an entry
When changes are made to the cluster including any automatically added information from lcmclient remember to save changes by right clicking the Hosts label and selecting Commit Changes. This allows for LCM to retain information if nodes are taken off line.
All host information is stored in /etc/cluster.conf as a standard text file. While is is not advisable to alter by hand, the format is as follows:
<hostname> {connect <method} {network {<eth#> <ip> <mac> <primary designator>}} {disk_group {<”group name”> <disk_1> <disk_2> <etc>}} {disk_device {<dev> <capacity in KB>}}
Example:node1 {connect ssh} {network {eth0 192.168.0.4 00:11:11:1F:D7:34 1} {eth1 192.168.1.4 00:0C:29:02:F3:5F 0}} {disk_group {“My Storage Group” sda}} {disk_device {sda 488386584} {sdb 78150744}}
Tip: To quickly build or add multiple nodes simply enter the host name as a single line in /etc/cluster.conf. When LCM starts it will resolve an IP address and if the node is running will connect to determine available information. Simply select 'Manage Nodes' and 'Commit Changes'.
Main Status
There are several components to this page (see screen shot in Chapter 1 Introduction):• An inventory of cluster members in the form of a host name and IP address• CPU status information• Connection status• Remote shell connectivity• Refresh interval for CPU status updates
Hovering over a host name or IP will show available hardware information including both logical and physical CPU counts, speed and type of CPU, and total memory installed. Clicking on a node name will bring up detailed a detailed inventory screen for that node also reachable through the Inventory menu item.

CPU status is updated in accordance with the refresh interval in the top right with a default of 2 seconds. The graph shows the total performance of all CPUs on this node as an aggregated percent. For example, a node with four CPUs with one busy will show a usage of 25%. Hovering over the graph will show a rounded numerical percentage.
Connection status indicators are next on the display and can have one of the following states:
● Green – indicates the node is a fully functioning cluster member with a connection to an LCMclient daemon
● Yellow – indicates the nodes is responding to a ping request but an LCMclient daemon is not running
● Red – indicates the node is not responding
A remote shell connection button is available for each node providing one touch access to each system using any protocol desired. A protocol can be defined through host management as documented above.
Monitoring
Real time monitoring of a cluster can be performed through the Monitor button on the main menu. A list of nodes will be displayed with check boxes for each of the available monitor targets. This list will include user defined storage groups which are monitored as a single entity. For example, if a storage group contains three disk devices, all I/O characteristics are added together to produce a single result. Values are not broken down, however, individual disks belonging to a group can also be monitored at the same.
Mass selection check boxes are available for convenience at the top of each monitor target to select all items within the cluster. For example, all CPUs for all nodes can be selected with one click, individual nodes can then be unchecked if desired.
Hovering over an Ethernet device will show the IP address and subnet mask for that device. Hovering over a disk group will display any member disk devices.
When selecting targets to monitor a log file can be specified to record incoming data for long term retention or future analysis. Data is kept in a csv file suitable for importing into any spread sheet application.
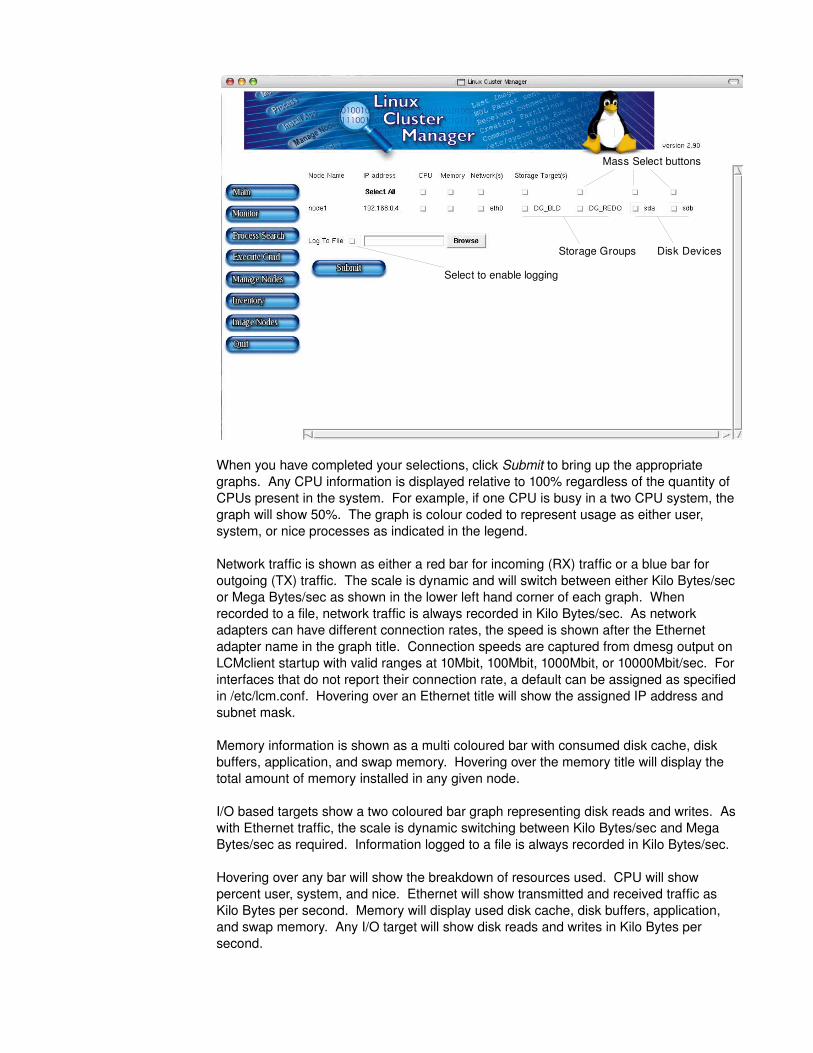
When you have completed your selections, click Submit to bring up the appropriate graphs. Any CPU information is displayed relative to 100% regardless of the quantity of CPUs present in the system. For example, if one CPU is busy in a two CPU system, the graph will show 50%. The graph is colour coded to represent usage as either user, system, or nice processes as indicated in the legend.
Network traffic is shown as either a red bar for incoming (RX) traffic or a blue bar for outgoing (TX) traffic. The scale is dynamic and will switch between either Kilo Bytes/sec or Mega Bytes/sec as shown in the lower left hand corner of each graph. When recorded to a file, network traffic is always recorded in Kilo Bytes/sec. As network adapters can have different connection rates, the speed is shown after the Ethernet adapter name in the graph title. Connection speeds are captured from dmesg output on LCMclient startup with valid ranges at 10Mbit, 100Mbit, 1000Mbit, or 10000Mbit/sec. For interfaces that do not report their connection rate, a default can be assigned as specified in /etc/lcm.conf. Hovering over an Ethernet title will show the assigned IP address and subnet mask.
Memory information is shown as a multi coloured bar with consumed disk cache, disk buffers, application, and swap memory. Hovering over the memory title will display the total amount of memory installed in any given node.
I/O based targets show a two coloured bar graph representing disk reads and writes. As with Ethernet traffic, the scale is dynamic switching between Kilo Bytes/sec and Mega Bytes/sec as required. Information logged to a file is always recorded in Kilo Bytes/sec.
Hovering over any bar will show the breakdown of resources used. CPU will show percent user, system, and nice. Ethernet will show transmitted and received traffic as Kilo Bytes per second. Memory will display used disk cache, disk buffers, application, and swap memory. Any I/O target will show disk reads and writes in Kilo Bytes per second.
Storage Groups Disk Devices
Select to enable logging
Mass Select buttons

A refresh pull down is also available to dynamically change the polling interval. This is the same pull down as presented on the main status page with the values selected linked together (i.e. changing in any location will impact the other).
If recording is selected, information will be logged to a file in the background for as long as the graphs are being displayed. That is, if you navigate away from the monitor display, logging stops and the file is closed off.
Searching Processes
To search running processes in the cluster, select the Process Search button from the main menu. This command effectively runs a 'ps elf' across the cluster so you can search for anything this output would include such as:
• User name• Application name• Terminal number• State Code (D=uninterruptible sleep, R=runnable, T=traces or stopped, Z=a
defunct process)
Execute Command
The Execute Cmd button from the main menu allows for a graphical interface to the LCMexec application. Any required data to complete the command (script or binary) must be accessible to all nodes through external means such as a common NFS mount or be locally available binaries. If your connection protocol does not require a user name or password (such as certificate managed ssh) these two fields can be ignored. For more information see the LCMexec section above.
Inventory Management
There are two methods of entering the inventory information screen, either by clicking

the Inventory button on the main menu or clicking the name of the node you are interested in on the main screen. Selecting the node from the main screen brings up that specific node. The inventory button displays a blank page awaiting your node selection from the drop down box on the right hand side.
Inventory information is collected by LCMclient from multiple sources on each node. The first method is done from the running kernel through the /proc file system. This gathers basic information such as CPU and OS version. The other, more detailed, method is done through the hwinfo binary which is included with SUSE distributions and available for others. This method gathers further details about CPU cache, memory layout, and PCI configurations. Other distributions running hwinfo is possible but have not been tested at this time.
Multiple nodes can be examined by exporting the inventory list to a CSV file and viewing in an external application such as a spread sheet. To do so, simply fill in the export file location and select either All Nodes or This Node to export the data.

System Imaging 5
Image Server Setup
All imaging functions are found by selecting the Image Nodes button from the main menu. A new page is displayed with four tabs across the top. Image Server is always the default page displayed and presents the options to setup services required for imaging a node over the network. These services are used for all image deployments and collection of block base images described later in this chapter.
Required services:• NFS server – used to mount the root partition of client nodes. /tftpboot/boot
image is the default location and must be exported via NFS. LCM will make required changes to /etc/exports for you.
• DHCP server gives each node a specific IP address keyed to the MAC address either detected from a previously running image or entered as part of the cluster setup. This allows LCM to appropriately alter the clients networking information giving each a unique personality on the network.
• TFTP server – delivers the initial PXE image to start the network boot process.
NFS services will be modified for LCM use and is checked with every visit to this page. The entry made is as follows:
• /tftpboot/bootimage *(rw,no_root_squash,insecure)
After verifying this entry, simply ensure NFS is running by clicking the start icon.
To verify TFTP services check your configuration file and ensure the server arguments are set to /tftpboot (LCM does not verify this). For most distributions this is the default as stored in /etc/xinetd.d/tftpd but for Debian changes may have to be made. The file
Start / Stop servicesService statusEthernet driver menu
Tab selection

location for tftpdhpa under Debian is /etc/default/tftphpa. Again, after verifying the entry, simply ensure TFTP is running by clicking on the start icon.
The DHCPD service has a few options and requirements to function properly. There are two configuration options that must be set manually. One is the location and filename LCM will use to store information as defined in /etc/lcm.conf. The default location is /etc/dhcpd.conf for RPM distributions and /etc/dhcp3/dhcpd.conf for deb packages.
A listening interface must also be defined as part of a DHCPD server configuration. For RedHat / SUSE this file is located in /etc/sysconfig/dhcpd. The field required is DHCPD_INTERFACE. For Debian this file is /etc/default/dhcp3server and the field is INTERFACES. For all distributions the default is a blank value and must be changed to the interface(s) facing your cluster nodes, e.g. “eth0”.
Once these items have been configured a client interface can be selected from the drop down menu. This is the specific driver required for your Ethernet card. If there is a running node you can determine the proper module with the output of lsmod. You can then select the appropriate driver from the menu and click the Regenerate DHCP button. Every click of the Regenerate button overwrites the existing dhcpd.conf file so ensure you have necessary backups available if any legacy information is required.
DHCPD check verifies that all systems configured with a MAC address have been properly entered in the dhcpd.conf file. It should change from INVALID to VALID and is simply meant as a reminder that the cluster configuration has changed since the last dhcpd.conf file was generated. It does not verify that you have assigned the host an IP address compatible with the imaging server or selected the proper Ethernet driver.
Image Creation
There are two types of images that can be created, file based or block based. In general a file based image is more granular allowing for changes to the redeployed system such as file system sizes or types (ext3 or reiser for example). It is also quicker occupying less space on the server with less data pushed back to the clients and can be created from a running system. Conversely a block based image must be created from a PXE booted system and must be deployed to a system with equal or greater disk capacity but can support any operating system with any boot configuration (including Solaris and Windows).
To start the imaging process select Create Image from the tabs under the Image Nodes menu item. Select the system to create an image from in the drop down box, name the image, and create any optional comments desired. Detailed information for each image type are listed below. In addition, a flow chart diagram is included in the appendix outlining LCM operations when creating an image.
Block Level Images
When selecting a block level image you must also tell LCM which block devices to gather. This is done in the Block Device field. Multiple devices can be specified by using a comma separated list without any white space. e.g. /dev/sda,/dev/sdb,/dev/sdc.
LCM requires a node to be PXE booted in order to before a block level image collection. The first thing it will do is send a wakeonLAN packet to power on the node and have it boot a reduced Linux OS over the network. If your system does not support wakeonLAN or does not issue a PXE boot upon receiving a WOL packet you will have to manually boot the server and instruct the BIOS to boot over Ethernet. This can often be

done as part of an initial boot selection as a one time boot rather than having to change BIOS entries multiple times.
Image collection will start automatically once the node comes online. The image itself is a compressed TAR image of the entire drive, block for block. This means all of the boot sector information ,partition information, data, and empty space is copied. As a general rule of thumb, the image size will be about ¼ of the total hard drive space. For example, the the original drive is 40GB, the image would be approximately 10Gb in size. Where this isn't the case is generally if the drive is largely filled or if data had at one time resided on the drive and has since been deleted. If you wish to attempt to correct this you can zero file the remaining disk space to create highly compressible blank data. For example, with the client system running normally type dd if=/dev/zero of=blank_file bs=1024k count=<x> where x is the free space in Mega Bytes. Once the command has completed the file can be deleted (rm blank_file) freeing the space back to the operating system but creating a large area of highly compressible zeros.
A block level image is suitable for any operating system with any file system, however, when redeploying an operating system other than Linux, LCM will produce errors when trying to change the host name and IP address. These errors are expected and can be ignored.
File Level Images
To create a file level image, a running LCMclient daemon needs to be established on the client system with the OS running normally. Ideally any additional applications would be shutdown to prevent modification of files during the imaging process but this may not be required depending on the circumstances. LCMclient will gather all locally mounted file systems and partitions capturing partition names, sizes, file system types, and all residing data. It does not capture boot sector information, this is reapplied as part of the deployment process from scratch. The requirements for a successful file level image are:

• RedHat, Fedora, SUSE, or Debian (all recent versions should work)• Currently using the GRUB boot loader• No more than four primary partitions on an IDE drive, eight on a SCSI disk (no
extended partitions)• No logical volume management used
Once the image is started the table at the bottom of the screen will be populated with information collected from the client. The storage capacities for a file based image are generally less than that required for a block based image. The rule of thumb is again ¼ but only of the used data, not the drive. For example, if you have the same 40GB drive as above but with only 2GB of data, the image would be approximately 500MB in size. Obviously quicker to create and deploy but will not work for all environments.
Image Information and Locations
All images are stored in /tftpboot/images with the image name provided plus either the physical device name for a block image or the mount point for a file image . Image information such as name, date create, comments, and image particulars are storage in /etc/image.conf as a flat text file. Example image entries are listed below:
Image File #Designating a file based imagebase image #Image nameSun Jul 18 04:38:25 PM PDT 2004 #Date image was takennode3 192.168.0.3 #Source node and IP1 #Number of data partitions/ /dev/hdc1 727146 1439 ext3 yes \ #File record(s){/tftpboot/images/baseimageslash.tar.gz}1 #Number of swap partitionsswap /dev/hdc2 89302 1728 swap no #Swap record(s)A base image including applications... #Comment// #End of record
A block level image for the same system would appear as follows:
Image Block #Designating a block based imagebase image #Image nameSun Jun 20 06:25:47 PM PDT 2004 #Date image was takennode3 192.168.0.3 #Source node and IP1 #Number of block devices/dev/hdc {/tftpboot/images/base filehdc.tar.gz} #Block device and image filenameA base image including application... #Comment// #End of record
Customizing Images
By selecting the Image Options tab you can alter your collected images. Before any changes are made it is recommended that you back up /etc/image.conf as any incorrect options can render images unavailable for redeployment. File level images provide the most flexibility allowing you to change the image name, partition size, and file system type. Block level images allow only the target device to be altered.
Tip: When a partition size or block device is changed, be sure the new target is equal to or larger than the original. Any additional capacity will be left as unpartitioned space for future use

Tip: Changing a boot device or partition may prevent a client node from booting properly as entries in its local grub.conf are generally keyed to a specific disk partition
Tip: Deleting an image will remove the appropriate entry in /etc/image.conf as well as the file(s) specified under the image name column from /tftpboot/images
Image Deployment
To deploy an image select the Deploy Images tab from the boot nodes window. Select the image desired and nodes to be imaged by either clicking the Select All check box or each system individually. Systems to be imaged must be networked boot which can either be done manually or if supported, by selecting the Issue WOL (WakeOnLAN) check box. Once the Execute button has been pressed, all nodes selected will display 'waiting for connection...'. To abort an image before the client has started remove the check box and press the Execute button again.
Any node that connects without being selected for imaging will drop out of the deployment process and power down without altering any local data. This is to prevent any accidental reimaging of nodes.
The current status for each node in the deployment process is shown in the status column with a historical log available for each node available for viewing with the view log button. Logs for each node are kept in /var/log/lcm on the master LCM system. Additional local logs are made by each node kept under /tftpboot/bootimage on the master node. These are meant for troubleshooting purposes only and can normally be ignored.
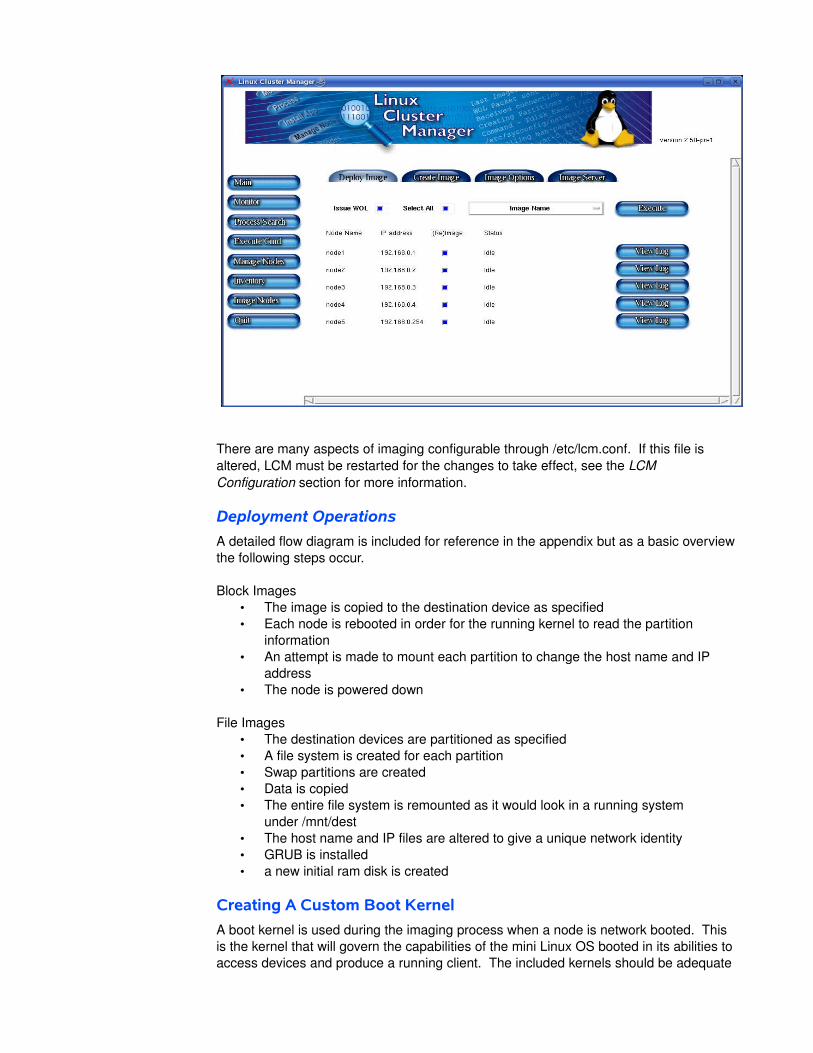
There are many aspects of imaging configurable through /etc/lcm.conf. If this file is altered, LCM must be restarted for the changes to take effect, see the LCM Configuration section for more information.
Deployment Operations
A detailed flow diagram is included for reference in the appendix but as a basic overview the following steps occur.
Block Images• The image is copied to the destination device as specified• Each node is rebooted in order for the running kernel to read the partition
information• An attempt is made to mount each partition to change the host name and IP
address• The node is powered down
File Images• The destination devices are partitioned as specified• A file system is created for each partition• Swap partitions are created• Data is copied• The entire file system is remounted as it would look in a running system
under /mnt/dest• The host name and IP files are altered to give a unique network identity• GRUB is installed• a new initial ram disk is created
Creating A Custom Boot Kernel
A boot kernel is used during the imaging process when a node is network booted. This is the kernel that will govern the capabilities of the mini Linux OS booted in its abilities to access devices and produce a running client. The included kernels should be adequate

for most deployments, however, there may be circumstances where you would want to create your own as either something doesn't work properly on your systems or you want to further customize some aspect of the deployment. You will need several components:
• Kernel source tree• mknbi rpm package (included in some distributions)• Etherboot package (optional for additional or updated PXE network drivers)
To start the process, configure all options you need into the new kernel. Do not use modules unless you really know what you are doing as there are several additional steps not documented here. Be sure to include all hardware required such as a video device, keyboard, mouse, SCSI or IDE controller, network devices, and file systems. Two options that are also required are:
• Root file system on NFS• IP: kernel level auto configuration, IP: DHCP support
These will permit the new kernel to boot from the network and obtain its IP address from the DHCP server.
Once the kernel is compiled you must run mknbi against it to make the kernel network bootable using PXE. The command used in the included kernel is as follows:
mkelf format=linux ip=dhcp append=noexec=off bzImage2.6.17x64 > vmlinuz2.6.17x64nbiormkelflinux –ip=dhcp –append=noexec=off bzImage2.6.17x64 > vmlinuz2.6.17x64nbi
The append option is used from past experience where incompatibilities with some AMD systems have caused the kernel to hang on boot. You can then place this kernel in /tftpboot/eboot/, edit lcm.conf, restart LCM, and be sure to regenerate your DHCP file regardless of whether LCM indicates it is valid or not.
If you also wish to compile new PXE Ethernet drivers, download a recent version of Etherboot and compile the PXE bootstrap loader format ROM images. To do this change directory to <etherboot_dir>/src and type make allzpxes. This will place compiled binaries for each driver in <etherboot_dir>/src/bin. If there is a specific driver you are looking for, you can also type make bin/<driver_name>.zpxe. For example, make bin/pcnet32.zpxe.
The PXE drivers included with LCM also have a DCONFIG_PCI_DIRECT compiled into them to overcome a BIOS 32 error for some AMD based systems. To do this, edit and add the option to the Config file under <etherboot_dir>/src, then build the images. The entry should look something similar to this:
CFLAGS+= DCONFIG_PCI DCONFIG_ISA DCONFIG_PCI_DIRECT
Any PXE drivers built should be placed in /tftpboot/eboot/pxe/. Once this is done, LCM will display them as a drop down option under the Image Server tab as described above.

LCM Configuration 6LCM.conf
The lcm.conf file is located in /etc directory and is used to control many aspects of the imaging process, some on the server side, some on the client. The available options are listed below but the file is also commented for immediate reference:
• hostname – this specifies the location of the file LCM will modify when imaging to ensure the client node has a unique name• The default value is “auto” which will attempt to determine the host type
being imaged using the following map• RedHat/Fedora /etc/sysconfig/network• Debian /etc/hostname• SUSE /etc/HOSTNAME
• ipfile – specifies the IP configuration file on the original client being imaged which will be altered during deployment.• The default value is “auto” which will attempt to determine the appropriate
file using the following map• RedHat/Fedora /etc/sysconfig/networkscripts/ifcfg$adapter• Debian /etc/network/interfaces• SUSE /etc/sysconfig/network/ifcfg$adapter
• For SUSE systems that use ifcfgethid<mac> as a file name an * is used as a wild card to match a specific manufacturer's card. For example:• ifcfgeth* will match the first adapter LCM finds• ifcfgethid00:11:11* will match a specific vendors card (eth1 for
example)• remember these are the files on the original system
• adapter – allows you to select the adapter number for the node the image is being deployed to. Typically this is the fist adapter found (i.e. eth0) but your hardware setup may dictate altering this value to a different card• The default value is “eth0”
• client_subnet – defines the subnet value for the new client being deployed• default value “default” meaning LCM will follow standard classful Internet
Networking (e.g. 255.0.0.0 or 255.255.0.0 or 255.255.255.0). If you have a different subnet for your cluster enter it here.
• kernel – an entry to specify the kernel in which nodes will boot from as part of the deployment or block image collection process. The kernel must exist in /tftpboot/bootimage/eboot and must be a network bootable image created with mknbi (see Creating a Custom Boot Kernel). LCM includes two kernels a 32 bit and 64 bit version.
• exclude – allows you to specify any local mount points that you wish to exclude when creating an image. This is useful if your host has extra mount points that are not required or not available on other nodes.
• completed_power – indicates whether LCM should power down nodes when imaging completes or leave them on (useful for debugging or other administration tasks)• default “off”
• pre_grub_cmd / post_grub_cmd – user specified commands that can provide any additional configuration for a customized imaging process. GRUB is installed at the very end of the imaging process but may require some tuning

before it is able to install correctly, or perhaps there is some customization you wish to include before or after grub has finished.
• dhcpd_location – used to specify where you want LCM to create any dhcpd server information• default “/etc/dhcpd.conf” (RedHat/Fedora/SUSE)• default “/etc/dhcp3/dhcpd.conf” (Debian)
• dhcpd_interface – the name of the interface on the LCM server used to service dhcp requests. This is used to add required entries to dhcpd.conf.• default “eth0”
• default_rate – The only non imaging based option, this is used to provide a default Ethernet connection rate for nodes that are not able to detect a value• default “1000”
• Optional file system definitions. By default LCM knows how to create the file system listed below, however, if you have another type you wish to use, enter the command to create it. If you require additional user level executables, copy them to /tftpboot/bootimage/sbin on the master LCM server. Required keywords are LABEL for a partition label and PARTITION for the partition number. The values will be filled in automatically during the deployment process.• ext3 = /sbin/mke2fs q j L LABEL PARTITION• reiserfs = /sbin/mkreiserfs q l LABEL PARTITION• xfs = /sbin/mkfs.xfs q L LABEL PARTITION• jfs = /sbin/mkfs.jfs q L LABEL PARTITION
Log Information
All log files for LCM are kept in /var/log/lcm/ for both client nodes and on the LCM management system as both LCMclient and the LCM GUI keep logs in the lcm.log file. In addition, deployment logs are kept on the management node for each machine images as <nodename>.log. This file lists the commands and results for all operations LCM performed during the client imaging process. This file can also be viewed by clicking View Log in the Deploy Image window.

Acknowledgments 7Michael England
All LCM related programming, manuals, help files, and web site
Greg PedersonBanner Graphic
Etherboot ProjectPXE boot process
ScyldWakeOnLAN application

Appendix A 8LCM Image Capture

LCM Image Deploy
Related Documents