© 2014 Cisco and/or its affiliates. All rights reserved. This document is Cisco Public Information. Page 1 of 41 Software Licensing Operations Cisco License Registration Portal (LRP) User Guide Version 0.5 June 2014 Name Version Notes Date Donna Bugarin 0.1 6/17/14 Donna Bugarin 0.2 Updated Add a Device section 6/24/14 Donna Bugarin 0.3 Updated Add a Device Section 07/14/14 Vinay Churi 0.4 Updated RMA Section 07/15/14 Donna Bugarin 0.5 Updated Add a Device Section 8/4/14

Welcome message from author
This document is posted to help you gain knowledge. Please leave a comment to let me know what you think about it! Share it to your friends and learn new things together.
Transcript

© 2014 Cisco and/or its affiliates. All rights reserved. This document is Cisco Public Information. Page 1 of 41
Software Licensing Operations
Cisco License Registration Portal (LRP) User Guide
Version 0.5
June 2014
Name Version Notes Date
Donna Bugarin 0.1 6/17/14
Donna Bugarin 0.2 Updated Add a Device section 6/24/14
Donna Bugarin 0.3 Updated Add a Device Section 07/14/14
Vinay Churi 0.4 Updated RMA Section 07/15/14
Donna Bugarin 0.5 Updated Add a Device Section 8/4/14
© 2013 Cisco and/or its affiliates. All rights reserved. This document is Cisco Public Information. Page 2 of 41
1/13
Welcome to the Cisco Software Licensing Operations: License Registration Portal User
Guide. This guide provides general instructions to assist with the basic navigation and
functionalities of the License Registration Portal (www.cisco.com/go/license).
Make a selection below to begin…
Table of Contents
1. Important Guidelines & Recommended Browsers
2. Support Information
How To…
3. Access the License Registration Portal (LRP)
4. Register and Fulfill a Product Authorization Key (PAK)
5. Register Multiple PAKs
6. Retrieve Existing Licenses
7. Add a Device to your Device Table
a) Device Credential Definitions & Product Selection
8. Re-Host a License
9. Transfer Features to a Token
10. Transfer All Licenses from a Failed Device to a Replacement Device using the Return Material Authorization (RMA) Function
a) Offline Device and Unable to Provide the Required Credentials, use the RMA Process
11. Find your Transaction History
12. Produce a Demo or Evaluation License
© 2013 Cisco and/or its affiliates. All rights reserved. This document is Cisco Public Information. Page 3 of 41
1/13
Important Guidelines
1. Have your CCO ID and password readily available for log-in
2. Recommended Browsers
Internet Explorer (IE) v. 10 & 11
Mozilla Firefox v. 28 & 29
Google Chrome v. 33 & 34
Safari v. 5 and up
Support Information & Helpful Links
Cisco License Registration Portal ‘How-To’ video series
New License Registration Portal Blog
Log-In at www.cisco.com/go/license
Back to Table of Contents

© 2013 Cisco and/or its affiliates. All rights reserved. This document is Cisco Public Information. Page 4 of 41
1/13
How To...Access the License Registration Portal (LRP)
1. Go to www.cisco.com.
2. Select “Support” from the top menu.
3. Under the Manage Software Section, select the Register and Manage Licenses link. This will take you to the LRP Log-In page.
© 2013 Cisco and/or its affiliates. All rights reserved. This document is Cisco Public Information. Page 5 of 41
1/13
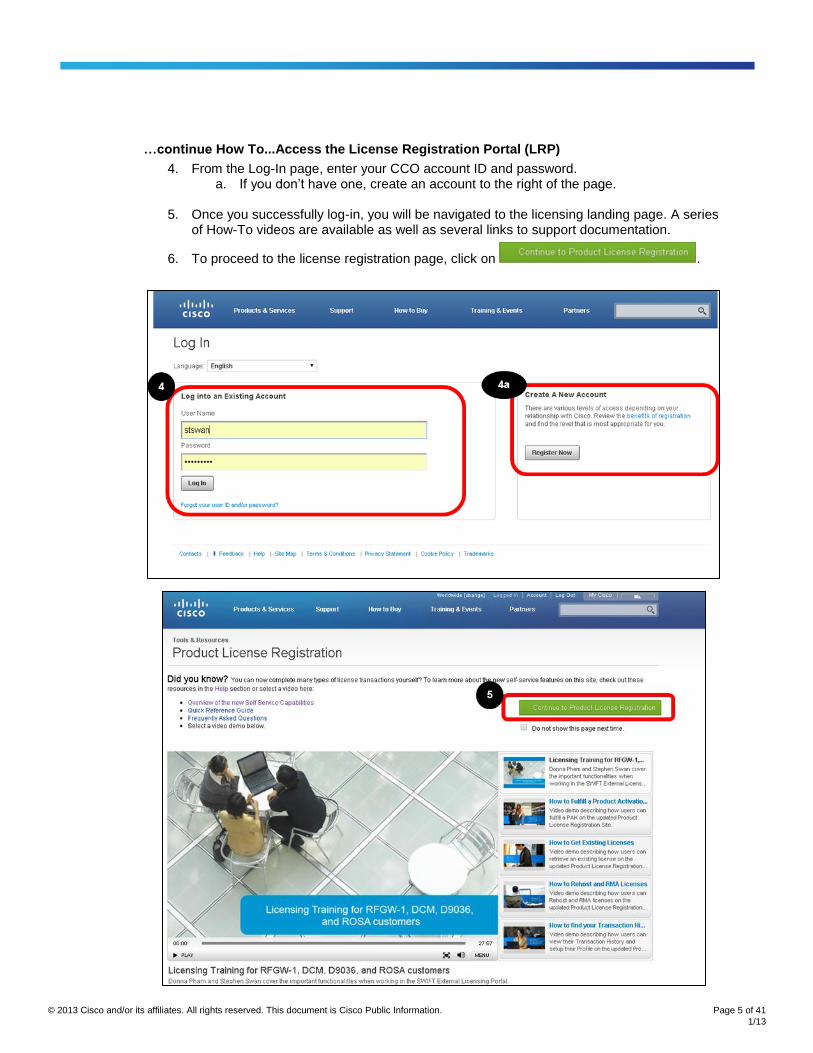
…continue How To...Access the License Registration Portal (LRP)
4. From the Log-In page, enter your CCO account ID and password. a. If you don’t have one, create an account to the right of the page.
5. Once you successfully log-in, you will be navigated to the licensing landing page. A series
of How-To videos are available as well as several links to support documentation.
6. To proceed to the license registration page, click on .
© 2013 Cisco and/or its affiliates. All rights reserved. This document is Cisco Public Information. Page 6 of 41
1/13
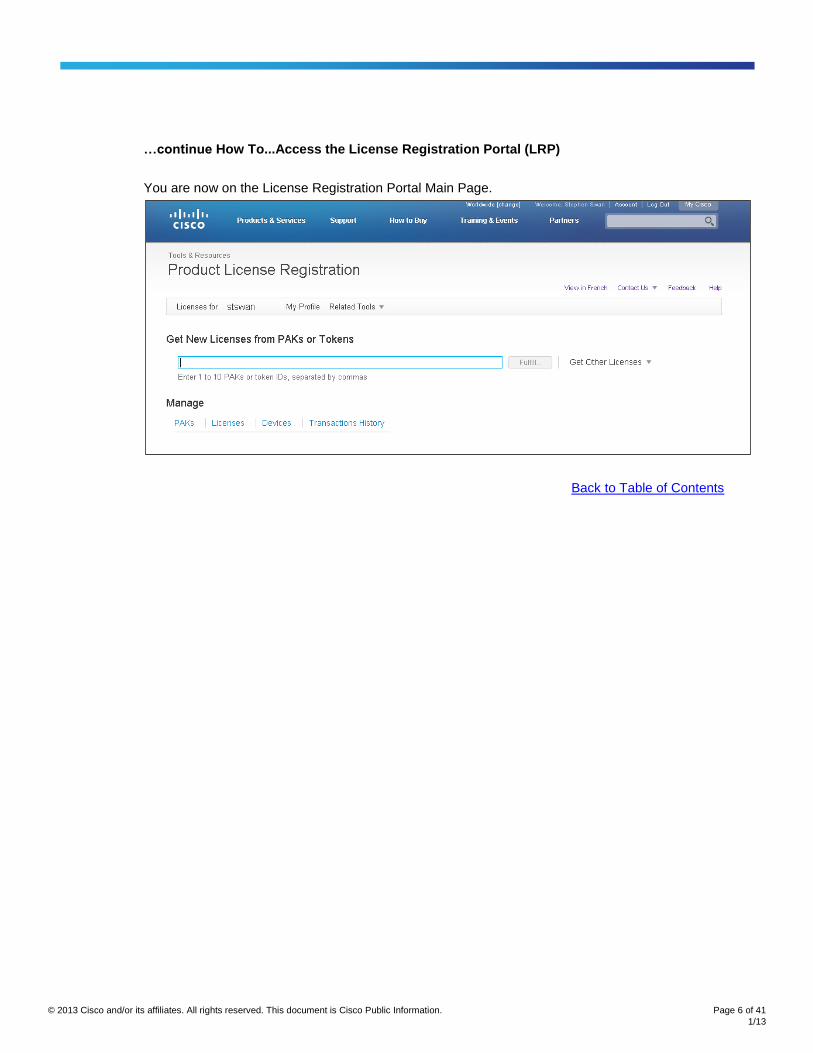
…continue How To...Access the License Registration Portal (LRP)
You are now on the License Registration Portal Main Page.
Back to Table of Contents
© 2013 Cisco and/or its affiliates. All rights reserved. This document is Cisco Public Information. Page 7 of 41
1/13
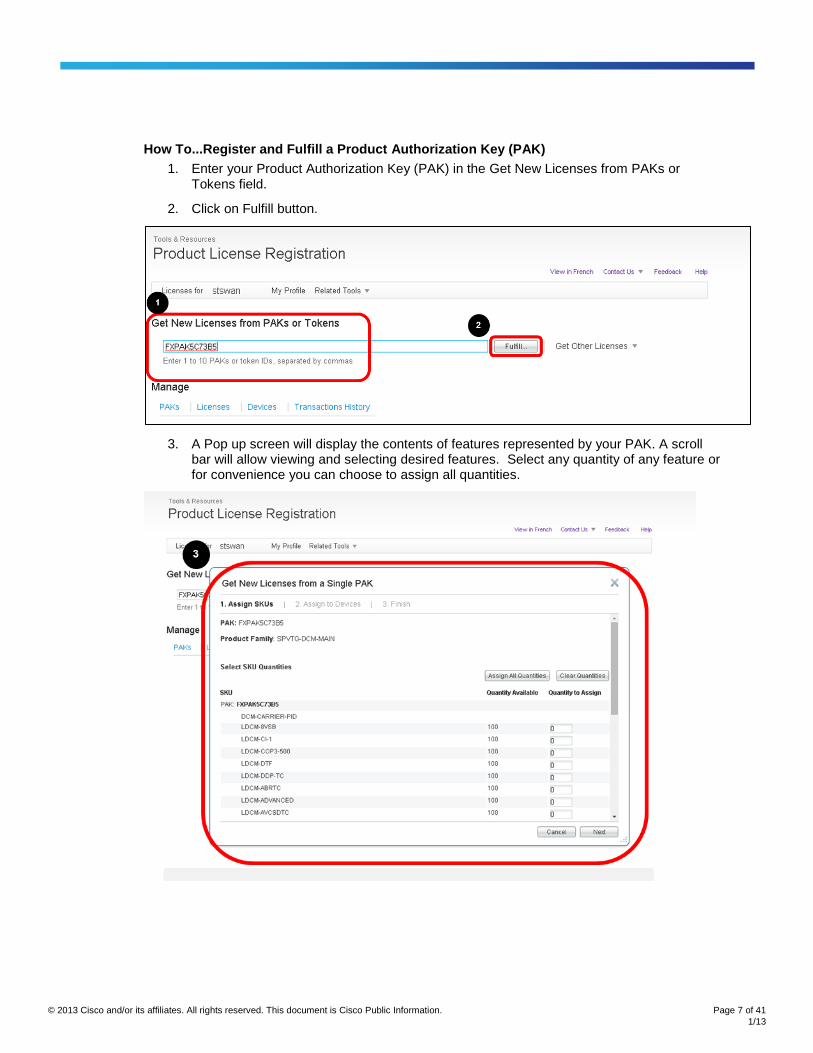
How To...Register and Fulfill a Product Authorization Key (PAK)
1. Enter your Product Authorization Key (PAK) in the Get New Licenses from PAKs or Tokens field.
2. Click on Fulfill button.
3. A Pop up screen will display the contents of features represented by your PAK. A scroll bar will allow viewing and selecting desired features. Select any quantity of any feature or for convenience you can choose to assign all quantities.

© 2013 Cisco and/or its affiliates. All rights reserved. This document is Cisco Public Information. Page 8 of 41
1/13
…continue How To...Register and Fulfill a Product Authorization Key (PAK)
4. Once you have selected the feature, click on Next.
5. Depending on the product you are attempting to license, you will then enter the Device ID information (this could be a PID and Serial Number or MAC address, or other Node Lock information).
6. Click Next.

© 2013 Cisco and/or its affiliates. All rights reserved. This document is Cisco Public Information. Page 9 of 41
1/13
…continue How To...Register and Fulfill a Product Authorization Key (PAK)
7. Agree to the Terms and Conditions and review the information on the page.
8. Click Submit.
The LRP will process your request designated by the progress bar.
© 2013 Cisco and/or its affiliates. All rights reserved. This document is Cisco Public Information. Page 10 of 41
1/13
…continue How To...Register and Fulfill a Product Authorization Key (PAK)
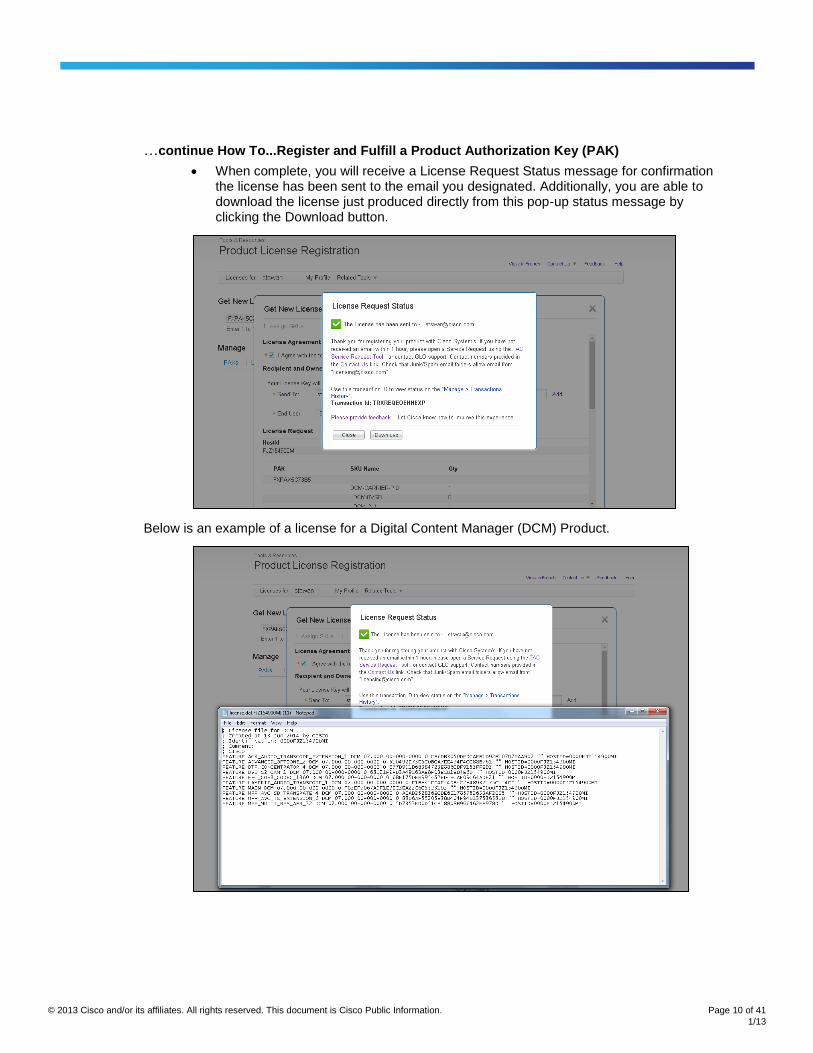
When complete, you will receive a License Request Status message for confirmation the license has been sent to the email you designated. Additionally, you are able to download the license just produced directly from this pop-up status message by clicking the Download button.
Below is an example of a license for a Digital Content Manager (DCM) Product.

© 2013 Cisco and/or its affiliates. All rights reserved. This document is Cisco Public Information. Page 11 of 41
1/13
…continue How To...Register and Fulfill a Product Authorization Key (PAK)
Along with the option of downloading a license, as mentioned, the license is also emailed to the user’s email account. Users are able to specify additional email addresses as needed.
In many cases, opening the email will reveal a zip file which contains the License file as well as instructions on how to install the license.
Back to Table of Contents

© 2013 Cisco and/or its affiliates. All rights reserved. This document is Cisco Public Information. Page 12 of 41
1/13
How To...Register Multiple PAKs
1. To register one or more PAK’s, select the PAKs Tab under the Manage section.
2. Then, click Actions and select Add New PAKs from the drop down menu.
3. The Add New PAKs pop-up window appears. You are able to enter up to 10 PAKs (keep in mind, use a comma to separate each PAK. Then click Submit.

© 2013 Cisco and/or its affiliates. All rights reserved. This document is Cisco Public Information. Page 13 of 41
1/13
... continue How To...Register Multiple PAKs
A summary of the PAKs you added are displayed.
After the PAKs are loaded, they are available for fulfillment and appear under the PAKs tab with an Unfulfilled Status.
To initiate fulfillment, left click the mouse over any PAK and the option to Get New Licenses appears. Another method is to select the checkbox next to the PAK you wish to use and then click on the Actions option. The Get New Licenses option appears in the drop down menu.
Back to Table of Contents

© 2013 Cisco and/or its affiliates. All rights reserved. This document is Cisco Public Information. Page 14 of 41
1/13
How To...Retrieve Existing Licenses
There are several ways to retrieve an existing license.
1. One method is to click on the License tab under the Manage section. This populates a list of all your registered licenses.
2. To find all the licenses associated to a particular product, select the Filters option
a. Populate one of the query fields. In this example, we use a query on the Device Product ID, then, click on Apply to sort the results.

© 2013 Cisco and/or its affiliates. All rights reserved. This document is Cisco Public Information. Page 15 of 41
1/13
…continue How To...Retrieve Existing Licenses
Once you click Apply, the list of all licenses appears for that device, sorted by Date. The most current licenses are listed first at the top.
3. Left clicking your mouse over a specific License ID provides a drop down menu that offers various options including Download or Resend the license. Selecting the Download option downloads the license to your laptop or system.

© 2013 Cisco and/or its affiliates. All rights reserved. This document is Cisco Public Information. Page 16 of 41
1/13
…continue How To...Retrieve Existing Licenses
If we selected the Resend option, the Resend License pop-up window would appear displaying the license ID. Clicking Resend sends the requested license to the user account’s email address.
A License Request Status message appears and a green check designates a successful operation.
Back to Table of Contents

© 2013 Cisco and/or its affiliates. All rights reserved. This document is Cisco Public Information. Page 17 of 41
1/13
How To...Add a Device to your Device Table
In the case you would need to retrieve an existing license associated to another device, you are able to do so by adding a device to your device table.
1. To add a device to your device table, click the Devices tab under the Manage section.
2. Select the Actions option and from the drop down menu, select Add Device.
3. Once you click Add Device, a pop-up window appears. From the Select drop down list, choose the type of product you would like to add to your device table. In the example below, we have selected DCM.
© 2013 Cisco and/or its affiliates. All rights reserved. This document is Cisco Public Information. Page 18 of 41
1/13
…continue How To...Add a Device to your Device Table
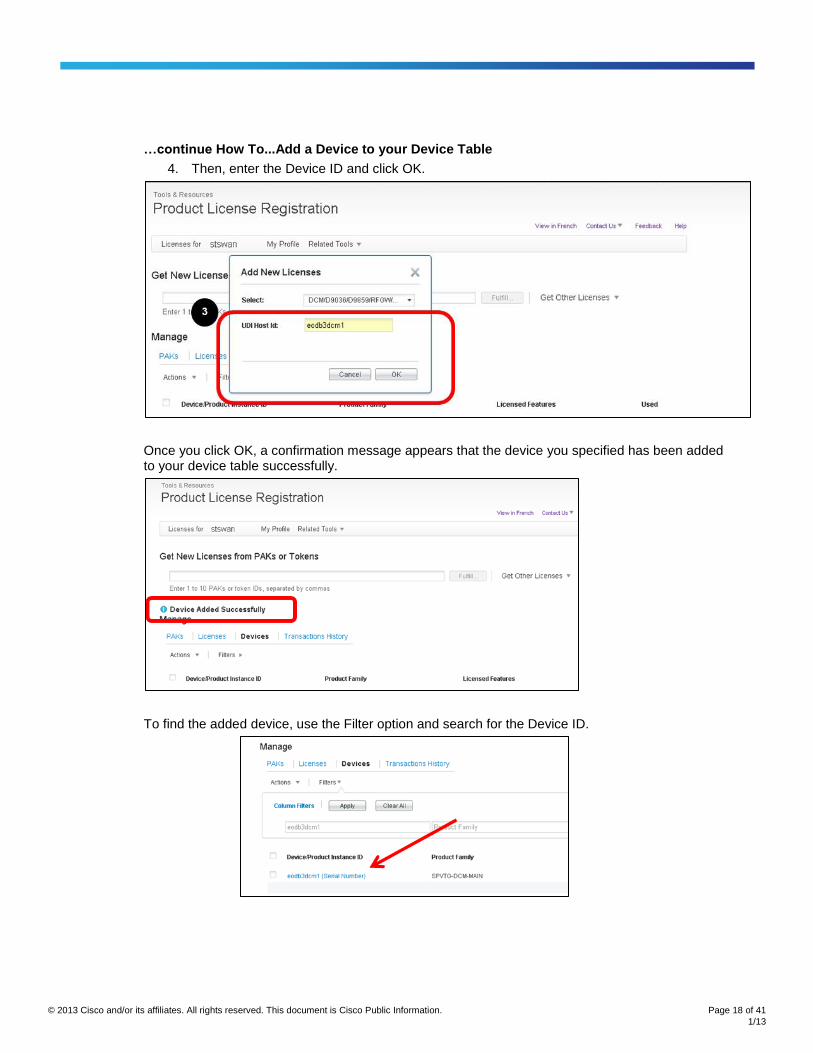
4. Then, enter the Device ID and click OK.
Once you click OK, a confirmation message appears that the device you specified has been added to your device table successfully.
To find the added device, use the Filter option and search for the Device ID.

© 2013 Cisco and/or its affiliates. All rights reserved. This document is Cisco Public Information. Page 19 of 41
1/13
Device Credential Definitions & Product Selection
Device Credential Definitions
License File: Select this option if you are using a Flex LM product (Flexera Technology). This license file would have been received via an email when the PAK was fulfilled.
Device Credential: Select this option if you are using a Sentinel product (SAFENET Technology). This credential is provided by the device via the admin function.
DCM/D9036/D9859/RFGW/ROSA: Select this option if you are using a Legacy Scientific Atlanta product (now known as SPVTG), this will require the UDI to be entered in the ‘UDI Host ID’ field.
Node Lock: Select this option if you are using NEXUS 7000 product. It represents the serial number/device identified located on the device.
License Request: Select this option if you are using a FNE product (Flexera Technology). This credential will be received in XML format from the PLM server.
ASR5000/ASR5500: Select this option if you are using ASR5K. This represents the device identifier.
Tandberg SN: Select this option if you are using a Tandberg product (now known as Cisco Telepresence). This represents the serial number of the product.
Cisco FirePOWER License Key: Select this option if you are using a Sourcefire Product. This represents the License Key of the Defense center.

© 2013 Cisco and/or its affiliates. All rights reserved. This document is Cisco Public Information. Page 20 of 41
1/13
The following Sentinel products can be added via option [Device Credentials]
Product Family
1861 ISR
5500 SERIES WIRELESS CONTROLLERS
7500 WIRELESS CONTROLLERS
800 FIXED
APPLICATION EXTENSION PLATFORM (AXP) AND UCSE
ASR 900
ASR 920
ASR1001
ASR901 SERIES ROUTERS
BRE QUALITY ANALYSIS PRODUCT
CARRIER PACKET TRANSPORT & 15454
CATALYST 2300 SERIES
CATALYST 2960
CATALYST 31XX (CBS30XX/CBS31XX)
CATALYST 3560E/X AND 3750E/X
CATALYST 4500E & 4500-X
CATALYST 4500E & 4500-X SERIES
CATALYST 6000 FREE CRYPTO LICENSE
CGR1000
CISCO 2504 WIRELESS CONTROLLERS
CISCO 5921 EMBEDDED SERVICES ROUTER
CISCO ASR9000
CISCO IOS XR SOFTWARE
CISCO MXE 5000 SERIES MEDIA EXPERIENCE ENGINE
CISCO NETWORK ANALYSIS MODULE (NAM)
CISCO NETWORK ANALYSIS MODULE ? VIRTUAL (VNAM)
CISCO UNIFIED MESSAGE GATEWAY
CISCO UNIFIED SIP PROXY (CUSP)
CISCO UNITY EXPRESS
CISCO VIDEO ANALYTICS
CISCO WIRELESS CONTROLLER ON SRE FOR ISR G2
CISCO WIRELESS CONTROLLERS (2500/5500/7500/WISM2) DTLS
CISCO WISM2 WIRELESS CONTROLLERS
CISCO5921ESR
CIVS-APPS
CLOUD SERVICES ROUTER
CRS
ES3 ETHERSWITCH
GATEKEEPER AND AMR
IE2000
IPS ISR LICENSING
IPS SERVICE LICENSE - 4270/4300/4500 SERIES, AIM-IPS-K9, OR VERSION 6.1+
ISA 500 SERIES SECURITY APPLIANCE
ISR G2

© 2013 Cisco and/or its affiliates. All rights reserved. This document is Cisco Public Information. Page 21 of 41
1/13
ISR4300
ISR4400
ITP 5500 SERIES WIRELESS CONTROLLERS
ITP 800 FIXED
ITP CATALYST 2960
ITP CATALYST 3560E/X AND 3750E/X
ITP CATALYST 4500E 4500-X SERIES
ITP CISCO 2504 WIRELESS CONTROLLERS
ITP ISR G2
ME3600X/3800X
ONS 15454 MSTP
PANDA SWITCH 6750X
RFGW-10 DS384
SA 500 SERIES SECURITY APPLIANCES
SA540 SSL LICENSE
SRE WLC BASE LICENSE (FREE)
SURVIVIABLE REMOTE SITE VOICEMAIL (SRSV)
UBR MC20X20/3G60/PRE5/3GSPA
UNIFIED COMMUNICATIONS 320
UNIFIED COMMUNICATIONS 500 SERIES
VIRTUAL DESKTOP SWITCHING
VIRTUAL WIRELESS LAN CONTROLLERS
VMSS
WIRELESS LAN CONTROLLER
The following Flex LM products can be added via option [License File]
Product Family
ACCESS REGISTRAR
ASA - DUCATI
BILLING AND MEASUREMENTS SERVER
BROADBAND ACCESS CENTER
BUSINESS VIDEO COLLECTOR
CABLE BROADBAND TROUBLESHOOTER
CARIDEN
CGNMS
CISCO 3GBPS GUARD/2GBPS DETECTOR
CISCO AON SOFTWARE
CISCO APPLICATION CONTROL ENGINE
CISCO APPLICATION CONTROL ENGINE (ACE) XML GATEWAY - CRO
CISCO APPLICATION CONTROL ENGINE (ACE) XML GATEWAY - NON CRO
CISCO APPLICATION NETWORKING MANAGER
CISCO CATALYST 6500/7600 WEBVPN
CISCO DATA CENTER NETWORK MANAGER
CISCO DATA VIRTUALIZATION - CIS
CISCO EMERGENCY RESPONDER
© 2013 Cisco and/or its affiliates. All rights reserved. This document is Cisco Public Information. Page 22 of 41
1/13
CISCO EXTENDED CARE 1.0
CISCO HEALTHPRESENCE
CISCO HEALTHPRESENCE 2.1 AND LATER
CISCO HEALTHPRESENCE EXTENDED REACH
CISCO INTERCOMPANY MEDIA ENGINE
CISCO IP INTEROPERABILITY AND COLLABORATION SYSTEM
CISCO IP INTEROPERABILITY AND COLLABORATION SYSTEM 4.5(X), 4.6(X) AND LATER
CISCO MATE DEDICATED
CISCO MATE DEDICATED - TNC SUBSCRIPTION
CISCO MATE FLOATING
CISCO MATE FLOATING - TNC SUBSCRIPTION
CISCO MEDIA EXPERIENCE ENGINE (MXE)
CISCO MEDIA EXPERIENCE ENGINE V 3.1 AND LATER
CISCO MEDIA EXPERIENCE ENGINE V 3.1 MIGRATION
CISCO MODELING LABS
CISCO MODELING LABS TNC SUBSCRIPTION
CISCO MULTICAST MANAGER (V3.2 AND LATER)
CISCO NETMANAGER - IP INFRASTRUCTURE 1.0
CISCO NETMANAGER - UNIFIED COMMUNICATIONS
CISCO NETWORK ASSET COLLECTOR 1.2
CISCO NETWORK BUILDING MEDIATOR
CISCO NETWORK BUILDING MEDIATOR - MEGATRON
CISCO NEXUS 9000 SERIES SWITCHES
CISCO PHYSICAL ACCESS MANAGER
CISCO PRIME CABLE PROVISIONING
CISCO PRIME COLLABORATION MANAGER
CISCO PRIME NETWORK
CISCO PRIME NETWORK REGISTRAR
CISCO PRIME SECURITY MANAGER
CISCO QUANTUM
CISCO SECURE ACCESS CONTROL SYSTEM
CISCO SECURE ACS VIEW SERVER
CISCO SECURITY AUDITOR
CISCO SECURITY MANAGER
CISCO SMART BUSINESS PORTAL
CISCO TELEPRESENCE
CISCO TELEPRESENCE EXCHANGE
CISCO TELEPRESENCE READINESS ASSESSMENT MANAGER
CISCO TELEPRESENCE READINESS ASSESSMENT MANAGER 1.0
CISCO TELEPRESENCE SATELLITE
CISCO TELEPRESENCE UPGRADE
CISCO UCS DIRECTOR (FORMERLY CLOUPIA) OFFERINGS
CISCO UCSD EXPRESS
CISCO UNIFIED APPLICATION ENVIRONMENT
CISCO UNIFIED APPLICATION ENVIRONMENT - V8 AND LATER
CISCO UNIFIED CALLCONNECTOR
CISCO UNIFIED COMMUNICATIONS MANAGER - ARMY

© 2013 Cisco and/or its affiliates. All rights reserved. This document is Cisco Public Information. Page 23 of 41
1/13
CISCO UNIFIED COMMUNICATIONS MANAGER - PARTIAL
CISCO UNIFIED COMMUNICATIONS MANAGER - SINGLE
CISCO UNIFIED COMMUNICATIONS MANAGER - UPGRADE
CISCO UNIFIED COMMUNICATIONS MANAGER AND CUPS - VMWARE
CISCO UNIFIED COMMUNICATIONS MANAGER BUSINESS EDITION 3000
CISCO UNIFIED CUSTOMER VOICE PORTAL STUDIO
CISCO UNIFIED CUSTOMER VOICE PORTAL(FLEX)
CISCO UNIFIED EXPERT ADVISOR
CISCO UNIFIED INTELLIGENCE CENTER
CISCO UNIFIED INTELLIGENCE CENTER 2
CISCO UNIFIED INTELLIGENCE SUITE
CISCO UNIFIED OPERATIONS MANAGER
CISCO UNIFIED PERSONAL COMMUNICATOR
CISCO UNIFIED PROVISIONING MANAGER
CISCO UNIFIED SERVICE MONITOR
CISCO UNIFIED SERVICE STATISTICS MANAGER
CISCO UNIFIED VIDEOCONFERENCING
CISCO VDS IS
CISCO VFRAME DATA CENTER - HA
CISCO VFRAME DATA CENTER - NON HA
CISCO VIDEO SURVEILLANCE MANAGER
CISCO VIDEOSCAPE MEDIA SUITE
CISCO VIRTUAL SECURITY GATEWAY
CISCOFOCALPOINT.COM
CISCOWORKS - HEALTH AND UTILIZATION MONITOR
CISCOWORKS INTERFACE CONFIGURATION MANAGER
CISCOWORKS IPC OPERATIONS MANAGER
CISCOWORKS IPC SERVICE MONITOR
CISCOWORKS LAN MANAGEMENT SOLUTION
CISCOWORKS NETWORK COMPLIANCE MANAGER (NCM) PRODUCT
CLEAN ACCESS
CLEAN ACCESS FAILOVER
CLEAN ACCESS FAILOVER MANAGER
CLEAN ACCESS PROFILER
COLLABORATION SERVER
CROSSBOW
CRS CRO VERSION
CRS SOFTWARE (ICD)
CRS SOFTWARE (IVR)
CRS SOFTWARE (NASR)
CRS SOFTWARE (NTTS)
CRS SOFTWARE (QM)
CS-MARS
CVP UPGRADE
DATA CENTER NETWORK MANAGEMENT (BASE LICENSE)
DATA CENTER NETWORK MANAGEMENT (INCREMENTAL LICENSE)
DATAINMOTION
ECLAT
© 2013 Cisco and/or its affiliates. All rights reserved. This document is Cisco Public Information. Page 24 of 41
1/13
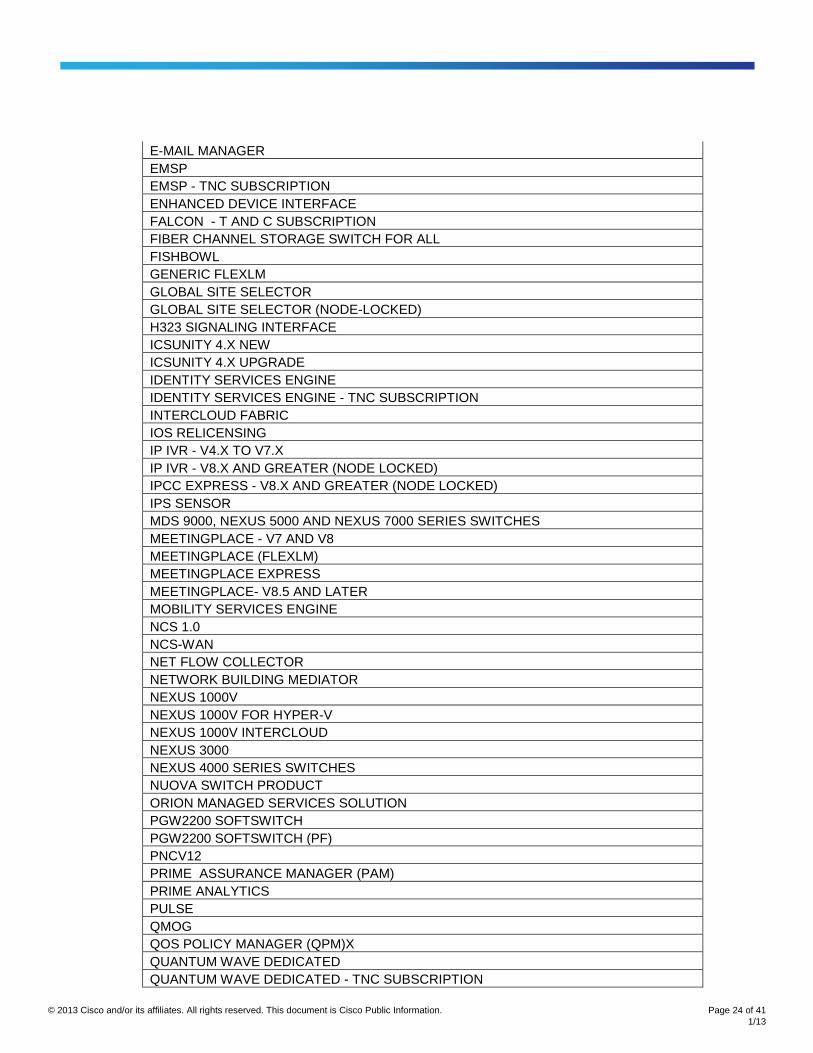
E-MAIL MANAGER
EMSP
EMSP - TNC SUBSCRIPTION
ENHANCED DEVICE INTERFACE
FALCON - T AND C SUBSCRIPTION
FIBER CHANNEL STORAGE SWITCH FOR ALL
FISHBOWL
GENERIC FLEXLM
GLOBAL SITE SELECTOR
GLOBAL SITE SELECTOR (NODE-LOCKED)
H323 SIGNALING INTERFACE
ICSUNITY 4.X NEW
ICSUNITY 4.X UPGRADE
IDENTITY SERVICES ENGINE
IDENTITY SERVICES ENGINE - TNC SUBSCRIPTION
INTERCLOUD FABRIC
IOS RELICENSING
IP IVR - V4.X TO V7.X
IP IVR - V8.X AND GREATER (NODE LOCKED)
IPCC EXPRESS - V8.X AND GREATER (NODE LOCKED)
IPS SENSOR
MDS 9000, NEXUS 5000 AND NEXUS 7000 SERIES SWITCHES
MEETINGPLACE - V7 AND V8
MEETINGPLACE (FLEXLM)
MEETINGPLACE EXPRESS
MEETINGPLACE- V8.5 AND LATER
MOBILITY SERVICES ENGINE
NCS 1.0
NCS-WAN
NET FLOW COLLECTOR
NETWORK BUILDING MEDIATOR
NEXUS 1000V
NEXUS 1000V FOR HYPER-V
NEXUS 1000V INTERCLOUD
NEXUS 3000
NEXUS 4000 SERIES SWITCHES
NUOVA SWITCH PRODUCT
ORION MANAGED SERVICES SOLUTION
PGW2200 SOFTSWITCH
PGW2200 SOFTSWITCH (PF)
PNCV12
PRIME ASSURANCE MANAGER (PAM)
PRIME ANALYTICS
PULSE
QMOG
QOS POLICY MANAGER (QPM)X
QUANTUM WAVE DEDICATED
QUANTUM WAVE DEDICATED - TNC SUBSCRIPTION

© 2013 Cisco and/or its affiliates. All rights reserved. This document is Cisco Public Information. Page 25 of 41
1/13
RED HAT ENTERPRISE LINUX SUBSCRIPTION ACTIVATION REQUEST
REMOTE EXPERT MANAGER
RESOURCE MANAGER ESSENTIALS AND PERFORMANCE MONITOR
SECURE IDS HOST SENSOR
SECURITY AGENT
SECURITY AGENT STARTER KIT
SMALL BUSINESS NETWORK MANAGEMENT
UCS 6100 SERIES FABRIC INTERCONNECT
UCS CENTRAL
UNIFIED COMMUNICATIONS AUDIT TOOL
UNIFIED COMMUNICATIONS DEPLOYMENT TOOL
UNIFIED CONNECTIONS
UNIFIED PRESENCE SERVER
UNITY BRIDGE
UNITY CONNECTION HA
UNITY CONNECTION NEW
UNITY CONNECTION WITH SIGNATURE
UNITY NEW
UNITY POOLING LICENSE
UNITY UPGRADE
VIPER
VMS (COMMON SERVICES)
VSG HYPER-V
WIRELES CONTROL SYSTEM 8.0 UPGRADE
WIRELESS CONTROL SYSTEM (WCS) NAVIGATOR
WIRELESS CONTROL SYSTEM (WCS) SITE
WIRELESS CONTROL SYSTEM 8.0
WIRELESS CONTROL SYSTEM SOFTWARE
The following FNE products can be added via option [License Request]
Product Family
CISCO UNIFIED COMMUNICATIONS
CISCO UNIFIED COMMUNICATIONS - 2
CISCO UNIFIED COMMUNICATIONS - CWMS
FNE TERM AND CONTENT
Back to Table of Contents

© 2013 Cisco and/or its affiliates. All rights reserved. This document is Cisco Public Information. Page 26 of 41
1/13
The following ASR5K products can be added via option [ASR5000/ASR5500]
Product Family
ASR5000/ASR5500
The following legacy Scientific Atlantic (now known as SPVTG) products can be added via option [DCM/D9036/D9859/RFGW/ROSA]
Product Family
SPVTG-D9036-BU
SPVTG-D9036-MAIN
SPVTG-D9600
SPVTG-D9859
SPVTG-DCM-BU
SPVTG-DCM-MAIN
SPVTG-RFGW-1
SPVTG-ROSA-EM
SPVTG-ROSA-NMS
SPVTG-ROSA-NMS-NG
SPVTG-ROSA-SIM
SPVTG-ROSA-VSM
The following Sourcefire products can be added via option [Cisco FirePOWER License Key]
Product Family
CISCO FIREPOWER PRODUCT - PERPETUAL
CISCO FIREPOWER PRODUCT - TERM
The following Tandberg (now known as Cisco Telepresence) products can be added via option [Tandberg SN]
Product Family
AM GW 3600 SERIES (TANDBERG)
BORDER CONTROL & GATEKEEPER
C SERIES (TANDBERG)
CISCO CONTENT SERVER (TANDBERG)
EX SERIES (TANDBERG)
IP GW 3500 SERIES (TANDBERG)
IP VCR 2200 SERIES (TANDBERG)
ISDN AND SERIAL GW (TANDBERG)
MCU 4200 SERIES (TANDBERG)
MCU 4500 SERIES (TANDBERG)
MCU 5300 SERIES (TANDBERG)
MPS (TANDBERG)
MSE 8000 BLADES (TANDBERG)
MSE 8000 SERIES CHASSIS (TANDBERG)
MX SERIES (TANDBERG)
MXP SERIES (TANDBERG)
PROFILE SERIES (TANDBERG)
QUICK SET (TANDBERG)
© 2013 Cisco and/or its affiliates. All rights reserved. This document is Cisco Public Information. Page 27 of 41
1/13
T1 AND T3 (TANDBERG)
TANDBERG
TANDBERG INTEGRATOR PACKAGE
TANDBERG PRODUCT UPGRADE
TANDBERG SOFTWARE UPGRADE RELEASE KEYS
TANDBERG SOFTWARE VERSION UPGRADE - PAK
TANDBERG SOFTWARE VERSION UPGRADE - SERVICE CONTRACT ENTITLEMENT
TANDBERG VIRTUAL FOR OPTIONS (TANDBERG)
TMS OPTIONS ACTIVATION (TANDBERG)
TS 7000 SERIES TELEPRESENCE SERVER (TANDBERG)
VCS CONTROL, EXPRESSWAY AND STARTER PACK (TANDBERG)
VCS-EXPRESSWAY (TANDBERG)
VIRTUAL TCS
Back to Table of Contents

© 2013 Cisco and/or its affiliates. All rights reserved. This document is Cisco Public Information. Page 28 of 41
1/13
How To...Re-host a License
1. To re-host a license, select the Devices tab under the Manage section and then, left click your mouse over the desired device ID. Select the Rehost/Transfer option from the drop down menu.
2. A pop-up window appears with a list of licenses for that device. Check the licenses you would like to re-host and click Next.

© 2013 Cisco and/or its affiliates. All rights reserved. This document is Cisco Public Information. Page 29 of 41
1/13
…continue How To...Re-host a License
3. Once you click Next, enter the targeted device’s ID number (in this case the UDI Product ID) and the UDI serial number. *Note the red asterisks are required fields. Then click Next
4. Now, enter the ‘Send To’ information by using one or more email addresses, populate ‘End User’ name and check the ‘License Agreement’ checkbox. The ‘Submit’ button will enable once you’ve completed all required fields. Then, click Submit.
The new license will be made available for downloading as well as being emailed to the specified email address(es).
T
Back to Table of Contents
© 2013 Cisco and/or its affiliates. All rights reserved. This document is Cisco Public Information. Page 30 of 41
1/13
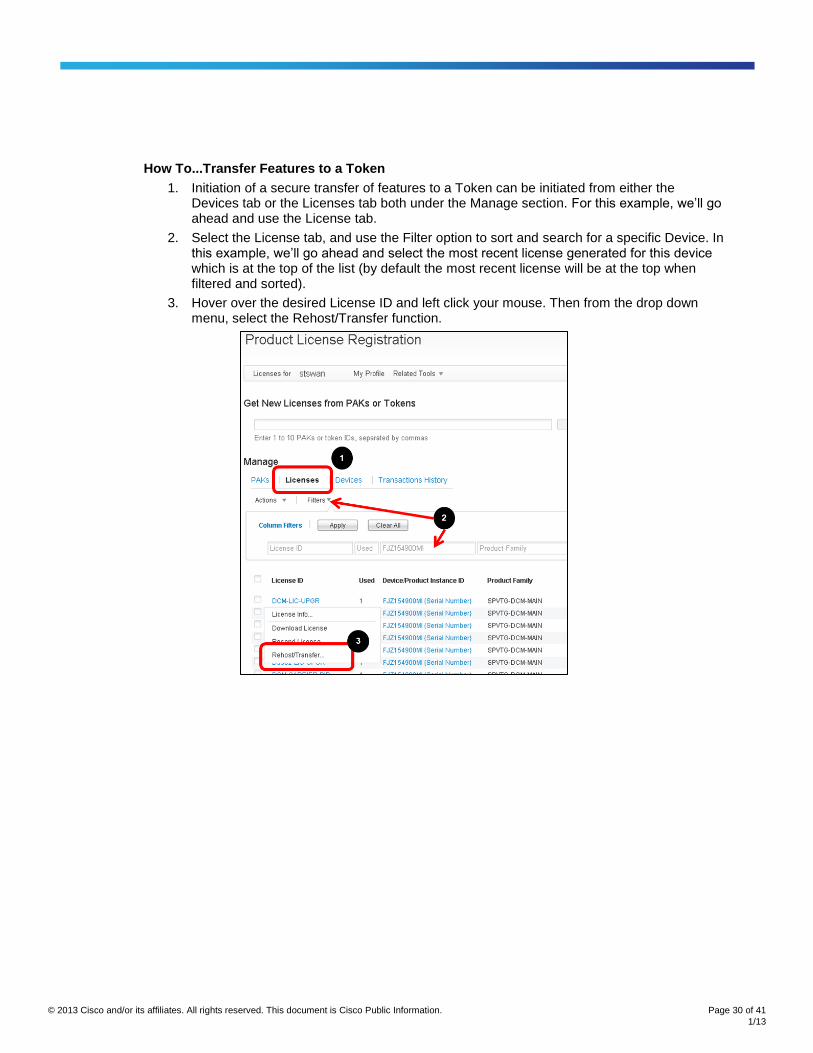
How To...Transfer Features to a Token
1. Initiation of a secure transfer of features to a Token can be initiated from either the Devices tab or the Licenses tab both under the Manage section. For this example, we’ll go ahead and use the License tab.
2. Select the License tab, and use the Filter option to sort and search for a specific Device. In this example, we’ll go ahead and select the most recent license generated for this device which is at the top of the list (by default the most recent license will be at the top when filtered and sorted).
3. Hover over the desired License ID and left click your mouse. Then from the drop down menu, select the Rehost/Transfer function.
© 2013 Cisco and/or its affiliates. All rights reserved. This document is Cisco Public Information. Page 31 of 41
1/13
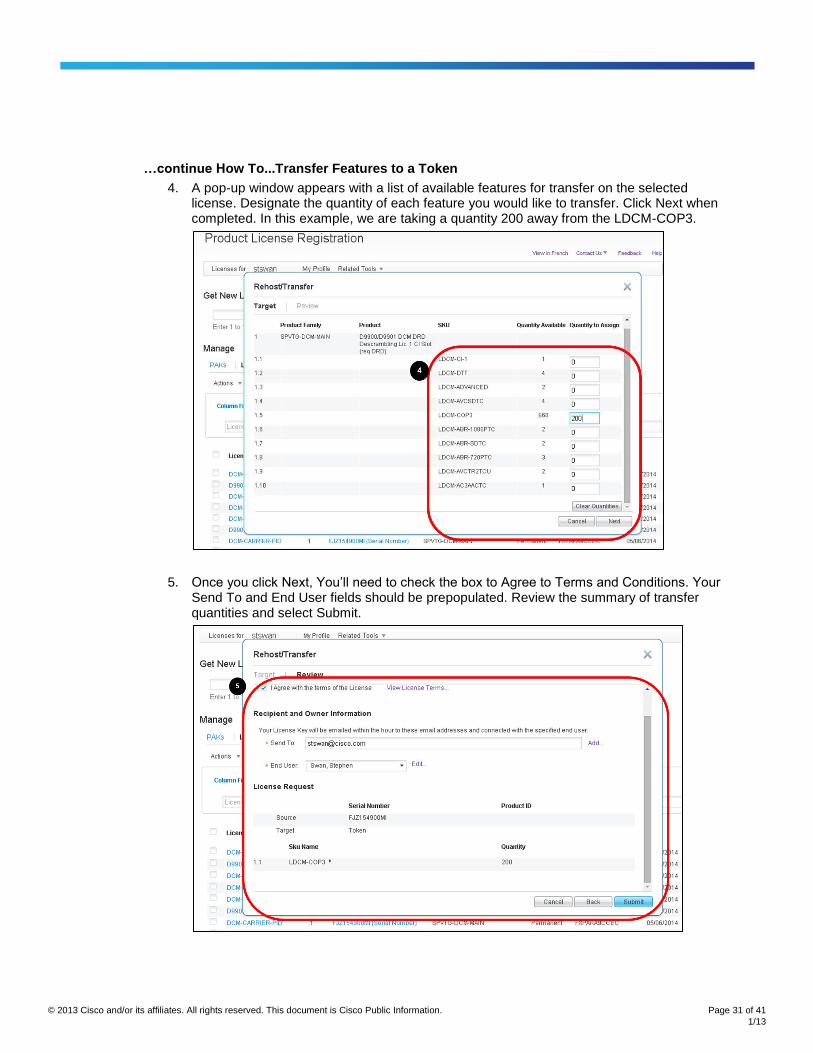
…continue How To...Transfer Features to a Token
4. A pop-up window appears with a list of available features for transfer on the selected license. Designate the quantity of each feature you would like to transfer. Click Next when completed. In this example, we are taking a quantity 200 away from the LDCM-COP3.
5. Once you click Next, You’ll need to check the box to Agree to Terms and Conditions. Your Send To and End User fields should be prepopulated. Review the summary of transfer quantities and select Submit.
© 2013 Cisco and/or its affiliates. All rights reserved. This document is Cisco Public Information. Page 32 of 41
1/13
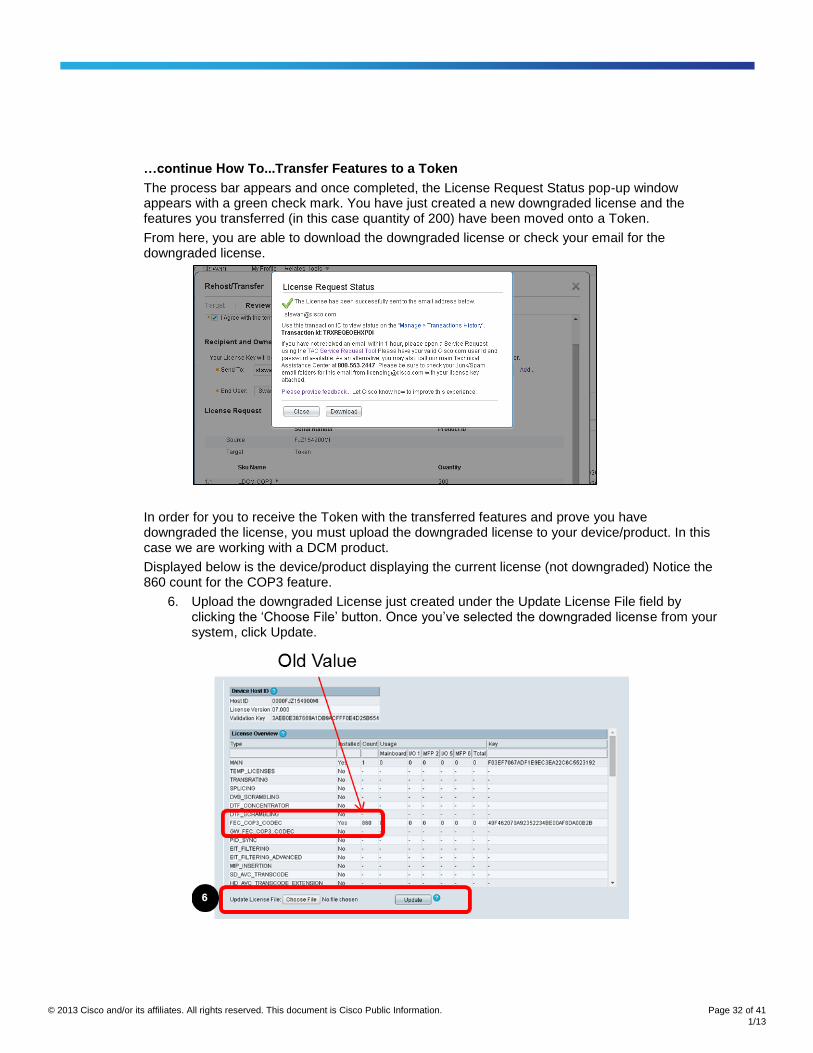
…continue How To...Transfer Features to a Token
The process bar appears and once completed, the License Request Status pop-up window appears with a green check mark. You have just created a new downgraded license and the features you transferred (in this case quantity of 200) have been moved onto a Token.
From here, you are able to download the downgraded license or check your email for the downgraded license.
In order for you to receive the Token with the transferred features and prove you have downgraded the license, you must upload the downgraded license to your device/product. In this case we are working with a DCM product.
Displayed below is the device/product displaying the current license (not downgraded) Notice the 860 count for the COP3 feature.
6. Upload the downgraded License just created under the Update License File field by clicking the ‘Choose File’ button. Once you’ve selected the downgraded license from your system, click Update.
© 2013 Cisco and/or its affiliates. All rights reserved. This document is Cisco Public Information. Page 33 of 41
1/13
…continue How To...Transfer Features to a Token
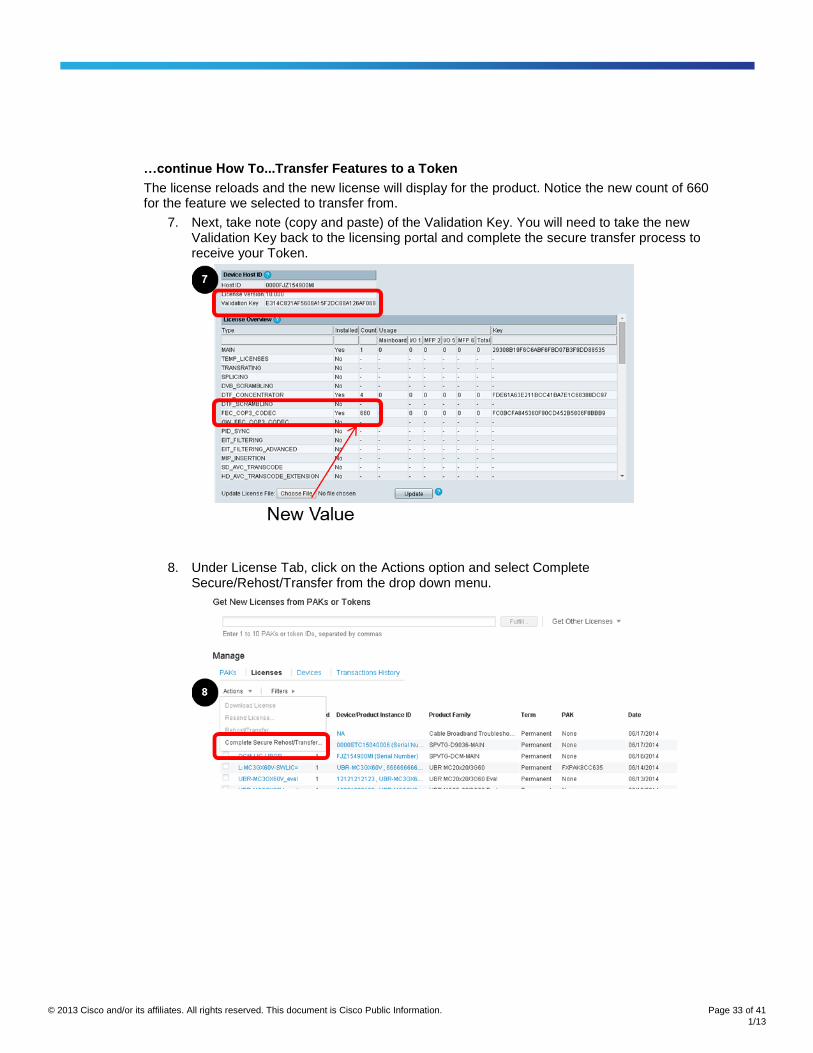
The license reloads and the new license will display for the product. Notice the new count of 660 for the feature we selected to transfer from.
7. Next, take note (copy and paste) of the Validation Key. You will need to take the new Validation Key back to the licensing portal and complete the secure transfer process to receive your Token.
8. Under License Tab, click on the Actions option and select Complete Secure/Rehost/Transfer from the drop down menu.

© 2013 Cisco and/or its affiliates. All rights reserved. This document is Cisco Public Information. Page 34 of 41
1/13
…continue How To...Transfer Features to a Token
A pop-up window appears allowing you to complete the Upload Re-host Ticket Process.
9. Identify the Product Type, Product ID (Serial Number), and the new Validation Key just created (recommended to use the copy and paste function). The Sent-To and End User fields are pre-populated, agree to the terms and conditions by clicking the checkbox, then click Submit.
After successful validation, the below message will be displayed:
You will then receive an email to the designated email address(es) with the Token ID.
Back to Table of Contents
© 2013 Cisco and/or its affiliates. All rights reserved. This document is Cisco Public Information. Page 35 of 41
1/13
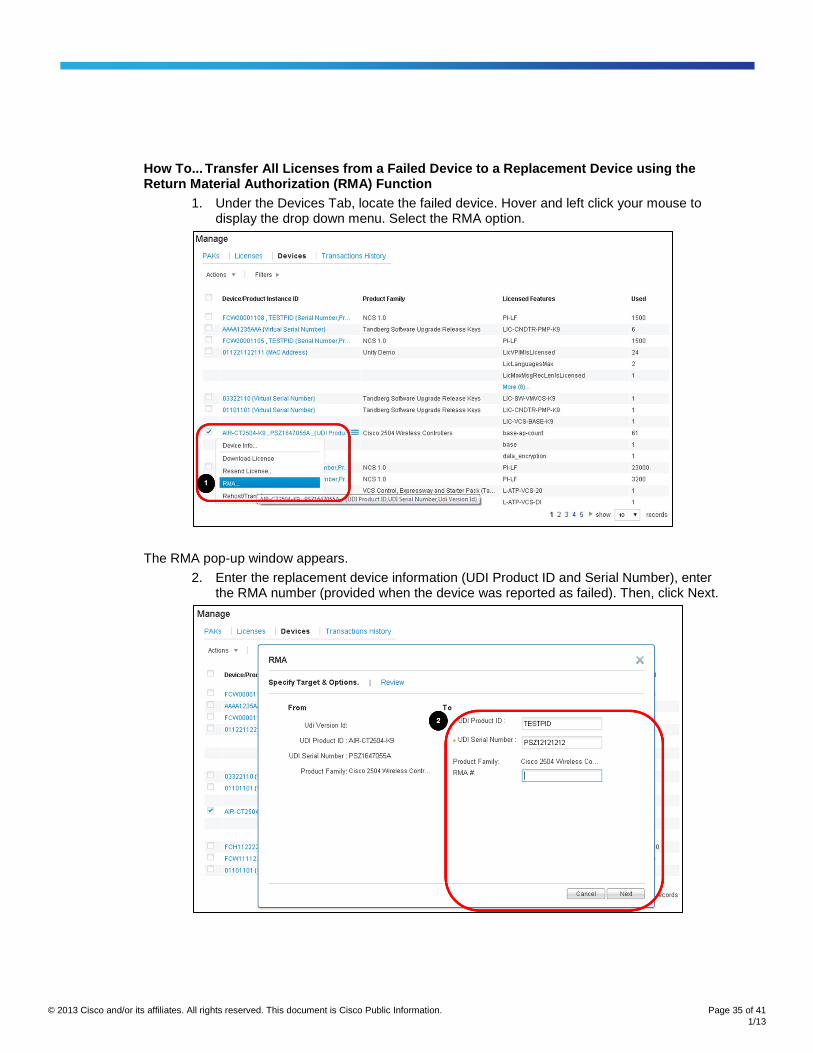
How To... Transfer All Licenses from a Failed Device to a Replacement Device using the Return Material Authorization (RMA) Function
1. Under the Devices Tab, locate the failed device. Hover and left click your mouse to display the drop down menu. Select the RMA option.
The RMA pop-up window appears.
2. Enter the replacement device information (UDI Product ID and Serial Number), enter the RMA number (provided when the device was reported as failed). Then, click Next.

© 2013 Cisco and/or its affiliates. All rights reserved. This document is Cisco Public Information. Page 36 of 41
1/13
…continue How To... Transfer All Licenses from a Failed Device to a Replacement Device using the Return Material Authorization (RMA) Function
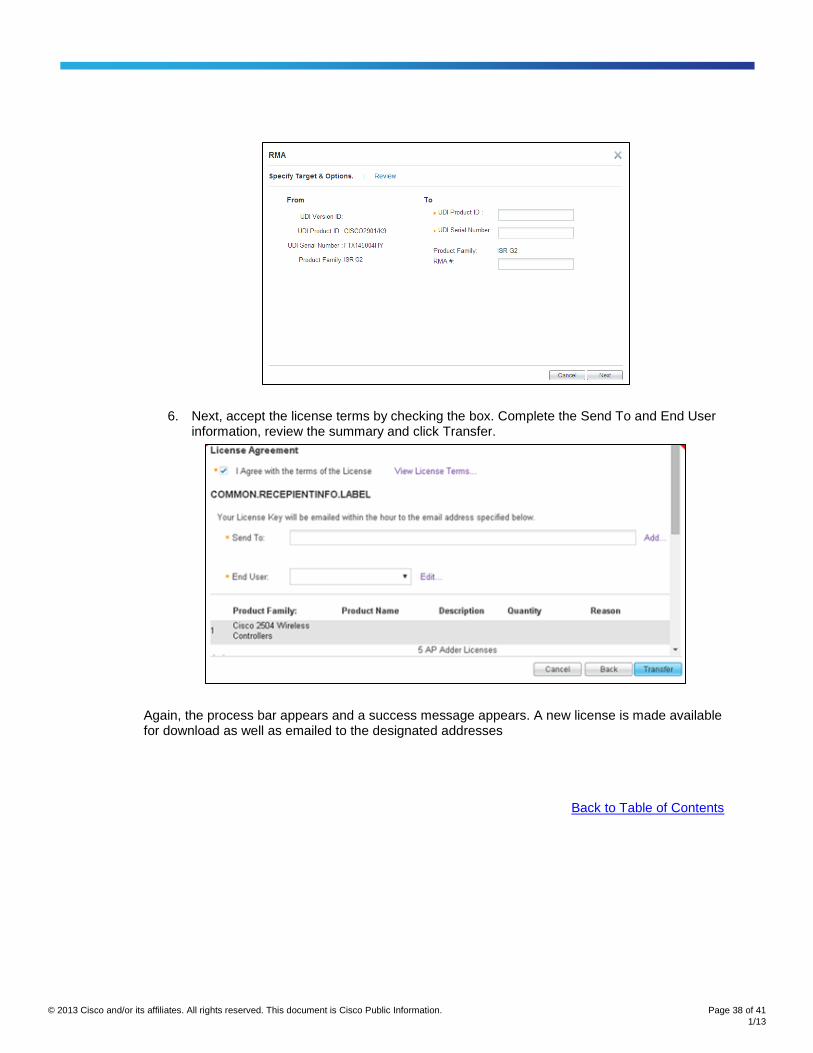
3. Next, accept the license terms by checking the box. Complete the Send To and End User information, review the summary and click Transfer.
Again, the process bar appears and a success message appears. A new license is made available for download as well as emailed to the designated addresses.
IMPORTANT NOTE:
In case the device is not available in the view table, users can add the device by providing the required device credentials which will be authenticated and added to the view table. Kindly refer the section “ADD DEVICE” for further details.
Offline Device and Unable to Provide the Required Credentials, use the RMA Process
If the device is offline and the user is unable to provide the required credentials, the RMA process can be performed as follows:
1. Under the Devices Tab, click on menu “Actions” and select sub option “RMA”

© 2013 Cisco and/or its affiliates. All rights reserved. This document is Cisco Public Information. Page 37 of 41
1/13
The product selector pop-up window appears as below:
2. Select the required product family from the list provided.
3. Provide the required device node-lock information as below.
Note: that inputs to this form will vary depending on the product family selected in the earlier step.
4. Enter the replacement device information (UDI Product ID and Serial Number),
5. Enter the RMA number (provided when the device was reported as failed). Then, click Next.
© 2013 Cisco and/or its affiliates. All rights reserved. This document is Cisco Public Information. Page 38 of 41
1/13
6. Next, accept the license terms by checking the box. Complete the Send To and End User information, review the summary and click Transfer.
Again, the process bar appears and a success message appears. A new license is made available for download as well as emailed to the designated addresses
Back to Table of Contents

© 2013 Cisco and/or its affiliates. All rights reserved. This document is Cisco Public Information. Page 39 of 41
1/13
How To...Find Your Transaction History
1. To view your Transaction History, select the Transaction History tab under the Manage Section.
2. Select the desired Transaction Id.
A Transaction Info pop-up window appears. This provides you further details regarding the selected transaction based on the 3 categories: Detailed Transaction Information, Org Information, and Transaction History.

© 2013 Cisco and/or its affiliates. All rights reserved. This document is Cisco Public Information. Page 40 of 41
1/13
Back to Table of Contents
How To...Produce a Demo or Evaluation License
1. From the main page, under Get Other Licenses, select Demo and Evaluation from the drop down menu.
2. A pop-up window appears. Select the Product Family and Product. Note: You are able to search by keywords. Then, click Next.
3. A summary of the selected Demo license appears. Click Next.

© 2013 Cisco and/or its affiliates. All rights reserved. This document is Cisco Public Information. Page 41 of 41
1/13
…continue How To...Produce a Demo or Evaluation License
4. Agree with the terms and conditions by checking the box. The Send-To and End User fields are prepopulated. Review the summary and click Submit.
Your Demo/Evaluation license will be produced and emailed to you as well as being made available for immediate download.
Back to Table of Contents
Thank you!
Related Documents