담 당 관리자 MODEL BRAND Printing Specification 1. Trim Size (Format) : 185mm x 260 mm 2. Printing Colors Cover : 1 COLOR (BLACK) Inside : 1 COLOR (BLACK) 3. Stock (Paper) Cover : Coated paper , S/White 150 g/㎡ Inside : Uncoated paper , 백상지 60 g/㎡ 4. Printing Method : Off set 5. Bindery : Perfect bind 6. Language : English/Spanish (2) 7. Number of pages : 168 Model Description Part No. 2. 1. User’s Guide Specification Changes 4. REV. NO. MM/DD/YY SIGNATURE CHANGE NO. CHANGE CONTENTS 1 2 3 4 5 7 6 SUFFIX 22LG30R-MA LG MFL41469212 (0903-REV04) KANG KWANG SUK 08.04.28 8 9 Special Instructions 3. Product Name LP81K Yang HM 08.4.28 22LG30R, 22/26/32LF15R “This part contain Eco-hazardous substances (Pb, Cd, Hg, Cr6+, PBB, PBDE, etc.) within LG standard level, Details should be followed Eco-SCM management standard[LG(56)-A-2524]. Especially, Part should be followed and controlled the following specification. (1)Eco-hazardous substances test report should be submitted when Part certification test and First Mass Production. (2) Especially, Don’t use or contain lead(Pb) and cadmium(Cd) in ink. N O T E S (1) Origin Notification * LGEMX : Printed in Mexico * LGERS : Printed in Mexico * LGEAZ : Printed in Brazil * LGESP : Printed in Brazil * LGESY : Printed in China * LGENT : Printed in China * LGENP : Printed in China * LGEIL : Printed in India * LGEDI : Printed in Indonesia * LGEIN : Printed in Indonesia * LGETH : Printed in Thailand * LGEVN : Printed in Vietnam * LGEMA : Printed in Poland * LGEWA : Printed in U.K. * LGEEG : Printed in Egypt * LGERA : Printed in Russia * LGEAK : Printed in Kazakhstan APR/16/08 Yang Hyo-Mi S8-17141 Changed the manual contents APR/28/08 Corrected the contents. S8-18380 Yang Hyo-Mi AUG/07/08 Added the safety instructions, corrected the contents. S8-26608 Yang Hyo-Mi MAR/12/09 Added the models. S9-46632 Yang Hyo-Mi

Welcome message from author
This document is posted to help you gain knowledge. Please leave a comment to let me know what you think about it! Share it to your friends and learn new things together.
Transcript

담 당 관 리 자
MODEL BRAND
Printing Specification
1. Trim Size (Format) : 185mm x 260 mm2. Printing ColorsCover : 1 COLOR (BLACK)Inside : 1 COLOR (BLACK)
3. Stock (Paper)Cover : Coated paper , S/White 150 g/㎡Inside : Uncoated paper , 백상지 60 g/㎡
4. Printing Method : Off set5. Bindery : Perfect bind6. Language : English/Spanish (2)7. Number of pages : 168
Model Description
Part No.
2.
User’s Guide Specification1.
User’s Guide Specification
Changes 4.
REV.NO. MM/DD/YY SIGNATURE CHANGE NO. CHANGE CONTENTS
1
2
3
4
5
7
6
SUFFIX
22LG30R-MA LGMFL41469212(0903-REV04)
KANG KWANG SUK
08.04.28
8
9
Special Instructions3.
Product NameLP81K
Yang HM08.4.28
22LG30R, 22/26/32LF15R
“This part contain Eco-hazardous substances (Pb, Cd, Hg, Cr6+, PBB, PBDE, etc.) within LG standard level, Details should be followed Eco-SCM management standard[LG(56)-A-2524].Especially, Part should be followed and controlled the following specification.(1)Eco-hazardous substances test report should be submitted
when Part certification test and First Mass Production.(2) Especially, Don’t use or contain lead(Pb) and cadmium(Cd) in ink.
NOTES
(1) Origin Notification* LGEMX : Printed in Mexico* LGERS : Printed in Mexico* LGEAZ : Printed in Brazil* LGESP : Printed in Brazil * LGESY : Printed in China
* LGENT : Printed in China * LGENP : Printed in China* LGEIL : Printed in India * LGEDI : Printed in Indonesia* LGEIN : Printed in Indonesia
* LGETH : Printed in Thailand* LGEVN : Printed in Vietnam
* LGEMA : Printed in Poland* LGEWA : Printed in U.K.* LGEEG : Printed in Egypt* LGERA : Printed in Russia * LGEAK : Printed in Kazakhstan
APR/16/08 Yang Hyo-Mi S8-17141 Changed the manual contents
APR/28/08 Corrected the contents.S8-18380Yang Hyo-Mi
AUG/07/08 Added the safety instructions, corrected the contents. S8-26608Yang Hyo-Mi
MAR/12/09 Added the models.S9-46632Yang Hyo-Mi
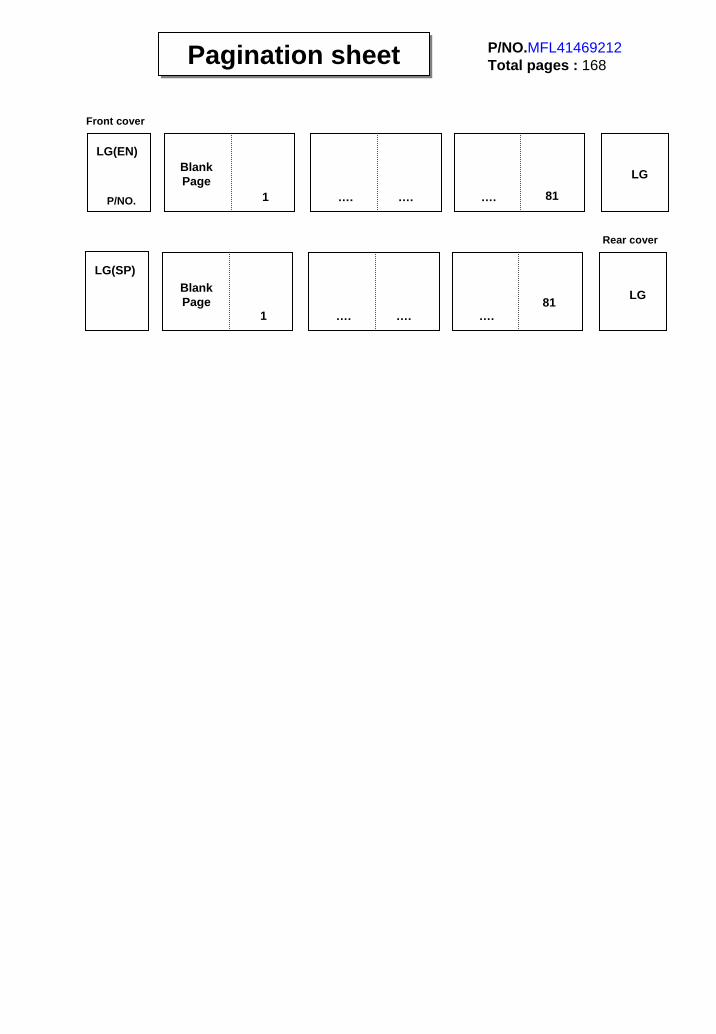
Pagination sheetPagination sheet P/NO.MFL41469212Total pages : 168
1 ….
Front cover
….
LG(EN)
LG
P/NO. …. 81
1 …. ….
LG(SP)
LG
Rear cover
….81
Blank Page
Blank Page
Please read this manual carefully before operatingyour set and retain it for future reference.Write the model number and serial number from thelabel on the back cabinet on the front or back ofthis manual.
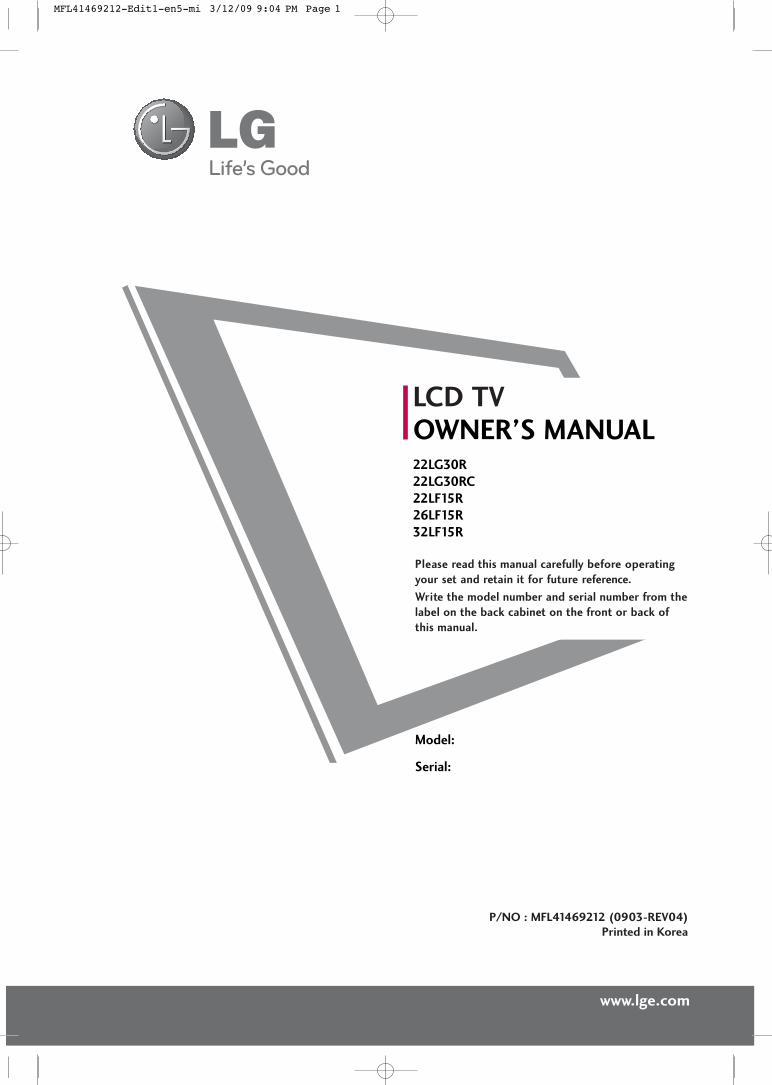
LCD TVOWNER’S MANUAL22LG30R22LG30RC22LF15R26LF15R32LF15R
P/NO : MFL41469212 (0903-REV04)Printed in Korea
www.lge.com
Model:
Serial:
MFL41469212-Edit1-en5-mi 3/12/09 9:04 PM Page 1
MFL41469212-Edit1-en5-mi 3/12/09 9:04 PM Page 2
1
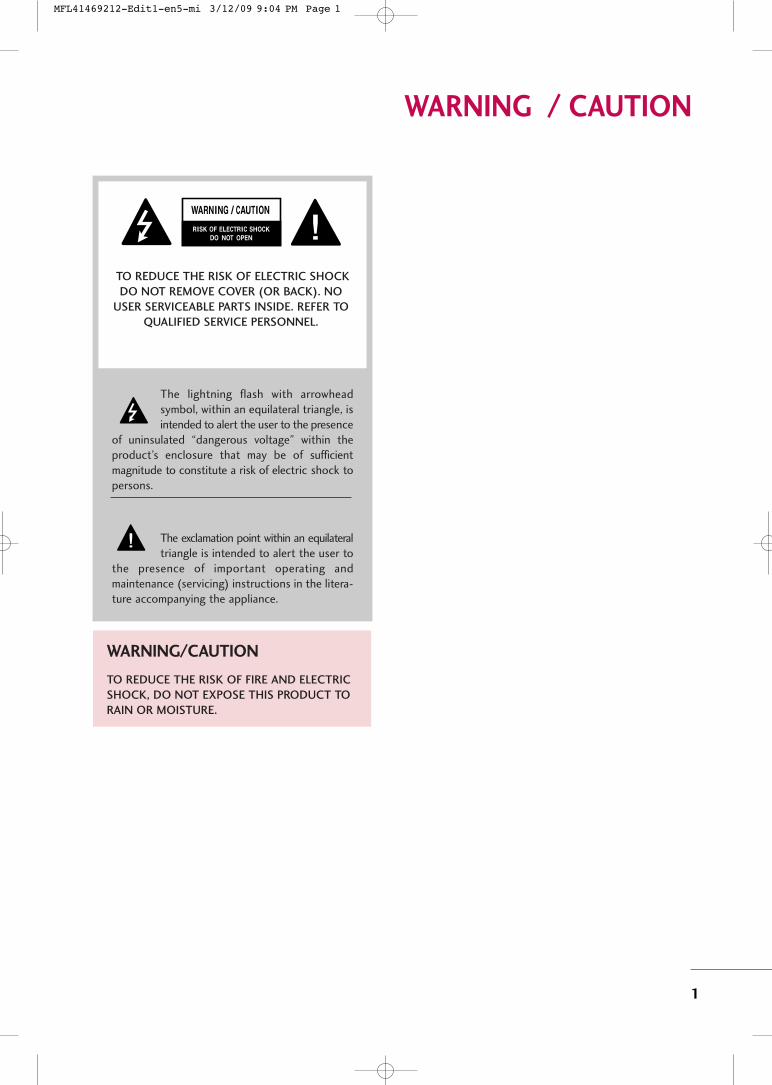
WARNING / CAUTION
The lightning flash with arrowheadsymbol, within an equilateral triangle, isintended to alert the user to the presence
of uninsulated “dangerous voltage” within theproduct’s enclosure that may be of sufficientmagnitude to constitute a risk of electric shock topersons.
The exclamation point within an equilateraltriangle is intended to alert the user to
the presence of important operating andmaintenance (servicing) instructions in the litera-ture accompanying the appliance.
TO REDUCE THE RISK OF ELECTRIC SHOCK
DO NOT REMOVE COVER (OR BACK). NO
USER SERVICEABLE PARTS INSIDE. REFER TO
QUALIFIED SERVICE PERSONNEL.
WARNING/CAUTION
TO REDUCE THE RISK OF FIRE AND ELECTRIC
SHOCK, DO NOT EXPOSE THIS PRODUCT TO
RAIN OR MOISTURE.
MFL41469212-Edit1-en5-mi 3/12/09 9:04 PM Page 1
2
IMPORTANT SAFETY INSTRUCTIONS
SAFETY INSTRUCTIONS
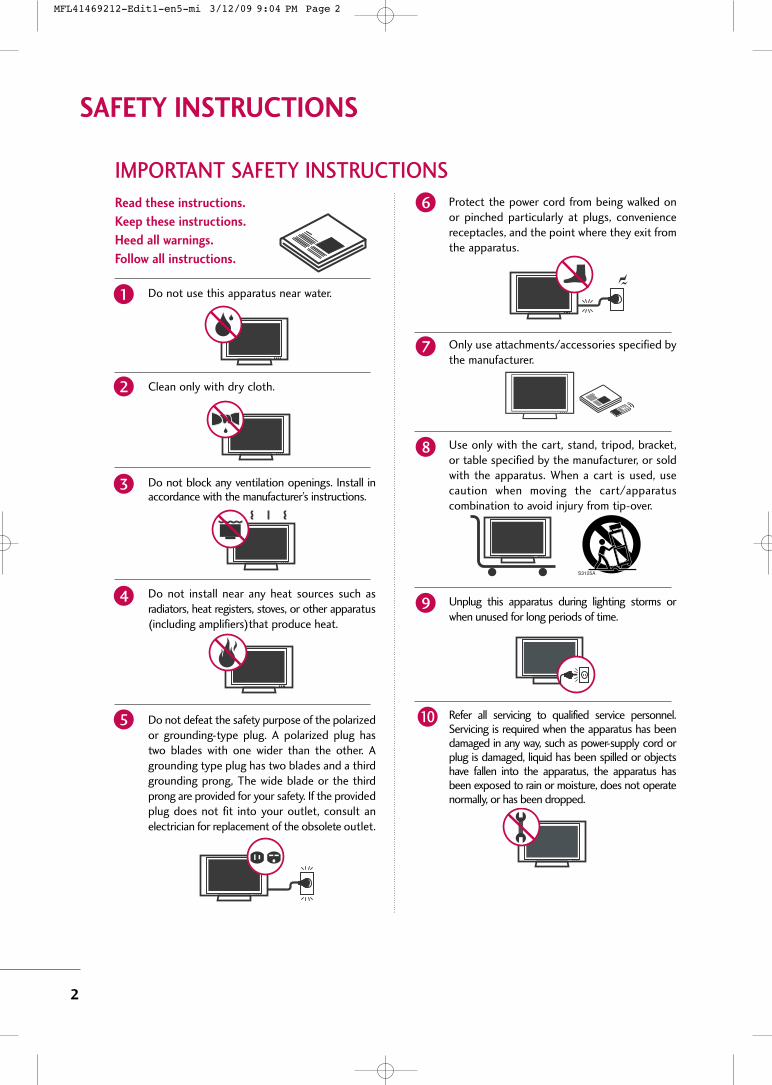
Read these instructions.
Keep these instructions.
Heed all warnings.
Follow all instructions.
Do not use this apparatus near water.
Clean only with dry cloth.
Do not block any ventilation openings. Install inaccordance with the manufacturer’s instructions.
Do not install near any heat sources such asradiators, heat registers, stoves, or other apparatus(including amplifiers)that produce heat.
Do not defeat the safety purpose of the polarizedor grounding-type plug. A polarized plug hastwo blades with one wider than the other. Agrounding type plug has two blades and a thirdgrounding prong, The wide blade or the thirdprong are provided for your safety. If the providedplug does not fit into your outlet, consult anelectrician for replacement of the obsolete outlet.
Protect the power cord from being walked onor pinched particularly at plugs, conveniencereceptacles, and the point where they exit fromthe apparatus.
Only use attachments/accessories specified bythe manufacturer.
Use only with the cart, stand, tripod, bracket,or table specified by the manufacturer, or soldwith the apparatus. When a cart is used, usecaution when moving the cart/apparatuscombination to avoid injury from tip-over.
Unplug this apparatus during lighting storms orwhen unused for long periods of time.
Refer all servicing to qualified service personnel.Servicing is required when the apparatus has beendamaged in any way, such as power-supply cord orplug is damaged, liquid has been spilled or objectshave fallen into the apparatus, the apparatus hasbeen exposed to rain or moisture, does not operatenormally, or has been dropped.
1
2
3
4
5
7
8
6
9
10
MFL41469212-Edit1-en5-mi 3/12/09 9:04 PM Page 2

3
Never touch this apparatus or antenna during athunder or lighting storm.
When mounting a TV on the wall, make sure not toinstall the TV by the hanging power and signalcables on the back of the TV.
Do not allow an impact shock or any objects to fallinto the product, and do not drop onto the screenwith something.
CAUTION concerning the Power Cord :It is recommend that appliances be placed upon adedicated circuit; that is, a single outlet circuit whichpowers only that appliance and has no additionaloutlets or branch circuits. Check the specificationpage of this owner's manual to be certain.Do not connect too many appliances to the sameAC power outlet as this could result in fire or elec-tric shock.Do not overload wall outlets. Overloaded wall out-lets, loose or damaged wall outlets, extension cords,frayed power cords, or damaged or cracked wireinsulation are dangerous. Any of these conditionscould result in electric shock or fire. Periodicallyexamine the cord of your appliance, and if itsappearance indicates damage or deterioration,unplug it, discontinue use of the appliance, andhave the cord replaced with an exact replacementpart by an authorized servicer. Protect the powercord from physical or mechanical abuse, such asbeing twisted, kinked, pinched, closed in a door, orwalked upon. Pay particular attention to plugs, walloutlets, and the point where the cord exits theappliance. Do not make the TV with the power cord pluggedin. Do not use a damaged or loose power cord. Besure do grasp the plug when unplugging the powercord. Do not pull on the power cord to unplug theTV.
WARNING - To reduce the risk of fire or electricalshock, do not expose this product to rain, moistureor other liquids. Do not touch the TV with wethands. Do not install this product near flammableobjects such as gasoline or candles or expose theTV to direct air conditioning.
Do not expose to dripping or splashing and do notplace objects filled with liquids, such as vases, cups,etc. on or over the apparatus (e.g. on shelves abovethe unit).
GGRROOUUNNDDIINNGG
Ensure that you connect the earth ground wire toprevent possible electric shock. (i.e. a TV with athree-prong grounded AC plug must be connectedto a three-prong grouned AC outlet) If groundingmethods are not possible, have a qualified electri-cian install a separate circuit breaker.
Do not try to ground the unit by connecting it totelephone wires, lightening rods, or gas pipes.
DDIISSCCOONNNNEECCTTIINNGG DDEEVVIICCEE FFRROOMM MMAAIINNSS
Mains plug is the disconnecting device. The plugmust remain readily operable.
Keep the product away from direct sunlight.
12
11
14
13
16
17
18
19
Power Supply
Short-circuitBreaker
15
MFL41469212-Edit1-en5-mi 3/12/09 9:04 PM Page 3
4
Cleaning
When cleaning, unplug the power cord and scrubgently with a soft cloth to prevent scratching. Do notspray water or other liquids directly on the TV aselectric shock may occur. Do not clean with chemi-cals such as alcohol, thinners or benzene.
Moving
Make sure the product is turned off, unpluggedand all cables have been removed. It may take 2 ormore people to carry larger TVs. Do not pressagainst or put stress on the front panel of the TV.
Ventilation
Install your TV where there is proper ventilation. Donot install in a confined space such as a bookcase.Do not cover the product with cloth or other mate-rials (e.g.) plastic while plugged in. Do not install inexcessively dusty places.
If you smell smoke or other odors coming from theTV or hear strange sounds, unplug the power cordcontact an authorized service center.
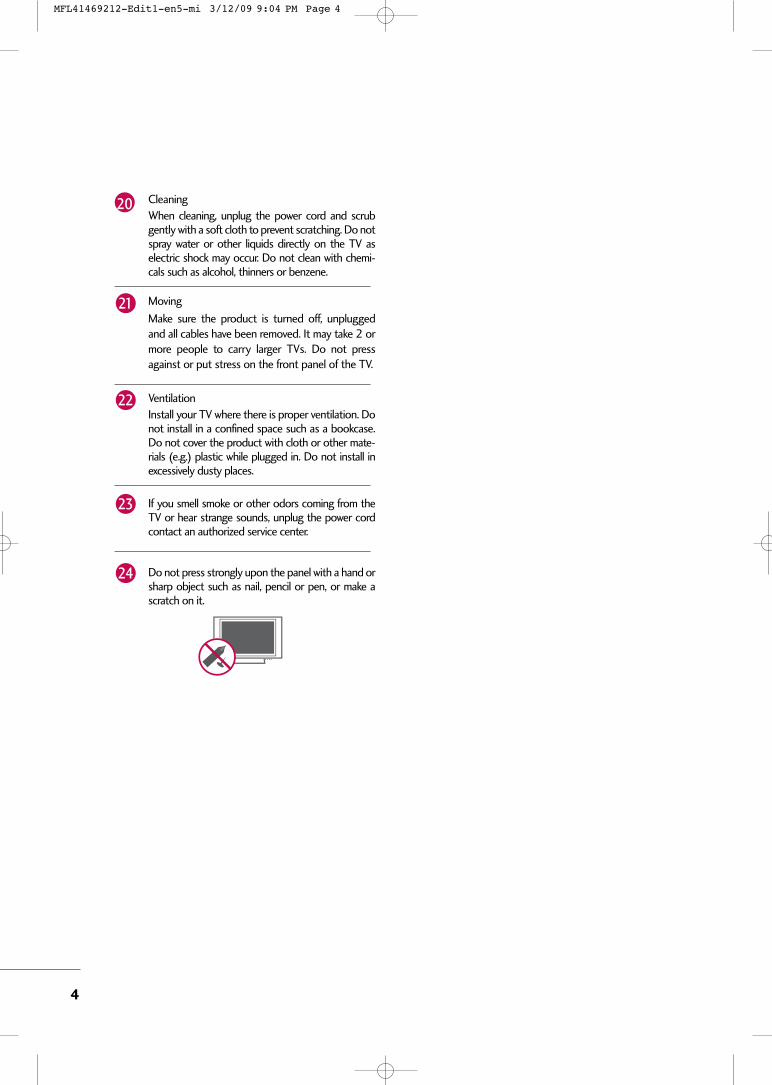
Do not press strongly upon the panel with a hand orsharp object such as nail, pencil or pen, or make ascratch on it.
22
20
23
21
24
MFL41469212-Edit1-en5-mi 3/12/09 9:04 PM Page 4

5
CONTENTS
WARNING / CAUTION . . . . . . . . . . . . . . . . . . . . . . . . . . . . 1
SAFETY INSTRUCTIONS . . . . . . . . . . . . . . . . . . . . . . . . . . 2
PREPARATION
Accessories . . . . . . . . . . . . . . . . . . . . . . . . . . . . . . . . . . . . . . . . . . . . . . . . . . . . . . 7
Front Panel Information . . . . . . . . . . . . . . . . . . . . . . . . . . . . . . . . . . . . . 8
Back Panel Information . . . . . . . . . . . . . . . . . . . . . . . . . . . . . . . . . . . . 10
Stand Installation . . . . . . . . . . . . . . . . . . . . . . . . . . . . . . . . . . . . . . . . . . . . 12
Cable Management . . . . . . . . . . . . . . . . . . . . . . . . . . . . . . . . . . . . . . . . . 14
Desktop Pedestal Installation . . . . . . . . . . . . . . . . . . . . . . . . . . . . 15
Wall Mount (Horizontal Installation) . . . . . . . . . . . . . . . . . 15
Attaching the tv to a desk . . . . . . . . . . . . . . . . . . . . . . . . . . . . . . . . 15
Protection Cover . . . . . . . . . . . . . . . . . . . . . . . . . . . . . . . . . . . . . . . . . . . . . 16
Positioning your Display . . . . . . . . . . . . . . . . . . . . . . . . . . . . . . . . . . . 18
Kensington Security System . . . . . . . . . . . . . . . . . . . . . . . . . . . . . 18
Swivel Stand . . . . . . . . . . . . . . . . . . . . . . . . . . . . . . . . . . . . . . . . . . . . . . . . . . . . 18
Antenna or Cable Connection . . . . . . . . . . . . . . . . . . . . . . . . . . 19
EXTERNAL EQUIPMENT SETUP
HD Receiver Setup . . . . . . . . . . . . . . . . . . . . . . . . . . . . . . . . . . . . . . . . . 20
Headphone Setup . . . . . . . . . . . . . . . . . . . . . . . . . . . . . . . . . . . . . . . . . . . 22
DVD Setup . . . . . . . . . . . . . . . . . . . . . . . . . . . . . . . . . . . . . . . . . . . . . . . . . . . . . 23
VCR Setup . . . . . . . . . . . . . . . . . . . . . . . . . . . . . . . . . . . . . . . . . . . . . . . . . . . . . 25
PC Setup . . . . . . . . . . . . . . . . . . . . . . . . . . . . . . . . . . . . . . . . . . . . . . . . . . . . . . . .27
External Stereo Setup . . . . . . . . . . . . . . . . . . . . . . . . . . . . . . . . . . . . . .29
AV Out Setup . . . . . . . . . . . . . . . . . . . . . . . . . . . . . . . . . . . . . . . . . . . . . . . . . .30
Screen Setup For PC Mode . . . . . . . . . . . . . . . . . . . . . . . . . . . . . . .31
WATCHING TV / CHANNEL CONTROL
Remote Control Functions . . . . . . . . . . . . . . . . . . . . . . . . . . . . . . . 34
Turning On TV . . . . . . . . . . . . . . . . . . . . . . . . . . . . . . . . . . . . . . . . . . . . . . . . 36
Channel Selection . . . . . . . . . . . . . . . . . . . . . . . . . . . . . . . . . . . . . . . . . . . 36
Volume Adjustment . . . . . . . . . . . . . . . . . . . . . . . . . . . . . . . . . . . . . . . . . 36
On-Screen Menus Selection . . . . . . . . . . . . . . . . . . . . . . . . . . . . . 37
Channel Search
- Auto Tuning (Program Search) . . . . . . . . . . . . . . . . . . . 38
- Manual Tuning (Additing/Deleting Channels) . .
. . . . . . . . . . . . . . . . . . . . . . . . . . . . . . . . . . . . . . . . . . . . . . . . . . . . . . . . . . . . . . . . . . . . . . 39
Fine Tuning Adjustment . . . . . . . . . . . . . . . . . . . . . . . . . . . . . . . . . . . 40
Booster . . . . . . . . . . . . . . . . . . . . . . . . . . . . . . . . . . . . . . . . . . . . . . . . . . . . . . . . . . 41
Favorite Channels Setup . . . . . . . . . . . . . . . . . . . . . . . . . . . . . . . . . . 42
Key Lock . . . . . . . . . . . . . . . . . . . . . . . . . . . . . . . . . . . . . . . . . . . . . . . . . . . . . . . . . 43
PICTURE CONTROL
Picture Size (Aspect Ratio) Control . . . . . . . . . . . . . . . . . . 44
Preset Picture Settings
- Picture Mode - Preset . . . . . . . . . . . . . . . . . . . . . . . . . . . . . . . 45
- Auto Color Tone Control . . . . . . . . . . . . . . . . . . . . . . . . . 46
Manual Picture Adjustment
- Picture Mode - User Mode . . . . . . . . . . . . . . . . . . . . . . . . 47
- Color Tone - User Mode . . . . . . . . . . . . . . . . . . . . . . . . . . . 48
XD - Picture Improvement Technology . . . . . . . . . . . . . 49
Advanced - Gamma . . . . . . . . . . . . . . . . . . . . . . . . . . . . . . . . . . . . . . . . . 50
Advanced - Film Mode . . . . . . . . . . . . . . . . . . . . . . . . . . . . . . . . . . . . . 51
Advanced - Black (Darkness) Level . . . . . . . . . . . . . . . . . . . 52
Advanced - Eye care . . . . . . . . . . . . . . . . . . . . . . . . . . . . . . . . . . . . . . . . 53
Picture Reset . . . . . . . . . . . . . . . . . . . . . . . . . . . . . . . . . . . . . . . . . . . . . . . . . 54
Power Indicator . . . . . . . . . . . . . . . . . . . . . . . . . . . . . . . . . . . . . . . . . . . . . . . 55
Factory Reset . . . . . . . . . . . . . . . . . . . . . . . . . . . . . . . . . . . . . . . . . . . . . . . . . 56
SOUND & LANGUAGE CONTROL
Auto Volume Leveler (Auto Volume) . . . . . . . . . . . . . . . . . 57
Preset Sound Settings (Sound Mode) . . . . . . . . . . . . . . 58
Sound Setting Adjustment - User Mode . . . . . . . . . . . 59
Balance . . . . . . . . . . . . . . . . . . . . . . . . . . . . . . . . . . . . . . . . . . . . . . . . . . . . . . . . . . 60
TV Speakers On/Off Setup . . . . . . . . . . . . . . . . . . . . . . . . . . . . . . 61
Selecting Audio Out . . . . . . . . . . . . . . . . . . . . . . . . . . . . . . . . . . . . . . . . 62
On-Screen Menus Language Selection . . . . . . . . . . . . . 63
Closed Captions . . . . . . . . . . . . . . . . . . . . . . . . . . . . . . . . . . . . . . . . . . . . . 64
Stereo/SAP Broadcasts Setup . . . . . . . . . . . . . . . . . . . . . . . . . . 65
TIME SETTING
Clock Setup . . . . . . . . . . . . . . . . . . . . . . . . . . . . . . . . . . . . . . . . . . . . . . . . . . . . 66
Auto On/Off Time Setting . . . . . . . . . . . . . . . . . . . . . . . . . . . . . . . 67
Sleep Timer Setting . . . . . . . . . . . . . . . . . . . . . . . . . . . . . . . . . . . . . . . . . 68
Auto Shut-Off Setting . . . . . . . . . . . . . . . . . . . . . . . . . . . . . . . . . . . . . . 69
APPENDIX
Troubleshooting . . . . . . . . . . . . . . . . . . . . . . . . . . . . . . . . . . . . . . . . . . . . . . 70
Maintenance . . . . . . . . . . . . . . . . . . . . . . . . . . . . . . . . . . . . . . . . . . . . . . . . . . . 72
Product Specifications . . . . . . . . . . . . . . . . . . . . . . . . . . . . . . . . . . . . . 73
External Control Through RS-232C . . . . . . . . . . . . . . . . . .74
MFL41469212-Edit1-en5-mi 3/12/09 9:04 PM Page 5
6
� If the TV feels cold to the touch, there may be a small “flicker” when it is turned on. This is normal, there is
nothing wrong with TV.� Some minute dot defects may be visible on the screen, appearing as tiny red, green, or blue spots. However, they
have no adverse effect on the monitor's performance.� Avoid touching the LCD screen or holding your finger(s) against it for long periods of time. Doing so may produce
some temporary distortion effects on the screen.
On Disposal
a. The fluorescent lamp used in this product contains a small amount of mercury.
b. Do not dispose of this product with general household waste.
c. Disposal of this product must be carried out in accordance to the regulations of your local authority.
MFL41469212-Edit1-en5-mi 3/12/09 9:04 PM Page 6
PR
EPA
RA
TIO
N
7
PREPARATION
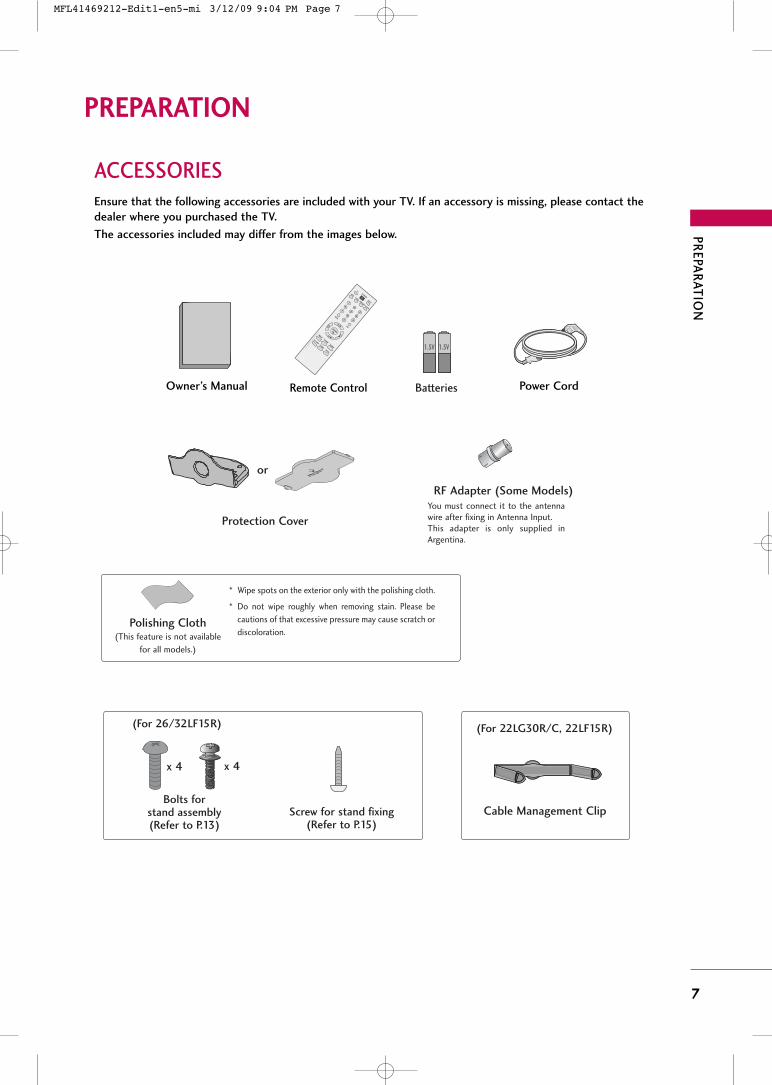
ACCESSORIESEnsure that the following accessories are included with your TV. If an accessory is missing, please contact the
dealer where you purchased the TV.
The accessories included may differ from the images below.
1.5V 1.5V
Owner’s Manual Power CordRemote Control
1
2
3
4
5
6
7
8
0 9
VOL
VOL
CH
CH
ENTER
Q.VIEW
SLEEPND
RATIO
FAV
MUTE
OGMEMORY/ERASE CAPTION
INPUT
1
2
3
4
5
6
7
8
0 9
VOL
VOL
CH
CH
ENTER
POWER
MENUQ.VIEW
SLEEP
RATIO
MTS
FAV
MUTE
A.PROG
CAPTION
TV
INPUTMEMORY/ERASE
SOUND
PICTURE
* Wipe spots on the exterior only with the polishing cloth.
* Do not wipe roughly when removing stain. Please be
cautions of that excessive pressure may cause scratch or
discoloration.Polishing Cloth
(This feature is not available
for all models.)
Cable Management Clip
Protection Cover
RF Adapter (Some Models)You must connect it to the antennawire after fixing in Antenna Input.This adapter is only supplied inArgentina.
Screw for stand fixing(Refer to P.15)
or
Bolts for stand assembly(Refer to P.13)
x 4 x 4
(For 26/32LF15R) (For 22LG30R/C, 22LF15R)
Batteries
MFL41469212-Edit1-en5-mi 3/12/09 9:04 PM Page 7
PR
EPA
RA
TIO
N
8
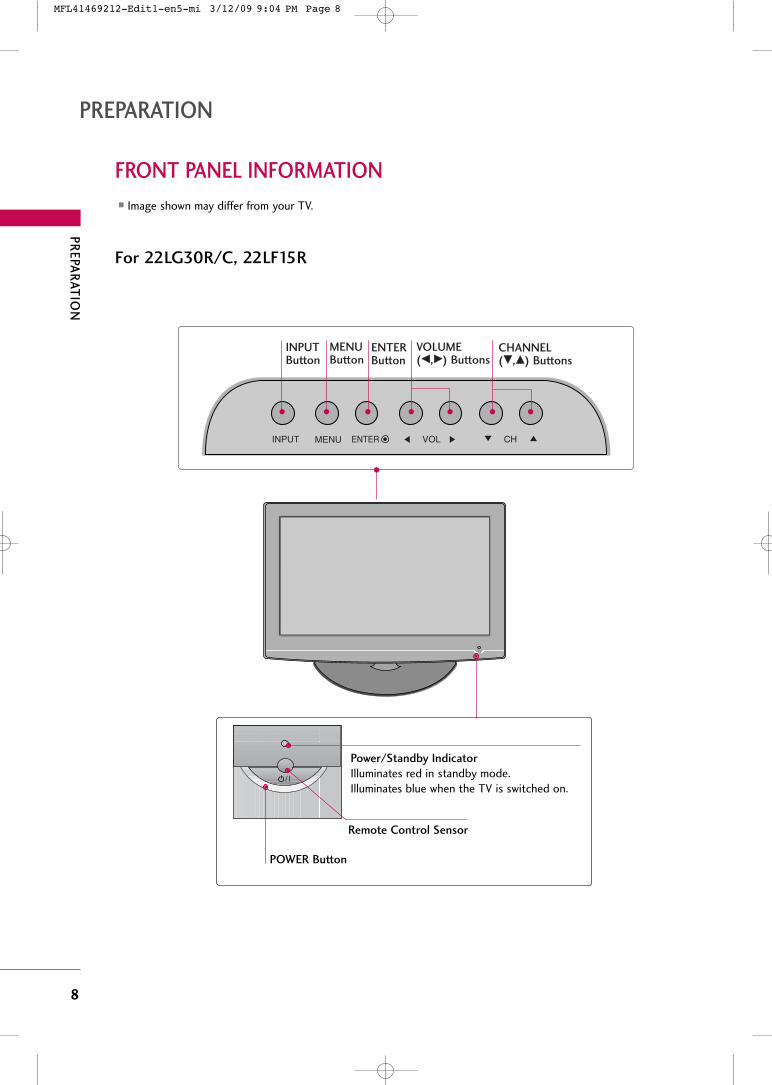
FRONT PANEL INFORMATION
PREPARATION
� Image shown may differ from your TV.
INPUT MENU VOL CHENTER
CHANNEL(EE,DD) Buttons
VOLUME(FF,GG) Buttons
MENUButton
ENTERButton
INPUTButton
POWER Button
Remote Control Sensor
Power/Standby Indicator
Illuminates red in standby mode.Illuminates blue when the TV is switched on.
For 22LG30R/C, 22LF15R
MFL41469212-Edit1-en5-mi 3/12/09 9:04 PM Page 8
PR
EPA
RA
TIO
N
9
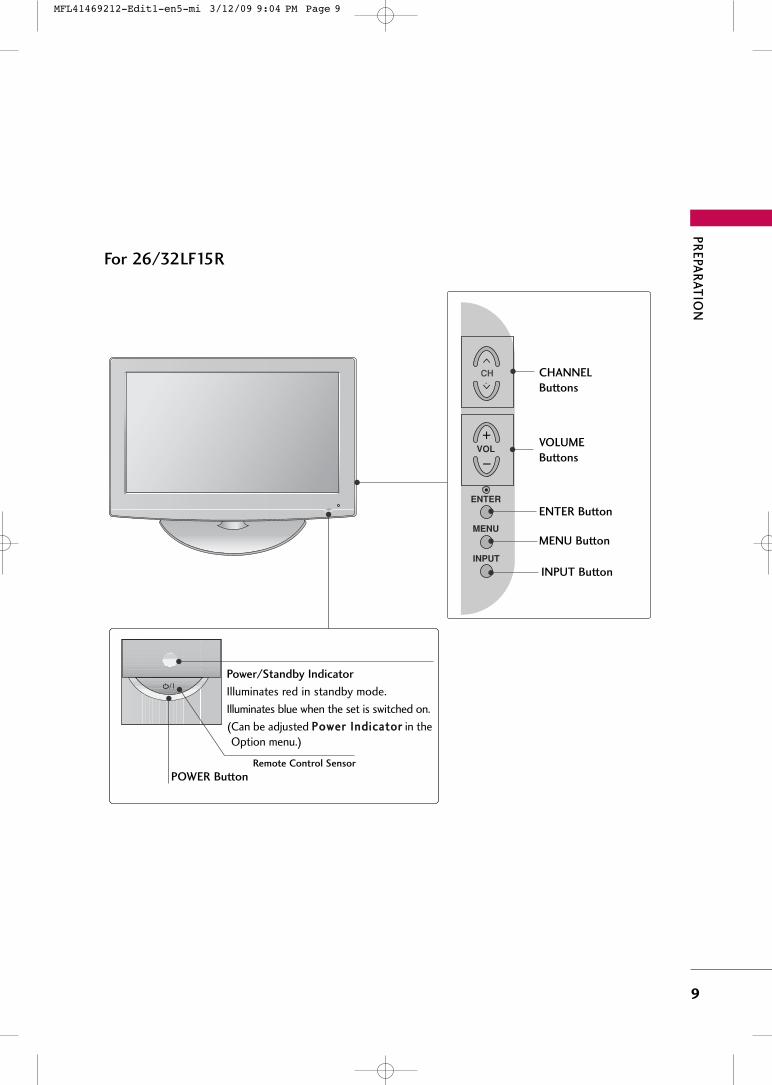
POWER Button
Power/Standby Indicator
Illuminates red in standby mode.
Illuminates blue when the set is switched on.
(Can be adjusted PPoowweerr IInnddiiccaattoorr in theOption menu.)
CH
VOL
MENU
INPUT
ENTER
CHANNEL
Buttons
VOLUME
Buttons
ENTER Button
MENU Button
INPUT Button
Remote Control Sensor
For 26/32LF15R
MFL41469212-Edit1-en5-mi 3/12/09 9:04 PM Page 9
PR
EPA
RA
TIO
N
10
PREPARATION
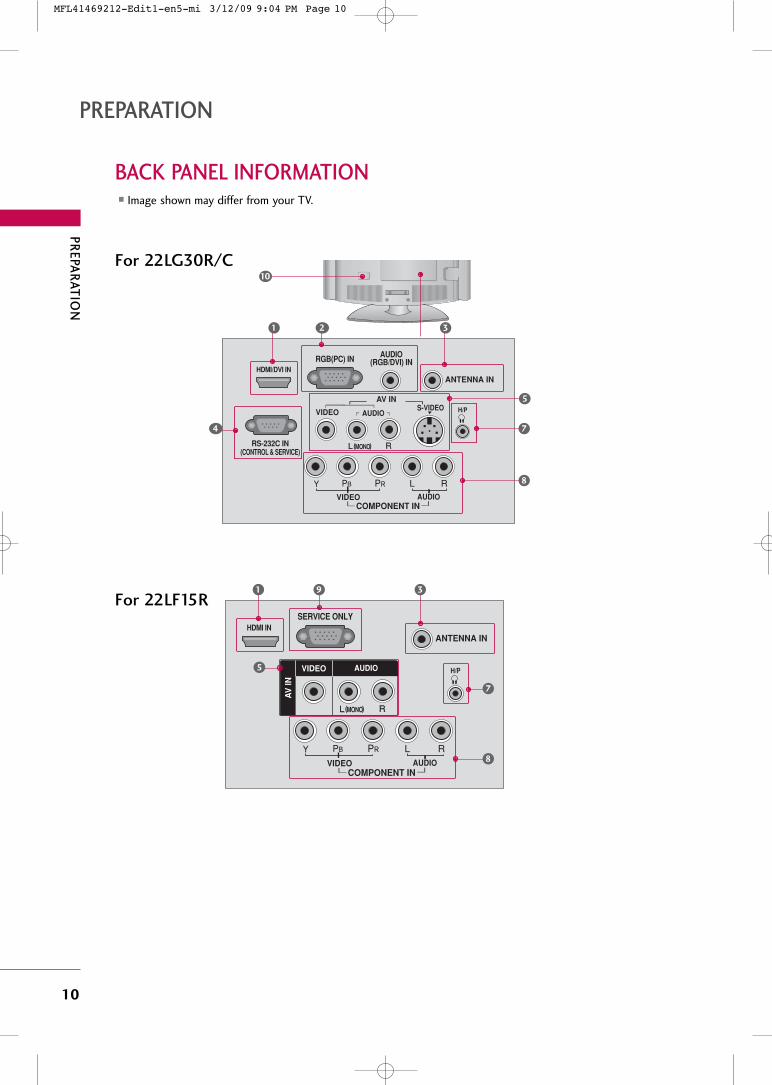
BACK PANEL INFORMATION� Image shown may differ from your TV.
( )
10
For 22LG30R/C
ANTENNA IN
SERVICE ONLY
AUDIOCOMPONENT IN
VIDEO
MONO( )
H/P
HDMI IN
( )
AV
IN
VIDEO AUDIO
1
7
8
3
For 22LF15R
5
ANTENNA IN
RGB(PC) IN
RS-232C IN(CONTROL & SERVICE)
AUDIO(RGB/DVI) IN
S-VIDEO
AUDIOCOMPONENT IN
VIDEO
VIDEO AUDIO
MONO( )
AV IN H/P
HDMI/DVI IN
1 2
4
8
7
3
5
9
MFL41469212-Edit1-en5-mi 3/12/09 9:04 PM Page 10
PR
EPA
RA
TIO
N
11
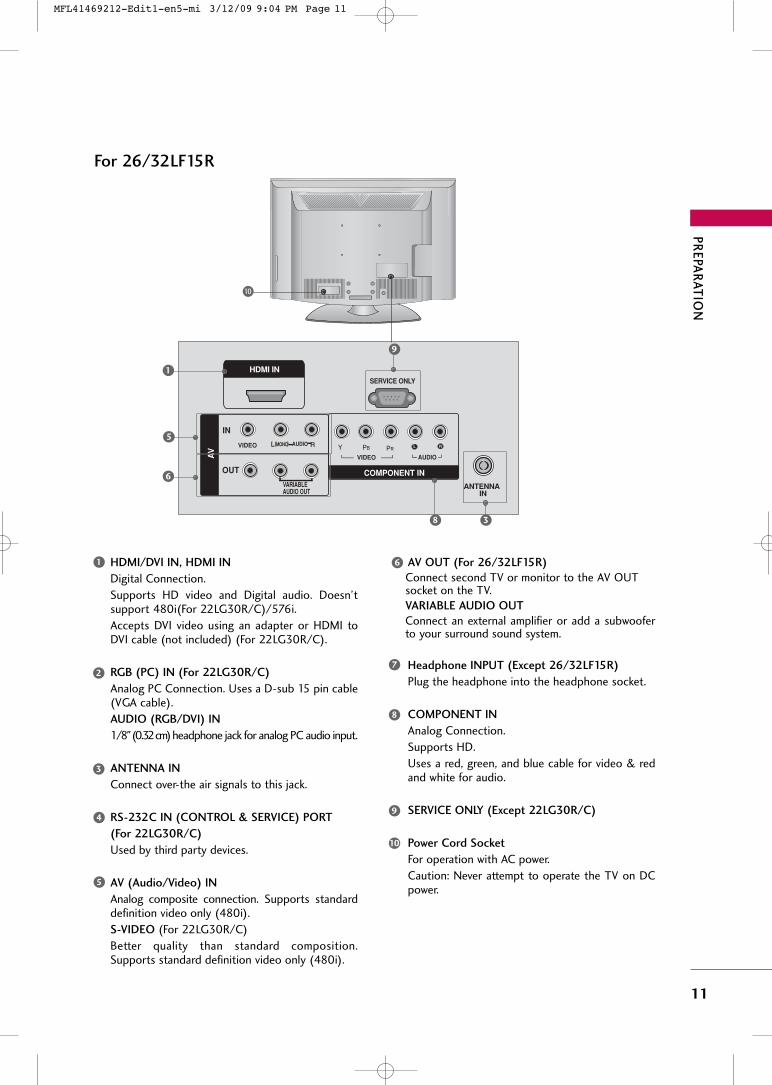
10
COMPONENT IN
SERVICE ONLY
VIDEO AUDIO
VIDEO MONO( ) AUDIO
ANTENNA IN
HDMI IN
IN
OUT
AV
VARIABLE AUDIO OUT
1
3
For 26/32LF15R
HDMI/DVI IN, HDMI IN
Digital Connection.
Supports HD video and Digital audio. Doesn’tsupport 480i(For 22LG30R/C)/576i.
Accepts DVI video using an adapter or HDMI toDVI cable (not included) (For 22LG30R/C).
RGB (PC) IN (For 22LG30R/C)
Analog PC Connection. Uses a D-sub 15 pin cable(VGA cable).
AUDIO (RGB/DVI) IN
1/8" (0.32 cm)headphone jack for analog PC audio input.
ANTENNA IN
Connect over-the air signals to this jack.
RS-232C IN (CONTROL & SERVICE) PORT
(For 22LG30R/C)
Used by third party devices.
AV (Audio/Video) IN
Analog composite connection. Supports standarddefinition video only (480i).
S-VIDEO (For 22LG30R/C)
Better quality than standard composition.Supports standard definition video only (480i).
AV OUT (For 26/32LF15R)
Connect second TV or monitor to the AV OUT socket on the TV.VARIABLE AUDIO OUT
Connect an external amplifier or add a subwooferto your surround sound system.
Headphone INPUT (Except 26/32LF15R)
Plug the headphone into the headphone socket.
COMPONENT IN
Analog Connection.
Supports HD.
Uses a red, green, and blue cable for video & redand white for audio.
SERVICE ONLY (Except 22LG30R/C)
Power Cord Socket
For operation with AC power.
Caution: Never attempt to operate the TV on DCpower.
1
2
3
4
5
6
7
6
5
8
9
8
9
10
MFL41469212-Edit1-en5-mi 3/12/09 9:04 PM Page 11
PR
EPA
RA
TIO
N
12
PREPARATION
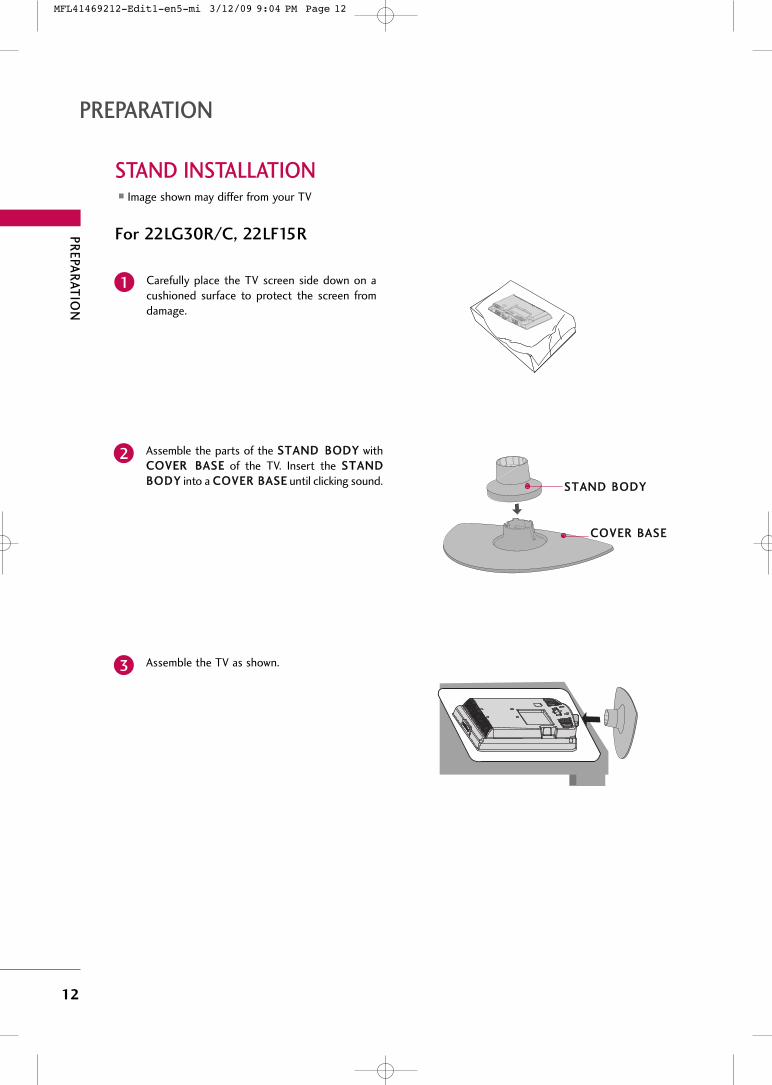
STAND INSTALLATION� Image shown may differ from your TV
Assemble the parts of the SSTTAANNDD BBOODDYY withCCOOVVEERR BBAASSEE of the TV. Insert the SSTTAANNDDBBOODDYY into a CCOOVVEERR BBAASSEE until clicking sound.
2
Assemble the TV as shown.3
SSTTAANNDD BBOODDYY
CCOOVVEERR BBAASSEE
Carefully place the TV screen side down on acushioned surface to protect the screen fromdamage.
1
For 22LG30R/C, 22LF15R
MFL41469212-Edit1-en5-mi 3/12/09 9:04 PM Page 12
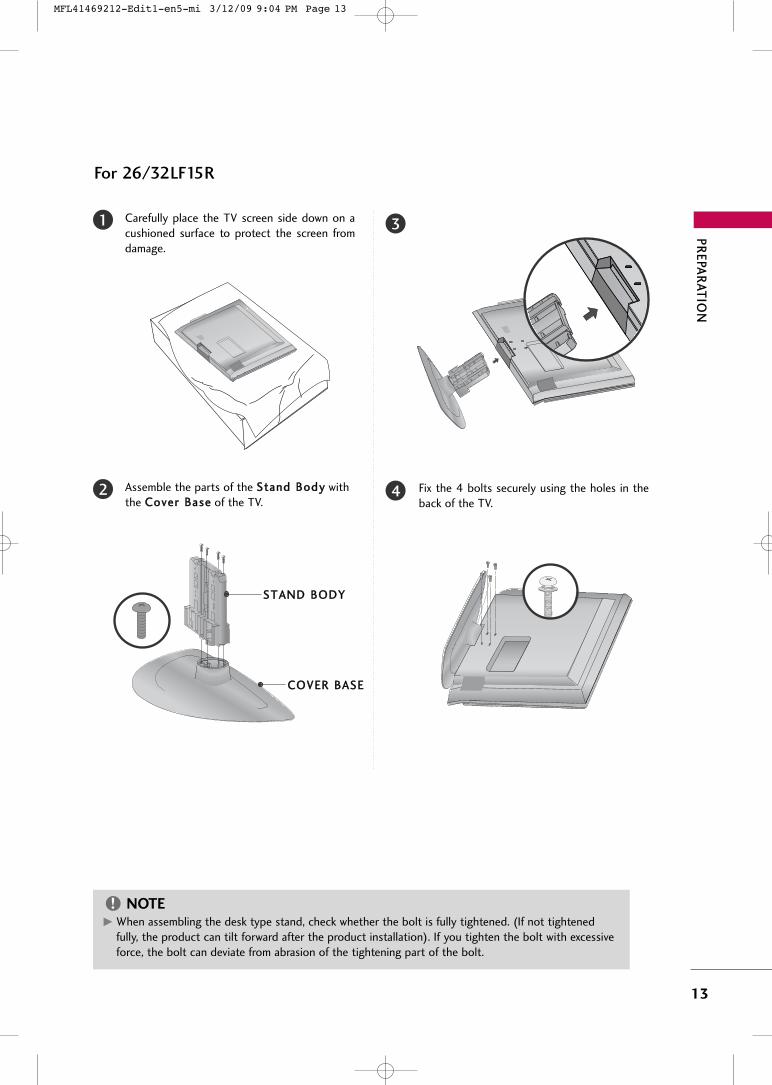
13
Carefully place the TV screen side down on acushioned surface to protect the screen fromdamage.
Assemble the parts of the SSttaanndd BBooddyy withthe CCoovveerr BBaassee of the TV.
1
2
3
Fix the 4 bolts securely using the holes in theback of the TV.
4
SSTTAANNDD BBOODDYY
CCOOVVEERR BBAASSEE
GG When assembling the desk type stand, check whether the bolt is fully tightened. (If not tightenedfully, the product can tilt forward after the product installation). If you tighten the bolt with excessiveforce, the bolt can deviate from abrasion of the tightening part of the bolt.
NOTE!
For 26/32LF15R
PR
EPA
RA
TIO
N
MFL41469212-Edit1-en5-mi 3/12/09 9:04 PM Page 13
PR
EPA
RA
TIO
N
14
PREPARATION
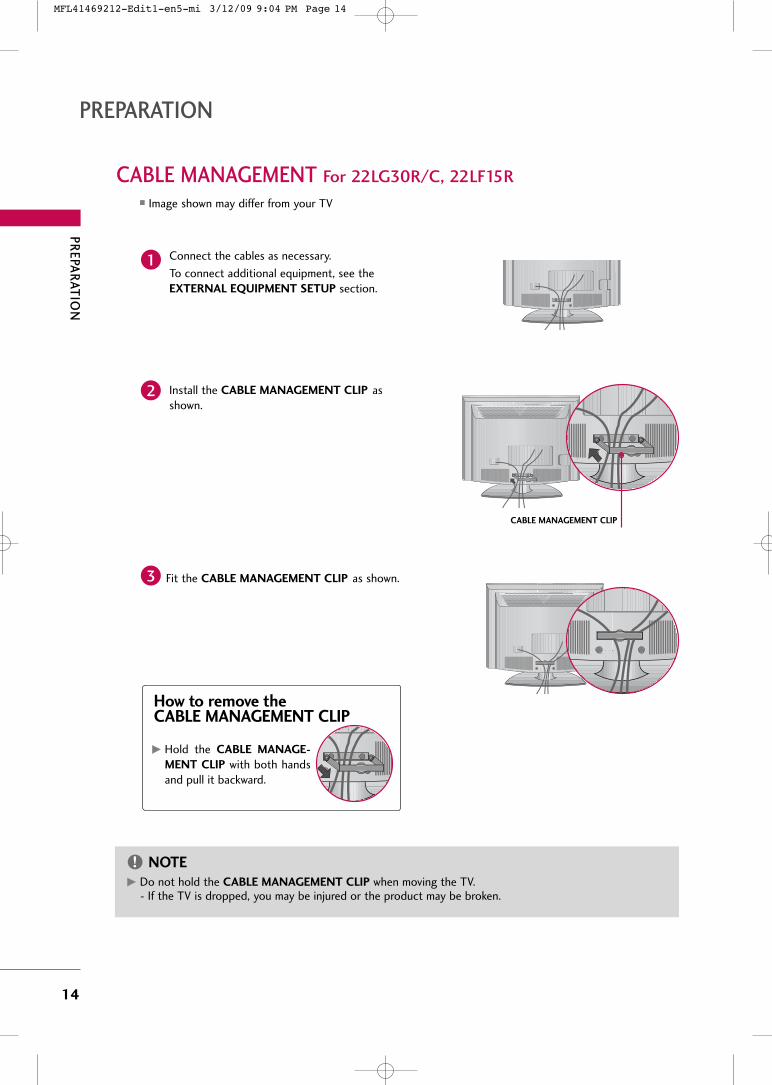
� Image shown may differ from your TV
Connect the cables as necessary.
To connect additional equipment, see theEXTERNAL EQUIPMENT SETUP section.
Install the CABLE MANAGEMENT CLIP asshown.
1
2
3
GG Do not hold the CABLE MANAGEMENT CLIP when moving the TV.- If the TV is dropped, you may be injured or the product may be broken.
NOTE!
How to remove the CABLE MANAGEMENT CLIP
GG Hold the CABLE MANAGE-
MENT CLIP with both handsand pull it backward.
CABLE MANAGEMENT For 22LG30R/C, 22LF15R
Fit the CABLE MANAGEMENT CLIP as shown.
CABLE MANAGEMENT CLIP
MFL41469212-Edit1-en5-mi 3/12/09 9:04 PM Page 14
PR
EPA
RA
TIO
N
15
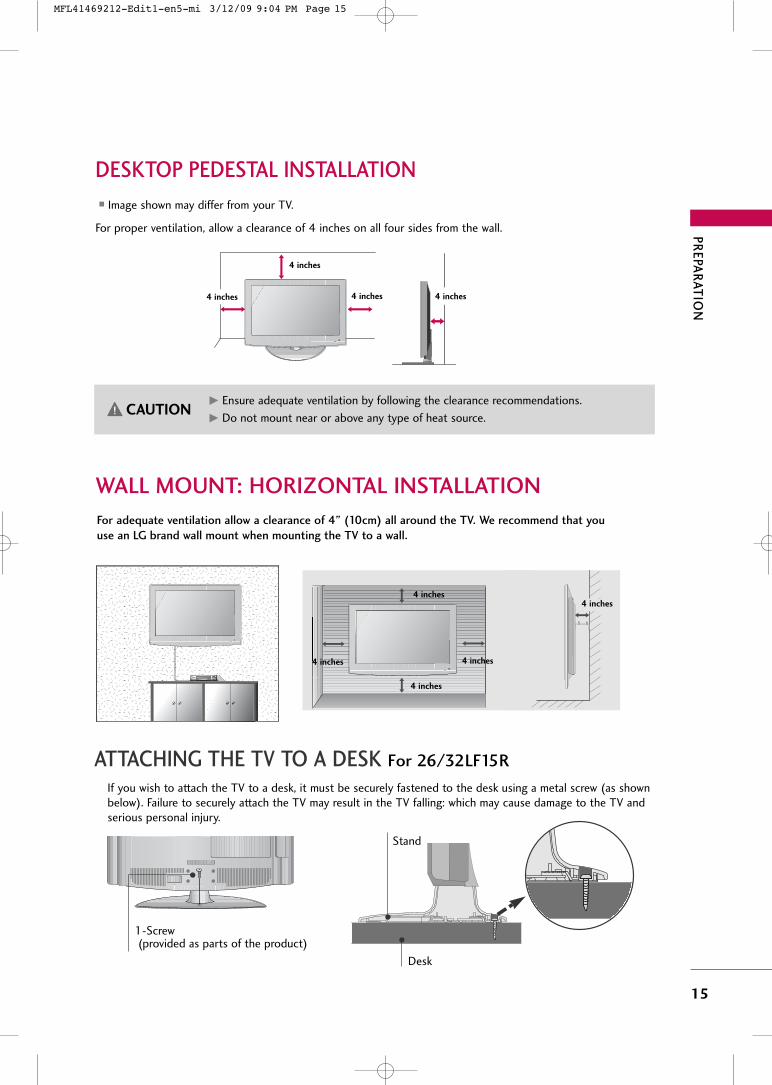
DESKTOP PEDESTAL INSTALLATION
GG Ensure adequate ventilation by following the clearance recommendations.
GG Do not mount near or above any type of heat source.CAUTION
4 inches
4 inches
4 inches 4 inches
For proper ventilation, allow a clearance of 4 inches on all four sides from the wall.
� Image shown may differ from your TV.
WALL MOUNT: HORIZONTAL INSTALLATION
For adequate ventilation allow a clearance of 4” (10cm) all around the TV. We recommend that you
use an LG brand wall mount when mounting the TV to a wall.
4 inches
4 inches4 inches
4 inches
4 inches
ATTACHING THE TV TO A DESK For 26/32LF15R
If you wish to attach the TV to a desk, it must be securely fastened to the desk using a metal screw (as shownbelow). Failure to securely attach the TV may result in the TV falling: which may cause damage to the TV andserious personal injury.
1-Screw(provided as parts of the product)
Desk
Stand
MFL41469212-Edit1-en5-mi 3/12/09 9:04 PM Page 15
PR
EPA
RA
TIO
N
16
PREPARATION
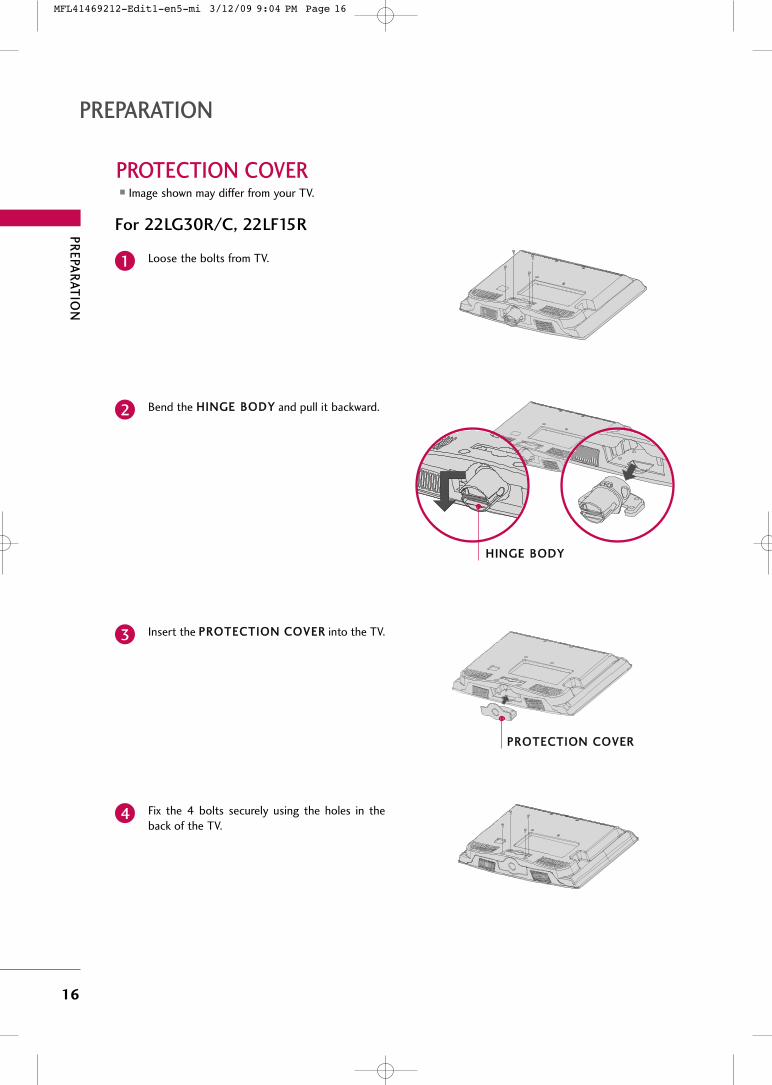
PROTECTION COVER � Image shown may differ from your TV.
HHIINNGGEE BBOODDYY
Loose the bolts from TV.1
Insert the PPRROOTTEECCTTIIOONN CCOOVVEERR into the TV.3
PPRROOTTEECCTTIIOONN CCOOVVEERR
Bend the HHIINNGGEE BBOODDYY and pull it backward.2
Fix the 4 bolts securely using the holes in theback of the TV.
4
For 22LG30R/C, 22LF15R
MFL41469212-Edit1-en5-mi 3/12/09 9:04 PM Page 16
PR
EPA
RA
TIO
N
17
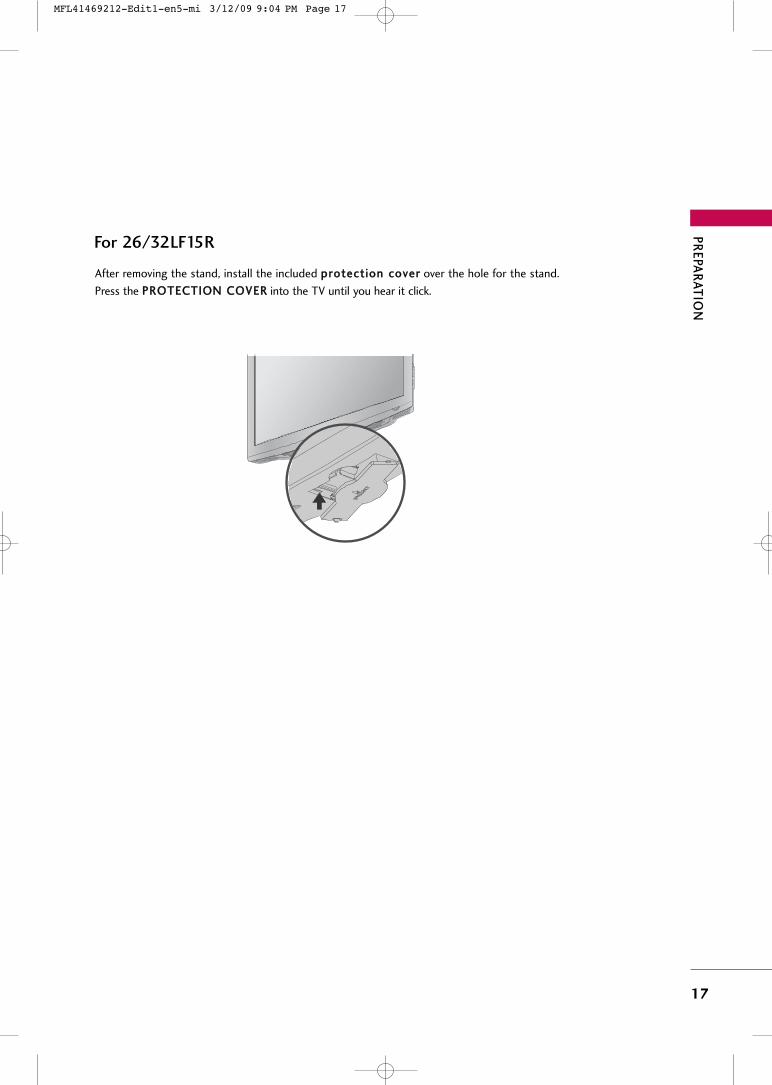
After removing the stand, install the included pprrootteeccttiioonn ccoovveerr over the hole for the stand.
Press the PPRROOTTEECCTTIIOONN CCOOVVEERR into the TV until you hear it click.
For 26/32LF15R
MFL41469212-Edit1-en5-mi 3/12/09 9:04 PM Page 17
PR
EPA
RA
TIO
N
18
PREPARATION
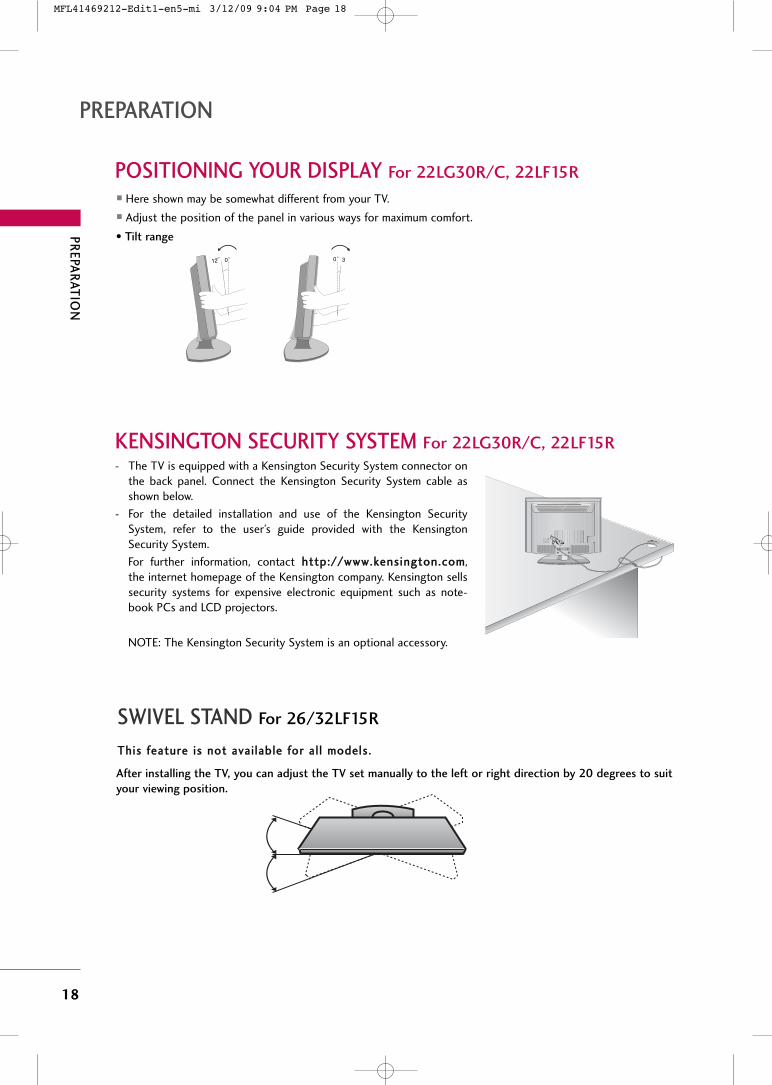
POSITIONING YOUR DISPLAY For 22LG30R/C, 22LF15R
� Here shown may be somewhat different from your TV.
� Adjust the position of the panel in various ways for maximum comfort.
• Tilt range
12 0 30
KENSINGTON SECURITY SYSTEM For 22LG30R/C, 22LF15R- The TV is equipped with a Kensington Security System connector on
the back panel. Connect the Kensington Security System cable asshown below.
- For the detailed installation and use of the Kensington SecuritySystem, refer to the user’s guide provided with the KensingtonSecurity System.
For further information, contact hhttttpp::////wwwwww..kkeennssiinnggttoonn..ccoomm,the internet homepage of the Kensington company. Kensington sellssecurity systems for expensive electronic equipment such as note-book PCs and LCD projectors.
NOTE: The Kensington Security System is an optional accessory.
SWIVEL STAND For 26/32LF15R
TThhiiss ffeeaattuurree iiss nnoott aavvaaii llaabbllee ffoorr aall ll mmooddeellss..
After installing the TV, you can adjust the TV set manually to the left or right direction by 20 degrees to suit
your viewing position.
MFL41469212-Edit1-en5-mi 3/12/09 9:04 PM Page 18
PR
EPA
RA
TIO
N
19
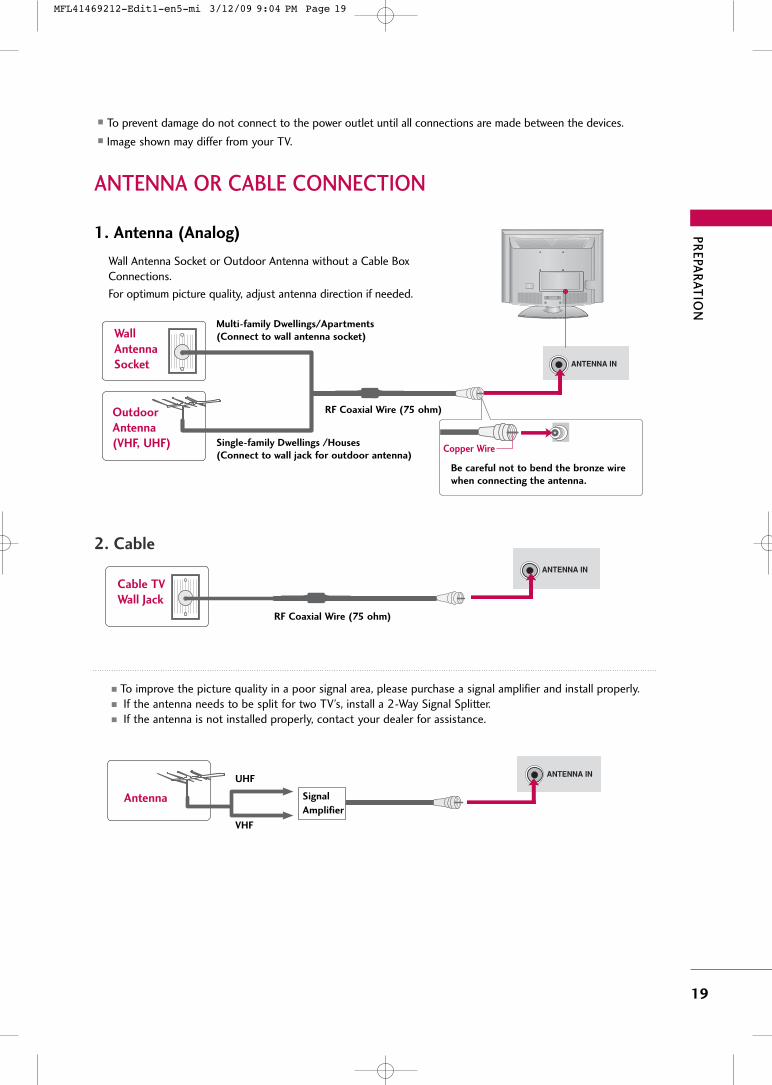
ANTENNA OR CABLE CONNECTION
� To prevent damage do not connect to the power outlet until all connections are made between the devices.
� Image shown may differ from your TV.
1. Antenna (Analog)
Wall Antenna Socket or Outdoor Antenna without a Cable BoxConnections.
For optimum picture quality, adjust antenna direction if needed.
2. Cable
WallAntennaSocket
OutdoorAntenna(VHF, UHF)
Cable TVWall Jack
Multi-family Dwellings/Apartments(Connect to wall antenna socket)
RF Coaxial Wire (75 ohm)
RF Coaxial Wire (75 ohm)
Single-family Dwellings /Houses(Connect to wall jack for outdoor antenna)
Be careful not to bend the bronze wirewhen connecting the antenna.
Copper Wire
� To improve the picture quality in a poor signal area, please purchase a signal amplifier and install properly. � If the antenna needs to be split for two TV’s, install a 2-Way Signal Splitter.� If the antenna is not installed properly, contact your dealer for assistance.
Antenna
UHF
Signal
Amplifier
VHF
ANTENNA IN
( )
ANTENNA IN
( )
ANTENNA IN
( )
( )
MFL41469212-Edit1-en5-mi 3/12/09 9:04 PM Page 19
EX
TE
RN
AL E
QU
IPM
EN
T S
ET
UP
20
EXTERNAL EQUIPMENT SETUP
HD RECEIVER SETUP
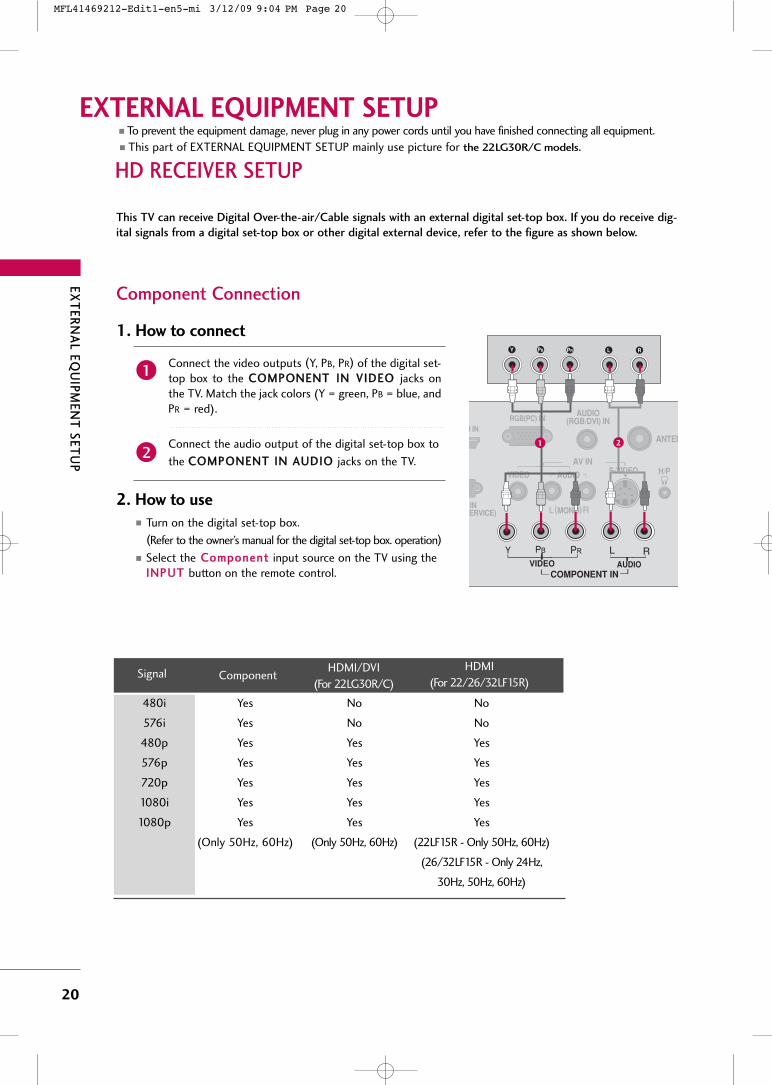
� To prevent the equipment damage, never plug in any power cords until you have finished connecting all equipment.
� This part of EXTERNAL EQUIPMENT SETUP mainly use picture for the 22LG30R/C models.
This TV can receive Digital Over-the-air/Cable signals with an external digital set-top box. If you do receive dig-
ital signals from a digital set-top box or other digital external device, refer to the figure as shown below.
Component Connection
1. How to connect
Connect the video outputs (Y, PB, PR) of the digital set-top box to the CCOOMMPPOONNEENNTT IINN VVIIDDEEOO jacks onthe TV. Match the jack colors (Y = green, PB = blue, andPR = red).
Connect the audio output of the digital set-top box to
the CCOOMMPPOONNEENNTT IINN AAUUDDIIOO jacks on the TV.2
1
2. How to use� Turn on the digital set-top box.
(Refer to the owner’s manual for the digital set-top box. operation)
� Select the CCoommppoonneenntt input source on the TV using theIINNPPUUTT button on the remote control.
Y PB PR L R
ANTEN
RGB(PC) IN
INERVICE)
AUDIO(RGB/DVI) IN
AUDIOCOMPONENT IN
VIDEO
VIDEO AUDIO
MONO( )
AV IN H/PS-VIDEO
I IN
1 2
Signal
480i
576i
480p
576p
720p
1080i
1080p
Component
Yes
Yes
Yes
Yes
Yes
Yes
Yes
(Only 50Hz, 60Hz)
HDMI/DVI
(For 22LG30R/C)
No
No
Yes
Yes
Yes
Yes
Yes
(Only 50Hz, 60Hz)
No
No
Yes
Yes
Yes
Yes
Yes
(22LF15R - Only 50Hz, 60Hz)
(26/32LF15R - Only 24Hz,
30Hz, 50Hz, 60Hz)
HDMI
(For 22/26/32LF15R)
MFL41469212-Edit1-en5-mi 3/12/09 9:04 PM Page 20
EX
TE
RN
AL E
QU
IPM
EN
T S
ET
UP
21
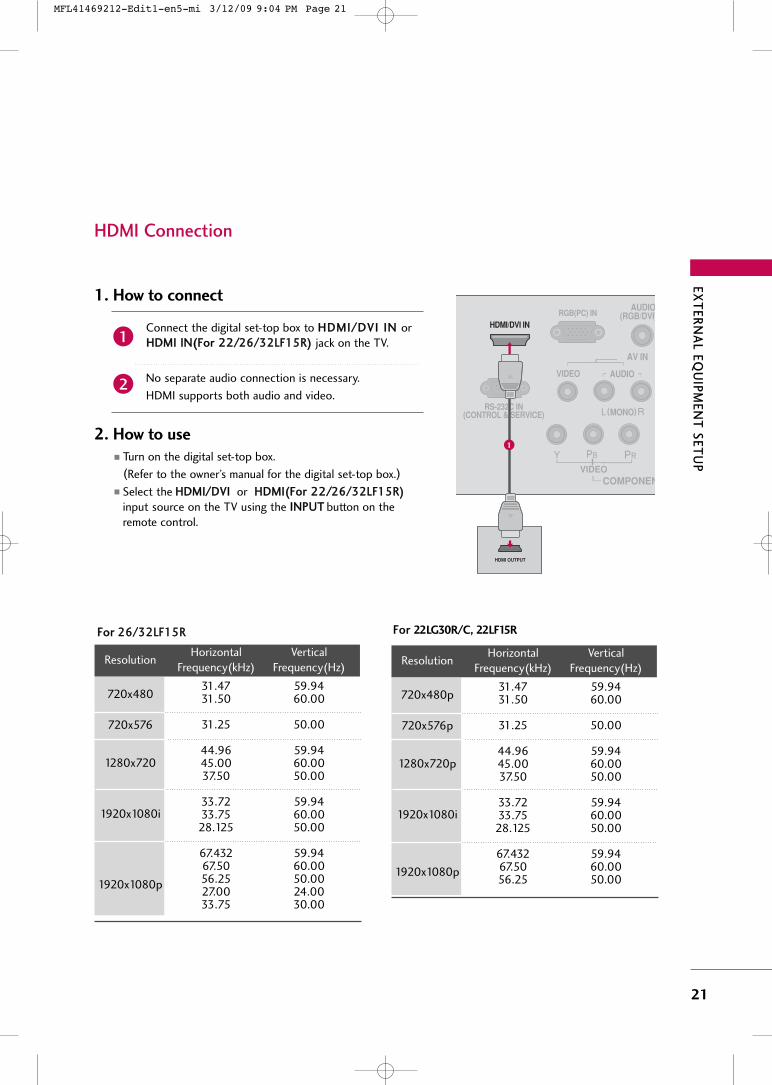
HDMI Connection
RGB(PC) IN
RS-232C IN(CONTROL & SERVICE)
AUDIO(RGB/DVI)
COMPONENVIDEO
VIDEO AUDIO
MONO( )
AV IN
HDMI/DVI IN
HDMI OUTPUT
Connect the digital set-top box to HHDDMMII//DDVVII IINN orHHDDMMII IINN((FFoorr 2222//2266//3322LLFF1155RR)) jack on the TV.
No separate audio connection is necessary.
HDMI supports both audio and video.
1. How to connect
2. How to use� Turn on the digital set-top box.
(Refer to the owner’s manual for the digital set-top box.)
� Select the HHDDMMII//DDVVII or HHDDMMII((FFoorr 2222//2266//3322LLFF1155RR))
input source on the TV using the IINNPPUUTT button on theremote control.
2
1
1
FFoorr 22LG30R/C, 22LF15R
Resolution
720x480p
720x576p
1280x720p
1920x1080i
1920x1080p
Horizontal Vertical Frequency(kHz) Frequency(Hz)
31.47 59.9431.50 60.00
31.25 50.00
44.96 59.9445.00 60.0037.50 50.00
33.72 59.9433.75 60.0028.125 50.00
67.432 59.9467.50 60.0056.25 50.00
FFoorr 2266//3322LLFF1155RR
Resolution
720x480
720x576
1280x720
1920x1080i
1920x1080p
Horizontal Vertical Frequency(kHz) Frequency(Hz)
31.47 59.9431.50 60.00
31.25 50.00
44.96 59.9445.00 60.0037.50 50.00
33.72 59.9433.75 60.0028.125 50.00
67.432 59.9467.50 60.0056.25 50.0027.00 24.0033.75 30.00
MFL41469212-Edit1-en5-mi 3/12/09 9:04 PM Page 21
EX
TE
RN
AL E
QU
IPM
EN
T S
ET
UP
22
EXTERNAL EQUIPMENT SETUP
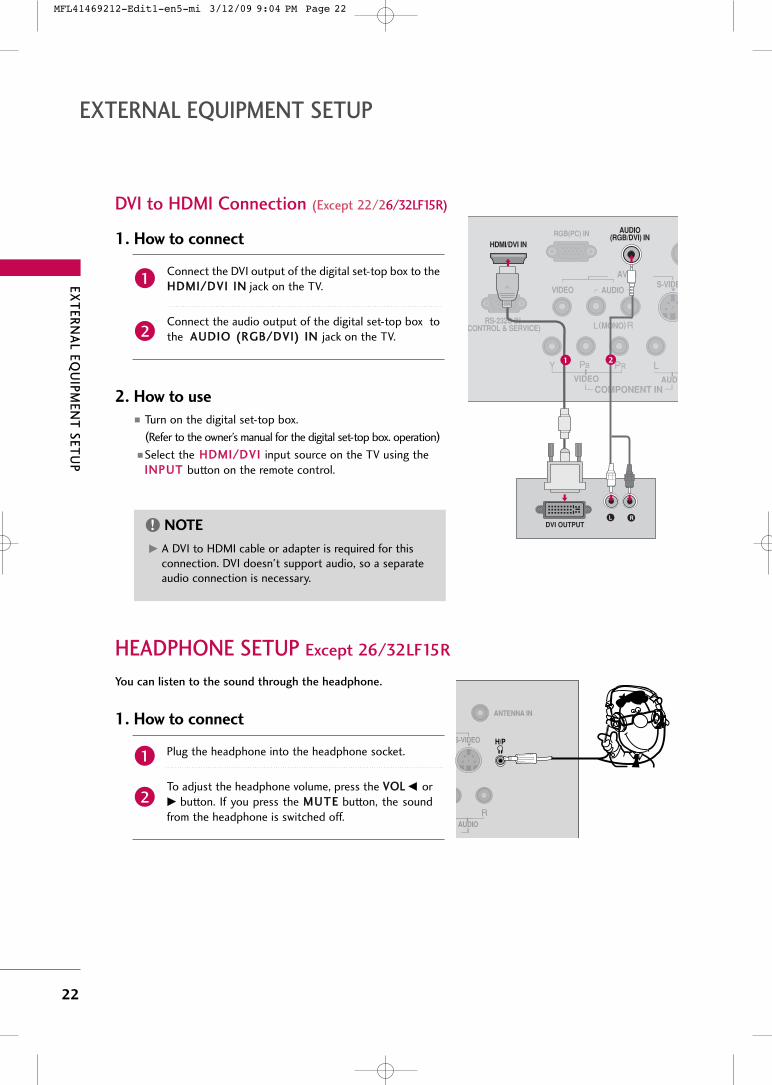
DVI to HDMI Connection (Except 22/26/32LF15R)
GG A DVI to HDMI cable or adapter is required for thisconnection. DVI doesn't support audio, so a separateaudio connection is necessary.
NOTE!
1. How to connect
Connect the DVI output of the digital set-top box to theHHDDMMII//DDVVII IINN jack on the TV.
Connect the audio output of the digital set-top box tothe AAUUDDIIOO ((RRGGBB//DDVVII)) IINN jack on the TV.2
1
2. How to use� Turn on the digital set-top box.
(Refer to the owner’s manual for the digital set-top box. operation)
� Select the HHDDMMII//DDVVII input source on the TV using theIINNPPUUTT button on the remote control.
RGB(PC) IN
RS-232C INCONTROL & SERVICE)
S-VIDE
AUDCOMPONENT IN
VIDEO
VIDEO AUDIO
MONO( )
AV IN
HDMI/DVI IN
L RDVI OUTPUT
AUDIO(RGB/DVI) IN
1 2
HEADPHONE SETUP Except 26/32LF15R
You can listen to the sound through the headphone.
Plug the headphone into the headphone socket.
To adjust the headphone volume, press the VVOOLL FF or
GG button. If you press the MMUUTTEE button, the soundfrom the headphone is switched off.
1. How to connect
2
1
ANTENNA IN
S-VIDEO
AUDIO
H/P
MFL41469212-Edit1-en5-mi 3/12/09 9:04 PM Page 22
EX
TE
RN
AL E
QU
IPM
EN
T S
ET
UP
23
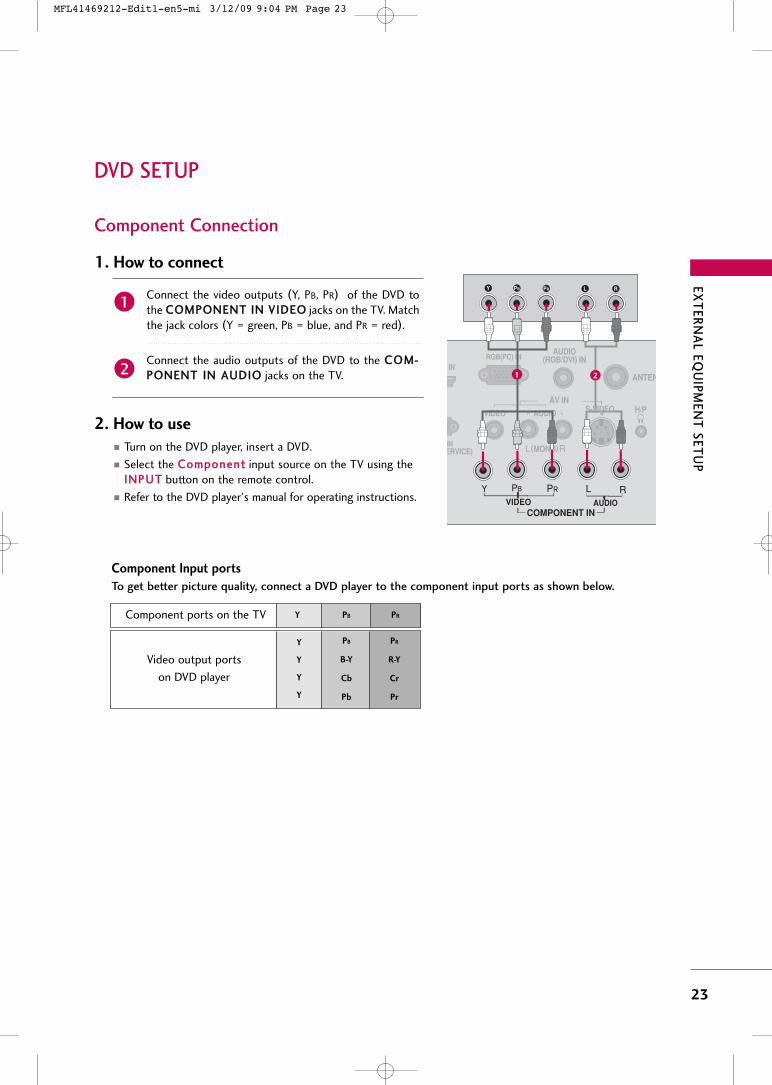
DVD SETUP
Component Input ports
To get better picture quality, connect a DVD player to the component input ports as shown below.
Component ports on the TV Y PB PR
Video output ports
on DVD player
Y
Y
Y
Y
PB
B-Y
Cb
Pb
PR
R-Y
Cr
Pr
Component Connection
1. How to connect
Connect the video outputs (Y, PB, PR) of the DVD tothe CCOOMMPPOONNEENNTT IINN VVIIDDEEOO jacks on the TV. Matchthe jack colors (Y = green, PB = blue, and PR = red).
Connect the audio outputs of the DVD to the CCOOMM--PPOONNEENNTT IINN AAUUDDIIOO jacks on the TV.2
1
2. How to use� Turn on the DVD player, insert a DVD.
� Select the CCoommppoonneenntt input source on the TV using theIINNPPUUTT button on the remote control.
� Refer to the DVD player's manual for operating instructions.
Y PB PR L R
ANTEN
RGB(PC) IN
INERVICE)
AUDIO(RGB/DVI) IN
AUDIOCOMPONENT IN
VIDEO
VIDEO AUDIO
MONO( )
AV IN H/PS-VIDEO
IN1 2
MFL41469212-Edit1-en5-mi 3/12/09 9:04 PM Page 23
EX
TE
RN
AL E
QU
IPM
EN
T S
ET
UP
24
EXTERNAL EQUIPMENT SETUP
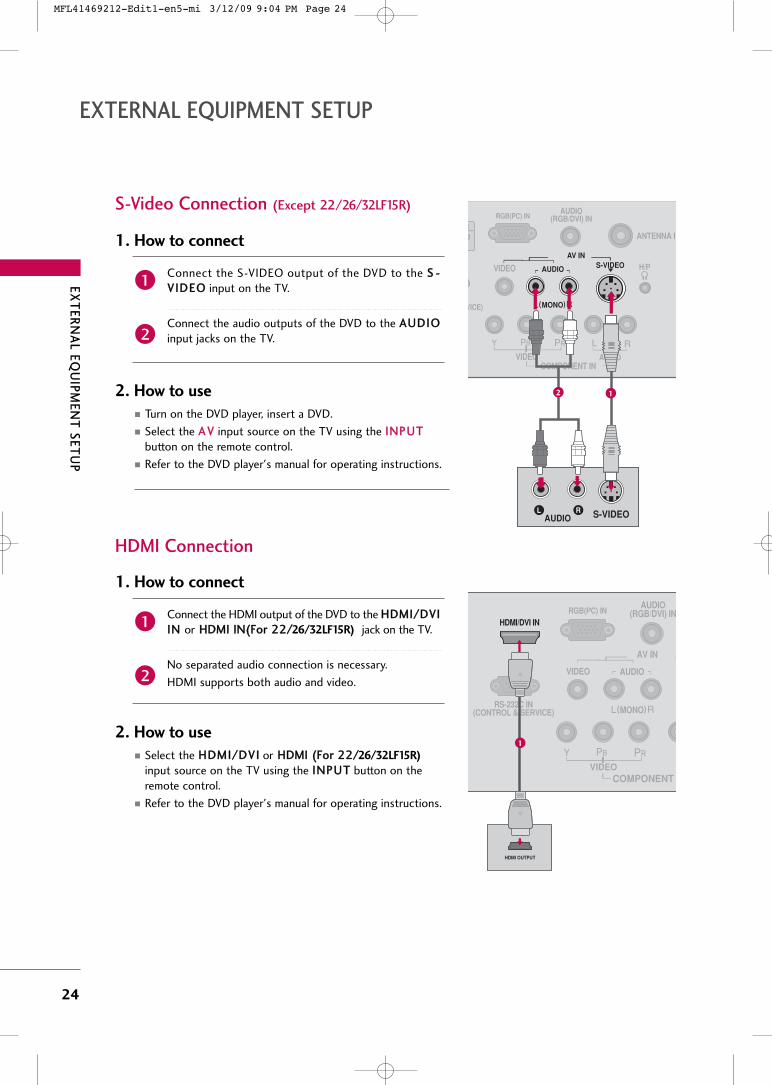
S-Video Connection (Except 22/26/32LF15R)
HDMI Connection
1. How to connect
Connect the S-VIDEO output of the DVD to the SS --VVIIDDEEOO input on the TV.
Connect the audio outputs of the DVD to the AAUUDDIIOO
input jacks on the TV.2
1
2. How to use� Turn on the DVD player, insert a DVD.
� Select the AA VV input source on the TV using the IINNPPUUTT
button on the remote control.
� Refer to the DVD player's manual for operating instructions.
1. How to connect
Connect the HDMI output of the DVD to the HHDDMMII//DDVVIIIINN or HHDDMMII IINN((FFoorr 2222//26/32LF15R) jack on the TV.
No separated audio connection is necessary.
HDMI supports both audio and video.2
1
2. How to use� Select the HHDDMMII//DDVVII or HHDDMMII ((FFoorr 2222//26/32LF15R)
input source on the TV using the IINNPPUUTT button on theremote control.
� Refer to the DVD player's manual for operating instructions.
S-VIDEO
ANTENNA I
RGB(PC) IN
VICE)
AUDIO(RGB/DVI) IN
S-VIDEO
COMPONENT IN
VIDEO
VIDEO AUDIO
MONO( )
AV IN
H/P
N
AUDIO
L RAUDIO
12
RGB(PC) IN
RS-232C IN(CONTROL & SERVICE)
AUDIO(RGB/DVI) IN
COMPONENT VIDEO
VIDEO AUDIO
MONO( )
AV IN
HDMI/DVI IN
HDMI OUTPUT
1
MFL41469212-Edit1-en5-mi 3/12/09 9:04 PM Page 24
EX
TE
RN
AL E
QU
IPM
EN
T S
ET
UP
25
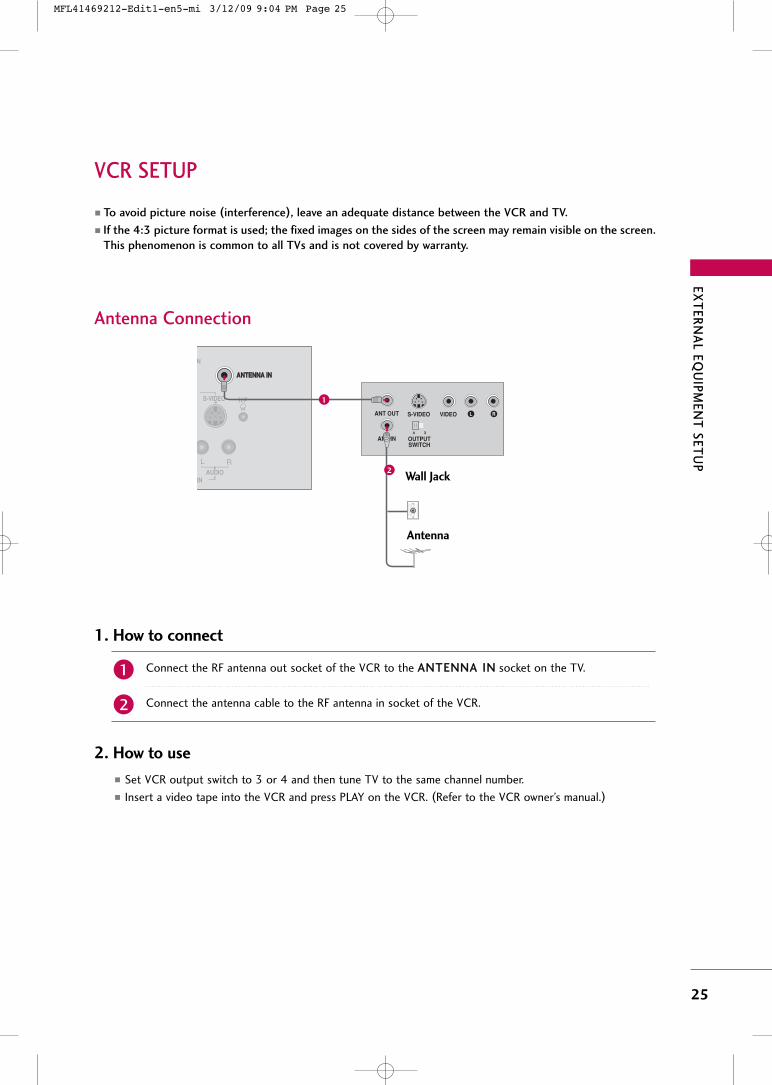
VCR SETUP
� To avoid picture noise (interference), leave an adequate distance between the VCR and TV.
� If the 4:3 picture format is used; the fixed images on the sides of the screen may remain visible on the screen.
This phenomenon is common to all TVs and is not covered by warranty.
Antenna Connection
L RS-VIDEO VIDEO
OUTPUTSWITCH
ANT IN
ANT OUT
ANTENNA INANTENNA IN
N
S-VIDEO
AUDIOIN
H/P
Wall Jack
Antenna
1
2
Connect the RF antenna out socket of the VCR to the AANNTTEENNNNAA IINN socket on the TV.
Connect the antenna cable to the RF antenna in socket of the VCR.
1. How to connect
� Set VCR output switch to 3 or 4 and then tune TV to the same channel number.
� Insert a video tape into the VCR and press PLAY on the VCR. (Refer to the VCR owner’s manual.)
2. How to use
2
1
MFL41469212-Edit1-en5-mi 3/12/09 9:04 PM Page 25
EX
TE
RN
AL E
QU
IPM
EN
T S
ET
UP
26
EXTERNAL EQUIPMENT SETUP
GG If you have a mono VCR, connect the audio cable fromthe VCR to the AAUUDDIIOO LL((MMOONNOO)) jack of the TV.
NOTE!
Composite (RCA) Connection
1. How to connect
Connect the AAUUDDIIOO/VVIIDDEEOO jacks between TV andVCR. Match the jack colors (Video = yellow, Audio Left= white, and Audio Right = red)
1
2. How to use� Insert a video tape into the VCR and press PLAY on the
VCR. (Refer to the VCR owner’s manual.)
� Select the AA VV input source on the TV using the IINNPPUUTT
button on the remote control.
ANTEN
RGB(PC) IN
RS-232C IN(CONTROL & SERVICE)
AUDIO(RGB/DVI) IN
COMPONENT INVIDEO AUDIO
MONO( )
AV IN
H/P
HDMI/DVI IN
AUDIO S-VIDEOVIDEO
OUTPUTSWITCH
L RS-VIDEO VIDEOANT IN
ANT OUT
ANTENNA IN
1 2
OUTPUTSWITCH
L R S-VIDEOVIDEOANT IN
ANT OUT
S-232C INOL & SERVICE)
S-VIDEO
COMPONENT IN
VIDEO
VIDEO AUDIO
MONO( )
AV IN
H/PAUDIO
ANTENNA IN
12
S-Video Connection (Except 22/26/32LF15R)
1. How to connect
Connect the S-VIDEO output of the VCR to the SS --VVIIDDEEOO input on the TV.
Connect the audio outputs of the VCR to the AAUUDDIIOO
input jacks on the TV.2
1
2. How to use� Insert a video tape into the VCR and press PLAY on the
VCR. (Refer to the VCR owner’s manual.)
� Select the AA VV input source on the TV using the IINNPPUUTT
button on the remote control.
GG S-Video provides better qualitythan composite. Use it whenavailable.
NOTE!GG Do not connect to both Video and S-Video at the sametime. In the event that you connect both Video and theS-Video cables, only the S-Video will work.
CAUTION
MFL41469212-Edit1-en5-mi 3/12/09 9:04 PM Page 26
EX
TE
RN
AL E
QU
IPM
EN
T S
ET
UP
27
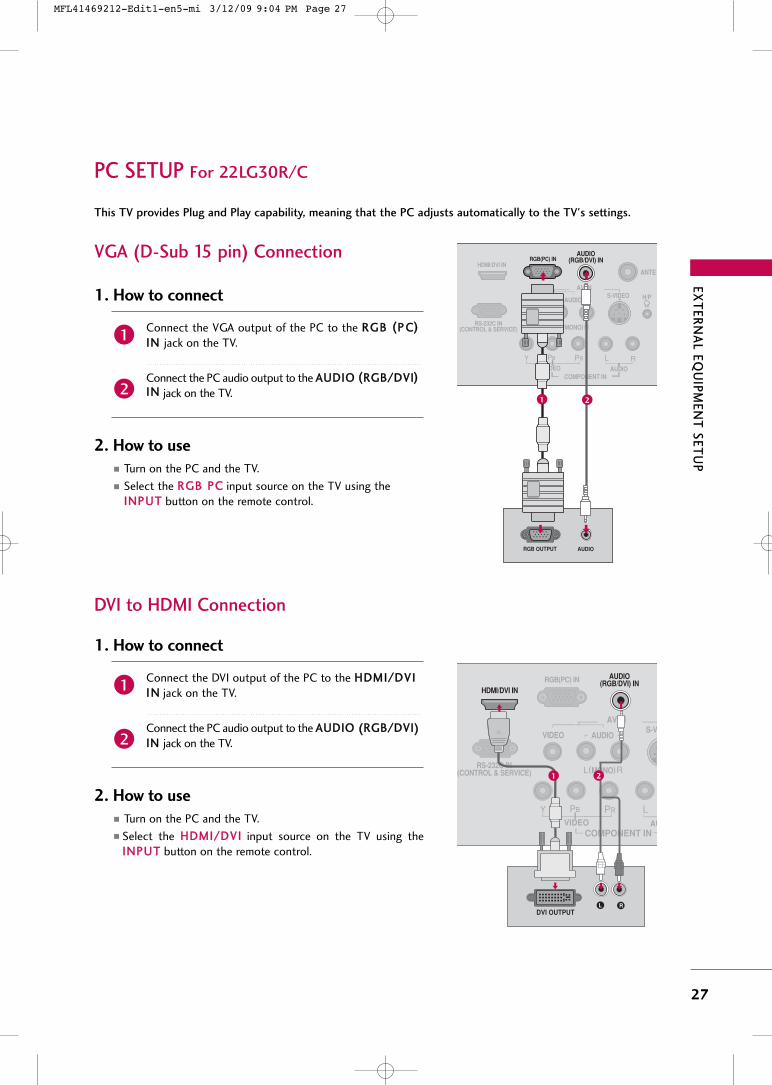
PC SETUP For 22LG30R/C
This TV provides Plug and Play capability, meaning that the PC adjusts automatically to the TV's settings.
VGA (D-Sub 15 pin) ConnectionANTE
RS-232C IN(CONTROL & SERVICE)
S-VIDEO
AUDIOCOMPONENT IN
VIDEO
VIDEO AUDIO
MONO( )
AV IN H/P
HDMI/DVI INRGB(PC) IN
AUDIO(RGB/DVI) IN
RGB OUTPUT AUDIO
1 2
RGB(PC) IN
RS-232C IN(CONTROL & SERVICE)
S-V
AUCOMPONENT IN
VIDEO
VIDEO AUDIO
MONO( )
AV IN
HDMI/DVI IN
L RDVI OUTPUT
AUDIO(RGB/DVI) IN
1 2
DVI to HDMI Connection
1. How to connect
Connect the VGA output of the PC to the RRGGBB ((PP CC))
IINN jack on the TV.
Connect the PC audio output to the AAUUDDIIOO ((RRGGBB//DDVVII))IINN jack on the TV.2
1
2. How to use� Turn on the PC and the TV.
� Select the RRGGBB PPCC input source on the TV using theIINNPPUUTT button on the remote control.
1. How to connect
Connect the DVI output of the PC to the HHDDMMII//DDVVIIII NN jack on the TV.
Connect the PC audio output to the AAUUDDIIOO ((RRGGBB//DDVVII))IINN jack on the TV.2
1
2. How to use� Turn on the PC and the TV.
� Select the HHDDMMII//DDVVII input source on the TV using theIINNPPUUTT button on the remote control.
MFL41469212-Edit1-en5-mi 3/12/09 9:04 PM Page 27
EX
TE
RN
AL E
QU
IPM
EN
T S
ET
UP
28
EXTERNAL EQUIPMENT SETUP
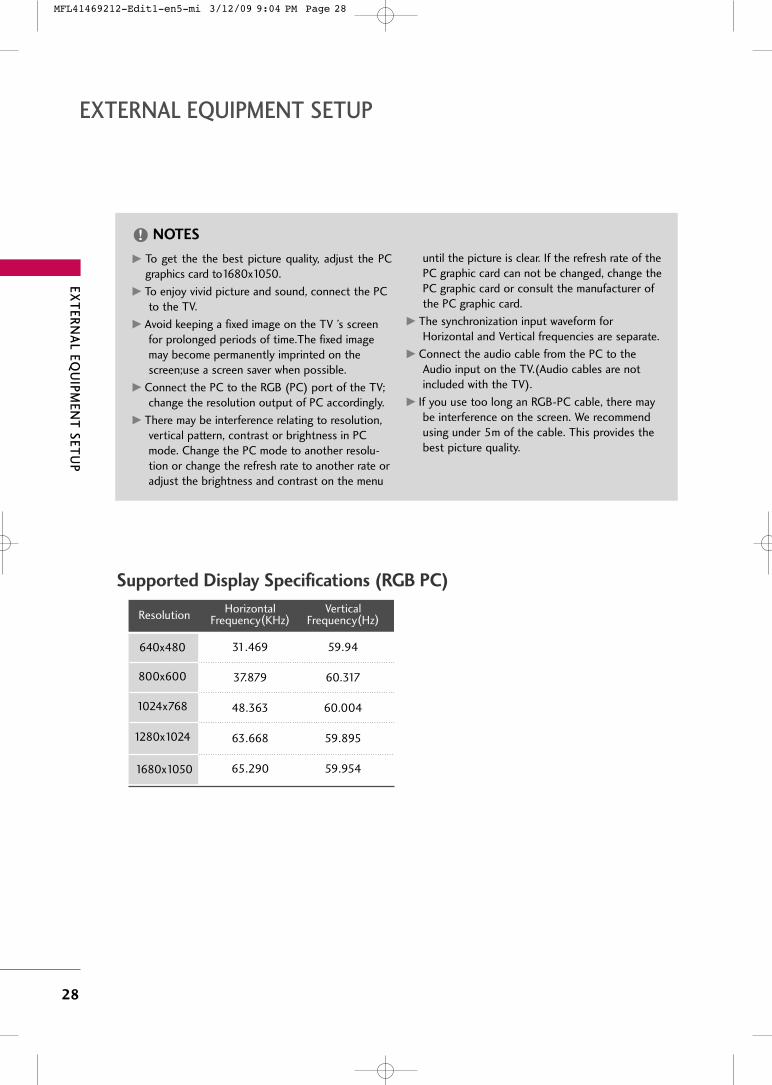
GG To get the the best picture quality, adjust the PCgraphics card to1680x1050.
GG To enjoy vivid picture and sound, connect the PCto the TV.
GG Avoid keeping a fixed image on the TV ’s screenfor prolonged periods of time.The fixed imagemay become permanently imprinted on thescreen;use a screen saver when possible.
GG Connect the PC to the RGB (PC) port of the TV;change the resolution output of PC accordingly.
GG There may be interference relating to resolution,vertical pattern, contrast or brightness in PCmode. Change the PC mode to another resolu-tion or change the refresh rate to another rate oradjust the brightness and contrast on the menu
until the picture is clear. If the refresh rate of thePC graphic card can not be changed, change thePC graphic card or consult the manufacturer ofthe PC graphic card.
GG The synchronization input waveform forHorizontal and Vertical frequencies are separate.
GG Connect the audio cable from the PC to theAudio input on the TV.(Audio cables are notincluded with the TV).
GG If you use too long an RGB-PC cable, there maybe interference on the screen. We recommendusing under 5m of the cable. This provides thebest picture quality.
NOTES!
Supported Display Specifications (RGB PC)
Horizontal Vertical Frequency(KHz) Frequency(Hz)
31.469 59.94
37.879 60.317
48.363 60.004
63.668 59.895
65.290 59.954
Resolution
640x480
800x600
1024x768
1280x1024
1680x1050
MFL41469212-Edit1-en5-mi 3/12/09 9:04 PM Page 28
EX
TE
RN
AL E
QU
IPM
EN
T S
ET
UP
29
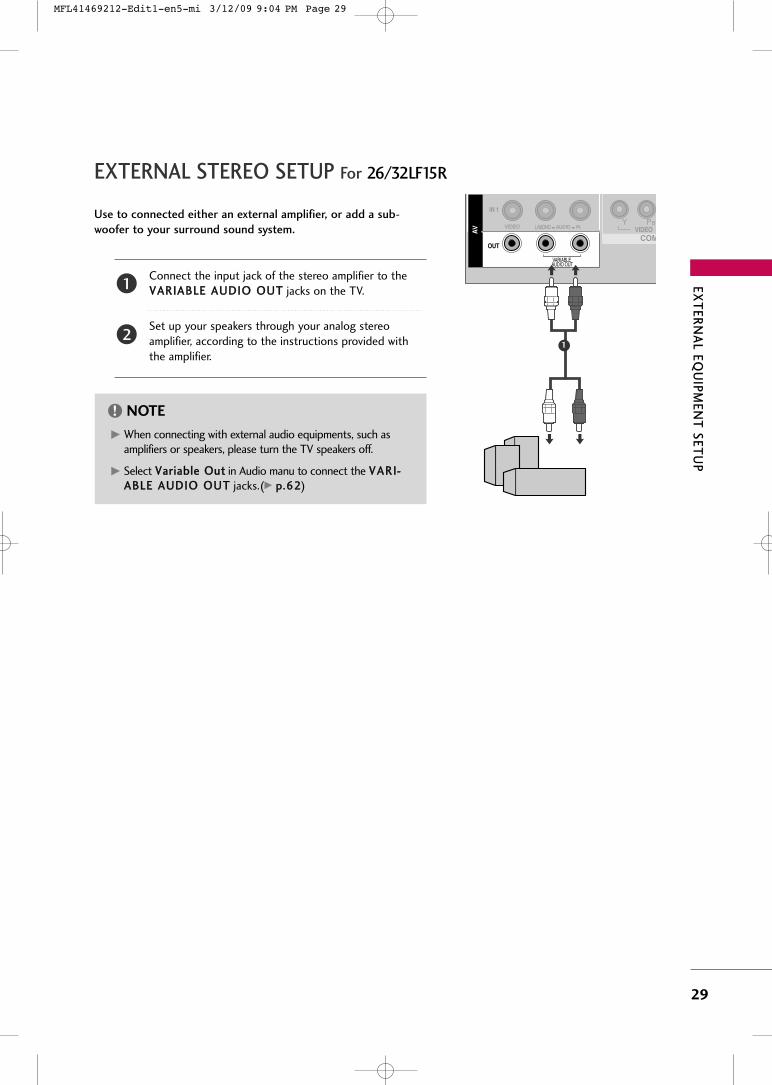
EXTERNAL STEREO SETUP For 26/32LF15R
L/MONO RAUDIOVIDEO
VARIABLE AUDIO OUT
L/L/MONOMONO RAUDIOAUDIOVIDEOVIDEO
AV
IN 1
OUT
VARIABLE AUDIO OUT
GG When connecting with external audio equipments, such asamplifiers or speakers, please turn the TV speakers off.
GG Select VVaarriiaabbllee OOuutt in Audio manu to connect the VVAARRII--AABBLLEE AAUUDDIIOO OOUUTT jacks.(GG pp..6622)
NOTE!
Use to connected either an external amplifier, or add a sub-
woofer to your surround sound system.
Connect the input jack of the stereo amplifier to theVVAARRIIAABBLLEE AAUUDDIIOO OOUUTT jacks on the TV.
Set up your speakers through your analog stereoamplifier, according to the instructions provided withthe amplifier.
2
1
11
MFL41469212-Edit1-en5-mi 3/12/09 9:04 PM Page 29
EX
TE
RN
AL E
QU
IPM
EN
T S
ET
UP
30
EXTERNAL EQUIPMENT SETUP
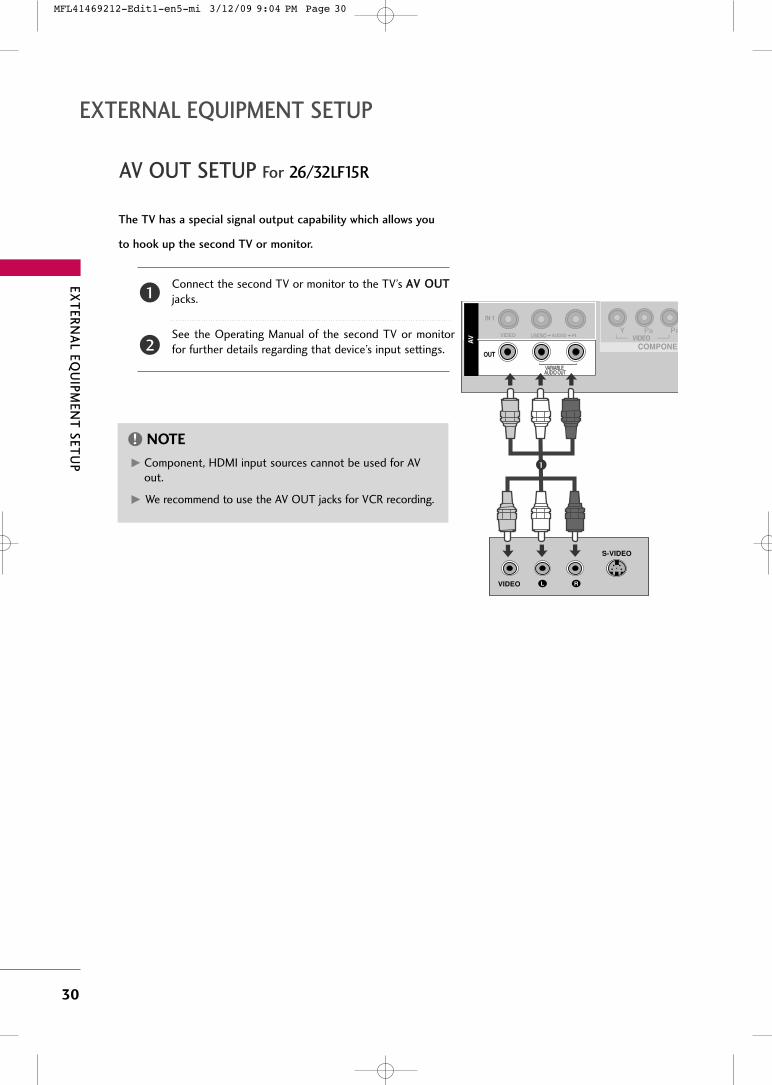
AV OUT SETUP For 26/32LF15R
The TV has a special signal output capability which allows you
to hook up the second TV or monitor.
L/L/MONOMONO RAUDIOAUDIOVIDEOVIDEO
AV
IN 1
OUT
VARIABLE ARIABLE AUDIO OUTAUDIO OUT
L/MONO RAUDIOVIDEO
L R
S-VIDEO
VIDEO
Connect the second TV or monitor to the TV’s AAVV OOUUTT
jacks.
See the Operating Manual of the second TV or monitorfor further details regarding that device’s input settings.
GG Component, HDMI input sources cannot be used for AVout.
GG We recommend to use the AV OUT jacks for VCR recording.
NOTE!
2
1
1
MFL41469212-Edit1-en5-mi 3/12/09 9:04 PM Page 30
EX
TE
RN
AL E
QU
IPM
EN
T S
ET
UP
31
SCREEN SETUP FOR PC MODE
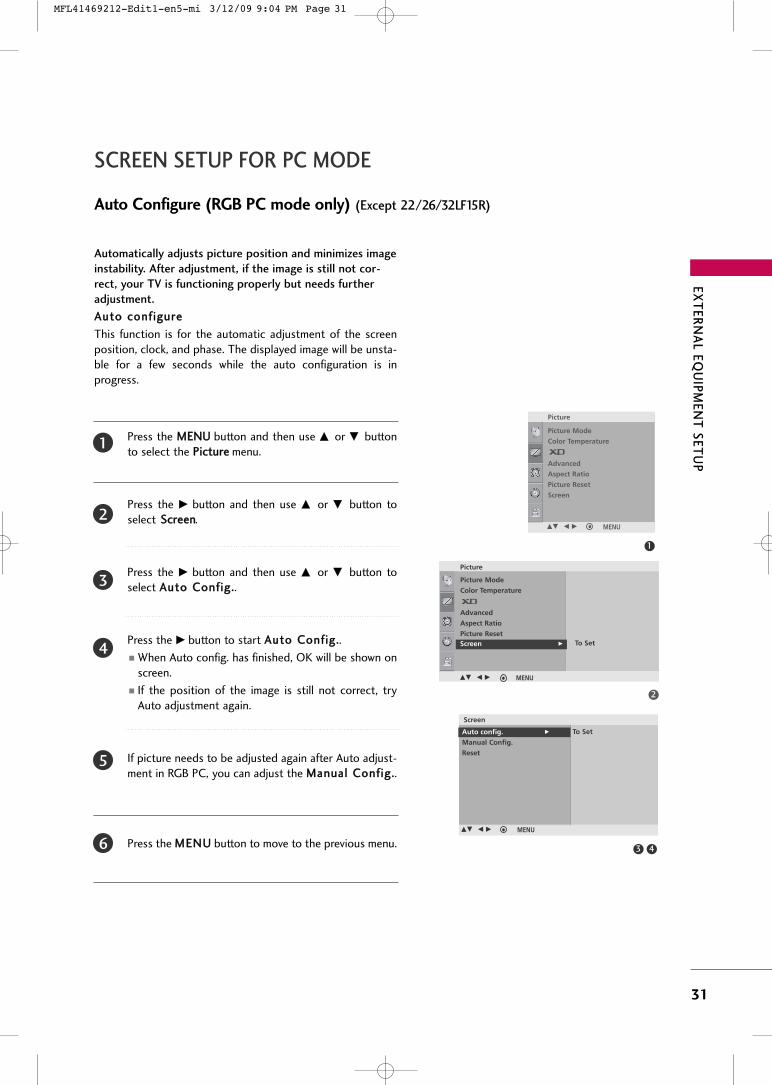
Auto Configure (RGB PC mode only) (Except 22/26/32LF15R)
Press the MMEENNUU button and then use DD or EE buttonto select the PPiiccttuurree menu.
Press the GG button and then use DD or EE button toselect SSccrreeeenn.
Press the GG button and then use DD or EE button toselect AAuuttoo CCoonnff iigg...
Press the GG button to start AAuuttoo CCoonnff iigg...
� When Auto config. has finished, OK will be shown onscreen.
� If the position of the image is still not correct, tryAuto adjustment again.
If picture needs to be adjusted again after Auto adjust-ment in RGB PC, you can adjust the MMaannuuaall CCoonnffiigg...
Press the MMEENNUU button to move to the previous menu.
2
1
4
5
3
6
Automatically adjusts picture position and minimizes image
instability. After adjustment, if the image is still not cor-
rect, your TV is functioning properly but needs further
adjustment.
AAuuttoo ccoonnff iigguurree
This function is for the automatic adjustment of the screenposition, clock, and phase. The displayed image will be unsta-ble for a few seconds while the auto configuration is inprogress.
1
Picture Mode
Color Temperature
Advanced
Aspect Ratio
Picture Reset
Screen
Picture
DE F G MENU
2
Picture
Picture Mode
Color Temperature
Advanced
Aspect Ratio
Picture Reset
Screen To SetScreen G
DE F G MENU
3 4
Screen
To Set
DE F G MENU
Auto config. G
Manual Config.
Reset
MFL41469212-Edit1-en5-mi 3/12/09 9:04 PM Page 31
EX
TE
RN
AL E
QU
IPM
EN
T S
ET
UP
32
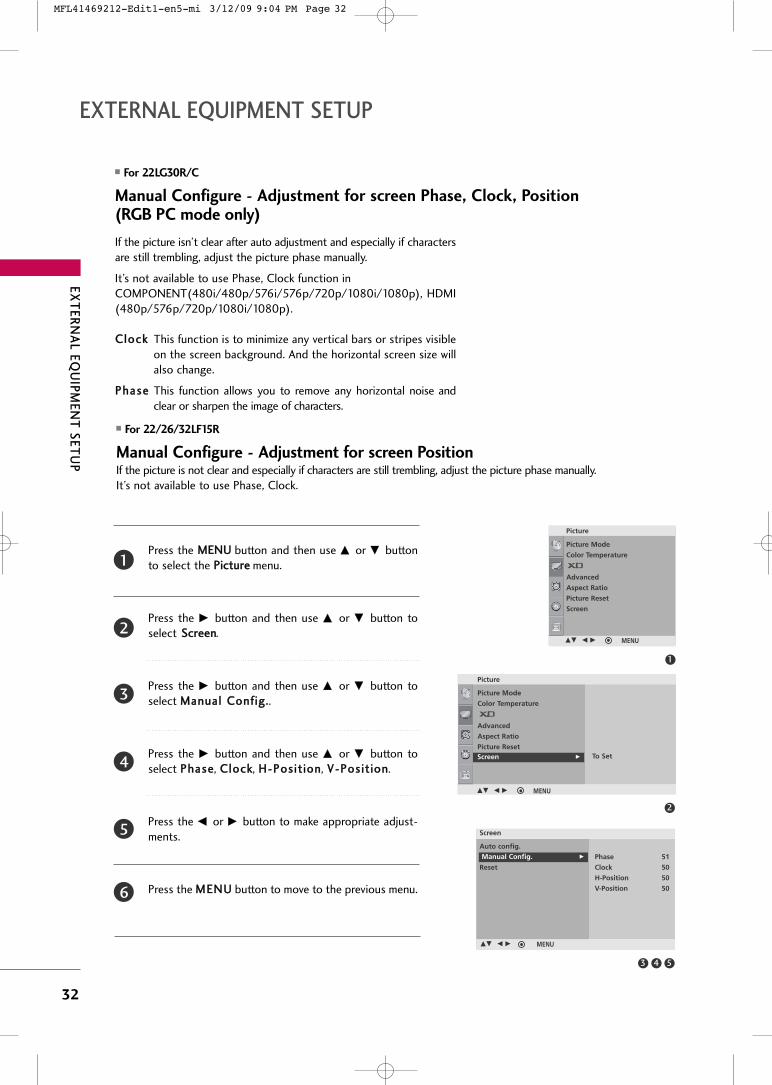
EXTERNAL EQUIPMENT SETUP
� For 22LG30R/C
Manual Configure - Adjustment for screen Phase, Clock, Position(RGB PC mode only)
Press the MMEENNUU button and then use DD or EE buttonto select the PPiiccttuurree menu.
Press the GG button and then use DD or EE button toselect SSccrreeeenn.
Press the GG button and then use DD or EE button toselect MMaannuuaall CCoonnffiigg...
Press the GG button and then use DD or EE button toselect PPhhaassee, CClloocckk, HH--PPoossiitt iioonn, VV--PPoossiitt iioonn.
Press the FF or GG button to make appropriate adjust-ments.
Press the MMEENNUU button to move to the previous menu.
2
1
4
5
3
6
If the picture isn’t clear after auto adjustment and especially if charactersare still trembling, adjust the picture phase manually.
It’s not available to use Phase, Clock function in COMPONENT(480i/480p/576i/576p/720p/1080i/1080p), HDMI(480p/576p/720p/1080i/1080p).
CClloocckk This function is to minimize any vertical bars or stripes visibleon the screen background. And the horizontal screen size willalso change.
PPhhaassee This function allows you to remove any horizontal noise andclear or sharpen the image of characters.
1
Picture Mode
Color Temperature
Advanced
Aspect Ratio
Picture Reset
Screen
Picture
DE F G MENU
2
Picture
Picture Mode
Color Temperature
Advanced
Aspect Ratio
Picture Reset
Screen To SetScreen G
DE F G MENU
3 4 5
Screen
Auto config.
Manual Config.
Reset
Manual Config. G
DE F G MENU
Phase 51
Clock 50
H-Position 50
V-Position 50
� For 22/26/32LF15R
Manual Configure - Adjustment for screen PositionIf the picture is not clear and especially if characters are still trembling, adjust the picture phase manually.It’s not available to use Phase, Clock.
MFL41469212-Edit1-en5-mi 3/12/09 9:04 PM Page 32
EX
TE
RN
AL E
QU
IPM
EN
T S
ET
UP
33
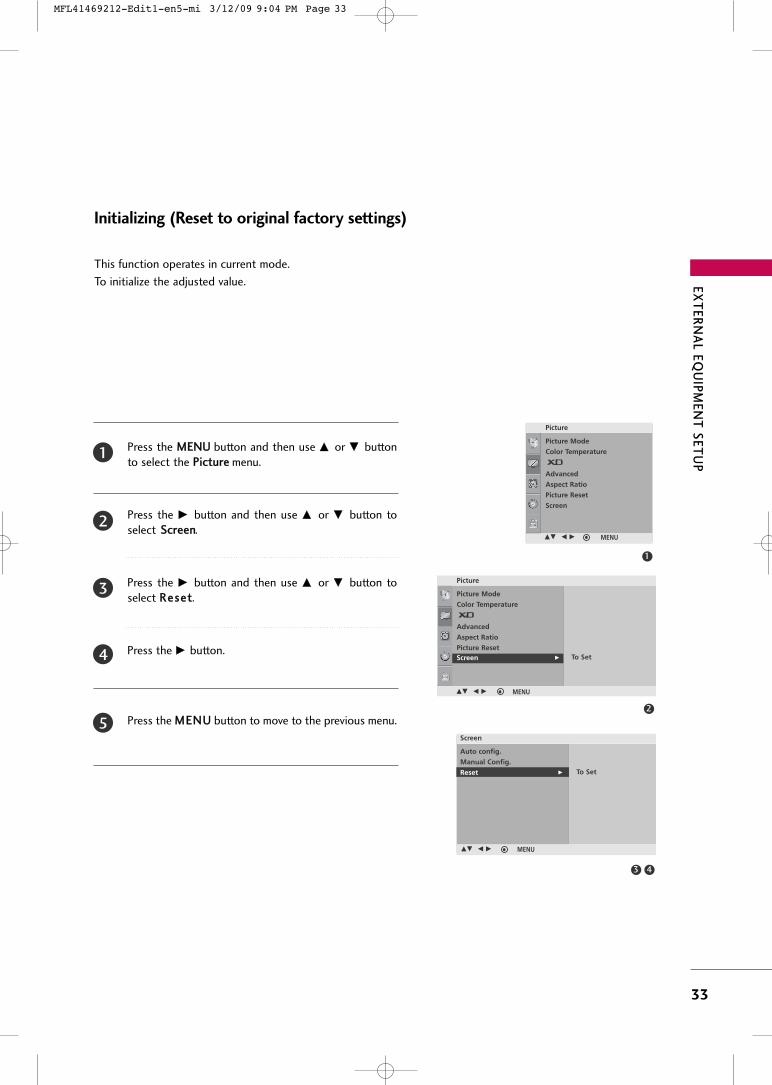
Initializing (Reset to original factory settings)
Press the MMEENNUU button and then use DD or EE buttonto select the PPiiccttuurree menu.
Press the GG button and then use DD or EE button toselect SSccrreeeenn.
Press the GG button and then use DD or EE button toselect RReesseett.
Press the GG button.
Press the MMEENNUU button to move to the previous menu.
2
1
4
5
3
This function operates in current mode.
To initialize the adjusted value.
DE F G MENU
1
Picture Mode
Color Temperature
Advanced
Aspect Ratio
Picture Reset
Screen
Picture
DE F G MENU
2
Picture
Picture Mode
Color Temperature
Advanced
Aspect Ratio
Picture Reset
Screen To SetScreen G
DE F G MENU
3 4
Screen
DE F G MENU
To Set
Auto config.
Manual Config.
Reset G
MFL41469212-Edit1-en5-mi 3/12/09 9:04 PM Page 33
WA
TC
HIN
G T
V / C
HA
NN
EL C
ON
TR
OL
34
REMOTE CONTROL FUNCTIONS
WATCHING TV / CHANNEL CONTROL
When using the remote control, aim it at the remote control sensor on the TV.
1 2 3
4 5 6
7 8
0
9
VOL VOL
CH
CH
ENTER
POWER
MENU Q.VIEW SLEEP
PICTURE SOUND RATIO
MTS
FAVMUTE
A.PROG MEMORY/ERASE CAPTION
TV INPUTMTS
A.PROG(AUTO PROGRAM)
MEMORY/ERASE
CAPTION
CHANNELUP/DOWN
VOLUME UP/DOWN
THUMBSTICK(Up/Down/Left
Right/ENTER)
MENU
Q.VIEW
SLEEP
PICTURE
SOUND
RATIO
Selects the MTS sound: Mono, Stereo, or SAP. GG pp..6655
Searches for available channels. GG pp..3388
Memorizes or erases selected channel. GG pp..3399
Selects CAPTION mode. GG pp..6644
Select available channels.
Increase/decrease the sound level.
Navigate the on-screen menus and adjust the system set-tings to your preference.
Displays the main menu.
Tune to the last channel viewed.
Select the amount of time before your TV turns off auto-matically. GG pp..6688
Selects the factory preset picture depend on the viewingenvironment. GG pp..4455
Selects the factory preset sound for type of program.
GG pp..5588
Change the aspect ratio.GG pp..4444
MFL41469212-Edit1-en5-mi 3/12/09 9:04 PM Page 34
WA
TC
HIN
G T
V / C
HA
NN
EL C
ON
TR
OL
35
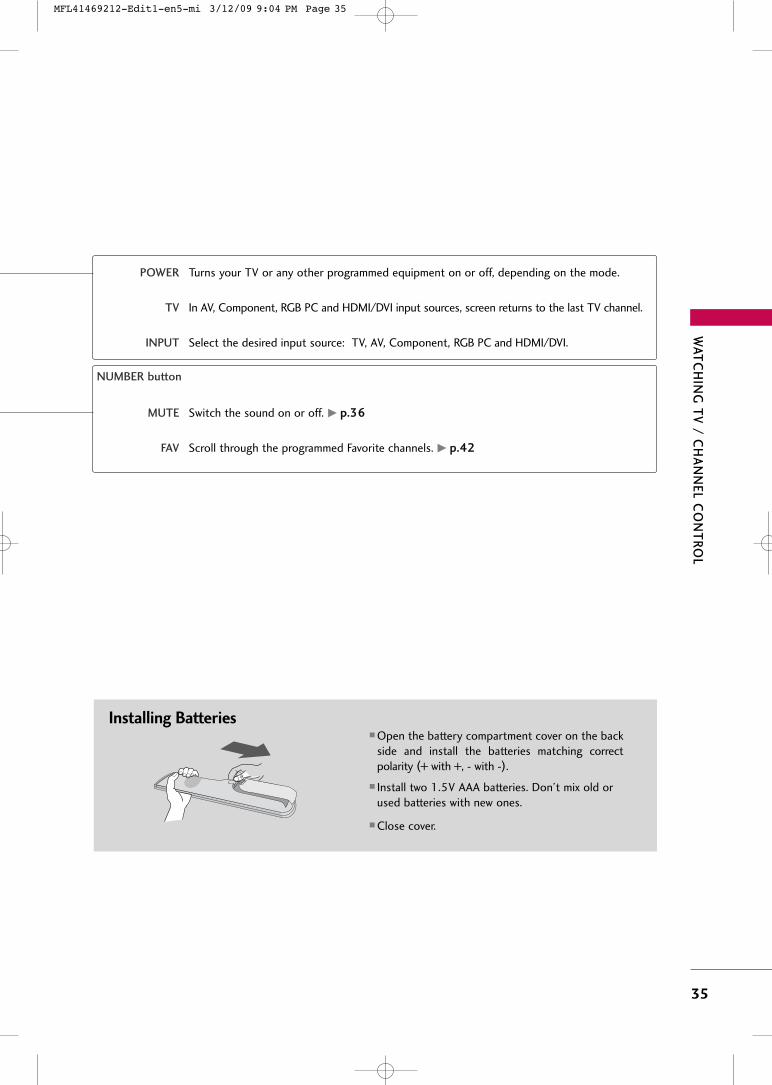
� Open the battery compartment cover on the backside and install the batteries matching correctpolarity (+ with +, - with -).
� Install two 1.5V AAA batteries. Don’t mix old orused batteries with new ones.
� Close cover.
Installing Batteries
NUMBER button
Turns your TV or any other programmed equipment on or off, depending on the mode.
In AV, Component, RGB PC and HDMI/DVI input sources, screen returns to the last TV channel.
Select the desired input source: TV, AV, Component, RGB PC and HDMI/DVI.
Switch the sound on or off. GG pp..3366
Scroll through the programmed Favorite channels. GG pp..4422
POWER
TV
INPUT
MUTE
FAV
MFL41469212-Edit1-en5-mi 3/12/09 9:04 PM Page 35
WA
TC
HIN
G T
V / C
HA
NN
EL C
ON
TR
OL
36
WATCHING TV /CHANNEL CONTROL
TURNING ON TV
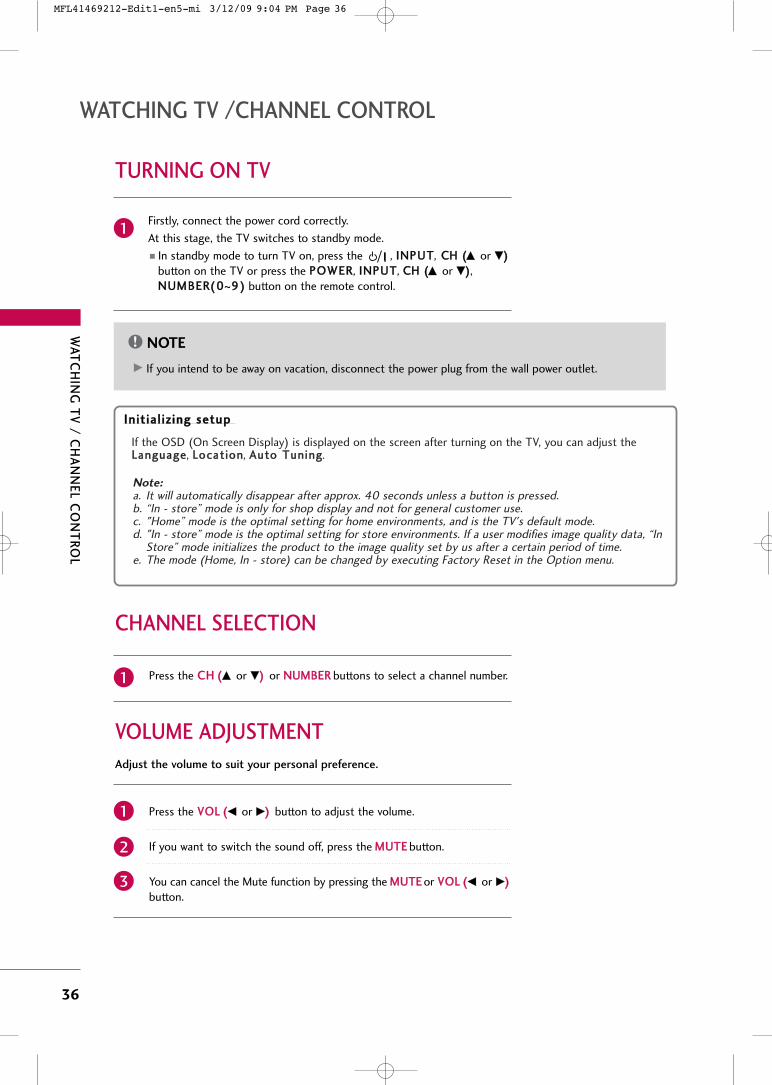
NOTE!
GG If you intend to be away on vacation, disconnect the power plug from the wall power outlet.
Firstly, connect the power cord correctly.
At this stage, the TV switches to standby mode.
� In standby mode to turn TV on, press the , IINNPPUUTT, CCHH ((DD or EE))
button on the TV or press the PPOOWWEERR, IINNPPUUTT, CCHH ((DD or EE)),NNUUMMBBEERR(( 00~99 )) button on the remote control.
1
Press the CCHH ((DD or EE)) or NNUUMMBBEERR buttons to select a channel number.1
VOLUME ADJUSTMENT
CHANNEL SELECTION
Press the VVOOLL ((FF or GG)) button to adjust the volume.
If you want to switch the sound off, press the MMUUTTEE button.
You can cancel the Mute function by pressing the MMUUTTEE or VVOOLL ((FF or GG))
button.
Adjust the volume to suit your personal preference.
1
2
3
IInniittiiaall iizziinngg sseettuupp
Note: a. It will automatically disappear after approx. 40 seconds unless a button is pressed.b. “In - store” mode is only for shop display and not for general customer use.c. "Home” mode is the optimal setting for home environments, and is the TV's default mode.d. "In - store” mode is the optimal setting for store environments. If a user modifies image quality data, “In
Store” mode initializes the product to the image quality set by us after a certain period of time.e. The mode (Home, In - store) can be changed by executing Factory Reset in the Option menu.
If the OSD (On Screen Display) is displayed on the screen after turning on the TV, you can adjust theLLaanngguuaaggee, LLooccaatt iioonn, AAuuttoo TTuunniinngg.
MFL41469212-Edit1-en5-mi 3/12/09 9:04 PM Page 36
WA
TC
HIN
G T
V / C
HA
NN
EL C
ON
TR
OL
37
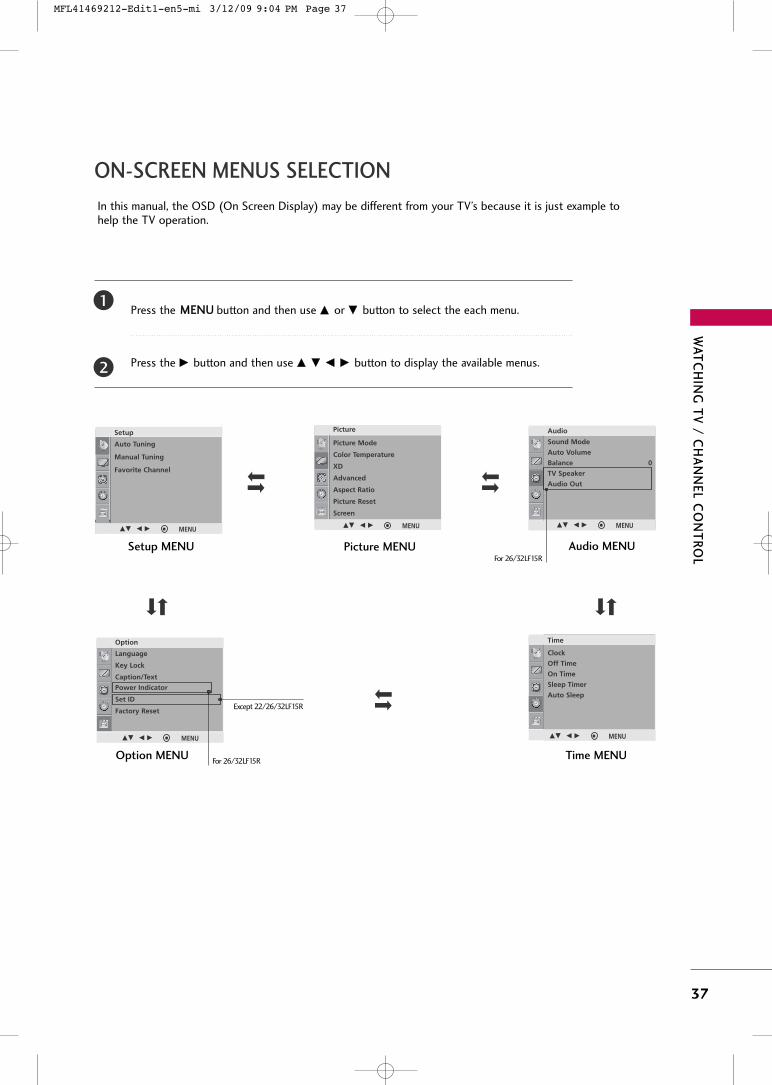
ON-SCREEN MENUS SELECTION
Setup MENU Picture MENU Audio MENU
Time MENUOption MENU
Language
Key Lock
Caption/Text
Power Indicator
Set ID
Factory Reset
Option
Clock
Off Time
On Time
Sleep Timer
Auto Sleep
Time
Sound Mode
Auto Volume
Balance 0
TV Speaker
Audio Out
Audio
Picture Mode
Color Temperature
XD
Advanced
Aspect Ratio
Picture Reset
Screen
Picture
Auto Tuning
Manual Tuning
Favorite Channel
Setup
In this manual, the OSD (On Screen Display) may be different from your TV’s because it is just example tohelp the TV operation.
Press the MMEENNUU button and then use DD or EE button to select the each menu.
Press the GG button and then use DD EE FF GG button to display the available menus.
1
2
For 26/32LF15R
For 26/32LF15R
DE F G MENU DE F G MENU DE F G MENU
DE F G MENUDE F G MENU
Except 22/26/32LF15R
MFL41469212-Edit1-en5-mi 3/12/09 9:04 PM Page 37
WA
TC
HIN
G T
V / C
HA
NN
EL C
ON
TR
OL
38
WATCHING TV /CHANNEL CONTROL
CHANNEL SEARCH
Setup
Auto Tuning
Manual Tuning
Favorite Channel
To StartAuto Tuning G
DE F G MENU
Auto Tuning
49%
MENU Stop
CATV
34
Auto Tuning: Program Search
Auto Tuning should be used to memorize all the active channels in
your area before you are able to use the TV.
There are two ways of storing channels in the TV's memory. You
can use either.
One is called AUTO TUNING and the other is called MANUAL
TUNING.
In AUTO TUNING mode, the TV will memorize the channels in
ascending numerical order. If there are additional channels you
want to add or delete, you can manually add or delete those
channels with Manual Tuning.
- Redo Auto Tuning if the TV is ever moved to another location.
- Auto Tuning will search for channels only through the Antenna
jack.
- If channels numbers for broadcast over-the air TV and cable TV
are duplicated where different channels have the same number,
press the same number buttons again to toggle between:
(For example, press 17 to go to the channel, press 17 again to go
to the duplicated channel.)
Broadcast TV Channels Cable TV Channels
Press the AA..PPRROOGG button. AAUUTTOO TTUUNNIINNGG starts the chan-nel search. If you want to stop auto tuning, press the MMEENNUU
button. Only the channels found up to at that time are memo-rized.
� You can also use the SSeettuupp menu to adjust AAuuttoo TTuunniinngg.
1
Auto Tuning
Manual Tuning
Favorite Channel
Setup
DE F G MENU
MFL41469212-Edit1-en5-mi 3/12/09 9:04 PM Page 38
WA
TC
HIN
G T
V / C
HA
NN
EL C
ON
TR
OL
39
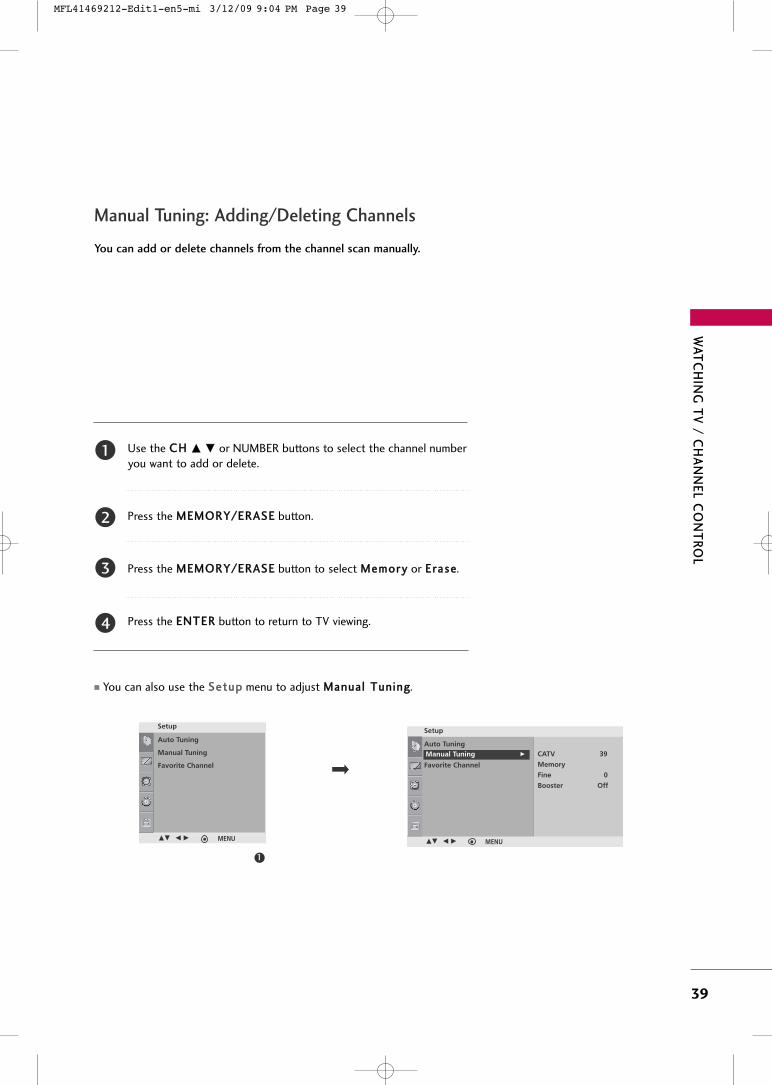
1
Setup
Auto Tuning
Manual Tuning
Favorite Channel
CATV 39
Memory
Fine 0
Booster Off
Manual Tuning G
DE F G MENU
Auto Tuning
Manual Tuning
Favorite Channel
Setup
DE F G MENU
You can add or delete channels from the channel scan manually.
Manual Tuning: Adding/Deleting Channels
Use the CCHH DD EE or NUMBER buttons to select the channel numberyou want to add or delete.
Press the MMEEMMOORRYY//EERRAASSEE button.
Press the MMEEMMOORRYY//EERRAASSEE button to select MMeemmoorryy or EErraassee.
Press the EENNTTEERR button to return to TV viewing.
1
2
3
4
� You can also use the SSeettuupp menu to adjust MMaannuuaall TTuunniinngg.
MFL41469212-Edit1-en5-mi 3/12/09 9:04 PM Page 39
WA
TC
HIN
G T
V / C
HA
NN
EL C
ON
TR
OL
40
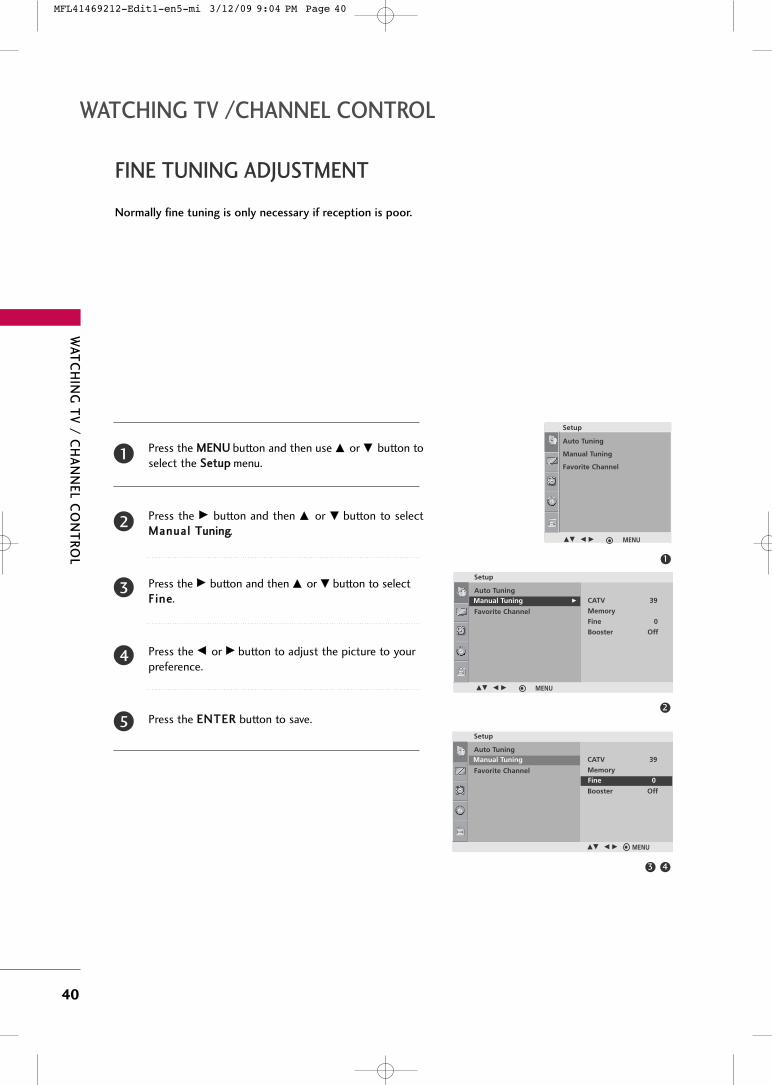
WATCHING TV /CHANNEL CONTROL
FINE TUNING ADJUSTMENT
Normally fine tuning is only necessary if reception is poor.
Press the MMEENNUU button and then use DD or EE button toselect the SSeettuupp menu.
Press the GG button and then DD or EE button to selectMMaannuuaall TTuunniinngg.
Press the GG button and then DD or EE button to selectFFiinnee.
Press the FF or GG button to adjust the picture to yourpreference.
Press the EENNTTEERR button to save.
2
1
4
5
3
1
2
Setup
Auto Tuning
Manual Tuning
Favorite Channel
CATV 39
Memory
Fine 0
Booster Off
Manual Tuning G
DE F G MENU
Auto Tuning
Manual Tuning
Favorite Channel
Setup
DE F G MENU
Setup
Auto Tuning
Manual Tuning
Favorite Channel
CATV 39
Memory
Fine 0
Booster Off
Manual Tuning
DE F G MENU
Fine 0
43
MFL41469212-Edit1-en5-mi 3/12/09 9:04 PM Page 40
WA
TC
HIN
G T
V / C
HA
NN
EL C
ON
TR
OL
41
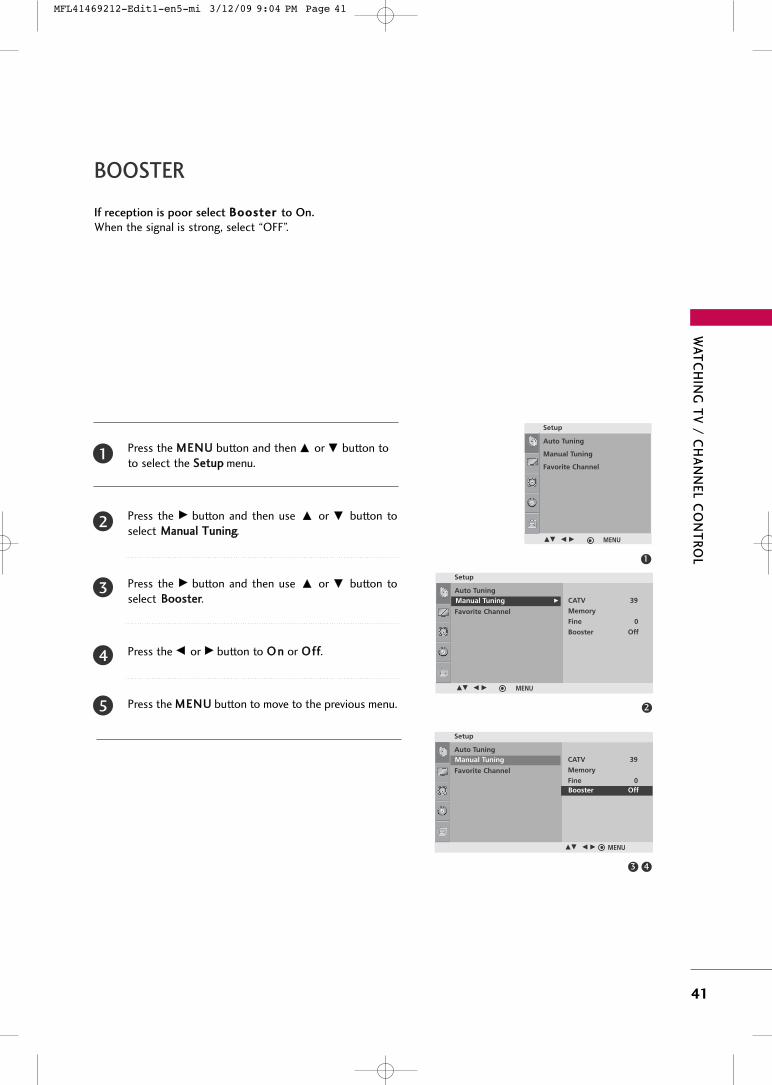
BOOSTER
If reception is poor select BBoooosstteerr to On.When the signal is strong, select “OFF”.
Press the MMEENNUU button and then DD or EE button toto select the SSeettuupp menu.
Press the GG button and then use DD or EE button toselect MMaannuuaall TTuunniinngg.
Press the GG button and then use DD or EE button toselect BBoooosstteerr.
Press the FF or GG button to OO nn or OOff ff.
Press the MMEENNUU button to move to the previous menu.
2
1
4
5
3
1
2
Setup
Auto Tuning
Manual Tuning
Favorite Channel
CATV 39
Memory
Fine 0
Booster Off
Manual Tuning G
DE F G MENU
Auto Tuning
Manual Tuning
Favorite Channel
Setup
DE F G MENU
4
Setup
Auto Tuning
Manual Tuning
Favorite Channel
CATV 39
Memory
Fine 0
Booster Off
Manual Tuning
Booster Off
3
DE F G MENU
MFL41469212-Edit1-en5-mi 3/12/09 9:04 PM Page 41
WA
TC
HIN
G T
V / C
HA
NN
EL C
ON
TR
OL
42
WATCHING TV /CHANNEL CONTROL
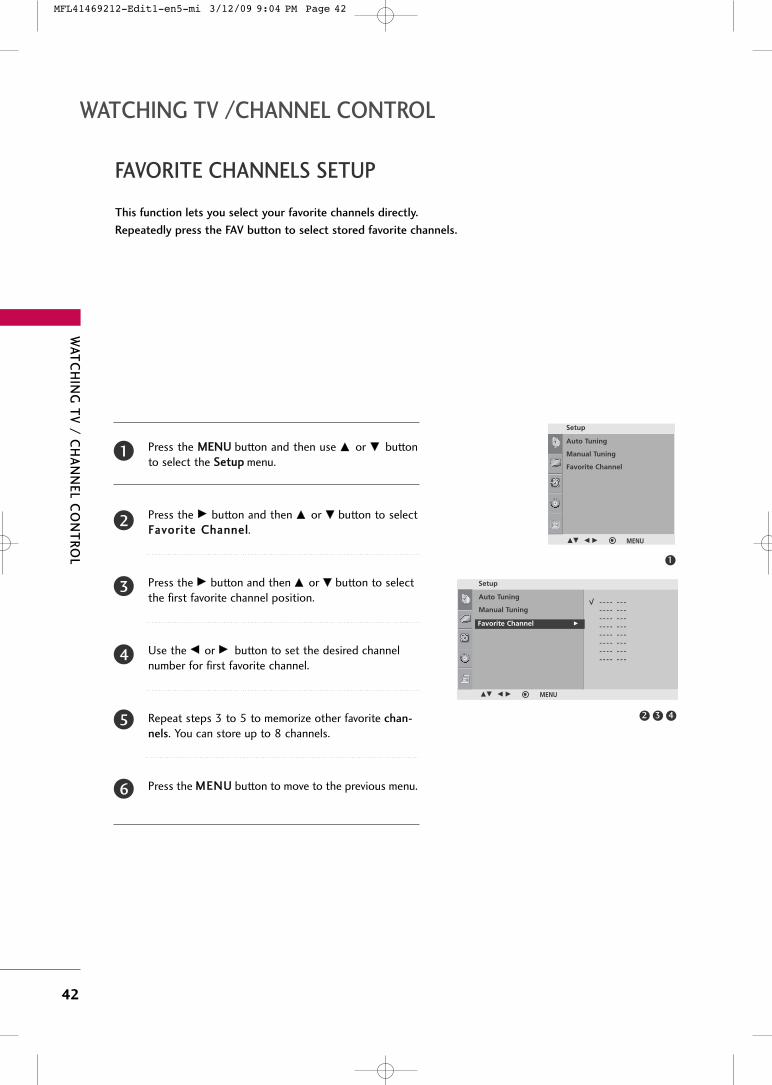
FAVORITE CHANNELS SETUP
This function lets you select your favorite channels directly.
Repeatedly press the FAV button to select stored favorite channels.
Press the MMEENNUU button and then use DD or EE buttonto select the SSeettuupp menu.
Press the GG button and then DD or EE button to selectFFaavvoorriittee CChhaannnneell.
Press the GG button and then DD or EE button to selectthe first favorite channel position.
Use the FF or GG button to set the desired channelnumber for first favorite channel.
Repeat steps 3 to 5 to memorize other favorite chan-
nels. You can store up to 8 channels.
Press the MMEENNUU button to move to the previous menu.
2
3
4
5
6
1
2 3 4
1
Setup
Auto Tuning
Manual Tuning
Favorite ChannelFavorite Channel G
DE F G MENU
Auto Tuning
Manual Tuning
Favorite Channel
Setup
- - - - - - -- - - - - - -- - - - - - -- - - - - - -- - - - - - -- - - - - - -- - - - - - -- - - - - - -
DE F G MENU
MFL41469212-Edit1-en5-mi 3/12/09 9:04 PM Page 42
WA
TC
HIN
G T
V / C
HA
NN
EL C
ON
TR
OL
43
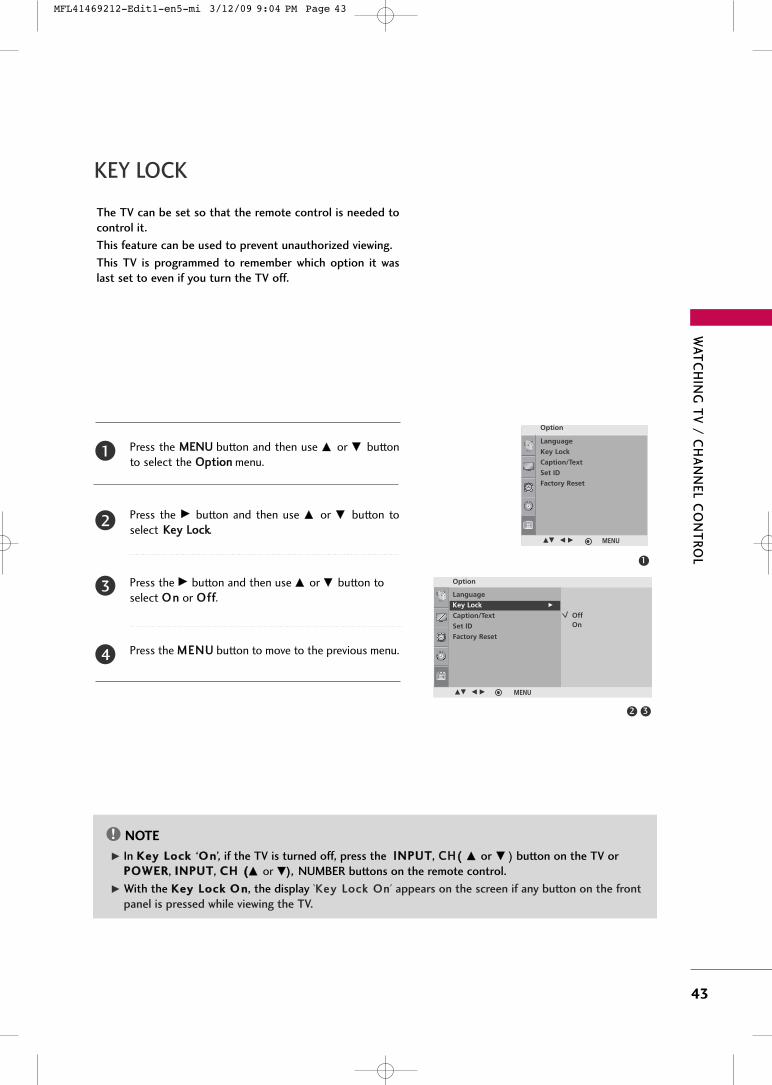
KEY LOCK
The TV can be set so that the remote control is needed to
control it.
This feature can be used to prevent unauthorized viewing.
This TV is programmed to remember which option it was
last set to even if you turn the TV off.
Press the MMEENNUU button and then use DD or EE buttonto select the OOppttiioonn menu.
Press the GG button and then use DD or EE button toselect KKeeyy LLoocckk.
Press the GG button and then use DD or EE button toselect OO nn or OOff ff.
Press the MMEENNUU button to move to the previous menu.
2
3
4
1
1
32
Option
Language
Key Lock
Caption/Text
Set ID
Factory Reset
Key Lock G
DE F G MENU
OffOn
Language
Key Lock
Caption/Text
Set ID
Factory Reset
Option
DE F G MENU
NOTE!
GG In KKeeyy LLoocckk ‘OO nn’, if the TV is turned off, press the IINNPPUUTT, CCHH(( DD or EE ) button on the TV orPPOOWWEERR, IINNPPUUTT, CCHH ((DD or EE), NUMBER buttons on the remote control.
GG With the KKeeyy LLoocckk OO nn, the display ‘KKeeyy LLoocckk OOnn’ appears on the screen if any button on the front
panel is pressed while viewing the TV.
MFL41469212-Edit1-en5-mi 3/12/09 9:04 PM Page 43
PIC
TU
RE
CO
NT
RO
L
44
PICTURE CONTROL
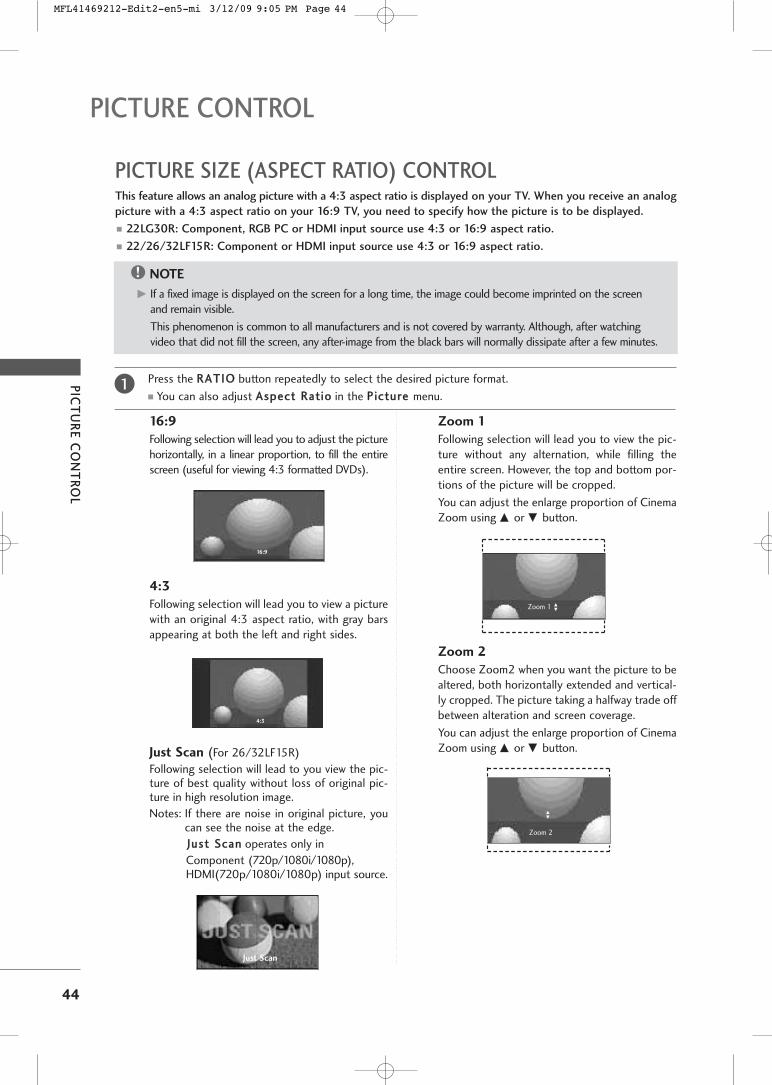
PICTURE SIZE (ASPECT RATIO) CONTROLThis feature allows an analog picture with a 4:3 aspect ratio is displayed on your TV. When you receive an analog
picture with a 4:3 aspect ratio on your 16:9 TV, you need to specify how the picture is to be displayed.
� 22LG30R: Component, RGB PC or HDMI input source use 4:3 or 16:9 aspect ratio.
� 22/26/32LF15R: Component or HDMI input source use 4:3 or 16:9 aspect ratio.
16:9
Following selection will lead you to adjust the picturehorizontally, in a linear proportion, to fill the entirescreen (useful for viewing 4:3 formatted DVDs).
4:3
Following selection will lead you to view a picturewith an original 4:3 aspect ratio, with gray barsappearing at both the left and right sides.
Just Scan (For 26/32LF15R)
Following selection will lead to you view the pic-ture of best quality without loss of original pic-ture in high resolution image.
Notes: If there are noise in original picture, youcan see the noise at the edge.
JJuusstt SSccaann operates only in
Component (720p/1080i/1080p),HDMI(720p/1080i/1080p) input source.
Zoom 1
Following selection will lead you to view the pic-ture without any alternation, while filling theentire screen. However, the top and bottom por-tions of the picture will be cropped.
You can adjust the enlarge proportion of CinemaZoom using DD or EE button.
Zoom 2
Choose Zoom2 when you want the picture to bealtered, both horizontally extended and vertical-ly cropped. The picture taking a halfway trade offbetween alteration and screen coverage.
You can adjust the enlarge proportion of CinemaZoom using DD or EE button.
4:3
16:9
NOTE!
GG If a fixed image is displayed on the screen for a long time, the image could become imprinted on the screenand remain visible.
This phenomenon is common to all manufacturers and is not covered by warranty. Although, after watchingvideo that did not fill the screen, any after-image from the black bars will normally dissipate after a few minutes.
Press the RRAATTIIOO button repeatedly to select the desired picture format.
� You can also adjust AAssppeecctt RRaattiioo in the PPiiccttuurree menu.1
Zoom 1
Zoom 2
DD
EE
DD
EE
Just Scan
MFL41469212-Edit2-en5-mi 3/12/09 9:05 PM Page 44
PIC
TU
RE
CO
NT
RO
L
45
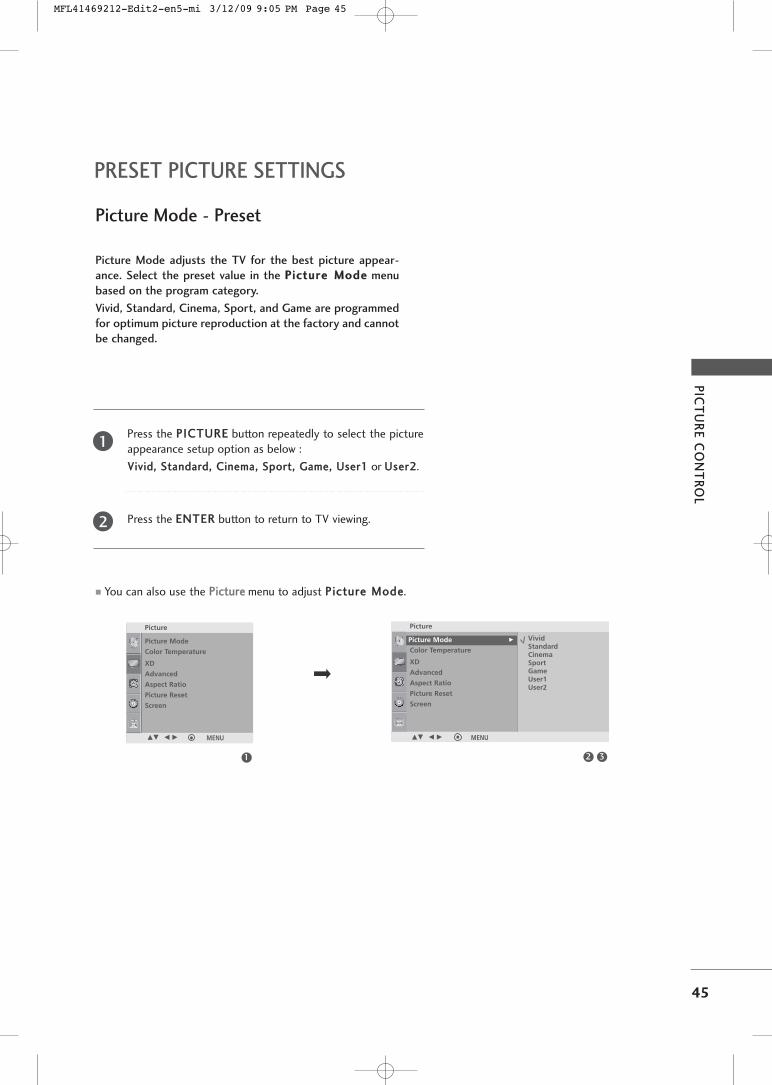
PRESET PICTURE SETTINGS
Picture Mode - Preset
1
Picture Mode
Color Temperature
XD
Advanced
Aspect Ratio
Picture Reset
Screen
Picture
32
Picture
Picture Mode
Color Temperature
XD
Advanced
Aspect Ratio
Picture Reset
Screen
Picture Mode G
DE F G MENU
VividStandardCinemaSportGameUser1User2
DE F G MENU
Picture Mode adjusts the TV for the best picture appear-
ance. Select the preset value in the PPiiccttuurree MMooddee menu
based on the program category.
Vivid, Standard, Cinema, Sport, and Game are programmed
for optimum picture reproduction at the factory and cannot
be changed.
Press the PPIICCTTUURREE button repeatedly to select the pictureappearance setup option as below :
VViivviidd,, SSttaannddaarrdd,, CCiinneemmaa,, SSppoorrtt,, GGaammee,, UUsseerr11 or UUsseerr22.
Press the EENNTTEERR button to return to TV viewing.
� You can also use the PPiiccttuurree menu to adjust PPiiccttuurree MMooddee.
2
1
MFL41469212-Edit2-en5-mi 3/12/09 9:05 PM Page 45
PIC
TU
RE
CO
NT
RO
L
46
PICTURE CONTROL
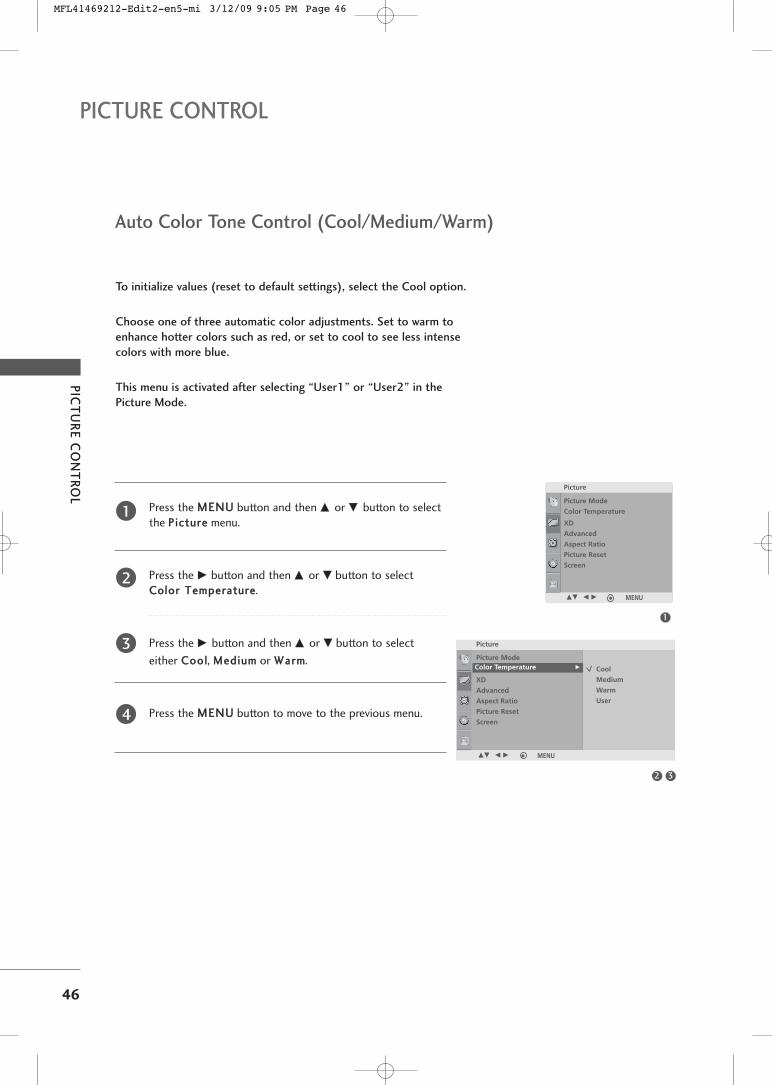
To initialize values (reset to default settings), select the Cool option.
Choose one of three automatic color adjustments. Set to warm to
enhance hotter colors such as red, or set to cool to see less intense
colors with more blue.
This menu is activated after selecting “User1” or “User2” in the
Picture Mode.
Press the MMEENNUU button and then DD or EE button to selectthe PPiiccttuurree menu.
Press the GG button and then DD or EE button to selectCCoolloorr TTeemmppeerraattuurree.
Press the GG button and then DD or EE button to select
either CCooooll, MMeeddiiuumm or WWaarrmm.
Press the MMEENNUU button to move to the previous menu.
1
2
3
4
Auto Color Tone Control (Cool/Medium/Warm)
1
32
Picture Mode
Color Temperature
XD
Advanced
Aspect Ratio
Picture Reset
Screen
Picture
Picture
Picture Mode
Color Temperature
XD
Advanced
Aspect Ratio
Picture Reset
Screen
Color Temperature G
DE F G MENU
Cool
Medium
Warm
User
DE F G MENU
MFL41469212-Edit2-en5-mi 3/12/09 9:05 PM Page 46
PIC
TU
RE
CO
NT
RO
L
47
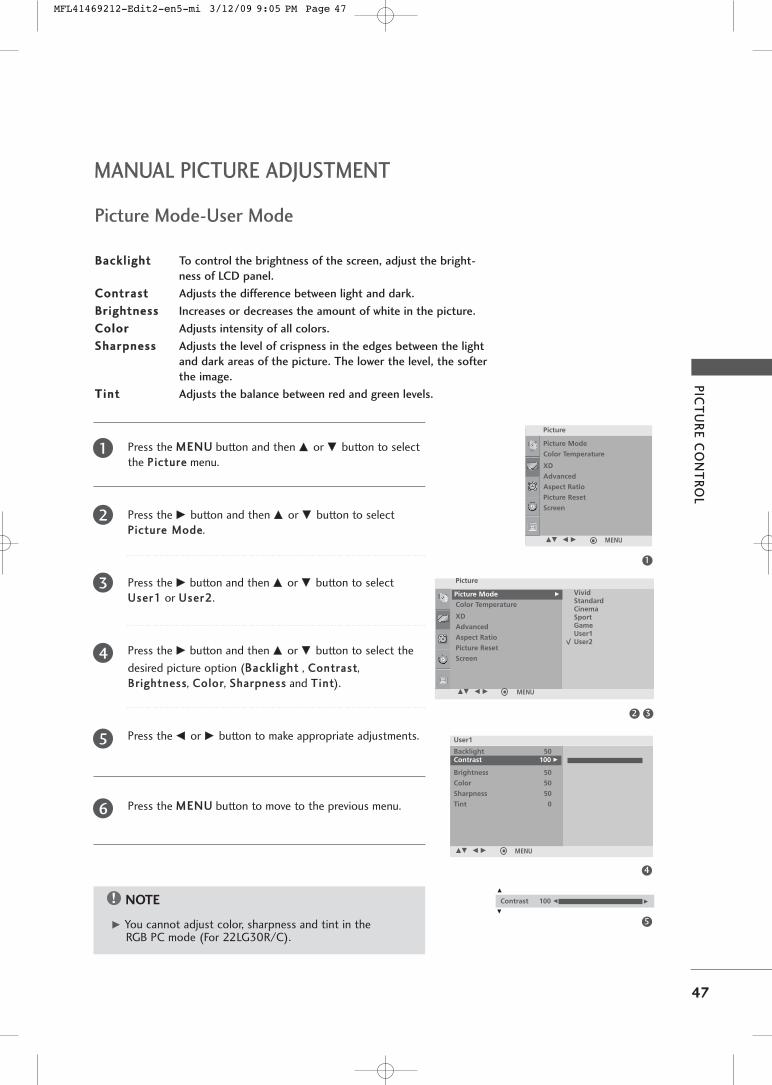
MANUAL PICTURE ADJUSTMENT
Press the MMEENNUU button and then DD or EE button to selectthe PPiiccttuurree menu.
Press the GG button and then DD or EE button to selectPPiiccttuurree MMooddee.
Press the GG button and then DD or EE button to selectUUsseerr11 or UUsseerr22.
Press the GG button and then DD or EE button to select the
desired picture option (BBaacckkll iigghhtt , CCoonnttrraasstt,BBrriigghhttnneessss, CCoolloorr, SShhaarrppnneessss and TTiinntt).
Press the FF or GG button to make appropriate adjustments.
Press the MMEENNUU button to move to the previous menu.
Picture Mode-User Mode
BBaacckkll iigghhtt To control the brightness of the screen, adjust the bright-
ness of LCD panel.
CCoonnttrraasstt Adjusts the difference between light and dark.
BBrriigghhttnneessss Increases or decreases the amount of white in the picture.
CCoolloorr Adjusts intensity of all colors.
SShhaarrppnneessss Adjusts the level of crispness in the edges between the light
and dark areas of the picture. The lower the level, the softer
the image.
TTiinntt Adjusts the balance between red and green levels.
NOTE!
GG You cannot adjust color, sharpness and tint in the RGB PC mode (For 22LG30R/C).
1
2
3
4
5
6
1
32
5
4
Picture Mode
Color Temperature
XD
Advanced
Aspect Ratio
Picture Reset
Screen
Picture
DE F G MENU
Picture
Picture Mode
Color Temperature
XD
Advanced
Aspect Ratio
Picture Reset
Screen
Picture Mode G
DE F G MENU
VividStandardCinemaSportGameUser1User2
User1
Backlight 50
Contrast 100
Brightness 50
Color 50
Sharpness 50
Tint 0
Contrast 100 G
DE F G MENU
Contrast 100 F
E
G
E
MFL41469212-Edit2-en5-mi 3/12/09 9:05 PM Page 47
PIC
TU
RE
CO
NT
RO
L
48
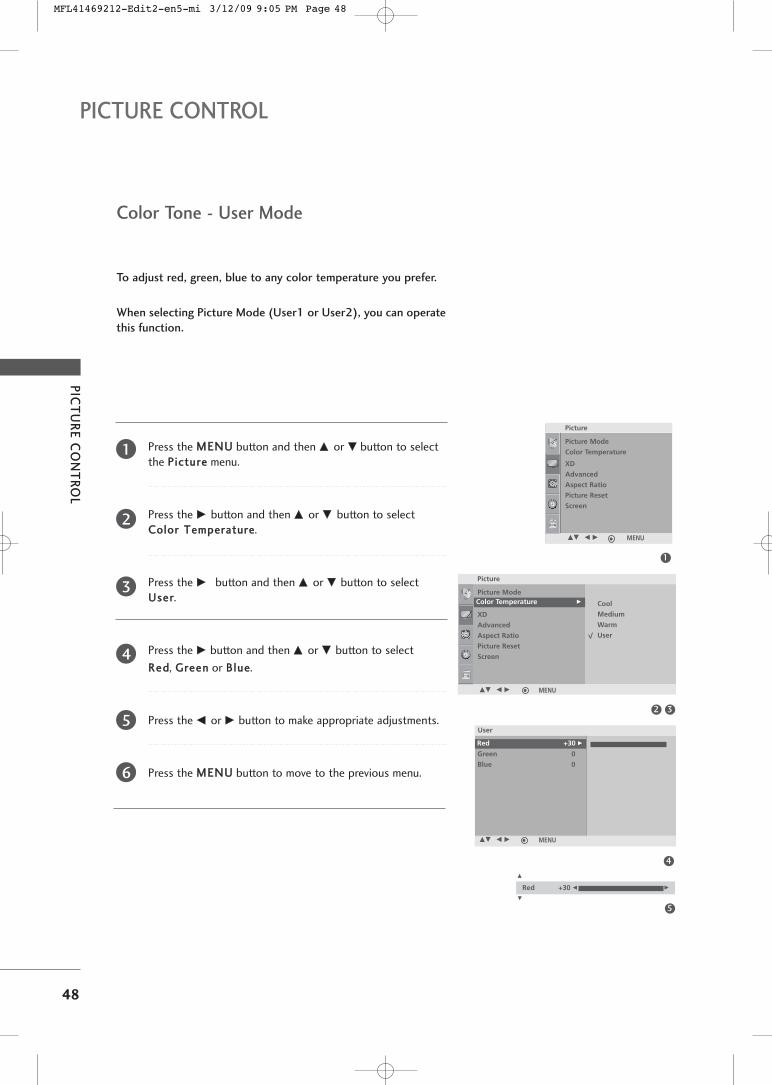
PICTURE CONTROL
To adjust red, green, blue to any color temperature you prefer.
When selecting Picture Mode (User1 or User2), you can operate
this function.
Color Tone - User Mode
Press the MMEENNUU button and then DD or EE button to selectthe PPiiccttuurree menu.
Press the GG button and then DD or EE button to selectCCoolloorr TTeemmppeerraattuurree.
Press the GG button and then DD or EE button to selectUUsseerr.
Press the GG button and then DD or EE button to select
RReedd, GGrreeeenn or BBlluuee.
Press the FF or GG button to make appropriate adjustments.
Press the MMEENNUU button to move to the previous menu.
1
2
3
4
5
6
1
32
4
Picture Mode
Color Temperature
XD
Advanced
Aspect Ratio
Picture Reset
Screen
Picture
DE F G MENU
Picture
Picture Mode
Color Temperature
XD
Advanced
Aspect Ratio
Picture Reset
Screen
Color Temperature G
DE F G MENU
Cool
Medium
Warm
User
Red +30
Green 0
Blue 0
Red +30 G
DE F G MENU
User
5
Red +30 F G
E
E
MFL41469212-Edit2-en5-mi 3/12/09 9:05 PM Page 48
PIC
TU
RE
CO
NT
RO
L
49
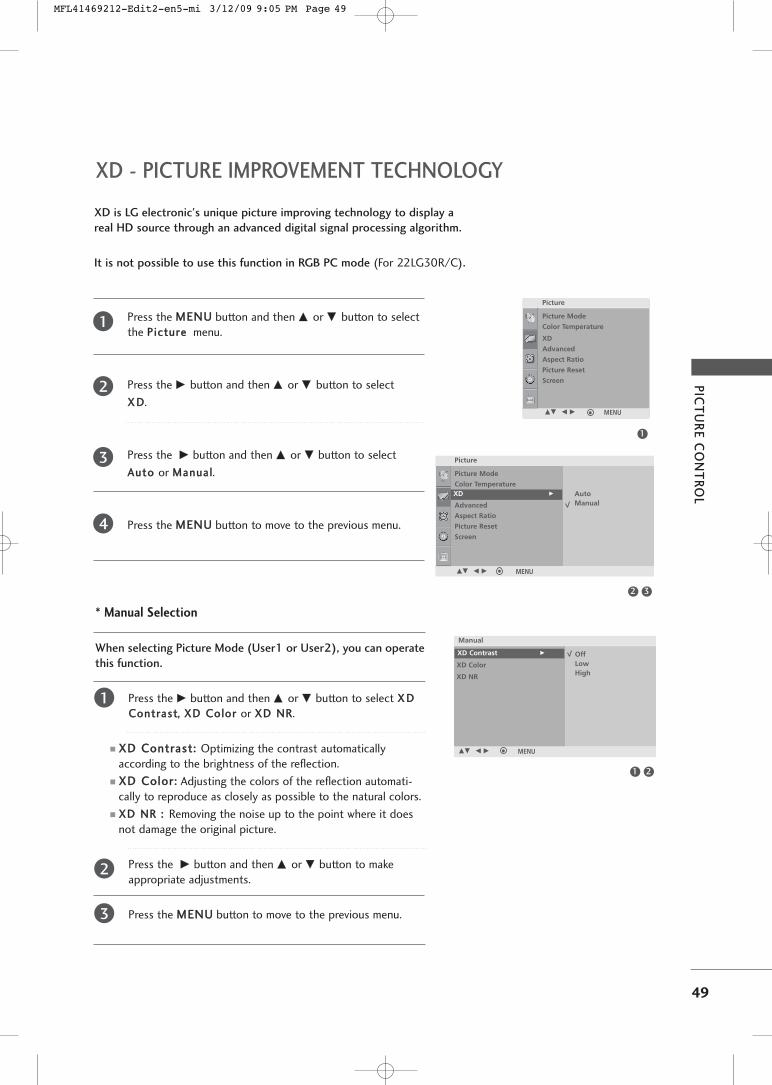
XD - PICTURE IMPROVEMENT TECHNOLOGY
Press the MMEENNUU button and then DD or EE button to select the PPiiccttuurree menu.
Press the GG button and then DD or EE button to select
XX DD.
Press the GG button and then DD or EE button to select
AAuuttoo or MMaannuuaall.
Press the MMEENNUU button to move to the previous menu.
XD is LG electronic's unique picture improving technology to display a
real HD source through an advanced digital signal processing algorithm.
It is not possible to use this function in RGB PC mode (For 22LG30R/C).
1
2
3
4
1
32
Picture Mode
Color Temperature
XD
Advanced
Aspect Ratio
Picture Reset
Screen
Picture
DE F G MENU
Picture
Picture Mode
Color Temperature
XD
Advanced
Aspect Ratio
Picture Reset
Screen
XD G
DE F G MENU
AutoManual
* Manual Selection
When selecting Picture Mode (User1 or User2), you can operate
this function.
Press the GG button and then DD or EE button to select XX DD
CCoonnttrraasstt,, XXDD CCoolloorr or XXDD NNRR.
� XXDD CCoonnttrraasstt:: Optimizing the contrast automaticallyaccording to the brightness of the reflection.
� XXDD CCoolloorr:: Adjusting the colors of the reflection automati-cally to reproduce as closely as possible to the natural colors.
� XXDD NNRR :: Removing the noise up to the point where it doesnot damage the original picture.
Press the GG button and then DD or EE button to makeappropriate adjustments.
Press the MMEENNUU button to move to the previous menu.
1
2
3
21
Manual
XD Contrast G
XD Color
XD NR
XD Contrast G
DE F G MENU
OffLowHigh
MFL41469212-Edit2-en5-mi 3/12/09 9:05 PM Page 49
PIC
TU
RE
CO
NT
RO
L
50
PICTURE CONTROL
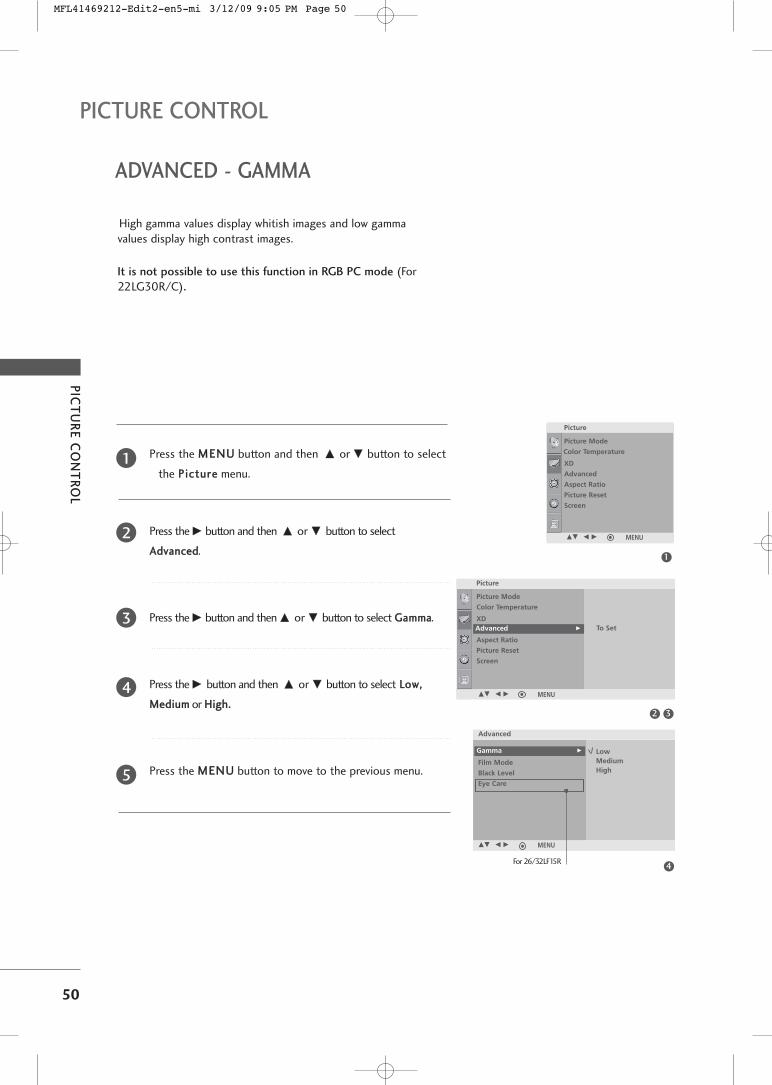
ADVANCED - GAMMA
High gamma values display whitish images and low gammavalues display high contrast images.
It is not possible to use this function in RGB PC mode (For22LG30R/C).
Press the MMEENNUU button and then DD or EE button to select
the PPiiccttuurree menu.
Press the GG button and then DD or EE button to select
AAddvvaanncceedd.
Press the GG button and then DD or EE button to select GGaammmmaa.
Press the GG button and then DD or EE button to select LLooww,,
MMeeddiiuumm or HHiigghh..
Press the MMEENNUU button to move to the previous menu.
1
2
3
4
5
1
32
4
Picture Mode
Color Temperature
XD
Advanced
Aspect Ratio
Picture Reset
Screen
Picture
DE F G MENU
Picture
Picture Mode
Color Temperature
XD
Advanced
Aspect Ratio
Picture Reset
Screen
Advanced G
DE F G MENU
To Set
Gamma
Film Mode
Black Level
Eye Care
Gamma G
DE F G MENU
Advanced
LowMediumHigh
For 26/32LF15R
MFL41469212-Edit2-en5-mi 3/12/09 9:05 PM Page 50
PIC
TU
RE
CO
NT
RO
L
51
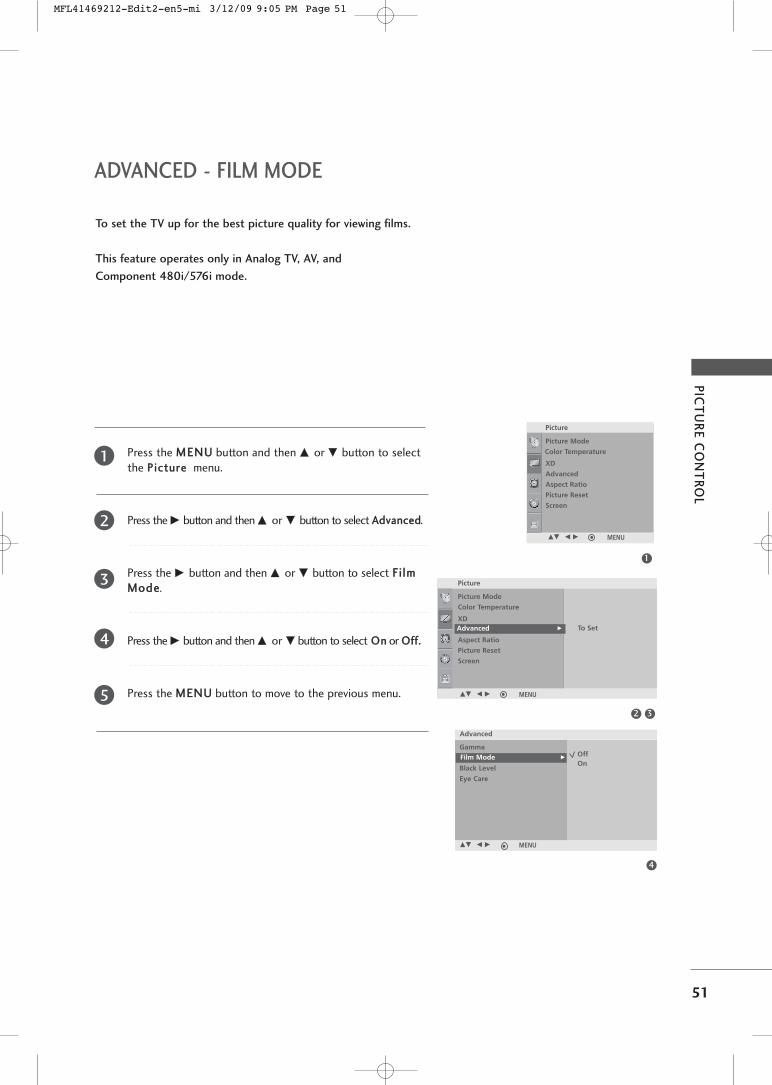
ADVANCED - FILM MODE
To set the TV up for the best picture quality for viewing films.
This feature operates only in Analog TV, AV, and
Component 480i/576i mode.
Press the MMEENNUU button and then DD or EE button to select the PPiiccttuurree menu.
Press the GG button and then DD or EE button to select AAddvvaanncceedd.
Press the GG button and then DD or EE button to select FFii llmmMMooddee.
Press the GG button and then DD or EE button to select OOnn or OOffff..
Press the MMEENNUU button to move to the previous menu.
1
2
3
4
5
1
32
4
Picture Mode
Color Temperature
XD
Advanced
Aspect Ratio
Picture Reset
Screen
Picture
DE F G MENU
Picture
Picture Mode
Color Temperature
XD
Advanced
Aspect Ratio
Picture Reset
Screen
Advanced G
DE F G MENU
To Set
Gamma
Film Mode
Black Level
Eye Care
Film Mode G
DE F G MENU
Advanced
OffOn
MFL41469212-Edit2-en5-mi 3/12/09 9:05 PM Page 51
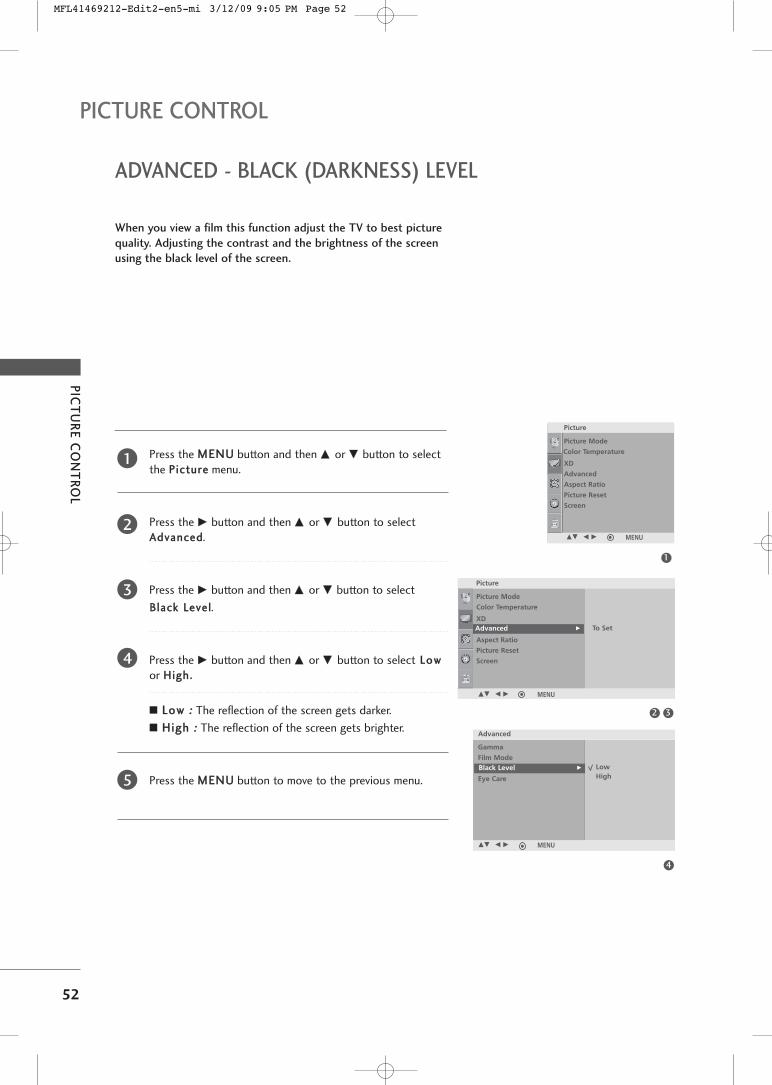
PIC
TU
RE
CO
NT
RO
L
52
PICTURE CONTROL
ADVANCED - BLACK (DARKNESS) LEVEL
When you view a film this function adjust the TV to best picture
quality. Adjusting the contrast and the brightness of the screen
using the black level of the screen.
Press the MMEENNUU button and then DD or EE button to select the PPiiccttuurree menu.
Press the GG button and then DD or EE button to selectAAddvvaanncceedd.
Press the GG button and then DD or EE button to select
BBllaacckk LLeevveell.
Press the GG button and then DD or EE button to select LLooww
or HHiigghh..
AA LLooww :: The reflection of the screen gets darker.
AA HHiigghh :: The reflection of the screen gets brighter.
Press the MMEENNUU button to move to the previous menu.
1
2
3
4
5
1
32
4
Picture Mode
Color Temperature
XD
Advanced
Aspect Ratio
Picture Reset
Screen
Picture
DE F G MENU
Picture
Picture Mode
Color Temperature
XD
Advanced
Aspect Ratio
Picture Reset
Screen
Advanced G
DE F G MENU
To Set
Gamma
Film Mode
Black Level
Eye Care
Black Level G
DE F G MENU
Advanced
LowHigh
MFL41469212-Edit2-en5-mi 3/12/09 9:05 PM Page 52
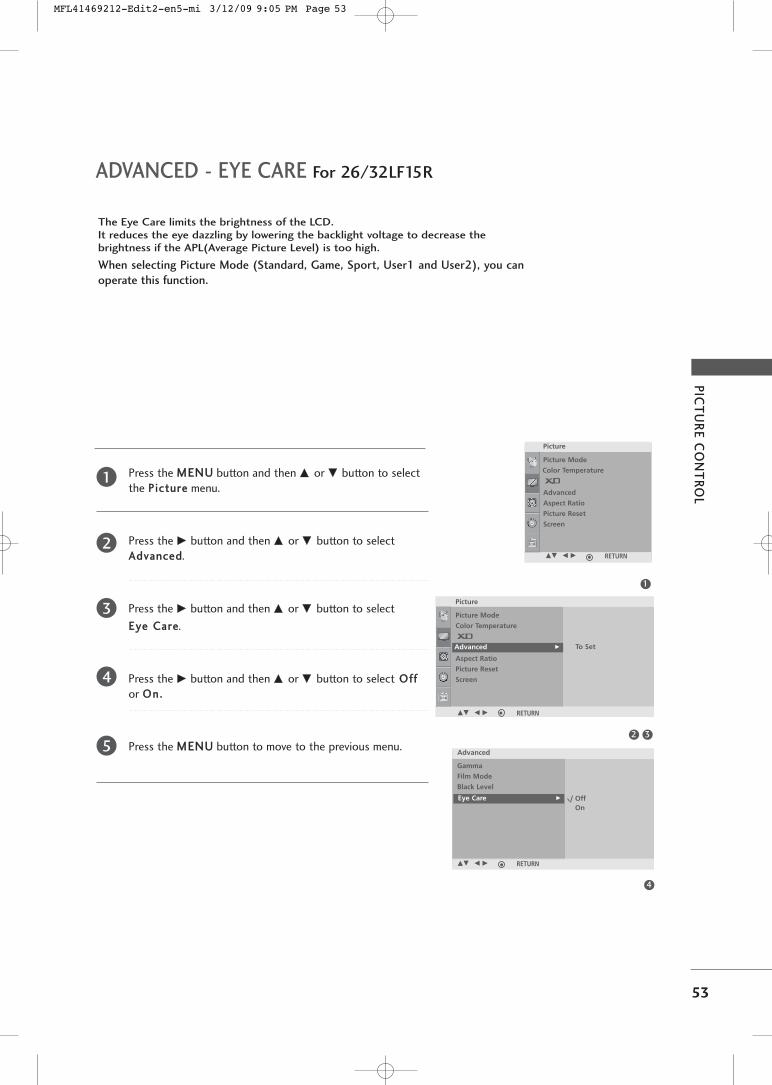
PIC
TU
RE
CO
NT
RO
L
53
ADVANCED - EYE CARE For 26/32LF15R
The Eye Care limits the brightness of the LCD.It reduces the eye dazzling by lowering the backlight voltage to decrease thebrightness if the APL(Average Picture Level) is too high.
When selecting Picture Mode (Standard, Game, Sport, User1 and User2), you can
operate this function.
Press the MMEENNUU button and then DD or EE button to select the PPiiccttuurree menu.
Press the GG button and then DD or EE button to selectAAddvvaanncceedd.
Press the GG button and then DD or EE button to select
EEyyee CCaarree.
Press the GG button and then DD or EE button to select OOff ff
or OOnn..
Press the MMEENNUU button to move to the previous menu.
1
2
3
4
5
1
32
4
Picture Mode
Color Temperature
Advanced
Aspect Ratio
Picture Reset
Screen
Picture
DE F G RETURN
Picture
Picture Mode
Color Temperature
Advanced
Aspect Ratio
Picture Reset
Screen
Advanced G
DE F G RETURN
To Set
Gamma
Film Mode
Black Level
Eye CareEye Care G
DE F G RETURN
Advanced
OffOn
MFL41469212-Edit2-en5-mi 3/12/09 9:05 PM Page 53
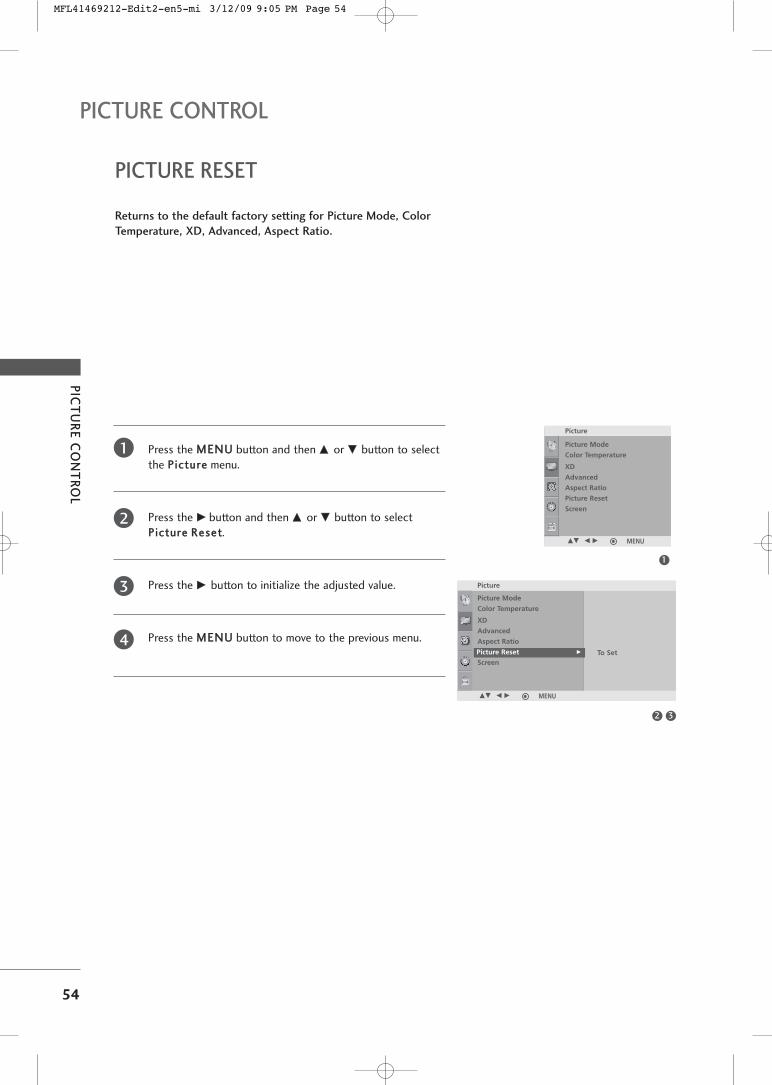
PIC
TU
RE
CO
NT
RO
L
54
PICTURE CONTROL
PICTURE RESET
Press the MMEENNUU button and then DD or EE button to selectthe PPiiccttuurree menu.
Press the GG button and then DD or EE button to selectPPiiccttuurree RReesseett.
Press the GG button to initialize the adjusted value.
Press the MMEENNUU button to move to the previous menu.
Returns to the default factory setting for Picture Mode, Color
Temperature, XD, Advanced, Aspect Ratio.
1
2
3
4
1
32
Picture Mode
Color Temperature
XD
Advanced
Aspect Ratio
Picture Reset
Screen
Picture
DE F G MENU
Picture
Picture Mode
Color Temperature
XD
Advanced
Aspect Ratio
Picture Reset
Screen
Picture Reset G
DE F G MENU
To Set
MFL41469212-Edit2-en5-mi 3/12/09 9:05 PM Page 54
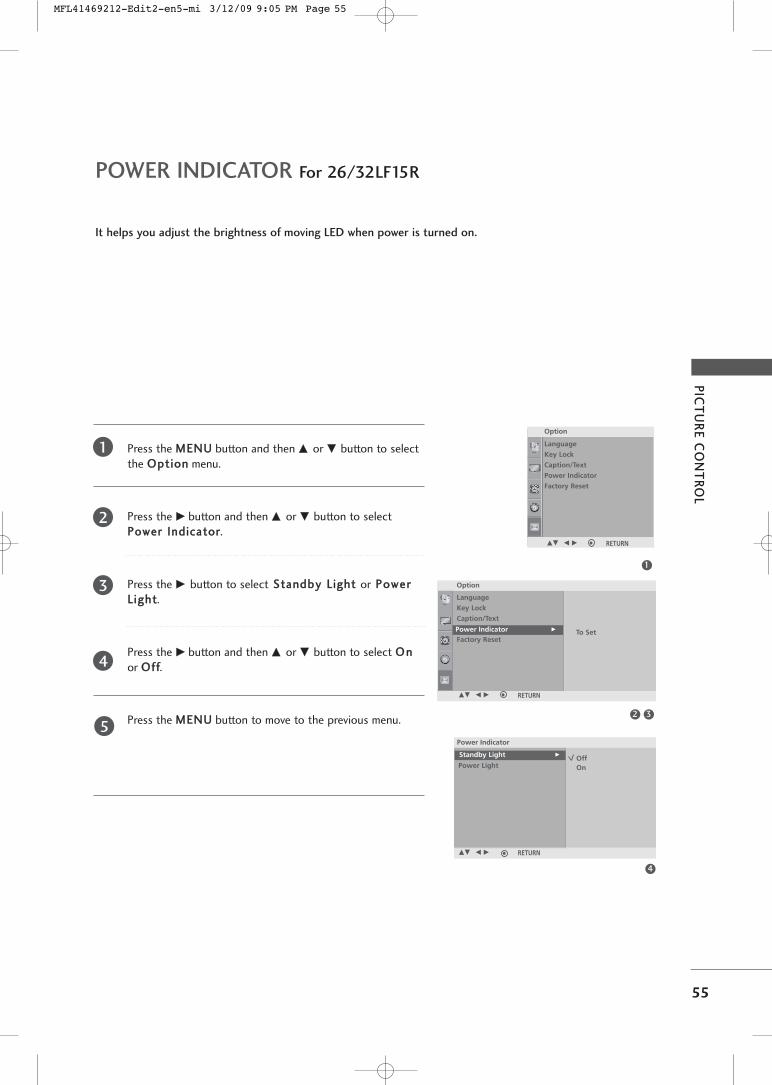
PIC
TU
RE
CO
NT
RO
L
55
POWER INDICATOR For 26/32LF15R
It helps you adjust the brightness of moving LED when power is turned on.
1
32
Option
Language
Key Lock
Caption/Text
Power Indicator
Factory ResetPower Indicator G
DE F G RETURN
To Set
Language
Key Lock
Caption/Text
Power Indicator
Factory Reset
Option
DE F G RETURN
Standby Light
Power Light
Standby Light G
DE F G RETURN
Power Indicator
OffOn
4
Press the MMEENNUU button and then DD or EE button to selectthe OOppttiioonn menu.
Press the GG button and then DD or EE button to selectPPoowweerr IInnddiiccaattoorr.
Press the GG button to select SSttaannddbbyy LLiigghhtt or PPoowweerrLL iigghhtt.
Press the GG button and then DD or EE button to select OOnn
or OOffff.
Press the MMEENNUU button to move to the previous menu.
1
2
3
4
5
MFL41469212-Edit2-en5-mi 3/12/09 9:05 PM Page 55
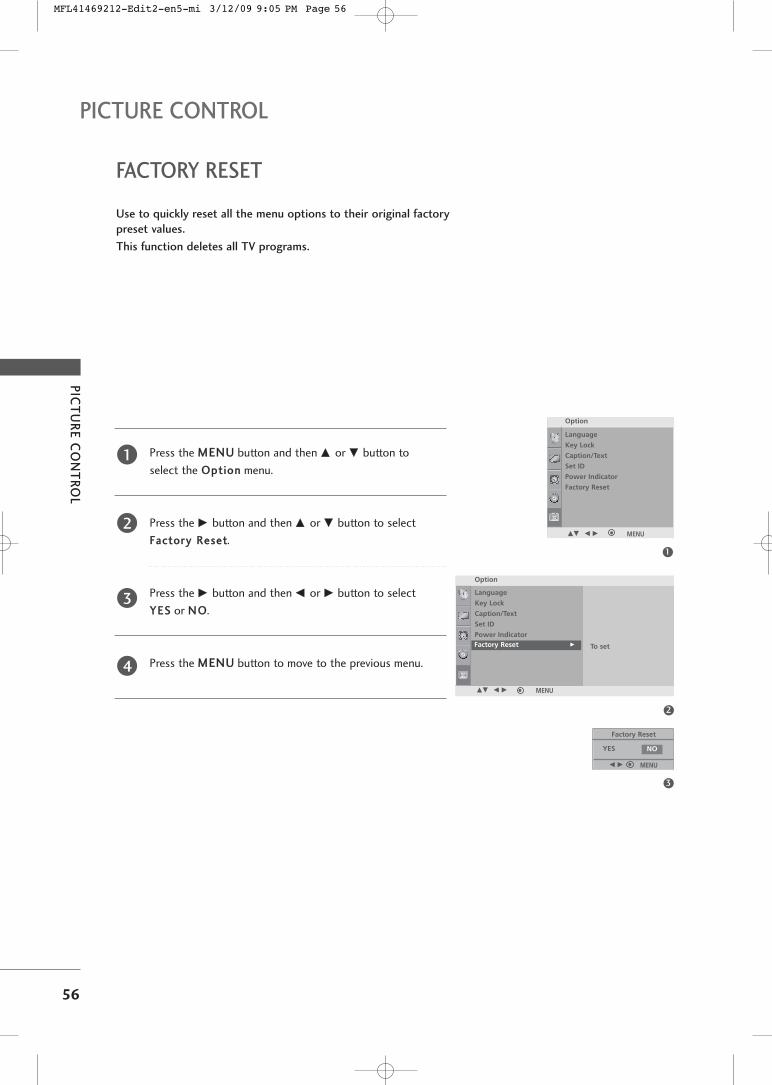
PIC
TU
RE
CO
NT
RO
L
56
PICTURE CONTROL
Use to quickly reset all the menu options to their original factory
preset values.
This function deletes all TV programs.
FACTORY RESET
Press the MMEENNUU button and then DD or EE button to
select the OOppttiioonn menu.
Press the GG button and then DD or EE button to select
FFaaccttoorryy RReesseett.
Press the GG button and then FF or GG button to select
YYEESS or NN OO.
Press the MMEENNUU button to move to the previous menu.
1
2
3
4
1
3
2
Option
Language
Key Lock
Caption/Text
Set ID
Power Indicator
Factory ResetFactory Reset G
DE F G MENU
Language
Key Lock
Caption/Text
Set ID
Power Indicator
Factory Reset
Option
DE F G MENU
To set
Factory Reset
YES NO
F G MENU
MFL41469212-Edit2-en5-mi 3/12/09 9:05 PM Page 56
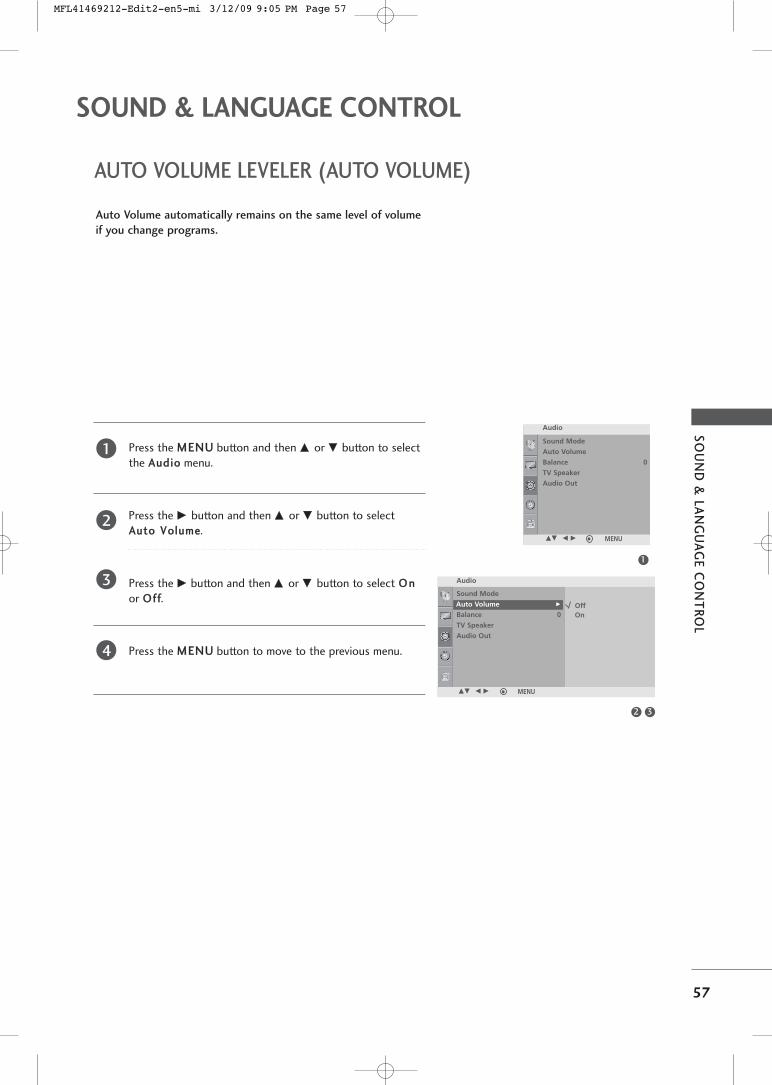
SO
UN
D &
LAN
GU
AG
E C
ON
TR
OL
57
AUTO VOLUME LEVELER (AUTO VOLUME)
Press the MMEENNUU button and then DD or EE button to selectthe AAuuddiioo menu.
Press the GG button and then DD or EE button to selectAAuuttoo VVoolluummee.
Press the GG button and then DD or EE button to select OO nn
or OOff ff.
Press the MMEENNUU button to move to the previous menu.
Auto Volume automatically remains on the same level of volume
if you change programs.
1
2
3
4
1
Sound Mode
Auto Volume
Balance 0
TV Speaker
Audio Out
Audio
32
Audio
Sound Mode
Auto Volume
Balance 0
TV Speaker
Audio Out
Auto Volume G
DE F G MENU
OffOn
DE F G MENU
SOUND & LANGUAGE CONTROL
MFL41469212-Edit2-en5-mi 3/12/09 9:05 PM Page 57
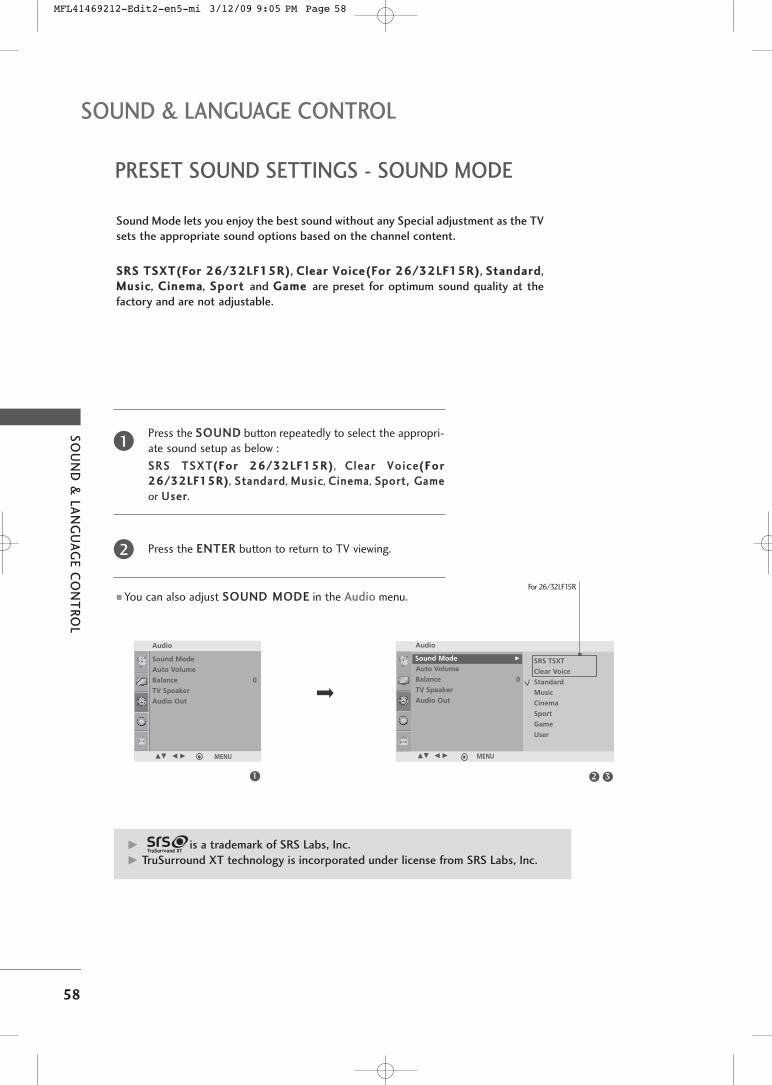
SO
UN
D &
LAN
GU
AG
E C
ON
TR
OL
58
SOUND & LANGUAGE CONTROL
PRESET SOUND SETTINGS - SOUND MODE
Sound Mode lets you enjoy the best sound without any Special adjustment as the TV
sets the appropriate sound options based on the channel content.
SSRRSS TTSSXXTT((FFoorr 2266//3322LLFF1155RR)), CClleeaarr VVooiiccee((FFoorr 2266//3322LLFF1155RR)), SSttaannddaarrdd,MMuussiicc, CCiinneemmaa, SSppoorrtt and GGaammee are preset for optimum sound quality at the
factory and are not adjustable.
1 32
Sound Mode
Auto Volume
Balance 0
TV Speaker
Audio Out
Audio Audio
Sound Mode
Auto Volume
Balance 0
TV Speaker
Audio Out
Sound Mode G
DE F G MENU
SRS TSXT
Clear Voice
Standard
Music
Cinema
Sport
Game
User
DE F G MENU
Press the SSOOUUNNDD button repeatedly to select the appropri-ate sound setup as below :
SSRRSS TTSSXXTT((FFoorr 2266//3322LLFF1155RR)), CClleeaarr VVoo ii ccee(( FF oo rr
2266//3322LLFF1155RR)), SSttaannddaarrdd, MMuussiicc, CCiinneemmaa, SSppoorrtt,, GGaammee
or UUsseerr.
Press the EENNTTEERR button to return to TV viewing.
� You can also adjust SSOOUUNNDD MMOODDEE in the AAuuddiioo menu.
2
1
GG is a trademark of SRS Labs, Inc.
GG TruSurround XT technology is incorporated under license from SRS Labs, Inc.
For 26/32LF15R
MFL41469212-Edit2-en5-mi 3/12/09 9:05 PM Page 58
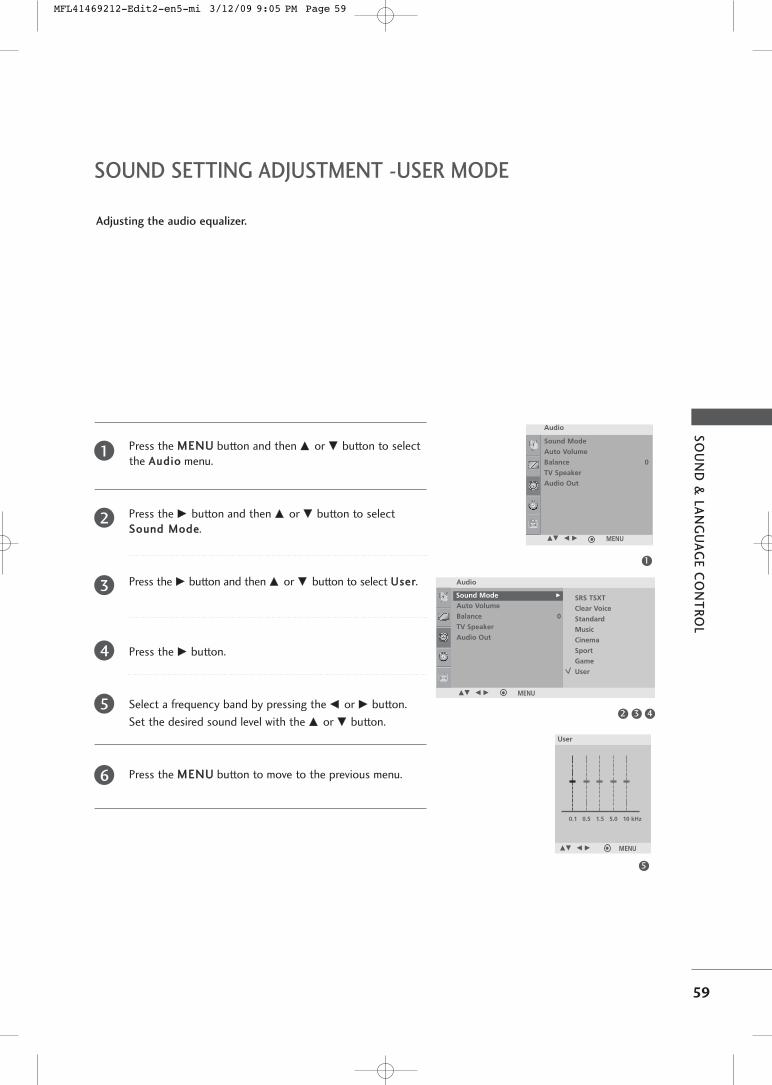
SO
UN
D &
LAN
GU
AG
E C
ON
TR
OL
59
SOUND SETTING ADJUSTMENT -USER MODE
Press the MMEENNUU button and then DD or EE button to selectthe AAuuddiioo menu.
Press the GG button and then DD or EE button to selectSSoouunndd MMooddee.
Press the GG button and then DD or EE button to select UUsseerr.
Press the GG button.
Select a frequency band by pressing the FF or GG button.
Set the desired sound level with the DD or EE button.
Press the MMEENNUU button to move to the previous menu.
Adjusting the audio equalizer.
1
2
3
4
5
6
1
3 42
Sound Mode
Auto Volume
Balance 0
TV Speaker
Audio Out
Audio
Audio
Sound Mode
Auto Volume
Balance 0
TV Speaker
Audio Out
Sound Mode G
DE F G MENU
SRS TSXT
Clear Voice
Standard
Music
Cinema
Sport
Game
User
DE F G MENU
User
DE F G MENU
0.1 0.5 1.5 5.0 10 kHz
5
MFL41469212-Edit2-en5-mi 3/12/09 9:05 PM Page 59
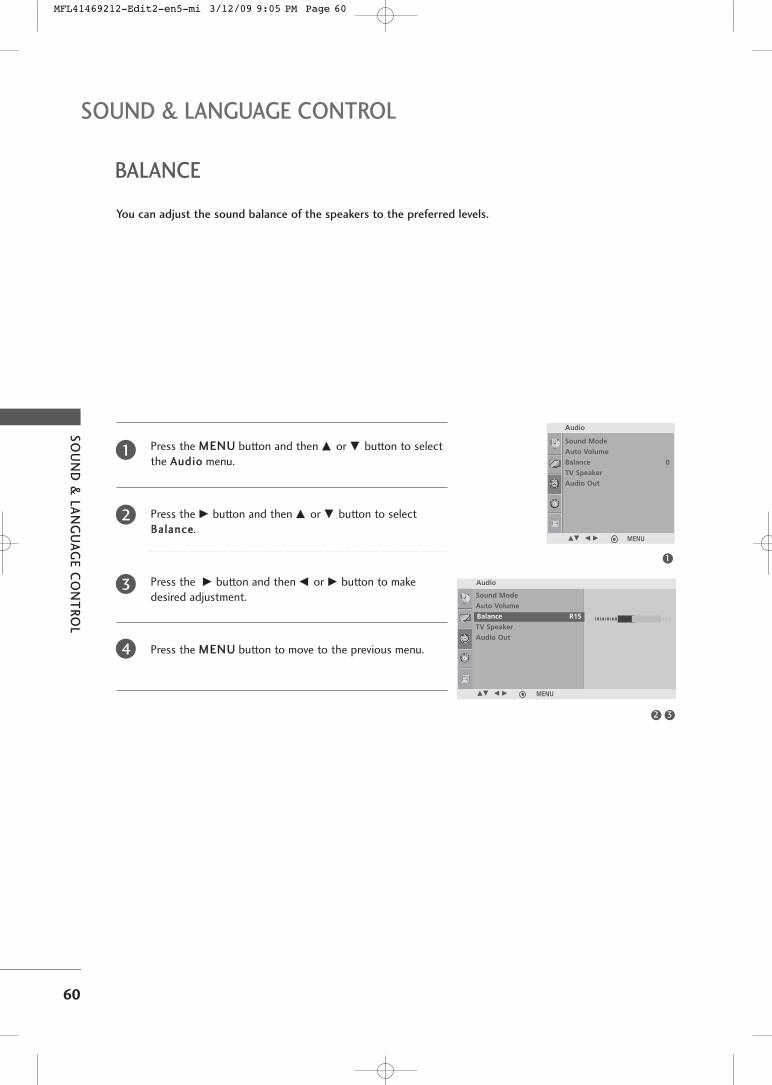
SO
UN
D &
LAN
GU
AG
E C
ON
TR
OL
60
SOUND & LANGUAGE CONTROL
BALANCE
You can adjust the sound balance of the speakers to the preferred levels.
Press the MMEENNUU button and then DD or EE button to selectthe AAuuddiioo menu.
Press the GG button and then DD or EE button to selectBBaallaannccee.
Press the GG button and then FF or GG button to makedesired adjustment.
Press the MMEENNUU button to move to the previous menu.
1
2
3
4
1
32
Sound Mode
Auto Volume
Balance 0
TV Speaker
Audio Out
Audio
DE F G MENU
Audio
Sound Mode
Auto Volume
Balance 0
TV Speaker
Audio Out
Balance R15
DE F G MENU
MFL41469212-Edit2-en5-mi 3/12/09 9:05 PM Page 60
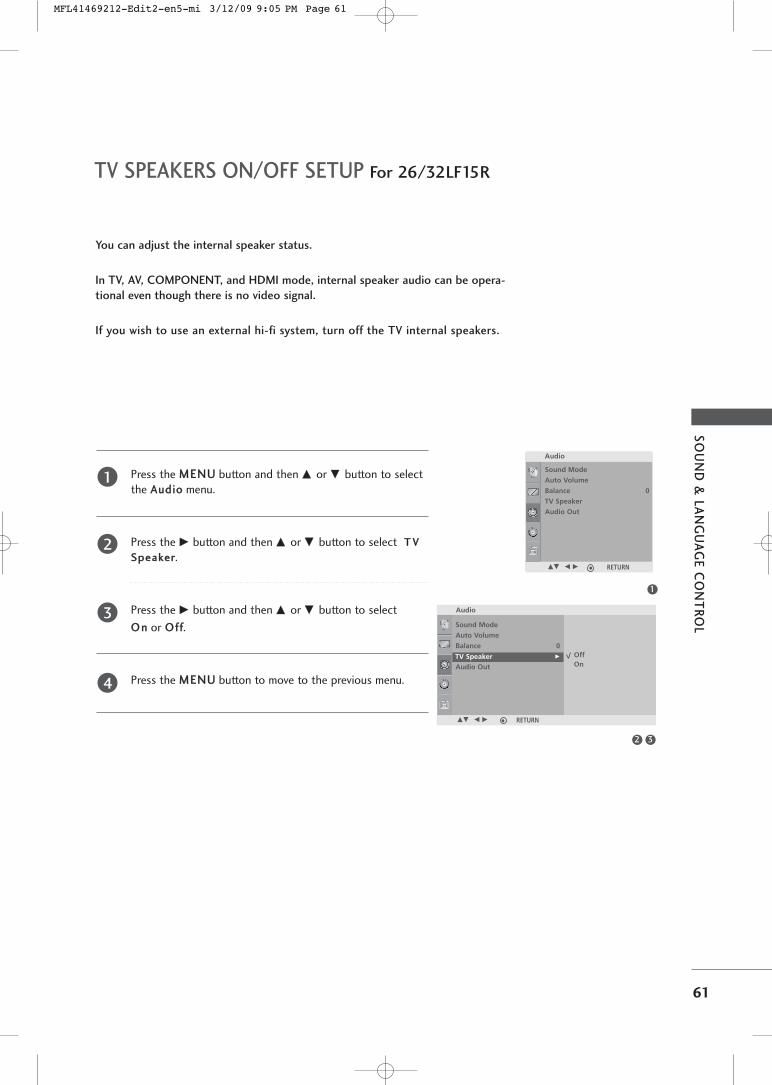
SO
UN
D &
LAN
GU
AG
E C
ON
TR
OL
61
TV SPEAKERS ON/OFF SETUP For 26/32LF15R
You can adjust the internal speaker status.
In TV, AV, COMPONENT, and HDMI mode, internal speaker audio can be opera-
tional even though there is no video signal.
If you wish to use an external hi-fi system, turn off the TV internal speakers.
Press the MMEENNUU button and then DD or EE button to selectthe AAuuddiioo menu.
Press the GG button and then DD or EE button to select TT VV
SSppeeaakkeerr.
Press the GG button and then DD or EE button to select
OO nn or OOff ff.
Press the MMEENNUU button to move to the previous menu.
1
2
3
4
1
2 3
Sound Mode
Auto Volume
Balance 0
TV Speaker
Audio Out
Audio
DE F G RETURN
Audio
Sound Mode
Auto Volume
Balance 0
TV Speaker
Audio OutTV Speaker G Off
On
DE F G RETURN
MFL41469212-Edit2-en5-mi 3/12/09 9:05 PM Page 61
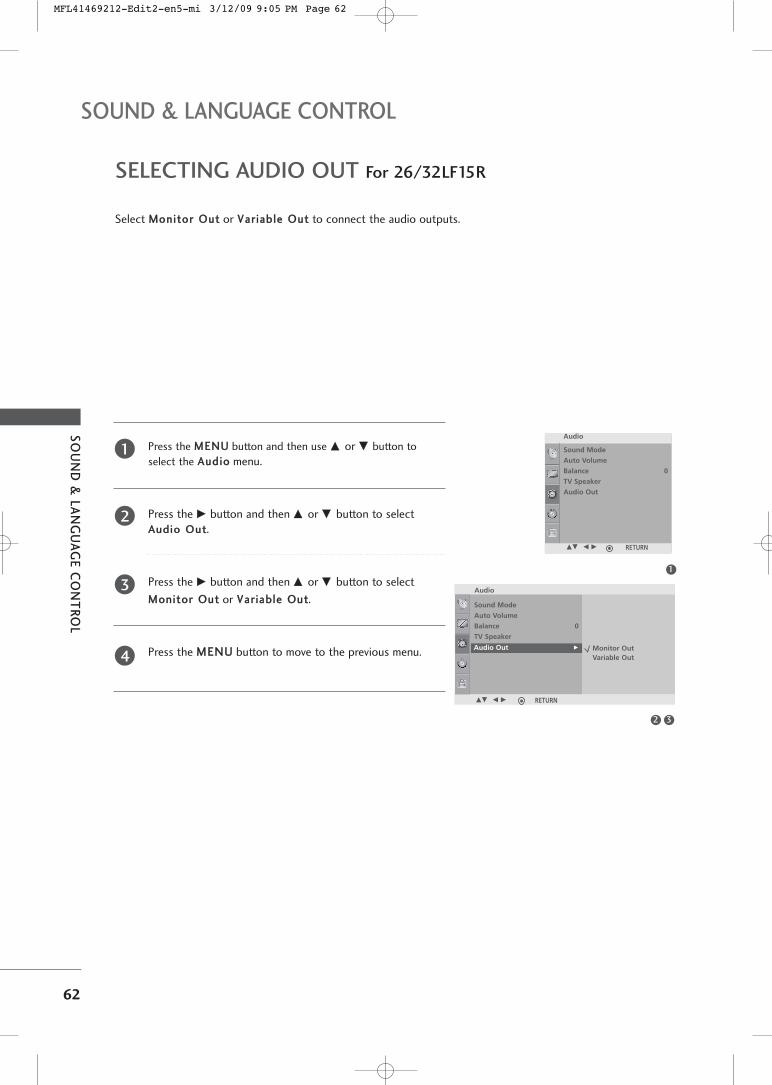
SO
UN
D &
LAN
GU
AG
E C
ON
TR
OL
62
SOUND & LANGUAGE CONTROL
SELECTING AUDIO OUT For 26/32LF15R
Select MMoonniittoorr OOuutt or VVaarr iiaabbllee OOuutt to connect the audio outputs.
Press the MMEENNUU button and then use DD or EE button to
select the AAuuddiioo menu.
Press the GG button and then DD or EE button to selectAAuuddiioo OOuutt.
Press the GG button and then DD or EE button to select
MMoonniittoorr OOuutt or VVaarr iiaabbllee OOuutt.
Press the MMEENNUU button to move to the previous menu.
1
2
3
4
1
2 3
Sound Mode
Auto Volume
Balance 0
TV Speaker
Audio Out
Audio
DE F G RETURN
Audio
Sound Mode
Auto Volume
Balance 0
TV Speaker
Audio OutAudio Out G
DE F G RETURN
Monitor OutVariable Out
MFL41469212-Edit2-en5-mi 3/12/09 9:05 PM Page 62
SO
UN
D &
LAN
GU
AG
E C
ON
TR
OL
63
ON-SCREEN MENUS LANGUAGE SELECTION
The menus can be shown on the screen in the selected language. First select your language.
Press the MMEENNUU button and then use DD or EE button to select the
OOppttiioonn menu.
Press the GG button and then use DD or EE button to select LLaanngguuaaggee.
Press the GG button and then use FF or GG button to select your desiredlanguage.
Press the MMEENNUU button to move to the previous menu.
1
2
3
4
MFL41469212-Edit2-en5-mi 3/12/09 9:05 PM Page 63
SO
UN
D &
LAN
GU
AG
E C
ON
TR
OL
64
SOUND & LANGUAGE CONTROL
CLOSED CAPTIONS
2. An old, bad, or illegally recorded tape is being played.3. Strong, random signals from a car or airplane interfere
with the TV signal.4. The signal from the antenna is weak.5. The program wasn’t captioned when it was produced,
transmitted, or taped.
Closed captioning is a process which converts the audioportion of a television program into written words whichthen appear as subtitles on the television screen. Closedcaptions allow viewers to read the dialogue and narrationof television programs.
UUssiinngg CClloosseedd CCaappttiioonnssCaptions are the subtitles of the dialogue and narrationof television programs. For prerecorded programs, program dialogue can be arranged into captions inadvance. Its possible to caption a live program by usinga process called real-time captioning, which creates captions instantly. Real-time captioning is normally doneby professional reporters using a machine shorthand
system and computer fortranslation into English.Captioning is an effectivesystem for the hearing-impaired, and it can alsoaid in teaching languageskills.
• The picture at left shows a typical caption.
CCaappttiioonn TTiippss• Not all TV broadcasts include closed caption signals.• Sometimes TV stations broadcast four different caption
signals on the same channel. By selecting Mode1 toMode2, you can choose which signal you view. Mode1is usually the signal with the captions, while anothermode might show demonstration or programminginformation.
• Your TV might not receive caption signals normally inthe following situations.
• IIGGNNIITTIIOONN::Picture may flutter, drift, suffer fromblack spots, or horizontal streaking.Usually caused by interference fromautomobile ignition systems, neonlamps, electrical drills, and otherelectrical appliances.
• GGHHOOSSTTSS::Ghosts are caused when the TV sig-nal splits and follows two paths.One is the direct path and the otheris reflected off tall buildings, hills orother objects. Changing the directionor position of the antenna mayimprove reception.
• SSNNOOWW::If your receiver is located at theweak, fringe area of a TV signal, yourpicture may be marred by smalldots. It may be necessary to install aspecial antenna to improve the picture.
FOLLOW ME
� You can also adjust CCaappttiioonn//TTeexxtt in the OOppttiioonn menu.
Use the CCAAPPTTIIOONN button repeatedly to select your captionMode 1, Mode 2, Text1, Text2, or Off.
Press the EENNTTEERR button to return to TV viewing.
1
2
1. Poor reception conditions are encountered:
MFL41469212-Edit2-en5-mi 3/12/09 9:05 PM Page 64
SO
UN
D &
LAN
GU
AG
E C
ON
TR
OL
65
STEREO/SAP BROADCASTS SETUP
The TV can receive MTS stereo programs and any SAP
(Secondary Audio Program) that accompanies the stereo program;
if the broadcaster transmits one additional sound signal in
addition to the original one.
Mono: The primary language is heard from left and right speakers.
Signal mode is mono.
Stereo: The primary language is heard from left and right speakers.
Signal mode is stereo.
SAP: The secondary language is heard from left and right speakers
in mono sound.
Use the MMTTSS button to select your desired MTS mode inanalog signal. Each time you press the MMTTSS button, MMoonnoo,SStteerreeoo, or SSAAPP appear in turn.
Press the EENNTTEERR button to return to TV viewing.
NOTE!
GG Select mono sound mode if the signal is not clear or in poor signal reception areas.
GG SStteerreeoo, SSAAPP modes are available only if included on the broadcast signal.
1
2
MFL41469212-Edit2-en5-mi 3/12/09 9:05 PM Page 65
TIM
E S
ET
TIN
G
66
TIME SETTING
CLOCK SETUP
Press the MMEENNUU button and then DD or EE button to selectthe TTiimmee menu.
Press the GG button and then DD or EE button to selectCClloocckk.
Press the GG button and then DD or EE button to set the
hour.
Press the GG button and then DD or EE button to set theminute.
Press the MMEENNUU button to move to the previous menu.
You must set the time correctly before using on/off timer function.
If current time setting is erased by a power failure or the TV is unplugged, reset
the clock.
1
2
3
4
5
1
3 42
Time
Clock
Off Time
On Time
Sleep Timer
Auto Sleep
Clock G
DE F G MENU
- - : - - AM
Clock
Off Time
On Time
Sleep Timer
Auto Sleep
Time
DE F G MENU
MFL41469212-Edit2-en5-mi 3/12/09 9:05 PM Page 66
TIM
E S
ET
TIN
G
67
AUTO ON/OFF TIME SETTING
Press the MMEENNUU button and then DD or EE button to selectthe TTiimmee menu.
Press the GG button and then DD or EE button to selectOO nn/OOffff TTiimmee.
Press the GG button and then DD or EE button to set the
hour.
Press the GG button and then DD or EE button to set the
minutes.
FFoorr OOnn TTiimmee ffuunnccttiioonn oonnllyy
• CChhaannnneell: Press the GG button and then DD or EE button toselect the channel.
• VVoolluummee: Press the GG button and then DD or EE button toadjust volume level at switch-on.
Press the MMEENNUU button to move to the previous menu.
The Off time function automatically switches the TV to standby at a preset
time.
Two hours after the TV is switched on by the on time function it will auto-
matically switch back to standby mode unless a button has been pressed.
Once the on time/off time is set, these functions operate daily at the preset
time.
The Off time function overrides the On time function if both are set to the
same time.
The TV must be in standby mode for the On time to work.
1
2
3
4
5
6
1
432
Clock
Off Time
On Time
Sleep Timer
Auto Sleep
Time
DE F G MENU
Time
Clock
Off Time
On Time
Sleep Timer
Auto Sleep
Off Time G
DE F G MENU
_ _ : _ _ AM
Off
5432
Time
Clock
Off Time
On Time
Sleep Timer
Auto Sleep
On Time G
DE F G MENU
_ _ : _ _ AM
Ch. TV 1
Vol. 8
On
• To cancel OO nn/OOffff TTiimmee function, select OOff ff.
MFL41469212-Edit2-en5-mi 3/12/09 9:05 PM Page 67
TIM
E S
ET
TIN
G
68
TIME SETTING
SLEEP TIMER SETTING
Press the SSLLEEEEPP button repeatedly to select the number ofminutes. First the ‘ - - - ’ option appears on the screen,followed by the following sleep timer options : 10, 20, 30,60, 90, 120, 180, and 240 minutes.
When the number of minutes you want is displayed on thescreen, press the EENNTTEERR button. The timer begins to countdown from the number of minutes selected.
To check the remaining minutes before the TV turns off, pressthe SSLLEEEEPP button once.
To cancel the Sleep Timer, press the SSLLEEEEPP button repeat-edly to select ‘ - - - ’.
The Sleep Timer turns the TV off at the preset time.
Note that this setting is cleared when the TV is turned off.
2
3
4
1
MFL41469212-Edit2-en5-mi 3/12/09 9:05 PM Page 68
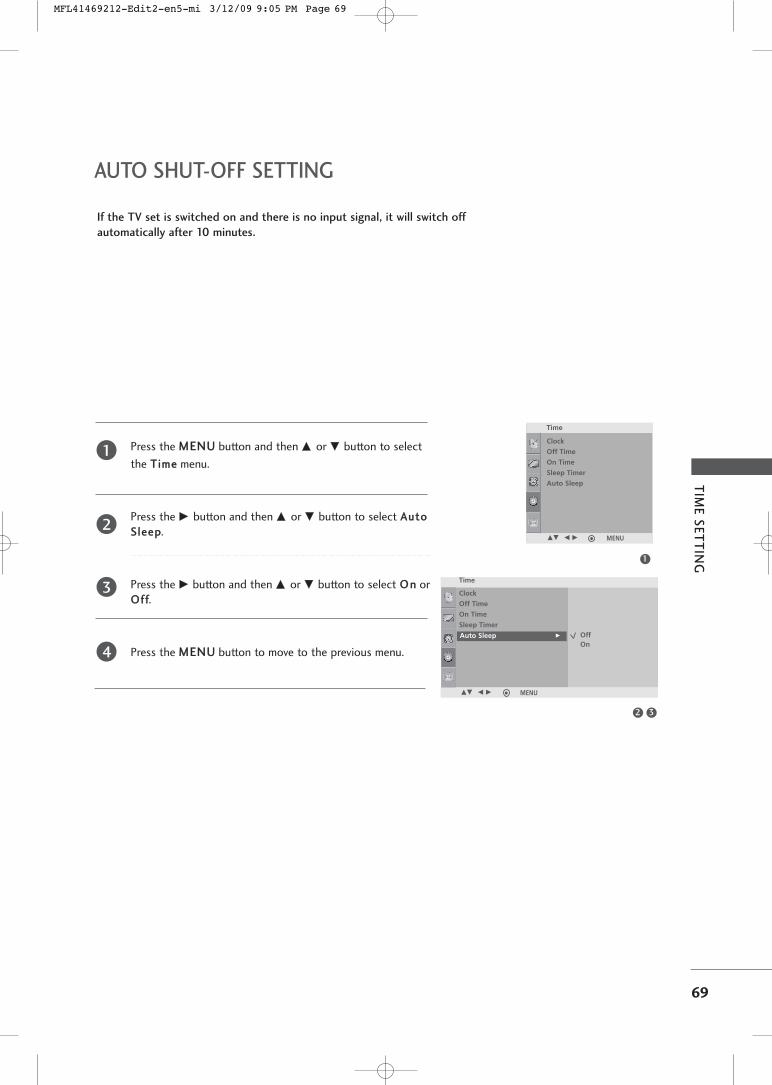
TIM
E S
ET
TIN
G
69
AUTO SHUT-OFF SETTING
If the TV set is switched on and there is no input signal, it will switch off
automatically after 10 minutes.
Press the MMEENNUU button and then DD or EE button to select
the TTiimmee menu.
Press the GG button and then DD or EE button to select AAuuttoo
SSlleeeepp.
Press the GG button and then DD or EE button to select OO nn orOOff ff.
Press the MMEENNUU button to move to the previous menu.
1
2
3
4
1
32
Time
Clock
Off Time
On Time
Sleep Timer
Auto SleepAuto Sleep G
DE F G MENU
Clock
Off Time
On Time
Sleep Timer
Auto Sleep
Time
DE F G MENU
OffOn
MFL41469212-Edit2-en5-mi 3/12/09 9:05 PM Page 69
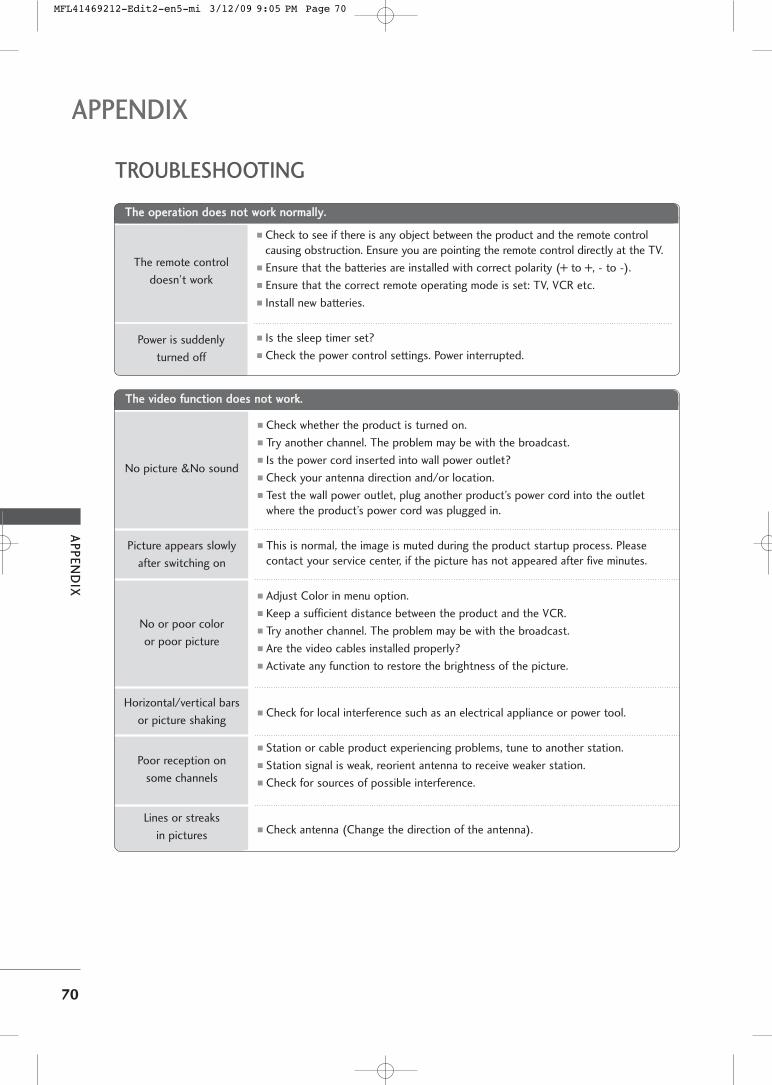
AP
PE
ND
IX
70
TROUBLESHOOTING
APPENDIX
TThhee ooppeerraattiioonn ddooeess nnoott wwoorrkk nnoorrmmaallllyy..
TThhee vviiddeeoo ffuunnccttiioonn ddooeess nnoott wwoorrkk..
No picture &No sound
No or poor color
or poor picture
Poor reception on
some channels
Lines or streaks
in pictures
Horizontal/vertical bars
or picture shaking
Picture appears slowly
after switching on
The remote control
doesn’t work
Power is suddenly
turned off
� Check to see if there is any object between the product and the remote controlcausing obstruction. Ensure you are pointing the remote control directly at the TV.
� Ensure that the batteries are installed with correct polarity (+ to +, - to -).
� Ensure that the correct remote operating mode is set: TV, VCR etc.
� Install new batteries.
� Is the sleep timer set?
� Check the power control settings. Power interrupted.
� Check whether the product is turned on.
� Try another channel. The problem may be with the broadcast.
� Is the power cord inserted into wall power outlet?
� Check your antenna direction and/or location.
� Test the wall power outlet, plug another product’s power cord into the outletwhere the product’s power cord was plugged in.
� This is normal, the image is muted during the product startup process. Pleasecontact your service center, if the picture has not appeared after five minutes.
� Adjust Color in menu option.
� Keep a sufficient distance between the product and the VCR.
� Try another channel. The problem may be with the broadcast.
� Are the video cables installed properly?
� Activate any function to restore the brightness of the picture.
� Check for local interference such as an electrical appliance or power tool.
� Station or cable product experiencing problems, tune to another station.
� Station signal is weak, reorient antenna to receive weaker station.
� Check for sources of possible interference.
� Check antenna (Change the direction of the antenna).
MFL41469212-Edit2-en5-mi 3/12/09 9:05 PM Page 70
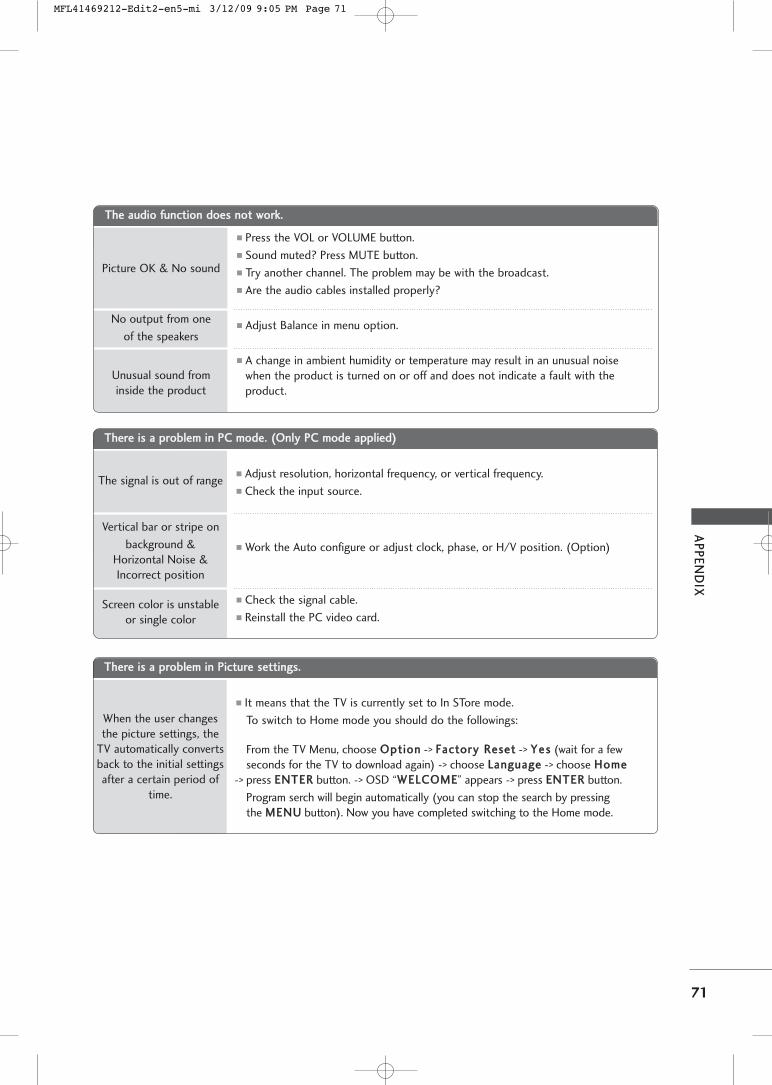
AP
PE
ND
IX
71
TThheerree iiss aa pprroobblleemm iinn PPCC mmooddee.. ((OOnnllyy PPCC mmooddee aapppplliieedd))
� Adjust resolution, horizontal frequency, or vertical frequency.
� Check the input source.
� Work the Auto configure or adjust clock, phase, or H/V position. (Option)
� Check the signal cable.
� Reinstall the PC video card.
The signal is out of range
Screen color is unstableor single color
Vertical bar or stripe on
background &Horizontal Noise &Incorrect position
Picture OK & No sound
Unusual sound frominside the product
No output from one
of the speakers
TThhee aauuddiioo ffuunnccttiioonn ddooeess nnoott wwoorrkk..
� Press the VOL or VOLUME button.
� Sound muted? Press MUTE button.
� Try another channel. The problem may be with the broadcast.
� Are the audio cables installed properly?
� Adjust Balance in menu option.
� A change in ambient humidity or temperature may result in an unusual noisewhen the product is turned on or off and does not indicate a fault with theproduct.
TThheerree iiss aa pprroobblleemm iinn PPiiccttuurree sseettttiinnggss..
� It means that the TV is currently set to In STore mode.
To switch to Home mode you should do the followings:
From the TV Menu, choose OOppttiioonn -> FFaaccttoorryy RReesseett -> YYeess (wait for a few seconds for the TV to download again) -> choose LLaanngguuaaggee -> choose HHoommee
-> press EENNTTEERR button. -> OSD “WWEELLCCOOMMEE” appears -> press EENNTTEERR button.
Program serch will begin automatically (you can stop the search by pressing the MMEENNUU button). Now you have completed switching to the Home mode.
When the user changesthe picture settings, the
TV automatically convertsback to the initial settingsafter a certain period of
time.
MFL41469212-Edit2-en5-mi 3/12/09 9:05 PM Page 71

AP
PE
ND
IX
72
APPENDIX
MAINTENANCE
Early malfunctions can be prevented. Careful and regular cleaning can extend the amount of time you will
have your new TV. Be sure to turn the power off and unplug the power cord before you begin any cleaning.
Cleaning the Screen
Here’s a great way to keep the dust off your screen for a while. Wet a soft cloth in a mixture of lukewarmwater and a little fabric softener or dish washing detergent. Wring the cloth until it’s almost dry, and thenuse it to wipe the screen.
Make sure the excess water is off the screen, and then let it air-dry before you turn on your TV.
Cleaning the Cabinet
� To remove dirt or dust, wipe the cabinet with a soft, dry, lint-free cloth.
� Please be sure not to use a wet cloth.
Extended Absence
GG If you expect to leave your TV dormant for a long time (such as a vacation), it’s a good idea to unplugthe power cord to protect against possible damage from lightning or power surges.
CAUTION
1
2
MFL41469212-Edit2-en5-mi 3/12/09 9:05 PM Page 72
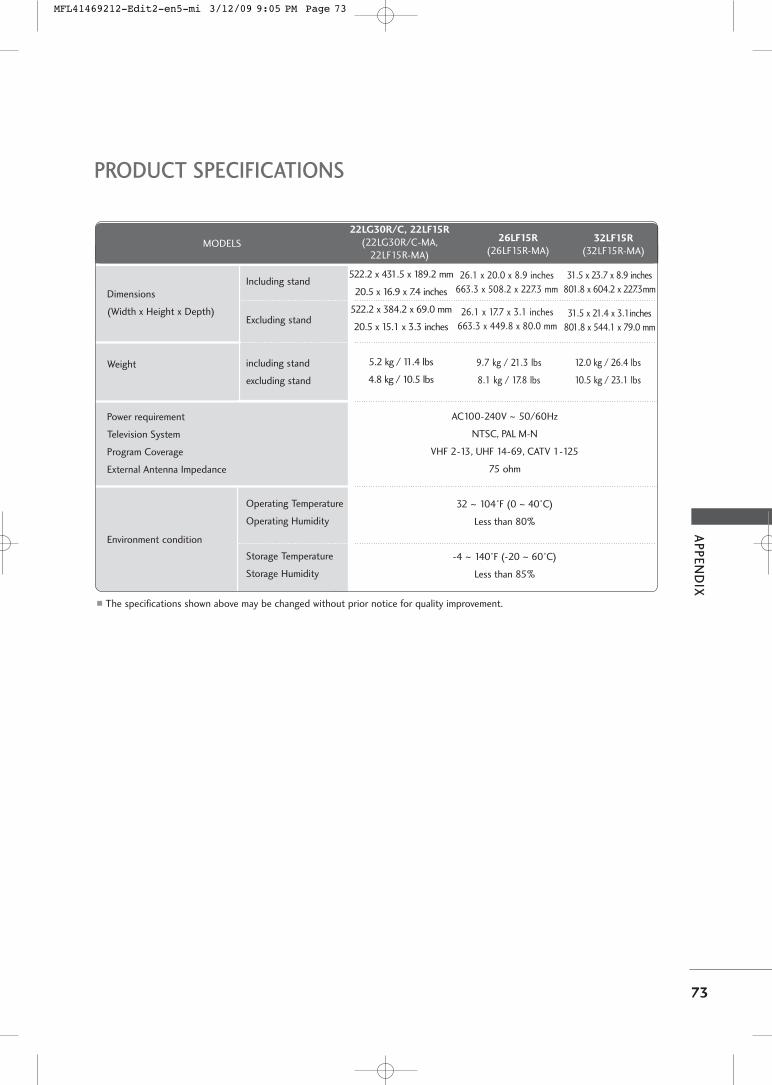
AP
PE
ND
IX
73
PRODUCT SPECIFICATIONS
� The specifications shown above may be changed without prior notice for quality improvement.
MODELS
Dimensions
(Width x Height x Depth)
Weight
Power requirement
Television System
Program Coverage
External Antenna Impedance
Environment condition
Including stand
Excluding stand
including stand
excluding stand
Operating Temperature
Operating Humidity
Storage Temperature
Storage Humidity
22LG30R/C, 22LF15R
(22LG30R/C-MA,22LF15R-MA)
522.2 x 431.5 x 189.2 mm
20.5 x 16.9 x 7.4 inches
522.2 x 384.2 x 69.0 mm
20.5 x 15.1 x 3.3 inches
5.2 kg / 11.4 lbs
4.8 kg / 10.5 lbs
AC100-240V ~ 50/60Hz
NTSC, PAL M-N
VHF 2-13, UHF 14-69, CATV 1-125
75 ohm
32 ~ 104°F (0 ~ 40°C)
Less than 80%
-4 ~ 140°F (-20 ~ 60°C)
Less than 85%
26LF15R
(26LF15R-MA)32LF15R
(32LF15R-MA)
31.5 x 23.7 x 8.9 inches
801.8 x 604.2 x 227.3mm
31.5 x 21.4 x 3.1inches
801.8 x 544.1 x 79.0 mm
12.0 kg / 26.4 lbs
10.5 kg / 23.1 lbs
26.1 x 20.0 x 8.9 inches
663.3 x 508.2 x 227.3 mm
26.1 x 17.7 x 3.1 inches
663.3 x 449.8 x 80.0 mm
9.7 kg / 21.3 lbs
8.1 kg / 17.8 lbs
MFL41469212-Edit2-en5-mi 3/12/09 9:05 PM Page 73
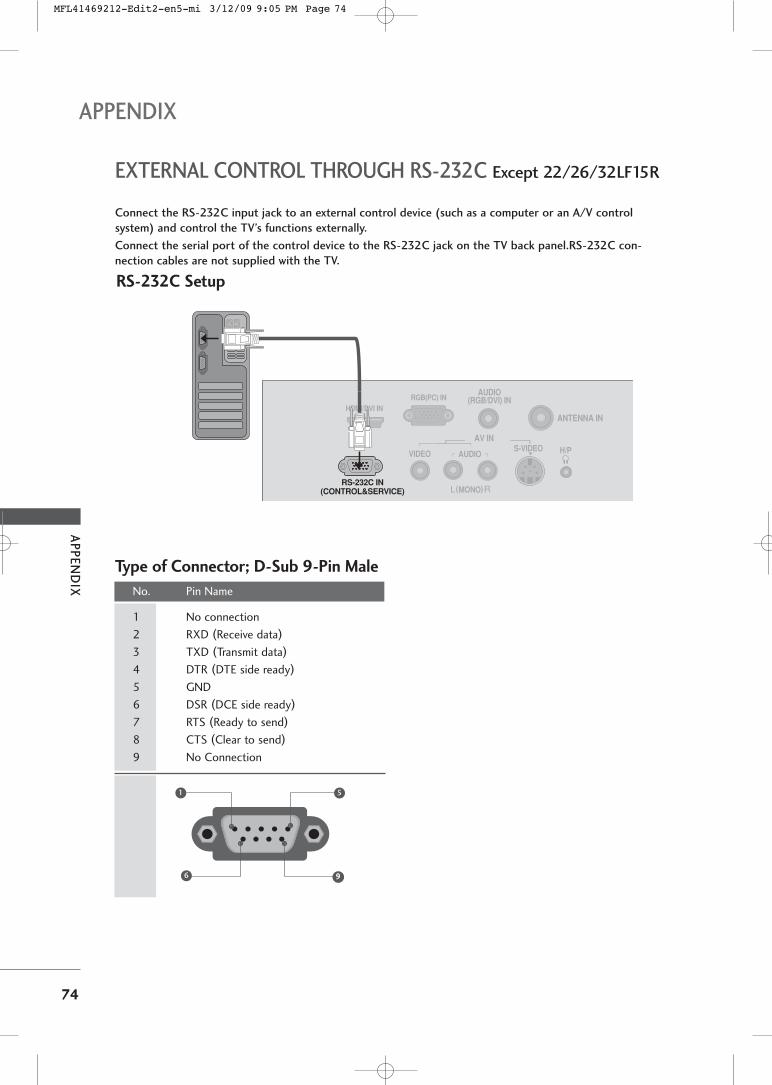
AP
PE
ND
IX
74
APPENDIX
EXTERNAL CONTROL THROUGH RS-232C Except 22/26/32LF15R
RS-232C Setup
Connect the RS-232C input jack to an external control device (such as a computer or an A/V control
system) and control the TV’s functions externally.
Connect the serial port of the control device to the RS-232C jack on the TV back panel.RS-232C con-
nection cables are not supplied with the TV.
ANTENNA IN
RGB(PC) INAUDIO
(RGB/DVI) IN
S-VIDEOVIDEO AUDIO
MONO( )
AV IN H/P
HDMI/DVI IN
RS-232C IN(CONTROL&SERVICE)
Type of Connector; D-Sub 9-Pin Male
No. Pin Name
1 No connection
2 RXD (Receive data)
3 TXD (Transmit data)
4 DTR (DTE side ready)
5 GND
6 DSR (DCE side ready)
7 RTS (Ready to send)
8 CTS (Clear to send)
9 No Connection
99
1 5
6
MFL41469212-Edit2-en5-mi 3/12/09 9:05 PM Page 74

AP
PE
ND
IX
75
Communication Parameters
ABaud rate : 9600 bps (UART)
AData length : 8 bits
AParity : None
AStop bit : 1 bit
ACommunication code : ASCII code
AUse a crossed (reverse) cable.
Press the MMEENNUU button and then use DD or EE buttonto select the OOppttiioonn menu.
Press the GG button and then DD or EE button to selectSSeett IIDD.
Press the GG button and then DD or EE button to adjustSSeett IIDD to choose the desired TV ID number.
• The adjustment range of SET ID is 1~99.
Press the MMEENNUU button to move to the previous menu.
Use this function to specify a set ID number.
Refer to ‘Real Data Mapping’1. GG pp..7799..
Set ID
2
3
4
1
1
32
Option
Language
Key Lock
Caption/Text
Set ID
Factory Reset
DE F G MENU
Language
Key Lock
Caption/Text
Set ID
Factory Reset
Option
DE F G MENU
Set ID G 1
RS-232C Configurations
7-Wire Configurations (Standard RS-232C cable)
PC TV
RXD 2 3 TXD
TXD 3 2 RXD
GND 5 5 GND
DTR 4 6 DSR
DSR 6 4 DTR
RTS 7 8 CTS
CTS 8 7 RTS
D-Sub 9 D-Sub 9
3-Wire Configurations(Not standard)
PC TV
RXD 2 3 TXD
TXD 3 2 RXD
GND 5 5 GND
DTR 4 6 DTR
DSR 6 4 DSR
RTS 7 7 RTS
CTS 8 8 CTS
D-Sub 9 D-Sub 9
MFL41469212-Edit2-en5-mi 3/12/09 9:05 PM Page 75
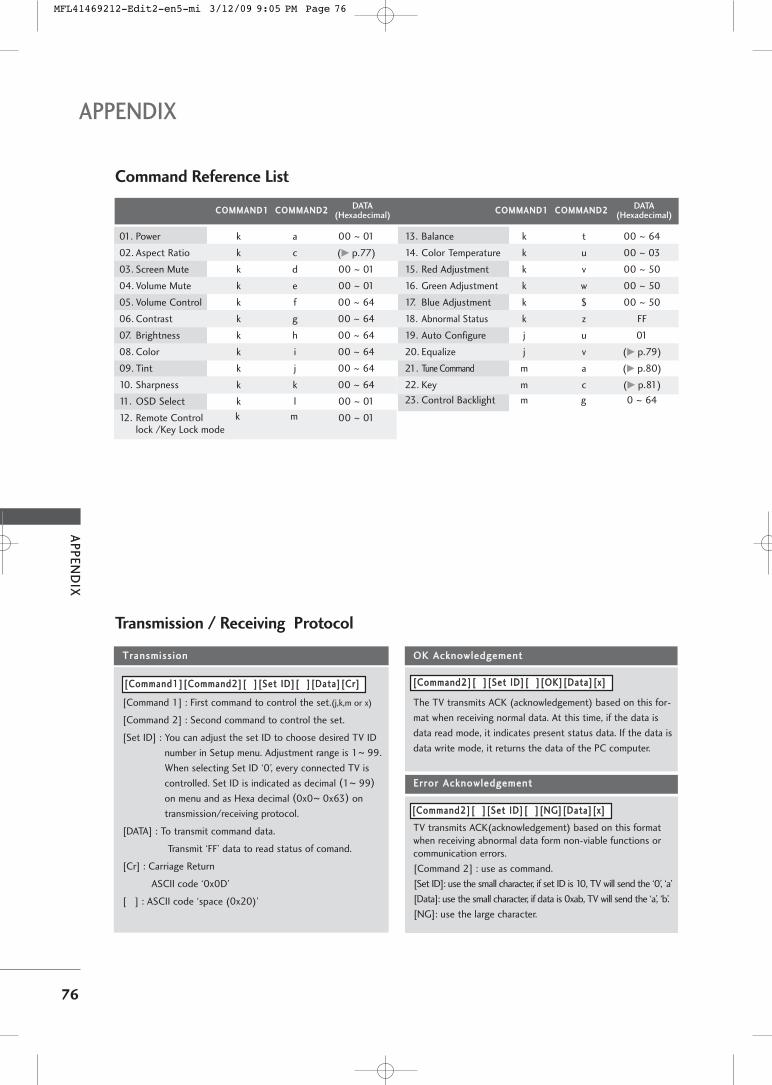
AP
PE
ND
IX
76
APPENDIX
Command Reference List
CCOOMMMMAANNDD11 CCOOMMMMAANNDD22 DATA(Hexadecimal)
CCOOMMMMAANNDD11 CCOOMMMMAANNDD22
13. Balance k t 00 ~ 64
14. Color Temperature k u 00 ~ 03
15. Red Adjustment k v 00 ~ 50
16. Green Adjustment k w 00 ~ 50
17. Blue Adjustment k $ 00 ~ 50
18. Abnormal Status k z FF
19. Auto Configure j u 01
20. Equalize j v (GG p.79)
21. Tune Command m a (GG p.80)
22. Key m c (GG p.81)
23. Control Backlight m g 0 ~ 64
DATA(Hexadecimal)
01. Power k a 00 ~ 01
02. Aspect Ratio k c (GG p.77)
03. Screen Mute k d 00 ~ 01
04. Volume Mute k e 00 ~ 01
05. Volume Control k f 00 ~ 64
06. Contrast k g 00 ~ 64
07. Brightness k h 00 ~ 64
08. Color k i 00 ~ 64
09. Tint k j 00 ~ 64
10. Sharpness k k 00 ~ 64
11. OSD Select k l 00 ~ 01
12. Remote Control 00 ~ 01lock /Key Lock mode
k m
Transmission / Receiving Protocol
TTrraannssmmiissssiioonn
[Command 1] : First command to control the set.(j,k,m or x)
[Command 2] : Second command to control the set.
[Set ID] : You can adjust the set ID to choose desired TV ID
number in Setup menu. Adjustment range is 1~ 99.
When selecting Set ID ‘0’, every connected TV is
controlled. Set ID is indicated as decimal (1~ 99)
on menu and as Hexa decimal (0x0~ 0x63) on
transmission/receiving protocol.
[DATA] : To transmit command data.
Transmit ‘FF’ data to read status of comand.
[Cr] : Carriage Return
ASCII code ‘0x0D’
[ ] : ASCII code ‘space (0x20)’
OOKK AAcckknnoowwlleeddggeemmeenntt
The TV transmits ACK (acknowledgement) based on this for-
mat when receiving normal data. At this time, if the data is
data read mode, it indicates present status data. If the data is
data write mode, it returns the data of the PC computer.
EErrrroorr AAcckknnoowwlleeddggeemmeenntt
TV transmits ACK(acknowledgement) based on this formatwhen receiving abnormal data form non-viable functions orcommunication errors.
[Command 2] : use as command.
[Set ID]: use the small character, if set ID is 10, TV will send the ‘0’, ‘a’
[Data]: use the small character, if data is 0xab, TV will send the ‘a’, ‘b’.
[NG]: use the large character.
[[CCoommmmaanndd11]][[CCoommmmaanndd22]][[ ]][[SSeett IIDD]][[ ]][[DDaattaa]][[CCrr]] [[CCoommmmaanndd22]][[ ]][[SSeett IIDD]][[ ]][[OOKK]][[DDaattaa]][[xx]]
[[CCoommmmaanndd22]][[ ]][[SSeett IIDD]][[ ]][[NNGG]][[DDaattaa]][[xx]]
MFL41469212-Edit2-en5-mi 3/12/09 9:05 PM Page 76
AP
PE
ND
IX
77
0011.. PPoowweerr ((CCoommmmaanndd:: kk aa))
To control Power On/Off of the TV.
Data 00 : Power Off Data 01 : Power On
Transmission [k][a][ ][Set ID][ ][Data][Cr]
Acknowledgement [a][ ][Set ID][ ][OK/NG][Data][x]
To show Power On/Off.
Transmission [k][a][ ][Set ID][ ][FF][Cr]
* If there is the time delay between command andack message during power on sequence, It shouldbe described like “Note: In this model, TV will sendthe Acknowledge after power on processing com-pletion. There might be a time delay between com-mand and acknowledge.”
Acknowledgement [a][ ][Set ID][ ][OK/NG][Data][x]
0022.. AAssppeecctt RRaattiioo ((CCoommmmaanndd:: kk cc)) ((MMaaiinn ppiiccttuurree ssiizzee))
To adjust the screen format. (Main picture format)
You can adjust the screen format using the Aspect
Ratio in the Picture menu.
Data 01: 4:3
Data 02: 16:9
Data 04: Zoom1
Data 05: Zoom2
Reserved
Transmission [k][c][ ][Set ID][ ][Data][Cr]
Acknowledgement [c][ ][Set ID][ ][OK/NG][Data][x]
* Using the RGB PC, Component or HDMI input, youselect either 16:9 or 4:3 screen aspect ratio.
0033.. SSccrreeeenn MMuuttee ((CCoommmmaanndd:: kk dd))
To select screen mute on/off.
Data 00 : Screen mute off (Picture on)
Data 01 : Screen mute on (Picture off)
Transmission [k][d][ ][Set ID][ ][Data][Cr]
Acknowledgement [d][ ][Set ID][ ][OK/NG][Data][x]
0044.. VVoolluummee MMuuttee ((CCoommmmaanndd:: kk ee))
To control volume mute on/off.
You can also adjust mute using the MUTE button on
remote control.
Data 00 : Volume mute on (Volume off)
Data 01 : Volume mute off (Volume on)
Transmission [k][e][ ][Set ID][ ][Data][Cr]
Acknowledgement [e][ ][Set ID][ ][OK/NG][Data][x]
0055.. VVoolluummee CCoonnttrrooll ((CCoommmmaanndd:: kk ff))
To adjust volume.
You can also adjust volume with the volume buttons
on remote control.
Data Min : 00 ~ Max : 64
Refer to ‘Real data mapping 1’ GG pp..7799..
Transmission [k][f][ ][Set ID][ ][Data][Cr]
Acknowledgement [f][ ][Set ID][ ][OK/NG][Data][x]
0066.. CCoonnttrraasstt ((CCoommmmaanndd:: kk gg))
To adjust screen contrast.
You can also adjust contrast in the Picture menu.
Data Min : 00 ~ Max : 64
Refer to ‘Real data mapping 1’ GG pp..7799..
Transmission [k][g][ ][Set ID][ ][Data][Cr]
Acknowledgement [g][ ][Set ID][ ][OK][Data][x]
0077.. BBrriigghhttnneessss ((CCoommmmaanndd:: kk hh))
To adjust screen brightness.
You can also adjust brightness in the Picture menu.
Data Min : 00 ~ Max : 64
Refer to ‘Real data mapping 1’ GG pp..7799..
Transmission [k][h][ ][Set ID][ ][Data][Cr]
Acknowledgement [h][ ][Set ID][ ][OK/NG][Data][x]
0088.. CCoolloorr ((CCoommmmaanndd:: kk ii))
To adjust the screen color.
You can also adjust color in the Picture menu.
Data Min : 00 ~ Max : 64
Refer to ‘Real data mapping 1’ GG pp..7799..
Transmission [k][i][ ][Set ID][ ][Data][Cr]
Acknowledgement [i][ ][Set ID][ ][OK/NG][Data][x]
0099.. TTiinntt ((CCoommmmaanndd:: kk jj))
To adjust the screen tint.
You can also adjust tint in the Picture menu.
Data Red : 00 ~ Green : 64
Refer to ‘Real data mapping 1’ GG pp..7799..
Transmission [k][j][ ][Set ID][ ][Data][Cr]
Acknowledgement [j][ ][Set ID][ ][OK/NG][Data][x]
MFL41469212-Edit2-en5-mi 3/12/09 9:05 PM Page 77
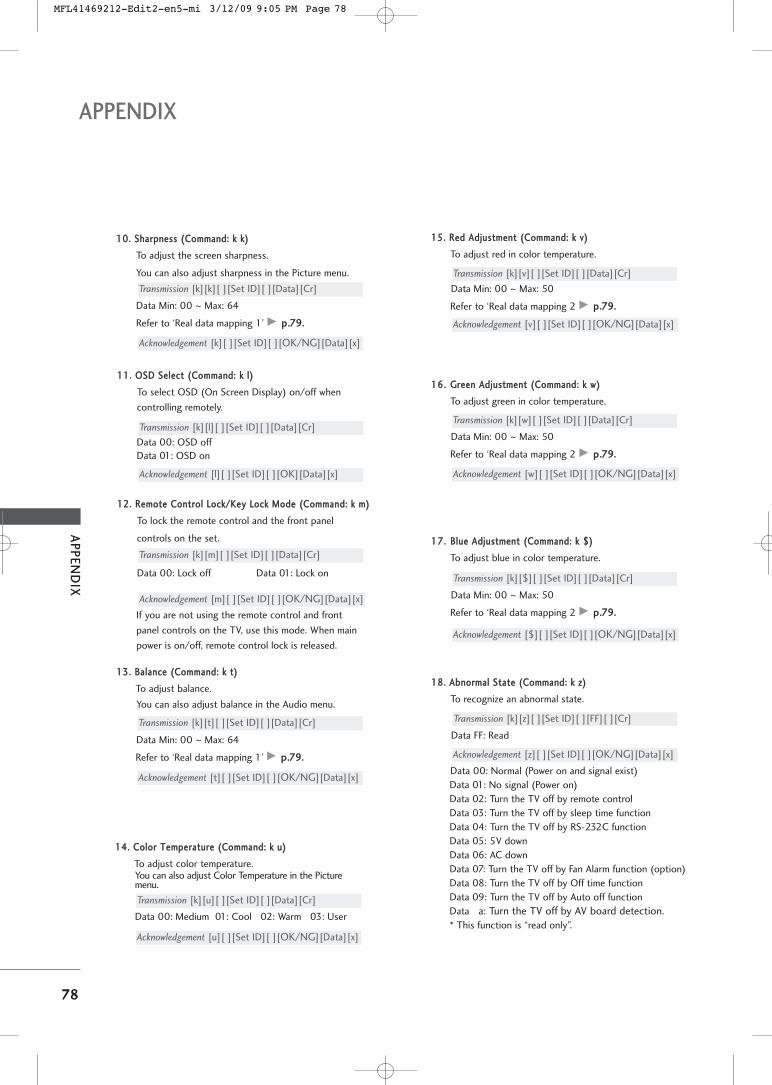
AP
PE
ND
IX
78
APPENDIX
1111.. OOSSDD SSeelleecctt ((CCoommmmaanndd:: kk ll))
To select OSD (On Screen Display) on/off when
controlling remotely.
Data 00: OSD off
Data 01: OSD on
Transmission [k][l][ ][Set ID][ ][Data][Cr]
Acknowledgement [l][ ][Set ID][ ][OK][Data][x]
1122.. RReemmoottee CCoonnttrrooll LLoocckk//KKeeyy LLoocckk MMooddee ((CCoommmmaanndd:: kk mm))
To lock the remote control and the front panel
controls on the set.
Data 00: Lock off Data 01: Lock on
If you are not using the remote control and front
panel controls on the TV, use this mode. When main
power is on/off, remote control lock is released.
Transmission [k][m][ ][Set ID][ ][Data][Cr]
Acknowledgement [m][ ][Set ID][ ][OK/NG][Data][x]
1133.. BBaallaannccee ((CCoommmmaanndd:: kk tt))
To adjust balance.
You can also adjust balance in the Audio menu.
Data Min: 00 ~ Max: 64
Refer to ‘Real data mapping 1’ GG pp..7799..
Transmission [k][t][ ][Set ID][ ][Data][Cr]
Acknowledgement [t][ ][Set ID][ ][OK/NG][Data][x]
1100.. SShhaarrppnneessss ((CCoommmmaanndd:: kk kk))
To adjust the screen sharpness.
You can also adjust sharpness in the Picture menu.
Data Min: 00 ~ Max: 64
Refer to ‘Real data mapping 1’ GG pp..7799..
Transmission [k][k][ ][Set ID][ ][Data][Cr]
Acknowledgement [k][ ][Set ID][ ][OK/NG][Data][x]
1144.. CCoolloorr TTeemmppeerraattuurree ((CCoommmmaanndd:: kk uu))
To adjust color temperature.You can also adjust Color Temperature in the Picturemenu.
Data 00: Medium 01: Cool 02: Warm 03: User
Transmission [k][u][ ][Set ID][ ][Data][Cr]
Acknowledgement [u][ ][Set ID][ ][OK/NG][Data][x]
1155.. RReedd AAddjjuussttmmeenntt ((CCoommmmaanndd:: kk vv))
To adjust red in color temperature.
Data Min: 00 ~ Max: 50
Refer to ‘Real data mapping 2 GG pp..7799..
Transmission [k][v][ ][Set ID][ ][Data][Cr]
Acknowledgement [v][ ][Set ID][ ][OK/NG][Data][x]
1166.. GGrreeeenn AAddjjuussttmmeenntt ((CCoommmmaanndd:: kk ww))
To adjust green in color temperature.
Data Min: 00 ~ Max: 50
Refer to ‘Real data mapping 2 GG pp..7799..
Transmission [k][w][ ][Set ID][ ][Data][Cr]
Acknowledgement [w][ ][Set ID][ ][OK/NG][Data][x]
1177.. BBlluuee AAddjjuussttmmeenntt ((CCoommmmaanndd:: kk $$))
To adjust blue in color temperature.
Data Min: 00 ~ Max: 50
Refer to ‘Real data mapping 2 GG pp..7799..
Transmission [k][$][ ][Set ID][ ][Data][Cr]
Acknowledgement [$][ ][Set ID][ ][OK/NG][Data][x]
1188.. AAbbnnoorrmmaall SSttaattee ((CCoommmmaanndd:: kk zz))
To recognize an abnormal state.
Data FF: Read
Data 00: Normal (Power on and signal exist)
Data 01: No signal (Power on)
Data 02: Turn the TV off by remote control
Data 03: Turn the TV off by sleep time function
Data 04: Turn the TV off by RS-232C function
Data 05: 5V down
Data 06: AC down
Data 07: Turn the TV off by Fan Alarm function (option)
Data 08: Turn the TV off by Off time function
Data 09: Turn the TV off by Auto off function
Data a: Turn the TV off by AV board detection.
* This function is “read only”.
Transmission [k][z][ ][Set ID][ ][FF][ ][Cr]
Acknowledgement [z][ ][Set ID][ ][OK/NG][Data][x]
MFL41469212-Edit2-en5-mi 3/12/09 9:05 PM Page 78
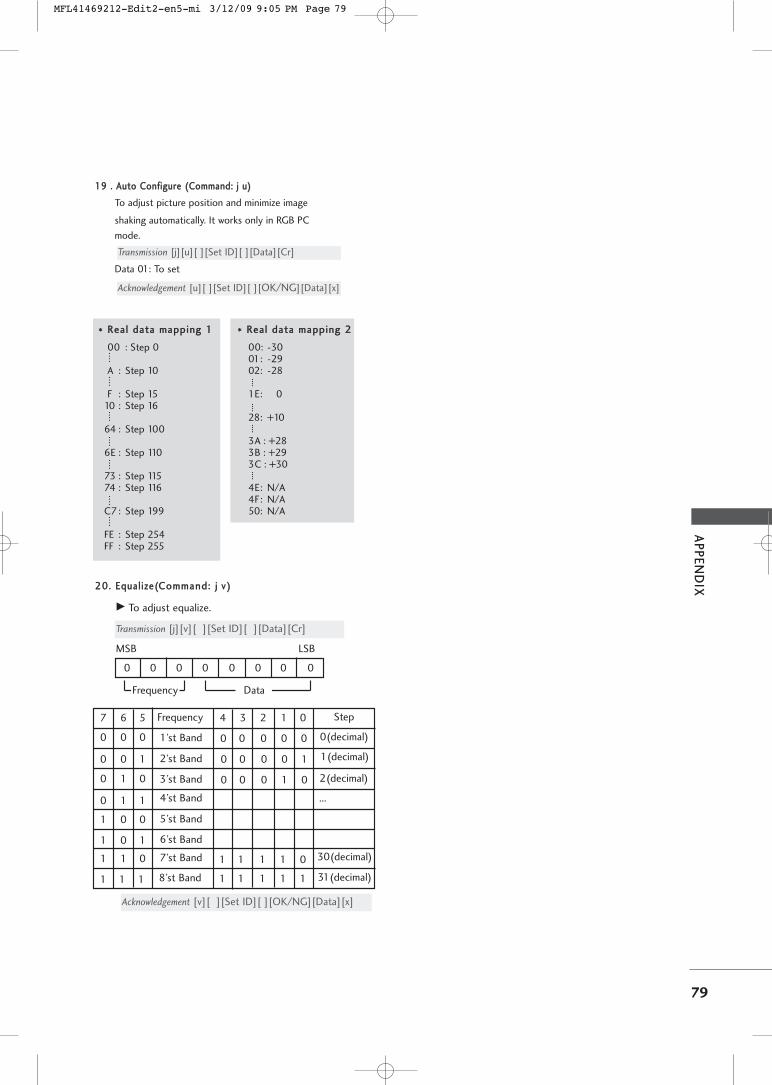
AP
PE
ND
IX
79
1199 .. AAuuttoo CCoonnffiigguurree ((CCoommmmaanndd:: jj uu))
To adjust picture position and minimize image
shaking automatically. It works only in RGB PC
mode.
Data 01: To set
Transmission [j][u][ ][Set ID][ ][Data][Cr]
Acknowledgement [u][ ][Set ID][ ][OK/NG][Data][x]
** RReeaall ddaattaa mmaappppiinngg 11
00 : Step 0
A : Step 10
F : Step 15 10 : Step 16
64 : Step 100
6E : Step 110
73 : Step 11574 : Step 116
C7 : Step 199
FE : Step 254FF : Step 255
** RReeaall ddaattaa mmaappppiinngg 22
00: -3001: -29 02: -28
1E: 0
28: +10
3A : +28 3B : +29 3C : +30
4E: N/A 4F: N/A 50: N/A
2200.. EEqquuaall iizzee((CCoommmmaanndd:: jj vv ))
G To adjust equalize.
MSB LSB
0
Transmission [j][v][ ][Set ID][ ][Data][Cr]
0 0 0 0 0 0 0
Frequency Data
Acknowledgement [v][ ][Set ID][ ][OK/NG][Data][x]
Frequency
1’st Band
2’st Band
3’st Band
4’st Band
5’st Band
6’st Band
7’st Band
7 6 5
0 0 0
0 0 1
0 1 0
0 1 1
1 0 0
1 0 1
1 1 0
4 3 2 1 0
1 1 1 8’st Band
Step
0 0 0 0 0
0 0 0 0 1
0 0 0 1 0
1 1 1 1 1
1 1 1 1 0
0(decimal)
1(decimal)
2(decimal)
...
30(decimal)
31(decimal)
MFL41469212-Edit2-en5-mi 3/12/09 9:05 PM Page 79
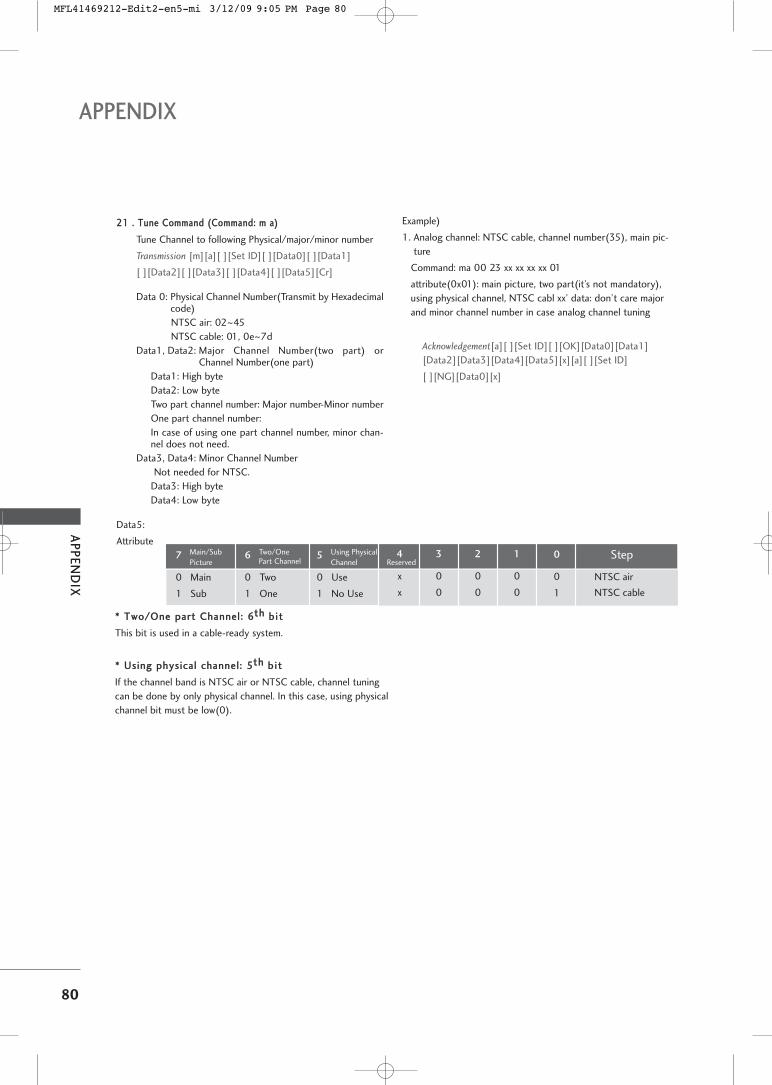
AP
PE
ND
IX
80
APPENDIX
2211 .. TTuunnee CCoommmmaanndd ((CCoommmmaanndd:: mm aa))
Tune Channel to following Physical/major/minor number
Transmission [m][a][ ][Set ID][ ][Data0][ ][Data1]
[ ][Data2][ ][Data3][ ][Data4][ ][Data5][Cr]
Data 0: Physical Channel Number(Transmit by Hexadecimalcode)
NTSC air: 02~45
NTSC cable: 01, 0e~7d
Data1, Data2: Major Channel Number(two part) orChannel Number(one part)
Data1: High byte
Data2: Low byte
Two part channel number: Major number-Minor number
One part channel number:
In case of using one part channel number, minor chan-nel does not need.
Data3, Data4: Minor Channel Number
Not needed for NTSC.
Data3: High byte
Data4: Low byte
Data5:
Attribute
Step
NTSC air
NTSC cable
1
0
0
2
0
0
3
0
0
4
x
x
Reserved5
0
1
Use
No Use
Using Physical
Channel6
0
1
Two
One
Two/One Part Channel
7
0
1
Main
Sub
Main/Sub
Picture0
0
1
** TTwwoo//OOnnee ppaarrtt CChhaannnneell :: 66tthh bb ii tt
This bit is used in a cable-ready system.
** UUssiinngg pphhyyssiiccaall cchhaannnneell :: 55tthh bb ii tt
If the channel band is NTSC air or NTSC cable, channel tuning
can be done by only physical channel. In this case, using physical
channel bit must be low(0).
Example)
1. Analog channel: NTSC cable, channel number(35), main pic-
ture
Command: ma 00 23 xx xx xx xx 01
attribute(0x01): main picture, two part(it’s not mandatory),
using physical channel, NTSC cabl xx’ data: don’t care major
and minor channel number in case analog channel tuning
Acknowledgement[a][ ][Set ID][ ][OK][Data0][Data1]
[Data2][Data3][Data4][Data5][x][a][ ][Set ID]
[ ][NG][Data0][x]
MFL41469212-Edit2-en5-mi 3/12/09 9:05 PM Page 80
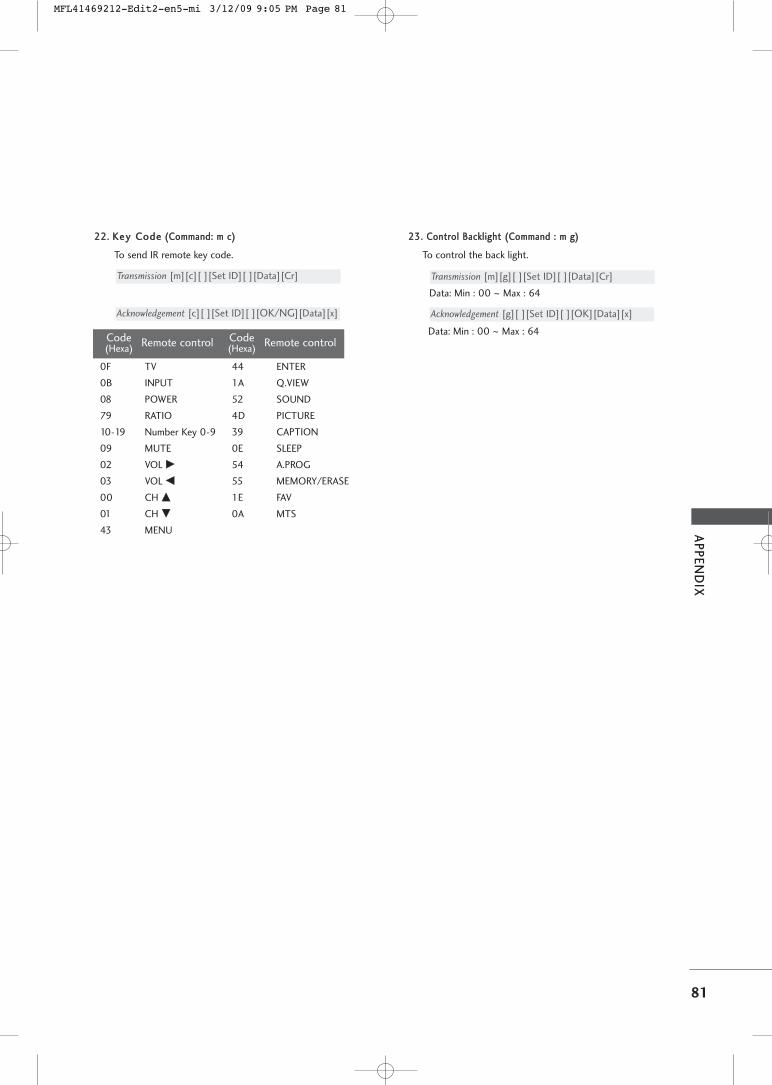
AP
PE
ND
IX
81
2222.. KKeeyy CCooddee ((CCoommmmaanndd:: mm cc))
To send IR remote key code.
Transmission [m][c][ ][Set ID][ ][Data][Cr]
Acknowledgement [c][ ][Set ID][ ][OK/NG][Data][x]
Code(Hexa)
Remote control Code(Hexa)
Remote control
0F TV
0B INPUT
08 POWER
79 RATIO
10-19 Number Key 0-9
09 MUTE
02 VOL GG
03 VOL FF
00 CH DD
01 CH EE
43 MENU
44 ENTER
1A Q.VIEW
52 SOUND
4D PICTURE
39 CAPTION
0E SLEEP
54 A.PROG
55 MEMORY/ERASE
1E FAV
0A MTS
2233.. CCoonnttrrooll BBaacckklliigghhtt ((CCoommmmaanndd :: mm gg))
To control the back light.
Data: Min : 00 ~ Max : 64
Transmission [m][g][ ][Set ID][ ][Data][Cr]
Acknowledgement [g][ ][Set ID][ ][OK][Data][x]
Data: Min : 00 ~ Max : 64
MFL41469212-Edit2-en5-mi 3/12/09 9:05 PM Page 81

MFL41469212-Edit2-en5-mi 3/12/09 9:05 PM Page 82
Por favor, lea detenidamente este manual antes deponer en funcionamiento su televisor.Guárdelo para referencias futuras. Registre el número de modelo y serie de la unidad.Vea la etiqueta pegada en el panel posterior y presenteesta información a su distribuidor cuando requierael servicio.
TELEVISOR LCDMANUAL DE USUARIO22LG30R22LG30RC22LF15R26LF15R32LF15R
www.lge.com
Modelo:
Serie:
MFL41469212-sp-mi 3/12/09 9:10 PM Page 1
MFL41469212-sp-mi 3/12/09 9:10 PM Page 2
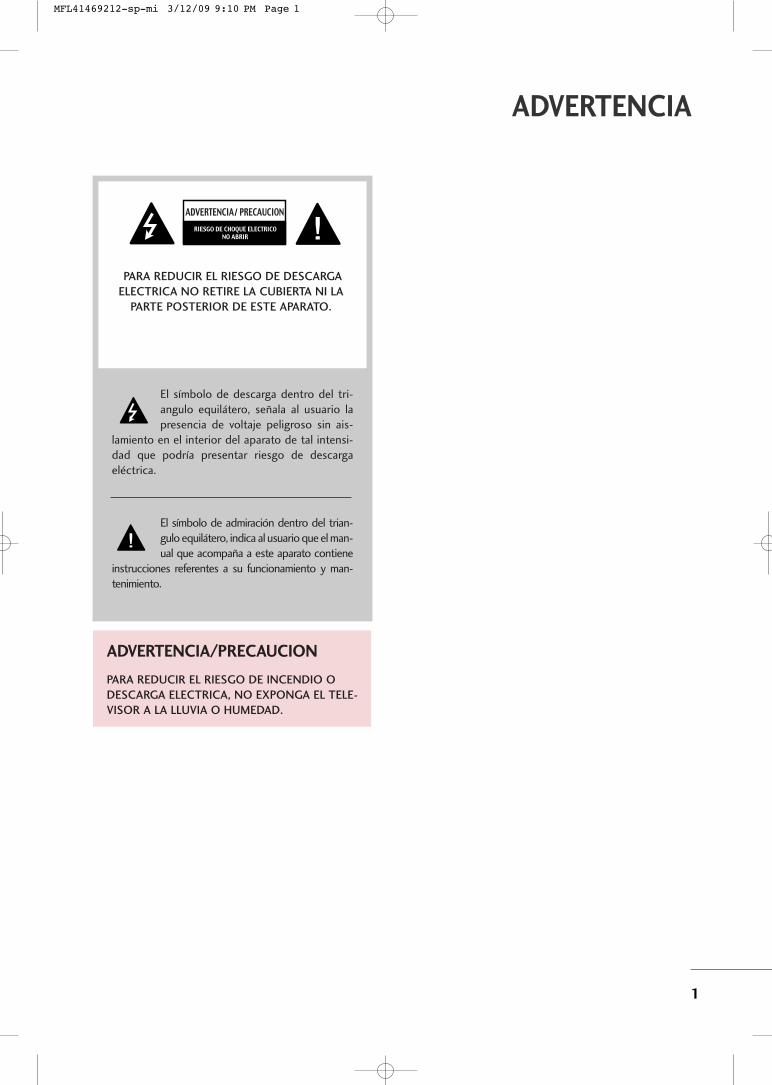
1
ADVERTENCIA
ADVERTENCIA PRECAUCION RIESGO DE CHOQUE ELECTRICO
NO ABRIR
El símbolo de descarga dentro del tri-angulo equilátero, señala al usuario lapresencia de voltaje peligroso sin ais-
lamiento en el interior del aparato de tal intensi-dad que podría presentar riesgo de descargaeléctrica.
El símbolo de admiración dentro del trian-gulo equilátero, indica al usuario que el man-ual que acompaña a este aparato contiene
instrucciones referentes a su funcionamiento y man-tenimiento.
PARA REDUCIR EL RIESGO DE DESCARGA
ELECTRICA NO RETIRE LA CUBIERTA NI LA
PARTE POSTERIOR DE ESTE APARATO.
ADVERTENCIA/PRECAUCION
PARA REDUCIR EL RIESGO DE INCENDIO O
DESCARGA ELECTRICA, NO EXPONGA EL TELE-
VISOR A LA LLUVIA O HUMEDAD.
MFL41469212-sp-mi 3/12/09 9:10 PM Page 1
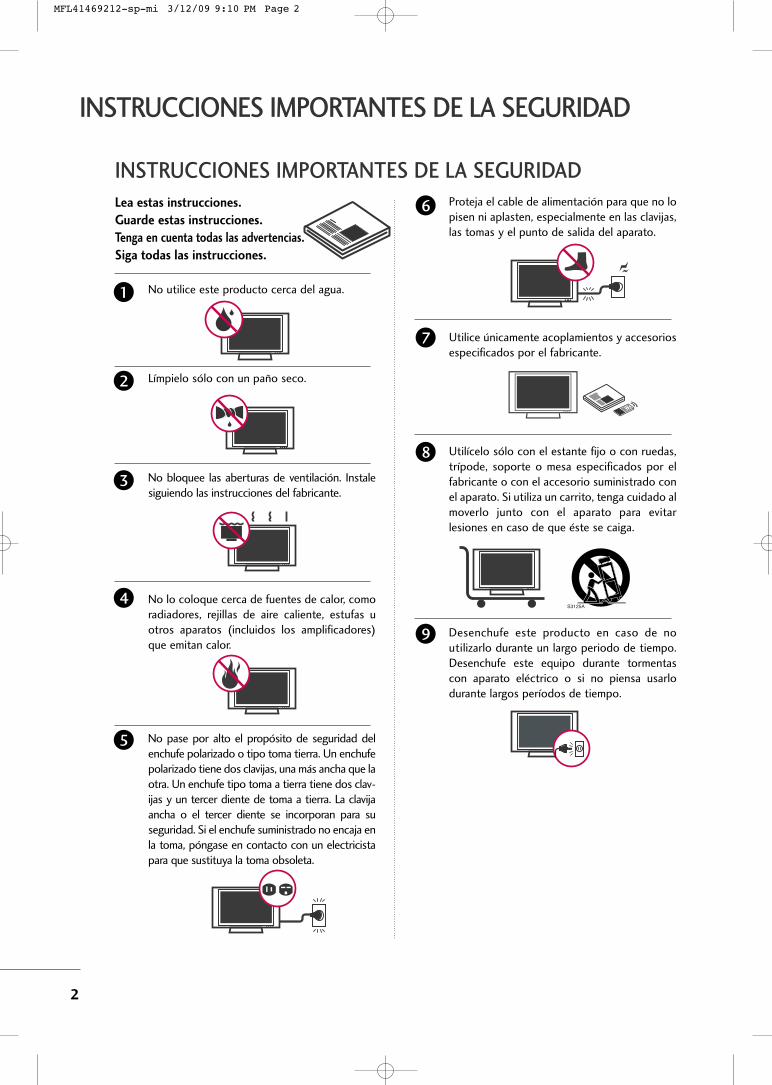
2
INSTRUCCIONES IMPORTANTES DE LA SEGURIDAD
INSTRUCCIONES IMPORTANTES DE LA SEGURIDAD
Lea estas instrucciones.
Guarde estas instrucciones.
Tenga en cuenta todas las advertencias.
Siga todas las instrucciones.
No utilice este producto cerca del agua.
Límpielo sólo con un paño seco.
No bloquee las aberturas de ventilación. Instalesiguiendo las instrucciones del fabricante.
No lo coloque cerca de fuentes de calor, comoradiadores, rejillas de aire caliente, estufas uotros aparatos (incluidos los amplificadores)que emitan calor.
No pase por alto el propósito de seguridad delenchufe polarizado o tipo toma tierra. Un enchufepolarizado tiene dos clavijas, una más ancha que laotra. Un enchufe tipo toma a tierra tiene dos clav-ijas y un tercer diente de toma a tierra. La clavijaancha o el tercer diente se incorporan para suseguridad. Si el enchufe suministrado no encaja enla toma, póngase en contacto con un electricistapara que sustituya la toma obsoleta.
Proteja el cable de alimentación para que no lopisen ni aplasten, especialmente en las clavijas,las tomas y el punto de salida del aparato.
Utilice únicamente acoplamientos y accesoriosespecificados por el fabricante.
Utilícelo sólo con el estante fijo o con ruedas,trípode, soporte o mesa especificados por elfabricante o con el accesorio suministrado conel aparato. Si utiliza un carrito, tenga cuidado almoverlo junto con el aparato para evitarlesiones en caso de que éste se caiga.
Desenchufe este producto en caso de noutilizarlo durante un largo periodo de tiempo.Desenchufe este equipo durante tormentascon aparato eléctrico o si no piensa usarlodurante largos períodos de tiempo.
1
2
3
4
5
6
7
8
9
MFL41469212-sp-mi 3/12/09 9:10 PM Page 2
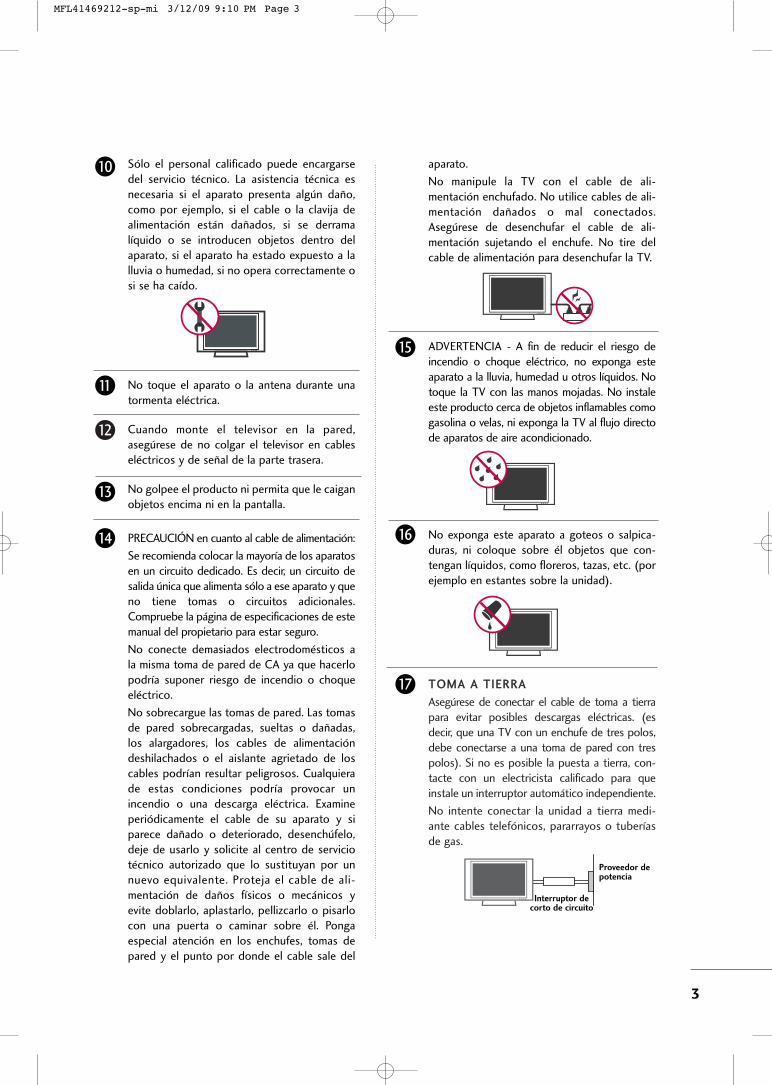
3
Sólo el personal calificado puede encargarsedel servicio técnico. La asistencia técnica esnecesaria si el aparato presenta algún daño,como por ejemplo, si el cable o la clavija dealimentación están dañados, si se derramalíquido o se introducen objetos dentro delaparato, si el aparato ha estado expuesto a lalluvia o humedad, si no opera correctamente osi se ha caído.
No toque el aparato o la antena durante unatormenta eléctrica.
Cuando monte el televisor en la pared,asegúrese de no colgar el televisor en cableseléctricos y de señal de la parte trasera.
No golpee el producto ni permita que le caiganobjetos encima ni en la pantalla.
PRECAUCIÓN en cuanto al cable de alimentación:
Se recomienda colocar la mayoría de los aparatosen un circuito dedicado. Es decir, un circuito desalida única que alimenta sólo a ese aparato y queno tiene tomas o circuitos adicionales.Compruebe la página de especificaciones de estemanual del propietario para estar seguro.
No conecte demasiados electrodomésticos ala misma toma de pared de CA ya que hacerlopodría suponer riesgo de incendio o choqueeléctrico.
No sobrecargue las tomas de pared. Las tomasde pared sobrecargadas, sueltas o dañadas,los alargadores, los cables de alimentacióndeshilachados o el aislante agrietado de loscables podrían resultar peligrosos. Cualquierade estas condiciones podría provocar unincendio o una descarga eléctrica. Examineperiódicamente el cable de su aparato y siparece dañado o deteriorado, desenchúfelo,deje de usarlo y solicite al centro de serviciotécnico autorizado que lo sustituyan por unnuevo equivalente. Proteja el cable de ali-mentación de daños físicos o mecánicos yevite doblarlo, aplastarlo, pellizcarlo o pisarlocon una puerta o caminar sobre él. Pongaespecial atención en los enchufes, tomas depared y el punto por donde el cable sale del
aparato.
No manipule la TV con el cable de ali-mentación enchufado. No utilice cables de ali-mentación dañados o mal conectados.Asegúrese de desenchufar el cable de ali-mentación sujetando el enchufe. No tire delcable de alimentación para desenchufar la TV.
ADVERTENCIA - A fin de reducir el riesgo deincendio o choque eléctrico, no exponga esteaparato a la lluvia, humedad u otros líquidos. Notoque la TV con las manos mojadas. No instaleeste producto cerca de objetos inflamables comogasolina o velas, ni exponga la TV al flujo directode aparatos de aire acondicionado.
No exponga este aparato a goteos o salpica-duras, ni coloque sobre él objetos que con-tengan líquidos, como floreros, tazas, etc. (porejemplo en estantes sobre la unidad).
TTOOMMAA AA TTIIEERRRRAA
Asegúrese de conectar el cable de toma a tierrapara evitar posibles descargas eléctricas. (esdecir, que una TV con un enchufe de tres polos,debe conectarse a una toma de pared con trespolos). Si no es posible la puesta a tierra, con-tacte con un electricista calificado para queinstale un interruptor automático independiente.
No intente conectar la unidad a tierra medi-ante cables telefónicos, pararrayos o tuberíasde gas.
12
10
11
14
13
15
16
17
Proveedor depotencia
Interruptor decorto de circuito
MFL41469212-sp-mi 3/12/09 9:10 PM Page 3
4
DDEESSCCOONNEEXXIIÓÓNN DDEE LLAA AALLIIMMEENNTTAACCIIÓÓNN
Link-Loader recibe alimentación si el cable dealimentación está conectado. Desenchufe elcable de alimentación del tomacorriente deCA para eliminar la alimentación.
Mantenga el producto lejos de la luz directadel sol.
LLiimmppiieezzaa
Antes de iniciar labores de limpieza, desenchufeel cable de alimentación y limpie cuidadosa-mente la unidad con un paño suave para evitararañazos superficiales. No rocíe directamenteagua vaporizada u otros líquidos sobre la TVpara evitar posibles choques eléctricos. Nolimpie la unidad con productos químicos comoalcoholes, disolventes o benceno.
TTrraannssppoorrttee
Asegúrese de que el producto esté apagado,desenchufado y que todos los cables hayansido desconectados. Harán falta dos o máspersonas para transportar TVs de gran tamaño.No someta el panel frontal de la TV a presioneso esfuerzos excesivos.
VVeennttii llaacciióónn
Instale su TV en un lugar que disponga de ven-tilación apropiada. No la instale en espacioscerrados como, por ejemplo, una estantería. Nocubra el producto con paños u otros materiales,como plásticos, mientras esté enchufada. Noinstale la unidad en lugares con exceso de polvo.
Si percibe olor a quemado o de cualquier otrotipo, o detecta sonidos extraños procedentesde su TV, desenchufe el cable de alimentacióny contacte con el servicio técnico autorizado.
No presione en exceso el panel con sus manos uobjetos afilados, como tornillos, lápices o bolí-grafos, y evite rayarlo.
18
19
20
21
23
22
24
MFL41469212-sp-mi 3/12/09 9:10 PM Page 4
5
CONTENIDO
ADVERTENCIA . . . . . . . . . . . . . . . . . . . . . . . . . . . . . . . . . . . . . . . . . . . . . . 1
INSTRUCCIÓNES DE LA SEGURIDAD . . . . . 2
PREPARACIÓN
Accessorios . . . . . . . . . . . . . . . . . . . . . . . . . . . . . . . . . . . . . . . . . . . . . . . . . . . . . . 7
Información del panel frontal . . . . . . . . . . . . . . . . . . . . . . . . . . . . 8
Información del panel posterior . . . . . . . . . . . . . . . . . . . . . . 10
Instalación de la base . . . . . . . . . . . . . . . . . . . . . . . . . . . . . . . . . . . . . . 12
Organizador de cables . . . . . . . . . . . . . . . . . . . . . . . . . . . . . . . . . . . . . 14
Instalación de un Pedestal de Escritorio . . . . . . . . . . . . .15
Montaje sobre pared: Instalación horizontal . . . . . . .15
Unión Del Televisor a un Escritorio . . . . . . . . . . . . . . . . . . . .15
Cubierta de protección . . . . . . . . . . . . . . . . . . . . . . . . . . . . . . . . . . . . 16
Posición de la pantalla . . . . . . . . . . . . . . . . . . . . . . . . . . . . . . . . . . . . . 18
Sistema de seguridad Kensington . . . . . . . . . . . . . . . . . . . . . 18
Soporte del eslabon giratorio . . . . . . . . . . . . . . . . . . . . . . . . . . . 18
Conexión de la Antena o cable . . . . . . . . . . . . . . . . . . . . . . . . . 19
CONEXIONES DE EQUIPO EXTERNO
Instalación del HDSTB . . . . . . . . . . . . . . . . . . . . . . . . . . . . . . . . . . . . . 20
Instalación del DVD . . . . . . . . . . . . . . . . . . . . . . . . . . . . . . . . . . . . . . . . . 23
Instalación del VCR . . . . . . . . . . . . . . . . . . . . . . . . . . . . . . . . . . . . . . . . 25
Instalación de la PC . . . . . . . . . . . . . . . . . . . . . . . . . . . . . . . . . . . . . . . . .27
Ajuste estéreo externo . . . . . . . . . . . . . . . . . . . . . . . . . . . . . . . . . . . . .29
Ajuste de la Salida AV out . . . . . . . . . . . . . . . . . . . . . . . . . . . . . . . .30
Configuración de pantalla para el modo PC . . . . . . .31
VER LA TV / CONTROL DE CANAL
Funciones de los botones del control remoto . . . . 34
Encendiendo la TV . . . . . . . . . . . . . . . . . . . . . . . . . . . . . . . . . . . . . . . . . 36
Ajuste del Canal . . . . . . . . . . . . . . . . . . . . . . . . . . . . . . . . . . . . . . . . . . . . . 36
Ajuste del volumen . . . . . . . . . . . . . . . . . . . . . . . . . . . . . . . . . . . . . . . . . 36
Selección y ajuste del menú pantalla . . . . . . . . . . . . . . . . 37
Búsqueda de canales
- Sinto. Auto: Búsqueda de canales . . . . . . . . . . . . . 38
- Sintonización Manual: Agregar/Eliminar losCanales . . . . . . . . . . . . . . . . . . . . . . . . . . . . . . . . . . . . . . . . . . . . . . . . . . . . . . . . . . . . . . . .39
Ajuste fino de sintonización.............................................................. 40
Amplificador . . . . . . . . . . . . . . . . . . . . . . . . . . . . . . . . . . . . . . . . . . . . . . . . . . . . 41
Ajuste de canales favoritos.................................................................. 42
Bloqueo de controles.................................................................................... 43
CONTROL DE IMAGEN
Tamaño de la Imagen(Control de Relacion deAspecto) . . . . . . . . . . . . . . . . . . . . . . . . . . . . . . . . . . . . . . . . . . . . . . . . . . . . . . . . 44
Ajustes de la Imagen Prestablecida
- Modo imagen – Presintonizada . . . . . . . . . . . . . . . . . . . 45
- Control de tono de color automático . . . . . . . . . . . . . . . . . . . . . . 46
Control Manual de Imagen
- Modo imagen - Modo usuario . . . . . . . . . . . . . . . . . . . 47
- Tono de color - Modo usuario . . . . . . . . . . . . . . . . . . . 48
XD - Tecnología de Mejora de la Imagen . . . . . . . . 49
Avanzado - Gamma . . . . . . . . . . . . . . . . . . . . . . . . . . . . . . . . . . . . . . . . . 50
Avanzado - Modo de Película . . . . . . . . . . . . . . . . . . . . . . . . . . . 51
Avanzado - Nivel de negro . . . . . . . . . . . . . . . . . . . . . . . . . . . . . . 52
Avanzado - Protección Visual . . . . . . . . . . . . . . . . . . . . . . . . . . . 53
Restablecimiento de la Imagen . . . . . . . . . . . . . . . . . . . . . . . . 54
Indicador de encendido . . . . . . . . . . . . . . . . . . . . . . . . . . . . . . . . . . . 55
Restablecer Ajustes de Fábrica . . . . . . . . . . . . . . . . . . . . . . . . 56
CONTROL DE SONIDO Y IDIOMA
Nivelador Automático de Volumen . . . . . . . . . . . . . . . . . . . 57
Ajustes de sonido preestablecidos (Modo de audio) . . 58
Ajuste de sonido - modo usuario . . . . . . . . . . . . . . . . . . . . . 59
Ajuste de Balance . . . . . . . . . . . . . . . . . . . . . . . . . . . . . . . . . . . . . . . . . . . 60
Disposición de bocinas de TV . . . . . . . . . . . . . . . . . . . . . . . . . . 61
Selección de Salida de Audio . . . . . . . . . . . . . . . . . . . . . . . . . . . 62
Selección del lenguaje en la pantalla . . . . . . . . . . . . . . . . . 63
Subtitulaje . . . . . . . . . . . . . . . . . . . . . . . . . . . . . . . . . . . . . . . . . . . . . . . . . . . . . . 64
Disfrute de la transmisión Estéreo/SAP . . . . . . . . . . . 65
CONFIGURACIÓN HORARIA
Ajuste del reloj . . . . . . . . . . . . . . . . . . . . . . . . . . . . . . . . . . . . . . . . . . . . . . . 66
Ajustes de Conexión/Desconexión AutomáticaMediante Temporizador . . . . . . . . . . . . . . . . . . . . . . . . . . . . . . . . . . . 67
Configuración Del Temporizador De ApagadoAutomático . . . . . . . . . . . . . . . . . . . . . . . . . . . . . . . . . . . . . . . . . . . . . . . . . . . .68
Configuración De Corte Automático . . . . . . . . . . . . . . . .69
APÉNDICE
Lista de verificación de problemas . . . . . . . . . . . . . . . . . . 70
Mantenimiento . . . . . . . . . . . . . . . . . . . . . . . . . . . . . . . . . . . . . . . . . . . . . . . 72
Especificaciones del producto . . . . . . . . . . . . . . . . . . . . . . . . . 73
Configuración de dispositivo externo del control . . . . . .74
MFL41469212-sp-mi 3/12/09 9:10 PM Page 5
6
Si siente la TV fría al tocar, puede que haya un pequeño “flicker” cuando se ha encendido. Esto es normal, no haynada malo con la TV.
Unos pocos defectos de puntos pueden ser visibles en la pantalla, apareciendo en un color rojo, verde o azul. Peroellos no tienen ningún efecto equivocado para la función del monitor.
Evitese tocar la pantalla LCD o agarrarla con su(s) dedo(s) por un periodo largo de tiempo. Si lo hace, eso puedeprovocar una distorción temporal en la pantalla.
DDiissppoossiicciióónn
a. Lámpara fluorescente usada en este producto contiene una cantidad mínima de mercurio.
b. No disponga este producto con basura normal de la casa.
c. La disposición de este producto debe ser manejado de acuerdo a la autoridad local de su provincia.
MFL41469212-sp-mi 3/12/09 9:10 PM Page 6
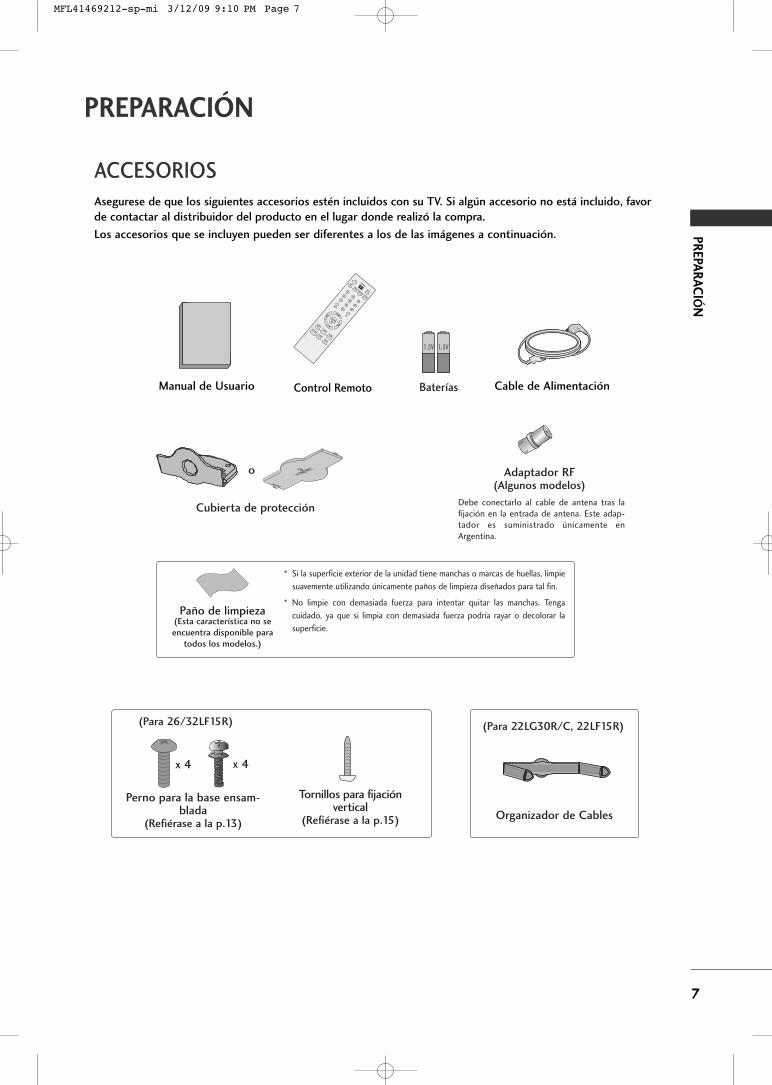
PR
EPAR
AC
I ÓN
7
PREPARACIÓN
ACCESORIOSAsegurese de que los siguientes accesorios estén incluidos con su TV. Si algún accesorio no está incluido, favor
de contactar al distribuidor del producto en el lugar donde realizó la compra.
Los accesorios que se incluyen pueden ser diferentes a los de las imágenes a continuación.
1.5V 1.5V
Manual de Usuario Cable de AlimentaciónControl Remoto
1
2
3
4
5
6
7
8
0 9
VOL
VOL
CH
CH
ENTER
MENUQ.VIEW
SLEEP
TURESOUND
RATIO
FAV
MUTE
OGMEMORY/ERASE CAPTION
INPUT
1
2
3
4
5
6
7
8
0 9
VOL
VOL
CH
CH
ENTER
POWER
MENUQ.VIEW
SLEEP
RATIO
MTS
FAV
MUTE
A.PROG
CAPTION
TV
INPUTMEMORY/ERASE
SOUND
PICTURE
* Si la superficie exterior de la unidad tiene manchas o marcas de huellas, limpie
suavemente utilizando únicamente paños de limpieza diseñados para tal fin.
* No limpie con demasiada fuerza para intentar quitar las manchas. Tenga
cuidado, ya que si limpia con demasiada fuerza podría rayar o decolorar la
superficie.
Paño de limpieza(Esta característica no seencuentra disponible para
todos los modelos.)
Organizador de Cables
Cubierta de protección
Tornillos para fijación vertical
(Refiérase a la p.15)
Perno para la base ensam-blada
(Refiérase a la p.13)
x 4 x 4
(Para 26/32LF15R) (Para 22LG30R/C, 22LF15R)
o
Baterías
Adaptador RF(Algunos modelos)
Debe conectarlo al cable de antena tras lafijación en la entrada de antena. Este adap-tador es suministrado únicamente enArgentina.
MFL41469212-sp-mi 3/12/09 9:10 PM Page 7
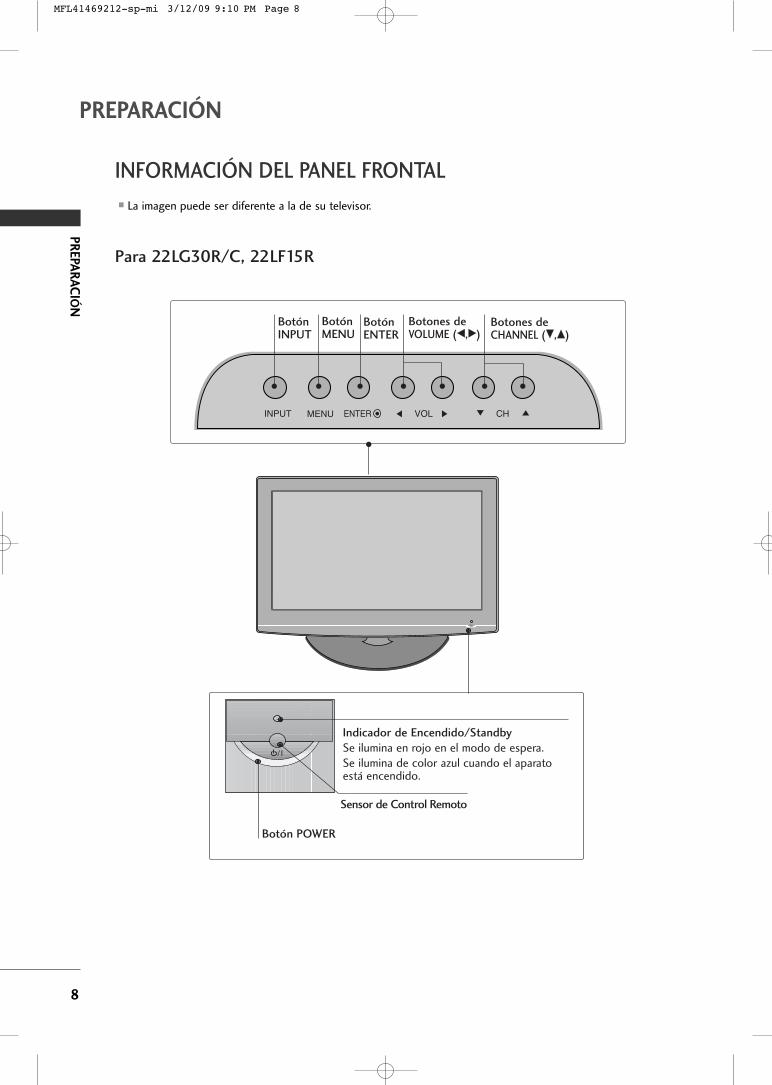
PR
EPAR
AC
IÓN
8
INFORMACIÓN DEL PANEL FRONTAL
PREPARACIÓN
� La imagen puede ser diferente a la de su televisor.
INPUT MENU VOL CHENTER
Botones deCHANNEL (EE,DD)
Botones deVOLUME (FF,GG)
BotónMENU
BotónENTER
BotónINPUT
Botón POWER
Sensor de Control Remoto
Indicador de Encendido/Standby
Se ilumina en rojo en el modo de espera.Se ilumina de color azul cuando el aparatoestá encendido.
Para 22LG30R/C, 22LF15R
MFL41469212-sp-mi 3/12/09 9:10 PM Page 8
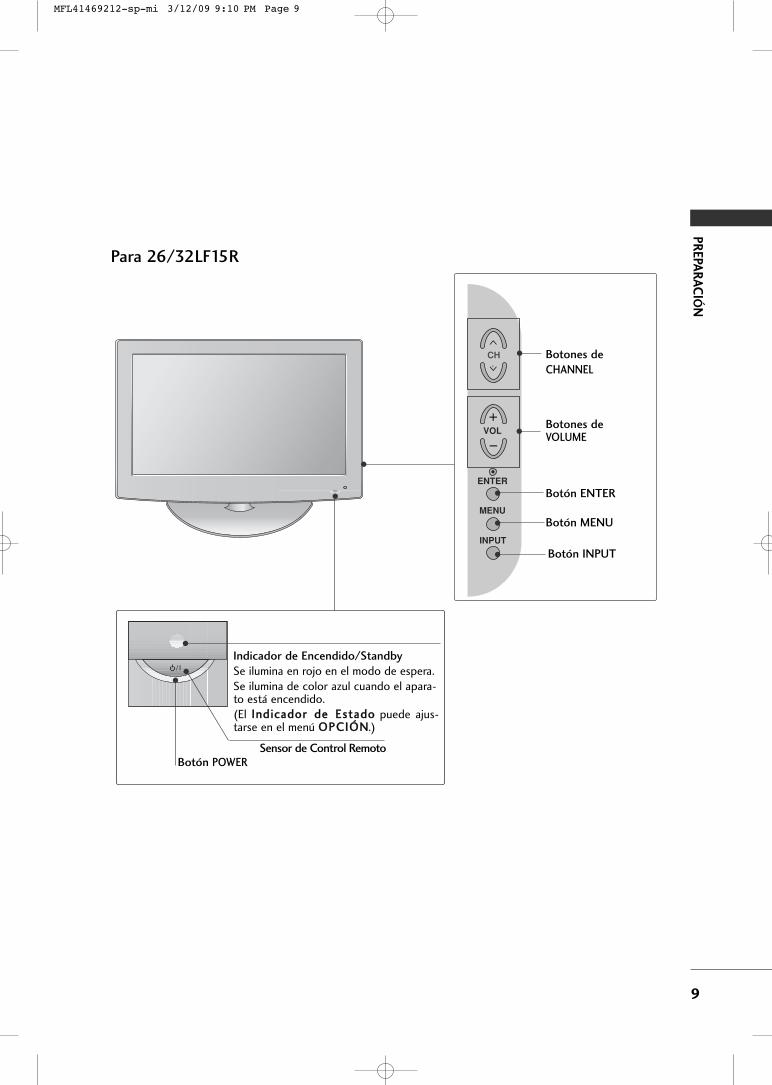
PR
EPAR
AC
I ÓN
9
Botón POWER
Indicador de Encendido/Standby
Se ilumina en rojo en el modo de espera.Se ilumina de color azul cuando el apara-to está encendido.(El IInnddiiccaaddoorr ddee EEssttaaddoo puede ajus-tarse en el menú OOPPCCIIÓÓNN.)
CH
VOL
MENU
INPUT
ENTER
Botones de
CHANNEL
Botones deVOLUME
Botón ENTER
Botón MENU
Botón INPUT
Sensor de Control Remoto
Para 26/32LF15R
MFL41469212-sp-mi 3/12/09 9:10 PM Page 9
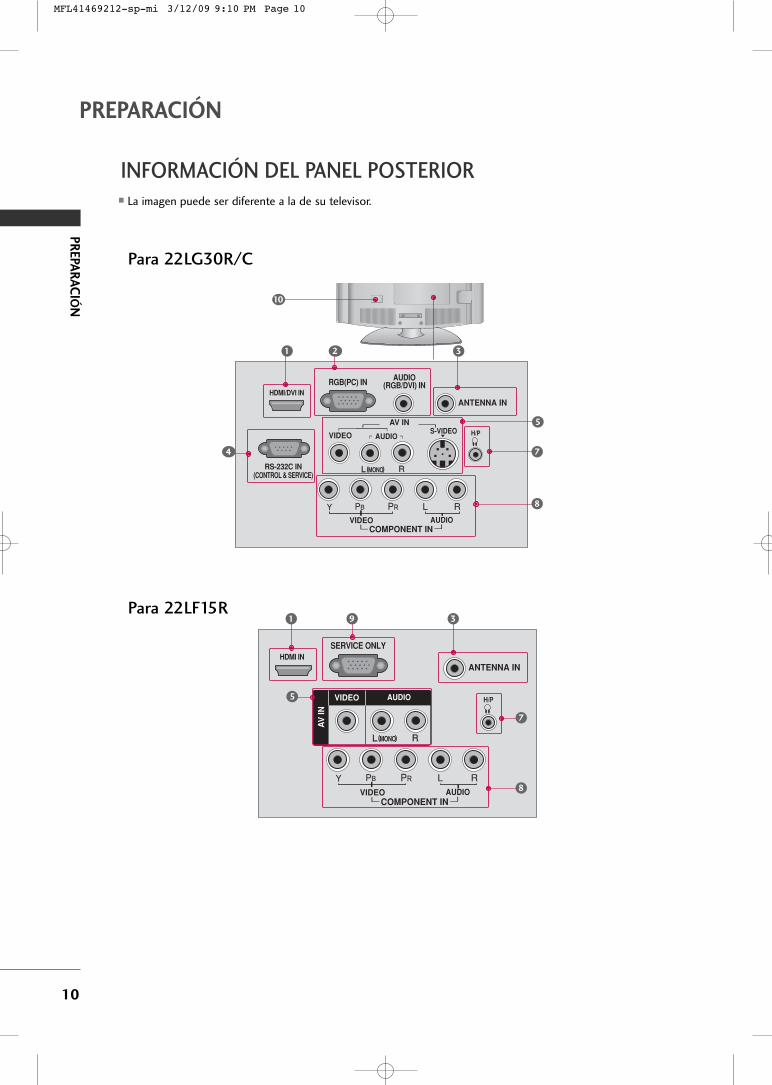
PR
EPAR
AC
IÓN
10
INFORMACIÓN DEL PANEL POSTERIOR
PREPARACIÓN
( )
10
Para 22LG30R/C
ANTENNA IN
SERVICE ONLY
AUDIOCOMPONENT IN
VIDEO
MONO( )
H/P
HDMI IN
( )
AV
IN
VIDEO AUDIO
1
7
8
3Para 22LF15R
5
ANTENNA IN
RGB(PC) IN
RS-232C IN(CONTROL & SERVICE)
AUDIO(RGB/DVI) IN
S-VIDEO
AUDIOCOMPONENT IN
VIDEO
VIDEO AUDIO
MONO( )
AV IN H/P
HDMI/DVI IN
1 2
4
8
7
3
5
9
� La imagen puede ser diferente a la de su televisor.
MFL41469212-sp-mi 3/12/09 9:10 PM Page 10
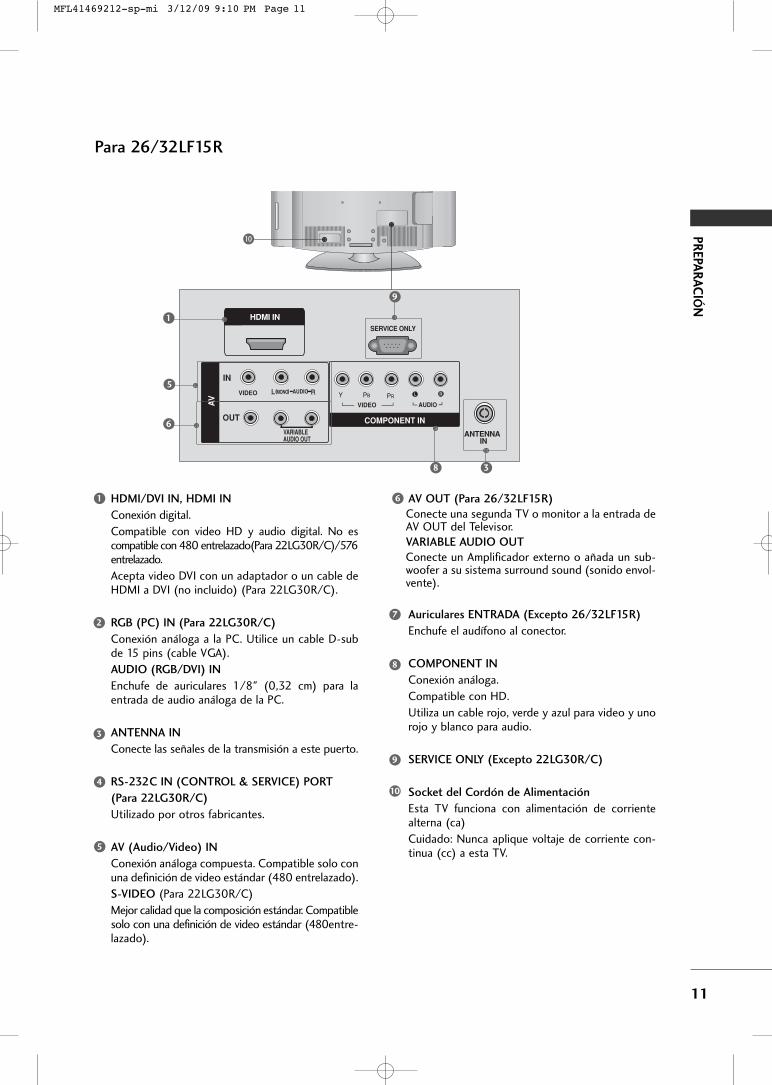
PR
EPAR
AC
I ÓN
11
10
COMPONENT IN
SERVICE ONLY
VIDEO AUDIO
VIDEO MONO( ) AUDIO
ANTENNA IN
HDMI IN
IN
OUT
AV
VARIABLE AUDIO OUT
1
3
Para 26/32LF15R
HDMI/DVI IN, HDMI IN
Conexión digital.
Compatible con video HD y audio digital. No escompatible con 480 entrelazado(Para 22LG30R/C)/576entrelazado.
Acepta video DVI con un adaptador o un cable deHDMI a DVI (no incluido) (Para 22LG30R/C).
RGB (PC) IN (Para 22LG30R/C)
Conexión análoga a la PC. Utilice un cable D-subde 15 pins (cable VGA).
AUDIO (RGB/DVI) IN
Enchufe de auriculares 1/8" (0,32 cm) para laentrada de audio análoga de la PC.
ANTENNA IN
Conecte las señales de la transmisión a este puerto.
RS-232C IN (CONTROL & SERVICE) PORT
(Para 22LG30R/C)
Utilizado por otros fabricantes.
AV (Audio/Video) IN
Conexión análoga compuesta. Compatible solo conuna definición de video estándar (480 entrelazado).
S-VIDEO (Para 22LG30R/C)
Mejor calidad que la composición estándar. Compatiblesolo con una definición de video estándar (480entre-lazado).
AV OUT (Para 26/32LF15R)
Conecte una segunda TV o monitor a la entrada deAV OUT del Televisor.VARIABLE AUDIO OUT
Conecte un Amplificador externo o añada un sub-woofer a su sistema surround sound (sonido envol-vente).
Auriculares ENTRADA (Excepto 26/32LF15R)
Enchufe el audífono al conector.
COMPONENT IN
Conexión análoga.
Compatible con HD.
Utiliza un cable rojo, verde y azul para video y unorojo y blanco para audio.
SERVICE ONLY (Excepto 22LG30R/C)
Socket del Cordón de Alimentación
Esta TV funciona con alimentación de corrientealterna (ca)
Cuidado: Nunca aplique voltaje de corriente con-tinua (cc) a esta TV.
1
2
3
4
5
6
7
6
5
8
9
8
9
10
MFL41469212-sp-mi 3/12/09 9:10 PM Page 11
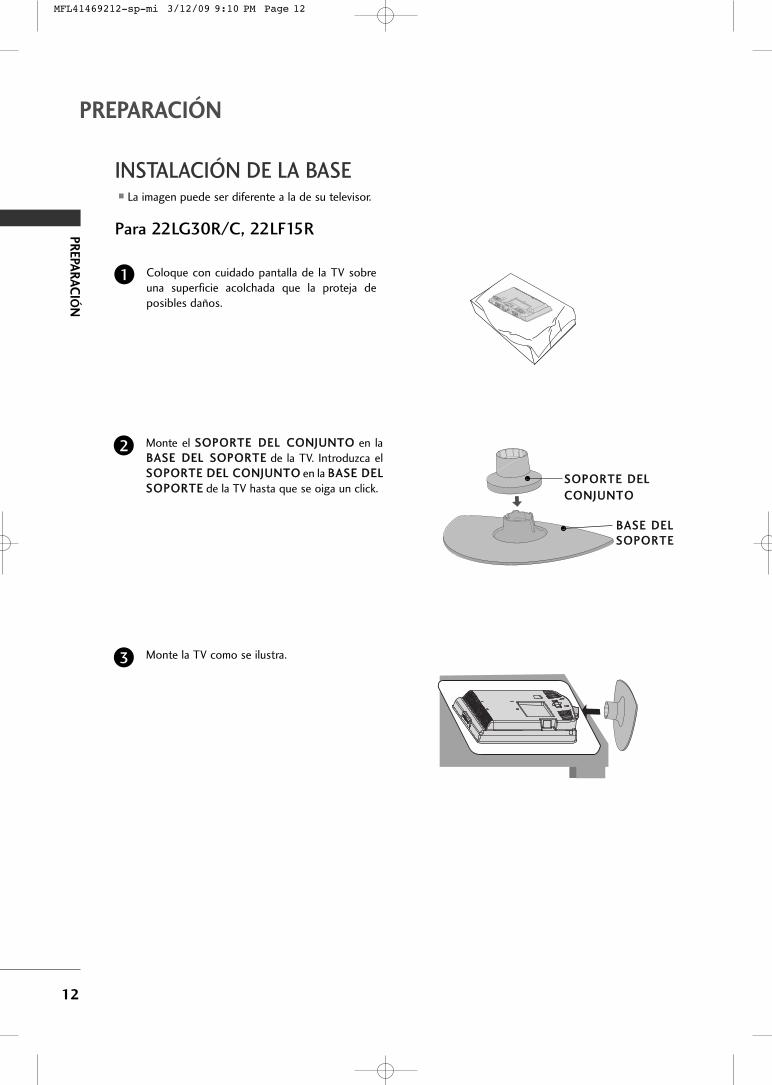
PR
EPAR
AC
IÓN
12
INSTALACIÓN DE LA BASE
PREPARACIÓN
� La imagen puede ser diferente a la de su televisor.
Monte el SSOOPPOORRTTEE DDEELL CCOONNJJUUNNTTOO en laBBAASSEE DDEELL SSOOPPOORRTTEE de la TV. Introduzca elSSOOPPOORRTTEE DDEELL CCOONNJJUUNNTTOO en la BBAASSEE DDEELLSSOOPPOORRTTEE de la TV hasta que se oiga un click.
2
Monte la TV como se ilustra.3
SSOOPPOORRTTEE DDEELL
CCOONNJJUUNNTTOO
BBAASSEE DDEELLSSOOPPOORRTTEE
Coloque con cuidado pantalla de la TV sobreuna superficie acolchada que la proteja deposibles daños.
1
Para 22LG30R/C, 22LF15R
MFL41469212-sp-mi 3/12/09 9:10 PM Page 12
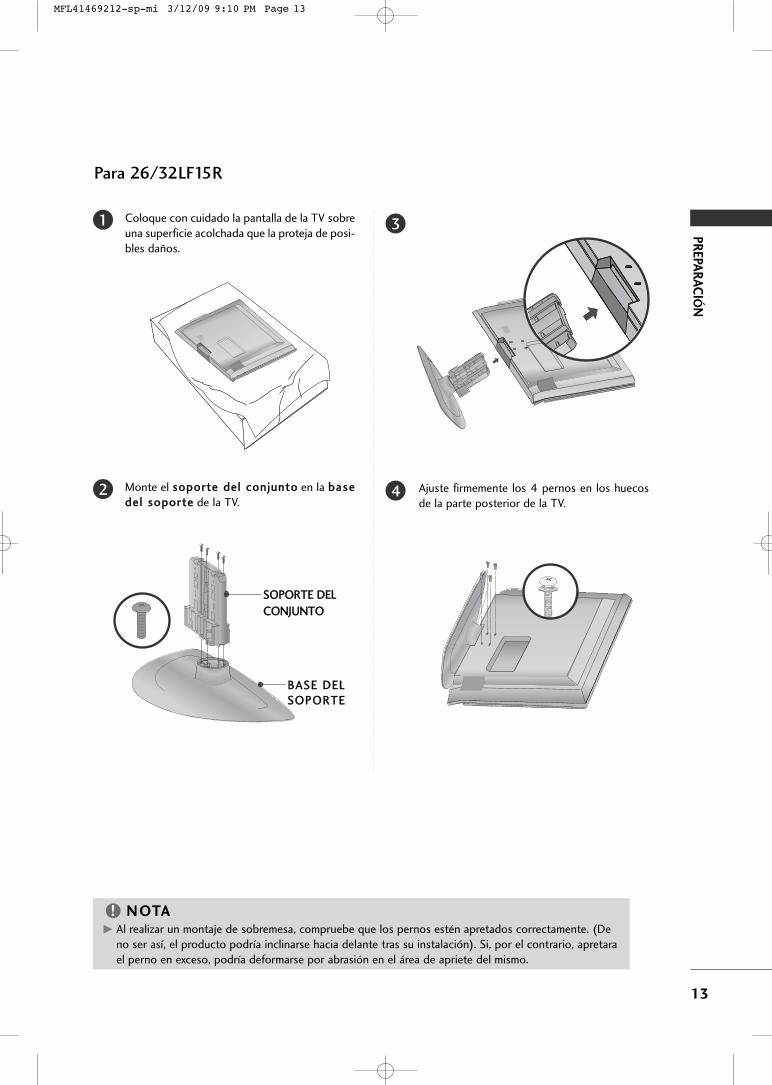
PR
EPAR
AC
I ÓN
13
Coloque con cuidado la pantalla de la TV sobreuna superficie acolchada que la proteja de posi-bles daños.
Monte el ssooppoorrttee ddeell ccoonnjjuunnttoo en la bbaasseeddeell ssooppoorrttee de la TV.
1
2
3
Ajuste firmemente los 4 pernos en los huecosde la parte posterior de la TV.
4
SSOOPPOORRTTEE DDEELL
CCOONNJJUUNNTTOO
BBAASSEE DDEELLSSOOPPOORRTTEE
GG Al realizar un montaje de sobremesa, compruebe que los pernos estén apretados correctamente. (Deno ser así, el producto podría inclinarse hacia delante tras su instalación). Si, por el contrario, apretarael perno en exceso, podría deformarse por abrasión en el área de apriete del mismo.
NOTA!
Para 26/32LF15R
MFL41469212-sp-mi 3/12/09 9:10 PM Page 13
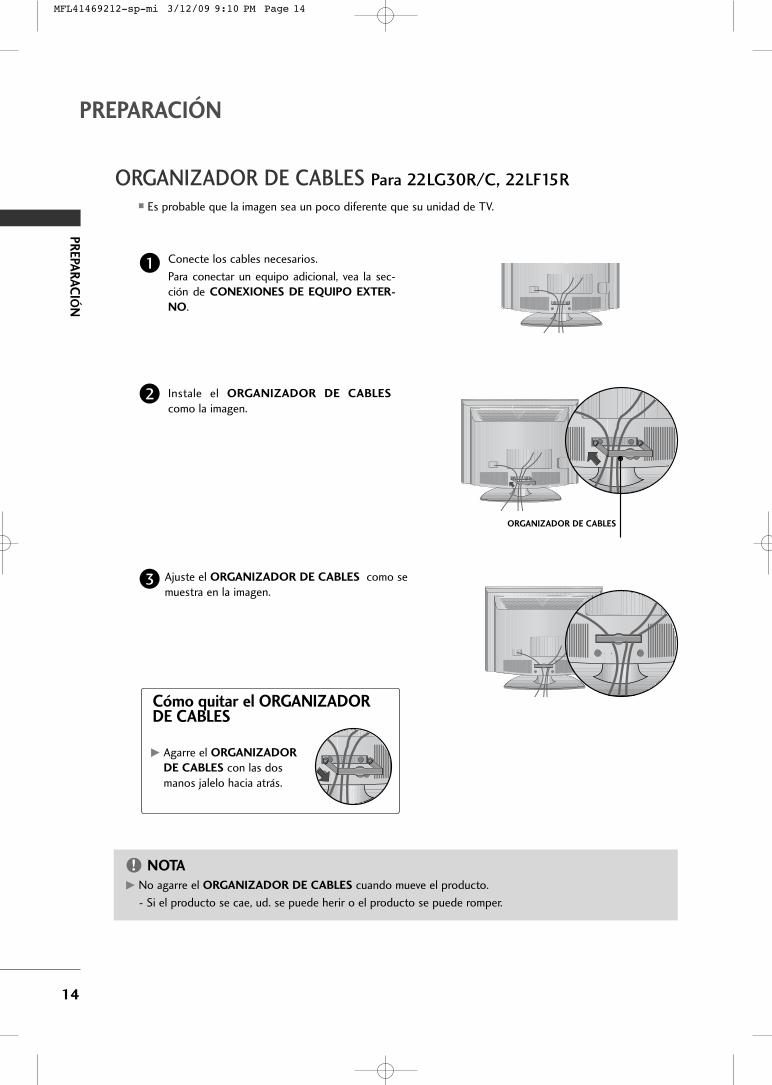
PR
EPAR
AC
IÓN
14
PREPARACIÓN
� Es probable que la imagen sea un poco diferente que su unidad de TV.
Conecte los cables necesarios.
Para conectar un equipo adicional, vea la sec-ción de CONEXIONES DE EQUIPO EXTER-
NO.
Instale el ORGANIZADOR DE CABLES
como la imagen.
1
2
3
GG No agarre el ORGANIZADOR DE CABLES cuando mueve el producto.
- Si el producto se cae, ud. se puede herir o el producto se puede romper.
NOTA!
Cómo quitar el ORGANIZADORDE CABLES
GG Agarre el ORGANIZADOR
DE CABLES con las dosmanos jalelo hacia atrás.
ORGANIZADOR DE CABLES Para 22LG30R/C, 22LF15R
Ajuste el ORGANIZADOR DE CABLES como semuestra en la imagen.
ORGANIZADOR DE CABLES
MFL41469212-sp-mi 3/12/09 9:10 PM Page 14
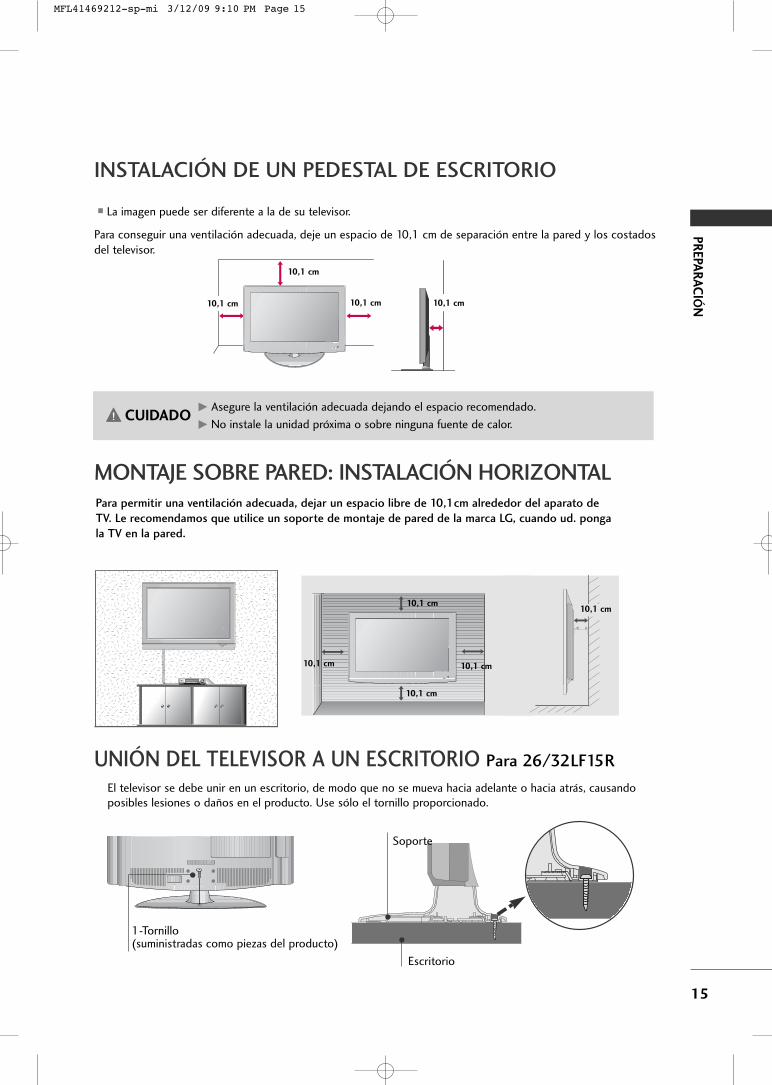
PR
EPAR
AC
I ÓN
15
INSTALACIÓN DE UN PEDESTAL DE ESCRITORIO
CUIDADO
10,1 cm
10,1 cm
10,1 cm 10,1 cm
Para conseguir una ventilación adecuada, deje un espacio de 10,1 cm de separación entre la pared y los costadosdel televisor.
� La imagen puede ser diferente a la de su televisor.
MONTAJE SOBRE PARED: INSTALACIÓN HORIZONTAL Para permitir una ventilación adecuada, dejar un espacio libre de 10,1cm alrededor del aparato de
TV. Le recomendamos que utilice un soporte de montaje de pared de la marca LG, cuando ud. ponga
la TV en la pared.
10,1 cm
10,1 cm10,1 cm
10,1 cm
10,1 cm
GG Asegure la ventilación adecuada dejando el espacio recomendado.
GG No instale la unidad próxima o sobre ninguna fuente de calor.
UNIÓN DEL TELEVISOR A UN ESCRITORIO Para 26/32LF15R
El televisor se debe unir en un escritorio, de modo que no se mueva hacia adelante o hacia atrás, causandoposibles lesiones o daños en el producto. Use sólo el tornillo proporcionado.
1-Tornillo(suministradas como piezas del producto)
Escritorio
Soporte
MFL41469212-sp-mi 3/12/09 9:10 PM Page 15
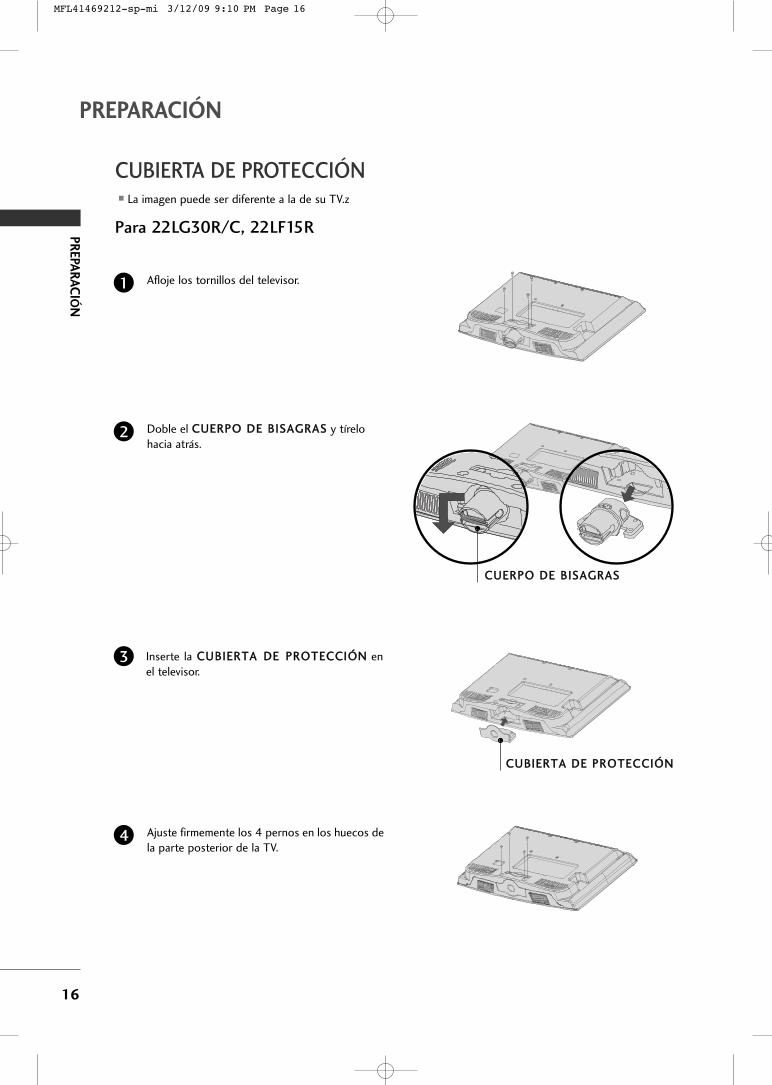
PR
EPAR
AC
IÓN
16
PREPARACIÓN
CUBIERTA DE PROTECCIÓN � La imagen puede ser diferente a la de su TV.z
CCUUEERRPPOO DDEE BBIISSAAGGRRAASS
Afloje los tornillos del televisor.1
Inserte la CCUUBBIIEERRTTAA DDEE PPRROOTTEECCCCIIÓÓNN enel televisor.
3
CCUUBBIIEERRTTAA DDEE PPRROOTTEECCCCIIÓÓNN
Doble el CCUUEERRPPOO DDEE BBIISSAAGGRRAASS y tírelohacia atrás.
2
Ajuste firmemente los 4 pernos en los huecos dela parte posterior de la TV.
4
Para 22LG30R/C, 22LF15R
MFL41469212-sp-mi 3/12/09 9:10 PM Page 16
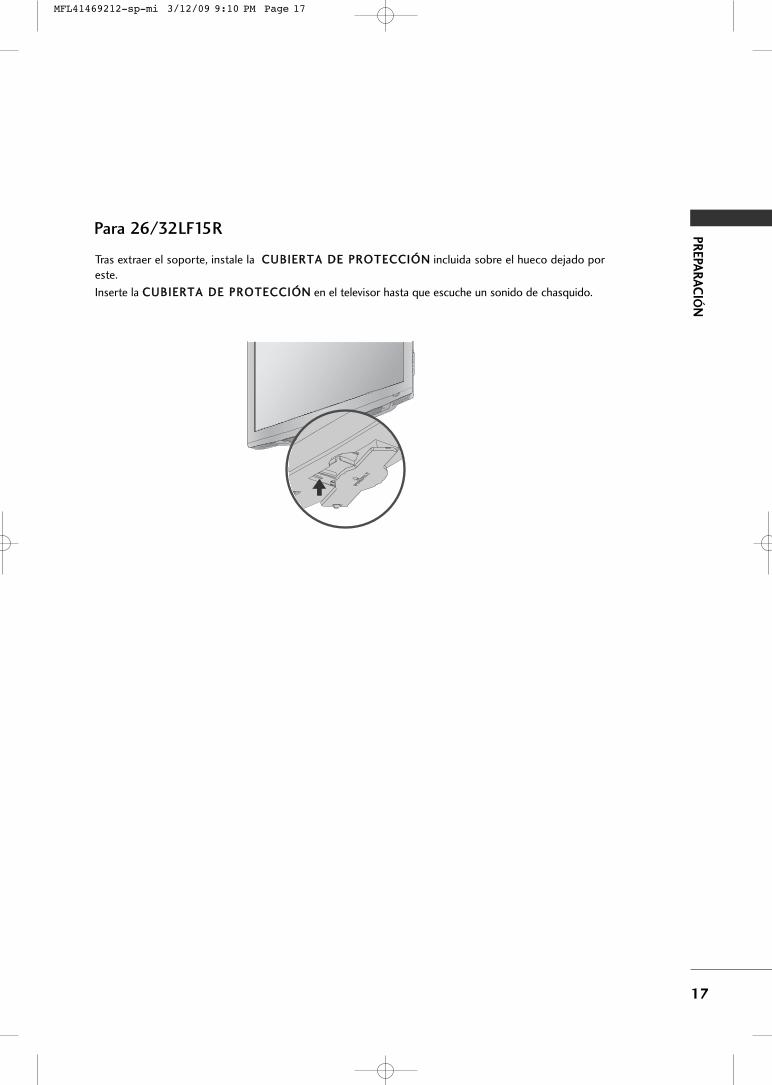
PR
EPAR
AC
I ÓN
17
Tras extraer el soporte, instale la CCUUBBIIEERRTTAA DDEE PPRROOTTEECCCCIIÓÓNN incluida sobre el hueco dejado poreste.
Inserte la CCUUBBIIEERRTTAA DDEE PPRROOTTEECCCCIIÓÓNN en el televisor hasta que escuche un sonido de chasquido.
Para 26/32LF15R
MFL41469212-sp-mi 3/12/09 9:10 PM Page 17
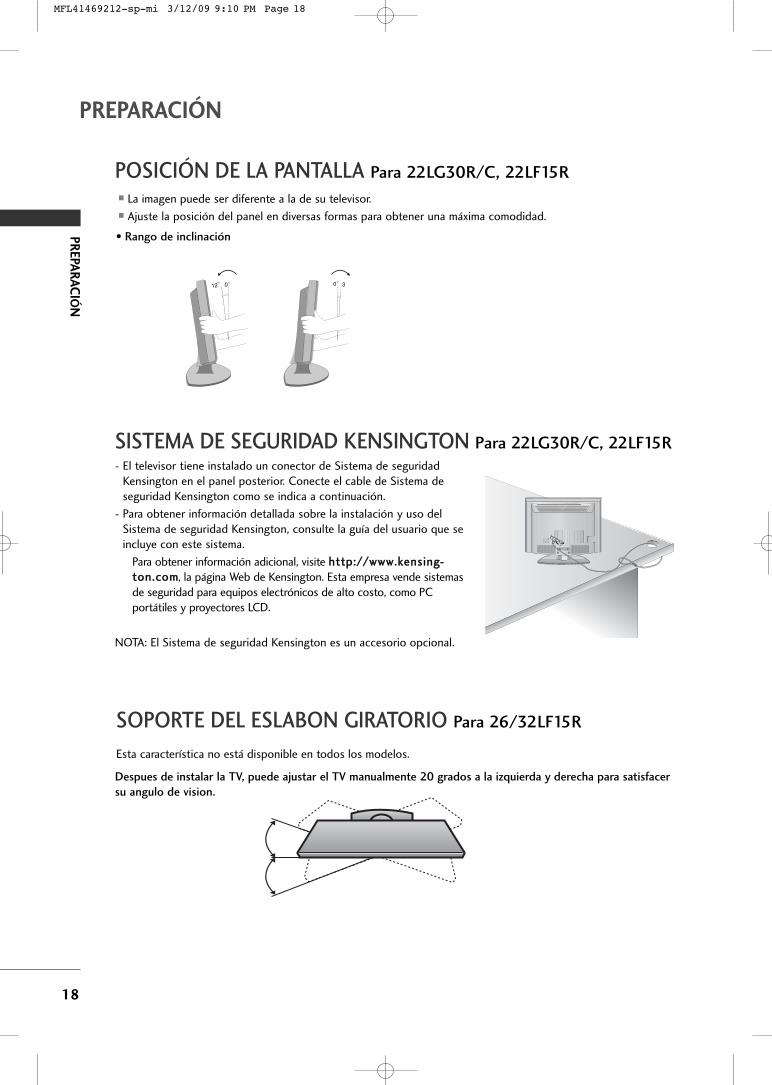
PR
EPAR
AC
IÓN
18
POSICIÓN DE LA PANTALLA Para 22LG30R/C, 22LF15R
PREPARACIÓN
� La imagen puede ser diferente a la de su televisor.� Ajuste la posición del panel en diversas formas para obtener una máxima comodidad.
• Rango de inclinación
12 0 30
SISTEMA DE SEGURIDAD KENSINGTON Para 22LG30R/C, 22LF15R- El televisor tiene instalado un conector de Sistema de seguridad
Kensington en el panel posterior. Conecte el cable de Sistema deseguridad Kensington como se indica a continuación.
- Para obtener información detallada sobre la instalación y uso delSistema de seguridad Kensington, consulte la guía del usuario que seincluye con este sistema.
Para obtener información adicional, visite hhttttpp::////wwwwww..kkeennssiinngg--ttoonn..ccoomm, la página Web de Kensington. Esta empresa vende sistemasde seguridad para equipos electrónicos de alto costo, como PCportátiles y proyectores LCD.
NOTA: El Sistema de seguridad Kensington es un accesorio opcional.
SOPORTE DEL ESLABON GIRATORIO Para 26/32LF15R
Esta característica no está disponible en todos los modelos.
Despues de instalar la TV, puede ajustar el TV manualmente 20 grados a la izquierda y derecha para satisfacer
su angulo de vision.
MFL41469212-sp-mi 3/12/09 9:10 PM Page 18

PR
EPAR
AC
I ÓN
19
CONEXIÓN DE LA ANTENA O CABLE
� Para prevenir daños, no conecte a la corriente hasta que estén instaladas todas las conexiones entre los dispositivos.
� La imagen puede ser diferente a la de su televisor.
1. Antena (analógica)
Toma de entrada de pared o antena exterior sin conexiones a cajade cables. Para lograr la mejor calidad de imagen, ajuste la posición de laantena si fuera necesario.
2. Cable
Enchufe deantena dela pared
Antena deexterior
Puerto deTV de Cable en la pared
Viviendas/Apartamentos(Conectar al enchufe de antena en la pared)
Cable Coaxial RF (75 ohm)
Cable Coaxial RF (75 ohm)
Casa privada(Conectar a un enchufe de pared de la
antena exterior) Asegúrese de no doblar el cable de cobrecuando conecte la antena.
Alambre debronce
� En áreas de señal deficiente,puede obtener una mejor calidad en la imagen si instala un amplificador deseñal como se muestra en la derecha.
� Si está siendo utilizando una antena para dos unidades, use un divisor de señal para conectarse.� El cable y el convertidor de antena no son proporcionados con el producto.
Antena
UHF
Amplificador
de la señal
VHF
ANTENNA IN
( )
ANTENNA IN
( )
ANTENNA IN
( )
( )
MFL41469212-sp-mi 3/12/09 9:10 PM Page 19

CO
NEX
ION
ES D
E EQU
IPO EX
TER
NO
20
CONEXIONES DE EQUIPO EXTERNO
INSTALACIÓN DEL HDSTB
� Para evitar daños en el equipo, no enchufe ningún cable de alimentación hasta haber finalizado la conexióncompleta de todo el equipo.
� Esta parte de la CONEXIONES DE EQUIPO EXTERNO utiliza principalmente imagen para modelo 22LG30R/C.
Este TV puede recibir señales de la transmisión digital/cable sin una caja sintonizadora externa. Pero si ud. recibe
señales digitales desde una caja sintonizadora u otro dispositivo externo digital, refiérase a las siguientes figuras.
Conexión de componentes
1. Cómo conectar
Conecte las salidas de video (Y, PB, PR) del DVD a lospuertos de CCOOMMPPOONNEENNTT IINN VVIIDDEEOO en la unidad.Haga coincidir los colores de los conectores (Y =Verde, PB = Azul, PR = Rojo).
Conecte la salida de audio del decodificador digital alos puertos de CCOOMMPPOONNEENNTT IINN AAUUDDIIOO en la unidad.2
1
2. Cómo usar � Encienda el decodificador digital.
(Refiérase al manual de usuario del decodificador digital.)
� Seleccione la entrada de la fuente CCoommppoonneennttee usando elbotón IINNPPUUTT del control remoto.
Y PB PR L R
ANTEN
RGB(PC) IN
INERVICE)
AUDIO(RGB/DVI) IN
AUDIOCOMPONENT IN
VIDEO
VIDEO AUDIO
MONO( )
AV IN H/PS-VIDEO
I IN
1 2
Resoluciones compatibles
Señal
480 entrelazado
576 entrelazado
480 progresivo
576 progresivo
720 progresivo
1 080 entrelazado
1 080 progresivo
Componente
Sí
Sí
Sí
Sí
Sí
Sí
Sí
(Sólo 50Hz, 60Hz)
HDMI/DVI
(Para 22LG30R/C)
No
No
Sí
Sí
Sí
Sí
Sí
(Sólo 50Hz, 60Hz)
No
No
Sí
Sí
Sí
Sí
Sí
(22LF15R - Sólo 50Hz, 60Hz)
(26/32LF15R - Sólo 24Hz,
30Hz, 50Hz, 60Hz)
HDMI
(Para 22/26/32LF15R)
MFL41469212-sp-mi 3/12/09 9:10 PM Page 20
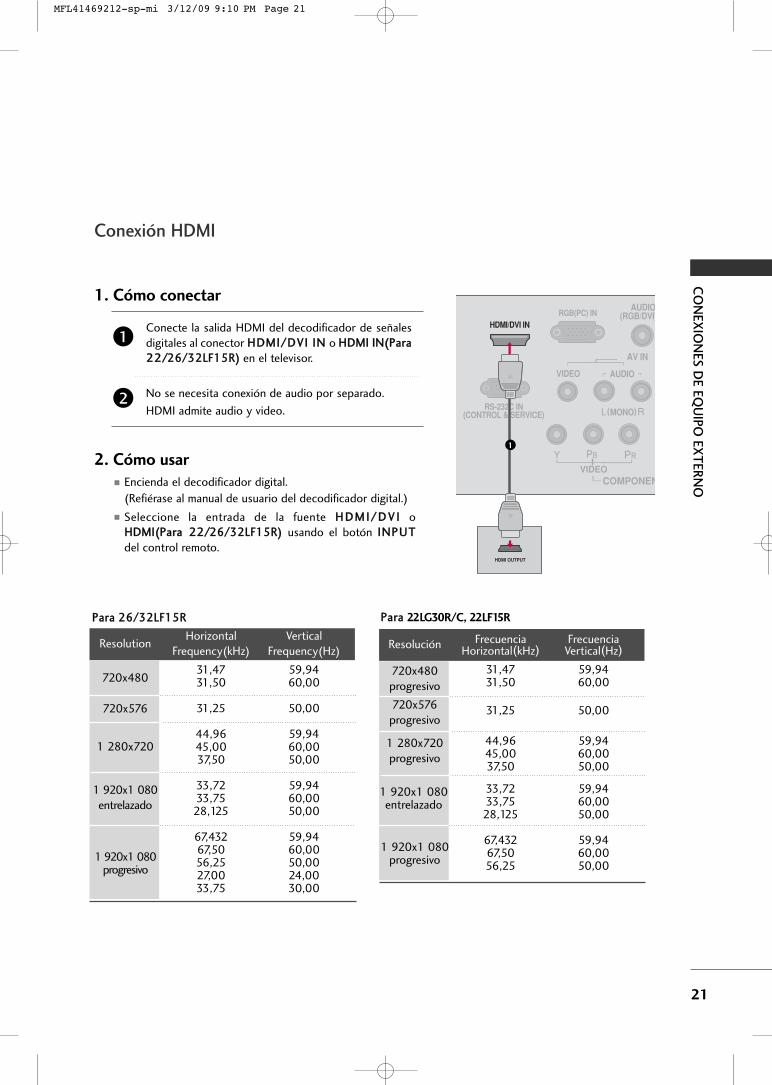
CO
NEX
ION
ES D
E EQU
IPO EX
TER
NO
21
Conexión HDMI
RGB(PC) IN
RS-232C IN(CONTROL & SERVICE)
AUDIO(RGB/DVI)
COMPONENVIDEO
VIDEO AUDIO
MONO( )
AV IN
HDMI/DVI IN
HDMI OUTPUT
Conecte la salida HDMI del decodificador de señalesdigitales al conector HHDDMMII//DDVVII IINN o HHDDMMII IINN((PPaarraa2222//2266//3322LLFF1155RR)) en el televisor.
No se necesita conexión de audio por separado.
HDMI admite audio y video.
1. Cómo conectar
2. Cómo usar � Encienda el decodificador digital.
(Refiérase al manual de usuario del decodificador digital.)
� Seleccione la entrada de la fuente HH DD MM II // DD VV II oHHDDMMII((PPaarraa 2222//2266//3322LLFF1155RR)) usando el botón IINNPPUUTT
del control remoto.
2
1
1
Resolución
720x480progresivo
720x576progresivo
1 280x720progresivo
1 920x1 080entrelazado
1 920x1 080progresivo
Frecuencia Frecuencia Horizontal(kHz) Vertical(Hz)
31,47 59,9431,50 60,00
31,25 50,00
44,96 59,9445,00 60,0037,50 50,00
33,72 59,9433,75 60,0028,125 50,00
67,432 59,9467,50 60,0056,25 50,00
PPaarraa 2266//3322LLFF1155RR
Resolution
720x480
720x576
1 280x720
1 920x1 080 entrelazado
1 920x1 080progresivo
Horizontal Vertical Frequency(kHz) Frequency(Hz)
31,47 59,9431,50 60,00
31,25 50,00
44,96 59,9445,00 60,0037,50 50,00
33,72 59,9433,75 60,0028,125 50,00
67,432 59,9467,50 60,0056,25 50,0027,00 24,0033,75 30,00
PPaarraa 22LG30R/C, 22LF15R
MFL41469212-sp-mi 3/12/09 9:10 PM Page 21
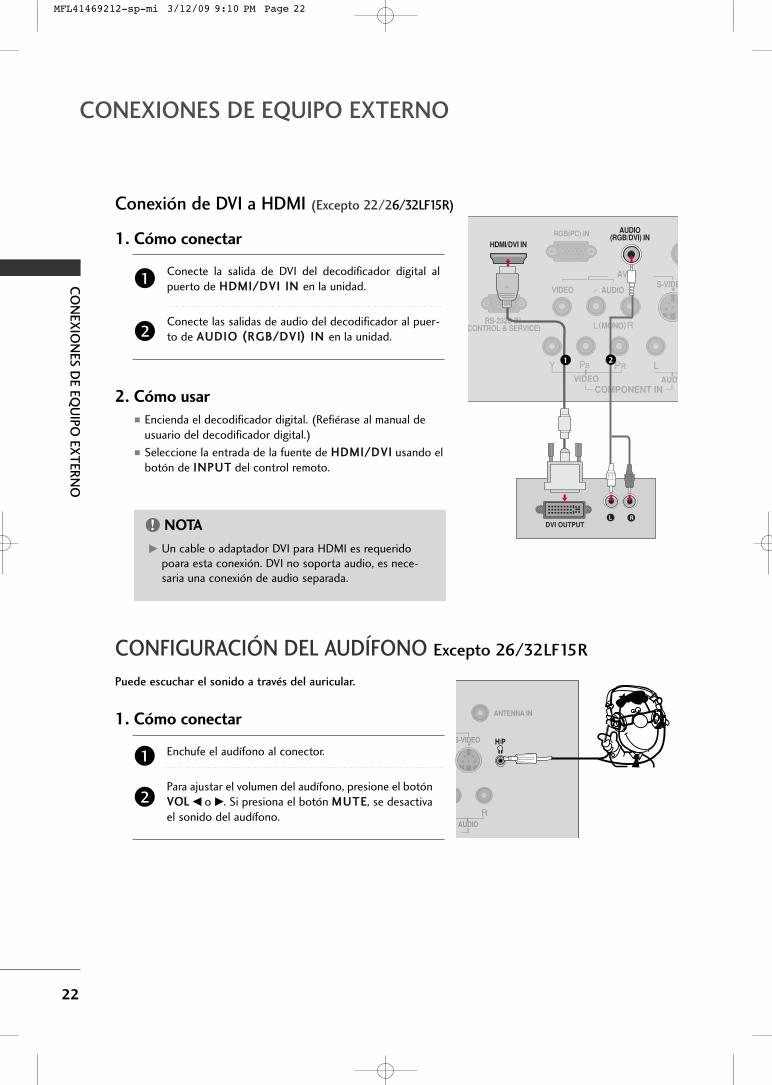
CO
NEX
ION
ES D
E EQU
IPO EX
TER
NO
22
CONEXIONES DE EQUIPO EXTERNO
Conexión de DVI a HDMI (Excepto 22/26/32LF15R)
GG Un cable o adaptador DVI para HDMI es requeridopoara esta conexión. DVI no soporta audio, es nece-saria una conexión de audio separada.
NOTA!
1. Cómo conectar
Conecte la salida de DVI del decodificador digital alpuerto de HHDDMMII//DDVVII IINN en la unidad.
Conecte las salidas de audio del decodificador al puer-to de AAUUDDIIOO ((RRGGBB//DDVVII)) IINN en la unidad.2
1
2. Cómo usar � Encienda el decodificador digital. (Refiérase al manual de
usuario del decodificador digital.)
� Seleccione la entrada de la fuente de HHDDMMII//DDVVII usando elbotón de IINNPPUUTT del control remoto.
RGB(PC) IN
RS-232C INCONTROL & SERVICE)
S-VIDE
AUDCOMPONENT IN
VIDEO
VIDEO AUDIO
MONO( )
AV IN
HDMI/DVI IN
L RDVI OUTPUT
AUDIO(RGB/DVI) IN
1 2
CONFIGURACIÓN DEL AUDÍFONO Excepto 26/32LF15R
Puede escuchar el sonido a través del auricular.
Enchufe el audífono al conector.
Para ajustar el volumen del audífono, presione el botónVVOOLL FF o GG. Si presiona el botón MMUUTTEE, se desactivael sonido del audífono.
1. Cómo conectar
2
1
ANTENNA IN
S-VIDEO
AUDIO
H/P
MFL41469212-sp-mi 3/12/09 9:10 PM Page 22
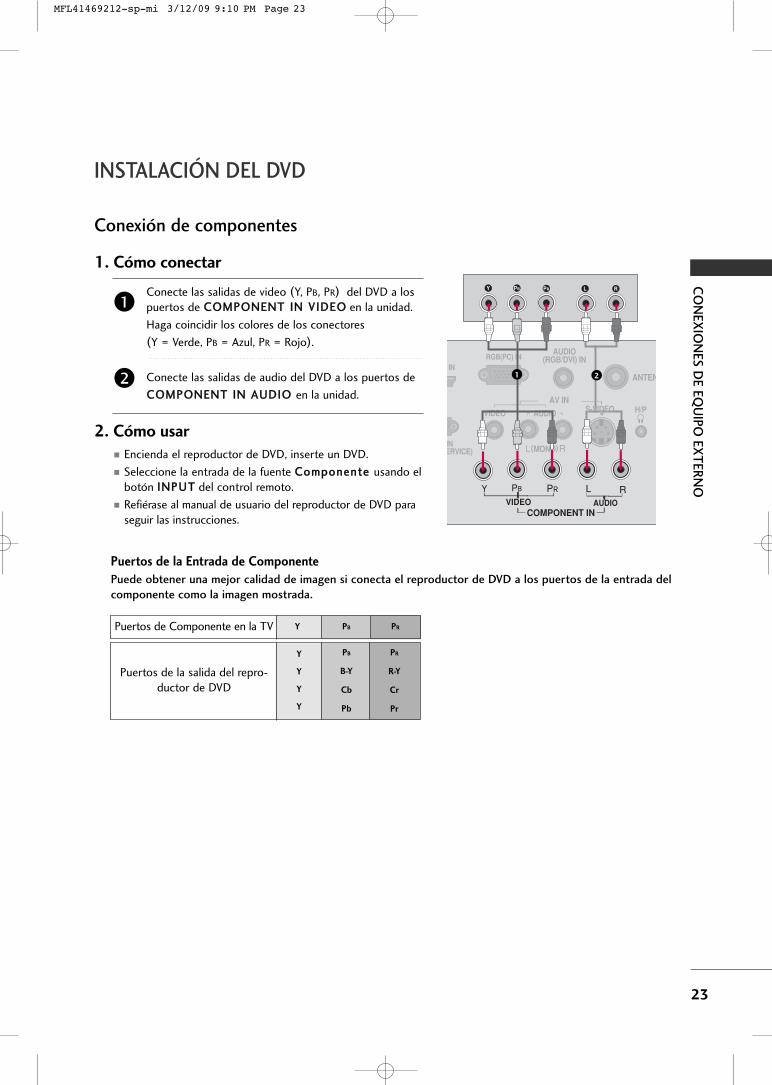
CO
NEX
ION
ES D
E EQU
IPO EX
TER
NO
23
INSTALACIÓN DEL DVD
Puertos de la Entrada de Componente
Puede obtener una mejor calidad de imagen si conecta el reproductor de DVD a los puertos de la entrada del
componente como la imagen mostrada.
Puertos de Componente en la TV Y PB PR
Puertos de la salida del repro-ductor de DVD
Y
Y
Y
Y
PB
B-Y
Cb
Pb
PR
R-Y
Cr
Pr
Conexión de componentes
1. Cómo conectar
Conecte las salidas de video (Y, PB, PR) del DVD a lospuertos de CCOOMMPPOONNEENNTT IINN VVIIDDEEOO en la unidad.
Haga coincidir los colores de los conectores
(Y = Verde, PB = Azul, PR = Rojo).
Conecte las salidas de audio del DVD a los puertos de
CCOOMMPPOONNEENNTT IINN AAUUDDIIOO en la unidad.2
1
2. Cómo usar � Encienda el reproductor de DVD, inserte un DVD.
� Seleccione la entrada de la fuente CCoommppoonneennttee usando elbotón IINNPPUUTT del control remoto.
� Refiérase al manual de usuario del reproductor de DVD paraseguir las instrucciones.
Y PB PR L R
ANTEN
RGB(PC) IN
INERVICE)
AUDIO(RGB/DVI) IN
AUDIOCOMPONENT IN
VIDEO
VIDEO AUDIO
MONO( )
AV IN H/PS-VIDEO
IN1 2
MFL41469212-sp-mi 3/12/09 9:10 PM Page 23
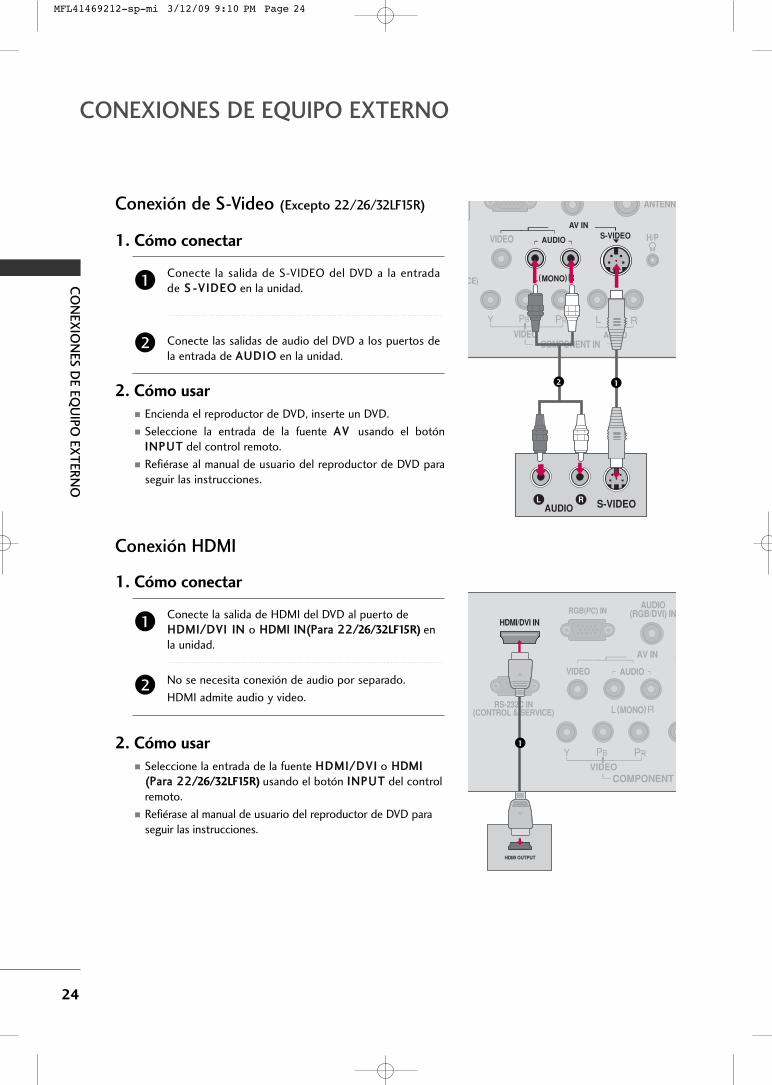
CO
NEX
ION
ES D
E EQU
IPO EX
TER
NO
24
CONEXIONES DE EQUIPO EXTERNO
Conexión de S-Video (Excepto 22/26/32LF15R)
Conexión HDMI
1. Cómo conectar
Conecte la salida de S-VIDEO del DVD a la entradade SS --VVIIDDEEOO en la unidad.
Conecte las salidas de audio del DVD a los puertos dela entrada de AAUUDDIIOO en la unidad.
2
1
2. Cómo usar � Encienda el reproductor de DVD, inserte un DVD.
� Seleccione la entrada de la fuente AAVV usando el botónIINNPPUUTT del control remoto.
� Refiérase al manual de usuario del reproductor de DVD paraseguir las instrucciones.
1. Cómo conectar
Conecte la salida de HDMI del DVD al puerto deHHDDMMII//DDVVII IINN o HHDDMMII IINN((PPaarraa 2222//26/32LF15R) enla unidad.
No se necesita conexión de audio por separado.
HDMI admite audio y video. 2
1
2. Cómo usar � Seleccione la entrada de la fuente HHDDMMII//DDVVII o HHDDMMII
((PPaarraa 2222//26/32LF15R) usando el botón IINNPPUUTT del controlremoto.
� Refiérase al manual de usuario del reproductor de DVD paraseguir las instrucciones.
S-VIDEO
ANTENNA
CE)
S-VIDEO
COMPONENT IN
VIDEO
VIDEO AUDIO
MONO( )
AV IN
H/PAUDIO
L RAUDIO
12
RGB(PC) IN
RS-232C IN(CONTROL & SERVICE)
AUDIO(RGB/DVI) IN
COMPONENT VIDEO
VIDEO AUDIO
MONO( )
AV IN
HDMI/DVI IN
HDMI OUTPUT
1
MFL41469212-sp-mi 3/12/09 9:10 PM Page 24
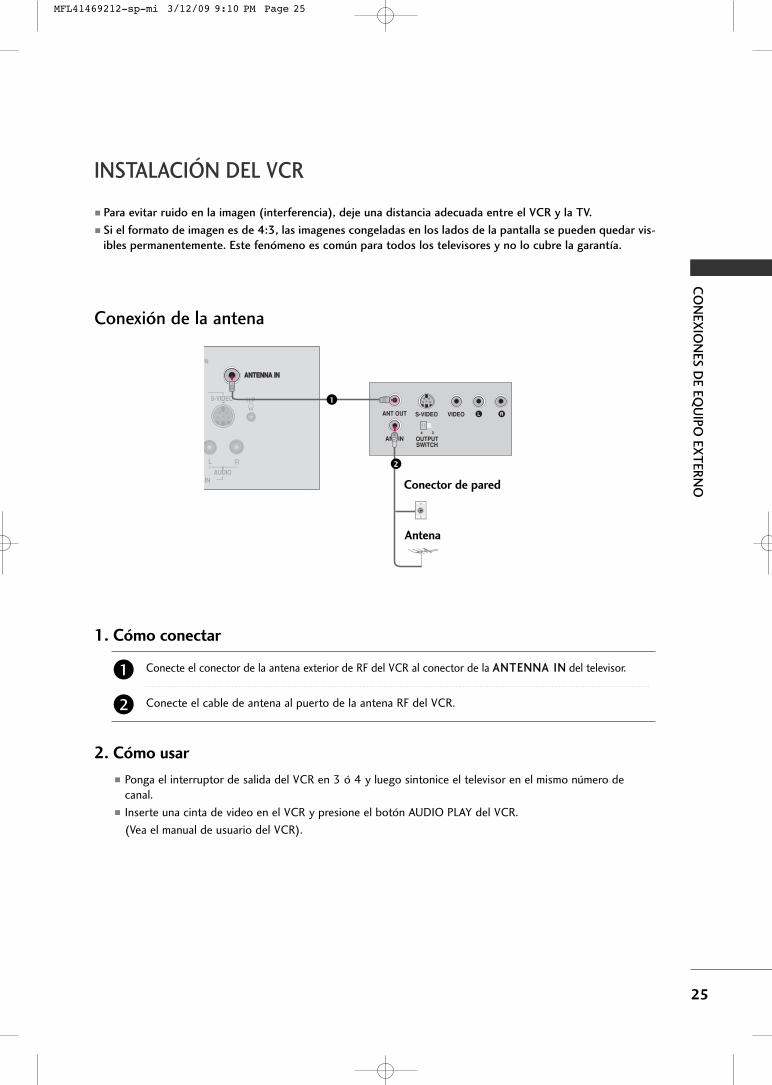
CO
NEX
ION
ES D
E EQU
IPO EX
TER
NO
25
INSTALACIÓN DEL VCR
� Para evitar ruido en la imagen (interferencia), deje una distancia adecuada entre el VCR y la TV.
� Si el formato de imagen es de 4:3, las imagenes congeladas en los lados de la pantalla se pueden quedar vis-
ibles permanentemente. Este fenómeno es común para todos los televisores y no lo cubre la garantía.
Conexión de la antena
L RS-VIDEO VIDEO
OUTPUTSWITCH
ANT IN
ANT OUT
ANTENNA INANTENNA IN
N
S-VIDEO
AUDIOIN
H/P
Conector de pared
Antena
1
2
Conecte el conector de la antena exterior de RF del VCR al conector de la AANNTTEENNNNAA IINN del televisor.
Conecte el cable de antena al puerto de la antena RF del VCR.
1. Cómo conectar
� Ponga el interruptor de salida del VCR en 3 ó 4 y luego sintonice el televisor en el mismo número decanal.
� Inserte una cinta de video en el VCR y presione el botón AUDIO PLAY del VCR.
(Vea el manual de usuario del VCR).
2. Cómo usar
2
1
MFL41469212-sp-mi 3/12/09 9:10 PM Page 25
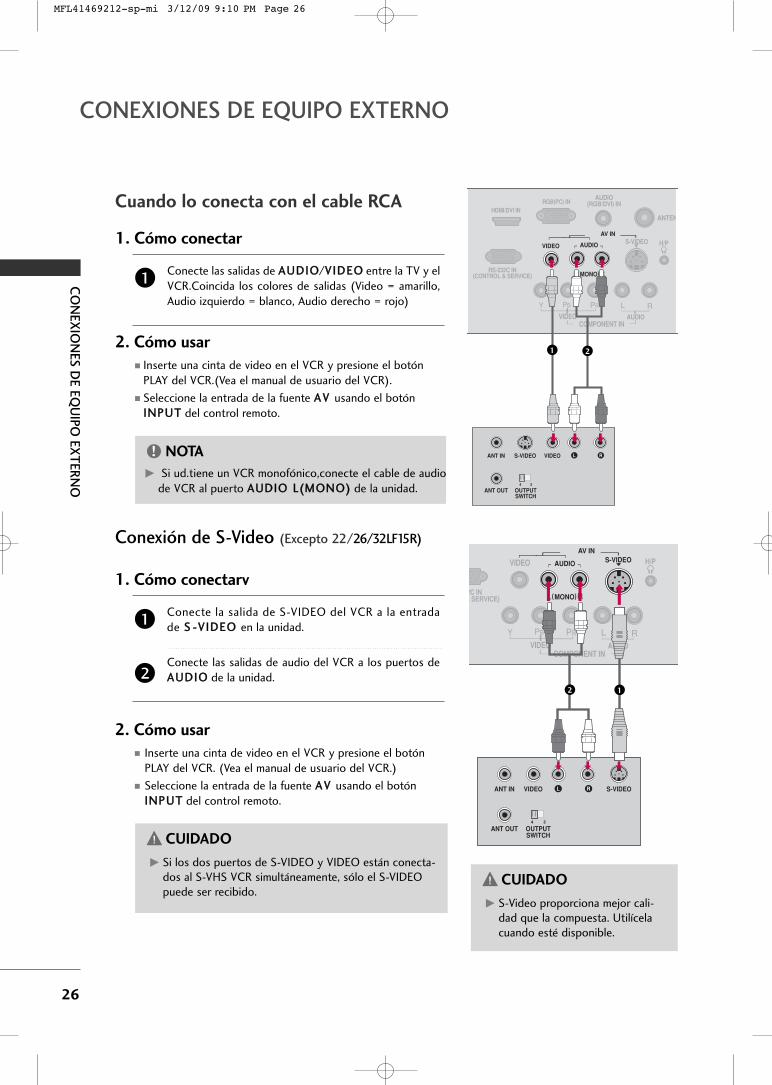
CO
NEX
ION
ES D
E EQU
IPO EX
TER
NO
26
CONEXIONES DE EQUIPO EXTERNO
GG Si ud.tiene un VCR monofónico,conecte el cable de audiode VCR al puerto AAUUDDIIOO LL((MMOONNOO)) de la unidad.
NOTA!
Cuando lo conecta con el cable RCA
1. Cómo conectar
Conecte las salidas de AAUUDDIIOO/VVIIDDEEOO entre la TV y elVCR.Coincida los colores de salidas (Video = amarillo,Audio izquierdo = blanco, Audio derecho = rojo)
1
2. Cómo usar � Inserte una cinta de video en el VCR y presione el botón
PLAY del VCR.(Vea el manual de usuario del VCR).
� Seleccione la entrada de la fuente AAVV usando el botónIINNPPUUTT del control remoto.
ANTEN
RGB(PC) IN
RS-232C IN(CONTROL & SERVICE)
AUDIO(RGB/DVI) IN
COMPONENT INVIDEO AUDIO
MONO( )
AV IN
H/P
HDMI/DVI IN
AUDIO S-VIDEOVIDEO
OUTPUTSWITCH
L RS-VIDEO VIDEOANT IN
ANT OUT
ANTENNA IN
1 2
OUTPUTSWITCH
L R S-VIDEOVIDEOANT IN
ANT OUT
2C IN& SERVICE)
S-VIDEO
COMPONENT IN
VIDEO
VIDEO AUDIO
MONO( )
AV IN
H/PAUDIO
ANTENNA IN
12
Conexión de S-Video (Excepto 22/26/32LF15R)
1. Cómo conectarv
Conecte la salida de S-VIDEO del VCR a la entradade SS --VVIIDDEEOO en la unidad.
Conecte las salidas de audio del VCR a los puertos deAAUUDDIIOO de la unidad.2
1
2. Cómo usar � Inserte una cinta de video en el VCR y presione el botón
PLAY del VCR. (Vea el manual de usuario del VCR.)
� Seleccione la entrada de la fuente AAVV usando el botónIINNPPUUTT del control remoto.
GG S-Video proporciona mejor cali-dad que la compuesta. Utilícelacuando esté disponible.
CUIDADOGG Si los dos puertos de S-VIDEO y VIDEO están conecta-
dos al S-VHS VCR simultáneamente, sólo el S-VIDEOpuede ser recibido.
CUIDADO
MFL41469212-sp-mi 3/12/09 9:10 PM Page 26
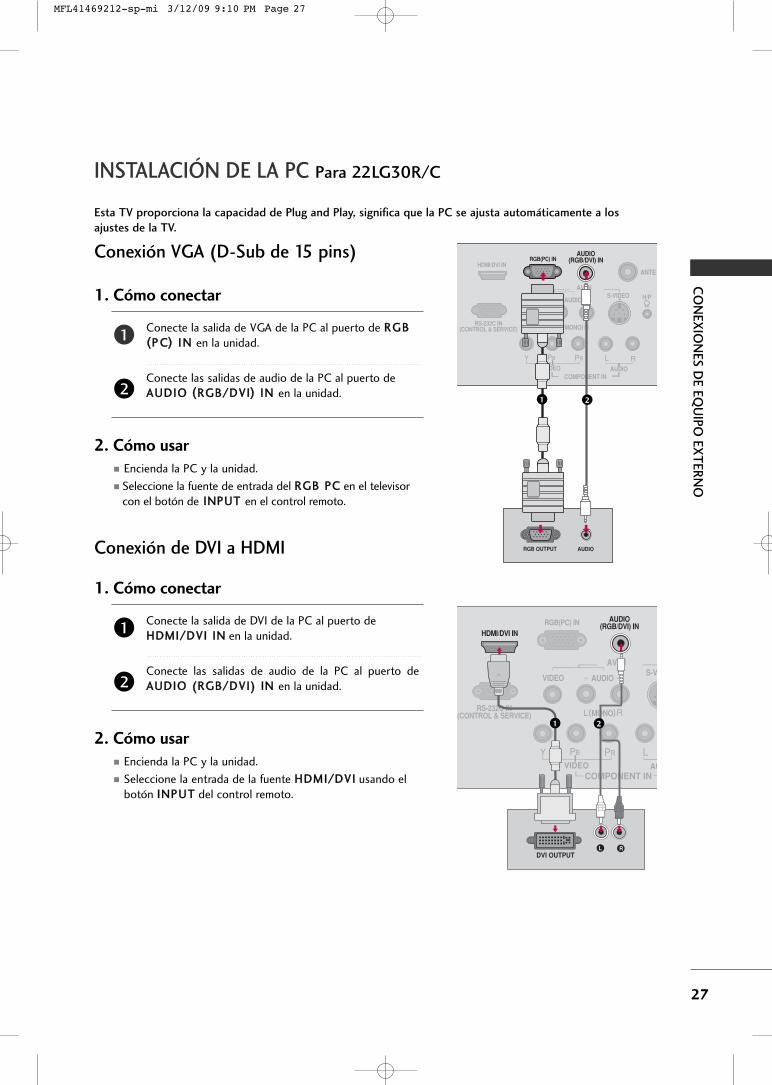
CO
NEX
ION
ES D
E EQU
IPO EX
TER
NO
27
INSTALACIÓN DE LA PC Para 22LG30R/C
Esta TV proporciona la capacidad de Plug and Play, significa que la PC se ajusta automáticamente a los
ajustes de la TV.
Conexión VGA (D-Sub de 15 pins)ANTE
RS-232C IN(CONTROL & SERVICE)
S-VIDEO
AUDIOCOMPONENT IN
VIDEO
VIDEO AUDIO
MONO( )
AV IN H/P
HDMI/DVI INRGB(PC) IN
AUDIO(RGB/DVI) IN
RGB OUTPUT AUDIO
1 2
RGB(PC) IN
RS-232C IN(CONTROL & SERVICE)
S-V
AUCOMPONENT IN
VIDEO
VIDEO AUDIO
MONO( )
AV IN
HDMI/DVI IN
L RDVI OUTPUT
AUDIO(RGB/DVI) IN
1 2
Conexión de DVI a HDMI
1. Cómo conectar
Conecte la salida de VGA de la PC al puerto de RRGGBB((PP CC)) II NN en la unidad.
Conecte las salidas de audio de la PC al puerto deAAUUDDIIOO ((RRGGBB//DDVVII)) IINN en la unidad.2
1
2. Cómo usar � Encienda la PC y la unidad.
� Seleccione la fuente de entrada del RRGGBB PPCC en el televisorcon el botón de IINNPPUUTT en el control remoto.
1. Cómo conectar
Conecte la salida de DVI de la PC al puerto deHHDDMMII//DDVVII IINN en la unidad.
Conecte las salidas de audio de la PC al puerto deAAUUDDIIOO ((RRGGBB//DDVVII)) IINN en la unidad.2
1
2. Cómo usar � Encienda la PC y la unidad.
� Seleccione la entrada de la fuente HHDDMMII//DDVVII usando elbotón IINNPPUUTT del control remoto.
MFL41469212-sp-mi 3/12/09 9:10 PM Page 27
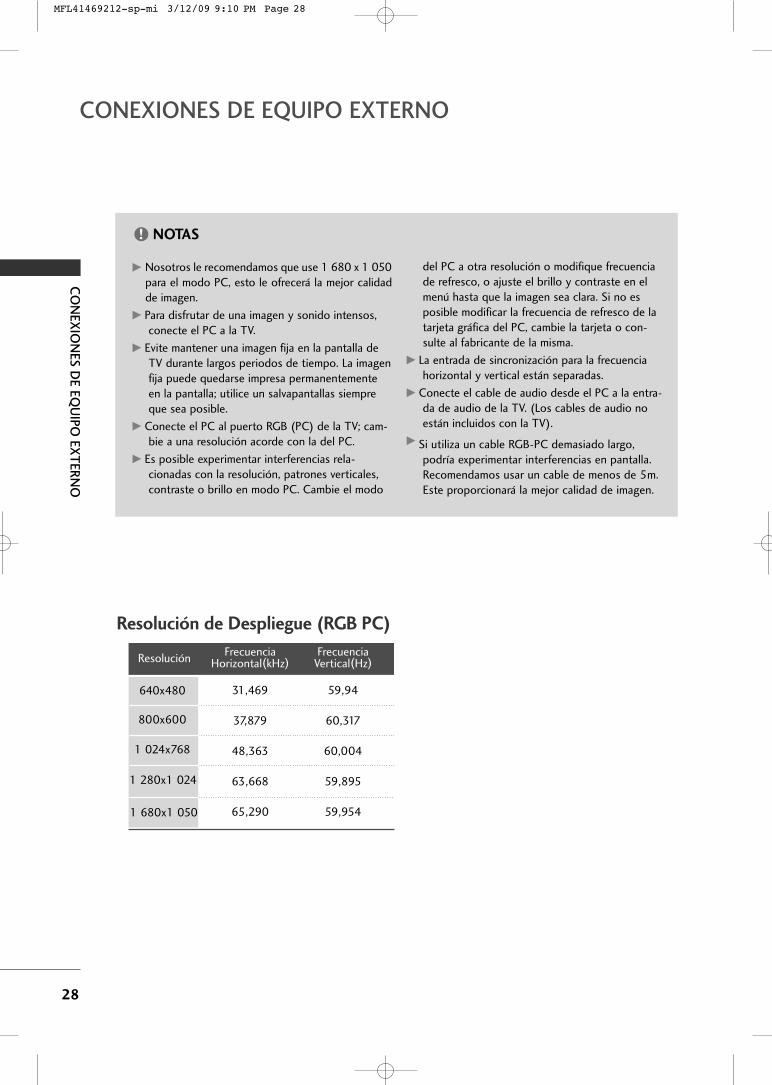
CO
NEX
ION
ES D
E EQU
IPO EX
TER
NO
28
CONEXIONES DE EQUIPO EXTERNO
GG Nosotros le recomendamos que use 1 680 x 1 050para el modo PC, esto le ofrecerá la mejor calidadde imagen.
GG Para disfrutar de una imagen y sonido intensos,conecte el PC a la TV.
GG Evite mantener una imagen fija en la pantalla deTV durante largos periodos de tiempo. La imagenfija puede quedarse impresa permanentementeen la pantalla; utilice un salvapantallas siempreque sea posible.
GG Conecte el PC al puerto RGB (PC) de la TV; cam-bie a una resolución acorde con la del PC.
GG Es posible experimentar interferencias rela-cionadas con la resolución, patrones verticales,contraste o brillo en modo PC. Cambie el modo
del PC a otra resolución o modifique frecuenciade refresco, o ajuste el brillo y contraste en elmenú hasta que la imagen sea clara. Si no esposible modificar la frecuencia de refresco de latarjeta gráfica del PC, cambie la tarjeta o con-sulte al fabricante de la misma.
GG La entrada de sincronización para la frecuenciahorizontal y vertical están separadas.
GG Conecte el cable de audio desde el PC a la entra-da de audio de la TV. (Los cables de audio noestán incluidos con la TV).
GG Si utiliza un cable RGB-PC demasiado largo,podría experimentar interferencias en pantalla.Recomendamos usar un cable de menos de 5m.Este proporcionará la mejor calidad de imagen.
NOTAS!
Resolución de Despliegue (RGB PC)
Frecuencia Frecuencia Horizontal(kHz) Vertical(Hz)
31,469 59,94
37,879 60,317
48,363 60,004
63,668 59,895
65,290 59,954
Resolución
640x480
800x600
1 024x768
1 280x1 024
1 680x1 050
MFL41469212-sp-mi 3/12/09 9:10 PM Page 28
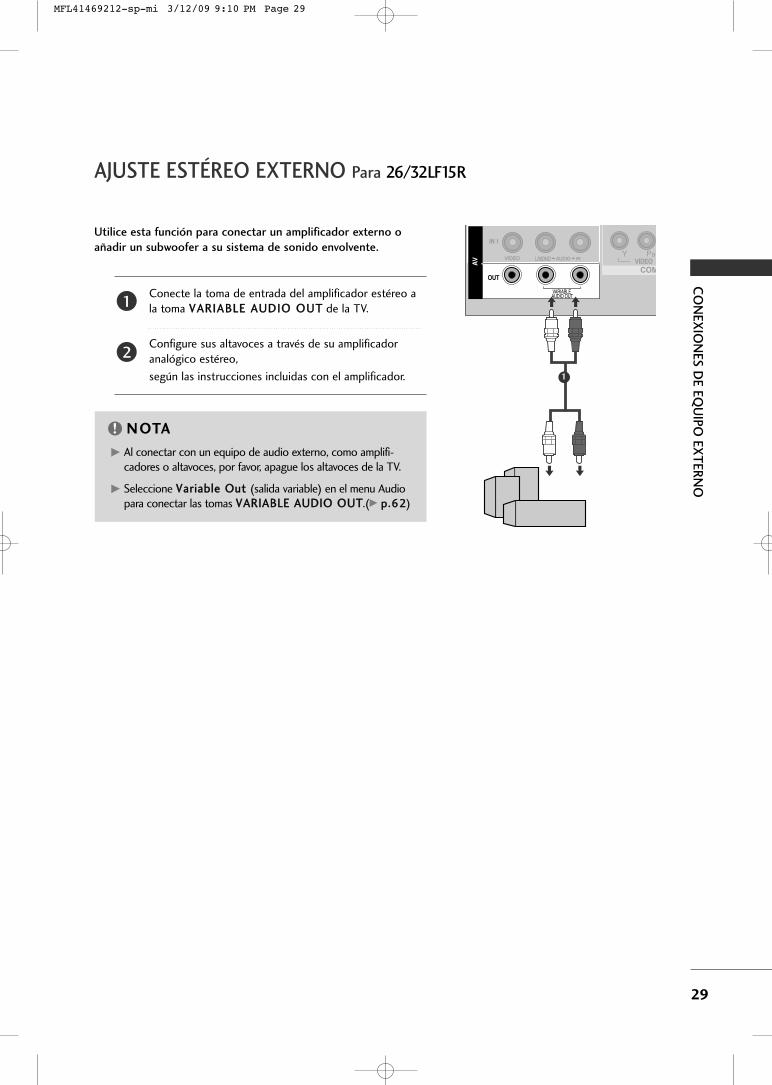
CO
NEX
ION
ES D
E EQU
IPO EX
TER
NO
29
AJUSTE ESTÉREO EXTERNO Para 26/32LF15R
L/MONO RAUDIOVIDEO
VARIABLE AUDIO OUT
L/L/MONOMONO RAUDIOAUDIOVIDEOVIDEO
AV
IN 1
OUT
VARIABLE AUDIO OUT
GG Al conectar con un equipo de audio externo, como amplifi-cadores o altavoces, por favor, apague los altavoces de la TV.
GG Seleccione VVaarriiaabbllee OOuutt (salida variable) en el menu Audiopara conectar las tomas VVAARRIIAABBLLEE AAUUDDIIOO OOUUTT.(GG pp..6622)
NOTA!
Utilice esta función para conectar un amplificador externo o
añadir un subwoofer a su sistema de sonido envolvente.
Conecte la toma de entrada del amplificador estéreo ala toma VVAARRIIAABBLLEE AAUUDDIIOO OOUUTT de la TV.
Configure sus altavoces a través de su amplificadoranalógico estéreo,
según las instrucciones incluidas con el amplificador.
2
1
11
MFL41469212-sp-mi 3/12/09 9:10 PM Page 29
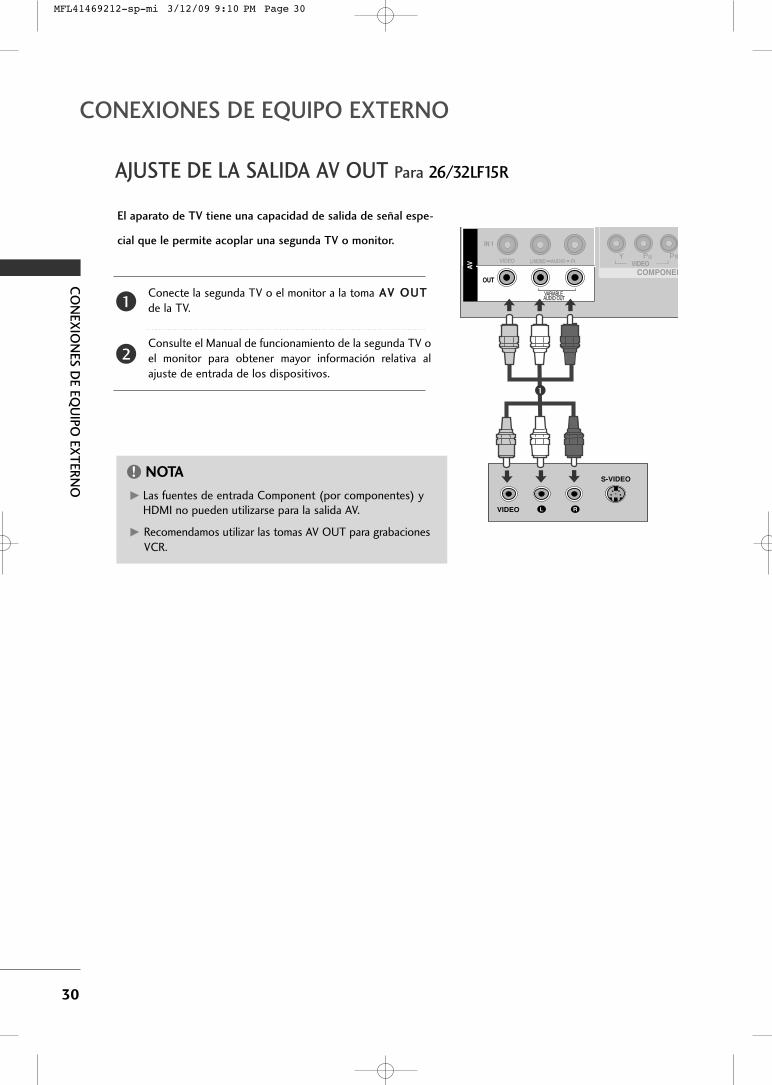
CO
NEX
ION
ES D
E EQU
IPO EX
TER
NO
30
AJUSTE DE LA SALIDA AV OUT Para 26/32LF15R
CONEXIONES DE EQUIPO EXTERNO
L/L/MONOMONO RAUDIOAUDIOVIDEOVIDEO
AV
IN 1
OUT
VARIABLE ARIABLE AUDIO OUTAUDIO OUT
L/MONO RAUDIOVIDEO
L R
S-VIDEO
VIDEO
1
El aparato de TV tiene una capacidad de salida de señal espe-
cial que le permite acoplar una segunda TV o monitor.
Conecte la segunda TV o el monitor a la toma AAVV OOUUTT
de la TV.
Consulte el Manual de funcionamiento de la segunda TV oel monitor para obtener mayor información relativa alajuste de entrada de los dispositivos.
GG Las fuentes de entrada Component (por componentes) yHDMI no pueden utilizarse para la salida AV.
GG Recomendamos utilizar las tomas AV OUT para grabacionesVCR.
NOTA!
2
1
MFL41469212-sp-mi 3/12/09 9:10 PM Page 30
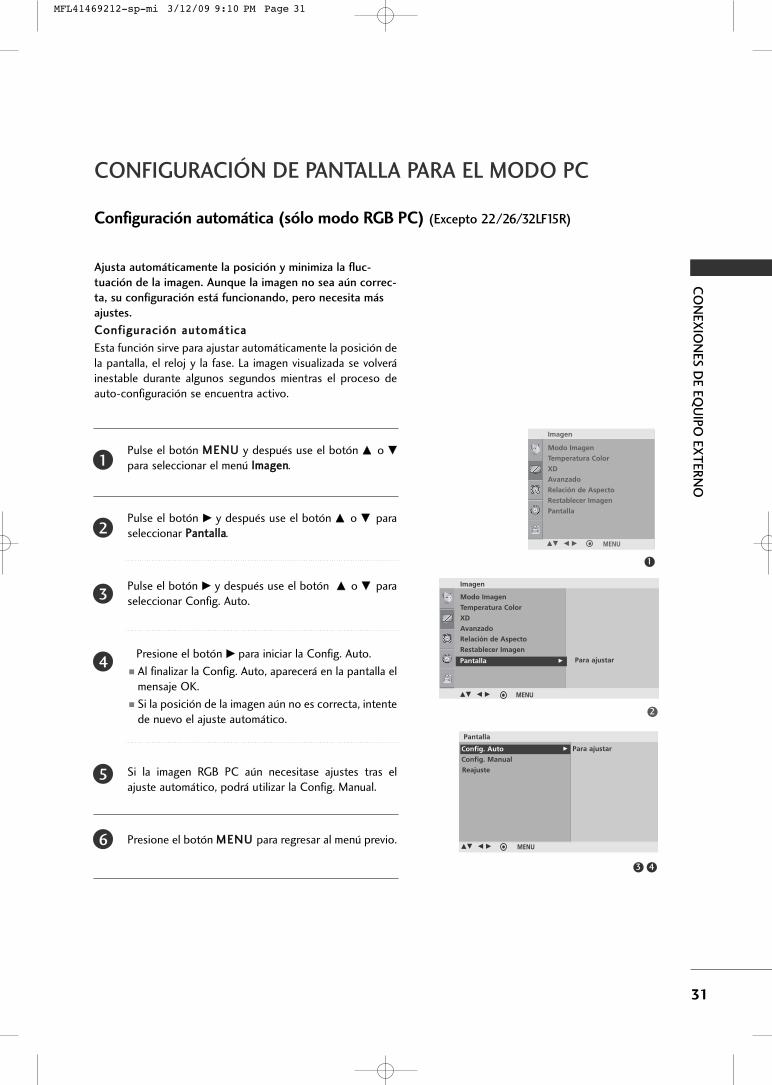
CO
NEX
ION
ES D
E EQU
IPO EX
TER
NO
31
CONFIGURACIÓN DE PANTALLA PARA EL MODO PC
Configuración automática (sólo modo RGB PC) (Excepto 22/26/32LF15R)
Pulse el botón MMEENNUU y después use el botón DD o EEpara seleccionar el menú IImmaaggeenn.
Pulse el botón GG y después use el botón DD o EE paraseleccionar PPaannttaallllaa.
Pulse el botón GG y después use el botón DD o EE paraseleccionar Config. Auto.
Presione el botón GG para iniciar la Config. Auto.
� Al finalizar la Config. Auto, aparecerá en la pantalla elmensaje OK.
� Si la posición de la imagen aún no es correcta, intentede nuevo el ajuste automático.
Si la imagen RGB PC aún necesitase ajustes tras elajuste automático, podrá utilizar la Config. Manual.
Presione el botón MMEENNUU para regresar al menú previo.
2
1
4
5
3
6
Ajusta automáticamente la posición y minimiza la fluc-
tuación de la imagen. Aunque la imagen no sea aún correc-
ta, su configuración está funcionando, pero necesita más
ajustes.
CCoonnff iigguurraacciióónn aauuttoommááttiiccaa
Esta función sirve para ajustar automáticamente la posición dela pantalla, el reloj y la fase. La imagen visualizada se volveráinestable durante algunos segundos mientras el proceso deauto-configuración se encuentra activo.
1
Modo Imagen
Temperatura Color
XD
Avanzado
Relación de Aspecto
Restablecer Imagen
Pantalla
Imagen
DE F G MENU
2
Imagen
Modo Imagen
Temperatura Color
XD
Avanzado
Relación de Aspecto
Restablecer Imagen
Pantalla Para ajustarPantalla G
DE F G MENU
3 4
Pantalla
Para ajustarG
DE F G MENU
Config. Auto
Config. Manual
Reajuste
MFL41469212-sp-mi 3/12/09 9:10 PM Page 31
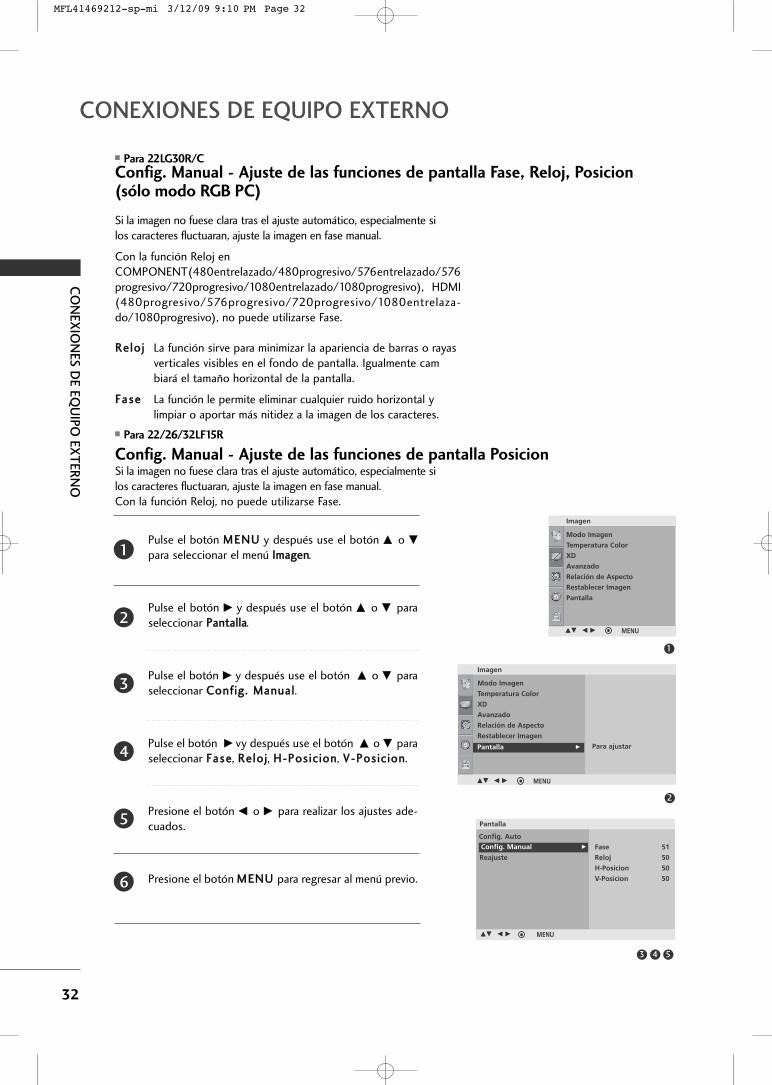
CO
NEX
ION
ES D
E EQU
IPO EX
TER
NO
32
CONEXIONES DE EQUIPO EXTERNO
� Para 22LG30R/CConfig. Manual - Ajuste de las funciones de pantalla Fase, Reloj, Posicion(sólo modo RGB PC)
Pulse el botón MMEENNUU y después use el botón DD o EEpara seleccionar el menú IImmaaggeenn.
Pulse el botón GG y después use el botón DD o EE paraseleccionar PPaannttaallllaa.
Pulse el botón GG y después use el botón DD o EE paraseleccionar CCoonnffiigg.. MMaannuuaall.
Pulse el botón GG vy después use el botón DD o EE paraseleccionar FFaassee, RReelloojj, HH--PPoossiicciioonn, VV--PPoossiicciioonn.
Presione el botón FF o GG para realizar los ajustes ade-cuados.
Presione el botón MMEENNUU para regresar al menú previo.
2
1
4
5
3
6
Si la imagen no fuese clara tras el ajuste automático, especialmente silos caracteres fluctuaran, ajuste la imagen en fase manual.
Con la función Reloj en COMPONENT(480entrelazado/480progresivo/576entrelazado/576progresivo/720progresivo/1080entrelazado/1080progresivo), HDMI(480progresivo/576progresivo/720progresivo/1080entrelaza-do/1080progresivo), no puede utilizarse Fase.
RReelloojj La función sirve para minimizar la apariencia de barras o rayasverticales visibles en el fondo de pantalla. Igualmente cambiará el tamaño horizontal de la pantalla.
FFaassee La función le permite eliminar cualquier ruido horizontal ylimpiar o aportar más nitidez a la imagen de los caracteres.
1
Modo Imagen
Temperatura Color
XD
Avanzado
Relación de Aspecto
Restablecer Imagen
Pantalla
Imagen
DE F G MENU
2
Imagen
Modo Imagen
Temperatura Color
XD
Avanzado
Relación de Aspecto
Restablecer Imagen
Pantalla Para ajustarPantalla G
DE F G MENU
3 4 5
Pantalla
Config. Auto
Config. Manual
Reajuste
Config. Manual G
DE F G MENU
Fase 51
Reloj 50
H-Posicion 50
V-Posicion 50
� Para 22/26/32LF15R
Config. Manual - Ajuste de las funciones de pantalla PosicionSi la imagen no fuese clara tras el ajuste automático, especialmente silos caracteres fluctuaran, ajuste la imagen en fase manual.Con la función Reloj, no puede utilizarse Fase.
MFL41469212-sp-mi 3/12/09 9:10 PM Page 32
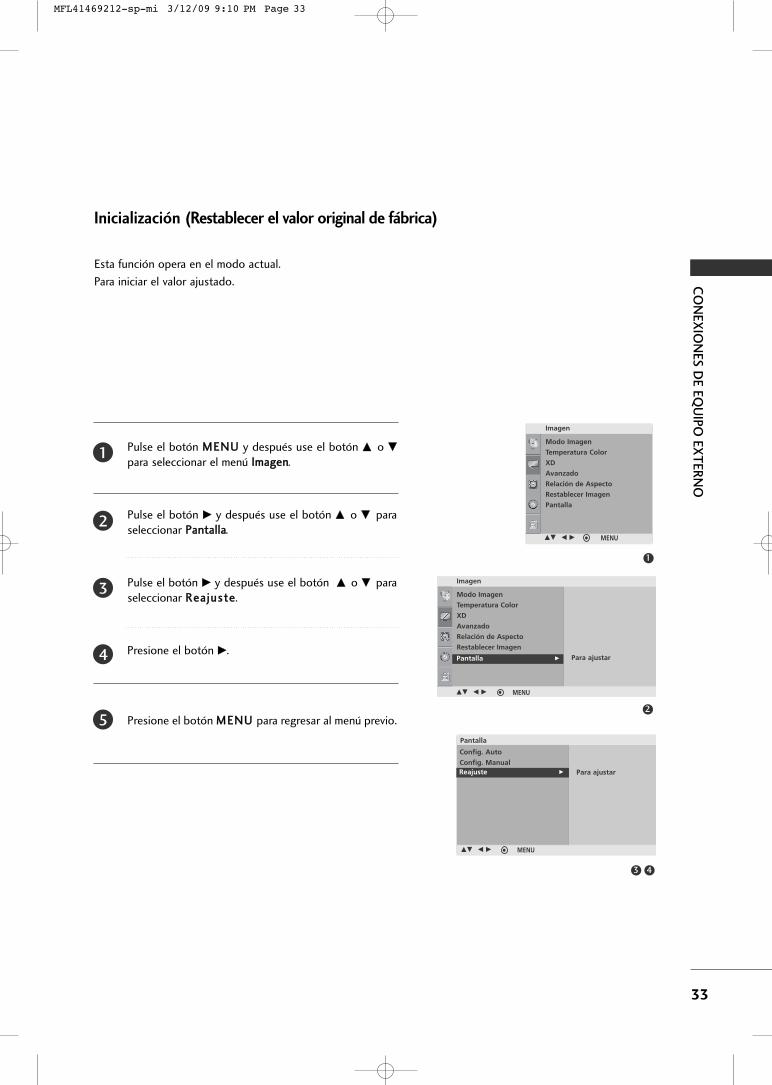
CO
NEX
ION
ES D
E EQU
IPO EX
TER
NO
33
Inicialización (Restablecer el valor original de fábrica)
Pulse el botón MMEENNUU y después use el botón DD o EEpara seleccionar el menú IImmaaggeenn.
Pulse el botón GG y después use el botón DD o EE paraseleccionar PPaannttaallllaa.
Pulse el botón GG y después use el botón DD o EE paraseleccionar RReeaajjuussttee.
Presione el botón GG.
Presione el botón MMEENNUU para regresar al menú previo.
2
1
4
5
3
Esta función opera en el modo actual.
Para iniciar el valor ajustado.
1
Modo Imagen
Temperatura Color
XD
Avanzado
Relación de Aspecto
Restablecer Imagen
Pantalla
Imagen
DE F G MENU
2
Imagen
Modo Imagen
Temperatura Color
XD
Avanzado
Relación de Aspecto
Restablecer Imagen
Pantalla Para ajustarPantalla G
DE F G MENU
3 4
Pantalla
Reajuste G
DE F G MENU
Para ajustar
Config. Auto
Config. Manual
MFL41469212-sp-mi 3/12/09 9:10 PM Page 33
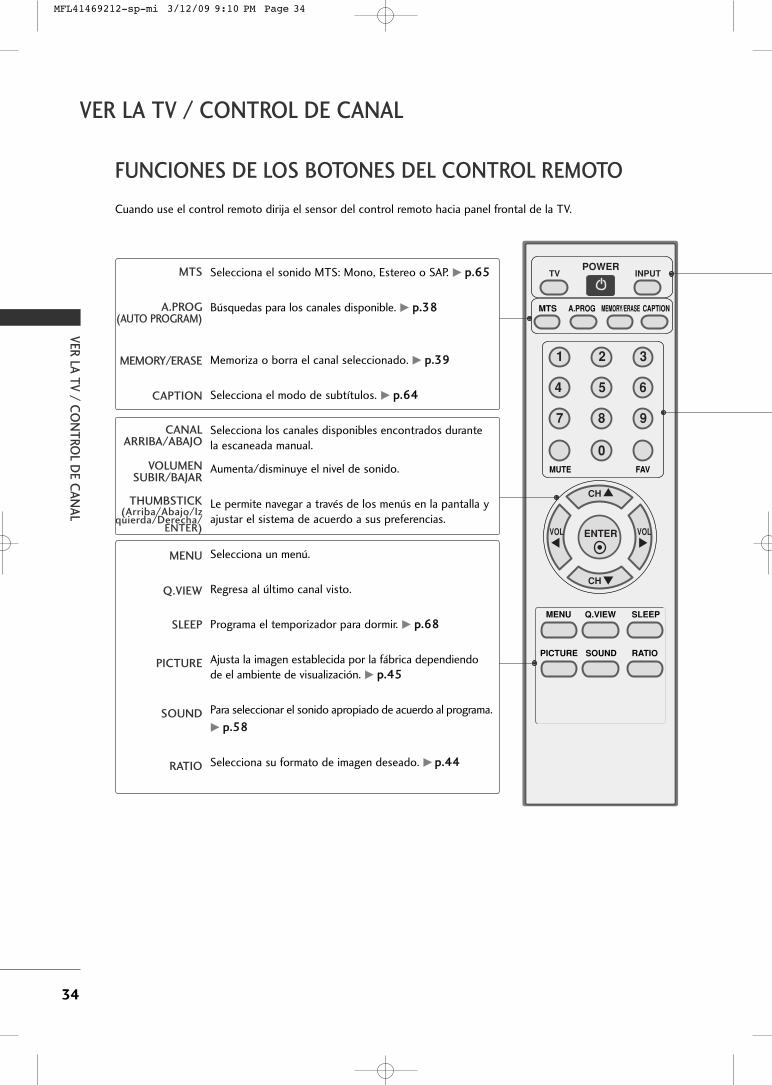
VER
LA T
V / C
ON
TRO
L DE C
AN
AL
34
FUNCIONES DE LOS BOTONES DEL CONTROL REMOTO
VER LA TV / CONTROL DE CANAL
Cuando use el control remoto dirija el sensor del control remoto hacia panel frontal de la TV.
1 2 3
4 5 6
7 8
0
9
VOL VOL
CH
CH
ENTER
POWER
MENU Q.VIEW SLEEP
PICTURE SOUND RATIO
MTS
FAVMUTE
A.PROG MEMORY/ERASE CAPTION
TV INPUTMTS
A.PROG(AUTO PROGRAM)
MEMORY/ERASE
CAPTION
CANALARRIBA/ABAJO
VOLUMENSUBIR/BAJAR
THUMBSTICK(Arriba/Abajo/Iz
quierda/Derecha/ENTER)
MENU
Q.VIEW
SLEEP
PICTURE
SOUND
RATIO
Selecciona el sonido MTS: Mono, Estereo o SAP. GG pp..6655
Búsquedas para los canales disponible. GG pp..3388
Memoriza o borra el canal seleccionado. GG pp..3399
Selecciona el modo de subtítulos. GG pp..6644
Selecciona los canales disponibles encontrados durantela escaneada manual.
Aumenta/disminuye el nivel de sonido.
Le permite navegar a través de los menús en la pantalla yajustar el sistema de acuerdo a sus preferencias.
Selecciona un menú.
Regresa al último canal visto.
Programa el temporizador para dormir. GG pp..6688
Ajusta la imagen establecida por la fábrica dependiendode el ambiente de visualización. GG pp..4455
Para seleccionar el sonido apropiado de acuerdo al programa.
GG pp..5588
Selecciona su formato de imagen deseado. GG pp..4444
MFL41469212-sp-mi 3/12/09 9:10 PM Page 34
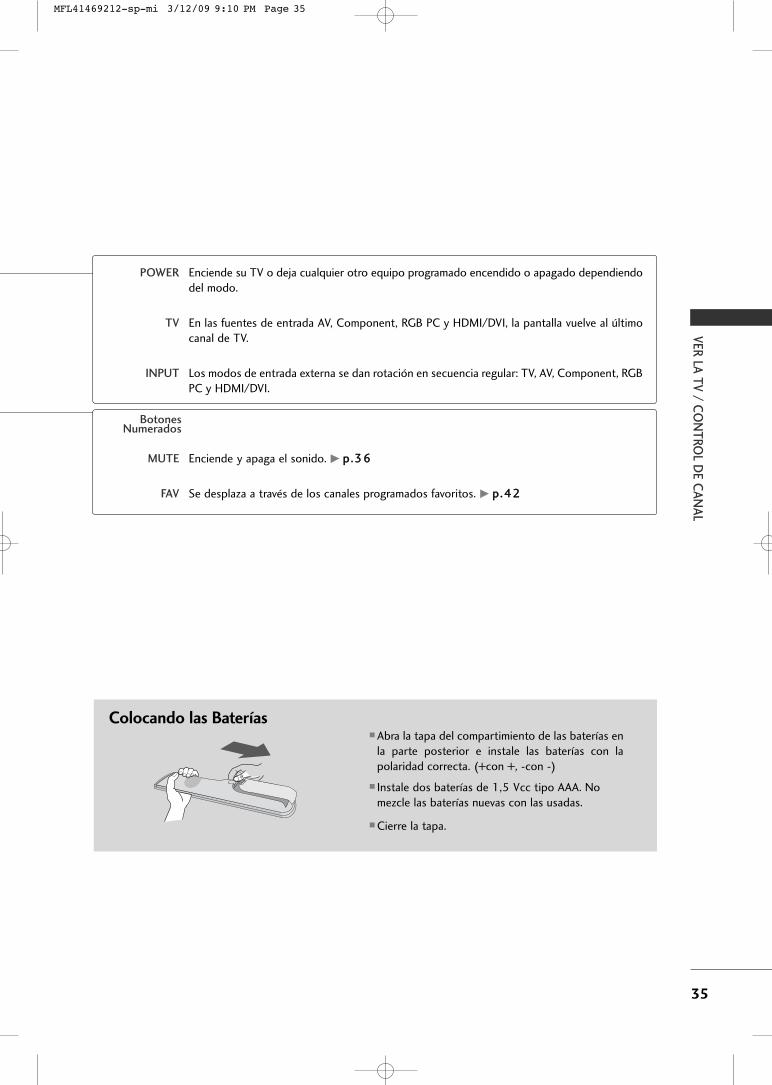
VER
LA T
V / C
ON
TRO
L DE C
AN
AL
35
� Abra la tapa del compartimiento de las baterías enla parte posterior e instale las baterías con lapolaridad correcta. (+con +, -con -)
� Instale dos baterías de 1,5 Vcc tipo AAA. Nomezcle las baterías nuevas con las usadas.
� Cierre la tapa.
Colocando las Baterías
BotonesNumerados
Enciende su TV o deja cualquier otro equipo programado encendido o apagado dependiendodel modo.
En las fuentes de entrada AV, Component, RGB PC y HDMI/DVI, la pantalla vuelve al últimocanal de TV.
Los modos de entrada externa se dan rotación en secuencia regular: TV, AV, Component, RGBPC y HDMI/DVI.
Enciende y apaga el sonido. GG pp..3366
Se desplaza a través de los canales programados favoritos. GG pp..4422
POWER
TV
INPUT
MUTE
FAV
MFL41469212-sp-mi 3/12/09 9:10 PM Page 35
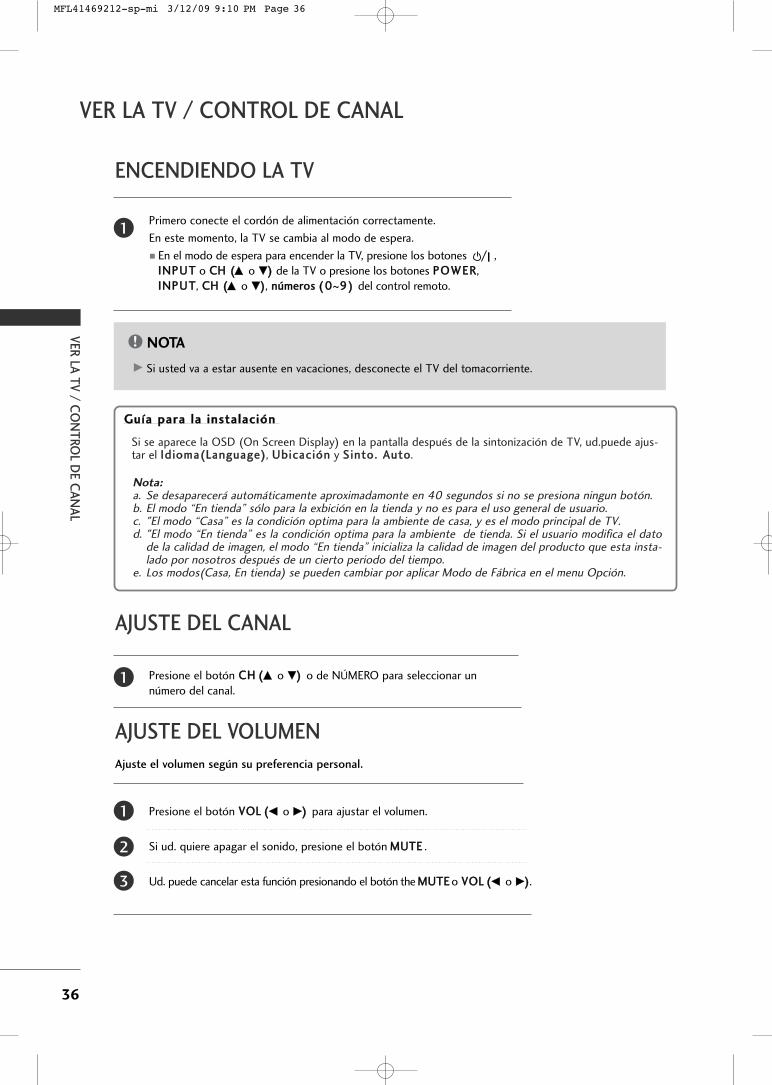
VER
LA T
V / C
ON
TRO
L DE C
AN
AL
36
ENCENDIENDO LA TV
VER LA TV / CONTROL DE CANAL
NOTA!
GG Si usted va a estar ausente en vacaciones, desconecte el TV del tomacorriente.
Primero conecte el cordón de alimentación correctamente.
En este momento, la TV se cambia al modo de espera.
� En el modo de espera para encender la TV, presione los botones ,IINNPPUUTT o CCHH ((DD o EE)) de la TV o presione los botones PPOOWWEERR,IINNPPUUTT, CCHH ((DD o EE)), nnúúmmeerrooss (( 00~99)) del control remoto.
1
Presione el botón CCHH ((DD o EE)) o de NÚMERO para seleccionar unnúmero del canal.
1
AJUSTE DEL VOLUMEN
AJUSTE DEL CANAL
Presione el botón VVOOLL ((FF o GG)) para ajustar el volumen.
Si ud. quiere apagar el sonido, presione el botón MMUUTTEE .
Ud. puede cancelar esta función presionando el botón the MMUUTTEE o VVOOLL ((FF o GG)).
Ajuste el volumen según su preferencia personal.
1
2
3
GGuuííaa ppaarraa llaa iinnssttaallaacciióónn
Nota: a. Se desaparecerá automáticamente aproximadamonte en 40 segundos si no se presiona ningun botón.b. El modo “En tienda” sólo para la exbición en la tienda y no es para el uso general de usuario.c. "El modo “Casa” es la condición optima para la ambiente de casa, y es el modo principal de TV.d. "El modo “En tienda” es la condición optima para la ambiente de tienda. Si el usuario modifica el dato
de la calidad de imagen, el modo “En tienda” inicializa la calidad de imagen del producto que esta insta-lado por nosotros después de un cierto periodo del tiempo.
e. Los modos(Casa, En tienda) se pueden cambiar por aplicar Modo de Fábrica en el menu Opción.
Si se aparece la OSD (On Screen Display) en la pantalla después de la sintonización de TV, ud.puede ajus-tar el IIddiioommaa((LLaanngguuaaggee)), UUbbiiccaacciióónn y SSiinnttoo.. AAuuttoo.
MFL41469212-sp-mi 3/12/09 9:10 PM Page 36
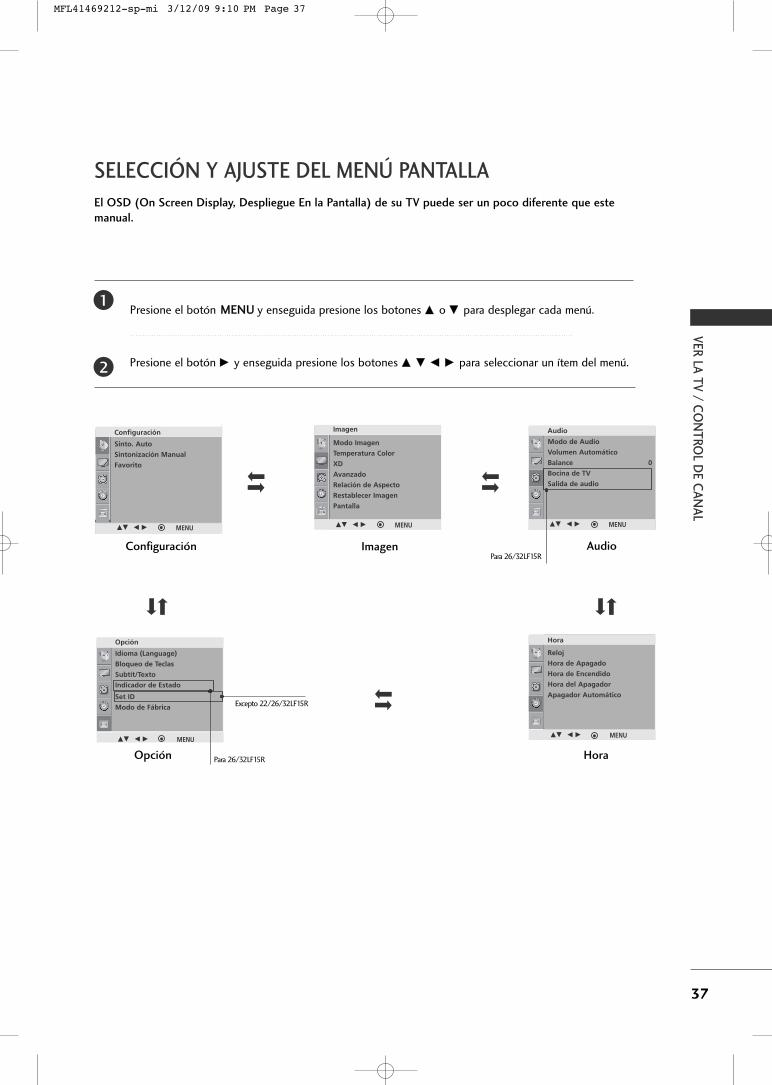
VER
LA T
V / C
ON
TRO
L DE C
AN
AL
37
SELECCIÓN Y AJUSTE DEL MENÚ PANTALLA
Configuración Imagen Audio
HoraOpción
Idioma (Language)
Bloqueo de Teclas
Subtít/Texto
Indicador de Estado
Set ID
Modo de Fábrica
Opción
Reloj
Hora de Apagado
Hora de Encendido
Hora del Apagador
Apagador Automático
Hora
Sinto. Auto
Sintonización Manual
Favorito
ConfiguraciónModo de Audio
Volumen Automático
Balance 0
Bocina de TV
Salida de audio
Audio
DE F G MENU DE F G MENU
DE F G MENUDE F G MENU
Modo Imagen
Temperatura Color
XD
Avanzado
Relación de Aspecto
Restablecer Imagen
Pantalla
Imagen
DE F G MENU
El OSD (On Screen Display, Despliegue En la Pantalla) de su TV puede ser un poco diferente que este
manual.
Presione el botón MMEENNUU y enseguida presione los botones DD o EE para desplegar cada menú.
Presione el botón GG y enseguida presione los botones DD EE FF GG para seleccionar un ítem del menú.
1
2
Para 26/32LF15R
Excepto 22/26/32LF15R
Para 26/32LF15R
MFL41469212-sp-mi 3/12/09 9:10 PM Page 37

VER
LA T
V / C
ON
TRO
L DE C
AN
AL
38
BÚSQUEDA DE CANALES
VER LA TV / CONTROL DE CANAL
Configuración
Sinto. Auto G
Sintonización Manual
Favorito
EmpezarSinto. Auto G
DE F G MENU
Sinto. Auto
49%
MENU Detener
CATV
34
Sinto. Auto: Búsqueda de canales
El Sinto. Auto debe memorizar todos los canales activos en su
área antes de poder usar la TV.
Hay dos maneras de almacenar canales en la memoria de la TV. Y
ud. también puede usar.
Una se llama SSiinnttoo.. AAuuttoo y la otra se llama SSiinnttoonniizzaacciióónnMMaannuuaall.
En el modo SSiinnttoo.. AAuuttoo, la TV memorizará los canales en el
orden numérico. Si hay canales que ud. quiere agregar o eliminar
adicionalmente, ud. puede agregar o eliminar manualmente estos
canales con SSiinnttoonniizzaacciióónn MMaannuuaall.
- Repita Sinto. Auto si la TV está movida a otra localidad.
- Sinto. Auto buscará los canales sólo por el puerto de la antena.
- Si los números de los canales para la emisión de TV o para elcable de TV están duplicados es decir, los canales diferentestienen mismo número, presione otra vez los botones de mismonúmero para mover entre:
(Por ejemplo, presione 17 para ir al canal, y presione 17 otra vez
para ir al canal duplicado.)
Canales de la Emisión de TV Canales del Cable de TV
Presione el botón AA..PPRROOGG. Asi SSiinnttoo.. AAuuttoo empezará abuscar los canales. Si ud.quiere parar la sintonizaciónautomática, presione el botón MMEENNUU. Sólo los canalesencontrados en este momento están memorizados.
� También ud. puede hacer el SSiinnttoo.. AAuuttoo. con el menú CCoonnffiigguurraacciióónn.
1
Sinto. Auto
Sintonización Manual
Favorito
Configuración
DE F G MENU
MFL41469212-sp-mi 3/12/09 9:10 PM Page 38
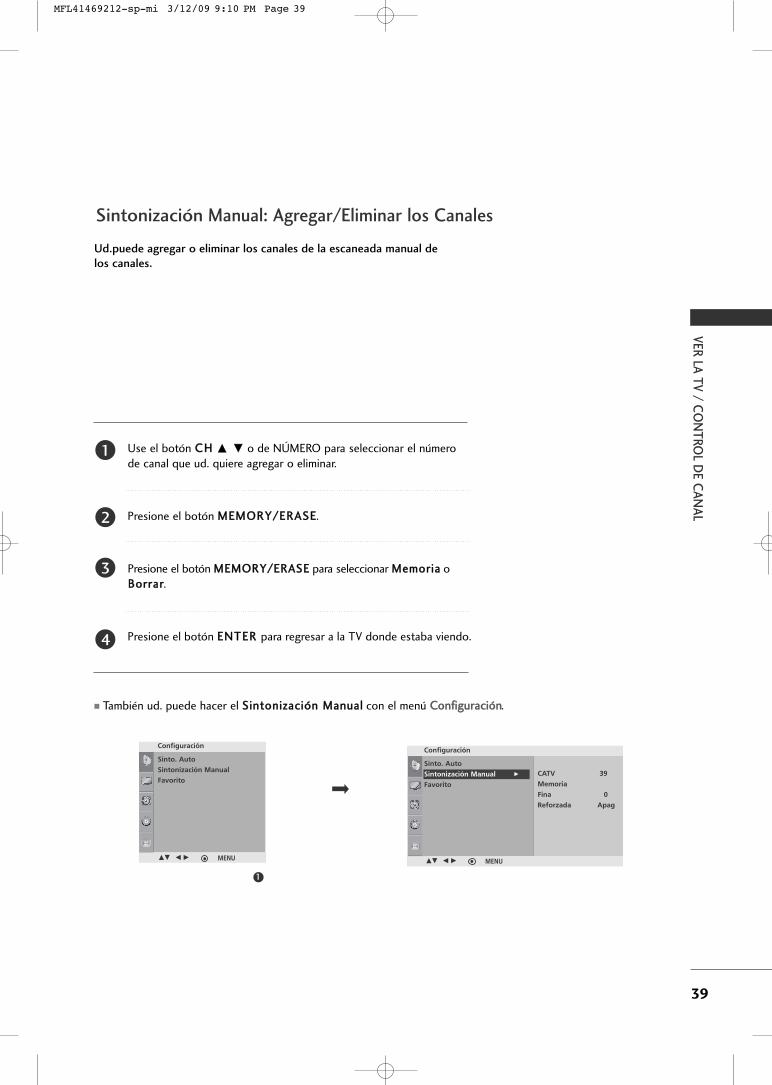
VER
LA T
V / C
ON
TRO
L DE C
AN
AL
39
1
Configuración
CATV 39
Memoria
Fina 0
Reforzada Apag
DE F G MENU
Sinto. Auto
Sintonización Manual
Favorito
Configuración
DE F G MENU
Ud.puede agregar o eliminar los canales de la escaneada manual delos canales.
Sintonización Manual: Agregar/Eliminar los Canales
Use el botón CCHH DD EE o de NÚMERO para seleccionar el númerode canal que ud. quiere agregar o eliminar.
Presione el botón MMEEMMOORRYY//EERRAASSEE.
Presione el botón MMEEMMOORRYY//EERRAASSEE para seleccionar MMeemmoorriiaa oBBoorrrraarr.
Presione el botón EENNTTEERR para regresar a la TV donde estaba viendo.
1
2
3
4
� También ud. puede hacer el SSiinnttoonniizzaacciióónn MMaannuuaall con el menú CCoonnffiigguurraacciióónn.
Sinto. Auto
Sintonización Manual G
Favorito
MFL41469212-sp-mi 3/12/09 9:10 PM Page 39
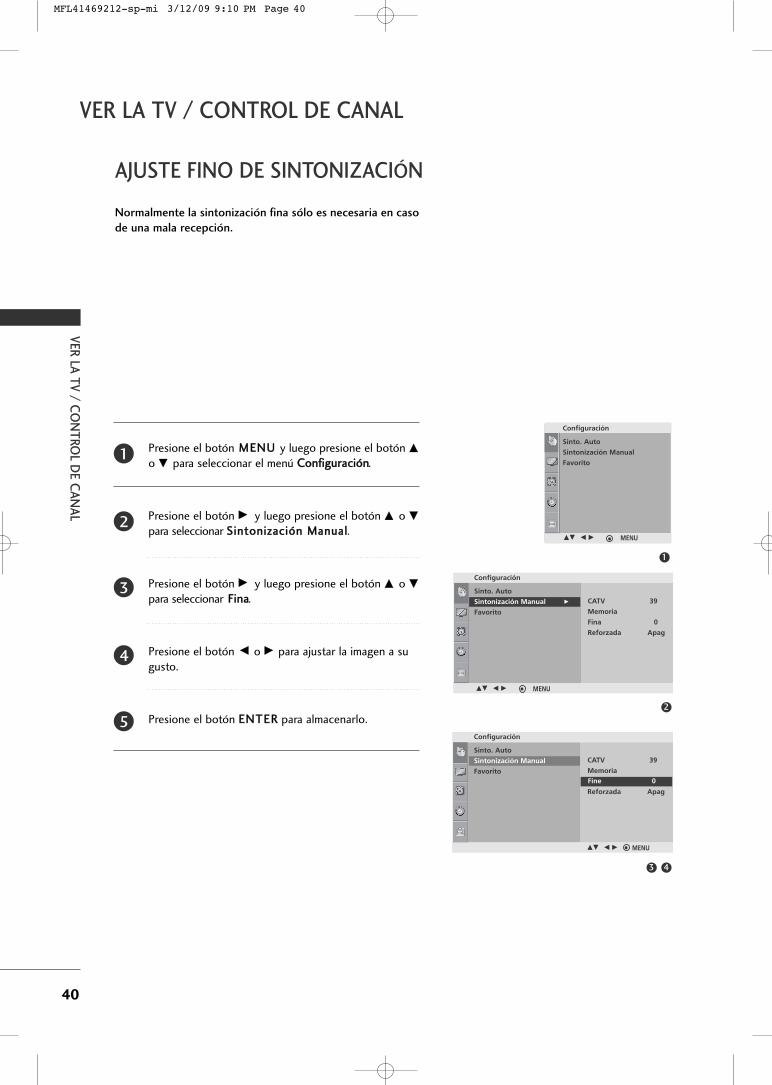
VER
LA T
V / C
ON
TRO
L DE C
AN
AL
40
AJUSTE FINO DE SINTONIZACIÓN
VER LA TV / CONTROL DE CANAL
Normalmente la sintonización fina sólo es necesaria en caso
de una mala recepción.
Presione el botón MMEENNUU y luego presione el botón DDo EE para seleccionar el menú CCoonnffiigguurraacciióónn.
Presione el botón GG y luego presione el botón DD o EEpara seleccionar SSiinnttoonniizzaacciióónn MMaannuuaall.
Presione el botón GG y luego presione el botón DD o EEpara seleccionar FFiinnaa.
Presione el botón FF o GG para ajustar la imagen a sugusto.
Presione el botón EENNTTEERR para almacenarlo.
2
1
4
5
3
1
2
Configuración
CATV 39
Memoria
Fina 0
Reforzada Apag
DE F G MENU
Sinto. Auto
Sintonización Manual
Favorito
Configuración
DE F G MENU
Configuración
CATV 39
Memoria
Fina 0
Reforzada Apag
DE F G MENU
Fine 0
43
Sinto. Auto
Sintonización Manual G
Favorito
Sinto. Auto
Sintonización Manual
Favorito
MFL41469212-sp-mi 3/12/09 9:10 PM Page 40
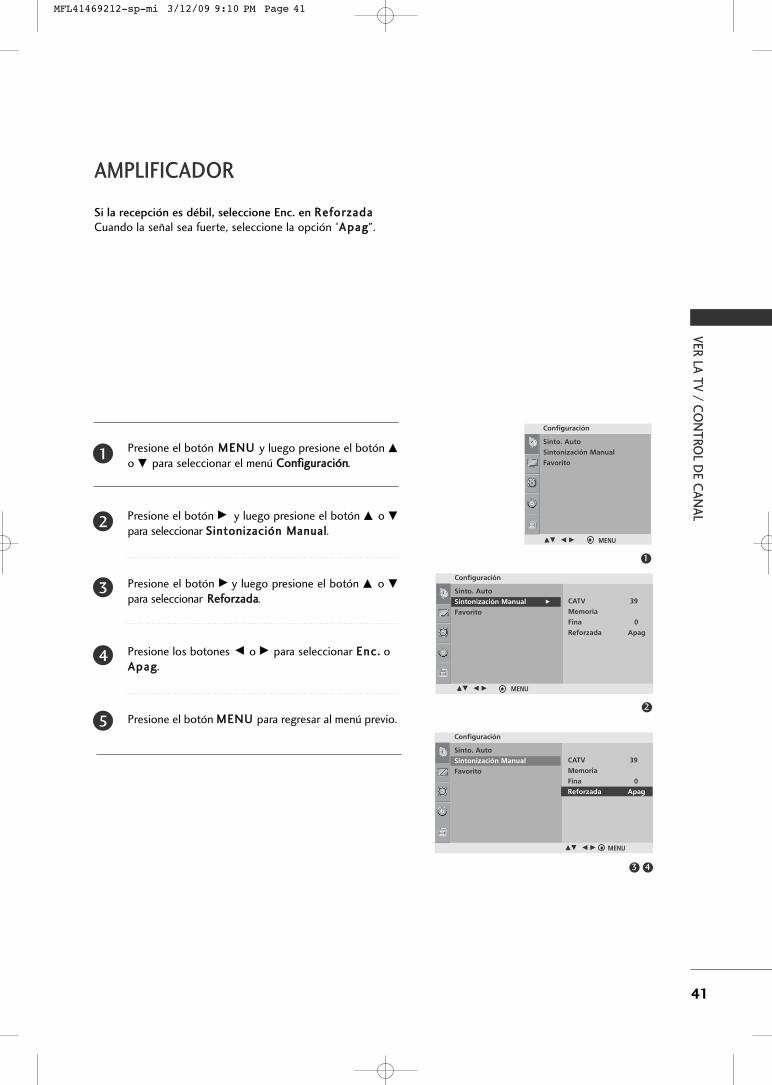
VER
LA T
V / C
ON
TRO
L DE C
AN
AL
41
AMPLIFICADOR
Si la recepción es débil, seleccione Enc. en RReeffoorrzzaaddaaCuando la señal sea fuerte, seleccione la opción °AAppaagg".
Presione el botón MMEENNUU y luego presione el botón DDo EE para seleccionar el menú CCoonnffiigguurraacciióónn.
Presione el botón GG y luego presione el botón DD o EEpara seleccionar SSiinnttoonniizzaacciióónn MMaannuuaall.
Presione el botón GG y luego presione el botón DD o EEpara seleccionar RReeffoorrzzaaddaa.
Presione los botones FF o GG para seleccionar EEnncc.. oAAppaagg.
Presione el botón MMEENNUU para regresar al menú previo.
2
1
4
5
3
1
2
Configuración
CATV 39
Memoria
Fina 0
Reforzada Apag
DE F G MENU
Sinto. Auto
Sintonización Manual
Favorito
Configuración
DE F G MENU
4
Configuración
3
DE F G MENU
CATV 39
Memoria
Fina 0
Reforzada Apag
Sinto. Auto
Sintonización Manual
Favorito
Sinto. Auto
Sintonización Manual G
Favorito
MFL41469212-sp-mi 3/12/09 9:10 PM Page 41
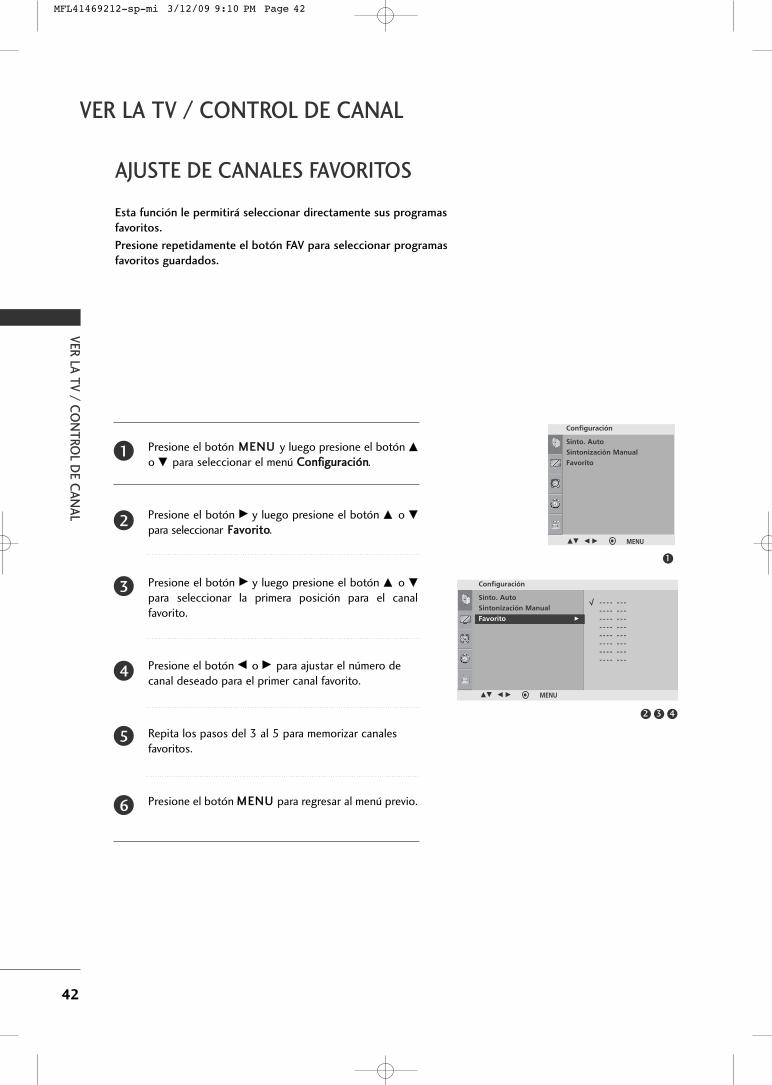
VER
LA T
V / C
ON
TRO
L DE C
AN
AL
42
AJUSTE DE CANALES FAVORITOS
VER LA TV / CONTROL DE CANAL
Esta función le permitirá seleccionar directamente sus programas
favoritos.
Presione repetidamente el botón FAV para seleccionar programas
favoritos guardados.
Presione el botón MMEENNUU y luego presione el botón DDo EE para seleccionar el menú CCoonnffiigguurraacciióónn.
Presione el botón GG y luego presione el botón DD o EEpara seleccionar FFaavvoorriittoo.
Presione el botón GG y luego presione el botón DD o EEpara seleccionar la primera posición para el canalfavorito.
Presione el botón FF o GG para ajustar el número decanal deseado para el primer canal favorito.
Repita los pasos del 3 al 5 para memorizar canalesfavoritos.
Presione el botón MMEENNUU para regresar al menú previo.
2
3
4
5
6
1
2 3 4
1
Configuración
DE F G MENU
Sinto. Auto
Sintonización Manual
Favorito
Configuración
- - - - - - -- - - - - - -- - - - - - -- - - - - - -- - - - - - -- - - - - - -- - - - - - -- - - - - - -
DE F G MENU
Sinto. Auto
Sintonización Manual
Favorito G
MFL41469212-sp-mi 3/12/09 9:10 PM Page 42
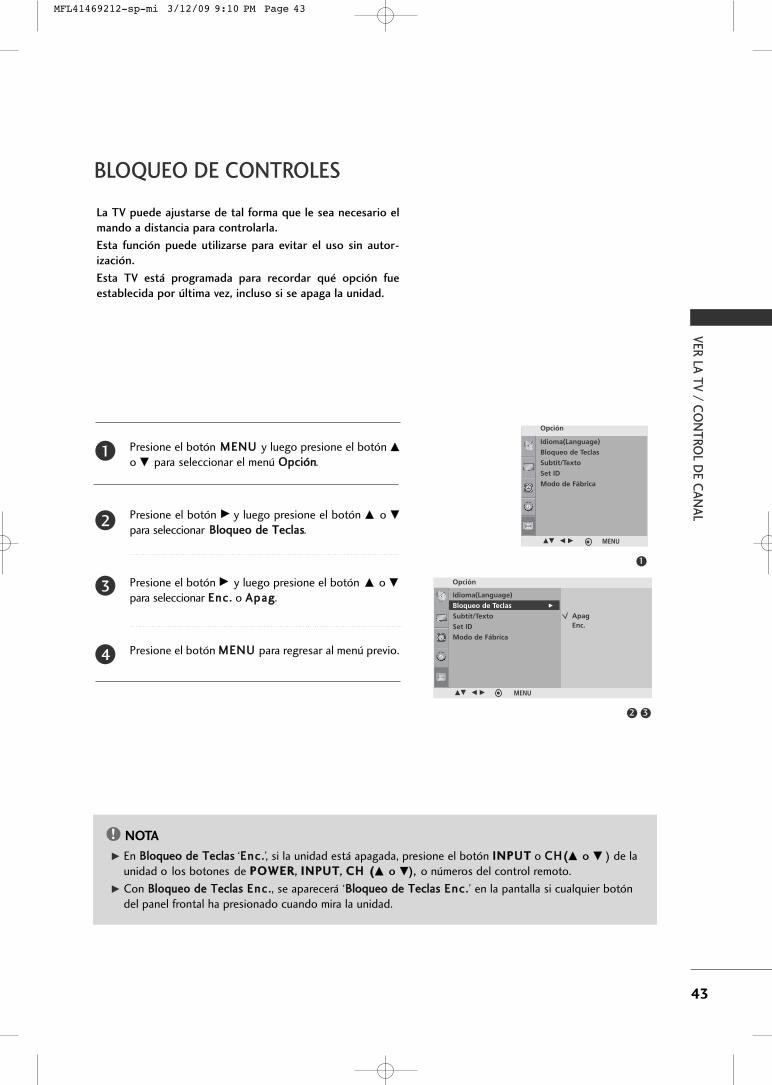
VER
LA T
V / C
ON
TRO
L DE C
AN
AL
43
BLOQUEO DE CONTROLES
La TV puede ajustarse de tal forma que le sea necesario el
mando a distancia para controlarla.
Esta función puede utilizarse para evitar el uso sin autor-
ización.
Esta TV está programada para recordar qué opción fue
establecida por última vez, incluso si se apaga la unidad.
Presione el botón MMEENNUU y luego presione el botón DDo EE para seleccionar el menú OOppcciióónn.
Presione el botón GG y luego presione el botón DD o EEpara seleccionar BBllooqquueeoo ddee TTeeccllaass.
Presione el botón GG y luego presione el botón DD o EEpara seleccionar EEnncc.. o AAppaagg.
Presione el botón MMEENNUU para regresar al menú previo.
2
3
4
1
1
32
Opción
DE F G MENU
ApagEnc.
Idioma(Language)
Bloqueo de Teclas
Subtít/Texto
Set ID
Modo de Fábrica
Opción
DE F G MENU
NOTA!
GG En BBllooqquueeoo ddee TTeeccllaass ‘EEnncc..’, si la unidad está apagada, presione el botón IINNPPUUTT o CCHH((DD o EE ) de launidad o los botones de PPOOWWEERR, IINNPPUUTT, CCHH ((DD o EE), o números del control remoto.
GG Con BBllooqquueeoo ddee TTeeccllaass EEnncc.., se aparecerá ‘BBllooqquueeoo ddee TTeeccllaass EEnncc..’ en la pantalla si cualquier botóndel panel frontal ha presionado cuando mira la unidad.
Idioma(Language)
Bloqueo de Teclas G
Subtít/Texto
Set ID
Modo de Fábrica
MFL41469212-sp-mi 3/12/09 9:10 PM Page 43
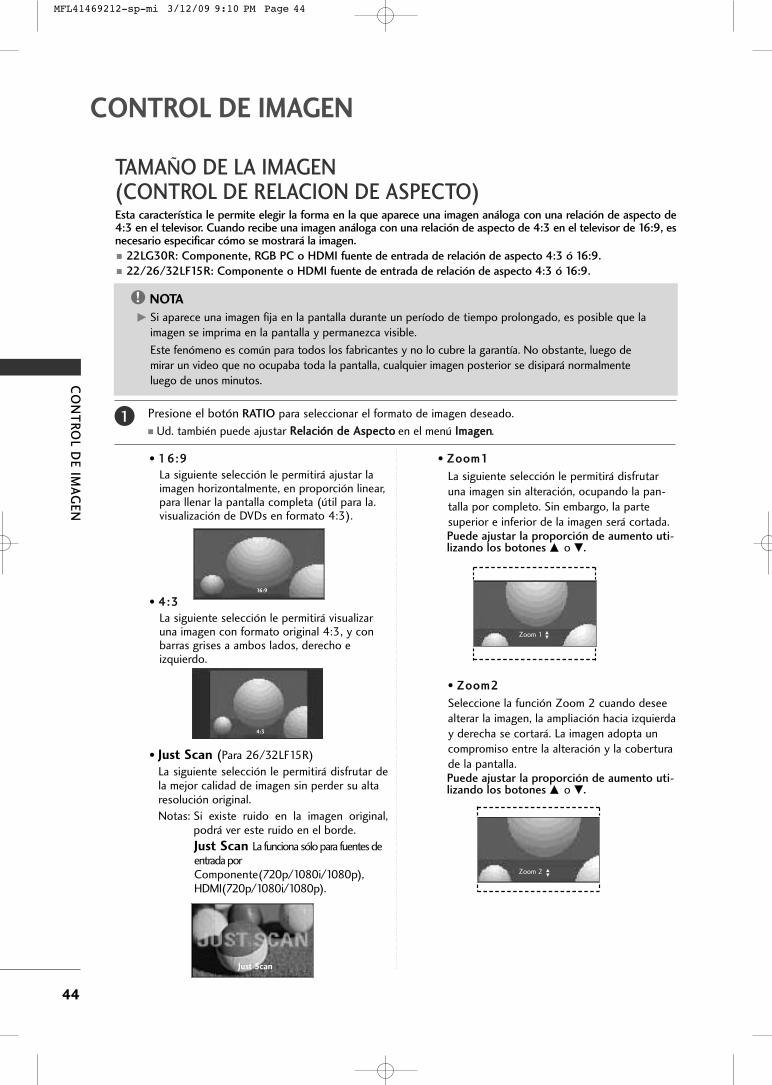
CO
NT
RO
L DE
IMA
GE
N
44
TAMAÑO DE LA IMAGEN (CONTROL DE RELACION DE ASPECTO)Esta característica le permite elegir la forma en la que aparece una imagen análoga con una relación de aspecto de4:3 en el televisor. Cuando recibe una imagen análoga con una relación de aspecto de 4:3 en el televisor de 16:9, esnecesario especificar cómo se mostrará la imagen. � 22LG30R: Componente, RGB PC o HDMI fuente de entrada de relación de aspecto 4:3 ó 16:9.� 22/26/32LF15R: Componente o HDMI fuente de entrada de relación de aspecto 4:3 ó 16:9.
• 1166::99
La siguiente selección le permitirá ajustar laimagen horizontalmente, en proporción linear,para llenar la pantalla completa (útil para la.visualización de DVDs en formato 4:3).
• 44::33
La siguiente selección le permitirá visualizaruna imagen con formato original 4:3, y conbarras grises a ambos lados, derecho eizquierdo.
• Just Scan (Para 26/32LF15R)
La siguiente selección le permitirá disfrutar dela mejor calidad de imagen sin perder su alta resolución original.
Notas: Si existe ruido en la imagen original,podrá ver este ruido en el borde.
Just Scan La funciona sólo para fuentes de entrada porComponente(720p/1080i/1080p),HDMI(720p/1080i/1080p).
• ZZoooomm11
La siguiente selección le permitirá disfrutaruna imagen sin alteración, ocupando la pan-talla por completo. Sin embargo, la partesuperior e inferior de la imagen será cortada. Puede ajustar la proporción de aumento uti-lizando los botones DD o EE.
• ZZoooomm22
Seleccione la función Zoom 2 cuando deseealterar la imagen, la ampliación hacia izquierday derecha se cortará. La imagen adopta uncompromiso entre la alteración y la coberturade la pantalla.Puede ajustar la proporción de aumento uti-lizando los botones DD o EE.
4:3
16:9
NOTA!
GG Si aparece una imagen fija en la pantalla durante un período de tiempo prolongado, es posible que laimagen se imprima en la pantalla y permanezca visible.
Este fenómeno es común para todos los fabricantes y no lo cubre la garantía. No obstante, luego demirar un video que no ocupaba toda la pantalla, cualquier imagen posterior se disipará normalmenteluego de unos minutos.
Presione el botón RATIO para seleccionar el formato de imagen deseado.
� Ud. también puede ajustar RReellaacciióónn ddee AAssppeeccttoo en el menú IImmaaggeenn.1
Zoom 1
Zoom 2
DD
EE
DD
EE
CONTROL DE IMAGEN
Just Scan
MFL41469212-sp-mi 3/12/09 9:10 PM Page 44
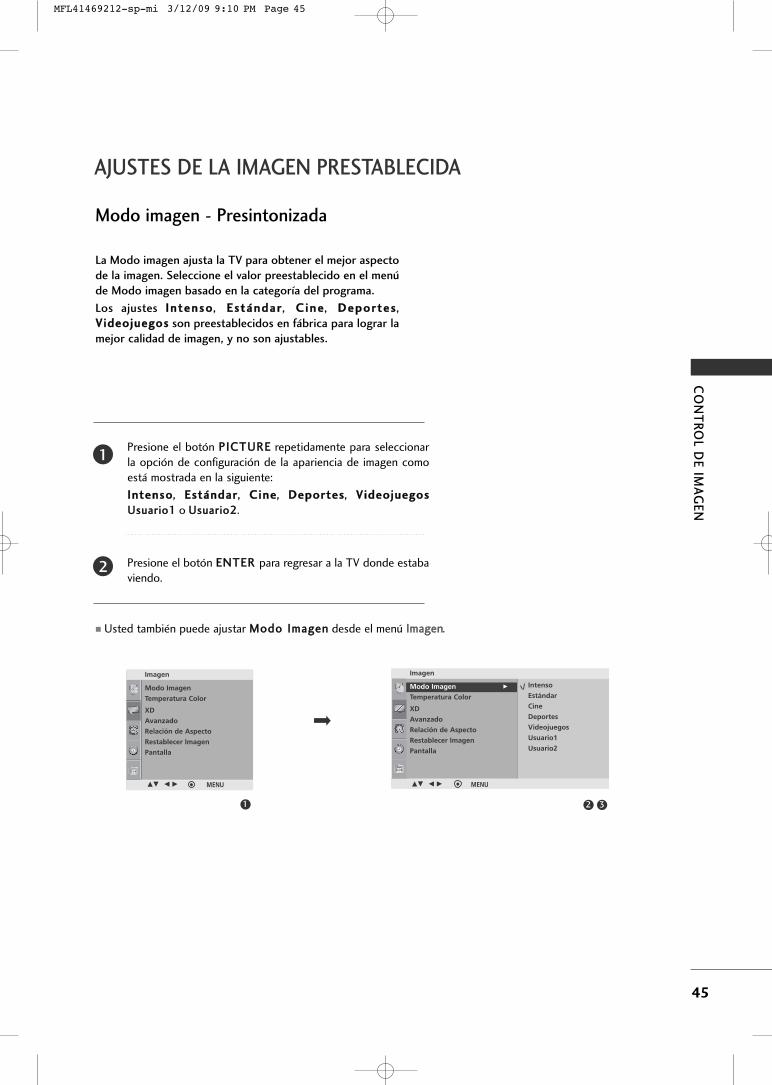
CO
NT
RO
L DE
IMA
GE
N
45
AJUSTES DE LA IMAGEN PRESTABLECIDA
Modo imagen - Presintonizada
1
Modo Imagen
Temperatura Color
XD
Avanzado
Relación de Aspecto
Restablecer Imagen
Pantalla
Imagen
32
Imagen
DE F G MENU
Intenso
Estándar
Cine
Deportes
Videojuegos
Usuario1
Usuario2
DE F G MENU
La Modo imagen ajusta la TV para obtener el mejor aspecto
de la imagen. Seleccione el valor preestablecido en el menú
de Modo imagen basado en la categoría del programa.
Los ajustes IInntteennssoo, EEssttáánnddaarr, CC iinnee, DDeeppoorrtteess,VViiddeeoojjuueeggooss son preestablecidos en fábrica para lograr la
mejor calidad de imagen, y no son ajustables.
Presione el botón PPIICCTTUURREE repetidamente para seleccionarla opción de configuración de la apariencia de imagen comoestá mostrada en la siguiente:
IInntteennssoo, EEssttáánnddaarr, CCiinnee, DDeeppoorrtteess, VViiddeeoojjuueeggooss
UUssuuaarriioo11 o UUssuuaarriioo22.
Presione el botón EENNTTEERR para regresar a la TV donde estabaviendo.
� Usted también puede ajustar MMooddoo IImmaaggeenn desde el menú IImmaaggeenn.
2
1
Modo Imagen G
Temperatura Color
XD
Avanzado
Relación de Aspecto
Restablecer Imagen
Pantalla
MFL41469212-sp-mi 3/12/09 9:10 PM Page 45
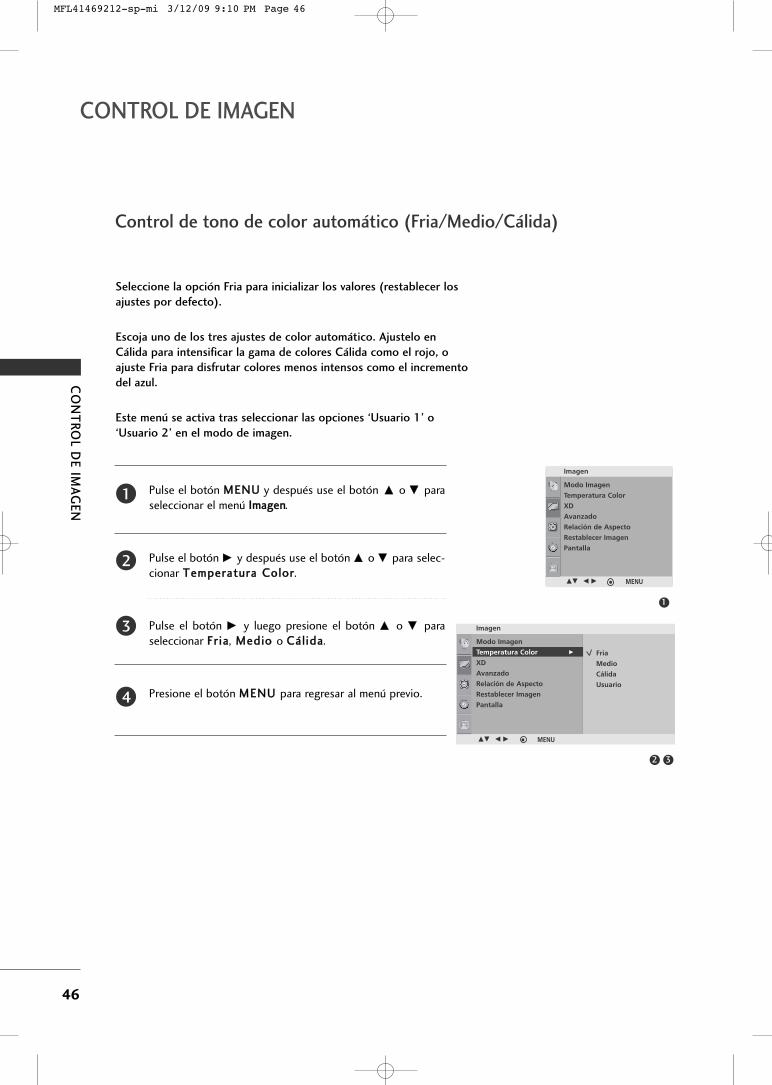
CONTROL DE IMAGEN
CO
NT
RO
L DE
IMA
GE
N
46
Seleccione la opción Fria para inicializar los valores (restablecer los
ajustes por defecto).
Escoja uno de los tres ajustes de color automático. Ajustelo en
Cálida para intensificar la gama de colores Cálida como el rojo, o
ajuste Fria para disfrutar colores menos intensos como el incremento
del azul.
Este menú se activa tras seleccionar las opciones ‘Usuario 1’ o
‘Usuario 2’ en el modo de imagen.
Pulse el botón MMEENNUU y después use el botón DD o EE paraseleccionar el menú IImmaaggeenn.
Pulse el botón GG y después use el botón DD o EE para selec-cionar TTeemmppeerraattuurraa CCoolloorr.
Pulse el botón GG y luego presione el botón DD o EE paraseleccionar FFrr iiaa, MMeeddiioo o CCááll iiddaa.
Presione el botón MMEENNUU para regresar al menú previo.
1
2
3
4
Control de tono de color automático (Fria/Medio/Cálida)
1
32
Modo Imagen
Temperatura Color
XD
Avanzado
Relación de Aspecto
Restablecer Imagen
Pantalla
Imagen
Imagen
DE F G MENU
Fria
Medio
Cálida
Usuario
DE F G MENU
Modo Imagen
Temperatura Color G
XD
Avanzado
Relación de Aspecto
Restablecer Imagen
Pantalla
MFL41469212-sp-mi 3/12/09 9:10 PM Page 46
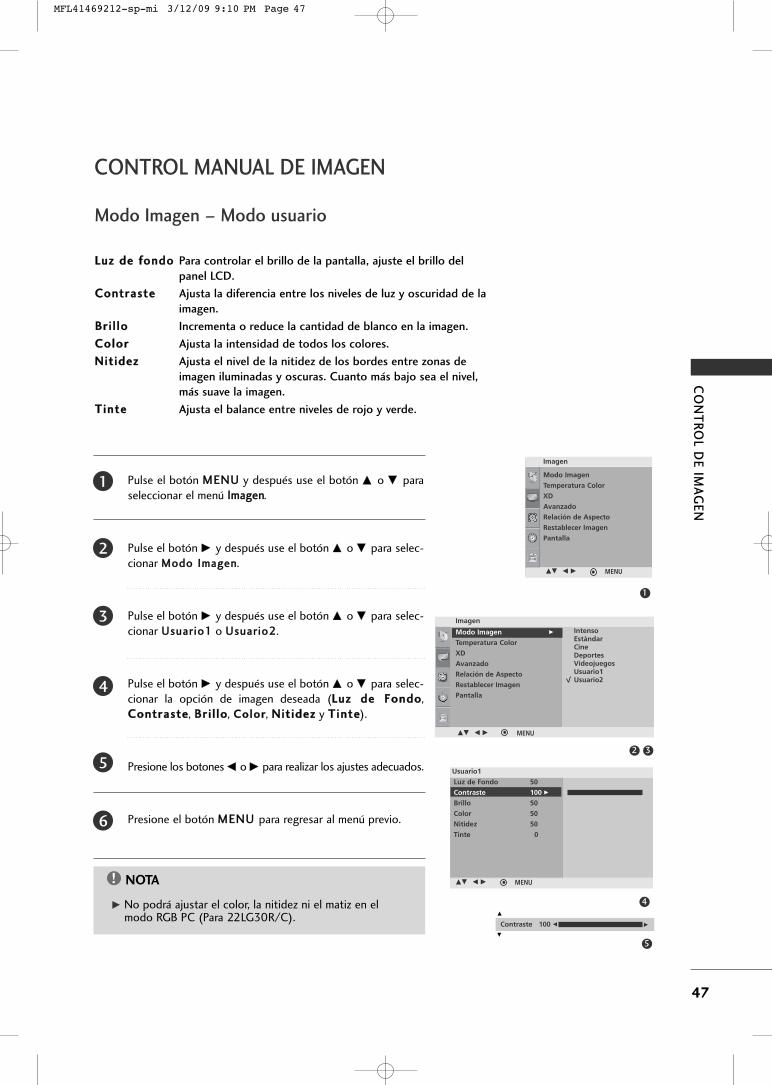
CO
NT
RO
L DE
IMA
GE
N
47
CONTROL MANUAL DE IMAGEN
Pulse el botón MMEENNUU y después use el botón DD o EE paraseleccionar el menú IImmaaggeenn.
Pulse el botón GG y después use el botón DD o EE para selec-cionar MMooddoo IImmaaggeenn.
Pulse el botón GG y después use el botón DD o EE para selec-cionar UUssuuaarriioo11 o UUssuuaarriioo22.
Pulse el botón GG y después use el botón DD o EE para selec-cionar la opción de imagen deseada (LLuuzz ddee FFoonnddoo,CCoonnttrraassttee, BBrrii ll lloo, CCoolloorr, NNiitt iiddeezz y TTiinnttee).
Presione los botones FF o GG para realizar los ajustes adecuados.
Presione el botón MMEENNUU para regresar al menú previo.
Modo Imagen – Modo usuario
LLuuzz ddee ffoonnddoo Para controlar el brillo de la pantalla, ajuste el brillo del
panel LCD.
CCoonnttrraassttee Ajusta la diferencia entre los niveles de luz y oscuridad de la
imagen.
BBrrii ll lloo Incrementa o reduce la cantidad de blanco en la imagen.
CCoolloorr Ajusta la intensidad de todos los colores.
NNiitt iiddeezz Ajusta el nivel de la nitidez de los bordes entre zonas de
imagen iluminadas y oscuras. Cuanto más bajo sea el nivel,
más suave la imagen.
TTiinnttee Ajusta el balance entre niveles de rojo y verde.
NOTA!
GG No podrá ajustar el color, la nitidez ni el matiz en elmodo RGB PC (Para 22LG30R/C).
1
2
3
4
5
6
1
32
5
4
Modo Imagen
Temperatura Color
XD
Avanzado
Relación de Aspecto
Restablecer Imagen
Pantalla
Imagen
DE F G MENU
Imagen
DE F G MENU
IntensoEstándarCineDeportesVideojuegosUsuario1Usuario2
Usuario1
DE F G MENU
Contraste 100 F
E
G
E
Modo Imagen G
Temperatura Color
XD
Avanzado
Relación de Aspecto
Restablecer Imagen
Pantalla
Luz de Fondo 50
Contraste 100 G
Brillo 50
Color 50
Nitidez 50
Tinte 0
MFL41469212-sp-mi 3/12/09 9:10 PM Page 47
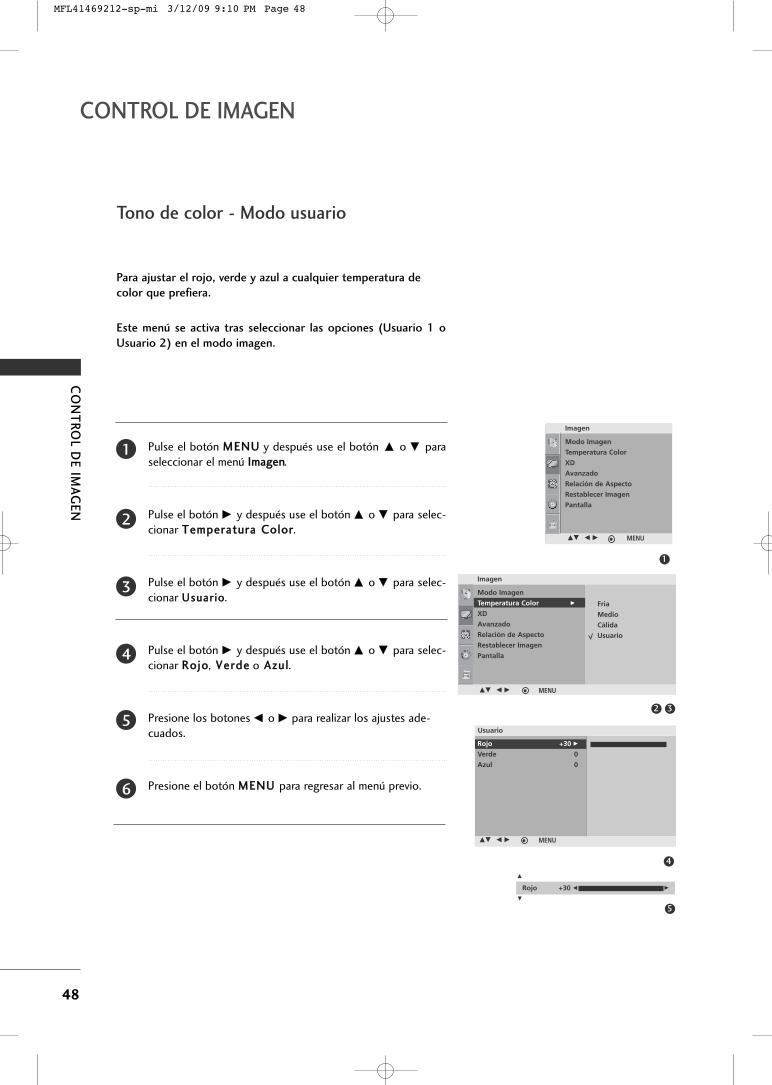
CONTROL DE IMAGEN
CO
NT
RO
L DE
IMA
GE
N
48
Para ajustar el rojo, verde y azul a cualquier temperatura de
color que prefiera.
Este menú se activa tras seleccionar las opciones (Usuario 1 o
Usuario 2) en el modo imagen.
Tono de color - Modo usuario
Pulse el botón MMEENNUU y después use el botón DD o EE paraseleccionar el menú IImmaaggeenn.
Pulse el botón GG y después use el botón DD o EE para selec-cionar TTeemmppeerraattuurraa CCoolloorr.
Pulse el botón GG y después use el botón DD o EE para selec-cionar UUssuuaarr iioo.
Pulse el botón GG y después use el botón DD o EE para selec-cionar RRoojjoo, VVeerrddee o AAzzuull.
Presione los botones FF o GG para realizar los ajustes ade-cuados.
Presione el botón MMEENNUU para regresar al menú previo.
1
2
3
4
5
6
1
32
4
Modo Imagen
Temperatura Color
XD
Avanzado
Relación de Aspecto
Restablecer Imagen
Pantalla
Imagen
DE F G MENU
Imagen
DE F G MENU
Fria
Medio
Cálida
Usuario
DE F G MENU
Usuario
5
Rojo +30 F G
E
E
Modo Imagen
Temperatura Color G
XD
Avanzado
Relación de Aspecto
Restablecer Imagen
Pantalla
Rojo +30 G
Verde 0
Azul 0
MFL41469212-sp-mi 3/12/09 9:10 PM Page 48
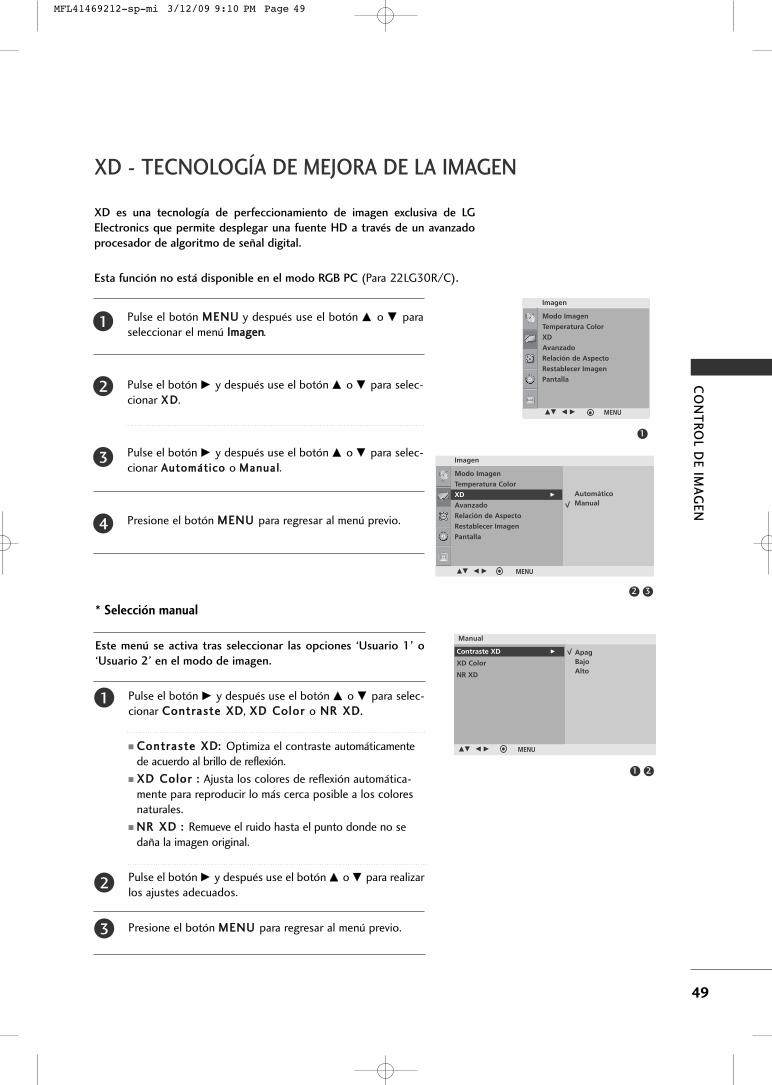
CO
NT
RO
L DE
IMA
GE
N
49
XD - TECNOLOGÍA DE MEJORA DE LA IMAGEN
Pulse el botón MMEENNUU y después use el botón DD o EE paraseleccionar el menú IImmaaggeenn.
Pulse el botón GG y después use el botón DD o EE para selec-cionar XX DD.
Pulse el botón GG y después use el botón DD o EE para selec-cionar AAuuttoommááttiiccoo o MMaannuuaall.
Presione el botón MMEENNUU para regresar al menú previo.
XD es una tecnología de perfeccionamiento de imagen exclusiva de LG
Electronics que permite desplegar una fuente HD a través de un avanzado
procesador de algoritmo de señal digital.
Esta función no está disponible en el modo RGB PC (Para 22LG30R/C).
1
2
3
4
1
32
Modo Imagen
Temperatura Color
XD
Avanzado
Relación de Aspecto
Restablecer Imagen
Pantalla
Imagen
DE F G MENU
Imagen
DE F G MENU
AutomáticoManual
* Selección manual
Este menú se activa tras seleccionar las opciones ‘Usuario 1’ o
‘Usuario 2’ en el modo de imagen.
Pulse el botón GG y después use el botón DD o EE para selec-cionar CCoonnttrraassttee XXDD, XXDD CCoolloorr o NNRR XXDD.
� CCoonnttrraassttee XXDD:: Optimiza el contraste automáticamentede acuerdo al brillo de reflexión.
� XXDD CCoolloorr :: Ajusta los colores de reflexión automática-mente para reproducir lo más cerca posible a los coloresnaturales.
� NNRR XXDD :: Remueve el ruido hasta el punto donde no sedaña la imagen original.
Pulse el botón GG y después use el botón DD o EE para realizarlos ajustes adecuados.
Presione el botón MMEENNUU para regresar al menú previo.
1
2
3
21
Manual
DE F G MENU
ApagBajoAlto
Modo Imagen
Temperatura Color
XD G
Avanzado
Relación de Aspecto
Restablecer Imagen
Pantalla
Contraste XD G
XD Color
NR XD
MFL41469212-sp-mi 3/12/09 9:10 PM Page 49
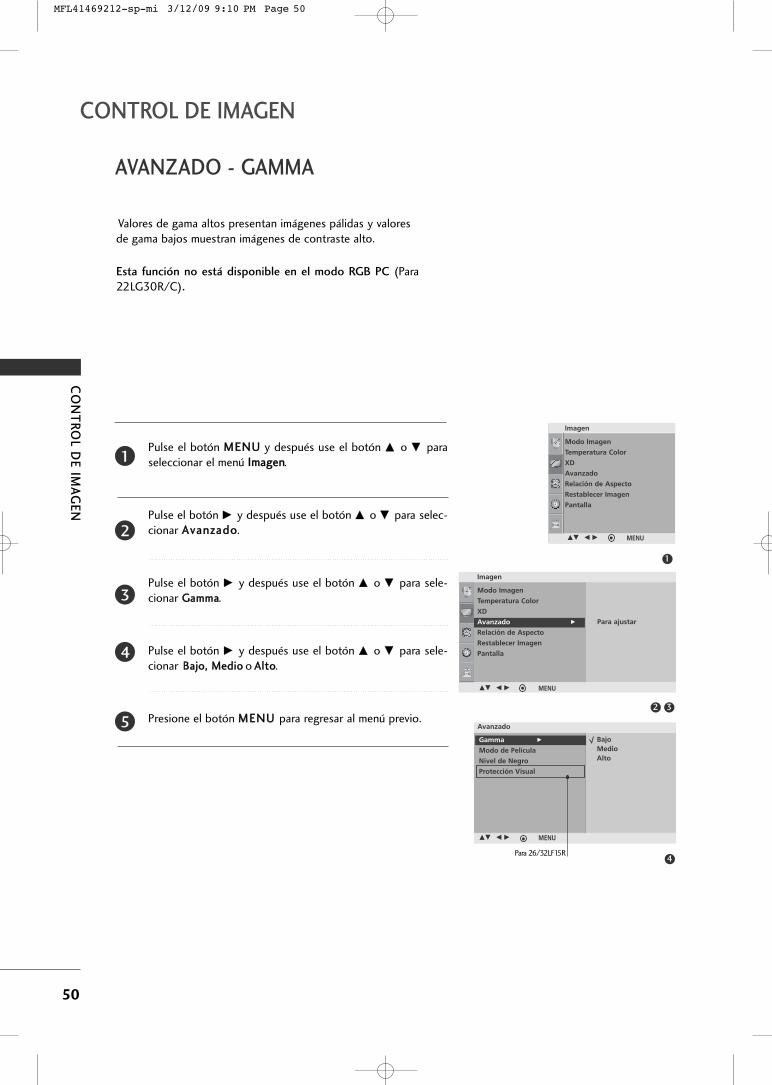
CONTROL DE IMAGEN
CO
NT
RO
L DE
IMA
GE
N
50
AVANZADO - GAMMA
Valores de gama altos presentan imágenes pálidas y valoresde gama bajos muestran imágenes de contraste alto.
Esta función no está disponible en el modo RGB PC (Para22LG30R/C).
Pulse el botón MMEENNUU y después use el botón DD o EE paraseleccionar el menú IImmaaggeenn.
Pulse el botón GG y después use el botón DD o EE para selec-cionar AAvvaannzzaaddoo.
Pulse el botón GG y después use el botón DD o EE para sele-cionar GGaammmmaa.
Pulse el botón GG y después use el botón DD o EE para sele-cionar BBaajjoo,, MMeeddiioo o AAllttoo.
Presione el botón MMEENNUU para regresar al menú previo.
1
2
3
4
5
1
32
4
Modo Imagen
Temperatura Color
XD
Avanzado
Relación de Aspecto
Restablecer Imagen
Pantalla
Imagen
DE F G MENU
Imagen
DE F G MENU
Para ajustar
DE F G MENU
Avanzado
BajoMedioAlto
Modo Imagen
Temperatura Color
XD
Avanzado G
Relación de Aspecto
Restablecer Imagen
Pantalla
Gamma G
Modo de Película
Nivel de Negro
Protección Visual
Para 26/32LF15R
MFL41469212-sp-mi 3/12/09 9:10 PM Page 50
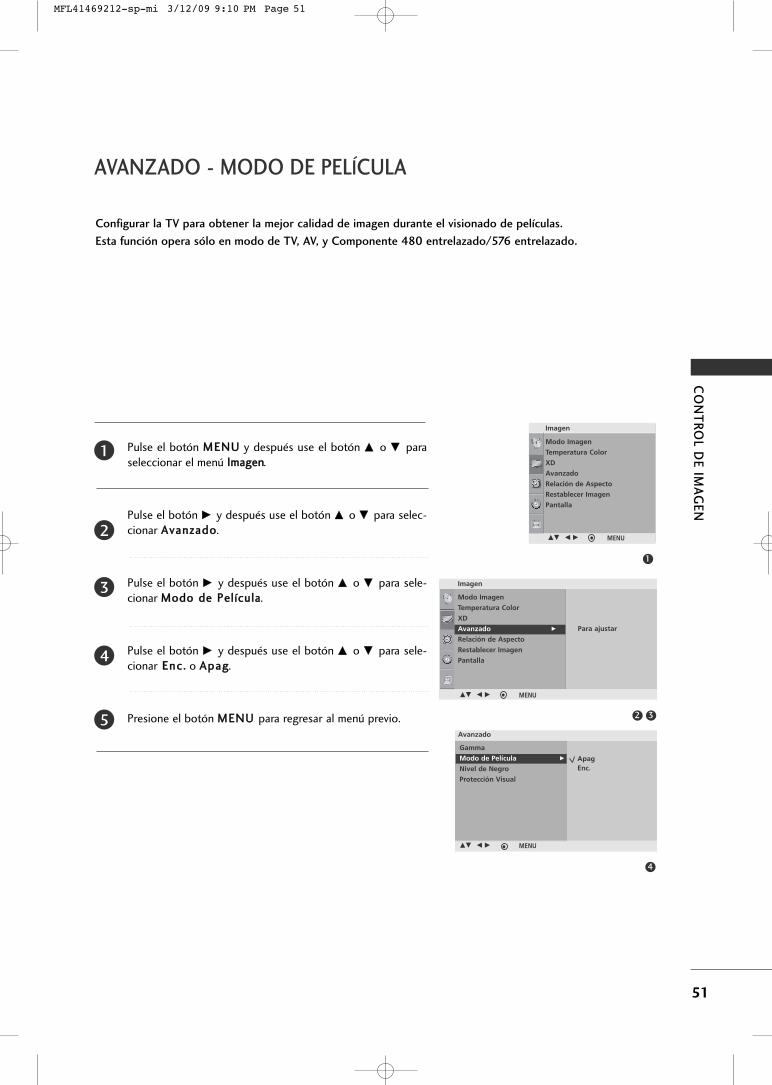
CO
NT
RO
L DE
IMA
GE
N
51
AVANZADO - MODO DE PELÍCULA
Configurar la TV para obtener la mejor calidad de imagen durante el visionado de películas.
Esta función opera sólo en modo de TV, AV, y Componente 480 entrelazado/576 entrelazado.
Pulse el botón MMEENNUU y después use el botón DD o EE paraseleccionar el menú IImmaaggeenn.
Pulse el botón GG y después use el botón DD o EE para selec-cionar AAvvaannzzaaddoo.
Pulse el botón GG y después use el botón DD o EE para sele-cionar MMooddoo ddee PPeellííccuullaa.
Pulse el botón GG y después use el botón DD o EE para sele-cionar EEnncc.. o AAppaagg.
Presione el botón MMEENNUU para regresar al menú previo.
1
2
3
4
5
1
32
4
Modo Imagen
Temperatura Color
XD
Avanzado
Relación de Aspecto
Restablecer Imagen
Pantalla
Imagen
DE F G MENU
Imagen
DE F G MENU
Para ajustar
DE F G MENU
Avanzado
ApagEnc.
Modo Imagen
Temperatura Color
XD
Avanzado G
Relación de Aspecto
Restablecer Imagen
Pantalla
Gamma
Modo de Película G
Nivel de Negro
Protección Visual
MFL41469212-sp-mi 3/12/09 9:10 PM Page 51
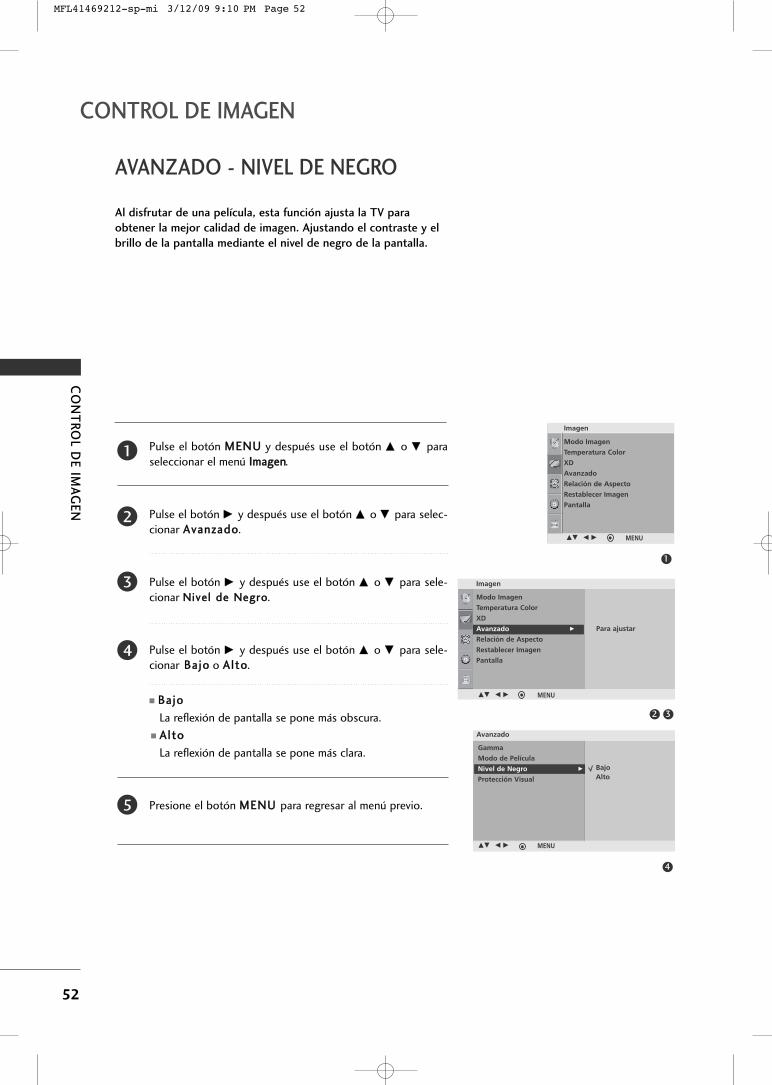
CONTROL DE IMAGEN
CO
NT
RO
L DE
IMA
GE
N
52
AVANZADO - NIVEL DE NEGRO
Al disfrutar de una película, esta función ajusta la TV para
obtener la mejor calidad de imagen. Ajustando el contraste y el
brillo de la pantalla mediante el nivel de negro de la pantalla.
Pulse el botón MMEENNUU y después use el botón DD o EE paraseleccionar el menú IImmaaggeenn.
Pulse el botón GG y después use el botón DD o EE para selec-cionar AAvvaannzzaaddoo.
Pulse el botón GG y después use el botón DD o EE para sele-cionar NNiivveell ddee NNeeggrroo.
Pulse el botón GG y después use el botón DD o EE para sele-cionar BBaajjoo o AAllttoo.
� BBaajjoo
La reflexión de pantalla se pone más obscura.
� AAllttoo
La reflexión de pantalla se pone más clara.
Presione el botón MMEENNUU para regresar al menú previo.
1
2
3
4
5
1
32
4
Modo Imagen
Temperatura Color
XD
Avanzado
Relación de Aspecto
Restablecer Imagen
Pantalla
Imagen
DE F G MENU
DE F G MENU
Avanzado
BajoAlto
Imagen
DE F G MENU
Para ajustar
Modo Imagen
Temperatura Color
XD
Avanzado G
Relación de Aspecto
Restablecer Imagen
Pantalla
Gamma
Modo de Película
Nivel de Negro G
Protección Visual
MFL41469212-sp-mi 3/12/09 9:10 PM Page 52
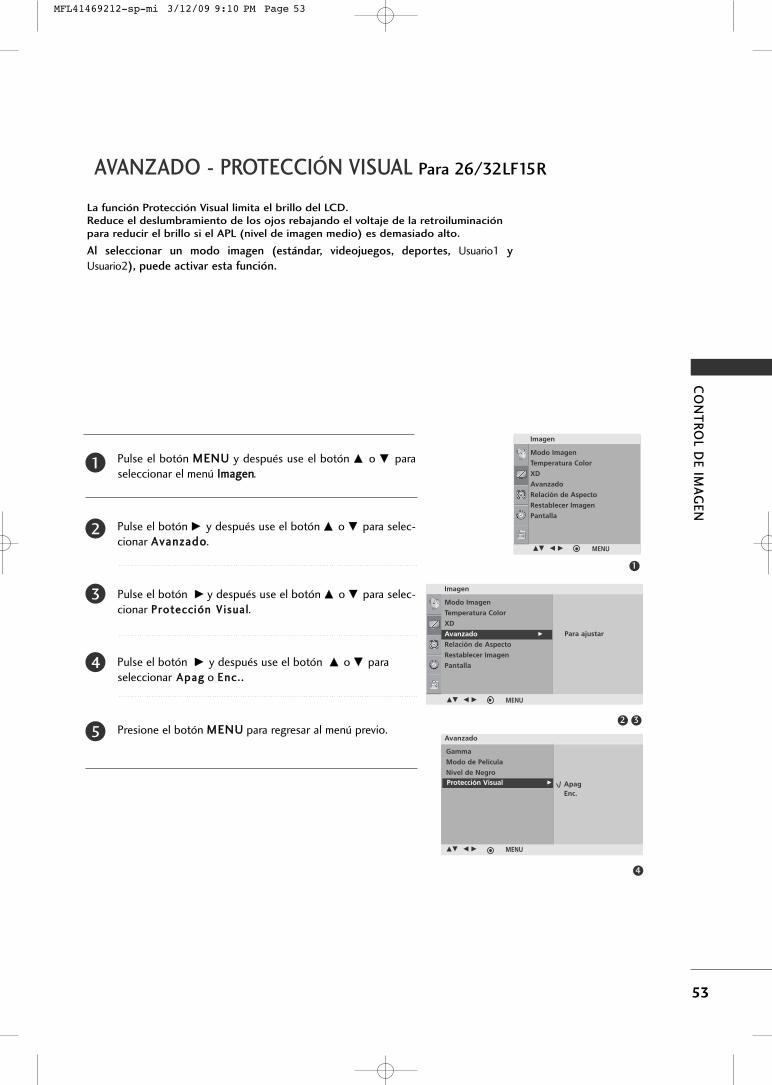
CO
NT
RO
L DE
IMA
GE
N
53
AVANZADO - PROTECCIÓN VISUAL Para 26/32LF15R
La función Protección Visual limita el brillo del LCD.Reduce el deslumbramiento de los ojos rebajando el voltaje de la retroiluminaciónpara reducir el brillo si el APL (nivel de imagen medio) es demasiado alto.
Al seleccionar un modo imagen (estándar, videojuegos, deportes, Usuario1 y
Usuario2), puede activar esta función.
Pulse el botón MMEENNUU y después use el botón DD o EE paraseleccionar el menú IImmaaggeenn.
Pulse el botón GG y después use el botón DD o EE para selec-cionar AAvvaannzzaaddoo.
Pulse el botón GG y después use el botón DD o EE para selec-cionar PPrrootteecccciióónn VViissuuaall.
Pulse el botón GG y después use el botón DD o EE paraseleccionar AAppaagg o EEnncc.. ..
Presione el botón MMEENNUU para regresar al menú previo.
1
2
3
4
5
1
32
4
Gamma
Modo de Película
Nivel de NegroProtección Visual G
DE F G MENU
Avanzado
ApagEnc.
Modo Imagen
Temperatura Color
XD
Avanzado
Relación de Aspecto
Restablecer Imagen
Pantalla
Imagen
DE F G MENU
Imagen
DE F G MENU
Para ajustar
Modo Imagen
Temperatura Color
XD
Avanzado G
Relación de Aspecto
Restablecer Imagen
Pantalla
MFL41469212-sp-mi 3/12/09 9:10 PM Page 53
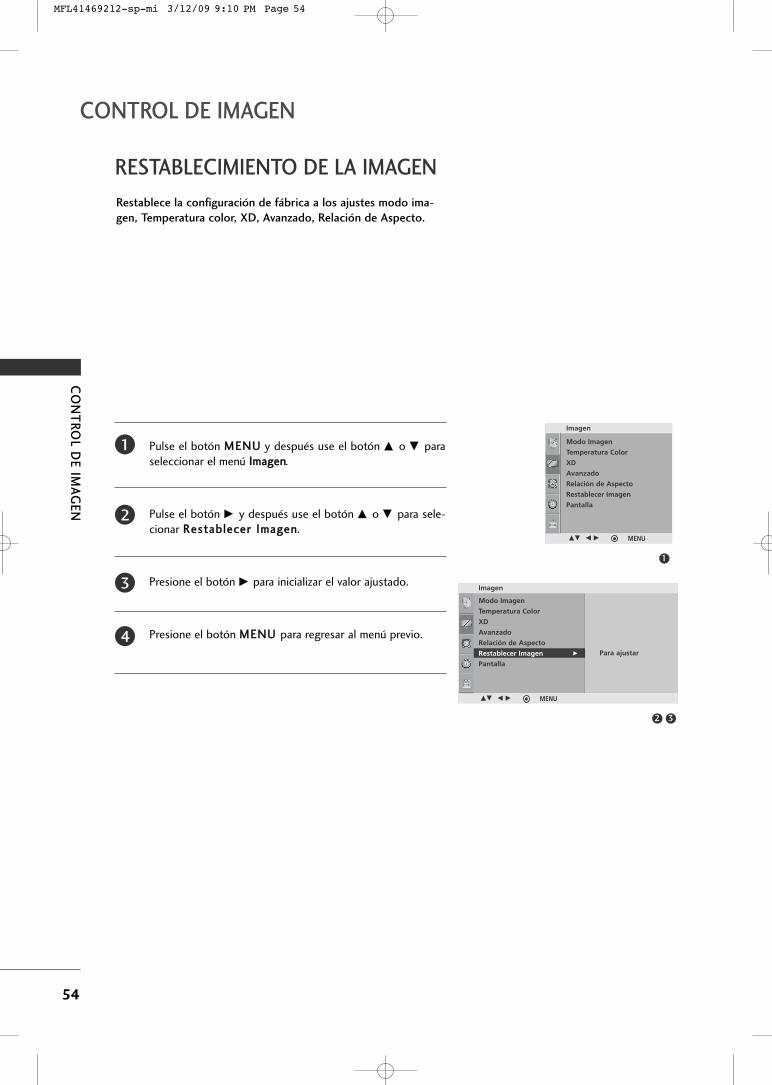
CONTROL DE IMAGEN
CO
NT
RO
L DE
IMA
GE
N
54
RESTABLECIMIENTO DE LA IMAGEN
Pulse el botón MMEENNUU y después use el botón DD o EE paraseleccionar el menú IImmaaggeenn.
Pulse el botón GG y después use el botón DD o EE para sele-cionar RReessttaabblleecceerr IImmaaggeenn.
Presione el botón GG para inicializar el valor ajustado.
Presione el botón MMEENNUU para regresar al menú previo.
Restablece la configuración de fábrica a los ajustes modo ima-
gen, Temperatura color, XD, Avanzado, Relación de Aspecto.
1
2
3
4
1
32
Modo Imagen
Temperatura Color
XD
Avanzado
Relación de Aspecto
Restablecer Imagen
Pantalla
Imagen
DE F G MENU
Imagen
DE F G MENU
Para ajustar
Modo Imagen
Temperatura Color
XD
Avanzado
Relación de Aspecto
Restablecer Imagen G
Pantalla
MFL41469212-sp-mi 3/12/09 9:10 PM Page 54
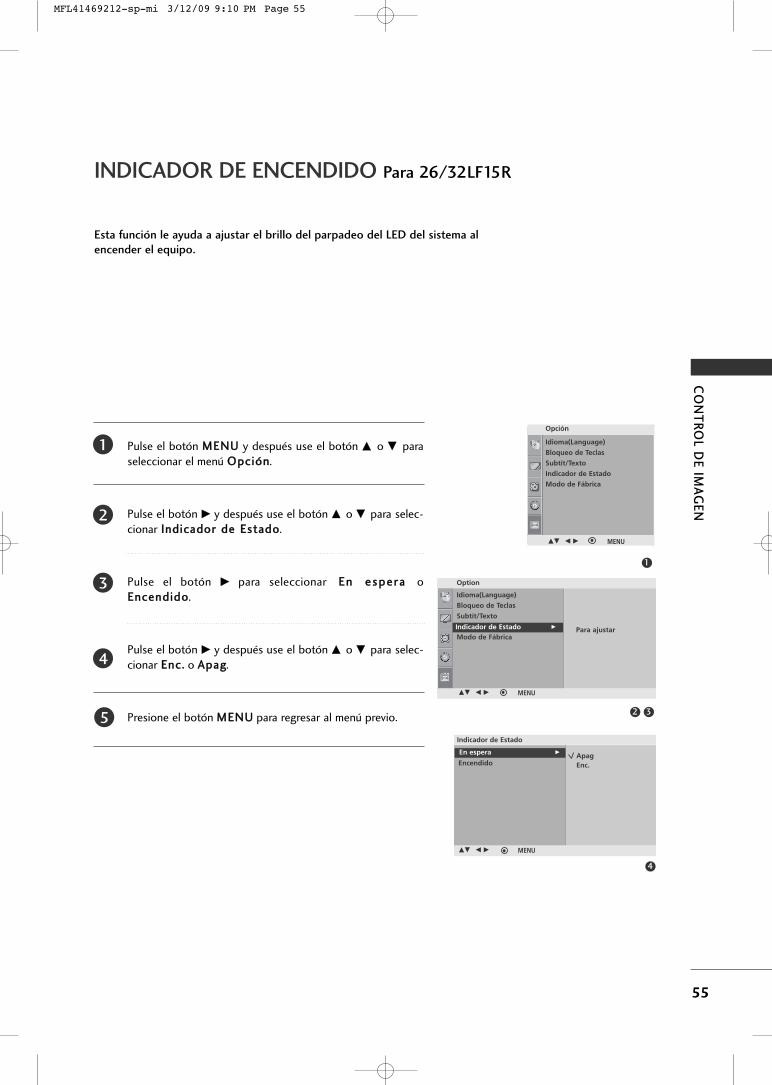
CO
NT
RO
L DE
IMA
GE
N
55
INDICADOR DE ENCENDIDO Para 26/32LF15R
Esta función le ayuda a ajustar el brillo del parpadeo del LED del sistema alencender el equipo.
1
32
Option
Idioma(Language)
Bloqueo de Teclas
Subtít/Texto
Indicador de Estado
Modo de FábricaIndicador de Estado G
DE F G MENU
Para ajustar
En espera
Encendido
En espera G
DE F G MENU
Indicador de Estado
ApagEnc.
4
Pulse el botón MMEENNUU y después use el botón DD o EE paraseleccionar el menú OOppcciióónn.
Pulse el botón GG y después use el botón DD o EE para selec-cionar IInnddiiccaaddoorr ddee EEssttaaddoo.
Pulse el botón GG para seleccionar EEnn eessppeerraa oEEnncceennddiiddoo.
Pulse el botón GG y después use el botón DD o EE para selec-cionar EEnncc.. o AAppaagg.
Presione el botón MMEENNUU para regresar al menú previo.
1
2
3
4
5
Idioma(Language)
Bloqueo de Teclas
Subtít/Texto
Indicador de Estado
Modo de Fábrica
Opción
DE F G MENU
MFL41469212-sp-mi 3/12/09 9:10 PM Page 55
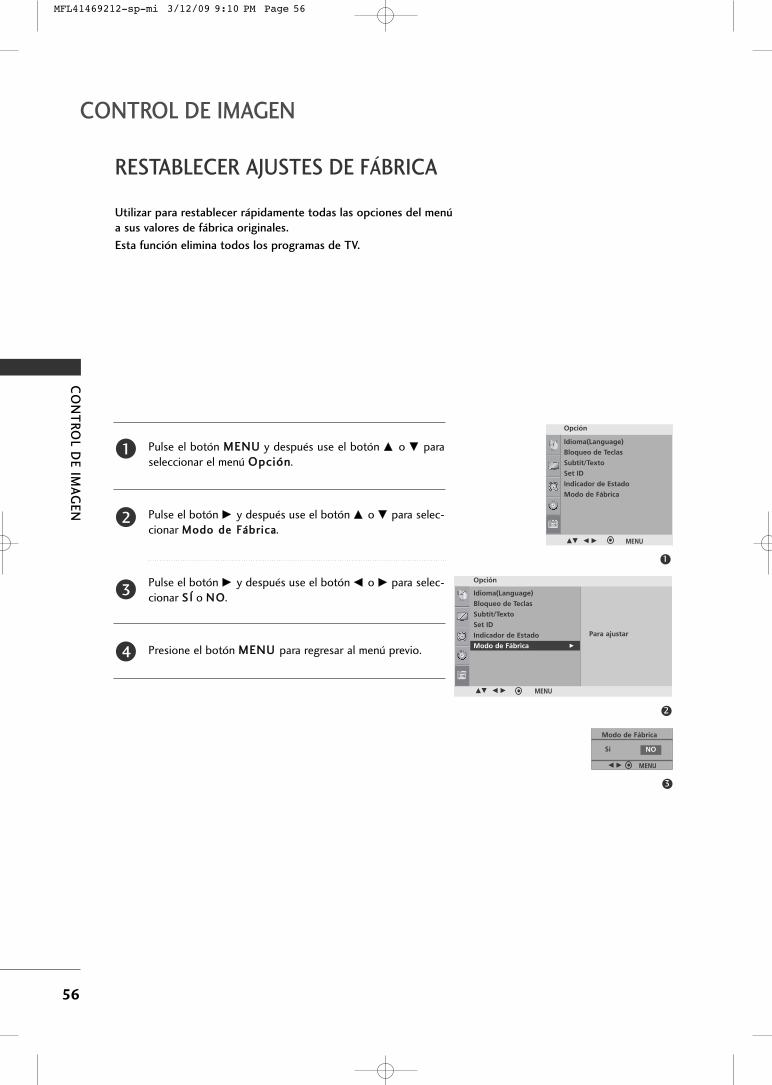
CONTROL DE IMAGEN
CO
NT
RO
L DE
IMA
GE
N
56
RESTABLECER AJUSTES DE FÁBRICA
Utilizar para restablecer rápidamente todas las opciones del menú
a sus valores de fábrica originales.
Esta función elimina todos los programas de TV.
Pulse el botón MMEENNUU y después use el botón DD o EE paraseleccionar el menú OOppcciióónn.
Pulse el botón GG y después use el botón DD o EE para selec-cionar MMooddoo ddee FFáábbrriiccaa.
Pulse el botón GG y después use el botón FF o GG para selec-cionar SS ÍÍ o NN OO.
Presione el botón MMEENNUU para regresar al menú previo.
1
2
3
4
1
3
2
Opción
DE F G MENU
Idioma(Language)
Bloqueo de Teclas
Subtít/Texto
Set ID
Indicador de Estado
Modo de Fábrica
Opción
DE F G MENU
Para ajustar
Modo de Fábrica
Sí NO
F G MENU
Idioma(Language)
Bloqueo de Teclas
Subtít/Texto
Set ID
Indicador de Estado
Modo de Fábrica G
MFL41469212-sp-mi 3/12/09 9:10 PM Page 56
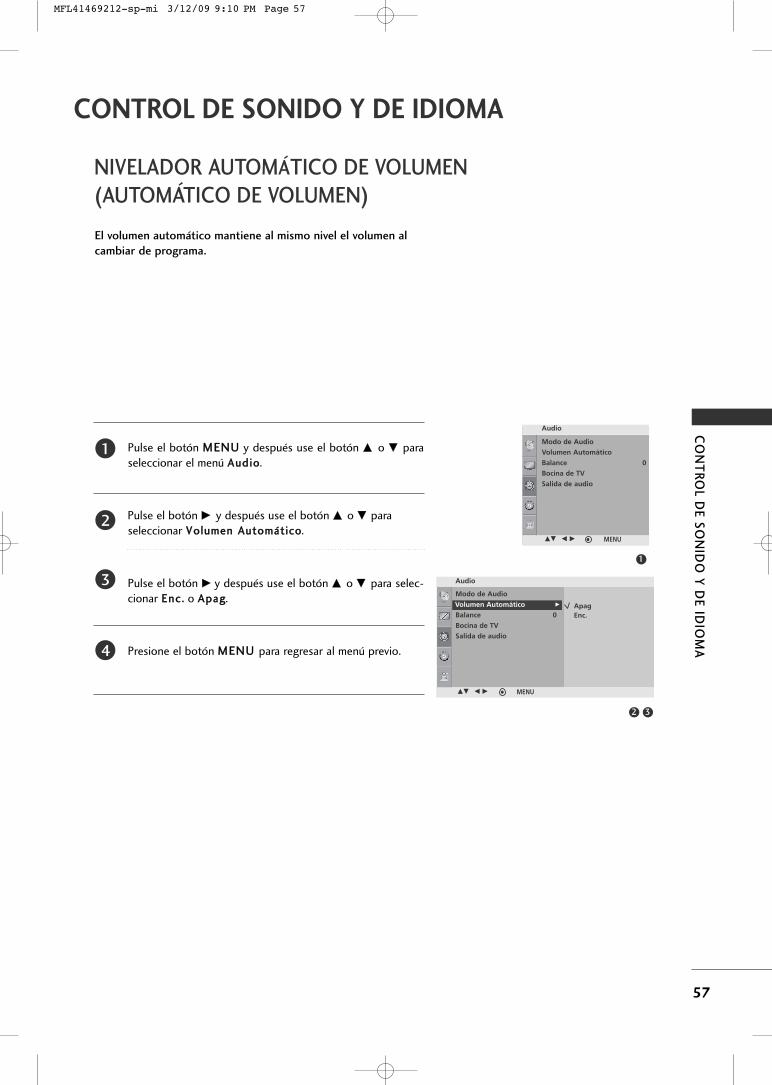
CO
NT
RO
L DE
SO
NID
O Y
DE
IDIO
MA
57
NIVELADOR AUTOMÁTICO DE VOLUMEN (AUTOMÁTICO DE VOLUMEN)
CONTROL DE SONIDO Y DE IDIOMA
Pulse el botón MMEENNUU y después use el botón DD o EE paraseleccionar el menú AAuuddiioo.
Pulse el botón GG y después use el botón DD o EE paraseleccionar VVoolluummeenn AAuuttoommááttiiccoo.
Pulse el botón GG y después use el botón DD o EE para selec-cionar EEnncc.. o AAppaagg.
Presione el botón MMEENNUU para regresar al menú previo.
El volumen automático mantiene al mismo nivel el volumen al
cambiar de programa.
1
2
3
4
1
Modo de Audio
Volumen Automático
Balance 0
Bocina de TV
Salida de audio
Audio
32
Audio
Modo de Audio
Volumen Automático
Balance 0
Bocina de TV
Salida de audio
Volumen Automático G
DE F G MENU
ApagEnc.
DE F G MENU
MFL41469212-sp-mi 3/12/09 9:10 PM Page 57
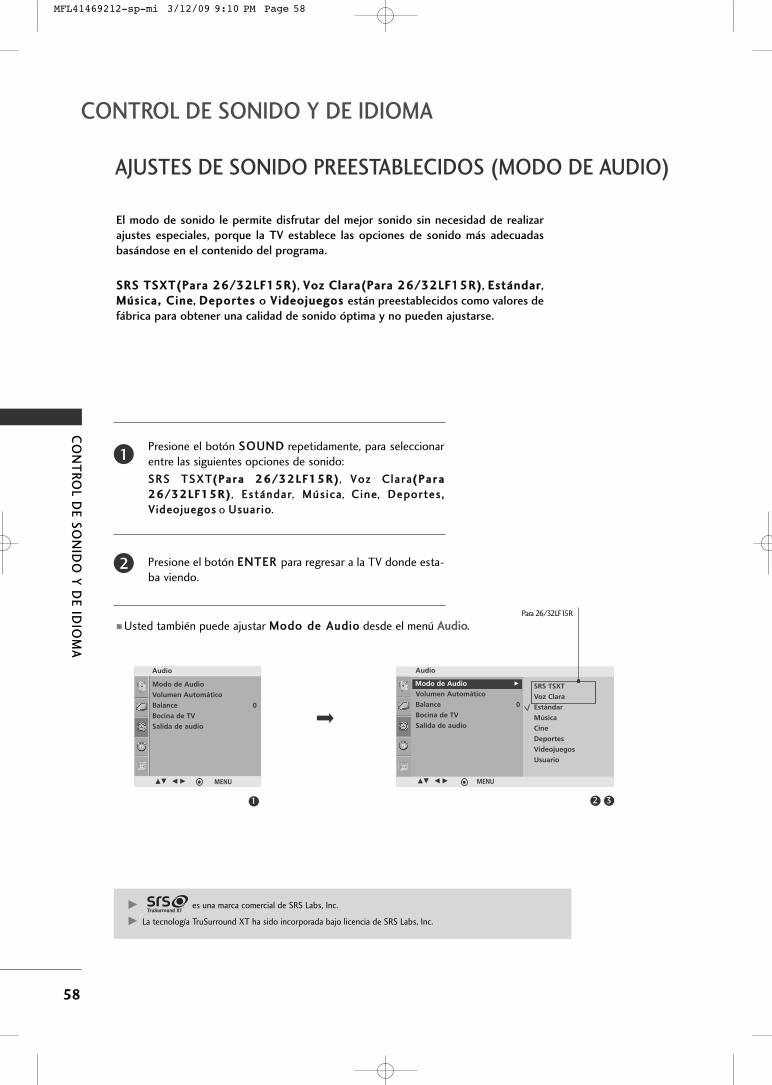
CO
NT
RO
L DE
SO
NID
O Y
DE
IDIO
MA
58
CONTROL DE SONIDO Y DE IDIOMA
AJUSTES DE SONIDO PREESTABLECIDOS (MODO DE AUDIO)
El modo de sonido le permite disfrutar del mejor sonido sin necesidad de realizar
ajustes especiales, porque la TV establece las opciones de sonido más adecuadas
basándose en el contenido del programa.
SSRRSS TTSSXXTT((PPaarraa 2266//3322LLFF1155RR)), VVoozz CCllaarraa((PPaarraa 2266//3322LLFF1155RR)), EEssttáánnddaarr,MMúússiiccaa,, CCiinnee, DDeeppoorrtteess o VViiddeeoojjuueeggooss están preestablecidos como valores de
fábrica para obtener una calidad de sonido óptima y no pueden ajustarse.
1 32
Modo de Audio
Volumen Automático
Balance 0
Bocina de TV
Salida de audio
Audio Audio
Sound Modo
Volumen Automático
Balance 0
Bocina de TV
Salida de audio
Modo de Audio G
DE F G MENU
SRS TSXT
Voz Clara
Estándar
Música
Cine
Deportes
Videojuegos
Usuario
DE F G MENU
Presione el botón SSOOUUNNDD repetidamente, para seleccionarentre las siguientes opciones de sonido:
SSRRSS TTSSXXTT((PPaarraa 2266//3322LLFF1155RR)), VVoozz CCllaa rraa((PPaarraa
2266//3322LLFF1155RR)), EEssttáánnddaarr, MMúúss ii ccaa, CCiinnee, DDeeppoorrtteess ,,
VViiddeeoojjuueeggooss o UUssuuaarr iioo.
Presione el botón EENNTTEERR para regresar a la TV donde esta-ba viendo.
� Usted también puede ajustar MMooddoo ddee AAuuddiioo desde el menú AAuuddiioo.
2
1
Para 26/32LF15R
GG es una marca comercial de SRS Labs, Inc.
GG La tecnología TruSurround XT ha sido incorporada bajo licencia de SRS Labs, Inc.
MFL41469212-sp-mi 3/12/09 9:10 PM Page 58
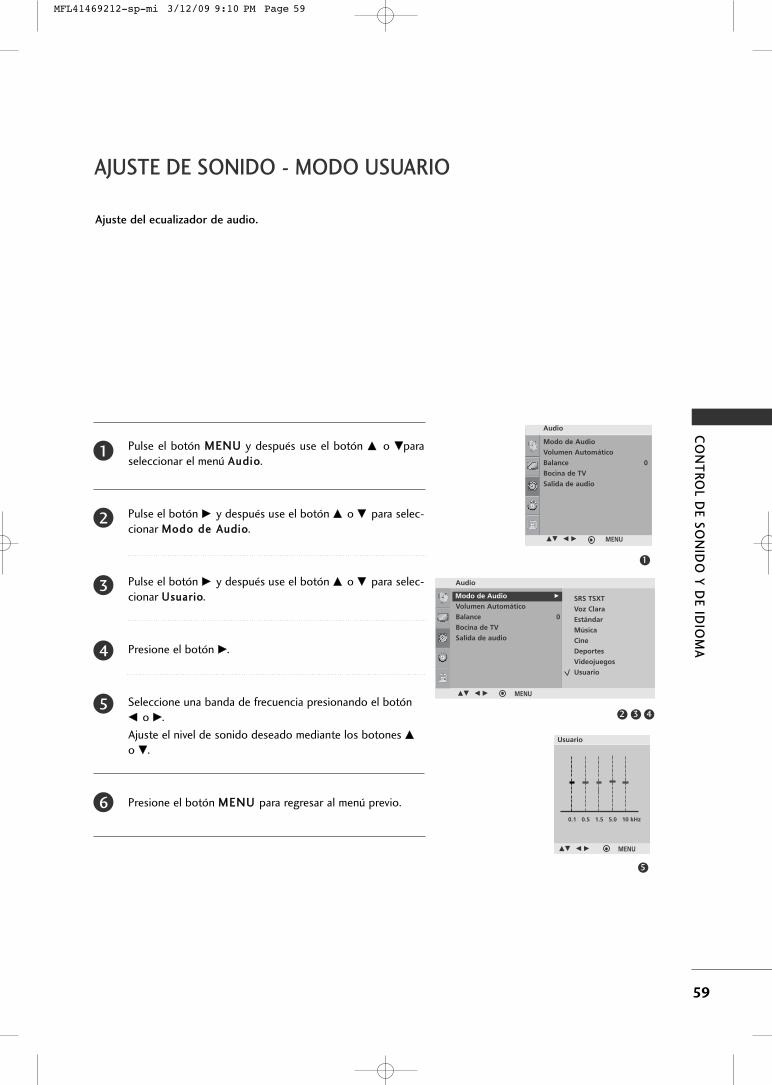
CO
NT
RO
L DE
SO
NID
O Y
DE
IDIO
MA
59
AJUSTE DE SONIDO - MODO USUARIO
Pulse el botón MMEENNUU y después use el botón DD o EEparaseleccionar el menú AAuuddiioo.
Pulse el botón GG y después use el botón DD o EE para selec-cionar MMooddoo ddee AAuuddiioo.
Pulse el botón GG y después use el botón DD o EE para selec-cionar UUssuuaarriioo.
Presione el botón GG.
Seleccione una banda de frecuencia presionando el botón
FF o GG.
Ajuste el nivel de sonido deseado mediante los botones DDo EE.
Presione el botón MMEENNUU para regresar al menú previo.
Ajuste del ecualizador de audio.
1
2
3
4
5
6
1
3 42
Modo de Audio
Volumen Automático
Balance 0
Bocina de TV
Salida de audio
Audio
Audio
Volumen Automático
Balance 0
Bocina de TV
Salida de audio
Modo de Audio G
DE F G MENU
SRS TSXT
Voz Clara
Estándar
Música
Cine
Deportes
Videojuegos
Usuario
DE F G MENU
Usuario
DE F G MENU
0.1 0.5 1.5 5.0 10 kHz
5
MFL41469212-sp-mi 3/12/09 9:10 PM Page 59

CO
NT
RO
L DE
SO
NID
O Y
DE
IDIO
MA
60
CONTROL DE SONIDO Y DE IDIOMA
AJUSTE DE BALANCE
Puede ajustar el balance de sonido de las bocinas a los niveles que desea ud.
Pulse el botón MMEENNUU y después use el botón DD o EE paraseleccionar el menú AAuuddiioo.
Pulse el botón GG y después use el botón DD o EE para selec-cionar BBaallaannccee.
Pulse el botón GG a continuación, los botones FF o GG pararealizar los ajustes deseados.
Presione el botón MMEENNUU para regresar al menú previo.
1
2
3
4
1
32
Modo de Audio
Volumen Automático
Balance 0
Bocina de TV
Salida de audio
Audio
DE F G MENU
Audio
Modo de Audio
Volumen Automático
Bocina de TV
Salida de audio
Balance R15
DE F G MENU
MFL41469212-sp-mi 3/12/09 9:10 PM Page 60
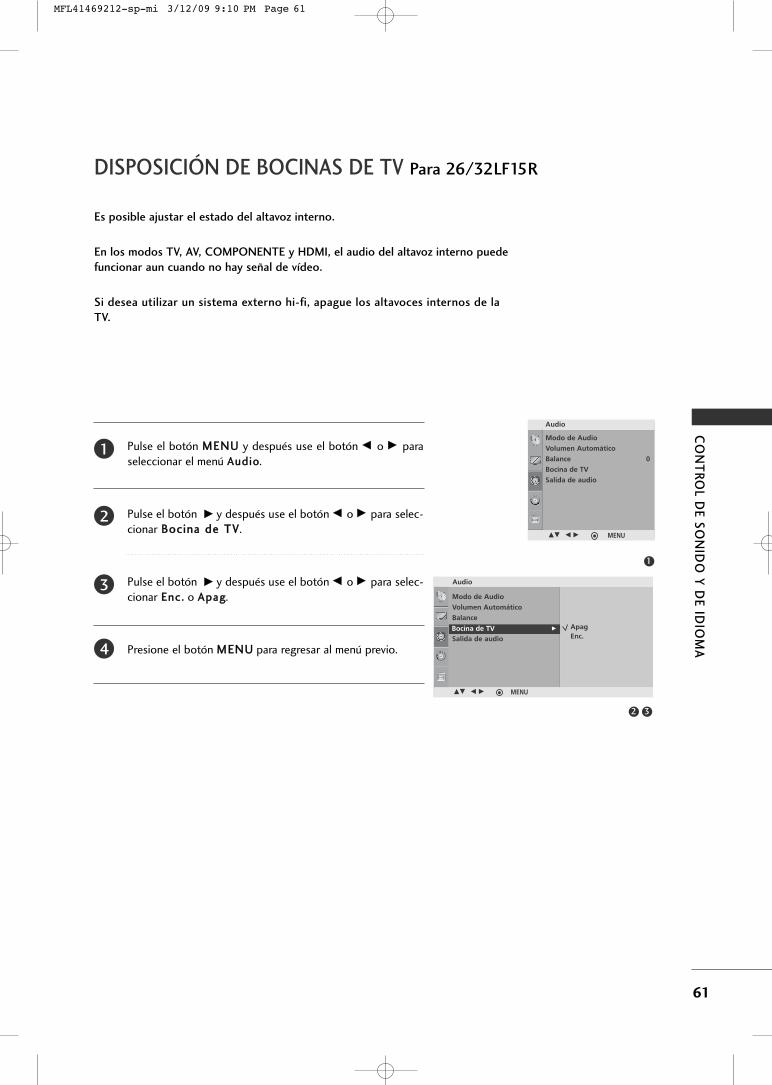
CO
NT
RO
L DE
SO
NID
O Y
DE
IDIO
MA
61
DISPOSICIÓN DE BOCINAS DE TV Para 26/32LF15R
Es posible ajustar el estado del altavoz interno.
En los modos TV, AV, COMPONENTE y HDMI, el audio del altavoz interno puede
funcionar aun cuando no hay señal de vídeo.
Si desea utilizar un sistema externo hi-fi, apague los altavoces internos de la
TV.
Pulse el botón MMEENNUU y después use el botón FF o GG paraseleccionar el menú AAuuddiioo.
Pulse el botón GG y después use el botón FF o GG para selec-cionar BBoocciinnaa ddee TTVV.
Pulse el botón GG y después use el botón FF o GG para selec-cionar EEnncc.. o AAppaagg.
Presione el botón MMEENNUU para regresar al menú previo.
1
2
3
4
1
2 3
Audio
Modo de Audio
Volumen Automático
Balance
Bocina de TV
Salida de audioBocina de TV G Apag
Enc.
DE F G MENU
Modo de Audio
Volumen Automático
Balance 0
Bocina de TV
Salida de audio
Audio
DE F G MENU
MFL41469212-sp-mi 3/12/09 9:10 PM Page 61
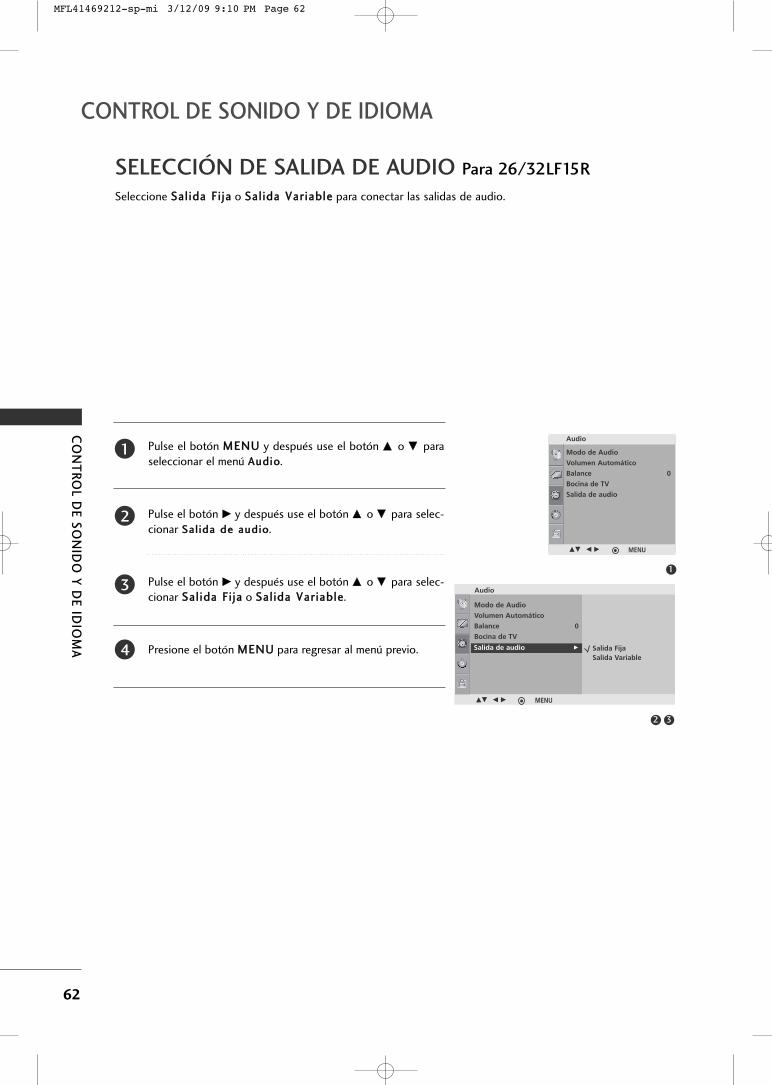
CO
NT
RO
L DE
SO
NID
O Y
DE
IDIO
MA
62
CONTROL DE SONIDO Y DE IDIOMA
SELECCIÓN DE SALIDA DE AUDIO Para 26/32LF15R
Seleccione SSaall iiddaa FFii jjaa o SSaall iiddaa VVaarriiaabbllee para conectar las salidas de audio.
Pulse el botón MMEENNUU y después use el botón DD o EE paraseleccionar el menú AAuuddiioo.
Pulse el botón GG y después use el botón DD o EE para selec-cionar SSaall iiddaa ddee aauuddiioo.
Pulse el botón GG y después use el botón DD o EE para selec-cionar SSaall iiddaa FFii jjaa o SSaall iiddaa VVaarriiaabbllee.
Presione el botón MMEENNUU para regresar al menú previo.
1
2
3
4
1
2 3
Audio
Modo de Audio
Volumen Automático
Balance 0
Bocina de TV
Salida de audioSalida de audio G
DE F G MENU
Salida FijaSalida Variable
Modo de Audio
Volumen Automático
Balance 0
Bocina de TV
Salida de audio
Audio
DE F G MENU
MFL41469212-sp-mi 3/12/09 9:10 PM Page 62
CO
NT
RO
L DE
SO
NID
O Y
DE
IDIO
MA
63
SELECCIÓN DEL LENGUAJE EN LA PANTALLA
Los menus pueden ser mostrados en la pantalla en el idioma inicial seleccionado.
Primero seleccione su idioma.
Pulse el botón MMEENNUU y después use el botón DD o EE para seleccionar elmenú OOppcciióónn.
Pulse el botón GG y después use el botón DD o EE para seleccionarIIddiioommaa((LLaanngguuaaggee)).
Pulse el botón GG a continuación, utilice el botón FF o GG para seleccionarel idioma que desee.
Presione el botón MMEENNUU para regresar al menú previo.
1
2
3
4
MFL41469212-sp-mi 3/12/09 9:10 PM Page 63
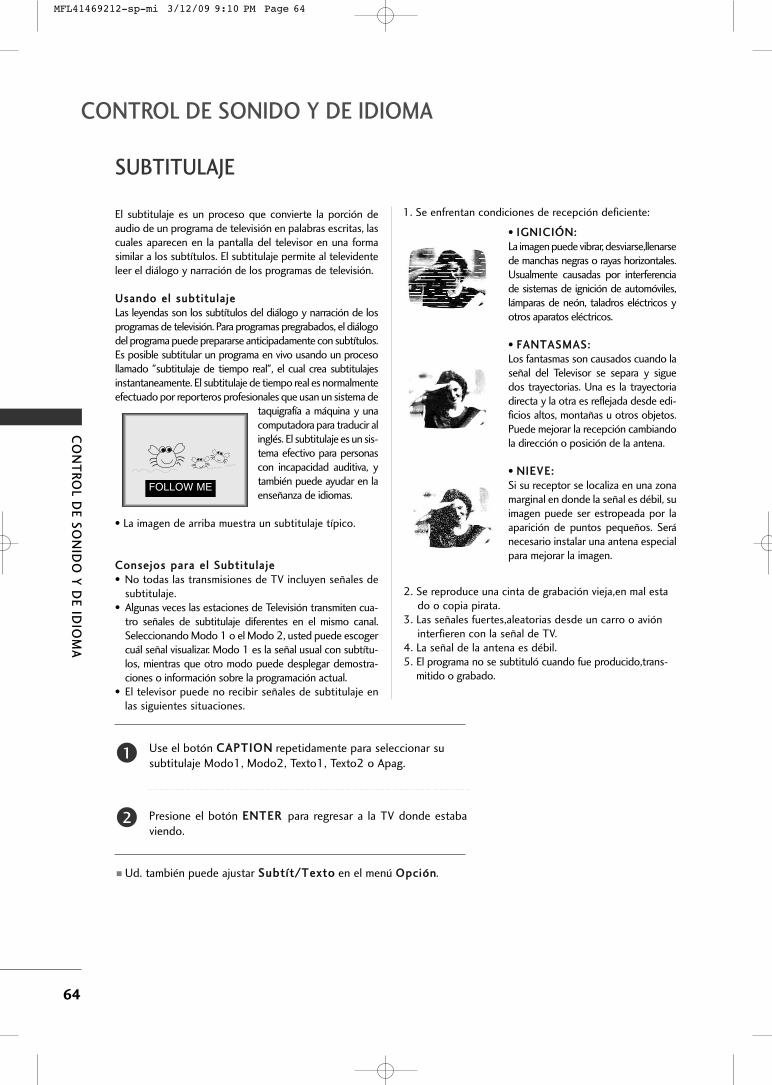
CO
NT
RO
L DE
SO
NID
O Y
DE
IDIO
MA
64
CONTROL DE SONIDO Y DE IDIOMA
SUBTITULAJE
2. Se reproduce una cinta de grabación vieja,en mal estado o copia pirata.
3. Las señales fuertes,aleatorias desde un carro o avión interfieren con la señal de TV.
4. La señal de la antena es débil.5. El programa no se subtituló cuando fue producido,trans-
mitido o grabado.
El subtitulaje es un proceso que convierte la porción deaudio de un programa de televisión en palabras escritas, lascuales aparecen en la pantalla del televisor en una formasimilar a los subtítulos. El subtitulaje permite al televidenteleer el diálogo y narración de los programas de televisión.
UUssaannddoo eell ssuubbttiittuullaajjeeLas leyendas son los subtítulos del diálogo y narración de losprogramas de televisión. Para programas pregrabados, el diálogodel programa puede prepararse anticipadamente con subtítulos.Es posible subtitular un programa en vivo usando un procesollamado "subtitulaje de tiempo real", el cual crea subtitulajesinstantaneamente. El subtitulaje de tiempo real es normalmenteefectuado por reporteros profesionales que usan un sistema de
taquigrafía a máquina y unacomputadora para traducir alinglés. El subtitulaje es un sis-tema efectivo para personascon incapacidad auditiva, ytambién puede ayudar en laenseñanza de idiomas.
• La imagen de arriba muestra un subtitulaje típico.
CCoonnsseejjooss ppaarraa eell SSuubbttiittuullaajjee• No todas las transmisiones de TV incluyen señales de
subtitulaje.• Algunas veces las estaciones de Televisión transmiten cua-
tro señales de subtitulaje diferentes en el mismo canal.Seleccionando Modo 1 o el Modo 2, usted puede escogercuál señal visualizar. Modo 1 es la señal usual con subtítu-los, mientras que otro modo puede desplegar demostra-ciones o información sobre la programación actual.
• El televisor puede no recibir señales de subtitulaje enlas siguientes situaciones.
• IIGGNNIICCIIÓÓNN::La imagen puede vibrar, desviarse,llenarsede manchas negras o rayas horizontales.Usualmente causadas por interferenciade sistemas de ignición de automóviles,lámparas de neón, taladros eléctricos yotros aparatos eléctricos.
• FFAANNTTAASSMMAASS::Los fantasmas son causados cuando laseñal del Televisor se separa y siguedos trayectorias. Una es la trayectoriadirecta y la otra es reflejada desde edi-ficios altos, montañas u otros objetos.Puede mejorar la recepción cambiandola dirección o posición de la antena.
• NNIIEEVVEE::Si su receptor se localiza en una zonamarginal en donde la señal es débil, suimagen puede ser estropeada por laaparición de puntos pequeños. Seránecesario instalar una antena especialpara mejorar la imagen.
FOLLOW ME
� Ud. también puede ajustar SSuubbttíítt//TTeexxttoo en el menú OOppcciióónn.
Use el botón CCAAPPTTIIOONN repetidamente para seleccionar susubtitulaje Modo1, Modo2, Texto1, Texto2 o Apag.
Presione el botón EENNTTEERR para regresar a la TV donde estabaviendo.
1
2
1. Se enfrentan condiciones de recepción deficiente:
MFL41469212-sp-mi 3/12/09 9:10 PM Page 64
CO
NT
RO
L DE
SO
NID
O Y
DE
IDIO
MA
65
DISFRUTE DE LA TRANSMISIÓN ESTÉREO/SAP
La TV puede recibir programas MTS estéreo y SAP que acompañen
la programación ya que se transmite una señal de audio adicional
de igual calidad que la señal original y cuando selecciona Stereo
(Estéreo) o SAP en el control remoto.
El sonido Mono se recibe automáticamente si el programa emite
en Mono aunque se haya seleccionado Stereo o SAP.
Seleccione Mono si desea escuchar el sonido mono en zonas
limítrofes remotas durante una emisión estéreo o SAP.
Es posible recibir emisiones estéreo o SAP en un canal analógico.
Utilice el botón MMTTSS para seleccionar el modo MTS deseadoen una señal analógica. Cuando presione el botón MMTTSS, veráaparecer uno a uno MMoonnoo, EEssttéérreeoo o SSAAPP.
Presione el botón EENNTTEERR para regresar a la TV donde estabaviendo.
NOTA!
GG Seleccione el modo de sonido monofónico si la señal no está clara o está pobre en el area de recepción.
GG Los modos de EEssttéérreeoo,, SSAAPP están disponibles sólo cuando están incluidos en la señal de transmisión.
1
2
MFL41469212-sp-mi 3/12/09 9:10 PM Page 65
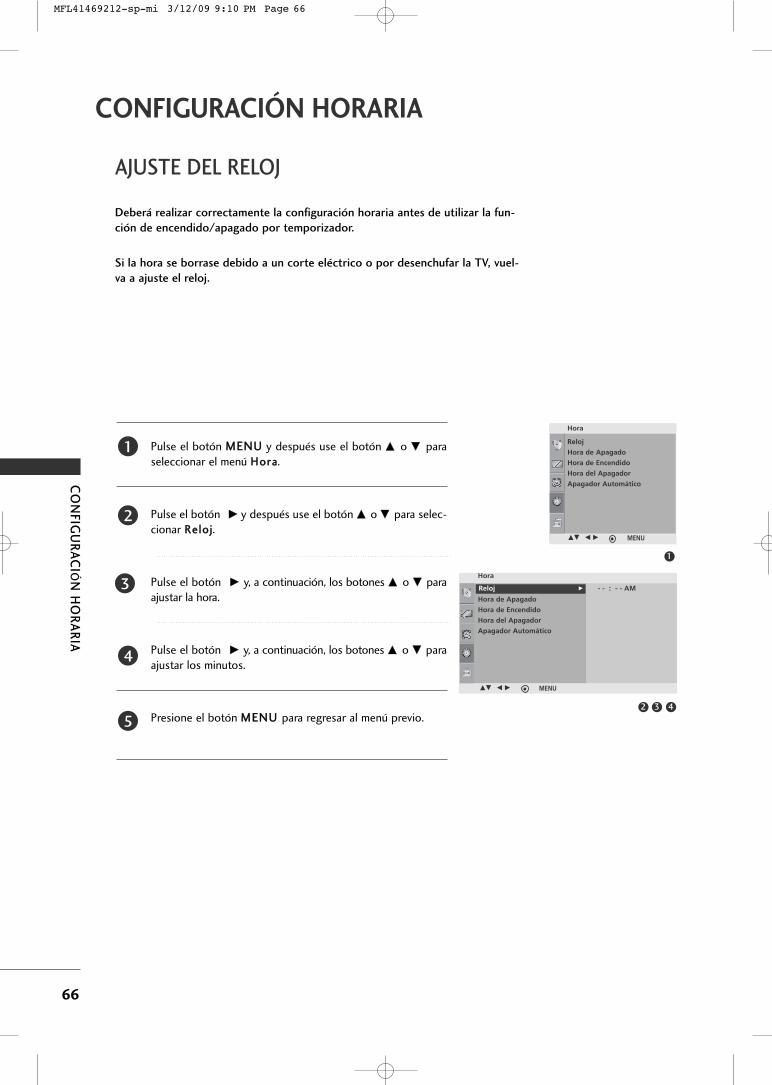
CO
NFIG
UR
AC
IÓN
HO
RA
RIA
66
AJUSTE DEL RELOJ
CONFIGURACIÓN HORARIA
Pulse el botón MMEENNUU y después use el botón DD o EE paraseleccionar el menú HHoorraa.
Pulse el botón GG y después use el botón DD o EE para selec-cionar RReelloojj.
Pulse el botón GG y, a continuación, los botones DD o EE paraajustar la hora.
Pulse el botón GG y, a continuación, los botones DD o EE paraajustar los minutos.
Presione el botón MMEENNUU para regresar al menú previo.
Deberá realizar correctamente la configuración horaria antes de utilizar la fun-
ción de encendido/apagado por temporizador.
Si la hora se borrase debido a un corte eléctrico o por desenchufar la TV, vuel-
va a ajuste el reloj.
1
2
3
4
5
1
3 42
Hora
Reloj
Hora de Apagado
Hora de Encendido
Hora del Apagador
Apagador Automático
Reloj G
DE F G MENU
- - : - - AM
Reloj
Hora de Apagado
Hora de Encendido
Hora del Apagador
Apagador Automático
Hora
DE F G MENU
MFL41469212-sp-mi 3/12/09 9:10 PM Page 66
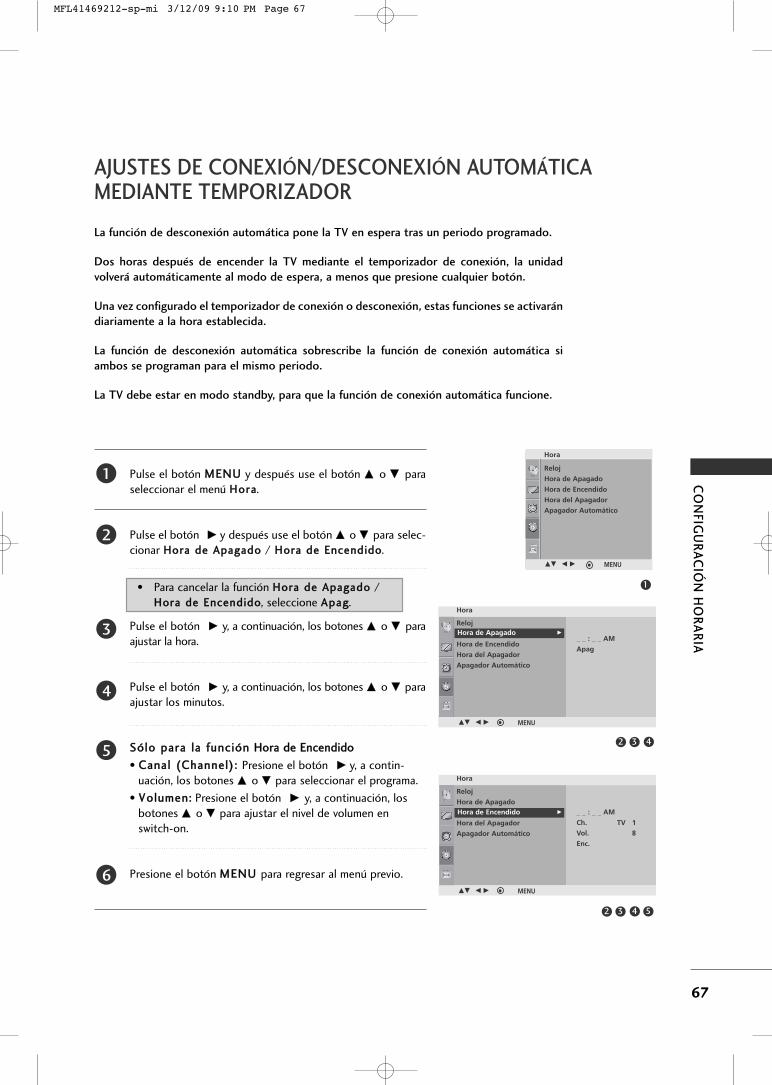
CO
NFIG
UR
AC
IÓN
HO
RA
RIA
67
AJUSTES DE CONEXIÓN/DESCONEXIÓN AUTOMÁTICAMEDIANTE TEMPORIZADOR
Pulse el botón MMEENNUU y después use el botón DD o EE paraseleccionar el menú HHoorraa.
Pulse el botón GG y después use el botón DD o EE para selec-cionar HHoorraa ddee AAppaaggaaddoo / HHoorraa ddee EEnncceennddiiddoo.
Pulse el botón GG y, a continuación, los botones DD o EE paraajustar la hora.
Pulse el botón GG y, a continuación, los botones DD o EE paraajustar los minutos.
SSóólloo ppaarraa llaa ffuunncciióónn HHoorraa ddee EEnncceennddiiddoo
• CCaannaall ((CChhaannnneell)):: Presione el botón GG y, a contin-uación, los botones DD o EE para seleccionar el programa.
• VVoolluummeenn:: Presione el botón GG y, a continuación, losbotones DD o EE para ajustar el nivel de volumen enswitch-on.
Presione el botón MMEENNUU para regresar al menú previo.
La función de desconexión automática pone la TV en espera tras un periodo programado.
Dos horas después de encender la TV mediante el temporizador de conexión, la unidad
volverá automáticamente al modo de espera, a menos que presione cualquier botón.
Una vez configurado el temporizador de conexión o desconexión, estas funciones se activarán
diariamente a la hora establecida.
La función de desconexión automática sobrescribe la función de conexión automática si
ambos se programan para el mismo periodo.
La TV debe estar en modo standby, para que la función de conexión automática funcione.
1
2
3
4
5
6
1
432
Reloj
Hora de Apagado
Hora de Encendido
Hora del Apagador
Apagador Automático
Hora
DE F G MENU
Hora
Reloj
Hora de Apagado
Hora de Encendido
Hora del Apagador
Apagador Automático
Hora de Apagado G
DE F G MENU
_ _ : _ _ AM
Apag
5432
Hora
Reloj
Hora de Apagado
Hora de Encendido
Hora del Apagador
Apagador Automático
Hora de Encendido G
DE F G MENU
_ _ : _ _ AM
Ch. TV 1
Vol. 8
Enc.
• Para cancelar la función HHoorraa ddee AAppaaggaaddoo /
HHoorraa ddee EEnncceennddiiddoo, seleccione AAppaagg.
MFL41469212-sp-mi 3/12/09 9:10 PM Page 67
CO
NFIG
UR
AC
IÓN
HO
RA
RIA
68
CONFIGURACIÓN HORARIA
CONFIGURACIÓN DEL TEMPORIZADOR DE APAGADO AUTOMÁTICO
Presione el botón SSLLEEEEPP para fijar el tiempo para dormir.‘ - - - ’ aparecerá en la pantalla, seguido de 10, 20, 30,60, 90, 120, 180 y 240.
Cuando el tiempo de dormir deseado aparece en la pantalla,Presione el botón EENNTTEERR. El temporizador comienza lacuenta atrás desde el número de minutos seleccionado.
Para verificar el tiempo de dormir que queda, presione elbotón SSLLEEEEPP solamente una vez.
Para cancelar dormir, presione repetidamente el botónSSLLEEEEPP hasta seleccionar ‘ - - - ’.
El Temporizador para Dormir apaga el TV después de un tiempo prefijado.
Nota: Si apaga el TV después de haber programado el temporizador para
dormir, el ajuste se borrará.
2
3
4
1
MFL41469212-sp-mi 3/12/09 9:10 PM Page 68
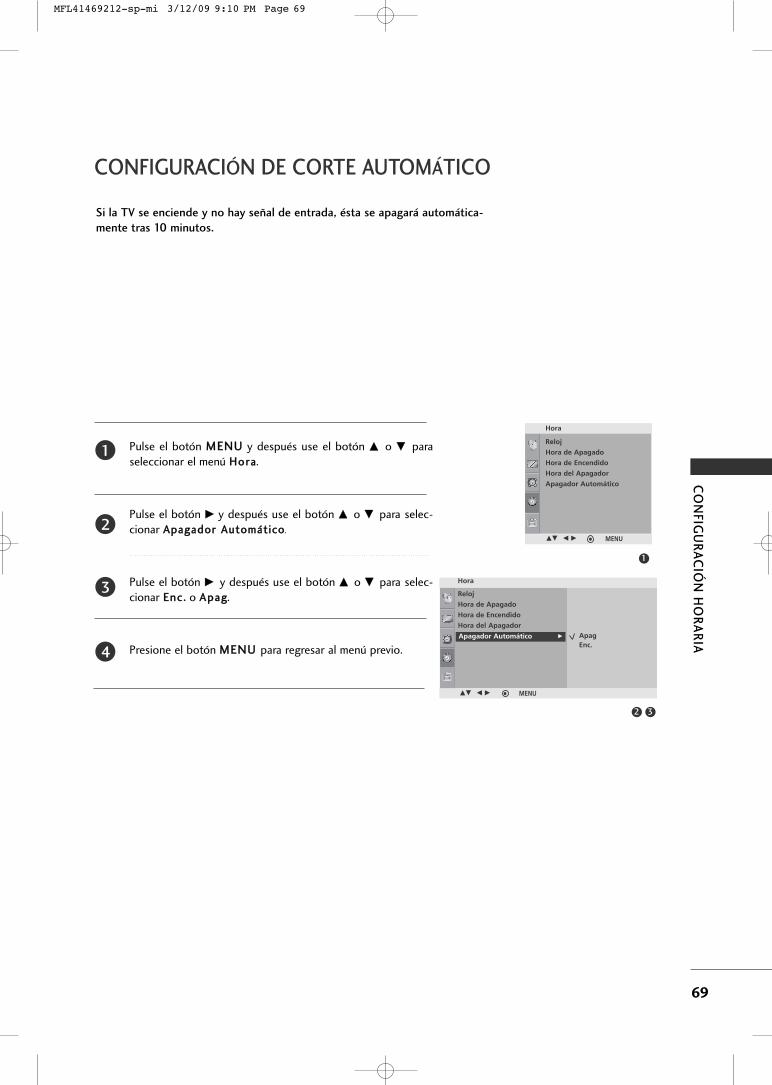
CO
NFIG
UR
AC
IÓN
HO
RA
RIA
69
CONFIGURACIÓN DE CORTE AUTOMÁTICO
Si la TV se enciende y no hay señal de entrada, ésta se apagará automática-
mente tras 10 minutos.
Pulse el botón MMEENNUU y después use el botón DD o EE paraseleccionar el menú HHoorraa.
Pulse el botón GG y después use el botón DD o EE para selec-cionar AAppaaggaaddoorr AAuuttoommááttiiccoo.
Pulse el botón GG y después use el botón DD o EE para selec-cionar EEnncc.. o AAppaagg.
Presione el botón MMEENNUU para regresar al menú previo.
1
2
3
4
1
32
Hora
Reloj
Hora de Apagado
Hora de Encendido
Hora del Apagador
Apagador AutomáticoApagador Automático G
DE F G MENU
Reloj
Hora de Apagado
Hora de Encendido
Hora del Apagador
Apagador Automático
Hora
DE F G MENU
ApagEnc.
MFL41469212-sp-mi 3/12/09 9:10 PM Page 69
AP
ÉND
ICE
70
APÉNDICE
LISTA DE VERIFICACIÓN DE PROBLEMAS
No imagenNo sonido
Color o imagen deficiente, oNo color
Recepción pobre enalgunos canales
Lineas o rayas en las imagenes
No hay recepción de imagen al conectar la
toma HDMI
Bar horizontal/vertical oimagen temblante
La imagen aparece lenta-mente después de enceder
la TV
NNoo ssee ttrraabbaajjaa nnoorrmmaallmmeennttee..
El control remoto no funciona
De repente la TV seapaga
� Verifique para ver si hay algún objeto entre el producto y el control remoto cau-
sando la obstrucción. Asegúrese de apuntar el control remoto directamente al televisor.
� Están puestas las baterías con la polaridad correcta (+con +, -con -)?
� Está correcta la configuración del modo remoto de la operación: TV, VCR etc.?
� Ponga nuevas baterías.
� Está configurado el tiempo para dormir?
� Verifique las configuraciones de control de la potencia. La potencia interrumpida.
NNoo ssiirrvvee llaa ffuunncciióónn ddee vviiddeeoo..
� Verifique si el producto está encendido.
� Intente otro canal. El problema puede ser con la transmisión.
� Está metido el cordón de alimentación dentro del tomacorriente de la pared?
� Verifique la dirección y/o la ubicación de su antena.
� Pruebe el tomacorriente, enchufe un cordón de alimentación de otro producto en el
tomacorriente donde estaba enchufado el cordón de alimentación del producto.
� Es normal, la imagen es muda durante el proceso de inicio del producto. Favor decontactar a su centro de servicio, si la imagen no aparece cinco minutos después.
� Ajuste Color en la opción del menú.
� Mantenga una distancia suficiente entre el producto y el VCR.
� Intente otro canal. El problema puede ser con la transmisión.
� Están instalados apropiadamente los cables de video?
� Active cualquier función para restablecer el brillo de la imagen.
� Verifique la inteferencia local como aparatos eléctricos o herramientas de potencia.
� Estación o cable con problemas experimentales, sintonice a otra estación.
� Si la señal de estación es débil, reubique la antena para recibir estación más debil.
� Verifique las fuentes de la interferencia posible.
� Verifique la antena (Cambie la dirección de la antena).
� Chequee que el cable HDMI admita la versión 1,3.
Los cables HDMI que no admiten la versión 1,3 de HDMI, provocan parpadeos ono muestran la imagen en pantalla. Si este es el caso, utilice cables recientes quesoporten la versión 1,3 de HDMI.
MFL41469212-sp-mi 3/12/09 9:10 PM Page 70
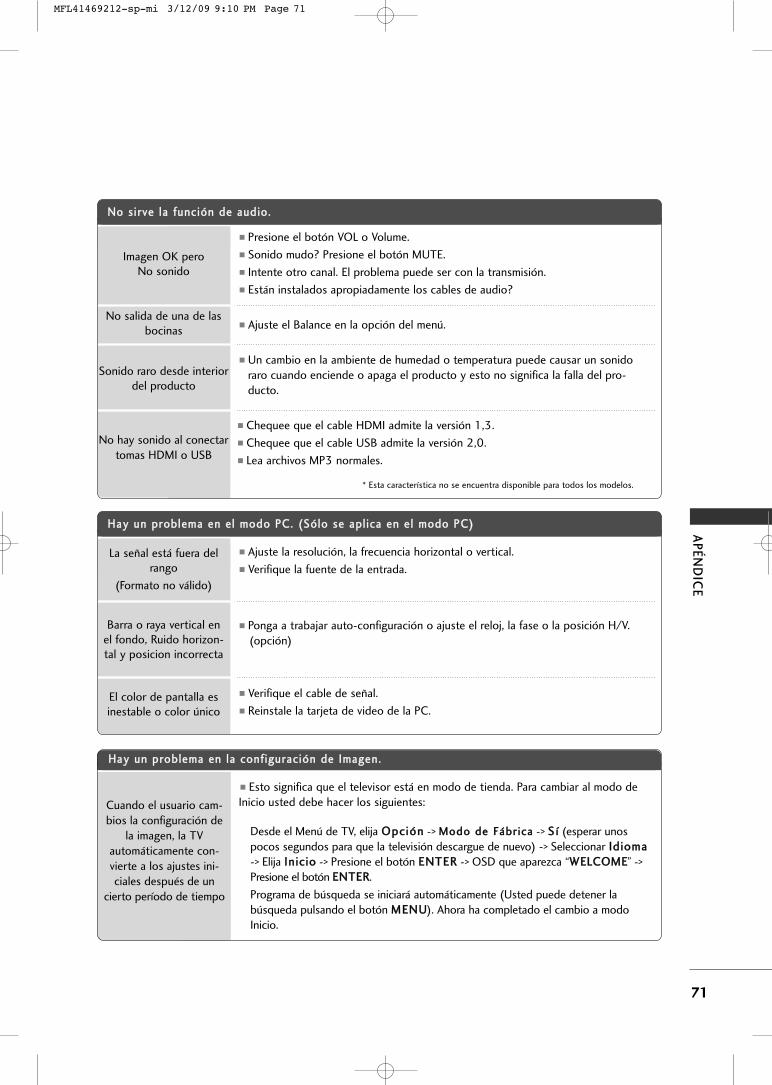
AP
ÉN
DIC
E
71
NNoo ssiirrvvee llaa ffuunncciióónn ddee aauuddiioo..
HHaayy uunn pprroobblleemmaa eenn eell mmooddoo PPCC.. ((SSóólloo ssee aappll iiccaa eenn eell mmooddoo PPCC))
Imagen OK peroNo sonido
Sonido raro desde interiordel producto
No hay sonido al conectartomas HDMI o USB
No salida de una de lasbocinas
� Ajuste la resolución, la frecuencia horizontal o vertical.
� Verifique la fuente de la entrada.
� Ponga a trabajar auto-configuración o ajuste el reloj, la fase o la posición H/V.(opción)
� Verifique el cable de señal.
� Reinstale la tarjeta de video de la PC.
La señal está fuera delrango
(Formato no válido)
El color de pantalla esinestable o color único
Barra o raya vertical enel fondo, Ruido horizon-tal y posicion incorrecta
� Presione el botón VOL o Volume.
� Sonido mudo? Presione el botón MUTE.
� Intente otro canal. El problema puede ser con la transmisión.
� Están instalados apropiadamente los cables de audio?
� Ajuste el Balance en la opción del menú.
� Un cambio en la ambiente de humedad o temperatura puede causar un sonidoraro cuando enciende o apaga el producto y esto no significa la falla del pro-ducto.
� Chequee que el cable HDMI admite la versión 1,3.
� Chequee que el cable USB admite la versión 2,0.
� Lea archivos MP3 normales.
* Esta característica no se encuentra disponible para todos los modelos.
HHaayy uunn pprroobblleemmaa eenn llaa ccoonnff iigguurraacciióónn ddee IImmaaggeenn..
� Esto significa que el televisor está en modo de tienda. Para cambiar al modo de Inicio usted debe hacer los siguientes:
Desde el Menú de TV, elija OOppcciióónn -> MMooddoo ddee FFáábbrriiccaa -> SS íí (esperar unos pocos segundos para que la televisión descargue de nuevo) -> Seleccionar IIddiioommaa
-> Elija IInniicciioo -> Presione el botón EENNTTEERR -> OSD que aparezca “WWEELLCCOOMMEE” -> Presione el botón EENNTTEERR.
Programa de búsqueda se iniciará automáticamente (Usted puede detener la búsqueda pulsando el botón MMEENNUU). Ahora ha completado el cambio a modo Inicio.
Cuando el usuario cam-bios la configuración de
la imagen, la TVautomáticamente con-vierte a los ajustes ini-ciales después de un
cierto período de tiempo
MFL41469212-sp-mi 3/12/09 9:10 PM Page 71
AP
ÉND
ICE
72
APÉNDICE
MANTENIMIENTO
Las malfunciones anticipadas pueden ser prevenidas. La limpieza regular y cuidadosa puede extender la suma
de tiempo que ud.va a tener su nueva TV. Asegurese apagar la TV y desenchufar el cordón de alimentación
antes de empezar cualquier tipo de limpieza.
Limpiando la pantalla
Aqui hay una buena manera para mantener su pantalla limpia por un tiempo. Moje una tela suave en unamezcla de agua tibia con un poco de suavizante de ropa, o detergente de platos. Escurra la tela hasta queesté casi seca, luego limpie la pantalla con ella.
Asegurese que no haya exceso de agua en la pantalla, luego dejela secar por el aire antes de encender su TV.
Limpiando el gabinete
� Para remover la suciedad o polvo, limpie el gabinete con una tela suave, seca y sin pelusa.
� Favor de asegurarse no usar una tela mojada.
Ausencia Extendida
GG Si ud. espera dejar su TV por un tiempo largo (como las vacaciones), será buena idea desenchufar el cordónde alimentación para proteger la TV contra el posible daño por tormentas o fallas de linea de alimentacion.
AVISO
1
2
MFL41469212-sp-mi 3/12/09 9:10 PM Page 72
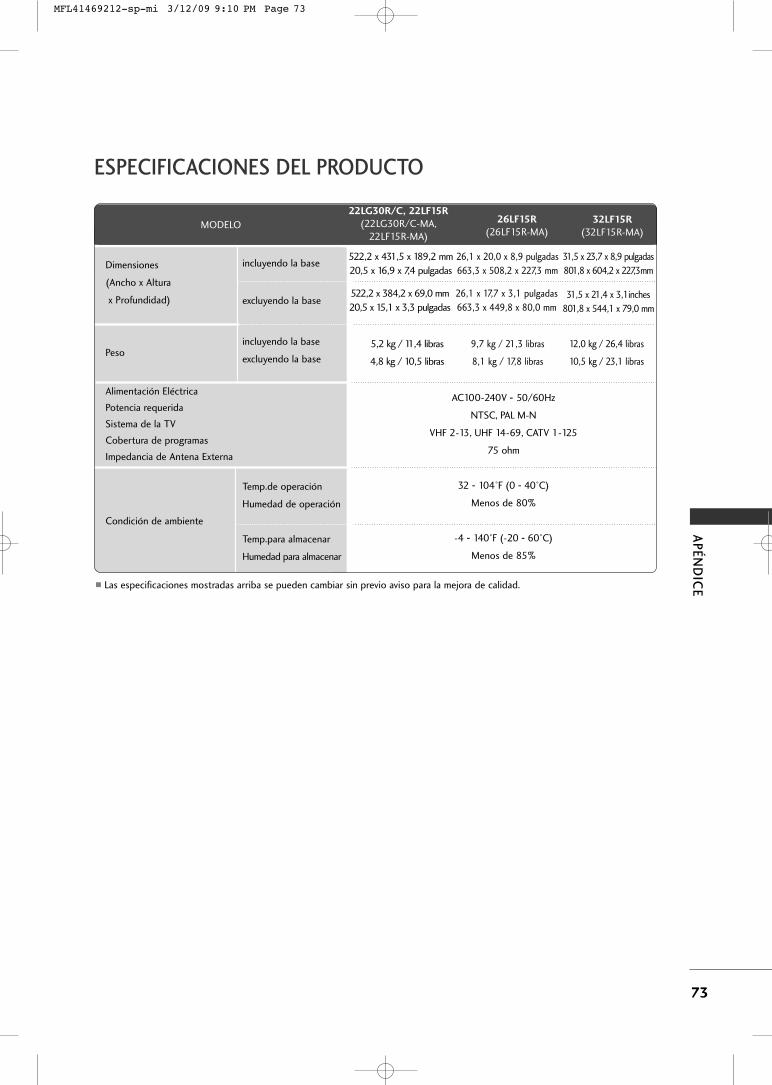
AP
ÉN
DIC
E
73
ESPECIFICACIONES DEL PRODUCTO
� Las especificaciones mostradas arriba se pueden cambiar sin previo aviso para la mejora de calidad.
MODELO
incluyendo la base
excluyendo la base
incluyendo la base
excluyendo la base
Temp.de operación
Humedad de operación
Temp.para almacenar
Humedad para almacenar
AC100-240V - 50/60Hz
NTSC, PAL M-N
VHF 2-13, UHF 14-69, CATV 1-125
75 ohm
32 - 104°F (0 - 40°C)
Menos de 80%
-4 - 140°F (-20 - 60°C)
Menos de 85%
22LG30R/C, 22LF15R
(22LG30R/C-MA,22LF15R-MA)
26LF15R
(26LF15R-MA)32LF15R
(32LF15R-MA)
31,5 x 23,7 x 8,9 pulgadas
801,8 x 604,2 x 227,3mm
31,5 x 21,4 x 3,1inches
801,8 x 544,1 x 79,0 mm
12,0 kg / 26,4 libras
10,5 kg / 23,1 libras
26,1 x 20,0 x 8,9 pulgadas
663,3 x 508,2 x 227,3 mm
26,1 x 17,7 x 3,1 pulgadas
663,3 x 449,8 x 80,0 mm
9,7 kg / 21,3 libras
8,1 kg / 17,8 libras
Dimensiones
(Ancho x Altura
x Profundidad)
Peso
Alimentación Eléctrica
Potencia requerida
Sistema de la TV
Cobertura de programas
Impedancia de Antena Externa
Condición de ambiente
522,2 x 431,5 x 189,2 mm
20,5 x 16,9 x 7,4 pulgadas
522,2 x 384,2 x 69,0 mm
20,5 x 15,1 x 3,3 pulgadas
5,2 kg / 11,4 libras
4,8 kg / 10,5 libras
MFL41469212-sp-mi 3/12/09 9:10 PM Page 73
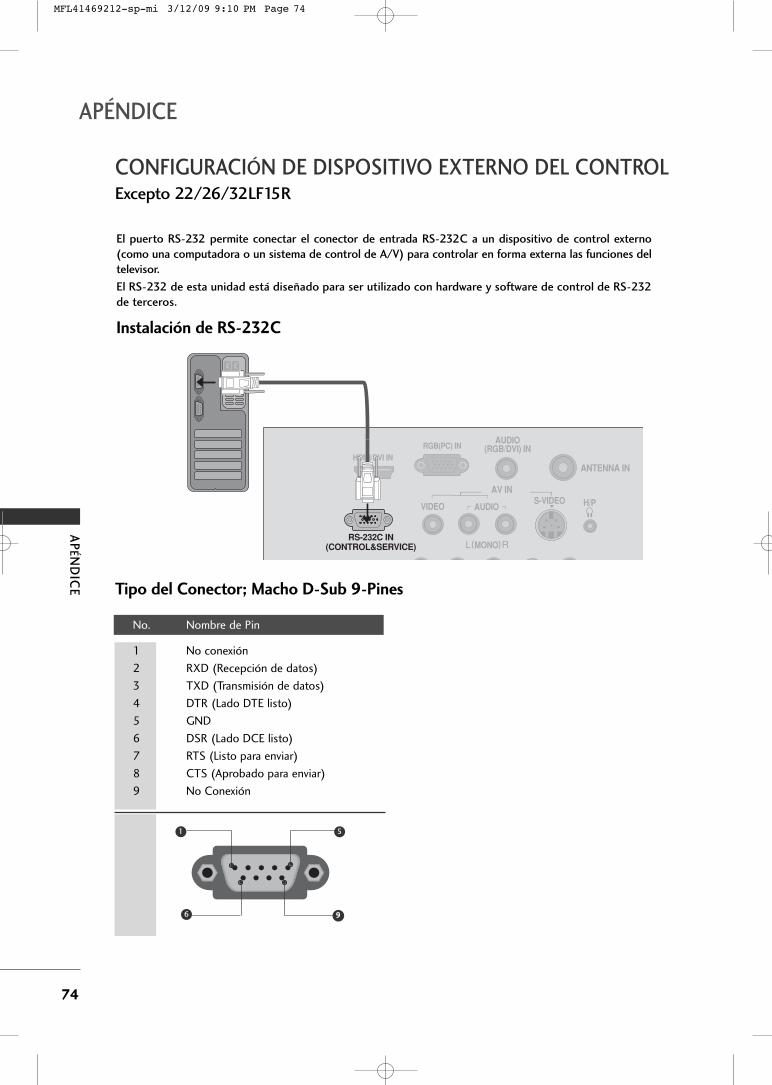
AP
ÉND
ICE
74
APÉNDICE
CONFIGURACIÓN DE DISPOSITIVO EXTERNO DEL CONTROLExcepto 22/26/32LF15R
Instalación de RS-232C
El puerto RS-232 permite conectar el conector de entrada RS-232C a un dispositivo de control externo
(como una computadora o un sistema de control de A/V) para controlar en forma externa las funciones del
televisor.
El RS-232 de esta unidad está diseñado para ser utilizado con hardware y software de control de RS-232
de terceros.
ANTENNA IN
RGB(PC) INAUDIO
(RGB/DVI) IN
S-VIDEOVIDEO AUDIO
MONO( )
AV IN H/P
HDMI/DVI IN
RS-232C IN(CONTROL&SERVICE)
Tipo del Conector; Macho D-Sub 9-Pines
No. Nombre de Pin
1 No conexión
2 RXD (Recepción de datos)
3 TXD (Transmisión de datos)
4 DTR (Lado DTE listo)
5 GND
6 DSR (Lado DCE listo)
7 RTS (Listo para enviar)
8 CTS (Aprobado para enviar)
9 No Conexión
99
1 5
6
MFL41469212-sp-mi 3/12/09 9:10 PM Page 74
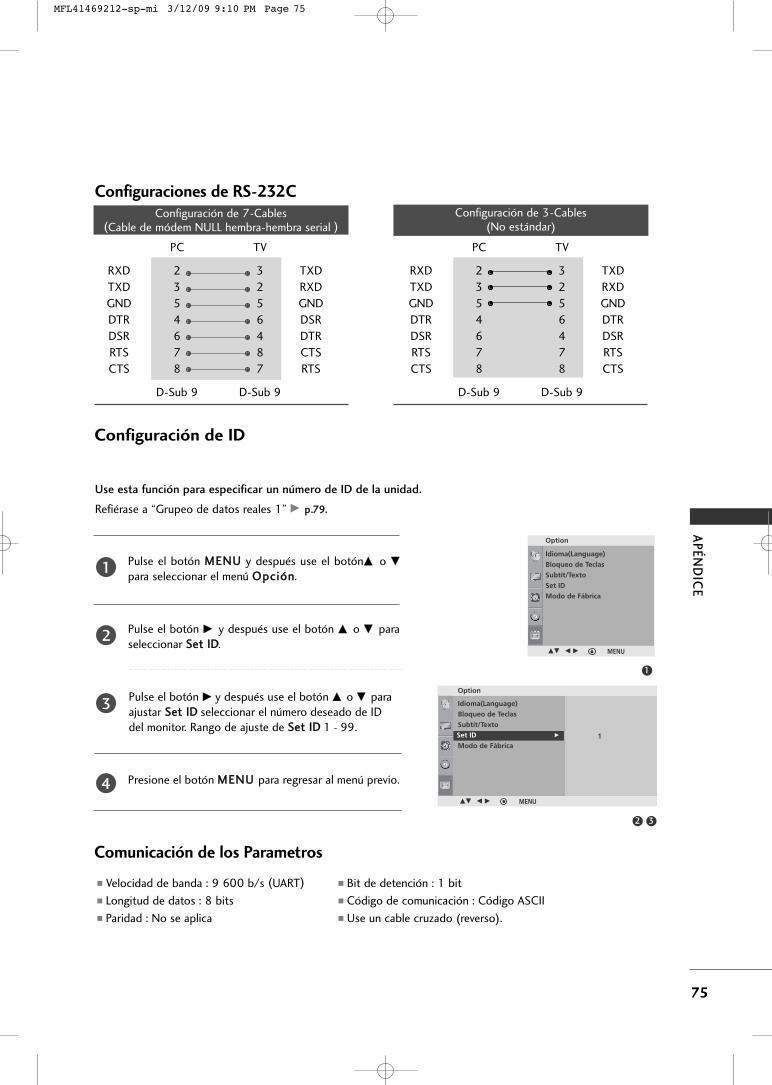
AP
ÉN
DIC
E
75
Configuraciones de RS-232CConfiguración de 7-Cables
(Cable de módem NULL hembra-hembra serial )
PC TV
RXD 2 3 TXD
TXD 3 2 RXD
GND 5 5 GND
DTR 4 6 DSR
DSR 6 4 DTR
RTS 7 8 CTS
CTS 8 7 RTS
D-Sub 9 D-Sub 9
Configuración de 3-Cables(No estándar)
PC TV
RXD 2 3 TXD
TXD 3 2 RXD
GND 5 5 GND
DTR 4 6 DTR
DSR 6 4 DSR
RTS 7 7 RTS
CTS 8 8 CTS
D-Sub 9 D-Sub 9
Comunicación de los Parametros
� Velocidad de banda : 9 600 b/s (UART)
� Longitud de datos : 8 bits
� Paridad : No se aplica
� Bit de detención : 1 bit
� Código de comunicación : Código ASCII
� Use un cable cruzado (reverso).
Pulse el botón MMEENNUU y después use el botónDD o EEpara seleccionar el menú OOppcciióónn.
Pulse el botón GG y después use el botón DD o EE paraseleccionar SSeett IIDD.
Pulse el botón GG y después use el botón DD o EE paraajustar SSeett IIDD seleccionar el número deseado de IDdel monitor. Rango de ajuste de SSeett IIDD 1 - 99.
Presione el botón MMEENNUU para regresar al menú previo.
Use esta función para especificar un número de ID de la unidad.
Refiérase a “Grupeo de datos reales 1” GG pp..7799..
Configuración de ID
2
3
4
1
32
Option
Idioma(Language)
Bloqueo de Teclas
Subtít/Texto
Set ID
Modo de Fábrica
DE F G MENU
1
Idioma(Language)
Bloqueo de Teclas
Subtít/Texto
Set ID
Modo de Fábrica
Option
DE F G MENU
Set ID G 1
MFL41469212-sp-mi 3/12/09 9:10 PM Page 75
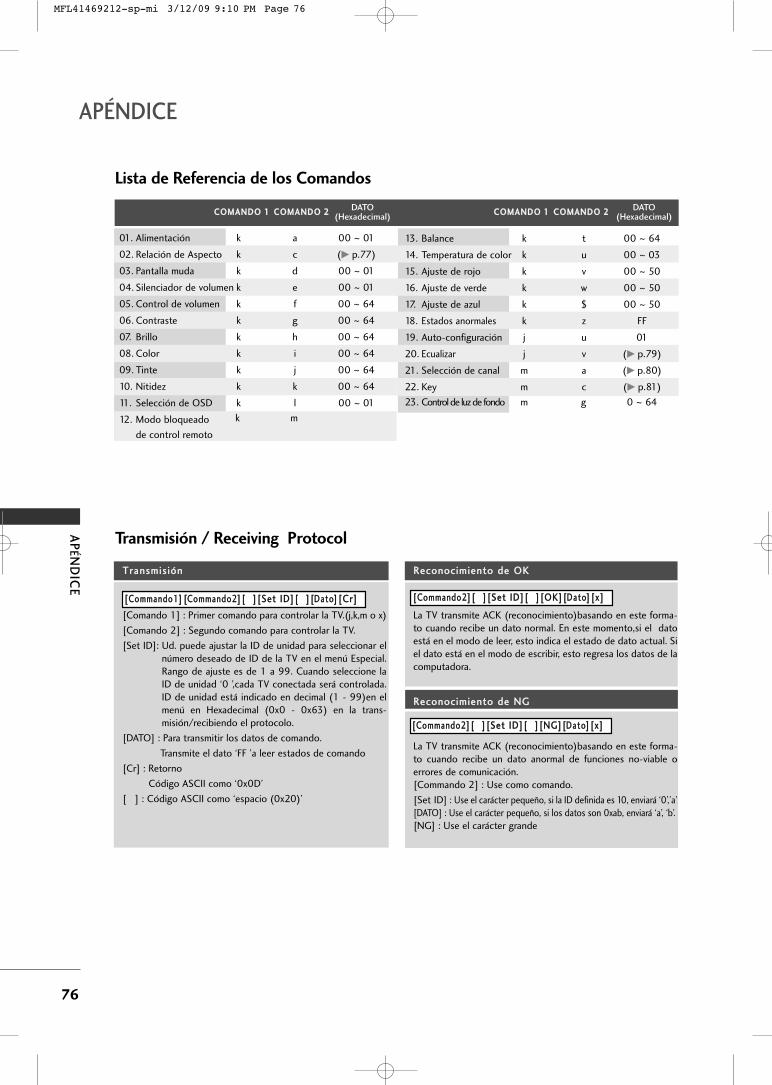
AP
ÉND
ICE
76
APÉNDICE
Lista de Referencia de los Comandos
CCOOMMAANNDDOO 11 CCOOMMAANNDDOO 22 DATO(Hexadecimal)
CCOOMMAANNDDOO 11 CCOOMMAANNDDOO 22
13. Balance k t 00 ~ 64
14. Temperatura de color k u 00 ~ 03
15. Ajuste de rojo k v 00 ~ 50
16. Ajuste de verde k w 00 ~ 50
17. Ajuste de azul k $ 00 ~ 50
18. Estados anormales k z FF
19. Auto-configuración j u 01
20. Ecualizar j v (GG p.79)
21. Selección de canal m a (GG p.80)
22. Key m c (GG p.81)
23. Control de luz de fondo m g 0 ~ 64
DATO(Hexadecimal)
01. Alimentación k a 00 ~ 01
02. Relación de Aspecto k c (GG p.77)
03. Pantalla muda k d 00 ~ 01
04. Silenciador de volumen k e 00 ~ 01
05. Control de volumen k f 00 ~ 64
06. Contraste k g 00 ~ 64
07. Brillo k h 00 ~ 64
08. Color k i 00 ~ 64
09. Tinte k j 00 ~ 64
10. Nitidez k k 00 ~ 64
11. Selección de OSD k l 00 ~ 01
12. Modo bloqueado
de control remoto
k m
Transmisión / Receiving Protocol
TTrraannssmmiissiióónn
[Comando 1] : Primer comando para controlar la TV.(j,k,m o x)
[Comando 2] : Segundo comando para controlar la TV.
[Set ID]: Ud. puede ajustar la ID de unidad para seleccionar elnúmero deseado de ID de la TV en el menú Especial.Rango de ajuste es de 1 a 99. Cuando seleccione laID de unidad ‘0 ’,cada TV conectada será controlada.ID de unidad está indicado en decimal (1 - 99)en elmenú en Hexadecimal (0x0 - 0x63) en la trans-misión/recibiendo el protocolo.
[DATO] : Para transmitir los datos de comando.
Transmite el dato ‘FF ’a leer estados de comando
[Cr] : Retorno
Código ASCII como ‘0x0D’
[ ] : Código ASCII como ‘espacio (0x20)’
RReeccoonnoocciimmiieennttoo ddee OOKK
La TV transmite ACK (reconocimiento)basando en este forma-to cuando recibe un dato normal. En este momento,si el datoestá en el modo de leer, esto indica el estado de dato actual. Siel dato está en el modo de escribir, esto regresa los datos de lacomputadora.
RReeccoonnoocciimmiieennttoo ddee NNGG
La TV transmite ACK (reconocimiento)basando en este forma-to cuando recibe un dato anormal de funciones no-viable oerrores de comunicación.[Commando 2] : Use como comando.
[Set ID] : Use el carácter pequeño, si la ID definida es 10, enviará ‘0’,’a’ [DATO] : Use el carácter pequeño, si los datos son 0xab, enviará ‘a’, ‘b’.[NG] : Use el carácter grande
[[CCoommmmaannddoo11]] [[CCoommmmaannddoo22]][[ ]][[SSeett IIDD]][[ ]][[DDaattoo]][[CCrr]] [[CCoommmmaannddoo22]][[ ]][[SSeett IIDD]][[ ]][[OOKK]][[DDaattoo]][[xx]]
[[CCoommmmaannddoo22]][[ ]][[SSeett IIDD]][[ ]][[NNGG]][[DDaattoo]][[xx]]
MFL41469212-sp-mi 3/12/09 9:10 PM Page 76
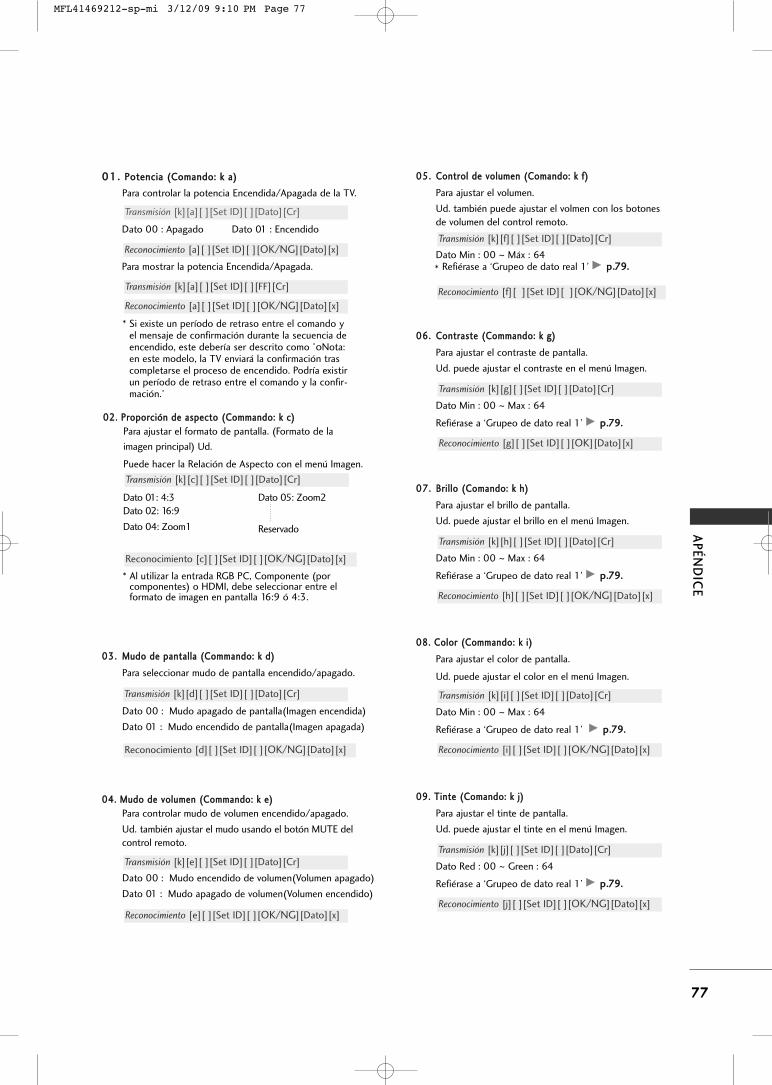
AP
ÉN
DIC
E
77
0011.. PPootteenncciiaa ((CCoommaannddoo:: kk aa))
Para controlar la potencia Encendida/Apagada de la TV.
Dato 00 : Apagado Dato 01 : Encendido
Transmisión [k][a][ ][Set ID][ ][Dato][Cr]
Reconocimiento [a][ ][Set ID][ ][OK/NG][Dato][x]
Para mostrar la potencia Encendida/Apagada.
Transmisión [k][a][ ][Set ID][ ][FF][Cr]
* Si existe un período de retraso entre el comando yel mensaje de confirmación durante la secuencia deencendido, este debería ser descrito como °∞Nota:en este modelo, la TV enviará la confirmación trascompletarse el proceso de encendido. Podría existirun período de retraso entre el comando y la confir-mación.°
Reconocimiento [a][ ][Set ID][ ][OK/NG][Dato][x]
0022.. PPrrooppoorrcciióónn ddee aassppeeccttoo ((CCoommmmaannddoo:: kk cc))
Para ajustar el formato de pantalla. (Formato de la
imagen principal) Ud.
Puede hacer la Relación de Aspecto con el menú Imagen.
Dato 01: 4:3
Dato 02: 16:9
Dato 04: Zoom1
Dato 05: Zoom2
Reservado
Transmisión [k][c][ ][Set ID][ ][Dato][Cr]
Reconocimiento [c][ ][Set ID][ ][OK/NG][Dato][x]
* Al utilizar la entrada RGB PC, Componente (porcomponentes) o HDMI, debe seleccionar entre elformato de imagen en pantalla 16:9 ó 4:3.
0033.. MMuuddoo ddee ppaannttaallllaa ((CCoommmmaannddoo:: kk dd))
Para seleccionar mudo de pantalla encendido/apagado.
Dato 00 : Mudo apagado de pantalla(Imagen encendida)
Dato 01 : Mudo encendido de pantalla(Imagen apagada)
Transmisión [k][d][ ][Set ID][ ][Dato][Cr]
Reconocimiento [d][ ][Set ID][ ][OK/NG][Dato][x]
0044.. MMuuddoo ddee vvoolluummeenn ((CCoommmmaannddoo:: kk ee))
Para controlar mudo de volumen encendido/apagado.
Ud. también ajustar el mudo usando el botón MUTE del
control remoto.
Dato 00 : Mudo encendido de volumen(Volumen apagado)
Dato 01 : Mudo apagado de volumen(Volumen encendido)
Transmisión [k][e][ ][Set ID][ ][Dato][Cr]
Reconocimiento [e][ ][Set ID][ ][OK/NG][Dato][x]
0055.. CCoonnttrrooll ddee vvoolluummeenn ((CCoommaannddoo:: kk ff))
Para ajustar el volumen.
Ud. también puede ajustar el volmen con los botones
de volumen del control remoto.
Dato Min : 00 ~ Máx : 64
* Refiérase a ‘Grupeo de dato real 1’ GG pp..7799..
Transmisión [k][f][ ][Set ID][ ][Dato][Cr]
Reconocimiento [f][ ][Set ID][ ][OK/NG][Dato][x]
0066.. CCoonnttrraassttee ((CCoommmmaannddoo:: kk gg))
Para ajustar el contraste de pantalla.
Ud. puede ajustar el contraste en el menú Imagen.
Dato Min : 00 ~ Max : 64
Refiérase a ‘Grupeo de dato real 1’ GG pp..7799..
Transmisión [k][g][ ][Set ID][ ][Dato][Cr]
Reconocimiento [g][ ][Set ID][ ][OK][Dato][x]
0077.. BBrriilllloo ((CCoommaannddoo:: kk hh))
Para ajustar el brillo de pantalla.
Ud. puede ajustar el brillo en el menú Imagen.
Dato Min : 00 ~ Max : 64
Refiérase a ‘Grupeo de dato real 1’ GG pp..7799..
Transmisión [k][h][ ][Set ID][ ][Dato][Cr]
Reconocimiento [h][ ][Set ID][ ][OK/NG][Dato][x]
0088.. CCoolloorr ((CCoommmmaannddoo:: kk ii))
Para ajustar el color de pantalla.
Ud. puede ajustar el color en el menú Imagen.
Dato Min : 00 ~ Max : 64
Refiérase a ‘Grupeo de dato real 1’ GG pp..7799..
Transmisión [k][i][ ][Set ID][ ][Dato][Cr]
Reconocimiento [i][ ][Set ID][ ][OK/NG][Dato][x]
0099.. TTiinnttee ((CCoommaannddoo:: kk jj))
Para ajustar el tinte de pantalla.
Ud. puede ajustar el tinte en el menú Imagen.
Dato Red : 00 ~ Green : 64
Refiérase a ‘Grupeo de dato real 1’ GG pp..7799..
Transmisión [k][j][ ][Set ID][ ][Dato][Cr]
Reconocimiento [j][ ][Set ID][ ][OK/NG][Dato][x]
MFL41469212-sp-mi 3/12/09 9:10 PM Page 77
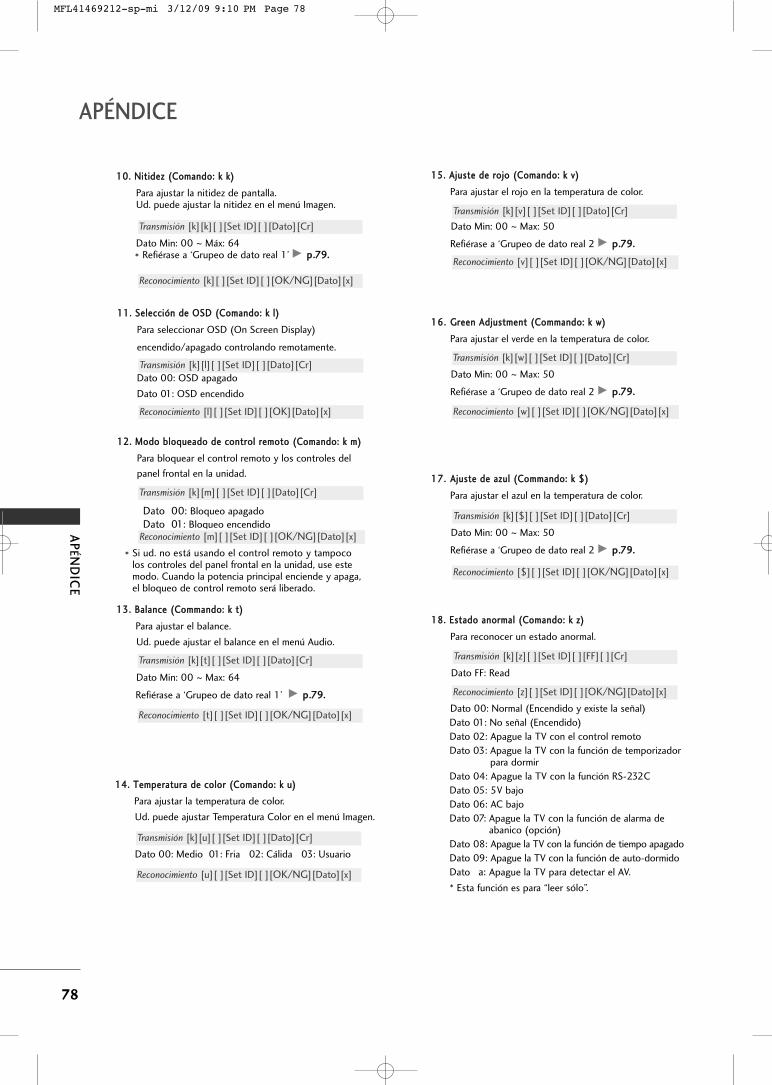
AP
ÉND
ICE
78
APÉNDICE
1111.. SSeelleecccciióónn ddee OOSSDD ((CCoommaannddoo:: kk ll))
Para seleccionar OSD (On Screen Display)
encendido/apagado controlando remotamente.
Transmisión [k][l][ ][Set ID][ ][Dato][Cr]
Reconocimiento [l][ ][Set ID][ ][OK][Dato][x]
1122.. MMooddoo bbllooqquueeaaddoo ddee ccoonnttrrooll rreemmoottoo ((CCoommaannddoo:: kk mm))
Para bloquear el control remoto y los controles del
panel frontal en la unidad.
Dato 00: Bloqueo apagado
Dato 01: Bloqueo encendido
* Si ud. no está usando el control remoto y tampocolos controles del panel frontal en la unidad, use estemodo. Cuando la potencia principal enciende y apaga,el bloqueo de control remoto será liberado.
Transmisión [k][m][ ][Set ID][ ][Dato][Cr]
Reconocimiento [m][ ][Set ID][ ][OK/NG][Dato][x]
1133.. BBaallaannccee ((CCoommmmaannddoo:: kk tt))
Para ajustar el balance.
Ud. puede ajustar el balance en el menú Audio.
Dato Min: 00 ~ Max: 64
Refiérase a ‘Grupeo de dato real 1’ GG pp..7799..
Transmisión [k][t][ ][Set ID][ ][Dato][Cr]
Reconocimiento [t][ ][Set ID][ ][OK/NG][Dato][x]
1100.. NNiittiiddeezz ((CCoommaannddoo:: kk kk))
Para ajustar la nitidez de pantalla.Ud. puede ajustar la nitidez en el menú Imagen.
Dato Min: 00 ~ Máx: 64
* Refiérase a ‘Grupeo de dato real 1’ GG pp..7799..
Transmisión [k][k][ ][Set ID][ ][Dato][Cr]
Reconocimiento [k][ ][Set ID][ ][OK/NG][Dato][x]
1144.. TTeemmppeerraattuurraa ddee ccoolloorr ((CCoommaannddoo:: kk uu))
Para ajustar la temperatura de color.
Ud. puede ajustar Temperatura Color en el menú Imagen.
Dato 00: Medio 01: Fria 02: Cálida 03: Usuario
Transmisión [k][u][ ][Set ID][ ][Dato][Cr]
Reconocimiento [u][ ][Set ID][ ][OK/NG][Dato][x]
1155.. AAjjuussttee ddee rroojjoo ((CCoommaannddoo:: kk vv))
Para ajustar el rojo en la temperatura de color.
Dato Min: 00 ~ Max: 50
Refiérase a ‘Grupeo de dato real 2 GG pp..7799..
Transmisión [k][v][ ][Set ID][ ][Dato][Cr]
Reconocimiento [v][ ][Set ID][ ][OK/NG][Dato][x]
1166.. GGrreeeenn AAddjjuussttmmeenntt ((CCoommmmaannddoo:: kk ww))
Para ajustar el verde en la temperatura de color.
Dato Min: 00 ~ Max: 50
Refiérase a ‘Grupeo de dato real 2 GG pp..7799..
Transmisión [k][w][ ][Set ID][ ][Dato][Cr]
Reconocimiento [w][ ][Set ID][ ][OK/NG][Dato][x]
1177.. AAjjuussttee ddee aazzuull ((CCoommmmaannddoo:: kk $$))
Para ajustar el azul en la temperatura de color.
Dato Min: 00 ~ Max: 50
Refiérase a ‘Grupeo de dato real 2 GG pp..7799..
Transmisión [k][$][ ][Set ID][ ][Dato][Cr]
Reconocimiento [$][ ][Set ID][ ][OK/NG][Dato][x]
1188.. EEssttaaddoo aannoorrmmaall ((CCoommaannddoo:: kk zz))
Para reconocer un estado anormal.
Dato FF: Read
Dato 00: Normal (Encendido y existe la señal)
Dato 01: No señal (Encendido)
Dato 02: Apague la TV con el control remoto
Dato 03: Apague la TV con la función de temporizadorpara dormir
Dato 04: Apague la TV con la función RS-232C
Dato 05: 5V bajo
Dato 06: AC bajo
Dato 07: Apague la TV con la función de alarma deabanico (opción)
Dato 08: Apague la TV con la función de tiempo apagado
Dato 09: Apague la TV con la función de auto-dormido
Dato a: Apague la TV para detectar el AV.
* Esta función es para “leer sólo”.
Transmisión [k][z][ ][Set ID][ ][FF][ ][Cr]
Reconocimiento [z][ ][Set ID][ ][OK/NG][Dato][x]
Dato 00: OSD apagado
Dato 01: OSD encendido
MFL41469212-sp-mi 3/12/09 9:10 PM Page 78
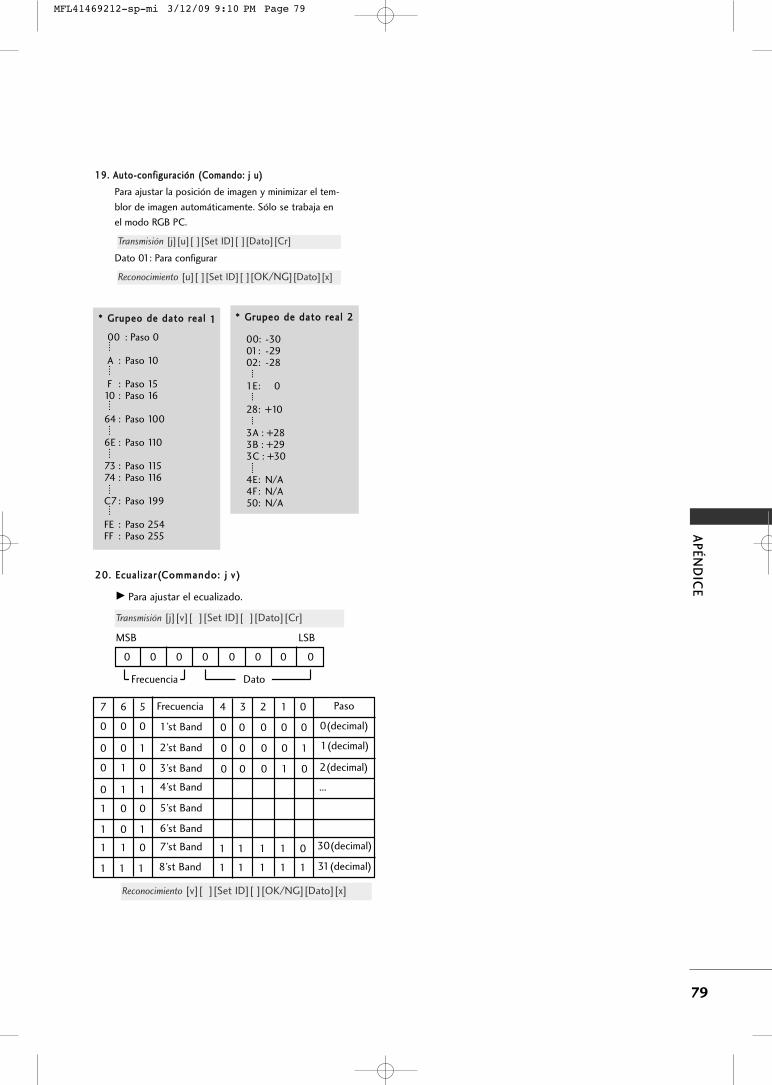
AP
ÉN
DIC
E
79
1199.. AAuuttoo--ccoonnffiigguurraacciióónn ((CCoommaannddoo:: jj uu))
Para ajustar la posición de imagen y minimizar el tem-
blor de imagen automáticamente. Sólo se trabaja en
el modo RGB PC.
Dato 01: Para configurar
Transmisión [j][u][ ][Set ID][ ][Dato][Cr]
Reconocimiento [u][ ][Set ID][ ][OK/NG][Dato][x]
** GGrruuppeeoo ddee ddaattoo rreeaall 11
00 : Paso 0
A : Paso 10
F : Paso 15 10 : Paso 16
64 : Paso 100
6E : Paso 110
73 : Paso 11574 : Paso 116
C7 : Paso 199
FE : Paso 254FF : Paso 255
** GGrruuppeeoo ddee ddaattoo rreeaall 22
00: -3001: -29 02: -28
1E: 0
28: +10
3A : +28 3B : +29 3C : +30
4E: N/A 4F: N/A 50: N/A
2200.. EEccuuaall iizzaarr((CCoommmmaannddoo:: jj vv ))
G Para ajustar el ecualizado.
MSB LSB
0
Transmisión [j][v][ ][Set ID][ ][Dato][Cr]
0 0 0 0 0 0 0
Frecuencia Dato
Reconocimiento [v][ ][Set ID][ ][OK/NG][Dato][x]
Frecuencia
1’st Band
2’st Band
3’st Band
4’st Band
5’st Band
6’st Band
7’st Band
7 6 5
0 0 0
0 0 1
0 1 0
0 1 1
1 0 0
1 0 1
1 1 0
4 3 2 1 0
1 1 1 8’st Band
Paso
0 0 0 0 0
0 0 0 0 1
0 0 0 1 0
1 1 1 1 1
1 1 1 1 0
0(decimal)
1(decimal)
2(decimal)
...
30(decimal)
31(decimal)
MFL41469212-sp-mi 3/12/09 9:10 PM Page 79
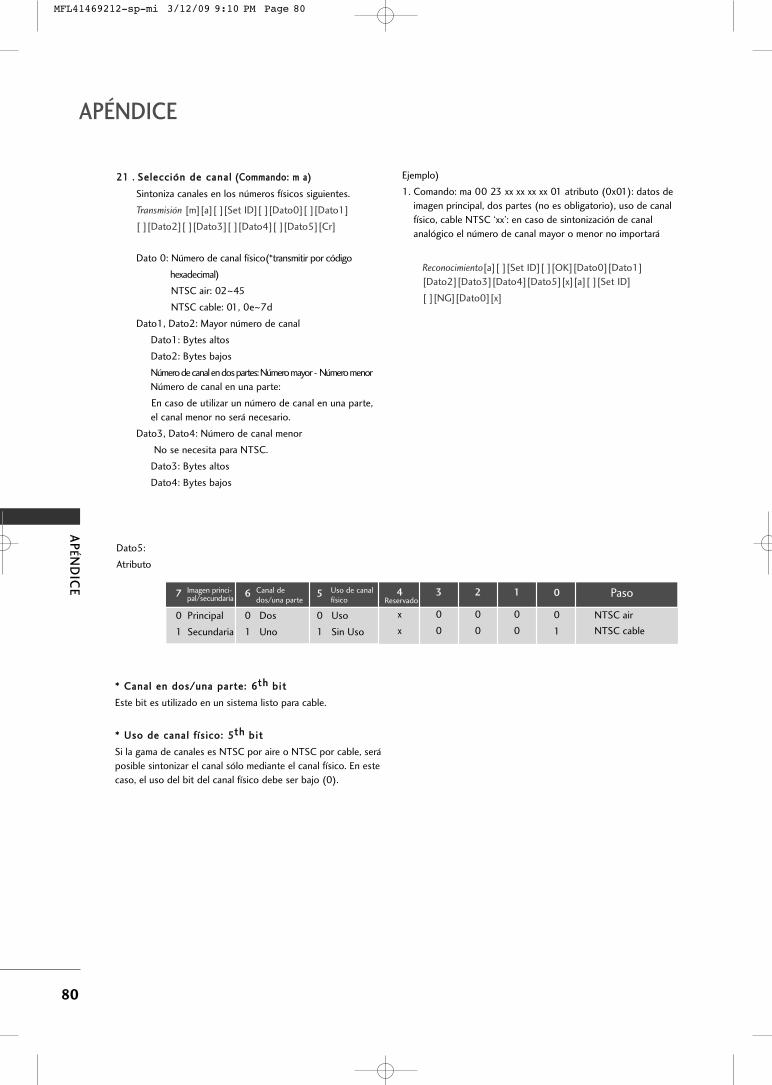
AP
ÉND
ICE
80
APÉNDICE
2211 .. SSeelleecccciióónn ddee ccaannaall ((CCoommmmaannddoo:: mm aa))
Sintoniza canales en los números físicos siguientes.
Transmisión [m][a][ ][Set ID][ ][Dato0][ ][Dato1]
[ ][Dato2][ ][Dato3][ ][Dato4][ ][Dato5][Cr]
Dato 0: Número de canal físico(*transmitir por código
hexadecimal)
NTSC air: 02~45
NTSC cable: 01, 0e~7d
Dato1, Dato2: Mayor número de canal
Dato1: Bytes altos
Dato2: Bytes bajos
Número de canal en dos partes: Número mayor - Número menor
Número de canal en una parte:
En caso de utilizar un número de canal en una parte,
el canal menor no será necesario.
Dato3, Dato4: Número de canal menor
No se necesita para NTSC.
Dato3: Bytes altos
Dato4: Bytes bajos
Dato5:
Atributo
Paso
NTSC air
NTSC cable
1
0
0
2
0
0
3
0
0
4
x
x
Reservado 5
0
1
Uso
Sin Uso
Uso de canalfísico
6
0
1
Dos
Uno
Canal dedos/una parte
7
0
1
Principal
Secundaria
Imagen princi-pal/secundaria
0
0
1
Ejemplo)
1. Comando: ma 00 23 xx xx xx xx 01 atributo (0x01): datos de
imagen principal, dos partes (no es obligatorio), uso de canal
físico, cable NTSC ‘xx’: en caso de sintonización de canal
analógico el número de canal mayor o menor no importará
Reconocimiento[a][ ][Set ID][ ][OK][Dato0][Dato1]
[Dato2][Dato3][Dato4][Dato5][x][a][ ][Set ID]
[ ][NG][Dato0][x]
** CCaannaall eenn ddooss//uunnaa ppaarrttee:: 66tthh bb ii tt
Este bit es utilizado en un sistema listo para cable.
** UUssoo ddee ccaannaall ff ííssiiccoo:: 55tthh bb ii tt
Si la gama de canales es NTSC por aire o NTSC por cable, será
posible sintonizar el canal sólo mediante el canal físico. En este
caso, el uso del bit del canal físico debe ser bajo (0).
MFL41469212-sp-mi 3/12/09 9:10 PM Page 80
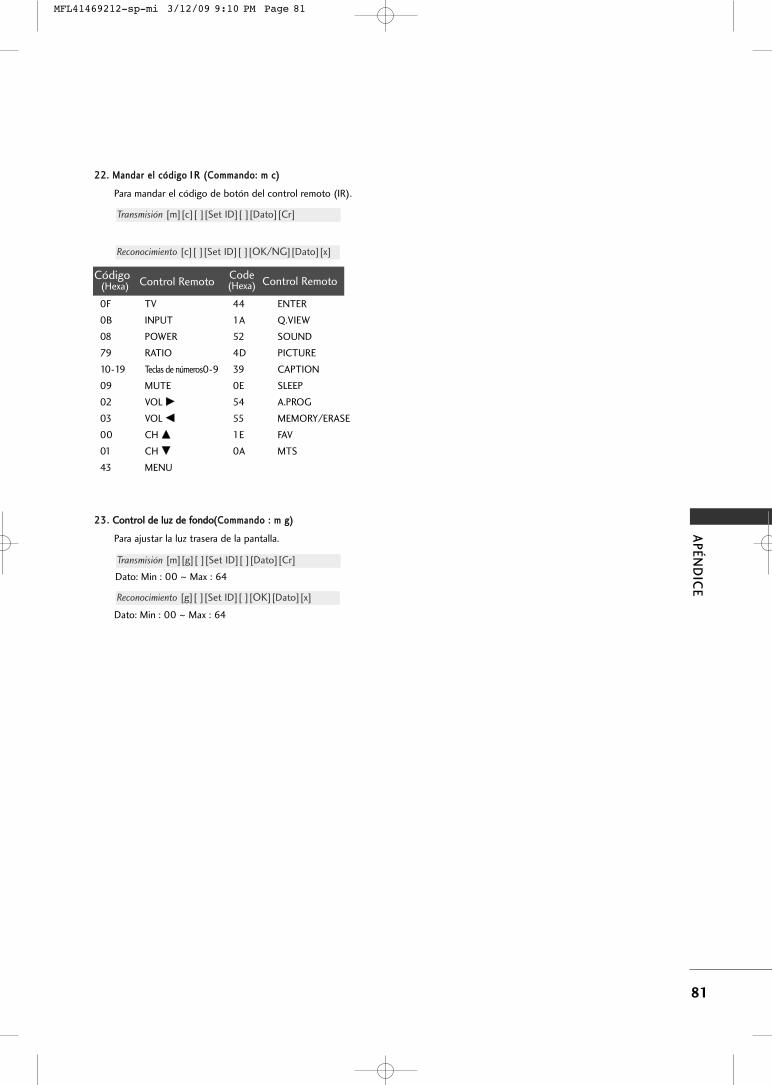
AP
ÉN
DIC
E
81
2222.. MMaannddaarr eell ccóóddiiggoo II RR ((CCoommmmaannddoo:: mm cc))
Para mandar el código de botón del control remoto (IR).
Transmisión [m][c][ ][Set ID][ ][Dato][Cr]
Reconocimiento [c][ ][Set ID][ ][OK/NG][Dato][x]
Código(Hexa) Control Remoto
Code(Hexa) Control Remoto
0F TV
0B INPUT
08 POWER
79 RATIO
10-19 Teclas de números0-9
09 MUTE
02 VOL GG
03 VOL FF
00 CH DD
01 CH EE
43 MENU
44 ENTER
1A Q.VIEW
52 SOUND
4D PICTURE
39 CAPTION
0E SLEEP
54 A.PROG
55 MEMORY/ERASE
1E FAV
0A MTS
2233.. CCoonnttrrooll ddee lluuzz ddee ffoonnddoo((CCoommmmaannddoo :: mm gg))
Para ajustar la luz trasera de la pantalla.
Dato: Min : 00 ~ Max : 64
Transmisión [m][g][ ][Set ID][ ][Dato][Cr]
Reconocimiento [g][ ][Set ID][ ][OK][Dato][x]
Dato: Min : 00 ~ Max : 64
MFL41469212-sp-mi 3/12/09 9:10 PM Page 81
MFL41469212-sp-mi 3/12/09 9:10 PM Page 82