-1- Rangifer Health & Body Condition Monitoring MONITORING PROTOCOLS LEVEL 1 CircumArctic Rangifer Monitoring and Assessment (CARMA) Network JULY 2008

Welcome message from author
This document is posted to help you gain knowledge. Please leave a comment to let me know what you think about it! Share it to your friends and learn new things together.
Transcript
-1-
Rangifer Health & Body Condition Monitoring
MONITORING
PROTOCOLS
LEVEL 1
CircumArctic Rangifer Monitoring and Assessment (CARMA) Network
JULY 2008

-2-
EDITORS: Anne Gunn Wendy Nixon
CONTRIBUTORS: Jan Adamczewski Barry Adams Perry Barboza Marsha Branigan Dorothy Cooley Bruno Croft Christine Cuyler Mary Gamberg Anne Gunn Doug Heard Gary Kofinas Susan Kutz Rolf Langvatn Jocylyn McDowell Aleksija Neimanis Robert Otto Katherine Parker Don Russell Leslie Wakelyn Robert White

-3-
Table of Contents
List of Figures .......................................................................................................1
INTRODUCTION ..................................................................................................2
DATA RECORDING STANDARDS ......................................................................2
THE PROTOCOLS ...............................................................................................3
1. AGE...............................................................................................................3 1.1 Maturity ....................................................................................................3 1.2 Cementum age ........................................................................................5
2. MORPHOLOGICAL MEASURES..................................................................7 2.1 Mandible and incisor tooth.......................................................................7 2.2 Metatarsus size......................................................................................11
3. FAT .............................................................................................................14 3.1 Direct measure of back fat (carcass) .....................................................14 3.2 Hunter assessment of fatness ...............................................................15 3.3 Metatarsus marrow fat ...........................................................................15 3.4 Kidney fat...............................................................................................17
4. PROTEIN ....................................................................................................19 4.1 Indirect measure of protein balance.......................................................19
5. INDIVIDUAL HEALTH.................................................................................20 5.1 Blood sampling ......................................................................................20 5.2 Disease, parasites and contaminants ....................................................21
6. DIET from FECAL SAMPLES (and option of pathogen analysis)................21
7. MATERNAL STATUS..................................................................................22

-1-
List of Figures
Figure 1. Tooth eruption of sub adult (> 1 year old) .............................................4
Figure 2. > 2 year old tooth eruption ....................................................................4
Figure 3. > 3 year mature adult with full set of 6 adult cheek teeth ......................5
Figure 4. Incisor bar .............................................................................................6
Figure 5. Dental elevators....................................................................................6
Figure 6. Jaw tag with adhesive label ..................................................................8
Figure 7. Diagram of jawbone boundaries ...........................................................9
Figure 8. Directions for sawing jaw for marrow extraction..................................10
Figure 9. Bone fragments from jaw bone marrow ..............................................10
Figure 10. Rangifer skeleton...............................................................................11
Figure 11. Removal of metatarsus ......................................................................12
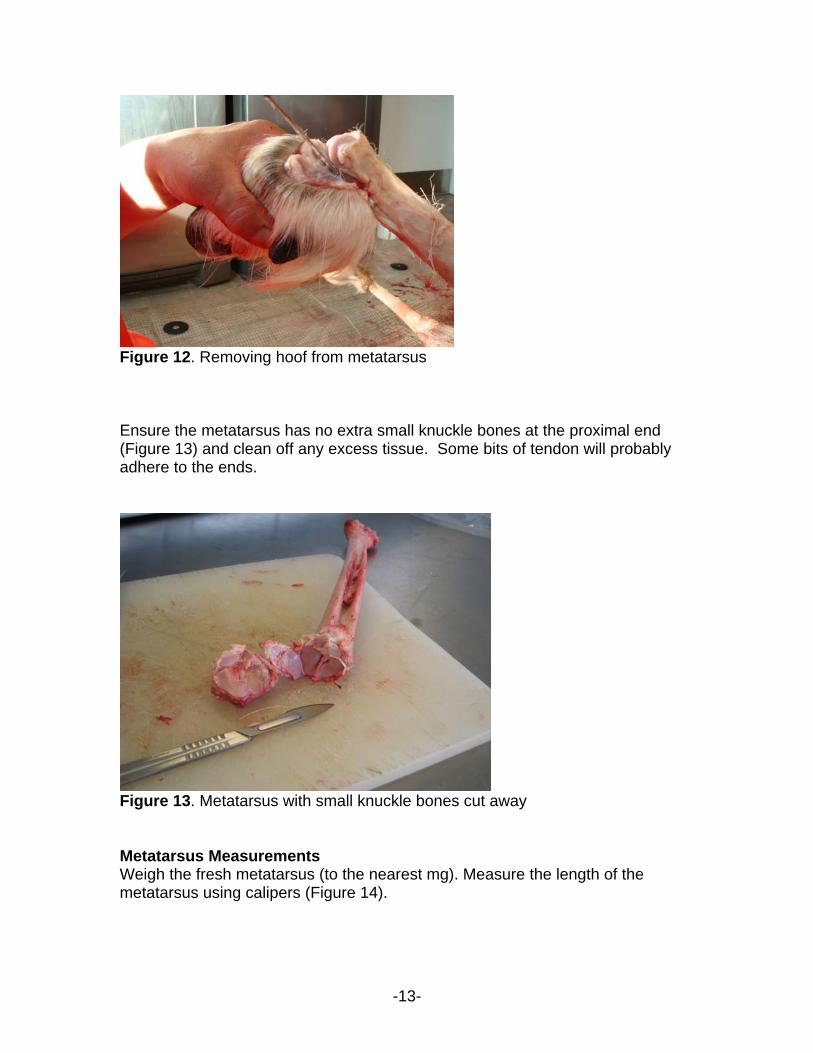
Figure 12. Removing hoof from metatarsus........................................................13
Figure 13. Metatarsus with small knuckle bones cut away .................................13
Figure 14. Length of the metatarsus ...................................................................14
Figure 15. Metatarsus measurements ................................................................14
Figure 16. Back fat depth....................................................................................15
Figure 17. Metatarsus with ends sawed..............................................................16
Figure 18. Bone marrow from metatarsus...........................................................17
Figure 19. Kidney in body cavity .........................................................................18
Figure 20. Kidney with all fat ...............................................................................18
Figure 21. Kidney fat sample collection and cut lines for Riney index calculation............................................................................................................................19
Figure 22. A set of Nobuto blood sampling strips before and after blood sampling............................................................................................................................20

-2-
INTRODUCTION This “Protocols Level 1” document should be used together with the Rangifer Health & Body Condition Monitoring Manual. Level 1 monitoring includes indicators of morphometrics and fatness, presence of dermal parasites, and the optional collection of blood on filter paper to assess blood pathogens. Collection of the kidney and surrounding fat will contribute to the assessment of body condition and detection of contaminants. Monitoring at this level will require training of technicians and field collectors, who would work closely with regional biologists. It will also require partnership with specific programs or laboratories to analyze blood samples for pathogens and kidneys for contaminants. We expect this monitoring will be coordinated through regional wildlife agencies, and in partnership with the communities and co-management boards in the areas where collections take place. If you have any suggestions for changes or improvements to this document please contact: Anne Gunn Don Russell 368 Roland Road Shadow Lake Environmental Saltspring Island, BC V8K 1V1 Consulting Ph: (250) 653-2332 Box 10038 email: [email protected] Whitehorse, YT Y1A 7A1 Ph: (867) 456-2695 email: [email protected]
DATA RECORDING STANDARDS Labels – All units MUST be clearly labelled. The following are a few examples:
gram (g), kilogram (kg) millimetre (mm), centimetre (cm), millilitre (ml), litre (l) calendar dates (day/month/year)
Handwriting – Handwriting (including numbers) must be legible. Sample Identification – Identification numbers for each animal collected should have a combination of alphabet letters and numbers. ID numbers MUST accompany ALL samples. Numbers – To clearly distinguish the number one (1) from the number seven (7), always ”cross” the vertical stroke of the number seven as shown: 7. If there is any doubt to whether the number is a 6 or a 9, underline it as shown: 6 9.

-3-
THE PROTOCOLS
VITALS: Prior to collecting samples from the caribou or reindeer, the following important information should be recorded:
- collection number (If your jurisdiction has a collection tracking system, use numbers that are compatible with that system.)
- herd - date - sex of animal - hunter - location of the harvest
1. AGE
1.1 Maturity Categories of maturity for all levels of monitoring are based on tooth eruption and should be recorded as:
- calf (less than one year old) - subadult (juveniles and yearlings: 1- 3 years old) (Figure 1) - adult (>= 3 years old, may or may not be breeding at time of collection
because reproductive pauses may occur in adult females) (Figure 2) It is important to record maturity independent of knowing the cementum age, as it tests the validity of using 3 maturity categories rather than only two (calf vs. adult). Age classification “calf – subadult – adult” by cheek tooth:
1.1.1 Calf teeth (< 1 year) are all milk teeth. They are obvious to even the most inexperienced observer.
1.1.2 Subadults (between 1 and 3 years) have clearly erupting cheek teeth
and often the first 3 cheek teeth are well worn because they are “milk” teeth (Figure 1). Sometimes premolars are seen in the process of being pushed out from below (Figure 2). If erupting teeth are present, the animal is NOT a mature adult therefore can be classed as a “subadult”.
1.1.3 Adult (> 3 years) have 6 adult cheek teeth. Absolutely nothing is
erupting from the gum line. The only change over time will be tooth wear (Figure 3) and with increasing age, erosion of the entire tooth row down to the gum line.

-4-
Figure 1. Tooth eruption of sub adult (> 1 year old). Photo & diagram (without gum tissue) shows only 5 teeth (3 milk premolars and 2 adult molars), and the 6th is barely visible and would still be buried in gum tissue. Note first 3 cheek teeth are milk teeth and show some wear, third tooth from the left (P4) has 3 “peaks”.
Figure 2. > 2 year old tooth eruption. This photo shows 6 teeth. The P2 & P3 teeth are adult, but P3 would be barely visible above the gum line, i.e., it is erupting, and the 6th (M3) has just come above the gum tissue. The best indicator of age here is the 3rd tooth, which is the well worn P4 milk tooth with 3 “peaks”. Most importantly P4 is being pushed out-of-the-way by the erupting adult P4 coming up from underneath. Be careful; do not to mistake a large bodied juvenile for an “old” adult because of the extreme tooth wear on the almost finished P4 milk tooth.

-5-
Figure 3. > 3 year mature adult with full set of 6 adult cheek teeth, which are all well above the gum line (as indicated by the separation of dark and light zones on this example). With some experience, observers will have no problem distinguishing adult teeth from juvenile teeth.
1.2 Cementum age Equipment needed: sharp knife or saw/axe dental elevator extractor or pliers labels small paper envelopes
The first incisors are used for cementum aging. From harvested caribou, ideally the whole jaw will be collected (along with the vitals – sex of the animal, data, location and hunter). Be careful when removing the jaw of young animals, the bones may be soft and easily cut. If the whole jaw is collected, do all jaw measurements before extracting the teeth. If you are not collecting whole jaws, the teeth may be cut from the jaw with a sturdy knife. You need to make sure the bottom of the root is intact since that is the easiest section to count cementum layers. The best method is to take the 2 first incisors together as a pair. This leaves the inside portions of both incisors untouched for counting cementum layers. Cut into the jawbone along the outside of each of the 2 incisors, angling toward the center. The cuts should meet about 1.5 inches below the top of the gum. Alternatively, you can cut the whole incisor bar (Figure 4) off with an axe or saw. In either case, keep the teeth frozen until you can extract them.

-6-
Extract the teeth: Use a dental elevator (Figure 5) to carefully and completely loosen the tissue around the entire tooth circumference. The tooth can then be pulled straight out with an extractor or a pair of pliers. Once they have been extracted, store teeth in paper envelopes in a cool and dry place. Do not store in plastic as they may rot. If teeth are to be stored for several months or years, store them cleaned and frozen. Commercial labs provide cementum aging services, although their reliability should be established, preferably with known age samples.
Figure 4. Incisor bar
Figure 5. Dental elevators
Post
Cut incisor bar

-7-
2. MORPHOLOGICAL MEASURES
2.1 Mandible and incisor tooth Equipment needed: labels and tags (see below) cable ties or wire small calipers sharp knife tooth elevator freezer vise and saw for cracking jaw and removing marrow beakers (oven proof) or foil trays drying oven electronic scales (capable of measuring to the nearest 0.5 g).
Attach pre-printed self-adhesive address labels to 2.5” X 4” poster board shipping (or equivalent size) tags (Figure 3).The self-adhesive address labels can be pre-printed with: - ID numbers (generated in MS Word by creating a new Caption with auto-
numbering) - A “ruler” along the edge of the label by creating a table of ½ cm columns. - Include space for vitals: hunter name, community, herd, date, location, sex,
reproductive / lactational status, hunter assessment of condition, depth of back fat using “ruler” - see Figure 6.
Attach tags to jaws using plastic cable ties or sturdy wire.

-8-
Figure 6. Jaw tag with adhesive label (not drawn to scale) Lab Measurements: Be sure all tissue is removed from the posterior edge of jaw before measuring (bone is fairly thin here – be careful not to cut into it). Measure the jaw before extracting the teeth and note whether the jaw was dried or not. With small calipers, make measurements recorded to the nearest mm along the tooth margins at the (i.e. diastema measured from anterior margin of premolar at gumline to posterior margin of canine at gumline) (see Figure 7).
As illustrated in Figure 7, measure:
1. diastema 2. * anterior jaw bone (assess growth from birth to subadult) 3. * posterior jaw bone (assess growth from subadult to mature adult) 4. total jaw bone
* This requires confidence in the location of PM4 and M1. If M3 has not yet erupted, there will only be 2 molars visible.
Once measurements have been completed, extract the first incisor as described in the preceding section “cementum age”.
SEX: Male Female PREGNANT?: Yes or No NURSING?: Yes or No CONDITION: skinny not bad fat very fat DEPTH of BACKFAT: _______________cm
| | | 2 | | 4 | | 6 | | 8 |
(YOUR HERD) _____________________ Jaw Collection ID: 001 Date: ________________________________ Location: _____________________________ Return to: (agency/office location, phone number)

-9-
Figure 7. Diagram of jawbone boundaries Jaw bone marrow (and connective tissue) Marrow from the lower jaw can be extracted for analysis of water content (providing a measure of fat content). However, the metatarsus marrow gives a more direct relationship with body fat, and is therefore the best option for fat assessment. It is also easier to remove than jaw marrow (See “metatarsus marrow measurement” for lab method). Removal of jaw bone marrow (and connective tissue) Figure 8 demonstrates the approach that CARMA is suggesting for removing jaw bone marrow. The intent is not to gather all of the bone marrow, but rather a large enough portion to allow for a calculation of the proportion of water in the sample (wet weight versus dry weight). Be careful to exclude any bone fragments from the inner jaw – you will be able to feel fragments with your fingers (Figure 9).
Anterior jaw bone Total jaw bone
I1 PM4 M1
Diastema
Posterior jaw bone

-10-
Figure 8. Directions for sawing jaw for marrow extraction”. Saw completely through the jaw at line A. Saw along the outside of the jaw at line B and crack open with a sturdy knife or screwdriver.
Figure 9. Bone fragments from jaw bone marrow.
A B

-11-
2.2 Metatarsus size Equipment list: sharp knife scale calipers (big and small) measuring tape
Removal of metatarsus from carcass Skin the lower back leg and cut the foot off at the metatarsal-phalynx joint (Figure 10).
Figure 10. Rangifer skeleton At the proximal end (closest to body of the caribou) of the metatarsal, there is a joint that is not readily seen. As you run your hand away from the hoof up the metatarsus towards the ankle/”hock”, it will start widening (Figure 11) About ½ or ¾ of a centimeter along the widened section, with a sharp knife make a cut completely around the bone and as deep as you can through the tendons. If the cut is in the right spot, you can bend the joint over your knee and the joint will break cleanly. If you are a bit off the right spot, there are 3 small bones that may come off with the metatarsus. If they aren’t attached too tightly, try to take them off in the field using a sharp knife. This is easier to do when the bone is fresh but they can be removed in the lab.
tibia
metatarsus
metatarsal-phalynx joint

-12-
Figure 11. Removal of metatarsus The hoof is easily removed from the metatarsus by cutting through the ligaments at the top of the hoof (Figure 12).
ankle joint
-13-
Figure 12. Removing hoof from metatarsus Ensure the metatarsus has no extra small knuckle bones at the proximal end (Figure 13) and clean off any excess tissue. Some bits of tendon will probably adhere to the ends.
Figure 13. Metatarsus with small knuckle bones cut away Metatarsus Measurements Weigh the fresh metatarsus (to the nearest mg). Measure the length of the metatarsus using calipers (Figure 14).

-14-
Figure 14. Length of the metatarsus In the middle (measure from each end to find middle – Figure 15) of the metatursus, measure (to the nearest mm) the diameter using small calipers, and the circumference using a measuring tape.
Figure 15. Metatarsus measurements (measure diameter and circumference at the same point)
3. FAT
3.1 Direct measure of back fat (carcass) Equipment list: sharp knife measuring tape or ruler
With a sharp knife, make a cut directly through the back fat layer on the rump near the base of the tail. The cut should be approximately 15-18 cm (6-7 inches) long across the rump, from the base of the tail. Spread the cut carefully so you don’t distort (stretch or compress) the fat layer. At the deepest point along the cut, measure the depth of fat (to the nearest millimeter) from the connective tissue above the muscle to the top of the fat against the skin. Depth of back fat may also be measured after the animal has been skinned, if care is taken to

-15-
remove the hide without any fat (Figure 16). Note if fat was still soft, or cool and hard.
Figure 16. Back fat depth. Left: knife showing cut angle from base of tail on skinned animal. Right: measuring depth of back fat.
3.2 Hunter assessment of fatness Ask hunters to assess fatness of the animals based on amount of fat around the gut and kidneys, depth of back fat, and appearance of bone marrow. Fatness recorded as: skinny (no back fat, little or no gut or kidney fat, bone marrow red and
runny) not bad (not too skinny) (little back fat, some gut or kidney fat, bone
marrow pink and greasy) fat (nice layer back fat and plenty of gut or kidney fat, bone marrow a bit
greasy and slightly pink) very fat (thick layer back fat all the way up the back and fat everywhere in
gut and around kidney, bone marrow solid and cream colored)
3.3 Metatarsus marrow fat Equipment list: tools for removing bone marrow oven proof containers heat and water proof labels and markers drying oven (85C) electronic scales (capable of measuring to the nearest 0.1 gram)
Record marrow fat characteristics. Categories are:
o good: light colored and/or firm

-16-
o poor: pink and/or semi-solid o very poor: red and/or runny
Direct measure - lab processing Storing and thawing bones Metatarsus bones need to be kept in airtight storage containers in the freezer. The marrow fat estimate is based on marrow water content, so the bones should not be allowed to dry out. Marrow fat extraction should be done as soon as possible and certainly storage time shouldn’t exceed a few months. The metatarsus must be thawed but the marrow extraction may be easier if the bone is still chilly. (Bones may be removed from the freezer and left in a cool room to thaw overnight.) The marrow of each bone will be oven-dried in its own individual container over several hours or days, so determine how many containers will fit into your oven at once to determine how many bones to thaw (and marrow samples to process) at one time. Once the bone is thawed, record the weight, length, circumference, diameter, and number of Besnoitia (rough, white, salt-grain sized) cysts. Extract the marrow. If the metatarsus has been frozen and partially thawed, it may be easier to break the bones in a vice before extracting the marrow. Good gloves help with keeping a grip on the bone and will protect your hands from the occasional bone sliver. Use a counter-mounted vice to crack the bone but try not to crush it since bone fragments will enter the marrow. If you start in the middle and begin a crack, you can often extend the crack to the ends of the bone by moving the bone along in the vice and cracking again. If the metatarsus is fresh, it may be easier (and faster) to saw the ends off the metatarsus, and extract the marrow from ends and middle (Figure 17).
Figure 17. Metatarsus with ends sawed Remove the marrow. Once the bone is broken and the marrow exposed, remove as much marrow as possible. Probes, small lab spatulas or small, dull carving tools work well to pick the marrow out of the ends. Put the marrow into clean, waterproof and heatproof containers such as small beakers (50 ml or 100 ml) or disposable foil trays (Figure 18). Prepare the container and label. Each container will have a slightly different weight so weigh each container before use. Label the container with the ID number (make sure the labels are waterproof and heat proof as well – wax

-17-
pencils or paper labels with ink won’t do). If you’re not using metal tags with ID numbers etched into them (they are nice but expensive), try using scraps of Tyvek or waterproof paper marked with soft pencil or indelible felt pens. If you put the tag in the empty beaker before weighing the beaker, then you can leave the tag in for the later weights that you will determine. Record the weight of the container and tag to the nearest 0.1 gram. Weigh the wet marrow. Place all the marrow from each metatarsus in one container. Weigh the container with tag, and “wet” marrow. Dry the marrow. Dry the marrow in its container in an oven at about 85Celsius. Check the weight at 24 hours and 48 hours. (Do the weighing before samples are fully cooled.) If weights are different, then put the container back in the oven for another 12 to 24 hours (for a total drying time of 72 hours or more if needed). When weights are consistent, drying is complete.
Figure 18. Bone marrow from metatarsus. Left: fresh. Right: dried for 48 hours.
3.4 Kidney fat Equipment list: clean, labeled plastic bags scale knife
Collection Always measure the LEFT kidney. The left kidney is the one that is loose in the gut cavity on the left side of the caribou’s body. (The right kidney is high against the back on the right side of the caribou and is attached to the liver - do NOT measure the right kidney.) The LEFT kidney should be collected with all attached fat: cut along the tissue connecting it to the body close to the spine (Figure 19). Freeze the LEFT kidney in a clearly labeled plastic bag for transport and storage.

-18-
Figure 19. Kidney in body cavity Cut off connected fat where it joins the body/abdominal wall, as shown by the dashed red line in Figure 19. Record if kidney:
- has no fat - has very little fat - is visible through the fat - is completely covered and not visible through the fat
Lab processing Try to measure weights prior to freezing. If this is not possible, cut the fat while still frozen as in the following instructions, and weigh the sample while still frozen, as samples tend to loose water after they have been frozen and thawed. a. Weigh (to the nearest mg) the kidney with all the fat attached (Figure 20).
Figure 20. Kidney with all fat b. If there is fat at each end of the kidney (Figure 21), cut the fat perpendicular
to the mid-line of the kidney and weigh the kidney with the remaining attached fat (Riney Index, Riney 1955).

-19-
Figure 21. Kidney fat sample collection and cut lines for Riney index calculation. It is important to do these cuts properly in the field because kidneys must be frozen for storage and they are hard to “reconstruct” and cut properly after they are thawed. (After these cuts are made, the kidney may be frozen in a labeled plastic bag for transport and storage.) c. Remove all the remaining fat and connective tissue from the LEFT kidney,
and weigh this fat along with the fat from “b”. d. Weigh the kidney (to the nearest mg). Calculate kidney fat mass by subtracting kidney weight from total weight of kidney with all fat attached (a-d). Record. Riney kidney fat index is calculated as: kidney fat weight after perpendicular cut fat has been removed (b-d)/ left kidney weight (d). Record. (RINEY, T. 1955. Evaluating condition of free-ranging red deer (Cervus elaphus) with special reference to New Zealand. New Zealand Journal of Science 36: 429-463.)
4. PROTEIN
4.1 Indirect measure of protein balance Equipment list: latex or nitrile gloves nalgene bottles Whirl-Pak plastic bottles
Using a “hands-off” approach, an indication of protein balance can be obtained by collecting snow urine and fecal samples in snow from a given caribou herd. Attempts should be made to collect samples excreted by adult cows. Collection The snow-urine (minimum 20 g) should be picked up using latex or nitrile gloves to limit contamination, and placed in 125-ml plastic bottles (e.g., Nalgene). The

-20-
fecal pellets can be collected into Whirl-Pak plastic bags or plastic bottles. Both should be labeled and kept frozen. Twenty samples from cows are needed per location. It is recommended that 3 different locations (3 x 20) within a given part of a herd’s range be sampled to describe a particular herd.
5. INDIVIDUAL HEALTH
5.1 Blood sampling Equipment list: filter strips labeled envelopes
Collection on filter paper (blood sampling strips) Use of filter paper to test for pathogens, hormones, vitamins, minerals, and enzymes that can be detected in the blood will be validated over the next couple of years. This technique has been used in human medicine for 50 years and is an economical and practical field collection technique for wildlife. Each strip holds 0.1 ml of whole blood, and is designed for use in a single analysis. Hunters dip the strips in blood from the femoral vein (i.e., big vein on inside of hind leg) and can collect blood onto 15 strips per animal (Figure 22). This provides enough blood for immediate testing as well as banking for future analyses. Blood soaked filter paper (which are labeled with animal ID) should be first dried thoroughly and then frozen at -20º C. If drying is not possible immediately, then place the blood soaked filter papers in labeled paper envelopes for transport. Within 24 hours, the filters should be dry. They can then be frozen in labeled bags.
Figure 22. A set of Nobuto blood sampling strips before and after blood sampling (blood strips on the right have been dried).

-21-
5.2 Disease, parasites and contaminants Equipment list: labeled clean plastic bags
Visual appraisal: Hunters should check the animals for any physical abnormalities, and collect any abnormal tissue or organs for diagnosis. Samples should be placed in a clearly labeled plastic bag and kept frozen until they are submitted for processing. Warble and bot fly larvae: Estimate and record categories of warbles, recent dermal scars and throat bots. Categories include: [0] [0-20] [20-100] [100-1,000] [>1,000]
6. DIET from FECAL SAMPLES (and option of pathogen analysis) Equipment: clean, labeled Ziploc bags clean lab gloves
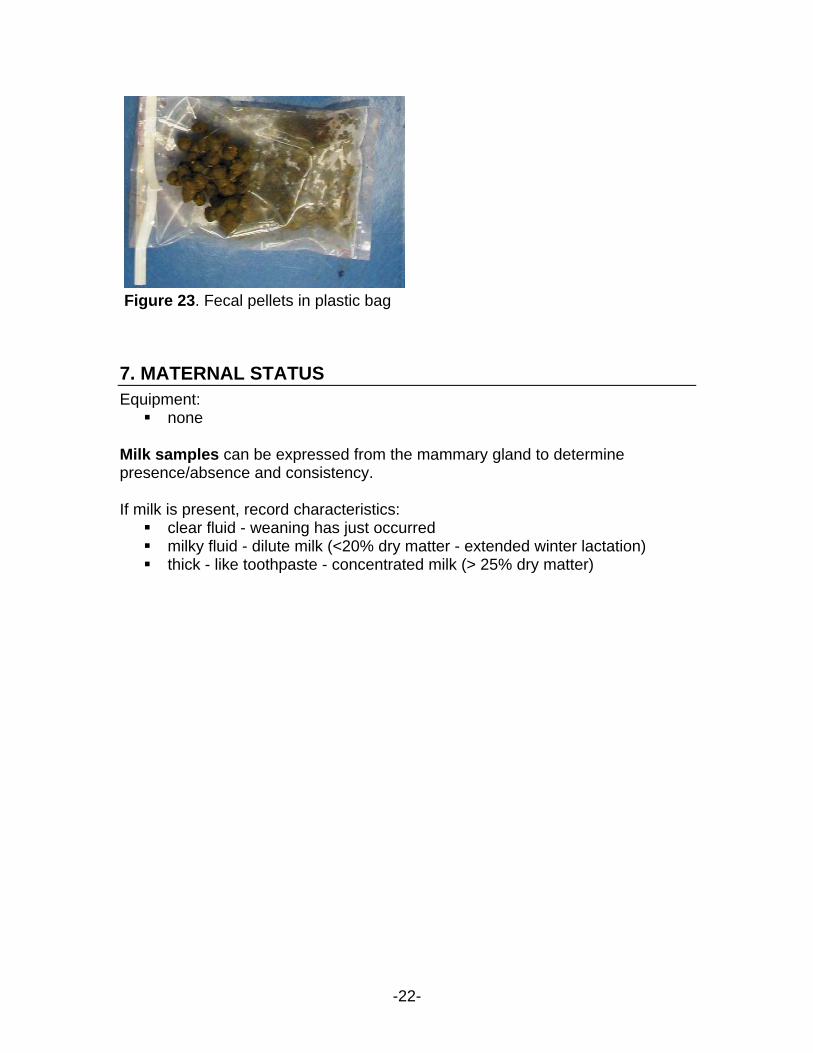
Fecal samples can be collected from the lower gut once the animal has been eviscerated. A portion of the fecal samples collected can be submitted for diet analysis. The rest can be used to test for the presence of helminthes, protozoa, viruses and bacteria. Feces, that are to be analyzed for parasites within one week, need to be kept cool (4ºC), but not frozen. Alternatively, they should be frozen and analyzed within 4 months. NOTE: even one freeze-thaw cycle will reduce recovery of fecal parasites, it is therefore imperative that this is considered if comparing across time or populations. Feces can also be tested for bacteria, viruses, and parasites through culture and molecular techniques. Unless these are to be processed immediately they should be frozen as soon as possible. An indication of stress can be determined from the level of fecal corticosteroids. If possible, collect a minimum of 20 pellets per collection, using clean lab gloves on your hands, and placing the pellets directly into labeled zip lock or Whirl-Pak plastic bags (Figure 23).
-22-
Figure 23. Fecal pellets in plastic bag
7. MATERNAL STATUS Equipment: none
Milk samples can be expressed from the mammary gland to determine presence/absence and consistency. If milk is present, record characteristics: clear fluid - weaning has just occurred milky fluid - dilute milk (<20% dry matter - extended winter lactation) thick - like toothpaste - concentrated milk (> 25% dry matter)
Related Documents