Welcome message from author
This document is posted to help you gain knowledge. Please leave a comment to let me know what you think about it! Share it to your friends and learn new things together.
Transcript

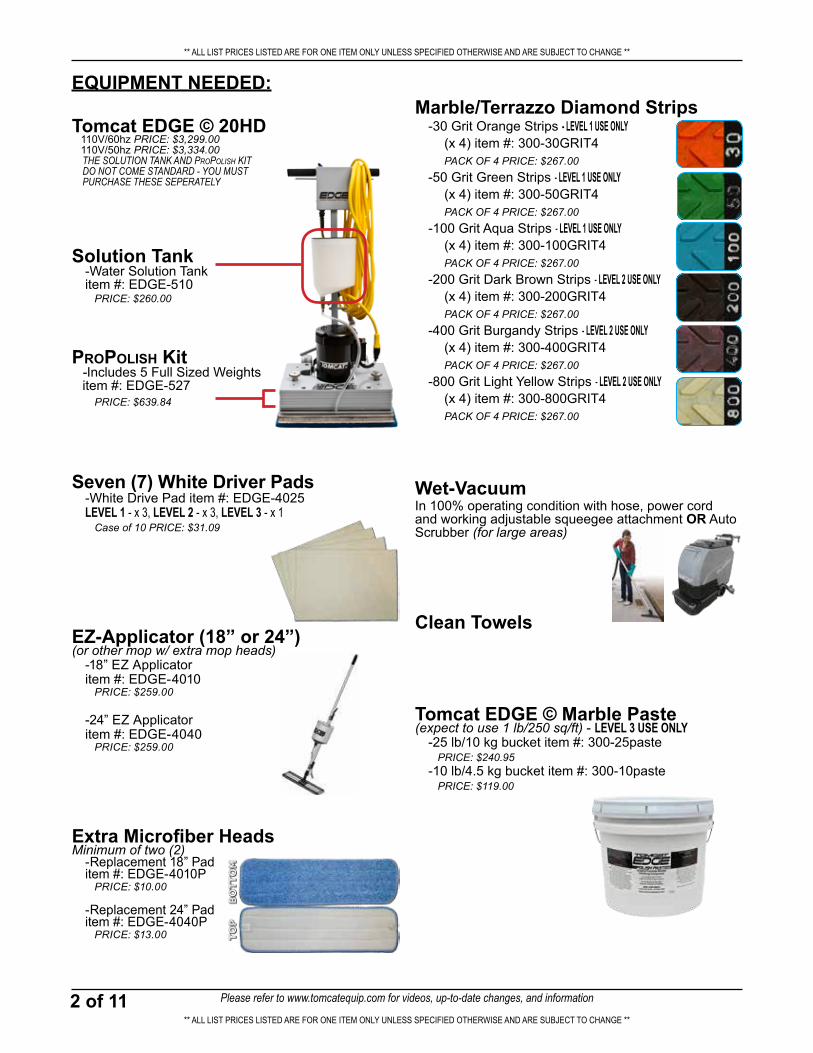
Tomcat EDGE © 20HD 110V/60hz PRICE: $3,299.00 110V/50hz PRICE: $3,334.00
THE SOLUTION TANK AND PROPOLISH KIT DO NOT COME STANDARD - YOU MUST PURCHASE THESE SEPERATELY
Solution Tank-Water Solution Tank item #: EDGE-510
PRICE: $260.00
PROPOLISH Kit-Includes 5 Full Sized Weights item #: EDGE-527
PRICE: $639.84
Seven (7) White Driver Pads-White Drive Pad item #: EDGE-4025 LEVEL 1 - x 3, LEVEL 2 - x 3, LEVEL 3 - x 1
Case of 10 PRICE: $31.09
EZ-Applicator (18” or 24”) (or other mop w/ extra mop heads)
-18” EZ Applicator item #: EDGE-4010
PRICE: $259.00
-24” EZ Applicator item #: EDGE-4040
PRICE: $259.00
Extra Microfiber Heads Minimum of two (2)
-Replacement 18” Pad item #: EDGE-4010P
PRICE: $10.00
-Replacement 24” Pad item #: EDGE-4040P
PRICE: $13.00
Marble/Terrazzo Diamond Strips-30 Grit Orange Strips - LEVEL 1 USE ONLY
(x 4) item #: 300-30GRIT4 PACK OF 4 PRICE: $267.00
-50 Grit Green Strips - LEVEL 1 USE ONLY(x 4) item #: 300-50GRIT4 PACK OF 4 PRICE: $267.00
-100 Grit Aqua Strips - LEVEL 1 USE ONLY(x 4) item #: 300-100GRIT4 PACK OF 4 PRICE: $267.00
-200 Grit Dark Brown Strips - LEVEL 2 USE ONLY(x 4) item #: 300-200GRIT4 PACK OF 4 PRICE: $267.00
-400 Grit Burgandy Strips - LEVEL 2 USE ONLY(x 4) item #: 300-400GRIT4 PACK OF 4 PRICE: $267.00
-800 Grit Light Yellow Strips - LEVEL 2 USE ONLY(x 4) item #: 300-800GRIT4 PACK OF 4 PRICE: $267.00
Wet-Vacuum In 100% operating condition with hose, power cord and working adjustable squeegee attachment OR Auto Scrubber (for large areas)
Clean Towels
Tomcat EDGE © Marble Paste (expect to use 1 lb/250 sq/ft) - LEVEL 3 USE ONLY
-25 lb/10 kg bucket item #: 300-25pastePRICE: $240.95
-10 lb/4.5 kg bucket item #: 300-10pastePRICE: $119.00
Please refer to www.tomcatequip.com for videos, up-to-date changes, and information2 of 11
EQUIPMENT NEEDED:
** ALL LIST PRICES LISTED ARE FOR ONE ITEM ONLY UNLESS SPECIFIED OTHERWISE AND ARE SUBJECT TO CHANGE **
** ALL LIST PRICES LISTED ARE FOR ONE ITEM ONLY UNLESS SPECIFIED OTHERWISE AND ARE SUBJECT TO CHANGE **

Please refer to www.tomcatequip.com for videos, up-to-date changes, and information 3 of 11
TABLE OF CONTENTS
Updated 7/18/2013
TABLE OF CONTENTS 3
HOW TO USE THIS MANUAL 4
POLISHING PROCESS DETAILS 5
LEVEL 1 - ROUTINE POLISHING 6
LEVEL 2 - RESTORE & REFINISH 8
LEVEL 3 - RESURFACE & LEVEL 10

Please refer to www.tomcatequip.com for videos, up-to-date changes, and information4 of 11
IT IS IMPORTANT THAT YOU FULLY READ AND UNDERSTAND ALL OF THE INSTRUCTIONS IN THIS MANUAL BEFORE BEGINNING. IF THERE ARE ANY QUESTIONS, PLEASE FEEL FREE TO CONTACT YOUR LOCAL TOMCAT REPRESENTATIVE.
This manual explains the full process in how to completely resurface Marble floors using the Tomcat EDGE © Diamond Strips polishing system. Because of the difference in floors due to wear and age, it’s impossible to say exactly what any specific floor needs without looking at it. This manual is divided by Levels of wear and methods of polishing for those specific wear levels. Level 1 is for Polish work. Level 1 Rountine Polishing is the most common stage for most floor needs. Always try to Polish your floors with Level 1 first. If after Level 1 Polishing is applied and the floor is still not satisfactory - drop down to Level 2. Level 2 is the Restore & Refinish which is a light scratch removal stage. Level 3 is the Resurface & Level, this stage is required to flatten the floor if it is not already and remove large scratches or gouges. This is an uncommon stage for most floors. Because not all floors need the same work, it’s up to the operator as to how much scratch removal to perform.
Before polishing begins, the floor quality needs to be inspected. Determine which step the floor needs to start with based off if you need to re-level the floor and large scratch removal (L3), if you need to only have light scratch removal (L2), or if you are just wanting to fine polish (L1) and continue the steps though till the final polish stage.
IMPORTANT: If you have never used this process on your floor before, Tomcat recommends you start in a less conspicuous area initially with less aggressive diamonds. More polishing can always be completed and Marble is a soft material.
IMPORTANT: Always wear personal protective equipment such as hearing protection, safety glasses, and steel toe shoes when operating this tool on a floor machine as well as gloves when handling any chemicals.
NOTE: Clean the floor before starting the polishing system to prevent unusual wear patterns or gouging of existing grit into the floor. No grease, oil, or other contaminants should remain on the surface.
CAUTION: Before installing different pads or strips, always remember to turn off the machine by unplugging the motor and the machine from the AC wall.
Marble - Resurface & Refinish3 Part Instructional Guide
HOW TO USE THIS MANUAL
Please refer to www.tomcatequip.com for videos, up-to-date changes, and information 5 of 11
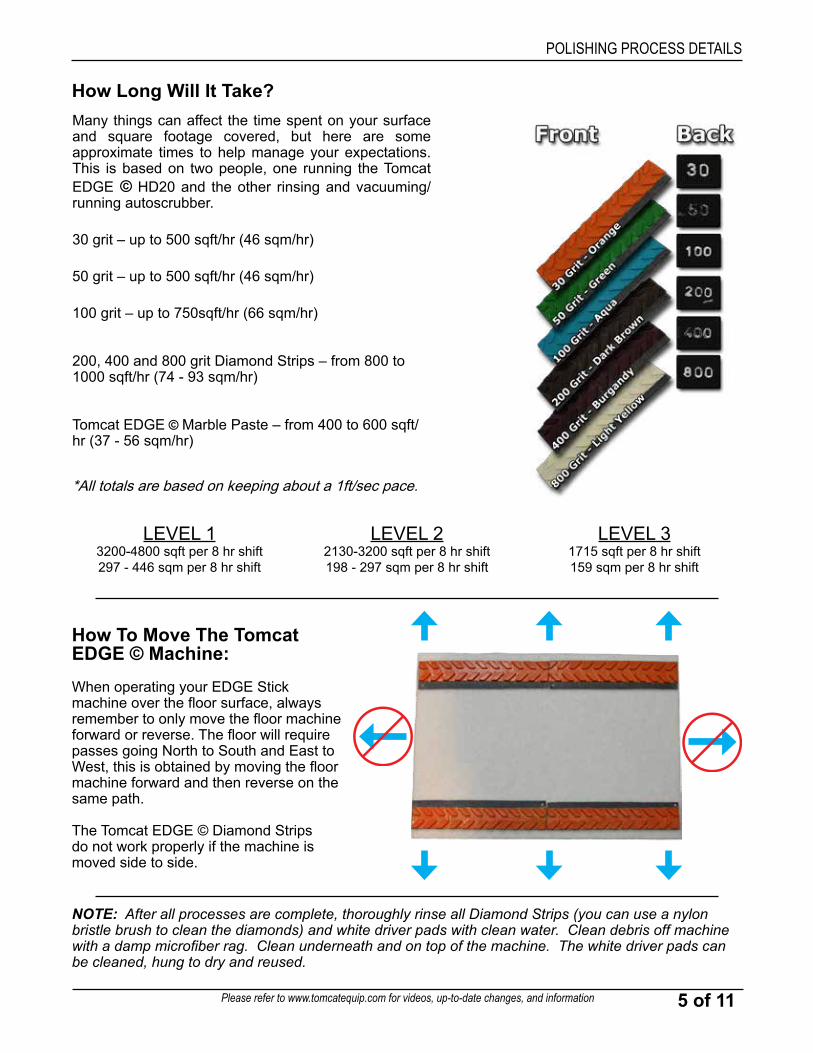
Many things can affect the time spent on your surface and square footage covered, but here are some approximate times to help manage your expectations. This is based on two people, one running the Tomcat EDGE © HD20 and the other rinsing and vacuuming/running autoscrubber.
30 grit – up to 500 sqft/hr (46 sqm/hr)
50 grit – up to 500 sqft/hr (46 sqm/hr)
100 grit – up to 750sqft/hr (66 sqm/hr)
200, 400 and 800 grit Diamond Strips – from 800 to 1000 sqft/hr (74 - 93 sqm/hr)
Tomcat EDGE © Marble Paste – from 400 to 600 sqft/hr (37 - 56 sqm/hr)
*All totals are based on keeping about a 1ft/sec pace.
How Long Will It Take?
POLISHING PROCESS DETAILS
LEVEL 31715 sqft per 8 hr shift159 sqm per 8 hr shift
LEVEL 22130-3200 sqft per 8 hr shift198 - 297 sqm per 8 hr shift
LEVEL 13200-4800 sqft per 8 hr shift297 - 446 sqm per 8 hr shift
How To Move The Tomcat EDGE © Machine:When operating your EDGE Stick machine over the floor surface, always remember to only move the floor machine forward or reverse. The floor will require passes going North to South and East to West, this is obtained by moving the floor machine forward and then reverse on the same path.
The Tomcat EDGE © Diamond Strips do not work properly if the machine is moved side to side.
NOTE: After all processes are complete, thoroughly rinse all Diamond Strips (you can use a nylon bristle brush to clean the diamonds) and white driver pads with clean water. Clean debris off machine with a damp microfiber rag. Clean underneath and on top of the machine. The white driver pads can be cleaned, hung to dry and reused.
Please refer to www.tomcatequip.com for videos, up-to-date changes, and information6 of 11
FOR FLOORS NEEDING ONLY REPOLISHINGNOTE: This level is for floors in good condition in need of only POLISH. For floors requiring more repair, see Level 3 titled “Resurface”, which will guide you through the process of grinding and polishing a floor with HEAVY SCRATCH REMOVAL needed or if you only need LIGHT SCRATCH REMOVAL, refer back to Level 2 titled “Restore & Refinish” for light grinding.
NOTE: Carefully protect any surrounding surfaces that may be harmed by this process.
NOTE: Surface must be free of any topical coatings and should be dust mopped and wet cleaned as necessary. If any type of mop-on finish is on the surface, you MUST use chemicals to strip the finish off or the diamonds will not work.
Place a total of seven (7) full weights (21 lb/9 kg each), removing two (2) small weights (if equipped) on the Tomcat EDGE © HD20 base. Fill solution tank with clean water.
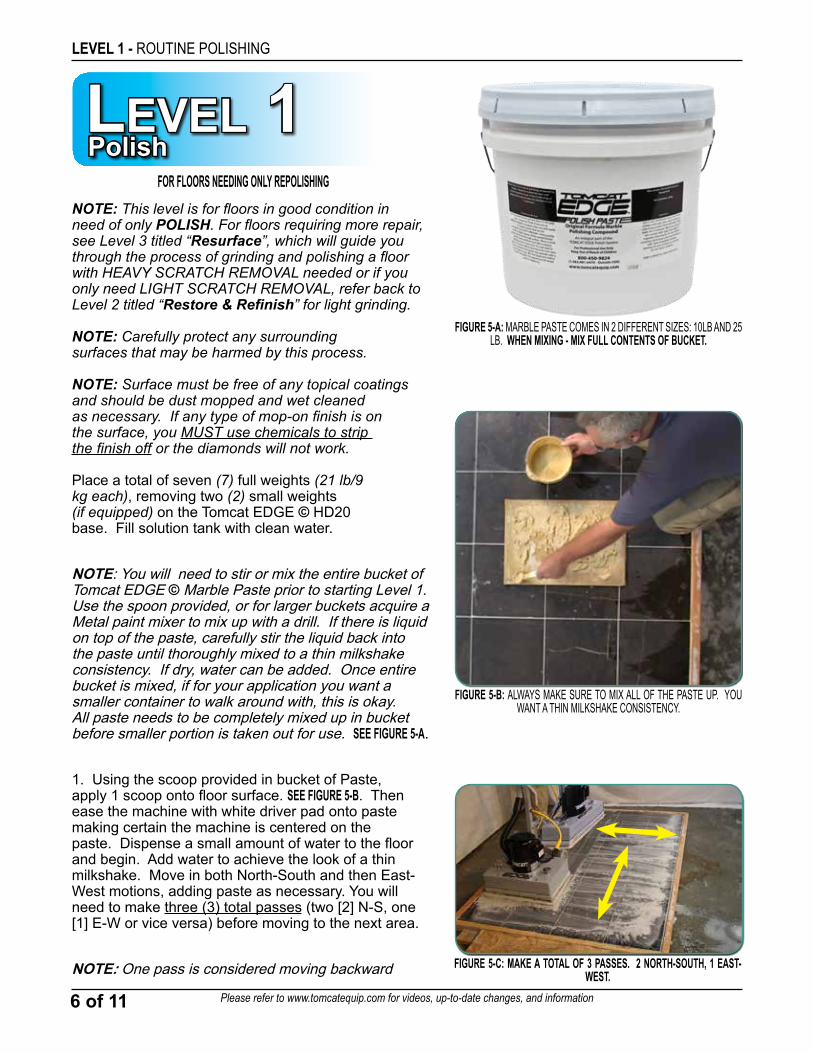
NOTE: You will need to stir or mix the entire bucket of Tomcat EDGE © Marble Paste prior to starting Level 1. Use the spoon provided, or for larger buckets acquire a Metal paint mixer to mix up with a drill. If there is liquid on top of the paste, carefully stir the liquid back into the paste until thoroughly mixed to a thin milkshake consistency. If dry, water can be added. Once entire bucket is mixed, if for your application you want a smaller container to walk around with, this is okay. All paste needs to be completely mixed up in bucket before smaller portion is taken out for use. SEE FIGURE 5-A.
1. Using the scoop provided in bucket of Paste, apply 1 scoop onto floor surface. SEE FIGURE 5-B. Then ease the machine with white driver pad onto paste making certain the machine is centered on the paste. Dispense a small amount of water to the floor and begin. Add water to achieve the look of a thin milkshake. Move in both North-South and then East-West motions, adding paste as necessary. You will need to make three (3) total passes (two [2] N-S, one [1] E-W or vice versa) before moving to the next area.
NOTE: One pass is considered moving backward
FIGURE 5-B: ALWAYS MAKE SURE TO MIX ALL OF THE PASTE UP. YOU WANT A THIN MILKSHAKE CONSISTENCY.
LEVEL 1 - ROUTINE POLISHING
FIGURE 5-C: MAKE A TOTAL OF 3 PASSES. 2 NORTH-SOUTH, 1 EAST-WEST.
FIGURE 5-A: MARBLE PASTE COMES IN 2 DIFFERENT SIZES: 10LB AND 25 LB. WHEN MIXING - MIX FULL CONTENTS OF BUCKET.
LeveL 1Polish

Please refer to www.tomcatequip.com for videos, up-to-date changes, and information 7 of 11
and forward in the same path, for example moving “North” and then “South”. When making two or more passes, alternate your directions from North-South to East-West. SEE FIGURE 5-C.
2. After the third (3rd) pass, take a clean damp cloth and wipe a spot on the floor to remove all residue. You should quickly see an obvious shine on the floor. SEE FIGURE 6-A. If not, make two (2) more passes over the surface with the Tomcat EDGE © Marble Paste and check again. Once the floor meets your expectations, move on to Step 7. The paste will need to be on the surface three to five (3-5) minutes max. If too much dwell time for the Paste occurs it could damage the floor.
NOTE: More passes with Marble Paste does not mean more shine. The Marble Paste is a 12,000 grit abrasive.
3. Take a squeegee and move paste residue from the work area to the adjacent area you plan to polish, spread a half (1/2) scoop of additional paste onto the adjacent floor area and continue to polish. Once one area is complete, rinse and vacuum twice to remove all residue. SEE FIGURE 6-B.
When using this method, you can expect to cover up to 500 sqft/hr (46 sqm/hr) with the Tomcat EDGE © Marble Paste. Keep a consistent movement of one foot (1’ or 31cm) forward (= to 1 tile if 12”x12”) per second for correct speed and maximum results.
Always make certain to thoroughly rinse and clean with Vac Wand and EZ Applicator between each grit and after the Tomcat EDGE © Marble Paste to avoid any issues with contamination.
Tomcat EDGE © Marble Paste MSDS Sheets shipped with each bucket of paste as well as located online on our website.
FIGURE 6-A: SPOT REMOVE THE RESIDUE TO CHECK FOR OBVIOUS FLOOR SHINE. IF NOT SATISFIED WITH RESULTS - LET SIT ON FLOOR
LONGER
FIGURE 6-B: FLOOR AFTER MARBLE PASTE WAS UTILIZED
Please refer to www.tomcatequip.com for videos, up-to-date changes, and information8 of 11
NOTE: This level is for floors in good condition in need of LIGHT SCRATCH REMOVAL. For floors requiring more care, see Level 3 titled “Resurface”, which will guide you through the process of grinding and polishing a floor with HEAVY SCRATCH REMOVAL needed. If you just need to polish your marble floor, see Level 1 “Polish” in which you do no grinding, and is just the polishing process.
NOTE: Carefully protect any surrounding surfaces that may be harmed by this process.
NOTE: Surface must be free of any topical coatings and should be dust mopped and wet cleaned as necessary. If any type of mop-on finish is on the surface, you MUST use chemicals to strip the finish off or the diamonds will not work.
Place a total of seven (7) full weights (21 lb/9 kg each), removing two (2) small weights (if equipped) on the Tomcat EDGE © HD20 base. Fill solution tank with clean water.
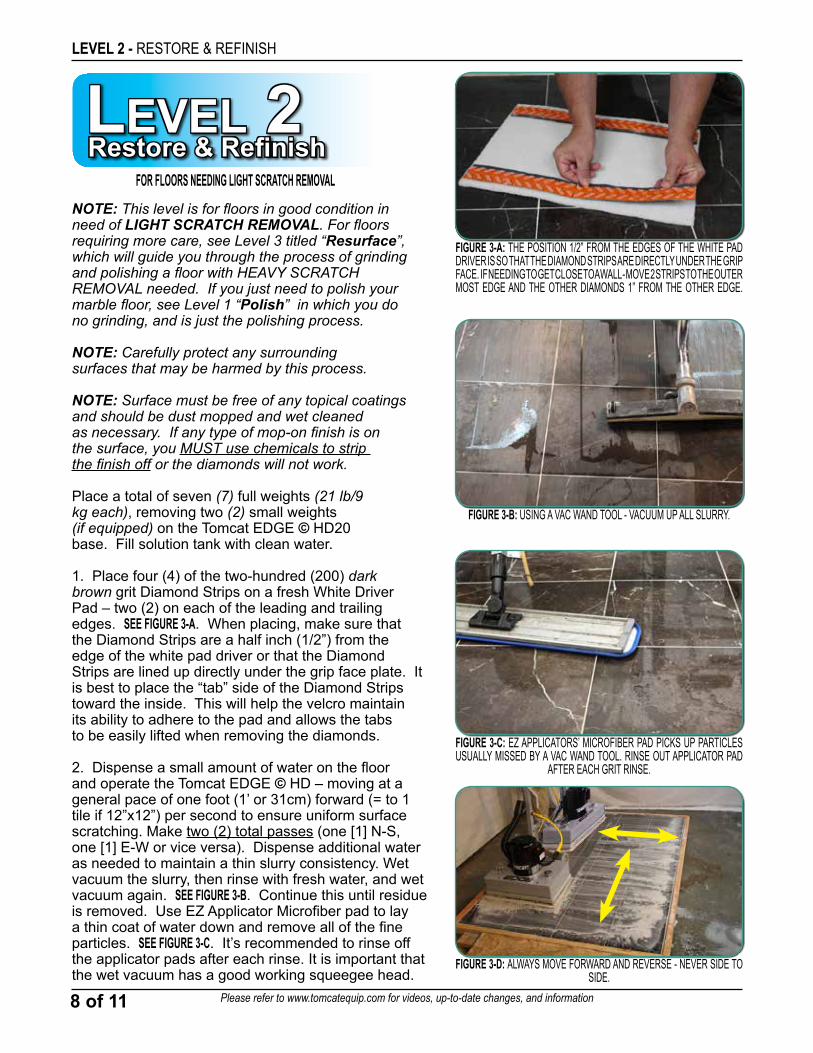
1. Place four (4) of the two-hundred (200) dark brown grit Diamond Strips on a fresh White Driver Pad – two (2) on each of the leading and trailing edges. SEE FIGURE 3-A. When placing, make sure that the Diamond Strips are a half inch (1/2”) from the edge of the white pad driver or that the Diamond Strips are lined up directly under the grip face plate. It is best to place the “tab” side of the Diamond Strips toward the inside. This will help the velcro maintain its ability to adhere to the pad and allows the tabs to be easily lifted when removing the diamonds.
2. Dispense a small amount of water on the floor and operate the Tomcat EDGE © HD – moving at a general pace of one foot (1’ or 31cm) forward (= to 1 tile if 12”x12”) per second to ensure uniform surface scratching. Make two (2) total passes (one [1] N-S, one [1] E-W or vice versa). Dispense additional water as needed to maintain a thin slurry consistency. Wet vacuum the slurry, then rinse with fresh water, and wet vacuum again. SEE FIGURE 3-B. Continue this until residue is removed. Use EZ Applicator Microfiber pad to lay a thin coat of water down and remove all of the fine particles. SEE FIGURE 3-C. It’s recommended to rinse off the applicator pads after each rinse. It is important that the wet vacuum has a good working squeegee head.
FOR FLOORS NEEDING LIGHT SCRATCH REMOVAL
LEVEL 2 - RESTORE & REFINISH
FIGURE 3-A: THE POSITION 1/2” FROM THE EDGES OF THE WHITE PAD DRIVER IS SO THAT THE DIAMOND STRIPS ARE DIRECTLY UNDER THE GRIP FACE. IF NEEDING TO GET CLOSE TO A WALL - MOVE 2 STRIPS TO THE OUTER MOST EDGE AND THE OTHER DIAMONDS 1” FROM THE OTHER EDGE.
FIGURE 3-B: USING A VAC WAND TOOL - VACUUM UP ALL SLURRY.
FIGURE 3-C: EZ APPLICATORS’ MICROFIBER PAD PICKS UP PARTICLES USUALLY MISSED BY A VAC WAND TOOL. RINSE OUT APPLICATOR PAD
AFTER EACH GRIT RINSE.
FIGURE 3-D: ALWAYS MOVE FORWARD AND REVERSE - NEVER SIDE TO SIDE.
LeveL 2Restore & Refinish

Please refer to www.tomcatequip.com for videos, up-to-date changes, and information 9 of 11
ALL liquid needs to be vacuumed and the surface clean of residue for the system to work properly.
NOTE: One pass is considered moving backward and forward in the same path, for example moving “North” and then “South”. When making two or more passes, alternate your directions from North-South to East-West. This will help make certain that all surface is evenly covered. Always move the machine forward and reverse - NEVER side to side as the Diamond Strips will not work properly. SEE FIGURE 3-D. A consistant coverage pattern over the floor is key.
3. Move to the adjacent area, only overlapping the previous area to blend.
4. When the entire area is complete, rinse and vacuum to remove any residue. Always avoid contamination between grits by cleaning the floor thoroughly after each grit. SEE FIGURE 4-A.
5. After using the two-hundred (200) dark brown grit Diamond Strips on a fresh White Driver Pad, repeat steps 1-4 for each additional grit of Diamond Strips: four-hundred (400) burgandy and the eight-hundred (800) light yellow grit Diamond Strips on fresh White Driver Pads. SEE FIGURE 4-B & 4-C. Once complete, move to the next level, Polish Level 1 for instructions on how to finish the Marble restoration project. You can expect to cover up to 1000 sqft/hr (93 sqm/hr) using the two-hundred (200) dark brown through eight-hundred (800) light yellow grit Diamond Strips, although results could vary.
FIGURE 4-A: FLOOR AFTER 200 GRIT DIAMOND STRIPS
FIGURE 4-B: FLOOR AFTER 400 GRIT DIAMOND STRIPS
FIGURE 4-C: FLOOR AFTER 800 GRIT DIAMOND STRIPS

Please refer to www.tomcatequip.com for videos, up-to-date changes, and information10 of 11
FIGURE 1-A: THE POSITION 1/2” FROM THE EDGES OF THE WHITE PAD DRIVER IS SO THAT THE DIAMOND STRIPS ARE DIRECTLY UNDER THE GRIP FACE. IF NEEDING TO GET CLOSE TO A WALL - MOVE 2 STRIPS TO THE OUTER MOST EDGE AND THE OTHER DIAMONDS 1” FROM THE OTHER EDGE.
NOTE: This level is for floors in rough to poor condition in need of HEAVY SCRATCH REMOVAL. For floors requiring less care, see Level 2 titled “Restore & Refinish”, which will guide you through the process grinding and polishing of a floor with only little scratch removal needed. If you just need to polish your marble floor, see Level 1 “Polish” in which you do no grinding, and is just the polishing process.
NOTE: Carefully protect any surrounding surfaces that may be harmed by this process.
NOTE: Surface must be free of any topical coatings and should be dust mopped and wet cleaned as necessary. If any type of mop-on finish is on the surface, you MUST use chemicals to strip the finish off or the diamonds will not work.
Place a total of seven (7) full weights (21 lb/9 kg each), removing two (2) small weights (if equipped) on the Tomcat EDGE © HD20 base. Fill solution tank with clean water.
1. Place four (4) of the thirty (30) orange grit Diamond Strips on a fresh White Driver Pad – two (2) on each of the leading and trailing edges. SEE FIGURE 1-A. When placing, make sure that the Diamond Strips are a half inch (1/2”) from the edge of the white pad driver or that the Diamond Strips are lined up directly under the grip face plate. It is best to place the “tab” side of the Diamond Strips toward the inside. This will help the velcro maintain its ability to adhere to the pad and allows the tabs to be easily lifted when removing the diamonds.
2. Dispense a small amount of water on the floor and operate the Tomcat EDGE © HD – moving at a general pace of one foot (1’ or 31cm) forward (= to 1 tile if 12”x12”) per second to ensure uniform surface scratching. Make three (3) total passes (two [2] North - South, one [1] East - West). Dispense additional water as needed to maintain a thin slurry consistency. Wet vacuum the slurry, then rinse with fresh water, and wet vacuum again. SEE FIGURE 1-B. Continue this until residue is removed. Use EZ Applicator Microfiber pad to lay a thin coat of water down and remove all of the fine particles. SEE FIGURE 1-C. It’s recommended to rinse off the applicator pads after each rinse. It is important that the wet vacuum has a good working
THIS LEVEL IS FOR FLOORS THAT ARE VERY UNEVEN OR HAVE DEEP SCRATCHES IN THEM
FIGURE 1-B: USING A VAC WAND TOOL - VACUUM UP ALL SLURRY.
FIGURE 1-C: EZ APPLICATORS’ MICROFIBER PAD PICKS UP PARTICLES USUALLY MISSED BY A VAC WAND TOOL. RINSE OUT APPLICATOR PAD
AFTER EACH GRIT RINSE.
FIGURE 1-D: ALWAYS MOVE FORWARD AND REVERSE - NEVER SIDE TO SIDE.
LEVEL 3 - RESURFACE & LEVEL
LeveL 3Resurface & Level
Please refer to www.tomcatequip.com for videos, up-to-date changes, and information 11 of 11
squeegee head. ALL liquid needs to be vacuumed and the surface clean of residue for the system to work properly. Expect results up to 500 sqft/hr (46 sqm/hr) using this grit, although results could vary between 250 - 750 sqft/hr (23 - 66 sqm/hr).
NOTE: One pass is considered moving backward and forward in the same path, for example moving “North” and then “South”. When making two or more passes, alternate your directions from North-South to East-West. This will help make certain that all surface is evenly covered. Always move the machine forward and reverse - NEVER side to side as the Diamond Strips will not work properly. SEE FIGURE 1-D. A consistant coverage pattern over the floor is key.
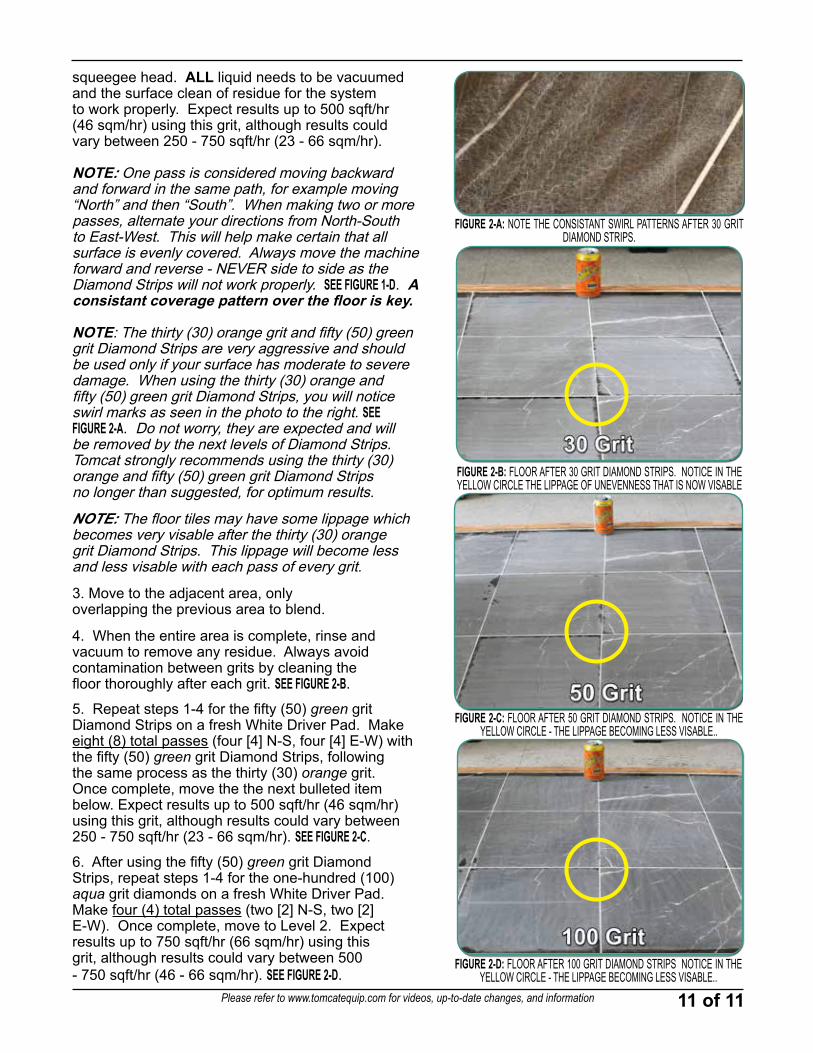
NOTE: The thirty (30) orange grit and fifty (50) green grit Diamond Strips are very aggressive and should be used only if your surface has moderate to severe damage. When using the thirty (30) orange and fifty (50) green grit Diamond Strips, you will notice swirl marks as seen in the photo to the right. SEE FIGURE 2-A. Do not worry, they are expected and will be removed by the next levels of Diamond Strips. Tomcat strongly recommends using the thirty (30) orange and fifty (50) green grit Diamond Strips no longer than suggested, for optimum results.
NOTE: The floor tiles may have some lippage which becomes very visable after the thirty (30) orange grit Diamond Strips. This lippage will become less and less visable with each pass of every grit.
3. Move to the adjacent area, only overlapping the previous area to blend.
4. When the entire area is complete, rinse and vacuum to remove any residue. Always avoid contamination between grits by cleaning the floor thoroughly after each grit. SEE FIGURE 2-B.
5. Repeat steps 1-4 for the fifty (50) green grit Diamond Strips on a fresh White Driver Pad. Make eight (8) total passes (four [4] N-S, four [4] E-W) with the fifty (50) green grit Diamond Strips, following the same process as the thirty (30) orange grit. Once complete, move the the next bulleted item below. Expect results up to 500 sqft/hr (46 sqm/hr) using this grit, although results could vary between 250 - 750 sqft/hr (23 - 66 sqm/hr). SEE FIGURE 2-C.
6. After using the fifty (50) green grit Diamond Strips, repeat steps 1-4 for the one-hundred (100) aqua grit diamonds on a fresh White Driver Pad. Make four (4) total passes (two [2] N-S, two [2] E-W). Once complete, move to Level 2. Expect results up to 750 sqft/hr (66 sqm/hr) using this grit, although results could vary between 500 - 750 sqft/hr (46 - 66 sqm/hr). SEE FIGURE 2-D.
FIGURE 2-A: NOTE THE CONSISTANT SWIRL PATTERNS AFTER 30 GRIT DIAMOND STRIPS.
FIGURE 2-B: FLOOR AFTER 30 GRIT DIAMOND STRIPS. NOTICE IN THE YELLOW CIRCLE THE LIPPAGE OF UNEVENNESS THAT IS NOW VISABLE
FIGURE 2-C: FLOOR AFTER 50 GRIT DIAMOND STRIPS. NOTICE IN THE YELLOW CIRCLE - THE LIPPAGE BECOMING LESS VISABLE..
FIGURE 2-D: FLOOR AFTER 100 GRIT DIAMOND STRIPS NOTICE IN THE YELLOW CIRCLE - THE LIPPAGE BECOMING LESS VISABLE..
Related Documents


![Inicio - SEDECO · Total a pagar 19558713083619 2016-05-04 8713 IMPORTE 223.28 223.28 35.72 259.00 259.00 Referencia ... hbXnu 9 / i DB fHRoC BY j 7 t GN f k 1 S HE s S V L 8 a t]](https://static.cupdf.com/doc/110x72/60242713adc9f77dc4676bcb/inicio-sedeco-total-a-pagar-19558713083619-2016-05-04-8713-importe-22328-22328.jpg)