Let Your Love Shine in LED Lights for Valentine’s Day How to Make This Decorative Heart Using LED Lights www.holidayleds. com

Let Your Love Shine in LED Lights for Valentine's Day: Learn to Make This Decorative Heart with LEDs!
Jul 25, 2015
Welcome message from author
This document is posted to help you gain knowledge. Please leave a comment to let me know what you think about it! Share it to your friends and learn new things together.
Transcript

Let Your Love Shine in LED Lights for Valentine’s Day
How to Make This Decorative Heart Using LED Lights
www.holidayleds.com

Choosing the Lights
Our LED Cherry Blossom Strands are available in Red, Warm White, and Pink, and are great to brighten up any occasion. Decorate your existing bushes/trees/foliage to add a spring-time feel, add a little romance to your wedding lighting, or use them for any creative project you can think of… just like this Valentine’s Day Heart we created. www.holidayleds.c
om

What We Need for the Project
1 Wire grid approximate size 30” x 24”, square
holes are 2 ¾” x 2 ¾” Your size can vary based on the size and
shape you are trying to create 27 Sets of the Pink LED Cherry
Blossom light sets Part #144361R-25 at
www.holidayleds.com Zip Ties
quantity will vary based on size and shape
We also added some “greenery” around the outside of the heart to cover the rest of the wire grid. There are many options/styles available, and you can find this product at your local craft/floral store.www.holidayleds.c
om

Step 1: Preparing the Lights
The first thing you will need to do is open all of the sets of LEDs. You will need to stretch them out, getting all the wire straight, and then neatly bundle them (Fig. 1).
You will then need to “fold” your bundle in half, securing it will a zip tie (Fig. 2).
TIP: we suggest prepping all of your sets first, as this will make the assembly go a lot faster.
Fig. 1Bundled set.
Fig. 2Zip tied
set.

Step 2: Assemble the Design
You will now need your Wire Grid (Fig. 3).
Insert the bundled end of your LED light set thru the square holes on your grid (Fig. 4), making sure to pull the male and female plugs thru to the back side (Fig. 5).
Once you are satisfied with the layout and design, you can zip-tie the light sets to the wire grid.
Fig. 3 Grid. Fig. 4 Inserted bundle. Fig. 5 Back view.
TIP: We suggest “dry fitting” the sets, to make sure your design is coming out, before
you secure the sets to the wire grid.
www.holidayleds.com
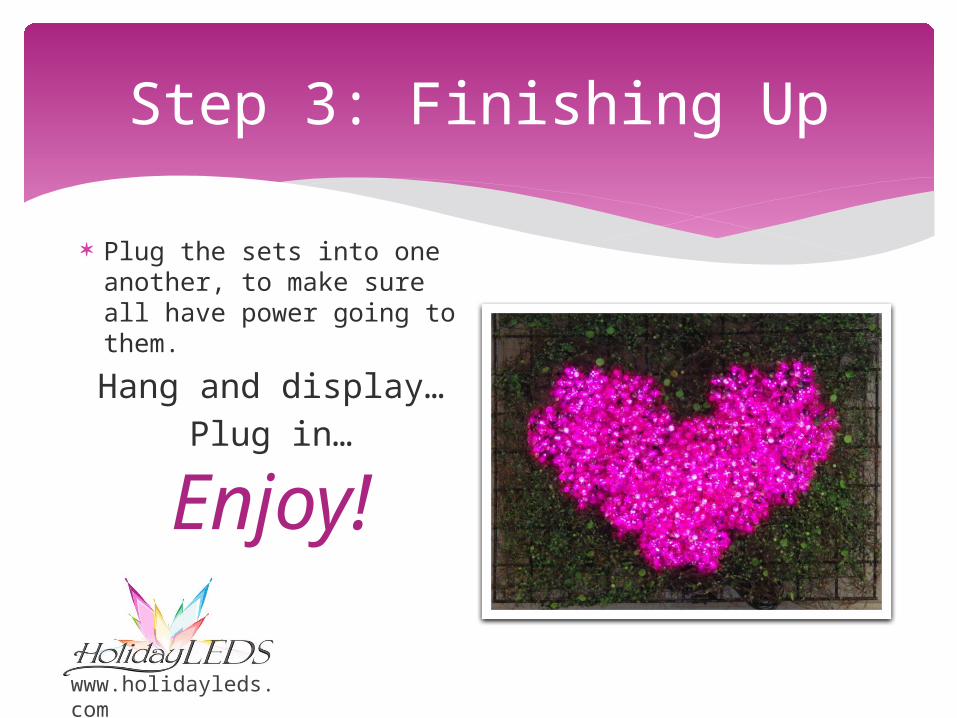
Step 3: Finishing Up
Plug the sets into one another, to make sure all have power going to them.
Hang and display…Plug in…
Enjoy!

For more great tips and the largest selection of LED holiday lights, visit
us at www.HolidayLEDs.com!
We hope you enjoyed this step-by-step tutorial!
www.holidayleds.comfacebook.com/ledchristmaslightstwitter.com/holidayledspinterest.com/holidayleds
Related Documents