Lesson 4: Computer Hardware Basic Maintenance

Lesson 4: Computer Hardware Basic Maintenance. to set up the input and output devices correctly state the steps to connect the peripherals to system unit.
Jan 02, 2016
Welcome message from author
This document is posted to help you gain knowledge. Please leave a comment to let me know what you think about it! Share it to your friends and learn new things together.
Transcript
Lesson 4:Computer Hardware Basic
Maintenance

• to set up the input and output devices correctly• state the steps to connect the peripherals to system unit• powering the system
At the end of this lesson, students should be able to:

This module contains 5 activities: Activity 1: Naming the peripheral port on
the system unit
Activity 2: Connecting the Monitor
to the system unit
Activity 3: Connecting the Keyboard and
mouse to the system unit
Activity 4: Connecting the Speaker to
the system unit
Activity 5: Powering the System

Activity 1: Naming the Peripherals Port
1. Power port
2. PS2 port (Mouse)
3. PS2 port (keyboard)
4. USB port
5. Parallel port (printer port)
6. Port (Modem)
7.VGA port (Monitor display)
8.Game port
9,10,11(Speaker,headphone
and microphone)
No: Label of the ports

Activity 2: Connecting the Monitor to the
system unitSteps:
1. Plug the VGA cable of the monitor to the display device port as in Figure 2.
2. The VGA cable is blue in colour must be connected to the display that has the same colour. Students must connect the tiny pin
on VGA cable carefully.

Figure 2: Connecting VGA cable to monitor port

Activity 3: Connecting the Keyboard and
mouse to the system unit
1. Plug the PS2 cable of the keyboard (purple nozzle) and mouse (green nozzle) to the device port as Figure 3.1.
2. Students also need to be extremely careful to attach the keyboard and mouse to their respective PS/2 port. For keyboard and mouse that have USB toggle use Figure 3.2.

Figure 3.1: Connecting keyboard and mouse to the PS2 ports

Figure 3.2: Connecting keyboard and mouse to the USB ports

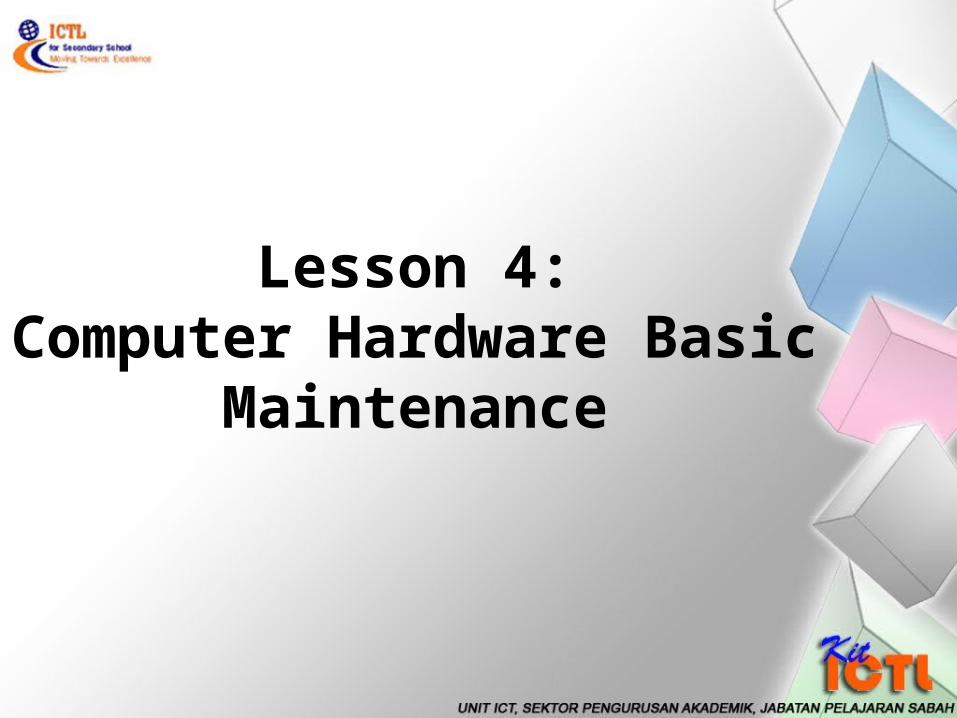
Activity 4: Connecting Audio and Microphone
Devices to the system unit
1. Plug the cable of the speaker (green
nozzle) and microphone (blue nozzle) to the device port as figure 4.
Figure 4: Connecting peripherals Audio and Microphone
to the Audio ports

Activity 5: Powering the System
• Steps:
1. Plug in the power cord and switch
the power supply switch to the‘On’ position.
2. Press the power button. If everything is
connected as it should be, all system fans
should start spinning. You should hear
a single beep, and after 2-5 seconds, the
computer will start to boot.

Figure 5: Connecting the power cable
Basic Computer Setting

BASIC COMPUTER SETTING
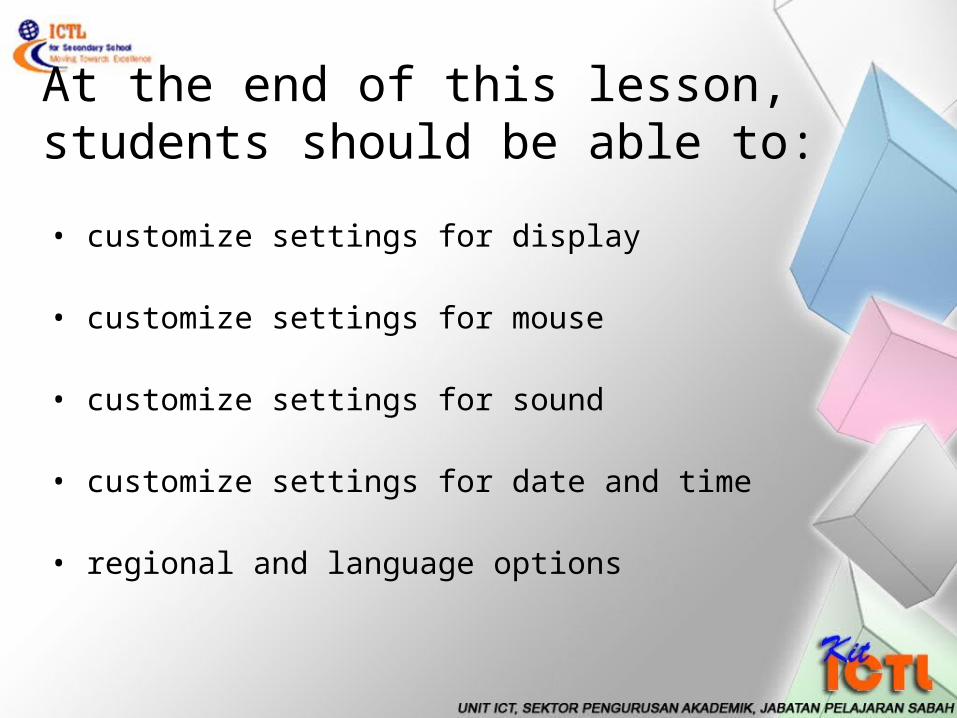
At the end of this lesson, students should be able to:• customize settings for display
• customize settings for mouse
• customize settings for sound
• customize settings for date and time
• regional and language options

This module contains 5 activities:
• Activity 1: Customizing settings for display.
• Activity 2: Customizing settings for mouse.
• Activity 3: Customizing settings for sound.
• Activity 4: Customizing settings for date and time.
• Activity 5: Customizing settings for regional and language options.

Activity 1: Customizing settings for display
1. Click Start button, then click Control Panel
Control Panel

2. Control Panel window will appear as shown below. Then click Appearance and Setting.
Appearance and
Setting
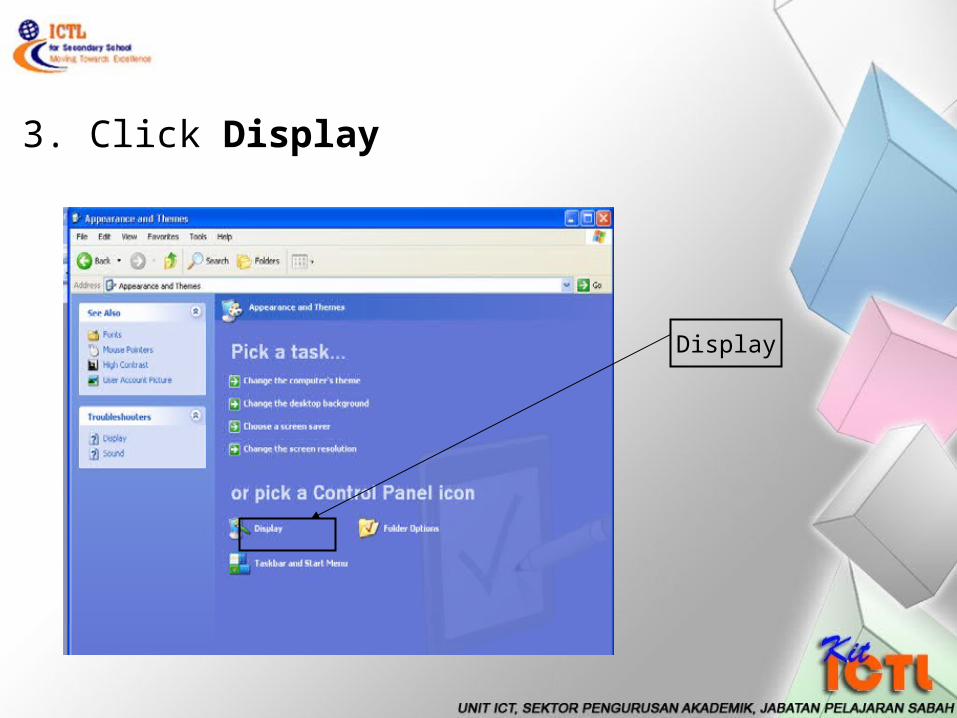
3. Click Display
Display

4. Display Properties window will appear as shown below.
Themes

In the Themes option, you can change the themes of your computer by choosing from the drop down menu. Choose Window XP and click OK.
Drop down menu

5. Click Desktop tab. You can change your desktop background. Choose Bliss in the Background menu and than click OK.
Desktop
Background menu
Ok
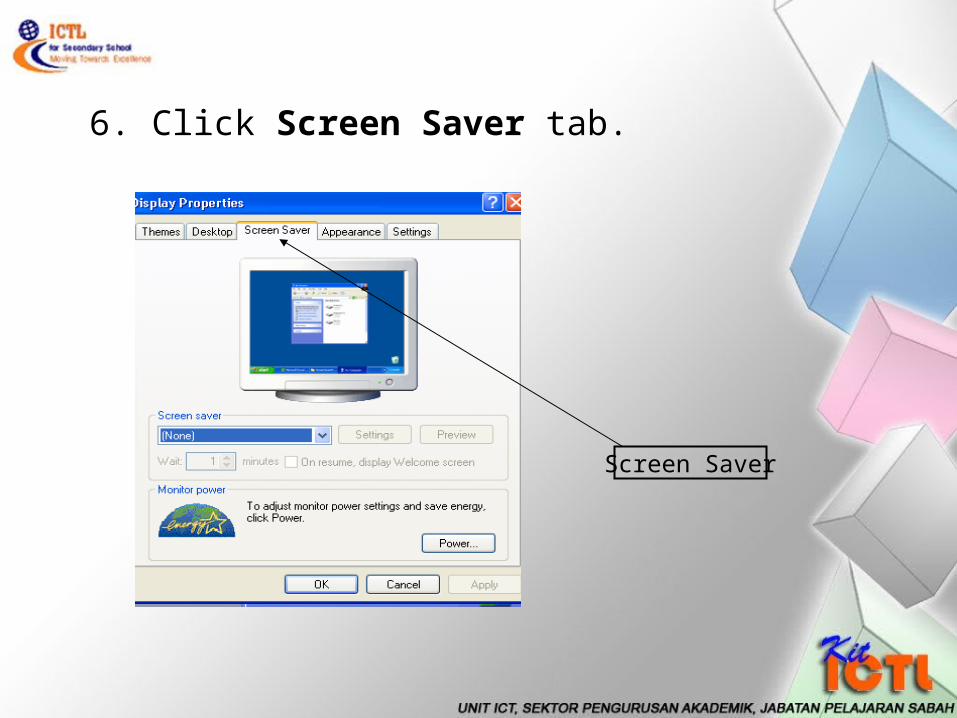
6. Click Screen Saver tab.
Screen Saver
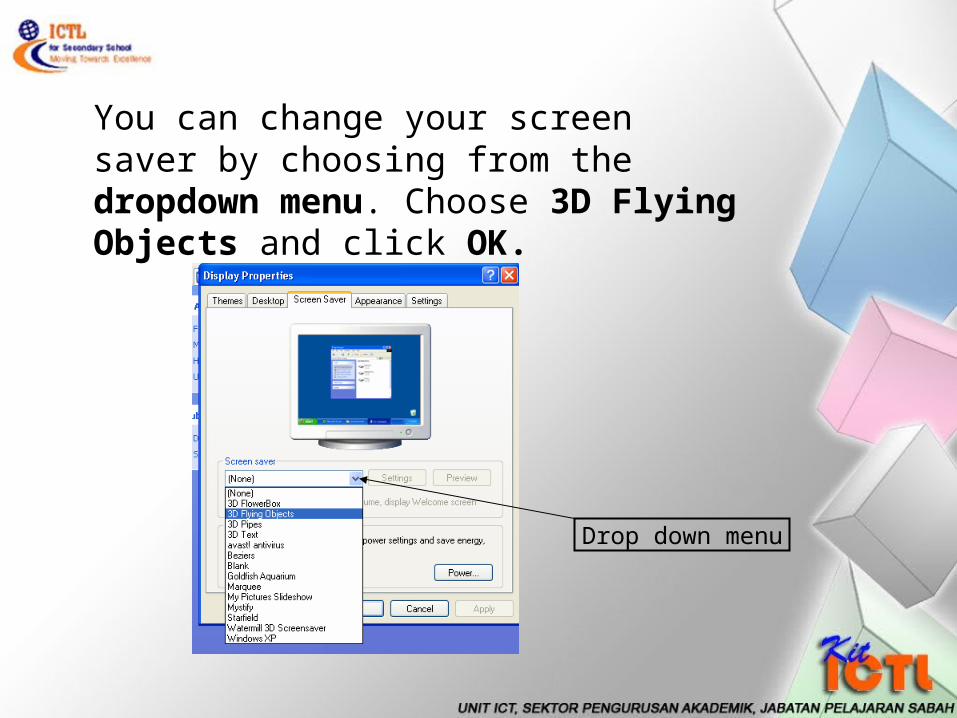
You can change your screen saver by choosing from the dropdown menu. Choose 3D Flying Objects and click OK.
Drop down menu

7. Click Appearance tab. In Windows and buttons,
Appearance

You can change the appearance of windows and buttons, colour schemes and font size by choosing from drop down menu.
Windows and buttons
Colour scheme
Font size
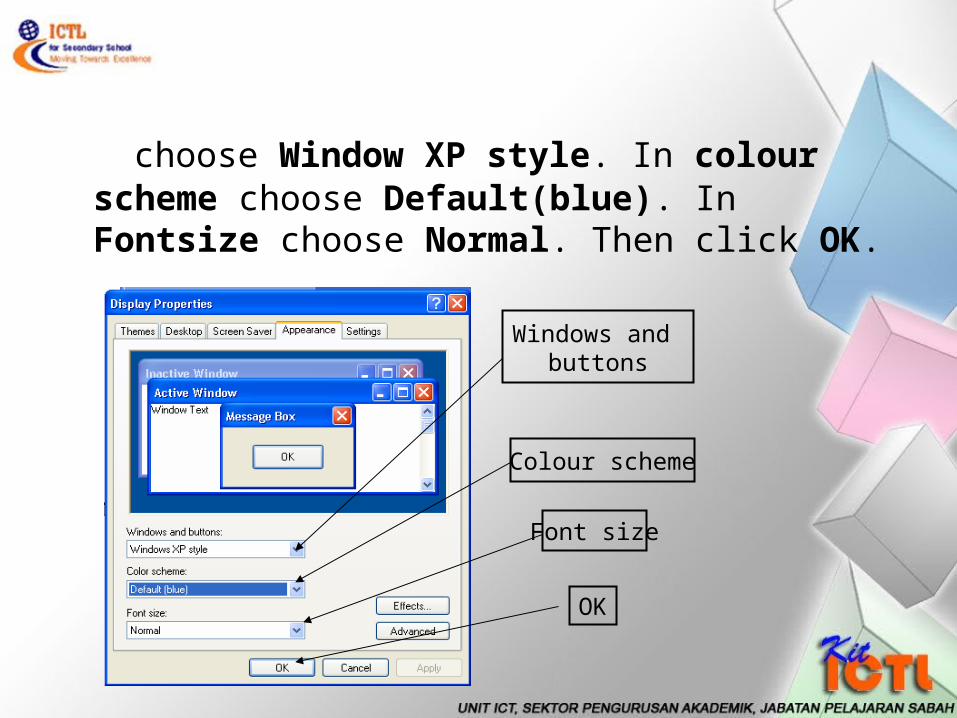
choose Window XP style. In colour scheme choose Default(blue). In Fontsize choose Normal. Then click OK.
Windows and buttons
Colour scheme
Font size
OK

Activity 2:Customizing settings for mouse
1. In the Control Panel, click Appearance and Themes.
Appearance and themes

2. Appearance and Themes window will be displayed, then click Mouse Pointers.
Mouse Pointers

3. The Mouse Properties window will appear as shown below. Choose Pointer tab option. You can customize the mouse pointer by choosing from the customize Drop down menu. Choose Normal Select and click OK.
Pointers
Customize Drop Down menu
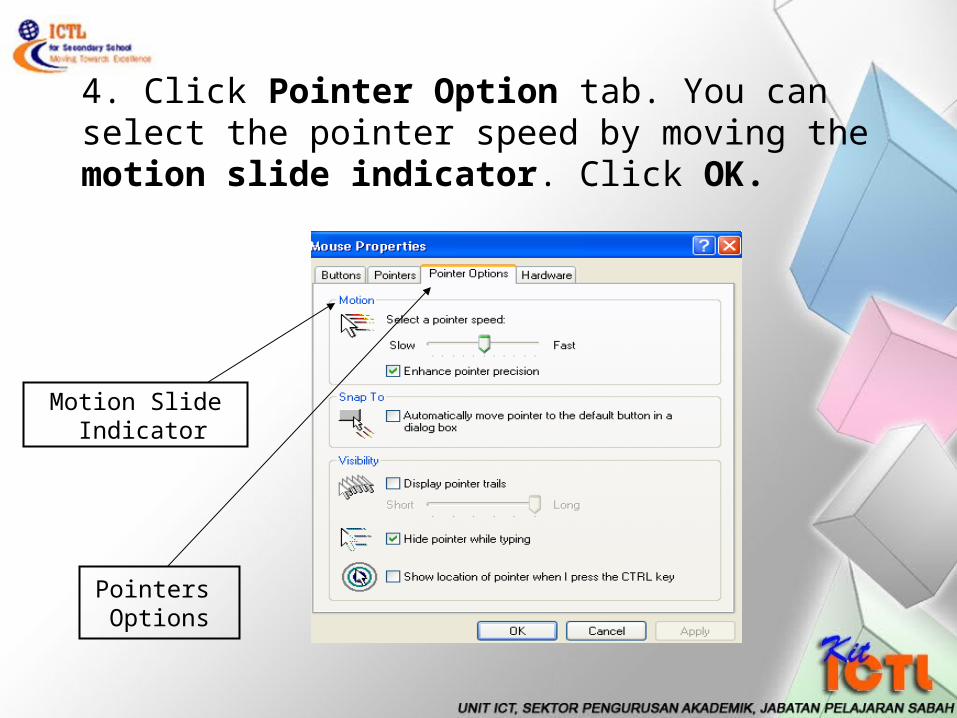
4. Click Pointer Option tab. You can select the pointer speed by moving the motion slide indicator. Click OK.
Pointers Options
Motion Slide Indicator

Activity 3: Customizing settings for sound1. In the Control Panel, click Sounds, Speech and Audio Devices. Then click Adjust the system volume.
Sound, Speech and Audio Devices Adjust the System Volume
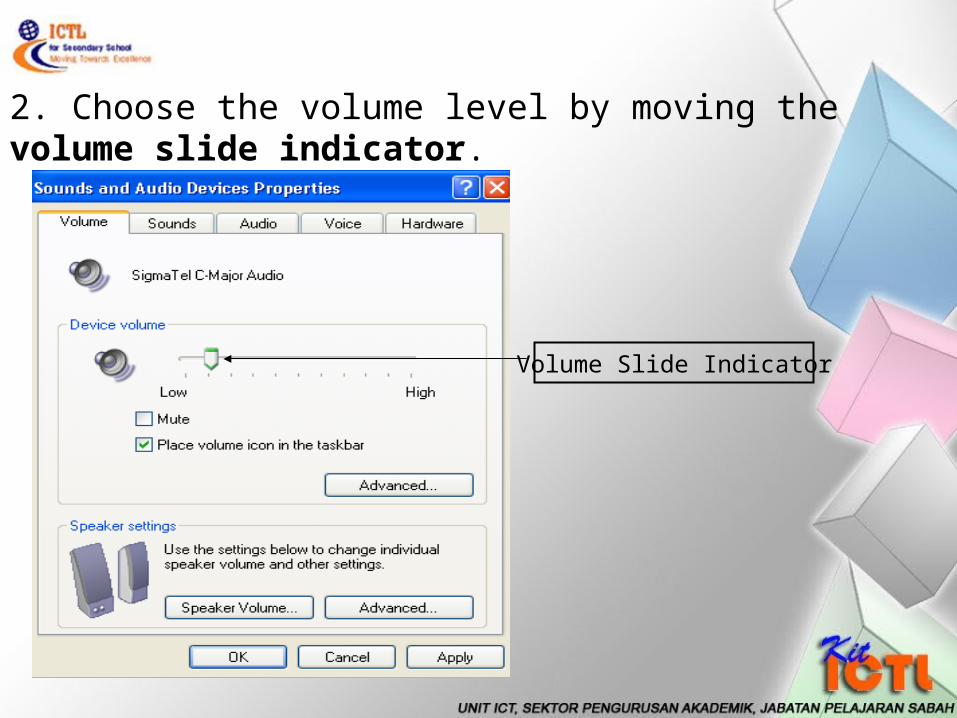
2. Choose the volume level by moving the volume slide indicator.
Volume Slide Indicator
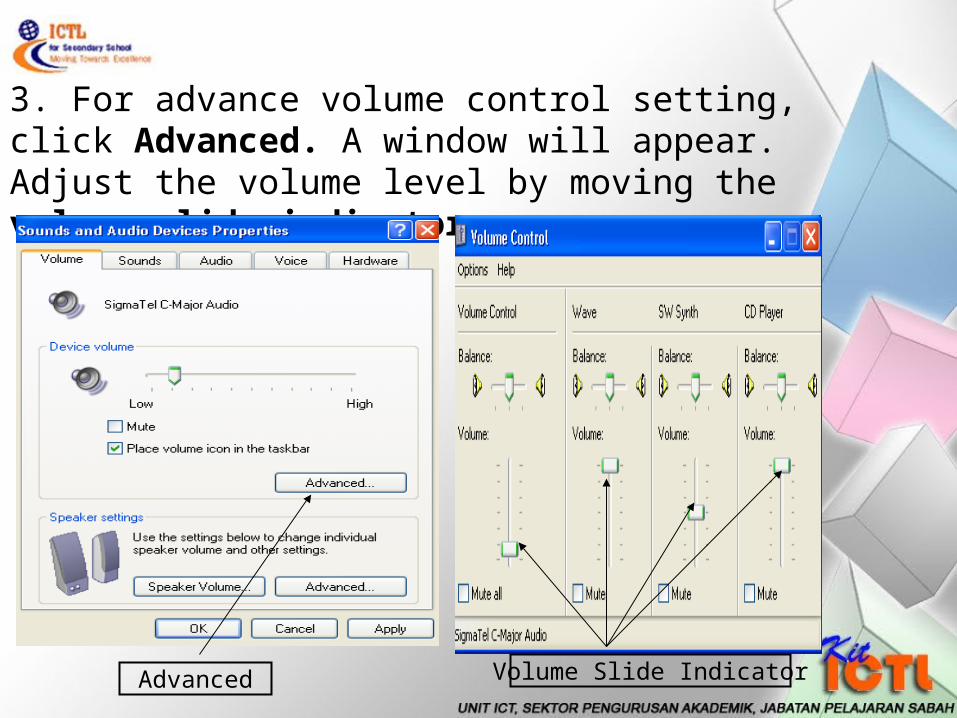
3. For advance volume control setting, click Advanced. A window will appear. Adjust the volume level by moving the volume slide indicator.
Advanced Volume Slide Indicator

Activity 4. Customizing settings for Date and Time1. In the Control Panel, click Date, Time, Language and Regional Options.
Date,Time,Language and Regional Options

Then click Date and Time.
Date and Time
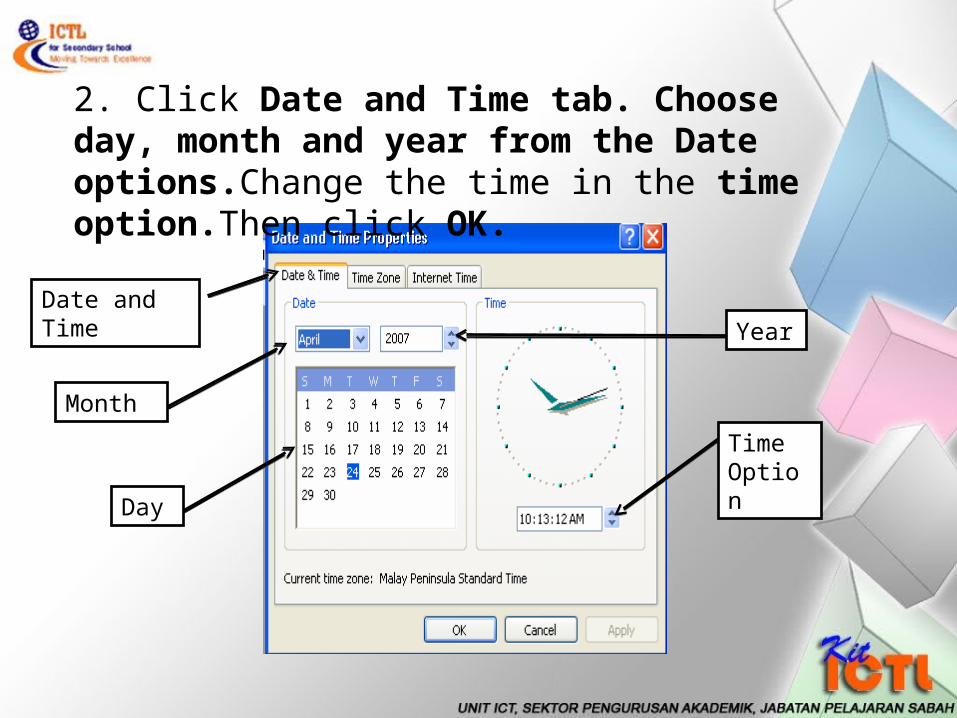
2. Click Date and Time tab. Choose day, month and year from the Date options.Change the time in the time option.Then click OK.
Month
Day
Date and Time
Time Option
Year
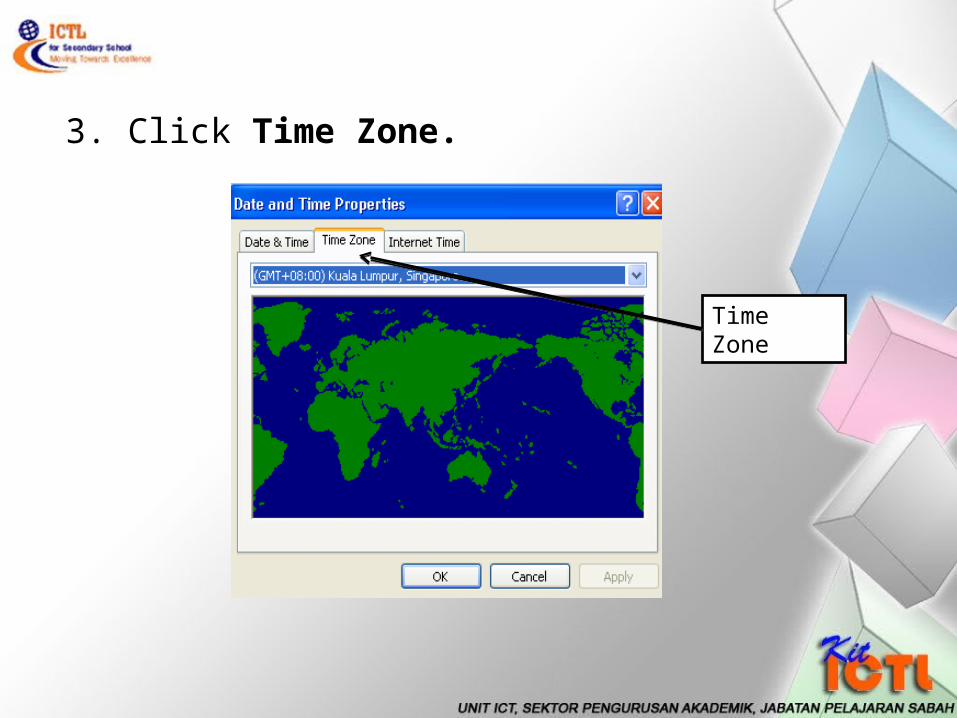
3. Click Time Zone.
Time Zone

Choose the time zone from the drop down menu according to the country you stay. Choose (GMT+08:00) Kuala Lumpur, Singapore and click OK.
Drop down menu

Activity 5: Customizing settings for Regional and Language Options.1. In the Control Panel, click Date, Time, Language and Regional Options.
Date,Time,Language and Regional Options
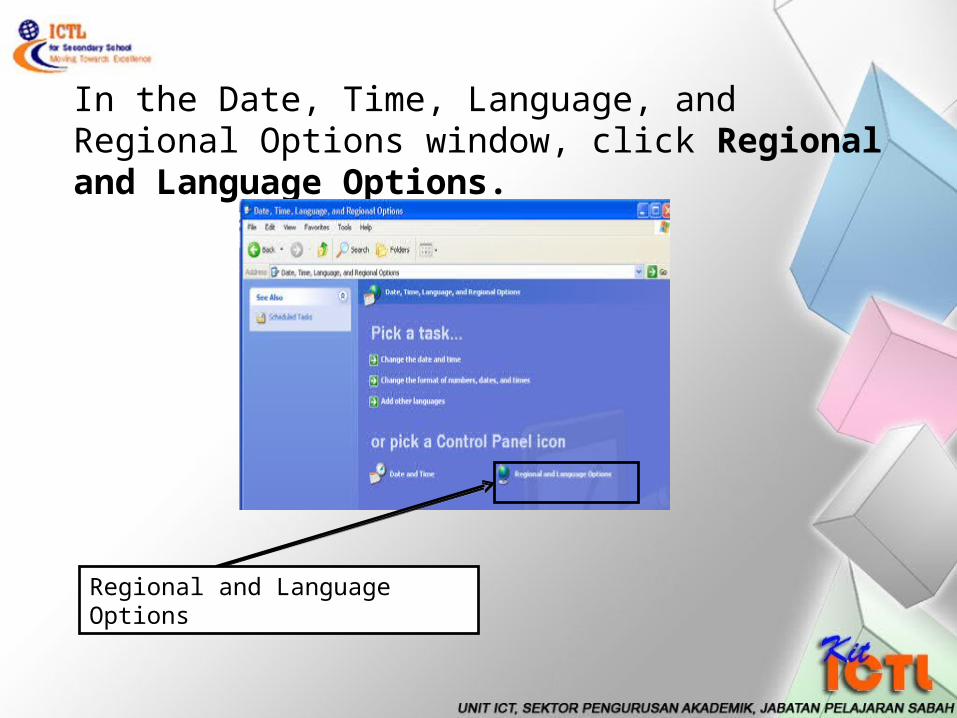
In the Date, Time, Language, and Regional Options window, click Regional and Language Options.
Regional and Language Options
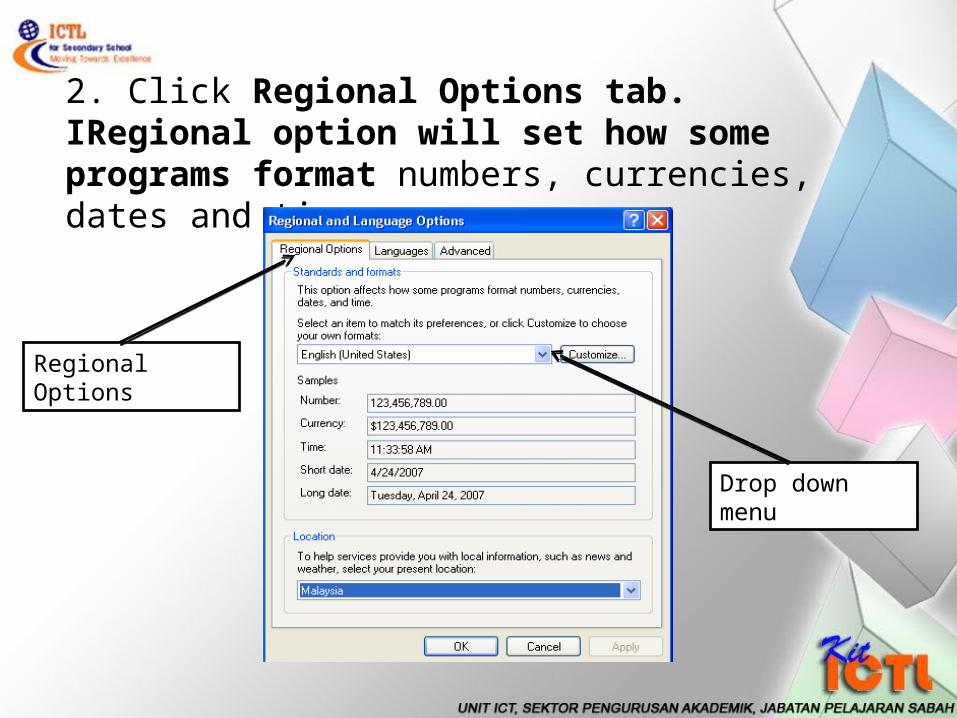
2. Click Regional Options tab. IRegional option will set how some programs format numbers, currencies, dates and time.
Drop down menu
Regional Options
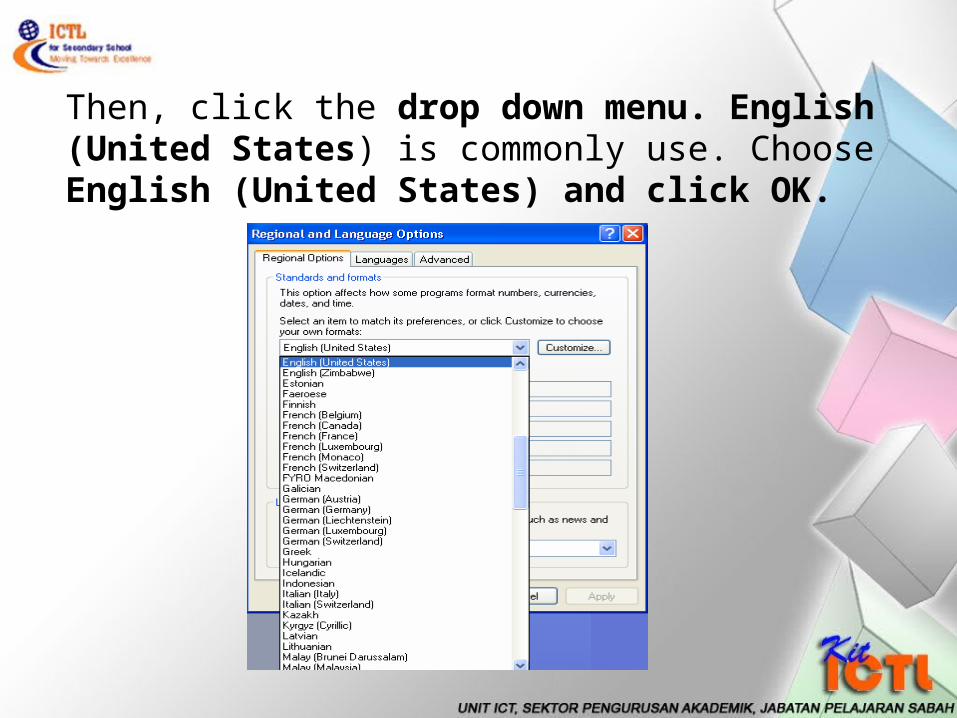
Then, click the drop down menu. English (United States) is commonly use. Choose English (United States) and click OK.

3. Control Panel window will appear as below. Close the Control Panel Window.
Close
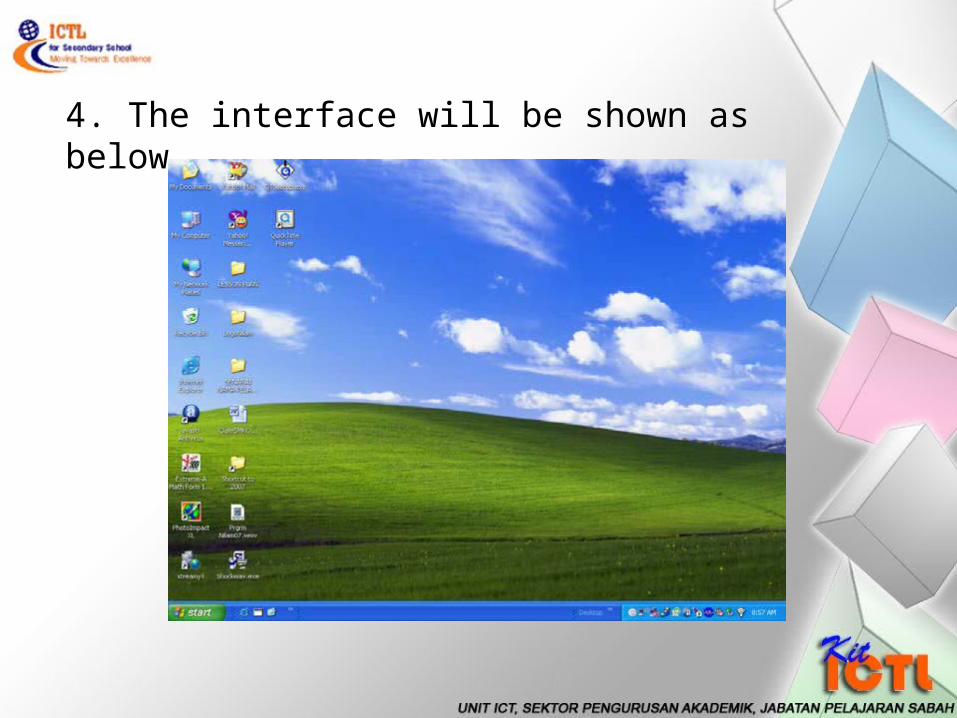
4. The interface will be shown as below.

Current Development of Hardware Technology

1. Blu-ray and HD (2008 – 2009)
2. Netbook ( 2007-2009)
3. 3G, WiFi and WiMax (2006-2008)
4. Intel: The Latest Processor Intel Itanium
siri 9100 (2002- present)
5. HP Photosmart Premium TouchSmart
Web All-in-One Printer
(2009)
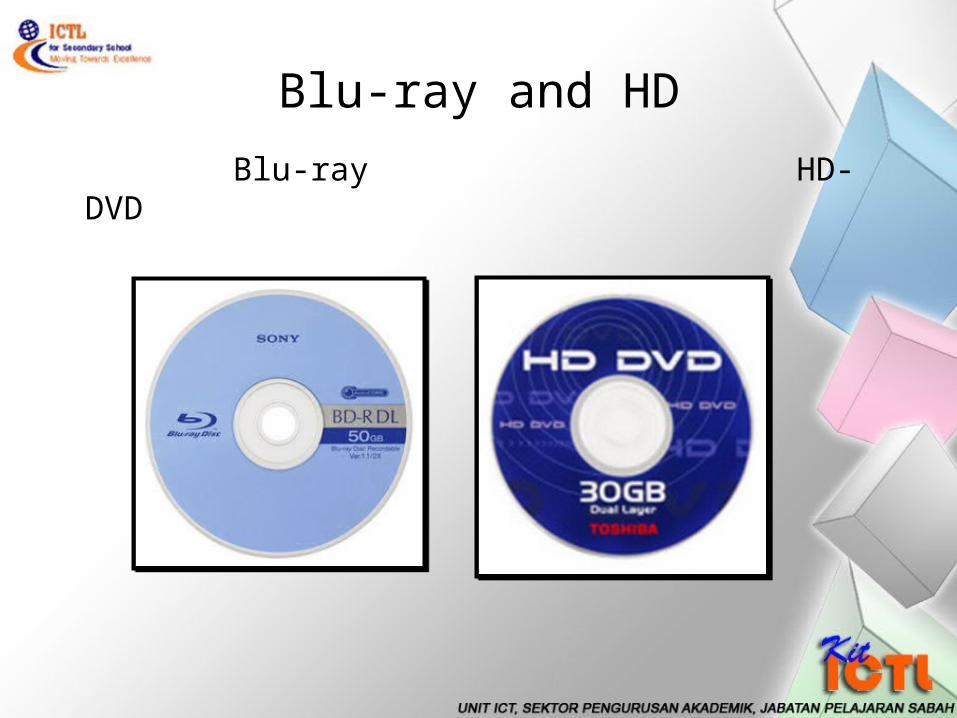
Blu-ray and HD
Blu-ray HD-DVD
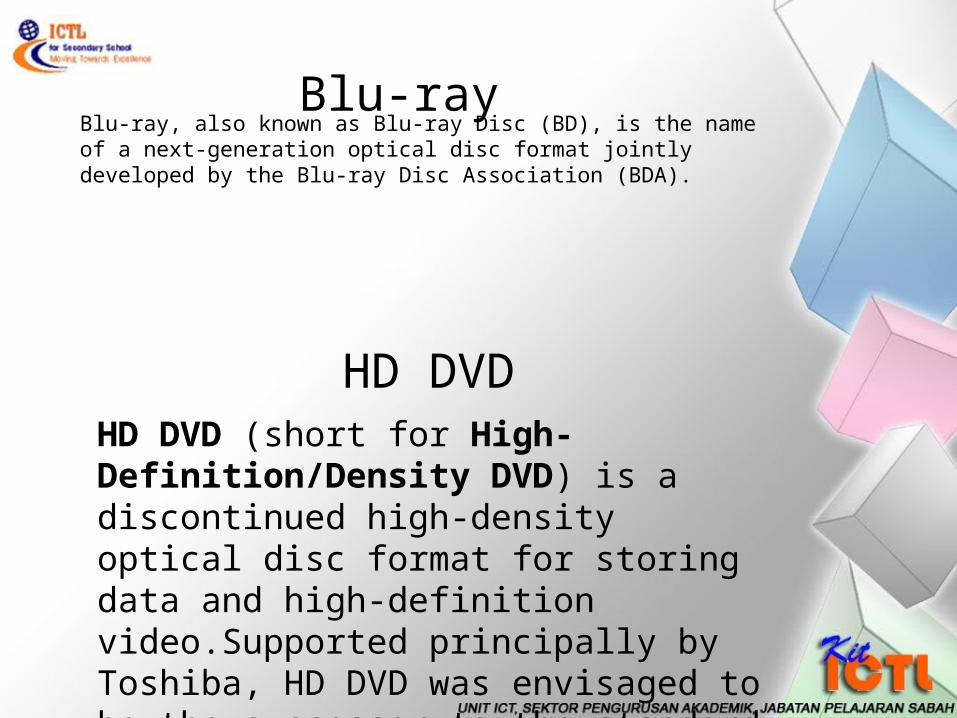
Blu-rayBlu-ray, also known as Blu-ray Disc (BD), is the name of a next-generation optical disc format jointly developed by the Blu-ray Disc Association (BDA).
HD DVDHD DVD (short for High-Definition/Density DVD) is a discontinued high-density optical disc format for storing data and high-definition video.Supported principally by Toshiba, HD DVD was envisaged to be the successor to the standard DVD format

Wireless Technology –
3G, WiFi dan WiMax Networking

3G
International Mobile Telecommunications-2000 (IMT-2000), better known as 3G or 3rd Generation.
WiFi
Wi-Fi is a class of wireless local area network (WLAN) devices based on the IEEE 802.11 standards.
WiMax
• WiMAX, meaning Worldwide Interoperability for Microwave Access, is a telecommunications technology that provides wireless transmission of data using a variety of transmission modes, from point-to-multipoint links to portable and fully mobile internet access.

The technology provides up to 10 Mbit/s [ broadband speed without the need for cables. The technology is based on the IEEE 802.16 standard (also called Broadband Wireless Access)

Netbooks• Netbooks (also called mini notebooks or
subnotebooks) are a rapidly evolving category of small, light and inexpensive laptop computers suited for general computing and accessing web-based applications.

The Latest Processor Intel Itanium siri 9100
The Latest Processor Intel Itanium siri 9100
• Itanium is a family of 64-bit Intel microprocessors that implement the Intel Itanium architecture (formerly called IA-64).
• The processors are marketed for use in enterprise servers and high-performance computing systems.

HP Photosmart Premium TouchSmart Web All-in-One
Printer

HP Photosmart Premium TouchSmart Web All-in-One
Printer
• Aside from the never-ending name, the HP Photosmart Premium TouchSmart Web All-in-One Printer looks good and prints high-quality photos at competitive speeds.
Related Documents