©Curriculum Associates, LLC Copying is not permitted. 643a Lesson 30 Points, Lines, Rays, and Angles Lesson Overview LESSON 30 Points, Lines, Rays, and Angles Lesson Objectives Content Objectives • Identify and draw points, lines, line segments, rays, and angles and identify them in two-dimensional figures. • Recognize an angle as a geometric shape. • Identify acute, right, and obtuse angles in two-dimensional figures. • Identify and draw parallel and perpendicular lines, distinguish between the two, and identify them in two-dimensional figures. Language Objectives • Identify points, lines, line segments, rays, and angles in two-dimensional figures. • Draw points, lines, line segments, rays, and angles. • Identify parallel and perpendicular lines in two-dimensional figures. • Use the terms point, line segment, line, ray, angle, right angle, acute angle, obtuse angle, parallel, perpendicular, and vertex to communicate effectively. Prerequisite Skills • Identify two-dimensional figures and their attributes. • Draw two-dimensional figures. • Compare and contrast two-dimensional figures. Standards for Mathematical Practice (SMP) SMPs 1, 2, 3, 4, 5, and 6 are integrated in every lesson through the Try-Discuss- Connect routine.* In addition, this lesson particularly emphasizes the following SMPs: 4 Model with mathematics. 5 Use appropriate tools strategically. 6 Attend to precision. *See page 363m to see how every lesson includes these SMPs. Lesson Vocabulary • acute angle an angle that measures more than 08 but less than 908. • angle a geometric shape formed by two rays, lines, or line segments that meet at a common point. • line a straight row of points that goes on forever in both directions. • line segment a straight row of points that starts at one point and ends at another point. • obtuse angle an angle that measures more than 908 but less than 1808. • parallel lines lines that are always the same distance apart and never cross. • perpendicular lines two lines that meet to form a right angle, or a 908 angle. • point a single location in space. • ray a straight row of points that starts at one point and goes on forever in one direction. • right angle an angle that looks like a square corner and measures 908. • vertex the point where two rays, lines, or line segments meet to form an angle. Learning Progression In Grade 3 students classified geometric figures according to properties such as the presence or absence of right angles and relationships between sides (e.g., opposite sides of equal length, parallel sides). In this lesson students identify, name, and draw geometric figures including points, line segments, lines, rays, and angles (right, acute, and obtuse) as well as parallel and perpendicular lines and line segments. Students gain a concrete understanding of the geometric concepts as they draw the figures as well as identify them in other two-dimensional figures. Other lessons in this unit build on the knowledge students gain in this lesson. Students will learn to use a protractor to measure angles and to draw angles of a specified measure; to add and subtract with angles; and to classify figures based on attributes such as parallel or perpendicular sides and kinds of angles.

Welcome message from author
This document is posted to help you gain knowledge. Please leave a comment to let me know what you think about it! Share it to your friends and learn new things together.
Transcript
©Curriculum Associates, LLC Copying is not permitted.643a Lesson 30 Points, Lines, Rays, and Angles
Lesson Overview
LESSON 30
Points, Lines, Rays, and Angles
Lesson Objectives
Content Objectives• Identify and draw points, lines, line
segments, rays, and angles and identify them in two-dimensional figures.
• Recognize an angle as a geometric shape.
• Identify acute, right, and obtuse angles in two-dimensional figures.
• Identify and draw parallel and perpendicular lines, distinguish between the two, and identify them in two-dimensional figures.
Language Objectives• Identify points, lines, line segments, rays,
and angles in two-dimensional figures.
• Draw points, lines, line segments, rays, and angles.
• Identify parallel and perpendicular lines in two-dimensional figures.
• Use the terms point, line segment, line, ray, angle, right angle, acute angle, obtuse angle, parallel, perpendicular, and vertex to communicate effectively.
Prerequisite Skills
• Identify two-dimensional figures and their attributes.
• Draw two-dimensional figures.
• Compare and contrast two-dimensional figures.
Standards for Mathematical Practice (SMP)
SMPs 1, 2, 3, 4, 5, and 6 are integrated in every lesson through the Try-Discuss-Connect routine.*
In addition, this lesson particularly emphasizes the following SMPs:
4 Model with mathematics.
5 Use appropriate tools strategically.
6 Attend to precision.
* See page 363m to see how every lesson includes these SMPs.
Lesson Vocabulary
• acute angle an angle that measures more than 08 but less than 908.
• angle a geometric shape formed by two rays, lines, or line segments that meet at a common point.
• line a straight row of points that goes on forever in both directions.
• line segment a straight row of points that starts at one point and ends at another point.
• obtuse angle an angle that measures more than 908 but less than 1808.
• parallel lines lines that are always the same distance apart and never cross.
• perpendicular lines two lines that meet to form a right angle, or a 908 angle.
• point a single location in space.
• ray a straight row of points that starts at one point and goes on forever in one direction.
• right angle an angle that looks like a square corner and measures 908.
• vertex the point where two rays, lines, or line segments meet to form an angle.
Learning Progression
In Grade 3 students classified geometric figures according to properties such as the presence or absence of right angles and relationships between sides (e.g., opposite sides of equal length, parallel sides).
In this lesson students identify, name, and draw geometric figures including points, line segments, lines, rays, and angles (right, acute, and obtuse) as well as parallel and perpendicular lines and line segments. Students gain a concrete understanding of the geometric concepts as they draw the figures as well as identify them in other two-dimensional figures.
Other lessons in this unit build on the knowledge students gain in this lesson. Students will learn to use a protractor to measure angles and to draw angles of a specified measure; to add and subtract with angles; and to classify figures based on attributes such as parallel or perpendicular sides and kinds of angles.

©Curriculum Associates, LLC Copying is not permitted. 643bLesson 30 Points, Lines, Rays, and Angles
Lesson Pacing Guide
PERSONALIZE
i-Ready Lessons*Grade 4• Identify Points, Lines, and Rays• Identify Angles
Independent Learning
PREPARE
Ready Prerequisite LessonGrade 3• Lesson 30 Understand Categories of Shapes
RETEACH
Tools for InstructionGrade 3• Lesson 30 Categories of Shapes
Grade 4• Lesson 30 Rays and Angles
REINFORCE
Math Center ActivitiesGrade 4• Lesson 30 Geometry Vocabulary Match• Lesson 30 Drawing for Geometry
EXTEND
Enrichment ActivityGrade 4• Lesson 30 New Roads
Small Group DifferentiationTeacher Toolbox
Lesson MaterialsLesson (Required)
Per student: ruler, index card, copy of Start slide (Session 2)
Activities Per student: 6 chenille stems, 6 sheets of paper, 3 straws, geoboard, tapePer pair: ruler or straightedgeActivity Sheet: 1-Centimeter Grid Paper
Math Toolkit geoboards, chenille stems, rulers, grid paper, tracing paper, straws
SESSION 1
Explore45–60 min
Points, Lines, Rays, and Angles• Start 5 min• Try It 10 min• Discuss It 10 min• Connect It 15 min• Close: Exit Ticket 5 min
Additional PracticeLesson pages 647–648
SESSION 2
Develop45–60 min
Points, Lines, Line Segments, and Rays• Start 5 min• Try It 10 min• Discuss It 10 min• Picture It & Model It 5 min• Connect It 10 min• Close: Exit Ticket 5 min
Additional PracticeLesson pages 653–654
Fluency Points, Lines, Line Segments, and Rays
SESSION 3
Develop45–60 min
Identifying Angles• Start 5 min• Try It 10 min• Discuss It 10 min• Picture It & Model It 5 min• Connect It 10 min• Close: Exit Ticket 5 min
Additional PracticeLesson pages 659–660
Fluency Identifying Angles
SESSION 4
Develop45–60 min
Parallel and Perpendicular Lines• Start 5 min• Try It 10 min• Discuss It 10 min• Picture It & Model It 5 min• Connect It 10 min• Close: Exit Ticket 5 min
Additional PracticeLesson pages 665–666
Fluency Parallel and Perpendicular Lines
SESSION 5
Refine45–60 min
Points, Lines, Rays, and Angles• Start 5 min• Example & Problems 1–3 15 min• Practice & Small Group
Differentiation 20 min• Close: Exit Ticket 5 min
Lesson Quiz or Digital Comprehension Check
Whole Class Instruction
* We continually update the Interactive Tutorials. Check the Teacher Toolbox for the most up-to-date offerings for this lesson.

©Curriculum Associates, LLC Copying is not permitted.643–644 Lesson 30 Points, Lines, Rays, and Angles
LESSON 30
Connect to Family, Community, and Language DevelopmentThe following activities and instructional supports provide opportunities to foster school, family, and community involvement and partnerships.
Connect to FamilyUse the Family Letter—which provides background information, math vocabulary, and an activity—to keep families apprised of what their child is learning and to encourage family involvement.
©Curriculum Associates, LLC Copying is not permitted.Lesson 30 Points, Lines, Rays, and Angles644
Do this activity with your child to identify lines, rays, and angles.
Together with your child, fi nd examples of real-life objects that have parts that look like lines, rays, and angles.
• Give clues to describe the objects to each other without naming the objects. Use some of the geometry vocabulary words that your child is learning about.
• Try to guess each object from the other person’s description of it.
• Here are some real-life examples you might use:
ACTIVITY Po����, Li���, Ra��, a�� An����
Guitar strings (parallel line segments)
Brick wall (perpendicular and parallel line segments)
Fence (angles, parallel and perpendicular line segments)
Ceiling fan (angles and line segments)
644©Curriculum Associates, LLC Copying is not permitted. Lesson 30 Points, Lines, Rays, and Angles 643
Points, Lines, Rays, and Angles
30Dear Family,This week your child is learning about points, lines, rays, and angles.Here are some vocabulary words that tell about the geometry concepts that your child is learning.
A point is a single location in space. Point A is shown at the right.
A line segment is a straight row of points that starts at one point and ends at another point. Line segment AB is written as ··· AB .
A line is a straight row of points that goes on forever in both directions. Line AB is written as
k
· l
AB .
A ray is a straight row of points that starts at one point and goes on forever in one direction. Ray AB is written as
· l
AB .
An angle is formed by two rays, lines, or line segments that meet at a common point called the vertex. The angle shown at the right can be named /A, /CAB, or /BAC.
Parallel lines are always the same distance apart and never cross.
Perpendicular lines cross to form a right angle.
Invite your child to share what he or she knows about points, lines, rays, and angles by doing the following activity together.
A
A B
A B
A B
A B
C
643
GoalThe goal of the Family Letter is to encourage students and family members to use geometric terms to discuss points, lines, rays, and angles. Some of the geometric terms used in the discussions are new to students. Definitions and illustrations are provided for the terms in the Family Letter.
ActivityIn the Points, Lines, Rays, and Angles activity, students and family members are encouraged to find real-world objects that look like they have lines, rays, and angles. Students and family members take turns giving clues and guessing the objects described.
Math Talk at HomeEncourage students to discuss the definitions and illustrations of new geometric terms with their family members by playing a listening/speaking game called I’m thinking of . . . . Instead of naming the term, students and family members may draw an illustration of the term being described.
Conversation Starters Below are additional conversation starters students can write in their Family Letter or math journal to engage family members:
• I’m thinking of a geometric term for lines that are the same distance apart and never cross. What term am I thinking of?
• I’m thinking of a geometric term for a straight row of points that goes on forever in both directions. What term am I thinking of?
Available in Spanish
Teacher Toolbox

©Curriculum Associates, LLC Copying is not permitted. 644aLesson 30 Points, Lines, Rays, and Angles
Connect to Community and Cultural ResponsivenessUse these activities to connect with and leverage the diverse backgrounds and experiences of all students.
Connect to Language DevelopmentFor ELLs, use the Differentiated Instruction chart to plan and prepare for specific activities in every session.
Listening/Reading Use with Connect It problem 2. Write the terms and draw the illustrations below on sentence strips:
point
line segment
line
ray
angle
Display and read the term point. Say: A point is a single location in space. Find the point illustration and display it near the term point. Continue this process with the remaining terms and illustrations. Shuffle the strips. Now have students read each term and find the matching illustration.
Reading/Listening Choral read Connect It problem 2. Write the following terms on sentence strips: point, line segment, line, ray, and angle. Display the term point. Ask students to go to Connect It problem 2 and reread the definition of the term point. Then ask them to define point in their own words. Write their responses on sentence strips. Continue this process with the remaining terms. Shuffle the strips. Ask students to read the strips and match each term to its definition. Once students have correctly matched the strips, read aloud the terms and definitions. Then have students illustrate each term.
Listening/Writing Have students read Connect It problem 2. Assign each student a partner and give each student pair 15 index cards. Ask student pairs to listen to and follow the directions:
• Write each of the following terms on a separate card: point, line segment, line, ray, and angle.
• In your own words, write a definition for each term on separate cards.
• Illustrate each term on separate cards.
• Shuffle your cards and exchange them with another group.
• Work with your partner to correctly match the terms with their definitions and illustrations.
Levels 3–5Levels 2–4Levels 1–3
ELLEnglish Language Learners:Differentiated Instruction
Prepare for Session 1Use with Connect It.
Session 2 Use with Try It.
• Explain to students that geometric shapes and figures are used in the arts from around the world, including Scandinavian quilt designs, Moroccan tile patterns, Native American Tigua pottery, Aztec paintings, Pennsylvania-Dutch artwork, and African Teke masks. Survey the class to see which art form they would like to see and then display pictures. For example, you can show a Scandinavian quilt with a sky design and ask students to point out the geometric shapes that make the repeating pattern. Remind students that in addition to finding shapes such as triangles, squares, and rectangles, they can look for points, lines, line segments, rays, and angles. Ask students to compare the designs found in the quilt to the illustration in Try It.
Session 3 Use with Connect It problems 1–3.
• To make the information relevant to students, provide real-world examples of right, acute, and obtuse angles. Take a class poll to see what students are interested in. For example, if you learn some students are interested in cars, use pictures of license plates, traffic signs, windshield wipers, and wheel rims to illustrate examples of
right, acute, and obtuse angles. If you learn students are interested in baking, use pictures of cake or pie pieces to illustrate the three different types of angles. As students deepen their understanding of angles, remind them to use the mental pictures of things that are of interest to them to help them remember the meanings of the terms right angle, acute angle, and obtuse angle.
Session 4 Use with Try It.
• Use a street map of the school neighborhood to teach students about parallel and perpendicular streets. Find streets the students live on to use as examples. For example, say: Kara lives on Peninsula Street. Hector lives on Sunset Street. Their streets are parallel. Antonia lives on Wave Street. Her street crosses Kara and Hector’s streets at a right angle. Antonia’s street is perpendicular to Kara’s street and to Hector’s street.
©Curriculum Associates, LLC Copying is not permitted.645 Lesson 30 Points, Lines, Rays, and Angles
LESSON 30
SESSION 1 Explore
Start
Connect to Prior KnowledgeMaterials For each student: ruler, index card
Why Support students’ facility with drawing two-dimensional shapes.
How Have students draw a square, a rectangle, and a triangle.
©Curriculum Associates, LLC Copying is permitted.
Start
Grade 4 Lesson 30 Session 1 | Explore Points, Lines, Rays, and Angles
1 Draw a square.
2 Draw a rectangle.
3 Draw a triangle.
SolutionsCheck drawings. 1. 4 sides of equal length, 4 right angles2. 4 sides, opposite sides of equal length, 4 right angles3. 3 sides, 3 angles
TRY ITMake Sense of the ProblemTo support students in making sense of the problem, have them show that they understand that the drawing is not a rectangle.
DISCUSS ITSupport Partner DiscussionTo reinforce the attributes of a rectangle that they need to describe, encourage students to use the terms sides and angles as they talk to each other.
Look for, and prompt as necessary for, understanding of:
• a rectangle has 4 sides and 4 right angles
• a rectangle has opposite sides of equal length
Common Misconception Look for students who do not understand what details are missing in the description of the rectangle. As students present solutions, have them specify the kinds of sides and angles that a rectangle has.
Select and Sequence Student SolutionsOne possible order for whole class discussion:
• physical models, such as geoboards or chenille stems, showing a rectangle
• accurate drawings of a rectangle with a few labels
• written descriptions of a rectangle that include 2 pairs of same-length sides
• written descriptions of a rectangle that include 2 pairs of same-length sides and 4 right angles
Support Whole Class DiscussionPrompt students to note how a rectangle is described in each model in terms of its sides and angles.
Ask How do [student name]’s and [student name]’s models show the sides and angles of a rectangle?
Listen for The model has 4 sides, 4 right angles, and 2 pairs of opposite sides that are the same length.
Purpose In this session, students draw on their experience with two-dimensional figures in order to write an accurate description of a rectangle. Students identify attributes of a rectangle to use in their descriptions. They will look ahead to learn several new terms used to describe geometric figures and to label points in each figure in order to name the figures.
©Curriculum Associates, LLC Copying is not permitted. Lesson 30 Points, Lines, Rays, and Angles 645
• Draw points, lines, line segments, rays, angles (right, acute, obtuse), and perpendicular and parallel lines. Identify these in two-dimensional fi gures.
• Recognize angles as geometric shapes that are formed wherever two rays share a common endpoint, and understand concepts of angle measurement.
SMP 1, 2, 3, 4, 5, 6
Learning Targets
SESSION 1 LESSON 30
Previously, you have learned about shapes such as squares, rectangles, and triangles. Now you will learn more about what makes up these shapes. Use what you know to try to solve the problem below.
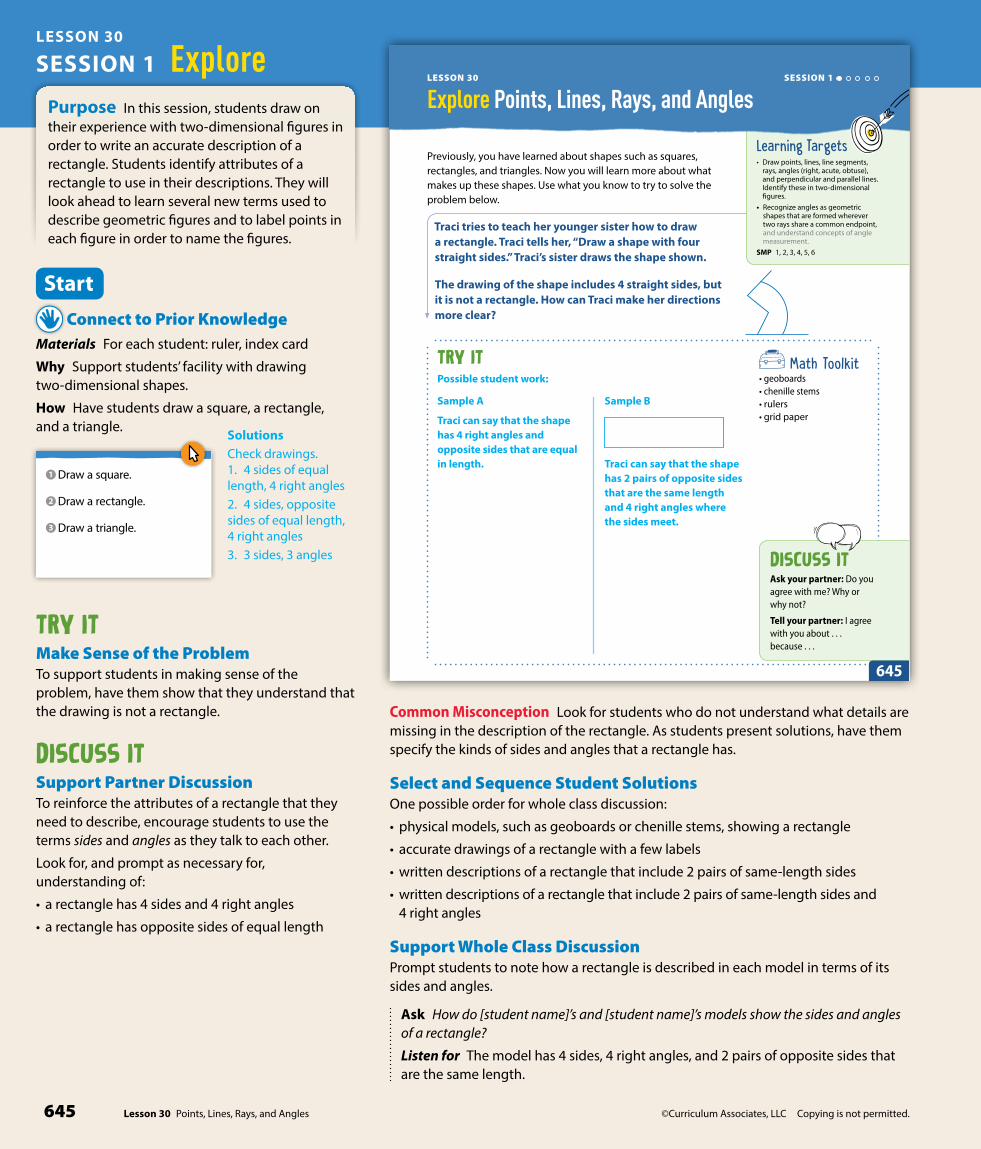
Traci tries to teach her younger sister how to draw a rectangle. Traci tells her, “Draw a shape with four straight sides.” Traci’s sister draws the shape shown.
The drawing of the shape includes 4 straight sides, but it is not a rectangle. How can Traci make her directions more clear?
TRY IT
DISCUSS ITAsk your partner: Do you agree with me? Why or why not?
Tell your partner: I agree with you about . . . because . . .
Math Toolkit• geoboards• chenille stems• rulers• grid paper
Explore Points, Lines, Rays, and Angles
645
Possible student work:
Sample A
Traci can say that the shape has 4 right angles and opposite sides that are equal in length.
Sample B
Traci can say that the shape has 2 pairs of opposite sides that are the same length and 4 right angles where the sides meet.

©Curriculum Associates, LLC Copying is not permitted. 646Lesson 30 Points, Lines, Rays, and Angles
©Curriculum Associates, LLC Copying is not permitted.Lesson 30 Points, Lines, Rays, and Angles646
LESSON 30 EXPLORE SESSION 1
CONNECT IT1 LOOK BACK
Explain how Traci can make her directions more clear.
2 LOOK AHEADCertain words in geometry are used to describe shapes in detail. Read each description and use it to label the point or points in the fi gure at the right.
a. A point is a single location in space. A dot can show a point. You can name a point with a capital letter, such as point A.
b. A line segment is a straight row of points that starts at one point and ends at another point. You can write “line segment AB” as ··· AB .
c. A line is a straight row of points that goes on forever in both directions. You can write “line AB” as
k
· l
AB .
d. A ray is a straight row of points that starts at one point and goes on forever in one direction. You can write “ray AB” as
· l
AB . When you name a ray, you always start with the endpoint.
e. Rays, lines, or line segments that meet at a common point, or vertex, form an angle. You can write “angle A” as /A or /CAB or /BAC. The vertex is always the middle letter.
3 REFLECTDoes a rectangle contain lines or line segments? Explain.
646
She can say, “Draw a shape with 4 straight sides and 4 right angles. Each side stops when it meets another side. The sides opposite each other are the same length; sides that meet at a corner can be different lengths.”
line segments; Possible explanation: Each side of a rectangle starts at one
point and ends at another point, so the sides are line segments.
Possible explanation:
A
A
A
A
A
B
B
B
B
C
CONNECT IT 1 LOOK BACK
Look for understanding that a rectangle has 4 straight sides with opposite sides equal in length and 4 right angles.
Hands-On ActivityUse geoboards to describe a shape.
If . . . students are unsure about the concept of identifying the attributes of a shape,
Then . . . use this activity to provide a more concrete experience.
Materials For each student: geoboard
• Have each student make a rectangle on their geoboard using rubber bands.
• Ask questions and have students use their responses to write a description of a rectangle: How many sides does your rectangle have? [4] How many angles? [4] Are any sides the same length? [yes] How would you describe the sides? [Opposite sides are the same length and are parallel.] How would you describe the angles? [They are square corners, so they are right angles.]
• If time allows, have students exchange their descriptions with a partner and have the partner try to draw the shape.
• Repeat the activity for a square and a triangle.
2 LOOK AHEADPoint out that the first figure is a point and that points are the building blocks of other geometric figures. Students should be able to use the terms and definitions to label the points in each shape.
Ask How are line segments, lines, and rays the same and different? Briefly explain the connection between angles and the other figures.
Listen for All three are made up of straight rows of points. Line segments start at one point and end at another point, lines go on forever in both directions, and rays start at one point and go on forever in one direction. Angles are made up of rays, lines, or line segments that meet at a vertex to form the angle.
Students will spend more time learning about these terms in the Additional Practice.
Close: Exit Ticket
3 REFLECTLook for understanding of the difference between lines, which go on forever in both directions, and line segments, which start at one point and end at another point. Explain that a line segment is a piece of a line.
Common Misconception If students are unsure about how lines and line segments differ, then walk them through an activity in which they use their arms to “show” different figures, including points (hold a fist up in the air), line segments (make fists with both hands and hold arms out straight to the sides), lines (hold arms out straight to the sides with fingers pointing out), rays (hold arms out straight to the sides, make a fist with one hand and have fingers pointing out with the other hand), and angles (hold both arms straight to form an angle with fingers pointing out).
Real-World ConnectionHave students look around the classroom and make a list of examples of all the
points, line segments, lines, rays, and angles that they can find. Examples include thumbtack on a bulletin board (point), edge of a floor tile (line segment), flashlight beam (ray), and corner of a window (angle).

©Curriculum Associates, LLC Copying is not permitted.647 Lesson 30 Points, Lines, Rays, and Angles
LESSON 30
©Curriculum Associates, LLC Copying is not permitted. Lesson 30 Points, Lines, Rays, and Angles 647
Name:
2 Label each fi gure as a point, line segment, line, ray, or angle.
A B A B
C
A B A B
1 Think about what you know about geometric fi gures. Fill in each box. Use words, numbers, and pictures. Show as many ideas as you can.
Word In My Own Words Example
point
line segment
line
ray
angle
Prepare for Points, Lines, Rays, and Angles
LESSON 30 SESSION 1
647
Possible answers:
A single location in space
A straight row of points that starts at one point and ends at another point
A straight row of points that goes on forever in both directions
A straight row of points that starts at one point and goes on forever in one direction
Two rays, lines, or line segments that meet at a common point
line segment angle ray line
Solutions
Support Vocabulary Development
1 Ask students to think about what they know about the geometric terms point, line segment, line, ray, and angle. Divide students into small groups. Give each group sticky notes. Write the term point on a large sheet of paper or chart paper. Ask students to work with group members and record what they know about a point on sticky notes. Have all groups post their completed notes around the term point. Read the information to students. Continue the process with the remaining geometric terms: line segment, line, ray, and angle. Encourage students to refer to the information as they complete their graphic organizers. Remind students that they can add new information to the class display as they learn more about the geometric figures.
2 Have students review the information they recorded on their graphic organizers to label each figure as a point, line segment, line, ray, or angle. Once students have labeled each figure, ask them to explain to a classmate why they labeled the figures as they did.
Supplemental Math Vocabulary• geometry
• vertex
SESSION 1 Additional Practice

©Curriculum Associates, LLC Copying is not permitted. 648Lesson 30 Points, Lines, Rays, and Angles
Levels 1–3 Levels 2–4 Levels 3–5
English Language Learners:Differentiated InstructionELL
Listening/Writing Use with Connect It problem 4. Have students prepare a graphic organizer.
Terms CharacteristicsName/Illustration
one linethree line segmentsfour raysone angle
Ask students to listen as you complete the information for one line. Then have them complete their organizers for the rest of the terms. Have students share their finished organizers with partners. Encourage them to add information as they learn from their partners.
Listening/Writing Have students underline one line in Connect It problem 4. Ask: How does this drawing represent one line? Students should listen to and then answer the following questions to help organize their thoughts:
• What are the characteristics of a line?
• What do the arrows on the ends represent?
• How could you name this line?
Record student responses. Continue the process with three line segments, four rays, and one angle. Suggest that students refer to the information that was recorded during the discussion when writing their responses to problem 4.
Listening/Speaking Underline one line in Connect It problem 4. Ask students to listen as you describe how the drawing represents one line. Point to the characteristics and say: This is one line with arrows on both ends. The arrows mean it goes on forever in both directions. I can name the line
k
· l
AB . Have students describe how the drawing represents one line in their own words. Use a sentence frame to guide their responses:
• This drawing represents . I can name it .
Continue the process with three line segments, four rays, and one angle.
Prepare for Session 2Use with Connect It.
©Curriculum Associates, LLC Copying is not permitted.Lesson 30 Points, Lines, Rays, and Angles648
3 Solve the problem. Show your work.
Marshall tries to teach his younger sister how to draw a square. Marshall tells her, “Draw a shape with four straight sides.” Marshall’s sister draws the shape shown.
The drawing of the shape includes 4 straight sides, but it is not a square. How can Marshall make his directionsmore clear?
Solution
4 Check your answer. Show your work.
LESSON 30 SESSION 1
648
Possible student work using words:
A square is a shape with 4 sides of equal length and 4 right angles.
I can use my directions to draw a shape.
My shape has 4 right angles and 4 straight sides that are the same length. My shape is a square.
Marshall can say that the shape has only 4 straight sides.
He can also say that the shape has 4 right angles and all 4 sides are the
same length.
3 Assign problem 3 to provide another look at the geometric figures that make up shapes.
This problem is very similar to the problem about Traci giving her younger sister directions on how to draw a rectangle. In both problems, students are given a word problem in which a younger child has followed directions to draw a shape. Students must clarify the directions so that the correct shape can be drawn. The question asks how Marshall can make his directions for drawing a square more clear.
Students may want to use pattern blocks or draw diagrams with pencil and paper.
Suggest that students read the problem three times, asking themselves one of the following questions each time:
• What is this problem about?
• What is the question I am trying to answer?
• What information is important?
Solution: Marshall can say that the shape has only 4 straight sides. He can also say that the shape has 4 right angles and all 4 sides are the same length. Medium
4 Have students solve the problem a different way to check their answer.

©Curriculum Associates, LLC Copying is not permitted.649 Lesson 30 Points, Lines, Rays, and Angles
LESSON 30
©Curriculum Associates, LLC Copying is not permitted. Lesson 30 Points, Lines, Rays, and Angles 649
LESSON 30
Develop Points, Lines, Line Segments, and RaysSESSION 2
Read and try to solve the problem below.
Kent draws a shape using three diff erent geometric fi gures. Describe the three geometric fi gures that Kent uses in his shape.
B
A
C
TRY IT Math Toolkit• chenille stems• rulers• tracing paper
DISCUSS ITAsk your partner: How did you get started?
Tell your partner: I started by . . .
649
Possible student work:
Sample A
· l
AC has a point at one end and one arrow that shows the points go on forever in that direction, so it must be a ray.
··· AB has a point at each end, so it must be a line segment.
k
· l
BC has an arrow at each end to show points go on forever in both directions, so it must be a line.
Sample B
CB
A
CB
A
I can draw each figure separately.
· l
AC is a ray.
··· AB is a line segment.
k
· l
BC is a line.
StartConnect to Prior KnowledgeMaterials For each student: copy of Start slide
Why Support students’ understanding of identifying lines, line segments, and rays.
How Have students match a drawing of a line, a line segment, and a ray with the correct term.
©Curriculum Associates, LLC Copying is permitted.
Start
Match each figure with its name.
1 ray
2 line
3 line segment
Grade 4 Lesson 30 Session 2 | Develop Points, Lines, Line Segments, and Rays
Solutions
1. line
2. line segment
3. ray
Develop LanguageWhy Develop an understanding of the term endpoint.
How Draw a line segment with points at the ends. Point to the endpoints on your drawing and say: An endpoint is the point that marks the end of a line segment or ray. Have students restate the definition in their own words.
TRY ITMake Sense of the ProblemTo support students in making sense of the problem, have them identify that they need to describe the three different figures that together form the shape.
Ask What do you know? What are you trying to find out?
DISCUSS ITSupport Partner DiscussionEncourage students to use the terms angle, line segment, line, and ray as they discuss.
Support as needed with questions such as:
• What characteristics did you use to find the geometric figures in the shape?
• How is your solution the same as or different from your partner’s?
Common Misconception Look for students who list only the line segments AB, BC, and CA because they “see” the shape as a triangle. Have them use those line segments to draw a shape and compare it with the shape that Kent draws.
Select and Sequence Student SolutionsOne possible order for whole class discussion:
• physical models, such as chenille stems, showing a ray, line segment, and line to represent the shape
• accurate drawings with one or two labels describing the figures in the shape
• accurate drawings with labels in words to describe the figures in the shape
• written descriptions or drawings that include mathematical notation to denote the geometric figures in the shape
SESSION 2 DevelopPurpose In this session, students solve a problem that requires identifying the geometric figures in a given shape. Students use words, mathematical notation, drawings, or manipulatives to model each geometric figure in the shape. The purpose of this problem is to have students develop strategies for identifying geometric figures in shapes.

©Curriculum Associates, LLC Copying is not permitted. 650Lesson 30 Points, Lines, Rays, and Angles
©Curriculum Associates, LLC Copying is not permitted.Lesson 30 Points, Lines, Rays, and Angles650
LESSON 30 DEVELOP
Explore diff erent ways to understand points, lines, line segments, and rays.
Kent draws a shape using three diff erent geometric fi gures. Describe the three geometric fi gures that Kent uses in his shape.
B
A
C
Picture ItYou can make some drawings to help describe the fi gures used in the shape.
Each fi gure is straight. Draw the diff erent kinds of straight rows of points that you know.
line segment ray line
m���� ItYou can also use words to help describe the fi gures used in the shape.
Label the line segment, ray, and line that are drawn as the fi gures in Kent’s shape. Look for endpoints and arrowheads.
B
A
C
line segment
line
ray
650
Support Whole Class DiscussionCompare and connect the different representations and have students identify how they are related.
Ask How does your model show the three geometric figures used in the shape?
Listen for Students should recognize that accurate responses include a line segment with two endpoints, a ray with one endpoint and an arrow on the other end, and a line with arrows at both ends. Responses may also include labeling the points or labeling the figures as line segment AB (or line segment BA), ray AC, and line BC (or line CB).
PICTURE IT & MODEL ITIf no student presented these models, connect them to the student models by pointing out the ways they each represent:
• line BC (or line CB)
• line segment AB (or line segment BA)
• ray AC
Ask How does each model represent a line, a line segment, and a ray that are used in the shape?
Listen for One model shows a labeled drawing of a line segment, a ray, and a line by themselves without showing them in the shape. The other model uses color and words to identify and label the line segment, ray, and line in the shape.
For the drawings of geometric figures, prompt students to consider how the figures are shown and labeled.
• How are points and arrows used to define each figure?
• How could the letter labels shown on the shape be used to label the three geometric figures?
For the labeled and colored shape, prompt students to consider how color and labels are used to show the geometric figures in the shape.
• What does the red, blue, and green coloring show?
• The figures identified as rays in Picture It and Model It do not look the same. How do you know that they are both rays?
Deepen UnderstandingIdentify Geometric FiguresSMP 6 Attend to precision.
When discussing the labeled and colored shape shown in Model It, prompt students to consider how labeling parts of a shape with words or letters helps identify and define the geometric figures in the shape.
Ask What is one way to name the line in the figure? the line segment? the ray?
Listen for You can write line BC or CB with the line symbol over the letters; you can write line segment AB or BA with the line segment symbol over the letters; you can write ray AC with the ray symbol over the letters.
Ask Which letter labels for figures can be swapped without changing the geometric figure they refer to? Which letter labels cannot be swapped without changing the geometric figure they refer to?Listen for You can swap the labels for the line and line segment by writing line BC or line CB and line segment AB or line segment BA. However, the labels for the ray cannot be swapped because ray AC is not the same as ray CA. The first letter of the label identifies the starting point of the ray.

©Curriculum Associates, LLC Copying is not permitted.651 Lesson 30 Points, Lines, Rays, and Angles
LESSON 30
©Curriculum Associates, LLC Copying is not permitted. Lesson 30 Points, Lines, Rays, and Angles 651
Co����� ItNow you will use the problem from the previous page to help you understand how to identify line segments, angles, and rays and to help you solve a similar problem.
1 Name a real-world example of a line segment.
2 When two line segments, lines, or rays meet at a point, they form an angle. Name a real-world example of an angle.
3 Is a beam of light from a fl ashlight more like a line or a ray? Explain.
4 The drawing below represents one line, three line segments, four rays, and one angle. Name each of these fi gures.
A B C
5 REFLECTLook back at your Try It, strategies by classmates, and Picture It and Model It. Which models or strategies do you like best for understanding and describing points, lines, line segments, angles, and rays? Explain.
SESSION 2
651
The edge of a kitchen counter top
The opening between scissor blades
More like a ray; Possible explanation: The beam of light starts at the point where it comes out from the flashlight and then goes on in one direction, so it’s more like a ray than a line.
The one line can be named 6 ways: k
· l
AB , k
· l
BA , k
· l
AC , k
· l
CA , k
· l
BC , or k
· l
CB .
There are 4 rays:
· l
CA (or
· l
CB ),
· l
AC (or
· l
AB ),
· l
BA ,
· l
BC .
Each of the three line segments can be named two ways: ··· AC (or ··· CA ), ··· BC
(or ··· CB ), and ··· AB (or ··· BA ).
The one angle can be named two ways: /ABC or /CBA.
I like the Model It strategy. I can find endpoints and arrows to label each
geometric figure. If a figure has two endpoints, it is a line segment. If it has
two arrows, it is a line. If it has one endpoint and one arrow, it is a ray.
Sample answers are provided.
Possible explanation:
CONNECT IT• Remind students that one thing that is alike about all
the models is the geometric figures they represent.
• Explain that on this page, students will identify real-world examples of those geometric figures.
Monitor and Confirm1 – 3 Check for understanding that:
• real-world examples of line segments and angles can be found in everyday objects
• a flashlight beam is more like a ray than a line because it starts at one point and goes on in one direction
Support Whole Class Discussion1 – 3 Tell students that these problems will help
prepare them to provide the explanation required in problem 4. Be sure students recognize that problem 4 is asking them to think about the attributes of lines, line segments, rays, and angles.
Ask How are a line and a ray similar and different?
Listen for Both are straight rows of points. A line is a straight row of points that go on forever in both directions. A ray is a straight row of points that starts at one point and goes on forever in only one direction.
4 Look for the idea that lines, rays, line segments, and angles can overlap in one shape and that letters can be used to label some of the geometric figures in more than one way.
Ask What assumption do you make about a line or a ray based on how it is drawn? Why is this an assumption?
Listen for I assume that the line goes on forever in both directions because it has arrowheads drawn at each end. I assume that a ray goes on forever in one direction because it has an arrowhead drawn at one end. These are assumptions because I accept them as true without proof. I cannot see the line or ray go on forever.
5 REFLECT Have all students focus on the strategies used to solve this problem. If time allows, have students share their responses with a partner.
SESSION 2 Develop
Visual ModelCopy a shape onto a whiteboard to identify geometric figures in the shape.
If . . . students are unsure about how to identify rays, line segments, and lines in a two-dimensional figure,
Then . . . use this activity to have them modify the Try It shape and identify a different combination of rays and line segments.• Have students draw the shape shown in the Try It problem on their
individual whiteboards.• Review how to identify the line, line segments, and rays in this shape. Point
out that as well as having line segment AB (or BA), the shape also has line segments BC (or CB) and AC (or CA).
• Have students make changes to the shape so that the revised shape has another ray and another line. [ray: Draw an arrow to either extend line segment AB past point A to make ray BA or to extend line segment BA past point B to make ray AB; line: Draw an arrow to extend line segment CA past point A to make line CA (or AC)]
• Have students label the figures in their revised shape with words.

©Curriculum Associates, LLC Copying is not permitted. 652Lesson 30 Points, Lines, Rays, and Angles
©Curriculum Associates, LLC Copying is not permitted.Lesson 30 Points, Lines, Rays, and Angles652
LESSON 30 DEVELOP
Ap��� ItUse what you just learned to solve these problems.
6 How many lines are in this shape? How many rays? Explain how you know.
B
A D
E
C
7 How many line segments are in this shape? Explain how you know.
8 Draw and label a point, line, line segment, and ray.
SESSION 2
652
0 lines; 0 rays. Possible explanation: No sides in the shape are lines that go on forever in both directions, so there are no lines. No sides have an arrow that indicates a row of points that goes on forever in one direction, so there are no rays.
12 line segments; Possible explanation: There are 6 line segments that go from left to right and 6 line segments that go from top to bottom.
Possible student work:
A A BApoint A line AB line segment AB ray AB
B A B
APPLY ITFor problems 6 and 7, encourage students to label the geometric figures in the shapes using words to help support their thinking.
6 0 lines; 0 rays; See possible explanation on the Student Worktext page; Students may also recognize that each side in the shape is a line segment and that the shape has 5 line segments.
7 12 line segments; See possible explanation on the Student Worktext page; Students may also count the number of line segments by going around the perimeter of the shape.
Close: Exit Ticket
8 See possible drawings of geometric figures on the Student Worktext page.
Students’ solutions should indicate understanding of:
• a point is a location in space and can be represented with a dot; lines, line segments, and rays are made up of straight rows of points
• line segments have 2 endpoints, rays have 1 endpoint and an arrow that indicates it goes on forever in one direction, and lines have arrows on each end that indicate they go on forever in both directions
• geometric figures can be labeled with words or with letters that represent points on the figure
Error Alert If students draw lines, line segments, and rays and incorrectly label them, then provide examples of various shapes and have students identify the lines, line segments, and rays in the shapes and describe the differences between the geometric figures shown in each shape.

©Curriculum Associates, LLC Copying is not permitted.653 Lesson 30 Points, Lines, Rays, and Angles
LESSON 30
©Curriculum Associates, LLC Copying is not permitted. Lesson 30 Points, Lines, Rays, and Angles 653
Name:
Study the Example showing a drawing with points, lines, line segments, and rays. Then solve problems 1−9.
Ex����eAmy makes a drawing of a letter “A” in her math notebook. Use geometry words to describe the drawing.
There are 4 points on the drawing: point A, point B, point C, and point D.
There is a line segment from point B to point D. ··· BD
There is a line through points A and C. k
· l
AC
There is a ray from point B through point A.
· l
BA
D
B
A C
Use the drawing below to solve problems 1–4.
A B
ED
C
1 How many lines are in the drawing?
2 How many rays are in the drawing?
3 Write the name of the line in the drawing.
4 Write the names of the rays in the drawing.
5 Look at the shape at the right. How many line segments are in
the shape?
Practice Points, Lines, Line Segments, and Rays
LESSON 30 SESSION 2
Vocabularypoint a single location in space. B
line segment a straight row of points that starts at one point and ends at another point.
B Dline a straight row of points that goes on forever in both directions.
A Cray a straight row of points that starts at one point and goes on forever in one direction.
B A
653
1
6
6
Possible answer: k
· l
AC , k
· l
CA , · l
AB , k
· l
BA , k
· l
BC , or k
· l
CB
· l
BA ,
· l
BD ,
· l
BE ,
· l
BC ,
· l
AC (or
· l
AB ),
· l
CA (or
· l
CB )
Solutions
1 1 line; Students should recognize that line AC, or CA, extends in both directions. Basic
2 6 rays; Students should recognize that the drawing contains rays BA, BD, BE, BC, AC (or AB), and CA (or CB). Basic
3 line AC, line CA, line AB, line BA, line BC, or line CB; Students use two of the labeled points A, B, and C to name the line. Medium
4 ray BA, ray BD, ray BE, ray BC, ray AC (or ray AB), and ray CA (or ray CB); Students use two labeled points to name each of the 6 rays. Medium
5 6 line segments; Students may count 3 horizontal line segments and 3 vertical segments. Basic
SESSION 2 Additional Practice
Fluency & Skills Practice Teacher Toolbox
Assign Points, Lines, Line Segments, and Rays
In this activity students draw and identify points, lines, line segments, and rays. Understanding the meanings of these terms and identifying examples of them will lay a foundation for all future study of geometry. Students may identify objects in their surroundings that are similar to these geometric figures, such as the line down the center of a road or an arrow on a street sign.
Name:
Fluency and Skills Practice
©Curriculum Associates, LLC Copying is permitted for classroom use.
Set A
Draw and label a line segment, a line, and a ray.
Set B
Use the drawing below to answer the questions.
D
C
BA
1 How many lines are in the drawing?
Name the line or lines.
2 Name 5 rays in the drawing.
3 Name 5 line segments in the drawing.
4 Are k
· l
AB and k
· l
BC the same line? Explain.
5 Are
· l
AC and
· l
BC the same ray? Explain.
6 Draw and label a fi gure that has at least 2 lines, 2 rays, and 4 line segments.
Points, Lines, Line Segments, and Rays
©Curriculum Associates, LLC Copying is not permitted. 654Lesson 30 Points, Lines, Rays, and Angles
Levels 1–3 Levels 2–4 Levels 3–5
English Language Learners:Differentiated InstructionELL
Listening/Speaking Have student pairs read Connect It problem 4. Provide the following questions to aid students as they discuss right, acute, and obtuse angles.
• What are the characteristics of a right angle? an acute angle? an obtuse angle?
• How can you tell the difference between the angles?
Have partners take turns giving clues to describe objects that include right, acute, and obtuse angles. Provide an example: I am thinking of something that has a right angle. It is something you see on a shelf. What am I thinking of?
Speaking/Writing Choral read Connect It problem 4. Draw a right angle. Guide a class discussion with the following questions:
• Is this a right angle, acute angle, or obtuse angle?
• How do you know?
• What are the characteristics of a right angle?
• Do you see a right angle in the classroom?
• How do you know it is a right angle?
Record student responses. Continue the process with acute and obtuse angles. Suggest students refer to the class responses while they write their answers for problem 4.
Reading/Speaking Read Connect It problem 4 to students. Draw a right angle. Trace your finger around it and say: This is a right angle. A right angle is a square corner. Continue the process with acute and obtuse angles. Describe the acute angle as having a smaller opening than a right angle and the obtuse angle as having a larger opening than a right angle. Draw several right, acute, and obtuse angles on index cards. Have students take turns selecting a card. Challenge them to identify the angle and explain the characteristics of the angle. Provide sentence frames to aid students when responding: This is a/an angle. It has .
©Curriculum Associates, LLC Copying is not permitted.Lesson 30 Points, Lines, Rays, and Angles654
LESSON 30 SESSION 2
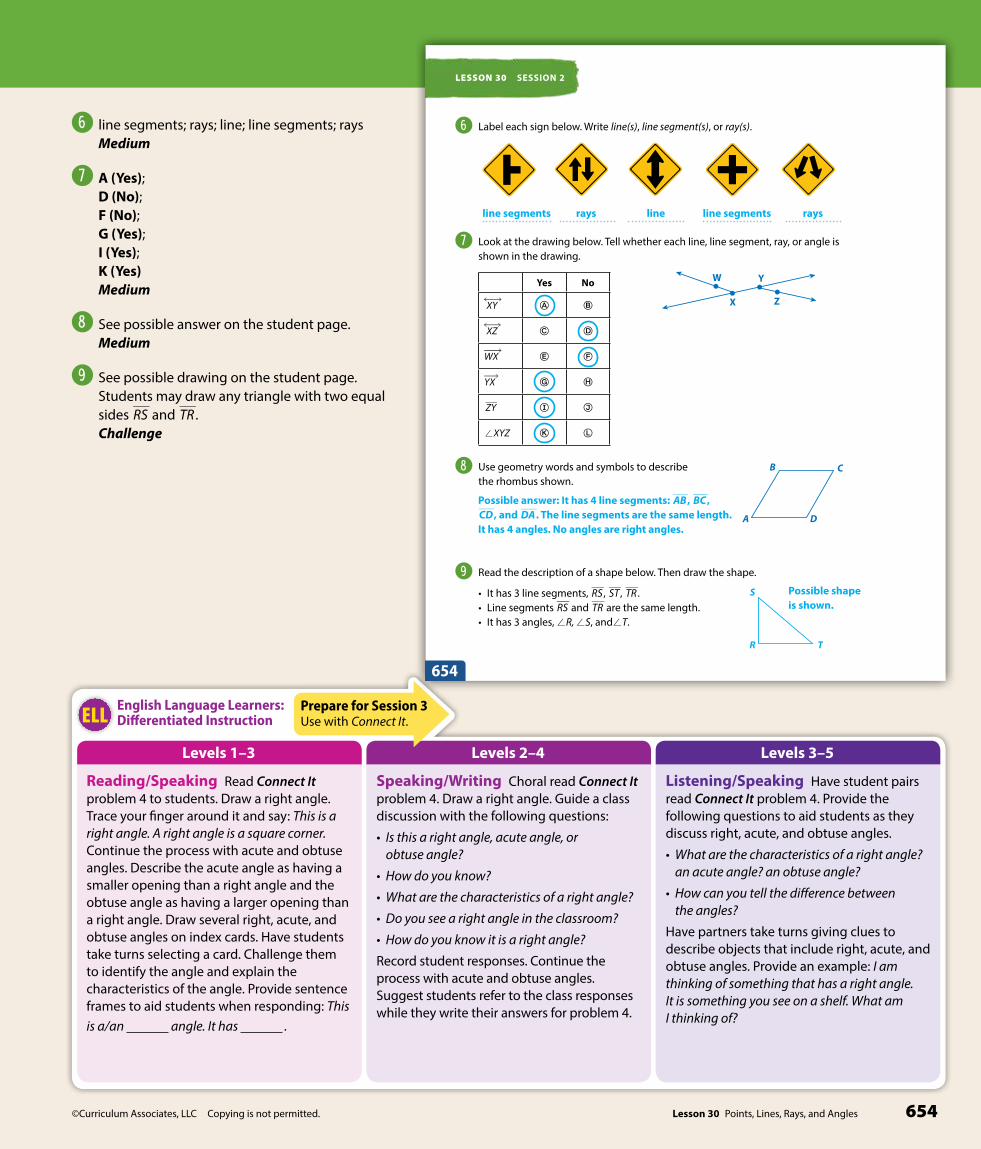
6 Label each sign below. Write line(s), line segment(s), or ray(s).
7 Look at the drawing below. Tell whether each line, line segment, ray, or angle is shown in the drawing.
Yes No
k
· l
XY � �
k
· l
XZ � �
· l
WX � �
· l
YX � �
··· ZY � �
/ XYZ � �
8 Use geometry words and symbols to describe the rhombus shown.
9 Read the description of a shape below. Then draw the shape.
• It has 3 line segments, ··· RS , ··· ST , ··· TR .• Line segments ··· RS and ··· TR are the same length. • It has 3 angles, /R, /S, and/T.
W
X
Y
Z
B C
A D
654
Possible answer: It has 4 line segments: ··· AB , ··· BC , ··· CD , and ··· DA . The line segments are the same length. It has 4 angles. No angles are right angles.
R
S
T
line segments line segmentsrays raysline
Possible shape is shown.
Prepare for Session 3Use with Connect It.
6 line segments; rays; line; line segments; rays Medium
7 A (Yes); D (No); F (No); G (Yes); I (Yes); K (Yes) Medium
8 See possible answer on the student page. Medium
9 See possible drawing on the student page. Students may draw any triangle with two equal sides ··· RS and ··· TR . Challenge

©Curriculum Associates, LLC Copying is not permitted.655 Lesson 30 Points, Lines, Rays, and Angles
LESSON 30
©Curriculum Associates, LLC Copying is not permitted. Lesson 30 Points, Lines, Rays, and Angles 655
LESSON 30
Develop Identifying AnglesSESSION 3
Read and try to solve the problem below.
The angle shown at the right is a right angle. A right angle is a square corner.
Look at the fi gure below. Name the rays that make up each of the angles listed.
1. A right angle.
2. An angle that has a smaller opening than a right angle.
3. An angle that has a wider opening than a right angle, but does not open as wide as a straight line.
TRY IT Math Toolkit• chenille stems• rulers• tracing paper
DISCUSS ITAsk your partner: Can you explain that again?
Tell your partner: I knew . . . so I . . .
BA
C
E
D
655
Possible student work:
Sample A
Rays BA and BC meet at a corner and form a right angle. So do rays BC and BE.Rays BC and BD form an angle that is smaller than a right angle. So do rays BE and BD.Rays BA and BD form an angle that is larger than a right angle.
Sample B
BA
D
BA
C
B E
D
Rays BA and BC make a right angle.Rays BD and BE make an angle with a smaller opening than a right angle.Rays BA and BD make an angle that has a wider opening than a right angle.
StartConnect to Prior KnowledgeWhy Support students’ understanding of identifying and naming rays.
How Have students name three rays shown in a figure.
©Curriculum Associates, LLC Copying is permitted.
Start
Grade 4 Lesson 30 Session 3 | Develop Identifying Angles
Name the rays shown in the figure below.
P
RQ
S
Solutionray PQ, ray PR, and ray PS
Develop LanguageWhy Reinforce understanding of the terms obtuse angle, acute angle, and right angle.
How Teach students the following poem to distinguish the different kinds of angles:
An obtuse angle is wide, wide, wide.
An acute angle tries to hide, hide, hide.
A right angle is part of a square.
You can remember angles without a care.
Encourage students to use their arms or hands to make each angle as they recite the poem.
TRY ITMake Sense of the ProblemTo support students in making sense of the problem, have them identify that they need to name the rays that make up each of three different angles in the figure shown. If available, you may want to provide students with 2 strips of cardboard attached with a brass fastener to use to model angles.
DISCUSS ITSupport Partner DiscussionEncourage students to use the terms ray, angle, and right angle as they discuss.
Support as needed with questions such as:
• What tools did you find helpful for identifying each type of angle?
• Did you and your partner name the same rays that make up each type of angle? If you named different rays, could you both still be correct?
Common Misconception Look for students who think that an angle with shorter rays has a smaller opening than one with longer rays. Have students trace one angle and use a straight edge to extend each ray and place the tracing over the original angle to see that the size of the opening of the angle is the same.
Select and Sequence Student SolutionsOne possible order for whole class discussion:
• physical models, such as chenille stems, showing each of the three angles
• accurate drawings with one or two rays labeled and named
• accurate drawings showing three rays labeled and named, using words
• written descriptions or drawings of three rays that include mathematical notation
Purpose In this session, students solve a problem that requires naming the rays that make up a right angle, an acute angle, and an obtuse angle in a given figure. Students use words, mathematical notation, drawings, or manipulatives to model each angle. The purpose of this problem is to have students develop strategies for identifying right, acute, and obtuse angles in two-dimensional figures.
SESSION 3 Develop

©Curriculum Associates, LLC Copying is not permitted. 656Lesson 30 Points, Lines, Rays, and Angles
©Curriculum Associates, LLC Copying is not permitted.Lesson 30 Points, Lines, Rays, and Angles656
LESSON 30 DEVELOP
Explore diff erent ways to understand how to identify angles.
The angle shown at the right is a right angle. A right angle is a square corner.
Look at the fi gure below. Name the rays that make up each of the angles listed.
1. A right angle.
2. An angle that has a smaller opening than a right angle.
3. An angle that has a wider opening than a right angle, but does not open as wide as a straight line.
Picture ItYou can make a drawing to help identify diff erent types of angles.
Use shading to fi nd the rays that make each angle.
A right angle is shaded. Look at the rays along the edges of the shaded area.
m���� ItYou can also use a model to help identify diff erent types of angles.
Compare the opening of an angle to a right angle by holding the corner of a sheet of paper next to the angle. The angle below opens as wide as a right angle.
BA
C
E
D
BA
C
E
D
656
Support Whole Class DiscussionCompare and connect the different representations and have students identify how they are related.
Ask How does your model show the rays that make up the three kinds of angles?
Listen for Students should recognize that accurate responses include two rays for each kind of angle and each ray named using two points. Responses may also include mathematical notation for the rays’ names, such as
· l
BC and
· l
BE , or drawings of three pairs of rays that include labeled points on the rays: two rays that meet at a square corner to form a right angle, two rays that form an angle that has a smaller opening than a square corner, and two rays that form an angle that has a wider opening than a square corner but is not as wide as a straight line.
PICTURE IT & MODEL ITIf no student presented these models, connect them to the student models by pointing out the ways they each represent:
• a right angle
• a way to compare other angles to a right angle
Ask How do the models represent the three kinds of angles?
Listen for Both models show a right angle. The drawing shows the figure with red shading and red rays to show the right angle and its opening. The other model shows a corner of a sheet of paper with a right angle along it. The drawing also shows the angles with smaller and wider openings than a right angle, but the model of the sheet of paper does not show them.
For a drawing of the figure, prompt students to consider how color is used to emphasize rays and angles.
• What does the red shading show?
• How do two rays and the size of the opening between them define the kind of angle the rays form?
For a model with a paper corner, prompt students to consider how an everyday object can be used as a tool to identify angles.
• What kind of angle is shown?
• What other right angle in the figure, beside angle CBE, can be identified using the corner of a sheet of paper?
Deepen UnderstandingIdentify Types of AnglesSMP 5 Use tools.
When discussing the Model It drawing, prompt students to consider how the corner of a sheet of paper can also be used to identify angles with wider openings than a right angle and angles with smaller openings than a right angle.
Ask How could you use the corner of a sheet of paper to determine whether an angle has a wider opening or a narrower opening than a right angle?
Listen for Place the corner of the paper where the rays that form the angle meet. Then line up one of the rays with one side of the paper so that the paper covers all or part of the rest of the angle. If the other ray that forms the angle is visible, then the angle has a wider opening than a right angle. If the other ray is hidden under the paper, then the angle has a narrower opening than a right angle.
Ask What else besides a sheet of paper could you use to perform this test?
Listen for You can use any object that has a square corner: a hundreds flat, a square block or rectangular block, or a book that has a square corner.

©Curriculum Associates, LLC Copying is not permitted.657 Lesson 30 Points, Lines, Rays, and Angles
LESSON 30
©Curriculum Associates, LLC Copying is not permitted. Lesson 30 Points, Lines, Rays, and Angles 657
Co����� ItNow you will use the problem from the previous page to help you understand how to identify angles in fi gures.
1 Model It shows a right angle. Draw a right angle. Then use 3 points to name
a right angle in the fi gure on the previous page.
2 An angle that has a smaller opening than a right angle is called an acute angle.
Name an acute angle in the fi gure on the previous page. Draw an acute angle.
3 An angle that has a wider opening than a right angle, but does not open as wide as a straight line, is called an obtuse angle. Name an obtuse angle in the
fi gure on the previous page. Draw an obtuse angle.
4 Explain how you can decide whether any angle is acute, right, or obtuse.
5 REFLECTLook back at your Try It, strategies by classmates, and Picture It and Model It. Which models or strategies do you like best for identifying angles? Explain.
SESSION 3
657
/ABC (or /CBA) or /EBC (or /CBE)
/ABD (or /DBA)
/CBD (or /DBC) or
Possible drawing shown.
Possible drawing shown.
Possible drawing shown.
You can compare the opening of any angle to the corner of a sheet of paper to see if it is the same (right), narrower (acute), or wider (obtuse).
Possible explanation: I like using a corner of a sheet of paper that shows a
right angle. A wider angle is obtuse. A narrower angle is acute.
/DBE (or /EBD)
CONNECT IT• Remind students that one thing that is alike
about all the representations is that they show rays and angles.
• Explain that on this page, students will learn the terms acute angle and obtuse angle, as well as identify these kinds of angles in the figure and draw on their own a right angle, an acute angle, and an obtuse angle.
Monitor and Confirm1 – 3 Check for understanding that:
• a drawing of an angle has two rays that meet at a common point
• a drawing of a right angle has a square corner
• a drawing of an acute angle has an opening narrower than a square corner
• a drawing of an obtuse angle has an opening wider than a square corner but not as wide as a straight line
• each kind of angle can be named using three points labeled with letters, with the middle letter representing the point at the vertex where the two rays meet
Support Whole Class Discussion1 – 3 Tell students that these problems will
prepare them to provide the explanation required in problem 4.
Be sure students recognize that these problems are asking them to name a right angle, an acute angle, and an obtuse angle in the figure shown in the problem and to draw an example of each kind of angle.
Ask How are a right angle, an acute angle, and an obtuse angle different?
Listen for A right angle has a square corner, an acute angle has an opening smaller than a right angle, and an obtuse angle has an opening wider than a right angle but not as wide as a straight line.
4 Look for understanding that the opening of any angle can be compared to the opening of a right angle to determine whether the angle is a right angle, an acute angle, or an obtuse angle.
5 REFLECT Have all students focus on the strategies used to solve this problem. If time allows, have students share their responses with a partner.
SESSION 3 Develop
Hands-On ActivityUse chenille stems to understand angles.
If . . . students are uncertain as to how to decide whether an angle is acute, right, or obtuse,
Then . . . have them use the activity below to compare a right angle with models of acute and obtuse angles.
Materials For each student: 6 chenille stems, 6 sheets of paper, tape
• Review the definitions of a right angle, an acute angle, and an obtuse angle.
• Show students how to make a right angle with a chenille stems. Have students use the right angle as a benchmark angle and form six other angles using chenille stems. Tell students to form some right angles, some angles that have a narrower opening than a right angle (acute), and some angles that have a wider opening than a right angle (obtuse).
• Have students tape each angle to a sheet of paper.
• Have students exchange their papers with a partner and identify the kinds of angles their partners made. Have them label each angle as right, acute, or obtuse. Partners check each other’s work and discuss any differences they find.
©Curriculum Associates, LLC Copying is not permitted. 658Lesson 30 Points, Lines, Rays, and Angles
©Curriculum Associates, LLC Copying is not permitted.Lesson 30 Points, Lines, Rays, and Angles658
LESSON 30 DEVELOP
Ap��� ItUse what you just learned to solve these problems.
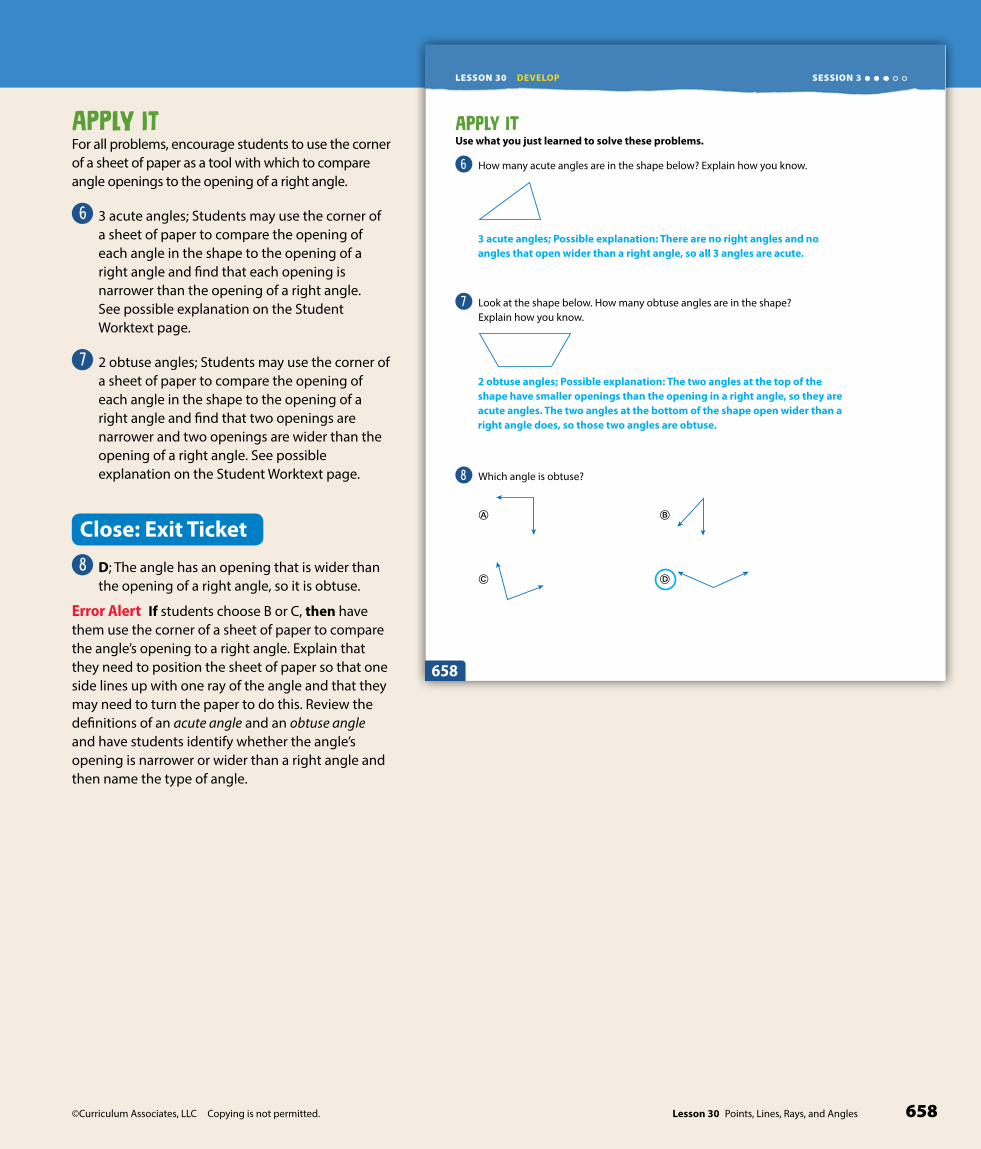
6 How many acute angles are in the shape below? Explain how you know.
7 Look at the shape below. How many obtuse angles are in the shape? Explain how you know.
8 Which angle is obtuse?
� �
� �
SESSION 3
658
3 acute angles; Possible explanation: There are no right angles and no angles that open wider than a right angle, so all 3 angles are acute.
2 obtuse angles; Possible explanation: The two angles at the top of the shape have smaller openings than the opening in a right angle, so they are acute angles. The two angles at the bottom of the shape open wider than a right angle does, so those two angles are obtuse.
APPLY ITFor all problems, encourage students to use the corner of a sheet of paper as a tool with which to compare angle openings to the opening of a right angle.
6 3 acute angles; Students may use the corner of a sheet of paper to compare the opening of each angle in the shape to the opening of a right angle and find that each opening is narrower than the opening of a right angle. See possible explanation on the Student Worktext page.
7 2 obtuse angles; Students may use the corner of a sheet of paper to compare the opening of each angle in the shape to the opening of a right angle and find that two openings are narrower and two openings are wider than the opening of a right angle. See possible explanation on the Student Worktext page.
Close: Exit Ticket
8 D; The angle has an opening that is wider than the opening of a right angle, so it is obtuse.
Error Alert If students choose B or C, then have them use the corner of a sheet of paper to compare the angle’s opening to a right angle. Explain that they need to position the sheet of paper so that one side lines up with one ray of the angle and that they may need to turn the paper to do this. Review the definitions of an acute angle and an obtuse angle and have students identify whether the angle’s opening is narrower or wider than a right angle and then name the type of angle.
©Curriculum Associates, LLC Copying is not permitted.659 Lesson 30 Points, Lines, Rays, and Angles
LESSON 30
©Curriculum Associates, LLC Copying is not permitted. 659
Name:
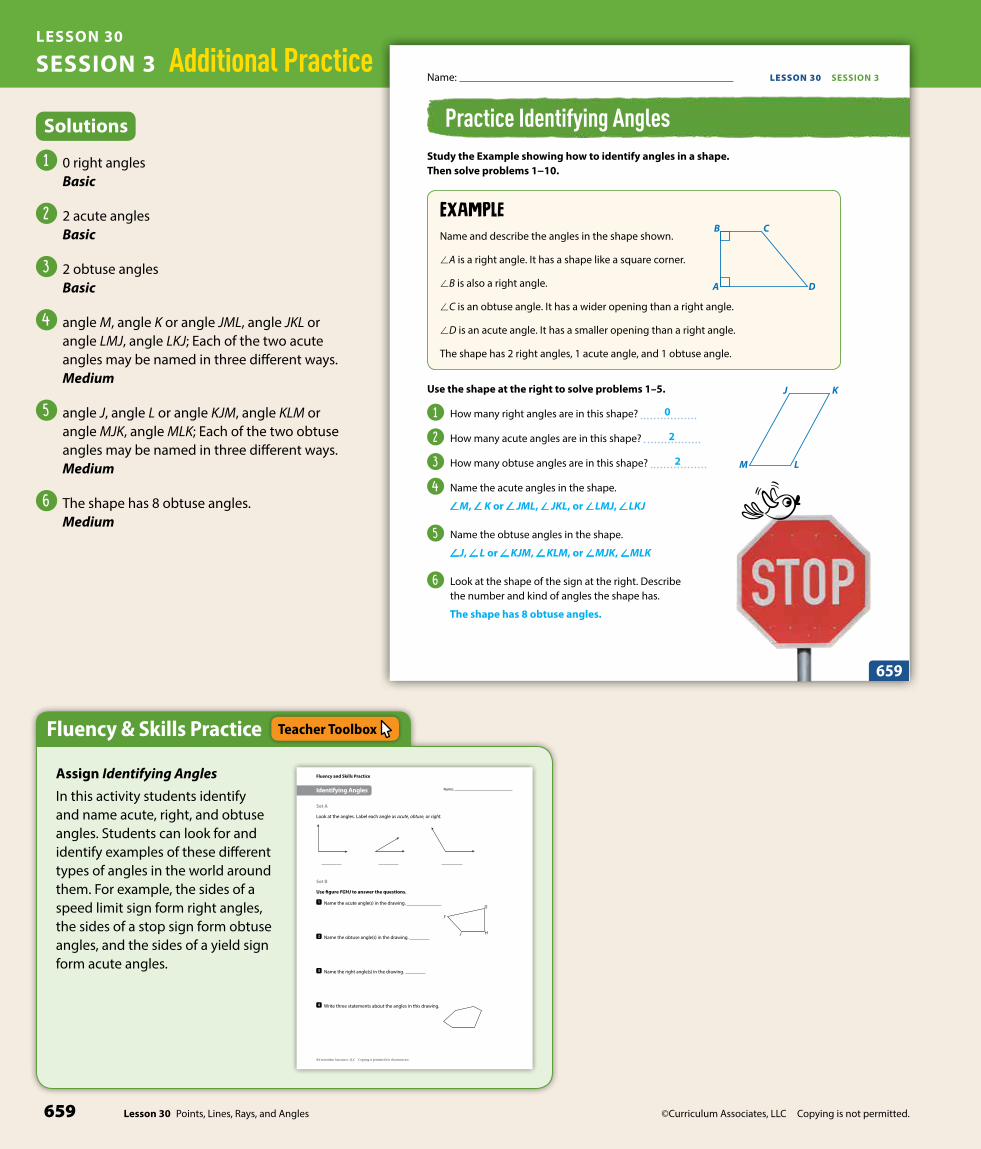
Study the Example showing how to identify angles in a shape. Then solve problems 1−10.
Ex����eName and describe the angles in the shape shown.
/A is a right angle. It has a shape like a square corner.
/B is also a right angle.
/C is an obtuse angle. It has a wider opening than a right angle.
/D is an acute angle. It has a smaller opening than a right angle.
The shape has 2 right angles, 1 acute angle, and 1 obtuse angle.
B C
A D
Use the shape at the right to solve problems 1–5.
1 How many right angles are in this shape?
2 How many acute angles are in this shape?
3 How many obtuse angles are in this shape?
4 Name the acute angles in the shape.
5 Name the obtuse angles in the shape.
6 Look at the shape of the sign at the right. Describe the number and kind of angles the shape has.
J K
M L
Practice Identifying Angles
LESSON 30 SESSION 3
Lesson 30 Points, Lines, Rays, and Angles
659
/ M, / K or / JML, / JKL, or / LMJ, / LKJ
/ J, / L or / KJM, / KLM, or / MJK, / MLK
The shape has 8 obtuse angles.
0
2
2
Solutions
1 0 right angles Basic
2 2 acute angles Basic
3 2 obtuse angles Basic
4 angle M, angle K or angle JML, angle JKL or angle LMJ, angle LKJ; Each of the two acute angles may be named in three different ways. Medium
5 angle J, angle L or angle KJM, angle KLM or angle MJK, angle MLK; Each of the two obtuse angles may be named in three different ways. Medium
6 The shape has 8 obtuse angles. Medium
SESSION 3 Additional Practice
Fluency & Skills Practice Teacher Toolbox
Assign Identifying Angles
In this activity students identify and name acute, right, and obtuse angles. Students can look for and identify examples of these different types of angles in the world around them. For example, the sides of a speed limit sign form right angles, the sides of a stop sign form obtuse angles, and the sides of a yield sign form acute angles.
Name:
Fluency and Skills Practice
©Curriculum Associates, LLC Copying is permitted for classroom use.
Set A
Look at the angles. Label each angle as acute, obtuse, or right.
Set B
Use fi gure FGHJ to answer the questions.
1 Name the acute angle(s) in the drawing.
2 Name the obtuse angle(s) in the drawing.
3 Name the right angle(s) in the drawing.
4 Write three statements about the angles in this drawing.
G
HJ
F
Identifying Angles
©Curriculum Associates, LLC Copying is not permitted. 660Lesson 30 Points, Lines, Rays, and Angles
Levels 1–3 Levels 2–4 Levels 3–5
English Language Learners:Differentiated InstructionELL
Listening/Speaking Use with Connect It problem 5. Distribute three straight objects, such as straws, pencils, or chenille stems, to each student. Say: Arrange your [objects] to make parallel lines. Prompt student response with the following sentence frames: These are lines. I know because . Now ask students to arrange their three objects to make perpendicular lines. Ask the following questions:
• What are the characteristics of perpendicular lines?
• When you use three [objects] to make perpendicular lines, what do you notice?
Listening/Speaking Use with Connect It problem 5. Make three parallel lines using three straight objects, such as straws, pencils, or chenille stems. Say: These lines are parallel. They stay the same distance apart and never touch. Now arrange the objects to show perpendicular lines. Say: These lines are perpendicular. The lines cross and form a right angle. Provide students with three straight objects. Challenge students to arrange the objects to make parallel lines and then perpendicular lines. Ask: What are these lines? How do you know? Provide a sentence frame to aid student responses: These are lines. I know because .
Listening/Speaking Use with Connect It problem 5. Make three parallel lines using three straight objects, such as straws, pencils, or chenille stems. Say: These lines are parallel. They stay the same distance apart and never touch. Now arrange the objects to show perpendicular lines. Say: These lines are perpendicular. The lines cross and form a right angle. Provide students with three straight objects. Challenge students to arrange the objects to make parallel lines and then perpendicular lines. Ask: What are these lines? How do you know? Provide a sentence frame to aid student responses: These are lines.
©Curriculum Associates, LLC Copying is not permitted.Lesson 30 Points, Lines, Rays, and Angles660
LESSON 30 SESSION 3
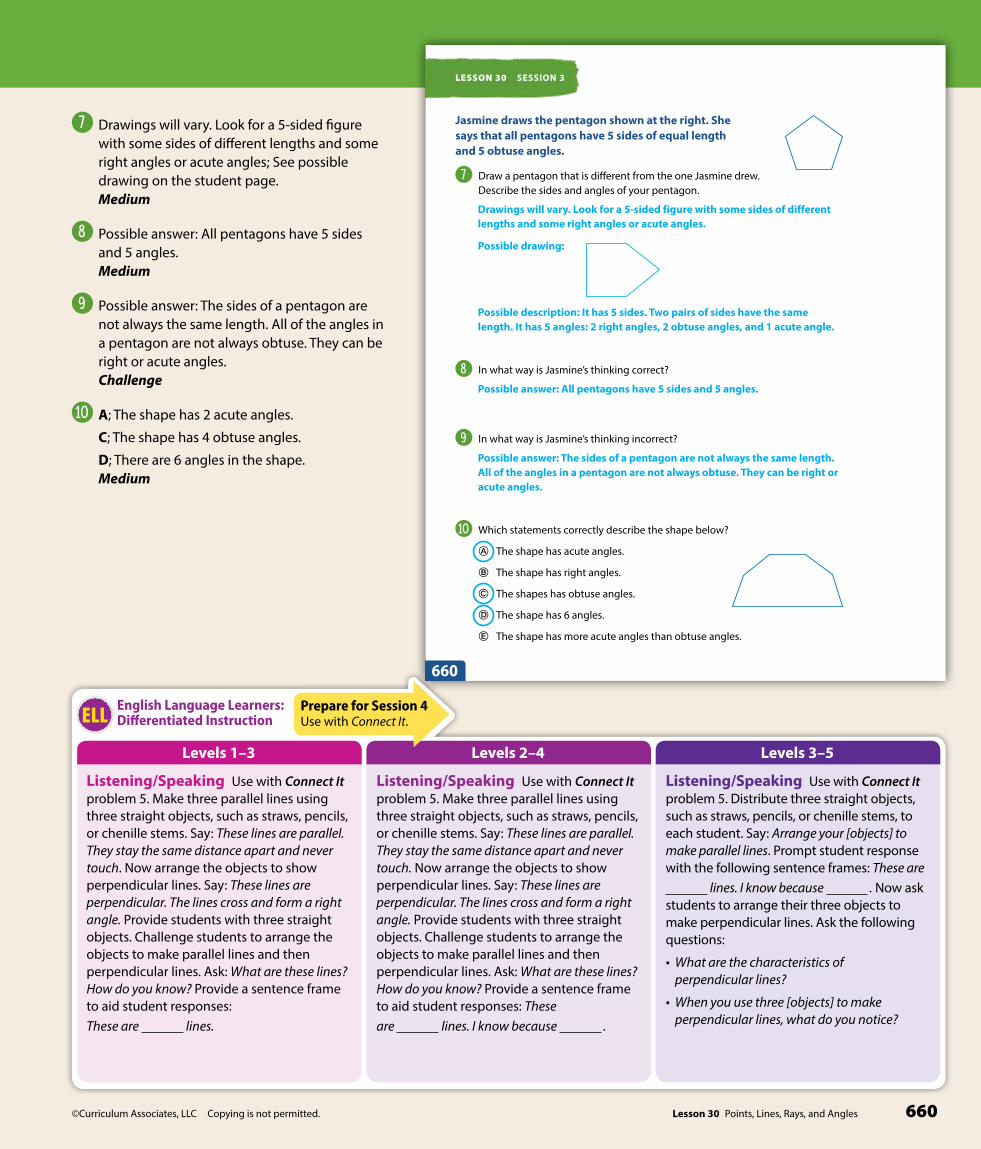
Jasmine draws the pentagon shown at the right. She says that all pentagons have 5 sides of equal length and 5 obtuse angles.
7 Draw a pentagon that is diff erent from the one Jasmine drew. Describe the sides and angles of your pentagon.
8 In what way is Jasmine’s thinking correct?
9 In what way is Jasmine’s thinking incorrect?
10 Which statements correctly describe the shape below?
� The shape has acute angles.
� The shape has right angles.
� The shapes has obtuse angles.
� The shape has 6 angles.
� The shape has more acute angles than obtuse angles.
660
Drawings will vary. Look for a 5-sided figure with some sides of different lengths and some right angles or acute angles.
Possible drawing:
Possible description: It has 5 sides. Two pairs of sides have the same length. It has 5 angles: 2 right angles, 2 obtuse angles, and 1 acute angle.
Possible answer: All pentagons have 5 sides and 5 angles.
Possible answer: The sides of a pentagon are not always the same length. All of the angles in a pentagon are not always obtuse. They can be right or acute angles.
Prepare for Session 4Use with Connect It.
7 Drawings will vary. Look for a 5-sided figure with some sides of different lengths and some right angles or acute angles; See possible drawing on the student page. Medium
8 Possible answer: All pentagons have 5 sides and 5 angles. Medium
9 Possible answer: The sides of a pentagon are not always the same length. All of the angles in a pentagon are not always obtuse. They can be right or acute angles. Challenge
10 A; The shape has 2 acute angles.
C; The shape has 4 obtuse angles.
D; There are 6 angles in the shape. Medium
©Curriculum Associates, LLC Copying is not permitted.661 Lesson 30 Points, Lines, Rays, and Angles
LESSON 30
©Curriculum Associates, LLC Copying is not permitted. Lesson 30 Points, Lines, Rays, and Angles 661
LESSON 30
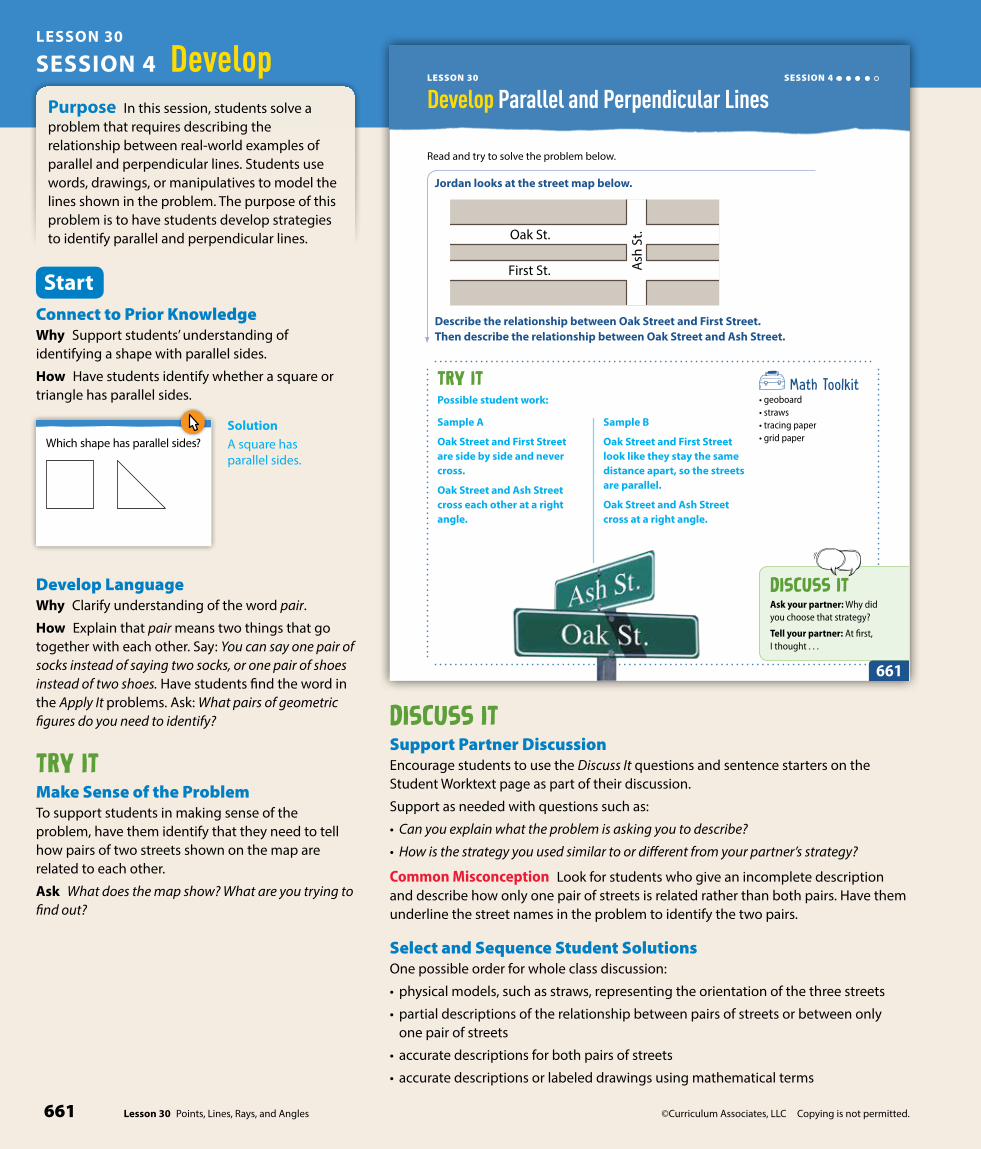
Develop Parallel and Perpendicular LinesSESSION 4
Read and try to solve the problem below.
Jordan looks at the street map below.
Oak St.
First St. Ash
St.
Describe the relationship between Oak Street and First Street. Then describe the relationship between Oak Street and Ash Street.
TRY IT Math Toolkit• geoboard• straws• tracing paper• grid paper
DISCUSS ITAsk your partner: Why did you choose that strategy?
Tell your partner: At fi rst, I thought . . .
661
Possible student work:
Sample A
Oak Street and First Street are side by side and never cross.
Oak Street and Ash Street cross each other at a right angle.
Sample B
Oak Street and First Street look like they stay the same distance apart, so the streets are parallel.
Oak Street and Ash Street cross at a right angle.
StartConnect to Prior KnowledgeWhy Support students’ understanding of identifying a shape with parallel sides.
How Have students identify whether a square or triangle has parallel sides.
©Curriculum Associates, LLC Copying is permitted.
Start
Which shape has parallel sides?
Grade 4 Lesson 30 Session 4 | Develop Parallel and Perpendicular Lines
SolutionA square has parallel sides.
Develop LanguageWhy Clarify understanding of the word pair.
How Explain that pair means two things that go together with each other. Say: You can say one pair of socks instead of saying two socks, or one pair of shoes instead of two shoes. Have students find the word in the Apply It problems. Ask: What pairs of geometric figures do you need to identify?
TRY ITMake Sense of the ProblemTo support students in making sense of the problem, have them identify that they need to tell how pairs of two streets shown on the map are related to each other.
Ask What does the map show? What are you trying to find out?
DISCUSS ITSupport Partner DiscussionEncourage students to use the Discuss It questions and sentence starters on the Student Worktext page as part of their discussion.
Support as needed with questions such as:
• Can you explain what the problem is asking you to describe?
• How is the strategy you used similar to or different from your partner’s strategy?
Common Misconception Look for students who give an incomplete description and describe how only one pair of streets is related rather than both pairs. Have them underline the street names in the problem to identify the two pairs.
Select and Sequence Student SolutionsOne possible order for whole class discussion:
• physical models, such as straws, representing the orientation of the three streets
• partial descriptions of the relationship between pairs of streets or between only one pair of streets
• accurate descriptions for both pairs of streets
• accurate descriptions or labeled drawings using mathematical terms
Purpose In this session, students solve a problem that requires describing the relationship between real-world examples of parallel and perpendicular lines. Students use words, drawings, or manipulatives to model the lines shown in the problem. The purpose of this problem is to have students develop strategies to identify parallel and perpendicular lines.
SESSION 4 Develop

©Curriculum Associates, LLC Copying is not permitted. 662Lesson 30 Points, Lines, Rays, and Angles
Lesson 30 Points, Lines, Rays, and Angles662
LESSON 30 DEVELOP
Explore diff erent ways to understand parallel and perpendicular lines and line segments.
Jordan looks at the street map below.
Describe the relationship between Oak Street and First Street. Then describe the relationship between Oak Street and Ash Street.
Picture ItYou can use a sketch to help understand the problem.
Sketch a picture of Oak Street and First Street. Shade the streets.
Oak St.
First St. Ash
St.
Notice that the streets do not cross.
Mo��� ItYou can also use a model to help understand the problem.
Look at Oak Street and Ash Street. Think of each street as a line. When the two lines cross, they form four angles.
Oak St. 1 2
3 4
Ash
St.
Oak St.
First St. Ash
St.
©Curriculum Associates, LLC Copying is not permitted.
662
Support Whole Class DiscussionCompare and connect the different models and have students identify how they are related.
Ask How does your model represent each of the streets? the relationships between the pairs of streets?
Listen for Students should recognize that accurate responses include representations that describe or show that both Oak Street and First Street go from side to side and are the same distance apart all along and that Oak Street and Ash Street cross each other at a right angle since Ash Street goes from top to bottom.
Picture IT & MoDEL ItIf no student presented these models, connect them to the student models by pointing out the ways they each represent:
• Oak Street, First Street, and Ash Street
• the relationship between Oak and First Streets
• the relationship between Oak and Ash Streets
Ask How does each model represent the streets? the relationship between the streets?
Listen for The picture shows a sketch of all three streets with Oak and First Streets colored in blue. The other model shows two lines representing Oak Street and Ash Street that cross each other and form four angles. First Street is not shown.
For a picture of the streets, prompt students to consider how color and labels are used to show the relationship between the streets.
• What does the blue shading represent?
• How does the blue shading help you see the relationship between Oak Street and First Street?
For a model with lines, prompt students to consider how geometric figures are used to represent the relationship between the streets.
• What do the arrows represent?
• What do the numbers in the model represent?
• How do the sizes of the openings of the four angles compare to each other?
Deepen UnderstandingIdentify Parallel and Perpendicular LinesSMP 4 Model with mathematics.
When discussing the model that uses lines to represent the streets, prompt students to consider how to change the model to represent all three streets.
Ask How could you change the model to show all three of the streets? How many lines would the model have in all?
Listen for You could draw a line for First Street from side to side below Oak Street. The model would have 3 lines in all.
Ask How many more angles would the model have? How many angles in all? How many of the angles would be right angles? How do you know?
Listen for There would be 4 more angles and 8 angles in all. All of the angles would be right angles because First Street is perpendicular to Ash Street.
Generalize When modeling the problem, what characteristics is it critical to represent? Have students explain their reasoning. Listen for understanding that it is important to show the parallel or perpendicular relationship between the streets in order to use the model to solve the problem.

©Curriculum Associates, LLC Copying is not permitted.663 Lesson 30 Points, Lines, Rays, and Angles
LESSON 30
©Curriculum Associates, LLC Copying is not permitted. Lesson 30 Points, Lines, Rays, and Angles 663
Co����� ItNow you will use the problem from the previous page to help you understand how to identify parallel and perpendicular lines.
1 Lines that are always the same distance apart and never cross are called parallel lines. Name a real-world example of parallel lines.
2 Suppose each street keeps going in a straight line. If Jordan travels on Oak Street and makes no turns, can he ever get to First Street? Explain.
3 Describe the angles that Oak Street and Ash Street make when they cross.
4 Lines that cross and form a right angle are called perpendicular lines. Name a real-world example of perpendicular lines.
5 Explain why 3 separate lines can all be parallel to each other, but cannot all be perpendicular to each other. Use a drawing to show your answer.
6 REFLECTLook back at your Try It, strategies by classmates, and Picture It and Model It. Which models or strategies do you like best for identifying parallel and perpendicular lines? Explain.
SESSION 4
663
Opposite edges of a square table
No; Oak Street and First Street are parallel, so they will never cross.
Oak Street and Ash Street cross to form 4 right angles.
Grids on window panes
Possible explanation:
Three lines can run side-by-side without ever crossing, but 3 lines can’t all be perpendicular to each other. If two lines are perpendicular, a third line can be perpendicular to one, but will be parallel to the other.
I like shading the streets to see that Oak Street and First Street never cross.
If I shade Oak Street and Ash Street, I can see they cross at a right angle.
SESSION 4 Develop
CONNECT IT• Remind students that one thing that is alike about
all the representations is the relationships shown between pairs of streets.
• Explain that on this page, students will learn the terms parallel lines and perpendicular lines, identify parallel and perpendicular lines in the context of the problem, and describe real-world examples of each kind of line.
Monitor and Confirm1 – 4 Check for understanding that:
• parallel lines are always the same distance apart and never cross
• Oak Street and First Street are parallel
• perpendicular lines cross each other to form four right angles
• Oak Street and Ash Street are perpendicular
• real-world examples of parallel and perpendicular lines can be found in everyday objects
Support Whole Class Discussion1 – 4 Tell students that these problems will
prepare them to provide the explanation required in problem 5.
Be sure students understand that these problems are asking them to provide real-world examples of parallel and perpendicular lines and to describe the relationships between the streets in the problem by identifying and using the characteristics of parallel and perpendicular lines.
Ask What is the difference between parallel lines and perpendicular lines?
Listen for Parallel lines never cross each other and always remain the same distance apart from each other. Perpendicular lines cross each other to form four right angles.
5 Look for the idea that two or more lines can be parallel, but that if two lines are perpendicular, a third line can be perpendicular to only one of them and will be parallel to the other.
6 REFLECT Have all students focus on the strategies used to solve this problem. If time allows, have students share their responses with a partner.
Hands-On ActivityUse straws to model parallel and perpendicular lines.
If . . . students are unsure about whether three separate lines can all be parallel or perpendicular,
Then . . . use this activity to provide a more concrete experience.
Materials For each student: 3 straws• Have students place two straws side by side a few inches apart. Ask: How can
you tell that these straws are parallel? [They do not cross each other; they are the same distance apart.]
• Ask: Can you place a third straw so that all three straws are parallel to one another? Why or why not? Have students place a third straw. [Yes; the third straw is parallel to one straw, so it must also be parallel to the other straw.]
• Have students move one straw to be perpendicular to the other. Ask: How can you tell that these straws are perpendicular? [They cross to form 4 right angles.]
• Ask: Can you place a third straw so that all three straws are perpendicular to each other? Have students try to place the third straw. [No, the third straw is perpendicular to one but parallel to the other.] Allow students time to try different arrangements of straws in order to come to this conclusion.
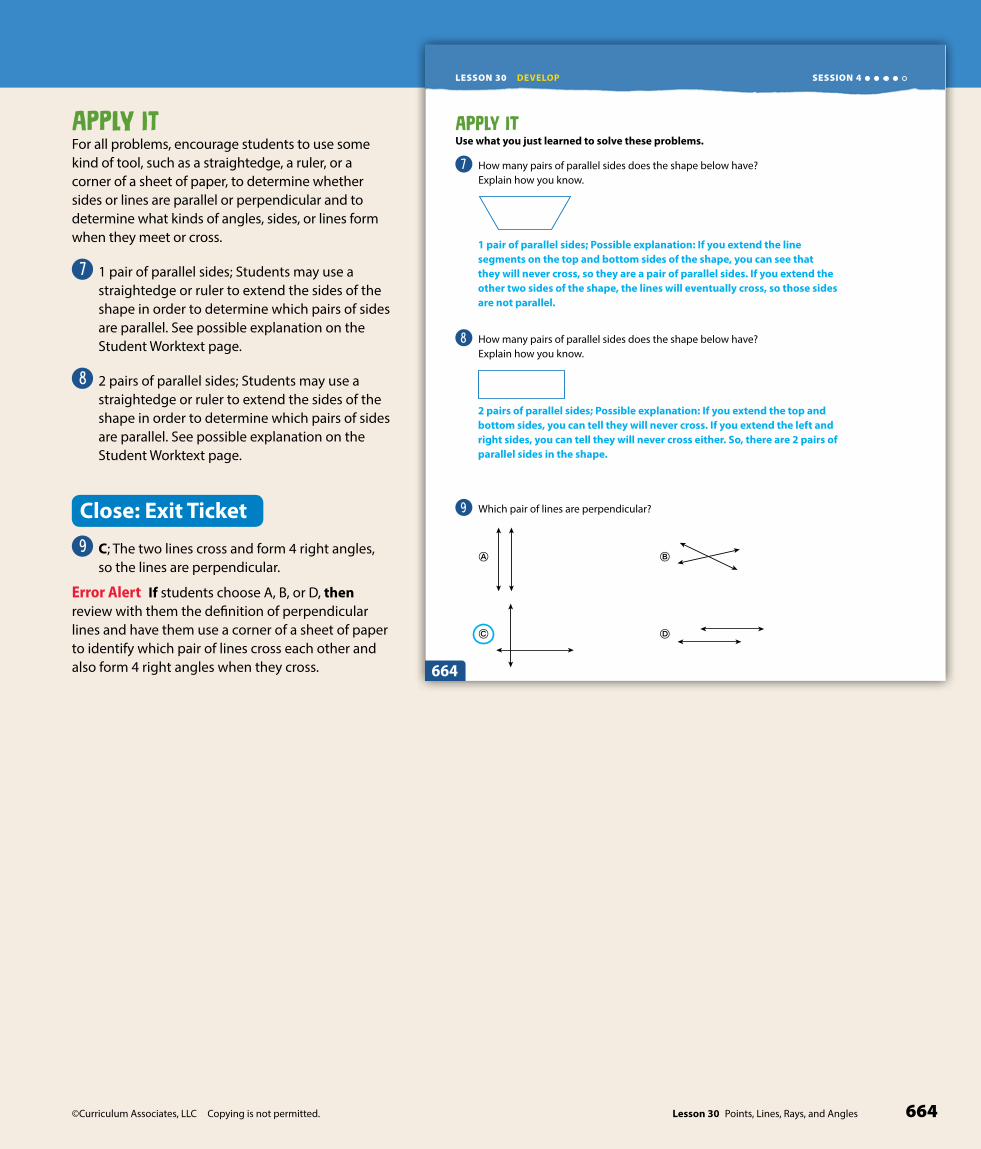
©Curriculum Associates, LLC Copying is not permitted. 664Lesson 30 Points, Lines, Rays, and Angles
©Curriculum Associates, LLC Copying is not permitted.Lesson 30 Points, Lines, Rays, and Angles664
LESSON 30 DEVELOP
Ap��� ItUse what you just learned to solve these problems.
7 How many pairs of parallel sides does the shape below have? Explain how you know.
8 How many pairs of parallel sides does the shape below have? Explain how you know.
9 Which pair of lines are perpendicular?
� �
� �
SESSION 4
664
1 pair of parallel sides; Possible explanation: If you extend the line segments on the top and bottom sides of the shape, you can see that they will never cross, so they are a pair of parallel sides. If you extend the other two sides of the shape, the lines will eventually cross, so those sides are not parallel.
2 pairs of parallel sides; Possible explanation: If you extend the top and bottom sides, you can tell they will never cross. If you extend the left and right sides, you can tell they will never cross either. So, there are 2 pairs of parallel sides in the shape.
APPLY ITFor all problems, encourage students to use some kind of tool, such as a straightedge, a ruler, or a corner of a sheet of paper, to determine whether sides or lines are parallel or perpendicular and to determine what kinds of angles, sides, or lines form when they meet or cross.
7 1 pair of parallel sides; Students may use a straightedge or ruler to extend the sides of the shape in order to determine which pairs of sides are parallel. See possible explanation on the Student Worktext page.
8 2 pairs of parallel sides; Students may use a straightedge or ruler to extend the sides of the shape in order to determine which pairs of sides are parallel. See possible explanation on the Student Worktext page.
Close: Exit Ticket
9 C; The two lines cross and form 4 right angles, so the lines are perpendicular.
Error Alert If students choose A, B, or D, then review with them the definition of perpendicular lines and have them use a corner of a sheet of paper to identify which pair of lines cross each other and also form 4 right angles when they cross.

©Curriculum Associates, LLC Copying is not permitted.665 Lesson 30 Points, Lines, Rays, and Angles
LESSON 30
©Curriculum Associates, LLC Copying is not permitted. Lesson 30 Points, Lines, Rays, and Angles 665
Name:
Study the Example showing how to identify parallel and perpendicular lines and line segments. Then solve problems 1−6.
Ex����eColby draws parallel and perpendicular lines to place the bases and pitcher’s mound on a drawing of a baseball fi eld.
k
· l
SF and k
· l
TH are parallel lines. k
· l
ST and k
· l
FH are parallel lines.
The pitcher’s mound is one place where perpendicular lines cross. At what point do perpendicular lines cross at the pitcher’s mound?
They cross at point P, where k
· l
TF crosses k
· l
SH .
For problems 1 and 2, use the shape at the right.
1 How many pairs of parallel sides does the
square have?
2 Put Xs on the square where each pair of perpendicular line segments meet.
3 Look at the drawing of a window at the right. Circle 3 parallel line segments in the drawing.
Practice Parallel and Perpendicular Lines
LESSON 30 SESSION 4
S
P
H
FT
665
2
SESSION 4 Additional Practice
Solutions
1 2 pairs of parallel sides; Students may use a straightedge to extend the sides of the square to determine whether they remain the same distance apart. Basic
2 See figure marked with Xs on the student page; All 4 corners of the square have Xs. Students may recognize that each angle in a square is a right angle and reason that the sides that form the right angle must be perpendicular to each other. Basic
3 See drawing marked with three circles on the student page. The three horizontal line segments in the drawing are all parallel to each other. Medium
Fluency & Skills Practice Teacher Toolbox
Assign Parallel and Perpendicular Lines
In this activity students name and identify parallel and perpendicular lines. Students may notice examples of parallel and perpendicular lines when looking around the school. For example, the top and bottom of a whiteboard are parallel, and two hallways in the school may be perpendicular. Architects, engineers, and artists commonly deal with parallel and perpendicular lines.
Name:
Fluency and Skills Practice
©Curriculum Associates, LLC Copying is permitted for classroom use.
Set A
1 Study the drawing. Name all the pairs of lines that are parallel. Name all the pairs of lines that are perpendicular.
A
D E F
B C
Pairs of parallel lines:
Pairs of perpendicular lines:
Set B
Draw a shape that matches the given conditions.
2 The shape has 5 sides in all, but only 1 pair of parallel sides.
3 The shape has 4 sides in all, but only 2 pairs of perpendicular sides.
Parallel and Perpendicular Lines

©Curriculum Associates, LLC Copying is not permitted. 666Lesson 30 Points, Lines, Rays, and Angles
Levels 1–3 Levels 2–4 Levels 3–5
English Language Learners:Differentiated InstructionELL
Speaking/Writing Have students read Apply It problem 8. Ask students to discuss with partners how the shapes are alike and different. Have them use the following list of terms in discussions with partners: line segments, angles, parallel sides, acute angles, and obtuse angles. After students have discussed how the shapes are the same and different, have them write responses for problem 8. Ask them to share their responses with partners. As they listen to their partner’s response, encourage them to add new information to their written responses.
Speaking/Writing Choral read Apply It problem 8. Write the following terms on sentence strips: line segments, angles, parallel sides, acute angles, and obtuse angles. Display a term, such as acute angles. Ask students to find the acute angles in the shapes. Ask: How many acute angles do you see in each shape? How do you know they are acute angles? Continue the process for the remaining terms. Assign each student a partner. Have each student pair make a T-chart with the headers alike and different. Have partners list how the shapes are alike and different. Review the charts with each pair and then have them use the information to write their responses to problem 8.
Speaking/Writing Read Apply It problem 8 to students. Assign each student a partner. Cut out large replicas of the two shapes and give each student pair a set. Write the following terms on sentence strips: line segments, angles, parallel sides, acute angles, and obtuse angles. Display the term line segment. Have students point to the line segments in their shapes. Ask: How many line segments do you see in each shape? Provide a sentence frame to aid student responses: I see line segments. Say: Each shape has 4 line segments. Continue the process for the remaining terms. Ask: How are the shapes alike? Have partners use a sentence starter for written responses: Each shape has .
Prepare for Session 5Use with Apply It.
©Curriculum Associates, LLC Copying is not permitted.Lesson 30 Points, Lines, Rays, and Angles666
LESSON 30 SESSION 4
4 Look at the line segments in the letters on the tiles at the right. Fill in the table with each letter to identify parallel line segments. The fi rst one is done for you.
No parallel line segments
Only 1 pair of parallel line
segments
More than 1 pair of parallel line
segments
L
5 Look at the line segments in the letters on the tiles again. Fill in the table to identify perpendicular line segments.
Only 1 pair of perpendicular line
segments
Only 2 pairs of perpendicular line
segments
3 pairs of perpendicular line
segments
6 Tell whether each statement that describes the streets shown on the map below is True or False.
Main Street
High Street
1st S
tree
t
3rd
Stre
et
2nd Street
True False
1st and 3rd Street are perpendicular. � �
Main and High Street are parallel. � �
2nd Street is perpendicular to Main St. � �
1st Street is perpendicular to High St. � �
666
, T F, H, I E
L, T F, H, I E
4 See completed table on the student page; Letter tiles that have no parallel line segments: L, T; Letter tiles that have only 1 pair of parallel line segments: F, H, I; Letter tiles that have more than 1 pair of parallel line segments: E Challenge
5 See completed table on the student page; Letter tiles that have only 1 pair of perpendicular line segments: L, T; Letter tiles that have only 2 pairs of perpendicular line segments: F, H, I; Letter tiles that have 3 pairs of perpendicular line segments: E Challenge
6 B (False); C (True); F (False); G (True) Medium

©Curriculum Associates, LLC Copying is not permitted.667 Lesson 30 Points, Lines, Rays, and Angles
LESSON 30
©Curriculum Associates, LLC Copying is not permitted. Lesson 30 Points, Lines, Rays, and Angles 667
LESSON 30
Complete the Example below. Then solve problems 1–9.
EXAMPLEIn the shape below, list each pair of parallel sides and circle the letter marking each obtuse angle.
A B
C D
Look at how you could show your work.
A B
C D
right angle
Solution
Refine Points, Lines, Rays, and AnglesSESSION 5
Ap��� i�1 Put an X where each pair of perpendicular line segments
meet in the shape below.
Even if the sides of the shape went on forever, the opposite sides would never cross each other.
Perpendicular line segments meet to form right angles.
PAIR/SHAREWhat kind of angles are /B and /C? How do you know?
PAIR/SHAREDescribe the angles that are NOT marked with an X.
667
··· AB and ··· CD are parallel. ··· AC and ··· BD are parallel.
/A and /D open wider than a right angle; they are obtuse.
StartCheck for UnderstandingWhy Confirm understanding of identifying kinds of angles.
How Have students find the number of obtuse angles in a rectangle using any strategy they want.
©Curriculum Associates, LLC Copying is permitted.
Start
How many obtuse angles does a rectangle have?
Grade 4 Lesson 30 Session 5 | Refi ne Points, Lines, Rays, and Angles
Solution0; There are no obtuse angles in a rectangle.
Purpose In this session, students solve word problems that involve identifying and reasoning about geometric figures, including lines, line segments, rays, parallel and perpendicular lines, and right, acute, and obtuse angles and then discuss and confirm their answers with a partner.
Before students begin to work, use their responses to the Check for Understanding to determine those who will benefit from additional support.
As students complete the Example and problems 1–3, observe and monitor their reasoning to identify groupings for differentiated instruction.
SESSION 5 Refine
If the error is . . . Students may . . . To support understanding . . .
4have mistaken a square corner for an obtuse angle.
Remind students that the corner of a sheet of paper is a right angle. If the angles in a figure open wider than that, they are obtuse.
2have thought that 2 longer sides means 2 bigger angles.
Remind students that the lengths of the sides of a rectangle, which form an angle where two sides meet, do not affect how wide the angle opens.
Error Alert
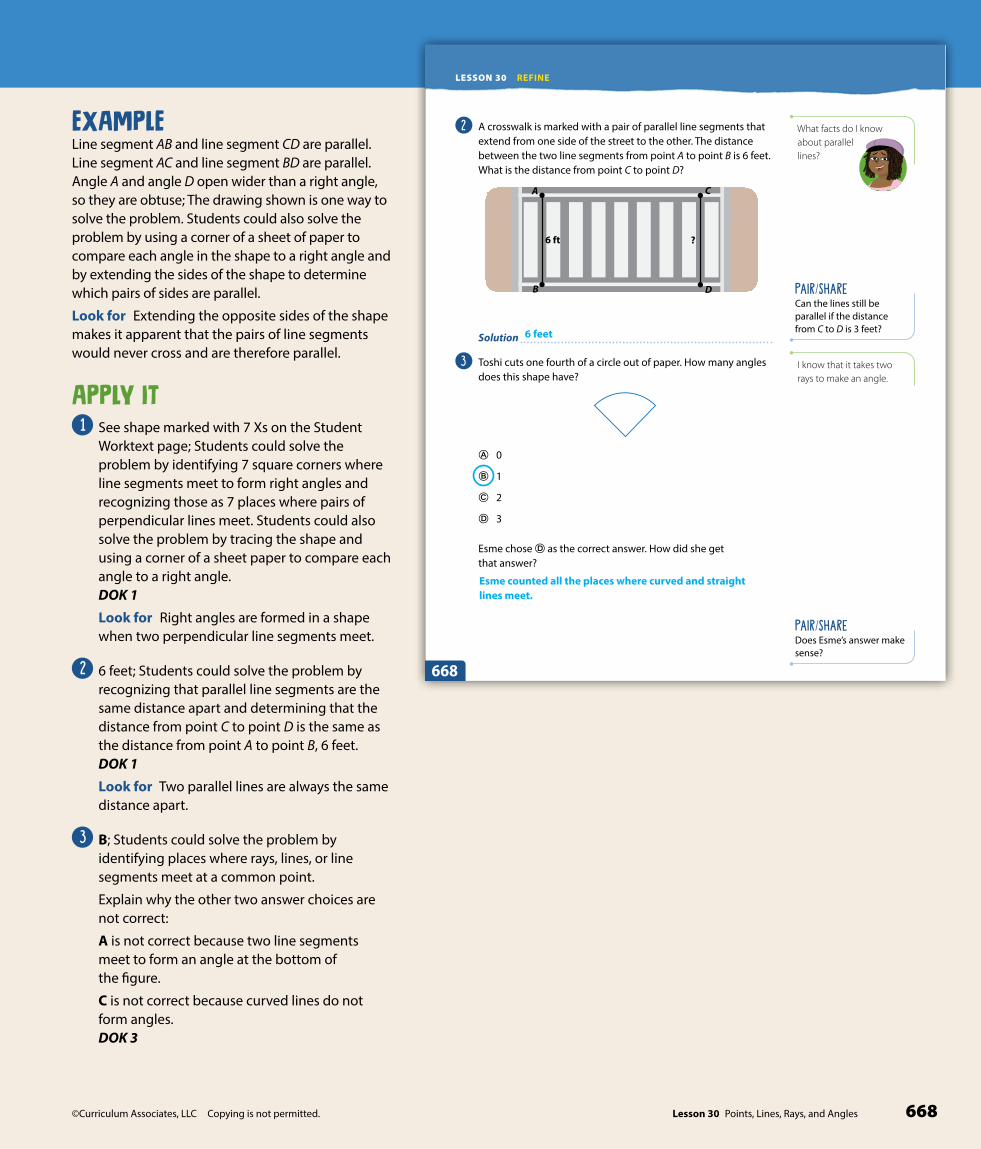
©Curriculum Associates, LLC Copying is not permitted. 668Lesson 30 Points, Lines, Rays, and Angles
©Curriculum Associates, LLC Copying is not permitted.Lesson 30 Points, Lines, Rays, and Angles668
LESSON 30 REFINE
2 A crosswalk is marked with a pair of parallel line segments that extend from one side of the street to the other. The distance between the two line segments from point A to point B is 6 feet. What is the distance from point C to point D?
Solution
3 Toshi cuts one fourth of a circle out of paper. How many angles does this shape have?
� 0
� 1
� 2
� 3
Esme chose � as the correct answer. How did she get that answer?
PAIR/SHARECan the lines still be parallel if the distance from C to D is 3 feet?
PAIR/SHAREDoes Esme’s answer make sense?
What facts do I know about parallel lines?
I know that it takes two rays to make an angle.
6 ft ?
A
B
C
D
6 ft ?
A
B
C
D
668
6 feet
Esme counted all the places where curved and straight lines meet.
EXAMPLELine segment AB and line segment CD are parallel. Line segment AC and line segment BD are parallel. Angle A and angle D open wider than a right angle, so they are obtuse; The drawing shown is one way to solve the problem. Students could also solve the problem by using a corner of a sheet of paper to compare each angle in the shape to a right angle and by extending the sides of the shape to determine which pairs of sides are parallel.
Look for Extending the opposite sides of the shape makes it apparent that the pairs of line segments would never cross and are therefore parallel.
APPLY IT1 See shape marked with 7 Xs on the Student
Worktext page; Students could solve the problem by identifying 7 square corners where line segments meet to form right angles and recognizing those as 7 places where pairs of perpendicular lines meet. Students could also solve the problem by tracing the shape and using a corner of a sheet paper to compare each angle to a right angle. DOK 1
Look for Right angles are formed in a shape when two perpendicular line segments meet.
2 6 feet; Students could solve the problem by recognizing that parallel line segments are the same distance apart and determining that the distance from point C to point D is the same as the distance from point A to point B, 6 feet. DOK 1
Look for Two parallel lines are always the same distance apart.
3 B; Students could solve the problem by identifying places where rays, lines, or line segments meet at a common point.
Explain why the other two answer choices are not correct:
A is not correct because two line segments meet to form an angle at the bottom of the figure.
C is not correct because curved lines do not form angles. DOK 3

©Curriculum Associates, LLC Copying is not permitted.669 Lesson 30 Points, Lines, Rays, and Angles
LESSON 30
©Curriculum Associates, LLC Copying is not permitted. Lesson 30 Points, Lines, Rays, and Angles 669
SESSION 5
4 Think about a real-world example of where a wall meets the fl oor and where the same wall meets the ceiling. Which term best describes what it looks like where these surfaces meet?
� parallel line segments
� perpendicular line segments
� right angle
� acute angle
5 Which drawing shows 3 lines?
� � � �
6 Look at the shape below. For which terms is an example shown in the shape?
� parallel line segments
� perpendicular line segments
� right angle
� acute angle
� obtuse angle
669
4 A; A line segment is formed where the wall and floor meet. Another line segment is formed where the wall and ceiling meet. In most cases, these real-world examples that represent line segments are always the same distance apart and never cross. DOK 1
5 A; A line is a straight row of points that goes on forever in both directions. DOK 1
6 B; The horizontal and vertical sides of the triangle meet to form a right angle.
C; The square corner is a right angle.
D; The angles at the top and right of the triangle both do not open as wide as a right angle. DOK 1
Error Alert Students may erroneously think that the angle on the right side of the triangle is an obtuse angle because it is formed by the two longest sides of the triangle, believing incorrectly that the lengths of the sides that form an angle determine the angle’s size.
SESSION 5 Refine
Differentiated Instruction
RETEACH EXTEND
Hands-On ActivityUse a geoboard to understand geometric figures.
Students struggling with concepts of parallel and perpendicular lines, as well as concepts of right, acute, and obtuse angles
Will benefit from additional work modeling, labeling, and describing these figures
Materials For each student: geoboard, several copies of Activity Sheet 1-Centimeter Grid Paper
• Provide each student with a geoboard and several sheets of grid paper.
• Have students make several different sets of parallel and perpendicular lines on their geoboard using rubber bands.
• Have students record their lines on grid paper and then label and describe the lines using the terms parallel and perpendicular.
• Repeat the same procedure and have students make several different right, acute, and obtuse angles on the geoboard with the rubber bands.
Challenge ActivityDesign quilt patterns.
Students who have achieved proficiency
Will benefit from deepening understanding of points, lines, rays, and angles used in a real-world context
Materials For each pair: ruler or straightedge• Have students design a quilt pattern by
using points, line segments, and angles. Patterns should include all types of angles, parallel lines, and perpendicular lines.
• Photocopy each pattern. Have students decorate one copy and label the other to identify the types of lines and angles.
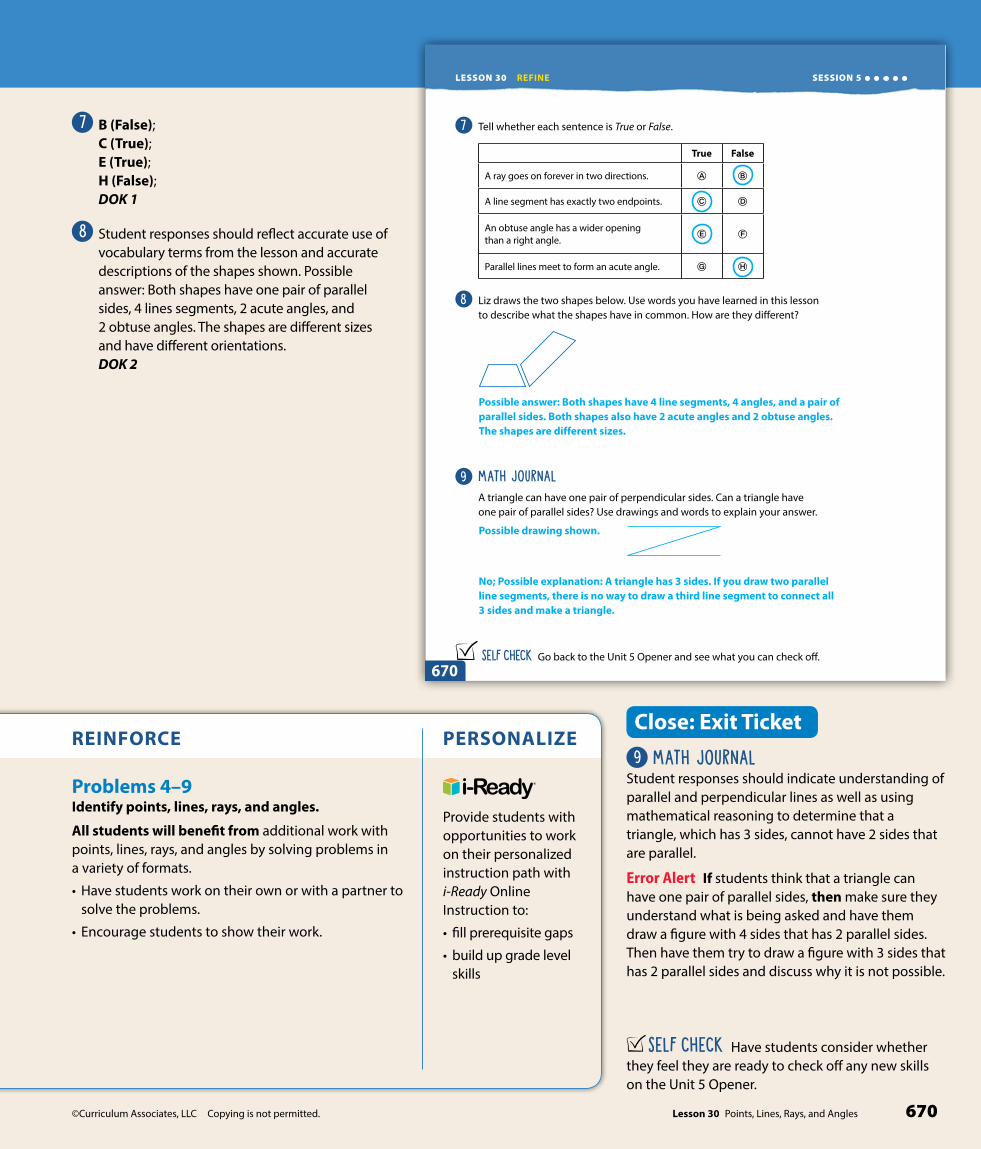
©Curriculum Associates, LLC Copying is not permitted. 670Lesson 30 Points, Lines, Rays, and Angles
©Curriculum Associates, LLC Copying is not permitted.Lesson 30 Points, Lines, Rays, and Angles670
LESSON 30 REFINE
7 Tell whether each sentence is True or False.
True False
A ray goes on forever in two directions. � �
A line segment has exactly two endpoints. � �
An obtuse angle has a wider opening than a right angle. � �
Parallel lines meet to form an acute angle. � �
8 Liz draws the two shapes below. Use words you have learned in this lesson to describe what the shapes have in common. How are they diff erent?
9 MATH JOURNAL A triangle can have one pair of perpendicular sides. Can a triangle have one pair of parallel sides? Use drawings and words to explain your answer.
SELF CHECK Go back to the Unit 5 Opener and see what you can check off .
SESSION 5
670
Possible answer: Both shapes have 4 line segments, 4 angles, and a pair of parallel sides. Both shapes also have 2 acute angles and 2 obtuse angles. The shapes are different sizes.
Possible drawing shown.
No; Possible explanation: A triangle has 3 sides. If you draw two parallel line segments, there is no way to draw a third line segment to connect all 3 sides and make a triangle.
7 B (False); C (True); E (True); H (False); DOK 1
8 Student responses should reflect accurate use of vocabulary terms from the lesson and accurate descriptions of the shapes shown. Possible answer: Both shapes have one pair of parallel sides, 4 lines segments, 2 acute angles, and 2 obtuse angles. The shapes are different sizes and have different orientations. DOK 2
Close: Exit Ticket
9 MATH JOURNALStudent responses should indicate understanding of parallel and perpendicular lines as well as using mathematical reasoning to determine that a triangle, which has 3 sides, cannot have 2 sides that are parallel.
Error Alert If students think that a triangle can have one pair of parallel sides, then make sure they understand what is being asked and have them draw a figure with 4 sides that has 2 parallel sides. Then have them try to draw a figure with 3 sides that has 2 parallel sides and discuss why it is not possible.
SELF CHECK Have students consider whether they feel they are ready to check off any new skills on the Unit 5 Opener.
REINFORCE PERSONALIZE
Problems 4–9Identify points, lines, rays, and angles.
All students will benefit from additional work with points, lines, rays, and angles by solving problems in a variety of formats.
• Have students work on their own or with a partner to solve the problems.
• Encourage students to show their work.
Provide students with opportunities to work on their personalized instruction path with i-Ready Online Instruction to:
• fill prerequisite gaps
• build up grade level skills

©Curriculum Associates, LLC Copying is not permitted.671a Lesson 31 Angles
Lesson Overview
LESSON 31
Angles
Lesson Objectives
Content Objectives• Recognize the relationship between the
measure of an angle and the part of a circle that the angle turns through.
• Use a protractor to measure an angle.
• Use benchmark angle measures to estimate the measure of an angle.
• Draw an angle of a specific degree.
Language Objectives• Describe a 3608 turn as a full circle.
• Record measures of angles.
• Compare an angle to a right angle and a straight line.
• Define the terms degree and protractor and use the terms in discussions.
Prerequisite Skills
• Recognize an angle as a geometric figure.
• Identify acute, right, and obtuse angles.
Standards for Mathematical Practice (SMP)
SMPs 1, 2, 3, 4, 5, and 6 are integrated in every lesson through the Try-Discuss-Connect routine.*
In addition, this lesson particularly emphasizes the following SMPs:
2 Reason abstractly and quantitatively.
5 Use appropriate tools strategically.
6 Attend to precision.
7 Look for and make use of structure.
* See page 363m to see how every lesson includes these SMPs.
Lesson Vocabulary
• degree (8) a unit of measure for angles. There are 3608 in a circle.
• protractor a tool used to measure angles.
Review the following key terms.
• acute angle an angle that measures more than 08 but less than 908.
• angle a geometric shape formed by two rays, lines, or line segments that meet at a common point.
• obtuse angle an angle that measures more than 908 but less than 1808.
• ray a straight row of points that starts at one point and goes on forever in one direction.
• right angle an angle that looks like a square corner and measures 908.
• vertex the point where two rays, lines, or line segments meet to form an angle.
Learning Progression
In the previous lesson students learned to recognize angles as geometric figures formed when two rays share a common endpoint, or vertex. Students identified angles as right, acute, or obtuse.
In this lesson students build on their understanding of angles and are introduced to the use of a protractor to measure and draw angles. Students use benchmark angle measures of 908 and 1808 to estimate the measure of an angle. They use their estimates to reason about the measure of an angle and then use a protractor to find angle measures and to draw angles of a specified measure.
In the next lesson students will learn to add and subtract angle measures to find the measure of angles that are composed of smaller angles. Students will apply their work with angle measures to solve word problems about real-world situations involving angle measures.

©Curriculum Associates, LLC Copying is not permitted. 671bLesson 31 Angles
Lesson Pacing Guide
PERSONALIZE
i-Ready Lessons*Grade 4• Measure Angles• Practice: Measure Angles
Independent Learning
PREPARE
Ready Prerequisite LessonGrade 3• Lesson 30 Understand Categories of Shapes
RETEACH
Tools for InstructionGrade 3• Lesson 30 Categories of Shapes
Grade 4• Lesson 31 Measure Angles
REINFORCE
Math Center ActivitiesGrade 4• Lesson 31 Angle Vocabulary Match• Lesson 31 Angles and Circles• Lesson 31 Measuring Angles• Lesson 31 Drawing Angles
EXTEND
Enrichment ActivityGrade 4• Lesson 31 Angles in Shapes
Small Group DifferentiationTeacher Toolbox
Lesson MaterialsLesson(Required)
Per student: protractor, ruler or straightedge, index card
Activities Per student: brass fastener, protractor, compass, ruler or straightedge, heavy paper, scissorsActivity Sheet: Regular Polygons**
Math Toolkit clocks, protractors, rulers, clock face, index cards, sticky notes
**Used for more than one activity.
SESSION 1
Explore45–60 min
Interactive Tutorial* (Optional) Prerequisite Review: Understand Categories of Shapes
Additional PracticeLesson pages 675–676
Angles• Start 5 min• Try It 10 min• Discuss It 10 min• Connect It 15 min• Close: Exit Ticket 5 min
SESSION 2
Develop45–60 min
Using a Protractor• Start 5 min• Try It 10 min• Discuss It 10 min• Picture It & Model It 5 min• Connect It 10 min• Close: Exit Ticket 5 min
Additional PracticeLesson pages 681–682
Fluency Using a Protractor
SESSION 3
Develop45–60 min
Drawing Angles• Start 5 min• Try It 10 min• Discuss It 10 min• Picture It & Model It 5 min• Connect It 10 min• Close: Exit Ticket 5 min
Additional PracticeLesson pages 687–688
Fluency Drawing Angles
SESSION 4
Refine45–60 min
Angles• Start 5 min• Example & Problems 1–3 15 min• Practice & Small Group
Differentiation 20 min• Close: Exit Ticket 5 min
Lesson Quiz or Digital Comprehension Check
Whole Class Instruction
* We continually update the Interactive Tutorials. Check the Teacher Toolbox for the most up-to-date offerings for this lesson.

©Curriculum Associates, LLC Copying is not permitted.671–672 Lesson 31 Angles
LESSON 31
Connect to Family, Community, and Language DevelopmentThe following activities and instructional supports provide opportunities to foster school, family, and community involvement and partnerships.
Connect to FamilyUse the Family Letter—which provides background information, math vocabulary, and an activity—to keep families apprised of what their child is learning and to encourage family involvement.
©Curriculum Associates, LLC Copying is not permitted.Lesson 31 Angles672
ACTIVITY Me�����Ng An����Do this activity with your child to estimate the measure of angles.
• Identify angles in and around your home or outside in the yard or neighborhood. You can also look through magazines or newspapers for pictures that show angles.
Here are some examples of angles you might fi nd (or make):
Angles formed by the hands on a clock or watch
Angles made by a bicycle frame
Angles formed by fi ngers or by the bend of an elbow
• Estimate the measure of each angle by using right angles (such as the corner of a sheet of paper) and straight angles (such as the side of a sheet of paper) as benchmarks.
Look for other real-world opportunities to estimate angle measures with your child.
672©Curriculum Associates, LLC Copying is not permitted.
Angles
31Dear Family,This week your child is learning to measure and draw angles. Your child is learning how to fi nd an angle’s exact measure.
Before measuring an angle, it is helpful to estimate the measure by using benchmarks, such as a right angle and a straight angle. For example, to estimate the measure of the blue angle below, compare it to a right angle and to a straight angle.
90° angle
180° angle
A right angle has a measure of 90 degrees. A straight angle has a measure of 180 degrees. The measure of the blue angle is between 90 degrees and 180 degrees.
To fi nd the exact measure of the angle, your child is learning to use a tool called a protractor.
• Line up the center point of the protractor with the vertex of the angle.
• Then line up one ray with the 08 mark.
• Read the mark on the protractor that the other ray passes through.
The angle measures 1308. (The ray also passes through the 508 mark, but since the angle is bigger than a 908 angle, the measure is not 508.)
Invite your child to share what he or she knows about measuring and drawing angles by doing the following activity together.
0° mark
vertex
908010070
11060
120
5013
0
40 140
30 150
20 160
10 170
0 180
180017010
1602015030
14040
13050
12060
11070
10080
Lesson 31 Angles 671671
GoalThe goal of the Family Letter is to provide opportunities for family members to help students discuss how to measure and draw angles. Family members are reminded of how to use a protractor to measure angles so they can support their student as he or she learns to use this tool.
ActivityIn the Measuring Angles activity, students and family members identify real-world objects to estimate the measure of angles using right angle and straight line benchmarks. Real-world examples are provided.
Math Talk at HomeEncourage students to compare angles they see in real-life with right angle and straight line benchmarks using the terms greater than, less than, and equal to. For example: I see an angle on the yield sign that has a measure less than a right angle. I see an angle on the window pane that has a measure equal to a right angle.
Conversation Starters Below are additional conversation starters students can write in their Family Letter or math journal to engage family members:• Find an angle that has a measure less than 90 8.• Find an angle that has a measure equal to 90 8.• Find an angle that has a measure greater than 90 8 and less than 180 8.• Find an angle that has a measure equal to 180 8.
Available in Spanish
Teacher Toolbox
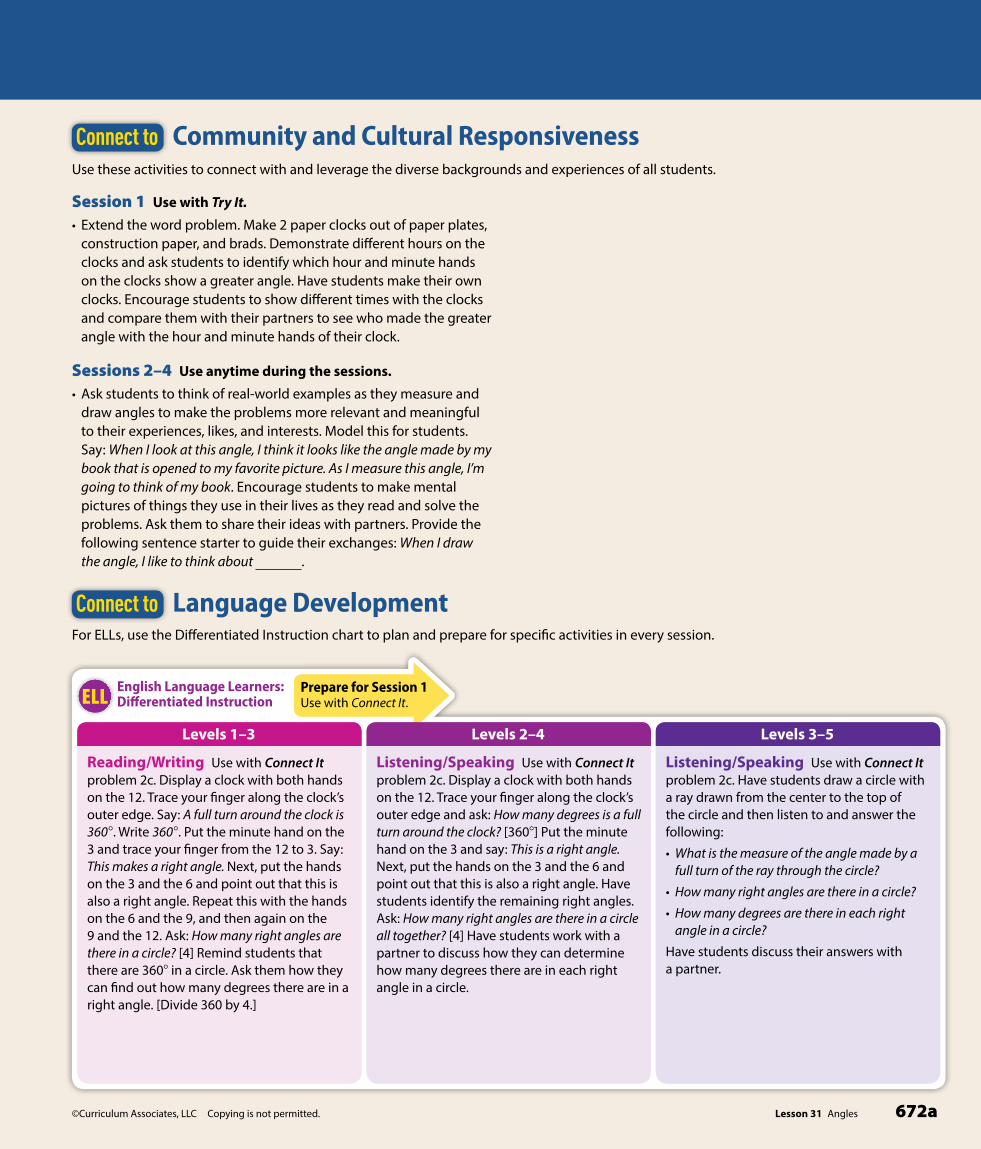
©Curriculum Associates, LLC Copying is not permitted. 672aLesson 31 Angles
Connect to Community and Cultural ResponsivenessUse these activities to connect with and leverage the diverse backgrounds and experiences of all students.
Connect to Language DevelopmentFor ELLs, use the Differentiated Instruction chart to plan and prepare for specific activities in every session.
Reading/Writing Use with Connect It problem 2c. Display a clock with both hands on the 12. Trace your finger along the clock’s outer edge. Say: A full turn around the clock is 360 8. Write 360 8. Put the minute hand on the 3 and trace your finger from the 12 to 3. Say: This makes a right angle. Next, put the hands on the 3 and the 6 and point out that this is also a right angle. Repeat this with the hands on the 6 and the 9, and then again on the 9 and the 12. Ask: How many right angles are there in a circle? [4] Remind students that there are 3608 in a circle. Ask them how they can find out how many degrees there are in a right angle. [Divide 360 by 4.]
Listening/Speaking Use with Connect It problem 2c. Display a clock with both hands on the 12. Trace your finger along the clock’s outer edge and ask: How many degrees is a full turn around the clock? [3608] Put the minute hand on the 3 and say: This is a right angle. Next, put the hands on the 3 and the 6 and point out that this is also a right angle. Have students identify the remaining right angles. Ask: How many right angles are there in a circle all together? [4] Have students work with a partner to discuss how they can determine how many degrees there are in each right angle in a circle.
Listening/Speaking Use with Connect It problem 2c. Have students draw a circle with a ray drawn from the center to the top of the circle and then listen to and answer the following:
• What is the measure of the angle made by a full turn of the ray through the circle?
• How many right angles are there in a circle?
• How many degrees are there in each right angle in a circle?
Have students discuss their answers with a partner.
Levels 3–5Levels 2–4Levels 1–3
ELLEnglish Language Learners:Differentiated Instruction
Prepare for Session 1Use with Connect It.
Session 1 Use with Try It.
• Extend the word problem. Make 2 paper clocks out of paper plates, construction paper, and brads. Demonstrate different hours on the clocks and ask students to identify which hour and minute hands on the clocks show a greater angle. Have students make their own clocks. Encourage students to show different times with the clocks and compare them with their partners to see who made the greater angle with the hour and minute hands of their clock.
Sessions 2–4 Use anytime during the sessions.
• Ask students to think of real-world examples as they measure and draw angles to make the problems more relevant and meaningful to their experiences, likes, and interests. Model this for students. Say: When I look at this angle, I think it looks like the angle made by my book that is opened to my favorite picture. As I measure this angle, I’m going to think of my book. Encourage students to make mental pictures of things they use in their lives as they read and solve the problems. Ask them to share their ideas with partners. Provide the following sentence starter to guide their exchanges: When I draw the angle, I like to think about .

©Curriculum Associates, LLC Copying is not permitted.673 Lesson 31 Angles
LESSON 31
SESSION 1 Explore
StartConnect to Prior KnowledgeWhy Activate students’ knowledge of acute, right, and obtuse angles.
How Have students identify whether an angle is acute, right, or obtuse.
©Curriculum Associates, LLC Copying is permitted.
Start
Grade 4 Lesson 31 Session 1 | Explore Angles
Tell whether each angle is acute, right, or obtuse.
Solutionsobtuse, right, acute
TRY ITMake Sense of the ProblemTo support students in making sense of the problem, have them show that they understand that Lily’s angle is formed by turning the hour hand clockwise from 12 o’clock to 3 o’clock and Dora’s angle is formed by turning the hour hand clockwise from 12 o’clock to 4 o’clock.
DISCUSS ITSupport Partner DiscussionEncourage students to use the term angle as they discuss their solutions.
Look for, and prompt as necessary for, understanding of:
• the hour hand and minute hand form an angle
• the angle changes as the hour hand turns
• Lily’s angle is a right angle
• Dora’s angle is an obtuse angle
Common Misconception Look for students who think that a clock cannot show angles because it is circular. As students present solutions, have them identify the two hands as two rays and the center of the clock as the vertex of the angle formed by the two rays.
Select and Sequence Student SolutionsOne possible order for whole class discussion:
• using physical models to compare the angles, noting that Dora’s angle opens wider
• using a benchmark angle to compare the angles, noting that Lily’s angle opens as wide as a right angle and that Dora’s angle opens wider than a right angle
• using reasoning to compare the angles, noting that Lily’s angle is a right angle and that Dora’s is an obtuse angle, which, by definition, opens wider than a right angle
Support Whole Class DiscussionPrompt students to note the relationship between the descriptions of angles in each solution and the angles in the clocks.
Ask How do [student name]’s and [student name]’s solutions describe the angle in each clock?
Listen for Dora’s angle has a wider opening than Lily’s angle.
Purpose In this session, students draw on their knowledge of identifying different types of angles. They share strategies to explore how various solution methods are based on comparing angles. They will look ahead to think about how angles are measured in reference to a circle.
©Curriculum Associates, LLC Copying is not permitted. 673Lesson 31 Angles
• An angle that turns through n one-degree angles is said to have an angle measure of n degrees.
• Measure angles in whole-number degrees using a protractor. Sketch angles of specifi ed measure.
SMP 1, 2, 3, 4, 5, 6, 7
Learning Targets
SESSION 1 LESSON 31
Previously, you learned to identify angles. Now you will learn more about angles and angle measurement. Use what you know to try to solve the problem below.
Lily and Dora each turn the hour hand on a clock face. They make diff erent angles by turning the hour hand.Who makes the greater angle? Explain how you know.
12
6
111
57
210
48
39
12
Lily’s angle Dora’s angle
6
111
57
210
48
39
12
6
111
57
210
48
39
TRY IT
DISCUSS ITAsk your partner: How did you get started?
Tell your partner: I started by . . .
Math Toolkit• clocks• clock face• index cards• sticky notes
Explore Angles
673
Possible student work:
Sample A
Dora makes the greater angle. You can compare the angles to see that Dora turns the hour hand more, so her angle looks greater.
Sample B
Dora turns the hour hand more than Lily does and makes the greater angle. Lily’s angle looks like a right angle, and Dora’s angle looks like an obtuse angle. An obtuse angle is greater than a right angle.

©Curriculum Associates, LLC Copying is not permitted. 674Lesson 31 Angles
©Curriculum Associates, LLC Copying is not permitted.674
SESSION 1
Lesson 31 Angles
LESSON 31 EXPLORE
CONNECT IT1 LOOK BACK
Explain how you know who makes the greater angle, Lily or Dora.
2 LOOK AHEADYou can measure angles to compare them. A degreeis a unit of measure for angles. Show degrees with the symbol 8. The angle made by a full turn of a ray in a circle measures 360 degrees, or 3608.
a. Look at the diagram below. An angle that turns through 1 ··· 360 of a circle
is called a 18 angle. How many 18 angles are in a circle?
1°
b. The red angle in the diagram turns through part of the circle. Count to fi nd
the measure of the red angle. Write the measure of the red angle.
c. A ray turns to form a right angle in the circle at the right. What is the measure, in degrees, of a right angle? Explain.
3 REFLECTHow does the way a ray turns through a circle help you think about the measure of an angle?
360°
674
Possible answer: Dora’s angle has a greater turn of the hour hand, so her angle is greater.
908; Four right angles make a circle. 360 4 4 5 90. So, a right angle has a measure of 908.
Possible explanation given.
Possible answer:
360
78
A ray that turns all the way through a circle makes an angle of 3608. So,
an angle’s measure is how far around a circle a ray in the angle turns.
CONNECT IT 1 LOOK BACK
Look for understanding that Dora’s angle has a wider opening than Lily’s angle, so Dora makes the greater angle.
Hands-On ActivityUse heavy paper to make an angle.
If . . . students are unsure about the differences between right, acute, and obtuse angles,
Then . . . use this activity to have them make physical models of the angles.
Materials For each student: brass fastener, heavy paper, scissors
• Have students cut two strips of paper the same length to represent two rays and attach them with a brass fastener to form an angle.
• Ask students to form a right angle with their paper model and then hold up their angles to show others in the group. Discuss what makes an angle a right angle. [Two rays meet at a common point to form a square corner.]
• Repeat the step above for an acute and obtuse angle, discussing how these angles are different from a right angle. [An acute angle does not open as wide as a right angle. An obtuse angle opens wider than a right angle but not as wide as a straight line.]
2 LOOK AHEADPoint out that now students will learn to measure an angle in units called degrees. Ask a volunteer to restate the definition of degree given on the Student Worktext page and to describe the symbol used to indicate degrees. Students will spend more time learning about the concept of degrees in the Additional Practice.
Students should be able to use the diagrams to determine the number of 18 angles in a circle and to find the measure of a given angle by counting the number of one-degree angles that it turns through. Students should also be able to use the diagram of a right angle in a circle as well as mathematical reasoning to determine that the measure of a right angle is 908.
Close: Exit Ticket
3 REFLECTLook for understanding that an angle that turns through a full circle has a measure of 3608 and that an angle’s measure can be determined by how far around a circle a ray in the angle turns.
Common Misconception If students do not relate how far around a circle an angle turns to the measure of an angle, then have students use two pencils to represent the rays of an angle and then turn one of the pencils so it goes through an entire circle. Encourage students to recognize that the end of the pencil moves in the shape of a circle and that you can make each move so small that it takes 360 turns to go around the full circle.
Real-World ConnectionEncourage students to think about everyday activities or situations in which
people might want to estimate or measure an angle. Have volunteers share their ideas. Examples include art, architecture, construction, gardening, and quilting.

©Curriculum Associates, LLC Copying is not permitted.675 Lesson 31 Angles
LESSON 31
©Curriculum Associates, LLC Copying is not permitted. 675
Name:
Lesson 31 Angles
Prepare for Angles
LESSON 31 SESSION 1
1 Think about what you know about angles. Fill in each box. Use words, numbers, and pictures. Show as many ideas as you can.
Examples
Examples
Examples
Examples
Examples
Examples
degree
2 The red angle below turns through part of the circle. Count to fi nd the measure of the red angle. Write the measure of the angle in degrees.
1°
675
58
Possible answers:
A unit of measure for angles
There are 3608 in a circle.
The symbol for degrees is 8.
A right angle measures 90 degrees.
908
Solutions
Support Vocabulary Development
1 Ask students to tell you what they think of when they hear the terms angle and degrees. Divide students into pairs or small groups and distribute a large sheet of paper to each group to make a poster. Ask students to divide their posters into 4–8 sections. Have them draw pictures, write definitions, or provide lists of what they know about angles and degrees.
Display the posters the groups have made. Have students use the posters for ideas as they complete the graphic organizer.
2 Have students explain to their partners what they do to find the measure of the red angle. Encourage them to use the terms ray, degrees, and angle in their explanations. When students have written responses to problem 2, ask the following questions:
• What symbol did you use to represent degrees?
• Is the red angle made with rays, lines, or line segments?
Supplemental Math Vocabulary• ray
• angle
• right angle
SESSION 1 Additional Practice

©Curriculum Associates, LLC Copying is not permitted. 676Lesson 31 Angles
Levels 1–3 Levels 2–4 Levels 3–5
English Language Learners:Differentiated InstructionELL
Writing/Reading Use with Connect It problem 6. Ask students to think of strategies for measuring angles. Divide students into pairs. Give each pair two 10” 3 14” sheets of paper. Have them make User’s Guide posters for using a protractor and benchmark angles to measure angles. Encourage students to use sequencing terms such as first, next, then, and finally to help them organize their thoughts, if needed. When partners have completed their posters, have them read them to other pairs. Encourage students to refer to the information on the User’s Guide posters as they write responses to problem 6.
Speaking/Writing Use with Connect It problem 6. Ask students to think of strategies for measuring angles. Work with them to make User’s Guide posters for using a protractor and benchmark angles to measure angles. Ask questions to help students organize their thoughts:• What do you do first?• What do you do next?• Then what do you do?
Record responses. Have students read the guides and add information as needed. Ask students to select the strategy they like best for measuring angles. Encourage students to refer to the posters for their written responses. Provide the sentence frame: I like using because .
Reading/Writing Use with Connect It problem 6. Say: You can use a protractor to measure angles or you can use benchmark angles. For using a protractor, display:• Line up one ray of the angle with 0 8.• Line up the center point.• Look at the number of degrees.
For using benchmark angles, display:• Look at the angle.• If it is narrower than a right angle, it is , 90 8.
If it opens wider than a right angle, it is . 90 8.• If it is wider than a right angle but is not a
straight line, it is between 90 8 and 180 8.
Have students choral read the information. Ask them to refer to the charts for their written responses to problem 6.
Prepare for Session 2Use with Connect It.
©Curriculum Associates, LLC Copying is not permitted.676 Lesson 31 Angles
LESSON 31 SESSION 1
3 Solve the problem. Show your work.
Beau and Kong each turn the hour hand on a clock face. They make diff erent angles by turning the hour hand.Who makes the greater angle? Explain how you know.
12
6
111
57
210
48
39
12
Beau’s angle Kong’s angle
6
111
57
210
48
39
12
6
111
57
210
48
39
Solution
4 Check your answer. Show your work.
676
Possible student work using reasoning:
Kong’s angle looks like a right angle, and Beau’s angle looks like an acute angle. A right angle has a wider opening than an acute angle.
Possible student work:
Kong turns the hour hand through more of the circle. So, his angle has a measure with a greater number of degrees. That means Kong’s angle is greater than Beau’s angle.
Kong makes the greater angle.
3 Assign problem 3 to provide another look at comparing angles.
This problem is very similar to the problem about who makes the greater angle, Lily or Dora. In both problems, student are asked to compare two angles formed by the hands of analog clocks. The question asks who makes the greater angle, Beau or Kong.
Students may want to use a demonstration clock or draw a clock face on paper and use pencils or crayons as the hands of the clock.
Suggest that students read the problem three times, asking themselves one of the following questions each time:
• What is this problem about?
• What is the question I am trying to answer?
• What information is important?
Solution: Kong makes the greater angle. See possible student work using reasoning on the student page. Medium
4 Have students solve the problem a different way to check their answer.
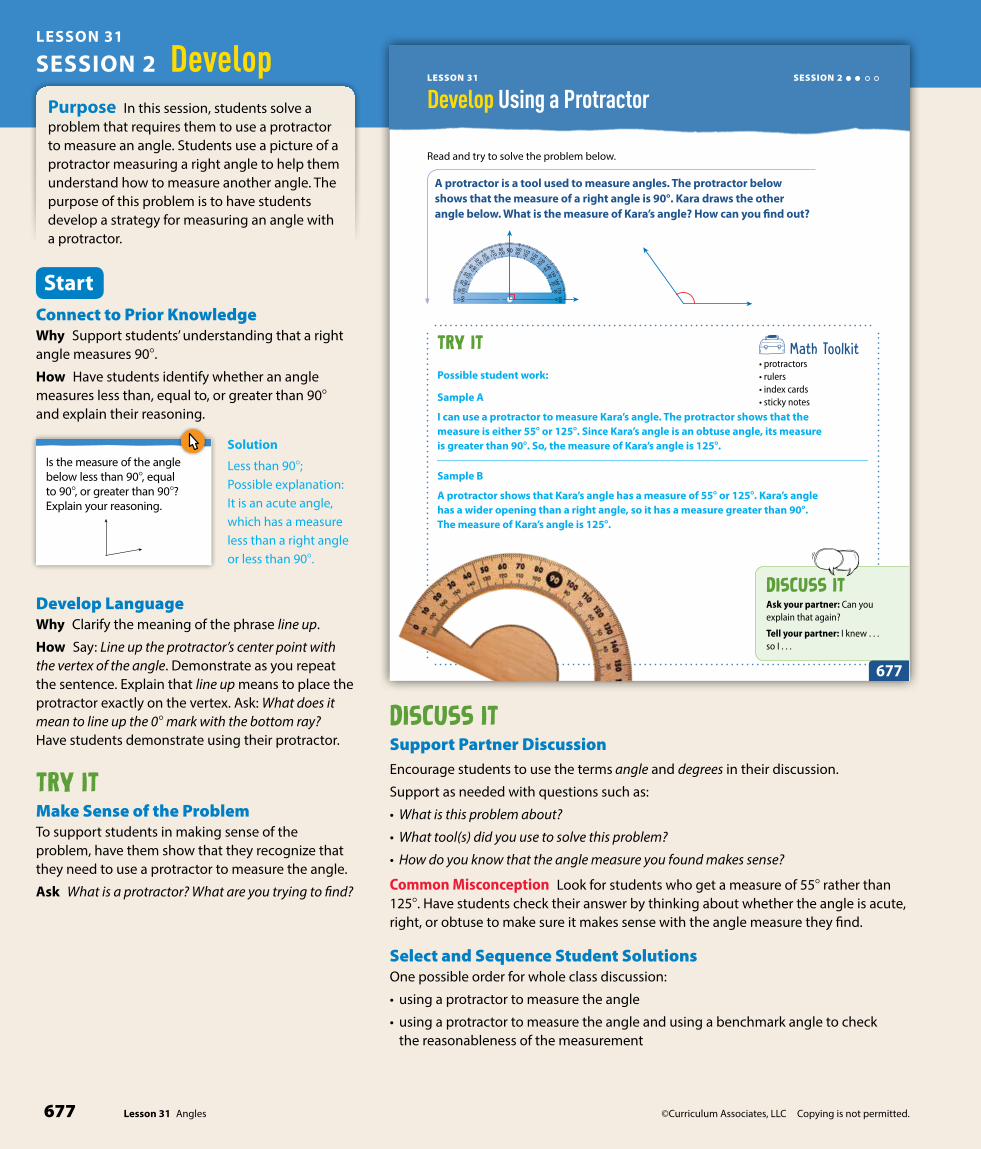
©Curriculum Associates, LLC Copying is not permitted.677 Lesson 31 Angles
LESSON 31
677
LESSON 31
Lesson 31 Angles
TRY IT
SESSION 2
Develop Using a Protractor
Read and try to solve the problem below.
A protractor is a tool used to measure angles. The protractor below shows that the measure of a right angle is 90°. Kara draws the other angle below. What is the measure of Kara’s angle? How can you fi nd out?
908010070
11060120
50130
40140
3015
0
20 160
10 170
0 180 1800
1701016020
1503014040
13050
12060
1107010080
Math Toolkit• protractors• rulers• index cards• sticky notes
DISCUSS ITAsk your partner: Can you explain that again?
Tell your partner: I knew . . . so I . . .
©Curriculum Associates, LLC Copying is not permitted.
677
Possible student work:
Sample A
I can use a protractor to measure Kara’s angle. The protractor shows that the measure is either 558 or 1258. Since Kara’s angle is an obtuse angle, its measure is greater than 908. So, the measure of Kara’s angle is 1258.
Sample B
A protractor shows that Kara’s angle has a measure of 558 or 1258. Kara’s angle has a wider opening than a right angle, so it has a measure greater than 908. The measure of Kara’s angle is 1258.
StartConnect to Prior KnowledgeWhy Support students’ understanding that a right angle measures 908.
How Have students identify whether an angle measures less than, equal to, or greater than 908 and explain their reasoning.
©Curriculum Associates, LLC Copying is permitted.
Start
Is the measure of the angle below less than 908, equal to 908, or greater than 908? Explain your reasoning.
Grade 4 Lesson 31 Session 2 | Develop Using a Protractor
Solution
Less than 908; Possible explanation: It is an acute angle, which has a measure less than a right angle or less than 908.
Develop LanguageWhy Clarify the meaning of the phrase line up.
How Say: Line up the protractor’s center point with the vertex of the angle. Demonstrate as you repeat the sentence. Explain that line up means to place the protractor exactly on the vertex. Ask: What does it mean to line up the 0 8 mark with the bottom ray? Have students demonstrate using their protractor.
TRY ITMake Sense of the ProblemTo support students in making sense of the problem, have them show that they recognize that they need to use a protractor to measure the angle.
Ask What is a protractor? What are you trying to find?
DISCUSS ITSupport Partner DiscussionEncourage students to use the terms angle and degrees in their discussion.
Support as needed with questions such as:
• What is this problem about?
• What tool(s) did you use to solve this problem?
• How do you know that the angle measure you found makes sense?
Common Misconception Look for students who get a measure of 558 rather than 1258. Have students check their answer by thinking about whether the angle is acute, right, or obtuse to make sure it makes sense with the angle measure they find.
Select and Sequence Student SolutionsOne possible order for whole class discussion:
• using a protractor to measure the angle
• using a protractor to measure the angle and using a benchmark angle to check the reasonableness of the measurement
SESSION 2 DevelopPurpose In this session, students solve a problem that requires them to use a protractor to measure an angle. Students use a picture of a protractor measuring a right angle to help them understand how to measure another angle. The purpose of this problem is to have students develop a strategy for measuring an angle with a protractor.

©Curriculum Associates, LLC Copying is not permitted. 678Lesson 31 Angles
©Curriculum Associates, LLC Copying is not permitted.678 Lesson 31 Angles
LESSON 31 DEVELOP
Explore diff erent ways to understand how to use benchmarks and a protractor to measure an angle.
A protractor is a tool used to measure angles. The protractor below shows that the measure of a right angle is 90°. Kara draws the other angle below. What is the measure of Kara’s angle? How can you fi nd out?
908010070
11060120
50130
40140
3015
0
20 160
10 170
0 180 1800
1701016020
1503014040
13050
12060
1107010080
Pi����� ItYou can use benchmarks to estimate the measure.
90° angle
180° angle
Kara’s angle seems to be between 908 and 1808. It is obtuse.
Mo��� ItYou can use a protractor to measure the angle.
• First, line up either mark showing 08 on the protractor with one ray of the angle.
908010070
11060120
50130
40140
3015
0
20 160
10 170
0 180 1800
1701016020
1503014040
13050
12060
1107010080
• Next, line up the center point of the protractor with the vertex of the angle. Remember that the vertex is the point where two rays meet to form an angle.
• Then look at the other ray to read the number of degrees.
vertex
ray
678
Support Whole Class DiscussionCompare and connect the process of measuring the angle, estimates of the angle measure, and the actual measure of the angle.
Ask Where does your work show the measure of Kara’s angle? How do you know the measure of the angle is correct?
Listen for Students should recognize that accurate responses include an angle measurement in degrees. Responses may include that Kara’s angle is an obtuse angle and that the angle’s measure is greater than a right angle, which measures 908, but less than a straight angle, which measures 1808.
PICTURE IT & MODEL ITIf no student presented these models, connect them to the student models by pointing out the ways they represent:
• using a benchmark angle to estimate the measure of an angle
• lining up the center point of the protractor with the vertex of the angle
• lining up a 08 mark on the protractor with one ray of the angle
Ask What do each of the marks between the 10 8 marks on the protractor represent?
Listen for Each of the marks represent 18.
For estimating an angle measure using benchmark angles, prompt students to identify whether Kara’s angle is acute, obtuse, or right.
• Why are a 90 8 and a 180 8 angle used as benchmarks?
• How does the picture help you determine what type of angle Kara drew?
For using a protractor, prompt students to identify the steps used to measure an angle with a protractor.
• What should the center point on the protractor be lined up with?
• What should one of the 0° marks on the protractor be lined up with?
• How do you know which scale on the protractor to use to read the angle measure?
Deepen UnderstandingUse a Protractor to Measure an AngleSMP 6 Attend to precision.
When discussing how to measure an angle with a protractor, prompt students to consider what to do if the rays of the angle do not reach the scale on the protractor.
Ask Suppose the rays on Kara’s angle were not long enough to reach the degree marks on the protractor. What could you do to make sure that you correctly read the protractor to get an accurate measurement?
Listen for You could use a ruler to extend the length of the rays.
To illustrate, draw a right angle on the board and use a ruler to extend the rays.
Ask Does extending the rays of the right angle change its measure? Explain.
Listen for No. The angle is still a right angle with a measure of 90 degrees.
Generalize Does extending the rays of any angle change the measure of an angle? Have students explain their reasoning. Listen for understanding that the length of the rays does not impact the part of a circle that an angle turns through and therefore does not impact the measure of the angle.

©Curriculum Associates, LLC Copying is not permitted.679 Lesson 31 Angles
LESSON 31
©Curriculum Associates, LLC Copying is not permitted. 679
SESSION 2
Lesson 31 Angles
Co����� ItNow you will use the problem from the previous page to help you understand how to use a protractor to measure an angle.
1 Estimate the angle measure of Kara’s angle.
2 Why must you line up the protractor’s center point with the vertex of the angle?
3 Suppose you line up one ray with either mark showing 108 or 1708 instead of either mark showing 08 or 1808. How would it change which mark the other ray points to?
4 Line up either mark showing 08 or 1808 with one ray. Which mark does the other ray point to?
5 Which number of degrees is the measure of the angle? Explain how you know.
6 REFLECTLook back at your Try It, strategies by classmates, and Picture It and Model It. Which models or strategies do you like best for measuring an angle? Explain.
679
Possible answer: 1208
Possible answer: The other ray would point 108 past the correct measure.
558 or 1258
1258; Possible explanation: The measure of the angle is greater than a right angle, so the measure has to be greater than 908.
Possible answer: The vertex of the angle must be the same as the center of the circle that was used to set the marks on the protractor.
Students may respond that they like using a protractor to measure an
angle in degrees. Also, students may respond that they like using a
benchmark of a 908 angle to help them decide whether an angle is acute
or obtuse because it tells them which scale to use on the protractor.
CONNECT IT• Remind students that one thing that is alike
about all the representations is that they show Kara’s angle.
• Explain that on this page, students will use the representations on the previous page to estimate and measure Kara’s angle in degrees.
Monitor and Confirm1 – 3 Check for understanding that:
• the angle measure is between 908 and 1808
• the center point of the protractor is lined up with the vertex of the angle in order to get an accurate measurement
• one of the rays is lined up with a 08 mark on the protractor
3 Look for understanding that the problem is asking students what would change if they line up one ray with 108 or 1708 while keeping the vertex of the angle lined up with the center point of the protractor. Students should recognize that the ray would point to a mark that is 108 past the correct measure.
Support Whole Class Discussion4 – 5 Be sure that students understand that
problem 5 is asking them to tell which of the two measures they found in problem 4 is the measure of Kara’s angle and to explain their reasoning.
Ask How does knowing whether Kara’s angle is acute or obtuse help you know which of the two measures is the measure of Kara’s angle?
Listen for If the angle is acute, use the degree measure that is less than 908. If the angle is obtuse, use the degree measure that is greater than 908.
Ask Look at the 08 mark on the protractor that is lined up with one ray of Kara’s angle. Is that 08 mark in the protractor’s bottom scale or top scale? How does this help you know which of the two measures is the measure of Kara’s angle?
Listen for The 08 mark is in the protractor’s bottom scale. So, I should use the measure from the bottom scale as the measure of Kara’s angle, 1258.
6 REFLECT Have all students focus on the strategies used to solve this problem. If time allows, have students share their responses with a partner.
SESSION 2 Develop
Hands-On ActivityMeasure angles in regular polygons.
For all . . . students to make sense of using a protractor to measure angles,
Use . . . the activity below to practice using a protractor to measure angles in regular polygons.
Materials For each student: protractor, ruler or straightedge, Activity Sheet Regular Polygons• Have students measure one angle in each polygon and record the measure on
the sheet. Tell them to use their ruler to extend the length of the sides of the polygon if the sides are not long enough to read the protractor accurately. [equilateral triangle: 608, square: 908, regular pentagon: 1088, regular hexagon: 1208, regular octagon: 1358]
• Have students compare their answers with a partner to check their results. Then have students share with the class and discuss whether the angle measures will stay the same if the figures are either enlarged or reduced. [The angle measures will remain the same.] Collect students’ completed Activity Sheets to use for an activity in the next session.

©Curriculum Associates, LLC Copying is not permitted. 680Lesson 31 Angles
©Curriculum Associates, LLC Copying is not permitted.680 Lesson 31 Angles
Ap��� ItUse what you just learned to solve these problems.
7 What is the measure, in degrees, of the angle shown?
90100110
120
130
140
150
160
170
80 70 6050
4030
2010
0360
270 280290
300
310
320
330340
350
260250240230
22021
020
019
018
0
8 What is the measure of the angle shown?
9 What is the measure of the angle shown?
LESSON 31 DEVELOP SESSION 2
680
2358
308
1508
APPLY ITFor all problems, encourage students to use their knowledge of the measures of right, acute, and obtuse angles so they know which of the two scales on the protractor to use to determine the measure of an angle.
7 2358; The protractor shown is a 3608, or full-circle, protractor rather than a 1808, or half-circle, protractor that students are more familiar with.
8 308; Line up a 08 mark with one ray of the angle and the center point with the vertex. The numbers on the protractor at the point of intersection are 308 and 1508. The angle measures 308 because it has a measure that is less than a right angle.
Close: Exit Ticket
9 1508; Line up a 08 mark with one ray of the angle and line up the center point of the protractor with the vertex of the angle. The numbers on the protractor at the point of intersection are 308 and 1508. The angle measures 1508 because it has a measure that is greater than a right angle.
Students’ solutions should indicate understanding of:
• lining up one ray with a 08 mark on a protractor
• lining up the center point of the protractor with the vertex of the angle
• the angle is obtuse, so its measure is between 908 and 1808
Error Alert If students get a measure close to 1508
but not exactly 1508, then they might not have carefully lined up a 08 mark with one of the rays. Remind students of the importance of lining up the initial ray and the vertex with the protractor to get an accurate measurement.

©Curriculum Associates, LLC Copying is not permitted.681 Lesson 31 Angles
LESSON 31
©Curriculum Associates, LLC Copying is not permitted. 681
Name:
Lesson 31 Angles
Practice Using a Protractor
LESSON 31 SESSION 2
Study the Example showing how to use a protractor to measure an angle. Then solve problems 1−5.
Ex�����Omar draws the angle at the right. What is the measure of the angle?
Line up the 08 or the 1808 mark on a protractor with one ray of the angle.
Line up the center point of the protractor with the vertex of the angle.
Look at the other ray. Read the number of degrees on the protractor. Read the number that is less than 90, since the angle is less than 908.
The angle measures 708.
908010070
11060120
50130
40140
3015
0
20 160
10 170
0 180 1800
1701016020
1503014040
13050
12060
1107010080
1 Read the number of degrees on the protractor to fi nd the measure of the angle.
908010070
11060120
50130
40140
3015
0
20 160
10 170
0 180 1800
1701016020
1503014040
13050
12060
1107010080
The angle measures degrees.
2 Use a protractor to measure the angle below.
The angle measures degrees.
Vocabularydegree (8) a unit of measure for angles.
protractor a tool used to measure angles.
vertex the point where two rays, lines, or line segments meet to form an angle.
681
115
50
Solutions
1 115 degrees; One ray is aligned with the 08 mark on the protractor’s bottom scale, and the other ray lines up with the 1158 mark on the bottom scale. Basic
2 50 degrees; Line up a 08 mark with one ray of the angle and the center point with the vertex. The numbers on the protractor at the point of intersection are 508 and 1308. The angle measures 508 because it has a measure that is less than a right angle. Medium
SESSION 2 Additional Practice
Fluency & Skills Practice Teacher Toolbox
Assign Using a Protractor
In this activity students measure angles in geometric figures using a protractor. Students can practice measuring angles that they find in the world around them, such as the angle formed by two roads that cross on a map.
Name:
Fluency and Skills Practice
©Curriculum Associates, LLC Copying is permitted for classroom use.
Use a protractor to measure the marked angle in each shape. Write the measure of the angle.
Using a Protractor
1
A
3
C
5 E
2
B
4
D
6
F
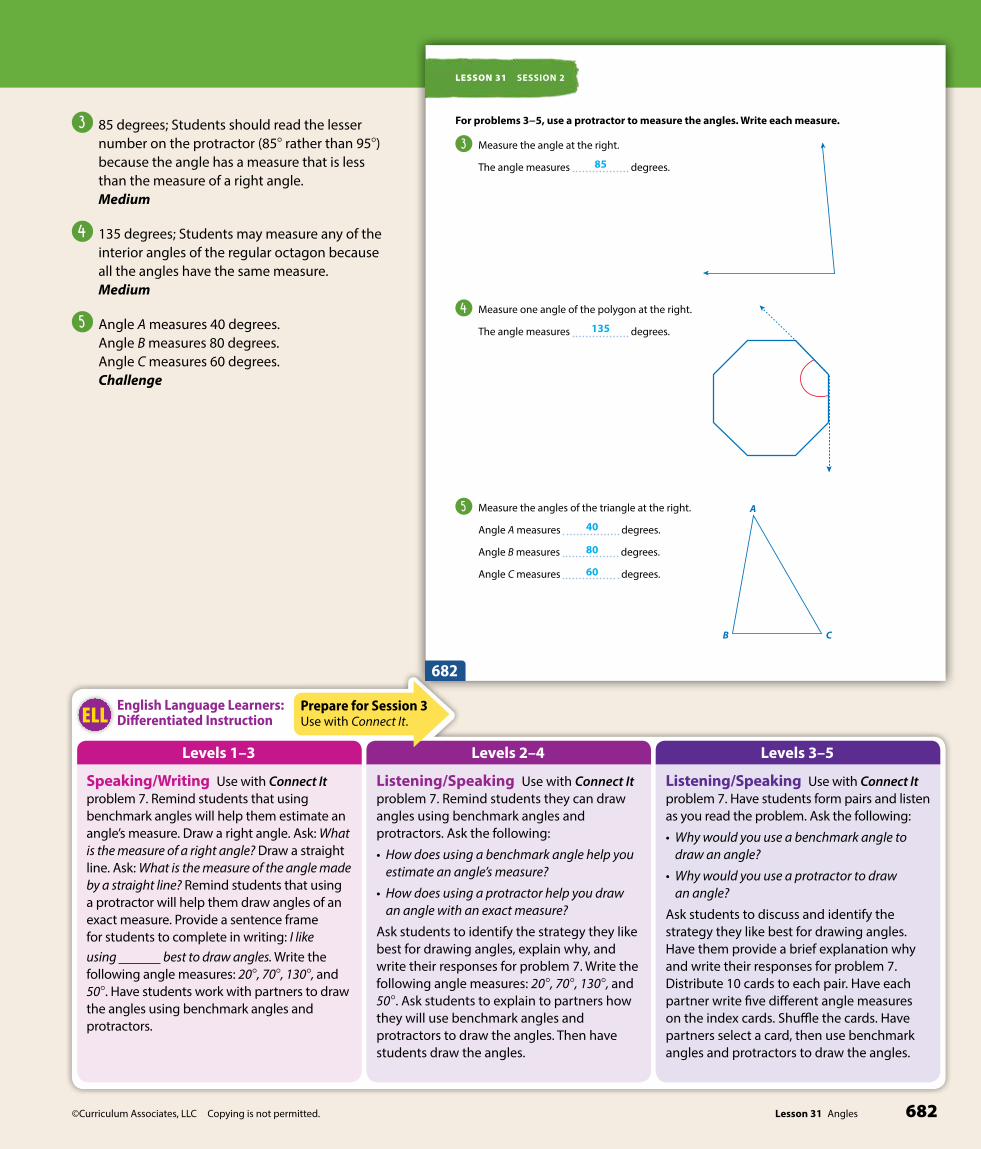
©Curriculum Associates, LLC Copying is not permitted. 682Lesson 31 Angles
Levels 1–3 Levels 2–4 Levels 3–5
English Language Learners:Differentiated InstructionELL
Listening/Speaking Use with Connect It problem 7. Have students form pairs and listen as you read the problem. Ask the following:
• Why would you use a benchmark angle to draw an angle?
• Why would you use a protractor to draw an angle?
Ask students to discuss and identify the strategy they like best for drawing angles. Have them provide a brief explanation why and write their responses for problem 7. Distribute 10 cards to each pair. Have each partner write five different angle measures on the index cards. Shuffle the cards. Have partners select a card, then use benchmark angles and protractors to draw the angles.
Listening/Speaking Use with Connect It problem 7. Remind students they can draw angles using benchmark angles and protractors. Ask the following:
• How does using a benchmark angle help you estimate an angle’s measure?
• How does using a protractor help you draw an angle with an exact measure?
Ask students to identify the strategy they like best for drawing angles, explain why, and write their responses for problem 7. Write the following angle measures: 20 8, 70 8, 130 8, and 50 8. Ask students to explain to partners how they will use benchmark angles and protractors to draw the angles. Then have students draw the angles.
Speaking/Writing Use with Connect It problem 7. Remind students that using benchmark angles will help them estimate an angle’s measure. Draw a right angle. Ask: What is the measure of a right angle? Draw a straight line. Ask: What is the measure of the angle made by a straight line? Remind students that using a protractor will help them draw angles of an exact measure. Provide a sentence frame for students to complete in writing: I like using best to draw angles. Write the following angle measures: 20 8, 70 8, 130 8, and 50 8. Have students work with partners to draw the angles using benchmark angles and protractors.
©Curriculum Associates, LLC Copying is not permitted.682 Lesson 31 Angles
LESSON 31 SESSION 2
For problems 3−5, use a protractor to measure the angles. Write each measure.
3 Measure the angle at the right.
The angle measures degrees.
4 Measure one angle of the polygon at the right.
The angle measures degrees.
5 Measure the angles of the triangle at the right.
Angle A measures degrees.
Angle B measures degrees.
Angle C measures degrees.
A
B C
682
85
135
40
80
60
Prepare for Session 3Use with Connect It.
3 85 degrees; Students should read the lesser number on the protractor (858 rather than 958) because the angle has a measure that is less than the measure of a right angle. Medium
4 135 degrees; Students may measure any of the interior angles of the regular octagon because all the angles have the same measure. Medium
5 Angle A measures 40 degrees. Angle B measures 80 degrees. Angle C measures 60 degrees. Challenge

©Curriculum Associates, LLC Copying is not permitted.683 Lesson 31 Angles
LESSON 31
©Curriculum Associates, LLC Copying is not permitted. 683
LESSON 31
Lesson 31 Angles
SESSION 3
Develop Drawing Angles
Read and try to solve the problem below.
Draw a 308 angle. Think about using two pencils to make an angle.
TRY IT
Math Toolkit• protractors• rulers• index cards• sticky notes
DISCUSS ITAsk your partner: Do you agree with me? Why or why not?
Tell your partner: I agree with you about . . . because . . .
683
Possible student work:
Sample A
Sample B
30°
Start
Connect to Prior KnowledgeMaterials For each student: ruler, index card
Why Prepare students to draw an angle with a given number of degrees by drawing a right, an acute, and an obtuse angle.
How Have students use a ruler to draw a right, acute, and obtuse angle.
©Curriculum Associates, LLC Copying is permitted.
Start
Draw a right angle, an acute angle, and an obtuse angle.
Grade 4 Lesson 31 Session 3 | Develop Drawing Angles
SolutionCheck students’ drawings.
Develop LanguageWhy Reinforce the meaning of the word common.
How Explain that the word common can mean “shared.” Have students find the word in Picture It. Ask them to point to the two rays (pencils) that make the angle. Then ask them to point to and identify the endpoint that is shared by both rays. Provide a sentence frame: This is the endpoint.
TRY ITMake Sense of the ProblemTo support students in making sense of the problem, have them show that they understand they can use two pencils to make an angle.
DISCUSS ITSupport Partner DiscussionEncourage students to use the terms ray and protractor as they discuss their solutions.
Support as needed with questions such as:
• What did you do first?
• What tool(s) did you use to solve this problem?
• How does your angle compare to your partner’s angle?
Common Misconception Look for students who draw an angle with a measure of 1508. Have them put a finger on the 08 mark of the scale they used on the protractor. Then have them move their finger along that scale to identify the correct measure.
Select and Sequence Student SolutionsOne possible order for whole class discussion:
• physical models, such as pencils, to represent the angle
• using a protractor to draw the angle
• using a protractor to draw the angle and using benchmark angles to check its measurements
Purpose In this session, students solve a problem that requires them to draw an angle of a given measure. Students may model the angle with manipulatives to get an idea of what their drawing should look like. The purpose of this problem is to have students develop a strategy for drawing angles of a given measure.
SESSION 3 Develop

©Curriculum Associates, LLC Copying is not permitted. 684Lesson 31 Angles
©Curriculum Associates, LLC Copying is not permitted.684 Lesson 31 Angles
LESSON 31 DEVELOP
Explore diff erent ways to understand how to draw angles.
Draw a 308 angle. Think about using two pencils to make an angle.
Pi����� ItYou know an angle is made up of two rays with a common endpoint, called the vertex.
You can use two pencils to make an angle.
m���� ItYou can use a benchmark angle to get an idea of what your drawing should look like.
Think about a right angle. A right angle measures 908.
90°
You know 30 × 3 = 90. Imagine rays that split the 908 angle into 3 angles of equal measure.
A 308 angle opens about the same amount as the angle shown at the right.
684
Support Whole Class DiscussionCompare and connect the different representations and have students identify how they are related.
Ask How does your model show the two rays of the angle? the vertex of the angle?
Listen for Students should recognize that accurate responses include that the rays are shown with straight objects or lines and that the vertex of the angle is the point where the two rays meet.
PICTURE IT & MODEL ITIf no student presented these models, connect them to the student models by pointing out the ways they each represent:
• the two rays of the angle
• the vertex of the angle
• the turn of one ray of the angle
Ask How is the way the angle is shown in the Picture It different from or the same as in the Model It?
Listen for In the Picture It, the angle is shown by using two pencils for the rays. In the Model It, the angle is shown in relation to a right angle. In both, the angle opens to the right.
For the picture with the two pencils, prompt students to identify how the picture is helpful when drawing an angle that measures 308.
• How do you know if this picture shows an estimate or an exact drawing?
• What tool is critical for drawing an angle with a precise measure?
• How does the angle shown help you think about a 30 8 angle?
For the drawing with the right angle, prompt students to identify how using a benchmark angle is helpful when drawing an angle.
• What is the measure of a right angle?
• Why is the right angle split into 3 angles of equal measure?
• How does a 30 8 angle compare to a right angle?
Deepen UnderstandingUse Benchmark AnglesSMP 2 Reason abstractly and quantitatively.
When discussing the Model It, prompt students to consider how using benchmark angles can help them prepare to draw an angle with a precise measure.
Ask Why do you think that a 90 8 angle is chosen as a benchmark?
Listen for It is easy to draw an angle with a measure close to 908 because it has a square corner.
Ask How could a benchmark angle of 90 8 help you think about other angle measures, for example, a 45 8 angle?
Listen for Since 45 1 45 5 90 or 45 3 2 5 90, a 458 angle opens half as wide as a right angle.
Ask Why is it helpful to get an idea of what an angle might look like before drawing the angle?
Listen for It will help you check that the opening of the angle you draw is reasonable.

©Curriculum Associates, LLC Copying is not permitted.685 Lesson 31 Angles
LESSON 31
©Curriculum Associates, LLC Copying is not permitted. 685Lesson 31 Angles
SESSION 3
Co����� ItNow you will use the problem from the previous page to help you understand how to draw angles.
1 Draw a ray on a sheet of paper. Then place the protractor’s center point on the
endpoint of your ray. What part of the angle is that point?
2 Keeping the protractor’s center point on the endpoint of your ray, draw a point on your ray at 08.
3 There are two marks on the protractor labeled “30.” Choose the one that is 308 from your 08 mark. Draw a point at this mark.
4 Use the straight edge of the protractor to draw a ray from the vertex through the point you drew at 308.
5 Suppose you choose the other “30” mark and draw a point at that mark.
What would be the measure of your angle?
6 Think about a right angle. Compare it to the angle you drew. How wide does
your angle open compared to a right angle?
7 REFLECTLook back at your Try It, strategies by classmates, and Picture It and Model It. Which models or strategies do you like best for drawing angles? Explain.
908010070
11060120
50130
40140
3015
0
20 160
10 170
0 180 1800
1701016020
1503014040
13050
12060
1107010080
685
vertex
1508
Students may respond that they like using a benchmark angle to get an
idea of how wide their angle will open. Students may also respond that
they like using a straightedge to draw the first ray and then using a
protractor to draw the second ray to form the angle.
1 ·· 3 as wide
CONNECT IT• Remind students that the representations on the
previous page show different ways to understand how to draw an angle.
• Explain that on this page, they will learn how to draw a 308 angle using a protractor.
Monitor and Confirm1 – 4 Distribute a protractor to each student so
that students can follow the steps in problems 1–4 to draw their own angles. Check for understanding that:
• the endpoint of the ray is the vertex of the angle
• the vertex is lined up with the center point of the protractor
• either 08 mark on the protractor can be used to draw the ray
• the protractor has two marks for each angle measure (except for 908)
Support Whole Class Discussion1 – 4 Have students consider that a different
angle of 308 can be drawn.
Ask How would the drawing in problem 2 and in problem 4 look different if the ray were drawn pointing to the left instead of to the right?
Listen for The point on the ray would be drawn at the 08 mark on the left side of the protractor instead of the 08 mark on the right side. The angle in problem 4 would open to the left.
5 Look for understanding that both the 308 mark and the 1508 mark are at the same location on the protractor and that you read the measure of an angle in relation to how wide it opens compared to a right angle that has a 908 measure.
6 Look for understanding that because a right angle has a measure of 90° and 90 4 3 5 30, a 308 angle opens 1 ·· 3 as wide as a 908 angle.
7 REFLECT Have all students focus on the strategies used to solve this problem. If time allows, have students share their responses with a partner.
SESSION 3 Develop
Hands-On ActivityDraw angles in regular polygons.
If . . . students could use more instruction and practice on using a protractor to draw angles of a given measure,
Then . . . have the whole class participate in the activity below to practice using a protractor to draw angles from regular polygons.
Materials For each student: protractor, ruler or straightedge, completed Activity Sheet Regular Polygons with angle measures recorded
• Distribute protractors, rulers, and each students’ completed Activity Sheet Regular Polygons.
• As a class, discuss the Hands-On Activity where they measured one angle in each polygon. Remind students that they recorded their angle measures and checked one another’s angle measures for accuracy.
• Have students draw angles that have the measures shown in each regular polygon. They can use their recorded measures or remeasure if desired.
• Then have students exchange their drawings with a partner to check each other’s work, extending the rays of the angle to measure if necessary.
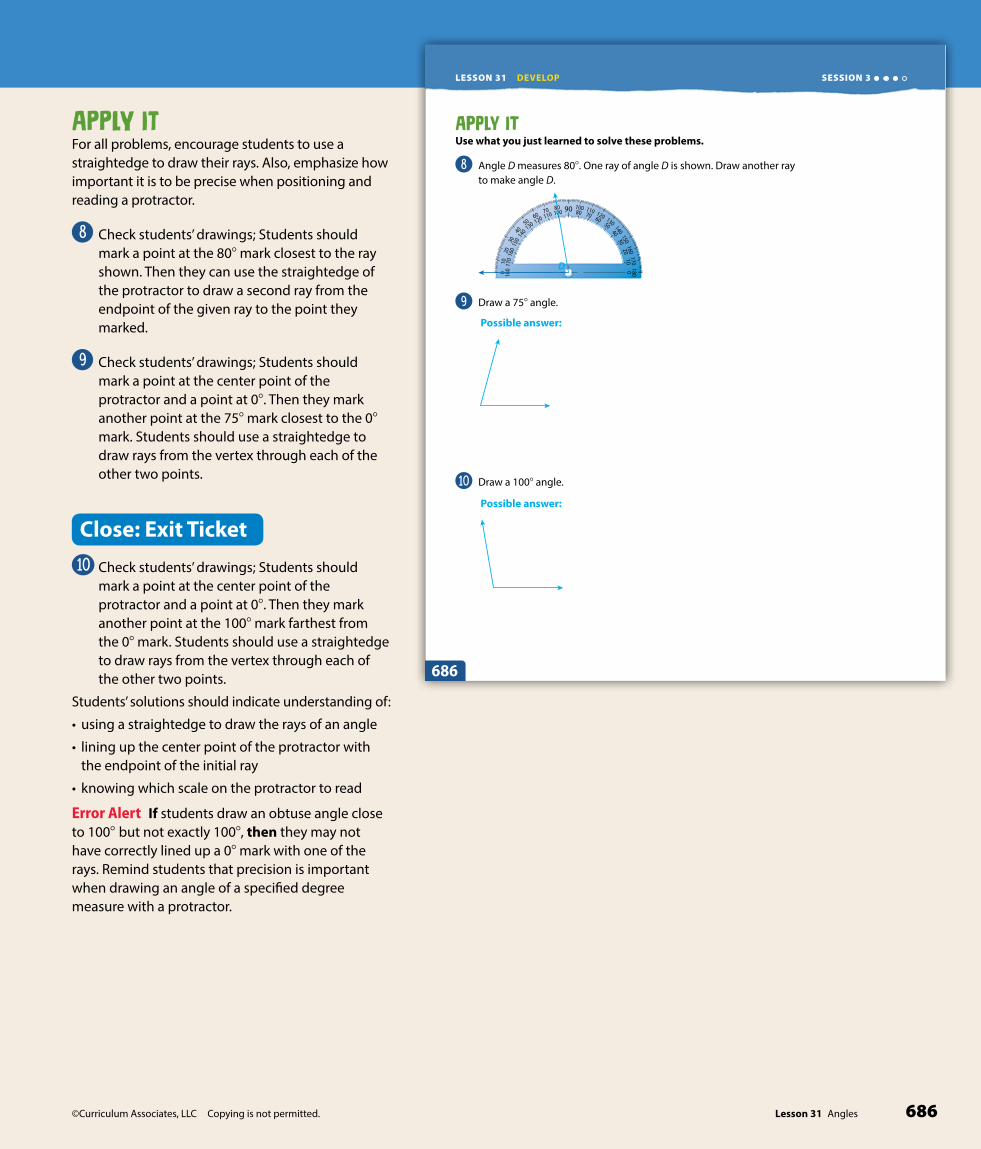
©Curriculum Associates, LLC Copying is not permitted. 686Lesson 31 Angles
©Curriculum Associates, LLC Copying is not permitted.686 Lesson 31 Angles
LESSON 31 DEVELOP
Ap��� ItUse what you just learned to solve these problems.
8 Angle D measures 808. One ray of angle D is shown. Draw another ray to make angle D.
908010070
11060120
50130
40140
3015
0
20 160
10 170
0 180 1800
1701016020
1503014040
13050
12060
1107010080
9 Draw a 758 angle.
10 Draw a 1008 angle.
SESSION 3
686
Possible answer:
Possible answer:
D
APPLY ITFor all problems, encourage students to use a straightedge to draw their rays. Also, emphasize how important it is to be precise when positioning and reading a protractor.
8 Check students’ drawings; Students should mark a point at the 808 mark closest to the ray shown. Then they can use the straightedge of the protractor to draw a second ray from the endpoint of the given ray to the point they marked.
9 Check students’ drawings; Students should mark a point at the center point of the protractor and a point at 08. Then they mark another point at the 758 mark closest to the 08 mark. Students should use a straightedge to draw rays from the vertex through each of the other two points.
Close: Exit Ticket
10 Check students’ drawings; Students should mark a point at the center point of the protractor and a point at 08. Then they mark another point at the 1008 mark farthest from the 08 mark. Students should use a straightedge to draw rays from the vertex through each of the other two points.
Students’ solutions should indicate understanding of:
• using a straightedge to draw the rays of an angle
• lining up the center point of the protractor with the endpoint of the initial ray
• knowing which scale on the protractor to read
Error Alert If students draw an obtuse angle close to 1008 but not exactly 1008, then they may not have correctly lined up a 08 mark with one of the rays. Remind students that precision is important when drawing an angle of a specified degree measure with a protractor.
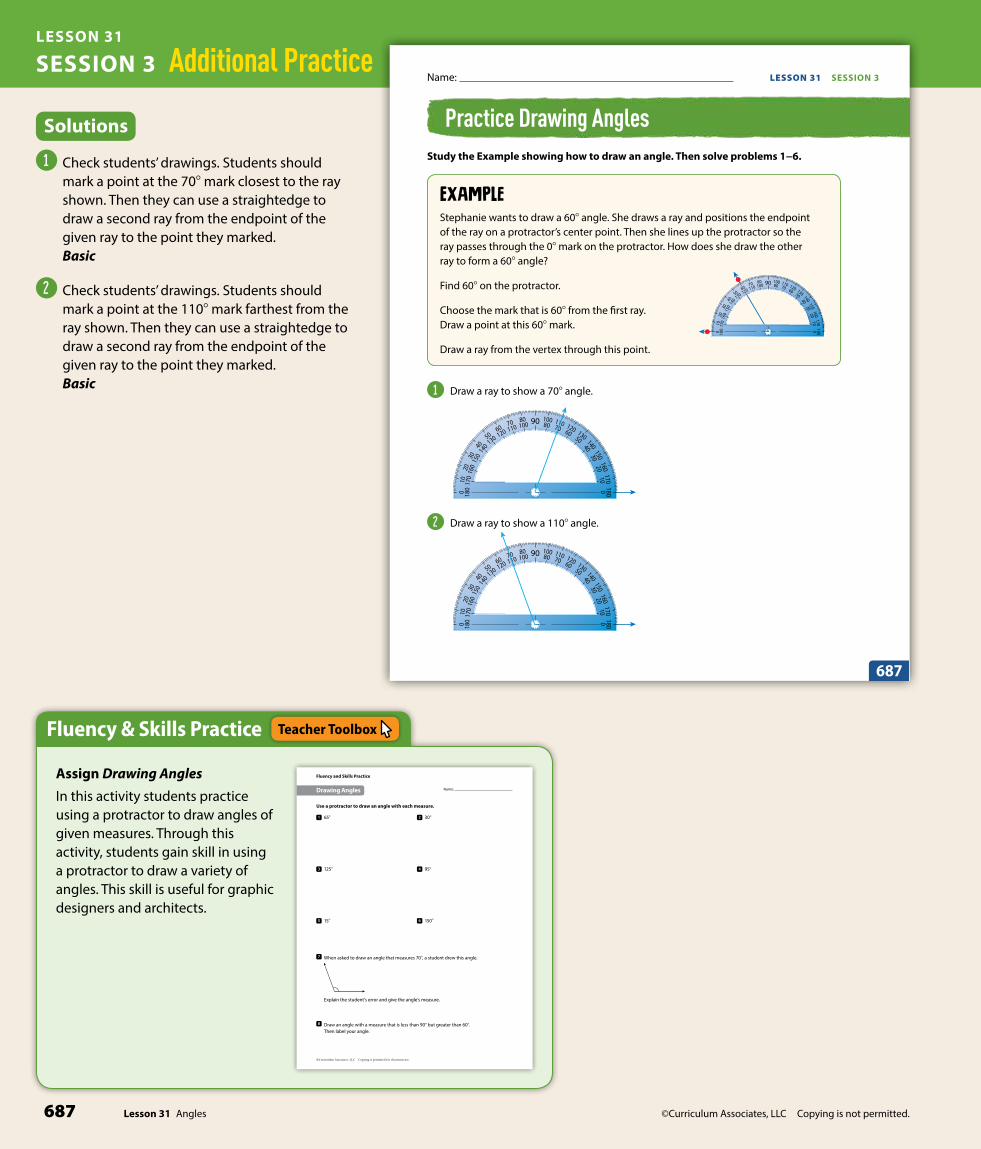
©Curriculum Associates, LLC Copying is not permitted.687 Lesson 31 Angles
LESSON 31
©Curriculum Associates, LLC Copying is not permitted. 687
Name:
Lesson 31 Angles
LESSON 31 SESSION 3
Practice Drawing AnglesStudy the Example showing how to draw an angle. Then solve problems 1−6.
Ex�����Stephanie wants to draw a 608 angle. She draws a ray and positions the endpoint of the ray on a protractor’s center point. Then she lines up the protractor so the ray passes through the 08 mark on the protractor. How does she draw the other ray to form a 608 angle?
Find 608 on the protractor.
Choose the mark that is 608 from the fi rst ray. Draw a point at this 608 mark.
Draw a ray from the vertex through this point.
908010070
11060120
50130
40140
3015
0
20 160
10 170
0 180 1800
1701016020
1503014040
13050
12060
1107010080
1 Draw a ray to show a 708 angle.
908010070
11060120
50130
40140
3015
0
20 160
10 170
0 180 1800
1701016020
1503014040
13050
12060
1107010080
2 Draw a ray to show a 1108 angle.
908010070
11060120
50130
40140
3015
0
20 160
10 170
0 180 1800
1701016020
1503014040
13050
12060
1107010080
687
Solutions
1 Check students’ drawings. Students should mark a point at the 708 mark closest to the ray shown. Then they can use a straightedge to draw a second ray from the endpoint of the given ray to the point they marked. Basic
2 Check students’ drawings. Students should mark a point at the 1108 mark farthest from the ray shown. Then they can use a straightedge to draw a second ray from the endpoint of the given ray to the point they marked. Basic
SESSION 3 Additional Practice
Fluency & Skills Practice Teacher Toolbox
Assign Drawing Angles
In this activity students practice using a protractor to draw angles of given measures. Through this activity, students gain skill in using a protractor to draw a variety of angles. This skill is useful for graphic designers and architects.
Name:
Fluency and Skills Practice
©Curriculum Associates, LLC Copying is permitted for classroom use.
Use a protractor to draw an angle with each measure.
Drawing Angles
1 658
3 1258
5 158
2 308
4 958
6 1508
7 When asked to draw an angle that measures 708, a student drew this angle.
Explain the student’s error and give the angle’s measure.
8 Draw an angle with a measure that is less than 90° but greater than 608. Then label your angle.
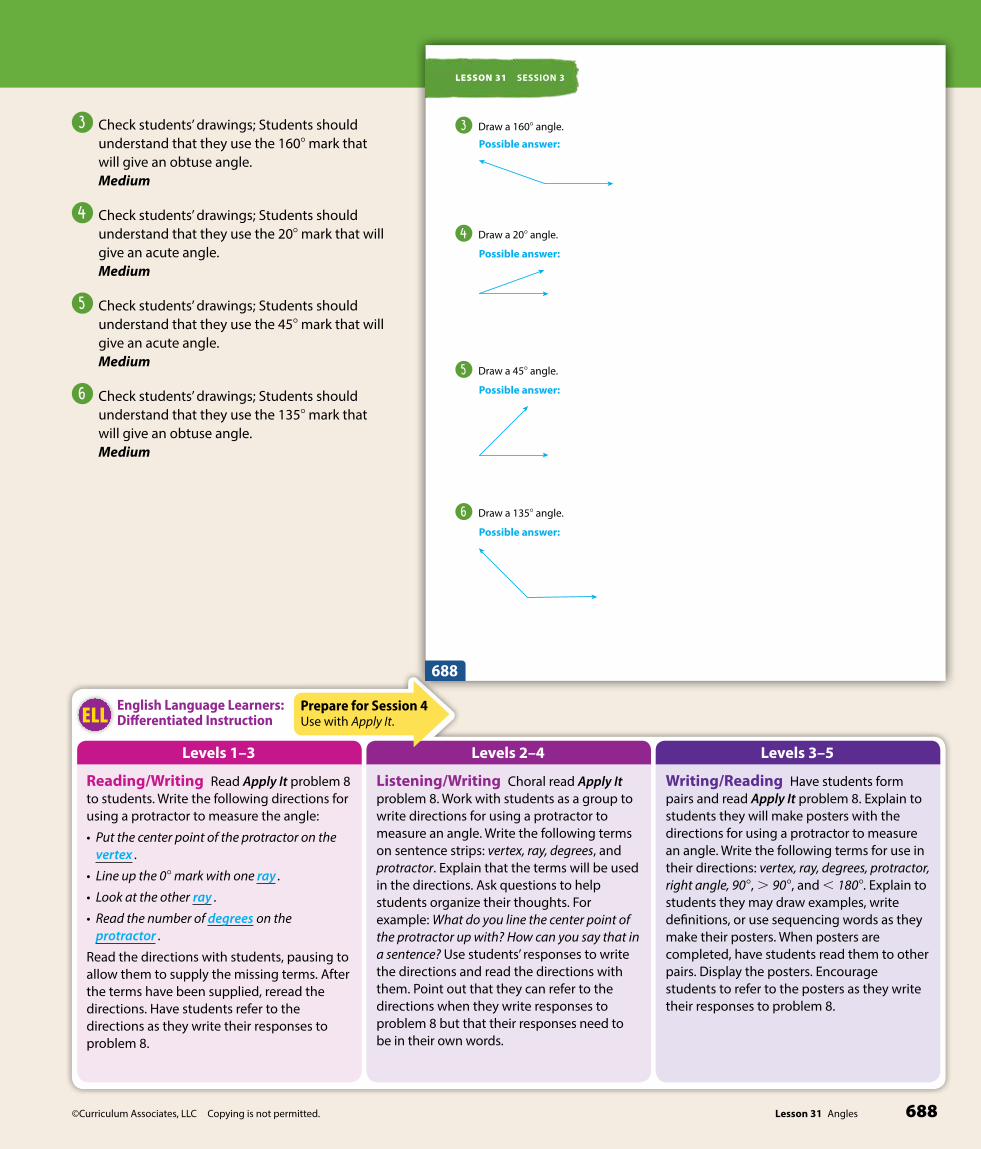
©Curriculum Associates, LLC Copying is not permitted. 688Lesson 31 Angles
Levels 1–3 Levels 2–4 Levels 3–5
English Language Learners:Differentiated InstructionELL
Writing/Reading Have students form pairs and read Apply It problem 8. Explain to students they will make posters with the directions for using a protractor to measure an angle. Write the following terms for use in their directions: vertex, ray, degrees, protractor, right angle, 90 8, . 90 8, and , 180 8. Explain to students they may draw examples, write definitions, or use sequencing words as they make their posters. When posters are completed, have students read them to other pairs. Display the posters. Encourage students to refer to the posters as they write their responses to problem 8.
Listening/Writing Choral read Apply It problem 8. Work with students as a group to write directions for using a protractor to measure an angle. Write the following terms on sentence strips: vertex, ray, degrees, and protractor. Explain that the terms will be used in the directions. Ask questions to help students organize their thoughts. For example: What do you line the center point of the protractor up with? How can you say that in a sentence? Use students’ responses to write the directions and read the directions with them. Point out that they can refer to the directions when they write responses to problem 8 but that their responses need to be in their own words.
Reading/Writing Read Apply It problem 8 to students. Write the following directions for using a protractor to measure the angle:
• Put the center point of the protractor on the vertex .
• Line up the 0 8 mark with one ray .
• Look at the other ray .
• Read the number of degrees on the protractor .
Read the directions with students, pausing to allow them to supply the missing terms. After the terms have been supplied, reread the directions. Have students refer to the directions as they write their responses to problem 8.
©Curriculum Associates, LLC Copying is not permitted.688 Lesson 31 Angles
LESSON 31 SESSION 3
3 Draw a 1608 angle.
4 Draw a 208 angle.
5 Draw a 458 angle.
6 Draw a 1358 angle.
688
Possible answer:
Possible answer:
Possible answer:
Possible answer:
Prepare for Session 4Use with Apply It.
3 Check students’ drawings; Students should understand that they use the 1608 mark that will give an obtuse angle. Medium
4 Check students’ drawings; Students should understand that they use the 208 mark that will give an acute angle. Medium
5 Check students’ drawings; Students should understand that they use the 458 mark that will give an acute angle. Medium
6 Check students’ drawings; Students should understand that they use the 1358 mark that will give an obtuse angle. Medium

©Curriculum Associates, LLC Copying is not permitted.689 Lesson 31 Angles
LESSON 31
©Curriculum Associates, LLC Copying is not permitted. 689
LESSON 31 SESSION 4
Lesson 31 Angles
Refine Angles
Complete the Example below. Then solve problems 1–8.
EXAMPLEWhat is the measure of the angle below?
Look at how you could use a protractor to measure the angle.
9080 100
70110
60120 50
130 40140 30
15020160
10170
0180
180
0
170
1016
020
150
3014
0 4013
0 5012
0 60110 70
100 80
Solution
Ap��� i�1 What is the measure of the angle below?
Solution
The center point lines up with the vertex of the angle, and the 08 mark lines up with one ray of the angle. The other ray points to the measure of the angle.
The angle looks like it opens less than a right angle. The measure will be less than 908.
PAIR/SHAREDoes it matter which ray you choose to line up with the 08 mark?
PAIR/SHAREHow did you and your partner decide where the vertex is?
689
1238
478
StartCheck for UnderstandingMaterials For each student: protractor, ruler or straightedge; For remediation: 2 pencils, protractor
Why Confirm understanding of drawing angles of a given measure.
How Have students draw an angle that measures 658.
©Curriculum Associates, LLC Copying is permitted.
Start
Draw a 65° angle.
Grade 4 Lesson 31 Session 4 | Refi ne Angles
SolutionCheck students’ drawings. Angles should measure 658 and may be drawn in any orientation.
Purpose In this session, students solve problems involving measuring and drawing angles and then discuss and confirm their answers with a partner.
Before students begin to work, use their responses to the Check for Understanding to determine those who will benefit from additional support.
As students complete the Example and problems 1–3, observe and monitor their reasoning to identify groupings for differentiated instruction. Have protractors and rulers or straightedges available for students to use as they complete the Example and problems 1–8.
SESSION 4 Refine
If the error is . . . Students may . . . To support understanding . . .
an angle that measures close to 658
not have lined up a 08 mark with one ray of the angle or the center of the protractor with the vertex of the angle.
Remind students that they need to align the center of the protractor with the vertex of the angle and also align the first ray with a 08 mark.
an angle that measures 1158
not have used the correct scale on the protractor.
Ask students what the measure of a right angle is. [908] Have them think about how a 658 angle compares to a right angle and then use two pencils to show an estimate of a 658 angle.
an angle with any other measure
be struggling with drawing angles using a protractor.
Have students write the steps involved in drawing an angle on an index card for reference. Also, discuss how to read the marks between each ten degrees on the protractor.
Error Alert

©Curriculum Associates, LLC Copying is not permitted. 690Lesson 31 Angles
©Curriculum Associates, LLC Copying is not permitted.690 Lesson 31 Angles
LESSON 31 REFINE
2 Draw a 1458 angle.
3 Which set of points can be used to draw a 1058 angle?
�
908010070
11060120
50130
40140
3015
0
20 160
10 170
0 180 1800
1701016020
1503014040
13050
12060
1107010080
�
908010070
11060120
50130
40140
3015
0
20 160
10 170
0 180 1800
1701016020
1503014040
13050
12060
1107010080
�
908010070
11060120
50130
40140
3015
0
20 160
10 170
0 180 1800
1701016020
1503014040
13050
12060
1107010080
�
908010070
11060120
50130
40140
3015
0
20 160
10 170
0 180 1800
1701016020
1503014040
13050
12060
1107010080
Mia chose � as the correct answer. How did she get that answer?
PAIR/SHAREIf you had drawn a point at the other 08 mark, how would it change your angle?
PAIR/SHAREDoes Mia’s answer make sense?
Will a 1058 angle be wider or narrower than a right angle?
I’ll need to draw two rays to make an angle.
690
Possible answer:
Possible answer: She thought the vertex belonged at 908 instead of at the center point of the protractor.
EXAMPLE1238; Lining up the protractor as shown is one way to solve the problem. Students could also solve the problem by lining up the 08 mark on the protractor with the other ray.
Look for Since the angle is obtuse, its measure is greater than 908 and less than 1808, so you need to read the greater number on the protractor at the point of intersection.
APPLY IT1 478; Students should understand that they line
up a 08 mark with one ray of the angle and line up the center point with the vertex, the point where the two rays meet. DOK 1
Look for The numbers on the protractor at the point of intersection are 478 and 1338. The angle measures 478 because it has a measure less than the measure of a right angle.
2 See possible angle on the Student Worktext page; Students should understand that they use the 1458 mark that will give an obtuse angle. DOK 1
Look for A point can be drawn at either 08 mark, so the angle may open either to the left or right.
3 B; Students could solve the problem by recognizing that the three points shown—the point at the center of the protractor for the vertex, the point at the 08 mark, and the point at the 1058 mark—could be used to draw a 1058 angle.
Explain why the other two answer choices are not correct:
A is not correct because an angle drawn with these three points would have a measure that is less than a right angle.
D is not correct because it does not have a point at the center of the protractor. DOK 3
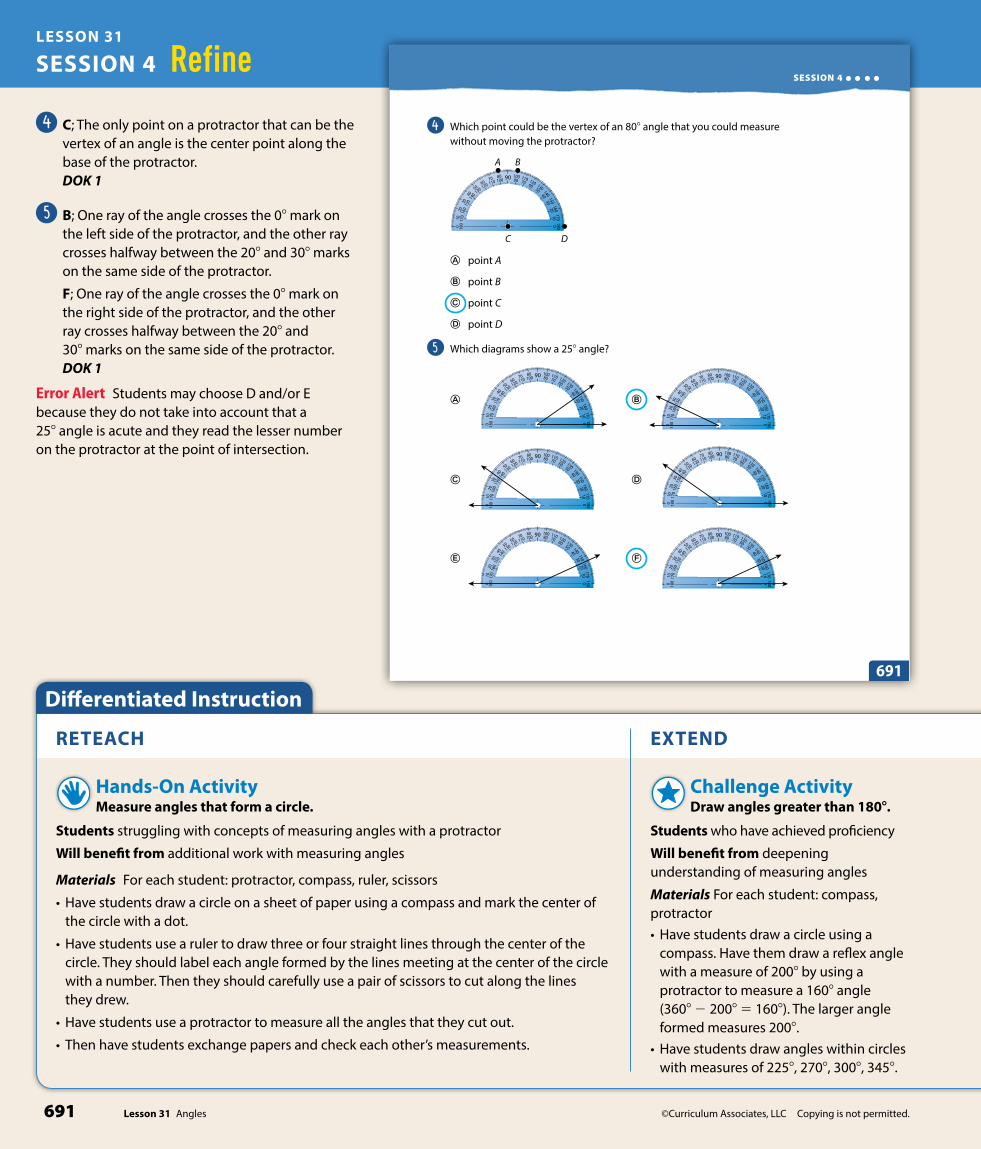
©Curriculum Associates, LLC Copying is not permitted.691 Lesson 31 Angles
LESSON 31
©Curriculum Associates, LLC Copying is not permitted. 691Lesson 31 Angles
SESSION 4
4 Which point could be the vertex of an 808 angle that you could measure without moving the protractor?
908010070
11060120
50130
40140
3015
0
20 160
10 170
0 180 1800
1701016020
1503014040
13050
12060
1107010080
A B
C D
� point A
� point B
� point C
� point D
5 Which diagrams show a 258 angle?
�
908010070
11060120
50130
40140
3015
0
20 160
10 170
0 180 1800
1701016020
1503014040
13050
12060
1107010080
�
908010070
11060120
50130
40140
3015
0
20 160
10 170
0 180 1800
1701016020
1503014040
13050
12060
1107010080
�
908010070
11060120
50130
40140
3015
0
20 160
10 170
0 180 1800
1701016020
1503014040
13050
12060
1107010080
�
908010070
11060120
50130
40140
3015
0
20 160
10 170
0 180 1800
1701016020
1503014040
13050
12060
1107010080
�
908010070
11060120
50130
40140
3015
0
20 160
10 170
0 180 1800
1701016020
1503014040
13050
12060
1107010080
�
908010070
11060120
50130
40140
3015
0
20 160
10 170
0 180 1800
1701016020
1503014040
13050
12060
1107010080
691
4 C; The only point on a protractor that can be the vertex of an angle is the center point along the base of the protractor. DOK 1
5 B; One ray of the angle crosses the 08 mark on the left side of the protractor, and the other ray crosses halfway between the 208 and 308 marks on the same side of the protractor.
F; One ray of the angle crosses the 08 mark on the right side of the protractor, and the other ray crosses halfway between the 208 and 308 marks on the same side of the protractor. DOK 1
Error Alert Students may choose D and/or E because they do not take into account that a 258 angle is acute and they read the lesser number on the protractor at the point of intersection.
SESSION 4 Refine
Differentiated Instruction
RETEACH EXTEND
Hands-On ActivityMeasure angles that form a circle.
Students struggling with concepts of measuring angles with a protractor
Will benefit from additional work with measuring angles
Materials For each student: protractor, compass, ruler, scissors
• Have students draw a circle on a sheet of paper using a compass and mark the center of the circle with a dot.
• Have students use a ruler to draw three or four straight lines through the center of the circle. They should label each angle formed by the lines meeting at the center of the circle with a number. Then they should carefully use a pair of scissors to cut along the lines they drew.
• Have students use a protractor to measure all the angles that they cut out.
• Then have students exchange papers and check each other’s measurements.
Challenge ActivityDraw angles greater than 1808.
Students who have achieved proficiency
Will benefit from deepening understanding of measuring angles
Materials For each student: compass, protractor• Have students draw a circle using a
compass. Have them draw a reflex angle with a measure of 2008 by using a protractor to measure a 1608 angle (3608 2 2008 5 1608). The larger angle formed measures 2008.
• Have students draw angles within circles with measures of 2258, 2708, 3008, 3458.
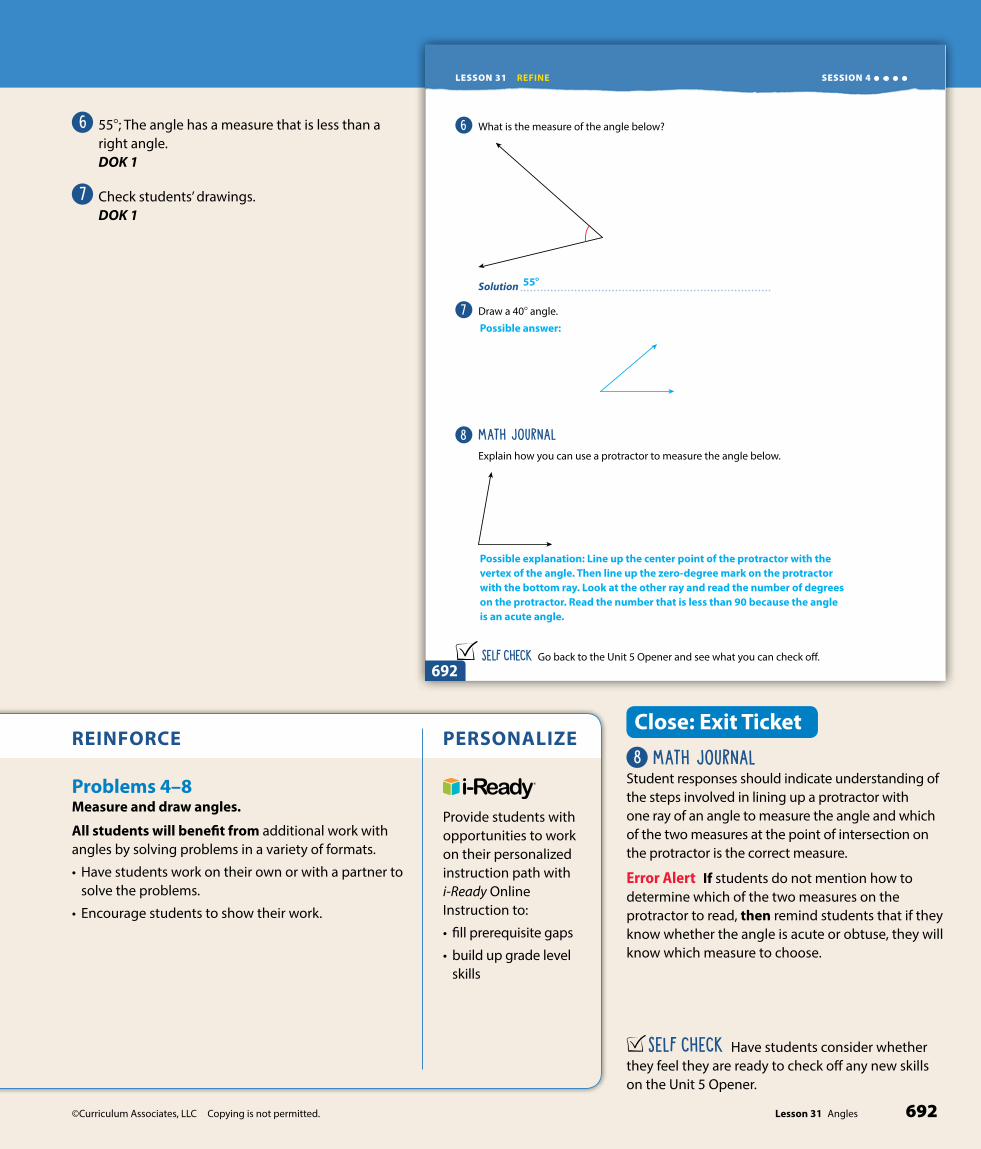
©Curriculum Associates, LLC Copying is not permitted. 692Lesson 31 Angles
©Curriculum Associates, LLC Copying is not permitted.692 Lesson 31 Angles
SESSION 4 LESSON 31 REFINE
6 What is the measure of the angle below?
Solution
7 Draw a 408 angle.
8 MATH JOURNALExplain how you can use a protractor to measure the angle below.
SELF CHECK Go back to the Unit 5 Opener and see what you can check off .692
Possible explanation: Line up the center point of the protractor with the vertex of the angle. Then line up the zero-degree mark on the protractor with the bottom ray. Look at the other ray and read the number of degrees on the protractor. Read the number that is less than 90 because the angle is an acute angle.
Possible answer:
558
6 558; The angle has a measure that is less than a right angle. DOK 1
7 Check students’ drawings. DOK 1
Close: Exit Ticket
8 MATH JOURNALStudent responses should indicate understanding of the steps involved in lining up a protractor with one ray of an angle to measure the angle and which of the two measures at the point of intersection on the protractor is the correct measure.
Error Alert If students do not mention how to determine which of the two measures on the protractor to read, then remind students that if they know whether the angle is acute or obtuse, they will know which measure to choose.
SELF CHECK Have students consider whether they feel they are ready to check off any new skills on the Unit 5 Opener.
REINFORCE PERSONALIZE
Problems 4–8Measure and draw angles.
All students will benefit from additional work with angles by solving problems in a variety of formats.
• Have students work on their own or with a partner to solve the problems.
• Encourage students to show their work.
Provide students with opportunities to work on their personalized instruction path with i-Ready Online Instruction to:
• fill prerequisite gaps
• build up grade level skills

©Curriculum Associates, LLC Copying is not permitted.715a Lesson 33 Classify Two-Dimensional Figures
Lesson Overview
LESSON 33
Classify Two-Dimensional Figures
Lesson Objectives
Content Objectives• Sort two-dimensional figures based on
parallel or perpendicular sides and on acute, obtuse, or right angles.
• Recognize that triangles can be classified based on the lengths of their sides (isosceles, equilateral, scalene).
• Name a triangle based on the kind of angles it has (acute, obtuse, right).
Language Objectives• Describe two-dimensional figures by
using terms such as parallel or perpendicular sides; acute, obtuse, or right angles; and equal length.
• Use the key vocabulary terms equilateral, isosceles, and scalene in discussions.
• Tell how to sort two-dimensional figures into groups based on their properties.
Prerequisite Skills
• Identify and draw angles, including identifying angles in two-dimensional figures.
• Identify and draw parallel and perpendicular lines, including identifying both in two-dimensional figures.
• Classify quadrilaterals based on sides and right angles.
Standards for Mathematical Practice (SMP)
SMPs 1, 2, 3, 4, 5, and 6 are integrated in every lesson through the Try-Discuss-Connect routine.*
In addition, this lesson particularly emphasizes the following SMPs:
3 Construct viable arguments and critique the reasoning of others.
5 Use appropriate tools strategically.
7 Look for and make use of structure.
8 Look for and express regularity in repeated reasoning.
* See page 363m to see how every lesson includes these SMPs.
Lesson Vocabulary
• acute triangle a triangle that has three acute angles.
• equilateral triangle a triangle that has all three sides the same length.
• hexagon a polygon with exactly 6 sides and 6 angles.
• isosceles triangle a triangle that has at least two sides the same length.
• obtuse triangle a triangle that has one obtuse angle.
• polygon a two-dimensional closed figure made with three or more straight line segments that do not cross over each other.
• right triangle a triangle that has one right angle.
• scalene triangle a triangle that has no sides the same length.
• trapezoid (exclusive) a quadrilateral with exactly one pair of parallel sides.
• trapezoid (inclusive) a quadrilateral with at least one pair of parallel sides.
• triangle a polygon with exactly 3 sides and 3 angles.
Review the following key terms.
• parallel lines lines that are always the same distance apart and never cross.
• parallelogram a quadrilateral with opposite sides parallel and equal in length.
• perpendicular lines two lines that meet to form a right angle, or a 908 angle.
• rhombus a quadrilateral with all sides the same length.
Learning Progression
In Grade 3 students analyzed, compared, and classified quadrilaterals based on properties such as length and number of sides and presence or absence of parallel sides and right angles.
In this lesson students extend their work classifying figures to include hexagons, trapezoids, and triangles. Students learn to name a triangle as equilateral, isosceles, or scalene, as well as right, acute, or obtuse.
In Grade 5 students will categorize polygons based on their attributes and relate the categories in a hierarchy.
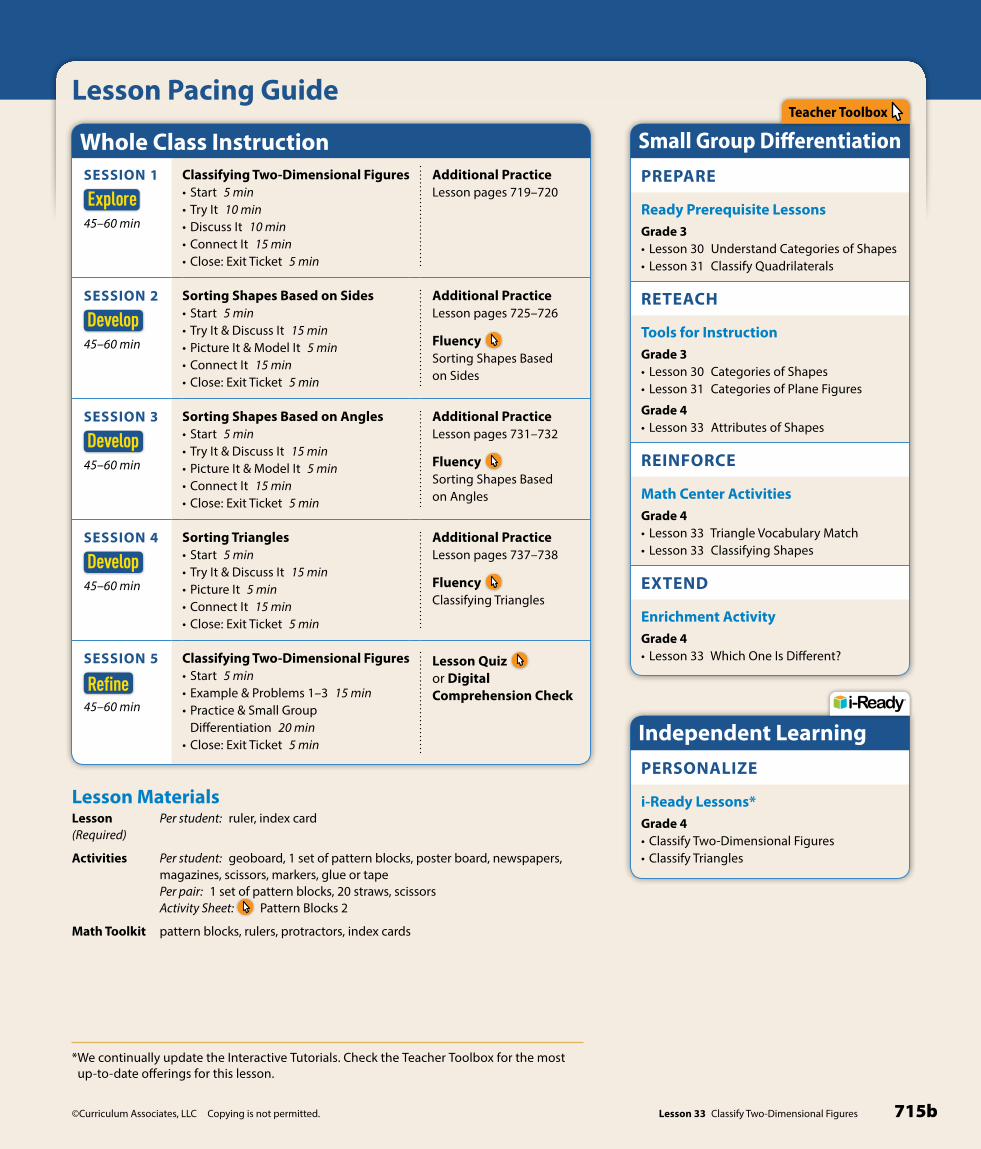
©Curriculum Associates, LLC Copying is not permitted. 715bLesson 33 Classify Two-Dimensional Figures
Lesson Pacing Guide
PERSONALIZE
i-Ready Lessons*Grade 4• Classify Two-Dimensional Figures• Classify Triangles
Independent Learning
PREPARE
Ready Prerequisite LessonsGrade 3• Lesson 30 Understand Categories of Shapes• Lesson 31 Classify Quadrilaterals
RETEACH
Tools for InstructionGrade 3• Lesson 30 Categories of Shapes• Lesson 31 Categories of Plane Figures
Grade 4• Lesson 33 Attributes of Shapes
REINFORCE
Math Center ActivitiesGrade 4• Lesson 33 Triangle Vocabulary Match• Lesson 33 Classifying Shapes
EXTEND
Enrichment ActivityGrade 4• Lesson 33 Which One Is Different?
Small Group DifferentiationTeacher Toolbox
Lesson MaterialsLesson (Required)
Per student: ruler, index card
Activities Per student: geoboard, 1 set of pattern blocks, poster board, newspapers, magazines, scissors, markers, glue or tapePer pair: 1 set of pattern blocks, 20 straws, scissorsActivity Sheet: Pattern Blocks 2
Math Toolkit pattern blocks, rulers, protractors, index cards
SESSION 1
Explore45–60 min
Classifying Two-Dimensional Figures• Start 5 min• Try It 10 min• Discuss It 10 min• Connect It 15 min• Close: Exit Ticket 5 min
Additional PracticeLesson pages 719–720
SESSION 2
Develop45–60 min
Sorting Shapes Based on Sides• Start 5 min• Try It & Discuss It 15 min• Picture It & Model It 5 min• Connect It 15 min• Close: Exit Ticket 5 min
Additional PracticeLesson pages 725–726
Fluency Sorting Shapes Based on Sides
SESSION 3
Develop45–60 min
Sorting Shapes Based on Angles• Start 5 min• Try It & Discuss It 15 min• Picture It & Model It 5 min• Connect It 15 min• Close: Exit Ticket 5 min
Additional PracticeLesson pages 731–732
Fluency Sorting Shapes Based on Angles
SESSION 4
Develop45–60 min
Sorting Triangles• Start 5 min• Try It & Discuss It 15 min• Picture It 5 min• Connect It 15 min• Close: Exit Ticket 5 min
Additional PracticeLesson pages 737–738
Fluency Classifying Triangles
SESSION 5
Refine45–60 min
Classifying Two-Dimensional Figures• Start 5 min• Example & Problems 1–3 15 min• Practice & Small Group
Differentiation 20 min• Close: Exit Ticket 5 min
Lesson Quiz or Digital Comprehension Check
Whole Class Instruction
* We continually update the Interactive Tutorials. Check the Teacher Toolbox for the most up-to-date offerings for this lesson.

©Curriculum Associates, LLC Copying is not permitted.715–716 Lesson 33 Classify Two-Dimensional Figures
LESSON 33
Connect to Family, Community, and Language DevelopmentThe following activities and instructional supports provide opportunities to foster school, family, and community involvement and partnerships.
Connect to FamilyUse the Family Letter—which provides background information, math vocabulary, and an activity—to keep families apprised of what their child is learning and to encourage family involvement.
©Curriculum Associates, LLC Copying is not permitted.Lesson 33 Classify Two-Dimensional Figures716
Do this activity with your child to classify two-dimensional fi gures.
• Use the grid of dots below or make a dot grid on another sheet of paper.
• One person draws a shape. The shape could be a triangle, a quadrilateral, or another kind of shape with straight sides.
• The other person describes the shape. Be sure to talk about any parallel sides and perpendicular sides that the shape has. Describe the angles of the shape, too! Then name the shape.
• Switch roles. Take turns drawing a shape and describing and naming it.
ACTIVITY CLASSIFYING Tw�-Di�����On�� FIGURES
716©Curriculum Associates, LLC Copying is not permitted. Lesson 33 Classify Two-Dimensional Figures 715
Classify Two-Dimensional Figures
33Dear Family,This week your child is learning to classify two-dimensional shapes.Shapes can be sorted into groups based on the kinds of sides they have and the kind of angles they have. Some shapes your child is classifying are triangles; quadrilaterals such as squares, rhombuses, trapezoids, and parallelograms; and hexagons.
A BC D
One way to classify shapes is by the kinds of sides they have.
• Shapes A and C have parallel sides and perpendicular sides.
• Shapes B and D have parallel sides only.
Another way to classify shapes is by the kinds of angles they have.
• Shapes A and C have all right angles.
• Shape B has some acute angles and some obtuse angles.
• Shape D has all obtuse angles.
Triangles can be classifi ed by their sides and angles.
• Triangle E is a scalene triangle. It has no sides the same length.
• Triangle F is a right triangle. It has a right angle.
Invite your child to share what he or she knows about classifying two-dimensional fi gures by doing the following activity together.
E F
715
GoalThe goal of the Family Letter is to provide opportunities to classify two-dimensional shapes, including triangles, quadrilaterals, parallelograms, and hexagons.
• When classifying two-dimensional shapes, students categorize shapes based on kinds of sides (parallel and perpendicular), kinds of angles (right, acute, and obtuse), and lengths of sides.
ActivityLook at the Classifying Two-Dimensional Figures activity and adjust as needed to connect with students.
Math Talk at Home• Encourage students to discuss with their family members
two-dimensional shapes they see in their everyday lives by playing the game I Spy. Provide examples students can describe, such as street signs, food shapes (pizza slices or sandwiches), and house parts (windows, doors, or roof lines).
Conversation Starters Below are additional conversation starters students can write in their Family Letter or math journal to engage family members:
• What street sign has three sides and three angles? [yield sign]
• What is something on my plate that has 4 sides and 4 angles? When I cut it in half diagonally, it has three sides and three angles. [sandwich]
Available in Spanish
Teacher Toolbox

©Curriculum Associates, LLC Copying is not permitted. 716aLesson 33 Classify Two-Dimensional Figures
Connect to Community and Cultural ResponsivenessUse these activities to connect with and leverage the diverse backgrounds and experiences of all students.
Connect to Language DevelopmentFor ELLs, use the Differentiated Instruction chart to plan and prepare for specific activities in every session.
Reading/Writing Use with Connect It problem 3. Have students prepare to describe shape C by counting how many of each of the following sides and angles it has.
• Pairs of Parallel Sides
• Pairs of Perpendicular Sides
• Right Angles
• Acute Angles
• Obtuse Angles
Point to the term Pairs of Parallel Sides and have students read it aloud. Ask: How many pairs of parallel sides do you see? Have students point to and count the parallel sides. Write 2 on the line. Continue this process with the remaining terms. Encourage students to refer to the list as they write responses to the problem.
Listening/Speaking Use with Connect It problem 3. Write the following list:
• Pairs of Parallel Sides
• Pairs of Perpendicular Sides
• Right Angles
• Acute Angles
• Obtuse Angles
Point to the terms and have students read them aloud. Assign each student a partner. Challenge student pairs to record the number and type of sides and angles in shape C. After students have completed the task, ask them to describe the sides and angles of shape C. Encourage them to refer to the information they recorded.
Speaking/Writing Use with Connect It problem 3. Write the following terms on the board: Parallel Sides, Perpendicular Sides, Right Angles, Acute Angles, and Obtuse Angles. Assign each student a partner. Explain that they will use the terms to describe the sides and angles of shape C to their partner. After all pairs have verbally described shape C, have them write their responses to problem 3. Provide the following questions to prompt student discussions.
• How did you determine there were two pairs of parallel sides?
• How do you know there are no obtuse angles in shape C?
Levels 3–5Levels 2–4Levels 1–3
ELLEnglish Language Learners:Differentiated Instruction
Prepare for Session 1Use with Connect It.
Session 2 Use anytime during the session.
• To make the questions relevant to students, encourage them to think of real-life examples or scenarios as they look at and make connections to the two-dimensional shapes used in the problems. Model as needed. For example: I think this shape looks like the tabletop we sit around for our reading groups. Our reading table has two parallel sides, just like the shape in the illustration.
Session 4 Use anytime during the session.
• Display several triangular nautical flags. Point out that some nautical flags are acute isosceles triangles. Explain that nautical flags are used on ships or sailboats to relay messages to other ships or boats. For example, a ship may display a flag with two white and two red squares to indicate another ship is headed into danger. In response, the other ship may display a white triangular flag with a red dot in the middle to signal the message is understood. Ask students to think of math messages that they could send. For example, a flag with a question mark could indicate that a student needs help on a problem, or a flag with a thumbs-up symbol could
indicate that a student is available to help another student. Make a list of math flags that students would like to have. Have students work together to make math message flags using construction paper. Remind students that their flags can be equilateral, isosceles, or scalene triangles with acute, right, or obtuse angles.

©Curriculum Associates, LLC Copying is not permitted.717 Lesson 33 Classify Two-Dimensional Figures
LESSON 33
SESSION 1 Explore
Start
Connect to Prior KnowledgeMaterials Per student: ruler, index card
Why Activate students’ knowledge of parallel and perpendicular lines.
How Have students draw a pair of parallel lines and a pair of perpendicular lines. Students may use the corner of an index card to make a right angle.
©Curriculum Associates, LLC Copying is permitted.
Start
Grade 4 Lesson 33 Session 1 | Explore Classifying Two-Dimensional Figures
1 Draw a pair of parallel lines.
2 Draw a pair of perpendicular lines.
Solution1.–2. Check students’ drawings.
TRY ITMake Sense of the ProblemTo support students in making sense of the problem, have them show that they understand that a shape may have both a check mark and a star.
DISCUSS ITSupport Partner DiscussionTo reinforce the attributes of the shapes, encourage students to use the terms parallel and perpendicular as they talk to each other.
Look for, and prompt as necessary for, understanding that:
• parallel sides are the same distance apart at all points and never cross
• perpendicular sides form a right angle
• shapes can have both parallel and perpendicular sides
Common Misconception Look for students who are not comfortable with explaining how they could test their choices. As students present solutions, have them specify the reason they put a check mark and/or a star on each shape.
Select and Sequence Student SolutionsOne possible order for whole class discussion:
• paper cut-out models of the shapes with check marks and stars
• drawings of the shapes with check marks and stars
• check marks and stars along with evidence of using tools, such as a ruler and a square corner, to test choices
Support Whole Class DiscussionPrompt students to note the relationship between the shapes in each model and the shapes in the problem.
Ask How do [student name]’s and [student name]’s models show the shapes in the problem? How do they indicate parallel and perpendicular sides?
Listen for The models show the same shapes in the problem with the same number of sides, pairs of parallel sides, and pairs of perpendicular sides and have check marks for parallel sides and stars for perpendicular sides.
Purpose In this session students draw on their knowledge of parallel and perpendicular lines to sort two-dimensional shapes. They share strategies to explore how various solution methods and strategies for checking solutions are based on the definitions of parallel and perpendicular. They will look ahead to think about sorting two-dimensional shapes based on the kind of angles they have.
Lesson 33 Classify Two-Dimensional Figures 717
• Classify two-dimensional fi gures based on the presence or absence of parallel or perpendicular lines, or the presence or absence of angles of a specifi ed size. Recognize right triangles as a category, and identify right triangles.
SMP 1, 2, 3, 4, 5, 6, 7, 8
Learning Target
LESSON 33
You have learned about parallel and perpendicular lines. Use what you know to try to solve the problem below.
Look at the shapes below. Put a check mark on all the shapes that have at least one pair of parallel sides. Put a star on all the shapes that have at least one pair of perpendicular sides. Explain how you could test your choices.
A B C ED
TRY IT
DISCUSS ITAsk your partner: Can you explain that again?
Tell your partner: I knew . . . so I . . .
Math Toolkit• pattern blocks• rulers• index cards• protractors
©Curriculum Associates, LLC Copying is not permitted.
Explore Classifying Two-Dimensional FiguresSESSION 1
717
A B C ED
Student explanations may vary. Possible explanation:
To test for parallel sides, measure the distance between two sides to see if they are the same distance apart at both endpoints. To test for perpendicular sides, check whether two sides meet to form a square corner.
w ww

©Curriculum Associates, LLC Copying is not permitted. 718Lesson 33 Classify Two-Dimensional Figures
Lesson 33 Classify Two-Dimensional Figures718
LESSON 33 EXPLORE SESSION 1
CONNECT IT1 LOOK BACK
Which shapes have at least one pair of parallel sides and at least one pair of perpendicular sides? Explain.
2 LOOK AHEADShapes with straight sides, such as triangles and quadrilaterals, are types of polygons. There are diff erent ways you can sort these shapes, such as by the number of sides the shape has and by the relationships between the sides. You can also sort shapes by the kinds of angles they have.
B C EA D
a. Which shapes have at least one right angle?
b. Which shapes have at least one acute angle?
c. Which shapes have at least one obtuse angle?
3 REFLECTDescribe the sides and angles of shape C.
©Curriculum Associates, LLC Copying is not permitted.
718
Shapes A and C; Shapes A and C both have pairs of parallel sides that go up and down and that go from left to right; they both also have pairs of sides that meet to form right angles, so the sides are perpendicular.
A, C, and D
D and E
B and E
Possible answer: Sides: Shape C has two pairs of parallel
sides, and the sides that meet are perpendicular to each
other. Angles: Shape C has four right angles, no acute
angles, and no obtuse angles.
CONNECT IT 1 LOOK BACK
Look for understanding that both the rectangle and the square have 2 pairs of parallel sides and 2 pairs of perpendicular sides.
Hands-On ActivityUse pattern blocks to sort shapes.
If . . . students are unsure about the attributes of some common polygons,
Then . . . use this activity to provide a more concrete experience.
Materials For each pair: 1 set of pattern blocks (hexagon, triangle, square, trapezoid, parallelogram, rhombus)
• Distribute one set of pattern blocks to each pair. Discuss each shape and ask students to identify the shape. Help students name the shapes as needed.
• Have students take turns tracing the blocks to become familiar with their attributes.
• Then have one student sort the blocks into groups based on the attributes of the shapes.
• Have the second student try to determine how the shapes were sorted. For example, they may have been sorted into shapes with right angles and shapes with no right angles.
• Have students switch roles and repeat the activity by sorting the shapes in a different way.
2 LOOK AHEADPoint out that there are other ways to sort the five shapes on the previous page, such as by the kind of angles they have. Tell students that each of the five shapes is a polygon and ask a volunteer to restate the definition of polygon given on the Student Worktext page. Students will spend more time learning about polygons in the Additional Practice.
Students should be able to identify acute and obtuse angles in the shapes by comparing these angles to a right angle.
Close: Exit Ticket
3 REFLECTLook for understanding of the relationships between the sides of shape C and understanding of the kinds of angles that it has.
Common Misconception If students do not think that shape C has both parallel and perpendicular sides, then have students identify a pair of opposite sides in the square and test for parallel sides using a ruler to measure the distance between the sides at both end points. Repeat for a pair of adjacent sides, testing for perpendicular sides using the corner of an index card or a sheet of paper.
Real-World ConnectionHave students identify objects in the classroom that look like they have parallel
sides, perpendicular sides, and both parallel and perpendicular sides. Examples of classroom objects include a whiteboard, desk, door, notebook, and folder.

©Curriculum Associates, LLC Copying is not permitted.719 Lesson 33 Classify Two-Dimensional Figures
LESSON 33
©Curriculum Associates, LLC Copying is not permitted. Lesson 33 Classify Two-Dimensional Figures 719
Name:
2 Which shapes are polygons?
A B CD
E
1 Think about what you know about polygons. Fill in each box. Use words, numbers, and pictures. Show as many ideas as you can.
polygon
Prepare for Classifying Two-Dimensional Figures
LESSON 33 SESSION 1
719A, C, and D
Possible answers:
A closed, flat shape with all straight sides
NOT a polygon
Solutions
Support Vocabulary Development
1 If students struggle to fill in the graphic organizer, provide support to ensure they understand the meaning of the term polygon. Ask students to explain the term. If necessary, clarify that a polygon is a closed, flat shape that has three or more straight sides that are connected and do not cross each other. One by one, hold up pictures of various polygons, such as a square, a triangle, a parallelogram, and a trapezoid, each time asking: Is this a polygon? Then hold up a picture of a circle and ask the question again. [A circle is not a polygon.] Encourage students to include drawings of their own examples of polygons in their graphic organizer. Remind them that they may also want to include a non-example of a polygon.
2 Assign students partners and have them explain the characteristics of a polygon to one another.
Have students look at shape A. Ask: Is shape A a polygon? How do you know? Continue this process with the remaining shapes. If a student incorrectly identifies a shape as a polygon, ask questions to help the student reconsider her answer. For example, say: A polygon has straight sides. Does a circle have straight sides? Could a circle be a polygon?
Supplemental Math Vocabulary • parallel lines
• perpendicular lines
• right angle
SESSION 1 Additional Practice

©Curriculum Associates, LLC Copying is not permitted. 720Lesson 33 Classify Two-Dimensional Figures
Levels 1–3 Levels 2–4 Levels 3–5
English Language Learners:Differentiated InstructionELL
Speaking/Writing Before students read Apply It problem 7, ask them to explain what perpendicular sides are. Draw and label the following shapes on large index cards: hexagon, parallelogram, rectangle, rhombus, square, and trapezoid. Be sure to include examples with and without perpendicular sides as needed. Shuffle the cards. Have students select a card and describe the shape. Ask: Does the shape have pairs of perpendicular sides? Then ask students to read and solve Apply It problem 7. Invite students to share their findings.
Listening/Speaking Before students read Apply It problem 7, ask them to explain what perpendicular sides are. Then have them draw a picture to show perpendicular sides. Draw and label the following shapes on large index cards: hexagon, parallelogram, rectangle, rhombus, square, and trapezoid. Be sure to include examples with and without perpendicular sides as needed. Show the cards one at a time and ask students to determine if the shape has perpendicular sides and how they know. Continue the process for all the shapes. Then ask students to read and solve Apply It problem 7. Invite students to share their findings, using the sentence frame:
always have pairs of perpendicular sides.
Reading/Speaking Before students read Apply It problem 7, draw an illustration of perpendicular sides on transparency film. Point to your illustration and say: Perpendicular sides make a right angle. Draw and label examples of the following shapes on large index cards: hexagon, parallelogram, rectangle, rhombus, square, and trapezoid. Be sure to include examples with and without perpendicular sides as needed. Point to the term hexagon and have students read it aloud. Lay the transparency over the hexagon drawing. Ask: Does the hexagon have perpendicular sides? Continue this process with the remaining shapes. Then have students work with partners to read and solve Apply It problem 7.
Prepare for Session 2Use with Apply It.
©Curriculum Associates, LLC Copying is not permitted.Lesson 33 Classify Two-Dimensional Figures720
LESSON 33 SESSION 1
3 Solve the problem. Show your work.
Look at the shapes below. Put a check mark on all the shapes that have at least one right angle. Put a star on all the shapes that have at least one pair of parallel sides. Explain how you could test your choices.
AB C D
E
Solution
4 Check your answer. Show your work.
720
A C DEB
Possible student work:
I measured the angles in each shape. Shapes A and C both have angles that measure 908. Shapes A and C both have at least one right angle.
In each shape, I measured the distance between two sides that look parallel. Shapes B, C, D, and E each have sides that are the same distance apart at both endpoints. Shapes B, C, D, and E each have at least one pair of parallel sides.
Possible explanation: To test for right angles, use a protractor to
measure each angle in a shape to see if its measure is 908. To test for
parallel sides, measure the distance between two sides to see if they are
the same distance apart at both endpoints.
3 Assign problem 3 to provide another look at classifying two-dimensional figures.
This problem is very similar to the problem about determining which of the given polygons have at least one pair of parallel sides and which have at least one pair of perpendicular sides. In both problems, students are given a set of five polygons and asked to determine which have certain attributes. They are then asked to explain how they could test their choices. The question asks which polygons have at least one right angle and which have at least one pair of parallel sides.
Students may want to use pattern blocks, rulers, and protractors.
Suggest that students read the problem three times, asking themselves one of the following questions each time:• What is this problem about?• What is the question I am trying to answer?• What information is important?
Solution: Shapes A and C have at least one right angle. Shapes B, C, D and E each have at least one pair of parallel sides. See possible explanation on the student page. Medium
4 Have students solve the problem another way to check their answer.

©Curriculum Associates, LLC Copying is not permitted.721 Lesson 33 Classify Two-Dimensional Figures
LESSON 33
©Curriculum Associates, LLC Copying is not permitted. Lesson 33 Classify Two-Dimensional Figures 721
LESSON 33
TRY IT
Develop Sorting Shapes Based on SidesSESSION 2
Read and try to solve the problem below.
Evan plays a board game. The board is divided into three sections.
perpendicular sides parallel andperpendicular sides
parallel sides
These are Evan’s cards. In which sections of the board do the cards belong?
hexagon rhombus parallelogram trapezoid
Math Toolkit• pattern blocks• rulers• index cards• protractors
DISCUSS ITAsk your partner: How did you get started?
Tell your partner: I started by . . .
721
Possible student work:
Sample A
parallel sides perpendicular sidesparallel and
perpendicular sides
hexagonrhombus
parallelogramtrapezoid
Sample B
parallel sides:
perpendicular sides: no shapesparallel and perpendicular sides: no shapes
StartConnect to Prior KnowledgeWhy Review quadrilaterals to prepare students for work with classifying quadrilaterals.
How Have students name four given shapes and identify a category that describes all four shapes.
©Curriculum Associates, LLC Copying is permitted.
Start
Identify the shapes below.
The shapes all have 4 sides and 4 angles, so they are .
Grade 4 Lesson 33 Session 2 | Develop Sorting Shapes Based on Sides
Solutions
rectangle,
parallelogram,
square,
rhombus;
quadrilaterals
Develop LanguageWhy Clarify the meaning of the word sections.
How Ask students if they know what the word section means. Explain that a section is one of the parts that form something. Ask students to think of examples of things that have sections. Suggestions may include: an orange, a theater, or a dictionary. Have students find the word in the Try It problem. Ask: What three sections is the board in Evan's game divided into? Have students describe each section of the board.
TRY ITMake Sense of the ProblemTo support students in making sense of the problem, have them identify each of the three sections of the game board and each of the four shapes.
Ask How many sections does the game board have? How would you describe each section of the game board?
DISCUSS ITSupport Partner DiscussionEncourage students to use the terms parallel and perpendicular as they discuss their solutions.
Support as needed with questions such as:
• What did you notice about your partner’s strategy that is different from your strategy?
• Do you agree with your partner? Explain.
Common Misconception Look for students who confuse the meanings of parallel and perpendicular.
Select and Sequence Student SolutionsOne possible order for whole class discussion:
• pattern blocks or other physical models of the shapes sorted into the “parallel sides” category
• drawings of the shapes with parallel sides indicated on each shape
• all shapes sorted into the “parallel sides” category with evidence of using a ruler to test
SESSION 2 DevelopPurpose In this session students solve a problem that requires them to sort and classify shapes based on their sides. Students model the shapes either on paper or with manipulatives to determine the relationships of their sides. The purpose of this problem is to have students develop a strategy to sort shapes based on parallel and perpendicular sides.

©Curriculum Associates, LLC Copying is not permitted. 722Lesson 33 Classify Two-Dimensional Figures
©Curriculum Associates, LLC Copying is not permitted.Lesson 33 Classify Two-Dimensional Figures722
LESSON 33 DEVELOP
Explore diff erent ways to understand how to sort shapes into groups based on parallel and perpendicular sides.
Evan plays a board game. The board is divided into three sections.
perpendicular sides parallel andperpendicular sides
parallel sides
These are Evan’s cards. In which sections of the board do the cards belong?
hexagon rhombus parallelogram trapezoid
Pi����� ItYou can use drawings to help sort shapes.
Draw a pair of parallel lines and parallel lines perpendicularlinesa pair of perpendicular lines.
Draw lines along opposite sides of each shape. Compare these lines to the parallel lines you drew.
Draw lines along sides of each shape that form angles. Compare these lines to the perpendicular lines you drew.
m���� ItYou can use a table to help sort shapes.
Make a table. Put the shape on each card in the table where the shape belongs.
Parallel SidesBoth Parallel and
Perpendicular SidesPerpendicular Sides
Evan’s cards belong in the “Parallel Sides” column of the table.
722
Support Whole Class DiscussionCompare and connect the different representations and have students identify how they are related.
Ask Where does your model show shapes with parallel sides? Perpendicular sides? Both parallel and perpendicular sides?
Listen for Students should recognize that accurate responses include that all the shapes have parallel sides and that none of the shapes have perpendicular sides.
PICTURE IT & MODEL ITIf no student presented these models, connect them to the student models by pointing out the ways they each represent:
• the four shapes
• a pair of parallel sides
• no perpendicular sides
Ask How did you decide if the shape has parallel sides? Perpendicular sides?
Listen for The shape has parallel sides if one pair of sides is the same distance apart at all points. The shape has perpendicular sides if the sides meet at a right angle.
For a drawing, prompt students to identify why the first pair of lines are parallel and the second pair are perpendicular.
• What do the lines drawn on opposite sides of the shape tell you about the shape?
• What do the lines drawn on sides that form an angle in the shape tell you about the shape?
For a table, prompt students to identify how the labels for each column help sort the shapes.
• How does the table show how many shapes have parallel sides?
• Can you tell from the table whether a shape has more than one pair of parallel sides?
• How does the table show that none of the shapes have perpendicular sides?
Deepen UnderstandingParallel and Perpendicular SidesSMP 5 Use tools.
When discussing the Picture It, prompt students to consider testing for parallel and perpendicular sides in a figure using a ruler and a square corner instead of drawing lines.
Ask How could using a ruler help you determine whether the sides of the rhombus are parallel?
Listen for If you measure the distance between two sides of the rhombus at both endpoints and the distances between the sides are the same, then the sides are parallel.
Ask How could using a square corner help you tell whether two of the sides of the rhombus are perpendicular?Listen for If the two sides meet at a square corner, then the angle is a right angle and the two sides are perpendicular.

©Curriculum Associates, LLC Copying is not permitted.723 Lesson 33 Classify Two-Dimensional Figures
LESSON 33
©Curriculum Associates, LLC Copying is not permitted. Lesson 33 Classify Two-Dimensional Figures 723
Co����� ItNow you will solve a problem similar to the one on the previous page tohelp you understand how to sort shapes into groups based on parallel and perpendicular sides. Evan gets two more cards. In which sections of the board do the cards with these shapes belong?
1 Evan gets a card with a square. In which section of the board does it belong?
2 Evan gets a card with a quadrilateral. Does the quadrilateral belong to any of the three categories on the board? If not, name a category that can be used to describe this shape.
3 Explain how to sort shapes based on parallel and perpendicular sides.
4 REFLECTLook back at your Try It, strategies by classmates, and Picture It and Model It. Which models or strategies do you like best for sorting shapes into groups based on parallel and perpendicular sides? Explain.
square
quadrilateral
SESSION 2
723
It belongs in “parallel and perpendicular sides.”
No, the shape does not belong to any category on the board. It has no parallel or perpendicular sides. Other categories could be “no parallel sides,” “no perpendicular sides,” or “no parallel or perpendicular sides.”
Possible answer: Shapes belong in one of four groups: parallel sides, perpendicular sides, both, or neither. Parallel sides are always the same distance apart. Perpendicular sides meet at right angles.
Students may respond that they like using a drawing because it helps
them decide whether a shape has parallel or perpendicular sides. Other
students may respond that they like using a table because it helps them
sort the shapes into groups based on the kind of sides they have.
CONNECT IT• Remind students that one thing that is alike about
all the representations is how the shapes are sorted into groups.
• Explain that on this page students will decide how to sort two additional shapes, a square and a quadrilateral, into the sections shown on the game board.
Monitor and Confirm1 – 2 Check for understanding that:
• a square has both parallel and perpendicular sides
• the quadrilateral shown has no parallel or perpendicular sides
• the quadrilateral cannot be sorted into any of the sections on the game board
Support Whole Class Discussion2 Tell students that this problem will prepare
them to provide the explanation required in problem 3.
Ask What do you know about the sides and angles of quadrilaterals?
Listen for Quadrilaterals have four sides and four angles.
Ask How can you tell whether the quadrilateral shown on the card has parallel sides?
Listen for I can test to see if opposite sides are the same distance apart at both endpoints.
Ask How can you tell whether the quadrilateral shown on the card has perpendicular sides?
Listen for I can use a square corner and test to see whether the quadrilateral has any right angles.
3 Look for the idea that two-dimensional shapes can be sorted into four categories based on parallel and perpendicular sides. These categories include the three categories listed in the table on the previous page and the remaining category that students defined in problem 2: “no parallel or perpendicular sides.”
4 REFLECT Have all students focus on the strategies used to solve this problem. If time allows, have students share their responses with a partner.
SESSION 2 Develop
Hands-On ActivityUse a geoboard to understand sorting shapes based on sides.
If . . . students are unsure about the difference between parallel and perpendicular sides in a shape,Then . . . use the activity below to provide a more concrete experience.Materials For each student: geoboard• Have students use a geoboard and rubber bands to model one of the
following shapes: square, rectangle, rhombus, trapezoid, or parallelogram. • Have students decide if their shape has parallel sides. Remind students that
sides that do not intersect on the geoboard might intersect if they were extended. Students should be able to see that the rows of pegs on the geoboard are parallel to one another.
• Have students decide if their shape has perpendicular sides. Students should be able to see that if one side is along a horizontal row of pegs and an adjacent side is along a vertical row of pegs, the sides are perpendicular.
• Have students report their findings and discuss any differences in results. For example, some students may show a right trapezoid with both parallel and perpendicular sides, while others may show a trapezoid with no right angles. Repeat for additional shapes.

©Curriculum Associates, LLC Copying is not permitted. 724Lesson 33 Classify Two-Dimensional Figures
©Curriculum Associates, LLC Copying is not permitted.Lesson 33 Classify Two-Dimensional Figures724
LESSON 33 DEVELOP
Ap��� ItUse what you just learned to solve these problems.
5 Describe the group that the shapes below belong in based on the kinds of sides they have.
Solution
6 Circle the shape below that belongs in the group: “no parallel sides.”
7 Select all the shapes that always have pairs of perpendicular sides.
� hexagon
� parallelogram
� rectangle
� rhombus
� square
� trapezoid
SESSION 2
724
Possible answer: parallel and perpendicular sides
APPLY ITFor all problems, encourage students to draw some kind of model to support their thinking. Allow some leeway in precision of student-drawn models.
5 Possible answer: parallel and perpendicular sides; Parallel sides are the same distance apart at all points. Perpendicular sides form square corners.
6 Students should circle the third shape. The first shape has 2 pairs of parallel sides and no pairs of perpendicular sides. The second shape has 2 pairs of parallel sides and 2 pairs of perpendicular sides. The third shape has no pairs of parallel sides and 1 pair of perpendicular sides.
Close: Exit Ticket
7 C; The sides of a rectangle meet at right angles so it always has 2 pairs of perpendicular sides. E; The sides of a square meet at right angles so it always has 2 pairs of perpendicular sides.
Error Alert If students choose A, B, D, and/or F, then review the definition of each shape and draw an example of the shape with and without perpendicular sides. Reinforce that although these shapes could have perpendicular sides, they do not always have perpendicular sides.

©Curriculum Associates, LLC Copying is not permitted.725 Lesson 33 Classify Two-Dimensional Figures
LESSON 33
©Curriculum Associates, LLC Copying is not permitted. Lesson 33 Classify Two-Dimensional Figures 725
Name:
Study the Example showing how to sort shapes into groups based on parallel and perpendicular sides. Then solve problems 1–4.
Ex�����Sort the shapes below based on parallel and perpendicular sides. Put the shapes in the table below.
triangle rectanglesquarerhombus hexagon
Parallel Sides
Both Parallel and Perpendicular Sides
Perpendicular Sides
1 Look at how the shapes in the Example above are sorted into groups. Then look at the shape at the right. Which group does the shape belong in?
Solution
2 Suppose there is another group for shapes: “no parallel or perpendicular sides.” Circle the shapes below that belong in this group.
Practice Sorting Shapes Based on Sides
LESSON 33 SESSION 2
725
parallel sides
Solutions
1 parallel sides; The trapezoid has one pair of parallel sides and no pairs of perpendicular sides. Basic
2 Students should circle the second shape and the third shape. Students should recognize that the first shape has 1 pair of parallel sides and the fourth shape has 2 pairs of parallel sides and 2 pairs of perpendicular sides. Medium
SESSION 2 Additional Practice
Fluency & Skills Practice Teacher Toolbox
Assign Sorting Shapes Based on Sides
In this activity students practice sorting shapes based on whether or not they have sides that are parallel or perpendicular. Through this activity, students will develop analytical skills as they determine whether the shapes have only parallel sides, only perpendicular sides, both, or neither. They may also start looking at shapes in their classroom or home differently as they begin to look for these characteristics of shapes.
Name:
Fluency and Skills Practice
©Curriculum Associates, LLC Copying is permitted for classroom use.
Sort the shapes based on parallel and perpendicular sides. Place an X in each column that describes the shape. Some shapes will have more than one X.
Sorting Shapes Based on Sides
1 Which shapes can be classifi ed as having both parallel and perpendicular sides?
2 How can a shape have parallel sides, but not perpendicular sides?
3 How can a shape have perpendicular sides, but not parallel sides?
ParallelSides
PerpendicularSides
No Parallel orPerpendicular Sides
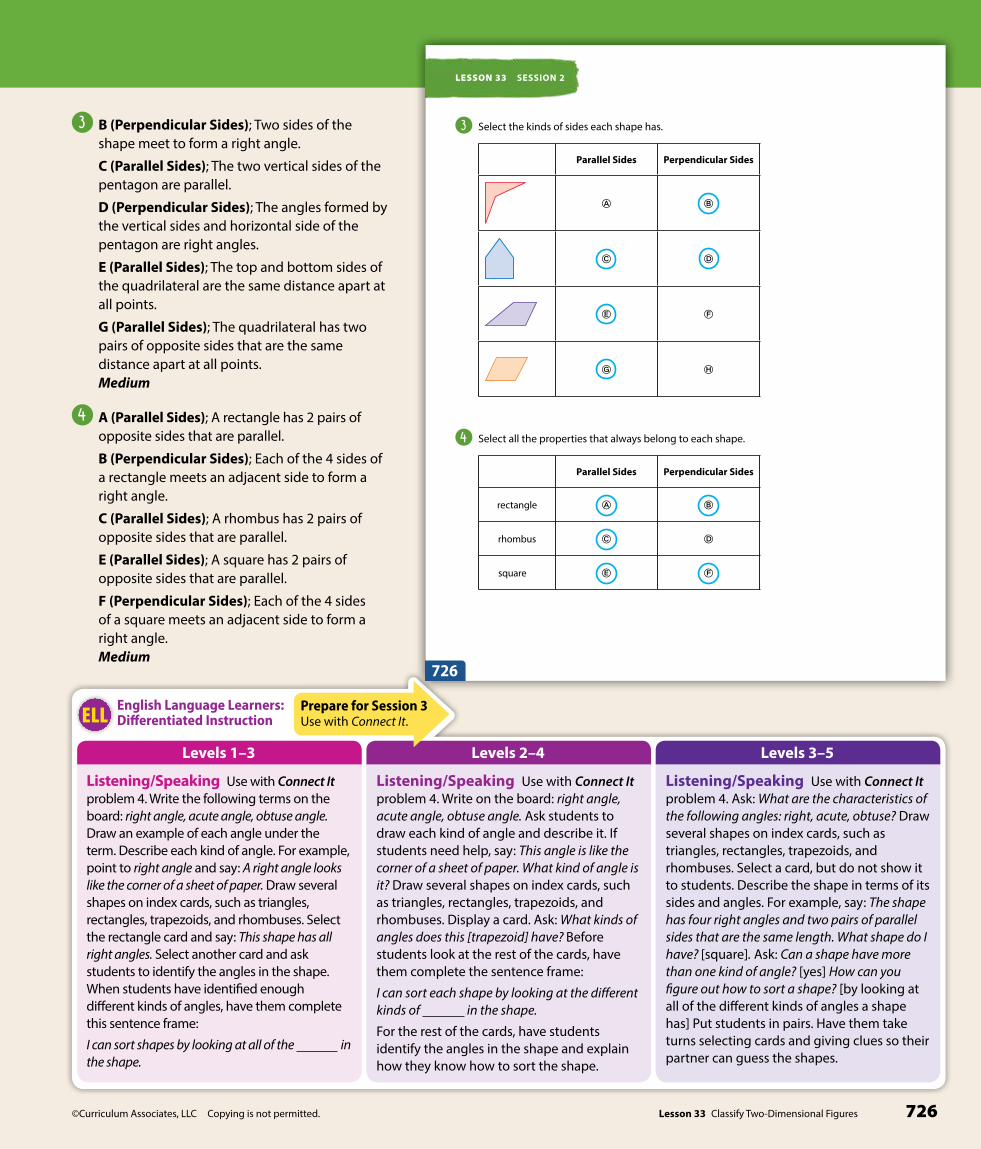
©Curriculum Associates, LLC Copying is not permitted. 726Lesson 33 Classify Two-Dimensional Figures
Levels 1–3 Levels 2–4 Levels 3–5
English Language Learners:Differentiated InstructionELL
Listening/Speaking Use with Connect It problem 4. Ask: What are the characteristics of the following angles: right, acute, obtuse? Draw several shapes on index cards, such as triangles, rectangles, trapezoids, and rhombuses. Select a card, but do not show it to students. Describe the shape in terms of its sides and angles. For example, say: The shape has four right angles and two pairs of parallel sides that are the same length. What shape do I have? [square]. Ask: Can a shape have more than one kind of angle? [yes] How can you figure out how to sort a shape? [by looking at all of the different kinds of angles a shape has] Put students in pairs. Have them take turns selecting cards and giving clues so their partner can guess the shapes.
Listening/Speaking Use with Connect It problem 4. Write on the board: right angle, acute angle, obtuse angle. Ask students to draw each kind of angle and describe it. If students need help, say: This angle is like the corner of a sheet of paper. What kind of angle is it? Draw several shapes on index cards, such as triangles, rectangles, trapezoids, and rhombuses. Display a card. Ask: What kinds of angles does this [trapezoid] have? Before students look at the rest of the cards, have them complete the sentence frame:
I can sort each shape by looking at the different kinds of in the shape.
For the rest of the cards, have students identify the angles in the shape and explain how they know how to sort the shape.
Listening/Speaking Use with Connect It problem 4. Write the following terms on the board: right angle, acute angle, obtuse angle. Draw an example of each angle under the term. Describe each kind of angle. For example, point to right angle and say: A right angle looks like the corner of a sheet of paper. Draw several shapes on index cards, such as triangles, rectangles, trapezoids, and rhombuses. Select the rectangle card and say: This shape has all right angles. Select another card and ask students to identify the angles in the shape. When students have identified enough different kinds of angles, have them complete this sentence frame:
I can sort shapes by looking at all of the in the shape.
©Curriculum Associates, LLC Copying is not permitted.Lesson 33 Classify Two-Dimensional Figures726
LESSON 33 SESSION 2
3 Select the kinds of sides each shape has.
Parallel Sides Perpendicular Sides
� �
� �
� �
� �
4 Select all the properties that always belong to each shape.
Parallel Sides Perpendicular Sides
rectangle � �
rhombus � �
square � �
726
Prepare for Session 3Use with Connect It.
3 B (Perpendicular Sides); Two sides of the shape meet to form a right angle.
C (Parallel Sides); The two vertical sides of the pentagon are parallel.
D (Perpendicular Sides); The angles formed by the vertical sides and horizontal side of the pentagon are right angles.
E (Parallel Sides); The top and bottom sides of the quadrilateral are the same distance apart at all points.
G (Parallel Sides); The quadrilateral has two pairs of opposite sides that are the same distance apart at all points. Medium
4 A (Parallel Sides); A rectangle has 2 pairs of opposite sides that are parallel.
B (Perpendicular Sides); Each of the 4 sides of a rectangle meets an adjacent side to form a right angle.
C (Parallel Sides); A rhombus has 2 pairs of opposite sides that are parallel.
E (Parallel Sides); A square has 2 pairs of opposite sides that are parallel.
F (Perpendicular Sides); Each of the 4 sides of a square meets an adjacent side to form a right angle. Medium

©Curriculum Associates, LLC Copying is not permitted.727 Lesson 33 Classify Two-Dimensional Figures
LESSON 33
©Curriculum Associates, LLC Copying is not permitted. Lesson 33 Classify Two-Dimensional Figures 727
LESSON 33
Develop Sorting Shapes Based on AnglesSESSION 3
Read and try to solve the problem below.
A classroom computer game shows a set of categories and a set of shapes. The player puts each shape in the correct category. Draw a line from each shape to the category it belongs in.
right only acute and right acute and obtuse
AB C D E
F
acute only
TRY IT Math Toolkit• protractors• rulers• index cards
DISCUSS ITAsk your partner: Do you agree with me? Why or why not?
Tell your partner: I agree with you about . . . because . . .
727
acute only right only acute and right acute and obtuse
A B C D EF
Some students may also identify the angles in the shapes.
StartConnect to Prior KnowledgeWhy Review acute, right, and obtuse angles to prepare students to identify these types of angles in a variety of shapes.
How Have students identify three given angles as acute, right, or obtuse.
©Curriculum Associates, LLC Copying is permitted.
Start
Grade 4 Lesson 33 Session 3 | Develop Sorting Shapes Based on Angles
Tell whether each angle is acute, right, or obtuse.
1 2 3
Solutions1. right2. obtuse3. acute
Develop LanguageWhy Reinforce understanding of the term parallelogram.
How Ask students to define the term parallelogram. If necessary, review that it is a four-sided shape made up of two pairs of opposite parallel sides that are equal in length. Have students draw the shape or find examples of it in the classroom. Help them notice the root word parallel in the word parallelogram. Point to a parallelogram and ask: What do you notice about the opposite sides of a parallelogram? Provide a sentence frame: The opposite sides of a parallelogram are . Help students as needed to see that the sides are parallel.
TRY ITMake Sense of the ProblemTo support students in making sense of the problem, have them identify that the problem is asking them to sort the six shapes into four categories.
DISCUSS ITSupport Partner DiscussionEncourage students to use the terms acute, right, and obtuse as they discuss their solutions.
Support as needed with questions such as:
• How was your solution method the same as or different from your partner’s method?
• What tool(s) did you find helpful?
Common Misconception Look for students who do not know the difference between an acute angle and an obtuse angle. Reinforce the definitions of acute and obtuse by having students compare each angle to a right angle.
Select and Sequence Student SolutionsOne possible order for whole class discussion:
• cut-out paper models of the shapes, labeled or placed correctly in a category
• drawings of the shapes, labeled correctly with category names
• lines correctly drawn on the Student Worktext page from each shape to a category
• shapes with marks indicating the use of tools (square corner or protractor) to determine the kind of angles the shapes have
Purpose In this session students solve a problem that requires sorting shapes based on their angles. Students model the shapes either on paper or with manipulatives to determine the kinds of angles they have. The purpose of this problem is to have students develop strategies to sort shapes based on their angles.
SESSION 3 Develop

©Curriculum Associates, LLC Copying is not permitted. 728Lesson 33 Classify Two-Dimensional Figures
©Curriculum Associates, LLC Copying is not permitted.Lesson 33 Classify Two-Dimensional Figures728
LESSON 33 DEVELOP
Explore diff erent ways to understand how to sort shapes into categories based on angles.
A classroom computer game shows a set of categories and a set of shapes. The player puts each shape in the correct category. Draw a line from each shape to the category it belongs in.
AB C D E
F
right only acute and right acute and obtuseacute only
Pi����� ItYou can use a model to help sort shapes based on angles.
Use the corner of a sheet of paper as a model of a right angle. Compare each angle to the paper corner.
For example, hold up the paper
This angle openswider than a rightangle. The angleis obtuse.corner to the trapezoid.
Then you can compare the paper corner to each of the other 3 angles in the trapezoid.
Mo��� ItYou can label a drawing to help sort shapes based on angles.
Look at each shape. Mark each angle a for acute, r for right, or o for obtuse.
For example, mark the trapezoid like this: o oa a
The trapezoid has 2 acute angles and 2 obtuse angles. It belongs in the group “acute and obtuse.”
Remember to look at all of the angles in a shape before you put it in a group.
728
Support Whole Class DiscussionCompare and connect the different representations and have students identify how they are related.
Ask Where does your model show acute angles? right angles? obtuse angles?
Listen for Students should recognize that accurate responses include that the angles in shape C and shape F with a red square corner are right angles, the angles that do not open as wide as a right angle are acute angles, and the angles that open wider than a right angle are obtuse angles.
PICTURE IT & MODEL ITIf no student presented these models, connect them to the student models by pointing out the ways they each represent:
• acute angles
• right angles
• obtuse angles
Ask How do the models show the types of angles that the trapezoid has?
Listen for The first model shows that one angle opens wider than a square corner, so the trapezoid has an obtuse angle. In the second model, the letters written in the angles of the trapezoid indicate the types of angles it has.
For using a square corner, prompt students to identify how comparing an angle in the trapezoid to a square corner is helpful.
• Why do you compare an angle of the trapezoid to a square corner?
• How do you align the square corner with the angle in the shape?
• How would you compare the other three angles in the trapezoid to a square corner?
For using labels, prompt students to identify the labels on the trapezoid.
• What do the labels on the trapezoid represent?
• Why is it important where the labels are written on the trapezoid?
• How can you use the labels to help you sort the trapezoid into one of the categories?
Deepen UnderstandingSort Shapes by Kinds of AnglesSMP 3 Construct arguments and critique reasoning.When discussing sorting shapes by angles, prompt students to consider the question, “Is it important to look at all angles in a shape in order to classify it?”
Ask Can shapes have only one type of angle? More than one type of angle? You can look at shapes A through E on the Student Worktext page.
Listen for Some shapes have only one type of angle, such as shapes D and F. Other shapes have more than one type of angle, such as shapes A, B, C, and E.
Ask How could labeling only the two acute angles on the trapezoid impact sorting the trapezoid by the kinds of angles it has?
Listen for You might think that the trapezoid belongs in the “acute only” category instead of the “acute and obtuse” category.
Generalize Is it important to look at all angles in a shape before sorting the shape into categories? Have students state their position and explain their reasoning. Have them respond to one another to critique reasoning. Listen for understanding that shapes can have more than one type of angle, so it is important to check every angle.
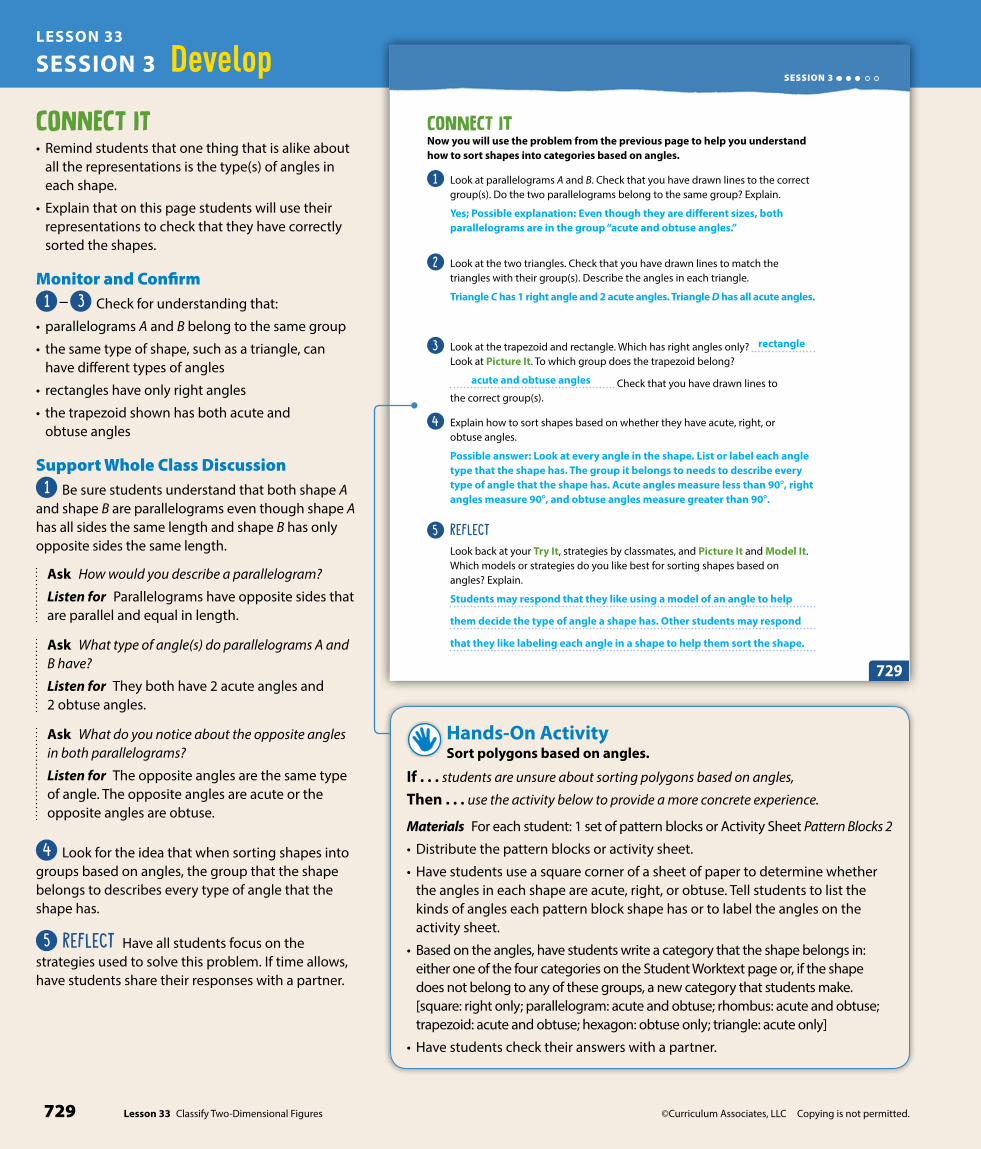
©Curriculum Associates, LLC Copying is not permitted.729 Lesson 33 Classify Two-Dimensional Figures
LESSON 33
©Curriculum Associates, LLC Copying is not permitted. Lesson 33 Classify Two-Dimensional Figures 729
Co����� ItNow you will use the problem from the previous page to help you understand how to sort shapes into categories based on angles.
1 Look at parallelograms A and B. Check that you have drawn lines to the correct group(s). Do the two parallelograms belong to the same group? Explain.
2 Look at the two triangles. Check that you have drawn lines to match the triangles with their group(s). Describe the angles in each triangle.
3 Look at the trapezoid and rectangle. Which has right angles only? Look at Picture It. To which group does the trapezoid belong?
Check that you have drawn lines to the correct group(s).
4 Explain how to sort shapes based on whether they have acute, right, or obtuse angles.
5 REFLECTLook back at your Try It, strategies by classmates, and Picture It and Model It. Which models or strategies do you like best for sorting shapes based on angles? Explain.
SESSION 3
729
Yes; Possible explanation: Even though they are different sizes, both parallelograms are in the group “acute and obtuse angles.”
Triangle C has 1 right angle and 2 acute angles. Triangle D has all acute angles.
Possible answer: Look at every angle in the shape. List or label each angle type that the shape has. The group it belongs to needs to describe every type of angle that the shape has. Acute angles measure less than 908, right angles measure 908, and obtuse angles measure greater than 908.
Students may respond that they like using a model of an angle to help
them decide the type of angle a shape has. Other students may respond
that they like labeling each angle in a shape to help them sort the shape.
rectangle
acute and obtuse angles
CONNECT IT• Remind students that one thing that is alike about
all the representations is the type(s) of angles in each shape.
• Explain that on this page students will use their representations to check that they have correctly sorted the shapes.
Monitor and Confirm1 – 3 Check for understanding that:
• parallelograms A and B belong to the same group
• the same type of shape, such as a triangle, can have different types of angles
• rectangles have only right angles
• the trapezoid shown has both acute and obtuse angles
Support Whole Class Discussion1 Be sure students understand that both shape A
and shape B are parallelograms even though shape A has all sides the same length and shape B has only opposite sides the same length.
Ask How would you describe a parallelogram?
Listen for Parallelograms have opposite sides that are parallel and equal in length.
Ask What type of angle(s) do parallelograms A and B have?
Listen for They both have 2 acute angles and 2 obtuse angles.
Ask What do you notice about the opposite angles in both parallelograms?
Listen for The opposite angles are the same type of angle. The opposite angles are acute or the opposite angles are obtuse.
4 Look for the idea that when sorting shapes into groups based on angles, the group that the shape belongs to describes every type of angle that the shape has.
5 REFLECT Have all students focus on the strategies used to solve this problem. If time allows, have students share their responses with a partner.
SESSION 3 Develop
Hands-On ActivitySort polygons based on angles.
If . . . students are unsure about sorting polygons based on angles,
Then . . . use the activity below to provide a more concrete experience.
Materials For each student: 1 set of pattern blocks or Activity Sheet Pattern Blocks 2
• Distribute the pattern blocks or activity sheet.
• Have students use a square corner of a sheet of paper to determine whether the angles in each shape are acute, right, or obtuse. Tell students to list the kinds of angles each pattern block shape has or to label the angles on the activity sheet.
• Based on the angles, have students write a category that the shape belongs in: either one of the four categories on the Student Worktext page or, if the shape does not belong to any of these groups, a new category that students make. [square: right only; parallelogram: acute and obtuse; rhombus: acute and obtuse; trapezoid: acute and obtuse; hexagon: obtuse only; triangle: acute only]
• Have students check their answers with a partner.

©Curriculum Associates, LLC Copying is not permitted. 730Lesson 33 Classify Two-Dimensional Figures
Lesson 33 Classify Two-Dimensional Figures730
Ap��� ItUse what you just learned to solve these problems.
6 Which of these groups does the rhombus below belong in: “acute angles only,” “obtuse angles only,” “right angles only,” “both acute and obtuse angles,” or “both right and obtuse angles”? Explain.
7 Circle the shape that has an acute angle, a right angle, and an obtuse angle.
8 The shapes below have been sorted into two groups based on their angles. Explain how the shapes could have been sorted.
Group 1 Group 2
LESSON 33 DEVELOP SESSION 3
©Curriculum Associates, LLC Copying is not permitted.
730
It belongs in “both acute and obtuse angles.” Possible explanation: It has 2 acute angles, one at the bottom left and one at the top right. It has 2 obtuse angles, one at the top left and one at the bottom right.
Accept student responses that match the angles in the shapes in each group. Possible explanation: In Group 1, each shape has at least one right angle. In Group 2, each shape has at least one obtuse angle.
APPLY ITFor all problems, encourage students to use a corner of a sheet of paper to check whether an angle is a right angle or opens wider than/not as wide as a right angle.
6 It belongs in ”both acute and obtuse angles.” Students should recognize that one pair of opposite angles are acute and the other pair are obtuse.
7 Students should circle the third shape. The first shape has 4 right angles. The second shape has 2 acute angles and 2 obtuse angles. The third shape has 1 acute angle, 1 right angle, and 2 obtuse angles.
Close: Exit Ticket
8 Accept student responses that match the angles in the shapes in each group. See possible explanation on the Student Worktext page.
Students’ solutions should indicate understanding of:
• correct identification of acute, right, and obtuse angles
• shapes can have more than one type of angle
• sorting shapes into groups based on the kinds of angles they have
Error Alert If students think that one category could be “at least one acute angle,” then they did not look closely enough at the angles of each shape or they did not recognize that a shape from each group belongs in this category (the triangle in Group 1 and each shape in Group 2) or they did not realize that the two groups have to be mutually exclusive. Have students list the kinds of angles in the shapes in each group to help them determine possible categories.

©Curriculum Associates, LLC Copying is not permitted.731 Lesson 33 Classify Two-Dimensional Figures
LESSON 33
©Curriculum Associates, LLC Copying is not permitted. Lesson 33 Classify Two-Dimensional Figures 731
Name:
Study the Example showing how to sort shapes into groups based on angles. Then solve problems 1−5.
1 Write the number of acute, right, and obtuse angles for each pentagon shown in the table below.
Acute Right Obtuse
X
Y
2 Explain how these pentagons are diff erent based on their angles.
Solution
Practice Sorting Shapes Based on Angles
LESSON 33 SESSION 3
Ex�����Label each angle in the shapes below with a for acute, r for right, and o for obtuse. Then draw a line from each shape to the group it belongs in.
a
ao
o
r a
a
o or r
o
right and acute
right and obtuse
acute and obtuse
731
1
0
2
0
2
5
Possible explanation: Pentagon X has acute, right, and
obtuse angles. Pentagon Y has all obtuse angles.
Solutions
1 See completed table on the student page. Students could solve the problem by comparing each of the angles in the pentagons to a square corner. Basic
2 Possible explanation: Pentagon X has acute, right, and obtuse angles. Pentagon Y has all obtuse angles. Medium
SESSION 3 Additional Practice
Fluency & Skills Practice Teacher Toolbox
Assign Matching Shapes with Angle Types
In this activity students practice matching shapes with angle descriptions. This practice will allow students to build on their ability to analyze a shape. Previously they analyzed a shape by focusing on whether or not its sides are parallel or perpendicular. Now they will analyze shapes in a different way, by looking at the shapes' angles.
Name:
Fluency and Skills Practice
©Curriculum Associates, LLC Copying is permitted for classroom use.
Draw a line from each shape to the best description of its angles.
Matching Shapes with Angle Types
acute only
obtuse only
right only
acute and right
acute and obtuse
obtuse and right
acute, obtuse, and right

©Curriculum Associates, LLC Copying is not permitted. 732Lesson 33 Classify Two-Dimensional Figures
Levels 1–3 Levels 2–4 Levels 3–5
English Language Learners:Differentiated InstructionELL
Reading/Writing Use with Connect It problem 4. Assign each student a partner. Distribute several index cards to students and ask them to draw various kinds of triangles on the cards. Have students exchange cards with their partners. Refer students to the following instructions for discussion:
• Look at each triangle and tell the type.
• Write the name of the type of triangle it is and how you know.
• Share your responses with your classmates to check your answers.
Ask: What did you need to know to give a complete description of each triangle? Why? Have students explain their reasoning to partners.
Reading/Speaking Use with Connect It problem 4. Show an illustration of a right isosceles triangle. Ask: What kind of triangle is this? How do you know? Provide students with the following sentence frames to aid their responses:
• This is a/an triangle.
• It has sides of the same length.
• It is also a/an triangle.
• The kinds of angles it has are .
Display illustrations of other triangles. Remind students to describe the number of sides with the same length and the types of angles in each triangle. Ask students what they need to know to give a complete description of a triangle.
Reading Use with Connect It problem 4. Draw an equilateral triangle. Read each of the following sentence frames and have students fill in the missing information:
• This is a/an equilateral triangle .• It has three sides of the same length.
• It is also a/an acute triangle . • The kinds of angles it has are acute .Display an obtuse scalene triangle. Have them use the sentence frames to describe it. Then have them use sentence frames to explain how to describe any triangle:
• You need to know how many sides are the same length.
• You need to know what kind of angles the triangle has.
©Curriculum Associates, LLC Copying is not permitted.Lesson 33 Classify Two-Dimensional Figures732
LESSON 33 SESSION 3
3 Tell whether each shape belongs in the group described.
Yes No
all right angles � �
right and acute angles � �
obtuse and acute angles � �
right and obtuse angles only � �
all obtuse angles � �
4 Describe a group that the two shapes at the right belong in, based on the kind of angles the shapes have.
Solution
5 Look at the shapes in problem 4. Where do they belong in the table below? Draw each shape in the column in which it belongs. Explain your answer.
Acute and Obtuse Angles
Acute and Right Angles
Obtuse and Right Angles
Acute, Right, and Obtuse Angles
732
right, acute, and obtuse angles
Possible explanation: Both shapes belong in the acute, right, and obtuse angles group because each shape has 1 acute angle, at least 1 right angle, and at least 1 obtuse angle.
Prepare for Session 4Use with Connect It.
3 A (Yes); The shape has 4 right angles.
D (No); The shape has 2 acute angles and 2 obtuse angles.
E (Yes); The shape has 2 acute angles and 2 obtuse angles.
H (No); The shape has 2 acute angles and 3 right angles. Note: The shape also has 2 reflex angles, which are angles greater than 180° and less than 360°.
I (Yes); The shape has 6 obtuse angles. Medium
4 right, acute, and obtuse angles Medium
5 Students should draw both shapes from problem 4 in the last column. See possible explanation on the student page. The trapezoid has 1 acute angle, 2 right angles, and 1 obtuse angle. The pentagon has 1 acute angle, 2 right angles, and 2 obtuse angles. Challenge

©Curriculum Associates, LLC Copying is not permitted.733 Lesson 33 Classify Two-Dimensional Figures
LESSON 33
©Curriculum Associates, LLC Copying is not permitted. Lesson 33 Classify Two-Dimensional Figures 733
LESSON 33
Develop Sorting TrianglesSESSION 4
Read and try to solve the problem below.
A website sells 7 kinds of triangular fl ags based on sides and angles.
Flag Equal Sides Angles
1 3 3 acute
2 2 2 acute, 1 right
3 2 2 acute, 1 obtuse
4 2 3 acute
Flag Equal Sides Angles
5 0 2 acute, 1 right
6 0 2 acute, 1 obtuse
7 0 3 acute
The triangle at the right is a model for which fl ag number?
TRY IT Math Toolkit• protractors• rulers• index cards
DISCUSS ITAsk your partner: Why did you choose that strategy?
Tell your partner: I do not understand how . . .
7 in.
10 in.
10 in.
733
Possible student work:
Sample A
The triangle has 2 equal sides (10 in.) and 3 acute angles, so the triangle is a model for flag 4.
Sample B
7 in.10 in.
10 in.
a
aa
Since the triangle has 2 sides of equal length and 3 acute angles, it is a model for flag 4.
StartConnect to Prior KnowledgeMaterials For each student: ruler
Why Support students’ facility with sorting shapes based on angles.
How Have students draw one shape that belongs in the category “acute and obtuse angles” and a different shape that belongs in the category “acute and right angles.”
©Curriculum Associates, LLC Copying is permitted.
Start
1 Draw a shape that belongs to the group “acute and obtuse angles.”
2 Draw a shape that belongs to the group “acute and right angles.”
Grade 4 Lesson 33 Session 4 | Develop Sorting Triangles
Solution1.– 2. Check that students’ shapes match the given category.
Develop LanguageWhy Support understanding of the phrase in common.
How Explain to students that the phrase in common means “shared together.” Draw two different-sized equilateral triangles. Ask students to identify the characteristics the triangles have in common. Have students look for characteristics that are the same in both triangles. Encourage students with questions that prompt them to analyze the sides and angles of the triangles.
TRY ITMake Sense of the ProblemTo support students in making sense of the problem, have them identify the characteristics of all 7 kinds of flags and recognize that the flag shown fits into one of the 7 categories.
Ask What does “equal sides” mean? Which flag or flags have 3 equal sides? Which flag or flags have 0 equal sides?
DISCUSS ITSupport Partner DiscussionEncourage students to use the terms acute, right, obtuse, and equal sides as they discuss their solutions.
Support as needed with questions such as:
• How did you think about the problem?
• Do you agree with your partner’s answer? Why or why not?
Common Misconception Look for students who think that the triangle has 3 equal sides because it has 3 sides. Have students use a ruler to measure the side lengths to recognize that only 2 of its 3 sides are the same length.
Select and Sequence Student SolutionsOne possible order for whole class discussion:
• cut-out paper flag labeled with 2 equal sides and 3 acute angles
• drawings of the triangular flag labeled with 2 equal sides and 3 acute angles
• notation on the triangular flag on the Student Worktext page or on a drawing of the triangular flag showing 2 equal sides and use of a benchmark right angle to determine that all 3 angles are acute
Purpose In this session students solve a problem that requires them to identify a triangle based on the kinds of angles it has and on the lengths of its sides. Students model the triangle either on paper or with manipulatives to determine the kinds of angles it has and to examine its sides. The purpose of this problem is to have students develop strategies for sorting triangles.
SESSION 4 Develop
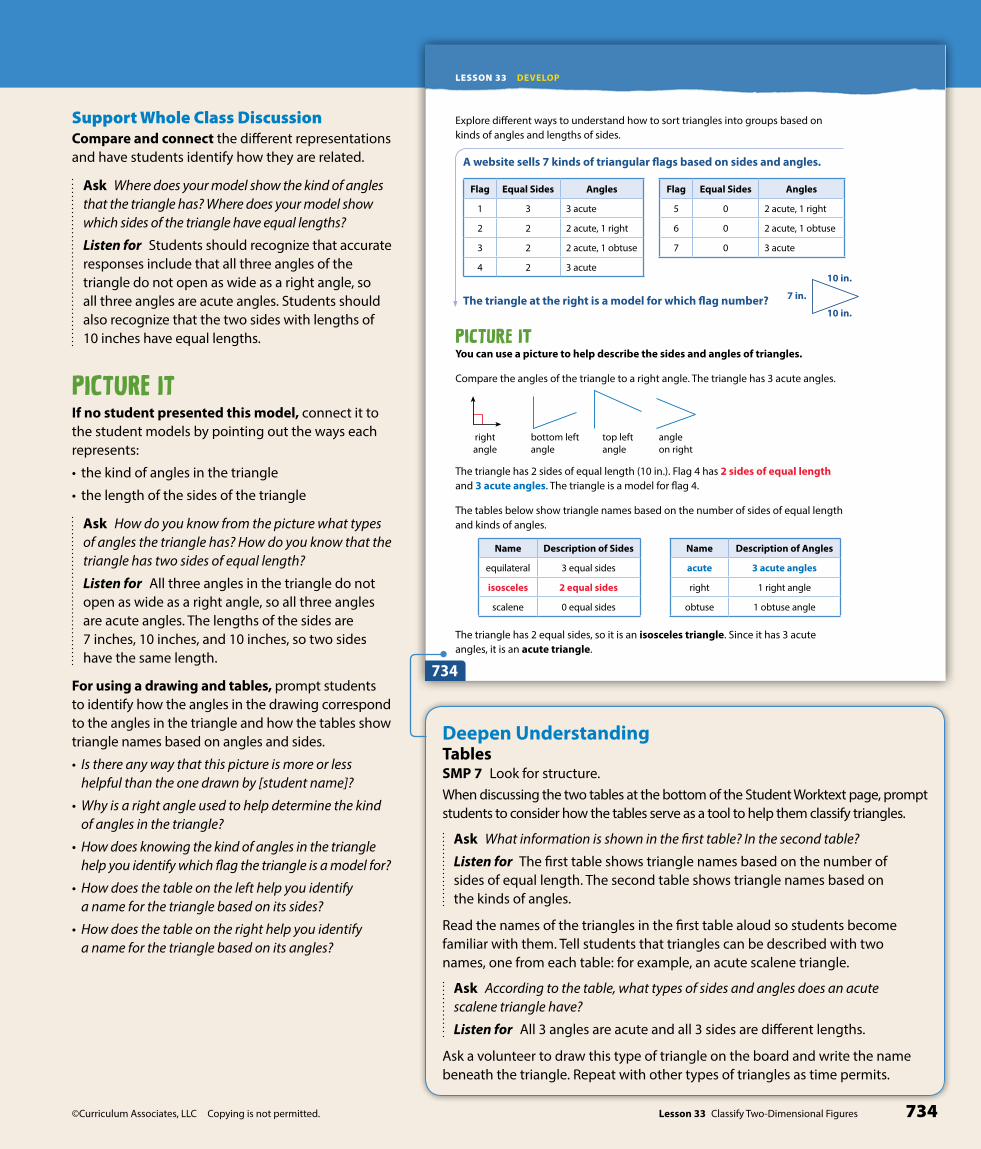
©Curriculum Associates, LLC Copying is not permitted. 734Lesson 33 Classify Two-Dimensional Figures
©Curriculum Associates, LLC Copying is not permitted.Lesson 33 Classify Two-Dimensional Figures734
LESSON 33 DEVELOP
Explore diff erent ways to understand how to sort triangles into groups based on kinds of angles and lengths of sides.
A website sells 7 kinds of triangular fl ags based on sides and angles.
Flag Equal Sides Angles
1 3 3 acute
2 2 2 acute, 1 right
3 2 2 acute, 1 obtuse
4 2 3 acute
Flag Equal Sides Angles
5 0 2 acute, 1 right
6 0 2 acute, 1 obtuse
7 0 3 acute
The triangle at the right is a model for which fl ag number?
Pi����� ItYou can use a picture to help describe the sides and angles of triangles.
Compare the angles of the triangle to a right angle. The triangle has 3 acute angles.
bottom leftangle
top leftangle
angleon right
rightangle
The triangle has 2 sides of equal length (10 in.). Flag 4 has 2 sides of equal length and 3 acute angles. The triangle is a model for fl ag 4.
The tables below show triangle names based on the number of sides of equal length and kinds of angles.
Name Description of Sides
equilateral 3 equal sides
isosceles 2 equal sides
scalene 0 equal sides
Name Description of Angles
acute 3 acute angles
right 1 right angle
obtuse 1 obtuse angle
The triangle has 2 equal sides, so it is an isosceles triangle. Since it has 3 acute angles, it is an acute triangle.
7 in.
10 in.
10 in.
734
Support Whole Class DiscussionCompare and connect the different representations and have students identify how they are related.
Ask Where does your model show the kind of angles that the triangle has? Where does your model show which sides of the triangle have equal lengths?
Listen for Students should recognize that accurate responses include that all three angles of the triangle do not open as wide as a right angle, so all three angles are acute angles. Students should also recognize that the two sides with lengths of 10 inches have equal lengths.
PICTURE ITIf no student presented this model, connect it to the student models by pointing out the ways each represents:
• the kind of angles in the triangle
• the length of the sides of the triangle
Ask How do you know from the picture what types of angles the triangle has? How do you know that the triangle has two sides of equal length?
Listen for All three angles in the triangle do not open as wide as a right angle, so all three angles are acute angles. The lengths of the sides are 7 inches, 10 inches, and 10 inches, so two sides have the same length.
For using a drawing and tables, prompt students to identify how the angles in the drawing correspond to the angles in the triangle and how the tables show triangle names based on angles and sides.
• Is there any way that this picture is more or less helpful than the one drawn by [student name]?
• Why is a right angle used to help determine the kind of angles in the triangle?
• How does knowing the kind of angles in the triangle help you identify which flag the triangle is a model for?
• How does the table on the left help you identify a name for the triangle based on its sides?
• How does the table on the right help you identify a name for the triangle based on its angles?
Deepen UnderstandingTablesSMP 7 Look for structure.When discussing the two tables at the bottom of the Student Worktext page, prompt students to consider how the tables serve as a tool to help them classify triangles.
Ask What information is shown in the first table? In the second table?
Listen for The first table shows triangle names based on the number of sides of equal length. The second table shows triangle names based on the kinds of angles.
Read the names of the triangles in the first table aloud so students become familiar with them. Tell students that triangles can be described with two names, one from each table: for example, an acute scalene triangle.
Ask According to the table, what types of sides and angles does an acute scalene triangle have?
Listen for All 3 angles are acute and all 3 sides are different lengths.
Ask a volunteer to draw this type of triangle on the board and write the name beneath the triangle. Repeat with other types of triangles as time permits.

©Curriculum Associates, LLC Copying is not permitted.735 Lesson 33 Classify Two-Dimensional Figures
LESSON 33
SESSION 4 Develop
©Curriculum Associates, LLC Copying is not permitted. Lesson 33 Classify Two-Dimensional Figures 735
Co����� It Now you will use the problem from the previous page to help you understand how to sort triangles into groups based on kinds of angles and lengths of sides and how to name triangles.
1 Look back at the model for the triangular fl ag. Fill in the blanks to name this
triangle based on its angles and sides: triangle
8 in.
8 in.8 in.A
14 in.
7 in.9 in.B
2 Look at triangle A above. How many sides are the same length?
What kinds of angles does it have?
What are two names for this triangle?
3 What are two names for triangle B?
Can triangle B also be called an acute triangle? Why or why not?
4 Explain how to give a complete description of a triangle.
5 REFLECTLook back at your Try It, strategies by classmates, and Picture It. Which models or strategies do you like best for sorting triangles into groups based on kinds of angles and lengths of sides and for naming triangles? Explain.
SESSION 4
735
acute isosceles
3
3 acute angles
equilateral and acute
obtuse and scalene
No, it is not an acute triangle because it only has 2 acute angles, not 3.
A complete description of a triangle tells how many sides are the same length and what kind of angles the triangle has.
Some students may like drawing a picture of each angle in a triangle to
decide which type(s) of angles a triangle has. Others may like using the
table to see the names of different triangles based on angles and sides.
CONNECT IT• Remind students that a triangle can be classified
by both its side lengths and its angles.
• Explain that students will use the two tables on the previous page to help them name triangles based on lengths of sides and kinds of angles.
Monitor and Confirm1 – 3 Check for understanding that:
• every triangle can be classified based on its sides and angles
• kinds of sides are equilateral, isosceles, or scalene
• kinds of angles are acute, right, or obtuse
Deepen UnderstandingClassify TrianglesSMP 3 Construct arguments.
To support discussion of problem 3, prompt students to consider how many angles of one type are needed for each classification.
Ask Does triangle B have more than one type of angle? Explain.
Listen for Yes. It has 2 acute angles and 1 obtuse angle.
Ask How many acute angles must a triangle have to be classified as acute? How many obtuse angles must it have to be classified as obtuse?
Listen for A triangle must have three acute angles to be classified as acute but only one obtuse angle to be classified as obtuse.
Generalize Is it possible for a triangle to have two obtuse angles? Why or why not? Have students try to draw a triangle with 2 obtuse angles as a way to explain their reasoning. Listen for understanding that there is no way to connect the triangle sides if two angles are obtuse, so a triangle cannot have two obtuse angles.
Support Whole Class Discussion4 Look for the idea that every triangle can be
described in two ways: by the lengths of its sides and by the kinds of angles it has.
5 REFLECT Have all students focus on the strategies used to solve this problem. If time allows, have students share their responses with a partner.
Hands-On ActivityUse straws to practice naming triangles.
If . . . students are unsure about naming triangles,
Then . . . use the activity below to have students connect names of triangles to triangles they build.
Materials For each pair: 20 straws, scissors
• Have pairs of students use the straws to build each of the 7 types of triangular flags shown on the previous Student Worktext page. Students can leave the straws whole or cut the straws to form sides for each triangle.
• Tell students to name each triangle based on the sides and angles. [Flag 1: acute equilateral; Flag 2: right isosceles; Flag 3: obtuse isosceles; Flag 4: acute isosceles; Flag 5: right scalene; Flag 6: obtuse scalene; Flag 7: acute scalene]
• Discuss how a triangle has to have only one right angle to be classified as a right triangle and only one obtuse angle to be classified as an obtuse triangle but must have three acute angles to be classified as an acute triangle.
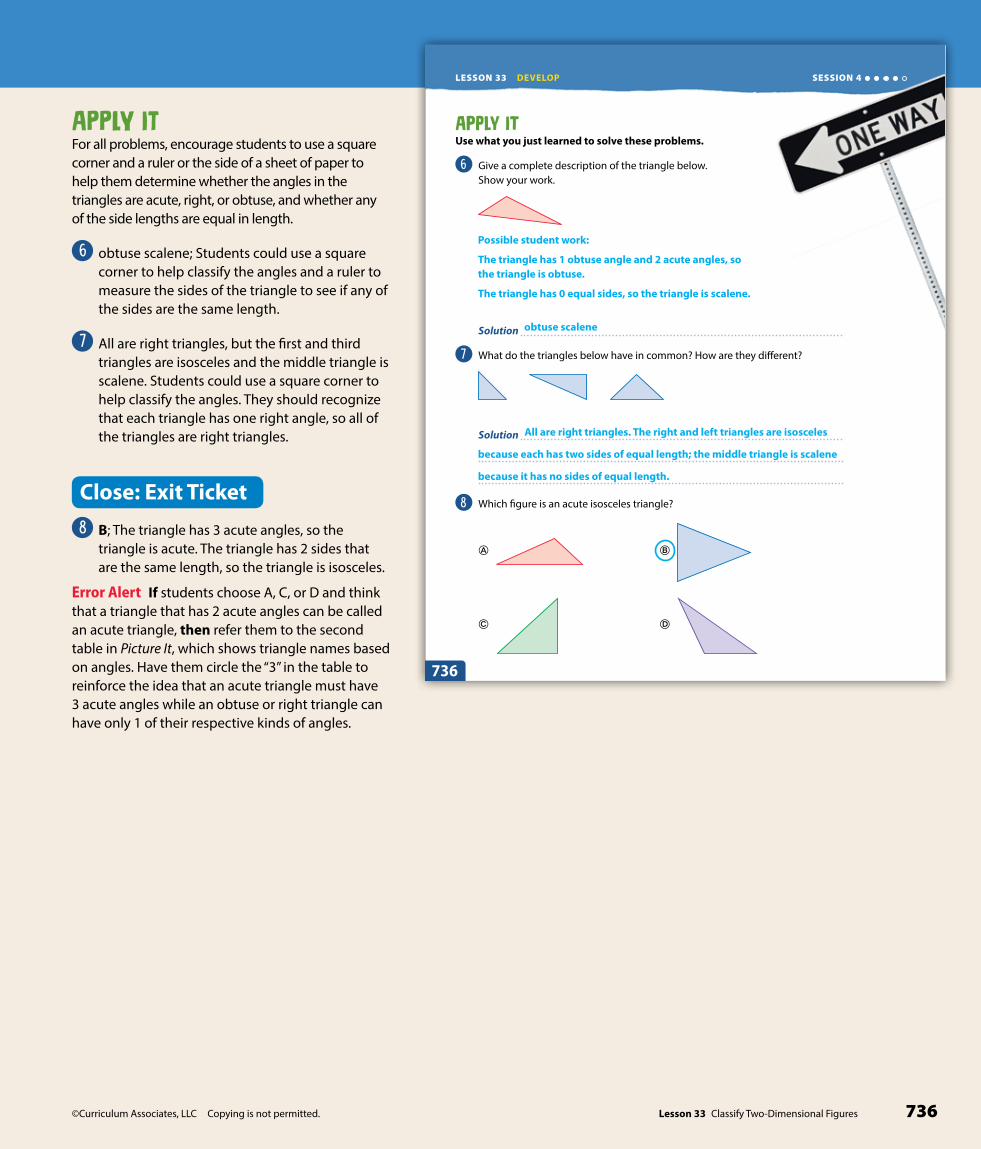
©Curriculum Associates, LLC Copying is not permitted. 736Lesson 33 Classify Two-Dimensional Figures
©Curriculum Associates, LLC Copying is not permitted.Lesson 33 Classify Two-Dimensional Figures736
LESSON 33 DEVELOP
Ap��� ItUse what you just learned to solve these problems.
6 Give a complete description of the triangle below. Show your work.
Solution
7 What do the triangles below have in common? How are they diff erent?
Solution
8 Which fi gure is an acute isosceles triangle?
� �
� �
SESSION 4
736
Possible student work:
The triangle has 1 obtuse angle and 2 acute angles, so the triangle is obtuse.
The triangle has 0 equal sides, so the triangle is scalene.
obtuse scalene
All are right triangles. The right and left triangles are isosceles
because each has two sides of equal length; the middle triangle is scalene
because it has no sides of equal length.
APPLY ITFor all problems, encourage students to use a square corner and a ruler or the side of a sheet of paper to help them determine whether the angles in the triangles are acute, right, or obtuse, and whether any of the side lengths are equal in length.
6 obtuse scalene; Students could use a square corner to help classify the angles and a ruler to measure the sides of the triangle to see if any of the sides are the same length.
7 All are right triangles, but the first and third triangles are isosceles and the middle triangle is scalene. Students could use a square corner to help classify the angles. They should recognize that each triangle has one right angle, so all of the triangles are right triangles.
Close: Exit Ticket
8 B; The triangle has 3 acute angles, so the triangle is acute. The triangle has 2 sides that are the same length, so the triangle is isosceles.
Error Alert If students choose A, C, or D and think that a triangle that has 2 acute angles can be called an acute triangle, then refer them to the second table in Picture It, which shows triangle names based on angles. Have them circle the “3” in the table to reinforce the idea that an acute triangle must have 3 acute angles while an obtuse or right triangle can have only 1 of their respective kinds of angles.

©Curriculum Associates, LLC Copying is not permitted.737 Lesson 33 Classify Two-Dimensional Figures
LESSON 33
©Curriculum Associates, LLC Copying is not permitted. Lesson 33 Classify Two-Dimensional Figures 737
Name:
Study the Example showing how to sort triangles into groups based on kinds of angles and lengths of sides. Then solve problems 1−4.
Ex�����What is the same about the two triangles shown at the right? What is diff erent?
You can sort triangles into groups based on the kinds of angles they have: acute, right, or obtuse.
You can also sort triangles based on the lengths of their sides.
equilateral: 3 equal sides isosceles: 2 equal sidesscalene: 0 equal sides
Triangles B and H are the same because they are both obtuse triangles. They each have 1 obtuse angle.
Triangles B and H are diff erent because triangle B is a scalene triangle and triangle H is an isosceles triangle.
B
H
1 Look at the table. Name each triangle below based on the kinds of angles that it has and the lengths of its sides.
Name Description of Angles
acute 3 acute angles
right 1 right angle
obtuse 1 obtuse angle
Name Description of Sides
equilateral 3 equal sides
isosceles 2 equal sides
scalene 0 equal sides
15 m15 m
20 m
13 m5 m
12 m
20 m14 m
14 m 14 m
14 m 14 m8 m15 m
20 m
Practice Sorting Triangles
LESSON 33 SESSION 4
737right, scalene acute, equilateral obtuse, isosceles
SESSION 4 Additional Practice
Solutions
1 right, scalene; acute, equilateral; obtuse, isosceles; Students could use a square corner to help them determine the kinds of angles in each triangle. Basic
Fluency & Skills Practice Teacher Toolbox
Assign Classifying Triangles
In this activity students practice identifying and naming a triangle by its angles and by its side lengths. This practice will strengthen students' ability to look at shapes in different ways as they analyze two different features of the triangles. Students can also practice naming various triangles that they see in the classroom or in their city or town.
Name:
Fluency and Skills Practice
©Curriculum Associates, LLC Copying is permitted for classroom use.
Classify each triangle by its angles and by its side lengths.
Classifying Triangles
Name Description of Angles
acute 3 acute angles
right 1 right angle
obtuse 1 obtuse angle
1
3
5
Name Description of Sides
equilateral 3 equal sides
isosceles 2 equal sides
scalene 0 equal sides
2
4
6
7 Draw an example of an acute equilateral triangle.
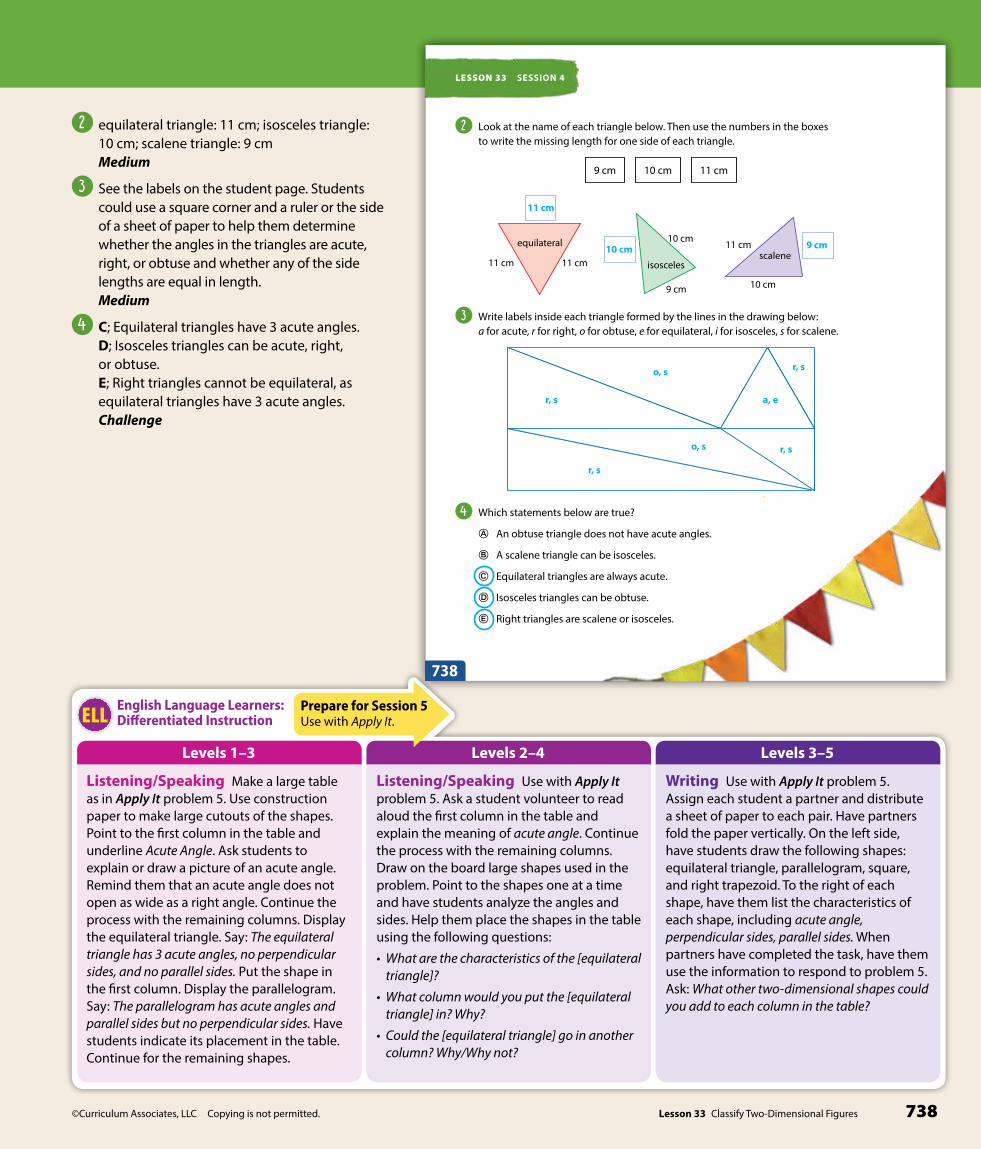
©Curriculum Associates, LLC Copying is not permitted. 738Lesson 33 Classify Two-Dimensional Figures
Levels 1–3 Levels 2–4 Levels 3–5
English Language Learners:Differentiated InstructionELL
Writing Use with Apply It problem 5. Assign each student a partner and distribute a sheet of paper to each pair. Have partners fold the paper vertically. On the left side, have students draw the following shapes: equilateral triangle, parallelogram, square, and right trapezoid. To the right of each shape, have them list the characteristics of each shape, including acute angle, perpendicular sides, parallel sides. When partners have completed the task, have them use the information to respond to problem 5. Ask: What other two-dimensional shapes could you add to each column in the table?
Listening/Speaking Use with Apply It problem 5. Ask a student volunteer to read aloud the first column in the table and explain the meaning of acute angle. Continue the process with the remaining columns. Draw on the board large shapes used in the problem. Point to the shapes one at a time and have students analyze the angles and sides. Help them place the shapes in the table using the following questions:
• What are the characteristics of the [equilateral triangle]?
• What column would you put the [equilateral triangle] in? Why?
• Could the [equilateral triangle] go in another column? Why/Why not?
Listening/Speaking Make a large table as in Apply It problem 5. Use construction paper to make large cutouts of the shapes. Point to the first column in the table and underline Acute Angle. Ask students to explain or draw a picture of an acute angle. Remind them that an acute angle does not open as wide as a right angle. Continue the process with the remaining columns. Display the equilateral triangle. Say: The equilateral triangle has 3 acute angles, no perpendicular sides, and no parallel sides. Put the shape in the first column. Display the parallelogram. Say: The parallelogram has acute angles and parallel sides but no perpendicular sides. Have students indicate its placement in the table. Continue for the remaining shapes.
Prepare for Session 5Use with Apply It.
©Curriculum Associates, LLC Copying is not permitted.738
LESSON 33 SESSION 4
2 Look at the name of each triangle below. Then use the numbers in the boxes to write the missing length for one side of each triangle.
9 cm
10 cm
11 cm
equilateral
isoscelesscalene
11 cm 11 cm
10 cm
9 cm
11 cm
10 cm
3 Write labels inside each triangle formed by the lines in the drawing below: a for acute, r for right, o for obtuse, e for equilateral, i for isosceles, s for scalene.
4 Which statements below are true?
� An obtuse triangle does not have acute angles.
� A scalene triangle can be isosceles.
� Equilateral triangles are always acute.
� Isosceles triangles can be obtuse.
� Right triangles are scalene or isosceles.
Lesson 33 Classify Two-Dimensional Figures
738
11 cm
10 cm 9 cm
r, s
o, s
a, e
r, so, s
r, s
r, s
2 equilateral triangle: 11 cm; isosceles triangle: 10 cm; scalene triangle: 9 cm Medium
3 See the labels on the student page. Students could use a square corner and a ruler or the side of a sheet of paper to help them determine whether the angles in the triangles are acute, right, or obtuse and whether any of the side lengths are equal in length. Medium
4 C; Equilateral triangles have 3 acute angles. D; Isosceles triangles can be acute, right, or obtuse. E; Right triangles cannot be equilateral, as equilateral triangles have 3 acute angles. Challenge

©Curriculum Associates, LLC Copying is not permitted.739 Lesson 33 Classify Two-Dimensional Figures
LESSON 33
©Curriculum Associates, LLC Copying is not permitted. Lesson 33 Classify Two-Dimensional Figures 739
Complete the Example below. Then solve problems 1–7.
EXAMPLEDo any of the shapes below have at least one pair of parallel sides and at least one right angle? If yes, list the shapes. If no, explain.
A B C D
Look at how you could show your work using a table.
Shape Parallel Sides Right Angle
A X XB XC XD X X
Solution
a���� It1 Nate and Alicia play Draw My Shape. Nate says: My shape
has 2 pairs of parallel sides, 2 acute angles, and 2 obtuse angles. Alicia draws the rectangle below. Explain why Alicia’s answer is incorrect.
Solution
Refine Classifying Two-Dimensional FiguresSESSION 5
The student listed each shape in a table and used an X to show that a shape had parallel sides or a right angle.
You can test the angles to see if they are acute, right, or obtuse.
PAIR/SHAREHow could you test for parallel sides?
PAIR/SHARECan you have a 4-sided shape with 4 right angles and only 1 pair of parallel sides?
LESSON 33
739
Yes; shapes A and D
A rectangle has 2 pairs of parallel sides, but its
4 angles are all right angles, not acute or obtuse.
StartCheck for UnderstandingWhy Confirm understanding of classifying two-dimensional figures based on sides and angles.
How Have students use geometry words to identify a triangle with one angle that has an opening wider than a right angle and that has no sides with the same length.
©Curriculum Associates, LLC Copying is permitted.
Start
Grade 4 Lesson 33 Session 5 | Refi ne Classifying Two-Dimensional Figures
A triangle has one angle thathas an opening wider than aright angle. The triangle hasno sides with the same length.
Use geometry words todescribe the triangle.
SolutionThe triangle is an obtuse scalene triangle.
Purpose In this session students solve problems involving sorting shapes based on their sides and angles and then discuss and confirm their answers with a partner.
Before students begin to work, use their responses to the Check for Understanding to determine those who will benefit from additional support.
As students complete the Example and Problems 1–3, observe and monitor their reasoning to identify groupings for differentiated instruction.
SESSION 5 Refine
If the error is . . . Students may . . . To support understanding . . .
acute scalenehave mistaken obtuse for acute.
Remind students that an angle that opens wider than a right angle is called obtuse, and a triangle only needs one obtuse angle to be called an obtuse triangle.
obtuse isosceleshave mistaken scalene for isosceles.
Remind students that a scalene triangle has no sides with the same length and that an isosceles triangle has 2 sides with the same length.
right scalenehave incorrectly read the problem.
Have students reread the problem. The problem states that the triangle has an angle that has an opening wider than a right angle. Point out that the problem does not state that the triangle has a right angle.
Error Alert

©Curriculum Associates, LLC Copying is not permitted. 740Lesson 33 Classify Two-Dimensional Figures
©Curriculum Associates, LLC Copying is not permitted.Lesson 33 Classify Two-Dimensional Figures740
LESSON 33 REFINE
2 Tell how the sides and angles of the shapes below are alike and diff erent.
square rhombus
Solution
3 Which is the best name for the triangle shown?
� acute isosceles triangle
� acute scalene triangle
� right isosceles triangle
� right scalene triangle
Ricky chose � as the correct answer. How did he get that answer?
PAIR/SHAREWhat does a rhombus have in common with a parallelogram?
PAIR/SHARECould a triangle ever have 2 right angles?
All the square’s angles look alike, but the rhombus looks like it has two di� erent kinds of angles.
How many right angles does a triangle have to have to be called a “right triangle”?
740
Possible answer: The square and the rhombus have
2 pairs of parallel sides. The square has 4 right angles, and
the rhombus has 2 acute angles and 2 obtuse angles.
The triangle has 2 acute angles. Ricky thought that made it an acute triangle, but an acute triangle has to have 3 acute angles.
EXAMPLEYes; shapes A and D; The table shown is one way to solve the problem. Students could also solve the problem by using a ruler to help decide if a shape has parallel sides and a square corner to help decide if a shape has a right angle.
Look for Shape A has 2 pairs of parallel sides and 4 right angles. Shape B has no parallel sides and 1 right angle. Shape C has 2 pairs of parallel sides and no right angles. Shape D has 1 pair of parallel sides and 2 right angles.
APPLY IT1 Possible explanation: A rectangle has 2 pairs of
parallel sides, but its 4 angles are all right angles, not acute or obtuse; Students could compare the angles in Alicia’s drawing to a square corner to see if they are acute, obtuse, or right. Some students may recognize that a 4-sided shape with 4 right angles always has 2 pairs of parallel sides. DOK 2
Look for A rectangle does not have acute or obtuse angles.
2 Possible answer: The square and the rhombus have 2 pairs of parallel sides. The square has 4 right angles, and the rhombus has 2 acute angles and 2 obtuse angles; Students could solve the problem by using a ruler to test if the sides are parallel and a square corner to test if the angles are acute, right, or obtuse. DOK 2
Look for Both the square and the rhombus have 4 sides of equal length, but the square has 4 right angles and the rhombus has no right angles.
3 D; Students could solve the problem by using a ruler to measure the sides and a square corner to determine if the angles in the triangle are acute, right, or obtuse.
Explain why the other two answer choices are not correct:
A is not correct because the triangle does not have 3 acute angles or 2 sides of the same length.
C is not correct because the triangle does not have 2 sides of the same length. DOK 3

©Curriculum Associates, LLC Copying is not permitted.741 Lesson 33 Classify Two-Dimensional Figures
LESSON 33
©Curriculum Associates, LLC Copying is not permitted. Lesson 33 Classify Two-Dimensional Figures 741
4 Which is the best name for the group of shapes below?
� shapes with acute angles
� shapes with right angles
� shapes with parallel sides
� shapes with perpendicular sides
5 Sort the four shapes below. Use the characteristics shown in the table. Draw each shape in each column where it belongs. Some shapes may belong in more than one column.
equilateral
triangleparallelogram square right
trapezoid
Shapes with at LeastOne Acute Angle
Shapes with at LeastOne Pair of
Perpendicular Sides
Shapes with at LeastOne Pair of
Parallel Sides
SESSION 5
741
4 C; The shapes have acute, right, and obtuse angles. Only three of the shapes have perpendicular sides. Each shape has 2 pairs of parallel sides. DOK 2
5 See the completed table on the Student Worktext page. The triangle, parallelogram, and trapezoid each have at least one angle that is less than 908. The square and trapezoid have at least one pair of sides that meet at a 908 angle. The parallelogram, square, and trapezoid each have at least one pair of sides that are the same distance apart at all points and would never meet. DOK 2
Error Alert Students may not be familiar with a right trapezoid and fail to recognize that it belongs in all three categories. Explain that a right trapezoid is a trapezoid with at least 2 right angles. The right trapezoid shown has 1 acute angle, 2 right angles, 1 obtuse angle, 1 pair of parallel sides, and 2 pairs of perpendicular sides.
SESSION 5 Refine
Differentiated Instruction
RETEACH EXTEND
Hands-On ActivityMake a poster to classify shapes.
Students struggling with concepts of classifying shapes based on angles and sides
Will benefit from additional work with classifying shapes
Materials For each student: poster board, newspapers, magazines, scissors, markers, glue or tape
• Tell students that they will make a poster about shapes with the following categories: acute scalene triangles, right scalene triangles, parallel sides only, and obtuse angles only. Explain that they need to leave space for pictures of shapes next to or underneath each category.
• Have students cut out examples of shapes from newspapers and magazines that match the descriptions. Tell students to include as many examples on their posters as they can.
• Explain that students may add additional categories to their poster if they find shapes that do not fit into one of the four categories.
• Have students share their posters with the class.
Challenge ActivityCompare attributes of shapes.
Students who have achieved proficiency
Will benefit from deepening understanding of classifying two-dimensional shapes• Have students work in pairs.• Tell students that they will make Venn
diagrams to compare and contrast two shapes. Show a Venn diagram.
• Provide students with the following sets of shapes: square and rectangle; rhombus and rectangle; equilateral triangle and scalene triangle.
• Repeat for other pairs of shapes.
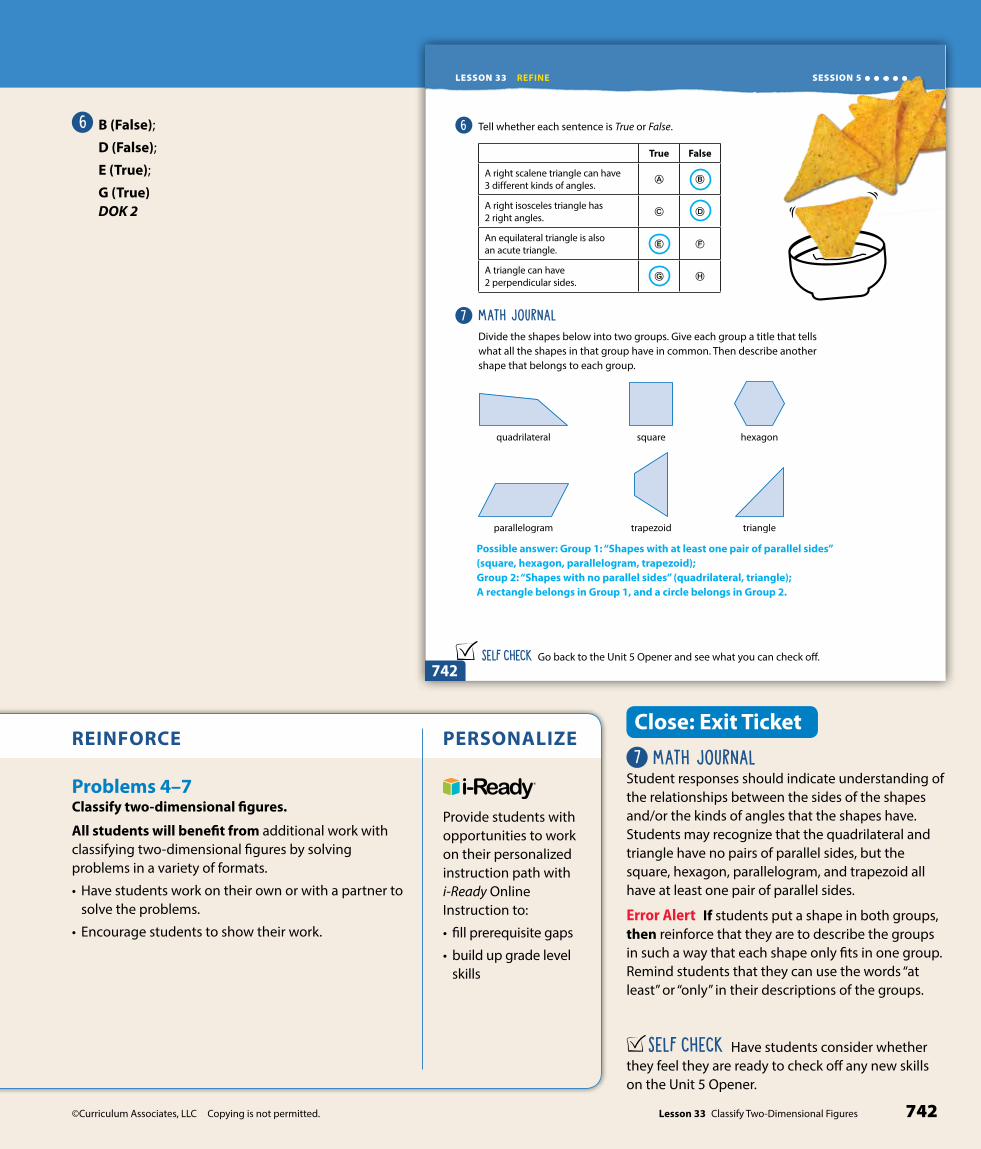
©Curriculum Associates, LLC Copying is not permitted. 742Lesson 33 Classify Two-Dimensional Figures
©Curriculum Associates, LLC Copying is not permitted.Lesson 33 Classify Two-Dimensional Figures742
LESSON 33 REFINE
6 Tell whether each sentence is True or False.
True False
A right scalene triangle can have 3 different kinds of angles. � �
A right isosceles triangle has 2 right angles. � �
An equilateral triangle is also an acute triangle. � �
A triangle can have 2 perpendicular sides. � �
7 MATH JOURNALDivide the shapes below into two groups. Give each group a title that tells what all the shapes in that group have in common. Then describe another shape that belongs to each group.
parallelogram
quadrilateral
trapezoid
square
triangle
hexagon
SESSION 5
SELF CHECK Go back to the Unit 5 Opener and see what you can check off .742
Possible answer: Group 1: “Shapes with at least one pair of parallel sides” (square, hexagon, parallelogram, trapezoid); Group 2: “Shapes with no parallel sides” (quadrilateral, triangle); A rectangle belongs in Group 1, and a circle belongs in Group 2.
6 B (False);
D (False);
E (True);
G (True) DOK 2
Close: Exit Ticket
7 MATH JOURNALStudent responses should indicate understanding of the relationships between the sides of the shapes and/or the kinds of angles that the shapes have. Students may recognize that the quadrilateral and triangle have no pairs of parallel sides, but the square, hexagon, parallelogram, and trapezoid all have at least one pair of parallel sides.
Error Alert If students put a shape in both groups, then reinforce that they are to describe the groups in such a way that each shape only fits in one group. Remind students that they can use the words “at least” or “only” in their descriptions of the groups.
SELF CHECK Have students consider whether they feel they are ready to check off any new skills on the Unit 5 Opener.
REINFORCE PERSONALIZE
Problems 4–7Classify two-dimensional figures.
All students will benefit from additional work with classifying two-dimensional figures by solving problems in a variety of formats.
• Have students work on their own or with a partner to solve the problems.
• Encourage students to show their work.
Provide students with opportunities to work on their personalized instruction path with i-Ready Online Instruction to:
• fill prerequisite gaps
• build up grade level skills
Related Documents