20/08/2013 LiveCode eBook Academy Transcript file://localhost/Users/oldsystem/Desktop/ebook Final/ebook/Lesson3/lesson3.html 1/12 Introduction Welcome to Lesson 3 of the LiveCode eBook Academy. In this lesson we are going to be looking at: Creating page 1 of the eBook Importing page 1 assets Creating the navigation button Initial asset positioning Creating Page 1 This lesson will focus on creating the first page of our graphic novel. The final Page 1 will look like this Lesson 3 Introduction Creating Page 1 Creating a New Card Importing Assets Creating the Navigation Button Animating the Page Components Lesson 3

Welcome message from author
This document is posted to help you gain knowledge. Please leave a comment to let me know what you think about it! Share it to your friends and learn new things together.
Transcript

20/08/2013 LiveCode eBook Academy Transcript
file://localhost/Users/oldsystem/Desktop/ebook Final/ebook/Lesson3/lesson3.html 1/12
IntroductionWelcome to Lesson 3 of the LiveCode eBook Academy.
In this lesson we are going to be looking at:
Creating page 1 of the eBookImporting page 1 assetsCreating the navigation buttonInitial asset positioning
Creating Page 1This lesson will focus on creating the first page of our graphic novel. Thefinal Page 1 will look like this
Lesson 3IntroductionCreating Page 1
Creating a New CardImporting AssetsCreating the Navigation Button
Animating the Page Components
Lesson 3

20/08/2013 LiveCode eBook Academy Transcript
file://localhost/Users/oldsystem/Desktop/ebook Final/ebook/Lesson3/lesson3.html 2/12
Creating a New CardStart by opening your Bitter Revenge stack in LiveCode.
Firstly we need to create a new card
Select New Card from the Object MenuLiveCode will automatically move to the new cardOpen the Card Inspector from the Object menuSet the name of the card to "Page1"

20/08/2013 LiveCode eBook Academy Transcript
file://localhost/Users/oldsystem/Desktop/ebook Final/ebook/Lesson3/lesson3.html 3/12
Importing AssetsAs in Lesson 2 we are going to import our controls onto the stack.
Select Import As Control - Image File, from the File menu

20/08/2013 LiveCode eBook Academy Transcript
file://localhost/Users/oldsystem/Desktop/ebook Final/ebook/Lesson3/lesson3.html 4/12
In the file selector go to the Images/Main Illustrations/Page 1 folder inthe BitterRevenge folder and select all the images.

20/08/2013 LiveCode eBook Academy Transcript
file://localhost/Users/oldsystem/Desktop/ebook Final/ebook/Lesson3/lesson3.html 5/12
Click "Open" and the images will appear on screen.
Rearrange the images by layer as necessary. You can relayer images bydragging in the Project Browser to change the order.

20/08/2013 LiveCode eBook Academy Transcript
file://localhost/Users/oldsystem/Desktop/ebook Final/ebook/Lesson3/lesson3.html 6/12
Arrange the assets on screen as below.

20/08/2013 LiveCode eBook Academy Transcript
file://localhost/Users/oldsystem/Desktop/ebook Final/ebook/Lesson3/lesson3.html 7/12
Next we are going to lock the size and position of each element.
Select a controlOpen the Property Inspector by clicking the Inspector button in theMenubarChoose Size & Position from the dropdownCheck the Lock size and position property
Creating the Navigation ButtonNext we are going to create a Navigation button which will allow us tomove to the next page.

20/08/2013 LiveCode eBook Academy Transcript
file://localhost/Users/oldsystem/Desktop/ebook Final/ebook/Lesson3/lesson3.html 8/12
Drag a button onto the stackResize the buttonThe font will already be set on the buttonOpen the Property Inspector by clicking Inspector in the MenubarSet the name of the button to "Navigation1"Set the label to "Proceed"
Choose Text Formatting from the dropdownSet the size to 24
20/08/2013 LiveCode eBook Academy Transcript
file://localhost/Users/oldsystem/Desktop/ebook Final/ebook/Lesson3/lesson3.html 9/12
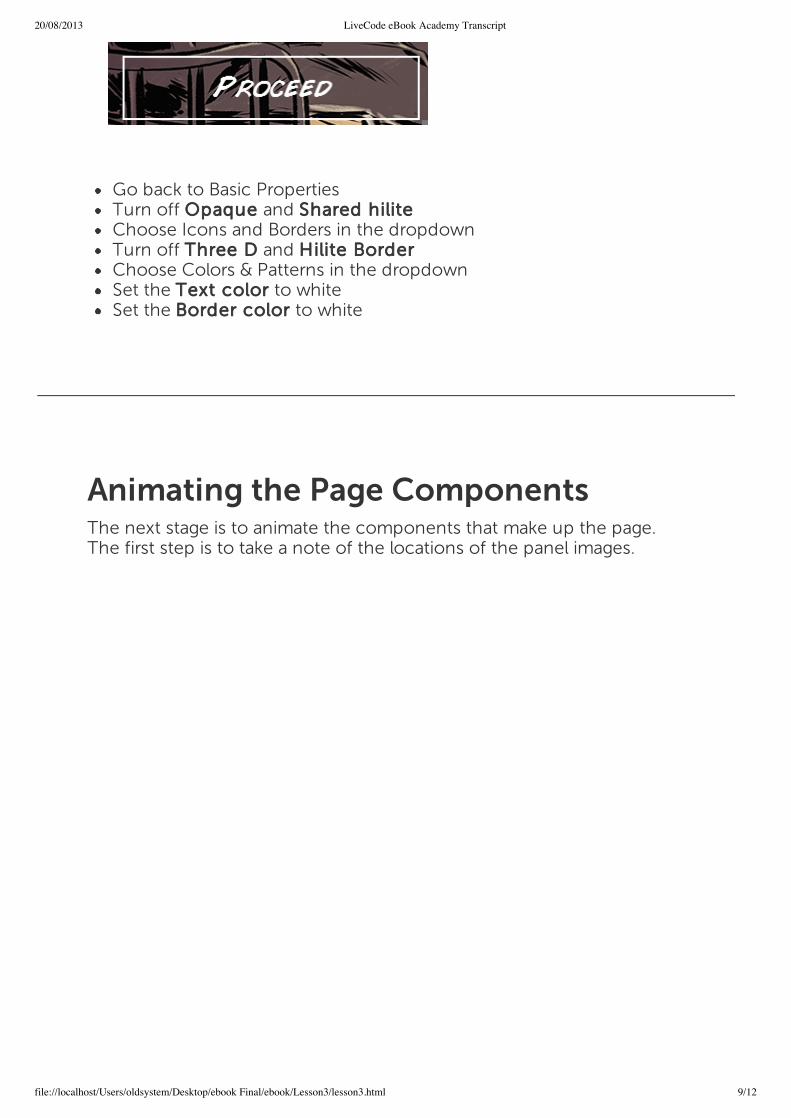
Go back to Basic PropertiesTurn off Opaque and Shared hiliteChoose Icons and Borders in the dropdownTurn off Three D and Hilite BorderChoose Colors & Patterns in the dropdownSet the Text color to whiteSet the Border color to white
Animating the Page ComponentsThe next stage is to animate the components that make up the page.The first step is to take a note of the locations of the panel images.

20/08/2013 LiveCode eBook Academy Transcript
file://localhost/Users/oldsystem/Desktop/ebook Final/ebook/Lesson3/lesson3.html 10/12
You get these from the Property Inspector or using the Message Box.
Open the Message Box by clicking the Message Box button in theMenubar(1)Enter the following line in the Message Box(2)
put the loc of the mouseControl
Ensure the Message Box is focused, that the cursor is in the top fieldHover your mouse over a control(3)Execute the line by pressing the Return keyThe location of the control under the mouse will be displayed in theMessage Box(4)
These are the coordinates we will use but yours might be slightlydifferent depending on the placing of your images.
Panel 1 - 842,140

20/08/2013 LiveCode eBook Academy Transcript
file://localhost/Users/oldsystem/Desktop/ebook Final/ebook/Lesson3/lesson3.html 11/12
Panel 2 - 843,472
We want these images to move onscreen when the card is opened soopen the Card Script from the Object menu and add the followinghandlers
Firstly we want to hide the text images:
on preOpenCard
hide image "p1-inset-text-1.png"
hide image "p1-inset-text-2.png"
hide image "p1-inset-text-3.png"
end preOpenCard
Next we move the panel images offscreen using the arrow keys, movethe top image off the top of the screen and the bottom image off thebottom of the screen.
We then set the offscreen locations of these images in thepreOpenCard handler and set the label of the "Navigation1" button to"Proceed".
on preOpenCard
hide image "p1-inset-text-1.png"
hide image "p1-inset-text-2.png"
hide image "p1-inset-text-3.png"
set the loc of image "p1-inset-panel-1.png" to 842,-140
set the loc of image "p1-inset-panel-2.png" to 843,942
set the label of button "Navigation1" to "Proceed"
end preOpenCard
The final stage is to set the visible of all the images to false, so only thebackground image and "Navigation" button are shown. Select eachimage, open the Property Inspector and turn off the visible property.
That's all for this lesson. In Lesson 4 we will be looking at

20/08/2013 LiveCode eBook Academy Transcript
file://localhost/Users/oldsystem/Desktop/ebook Final/ebook/Lesson3/lesson3.html 12/12
Using visual effectsAsset animationSwipe gesture implementation
Related Documents