1 Les Fabrications TJD St-Antonin Québec, Canada G0L 2J0 Les Fabrications TJD All rights reserved by Les Fabrications TJD, St Antonin. No copy or reproduction of this manual, in whole or in parts, may be made without the explicit consent of Les Fabrications TJD. Copyright © 2002 Les Fabrications TJD

Welcome message from author
This document is posted to help you gain knowledge. Please leave a comment to let me know what you think about it! Share it to your friends and learn new things together.
Transcript

1
Les Fabrications TJD
St-Antonin
Québec, Canada
G0L 2J0 Les Fabrications TJD All rights reserved by Les Fabrications TJD, St Antonin. No copy or reproduction of this manual, in whole or in parts, may be made without the explicit consent of Les Fabrications TJD.
Copyright © 2002 Les Fabrications TJD
2
TABLE OF CONTENTS
Page
Introduction ………………………………..…………………………………………………….… Safety precautions ………………………………………………………………………………..
2 4
Installation ……………………..………………………………………………………………….. 6 - Installation of the rear tracks ……………………………………………….…..… 7 - Adjustments on the rear tracks …………………………………………………… 8 - Installation of the front tracks ………………………………………….……..…… 9 - Adjustments on the front tracks ……………………………………………...…… 10 - Adjustments of the front swivel …………………………………………………… 11 - Adjustments of the stabilizing rods ……………………………………….……… 11 Using your track ……………………………..………………………………………….………… 12 Maintenance ……….……………………………………………………………………………… 13 Removal of the track ……...……………….……………………………….……………...…….. 13 Warranty ………………………………………………………………………………………..…. 14 Parts list …………………...……………………………………………………………………… 15 ANNEX – Installation the adapting plate ………………………………………………………. ---
TECHNICAL ASSISTANCE If a problem concerning the warranty of your TJD CAT TRACK tracks should arise, and if your local authorized dealer cannot solve it, please contact us.
INTRODUCTION Les Fabrications TJD Thank you for choosing the TJD CAT TRACK. They have been carefully conceived to give you entire satisfaction as well as a lasting use. They are easily installed within an hour without any modification to the vehicle, and they have been conceived for use with 4 wheel-drive off-road vehicles only. They are ideal for small logging operations, and also provide a wider range of uses through a longer period of the year. They have been conceived for circulating in any snow conditions as well as for swampy or marshy grounds

3
Advice to buyer This owner’s manual has been carefully drafted in order to allow you to easily install the TJD CAT TRACK on your vehicle, to prudently and safely use it and to avoid accidents during installation and excursions.
Please read entirely this owner’s manual. It will allow you to become better acquainted with the security
recommendations, the assembly procedures and the proper functioning of the track. It is also advisable to communicate these informations to anyone who will use this equipment.
Also read the owner’s manual of youre vehicle for security and proper handling recommendations since they
also apply when equipped with track. Also consult your local, provincial or national authorities about the regulations pertaining to track equipped vehicles. You should also get informations from the off-road vehicles clubs concerning the use of tracks on their estates. N.B. Also consult the manufacturer of your vehicle to make sure that he authorizes the use of equipments other than those he manufactures.
When transferring or selling the track, it is important to also transfer this manual to the new owner.
N.B. All photographs and illustrations in this manual are for use as a reference and are based on the latest available
informations at time of printing.
N.B. The drawings, specifications and informations contained in this manual are subject to changes
without previous notice.
In this owner’s manual, this symbol means that there is a security recommendation to be followed. When you see it, please read carefully all that is written because there is a possibility of serious or fatal accident.
In this owner’s manual, this symbol means that an incorrect use or handling could cause damages
In this manual the right and left sides are determined as while sitting in the driver’s place..

4
SAFETY PRECAUTIONS
The following safety precautions are important to help you avoid accidents. Most accidents can be avoided
by taking the necessary precautions. In order to prevent them from happening, read the safety advices carefully before installing and using your track. They should be used only by people who have read this manual an all the safety advices.
You will notice that the most efficient safety precautions are derived from simple common sense. So, always be calm, attentive and preventive.
Do not remove the warning stickers and replace them if they are damaged or become illegible
Safety advices from your vehicle's owner's manual, as well as all road regulations, also apply when using tracks on your vehicle. (consult local authorities for specific rules of your province or country).
Even when equipped with track, only the driver may ride on the vehicle (see the vehicle’s owner’s manual and provincial or national regulations)
Never allow a child to drive the vehicle (see road regulations and vehicle’s owner’s manual), nor an adult who has not received proper training.
It is important to communicate all the necessary informations on safety and handling to anybody who will use the vehicle,
When driving, make sure that your path is free of any person, child or pet.
Never let anybody or yourself use the vehicle while under the influence of alcohol, drugs or medications. They affect judgment, slow down reflexes and can lead to severe frostbites in winter.
Use
Every time you drive, wear an approved motorcycle helmet and visor as well as adequate riding clothes for the season. Use them even for short rides, as one never knows what can happen.
In order to avoid serious injuries, it is important to keep hands and feet away from the running track.
Make sure that coats, sleeves, scarves, boot laces and other such items are not at risk of being caught by the moving parts of the track.
Always carry a first aid kit, a cell phone, a
hatchet, basic tools, safety matches and lighting paper, as well as a strong rope, in order to be able to face any situation, even a serious one.
If, for any reason, you must leave your vehicle, put it in neutral, apply the parking brake, stop the engine and remove the key..

5
Always be prudent when crossing public or
private roads, and respect other’s property when you did not obtain an authorization. It is also strictly prohibited by law to cross railroad tracks.
On unknown grounds, be doubly prudent and reduce your speed.
On trackless ground or in remote areas, beware of dangers hidden in deep snow, such as stumps, fallen trees, fences, ditches and others.
Before going on a lengthy ride, get well acquainted to driving with your track near your home and on level ground; driving on track being different than driving on wheels.
If your vehicle becomes unstable during a ride, stop the vehicle and the engine in order to find the cause of it.
During rides, it is recommended to keep a safe distance between vehicles in order to avoid being hit by materials that may be thrown by the preceding vehicle track.
Preventive maintenance
In order to de-ice the track components, stop engine, apply parking brake and remove key. Never use your hands or feet, but a wooden stick or other stiff non-metallic object.
Never try to adjust the track if the engine is running or if the parking brake is not on.
Regularly inspect all nuts and bolts, and tighten them if necessary to avoid costly repairs. Also make sure that your equipment is in sufficiently good condition to be ridden safely.
THIS SYMBOL MEANS
THAT THERE IS A DANGER TO YOUR
OWN SAFETY OR TO
OF OTHERS
TJD cannot be held responsible for the changes that the use of track could bring to the handling of the vehicle.
Even when equipped with track, it is important to respect the towing capacity specified by your vehicle manufacturer.
Do not ride over stumps and branches, or on rocky ground, as this could damage the track or their
mechanisms.
While driving around nature, please respect the environment and avoid damaging plants or disturbing wild animals.

6
INSTALLATION
Stop engine and remove key before starting to install the track on your vehicle in order to avoid asphyxiation by exhaust gases. They might be odorless and colorless, but they can be fatal.
Wear adequate working clothes during installation : safety glasses, shoes and gloves.
Make sure that sleeves, coats, scarves boot laces and other such items are not at risk of getting caught in the moving parts of the track.
While installing your tracks, avoid spinning them with engine power as long as they don’t rest on the ground and you are not in the driver’s seat.
Never try to adjust the track while the engine is running or if the parking brake is not on.
Put anti-slip component ( Loctite ) on all the nuts and bolts that you install.
Make sure that the track have the correct tension for them to keep the correct position on the guiding rollers.
For installing the track on your vehicle, choose a place with a clean and level floor, well lit and ventilated. Put it in neutral. Stop the engine, remove key ,apply the parking brake and block the set of wheels which will remain on the ground with wedges.
The vehicle requires no modifications in order to be fitted with the track. First, identify the rear and front track, as well as the right and left sides
7
Rear Track
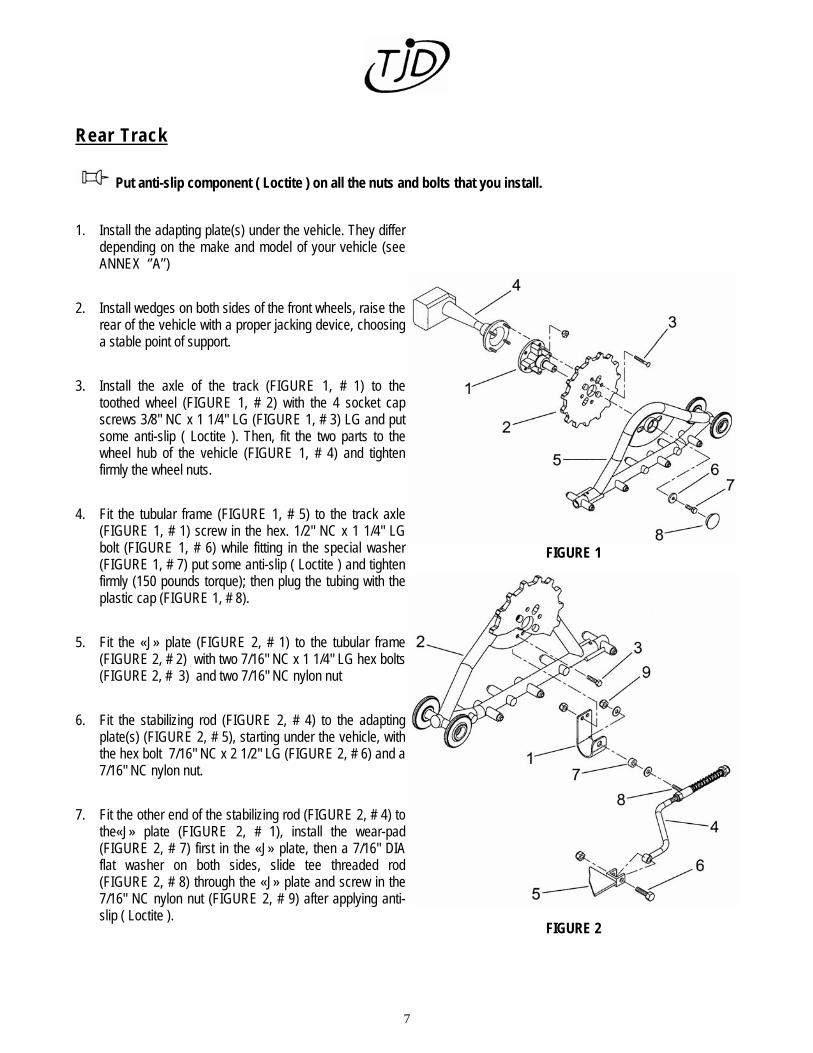
Put anti-slip component ( Loctite ) on all the nuts and bolts that you install.
1. Install the adapting plate(s) under the vehicle. They differ
depending on the make and model of your vehicle (see ANNEX ‘’A’’)
2. Install wedges on both sides of the front wheels, raise the
rear of the vehicle with a proper jacking device, choosing a stable point of support.
3. Install the axle of the track (FIGURE 1, # 1) to the
toothed wheel (FIGURE 1, # 2) with the 4 socket cap screws 3/8" NC x 1 1/4" LG (FIGURE 1, # 3) LG and put some anti-slip ( Loctite ). Then, fit the two parts to the wheel hub of the vehicle (FIGURE 1, # 4) and tighten firmly the wheel nuts.
4. Fit the tubular frame (FIGURE 1, # 5) to the track axle
(FIGURE 1, # 1) screw in the hex. 1/2" NC x 1 1/4" LG bolt (FIGURE 1, # 6) while fitting in the special washer (FIGURE 1, # 7) put some anti-slip ( Loctite ) and tighten firmly (150 pounds torque); then plug the tubing with the plastic cap (FIGURE 1, # 8).
5. Fit the «J» plate (FIGURE 2, # 1) to the tubular frame
(FIGURE 2, # 2) with two 7/16" NC x 1 1/4" LG hex bolts (FIGURE 2, # 3) and two 7/16" NC nylon nut
6. Fit the stabilizing rod (FIGURE 2, # 4) to the adapting
plate(s) (FIGURE 2, # 5), starting under the vehicle, with the hex bolt 7/16" NC x 2 1/2" LG (FIGURE 2, # 6) and a 7/16" NC nylon nut.
7. Fit the other end of the stabilizing rod (FIGURE 2, # 4) to
the«J» plate (FIGURE 2, # 1), install the wear-pad (FIGURE 2, # 7) first in the «J» plate, then a 7/16" DIA flat washer on both sides, slide tee threaded rod (FIGURE 2, # 8) through the «J» plate and screw in the 7/16" NC nylon nut (FIGURE 2, # 9) after applying anti-slip ( Loctite ).
FIGURE 1
FIGURE 2

8
8. Fit the track (FIGURE 3, # 1) to the toothed wheel
(FIGURE 3, # 2) first, and then to the guiding rollers (FIGURE 3, # 3).
9. Fit the guiding rollers (FIGURE 3, # 4) to the track’s
adjusting system (FIGURE 3, # 5) first, and then to the tubular frame (FIGURE 3, # 6) with two 7/16" DIA. flat washers (FIGURE 3, # 7) and two 7/16" NC x 1 1/4" LG hex bolts (FIGURE 3, # 8) .
10. Make sure that all parts are in their proper place and
firmly tighten all nuts and bolts after putting anti-slip ( Loctite ) on all of them.
FIGURE 3
Put anti-slip component ( Loctite ) on all the nuts and bolts that you install.
Self locking nuts are meant for a single use and should never be re-used once they have been removed. ADJUSTMENTS ON THE REAR TRACK 1. In order to obtain an en equal tension on both sides of
the track, tighten equally both adjustment nuts (FIGURE 4, # 1) using two 9/16’’ wrenches and set both locking nuts (FIGURE 4, # 2) in a manner that will make it rest equally against every one of the rollers (FIGURE 4, # 3) in the tubular frame.
2. Lower the track to the ground.
FIGURE 4

9
INSTALLATION OF THE FRONT TRACK
Put anti-slip component ( Loctite ) on all the nuts and bolts that you install. 1. Install wedges on both sides of the back wheels and
raise the front of the vehicle with a proper jacking device, choosing a stable point of support.
2. Install the axle of the track (FIGURE 5, # 1) to the
toothed wheel (FIGURE 5, # 2) with the 4 socket cap screws 3/8" NC x 1 1/4" LG (FIGURE 5, # 3) and put some anti-slip ( Loctite ). Then, fit these two parts to the wheel hub of the vehicle (FIGURE 1, # 4) and tighten firmly the wheel nuts.
3. Fit the retaining plate (FIGURE 5, # 5) to the tubular
frame (FIGURE 5, # 6) fastening it with the external snap-ring (FIGURE 5, # 7). Then fit the bushing (FIGURE 5, # 8) to the retaining plate (FIGURE 5, # 5) and fasten it with an hex. 3/8" NC x 1 1/4" LG bolt (FIGURE 5, # 9), a 3/8’’ flat washer and a 3/8’’ nylon nut.
4. Fit the tubular frame (FIGURE 5, # 6) to the track axle
(FIGURE 5, # 1)and screw in the hex. 1/2" NC x 1 1/4" LG bolt (FIGURE 5, # 10) while fitting in the special washer (FIGURE 5, # 11). Put some anti-slip ( Loctite ) and tighten firmly (150 pounds torque); then plug the tubing with the plastic cap (FIGURE 5, # 12).
5. Fasten the retaining plate of the trail-arm (FIGURE 6, #
1) to the retaining plate (FIGURE 6, # 2) with two 3/8’’ NC x 1 1/4" LG bolts (FIGURE 6, # 3) and two 3/8" NC nylon nuts.
6. Install the fastening of the trail-arm (FIGURE 6, # 4) to
the trail-arm of the vehicle (FIGURE 6, # 5) with a 7/16" NC x 2 1/2" LG hex. bolt, a 7/16" NC nylon nut (FIGURE 6, # 6) and two 7/16" DIA flat washers; then, fasten it to the retaining plate of the trail-arm (FIGURE 6, # 1) inserting the bushing (FIGURE 6, # 7) in the hole of the retaining plate of the trail-arm (FIGURE 6, # 1) using the hex. 1/2" NC x 2 1/2" LG bolt (FIGURE 6, # 8), a 1/2" NC nylon nut and two 1/2 " DIA flat washers
FIGURE 5
FIGURE 6

10
7. Fit the track (FIGURE 7, # 1) to the toothed wheel
(FIGURE 7, # 2) first, and then to the guiding rollers (FIGURE 7, # 3).
8. Fit the guiding rollers (FIGURE 7, # 4) to the track’s
adjustment system (FIGURE 7, # 5) first, and then to the tubular frame (FIGURE 7, # 6) with two 7/16" DIA. flat washers (FIGURE 7, # 7) and two 7/16" NC x 1 1/4" LG hex bolts (FIGURE 7, # 8).
9. Make sure that all parts are in their proper place and
firmly tighten all nuts and bolts after putting anti-slip ( Loctite ) on all of them.
FIGURE 7
Put anti-slip component ( Loctite ) on all the nuts and bolts that you install.
Self locking nuts are meant for a single use and should never be re-used once they have been removed.
ADJUSTMENTS ON THE FRONT TRACK 1. In order to obtain an en equal tension on both sides of
the track, tighten equally both adjustment nuts (FIGURE 4, # 1) using two 9/16" wrenches and set both locking nuts (FIGURE 4, # 2) in a manner that will make it rest equally against every one of the guiding rollers (FIGURE 4, # 3) in the tubular frame.
2. Lower the track to the ground.
FIGURE 4

11
ADJUSTEMENT OF THE FRONT SWIVEL 1. Once the track are on the ground, adjust the locking bolt
(FIGURE 8, # 1) on the retaining plate (FIGURE 8, # 2) in order to keep the heel of the track from hitting the vehicle’s fender during rides.
2. Tighten the blocking nut (FIGURE 8, # 3) to keep
everything in place. 3. Test your installation, keeping within half (1/2) a kilometer
around.
A wrong adjustment on the swivel could damage
the fender in case of a sudden or sharp turn.
FIGURE 8
ADJUSTEMENT OF THE STABILIZING ROD (rear track) Adjust this nut to keep the front of the track from hitting the fender.
Adjust this other nut to control the height of the swiveling of the heel of the track.
A wrong adjustment of the stabilizing rod could damage the fender in case of a sudden or sharp turn.

12
USING YOUR TRACK
They are conceived for circulating in any snow conditions as well as for swampy or marshy grounds. Before every ride, de-ice the components of the track with a stick or any other stiff non-metallic object, never directly with your hands. The track are conceived for a maximum speed of 30 km/h and, for maximum load, refer to the owner’s manual of your vehicle.
Carefully read the owner’s manual in order to get acquainted with all the safety advices and be able to make the best use of your equipment..
It is recommended to drive at low speed in order to obtain a better grip on the ground and a better control of the vehicle.
In order to de-ice the track components, stop engine, apply parking brake and remove key. For your safety, never use your hands or feet, but a wooden stick or other stiff non-metallic object.
When de-icing, do not hit the components of the track directly in order to avoid damaging them
Do not ride over stumps and branches, or on rocky ground, as this could damage the track or their mechanisms.
While driving around nature, please respect the environment and avoid damaging plants or disturbing wild animals.

13
MAINTENANCE
Before any maintenance, either on the track or the vehicle (see vehicle’s manual), stop engine and remove key before performing maintenance or inspection.
Tension of the track The tension of the track must be frequently checked to maintain a stable handling. Adjust them with the adjusting nuts (FIGURE 4, # 1 & 2) of the adjustment system of the track (FIGURE 7, # 5) and block the adjustment in place with the nut against the tube (FIGURE 4, # 1). Checking condition of the hardware In order to keep your equipment in optimal condition , replace damaged bolts, nylon nuts and all other parts subject to normal wear such as bearings, bushings, tubing caps etc. Replace them with original parts from the manufacturer and consult your local authorized dealer on this matter.
Regularly inspect all nuts and bolts, and tighten them if necessary to avoid costly repairs. Also make sure that your equipment is in sufficiently good condition to be ridden safely.
Self locking nuts are meant for a single use and should never be re-used once they have been removed. Adjustment of the rocking motion of the track In order to keep the track from hitting the fenders of the vehicle during rides, refer to the following sections : ADJUSTMENT OF THE FRONT SWIVEL (front track) and ADJUSTMENT OF THE STABILIZING ROD (rear track). Cleaning
In order to obtain a longer life from them, use only soapy water to clean the rubber track.
REMOVAL
Before removing the track from the vehicle, stop engine and remove key. In removing the track, follow the same safety advices that you followed during installation (see installation). Remove the track by reversing the steps in the INSTALLATION section. They are easily removed and you don’t need to take the rubber track off the frame, just completely slacken their tension. In order for the track not to deteriorate, they must be stored in a wheather-proof place for their reinstallation in the next season. It is also a good time to carefully inspect them and check hardware condition. Lubrication Put some grease between the swivel plate (FIGURE 6, # 2) and the«J» plate of the tubular frame during storage and before reinstalling.

14
THE TJD WARRANTY
Les Fabrications TJD gives a warranty against any manufacturing defect for a period of six months from the date on the original invoice. Les Fabrications TJD. Will cover the cost of repairs providing that they were subjected to normal use and have received proper maintenance. The manufacturer and authorized dealer reserve the right, with an authorized person approval, to either replace or repair, at their choice and without cost, any part judged defective.
The rubber track carry a warranty against any manufacturing defect.
However this warranty does not cover :
• Parts subject to normal wear such as toothed wheels, guiding rollers and rubber track.
• Any part that was damaged by abusive use, neglect accidents or any anormal use such as racing or improper installation..
• Any part having been modified or tampered with without manufacturer’s authorization.
• Damages caused to the vehicle or any other part by a defective track.
• Damages caused by use on any other surface than snow or marshy ground.
• TJD cannot be held responsible for any accident or injury resulting from the use of it’s tracks.
• In case of break-down or damages, the TJD warranty does not cover travel expenses, hotels, towing, phone calls or any other related costs.
For warranty service, please bring the track(s) to an authorized dealer.
Please, be aware that the warranty is not transferable.
Les Fabrications TJD ST-Antonin
Québec, Canada G0L 2J0

15
PARTS LIST
Front track

16
Front track
REF. QTY PART N° DESCRIPTION
1 1 FB0001 Right side front tubular frame 1 FB0002 Left side front tubular frame
2 1 FB0005 Rubber track 3 1 FB0006 Front track axle 4 1 FB0008 Tooted wheel 5 4 O/L 3/8" NC x 1 1/4" LG socket cap screws 6 2 HT5001 Ball bearing 7 1 FB0009 Sleeve 8 1 FB0010 Special washer 9 1 O/L 1/2" NC x 1 1/4" LG hex. bolt 10 1 FB0011 Plastic cap for hub 11 5 FB0012 Plastic cap for guiding rollers 12 9 FB0014 Guiding roller 13 9 O/L 7/16" NC x 1 1/4" LG hex. bolt 14 11 O/L 7/16" DIA flat washer 15 1 FB0013 Plastic cap for tubular frame 16 1 FB0015 Track’s adjustment system 17 1 FB0014 Plastic cap for adjustment system 18 8 O/L 3/8" NC nylon nut 19 2 O/L 3/8" NC x 5" LG threaded rod 20 2 O/L 3/8" NC x 2 1/2" LG hex. bolt 21 1 FB0016 Guiding tube 22 1 O/L 3/8" NC x 3 1/4" LG hex. bolt 23 1 O/L 3/8" NC hex. nut 24 1 FB0017 Retaining plate 25 1 HT5002 External snap-ring 26 1 FB0018 Bushing 27 1 O/L 3/8" NC x 1 1/4" LG hex. bolt 28 1 O/L 3/8" DIA flat washer 29 1 FB0020 Retaining plate of the trail-arm 30 1 FB0021 Fastening of the trail-arm 31 1 FB0022 Fastening plate of the trail-arm 32 1 O/L 7/16" NC x 2 1/2" LG hex. bolt 33 1 O/L 7/16" NC nylon nut 34 1 FB0019 Bushing 35 1 O/L 1/2" NC x 2 1/2" LG hex. bolt 36 1 O/L 1/2" NC nylon nut 37 2 O/L 1/2" DIA flat washer 38 4 -------- Supplied on certain models
O/L = Obtenir localement / Obtain locally
N.B. the quantities listed for parts are for only one side of the front system.
17
Rear track

18
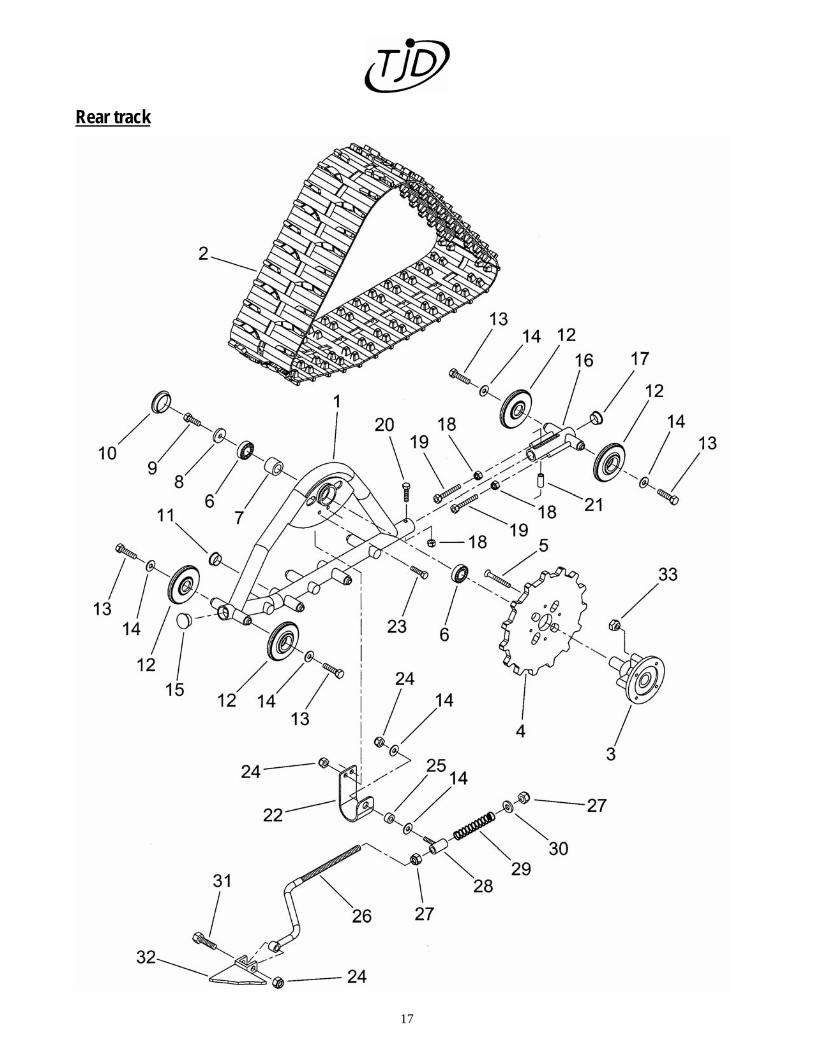
Rear track
REF. QTY PART N° DESCRIPTION
1 1 FB0003 Right side rear tubular frame 1 FB0004 Left side rear tubular frame
2 1 FB0005 Rubber track 3 1 FB0007 Rear track axle 4 1 FB0008 Tooted wheel 5 4 O/L 3/8" NC x 1 1/4" LG socket cap screws 6 2 HT5001 Ball bearing 7 1 FB0009 Sleeve 8 1 FB0010 Special washer 9 1 O/L 1/2" NC x 1 1/4" LG hex. bolt 10 1 FB0011 Plastic cap for hub 11 5 FB0012 Plastic cap for guiding rollers 12 9 FB0014 Guiding roller 13 9 O/L 7/16" NC x 1 1/4" LG hex. bolt 14 11 O/L 7/16" DIA flat washer 15 1 FB0013 Plastic cap for tubular frame 16 1 FB0015 Track’s adjustment system 17 1 FB0014 Plastic cap for adjustment system 18 3 O/L 3/8" NC nylon nut 19 2 O/L 3/8" NC x 3 1/2" LG threaded rod 20 1 O/L 3/8" NC x 2 1/2" LG hex. bolt 21 1 FB0016 Guiding tube 22 1 FB0023 «J» plate 23 2 O/L 7/16" NC x 1 1/4" LG hex. bolt 24 4 O/L 7/16" NC nylon nut 25 1 FB0019 Bushing 26 1 FB0024 Stabilizing rod 27 2 O/L 3/4" NC nylon nut 28 1 FB0025 Adjustment slide 29 1 FB0026 Pressure spring 30 1 O/L 3/4" DIA flat washer 31 1 O/L 7/16" NC x 2 1/2" LG hex. bolt
32 Selon VTT Selon VTT Attachment plate
33 4 -------- Supplied on certain models O/L = Obtenir localement / Obtain locally N.B. the quantities listed for parts are for only one side of the rear system.
Related Documents