Lecture Prep Get samples from Trevor Marks for hand around during lect.

Welcome message from author
This document is posted to help you gain knowledge. Please leave a comment to let me know what you think about it! Share it to your friends and learn new things together.
Transcript
Lecture PrepGet samples from Trevor Marks for hand around during
lect.

Rapid Prototyping: Introduction to 3D Printing
UC Santa Barbara: ME 125MSJune 2015
Instructor: Matt SpranklePrepared by: Matt DeVogelaere

Quick summary/Intro video:
• This video does not include the 3D printer that we will be using, but it is a good introduction the basics of 3D printing:
• https://www.youtube.com/watch?v=FOxZcpyKmzM&list=UUFYr58QuufVkP97L2Mifbow&index=1&feature=plcp

3D printing is not a recent invention. Here is a newspaper article from 1987:

Brief history of 3D printing
• 1984-Charles Hull developed the first 3D printer and called the process “Stereolithography”
• 1990’s-More companies develop other models with similar processes
• 2005-Z Corp (now a leading producer of 3D printers) developed the first HD color 3D printer
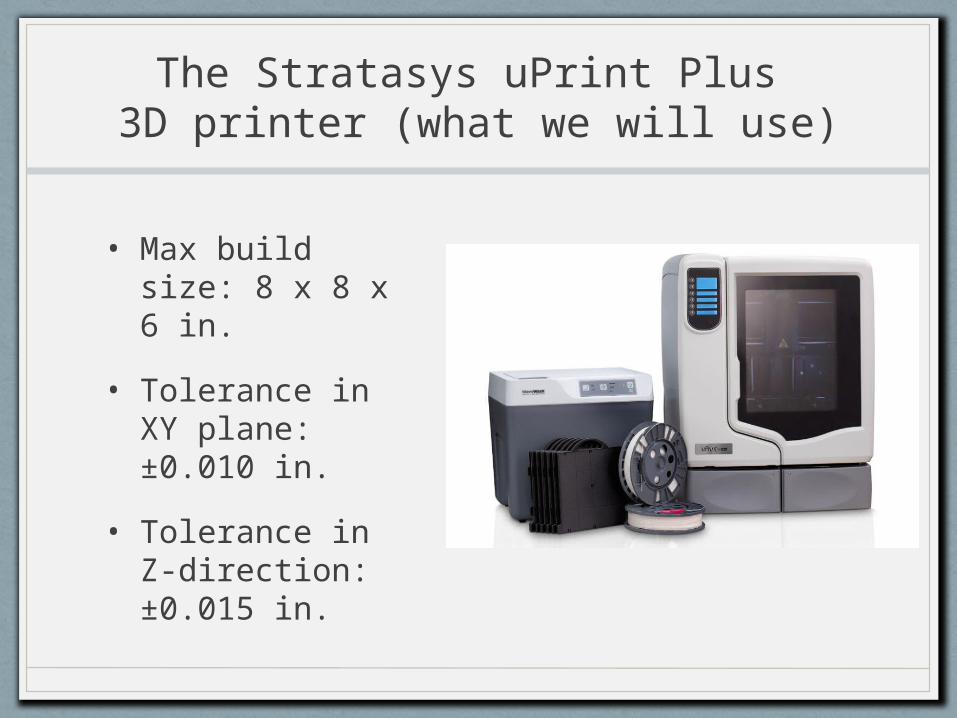
The Stratasys uPrint Plus 3D printer (what we will use)
• Max build size: 8 x 8 x 6 in.
• Tolerance in XY plane: ±0.010 in.
• Tolerance in Z-direction: ±0.015 in.

3 Popular processes
• Selective laser sintering (SLS)
• Stereolithography (SL)
• Fused Deposition Modeling/Fused Filament Fabrication (FDM/FFF)• This is the process used by the Stratasys uPrint
Plus• Builds projects using ABSplus thermoplastic to
create durable prototypes• FDM and FFF are equivalent, but FDM is a
trademark of Stratasys, Inc.
The general process is simple:
1.Design
2.Convert
3.Print

(1) Design
• Design what you want to print on SolidWorks
• See “Proj 2 ME 125MS…” on GauchoSpace

(1) Design-Guidelines for the Stratasys uPrint plus
• Walls: Walls should have a minimum thickness of 0.040 inches (1 mm)
• Holes: Holes on an FFF part are generally fractionally undersized. When tight tolerances are required, holes should be drilled or reamed to ensure the diameter is accurate
• Fillets: Use fillets at intersections to reduce stress concentration
• Text: Minimum suggested text size on the top or bottom build plane of an FFF model is 16 point (0.221 inches tall) boldface. Minimum suggested text size on vertical walls is 10 point (0.139 inches tall) boldface
• Clearance: Minimum suggested gap for parts that are intended to move with respect to each other: • Z clearance = layer thickness, i.e., 0.01inches (0.25 mm) XY clearance = layer
thickness, i.e., 0.02 inches (0.50 mm)
• Size and Orientation: Size and orientation should be considered to reduce material usage, machine print time, and strength of finished product

(2) Convert
• Convert the file to stereolithography format (save your design as a .STL file). This file uses triangles and tessellations to map the exterior surface only
• The .STL file is then uploaded to the native print support program for the printer, which “slices” the part and describes how the print head should move for each subsequent layer, and whether to print build material or support material

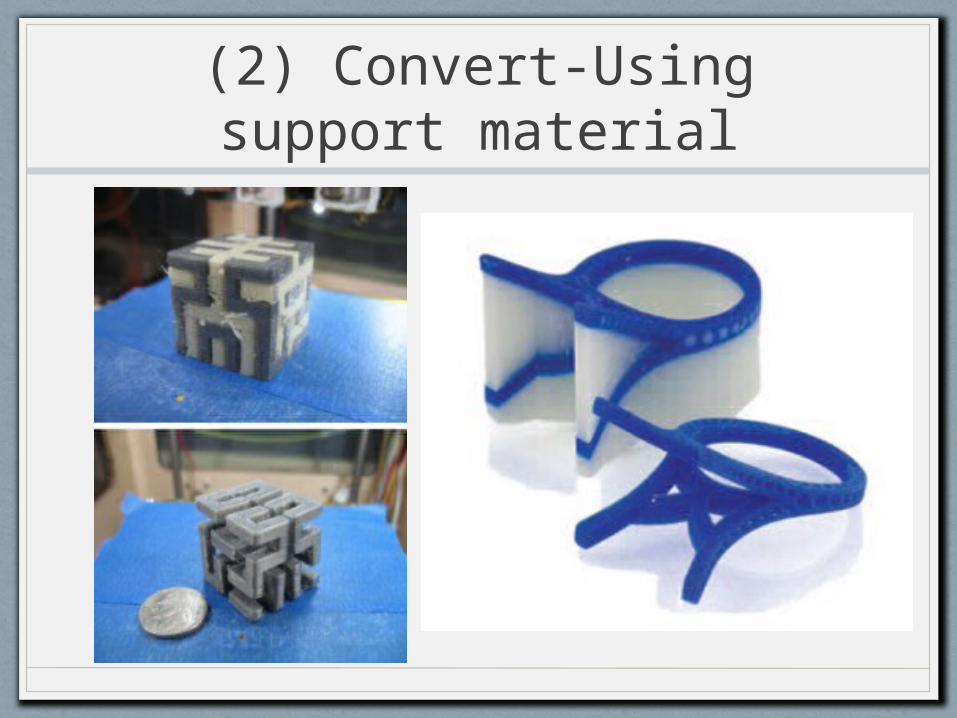
(2) Convert-Using support material
• Originally there was no support material, and if an object overhung by more than 45° (like the submarine fins in the video) the 3D printer would lay down a lattice structure next to the part to build on, then the designer would have to break it off later and sand down the part
• FDM/FFF uses ABSplus as a base material and uses support material that dissolves when placed in a chemical bath (a sodium hydroxide solution). A slow process but easy and effective
(2) Convert-Using support material

(2) Convert-“Slicing”
• The .STL file tells the native print support program what slices to print at each level and where to print support material

(3) Print
• Click “Print”!
• The machine reads the design and lays down successive layers of molten thermoplastic or support material to build the model from a series of cross sections (corresponding with the virtual cross sections from the .STL file)

(3) Print

(3) Print-Fill Type:
1. Solid: Tries to fill the model as completely as possible using a rectilinear pattern
2. Sparse low-density interior: Creates an exterior wall (solid, 2-3 layers thick) then fills about 45% of the interior, saving the most time and material
3. Sparse high-density interior: Creates an exterior wall (solid, 2-3 layers thick) then fills about 75% of the interior

(3) Print-Fill Type:
1. Solid
2. Sparse low-density interior
3. Sparse high-density interior
1 2 31 2 3

ABSplus thermoplastic feeder material
• Comes in a wide range of colors (can even order custom) but ivory is preferred because it takes paint well—so it is easy to detail—and allows more features to be visible
• Mechanically strong material and durable over time
• Is not soluble in the chemical bath so can be used with support material

Design optimization
• As a designer, it is important to select an optimal orientation of your part, taking into account:
1. Resolution of features
2. Limiting the use of unnecessary support material
3. Increasing strength of the part for future applications

Design optimization 1: Resolution of features
• Orient your part so that critical features are created by more layers to optimize resolution
(lower resolution) (higher resolution)

Design optimization 2: Support material
• Orient your part to limit the use of unnecessary support material
vs.
(a lot of support material) (no support material necessary)

Design optimization 3: Strength
• Orient your part so that it will most effectively resist any future stress or strain forces when it is in use
(easier to break) (harder to break)

Design optimization
• These are three important design optimizations, but there are more you may have to consider when preparing to print your part (print time, layer thickness, etc.)
• As the designer of a 3D printed part, you will have to consider all these factors and choose the most efficient orientation before printing

Applications of 3D printing
• Made in Space (the space manufacturing company) has partnered with NASA’s Marshall Space Flight Center to launch the first 3D printer in space.
• Their customized 3D printer is the first device to manufacture parts away from planet Earth

Applications of 3D printing
• “Urbee 2” is a hybrid car that is mostly 3D printed
• Over 50% will be 3D printed (all the parts of the car you normally see and touch)
• In about 2 years, Urbee 2 will drive from New York to San Francisco on an estimated 10 gallons of fuel

Applications of 3D printing
• Project Deep-Z was an experiment to test if 3D printing can be used to build inexpensive devices for deep water exploration
• The project started with building a 3D printed waterproof housing for a GoPro camera, which descended 200 meters (656 feet) without any signs of it breaking apart under the immense pressure

Cost of 3D printers
• You get what you pay for (see the next slide), the price depends on• Size of the build area (and if it is enclosed or
open)• Number of nozzles• Resolution and layer size• Heated platform bed• How much of the software is included

Cost of 3D printers

Disadvantages of 3D printing
• Slow process
• Components are not as strong as traditionally machined components
• 3D printers are still expensive
• Raw material is expensive
• FFF printed parts are not well-suited for applications involving heat

Advantages of 3D printing
• Rapid prototyping
• Clean process (very little waste)
• Can produce very complex shapes
• Easy to use
• Cost of raw materials is dropping (12in3 of Aluminum 6061 is $6.91 and 12in3 of ABS plastic is $5.90)
• A wide range of thermoplastic materials are used

Looking to a futurewith 3D printing
• 3D printers are constantly getting better and cheaper
• Today, if you lose the battery cover to your TV remote, you can print a replacement cover. Imagine printing an entire replacement remote
• Within a decade, 3D printers could be a commonplace object in the average household (last year several UCSB students had access to 3D printers at home)
• Research has been initiated on printing organs for people who need transplants

Resources
• 3D printer Technology—Vijay Patil
• http://www.3ders.org/articles/20131113-3d-printing-from-android-devices-with-gcode-simulator-printer-android-app.html
• http://www.stratasys.com/3d-printers/idea-series/uprint-se-plus
• http://www.pddnet.com/blogs/2012/07/3d-printing-understanding-support-material
• http://www.slideshare.net/gouravpal/3-d-printing-17142694?related=3
• http://www.popularmechanics.com/cars/a9645/urbee-2-the-3d-printed-car-that-will-drive-across-the-country-16119485/
Related Documents