ME 327: Design and Control of Haptic Systems Spring 2019 Lecture 6: Kinesthetic haptic devices: 1-DoF Rendering Allison M. Okamura Stanford University

Welcome message from author
This document is posted to help you gain knowledge. Please leave a comment to let me know what you think about it! Share it to your friends and learn new things together.
Transcript

ME 327: Design and Control of Haptic Systems Spring 2019
Lecture 6:Kinesthetic haptic devices:
1-DoF Rendering
Allison M. OkamuraStanford University

rendering surface properties
(in one degree of freedom)
Stanford University ME 327: Design and Control of Haptic Systems © Allison M. Okamura, 2019

rendering friction (in one degree of freedom)
Stanford University ME 327: Design and Control of Haptic Systems © Allison M. Okamura, 2019

surface properties
• typical haptic VEs display general shape very well, but don’t feel “realistic”
– add surface properties to increase realism
• how you do it depends on
– the surface model
– complexity of the surface property
– frequency response of your haptic device
Stanford University ME 327: Design and Control of Haptic Systems © Allison M. Okamura, 2019
damping for virtual walls• a pure spring force for a wall may seem to “active”
• add a dissipative term, where b is the damping coefficient
• only damps when going into the wall
• this can also create vibrations upon wall impact
Stanford University ME 327: Design and Control of Haptic Systems © Allison M. Okamura, 2019

“frictional” damping
• surfaces can feel unnaturally slippery
• friction would help, but it is difficult to implement
• you can add damping to motion parallel to surface
friction dampingStanford University ME 327: Design and Control of Haptic Systems © Allison M. Okamura, 2019

friction displaydifficult to render because it is non-linear
Richard & Cutkosky
stiction static Stribeck effect
damping Coulomb a & b
Stanford University ME 327: Design and Control of Haptic Systems © Allison M. Okamura, 2019

Karnopp modeladds viscous damping, Coulomb friction, and static friction
Richard & Cutkosky
Stanford University ME 327: Design and Control of Haptic Systems © Allison M. Okamura, 2019

aside: friction display evaluation
Richard & Cutkosky, 2000
Stanford University ME 327: Design and Control of Haptic Systems © Allison M. Okamura, 2019
rendering bumps and textures
(in one degree of freedom)
Stanford University ME 327: Design and Control of Haptic Systems © Allison M. Okamura, 2019

bumps and valleys• as a user moves “up” a bump, motion is opposed.• done in 2D, spring force proportional to height of bump• force information can
overcome geometry!
Minsky, 1990
Stanford University ME 327: Design and Control of Haptic Systems © Allison M. Okamura, 2019
Robles-De-La-Torre & Hayward, 2001

damping textures
note that vibrations occur due to discontinuity in force
€
if ! p user is inside a damping areaF = b" v user
(" v user =! ˙ p user )
Stanford University ME 327: Design and Control of Haptic Systems © Allison M. Okamura, 2019

simulating and rendering dynamic objects
(in one degree of freedom)
Stanford University ME 327: Design and Control of Haptic Systems © Allison M. Okamura, 2019

dynamic simulation of“rigid” bodies
• assumptions
– you have an impedance-type force-feedback display
– you are using a linear stiffness model of the surface
• basic approach:
1. save the state of the moving object
2. sum the forces on the object
3. calculate the new stateStanford University ME 327: Design and Control of Haptic Systems © Allison M. Okamura, 2019

object state• the “state” of an object is used to describe it’s
current condition
• made up of variables that will change with time, such as
– position– velocity – acceleration– rarely: other parameters such as mass, shape, etc. that might be changed by dynamic interaction
Stanford University ME 327: Design and Control of Haptic Systems © Allison M. Okamura, 2019

calculating forces on an object
• for forces from the user’s hand pushing, this is equal and opposite to the force fed back to the user
• for forces fromother objects in the VE, use the same idea: forceis proportional to penetration
Stanford University ME 327: Design and Control of Haptic Systems © Allison M. Okamura, 2019
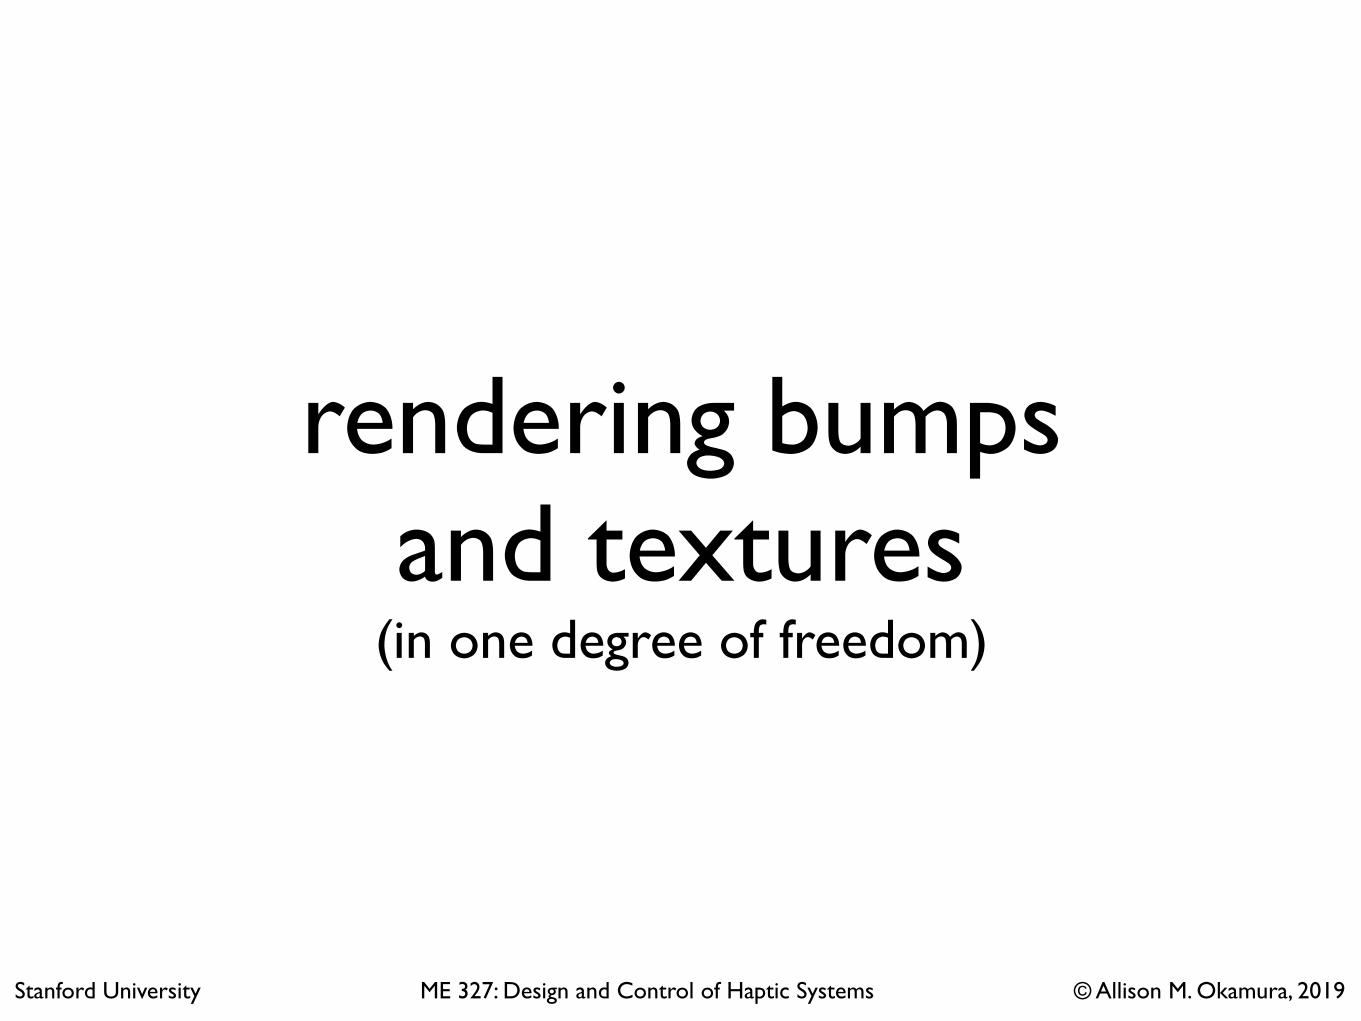
pseudocode• store last_ObjAcc, last_ObjVel
• ObjForce = Force_from_user + Force_from_other_objects
Force_from_user = k*penetration_distance_user
Force_from_other_objects = k*penetration_distances_objects
can add other effects (e.g. damping) as well
• ObjAcc = ObjForce/mass (F=ma -> a = F/m)
• integrate using (for example) the trapeziodal rule: ObjVel += 1/2(last_ObjAcc + ObjAcc)/sim_freq ObjPos += 1/2 (last_ObjVel + ObjVel)/sim_freq
Stanford University ME 327: Design and Control of Haptic Systems © Allison M. Okamura, 2019

the new state
• now you have a new position, velocity, and acceleration of the object
• use new position for collision detection, penetration and force calculation
• store velocity and acceleration for the next integration
• do the loop again
Stanford University ME 327: Design and Control of Haptic Systems © Allison M. Okamura, 2019

second order dynamic systemsmass-spring-damper
x = 0 at equilibrium
Stanford University ME 327: Design and Control of Haptic Systems © Allison M. Okamura, 2019

free body diagram
• Fb = bx, Fk = kx
• sum forces, equate to inertia:
mx = Fa – Fb – Fk
mx + bx + kx = Fa
Stanford University ME 327: Design and Control of Haptic Systems © Allison M. Okamura, 2019

how would you render(in 1 DoF)…
Stanford University ME 327: Design and Control of Haptic Systems © Allison M. Okamura, 2019

a virtual button

petting a cat

Assignment 3 due 4/25
1. Calibrating and testing your Hapkit
2. Render a Virtual Spring
3. Render Basic Haptic Virtual Environments (virtual wall, linear damping, nonlinear friction, hard surface, bump and valley, texture)
4. Peer Review
Suggested (optional) readings
Stanford University ME 327: Design and Control of Haptic Systems © Allison M. Okamura, 2019
(a) (b) (c) (d) 11. Final electronic connections. (a) Insert the "micro" end of the USB cable to the connector on the Hapkit board. Hold on to the board with your other hand while you do this. Be very careful during insertion and removal of the USB cable, since (depending on where you get your USB cable), it can be a very tight fit. Warning: It is possible to yank the USB connector off the Hapkit board! (b) Insert the power supply cable (coaxial connector) into the corresponding connector on the Hapkit board.
(a) (b) (c)
(c) When you plug the other end of the USB connector into your computer, you should see a green light on your Hapkit board. This tells you that the basic power functions of the Hapkit board are working. (You do not need to plug the power supply into the wall until you want to use the motor, so to avoid unintended motor commands, we suggest you wait to power the motor until you are ready to test it.)
Congratulations – you have successfully assembled your Hapkit. Now you can start programming!
Related Documents


![1 Haptic Manipulation of Serial-Chain Virtual Mechanismsdanielac/constantinescu_jdsmc06.pdf · the haptic rendering of user interaction with a virtual environment through a VM [1],](https://static.cupdf.com/doc/110x72/6019a647c9a9e3303968ba27/1-haptic-manipulation-of-serial-chain-virtual-danielacconstantinescujdsmc06pdf.jpg)