1 | Page www.apieceofrainbow.com Learning To Build A Wood Fired Earth Oven Dedicated to all lovers of planet Earth

Welcome message from author
This document is posted to help you gain knowledge. Please leave a comment to let me know what you think about it! Share it to your friends and learn new things together.
Transcript

1 | P a g e
www.apieceofrainbow.com
Learning To Build A Wood Fired Earth Oven
Dedicated to all lovers of planet Earth

2 | P a g e
www.apieceofrainbow.com
3 weeks ago I attended an earth oven building class taught by one of the best teachers in this
field, Kiko Denzer, at the fabulous Grain Gathering.
Kiko and the event organizers graciously allowed me to share my amazing class experience. This
article is not meant to be used as a building manual. If you are planning to build one, make sure
to check out the indispensable resources here http://www.apieceofrainbow.com/build-a-wood-
fired-earth-oven/#Helpful-Resources as well as safety and local building codes.
During the 6 hour long class, we built 2 portable earth ovens, which were auctioned the next
day. I learned so much about building with earth and other readily available materials. There's
such simplicity and beauty to the process that I find deeply inspiring. The wood fired earth
ovens(aka- cob ovens) are easy to build, and can give 12 hours of cooking after each firing, to
make super delicious goodies from pizzas, bread, cookies to casseroles.

3 | P a g e
www.apieceofrainbow.com
Above is a top section of an earth oven.
Materials, Design and Foundation
The ovens we made measure about 24" in finished diameter, and have an inside cooking area
of 12" diameter by 14" high. They each weigh about 250 lbs, and each took about two 5-gallon
buckets of clay and sand mixture to build. If you want a larger oven, please adjust the materials
accordingly.
Materials and tools we used in class:
clay soil : soil with high clay content. It’s likely to be found beneath the loamy layer,
often seen at excavation sites.

4 | P a g e
www.apieceofrainbow.com
sand : to reduce shrinkage / cracking of clay, see next step for mix ratio. construction
sand is great for the thermal layer, and beach sand is great for the finish layer, but use
what you have readily available!
wood shavings , coarse saw dust or coarse straw: mixed with clay to form the insulation
layer
finely chopped straw : used in the finish layer to make earthen plaster
water : to mix everything
oven door: can be made out of wood or metal. Plywood is not a good choice to use on
the inside face, because the glue can give off undesirable gas at high temperature. See
below for more on door heights, etc
fire brick: forms the oven floor
materials to build a foundation: see below
Oven Foundation:
The ovens we made had a base of sheet metal bolted onto a wood frame to be portable, then
placed on a sturdy foundation at their new home - see the base that our friend Bill made after
he bought the oven from last year's class.
If you are building an oven directly in your backyard, then consider the following keys to a
foundation: stability, height, and insulation.
1. stability: a foundation can be built out of any sturdy materials such as broken concrete,
brick, masonry block, stone, rocks, old tables or even wooden pallets, as long as it can
hold an oven (which can weigh 300 to 600 lbs depending on size) without sinking and
shifting.
2. height: the foundation should support your oven at a height that allows you to work
comfortably!
3. insulation: there should be a minimum of 4"-6" of insulation between the fire brick oven
floor and the masonry or wood foundation. The insulation will prevent the masonry from
absorbing all the valuable heat we want for cooking, and protect the wood foundation
from burning. In the picture above, we made the insulation layer out of glass jars and
vermiculite. You can also use perlite or pumice, old beer bottles, etc. These materials
holds air and are slow to conduct heat.
There are many variations of foundations one can build, see resources here -
http://www.apieceofrainbow.com/build-a-wood-fired-earth-oven/#Helpful-Resources
On top of the insulation layer, we used some of the clay-sand mix (see next step) as a mortar to
set the fire bricks as our oven floor. Creating some grooves in this mortar will make it easier to
level the fire bricks with a gentle tap.
Also we need an oven door before the building begins. For this oven with a 14" high inner dome,
our door is 8.75" high by 8" wide. The width is not as crucial as the height. Researchers found
through studies of hundreds of traditional ovens that the best designs all have a ratio of 63%
between the door height and the inner dome height! Isn't it cool that it's so close to the Golden
Ratio?!
If you use nails or screws on a wood door, make sure they are not exposed on the inside to the
fire and heat.

5 | P a g e
www.apieceofrainbow.com
Sand and Clay Mix
How fun it is that our work is to dance in the mud?
For each part of clay soil, we mix in 2-3 part sand. More sand if using pure clay. Make sure the
mix does not have any sharp rocks or debris. If unsure, wear rain boots!
Put everything on a large tarp, add some water, and start singing and dancing - which means,
mixing!
Folding the tarp is a good way to get everything mixed more thoroughly.
You will know that your mixture is a good consistency and ready to go if you can form it into a
ball about 3" diameter, drop it to the ground, and the ball holds its shape with little cracking.
We will be using this mix to form the thermal layer. But first we will build a sand form.

6 | P a g e
www.apieceofrainbow.com

7 | P a g e
www.apieceofrainbow.com
To create the interior dome, we will mix some water with sand, just like building a sand castle.
You can cheat a little by adding a small amount of clay soil so the form holds up easier, but is still
loose enough to be scooped out later.
Use a 14" stick as a guide to mark the tip of the inner dome, then carefully pack and shape the
sand. When we have the general form, take out the stick, slide the oven door to where the
opening is, and refine the shape, using some 2x4s as float.
When finished, we will wrap the sand with a layer of damp newspaper, and this will indicate
where to stop when we scoop out the sand later.
Thermal Layer
8 | P a g e
www.apieceofrainbow.com
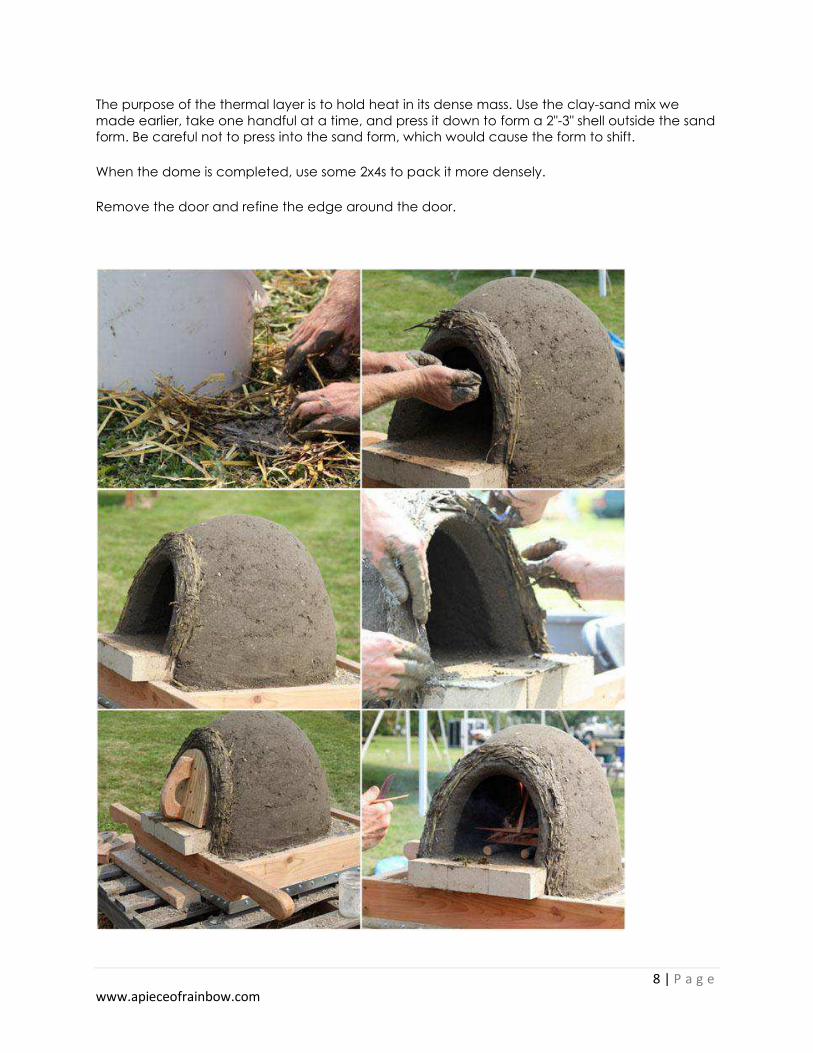
The purpose of the thermal layer is to hold heat in its dense mass. Use the clay-sand mix we
made earlier, take one handful at a time, and press it down to form a 2"-3" shell outside the sand
form. Be careful not to press into the sand form, which would cause the form to shift.
When the dome is completed, use some 2x4s to pack it more densely.
Remove the door and refine the edge around the door.

9 | P a g e
www.apieceofrainbow.com
Wait untill this layer dries for a day or 2 to empty the sand form. We did not wait this long
because our class is held in one day. If you can't wait, then be gentle when you build on the
next 2 layers, so the dome holds its shape!
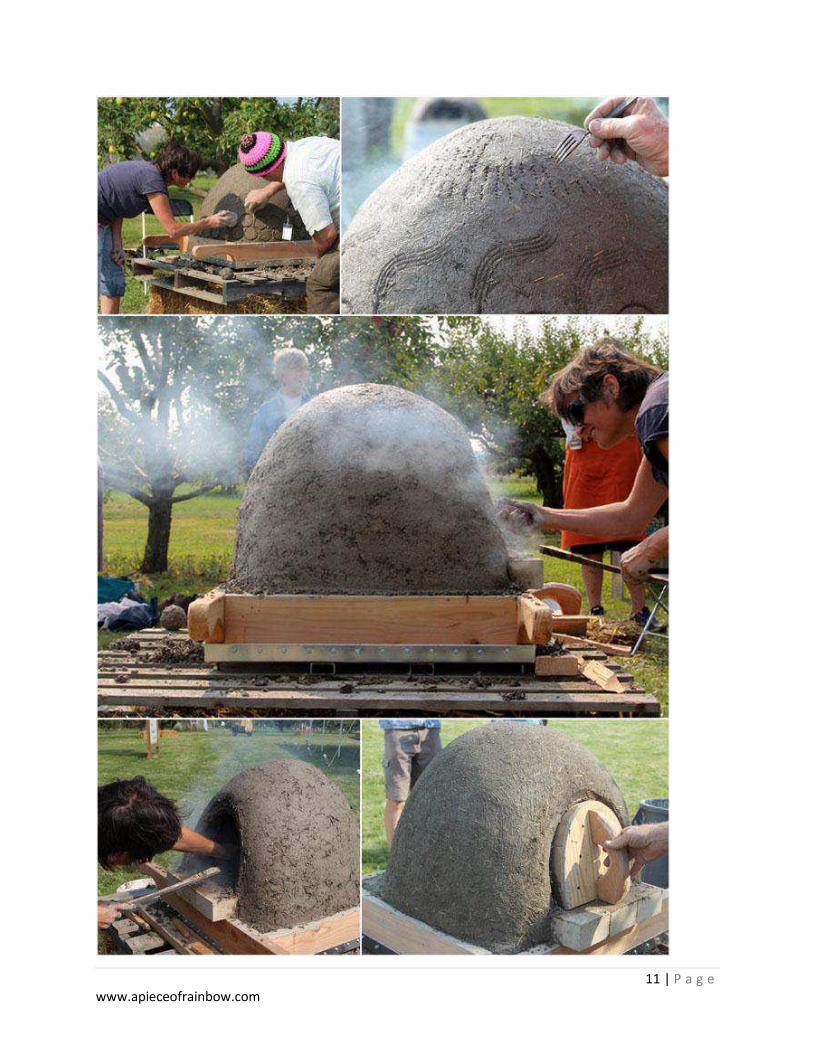
Before moving on to the insulation layer, we made a "molding" with strands of straw dipped in
clay, and form it around the door opening to give it a more finished look. It also acts as a stop
for the insulation layer.
Insulation Layer
The purpose of this layer is to hold the heat of the thermal layer.
When coarse saw dust or wood shavings are mixed with just enough clay to hold the shape, and
when they are exposed to the high temperature from the thermal layer, a new material- clay
foam - is created. It's sort of a light weight charcoal-clay which is airy, thus conducts heat slowly.
Mix clayslip and wood shavings till they hold together, and about 4"-5" thick is applied around
the thermal layer. Use the same technique to pack it down onto itself.
During the class we lit a fire inside to speed up the drying process as we worked on this layer. An
easier alternative would be to wait till this layer is finished to light the fire, so both layers can dry a
bit before we add the final layer.
And of course, don't forget to take a nice break and show off your muddy hands!

10 | P a g e
www.apieceofrainbow.com
Finish Layer
An earthen plaster is applied to the final layer to give the oven a smooth finish. This layer can be
as thin as 0.5" or as thick as you want to create decorative sculptural details!
Start with the mix we made for the thermal layer at the beginning, mix in about 20% to 30% finely
chopped straw and some water to create a spreadable mix.
One of our teams decides to make some decorative surface details using glass jars and metal
spoons.
Never seal the outside of your oven with materials such as cement stucco or water proof paint!
The oven needs to breathe, and moisture vapor from cooking must evaporate through the walls!
The adobe St. Francis de Assisi church of New Mexico which was built 200 years ago suffered
deterioration when cement stucco was applied over the earth plaster in 1967. Fortunately
people realized this in time to remove the cement stucco, and resumed the old practice of
earth plaster finishing!
11 | P a g e
www.apieceofrainbow.com

12 | P a g e
www.apieceofrainbow.com
Cooking Tips!
All pictures in this step are from our friend Bill! Thank you Bill!!!
Bill bought an oven made by the class last year. He loves it so much and decided to join our
class this year so he can build another one!
Look at the gorgeous roof he made for the oven! and the yummy pizza - drool!
Bill has been using the oven almost once a week for a year now. I asked him to share what are
his favorite things to make, here's what Bill said -
" you do get a long cooking time from each firing if you think of cooking along the temperature
curve with pizza first, bread, then braises of all sorts.( pulled pork,beans, rice of all ethnic
cooking styles) pies and cookies and then overnight meats like carnitas. the end temp. is long in
the 250 f range and is great for drying fruits, toasting nut's and great grilled cheese. those are my
favorites ... really it works for everything that you can imagine as long as you understand a
dishe's temperature requirements."
"Here are a few shots of a fun sunday bake. 3.5 hr fire, coals burned out and got 900 F dropping
to 600 after coals out. Baked pizza, bread at 500 F then cooled to 400 F and did the bean
casserole and still the next day(24hrs) oven still at 250 F for any drying of fruit!!"

13 | P a g e
www.apieceofrainbow.com
Cob (earth and straw) structures can be surprisingly durable- there are 500 year old cob houses
still standing in rainy Devon. However it is a good idea to protect your oven from the rain. It can
be as simple as a tarp to cover it while it's not in use, or you can build a nice custom roof!

14 | P a g e
www.apieceofrainbow.com
Again, This is not meant to be a building manual. There's a vast depth of knowledge that cannot
be covered in just one article from a beginner. So make sure to check out the list of great
resources, including Kiko’s amazing book on earth ovens, here -
http://www.apieceofrainbow.com/build-a-wood-fired-earth-oven/#Helpful-Resources
Once you get your hands DIRT-Y, you will fall in love with earth building! It’s a magical way of building that connects us with our essence, with the elements of earth, fire, water and air, with
makers across centuries and continents, and, with one another.
Related Documents