Lazy OpenCV installation and use with Visual Studio Overview This tutorial will walk you through: How to install OpenCV on Windows, both: The pre-built version (useful if you won’t be modifying the OpenCV library itself, and only want to use it for your applications) A built-from-scratch version (useful for debugging your own applications, if you need customised builds of OpenCV with specific features (multicore processing with Threading Building Blocks, improved user interface with Qt, etc.), or if you are modifying the underlying OpenCV library itself. How to configure a property sheet to allow easy setup of Visual Studio projects to link against OpenCV. How to use a property sheet in a project. This configures all required header files and libraries in a new Visual Studio project in a few clicks. Contents Overview ................................................................................................................................................. 1 Prerequisites ....................................................................................................................................... 2 Optional .............................................................................................................................................. 2 1. Installing OpenCV ............................................................................................................................ 2 1.1. Pre-built version ...................................................................................................................... 3 1.2. Building from source: configuration with CMake ................................................................... 5 1.3. Building from source: compiling in Visual Studio ................................................................... 8 1.4. Building from source: setting environment variables........................................................... 10 2. Configuring a Property Sheet ........................................................................................................ 12 2.1. Using a pre-built OpenCV build............................................................................................. 12 2.2. Using OpenCV built from source........................................................................................... 13 3. Using a Property Sheet ................................................................................................................. 15 3.1. An example project ............................................................................................................... 15 3.2. Applying the property sheet ................................................................................................. 17 3.3. Testing the example project ................................................................................................. 19

Welcome message from author
This document is posted to help you gain knowledge. Please leave a comment to let me know what you think about it! Share it to your friends and learn new things together.
Transcript

Lazy OpenCV installation and use with Visual Studio
Overview This tutorial will walk you through:
How to install OpenCV on Windows, both:
The pre-built version (useful if you won’t be modifying the OpenCV library itself, and
only want to use it for your applications)
A built-from-scratch version (useful for debugging your own applications, if you need
customised builds of OpenCV with specific features (multicore processing with
Threading Building Blocks, improved user interface with Qt, etc.), or if you are modifying
the underlying OpenCV library itself.
How to configure a property sheet to allow easy setup of Visual Studio projects to link against
OpenCV.
How to use a property sheet in a project. This configures all required header files and libraries in
a new Visual Studio project in a few clicks.
Contents Overview ................................................................................................................................................. 1
Prerequisites ....................................................................................................................................... 2
Optional .............................................................................................................................................. 2
1. Installing OpenCV ............................................................................................................................ 2
1.1. Pre-built version ...................................................................................................................... 3
1.2. Building from source: configuration with CMake ................................................................... 5
1.3. Building from source: compiling in Visual Studio ................................................................... 8
1.4. Building from source: setting environment variables ........................................................... 10
2. Configuring a Property Sheet ........................................................................................................ 12
2.1. Using a pre-built OpenCV build ............................................................................................. 12
2.2. Using OpenCV built from source ........................................................................................... 13
3. Using a Property Sheet ................................................................................................................. 15
3.1. An example project ............................................................................................................... 15
3.2. Applying the property sheet ................................................................................................. 17
3.3. Testing the example project ................................................................................................. 19

Prerequisites Visual Studio professional or better – version 2010 is the latest version which works with CUDA
builds for GPU, so we’ll use that. 2012 will work for non-GPU versions too. 2008 will probably work,
but hasn’t been tested. Available for free from Dreamspark https://www.dreamspark.com/ for
students. Express versions will probably work too.
CMake 2.8.x build system. Available from
http://www.cmake.org/cmake/resources/software.html#latest – download and install the win32
binary.
Optional None of the following libraries are needed to get OpenCV running. However, depending on the
extra features you want to add to OpenCV, download and install the following extras before
installing OpenCV. Full details are on the main OpenCV installation tutorial here, but these are the
ones I’ve found useful.
GPU support for nVidia GPUs: download and install the CUDA toolkit from
http://www.nvidia.com/getcuda
Threading building blocks (TBB) for multicore processing: get the windows build from
http://threadingbuildingblocks.org/download. Unpack it somewhere and add the
appropriate binaries folder to the system path.
Improved GUI with Qt: (puts a toolbar on all GUI windows, allows access to a control panel
with buttons, sliders etc.). Download and install the Qt libraries from http://qt-
project.org/downloads.
mexopencv http://www.cs.stonybrook.edu/~kyamagu/mexopencv/index.html is also handy
and allows use of OpenCV functions from within MATLAB. Set up to work with prebuilt
OpenCV, and anything else needs modification of the build script. Not covered here.
1. Installing OpenCV Note: there is an official tutorial at
http://docs.opencv.org/doc/tutorials/introduction/windows_install/windows_install.html. It’s quite
comprehensive, but this one takes slightly less time and has notes on property sheets.
Download the latest version of the installer from
http://sourceforge.net/projects/opencvlibrary/files/opencv-win/ (currently 2.4.4, March 2013) and
extract it somewhere. We’ll refer to this folder as <opencv_install_path>:

1.1. Pre-built version If you only need the pre-built version (i.e. if you won’t be modifying the OpenCV library itself, don’t
need GPU support, and will only use it to link against your own applications), the library is now
installed to e.g. C:\lazy\opencv.
Set the OpenCV_DIR environment variable to the build folder under this: here,
C:\lazy\opencv\build.
Add the folder containing the dynamic libraries to your system path. If using Visual Studio 2012, this
will be:
<opencv_install_path>\build\x86\vc11\bin
For Visual Studio 2010 or 2012, this will be:
<opencv_install_path>\build\x86\vc10\bin
For Visual Studio 2008, this will be:
<opencv_install_path>\build\x86\vc9\bin
For 64-bit Operating Systems: Visual Studio generates 32-bit code by default, so unless you have
downloaded the 64-bit compilers separately, you should still use the x86 versions of the libraries.
For these steps, use an environment variable editor like Rapid or use the method below:
Figure 1 Select 'edit environment variables'
Figure 2 Choose 'New variable'

Figure 3 Enter name: OpenCV_DIR, value: <opencv_install_path>\build, then hit
OK.
Figure 4 Add the appropriate path to the END of the value: <opencv_install_path>\build\x86\vc10\b
in this time.
Done! Go to stage 2.

1.2. Building from source: configuration with CMake For anything more complex than the basic stuff, we need to build from scratch. Open CMake and
point it at the <opencv_install_path>. Choose a build directory. Anywhere except build is
fine:
Select the IDE version then hit finish:

Select any extra features, then provide any extra info to make the red lines go away. This time we’ll
select CUDA and TBB:
Figure 5 Select any extra features
Figure 6: I prefer to disable tests and performance tests for faster builds. Enable BUILD_EXAMPLES to build various demos (takes a while).
IMPORTANT: note the install location. By default it’s
<opencv_install_path>\<build_location>\install. We’ll need this later.
Press Configure again to make the red backgrounds go away. Anything with red text is something
that needs fixing. Recent versions of CMake are generally quite good at finding library locations:

Figure 7 Fix any remaining red text by supplying the right paths. These will show up correctly once we press configure again.
Figure 8 Speed up CUDA builds dramatically by only building for the card you have: this machine has compute capability 1.2
Finally, press Configure again. If there are no remaining red boxes or red text, check the options
match what you selected and hit generate. This generates Visual Studio project files in the build
directory. If this works, you should see ’generating done’ at the bottom of the window. On to 1.3!

1.3. Building from source: compiling in Visual Studio In Visual Studio, open the resulting solution from the build folder. (I prefer to rename the solution at
this point to make it easier to distinguish different custom builds):
When the solution loads, there are two important projects: ALL_BUILD and INSTALL. First build the
ALL_BUILD project. This takes a while, particularly with GPU builds:

If you get any messages from CMake asking to reload, just hit ‘Cancel’:
Similarly , ignore any messages about individual projects:
Finally, once ALL_BUILD shows as building successfully, build the INSTALL project:

This installs the headers, static and dynamic libraries to the install location set in step 1.2. Here, it’s
C:\lazy\opencv\build_custom\install.
Once the install is finished, switch to Release mode and build the ALL_BUILD and INSTALL projects in
the same way. (You can also automate all of this with BuildBatch build…)
Once the release mode binaries have been built and installed, go to 1.4.
1.4. Building from source: setting environment variables Set the OpenCV_DIR environment variable to the folder you installed OpenCV to in the previous
step (<opencv_install_path>\<build_location>\install from above). Here, this is
C:\lazy\opencv\build_custom\install.

Add the folder containing the dynamic libraries to your system path. This is
<opencv_install_path>\<build_location>\install\bin, or
C:\lazy\opencv\build_custom\install\bin here.
For these steps, use an environment variable editor like Rapid or use the method below:
Figure 9 Select 'edit environment variables'
Figure 10 Choose 'New variable'
Figure 11 Enter name: OpenCV_DIR, value: <opencv_install_path>\<build_locati
on>\install, then hit OK.
Figure 12 Add the appropriate path to the END of the value: C:\lazy\opencv\build_custom\install\bin
this time.
Done! Go to stage 2.
2. Configuring a Property Sheet
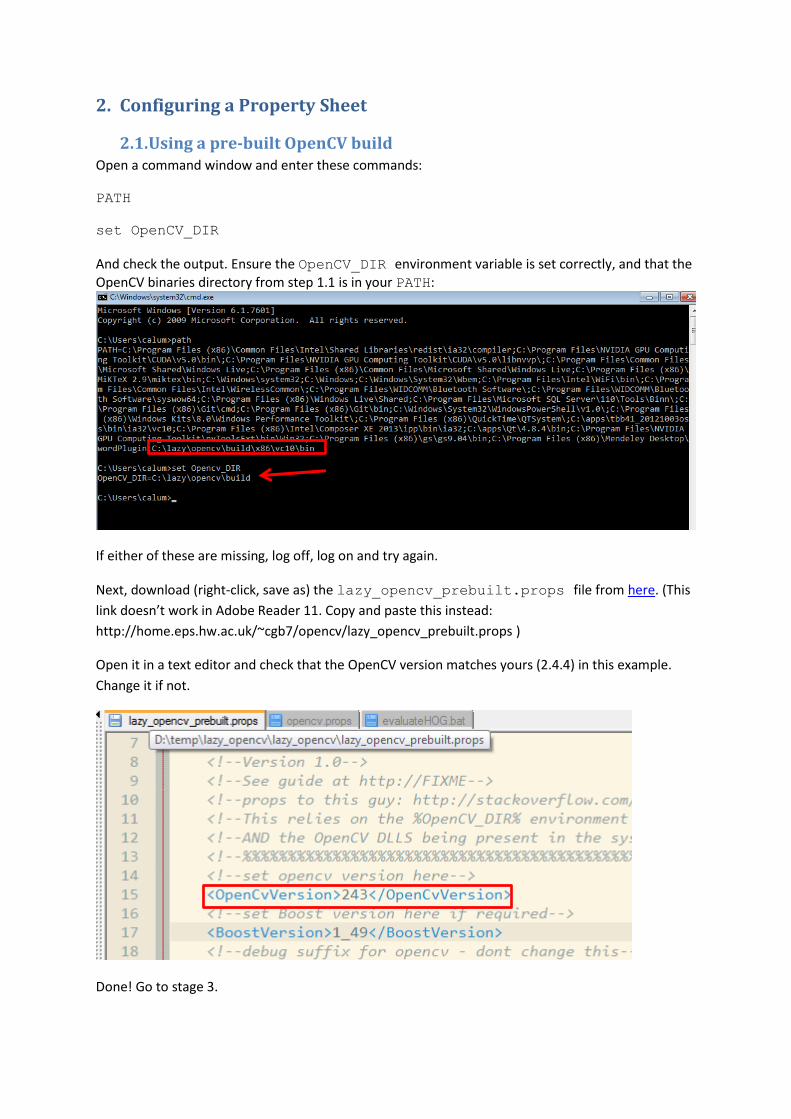
2.1. Using a pre-built OpenCV build Open a command window and enter these commands:
PATH
set OpenCV_DIR
And check the output. Ensure the OpenCV_DIR environment variable is set correctly, and that the OpenCV binaries directory from step 1.1 is in your PATH:
If either of these are missing, log off, log on and try again.
Next, download (right-click, save as) the lazy_opencv_prebuilt.props file from here. (This
link doesn’t work in Adobe Reader 11. Copy and paste this instead:
http://home.eps.hw.ac.uk/~cgb7/opencv/lazy_opencv_prebuilt.props )
Open it in a text editor and check that the OpenCV version matches yours (2.4.4) in this example.
Change it if not.
Done! Go to stage 3.

2.2. Using OpenCV built from source Open a command window and enter these commands:
PATH
set OpenCV_DIR
And check the output. Ensure the OpenCV_DIR environment variable is set correctly, and that the
OpenCV binaries directory from step 1.3 is in your PATH:
If either of these are missing, log off, log on and try again.
Next, download (right-click, save as) and save the lazy_opencv.props file from here. (This link
doesn’t work in Adobe Reader 11. Copy and paste this instead:
http://home.eps.hw.ac.uk/~cgb7/opencv/lazy_opencv.props )
Open it in a text editor, and check the OpenCV version matches yours (2.4.4) in this example. Change
it if not. If using GPU, check your compute capability matches what’s in the file (1.2 here).

Done! Go to stage 3.

3. Using a Property Sheet
3.1. An example project Start a new console project in Visual Studio. Untick the ‘precompiled header’ option.

Now write a ‘hello world’ in the resulting project:
Note the red lines under unknown terms.
#include <opencv2\core\core.hpp> #include <opencv2\highgui\highgui.hpp> using namespace cv; int main(int argc, char* argv[]) { VideoCapture vc; Mat frame; char ch; bool isVideo=true; try{ vc.open(0);//open default camera } catch (Exception e){ frame = Mat::eye(100,100,CV_32FC1); isVideo = false; } while ((ch=waitKey(10)) !='q'){ if (isVideo) vc>>frame; imshow("hello world",frame); } if (isVideo) vc.release(); return 0; }

3.2. Applying the property sheet Now click Property Manager on the bottom left, or choose View->Property Manager.

Right-click the project name on the left, choose Add Existing Property Sheet and select the (normal
or pre-built) appropriate property sheet:
Hit Open.
IMPORTANT: Right-click and save the project now, otherwise it will fail to build.
The project should now build and debug. To do this for any other project, just repeat section 3.2.

3.3. Testing the example project Build the test project. Note the red underlines have disappeared at this point:
…And run it1:
1 Dog not included.

We now also get full Intellisense:
Access to definitions in the headers:
And ability to step inside OpenCV Library code while debugging.
Related Documents