©2013 Johnson Level & Tool - Rev. 1 1 Laser Distance Measure Model No. 40-6005 Instruction Manual Congratulations on your choice of this Laser Distance Measure. We suggest you read this instruction manual thoroughly before using the instrument. Save this instruction manual for future use. This is a Class II laser tool and is manufactured to comply with CRF 21, parts 1040.10 and 1040.11 as well as international safety rule IEC 285. The laser also complies with EMC Test according to EN61000-6-3; 2001+A11:2004, EN 6100-6-1:2011, EN 6100-4-2, EN 61000-4-3, EN 60825, FCC Test according to PART 15. 6834H-English_Manuals 4/2/13 1:28 PM Page 1

Welcome message from author
This document is posted to help you gain knowledge. Please leave a comment to let me know what you think about it! Share it to your friends and learn new things together.
Transcript

©2013 Johnson Level & Tool - Rev. 1 1
Laser Distance MeasureModel No. 40-6005
Instruction ManualCongratulations on your choice of this Laser Distance Measure. We suggest you read this instruction manual thoroughly before using theinstrument. Save this instruction manual for future use.
This is a Class II laser tool and is manufactured to comply with CRF 21,parts 1040.10 and 1040.11 as well as international safety rule IEC 285.The laser also complies with EMC Test according to EN61000-6-3;2001+A11:2004, EN 6100-6-1:2011, EN 6100-4-2, EN 61000-4-3, EN 60825, FCC Test according to PART 15.
6834H-English_Manuals 4/2/13 1:28 PM Page 1

2 ©2013 Johnson Level & Tool - Rev. 1
Table of Contents 1.Kit Contents . . . . . . . . . pg. 22.Safety Information . . . pg. 2-33.Location/Content ofWarning Labels . . . . . . . pg. 3
4.Location of Parts/Components . . . . . . . pg. 4-5
5.Start Up - Battery InstallationInstructions . . . . . . . . . . pg. 7
6.Using the Product . . pg. 8-247.Technical Specifications pg. 258.Product Warranty. . . . . pg. 269.Product Registration . . pg. 27
1. Kit ContentsDescription for Model 40-6005 Qty.Laser Distance Measure 1Wrist Strap 1“AA” Alkaline Batteries 2Soft-Sided Pouch 1Instruction Manual 1
2. Safety Instructions Please read and understand all of the following instructions, prior to using this tool. Failure to do so, may result in bodily injury.
CAUTION!Class II Laser ProductMax. Power Output: ≤ 1mWWavelength: 640-660nmTHIS TOOL EMITS LASER RADIATION.DO NOT STARE INTO BEAM.AVOID DIRECT EYE EXPOSURE.
6834H-English_Manuals 4/2/13 1:28 PM Page 2

©2013 Johnson Level & Tool - Rev. 1 3
3. Location/Content of Warning Labels
ATTENTION IMPORTANT
• Read all instructions prior to operating this laser tool. Do not remove any labels from tool.• Do not stare directly at the laser beam.• Do not project the laser beam directly into the eyes of others.• Do not set up laser tool at eye level or operate the tool near a reflective surface as the laser beam could be projected into your eyes or into the eyes of others.
• Do not place the laser tool in a manner that may cause someone to unintentionally stare into the laser beam. Serious eye injury may result.
• Do not operate the tool in explosive environments, i.e. in the presence of gases or flammable liquids.
• Keep the laser tool out of the reach of children and other untrained persons.• Do not attempt to view the laser beam through optical tools such as telescopes as serious eye injury may result.
• Always turn the laser tool off when not in use or left unattended for a period of time.• Remove the battery when storing the tool for an extended time (more than 3 months) to avoid damage to the tool should the batteries deteriorate.
• Do not attempt to repair or disassemble the laser tool. If unqualified persons attemptto repair this tool, warranty will be void.
• Use only original Johnson® parts and accessories purchased from your Johnson®
authorized dealer.
6834H-English_Manuals 4/2/13 1:28 PM Page 3

4 ©2013 Johnson Level & Tool - Rev. 1
4. Location of Part/Components
1
2 8
91011
13
14
12
34
5
6
7
1. LCD Display2. Add/Unit of Measure3. Measure Button4. Measure Function
AreaVolumeStake-Out
5. Countdown Measure/Memory Recall
6. Wrist Strap Bracket
7. Laser Emitting Window8. Subtract/Back-Light9. Indirect Measurement/Pythagoras10. Power Button/Clear/Escape11. Measuring Reference Position/
Continuous Laser Mode12. Receiver Window13. Battery Cover14. Corner Measurement
Extension Piece
6834H-English_Manuals 4/2/13 1:28 PM Page 4
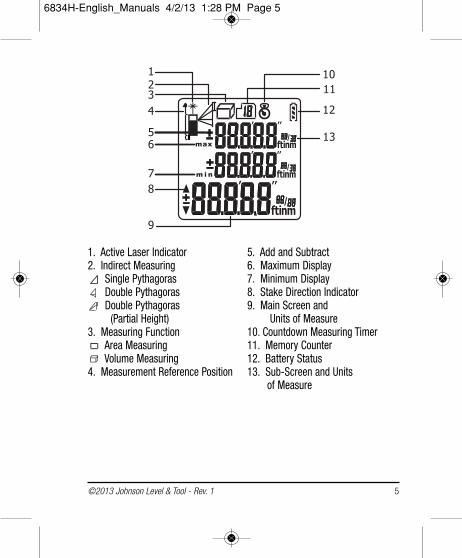
©2013 Johnson Level & Tool - Rev. 1 5
1. Active Laser Indicator2. Indirect Measuring
Single PythagorasDouble PythagorasDouble Pythagoras (Partial Height)
3. Measuring FunctionArea MeasuringVolume Measuring
4. Measurement Reference Position
5. Add and Subtract6. Maximum Display7. Minimum Display8. Stake Direction Indicator9. Main Screen and
Units of Measure10. Countdown Measuring Timer11. Memory Counter12. Battery Status13. Sub-Screen and Units
of Measure
6834H-English_Manuals 4/2/13 1:28 PM Page 5

6 ©2013 Johnson Level & Tool - Rev. 1
Measuring ReferenceRangeRange is specified between a minimum 2-inches to a maximum of 230-feet with an accuracy of 1/16”. Longer ranges will be found by theinstrument but a variance in the accuracy may exist. At night or dusk the range may be greater than during daylight or if the target has poorreflective properties.
Target SurfacesMeasuring errors may occur when aiming at surfaces composed of colorless liquids (e.g. water), glass, Styrofoam or similar semi-permeable surfaces. Aiming at high gloss surfaces may deflect thelaser beam and lead to measurement errors.
Hazards of UseBe aware that errors in distance measurements may occur if the instrument is defective or has been dropped, been misused or modified.
NoteConduct periodic test measurements to ensure the instrument is measuring accurately and consistently. This is most important if theinstrument has been exposed to abnormal use. Always confirm accuracy before and during important measurements. Keep the laserdistance measure optic clean and inspect for damage.
6834H-English_Manuals 4/2/13 1:28 PM Page 6

©2013 Johnson Level & Tool - Rev. 1 7
5. Start Up - Battery Installation
1. Remove battery compartment lid.2. Insert 2-“AA” batteries observing
correct polarity.3. Close battery compartment lid.4. Battery status will be shown in start
up screen.5. When the icon appears there are
approximately 1,000 measurements remaining.
6. Replace batteries when the icon flashes on the screen.7. Remove old batteries and replace with new “AA” alkaline batteries
following steps 1-3 above.
NoteUse only alkaline batteries. If the instrument will not be used for an extended time, remove the batteries to protect against corrosion.
Power ButtonPress Power Button to power up.Press and hold Power Button to power off.
Automatic ShutoffLaser will turn off after 30 secondsUnit will turn off after 3 minutes of inactivity
6834H-English_Manuals 4/2/13 1:28 PM Page 7

8 ©2013 Johnson Level & Tool - Rev. 1
6. Using the ProductTip: Place a white sheet of paper over the targeted measuring surface if error message Err02 occurs to improve the return signal.
MeasuringMeasuring ModesYour Laser Distance Measure has four measuring modes:LengthArea/SquareVolume/CubeIndirect/Pythagoras
Units of MeasureThis instrument has seven units of measure. The desired unit of measure can be set by pressing and holding for two seconds.The main screen will display square feet/square meters or cubicfeet/cubic meters in a decimal format when calculating area and volume.The following units can be set:
Distance Area Volume
1. 0.000 m 0.000 m2 0.000 m3
2. 0.00 ft 0.00 ft2 0.00 ft3
3. 0’0” 1/32 0.00 ft2 0.00 ft3
4. 0.00 in 0.00 ft2 0.00 ft3
5. 0 1/32 in 0.00 ft2 0.00 ft3
6. 0 1/16 in 0.00 ft2 0.00 ft3
7. 0 1/8 in 0.00 ft2 0.00 ft3
6834H-English_Manuals 4/2/13 1:28 PM Page 8

©2013 Johnson Level & Tool - Rev. 1 9
Measurement Reference PositionBe sure to adjust the measuring reference position prior to engaging ameasuring calculation mode. Press and release to scroll through the reference point options
FrontRearCorner Extension Piece
Single Distance Measuring
Press to turn power on.Direct Laser Beam to Target.Press and release .Keep unit still until measurement has beenrecorded. Laser beam will shut off once measurement has been recorded.Recorded measurements (up to 20 measurements will be stored automatically and available for recall, see Memory Recall page 21).Press and release to clear screen.Press and hold to power down unit
6834H-English_Manuals 4/2/13 1:28 PM Page 9

10 ©2013 Johnson Level & Tool - Rev. 1
Measuring with Countdown TimerPress and release .
icon will appear on screen with default setting of three second countdown timer.
Press and release to activate laser (if inactive.)
Direct the laser beam towards the target and hold steady.
Press and release to activate the countdown timer.
Measurement will be recorded on screen.
Repeat these steps for each measurement. Countdown measuring may beused during any measuring function (e.g. Pythagorean, area, volume, etc).
To extend the time from three seconds press and release until you reach desired time. Timer can be set up to 15 seconds.
Adding or SubtractingPress and release the button to activate laser.
Press and release the button to record first measurement.
Press and release (first measurement moves to sub value position
on screen and a “+” sign temporarily appears).
Press and release the button to activate laser. (If inactive.)
Press and release the button to record second measurement.
Press and release to add measurement 1 (stored in sub value position) and measurement 2 together.
6834H-English_Manuals 4/2/13 1:28 PM Page 10

©2013 Johnson Level & Tool - Rev. 1 11
To add another measurement to sum (repeat same measurement sequence) to tally.
To subtract a value in the tally sequence press button.
This laser distance measure has the capability to add or subtract area,volume or indirect measurement calculations. For example, if you needthe square footage of four rooms this instrument will allow you to addeach area calculation together to sum the dimensions of the fourrooms. The same holds true for volume or indirect measurementmodes. Please see each respective measurement section for the step-by-step instructions.
6834H-English_Manuals 4/2/13 1:28 PM Page 11

12 ©2013 Johnson Level & Tool - Rev. 1
Continuous MeasuringThis mode will take continuousmeasurements as you move closer orfurther away from the target.Minimum working range is 2-inches.Maximum working range is 230-feet.
Press and hold the button to activate continuous
measuring mode.
To pause Continuous Measuring mode press or .
To resume Continuous Measuring mode press or to exit
Continuous Measuring mode press .
Minimum / Maximum MeasurementsAs the laser beam is scanned acrossthe measuring surface, the maximum and minimum distance issimultaneously recorded in the subvalue positions on the screen as thelaser is scanning the targeted surface.
6834H-English_Manuals 4/2/13 1:28 PM Page 12

©2013 Johnson Level & Tool - Rev. 1 13
Area Measurement (Square2)Press Power Button to turn power on.
Press button to enter Area mode.A rectangle icon will appear on the upper left side of screen.Observe flashing line for each required measurement (Length & Width).
Follow flashing line instructions on screen to measure width & length.Press and release button to record measurements.Area calculation will be presented in sub value position at top of screen.Note: Unit of measure for area calculation will be displayed in decimalform in square feet or square meters on main screen.
To tally (or sum) the Area calculations of multiple rooms use the following steps:
Suggestions:Be sure you have the desired unit of measure selected.For better visibility press and hold the backlight button to activate the backlight.
6834H-English_Manuals 4/2/13 1:28 PM Page 13

14 ©2013 Johnson Level & Tool - Rev. 1
It is recommended that you test this function prior to taking importantmeasurements. Simply write down each Area calculation on a piece ofpaper and add (or subtract) the Area calculations along with the LaserDistance Measure. This will familiarize you with the process of how thecalculations are determined.
Follow the Area measurement instructions above to enter Area mode.
Once the first Area calculation is taken it will be displayed in the bottomrow on the LCD screen.
Press and release the button.
Upon pressing the button the LCD screen will be cleared however theArea calculation is stored.
The Area mode will remain active on the LCD screen.
Take the second room Area dimensions.
When the Area calculation appears in the bottom row press and releasethe button again.
You will now see the previous Area calculation at the top row being addedto the most recent Area calculation in the middle row.
The sum of both Area calculations will be displayed in the bottom row.
Follow this sequence to continue tallying additional room dimensions.
To subtract an Area measurement simply press and release the button during the sequence and that value will be deducted from the total.
6834H-English_Manuals 4/2/13 1:28 PM Page 14

©2013 Johnson Level & Tool - Rev. 1 15
Volume Measurement (Cube3)Press Power Button to turn power on.
Press and release button two times.A 3- dimensional rectangle icon will appear on the upper left side ofscreen. Observe flashing line for each required measurement (Length,Height & Width).
Follow flashing line instructions on screen to measure length, width &height. Press and release button to record measurements.Volume calculation will be presented in sub value position at top ofscreen.Note: Unit of measure for cube calculation will be displayed in decimalform in cubic feet or cubic meters on main screen.
To tally (or sum) the Volume calculations of multiple rooms usethe following steps:
Suggestions:Be sure you have the desired unit of measure selected.
6834H-English_Manuals 4/2/13 1:28 PM Page 15

16 ©2013 Johnson Level & Tool - Rev. 1
For better visibility press and hold the backlight button to activate the backlight.
It is recommended that you test this function prior to taking importantmeasurements. Simple write down each Volume calculation on a pieceof paper and add (or subtract) the Volume calculations along with theLaser Distance Measure. This will familiarize you with the process ofhow the calculations are determined.
Follow the Volume measurement instructions above to enter Volume mode.
Once the first Volume calculation is taken it will be displayed in the bottomrow on the LCD screen.
Press and release the button.
Upon pressing the button the LCD screen will be cleared however theVolume calculation is stored.
The Volume mode will remain active on the LCD screen.
Take the second Volume dimensions.
When the Volume calculation appears in the bottom row press andrelease the button again.
You will now see the previous Volume calculation at the top row beingadded to the most recent Volume calculation in the middle row.
The sum of both Volume calculations will be displayed in the bottom row.
Follow this sequence to continue tallying additional room dimensions.
To subtract an Volume measurement simply press and release the button during the sequence and that value will be deducted from the total.
6834H-English_Manuals 4/2/13 1:28 PM Page 16

©2013 Johnson Level & Tool - Rev. 1 17
Indirect Measurements (Pythagorean Methods)All Calculations are based on Pythagorean Theorem a2+b2=c2.
This function allows for the measurement of hard to reach jobs.
Follow the order of the flashing lines for each required measurement.
Note: For accurate measurements the instrument’s position must beheld constant. For example, note the position of your hand when taking first measurement. Do not move your hand when preparing totake the second measurement. Simply pivot your wrist (keeping instrument in same position) to align the next target. Then record next measurement.
First Press for SinglePythagoras
Calculates distance betweenPoint 1 and Point 2
Second Press for DoublePythagoras (Summary)
Calculates distance betweenPoint 1 and Point 3
Third Press for Double Pythagoras (Partial Measurement)Calculates distance between
Point 1 and Point 2
6834H-English_Manuals 4/2/13 1:28 PM Page 17

18 ©2013 Johnson Level & Tool - Rev. 1
Indirect Measurement 1 (2 shot measurements FULL Height)Press and release Indirect Measure button once to enter mode.
Position instrument by observing flashing line on screen. (Base of triangle)
Press and release Measure button to record first measurement.
Hold instrument position and pivot to aim laser at second targetobserving flashing line on screen.
Press and release Measure button to record second measurement.
Pythagoras calculation (full height) will be presented in main screenposition at bottom.
Indirect Measurement 2 (3 shot measurements FULL Height)Press and release Indirect Measure button twice to enter Mode.
Aim laser at target-observe flashing lines on screen.
Press and release Measure button to record first measurement.
Hold instrument position and pivot to aim laser at second targetobserving flashing line on screen.
Press and release Measure button to record second measurement.
Hold instrument position and pivot to aim laser at third target.
Press and release Measure button to record third measurement.
Pythagoras calculation (full height) will be presented in main screenposition bottom.
6834H-English_Manuals 4/2/13 1:28 PM Page 18

©2013 Johnson Level & Tool - Rev. 1 19
Indirect Measurement 3 (3 shot measurements PARTIAL Height)Press and release Indirect Measure button three times to enter mode.Aim laser at targeted measuring surface observe flashing line on screen.Press and release Measure button to record first measurement.Hold instrument position and pivot to aim laser at second targetobserving flashing line on screen. Press and release Measure button to record second measurement.Hold instrument position and pivot to aim laser at third target. Press and release Measure button to record third measurement.Pythagoras calculation (partial height) will be presented in main screenposition at bottom.Note: Unit of measure for each Pythagoras function is capable of beingdisplayed in decimal (feet, inches or metric) or inches and feet to 1/32.Simply press and hold to scroll through each unit of measure.
To tally (or sum) the Indirect measurement calculations of multiple rooms use the following steps:
Suggestions:Be sure you have the desired unit of measure selected.For better visibility press and hold the backlight button to activate the backlight.
It is recommended that you test this function prior to taking importantmeasurements. Simple write down each Indirect measurement calculationon a piece of paper and add (or subtract) the Indirect measurement calculations along with the Laser Distance Measure. This will familiarizeyou with the process of how the calculations are determined.
6834H-English_Manuals 4/2/13 1:28 PM Page 19

20 ©2013 Johnson Level & Tool - Rev. 1
Follow the Indirect measurement instructions above to enter Indirect measurement mode.
Once the first Indirect measurement calculation is taken it will be displayed in the bottom row on the LCD screen.
Press and release the button.
Upon pressing the button the LCD screen will be cleared however theIndirect measurement calculation is stored.
The Indirect measurement mode will remain active on the LCD screen .
Take the second Indirect measurement.
When the Indirect measurement calculation appears in the bottom rowpress and release the button again.
You will now see the previous Indirect measurement calculation at the toprow being added to the most recent Indirect measurement calculation inthe middle row.
The sum of both Indirect measurement calculations will be displayed inthe bottom row.
Follow this sequence to continue tallying additional Indirect measurementdimensions.
To subtract an Indirect measurement simply press and release thebutton during the sequence and that value will be deducted from the total.
6834H-English_Manuals 4/2/13 1:28 PM Page 20

©2013 Johnson Level & Tool - Rev. 1 21
Stake-outStake-out mode is designed to mark off repetitive equal distances. For example, fence post installation or framing.
1. To use Stake-out, you have to set one value or “stake” in memory.
2. Turn the unit on.
3. Press and release three times to enter the first stake setting.
4. Press to increase your value.
5. Press to decrease your value.
6. Hold for two seconds to shift to positions.
7. Once value is set, press to enter.
Enter Continuous Measuring Mode by pressing and holding . An arrow will guide direction. This function can be stopped by pressing the red power button .
Memory RecallThis instrument stores your last 20 measurements in order recognizingtheir unit of measure and measuring mode.
Press and hold the button.
Press or buttons to scroll up or down through the recorded measurements.
6834H-English_Manuals 4/2/13 1:28 PM Page 21

22 ©2013 Johnson Level & Tool - Rev. 1
Indoor & Outdoor MeasurementsThis model is designed to take measurements indoors under normalsettings. The measuring surfaces and ambient light are critical factorsto the quality of measurement (indoors an outdoors). Outdoor measurement capability may be limited due to sunlight/UV ray interference. Please note that in some situations the unit may havedifficulty reading the surface you try to measure if lighting or sunlight is intense and/or the surface being measured does not reflect the laser beam appropriately.
BacklightPress and hold the button for two secondsto activate backlight. Repeat this step to turn offbacklight.
6834H-English_Manuals 4/2/13 1:28 PM Page 22

©2013 Johnson Level & Tool - Rev. 1 23
Measurement ErrorsError messages will appear if the unit’s receiver is not getting a sufficient laser return signal.Common surfaces that could cause an error reading:
- Water or other fluids- Translucent to clear surfaces like glass or acrylic- Porous or dark surfaces may require longer reading times or cause an error reading
- Moving surfaces or objects such as curtains- Highly reflective or angled surfaces may deflect the laser beam signal
Error CodesCode Description SolutionErr01 Distance is outside of measuring range Measure in a shorter
distance or longer distance
Err02 Reflected signal is too weak Measure a better surface
Err03 Out of display range Maximum Value: 99,999Split up measurement area into smaller segments.
Err04 Pythagorean theorem calculation error Check and verify value or the sequence of measurements is correct
Err05 Low Battery Install a new battery
Err06 Temperature is outside of working range Measure in an environment within specified working temperature range
Err07 Ambient light is too strong Measure in a darker place (shadow target)
6834H-English_Manuals 4/2/13 1:28 PM Page 23

24 ©2013 Johnson Level & Tool - Rev. 1
Tips from the Pro’sTake more than one measurement in critical situations where accuracyneeds to be greater than an estimation measurement. Take 3-4 measurements from the same position to compare consistency of eachreading. Prior to important measurements verify that the instrument isin proper working order and take sample measurements to of a known distance to verify accuracy.
To accurately measure from the rear of the instrument, use a scrappiece of drywall or other flat material. Extend the material off the corner and butt the LDM up to the material. Then take measurement.
Place a white sheet of paper over the targeted measuring surface iferror message Err02 occurs to improve the return signal.
6834H-English_Manuals 4/2/13 1:28 PM Page 24

©2013 Johnson Level & Tool - Rev. 1 25
7. Technical SpecificationsMeasure Range* 2” - 230’
Accuracy* ± 1/16”
Measure Speed* 0.5 seconds
Laser Type 650 nm, ± 10nm, Class II, ≤ 1mW
Power Supply 2 - “AA” Alkaline Batteries (included)
Battery Life 10,000 measurements
Dimensions 4.33” x 1.77” x 1.18”(110 x 45 x 30 mm)
Working Temperature 23°F to 104°F (-5°C to +40°C)
Storage Temperature -4°F to 140°F (-20°C to +60°C)
Auto Shut-off Laser 30 seconds
Auto Shut-off Main Power 3 minutes
IP Protection Class 54
*The working range and accuracy is dependent on how well laserlight is reflected from the surface for the target and with increasedbrightness of the ambient light intensity measuring accuracy maydeteriorate.
6834H-English_Manuals 4/2/13 1:28 PM Page 25

26 ©2013 Johnson Level & Tool - Rev. 1
8. Product WarrantyJohnson Level & Tool offers a two year limited warranty on our laserdistance measure products. You can obtain a copy of the limited warranty for a Johnson Level & Tool product by contacting JohnsonLevel & Tool's Customer Service Department as provided below or byvisiting us online at www.johnsonlevel.com. The limited warranty foreach product contains various limitations and exclusions.
NOTE: The user is responsible for the proper use and care of the product.
For further assistance, or if you experience problems with this productthat are not addressed in this instruction manual, please contact ourCustomer Service Department.
In the U.S., contact Johnson Level & Tool’s Customer ServiceDepartment at 888-9-LEVELS.
In Canada, contact Johnson Level & Tool’s Customer ServiceDepartment at 800-346-6682.
6834H-English_Manuals 4/2/13 1:28 PM Page 26
©2013 Johnson Level & Tool - Rev. 1 27
9. Product RegistrationEnclosed with this instruction manual you will find a warranty registration card to be completed for your product. You will need tolocate the serial number for your product that is located inside thebattery compartment. PLEASE NOTE THAT IN ADDITION TO ANYOTHER LIMITATIONS OR CONDITIONS OF JOHNSON LEVEL &TOOL'S LIMITED WARRANTY, JOHNSON LEVEL & TOOL MUST HAVERECEIVED YOUR PROPERLY COMPLETED WARRANTY CARD WITHIN 30 DAYS OF YOUR PURCHASE OF THE PRODUCT OR ANYLIMITED WARRANTY THAT MAY APPLY SHALL NOT APPLY ANDTHERE SHALL BE NO WARRANTY.
6834H-English_Manuals 4/2/13 1:28 PM Page 27

28 ©2013 Johnson Level & Tool - Rev. 1
6834H-English_Manuals 4/2/13 1:28 PM Page 28
Related Documents