Laplink® PCmover® Enterprise Client The Only Software that Moves Programs, Files, and Settings to a New PC! User Guide Customer Service/Technical Support: Web: www.laplink.com/enterprise/documentation E-mail: [email protected] Tel (USA): +1 (425) 952-6001 Fax (USA): +1 (425) 952-6002 Tel (UK): +44 (0) 870-2410-983 Fax (UK): +44 (0) 870-2410-984 Laplink Software, Inc. 600 108th Ave. NE, Suite 610 Bellevue, WA 98004 U.S.A. Copyright / Trademark Notice © Copyright 2015 Laplink Software, Inc. All rights reserved. Laplink, the Laplink logo, Connect Your World, and PCmover are registered trademarks or trademarks of Laplink Software, Inc. in the United States and/or other countries. Other trademarks, product names, company names, and logos are the property of their respective holder(s). MN-PCMENT-CL-EN-10 (REV. 11/04/2015)

Welcome message from author
This document is posted to help you gain knowledge. Please leave a comment to let me know what you think about it! Share it to your friends and learn new things together.
Transcript

Laplink® PCmover® Enterprise Client The Only Software that Moves Programs, Files, and Settings to a New PC!
User Guide Customer Service/Technical Support: Web: www.laplink.com/enterprise/documentation E-mail: [email protected] Tel (USA): +1 (425) 952-6001 Fax (USA): +1 (425) 952-6002 Tel (UK): +44 (0) 870-2410-983 Fax (UK): +44 (0) 870-2410-984 Laplink Software, Inc. 600 108th Ave. NE, Suite 610 Bellevue, WA 98004 U.S.A. Copyright / Trademark Notice © Copyright 2015 Laplink Software, Inc. All rights reserved. Laplink, the Laplink logo, Connect Your World, and PCmover are registered trademarks or trademarks of Laplink Software, Inc. in the United States and/or other countries. Other trademarks, product names, company names, and logos are the property of their respective holder(s). MN-PCMENT-CL-EN-10 (REV. 11/04/2015)
2
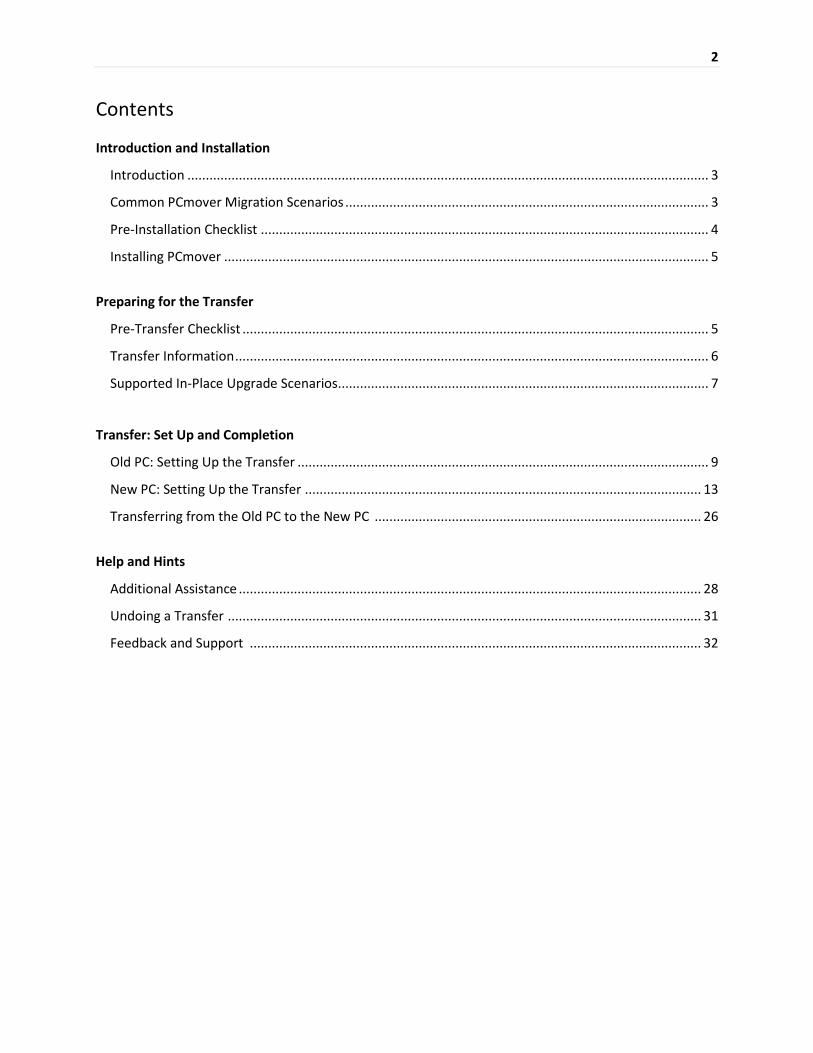
Contents
Introduction and Installation Introduction .............................................................................................................................................. 3
Common PCmover Migration Scenarios ................................................................................................... 3
Pre-Installation Checklist .......................................................................................................................... 4
Installing PCmover .................................................................................................................................... 5
Preparing for the Transfer
Pre-Transfer Checklist ............................................................................................................................... 5
Transfer Information ................................................................................................................................. 6
Supported In-Place Upgrade Scenarios ..................................................................................................... 7
Transfer: Set Up and Completion
Old PC: Setting Up the Transfer ................................................................................................................ 9
New PC: Setting Up the Transfer ............................................................................................................ 13
Transferring from the Old PC to the New PC ......................................................................................... 26
Help and Hints
Additional Assistance .............................................................................................................................. 28
Undoing a Transfer ................................................................................................................................. 31
Feedback and Support ........................................................................................................................... 32
3
Laplink PCmover Enterprise is a business-class migration utility capable of automatically moving selected
files, users, settings, and programs from an old PC to the new PC. Transferring a PC or laptop across a
network, Laplink USB cable, Laplink Ethernet cable or using external media or storage can be as simple
as a single click. Computers with multiple users have the option to transfer some or all of the users at
once, with security information about file ownership and access control preserved for each user.
Note: This user guide provides instructions on using the PCmover Enterprise Client to perform a
transfer. Before running the Client, the PCmover Enterprise policy file should first be configured.
Through the PCmover Enterprise Policy Manager, you can customize the PCmover transfer experience
by choosing which screens you want shown during the transfer and configuring other settings.
For instructions on using PCmover Enterprise to configure the policy file, see the PCmover Enterprise
Policy Manager user guide on Laplink’s Web site:
www.laplink.com/enterprise/documentation
Common PCmover Migration Scenarios 1. Transfer a user from an old machine to a new machine with the same or newer
Windows Operating System.
2. Upgrade a user’s machine to a newer version OS, including Windows 10 (32-bit and 64-bit).
Supported in-place upgrade scenarios are:
A. Performing a “custom” Windows installation (e.g., using Windows DVD or
bootable USB flash drive). For migration instructions for this scenario, see the
PCmover Windows Upgrade Assistant user guide on Laplink’s Web site:
www.laplink.com/pcmover/inplaceupgrade/pro8
B. Applying a “base” image or performing a “clean” Windows installation.
Note: For more details on these two in-place upgrade scenarios, see the section ‘Supported In-
Place Upgrade Scenarios’.
Option B, otherwise known as “File Storage Device”, is available as a
migration option if it was specifically included in your company’s PCmover
Enterprise purchase.
3. Restore a user from an image file or physical hard drive. For migration instructions for this
scenario, see the PCmover Image & Drive Assistant user guide on Laplink’s Web site:
4
www.laplink.com/pcmover/ida/pro8
4. Transfer applications, users, data, and settings from Physical to Virtual environment.
Pre-Installation Checklist (both PCs) The source PC is the “old” PC that contains the applications, files, and settings that you wish to move to
the destination, or “new” PC.
System requirements for each PC:
• CPU: Intel® or compatible Pentium® or higher processor.
• RAM: Same as minimum required by operating system.
• Available hard disk space: 200 MB.
• Windows 10/8.1/8/7/Vista/XP
FAQ: PCmover does not support full server restorations, such as is found on Windows Server Editions.
It will execute on these operating systems and can be used to restore accounts and locally
installed applications. However, it will not properly restore any of the systems services and
settings for items such as the Domain Name Service, SQL Server, Exchange, IIS, or Terminal
Licensing.
• The operating system on the new PC must be the same as or newer than the operating system
on the old PC.
• All Windows Important Updates should be applied to the NEW PC. To open Windows Update:
• Windows 10: From Windows Search (‘Search the Web and Windows’), type ‘Windows Update’ and Enter. Click Check for Update.
• Windows 8: Press the Windows key + X. In the menu that appears, click Control Panel. Then, click System and Security and click Windows Update. In the left pane, click Check for updates and choose to install all Important Updates.
• Windows 7 and Windows Vista: Click the Start button, click All Programs, and then click Windows Update. In the left pane, click Check for updates and choose to install all Important Updates.
• Do not plug in the Laplink USB cable or Laplink Ethernet cable until directed to do so later by the
PCmover application.
5
IMPORTANT - License Information: PCmover Enterprise is offered as either a volume license (fixed
quantity) or site license (annualized license). For questions regarding which license is right for you,
please contact your Laplink Account Representative or the Laplink Corporate Sales team by email
[email protected] or phone 866-952-6013.
Installing PCmover PCmover Enterprise can run from a “remote” location, like a file-server, USB flash drive, or other remote
folder location, avoiding the need to install PCmover locally on every PC involved in the transfer.
To begin, install the PCmover Enterprise Client locally by following these steps:
1. Double-click on the PCmover setup file in the folder where the installation file was saved. Follow
the on-screen prompts.
2. After confirming installation is complete, copy and paste the entire “PCmover Client” directory
to the remote location it will be run from (such as external drive, USB flash drive, or network
folder).
Note: When PCmover Enterprise is installed locally, default location of the PCmover Client
Directory is:
C:\Program Files (x86)\Laplink\PCmover Enterprise\PCmover Client
3. When the copying process is complete, navigate to the remote directory location and double-
click pcmover.exe to launch the application.
Pre-Transfer Checklist (both PCs) The following items should be addressed and/or completed on both of your PCs before starting
PCmover.
• PCmover Installation: PCmover has been installed on both PCs, or is installed to a folder with
read/write access (USB flash drive, file-share, etc…).
• Administrator-level Permissions: On some operating systems, you will need Administrator-level
permissions to do a transfer.
• Network Domain PCs: Corporate PCs on a network domain should be connected and logged into
the domain at least once prior to the transfer.
• Hard Disk Space (Old PC vs. New PC): The hard drive(s) on the new computer has as much or
more disk space as that on the old computer.

6
• Windows Versions (Old vs. New): The new PC has the same Windows version as or newer
Windows version than that installed on the old PC.
• Internet Explorer Versions (Old vs. New): The new PC should have the same or newer version of
Internet Explorer as that installed on the old PC.
• Computer Cleanup and Backup: Laplink recommends using anti-virus/anti-spyware and a PC
backup or imaging utility.
• PC Power Settings/Options: Screen savers, hibernation protocols, and power-saving options on
both computers should be turned OFF (i.e. All power management options in the Control Panel
should be set to “Never” so they are completely disabled). Both computers need to remain on
and completely “awake” during the transfer and must not go into screensaver or
sleep/hibernation mode.
A laptop PC must be plugged into a power outlet, rather than running on its batteries, as the
transfer is likely to take a longer time than the battery life.
• Disable All Scheduled Tasks/Programs: Using the Windows Task Scheduler (within
Administrative Tools), turn off any tasks or programs that are set to automatically run, as these
will interfere with a PCmover transfer.
• Exit All Programs: Exit all programs that are running on both computers. Turn off system tools
such as virus scanners, spyware scanners, firewall software, and desktop search utilities on both
PCs. Due to the nature of these types of applications, you should choose not to transfer them, as
they are unlikely to transfer correctly.
Note: As a safeguard, PCmover makes it possible, if necessary, to revert back to the original state and
settings of your new PC. See the section ‘Undoing a Transfer’ of this guide for instructions.
Transfer Information • Set Up Old PC First: To perform a PCmover transfer, start PCmover on your old PC first.
Complete the PCmover screens as directed in the section Old PC: Setting Up the Transfer.
Then, when instructed to do so by PCmover, start PCmover on the new PC. Complete the
screens to prepare your new PC and perform the transfer (beginning with the section New PC:
Setting Up the Transfer).
• Length of Time: The transfer may take quite a while, depending on several factors: the size of
the hard drive(s) you are transferring, the amount of data on them, their level of fragmentation,

7
the number and size of applications and other files and folders you are transferring, and other
factors.
• Application/Folder Selection: PCmover allows you to choose which applications and files you
would like to transfer. For more details, see Customize the Transfer.
• Updates For Applications: Some older applications may not work correctly after transfer
without an update, especially if the operating system on the new PC is a more recent one than
on the old. If you find this to be the case, please check with the application’s manufacturer for
an update.
IMPORTANT: Some applications with a copy-protection process known as Digital Rights Management
may not function correctly after the transfer. These include such music-sharing programs as iTunes,
MusicMatch and Napster, which will probably require reactivation on the new PC, possibly a Repair
done through the Windows Control Panel, and possibly reinstallation. Certain other applications, such
as Microsoft Office, may also require reactivation.
Supported In-Place Upgrade Scenarios A. Performing a “custom” Windows installation (e.g., using Windows DVD or
bootable USB flash drive)
The PCmover Windows Upgrade Assistant option is used after performing a “custom” install of a
new Windows version on the same PC (not a “clean” install where ALL pre-existing data is
permanently deleted).
When installing Windows using the “custom” method, a Windows.old folder will be created and
populated with the PC’s data. This folder will remain on the PC following the Windows operating
system upgrade.
PCmover’s Windows Upgrade Assistant feature can then be used afterwards to access the
Windows.old folder and restore the saved data, apps, users, and settings onto the new
Windows operating system.
If you have already completed the “custom” Windows installation, click Next to continue.
B. Applying a “base” image or performing a “clean” Windows installation
If a base image is applied to the PC or if a “clean” install of Windows is performed on the PC, ALL
pre-existing data will be permanently deleted.

8
PCmover can be used, prior to applying an image or installing Windows, to transfer all data,
apps, users and settings to external storage. Then, after applying the image or installing
Windows, PCmover can transfer everything back to the PC.
For this workflow, select the PC to PC Transfer option on the Welcome to PCmover screen and
proceed with a migration as follows:
1. Select Old PC as the source PC prior to applying an image or performing a “clean” installation
of Windows.
2. Select File Storage Device for the connection method to create a Transfer File and save it to
external storage.
3. Apply the new image or install Windows.
4. Install and run PCmover again, but this time select New PC.
5. Select File Storage Device again.
6. Import the Transfer File from the saved location.
Note: File Storage Device is available as a migration option if it was specifically included in
your company’s PCmover Enterprise purchase.
9
Old PC: Setting Up the Transfer
IMPORTANT: The sections ‘PCmover Pre-Transfer Checklist’ and ‘Transfer Information’ should be
reviewed and completed before beginning a PCmover transfer.
Note: The following instructions and screenshots reflect a PCmover transfer in which every screen and
every option is shown to the user. If changes have been made to the policy file to customize the
transfer, the PCmover transfer experience may not include some or all of the following screens and/or
options.
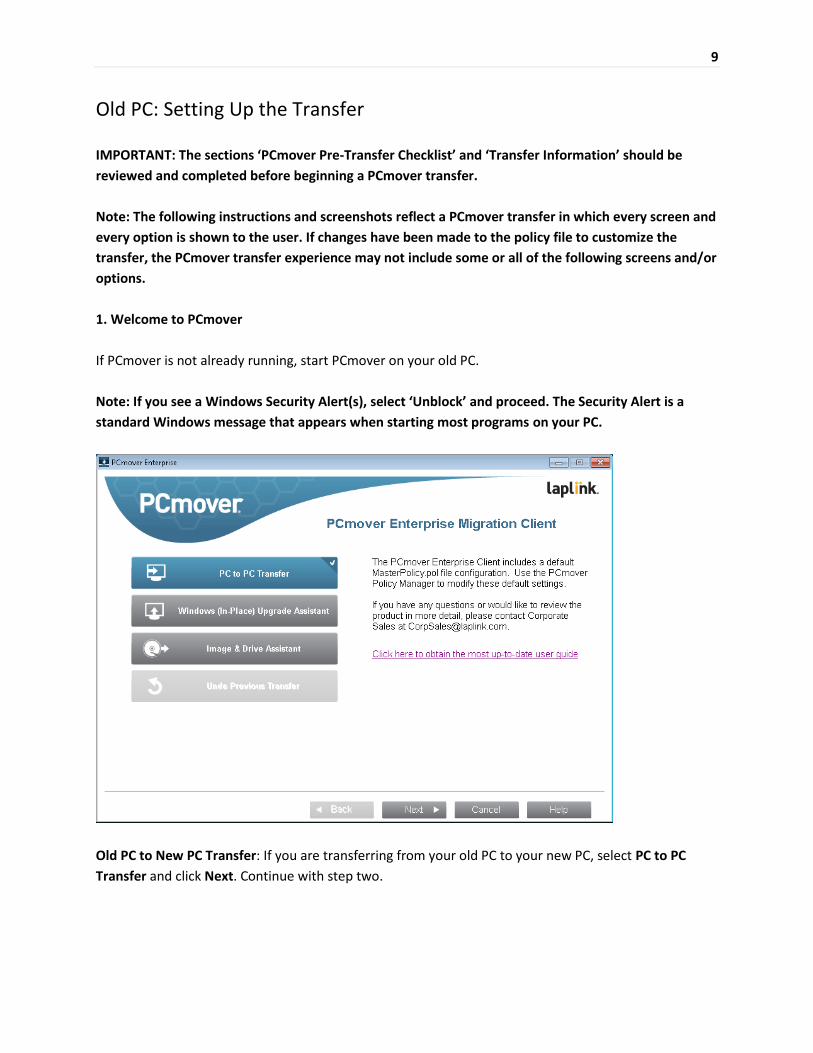
1. Welcome to PCmover
If PCmover is not already running, start PCmover on your old PC.
Note: If you see a Windows Security Alert(s), select ‘Unblock’ and proceed. The Security Alert is a
standard Windows message that appears when starting most programs on your PC.
Old PC to New PC Transfer: If you are transferring from your old PC to your new PC, select PC to PC
Transfer and click Next. Continue with step two.

10
Additional Transfer Options
• PCmover Windows Upgrade Assistant: The PCmover Windows Upgrade Assistant option is used
after performing a “custom” install of a new Windows version on the same PC (not a “clean”
install where ALL pre-existing data is permanently deleted).
See the PCmover Windows Upgrade Assistant user guide on Laplink’s Web site for complete
instructions:
http://www.laplink.com/pcmover/inplaceupgrade/pro8
• PCmover Image & Drive Assistant: If you are restoring a user from an image file or physical hard
drive, select Image & Drive Assistant and click Next.
See the PCmover Image & Drive Assistant user guide on Laplink’s Web site:
www.laplink.com/pcmover/ida/pro8
2. PC to PC Transfer: Requirements and Limitations
Required Prior to Transfer: Make sure these important items are completed before continuing with the
PCmover transfer.
11
Transfer Limitations: Review important information about transferring certain types of applications.
After addressing all items listed, check the box and click Next.
3. Preparing Computers for Transfer
Choose Old (computer) and click Next.
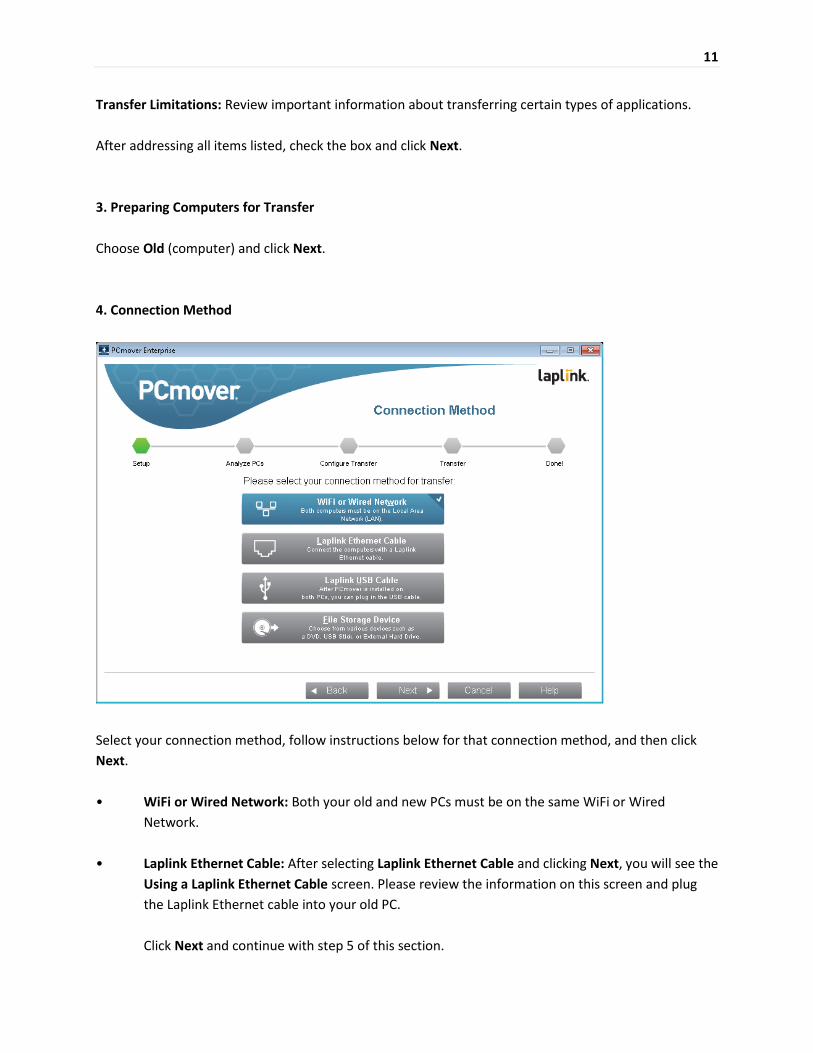
4. Connection Method
Select your connection method, follow instructions below for that connection method, and then click
Next.
• WiFi or Wired Network: Both your old and new PCs must be on the same WiFi or Wired
Network.
• Laplink Ethernet Cable: After selecting Laplink Ethernet Cable and clicking Next, you will see the
Using a Laplink Ethernet Cable screen. Please review the information on this screen and plug
the Laplink Ethernet cable into your old PC.
Click Next and continue with step 5 of this section.
12
Note: As instructed on this screen, you should ONLY plug the Laplink Ethernet cable into your
old PC. Do NOT plug the cable into your new PC yet. You will be instructed on the new PC
when to complete this step.
• Laplink USB Cable: Whether PCmover is installed locally or you are running it from a remote
location (e.g., USB flash drive), the Laplink USB Cable drivers must be installed separately on
each PC before connecting with a Laplink USB Cable.
The installation of PCmover includes a simple wizard (USBDriversSetup2x.exe) to install the
Laplink USB Cable drivers:
<Drive or Path>:\Program Files (x86)\Laplink\PCmover Enterprise\PCmover
Client\USBDriversSetup2x.exe
You can complete the installation by opening USBDriversSetup2x.exe on each PC, whether that
file resides on the same local PC or in a remote location. With the USB drivers installed on both
PCs, plug the USB cable into both PCs.
Windows XP Note: If the ‘New Hardware Detected Wizard’ is displayed when you plug in the
USB cable on Windows XP, select “No, not this time”, click ‘Next’, and ‘Next’.
• File Storage Device: If you are applying a “base” image or performing a “clean” Windows
installation on the same PC, PCmover can be used as part of the upgrade process.
Prior to applying an image or installing Windows, use PCmover to transfer all data, apps, users
and settings to external storage. Then, after applying the image or installing Windows, PCmover
can transfer everything back to the PC.
To use this option, see the workflow steps in the section ‘Supported In-Place Upgrade
Scenarios’.
Note: File Storage Device is available as a migration option if it was specifically included in
your company’s PCmover Enterprise purchase.
5. In Progress
PCmover is now waiting for the connection from your new computer. Please proceed to the next section
to prepare your new PC for the transfer.

13
New PC: Setting Up the Transfer
Note: The following instructions and screenshots reflect a PCmover transfer in which every screen and
every option is shown to the user. If changes have been made to the policy file to customize the
transfer, the PCmover transfer experience may not include some or all of the following screens and/or
options.
1. Welcome to PCmover
Start PCmover on your new PC. Select PC to PC Transfer and click Next.
2. Transfer to a New Computer: Requirements and Limitations
Required Prior to Transfer: Make sure these important items are completed before continuing with the
PCmover transfer.
Transfer Limitations: Review important information about transferring certain types of applications.
After addressing all items listed, check the box and click Next.
3. Preparing Computers for Transfer
Choose New (computer), and click Next.

14
4. Serial Number Validation
Enter your name, e-mail address, and serial number, and click Next.
• Serial Number Location: When you purchased the product, you should have received a
confirmation e-mail containing your serial number. If you no longer have the e-mail message,
visit the “My Downloads” page of your Laplink Support Account at:
http://www.laplink.com/mysupport/myStore.asp
Once there, enter the e-mail address you supplied when you purchased the product. If you have
forgotten your password, please enter your e-mail address and click on the Forgot Your
Password link.
• Serial Number Validation: When you enter your serial number into PCmover, it is “validated”
(checked for authenticity) using your new computer’s Internet connection. If you are connected
to the Internet but are unable to continue past the Serial Number Validation screen, first
disable all security software, such as virus scanning, spyware scanning, and firewalls, and try
again.
If that does not work, click No Internet Access. A screen will appear with your Network Name
and Session Code.

15
You will need the Network Name and the Session Code, along with your PCmover Serial
Number, in order to obtain the Validation Code, which will be used in place of your serial
number to activate the product.
On another PC with Internet access, go to:
http://www.laplink.com/validation
Select PCmover, and follow the instructions on the page.
If an Internet connection is not available to you on any PC, please call our Customer Service
team at (425) 952-6001.
• Proxy Servers: PCmover supports Basic Authentication and NTLM Proxy Servers.
If you are using a Basic Authentication Proxy Server, a dialog box will appear after you enter
your serial number, asking you for your credentials. Enter your credentials and click OK.
If you are using an NTLM proxy server or no proxy server at all, this dialog box will not appear.
Continue to step 5, “Connection Method”.
5. Connection Method
Select the same method of data transfer as you selected on the old PC, follow instructions below for
that connection method, and then click Next.
• WiFi or Wired Network: Both your old and new PCs must be on the same WiFi or Wired
Network. Once you have selected WiFi or Wired Network and clicked Next, you will see the
Identify Old Computer screen.
If the old PC is not listed, click Browse to find the old computer. If you do not see your old
computer in the list, click Re-scan. Select your old computer and click OK.
Click Next and proceed with step 8 of this section.
Note: If your old computer isn’t listed after clicking ‘Re-scan’, click ‘Cancel’ on both PCs to exit
PCmover. Disable all firewall, antivirus, and antispyware applications on both PCs, confirm
that both your old PC and new PC are connected to the Network and restart PCmover on both
PCs.

16
• Laplink Ethernet Cable: After selecting Laplink Ethernet Cable and clicking Next, you will see the
Using a Laplink Ethernet Cable screen. Please review the information on this screen, plug the
Laplink Ethernet cable into your new PC, and click Next.
On the Identify Old Computer screen, your old PC should be listed in the Network Name text
field.
Click Next and proceed with step 6 of this section.
Note: Per the instructions, the Laplink Ethernet cable should now be plugged into both
computers, connecting your old and new PCs.
If you do not see your old PC listed in the text field, wait a moment for the connection
between PCs to be established. If connection has not occurred after 60 seconds, click ‘Browse’
and manually select your old PC from the list.
If you do not see your old computer in the list, click ‘Re-scan’. Select your old computer and
click ‘OK’.
If your old computer isn’t listed after clicking ‘Re-scan’, click ‘Cancel’ on both PCs to exit
PCmover. Verify the Laplink Ethernet cable is plugged into both PCs and restart PCmover.
• Laplink USB Cable: Per the previous instructions for the old PC, the USB cable should already be
plugged into both PCs.
Note: If you see an error message on the New PC stating, ”Cannot connect to computer”,
please verify you have installed the Laplink USB Cable drivers on each PC, and confirm the
cable is plugged into both PCs.
See step 4 in the ‘Old PC’ section for instructions on installing the Laplink USB Cable drivers.
• File Storage Device: If you are applying a “base” image or performing a “clean” Windows
installation on the same PC, PCmover can be used as part of the upgrade process.
Prior to applying an image or installing Windows, use PCmover to transfer all data, apps, users
and settings to external storage. Then, after applying the image or installing Windows, PCmover
can transfer everything back to the PC.
To use this option, see the workflow steps in the section ‘Supported In-Place Upgrade
Scenarios’.
17
Note: File Storage Device is available as a migration option if it was specifically included in
your company’s PCmover Enterprise purchase.
6. Depending on the configuration of your PCs, you may need to review certain settings before proceeding with the transfer. In this case, the Standard or Customized screen will not appear and the Customize the Transfer screen will be presented next. Any settings requiring review will be marked with an “Attention” symbol. • Standard (Recommended): To transfer using default settings, select Standard and click Next.
Continue with step 8, Ready to Transfer (skipping the Customize the Transfer screens). • Customize Application Selection: Same as ‘Standard’ but you can review and edit the
applications to be transferred. • Full Customization: Change any of the default transfer settings, such as user accounts, drives,
folders, and file types.
18
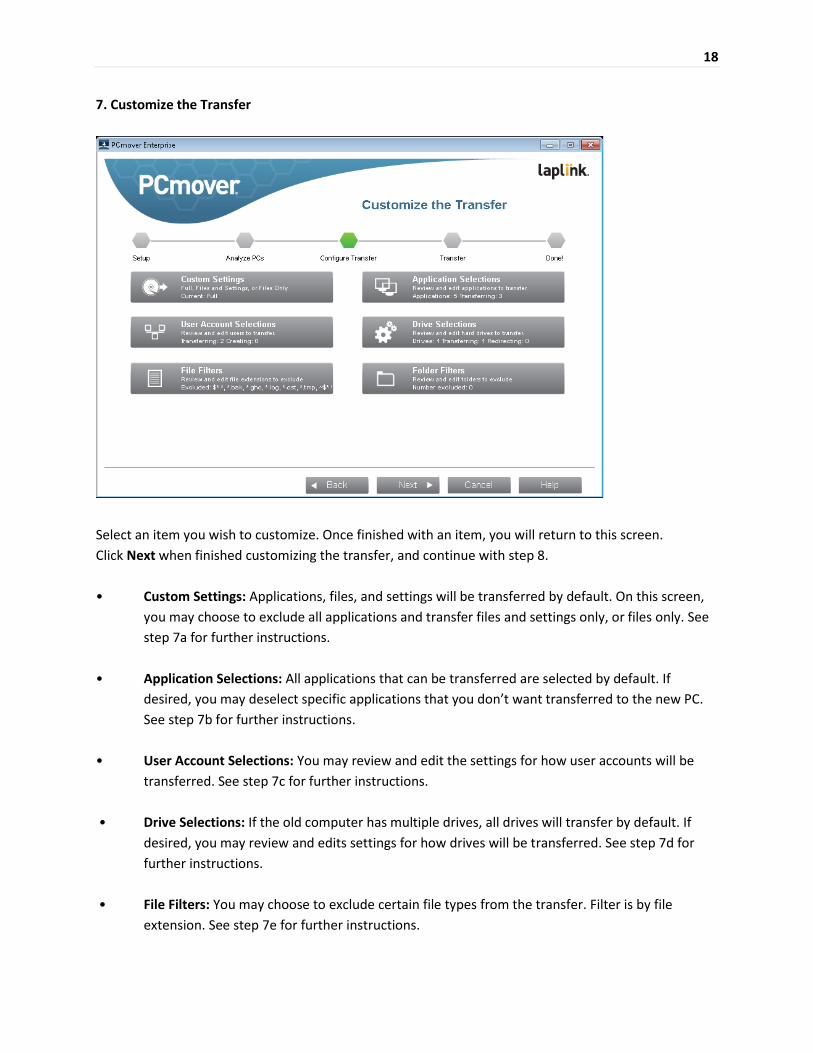
7. Customize the Transfer
Select an item you wish to customize. Once finished with an item, you will return to this screen.
Click Next when finished customizing the transfer, and continue with step 8.
• Custom Settings: Applications, files, and settings will be transferred by default. On this screen,
you may choose to exclude all applications and transfer files and settings only, or files only. See
step 7a for further instructions.
• Application Selections: All applications that can be transferred are selected by default. If
desired, you may deselect specific applications that you don’t want transferred to the new PC.
See step 7b for further instructions.
• User Account Selections: You may review and edit the settings for how user accounts will be
transferred. See step 7c for further instructions.
• Drive Selections: If the old computer has multiple drives, all drives will transfer by default. If
desired, you may review and edits settings for how drives will be transferred. See step 7d for
further instructions.
• File Filters: You may choose to exclude certain file types from the transfer. Filter is by file
extension. See step 7e for further instructions.

19
• Folder Filters: You may choose to exclude certain folders from the transfer. See step 7f for
further instructions.
Note: Any exceptions(s) marked with the “Attention” symbol must be reviewed before
continuing.
7a. Custom Settings
• To continue with a full transfer, leave the default Full selected, and click Done. Otherwise, you
may select Files and Settings only or Files only, depending on your transfer needs.
Note: For most transfers, no change from the default is needed. However, if you do choose
‘Files and Settings only’ or ‘Files only’, the other ‘Customize the Transfer’ screens will operate
in conjunction with this selection.
Your choices on certain screens may also produce a different transfer result than if you had
chosen to perform a full transfer. See specific screens for more information.
• To make other custom changes to the transfer settings, click Additional Settings.
Note: Only specialized transfers will need revision of these settings. Be very careful when
changing from the defaults, as any changes will have a significant impact on the transfer
results.
20
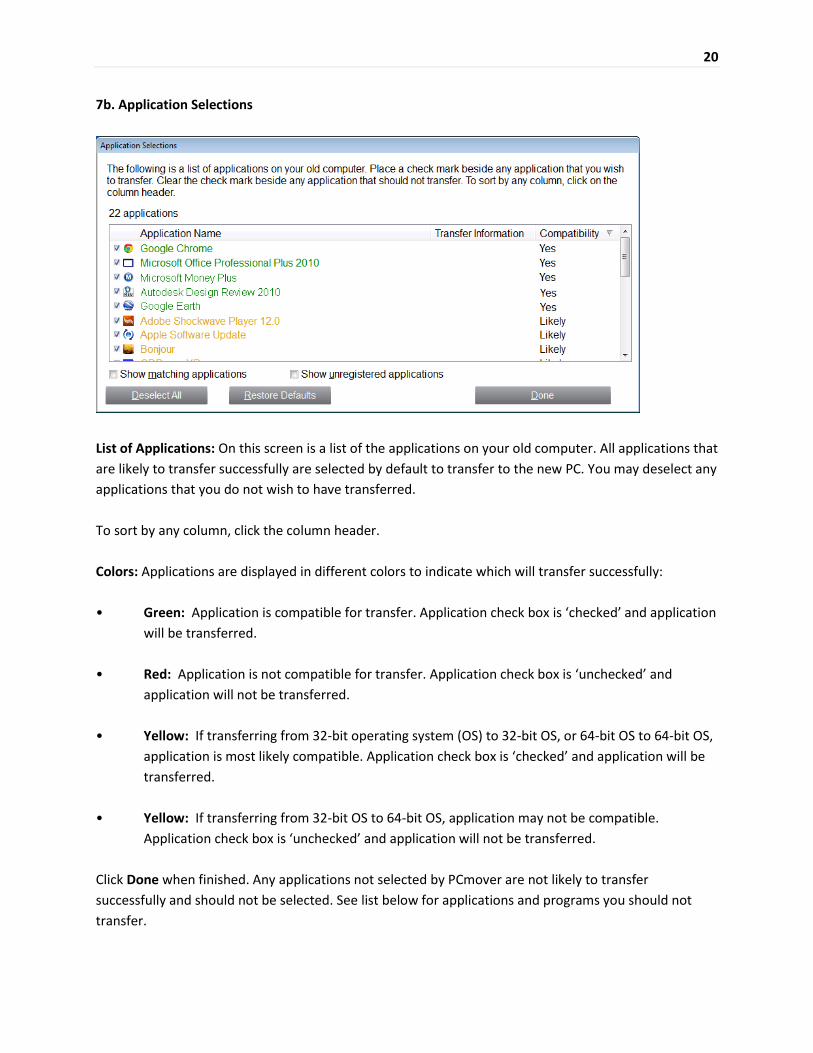
7b. Application Selections
List of Applications: On this screen is a list of the applications on your old computer. All applications that
are likely to transfer successfully are selected by default to transfer to the new PC. You may deselect any
applications that you do not wish to have transferred.
To sort by any column, click the column header.
Colors: Applications are displayed in different colors to indicate which will transfer successfully:
• Green: Application is compatible for transfer. Application check box is ‘checked’ and application
will be transferred.
• Red: Application is not compatible for transfer. Application check box is ‘unchecked’ and
application will not be transferred.
• Yellow: If transferring from 32-bit operating system (OS) to 32-bit OS, or 64-bit OS to 64-bit OS,
application is most likely compatible. Application check box is ‘checked’ and application will be
transferred.
• Yellow: If transferring from 32-bit OS to 64-bit OS, application may not be compatible.
Application check box is ‘unchecked’ and application will not be transferred.
Click Done when finished. Any applications not selected by PCmover are not likely to transfer
successfully and should not be selected. See list below for applications and programs you should not
transfer.
21
Do not transfer:
• Applications incompatible with the operating system on the new PC. Occasionally this may occur
when transferring from an older operating system to a newer operating system, or when
transferring from a 32-bit OS to a 64-bit OS.
• Applications already installed on the new PC.
• Applications with a trial version installed on one PC and the full version on the other PC.
IMPORTANT: Trial versions of applications should always be uninstalled from the new PC
before transferring a full version of the application from the old PC.
• System tools, such as virus scanners, spyware detectors, firewall software, and desktop search
utilities, which are unlikely to transfer correctly.
IMPORTANT: “Unregistered Applications” are those that do not appear in the Add/Remove Programs
Control Panel in Windows. The term “Unregistered” does not, in this case, refer to whether you have
registered a given application with its manufacturer.
This Unregistered Applications list will often include applications that are specific to hardware
installed on the old computer. These will only work on the hardware for which they are designed, and
may interfere or conflict with hardware for which they are not designed.
Note for ‘Files and Settings only’ and ‘Files only’ transfers: Applications will not be transferred, based
on your previous selection.
22
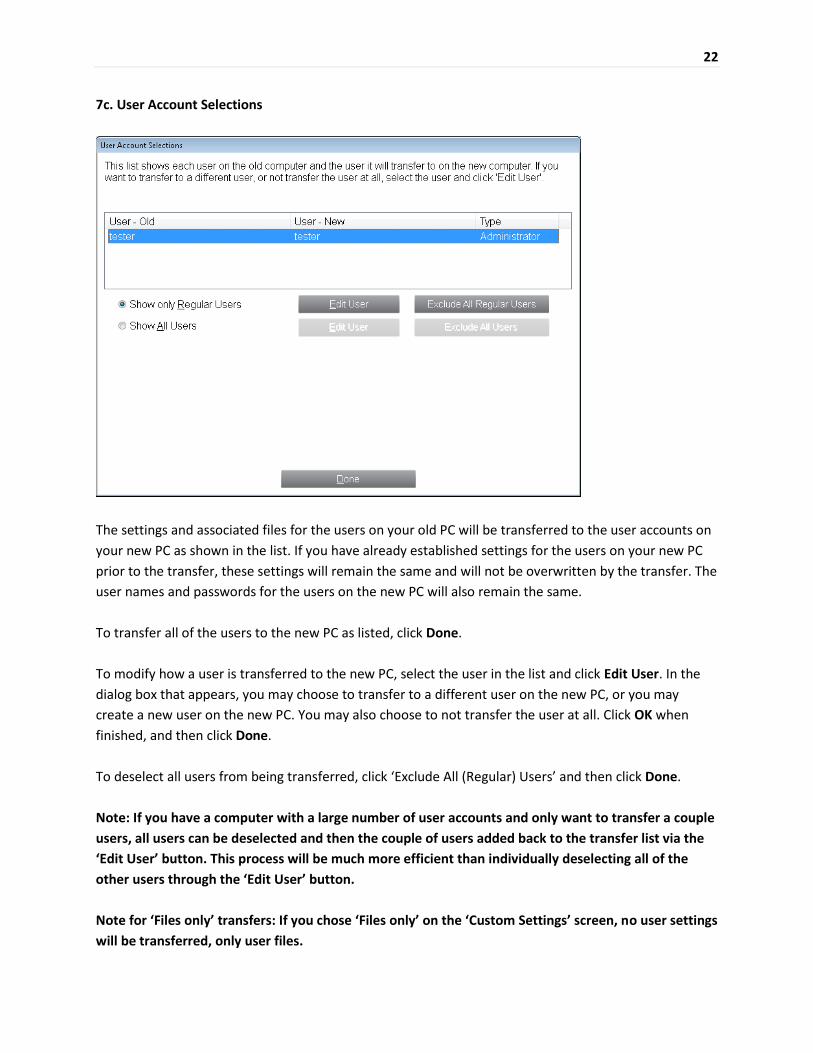
7c. User Account Selections
The settings and associated files for the users on your old PC will be transferred to the user accounts on
your new PC as shown in the list. If you have already established settings for the users on your new PC
prior to the transfer, these settings will remain the same and will not be overwritten by the transfer. The
user names and passwords for the users on the new PC will also remain the same.
To transfer all of the users to the new PC as listed, click Done.
To modify how a user is transferred to the new PC, select the user in the list and click Edit User. In the
dialog box that appears, you may choose to transfer to a different user on the new PC, or you may
create a new user on the new PC. You may also choose to not transfer the user at all. Click OK when
finished, and then click Done.
To deselect all users from being transferred, click ‘Exclude All (Regular) Users’ and then click Done.
Note: If you have a computer with a large number of user accounts and only want to transfer a couple
users, all users can be deselected and then the couple of users added back to the transfer list via the
‘Edit User’ button. This process will be much more efficient than individually deselecting all of the
other users through the ‘Edit User’ button.
Note for ‘Files only’ transfers: If you chose ‘Files only’ on the ‘Custom Settings’ screen, no user settings
will be transferred, only user files.

23
7d. Drive Selections
If the old PC contains more disk drives than the new PC, PCmover will create a folder for each drive that
does not exist on the new PC.
To transfer all of the drives to the new PC as listed, click Done.
To modify how a drive is transferred to the new PC, select the drive and click Edit Drive. In the dialog
box that appears, you may modify the drive and/or default folder to which the drive from the old PC is
transferred. Make these changes in the “Transfer to New Directory” text field. You may also choose to
not transfer the drive from the old PC. Click OK when finished, and then click Done.
Note: To run properly, some applications require installation to the same drive on which they were
originally installed. If any applications that were installed on a secondary drive do not work on the
new machine, uninstall them from the secondary drive and reinstall them on the primary drive.
Note for ‘Files and Settings only’ and ‘Files only’ transfers: Your choices on this screen will only affect
settings and/or files (as applicable) on each drive. Applications will not be transferred, even if you
choose to transfer a specific drive that contains applications.

24
7e. File Filters
PCmover allows you to list file types to exclude from the transfer.
Some file types are already set up for you in this screen, such as temporary files (.tmp). These files are
generally small, but if you have a large number of them, they can take up quite a bit of hard drive space.
To exclude any of these file types, select the check box(es).
To exclude other file types not shown on this screen, click Add and type the file type extension(s) of the
file(s) you wish to exclude. For instance, if you want to exclude all files in .jpg format, this is where you
list “*.jpg”. Click OK when finished listing file types.
Click Done when finished.

25
7f. Folder Filters
PCmover allows you to deselect and exclude specific folders from the transfer. If, for instance, you do
not want to transfer any of the files in the Pictures or Music folders, you can deselect those folders in
this screen, and they will not transfer to the new PC. You cannot exclude specific files, but you can
exclude specific folders.
All folders that remain selected in this screen will transfer to the new PC. The approximate size of each
folder on the old PC is listed for your reference in assessing the scope of the transfer.
Click Done when you have finished deselecting folders.
8. Ready to Transfer
This window presents a summary of applications, files, settings, and total data that will be transferred.
Click Next when ready.

26
Transferring from the Old PC to the New PC
1. In Progress - Complete Transfer
PCmover is now transferring all of your selected programs, data files and registry settings to the new PC.
The length of time required to perform the transfer depends on the configuration of the computers and
the amount of data to be transferred, and could be as much as several hours or more.
Note: In very rare occasions the transfer of data will not continue; if you do not see any progress for
more than an hour, you should restart the transfer.
27
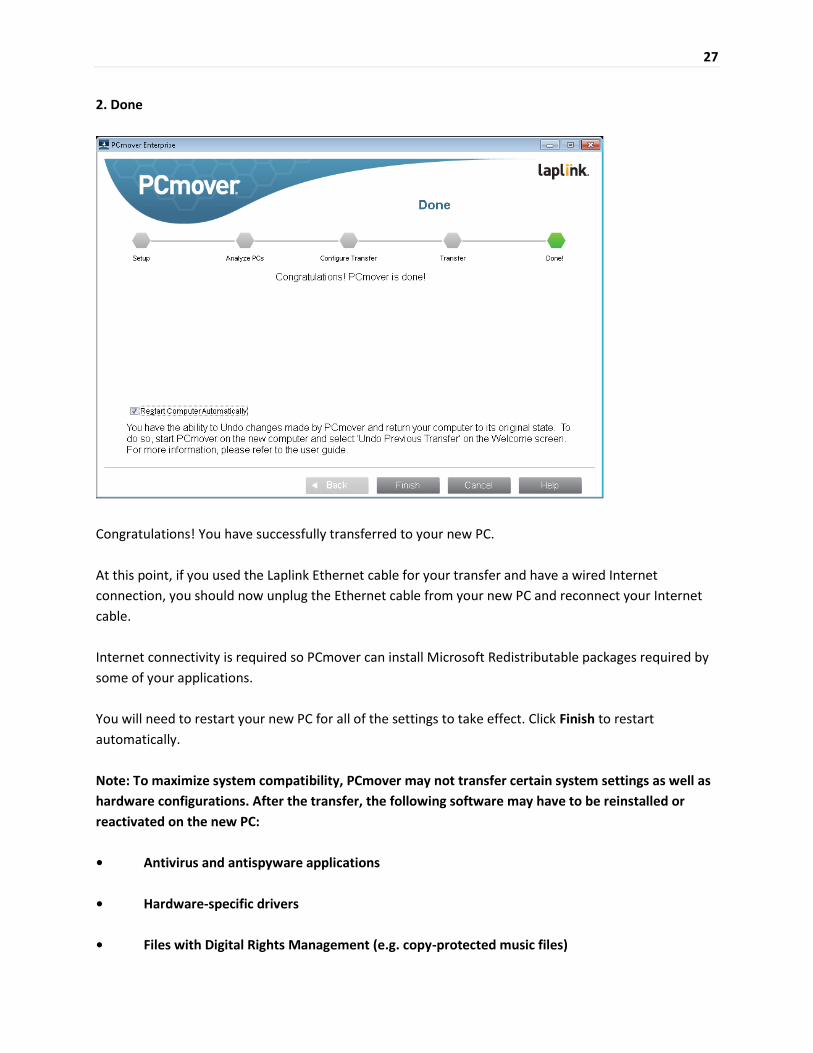
2. Done
Congratulations! You have successfully transferred to your new PC.
At this point, if you used the Laplink Ethernet cable for your transfer and have a wired Internet
connection, you should now unplug the Ethernet cable from your new PC and reconnect your Internet
cable.
Internet connectivity is required so PCmover can install Microsoft Redistributable packages required by
some of your applications.
You will need to restart your new PC for all of the settings to take effect. Click Finish to restart
automatically.
Note: To maximize system compatibility, PCmover may not transfer certain system settings as well as
hardware configurations. After the transfer, the following software may have to be reinstalled or
reactivated on the new PC:
• Antivirus and antispyware applications
• Hardware-specific drivers
• Files with Digital Rights Management (e.g. copy-protected music files)
28
If reinstallation or reactivation does not resolve problems, you may need to contact the appropriate
vendor for specific instructions. For more details regarding difficulty with applications running on the
new PC, please see the ‘Helpful Hints’ section.
Additional Assistance
Troubleshooting
• Registration - Validation Code
When you enter your serial number into PCmover, it is “validated” (checked for authenticity)
using your new computer’s Internet connection. If you are connected to the Internet but are
unable to continue past the Serial Number Validation screen, first disable all security software,
such as virus scanning, spyware scanning, and firewalls, and try again.
If that does not work, click No Internet Access. A screen will appear with your Network Name
and Session Code.
You will need the Network Name and the Session Code, along with your PCmover Serial
Number, in order to obtain the Validation Code, which will be used in place of your serial
number to activate the product.
On another PC with Internet access, go to:
http://www.laplink.com/validation/
Select PCmover, and follow the instructions on the page.
If an Internet connection is not available to you on any PC, please call our Customer Service
team at (425) 952-6001.
• USB Cable - Cannot Connect to Computer
If you see an error message on the New PC stating, ”Cannot connect to computer”, please verify
you have installed the Laplink USB Cable drivers on each PC, and confirm the cable is plugged
into both PCs.
To install the Laplink USB Cable drivers, access the simple wizard (USBDriversSetup2x.exe) that
is included with the installation of PCmover:

29
<Drive or Path>:\Program Files (x86)\Laplink\PCmover Enterprise\PCmover
Client\USBDriversSetup2x.exe
You can complete the installation of the Cable drivers by opening USBDriversSetup2x.exe on
each PC, whether that file resides on the same local PC or in a remote location.
• Old PC Not Listed When Using Laplink Ethernet Cable
Once you have reached the Identify Old Computer screen on the new PC when using the Laplink
Ethernet cable method of transfer, your old PC should be listed in the Network Name text field.
If you do not see your old PC listed in the text field, first make sure that the Laplink Ethernet
cable is plugged into both computers, connecting your old and new PCs.
Then, wait a moment for the connection between PCs to be established. If connection has not
occurred after 60 seconds, click Browse and manually select your old PC from the list. If you do
not see your old computer in the list, click Re-scan. Select your old computer and click OK.
If your old computer isn’t listed after clicking Re-scan, click Cancel on both PCs to exit PCmover.
Verify the Laplink Ethernet cable is plugged into both PCs and restart PCmover.
• “Cannot Transfer PC Analysis” on “In Progress - Transfer PC Analysis” Screen
Click Cancel on both PCs to exit PCmover. Then, restart PCmover and, on the Welcome screen, if
you see the New Version Available button, click this button to get the latest version of
PCmover. You will be taken to a Web page from which you can download the update. On this
Web page, you will find a link to the latest version of this guide, which you should also use.
IMPORTANT: If a new version is available, please install the new version on BOTH computers.
Both PCs must be running the same version of PCmover.
• “Internal Compression” Error
This error can occur during transfer if firewalls or other software are running in the background.
Click Cancel on both PCs, disable all firewall and other programs running, and start the transfer
again.
Helpful Hints
• Microsoft Outlook/Outlook Express/Windows Mail: PCmover will transfer Microsoft Outlook,
Outlook Express, and Windows Mail but may not update your contacts and messages correctly.

30
For help on updating these, please see:
http://www.laplink.com/faq324.html
Note: Windows 7, 8, and 10 operating systems do not include an e-mail program. If
transferring to Windows 7, 8 or 10, your mail data will still be transferred, but you will need to
obtain an e-mail client in order to use your mail data.
• Using Transferred Applications: If an application does not work or displays errors on the new
machine, try a Repair done through the Windows Control Panel, and if that does not suffice, try
uninstalling and reinstalling it. You may need to run the installation file as an Administrator. For
more information on running programs as an Administrator, please check Windows Help.
• Updates For Applications: Some older applications may not work correctly after the transfer
without an update, especially if the operating system on the new PC is a more recent one than
on the old. If you find this to be the case, please check with the application’s manufacturer for
an update.
• Programs Requiring Reactivation: Some applications with a copy-protection process known as
Digital Rights Management may not function correctly after the transfer. These include such
music-sharing programs as iTunes, MusicMatch and Napster, which will probably require
reactivation on the new PC, possibly a Repair done through the Windows Control Panel, and
possibly reinstallation.
Certain other applications, such as Microsoft Office, may also require reactivation.
• Music Files: Because of the copy-protection methods, music files that are copy-protected may
not play on the new computer without transferring the licenses for the music files. Look at the
music application help files for information on transferring the licenses, or contact the music
application vendor. You may also need to reinstall the music application.
• Antivirus/Antispyware Applications: Reinstall any antivirus or antispyware software. As
previously stated, these types of applications are unlikely to transfer correctly.

31
Undoing a Transfer
PCmover allows you to restore your new PC to its original state before the transfer. If you wish to undo
your transfer, please start PCmover on your new PC and follow the screens.
1. Welcome to PCmover
Select Undo Previous Transfer. Click Next.
2. Undo Previous Transfer
Required Prior to Undo: Make sure these important items are completed before continuing with the
Undo. After addressing all items listed, check the box and click Next.
3. Done
Click Finish to restart automatically.

32
Feedback and Support
For PCmover Enterprise product support or inquires about other Laplink products, contact your Laplink
Corporate Sales Representative, or send an e-mail to:
Related Documents


