Laboratory Processing MOST Operations Manual page 1 Laboratory Processing Version 1.0p May 2009 LABORATORY PROCESSING TABLE OF CONTENTS 1. Background and rationale............................................................................................................. 2 2. Equipment and supplies ................................................................................................................ 2 2.1 Specimen ID labels ......................................................................................................................... 3 3. Safety issues and exclusion ............................................................................................................ 4 3.1 Precautions for handling blood specimens .................................................................................. 4 4. Laboratory room preparation ...................................................................................................... 4 4.1 Preparation for processing ............................................................................................................ 4 5. Detailed procedures ....................................................................................................................... 6 5.1 Processing ....................................................................................................................................... 6 5.1.1 General ............................................................................................................................................ 6 5.1.2 Description of blood collection tubes............................................................................................ 6 5.1.3 Processing of blood and urine specimens ..................................................................................... 6 5.1.3.1 Plasma processing .......................................................................................................................... 7 5.1.3.2 Serum processing ........................................................................................................................... 9 5.1.3.3 Urine specimen ............................................................................................................................. 10 5.1.4 Aliquots per specimen type ......................................................................................................... 10 5.1.5 Cryovial storage box grid form .................................................................................................. 12 5.1.6 Freezing......................................................................................................................................... 12 5.1.7 Completing forms......................................................................................................................... 12 5.2 End of the day procedures .......................................................................................................... 14 5.3 Summary of processing time limitations.................................................................................... 14 5.4 Shipping the blood specimens ..................................................................................................... 14 5.4.1 General .......................................................................................................................................... 14 5.4.2 Methods for shipping frozen specimens ..................................................................................... 15 6. Laboratory Processing Form ...................................................................................................... 16 6.1 Laboratory Processing Form: baseline visit .............................................................................. 16 6.2 Laboratory Processing Form: 30-month visit ........................................................................... 17 7. Quality Assurance ........................................................................................................................ 18 7.1 Training Requirements ............................................................................................................... 18 7.2 Certification Requirements ......................................................................................................... 18 7.3 Quality Assurance Checklist ....................................................................................................... 18 Appendix 1 Laboratory Processing Checklist ........................................................................................ 20 Appendix 2 MOST Specimen Processing Schematics............................................................................ 21 Appendix 3 How to Prepare Perchloric acid, EDTA (PCA) ................................................................. 23 Appendix 4 Cryovial Labels ..................................................................................................................... 24 Appendix 5 Laboratory Processing Supplies.......................................................................................... 28 Appendix 6 Cryovial Storage Box Grid form......................................................................................... 32 Appendix 7 Specimen Shipping Checklist .............................................................................................. 34 Appendix 8 Federal Express Airbill for Dry Ice Shipment ................................................................... 35 Appendix 9 Dry Ice and Labeling Diagram............................................................................................ 36

Welcome message from author
This document is posted to help you gain knowledge. Please leave a comment to let me know what you think about it! Share it to your friends and learn new things together.
Transcript

Laboratory Processing MOST Operations Manual page 1
Laboratory Processing Version 1.0p
May 2009
LABORATORY PROCESSING TABLE OF CONTENTS 1. Background and rationale............................................................................................................. 2 2. Equipment and supplies ................................................................................................................ 2 2.1 Specimen ID labels......................................................................................................................... 3 3. Safety issues and exclusion............................................................................................................ 4 3.1 Precautions for handling blood specimens .................................................................................. 4 4. Laboratory room preparation ...................................................................................................... 4 4.1 Preparation for processing............................................................................................................ 4 5. Detailed procedures ....................................................................................................................... 6 5.1 Processing ....................................................................................................................................... 6 5.1.1 General............................................................................................................................................ 6 5.1.2 Description of blood collection tubes............................................................................................ 6 5.1.3 Processing of blood and urine specimens..................................................................................... 6 5.1.3.1 Plasma processing .......................................................................................................................... 7 5.1.3.2 Serum processing ........................................................................................................................... 9 5.1.3.3 Urine specimen............................................................................................................................. 10 5.1.4 Aliquots per specimen type ......................................................................................................... 10 5.1.5 Cryovial storage box grid form .................................................................................................. 12 5.1.6 Freezing......................................................................................................................................... 12 5.1.7 Completing forms......................................................................................................................... 12 5.2 End of the day procedures .......................................................................................................... 14 5.3 Summary of processing time limitations.................................................................................... 14 5.4 Shipping the blood specimens ..................................................................................................... 14 5.4.1 General.......................................................................................................................................... 14 5.4.2 Methods for shipping frozen specimens..................................................................................... 15 6. Laboratory Processing Form ...................................................................................................... 16 6.1 Laboratory Processing Form: baseline visit .............................................................................. 16 6.2 Laboratory Processing Form: 30-month visit ........................................................................... 17 7. Quality Assurance........................................................................................................................ 18 7.1 Training Requirements ............................................................................................................... 18 7.2 Certification Requirements......................................................................................................... 18 7.3 Quality Assurance Checklist ....................................................................................................... 18 Appendix 1 Laboratory Processing Checklist ........................................................................................ 20 Appendix 2 MOST Specimen Processing Schematics............................................................................ 21 Appendix 3 How to Prepare Perchloric acid, EDTA (PCA) ................................................................. 23 Appendix 4 Cryovial Labels..................................................................................................................... 24 Appendix 5 Laboratory Processing Supplies.......................................................................................... 28 Appendix 6 Cryovial Storage Box Grid form......................................................................................... 32 Appendix 7 Specimen Shipping Checklist .............................................................................................. 34 Appendix 8 Federal Express Airbill for Dry Ice Shipment................................................................... 35 Appendix 9 Dry Ice and Labeling Diagram............................................................................................ 36

Laboratory Processing MOST Operations Manual page 2
Laboratory Processing Version 1.0p
May 2009
1. Background and rationale The MOST baseline visit involves the collection of approximately 44 mL of blood from participants; approximately 15mL of blood is collected from participant at follow-up visits. The blood is collected in two types of tubes for specialized processing of different blood components. After processing, the specimens will be aliquoted into cryovials to be sent to Biomedical Research Institute (BRI) to store for later analyses. 2. Equipment and supplies A complete supply list with ordering information for laboratory processing can be found in Appendix 5. Necessary supplies include: Refrigerated centrifuge (4°C) Vortex mixer (baseline visit only) 70°C freezer space is required Preprinted specimen ID barcode labels (see Appendix 4) 5 mL plastic mixing tube for vortexing plasma and PCA (baseline visit only) 0.5M PCA (kept at 2-6° C) (baseline visit only) [Appendix 3: How to prepare 500 mM (.5M) Perchloric acid, 0.1 mg/mL EDTA (PCA)] Balance tubes for the centrifuge Pipettes: disposable polyethylene transfer pipettes Rainin pipette and tips (or similar pipette filler) Cryovials and cap inserts (provided by Coordinating Center) Cryovial storage/freezer boxes 9x9 grid (provided by Coordinating Center) Lab coat and gloves Biohazardous waste disposal container Aliquot rack Lab mat 10% bleach solution Rubber bands Styrofoam shipping containers Absorbent pads Dry ice (for shipping) FedEx shipping labels TO and FROM labels
Laboratory Processing MOST Operations Manual page 3
Laboratory Processing Version 1.0p
May 2009
2.1 Specimen ID labels You will be supplied with specimen ID barcode labels from Biomedical Research Institute (BRI) to use for labeling forms, draw tubes, the plasma/PCA mixing tube (baseline visit only), urine specimen cup, cryovials, and the Cryovial Storage Box Grid form. A sample of the barcode labels can be found in Appendix 4. Specimen labels for each participant will have a unique 5-digit specimen ID number. Labels: baseline visit
one for the “Specimen Collection form” one for the “Laboratory Processing form” four for pre-labeling the 4 draw tubes two extras for back-up vacutainers one for the urine specimen cup one for the 5 mL disposable plastic mixing tube that will be used to vortex the PCA
into the plasma 25 for cryovials 25 labels for the Cryovial Storage Box Grid form
Labels: follow-up visit
one for the “Urine Collection form” one for the “Laboratory Processing form” two for pre-labeling the 2 draw tubes two extras for back-up vacutainers one for the urine specimen cup 14 for cryovials 14 labels for the Cryovial Storage Box Grid form
There is one barcode label with the words MOST (xx_Month) “Lab Form,” which is placed on the upper right hand corner of the Laboratory Processing form. Write the 5-digit specimen ID# in the boxes under the label. This process will match the 7-digit participant-specific MOST ID# to a barcoded 5-digit specimen-specific ID# in the data system. It is crucial that the Coordinating Center be able to match the specimen to the MOST participant in order to use the data collected from laboratory tests. Each of the cryovials will already have a specimen ID label affixed to it. This is done the day before the clinic visit. Each cryovial label has a 2-digit extension that serves as a unique identifier for each cryovial type within a specimen ID. The labels for cryovials and the Cryovial Storage Box Grid form have barcodes to help BRI track the repository. On the top of the label is the barcode. The second line has the 5-digit specimen ID# (Baseline specimens will be labeled beginning with a “0” for Alabama (e.g., 00001, 00002, etc.) and a “5” for Iowa (e.g., 50001, 50002); 30-month specimen ID#s will begin with a “1” for Alabama (e.g., 10001, 10002, etc.) and a “6” for Iowa (e.g., 60001, 60002, etc.). The label also includes the study name, MOST, and if it is a cryovial label, whether the label is for the vial or grid. The

Laboratory Processing MOST Operations Manual page 4
fourth line refers to the cap color and number of the cryovial, or the purpose of the label. The last line describes the contents of the cryovial. Baseline (Alabama) 30-Month (Alabama)
Laboratory Processing Version 1.0p May 2009
Each cryovial label has a duplicate label identified with the word “grid,” which will be placed on a paper grid. This grid shows the contents in the cryovial storage box.
00001 MOST grid Red 17 1.0 mL serum
10001 MOST vial Violet 03 0.5 plasma-30M
3. Safety issues and exclusion 3.1 Precautions for handling blood specimens In accordance with the OSHA regulations on blood-borne pathogens (see copy on file in laboratory), the following laboratory safety protocol is recommended for the clinical center laboratories: • Non-permeable lab coats, latex gloves, and face shields should be used when handling any
blood in any situation where splashes, spray, spatter, or droplets of blood may be generated and eye, nose, or mouth contamination can be reasonably anticipated.
• ‘Universal Precautions’ should be followed when handling any blood or bodily fluid products.
• Contaminated needles and sharps shall be immediately placed in a puncture-resistant, leak-proof container. Never recap or break needles.
• Hepatitis B vaccine must be offered to all unvaccinated technicians handling blood and documentation of vaccination or technician’s declining to be vaccinated should be kept.
4. Laboratory room preparation 4.1 Preparation for processing All items on the Laboratory Processing Checklist (Appendix 1) should be on hand before beginning processing. Aliquot racks will be set up to correspond to each blood collection tube rack. Rack setup is completed the previous day. All tubes and vials are labeled with appropriate Specimen ID

Laboratory Processing MOST Operations Manual page 5
Laboratory Processing Version 1.0p
May 2009
Label (Label Orientation in Specimen Collection Chapter, Appendix 2) and arranged in the appropriate working order (details in Specimen Collection chapter, sections 2.1 and 2.2.2). Baseline visit There are a total of 60 labels. The following 33 labels will be affixed or discarded prior to the specimens arriving to the lab: Four labels for the vacutainers Two labels for the extra vacutainers One label for the “Specimen Collection form” One label for the urine cup 25 labels for cryovials
The following 27 labels will be affixed in the lab: One label “Lab form” for the “Laboratory Processing form,” (clipped to blood collection
tray) One label “Mixing Tube” for the 5 mL plasma/PCA mixing tube, (clipped to the aliquot
rack) 25 labels “MOST grid” for the Cryovial Storage Box Grid form
Follow-up visits There are a total of 36 labels. The last label identified as “END OF SET” can be discarded. The following 20 labels will be affixed or discarded prior to the specimens arriving to the lab: Two labels for the vacutainers Two labels for the extra vacutainers One label for the “Urine Collection form” One label for the urine cup 14 labels for cryovials
The following 15 labels will be affixed in the lab: One label “Lab form” for the “Laboratory Processing form,” (clipped to blood collection
tray) 14 labels “MOST grid” for the Cryovial Storage Box Grid form

Laboratory Processing MOST Operations Manual page 6
Laboratory Processing Version 1.0p
May 2009
5. Detailed procedures 5.1 Processing 5.1.1 General
Personal protective equipment (non-permeable lab coats, double-gloves with at least one latex pair, splatter shields) MUST BE worn for processing. It is possible that not all tubes will be collected due to problems with blood collection. During laboratory processing, work in the cryovial numerical order and make as many aliquots as possible while meeting the volume requirement of each cryovial. After aliquoting the specimens, discard the PCA/plasma mixing tube (baseline visit only), vacutainers, disposable pipettes and pipette tips as biohazardous materials. 5.1.2 Description of blood collection tubes Each draw tube is color coded (lavender or red vacutainer top) to aid in handling. Lavender top draw tube The lavender top vacutainer contains 15% EDTA as the anticoagulant. This tube is used to collect plasma (all visits) and buffy coat sample (baseline visit only). It is very important that this tube is completely filled. If the tube is less than 2/3 full, discard the tube. After drawing the blood, the tube will have been gently inverted 10 to 15 times minimum, protected from light contamination, and placed in a “wet ice” bath. Red top draw tube The red top vacutainer is used to collect serum. This tube contains no anticoagulant, so the blood will clot to form serum. After drawing the blood, protect the tube from light contamination, and put in the tube rack at room temperature for 30 minutes. If not processed at that time, the tube should be placed in a refrigerator for up to an additional 30 minutes (processed no more than 60 minutes total after blood draw). 5.1.3 Processing of blood and urine specimens Upon reaching the blood processing station, remove the blood drawing rack and “wet ice” bath containing the tube(s) from the collection tray. The “wet ice” bath should contain lavender top tube(s). The rack should contain red top tube(s). The urine specimen cup should be processed immediately or refrigerated for up to 4 hours and then processed.

Laboratory Processing MOST Operations Manual page 7
Laboratory Processing Version 1.0p
May 2009
5.1.3.1 Plasma processing Baseline visit Centrifuging and processing of lavender top tubes should take place immediately (maximum time of 15 minutes after collection). Three types of aliquots will be made from the lavender top draw tubes: plasma supernatant (plasma/PCA), plasma, and buffy coat. The supernatant (plasma/PCA) will be aliquoted into two cryovials with yellow cap inserts. The plasma supernatant (yellow cap cryovials 01-02) will be used for measurement of vitamin C. The plasma will be aliquoted into cryovials with violet cap inserts. The plasma (violet cap cryovials 03-07) will be used for the measurement of vitamin D and for archiving. After the plasma is aliquoted, the buffy coat will be removed from the top layer of the red cells. The buffy coat (white cap cryovial 08) will be used for DNA analysis. Aliquot Cryovial # Cap color Analysis Supernatant 01-02 yellow vitamin C plasma 03-07 violet vitamin D/save Buffy coat 08 white DNA Step 1 Note the time that the plasma processing started in the space provided on the top of the Laboratory Processing form Both lavender tubes are to be spun down in a refrigerated horizontal centrifuge at 4°C for
15 minutes at 2500 rpm. After centrifuging, immediately and accurately pipette 1000 l of plasma into the 5 mL
plastic mixing tube prelabeled “plasma/PCA" using an air displacement pipette. Place the plastic tube in the vortex mixer and while vortexing the “plasma/PCA” in the
mixing tube, add 1000 l cold (2-6°C) 0.5M PCA (500 mM [.5M] Perchloric acid, 0.1 mg/mL EDTA) to the plasma in the 5 mL processing tube.
Vortex the “plasma/PCA” for an additional 20 to 30 seconds. Note the end time of vortexing on the Laboratory Processing form.
The critical points of this procedure are to: a) use equal volumes of the plasma and the PCA solution. b) vortex while adding the PCA solution to the plasma. c) vortexing must be continued for an additional 20 to 30 seconds.

Laboratory Processing MOST Operations Manual page 8
Laboratory Processing Version 1.0p
May 2009
Step 2 Centrifuge the “plasma/PCA” in a refrigerated centrifuge at 4°C at 2500 rpm for 15
minutes. While the plasma/PCA is in the centrifuge, transfer 1.0 mL of the plasma from the
lavender top tubes into each of the pre-labeled plasma cyrovials 03 –07 (violet caps). Cap the cryovials, place in cryovial storage box, and place in 70 freezer. Do not discard the lavender top tubes, as the buffy coat specimen must be extracted (see
processing step 4 below). Confirm that the participant consented to DNA/genetic testing (see right hand column of Laboratory Processing form) BEFORE collecting the buffy coat sample.
Step 3 As soon as the plasma/PCA has been centrifuged, pipette 0.5 mL of the plasma
supernatant into each of the pre-labeled plasma/PCA cryovials 01 and 02 (yellow caps). Cap these cryovials, place in the cryovial storage box and place in 70 freezer.
Step 4 After the plasma is aliquoted from the lavender top draw tubes, the buffy coat layer between the plasma and red blood cell layers will be isolated. Prior to isolating the buffy coat, isolate as much of the remaining unaliquoted plasma as
possible without disturbing the white cells. The key to successful isolation of the buffy coat is to use one continuous skimming motion with a transfer pipette. Use a new disposable polyethylene transfer pipette to ensure maximum suction. Do not be concerned if your buffy coat contains red blood cells or residual plasma that could not be removed, this is unavoidable.
At least 500 l is required for specimen aliquot; therefore it is imperative to retrieve the entire white blood cell layer from both of the lavender top draw tubes. If the buffy coat is disturbed, recentrifuge and reprocess.
Place the isolated buffy coat into the pre-labeled buffy coat cryovial 08 (white cap). Note: do not overfill the cryovial.
Discard the draw tubes with only the clot remaining. Cap the cryovial, place in the cryovial storage box, and place in the freezer Note ending time of EDTA processing on the data collection form.
Follow-up visit Centrifuging and processing of the lavender top tube should take place immediately (maximum time of 15 minutes after collection). Plasma aliquots will be made from the lavender top draw tube. The plasma will be aliquoted into cryovials with violet caps. The plasma (violet cap cryovials 01-03) will be archived for future analysis.
Aliquot Cryovial # Cap color Analysis Plasma 01-03 Violet Archived

Laboratory Processing MOST Operations Manual page 9
Laboratory Processing Version 1.0p
May 2009
Note the time that the time at start of EDTA plasma processing should be documented in the space provided on the top of the Laboratory Processing form. The EDTA lavender top tube is to be spun down in a refrigerated horizontal centrifuge at
4°C for 15 minutes at 2500 rpm. After centrifuging, immediately pipette and transfer 0.5 mL of the plasma from the
lavender top tube into each of the 3 pre-labeled plasma cryovials 01 –03 (violet caps). Cap the cryovials with violet caps, place in cryovial storage box, and place in 70
freezer.Discard the draw tubes with only the clot remaining. Note ending time of EDTA plasma aliquoting on the Laboratory Processing form.
5.1.3.2 Serum processing Baseline visit Draw tubes #2 and 4 (15 mL red tops) must remain at room temperature for 30 minutes and then either be processed or placed upright in a refrigerator for up to an additional 30 minutes until processed. Room temperature is 21° C (the range of 15.5° 23.5° is acceptable), 70° F (the range of 60° 75° is acceptable). The maximum allowable time before centrifugation is 60 minutes. The tubes should display a clot by this time. The serum (red cap cryovials 09 to 22) will be used for the measurement of Vitamin E, PTH, and for archiving. Aliquot Cryovial # Cap color Analysis serum
09-22
red
vitamin E, PTH, save
Both red top tubes are to be spun down in a refrigerated centrifuge at 4°C for 15 minutes
at 2500 rpm. After centrifuging, immediately pipette 1.0 mL of serum into each of the red cap
cryovials 09 – 22. Cap cryovials, place in cryovial storage box, and place in freezer. Discard the draw tubes with only the clot remaining. Note the ending time of serum processing on the Laboratory Processing form. The total
time for serum processing should not exceed 90 minutes. Follow-up visit Draw tube #2 (7 to 10 mL red top) must remain at room temperature for 30 minutes and then either be processed or placed upright in a refrigerator for up to an additional 30 minutes until processed. Room temperature is 21° C (the range of 15.5° 23.5° is acceptable), 70° F (the range of 60° 75° is acceptable). The maximum allowable time before centrifugation is 60 minutes. The tube should display a clot by this time. The serum (red cap cryovials 04 to 10) will be stored for future analysis.
Aliquot Cryovial # Cap color Analysis Serum 04-10 Red Archived

Laboratory Processing MOST Operations Manual page 10
Laboratory Processing Version 1.0p
May 2009
Note the time that the time at start of serum processing should be documented in the space provided in the appropriate section of the Laboratory Processing form. The red top tube is to be spun down in a refrigerated centrifuge at 4°C for 15 minutes at
2500 rpm. After centrifuging, immediately pipette 0.5 mL of serum into each of the red cap
cryovials 04 – 10. Once serum is centrifuged it is must either be aliquoted immediately or placed in a refrigerator up to an additional 15 minutes maximum and then aliquoted.
Cap cryovials with red caps, place in cryovial storage box, and place in freezer. Discard the draw tubes with only the clot remaining. Note the ending time of serum processing on the Laboratory Processing form. The total
time from blood draw to end of serum processing should not exceed 90 minutes. 5.1.3.3 Urine specimen Urine specimens will be archived for future analysis. If the urine specimen cannot be immediately aliquoted into the pre-labeled cryovials, place the filled urine cup into the refrigerator until the processing can begin (maximum time 4 hours). Do not allow the urine to be overly exposed to a light environment. The urine specimen is mixed by inverting the urine cup 3 to 5 times and then aliquoting 0.5 mL into each of the cryovials.
Aliquot Cryovial # Cap color Analysis Urine 11-14 Clear Archived
Pipette 0.5 mL of urine into the clear capped cryovials. Note: do not overfill the cryovial. Cap the cryovials with clear caps, place in cryovial storage box and place in freezer. Discard the remaining urine.
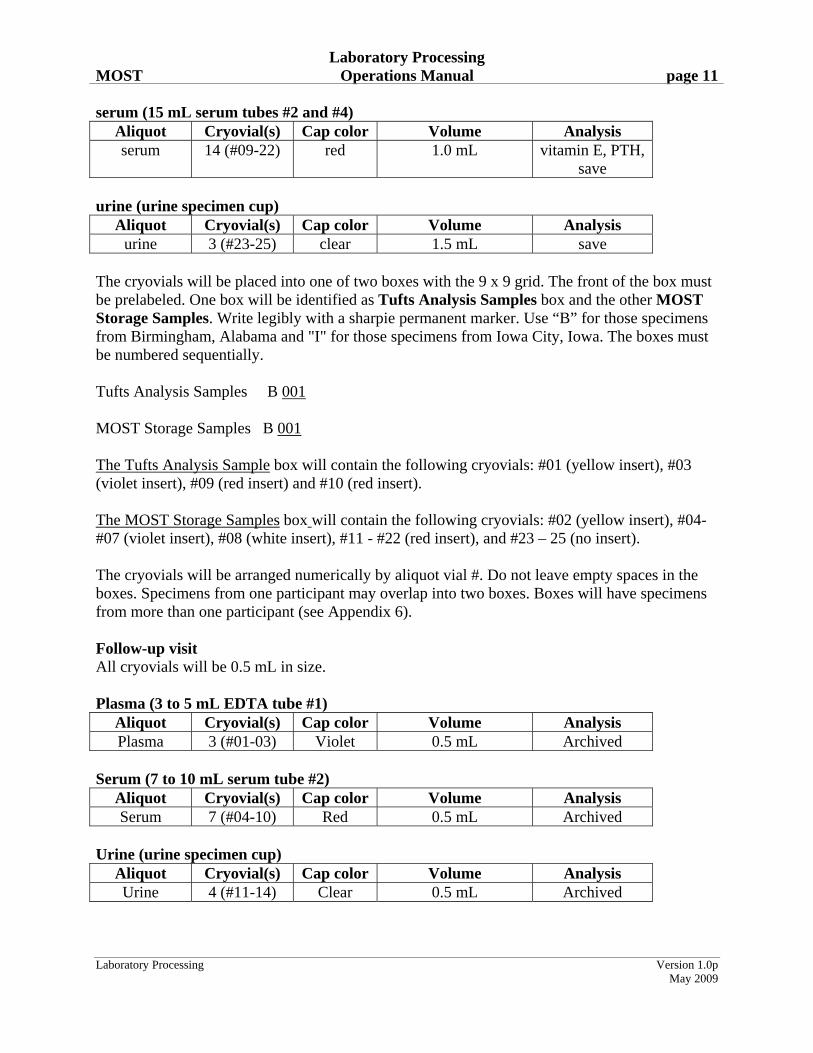
5.1.4 Aliquots per specimen type The following is a summary of the specimen processing. Volume indicates aliquot size for each cryovial. Baseline visit All cryovials will be 2 mL in size. plasma (7 mL EDTA tubes #1 and #3)
Aliquot Cryovial(s) Cap color Volume Analysis supernatant 2 (#01-02) yellow 0.5 mL supernatant vitamin C
plasma 5 (#03-07) violet 1.0 mL vitamin D, save buffy coat 1 (#08) white ~500 l DNA
Laboratory Processing MOST Operations Manual page 11
Laboratory Processing Version 1.0p
May 2009
serum (15 mL serum tubes #2 and #4) Aliquot Cryovial(s) Cap color Volume Analysis serum 14 (#09-22) red 1.0 mL vitamin E, PTH,
save
urine (urine specimen cup) Aliquot Cryovial(s) Cap color Volume Analysis
urine 3 (#23-25) clear 1.5 mL save The cryovials will be placed into one of two boxes with the 9 x 9 grid. The front of the box must be prelabeled. One box will be identified as Tufts Analysis Samples box and the other MOST Storage Samples. Write legibly with a sharpie permanent marker. Use “B” for those specimens from Birmingham, Alabama and "I" for those specimens from Iowa City, Iowa. The boxes must be numbered sequentially. Tufts Analysis Samples B 001 MOST Storage Samples B 001 The Tufts Analysis Sample box will contain the following cryovials: #01 (yellow insert), #03 (violet insert), #09 (red insert) and #10 (red insert). The MOST Storage Samples box will contain the following cryovials: #02 (yellow insert), #04-#07 (violet insert), #08 (white insert), #11 - #22 (red insert), and #23 – 25 (no insert). The cryovials will be arranged numerically by aliquot vial #. Do not leave empty spaces in the boxes. Specimens from one participant may overlap into two boxes. Boxes will have specimens from more than one participant (see Appendix 6). Follow-up visit All cryovials will be 0.5 mL in size. Plasma (3 to 5 mL EDTA tube #1)
Aliquot Cryovial(s) Cap color Volume Analysis Plasma 3 (#01-03) Violet 0.5 mL Archived
Serum (7 to 10 mL serum tube #2) Aliquot Cryovial(s) Cap color Volume Analysis Serum 7 (#04-10) Red 0.5 mL Archived
Urine (urine specimen cup) Aliquot Cryovial(s) Cap color Volume Analysis Urine 4 (#11-14) Clear 0.5 mL Archived

Laboratory Processing MOST Operations Manual page 12
Laboratory Processing Version 1.0p
May 2009
The cryovials will be placed into one of three boxes with the 9 x 9 grid. The front of the box must be prelabeled. One box will be identified as PLASMA, one box will be identified as SERUM, and the third box will be identified as URINE. Write legibly with a sharpie permanent marker. The boxes must be numbered sequentially. The PLASMA box will contain cryovials #01-03 with violet caps. The SERUM box will contain the cryovials #04-10 with violet caps. The URINE box will contain the cryovials #11-14 with clear caps. Within each box the cryovials will be arranged numerically by aliquot vial #. Do not leave empty spaces in the boxes. Specimens from one participant may overlap into two boxes. Boxes will have specimens from more than one participant (see Appendix 6). 5.1.5 Cryovial storage box grid form Complete the Cryovial Storage Box Grid form. This form will serve as the manifest for archiving the specimens. It is very important that the form exactly match the contents of the box, as the master database of archived specimens will be created from the information on the form. Photocopy the completed form prior to shipping and keep a binder of completed specimen grid forms. 5.1.6 Freezing Upon completion of each of the processing steps, plasma, serum, and urine specimens must be placed in numbered 9” x 9” cryovial storage boxes and frozen at 70° immediately. 5.1.7 Completing forms On the Laboratory Processing form, fill the bubble next to each cryovial that is filled, whether partially or totally. If the specimen is hemolyzed, fill the bubble marked "H." If the serum is reddish in color, determine if it is hemolyzed or simply contaminated with red blood cells. One can tell the difference by recentrifuging the vacutainer tube. This will pellet any contaminating red cells and the serum will clear. If the specimen is hemolyzed the red color will remain in the serum. If the tube is only partially filled, fill the bubble marked "P." If the tube is both hemolyzed and partially filled, fill the bubble marked "B." If the tube is not filled at all, only fill the last bubble, ‘not filled.’

Laboratory Processing MOST Operations Manual page 13
Laboratory Processing Version 1.0p
May 2009
How to fill out the Laboratory Processing form for each cryovial: Condition of tube Indication on form Filled, not hemolyzed------------------------- OK Filled, hemolyzed------------------------------- H (for hemolyzed) Partially filled, not hemolyzed--------------- P (for partial) Partially filled, hemolyzed-------------------- B (for both) Not filled------------------------------------------Not filled The completed specimen collection, laboratory processing, and specimen grid form can be set-aside in a daily work folder. The specimen grid form must be photocopied and kept on file at the site. Be sure the participant's MOST ID#, Acrostic, the specimen-specific ID#, and the staff ID# are legible on the copies (e.g., not cut off by the copier). The original specimen grid form must be included with shipment of specimens to Biomedical Research Institute (BRI). Send to BRI: Original of specimen grid form
The 9” x 9” cryovial storage box holds 81 cryovials. Baseline visit The front of the cryovial box must be prelabeled. Write legibly with a sharpie permanent marker. Use “B” for those specimens from Birmingham, Alabama and "I" for those specimens from Iowa City, Iowa. Write the sequential box number on the front of the cryovial box Follow-up visit The front of the cryovial box must be prelabeled:
PLASMA B0001 (or I0001) – sequentially number the boxes SERUM B0001 (or I0001) – sequentially number the boxes URINE B0001 (or I0001) – sequentially number the boxes
Write legibly with a sharpie permanent marker. Write the type of specimen (plasma, serum or urine) and the sequential box number on the front of the cryovial box.

Laboratory Processing MOST Operations Manual page 14
Laboratory Processing Version 1.0p
May 2009
5.2 End of the day procedures Each site will determine which phlebotomy or lab staff are responsible for end-of-day procedures including: Re-stock blood collection trays with supplies. Label the next day's draw tubes, urine cup, processing tube (baseline visit only), and
cryovials for each participant. Arrange draw tubes and cryovials in their proper racks. Clip the extra labels to the blood collection rack or aliquot rack Wipe down all work areas with 10% Clorox solution.
5.3 Summary of processing time limitations From end of venipuncture to start of processing: 1. EDTA tube immediately to 15 minutes 2. Add PCA to plasma (baseline only) immediately after centrifuging 3. Serum tube 30 minutes to 60 minutes maximum
4. Urine container immediately to 4 hours maximum (refrigerated) After the serum has been at room temperature for 30 minutes, it must either be processed or placed upright in a refrigerator for up to an additional 30 minutes maximum and then processed. Once serum is centrifuged it must either be aliquoted or placed in a refrigerator up to an additional 15 minutes maximum and then aliquoted. After aliquoting specimens, place the cryovials in a cryovial storage box, and freeze immediately at –70°C. 5.4 Shipping the blood specimens 5.4.1 General Frozen blood and urine specimens are shipped two times a month to BRI by Federal Express overnight delivery. Do not ship on Thursdays or Fridays to avoid delivery of shipments during a weekend. Shipments to BRI are charged to your local Federal Express account number. The shipping protocol is the mandated International Air Transport Association’s Dangerous Goods Regulations-Packaging Instructions 650 and 904. Use the Specimen Shipping checklist (Appendix 7) to prepare for shipping specimens. A sample of the Federal Express Airbill for Dry Ice Shipment is in Appendix 8 and the Dry Ice Outer Box Labeling Diagram is in Appendix 9.

Laboratory Processing MOST Operations Manual page 15
Laboratory Processing Version 1.0p
May 2009
5.4.2 Methods for shipping frozen specimens The frozen blood and urine cryovials are already packaged in prelabeled freezer boxes and stored in the –70° C freezer by consecutive box number. Complete the Cryovial Storage Box Grid form detailing the contents of the shipment, including specimen ID#, cryovial cap color codes (e.g., V, R, C) and vial# (see Appendix 6). Place an absorbent pad with a 100 mL capacity in the cryovial box. Place two rubber bands around the box so the contents do not shift during shipping. Put one or two cryovial boxes in a leak-proof zip lock bag, and put the original Cryovial Storage/Shipping Grid –form(s) inside a separate leak proof zip-lock bag. Keep the photocopy of the grid form(s) in a binder at the laboratory. Pack the shipping boxes with dry ice according to the International Air Transport Association’s Dangerous Goods Regulations-Packaging Instructions for shipping frozen specimens. E-mail BRI ([email protected]) the day before you send a shipment, letting them know how may boxes they will be receiving and the FedEx airbill number. Securely tape the bottom copy of the airbill to the shipping container with scotch tape. Apply separate TO: and FROM: labels to the shipping container (in addition to the FedEx airbill). Be sure to include the name, address and phone number on the TO: label to Biomedical Research Institute (BRI) and the FROM: label from the clinical center.

Laboratory Processing MOST Operations Manual page 16
6. Laboratory Processing Form 6.1 Laboratory Processing Form: baseline visit
Laboratory Processing Version 1.0p May 2009

Laboratory Processing MOST Operations Manual page 17
6.2 Laboratory Processing Form: 30-month visit
Laboratory Processing Version 1.0p May 2009

Laboratory Processing MOST Operations Manual page 18
Laboratory Processing Version 1.0p
May 2009
7. Quality Assurance
7.1 Training Requirements Clinical experience with processing of blood samples is strongly recommended. Additional training should include:
• Read and study manual • Attend MOST training session on techniques (or observe administration by experienced
examiner) • Discuss problems and questions with local expert or QC officer
7.2 Certification Requirements
__ Complete training requirements __ Recite shipping schedule for applicable field center __ Process one set of specimens from volunteer or participant while being observed by QC officer using QC checklist
7.3 Quality Assurance Checklist
Preparation Aliquot racks correctly set up Cryovials correctly labeled Cryovial storage boxes labeled PCA refrigerated in lab refrigerator Hepatitis B vaccination given or offered to all personnel handling blood Non-permeable lab coats, gloves, and face shields used
Processing EDTA plasma and urine
Time checked to ensure that tube(s) processed within 15 minutes of completion of phlebotomy
Urine specimen refrigerated until processed Note time of EDTA tube processing on data collection form EDTA plasma tube #1 at least 2/3 full, otherwise discarded Tube(s) centrifuged at 4° C for 15 min at 2500 rpm First EDTA plasma aliquot (1000 l) aliquoted into plastic mixing tube and 1000 l
PCA added while vortexing plasma (baseline only) Plasma/PCA vortexing for additional 20-30 seconds (baseline only) Note end time of vortexing on Lab Processing form (baseline only) Plasma/PCA tube centrifuged at 4° C for 15 min at 2500 rpm (baseline only) Pipette 0.5 mL of the plasma/PCA into cryovials 01 and 02 (baseline only) Aliquots immediately placed in 70° freezer New disposable pipette used for buffy coat (baseline only)

Laboratory Processing MOST Operations Manual page 19
Laboratory Processing Version 1.0p
May 2009
Buffy coat extracted from tubes #1 and 3 (baseline only) New pipette tips used for EDTA plasma
Plasma correctly aliquoted in correct order Note ending time of EDTA processing on the form Urine specimen inverted 3 to 5 times before aliquoting New pipette or tip used for urine aliquoting Urine correctly aliquoted
Processing serum tubes
Time checked to ensure that tube(s) stood at room temperature for at least 30 minutes, and if longer than 30 minutes then refrigerated
Time checked to ensure that tube(s) processed within 60 minutes Tube(s) centrifuged for 15 minutes at 2500 rpm Centrifuge correctly balanced with water tube(s) Serum correctly aliquoted Note ending time of serum processing on the form
Freezing
Duplicate cryovial labels placed on Specimen Cryovial Storage Grid form Aliquots 01, 03, 09, and 10 placed in cryovial storage box and immediately frozen
in 70° freezer (baseline only) Aliquots 02, 04, 05, 06, 07, 08, 11-25 placed in cryovial storage box and
immediately frozen in 70° freezer (baseline only) Aliquots placed in cryovial storage boxes and immediately frozen in 70° freezer
(follow-up visit only)
End of day procedure Specimen collection and laboratory processing forms reviewed for thoroughness
and placed in daily work folder Freezer boxes correctly labeled Specimen Cryovial Storage Grid form checked for completeness
Shipment procedures -- dry ice Freezer boxes correctly wrapped -- absorbent material, rubber band, and zip-lock
bag Styrofoam mailers correctly packed -- absorbent material, dry ice, top sealed with
tape Styrofoam mailer sealed in cardboard sleeve FedEx airbill correctly filled out and affixed to shipping container Extra scotch tape applied to bottom FedEx airbill TO and FROM labels with address and phone information correctly affixed to
shipping container BRI notified by e-mail the day before shipment with FedEx airbill tracking number
information

Laboratory Processing MOST Operations Manual page 20
Laboratory Processing Version 1.0p
May 2009
Appendix 1 Laboratory Processing Checklist
Pipettes: disposable and pipette filler with tips Labeled cryovials in rack Vortex mixer (baseline visit only) 5 mL plastic tube labeled for plasma/PCA mixing (baseline visit only) Refrigerated PCA (baseline visit only) Lab coat and gloves
Biohazardous waste disposal Refrigerated centrifuge (4°C) capable of spinning at 2,500 rpm
Balance tubes for the centrifuge Tube rack in refrigerator 10% bleach solution Cryovial storage box for freezing specimens Freezer boxes with 9 x 9 grid Rubber bands Sharpie marking pen

Laboratory Processing MOST Operations Manual page 21
Appendix 2 MOST Specimen Processing Schematics
Baseline Visit
Laboratory Processing Version 1.0p May 2009

Laboratory Processing MOST Operations Manual page 22
Follow-up Visit
Laboratory Processing Version 1.0p May 2009

Laboratory Processing MOST Operations Manual page 23
Laboratory Processing Version 1.0p
May 2009
Appendix 3 How to Prepare Perchloric acid, EDTA (PCA)
How to prepare 500 mM (.5M) Perchloric acid, 0.1 mg/mL EDTA (PCA) (Baseline Visit
Only) Use standard laboratory safety precautions when working with chemicals in the laboratory, (i.e., safety glasses, gloves, lab coat) 1) Put 800 mL of dH2O into a 1000 mL flask. 2) Weigh 95 mg of EDTA (disodium ethylenediamine tetra acetate). Dissolve the EDTA in the dH2O on a stirring plate with a stirring bar at medium speed for 5 minutes or until EDTA completely goes into solution. 3) Measure 50 mL of PCA (Perchloric Acid, Aldrich, 60% HclO4) in a graduated cylinder (be careful, it’s very concentrated), pour it into the EDTA/dH2O solution and continue to mix for 1 minute on the stirring plate with stirring bar at medium speed. Carefully pour this solution into a 1.0 L graduated cylinder using a funnel. (Make sure stirring bar is not transferred in the process.) 4) Add approximately 75 mL of dH2O to the flask to rinse. Then add this volume to the graduated cylinder. 5) Fill with dH2O to 1.0 L mark. 6) Transfer prepared solution into a 1.0 L glass bottle and cover with the glass stopper. Store in refrigerator.

Laboratory Processing MOST Operations Manual page 24
Appendix 4 Cryovial Labels
Baseline Visit Cryovial Labels (page 1 of 2)
B00001 00001 MOST Tube 1 Lav top–15 mL
B00001 00001 MOST Tube2 Red top – 15 mL
B00001 00001 MOST vial Yellow 01 0.5 mL PCA
B00001 00001 MOST grid Yellow 01 0.5 mL PCA
B00001 00001 MOST vial Violet 06 1.0 mL plasma
B00001 00001 MOST grid Violet 06 1.0 mL plasma
B00001 00001 MOST Tube 3 Lav top – 7 mL
B00001 00001 MOST Tube2 Red top – 15 mL
B00001 00001 MOST vial Yellow 02 0.5 mL PCA
B00001 00001 MOST grid Yellow 02 0.5 mL PCA
B00001 00001 MOST vial Violet 07 1.0 mL plasma
B00001 00001 MOST grid Violet 07 1.0 mL plasma
B00001 00001 MOST X-tra Lav top – 7 mL
B00001 00001 MOST X-tra 15mL Red top
B00001 00001 MOST vial Violet 03 1.0 mL plasma
B00001 00001 MOST grid Violet 03 1.0 mL plasma
B00001 00001 MOST vial White 08 buffy coat
B00001 00001 MOST grid White 08 buffy coat
B00001 00001 MOST Urine Cup
B00001
00001 MOST Mixing Tube
B00001 00001 MOST vial Violet 04 1.0 mL plasma
B00001 00001 MOST grid Violet 04 1.0 mL plasma
B00001
00001 MOST vial Red 09 1.0 mL serum
B00001 00001 MOST grid Red 09 1.0 mL serum
B00001 00001 Collect form
B00001 00001 Lab form
B00001 00001 MOST vial Violet 05 1.0 mL plasma
B00001 00001 MOST grid Violet 05 1.0 mL plasma
B00001 00001 MOST vial Red 10 1.0 mL serum
B00001 00001 MOST grid Red 10 1.0 mL serum
Laboratory Processing Version 1.0p May 2009

Laboratory Processing MOST Operations Manual page 25
B00001 00001 MOST vial Red 11 1.0 mL serum
B00001 00001 MOST grid Red 11 1.0 mL serum
B00001
00001 MOST vial Red 16 1.0 mL serum
B00001 00001 MOST grid Red 16 1.0 mL serum
B00001 00001 MOST vial Red 21 1.0 mL serum
B00001 00001 MOST grid Red 21 1.0 mL serum
B00001 00001 MOST vial Red 12 1.0 mL serum
B00001 00001 MOST grid Red 12 1.0 mL serum
B00001 00001 MOST vial Red 17 1.0 mL serum
B00001 00001 MOST grid Red 17 1.0 mL serum
B00001 00001 MOST vial Red 22 1.0 mL serum
B00001 00001 MOST grid Red 22 1.0 mL serum
B00001 00001 MOST vial Red 13 1.0 mL serum
B00001 00001 MOST grid Red 13 1.0 mL serum
B00001 00001 MOST vial Red 18 1.0 mL serum
B00001 00001 MOST grid Red 18 1.0 mL serum
B00001 00001 MOST vial Clear 23 1.5 mL urine
B00001 00001 MOST grid Clear 23 1.5 mL urine
B00001 00001 MOST vial Red 14 1.0 mL serum
B00001 00001 MOST grid Red 14 1.0 mL serum
B00001 00001 MOST vial Red 19 1.0 mL serum
B00001 00001 MOST grid Red 19 1.0 mL serum
B00001 00001 MOST vial Clear 24 1.5 mL urine
B00001 00001 MOST vial Clear 24 1.5 mL urine
B00001 00001 MOST vial Red 15 1.0 mL serum
B00001 00001 MOST grid Red 15 1.0 mL serum
B00001 00001 MOST vial Red 20 1.0 mL serum
B00001 00001 MOST grid Red 20 1.0 mL serum
B00001 00001 MOST vial Clear 25 1.5 mL urine
B00001 00001 MOST vial Clear 25 1.5 mL urine
Laboratory Processing Version 1.0p May 2009
Laboratory Processing MOST Operations Manual page 26
30-Month Follow-up Visit Cryovial Labels (page 1 of 2)
00001 ##### MOST vial Violet 01 0.5 plasma-30M
00001 ##### MOST grid Violet 01 0.5 plasma-30M
00001 ##### MOST vial Red 06 0.5 serum-30M
00001 ##### MOST grid Red 06 0.5 serum-30M
00001 ##### MOST vial Clear 11 0.5 urine-30M
00001 ##### MOST grid Clear 11 0.5 urine-30M
00001 ##### MOST vial Violet 02 0.5 plasma-30M
00001 ##### MOST grid Violet 02 0.5 plasma-30M
00001 ##### MOST vial Red 07 0.5 serum-30M
00001 ##### MOST grid Red 07 0.5 serum-30M
00001 ##### MOST vial Clear 12 0.5 urine-30M
00001 ##### MOST grid Clear 12 0.5 urine-30M
00001 ##### MOST vial Violet 03 0.5 plasma-30M
00001 ##### MOST grid Violet 03 0.5 plasma-30M
00001 ##### MOST vial Red 08 0.5 serum-30M
00001 ##### MOST grid Red 08 0.5 serum-30M
00001 ##### MOST vial Clear 13 0.5 urine-30M
00001 ###### MOST grid Clear 13 0.5 urine-30M
00001 ##### MOST vial Red 04 0.5 serum-30M
00001 ##### MOST grid Red 04 0.5 serum-30M
00001 ##### MOST vial Red 09 0.5 serum-30M
00001 ##### MOST grid Red 09 0.5 serum-30M
00001
##### MOST vial Clear 14 0.5 urine-30M
00001 ##### MOST grid Clear 14 0.5 urine-30M
00001 ##### MOST vial Red 05 0.5 serum-30M
00001 ##### MOST grid Red 05 0.5 serum-30M
00001 ##### MOST vial Red 10 0.5 serum-30M
00001 ##### MOST grid Red 10 0.5 serum-30M
00001 ##### MOST-30M Collect Form
00001 ##### MOST-30M Lab Form
00001 ##### MOST-30M X-tra Tube Lav top 3-5 mL
00001 ##### MOST-30M X-tra Tube Red top 7-10 mL
Laboratory Processing Version 1.0p May 2009

Laboratory Processing MOST Operations Manual page 27
00001 ##### MOST-30M Tube 1 Lav top 3-5 mL
00001 ##### MOST-30M Tube 2 Red top 7-10 mL
00001 ##### MOST-30M Urine Cup
END OF SET
Laboratory Processing Version 1.0p May 2009

Laboratory Processing MOST Operations Manual page 28
Laboratory Processing Version 1.0p
May 2009
Appendix 5 Laboratory Processing Supplies
Laboratory Processing Supplies: Baseline Visit Lab Supplies # suggested sample type vendor: catalog # $ price/unit
PCA: Perchloric Acid 60% Hc104 disodium ethylenediamine tetra acetate
(EDTA) distilled water Use: Mix perchloric acid, EDTA and distilled water per protocol for plasma/PCA mixing.
Sigma-Aldrich: 31-141-3 Fisher: S3111-100 Purchase locally
$33.10/100mL $40.26/100g TBD
Vortex mixer (Maxi Mix* II Mixer) Use: To mix plasma and PCA in plastic tubes for vitamin C
1 plasma / PCA
Fisher: M37615 (12-814-5)
$322.00
Fisherbrand* Sterile Plastic Tubes with Caps (12 x 75) Use: To mix plasma with PCA – Centrifuge with cap on.
1/participant plasma/ PCA Fisher: 14-956-3D
$156.82/1000 (125/ bag)
Fisherbrand* Disposable Polyethylene Transfer Pipettes Use: To isolate and pipette the buffy coat and remove excess plasma from vacutainer tube. Can be used for plasma, serum, urine, and PCA volumes as well.
1/participant (or +4/participant
if used for plasma, serum, urine aliquots)
buffy coat Fisher: 13-711-5A
$35.90/500
Rainin Pipette – Air-displacement Pipet-Plus® Latch-Mode™ Pipette with LTS manufactured by Rainin Instruments, LLC. Use: Required for measuring volumes for plasma/PCA. Also can be used to make all aliquots (serum, plasma, urine) for project.
1 REQUIRED for plasma /PCA. plasma, serum, urine
RL-1000 (volume range 100 uL – 1 mL)
$265.00
Rainin Pipette Tips for Pipet-Plus® Latch-Mode™ Pipette Use: Pippete tips used in conjunction with the Rainin Pipette to make aliquots and to measure PCA volumes. A new tip must be used for each different type of matrix.
4/participant PCA volumes, plasma, serum, urine
RT-L1000 $40.00/pack 768 tips/pack
Storage/ Shipping Supplies # suggested sample type vendor: catalog # $ price/unit
Leakproof ziplock bags (12" x 12") Use: Place cryovial storage boxes in ziplock bag before placing in shipping container.
Purchase locally TBD
Saf-T-Pak absorbent pads (100 mL absorbent capability) Use: Place inside storage boxes
1/cryovial box Catalog No. STP 151 $31.90 / 250 pieces
Polyfoam Packer shipping containers (reusable) Use: To ship cryovial storage boxes to BRI.
4 for start-up. Can be reused,
but shipping costs may prohibit)
Catalog No. 398 –(18”x11”x12”), up to twenty 2” freezer boxes. Catalog No. 346 –(11.375”x8.375”x11”), up to twelve 2” freezer boxes. Catalog No. 430- 10”x17”x11”), up to five 2” freezer boxes.
$41.00/two containers. $74.90/six containers. $74.90/four containers.
Note: Prices are from the catalogs. Educational discounts should apply.

Laboratory Processing MOST Operations Manual page 29
Laboratory Processing Version 1.0p
May 2009
Fisher Scientific: Fisher HealthCare 9999 Veterans Memorial Drive Houston, Texas 77038 1-800-640-0640 www.fishersci.com Sigma-Aldrich Corp. St. Louis, MO, USA Phone: 314-771-5765 www.sigmaaldrich.com Rainin Instrument, LLC 7500 Edgewater Drive, Box 2160 Oakland, CA 94621-0060 1-800-472-4646 Styrofoam shipping containers: Polyfoam Packers 2320 Foster Avenue Wheeling, IL 60090 1-800-323-7442 www.polyfoam.com Saf-T-Pak 10807 – 182 Street Edmonton, Alberta Canada T5S 1J5 1-800-814-7484 www.saftpak.com Additional Supplies: FedEx airbills and airbill pouches: Local FedEx office, Class 9 labels: Local FedEx office, “Diagnostic Specimens” and “Keep Frozen” labels: produced by site, Dry Ice: Purchase locally. Supplies provided by the Coordinating Center: Cryovials Cryovial labels Cryovial storage boxes

Laboratory Processing MOST Operations Manual page 30
Laboratory Processing Version 1.0p
May 2009
Laboratory Processing Supplies: 30-Month Follow-up Visit Lab Supplies # suggested sample type vendor: catalog # $ price/unit
Fisherbrand* Disposable Polyethylene Transfer Pipettes Use: Can be used to pipette plasma, serum, and urine volumes.
3/participant if
used for plasma, serum, and urine
aliquots
plasma, serum, urine
Fisher: 13-711-5A
$40.85/500
Rainin Pipette – Air-displacement Pipet-Plus® Latch-Mode™ Pipette with LTS manufactured by Rainin Instruments, LLC. Use: Can be used to make all aliquots (serum, plasma, urine).
1
plasma, serum, urine
RL-1000 (volume range 100 uL – 1 mL)
$265.00
Rainin Pipette Tips for Pipet-Plus® Latch-Mode™ Pipette Use: Pipette tips used in conjunction with the Rainin Pipette to measure volumes and make aliquots. A new tip must be used for each different type of matrix.
3/participant if
used for plasma, serum, and urine
aliquots
plasma, serum, urine
RT-L1000 $40.00/pack 768 tips/pack
Storage/ Shipping Supplies # suggested sample type vendor: catalog # $ price/unit
Leakproof ziplock bags (12" x 12") Use: Place cryovial storage boxes in ziplock bag before placing in shipping container.
Purchase locally TBD
Saf-T-Pak absorbent pads (100 mL absorbent capability) Use: Place inside storage boxes
1/cryovial box Catalog No. STP 151 $34.62 / 250 pieces
Polyfoam Packer shipping containers (reusable) Use: To ship cryovial storage boxes to BRI.
4 for start-up. Can be reused,
but shipping costs may prohibit)
Catalog No. 398: (18”x11”x12”), up to twenty 2” freezer boxes. Catalog No. 346-UPS: (11.375”x8.375”x11”), up to twelve 2” freezer boxes. Catalog No. 430: (10”x17”x11”), up to five 2” freezer boxes.
$44.00/two containers. $80.30/six containers. $80.30/four containers.
Note: Prices are from the catalogs. Educational discounts should apply.
Fisher Scientific: Fisher HealthCare 9999 Veterans Memorial Drive Houston, Texas 77038 1-800-640-0640 www.fishersci.com Sigma-Aldrich Corp. St. Louis, MO, USA Phone: 314-771-5765 www.sigmaaldrich.com

Laboratory Processing MOST Operations Manual page 31
Laboratory Processing Version 1.0p
May 2009
Rainin Instrument, LLC 7500 Edgewater Drive, Box 2160 Oakland, CA 94621-0060 1-800-472-4646 Styrofoam shipping containers: Polyfoam Packers 2320 Foster Avenue Wheeling, IL 60090 1-800-323-7442 www.polyfoam.com Saf-T-Pak 10807 – 182 Street Edmonton, Alberta Canada T5S 1J5 1-800-814-7484 www.saftpak.com Additional Supplies: FedEx airbills and airbill pouches: Local FedEx office, Class 9 labels: Local FedEx office, “Diagnostic Specimens” and “Keep Frozen” labels: produced by site, Dry Ice: Purchase locally. Supplies provided by the Coordinating Center: Cryovials Cryovial labels Cryovial storage boxes

Laboratory Processing MOST Operations Manual page 32
Laboratory Processing Version 1.0p
May 2009
Appendix 6 Cryovial Storage Box Grid form
Freezer Box Diagram for Shipping Plasma, Serum, Buffy Coat, and
Urine Specimens to Biomedical Research Institute (BRI): Baseline Visit Affix a MOST grid label that matches the MOST vial place in each cryovial box slot.
MOST Shipping Grid MOST Study Box #___________ SENT TO BRI:__________________________ NOTE: Use a separate MOST Shipping Grid form and cryovial box for specimens that have planned analysis [cryovials #01, #03, #09 and #10].)
Start Top
Bottom

Laboratory Processing MOST Operations Manual page 33
Laboratory Processing Version 1.0p
May 2009
Freezer Box Diagram for Shipping Plasma, Serum, and Urine Specimens to Biomedical
Research Institute (BRI): 30-Month Follow-up Visit
MOST Laboratory Shipping Grid – 30 Month Visit Specimens SPECIMEN TYPE (MARK ONE): ____PLASMA ____SERUM ____URINE MOST BOX #: __________________________ NOTE: AFFIX A MOST GRID LABEL THAT MATCHES THE MOST VIAL PLACE IN EACH CRYOVIAL BOX SLOT. Use a separate MOST Shipping Grid form and cryovial box for plasma, serum and urine biological specimens. Sequentially number the boxes starting with B0001 (UAB) or I0001 (U of Iowa) for each specimen type (plasma, serum and urine). Write the specimen type (plasma, serum or urine) and the sequential box number on the front of each cryovial box).
Start Top
Bottom End

Laboratory Processing MOST Operations Manual page 34
Laboratory Processing Version 1.0p
May 2009
Appendix 7 Specimen Shipping Checklist
Styrofoam Mailing Container (2 different sizes) with outer cardboard sleeve Polyfoam Packers # 398 Polyfoam Packers # 346 Polyfoam Packers # 430 Absorbent material Freezer boxes with 9 x 9 grids (rubber bands around box) Leakproof Zip-lock bags Packaging tape Dry ice (approximately 20 lbs. per box) FedEx Labels (provided by carrier) Original Cryovial Storage Box Grid form (baseline visit) Original MOST Laboratory Shipping Grid – 30 Month Visit Specimens (30-
month visit only) Copies of Completed Specimen Collection/Laboratory Processing Forms
(baseline visit only) Ice Packs (for whole blood shipments only) (baseline visit only)

Laboratory Processing MOST Operations Manual page 35
Appendix 8 Federal Express Airbill for Dry Ice Shipment
Laboratory Processing Version 1.0p May 2009

Laboratory Processing MOST Operations Manual page 36
Appendix 9 Dry Ice and Labeling Diagram
Laboratory Processing Version 1.0p May 2009
Related Documents