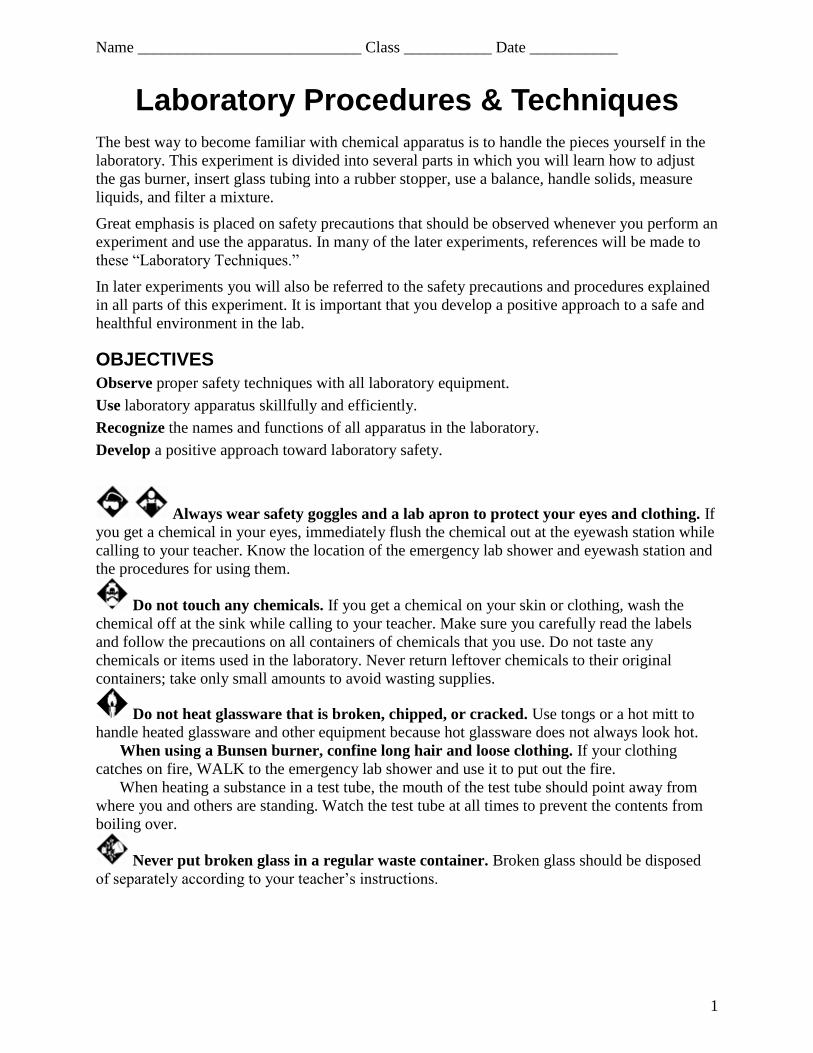
Name ____________________________ Class ___________ Date ___________ 1 Laboratory Procedures & Techniques The best way to become familiar with chemical apparatus is to handle the pieces yourself in the laboratory. This experiment is divided into several parts in which you will learn how to adjust the gas burner, insert glass tubing into a rubber stopper, use a balance, handle solids, measure liquids, and filter a mixture. Great emphasis is placed on safety precautions that should be observed whenever you perform an experiment and use the apparatus. In many of the later experiments, references will be made to these “Laboratory Techniques.” In later experiments you will also be referred to the safety precautions and procedures explained in all parts of this experiment. It is important that you develop a positive approach to a safe and healthful environment in the lab. OBJECTIVES Observe proper safety techniques with all laboratory equipment. Use laboratory apparatus skillfully and efficiently. Recognize the names and functions of all apparatus in the laboratory. Develop a positive approach toward laboratory safety. Always wear safety goggles and a lab apron to protect your eyes and clothing. If you get a chemical in your eyes, immediately flush the chemical out at the eyewash station while calling to your teacher. Know the location of the emergency lab shower and eyewash station and the procedures for using them. Do not touch any chemicals. If you get a chemical on your skin or clothing, wash the chemical off at the sink while calling to your teacher. Make sure you carefully read the labels and follow the precautions on all containers of chemicals that you use. Do not taste any chemicals or items used in the laboratory. Never return leftover chemicals to their original containers; take only small amounts to avoid wasting supplies. Do not heat glassware that is broken, chipped, or cracked. Use tongs or a hot mitt to handle heated glassware and other equipment because hot glassware does not always look hot. When using a Bunsen burner, confine long hair and loose clothing. If your clothing catches on fire, WALK to the emergency lab shower and use it to put out the fire. When heating a substance in a test tube, the mouth of the test tube should point away from where you and others are standing. Watch the test tube at all times to prevent the contents from boiling over. Never put broken glass in a regular waste container. Broken glass should be disposed of separately according to your teacher’s instructions.

Welcome message from author
This document is posted to help you gain knowledge. Please leave a comment to let me know what you think about it! Share it to your friends and learn new things together.
Transcript
Name ____________________________ Class ___________ Date ___________
1
Laboratory Procedures & Techniques
The best way to become familiar with chemical apparatus is to handle the pieces yourself in the
laboratory. This experiment is divided into several parts in which you will learn how to adjust
the gas burner, insert glass tubing into a rubber stopper, use a balance, handle solids, measure
liquids, and filter a mixture.
Great emphasis is placed on safety precautions that should be observed whenever you perform an
experiment and use the apparatus. In many of the later experiments, references will be made to
these “Laboratory Techniques.”
In later experiments you will also be referred to the safety precautions and procedures explained
in all parts of this experiment. It is important that you develop a positive approach to a safe and
healthful environment in the lab.
OBJECTIVES
Observe proper safety techniques with all laboratory equipment.
Use laboratory apparatus skillfully and efficiently.
Recognize the names and functions of all apparatus in the laboratory.
Develop a positive approach toward laboratory safety.
Always wear safety goggles and a lab apron to protect your eyes and clothing. If
you get a chemical in your eyes, immediately flush the chemical out at the eyewash station while
calling to your teacher. Know the location of the emergency lab shower and eyewash station and
the procedures for using them.
Do not touch any chemicals. If you get a chemical on your skin or clothing, wash the
chemical off at the sink while calling to your teacher. Make sure you carefully read the labels
and follow the precautions on all containers of chemicals that you use. Do not taste any
chemicals or items used in the laboratory. Never return leftover chemicals to their original
containers; take only small amounts to avoid wasting supplies.
Do not heat glassware that is broken, chipped, or cracked. Use tongs or a hot mitt to
handle heated glassware and other equipment because hot glassware does not always look hot.
When using a Bunsen burner, confine long hair and loose clothing. If your clothing
catches on fire, WALK to the emergency lab shower and use it to put out the fire.
When heating a substance in a test tube, the mouth of the test tube should point away from
where you and others are standing. Watch the test tube at all times to prevent the contents from
boiling over.
Never put broken glass in a regular waste container. Broken glass should be disposed
of separately according to your teacher’s instructions.
Name ____________________________ Class ___________ Date ___________
2
PART 1—THE BURNER
MATERIALS
Bunsen burner and related equipment
copper wire, 18 gauge
evaporating dish
crucible tongs (not beaker tongs)
heat-resistant mat
cloth towel
lab apron
safety goggles
sparker
Procedure 1. Put on safety goggles, and a lab apron. Use heat-resistant gloves when handling hot items.
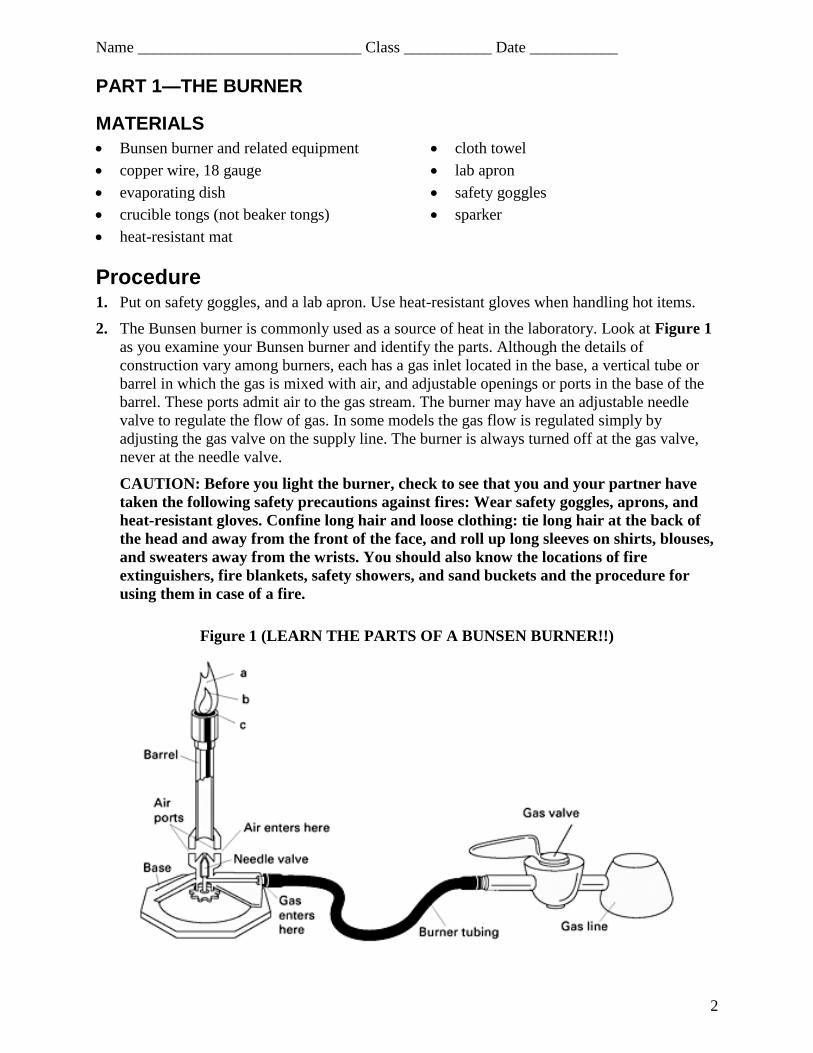
2. The Bunsen burner is commonly used as a source of heat in the laboratory. Look at Figure 1
as you examine your Bunsen burner and identify the parts. Although the details of
construction vary among burners, each has a gas inlet located in the base, a vertical tube or
barrel in which the gas is mixed with air, and adjustable openings or ports in the base of the
barrel. These ports admit air to the gas stream. The burner may have an adjustable needle
valve to regulate the flow of gas. In some models the gas flow is regulated simply by
adjusting the gas valve on the supply line. The burner is always turned off at the gas valve,
never at the needle valve.
CAUTION: Before you light the burner, check to see that you and your partner have
taken the following safety precautions against fires: Wear safety goggles, aprons, and
heat-resistant gloves. Confine long hair and loose clothing: tie long hair at the back of
the head and away from the front of the face, and roll up long sleeves on shirts, blouses,
and sweaters away from the wrists. You should also know the locations of fire
extinguishers, fire blankets, safety showers, and sand buckets and the procedure for
using them in case of a fire.
Figure 1 (LEARN THE PARTS OF A BUNSEN BURNER!!)
Name ____________________________ Class ___________ Date ___________
3
3. When lighting the burner, partially close the ports at the base of the barrel, turn the gas full
on, hold the sparker about 5 cm above the top of the burner, and proceed to light.
The gas flow may then be regulated by adjusting the gas valve until the flame has the desired
height. If a very low flame is needed, remember that the ports should be partially closed
when the gas pressure is reduced. Otherwise the flame may burn inside the base of the barrel.
When the flame is improperly burning in this way, the barrel will get very hot, and the flame
will produce a poisonous gas, carbon monoxide.
CAUTION: If the flame is burning inside the base of the barrel, immediately turn off
the gas at the gas valve. Do not touch the barrel, because it is extremely hot. Allow the
barrel of the burner to cool, and then proceed as follows:
Begin again, but first decrease the amount of air admitted to the burner by partially closing
the ports. Turn the gas full on, and then relight the burner. Control the height of the flame by
adjusting the gas valve. By taking these steps, you should acquire a flame that is burning
safely and is easily regulated.
4. Once you have a flame that is burning safely and steadily, you can experiment by completely
closing the ports at the base of the burner. What effect does this have on the flame?
_________________________________________________________________________
_________________________________________________________________________
_________________________________________________________________________
Using the tongs (not beaker tongs!!), hold an evaporating dish in the tip of the flame for
about 2 min. Place the dish on a heat-resistant mat and allow the dish to cool. Then examine
the bottom of the dish. Describe the results and suggest a possible explanation.
_________________________________________________________________________
_________________________________________________________________________
_________________________________________________________________________
Such a flame is seldom used in the lab. For laboratory work, you should adjust the burner so
that the flame is free of yellow color, nonluminous, and also free of the roaring sound caused
by admitting too much air.
5. Regulate the flow of gas so that the flame extends roughly 8 cm above the barrel. Now adjust
the supply of air until you have a noisy, steady flame with a sharply defined, light-blue inner
cone. This adjustment gives the highest temperature possible with your burner. Using the
tongs, insert a 10-cm piece of copper wire into the flame just above the barrel. Lift the wire
slowly up through parts of the flame. Where is the hottest portion of the flame located?
_________________________________________________________________________
_________________________________________________________________________
Hold the wire in this part of the flame for a few seconds. What happens?
_________________________________________________________________________
_________________________________________________________________________
Name ____________________________ Class ___________ Date ___________
4
6. Shut off the gas burner. Now think about what you have just observed in steps 4 and 5. Why
is the nonluminous flame preferred over the yellow luminous flame in the laboratory?
_________________________________________________________________________
_________________________________________________________________________
7. Clean the evaporating dish and put away the burner. All the equipment you store in the lab
locker or drawer should be completely cool, clean, and dry. Be sure that the valve on the gas
jet is completely shut off. Remember to wash your hands thoroughly with soap at the end of
each laboratory period.
PART 2—GLASS MANIPULATION (Read only)
MATERIALS
cloth pads or leather gloves
glass funnel
rubber hose
rubber stopper, 1-hole
safety goggles & lab apron
water or glycerin
Procedure
1. Inserting glass tubing into rubber stoppers can be very dangerous. The following precautions
should be observed to prevent injuries:
a. Never attempt to insert glass tubing that has a jagged end. Glass tubing should be fire
polished before it is inserted into a rubber stopper. To fire polish glass tubing, heat the
end in a flame until the end is smooth. Never fire polish anything without your
teacher’s permission, and proper supervision. Use tongs or a hot mitt to handle
heated glassware and other equipment, because heated glassware does not look hot.
b. Use water or glycerin as a lubricant on the end of the glass tubing before inserting it into
a rubber stopper. Ask your teacher for the proper lubricant.
CAUTION: Protect your hands and fingers when inserting glass tubing into a
rubber stopper.
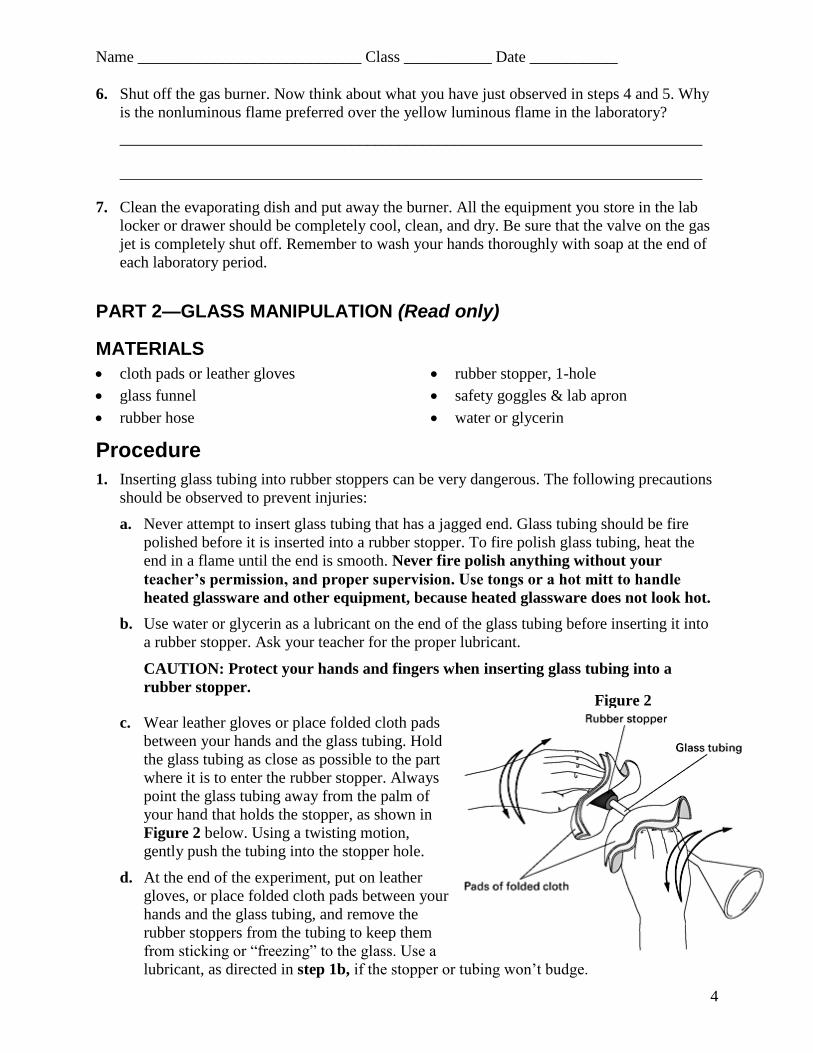
c. Wear leather gloves or place folded cloth pads
between your hands and the glass tubing. Hold
the glass tubing as close as possible to the part
where it is to enter the rubber stopper. Always
point the glass tubing away from the palm of
your hand that holds the stopper, as shown in
Figure 2 below. Using a twisting motion,
gently push the tubing into the stopper hole.
d. At the end of the experiment, put on leather
gloves, or place folded cloth pads between your
hands and the glass tubing, and remove the
rubber stoppers from the tubing to keep them
from sticking or “freezing” to the glass. Use a
lubricant, as directed in step 1b, if the stopper or tubing won’t budge.
Figure 2
Name ____________________________ Class ___________ Date ___________
5
2. When inserting glass tubing into a rubber or plastic hose, observe the same precautions
discussed in steps 1a–1c. The glass tubing should be lubricated before inserting it into the
rubber or plastic hose. The rubber hose should be cut at an angle before the insertion of the
glass tubing. The angled cut in the hose allows the rubber to stretch more readily.
CAUTION: Protect your hands when inserting or removing glass tubing.
At the end of an experiment, immediately remove the glass tubing from the hose. When
disassembling, follow the precautions that were given in step 1d.
Carefully follow these precautions and techniques whenever an experiment requires that you
insert glass tubing into either a rubber stopper or a rubber or plastic hose. You will be
referred to these safety precautions, wherever appropriate, throughout the lab course.
PART 3—HANDLING SOLIDS (Read only)
MATERIALS
Weigh boat
lab apron
safety goggles
salt and sand mixture
spatula
Procedure
1. Solids are usually kept in wide-mouthed bottles. Read the label at least three times to make
sure you have the correct chemical.
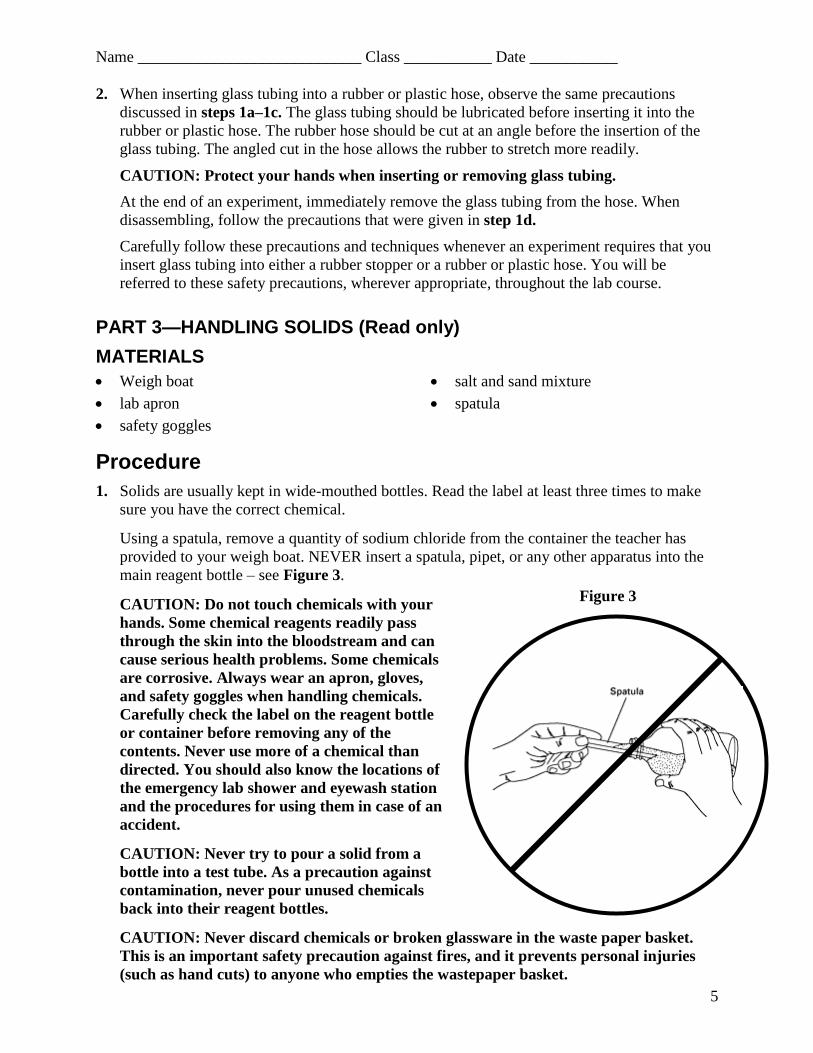
Using a spatula, remove a quantity of sodium chloride from the container the teacher has
provided to your weigh boat. NEVER insert a spatula, pipet, or any other apparatus into the
main reagent bottle – see Figure 3.
CAUTION: Do not touch chemicals with your
hands. Some chemical reagents readily pass
through the skin into the bloodstream and can
cause serious health problems. Some chemicals
are corrosive. Always wear an apron, gloves,
and safety goggles when handling chemicals.
Carefully check the label on the reagent bottle
or container before removing any of the
contents. Never use more of a chemical than
directed. You should also know the locations of
the emergency lab shower and eyewash station
and the procedures for using them in case of an
accident.
CAUTION: Never try to pour a solid from a
bottle into a test tube. As a precaution against
contamination, never pour unused chemicals
back into their reagent bottles.
CAUTION: Never discard chemicals or broken glassware in the waste paper basket.
This is an important safety precaution against fires, and it prevents personal injuries
(such as hand cuts) to anyone who empties the wastepaper basket.
Figure 3
Name ____________________________ Class ___________ Date ___________
6
PART 4—THE BALANCE
MATERIALS
balance, centigram
weigh boat
lab apron
safety goggles
salt and sand mixture
spatula
Procedure
1. Make sure you have carefully read Part 3 before you begin this part.
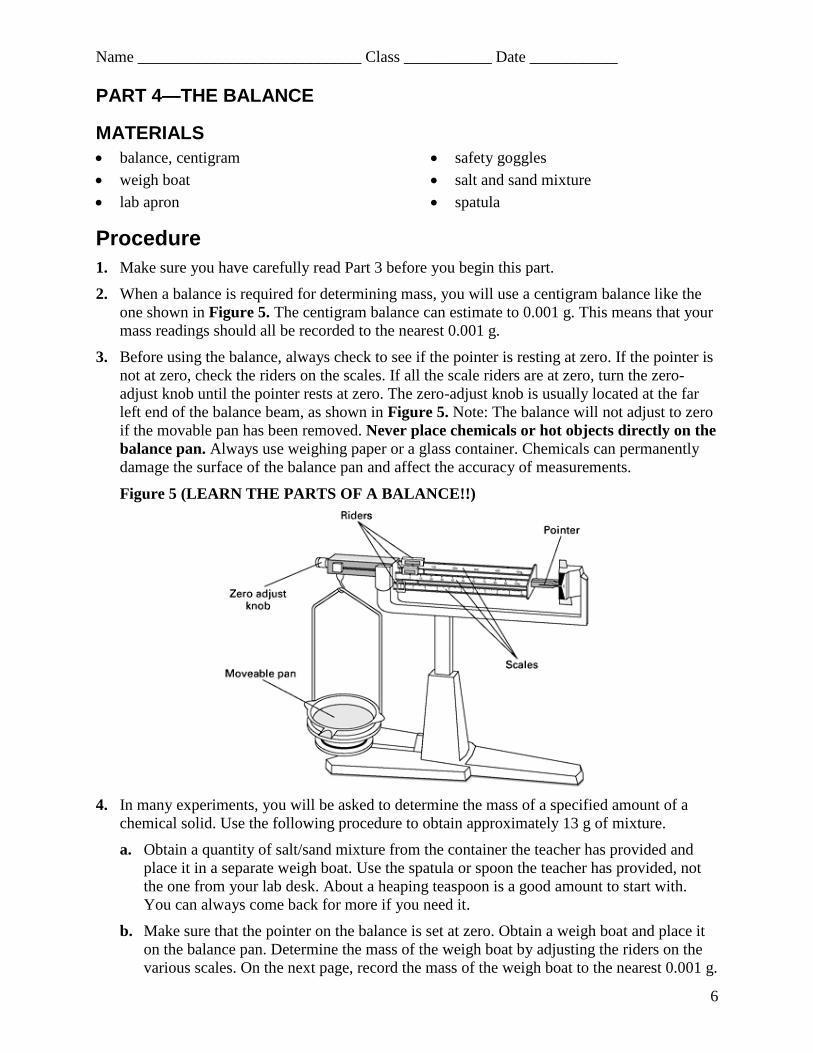
2. When a balance is required for determining mass, you will use a centigram balance like the
one shown in Figure 5. The centigram balance can estimate to 0.001 g. This means that your
mass readings should all be recorded to the nearest 0.001 g.
3. Before using the balance, always check to see if the pointer is resting at zero. If the pointer is
not at zero, check the riders on the scales. If all the scale riders are at zero, turn the zero-
adjust knob until the pointer rests at zero. The zero-adjust knob is usually located at the far
left end of the balance beam, as shown in Figure 5. Note: The balance will not adjust to zero
if the movable pan has been removed. Never place chemicals or hot objects directly on the
balance pan. Always use weighing paper or a glass container. Chemicals can permanently
damage the surface of the balance pan and affect the accuracy of measurements.
Figure 5 (LEARN THE PARTS OF A BALANCE!!)
4. In many experiments, you will be asked to determine the mass of a specified amount of a
chemical solid. Use the following procedure to obtain approximately 13 g of mixture.
a. Obtain a quantity of salt/sand mixture from the container the teacher has provided and
place it in a separate weigh boat. Use the spatula or spoon the teacher has provided, not
the one from your lab desk. About a heaping teaspoon is a good amount to start with.
You can always come back for more if you need it.
b. Make sure that the pointer on the balance is set at zero. Obtain a weigh boat and place it
on the balance pan. Determine the mass of the weigh boat by adjusting the riders on the
various scales. On the next page, record the mass of the weigh boat to the nearest 0.001 g.
Name ____________________________ Class ___________ Date ___________
7
c. Move the riders on the balance to read 13 grams by sliding the rider on the 100 g scale to
10 and the rider on the 10 g scale to 3. The riders must fit into the slot with the number
showing through the window.
d. Now slowly pour the salt and sand mixture from the weigh boat onto the second weigh
boat on the balance pan until the pointer once again comes to zero. You can bend the
weigh boat to make a spout or you can use your spatula.
This time you will only have to be close to the specified mass. Do not waste time trying
to obtain exactly 13.000 g. Instead, when you think you have almost 13 g, move the other
riders until the pointer rests close to zero and then read the exact mass. For example, the
mass might be 13.183 g. Record your exact mass of sodium chloride and the weighing
paper to the nearest 0.001 g. (Hint: Remember to subtract the mass of the weighing paper
to find the mass of sodium chloride.)
Mass of weigh boat: __________________________
Mass of salt/sand mixture and weigh boat: ____________________________
Mass of salt/sand mixture alone: _____________________________________
e. Save your sample for Part 6. If you will be doing Part 6 at a later time, be sure and put
your sample in a labeled zip-top bag and place it in your lab drawer. The label should
have both your name and your partner’s name and your class period.
f. Return any excess chemicals to the excess chemical container at the front lab station.
5. Wash your hands thoroughly with soap and water at the end of each lab period.
PART 5—MEASURING LIQUIDS
MATERIALS
beaker, 250 mL
graduated cylinder, 100 mL
lab apron
thin stem pipet
safety goggles
water
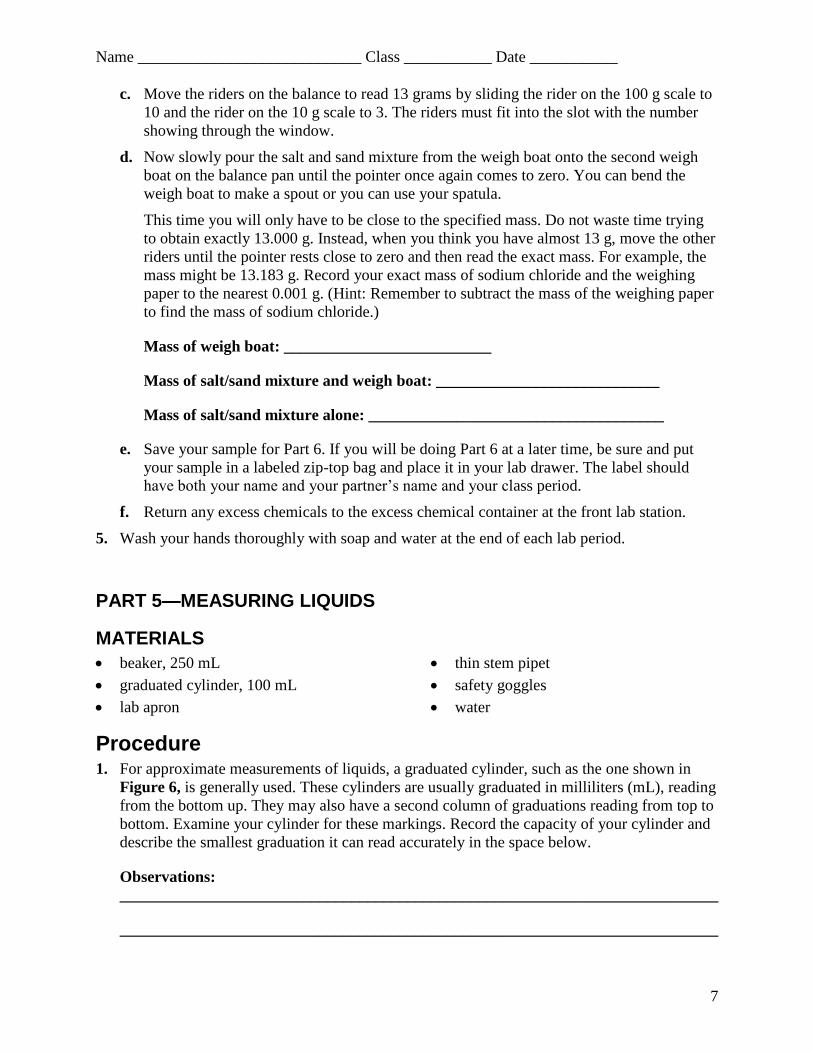
Procedure 1. For approximate measurements of liquids, a graduated cylinder, such as the one shown in
Figure 6, is generally used. These cylinders are usually graduated in milliliters (mL), reading
from the bottom up. They may also have a second column of graduations reading from top to
bottom. Examine your cylinder for these markings. Record the capacity of your cylinder and
describe the smallest graduation it can read accurately in the space below.
Observations:
___________________________________________________________________________
___________________________________________________________________________
Name ____________________________ Class ___________ Date ___________
8
Figure 6 Figure 7
2. A pipet may be used for more accurate volume measurements. Pipets, which are made in
many sizes, are used to deliver measured volumes of liquids. A pipet may be fitted with a
suction bulb, as shown in Figure 7, or be made with a bulb – such as the thin stem pipet
in your lab station. The bulb is used to withdraw air from the pipet while drawing up the
liquid to be measured.
CAUTION: Always use the suction bulb. NEVER pipet by mouth.
3. Accurately measure a volume of water in your graduated cylinder by following these steps:
CAUTION: When obtaining liquid chemical, first read the label three times to make
sure you have the right chemical. Never put a pipet into the reagent bottle. Never
pour any unused liquid back into the reagent bottle.
a. Pour a quantity of liquid that you want to measure from the liquid’s reagent bottle into a
beaker. In this case, use more than 50 mL but less than 100 mL. (NOTE: The beaker will
only ESTIMATE the volume of water.) You can use a pipet to help add or take away the
liquid to get a more accurate reading.
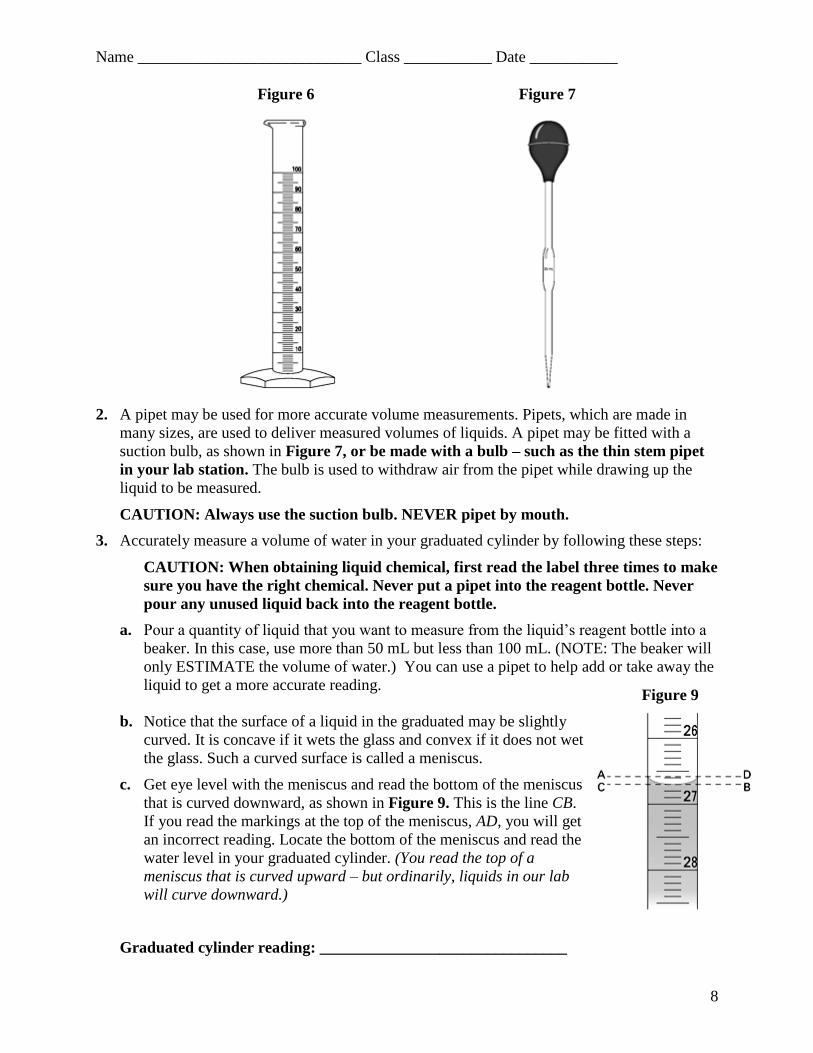
b. Notice that the surface of a liquid in the graduated may be slightly
curved. It is concave if it wets the glass and convex if it does not wet
the glass. Such a curved surface is called a meniscus.
c. Get eye level with the meniscus and read the bottom of the meniscus
that is curved downward, as shown in Figure 9. This is the line CB.
If you read the markings at the top of the meniscus, AD, you will get
an incorrect reading. Locate the bottom of the meniscus and read the
water level in your graduated cylinder. (You read the top of a
meniscus that is curved upward – but ordinarily, liquids in our lab
will curve downward.)
Graduated cylinder reading: _______________________________
Figure 9
Name ____________________________ Class ___________ Date ___________
9
CAUTION: In many experiments, you will have to dispose of a liquid chemical at the
end of a lab. Always ask your teacher about the correct method of disposal. In many
instances, liquid chemicals can be washed down the sink’s drain by diluting them with
plenty of tap water. Toxic chemicals should be handled only by your teacher. All
apparatus should be washed, rinsed, and dried.
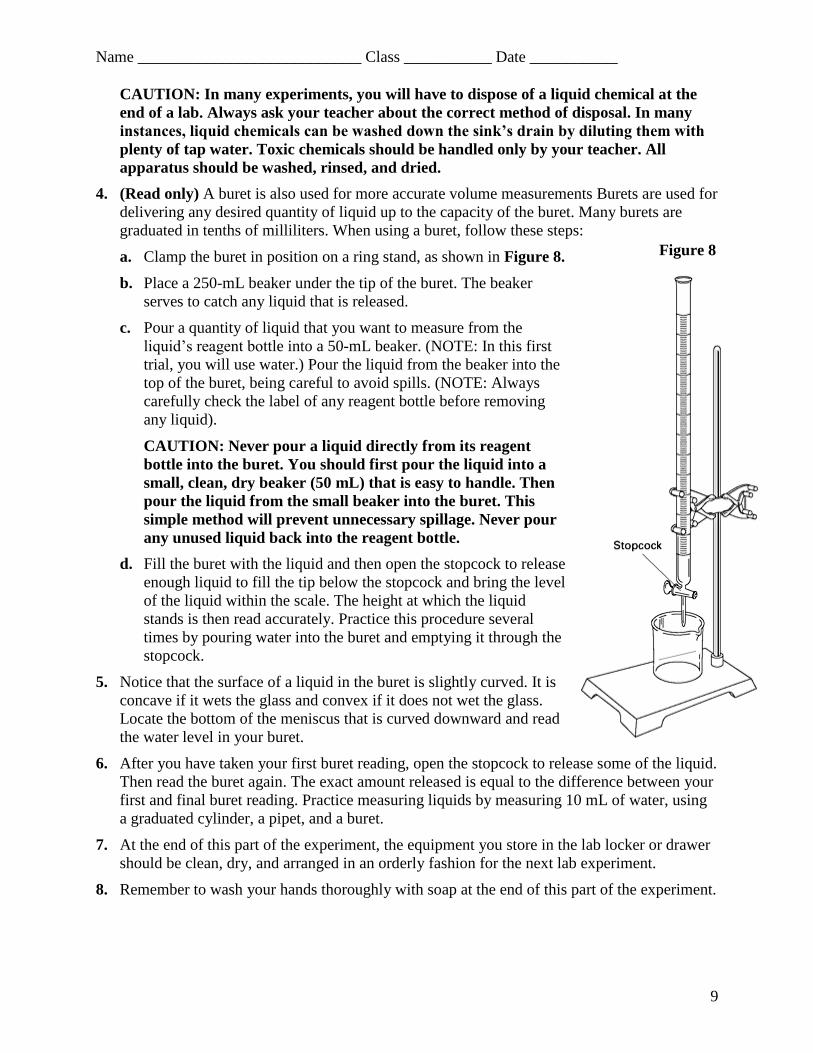
4. (Read only) A buret is also used for more accurate volume measurements Burets are used for
delivering any desired quantity of liquid up to the capacity of the buret. Many burets are
graduated in tenths of milliliters. When using a buret, follow these steps:
a. Clamp the buret in position on a ring stand, as shown in Figure 8.
b. Place a 250-mL beaker under the tip of the buret. The beaker
serves to catch any liquid that is released.
c. Pour a quantity of liquid that you want to measure from the
liquid’s reagent bottle into a 50-mL beaker. (NOTE: In this first
trial, you will use water.) Pour the liquid from the beaker into the
top of the buret, being careful to avoid spills. (NOTE: Always
carefully check the label of any reagent bottle before removing
any liquid).
CAUTION: Never pour a liquid directly from its reagent
bottle into the buret. You should first pour the liquid into a
small, clean, dry beaker (50 mL) that is easy to handle. Then
pour the liquid from the small beaker into the buret. This
simple method will prevent unnecessary spillage. Never pour
any unused liquid back into the reagent bottle.
d. Fill the buret with the liquid and then open the stopcock to release
enough liquid to fill the tip below the stopcock and bring the level
of the liquid within the scale. The height at which the liquid
stands is then read accurately. Practice this procedure several
times by pouring water into the buret and emptying it through the
stopcock.
5. Notice that the surface of a liquid in the buret is slightly curved. It is
concave if it wets the glass and convex if it does not wet the glass.
Locate the bottom of the meniscus that is curved downward and read
the water level in your buret.
6. After you have taken your first buret reading, open the stopcock to release some of the liquid.
Then read the buret again. The exact amount released is equal to the difference between your
first and final buret reading. Practice measuring liquids by measuring 10 mL of water, using
a graduated cylinder, a pipet, and a buret.
7. At the end of this part of the experiment, the equipment you store in the lab locker or drawer
should be clean, dry, and arranged in an orderly fashion for the next lab experiment.
8. Remember to wash your hands thoroughly with soap at the end of this part of the experiment.
Figure 8
Name ____________________________ Class ___________ Date ___________
10
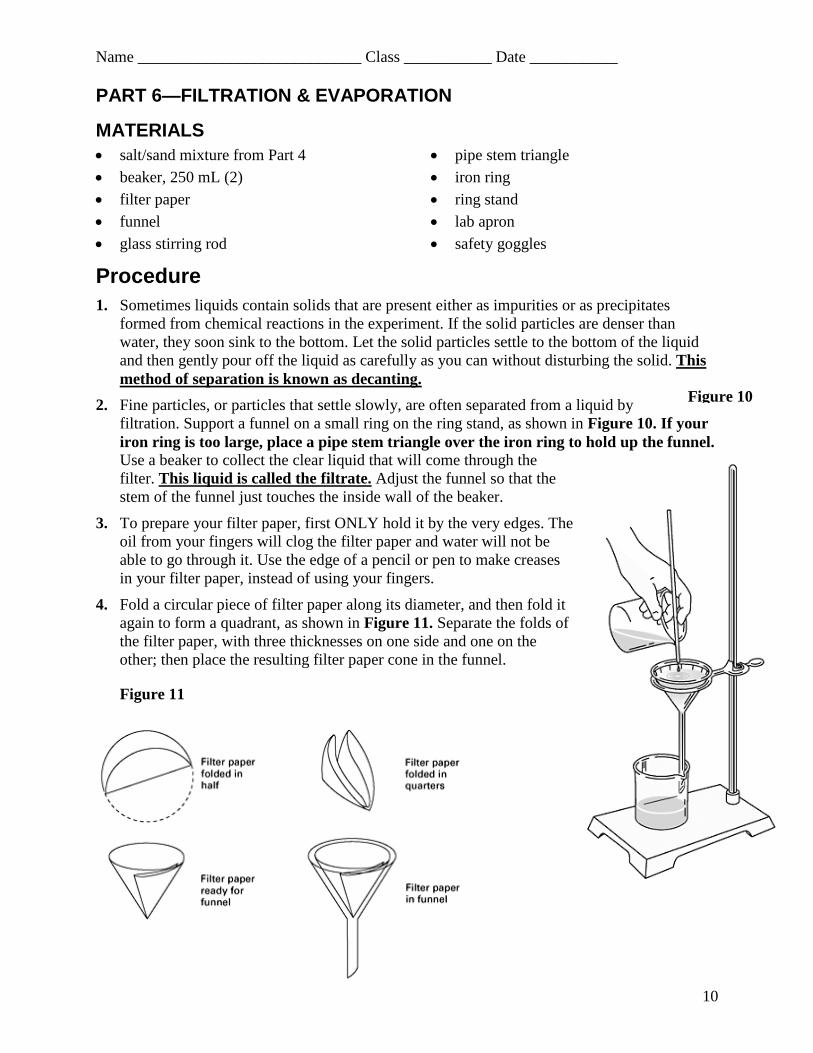
Figure 10
PART 6—FILTRATION & EVAPORATION
MATERIALS
salt/sand mixture from Part 4
beaker, 250 mL (2)
filter paper
funnel
glass stirring rod
pipe stem triangle
iron ring
ring stand
lab apron
safety goggles
Procedure
1. Sometimes liquids contain solids that are present either as impurities or as precipitates
formed from chemical reactions in the experiment. If the solid particles are denser than
water, they soon sink to the bottom. Let the solid particles settle to the bottom of the liquid
and then gently pour off the liquid as carefully as you can without disturbing the solid. This
method of separation is known as decanting.
2. Fine particles, or particles that settle slowly, are often separated from a liquid by
filtration. Support a funnel on a small ring on the ring stand, as shown in Figure 10. If your
iron ring is too large, place a pipe stem triangle over the iron ring to hold up the funnel. Use a beaker to collect the clear liquid that will come through the
filter. This liquid is called the filtrate. Adjust the funnel so that the
stem of the funnel just touches the inside wall of the beaker.
3. To prepare your filter paper, first ONLY hold it by the very edges. The
oil from your fingers will clog the filter paper and water will not be
able to go through it. Use the edge of a pencil or pen to make creases
in your filter paper, instead of using your fingers.
4. Fold a circular piece of filter paper along its diameter, and then fold it
again to form a quadrant, as shown in Figure 11. Separate the folds of
the filter paper, with three thicknesses on one side and one on the
other; then place the resulting filter paper cone in the funnel.
Figure 11
Name ____________________________ Class ___________ Date ___________
11
5. The funnel should be wet before you insert the filter paper. Gently run the funnel under the
faucet of your sink to wet the funnel and the filter paper. Press the edges of the filter paper
firmly against the sides of the funnel with the edges of a pencil or pen so no air can get
between the funnel and the filter paper while the liquid is being filtered. EXCEPTION: A
filter should not be wetted with water when the liquid to be filtered does not mix with water.
Why?
_________________________________________________________________________
_________________________________________________________________________
_________________________________________________________________________
6. Dissolve your salt/sand mixture from Part 4 in a beaker containing about 30 mL of water. Let
the sand settle to the bottle of the beaker and gently pour the salt water into the filter
observing the following suggestions:
a. The filter paper should not extend above the edge of the funnel. Use filter paper that
leaves about 1 cm of the funnel exposed.
b. Keep as much sand out of the filter paper as possible. Sand will clog your filter paper.
c. Do not completely fill the funnel. The liquid must NEVER go above the top of the filter
paper.
d. When a liquid is poured from a beaker, it may adhere to the glass and run down the
outside wall. This may be avoided by holding a stirring rod against the lip of the beaker,
as shown in Figure 10 on the previous page. The liquid will run down the rod and drop
off into the funnel without running down the outside of the beaker. The sand that was in
the water is retained on the filter paper. What TWO properties of the sand enabled it to be
separated from the water in this procedure?
________________________________________________________________________
________________________________________________________________________
________________________________________________________________________
What does the filtrate contain?
________________________________________________________________________
________________________________________________________________________
Name ____________________________ Class ___________ Date ___________
12
PART 7—EVAPORATION
MATERIALS
Filtrate from Part 6
Bunsen burner and
related equipment
evaporating dish
watch glass
wire gauze, ceramic-
centered
heat resistant mat
cloth towel
beaker tongs
iron ring
ring stand
lab apron
safety goggles
sparker
Procedure
1. The salt can be recovered from the filtrate by pouring the filtrate into an evaporating dish and
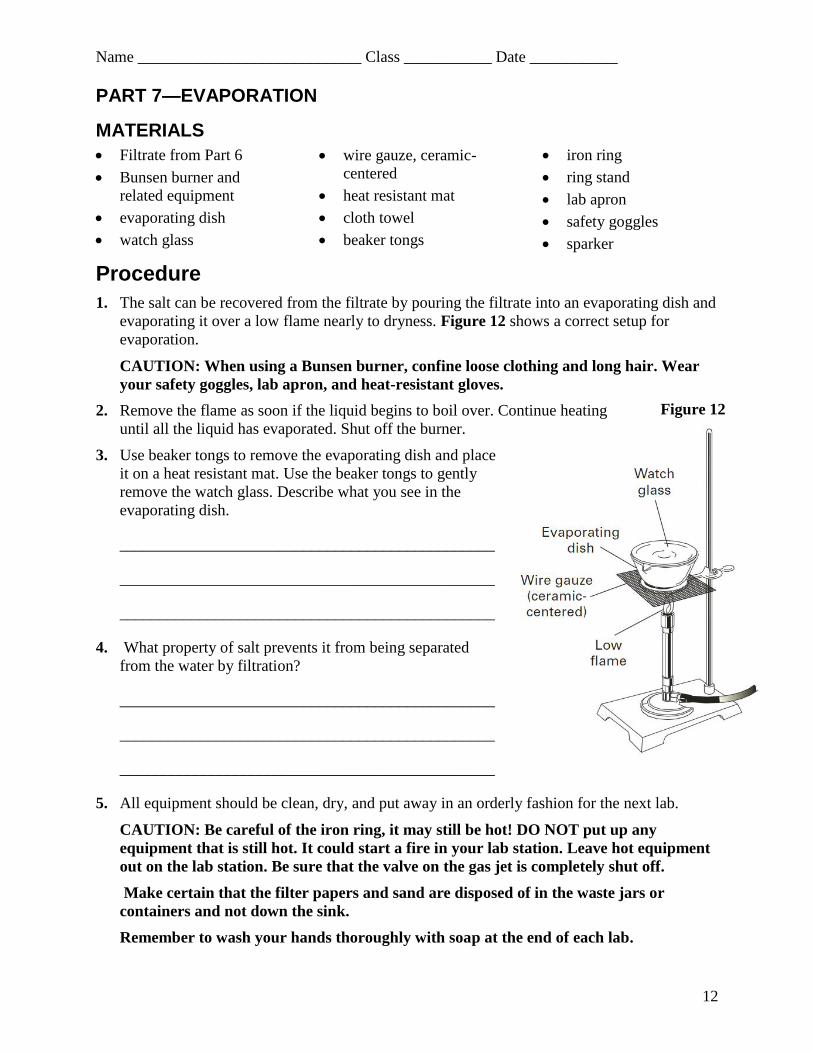
evaporating it over a low flame nearly to dryness. Figure 12 shows a correct setup for
evaporation.
CAUTION: When using a Bunsen burner, confine loose clothing and long hair. Wear
your safety goggles, lab apron, and heat-resistant gloves.
2. Remove the flame as soon if the liquid begins to boil over. Continue heating
until all the liquid has evaporated. Shut off the burner.
3. Use beaker tongs to remove the evaporating dish and place
it on a heat resistant mat. Use the beaker tongs to gently
remove the watch glass. Describe what you see in the
evaporating dish.
_______________________________________________
_______________________________________________
_______________________________________________
4. What property of salt prevents it from being separated
from the water by filtration?
_______________________________________________
_______________________________________________
_______________________________________________
5. All equipment should be clean, dry, and put away in an orderly fashion for the next lab.
CAUTION: Be careful of the iron ring, it may still be hot! DO NOT put up any
equipment that is still hot. It could start a fire in your lab station. Leave hot equipment
out on the lab station. Be sure that the valve on the gas jet is completely shut off.
Make certain that the filter papers and sand are disposed of in the waste jars or
containers and not down the sink.
Remember to wash your hands thoroughly with soap at the end of each lab.
Figure 12
Name ____________________________ Class ___________ Date ___________
13
Analysis Questions Answer the following questions in complete sentences.
1. As soon as you enter the lab, what safety equipment should you put on immediately?
2. Before you light a burner, what safety precautions should always be followed?
3. What immediate action should you take when the flame of your burner is burning inside the
base of the barrel?
4. What type of flame is preferred for laboratory work, and why?
5. When inserting glass tubing, why is it important that you wear safety goggles and gloves and
that you cover the tubing and stopper with protective pads of cloth?
6. What do you think might be a common cause of fires in lab drawers or lockers?
7. Why are broken glassware, chemicals, matches, and other laboratory debris never discarded
in a wastepaper basket?
Name ____________________________ Class ___________ Date ___________
14
8. List three safety precautions that should be observed when inserting or removing glass tubing
from a rubber stopper or rubber hose.
9. Why should you never touch chemicals with your hands?
10. What precaution can help prevent chemical contamination in reagent bottles?
11. Why are chemicals and hot objects never placed directly on the balance pan?
12. List three pieces of equipment used in the laboratory for measuring small quantities of
liquids. Label them as “accurate” and “not accurate.”
13. What important guideline should you follow when folding filter paper?
Name ____________________________ Class ___________ Date ___________
15
14. Describe the condition of all lab equipment at the end of an experiment. What should be
checked before you leave the lab?
15. What is the correct procedure for removing a solid reagent from its container in preparation
for its use in an experiment?
16. What is the correct procedure for removing a liquid reagent from its container in preparation
for its use in an experiment?
17. Why is it important to use low flame when evaporating water from a recovered filtrate?
Name ____________________________ Class ___________ Date ___________
16
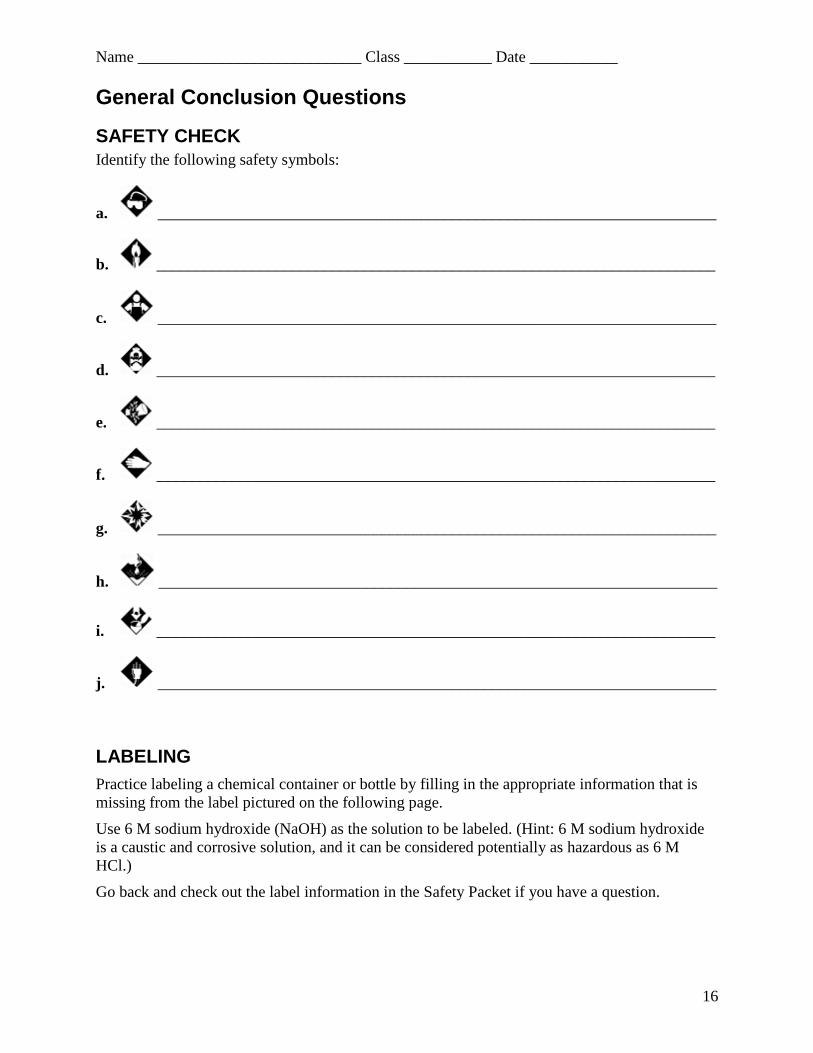
General Conclusion Questions
SAFETY CHECK
Identify the following safety symbols:
a. ______________________________________________________________________
b. ______________________________________________________________________
c. ______________________________________________________________________
d. ______________________________________________________________________
e. ______________________________________________________________________
f. ______________________________________________________________________
g. ______________________________________________________________________
h. ______________________________________________________________________
i. ______________________________________________________________________
j. ______________________________________________________________________
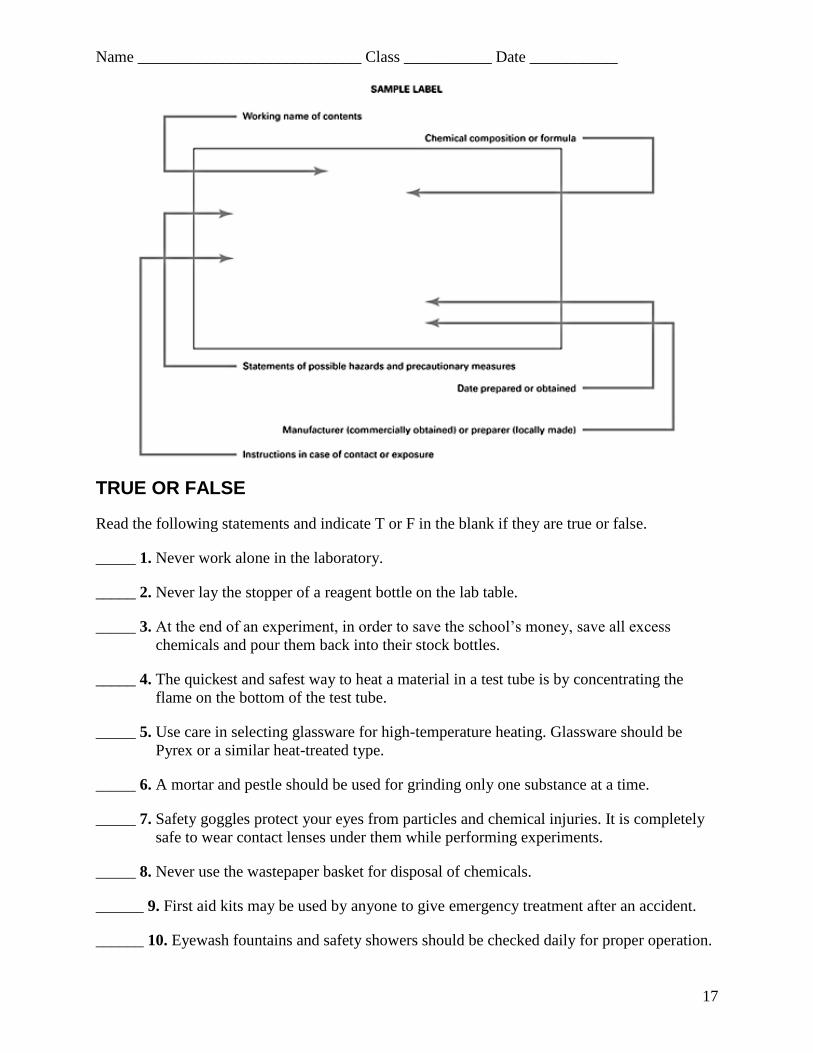
LABELING
Practice labeling a chemical container or bottle by filling in the appropriate information that is
missing from the label pictured on the following page.
Use 6 M sodium hydroxide (NaOH) as the solution to be labeled. (Hint: 6 M sodium hydroxide
is a caustic and corrosive solution, and it can be considered potentially as hazardous as 6 M
HCl.)
Go back and check out the label information in the Safety Packet if you have a question.
Name ____________________________ Class ___________ Date ___________
17
TRUE OR FALSE
Read the following statements and indicate T or F in the blank if they are true or false.
_____ 1. Never work alone in the laboratory.
_____ 2. Never lay the stopper of a reagent bottle on the lab table.
_____ 3. At the end of an experiment, in order to save the school’s money, save all excess
chemicals and pour them back into their stock bottles.
_____ 4. The quickest and safest way to heat a material in a test tube is by concentrating the
flame on the bottom of the test tube.
_____ 5. Use care in selecting glassware for high-temperature heating. Glassware should be
Pyrex or a similar heat-treated type.
_____ 6. A mortar and pestle should be used for grinding only one substance at a time.
_____ 7. Safety goggles protect your eyes from particles and chemical injuries. It is completely
safe to wear contact lenses under them while performing experiments.
_____ 8. Never use the wastepaper basket for disposal of chemicals.
______ 9. First aid kits may be used by anyone to give emergency treatment after an accident.
______ 10. Eyewash fountains and safety showers should be checked daily for proper operation.
Name ____________________________ Class ___________ Date ___________
18
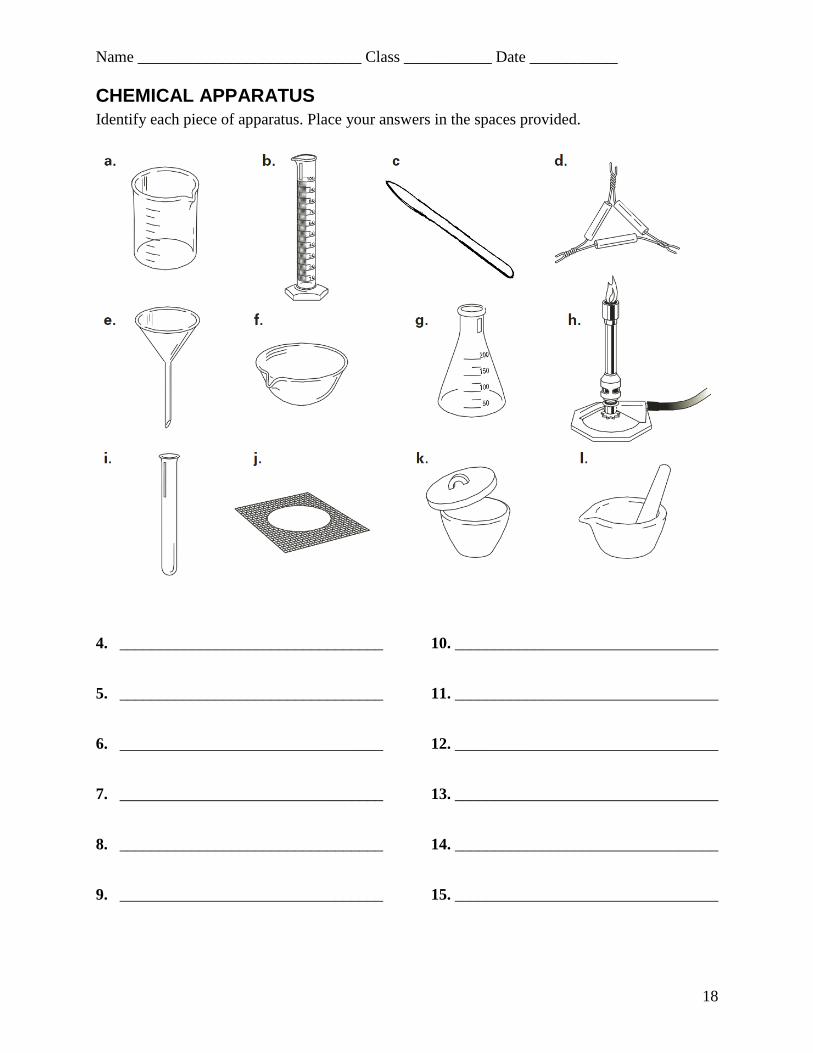
CHEMICAL APPARATUS
Identify each piece of apparatus. Place your answers in the spaces provided.
4. _________________________________
5. _________________________________
6. _________________________________
7. _________________________________
8. _________________________________
9. _________________________________
10. _________________________________
11. _________________________________
12. _________________________________
13. _________________________________
14. _________________________________
15. _________________________________
Related Documents