Department of Computer Science and Engineering Dr. Yinong Chen Lab#7 SOA Programming Overview In this lab, you will create service-oriented software that consists of the services found in the public service directories. The purpose of this lab is to exercise service development and application composition. Some of the required operations are synthetic, while others are realistic. The software will be implemented using Visual C# on Visual Studio .Net 2005.

Welcome message from author
This document is posted to help you gain knowledge. Please leave a comment to let me know what you think about it! Share it to your friends and learn new things together.
Transcript

Department of Computer Science and Engineering Dr. Yinong Chen
Lab#7
SOA Programming
Overview
In this lab, you will create service-oriented software that consists of the services found in
the public service directories. The purpose of this lab is to exercise service development
and application composition. Some of the required operations are synthetic, while others are
realistic. The software will be implemented using Visual C# on Visual Studio .Net 2005.

2
What is SOA and SOC?
Service-Oriented Architecture (SOA) is a software system consisting of a collection of
loosely coupled services (components) that communicates with each other through standard
interfaces (Tsai). These services are platform independent (can be operated in different
operating systems), and can be run separately from other services. Technically speaking, a
service is defined as an interface between the developer (the producer) and its customers
(the consumers). The goal of a service is to create a well-defined and well-contained set of
functions that be used by the consumers to form a larger service (component). Thus
services are often described as agents that conduct their work and pass their results to
the next agent(s).
While we use the terminology Service-Oriented Architecture (SOA) to describe a software
system as Service-Oriented, Service-Oriented Computing (SOC) refers to the paradigm
that represents computation in SOA. A paradigm is set of basic principles, concepts, and
methods of how computation or algorithms are expressed. In traditional software
development paradigms, the developer will take the requirements and convert them into
specifications, and then translate them into an executable program. However, SOC takes a
different approach.
Evolved from object-oriented computing and component-based computing, SOC splits the
developers into three independent, but collaborative entities. The first entity is the
service developers (or service providers); their primary responsibility is to develop software
3
services (either local based or web services). The second entity is the service brokers (or
the publishers); their primary responsibility is to publish and/or market the available
services. The last entity is the application builders or the service requestors, their primary
responsibility is to find available services through the service brokers and use the services
to develop their new applications. Unlike the traditional paradigm, the application
development is now done via discovery and composition rather than traditional design and
coding.
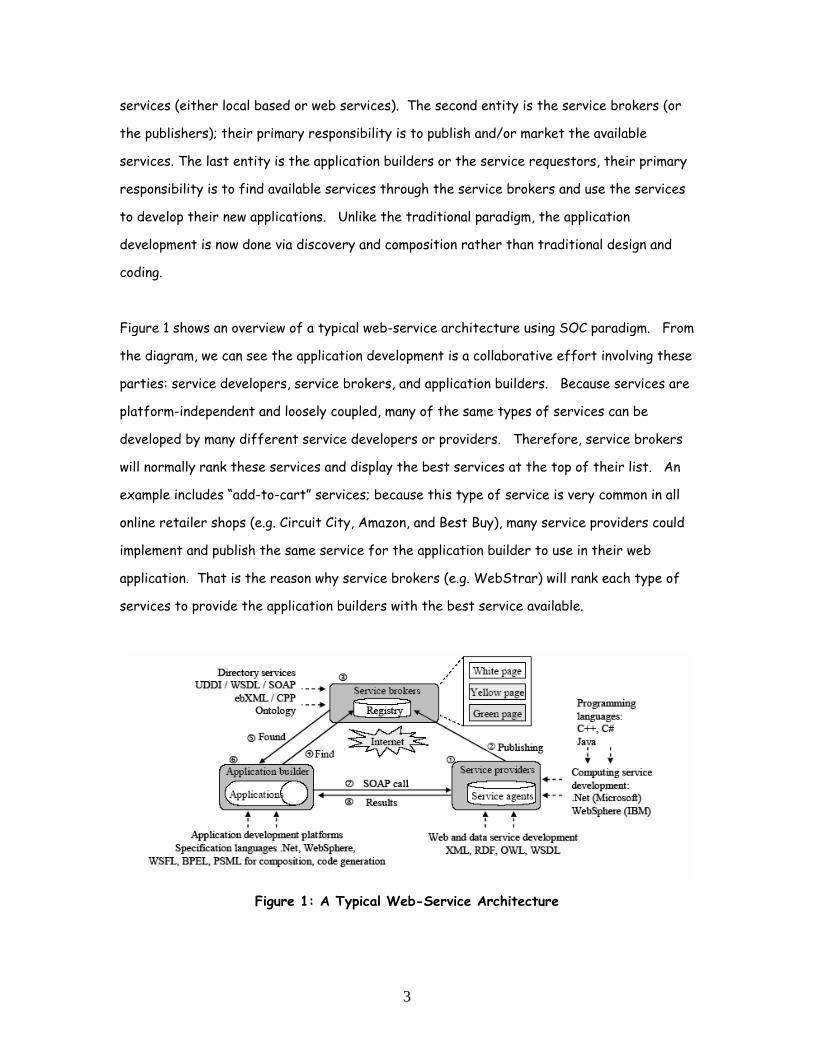
Figure 1 shows an overview of a typical web-service architecture using SOC paradigm. From
the diagram, we can see the application development is a collaborative effort involving these
parties: service developers, service brokers, and application builders. Because services are
platform-independent and loosely coupled, many of the same types of services can be
developed by many different service developers or providers. Therefore, service brokers
will normally rank these services and display the best services at the top of their list. An
example includes “add-to-cart” services; because this type of service is very common in all
online retailer shops (e.g. Circuit City, Amazon, and Best Buy), many service providers could
implement and publish the same service for the application builder to use in their web
application. That is the reason why service brokers (e.g. WebStrar) will rank each type of
services to provide the application builders with the best service available.
Figure 1: A Typical Web-Service Architecture
4
In order to publish a web service onto the web, the service brokers must uses UDDI or
ebXML protocols that provide a set of standard interface to register and publish the web
service. Under the UDDI (Universal Description Discovery and Integration) protocol, the
information needed for registering a service includes: (1) White page information: Service
provider's name, and contact information. (2) Yellow page information (business category):
industry type, product and service type, and geographical location. (3) Green page
information: technical detail how other Web services can access (invocate) the services,
such as APIs (Application Programming Interfaces).
EXPERIMENT
Now that you have an idea about SOC and Web Services, you are ready to begin the
experiment.
In this experiment, you will be asked to create a window application to locate movie
theaters in your community. You be using third-party web services to create this
application. The experiment is split into three parts: (1) building a Windows application, (2)
discovering and invoking web services, and (3) coding.

5
Part 1: Creating a Windows Application?
Open Visual Studio .NET 2005 and create a new project. Select “Visual C#” as your
project type. Instead of selecting “Console Application,” please select “Windows
Application” for your template. Then name this project “L7_MovieApp_TeamName” and
click OK. (See figure 2: A New Windows Application)
Figure 2: A New Windows Application.
Notice the difference from your last lab? Instead of just seeing code in the code editor,
you also see design view. The design view allows you to customize the GUI (Graphical User
Interface) application using the toolbox located on the top-left of the screen (See figure
3).

6
Figure 3: Visual Studio Environment with Design View in the Code Editor.
STEP 1: Create a textbox and a corresponding label to prompt the user to enter their zip
code.
1. First click on Toolbox and a list of controls will appear.
2. Double-click on “All Windows Forms,” the menu should expand.
3. Select the “Label” control from the Toolbox and drag it into the form.
a. Inside the properties window, change the (Name) from “label1” to
“lblZipCode.”
b. Inside the properties window, change the Text from “label1” to
“Enter ZIP: “
4. Select the “Textbox” control from the Toolbox and drag it into the form next to
“lblZipCode”.
a. Inside the properties window, change the (Name) from “textBox1” to
“txtZipCode”.
Toolbox
Form
Properties Window
Solution Explorer
7
STEP 2: Create a button for the user to click after they have entered their zip code.
1. Select the “Button” control from the Toolbox and drag it into the form next to
“txtZipCode”
a. Inside the properties window, change the (Name) from “button1” to
“btnLocate”
b. Inside the properties window, change the Text from “button1” to “Locate”.
STEP 3: Create a radio button list.
1. Select the “GroupBox” control from the Toolbox and drag it into the form.
a. Inside the properties window, change the (Name) from “groupbox1” to
“grpRadiusLoc”
b. Inside the properties window, change the Text from “groupBox1” to “ Find
location within ”
2. Select the “RadioButton” control from the Toolbox and drag it into the form, inside
“grpRadiusLoc”
a. Inside the properties window, change the (Name) form “radioButton1” to
“btn15miles”
b. Inside the properties window, change the Text from “radioButton1” to “15
miles”
3. Repeat step 2 for 20 miles. Make sure to change the (Name) to “btn20miles”.
4. Select “btn15miles” and in the properties window, set checked to “True”.
STEP 4: Creating an output for the result.
1. Select the “RichTextBox” control from the Toolbox and drag it into the form.
a. Inside the properties window, change the (Name) from “richTextBox1” to
“txtResult.”
2. Your application should look something like figure 4.

8
Figure 4: Window Application after Step 4.
When you are done with this part, please notify the lab instructor for check–off.
Part 2: Discovering and Invoking Web Services
The next part of this experiment is to map a web service onto your Windows Application.
You will be using a third-party service, from http://www.xmethods.com. To add a Web
reference to your project, follow these steps:
STEP 1: Locating the Web Service
1. To begin, open your web browser and enter the following URL
(http://www.xmethods.com) into the address bar and press “enter.”
2. Once the page has been fully loaded, search through the website for a service called
“Ignyte's Retrieve Theaters and Movie Showtimes.” You may have to expand the
entire list to find this service. Click on the link and this should take you to the next
page (see Figure 5).
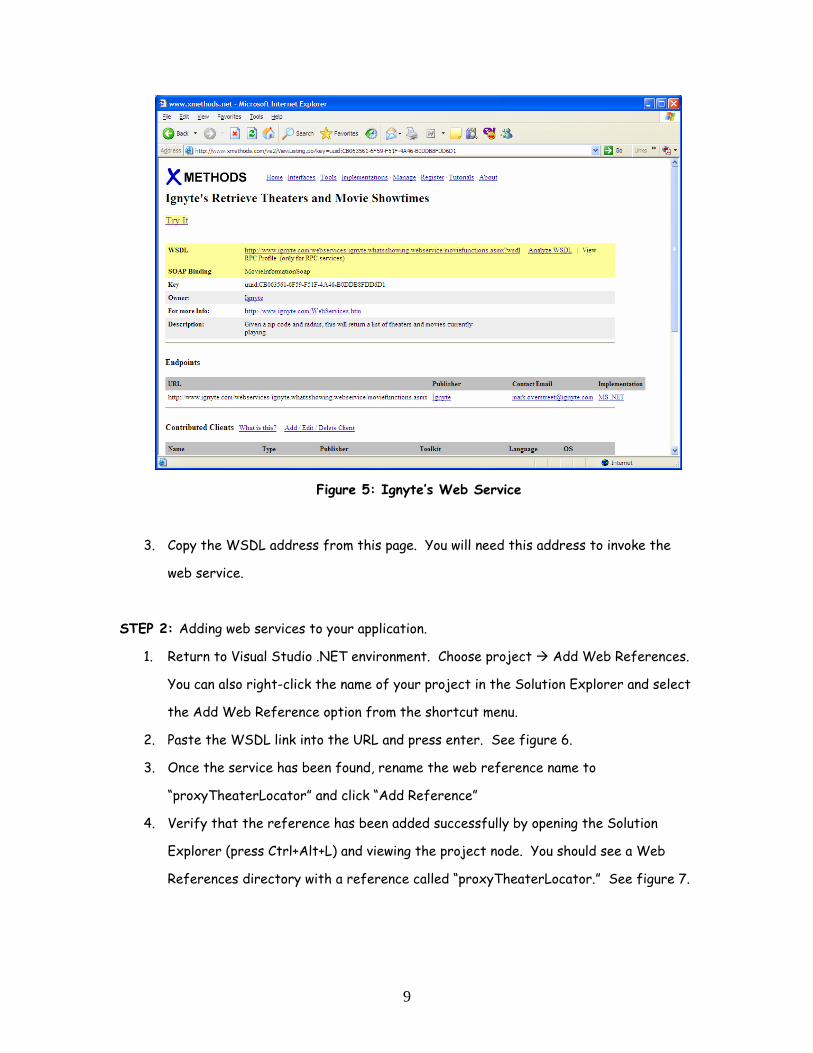
9
Figure 5: Ignyte’s Web Service
3. Copy the WSDL address from this page. You will need this address to invoke the
web service.
STEP 2: Adding web services to your application.
1. Return to Visual Studio .NET environment. Choose project Add Web References.
You can also right-click the name of your project in the Solution Explorer and select
the Add Web Reference option from the shortcut menu.
2. Paste the WSDL link into the URL and press enter. See figure 6.
3. Once the service has been found, rename the web reference name to
“proxyTheaterLocator” and click “Add Reference”
4. Verify that the reference has been added successfully by opening the Solution
Explorer (press Ctrl+Alt+L) and viewing the project node. You should see a Web
References directory with a reference called “proxyTheaterLocator.” See figure 7.

10
Figure 6: Adding a New Web Reference.
Figure 7: Solution Explorer.
When you are done with this part, please notify the lab instructor for check–off.

11
Part 3: Coding
In this section, you will begin coding our application. Please verify that all control (Names)
are labeled correctly (see figure 8). Remember C# is case-sensitive.
Figure 8: Controls with its Corresponding Labels.
STEP 1: Adding code to “btnLocate”
1. In the Design View, double-click the “Locate” button. The code editor appears and
displays a method named btnLocate_Click. This method, an event handler, handles
the click event for this button.
2. Type in the following code to this method:
txtResult
btnLocate
btn15miles btn20miles
txtZip

12
private void btnLocate_Click(object sender, EventArgs e) { int indexA, indexB; int radius; if (btn15miles.Checked) // Check if btn15miles was selected { radius = 15; } else if (btn20miles.Checked) { radius = 20; } else { radius = 15; } // Proxy to activate and use the web service // The proxy requires a ZIP Code (type string) and a radius (type integer) proxyMovieLocator.MovieInformation theater = new L7_MovieApp_TA.proxyMovieLocator.MovieInformation(); proxyMovieLocator.Theater[] theaterDS = theater.GetTheatersAndMovies(txtZipCode.Text.Trim(), radius); // Printing the result out using array txtResult.Text = ""; for(indexA = 0; indexA < theaterDS.Length; indexA++) { txtResult.AppendText(theaterDS[indexA].Name.ToString() + "\n"); txtResult.AppendText(theaterDS[indexA].Address.ToString() + "\n"); for (indexB = 0; indexB < theaterDS[indexA].Movies.Length-1; indexB++) { txtResult.AppendText(theaterDS[indexA].Movies[indexB].Name.ToString() + "\n"); try { txtResult.AppendText(theaterDS[indexA].Movies[indexB].Rating.ToString() + "\n"); } catch (NullReferenceException) {}

13
try { txtResult.AppendText(theaterDS[indexA].Movies[indexB].RunningTime.ToString() + "\n"); } catch (NullReferenceException) {} try { txtResult.AppendText(theaterDS[indexA].Movies[indexB].ShowTimes.ToString() + "\n"); } catch (NullReferenceException) { } } txtResult.AppendText("\n\n"); } }
Figure 9: Code to Utilize the Web Service.
When you are done with this part, please notify the lab instructor for check–off.
What is this method trying to do? For each statement in the program, insert a comment stating what this line does. Example: int counter; \\ Initialize an integer variable call counter.

14
STEP 2: Customizing the program.
1. To expand the search area, please add two (2) more distances (25 and 30 miles) to
“grpRadiusLoc.”
a. You will need to update the code to reflect these changes as well.
b. When you are done with this part, please notify the lab instructor for check–off.
2. Next, you need to change the output format to match the figure below (figure 10):
Harkins Shea 14 7354 E. Shea Blvd., Scottsdale, AZ Employee of the Month (PG-13) 1 hr 43 mins 12:10pm | 2:40pm | 5:10pm | 7:40pm | 10:05pm
Figure 10: Sample Output
a. Hint: You will need to change the code to display the result differently.
b. To change the font and the font style use the following segment of code:
txtResult.SelectionFont = new Font("Tahoma", 10, FontStyle.Underline);
c. When you are done with this part, please notify the lab instructor for check–off.
3. Lastly, you will need to include a search field in your application. This field is used to find
theaters that are showing only that particular movie.
a. You will need to include an additional textbox for users to enter a movie that they
like to see.
b. The textbox is not case-sensitive and will accept both upper and lower-case input.
(HINT: When you are do comparisons, switch your data to all uppercase or
lowercase before comparing the data.)
c. The textbox is an optional field; therefore, if a user left the textbox blank, you
will need to display all the theaters within that location.
d. When you are done with this part, please notify the lab instructor for check–off.

15
EEE/CSE 101 – Introduction to Engineering Design Check-In/Check-Out/Verification Sheet Lab 7: SOA Programming Group Number & Name: Station ID: Session Date: Students’ Names and Check-in/Check-out Time: Member Name Check-In Time Check-Out Time TA Signature 1. _____________________ _____________ ______________ ____________ 2. _____________________ _____________ ______________ ____________ 3. _____________________ _____________ ______________ ____________ Equipment Verification: TA Signature CHECK IN: Speedy-33 Webcam Headphones ___________________ CHECK OUT: Speedy-33 Webcam Headphones ___________________
Items to be checked Part 1: GUI Complete TA Signature:
Part 2: Discovering the Web Service TA Signature:
Part 3: Coding the Application TA Signature:
Expanding the search area TA Signature:
Customizing the output TA Signature:
Creating a search field TA Signature:
All above items and lab report submitted to Digital Drop Box as a single archived file TA Signature:
Comments (TA use)
Related Documents