Lab Manual Introductory Chemistry: A Green Approach Version 3.1 © 2009, eScience Labs, Inc. All rights reserved esciencelabs.com • 888.375.5487

Welcome message from author
This document is posted to help you gain knowledge. Please leave a comment to let me know what you think about it! Share it to your friends and learn new things together.
Transcript

Lab Manual Introductory Chemistry: A Green Approach Version 3.1
© 2009, eScience Labs, Inc. All rights reserved esciencelabs.com • 888.375.5487


3
Table of Contents
Chemistry and Experiments
Lab 1: Introduction and Safety
Lab 2: The Scientific Method
Measurements
Lab 3: Measurements
Lab 4: Properties of Matter ‐ Density
Matter and Energy
Lab 5: Mixtures and Solutions
Lab 6: Chemical and Physical Change
Lab 7: Heat and Calorimetry
Lab 8: Chemical Processes
Atomic Theory and Structure
Lab 9: Electron Configuration
Lab 10: Light Spectrum
Chemical Bonding
Lab 11: Molecular Models
Lab 12: Ionic and Covalent Bonds
Lab 13: Polar Bonding
Introducing Chemical Reactions
Lab 14: Chemical Reactions I
Lab 15: Chemical Reactions II
Lab 16: Metals and Oxidation
Classification of Elements
Lab 17: The Mole and Avogadro’s Number
Lab 18: The Periodic Table
Lab 19: Stoichiometry
Gas Laws
Lab 20: Ideal Gas Law
Reaction Rates
Lab 21: Reaction Rate
Lab 22: Catalysts
Acids and Bases
Lab 23: Acids and Bases
Lab 24: Titration
Page

Introductory Chemistry
Lab 12: Ionic and Covalent Bonds


13
Lab 12: Ionic and Covalent Bonds
Objectives
Understand the differences between ionic and covalent bonding
Link ionic and covalent bonding with the physical properties of matter
Introduction
Have you ever accidentally used salt instead of sugar?
Drinking tea that has been sweetened with salt or eating vegeta‐bles that have been salted with sugar tastes awful! Salt and sugar may look the same, but they obviously taste very different. They are also very different chemically. Salt is made up of sodium and chloride and is ionically bonded. Sugar, on the other hand, is com‐posed of carbon, oxygen, and hydrogen and has covalent bonds.
A salt (sodium‐chloride) molecule is made up of one sodium atom and one chlorine atom. In order for the atoms to combine, the sodium atom must lose an electron, while the chlorine atom must gain an electron; the resulting ions have opposite charges and at‐tract one another.
When sodium loses an electron it becomes a positively charged ion (Na+), called a cation.
Na Na+ + e-
The chlorine atom adds this free electron, becoming a negatively charged anion.
Cl + e- Cl-
A bond can now form between the negatively‐charged Cl– and the positively‐charged Na+. This type of bond is called an ionic bond. Ionic bonds typically form between one metal and one non‐metal ion. The above reaction can be written as:
Na+ + Cl- Na+Cl-
Table sugar (sucrose) differs from salt in the bonding between its atoms. The atoms in sugar do not form ions; instead, they are held together because of shared electrons. This is an example of covalent bonding. Table sugar has a much more complex chemical structure than salt (see Figure 3). A covalent bond between one carbon atom and one hydrogen atom forms when one of the valence electrons of the carbon atom groups with one of the valence electrons of the hydrogen atom, forming an electron pair.
Figure 1: In order to undergo ionic bonding, an electron must transfer between the Na and Cl atoms. This gives each atom an opposite charge, resulting in attraction.
Figure 2: Covalent bonding diagram for meth‐ane (CH4). Note that both the carbon and hydrogen atoms have full outer shells.

14
Note: This is normally written C‐H.
Ionically bonded compounds behave very differently from covalently bonded compounds. In the first part of this lab you will investigate how ionically bonded and covalently bonded substances behave differently in their conduction of electricity. You will do this by using a simple anodizing apparatus that uses a stainless steel screw and an iron nail as electrodes. In an anodiz‐ing apparatus the water between the electrodes must contain enough ions to conduct electricity. As this happens, the water will react to form hydrogen and oxygen gases.
2H2O 2H2 + O2
In the second part of this lab you will explore the differences in melting points between ionically bonded and covalently bonded compounds.
Figure 3: Chemical structure for table sugar (sucrose). Here, different atoms combine via covalent bonding, as opposed to ionic bonding. Notice the complexity of this molecule compared to NaCl.
Lab 12: Ionic and Covalent Bonds

15
Pre‐lab Questions
1. What is an ionic bond?
2. What is a covalent bond?
3. Do you think sugar or salt will melt at a higher temperature? Explain your answer.
Lab 12: Ionic and Covalent Bonds
16
Experiment: Sugar or Salt?
Stainless steel is not very reactive, while iron will react with oxygen to form iron oxide, commonly called rust. You will use this fact to help determine how well dissolved sugar and salt conduct electricity.
The melting points of sugar and salt can be tested by placing a small amount of substance in a test tube and heating it at differ‐ent heights over a burner or lighter flame. These experiments will help you draw comparisons between ionically and covalently bonded materials.
Materials
2 Sugar packets
2 Salt packets
9‐Volt battery
2 Rubber bands
Iron nail (uncoated)
Stainless steel screw
Wire leads with alligator clips on each end
150 mL beaker
2 Test tubes
Test tube holder
Test tube rack
Stir rod
Butane lighter
Tea light candle
Spatula
Permanent marker
Ruler
Distilled water*
Procedure
Part 1: Nail Test for Ionic Bonding
1. Rinse a clean 150 mL beaker several times with distilled water to prevent contamination from ions that may be on the beaker. Fill the beaker about ¾ full with distilled water.
2. Pour a packet of sugar (about 3 g) into the 150 mL beaker. Stir the solution with a clean stirring rod until the sugar is dissolved and the solution is well mixed.
3. Stretch two rubber bands around the 150 mL beaker. Be careful not to spill any of the solution. The rubber bands should loop from the top to the bottom of the beaker. Position the 2 rubber bands next to each other (Figure 4). HINT: Do not position the bands around the circumference of the beaker.
4. Attach the first wire lead to just underneath the flat head of an iron nail (using the alligator clip). Place the iron nail between the 2 rubber bands on one side of the 150 mL beaker so that it is suspended in the water. The end of the nail should be in the solution while the head with clip is resting on the rubber bands. (See Figure 4).
5. Attach the second wire to just below the head of the stainless steel screw. Place the screw between the 2 rubber bands on the opposite side of the 150 mL beaker, next to the nail. Make sure the end of the screw is in the solution and the head with the clip is resting on the rubber bands.
Lab 12: Ionic and Covalent Bonds
Safety Equipment: Eye goggles, gloves
*You must provide
17
Part 2: Melting Points
1. Place a spatula tip full of sugar into a test tube. The sugar should just coat the bottom of the test tube. CAUTION: Be sure the test tube does not have any small cracks or chips in it.
2. Light the candle using the butane lighter. CAUTION: Long hair should be tied up and loose clothing re‐strained when around an open flame to prevent fire and burns. Be sure you are wearing your safety gog‐gles.
3. Place the test tube containing the sugar in a test tube holder. Hold the test tube at a slight angle over the candle flame. Position the test tube so that it contacts the blue inner core of the flame.
4. Continue to hold the test tube in the flame until the sugar just begins to melt. HINT: If you keep the sugar in the flame until it turns dark brown or black, you will not be able to clean the test tube. Stop heating test tube as soon as it begins to melt. Extinguish the candle.
5. Allow the test tube to cool to room temperature before touching it. CAUTION: The test tube will be very hot and can burn your skin if touched before it cools. Hint: After the test tube has cooled for a few sec‐onds, place it in the test tube rack to finish cooling and continue with the procedure.
Lab 12: Ionic and Covalent Bonds
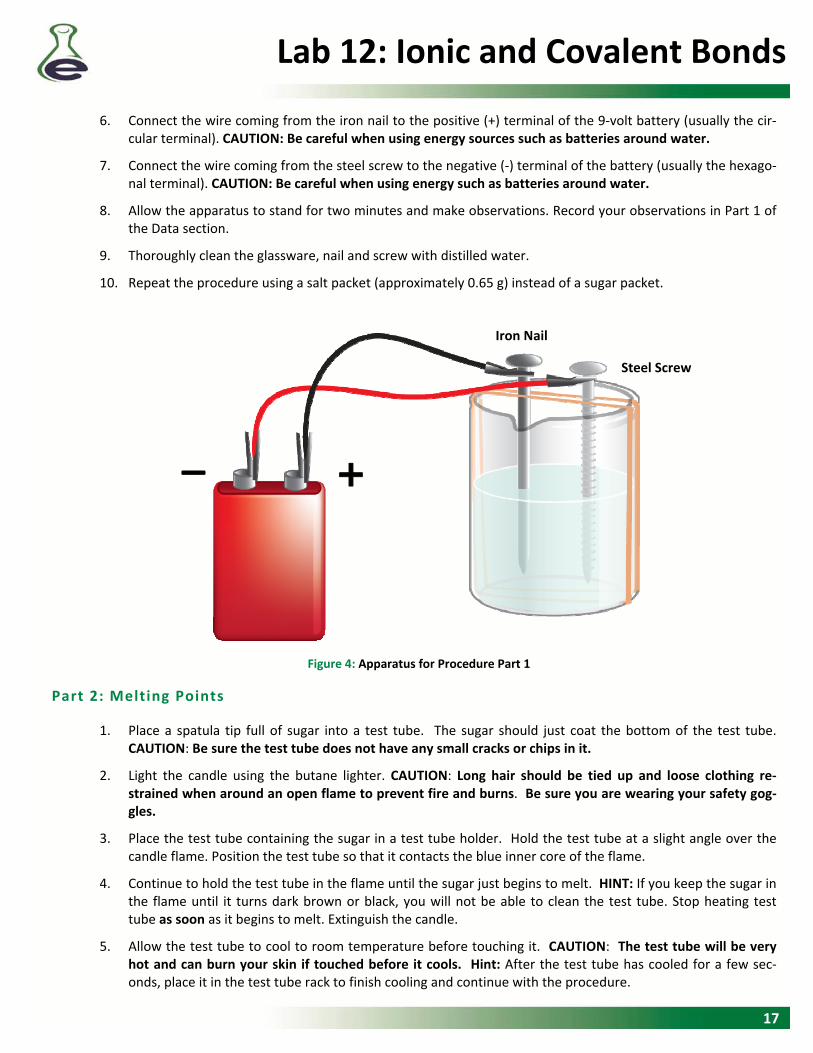
Figure 4: Apparatus for Procedure Part 1
+ _
Iron Nail
Steel Screw
6. Connect the wire coming from the iron nail to the positive (+) terminal of the 9‐volt battery (usually the cir‐cular terminal). CAUTION: Be careful when using energy sources such as batteries around water.
7. Connect the wire coming from the steel screw to the negative (‐) terminal of the battery (usually the hexago‐nal terminal). CAUTION: Be careful when using energy such as batteries around water.
8. Allow the apparatus to stand for two minutes and make observations. Record your observations in Part 1 of the Data section.
9. Thoroughly clean the glassware, nail and screw with distilled water.
10. Repeat the procedure using a salt packet (approximately 0.65 g) instead of a sugar packet.
18
Lab 12: Ionic and Covalent Bonds
Data
Part 1
Observations for the sugar solution:
Observations for the salt solution:
Part 2
Observations for the melting of sugar:
Observations for the melting of salt:
6. Record your observations in the Data section.
7. Repeat the procedure using salt instead of the sugar.
8. Make sure the test tubes have cooled to room temperature before touching them. CAUTION: The test tube will be very hot and can burn your skin if touched before it cools.
9. Record your observations in the Data section.
10. Clean‐up: The sugar and salt solutions can be poured down the drain. Rinse the beaker, screw, nail, and stir‐ring rod several times with distilled water. Clean the test tubes with water first and then rinse them with distilled water. They may need to soak for a few minutes in hot water in order to remove the melted sub‐stances.

19
Lab 12: Ionic and Covalent Bonds
Post‐lab Questions
1. Why is distilled water instead of tap water used in Part 1?
2. In Part 1, why did you not observe a stream of bubbles coming off the stainless steel screw in the sugar solu‐tion?
3. Did any bubbles form off the screw in the sugar solution at all? Why might this happen, despite your answer to Question 2?
20
Lab 12: Ionic and Covalent Bonds
4. In Part 1, why did you observe a stream of bubbles coming off the steel screw in the salt solution?
5. Explain any changes that took place on the nail.
6. In Part 2, which of the substances has the lower melting point? Was this what you expected? Explain your results.


1500 West Hampden Avenue
Suite 5‐H
Sheridan, CO 80110
303‐741‐0674 ⋅ 888‐ESL‐KITS
www.eScienceLabs.com
Related Documents