CompTIA Security+ ® Lab Series Lab 4: Protocols and Default Network Ports - Connecting to a Remote System CompTIA Security+ ® Domain 1 - Network Security Objective 1.4: Implement and use common protocols Objective 1.5: Identify commonly used default network ports Document Version: 2013-08-02 Organization: Moraine Valley Community College Author: Jesse Varsalone Copyright © Center for Systems Security and Information Assurance (CSSIA), National Information Security, Geospatial Technologies Consortium (NISGTC) The original works of this document were funded by the National Science Foundation’s (NSF) Advanced Technological Education (ATE) program Department of Undergraduate Education (DUE) Award No. 0702872 and 1002746; Center for Systems Security and Information Assurance (CSSIA) at Moraine Valley Community College (MVCC). This work has been adapted by The Department of Labor (DOL) Trade Adjustment Assistance Community College and Career Training (TAACCCT) Grant No. TC-22525-11-60-A-48. The National Information Security, Geospatial Technologies Consortium (NISGTC) is authorized to create derivatives of identified elements modified from the original works. These elements are licensed under the Creative Commons Attributions 3.0 Unported License. To view a copy of this license, visit http://creativecommons.org/licenses/by/3.0/ or send a letter to Creative Commons, 444 Castro Street, Suite 900, Mountain View, California, 94041, USA. The Network Development Group (NDG) is given a perpetual worldwide waiver to distribute per US Law this lab and future derivatives of these works.

Welcome message from author
This document is posted to help you gain knowledge. Please leave a comment to let me know what you think about it! Share it to your friends and learn new things together.
Transcript
CompTIA Security+®
Lab Series
Lab 4: Protocols and Default Network Ports -
Connecting to a Remote System
CompTIA Security+® Domain 1 - Network Security
Objective 1.4: Implement and use common protocols Objective 1.5: Identify commonly used default network ports
Document Version: 2013-08-02
Organization: Moraine Valley Community College Author: Jesse Varsalone
Copyright © Center for Systems Security and Information Assurance (CSSIA), National Information Security, Geospatial Technologies Consortium (NISGTC) The original works of this document were funded by the National Science Foundation’s (NSF) Advanced Technological Education (ATE) program Department of Undergraduate Education (DUE) Award No. 0702872 and 1002746; Center for Systems Security and Information Assurance (CSSIA) at Moraine Valley Community College (MVCC).
This work has been adapted by The Department of Labor (DOL) Trade Adjustment Assistance Community College and Career Training (TAACCCT) Grant No. TC-22525-11-60-A-48. The National Information Security, Geospatial Technologies Consortium (NISGTC) is authorized to create derivatives of identified elements modified from the original works. These elements are licensed under the Creative Commons Attributions 3.0 Unported License. To view a copy
of this license, visit http://creativecommons.org/licenses/by/3.0/ or send a letter to Creative Commons, 444 Castro Street, Suite 900, Mountain View, California, 94041, USA. The Network Development Group (NDG) is given a perpetual worldwide waiver to distribute per US Law this lab and future derivatives of these works.

Lab 4: Protocols and Default Network Ports - Connecting to a Remote System
8/2/2013 Copyright © 2013 CSSIA, NISGTC Page 2 of 31
Contents Introduction ........................................................................................................................ 3
Objectives: Implement and Use Common Protocols ......................................................... 3
Identify Commonly Used Default Network Ports ............................................................... 3
Pod Topology ...................................................................................................................... 5
Lab Settings ......................................................................................................................... 6
1 Connecting to a Windows System through the Command Line ................................. 9
1.1 Using TELNET to Perform Remote Administration .............................................. 9
1.2 Conclusion .......................................................................................................... 16
1.3 Discussion Questions .......................................................................................... 16
2 Connecting to a Linux System through the Command Line ...................................... 17
2.1 Using SSH to Connect to a Remote Linux System .............................................. 17
2.2 Conclusion .......................................................................................................... 24
2.3 Discussion Questions .......................................................................................... 24
3 Analyzing Remote Connections in Network Traffic ................................................... 25
3.1 Using Wireshark to Analyze Connections to a Remote Linux System ............... 25
3.2 Conclusion .......................................................................................................... 30
3.3 Discussion Questions .......................................................................................... 30
References ........................................................................................................................ 31
Lab 4: Protocols and Default Network Ports - Connecting to a Remote System
8/2/2013 Copyright © 2013 CSSIA, NISGTC Page 3 of 31
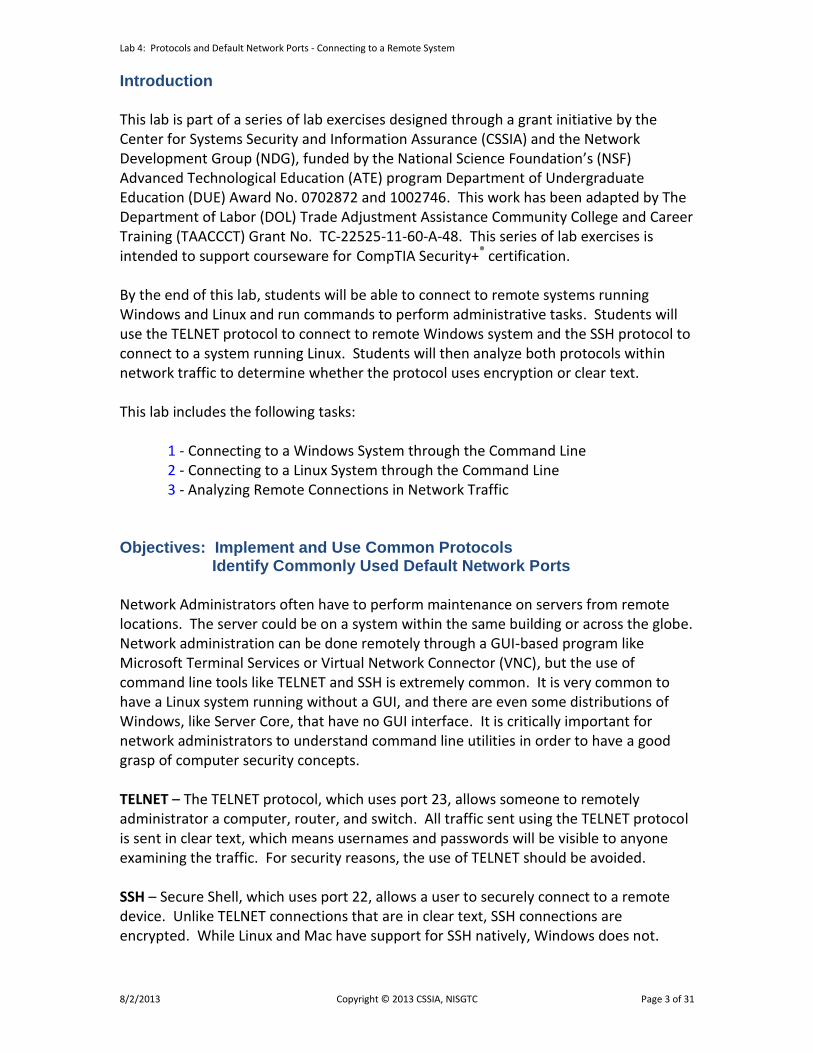
Introduction
This lab is part of a series of lab exercises designed through a grant initiative by the Center for Systems Security and Information Assurance (CSSIA) and the Network Development Group (NDG), funded by the National Science Foundation’s (NSF) Advanced Technological Education (ATE) program Department of Undergraduate Education (DUE) Award No. 0702872 and 1002746. This work has been adapted by The Department of Labor (DOL) Trade Adjustment Assistance Community College and Career Training (TAACCCT) Grant No. TC-22525-11-60-A-48. This series of lab exercises is intended to support courseware for CompTIA Security+® certification. By the end of this lab, students will be able to connect to remote systems running Windows and Linux and run commands to perform administrative tasks. Students will use the TELNET protocol to connect to remote Windows system and the SSH protocol to connect to a system running Linux. Students will then analyze both protocols within network traffic to determine whether the protocol uses encryption or clear text. This lab includes the following tasks:
1 - Connecting to a Windows System through the Command Line 2 - Connecting to a Linux System through the Command Line 3 - Analyzing Remote Connections in Network Traffic
Objectives: Implement and Use Common Protocols Identify Commonly Used Default Network Ports
Network Administrators often have to perform maintenance on servers from remote locations. The server could be on a system within the same building or across the globe. Network administration can be done remotely through a GUI-based program like Microsoft Terminal Services or Virtual Network Connector (VNC), but the use of command line tools like TELNET and SSH is extremely common. It is very common to have a Linux system running without a GUI, and there are even some distributions of Windows, like Server Core, that have no GUI interface. It is critically important for network administrators to understand command line utilities in order to have a good grasp of computer security concepts. TELNET – The TELNET protocol, which uses port 23, allows someone to remotely administrator a computer, router, and switch. All traffic sent using the TELNET protocol is sent in clear text, which means usernames and passwords will be visible to anyone examining the traffic. For security reasons, the use of TELNET should be avoided. SSH – Secure Shell, which uses port 22, allows a user to securely connect to a remote device. Unlike TELNET connections that are in clear text, SSH connections are encrypted. While Linux and Mac have support for SSH natively, Windows does not.

Lab 4: Protocols and Default Network Ports - Connecting to a Remote System
8/2/2013 Copyright © 2013 CSSIA, NISGTC Page 4 of 31
Windows Command Shell – The Windows command shell allows users to interact with the operating system from a command line environment. Virtually anything that can be done in the Graphical User Interface, or GUI, in Windows can be done from the command line. Linux Bash Shell – The Linux Bourne Again Shell, or Bash, is one of many shells that are available in a Linux environment. Linux servers are often managed from the command line; therefore, network administrators need to be comfortable with bash.
Wireshark – Wireshark is a protocol analyzer that will allow you to capture and analyze network traffic. Wireshark can be used to inspect traffic and examine the clear text communication of TELNET and encrypted communication of SSH.
Lab 4: Protocols and Default Network Ports - Connecting to a Remote System
8/2/2013 Copyright © 2013 CSSIA, NISGTC Page 5 of 31
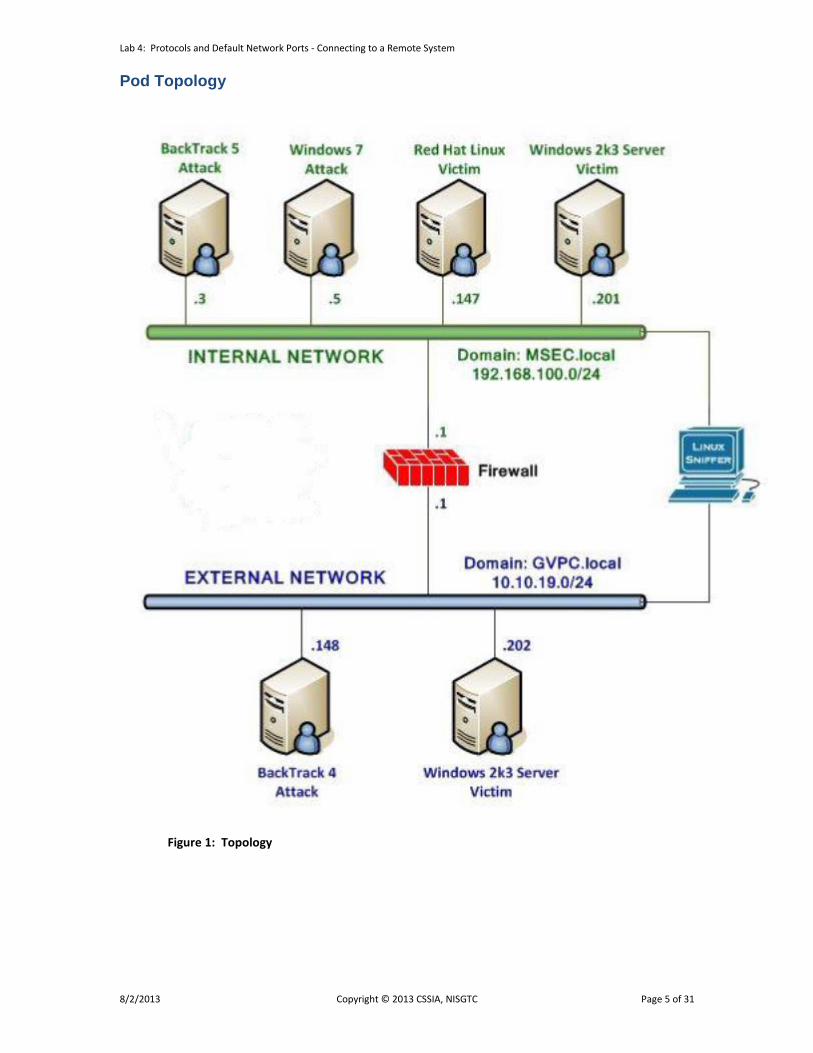
Pod Topology
Figure 1: Topology
Lab 4: Protocols and Default Network Ports - Connecting to a Remote System
8/2/2013 Copyright © 2013 CSSIA, NISGTC Page 6 of 31
Lab Settings
The information in the table below will be needed in order to complete the lab. The task sections below provide details on the use of this information. Required Virtual Machines and Applications Log in to the following virtual machines before starting the tasks in this lab: BackTrack 5 Internal Attack Machine
192.168.100.3
BackTrack 5 root password
password
Windows 2k3 Server Internal Victim Machine
192.168.100.201
Windows 2k3 Server administrator password
password
Red Hat Enterprise Linux Internal Victim Machine
192.168.100.3
Red Hat Enterprise Linux root password
password
Windows 7 Internal Attack Machine
192.168.100.201
Windows 7 student password
password
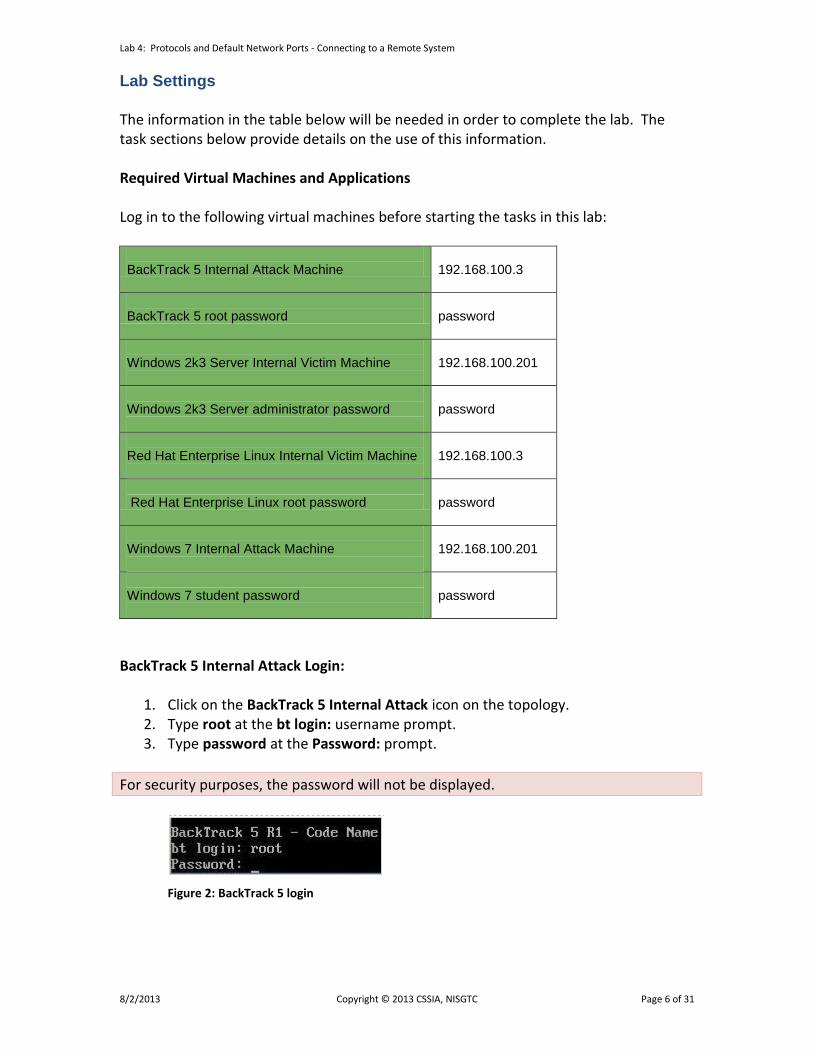
BackTrack 5 Internal Attack Login:
1. Click on the BackTrack 5 Internal Attack icon on the topology. 2. Type root at the bt login: username prompt. 3. Type password at the Password: prompt.
For security purposes, the password will not be displayed.
Figure 2: BackTrack 5 login

Lab 4: Protocols and Default Network Ports - Connecting to a Remote System
8/2/2013 Copyright © 2013 CSSIA, NISGTC Page 7 of 31
4. To start the GUI, type startx at the root@bt:~# prompt.
Figure 3: BackTrack 5 GUI start up
Windows 2k3 Server Internal Victim Login:
1. Click on the Windows 2k3 Server Internal Victim icon on the topology 2. Use the PC menu in the NETLAB+ Remote PC Viewer to send a Ctrl-Alt-Del
(version 2 viewer), or click the Send Ctrl-Alt-Del link in the bottom right corner of the viewer window (version 1 viewer).
3. Enter the User name, Administrator (verify the username with your instructor). 4. Type in the password, password, and click the OK button (verify the password
with your instructor).
Figure 4: Windows 2k3 login
Red Hat Enterprise Linux Internal Victim Login:
1. Click on the Red Hat Linux Internal Victim icon on the topology. 2. Type root at the rhel login: prompt. 3. Type password at the Password: prompt.
For security purposes, the password will not be displayed.
Lab 4: Protocols and Default Network Ports - Connecting to a Remote System
8/2/2013 Copyright © 2013 CSSIA, NISGTC Page 8 of 31
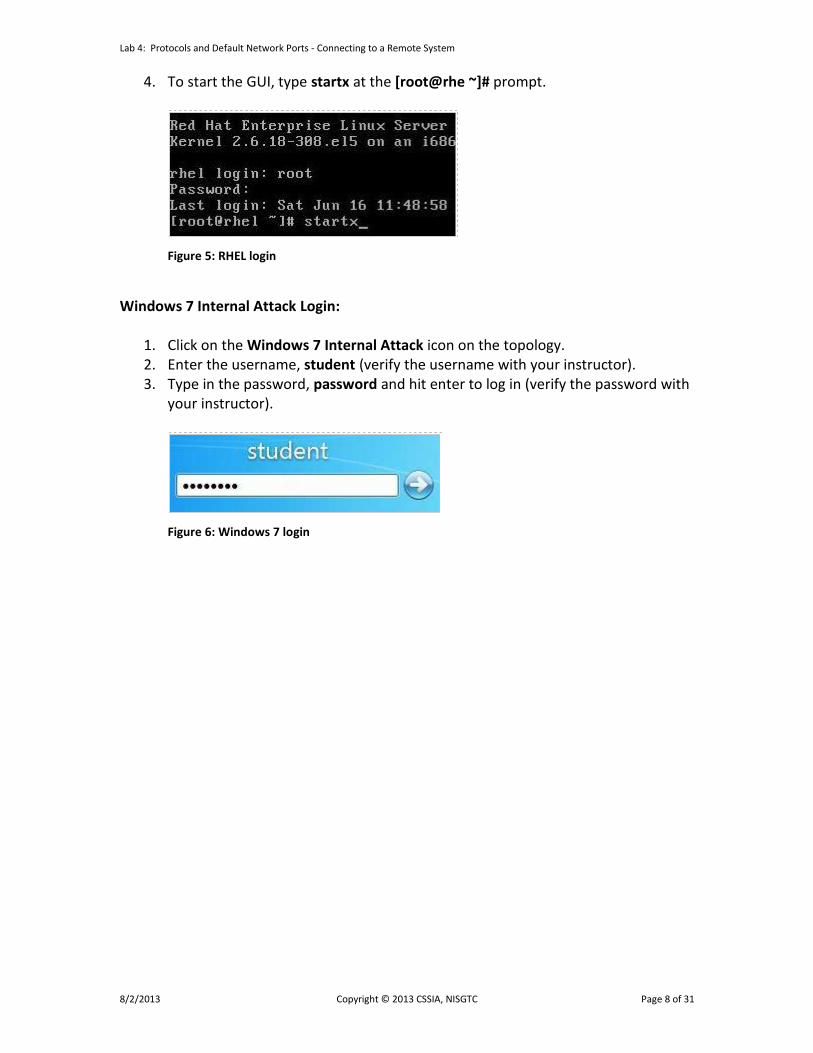
4. To start the GUI, type startx at the [root@rhe ~]# prompt.
Figure 5: RHEL login
Windows 7 Internal Attack Login:
1. Click on the Windows 7 Internal Attack icon on the topology. 2. Enter the username, student (verify the username with your instructor). 3. Type in the password, password and hit enter to log in (verify the password with
your instructor).
Figure 6: Windows 7 login

Lab 4: Protocols and Default Network Ports - Connecting to a Remote System
8/2/2013 Copyright © 2013 CSSIA, NISGTC Page 9 of 31
1 Connecting to a Windows System through the Command Line
For a variety of reasons, network administrators may need to perform tasks on a remote system. TELNET can be used to perform remote administration on computers, routers, switches, and other devices. The disadvantage of using TELNET is that it sends everything across the wire in clear text including usernames, passwords, and commands. For this reason, the use of TELNET should be avoided if possible. First, we will scan the victim machine to determine if the TELNET port is open. We will specify the default TELNET port of 23 when conducting the Nmap scan.
Keep in mind that Linux commands are case sensitive. The commands must be entered exactly as shown, or errors will occur.
1.1 Using TELNET to Perform Remote Administration
Open a Command Prompt to Get Started
1. Open a command prompt on the Windows 7 Internal Attack Machine by double-clicking on the cmd.exe icon on the Desktop.
Figure 7: Opening a Command Prompt on Windows 7
2. Before you start, determine the IP address of the Windows 7 Internal Attack
Machine by typing: C:\ipconfig
Figure 8: The IP address Information of the Windows 7 Machine
Lab 4: Protocols and Default Network Ports - Connecting to a Remote System
8/2/2013 Copyright © 2013 CSSIA, NISGTC Page 10 of 31
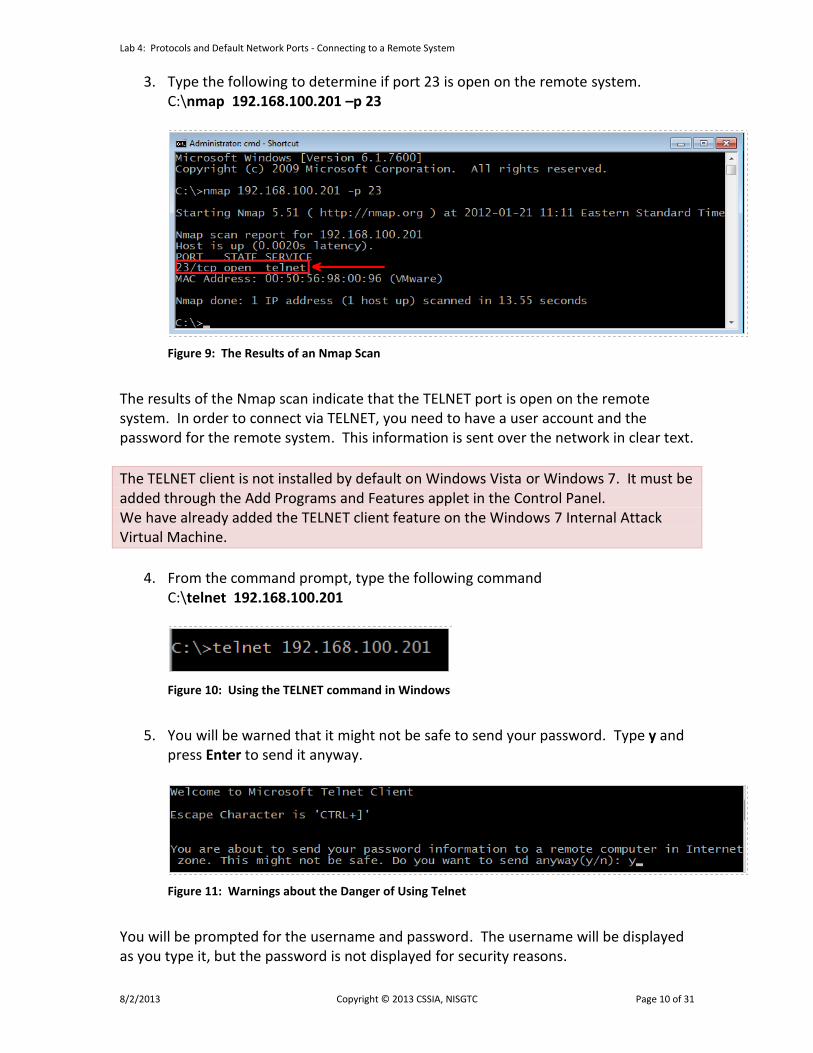
3. Type the following to determine if port 23 is open on the remote system. C:\nmap 192.168.100.201 –p 23
Figure 9: The Results of an Nmap Scan
The results of the Nmap scan indicate that the TELNET port is open on the remote system. In order to connect via TELNET, you need to have a user account and the password for the remote system. This information is sent over the network in clear text.
The TELNET client is not installed by default on Windows Vista or Windows 7. It must be added through the Add Programs and Features applet in the Control Panel. We have already added the TELNET client feature on the Windows 7 Internal Attack Virtual Machine.
4. From the command prompt, type the following command C:\telnet 192.168.100.201
Figure 10: Using the TELNET command in Windows
5. You will be warned that it might not be safe to send your password. Type y and
press Enter to send it anyway.
Figure 11: Warnings about the Danger of Using Telnet
You will be prompted for the username and password. The username will be displayed as you type it, but the password is not displayed for security reasons.
Lab 4: Protocols and Default Network Ports - Connecting to a Remote System
8/2/2013 Copyright © 2013 CSSIA, NISGTC Page 11 of 31
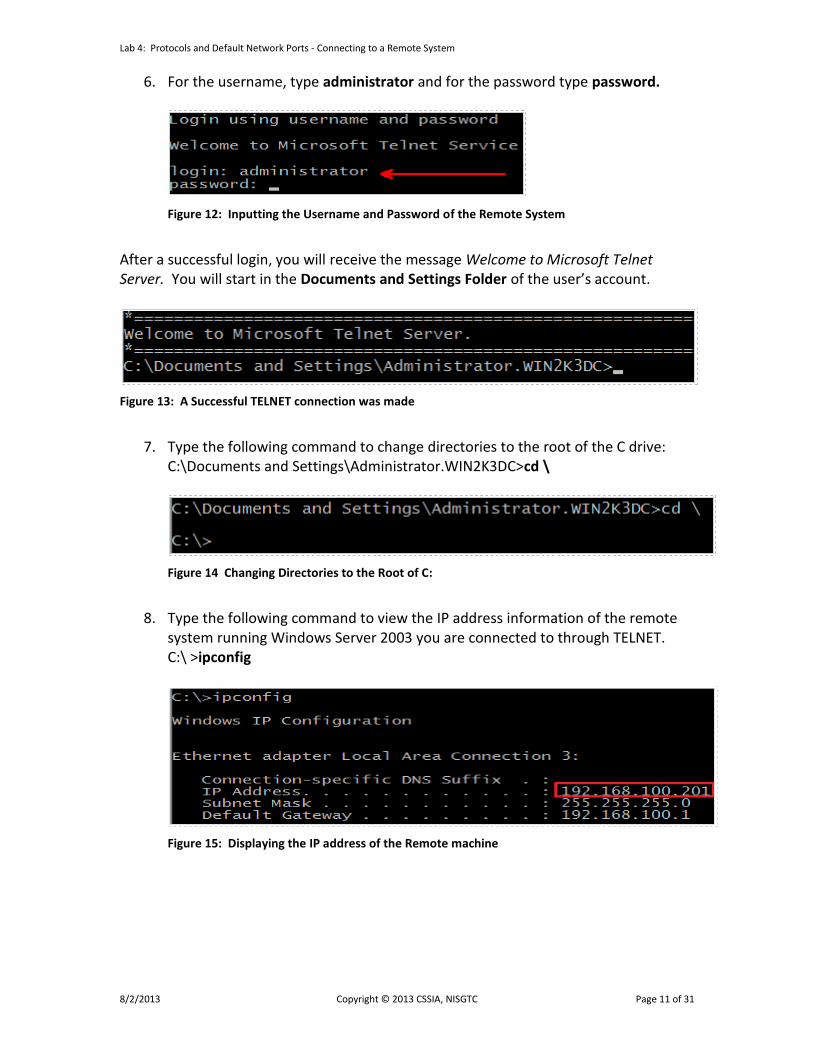
6. For the username, type administrator and for the password type password.
Figure 12: Inputting the Username and Password of the Remote System
After a successful login, you will receive the message Welcome to Microsoft Telnet Server. You will start in the Documents and Settings Folder of the user’s account.
Figure 13: A Successful TELNET connection was made
7. Type the following command to change directories to the root of the C drive:
C:\Documents and Settings\Administrator.WIN2K3DC>cd \
Figure 14 Changing Directories to the Root of C:
8. Type the following command to view the IP address information of the remote
system running Windows Server 2003 you are connected to through TELNET. C:\ >ipconfig
Figure 15: Displaying the IP address of the Remote machine
Lab 4: Protocols and Default Network Ports - Connecting to a Remote System
8/2/2013 Copyright © 2013 CSSIA, NISGTC Page 12 of 31
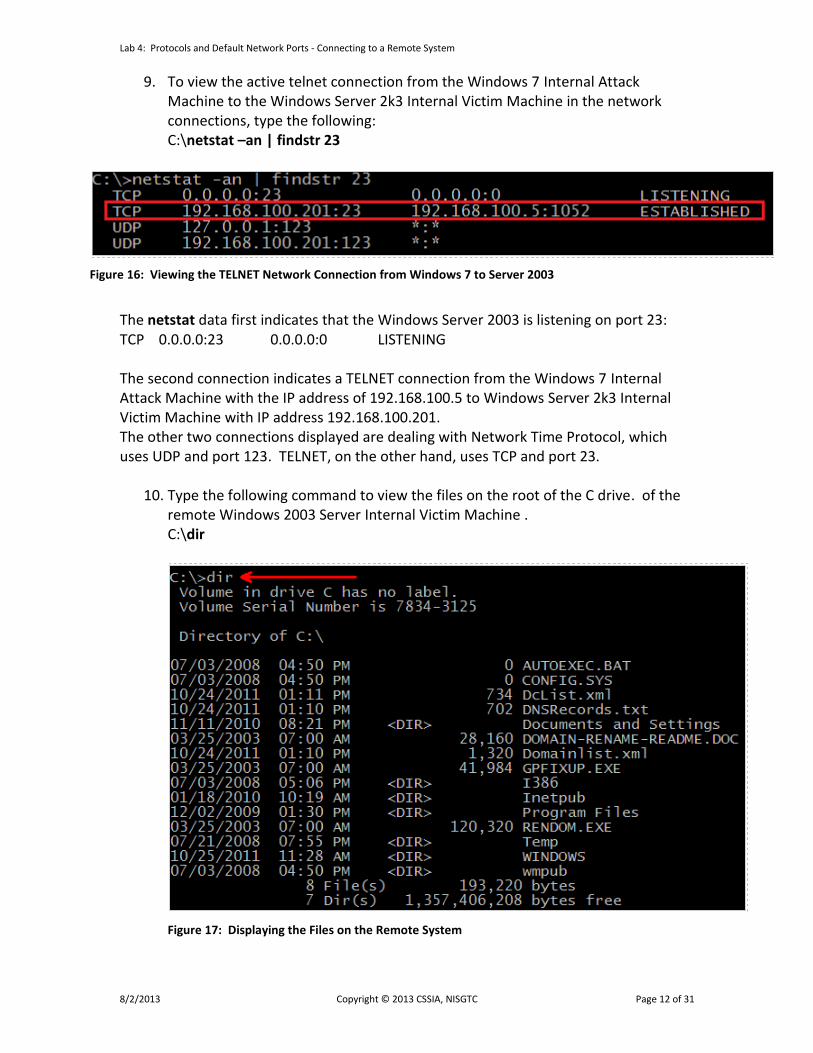
9. To view the active telnet connection from the Windows 7 Internal Attack Machine to the Windows Server 2k3 Internal Victim Machine in the network connections, type the following:
C:\netstat –an | findstr 23
Figure 16: Viewing the TELNET Network Connection from Windows 7 to Server 2003
The netstat data first indicates that the Windows Server 2003 is listening on port 23: TCP 0.0.0.0:23 0.0.0.0:0 LISTENING The second connection indicates a TELNET connection from the Windows 7 Internal Attack Machine with the IP address of 192.168.100.5 to Windows Server 2k3 Internal Victim Machine with IP address 192.168.100.201. The other two connections displayed are dealing with Network Time Protocol, which uses UDP and port 123. TELNET, on the other hand, uses TCP and port 23.
10. Type the following command to view the files on the root of the C drive. of the remote Windows 2003 Server Internal Victim Machine .
C:\dir
Figure 17: Displaying the Files on the Remote System

Lab 4: Protocols and Default Network Ports - Connecting to a Remote System
8/2/2013 Copyright © 2013 CSSIA, NISGTC Page 13 of 31
In the next step, we will make a text file on a remote system through the command line. Notepad and WordPad are GUI applications and cannot be utilized in a TELNET session. Using the edit command is not a good idea either because there is a good likelihood you will get stuck in the editor. In order to create a text file, we will use the echo command along with a redirect (>). This technique can be used in Windows or Linux.
11. Type the following command to create a text file through the command line: C:\echo I am creating a text file here > securityplus.txt
Figure 18: Creating a Text File Using Echo
12. Type the following command to view the newly created file.
C:\dir s*
Figure 19: Listing the File Created on the Remote System
13. To view what is written inside the file, type the following command:
C:\type securityplus.txt
Figure 20: Displaying the Contents of the Text File on the Remote System
There are attributes you can add to a file from the command line, including:
Hidden – File is not displayed in a directory listing.
Read Only – File is readable, but cannot be changed or deleted.
System – File is used by the operating system.
Archive –Used for backup purposes.
Lab 4: Protocols and Default Network Ports - Connecting to a Remote System
8/2/2013 Copyright © 2013 CSSIA, NISGTC Page 14 of 31
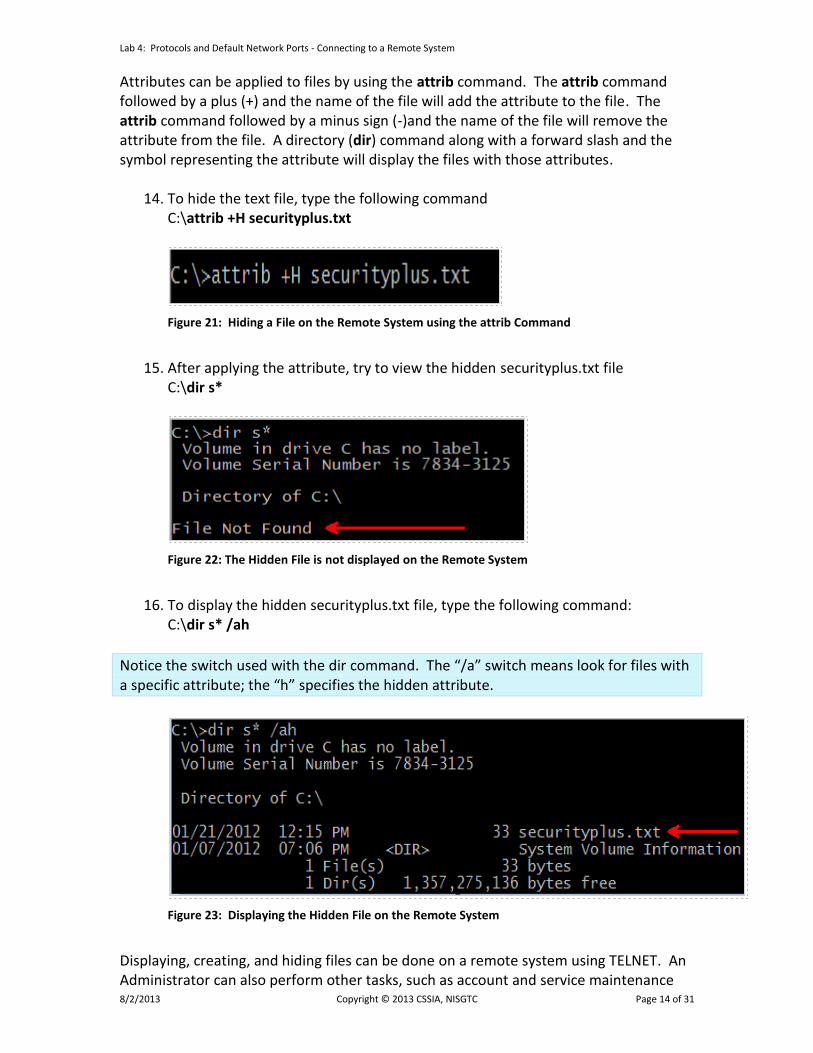
Attributes can be applied to files by using the attrib command. The attrib command followed by a plus (+) and the name of the file will add the attribute to the file. The attrib command followed by a minus sign (-)and the name of the file will remove the attribute from the file. A directory (dir) command along with a forward slash and the symbol representing the attribute will display the files with those attributes.
14. To hide the text file, type the following command C:\attrib +H securityplus.txt
Figure 21: Hiding a File on the Remote System using the attrib Command
15. After applying the attribute, try to view the hidden securityplus.txt file
C:\dir s*
Figure 22: The Hidden File is not displayed on the Remote System
16. To display the hidden securityplus.txt file, type the following command:
C:\dir s* /ah
Notice the switch used with the dir command. The “/a” switch means look for files with a specific attribute; the “h” specifies the hidden attribute.
Figure 23: Displaying the Hidden File on the Remote System
Displaying, creating, and hiding files can be done on a remote system using TELNET. An Administrator can also perform other tasks, such as account and service maintenance

Lab 4: Protocols and Default Network Ports - Connecting to a Remote System
8/2/2013 Copyright © 2013 CSSIA, NISGTC Page 15 of 31
17. To create a user on the remote system type the following command: C:\net user admin1 P@ssword /add
Figure 24: Adding a User through the Command Line
Be aware that only administrative accounts have the capability to add users.
You should receive the message that the command completed successfully. The user created will have an account named admin1 and a password of P@ssw0rd. The administrator logged into the system remotely through the command line can also view, stop, and start services by using the net start and net stop commands. One service that should not be stopped is the TELNET service or the connection will die.
18. To stop the Automatic Updates service on the remote machine, type: C:\ net stop "Automatic Updates"
Figure 25: Stopping the Automatic Updates Service
19. Type exit to leave the command prompt session on the remote machine.
Figure 26: Leaving the TELNET session

Lab 4: Protocols and Default Network Ports - Connecting to a Remote System
8/2/2013 Copyright © 2013 CSSIA, NISGTC Page 16 of 31
20. To be sure that your TELNET session to the Windows Server is disconnected, type ipconfig and the IP address of the Windows 7 Internal Attack Machine should be displayed again.
C:\ipconfig
Figure 27: The IP address Information of the Windows 7 Machine
1.2 Conclusion
A network administrator can use TELNET to remotely connect to a computer to run commands. A TELNET connection can be used to display and create files on the remote system, as well as perform other administrative tasks, like maintenance of accounts and services. TELNET uses TCP port 23 and sends information over the network in clear text. 1.3 Discussion Questions
1. What command can be used to show an active TELNET connection? 2. What is the command that can be used to display files on a remote system when
an administrator is connected via a TELNET session? 3. How can you create a file on a remote system during a TELNET session? 4. What command can be used to determine if a remote system is running TELNET?

Lab 4: Protocols and Default Network Ports - Connecting to a Remote System
8/2/2013 Copyright © 2013 CSSIA, NISGTC Page 17 of 31
2 Connecting to a Linux System through the Command Line
Most people would agree with the fact that since its inception, Linux has always been an operating system that took security seriously. Most distributions of Linux come with a built in SSH server as well as an SSH client that will allow you to connect to servers running SSH. The SSH, or secure shell, protocol, use Transmission Control Protocol port 22. Unlike TELNET, everything sent over the wire using SSH is encrypted. 2.1 Using SSH to Connect to a Remote Linux System
Warning - This must be done before starting Task 2: The Red Hat Linux Internal Victim Machine needs to be logged into using the root username with the password: password (the password will not be displayed for security reasons). Once you have logged in, issue the command startx to start the GUI (Graphical User Interface). See Lab Settings, section 0 for details. Until this procedure has been performed, Task 2 cannot be started.
1. From a command prompt on the Windows 7 Internal Attack Machine, type the
following to determine if port 22 is open on the remote Linux system: C:\>nmap 192.168.100.147 –p 22
Figure 28: Determining if SSH Port 22 is Open on the Remote Machine
Microsoft Windows does not have a Secure Shell (SSH) client built into the operating system. However, third-party SSH client and server applications can be used to make SSH connections to other systems or to allow incoming SSH connections. PuTTY is a third-party application that will allow you to connect to a remote system running SSH.
Lab 4: Protocols and Default Network Ports - Connecting to a Remote System
8/2/2013 Copyright © 2013 CSSIA, NISGTC Page 18 of 31
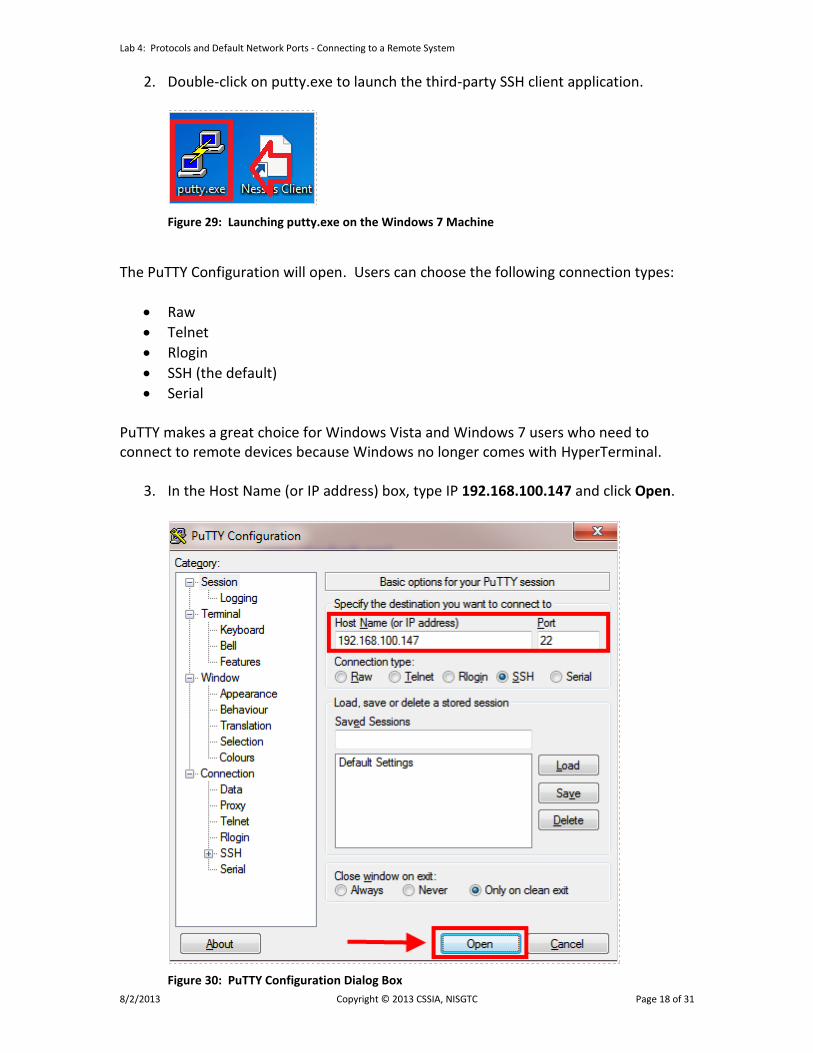
2. Double-click on putty.exe to launch the third-party SSH client application.
Figure 29: Launching putty.exe on the Windows 7 Machine
The PuTTY Configuration will open. Users can choose the following connection types:
Raw
Telnet
Rlogin
SSH (the default)
Serial PuTTY makes a great choice for Windows Vista and Windows 7 users who need to connect to remote devices because Windows no longer comes with HyperTerminal.
3. In the Host Name (or IP address) box, type IP 192.168.100.147 and click Open.
Figure 30: PuTTY Configuration Dialog Box

Lab 4: Protocols and Default Network Ports - Connecting to a Remote System
8/2/2013 Copyright © 2013 CSSIA, NISGTC Page 19 of 31
4. A PuTTY Security Alert Dialog will pop up. Click Yes to the Warning.
Figure 31: Security Alert Dialog
5. When you receive the login prompt, type root. The password is password.
Note: the password will not appear when you type it for security reasons.
Figure 32: Logging in to the Remote Machine via SSH
After a successful login, you will receive a Last Login message and a prompt.
Figure 33: A Successful Login to the SSH Server Displays the Last Login Time
6. Checking the IP address of the machine you are connecting to remotely is never
a bad idea. To display IP address information in Linux, type the following: [root@rhel ~]#ifconfig
Figure 34: Displaying the IP address of the Remote Linux Machine
Lab 4: Protocols and Default Network Ports - Connecting to a Remote System
8/2/2013 Copyright © 2013 CSSIA, NISGTC Page 20 of 31
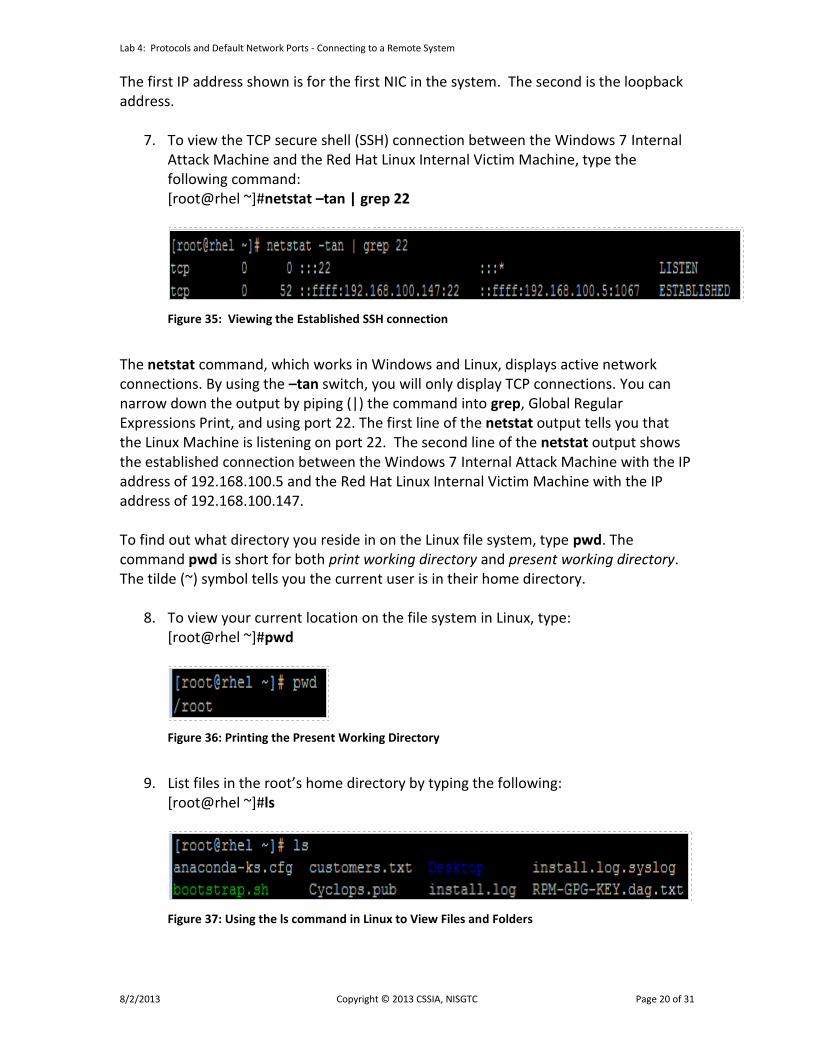
The first IP address shown is for the first NIC in the system. The second is the loopback address.
7. To view the TCP secure shell (SSH) connection between the Windows 7 Internal Attack Machine and the Red Hat Linux Internal Victim Machine, type the following command:
[root@rhel ~]#netstat –tan | grep 22
Figure 35: Viewing the Established SSH connection
The netstat command, which works in Windows and Linux, displays active network connections. By using the –tan switch, you will only display TCP connections. You can narrow down the output by piping (|) the command into grep, Global Regular Expressions Print, and using port 22. The first line of the netstat output tells you that the Linux Machine is listening on port 22. The second line of the netstat output shows the established connection between the Windows 7 Internal Attack Machine with the IP address of 192.168.100.5 and the Red Hat Linux Internal Victim Machine with the IP address of 192.168.100.147. To find out what directory you reside in on the Linux file system, type pwd. The command pwd is short for both print working directory and present working directory. The tilde (~) symbol tells you the current user is in their home directory.
8. To view your current location on the file system in Linux, type: [root@rhel ~]#pwd
Figure 36: Printing the Present Working Directory
9. List files in the root’s home directory by typing the following:
[root@rhel ~]#ls
Figure 37: Using the ls command in Linux to View Files and Folders

Lab 4: Protocols and Default Network Ports - Connecting to a Remote System
8/2/2013 Copyright © 2013 CSSIA, NISGTC Page 21 of 31
The ls command usually display files as different colors than folders. Also, files with executable permissions are typically displayed using a green font color. Another common practice is to have folders start with a capital letter, although this is not a requirement.
10. Creating a file in Linux can be done by using the VI Editor or by using the echo command and a redirect symbol (>), like in Microsoft Windows. To make a file called securityplus.txt with the phrase ”this is a file” in it, type the following:
[root@rhel ~]#echo this is a file > securityplus.txt
Figure 38: Creating a File in Linux
11. Type ls to view the created securityplus.txt file within root’s home directory.
[root@rhel ~]#ls
Figure 39: Displaying Files with the ls Command
In Linux, the mv (move) command is used to rename a file. By placing a period (.) at the beginning of a file name, that file will be hidden. This is the equivalent to using the attrib command to add the hidden attribute to a file in Windows.
12. To hide the file, rename it using the mv command and put a period in the front. [root@rhel ~]#mv securityplus.txt .securityplus.txt
Figure 40: Renaming and Hiding a File
The file is now hidden and will not be displayed when ls is used without any switches.
13. Type ls to see that the securityplus.txt file is no longer displayed. [root@rhel ~]#ls
Figure 41: The Hidden File is not Displayed with ls
Lab 4: Protocols and Default Network Ports - Connecting to a Remote System
8/2/2013 Copyright © 2013 CSSIA, NISGTC Page 22 of 31
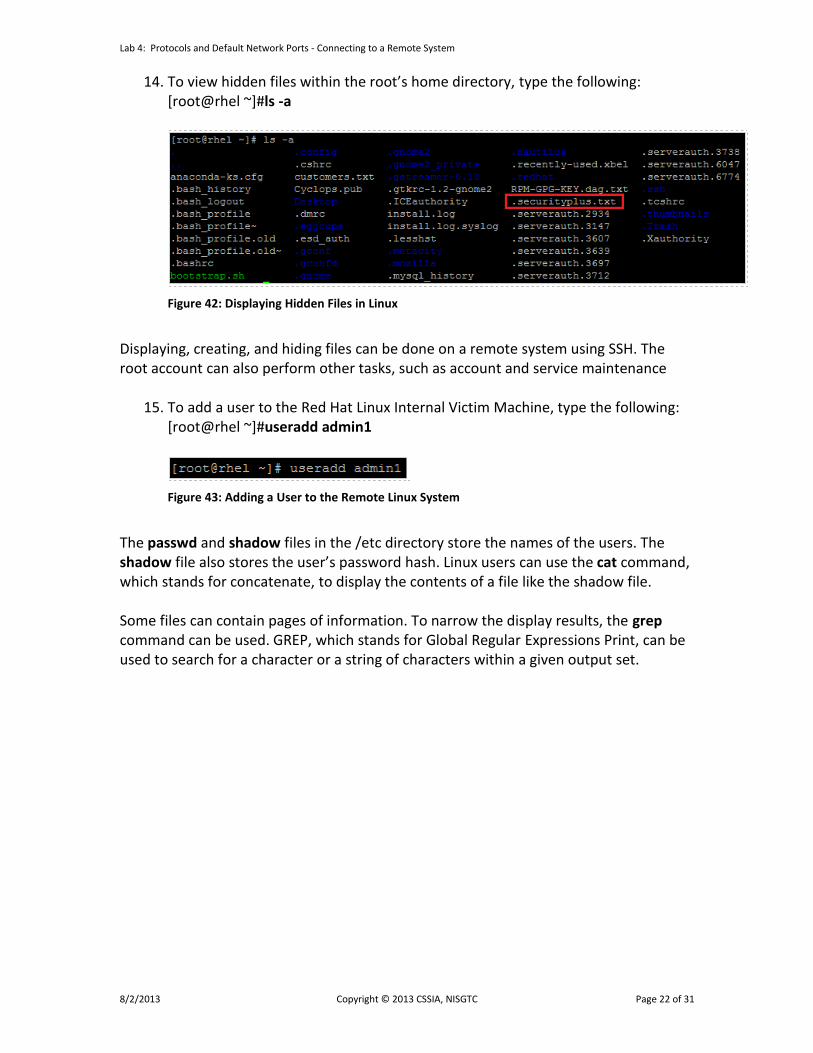
14. To view hidden files within the root’s home directory, type the following: [root@rhel ~]#ls -a
Figure 42: Displaying Hidden Files in Linux
Displaying, creating, and hiding files can be done on a remote system using SSH. The root account can also perform other tasks, such as account and service maintenance
15. To add a user to the Red Hat Linux Internal Victim Machine, type the following: [root@rhel ~]#useradd admin1
Figure 43: Adding a User to the Remote Linux System
The passwd and shadow files in the /etc directory store the names of the users. The shadow file also stores the user’s password hash. Linux users can use the cat command, which stands for concatenate, to display the contents of a file like the shadow file. Some files can contain pages of information. To narrow the display results, the grep command can be used. GREP, which stands for Global Regular Expressions Print, can be used to search for a character or a string of characters within a given output set.

Lab 4: Protocols and Default Network Ports - Connecting to a Remote System
8/2/2013 Copyright © 2013 CSSIA, NISGTC Page 23 of 31
16. To view the admin1 user created within the shadow file, type the following: [root@rhel ~]#cat /etc/shadow | grep admin1
Figure 44: Using GREP to Filter Search Results
The service command can be used to stop, start, and view server status.
17. To view the status of the Very Secure FTP Daemon9 (vsftpd), type the following: [root@rhel ~]#service vsftpd status
Figure 45: Viewing the Status of the vftpd Service
18. To stop the vsftpd service on the remote Linux system, type the following:
[root@rhel ~]#service vsftpd stop
Figure 46: Shutting Down the vsftpd service
19. To end the SSH session on the remote Linux system, type the following:
[root@rhel ~]#exit
Figure 47: Typing Exit to Leave the SSH Session
The PuTTY Window will close and the SSH session will be terminated.

Lab 4: Protocols and Default Network Ports - Connecting to a Remote System
8/2/2013 Copyright © 2013 CSSIA, NISGTC Page 24 of 31
2.2 Conclusion
Secure Shell, or SSH, allows users to remotely connect and administer computers running the Linux, Unix, and Mac operating systems as well other network devices such as routers and switches. Secure Shell encrypts the traffic, unlike TELNET, so the usernames, passwords, and commands will not be visible to anyone inspecting network traffic. It is strongly recommended that SSH be used instead of TELNET when possible. 2.3 Discussion Questions
1. What port does Secure Shell use? 2. Is there a native SSH client or server on Microsoft Windows system? 3. What is the file in Linux that contains the password hash? 4. What are two methods that can be used for creating a file during a remote
secure shell (SSH) connection within Linux?

Lab 4: Protocols and Default Network Ports - Connecting to a Remote System
8/2/2013 Copyright © 2013 CSSIA, NISGTC Page 25 of 31
3 Analyzing Remote Connections in Network Traffic
In this section, you will analyze a preexisting network capture file with TELNET and SSH traffic. You will be able to view the clear text communication during the TELNET session, but you will be unable to view the encrypted communication of the SSH connection. 3.1 Using Wireshark to Analyze Connections to a Remote Linux System
Wireshark is a protocol analyzer, which will allow you to inspect and capture network traffic. The 32-bit and 64-bit versions can be downloaded from www.wireshark.org. Open a Terminal to Get Started
1. Open a terminal on the BackTrack 5 Internal Attack Machine by clicking on the picture to the right of the word System in the task bar in the top of the screen. Type wireshark (all lowercase) to bring up the Wireshark program.
Figure 48: The Terminal Windows within BackTrack
2. If you receive a message about running Wireshark as root can be dangerous,
click the button that says Don’t show this message again, and click OK.
Figure 49: Allow Wireshark to run as root
Lab 4: Protocols and Default Network Ports - Connecting to a Remote System
8/2/2013 Copyright © 2013 CSSIA, NISGTC Page 26 of 31
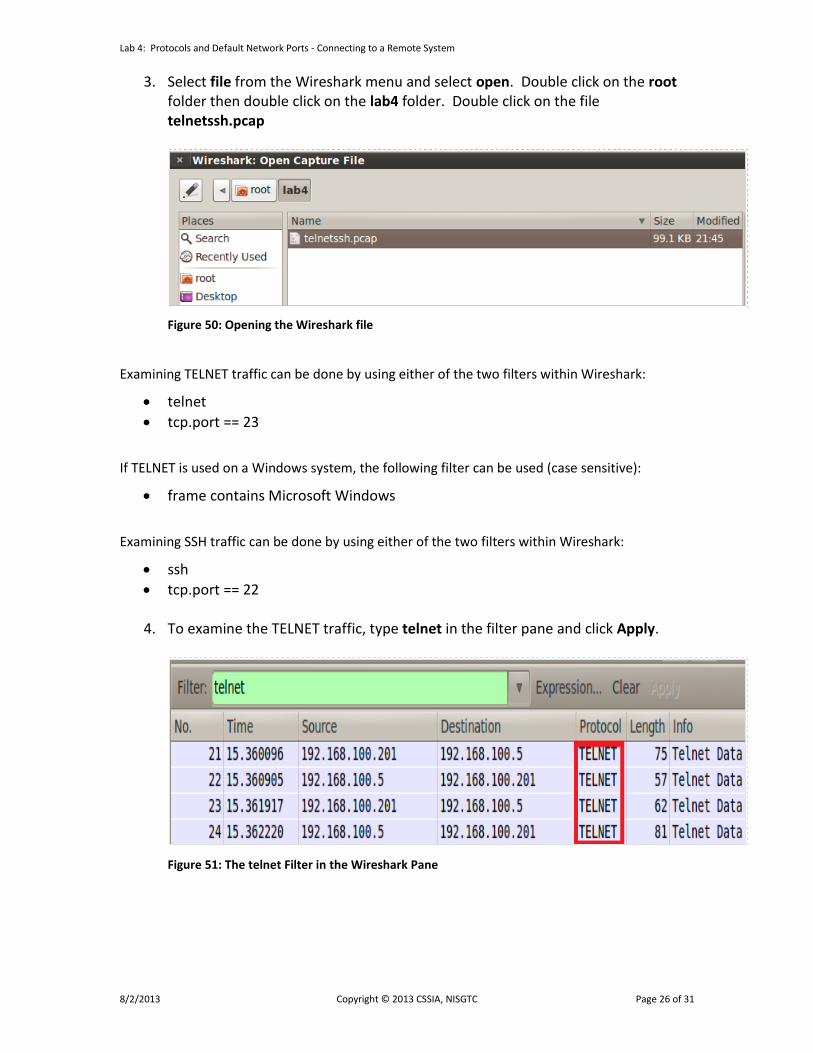
3. Select file from the Wireshark menu and select open. Double click on the root folder then double click on the lab4 folder. Double click on the file telnetssh.pcap
Figure 50: Opening the Wireshark file
Examining TELNET traffic can be done by using either of the two filters within Wireshark:
telnet
tcp.port == 23
If TELNET is used on a Windows system, the following filter can be used (case sensitive):
frame contains Microsoft Windows
Examining SSH traffic can be done by using either of the two filters within Wireshark:
ssh
tcp.port == 22
4. To examine the TELNET traffic, type telnet in the filter pane and click Apply.
Figure 51: The telnet Filter in the Wireshark Pane
Lab 4: Protocols and Default Network Ports - Connecting to a Remote System
8/2/2013 Copyright © 2013 CSSIA, NISGTC Page 27 of 31
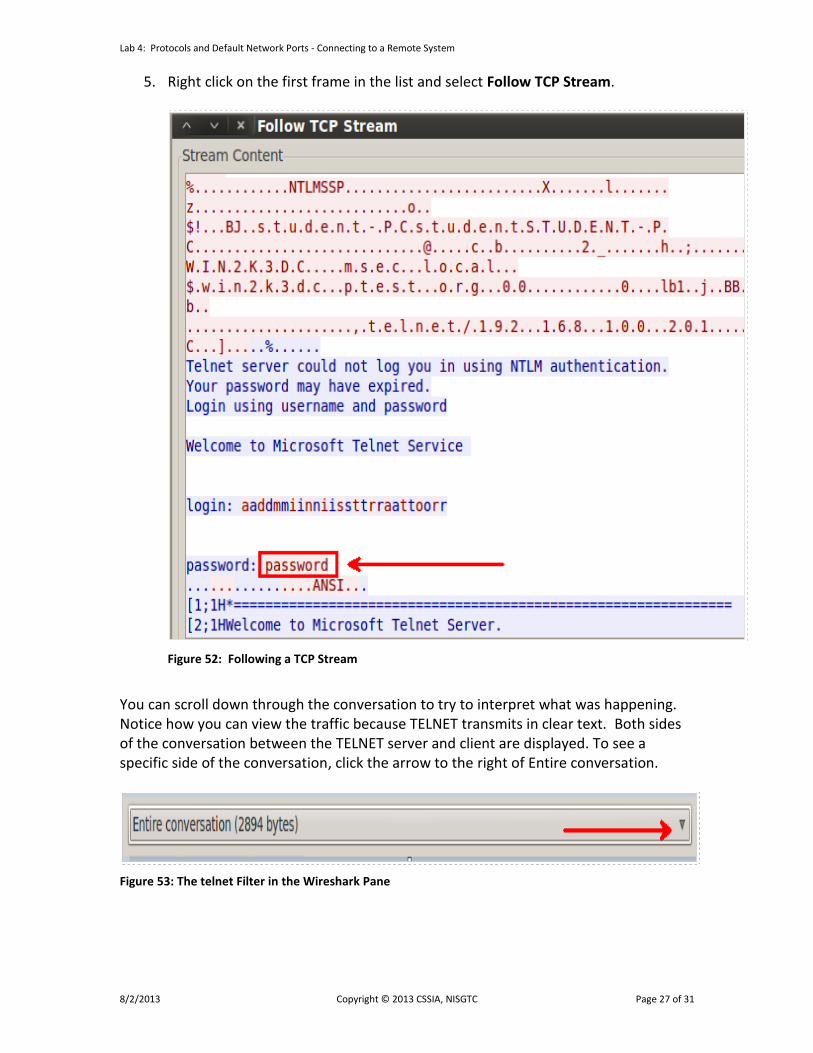
5. Right click on the first frame in the list and select Follow TCP Stream.
Figure 52: Following a TCP Stream
You can scroll down through the conversation to try to interpret what was happening. Notice how you can view the traffic because TELNET transmits in clear text. Both sides of the conversation between the TELNET server and client are displayed. To see a specific side of the conversation, click the arrow to the right of Entire conversation.
Figure 53: The telnet Filter in the Wireshark Pane

Lab 4: Protocols and Default Network Ports - Connecting to a Remote System
8/2/2013 Copyright © 2013 CSSIA, NISGTC Page 28 of 31
6. Select the conversation from the client with the IP address of 192.168.100.5 to the telnet server with the IP address of 192.168.100.201 by clicking the arrow to the right of Entire conversation, and selecting the first conversation in the drop box.
In the figure below, you may notice the dots (.) included in the net user and net stop commands. This occurs if the user entered a command incorrectly and pressed the backspace key to correct their mistake.
Figure 54: The Commands Sent to the TELNET Server
The client sent the username of administrator and password of password to the TELNET server. The client sent the command to add a user called admin1 with the password of P@ssw0rd. The client also sent a net start command to the server to list the services, and then stopped the Automatic Updates service. The session terminated with the command exit. Viewing the details of this conversation illustrates why the use of TELNET should not be avoided. When SSH traffic is examined, it will be unreadable.
7. Click the Close button in the bottom right of Wireshark to close the TCP stream.
Figure 55: Closing the TCP Stream
Lab 4: Protocols and Default Network Ports - Connecting to a Remote System
8/2/2013 Copyright © 2013 CSSIA, NISGTC Page 29 of 31
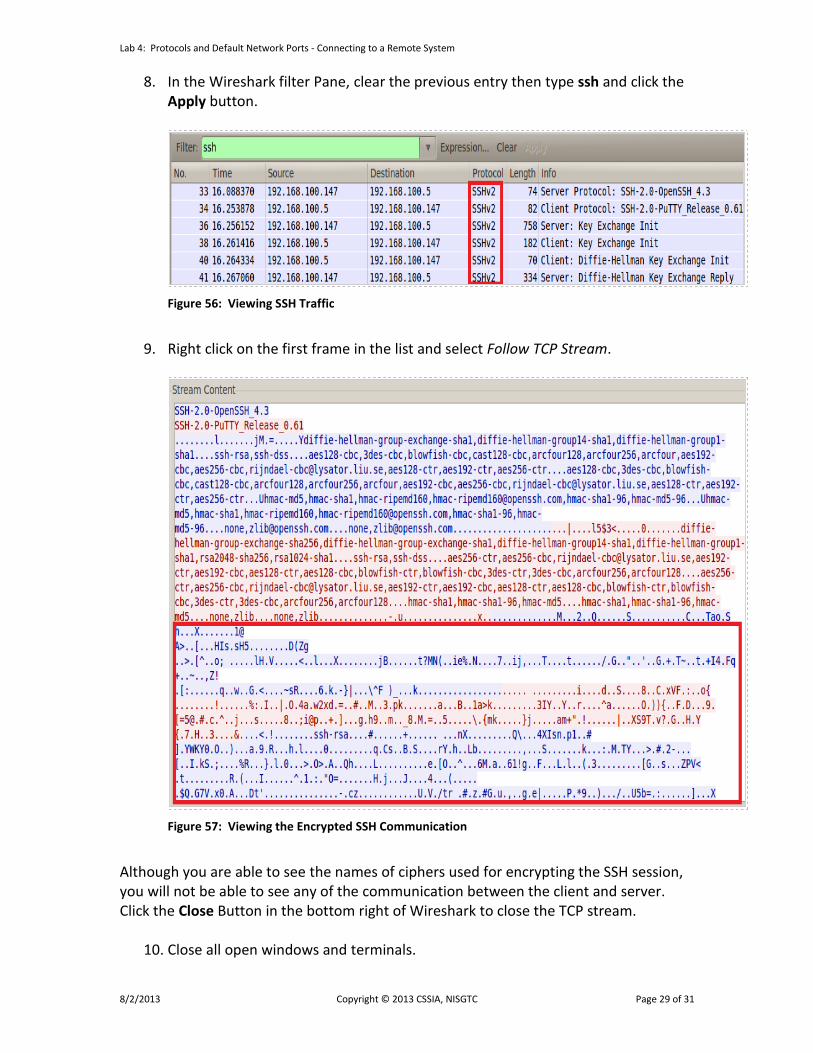
8. In the Wireshark filter Pane, clear the previous entry then type ssh and click the Apply button.
Figure 56: Viewing SSH Traffic
9. Right click on the first frame in the list and select Follow TCP Stream.
Figure 57: Viewing the Encrypted SSH Communication
Although you are able to see the names of ciphers used for encrypting the SSH session, you will not be able to see any of the communication between the client and server. Click the Close Button in the bottom right of Wireshark to close the TCP stream.
10. Close all open windows and terminals.

Lab 4: Protocols and Default Network Ports - Connecting to a Remote System
8/2/2013 Copyright © 2013 CSSIA, NISGTC Page 30 of 31
3.2 Conclusion
TELNET uses TCP port 23 and sends everything over the network in clear text. When examining TELNET traffic, you are able to see usernames, passwords, and commands. Secure Shell (SSH) uses TCP port 22 and provides a secure channel for remote administration tasks. Examining SSH traffic provides you with no details of what occurred during the session between the SSH client and the SSH server. 3.3 Discussion Questions
1. Type frame contains PuTTY in the Wireshark filter pane and click Apply.
Determine which version of PuTTY is in use. 2. If you type frame contains shadow in the Wireshark filter pane, why are there
no results that show the root account viewed the shadow file remotely?
Type frame contains “Microsoft” in the Wireshark filter pane and click Apply. Right click on the first frame and select Follow TCP Stream to answer Questions 3 and 4.
3. Name a user account that was displayed in the clear text traffic. 4. Name the file that was created, and then hidden.
Lab 4: Protocols and Default Network Ports - Connecting to a Remote System
8/2/2013 Copyright © 2013 CSSIA, NISGTC Page 31 of 31
References
1. SSH MAN Page: http://linux.die.net/man/1/ssh
2. Wireshark:
www.wireshark.org/
3. PuTTY home Page: http://www.chiark.greenend.org.uk/~sgtatham/putty/
4. BackTrack Linux:
http://www.backtrack-linux.org/
5. Telnet Commands for Windows: http://technet.microsoft.com/en-us/library/c.aspx
Related Documents


