Lab 3 – It’s all about data the Android SQLite Database Getting started This is the third in a series of labs that allow you to develop the MyRuns App. The goal of the app is to capture and display (using maps) walks and runs using your Android phone. The third lab focuses on allowing the user to manually enter data associated with a workout (e.g., running) and then display the workout data that was entered. All workouts entered are stored (i.e., historical workouts) and can be displayed and deleted in need be. Technically the lab focuses on how data is input, stored and retrieved using the SQLite database. Students will learn how to create a database and store and retrieve data. This lab builds on existing activities we have already coded: specifically, the lab extends ActivityTabStart and ActivityTabHistory. It also creates two new activities to deal with user data input (ActivityManualInput) and display (ActivityDisplayEntry).. In addition, a new class is created to deal with the database operations (DatabaseActivity). We also create a number of new screens for input and display – therefore, there are a number of new layouts for existing activities (ActivityTabStart screen’s is defined in start.xml; ActivityTabHistory screen’s is defined by history.xml) and new activities (ActivityManualInput screen’s is defined by manualinput.xml; ActivityDisplayEntry screen’s is defined by display_entry.xml). We will discuss the design of the layout and functionally provided by each of the activities in what follows. This lab builds on programming APIs we have used in previous labs; including intents, adapters, click on buttons, dialogs, and shared preferences. This lab extends lab 2. So to start with create a copy of lab 2 and rename/refactor it and call it lab 3. That way you can extend the code in lab 3 and keep your original lab 2 untouched. We are going to start this lab by having you download the lab 3 app from my website and install it on your emulator. Once you install it you can run it and play with the app. You can get a good sense of what is needed since your code will have

Welcome message from author
This document is posted to help you gain knowledge. Please leave a comment to let me know what you think about it! Share it to your friends and learn new things together.
Transcript
Lab 3 – It’s all about data -‐ the Android SQLite Database
Getting started This is the third in a series of labs that allow you to develop the MyRuns App. The goal of the app is to capture and display (using maps) walks and runs using your Android phone. The third lab focuses on allowing the user to manually enter data associated with a workout (e.g., running) and then display the workout data that was entered. All workouts entered are stored (i.e., historical workouts) and can be displayed and deleted in need be. Technically the lab focuses on how data is input, stored and retrieved using the SQLite database. Students will learn how to create a database and store and retrieve data. This lab builds on existing activities we have already coded: specifically, the lab extends ActivityTabStart and ActivityTabHistory. It also creates two new activities to deal with user data input (ActivityManualInput) and display (ActivityDisplayEntry).. In addition, a new class is created to deal with the database operations (DatabaseActivity). We also create a number of new screens for input and display – therefore, there are a number of new layouts for existing activities (ActivityTabStart screen’s is defined in start.xml; ActivityTabHistory screen’s is defined by history.xml) and new activities (ActivityManualInput screen’s is defined by manualinput.xml; ActivityDisplayEntry screen’s is defined by display_entry.xml). We will discuss the design of the layout and functionally provided by each of the activities in what follows. This lab builds on programming APIs we have used in previous labs; including intents, adapters, click on buttons, dialogs, and shared preferences. This lab extends lab 2. So to start with create a copy of lab 2 and rename/refactor it and call it lab 3. That way you can extend the code in lab 3 and keep your original lab 2 untouched. We are going to start this lab by having you download the lab 3 app from my website and install it on your emulator. Once you install it you can run it and play with the app. You can get a good sense of what is needed since your code will have
to functionally be the same – you can change the style or do more things but the downloaded app serves as a baseline for the design of your lab 2. Read Chapter 6 before starting this – specifically, the section called ‘creating and using databases’. SQLite is used heavily in industry so this is good experience, if a little Android specific. This is a challenging programming exercise. You will have to do some digging and self-‐learning using the book and web to craft your solution. OK. Let’s get started.
Play with the real app You can run lab 3 by downloading the .apk file using the browser on your emulator (or phone if you have an Android phone) and installing it. Follow the notes in Lab 1 on loading the app. The apk is here: www.cs.dartmouth.edu/~campbell/lab3.apk
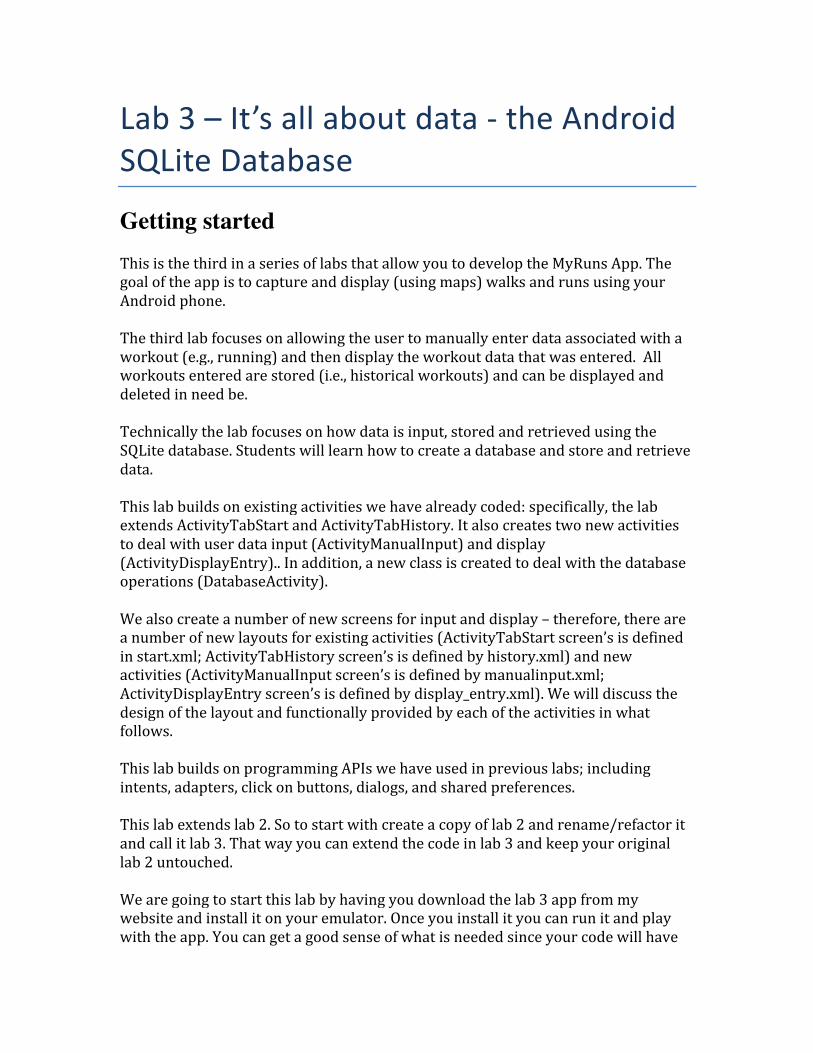
Create a new lab We will create new activities to handle the extended UI – Figure 1 below shows the names of all the activities we need to code. The diagram also shows that we will be creating some new layout and xml files – we will come back to those.
Figure 1: Lab 1 Project Files
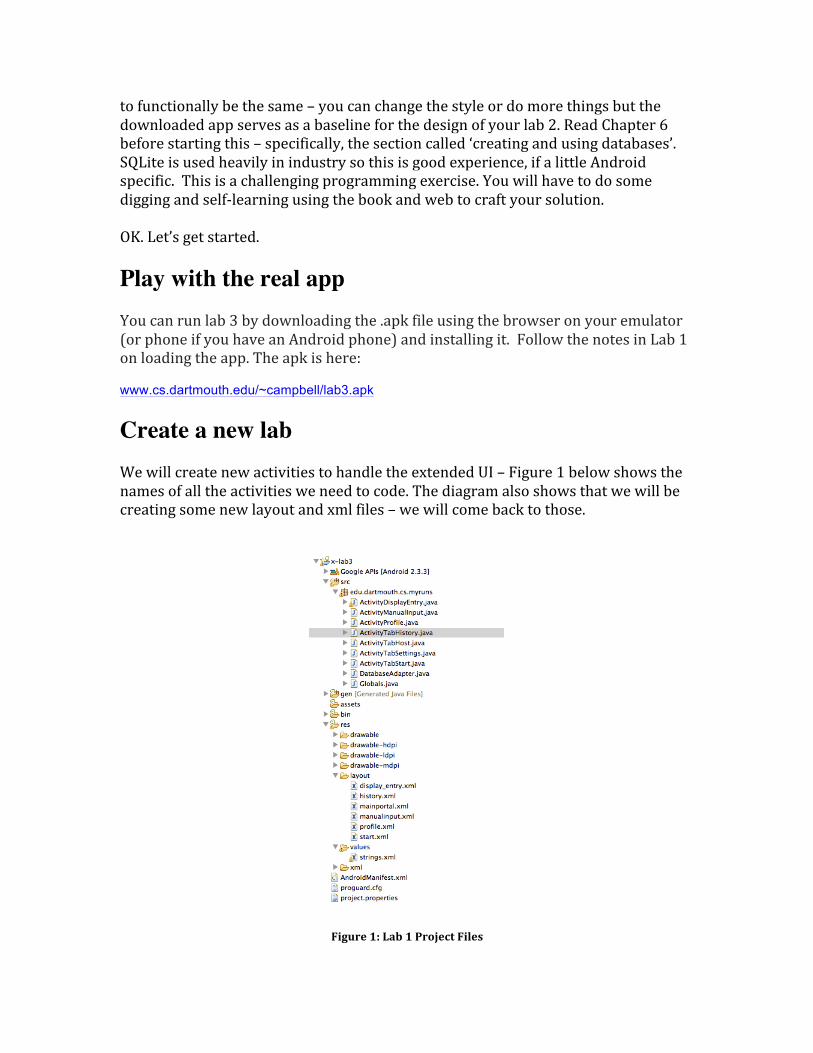
ActivityTabStart We created ActivityTabStart in Lab 2 but it had no code – other than printing out a message to the screen. We extend this activity and capture the UI design in start.xml. The main goal of this activity is to allow the user to enter the ‘input type’, as shown in Figure 2(a) (i.e., GPS or Manual Entry). Note in this lab we only support manual input and we disable the spinner so it always shows Manual Entry as default; we will use the GPS sensor in a future lab. The user can also select the ‘activity Type’ from a ListView. Figure 2(a) currently shows running. If the user clicks on the ‘activity type’ spinner the UI will display the list of items as show in Figure 2(b).
Figure 2(a): The ActivityTabStart includes two spinners and button; Figure 2(b) is the start.xml for the two spinners and button; Figure 2(c) spinner activity showing all activity that the user can select from.
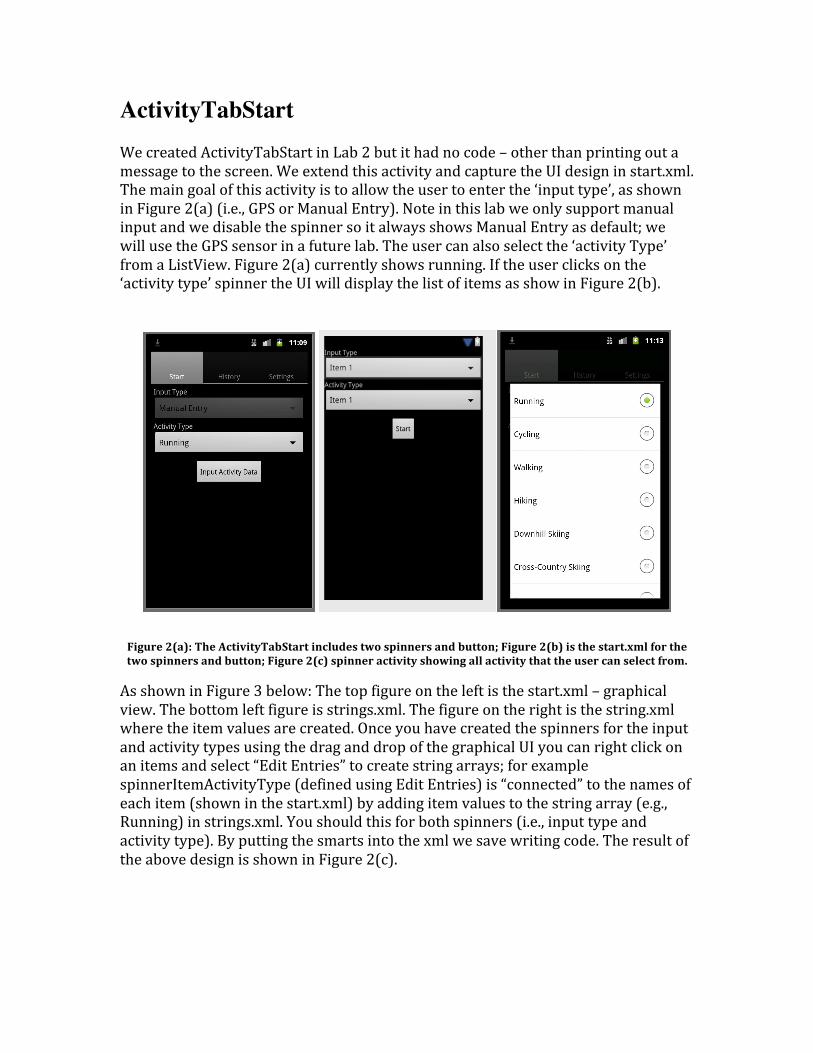
As shown in Figure 3 below: The top figure on the left is the start.xml – graphical view. The bottom left figure is strings.xml. The figure on the right is the string.xml where the item values are created. Once you have created the spinners for the input and activity types using the drag and drop of the graphical UI you can right click on an items and select “Edit Entries” to create string arrays; for example spinnerItemActivityType (defined using Edit Entries) is “connected” to the names of each item (shown in the start.xml) by adding item values to the string array (e.g., Running) in strings.xml. You should this for both spinners (i.e., input type and activity type). By putting the smarts into the xml we save writing code. The result of the above design is shown in Figure 2(c).
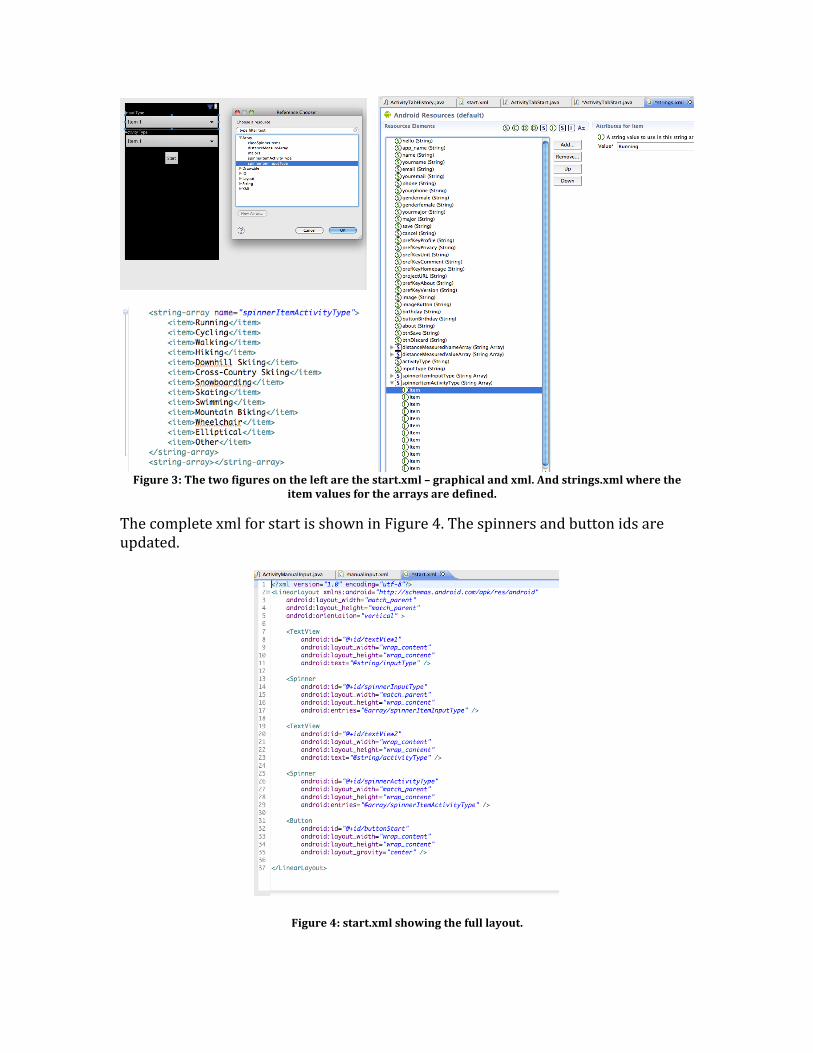
Figure 3: The two figures on the left are the start.xml – graphical and xml. And strings.xml where the
item values for the arrays are defined.
The complete xml for start is shown in Figure 4. The spinners and button ids are updated.
Figure 4: start.xml showing the full layout.
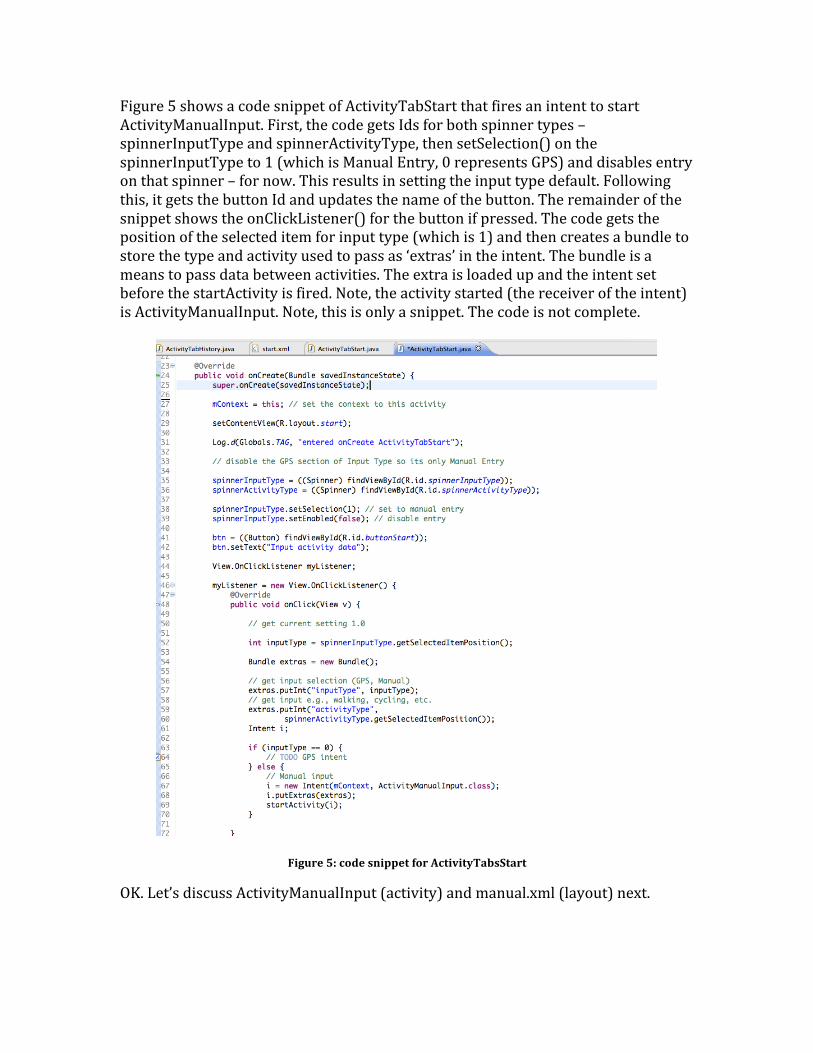
Figure 5 shows a code snippet of ActivityTabStart that fires an intent to start ActivityManualInput. First, the code gets Ids for both spinner types – spinnerInputType and spinnerActivityType, then setSelection() on the spinnerInputType to 1 (which is Manual Entry, 0 represents GPS) and disables entry on that spinner – for now. This results in setting the input type default. Following this, it gets the button Id and updates the name of the button. The remainder of the snippet shows the onClickListener() for the button if pressed. The code gets the position of the selected item for input type (which is 1) and then creates a bundle to store the type and activity used to pass as ‘extras’ in the intent. The bundle is a means to pass data between activities. The extra is loaded up and the intent set before the startActivity is fired. Note, the activity started (the receiver of the intent) is ActivityManualInput. Note, this is only a snippet. The code is not complete.
Figure 5: code snippet for ActivityTabsStart
OK. Let’s discuss ActivityManualInput (activity) and manual.xml (layout) next.
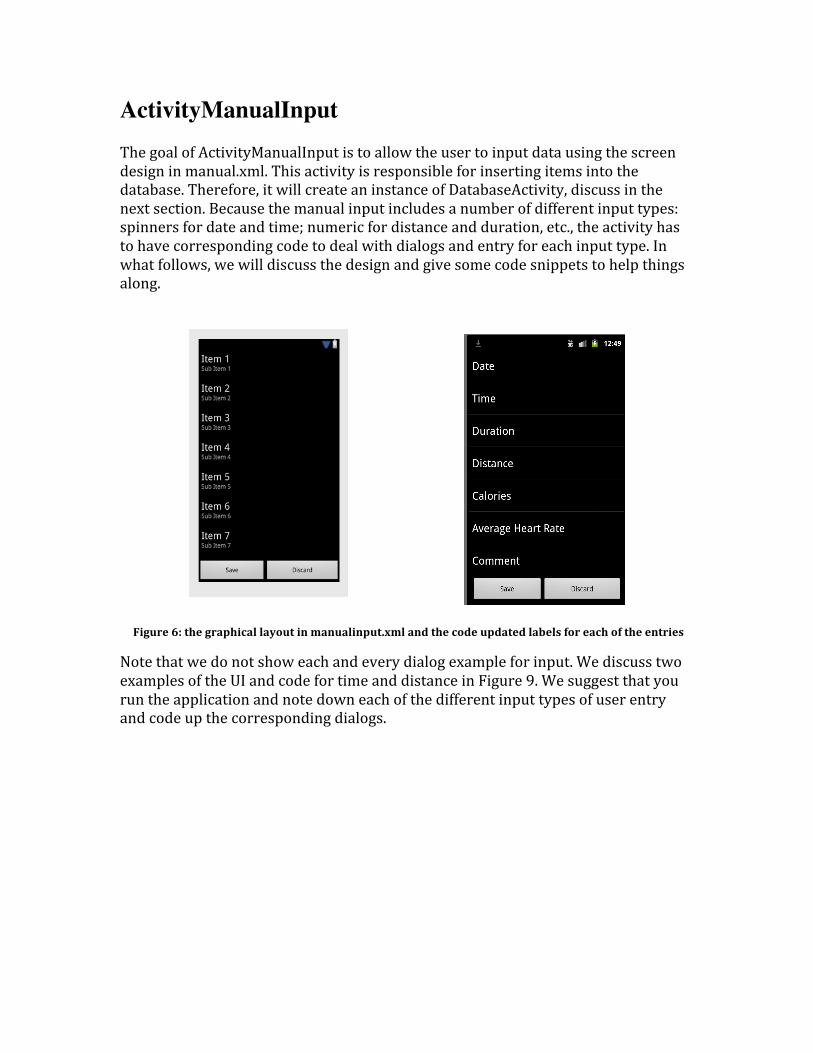
ActivityManualInput The goal of ActivityManualInput is to allow the user to input data using the screen design in manual.xml. This activity is responsible for inserting items into the database. Therefore, it will create an instance of DatabaseActivity, discuss in the next section. Because the manual input includes a number of different input types: spinners for date and time; numeric for distance and duration, etc., the activity has to have corresponding code to deal with dialogs and entry for each input type. In what follows, we will discuss the design and give some code snippets to help things along.
Figure 6: the graphical layout in manualinput.xml and the code updated labels for each of the entries
Note that we do not show each and every dialog example for input. We discuss two examples of the UI and code for time and distance in Figure 9. We suggest that you run the application and note down each of the different input types of user entry and code up the corresponding dialogs.
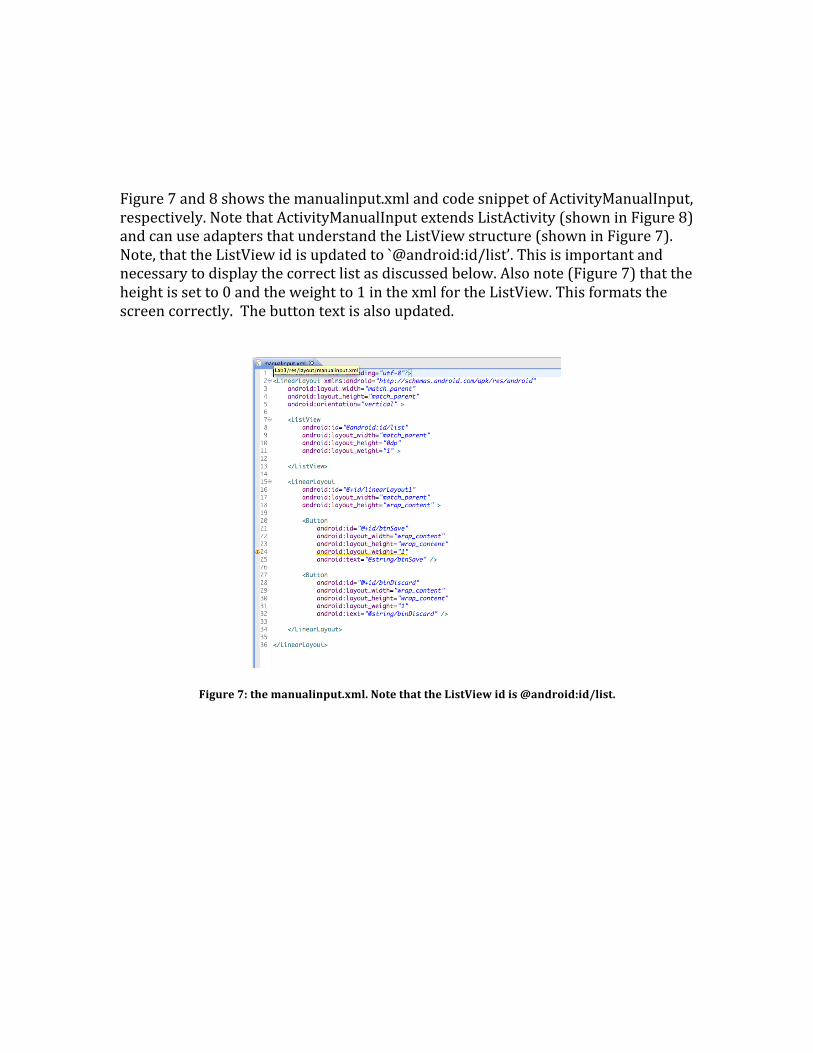
Figure 7 and 8 shows the manualinput.xml and code snippet of ActivityManualInput, respectively. Note that ActivityManualInput extends ListActivity (shown in Figure 8) and can use adapters that understand the ListView structure (shown in Figure 7). Note, that the ListView id is updated to `@android:id/list’. This is important and necessary to display the correct list as discussed below. Also note (Figure 7) that the height is set to 0 and the weight to 1 in the xml for the ListView. This formats the screen correctly. The button text is also updated.
Figure 7: the manualinput.xml. Note that the ListView id is @android:id/list.
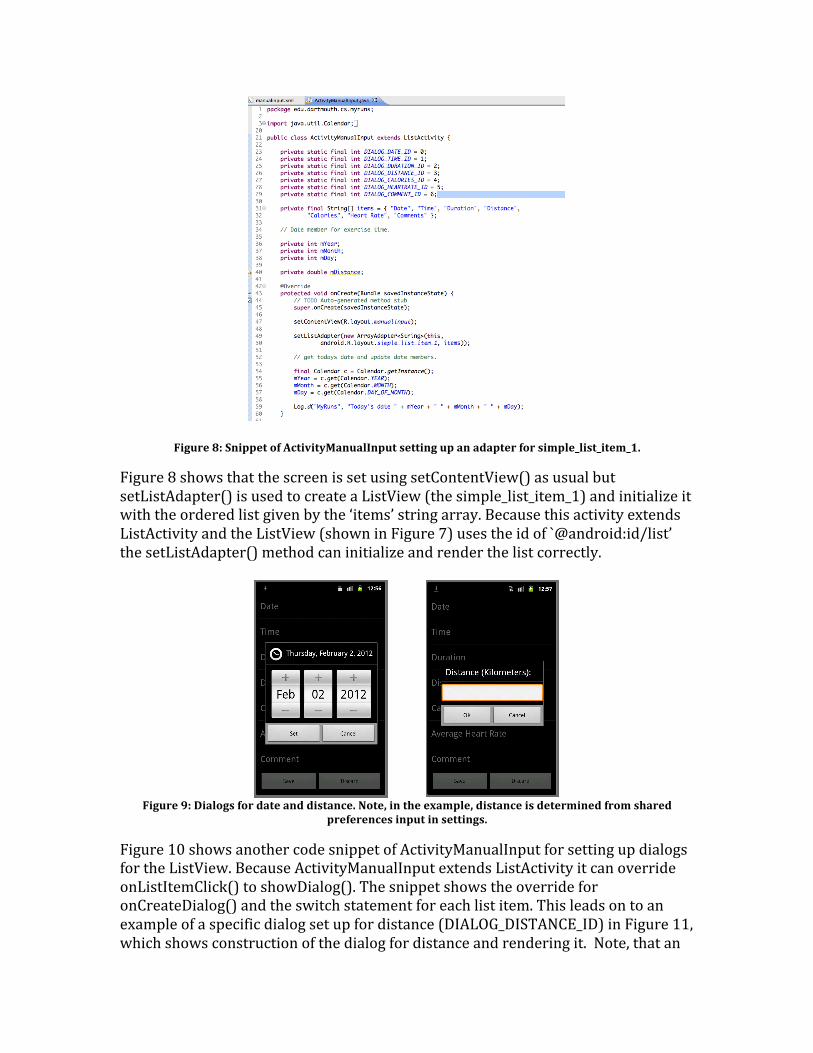
Figure 8: Snippet of ActivityManualInput setting up an adapter for simple_list_item_1.
Figure 8 shows that the screen is set using setContentView() as usual but setListAdapter() is used to create a ListView (the simple_list_item_1) and initialize it with the ordered list given by the ‘items’ string array. Because this activity extends ListActivity and the ListView (shown in Figure 7) uses the id of `@android:id/list’ the setListAdapter() method can initialize and render the list correctly.
Figure 9: Dialogs for date and distance. Note, in the example, distance is determined from shared
preferences input in settings.
Figure 10 shows another code snippet of ActivityManualInput for setting up dialogs for the ListView. Because ActivityManualInput extends ListActivity it can override onListItemClick() to showDialog(). The snippet shows the override for onCreateDialog() and the switch statement for each list item. This leads on to an example of a specific dialog set up for distance (DIALOG_DISTANCE_ID) in Figure 11, which shows construction of the dialog for distance and rendering it. Note, that an
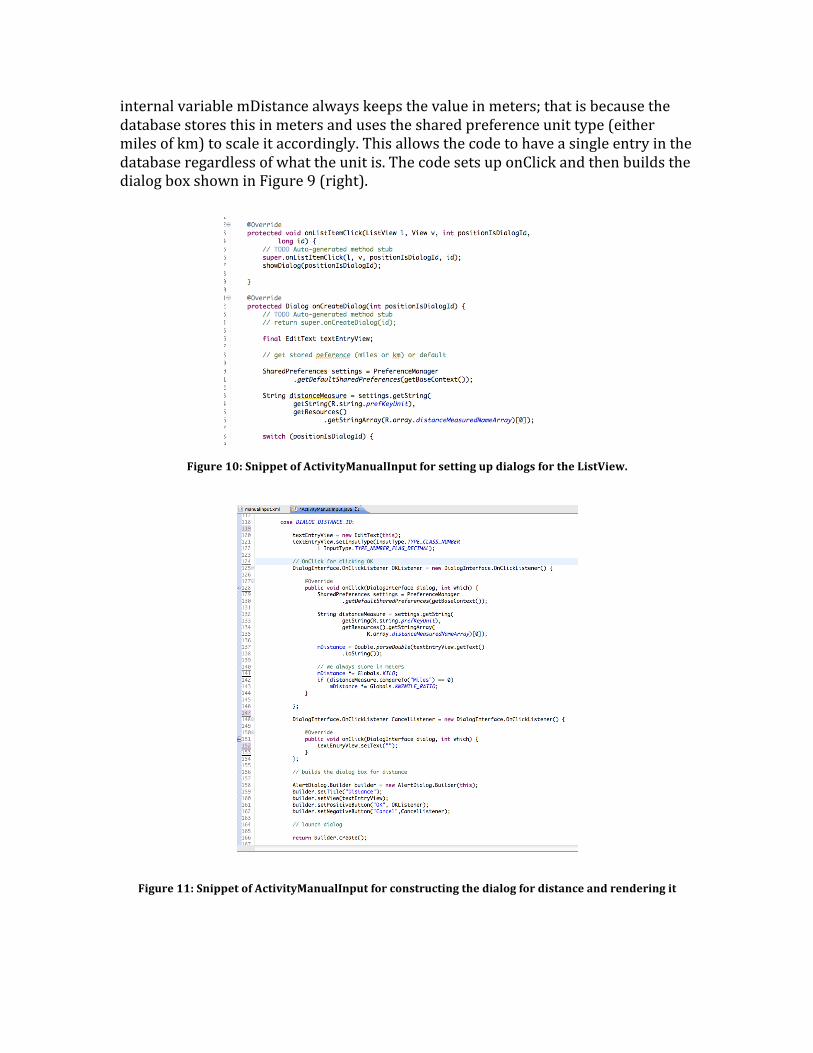
internal variable mDistance always keeps the value in meters; that is because the database stores this in meters and uses the shared preference unit type (either miles of km) to scale it accordingly. This allows the code to have a single entry in the database regardless of what the unit is. The code sets up onClick and then builds the dialog box shown in Figure 9 (right).
Figure 10: Snippet of ActivityManualInput for setting up dialogs for the ListView.
Figure 11: Snippet of ActivityManualInput for constructing the dialog for distance and rendering it
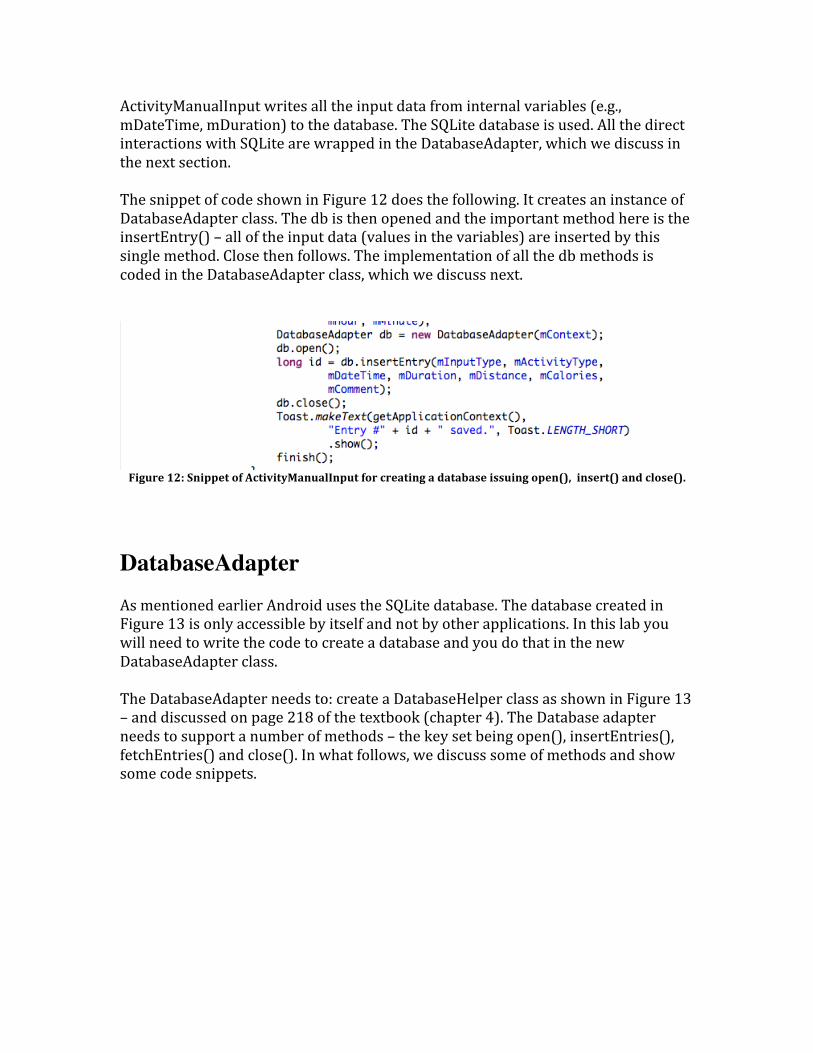
ActivityManualInput writes all the input data from internal variables (e.g., mDateTime, mDuration) to the database. The SQLite database is used. All the direct interactions with SQLite are wrapped in the DatabaseAdapter, which we discuss in the next section. The snippet of code shown in Figure 12 does the following. It creates an instance of DatabaseAdapter class. The db is then opened and the important method here is the insertEntry() – all of the input data (values in the variables) are inserted by this single method. Close then follows. The implementation of all the db methods is coded in the DatabaseAdapter class, which we discuss next.
Figure 12: Snippet of ActivityManualInput for creating a database issuing open(), insert() and close().
DatabaseAdapter As mentioned earlier Android uses the SQLite database. The database created in Figure 13 is only accessible by itself and not by other applications. In this lab you will need to write the code to create a database and you do that in the new DatabaseAdapter class. The DatabaseAdapter needs to: create a DatabaseHelper class as shown in Figure 13 – and discussed on page 218 of the textbook (chapter 4). The Database adapter needs to support a number of methods – the key set being open(), insertEntries(), fetchEntries() and close(). In what follows, we discuss some of methods and show some code snippets.
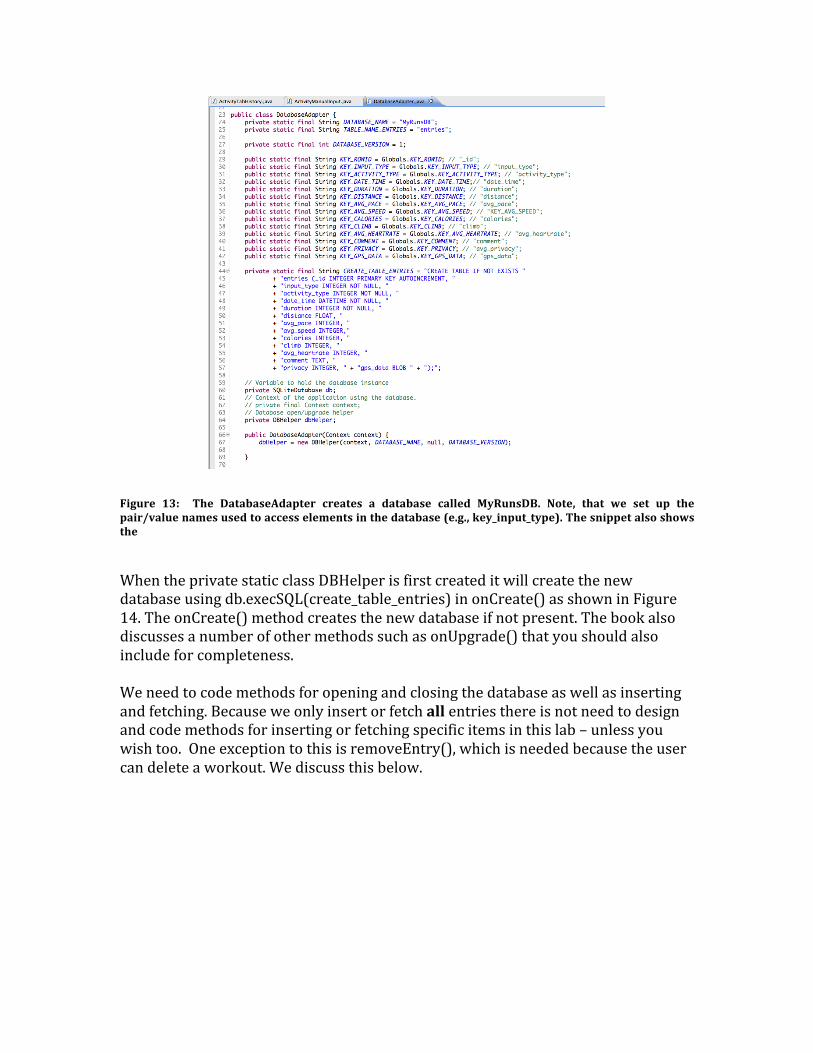
Figure 13: The DatabaseAdapter creates a database called MyRunsDB. Note, that we set up the pair/value names used to access elements in the database (e.g., key_input_type). The snippet also shows the
When the private static class DBHelper is first created it will create the new database using db.execSQL(create_table_entries) in onCreate() as shown in Figure 14. The onCreate() method creates the new database if not present. The book also discusses a number of other methods such as onUpgrade() that you should also include for completeness. We need to code methods for opening and closing the database as well as inserting and fetching. Because we only insert or fetch all entries there is not need to design and code methods for inserting or fetching specific items in this lab – unless you wish too. One exception to this is removeEntry(), which is needed because the user can delete a workout. We discuss this below.
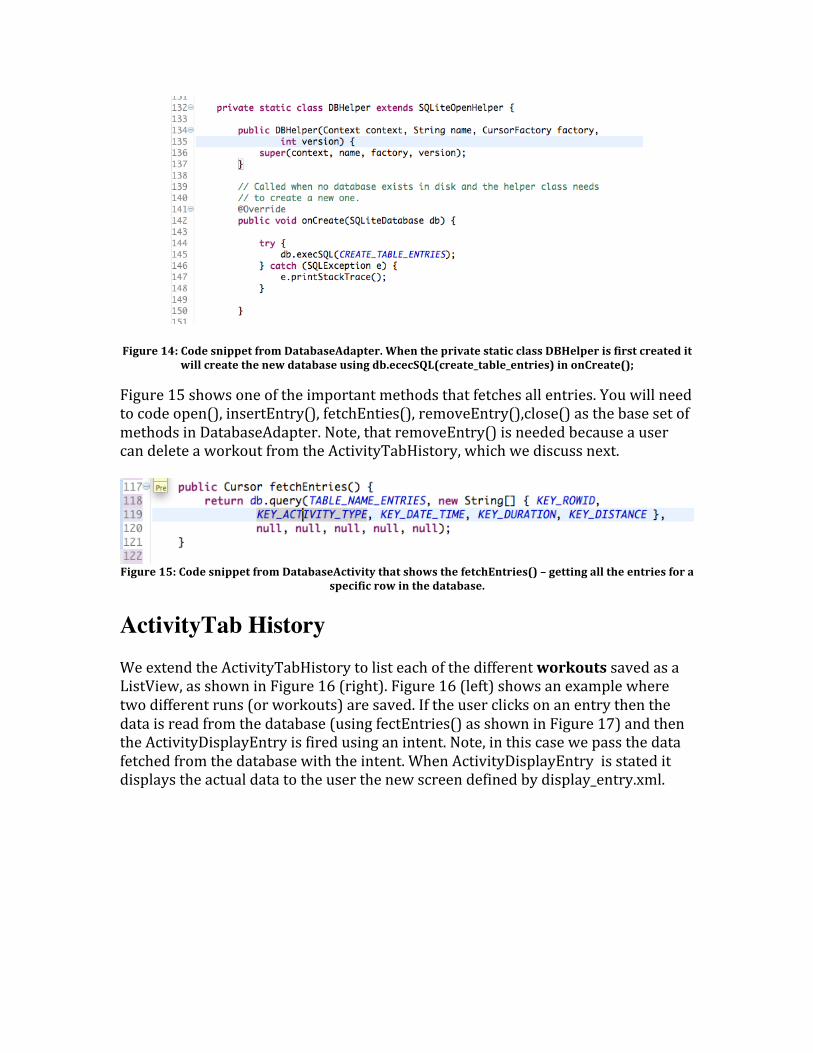
Figure 14: Code snippet from DatabaseAdapter. When the private static class DBHelper is first created it
will create the new database using db.ececSQL(create_table_entries) in onCreate();
Figure 15 shows one of the important methods that fetches all entries. You will need to code open(), insertEntry(), fetchEnties(), removeEntry(),close() as the base set of methods in DatabaseAdapter. Note, that removeEntry() is needed because a user can delete a workout from the ActivityTabHistory, which we discuss next.
Figure 15: Code snippet from DatabaseActivity that shows the fetchEntries() – getting all the entries for a
specific row in the database.
ActivityTab History We extend the ActivityTabHistory to list each of the different workouts saved as a ListView, as shown in Figure 16 (right). Figure 16 (left) shows an example where two different runs (or workouts) are saved. If the user clicks on an entry then the data is read from the database (using fectEntries() as shown in Figure 17) and then the ActivityDisplayEntry is fired using an intent. Note, in this case we pass the data fetched from the database with the intent. When ActivityDisplayEntry is stated it displays the actual data to the user the new screen defined by display_entry.xml.
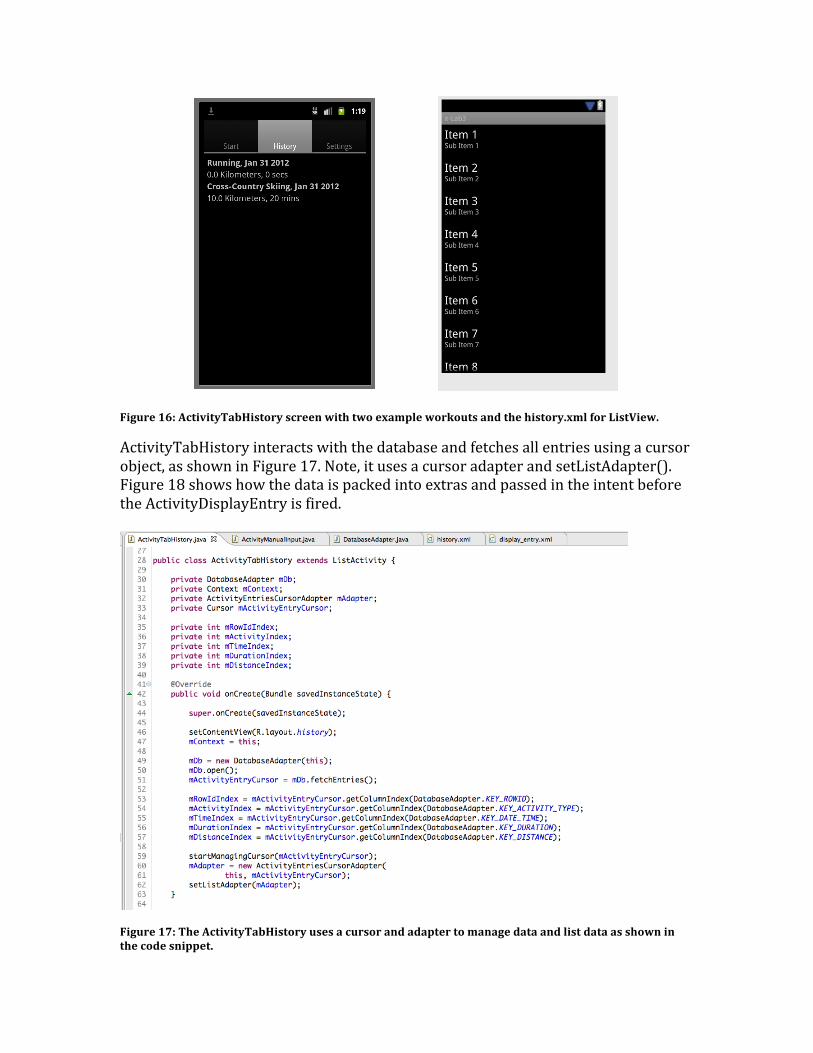
Figure 16: ActivityTabHistory screen with two example workouts and the history.xml for ListView.
ActivityTabHistory interacts with the database and fetches all entries using a cursor object, as shown in Figure 17. Note, it uses a cursor adapter and setListAdapter(). Figure 18 shows how the data is packed into extras and passed in the intent before the ActivityDisplayEntry is fired.
Figure 17: The ActivityTabHistory uses a cursor and adapter to manage data and list data as shown in the code snippet.
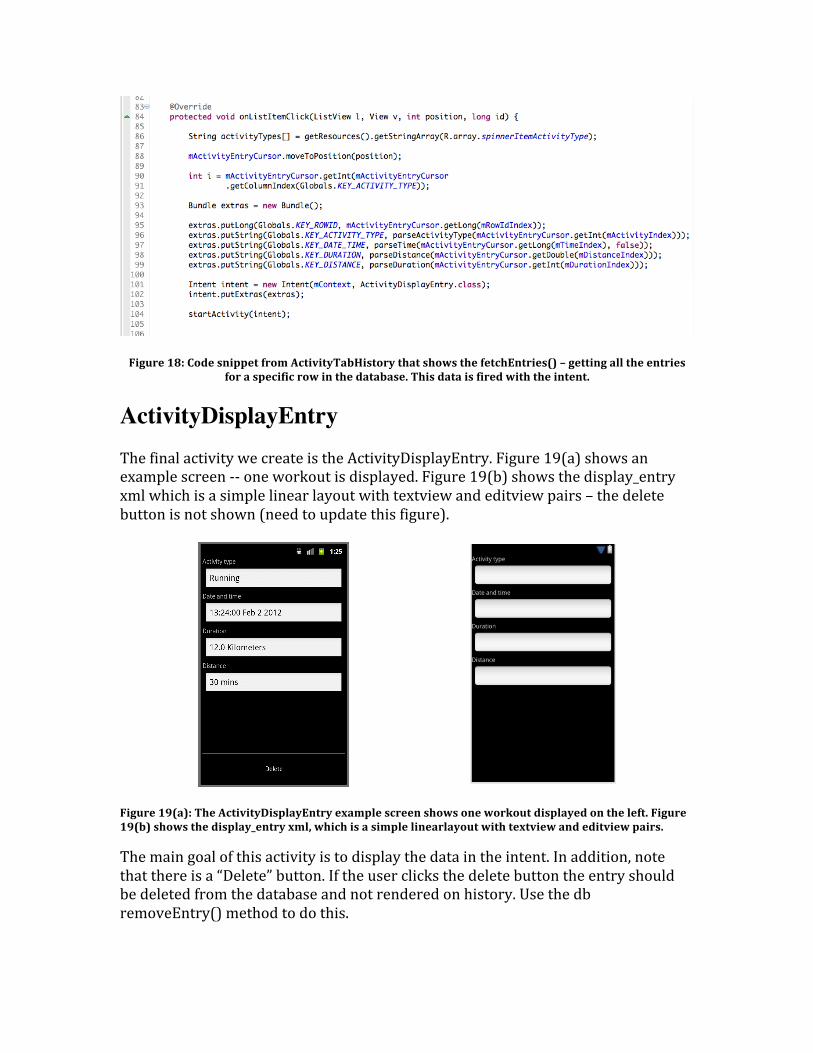
Figure 18: Code snippet from ActivityTabHistory that shows the fetchEntries() – getting all the entries
for a specific row in the database. This data is fired with the intent.
ActivityDisplayEntry The final activity we create is the ActivityDisplayEntry. Figure 19(a) shows an example screen -‐-‐ one workout is displayed. Figure 19(b) shows the display_entry xml which is a simple linear layout with textview and editview pairs – the delete button is not shown (need to update this figure).
Figure 19(a): The ActivityDisplayEntry example screen shows one workout displayed on the left. Figure 19(b) shows the display_entry xml, which is a simple linearlayout with textview and editview pairs.
The main goal of this activity is to display the data in the intent. In addition, note that there is a “Delete” button. If the user clicks the delete button the entry should be deleted from the database and not rendered on history. Use the db removeEntry() method to do this.
Tips Don’t miss this step: Download the real app to your emulator and play with it Use command shift f to correctly format your code Use command shift o to import classes automatically Reading: Generally keep reading through the book but for this lab make sure you cover Chapter 6 – specifically, the section called ‘creating and using databases’. Debugging: Use Log.d() as printf style debugging to start with. It helps answer the obvious problems. You can print out data using Log.d(). More sophisticated debugging would help in addition start getting use to the messages printed out on LogCat.
Related Documents