1 Lab 2: Xilinx ISE WebPack Tutorial EE-459/500 HDL Based Digital Design with Programmable Logic Electrical Engineering Department, University at Buffalo Last update: Cristinel Ababei, August 2012 1. Objective To introduce you to Xilinx’s ISE WebPack by performing the following tasks on a 4-bit adder design example: Use Xilinx ISE WebPack software to: o Specify the type of FPGA to be programmed o Assign input and output signals to FPGA pins o Implement the design (producing a bit file) o Generate reports Use Digilent Adept software to: o Select the board to be programmed: Digilent ATLYS FPGA board o Select the bit file to be used o Program the FPGA board Test the design on the ATLYS board 2. Introduction In this course, we use Xilinx ISE WebPack 14.1 to synthesize our designs. The target FPGA is Xilinx Spartan-6. This FPGA is mounted on a board called Atlys by Digilent. The Atlys circuit board is a complete, ready-to-use digital circuit development platform based on a Xilinx Spartan-6 LX45 FPGA. It offers a large on-board collection of high-end peripherals including Gbit Ethernet, HDMI Video, 128MByte 16-bit DDR2 memory, and USB and audio ports. A typical design flow is illustrated in the next figure: Aldec Active-HDL or Xilinx ISim Specify design functionality Define inputs and outputs Write VHDL files; create testbenches Compile, simulate, and debug Xilinx ISE WebPack Specify FPGA (Spartan-6, etc.) Assigns signals to pins Implement design (synthesis, place, route) Generate reports Generate bitstream file (to program FPGA) Digilent Adept or Xilinx iMPACT Program to download bit file to the FPGA on the Atlys board VHDL file (e.g., MyFile.vhd) bit file (e.g., MyFile.bit) USB Previous tutorial (lab 1) This tutorial (lab 2)

Welcome message from author
This document is posted to help you gain knowledge. Please leave a comment to let me know what you think about it! Share it to your friends and learn new things together.
Transcript

1
Lab 2: Xilinx ISE WebPack Tutorial EE-459/500 HDL Based Digital Design with Programmable Logic
Electrical Engineering Department, University at Buffalo
Last update: Cristinel Ababei, August 2012
1. Objective
To introduce you to Xilinx’s ISE WebPack by performing the following tasks on a 4-bit adder design
example:
Use Xilinx ISE WebPack software to:
o Specify the type of FPGA to be programmed
o Assign input and output signals to FPGA pins
o Implement the design (producing a bit file)
o Generate reports
Use Digilent Adept software to:
o Select the board to be programmed: Digilent ATLYS FPGA board
o Select the bit file to be used
o Program the FPGA board
Test the design on the ATLYS board
2. Introduction
In this course, we use Xilinx ISE WebPack 14.1 to synthesize our designs. The target FPGA is Xilinx
Spartan-6. This FPGA is mounted on a board called Atlys by Digilent. The Atlys circuit board is a
complete, ready-to-use digital circuit development platform based on a Xilinx Spartan-6 LX45 FPGA. It
offers a large on-board collection of high-end peripherals including Gbit Ethernet, HDMI Video, 128MByte
16-bit DDR2 memory, and USB and audio ports.
A typical design flow is illustrated in the next figure:
Aldec Active-HDL or Xilinx ISim Specify design functionality Define inputs and outputs Write VHDL files; create testbenches Compile, simulate, and debug
Xilinx ISE WebPack Specify FPGA (Spartan-6, etc.) Assigns signals to pins Implement design (synthesis, place, route) Generate reports Generate bitstream file (to program FPGA)
Digilent Adept or Xilinx iMPACT Program to download bit file to the FPGA on the Atlys board
VHDL file (e.g., MyFile.vhd)
bit file (e.g., MyFile.bit)
USB
Previous tutorial (lab 1)
This tutorial (lab 2)

2
3. Procedure: Design Implementation with Xilinx ISE WebPack
3.1 Start Xilinx ISE
Launch Xilinx ISE using the shortcut on the desktop (or Start->All Programs->Xilinx Design Tools->ISE
Design Suite 14.1->ISE Design Tools->Project Navigator)
3.2 Create a Project
--Click “New Project” button or Select File->New Project
--Enter the project name fourbit_adder and select the location where you want it to be saved. For example,
M:\UB\labs\fall2012_ise.
--Select HDL for Top-Level source type and click Next. You should get the Project Settings window.
3.3 Specify the FPGA to be Used
--In the Project Settings window, select Spartan6 for Family, select XC6SLX45 for Device, select CSG324
for Package, and VHDL for Preferred Language. Leave the rest of the options unchanged (see figure
below). Then, click Next.
3
--You should get a Project Summary window. Click Finish to create the project.
3.4 Add Existing Source Files to Project
--Select Project->Add Source and locate the vhd files for our design. In this example, we will use the
full_ader.vhd and fourbit_adder.vhd files that we have already created in lab1. So, go ahead and locate
them and add them to the project, then click Open.
--At this time, you should see the Design Overview - Summary being displayed.
3.5 Implement the Design
Design implementation is the process of translating, mapping, placing, routing, and generating a bitstream
file for your design. The design implementation tools are embedded in the Xilinx ISE software for easy
access and project management. The figure below illustrates the design implementation step within a typical
FPGA design flow.
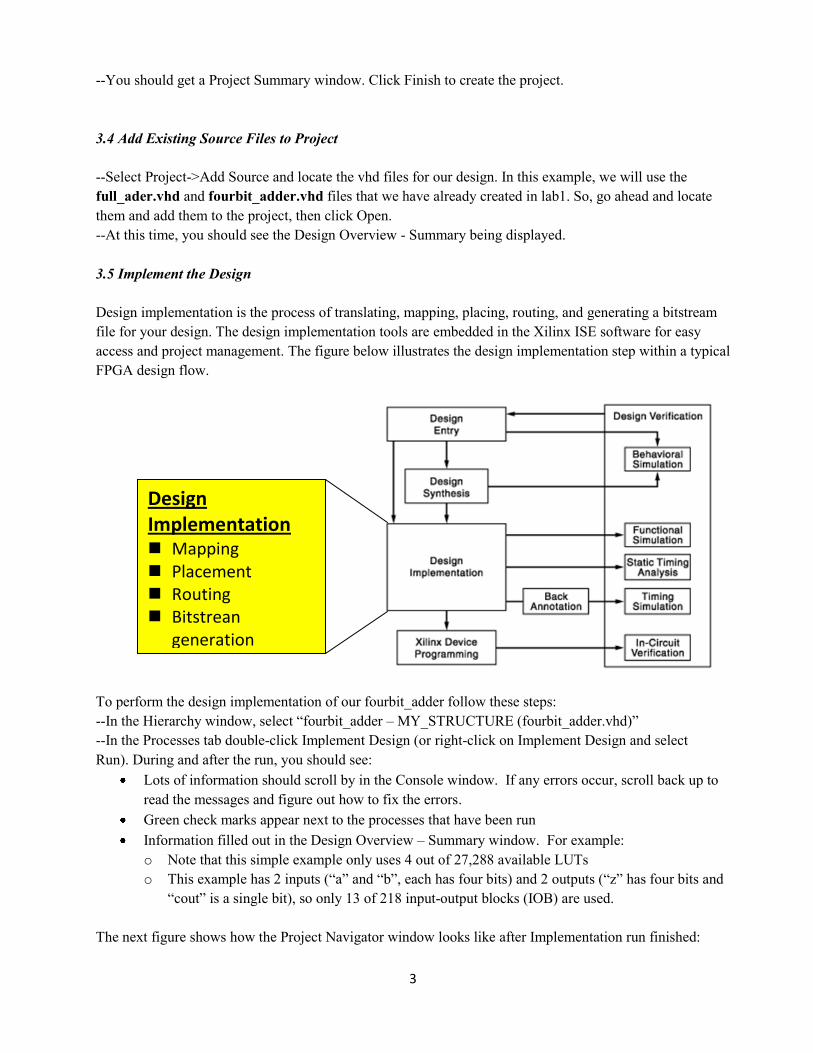
To perform the design implementation of our fourbit_adder follow these steps:
--In the Hierarchy window, select “fourbit_adder – MY_STRUCTURE (fourbit_adder.vhd)”
--In the Processes tab double-click Implement Design (or right-click on Implement Design and select
Run). During and after the run, you should see:
Lots of information should scroll by in the Console window. If any errors occur, scroll back up to
read the messages and figure out how to fix the errors.
Green check marks appear next to the processes that have been run
Information filled out in the Design Overview – Summary window. For example:
o Note that this simple example only uses 4 out of 27,288 available LUTs
o This example has 2 inputs (“a” and “b”, each has four bits) and 2 outputs (“z” has four bits and
“cout” is a single bit), so only 13 of 218 input-output blocks (IOB) are used.
The next figure shows how the Project Navigator window looks like after Implementation run finished:
Design Implementation Mapping Placement Routing Bitstrean
generation
4
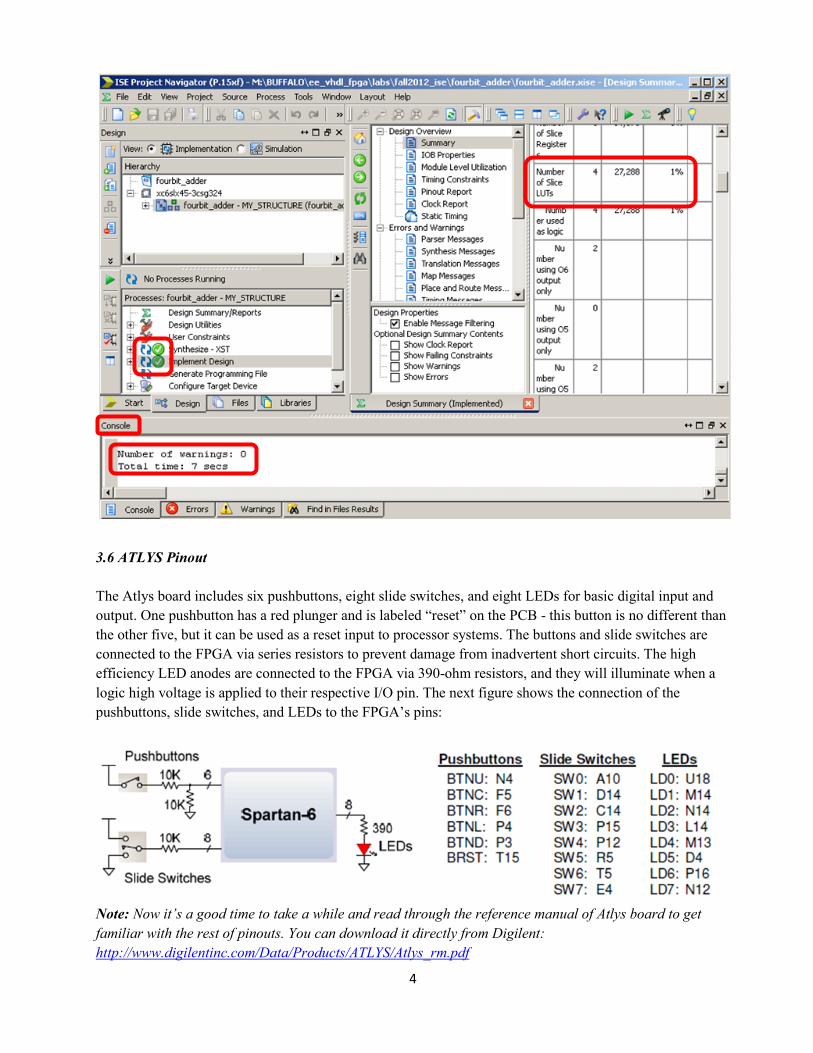
3.6 ATLYS Pinout
The Atlys board includes six pushbuttons, eight slide switches, and eight LEDs for basic digital input and
output. One pushbutton has a red plunger and is labeled “reset” on the PCB - this button is no different than
the other five, but it can be used as a reset input to processor systems. The buttons and slide switches are
connected to the FPGA via series resistors to prevent damage from inadvertent short circuits. The high
efficiency LED anodes are connected to the FPGA via 390-ohm resistors, and they will illuminate when a
logic high voltage is applied to their respective I/O pin. The next figure shows the connection of the
pushbuttons, slide switches, and LEDs to the FPGA’s pins:
Note: Now it’s a good time to take a while and read through the reference manual of Atlys board to get
familiar with the rest of pinouts. You can download it directly from Digilent:
http://www.digilentinc.com/Data/Products/ATLYS/Atlys_rm.pdf
5
Also, take some time to read through some of the documentation of Spartan-6 FPGA:
http://www.xilinx.com/support/documentation/spartan-6.htm
Because our fourbit_adder design is pretty small, we can actually conveniently assign the eight slide
switches to control the two inputs and use five LEDs to be driven by the outputs. We will use the first four
slide switches (SW0-SW3) as input “a” and the last four slide switches (SW4-SW7) as input “b” of the
fourbit_adder. The output “z” of the fourbit_adder will drive the first four LEDs (LD0-LD3) and the output
“cout” will drive the last LED (LD7).
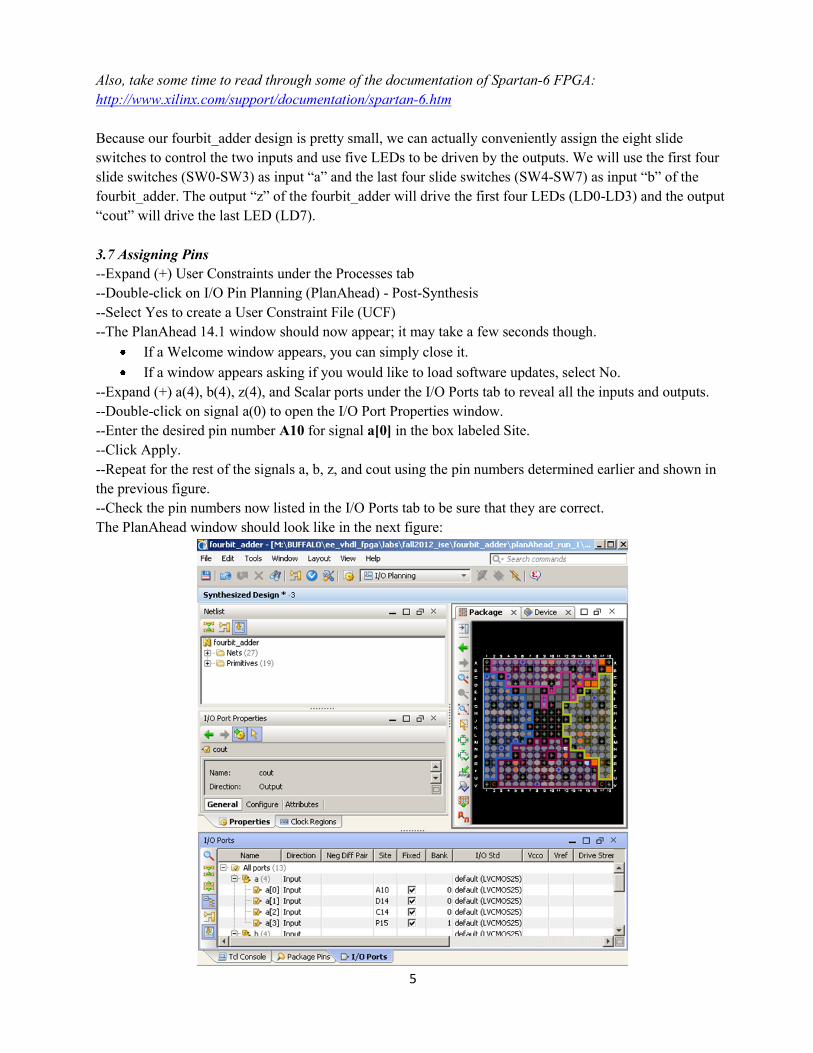
3.7 Assigning Pins
--Expand (+) User Constraints under the Processes tab
--Double-click on I/O Pin Planning (PlanAhead) - Post-Synthesis
--Select Yes to create a User Constraint File (UCF)
--The PlanAhead 14.1 window should now appear; it may take a few seconds though.
If a Welcome window appears, you can simply close it.
If a window appears asking if you would like to load software updates, select No.
--Expand (+) a(4), b(4), z(4), and Scalar ports under the I/O Ports tab to reveal all the inputs and outputs.
--Double-click on signal a(0) to open the I/O Port Properties window.
--Enter the desired pin number A10 for signal a[0] in the box labeled Site.
--Click Apply.
--Repeat for the rest of the signals a, b, z, and cout using the pin numbers determined earlier and shown in
the previous figure.
--Check the pin numbers now listed in the I/O Ports tab to be sure that they are correct.
The PlanAhead window should look like in the next figure:

6
3.8 Printing the Package View
Note: This step is optional. It is described here for the sake of completeness. To save a tree, do not actually
print.
Before printing the package view, change the background from black to white as follows:
--Bring the mouse pointer within the Package window, then Right-click and select View – Options
--When the Options window opens, change the PlanAhead Default Theme to PlanAhead Light Theme under
Colors option. Click Apply. Notice that the package now has a light color background.
--At this time you could select File->Print and the Package View will print. However, do not do it. Instead,
in the Package window zoom-in to pin A10 and verify that it is assigned to a[0]: you should see a[0] written
inside the cell at location row A column 10. Verify the correct assignment of the other pins as well.
--Select File->Save Project
--Select File->Exit
--Select OK
3.9 Re-Implementing the Design after Pins Assignment
--The Xilinx ISE screen should now again appear and a question mark (?) should appear next to
Implement Design indicating that the design is no longer current (since we assigned pins).
--Double-click on Implement Design to implement the design again using the assigned pins.
--The (?) next to Implement Design should now have been replaced by a green check again.
3.10 Generating the Programming File
--Double-click on Generate Programming File in the Process tab. This step will generate the bit file
(fourbit_adder.bit in this example) that will be downloaded to the FPGA in a later step. A green check
mark should appear after it has successfully run.
3.11 Viewing and Printing Reports
Note: Again, this step is described for completeness; do not actually do the printing.
--The Design Summary tab shows that several types of reports are available. Click on Summary, IOB
Properties, Pinout Report, etc. reports and take some time to read through and understand them. For
example, notice in the Static Timing report that the longest path delay of 14.427 ns is between input bit
a<0> and output cout.
--You could print any of these reports by selecting File->Print.
--An alternative to printing the Pinout Report is to print the User Configuration File (UCF). Look in the
project folder for a file with a ucf extension (fourbit_adder.ucf in this case). Open the file with any text
editor. Notice that this file only contains information on pins that were assigned.
--A schematic can be printed as follows:
Select Tools->Schematic Viewer->RTL. When you do this first time, we are asked to select the
Viewer Startup Mode; leave it as “Start with the Explorer Wizard”. At this time you should get a
new dialog window, “Create RTL Schematic”.
Expand the (+) sign of the Signals area, select all of the signals, and click the “Add ->” button.

7
Click Create Schematic button. The schematic now appears as shown in the figure below. Double
click on the full_adder box to go lower into the hierarchy of the design.
You could print it by selecting File->Print to print the schematic (the background changes to white).
3.12 Save and Close the Project
--Select File->Save
--Select File->Close Project
--Select File->Exit to shut down Xilinx ISE
3.13 Opening an existing project
--If you need to open an existing project, look in the project folder for a file with an .xise extension
(full_adder.xise in this example).
--If you modify the VHDL source code you must run again Implement Design and Generate Programming
File. There is no need to run PlanAhead and assign signals to pins since the UCF file still exits - unless you
added/changed inputs or outputs.
4. Procedure: FPGA Programming with Digilent Adept
Digilent Adept is a free program available from Digilent to download synthesized designs (bit files) onto
Digilent FPGA boards.
4.1 Method 1: Direct programming via USB cable
To program the Atlys board using Adept software, first set up the board and initialize the software:
--Plug in and attach the power supply
--Plug in the USB cable to the PC and to the USB port on the board – the one marked “PROG” on the
board’s PCB (this is the so called Adept USB port).
--Turn ON Atlys’ power switch
--Start the Adept software
--Wait for the FPGA to be recognized.
If everything is properly connected and powered-up, the software should recognize the board as indicated in
the figure below.
8
--Select the Browse… button next to the FPGA box and locate the bit file generated by the Xilinx ISE
WebPack software. In this example, the file is fourbit_adder.bit, located in the project folder created in the
previous section of this tutorial.
--If everything is ok, then the Adept software should print the message “Programming Successful” once the
programming is finished.
--Congratulations! You just programmed the Spartan-6 FPGA to implement the fourbit_adder
design!
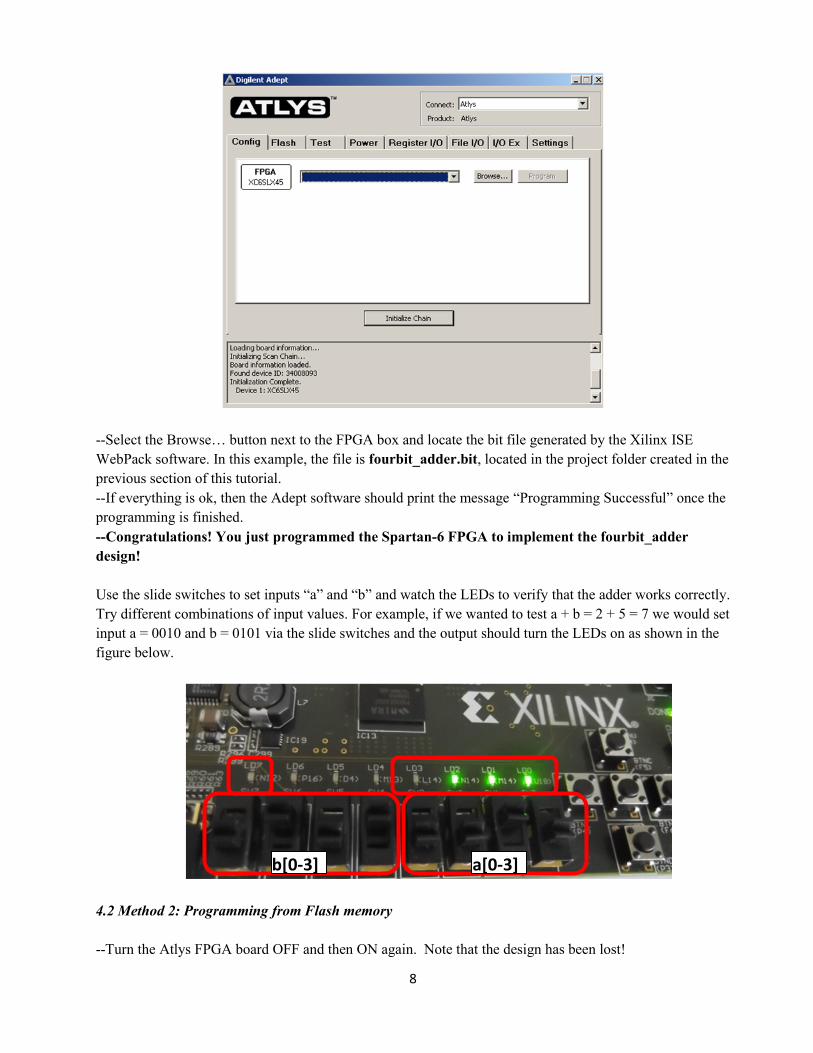
Use the slide switches to set inputs “a” and “b” and watch the LEDs to verify that the adder works correctly.
Try different combinations of input values. For example, if we wanted to test a + b = 2 + 5 = 7 we would set
input a = 0010 and b = 0101 via the slide switches and the output should turn the LEDs on as shown in the
figure below.
4.2 Method 2: Programming from Flash memory
--Turn the Atlys FPGA board OFF and then ON again. Note that the design has been lost!
a[0-3] b[0-3]

9
Recall that the LUTs in an FPGA are essentially RAM and their contents are lost when power is turned off.
The Atlys board also contains 16Mbyte x4 SPI Flash, which can be used to permanently store the
configuration file of our design.
--To program the SPI Flash ROM, select the “Flash” tab in the Adept’s software window.
--In the “FPGA Programming File” section click Browse… and locate the fourbit_adder.bit file and then
click Program. If everything went ok, you should get the message “Flash configuration successful”.
--Turn the FPGA board OFF and then ON again. The SPI Flash ROM is automatically transferred to the
FPGA at power-on.
--Disconnect the USB cable and turn the power switch OFF and ON again. Note that the design should still
work!
4.3 Other programming methods
As mentioned in the Reference Manual of the Atlys board (link to it provided earlier), the FPGA can be
programmed also via the JTAG interface. In addition, the programming file can be transferred from a USB
memory stick attached to the USB HID port (the one marked J13 on the board’s PCB).
It is left as an assignment for you to search and read through the documentation to figure out how exactly
programming from an USB memory stick can be done.
5. Taking it further
As you already realized, Xilinx ISE WebPack is a sophisticated software with lots of features. It is outside
the scope of this tutorial to discuss all of them. You should spend time on your own to search and read
additional documentation and tutorials. A few first examples:
Xilinx’s ISE In-Depth Tutorial:
http://www.xilinx.com/support/documentation/sw_manuals/xilinx14_1/ise_tutorial_ug695.pdf
Digilent’s ISE WebPack VHDL Tutorial:
http://www.digilentinc.com/Data/Documents/Tutorials/Xilinx%20ISE%20WebPACK%20VHDL%20T
utorial.pdf
Digilent’s Adept Software Advanced Tutorial:
http://digilentinc.com/Data/Documents/Tutorials/Adept%20Software%20Advanced%20Tutorial.pdf
Once you launched the ISE tool select the Help menu and read stuff
Google for “ISE WebPack tutorial”. You will find a lot of detailed tutorials (some written for older
versions of the tool but a lot of concepts still apply), which have been kindly made public by the online
community.
Note: As it is the case with most of the electronic design automation (EDA) tools, there are multiple ways of
achieving or performing something. If by reading the documentation or other tutorials you learn how to
accomplish any of the steps described in this tutorial in a different way - that is OK. You should learn and
use the methods you like the most and are more comfortable with.
Related Documents