Configuration and management of Networks 2014 LAB 1 – Introduction to packet tracer Objectives: x Learn Packet Tracer to design and simulate networks. x Learn to create a simple LAN with two PCs using an Ethernet hub and two straightͲthrough cables to connect the workstations. x Learn to configure and verify the network connectivity. x Learn about various network related commands. 1.) Click on Packet Tracer Icon on the desktop of your computer screen. 2.) You will see a window appear as below. 3. Click on Help then click on Tutorials. Under Tutorials Ͳ> Click on Interface Overview. An automated tutorial will begin. Try to understand it as much as possible. When finished with the tutorial start the next tutorial. Under Logical Workspace Ͳ> click on Creating a Network Topology. Again an automated tutorial will begin and go through it. After finishing, you will now design a simple network next. 4. By now you should have a basic understanding of Packet Tracer. Now let us make a simple network with 2 PC and a hub or a switch. Move your mouse cursor to lower left corner over the PC icon. Now click on PC icon. On the window right, you will see Generic under a PC icon. Click on it and drag the mouse to main window and drop it. You will see a picture of PCO. Again click on PC icon and drag the mouse to the main window and let it go. You will see another PC1 appearing. That is you have 2 computers on the main window. 5. Now choose a hub. You do this by going to the lower corner and choosing the third icon, note in the box the word Hubs will appear. On the right window next to it, you will see 2 generic devices. Click on it and drag the mouse to main window and let go. This is what you should have by now, 2 PCs and 1 Hub.

Welcome message from author
This document is posted to help you gain knowledge. Please leave a comment to let me know what you think about it! Share it to your friends and learn new things together.
Transcript

Configuration and management of Networks 2014
LAB 1 – Introduction to packet tracer
ICS432:�Computer�Network�Systems� � � � � � � � � � � � � � � � � � � � � � � � � � � � � � � � � ©Dr.�Fazal�Noor� �
Computer�Science�and�Software�Eng.�Dept.� � � Lab�Instructor:�Tuwailaa�Alshammari�University�of�Hail� � � � � � � � � � � � � � � � � � � � � � � � � � � � � � � � � Student�ID:� �
� � � � � � � � _____________________________�
©Dr.�Fazal�Noor�
� � � � � � � � http://faculty.uoh.edu.sa/f.noor/� � � � � � � � � � � � � � � � � � � � � � � � � � � � � 3�
��
LAB�1:�Introduction�to�Packet�Tracer�and�Simple�2�PC�network.�Objectives:� � �
x Learn�Packet�Tracer�to�design�and�simulate�networks.� �x Learn�to�create�a�simple�LAN�with�two�PCs�using�an�Ethernet�hub�and�two�straightͲthrough�cables�
to�connect�the�workstations.� � �x Learn�to�configure�and�verify�the�network�connectivity.� �x Learn�about�various�network�related�commands.� �
1.)�Click�on�Packet�Tracer�Icon�on�the�desktop�of�your�computer�screen.� � � � 2.)�You�will�see�a�window�appear�as�below.� � �
�� �� �3.�Click�on�Help�then�click�on�Tutorials.� � Under�Tutorials�Ͳ>�Click�on�Interface�Overview.� � An�automated�tutorial�will�begin.� � Try�to�understand�it�as�much�as�possible.� � When�finished�with�the�tutorial�start�the�next�tutorial.�Under�Logical�Workspace� Ͳ>�click�on�Creating�a�Network�Topology.� � Again�an�automated�tutorial�will�begin�and�go�through�it.� � After�finishing,�you�will�now�design�a�simple�network�next.� �� �4.�By�now�you�should�have�a�basic�understanding�of�Packet�Tracer.� � Now�let�us�make�a�simple�network�with�2�PC�and�a�hub�or�a�switch.�Move�your�mouse�cursor�to�lower�left�corner�over�the�PC�icon.�Now�click�on�PC�icon.�On�the�window�right,�you�will�see�Generic�under�a�PC�icon.�Click�on�it�and�drag�the�mouse�to�main�window�and�drop�it.� � You�will�see�a�picture�of�PCO.� � Again�click�on�PC�icon�and�drag�the�mouse�to�the�main�window�and� let� it�go.� � You�will�see�another�PC1�appearing.�That� is�you�have�2�computers�on�the�main�window.� �� �5.�Now�choose�a�hub.�You�do�this�by�going�to�the� lower�corner�and�choosing�the�third� icon,�note� in�the�box�the�word�Hubs�will�appear.� � On�the�right�window�next�to�it,�you�will�see�2�generic�devices.� � Click�on�it�and�drag�the�mouse�to�main�window�and� let�go.� � This� is�what�you�should�have�by�now,�2�PCs�and�1�Hub.� �� �

Configuration and management of Networks 2014
ICS432:�Computer�Network�Systems� � � � � � � � � � � � � � � � � � � � � � � � � � � � � � � � � ©Dr.�Fazal�Noor� �
Computer�Science�and�Software�Eng.�Dept.� � � Lab�Instructor:�Tuwailaa�Alshammari�University�of�Hail� � � � � � � � � � � � � � � � � � � � � � � � � � � � � � � � � Student�ID:� �
� � � � � � � � _____________________________�
©Dr.�Fazal�Noor�
� � � � � � � � http://faculty.uoh.edu.sa/f.noor/� � � � � � � � � � � � � � � � � � � � � � � � � � � � � 4�
�
� �� �6.�Now�we�want�to�connect�the�cables.�Again�lower�left�corner�the�5th�icon�(zigͲzag�orange�in�color)�click�on� it�and� in�box� the�word�connections�will�appear.�Now�on� the�window�on�right�you�will�see�different�types�of�cables�appearing.�Choose�the�third�on�“Copper�StraightͲThrough”.�Click�on�this�cable�and�drag�it�to�the�PCO�and�to�the�Hub.�You�will�see�ports�with�numbers�you�may�connect�to�anyone.� � Again�repeat�between�PC1�and�the�Hub.�This�is�what�you�should�have�by�now.� �
� ��7.� � Now�that�we�have�the�simple�network,�we�need�to�assign�IP�addresses�to�the�2�PCs.� � Fast�double�
ICS432:�Computer�Network�Systems� � � � � � � � � � � � � � � � � � � � � � � � � � � � � � � � � ©Dr.�Fazal�Noor� �
Computer�Science�and�Software�Eng.�Dept.� � � Lab�Instructor:�Tuwailaa�Alshammari�University�of�Hail� � � � � � � � � � � � � � � � � � � � � � � � � � � � � � � � � Student�ID:� �
� � � � � � � � _____________________________�
©Dr.�Fazal�Noor�
� � � � � � � � http://faculty.uoh.edu.sa/f.noor/� � � � � � � � � � � � � � � � � � � � � � � � � � � � � 5�
click�on�PC0.�You�will�get�popͲup�window�of�PCO�and�click�on�“Config”�menu�to�get�the�window�below.�Click�on�Fastethernet.� � In�the�IP�Address�type�in�192.168.7.5�and�for�subnet�mask�type�255.255.255.0.� �Click�on�X�to�close�this�box�afterwards.� �� �
�� �8.�Similarily�do�with�PC1�but�assign�the�following�IP�address�192.168.7.10�and�subnet�mask�255.255.255.0�
Click�on�X�to�close�the�sub�window.� �
9.�To�test�the�ping�command.� � Fast�double�click�on�PCO�to�get�the�following.� � Under�desktop�click�on�
“COMMAND�PROMPT”�window.� �

Configuration and management of Networks 2014
ICS432:�Computer�Network�Systems� � � � � � � � � � � � � � � � � � � � � � � � � � � � � � � � � ©Dr.�Fazal�Noor� �
Computer�Science�and�Software�Eng.�Dept.� � � Lab�Instructor:�Tuwailaa�Alshammari�University�of�Hail� � � � � � � � � � � � � � � � � � � � � � � � � � � � � � � � � Student�ID:� �
� � � � � � � � _____________________________�
©Dr.�Fazal�Noor�
� � � � � � � � http://faculty.uoh.edu.sa/f.noor/� � � � � � � � � � � � � � � � � � � � � � � � � � � � � 5�
click�on�PC0.�You�will�get�popͲup�window�of�PCO�and�click�on�“Config”�menu�to�get�the�window�below.�Click�on�Fastethernet.� � In�the�IP�Address�type�in�192.168.7.5�and�for�subnet�mask�type�255.255.255.0.� �Click�on�X�to�close�this�box�afterwards.� �� �
�� �8.�Similarily�do�with�PC1�but�assign�the�following�IP�address�192.168.7.10�and�subnet�mask�255.255.255.0�
Click�on�X�to�close�the�sub�window.� �
9.�To�test�the�ping�command.� � Fast�double�click�on�PCO�to�get�the�following.� � Under�desktop�click�on�
“COMMAND�PROMPT”�window.� �
ICS432:�Computer�Network�Systems� � � � � � � � � � � � � � � � � � � � � � � � � � � � � � � � � ©Dr.�Fazal�Noor� �
Computer�Science�and�Software�Eng.�Dept.� � � Lab�Instructor:�Tuwailaa�Alshammari�University�of�Hail� � � � � � � � � � � � � � � � � � � � � � � � � � � � � � � � � Student�ID:� �
� � � � � � � � _____________________________�
©Dr.�Fazal�Noor�
� � � � � � � � http://faculty.uoh.edu.sa/f.noor/� � � � � � � � � � � � � � � � � � � � � � � � � � � � � 6�
� �� �10.�You�will�get�the�following�and�in�the�window�type:� � ping�192.168.7.10�<�press�enter�>.� �
� �� �
ICS432:�Computer�Network�Systems� � � � � � � � � � � � � � � � � � � � � � � � � � � � � � � � � ©Dr.�Fazal�Noor� �
Computer�Science�and�Software�Eng.�Dept.� � � Lab�Instructor:�Tuwailaa�Alshammari�University�of�Hail� � � � � � � � � � � � � � � � � � � � � � � � � � � � � � � � � Student�ID:� �
� � � � � � � � _____________________________�
©Dr.�Fazal�Noor�
� � � � � � � � http://faculty.uoh.edu.sa/f.noor/� � � � � � � � � � � � � � � � � � � � � � � � � � � � � 7�
�You�will�see�that�4�packets�are�sent�to�PC1�and�get�a�reply�back.�If�you�do�not�get�a�reply�then�something�
is�wrong�with�your�network.� � The�ping�utility�shows�if�the�connection�between�source�pc�and�destination�
pc�is�working�or�not.� �
11.)� � After�testing�out�the�“ping”�command.�Do�the�following�excerises.� �
12.)�In�the�Command�Prompt�as�above�instead�of�typing�ping.�Now�type�ipconfig�<�press�enter�>.� �
Write�down�what�you�get:� �
IP�address� � � �
Subnet�mask� � � �
Default�gateway:� � �
� �
13.)�Next�type�tracert� � 192.168.7.10�<�press�enter�>.� � What�do�you�see�?� �
�
14.)�Next�type�arp�–a� � <press�enter>.�What�do�you�see�?� �
�
15.)�Practice�by�adding�more�PCs�to�your�network�and�assigning�IP�addresses.� �
�
16.)�If�you�assign�one�PC�an�ip�address�of�192.168.7.15�and�another�PC�with�ip�address�of�192.168.8.20.�
Can�you�ping�each�other�?� � Yes�or�No.� �
��������

Configuration and management of Networks 2014
Exercise 3 – Connecting to a Switch and navigating the Cisco Command Line Interface Create the following topology in Packet Tracer:
There are two ways to access the CLI of the switches in packet tracer: The first one is to click in the switch and then choose the CLI tab, the other is to access them remotely via the client PCs (has would be the case in a real network). However to access the switches via the PCs some configuration has to be already in the switches, namely the creation of a vty port and the configuration of a management IP address. Connecting via the console port to the equipment is usually how we perform these configurations. To simplify we will do them using the Packet Tracer interface. 1) Select the 2960 Switch1, enter the CLI in the CLI tab of the packet tracer window.
ICS432:�Computer�Network�Systems� � � � � � � � � � � � � � � � � � � � � � � � � � � � � � � � � ©Dr.�Fazal�Noor� �
Computer�Science�and�Software�Eng.�Dept.� � � Lab�Instructor:�Tuwailaa�Alshammari�University�of�Hail� � � � � � � � � � � � � � � � � � � � � � � � � � � � � � � � � Student�ID:� �
� � � � � � � � _____________________________�
©Dr.�Fazal�Noor�
� � � � � � � � http://faculty.uoh.edu.sa/f.noor/� � � � � � � � � � � � � � � � � � � � � � � � � � � � � 7�
�You�will�see�that�4�packets�are�sent�to�PC1�and�get�a�reply�back.�If�you�do�not�get�a�reply�then�something�
is�wrong�with�your�network.� � The�ping�utility�shows�if�the�connection�between�source�pc�and�destination�
pc�is�working�or�not.� �
11.)� � After�testing�out�the�“ping”�command.�Do�the�following�excerises.� �
12.)�In�the�Command�Prompt�as�above�instead�of�typing�ping.�Now�type�ipconfig�<�press�enter�>.� �
Write�down�what�you�get:� �
IP�address� � � �
Subnet�mask� � � �
Default�gateway:� � �
� �
13.)�Next�type�tracert� � 192.168.7.10�<�press�enter�>.� � What�do�you�see�?� �
�
14.)�Next�type�arp�–a� � <press�enter>.�What�do�you�see�?� �
�
15.)�Practice�by�adding�more�PCs�to�your�network�and�assigning�IP�addresses.� �
�
16.)�If�you�assign�one�PC�an�ip�address�of�192.168.7.15�and�another�PC�with�ip�address�of�192.168.8.20.�
Can�you�ping�each�other�?� � Yes�or�No.� �
��������

Configuration and management of Networks 2014
In the terminal you can see that after pressing return you’re placed into Cisco CLI with the “>” greater then sign next to the hostname. This is called user mode. 2) Press ? to get a context mode sensitive help list of available commands to execute from your current privilege level. Navigate using the space bar and quit using the q key. 3) In user mode you can elevate your privileges by issuing the command enable. If an enable password or enable secret is configured then you’ll be prompted to provide such authentication information to elevate your privileges. 4) In privileged mode enter the command configure terminal. This command will place you into global configuration mode where you can make device configuration changes. The global configuration mode is denoted by the (config)# prompt. 5) Star by erasing the VLAN database file and the startup config:
6) Perform the same operations in the 3560 switch.
CCNPv6 SWITCH
All contents are Copyright © 1992–2010 Cisco Systems, Inc. All rights reserved. This document is Cisco Public Information. Page 2 of 5
Step 1: Connect to the switch console port and enter privileged EXEC mode. From a computer running a terminal emulation program, connect to the console port of the switch that you want to clear using a console cable. You should see a console prompt that includes the switch’s hostname, followed by a > or #. The default switch hostname is “Switch.”
Switch> or
Switch#
If the prompt ends with a >, you are not in privileged EXEC mode. To enter privileged EXEC mode, type enable. This might require a password. If you are in a configuration mode, type exit or end.
If not enabled:
Switch> enable Switch#
If in global configuration mode:
Switch(config)# exit Switch#
Step 2: Delete the VLAN database file. In privileged EXEC mode, type delete flash:vlan.dat and press Enter. If you are asked to confirm, press Enter until you are back to the original prompt.
Switch# delete flash:vlan.dat Delete flash:vlan.dat? [confirm] Switch#
Step 3: Erase the startup config from NVRAM. After deleting the vlan.dat file, you can erase the startup configuration on the switch by typing erase startup-config. You again have to press Enter to confirm.
Switch# erase startup-config Erasing the nvram filesystem will remove all configuration files! Continue? [confirm] [OK] Erase of nvram: complete Switch#
Step 4: Reload the device, but do not save the system configuration if prompted. After clearing the switch configuration, reload the switch by typing reload and pressing Enter. If you are asked whether to save the current configuration, answer no. Press Enter to confirm. The switch starts reloading. Your output might look different depending on the switch model that you are using. This step might take a few minutes, because the switch needs time to reload.
Switch# reload System configuration has been modified. Save? [yes/no]: no Proceed with reload? [confirm] %SYS-5-RELOAD: Reload requested by console. Reload Reason: Reload command. Base ethernet MAC Address: 00:1b:0c:6d:8f:00 Xmodem file system is available. The password-recovery mechanism is enabled.
CCNPv6 SWITCH
All contents are Copyright © 1992–2010 Cisco Systems, Inc. All rights reserved. This document is Cisco Public Information. Page 5 of 5
Motherboard assembly number : 73-10390-03 Power supply part number : 341-0097-02 Motherboard serial number : FOC11036013 Power supply serial number : AZS1103015V Model revision number : B0 Motherboard revision number : C0 Model number : WS-C2960-24TT-L System serial number : FOC1104W0G0 Top Assembly Part Number : 800-27221-02 Top Assembly Revision Number : C0 Version ID : V02 CLEI Code Number : COM3L00BRA Hardware Board Revision Number : 0x01 Switch Ports Model SW Version SW Image ------ ----- ----- ---------- ---------- * 1 26 WS-C2960-24TT-L 12.2(46)SE C2960-LANBASEK9-M
Step 5: When the switch restarts, do not enter the initial configuration dialog, but terminate autoinstall.
The switch might log messages to the console, such as interfaces coming up and down. When you see the “Press RETURN to get started!” prompt, press Enter.
If you are asked to enter an initial configuration dialog, type no. This places you at the user EXEC prompt. If you accidentally type yes, you can break out of the initial configuration dialog at any time by pressing Ctrl-C. If you are asked whether you want to terminate autoinstall, press Enter for “yes.”
Press RETURN to get started! Enter --- System Configuration Dialog --- Would you like to enter the initial configuration dialog? [yes/no]: no Would you like to terminate autoinstall? [yes]: Enter

Configuration and management of Networks 2014
7) Perform initial switch configurations for both switches
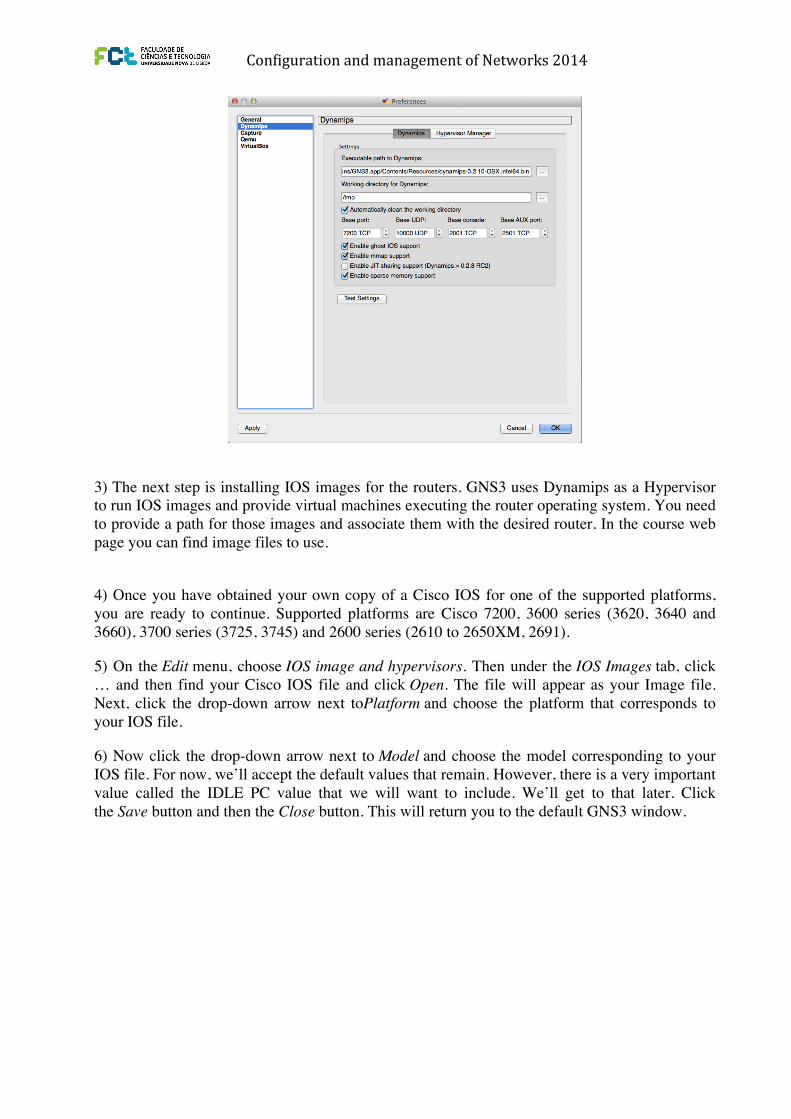
8) After the configuration of the switches you can click in the PCs and in the config tab choose the FastEthernet tab. For host C configure a manual IP address of 10.1.1.100 with a 255.255.255.0 mask. Do the same for host A with address 10.1.1.99 255.255.255.0. 9) Now open the desktop tab in the pc window and start a command prompt. You can now reach the CLI of the switches by telnet to their VLAN 1 IP addresses. LAB 1 – Introduction to GNS3 1) Install the GNS3 network simulator from the http://www.gns3.net/ site. GNS3 depends on several other programs to operate. Those dependencies include WinPCAP, Dynamips and Qemu. You should select them for installation during the setup procedure. You can find detailed setup instructions in http://www.gns3.net/documentation/. 2) After the installation start the GNS3 Simulator. Verify is Dynamics is running correctly. For this you should go to the preferences menu under the dynamics tab the path for the dynamics file should be file. You can press the test settings button to start dynamics and see if it is operating correctly.
CCNPv6 SWITCH
All contents are Copyright © 1992–2010 Cisco Systems, Inc. All rights reserved. This document is Cisco Public Information. Page 2 of 16
Required Resources x 2 switches (Cisco 2960 with the Cisco IOS Release 12.2(46)SE C2960-LANBASEK9-M image or
comparable) x 2 switches (Cisco 3560 with the Cisco IOS Release 12.2(46)SE C3560-ADVIPSERVICESK9-M
image or comparable) x 4 PCs (optional) x Ethernet and console cables
Step 1: Prepare the switches for the lab. Power up the switches and use the standard process for establishing a HyperTerminal console connection from a workstation to each switch in your pod. If you are connecting remotely to the switches, follow the instructions that have been supplied by your instructor.
Remove all VLAN information and configurations that may have been previously entered into the switches. Refer to Lab 1-1, “Clearing a Switch,” and Lab 1-2, “Clearing a Switch Connected to a Larger Network.”
Step 2: Configure basic switch parameters. Assign each switch a hostname and configure an IP address on the management VLAN according to the diagram. By default, VLAN 1 is used as the management VLAN.
Enter basic configuration commands on each switch according to the diagram.
DLS1 example: Switch# configure terminal Enter configuration commands, one per line. End with CNTL/Z. Switch(config)# hostname DLS1 DLS1(config)# interface vlan 1 DLS1(config-if)# ip address 10.1.1.101 255.255.255.0 DLS1(config-if)# no shutdown
(Optional) On each switch, create an enable secret password and configure the vty lines to allow remote access from other network devices.
DLS1 example: DLS1(config)# enable secret cisco DLS1(config)# line vty 0 15 DLS1(config-line)# password cisco DLS1(config-line)# login
Step 3: Display the switch default VLAN information. Use the show vlan command in privileged mode on any switch. The following output is for a 2960 switch.
ALS1# show vlan VLAN Name Status Ports ---- -------------------------------- --------- ------------------------------- 1 default active Fa0/1, Fa0/2, Fa0/3, Fa0/4 Fa0/5, Fa0/6, Fa0/7, Fa0/8 Fa0/9, Fa0/10, Fa0/11, Fa0/12 Fa0/13, Fa0/14, Fa0/15, Fa0/16 Fa0/17, Fa0/18, Fa0/19, Fa0/20 Fa0/21, Fa0/22, Fa0/23, Fa0/24 Gi0/1, Gi0/2
Configuration and management of Networks 2014
3) The next step is installing IOS images for the routers. GNS3 uses Dynamips as a Hypervisor to run IOS images and provide virtual machines executing the router operating system. You need to provide a path for those images and associate them with the desired router. In the course web page you can find image files to use.
4) Once you have obtained your own copy of a Cisco IOS for one of the supported platforms, you are ready to continue. Supported platforms are Cisco 7200, 3600 series (3620, 3640 and 3660), 3700 series (3725, 3745) and 2600 series (2610 to 2650XM, 2691).
5) On the Edit menu, choose IOS image and hypervisors. Then under the IOS Images tab, click … and then find your Cisco IOS file and click Open. The file will appear as your Image file. Next, click the drop-down arrow next toPlatform and choose the platform that corresponds to your IOS file.
6) Now click the drop-down arrow next to Model and choose the model corresponding to your IOS file. For now, we’ll accept the default values that remain. However, there is a very important value called the IDLE PC value that we will want to include. We’ll get to that later. Click the Save button and then the Close button. This will return you to the default GNS3 window.

Configuration and management of Networks 2014
An important issue in GNS3 is performance. For each specific computer where it is running and for each specific image used in Virtual machines you need to configure a value called IDLE PC that greatly impacts the performance of the simulations. When an IOS is running, it will consume up to 100% of your CPU time. This will cause your computer to become very sluggish and will prevent building more complex topologies. However, if we use an IDLE PC value, we can reduce CPU usage dramatically. It puts the IOS into a sleep state when it is not in active use and wakes it up only when it is necessary. 7) Start by creating a topology with one router. Click on a router icon under Nodes Types corresponding to the IOS platform you are using.
You must use a platform for which you defined an IOS. Drag an appropriate router node type over to the workplace pane in the middle and let go. We now have a router ready to configure.
8) Right-click the router and choose Configure.
Click on R1 and then the Slots tab. Click the drop-down arrow next to slot0 and choose an adapter that includes FE in its description. This will add a FastEthernet adapter to the router. Next, click the drop-down arrow next toslot1 and choose PA-4T+, PA-4T, or NM-4T (if you do not have these exact adapters, just choose something close.). This will add four serial interfaces to the router. Click OK.
9) Right-click the router and choose Start. Right-click the router again and choose Console. A Putty console opens up.

Configuration and management of Networks 2014
You may need to press Enter once initially in the Console window. After a few seconds, your virtual router should have started.
10) Apply an IDLEPC value. Be sure you can see the prompt of your router in Putty window. Right-click R1 and choose Idle PC. GNS3 will spend a moment calculating an Idle PC value before presenting the screen to the right. If you click the drop-down arrow, you see a list of possible idlepc values. Potentially better idlepc values are marked with an asterisk. Choose one of the values with an asterick and click OK.
If you choose IOS images and hypervisors on the Edit menu, and double-click on the image under the IOS Images tab, you’ll see the new idlepc value displayed under Settings.
You can use the task manager (windows) activity monitor (MAC OS) or System Monitor (Ubuntu) to see the results in the CPU usage by the Dynamips process when you apply different IDLEPC values. 11) Return to the terminal window to use your router. You are actually running the Cisco IOS that you chose. All commands supported by the IOS are available. Take a brief tour entering in the 3 different modes of IOS.
Related Documents