LAB 1: 1.Introduction

Welcome message from author
This document is posted to help you gain knowledge. Please leave a comment to let me know what you think about it! Share it to your friends and learn new things together.
Transcript

LAB 1:
1.Introduction

QtSpim is software that will help you to simulate the execution of MIPS assembly programs. It does a context and syntax check while loading an assembly program. In addition, it adds in necessary overhead instructions as needed, and updates register and memory content as each instruction is executed. In the experiments, we will use a simulator instead of a workstation with a MIPS processor, because a simulator provides us miscellaneous features in understanding the instruction set as well as in debugging. Moreover, a MIPS simulator is available for almost any computer- and operating-system. Furthermore, the simulator can be updated to include the new features, instructions or pseudo-instructions developed in later versions of the processor for almost without any additional cost.
.Introduction1

Comments in assembler files begin with a sharp sign " # ". Everything from the sharp sign to the end of the line is ignored. Identifiers are a sequence of alphanumeric characters, underbars "_", and dots " . " that do not begin with a number Instruction opcodes are reserved words that cannot be used as identifiers. Labels are declared by putting them at the beginning of a line followed by a colon, for example:
2. MIPS ASSEMBLER SYNTAX

Numbers are base 10 by default. If they are preceded by 0x, they are interpreted as hexadecimal. Hence, 256 and 0x100 denote the same value. Strings are enclosed in doublequote "...". Special characters in strings follow the C convention: i.e., newline is \n; tab \t, and quote \" Some important SPIM (and also MIPS) assembler directives:
2. MIPS ASSEMBLER SYNTAX

The QtSpim simulator program has a pull-down menu appearance as shown below and also you can see different area in QtSPIM as follow:
3. QtSpim workspace:

4. Main menu (green one):
1. File:

2. Simulation: These items will be used more frequently
And also, we can change some setting from “Setting” item:

The Setting window is divided into two section as follow:

3. Resister menu: in this sub menu we can determine the type of register contain such as binary, hex, decimal as follow:

4. Text Segment menu: this section is about Text part of workstation where you can find your instructions as follow:
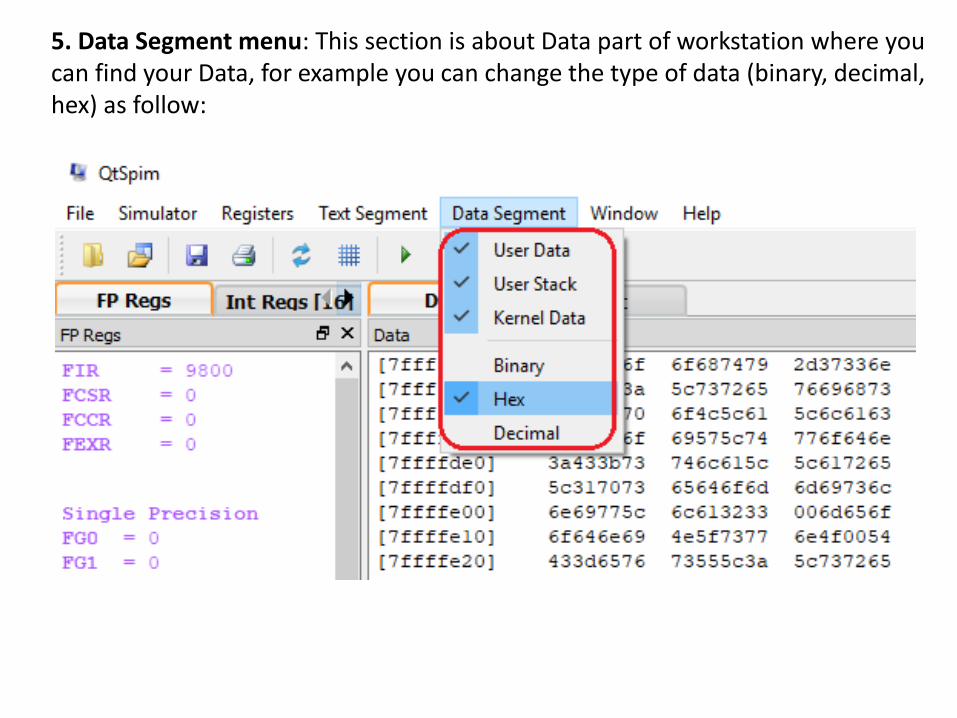
5. Data Segment menu: This section is about Data part of workstation where you can find your Data, for example you can change the type of data (binary, decimal, hex) as follow:

Note: And also, we have a useful tools menu which has some most frequently tools such as Run, Open, Save, and etc.

6. First project (simulation): Now, lets begin with first simulation, follow the steps one by one: First of all, we should Set the Simulator: In the first part of this experiment you will use SPIM to simulate _ a bare MIPS machine, _ without allowing pseudo-codes, and _ no mapped I/O option. _ without loading any trap-features. In this mode, the assembler will not allow any pseudo-codes (i.e., li, mul, blt, ... etc. and also any long offset fields in the lw and sw instructions) to be used in your program. For the convenience in reading the register contents you may prefer to have hexadecimal readings in the display windows. In the second part, you will use SPIM in the more elaborated mode with the pseudo-code and trap-features loaded All of these settings can be set on the settings form that is accessed starting from the drop-down menu by simulator>settings.

Organization of a MIPS assembly program: The MIPS assembly programs are text files with the extension "-.s" or "- .asm" . SPIM has no built-in editor-program for writing the assembly source. You have to use your favorite, or any available text editor such as NOTEPAD.EXE. The Notepad program of Windows 95/98 or NT is located in: Start > Programs > Accessories > Notepad Type your MIPS assembly program (you have to leave an empty line at the end of the program) and save it by specifying a filename for your program. Note that the extension of the filename must be “.s” or ".asm". You should first click on the PCSpim for Windows icon to start the PCSpim main window. Then load your program by using the PCSpim’s menu File > Open. Use the opened browser to choose the path and the assembly source file that you want to open. If there is any syntax or structure error in your file, SPIM will give you a message indicating the line number and the reason of the rejected line. You have to clean your program from the syntax bugs and load it to SPIM. After loading your assembly source, you are ready to run or trace it. Use Simulator > Go (F5-key) or Simulator > single step (F10-key) of the main menu. The starting address is automatically defined by the compiler according to the options your set-up on the settings window. You can watch the contents of the registers using window > Registers of the main menu. For an easy to observe page organization try the window > tile option.

Experimental Work A. Part-1 Following program multiplies two unsigned integers in the registers R8 by R9 and writes the 32-bit product to register R10. In order to understand the operation of your simulator program, type and execute the following MIPS assembly program in non-pseudo-instruction mode.

1. You can put comments to the end of a line after a sharp sign (#). 2. You can start the single step execution applying the following items.
A.First set the PC (prog.counter) to the starting address of the program if SPIM is set correctly the starting address is 0x00400000. To set the value use the key-sequence alt-s,v (or menu simulator>set value) to open the register-value assignment dialog box. Enter PC and the starting address in hexadecimal format.
B. Next, use the fn10 key to execute one instruction at each key-press. You can also use the fn5 key to execute the complete progam at once. Correct the starting address to 0x00400000 before clicking the OK button.
3. After syscal stops the execution save the log file with the filename "exp1a.log". Open the log file by dragging it into the textpad and inspect the text segment. Fill in the following machine code table according to hexadecimal machine codes assigned by SPIM.

Reporting Before the Lab-time is over, fill in the following report page as soon as you complete the laboratory work, and submit it to your assistant. Your report is important for your grading. The observed binary machine codes of the instructions are:
Related Documents