Kurzweil 3000 for Mac Getting Started Learning Technologies, Training & Audiovisual Outreach University Information Technology Services

Welcome message from author
This document is posted to help you gain knowledge. Please leave a comment to let me know what you think about it! Share it to your friends and learn new things together.
Transcript

Kurzweil 3000 for Mac Getting Started
Learning Technologies, Training & Audiovisual Outreach
University Information Technology Services

Copyright © 2016 KSU Division of University Information Technology Services
This document may be downloaded, printed, or copied for educational use without further permission
of the University Information Technology Services Division (UITS), provided the content is not modified
and this statement is not removed. Any use not stated above requires the written consent of the UITS
Division. The distribution of a copy of this document via the Internet or other electronic medium
without the written permission of the KSU - UITS Division is expressly prohibited.
Published by Kennesaw State University – UITS 2016
The publisher makes no warranties as to the accuracy of the material contained in this document and
therefore is not responsible for any damages or liabilities incurred from UITS use.
Kurzweil 3000 and Kurzweil 3000+firefly are registered trademarks of Kurzweil Educational Systems

University Information Technology Services
Kurzweil 3000 for Mac
Getting Started Table of Contents
Introduction ................................................................................................................................................ 4
Learning Objectives ..................................................................................................................................... 4
Supported File Types ................................................................................................................................... 4
Minimum System Requirements: ............................................................................................................... 4
Installing Kurzweil 3000 for Mac................................................................................................................. 4
Installing High Quality Acapela Voices .................................................................................................... 6
Creating an Account .................................................................................................................................... 7
Running Kurzweil 3000 ............................................................................................................................... 7
Changing Your Password ......................................................................................................................... 8
The Kurzweil 3000 Interface ..................................................................................................................... 10
Opening a Document from your Mac ................................................................................................... 11
Opening a Document from the Universal Library ................................................................................. 12
Reader Interface ....................................................................................................................................... 13
Reading a Document ................................................................................................................................. 15
Reading a Web Page with Kurzweil 3000 ............................................................................................. 15
Enable Read the Web on Chrome ..................................................................................................... 15
Using the Read the Web Toolbar in Chrome. ................................................................................... 16
Look Up Tool ......................................................................................................................................... 18
Notes Tool Bar Interface ........................................................................................................................... 19
Taking Notes ......................................................................................................................................... 19
Highlight Text .................................................................................................................................... 19
Add Notes.......................................................................................................................................... 20
Spell Check a Document ....................................................................................................................... 21
Creating a New Text File ........................................................................................................................... 21
Creating a New Draft Document............................................................................................................... 22
Creating a New Brainstorm Document ..................................................................................................... 22
Creating a New Outline Document ........................................................................................................... 23
Creating a New Draft Document from an Existing Brainstorm Document ........................................... 24
Saving Your Document .......................................................................................................................... 25
Additional Help ......................................................................................................................................... 25

Revised: 11/28/2016 Page 4 of 25
Introduction
The Kurzweil 3000 software program offers features that promote and aid in reading, studying, and
writing. It provides users with multiple ways to access information, read aloud a wide variety of
supported files, add notes, and draft documents and brainstorm diagrams. With the installation of the
KESI Reader, Kurzweil 3000 can also read web pages from the Chrome web browser.
Learning Objectives
After completing the instructions in this booklet, you will be able to:
Install Kurzweil 3000 and create a user account.
Understand and navigate the Kurzweil 3000 interface.
Open documents and utilize the text to speech feature.
Take notes and use the look up tool.
Read web pages aloud (Read the Web extension and Chrome Web Browser Required).
Draft documents, brainstorm diagrams, and outlines.
Save your work.
Supported File Types
The following file types can be opened and read in Kurzweil 3000:
Text File (.TXT)
Rich Text Format (.RTF)
Microsoft Word files (.DOC, .DOCX)
Portable Document Format (.PDF)
Kurzweil 3000 and Kurzweil 1000 (.KES) text and image
Hyper Text Markup Language (.HTML)
Reference:
https://www.kurzweiledu.com/files/v14mac/Getting_Started_with_Kurzweil_3000_firefly_Mac_04_14_2015.pdf
For more information on Supported File Formats, check the Help Topics (F1) within Kurzweil
3000.
Minimum System Requirements:
Processor Intel processor
System Memory 1 GB RAM.
Hard Disk Space 1 GB hard disk space.
Operating System Mac OS 10.6 through 10.11.
Bandwidth Recommend a minimum of 56k
Additional Requirements DVD drive, keyboard, mouse, speakers, microphone, Internet connection
for Read the Web functionality.
Reference: https://www.kurzweiledu.com/includes/new-mac-system-requirements.html
Installing Kurzweil 3000 for Mac
The following will explain how to download and install Kurzweil 3000 on your Mac:

Page 5 of 25
1. Navigate your web browser to www.kurzweiledu.com/k3mac.
2. The Kurzweil 3000 Downloads page will open. Click the latest version of the Kurzweil 3000 web
license download.
3. Save the file to a location on your computer.
Note: The file is a large download. Make sure you are on a wired internet connection to maintain
connection and download speed.
4. Open the file once it has finished downloading.
5. The installation window will appear. Click and drag the Kurzweil 3000 file on to the Applications
folder. Kurzweil 3000 will begin to install on your computer.
Figure 1 - Install Kurzweil 3000 to Mac
6. After Kurzweil 3000 has finished installing, you will be able to access the program from your
Launchpad by clicking on the Kurzweil 3000 icon.
Figure 2 - Kurzweil 3000 Icon

Page 6 of 25
Installing High Quality Acapela Voices
Extra high quality Acapela text-to-speech voices may be installed for use in Kurzweil 3000 to improve
the quality of text read aloud. This speech pack can be installed after the installation of Kurzweil 3000.
Note: Make sure Kurzweil 3000 is closed before installing the voice pack.
1. Open the Kurzweil 3000 install file if it is not already open.
2. The installation window will appear. Double-click on the Extras folder.
Figure 3 - Extras Folder
3. The Extras folder will open. Open the Acapela Voices folder (see Figure 4).
4. Double-click the InstallAcapelaVoices.pkg to run the installer (see Figure 4).
Figure 4 - Run Acapela Voice Installer
5. The installer will open. Follow the onscreen prompts to continue installation.
6. Once the installer is complete, click close to close the installer. The voice pack has been
installed.

Page 7 of 25
Creating an Account
Before using the Kurzweil 3000 Web License program, you will need to create an account:
1. Access the KSU Software Downloads page at https://uits.kennesaw.edu/downloads.
2. Log in with your netid and password.
3. Click My Available Downloads.
Figure 5 - User Sign-Up
4. A list of your available downloads will appear. Scroll down and click on View Files next to
Kurzweil 3000 Account Creation.
Figure 6 - View Files
5. Click Download File. You will be prompted to download a PDF with additional instructions on
creating your account, including a link to access the registration page. Follow the instructions in
this guide to create your account.
Running Kurzweil 3000
To run Kurzweil 3000:
1. Click the program on your computer.
Note: If this is your first time running Kurzweil 3000, a security window will appear and ask if you want
to open the file. Click Open.
Figure 7 - Open Application

Page 8 of 25
2. A login window will appear. Enter the username and password received when creating your
account (see Creating an Account for more information) (see Figure 8).
3. Click Login (see Figure 8).
Figure 8 - Enter Username and Password
4. You are now logged in to Kurzweil 3000.
Changing Your Password
When first creating an account, you will automatically be assigned a password. Follow the steps below
if you wish to create your own password:
1. Open the Kurzweil 3000 program and login to your account.
2. In the Menu bar, click Kurzweil 3000 (see Figure 9).
3. Click My Account (see Figure 9).
Figure 9 - Access Your Account

Page 9 of 25
Note: You can also click the My Account icon on the Exploring tool bar.
Figure 10 - Exploring Tool bar: My Account
4. Your web browser will open to the Kurzweil 3000+firefly website. Log in with your Username
and Password.
5. The My Account page will appear. Click Update Profile.
Figure 11 – Update Profile
6. The Manage Profile page will appear. Under Login Information, enter your preferred password
in the password field (see Figure 12).
7. In the Retype Password field, reenter your preferred password to confirm (see Figure 12).
8. Click Update Account Information (see Figure 12).
Figure 12 - Manage Profile
9. Your password has been changed, and a reminder will be sent to the email registered with your
profile. You will need to use your new password the next time you log-in.
Page 10 of 25
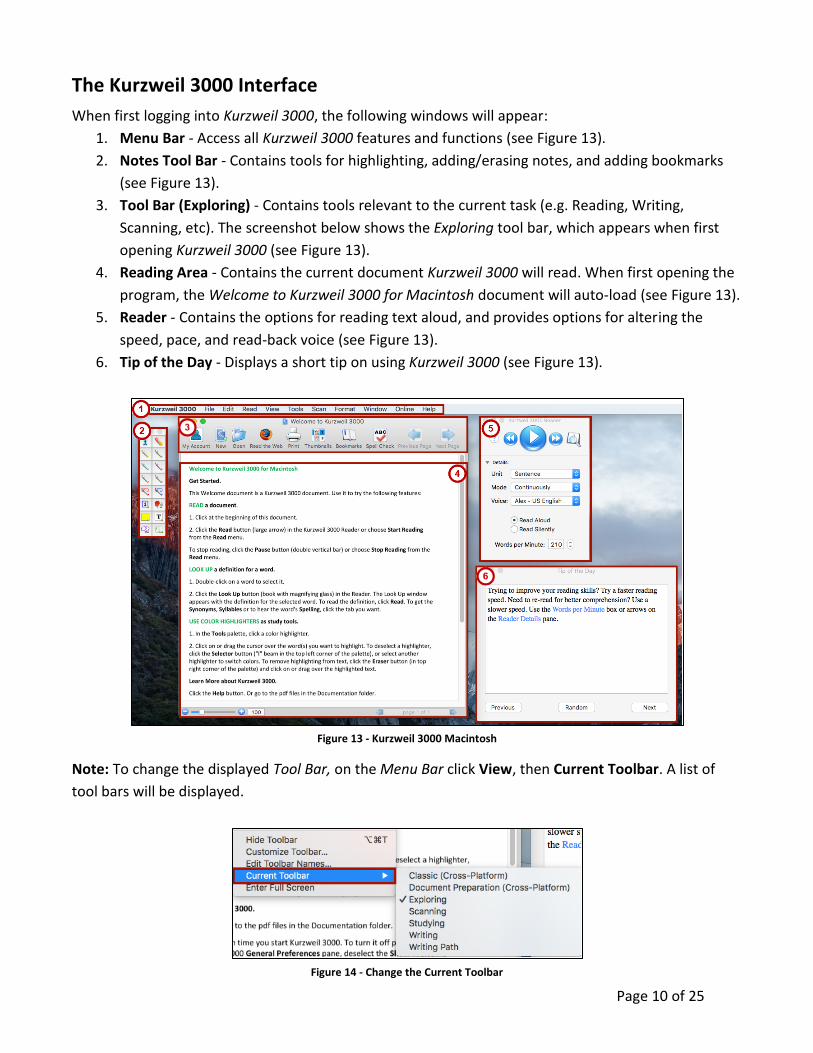
The Kurzweil 3000 Interface
When first logging into Kurzweil 3000, the following windows will appear:
1. Menu Bar - Access all Kurzweil 3000 features and functions (see Figure 13).
2. Notes Tool Bar - Contains tools for highlighting, adding/erasing notes, and adding bookmarks
(see Figure 13).
3. Tool Bar (Exploring) - Contains tools relevant to the current task (e.g. Reading, Writing,
Scanning, etc). The screenshot below shows the Exploring tool bar, which appears when first
opening Kurzweil 3000 (see Figure 13).
4. Reading Area - Contains the current document Kurzweil 3000 will read. When first opening the
program, the Welcome to Kurzweil 3000 for Macintosh document will auto-load (see Figure 13).
5. Reader - Contains the options for reading text aloud, and provides options for altering the
speed, pace, and read-back voice (see Figure 13).
6. Tip of the Day - Displays a short tip on using Kurzweil 3000 (see Figure 13).
Figure 13 - Kurzweil 3000 Macintosh
Note: To change the displayed Tool Bar, on the Menu Bar click View, then Current Toolbar. A list of
tool bars will be displayed.
Figure 14 - Change the Current Toolbar

Page 11 of 25
Opening a Document from your Mac
To open a document from your computer to read in Kurzweil 3000:
1. On the Exploring tool bar, click the Open button.
Figure 15 - Open File from Local Computer
2. The Finder will appear. Select a document from your computer and click Open.
Figure 16 - Select a Document to Open
3. The file will open in a new window within Kurzweil 3000. The document will be converted into a
text file and the Writing tool bar will be displayed.
Figure 17 - Writing Tool Bar

Page 12 of 25
Opening a Document from the Universal Library
The Universal Library is an online folder that can be used to store and distribute documents to all
users, regardless of their account privileges. To open an existing document from the Universal Library:
1. From the Menu Bar, click File (see Figure 18).
2. Click the Open from Universal Library (see Figure 18).
Figure 18 - Open from the Universal Library
3. The Open from the Universal Library window will open and display available folders online.
Double-click a folder to open it and see its contents.
Figure 19 - Open from the Universal Library Window
4. When a folder contains a readable document, it will be displayed in the right column. Click the
document you wish to open.
Figure 20 - Readable Documents Available
5. Click Open. The document will be displayed as a text file and the Writing tool bar will be
displayed.

Page 13 of 25
Reader Interface
1. The following options are available on the Kurzweil 3000 Reader:
a. To access help on using the Kurzweil 3000 Reader, click the Help button (see Figure 21).
b. To move to the previous/next reading unit, click the read previous/next button
(see Figure 21).
c. Click Read to have Kurzweil 3000 read text aloud (see Figure 21).
d. To look up definitions, synonyms, syllables, spellings, and pictures of a selected word,
click Look Up (see Figure 21).
Figure 21 - Reader Options

Page 14 of 25
2. Click the Details drop-down arrow to display additional options:
a. The Reading Units determines how much text Kurzweil 3000 will highlight to be read
(see Figure 22):
Word - Highlights only the current word being read in green.
Phrase - Highlights a small section of a sentence.
Line - Highlights all the text on one line.
Sentence - Highlights the entire sentence.
Highlight - Highlights any currently highlighted text within the document
b. The Reading Mode determines how much Kurzweil 3000 will read before pausing
(see Figure 22):
Continuous (default) - Will read the entire document.
Self-Paced - Will pause after reading each reading unit.
Word by Word - Will pause after reading each word.
c. Change the speaker to change the voice reading text (see Figure 22).
d. Click a radio button to have text read aloud, or highlighted in silence (see Figure 22).
e. To decrease/increase the reading speed (WPM), click the down/up arrows
(see Figure 22).
Figure 22 - Reader: Details

Page 15 of 25
Reading a Document
After opening one of the supported file types (see Supported File Types for more information), you can
use Kurzweil 3000 to read text out loud. As text is read, it will be highlighted to help you keep pace
with the reading.
1. After opening a document, click the Read button on the Reader.
Figure 23 - Reader: Read Button
2. The text to be read will be highlighted in yellow, and text being read will be highlighted green.
Figure 24 - Highlighted Text During Reading
Reading a Web Page with Kurzweil 3000
Kurzweil 3000 can read web pages aloud. It is recommended to use this feature with Chrome.
Enable Read the Web on Chrome
The Read the Web extension must first be installed to Chrome in order to use this feature.
Note: Once installed, you can access Read The Web from within Chrome.
1. Access the Chrome Web Store at https://chrome.google.com/webstore/category/apps.
2. Search the Chrome Web Store for Kurzweil.
3. In the search results under Extensions next to Read The Web, click Add to Chrome.
Figure 25 - Add Read The Web to Chrome

Page 16 of 25
4. If asked to add Read The Web extension to Chrome, click Add extension.
Figure 26 - Add Extension
5. The extension will be installed to Chrome and will appear next to the address bar.
Figure 27 - Read The Web in Chrome
Using the Read the Web Toolbar in Chrome.
Once the Read The Web extension has been installed, you will be able to access Read the Web from
Chrome and enable a toolbar to read text aloud from websites online. To use the tool bar:
1. Open the Chrome browser.
2. Click on the Read the Web icon next to the address bar.
3. Enter your username and password for your Kurzweil 3000 account.
4. Click Login.
Figure 28 - Access the Read The Web Toolbar

Page 17 of 25
5. After logging in, the Read the Web toolbar will display the interface:
a. Kurzweil3000.com: access the Kurzweil3000.com log-in page (see Figure 29).
b. Options: alter the reading voice, speed, mode, and unit settings (see Figure 29).
c. Go: allows you to move backwards/forwards throughout text in the website
(see Figure 29)
d. Play: begins reading text on the webpage. To read a specific passage, click your mouse
on the section where you wish to begin (see Figure 29).
e. Mute: mute/unmute the sound (see Figure 29).
f. Dictionary: access the dictionary to define the currently highlighted word
(see Figure 29).
Figure 29 - Chrome Read the Web Toolbar Interface
6. To begin reading a web page, click a section of the page where you want the reader to begin,
and click Play on the toolbar.
Figure 30 - Selection Cursor

Page 18 of 25
Look Up Tool
The look up tool provides access to definitions, synonyms, syllables, spellings, and pictures of selected
words within a document. To activate the look up feature:
1. Select a word within your document you wish to look up.
2. On the Kurzweil 3000 Reader, click the Look Up tool.
Figure 31 - Look Up Tool
3. The Look Up window will open and display results for a word’s definition, synonyms, syllables,
spelling, and pictures.
Figure 32 - Look Up Results
4. Click on a tab to display the results.
5. When finished, click the red x in the upper-left corner to close the window.

Page 19 of 25
Notes Tool Bar Interface
The Notes Tool Bar contains several tools that can be useful for making notations on an opened
document. Clicking a tool will select it and make your mouse cursor perform one of the following
actions:
1. Selector - Allows cursor to select areas of text within a document to be read (see Figure 33).
2. Eraser - Erases highlights, circles, or notes (see Figure 33).
3. Highlighters - Mark documents with highlights and circles (see Figure 33).
4. Add Footnote - Adds a footnote to the selected location in the document (see Figure 33).
5. Add Voice Note - Record a voice note that can be added into the document (see Figure 33).
6. Add Sticky Note - Adds a text note with a yellow background to the document (see Figure 33).
7. Add Text Note - Adds a transparent text note to the document (see Figure 33).
8. Bubble Note - Adds a bubble note that can be used to ask a question and input an answer
(see Figure 33).
9. Bookmark - Adds a bookmark within the text (see Figure 33).
Figure 33 - Notes Tool Bar
Taking Notes
Kurzweil 3000 contains tools on the Notes Tool Bar that can be used to mark ideas within your
document. Some examples are making notes and highlighting key ideas:
Highlight Text
1. To highlight an area of text within your document, select a Highlight tool from the Notes Tool
Bar.

Page 20 of 25
2. The cursor will change to a highlighter. Click and select the text and it will be automatically
highlighted.
Figure 34 - Highlight Text
3. To deselect the highlighter, click the Selector tool.
4. To erase highlighted text, click the Eraser tool.
5. The cursor will change to an eraser. Click and drag across the highlighted text and the highlights
will be erased.
6. To deselect the eraser, click the Selector tool.
Add Notes
1. To enter a sticky note or text note to your document, click the Sticky Note/Text Note button.
Figure 35 - Sticky Note and Text Note
2. Click a location on your document to add the note.
3. The note will be added. Begin typing to add your note.
Figure 36 - Sticky Notes and Text Notes
Note: A Sticky Note is solid and highlighted in yellow, while a Text Note is transparent.
4. When finished, click anywhere outside the note to deselect it.
5. To edit the note, click the text within the note to edit it.
6. Click and hold on a note to drag it to a new location.
7. Sticky notes can be resized. Click and hold the corner of a sticky note to resize it.
8. To delete a note, select the eraser tool, and click the Note to be deleted.
Figure 37 - Delete the Current Note

Page 21 of 25
Spell Check a Document
While writing a document within Kurzweil 3000 (or after opening a document), the Writing tool bar will
be displayed by default. Selecting the spellchecker will search the current document for any spelling
errors, and allow you to make changes to the document within Kurzweil 3000.
1. From the Writing tool bar, click the Spell Check tool.
Figure 38 - Spell Check the Current Document
2. Kurzweil 3000 will begin to check the document for spelling errors. When a misspelling is found,
the Spelling and Grammar window will appear.
3. Select the correct spelling from the Suggestion list and click Change.
Figure 39 - Spelling Correction
4. Kurzweil 3000 will continue checking the document until there are no more spelling errors
found.
Creating a New Text File
You can create a new text document within Kurzweil 3000. To create a text file:
1. On the Exploring Toolbar, click New.
Figure 40 - Exploring Toolbar: New
2. A new, blank text document will open and you can begin writing.

Page 22 of 25
Creating a New Draft Document
Draft documents are similar to text files, but can also be created from an existing outline. There are
also templates available when working with a draft. The following will explain how to create a new
blank draft document:
1. From the Menu bar, click File (see Figure 41).
2. Hover the mouse cursor over Start Writing. A new menu will appear (see Figure 41).
3. Hover the mouse cursor over Draft. A new menu will appear (see Figure 41).
4. Click Blank (see Figure 41).
Note: You can also open a new draft from an existing template by selecting From Template.
Figure 41 - New Draft
5. The new draft document will open, and you can begin typing your document.
Creating a New Brainstorm Document
A Brainstorm document can be useful when you need to generate topics to write about, or points to
make during your topic; acting as a good way to structure a paper before you begin writing. To begin a
new brainstorm document:
1. From the Menu bar, click File (see Figure 42).
2. Hover the mouse cursor over Start Writing. A new menu will appear (see Figure 42).
3. Hover the mouse cursor over Brainstorm. A new menu will appear (see Figure 42).
4. Click Blank (see Figure 42).
Note: You can also open a new brainstorm from an existing template by selecting From Template.
Figure 42 - New Brainstorm

Page 23 of 25
5. The new brainstorm document will open and display a toolbar with different tools you can use
for brainstorming.
Figure 43 - New Brainstorm Document and Palette
6. To add an object from the Toolbar, click on the drafting area where you want the object to go,
then click the object from the Brainstorm Palette.
Creating a New Outline Document
An Outline document can also be useful when you need to keep track of ideas and flesh out a main
idea. To begin a new outline document:
1. From the Menu bar, click File (see Figure 44).
2. Hover the mouse cursor over Start Writing. A new menu will appear (see Figure 44).
3. Hover the mouse cursor over Outline. A new menu will appear (see Figure 44).
4. Click Blank (see Figure 44).
Note: You can also open a new outline from an existing template by selecting From Template.
Figure 44 - New Outline

Page 24 of 25
5. The new outline document will open and display a toolbar with different tools you can use
when creating your outline.
Figure 45 - New Outline Document and Tools
6. As you are typing your outline, you can click on tools within the Outline Palette to add them to
your outline (e.g. Add Subtopic, Increase/decrease indent).
Creating a New Draft Document from an Existing Brainstorm Document
After creating a brainstorming document, you can use it to create a draft to write from. First you will
need to change the brainstorming document into an outline, and then a draft:
1. After creating your brainstorming document, click Outline View on the Writing Path toolbar.
Figure 46 - Writing Path Toolbar: Outline View
2. The Outline View will open and display your outline based off of your brainstorming document.
On the Writing Path toolbar, click Create Draft.
Figure 47 - Writing Path: Create Draft
3. The Draft View will open and your outline will be converted into draft form.

Page 25 of 25
Saving Your Document
You can save your drafts (text, brainstorm, outline) document as a .KES file to access at a later time.
1. From the Menu Bar. click File (see Figure 48).
2. From the drop-down menu, click Save As (see Figure 48).
Figure 48 – Save As
3. The Save As window will appear. Next to Save As, type in a name for your file (see Figure 49).
4. Next to File Format, select a file format (default is a Kurzweil 3000 .KES file) (see Figure 49).
5. Click Save (see Figure 49).
Figure 49 - Save File As
6. The document will be saved to your computer. It can be opened again using Kurzweil 3000.
Additional Help For additional support, please contact the KSU Service Desk: KSU Service Desk for Faculty & Staff KSU Student Helpdesk Phone: 470-578-6999 Phone: 470-578-3555 Email: [email protected] Email: [email protected] Website: http://uits.kennesaw.edu Website: http://uits.kennesaw.edu
Related Documents


