40 50 ... + 1x A B C A B C 5 1 2 3 4 6 7 8 1 measure setting 2 end cover 3 basic settings 4 basic functions 5 calculation 6 memory 1 reference 2 offset 3 timer 4 laser 5 tracking 9 D + ... > 1 sec. + 1 x + + 2 x + > 1 sec. + E F Version 1.0, Français Guide rapide d'instructions Eléments de réglage et de commande A Affichage B Clavier C Touche de déverrouillage D Pièce finale à appui orientable (surfaces planes, coins) E Pièce finale à languette d’appui (bords, surfaces planes) F Adaptateur (trépied, applications spéciales) Fonctions clavier 1 Touche menu 2 Multiplier, déclencheur autom. 3 Touche Clear, Clear-Entry, mode normal 4 Touche de mise sous tension/mesure 5 Touche +/de navigation, vers le haut 6 Touche -/de navigation, vers le bas 7 Touche résultat/Enter (enregistrer) 8 Pavé alphanumérique 9 Touche 0 (mémoire touche, stack) Allumer / éteindre le DISTO Allumer : Appuyer brièvement sur la touche de mise sous tension/mesure. Eteindre : Appeler avec la touche Clear la fenêtre de base. Presser simultanément les touches + et –. Ou maintenir une des touches enfoncée et actionner la deuxième. DISTO s’éteint automatiquement au bout de 90 s si aucune touche n’a été actionnée durant cet intervalle de temps. Se référer au Manual d'Utilisation correspondant pour obtenir des informations plus détaillées sur le DISTO. Pour utiliser le DISTO de façon conforme, se référer aux instructions de sécurité dans le Manuel d'Utilisation. Mesure de distance / niveau de mesure einstellen 1. Presser brièvement la touche de mise sous tension/mesure. 2. Sélectionner le niveau de référence requis avec la touche + ou – (s’applique seulement à 1 mesure) : A ........ bord avant B .............. trépied C ...... bord arrière 3. Viser la cible avec le laser. 4. Réappuyer brièvement sur la touche de mise sous tension/mesure. 5. Lire la valeur mesurée. Utilisation du menu Appeler le menu principal dans la fenêtre de base. Sélectionner la fonction/le sous-menu requis avec les touches de navigation et confirmer le choix avec la touche Enter ou … … introduire le raccourci de la fonction requise. Presser brièvement cette touche dans le menu pour retourner à la fenêtre précédente ou la presser longuement pour accéder à la fenêtre de base. Utilisation de la mémoire Les fonctions d’enregistrement suivantes peuvent aussi être appelées via le menu (voir verso). Mémoire touche : 9 positions pour l’enregistrement de constantes, de résultats intermédiaires, etc. Enregistrer Appeler Stack : Les 15 derniers calculs, mesures ou entrées sont automatiquement mémorisés temporairement. Mémoire de données : Mémoire principale (> 800 positions) avec possibilité de transmission PC. Version 1.0, English Quick Guide Control Elements A Display B Keypad C Release button D End cover with swivel foot (flat planes, corners) E End cover with positioning bracket/alignment aid (edges, flat planes) F Adapter end cover (stand, for special applications) Keypad Functions 1 Menu key 2 Multiplications / Time delay release 3 Clear key, Clear-Entry, Normal mode 4 Power on and measuring key 5 Plus / Navigation key, up 6 Minus / Navigation key, down 7 Result / Enter key (Store) 8 Alpha numeric keypad 9 Key 0 (keypad memory, stack) Switching on / off DISTO Switching on: Press briefly Power on and measuring key. Switching off : Press Clear key until basic settings are displayed. Press Plus and Minus key simultaneously. Or hold one of both keys and then press second key. The DISTO switches off automatically after 90 seconds if no key is pressed. More and detailled information can be found in the respective User Manual. To use the DISTO in the permitted manner, please refer to the detailled safety instructions in the User Manual. Distance measurement / Selecting reference setting 1. Press briefly Power on and measuring key. 2. Set reference with Plus or Minus key (only valid for one measurement): A ......... Front B ........ Stand C .......... Rear 3. Aim at target with laser. 4. Briefly press Power on and measuring key again. 5. Read off measured value. Using menu Recall Main menu in basic settings. Select submenu / menu function with navigation keys and confirm with Enter key ... enter shortcut number of desired menu function. Press briefly in the menu to return to previous display or press and hold to display basic settings. Using memory The following memory areas can also be recalled via menu (see overleaf). Memory key: 9 memory places for constants, intermediate results, etc. Store Recall Stack: Saves the last 15 measurements, computations or entries automatically to a shift register. Data: Main memory (> 800 memory places) with the possibility of data transfer to PC. Version 1.0, Español Manual breve de instrucciones Elementos de ajuste y control A Display B Teclado C Tecla para liberar el extremo D Extremo con pie rotativo (superficies planas, esquinas) E Extremo con indicador de alineación (bordes, superficies planas) F Extremo adaptador (trípode, aplicaciones especiales) Funciones del teclado 1 Tecla Menú 2 Multiplicar, Disparador automático 3 Tecla Borrar, Clear Entry, modo Normal 4 Tecla de encendido y de medición 5 Sumar / Tecla de navegación, hacia arriba 6 Restar / Tecla de navegación, hacia abajo 7 Tecla Resultado / INTRO (memorizar) 8 Bloque de teclas alfanuméricas 9 Tecla 0 (memoria de tecla, stack) Encender/Apagar el DISTO Encender: Presionar brevemente una vez la tecla de encendido y medición. Apagar: Acceder a la pantalla básica con la tecla Borrar. Presionar simultáneamente las teclas Sumar/Restar. o bien, mantener presionada una de las dos teclas y luego presionar la otra. El DISTO se apaga automáticamente si después de 90 seg. no se ha presionado ninguna tecla. Puede consultar más informaciones detalladas en el correspondiente manual de empleo. Para evitar riesgos en el empleo del DISTO, le rogamos que siga las Instrucciones de seguridad contenidas en el Manual de empleo. Medición de distancia / Fijar el plano de medición 1. Presionar brevemente la tecla de encendido y medición. 2. Si se desea, seleccionar con las teclas +/- el plano de medición (sólo se aplica a una medición): A ...... delante B ...... trípode C ........ detrás 3. Dirigir el rayo láser al punto de interés. 4. Volver a presionar brevemente la tecla de encendido y medición. 5. Leer el valor medido. Manejo del menú Acceder al menú principal en la pantalla básica. Seleccionar con las teclas de navegación el submenú y la función y confirmar con la tecla INTRO, o bien... ... introducir el número de selección abreviada de la función deseada. Presionar brevemente en el menú para regresar a la pantalla anterior o presionar prolongadamente para visualizar la pantalla básica. Utilización de las memorias Las siguientes posibilidades para guardar datos también son accesibles a través del menú (ver página posterior). Memorias de tecla: 9 posiciones para memorizar constantes, resultados intermedios, etc. Memorizar Acceder Pila de memoria (stack): Los 15 últimos valores medidos, resultados de cálculo o introducciones por teclado se guardan automáticamente en una memoria intermedia. Memoria de datos: Memoria principal (> 800 posiciones) con posibilidad de transferir datos a un PC. Versão 1.0, Português Guia de consulta rápida Elementos de Comando A Visor B Teclado C Botão de libertação D Adaptador com pé rotativo (planos, cantos) 5 Adaptador com suporte de posicionamento/ traçador (cunhais, planos) F Adaptador com fixação (tripé, para aplicações especiais) Função do Teclado 1 Tecla de menu 2 Multiplicação / Comando da medição retardada 3 Tecla de apagamento, apagamento de entradas, modo Normal 4 Ligação do aparelho e tecla de medição 5 Tecla de adição / navegação, para cima 6 Tecla de subtracção / navegação, para baixo 7 Tecla de resultado / Enter (Memorizar) 8 Teclado alfanumérico 9 Tecla 0 (memória do teclado, pilha de memória) Ligação / desligação do DISTO Ligação: Premir brevemente a tecla Power On e a tecla de medição. Desligação: Premir a tecla Clear, até serem visualizados os ajustes básicos. Premir ao mesmo tempo as teclas (+) e (-). Ou accionar uma das teclas e premir depois a outra. O aparelho desliga-se automaticamente, após 90 segundos sem qualquer accionamento das teclas. Para mais informações, consultar o Manual de Operação do Aparelho. Para a utilização correcta do DISTO, consultar as instruções de segurança pormenorizadas constantes do Manual de Operação. Medição de distâncias / Definição da referência de medição 1. Premir brevemente a tecla Power On e a tecla de medição. 2. Definir a referência de medição com as teclas (+) e (-) (apenas válido para uma só medição): A ....... Frente B ......... Tripé C ......... Atrás 3. Apontar o laser para o alvo. 4. Premir brevemente a tecla Power On e a tecla de medição. 5. Ler o valor medido. Utilização dos menus Chamada do Menu Principal (ajustes básicos). Seleccionar a função de menu / sub-menu com as teclas de navegação; confirmar com a tecla Enter ... entrar o número correspondente à função de menu desejada. Premir brevemente no menu, para regressar ao visor anterior ou manter a tecla premida para visualizar os ajustes básicos. Utilização da memória As áreas da memória seguintes podem também ser consultadas através do menu (ver página seguinte). Tecla de memória: 9 posições de memória para gravação de constantes, resultados intermédios, etc. Memorizar Chamar (consultar) Stack (Pilha de Memória): Gravação automática das últimas 15 medições, cálculos ou entradas para uma memória flutuante. Dados: Memória principal (mais de 800 posições de memória) com possibilidade de transferência dos dados para computador. www.kreitel-vermessungsgeraete.de

Welcome message from author
This document is posted to help you gain knowledge. Please leave a comment to let me know what you think about it! Share it to your friends and learn new things together.
Transcript

40 50
...
+
1x
A B C
A
B
C
51
2
3
4
6
7
8
1 measure setting2 end cover3 basic settings4 basic functions5 calculation6 memory
1 reference2 offset3 timer4 laser5 tracking
9
D
+
...
> 1 sec.
+
1 x
+
+
2 x
+
> 1 sec.
+
E F
Version 1.0, Français
Guide rapide d'instructions
Eléments de réglage et de commandeA AffichageB ClavierC Touche de déverrouillageD Pièce finale à appui orientable (surfaces planes,
coins)E Pièce finale à languette d’appui (bords, surfaces
planes)F Adaptateur (trépied, applications spéciales)
Fonctions clavier1 Touche menu2 Multiplier, déclencheur autom.3 Touche Clear, Clear-Entry, mode normal4 Touche de mise sous tension/mesure5 Touche +/de navigation, vers le haut6 Touche -/de navigation, vers le bas7 Touche résultat/Enter (enregistrer)8 Pavé alphanumérique9 Touche 0 (mémoire touche, stack)
Allumer / éteindre le DISTOAllumer :Appuyer brièvement sur la touche de mise soustension/mesure.
Eteindre :Appeler avec la touche Clear la fenêtre de base.
Presser simultanément les touches + et –.Ou maintenir une des touches enfoncée et actionnerla deuxième.
DISTO s’éteint automatiquement au bout de90 s si aucune touche n’a été actionnée
durant cet intervalle de temps.
Se référer au Manual d'Utilisation correspondant pourobtenir des informations plus détaillées sur le DISTO.
Pour utiliser le DISTO de façon conforme, se référeraux instructions de sécurité dans le Manueld'Utilisation.
Mesure de distance / niveau demesure einstellen1. Presser brièvement la touche de mise sous
tension/mesure.
2. Sélectionner le niveau de référence requis avecla touche + ou – (s’applique seulement à 1mesure) :
A ........ bord avantB .............. trépiedC ...... bord arrière
3. Viser la cible avec le laser.
4. Réappuyer brièvement sur la touche de misesous tension/mesure.
5. Lire la valeur mesurée.
Utilisation du menuAppeler le menu principal dans la fenêtre de base.
Sélectionner la fonction/le sous-menu requis avecles touches de navigation et confirmer le choix avecla touche Enter ou …
… introduire le raccourci de la fonction requise.
Presser brièvement cette touche dans le menu pourretourner à la fenêtre précédente ou la presserlonguement pour accéder à la fenêtre de base.
Utilisation de la mémoireLes fonctions d’enregistrement suivantes peuventaussi être appelées via le menu (voir verso).
Mémoire touche :9 positions pour l’enregistrement de constantes, derésultats intermédiaires, etc.
Enregistrer
Appeler
Stack :Les 15 derniers calculs, mesures ou entrées sontautomatiquement mémorisés temporairement.
Mémoire de données :Mémoire principale (> 800 positions) avec possibilitéde transmission PC.
Version 1.0, English
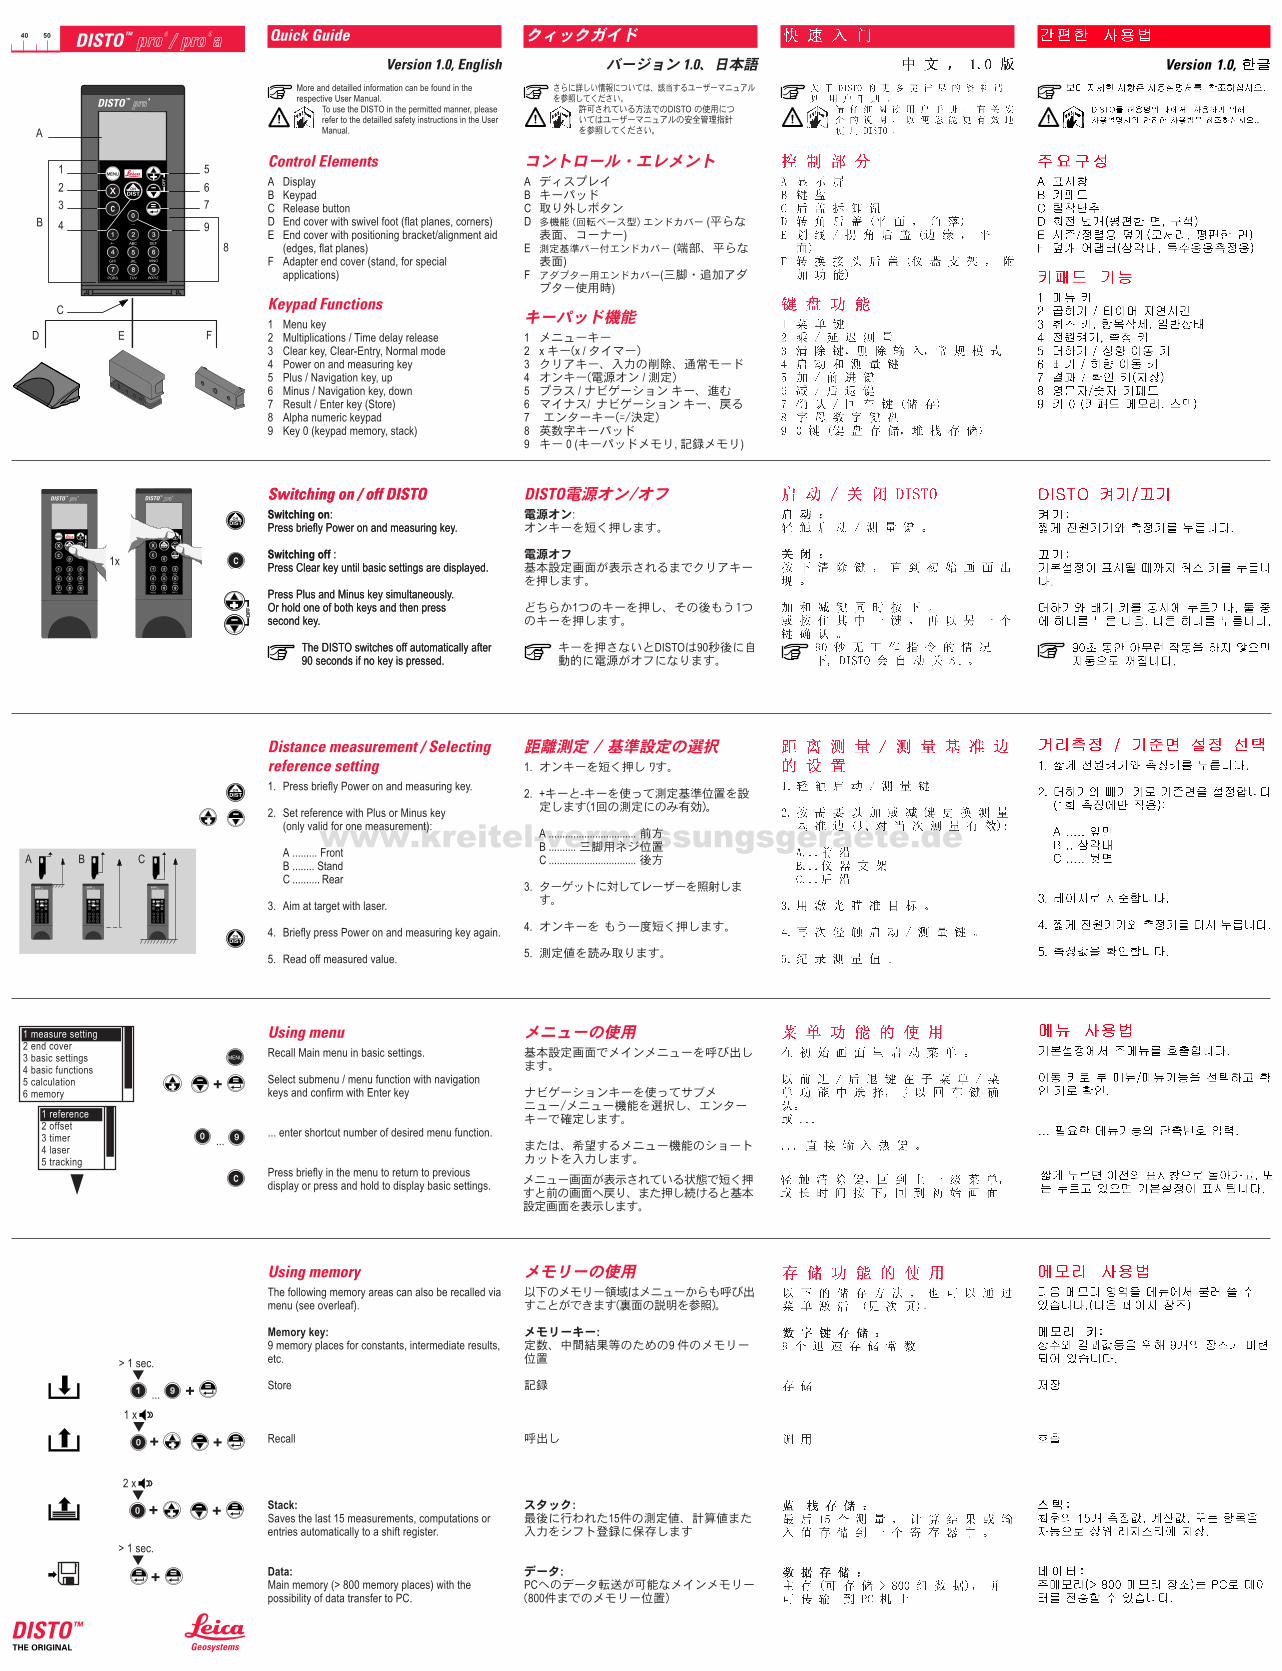
Quick Guide
Control ElementsA DisplayB KeypadC Release buttonD End cover with swivel foot (flat planes, corners)E End cover with positioning bracket/alignment aid
(edges, flat planes)F Adapter end cover (stand, for special
applications)
Keypad Functions1 Menu key2 Multiplications / Time delay release3 Clear key, Clear-Entry, Normal mode4 Power on and measuring key5 Plus / Navigation key, up6 Minus / Navigation key, down7 Result / Enter key (Store)8 Alpha numeric keypad9 Key 0 (keypad memory, stack)
Switching on / off DISTOSwitching on:Press briefly Power on and measuring key.
Switching off :Press Clear key until basic settings are displayed.
Press Plus and Minus key simultaneously.Or hold one of both keys and then presssecond key.
The DISTO switches off automatically after90 seconds if no key is pressed.
More and detailled information can be found in therespective User Manual.
To use the DISTO in the permitted manner, pleaserefer to the detailled safety instructions in the UserManual.
Distance measurement / Selectingreference setting1. Press briefly Power on and measuring key.
2. Set reference with Plus or Minus key(only valid for one measurement):
A ......... FrontB ........ StandC .......... Rear
3. Aim at target with laser.
4. Briefly press Power on and measuring key again.
5. Read off measured value.
Using menuRecall Main menu in basic settings.
Select submenu / menu function with navigationkeys and confirm with Enter key
... enter shortcut number of desired menu function.
Press briefly in the menu to return to previousdisplay or press and hold to display basic settings.
Using memoryThe following memory areas can also be recalled viamenu (see overleaf).
Memory key:9 memory places for constants, intermediate results,etc.
Store
Recall
Stack:Saves the last 15 measurements, computations orentries automatically to a shift register.
Data:Main memory (> 800 memory places) with thepossibility of data transfer to PC.
Version 1.0, Español
Manual breve de instrucciones
Elementos de ajuste y controlA DisplayB TecladoC Tecla para liberar el extremoD Extremo con pie rotativo (superficies planas,
esquinas)E Extremo con indicador de alineación (bordes,
superficies planas)F Extremo adaptador (trípode, aplicaciones
especiales)
Funciones del teclado1 Tecla Menú2 Multiplicar, Disparador automático3 Tecla Borrar, Clear Entry, modo Normal4 Tecla de encendido y de medición5 Sumar / Tecla de navegación, hacia arriba6 Restar / Tecla de navegación, hacia abajo7 Tecla Resultado / INTRO (memorizar)8 Bloque de teclas alfanuméricas9 Tecla 0 (memoria de tecla, stack)
Encender/Apagar el DISTOEncender:Presionar brevemente una vez la tecla deencendido y medición.
Apagar:Acceder a la pantalla básica con la tecla Borrar.
Presionar simultáneamente las teclas Sumar/Restar.o bien, mantener presionada una de las dos teclas yluego presionar la otra.
El DISTO se apaga automáticamente sidespués de 90 seg. no se ha presionado
ninguna tecla.
Puede consultar más informaciones detalladas en elcorrespondiente manual de empleo.
Para evitar riesgos en el empleo del DISTO, lerogamos que siga las Instrucciones de seguridadcontenidas en el Manual de empleo.
Medición de distancia / Fijar elplano de medición1. Presionar brevemente la tecla de encendido y
medición.
2. Si se desea, seleccionar con las teclas +/- el planode medición (sólo se aplica a una medición):
A ...... delanteB ...... trípodeC ........ detrás
3. Dirigir el rayo láser al punto de interés.
4. Volver a presionar brevemente la tecla deencendido y medición.
5. Leer el valor medido.
Manejo del menúAcceder al menú principal en la pantalla básica.
Seleccionar con las teclas de navegación elsubmenú y la función y confirmar con la teclaINTRO, o bien...
... introducir el número de selección abreviada de lafunción deseada.
Presionar brevemente en el menú para regresar a lapantalla anterior o presionar prolongadamente paravisualizar la pantalla básica.
Utilización de las memoriasLas siguientes posibilidades para guardar datostambién son accesibles a través del menú (verpágina posterior).
Memorias de tecla:9 posiciones para memorizar constantes, resultadosintermedios, etc.
Memorizar
Acceder
Pila de memoria (stack):Los 15 últimos valores medidos, resultados decálculo o introducciones por teclado se guardanautomáticamente en una memoria intermedia.
Memoria de datos:Memoria principal (> 800 posiciones) con posibilidadde transferir datos a un PC.
Versão 1.0, Português
Guia de consulta rápida
Elementos de ComandoA VisorB TecladoC Botão de libertaçãoD Adaptador com pé rotativo (planos, cantos)5 Adaptador com suporte de posicionamento/
traçador (cunhais, planos)F Adaptador com fixação (tripé, para aplicações
especiais)
Função do Teclado1 Tecla de menu2 Multiplicação / Comando da medição retardada3 Tecla de apagamento, apagamento de entradas,
modo Normal4 Ligação do aparelho e tecla de medição5 Tecla de adição / navegação, para cima6 Tecla de subtracção / navegação, para baixo7 Tecla de resultado / Enter (Memorizar)8 Teclado alfanumérico9 Tecla 0 (memória do teclado, pilha de memória)
Ligação / desligação do DISTOLigação:Premir brevemente a tecla Power On e a tecla de medição.
Desligação:Premir a tecla Clear, até serem visualizados osajustes básicos.
Premir ao mesmo tempo as teclas (+) e (-).Ou accionar uma das teclas e premir depois a outra.
O aparelho desliga-se automaticamente,após 90 segundos sem qualquer
accionamento das teclas.
Para mais informações, consultar o Manual de Operaçãodo Aparelho.
Para a utilização correcta do DISTO, consultar asinstruções de segurança pormenorizadasconstantes do Manual de Operação.
Medição de distâncias / Definiçãoda referência de medição1. Premir brevemente a tecla Power On e a tecla
de medição.
2. Definir a referência de medição com as teclas (+)e (-) (apenas válido para uma só medição):
A ....... FrenteB ......... TripéC ......... Atrás
3. Apontar o laser para o alvo.
4. Premir brevemente a tecla Power On e a teclade medição.
5. Ler o valor medido.
Utilização dos menusChamada do Menu Principal (ajustes básicos).
Seleccionar a função de menu / sub-menu com asteclas de navegação; confirmar com a tecla Enter
... entrar o número correspondente à função demenu desejada.
Premir brevemente no menu, para regressar aovisor anterior ou manter a tecla premida paravisualizar os ajustes básicos.
Utilização da memóriaAs áreas da memória seguintes podem também serconsultadas através do menu (ver página seguinte).
Tecla de memória:9 posições de memória para gravação deconstantes, resultados intermédios, etc.
Memorizar
Chamar (consultar)
Stack (Pilha de Memória):Gravação automática das últimas 15 medições,cálculos ou entradas para uma memória flutuante.
Dados:Memória principal (mais de 800 posições dememória) com possibilidade de transferência dosdados para computador.
www.kreitel-vermessungsgeraete.de
Total Quality Management -Our commitment to total customer satisfaction
Ask your local Leica Geosystems agent for moreinformation about our TQM program.
Class 2 laser product in accordance with:IEC60825-1 and EN60825-1Class II laser product in accordance with:FDA 21CFR Ch.I §1040
Leica Geosystems AG
CH-9435 Heerbrugg
(Switzerland)
www.leica-geosystems.com
Subject to change.
Printed in Switzerland
Copyright
Leica Geosystems AG,
Heerbrugg, Switzerland 2001.
723893 - V.04 - VD
Total Quality ManagementNotre engagement à vous satisfaire totalement
De plus amples informations sont disponiblesauprès de votre représentant local LeicaGeosystems distributeur.
Normes de sécurité des lasers catégorie 2 :IEC60825-1 et EN60825-1Normes des lasers, catégorie II :FDA 21CFR Ch.I §1040
Total Quality Management - nuestro compromisopara la satisfacción total de nuestros clientes.
Recibirá más informaciones sobre nuestro programaTQM a través de nuestra agencia Leica Geosystemslocal.
clase de laser 2 según: IEC60825-1 y EN60825-1clase de laser II según: FDA 21CFR Ch.I §1040
Qualidade Total -Nossa meta é a total satisfação do cliente.
Solicite ao seu representante local da LeicaGeosystems por mais informações sobre o nossoprograma TQM.
Laser Classe 2, de acordo com:IEC60825-1 e EN60825-1Laser Classe II, de acordo com:FDA 21CFR Ch.I §1040
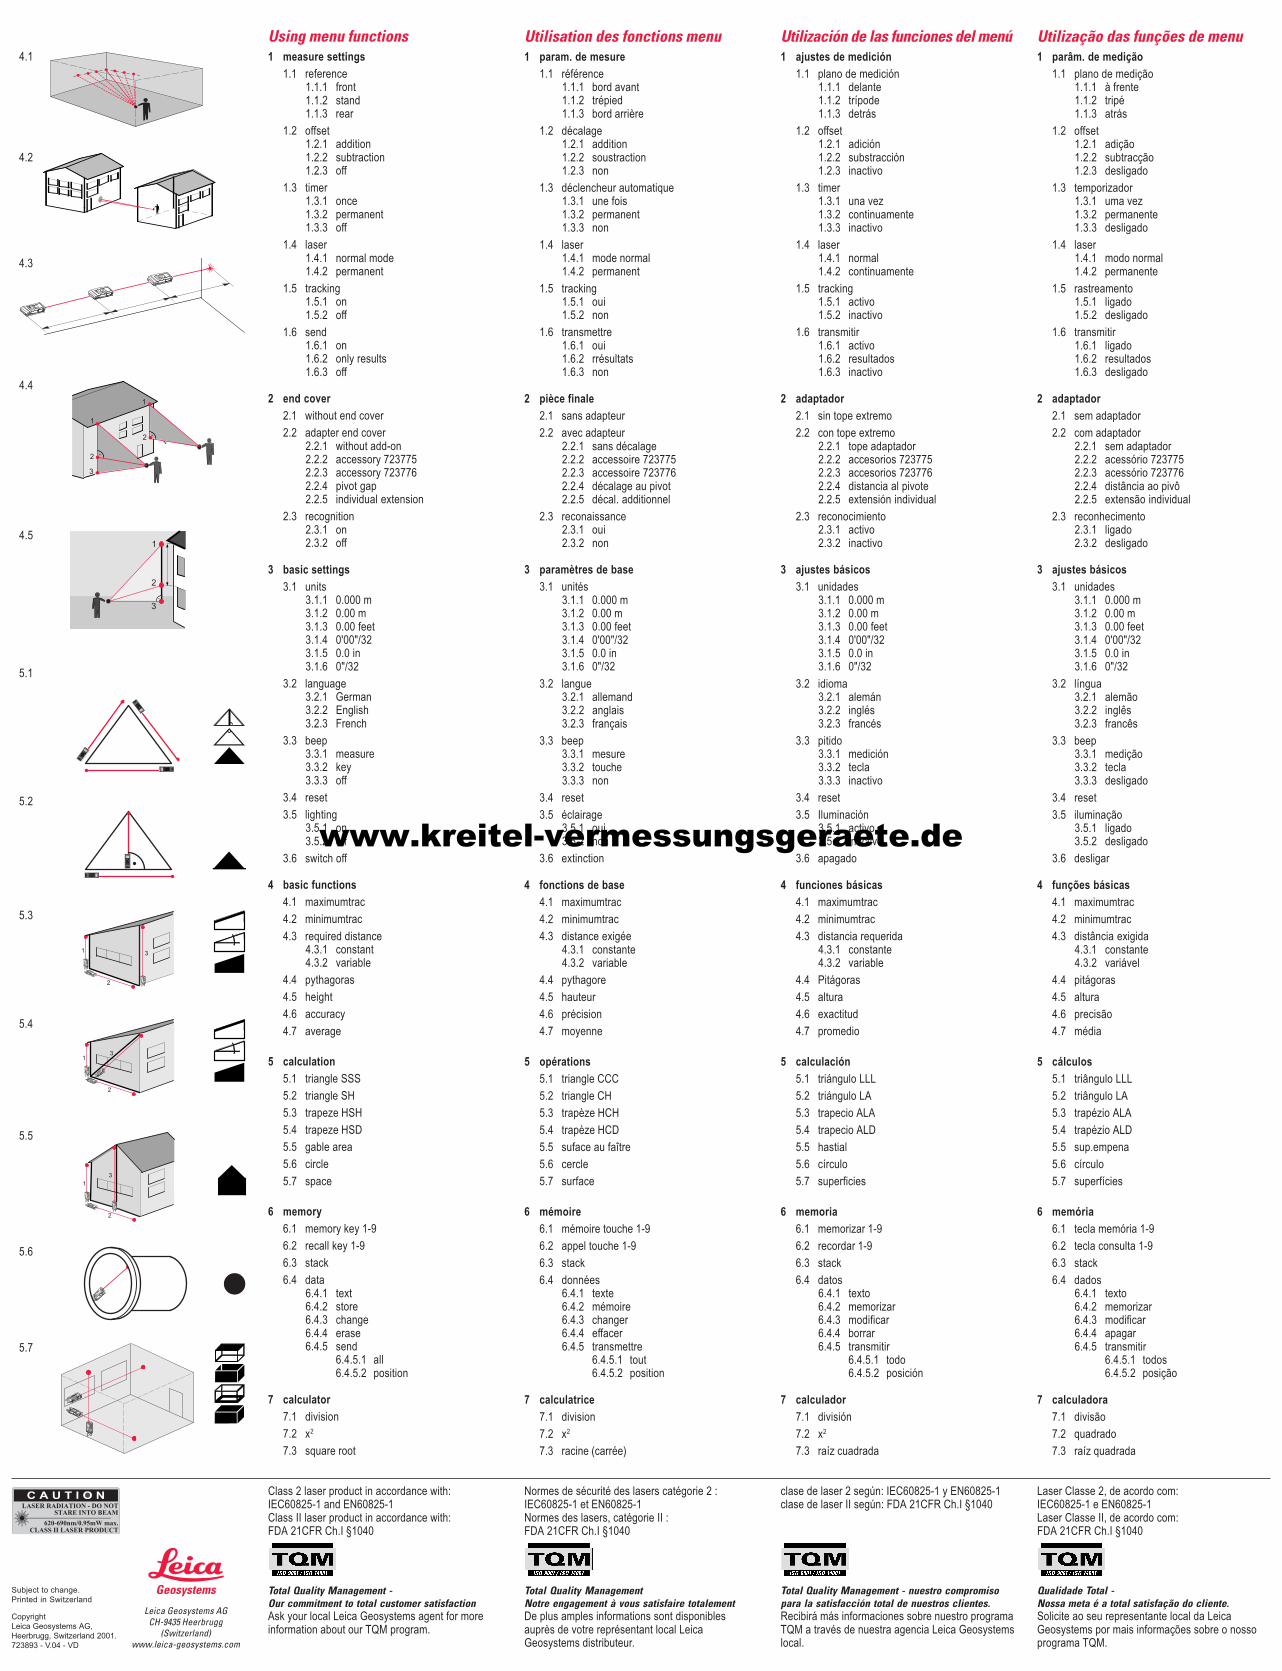
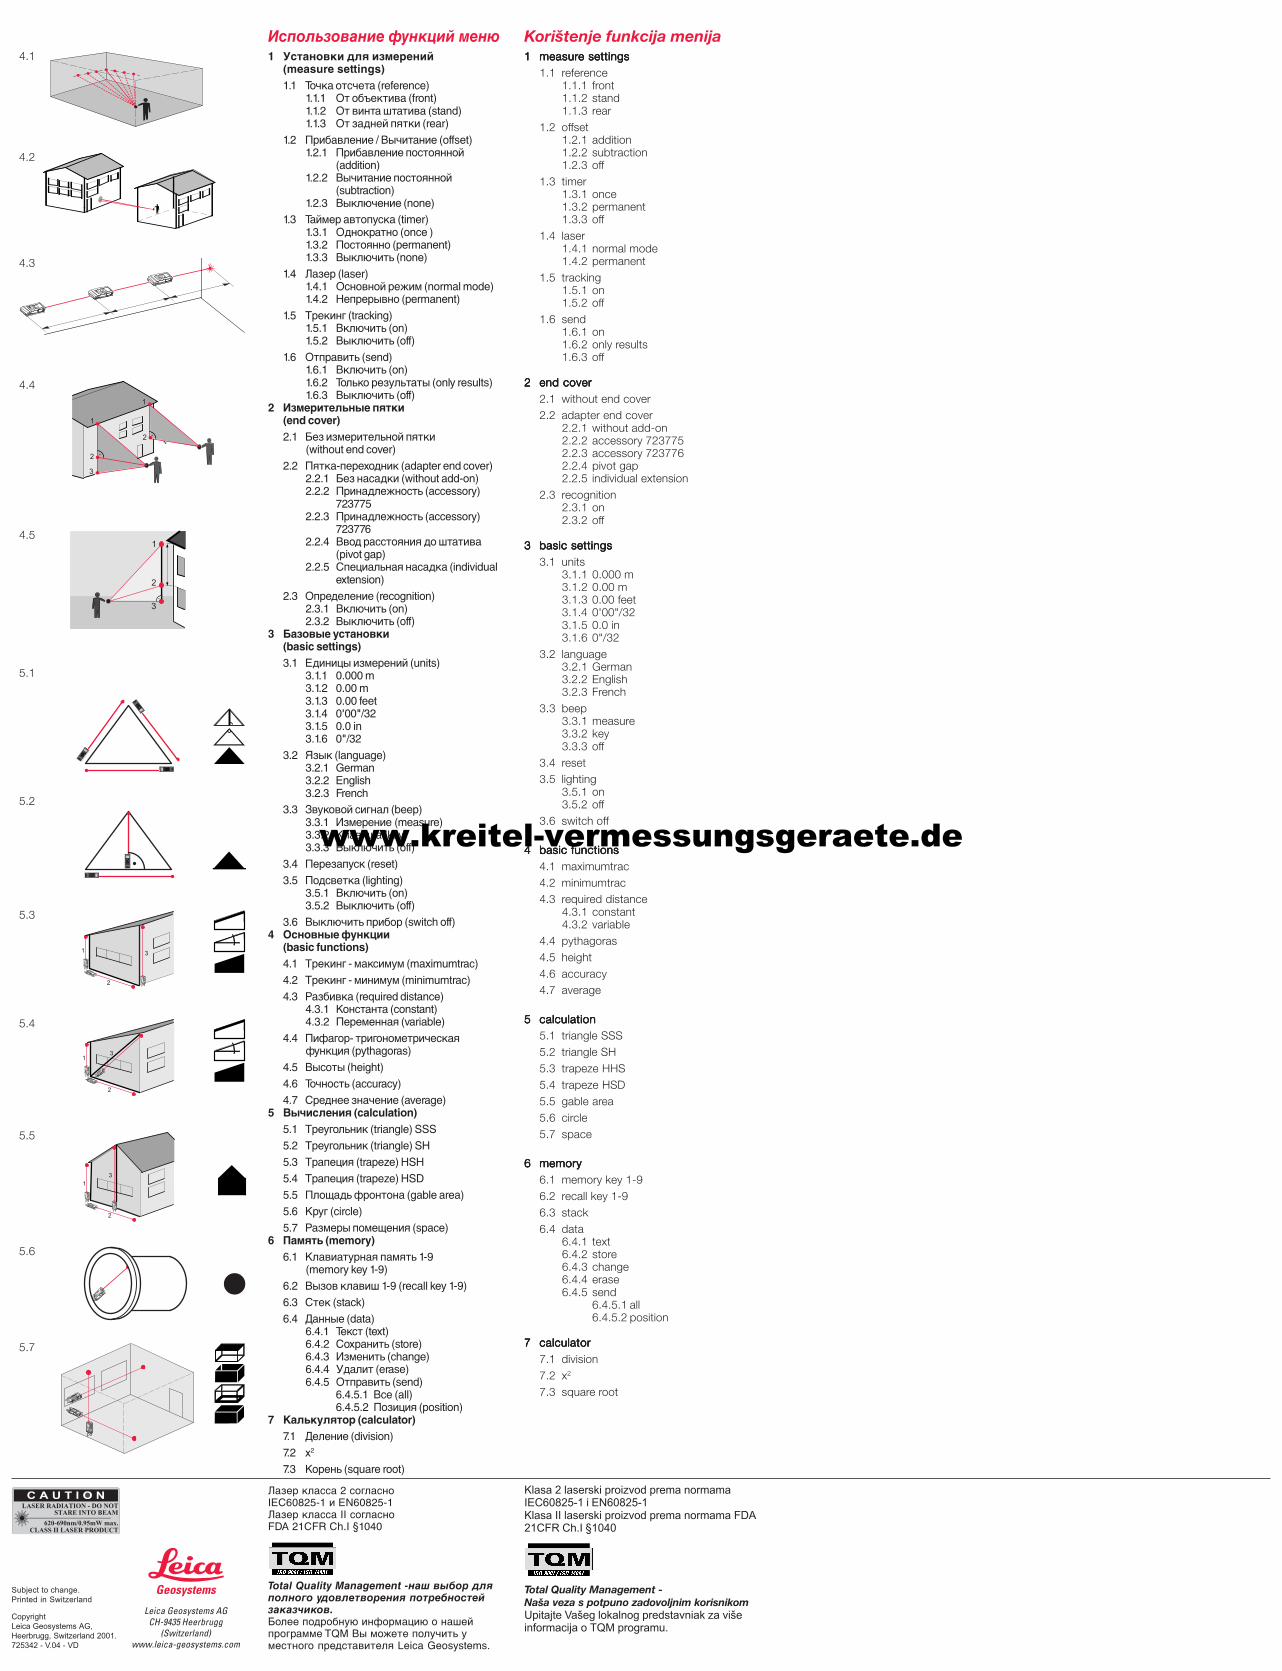
Using menu functions1 measure settings
1.1 reference1.1.1 front1.1.2 stand1.1.3 rear
1.2 offset1.2.1 addition1.2.2 subtraction1.2.3 off
1.3 timer1.3.1 once1.3.2 permanent1.3.3 off
1.4 laser1.4.1 normal mode1.4.2 permanent
1.5 tracking1.5.1 on1.5.2 off
1.6 send1.6.1 on1.6.2 only results1.6.3 off
2 end cover
2.1 without end cover
2.2 adapter end cover2.2.1 without add-on2.2.2 accessory 7237752.2.3 accessory 7237762.2.4 pivot gap2.2.5 individual extension
2.3 recognition2.3.1 on2.3.2 off
3 basic settings
3.1 units3.1.1 0.000 m3.1.2 0.00 m3.1.3 0.00 feet3.1.4 0'00"/323.1.5 0.0 in3.1.6 0"/32
3.2 language3.2.1 German3.2.2 English3.2.3 French
3.3 beep3.3.1 measure3.3.2 key3.3.3 off
3.4 reset
3.5 lighting3.5.1 on3.5.2 off
3.6 switch off
4 basic functions
4.1 maximumtrac
4.2 minimumtrac
4.3 required distance4.3.1 constant4.3.2 variable
4.4 pythagoras
4.5 height
4.6 accuracy
4.7 average
5 calculation
5.1 triangle SSS
5.2 triangle SH
5.3 trapeze HSH
5.4 trapeze HSD
5.5 gable area
5.6 circle
5.7 space
6 memory
6.1 memory key 1-9
6.2 recall key 1-9
6.3 stack
6.4 data6.4.1 text6.4.2 store6.4.3 change6.4.4 erase6.4.5 send
6.4.5.1 all6.4.5.2 position
7 calculator
7.1 division
7.2 x2
7.3 square root
4.1
4.4
4.5
5.1
5.2
5.3
5.4
5.5
5.6
5.7
4.2
4.3
Utilización de las funciones del menú1 ajustes de medición
1.1 plano de medición1.1.1 delante1.1.2 trípode1.1.3 detrás
1.2 offset1.2.1 adición1.2.2 substracción1.2.3 inactivo
1.3 timer1.3.1 una vez1.3.2 continuamente1.3.3 inactivo
1.4 laser1.4.1 normal1.4.2 continuamente
1.5 tracking1.5.1 activo1.5.2 inactivo
1.6 transmitir1.6.1 activo1.6.2 resultados1.6.3 inactivo
2 adaptador
2.1 sin tope extremo
2.2 con tope extremo2.2.1 tope adaptador2.2.2 accesorios 7237752.2.3 accesorios 7237762.2.4 distancia al pivote2.2.5 extensión individual
2.3 reconocimiento2.3.1 activo2.3.2 inactivo
3 ajustes básicos
3.1 unidades3.1.1 0.000 m3.1.2 0.00 m3.1.3 0.00 feet3.1.4 0'00"/323.1.5 0.0 in3.1.6 0"/32
3.2 idioma3.2.1 alemán3.2.2 inglés3.2.3 francés
3.3 pitido3.3.1 medición3.3.2 tecla3.3.3 inactivo
3.4 reset
3.5 Iluminación3.5.1 activo3.5.2 inactivo
3.6 apagado
4 funciones básicas
4.1 maximumtrac
4.2 minimumtrac
4.3 distancia requerida4.3.1 constante4.3.2 variable
4.4 Pitágoras
4.5 altura
4.6 exactitud
4.7 promedio
5 calculación
5.1 triángulo LLL
5.2 triángulo LA
5.3 trapecio ALA
5.4 trapecio ALD
5.5 hastial
5.6 círculo
5.7 superficies
6 memoria
6.1 memorizar 1-9
6.2 recordar 1-9
6.3 stack
6.4 datos6.4.1 texto6.4.2 memorizar6.4.3 modificar6.4.4 borrar6.4.5 transmitir
6.4.5.1 todo6.4.5.2 posición
7 calculador
7.1 división
7.2 x2
7.3 raíz cuadrada
Utilização das funções de menu1 parâm. de medição
1.1 plano de medição1.1.1 à frente1.1.2 tripé1.1.3 atrás
1.2 offset1.2.1 adição1.2.2 subtracção1.2.3 desligado
1.3 temporizador1.3.1 uma vez1.3.2 permanente1.3.3 desligado
1.4 laser1.4.1 modo normal1.4.2 permanente
1.5 rastreamento1.5.1 ligado1.5.2 desligado
1.6 transmitir1.6.1 ligado1.6.2 resultados1.6.3 desligado
2 adaptador
2.1 sem adaptador
2.2 com adaptador2.2.1 sem adaptador2.2.2 acessório 7237752.2.3 acessório 7237762.2.4 distância ao pivô2.2.5 extensão individual
2.3 reconhecimento2.3.1 ligado2.3.2 desligado
3 ajustes básicos
3.1 unidades3.1.1 0.000 m3.1.2 0.00 m3.1.3 0.00 feet3.1.4 0'00"/323.1.5 0.0 in3.1.6 0"/32
3.2 língua3.2.1 alemão3.2.2 inglês3.2.3 francês
3.3 beep3.3.1 medição3.3.2 tecla3.3.3 desligado
3.4 reset
3.5 iluminação3.5.1 ligado3.5.2 desligado
3.6 desligar
4 funções básicas
4.1 maximumtrac
4.2 minimumtrac
4.3 distância exigida4.3.1 constante4.3.2 variável
4.4 pitágoras
4.5 altura
4.6 precisão
4.7 média
5 cálculos
5.1 triângulo LLL
5.2 triângulo LA
5.3 trapézio ALA
5.4 trapézio ALD
5.5 sup.empena
5.6 círculo
5.7 superfícies
6 memória
6.1 tecla memória 1-9
6.2 tecla consulta 1-9
6.3 stack
6.4 dados6.4.1 texto6.4.2 memorizar6.4.3 modificar6.4.4 apagar6.4.5 transmitir
6.4.5.1 todos6.4.5.2 posição
7 calculadora
7.1 divisão
7.2 quadrado
7.3 raíz quadrada
Utilisation des fonctions menu1 param. de mesure
1.1 référence1.1.1 bord avant1.1.2 trépied1.1.3 bord arrière
1.2 décalage1.2.1 addition1.2.2 soustraction1.2.3 non
1.3 déclencheur automatique1.3.1 une fois1.3.2 permanent1.3.3 non
1.4 laser1.4.1 mode normal1.4.2 permanent
1.5 tracking1.5.1 oui1.5.2 non
1.6 transmettre1.6.1 oui1.6.2 rrésultats1.6.3 non
2 pièce finale
2.1 sans adapteur
2.2 avec adapteur2.2.1 sans décalage2.2.2 accessoire 7237752.2.3 accessoire 7237762.2.4 décalage au pivot2.2.5 décal. additionnel
2.3 reconaissance2.3.1 oui2.3.2 non
3 paramètres de base
3.1 unités3.1.1 0.000 m3.1.2 0.00 m3.1.3 0.00 feet3.1.4 0'00"/323.1.5 0.0 in3.1.6 0"/32
3.2 langue3.2.1 allemand3.2.2 anglais3.2.3 français
3.3 beep3.3.1 mesure3.3.2 touche3.3.3 non
3.4 reset
3.5 éclairage3.5.1 oui3.5.2 non
3.6 extinction
4 fonctions de base
4.1 maximumtrac
4.2 minimumtrac
4.3 distance exigée4.3.1 constante4.3.2 variable
4.4 pythagore
4.5 hauteur
4.6 précision
4.7 moyenne
5 opérations
5.1 triangle CCC
5.2 triangle CH
5.3 trapèze HCH
5.4 trapèze HCD
5.5 suface au faître
5.6 cercle
5.7 surface
6 mémoire
6.1 mémoire touche 1-9
6.2 appel touche 1-9
6.3 stack
6.4 données6.4.1 texte6.4.2 mémoire6.4.3 changer6.4.4 effacer6.4.5 transmettre
6.4.5.1 tout6.4.5.2 position
7 calculatrice
7.1 division
7.2 x2
7.3 racine (carrée)
www.kreitel-vermessungsgeraete.de

Version 1.0, Deutsch
Kurzbedienungsanleitung
Einstell- und Bedienelemente
A Anzeige (Display)B TastaturC EntriegelungstasteD Endstück mit Drehfuss (ebene Flächen, Ecken)E Endstück mit Anreissende (Kanten, ebene
Flächen)F Adapterendstück (Stativ, Sonderanwendungen)
Tastaturfunktionen
1 Menütaste2 Multiplizieren, Selbstauslöser3 Clear-Taste, Clear-Entry, Normalmodus4 Einschalt- und Messtaste5 Plus- / Navigationstaste, nach oben6 Minus- / Navigationstaste, nach unten7 Ergebnis- / Eingabe-Taste (Speichern)8 Alphanumerischer Tastenblock9 Taste 0 (Tastenspeicher, Stack)
DISTO ein- / ausschalten
Einschalten:Einschalt- und Messtaste einmal kurz drücken.
Auschalten:Mit Clear-Taste das Grundbild aufrufen.
Plus- und Minustaste gleichzeitig drücken.Alternativ eine der beiden Tasten gedrückt haltenund dann die zweite Taste betätigen.
Der DISTO schaltet nach 90 sec. automa-tisch ab, wenn während dieser Zeit keine
Bedienung stattfindet.
Zusätzliche detaillierte Informationen finden Sie in der zu-gehörigen Gebrauchsanweisung.
Zur sicheren Anwendung des DISTOs beachten Siebitte die detaillierten Sicherheitshinweise der Ge-brauchsanweisung.
40 50
Distanzmessung / Messebene
einstellen
1. Einschalt- und Messtaste kurz drücken.
2. Nach Wunsch die Messebene mit Plus- oderMinustaste wählen (gilt nur für eine Messung):
A ......... vorneB ........ StativC ........ hinten
3. Zielobjekt mit Laserpunkt anzielen.
4. Einschalt- und Messtaste erneut kurz drücken.
5. Messwert ablesen.
Menü bedienen
Hauptmenü im Grundbild aufrufen.
Untermenü / Menüfunktion mit Navigationstastenauswählen und mit der Eingabe-Taste bestätigenoder ...
... Kurzwahlnummer der gewünschten Menüfunktioneingeben.
Im Menü kurz drücken, um zur vorherigen Anzeigezurückzuspringen oder lange drücken, um dasGrundbild anzuzeigen.
...
+
1x
A B C
A
B
C
51
2
3
4
6
7
8
1 measure setting2 end cover3 basic settings4 basic functions5 calculation6 memory
1 reference2 offset3 timer4 laser5 tracking
9
D
Speicher benutzen
Die folgenden Speichermöglichkeiten können auchüber das Menü aufgerufen werden (siehe Rückseite).
Tastenspeicher:9 Speicherplätze für Konstanten, Zwischenergebnis-se, etc.
Abspeichern
Aufrufen
Stack:Die letzten 15 Messungen, Berechnungen oderEingaben werden automatisch zwischengespeichert.
Datenspeicher:Hauptspeicher (> 800 Speicherplätze) mit Möglich-keit der Datenübertragung auf PC.
+
...
> 1 sec.
+
1 x
+
+
2 x
+
> 1 sec.
+
E F
Versione 1.0, Italiano
Guida rapida
Elementi di Controllo
A DisplayB TastieraC Tasto di sbloccoD Adattatore con piedino regolabile (superfici
piane, angoli)E Adattatore con estremità di tracciamento (spigoli,
superfici piane)F Adattatore posteriore (treppiede, applicazioni
speciali)
Tasti Funzione
1 Tasto Menu2 Moltiplicazione, autoscatto3 Tasto Clear, Clear Entry, modalità normale4 Tasto di accensione e tasto di misura5 Tasto Più / Navigazione, verso l’alto6 Tasto Meno / Navigazione, verso il basso7 Tasto Uguale / Invio (memorizzazione)8 Tastierino alfanumerico9 Tasto O (memoria tasti, stack)
Accensione / spegnimento del DISTO
Accensione:Premere una volta brevemente il tasto di accensionee misura.
Spegnimento:Richiamare l’immagine di base con il tasto Clear.
Premere contemporaneamente i tasti Più e Meno.In alternativa tenere premuto uno dei due tasti e poipremere l’altro tasto.
Il DISTO si spegne automaticamente dopo90 secondi se durante questo intervallo di
tempo non vengono eseguite operazioni.
Per informazioni dettagliate consultare il relativo Manualed'Uso.
Per utilizzare l’DISTO nella maniera consentita, fateriferimento alle norme particolareggiate di sicurezzanel Manuale d’Uso.
Misura della distanza/impostazione
del piano di misura1. Premere brevemente il tasto di accensione e
misura.
2. Selezionare il piano di misura con il tasto Più oMeno (vale per solo una misura):
A ......... anterioreB ........ treppiedeC ....... posteriore
3. Puntare l’oggetto con il punto laser.
4. Premere di nuovo brevemente il tasto diaccensione e misura.
5. Leggere il valore misurato.
Utilizzo del menuRichiamare il menu principale dalla modalità dimisura.
Selezionare il sotto menu o la funzione menumediante i tasti di navigazione e confermare con iltasto Invio oppure…
… inserire il numero di selezione abbreviata dellafunzione menu desiderata.
Premere brevemente nel menu per tornare allavisualizzazione precedente oppure premere a lungoper visualizzare la modalità di misura.
Utilizzo della memoria
Le seguenti possibilità di memorizzazione possonoessere utilizzate anche mediante il menu (vedi atergo).
Memoria tasti:9 memorie per costanti, risultati intermedi, ecc.
Memorizzazione
Richiamo
Costanti:Gli ultimi 15 valori (misure, calcoli o risultati)vengono memorizzati automaticamente in modoprovvisorio.
Memoria dati:Memoria principale (>800 memorie) con possibilitàdi trasferimento dati sul PC.
Versie 1.0, Nederlands
Verkorte gebruiksaanwijzing
Instrumentbeschrijving
A DisplayB ToetsenbordC Losmaakknop eindsteunD Eindsteun met roterende voet (platte vlakken,
hoeken)E Eindsteun met positioneersteun en
uitlijngeleiding (hoeken, platte vlakken)F Adapter eindsteun (statief, voor speciale
applicaties)
Toetsenbordfuncties
1 Menu toets2 Vermenigvuldigen / Tijdsvertraging3 Wissentoets, Wis Invoer, Normale Mode4 Inschakelen en Meettoets5 Plus / Besturingstoets, naar boven6 Minus / Besturingstoets, naar beneden7 Resultaat / Invoertoets (Opslaan)8 Alfanumeriek toetsenbord9 Toets 0 (toetsenbordgeheugen, stapelen)
Schakel de DISTO in / uit
Inschakelen:Druk kort op de Aan-toets en de Meet-toets.
Uitschakelen:Druk op de Wissen-toets tot de basisinstellingenworden getoond.
Druk tegelijkertijd op de Plus en Minus-toets.Of houdt één van de toetsen ingedrukt en druk danop de andere.
De DISTO schakelt automatisch na 90seconden uit, als er geen toets is ingedrukt.
Meer gedetailleerde informatie kunt u vinden in degebruiksaanwijzing.
Raadpleeg voor het juiste gebruik van de DISTO deveiligheidsaanwijzing in de Gebruiksaanwijzing.
Afstandmeting / Referentie-
instelling
1. Druk kort op de Aan-toets en de Meet-toets.
2. Stel de referentie in met de Plus of Minus-toets(alleen geldig voor één meting):
A ......... voorkantB ............. statiefC ...... achterkant
3. Richt met de laser op het richtpunt.
4. Druk opnieuw kort op de Aan-toets en de Meet-toets.
5. Lees de gemeten waarde af.
Gebruik van het menu
Oproepen hoofdmenu in de basisinstellingen.
Selecteer submenu / menu functie met debesturingstoets en bevestig dit met de Invoertoets.
... voer het sneltoetsnummer van de gewenstemenufunctie in.
Kort indrukken om terug te gaan naar het vorigedisplay of ingedrukt houden om de basisinstellingente tonen.
Gebruik van het geheugen
De volgende geheugenfuncties kunnen tevensworden opgeroepen via het menu (zie ommezijde).
Geheugentoets:9 geheugenplaatsen voor constante, tussentijdseresultaten, etc.
Opslaan
Oproepen
Stapelen:Opslag van de laatste 15 metingen, berekeningen ofinvoer automatisch naar een wisselend register.
Data:Geheugen (> 800 geheugenplaatsen) met demogelijkheid tot data-overdracht naar een PC.
Version 1.0, Français
Guide rapide d'instructions
Eléments de réglage et de commande
A AffichageB ClavierC Touche de déverrouillageD Pièce finale à appui orientable (surfaces planes,
coins)E Pièce finale à languette d’appui (bords, surfaces
planes)F Adaptateur (trépied, applications spéciales)
Fonctions clavier
1 Touche menu2 Multiplier, déclencheur autom.3 Touche Clear, Clear-Entry, mode normal4 Touche de mise sous tension/mesure5 Touche +/de navigation, vers le haut6 Touche -/de navigation, vers le bas7 Touche résultat/Enter (enregistrer)8 Pavé alphanumérique9 Touche 0 (mémoire touche, stack)
Allumer / éteindre le DISTO
Allumer :Appuyer brièvement sur la touche de mise soustension/mesure.
Eteindre :Appeler avec la touche Clear la fenêtre de base.
Presser simultanément les touches + et –.Ou maintenir une des touches enfoncée et actionnerla deuxième.
DISTO s’éteint automatiquement au bout de90 s si aucune touche n’a été actionnée
durant cet intervalle de temps.
Se référer au Manual d'Utilisation correspondant pourobtenir des informations plus détaillées sur le DISTO.
Pour utiliser le DISTO de façon conforme, se référeraux instructions de sécurité dans le Manueld'Utilisation.
Mesure de distance / niveau de
mesure einstellen
1. Presser brièvement la touche de mise soustension/mesure.
2. Sélectionner le niveau de référence requis avecla touche + ou – (s’applique seulement à 1mesure) :
A ........ bord avantB .............. trépiedC ...... bord arrière
3. Viser la cible avec le laser.
4. Réappuyer brièvement sur la touche de misesous tension/mesure.
5. Lire la valeur mesurée.
Utilisation du menu
Appeler le menu principal dans la fenêtre de base.
Sélectionner la fonction/le sous-menu requis avecles touches de navigation et confirmer le choix avecla touche Enter ou …
… introduire le raccourci de la fonction requise.
Presser brièvement cette touche dans le menu pourretourner à la fenêtre précédente ou la presserlonguement pour accéder à la fenêtre de base.
Utilisation de la mémoire
Les fonctions d’enregistrement suivantes peuventaussi être appelées via le menu (voir verso).
Mémoire touche :9 positions pour l’enregistrement de constantes, derésultats intermédiaires, etc.
Enregistrer
Appeler
Stack :Les 15 derniers calculs, mesures ou entrées sontautomatiquement mémorisés temporairement.
Mémoire de données :Mémoire principale (> 800 positions) avec possibilitéde transmission PC.
HERBERT KREITELFeinmechanische WerkstättenVermessungs-, Navigations-
und KontrollinstrumenteInh. Norbert KreitelTaunusstrasse 30
53119 BonnGermany
Tel. +49 (0) 2 28 65 47 60Fax +49 (0) 2 28 69 74 93
www.kreitel-vermessungsgeraete.deinfo@kreitel-vermessungsgeraete.de
www.kreitel-vermessungsgeraete.de

Total Quality Management - unser Engagement für
totale Kundenzufriedenheit
Mehr Informationen über unser TQM Programmerhalten Sie bei Ihrem lokalen Leica GeosystemsVertreter.
Laserklasse 2 gemäss IEC60825-1 und EN60825-1Laserklasse II gemäss FDA 21CFR Ch.I §1040
Leica Geosystems AG
CH-9435 Heerbrugg
(Switzerland)
www.leica-geosystems.com
Subject to change.
Printed in Switzerland
Copyright
Leica Geosystems AG,
Heerbrugg, Switzerland 2001.
723886 - V.04 - VD
Gestione Totale della Qualità - Il nostro impegno
per la totale soddisfazione del cliente
Per maggiori informazioni sul nostro programmaTQM chiedete al vostro rappresentante locale LeicaGeosystems.
Prodotto laser della Classe 2, in conformità aIEC60825-1 e EN60825-1Prodotto laser della Classe II, in conformità a FDA21CFR Ch.I §1040
Total Quality Management - notre engagement pour
la satisfaction totale des clients.
Vous pouvez obtenir de plus amples informationsconcernant notre programme TQM auprès dureprésentant Leica Geosystems le plus proche.
Classe laser 2 selon IEC60825-1 et EN60825-1Classe laser II selon FDA 21CFR Ch.I §1040
Total Quality Management – Our commitment to
total customer satisfaction
Meer informatie over ons TQM-programma isverkrijgbaar bij uw plaatselijke Leica Geosystems-leverancier.
Laserklasse 2 volgens IEC60825-1 en EN60825-1Laserklasse II volgens FDA 21CFR Ch.I §1040
Menüfunktionen verwenden
1 Messeinstellungen
1.1 Messebene1.1.1 Vorne1.1.2 Stativ1.1.3 Hinten
1.2 Zu- / Abschlag1.2.1 Masszuschlag1.2.2 Massabzug1.2.3 aus
1.3 Selbstauslöser1.3.1 einmalig1.3.2 permanent1.3.3 aus
1.4 Laser1.4.1 normal1.4.2 permanent
1.5 Tracking1.5.1 ein1.5.2 aus
1.6 Senden1.6.1 ein1.6.2 nur Resultate1.6.3 aus
2 Endstücke
2.1 ohne Endstück
2.2 Adapterendstück2.2.1 ohne Aufsatz2.2.2 Zubehör 7237752.2.3 Zubehör 7237762.2.4 Stativabstand2.2.5 Freies Ende
2.3 Erkennung2.3.1 ein2.3.2 aus
3 Grundeinstellungen
3.1 Einheiten3.1.1 0.000 m3.1.2 0.00 m3.1.3 0.00 feet3.1.4 0'00"/323.1.5 0.0 in3.1.6 0"/32
3.2 Sprache3.2.1 Deutsch3.2.2 English3.2.3 Français
3.3 Beep3.3.1 Messung3.3.2 pro Tastendruck3.3.3 aus
3.4 Reset
3.5 Beleuchtung3.5.1 ein3.5.2 aus
3.6 Gerät ausschalten
4 Basisfunktionen
4.1 Maximaltracking
4.2 Minimaltracking
4.3 Abstecken4.3.1 Konstante4.3.2 Variable
4.4 Pythagoras
4.5 Höhen
4.6 Genau
4.7 Mittelwert
5 Berechnungen
5.1 Dreieck SSS
5.2 Dreieck SH
5.3 Trapez HSH
5.4 Trapez HSD
5.5 Giebelfläche
5.6 Kreis
5.7 Raummasse
6 Speicher
6.1 Tastenspeicher 1-9
6.2 1-9 abrufen
6.3 Stack
6.4 Daten6.4.1 Text6.4.2 Speichern6.4.3 Ändern6.4.4 Löschen6.4.5 Senden
6.4.5.1 alles6.4.5.2 Position
7 Rechner
7.1 Division
7.2 x2
7.3 Wurzel
4.1
4.4
4.5
5.1
5.2
5.3
5.4
5.5
5.6
5.7
4.2
4.3
Utilizzo delle funzioni menu
1 parametri misura
1.1 piano di misura1.1.1 anteriore1.1.2 treppiede1.1.3 posteriore
1.2 offset1.2.1 addizione1.2.2 sottrazione1.2.3 off
1.3 autoscatto1.3.1 una volta1.3.2 permanente1.3.3 off
1.4 laser1.4.1 modo normale1.4.2 fisso
1.5 tracking1.5.1 on1.5.2 off
1.6 invia1.6.1 on1.6.2 solo risultati1.6.3 off
2 adattatore posteriore
2.1 senza adattatore
2.2 con adattatore2.2.1 senza costante attiva2.2.2 accessorio 7237752.2.3 accessorio 7237762.2.4 distanza treppiede2.2.5 estensione indiv.
2.3 riconoscimento2.3.1 on2.3.2 off
3 parametri base
3.1 unità3.1.1 0.000 m3.1.2 0.00 m3.1.3 0.00 feet3.1.4 0'00"/323.1.5 0.0 in3.1.6 0"/32
3.2 lingua3.2.1 tedesco3.2.2 inglese3.2.3 francese
3.3 bip3.3.1 misura3.3.2 per ogni tasto3.3.3 off
3.4 reset
3.5 illuminazione3.5.1 on3.5.2 off
3.6 spegnimento
4 funzioni base
4.1 trac max
4.2 trac min
4.3 distanza richiesta4.3.1 costante4.3.2 variabile
4.4 Pitagora
4.5 altezza
4.6 precisione
4.7 media
5 calcoli
5.1 triangolo LLL
5.2 triangolo LA
5.3 trapezio ALA
5.4 trapezio ALD
5.5 superf. trapezio
5.6 diametro
5.7 misure volume
6 memoria
6.1 tasto memoria 1-9
6.2 richiama 1-9
6.3 costanti
6.4 dati6.4.1 testo6.4.2 salva6.4.3 modifica6.4.4 cancella6.4.5 invia
6.4.5.1 tutti6.4.5.2 posizione
7 calcolatrice
7.1 divisione
7.2 x2
7.3 radice quadrata
Menufuncties
1 meetinstellingen
1.1 referentie1.1.1 voorkant1.1.2 statief1.1.3 achterkant
1.2 excentriciteit1.2.1 toevoegen1.2.2 aftrekken1.2.3 uit
1.3 Tijdsvertraging1.3.1 eenmalig1.3.2 permanent1.3.3 uit
1.4 laser1.4.1 normale mode1.4.2 permanent
1.5 tracking1.5.1 aan1.5.2 uit
1.6 zenden1.6.1 aan1.6.2 alleen resultaten1.6.3 uit
2 eindsteun
2.1 zonder eindsteun
2.2 adapter eindsteun2.2.1 zonder toevoegen2.2.2 accessoire 7237752.2.3 accessoire 7237762.2.4 statiefafstand2.2.5 individuele extensie
2.3 herkenning2.3.1 aan2.3.2 uit
3 basis instellingen
3.1 eenheden3.1.1 0.000 m3.1.2 0.00 m3.1.3 0.00 feet3.1.4 0'00"/323.1.5 0.0 in3.1.6 0"/32
3.2 taal3.2.1 Duits3.2.2 Engels3.2.3 Frans
3.3 piep3.3.1 meten3.3.2 toets3.3.3 uit
3.4 reset
3.5 verlichting3.5.1 aan3.5.2 uit
3.6 uitschakelen
4 basis functies
4.1 max tracking
4.2 min tracking
4.3 gewenste afstand4.3.1 constante4.3.2 variabel
4.4 pythagoras
4.5 hoogte
4.6 nauwkeurigheid
4.7 gemiddeld
5 berekeningen
5.1 driehoek ZZZ
5.2 driehoek ZH
5.3 trapeze HZH
5.4 trapeze HZD
5.5 geveltop oppervlak
5.6 cirkel
5.7 ruimte
6 geheugen
6.1 geheugentoets 1-9
6.2 oproeptoets 1-9
6.3 stapelen
6.4 data6.4.1 tekst6.4.2 opslaan6.4.3 wijzigen6.4.4 verwijderen6.4.5 zenden
6.4.5.1 alles6.4.5.2 positie
7 calculator
7.1 verdeling
7.2 x2
7.3 wortel
Utilización de las funciones del menú
1 ajustes de medición
1.1 plano de medición1.1.1 delante1.1.2 trípode1.1.3 detrás
1.2 offset1.2.1 adición1.2.2 substracción1.2.3 inactivo
1.3 timer1.3.1 una vez1.3.2 continuamente1.3.3 inactivo
1.4 laser1.4.1 normal1.4.2 continuamente
1.5 tracking1.5.1 activo1.5.2 inactivo
1.6 transmitir1.6.1 activo1.6.2 resultados1.6.3 inactivo
2 adaptador
2.1 sin tope extremo
2.2 con tope extremo2.2.1 tope adaptador2.2.2 accesorios 7237752.2.3 accesorios 7237762.2.4 distancia al pivote2.2.5 extensión individual
2.3 reconocimiento2.3.1 activo2.3.2 inactivo
3 ajustes básicos
3.1 unidades3.1.1 0.000 m3.1.2 0.00 m3.1.3 0.00 feet3.1.4 0'00"/323.1.5 0.0 in3.1.6 0"/32
3.2 idioma3.2.1 alemán3.2.2 inglés3.2.3 francés
3.3 pitido3.3.1 medición3.3.2 tecla3.3.3 inactivo
3.4 reset
3.5 Iluminación3.5.1 activo3.5.2 inactivo
3.6 apagado
4 funciones básicas
4.1 maximumtrac
4.2 minimumtrac
4.3 distancia requerida4.3.1 constante4.3.2 variable
4.4 Pitágoras
4.5 altura
4.6 exactitud
4.7 promedio
5 calculación
5.1 triángulo LLL
5.2 triángulo LA
5.3 trapecio ALA
5.4 trapecio ALD
5.5 hastial
5.6 círculo
5.7 superficies
6 memoria
6.1 memorizar 1-9
6.2 recordar 1-9
6.3 stack
6.4 datos6.4.1 texto6.4.2 memorizar6.4.3 modificar6.4.4 borrar6.4.5 transmitir
6.4.5.1 todo6.4.5.2 posición
7 calculador
7.1 división
7.2 x2
7.3 raíz cuadrada
www.kreitel-vermessungsgeraete.de
40 50
...
+
1x
A B C
A
B
C
51
2
3
4
6
7
8
1 measure setting2 end cover3 basic settings4 basic functions5 calculation6 memory
1 reference2 offset3 timer4 laser5 tracking
9
D
+
...
> 1 sec.
+
1 x
+
+
2 x
+
> 1 sec.
+
E F
Version 1.0, English
Quick Guide
Control ElementsA DisplayB KeypadC Release buttonD End cover with swivel foot (flat planes, corners)E End cover with positioning bracket/alignment aid
(edges, flat planes)F Adapter end cover (stand, for special
applications)
Keypad Functions1 Menu key2 Multiplications / Time delay release3 Clear key, Clear-Entry, Normal mode4 Power on and measuring key5 Plus / Navigation key, up6 Minus / Navigation key, down7 Result / Enter key (Store)8 Alpha numeric keypad9 Key 0 (keypad memory, stack)
Switching on / off DISTOSwitching on:Press briefly Power on and measuring key.
Switching off :Press Clear key until basic settings are displayed.
Press Plus and Minus key simultaneously.Or hold one of both keys and then presssecond key.
The DISTO switches off automatically after90 seconds if no key is pressed.
More and detailled information can be found in therespective User Manual.
To use the DISTO in the permitted manner, pleaserefer to the detailled safety instructions in the UserManual.
Distance measurement / Selectingreference setting1. Press briefly Power on and measuring key.
2. Set reference with Plus or Minus key(only valid for one measurement):
A ......... FrontB ........ StandC .......... Rear
3. Aim at target with laser.
4. Briefly press Power on and measuring key again.
5. Read off measured value.
Using menuRecall Main menu in basic settings.
Select submenu / menu function with navigationkeys and confirm with Enter key
... enter shortcut number of desired menu function.
Press briefly in the menu to return to previousdisplay or press and hold to display basic settings.
Using memoryThe following memory areas can also be recalled viamenu (see overleaf).
Memory key:9 memory places for constants, intermediate results,etc.
Store
Recall
Stack:Saves the last 15 measurements, computations orentries automatically to a shift register.
Data:Main memory (> 800 memory places) with thepossibility of data transfer to PC.
バージョン 1.0、日本語
クィックガイド
コントロール・エレメントA ディスプレイB キーパッドC 取り外しボタンD 多機能 (回転ベース型) エンドカバー (平らな表面、コーナー)
E 測定基準バー付エンドカバー (端部、平らな表面)
F アダプター用エンドカバー(三脚・追加アダプター使用時)
キーパッド機能1 メニューキー2 x キー(x / タイマー)3 クリアキー、入力の削除、通常モード4 オンキー(電源オン / 測定)5 プラス / ナビゲーション キー、進む6 マイナス/ ナビゲーション キー、戻る7 エンターキー(=/決定)8 英数字キーパッド9 キー 0 (キーパッドメモリ, 記録メモリ)
DISTO電源オン/オフ電源オン:オンキーを短く押します。
電源オフ基本設定画面が表示されるまでクリアキーを押します。
どちらか1つのキーを押し、その後もう1つのキーを押します。
キーを押さないとDISTOは90秒後に自動的に電源がオフになります。
さらに詳しい情報については、該当するユーザーマニュアルを参照してください。
許可されている方法でのDISTO の使用についてはユーザーマニュアルの安全管理指針を参照してください。
距離測定 / 基準設定の選択1. オンキーを短く押し ワす。
2. +キーと-キーを使って測定基準位置を設定します(1回の測定にのみ有効)。
A ................................ 前方B ..........三脚用ネジ位置C ................................ 後方
3. ターゲットに対してレーザーを照射します。
4. オンキーを もう一度短く押します。
5. 測定値を読み取ります。
メニューの使用基本設定画面でメインメニューを呼び出します。
ナビゲーションキーを使ってサブメニュー/メニュー機能を選択し、エンターキーで確定します。
または、希望するメニュー機能のショートカットを入力します。
メニュー画面が表示されている状態で短く押すと前の画面へ戻り、また押し続けると基本設定画面を表示します。
メモリーの使用以下のメモリー領域はメニューからも呼び出すことができます(裏面の説明を参照)。
メモリーキー:定数、中間結果等のための9 件のメモリー位置
記録
呼出し
スタック:最後に行われた15件の測定値、計算値また入力をシフト登録に保存します
データ:PCへのデータ転送が可能なメインメモリー(800件までのメモリー位置)
Switching on / off DISTOSwitching on:Press briefly Power on and measuring key.
Switching off :Press Clear key until basic settings are displayed.
Press Plus and Minus key simultaneously.Or hold one of both keys and then presssecond key.
The DISTO switches off automatically after90 seconds if no key is pressed.
�������� ���
.
www.kreitel-vermessungsgeraete.de
Total Quality Management -Our commitment to total customer satisfactionAsk your local Leica Geosystems agent for moreinformation about our TQM program.
Class 2 laser product in accordance with:IEC60825-1 and EN60825-1Class II laser product in accordance with:FDA 21CFR Ch.I §1040
Leica Geosystems AGCH-9435 Heerbrugg
(Switzerland)www.leica-geosystems.com
Subject to change.
Printed in Switzerland
Copyright
Leica Geosystems AG,
Heerbrugg, Switzerland 2001.
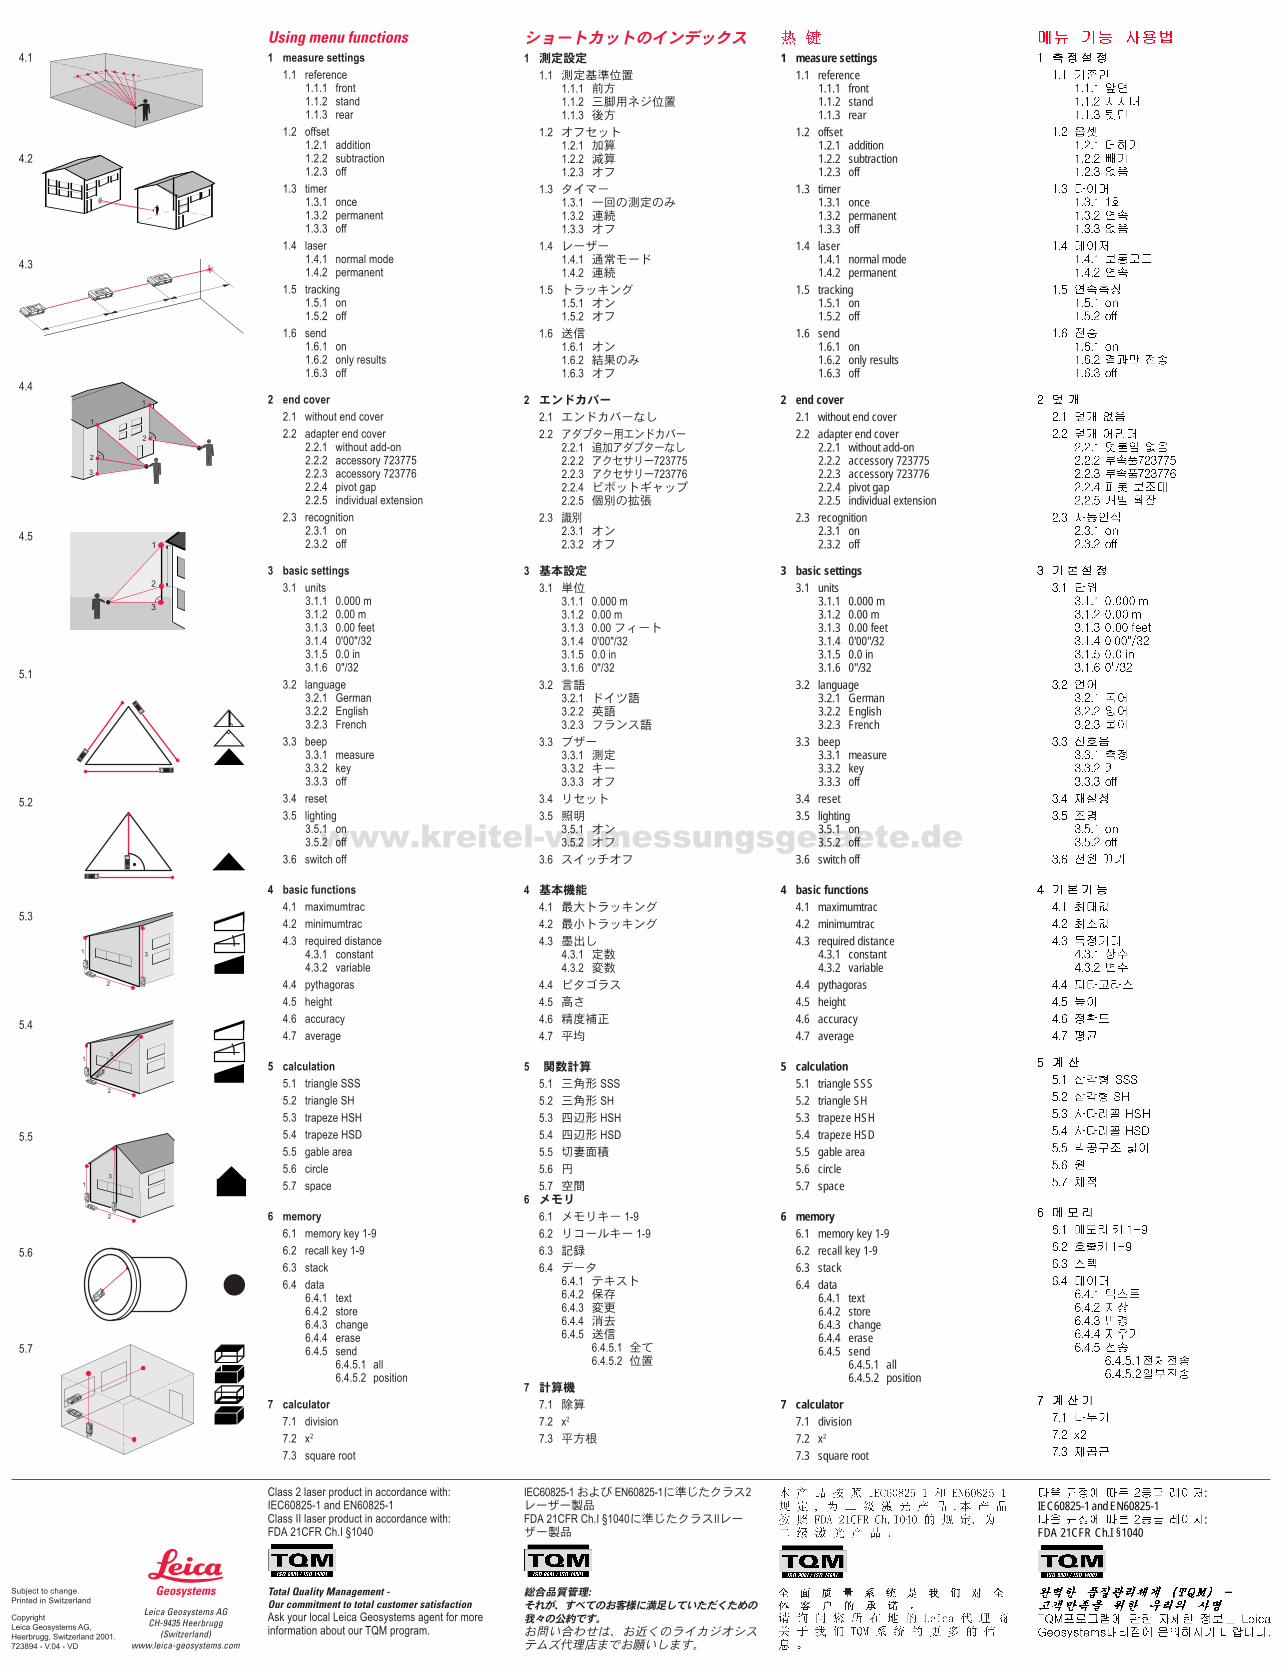
Using menu functions1 measure settings
1.1 reference1.1.1 front1.1.2 stand1.1.3 rear
1.2 offset1.2.1 addition1.2.2 subtraction1.2.3 off
1.3 timer1.3.1 once1.3.2 permanent1.3.3 off
1.4 laser1.4.1 normal mode1.4.2 permanent
1.5 tracking1.5.1 on1.5.2 off
1.6 send1.6.1 on1.6.2 only results1.6.3 off
2 end cover
2.1 without end cover
2.2 adapter end cover2.2.1 without add-on2.2.2 accessory 7237752.2.3 accessory 7237762.2.4 pivot gap2.2.5 individual extension
2.3 recognition2.3.1 on2.3.2 off
3 basic settings
3.1 units3.1.1 0.000 m3.1.2 0.00 m3.1.3 0.00 feet3.1.4 0'00"/323.1.5 0.0 in3.1.6 0"/32
3.2 language3.2.1 German3.2.2 English3.2.3 French
3.3 beep3.3.1 measure3.3.2 key3.3.3 off
3.4 reset
3.5 lighting3.5.1 on3.5.2 off
3.6 switch off
4 basic functions
4.1 maximumtrac
4.2 minimumtrac
4.3 required distance4.3.1 constant4.3.2 variable
4.4 pythagoras
4.5 height
4.6 accuracy
4.7 average
5 calculation
5.1 triangle SSS
5.2 triangle SH
5.3
5.4 trapeze HSD
5.5 gable area
5.6 circle
5.7 space
6 memory
6.1 memory key 1-9
6.2 recall key 1-9
6.3 stack
6.4 data6.4.1 text6.4.2 store6.4.3 change6.4.4 erase6.4.5 send
6.4.5.1 all6.4.5.2 position
7 calculator
7.1 division
7.2 x2
7.3 square root
4.1
4.4
4.5
5.1
5.2
5.3
5.4
5.5
5.6
5.7
4.2
4.3
総合品質管理:それが、すべてのお客様に満足していただくための我々の公約です。お問い合わせは、お近くのライカジオシステムズ代理店までお願いします。
IEC60825-1 および EN60825-1に準じたクラス2レーザー製品FDA 21CFR Ch.I §1040に準じたクラスIIレーザー製品
ショートカットのインデックス1 測定設定
1.1 測定基準位置1.1.1 前方1.1.2 三脚用ネジ位置1.1.3 後方
1.2 オフセット1.2.1 加算1.2.2 減算1.2.3 オフ
1.3 タイマー1.3.1 一回の測定のみ1.3.2 連続1.3.3 オフ
1.4 レーザー1.4.1 通常モード1.4.2 連続
1.5 トラッキング1.5.1 オン1.5.2 オフ
1.6 送信1.6.1 オン1.6.2 結果のみ1.6.3 オフ
2 エンドカバー
2.1 エンドカバーなし
2.2 アダプター用エンドカバー2.2.1 追加アダプターなし2.2.2 アクセサリー7237752.2.3 アクセサリー7237762.2.4 ピボットギャップ2.2.5 個別の拡張
2.3 識別2.3.1 オン2.3.2 オフ
3 基本設定
3.1 単位3.1.1 0.000 m3.1.2 0.00 m3.1.3 0.00 フィート3.1.4 0'00"/323.1.5 0.0 in3.1.6 0"/32
3.2 言語3.2.1 ドイツ語3.2.2 英語3.2.3 フランス語
3.3 ブザー3.3.1 測定3.3.2 キー3.3.3 オフ
3.4 リセット
3.5 照明3.5.1 オン3.5.2 オフ
3.6 スイッチオフ
4 基本機能
4.1 最大トラッキング
4.2 最小トラッキング
4.3 墨出し4.3.1 定数4.3.2 変数
4.4 ピタゴラス
4.5 高さ
4.6 精度補正
4.7 平均
5 関数計算
5.1 三角形 SSS
5.2 三角形 SH
5.3 四辺形
5.4 四辺形 HSD
5.5 切妻面積
5.6 円
5.7 空間6 メモリ
6.1 メモリキー 1-9
6.2 リコールキー 1-9
6.3 記録
6.4 データ6.4.1 テキスト6.4.2 保存6.4.3 変更6.4.4 消去6.4.5 送信
6.4.5.1 全て6.4.5.2 位置
7 計算機
7.1 除算
7.2 x2
7.3 平方根
HSHtrapeze HSH
723894 - V.04 - VD
1 measure settings1.1 reference
1.1.1 front1.1.2 stand1.1.3 rear
1.2 offset1.2.1 addition1.2.2 subtraction1.2.3 off
1.3 timer1.3.1 once1.3.2 permanent1.3.3 off
1.4 laser1.4.1 normal mode1.4.2 permanent
1.5 tracking1.5.1 on1.5.2 off
1.6 send1.6.1 on1.6.2 only results1.6.3 off
2 end cover2.1 without end cover2.2 adapter end cover
2.2.1 without add-on2.2.2 accessory 7237752.2.3 accessory 7237762.2.4 pivot gap2.2.5 individual extension
2.3 recognition2.3.1 on2.3.2 off
3 basic settings3.1 units
3.1.1 0.000 m3.1.2 0.00 m3.1.3 0.00 feet3.1.4 0'00"/323.1.5 0.0 in3.1.6 0"/32
3.2 language3.2.1 German3.2.2 English3.2.3 French
3.3 beep3.3.1 measure3.3.2 key3.3.3 off
3.4 reset3.5 lighting
3.5.1 on3.5.2 off
3.6 switch off
4 basic functions4.1 maximumtrac4.2 minimumtrac4.3 required distance
4.3.1 constant4.3.2 variable
4.4 pythagoras4.5 height4.6 accuracy4.7 average
5 calculation5.1 triangle SSS5.2 triangle SH5.35.4 trapeze HSD5.5 gable area5.6 circle5.7 space
6 memory6.1 memory key 1-96.2 recall key 1-96.3 stack6.4 data
6.4.1 text6.4.2 store6.4.3 change6.4.4 erase6.4.5 send
6.4.5.1 all6.4.5.2 position
7 calculator7.1 division7.2 x2
7.3 square root
:IEC60825-1 and EN60825-1
:FDA 21CFR Ch.I §1040
trapeze HSH
www.kreitel-vermessungsgeraete.de

Versjon 1.0, Norsk
Kortfattet bruksanvisning
Innstillings- og betjeningselementerA Skjerm (Display)B TastaturC UtløsertastD Endedeksel med dreibar støttefot (plane flater,
hjørner)E Oppmerkingsdeksel med vippeanslag (kanter,
plane flater)F Adapterdeksel (stativ spesielle bruksområder)
Tastaturfunksjoner1 Menytast2 Multiplikasjon, selvutløser3 Slettetast, slett inntasting, grunnfunksjon4 Tast for tilkobling og måling5 Forskyvnings- / piltast, opp6 Forskyvnings- / piltast, ned7 Resultat- / lagringstast (lagring i minnet)8 Alfanumerisk tastatur9 Tast 0 (minnetast, stakk)
Slå på/av DISTOSlå på:Slår på DISTO med ett kort trykk på innkoplings- ogmåletasten.
Slå av:Henter standard skjermbildet med slettetasten.
Slår av DISTO når pluss- og minustasten trykkessamtidig. Alternativt holdes den ene av tastene innemens den andre trykkes inn.
DISTO blir automatisk slått av etter 90 sek.hvis det ikke har vært noen betjening i dette
tidsrommet.
Ytterligere detaljerte opplysninger finnes i den aktuellebrukerhåndboka.
For å sikre at DISTO benyttes på forskriftsmessigmåte, må utførlige sikkerhetsinstruksjoner ibrukerhåndboka følges.
40 50
Avstandsmålingen / innstilling avreferanseplan1. Åpner for innstilling med ett kort trykk på
innkoplings- og måletasten.
2. Velger referanseplanet etter behov med pluss-eller minustasten (gjelder bare for én måling):
A .......... frontB ......... stativC ............ bak
3. Målet tilsiktes med laserstrålen.
4. Måler med et nytt kort trykk på innkoplings- ogmåletasten.
5. Måleverdi avleses.
Betjening av menyHenter hovedmeny fra standard skjermbildet.
Velger undermeny / menyfunksjon med piltaster ogbekrefter med lagringstasten eller …
... taster inn snarveinummeret for ønsketmenyfunksjon.
Går tilbake til forrige skjermbilde med et kort trykk imenyen eller går til standard skjermbildet med etlangt trykk.
...
+
1x
A B C
A
B
C
51
2
3
4
6
7
8
1 measure setting2 end cover3 basic settings4 basic functions5 calculation6 memory
1 reference2 offset3 timer4 laser5 tracking
9
D
Bruk av minneFølgende lagringsmuligheter kan også hentes framenyen (se baksiden).
Minnetaster:9 minneplasser for konstanter, mellomresultater osv.
Lagrer
Henter
Stakk:Mellomlagrer automatisk de siste 15 målinger,beregninger eller inntastinger.
Datalager:Lagrer i hovedlager (> 800 lagringsplasser) medmulighet for dataoverføring til PC.
+
...
> 1 sec.
+
1 x
+
+
2 x
+
> 1 sec.
+
E F
Version 1.0, Svenska
Snabbruksanvisning
Tangenter och bakstyckenA DisplayB TangentbordC LåsknappD Bakstycke med vridfot (jämna ytor, hörn)E Bakstycke med rikthjälpmedel
(kanter, jämna ytor)F Adapterbakstycke (stativ, specialbakstycken)
Tangentfunktioner1 Meny2 Multiplicera, självutlösare3 Clear, Rensa inmatn., Normalläge4 Påslags- och mättangent5 Plus / Upp6 Minus / Ner7 Resultat / ENTER (spara)8 Alfanumeriska tangenter9 Tangent 0 (minnestangent, stack)
Ytterligare detaljerad information hittar Du i tillhörandebruksanvisning.
För ett optimalt utnyttjande av program ochinstrument rekommenderas att noga läsa igenomresp. bruksanvisning.
Version 1.0, Dansk
Kort betjeningsvejledning
Instrumentets deleA DisplayB TastaturC UdløserknapD Endestykke med drejefod (plane overflader, hjørner)E Endestykke med positioneringskonsol/
måleliniestøtte (kanter, plane overflader)F Adapterendestykke (stativ, til særlige
anvendelser)
Tastaturfunktioner1 Menutaste2 Gange, selvudløser3 Clear-taste, Clear-Entry, normalmodus4 Tænd- og Måletaste5 Plus- / Navigationstaste opad6 Minus- / Navigationstaste nedad7 Resultat- / Enter-taste (Gem)8 Alfanumerisk tastatur9 Taste 0 (tastaturhukommelse, stack)
Yderligere detaljerede oplysninger fremgår af den dertilhørende brugervejledning.
Af hensyn til en sikker anvendelse af DISTO,overhold venligst de detaljeredesikkerhedsanvisninger i brugervejledningen.
Versio 1.0, Suomi
Järjestelmän kenttäopas
Asetus- ja käyttöelementitA Näyttö (Display)B NäppäimistöC IrrotuspainikeD Käännettävä päätykappale (tasaiset pinnat,
nurkat)E Päätykappale merkintäpäätteellä (reunat,
tasaiset pinnat)F Sovittimen päätykappale (jalusta, erikoiskäytöt)
Näppäimistötoiminnot1 Valikkopainike2 Kertominen, itselaukaisin3 Clear-painike, Clear-Entry -painike, normaalimoodi4 Käynnistys- ja mittausnäppäin5 Plus- / navigointipainike, ylöspäin6 Miinus- / navigointipainike, alaspäin7 Tulos- / syöttöpainike (tallennus)8 Aakkosnumeerinen painikeryhmä9 Painike 0 (näppäinmuisti, pino)
Yksityiskohtaisempia tietoja on löydettävissä varsinaisestakäyttöohjeesta.
DISTOn turvallisempaa käyttöä vartennoudata yksityiskohtaisia käyttöohjeessaolevia turvaohjeita.
Slå på / stänga av DISTOSlå på:Tryck kort på PÅ / MÄT.
Stänga av:Hämta grundbilden med Clear.
Tryck Plus och minus samtidigt.Alternativt, håll den ena intryckt och tryck in denandra.
DISTO slår av automatiskt efter 90 sekunderom ingen tangent tryckt.
Tænd / sluk for DISTOTænd for:Tryk kortvarigt på Tænd- og Måletasten
Sluk for:Tryk på Clear-tasten indtil grundinstillingerne vises
Tryk på Plus- og Minustasten samtidig.Eller hold den ene af de to knapper inde og trykderefter på den anden.
DISTO slukker automatisk efter 90 sekunder,hvis der ikke trykkes på nogen taster.
DISTOn päälle/pois kytkeminenPäälle kytkeminen:Paina lyhyesti kerran kytkentä- ja mittauspainiketta.
Pois kytkeminen:Paina Clear-painiketta, kunnes perusnäyttö onnäkyvissä
Paina plus- ja miinuspainiketta samanaikaisesti.Pidä vaihtoehtoisesti toista kahdesta painikkeestapainettuna ja paina sitten toista painiketta.
DISTO kytkeytyy pois toiminnasta 90sekunnin jälkeen automaattisesti, jos mitäännäppäintä ei paineta.
Distansmätning / ställa inreferensläge1. Tryck kort på PÅ/MÄT.
2. Välj referensläge med „PLUS/MINUS“ (gällerendast för en mätning):
A .......... framB ......... stativC ............ bak
3. Sikta mot målet med laserpunkten.
4. Tryck kort på PÅ/MÄT en gång till.
5. Läs av mätvärdet.
Afstandsmålingen / indstilling afmåleniveau1. Tryk kortvarigt på Tænd- og Måletasten
2. Indstil referencen med Plus- eller Minustasten(gælder kun for en enkelt måling):
A ....... forsideB ......... stativC ..... bagside
3. Sigt på målet med laseren
4. Tryk kortvarigt på Tænd- og Måletasten igen
5. Aflæs den målte værdi
Etäisyysmittaus / mittatasonasettaminen1. Paina lyhyesti kerran kytkentä- ja mittauspainiketta.
2. Valitse haluamasi mittataso plus- taimiinuspainikkeella (koskee vain yhtä mittausta):
A ..... julkisivuB ....... jalustaC ..... takaosa
3. Tähtää kohteeseen laserpisteellä.
4. Paina lyhyesti uudelleen kytkentä- jamittauspainiketta.
5. Lue mittausarvo.
MenyhanteringHämta huvudmeny i grundbilden.
Välj undermeny/menyfunktion med „PLUS/MINUS“och bekräfta med „ENTER“eller …
... ange snabbvalsnummer för önskad funktion.
Tryck kort i en meny för att gå tillbaka ett stegeller tryck länge för att visa grundbilden.
Brug af menuenGenkald hovedmenuen i grundindstillingerne.
Vælg undermenu / menufunktion mednavigationstasterne og bekræft valget med Enter-tasten.
…indtast genvejsnummeret på den ønskedemenufunktion.
Tryk kortvarigt i menuen for at vende tilbage til detforegående skærmbillede eller tryk og hold inde forat se grundindstillingerne.
Valikon käyttöKutsu päävalikko perusnäytöstä.
Valitse alavalikko / valikkotoimintonavigointipainikkeilla ja vahvista syöttöpainikkeellatai ...
... anna halutun valikkotoiminnonlyhytvalintanumero.
Paina lyhyesti hypätäksesi valikossa takaisinedelliseen näyttöön tai paina pitkään palataksesiperusnäyttöön.
MinneshanteringFöljande minnesmöjligheter kan även hämtas viamenyn (se baksidan).
Minnestangent:9 minnesplatser för konstanter, delresultat, o.s.v.
Spara
Hämta
Stack:De senaste 15 mätningarna, beräkningar ellerinmatningarna sparas automatiskt som delresultat.
Dataminne:Huvudminne (> 800 minnesplatser) med möjlig-het för överföring till PC.
Brug af hukommelsenDe følgende hukommelsesområder kan ogsågenkaldes via menuen (se omstående).
Hukommelsestaste:Der er ni hukommelsespladser til konstanter,mellemresultater etc.
Gem
Genkald
Stack:Gemmer automatisk de seneste 15 opmålinger,beregninger eller indtastninger i et skifteregister.
Data:Hovedhukommelsen (> 800 hukommelsespladser)med mulighed for overførsel af data til en PC.
Muistin hyväksikäyttöSeuraavia muistialueita voidaan myös kutsuavalikosta (katso takasivu).
Näppäinmuisti:9 muistipaikkaa vakioille, välituloksille jne.
Tallenna
Hae
Pino:15 viimeisintä mittausta, laskutoimitusta tai syöttöäpuskuroidaan automaattisesti.
Datamuisti:Keskusmuisti (> 800 muistipaikkaa), jossamahdollisuus tiedonsiirtoon PC:een.
www.kreitel-vermessungsgeraete.de
Total Quality Management - vårt engasjement for å
sikre våre kunders fulle tilfredshet.
Ytterligere opplysninger om vårt TQM program fårdu hos din lokale Leica Geosystems forhandler.
Laserklasse 2 i samsvar med:IEC60825-1 i EN60825-1Laserklasse II i samsvar med:FDA 21CFR Ch.I §1040
Leica Geosystems AG
CH-9435 Heerbrugg
(Switzerland)
www.leica-geosystems.com
Subject to change.
Printed in Switzerland
Copyright
Leica Geosystems AG,
Heerbrugg, Switzerland 2001.
723895 - V.04 - VD
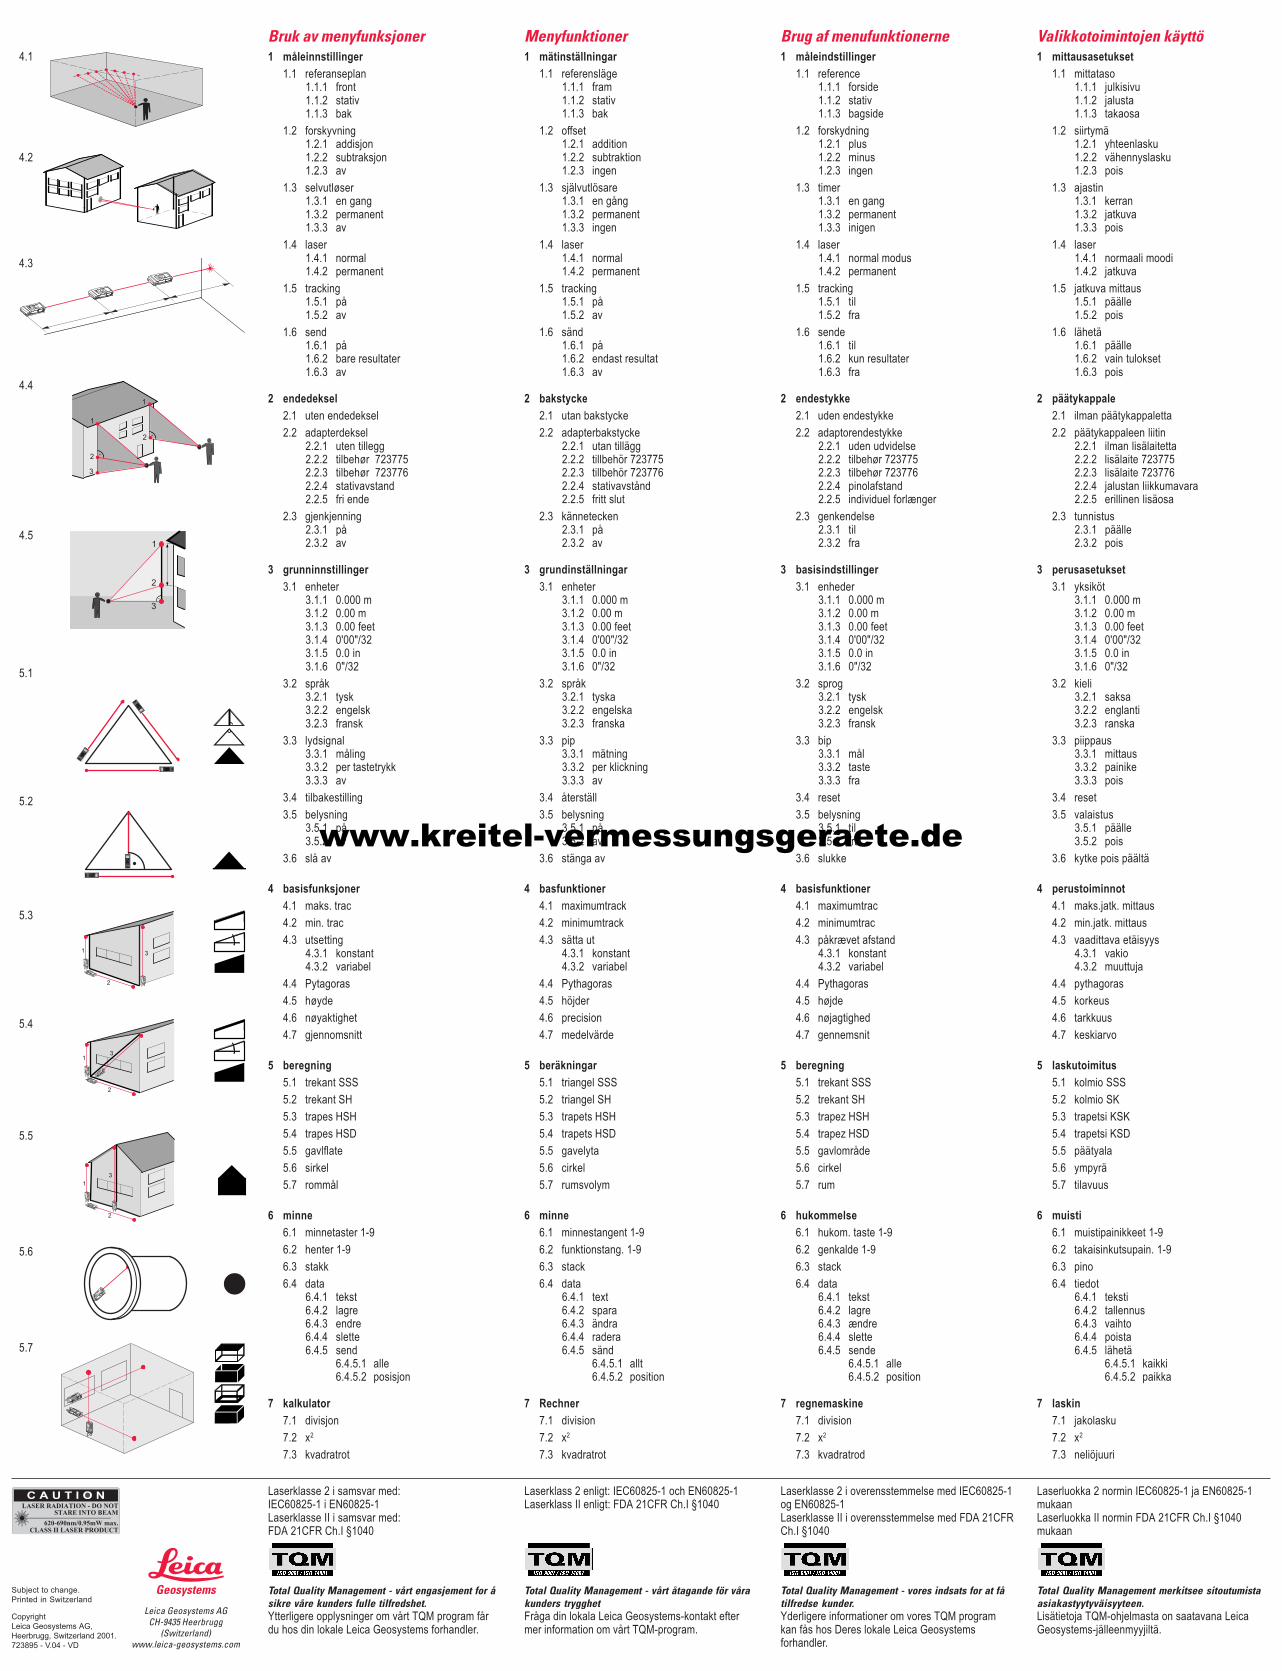
Bruk av menyfunksjoner
1 måleinnstillinger
1.1 referanseplan1.1.1 front1.1.2 stativ1.1.3 bak
1.2 forskyvning1.2.1 addisjon1.2.2 subtraksjon1.2.3 av
1.3 selvutløser1.3.1 en gang1.3.2 permanent1.3.3 av
1.4 laser1.4.1 normal1.4.2 permanent
1.5 tracking1.5.1 på1.5.2 av
1.6 send1.6.1 på1.6.2 bare resultater1.6.3 av
2 endedeksel
2.1 uten endedeksel
2.2 adapterdeksel2.2.1 uten tillegg2.2.2 tilbehør 7237752.2.3 tilbehør 7237762.2.4 stativavstand2.2.5 fri ende
2.3 gjenkjenning2.3.1 på2.3.2 av
3 grunninnstillinger
3.1 enheter3.1.1 0.000 m3.1.2 0.00 m3.1.3 0.00 feet3.1.4 0'00"/323.1.5 0.0 in3.1.6 0"/32
3.2 språk3.2.1 tysk3.2.2 engelsk3.2.3 fransk
3.3 lydsignal3.3.1 måling3.3.2 per tastetrykk3.3.3 av
3.4 tilbakestilling
3.5 belysning3.5.1 på3.5.2 av
3.6 slå av
4 basisfunksjoner
4.1 maks. trac
4.2 min. trac
4.3 utsetting4.3.1 konstant4.3.2 variabel
4.4 Pytagoras
4.5 høyde
4.6 nøyaktighet
4.7 gjennomsnitt
5 beregning
5.1 trekant SSS
5.2 trekant SH
5.3 trapes HSH
5.4 trapes HSD
5.5 gavlflate
5.6 sirkel
5.7 rommål
6 minne
6.1 minnetaster 1-9
6.2 henter 1-9
6.3 stakk
6.4 data6.4.1 tekst6.4.2 lagre6.4.3 endre6.4.4 slette6.4.5 send
6.4.5.1 alle6.4.5.2 posisjon
7 kalkulator
7.1 divisjon
7.2 x2
7.3 kvadratrot
4.1
4.4
4.5
5.1
5.2
5.3
5.4
5.5
5.6
5.7
4.2
4.3
Menyfunktioner
1 mätinställningar
1.1 referensläge1.1.1 fram1.1.2 stativ1.1.3 bak
1.2 offset1.2.1 addition1.2.2 subtraktion1.2.3 ingen
1.3 självutlösare1.3.1 en gång1.3.2 permanent1.3.3 ingen
1.4 laser1.4.1 normal1.4.2 permanent
1.5 tracking1.5.1 på1.5.2 av
1.6 sänd1.6.1 på1.6.2 endast resultat1.6.3 av
2 bakstycke
2.1 utan bakstycke
2.2 adapterbakstycke2.2.1 utan tillägg2.2.2 tillbehör 7237752.2.3 tillbehör 7237762.2.4 stativavstånd2.2.5 fritt slut
2.3 kännetecken2.3.1 på2.3.2 av
3 grundinställningar
3.1 enheter3.1.1 0.000 m3.1.2 0.00 m3.1.3 0.00 feet3.1.4 0'00"/323.1.5 0.0 in3.1.6 0"/32
3.2 språk3.2.1 tyska3.2.2 engelska3.2.3 franska
3.3 pip3.3.1 mätning3.3.2 per klickning3.3.3 av
3.4 återställ
3.5 belysning3.5.1 på3.5.2 av
3.6 stänga av
4 basfunktioner
4.1 maximumtrack
4.2 minimumtrack
4.3 sätta ut4.3.1 konstant4.3.2 variabel
4.4 Pythagoras
4.5 höjder
4.6 precision
4.7 medelvärde
5 beräkningar
5.1 triangel SSS
5.2 triangel SH
5.3 trapets HSH
5.4 trapets HSD
5.5 gavelyta
5.6 cirkel
5.7 rumsvolym
6 minne
6.1 minnestangent 1-9
6.2 funktionstang. 1-9
6.3 stack
6.4 data6.4.1 text6.4.2 spara6.4.3 ändra6.4.4 radera6.4.5 sänd
6.4.5.1 allt6.4.5.2 position
7 Rechner
7.1 division
7.2 x2
7.3 kvadratrot
Brug af menufunktionerne
1 måleindstillinger
1.1 reference1.1.1 forside1.1.2 stativ1.1.3 bagside
1.2 forskydning1.2.1 plus1.2.2 minus1.2.3 ingen
1.3 timer1.3.1 en gang1.3.2 permanent1.3.3 inigen
1.4 laser1.4.1 normal modus1.4.2 permanent
1.5 tracking1.5.1 til1.5.2 fra
1.6 sende1.6.1 til1.6.2 kun resultater1.6.3 fra
2 endestykke
2.1 uden endestykke
2.2 adaptorendestykke2.2.1 uden udvidelse2.2.2 tilbehør 7237752.2.3 tilbehør 7237762.2.4 pinolafstand2.2.5 individuel forlænger
2.3 genkendelse2.3.1 til2.3.2 fra
3 basisindstillinger
3.1 enheder3.1.1 0.000 m3.1.2 0.00 m3.1.3 0.00 feet3.1.4 0'00"/323.1.5 0.0 in3.1.6 0"/32
3.2 sprog3.2.1 tysk3.2.2 engelsk3.2.3 fransk
3.3 bip3.3.1 mål3.3.2 taste3.3.3 fra
3.4 reset
3.5 belysning3.5.1 til3.5.2 fra
3.6 slukke
4 basisfunktioner
4.1 maximumtrac
4.2 minimumtrac
4.3 påkrævet afstand4.3.1 konstant4.3.2 variabel
4.4 Pythagoras
4.5 højde
4.6 nøjagtighed
4.7 gennemsnit
5 beregning
5.1 trekant SSS
5.2 trekant SH
5.3 trapez HSH
5.4 trapez HSD
5.5 gavlområde
5.6 cirkel
5.7 rum
6 hukommelse
6.1 hukom. taste 1-9
6.2 genkalde 1-9
6.3 stack
6.4 data6.4.1 tekst6.4.2 lagre6.4.3 ændre6.4.4 slette6.4.5 sende
6.4.5.1 alle6.4.5.2 position
7 regnemaskine
7.1 division
7.2 x2
7.3 kvadratrod
Valikkotoimintojen käyttö
1 mittausasetukset
1.1 mittataso1.1.1 julkisivu1.1.2 jalusta1.1.3 takaosa
1.2 siirtymä1.2.1 yhteenlasku1.2.2 vähennyslasku1.2.3 pois
1.3 ajastin1.3.1 kerran1.3.2 jatkuva1.3.3 pois
1.4 laser1.4.1 normaali moodi1.4.2 jatkuva
1.5 jatkuva mittaus1.5.1 päälle1.5.2 pois
1.6 lähetä1.6.1 päälle1.6.2 vain tulokset1.6.3 pois
2 päätykappale
2.1 ilman päätykappaletta
2.2 päätykappaleen liitin2.2.1 ilman lisälaitetta2.2.2 lisälaite 7237752.2.3 lisälaite 7237762.2.4 jalustan liikkumavara2.2.5 erillinen lisäosa
2.3 tunnistus2.3.1 päälle2.3.2 pois
3 perusasetukset
3.1 yksiköt3.1.1 0.000 m3.1.2 0.00 m3.1.3 0.00 feet3.1.4 0'00"/323.1.5 0.0 in3.1.6 0"/32
3.2 kieli3.2.1 saksa3.2.2 englanti3.2.3 ranska
3.3 piippaus3.3.1 mittaus3.3.2 painike3.3.3 pois
3.4 reset
3.5 valaistus3.5.1 päälle3.5.2 pois
3.6 kytke pois päältä
4 perustoiminnot
4.1 maks.jatk. mittaus
4.2 min.jatk. mittaus
4.3 vaadittava etäisyys4.3.1 vakio4.3.2 muuttuja
4.4 pythagoras
4.5 korkeus
4.6 tarkkuus
4.7 keskiarvo
5 laskutoimitus
5.1 kolmio SSS
5.2 kolmio SK
5.3 trapetsi KSK
5.4 trapetsi KSD
5.5 päätyala
5.6 ympyrä
5.7 tilavuus
6 muisti
6.1 muistipainikkeet 1-9
6.2 takaisinkutsupain. 1-9
6.3 pino
6.4 tiedot6.4.1 teksti6.4.2 tallennus6.4.3 vaihto6.4.4 poista6.4.5 lähetä
6.4.5.1 kaikki6.4.5.2 paikka
7 laskin
7.1 jakolasku
7.2 x2
7.3 neliöjuuri
Total Quality Management - vårt åtagande för våra
kunders trygghet
Fråga din lokala Leica Geosystems-kontakt eftermer information om vårt TQM-program.
Laserklass 2 enligt: IEC60825-1 och EN60825-1Laserklass II enligt: FDA 21CFR Ch.I §1040
Total Quality Management - vores indsats for at få
tilfredse kunder.
Yderligere informationer om vores TQM programkan fås hos Deres lokale Leica Geosystemsforhandler.
Laserklasse 2 i overensstemmelse med IEC60825-1og EN60825-1Laserklasse II i overensstemmelse med FDA 21CFRCh.I §1040
Total Quality Management merkitsee sitoutumista
asiakastyytyväisyyteen.
Lisätietoja TQM-ohjelmasta on saatavana LeicaGeosystems-jälleenmyyjiltä.
Laserluokka 2 normin IEC60825-1 ja EN60825-1mukaanLaserluokka II normin FDA 21CFR Ch.I §1040mukaan
www.kreitel-vermessungsgeraete.de
40 50
...
+
1x
A B C
A
B
C
51
2
3
4
67
8
1 measure setting2 end cover3 basic settings4 basic functions5 calculation6 memory
1 reference2 offset3 timer4 laser5 tracking
9
D
+
...
> 1sec.
+
1 x
+
+
2 x
+
> 1sec.
+
E F
Версия 1.0 Русский язык
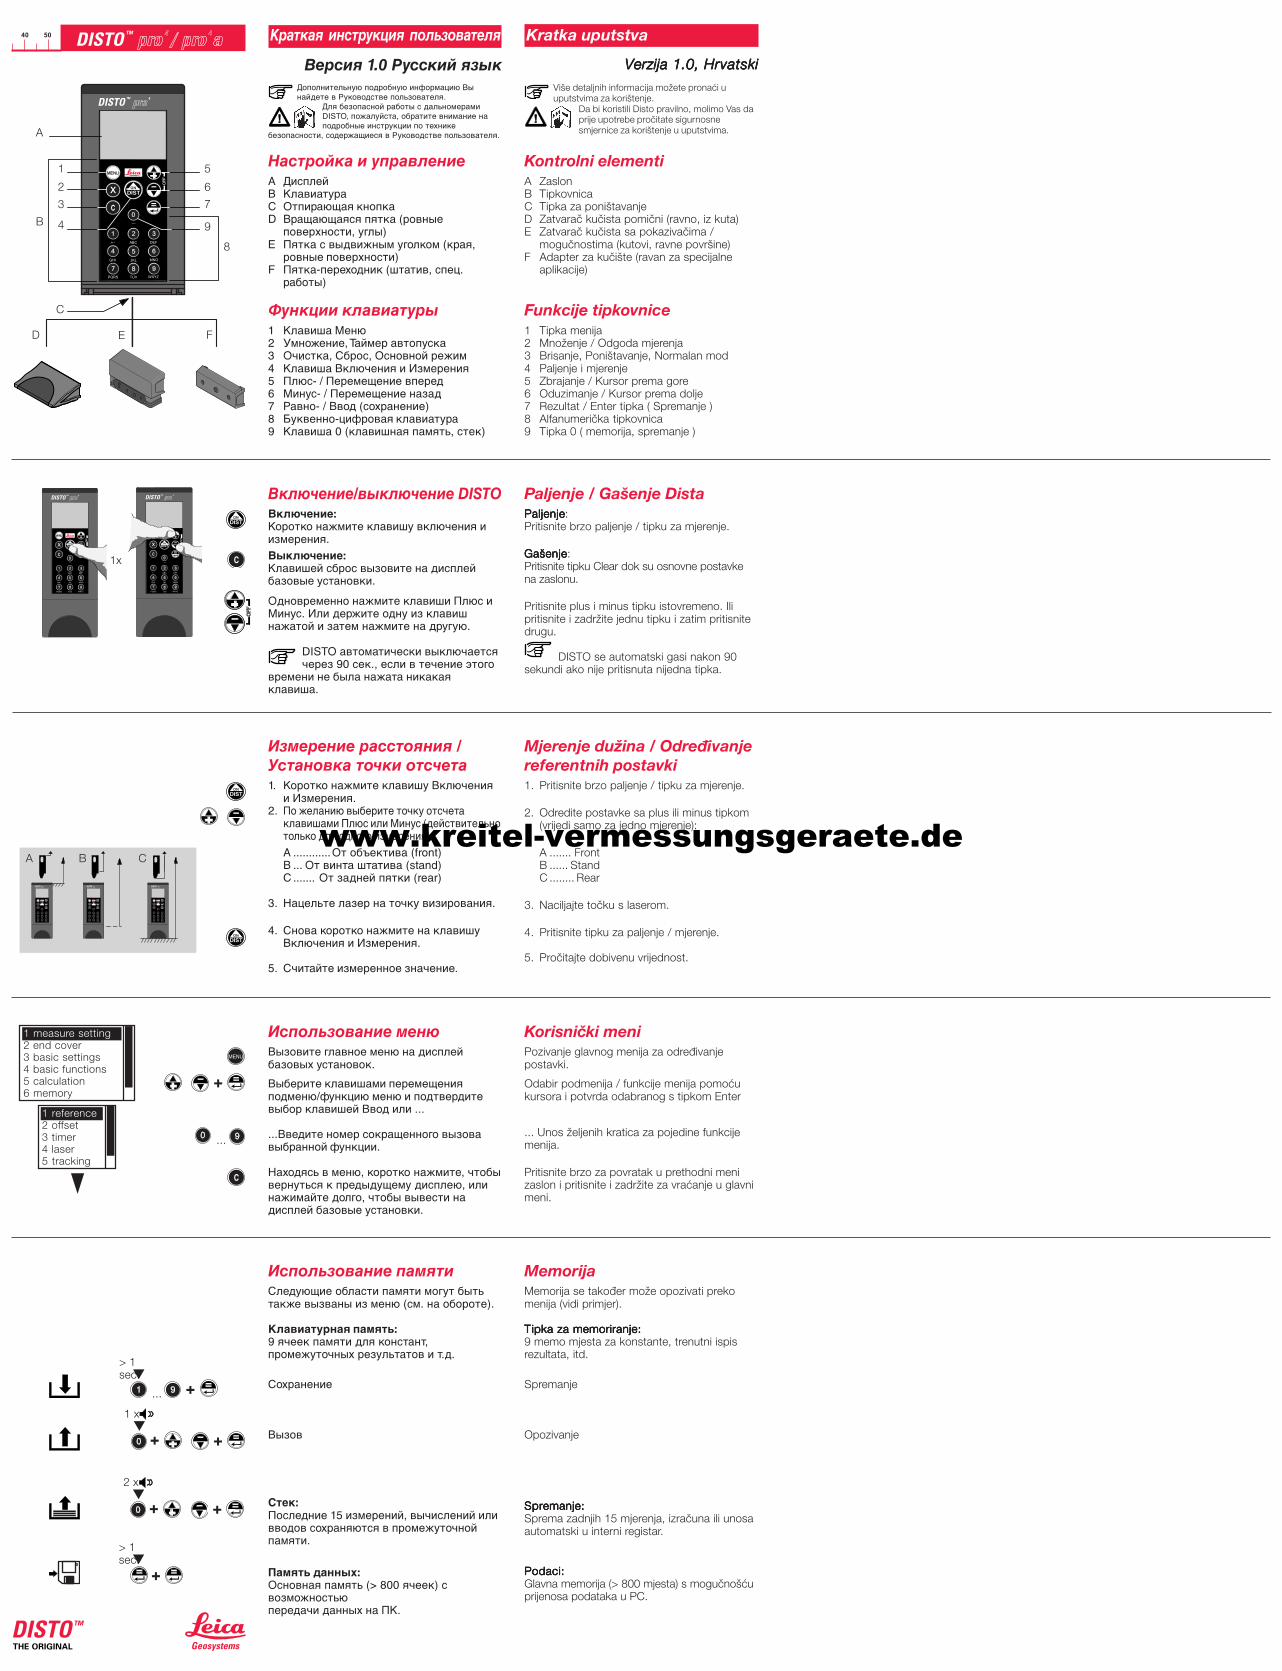
Краткая инструкция пользователя
Настройка и управлениеA ДисплейB КлавиатураC Отпирающая кнопкаD Вращающаяся пятка (ровные
поверхности, углы)E Пятка с выдвижным уголком (края,
ровные поверхности)F Пятка-переходник (штатив, спец.
работы)
Функции клавиатуры1 Клавиша Меню2 Умножение, Таймер автопуска3 Очистка, Сброс, Основной режим4 Клавиша Включения и Измерения5 Плюс- / Перемещение вперед6 Минус- / Перемещение назад7 Равно- / Ввод (сохранение)8 Буквенно-цифровая клавиатура9 Клавиша 0 (клавишная память, стек)
Включение/выключение DISTOВключение:Коротко нажмите клавишу включения иизмерения.
Выключение:Клавишей сброс вызовите на дисплейбазовые установки.
Одновременно нажмите клавиши Плюс иМинус. Или держите одну из клавишнажатой и затем нажмите на другую.
DISTO автоматически выключаетсячерез 90 сек., если в течение этого
времени не была нажата никакаяклавиша.
Дополнительную подробную информацию Вынайдете в Руководстве пользователя.
Для безопасной работы с дальномерамиDISTO, пожалуйста, обратите внимание наподробные инструкции по технике
безопасности, содержащиеся в Руководстве пользователя.
Измерение расстояния /Установка точки отсчета1. Коротко нажмите клавишу Включения
и Измерения.2. По желанию выберите точку отсчета
клавишами Плюс или Минус (действительнотолько для одного измерения)
A ............От объектива (front)B ... От винта штатива (stand)C ....... От задней пятки (rear)
3. Нацельте лазер на точку визирования.
4. Снова коротко нажмите на клавишуВключения и Измерения.
5. Считайте измеренное значение.
Использование менюВызовите главное меню на дисплейбазовых установок.
Выберите клавишами перемещенияподменю/функцию меню и подтвердитевыбор клавишей Ввод или ...
...Введите номер сокращенного вызовавыбранной функции.
Находясь в меню, коротко нажмите, чтобывернуться к предыдущему дисплею, илинажимайте долго, чтобы вывести надисплей базовые установки.
Использование памятиСледующие области памяти могут бытьтакже вызваны из меню (см. на обороте).
Клавиатурная память:9 ячеек памяти для констант,промежуточных результатов и т.д.
Сохранение
Вызов
Стек:Последние 15 измерений, вычислений иливводов сохраняются в промежуточнойпамяти.
Память данных:Основная память (> 800 ячеек) свозможностьюпередачи данных на ПК.
VVVVVerzija 1.0, Hrerzija 1.0, Hrerzija 1.0, Hrerzija 1.0, Hrerzija 1.0, Hrvatskivatskivatskivatskivatski
Kratka uputstva
Kontrolni elementiA ZaslonB TipkovnicaC Tipka za poništavanjeD Zatvarač kučista pomični (ravno, iz kuta)E Zatvarač kučista sa pokazivačima /
mogučnostima (kutovi, ravne površine)F Adapter za kučište (ravan za specijalne
aplikacije)
Funkcije tipkovnice1 Tipka menija2 Množenje / Odgoda mjerenja3 Brisanje, Poništavanje, Normalan mod4 Paljenje i mjerenje5 Zbrajanje / Kursor prema gore6 Oduzimanje / Kursor prema dolje7 Rezultat / Enter tipka ( Spremanje )8 Alfanumerička tipkovnica9 Tipka 0 ( memorija, spremanje )
Više detaljnih informacija možete pronaći uuputstvima za korištenje.
Da bi koristili Disto pravilno, molimo Vas daprije upotrebe pročitate sigurnosnesmjernice za korištenje u uputstvima.
Mjerenje dužina / Određivanjereferentnih postavki1. Pritisnite brzo paljenje / tipku za mjerenje.
2. Odredite postavke sa plus ili minus tipkom(vrijedi samo za jedno mjerenje):
A ....... FrontB ...... StandC ........ Rear
3. Naciljajte točku s laserom.
4. Pritisnite tipku za paljenje / mjerenje.
5. Pročitajte dobivenu vrijednost.
Korisnički meniPozivanje glavnog menija za određivanjepostavki.
Odabir podmenija / funkcije menija pomoćukursora i potvrda odabranog s tipkom Enter
... Unos željenih kratica za pojedine funkcijemenija.
Pritisnite brzo za povratak u prethodni menizaslon i pritisnite i zadržite za vraćanje u glavnimeni.
MemorijaMemorija se također može opozivati prekomenija (vidi primjer).
TTTTTipka za memoriranje:ipka za memoriranje:ipka za memoriranje:ipka za memoriranje:ipka za memoriranje:9 memo mjesta za konstante, trenutni ispisrezultata, itd.
Spremanje
Opozivanje
SprSprSprSprSpremanje:emanje:emanje:emanje:emanje:Sprema zadnjih 15 mjerenja, izračuna ili unosaautomatski u interni registar.
Podaci:Podaci:Podaci:Podaci:Podaci:Glavna memorija (> 800 mjesta) s mogučnošćuprijenosa podataka u PC.
Paljenje / Gašenje DistaPaljenjePaljenjePaljenjePaljenjePaljenje:Pritisnite brzo paljenje / tipku za mjerenje.
GašenjeGašenjeGašenjeGašenjeGašenje:Pritisnite tipku Clear dok su osnovne postavkena zaslonu.
Pritisnite plus i minus tipku istovremeno. Ilipritisnite i zadržite jednu tipku i zatim pritisnitedrugu.
DISTO se automatski gasi nakon 90sekundi ako nije pritisnuta nijedna tipka.
www.kreitel-vermessungsgeraete.de
Total Quality Management -наш выбор дляполного удовлетворения потребностейзаказчиков.Более подробную информацию о нашейпрограмме TQM Вы можете получить уместного представителя Leica Geosystems.
Лазер класса 2 согласноIEC60825-1 и EN60825-1Лазер класса II согласноFDA 21CFR Ch.I §1040
Leica Geosystems AG
CH-9435 Heerbrugg
(Switzerland)
www.leica-geosystems.com
Subject to change.
Printed in Switzerland
Copyright
Leica Geosystems AG,
Heerbrugg, Switzerland 2001.
725342 - V.04 - VD
4.1
4.4
4.5
5.1
5.2
5.3
5.4
5.5
5.6
5.7
4.2
4.3
Korištenje funkcija menija11111 measurmeasurmeasurmeasurmeasure settingse settingse settingse settingse settings
1.1 reference1.1.1 front1.1.2 stand1.1.3 rear
1.2 offset1.2.1 addition1.2.2 subtraction1.2.3 off
1.3 timer1.3.1 once1.3.2 permanent1.3.3 off
1.4 laser1.4.1 normal mode1.4.2 permanent
1.5 tracking1.5.1 on1.5.2 off
1.6 send1.6.1 on1.6.2 only results1.6.3 off
22222 end coverend coverend coverend coverend cover2.1 without end cover2.2 adapter end cover
2.2.1 without add-on2.2.2 accessory 7237752.2.3 accessory 7237762.2.4 pivot gap2.2.5 individual extension
2.3 recognition2.3.1 on2.3.2 off
33333 basic settingsbasic settingsbasic settingsbasic settingsbasic settings3.1 units
3.1.1 0.000 m3.1.2 0.00 m3.1.3 0.00 feet3.1.4 0'00"/323.1.5 0.0 in3.1.6 0"/32
3.2 language3.2.1 German3.2.2 English3.2.3 French
3.3 beep3.3.1 measure3.3.2 key3.3.3 off
3.4 reset3.5 lighting
3.5.1 on3.5.2 off
3.6 switch off
44444 basic functionsbasic functionsbasic functionsbasic functionsbasic functions4.1 maximumtrac4.2 minimumtrac4.3 required distance
4.3.1 constant4.3.2 variable
4.4 pythagoras4.5 height4.6 accuracy4.7 average
55555 calculationcalculationcalculationcalculationcalculation5.1 triangle SSS5.2 triangle SH5.3 trapeze HHS5.4 trapeze HSD5.5 gable area5.6 circle5.7 space
66666 memorymemorymemorymemorymemory6.1 memory key 1-96.2 recall key 1-96.3 stack6.4 data
6.4.1 text6.4.2 store6.4.3 change6.4.4 erase6.4.5 send
6.4.5.1 all6.4.5.2 position
77777 calculatorcalculatorcalculatorcalculatorcalculator7.1 division7.2 x2
7.3 square root
Использование функций меню1 Установки для измерений
(measure settings)
1.1 Точка отсчета (reference)1.1.1 От объектива (front)1.1.2 От винта штатива (stand)1.1.3 От задней пятки (rear)
1.2 Прибавление / Вычитание (offset)1.2.1 Прибавление постоянной
(addition)1.2.2 Вычитание постоянной
(subtraction)1.2.3 Выключение (none)
1.3 Таймер автопуска (timer)1.3.1 Однократно (once )1.3.2 Постоянно (permanent)1.3.3 Выключить (none)
1.4 Лазер (laser)1.4.1 Основной режим (normal mode)1.4.2 Непрерывно (permanent)
1.5 Трекинг (tracking)1.5.1 Включить (on)1.5.2 Выключить (off)
1.6 Отправить (send)1.6.1 Включить (on)1.6.2 Только результаты (only results)1.6.3 Выключить (off)
2 Измерительные пятки(end cover)
2.1 Без измерительной пятки(without end cover)
2.2 Пятка-переходник (adapter end cover)2.2.1 Без насадки (without add-on)2.2.2 Принадлежность (accessory)
7237752.2.3 Принадлежность (accessory)
7237762.2.4 Ввод расстояния до штатива
(pivot gap)2.2.5 Специальная насадка (individual
extension)
2.3 Определение (recognition)2.3.1 Включить (on)2.3.2 Выключить (off)
3 Базовые установки(basic settings)
3.1 Единицы измерений (units)3.1.1 0.000 m3.1.2 0.00 m3.1.3 0.00 feet3.1.4 0'00"/323.1.5 0.0 in3.1.6 0"/32
3.2 Язык (language)3.2.1 German3.2.2 English3.2.3 French
3.3 Звуковой сигнал (beep)3.3.1 Измерение (measure)3.3.2 Клавиша (key)3.3.3 Выключить (off)
3.4 Перезапуск (reset)
3.5 Подсветка (lighting)3.5.1 Включить (on)3.5.2 Выключить (off)
3.6 Выключить прибор (switch off)4 Основные функции
(basic functions)
4.1 Трекинг - максимум (maximumtrac)
4.2 Трекинг - минимум (minimumtrac)
4.3 Разбивка (required distance)4.3.1 Константа (constant)4.3.2 Переменная (variable)
4.4 Пифагор- тригонометрическаяфункция (pythagoras)
4.5 Высоты (height)
4.6 Точность (accuracy)
4.7 Среднее значение (average)5 Вычисления (calculation)
5.1 Треугольник (triangle) SSS
5.2 Треугольник (triangle) SH
5.3 Трапеция (trapeze) HSH
5.4 Трапеция (trapeze) HSD
5.5 Площадь фронтона (gable area)
5.6 Круг (circle)
5.7 Размеры помещения (space)6 Память (memory)
6.1 Клавиатурная память 1-9(memory key 1-9)
6.2 Вызов клавиш 1-9 (recall key 1-9)
6.3 Стек (stack)
6.4 Данные (data)6.4.1 Текст (text)6.4.2 Сохранить (store)6.4.3 Изменить (change)6.4.4 Удалит (erase)6.4.5 Отправить (send)
6.4.5.1 Все (all)6.4.5.2 Позиция (position)
7 Калькулятор (calculator)
7.1 Деление (division)
7.2 x2
7.3 Корень (square root)
Total Quality Management -Naša veza s potpuno zadovoljnim korisnikomUpitajte Vašeg lokalnog predstavniak za višeinformacija o TQM programu.
Klasa 2 laserski proizvod prema normamaIEC60825-1 i EN60825-1Klasa II laserski proizvod prema normama FDA21CFR Ch.I §1040
www.kreitel-vermessungsgeraete.de

40 50
...
+
1x
A B C
A
B
C
51
2
3
4
67
8
1 measure setting2 end cover3 basic settings4 basic functions5 calculation6 memory
1 reference2 offset3 timer4 laser5 tracking
9
D
+
...
> 1 sec.
+
1 x
+
+
2 x
+
> 1 sec.
+
E F
Έκδ�ση 1.0, Ελληνικά
Σύντ�µες �δηγίες �ειρισµ�ύ
�ειριστήρια / ε�αρτήµατα ελέγ��υA �θ�νηB Πληκτρ�λ�γι�C Πλήκτρ� απελευθέρωσηςD Τελικ� ε�άρτηµα µε περιστρεφ�µενη �άση (επίπεδες
επιφάνειες, γωνίες)E Τελικ� ε�άρτηµα µε �ρα�ί�να τ�π�θέτησης /
��ηθητικ� ε�άρτηµα ευθυγράµµισης (ακµές, επίπεδεςεπιφάνειες)
F Τελικ� ε�άρτηµα πρ�σαρµ�γής (τρίπ�δας, για ειδικέςεφαρµ�γές)
Λειτ�υργίες Πληκτρ�λ�γί�υ1 Πλήκτρ� µεν�ύ2 Π�λλαπλασιασµ�ς / Λειτ�υργία �ρ�ν�καθυστέρησης3 Πλήκτρ� επαναφ�ράς, ∆ιαγραφή Εισαγωγής,
Πρ�γραµµα καν�νικής λειτ�υργίας (Normal Mode)4 Πλήκτρ� ενεργ�π�ίησης και µέτρησης5 Συν / Επ�µενη λειτ�υργία, επάνω6 Μεί�ν / Πρ�ηγ�ύµενη λειτ�υργία, κάτω7 Πλήκτρ� απ�τελέσµατ�ς / επι�ε�αίωσης
(απ�θήκευση)8 Αλφαριθµητικ� πληκτρ�λ�γι�9 Πλήκτρ� 0 (µνήµη πληκτρ�λ�γί�υ, πρ�σωρινή µνήµη)
Ενεργ�π�ίηση /Απενεργ�π�ίηση τ�υ DISTOΕνεργ�π�ίηση:Πατήστε µια φ�ρά τ� πλήκτρ� Ενεργ�π�ίησης καιΜέτρησης.
Απενεργ�π�ίηση:Πατήστε τ� πλήκτρ� Επαναφ�ράς µέ�ρι ναεµφανιστεί η �ασική ρύθµιση.
Πατήστε τα πλήκτρα Συν και Μεί�ν ταυτ��ρ�να.Ή κρατήστε πατηµέν� τ� ένα απ� τα δύ� αυτάπλήκτρα και στη συνέ�εια πατήστε και τ� άλλ�πλήκτρ�.
Τ� DISTO απενεργ�π�ιείται αυτ�µατα, εάνεντ�ς 90 δευτερ�λέπτων δεν πατηθεί
κανένα πλήκτρ�.
More and detailled information can be found inthe respective User Manual.
Για τ� σωστ� τρ�π� �ρήσης τ�υ DISTO,ανατρέ�τε στις λεπτ�µερείς �δηγίεςασφαλείας στ� Εγ�ειρίδι� +ρήσης.
Μέτρηση απ!στασης / Επιλ�γήρύθµισης αναφ�ράς1. Πατήστε µια φ�ρά τ� πλήκτρ� Ενεργ�π�ίησης και
Μέτρησης.2. Ρυθµίστε την αναφ�ρά µε τ� πλήκτρ� Συν ή Μεί�ν
(ισ�ύει για µία µ�ν� µέτρηση):
A ............... Μπρ�στάB ... Βάση (τρίπ�δας)C ...................... Πίσω
3. Σκ�πεύστε µε την ακτίνα λέι<ερ στ� στ���.
4. =αναπατήστε µια φ�ρά τ� πλήκτρ� Ενεργ�π�ίησηςκαι Μέτρησης.
5. ∆ια�άστε την τιµή µέτρησης.
�ρήση τ�υ µεν�ύΕπαναφέρετε τ� �ασικ� µεν�ύ στις �ασικέςρυθµίσεις.
Επιλέ�τε τη λειτ�υργία τ�υ υπ�µεν�ύ / µεν�ύ µε ταπλήκτρα επ�µενης / πρ�ηγ�ύµενης λειτ�υργίας(επάνω / κάτω) και επι�ε�αιώστε την επιλ�γή µε τ�πλήκτρ� Επι�ε�αίωσης (enter).
…εισάγετε τ�ν αριθµ� συντ�µευσης τηςλειτ�υργίας µεν�ύ π�υ επιθυµείτε.
Πατήστε µια φ�ρά αυτ� τ� πλήκτρ� �ταν �ρίσκεστεστ� µεν�ύ για να επιστρέψετε στην πρ�ηγ�ύµενη�θ�νη ή πατήστε και κρατήστε τ� πατηµέν� για ναεµφανιστ�ύν �ι �ασικές ρυθµίσεις.
�ρήση της µνήµηςΜπ�ρείτε επίσης να επανακαλέσετε τα παρακάτωτµήµατα της µνήµης µέσω τ�υ µεν�ύ (�λ. επ�µενησελίδα).
Πλήκτρ� µνήµης:9 θέσεις µνήµης για σταθερές, ενδιάµεσααπ�τελέσµατα, κ.λπ.
Απ�θήκευση
Επανάκληση
Πρ�σωρινή µνήµη:Απ�θηκεύει αυτ�µατα τις τελευταίες 15 µετρήσεις,αριθµητικ�ύς υπ�λ�γισµ�ύς ή εισαγωγές σε µησταθερ� αρ�εί� καταγραφής.
∆εδ�µένα:Κύρια µνήµη ( περισσ�τερες απ� 800 θέσειςµνήµης) µε δυνατ�τητα µεταφ�ράς δεδ�µένων σεH/Y.
Wersja 1.0, język polski
Instrukcja skrócona
Elementy użytkoweA WyświetlaczB KlawiaturaC Przycisk zwalniający stopkęD Stopka obrotowa (powierzchnie płaskie,
narożniki)E Stopka pozycyjna / przymiar liniowy
(krawędzie, powierzchnie płaskie)F Uchwyt adaptujący (statyw, zastosowania
specjalne)
Funkcje klawiatury1 Klawisz menu2 Mnożenie / samowyzwalacz czasowy3 Przycisk kasujący, tryb normalny4 Włączanie oraz pomiar5 Znak “plus” / klawisz nawigacyjny “do góry”6 Znak “minus” / klawisz nawigacyjny “na dół”7 Wynik / klawisz wprowadzania “Enter” oraz
zapis8 Klawiatura alfanumeryczna9 Przycisk “0” (pamięć przycisków, stos)
Więcej szczegółowych informacji znajduje się“Instrukcji obsługi”.
Aby używać DISTO w sposób prawidłowy, należyzapoznać się ze wskazówkami bezpieczeństwaznajdującymi się w “Instrukcji obsługi”.
Pomiar odległości / wybórmiejsca odniesienia pomiaru1. Naciśnij szybko przycisk włączania / pomiaru.
2. Ustaw odniesienie pomiarów za pomocąklawiszy “plus” i “minus” (dotyczy tylkopojedynczego pomiaru).
A ....... FrontB ...... StandC ........ Rear
3. Wyceluj wiązkę lasera na żądany cel.
4. Naciśnij szybko przycisk włączania /pomiaru.
5. Odczytaj z ekranu pomierzoną wartość.
Używanie menuWywołaj menu główne z poziomu ustawieńpodstawowych.
Wybierz podmenu / funkcję menu za pomocąklawiszy nawigacyjnych. Potwierdźprzyciskiem wprowadzanie “Enter”.
... wprowadź numer skrótu żądanej funkcji.
Przyciśnij szybko, by powrócić dopoprzedniego ekranu lub naciśnij i przytrzymajw celu wyświetlenia ustawień podstawowych.
Używanie pamięci wewnętrznejPoniższa zawartość pamięci może zostaćwywołana z poziomu menu (patrz na odwrocie).
Przycisk pamięci:Przycisk pamięci:Przycisk pamięci:Przycisk pamięci:Przycisk pamięci:Dziewięć miejsc rejestracji stałych, wartościpośrednich itp.
Zapis
Wywołanie
Stos:Stos:Stos:Stos:Stos:Umożliwia zapisanie 15 wyników pomiarów,obliczeń lub wprowadzonych wartości
Dane:Dane:Dane:Dane:Dane:Pamięć główna (>800 pozycji) z możliwościątransmisji danych do komputera PC.
Włączanie / wyłączanie DISTOWłączanie:Włączanie:Włączanie:Włączanie:Włączanie:Naciśnij szybko przycisk włączania / pomiaru.
Wyłączanie:Wyłączanie:Wyłączanie:Wyłączanie:Wyłączanie:Naciśnij przycisk kasujący do momentu ukazaniasię na ekranie ustawień podstawowych.
Przyciśnij jednocześnie klawisze “plus” i “minus”lub przytrzymaj dłużej jeden z nich, a następniewciśnij drugi.
Jeśli żaden przycisk nie zostanienaciśniety, DISTO wyłączy się
automatycznie po 90 sekundach.
1.0 verzió, magyar
Rövid útmutató
Beállító- és kezelőelemekA kijelzőB billentyűzetC kioldógombD lezáró vég elforgatható talppal (sík felületek,
sarkok)E lezáró vég előrajzoló éllel / vonó véggel
(élek, sík felületek)F adaptervég (állvány, speciális alkalmazások)
Billentyűfunkciók1 menügomb2 szorzás / időzített mérés3 törlőgomb, bevitel törlése, normál
üzemmód4 bekapcsoló- és mérőgomb5 plusz / navigációs gomb, felfelé6 mínusz / navigációs gomb, lefelé7 eredmény / Enter gomb (elmentés)8 alfanumerikus billentyűzet9 “0” gomb (billentyűmemória, veremtár)
A DISTO be- és kikapcsolásaBekapcsolás:Bekapcsolás:Bekapcsolás:Bekapcsolás:Bekapcsolás:nyomja le egyszer, röviden a bekapcsoló- ésmérőgombot.
Kikapcsolás:Kikapcsolás:Kikapcsolás:Kikapcsolás:Kikapcsolás:nyomja le a törlőgombot, amíg meg nemjelenik az alapbeállítás szerinti kijelzőkép.
Nyomja le egyidejűleg a plusz- ésmínuszgombot, vagy tartsa lenyomva az egyikgombot, és közben nyomja le a másikat.
Ha 90 másodpercig egyetlen gombotsem nyomnak le, a DISTO
automatikusan kikapcsol.
További, részletesebb információkat a géphez tartozóFelhasználói útmutatóban találhat.
A DISTO biztonságos használatához kérjük,vegye figyelembe a Felhasználói útmutatóbanlévő részletes biztonsági tudnivalókat.
Távmérés / vonatkoztatásipont beállítása1. Nyomja le röviden a bekapcsoló- és
mérőgombot.
2. A plusz- és mínuszgombbal kívánságszerint állítsa be a vonatkoztatási pontot(csak egy mérésre érvényes).
A front (elöl)B stand (állvány)C rear (hátul)
3. A lézerponttal irányozza meg a céltárgyat.
4. Röviden nyomja le ismét a bekapcsoló- ésmérőgombot.
5. Olvassa le a mérési eredményt.
A menü kezeléseAz alapbeállítás szerinti kijelzőről indítsa el afőmenüt.
A navigációs gombokkal válasszon almenüt/menüfunkciót, és az Enter gombbal erősítsemeg őket, vagy...
...írja be a kívánt menüfunkciógyorsbillentyűkódját.
E gombot a menüben röviden megnyomva azelőző kijelzőképhez, hosszan lenyomva azalapbeállítás szerinti kijelzőhöz térhet vissza.
A memória használataAz alábbi memóriaterületeket a menü útján iselő lehet hívni (lásd a hátoldalon).
Billentyűmemóriák:Billentyűmemóriák:Billentyűmemóriák:Billentyűmemóriák:Billentyűmemóriák:9 memóriahely konstansok, részeredményekstb. számára.
Elmentés
Előhívás
Gyorsmemória:Gyorsmemória:Gyorsmemória:Gyorsmemória:Gyorsmemória:a legutolsó 15 mérési vagy számításieredményt, illetve bevitt adatot a gépautomatikusan egy léptetőtárolóba helyezi.
Adatmemória:Adatmemória:Adatmemória:Adatmemória:Adatmemória:főmemória (> 800 memóriahely), PC-re történőátviteli lehetőséggel.
VVVVVerze 1.0, českyerze 1.0, českyerze 1.0, českyerze 1.0, českyerze 1.0, česky
Rychlonávod
Ovládací částiA DisplejB KlávesniceC Tlačítko pro uvolněníD Koncová část s otočným koncem (rovné
plochy, rohy)E Koncová část s podpěrou pro umístění a
urovnání (hrany, rovné plochy)F Koncová část s adaptérem (stativ, speciální
aplikace)
Funkce klávesnice1 Tlačítko menu2 Násobení / měření s časovou prodlevou3 Clear - tlačítko vyčištění, normální režim4 Zapnutí a tlačítko měření5 Plus / navigační tlačítko6 Minus / navigační tlačítko7 Výsledek / tlačítko uložení (Enter)8 Alfanumerická klávesnice9 Tlačítko 0 (paměť klávesnice a posledních
měření)
Zapnutí a vypnutí DISTAZapnutí:Zapnutí:Zapnutí:Zapnutí:Zapnutí:Krátce stiskněte tlačítko zapnutí a měření.
VVVVVypnutí:ypnutí:ypnutí:ypnutí:ypnutí:Stiskněte tlačítko Clear dokud se nezobrazízákladní nastavení.
Současně stiskněte tlačítka Plus a Minus.Nebo držte jedno ze dvou tlačítek stisknuté apotom stiskněte druhé tlačítko.
Pokud po dobu 90 vteřin nestisknetežádné tlačítko, DISTO se vypne
automaticky.
Více a podrobnější informace ohledně přístrojenajdete v příslušném Návodu k použití.
Abyste DISTO používali přípustným způsobem,řiďte se podrobnými bezpečnostními pokynyuvedenými v Návodu k použití.
Měření délky / Výběr počátkuměření1. Krátce stiskněte tlačítko zapnutí a měření.
2. Pomocí tlačítek Plus nebo Minus nastavtepočátek měření (platí pouze pro jednoměření)
A ....... FrontB ...... StandC ........ Rear
3. Laserem zacilte na cílový bod.
4. Znovu krátce stiskněte tlačítko zapnutí aměření.
5. Přečtěte si změřenou hodnotu.
Používání menuZavolání hlavního menu ze základníhonastavení.
Navigačními tlačítky výběr podmenu / funkcemenu a tlačítkem Enter potvrzení.
… zadání číselné zkratky požadované funkcemenu.
Krátkým stisknutím v menu se vrátíte napředcházející displej. Nebo stisknutím apodržením se zobrazí základní nastavení.
Používání pamětiNásledující oblasti paměti lze zavolat také přesmenu (viz druhá strana).
Paměťová tlačítka:Paměťová tlačítka:Paměťová tlačítka:Paměťová tlačítka:Paměťová tlačítka:9 míst v paměti pro konstanty, mezivýpočty,atd.
Uložení
Vyvolání
Paměť posledních měřPaměť posledních měřPaměť posledních měřPaměť posledních měřPaměť posledních měření:ení:ení:ení:ení:Do “posuvného” registru se automatickyukládá 15 posledních měření, výpočtů nebovstupů.
Data:Data:Data:Data:Data:Hlavní paměť (> 800 míst) s možností přenosudat do PC.
www.kreitel-vermessungsgeraete.de
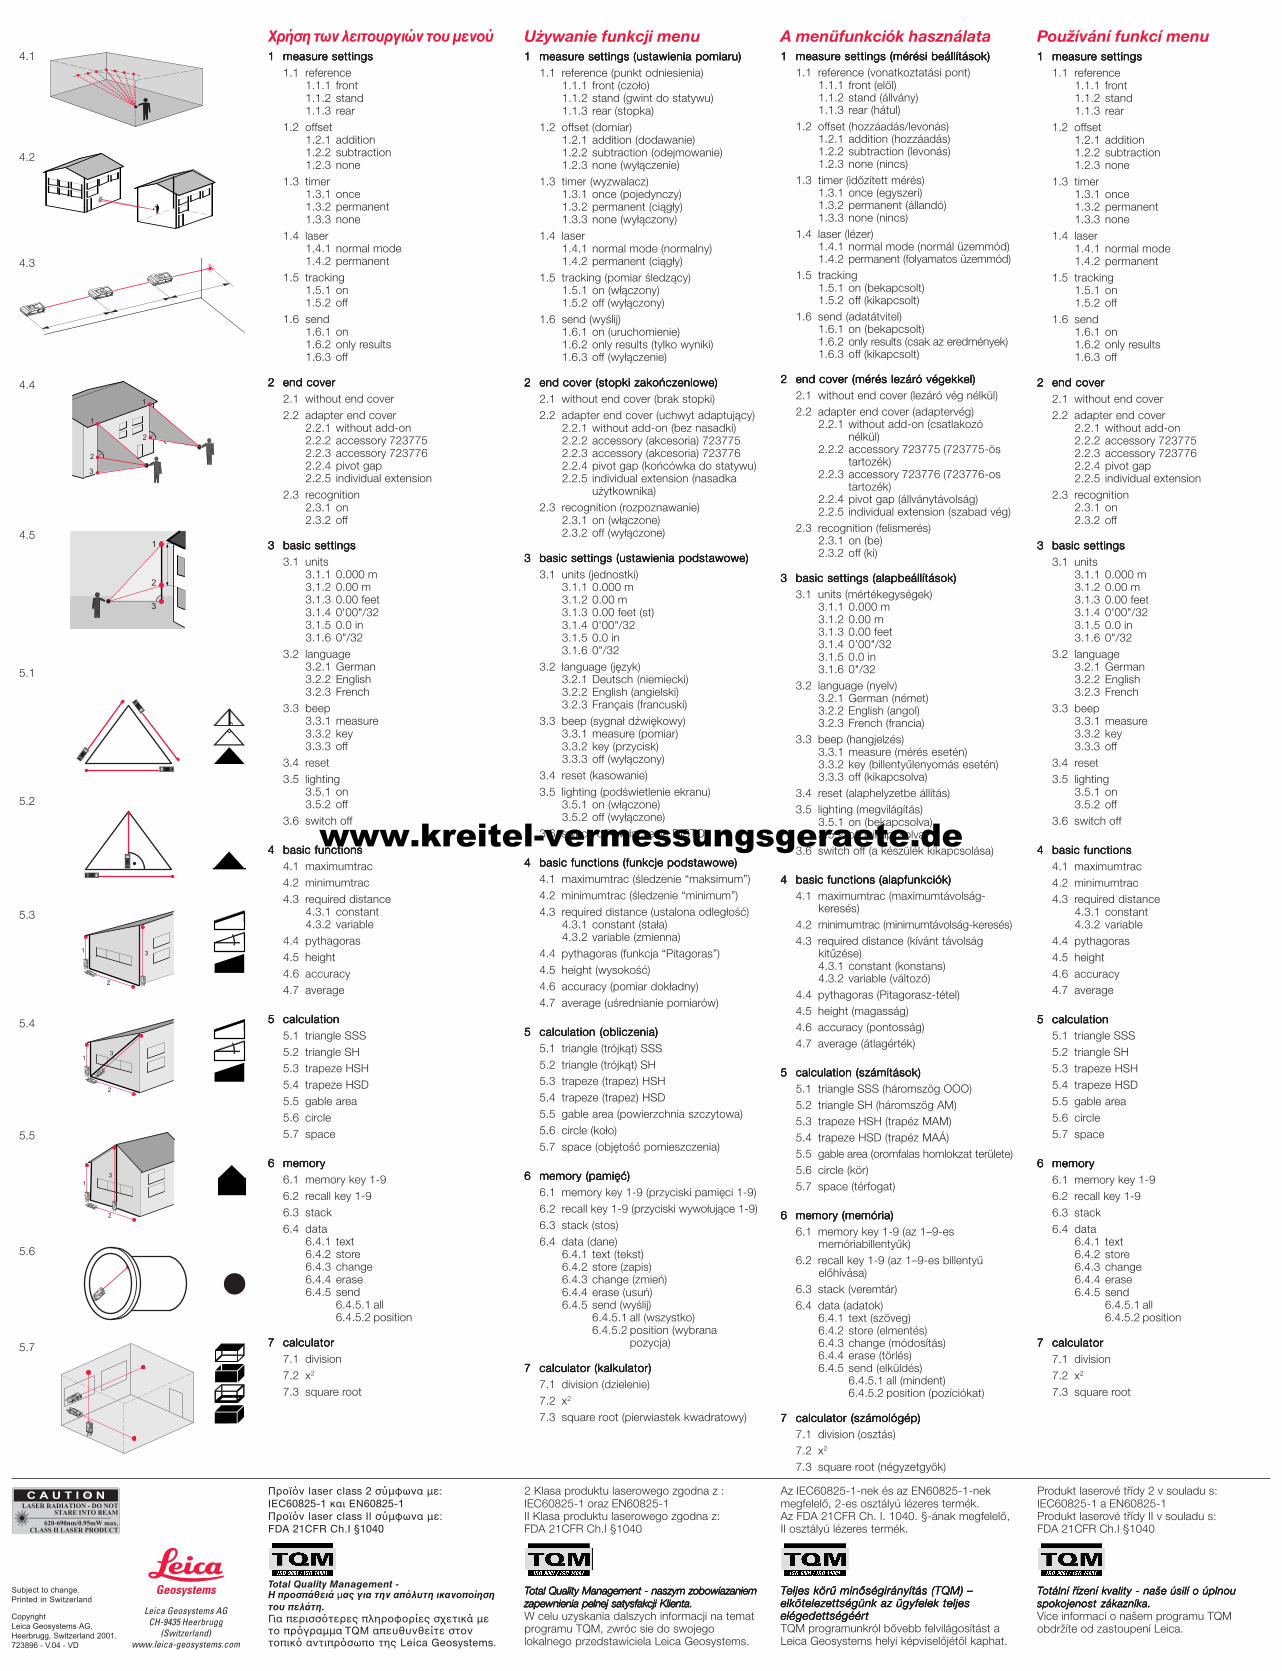
Total Quality Management -H πρ�σπάθειά $ας για την απ!λυτη ικαν�π�ίησητ�υ πελάτη.Για περισσ�τερες πληρ�φ�ρίες σ�ετικά µετ� πρ�γραµµα TQM απευθυνθείτε στ�ντ�πικ� αντιπρ�σωπ� της Leica Geosystems.
Πρ�ϊ�ν laser class 2 σύµφωνα µε:IEC60825-1 και EN60825-1Πρ�ϊ�ν laser class II σύµφωνα µε:FDA 21CFR Ch.I §1040
Leica Geosystems AG
CH-9435 Heerbrugg
(Switzerland)
www.leica-geosystems.com
Subject to change.
Printed in Switzerland
Copyright
Leica Geosystems AG,
Heerbrugg, Switzerland 2001.
723896 - V.04 - VD
�ρήση των λειτ�υργιών τ�υ µεν�ύ11111 measurmeasurmeasurmeasurmeasure settingse settingse settingse settingse settings
1.1 reference1.1.1 front1.1.2 stand1.1.3 rear
1.2 offset1.2.1 addition1.2.2 subtraction1.2.3 none
1.3 timer1.3.1 once1.3.2 permanent1.3.3 none
1.4 laser1.4.1 normal mode1.4.2 permanent
1.5 tracking1.5.1 on1.5.2 off
1.6 send1.6.1 on1.6.2 only results1.6.3 off
22222 end coverend coverend coverend coverend cover2.1 without end cover2.2 adapter end cover
2.2.1 without add-on2.2.2 accessory 7237752.2.3 accessory 7237762.2.4 pivot gap2.2.5 individual extension
2.3 recognition2.3.1 on2.3.2 off
33333 basic settingsbasic settingsbasic settingsbasic settingsbasic settings3.1 units
3.1.1 0.000 m3.1.2 0.00 m3.1.3 0.00 feet3.1.4 0'00"/323.1.5 0.0 in3.1.6 0"/32
3.2 language3.2.1 German3.2.2 English3.2.3 French
3.3 beep3.3.1 measure3.3.2 key3.3.3 off
3.4 reset3.5 lighting
3.5.1 on3.5.2 off
3.6 switch off
44444 basic functionsbasic functionsbasic functionsbasic functionsbasic functions4.1 maximumtrac4.2 minimumtrac4.3 required distance
4.3.1 constant4.3.2 variable
4.4 pythagoras4.5 height4.6 accuracy4.7 average
55555 calculationcalculationcalculationcalculationcalculation5.1 triangle SSS5.2 triangle SH5.3 trapeze HSH5.4 trapeze HSD5.5 gable area5.6 circle5.7 space
66666 memorymemorymemorymemorymemory6.1 memory key 1-96.2 recall key 1-96.3 stack6.4 data
6.4.1 text6.4.2 store6.4.3 change6.4.4 erase6.4.5 send
6.4.5.1 all6.4.5.2 position
77777 calculatorcalculatorcalculatorcalculatorcalculator7.1 division7.2 x2
7.3 square root
4.1
4.4
4.5
5.1
5.2
5.3
5.4
5.5
5.6
5.7
4.2
4.3
TTTTTotal Quality Management - naszym zobowiazaniemotal Quality Management - naszym zobowiazaniemotal Quality Management - naszym zobowiazaniemotal Quality Management - naszym zobowiazaniemotal Quality Management - naszym zobowiazaniemzapewnienia pelnej satysfakcji Klienta.zapewnienia pelnej satysfakcji Klienta.zapewnienia pelnej satysfakcji Klienta.zapewnienia pelnej satysfakcji Klienta.zapewnienia pelnej satysfakcji Klienta.W celu uzyskania dalszych informacji na tematprogramu TQM, zwróc sie do swojegolokalnego przedstawiciela Leica Geosystems.
2 Klasa produktu laserowego zgodna z :IEC60825-1 oraz EN60825-1II Klasa produktu laserowego zgodna z:FDA 21CFR Ch.I §1040
Używanie funkcji menu11111 measurmeasurmeasurmeasurmeasure settings (ustawienia pomiaru)e settings (ustawienia pomiaru)e settings (ustawienia pomiaru)e settings (ustawienia pomiaru)e settings (ustawienia pomiaru)
1.1 reference (punkt odniesienia)1.1.1 front (czoło)1.1.2 stand (gwint do statywu)1.1.3 rear (stopka)
1.2 offset (domiar)1.2.1 addition (dodawanie)1.2.2 subtraction (odejmowanie)1.2.3 none (wyłączenie)
1.3 timer (wyzwalacz)1.3.1 once (pojedynczy)1.3.2 permanent (ciągły)1.3.3 none (wyłączony)
1.4 laser1.4.1 normal mode (normalny)1.4.2 permanent (ciągły)
1.5 tracking (pomiar śledzący)1.5.1 on (włączony)1.5.2 off (wyłączony)
1.6 send (wyślij)1.6.1 on (uruchomienie)1.6.2 only results (tylko wyniki)1.6.3 off (wyłączenie)
22222 end cover (stopki zakończeniowe)end cover (stopki zakończeniowe)end cover (stopki zakończeniowe)end cover (stopki zakończeniowe)end cover (stopki zakończeniowe)2.1 without end cover (brak stopki)2.2 adapter end cover (uchwyt adaptujący)
2.2.1 without add-on (bez nasadki)2.2.2 accessory (akcesoria) 7237752.2.3 accessory (akcesoria) 7237762.2.4 pivot gap (końcówka do statywu)2.2.5 individual extension (nasadka
użytkownika)2.3 recognition (rozpoznawanie)
2.3.1 on (włączone)2.3.2 off (wyłączone)
33333 basic settings (ustawienia podstawowe)basic settings (ustawienia podstawowe)basic settings (ustawienia podstawowe)basic settings (ustawienia podstawowe)basic settings (ustawienia podstawowe)3.1 units (jednostki)
3.1.1 0.000 m3.1.2 0.00 m3.1.3 0.00 feet (st)3.1.4 0'00"/323.1.5 0.0 in3.1.6 0"/32
3.2 language (język)3.2.1 Deutsch (niemiecki)3.2.2 English (angielski)3.2.3 Français (francuski)
3.3 beep (sygnał dźwiękowy)3.3.1 measure (pomiar)3.3.2 key (przycisk)3.3.3 off (wyłączony)
3.4 reset (kasowanie)3.5 lighting (podświetlenie ekranu)
3.5.1 on (włączone)3.5.2 off (wyłączone)
3.6 switch off (wyłączenie DISTO)
44444 basic functions (funkcje podstawowe)basic functions (funkcje podstawowe)basic functions (funkcje podstawowe)basic functions (funkcje podstawowe)basic functions (funkcje podstawowe)4.1 maximumtrac (śledzenie “maksimum”)4.2 minimumtrac (śledzenie “minimum”)4.3 required distance (ustalona odległość)
4.3.1 constant (stała)4.3.2 variable (zmienna)
4.4 pythagoras (funkcja “Pitagoras”)4.5 height (wysokość)4.6 accuracy (pomiar dokładny)4.7 average (uśrednianie pomiarów)
55555 calculation (obliczenia)calculation (obliczenia)calculation (obliczenia)calculation (obliczenia)calculation (obliczenia)5.1 triangle (trójkąt) SSS5.2 triangle (trójkąt) SH5.3 trapeze (trapez) HSH5.4 trapeze (trapez) HSD5.5 gable area (powierzchnia szczytowa)5.6 circle (koło)5.7 space (objętość pomieszczenia)
66666 memory (pamięć)memory (pamięć)memory (pamięć)memory (pamięć)memory (pamięć)6.1 memory key 1-9 (przyciski pamięci 1-9)6.2 recall key 1-9 (przyciski wywołujące 1-9)6.3 stack (stos)6.4 data (dane)
6.4.1 text (tekst)6.4.2 store (zapis)6.4.3 change (zmień)6.4.4 erase (usuń)6.4.5 send (wyślij)
6.4.5.1 all (wszystko)6.4.5.2 position (wybrana
pozycja)
77777 calculator (kalkulator)calculator (kalkulator)calculator (kalkulator)calculator (kalkulator)calculator (kalkulator)7.1 division (dzielenie)7.2 x2
7.3 square root (pierwiastek kwadratowy)
TTTTTeljes körű minőségirányítás (TQM) –eljes körű minőségirányítás (TQM) –eljes körű minőségirányítás (TQM) –eljes körű minőségirányítás (TQM) –eljes körű minőségirányítás (TQM) –elkötelezettségünk az ügyfelek teljeselkötelezettségünk az ügyfelek teljeselkötelezettségünk az ügyfelek teljeselkötelezettségünk az ügyfelek teljeselkötelezettségünk az ügyfelek teljeselégedettségéértelégedettségéértelégedettségéértelégedettségéértelégedettségéértTQM programunkról bővebb felvilágosítást aLeica Geosystems helyi képviselőjétől kaphat.
Az IEC60825-1-nek és az EN60825-1-nekmegfelelő, 2-es osztályú lézeres termék.Az FDA 21CFR Ch. I. 1040. §-ának megfelelő,II osztályú lézeres termék.
A menüfunkciók használata11111 measurmeasurmeasurmeasurmeasure settings (mére settings (mére settings (mére settings (mére settings (mérési beállítások)ési beállítások)ési beállítások)ési beállítások)ési beállítások)
1.1 reference (vonatkoztatási pont)1.1.1 front (elöl)1.1.2 stand (állvány)1.1.3 rear (hátul)
1.2 offset (hozzáadás/levonás)1.2.1 addition (hozzáadás)1.2.2 subtraction (levonás)1.2.3 none (nincs)
1.3 timer (időzített mérés)1.3.1 once (egyszeri)1.3.2 permanent (állandó)1.3.3 none (nincs)
1.4 laser (lézer)1.4.1 normal mode (normál üzemmód)1.4.2 permanent (folyamatos üzemmód)
1.5 tracking1.5.1 on (bekapcsolt)1.5.2 off (kikapcsolt)
1.6 send (adatátvitel)1.6.1 on (bekapcsolt)1.6.2 only results (csak az eredmények)1.6.3 off (kikapcsolt)
22222 end cover (mérend cover (mérend cover (mérend cover (mérend cover (mérés lezárés lezárés lezárés lezárés lezáró végekkel)ó végekkel)ó végekkel)ó végekkel)ó végekkel)2.1 without end cover (lezáró vég nélkül)2.2 adapter end cover (adaptervég)
2.2.1 without add-on (csatlakozónélkül)
2.2.2 accessory 723775 (723775-östartozék)
2.2.3 accessory 723776 (723776-ostartozék)
2.2.4 pivot gap (állványtávolság)2.2.5 individual extension (szabad vég)
2.3 recognition (felismerés)2.3.1 on (be)2.3.2 off (ki)
33333 basic settings (alapbeállítások)basic settings (alapbeállítások)basic settings (alapbeállítások)basic settings (alapbeállítások)basic settings (alapbeállítások)3.1 units (mértékegységek)
3.1.1 0.000 m3.1.2 0.00 m3.1.3 0.00 feet3.1.4 0’00"/323.1.5 0.0 in3.1.6 0"/32
3.2 language (nyelv)3.2.1 German (német)3.2.2 English (angol)3.2.3 French (francia)
3.3 beep (hangjelzés)3.3.1 measure (mérés esetén)3.3.2 key (billentyűlenyomás esetén)3.3.3 off (kikapcsolva)
3.4 reset (alaphelyzetbe állítás)3.5 lighting (megvilágítás)
3.5.1 on (bekapcsolva)3.5.2 off (kikapcsolva)
3.6 switch off (a készülék kikapcsolása)
44444 basic functions (alapfunkciók)basic functions (alapfunkciók)basic functions (alapfunkciók)basic functions (alapfunkciók)basic functions (alapfunkciók)4.1 maximumtrac (maximumtávolság-
keresés)4.2 minimumtrac (minimumtávolság-keresés)4.3 required distance (kívánt távolság
kitűzése)4.3.1 constant (konstans)4.3.2 variable (változó)
4.4 pythagoras (Pitagorasz-tétel)4.5 height (magasság)4.6 accuracy (pontosság)4.7 average (átlagérték)
55555 calculation (számítások)calculation (számítások)calculation (számítások)calculation (számítások)calculation (számítások)5.1 triangle SSS (háromszög OOO)5.2 triangle SH (háromszög AM)5.3 trapeze HSH (trapéz MAM)5.4 trapeze HSD (trapéz MAÁ)5.5 gable area (oromfalas homlokzat területe)5.6 circle (kör)5.7 space (térfogat)
66666 memory (memória)memory (memória)memory (memória)memory (memória)memory (memória)6.1 memory key 1-9 (az 1–9-es
memóriabillentyűk)6.2 recall key 1-9 (az 1–9-es billentyű
előhívása)6.3 stack (veremtár)6.4 data (adatok)
6.4.1 text (szöveg)6.4.2 store (elmentés)6.4.3 change (módosítás)6.4.4 erase (törlés)6.4.5 send (elküldés)
6.4.5.1 all (mindent)6.4.5.2 position (pozíciókat)
77777 calculator (számológép)calculator (számológép)calculator (számológép)calculator (számológép)calculator (számológép)7.1 division (osztás)7.2 x2
7.3 square root (négyzetgyök)
TTTTTotální řízení kvality - naše úsilí o úplnouotální řízení kvality - naše úsilí o úplnouotální řízení kvality - naše úsilí o úplnouotální řízení kvality - naše úsilí o úplnouotální řízení kvality - naše úsilí o úplnouspokojenost zákazníka.spokojenost zákazníka.spokojenost zákazníka.spokojenost zákazníka.spokojenost zákazníka.Více informací o našem programu TQMobdržíte od zastoupení Leica.
Produkt laserové třídy 2 v souladu s:IEC60825-1 a EN60825-1Produkt laserové třídy II v souladu s:FDA 21CFR Ch.I §1040
Používání funkcí menu11111 measurmeasurmeasurmeasurmeasure settingse settingse settingse settingse settings
1.1 reference1.1.1 front1.1.2 stand1.1.3 rear
1.2 offset1.2.1 addition1.2.2 subtraction1.2.3 none
1.3 timer1.3.1 once1.3.2 permanent1.3.3 none
1.4 laser1.4.1 normal mode1.4.2 permanent
1.5 tracking1.5.1 on1.5.2 off
1.6 send1.6.1 on1.6.2 only results1.6.3 off
22222 end coverend coverend coverend coverend cover2.1 without end cover2.2 adapter end cover
2.2.1 without add-on2.2.2 accessory 7237752.2.3 accessory 7237762.2.4 pivot gap2.2.5 individual extension
2.3 recognition2.3.1 on2.3.2 off
33333 basic settingsbasic settingsbasic settingsbasic settingsbasic settings3.1 units
3.1.1 0.000 m3.1.2 0.00 m3.1.3 0.00 feet3.1.4 0'00"/323.1.5 0.0 in3.1.6 0"/32
3.2 language3.2.1 German3.2.2 English3.2.3 French
3.3 beep3.3.1 measure3.3.2 key3.3.3 off
3.4 reset3.5 lighting
3.5.1 on3.5.2 off
3.6 switch off
44444 basic functionsbasic functionsbasic functionsbasic functionsbasic functions4.1 maximumtrac4.2 minimumtrac4.3 required distance
4.3.1 constant4.3.2 variable
4.4 pythagoras4.5 height4.6 accuracy4.7 average
55555 calculationcalculationcalculationcalculationcalculation5.1 triangle SSS5.2 triangle SH5.3 trapeze HSH5.4 trapeze HSD5.5 gable area5.6 circle5.7 space
66666 memorymemorymemorymemorymemory6.1 memory key 1-96.2 recall key 1-96.3 stack6.4 data
6.4.1 text6.4.2 store6.4.3 change6.4.4 erase6.4.5 send
6.4.5.1 all6.4.5.2 position
77777 calculatorcalculatorcalculatorcalculatorcalculator7.1 division7.2 x2
7.3 square root
www.kreitel-vermessungsgeraete.de
Related Documents


![FE-115 X-715 Manual Avancado PT - … · • É visualizada a imagem rodada. 3 Premir [\ para seleccionar [SAIR] e premir i. • Premir para sair do menu. ... Ligar a câmara à impressora](https://static.cupdf.com/doc/110x72/5bb53a1a09d3f250788c6a1e/fe-115-x-715-manual-avancado-pt-e-visualizada-a-imagem-rodada-3-premir.jpg)
![FE-110 X-705 FE-100 X-710 Manual Avancado PT.pdf€¦ · • É visualizada a imagem rodada. 3 Premir [\ para seleccionar [SAIR] e premir i. • Premir para sair do menu. ... Ligar](https://static.cupdf.com/doc/110x72/5bb53a1a09d3f250788c6a15/fe-110-x-705-fe-100-x-710-manual-avancado-pt-e-visualizada-a-imagem-rodada.jpg)

