Kofax RPA Installation Guide Version: 11.1.0 Date: 2020-09-16

Welcome message from author
This document is posted to help you gain knowledge. Please leave a comment to let me know what you think about it! Share it to your friends and learn new things together.
Transcript
Kofax RPAInstallation GuideVersion: 11.1.0
Date: 2020-09-16

© 2015–2020 Kofax. All rights reserved.
Kofax is a trademark of Kofax, Inc., registered in the U.S. and/or other countries. All other trademarksare the property of their respective owners. No part of this publication may be reproduced, stored, ortransmitted in any form without the prior written permission of Kofax.

Table of ContentsPreface.......................................................................................................................................................... 4
Related Documentation...................................................................................................................... 4Offline Documentation............................................................................................................. 6
Training............................................................................................................................................... 9Getting help with Kofax products.......................................................................................................9
Chapter 1: Dependencies and Prerequisites......................................................................................... 11Chapter 2: Install Kofax RPA................................................................................................................... 19
Install on Windows........................................................................................................................... 20Install Desktop Automation Service.......................................................................................21Install Document Transformation Components..................................................................... 23Install Kapplets.......................................................................................................................35
Install on Linux................................................................................................................................. 41Silent Installation on Windows......................................................................................................... 42Install and Configure CyberArk........................................................................................................ 43Important Folders in Kofax RPA...................................................................................................... 46White-label Kofax RPA..................................................................................................................... 48
Chapter 3: Provide License Information.................................................................................................49License Keys.................................................................................................................................... 49Concurrent Robot Execution License...............................................................................................50Kofax RPA Compute Units...............................................................................................................51Enter License in Design Studio........................................................................................................52
Chapter 4: Switch Display Language for Management Console and Design Studio......................... 53Chapter 5: Kofax RPA Initial Configuration........................................................................................... 55Chapter 6: Quick Start Guide.................................................................................................................. 56
Install the software........................................................................................................................... 56Start Management Console and RoboServer.................................................................................. 56Access Management Console and enter license key......................................................................57Configure Management Console settings........................................................................................ 57Management Console authentication...............................................................................................58Configure Management Console before running robots..................................................................59Build Robots..................................................................................................................................... 62Upload Robots..................................................................................................................................62Run robots........................................................................................................................................ 62
3
Preface
This guide, which explains how to install Kofax RPA in a development environment, covers both interactive and "silent" installation procedures for Windows, as well as standard and "headless"procedures for Linux.
Note If you plan to install Kofax RPA in a production environment, see the Administrator's Guide.
In a production environment, we strongly recommend deployment of the Management Console on astand-alone Tomcat server. This recommendation is based on, but not limited to the following.• Derby is used as a system database in embedded mode, which is not recommended for production
environment.• Management Console on Tomcat:
• Can use an enterprise class database for improved performance and data security.• Can integrate with LDAP and SAML.
• Tomcat can be configured to customer requirements.
Before installing Kofax RPA, you must decide whether to install the 32-bit or the 64-bit version. The keyissues to consider are:• Your operating system may only support one of the versions. 64-bit Windows supports both. On Linux,
only the 64-bit version is supported.• The 64-bit version is mainly useful on servers where you want to run a RoboServer that uses significant
RAM. (You will need to configure the allowed amount of RAM after installation, as described in the"Changing the RAM Allocation" section in the Administrator's Guide).
This guide describes:• How to install Kofax RPA, either interactively or "silently" (without user interaction).• How to enter license information so that you can start Kofax RPA.• How to configure Kofax RPA.• How to set up Kofax RPA server applications to start automatically when the computer restarts.
Related DocumentationThe documentation set for Kofax RPA is available here:1
https://docshield.kofax.com/Portal/Products/RPA/11.1.0_vwsnqu4c9o/RPA.htm
1 You must be connected to the Internet to access the full documentation set online.
4

Kofax RPA Installation Guide
You can also access individual guides and online help directly from your Kofax RPA installation. When youclick the help button in Design Studio, Management Console, Desktop Automation Service, and ProcessDiscovery, online documentation appears in a new browser window.
Note If the security policy for your organization restricts Internet access or the Internet connection is notstable, you can access the documentation in offline mode while using the product.
In addition to this guide, the documentation set includes the following items:
Kofax RPA Release NotesContains late-breaking details and other information that is not available in your other Kofax RPAdocumentation.
Kofax RPA Technical SpecificationsContains information on supported operating systems and other system requirements.
Kofax RPA Upgrade GuideContains instructions on upgrading Kofax RPA and its components to a newer version.
Kofax RPA Administrator's GuideDescribes administrative and management tasks in Kofax RPA.
Help for Kofax RPADescribes how to use Kofax RPA. The Help is also available in PDF format under the title of Kofax RPAUser's Guide.
Kofax RPA Best Practices Guide for Robot Lifecycle ManagementOffers recommended methods and techniques to help you optimize performance and ensure successwhile using Robot Lifecycle Management in your Kofax RPA environment.
Kofax RPA Getting Started with Desktop Automation GuideProvides a tutorial that walks you through the process of using Kofax RPA Desktop Automation to build arobot.
Kofax RPA Getting Started with Document Transformation GuideProvides a tutorial that explains how to use Document Transformation functionality in a Kofax RPAenvironment, including OCR, classification, extraction, field formatting, and validation.
Kofax RPA Desktop Automation Service Configuration GuideDescribes how to configure the Desktop Automation Service required to use Desktop Automation on aremote computer.
Kofax RPA Developer's GuideContains information on the API that is used to execute robots on the RoboServer.
5
Kofax RPA Installation Guide
Kofax RPA Integration API documentationContains information about the Kofax RPA Java API and the Kofax RPA .NET API, which provideprogrammatic access to the Kofax RPA product. The Java API documentation is available from both theonline and offline Kofax RPA documentation, while the .NET API documentation is available only offline.
Note The Kofax RPA APIs include extensive references to RoboSuite, the original product name. TheRoboSuite name is preserved in the APIs to ensure backward compatibility. In the context of the APIdocumentation, the term RoboSuite has the same meaning as Kofax RPA.
Offline DocumentationTo make the documentation available for use in offline mode, obtain the documentation files from theKofax RPA product package that you downloaded from the Kofax Fulfillment Site. The product packageincludes the following documentation files for offline use:• KofaxRPADocumentation_11.1.0_EN.zip
Contains the entire Kofax RPA documentation set in English.• KofaxRPADocumentation_11.1.0_JA.zip
Contains the entire Kofax RPA documentation set in Japanese.
After you install the Kofax RPA product, extract the contents of the documentation .zip files for thelanguages you require. The .zip file for each language contains the following folders:• API• Best Practices• Design Studio• Desktop Automation Service• Management Console• Process Discovery
After you extract the files, the documentation folder for Design Studio, Desktop Automation Service, andProcess Discovery will have the following structure:
• EN and/or JA (for English and Japanese, respectively)• print and/or help (for PDF documentation and Help for Kofax RPA, respectively)
For Management Console, there are no documentation or language code folders, and only theManagementConsoleHelp.war file will be added to the Management Console program files.
When the offline documentation is installed for an RPA component according to the instructions below,the component will use the offline version of the documentation by default, even if an active Internetconnection exists.
Offline API documentationThe API folder contains the API references in English.
1. Copy the API folder from the English .zip file extracted above to any folder on your computer.
2. In this folder, double-click Overview.html to open the API documentation.
6

Kofax RPA Installation Guide
Offline documentation for Design Studio
1. Open the Design Studio folder from the English .zip file extracted above and copy the EN folder toone of the following folders, depending on your installation:• C:\Program Files(x86)\Kofax RPA 11.1.0.0 x32\documentation
• C:\Program Files\Kofax RPA 11.1.0.0 x64\documentation
2. If you require the Japanese documentation, open the Design Studio folder from the Japanese .zipfile extracted above and copy the JA folder to the same location.
3. Start Design Studio and navigate to Settings > Design Studio Settings.
4. On the General tab, in Documentation location, select Offline in the list.
5. Save the changes.
To switch to online mode, select Online in Design Studio Settings and save the changes.
Note If you try to access the online documentation from Kofax RPA without Internet access, theRetrieving help and documentation warning is displayed. If you select Do not show this notificationagain and later you want to reset this option, select Show documentation retrieval notifications onthe General tab in Design Studio Settings.
Offline documentation for Management Console
1. Open the Management Console folder from the English .zip file extracted above and copy theManagementConsoleHelp.war file to:C:\<Tomcat installation folder>\Tomcat <version>\webapps
Note The English and Japanese .zip files contain the same .war file, which includes both Englishand Japanese documentation. If you copied the .war file from the English .zip file and you requirethe Japanese version of documentation, no further actions are needed.
2. Start Management Console.
3. In the Settings section, open the Base URL settings.
4. Select Use local documentation. In Local documentation base URL, specify the URL to theTomcat website containing the documentation.Example: http://localhost:8080/ManagementConsoleHelp/
5. Save the changes.
You may need to refresh Management Console for the changes to take effect.
To switch to online mode, clear Use local documentation in the Base URL settings and save thechanges.
7
Kofax RPA Installation Guide
Offline documentation for Desktop Automation Service
1. Navigate to the folder documentation that resides in:C:\Program Files(x86)\RPA DesktopAutomation 11.1.0.0 x32
2. Open the Desktop Automation Service folder from the English .zip file extracted above andcopy the EN folder to the documentation folder.
3. If you require the Japanese documentation, open the Desktop Automation Service folder fromthe Japanese .zip file extracted above and copy the JA folder to the same location.
To switch to online mode, delete or move the documentation folder from the RPADesktopAutomation 11.1.0.0 x32 folder.
Offline documentation for Process Discovery
1. In each of the following folders, create a new folder called documentation.• C:\Program Files (x86)\Kofax RPA Process Discovery Agent 11.1.0.0 x32
• C:\Program Files (x86)\Kofax RPA Process Discovery Analyzer 11.1.0.0 x32
2. Open the Process Discovery folder from the English .zip file extracted above and copy the ENfolder to the newly created documentation folders.
3. If you require the Japanese documentation, open the Process Discovery folder from theJapanese .zip file extracted above and copy the JA folder to the same locations.
To switch to online mode, delete or move the documentation folder from the Kofax RPA ProcessDiscovery Agent 11.1.0.0 x32 and Kofax RPA Process Discovery Analyzer 11.1.0.0x32 folders.
Offline documentation for KappletsThe offline documentation for Kofax RPA Kapplets is contained in the same .war file as for ManagementConsole, which you have already copied from the English.zip file to the required location on yourcomputer (Tomcat installation folder). To use the Kapplets documentation in offline mode, follow thesesteps.
1. Depending on whether Kapplets are installed in embedded mode, on Tomcat, or on Docker,configure the required properties in a respective configuration file. For information on eachinstallation scenario, see "Install Kapplets" in the Kofax RPA Installation Guide.• Embedded mode. Create an application-help.properties using the following template
and place it next to the application.properties file in the folder from where Kapplets arerun.kapplets.services.mc.connection.url=http:// <host-url>:<port>/ManagementConsolekapplets.services.mc.connection.username=<username>kapplets.services.mc.connection.password=<password>kapplets.services.help.languages-map[en]=ENkapplets.services.help.languages-map[ja]=JAkapplets.services.help.base-url=http://<host-url>:<port>/ManagementConsoleHelp/@@language@@/help/kap_help/kapplets
8
Kofax RPA Installation Guide
kapplets.services.help.landing-url=http://<host-url>:<port>/ManagementConsoleHelp/@@language@@/help/kap_help/kapplets/c_rpakappletsmain.html
Note In this scenario, the offline documentation can be used only if the Management Console isdeployed on Tomcat.
• On Tomcat. To the kapplets.xml file, add the following properties at the end of the file.<Environment name="kapplets.services.help.languages-map[en]" value="EN" type="java.lang.String" override="false"/><Environment name="kapplets.services.help.languages-map[ja]" value="JA" type="java.lang.String" override="false"/><Environment name="kapplets.services.help.base-url" value="http://<host-url>:<port>/ManagementConsoleHelp/@@language@@/help/kap_help/kapplets" type="java.lang.String" override="false"/><Environment name="kapplets.services.help.landing-url" value="http://<host-url>:<port>/ManagementConsoleHelp/@@language@@/help/kap_help/kapplets/c_rpakappletsmain.html" type="java.lang.String" override="false"/>
• On Docker. In the docker-compose.yml file, add the following properties to the environmentsection at the end of the file. - KAPPLETS_SERVICES_HELP_LANGUAGES-MAP[en]=EN - KAPPLETS_SERVICES_HELP_LANGUAGES-MAP[ja]=JA - KAPPLETS_SERVICES_HELP_BASE-URL=http://<host-url>:<port>/ManagementConsoleHelp/@@language@@/help/kap_help/kapplets - KAPPLETS_SERVICES_HELP_LANDING-URL=http://<host-url>:<port>/ManagementConsoleHelp/@@language@@/help/kap_help/kapplets/c_rpakappletsmain.html
2. Save the file. You may need to restart the Tomcat server for the changes to take effect.
To switch to online mode, delete the four properties from the configuration file, save the changes, andrestart the server.
TrainingKofax offers both classroom and computer-based training to help you make the most of your Kofax RPAsolution. Visit the Kofax Education Portal at https://learn.kofax.com/ for details about the available trainingoptions and schedules.
Also, you can visit the Kofax Intelligent Automation SmartHub at https://smarthub.kofax.com/ to exploreadditional solutions, robots, connectors, and more.
Getting help with Kofax productsThe Kofax Knowledge Base repository contains articles that are updated on a regular basis to keep youinformed about Kofax products. We encourage you to use the Knowledge Base to obtain answers to yourproduct questions.
To access the Kofax Knowledge Base, go to the Kofax website and select Support on the home page.
9

Kofax RPA Installation Guide
Note The Kofax Knowledge Base is optimized for use with Google Chrome, Mozilla Firefox or MicrosoftEdge.
The Kofax Knowledge Base provides:• Powerful search capabilities to help you quickly locate the information you need.
Type your search terms or phrase into the Search box, and then click the search icon.• Product information, configuration details and documentation, including release news.
Scroll through the Kofax Knowledge Base home page to locate a product family. Then click a productfamily name to view a list of related articles. Please note that some product families require a validKofax Portal login to view related articles.
• Access to the Kofax Customer Portal (for eligible customers).Click the Customer Support link at the top of the page, and then click Log in to the Customer Portal.
• Access to the Kofax Partner Portal (for eligible partners).Click the Partner Support link at the top of the page, and then click Log in to the Partner Portal.
• Access to Kofax support commitments, lifecycle policies, electronic fulfillment details, and self-servicetools.Scroll to the General Support section, click Support Details, and then select the appropriate tab.
10
Chapter 1
Dependencies and Prerequisites
This chapter lists components and required configuration settings to use different Kofax RPA features. Forinformation on supported platforms and versions, see the Kofax RPA Technical Specifications documenton the Kofax RPA Product Documentation site.
Real-time data: If you have a solution where users are waiting for results in real-time, CPU speed isnormally the bottleneck, and you should buy the fastest CPU available for your hardware platform.
Dedicated hardware: For best performance, we recommend that you always run RoboServer,Management Console, or Document Transformation Service each on dedicated hardware. That meansthat you should not run database servers and other services on the same hardware with your RoboServer,Management Console, or Document Transformation Service.
Any email field in Kofax RPA can contain up to 255 characters. Do not exceed the number of characters inthe email field.
Windows installation prerequisitesIf you get the error: "Module <modulename> not found," install the following update.https://support.microsoft.com/en-us/kb/2999226Note that <modulename> can be "automationnative", "cef" or any other Kofax RPA module name.If the Windows update is not available on your system, use the following workaround.
1. Create a c:\temp\976571 folder.
2. Use the following command to extract the contents of the MSU file:Expand -F:* c:\kb976571\Windows6.1-KB976571-v2-x64.msu c:\temp\976571
This command extracts multiple files, from Windows6.1-KB976571-v2-x64.cab.
3. Run the following command:DISM.exe /Online /Add-Package /PackagePath:c:\temp\976571\Windows6.1-KB976571-v2-x64.cab
For more information, see How to use DISM to install a hotfix from within Windows on the MicrosoftTechnet website https://blogs.technet.microsoft.com.
11

Kofax RPA Installation Guide
Linux installation dependenciesWhen installing on Ubuntu, Ubuntu 14.04 LTS with the libqt5webkit5 library is required.The minimal Linux installation must include the following libraries to be able to run robots created with thedefault browser engine.• libX11.so.6• libGL.so.1• libXext.so.6
To use cross-platform authentication (Negotiate and NTLM protocols), your Linux installation must includethese Generic Security Service API (GSS-API) libraries:• libgssapi_krb5.so.2• libgssapi.so.4• libgssapi.so.2• libgssapi.so.1
Note Kofax RPA supports libssl1.0.2 or below.
Use the yum install or sudo apt-get command to install necessary libraries on a Linux platform.You must also install fonts on a headless Linux server for the WebKit robots to work.• Instructions for installing fonts for CentOS / RedHat• Instructions for installing fonts for Ubuntu
Databases
Important Please create and maintain the Kofax RPA product databases according to therecommendations in the product documentation. If you are considering database modifications orcustomizations, do not proceed without consulting Kofax; otherwise, the results are unpredictable andthe software may become inoperable.
You can use Microsoft SQL Server with integrated Windows Authentication as a logging (logdb) databaseonly in the following cases:
Important Microsoft SQL Server with integrated Windows Authentication cannot be used as a logging(logdb) database when you run Management Console and RoboServer in embedded mode.Also, make sure that SQL Server Authentication of the Microsoft SQL Server is disabled.
• Both Management Console and RoboServer must run only on a Windows platform.• Management Console must be installed on a Tomcat server.• The JDBC driver, including DLLs, must be manually installed into both Management Console and all
RoboServer installations without using the JDBC distribution mechanism in the Management Console.
Oracle Connection URL must use ${ServerName}:${Schema}. Using ${ServerName}:${ServiceName} is not supported.You can use PostgreSQL database only for storing your data. PostgreSQL cannot be used as aManagement Console system, logging, or audit database.
12
Kofax RPA Installation Guide
Be aware that loss of data may occur when storing data in Oracle, Sybase or MySQL. On Oracle, anempty string is converted to null. On Sybase, an empty string is converted to " " (a single space). OnMySQL, millisecond precision is lost when storing dates. For details, see the ObjectKey Caveats sectionin the Storing Data in Databases topic in the Kofax RPA help.
Note For correct display of data in the Kofax Insight Dashboard, make sure Java correctly sets thetime according to your time zone on RoboServers and computers running Management Consoles. Seethe Timezone Data Versions in the JRE Software on the Oracle web site for the latest updates in timezones. If necessary, use the Timezone Updater Tool to update the time zone information.
Document Transformation prerequisites and limitationsInstall all the latest Windows updates before installing and using Kofax RPA Document Transformation.
PrerequisitesThe maximum document size for transformation is 100 MB. Kofax RPA imposes a file size limit for atransformed document to enable protection against the denial-of-service attacks. You can lower thefile size value to protect against such an attack. To change the document size limit, edit the followingparameter in the Web.config file in the Kofax DTS\Transformation Services directory in theKofax RPA installation folder.<httpRuntime targetFramework="4.5.1" maxRequestLength="104857600"/>
The following are other requirements you need to observe.• Do not install Kofax RPA Document Transformation on the computer running Kofax Transformation
or Kofax TotalAgility.• You can re-use existing KTM, KTT, and RTTI projects version 6.2 or earlier.• You cannot re-use KTA projects, because KTA does not provide a way to export a KTA Extraction/
Classification group to a complete .fpr file.
LimitationsThe following Kofax Transformation features are not supported.• Rich client user modules (Doc Review, Validation, Verification, Correction)• ThinClient user modules other than validation (Verification and Correction)• Multiple steps of Validation• Configuration Sets for migration between systems• A2iA engines• Reporting settings
Desktop Automation requirements and prerequisitesThe following sections list components that must be installed and configured on the automation devices(remote computers you want to automate) before you can use the Desktop Automation feature in KofaxRPA.
Java Access BridgeTo automate Java programs or Java applets on remote devices with Kofax RPA, install Java 32-bit onyour device (JRE or JDK) and enable the Java Access Bridge in the Java Runtime Environment usedby the application. We recommend using the latest available Java version.
For JRE 7 or LaterTo enable Java Access Bridge for Java version 7 or later, navigate to the bin directory in the Javainstallation directory and run the following command.
13

Kofax RPA Installation Guide
jabswitch -enable
For JRE6Follow this procedure to install Java Access Bridge 2.0.2 on a Windows 32-bit system. For olderapplications that require Java version 1.6, copy the following files to the specified destinationdirectories, where %WINDOWSHOME% is the directory where Microsoft Windows is installed (forexample, C:\WINDOWS), and %JAVAHOME% is the directory where your JDK or JRE is installed.The following are examples of directory names for Java SE 6 Update 24.• JDK: C:\Program Files\Java\jdk1.6.0_24\jre
• JRE: C:\Program Files\Java\jre6
The following table lists Java Access Bridge Windows libraries and related files for Windows 32-bitsystems.
Java Access Bridge File Destination Directory
WindowsAccessBridge.dll %WINDOWSHOME%\SYSTEM32
JavaAccessBridge.dll %JAVAHOME%\bin
JAWTAccessBridge.dll %JAVAHOME%\bin
accessibility.properties %JAVAHOME%\lib
access-bridge.jar %JAVAHOME%\lib\ext
14

Kofax RPA Installation Guide
Java Access Bridge File Destination Directory
jaccess.jar %JAVAHOME%\lib\ext
For more information, search the Downloads page on the Oracle web site ( http://www.oracle.com/technetwork/java/javase/downloads/) to locate and download jab-2-0-2. For installationinstructions, see "installing-jab-32-bit" on the http://docs.oracle.com website.Perform the following to test that you have installed Java Access Bridge properly.
1. Run the SwingSet2 application and then run the JavaMonkey.exe application.
2. Select File > Refresh Tree in the Java Monkey application and the SwingSet2 applicationshould appear.
Alternatively, you can use the JavaFerret.exe application.
WebDAV RedirectorWhen using the Robot File System on a computer where the Desktop Automation Service is installed,to be able to connect to the service, you require the WebDAV Redirector. Some operating systems donot include WebDAV by default, so you need to manually install it.For example, to install it on a Windows Server 2008, 2008 R2, 2012, or 2012 R2, in the WindowsServer Manager -> Features, check the Desktop Experience option. For a Windows Server 2016,check the WebDAV Redirector option..
Requirements for Linux-based platformsTo use Desktop Automation, install the libxslt1.1 package.To use the built-in browser in Desktop Automation on Ubuntu-based distributions, install the followingpackages:• gconf-service• libasound2• libatk1.0-0• libc6• libcairo2• libcups2• libdbus-1-3• libexpat1• libfontconfig1• libgcc1• libgconf-2-4• libgdk-pixbuf2.0-0• libglib2.0-0• libgtk2.0-0• libnspr4• libnss3• libpango-1.0-0• libpangocairo-1.0-0
15

Kofax RPA Installation Guide
• libx11-xcb1• libxcb1• libxcomposite1• libxcursor1• libxdamage1• libxfixes3• libxi6• libxrandr2• libxrender1• libxss1• libxtst6• Xvfb
To use the built-in browser in Desktop Automation on Red Hat and CentOS-based distributions, installthe packages containing the following libraries:• atk.x86_64• gtk2.x86_64• epel-release• GConf2• qt5-qtwebkit• qt5-qtwebkit-devel• qtwebkit-devel• libX11.so.6• libGL.so.1• libXext.so.6• libxslt• libXtst.x86_64• libXScrnSaver• libX11-xcb.so.1• libfontconfig.so.1• libpango-1.0.so.0• libpangocairo-1.0.so.0• libcairo.so.2• libXcomposite.so.1• libXcursor.so.1• libXdamage.so.1• libXfixes.so.3• libXi.so.6• libXrender.so.1• libXtst.so.6• libXrandr.so.2
16
Kofax RPA Installation Guide
• libXss.so.1• libgconf-2.so.4• libgio-2.0.so.0• libasound.so.2• libcups.so.2• libdbus-1.so.3• libatk-1.0.so.0• libgtk-x11-2.0.so.0• libgdk-x11-2.0.so.0• libgdk_pixbuf-2.0.so.0• libnspr4.so• libnss3.so• libnssutil3.so• libsmime3.so• libexpat.so.1• libxcb.so.1• xorg-x11-server-Xvfb
To use the "Open" step action, which allows an application to open on an automated device with anRDP connection, install the packages containing the following libraries:• libc.so.6• libxcb.so.1• libXext.so.6• libdl.so.2• libpthread.so.0• libm.so.6• libssl.so.1.1• libcrypto.so.1.1.0• libXau.so.6• libXdmcp.so.6
For more information on this action, see "Open" in the Kofax RPA help.
Prerequisites for Internet ExplorerTo automate Internet Explorer for use with the Desktop Automation feature, check the followingrequirements.• In Internet Explorer 7 and higher on Windows 7, set the same value (either On or Off) in the
Protected Mode settings for each zone. To open the Protected Mode settings in Internet Explorer,select Tools > Internet options and click the Security tab. For each zone, select the EnableProtected Mode option and select the same security level.
• For IE 10 and higher, disable the Enhanced Protected Mode in the Security settings on theAdvanced tab of the Internet Options window.
• For IE 11 only, check that a FEATURE_BFCACHE subkey with a DWORD value namediexplore.exe is present in the registry on the target computer. This subkey enables the driver
17
Kofax RPA Installation Guide
to maintain a connection to the instance of Internet Explorer it creates. For 32-bit Windows,examine the HKEY_LOCAL_MACHINE\SOFTWARE\Microsoft\Internet Explorer\Main\FeatureControl\FEATURE_BFCACHE key in the registry editor. For 64-bit Windows, examinethe HKEY_LOCAL_MACHINE\SOFTWARE\Wow6432Node\Microsoft\Internet Explorer\Main\FeatureControl\FEATURE_BFCACHE key. If the FEATURE_BFCACHE subkey is notpresent, create it and create a DWORD value named iexplore.exe with the value "0" in the key.
• Set the browser zoom level to 100% to align the native mouse events with the correct coordinates.
Note In some cases, out-of-browser Silverlight applications can interfere with Desktop Automation.The cause of the problem is the Internet Explorer subdriver. To disable the subdriver, clear the"Extended Internet Explorer Support" option on the Windows tab of the Desktop AutomationService configuration window.
SAP prerequisitesTo automate an SAP application for use with the Desktop Automation feature, enable scripting on boththe server and the client sides.• On the client, go to SAP GUI Options and enable scripting. Also, turn off notifications, because
they interrupt the automation process.• To enable scripting on the SAP server, perform the following steps. Note that you must have
administrative privileges to change the sapgui/user_scripting parameter.
1. Log in to your SAP server.
2. Run transaction RZ11. Specify the parameter name sapgui/user_scripting and clickDisplay. If Parameter name is unknown appears in the status bar, it indicates that youare missing the current support package. Check your installed packages.
3. Change the value to TRUE.
4. Click Save.
Note that some elements, such as scroll bars, are only available if you run the SAP client on amachine with a Windows Classic desktop theme.
18

Chapter 2
Install Kofax RPA
This chapter describes how to install Kofax RPA on a single computer in a developer environment. Seethe Administrators Guide for installation and deployment in a production environment.
The complete installer is delivered as a .zip file. For the Windows platform, Kofax RPA has five installersthat install different components of the software:• Kofax RPA Design Studio installer: Installs Design Studio, but does not install RoboServer,
Management Console or API. Use this installer if you have a central Management Console/LicenseServer and need a separate copy of Design Studio.
• Kofax RPA RoboServer installer: Installs RoboServer only and does not install Management Console orDesign Studio. This installer is useful, if you need to set up dedicated RoboServer machines.
• Configurable full Kofax RPA installer: Installs all of the core components, including Git Synchronizer, orselected components that you specify.
• Kofax RPA Desktop Automation installer: Installs the Desktop Automation Agent to automate remotedevices.
• Kofax RPA DTS (Document Transformation Service) installer: Installs the Kofax RPA DocumentTransformation components.This installer contains the following components required to run:• Document Transformation Project Builder• Kofax Licensing Server• Document Transformation Services• Document Transformation Thin Client Server• Document Transformation Standard Projects• Document Transformation Service Scheduler
Prerequisite: Prior to unzipping the software archive file, right-click the .zip file and unblock it to preventissues during installation. Disregard this step if the Unblock option is not displayed.
Silent Installation
19
Kofax RPA Installation Guide
As another option, you can perform a silent installation. If you run a silent installation of the full installer,you get the "Typical" install. See Silent Installation on Windows for details.
For Linux, Kofax RPA provides a full installer as well as rpm and deb packages for installing RoboServeras a service. See Install on Linux for details.
Upgrade from Earlier VersionsIn the interest of stability, different versions of Kofax RPA may be installed side by side on the samecomputer without interfering with each other (except that they must be configured to use different portnumbers for the Management Console if run simultaneously). This means that you can install a newerversion and get acquainted with it while still doing your daily work with the older version.You can copy important data such as uploaded robots, execution schedules and so on from one version ofManagement Console to another by making a backup of the old installation and "restoring" it into the newone. Making a backup varies in different versions of Kofax RPA, so check help or User's Guide to learnhow to create a backup.For more information about upgrade procedures, see the Kofax RPA Upgrade Guide.
Note Effective since Kofax RPA version 10.3, any admin user can restore a backup created by any otheradmin user.
Install on WindowsThe complete Kofax RPA installer provides the following installation options. Optional items are listed withan asterisk.• Design Studio: Installs Design Studio and its required components• RoboServer: Installs RoboServer
• Embedded Management Console: Installs components needed to run an embedded ManagementConsole on the RoboServer
• Management Console: Creates the WAR file for manual installation of the Management Console• SQL scripts for database tables• API*: Installs necessary API components
The following files install separate Kofax RPA components.• If you are installing Design Studio only, download and save
the Kofax_RPA_DesignStudio_11.1.0.0_x32.msi orKofax_RPA_DesignStudio_11.1.0.0_x64.msi file to your hard disk. After the download iscompleted, run the file to start the installation and follow the installer prompts.
• To install a RoboServer, download and save the Kofax_RPA_RoboServer_11.1.0.0_x32.msior Kofax_RPA_RoboServer_11.1.0.0_x64.msi file to your hard disk. After the download iscompleted, run the file to start the installation and follow the installer prompts.
• To install the Desktop Automation Service, download and save theKofax_RPA_DesktopAutomation_11.1.0.0_x32.msi. After the download is completed, run thefile on the computer you want to automate and follow the installer prompts. For more information, seeInstall Desktop Automation Service.
20
Kofax RPA Installation Guide
As another option, you can use the silent installation to automate the installation process.
Note You need administrator rights to install Kofax RPA on Windows.
Install Desktop Automation ServiceTo install the Desktop Automation Service, download and save theKofax_RPA_DesktopAutomation_11.1.0.0_x32.msi file to your hard disk. After the downloadis completed, run the file on the computer you want to automate to start the installation. The DesktopAutomation Service is installed in autostart mode. Note that you do not need to install the DesktopAutomation Service to automate terminals.
Note• To avoid the conflict of resources, the Desktop Automation Service must not be installed on the same
local computer as the Design Studio, unless you intend to use the Local Desktop Automation feature,which was designed primarily for demonstration purposes. For more information on the latter, seeHelp for Kofax RPA.
• RoboServer cannot run a Desktop Automation robot more than once if it is installed on the samecomputer as the Desktop Automation Service. Therefore, the Desktop Automation Service must notbe installed on the same local computer as the RoboServer that it connects to.
Install the virtual input driverDuring the Desktop Automation Service installation, you can install the virtual input driver, which is aWindows device driver that simulates hardware keyboard and mouse. To install it, select Install thevirtual input driver on the Virtual input driver step of the installer. The driver is supported by 64-bitversions of Windows 8.1 and Server 2012 or later.The driver is not installed by default. To install the virtual input driver from command-line, such as duringthe silent installation, specify the INSTALLINPUTDRIVER=1 parameter. Note that when the driveris installed for the first time, Windows prompts to confirm a device installation even when running asAdministrator. To avoid this prompt during an unattended installation, add the certificate to the WindowsTrusted Publishers store beforehand. You can install the certificate from the InputDriver.cat file,located in the DesktopAutomationService\bin\inputdriver directory under the Kofax RPADesktop Automation Service installation directory.To enable the virtual input driver for keyboard and mouse operations on the automated computer, set theenvironment variable KOFAX_RPA_VIRTUAL_INPUT to Y. To cancel the virtual input driver usage, set theenvironment variable to N.For compatibility, the variable KAPOW_KEYBOARD_INPUT_METHOD, which was used to enable thekeyboard, is preserved, but KOFAX_RPA_VIRTUAL_INPUT should be used instead.To uninstall the driver and its devices, uninstall the Desktop Automation Service. Do not modify, disable orremove the devices through Windows Device Manager, as it may cause issues during robot runs.
21

Kofax RPA Installation Guide
Important The Desktop Automation Service version must match the version of other Kofax RPAcomponents, such as Design Studio and Management Console.
The Desktop Automation Service creates two firewall rules:• "Kofax RPA DA Service" that opens port 49998• "Kofax RPA DA Service Stream" that opens port 49999
49998 is the default command port and 49999 is the stream port. If the Desktop Automation Service isstarted without being manually configured, it uses the default configuration and listens on the default49998 port. Reassign the ports if necessary and edit the Desktop Automation Service configuration touse the appropriate ports. See Configure Desktop Automation Service in Help for Kofax RPA or in theDesktop Automation Service Configuration Guide for details.
When the Desktop Automation Service saves its configuration, the WebClient windows service ischecked and, if necessary, the service is started and its startup type is changed to "auto."
Automatic Desktop Automation Service upgradeStarting from version 10.7, new Desktop Automation Service version packages are installed automaticallyif the Lock package option is not selected on the Windows tab of the Desktop Automation Servicewindow. The first time a newer version of Management Console (or Design Studio if a direct connectionis used) tries to connect to the Desktop Automation Service, a new service version package is installed.The packages in ZIP files are installed to C:\ProgramData\Kofax RPA on the automated computer.The appropriate package is selected automatically depending on the Kofax RPA component version. Fordetails see Windows tab options in the Configure Desktop Automation Service topic in Help for Kofax RPAor in the Desktop Automation Service Configuration Guide.
Install Components for Desktop Automation ServiceDesktop Automation Service is designed to automate any work process involving computer applicationson Windows systems. The following components and configuration steps are required for the DesktopAutomation Service to access applications on Windows.Make sure that the latest Windows operating system updates are installed. For Windows 7, 8, and 8.1,the KB2999226 update is required. If this update is not installed on your system, download it from theMicrosoft website and install according to the provided instructions.To work with Java applications, check the following.• Install the latest Oracle Java 32-bit (JRE or JDK) that installs the Java Access Bridge 32-bit dlls. The
Java applications started by the robots can run in a 64-bit JVM, but the 64-bit installer does not includethe 32-bit dlls. If your corporate policy does not allow upgrading the Oracle Java, manually install thefiles needed for Java Access Bridge support as follows.
Java Access Bridge Installation on Windows 64-bit
1. Download Java Access Bridge 2.0.2 from the Java Access Bridge download page at thefollowing URL:http://www.oracle.com/technetwork/java/javase/downloads/jab-2-0-2-download-354311.html
2. Extract the Java Access Bridge to a folder in your drive and copyWindowsAccessBridge-32.dll to [WINDOWSHOME]\SYSWOW64. Where
22

Kofax RPA Installation Guide
WINDOWSHOME is the directory where Microsoft Windows is installed, for example, C:\WINDOWS.
Java Access Bridge Installation on Windows 32-bit
1. Download Java Access Bridge 2.0.2 from the Java Access Bridge download page at thefollowing URL:http://www.oracle.com/technetwork/java/javase/downloads/jab-2-0-2-download-354311.html
2. Extract the Java Access Bridge to a folder in your drive and copyWindowsAccessBridge-32.dll to %WINDOWSHOME%\SYSTEM32. Where %WINDOWSHOME%is the directory where Microsoft Windows is installed, for example, C:\WINDOWS.
Note For detailed Java Access Bridge installation instructions, see Installing Java Access Bridge onthe Oracle website.
• Enable the Java Access Bridge by selecting the Enable Java Access Bridge option in the ControlPanel > Ease of Access Center > Use the computer without a display or by running thefollowing command prompt command in the bin subdirectory of the Java JRE installation directory:jabswitch.exe /enable.
Install Document Transformation ComponentsThis section describes how to install Kofax RPA Document Transformation components on one computer.See the Kofax Transformation product documentation for installation and configuration details.
Note Document Transformation Service product version corresponds to the Kofax RPA product version.
Kofax Transformation Toolkit product version used with Kofax RPA 11.1.0 is 6.3.1.
This Document Transformation installer contains the following components required to run. Beforeinstalling these components, you need to have Kofax RPA installed.• Project Builder• Kofax Licensing Server• Transformation Services• Thin Client Server• Standard Projects• DTS Scheduler
To access each component documentation, see the Related Documentation section in this document. Seethe Troubleshooting section below for resolving common issues.
By default, the Document Transformation folders are located in c:\Document Transformation.
23
Kofax RPA Installation Guide
Important Kofax RPA Document Transformation Service and Document Transformation Thin ClientServer require IIS (Internet Information Services) and ASP.NET to be installed. Depending on theversion of Windows, these components are either a Windows feature that can be enabled in the ControlPanel, or they are available as separate downloadable components. For installation and configurationinstructions, see the Kofax Transformation Toolkit Thin Client Server Developer's Guide.
Requirements• You must have administrator rights on the computer where the Kofax RPA is installed. Disable User
Account Control (UAC) to minimize installation issues.• Some Windows operating systems disable localhost mapping. Prior to starting this installation, either
enable it by modifying your hosts file or use 127.0.0.1 where localhost is referenced. If you choose tokeep the localhost mapping disabled, modify the Web.config files in the Document Transformationsubfolders after installation is complete.
• Executing the PowerShell scripts, EnableDocumentTransformationWindows7.ps1 andEnableDocumentTransformationWindows10.ps1, requires PowerShell version 3, which is not alwaysinstalled on Windows 7. You can install the required PowerShell version via the Windows Update. Formore information on the scripts, see later in this section.
• Both IIS services, Kofax RPA Document Transformation Service and Document TransformationThin Client Server, must have modification privileges on the folders used by the DocumentTransformation Service. The PowerShell scripts, EnableDocumentTransformationWindows7.ps1and EnableDocumentTransformationWindows10.ps1, set these privileges automatically, but if thescripts are not used, the IIS application pool users must be explicitly assigned access to the DocumentTransformation folders.
• .NET version 4.7 and DirectX are required for the Document Transformation Service.• 32-bit support must be enabled for the Document Transformation Service application pool.
1. Run the Document Transformation installer, read and accept the terms in the license agreement, andthen enable all components (default) and let the installer run until you see the Kofax License Utilitywindow.
24
Kofax RPA Installation Guide
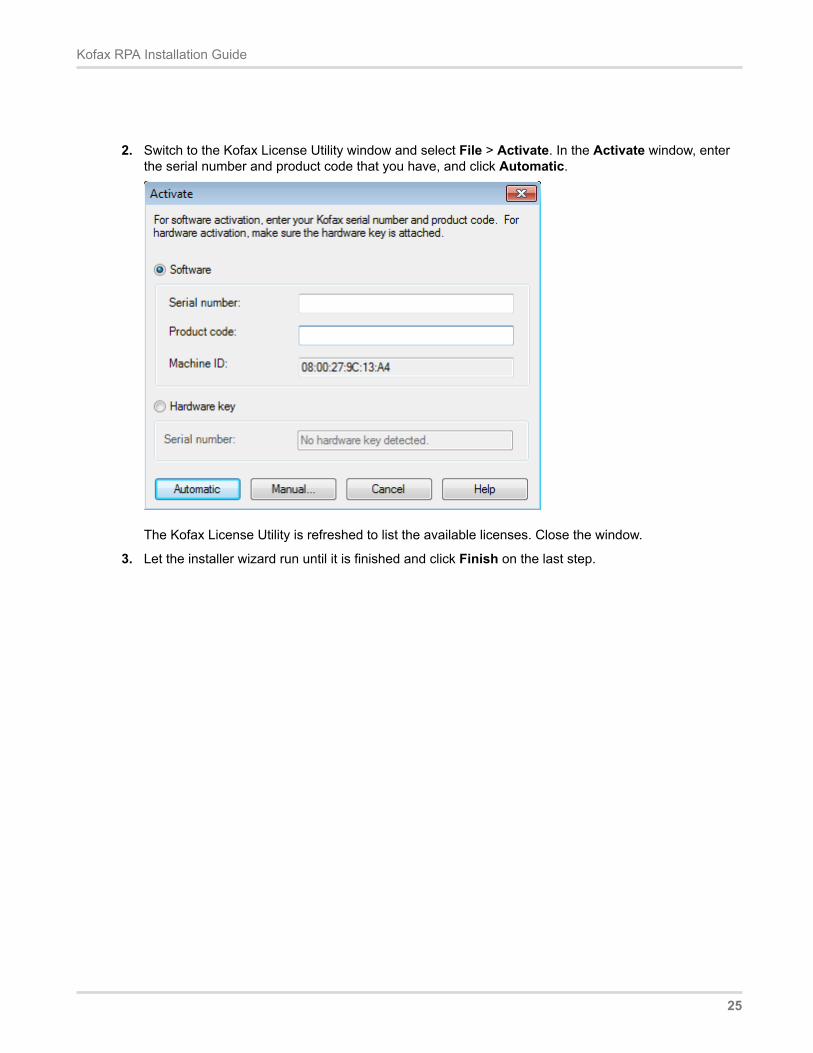
2. Switch to the Kofax License Utility window and select File > Activate. In the Activate window, enterthe serial number and product code that you have, and click Automatic.
The Kofax License Utility is refreshed to list the available licenses. Close the window.
3. Let the installer wizard run until it is finished and click Finish on the last step.
25
Kofax RPA Installation Guide
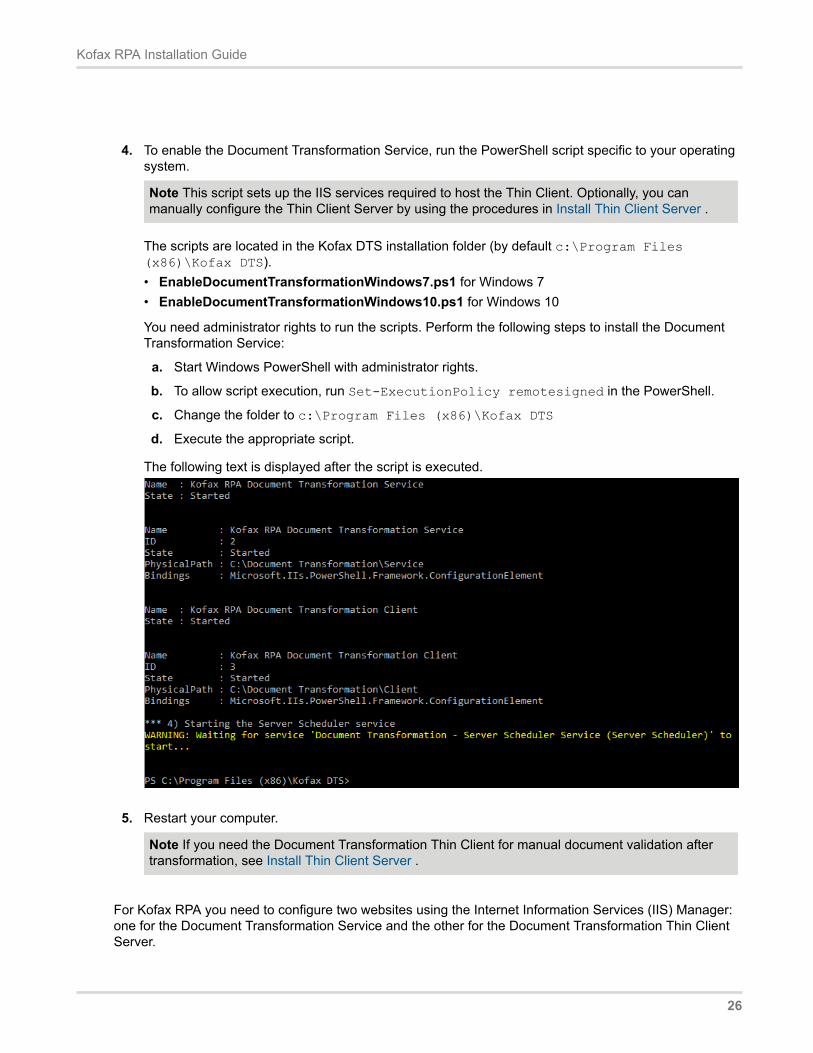
4. To enable the Document Transformation Service, run the PowerShell script specific to your operatingsystem.
Note This script sets up the IIS services required to host the Thin Client. Optionally, you canmanually configure the Thin Client Server by using the procedures in Install Thin Client Server .
The scripts are located in the Kofax DTS installation folder (by default c:\Program Files(x86)\Kofax DTS).• EnableDocumentTransformationWindows7.ps1 for Windows 7• EnableDocumentTransformationWindows10.ps1 for Windows 10
You need administrator rights to run the scripts. Perform the following steps to install the DocumentTransformation Service:
a. Start Windows PowerShell with administrator rights.
b. To allow script execution, run Set-ExecutionPolicy remotesigned in the PowerShell.
c. Change the folder to c:\Program Files (x86)\Kofax DTS
d. Execute the appropriate script.
The following text is displayed after the script is executed.
5. Restart your computer.
Note If you need the Document Transformation Thin Client for manual document validation aftertransformation, see Install Thin Client Server .
For Kofax RPA you need to configure two websites using the Internet Information Services (IIS) Manager:one for the Document Transformation Service and the other for the Document Transformation Thin ClientServer.
26
Kofax RPA Installation Guide
Default Web server locations:• C:\Document Transformation\Client
• C:\Document Transformation\Service
Both websites have a Web.config file you need to modify.
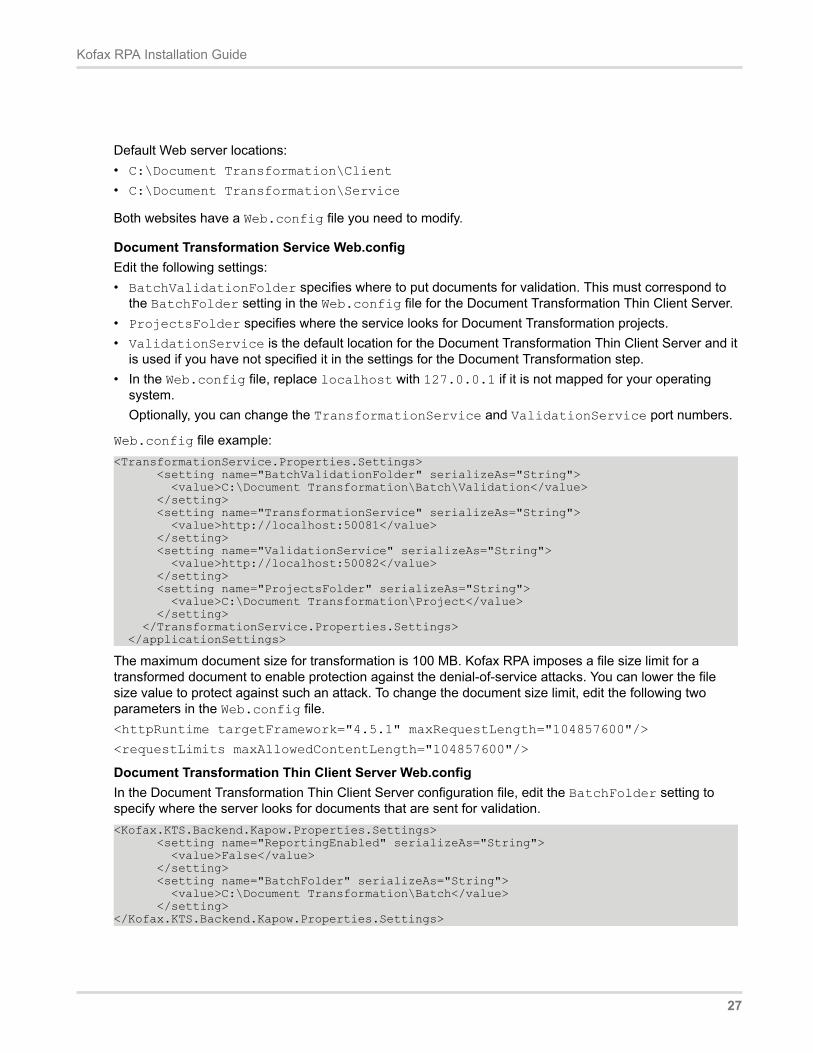
Document Transformation Service Web.configEdit the following settings:• BatchValidationFolder specifies where to put documents for validation. This must correspond to
the BatchFolder setting in the Web.config file for the Document Transformation Thin Client Server.• ProjectsFolder specifies where the service looks for Document Transformation projects.• ValidationService is the default location for the Document Transformation Thin Client Server and it
is used if you have not specified it in the settings for the Document Transformation step.• In the Web.config file, replace localhost with 127.0.0.1 if it is not mapped for your operating
system.Optionally, you can change the TransformationService and ValidationService port numbers.
Web.config file example:<TransformationService.Properties.Settings> <setting name="BatchValidationFolder" serializeAs="String"> <value>C:\Document Transformation\Batch\Validation</value> </setting> <setting name="TransformationService" serializeAs="String"> <value>http://localhost:50081</value> </setting> <setting name="ValidationService" serializeAs="String"> <value>http://localhost:50082</value> </setting> <setting name="ProjectsFolder" serializeAs="String"> <value>C:\Document Transformation\Project</value> </setting> </TransformationService.Properties.Settings> </applicationSettings>
The maximum document size for transformation is 100 MB. Kofax RPA imposes a file size limit for atransformed document to enable protection against the denial-of-service attacks. You can lower the filesize value to protect against such an attack. To change the document size limit, edit the following twoparameters in the Web.config file.<httpRuntime targetFramework="4.5.1" maxRequestLength="104857600"/>
<requestLimits maxAllowedContentLength="104857600"/>
Document Transformation Thin Client Server Web.configIn the Document Transformation Thin Client Server configuration file, edit the BatchFolder setting tospecify where the server looks for documents that are sent for validation.<Kofax.KTS.Backend.Kapow.Properties.Settings> <setting name="ReportingEnabled" serializeAs="String"> <value>False</value> </setting> <setting name="BatchFolder" serializeAs="String"> <value>C:\Document Transformation\Batch</value> </setting></Kofax.KTS.Backend.Kapow.Properties.Settings>
27
Kofax RPA Installation Guide
After installation, the built-in projects are located here:
C:\Document Transformation\Projects
Test configurationNow you are ready to verify that everything works. The Examples folder in the default Kofax RPA projectcontains a robot to test the Document Transformation Service.
1. Start the Management Console by selecting Start Management Console 11.1.0.0 from the Startmenu. Make sure that HTTP Connector started on port 50080 displays in the commandwindow. The Management Console acts as license server for Design Studio that uses the licenseyou activated earlier.
2. Open Design Studio by selecting Design Studio 11.1.0.0 from the Start menu.In the Enter License Information window, select License Server and click OK.
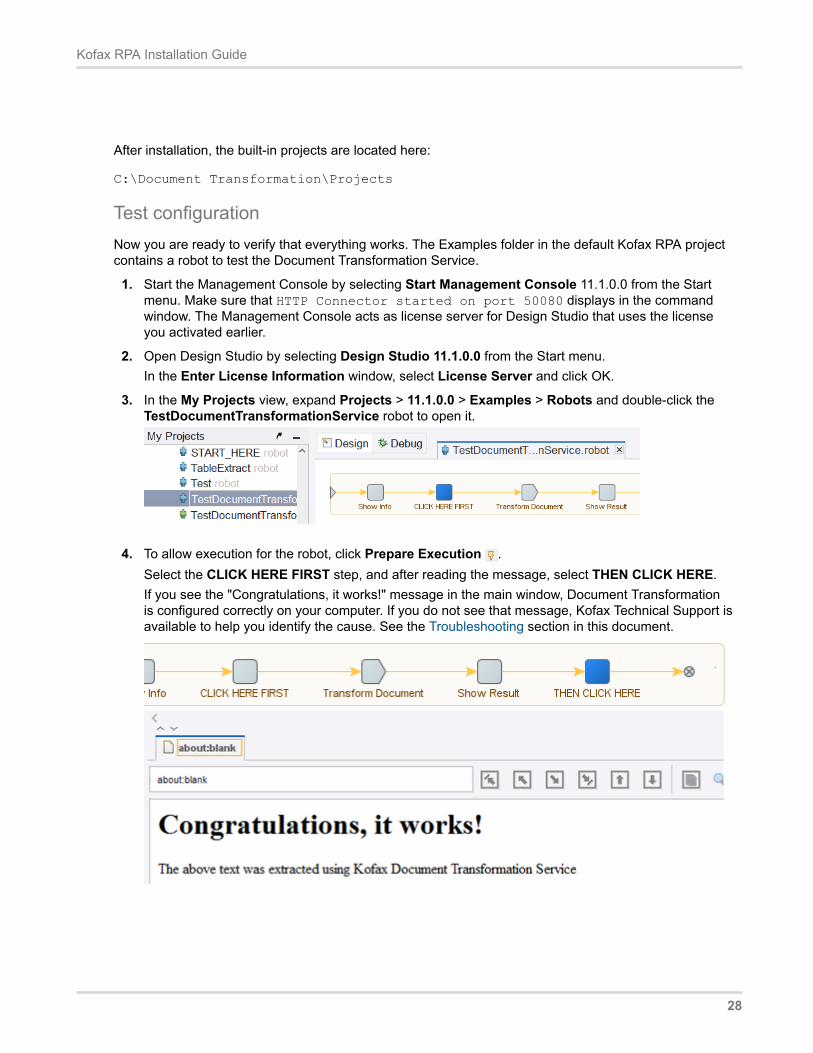
3. In the My Projects view, expand Projects > 11.1.0.0 > Examples > Robots and double-click theTestDocumentTransformationService robot to open it.
4. To allow execution for the robot, click Prepare Execution .Select the CLICK HERE FIRST step, and after reading the message, select THEN CLICK HERE.If you see the "Congratulations, it works!" message in the main window, Document Transformationis configured correctly on your computer. If you do not see that message, Kofax Technical Support isavailable to help you identify the cause. See the Troubleshooting section in this document.
28
Kofax RPA Installation Guide
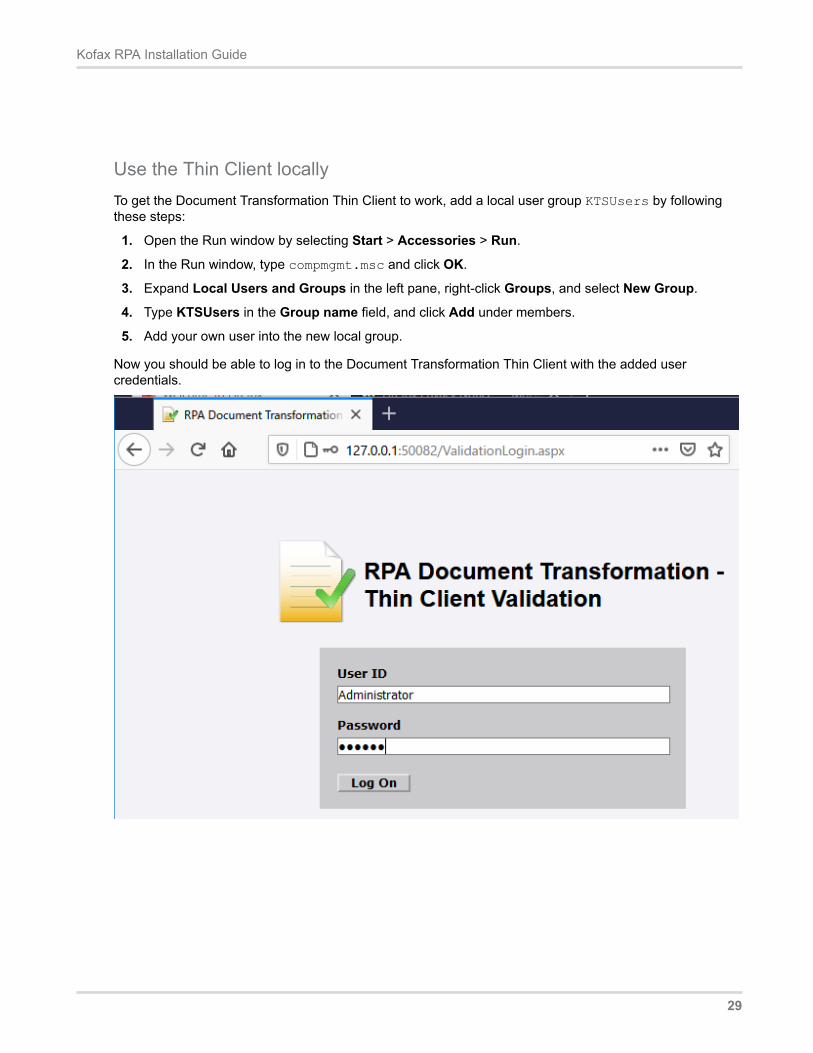
Use the Thin Client locallyTo get the Document Transformation Thin Client to work, add a local user group KTSUsers by followingthese steps:
1. Open the Run window by selecting Start > Accessories > Run.
2. In the Run window, type compmgmt.msc and click OK.
3. Expand Local Users and Groups in the left pane, right-click Groups, and select New Group.
4. Type KTSUsers in the Group name field, and click Add under members.
5. Add your own user into the new local group.
Now you should be able to log in to the Document Transformation Thin Client with the added usercredentials.
29
Kofax RPA Installation Guide
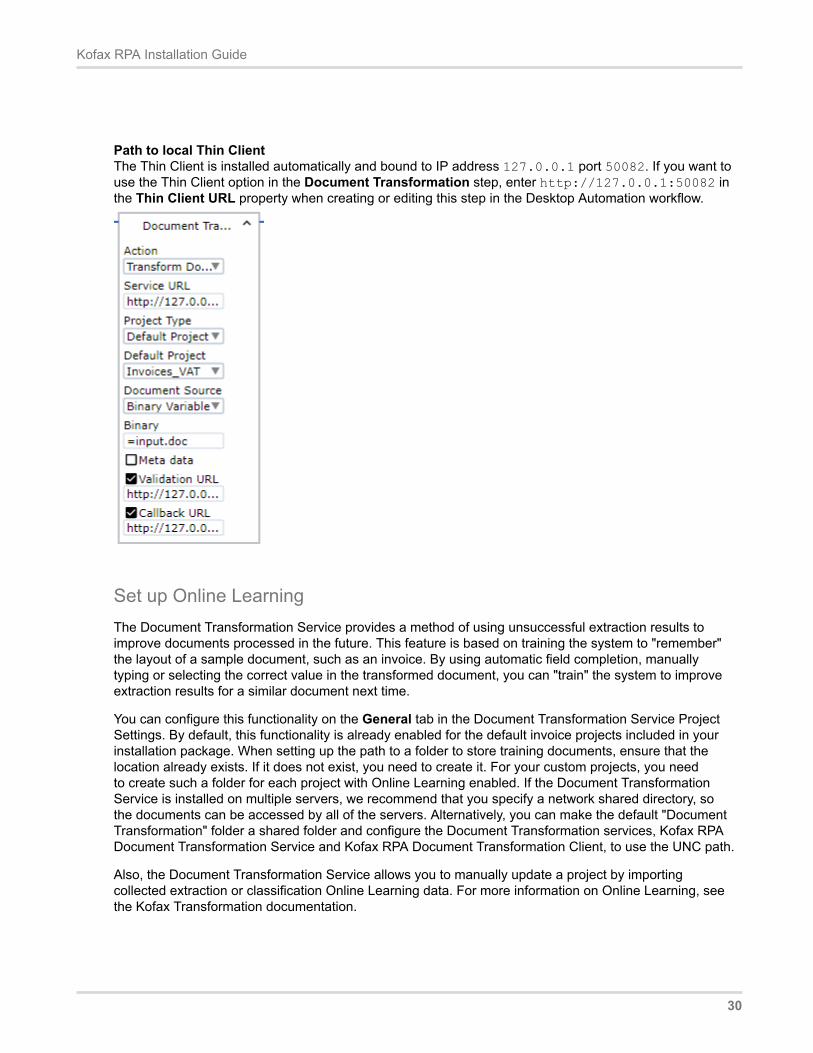
Path to local Thin ClientThe Thin Client is installed automatically and bound to IP address 127.0.0.1 port 50082. If you want touse the Thin Client option in the Document Transformation step, enter http://127.0.0.1:50082 inthe Thin Client URL property when creating or editing this step in the Desktop Automation workflow.
Set up Online LearningThe Document Transformation Service provides a method of using unsuccessful extraction results toimprove documents processed in the future. This feature is based on training the system to "remember"the layout of a sample document, such as an invoice. By using automatic field completion, manuallytyping or selecting the correct value in the transformed document, you can "train" the system to improveextraction results for a similar document next time.
You can configure this functionality on the General tab in the Document Transformation Service ProjectSettings. By default, this functionality is already enabled for the default invoice projects included in yourinstallation package. When setting up the path to a folder to store training documents, ensure that thelocation already exists. If it does not exist, you need to create it. For your custom projects, you needto create such a folder for each project with Online Learning enabled. If the Document TransformationService is installed on multiple servers, we recommend that you specify a network shared directory, sothe documents can be accessed by all of the servers. Alternatively, you can make the default "DocumentTransformation" folder a shared folder and configure the Document Transformation services, Kofax RPADocument Transformation Service and Kofax RPA Document Transformation Client, to use the UNC path.
Also, the Document Transformation Service allows you to manually update a project by importingcollected extraction or classification Online Learning data. For more information on Online Learning, seethe Kofax Transformation documentation.
30
Kofax RPA Installation Guide
Note For validation purposes, when creating a new project to use with the Document TransformationService, we recommend that you add a version number to the project name, such as Project_1. Afterimporting collected Online Learning data, save this project as Project _2, and so on. This approachwill allow the system to keep using the older project, Project_1, for the document validation. Afterward,update the respective robots to use the new project (Project_2).
When the validation is completed, you can delete the older project and continue using the newer oneuntil a new set of learned data is imported.
Troubleshooting
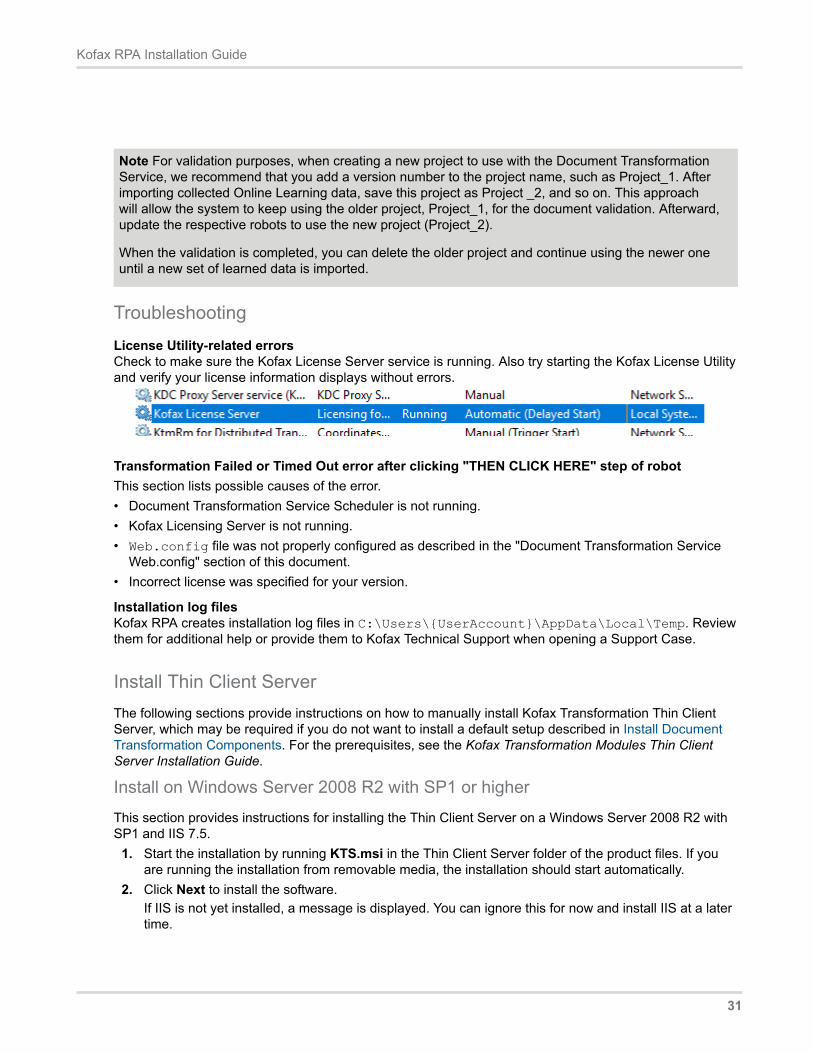
License Utility-related errorsCheck to make sure the Kofax License Server service is running. Also try starting the Kofax License Utilityand verify your license information displays without errors.
Transformation Failed or Timed Out error after clicking "THEN CLICK HERE" step of robotThis section lists possible causes of the error.• Document Transformation Service Scheduler is not running.• Kofax Licensing Server is not running.• Web.config file was not properly configured as described in the "Document Transformation Service
Web.config" section of this document.• Incorrect license was specified for your version.
Installation log filesKofax RPA creates installation log files in C:\Users\{UserAccount}\AppData\Local\Temp. Reviewthem for additional help or provide them to Kofax Technical Support when opening a Support Case.
Install Thin Client ServerThe following sections provide instructions on how to manually install Kofax Transformation Thin ClientServer, which may be required if you do not want to install a default setup described in Install DocumentTransformation Components. For the prerequisites, see the Kofax Transformation Modules Thin ClientServer Installation Guide.
Install on Windows Server 2008 R2 with SP1 or higher
This section provides instructions for installing the Thin Client Server on a Windows Server 2008 R2 withSP1 and IIS 7.5.
1. Start the installation by running KTS.msi in the Thin Client Server folder of the product files. If youare running the installation from removable media, the installation should start automatically.
2. Click Next to install the software.If IIS is not yet installed, a message is displayed. You can ignore this for now and install IIS at a latertime.
31
Kofax RPA Installation Guide
3. Read the End-User License Agreement and, if you agree with the terms, select the I accept theterms in the License Agreement option, and click Next. Otherwise, click Cancel to exit.
4. If necessary, change the default installation location or folder name, and click Next.
a. Click Change.
b. Browse to, or type the new location, and click OK.5. Click Install.6. When the installation is complete, click Finish.7. Optionally, if upgrading to a newer version of the Thin Client Server, you are notified if there are any
merge conflicts. These conflicts need to be fixed before continuing with the rest of the installation.For more information, see "Resolve Upgrade Conflicts" in the Kofax Transformation Modules ThinClient Server Installation Guide.
8. Configure the Thin Client Server web site using the Internet Information Services (IIS) Manager:
a. From the Connections pane, expand the Sites folder.
b. Right-click the Default Web Site and select Add Application from the menu. This launches theAdd Application window.
c. Type an Alias for your application, such as "ThinClientServer."
d. Select an Application pool. The DefaultAppPool is selected by default and click OK.
e. Browse to the location where you installed the Thin Client Server in step 4 to set the path forthis website, and click OK.
9. From the left Connections pane, select your newly added site a second time. A list of features isdisplayed in the middle pane.
a. From the IIS section, double-click the Authentication feature. A list of authentication types isdisplayed in the middle pane.
b. Select the ASP.NET Impersonation option and ensure it is Disabled.
c. Restart the World Wide Web Publishing Service.10. To install the version v4.0.30319 of ASP.NET, open a Command Prompt window that is "Run as
administrator."
a. At the prompt type %windir%\Microsoft.NET\Framework\v4.0.30319\aspnet_regiis.exe -i and press Enter.ASP.NET is installed. Close the Command Prompt window.
32
Kofax RPA Installation Guide
11. In IIS, click the Application Pools option above the Sites group. A list of application pools isdisplayed on the right.
a. Right-click the application pool you selected when adding your application and selectAdvanced Settings. The Advanced Settings window is displayed.
b. Under the Process Model group, set the Maximum Worker Processes option to 1. This is thedefault setting.
c. Optionally, if you are using an encrypted file system, you also need to click the Identity optionthat currently says NetworkService, and change it to a custom account. This custom accountneeds to have the same permissions as the NetworkService account.Click the button to the right of NetworkService. The Application Pool Identity window isdisplayed.Select the Custom account option, and click Set.Type a User name, Password, and Confirm password, and click OK.
d. Click OK to close the Application Pool Identity window, and again to close the AdvancedSettings window.
e. Double-click the selected application pool.The Edit Application Pool window is displayed.
f. From the .NET Framework version list, select .NET Framework v4.0.30319.
g. Click OK to close the Edit Application Pool window.12. If you are running a 64-bit operating system, set the following settings:
a. Click Advanced Settings on the shortcut menu by right-clicking on the application pool used inyour application.
b. Set the Enable 32-bit Applications option to True in the General Settings and click OK.13. Ensure that the IIS user account IUSR is part of the IIS_IUSRS group.14. Open Services and ensure that the World Wide Web Publishing Service is set to start
automatically.
Install on Windows Server 2012, 2012 R2, and 2016
This section provides instructions for installing the Thin Client Server on a Windows Server 2012,Windows Server 2012 R2, and Windows server 2016.
1. Start the installation by running KTS.msi in the Thin Client Server folder of the product files. If youare running the installation from removable media, the installation should start automatically.
2. Click Next to install the software.If IIS is not yet installed, a message is displayed. You can ignore this for now and install IIS at a latertime.
3. Read the End-User License Agreement and, if you agree with the terms, select the I accept theterms in the License Agreement option, and click Next. Otherwise, click Cancel to exit.
4. If necessary, change the default installation location or folder name, and click Next.
a. Click Change.
b. Browse to, or type the new location, and click OK.5. Click Install.
33

Kofax RPA Installation Guide
6. When the installation is complete, click Finish.7. Optionally, if upgrading to a newer version of the Thin Client Server, you are notified if there are any
merge conflicts. These conflicts need to be fixed before continuing with the rest of the installation.For more information, see "Resolve Upgrade Conflicts" in the Kofax Transformation Modules ThinClient Server Installation Guide.
8. Configure the Thin Client Server web site using the Internet Information Services (IIS) Manager.
a. From the Connections pane, expand the Sites folder.
b. Right-click the Default Web Site and select Add Application from the menu. This launches theAdd Application window.
c. Type an Alias for your application, such as "ThinClientServer."
d. Select an Application pool. The "DefaultAppPool" is selected by default and click OK.
e. Browse to the location where you installed the Thin Client Server earlier in step 4 to set the pathfor this website, and click OK.
9. From the left Connections pane, select your newly added site a second time. A list of features isdisplayed in the middle pane.
a. From the IIS section, double-click the Authentication feature. A list of authentication types isdisplayed in the middle pane.
b. Select the ASP.NET Impersonation option and ensure it is Disabled.
c. Restart the World Wide Web Publishing Service.10. Click the Application Pools option from the Connections pane. A list of application pools is
displayed on the right.
a. Right-click the application pool you selected when adding your application and selectAdvanced Settings.The Advanced Settings window is displayed.
b. In the General group, set Enable 32-Bit Applications to True.
c. In the Process Model group, set the Maximum Worker Processes option to 1. This is thedefault setting.
d. Optionally, if you are using an encrypted file system, you also need to click the Identity optionfrom the Process Model group and change it to a custom account. This custom account needsto have the same permissions as the NetworkService account.Click the button to the right of Identity value. The Application Pool Identity window isdisplayed.Select the Custom account option, and click Set.Type a User name, Password, and Confirm password, and click OK.Click OK to close the Application Pool Identity window, and again to close the AdvancedSettings window.
e. Double-click the selected application pool.The Edit Application Pool window is displayed.
f. From the .NET CLR version list, select .NET Framework v4.0.30319.
g. Click OK to close the Edit Application Pool window.
34
Kofax RPA Installation Guide
11. Ensure that the IIS user account IUSR is part of the IIS_IUSRS group.12. Open Services and ensure that the World Wide Web Publishing Service is set to start
automatically.
Install KappletsThis section describes how to install and configure Kofax RPA Kapplets.
It includes the following installation details:• General Settings• Embedded Mode Installation• Tomcat Server Installation• Docker Installation
General SettingsTo configure a Kofax RPA Kapplets installation, make a copy of the application.properties file under C:\Program Files\Kofax RPA 11.0.0.0 x64\WebApps\kapplets.war, configure it in accordancewith each installation scenario, and place it in the corresponding directory. Accordingly, in the embeddedmode Installation scenario create the application.properties file, in the Tomcat Server installationscenario create the kapplets.xml file, and in the Docker Installation scenario configure the env.variablesfile.• Configure Management Console settings:
• Configure Management Console connection credentials:kapplets.services.mc.connection.url=http://<ip_adress>:8080kapplets.services.mc.connection.username=<username>kapplets.services.mc.connection.password=<password>
kapplets.services.mc.connection.proxy.host=<ip_adress>kapplets.services.mc.connection.proxy.port=8888kapplets.services.mc.connection.proxy.username=<proxy-user>kapplets.services.mc.connection.proxy.password=<password>kapplets.services.mc.connection.proxy.enabled=false
• Configure the auto-refresh-functions (in seconds):The following functions cache a list of robots and projects to ensure a quicker access to it. Values inthe functions must be the same. If you specify zero (0), caching is disabled and each user query toget a robot list is sent directly to the Management Console, which greatly increases the load.kapplets.services.mc.caching.descriptions.life-time=300kapplets.services.mc.caching.robots.life-time=300
The following auto-refresh function reloads the list of robots and projects to keep it up-to-date. Do notalter its value without consulting with Kofax support.kapplets.services.mc.caching.auto-fetch-interval=10
• Configure Excel export format settings for English and Japanese languages:kapplets.services.result.xls-export-formats[ja].number-format=#,##0.00kapplets.services.result.xls-export-formats[ja].integer-format=#,#kapplets.services.result.xls-export-formats[ja].date-format=yyyy/m/dd h:mm:ss
kapplets.services.result.xls-export-formats[en].number-format=#,##0.00kapplets.services.result.xls-export-formats[en].integer-format=#,#
35
Kofax RPA Installation Guide
kapplets.services.result.xls-export-formats[en].date-format=mm/dd/yyyy h:mm:ss
• Configure Kapplets execution queue settings:• Number of robots executing simultaneously:
kapplets.services.execution.max-pool-size=100
• Maximum number of robots waiting for the execution on Kapplets server:kapplets.services.execution.task-queue-limit=1000
• Default cluster name to execute robots on:kapplets.services.execution.cluster-name=Production
• Configure Kapplets execution watching service settings (in minutes):• Maximum Kapplet execution time to mark the execution failed:
kapplets.services.execution.watcher.timeout=190
• Maximum execution time used to execute a robot on the RoboServer:kapplets.services.execution.max-robot-execution-time=180
• Automatically clean all execution records older than set amount of days:kapplets.services.execution.purge.timeout=365
• Configure Kapplets brute force protection settings (in minutes):kapplets.services.auth.login.brute-force-protection.enabled=truekapplets.services.auth.login.brute-force-protection.attempts-count=3kapplets.services.auth.login.brute-force-protection.lock-period=10
Kapplets support various databases. See the list of supported databases with corresponding databasesettings below:• MySQL 5:
spring.datasource.username=<username>spring.datasource.password=<password>spring.datasource.url=jdbc:mysql://database-service:3306/<database-name>?autoReconnect=truespring.datasource.driverClassName=com.mysql.jdbc.Driverspring.jpa.database-platform=org.hibernate.dialect.MySQL55Dialect
Note If you need to use supplementary characters, use MySQL 5.7 or later.
• MySQL 8:spring.datasource.username=<username>spring.datasource.password=<password>spring.datasource.url=jdbc:mysql://database-service:3306/<database-name>?autoReconnect=truespring.datasource.driverClassName=com.mysql.cj.jdbc.Driverspring.jpa.database-platform=org.hibernate.dialect.MySQL8Dialect
• Oracle 12c:spring.datasource.username=<username>spring.datasource.password=<password>spring.datasource.url=jdbc:oracle:thin:@database-service:1522:<database-name>spring.datasource.driverClassName=oracle.jdbc.driver.OracleDriverspring.jpa.database-platform=org.hibernate.dialect.Oracle12cDialect
• SQL Server 2012:spring.datasource.username=<username>spring.datasource.password=<password>
36
Kofax RPA Installation Guide
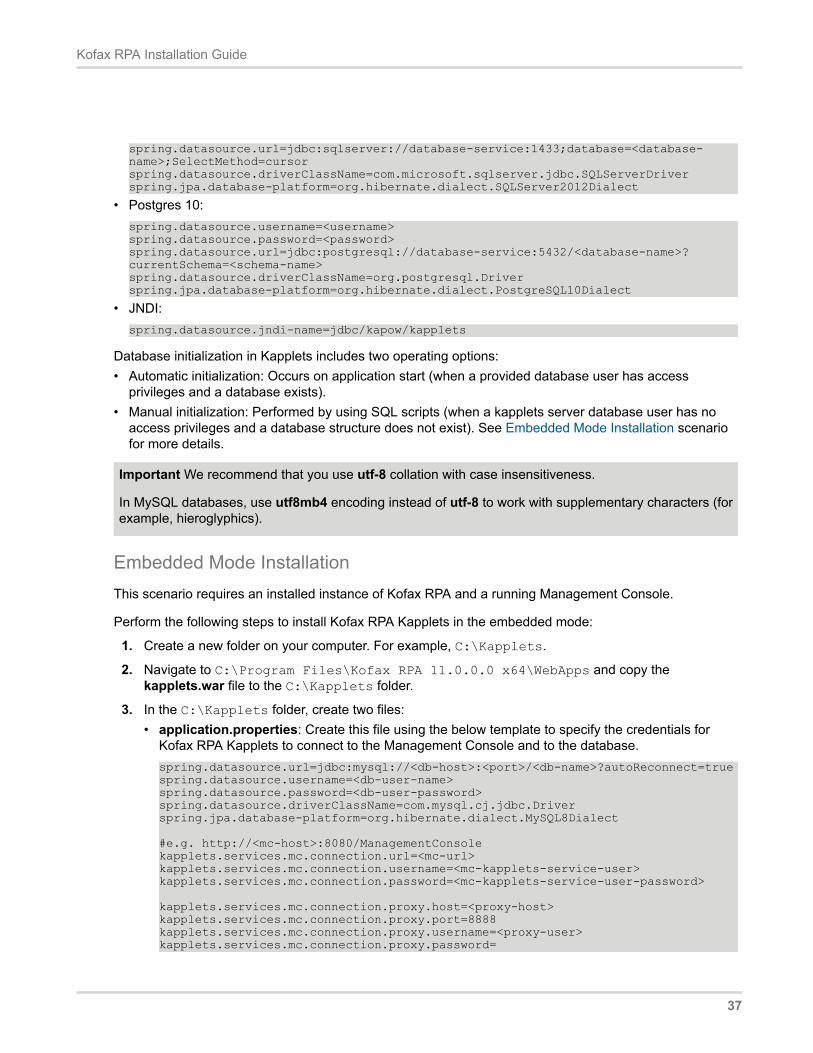
spring.datasource.url=jdbc:sqlserver://database-service:1433;database=<database-name>;SelectMethod=cursorspring.datasource.driverClassName=com.microsoft.sqlserver.jdbc.SQLServerDriverspring.jpa.database-platform=org.hibernate.dialect.SQLServer2012Dialect
• Postgres 10:spring.datasource.username=<username>spring.datasource.password=<password>spring.datasource.url=jdbc:postgresql://database-service:5432/<database-name>?currentSchema=<schema-name>spring.datasource.driverClassName=org.postgresql.Driverspring.jpa.database-platform=org.hibernate.dialect.PostgreSQL10Dialect
• JNDI:spring.datasource.jndi-name=jdbc/kapow/kapplets
Database initialization in Kapplets includes two operating options:• Automatic initialization: Occurs on application start (when a provided database user has access
privileges and a database exists).• Manual initialization: Performed by using SQL scripts (when a kapplets server database user has no
access privileges and a database structure does not exist). See Embedded Mode Installation scenariofor more details.
Important We recommend that you use utf-8 collation with case insensitiveness.
In MySQL databases, use utf8mb4 encoding instead of utf-8 to work with supplementary characters (forexample, hieroglyphics).
Embedded Mode InstallationThis scenario requires an installed instance of Kofax RPA and a running Management Console.
Perform the following steps to install Kofax RPA Kapplets in the embedded mode:
1. Create a new folder on your computer. For example, C:\Kapplets.
2. Navigate to C:\Program Files\Kofax RPA 11.0.0.0 x64\WebApps and copy thekapplets.war file to the C:\Kapplets folder.
3. In the C:\Kapplets folder, create two files:• application.properties: Create this file using the below template to specify the credentials for
Kofax RPA Kapplets to connect to the Management Console and to the database.spring.datasource.url=jdbc:mysql://<db-host>:<port>/<db-name>?autoReconnect=truespring.datasource.username=<db-user-name>spring.datasource.password=<db-user-password>spring.datasource.driverClassName=com.mysql.cj.jdbc.Driverspring.jpa.database-platform=org.hibernate.dialect.MySQL8Dialect
#e.g. http://<mc-host>:8080/ManagementConsolekapplets.services.mc.connection.url=<mc-url>kapplets.services.mc.connection.username=<mc-kapplets-service-user>kapplets.services.mc.connection.password=<mc-kapplets-service-user-password>
kapplets.services.mc.connection.proxy.host=<proxy-host>kapplets.services.mc.connection.proxy.port=8888kapplets.services.mc.connection.proxy.username=<proxy-user>kapplets.services.mc.connection.proxy.password=
37
Kofax RPA Installation Guide
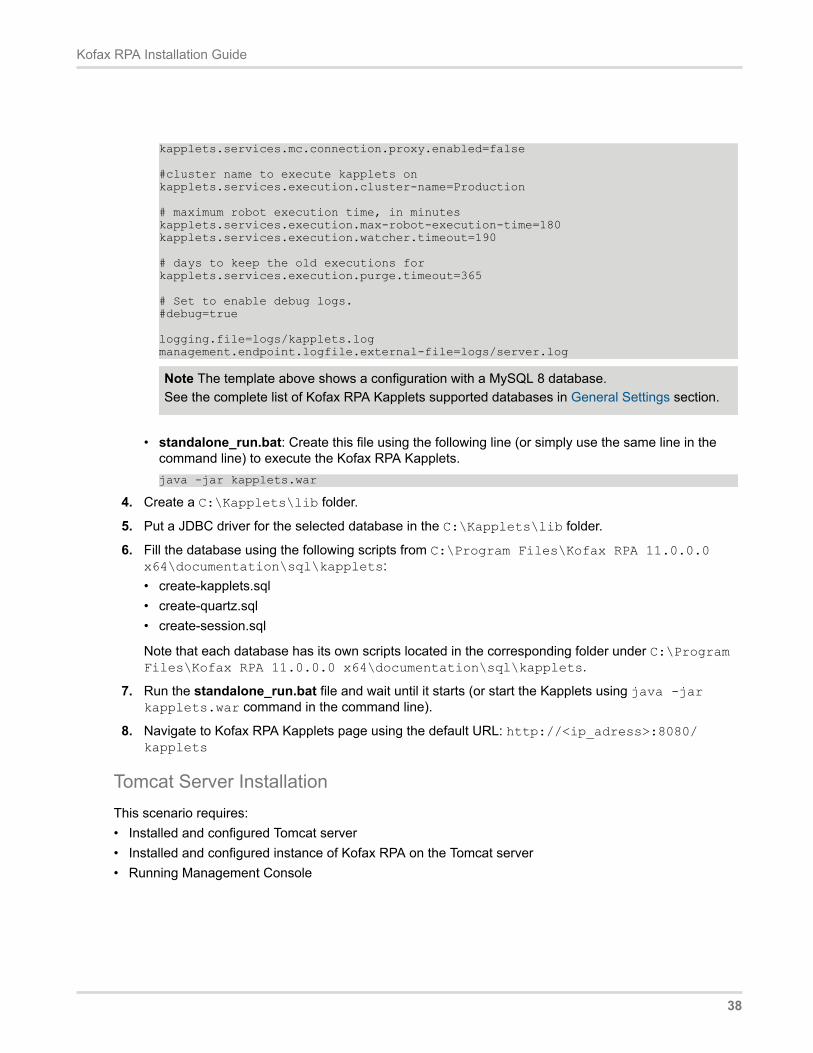
kapplets.services.mc.connection.proxy.enabled=false
#cluster name to execute kapplets onkapplets.services.execution.cluster-name=Production
# maximum robot execution time, in minuteskapplets.services.execution.max-robot-execution-time=180kapplets.services.execution.watcher.timeout=190
# days to keep the old executions forkapplets.services.execution.purge.timeout=365
# Set to enable debug logs.#debug=true
logging.file=logs/kapplets.logmanagement.endpoint.logfile.external-file=logs/server.log
Note The template above shows a configuration with a MySQL 8 database.See the complete list of Kofax RPA Kapplets supported databases in General Settings section.
• standalone_run.bat: Create this file using the following line (or simply use the same line in thecommand line) to execute the Kofax RPA Kapplets.java -jar kapplets.war
4. Create a C:\Kapplets\lib folder.
5. Put a JDBC driver for the selected database in the C:\Kapplets\lib folder.
6. Fill the database using the following scripts from C:\Program Files\Kofax RPA 11.0.0.0x64\documentation\sql\kapplets:• create-kapplets.sql• create-quartz.sql• create-session.sql
Note that each database has its own scripts located in the corresponding folder under C:\ProgramFiles\Kofax RPA 11.0.0.0 x64\documentation\sql\kapplets.
7. Run the standalone_run.bat file and wait until it starts (or start the Kapplets using java -jarkapplets.war command in the command line).
8. Navigate to Kofax RPA Kapplets page using the default URL: http://<ip_adress>:8080/kapplets
Tomcat Server InstallationThis scenario requires:• Installed and configured Tomcat server• Installed and configured instance of Kofax RPA on the Tomcat server• Running Management Console
38
Kofax RPA Installation Guide
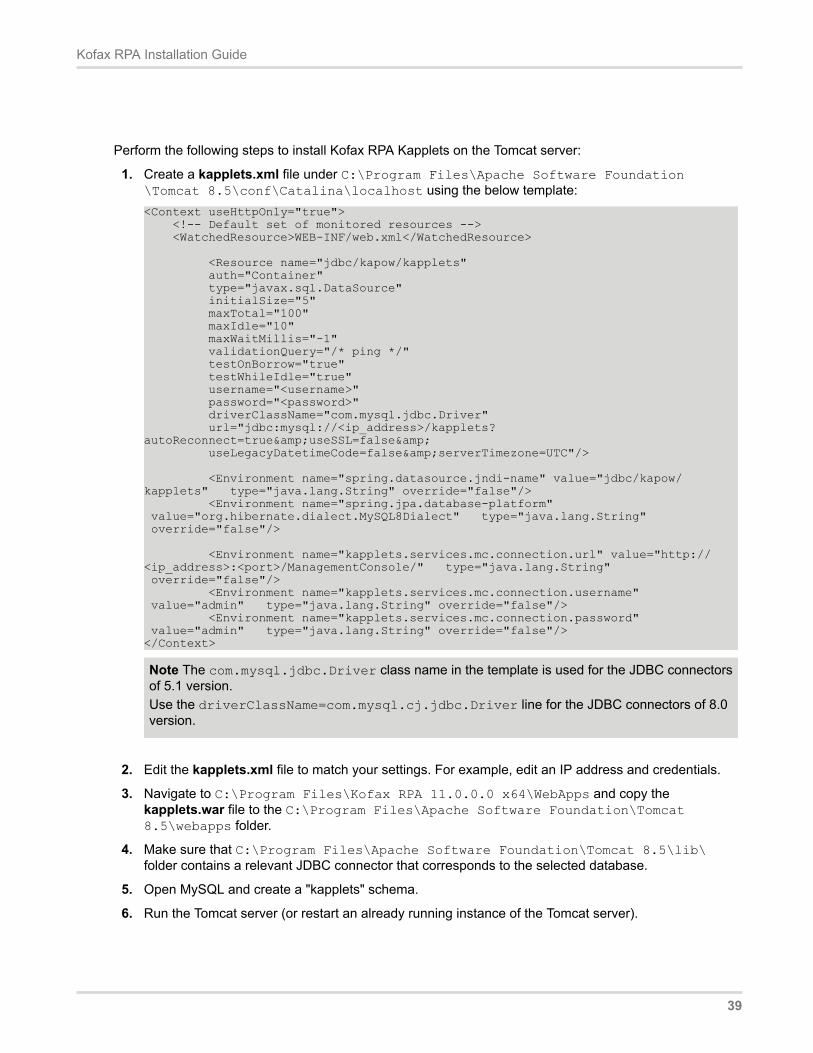
Perform the following steps to install Kofax RPA Kapplets on the Tomcat server:
1. Create a kapplets.xml file under C:\Program Files\Apache Software Foundation\Tomcat 8.5\conf\Catalina\localhost using the below template:<Context useHttpOnly="true"> <!-- Default set of monitored resources --> <WatchedResource>WEB-INF/web.xml</WatchedResource>
<Resource name="jdbc/kapow/kapplets" auth="Container" type="javax.sql.DataSource" initialSize="5" maxTotal="100" maxIdle="10" maxWaitMillis="-1" validationQuery="/* ping */" testOnBorrow="true" testWhileIdle="true" username="<username>" password="<password>" driverClassName="com.mysql.jdbc.Driver" url="jdbc:mysql://<ip_address>/kapplets?autoReconnect=true&useSSL=false& useLegacyDatetimeCode=false&serverTimezone=UTC"/>
<Environment name="spring.datasource.jndi-name" value="jdbc/kapow/kapplets" type="java.lang.String" override="false"/> <Environment name="spring.jpa.database-platform" value="org.hibernate.dialect.MySQL8Dialect" type="java.lang.String" override="false"/>
<Environment name="kapplets.services.mc.connection.url" value="http://<ip_address>:<port>/ManagementConsole/" type="java.lang.String" override="false"/> <Environment name="kapplets.services.mc.connection.username" value="admin" type="java.lang.String" override="false"/> <Environment name="kapplets.services.mc.connection.password" value="admin" type="java.lang.String" override="false"/></Context>
Note The com.mysql.jdbc.Driver class name in the template is used for the JDBC connectorsof 5.1 version.Use the driverClassName=com.mysql.cj.jdbc.Driver line for the JDBC connectors of 8.0version.
2. Edit the kapplets.xml file to match your settings. For example, edit an IP address and credentials.
3. Navigate to C:\Program Files\Kofax RPA 11.0.0.0 x64\WebApps and copy thekapplets.war file to the C:\Program Files\Apache Software Foundation\Tomcat8.5\webapps folder.
4. Make sure that C:\Program Files\Apache Software Foundation\Tomcat 8.5\lib\folder contains a relevant JDBC connector that corresponds to the selected database.
5. Open MySQL and create a "kapplets" schema.
6. Run the Tomcat server (or restart an already running instance of the Tomcat server).
39
Kofax RPA Installation Guide
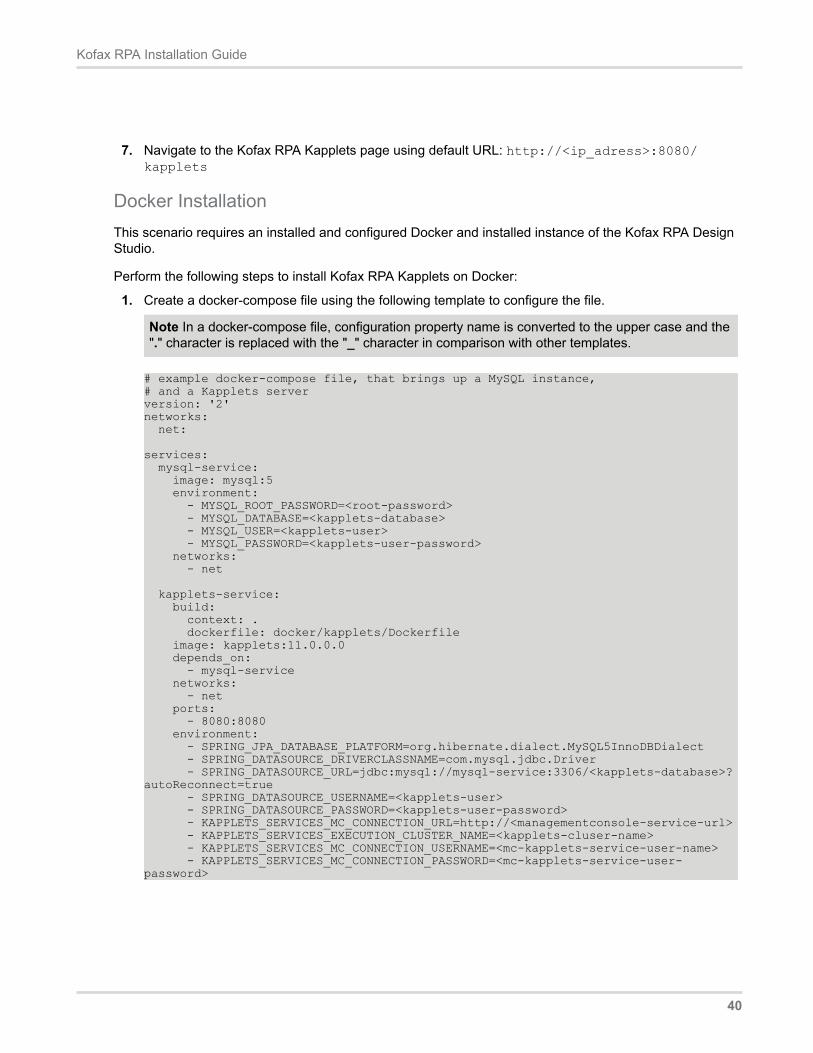
7. Navigate to the Kofax RPA Kapplets page using default URL: http://<ip_adress>:8080/kapplets
Docker InstallationThis scenario requires an installed and configured Docker and installed instance of the Kofax RPA DesignStudio.
Perform the following steps to install Kofax RPA Kapplets on Docker:
1. Create a docker-compose file using the following template to configure the file.
Note In a docker-compose file, configuration property name is converted to the upper case and the"." character is replaced with the "_" character in comparison with other templates.
# example docker-compose file, that brings up a MySQL instance,# and a Kapplets serverversion: '2'networks: net:
services: mysql-service: image: mysql:5 environment: - MYSQL_ROOT_PASSWORD=<root-password> - MYSQL_DATABASE=<kapplets-database> - MYSQL_USER=<kapplets-user> - MYSQL_PASSWORD=<kapplets-user-password> networks: - net
kapplets-service: build: context: . dockerfile: docker/kapplets/Dockerfile image: kapplets:11.0.0.0 depends_on: - mysql-service networks: - net ports: - 8080:8080 environment: - SPRING_JPA_DATABASE_PLATFORM=org.hibernate.dialect.MySQL5InnoDBDialect - SPRING_DATASOURCE_DRIVERCLASSNAME=com.mysql.jdbc.Driver - SPRING_DATASOURCE_URL=jdbc:mysql://mysql-service:3306/<kapplets-database>?autoReconnect=true - SPRING_DATASOURCE_USERNAME=<kapplets-user> - SPRING_DATASOURCE_PASSWORD=<kapplets-user-password> - KAPPLETS_SERVICES_MC_CONNECTION_URL=http://<managementconsole-service-url> - KAPPLETS_SERVICES_EXECUTION_CLUSTER_NAME=<kapplets-cluser-name> - KAPPLETS_SERVICES_MC_CONNECTION_USERNAME=<mc-kapplets-service-user-name> - KAPPLETS_SERVICES_MC_CONNECTION_PASSWORD=<mc-kapplets-service-user-password>
40
Kofax RPA Installation Guide
- SLEEP_DELAY=30s
Note The - SLEEP_DELAY configuration makes it possible to stagger the launching of databaseand Kapplets containers: A container with Kapplets starts assigned amount of seconds after thecontainer with a database. This time shift makes the launching procedure more predictable andavoids the situation when kapplets try to connect to the database, which is not initiated.
2. Run the docker-compose file.
3. Navigate to the Kofax RPA Kapplets page using the default URL: http://<ip_adress>:8080/kapplets
Install on LinuxKofax RPA provides two installers for Linux:• A tar.gz file containing all the components.• Kofax RPA RoboServer installer: Installs the roboserver service only.
Full InstallationThe installation is performed by extracting the contents of the tar.gz file. In most Linux distributions, thiscan be done by right-clicking the file and selecting the appropriate extraction option. The file can also beextracted from the command line as follows:$tar xzf Kofax_RPA_11.1.0.0_x64.tar.gz
Alternatively, to extract the file to a specific directory, use the following command:$tar xzf Kofax_RPA_11.1.0.0_x64.tar.gz -C /destination_directory
When the file is extracted, run the following commands as a user with root privileges. The commands helpmanage chrome-sandbox file permissions and set the creator and owner of chrome-sandbox as the rootto enable SUID mode.The chrome-sandbox file resides in: .../Kofax_RPA_<build number>/nativelib/hub/linux-x64/<build number>/node_modules/cef/chrome-sandbox
• chown root:root chrome-sandbox
• chmod 4755 chrome-sandbox
Proceed to enter license information as described in Provide License Information.
Note You can install Kofax RPA as an unprivileged user on Linux.
Running RoboServer InstallerThe RoboServer only installers are created for the deb and rpm packages. The default installation folderfor these packages is /opt/Kofax RPA/.Each of the RoboServer packages contains a RoboServer launcher that is used to run RoboServer as aLinux /etc/init.d service. This makes it automatically start on system boot.The packages create a Kofax RPA user and group in the system used when running the RoboServer/etc/init.d service. The configuration files (most importantly roboserver.settings) for the
41

Kofax RPA Installation Guide
RoboServer service are located in the Kofax RPA users home directory (/home/<username>/) underthe hidden directory .Kofax RPA/<version>.The roboserver.settings file can also be accessed through /etc/opt/Kofax RPA/RoboServer.conf.To see all available commands, just run RoboServer from /etc/init.d without any arguments.By default, the RoboServer starts with an SSL port listening (the port number is defined in theroboserver.settings file). Keep in mind that this is a RoboServer only installation; it is not possiblefor the service to be configured to start a Management Console, such as with the -MC parameter, which isdone via the full installation of Kofax RPA.To run roboserver as a init.d service:
1. Install the RPM or DEB package.
2. Change the RoboServer configuration (optional).
3. Run #service RoboServer start, or restart the machine to start the service automatically.
Silent Installation on WindowsA silent installer runs without user interaction. This is convenient if, for instance, you need to automate theinstallation process in a script.
Using Full InstallerTo perform a silent installation of Kofax RPA, run the following command with administrative rights.Note that commands are specified for the 32-bit installer versions. For 64-bit versions, use the samecommands.msiexec /qn /i Kofax_RPA_11.1.0.0_x32.msi
This command installs the program to the default location. To specify another location, use a command asfollows:msiexec /qn /i Kofax_RPA_11.1.0.0_x32.msi INSTALLDIR="dir"
where "dir" is the location where you want to install. For example: msiexec /qn /i Kofax_RPA_11.1.0.0_x32.msi INSTALLDIR="C:\Kofax_RPA 11.1.0.0 x64\"
To specify a file to log the installation process, use the following parameter:msiexec /qn /i Kofax_RPA_11.1.0.0_x32.msi /l msilog.txt
After installation, proceed to enter license information as described in Provide License Information.
Using Limited InstallersThe following are examples of using different installers in silent mode.msiexec /qn /i Kofax_RPA_DesignStudio_11.1.0.0_x32.msi
msiexec /qn /i Kofax_RPA_RoboServer_11.1.0.0_x32.msi
msiexec /qb /i Kofax_RPA_DesktopAutomation_11.1.0.0_x32.msi
42
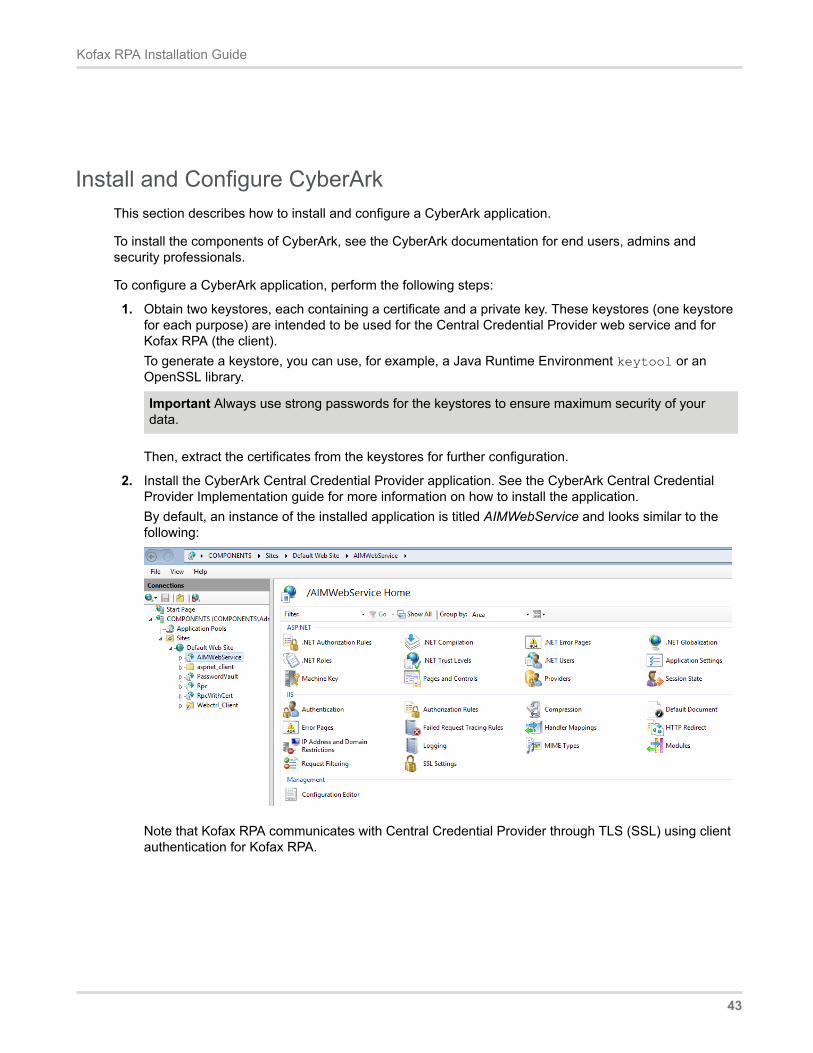
Kofax RPA Installation Guide
Install and Configure CyberArkThis section describes how to install and configure a CyberArk application.
To install the components of CyberArk, see the CyberArk documentation for end users, admins andsecurity professionals.
To configure a CyberArk application, perform the following steps:
1. Obtain two keystores, each containing a certificate and a private key. These keystores (one keystorefor each purpose) are intended to be used for the Central Credential Provider web service and forKofax RPA (the client).To generate a keystore, you can use, for example, a Java Runtime Environment keytool or anOpenSSL library.
Important Always use strong passwords for the keystores to ensure maximum security of yourdata.
Then, extract the certificates from the keystores for further configuration.
2. Install the CyberArk Central Credential Provider application. See the CyberArk Central CredentialProvider Implementation guide for more information on how to install the application.By default, an instance of the installed application is titled AIMWebService and looks similar to thefollowing:
Note that Kofax RPA communicates with Central Credential Provider through TLS (SSL) using clientauthentication for Kofax RPA.
43

Kofax RPA Installation Guide
3. Configure the CyberArk Password vault. For example, you can configure it on the Password vaultpage of the CyberArk web interface.Add an application to use with Kofax RPA. Navigate to the Applications tab and click AddApplication in the upper right corner of the page to add an application.
CyberArk provides the following application authentication methods. We recommend that you useone of these authentication methods or both methods together:• Client certificates: A signed certificate that enables Kofax RPA authentication of the requesting
application against the Central Credential Provider web service. Applications can authenticate witheither a self-signed certificate or a certificate signed by a Certificate Authority.
• Allowed machines: The list of allowed machines, based on IP or DNS, from where an applicationcan run. Multiple addresses can be specified for a single application ID, which enables multipleinstances of a single application to run on different machines and use the same application ID.
44
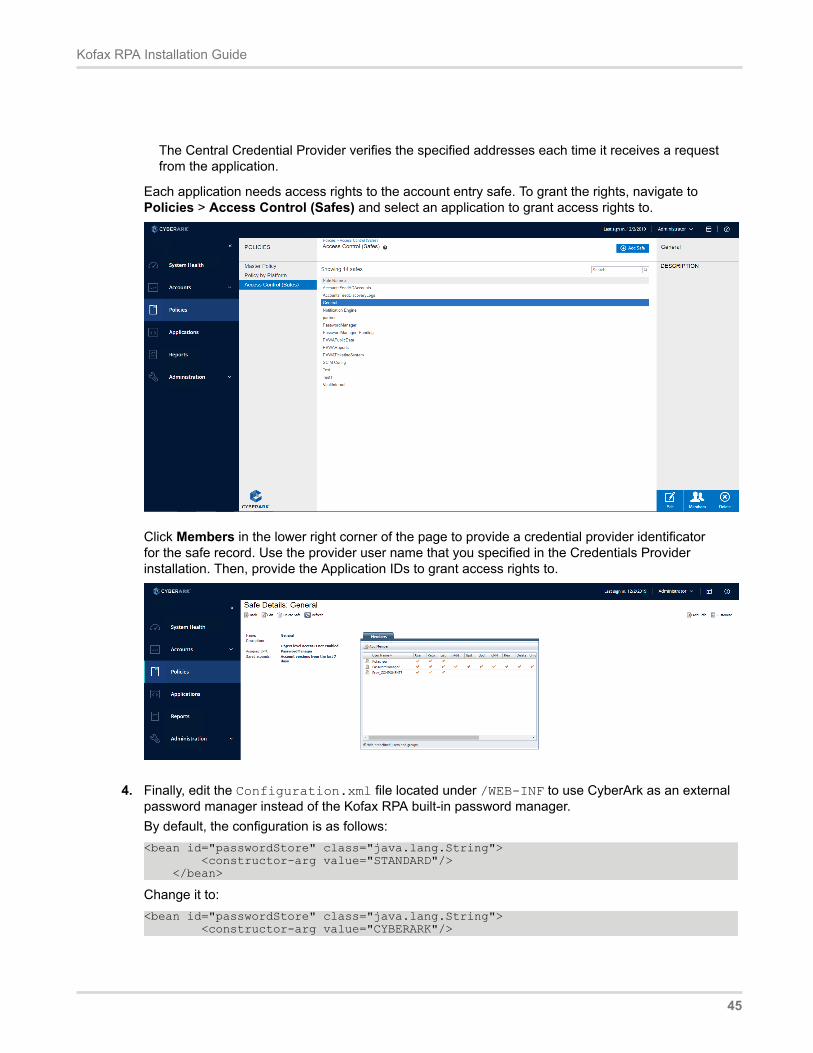
Kofax RPA Installation Guide
The Central Credential Provider verifies the specified addresses each time it receives a requestfrom the application.
Each application needs access rights to the account entry safe. To grant the rights, navigate toPolicies > Access Control (Safes) and select an application to grant access rights to.
Click Members in the lower right corner of the page to provide a credential provider identificatorfor the safe record. Use the provider user name that you specified in the Credentials Providerinstallation. Then, provide the Application IDs to grant access rights to.
4. Finally, edit the Configuration.xml file located under /WEB-INF to use CyberArk as an externalpassword manager instead of the Kofax RPA built-in password manager.By default, the configuration is as follows:<bean id="passwordStore" class="java.lang.String"> <constructor-arg value="STANDARD"/> </bean>
Change it to:<bean id="passwordStore" class="java.lang.String"> <constructor-arg value="CYBERARK"/>
45
Kofax RPA Installation Guide
</bean>
Save the Configuration.xml file to complete the configuration.
Note The Account Name of a CyberArk account, which corresponds to the Account Name field inthe Management Console, is displayed on the Accounts > Accounts View (Classic UI) tab of theCyberArk web interface.
See Help for Kofax RPA for more details.
For further information on using CyberArk with Kofax RPA, see Help for Kofax RPA.
When Kofax RPA is deployed using Docker, specify the following variables in the environment section ofthe Management Console service of docker-compose file:environment:- CONFIG_PASSWORDSTORE=CYBERARK- SETTINGS_CYBERARK_URL=https://localhost- SETTINGS_CYBERARK_PORT=443- SETTINGS_CYBERARK_IISAPPLICATIONNAME=AIMWebService
For the configuration with a self-signed certificate, specify the following additional environment variable:environment:- SETTINGS_CYBERARK_CERTIFICATEPATH=/usr/local/tomcat/root.cer
Important Folders in Kofax RPAWe recommend that you become familiar with the folders and files described in this section.
Installation FolderThe installation folder is the folder where Kofax RPA is installed. On Windows, the installation folderdefaults to:C:\Program Files\Kofax RPA 11.1.0.0
On Linux it will be a directory named Kofax_RPA_11.1.0.0 in the directory where you extracted thearchive.The installation folder contains the following important folders:
binContains all executable programs for Kofax RPA.
APIContains files related to the Kofax RPA Integration APIs.
lib on Windows and lib/jdbc on LinuxContains the installed JDBC database drivers. These drivers are always available in Kofax RPAapplications. Normally, you should manage JDBC drivers as described in the Database Drivers topicin the Management Console section of the Help for Kofax RPA.
Project FolderThe project folder contains your library of robots and types, as described in the Design Studio help topic.Configure the location of the project folder with the Settings application as described in the Working with
46
Kofax RPA Installation Guide
Projects and Libraries topic of the Design Studio Help for Kofax RPA. On Windows, the default location issimilar to the following, depending on your Windows version:C:\Documents and Settings\username\My Documents\My Robots\11.1.0.0
C:\Users\username\Documents\My Robots\11.1.0.0
Default project directory location for Linux:~/Kofax RPA/11.1.0.0
The project directory must contain a single subdirectory named Library.
Application Data FolderThe application data folder contains files that are private to the Kofax RPA but which differ for differentusers of the same computer. On Windows, the application data folder is (depending on your Windowsversion):C:\Documents and Settings\username\Local Settings\Application Data\Kofax RPA\11.1.0.0
C:\Users\username\AppData\Local\Kofax RPA\11.1.0.0
Application data directory for Linux:~/.Kofax RPA/11.1.0.0
To change the location of the application data folder, you can edit the common.conf file in theinstallation\bin folder. Add the following two lines:• wrapper.java.additional.<NUMBER>=-Dkapow.applicationDataFolder="Foldercontaining Configuration folder"
• wrapper.java.additional.<NUMBER>.stripquotes=TRUEWhere <NUMBER> is a unique integer.
Make sure that the user running Kofax RPA has read and write access to the folder.Under normal circumstances, you should never modify or delete files or folders within this folder directly;the GUI tools should be used instead. The application data folder contains the following important folders:
CertificatesContains the HTTPS certificates known by Kofax RPA. See the "Certificates" section in theAdministrator's Guide for more information.
ConfigurationContains configuration files, which are maintained as described in the section Configuring Kofax RPA.
DataContains the embedded Derby database used by the Management Console (except when installedas a web application in a Tomcat web server). See "Management Console on Tomcat" chapter in theAdministrator's Guide.
DemoDatabaseContains the Development Database that you can also use in "toy projects" during your introduction toKofax RPA.
LogsContains log files.
47
Kofax RPA Installation Guide
White-label Kofax RPAUse the following procedure to white-label Kofax RPA.
Requirements• A ZIP file provided by Kofax containing files required for white-labeling• A Design Studio or a complete MSI installer• A set of images for replacement as listed below• PowerShell version 5 installed• Java Development Kit with jar.exe
1. Create a working directory. The new directory needs to be located close to the root directory becausefile paths may get close to Windows limits.
2. Extract the ZIP file to the new directory.
3. Edit the updateMsi.ps1 file in the following way:• $msiFile variable must point to the MSI file to white-label.• $wdir variable must point to the working directory.• $pathtojarexe variable must point to jar.exe in your JDK installation.• $imagesjar variable must point to a JAR file containing images (for the specification, see the
Word document included in the ZIP file).• $pathToBanner variable must point to a BMP file of size 493x58 to use in the installer.• $pathToDialog variable must point to a BMP file of size 493x312 to use in the installer• $help_logo variable must point to an image to use for the online documentation (both Design
Studio and Management Console)• $favicon variable must point to an ICO image to use for Management Console.• $mclogo variable must point to a logo to use for Management Console.• $companyName and $companyUrl variables replace the company name and URL in the About
dialog boxes.
4. Execute the following PowerShell script to update the MSI file:.\updateMsi.ps1
Kofax RPA is now white-labeled. Additionally, use the custom library of robots provided in the product forthe white-labeling purpose.
48
Chapter 3
Provide License Information
The first step after basic installation is to enter license information. The Management Console inKofax RPA can work in two different ways. In a development environment, you enter the developmentlicense information in Design Studio. In enterprise mode, a shared Management Console is used asa license server. This chapter provides information about the development environment license. Seethe Administrator's Guide for using the Management Console as a license server in the enterpriseenvironment.
Note that it is not necessary to enter license information in RoboServers, as they automatically receive thenecessary license information from Management Console.
To use the Desktop Automation feature, obtain a separate license for this feature from Kofax.
License KeysThere are three different kinds of license key:
Production keyPermits production use of the Kofax RPA system.
Non-Production keyPermits use of the Kofax RPA system for non-production purposes, such as testing and staging.
Developer Seat keyA special kind of non-production key that allows you to run all the Kofax RPA programs on your owncomputer as part of the same installation. There are, however, some performance limitations, as this keyis intended to be used only for development or with a trial installation.
Each type of license key describes which Kofax RPA features you have and how many robots can run in acluster.
If you have both a Production key and a Non-Production key, you may install them into the same KofaxRPA system (that is, in the same Management Console). You may also choose to set up one system foreach key. In both cases, you need to set up at least two different clusters (either on the single system orone cluster on each of the two systems), configured as Production and Non-Production, respectively. TheKCUs in your licenses can then be assigned to these clusters.
Do not use one key in more than one Management Console.
49
Kofax RPA Installation Guide
Concurrent Robot Execution LicenseThe Kofax RPA Concurrent Robot Execution (CRE) licensing centers around a Kofax RPA Robot license,where the Kofax RPA Robot license controls how many robots can execute on a Kofax RPA RoboServerat one time concurrently. For example, if an organization is licensed for five Kofax RPA Robots, then fiverobots can be executed concurrently.
There is no limit to the number of robots that can be designed and deployed into production, and robotscan be as simple or complex as they need to be. For example, a robot can consist of a few or many stepsthat execute a set of business workflow actions, such as inputting and outputting data, transforming data,writing data to an Excel worksheet or calling a RESTful Service API.
When you add a CRE-based license, you need to assign licenses to a cluster. To adjust the number ofCREs, in Management Console > Admin > RoboServers, in the Action column for the cluster, fromthe context menu for a cluster, click Assign CRE. This action opens the Assign license units panewhere you can adjust the number of license units and see how many units are available in total and howmany remain. Depending on the selected license distribution mode, licenses are distributed betweenRoboServers as in the following table.
Option Description
Static In this mode, CREs in a cluster are distributed evenly between onlineRoboServers in the cluster. A CRE is an integral unit, and you cannot splitone CRE among multiple RoboServers. For example, if you have 9 licensesthat you assigned to a cluster and there is one RoboServer in the cluster, theRoboServer can run nine robots. If there are two RoboServers, they can runfour robots each, because a CRE license cannot be split. If you start threeRoboServers, each can run three robots.
Note The number of CREs in a cluster must be equal to or bigger thanthat of RoboServers. If you assign fewer CREs to a cluster than thenumber of RoboServers present in the cluster, the cluster is disabled.
Dynamic In this mode, RoboServers receive the licenses from the cluster per request.A RoboServer can get as many licenses as it requests if they are available.In this mode, RoboServers communicate only with the Management Consoleand block other requests, such as API calls.
Important Dynamic license distribution mode is supported by KofaxRPA version 10.3 and later. Version 10.7 and later support this modeimmediately after installation. To use dynamic license distribution, inversions 10.3 to 10.6, install the latest fix pack for the correspondingversion. See Enable Dynamic License Distribution Mode in the KofaxRPA Upgrade Guide.
Kofax RPA licensing is available on a perpetual or annual term basis. Kofax RPA licensing is independentof the target hardware environment and physical CPUs, and a robot license is not tied to a physicaldesktop or virtual machine, allowing you the flexibility to choose cloud-based or on-premise, as well asvirtualized or physical CPU environments.
Learn more about Kofax RPA licensing at https://www.kofax.com/
50

Kofax RPA Installation Guide
Kofax RPA Compute UnitsAnother way to license Kofax RPA is to use capacity-based pricing based on Kofax RPA Compute Units(KCUs). This pricing model is completely independent of the chosen hardware configuration.
What are KCUs?A KCU is a Kofax RPA Compute Unit and is defined as a unit of measure for how many operations (orsteps) a Kofax RPA RoboServer can perform in one second (which is unrelated to underlying servercapacity).A step is the smallest unit of action that can be performed within a RoboServer. Examples of stepsare loading a web page, writing a data record to a database, or performing a transformation on a dataelement.One KCU represents a total of 5000 KCU points per second. The number of Kofax RPA steps that makeup one (1) KCU depends on the type of Kofax RPA steps involved, as each step consumes a differentamount of the KCU. The steps are divided into groups, and the most important groups are listed here:
1. Steps that both do I/O and execute JavaScript that cost 10,000 KCU points, such as 2 page loadsper second with 4 KCUs
2. Steps that do either I/O or execute JavaScript (but not both) that cost 1000 KCU points, such as 20Call REST Web Service Steps per second with 4 KCUs
3. Extraction and transformation steps that cost 1 KCU point, such as 40,000 extract or assign stepsper second with 4 KCUs
4. Desktop Automation step that costs 5000 KCU points.
5. Looping in Desktop Automation that costs 5000 KCU points per iteration.
The complete KCU list is available in Design Studio by clicking Help > Show KCU Information.You should have enough CPU power and sufficiently low response time from the source server.
Note We have empirically measured the average page load time to be 6.7 seconds on a powerful CPUover the 23,000 most visited web sites.
The total number of KCUs a robot uses can be seen in the Design Studio Debugger Summary informationafter running the robot.
Deploying and Assigning KCUsWith KCUs we can deliver the needed computing capacity independent of the target hardwareenvironment and physical CPUs. This approach allows the flexibility of choosing cloud-based or on-premise, virtualized or physical CPU environments without the need to control the number of allocatedCPUs.The available KCUs are assigned to the RoboServer clusters in Management Console and automaticallydistributed among the RoboServers available within the cluster.To adjust the number of KCUs, in Management Console > Admin > RoboServers, in the Action columnfor the cluster, from the context menu for a cluster, click Assign KCU. This action opens the Assignlicense units pane where you can adjust the number of license units and see how many units are availablein total and how many remain.
51
Kofax RPA Installation Guide
Enter License in Design StudioIf Design Studio is not already started, do as follows:
WindowsUse the Design Studio item from the Start menu.To start Design Studio from the command line, run the following command in the bin subfolder of theinstallation folder.DesignStudio
LinuxStart Design Studio from the command line by launching the DesignStudio program in the bin directoryunder the installation directory (see Important Folders in Kofax RPA) as follows:$./DesignStudio
On the next screen, enter your license information. You have three choices, depending on whatinformation you have been provided from Kofax RPA and/or your system administrator.
License ServerIf your administrator provided you with the URL to a central license server (Management Console)that administers the license for all Design Studio users, select License Server and enter the URL andcredentials for that server. If you enter the URL without specifying a port, the default port 80 or 443 will beused for HTTP or HTTPS, respectively.The license server must be running and have available Design Studio seats for you to use Design Studio.If your policies forbid storing the license server password, clear the Remember Password option and youwill have to type your password every time you open Design Studio.See the Administrator's Guide for information on using Management Console as a license server.
Developer LicenseThe developer license is a combined license key for both Management Console and Design Studio. Youcan either enter the license key in your local (embedded) Management Console, or use the dialog box inDesign Studio. Whenever you start Design Studio, Management Console will automatically start as well.
Trial LicenseFor the trial license you only need to provide the name, email, and company. You do not enter a licensekey. Design Studio starts without contacting Management Console and with limited capabilities. Thislicense is intended for short-time use for trial/demonstration purposes.
Normally, Design Studio displays the Enter License Information dialog box only the first time it is started.It will, however, display this dialog box again if the license server cannot be contacted because it has beenmoved, is not running, or is unavailable for another reason.
52

Chapter 4
Switch Display Language for ManagementConsole and Design Studio
Follow this procedure to change the display language for Management Console and Design Studio. Theexamples in this procedure use the Japanese language.
Note On your computer, ensure that the language setting for non-Unicode programs is set to theapplicable language. The steps to take depend on your operating system.
• If Management Console is run as an embedded component, follow these steps:
1. In the folder {path}\<Kofax RPA_installed_folder>\bin, locate and create a backupcopy of the file common.conf. Open the file with a text editor, such as Notepad. You may need torun the text editor as an administrator.
2. Locate the setting Wrapper Localization, scroll down to the section Java AdditionalParameters, and then make the following changes as applicable to the desired display language.
# Wrapper Localization#********************************************************************# Specify the locale which the Wrapper should use. By default the system# locale is used.wrapper.lang=ja_JP # en_US or ja_JP
# Java Additional Parameters
wrapper.java.additional.2=-Duser.country=JPwrapper.java.additional.3=-Duser.region=JPwrapper.java.additional.4=-Duser.language=ja
3. Save the changes.• If Management Console is installed on a stand-alone Tomcat server that runs via startup/shutdown
scripts, follow these steps:
1. In your Tomcat installation, locate and open the file catalina.bat. You may need to run the texteditor as administrator.
2. Locate the setting CATALINA_OPTS and then make the following changes as applicable to thedesired display language.set CATALINA_OPTS="-Duser.language=ja" "-Duser.region=JP" "-Duser.country=JP"
3. Save the changes.
53

Kofax RPA Installation Guide
• If Management Console is installed on a stand-alone Tomcat server that runs as a windows service, dothe following:
1. Run tomcat9w.exe from the bin subfolder of the Tomcat installation folder.
2. In the Apache Tomcat Properties window, select the Java tab and add the following options to theJava Options section:-Duser.language=ja-Duser.region=JP-Duser.country=JP
Click OK.
3. Restart the server for the changes to take effect.
From the Kofax RPA 11.1.0 folder, run the following shortcuts: Start Management Console and StartDevelopment Database in the Development Database folder. Leave the Command Prompt windowsopen while the applications are running.
When you start Management Console and Design Studio, the display language is changed to the desireddisplay language. To switch back to English, close both Command Prompt windows. If required restore thebackup copy of common.conf, and then restart both shortcuts.
54
Chapter 5
Kofax RPA Initial Configuration
After installing Kofax RPA, configure the installation to suit your needs. Some configuration is done usingthe Settings application as described in the "RoboServer Configuration" section in the Administrator'sGuide.
Other configuration tasks, relevant mostly for administrators of the Kofax RPA system, are done withManagement Console, more specifically in the Admin > RoboServers and Projects sections. It isespecially important to set up the necessary RoboServers and clusters in the RoboServers section. Seethe Management Console chapter in Help for Kofax RPA for information on these sections.
55
Chapter 6
Quick Start Guide
This chapter explains how to start using Kofax RPA.
Prerequisites• The examples below use a standalone Management Console (NOT deployed on Tomcat) and
RoboServer that are on a different computer than Design Studio.• This chapter assumes you have at least a non-production key for running Management Console.
Install the software1. Make sure that the system requirements are met based on the information in Dependencies and
Prerequisites.
2. Install the Kofax RPA software on the computer where you will use Management Console andRoboServer. Follow the instructions in Install Kofax RPA as applicable for your operating system.
3. Install Design Studio on the applicable computers. Use the installer for the Design Studiocomponent, as described in the Install Kofax RPA chapter. In this chapter, Management Console isused for licensing.
Start Management Console and RoboServerBefore you start an embedded Management Console, configure the RoboServer. See ConfigureManagement Console settings for details.
1. Start the RoboServer Settings application.
2. On the General tab, select Register to a Management Console, and supply all necessaryinformation including the administrator name and password to connect to the Management Console.The default admin user name and password:• User name: admin• Password: admin
To start a Management Console, either run Start Management Console from the Start menu on Windowsor run the following command from the bin folder of the Kofax RPA installation folder.• On Windows: RoboServer.exe -MC -p 50000• On Linux: ./RoboServer -MC -p 50000
56
Kofax RPA Installation Guide
Notes• All RoboServer command parameters are listed in the Runtime chapter in the Administrator's Guide.• You can reach Management Console on http://<ServerNameOrIP>:<port>. Additional settings
(different port, HTTPS usage, and so on) are available in the RoboServer Settings application fromthe Start menu.
• You can start RoboServer on different ports (default is 50000). By default, Kofax RPA registers theRoboServer on the port specified in the command for this Management Console.
• It is possible to start Management Console and RoboServer in separate JVMs by running theRoboServer command with separate parameters.See the RoboServer parameters in the Administrator's Guide.RoboServer -MC command starts Management Console only.RoboServer -p 50000 -mcUrl http://admin:password@ServerName:port -cl"Production" command starts a RoboServer on port 50000 and registers it to the ManagementConsole at ServerName:port under the Production cluster with the specified user name andpassword.
• A Kofax RPA environment always has one Management Console that can control multipleRoboServers. Do not configure multiple Management Consoles to control the same RoboServer.
• It is possible to configure Kofax RPA Management Console and RoboServers to start automatically.See the Kofax RPA Initial Configuration chapter for more information.
Access Management Console and enter license keyUse your browser to open Management Console.
Example: http://MCServer:50080
The first time you open Management Console and log in using the default credentials, it prompts for thelicense key. Make sure that the keys and the company name match exactly the data you received fromKofax. The license data can later be replaced in the Management Console > Admin > License.
Tip Click the Help icon in any section to get more information about the opened section. The icon isusually located in the top right corner.
Configure Management Console settingsManagement Console security settings are configured on the Management Console tab of theRoboServer Settings application. You can open the application from the Start menu or from the bin folderin the Kofax RPA installation folder.
Set the RoboServer to register to this Management Console as described in Start Management Consoleand RoboServer.
Important It is very important to run the RoboServer Settings application as the same user that runsManagement Console. Otherwise, the changes are not applied.
57
Kofax RPA Installation Guide
Change Management Console port: change "HTTP Port Number"To change the default port number, on the Management Console tab in the RoboServer Settingsapplication, edit the HTTP Port Number property.
Upload JDBC driverThe JDBC Driver Upload option changes the way the JDBC drivers are uploaded. By default, only anadmin user is allowed to upload a JDBC driver and only while accessing the Management Console on thecomputer it is running (localhost). If you are accessing Management Console from a different computerand if you need to upload JDBC drivers (to use with databases), change this option to Admin from anyhost.More detailed information, including information about the other tabs in the RoboServer Settingsapplication, is available in the "Runtime" section in the Kofax RPA Administrator's Guide.
Important Management Console and RoboServer must be restarted for changes done in theRoboServer Settings application to take effect.
Management Console authenticationManagement Console prompts you for a user name and password when you connect to it. Either usethe default admin superuser password or the one you set on the Users & groups page under Admin inthe Management Console. When you are logged in, the user name is shown in the top right corner. Fordetails, see "Users & groups" in Help for Kofax RPA or the Kofax RPA User's Guide.
Change the admin user passwordManagement Console provides the default admin superuser password for logging in (name - admin,password - admin). To change the admin user password, perform the following steps.
1. Expand Admin on the left pane and click Users & groups.
2. On the Users tab, select the admin user and click above the tab.
3. Type the new password, type it again to confirm, and click OK.
Create users and groupsCreate new users and groups (or assign users to groups) from Management Console > Admin > Users &groups.Note that there is no connection between users/groups and your Active Directory/LDAP/SAML/Domainusers and groups. If users change their domain password, it has no effect on the user credentials for theManagement Console.Although it is possible to integrate Kofax RPA Management Console with LDAP, this is an advancedconfiguration that works when Management Console is deployed as a stand-alone application in a Tomcatweb server. For details, see the Tomcat Management Console topic in the Kofax RPA Administrator'sGuide.
58
Kofax RPA Installation Guide
Add users to groupsThere are two ways to add users to groups.• Select a user, click Edit from the context menu and type the name of groups the user should be a
member of.• Select a group, click Edit from the context menu and select users that should be members of this
group.
Assign privileges to users
Important A user created in the Management Console is able to log in to the Management Consoleonly if the user is part of a group that has been assigned rights to at least one project.
To assign a privilege to access projects, follow these steps:
1. Go to Management Console > Admin > Projects.
2. Create a project or open the existing project properties by clicking Edit from the context menu.
3. On the Permissions tab, click the plus sign.
4. Select a project role in the Project role drop-down list.For a description of built-in roles, see "Manage Users and Groups" in Kofax RPA help or in the KofaxRPA User's Guide.
5. Select a group in the Security group drop-down list.
6. Add other groups if needed and click Submit.
Configure Management Console before running robotsJDBC database driversKofax RPA has a default database that can be used for logging (logdb) and for robots to store data(objectdb). To use this database, start it from the Kofax RPA program group under (Start > Programs)
59
Kofax RPA Installation Guide
using Start Development Database. An executable is also available in the bin subfolder in yourinstallation.To use a custom database (which is recommended even when testing), do the following first.
1. Check Dependencies and Prerequisites to see the database systems that Kofax RPA supports.
2. Get the JDBC driver for the database. Kofax RPA does not provide these drivers, but you candownload them from the database provider, such as Microsoft, Oracle, or other.
3. Upload the JDBC driver in the Management Console > Settings > Database drivers by clicking theUpload driver JAR button.
Note If the Upload Driver Jar button is disabled, you might be accessing the Management Consolefrom a different computer than the one on which it is running and you have not changed the settingto allow driver upload from a different computer. See "Upload JDBC driver" in the ConfigureManagement Console settings and change the "JDBC driver upload" to "Admin from any host".Restart Management Console (the process itself) and the "Upload Driver JAR" button should beenabled.
4. Click Save to save the JDBC driver in Management Console. You can see it listed under "Databasedrivers."
To use multiple types of databases in the same Management Console, upload the driver they should use.
RoboServer log databaseBy default, the RoboServer log database in set to logdb (which can be accessed if you start theDevelopment database only).You can configure the RoboServer log database as a custom database. If the user you provide has rightsto create tables in this database, Kofax RPA creates all the tables it needs.If the user cannot create tables, a database administrator has to create them before the database isconfigured as a RoboServer log database. See "Scripts for Creating Database Tables" in Help for KofaxRPA or the Kofax RPA User's Guide to get the queries needed to create the log tables (make sure to getthe one that applies to your database type).Your user must be able to write to these tables.After the RoboServer Log Database is configured, you can see all the logs in Management Console > Logview.
60
Kofax RPA Installation Guide
Harvest databaseRobots can store data in databases or query tables for data. By default, objectdb is used (DevelopmentDatabase). To use a custom database, follow these steps:
1. In Management Console, go to Admin > RoboServers > Cluster settings from the cluster context menu.
2. On the Databases tab, click New database.
3. Fill in the information, click Test to make sure Management Console connect to the database.
Note The Name field here is the name of the mapping, not the database (you specify the actualdatabase name in the Schema option). The mapping name differs from the database nameand you can keep it different if you do not want robot developers to know the real name of thedatabase. If security is not a concern, you can keep the mapping name the same as the databasename (less confusion).
Data stored by robots in this database can be viewed from Management Console > Data view page.Only tables created from types are shown. If a table is created in SQL Manager, you will not see it inManagement Console (even if you have robots configured to query it or add/change data in it).
Shared databases (between Management Console and Design Studio)Management Console can push database mappings created in the cluster settings to Design Studioinstances. If you have multiple clusters, only one cluster can push database mappings.To configure shared databases, follow these steps.
1. Select which clusters will push the databases: go to Management Console > Settings > DesignStudio and select the required cluster.
2. Create your database mappings in the cluster settings (see the "Harvest database" section above fordetails).
3. Assign database mappings to projects as follows:
a. Go to Management Console > Repository > Database mappings and click the plus sign inthe upper left corner to create a new database mapping.
b. Fill in the information.• Mapping name: It can be the same as the name given when creating the mapping in cluster
settings (it can be different too, but might cause more confusion).• Project: Set to the project where this mapping will be used.
Note Keep in mind project permissions when using authentication (see ManagementConsole authentication for details). If a mapping is assigned to a project, only users withrights to that project will be able to use it (and see its data when opening ManagementConsole > Data view).
• Cluster: Must be the same as the one you already set in Settings > Design Studio.• Database: Select the mapping created in the cluster settings from the drop-down list.
4. After you save these settings, the users that have Design Studio connected to this ManagementConsole can right-click the Management Console connection under My Projects, refresh the data,and see the new mapping available.
61

Kofax RPA Installation Guide
Build RobotsRobots are built in Design Studio. See Enter License in Design Studio for more information on how to startDesign Studio and configure a license for it.
In Design Studio, you can click the Help button to open the help and read more information about specificsteps and configuration.
Design Studio also has a default project (its name is the name of the version, such as 11.1.0.0) where youcan find robot examples for common operations.
Upload RobotsTo upload a robot from Design Studio, right-click the robot under My Projects and select Upload. In theUpload to Management Console dialog box, select the Management Console and the project where therobot should be uploaded.
Notes• You cannot create a project from this dialog box; it must be created in Management Console in
advance.• When using this option, you only need to select the robot. Design Studio automatically sends all the
types and snippets that it uses.• You can share a project between Management Console and Design Studio by selecting Remember
this (as a shared project).You can find more information about shared projects and how to work withthem in the "Projects and Libraries" topic in Help for Kofax RPA.
• You can also upload the robot files directly in Management Console but you have to select the robotand each type and snippet one by one. In the Management Console, in Repository, you can use theplus sign in each section to add robots, types, snippets, and so on.
Run robotsRun robots from Management ConsoleEach robot in Repository > Robots has a Run now option in the context menu. However, onlyrobots that do not require input can be run this way. If your robots require input, they can only be run bya schedule (by Management Console), API, or REST/SOAP services. See the next sections for moreinformation.If you have multiple clusters, you will be asked to select a cluster on which to run.
62
Kofax RPA Installation Guide
Run robots from a scheduleYou can create a schedule from the Management Console > Repository > Robots by right-clicking arobot and selecting Create schedule from the context menu.This action automatically adds the robot to the schedule. The other option (easier to use when you want toadd multiple robots to a schedule) is to create a schedule using the plus sign in the Management Console> Schedules section.
Run robots via APIIn the Management Console > Repository > Robots section, you can see the API option in the contextmenu for a robot.Clicking this option opens the sample code for Java and .NET APIs that you can use to call this robot.More information is available in the Kofax RPA Developer's Guide.
Run robots using REST/SOAPIn the Management Console > Repository > Robots section, from the context menu for a robot, clickREST or SOAP to get a service example that you can use to call that specific robot.
63
Related Documents