Keyboarding Reinforcement CD UNIT 1 Home Keys and First-Finger Reaches 2 Second-Finger Reaches 3 Third-Finger Reaches 4 Fourth-Finger Reaches 5 Shift Keys; Numbers; Timed Writings 1 lessons

Welcome message from author
This document is posted to help you gain knowledge. Please leave a comment to let me know what you think about it! Share it to your friends and learn new things together.
Transcript
KeyboardingReinforcementCD
UNIT
1 Home Keys and First-Finger Reaches
2 Second-Finger Reaches
3 Third-Finger Reaches
4 Fourth-Finger Reaches
5 Shift Keys; Numbers; Timed Writings
1
l e s s o n s
HOME KEYS ANDFIRST-FINGER REACHES
Learn Home Keys, Space Bar, and Enter Key
“F” Finger Reach Keys
“J” Finger Reach Keys
“F” and “J” Finger Reach Words
Estimated Time for Lesson 1: 6 hoursLE
SS
ON1
e x e r c i s e 1
e x e r c i s e 2
e x e r c i s e 3
e x e r c i s e 4
2

Learn Home Keys, Space Bar, and Enter Key
IMPORTANT—BEFORE YOU BEGIN:� Turn off the AutoCorrect feature that capitalizes the first
letter in a sentence. Do this so the first letter in every drillis not automatically capitalized.
� Ignore wavy red lines, which appear if words are mis-spelled or repeated. This occurs in practice drills wheretext is repeated and does not form words.
� Set the font to Courier 12 point so your line endings matchtext illustrations:
• Click Format
• Click Font
• Click Courier in the Font list box
• Click 12 in the size list box
• Click OK.
1. Start your word processing program.
2. Start a new document.
3. Place your hands on the Home keys.
4. Remove your left hand; then return it to the Home position.
5. Remove your right hand; then return it to the Home position.
CD UNIT: KEYBOARDING 3Lesson 1 Exercise 1
E X E R C I S E
1
D I R E C T I O N S
continued on next page
Concept Builders
• The home keys A S D F J K L; areyour base of operation.
• The left hand rests on the followingkeys:
Pinky finger on A
Ring finger on S
Middle finger on D
Index finger on F
• The right hand rests on the follow-ing keys:
Pinky finger on ;
Ring finger on L
Middle finger on K
Index finger on J
• The right pinky reaches over tostrike the Enter key.
• The right thumb strikes the SpaceBar but does not rest on it; the leftthumb does nothing.
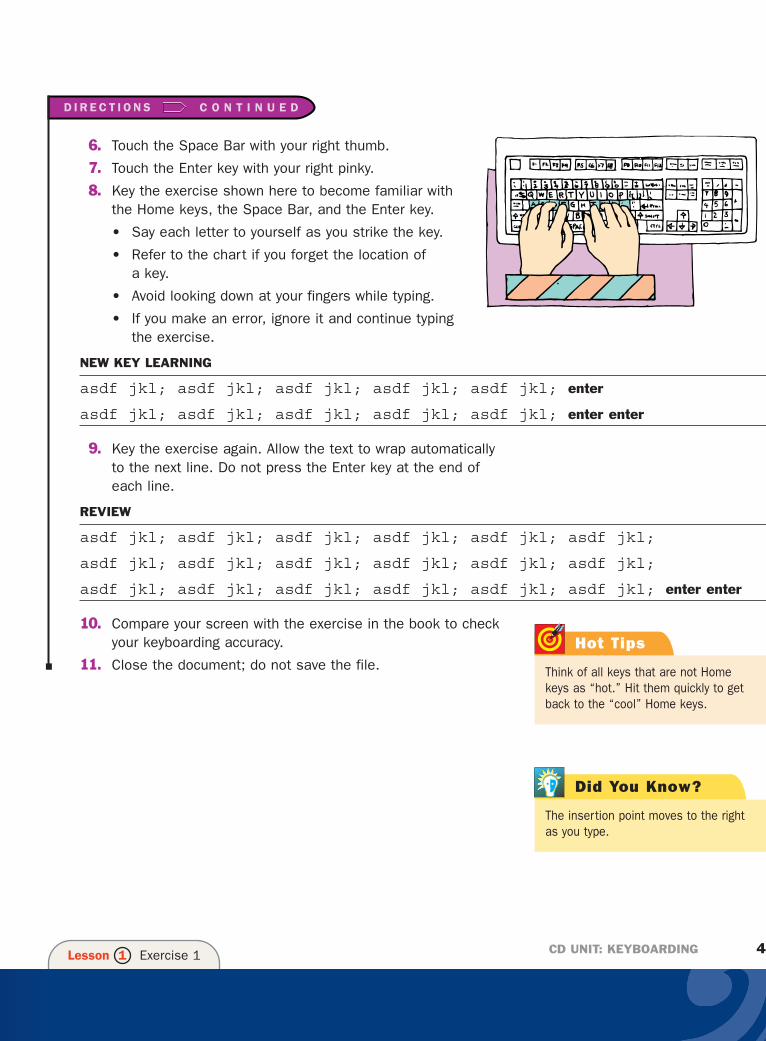
6. Touch the Space Bar with your right thumb.
7. Touch the Enter key with your right pinky.
8. Key the exercise shown here to become familiar withthe Home keys, the Space Bar, and the Enter key.
• Say each letter to yourself as you strike the key.
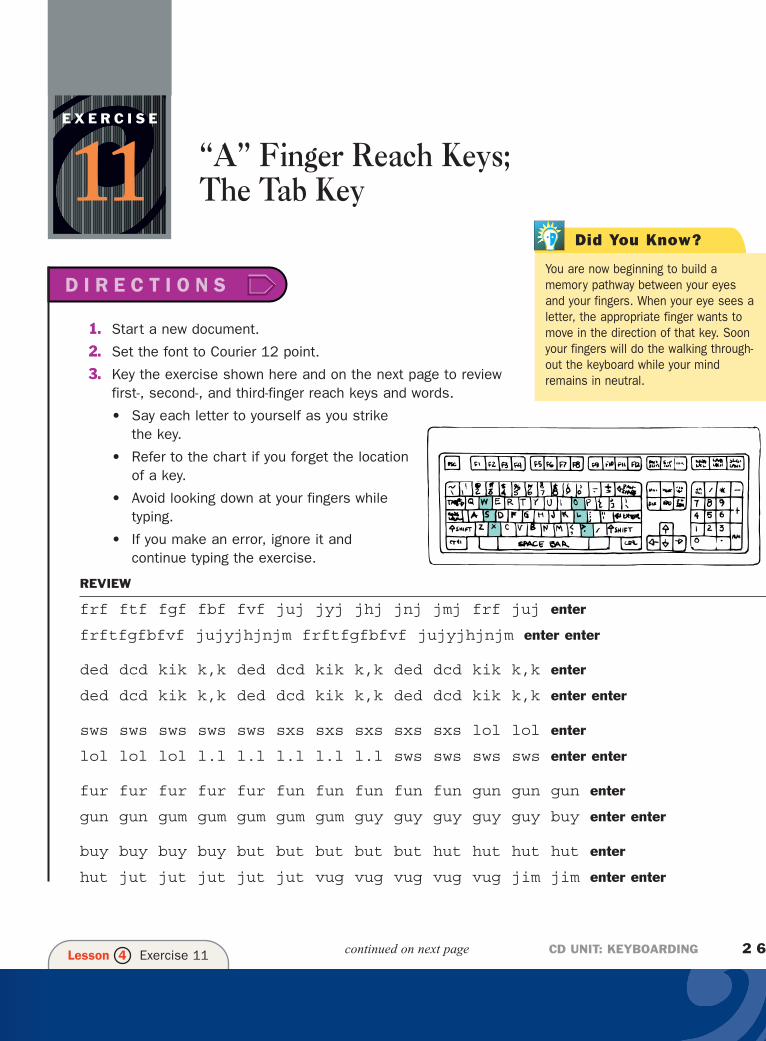
• Refer to the chart if you forget the location of a key.
• Avoid looking down at your fingers while typing.
• If you make an error, ignore it and continue typingthe exercise.
NEW KEY LEARNING
asdf jkl; asdf jkl; asdf jkl; asdf jkl; asdf jkl; enter
asdf jkl; asdf jkl; asdf jkl; asdf jkl; asdf jkl; enter enter
9. Key the exercise again. Allow the text to wrap automaticallyto the next line. Do not press the Enter key at the end ofeach line.
REVIEW
asdf jkl; asdf jkl; asdf jkl; asdf jkl; asdf jkl; asdf jkl;
asdf jkl; asdf jkl; asdf jkl; asdf jkl; asdf jkl; asdf jkl;
asdf jkl; asdf jkl; asdf jkl; asdf jkl; asdf jkl; asdf jkl; enter enter
10. Compare your screen with the exercise in the book to checkyour keyboarding accuracy.
11. Close the document; do not save the file.
CD UNIT: KEYBOARDING 4Lesson 1 Exercise 1
D I R E C T I O N S C O N T I N U E D
Hot Tips
Think of all keys that are not Homekeys as “hot.” Hit them quickly to getback to the “cool” Home keys.
Did You Know?
The insertion point moves to the rightas you type.
“F” Finger Reach Keys
1. Start a new document.
2. Set the font to Courier 12 point.
3. Place your hands on the Home keys.
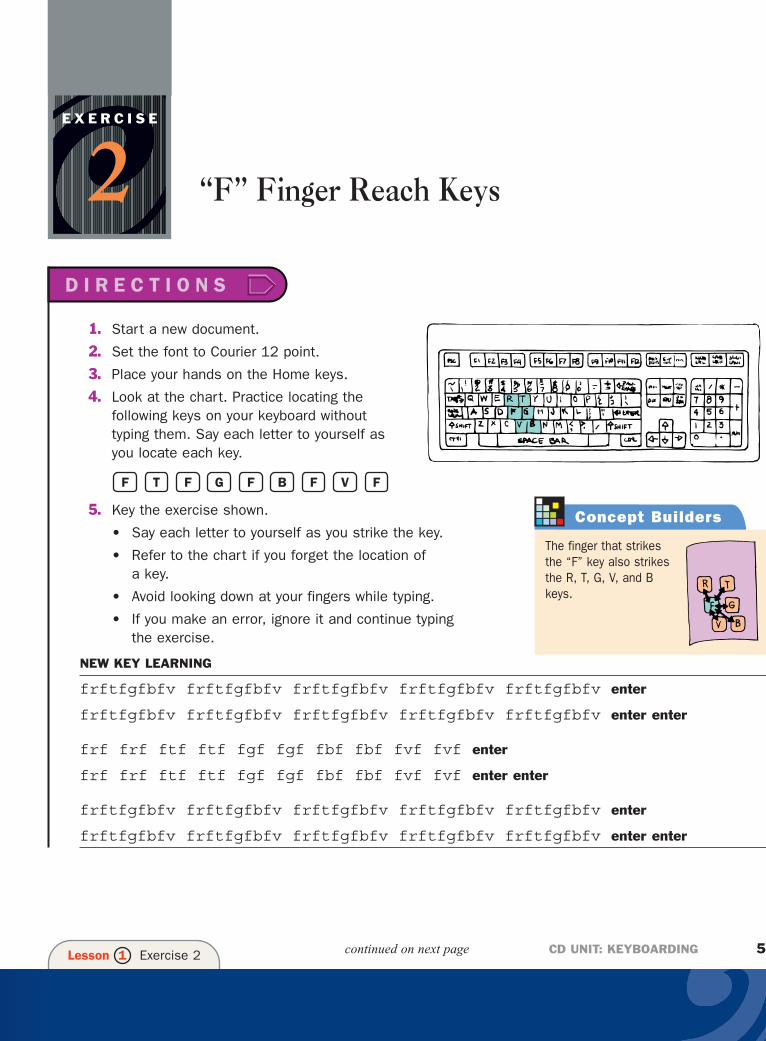
4. Look at the chart. Practice locating the following keys on your keyboard without typing them. Say each letter to yourself as you locate each key.
5. Key the exercise shown.
• Say each letter to yourself as you strike the key.
• Refer to the chart if you forget the location of a key.
• Avoid looking down at your fingers while typing.
• If you make an error, ignore it and continue typing the exercise.
NEW KEY LEARNING
frftfgfbfv frftfgfbfv frftfgfbfv frftfgfbfv frftfgfbfv enter
frftfgfbfv frftfgfbfv frftfgfbfv frftfgfbfv frftfgfbfv enter enter
frf frf ftf ftf fgf fgf fbf fbf fvf fvf enter
frf frf ftf ftf fgf fgf fbf fbf fvf fvf enter enter
frftfgfbfv frftfgfbfv frftfgfbfv frftfgfbfv frftfgfbfv enter
frftfgfbfv frftfgfbfv frftfgfbfv frftfgfbfv frftfgfbfv enter enter
FVFBFGFTF
CD UNIT: KEYBOARDING 5Lesson 1 Exercise 2
E X E R C I S E
2D I R E C T I O N S
continued on next page
Concept Builders
The finger that strikesthe “F” key also strikesthe R, T, G, V, and Bkeys.
6. Key the exercise shown. Allow the text to wrap automaticallyto the next line. Do not press the Enter key at the end ofeach line.
REVIEW
frftfgfbfv frftfgfbfv frftfgfbfv frftfgfbfv frftfgfbfv
frftfgfbfv frftfgfbfv frftfgfbfv frftfgfbfv frftfgfbfv
frftfgfbfv frftfgfbfv frftfgfbfv frftfgfbfv frftfgfbfv
frftfgfbfv frftfgfbfv frftfgfbfv frftfgfbfv frftfgfbfv enter enter
7. Compare your screen with the exercise in the book to checkyour keyboarding accuracy.
8. Close the document; do not save the file.
CD UNIT: KEYBOARDING 6Lesson 1 Exercise 2
D I R E C T I O N S C O N T I N U E D
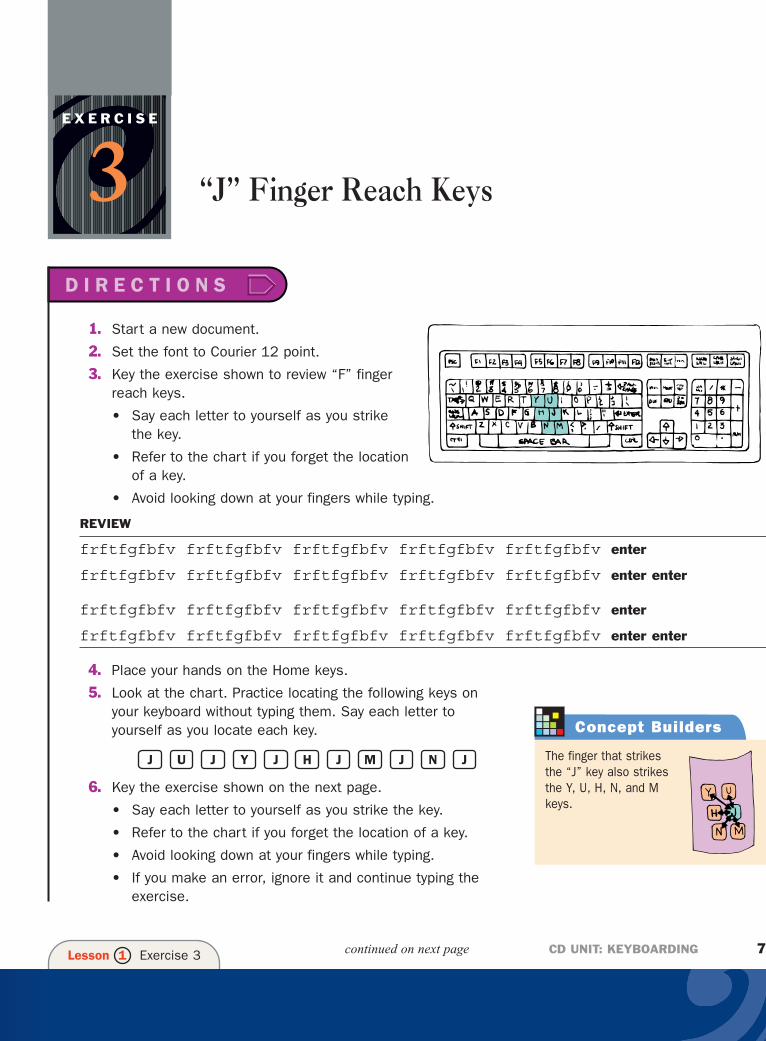
“J” Finger Reach Keys
1. Start a new document.
2. Set the font to Courier 12 point.
3. Key the exercise shown to review “F” fingerreach keys.
• Say each letter to yourself as you strikethe key.
• Refer to the chart if you forget the locationof a key.
• Avoid looking down at your fingers while typing.
REVIEW
frftfgfbfv frftfgfbfv frftfgfbfv frftfgfbfv frftfgfbfv enter
frftfgfbfv frftfgfbfv frftfgfbfv frftfgfbfv frftfgfbfv enter enter
frftfgfbfv frftfgfbfv frftfgfbfv frftfgfbfv frftfgfbfv enter
frftfgfbfv frftfgfbfv frftfgfbfv frftfgfbfv frftfgfbfv enter enter
4. Place your hands on the Home keys.
5. Look at the chart. Practice locating the following keys onyour keyboard without typing them. Say each letter toyourself as you locate each key.
6. Key the exercise shown on the next page.
• Say each letter to yourself as you strike the key.
• Refer to the chart if you forget the location of a key.
• Avoid looking down at your fingers while typing.
• If you make an error, ignore it and continue typing theexercise.
JNJMJHJYJUJ
CD UNIT: KEYBOARDING 7Lesson 1 Exercise 3
E X E R C I S E
3D I R E C T I O N S
continued on next page
Concept Builders
The finger that strikesthe “J” key also strikesthe Y, U, H, N, and Mkeys.
NEW KEY LEARNING
jujyjhjnjm jujyjhjnjm jujyjhjnjm jujyjhjnjm jujyjhjnjm enter
jujyjhjnjm jujyjhjnjm jujyjhjnjm jujyjhjnjm jujyjhjnjm enter enter
juj juj jyj jyj jhj jhj jmj jmj jnj jnj enter
juj juj jyj jyj jhj jhj jmj jmj jnj jnj enter enter
jujyjhjnjm jujyjhjnjm jujyjhjnjm jujyjhjnjm jujyjhjnjm enter
jujyjhjnjm jujyjhjnjm jujyjhjnjm jujyjhjnjm jujyjhjnjm enter enter
7. Key the exercise shown. Allow the text to wrap automaticallyto the next line. Do not press the Enter key at the end ofeach line.
REVIEW
jujyjhjnjm jujyjhjnjm jujyjhjnjm jujyjhjnjm jujyjhjnjm
jujyjhjnjm jujyjhjnjm jujyjhjnjm jujyjhjnjm jujyjhjnjm
jujyjhjnjm jujyjhjnjm jujyjhjnjm jujyjhjnjm jujyjhjnjm
jujyjhjnjm jujyjhjnjm jujyjhjnjm jujyjhjnjm jujyjhjnjm enter enter
8. Compare your screen with the exercise in the book to checkyour keyboarding accuracy.
9. Close the document; do not save the file.
CD UNIT: KEYBOARDING 8Lesson 1 Exercise 3
D I R E C T I O N S C O N T I N U E D
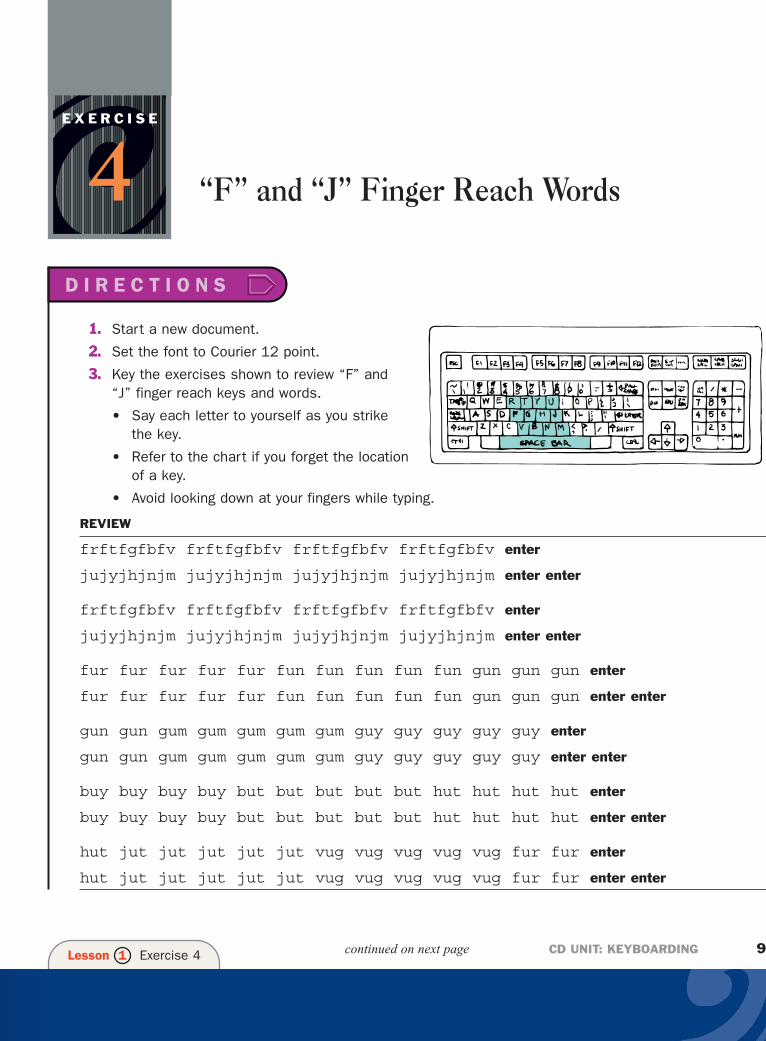
“F” and “J” Finger Reach Words
1. Start a new document.
2. Set the font to Courier 12 point.
3. Key the exercises shown to review “F” and“J” finger reach keys and words.
• Say each letter to yourself as you strikethe key.
• Refer to the chart if you forget the locationof a key.
• Avoid looking down at your fingers while typing.
REVIEW
frftfgfbfv frftfgfbfv frftfgfbfv frftfgfbfv enter
jujyjhjnjm jujyjhjnjm jujyjhjnjm jujyjhjnjm enter enter
frftfgfbfv frftfgfbfv frftfgfbfv frftfgfbfv enter
jujyjhjnjm jujyjhjnjm jujyjhjnjm jujyjhjnjm enter enter
fur fur fur fur fur fun fun fun fun fun gun gun gun enter
fur fur fur fur fur fun fun fun fun fun gun gun gun enter enter
gun gun gum gum gum gum gum guy guy guy guy guy enter
gun gun gum gum gum gum gum guy guy guy guy guy enter enter
buy buy buy buy but but but but but hut hut hut hut enter
buy buy buy buy but but but but but hut hut hut hut enter enter
hut jut jut jut jut jut vug vug vug vug vug fur fur enter
hut jut jut jut jut jut vug vug vug vug vug fur fur enter enter
CD UNIT: KEYBOARDING 9Lesson 1 Exercise 4
E X E R C I S E
4D I R E C T I O N S
continued on next page

4. Key the exercise. Allow the text to wrap automatically to thenext line. Do not press the Enter key at the end of each line.
fur fur fur fur fur fun fun fun fun fun gun gun gun gun gun
gum gum gum gum gum guy guy guy guy guy buy buy buy buy buy
but but but but but hut hut hut hut hut jut jut jut jut jut
vug vug vug vug vug fur fur enter enter
5. Compare your screen with the exercise in the book to checkyour keyboarding accuracy.
6. Close the document; do not save the file.
CD UNIT: KEYBOARDING 1 0Lesson 1 Exercise 4
D I R E C T I O N S C O N T I N U E D

SECOND-FINGER REACHES
“D” Finger Reach Keys
“K” Finger Reach Keys
“D” and “K” Finger Reach Words
Estimated Time for Lesson 2: 6 hours
LE
SS
ON2
e x e r c i s e 5
e x e r c i s e 6
e x e r c i s e 7
1 1
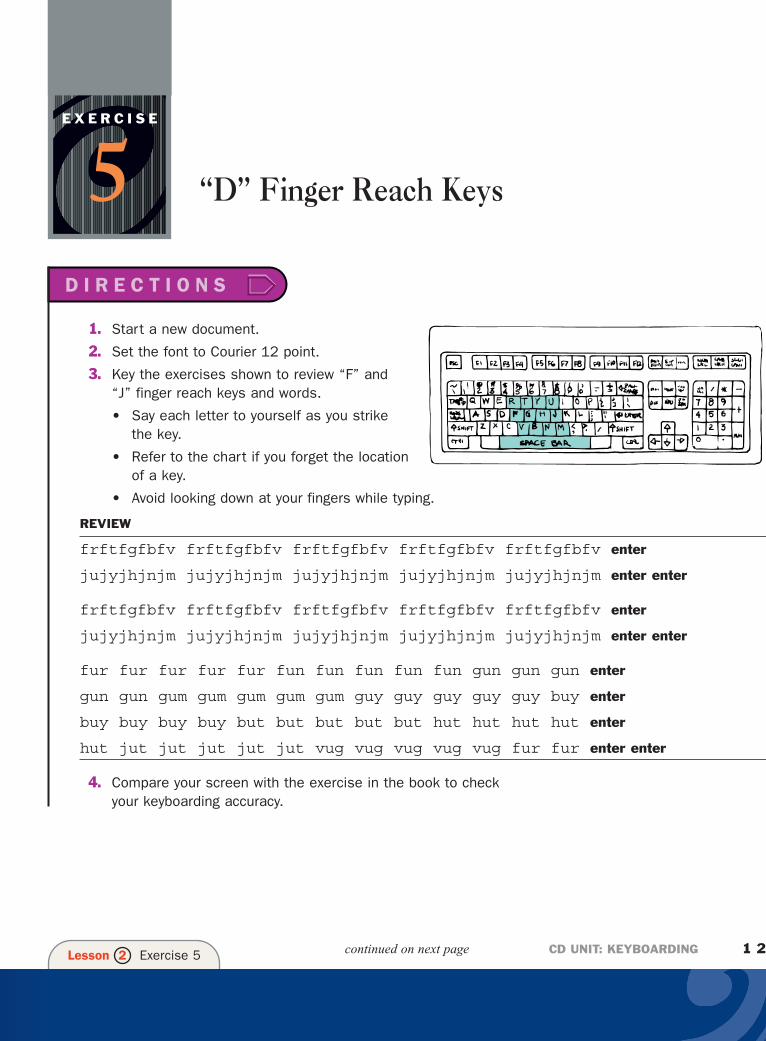
“D” Finger Reach Keys
1. Start a new document.
2. Set the font to Courier 12 point.
3. Key the exercises shown to review “F” and“J” finger reach keys and words.
• Say each letter to yourself as you strikethe key.
• Refer to the chart if you forget the locationof a key.
• Avoid looking down at your fingers while typing.
REVIEW
frftfgfbfv frftfgfbfv frftfgfbfv frftfgfbfv frftfgfbfv enter
jujyjhjnjm jujyjhjnjm jujyjhjnjm jujyjhjnjm jujyjhjnjm enter enter
frftfgfbfv frftfgfbfv frftfgfbfv frftfgfbfv frftfgfbfv enter
jujyjhjnjm jujyjhjnjm jujyjhjnjm jujyjhjnjm jujyjhjnjm enter enter
fur fur fur fur fur fun fun fun fun fun gun gun gun enter
gun gun gum gum gum gum gum guy guy guy guy guy buy enter
buy buy buy buy but but but but but hut hut hut hut enter
hut jut jut jut jut jut vug vug vug vug vug fur fur enter enter
4. Compare your screen with the exercise in the book to checkyour keyboarding accuracy.
CD UNIT: KEYBOARDING 1 2Lesson 2 Exercise 5
E X E R C I S E
5D I R E C T I O N S
continued on next page
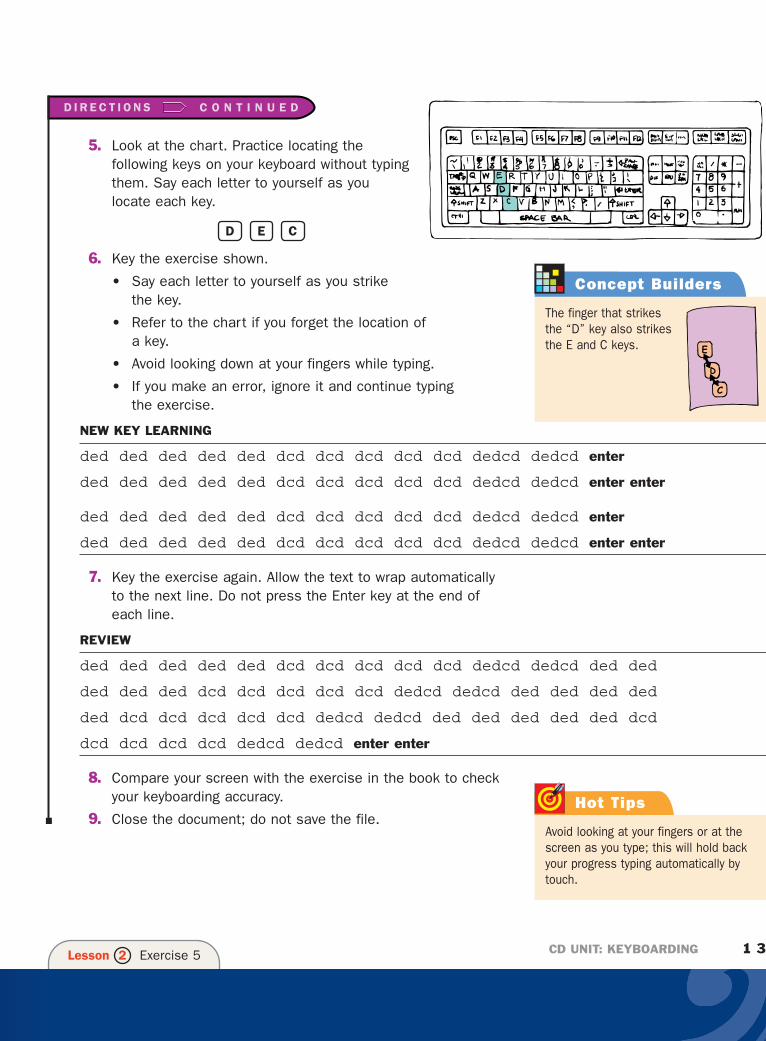
5. Look at the chart. Practice locating thefollowing keys on your keyboard without typingthem. Say each letter to yourself as youlocate each key.
6. Key the exercise shown.
• Say each letter to yourself as you strike the key.
• Refer to the chart if you forget the location of a key.
• Avoid looking down at your fingers while typing.
• If you make an error, ignore it and continue typing the exercise.
NEW KEY LEARNING
ded ded ded ded ded dcd dcd dcd dcd dcd dedcd dedcd enter
ded ded ded ded ded dcd dcd dcd dcd dcd dedcd dedcd enter enter
ded ded ded ded ded dcd dcd dcd dcd dcd dedcd dedcd enter
ded ded ded ded ded dcd dcd dcd dcd dcd dedcd dedcd enter enter
7. Key the exercise again. Allow the text to wrap automaticallyto the next line. Do not press the Enter key at the end ofeach line.
REVIEW
ded ded ded ded ded dcd dcd dcd dcd dcd dedcd dedcd ded ded
ded ded ded dcd dcd dcd dcd dcd dedcd dedcd ded ded ded ded
ded dcd dcd dcd dcd dcd dedcd dedcd ded ded ded ded ded dcd
dcd dcd dcd dcd dedcd dedcd enter enter
8. Compare your screen with the exercise in the book to checkyour keyboarding accuracy.
9. Close the document; do not save the file.
CED
CD UNIT: KEYBOARDING 1 3Lesson 2 Exercise 5
D I R E C T I O N S C O N T I N U E D
Hot Tips
Avoid looking at your fingers or at thescreen as you type; this will hold backyour progress typing automatically bytouch.
Concept Builders
The finger that strikesthe “D” key also strikesthe E and C keys.
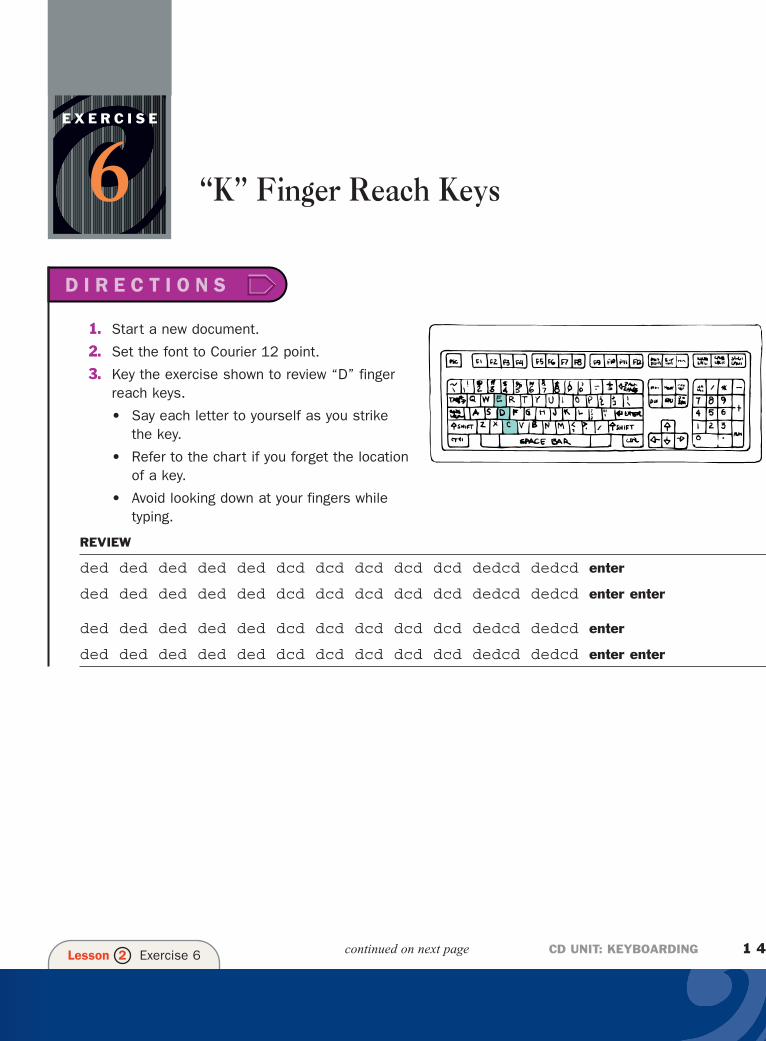
“K” Finger Reach Keys
1. Start a new document.
2. Set the font to Courier 12 point.
3. Key the exercise shown to review “D” fingerreach keys.
• Say each letter to yourself as you strikethe key.
• Refer to the chart if you forget the locationof a key.
• Avoid looking down at your fingers while typing.
REVIEW
ded ded ded ded ded dcd dcd dcd dcd dcd dedcd dedcd enter
ded ded ded ded ded dcd dcd dcd dcd dcd dedcd dedcd enter enter
ded ded ded ded ded dcd dcd dcd dcd dcd dedcd dedcd enter
ded ded ded ded ded dcd dcd dcd dcd dcd dedcd dedcd enter enter
CD UNIT: KEYBOARDING 1 4Lesson 2 Exercise 6
E X E R C I S E
6D I R E C T I O N S
continued on next page
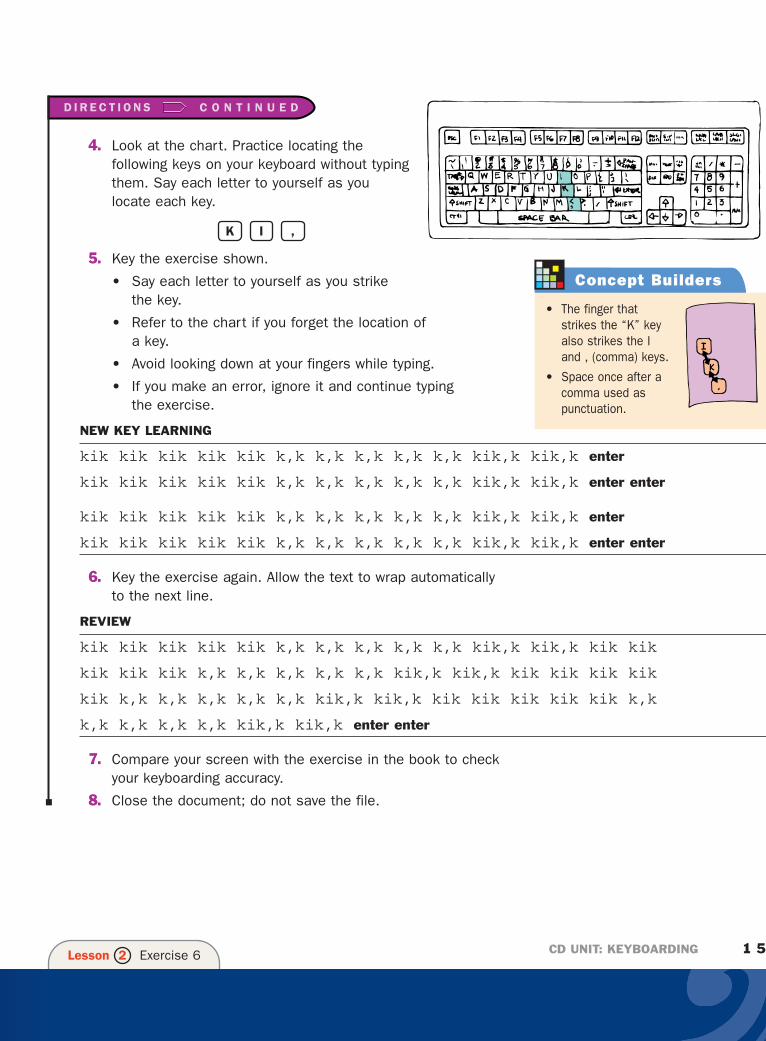
4. Look at the chart. Practice locating thefollowing keys on your keyboard without typingthem. Say each letter to yourself as youlocate each key.
5. Key the exercise shown.
• Say each letter to yourself as you strike the key.
• Refer to the chart if you forget the location of a key.
• Avoid looking down at your fingers while typing.
• If you make an error, ignore it and continue typing the exercise.
NEW KEY LEARNING
kik kik kik kik kik k,k k,k k,k k,k k,k kik,k kik,k enter
kik kik kik kik kik k,k k,k k,k k,k k,k kik,k kik,k enter enter
kik kik kik kik kik k,k k,k k,k k,k k,k kik,k kik,k enter
kik kik kik kik kik k,k k,k k,k k,k k,k kik,k kik,k enter enter
6. Key the exercise again. Allow the text to wrap automaticallyto the next line.
REVIEW
kik kik kik kik kik k,k k,k k,k k,k k,k kik,k kik,k kik kik
kik kik kik k,k k,k k,k k,k k,k kik,k kik,k kik kik kik kik
kik k,k k,k k,k k,k k,k kik,k kik,k kik kik kik kik kik k,k
k,k k,k k,k k,k kik,k kik,k enter enter
7. Compare your screen with the exercise in the book to checkyour keyboarding accuracy.
8. Close the document; do not save the file.
,IK
CD UNIT: KEYBOARDING 1 5Lesson 2 Exercise 6
D I R E C T I O N S C O N T I N U E D
Concept Builders
• The finger thatstrikes the “K” keyalso strikes the Iand , (comma) keys.
• Space once after acomma used aspunctuation.
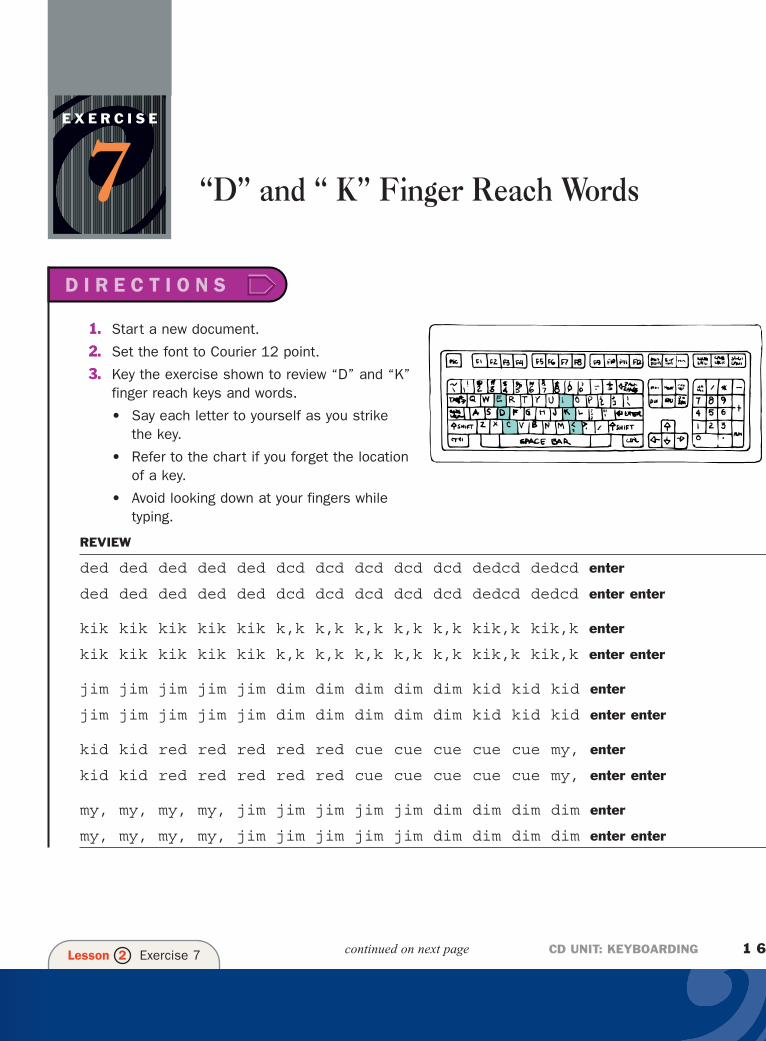
“D” and “ K” Finger Reach Words
1. Start a new document.
2. Set the font to Courier 12 point.
3. Key the exercise shown to review “D” and “K”finger reach keys and words.
• Say each letter to yourself as you strikethe key.
• Refer to the chart if you forget the locationof a key.
• Avoid looking down at your fingers while typing.
REVIEW
ded ded ded ded ded dcd dcd dcd dcd dcd dedcd dedcd enter
ded ded ded ded ded dcd dcd dcd dcd dcd dedcd dedcd enter enter
kik kik kik kik kik k,k k,k k,k k,k k,k kik,k kik,k enter
kik kik kik kik kik k,k k,k k,k k,k k,k kik,k kik,k enter enter
jim jim jim jim jim dim dim dim dim dim kid kid kid enter
jim jim jim jim jim dim dim dim dim dim kid kid kid enter enter
kid kid red red red red red cue cue cue cue cue my, enter
kid kid red red red red red cue cue cue cue cue my, enter enter
my, my, my, my, jim jim jim jim jim dim dim dim dim enter
my, my, my, my, jim jim jim jim jim dim dim dim dim enter enter
CD UNIT: KEYBOARDING 1 6Lesson 2 Exercise 7
E X E R C I S E
7D I R E C T I O N S
continued on next page
4. Key the exercise again. Allow the text to wrap automaticallyto the next line. Do not press the Enter key at the end ofeach line.
jim jim jim jim jim dim dim dim dim dim kid kid kid kid kid
red red red red red cue cue cue cue cue my, my, my, my, my,
jim jim jim jim jim dim dim dim dim enter enter
5. Compare your screen with the exercise in the book to checkyour keyboarding accuracy.
6. Close the document; do not save the file.
CD UNIT: KEYBOARDING 1 7Lesson 2 Exercise 7
D I R E C T I O N S C O N T I N U E D
THIRD-FINGER REACHES
“S” Finger Reach Keys
“L” Finger Reach Keys
“S” and “L” Finger Reach Words
Estimated Time for Lesson 3: 6 hours
LE
SS
ON3
e x e r c i s e 8
e x e r c i s e 9
e x e r c i s e 10
1 8
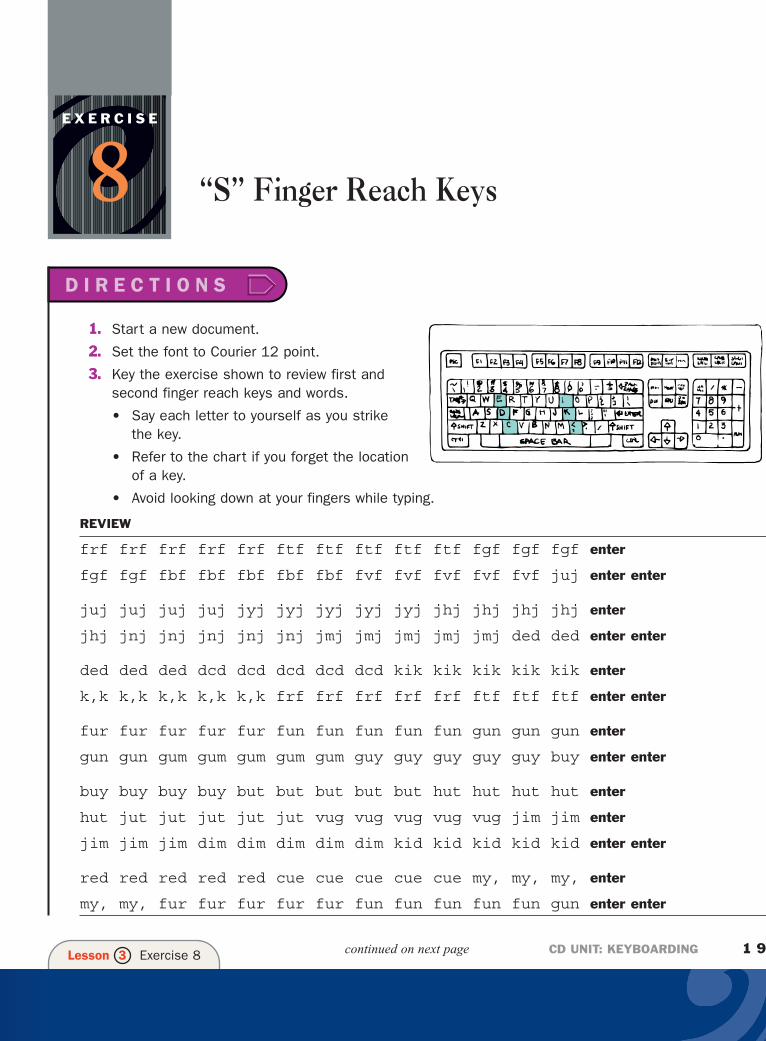
“S” Finger Reach Keys
1. Start a new document.
2. Set the font to Courier 12 point.
3. Key the exercise shown to review first andsecond finger reach keys and words.
• Say each letter to yourself as you strikethe key.
• Refer to the chart if you forget the locationof a key.
• Avoid looking down at your fingers while typing.
REVIEW
frf frf frf frf frf ftf ftf ftf ftf ftf fgf fgf fgf enter
fgf fgf fbf fbf fbf fbf fbf fvf fvf fvf fvf fvf juj enter enter
juj juj juj juj jyj jyj jyj jyj jyj jhj jhj jhj jhj enter
jhj jnj jnj jnj jnj jnj jmj jmj jmj jmj jmj ded ded enter enter
ded ded ded dcd dcd dcd dcd dcd kik kik kik kik kik enter
k,k k,k k,k k,k k,k frf frf frf frf frf ftf ftf ftf enter enter
fur fur fur fur fur fun fun fun fun fun gun gun gun enter
gun gun gum gum gum gum gum guy guy guy guy guy buy enter enter
buy buy buy buy but but but but but hut hut hut hut enter
hut jut jut jut jut jut vug vug vug vug vug jim jim enter
jim jim jim dim dim dim dim dim kid kid kid kid kid enter enter
red red red red red cue cue cue cue cue my, my, my, enter
my, my, fur fur fur fur fur fun fun fun fun fun gun enter enter
CD UNIT: KEYBOARDING 1 9Lesson 3 Exercise 8
E X E R C I S E
8D I R E C T I O N S
continued on next page
4. Compare your screen with the exercise in the book to check your keyboardingaccuracy.
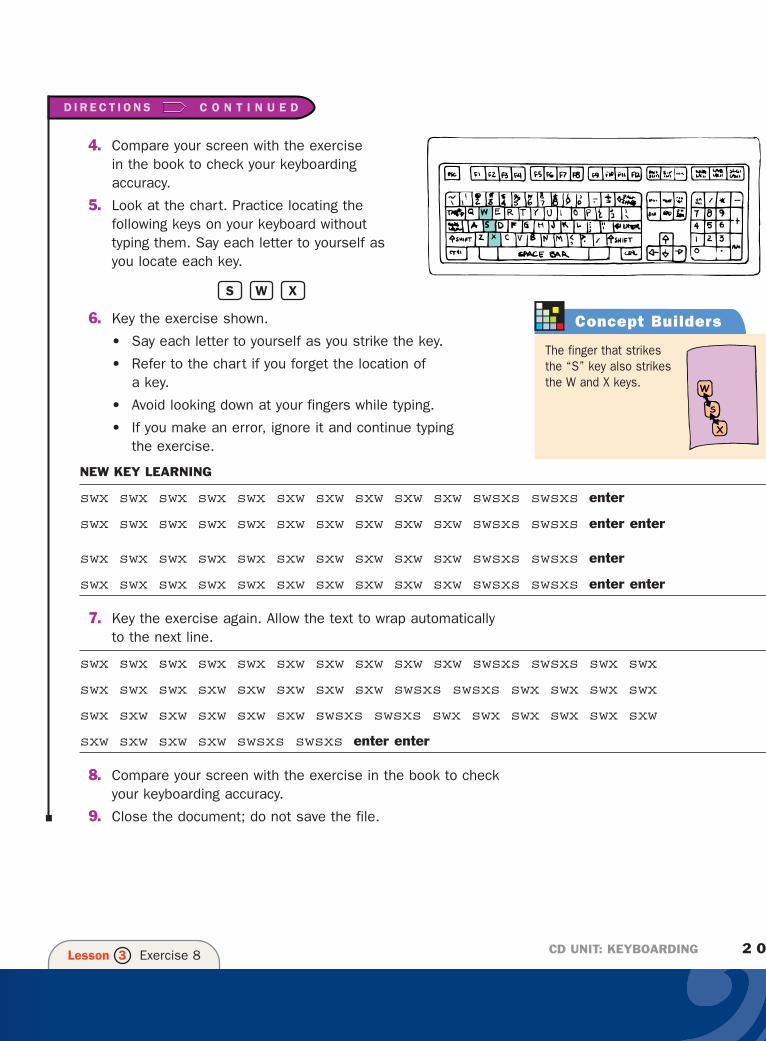
5. Look at the chart. Practice locating thefollowing keys on your keyboard without typing them. Say each letter to yourself asyou locate each key.
6. Key the exercise shown.
• Say each letter to yourself as you strike the key.
• Refer to the chart if you forget the location of a key.
• Avoid looking down at your fingers while typing.
• If you make an error, ignore it and continue typing the exercise.
NEW KEY LEARNING
swx swx swx swx swx sxw sxw sxw sxw sxw swsxs swsxs enter
swx swx swx swx swx sxw sxw sxw sxw sxw swsxs swsxs enter enter
swx swx swx swx swx sxw sxw sxw sxw sxw swsxs swsxs enter
swx swx swx swx swx sxw sxw sxw sxw sxw swsxs swsxs enter enter
7. Key the exercise again. Allow the text to wrap automaticallyto the next line.
swx swx swx swx swx sxw sxw sxw sxw sxw swsxs swsxs swx swx
swx swx swx sxw sxw sxw sxw sxw swsxs swsxs swx swx swx swx
swx sxw sxw sxw sxw sxw swsxs swsxs swx swx swx swx swx sxw
sxw sxw sxw sxw swsxs swsxs enter enter
8. Compare your screen with the exercise in the book to checkyour keyboarding accuracy.
9. Close the document; do not save the file.
XWS
CD UNIT: KEYBOARDING 2 0Lesson 3 Exercise 8
D I R E C T I O N S C O N T I N U E D
Concept Builders
The finger that strikesthe “S” key also strikesthe W and X keys.

“ L” Finger Reach Keys
1. Start a new document.
2. Set the font to Courier 12 point.
3. Key the exercise shown to review “S” fingerreach keys.
• Say each letter to yourself as you strikethe key.
• Refer to the chart if you forget the locationof a key.
• Avoid looking down at your fingers while typing.
REVIEW
swx swx swx swx swx sxw sxw sxw sxw sxw swsxs swsxs enter
swx swx swx swx swx sxw sxw sxw sxw sxw swsxs swsxs enter enter
swx swx swx swx swx sxw sxw sxw sxw sxw swsxs swsxs enter
swx swx swx swx swx sxw sxw sxw sxw sxw swsxs swsxs enter enter
CD UNIT: KEYBOARDING 2 1Lesson 3 Exercise 9
E X E R C I S E
9D I R E C T I O N S
continued on next page

4. Look at the chart. Practice locating thefollowing keys on your keyboard without typingthem. Say each letter to yourself as youlocate each key.
5. Key the exercise.
• Say each letter to yourself as you strike the key.
• Refer to the chart if you forget the location of a key.
• Avoid looking down at your fingers while typing.
• If you make an error, ignore it and continue typing the exercise.
NEW KEY LEARNING
lol lol lol lol lol l.l l.l l.l l.l l.l lol.l lol.l enter
lol lol lol lol lol l.l l.l l.l l.l l.l lol.l lol.l enter enter
lol lol lol lol lol l.l l.l l.l l.l l.l lol.l lol.l enter
lol lol lol lol lol l.l l.l l.l l.l l.l lol.l lol.l enter enter
6. Key the exercise again. Allow the text to wrap automaticallyto the next line.
REVIEW
lol lol lol lol lol l.l l.l l.l l.l l.l lol.l lol.l lol lol
lol lol lol l.l l.l l.l l.l l.l lol.l lol.l Lol lol lol lol
lol l.l l.l l.l l.l l.l lol.l lol.l lol lol lol lol lol l.l
l.l l.l l.l l.l lol.l lol.l enter enter
7. Compare your screen with the exercise in the book to checkyour keyboarding accuracy.
8. Close the document; do not save the file.
.OL
CD UNIT: KEYBOARDING 2 2Lesson 3 Exercise 9
D I R E C T I O N S C O N T I N U E D
Concept Builders
The finger that strikesthe “L” key also strikesthe O and . (period)keys.
“S” and “L” Finger Reach Words
1. Start a new document.
2. Set the font to Courier 12 point.
3. Key the exercise shown to review “S” and “L”finger reach keys and words.
• Say each letter to yourself as you strikethe key.
• Refer to the chart if you forget the locationof a key.
• Avoid looking down at your fingers while typing.
REVIEW
swx swx swx swx swx sxw sxw sxw sxw sxw swsxs swsxs enter
swx swx swx swx swx sxw sxw sxw sxw sxw swsxs swsxs enter enter
lol lol lol lol lol l.l l.l l.l l.l l.l lol.l lol.l enter
lol lol lol lol lol l.l l.l l.l l.l l.l lol.l lol.l enter enter
lot lot lot lot lot sit sit sit sit sit wet wet wet enter
lot lot lot lot lot sit sit sit sit sit wet wet wet enter
wet wet tex tex tex tex tex co. co. co. co. co. lot enter
wet wet tex tex tex tex tex co. co. co. co. co. lot enter enter
CD UNIT: KEYBOARDING 2 3Lesson 3 Exercise 10
E X E R C I S E
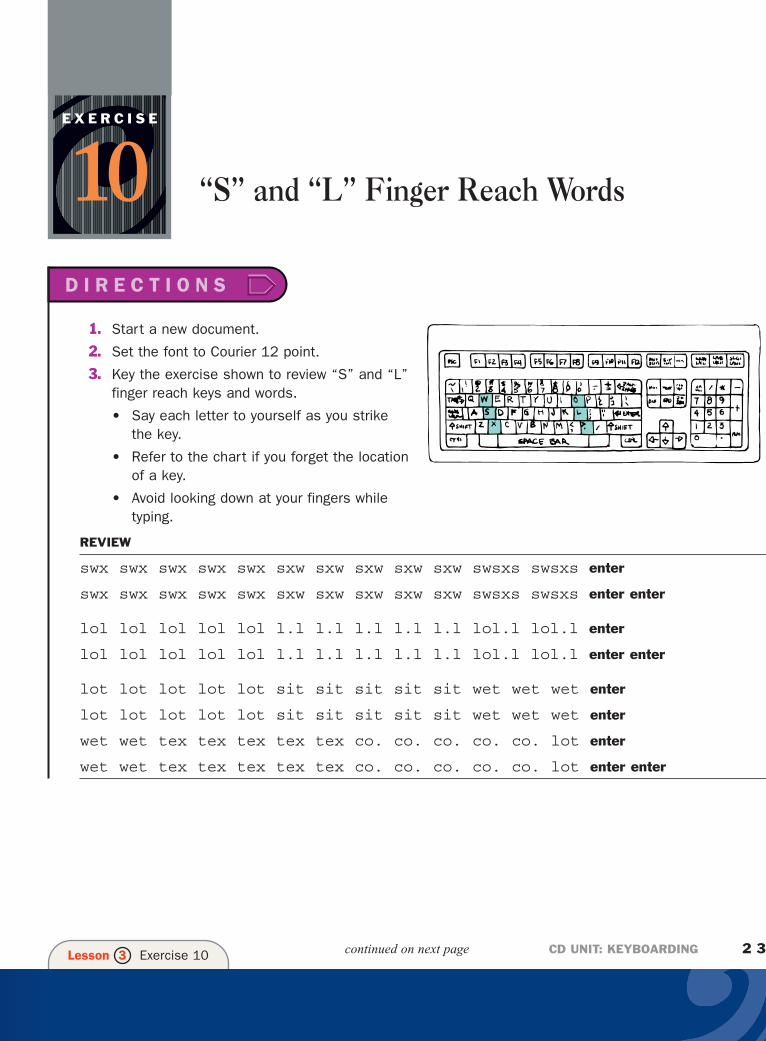
10D I R E C T I O N S
continued on next page
4. Key the exercise again. Allow the text to wrap automaticallyto the next line. Do not press the Enter key at the end ofeach line.
lot lot lot lot lot sit sit sit sit sit wet wet wet lot lot
lot lot lot sit sit sit sit sit wet wet wet wet wet tex tex
tex tex tex co. co. co. co. co. lot wet wet tex tex tex tex
tex co. co. co. co. co. lot enter enter
5. Compare your screen with the exercise in the book to checkyour keyboarding accuracy.
6. Close the document; do not save the file.
CD UNIT: KEYBOARDING 2 4Lesson 3 Exercise 10
D I R E C T I O N S C O N T I N U E D
FOURTH-FINGER REACHES
“A” Finger Reach Keys; The Tab Key
“;” Finger Reach Keys
“A” and “;” Finger Reach Words
Estimated Time for Lesson 4: 6 hours
LE
SS
ON4
e x e r c i s e 11
e x e r c i s e 12
e x e r c i s e 13
2 5
“A” Finger Reach Keys; The Tab Key
1. Start a new document.
2. Set the font to Courier 12 point.
3. Key the exercise shown here and on the next page to reviewfirst-, second-, and third-finger reach keys and words.
• Say each letter to yourself as you strikethe key.
• Refer to the chart if you forget the locationof a key.
• Avoid looking down at your fingers whiletyping.
• If you make an error, ignore it andcontinue typing the exercise.
REVIEW
frf ftf fgf fbf fvf juj jyj jhj jnj jmj frf juj enter
frftfgfbfvf jujyjhjnjm frftfgfbfvf jujyjhjnjm enter enter
ded dcd kik k,k ded dcd kik k,k ded dcd kik k,k enter
ded dcd kik k,k ded dcd kik k,k ded dcd kik k,k enter enter
sws sws sws sws sws sxs sxs sxs sxs sxs lol lol enter
lol lol lol l.l l.l l.l l.l l.l sws sws sws sws enter enter
fur fur fur fur fur fun fun fun fun fun gun gun gun enter
gun gun gum gum gum gum gum guy guy guy guy guy buy enter enter
buy buy buy buy but but but but but hut hut hut hut enter
hut jut jut jut jut jut vug vug vug vug vug jim jim enter enter
CD UNIT: KEYBOARDING 2 6Lesson 4 Exercise 11
E X E R C I S E
11D I R E C T I O N S
continued on next page
Did You Know?
You are now beginning to build amemory pathway between your eyesand your fingers. When your eye sees aletter, the appropriate finger wants tomove in the direction of that key. Soonyour fingers will do the walking through-out the keyboard while your mindremains in neutral.
jim jim jim dim dim dim dim dim kid kid kid kid kid enter
red red red red red cue cue cue cue cue my, my, my, enter enter
my, my, lot lot lot lot lot sit sit sit sit sit wet enter
wet wet wet wet tex tex tex tex tex co. co. co. co. enter enter
dot dot dot not not not sit sit sit sod sod sod sod enter
dot dot dot not not not sit sit sit sod sod sod sod enter enter
4. Compare your screen with the exercise in the book to check your keyboardingaccuracy.
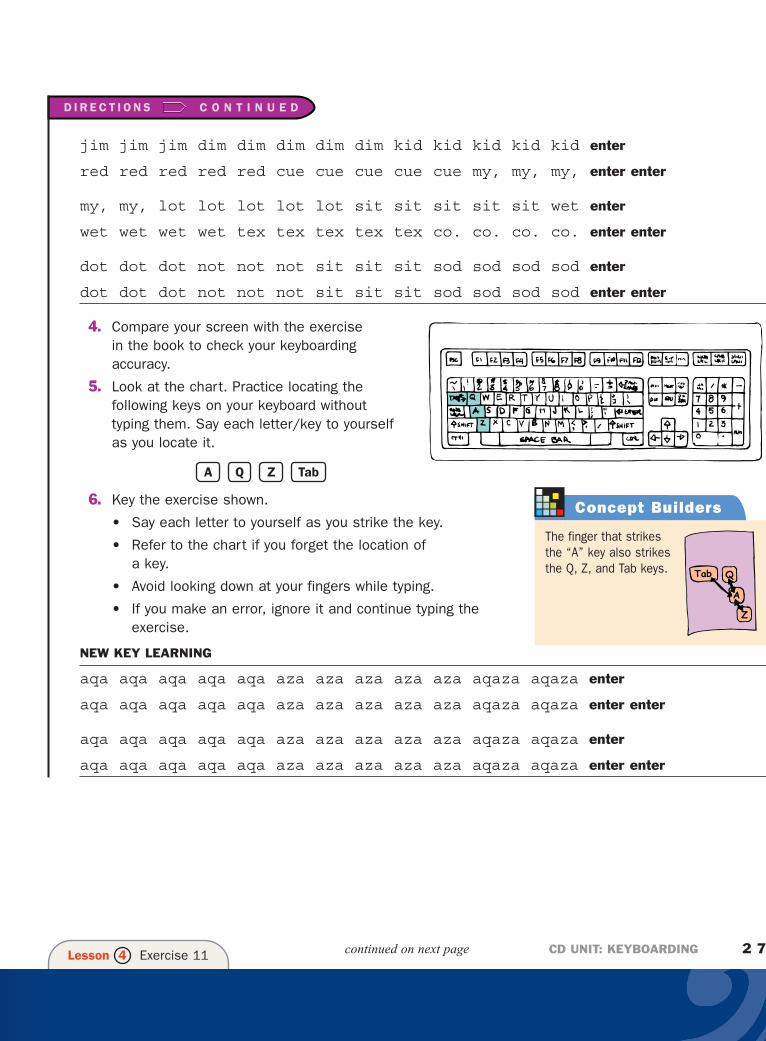
5. Look at the chart. Practice locating thefollowing keys on your keyboard without typing them. Say each letter/key to yourselfas you locate it.
6. Key the exercise shown.
• Say each letter to yourself as you strike the key.
• Refer to the chart if you forget the location of a key.
• Avoid looking down at your fingers while typing.
• If you make an error, ignore it and continue typing theexercise.
NEW KEY LEARNING
aqa aqa aqa aqa aqa aza aza aza aza aza aqaza aqaza enter
aqa aqa aqa aqa aqa aza aza aza aza aza aqaza aqaza enter enter
aqa aqa aqa aqa aqa aza aza aza aza aza aqaza aqaza enter
aqa aqa aqa aqa aqa aza aza aza aza aza aqaza aqaza enter enter
TabZQA
CD UNIT: KEYBOARDING 2 7Lesson 4 Exercise 11 continued on next page
D I R E C T I O N S C O N T I N U E D
Concept Builders
The finger that strikesthe “A” key also strikesthe Q, Z, and Tab keys.
7. Key the exercise shown. Press the Tab key once to begineach new paragraph. Allow the second sentence to wrapautomatically to the next line.
tab fur fur fur fur fur fun fun fun fun fun gun gun gun gun
gun gum gum gum gum gum guy guy guy guy guy buy enter enter
tab buy buy buy buy but but but but but hut hut hut hut hut
jut jut jut jut jut vug vug vug vug vug jim jim enter enter
8. Compare your screen with the exercise in the book to checkyour keyboarding accuracy.
9. Close the document; do not save the file.
CD UNIT: KEYBOARDING 2 8Lesson 4 Exercise 11
D I R E C T I O N S C O N T I N U E D
Did You Know?
Pressing the tab key once advancesthe insertion point to the next tab stop.Tab stops are set .5" apart.
“;” Finger Reach Keys
1. Start a new document.
2. Set the font to Courier 12 point.
3. Key the exercise shown to review “A” fingerreach keys.
• Say each letter to yourself as you strikethe key.
• Refer to the chart if you forget the locationof a key.
• Avoid looking down at your fingers while typing.
• If you make an error, ignore it and continue typing theexercise.
REVIEW
tab aqa aqa aqa aqa aqa aza aza aza aza aza aqaza enter
aqa aqa aqa aqa aqa aza aza aza aza aza aqaza aqaza enter enter
tab aqa aqa aqa aqa aqa aza aza aza aza aza aqaza enter
aqa aqa aqa aqa aqa aza aza aza aza aza aqaza aqaza enter enter
CD UNIT: KEYBOARDING 2 9Lesson 4 Exercise 12
E X E R C I S E
12D I R E C T I O N S
continued on next page
Concept Builders
• The Backspace key is used to erase an immediately preceding typed character.
• Space once after a semicolon (;) used as punctuation.
• Do not space between a letter and the forward slash (/).
• The apostrophe is used in a contraction (can’t, don’t) and to show possession (John’s book). It is also used as a symbolfor “feet” (19')
• Use a hyphen to join compound words (twenty-six) and adjectives before a noun (old-fashioned gown).
• Use a dash (made by pressing the hyphen key twice) for emphasis (Don’t wait--is what I said). When you enter twohyphens without spacing before or after them, the word processing software joins the hyphens to form an “em” dash.
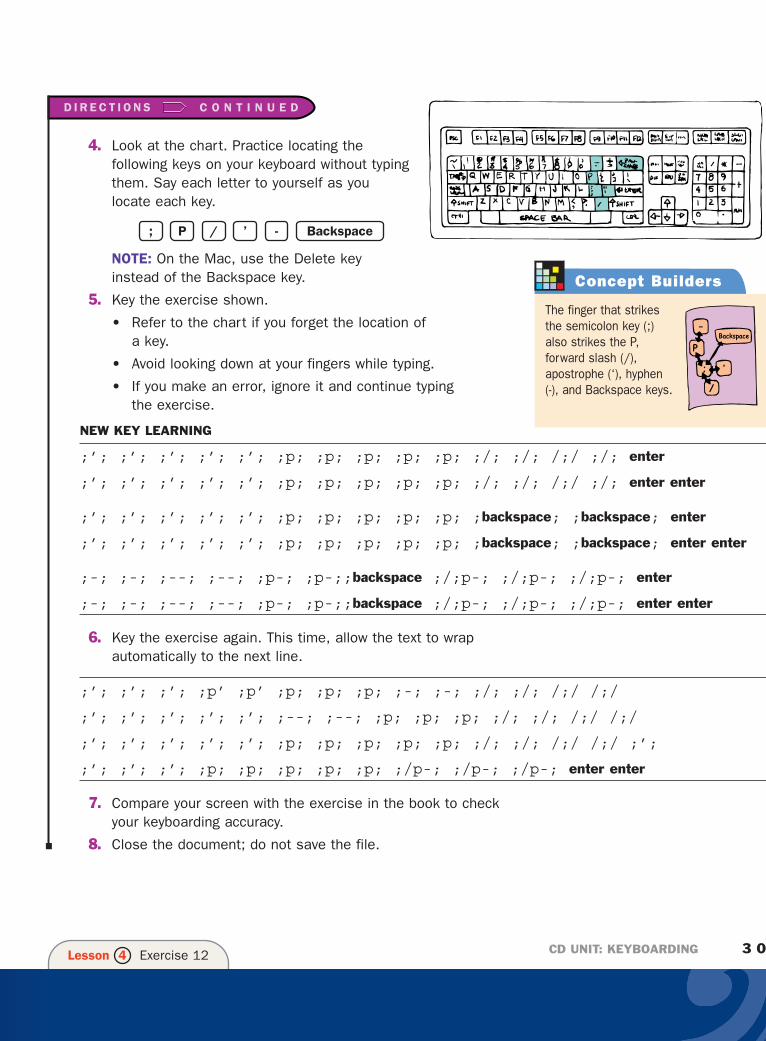
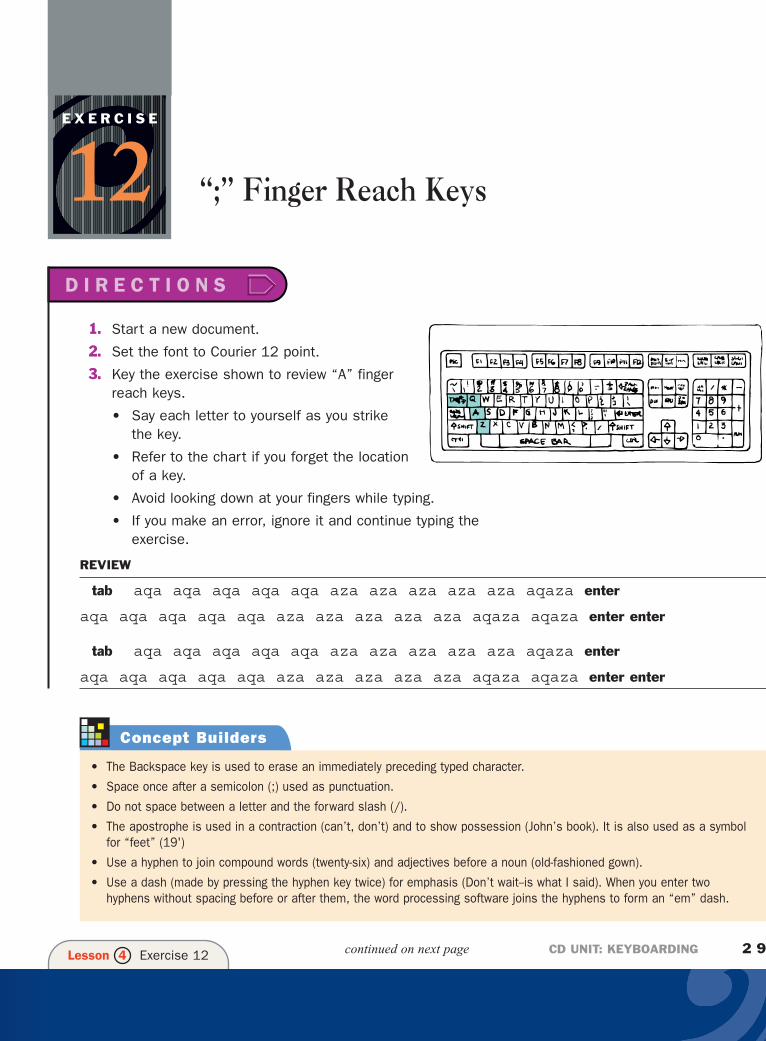
4. Look at the chart. Practice locating thefollowing keys on your keyboard without typingthem. Say each letter to yourself as youlocate each key.
NOTE: On the Mac, use the Delete keyinstead of the Backspace key.
5. Key the exercise shown.
• Refer to the chart if you forget the location of a key.
• Avoid looking down at your fingers while typing.
• If you make an error, ignore it and continue typing the exercise.
NEW KEY LEARNING
;’; ;’; ;’; ;’; ;’; ;p; ;p; ;p; ;p; ;p; ;/; ;/; /;/ ;/; enter
;’; ;’; ;’; ;’; ;’; ;p; ;p; ;p; ;p; ;p; ;/; ;/; /;/ ;/; enter enter
;’; ;’; ;’; ;’; ;’; ;p; ;p; ;p; ;p; ;p; ;backspace; ;backspace; enter
;’; ;’; ;’; ;’; ;’; ;p; ;p; ;p; ;p; ;p; ;backspace; ;backspace; enter enter
;-; ;-; ;--; ;--; ;p-; ;p-;;backspace ;/;p-; ;/;p-; ;/;p-; enter
;-; ;-; ;--; ;--; ;p-; ;p-;;backspace ;/;p-; ;/;p-; ;/;p-; enter enter
6. Key the exercise again. This time, allow the text to wrapautomatically to the next line.
;’; ;’; ;’; ;p’ ;p’ ;p; ;p; ;p; ;-; ;-; ;/; ;/; /;/ /;/
;’; ;’; ;’; ;’; ;’; ;--; ;--; ;p; ;p; ;p; ;/; ;/; /;/ /;/
;’; ;’; ;’; ;’; ;’; ;p; ;p; ;p; ;p; ;p; ;/; ;/; /;/ /;/ ;’;
;’; ;’; ;’; ;p; ;p; ;p; ;p; ;p; ;/p-; ;/p-; ;/p-; enter enter
7. Compare your screen with the exercise in the book to checkyour keyboarding accuracy.
8. Close the document; do not save the file.
Backspace-’/P;
CD UNIT: KEYBOARDING 3 0Lesson 4 Exercise 12
D I R E C T I O N S C O N T I N U E D
Concept Builders
The finger that strikesthe semicolon key (;)also strikes the P,forward slash (/),apostrophe (‘), hyphen (-), and Backspace keys.
Backspace
’
–
P
;
/
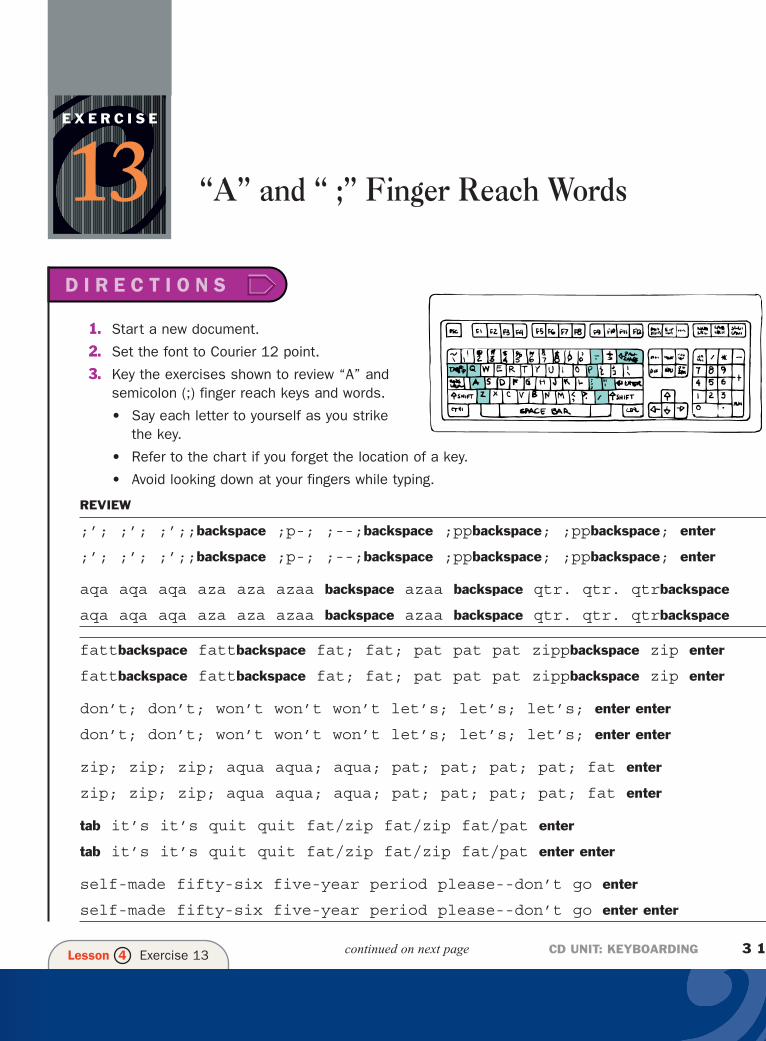
“A” and “ ;” Finger Reach Words
1. Start a new document.
2. Set the font to Courier 12 point.
3. Key the exercises shown to review “A” andsemicolon (;) finger reach keys and words.
• Say each letter to yourself as you strikethe key.
• Refer to the chart if you forget the location of a key.
• Avoid looking down at your fingers while typing.
REVIEW
;’; ;’; ;’;;backspace ;p-; ;--;backspace ;ppbackspace; ;ppbackspace; enter
;’; ;’; ;’;;backspace ;p-; ;--;backspace ;ppbackspace; ;ppbackspace; enter
aqa aqa aqa aza aza azaa backspace azaa backspace qtr. qtr. qtrbackspace
aqa aqa aqa aza aza azaa backspace azaa backspace qtr. qtr. qtrbackspace
fattbackspace fattbackspace fat; fat; pat pat pat zippbackspace zip enter
fattbackspace fattbackspace fat; fat; pat pat pat zippbackspace zip enter
don’t; don’t; won’t won’t won’t let’s; let’s; let’s; enter enter
don’t; don’t; won’t won’t won’t let’s; let’s; let’s; enter enter
zip; zip; zip; aqua aqua; aqua; pat; pat; pat; pat; fat enter
zip; zip; zip; aqua aqua; aqua; pat; pat; pat; pat; fat enter
tab it’s it’s quit quit fat/zip fat/zip fat/pat enter
tab it’s it’s quit quit fat/zip fat/zip fat/pat enter enter
self-made fifty-six five-year period please--don’t go enter
self-made fifty-six five-year period please--don’t go enter enter
CD UNIT: KEYBOARDING 3 1Lesson 4 Exercise 13
E X E R C I S E
13D I R E C T I O N S
continued on next page

4. Key the exercise again. Allow the text to wrap automaticallyto the next line.
tab fattbackspace fattbackspace fat; fat; pat pat pat
zippbackspace zip don’t; don’t; won’t won’t won’t let’s;
let’s; let’s; zip; zip; zip; aqua aqua; aqua; pat;
pat; pat; pat; fat it’s it’s quit quit fat/zip fat/zip
self-made fifty-six five-year period don’t please--
don’t go
5. Compare your screen with the exercise in the book to checkyour keyboarding accuracy.
6. Close the document; do not save the file.
CD UNIT: KEYBOARDING 3 2Lesson 4 Exercise 13
D I R E C T I O N S C O N T I N U E D
SHIFT KEYS; NUMBERS; TIMED WRITINGS
Capital Letters; Caps Lock; Print
Quotation, Colon, and Question Keys
Sentences
Numbers
Timed Writings
Estimated Time for Lesson 5: 6 hoursLE
SS
ON5
e x e r c i s e 14
e x e r c i s e 15
e x e r c i s e 16
e x e r c i s e 17
e x e r c i s e 18
3 3
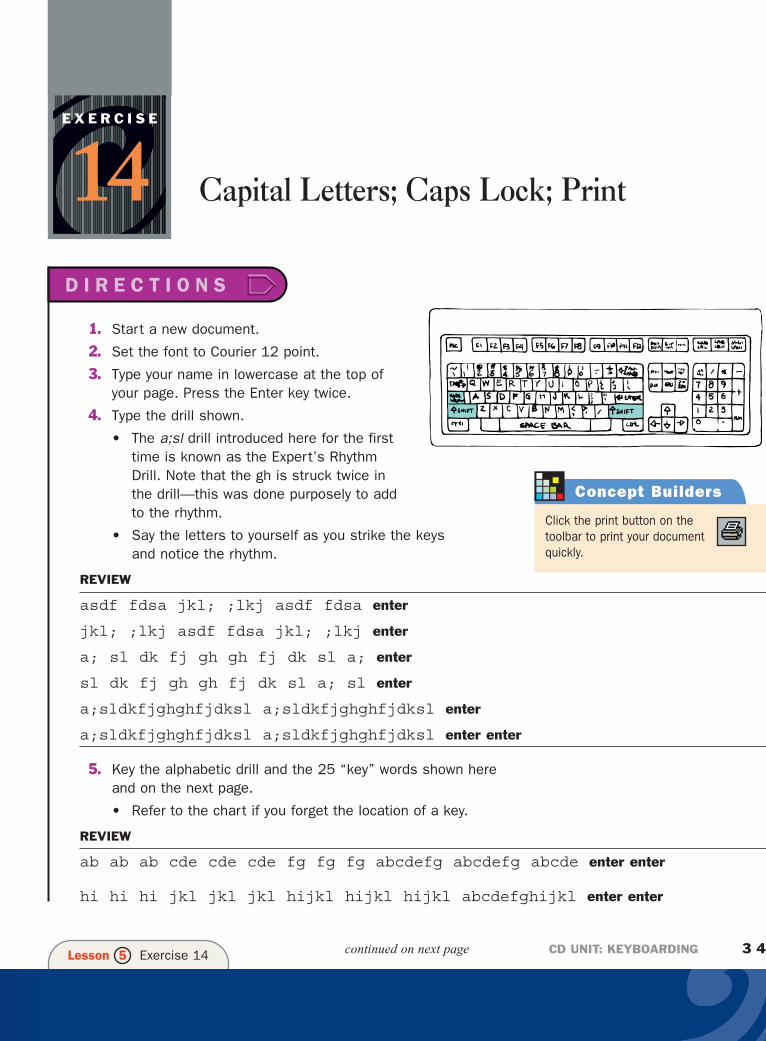
Capital Letters; Caps Lock; Print
1. Start a new document.
2. Set the font to Courier 12 point.
3. Type your name in lowercase at the top ofyour page. Press the Enter key twice.
4. Type the drill shown.
• The a;sl drill introduced here for the firsttime is known as the Expert’s RhythmDrill. Note that the gh is struck twice in the drill—this was done purposely to add to the rhythm.
• Say the letters to yourself as you strike the keys and notice the rhythm.
REVIEW
asdf fdsa jkl; ;lkj asdf fdsa enter
jkl; ;lkj asdf fdsa jkl; ;lkj enter
a; sl dk fj gh gh fj dk sl a; enter
sl dk fj gh gh fj dk sl a; sl enter
a;sldkfjghghfjdksl a;sldkfjghghfjdksl enter
a;sldkfjghghfjdksl a;sldkfjghghfjdksl enter enter
5. Key the alphabetic drill and the 25 “key” words shown hereand on the next page.
• Refer to the chart if you forget the location of a key.
REVIEW
ab ab ab cde cde cde fg fg fg abcdefg abcdefg abcde enter enter
hi hi hi jkl jkl jkl hijkl hijkl hijkl abcdefghijkl enter enter
CD UNIT: KEYBOARDING 3 4Lesson 5 Exercise 14
E X E R C I S E
14D I R E C T I O N S
continued on next page
Concept Builders
Click the print button on thetoolbar to print your documentquickly.
mnop mnop mnop abcedfghijklmnop qrs qrs qrs tuv tuv tuv enter enter
qrstuv qrstuv qrstuv abcedfghijklmnopqrstuv wxyz wxyz enter enter
abcedfghijklmnopqrstuvwxyz abcedfghijklmnopqrstuvwxyz enter enter
fur fun gun gum guy buy hut jut vim jim dim kid red enter
cue my, lot sit wet tex co. fat pat zip qt. it’s enter enter
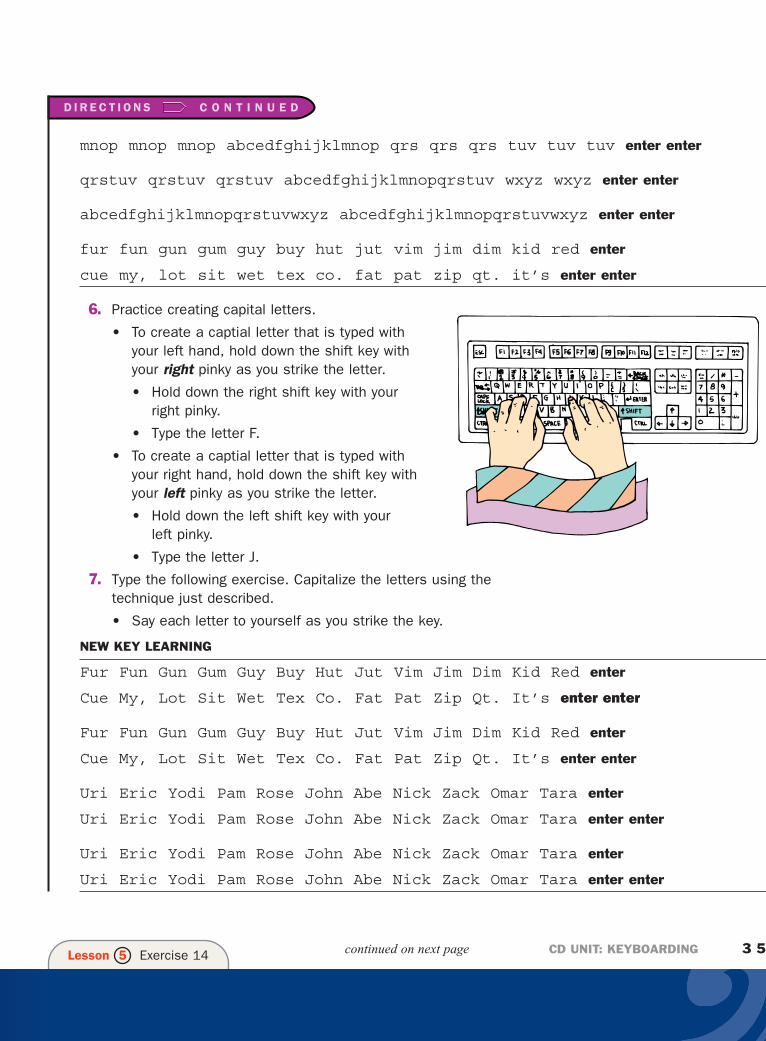
6. Practice creating capital letters.
• To create a captial letter that is typed withyour left hand, hold down the shift key withyour right pinky as you strike the letter.
• Hold down the right shift key with your right pinky.
• Type the letter F.
• To create a captial letter that is typed withyour right hand, hold down the shift key withyour left pinky as you strike the letter.
• Hold down the left shift key with your left pinky.
• Type the letter J.
7. Type the following exercise. Capitalize the letters using thetechnique just described.
• Say each letter to yourself as you strike the key.
NEW KEY LEARNING
Fur Fun Gun Gum Guy Buy Hut Jut Vim Jim Dim Kid Red enter
Cue My, Lot Sit Wet Tex Co. Fat Pat Zip Qt. It’s enter enter
Fur Fun Gun Gum Guy Buy Hut Jut Vim Jim Dim Kid Red enter
Cue My, Lot Sit Wet Tex Co. Fat Pat Zip Qt. It’s enter enter
Uri Eric Yodi Pam Rose John Abe Nick Zack Omar Tara enter
Uri Eric Yodi Pam Rose John Abe Nick Zack Omar Tara enter enter
Uri Eric Yodi Pam Rose John Abe Nick Zack Omar Tara enter
Uri Eric Yodi Pam Rose John Abe Nick Zack Omar Tara enter enter
CD UNIT: KEYBOARDING 3 5Lesson 5 Exercise 14 continued on next page
D I R E C T I O N S C O N T I N U E D
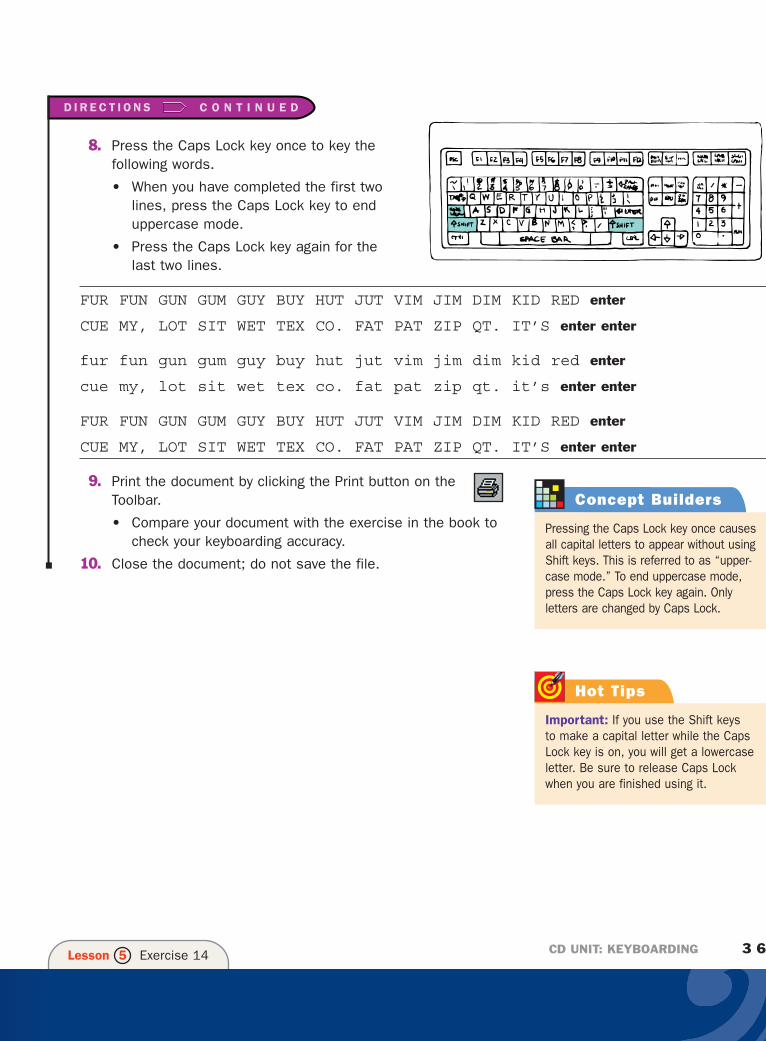
8. Press the Caps Lock key once to key thefollowing words.
• When you have completed the first twolines, press the Caps Lock key to enduppercase mode.
• Press the Caps Lock key again for the last two lines.
FUR FUN GUN GUM GUY BUY HUT JUT VIM JIM DIM KID RED enter
CUE MY, LOT SIT WET TEX CO. FAT PAT ZIP QT. IT’S enter enter
fur fun gun gum guy buy hut jut vim jim dim kid red enter
cue my, lot sit wet tex co. fat pat zip qt. it’s enter enter
FUR FUN GUN GUM GUY BUY HUT JUT VIM JIM DIM KID RED enter
CUE MY, LOT SIT WET TEX CO. FAT PAT ZIP QT. IT’S enter enter
9. Print the document by clicking the Print button on theToolbar.
• Compare your document with the exercise in the book tocheck your keyboarding accuracy.
10. Close the document; do not save the file.
CD UNIT: KEYBOARDING 3 6Lesson 5 Exercise 14
D I R E C T I O N S C O N T I N U E D
Concept Builders
Pressing the Caps Lock key once causesall capital letters to appear without usingShift keys. This is referred to as “upper-case mode.” To end uppercase mode,press the Caps Lock key again. Onlyletters are changed by Caps Lock.
Hot Tips
Important: If you use the Shift keys to make a capital letter while the CapsLock key is on, you will get a lowercaseletter. Be sure to release Caps Lockwhen you are finished using it.

Quotation, Colon, and Question Keys
1. Start a new document.
2. Set the font to Courier 12 point.
3. Type your name at the top of the page.Capitalize the first letters of your first and last name. Press the Enter key twice.
4. Key the Expert’s Rhythm Drill shown.
REVIEW
asdf fdsa jkl; ;lkj asdf fdsa enter
jkl; ;lkj asdf fdsa jkl; ;lkj enter
a; sl dk fj gh gh fj dk sl a; enter
sl dk fj gh gh fj dk sl a; sl enter
a;sldkfjghghfjdksl a;sldkfjghghfjdksl enter
a;sldkfjghghfjdksl a;sldkfjghghfjdksl enter enter
5. Key the alphabetic drill and the 25 “key” words shown hereand on the next page.
• Refer to the chart if you forget the location of a key.
REVIEW
ab ab ab cde cde cde fg fg fg abcdefg abcdefg abcdefg abcde enter enter
hi hi hi jkl jkl jkl hijkl hijkl hijkl abcdefghijkl abcdefg enter enter
mnop mnop mnop abcdefghijklmnop qrs qrs qrs tuv tuv tuv qrs enter enter
qrstuv qrstuf qrstuv abcdefghijklmnopqrstuv wxyz wxyz wxyz enter enter
abcdefghijklmnopqrstuvwxyz abcdefghijklmnopqrstuvwxyz abcde enter enter
CD UNIT: KEYBOARDING 3 7Lesson 5 Exercise 15
E X E R C I S E
15D I R E C T I O N S
continued on next page
Concept Builders
• Space twice after a colon (:) used aspunctuation (for a list, not for time).
• A quotation mark is used before and after a quotation or to representthe symbol for inches (15"). Do notspace between the opening quotationand the first word of the quote or the last word of the quote and theclosing quotation.
fur fun gun gum guy buy hut jut vim jim dim kid red enter
cue my, lot sit wet tex co. fat pat zip qt. it’s enter enter
Fur Fun Gun Gum Guy Buy Hut Jut Vim Jim Dim Kid Red enter
Cue My, Lot Sit Wet Tex Co. Fat Pat Zip Qt. It’s enter enter
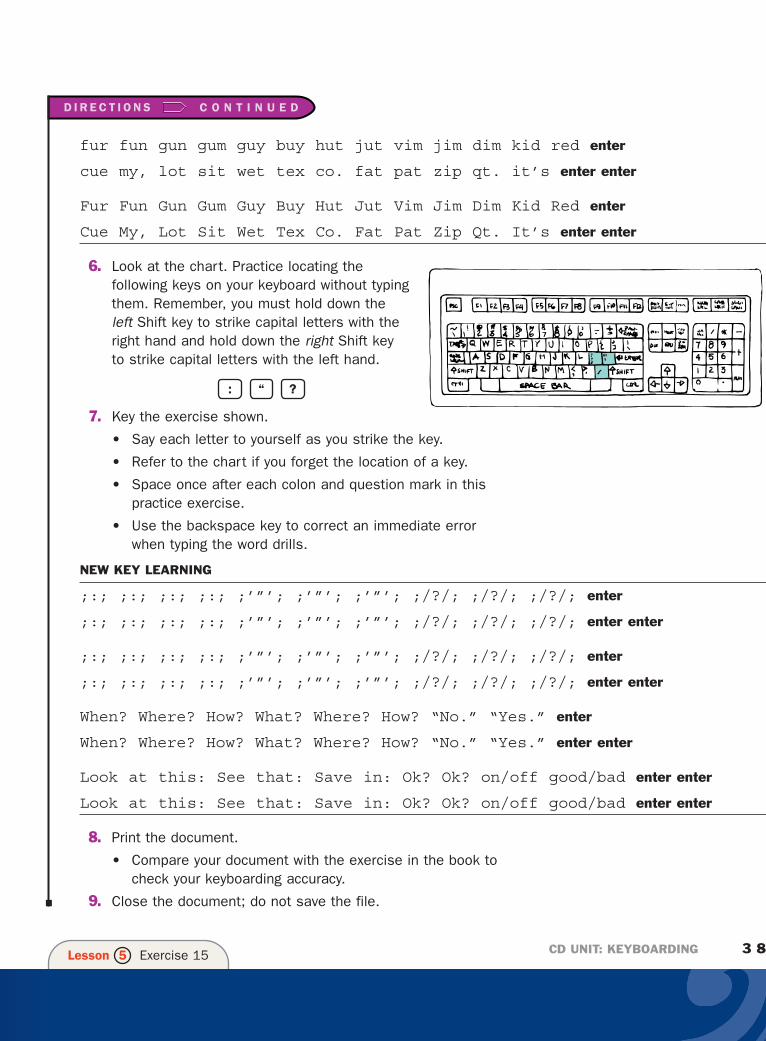
6. Look at the chart. Practice locating thefollowing keys on your keyboard without typingthem. Remember, you must hold down theleft Shift key to strike capital letters with theright hand and hold down the right Shift keyto strike capital letters with the left hand.
7. Key the exercise shown.
• Say each letter to yourself as you strike the key.
• Refer to the chart if you forget the location of a key.
• Space once after each colon and question mark in thispractice exercise.
• Use the backspace key to correct an immediate errorwhen typing the word drills.
NEW KEY LEARNING
;:; ;:; ;:; ;:; ;’”’; ;’”’; ;’”’; ;/?/; ;/?/; ;/?/; enter
;:; ;:; ;:; ;:; ;’”’; ;’”’; ;’”’; ;/?/; ;/?/; ;/?/; enter enter
;:; ;:; ;:; ;:; ;’”’; ;’”’; ;’”’; ;/?/; ;/?/; ;/?/; enter
;:; ;:; ;:; ;:; ;’”’; ;’”’; ;’”’; ;/?/; ;/?/; ;/?/; enter enter
When? Where? How? What? Where? How? “No.” “Yes.” enter
When? Where? How? What? Where? How? “No.” “Yes.” enter enter
Look at this: See that: Save in: Ok? Ok? on/off good/bad enter enter
Look at this: See that: Save in: Ok? Ok? on/off good/bad enter enter
8. Print the document.
• Compare your document with the exercise in the book tocheck your keyboarding accuracy.
9. Close the document; do not save the file.
?“:
CD UNIT: KEYBOARDING 3 8Lesson 5 Exercise 15
D I R E C T I O N S C O N T I N U E D

Sentences
1. Start a new document.
2. Set the font to Courier 12 point.
3. Type your name at the top of the page.Capitalize the first letters of your first and last name. Press the Enter key twice.
4. Key the Expert’s Rhythm Drill shown.
REVIEW
asdf fdsa jkl; ;lkj asdf fdsa enter
jkl; ;lkj asdf fdsa jkl; ;lkj enter
a; sl dk fj gh gh fj dk sl a; enter
sl dk fj gh gh fj dk sl a; sl enter
a;sldkfjghghfjdksl a;sldkfjghghfjdksl enter
a;sldkfjghghfjdksl a;sldkfjghghfjdksl enter enter
5. Key the alphabetic drill and the 25 “key” words shown hereand on the next page.
• Refer to the chart if you forget the location of a key.
REVIEW
ab ab ab cde cde cde fg fg fg abcdefg abcdefg abcdefg enter enter
hi hi hi jkl jkl jkl hijkl hijkl hijkl abcdefghijkl enter enter
mnop mnop mnop abcdefghijklmnop qrs qrs qrs tuv tuv tuv enter enter
qrstuv qrstuf qrstuv abcdefghijklmnopqrastuv wxyz wxyz enter enter
abcdefghijklmnopqrstuvwxyz abcdefghijklmnopqrstuvwxyz enter enter
CD UNIT: KEYBOARDING 3 9Lesson 5 Exercise 16
E X E R C I S E
16D I R E C T I O N S
continued on next page
fur fun gun gum guy buy hut jut vim jim dim kid red enter
cue my, lot sit wet tex co. fat pat zip qt. it’s enter enter
Fur Fun Gun Gum Guy Buy Hut Jut Vim Jim Dim Kid Red enter
Cue My, Lot Sit Wet Tex Co. Fat Pat Zip Qt. It’s enter enter
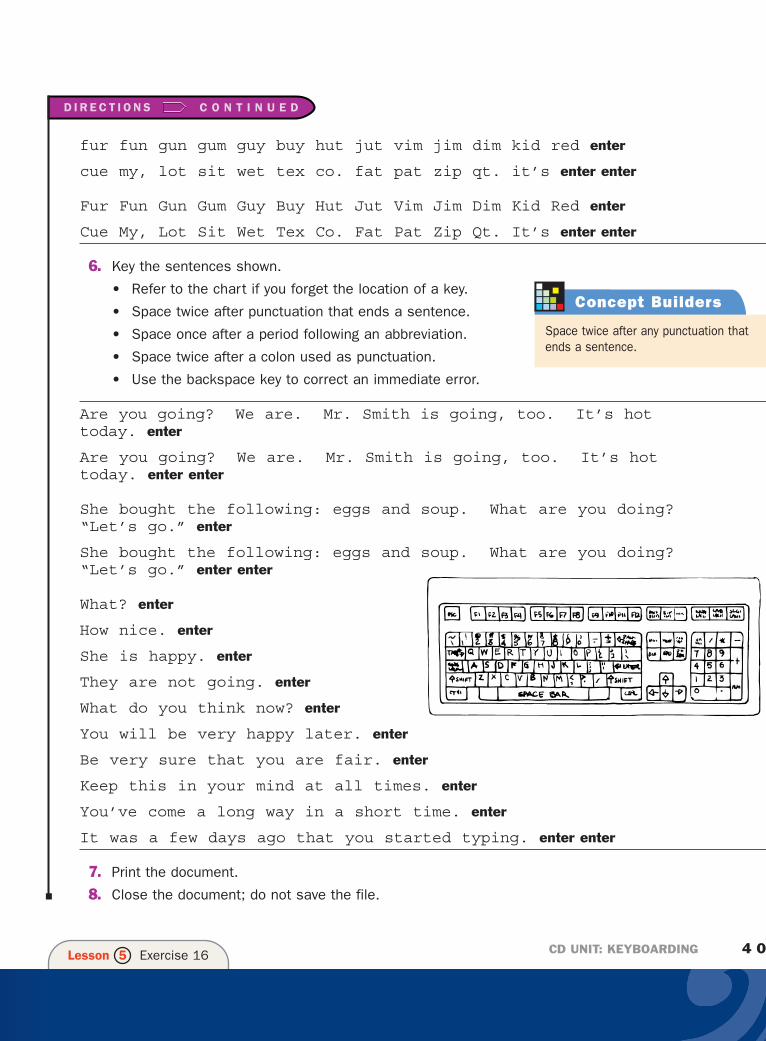
6. Key the sentences shown.
• Refer to the chart if you forget the location of a key.
• Space twice after punctuation that ends a sentence.
• Space once after a period following an abbreviation.
• Space twice after a colon used as punctuation.
• Use the backspace key to correct an immediate error.
Are you going? We are. Mr. Smith is going, too. It’s hot today. enter
Are you going? We are. Mr. Smith is going, too. It’s hot today. enter enter
She bought the following: eggs and soup. What are you doing? “Let’s go.” enter
She bought the following: eggs and soup. What are you doing? “Let’s go.” enter enter
What? enter
How nice. enter
She is happy. enter
They are not going. enter
What do you think now? enter
You will be very happy later. enter
Be very sure that you are fair. enter
Keep this in your mind at all times. enter
You’ve come a long way in a short time. enter
It was a few days ago that you started typing. enter enter
7. Print the document.
8. Close the document; do not save the file.
CD UNIT: KEYBOARDING 4 0Lesson 5 Exercise 16
D I R E C T I O N S C O N T I N U E D
Concept Builders
Space twice after any punctuation thatends a sentence.
Numbers
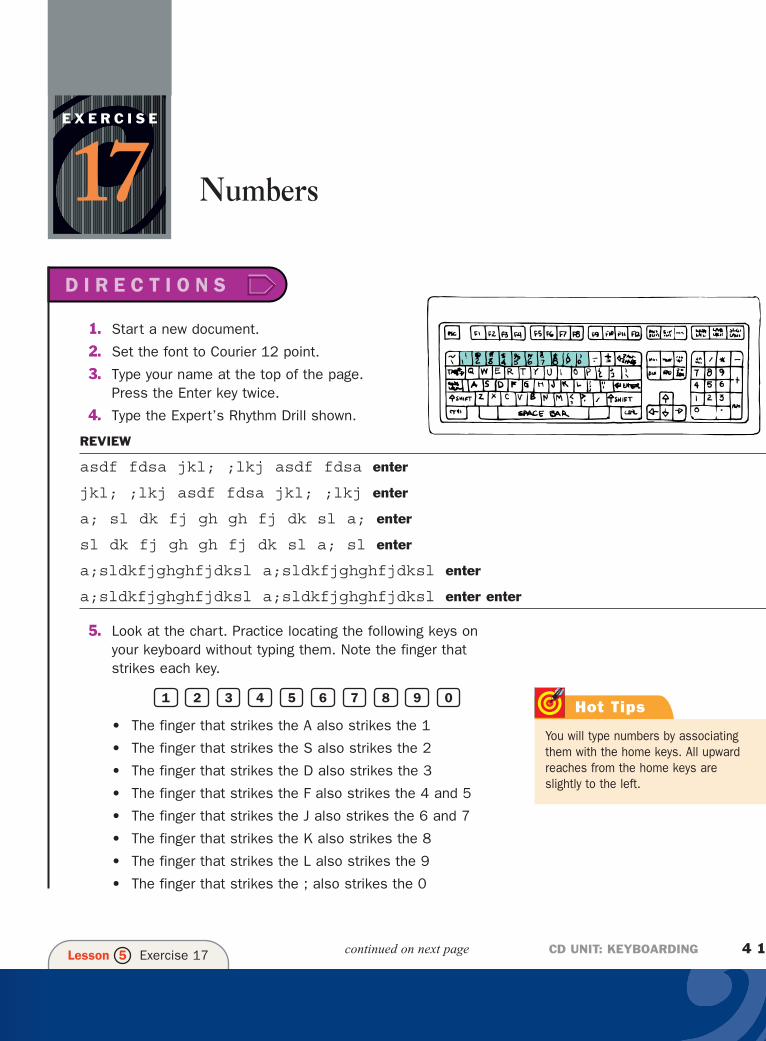
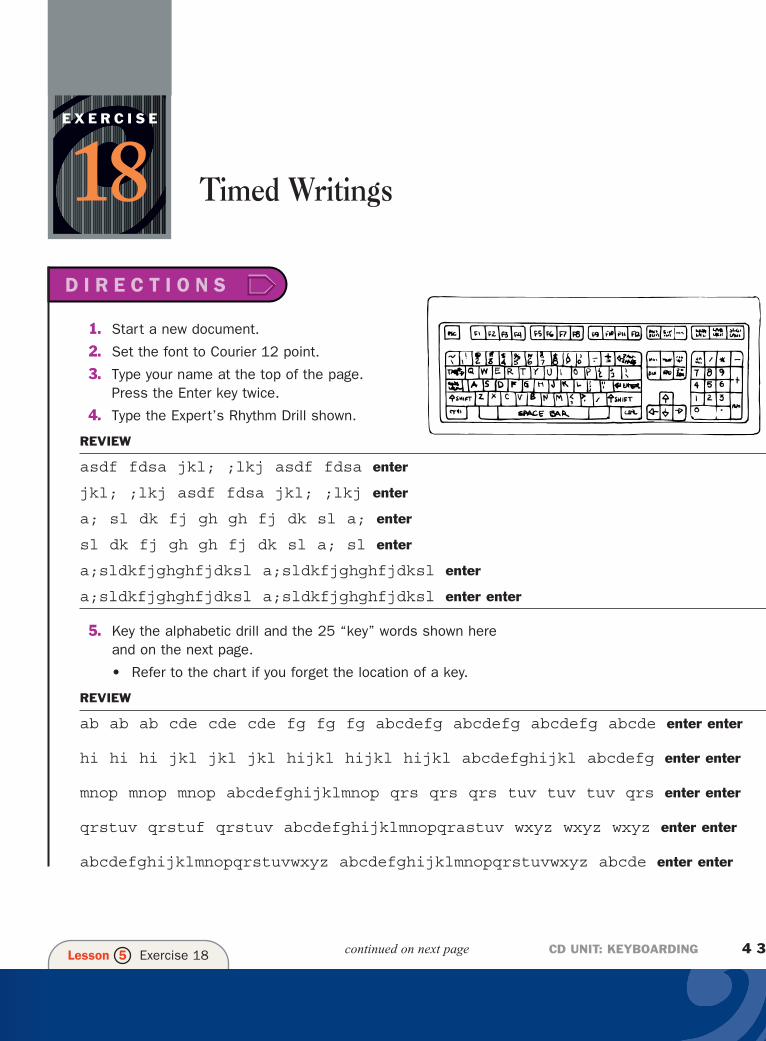
1. Start a new document.
2. Set the font to Courier 12 point.
3. Type your name at the top of the page. Press the Enter key twice.
4. Type the Expert’s Rhythm Drill shown.
REVIEW
asdf fdsa jkl; ;lkj asdf fdsa enter
jkl; ;lkj asdf fdsa jkl; ;lkj enter
a; sl dk fj gh gh fj dk sl a; enter
sl dk fj gh gh fj dk sl a; sl enter
a;sldkfjghghfjdksl a;sldkfjghghfjdksl enter
a;sldkfjghghfjdksl a;sldkfjghghfjdksl enter enter
5. Look at the chart. Practice locating the following keys onyour keyboard without typing them. Note the finger thatstrikes each key.
• The finger that strikes the A also strikes the 1
• The finger that strikes the S also strikes the 2
• The finger that strikes the D also strikes the 3
• The finger that strikes the F also strikes the 4 and 5
• The finger that strikes the J also strikes the 6 and 7
• The finger that strikes the K also strikes the 8
• The finger that strikes the L also strikes the 9
• The finger that strikes the ; also strikes the 0
0987654321
CD UNIT: KEYBOARDING 4 1Lesson 5 Exercise 17
E X E R C I S E
17D I R E C T I O N S
continued on next page
Hot Tips
You will type numbers by associatingthem with the home keys. All upwardreaches from the home keys areslightly to the left.

6. Key the exercise shown.
• Say each letter to yourself as you strikethe key.
• Refer to the chart if you forget the locationof a key.
• Avoid looking down at your fingers while typing.
• If you make an error, ignore it and continue typing theexercise.
NEW KEY LEARNING
s2l9 s2l9 s2l9 s2l9 d3k8 d3k8 d3k8 d3k8 f4j7 f4j7 f4j7 enter
f4j7 f4j7 f5j6 f5j6 f5j6 f5j6 f5j6 a1;0 a1;0 a1;0 a1;0 enter enter
s2l9 s2l9 s2l9 s2l9 d3k8 d3k8 d3k8 d3k8 f4j7 f4j7 f4j7 enter
f4j7 f4j7 f5j6 f5j6 f5j6 f5j6 f5j6 a1;0 a1;0 a1;0 a1;0 enter enter
7. Key the exercise again. This time allow the text to wrapautomatically to the next line.
s2l9 s2l9 s2l9 s2l9 d3k8 d3k8 d3k8 d3k8 f4j7 f4j7 f4j7 f4j7
f4j7 f5j6 f5j6 f5j6 f5j6 f5j6 a1;0 a1;0 a1;0 a1;0 s2l9 s2l9
s2l9 s2l9 d3k8 d3k8 d3k8 d3k8 f4j7 f4j7 f4j7 enter enter
8. Key the exercise shown.
• As you type each number, think of the home key fingerused to reach for each number.
• Avoid looking down at your fingers while typing.
29 29 29 29 38 38 38 38 47 47 47 47 56 56 56 56 10 10 enter
10 10 10 29 29 29 29 29 38 38 38 38 38 47 47 47 47 47 enter enter
29 29 29 29 38 38 38 38 47 47 47 47 56 56 56 56 10 10 enter
10 10 10 29 29 29 29 29 38 38 38 38 38 47 47 47 47 47 enter enter
12 noon, 8:30 p.m., 3477 Water Street, New York, NY 10021 enter
12 noon, 8:30 p.m., 3477 Water Street, New York, NY 10021 enter enter
9. Print the document.
10. Close the document; do not save the changes.
CD UNIT: KEYBOARDING 4 2Lesson 5 Exercise 17
D I R E C T I O N S C O N T I N U E D
Timed Writings
1. Start a new document.
2. Set the font to Courier 12 point.
3. Type your name at the top of the page. Press the Enter key twice.
4. Type the Expert’s Rhythm Drill shown.
REVIEW
asdf fdsa jkl; ;lkj asdf fdsa enter
jkl; ;lkj asdf fdsa jkl; ;lkj enter
a; sl dk fj gh gh fj dk sl a; enter
sl dk fj gh gh fj dk sl a; sl enter
a;sldkfjghghfjdksl a;sldkfjghghfjdksl enter
a;sldkfjghghfjdksl a;sldkfjghghfjdksl enter enter
5. Key the alphabetic drill and the 25 “key” words shown hereand on the next page.
• Refer to the chart if you forget the location of a key.
REVIEW
ab ab ab cde cde cde fg fg fg abcdefg abcdefg abcdefg abcde enter enter
hi hi hi jkl jkl jkl hijkl hijkl hijkl abcdefghijkl abcdefg enter enter
mnop mnop mnop abcdefghijklmnop qrs qrs qrs tuv tuv tuv qrs enter enter
qrstuv qrstuf qrstuv abcdefghijklmnopqrastuv wxyz wxyz wxyz enter enter
abcdefghijklmnopqrstuvwxyz abcdefghijklmnopqrstuvwxyz abcde enter enter
CD UNIT: KEYBOARDING 4 3Lesson 5 Exercise 18
E X E R C I S E
18D I R E C T I O N S
continued on next page

fur fun gun gum guy buy hut jut vim jim dim kid red enter
cue my, lot sit wet tex co. fat pat zip qt. it’s enter enter
Fur Fun Gun Gum Guy Buy Hut Jut Vim Jim Dim Kid Red enter
Cue My, Lot Sit Wet Tex Co. Fat Pat Zip Qt. It’s enter enter
6. Take three 1/2 minute timings on each paragraph shownbelow and on the next page.
• Allow the text to wrap automatically to the next line. Do not press the Enter key at the end of each line.
• Say each letter to yourself as you strike the key. Think of the space after a word or a punctuation mark as part of the word just typed.
• Space once after a comma and twice after a period that ends a sentence.
• Use the Backspace key to correct an immediate error.
• Press the Enter key twice after each timed writing.
• The numbers to the left, right, and bottom of the text will help you calculate your speed. Ignore them,however, when typing the exercise.
Line Stroke Words
1 It’s fun to buy at the Tex Co. store. They seem to have lots 12
2 of red zip disks, which is just what Pat and Jim want to buy 24
3 for Guy. 26
....1....2....3....4....5....6....7....8....9....10....11....12
Line Stroke Words
1 The World Wide Web, commonly known as WWW, or the Web, is a 12
2 service that organizes and searches information on the Net. An 24
3 Internet site is located by an address, called a URL. Internet 36
4 addresses typically look like this: http://www.kid.com. 51
....1....2....3....4....5....6....7....8....9....10....11....12
CD UNIT: KEYBOARDING 4 4Lesson 5 Exercise 18 continued on next page
D I R E C T I O N S C O N T I N U E D
Concept Builders
• A “timed writing” is an exercise thatallows you to determine how fastyou can type.
• You might be asked how manywords per minute you type. Aftercompleting this exercise, you will be able to provide an answer.
• In calculating your typing speed,words are counted by “strokes.”Every five strokes counts for oneword. This includes the spacebetween words. Stroke words arenot actual words. For example, the first timed writing exercisecontains 26 stroke words, but only 30 actual words.
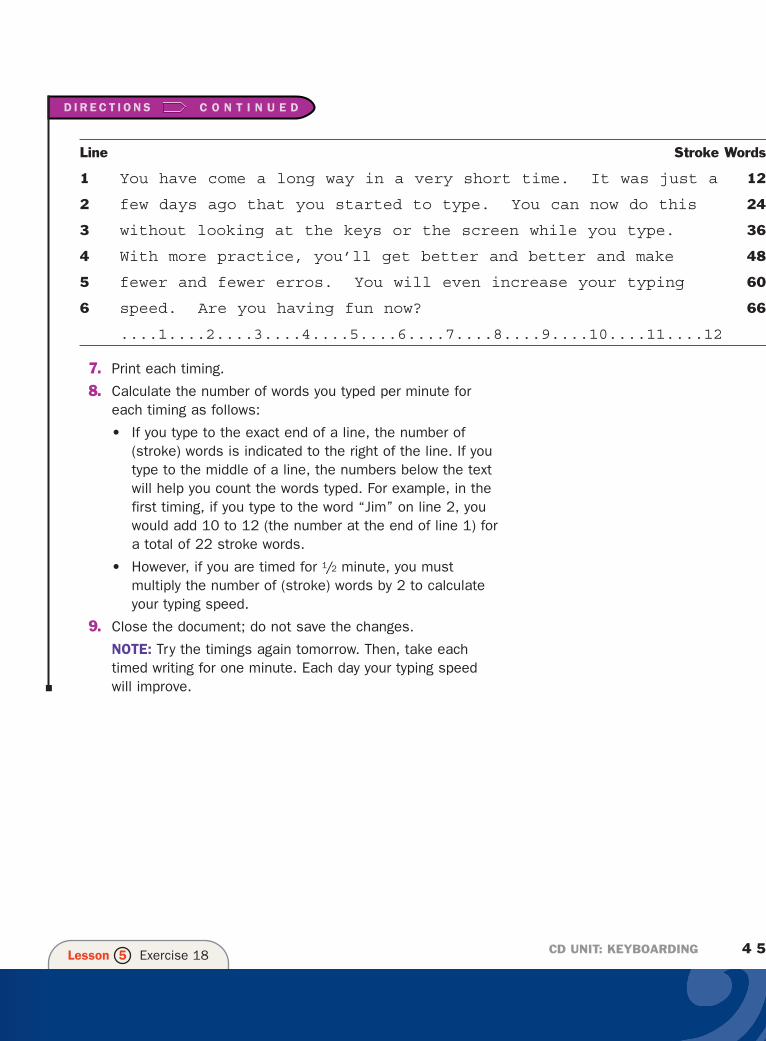
Line Stroke Words
1 You have come a long way in a very short time. It was just a 12
2 few days ago that you started to type. You can now do this 24
3 without looking at the keys or the screen while you type. 36
4 With more practice, you’ll get better and better and make 48
5 fewer and fewer erros. You will even increase your typing 60
6 speed. Are you having fun now? 66
....1....2....3....4....5....6....7....8....9....10....11....12
7. Print each timing.
8. Calculate the number of words you typed per minute foreach timing as follows:
• If you type to the exact end of a line, the number of(stroke) words is indicated to the right of the line. If youtype to the middle of a line, the numbers below the textwill help you count the words typed. For example, in thefirst timing, if you type to the word “Jim” on line 2, youwould add 10 to 12 (the number at the end of line 1) fora total of 22 stroke words.
• However, if you are timed for 1/2 minute, you mustmultiply the number of (stroke) words by 2 to calculateyour typing speed.
9. Close the document; do not save the changes.
NOTE: Try the timings again tomorrow. Then, take eachtimed writing for one minute. Each day your typing speed will improve.
CD UNIT: KEYBOARDING 4 5Lesson 5 Exercise 18
D I R E C T I O N S C O N T I N U E D
Related Documents