Connectivity Guide KEPServerEX ® and Rockwell Software’s FactoryTalk View Studio February 2022 Ref. 1.001

Welcome message from author
This document is posted to help you gain knowledge. Please leave a comment to let me know what you think about it! Share it to your friends and learn new things together.
Transcript

Connectivity Guide
KEPServerEX® and Rockwell Software’s FactoryTalk View Studio
February 2022 Ref. 1.001

www.kepware.com 1 ©2022 PTC, Inc. All Rights Reserved.
Table of Contents
1. Overview and Requirements ........................................................................ 1
2. Creating a New FactoryTalk Project .............................................................. 1
3. Adding a New Data Server to the Project ....................................................... 2
4. Synchronizing the New FactoryTalk Project with the OPC Server ...................... 6
5. Creating a Tag for Indirect Addressing .......................................................... 6
6. Creating a FactoryTalk Project Display .......................................................... 8
7. Creating an SE Client Configuration File ...................................................... 12
8. Using Kepware’s OPC Quick Client .............................................................. 16
www.kepware.com 1 ©2022 PTC, Inc. All Rights Reserved.
1. Overview and Requirements
This guide will demonstrate how to establish a connection between the
KEPServerEX OPC server and a FactoryTalk runtime project. Users must
complete the following before continuing with this tutorial:
• Configure a server project: Users may either select the appropriate driver
and settings or run the Simulation Driver Demo that is included with
KEPServerEX. The Simulation Driver Demo project will be used for all
examples in this tutorial.
• Start KEPServerEX and load the Simulation Driver Demo project. Once the
server project has been loaded, open the Runtime menu on the main menu
bar and verify that the server project has been connected.
2. Creating a New FactoryTalk Project
Note: For this tutorial, FactoryTalk View Studio version 5.10.00 is used.
1. Start the program FactoryTalk View Studio.
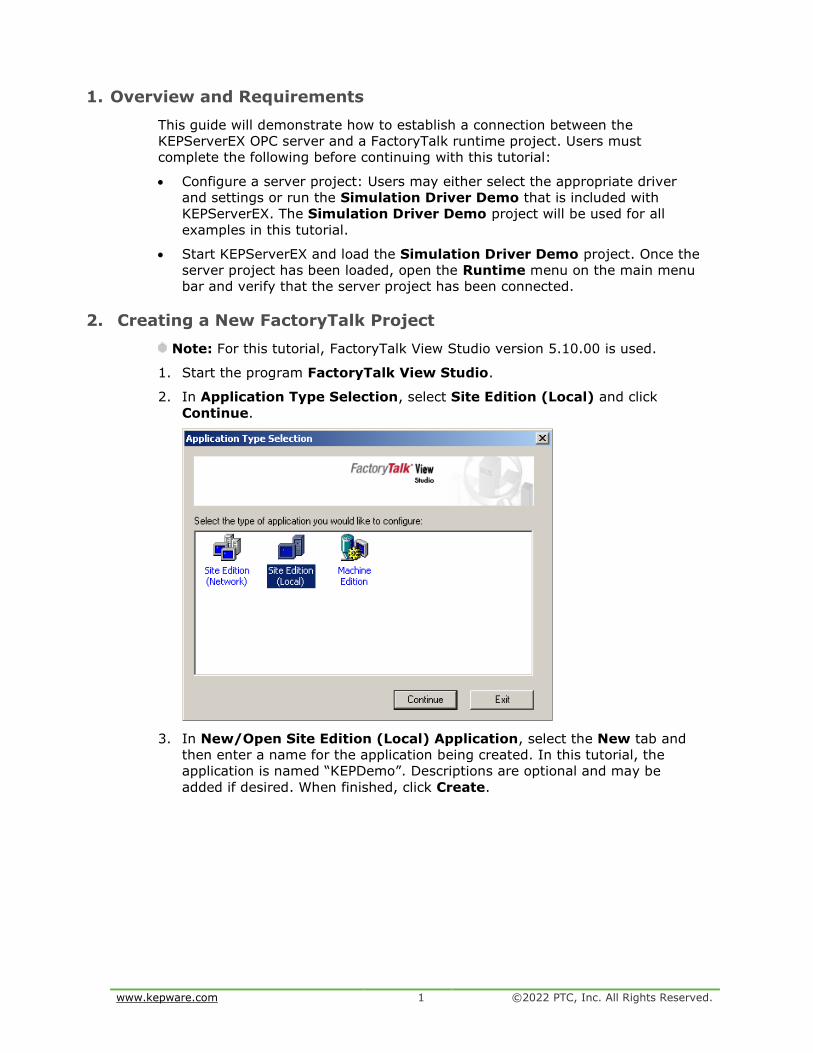
2. In Application Type Selection, select Site Edition (Local) and click
Continue.
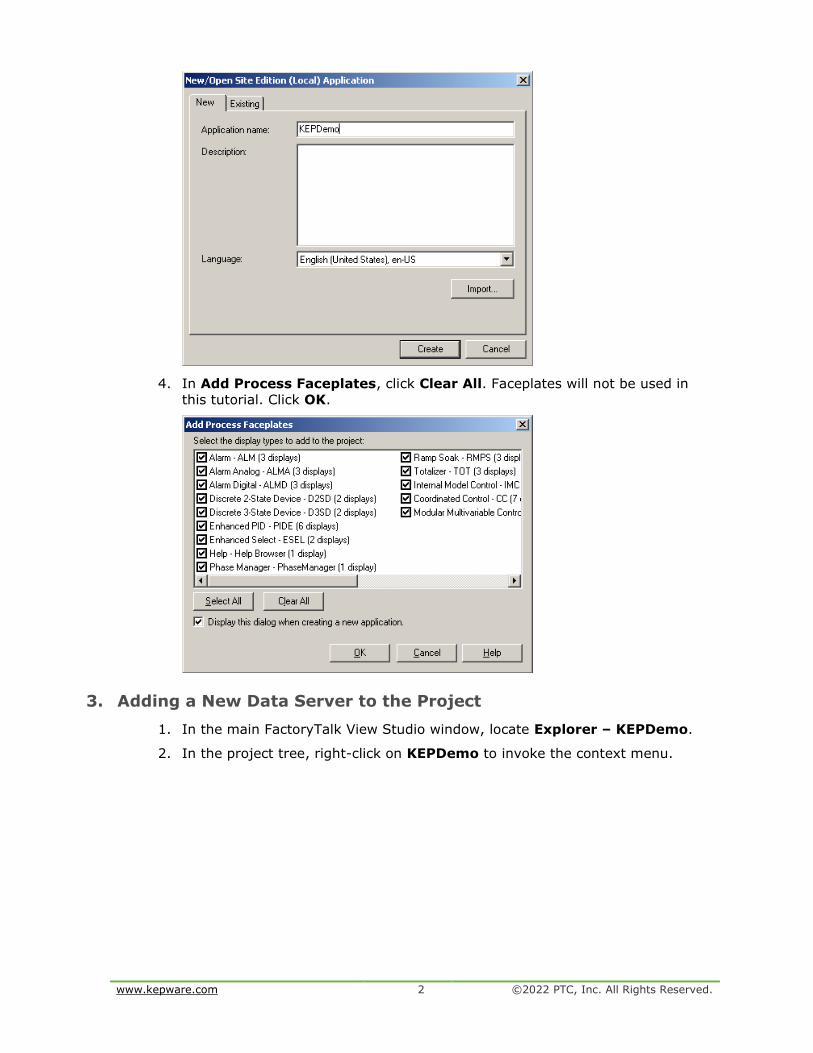
3. In New/Open Site Edition (Local) Application, select the New tab and
then enter a name for the application being created. In this tutorial, the
application is named “KEPDemo”. Descriptions are optional and may be
added if desired. When finished, click Create.
www.kepware.com 2 ©2022 PTC, Inc. All Rights Reserved.
4. In Add Process Faceplates, click Clear All. Faceplates will not be used in
this tutorial. Click OK.
3. Adding a New Data Server to the Project
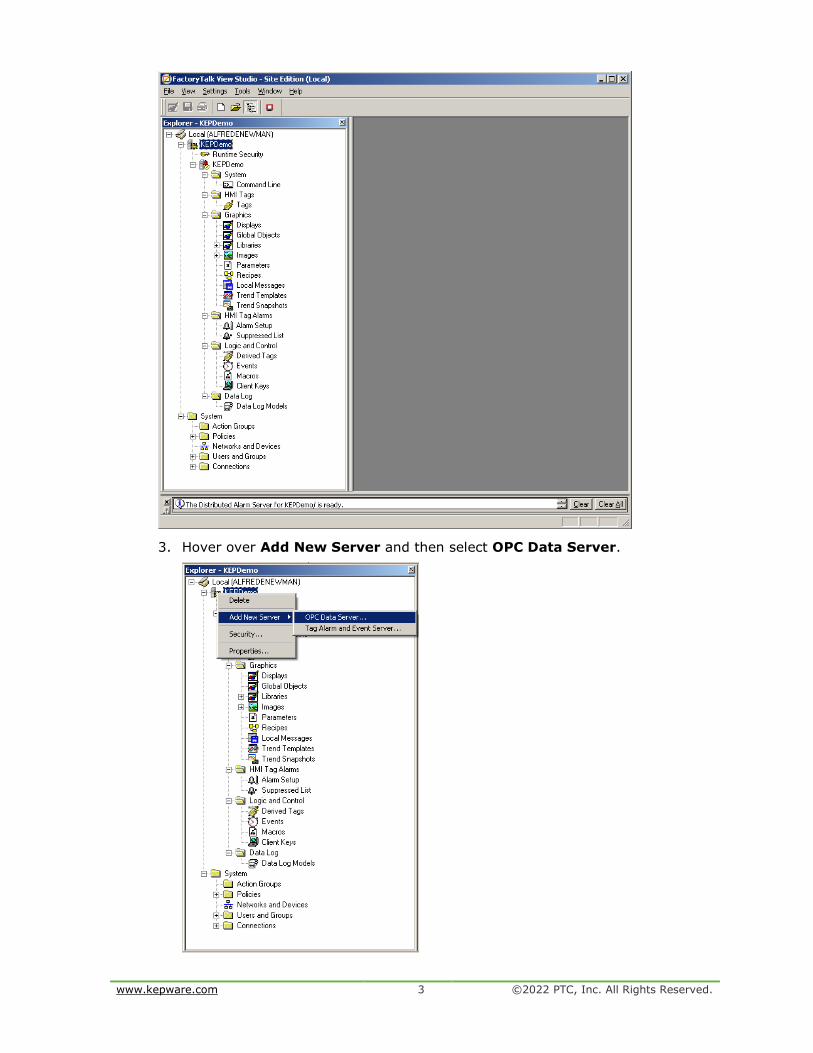
1. In the main FactoryTalk View Studio window, locate Explorer – KEPDemo.
2. In the project tree, right-click on KEPDemo to invoke the context menu.
www.kepware.com 3 ©2022 PTC, Inc. All Rights Reserved.
3. Hover over Add New Server and then select OPC Data Server.
www.kepware.com 4 ©2022 PTC, Inc. All Rights Reserved.
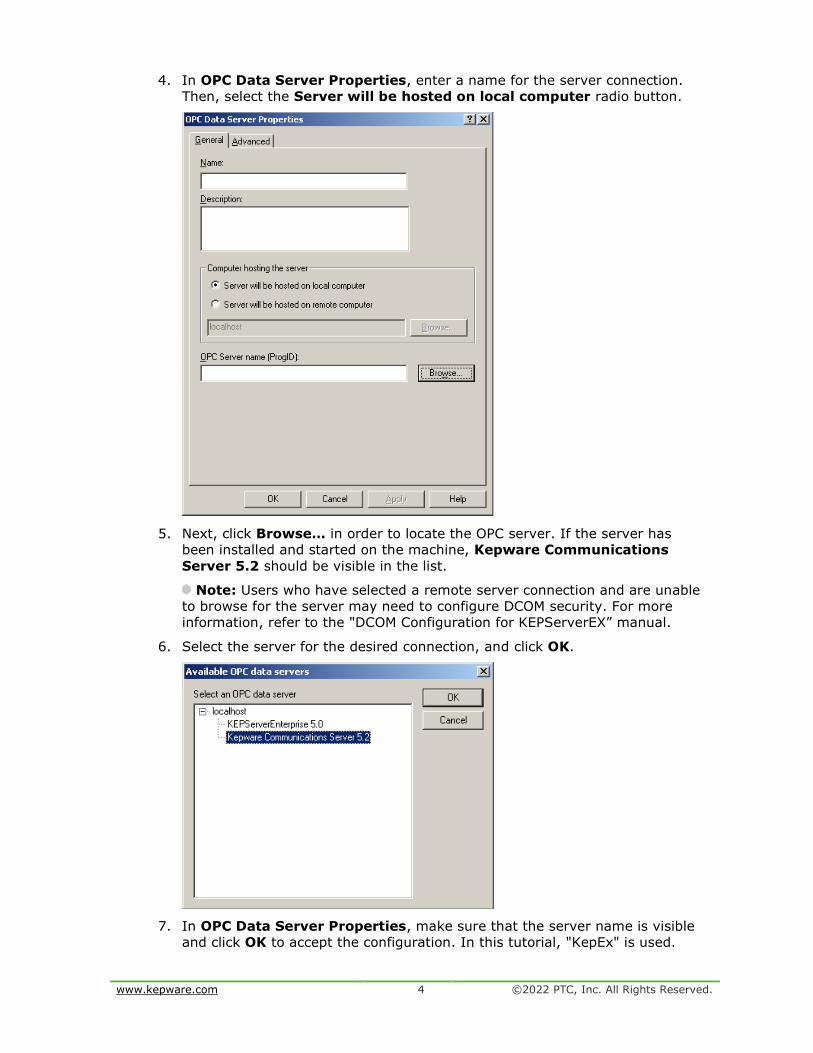
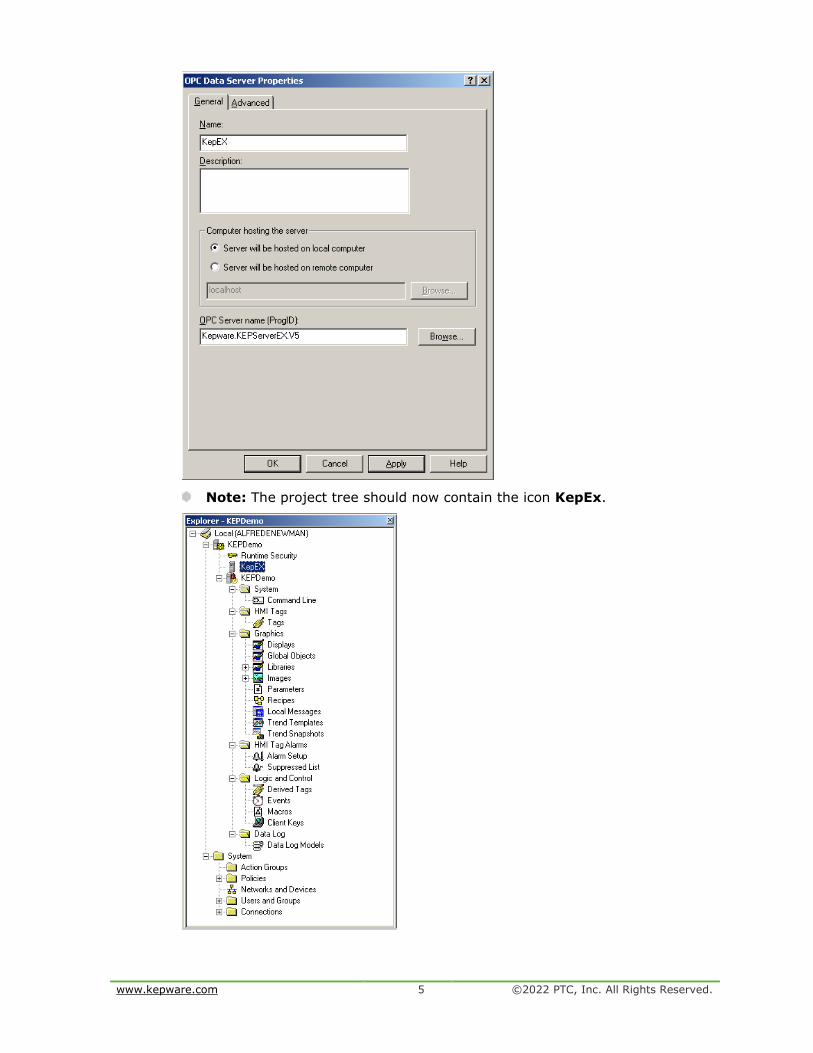
4. In OPC Data Server Properties, enter a name for the server connection.
Then, select the Server will be hosted on local computer radio button.
5. Next, click Browse… in order to locate the OPC server. If the server has
been installed and started on the machine, Kepware Communications
Server 5.2 should be visible in the list.
Note: Users who have selected a remote server connection and are unable
to browse for the server may need to configure DCOM security. For more
information, refer to the "DCOM Configuration for KEPServerEX” manual.
6. Select the server for the desired connection, and click OK.
7. In OPC Data Server Properties, make sure that the server name is visible
and click OK to accept the configuration. In this tutorial, "KepEx" is used.
www.kepware.com 5 ©2022 PTC, Inc. All Rights Reserved.
Note: The project tree should now contain the icon KepEx.
www.kepware.com 6 ©2022 PTC, Inc. All Rights Reserved.
4. Synchronizing the New FactoryTalk Project with the OPC Server
Even though a server has been added, the new FactoryTalk project will not be
able to access server tags until the following synchronization steps are
completed. The server must remain connected for the duration of the
synchronization.
1. To start, shut down FactoryTalk by clicking File | Exit.
2. Restart FactoryTalk and then re-open the KEPDemo project.
5. Creating a Tag for Indirect Addressing
FactoryTalk has two methods for accessing tags: Indirect Addressing and Direct
Addressing. Indirect addressing requires the creation of a tag database, whereas
direct addressing allows OPC items to be accessed directly.
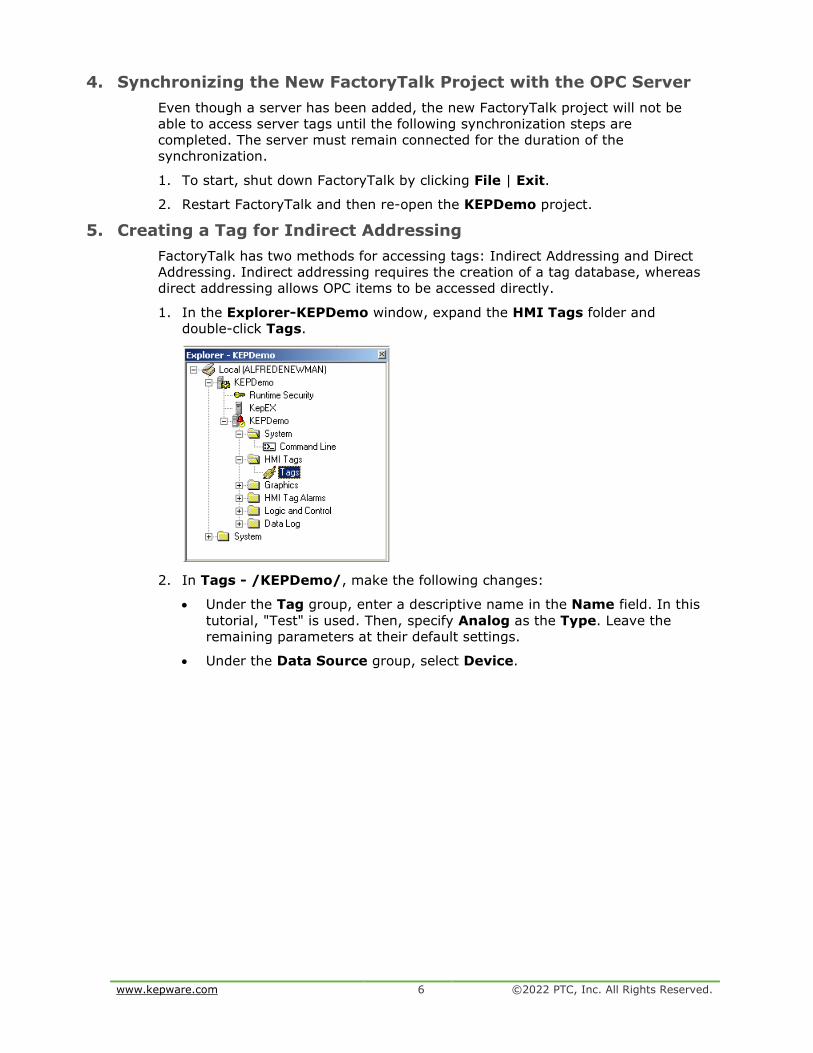
1. In the Explorer-KEPDemo window, expand the HMI Tags folder and
double-click Tags.
2. In Tags - /KEPDemo/, make the following changes:
• Under the Tag group, enter a descriptive name in the Name field. In this
tutorial, "Test" is used. Then, specify Analog as the Type. Leave the
remaining parameters at their default settings.
• Under the Data Source group, select Device.

www.kepware.com 7 ©2022 PTC, Inc. All Rights Reserved.
3. Click on the Address browse button to open the Tag Browser.
4. In the Folders pane, expand the tree view and then locate the folder that
contains the desired tag. In this tutorial “Channel1/Device1” is used.
5. In the View pane, select the desired tag. In this tutorial, "Tag1" is used.
Then click OK.
6. In Tags - /KEPDemo/, the chosen tag will be displayed in the Address
field. Review the other parameters and make sure that the Minimum,
Scale, Maximum, Offset and Data Type fields are set accordingly. The
Description and Units fields may be left empty.

www.kepware.com 8 ©2022 PTC, Inc. All Rights Reserved.
7. Next, click Accept to add the tag to the tag database.
8. Click Close.
6. Creating a FactoryTalk Project Display
To verify a runtime connection to KEPServerEX, a display must be added to the
FactoryTalk client project.
1. In the Explorer - KEPDemo window, open the Graphics folder.

www.kepware.com 9 ©2022 PTC, Inc. All Rights Reserved.
2. Right-click on Displays and then select New.
3. The Graphics Toolbar should now appear below the main menu bar. Select
the Text tool icon and then add two text labels to the display. In this
tutorial, they are named "Display1" and "Display2".
4. Select the Numeric Display tool and then add a numeric display beneath
"Display1."
5. The dialog Numeric Display Properties will appear. Click Tags… to invoke
the tag browser.
www.kepware.com 10 ©2022 PTC, Inc. All Rights Reserved.
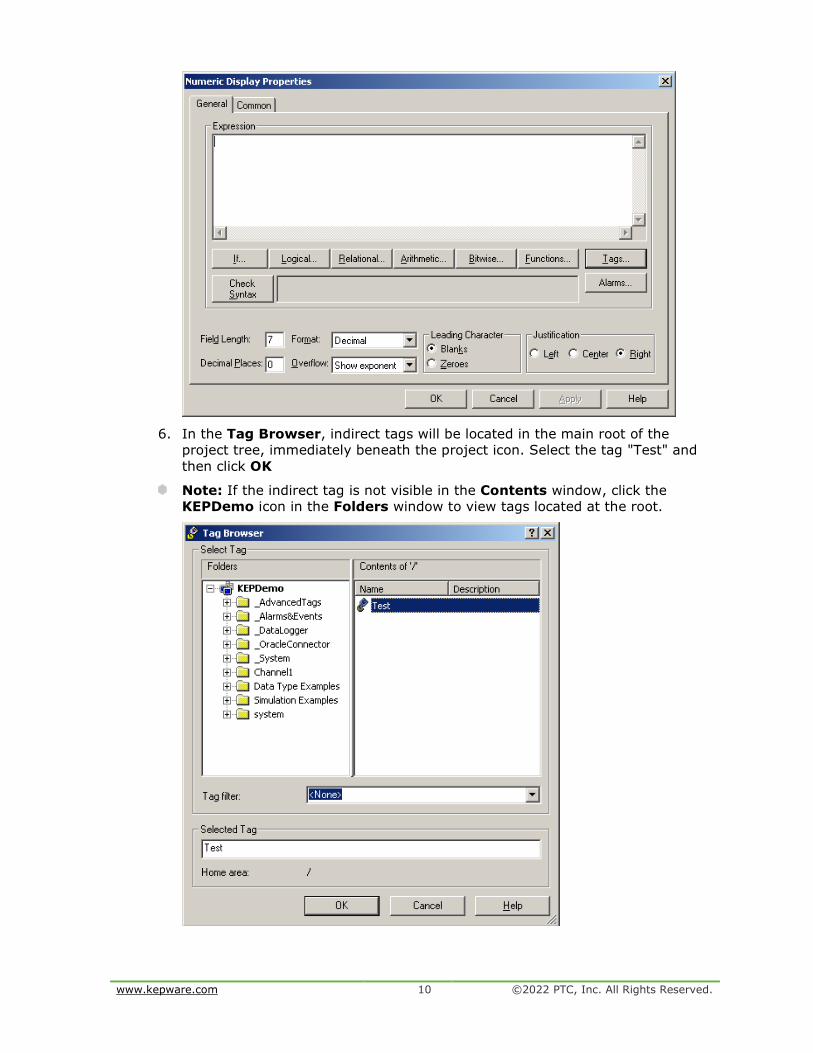
6. In the Tag Browser, indirect tags will be located in the main root of the
project tree, immediately beneath the project icon. Select the tag "Test" and
then click OK
Note: If the indirect tag is not visible in the Contents window, click the
KEPDemo icon in the Folders window to view tags located at the root.
www.kepware.com 11 ©2022 PTC, Inc. All Rights Reserved.
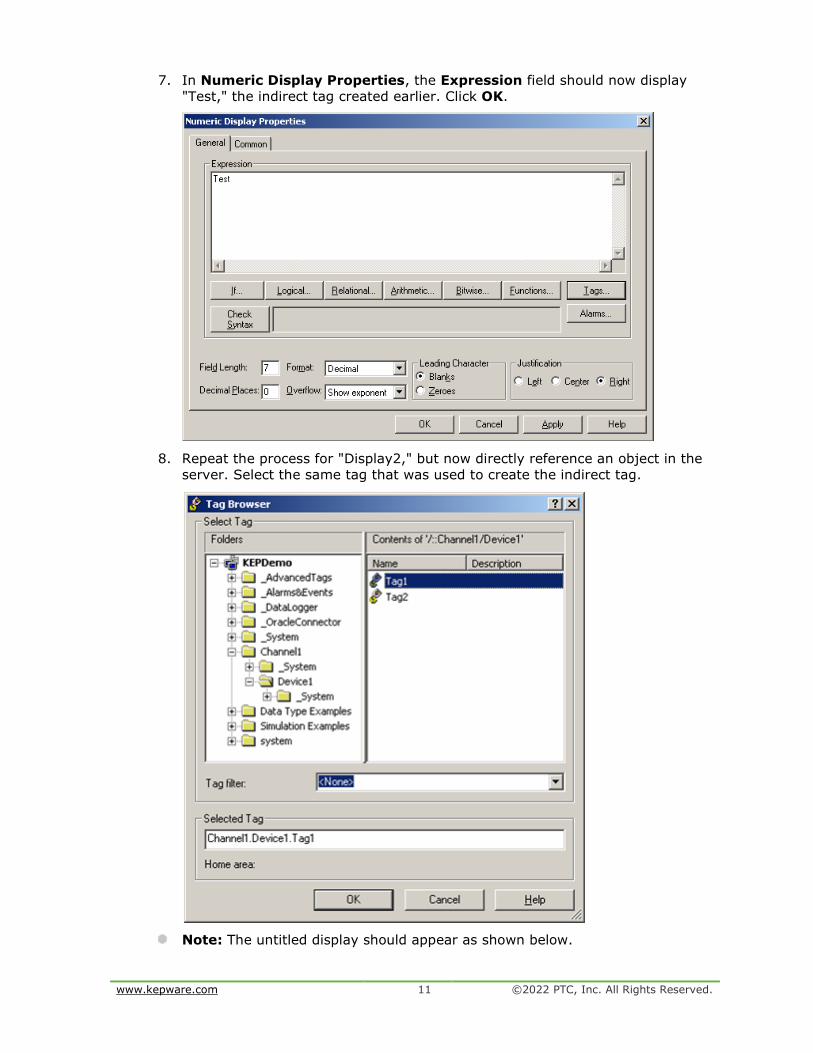
7. In Numeric Display Properties, the Expression field should now display
"Test," the indirect tag created earlier. Click OK.
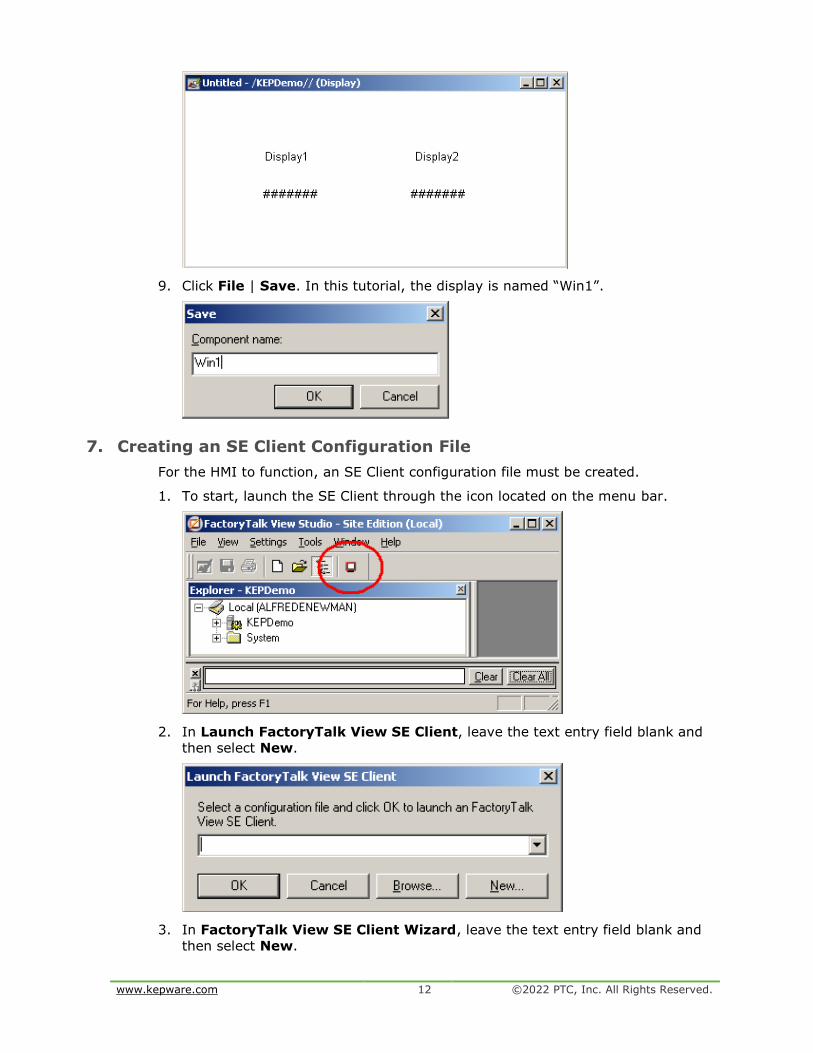
8. Repeat the process for "Display2," but now directly reference an object in the
server. Select the same tag that was used to create the indirect tag.
Note: The untitled display should appear as shown below.
www.kepware.com 12 ©2022 PTC, Inc. All Rights Reserved.
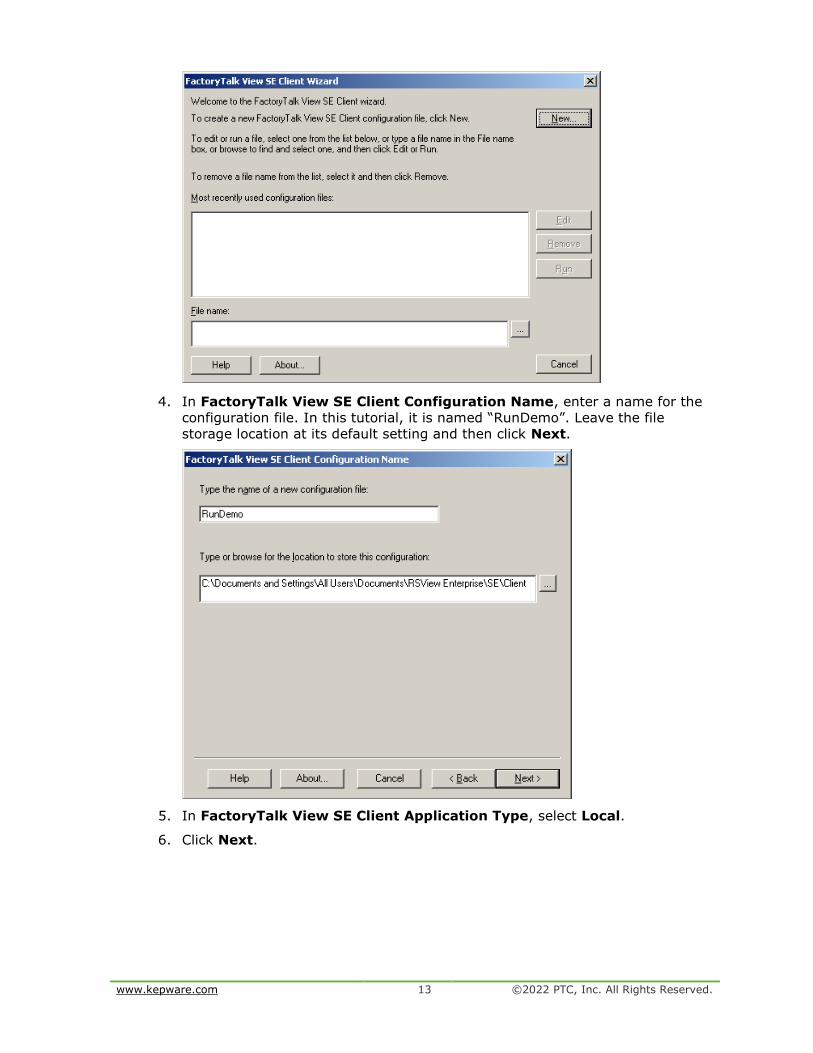
9. Click File | Save. In this tutorial, the display is named “Win1”.
7. Creating an SE Client Configuration File
For the HMI to function, an SE Client configuration file must be created.
1. To start, launch the SE Client through the icon located on the menu bar.
2. In Launch FactoryTalk View SE Client, leave the text entry field blank and
then select New.
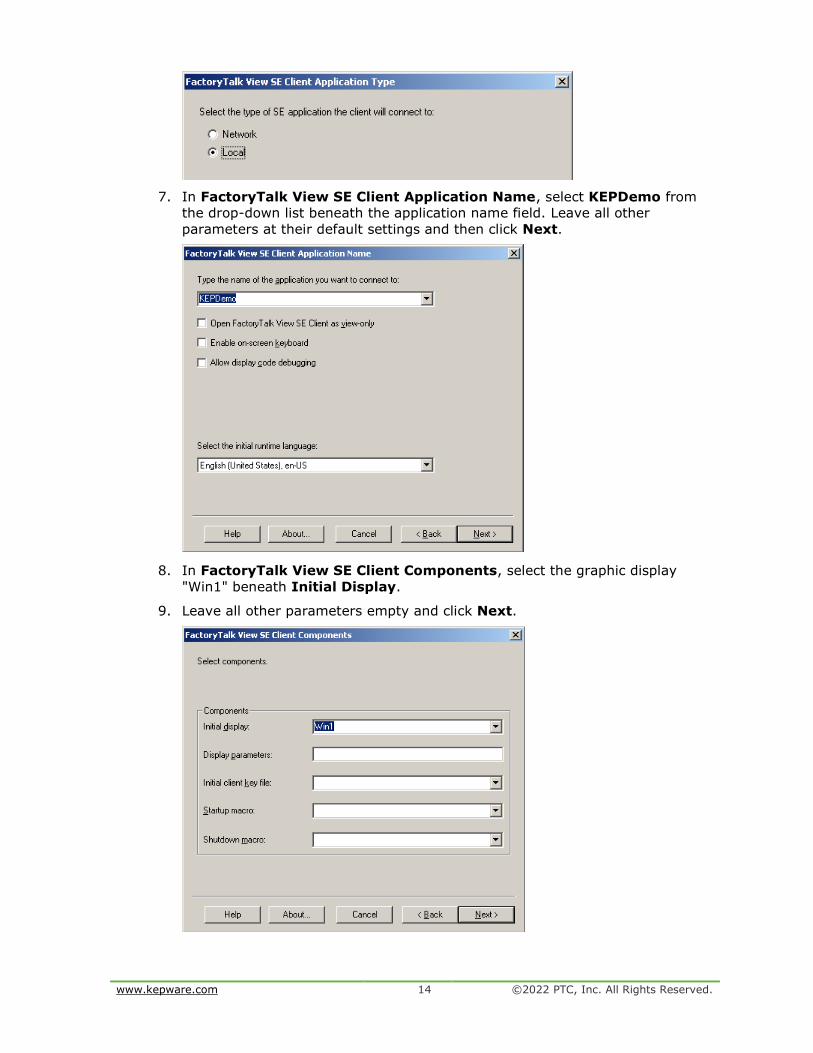
3. In FactoryTalk View SE Client Wizard, leave the text entry field blank and
then select New.
www.kepware.com 13 ©2022 PTC, Inc. All Rights Reserved.
4. In FactoryTalk View SE Client Configuration Name, enter a name for the
configuration file. In this tutorial, it is named “RunDemo”. Leave the file
storage location at its default setting and then click Next.
5. In FactoryTalk View SE Client Application Type, select Local.
6. Click Next.
www.kepware.com 14 ©2022 PTC, Inc. All Rights Reserved.
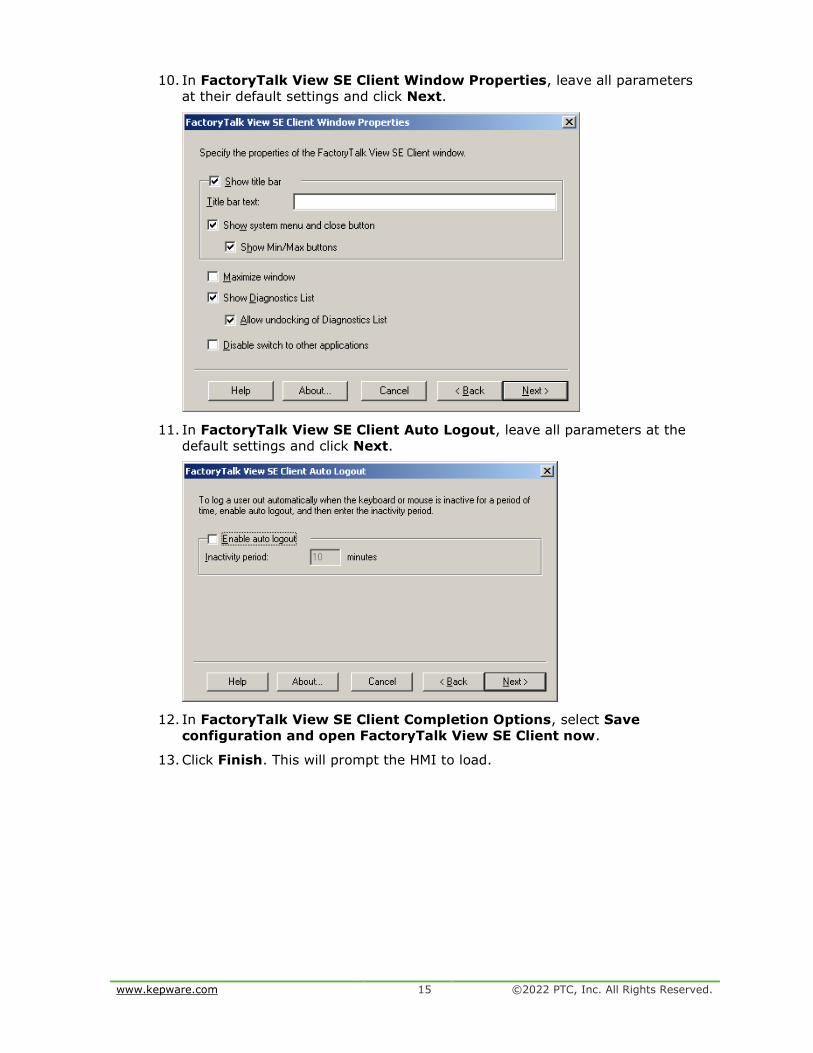
7. In FactoryTalk View SE Client Application Name, select KEPDemo from
the drop-down list beneath the application name field. Leave all other
parameters at their default settings and then click Next.
8. In FactoryTalk View SE Client Components, select the graphic display
"Win1" beneath Initial Display.
9. Leave all other parameters empty and click Next.
www.kepware.com 15 ©2022 PTC, Inc. All Rights Reserved.
10. In FactoryTalk View SE Client Window Properties, leave all parameters
at their default settings and click Next.
11. In FactoryTalk View SE Client Auto Logout, leave all parameters at the
default settings and click Next.
12. In FactoryTalk View SE Client Completion Options, select Save
configuration and open FactoryTalk View SE Client now.
13. Click Finish. This will prompt the HMI to load.

www.kepware.com 16 ©2022 PTC, Inc. All Rights Reserved.
14. Once the HMI starts, it should appear as shown below. Changing data should
be visible in the numeric displays.
Note: The indirect tag display updates slightly slower than the direct tag
display. This is because the indirect tag display must update the
FactoryTalk View tag database before displaying its update from the
cache. The direct tagged object does not have this wait.
8. Using Kepware’s OPC Quick Client
Kepware provides an OPC client application for testing purposes with each
installation of KEPServerEX. For more information, refer to the OPC Quick Client
help documentation.
Related Documents