Kentico 8.1

Welcome message from author
This document is posted to help you gain knowledge. Please leave a comment to let me know what you think about it! Share it to your friends and learn new things together.
Transcript

Kentico 8.1
1. Installation . . . . . . . . . . . . . . . . . . . . . . . . . . . . . . . . . . . . . . . . . . . . . . . . . . . . . . . . . . . . . . . . . . . . . . . . . . . . . . . . . . . . . . . . . . . . . 31.1 Quick installation on a local machine (no requirements needed) . . . . . . . . . . . . . . . . . . . . . . . . . . . . . . . . . . . . . . . . . . . . . . . 41.2 Server and hosting requirements . . . . . . . . . . . . . . . . . . . . . . . . . . . . . . . . . . . . . . . . . . . . . . . . . . . . . . . . . . . . . . . . . . . . . . . . 5
1.2.1 Configuring IIS for the installation of Kentico . . . . . . . . . . . . . . . . . . . . . . . . . . . . . . . . . . . . . . . . . . . . . . . . . . . . . . . . . . 71.3 Installing Kentico - custom installation . . . . . . . . . . . . . . . . . . . . . . . . . . . . . . . . . . . . . . . . . . . . . . . . . . . . . . . . . . . . . . . . . . . . 81.4 Installing Kentico (Questions and Answers) . . . . . . . . . . . . . . . . . . . . . . . . . . . . . . . . . . . . . . . . . . . . . . . . . . . . . . . . . . . . . . . 131.5 Deploying Kentico to a live server . . . . . . . . . . . . . . . . . . . . . . . . . . . . . . . . . . . . . . . . . . . . . . . . . . . . . . . . . . . . . . . . . . . . . . . 15
1.5.1 Creating virtual directories and application pools in IIS 7.5 and 7.0 . . . . . . . . . . . . . . . . . . . . . . . . . . . . . . . . . . . . . . . . 171.6 Additional database installation . . . . . . . . . . . . . . . . . . . . . . . . . . . . . . . . . . . . . . . . . . . . . . . . . . . . . . . . . . . . . . . . . . . . . . . . . 201.7 Adding and removing components from an installed Kentico web project . . . . . . . . . . . . . . . . . . . . . . . . . . . . . . . . . . . . . . . . 221.8 Installing Kentico from the command line . . . . . . . . . . . . . . . . . . . . . . . . . . . . . . . . . . . . . . . . . . . . . . . . . . . . . . . . . . . . . . . . . 22
1.8.1 Command line installation - XML configuration . . . . . . . . . . . . . . . . . . . . . . . . . . . . . . . . . . . . . . . . . . . . . . . . . . . . . . . . 231.9 Troubleshooting installation issues . . . . . . . . . . . . . . . . . . . . . . . . . . . . . . . . . . . . . . . . . . . . . . . . . . . . . . . . . . . . . . . . . . . . . . 29
1.9.1 Application stops after being idle . . . . . . . . . . . . . . . . . . . . . . . . . . . . . . . . . . . . . . . . . . . . . . . . . . . . . . . . . . . . . . . . . . . 291.9.2 Disk permission problems . . . . . . . . . . . . . . . . . . . . . . . . . . . . . . . . . . . . . . . . . . . . . . . . . . . . . . . . . . . . . . . . . . . . . . . . 30
1.10 Uninstalling Kentico . . . . . . . . . . . . . . . . . . . . . . . . . . . . . . . . . . . . . . . . . . . . . . . . . . . . . . . . . . . . . . . . . . . . . . . . . . . . . . . . . 311.11 Hotfix Instructions - Kentico 8.1 . . . . . . . . . . . . . . . . . . . . . . . . . . . . . . . . . . . . . . . . . . . . . . . . . . . . . . . . . . . . . . . . . . . . . . . . 32
1.11.1 Hotfix Instructions - Kentico 8.1 Source Code . . . . . . . . . . . . . . . . . . . . . . . . . . . . . . . . . . . . . . . . . . . . . . . . . . . . . . . . 351.12 Upgrading to Kentico 8.1 . . . . . . . . . . . . . . . . . . . . . . . . . . . . . . . . . . . . . . . . . . . . . . . . . . . . . . . . . . . . . . . . . . . . . . . . . . . . . 36
1.12.1 Upgrading Kentico manually . . . . . . . . . . . . . . . . . . . . . . . . . . . . . . . . . . . . . . . . . . . . . . . . . . . . . . . . . . . . . . . . . . . . . 401.12.2 Upgrading custom code . . . . . . . . . . . . . . . . . . . . . . . . . . . . . . . . . . . . . . . . . . . . . . . . . . . . . . . . . . . . . . . . . . . . . . . . . 411.12.3 Upgrading Microsoft Azure projects . . . . . . . . . . . . . . . . . . . . . . . . . . . . . . . . . . . . . . . . . . . . . . . . . . . . . . . . . . . . . . . . 43
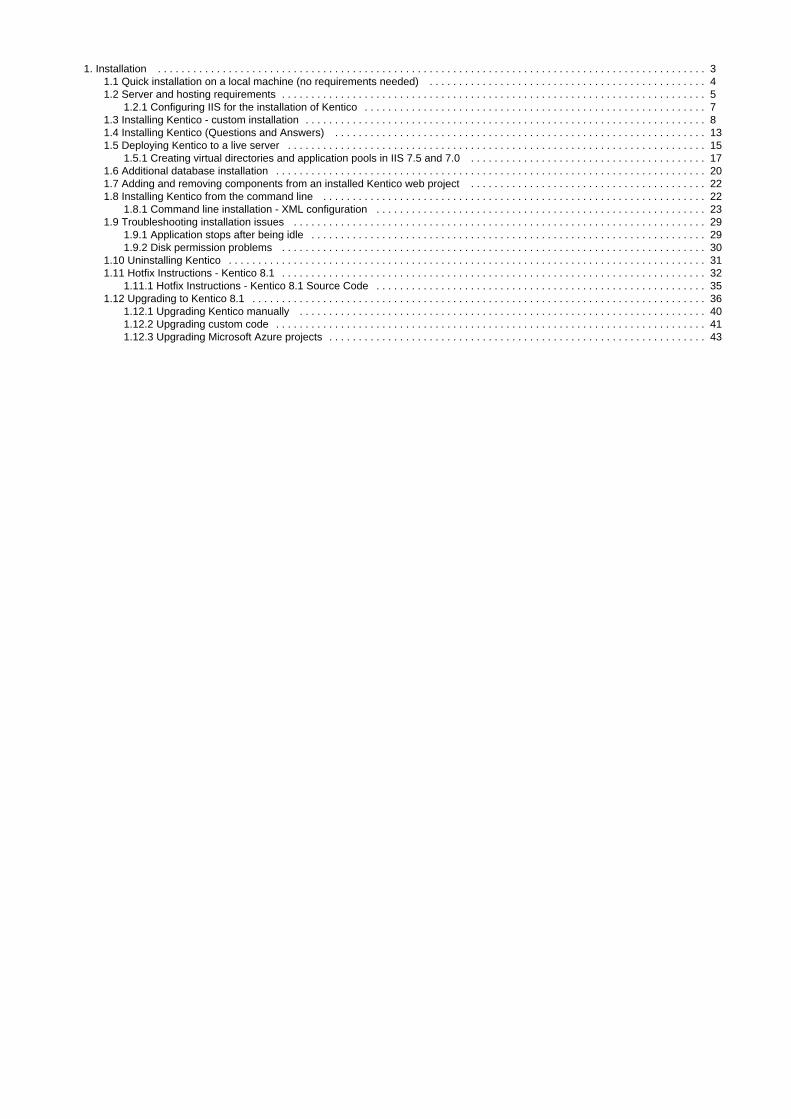
InstallationTo install Kentico, run the file, which opens the :Kentico_8_1.exe Kentico Installer
Installing Kentico
Where to get more information?To learn how to develop websites, see .Kentico 8.1 Tutorial
You can also visit our portal for developers with blogs, forums, knowledge base and other documentation material at .DevNet
If you need advice on how to use Kentico, feel free to write to The support team operates non-stop and will be [email protected] help you.
Evaluation
You can begin by using the button.installing Kentico for evaluation purposes Quick installation
Local installation
Check if your development server meets the recommended configuration.
Install Kentico on your local computer with your own preferred settings using the button. If you come across anyCustom installationdifficulties with selecting the right options, see for recommendations.Installing Kentico (Q&A)
Remote installation
Check if your development server meets the recommended configuration.
Develop your website on a remote server or set up a production environment. You will find detailed procedures for this type ofinstallation in the section.Deploying Kentico to a live server

1. 2.
3.
Quick installation on a local machine (no requirements needed)This type of installation is the quickest way of installing Kentico on your machine. The only prerequisites you will need are:
The operating system: Windows Vista Home Premium/Business/Enterprise/Ultimate, Windows 7 (both 32bit and 64bit) or Windows 8(both 32bit and 64bit), or their corresponding server versions – Windows Server 2008, 2008 R2, 2012.Connection to the Internet.
Quick installation
All you need to do is:
On the home page of the Installer, agree to the license terms.Click .Quick installation
Choose a sample site you wish to install. We recommend the and the . These sites utilize andCorporate site E-commerce sitepresent most of the functionality Kentico provides, and are therefore best suited for evaluation purposes.

3.
4. Click .Install
The Kentico Installer now installs Kentico including everything else needed for it to run.
Default configuration of the quick installation
If you choose the Quick installation option, the installer installs and configures the following items:
.NET Framework 4.0Program files (in c:\Program Files (x86)\Kentico\8.1\)IIS Express (if you do not have installed already) with Integrated mode of the application pool andIIS and all required componentswith a virtual directory ( )http://localhost/Kentico8SQL server native clientSQL Server 2012 Express LocalDBDatabaseWeb application project (in c:\inetpub\wwwroot\Kentico81\)
Kentico core filesAll available modulesAll sample site templatesAll available spell checker dictionariesAll available UI Cultures
Your chosen sample sitesTrial license
Server and hosting requirements
Supported server-side configuration
We recommend that you install the following components on the computer where you want to run Kentico. If you do not install thesecomponents on your computer before installing Kentico, the Installer is capable of downloading and installing them or their suitablealternatives (except for the operating system and the built-in Visual Studio server) on its own. In such cases, your computer must beconnected to the Internet.
Windows 7 (both 32bit and 64bit) or Windows 8 (both 32bit and 64bit), or their corresponding server versions – Windows Server2008 R2, 2012, 2012 R2.Microsoft .NET Framework or newer.4.0Microsoft Internet Information Services (see the table below) or Visual Studio/Visual Web Developer 2012/2013 built-in web server.Depends on which server you choose to install your web project into.Microsoft SQL Server 2008, 2008 R2, 2012, 2014 (including free SQL Server Express Edition / / ).2008 2012 2014
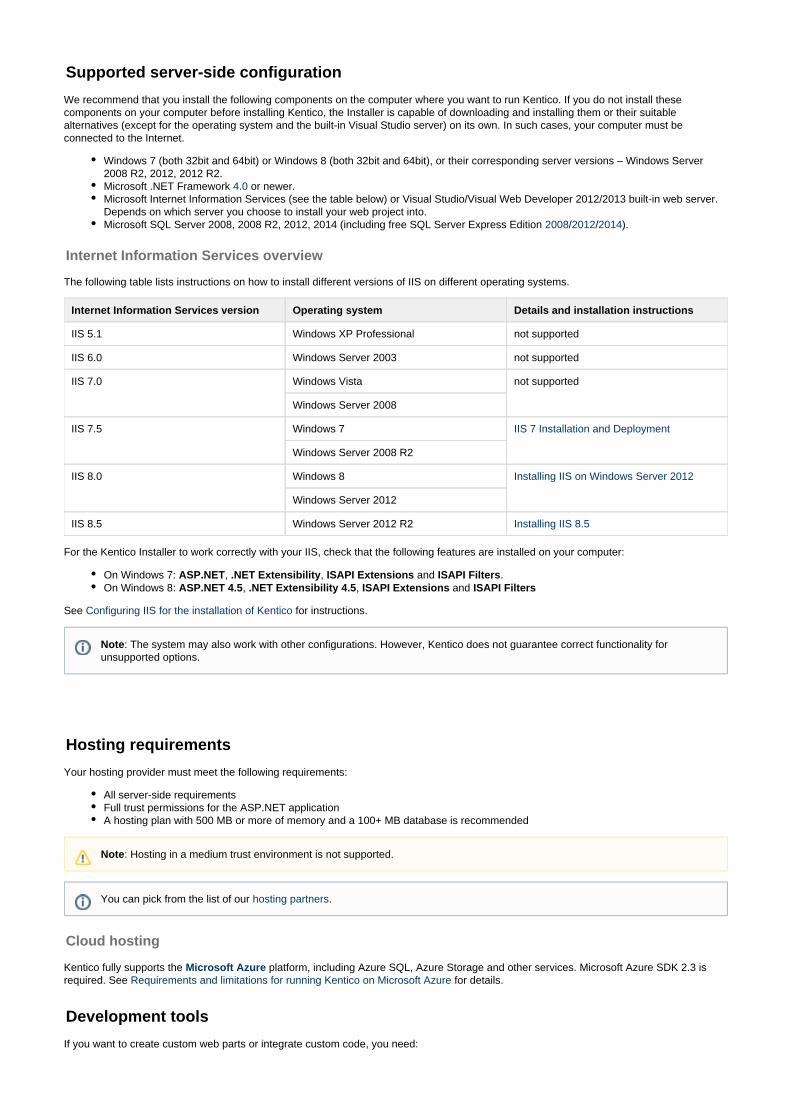
Internet Information Services overview
The following table lists instructions on how to install different versions of IIS on different operating systems.
Internet Information Services version Operating system Details and installation instructions
IIS 5.1 Windows XP Professional not supported
IIS 6.0 Windows Server 2003 not supported
IIS 7.0 Windows Vista not supported
Windows Server 2008
IIS 7.5 Windows 7 IIS 7 Installation and Deployment
Windows Server 2008 R2
IIS 8.0
Windows 8 Installing IIS on Windows Server 2012
Windows Server 2012
IIS 8.5 Windows Server 2012 R2 Installing IIS 8.5
For the Kentico Installer to work correctly with your IIS, check that the following features are installed on your computer:
On Windows 7: , , and . ASP.NET .NET Extensibility ISAPI Extensions ISAPI FiltersOn Windows 8: , , and ASP.NET 4.5 .NET Extensibility 4.5 ISAPI Extensions ISAPI Filters
See for instructions.Configuring IIS for the installation of Kentico
Hosting requirements
Your hosting provider must meet the following requirements:
All server-side requirementsFull trust permissions for the ASP.NET applicationA hosting plan with 500 MB or more of memory and a 100+ MB database is recommended
Cloud hosting
Kentico fully supports the platform, including Azure SQL, Azure Storage and other services. Microsoft Azure SDK 2.3 isMicrosoft Azurerequired. See for details.Requirements and limitations for running Kentico on Microsoft Azure
Development tools
If you want to create custom web parts or integrate custom code, you need:
Note: The system may also work with other configurations. However, Kentico does not guarantee correct functionality forunsupported options.
Note: Hosting in a medium trust environment is not supported.
You can pick from the list of our .hosting partners
1. 2. 3.
4.
5.
Visual Studio 2012/2013 or free Visual Studio Express for Web / .2012 Visual Studio Express 2013 for Web
Supported client browsers for the Kentico administration interface
Chrome 12+Internet Explorer 9+Firefox 4.0+Safari 4.0+ on Mac OS
We strongly recommend using the of the browsers. Older browsers , but may display simplifiedlatest versions remain fully functionalrenderings of certain components.
Supported client browsers for site visitors
Chrome 12+Internet Explorer 7+Firefox 1.0.5+Opera 7.52+Mozilla 1.7.1+Safari on Mac OSMobile browsers are supported, but some features may be limited by browser capabilities
Older browsers may need slight adjustments to the site's stylesheet to ensure that all functionality is displayed correctly.
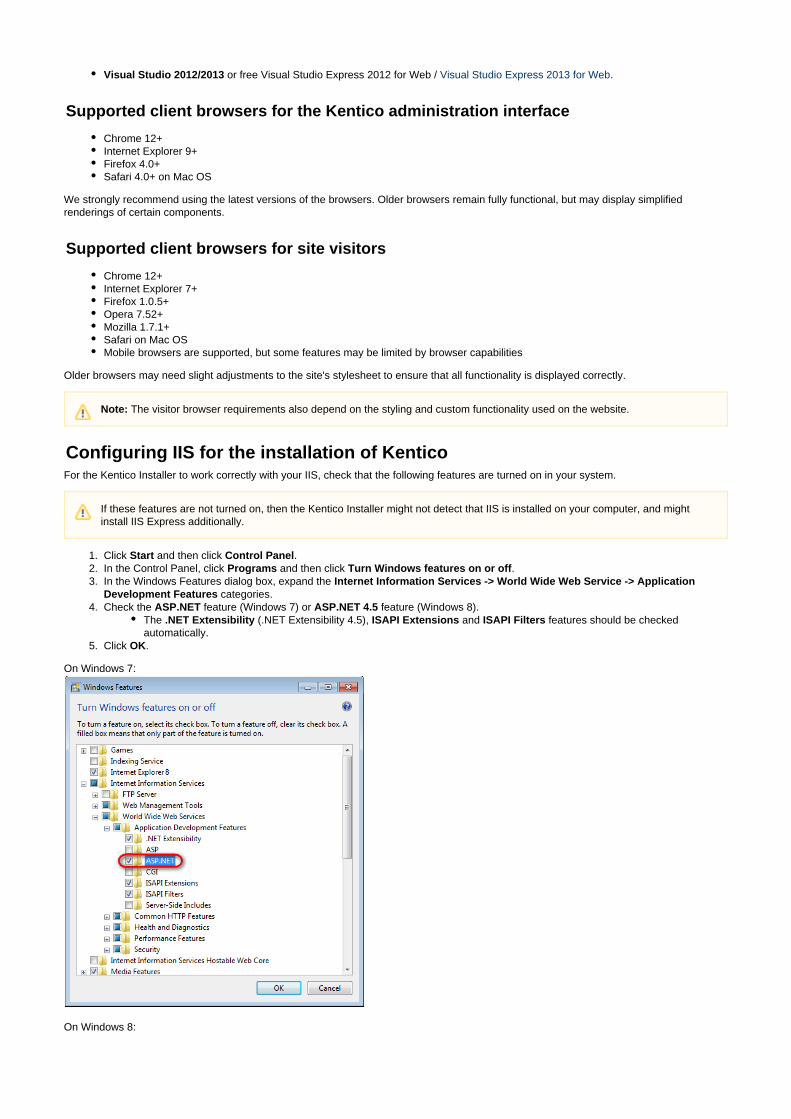
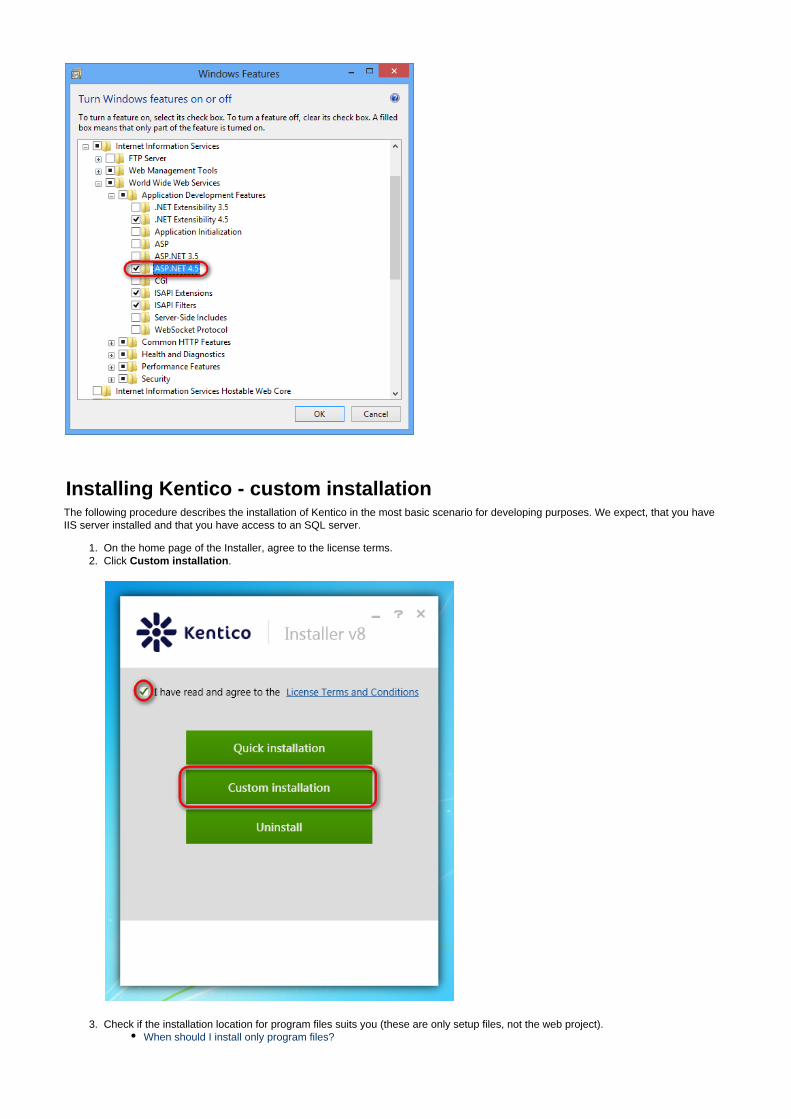
Configuring IIS for the installation of KenticoFor the Kentico Installer to work correctly with your IIS, check that the following features are turned on in your system.
Click and then click .Start Control PanelIn the Control Panel, click and then click .Programs Turn Windows features on or offIn the Windows Features dialog box, expand the Internet Information Services -> World Wide Web Service -> Application
categories.Development FeaturesCheck the feature (Windows 7) or feature (Windows 8).ASP.NET ASP.NET 4.5
The (.NET Extensibility 4.5), and features should be checked.NET Extensibility ISAPI Extensions ISAPI Filtersautomatically.
Click .OK
On Windows 7:
On Windows 8:
Note: The visitor browser requirements also depend on the styling and custom functionality used on the website.
If these features are not turned on, then the Kentico Installer might not detect that IIS is installed on your computer, and mightinstall IIS Express additionally.
1. 2.
3.
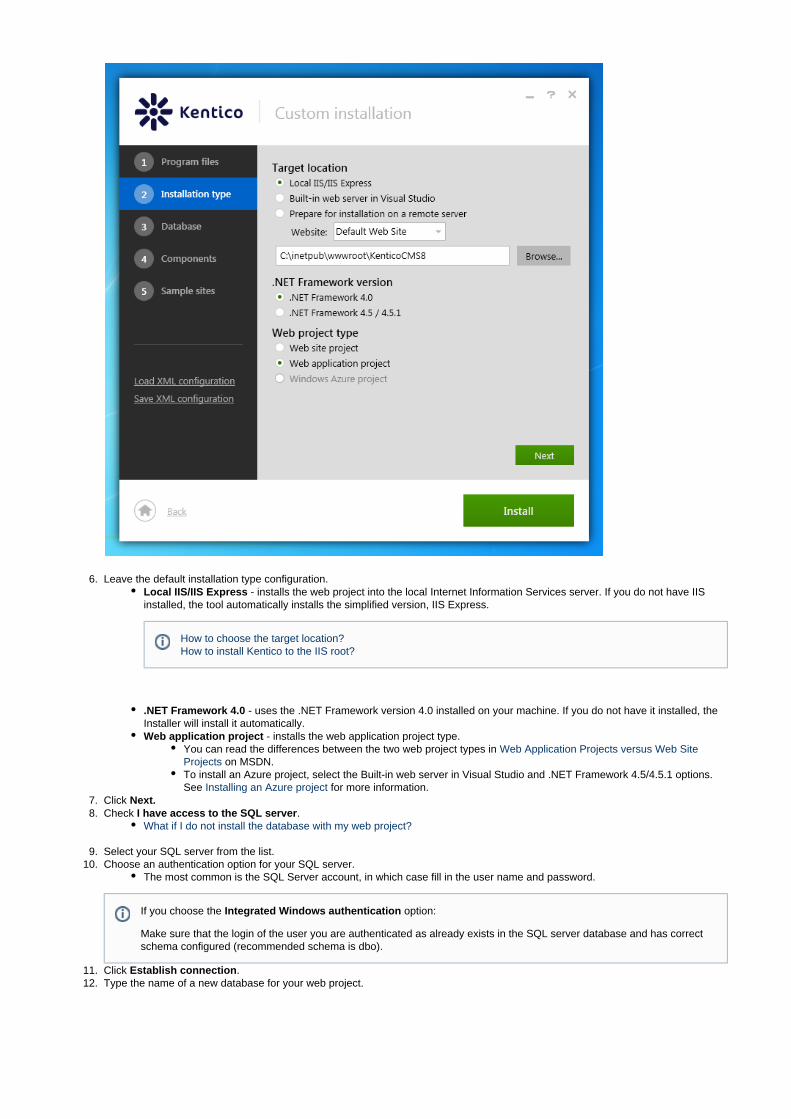
Installing Kentico - custom installationThe following procedure describes the installation of Kentico in the most basic scenario for developing purposes. We expect, that you haveIIS server installed and that you have access to an SQL server.
On the home page of the Installer, agree to the license terms.Click .Custom installation
Check if the installation location for program files suits you (these are only setup files, not the web project).When should I install only program files?

3.
4. 5.
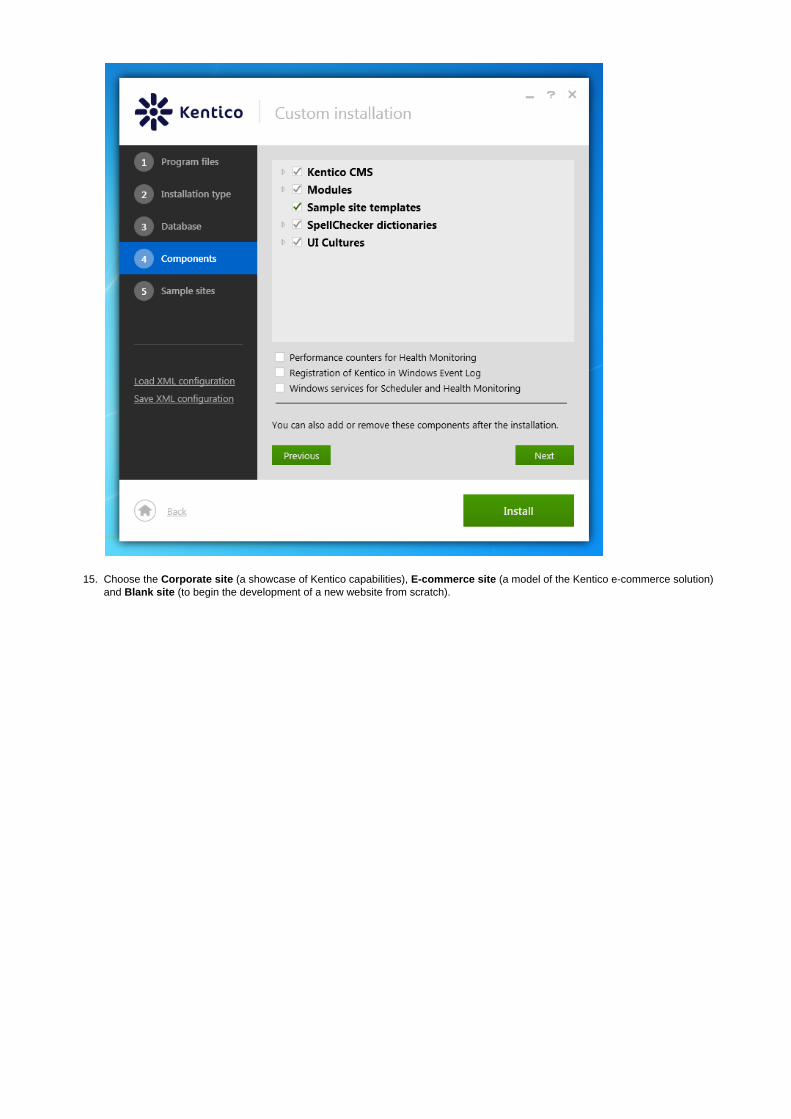
Click .NextCheck if the installation location for your web project suits you (the default path is ).C:\inetpub\wwwroot\Kentico81
5.
6.
7. 8.
9. 10.
11. 12.
Leave the default installation type configuration.Local IIS/IIS Express - installs the web project into the local server. If you do not have IISInternet Information Servicesinstalled, the tool automatically installs the simplified version, IIS Express.
.NET Framework 4.0 - uses the .NET Framework version 4.0 installed on your machine. If you do not have it installed, theInstaller will install it automatically.Web application project - installs the web application project type.
You can read the differences between the two web project types in Web Application Projects versus Web Site on MSDN.Projects
To install an Azure project, select the Built-in web server in Visual Studio and .NET Framework 4.5/4.5.1 options.See for more information.Installing an Azure project
Click Next.Check . I have access to the SQL server
What if I do not install the database with my web project?
Select your SQL server from the list.Choose an authentication option for your SQL server.
The most common is the SQL Server account, in which case fill in the user name and password.
Click .Establish connectionType the name of a new database for your web project.
How to choose the target location?How to install Kentico to the IIS root?
If you choose the option:Integrated Windows authentication
Make sure that the login of the user you are authenticated as already exists in the SQL server database and has correctschema configured (recommended schema is ).dbo

12.
13. 14.
Click .NextLeave the default configuration of components (all components included) and click .Next
What are performance counters for Health MonitoringWhat are Windows services for Scheduler and Health Monitoring
14.
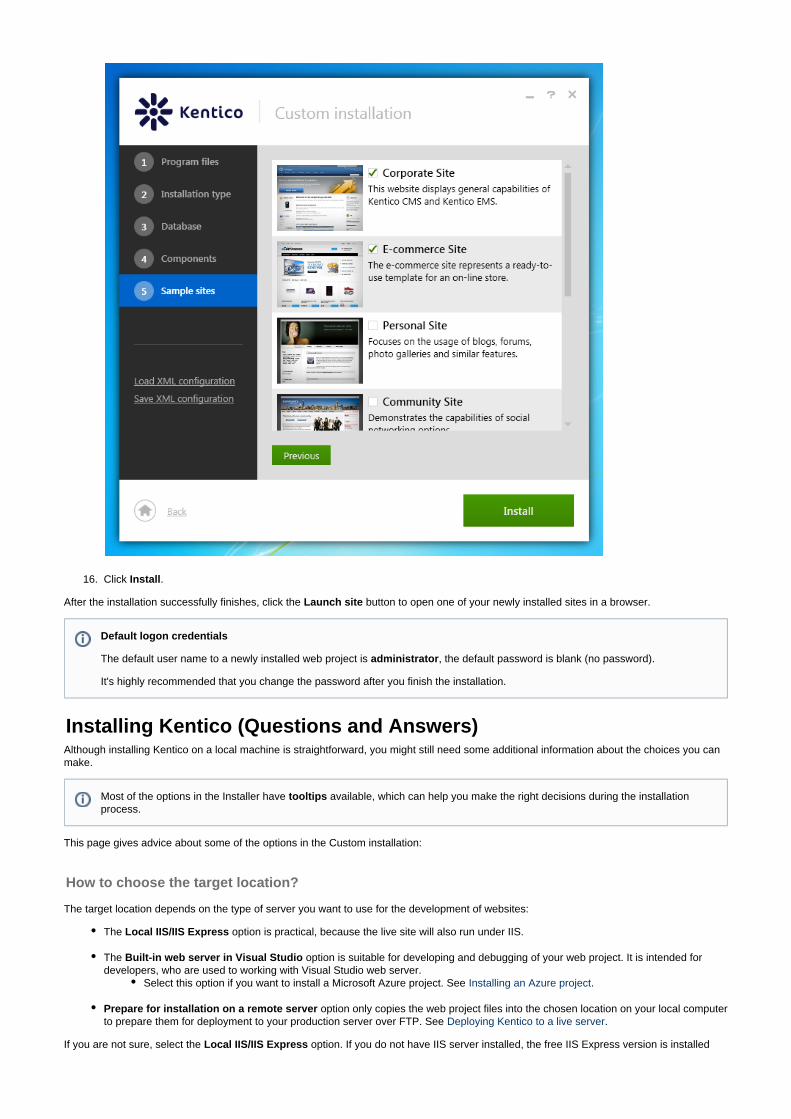
15. Choose the (a showcase of Kentico capabilities), (a model of the Kentico e-commerce solution)Corporate site E-commerce siteand (to begin the development of a new website from scratch).Blank site
15.
16. Click .Install
After the installation successfully finishes, click the button to open one of your newly installed sites in a browser.Launch site
Installing Kentico (Questions and Answers)Although installing Kentico on a local machine is straightforward, you might still need some additional information about the choices you canmake.
This page gives advice about some of the options in the Custom installation:
How to choose the target location?
The target location depends on the type of server you want to use for the development of websites:
The option is practical, because the live site will also run under IIS.Local IIS/IIS Express
The option is suitable for developing and debugging of your web project. It is intended forBuilt-in web server in Visual Studiodevelopers, who are used to working with Visual Studio web server.
Select this option if you want to install a Microsoft Azure project. See .Installing an Azure project
Prepare for installation on a remote server option only copies the web project files into the chosen location on your local computerto prepare them for deployment to your production server over FTP. See .Deploying Kentico to a live server
If you are not sure, select the option. If you do not have IIS server installed, the free IIS Express version is installedLocal IIS/IIS Express
Default logon credentials
The default user name to a newly installed web project is , the default password is blank (no password).administrator
It's highly recommended that you change the password after you finish the installation.
Most of the options in the Installer have available, which can help you make the right decisions during the installationtooltipsprocess.

1. 2. 3.
automatically for you.
How to install Kentico to the root of a website?
If you wish to run Kentico in the root of an IIS website:
Perform a standard installation of Kentico to a virtual directory.Develop the project inside the virtual directory.Deploy the project to the root of your IIS website. You can choose one of the following approaches:
Use the feature of the utility (recommended, only available for projects)Deploy to Kentico Installation Manager web site Directly copy the content of the project's folder to the rootCMS (for example, )C:\inetpub\wwwroot\Kentico81\CMS
Note: You will not be able to compile the deployed project.
You can find more information about virtual directories in this article: .Understanding Sites, Applications, and Virtual Directories on IIS 7
Which web project type to choose?
Each project type has certain pros and cons. You should consider them carefully before creating your project, as it is quite difficult to convertone project type to another.
Please read the article to learn about the differences between WebWeb Application Projects versus Web Site Projects in Visual Studioapplication projects and Web site projects.
To learn more about the requirements for installing projects, see Microsoft Azure Requirements and limitations for running Kentico on.Microsoft Azure
When should I install only program files?
The Kentico program files contain the external utilities (Kentico Installation Manager, Kentico Service Manager, etc.) and are needed to installweb projects on your computer. The installation of program files is separated from the rest, so you can install only the program files if you donot want to install the web project, database and website at the same time. When you run the Installer again, you do not have to install theprogram files and can install a new web project without delays.
You can also uninstall the program files or move them to a different location:
For uninstalling, use the option of the installer. Uninstall -> Remove only Kentico program filesFor moving the program files, uninstall them first and then use the Custom installation -> Program files -> Install only program
option to install them again in a different location.files
What if I do not install the database with my web project?
Without the database, your web project cannot function at all. If you do not install the database during the installation process, you canalways install it later. You only have to access any page of your web project in a browser and the system opens the database installationwizard (see ).Additional database installation
If you do not have any SQL server available during the installation process, consider checking only the option. InInstallation with databasethis case, the free SQL Server 2012 Express LocalDB will be installed automatically for you.
How can I access my LocalDB database through Microsoft SQL Server Management Studio?
Use the server name. The database files (Kentico8.mdf, Kentico8_log.ldf) are physically stored in your user's profile (e.g.,(localdb)\KenticoC:\Users\Andy\).
What are Windows services for Scheduler and Health Monitoring?
You can install the following Windows services to further improve the performance of your Kentico web project:
The Health Monitoring service - some performance counters require database access for collecting values, which can slow down thehealth monitoring process. By using this Windows service, you can improve the performance of . You can also useHealth Monitoringthis service to additionally register performance counters.The Scheduler service - allows you to improve the performance of .scheduled tasks
You can also install and uninstall these services separately after the installation using the .Kentico Service Manager
What are performance counters for Health Monitoring?
Performance counters collect information about the performance of a Kentico web project. If you let the Installer register the performance
The option is available only during the first installation of Kentico or after you uninstall the program filesInstall only program filesusing the Installer.

1. 2. 3.
1. 2.
1. 2. 3. 4.
5.
counters in Windows, you will be able to use the data they provide to determine weak spots and bottlenecks of your web project.
However, Kentico does not provide means for displaying the performance information and you need to use an external application for thispurpose (for example the ). See the chapter for more information about monitoring theWindows Performance Monitor Health monitoringperformance of your system.
Can I install and uninstall modules or other components after the installation of my web project?
Yes, using the option of the Installer. See for moreModify Adding and removing components from an installed Kentico web projectinformation.
Which sample site should I install?
If you want to evaluate the capabilities of Kentico or if you are new to the Kentico system, choose the or the Corporate site E-commerce.site
For development, we recommend the , which is best suited for developing websites form scratch. However, you can also installBlank Siteone of the preconfigured sample sites and then adjust them accordingly.
If you want to install sample sites after the installation, use the . Keep in mind, though, that you must have the Sample siteNew site wizardtemplates installed (you can add these templates additionally using the Modify option of the Installer).
Saving the XML configuration
If you save the configuration of an installation into an XML file, you can load it the next time you need to install Kentico on a computer. Youcan also use the XML file to install Kentico through the command line. See the topic and the Installing Kentico from the command line Comm
, where you can also learn how to adjust the XML file manually.and line installation - XML configuration
Can I run the Installer if I accidentally delete the file?Kentico_8_1.exe
Yes, you can find the Installer in Windows Start -> All programs -> Kentico 8.1 -> Kentico Installer 8.1. If you run the Installer this way though,you will not be able to uninstall the Kentico program files.
To run the Kentico Installer with all options:
Open Windows Start -> All programs -> Kentico 8.1 -> Uninstall Kentico 8.1.Select Kentico 8.1 in the Programs and Features list.Click Change.
The Windows system opens full Kentico Installer.
I can't open my site in the browser
If your browser shows the 404 error after trying to open a site, try to open the site from the Windows Start menu:
Click Start -> All Programs -> Kentico 8.1 -> Sites -> your site
If you have installed a site with a LocalDB or IIS Express, then it may happen that these applications are not run automatically after yourestart Windows. In this case, open the site from the Start menu, which ensures that these applications are started properly.
Where can I find the installation log?
The path to the log is or the location of the program files.C:\Program Files (x86)\Kentico\8.1\
Where can I get more information?
You can contact our support department, which will gladly help you at [email protected]
Deploying Kentico to a live serverWhen you need to deploy a Kentico website to a remote hosting server, install Kentico on the server and then import your website to theinstallation:
Install Kentico on a remote server Deploy an already developed website to a live server
Installing Kentico on a remote server
To install Kentico on a remote server:
Run the Kentico Installer on your development computer.localCheck the license agreement and select the option.Custom installationSwitch to the tab.Installation typeSelect .Prepare for installation on a remote server

5. 6.
7.
8.
1. 2.
3. 4.
5.
6.
Choose a folder for the project files (for example, C:\Temp\Kentico).Select the .NET Framework version of the remote server.
Click .InstallThe Installer copies the project files to the specified folder.
Copy the web project files from your local folder (C:\Temp\Kentico) to the root of the website using FTP. If you want to use a sub-folder, .create a new virtual directory
Kentico is now installed on your remote server. Continue to the next section to deploy a website to the server.
Deploying a website to a live server
After you have installed Kentico on a live server, you can import an already developed website:
Open the application on your local development computer and click ( ) next to the site that you want to deploy. Sites Export siteEnter the name of the export package and go through the .site export wizard
The system saves the export package into the folder.<web project>\CMS\CMSSiteUtils\ExportCopy the exported package into the folder on the .<web project>\CMS\CMSSiteUtils\Import live serverOpen a web browser and navigate to the /default.aspx page of your live server.
The starts up.Database Setup wizardGo through the wizard and create a new Kentico database on your live server.
At the end of the process, you may be asked to update your web.config file manually – please follow the instructions on thescreen.
At the end of the Database Setup Wizard, choose to import your existing Kentico website (from the previously exported package).
The system imports the existing website.
1.
2.
3.
After you have imported the website, you may need to adjust its configuration:
Open the application. Edit the website and make sure the website domain and domain aliases are configuredSitescorrectly for the production domains.Open the application and make sure your site settings contain correct values, especially the valueSettings SMTP serverin the section.System -> E-mails
Open the application. Click ( ) next to your new site and make sure the website is displayedSites Open live sitecorrectly.

Creating virtual directories and application pools in IIS 7.5 and 7.0If you need to install Kentico manually on a remote server or restore it from a backup and, at the same time, you run Kentico in a sub-folder(in contrast to running Kentico in the root of the website), you need to create a new virtual directory for the folder where you have the webproject files.
Creating a virtual directory in IIS 7.5 and 7.0
Since IIS 7, there exists a separate concept for a and an .virtual directory application
You can map a virtual directory to a physical directory that is located on a local or a remote computer. The physical directory (underthe specified name of the virtual directory) then becomes part of the application's URL.An application, on the other hand, is a group of files that provides services over protocols. So if you want to run your website as http:
, you have to and specify KenticoCMSDemo as the//localhost/KenticoCMSDemo use an application instead of a virtual directoryapplication's alias.
To create a virtual directory:
1. Open IIS Manager
On Windows 7: Open category Start -> Control Panel -> System and Security -> Administrative Tools -> Internet Information.Services (IIS) Manager
On Windows Server 2008 or Windows Vista: Open category Start -> Control Panel -> System and Maintenance -> .Administrative Tools -> Internet Information Services (IIS) Manager
2. Expand right-click on (or other website if you're running multiple websites on the samelocal computer -> Sites -> Default Web Sitecomputer) and choose Add Virtual Directory...
An dialog appears. Add Virtual Directory
3. Enter the Virtual Directory . If you want the website to run as , enter alias .Alias http://localhost/KenticoCMSDemo KenticoCMSDemo
4. Type a path or browse to the physical directory that contains the chosen directory.
Application rootThe root of the website or the virtual directory must be the same as the folder that contains the file of Kentico. Thisweb.configfolder is called .application root
You can find more information about virtual directories in .Understanding Sites, Applications, and Virtual Directories on IIS 7

5. Click .OK
The system creates a new virtual directory.
6. Right-click the virtual directory and choose .Convert to Application
An appears.Add Application dialog
7.Click and choose the application pool from the drop-down menu.Select... ASP.NET v4.0
8. Click .OK
The system converts the virtual directory to an application.
Alternatively, you can create an application in one step by right-clicking a web site and choosing and filling the requiredAdd Application...information in the dialog as mentioned above.Add Application
Configuring application pools in IIS 7 and IIS 7.5
Application Pools provide you with additional level of website management. They are supported only by Windows Server 2003/2008/Vista/7.You can configure them in the under Internet Information Services (IIS) Manager local computer -> Application Pools.
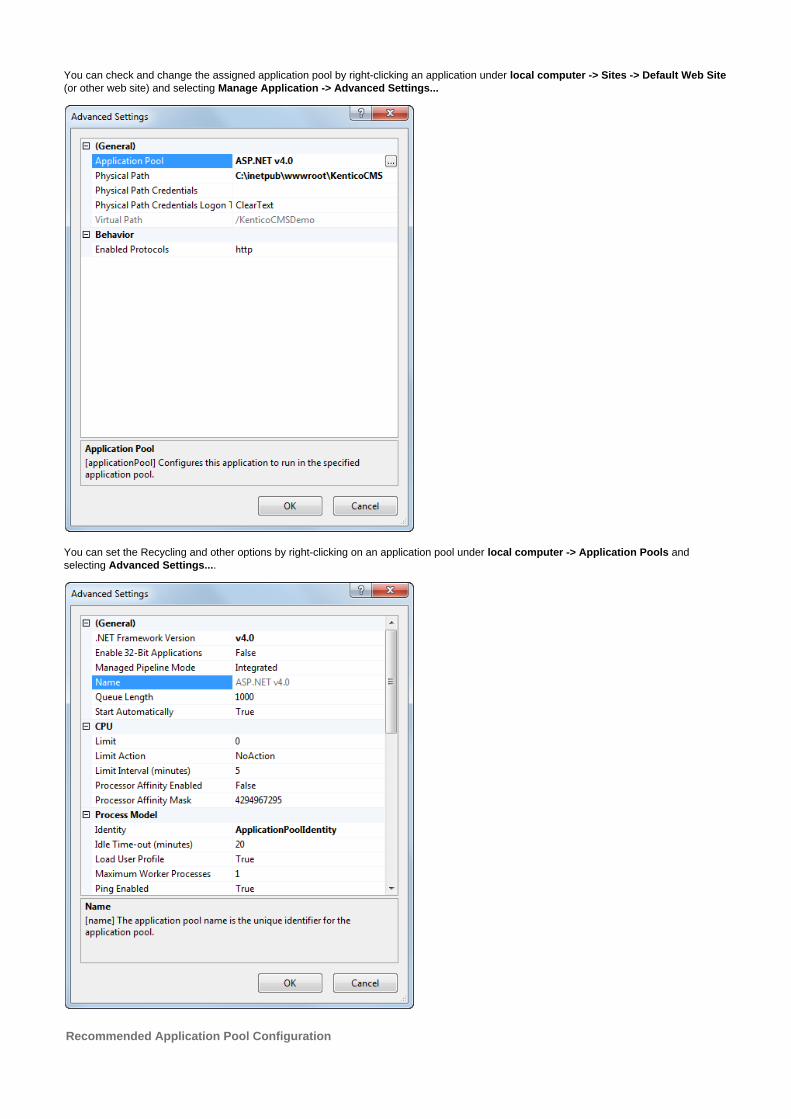
You can check and change the assigned application pool by right-clicking an application under local computer -> Sites -> Default Web Site(or other web site) and selecting Manage Application -> Advanced Settings...
You can set the Recycling and other options by right-clicking on an application pool under andlocal computer -> Application Poolsselecting .Advanced Settings...
Recommended Application Pool Configuration

It's highly recommended that you run Kentico in a separate application pool. If you share the pool with other websites, the systemmay behave unpredictably.We do not recommend to run multiple websites in a single pool.It's recommended that you specify some value in the processes on the tab. This value shouldn't be tooRecycle worker Recyclingshort (less than ) or too long (more than /1 day). Setting this value ensures that the 60 minutes 1440 minutes memory is recycled
by regular restart. time to time, you canand the application is automatically recovered from failures If your website freezestemporarily set the value to 30 minutes to ensure that the website is restarted automatically. may lead to high serverShort intervalsload and slow response since after each recycling, the application needs to be restarted and data reloaded to the cache.It's recommended that you . If you need to use some value, use do not limit the maximum virtual or used memory at least 100
. If your website is being , it may be caused by low maximum memory limit. You can check the frequency ofMB restarted too oftenapplication restarts in Kentico .Event logThe on the tab must be set to 1. If you set a higher value, the workerMaximum number of worker processes Performance processes will not be synchronized and Kentico website will not work correctly. This may lead to unexpected caching of content
.and system objectsYou can configure the under which the application runs on the tab. This information is useful if you need touser account Identitytroubleshoot issues with , such as disk write permissions.permissionsKentico . Therefore, the has to be set to .does not support Web garden Maximum number of worker processes 1
Additional database installationIf you chose not to install the database during the installation process, you can install it later. To trigger the database installation, access anypage of your web project in a browser. The system will redirect you to the database installation wizard.
Step 1 - SQL Server and Authentication Mode
Specify the SQL Server and authentication mode used to access the server:
SQL Server name or IP address - enter the name of the server. You will typically use one of these:the name of the server (such as DBSERVER1)the IP address of the server (such as 192.168.1.105)(local) (if you're using Microsoft SQL Server Express Edition)<SERVERNAME>\sqlexpress
Use SQL Server account - use this option if your server is configured for with SQL logins.SQL Server AuthenticationUse integrated Windows authentication (ASP.NET account) - use this option if your SQL Server is configured for Windowsintegrated authentication. In this case, you need to use SQL Server Management Studio to create a new login for user accountunder which you currently run the web application (for example, the for Windows 7 - theNT AUTHORITY\NETWORK SERVICEactual ASP.NET account name is displayed on the screen).
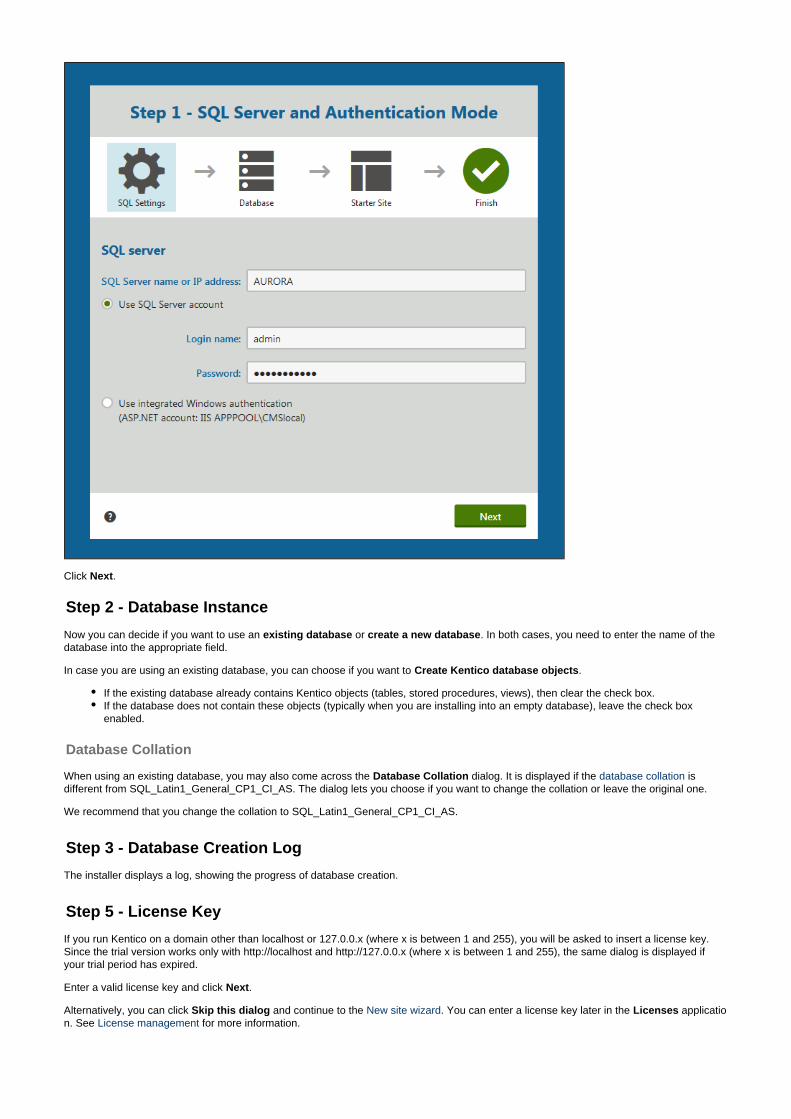
Click .Next
Step 2 - Database Instance
Now you can decide if you want to use an or . In both cases, you need to enter the name of theexisting database create a new databasedatabase into the appropriate field.
In case you are using an existing database, you can choose if you want to .Create Kentico database objects
If the existing database already contains Kentico objects (tables, stored procedures, views), then clear the check box.If the database does not contain these objects (typically when you are installing into an empty database), leave the check boxenabled.
Database Collation
When using an existing database, you may also come across the dialog. It is displayed if the isDatabase Collation database collationdifferent from . The dialog lets you choose if you want to change the collation or leave the original one.SQL_Latin1_General_CP1_CI_AS
We recommend that you change the collation to .SQL_Latin1_General_CP1_CI_AS
Step 3 - Database Creation Log
The installer displays a log, showing the progress of database creation.
Step 5 - License Key
If you run Kentico on a domain other than or (where is between 1 and 255), you will be asked to insert a license key.localhost 127.0.0.x xSince the trial version works only with and (where is between 1 and 255), the same dialog is displayed ifhttp://localhost http://127.0.0.x xyour trial period has expired.
Enter a valid license key and click .Next
Alternatively, you can click and continue to the . You can enter a license key later in the applicatioSkip this dialog New site wizard Licensesn. See for more information.License management
1. 2. 3.
4. 5. 6.
Step 6 - Starter Site
The installer offers you the following options:
Choose a starter site - select this option if you want to install a site that demonstrates the capabilities of Kentico.Continue to the New site wizard - this option is recommended if you're starting a new site from scratch; learn more in the New site
chapter.wizardImport existing Kentico website - use this option if you have already created an export package with a website and you need toimport it into a new installation (e.g., on the production server).
If you're new to Kentico, it's highly recommended that you start with the sample Corporate Site.
Step 7 - Starter Site Creation Log
The installer displays a log showing the progress of website creation.
Step 8 - Finished
Once the website is created, the installer displays a confirmation and you can follow the link to access the new live website.
This is the final step of the necessary installation procedure.
Further reading
Using the Kentico interfaceDefining website data structureLoading and displaying data on websitesManaging website content
Adding and removing components from an installed Kentico webprojectAfter you have installed Kentico web project using the Quick installation or the Custom installation, you can additionally modify itscomponents using the Installer. You can add components which you did not install or you can remove components which you no longerneed.
Adding and removing components after the installation
Run the Installer from Windows .Start -> All programs -> Kentico 8.1 -> Kentico Installer 8.1 On the home page of the Installer, click .Modify Select the web project you want to modify.
Either select an already registered project from the list or select any other folder containing a web project of Kentico 8.1using the button.Select another
Check the components you want to install and uncheck the components you want to uninstall. You can also additionally install Windows services or register performance counters or event logging.Click .Apply changes
The Installer now installs and uninstalls components according to your specification.
Installing Kentico from the command lineYou can install Kentico from the command line without any user interface and user interaction involved using the . TheKentico Installercommand line installation also allows you to modify an existing installation and add or remove components contained in this installation. Youwill need to prepare a configuration XML file and execute a command from the command line with this XML file as a parameter.
Default user name and password
The default user name is , the default password is blank.administrator
It's highly recommended that you after you finish the installation.change the password
The default URL of your site is: http://localhost/Kentico
The default URL of the administration interface is: http://localhost/Kentico/Admin.
Learn how to navigate the user interface
You can find more information about the and Register performance counters for Health Monitoring Install Windows services options in .for Scheduler and Health Monitoring Installing Kentico (Questions and Answers)

1.
2. 3.
The main purpose of the command line installation is the possibility of automated installation and modification of Kentico.
The command line installation is capable of substituting the whole procedure including the installation of:
the program files,new web project and IIS configuration,new database on your SQL server,sample websites based on available web templates.
Command line installation procedure
Create an XML configuration file during the custom installation process using the link. This way, you canSave XML configurationcomfortably set all the options you need in the Installer UI and the XML file will be generated automatically for you.
You can also create the XML file according to the .specifications
Move the XML file to the folder containing Kentico Installer (Kentico<version>.exe).Execute a command with the syntax in the folder:Kentico<version>.exe <configuration XML file name>.xml
Kentico_8_0.exe KenticoInstallationProfile.xml
The installation will be executed and carried out according to the configuration in the XML file.
Command line installation - XML configurationThis topic provides reference on the format of the XML file used as a source of configuration for the command line installation.
You can create the XML file from scratch or during the installation procedure using the link.Save XML configuration
Boolean attribute values
You can enter the boolean attribute values in these ways:
True value False value Usability
true false currently used
Yes No obsolete
1 0 obsolete
All of these values are recognized as the respective boolean values at the moment. Keep in mind though, that in future versions, we willgradually stop supporting the and values.No/Yes 1/0
Supported macros in attribute values
You can use macros in the following XML attributes to get the respective values dynamically:
SilentInstall -> LogFileSetup -> SetupFolderIIS -> TargetFolderSQL -> Database
Macro expression Description Sample resolved value
{%productversion%} Kentico version number according to Sema.ntic Versioning
8.0.0-alpha
{%fileversion%} Full version number of the installed Kenticoversion.
8.0.5191.17572
{%programfiles%} Path to the folder on yourProgram Fileslocal drive.
c:\Program Files (x86)\
The log file
If the command line Installation crashes without explanation, try searching for the log file in the default locations: C:\Program Files or the Installer folder.(x86)\Kentico\8.0\
{%machine%} Name of the current machine. PC01
{%username%} User name of the currently used account. Andy
{%date%} Current date in format .yyyy-mm-dd 2014-01-21
{%time%} Current time in format .hh-mm-ss 14-53-23
Note that these macros are completely independent of standard Kentico macros that can be used in the system's user interface.
SilentInstall XML element
The root element of the XML file is . Using the attributes of this element, you can configure general options of the installation:SilentInstall
Attribute name Description Accepted values Required?
ShowProgress Determines if the Silent Installtool displays the progress of theinstallation or not.
No - the progress is notshown.CommandPrompt - theprogress is shown in thecommand line.
No | CommandPrompt Yes
Log Enables logging of importprogress to a file.
true | false Yes
OnError Determines the action the toolperforms when an error occursduring the installation.
Stop | Continue Yes
LogFile File where the log is saved. Thedefault value is <installation
.path>\setup.log
full path to a file Yes
CheckRequirements Indicates, if the tool checkswhether the correct .NETversion is installed on the targetmachine before executing theinstallation. If the installed .NETversion is not matching, theinstallation is aborted.
true | false No
Setup XML element
The first sub-element that should be present under is . This element allows you to configure the general options by meansSilentInstall Setupof attributes:
Attribute name Description Accepted values Required?
NET .NET version installed on thetarget machine.
4.0 | 4.5 Yes
SetupFolder Folder where the tool installsthe Kentico setup files (not theweb project).
full path to a folder Yes

Location Determines where will the toolinstall the web files:
Local - on a local IISserver.VisualStudio - on abuild-in server which isincluded in Visual Studio orVisual Web DeveloperExpress Edition.Remote - copies the filesinto a temporary folder onyour disk. You will need tocopy these files to yourproduction server.Modify - modifies anexisting installation (addsor removes components)on a local machine.
See forInstalling Kentico (Q&A)more details.
Local | VisualStudio | Remote |Modify
Yes
WebProject Determines if the project isinstalled as an ASP.NET website, ASP.NET web application,or as a Microsoft Azure project.
WebSite | WebApplication |WindowsAzure
No
OpenAfterInstall Indicates, if the tool opens thenewly installed website in a newbrowser window when theinstallation finishes.
true | false No
RegisterCounters Indicates, if performancecounters for Health Monitoringshould be registered.
true | false No
InstallWinServices Indicates, if the tool installsKentico Windows services inWindows.
true | false No
RegisterApplicationToEventLog Indicates, if the tool registersthe Kentico application inWindows Event Log.
true | false No
DeleteExisting Indicates, if the the tool deletesthe existing setup files in afolder with the same name asset in the attribute.SetupFolder
true | false No
KillRunningProcesses If the tool deletes existing setupfiles, this parameter indicates, ifit can also kill already runningprocesses related to these files.
true | false No
InstallOnlyProgramFiles Indicates, if only the programfiles should be installed. Thisoption ignores all other settings.
true | false No
DoNotOverwriteInstallation If set to , then the files offalsethe existing installation will beoverwritten. The default value is
(do not overwrite).true
true | false No
IIS XML element
The sub-element is also located directly under . Its attributes allow you to adjust IIS-related settings of the installation:IIS SilentInstall
Attribute name Description Accepted values Required?
WebSite Name of the website in IIS. string value Yes
TargetFolder Path to the folder where IISwebsites are stored (typically C:
).\Inetpub\wwwroot\
full path to a folder Yes
DeleteExisting Indicates, if the the tool deletesan existing website with thesame name as set in the WebSi
attribute.te
GetUnique - if a websitewith the same name exists,the tool will not delete itand it will create a newwebsite folder with asimilar name.
true | false | GetUnique No
KillRunningProcesses If the tool deletes existingwebsites, this parameterindicates, if it can also killalready running processesrelated to these files.
true | false No
AllowISAPIAndCGI Indicates, if the tool shouldinstall ISAPI and CGIrestrictions in IIS, which arenecessary to run a webapplication in the Classicapplication pool mode.
true | false No
SQL XML element
The sub-element of the element allows you to configure database-related settings of the installation. This element is notSQL SilentInstallrequired and if you do not include it in your XML file, the database will not be installed.
Attribute name Description Accepted values Required?
InstallDatabase Indicates, if the tool will installthe database. If you do notinstall the database, you will notbe able to install sample sites (
element).WebSites
true | false No
Database Name of the target database. string value No
SqlName User name of the account usedfor access to the SQL server.
string value No
SqlPswd Password for the SQL serveraccount.
string value No
Server Name of the target SQL server. string value No
Operation Determines whether the toolcreates a new database ormodifies an existing one. Thedefault value is .New
New | Modify No
Authentication Type of the authentication usedto access the SQL server.
SQL | Windows No
DeleteExisting Indicates, if the tool deletes anexisting database with thesame name as set in the Datab
attribute.ase
GetUnique - if a databasewith the same name exists,the tool will not delete itand it will create a newdatabase with a similarname.
true | false | GetUnique No
Schema Our default database schema is. If you have a differentdbo
schema on your SQL server(e.g., db_owner), specify ithere, so that the installation toolcan make adjustments to thedatabase.
string value No
Notification XML element

The sub-element allows you to configure the automatic notification e-mail messages. The system sends them to the specifiedNotificatione-mail address when an error occurs during the installation.
Attribute name Description Accepted values Required?
Enabled Indicates, if the tool sendsnotification e-mails when anerror occurs during theinstallation.
true | false Yes
From E-mail address of the sender ofthe notification e-mail. Thisvalue is required in the Notificati
element.on
e-mail address Yes
To E-mail address of the recipientof the notification e-mail. Thisvalue is required in the Notificati
element.on
e-mail address (or multipleaddresses separated by asemicolon (;))
Yes
Server Name of the SMTP server usedto send out the notificatione-mail.
string value Yes
Subject Subject of the notification e-mailmessage.
string value Yes
UserName User name of the SMTP serveraccount used to send out thenotification e-mail.
string value No
Password Password for the SMTP serveraccount used to send out thenotification e-mail.
string value No
SSL Indicates, if SSL is used whensending the notification e-mail.
true | false No
AttachLogFile Indicates, if the tool includes acompressed installation log fileas an attachment.
true | false No
WebTemplates, UICultures, Modules and Dictionaries XML elements
The , , and elements allow you to configure which web templates, UI cultures, modules andWebTemplates UICultures Modules Dictionariesdictionaries will be installed by the tool. If you chose to modify an existing Kentico installation (by specifying the value for the Modify Locationattribute), you can also use these elements to add new components to the existing installation or to remove unwanted components.
Each of these elements only has a single attribute:
Attribute name Description Accepted values Required?
type InstallAll - the tool adds allcomponents of the type tothe installation. However,you can limit addedcomponents in thesub-elements by specifying
or in their No Remove oper attribute.ation
RemoveAll - the toolremoves all components ofthe type from theinstallation. However, youcan limit removedcomponents in thesub-elements by specifying
or in their No Add operatio attribute.n
Mix - only configuration inthe attribute ofoperationthe sub-elements will betaken into account.
Mix | InstallAll | RemoveAll Yes
Each of the , , and elements can have any number of sub-elements named , WebTemplates UICultures Modules Dictionaries WebTemplate UI
, or . These sub-elements represent particular web templates, UI cultures, modules or dictionaries and have theCulture Module Dictionaryfollowing attributes:
Attribute name Description Accepted values Required?
name Name of the web template, UIculture, module or dictionary.
string value Yes
operation The operation that should beperformed with the component:
Add - the component isadded to the installation.Remove - the componentis removed from theinstallation.No - no action is taken.
Add | Remove | No Yes
WebSites XML element
The element lets you configure which websites will be installed based on available web templates. It has no attributes itself – it onlyWebSitescontains sub-elements representing particular websites to be installed. Each sub-element has the following attributes:WebSite WebSite
Attribute name Description Accepted values Required?
domain Domain used by the website. string value Yes
displayname Name of the website used inKentico user interface.
string value Yes
webtemplatename Code name of the chosen webtemplate.
available web template codename
Yes
runsite Indicates, if the tool should runthe website after it is importedto the system.
true | false No
rebuildsearchindexes Indicates, if the search indexesshould be rebuilt after installingthe website.
true | false No
Licenses XML element
You can add any number of sub-elements under the element. These sub-elements represent particular licenses forLicense Licensesseparate domains. You should state the domain in the attribute and add the actual key as a sub-element wrapped in a CDATAdomainenclosure.
Example
Here you can find an example of the configuration file. The file configures installation of Kentico with the sample Corporate site website andall the available web templates, UI cultures, modules and dictionaries.
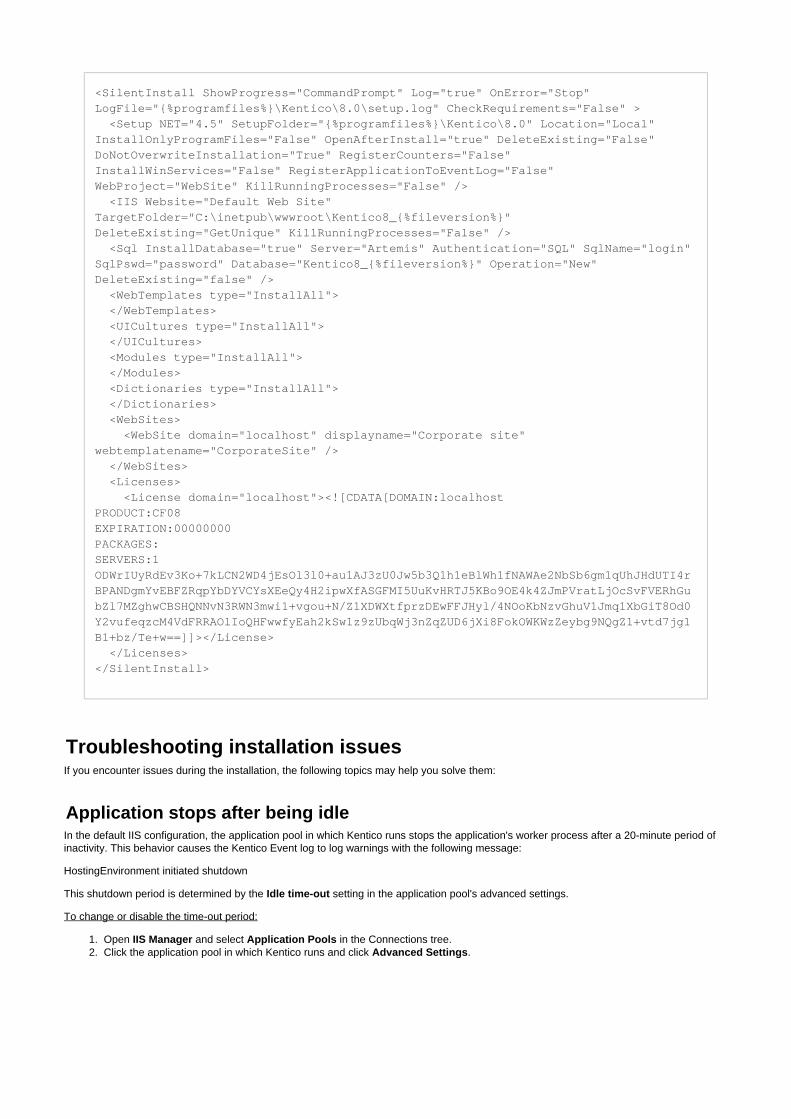
1. 2.
<SilentInstall ShowProgress="CommandPrompt" Log="true" OnError="Stop"LogFile="{%programfiles%}\Kentico\8.0\setup.log" CheckRequirements="False" > <Setup NET="4.5" SetupFolder="{%programfiles%}\Kentico\8.0" Location="Local"InstallOnlyProgramFiles="False" OpenAfterInstall="true" DeleteExisting="False"DoNotOverwriteInstallation="True" RegisterCounters="False"InstallWinServices="False" RegisterApplicationToEventLog="False"WebProject="WebSite" KillRunningProcesses="False" /> <IIS Website="Default Web Site"TargetFolder="C:\inetpub\wwwroot\Kentico8_{%fileversion%}"DeleteExisting="GetUnique" KillRunningProcesses="False" /> <Sql InstallDatabase="true" Server="Artemis" Authentication="SQL" SqlName="login"SqlPswd="password" Database="Kentico8_{%fileversion%}" Operation="New"DeleteExisting="false" /> <WebTemplates type="InstallAll"> </WebTemplates> <UICultures type="InstallAll"> </UICultures> <Modules type="InstallAll"> </Modules> <Dictionaries type="InstallAll"> </Dictionaries> <WebSites> <WebSite domain="localhost" displayname="Corporate site"webtemplatename="CorporateSite" /> </WebSites> <Licenses> <License domain="localhost"><![CDATA[DOMAIN:localhostPRODUCT:CF08EXPIRATION:00000000PACKAGES:SERVERS:1ODWrIUyRdEv3Ko+7kLCN2WD4jEsOl3l0+au1AJ3zU0Jw5b3Q1h1eBlWh1fNAWAe2NbSb6gm1qUhJHdUTI4rBPANDgmYvEBFZRqpYbDYVCYsXEeQy4H2ipwXfASGFMI5UuKvHRTJ5KBo9OE4k4ZJmPVratLjOcSvFVERhGubZl7MZghwCBSHQNNvN3RWN3mwi1+vgou+N/Z1XDWXtfprzDEwFFJHyl/4NOoKbNzvGhuV1Jmq1XbGiT8Od0Y2vufeqzcM4VdFRRAOlIoQHFwwfyEah2kSw1z9zUbqWj3nZqZUD6jXi8FokOWKWzZeybg9NQgZ1+vtd7jg1B1+bz/Te+w==]]></License> </Licenses></SilentInstall>
Troubleshooting installation issuesIf you encounter issues during the installation, the following topics may help you solve them:
Application stops after being idleIn the default IIS configuration, the application pool in which Kentico runs stops the application's worker process after a 20-minute period ofinactivity. This behavior causes the Kentico Event log to log warnings with the following message:
HostingEnvironment initiated shutdown
This shutdown period is determined by the setting in the application pool's advanced settings.Idle time-out
To change or disable the time-out period:
Open and select in the Connections tree.IIS Manager Application PoolsClick the application pool in which Kentico runs and click .Advanced Settings

2.
3.
4.
1. 2.
In the section, locate the setting and change its value. To disable the time-out altogether, enter (zerProcess Model Idle Time-out 0o).
Click to save the settings.OK
If you set the Idle time-out setting to a non-zero value, IIS stops your application if the application doesn't receive any request in the specifiedtime period. If you set the setting to zero, the application will run without shutting down even if it is idle.
Disk permission problemsKentico performs most operations without writing to the disk. However, there are situations when the web application needs to access thedisk, such as:
importing/exporting sitesstoring uploaded files in the file system (optional)
If you receive an error message, saying that the web application cannot write to disk, you need to:
Identify the user account under which your web application is runningGrant the Modify permissions for the whole web project folder to the account
User account of the web application
IIS 6.0 introduced the concept of application pools (you can find more information at ). The name of the userhttp://technet.microsoft.comaccount is based on the application pool that your web application is using.
You can find the user account name:
In the error/information message.
If you're using built-in web server, the application runs under your Windows user account.Visual Studio's
1. 2. 3. 4. 5.
In the application, under . System ASP.NET accountIn :IIS Manager
Open the and select the page. According to the value in the column, determine theIIS Manager Application Pools Identityuser account of your application.
Application pool identity User account name
Local Service Service
LocalSystem System
NetworkService Network Service
ApplicationPoolIdentity IIS AppPool\<app pool name>
Granting disk permissions
It is a best practice to grant the permissions to the previously determined account.Modify
However, in case your application pool uses the application pool identity, you can grant the permissions to the built-inApplicationPoolIdentitygroup account instead. This group account contains all accounts with the application pool identity.IIS_IUSRS ApplicationPoolIdentity
How to configure file and folder permissions (Microsoft documentation)
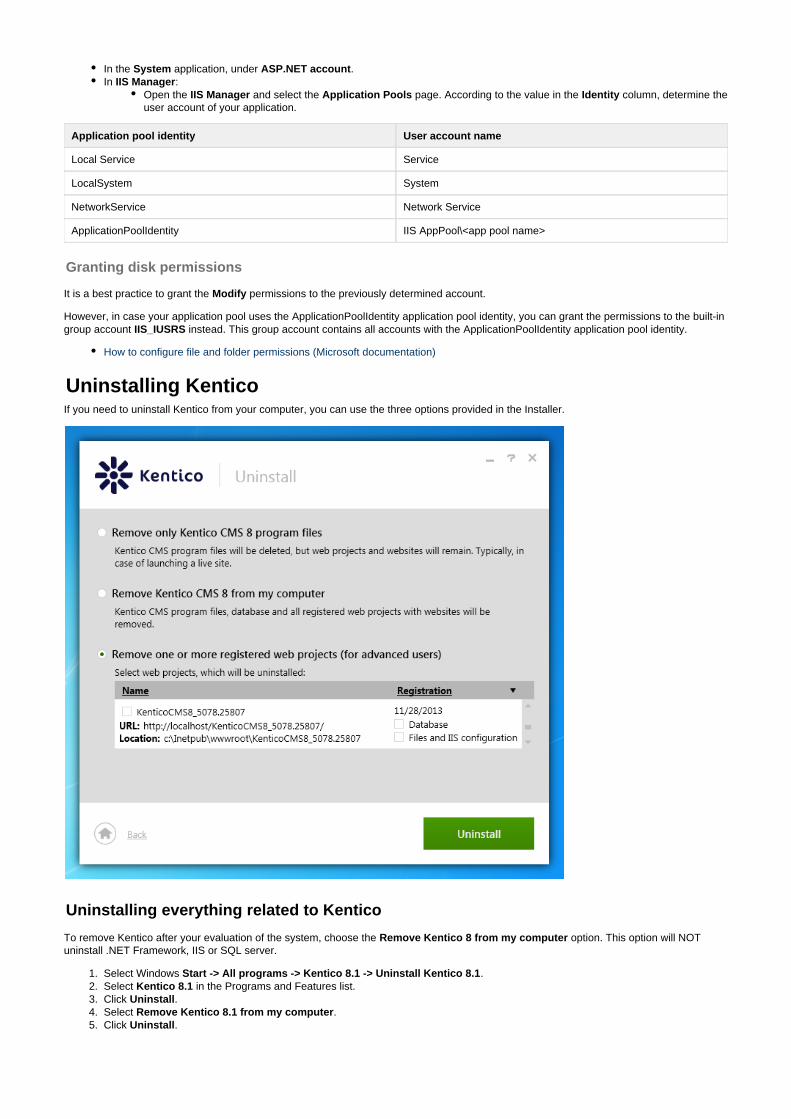
Uninstalling KenticoIf you need to uninstall Kentico from your computer, you can use the three options provided in the Installer.
Uninstalling everything related to Kentico
To remove Kentico after your evaluation of the system, choose the option. This option will NOTRemove Kentico 8 from my computeruninstall .NET Framework, IIS or SQL server.
Select Windows .Start -> All programs -> Kentico 8.1 -> Uninstall Kentico 8.1Select in the Programs and Features list.Kentico 8.1Click .UninstallSelect .Remove Kentico 8.1 from my computerClick .Uninstall

1. 2. 3. 4. 5.
1. 2. 3. 4.
1.
2.
3.
4.
5.
6.
7.
8.
Uninstalling only the program files
There may be a few cases, when you will want to remove only the Kentico program files (the files needed to install the web projects). Forexample, when you want to move the program files to a different hard drive or when you want to launch a live site and you no longer needthe program files on your server. For this purpose, choose the option.Remove only Kentico program files
Uninstalling the program files will also remove external utilities, like Kentico Installation Manager or Kentico Import Toolkit.
Select Windows .Start -> All programs -> Kentico 8.1 -> Uninstall Kentico 8.1Select in the Programs and Features list.Kentico 8.1Click .UninstallSelect .Remove only Kentico 8.1 program filesClick .Uninstall
Uninstalling individual web projects (instances)
If you have installed multiple web projects (instances) and you want to remove only some of them, use the third option Remove one or more. Using this approach, you can also choose to remove only the web project files (this option will also removeregistered web projects
Windows services, performance counters and event log sources) and keep the database for further use.
Run the Installer from Windows .Start -> All programs -> Kentico 8.1 -> Kentico Installer 8.1On the Home page of the Installer select .UninstallSelect the instances you want to remove.Click .Uninstall
Hotfix Instructions - Kentico 8.1
Table of Contents
Applying the hotfix to web site projectsLocal installationRemote installation
Applying the hotfix to web application projectsLocal installationRemote installation
Applying the hotfix to Microsoft AzureUpdating setup files and external utilitiesAdditional notes and workaroundsFixed bugs
Applying the hotfix to web site projects
Local installation
If your system stores virtual objects on the file system (due to enabled or source control options), return the filesDeployment modeto the database. You can re-enable deployment mode or source control after you apply the hotfix.
Run from the location where you installed the hotfix.Kentico Hotfix Utility (Hotfix.exe)
Select your project installation folder using the button or type in the path to the project manually.Browse
Use the application to back up your project files and/or database if you haven’t already done so.
Select whether you want to update files, database or both. It is recommended to update both the project files and the database.
Choose a method of taking the project offline and back online.
Click to start the update procedure.Next
After the update finishes, click to view any problems that may have occurred and the instructions to solve them.Next
For more information, see .Kentico Hotfix and Upgrade Utility
For managing individual web projects you can also use the utility.Kentico Installation Manager
Note
Hotfixes are not tested for all possible scenarios, so you may experience issues after applying the hotfix.
Always before applying a hotfix.backup your project files and database
1.
2.
3.
4.
5.
1.
2.
3.
4.
5.
6.
7.
8.
9.
Remote installation
If you cannot access your web project directly (e.g. when the project is located on a remote hosting server), you can use the Hotfix Utility tocreate the updated file structure and then upload them to your web project location.
Run from the command line with the parameter. Set the parameter value based on the installation type you’reHotfix.exe /deployusing:
net40site - web site project using .NET version 4.0net45site - web site project using .NET version 4.5
Example: Hotfix.exe /deploy=net40site
This launches the Hotfix Utility, which then creates the files and folders necessary for updating a project running on .NET version 4.0and saves them into the folder chosen in the first step of the Hotfix Utility wizard.
Additionally, you can provide the parameter, which tells the application where to create the file structure. This way you won’t/pathhave to set the path in the first step of the Hotfix Wizard.
You can supply the parameter in two different formats — , which represents a folder in the location from which the/path relativeutility was executed; or , which can be any path to a local disk.absolute
Example: Hotfix.exe /deploy=net40site /path=Deploy
This launches the Hotfix Utility, which then creates a folder named in the directory from which the utility was executed andDeploycopies all files and folders necessary for updating a project running on .NET version 4.0 into that folder.
Once you have the update files ready, take your website offline. You can do this by copying the file from the hotfixApp_Offline.htminstallation directory into the root of the remote web project.
Upload the update files created by the Hotfix Utility into your remote web project (overwrite the original files).
Manually execute the hotfix SQL scripts on your Kentico database.
If you do not use separated databases - run the and script files located in the Hotfix_separated.sql Hotfix_default.sql SQ folder of your hotfix installation directory. We recommend running the files in the described order.L
If you use - run the script file on the separated database and separated databases Hotfix_separated.sql Hotfix_default.sqon your main database. The script files are located in the folder of your hotfix installation directory.l SQL
Bring your website back online (delete the file).App_Offline.htm
Applying the hotfix to web application projects
Local installation
If your system stores virtual objects on the file system (due to enabled or source control options), return the filesDeployment modeto the database. After you apply the hotfix, re-enable deployment mode or source control and rebuild the project.
Run from the location where you installed the hotfix.Kentico Hotfix Utility (Hotfix.exe)
Select your project installation folder using the button or type in the path to the project manually.Browse
Use the application to back up your project files and/or database if you haven’t already done so.
Select whether you want to update files, database or both. It is recommended to update both the project files and the database.
Choose a method of taking the project offline and back online.
Click to start the update procedure.Next
After the update finishes, click to view any problems that may have occurred and the instructions to solve them.Next
Open the project solution in Visual Studio and build the solution.
For more information, see .Kentico Hotfix and Upgrade Utility
Important
If you have previously modified some of the Kentico project files (such as web parts or administration interface files), DONOT OVERWRITE these files. You could lose your modifications.
You need to compare the modified files with the new versions and make appropriate changes manually.

1.
2.
3.
4.
5.
6.
1.
2.
3.
4.
5.
6.
7.
8.
9.
Remote installation
If you cannot access your web project directly (e.g. when the project is located on a remote hosting server), you can use the Hotfix Utility tocreate the updated file structure and then upload them to your web project location.
Run from the command line with the parameter. Set the parameter value based on the installation type you’reHotfix.exe /deployusing:
net40app - web site project using .NET version 4.0net45app - web site project using .NET version 4.5
Example: Hotfix.exe /deploy=net40appThis launches the Hotfix Utility, which then creates the files and folders necessary for updating a project running on .NET version 4.0and saves them into the folder chosen in the first step of the Hotfix Utility wizard.
Additionally, you can provide the parameter, which tells the application where to create the file structure. This way you won’t/pathhave to set the path in the first step of the Hotfix Wizard.
You can supply the parameter in two different formats – , which represents a folder in the location from which the utility/path relativewas executed; or , which can be any path to a local disk.absolute
Example: Hotfix.exe /deploy=net40app /path=DeployThis launches the Hotfix Utility, which then creates a folder named in the directory from which the utility was executed andDeploycopies all files and folders necessary for updating a project running on .NET version 4.0 into that folder.
Once you have the update files ready, take your website offline. You can do this by copying the file from the hotfixApp_Offline.htminstallation directory into the root of the remote web project.
Upload the update files created by the Hotfix Utility into your remote web project (overwrite the original files).
Manually execute the hotfix SQL scripts on your Kentico database.
If you do not use separated databases - run the and script files located in the Hotfix_separated.sql Hotfix_default.sql SQ folder of your hotfix installation directory. We recommend running the files in the described order.L
If you use - run the script file on the separated database and separated databases Hotfix_separated.sql Hotfix_default.sqon your main database. The script files are located in the folder of your hotfix installation directory.l SQL
Open the project in Visual Studio and build the solution.
Bring your website back online (delete the file).App_Offline.htm
Applying the hotfix to Microsoft Azure
In the case of websites hosted on Microsoft Azure, you need to apply the hotfix to your local copy of the web application and then redeploy.
Run from the location where you installed the hotfix.Kentico Hotfix Utility (Hotfix.exe)
Select the folder containing your local version of the project using the button or type in the path to the project manually.Browse
Use the application to back up your project files and/or database in case you haven’t already done so.
Select whether you want to update files, database or both. If your database is hosted on SQL Azure, you need to update it manually.
Click to start the update procedure.Next
After the update finishes, click to view any problems that may have occurred and the instructions to solve them.Next
Open the project’s solution in Visual Studio and rebuild it.
Redeploy the application to Microsoft Azure.
If your website’s database is hosted on SQL Azure, manually execute the hotfix SQL scripts against it.
If you do not use separated databases - run the and script files located in the Hotfix_separated.sql Hotfix_default.sql SQ
Important
If you have previously modified some of the Kentico project files (such as web parts or administration interface files), DONOT OVERWRITE these files. You could lose your modifications.
You need to compare the modified files with the new versions and make appropriate changes manually.
9.
1.
2.
3.
4.
5.
6.
7.
8.
9.
10.
folder of your hotfix installation directory. We recommend running the files in the described order.L
If you use - run the script file on the separated database and separated databases Hotfix_separated.sql Hotfix_default.sqon your main database. The script files are located in the folder of your hotfix installation directory.l SQL
Updating setup files and external utilities
This hotfix contains bug fixes for all the files in the Kentico installation. This includes the Web Installer with its associated files and externalutilities, such as Kentico Installation Manager or Kentico Service Manager. In order to update these files and utilities, you need to launch theHotfix utility with an additional parameter - - which specifies the location where you installed Kentico (typically the f/setuppath Program Filesolder).
When launched with the parameter, the Hotfix utility offers the option of updating the setup files in the step.Change confirmation
Example: launches the Hotfix utility, which then tries to update all original files inHotfix.exe /setuppath="c:\Program Files (x86)\Kentico\8.1"the default installation directory.
Additional notes and workarounds
*
Fixed bugs
For a full list of bugs covered by the hotfix, open the on DevNet and click for the appropriate Kentico version.Hotfixes page Fixed bugs
Hotfix Instructions - Kentico 8.1 Source Code
Table of Contents
Applying the hotfix to a local projectApplying the hotfix to a remote projectUpdating setup files and external utilitiesSource code compilation instructionsAdditional notes and workaroundsFixed bugs
Applying the hotfix to a local project
If your system stores virtual objects on the file system (due to enabled or source control options), return the filesDeployment modeto the database. After you apply the hotfix, re-enable deployment mode or source control and rebuild the solution.
Run from the location where you installed the hotfix.Kentico Hotfix Utility (Hotfix.exe)
Select your project installation folder using the button or type in the path to the project manually.Browse
Use the application to back up your project files and/or database if you haven’t already done so.
Select whether you want to update source files, database, CMS project files or all of them. We recommend updating all components.
Choose a method of taking the project offline and back online.
Click to start the update procedure.Next
After the update finishes, click to view any problems that may have occurred and the instructions to solve them.Next
Open the project solution in Visual Studio and follow the .compilation instructions
Rebuild the solution.
For more information, see .Kentico Hotfix and Upgrade Utility
Applying the hotfix to a remote project
If you cannot access your web project directly (e.g. when the project is located on a remote hosting server), you can use the Hotfix Utility tocreate the updated file structure and then upload them to your web project location.
Note
Hotfixes are not tested for all possible scenarios, so you may experience issues after applying the hotfix.
Always before applying a hotfix.backup your project files and database
1.
2.
3.
4.
5.
6.
1.
Run from the command line with the parameter. Set the parameter value based on the installation type you’reHotfix.exe /deployusing:
net40site - web site project using .NET version 4.0net45site - web site project using .NET version 4.5
Example: Hotfix.exe /deploy=net40appThis launches the Hotfix Utility, which then creates the files and folders necessary for updating a project running on .NET version 4.0and saves them into the folder chosen in the first step of the Hotfix Utility wizard.
Additionally, you can provide the parameter, which tells the application where to create the file structure. This way you won’t/pathhave to set the path in the first step of the Hotfix Wizard.
You can supply the parameter in two different formats — , which represents a folder in the location from which the/path relativeutility was executed; or , which can be any path to a local disk.absolute
Example: Hotfix.exe /deploy=net40site /path=DeployThis launches the Hotfix Utility, which then creates a folder named in the directory from which the utility was executed andDeploycopies all files and folders necessary for updating a project running on .NET version 4.0 into that folder.
Once you have the update files ready, take your website offline. You can do this by copying the file from the hotfixApp_Offline.htminstallation directory into the root of the remote web project.
Upload the update files created by the Hotfix Utility into your remote web project (overwrite the original files).
Manually execute the hotfix SQL scripts on your Kentico database.
If you do not use separated databases - run the and script files located in the Hotfix_separated.sql Hotfix_default.sql SQ folder of your hotfix installation directory. We recommend running the files in the described order.L
If you use - run the script file on the separated database and separated databases Hotfix_separated.sql Hotfix_default.sqon your main database. The script files are located in the folder of your hotfix installation directory.l SQL
Open the project in Visual Studio, follow the , and rebuild the solution.compilation instructions
Bring your website back online (delete the file).App_Offline.htm
Updating setup files and external utilities
This hotfix contains bug fixes for all the files in the Kentico installation. This includes the Web Installer with its associated files and externalutilities, such as Kentico Installation Manager or Kentico Service Manager. In order to update these files and utilities, you need to launch theHotfix utility with an additional parameter - - which specifies the location where you installed Kentico (typically the f/setuppath Program Filesolder).
When launched with the parameter, the Hotfix utility offers the option of updating the setup files in the step.Change confirmation
Example: launches the Hotfix utility, which then tries to update all original files inHotfix.exe /setuppath="c:\Program Files (x86)\Kentico\8.1"the default installation directory.
Source code compilation instructions
Currently you do not need to perform any manual steps after applying the hotfix to the Kentico 8.1 source code.
Additional notes and workarounds
*
Fixed bugs
For a full list of bugs covered by the hotfix, open the on DevNet and click for the appropriate Kentico version.Hotfixes page Fixed bugs
Upgrading to Kentico 8.1This page provides instructions for upgrading Kentico projects from version 8 to 8.1.
Important
If you have previously modified some of the Kentico project files, DO NOT OVERWRITE these files. You could lose yourmodifications.
You need to compare the modified files with the new versions and make appropriate changes manually.

1. 2. 3. 4. 5.
1. 2. 3.
Check the prerequisites and Upgrade overviewInstall the upgrade procedurePerform the required steps before the upgradeApply the upgrade to your Kentico projectPerform the required steps after the upgrade
Prerequisites
Before you start the upgrade, please make sure that your environment fulfills the requirements of Kentico 8.1. See Server and hosting for details.requirements
Upgrade overview
The following is a summary of the most important changes that the upgrade performs.
Kentico 8.1 updates the document terminology — the word is replaced by in the administration interface. ThisDocument Pageaffects the names of applications, web parts, and other related text. Code names and API keywords remain unchanged.Custom files in the original project are transferred to the upgraded project.Customized Kentico files are preserved:
For each customized file, the upgrade creates the new Kentico 8.1 version (with the extension). You need to manually.newtransfer your customizations to the new files and then replace the original ones.Customized files that no longer exist in Kentico 8.1 remain in the file system (but are not included in the project inCMSAppweb application projects).
The upgrade disables functionality. You can re-enable web farms after you complete the upgrade.web farm
Class fields
The upgrade overwrites the form definitions of the default fields of system classes and their alternative forms. Custom fields fromversion 8 are transferred over.
Default objects
The upgrade procedure imports new versions of the following default objects (overwrites existing objects):Web partsWidgetsReportsTime zones
The default objects are overwritten (both the source files and form control objects in the system).Form control
E-commerce
The order rule for order discount and free shipping offer conditions is now obsolete.Shopping cart contains productExisting discounts keep the rule and continue to work after the upgrade, but the rule is disabled for new discounts.For new rules, you can use the new order rule with options and .Shopping cart contains products All AnyTo allow the obsolete rule for new discounts, go to , edit the rule andStore configuration -> Discount rules -> Order rulesenable it.
The is now obsolete.Bundle items selector form controlTo create fields for selecting which products belong to a bundle, use the form control andMultiple object binding controlset the to .Binding object type ecommerce.bundle
LinkedIn integration
The web part was removed (LinkedIn no longer supports this functionality).LinkedIn apply with
Installing the upgrade procedure
Download the .Kentico 8.1 upgradeRun .Upgrade_8_0_8_1.exeInstall the upgrade procedure (the installer places the upgrade into the folder byC:\Program Files\Kentico\8.1\Upgrade80_81 default).
Steps before you start the upgrade
Microsoft Azure projects
If you are upgrading a project hosted on Microsoft Azure, please follow the instructions on the Upgrading Microsoft Azure projectspage.
This does not include all Kentico 8.1 features and changes — see for a comprehensive list.Release notes - Kentico 8.1

1. 2. 3. 4.
5.
6.
7. 8.
9.
10.
Custom code analysis
If your project contains any custom code (including virtual objects such as ), we strongly recommend using the transformations Kentico code before you start the upgrade procedure.upgrade tool
Download the tool from the page on the DevNet portal. See to learn more.API Changes Upgrading custom code
The tool has the following functionality:
Detects custom code that is no longer valid in version 8.1Provides recommendations for each occurrence of invalid codeCan automatically convert the majority of code to the Kentico 8.1 API
The code upgrade tool’s output will help you update your custom code after you perform the upgrade.
Deployment mode and Source control
If your system stores virtual objects on the file system (due to enabled options), you need to return thedeployment mode or source controlfiles to the database before performing the upgrade.
You can re-enable deployment mode or source control after you finish the upgrade.
Separated on-line marketing database
The upgrade is NOT supported for instances with a separated on-line marketing database. In this case, you need to rejoin the databasebefore starting the upgrade procedure. You can perform the separation again after the upgrade is complete.
See also: Separating the contact management database
Full-text search for Kentico database tables
If you are using full-text search catalogs for any Kentico database tables, you need to remove the catalogs before starting the upgrade. Theprocedure drops and recreates indexes for most tables. You can set up the full-text search again after the upgrade is complete.
Applying the upgrade
We strongly recommend using the to perform the upgrade automatically.Kentico Upgrade Utility
Open the folder where you installed the upgrade.Run the ( .Kentico Upgrade Utility Upgrade.exe)Enter the path to your Kentico 8 web project folder (you can select a folder using the button).BrowseUse the utility to back up your project files and/or database if you haven’t done so already.
Select whether you want to upgrade files, database or both. To successfully perform the upgrade, you need to update both theproject files and the database. Only change the settings in special scenarios (for example when performing part of the processmanually).
On projects, the upgrade utility rebuilds the solution at the end of the upgrade by default. If your project containsweb applicationcustom code that is no longer supported in Kentico 8.1, or has certain modules uninstalled, the rebuild will not be successful. Youcan disable the option on customized projects, and perform the rebuild manually once you update the projectRebuild web projectafter the upgrade.
Choose a method of taking the project offline and bringing it back online.Click to start the upgrade procedure.Next
After the upgrade finishes, click to view any conflicts of customized files that occurred during the upgrade process. By default,Nextthe upgrade utility doesn’t overwrite modified files in order to preserve your customizations:
For each customized file, the upgrade creates the new Kentico 8.1 version (with the extension). You need to manually.newtransfer your customizations to the new files and then replace the original ones.Customized files that no longer exist in Kentico 8.1 remain in the file system (but are not included in the project inCMSAppweb application projects).
The upgrade attempts to automatically update your project’s file. The process may fail if your web.config containsweb.configcertain types of customizations. In this case, a new web.config file is created in the web project’s CMS folder with the extension.new
For a list of breaking changes in the Kentico 8.1 API, see the .Release notes
Manual upgrade
If you cannot perform the upgrade automatically (for example when you cannot directly access the environment hosting the Kenticoinstance), you can perform the upgrade manually.
See .Upgrading Kentico manually

10.
1. 2. 3. 4.
1. 2. 3. 4. 5.
. You need to:Edit the new web.config and transfer over any customizations and the connection string from the original web.config.Move your original web.config to a different location.Rename to .web.config.new web.config
Close the upgrade utility.
Steps after performing the upgrade
After you apply the upgrade to your project, please check the following sections and perform the required actions. Go through the sections inthe listed order.
API changes
You need to update your custom code according to the new API of Kentico 8.1, including:
Custom or customized code files in the web projectVirtual objects in Kentico, such as and transformations page layouts
Use the output of the Kentico code upgrade tool (described in ) to find occurrences of invalid code andCustom code analysisrecommendations on how to fix or replace them.
Tip: Enable and fix the code of virtual objects in the corresponding physical files. This makes it easier to update the codeDeployment modeof virtual objects according to the output of the code upgrade tool. Disable deployment mode to return the updated virtual objects back intothe database.
You can also search for specific API resolutions on the .DevNet portal
Kentico 8.1 setup files
The upgrade converts your web projects to version 8.1, but does not provide the associated setup files (i.e. the Kentico program files that areseparate from individual web projects). The setup files contain , sample files, and allow you to install new Kentico 8.1 webexternal utilitiesprojects.
To obtain the installer and setup files for Kentico 8.1:
Download the .Kentico 8.1 installerRun .Kentico_8_1.exeRead and accept the License Terms and Conditions and click .Custom installationSelect and click .Install only program files Install
Running the website - First request
Open the upgraded website in a browser. When handling the first request, the system performs certain tasks required to finalize the upgrade.Processing of the first request may take longer than usual.
Object import
The upgrade procedure automatically imports new web part, widget, report and time zone objects. Once the upgrade is finished, pleasecheck the system’s for import errors.Event log
If you find import-related errors, open the application, click and try to import the packageSites Import site or objects upgrade_80_81.zipmanually.
Macros
To ensure that macros and the administration interface work correctly after the upgrade:
Log in to the Kentico administration interface as a global administrator.Open the application.SystemSelect the tab.Macros -> SignaturesEnable the option.Sign all macrosClick .Update macro signatures
The system resigns all macros. The new security signatures of all macros contain the username of your administrator account.
Important
After you apply the upgrade, before you open the website or Kentico administration interface.clear your browser cache
Note: If you do not install the 8.1 version of the setup files, you may encounter incorrect behavior when using the Kentico utility. The original 8.0 version of the utility cannot correctly identify Kentico 8.1 projects and handles them asInstallation Manager
8.0 projects.
1. 2.
1. 2. 3.
1. 2. 3. 4.
1. 2. 3.
1. 2. 3. 4.
Validate that all macros in the system work correctly:
In the application, select the tab.System Macros -> ReportEnable and click .Report problems Search
For more information, see the chapter.Macro expressions
SharePoint integration
The upgrade installs the new module by default. See for more information.SharePoint Integrating SharePoint
If you plan to use the new module:
In the Kentico administration interface, open the application.ModulesEdit the module.SharePointSelect the tab and add your sites.Sites
Web farms
The upgrade procedure automatically disables web farm functionality. If your Kentico instance runs on a web farm, you need to manuallyenable web farms after you complete the upgrade.
In the Kentico administration interface, open the application.SettingsExpand the category.Versioning & Synchronization -> Web farmCheck the setting.Enable web farmClick .Save
Upgrading Kentico manually
If you cannot directly access the environment hosting your Kentico instance, you can perform the upgrade from version 8 to 8.1 manually.
Before you start the manual upgrade, and go through the required .install the upgrade Steps before the upgrade
Step 1 - Backup
Back up your Kentico web project files and database. We recommend that you:
Make a copy of the Kentico project.Upgrade the project locally.Deploy the project to the production environment once the upgrade is complete.
Step 2 - Site shutdown
Your site must be offline during the upgrade process. Copy (available in the upgrade installation folder) into the root of yourApp_offline.htmweb project or use another approach to shut down your site.
Step 3 - Database upgrade
Launch .Microsoft SQL Server Management StudioConnect to the Kentico database that you wish to upgrade.Open the script from the directory in the upgrade installation folder.upgrade.sql SQLRun the script against your Kentico database.
If you encounter any errors, please send them to (include the error log in the message).Kentico support
Step 4 - Creating the upgrade file structure
Launch the Kentico Upgrade Utility from the command line with the parameter. Set the parameter’s value according to the .NET/deploy version and project that to which you wish to upgrade:
Note: We strongly recommend using the automatic upgrade described in .Upgrading to Kentico 8.1
Important: If you do not create a backup, your project may get corrupted without a way to reverse the changes.
Important
Kentico uses database objects with the schema. If your database uses a different or no schema, you need to modify thedboschema occurrences in the script accordingly.
Please check whether the upgrade script is running against the correct database. Many upgrade problems are caused bylaunching the SQL script on a non-Kentico database.
1. 2. 3. 4. 5. 6. 7. 8. 9.
10. 11.
1. 2.
3.
net40site - web site using .NET version 4.0net40app - web application using .NET version 4.0net45site - web site using .NET version 4.5net45app - web application using .NET version 4.5
You can also add the optional parameter, which sets the target location for the upgrade file structure. This way you won’t have to/pathprovide the path in the first step of the update process.
The parameter value can be supplied in two different formats – , which represents a folder in the location from which the utility/path relativeis executed; or , which can be any path to a local disk.absolute
Example: Upgrade.exe /deploy=net40site /path=DeployLaunches the upgrade utility, which creates a folder named in the upgrade installation directory, and copies all files and foldersDeploynecessary for upgrading to a .NET 4.0 web site project.
If you have removed some of the default modules from your Kentico 8 installation, you can use the following process to remove the givenmodules from the upgrade files:
Open the folder in the upgrade files.CMSRename to .web.config.integrated web.configDownload the .Kentico 8.1 InstallerRun .Kentico_8_1.exeRead and accept the License Terms and Conditions and click .Custom installationSelect and click .Install only program files InstallNavigate to the Kentico setup files by default).(C:\Program Files\Kentico\8.1Run .Bin\KenticoInstaller.exeClick .ModifyClick and choose the folder containing the upgrade files.Select anotherRemove the required modules and click .Apply Changes
In the folder of the upgrade files, add the original extension back to the name of the web.config file ( ).CMS web.config.integrated
Step 5 - Project file upgrade
Copy all customized and custom files from your Kentico 8 project to a backup directory.Open . in the upgrade installation directory and delete all of the listed files from your web project (you can prepare aupgrade xmlbatch file to automate the process).Copy the content of the upgrade file folder (created in step 4) into the root of your web project folder. Overwrite all files.
If you have customized any of the default files or have added custom files to the project, you need to compare your backup project with theupgraded project, and manually transfer the customizations.
If your solution contained custom projects, open the new Kentico solution in Visual Studio and add the projects. You also need to manuallyupdate the required reference for both the custom and Kentico projects.
If your project is a web application, the Kentico solution in Visual Studio. You may need to to successfullyrebuild upgrade your custom coderebuild the solution.
Step 6 - Web.config upgrade
The upgrade files contain two versions of the web.config, one for each application pool managed pipeline mode. You can tell them apart bytheir extension ( and ). Choose the one that matches the application pool that your application uses..classic .integrated
Copy the and replace the old web.config with the new one.connection string
If your web.config contains any custom configuration, you need to manually transfer the changes to the new web.config.
Step 7 - Finishing and starting the site
To bring your site back on-line, remove or rename the file from the folder after finishing the upgrade procedure.App_Offline.htm CMS
Continue with the .Steps after the upgrade
Upgrading custom codeThe provides a way to analyze Kentico 8 projects and helps convert custom code to version 8.1. You canKentico Code upgrade tooldownload the tool from the page on the DevNet portal.API Changes
The tool has the following functionality:
Detects custom code that is no longer valid in version 8.1Provides recommendations for each occurrence of invalid codeAutomatic conversion of the majority of code to the Kentico 8.1 API
Prerequisites
The machine where you plan to run the code upgrade tool must fulfill the following requirements:

Microsoft .NET Framework 4.5.1Visual Studio 2013 or Microsoft Build Tools 2013
The Kentico 8 solution that you wish to analyze must compile without errors.
To allow the tool to check the code of Kentico virtual objects, such as and , you need to enable transformations page layouts Deployment for your Kentico 8 instance.mode
Analyzing Kentico 8 projects
Basic detection
Run from the , with the path to your project’s solution file as the parameter ( or . ).CodeUpgrade.exe command line WebSite.sln WebApp sln
For example:
CodeUpgrade.exe C:\inetpub\wwwroot\Kentico8\WebSite.sln
The tool generates a file containing a list of custom code occurrences in your project that are no longer valid in Kentico 8.1. Thecsvinformation will help you update your custom code after you perform the upgrade.
Automatic conversion
You can also use the tool to provide automatic resolutions for most types of code expressions. Add the parameter when running -resolve Co. Set the target folder for the output using the parameter.deUpgrade.exe -outputfolder
For example:
CodeUpgrade.exe -resolve –outputfolder=C:\ConvertedCodeC:\inetpub\wwwroot\Kentico8\WebSite.sln
If the tool detects code issues that can be automatically resolved, it creates copies of the given files in the specified output folder. Allresolvable issues in the files are updated to be compatible with the Kentico 8.1 API.
Optional parameters
You can also add the following parameters when running the tool:
-output=results.csv - sets the name of the file containing the tool’s results.-verbose=0 - determines how detailed the tool’s output is in the console (enter values from 0 to 3). Does not affect the output file.
Limiting the scope of the analysis
For customized Kentico files, the tool reports all detected issues, including the default Kentico 8 code. You can avoid reporting of these falsepositives by enclosing your custom code into directives with a specific name. For ASPX markup, use the following syntax:#region
<%-- #region Name --%> ... <%-- #endregion --%>
To analyze only the code placed inside the regions, run the tool with an additional parameter: -customregion=<regionName>
Implementing the API changes
Use the output of the tool to update your custom code AFTER you .upgrade the project to Kentico 8.1
The output file lists all occurrences of invalid custom code, including:
The path of the affected file and line numberThe exact source code of the expressionA set of instructions on how to resolve the issue
If you generated automatic conversions for your code, use the following approaches to insert the new code into your upgraded project:
Customized Kentico files - use a code comparison tool and merge the Kentico 8.1 files with the matching files in the tool’s outputfolder.Fully custom files - directly replace the files using the converted files created by the tool.
For more details about the available parameters, run the tool without any parameters.
1.
a. b. c.
2. a.
b. c. d. e. f.
3.
4.
5. 6.
7. 8.
9.
10.
11.
12.
Upgrading Microsoft Azure projectsFor projects hosted on Microsoft Azure, you need to and then redeploy the project after theperform the entire upgrade on a local machineupgrade is successfully completed.
Completing the upgrade procedure may take a significant amount of time, particularly for heavily customized projects. We recommend thatyou keep your production site running and first perform a local upgrade of your project to upgrade your code files and try out the databaseupgrade in advance. Then you need to take your website offline and repeat the process for a copy of the production database.
See also: Running Kentico on Microsoft Azure
Upgrading Azure projects through the local emulator
We recommend that you perform the first site request and testing after the upgrade of an Azure project through the local emulator.
Project upgrade
First upgrade your project code files in a local environment and try out the upgrade of your database.
Copy your Azure database to the same Azure SQL server. Creating a copy of a running database ensures that the copied databasestays consistent, unlike database export performed in the next step, which may result in a faulty export.
Open and select your database.Microsoft Azure management portalClick in the bottom panel.CopyCopy the database to the same Azure SQL server.
Export the copied Azure database and import it to your server:on premiseOpen and connect to your Azure SQL server (supported versions of MicrosoftMicrosoft SQL Server Management StudioSQL Server are 2012 SP1 and newer).
You can find the name of your database server when you edit your database on the Azure management portal anddisplay the tab. Enter the username and password that you used for creating the Azure SQL server.DashboardTo connect to the Azure SQL server, you need to configure the firewall rules for the server in the Microsoft Azure
— select your database server and add the firewall rules for your machine on the tamanagement portal Configureb.
Right-click the copied database and select .Tasks -> Export Data-tier ApplicationSave the database export to the disk.Connect to your own SQL server.Right-click the node and select .Databases Import Data-tier ApplicationImport the exported database to your server.
Set up your project in a local development environment (emulated) and set the connection strings for the and CMSApp SmartSearc roles to connect to the imported database on your server. hWorker
You need to set the connection string for all configurations (both Local and Cloud). The upgrade procedure upgrades thedatabase specified in the connection string of the Cloud configuration.See for details.Developing Azure projects locallyYou do not need to start the emulator right now.
Increase the value in the connection strings of the CMSApp and SmartSearchWorker roles. We recommend atConnection Timeout least 600 seconds.Perform the required .Steps before the upgradeInstall . We recommend using the WebPI all-in-one feed for your version of Visual Studio. You mayMicrosoft Azure SDK version 2.3also need to uninstall your previous version of Microsoft Azure Emulator and Tools for Visual Studio.Run the upgrade utility for your local project (see ).Applying the upgradeThe upgrade creates new versions of the project’s Microsoft Azure configuration files ( , ServiceConfiguration.cscfg ServiceDefinition.
, of the SmartSearchWorker) with the extension. You need to manually transfer your configuration to the newcsdef app.config .newfiles and then replace the original ones.If your CMSAzure project is customized, the upgrade creates a new version of in the folder (with the .CMSAzure.ccproj CMSAzure n
extension). Transfer any customizations from your original CMSAzure.ccproj file and remove the .new extension from the newewone.Open the project in Visual Studio (using CMSAzure.sln) and start the site in the emulator. Wait for the upgrade procedure to finish.
Perform the required and test your site.Steps after the upgrade
Tip: To update the code of virtual objects, enable . You can then fix the code in the corresponding physical files,Deployment modewhich match the output of the code upgrade tool. Disable deployment mode to return the updated virtual objects back into thedatabase.
We do NOT recommend upgrading your database on an Azure SQL server directly, as this may prevent the upgrade script fromperforming certain changes in the database.
Important: You always need to perform the first request on the upgraded site in a local development environment.Processing of the first request may take a longer than usual (up to an hour).

12.
1. a. b. c. d. e. f.
g.
h.
2. 3.
4.
5.
6. a. b. c. d. e. f.
7.
a. b. c.
8. 9.
Remove the connection string from the Cloud configurations of both the CMSApp and SmartSearchWorker roles and deploy theproject to your Microsoft Azure staging environment. See for more information.Deploying an Azure project
It is essential NOT to include the connection string to ensure that the application does not start after the deployment, whichcould cause problems with the web farm server settings.
Production database upgrade
When you have upgraded your code files and uploaded your project to the staging environment, you can now shut down your productionwebsite and upgrade the production database.
Take your website offline. We recommend uploading the file to your site using remote desktop:Open the and select your cloud service.Microsoft Azure management portalSwitch to the tab and click in the bottom panel.Configure RemoteConfigure the remote desktop access for all roles.Switch to the tab.InstancesSelect an instance and click in the bottom panel. The system downloads a file for remote connection.ConnectRun the file and connect to the cloud server.Locate your application and upload the file (available in the upgrade installation folder) to its root. You canApp_offline.htmsimply use copy & paste.Repeat the steps - for all instances.e g
Export your production database from the Azure SQL server and import it to your server.on premiseRun the SQL upgrade script ( included in the folder of the upgrade package) on the imported database on yourupgrade.sql SQLserver.Open the Azure project in Visual Studio (using CMSAzure.sln) and start the site in the emulator. Wait for the upgrade procedure tofinish.Open the administration interface of the upgraded local project and open the application. Delete all web farm servers.Web farms
This step is necessary to prevent more than the required number of web farm servers from being generated.
Export your upgraded database from your SQL server and import it to the Azure SQL server into a new database:on premiseOpen and connect to your server.Microsoft SQL Server Management Studio on premiseRight-click your upgraded database and select .Tasks -> Export Data-tier ApplicationSave the database export to the disk.Connect to the Azure SQL server.Right-click the node and select .Databases Import Data-tier ApplicationImport the exported database to the Azure SQL server. We recommend that you do not delete the original database at themoment and wait after you have tested the upgraded database.
Set the connection string of your previously deployed project in the staging environment to connect to the new upgraded database.Set the connection string for both the CMSApp and SmartSearchWorker roles.
Open the and select your cloud service.Microsoft Azure management portalSwitch to the deployment and the tab.Staging ConfigureSet the connection string to connect to the upgraded database.
Swap the staging deployment with your production deployment.Open your website in the administration interface and open the application and check if any errors occurred.Event log
Your project files and database are now upgraded. When you have adequately tested your website and you are sure it is running asexpected, you can delete your original Azure SQL database, the copied database and the staging deployment. You can also add theconnection string to the Cloud configuration file of your local project to have it prepared for future deployments.
Upgrading Azure projects through a web application
If you are , you can also upgrade your projects this way, without setting updeveloping Azure projects locally as web applicationsthe local emulator. The differences are that:
You set the connection string in the web.config file instead of the configuration files.When you run the website locally as a web application, you need to open the solution using the file andWebApp.slnexclude the folder from the project. Before theCMSApp_AppCode\Old_App_Code\CMSModules\WindowsAzureupgrade or deployment, you need to include the folder back in the project. See Developing Azure projects locally as web
for details.applications
Related Documents